![Digimon UP Tier List [Supports, Buddies, and Partners]](/wp-content/uploads/2026/07/digimon-up-tier-list.jpg "Digimon UP Tier List [Supports, Buddies, and Partners]")
Digimon UP Tier List [Supports, Buddies, and Partners]
These Digimon will get you UP the leaderboard.


![Haze Seas Boss Drops [Chances, Locations, and How to Spawn]](/wp-content/uploads/2026/07/haze-seas-boss-drops.jpg "Haze Seas Boss Drops [Chances, Locations, and How to Spawn]")

Welcome to the Awakening: Moonfell Wood walkthrough on Gamezebo.com. Awakening: Moonfell Wood is a puzzle / adventure game for the PC created by Boomzap and published by Big Fish Games. This walkthrough includes tips and tricks, helpful hints, and a strategy guide on how to complete Awakening: Moonfell Wood.
Welcome to the Awakening: Moonfell Wood walkthrough on Gamezebo.com. Awakening: Moonfell Wood is a puzzle / adventure game for the PC created by Boomzap and published by Big Fish Games. This walkthrough includes tips and tricks, helpful hints, and a strategy guide on how to complete Awakening: Moonfell Wood.
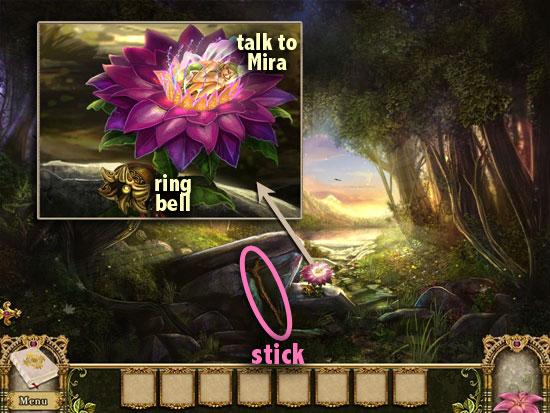
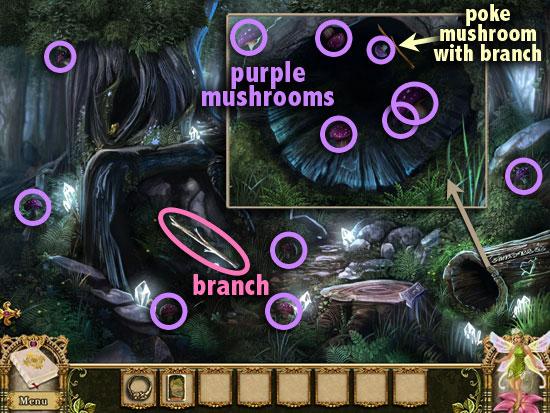
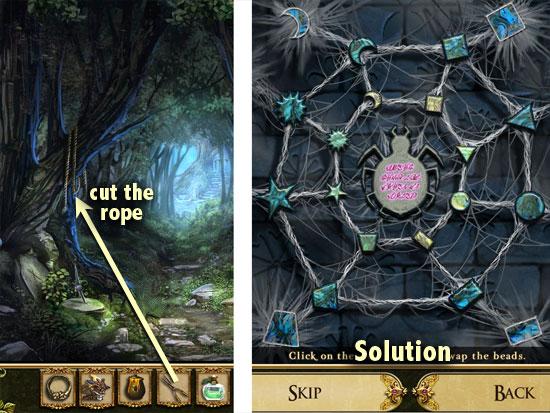
RIVER PATH

RIVER

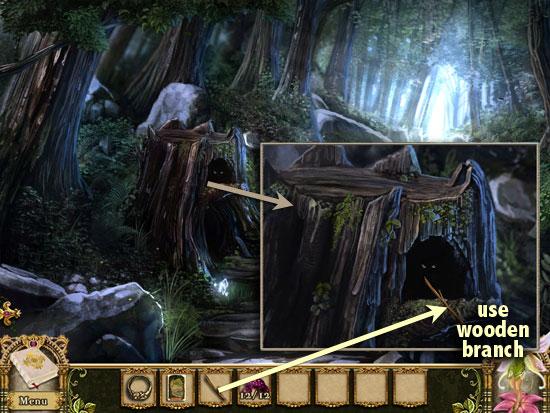
PATH TO THE FALLS
PATH TO CLIFFSIDE POOL
CLIFFSIDE POOL
PATH TO CLIFFSIDE POOL
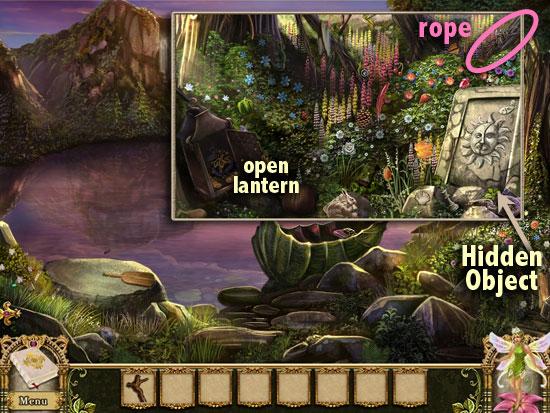
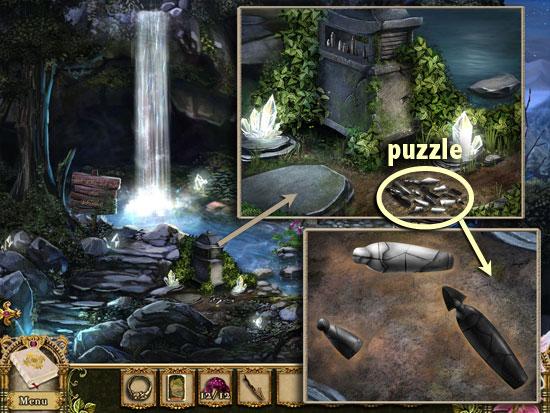
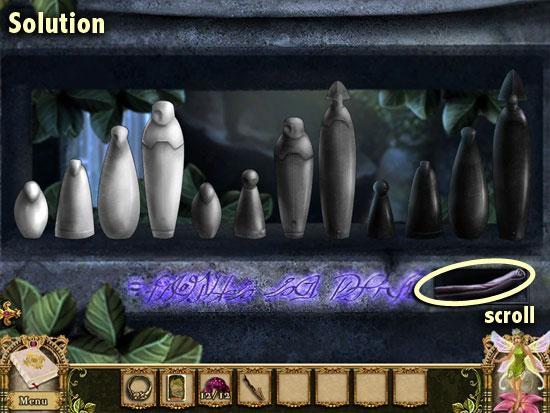
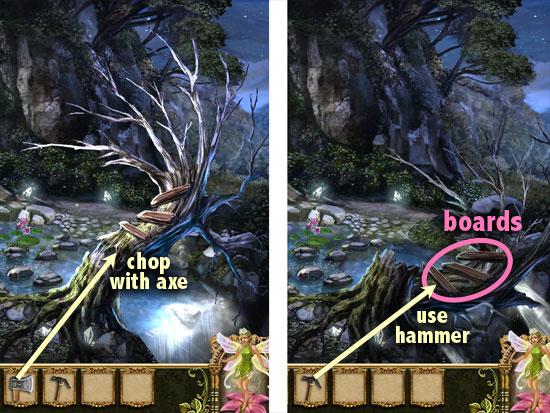
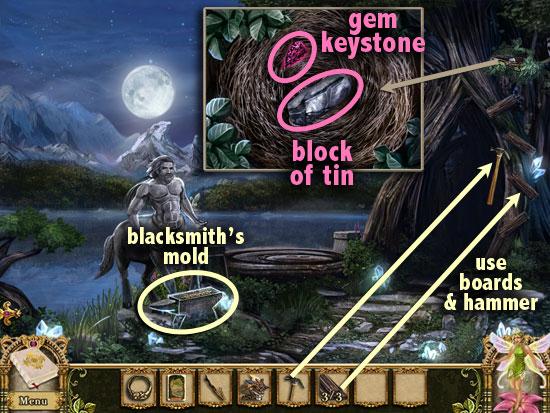
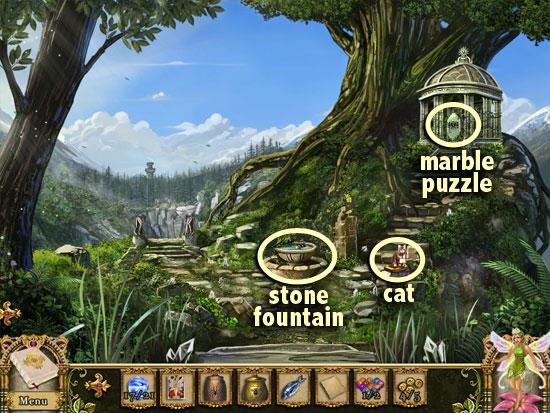
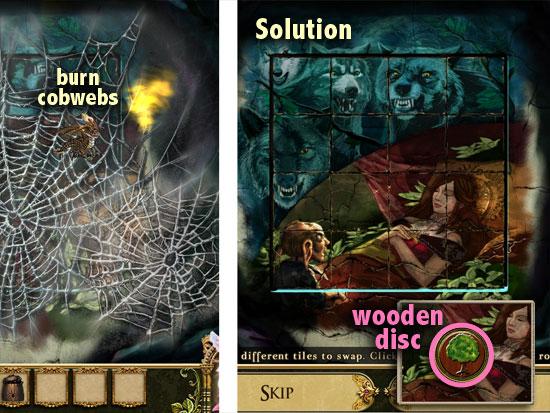
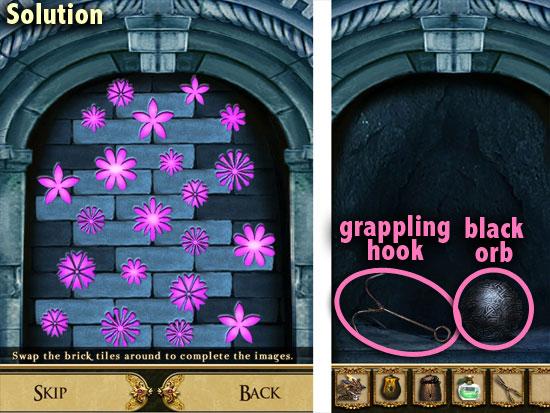
TEARDROP FALLS
PATH TO OVERLOOK

LAKE OVERLOOK
PATH TO THE FALLS
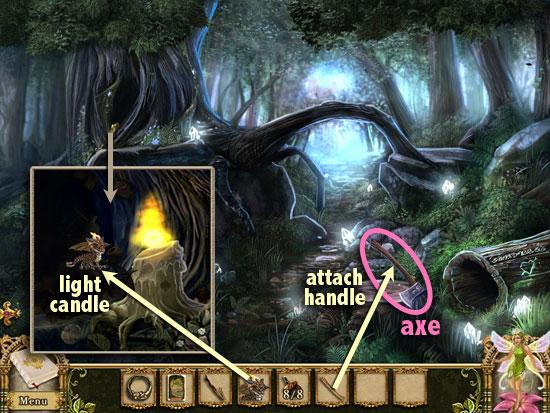
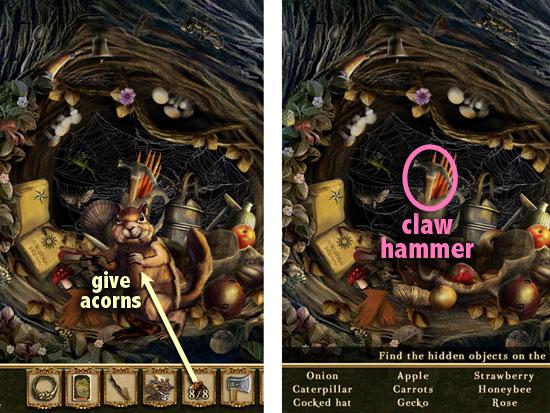
CLIFFSIDE POOL
LAKE OVERLOOK
TEARDROP FALLS
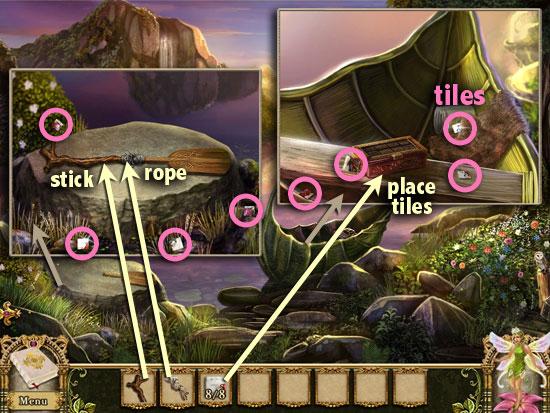
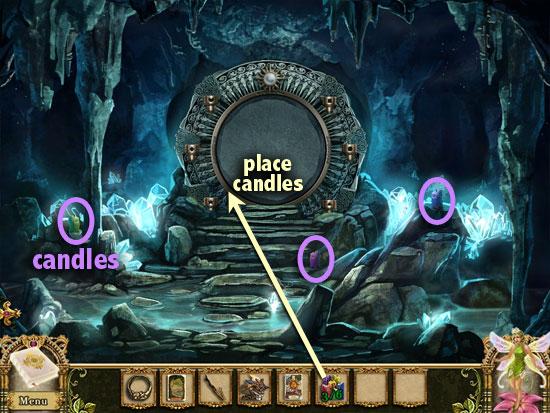
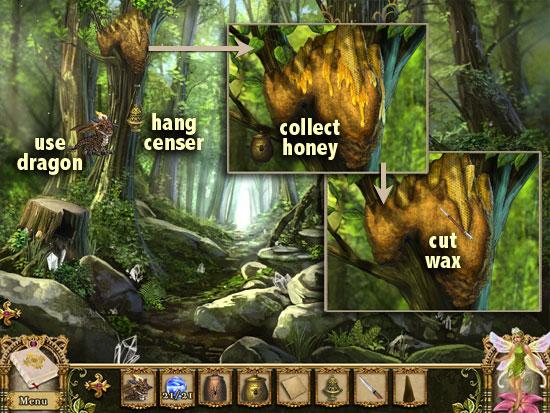
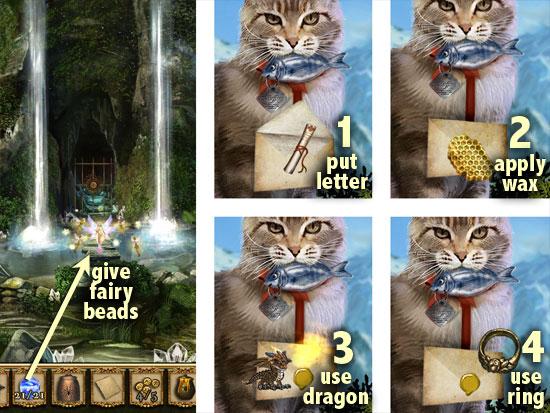
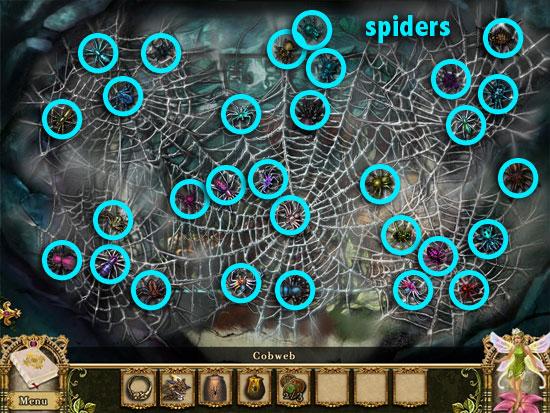
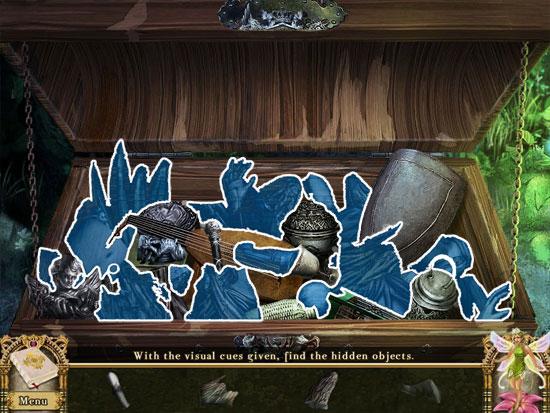
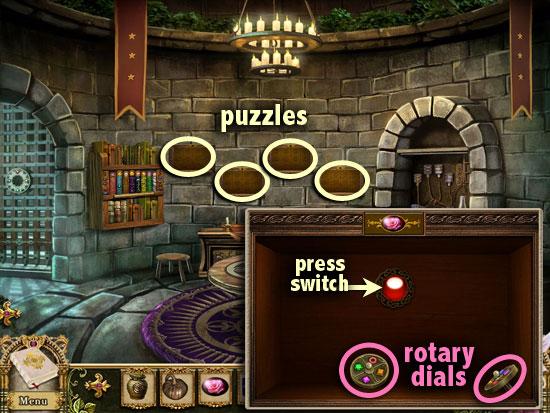
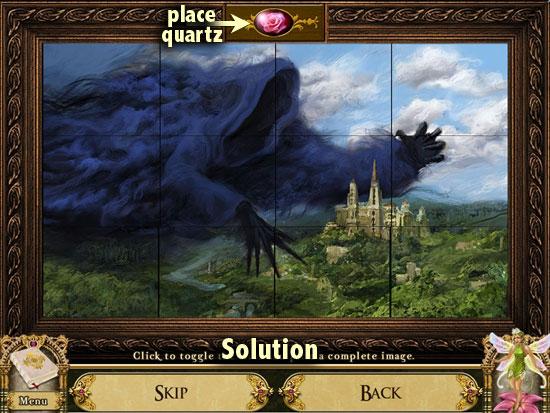
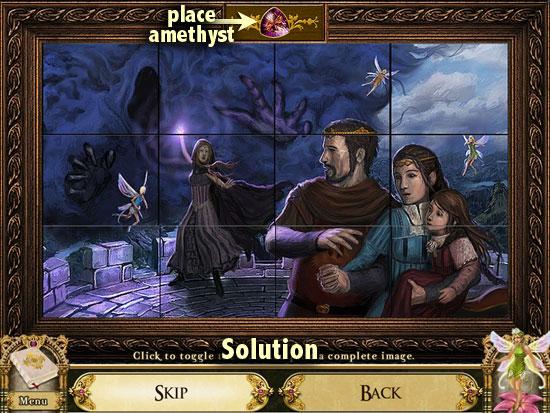
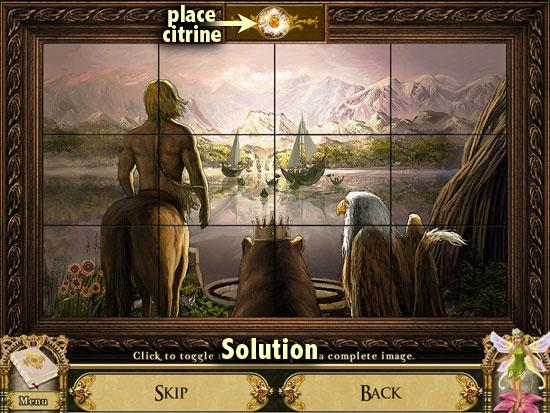
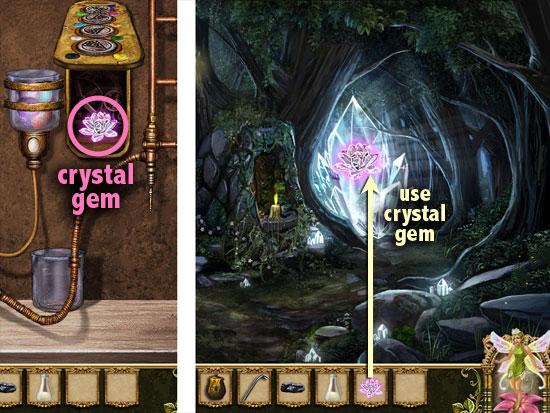
WATERFALL CAVE
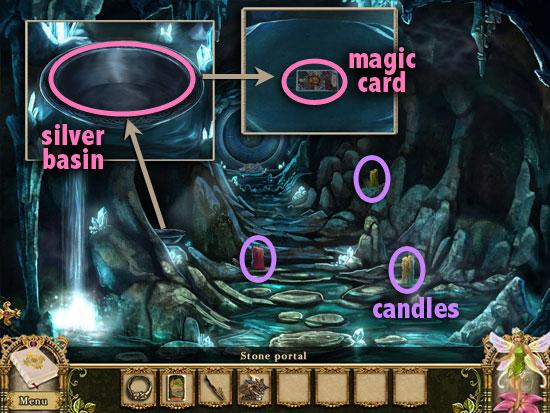
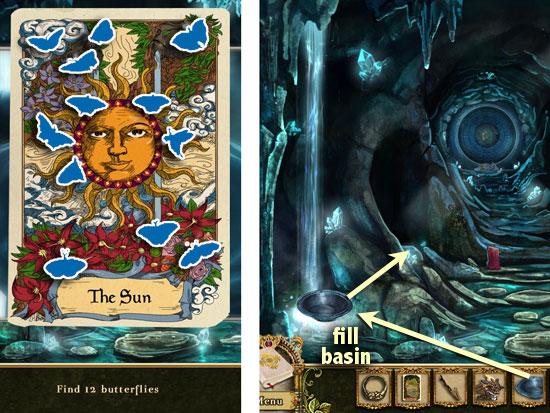
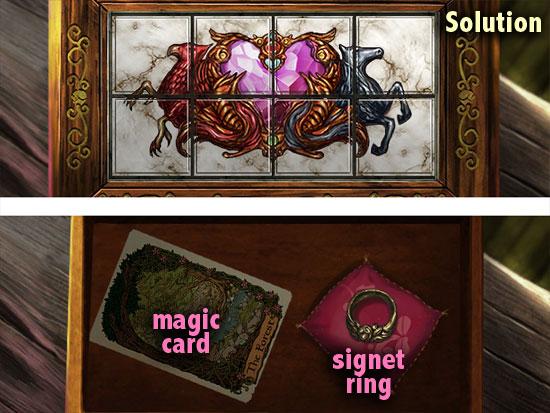
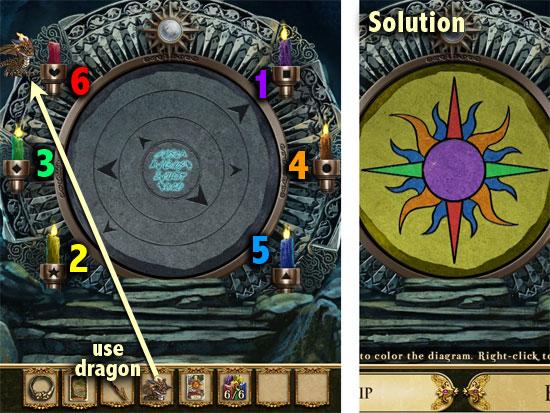
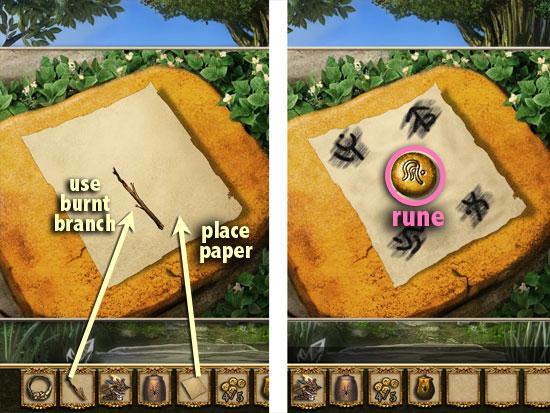
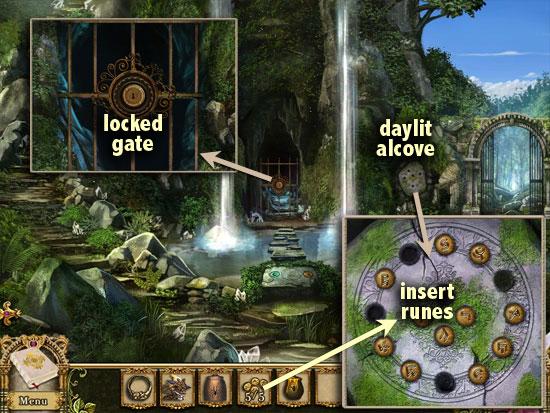
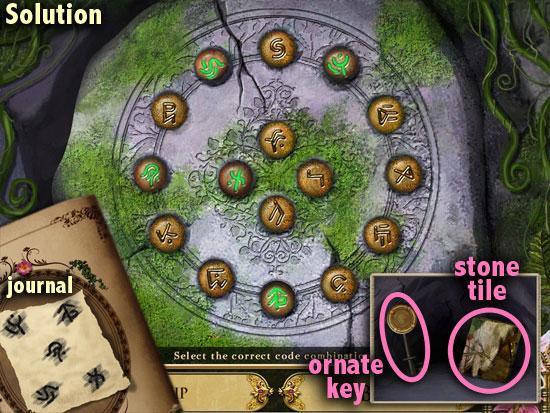
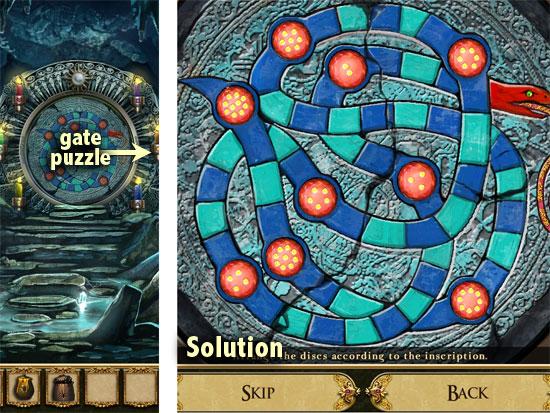
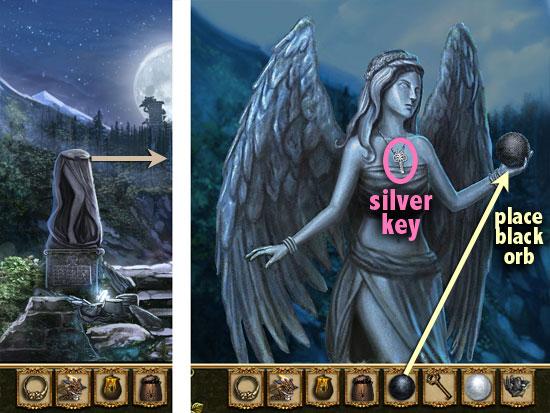
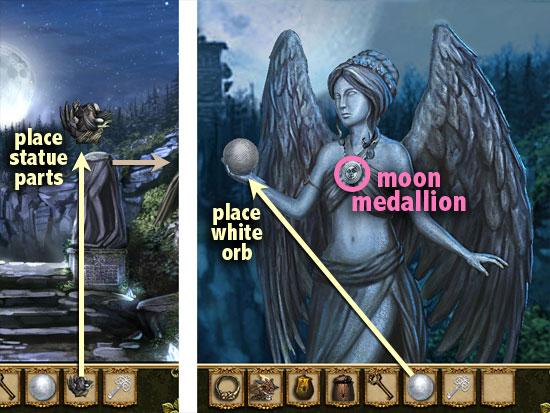
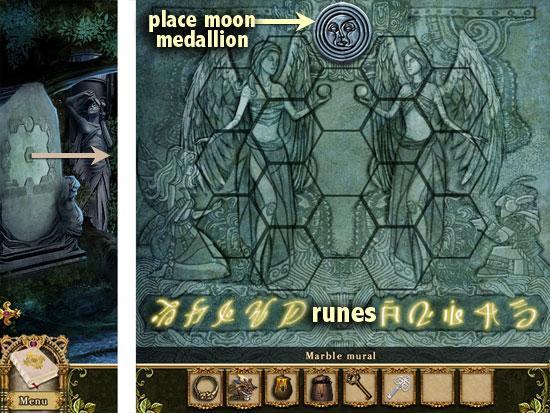
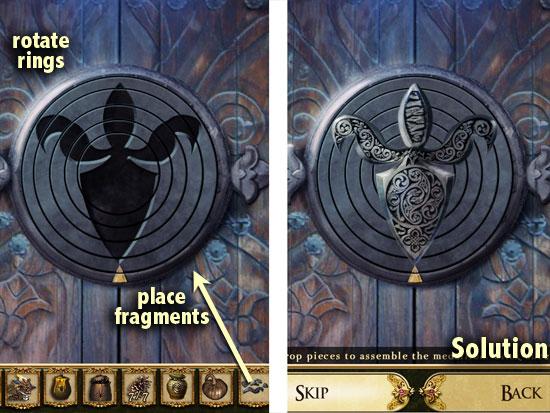
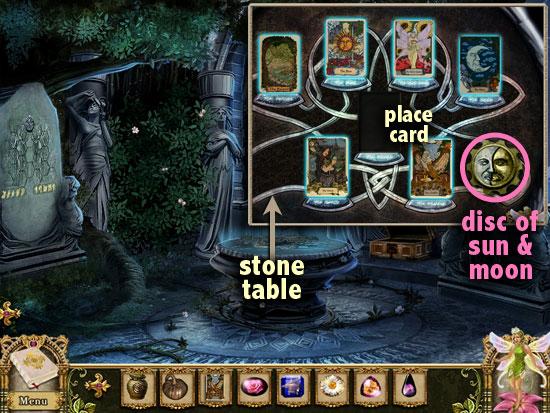
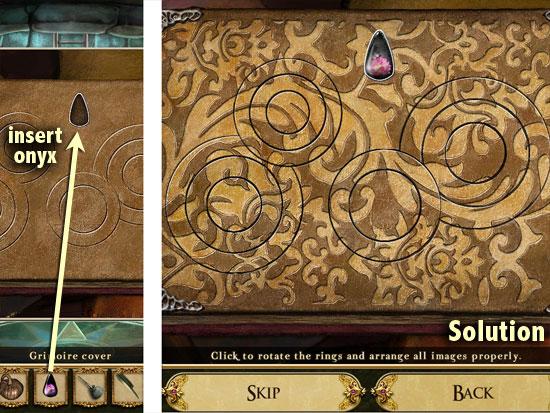
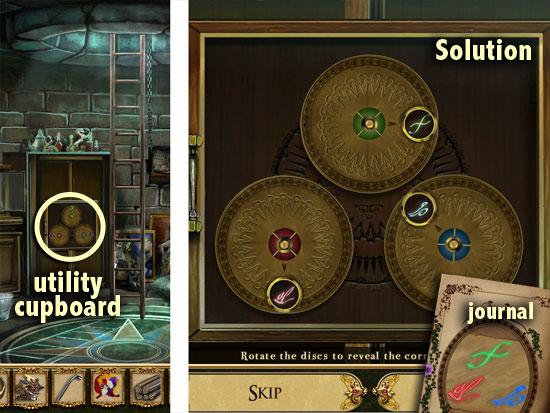
STONE PORTAL
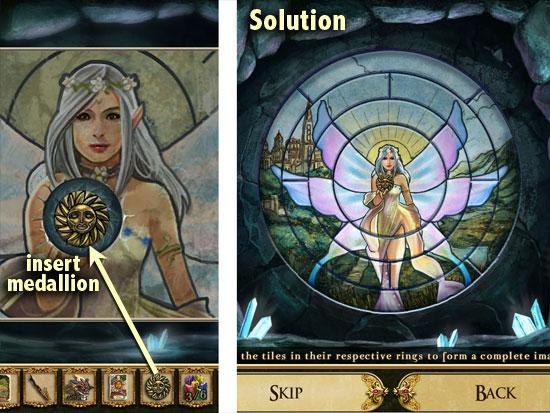
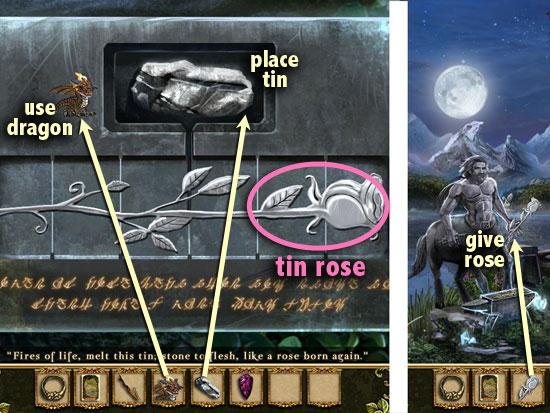
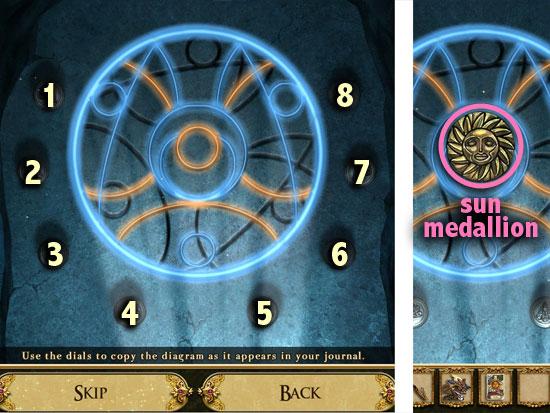
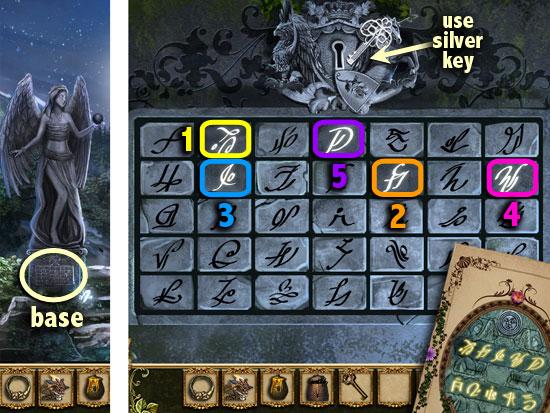
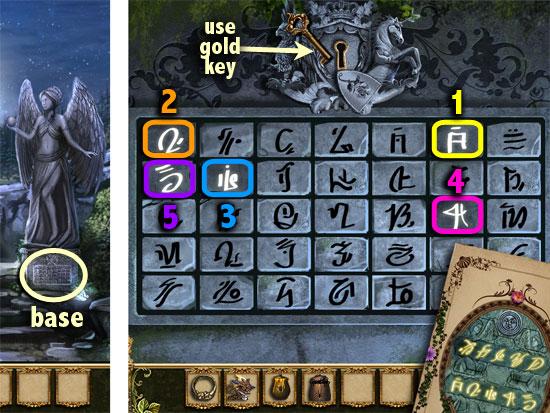
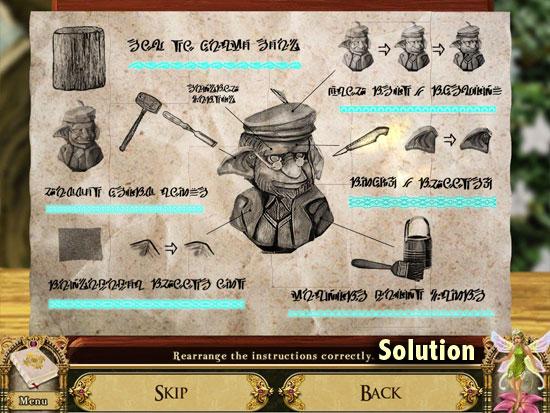
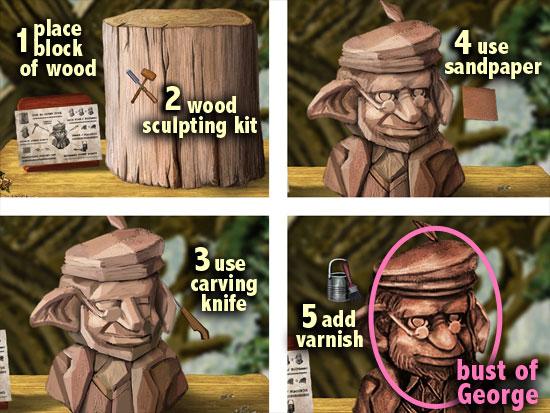
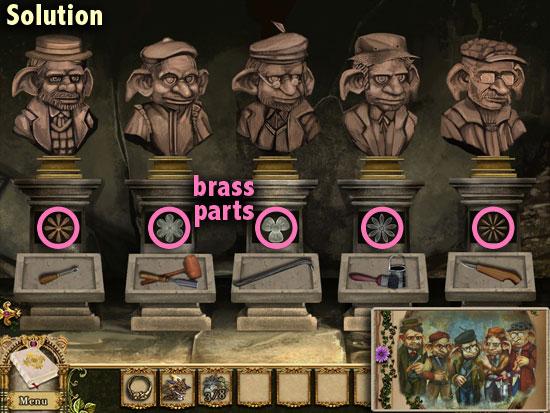
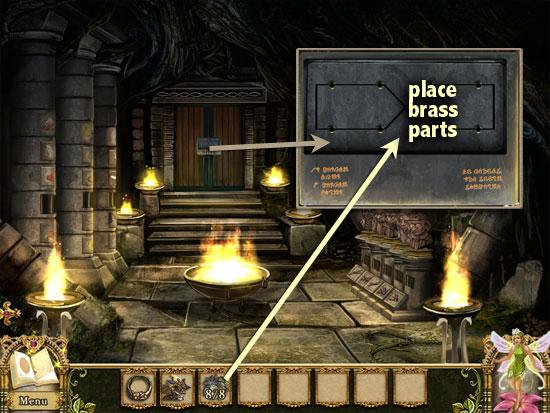
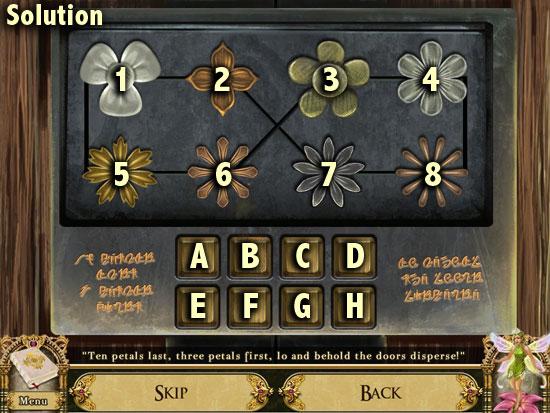
GATE OF SUN AND MOON
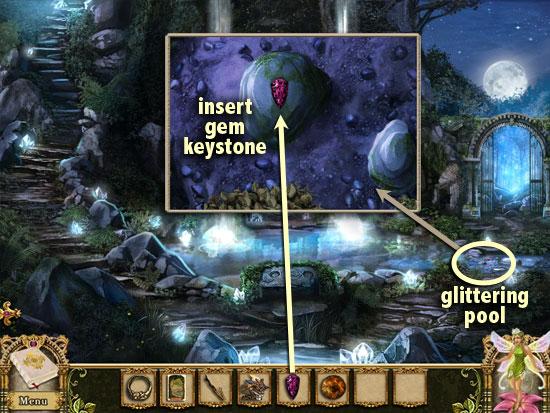
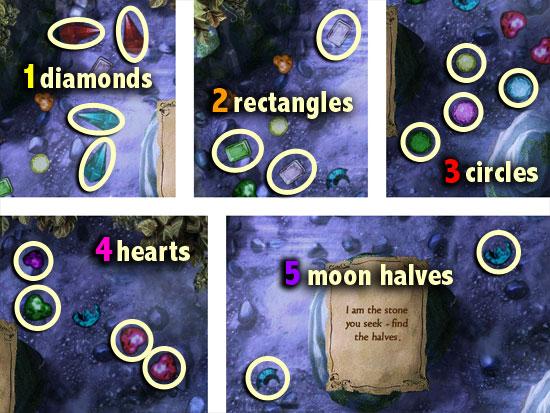
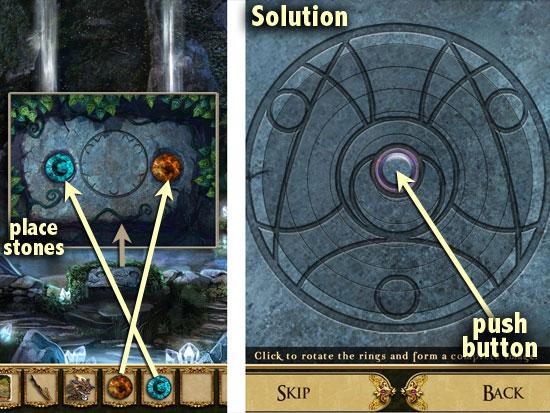
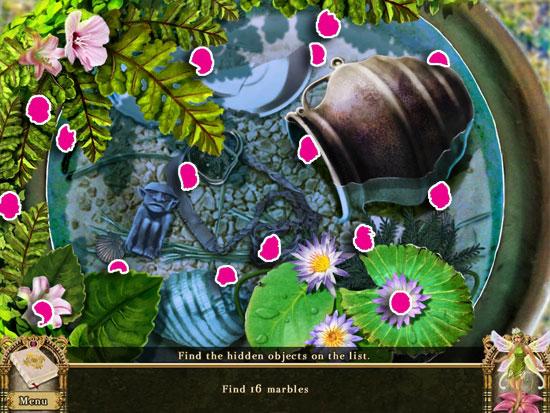
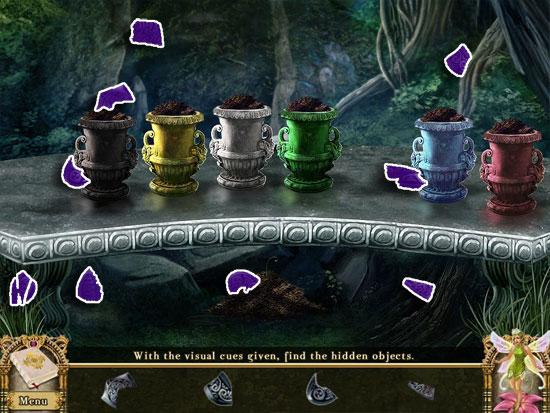
LAKE
PATH TO OVERLOOK
TEARDROP FALLS & PATH

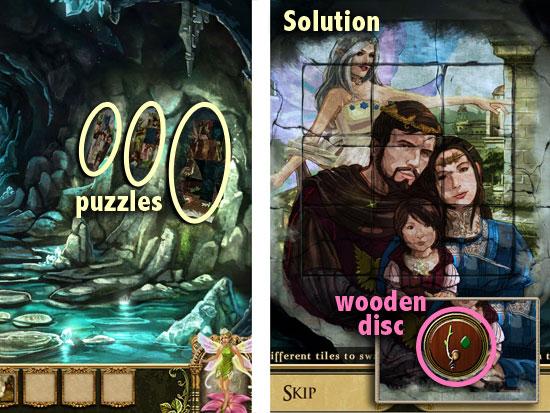
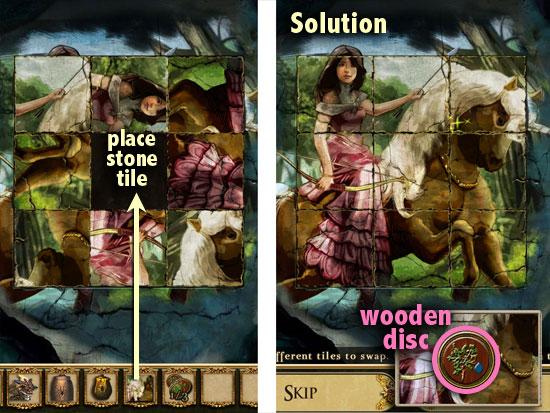
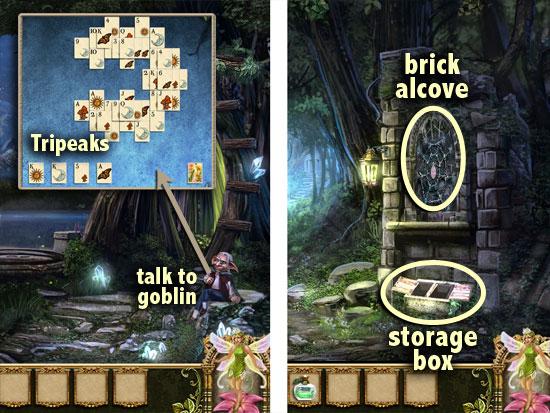
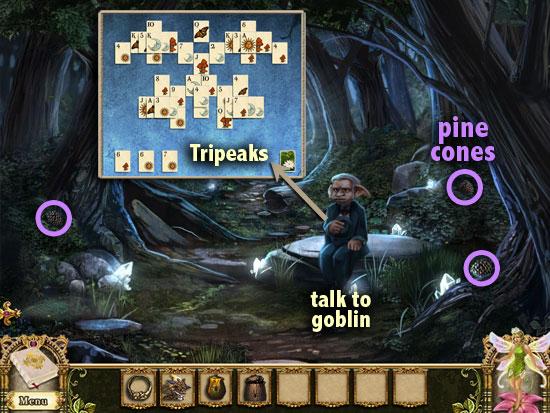
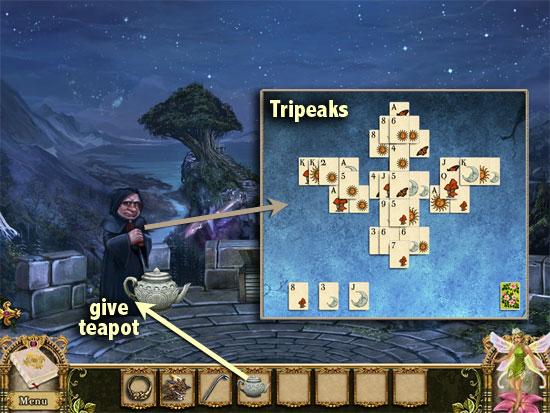
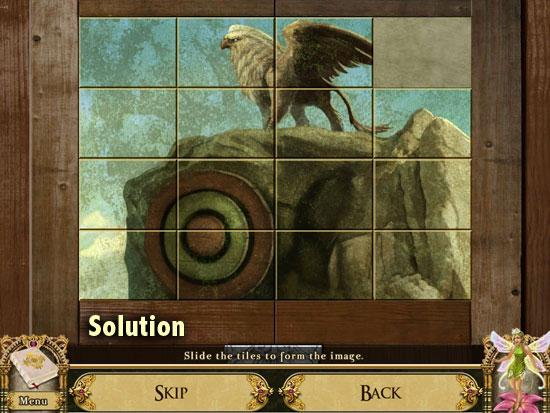
TRIPEAKS
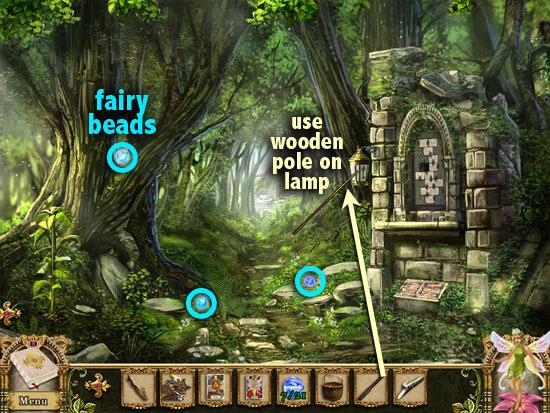
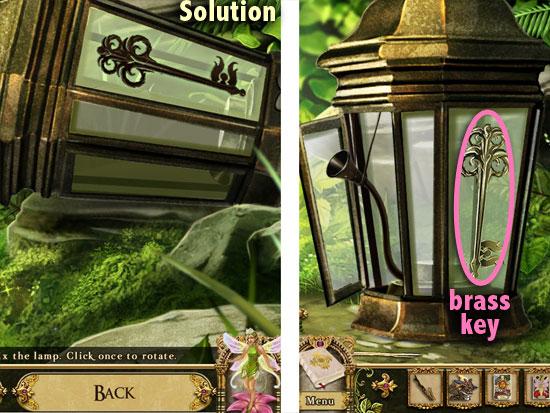
PATH TO THE FALLS
PATH TO PAVILION
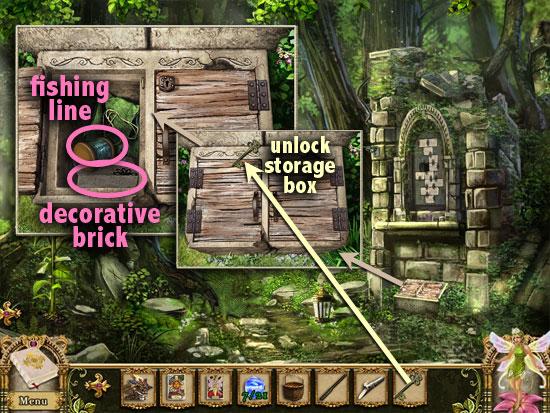
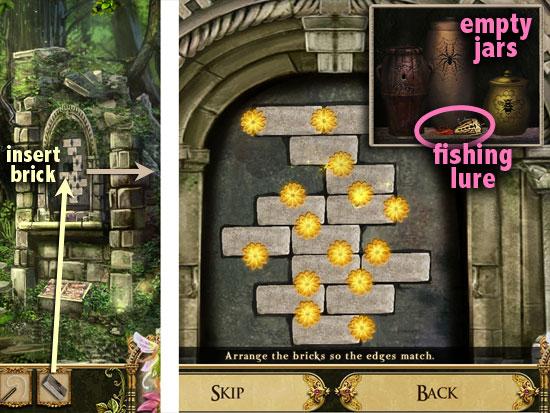
PATH TO CLIFFSIDE POOL

CLIFFSIDE POOL


PATH TO THE FALLS
PATH TO OVERLOOK
PATH TO PAVILION
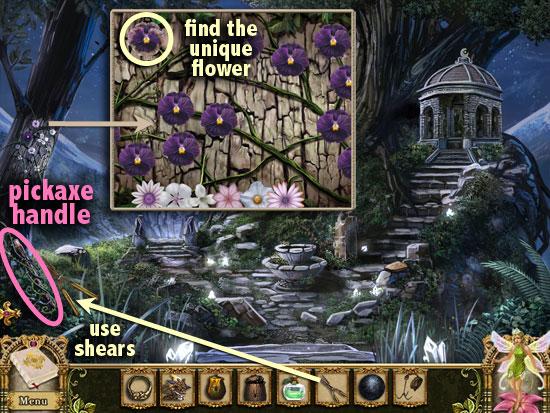
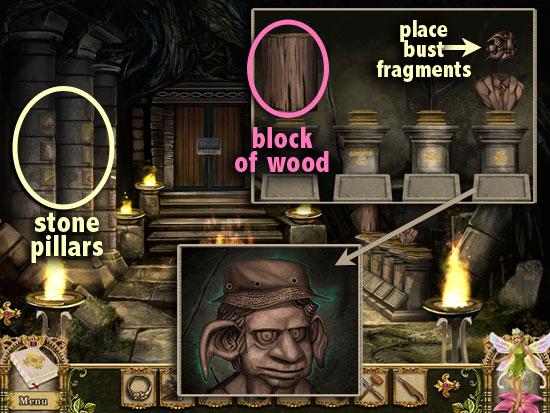
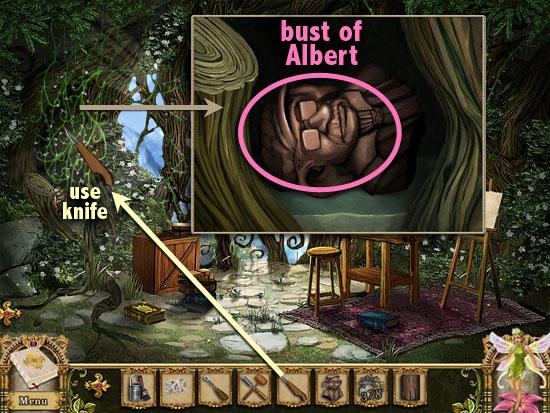
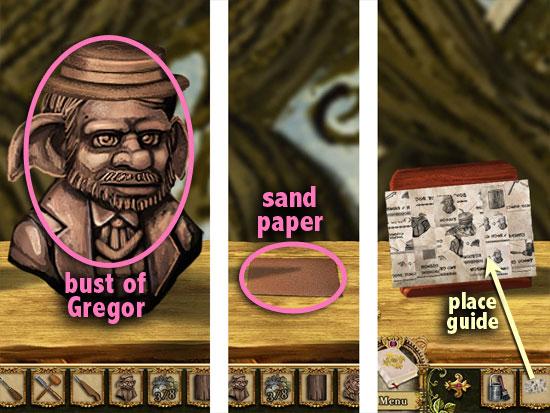
OUTSIDE THE PAVILION


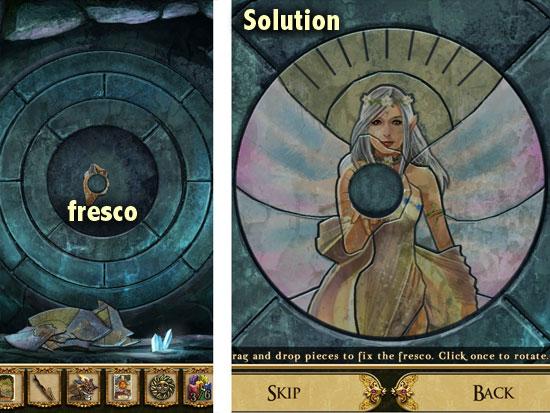
PAVILION OF THE SUN

PATH TO OVERLOOK
TEARDROP FALLS
OUTSIDE THE PAVILION
TEARDROP FALLS
WATERFALL CAVE
STONE PORTAL

GATE OF SUN AND MOON
LAKE
PATH TO THE PAVILION
OUTSIDE OF THE PAVILION
PAVILION OF THE MOON

PATH TO THE PAVILION
FOOT OF THE MOONBRIDGE
PAVILION OF THE MOON
FOOT OF THE MOONBRIDGE
ACROSS THE MOONBRIDGE
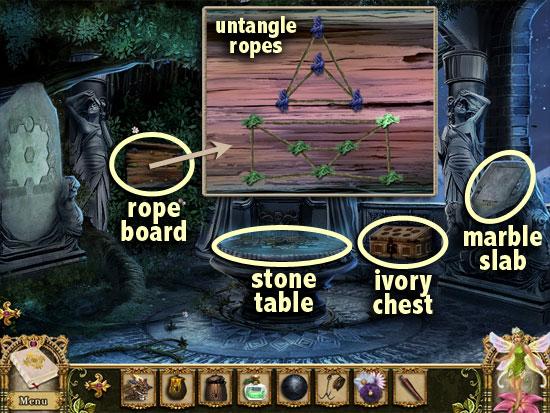
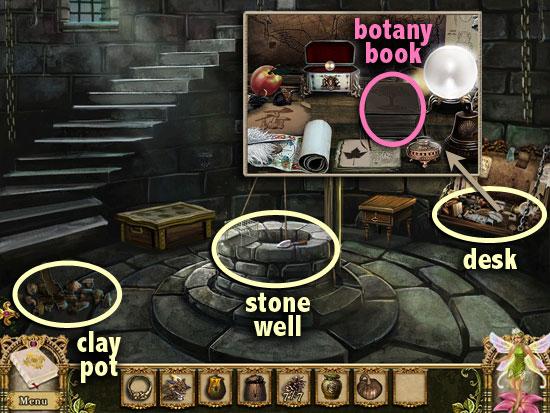
CROSSROADS

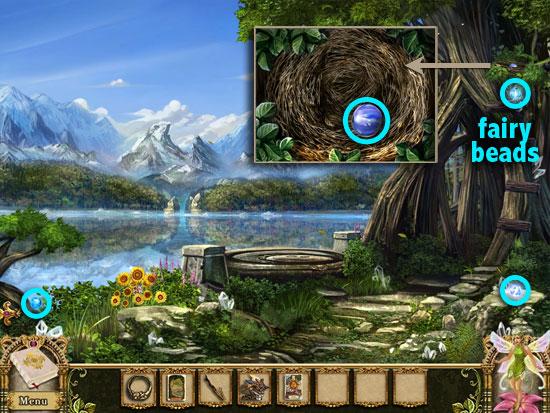
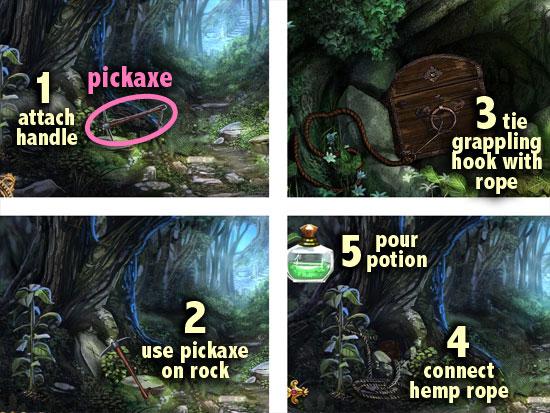
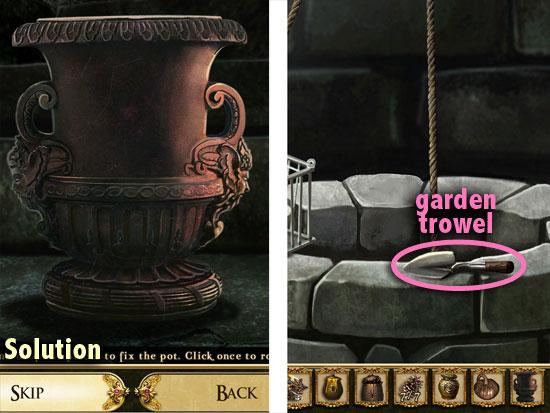
ROOT GATE
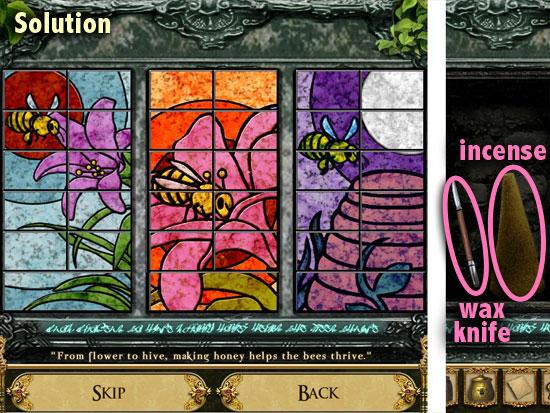
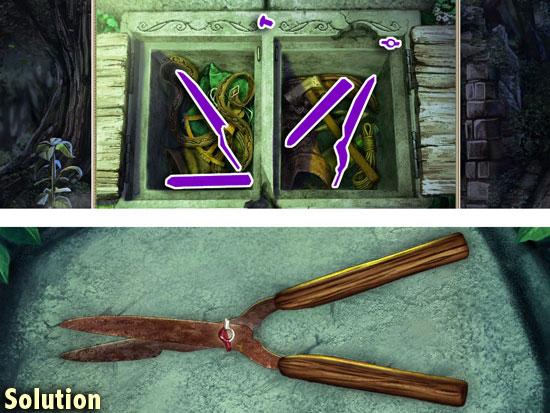
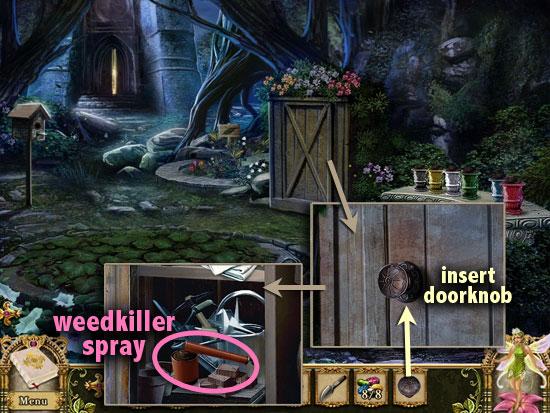
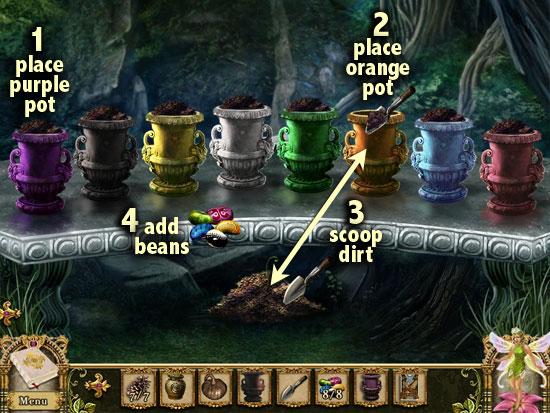
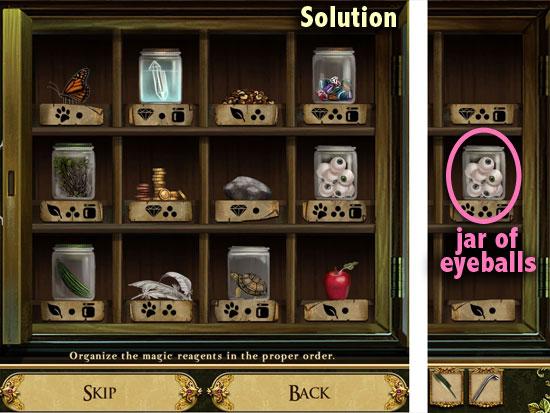
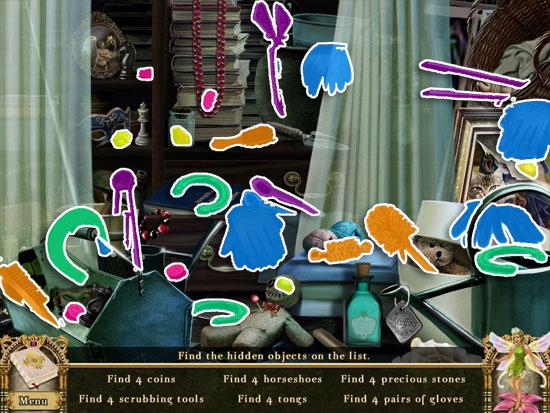
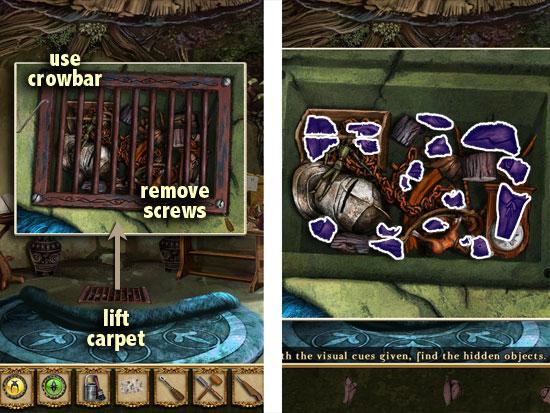
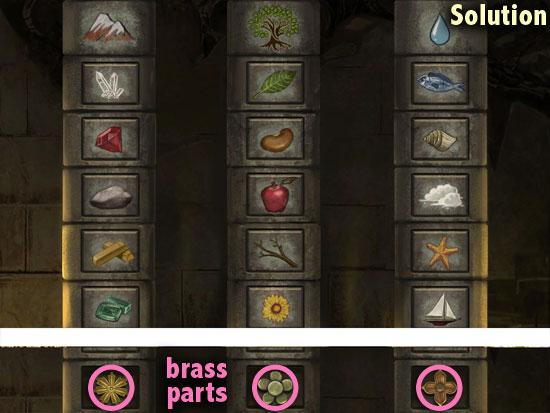
HERB GARDEN
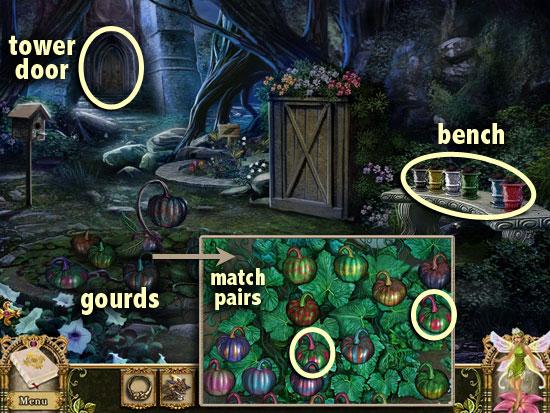
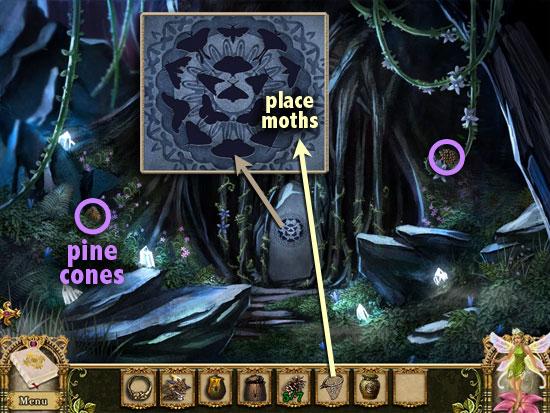
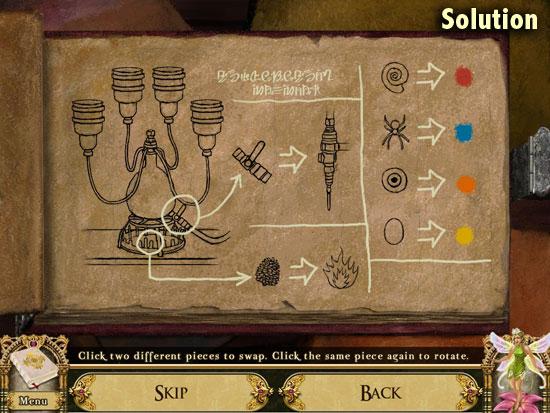
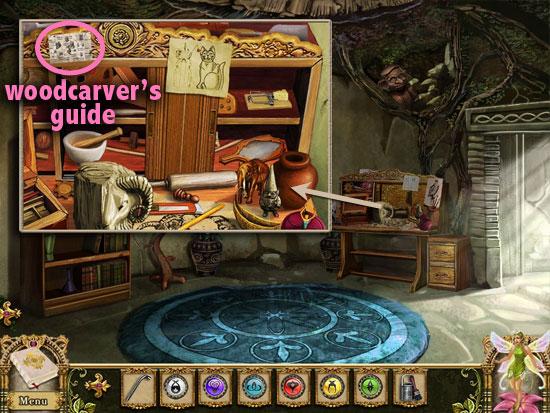
TOWER DOOR
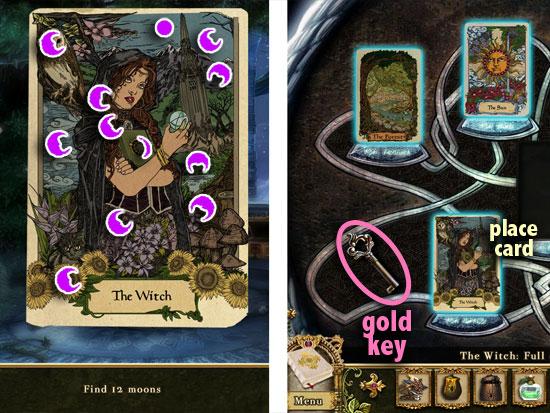
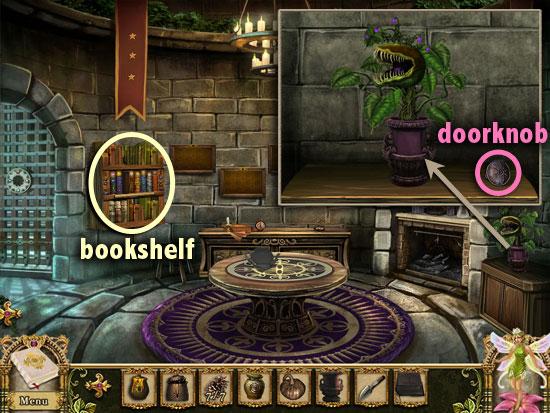
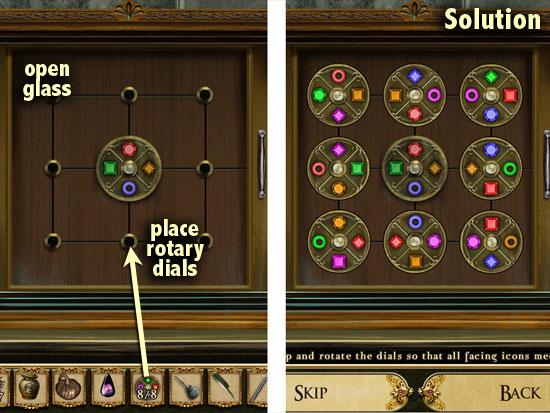
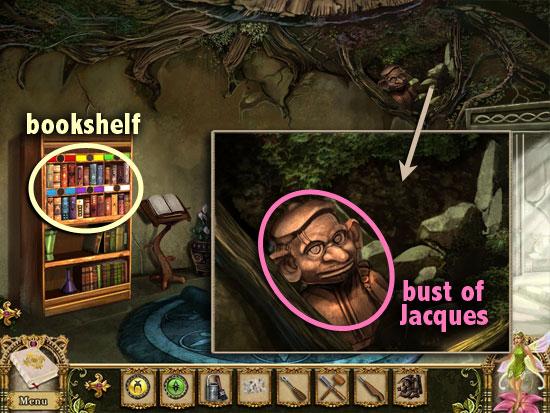
WITCH’S TOWER, GROUND FLOOR
WITCH’S TOWER, MIDDLE FLOOR

HERB GARDEN
WITCH’S TOWER, MIDDLE FLOOR

HERB GARDEN

PAVILION OF THE MOON
WITCH’S TOWER, MIDDLE FLOOR

WITCH’S TOWER, UPPER FLOOR
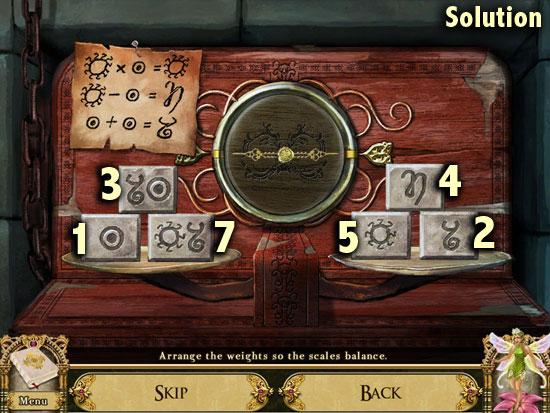
VENTILATION SHAFT
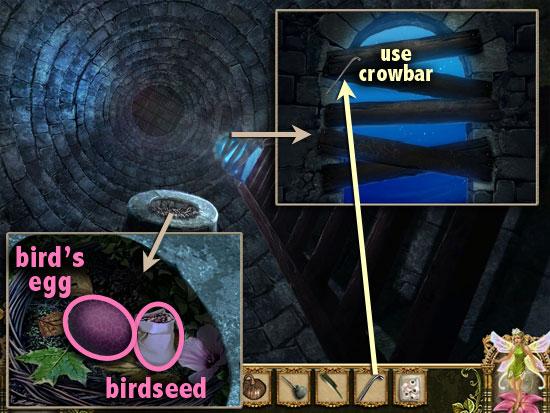
WITCH’S TOWER, ROOFTOP

WITCH’S TOWER, UPPER FLOOR
HERB GARDEN
WITCH’S TOWER, GROUND FLOOR

WITCH’S TOWER, MIDDLE FLOOR
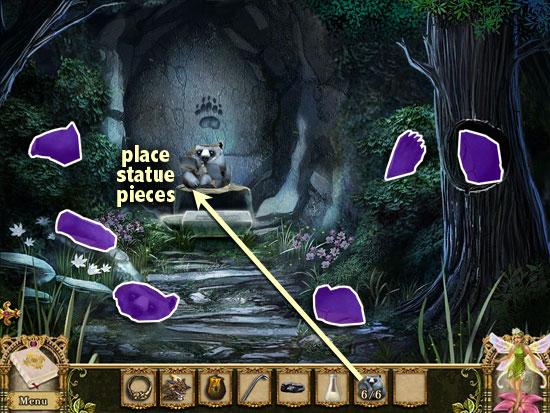
CROSSROADS
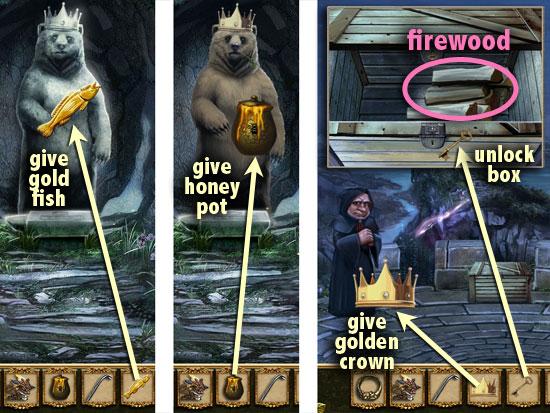
BEAR KING’S CLEARING
WITCH’S TOWER, ROOFTOP
WITCH’S TOWER, UPPER FLOOR
WITCH’S TOWER, GROUND FLOOR
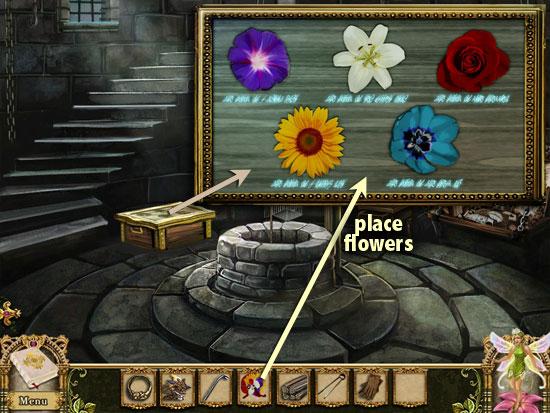
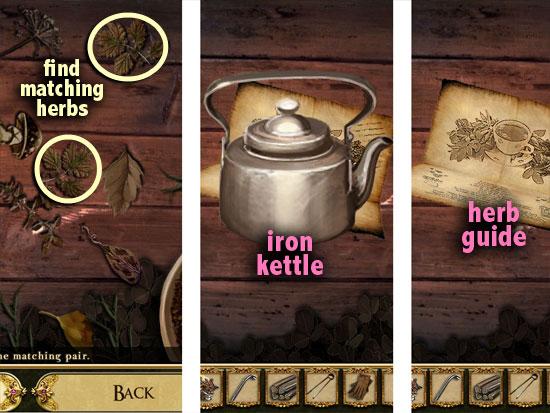
HERB GARDEN
OUTSIDE THE PAVILION
WITCH’S TOWER, MIDDLE FLOOR
WITCH’S TOWER, ROOFTOP
PAVILION OF THE SUN
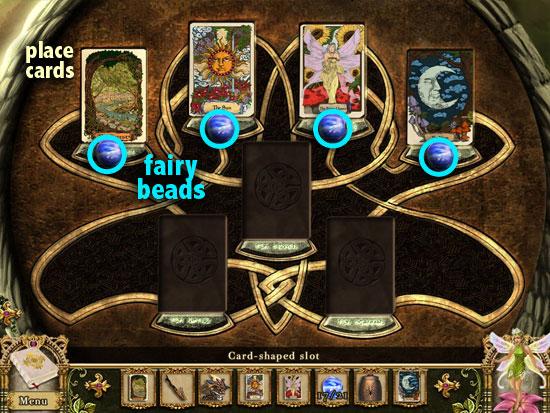
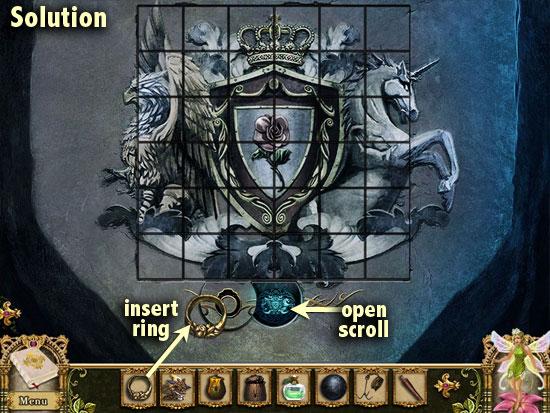
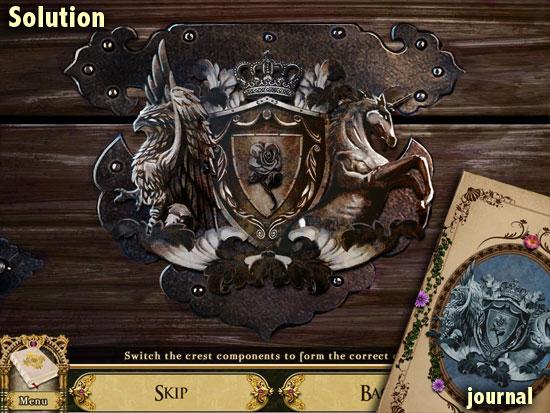
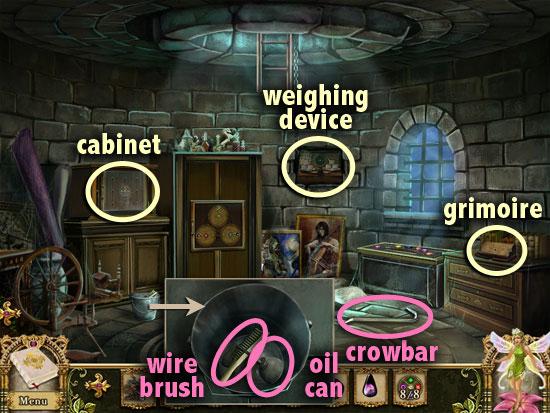
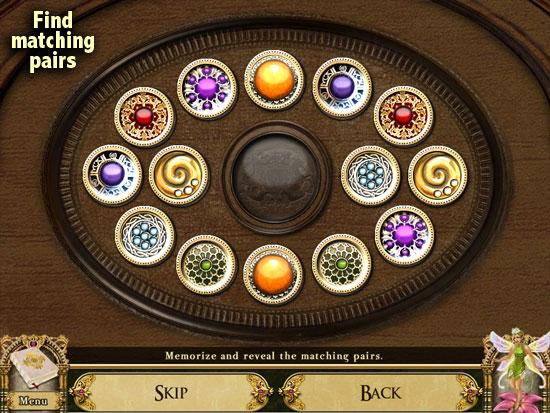
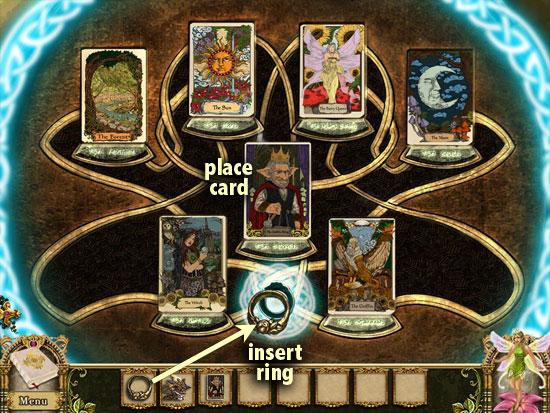
ROOT CHAMBER


SECRET PASSAGE
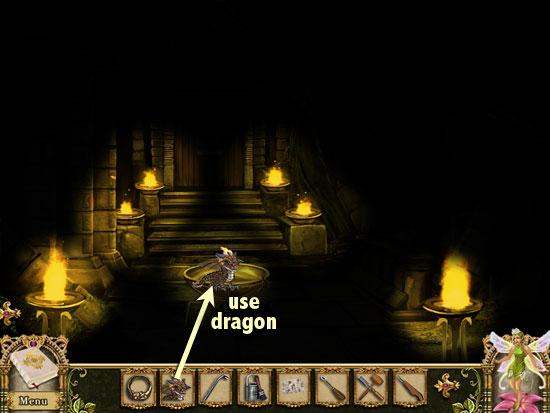
ROOT BALCONY
SECRET PASSAGE
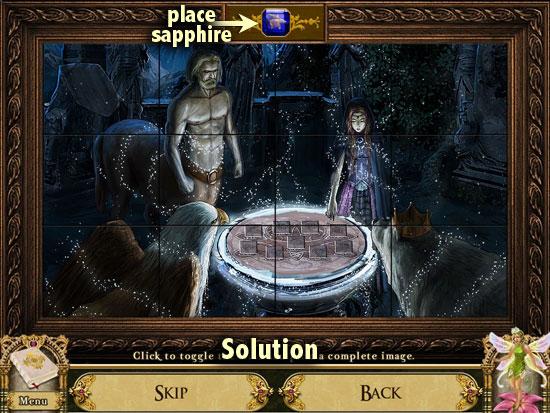
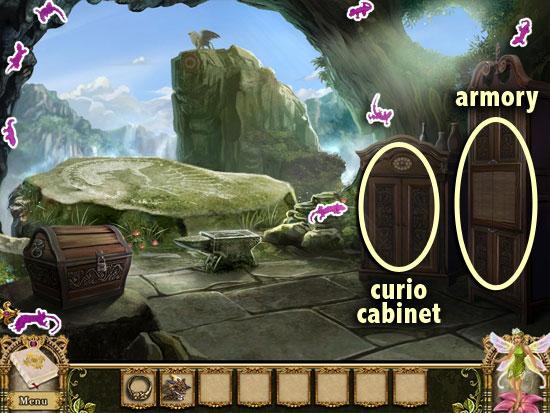
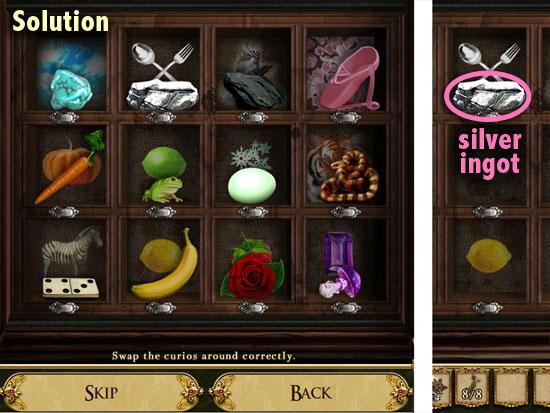
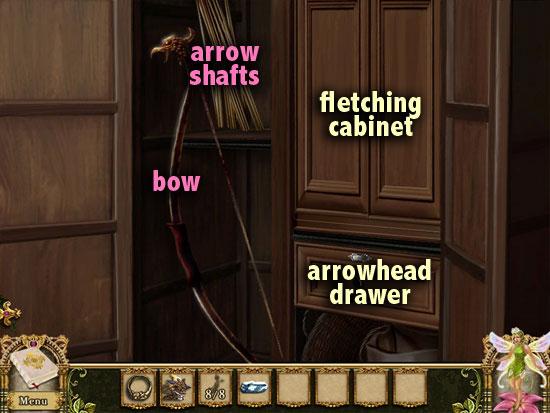
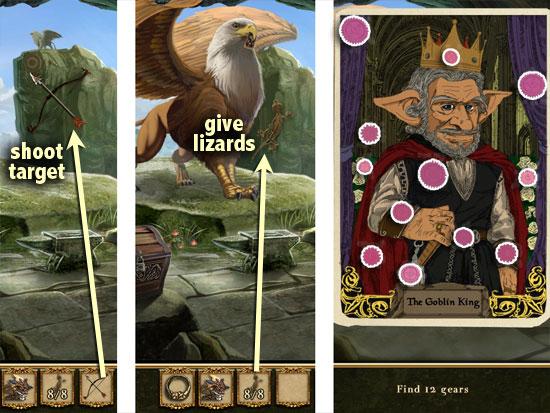
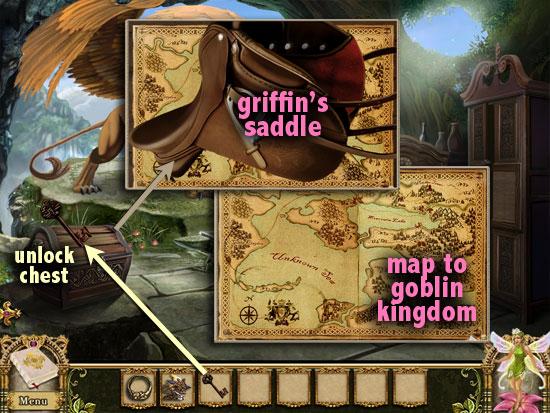
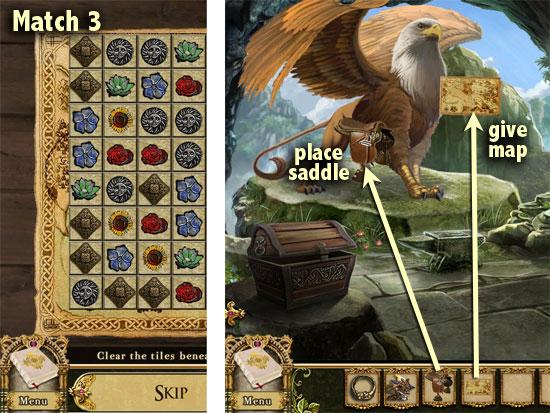
GRIFFIN’S EYRIE


PAVILION OF THE SUN
PAVILION OF THE SUN
GRIFFIN’S EYRIE
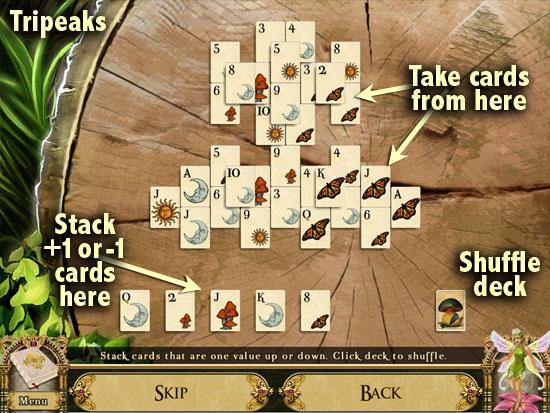
Congratulations! You have completed Awakening: Moonfell Wood. You have unlocked the bonus game of Tripeaks, which you can play outside of the adventure. It starts out at the easiest level with 5 stack piles, and gets more difficult as you progress through the rounds.
Be sure to click on “set an alert” on the top of this page to be notified of any updates, reviews, posts, tips, and cheats for Awakening: Moonfell Wood. Have tips of your own? Post your user tips in the User Tips + Cheats section.
