
Grow A Garden 2 Base Price List
What's the most valuable crop?![Evomon Best Starter [Leafbun, Blazpup, or Bubble?]](/wp-content/uploads/2026/06/evomon-best-starter.jpg "Evomon Best Starter [Leafbun, Blazpup, or Bubble?]")
Evomon Best Starter [Leafbun, Blazpup, or Bubble?]
Grass-type, Fire-type, or Water-type?![Evomon Tier List [META and BEST Evomon]](/wp-content/uploads/2026/06/evomon-tier-list.jpg "Evomon Tier List [META and BEST Evomon]")
Evomon Tier List [META and BEST Evomon]
The Evomon dream team.
![[Roblox] Evomon Shiny Hunting Guide – Including Prismatic and Pris Shinies!](/wp-content/uploads/2026/06/evomon-shiny-hunting-guide.jpg "[Roblox] Evomon Shiny Hunting Guide – Including Prismatic and Pris Shinies!")
Avenue Flo Walkthrough
Welcome to Gamezebo's strategy guide for Avenue Flo. This is a Hidden Object Adventure game in which you must both find objects and solve tasks in the scenes to progress. You play as Flo, who will be familiar to fans of Playfirst's Diner Dash series. This Strategy Guide is divided into two sections: General Tips (no spoilers) Detailed Walkthrough GENERAL TIPS To return to the Main Menu, click on the MENU button in the upper left. Each location has multiple Tasks…


- Prefer Gamezebo on Google

a:1:i:0;a:2:s:13:”section_title”;s:22:”Avenue Flo Walkthrough”;s:12:”section_body”;s:82966:”
Welcome to Gamezebo’s strategy guide for Avenue Flo. This is a Hidden Object Adventure game in which you must both find objects and solve tasks in the scenes to progress. You play as Flo, who will be familiar to fans of Playfirst’s Diner Dash series.
This Strategy Guide is divided into two sections:
- To return to the Main Menu, click on the MENU button in the upper left.
- Each location has multiple Tasks. Tasks may be Hidden Object scenes, inventory tasks like figuring out how to use items in the scene to fix a broken machine, or various other puzzles. Some of the puzzles are quite difficult.
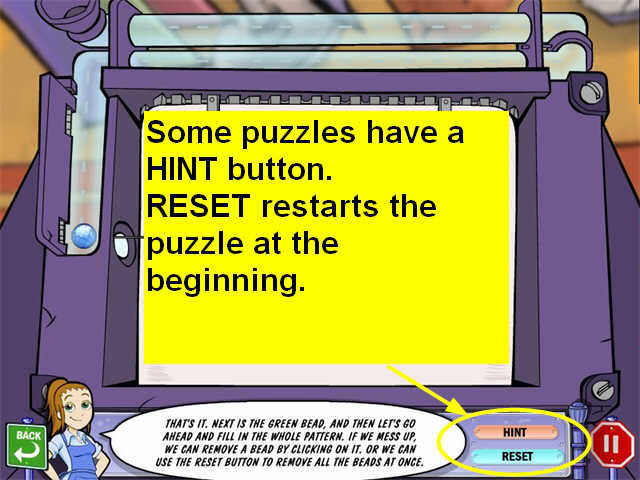
- Puzzles cannot be skipped. If you get stuck, try the HINT button, or consult our detailed walkthrough below.
- If you exit the game without completing a location, you may have to start over at the beginning of that location when you return.
- There is no timer.
- As with most adventure games, you are collecting not just objects but information, so it is a good idea to click on every character you see to find out if they have something important to tell you.
- In some cases you will need to click on a character 2 or 3 times before a dialog is completed. You can tell you’ve reached the end of the current dialog when they start to repeat themselves.
- Flo keeps a task list for herself that you can access at any time by clicking in the lower right corner. Not only does this tell you what Flo is working on, but it also has notes about things like codes or combinations that you have discovered in the game.

- You have a lot of freedom about what order to do things in, but the story will make the most sense if you try to do things as the story suggests them.
- To use an item from your inventory, just drag it to the place in the scene where you want to use it, or the person you want to give it to
- The only hints in the main game come from conversation between the characters, or from reading the Task List.
- If you are working on a puzzle, there may be a HINT button available.
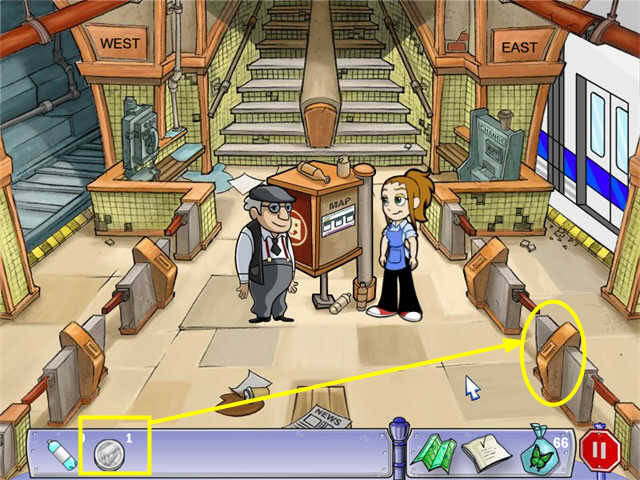
- There are three neighborhoods in the game. To travel between neighborhoods, use the Subway or the Bus.
- When you are in the Subway Station, click on the map on the central kiosk to find out whether you should be taking an Eastbound or Westbound train.
- Within a neighborhood, there are usually 2 or 3 streets, each one 2 or 3 blocks long. You can access the map at any time to see what the neighborhood looks like, but you will have to walk to each location on your own.
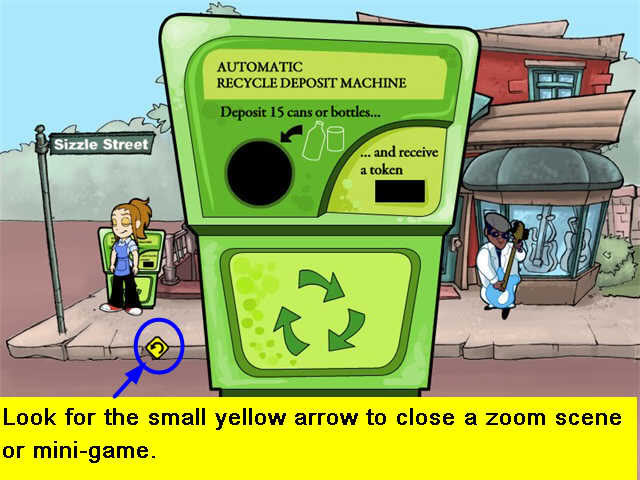
- When you click on some objects, a zoom scene or mini-game will open up. To close this and return to main view, look for a small yellow return arrow and click on it.
- Sometime during the third neighborhood you are going to be asked to answer a series of trivia questions about people and places there. These things are really trivial, like decorations on specific buildings. So make sure you talk to everyone you meet in this neighborhood, or you won’t be able to pass the test.
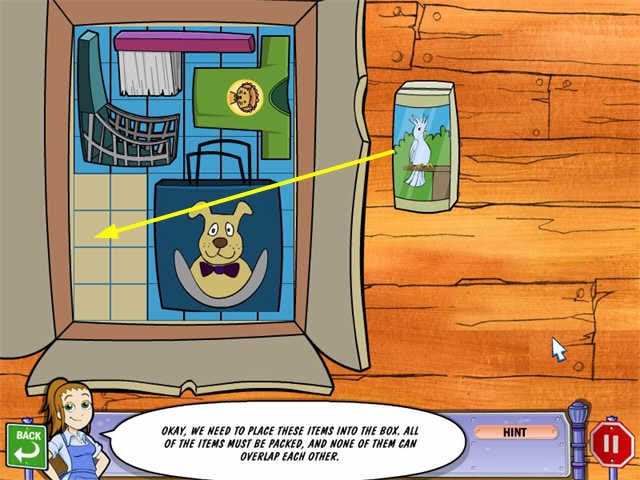
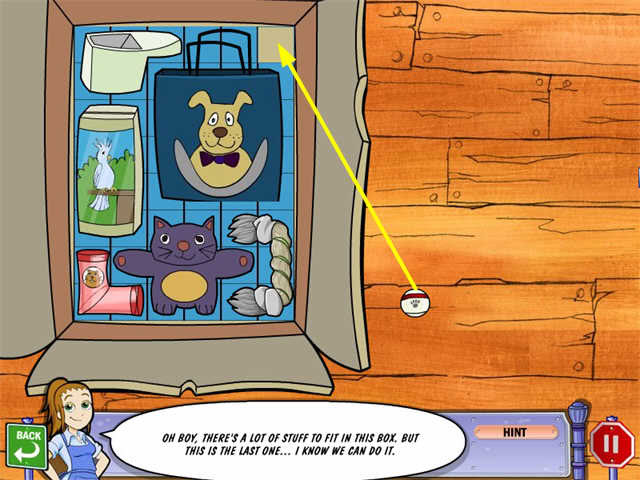
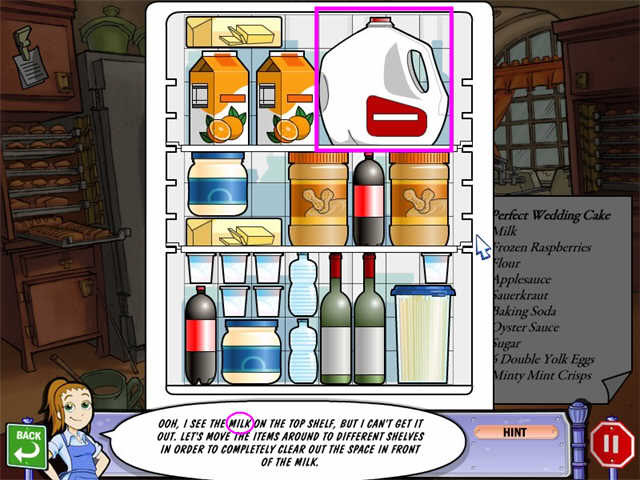
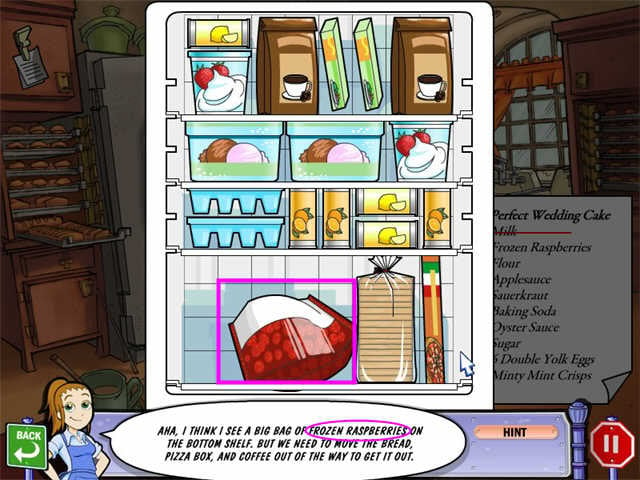
General Tips for the Bakery Kitchen Puzzles
- In these puzzles, you have to move items around in a cabinet in order to get something out.
- You are not allowed to take anything out of the cabinet except the one item you’re searching for.
- The item you want will always be stuck behind at least one other item. This will be the only place in the cabinet where you can stack things more than one deep.
- Notice that each shelf is marked like a grid so you can tell exactly how tall and wide each item is.
- Different shelves will be different heights.
- You cannot rotate items, so if a box of spaghetti is 4 units high, it can only go on a shelf that is 4 units high, you can’t lie it down on its side.
- For most of the puzzles, you will have to use every square available, so the trick is to redistribute the items for the most efficient packing.
- You may stack items on top of each other, provided the item is completed supported underneath. So an item that is 2 units wide must have something below both of its columns, or you won’t be allowed to put it there.
- You cannot move an item that has things on top of it-you have to move the higher items first.
- You ARE allowed to put things back in front of your goal item if needed. In fact, that’s the only way to solve many of the puzzles-take something away, put a different item there temporarily, make space for it on another shelf, then move it away again.
- Usually you want to be as efficient as possible. Whenever you have a shelf that is 3 units high, try to fill it with items that are 3 units high, rather than some 2 unit high items with 1 unit high items on top of them.
- The spoiler section of the walkthrough shows a solved position for each puzzle.
- "Cyan" is neon blue.
- An object that can be picked up, like a key, is marked with a solid square.
- A place where you can interact with the scene, like a lock, is marked with a solid oval.
- A door or panel that can be opened or shut is marked with a dashed oval.
- If an area is marked with a dashed oval and there is an item marked with a solid square inside the oval, it means that the object is hidden inside or behind something that you have to move.
- You may enter locations in a different sequence than I did. This is the one that most closely follows the story.
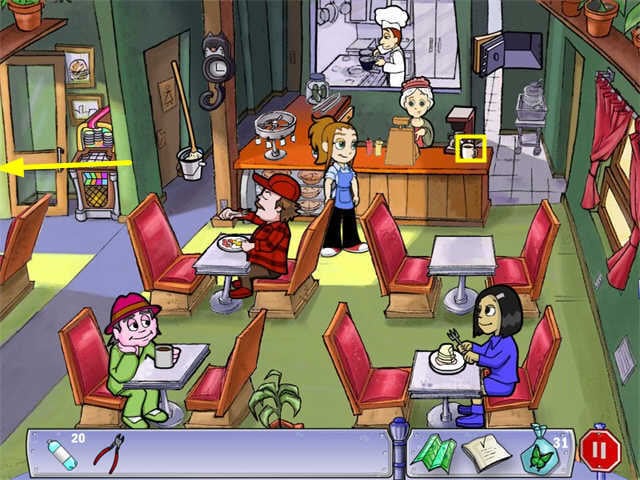
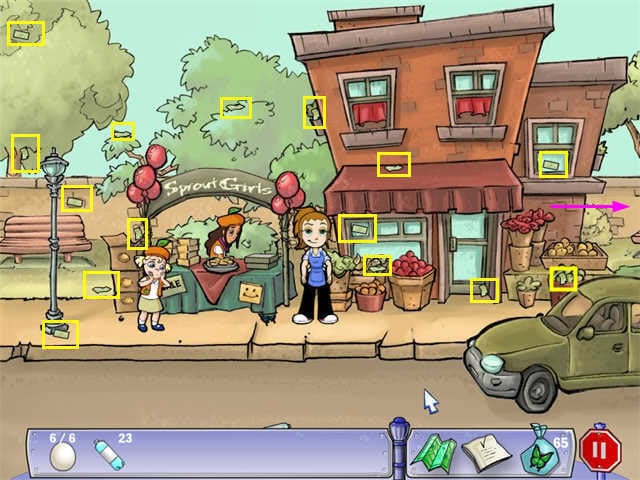
Scene 1: The Diner
- The coffeemaker is spilling over. Pick up the Mop and put it on the spill.
- Flo needs her purse. Look in the drawer behind the counter.
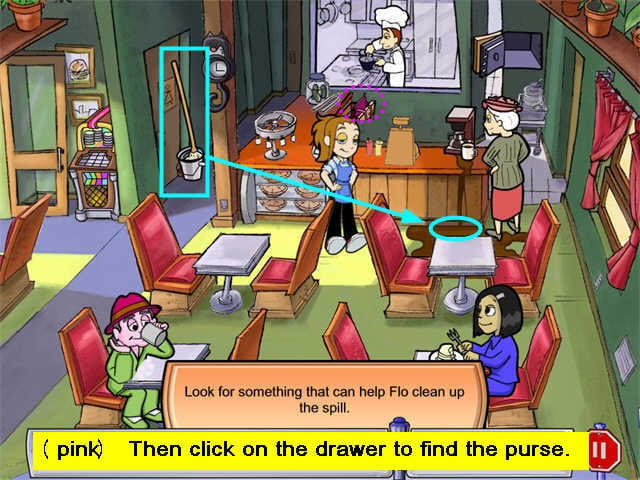
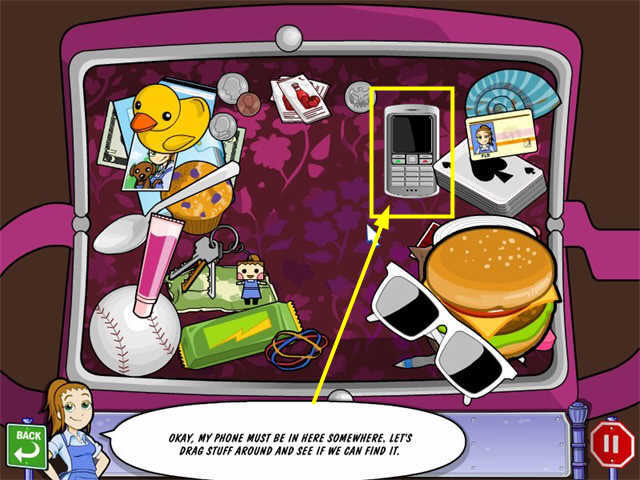
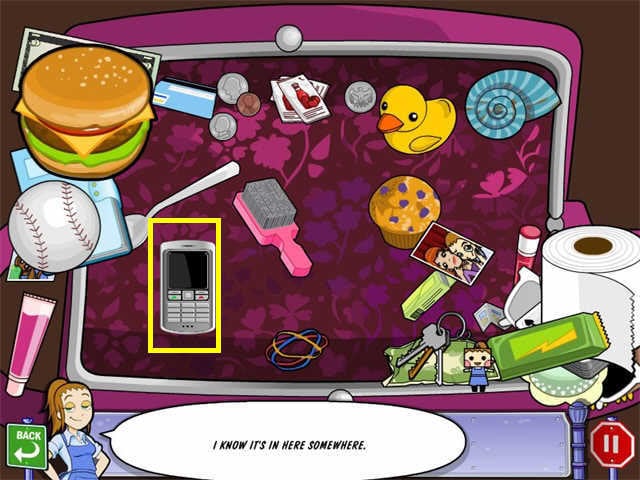
- Find the cellphone by moving aside objects until you see it.
- It’s Quinn. She gives Flo a whole set of tasks that need to be done to rescue Miss Big’s wedding. These tasks will appear on the task list in the lower right corner.
- New tasks will be added as Flo goes through the story.
- Leave the diner.
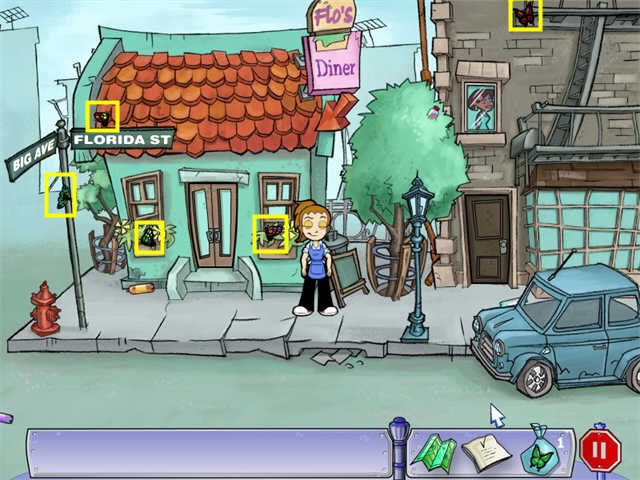
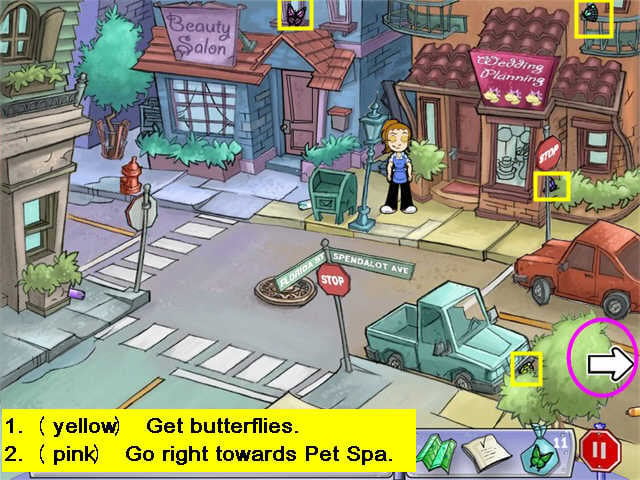
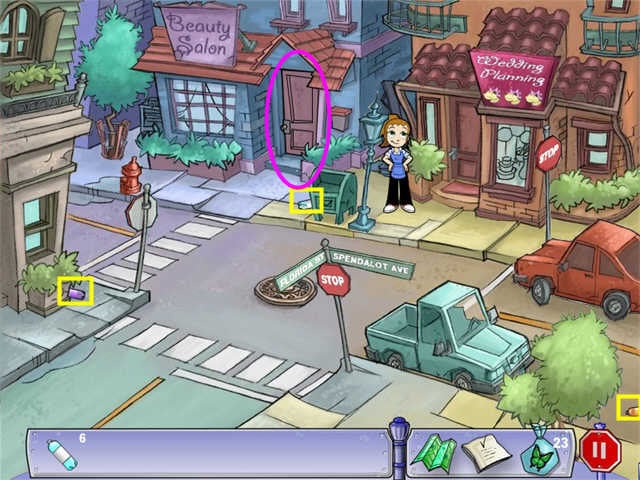
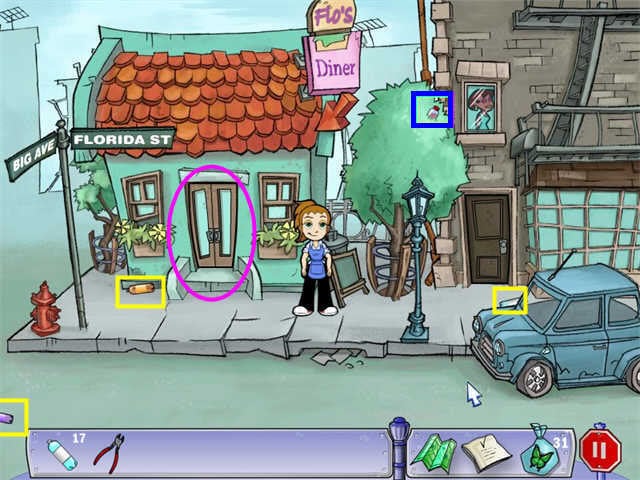
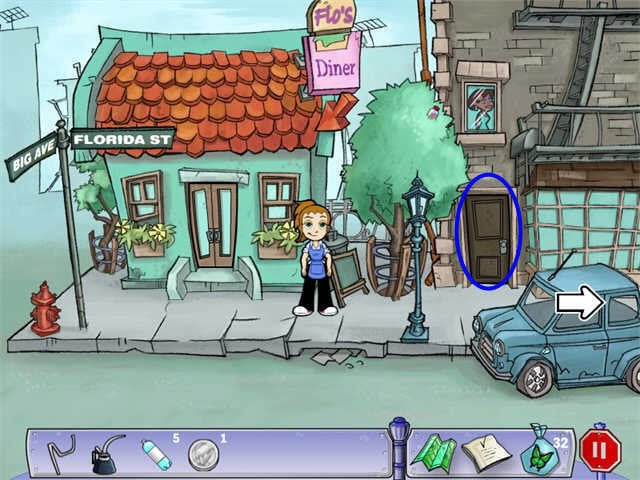
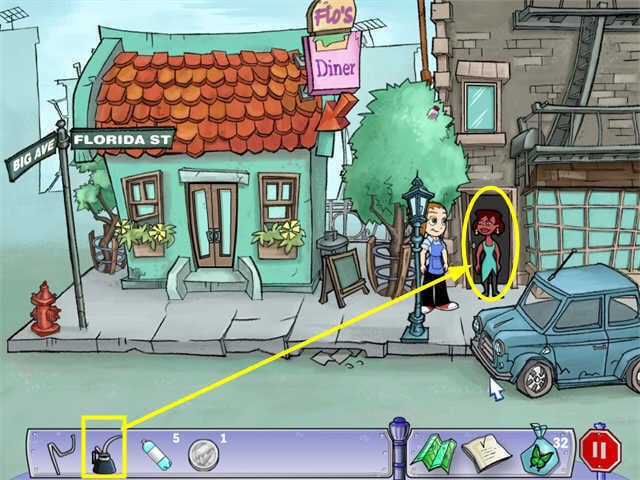
Scene 2: The Street in front of Flo’s Diner
- From now you will want to collect butterflies whenever you see them. But first you need a bag to put them in.
- Walk to the right.
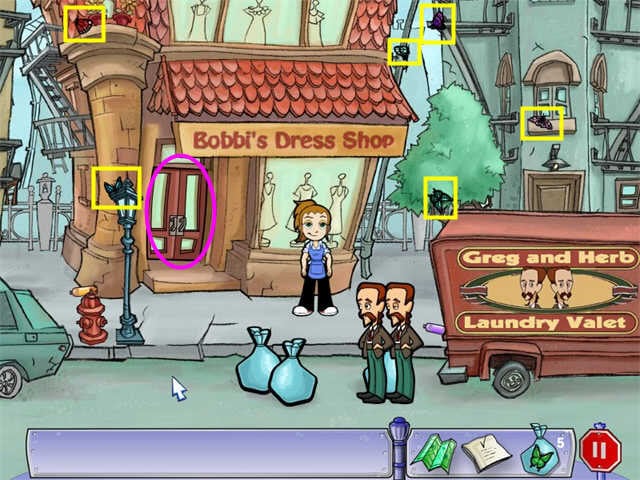
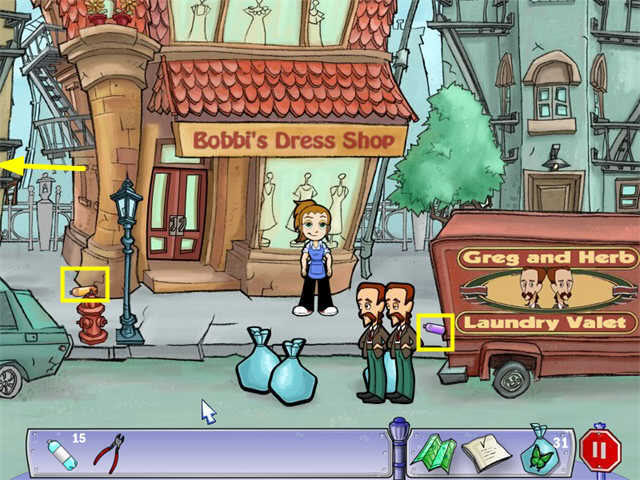
Scene 3: The Street in front of Bobbi’s Dress Shop
- Talk to the brothers. They will let you take a laundry bag. You can use this for butterflies.
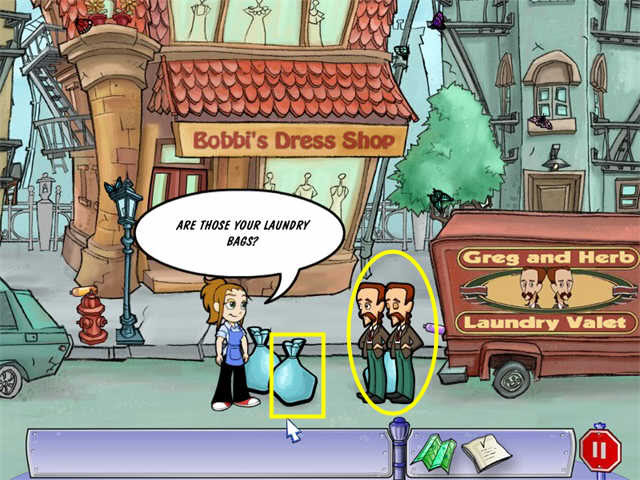
- Collect all the butterflies.
- I think Flo should be afraid that the butterflies will fly away, even thought they won’t in the game.
- So walk back to the left and collect all the butterflies in front of Flo’s Diner.
- Then return to the right.
- Collect more butterflies here.
- Go into Bobbi’s Dress Shop
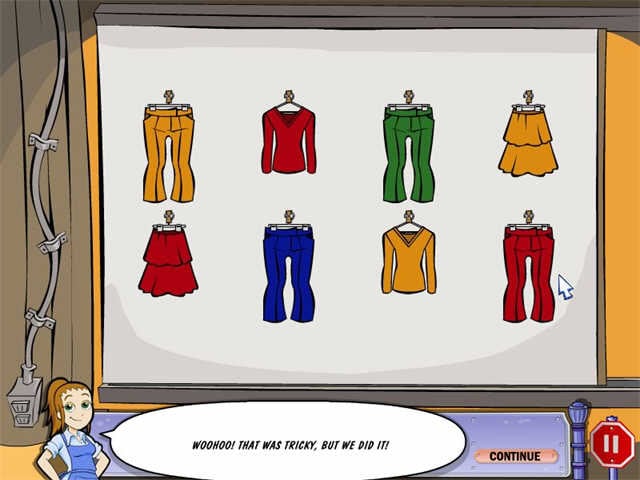
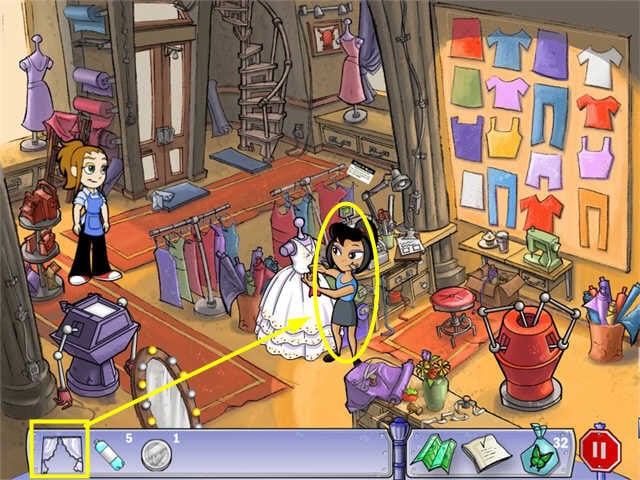
Scene 4: Bobbi’s Dress Shop
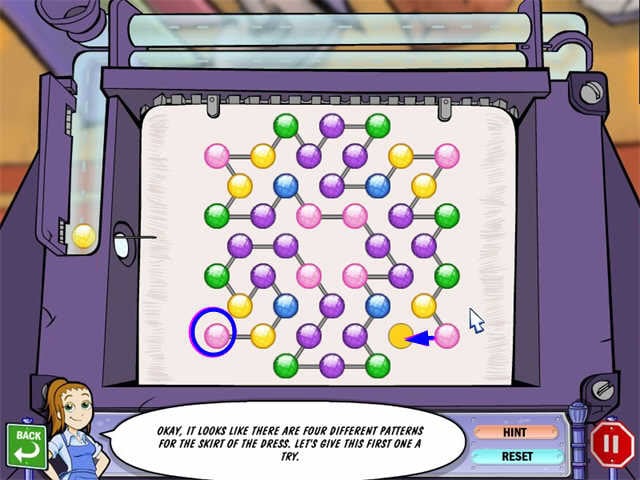
- Talk to Bobbi. The beading machine went crazy!
- Collect the beads scattered around the shop.
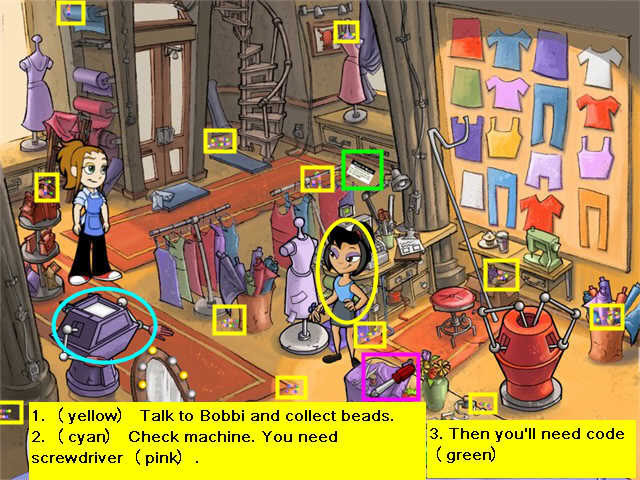
- Put the beads on the machine.
- You’ll need a screwdriver to open the machine so you can fix it.
- Ask Bobbi, she’ll tell you to look for the screwdriver.
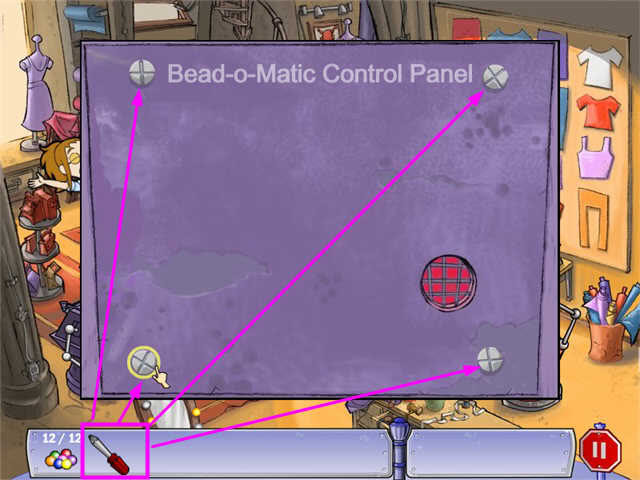
- Get the screwdriver and use it on each of the 4 screws on the machine.
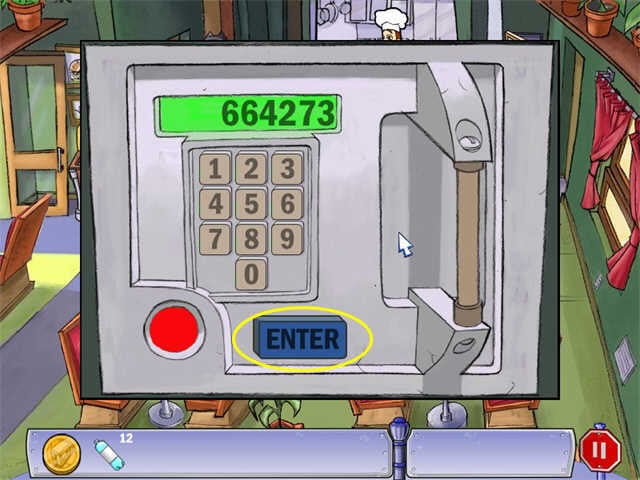
- Now you need the code. Ask Bobbi again.
- Find the card with the code.
- Enter the code in the machine and click ENTER.
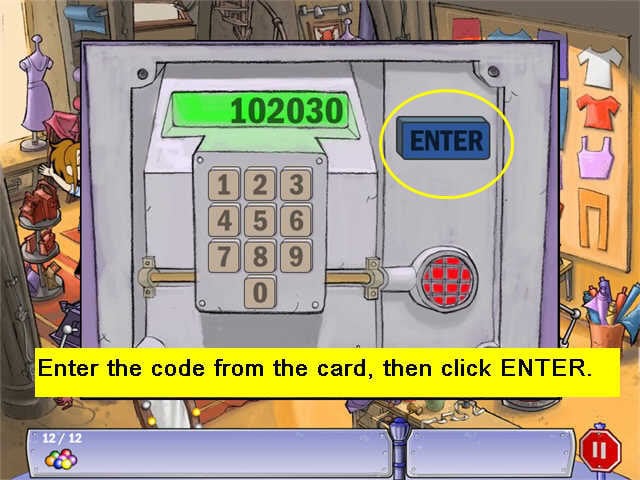
- That fixed it!
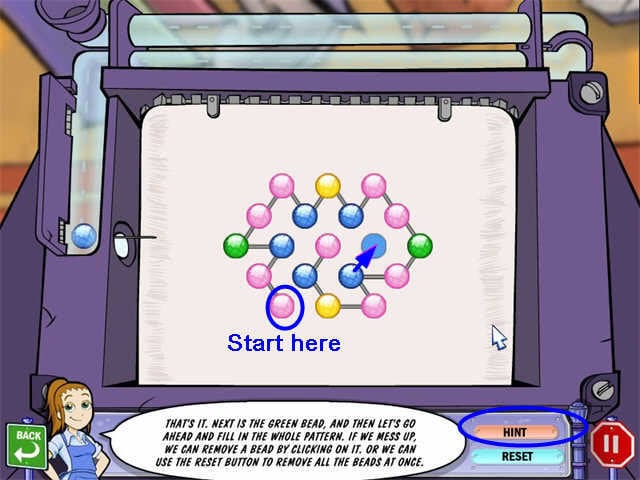
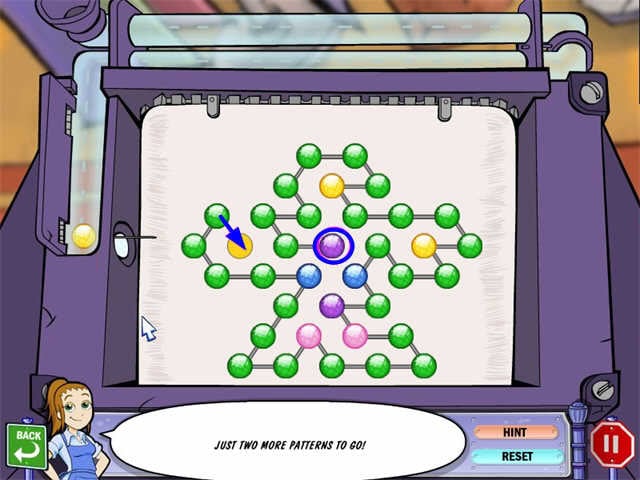
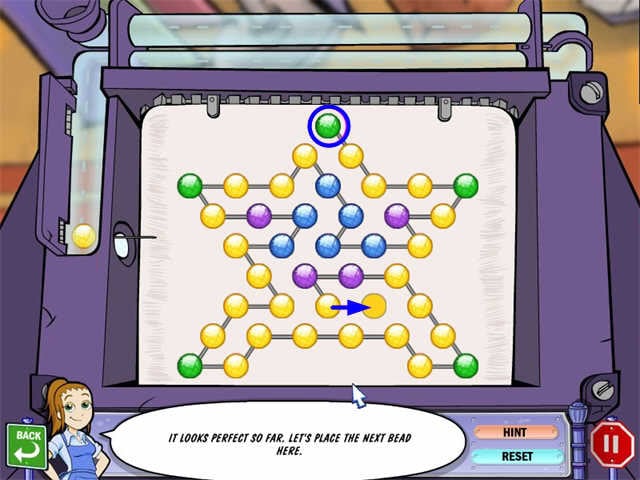
- Put the beads in the machine.
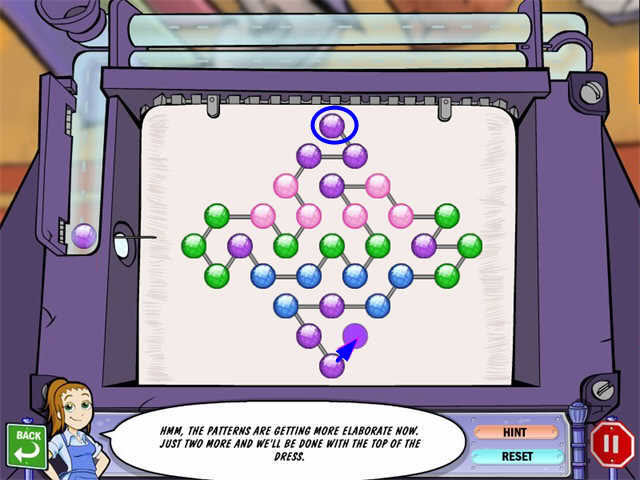
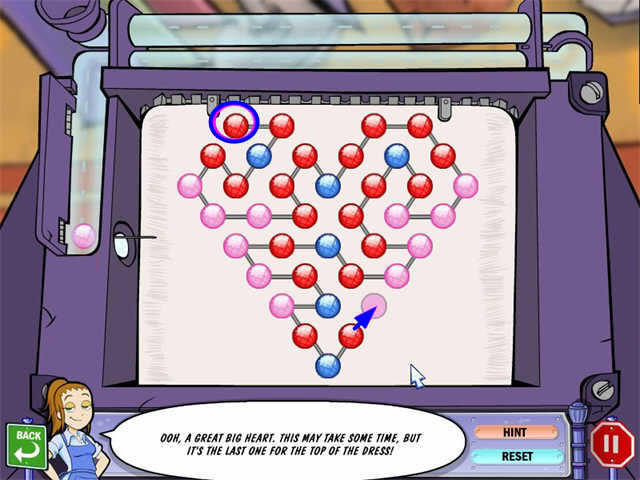
- This will trigger a mini-game. You must complete 4 bead patterns.
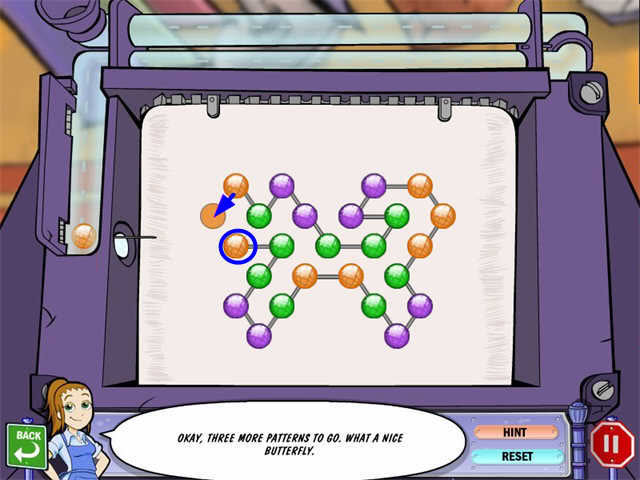
- Talk to Bobbi some more. There aren’t enough beads to do the bottom of the dress-you’ll have to find some more.
- Meanwhile, on to the Pet Spa.
Scene 5: Neighborhood 1 Intersection
- Collect more butterflies.
- Turn right towards Pet Spa
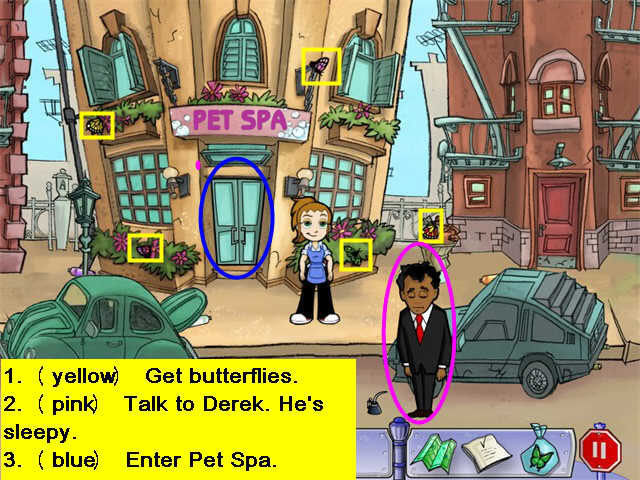
Scene 6: Outside Pet Spa
- Collect butterflies.
- Talk to Derek-he’s sleepy.
- Enter Pet Spa.
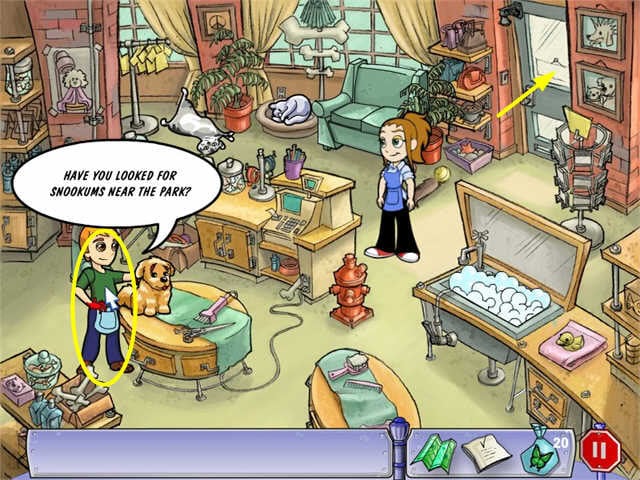
Scene 7: Pet Spa
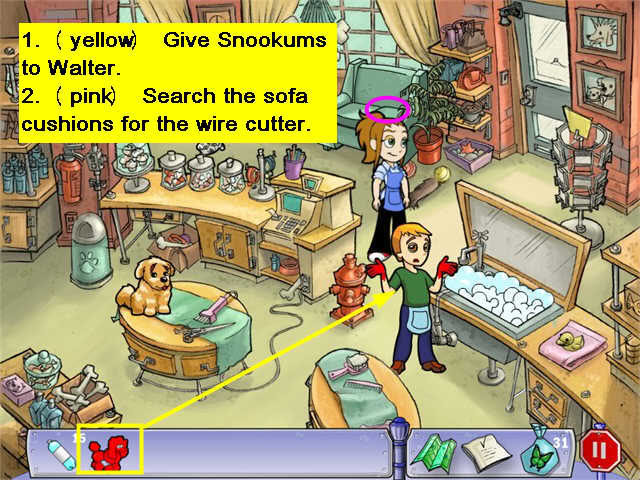
- Talk to Walter. He will tell you everything that happened. Snookums is red!
- Keep talking to him until eventually he will tell you to look for Snookums near the park.
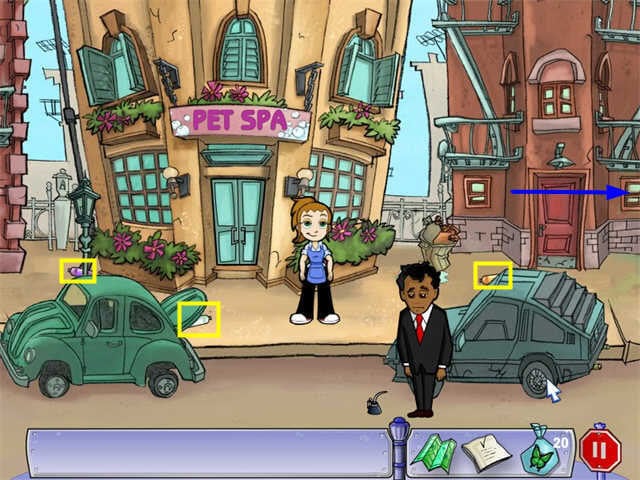
Scene 8: Outside the Pet Spa
- Because Walter said he threw the red bottle out in the street, at this point I started picking up all the bottles. It turns out you will need them, but for a different reason.
- If you picked some up before, that’s fine.
- Then go left to get to the park.
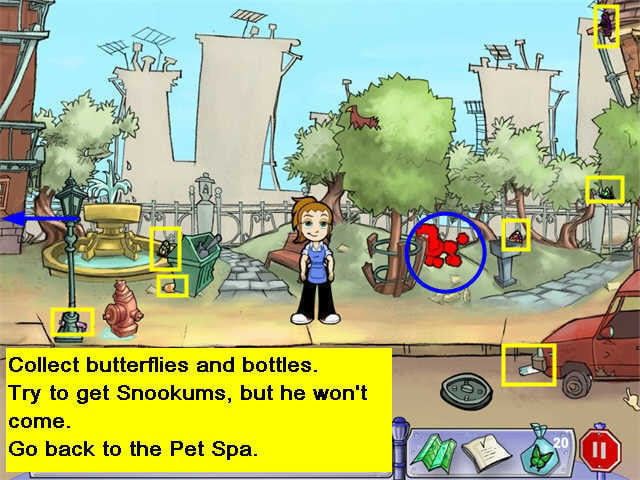
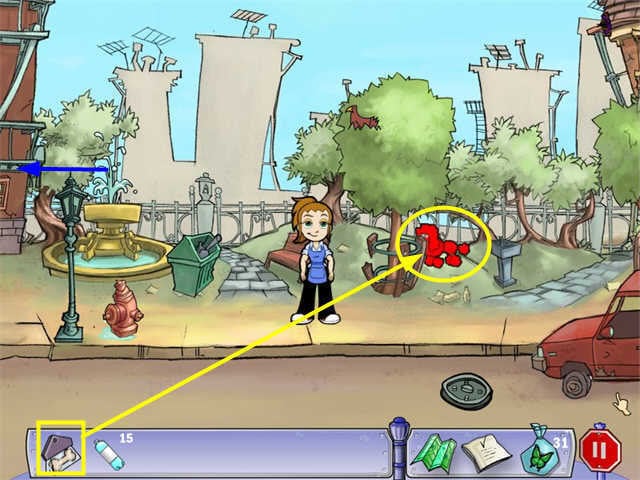
Scene 9: The Park
- Snookums is here! And so are some butterflies!
- Collect the butterflies and the bottles.
- Try to get Snookums, but he won’t come to you.
- Go back to the Pet Spa to ask Walter what to do.
Scene 10: The Pet Spa
- Walter will tell you Snookums only likes fresh-baked treats, and he doesn’t carry any.
- He’ll remind you he’ll need dye remover, but the Beauty Salon will probably have some.
- When you come out of the Spa, go left to go back to the intersection where the Beauty Salon is.
Scene 11: Outside the Beauty Salon
- Collect bottle.
- Go into the Beauty Salon.
Scene 12: The Beauty Salon
- Talk to Betty. She’s in a really bad mood because she needs the red hair dye. She won’t help you with anything until you find it.
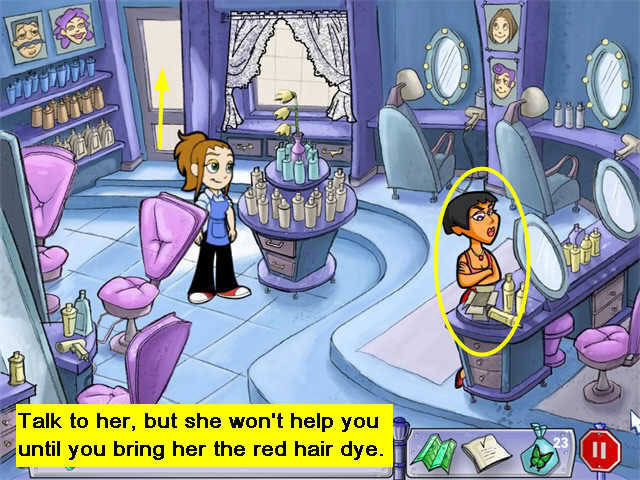
- Go back outside, then head left up the street, still looking for the hair dye bottle.
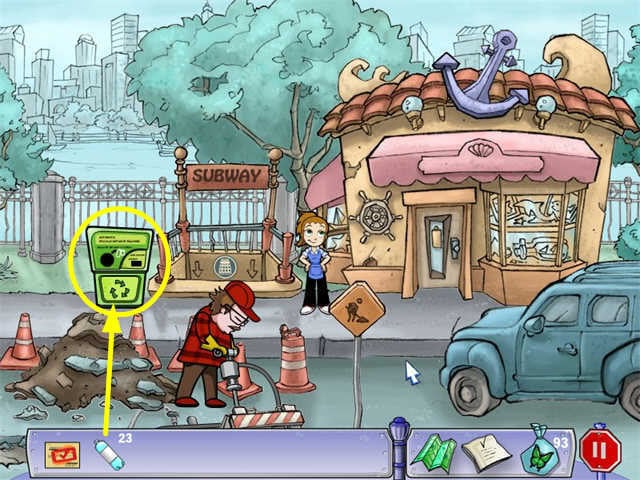
Scene 13: Above the Subway
- Collect more bottles and butterflies, then head left.
- If you click on the Green Machine, you’ll notice that you can exchange 15 bottles for a Subway token-that’s good to know, but you don’t need it yet.
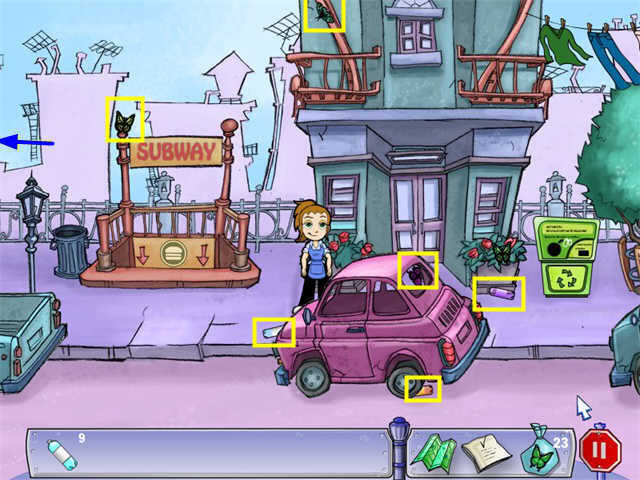
- Continue right.
Scene 14: Aunt Ethel
- Collect butterflies and bottles.
- Talk to Aunt Ethel. She can give you more beads, but you’ll have to find her wire cutter. She thinks she left it at the Pet Spa (not the Pet Shop).
- Go into the Pet Shop.
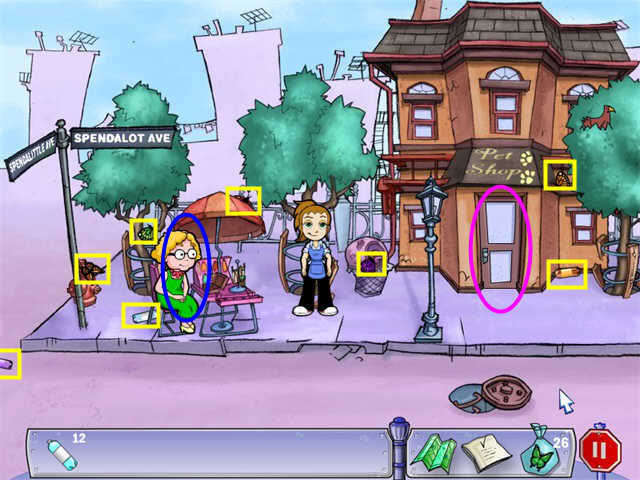
Scene 15: the Pet Shop
- Talk to Cassie.
- Look at the Gourmet Pet Treats.

- Aha! This is where Snookums gets his treats!
- But you need a peanutbutter one, and she doesn’t have time to make it.
- Offer to help with the boxes.
- You have to pack 4 boxes.

Scene 16: the Park
- Go back to the Park and offer Snookums the peanutbutter treat.
- Take Snookums back to Walter at the Pet Spa.
- Search the Pet Spa for the Wire Cutter. You will find it under the Sofa Cushions.
- There are several alternatives for what to do next. I chose to head back up Avenue Flo towards Flo’s Diner to get Derek some coffee. At the time, I thought that the Hair Dye bottle might be behind Derek’s car and if he woke up he would move it. That turned out not to be the case, but it was a useful trip anyway, as you’ll see.
- Come out of the Pet Spa.
- Go left to the intersection, then come down Avenue Flo.
Scene 17: In Front of the Dress Shop
- Talk to the brothers again.
- Pick up the bottles if you haven’t already.
Scene 18: Outside the Diner
- Pick up the bottles if you haven’t already.
- Ah, ha! The Dye Bottle is up in the tree. But you can’t get it down.
- Go in the diner to see if there’s something there to help.
Scene 19: In the Diner
- Pick up a cup of coffee for Derek.
- Nothing to help get the Dye bottle, though.
- Go back outside.
Scene 20: The Street in Front of the Diner
- How are you going to get that hair dye?
- You can see Diane in her apartment-maybe she can help.
- Knock on Diane’s door until she comes down to talk to you.
- Talk to her. She will help you, but her window is rusted shut.
- Head back right. Go all the way back to the Pet Spa.
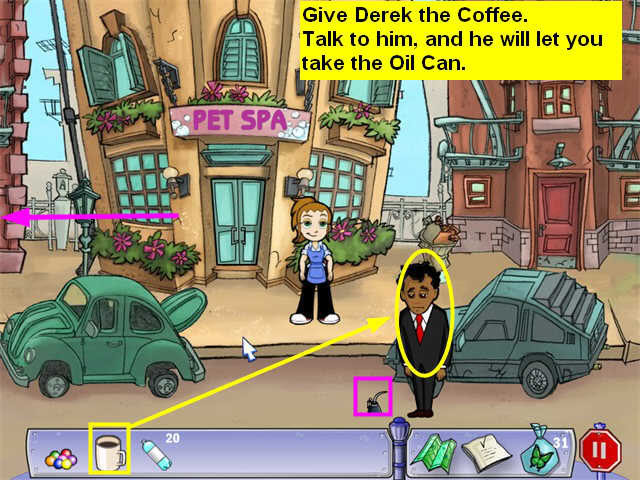
Scene 21: In Front of the Pet Spa
- Give Derek the Coffee.
- Talk to him, and he will let you take the Oil Can.
- Walk back up the street, but before you turn back on Avenue Flo, continue left on Spendalot Avenue and go see Aunt Ethel.
Scene 22: Aunt Ethel
- Give her the wire cutters and she will give you the beads you need to finish the dress.
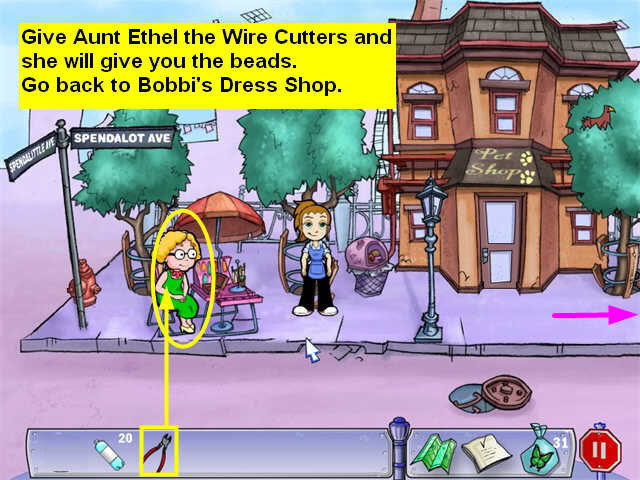
- Head back to Avenue Flo and Bobbi’s Dress Shop
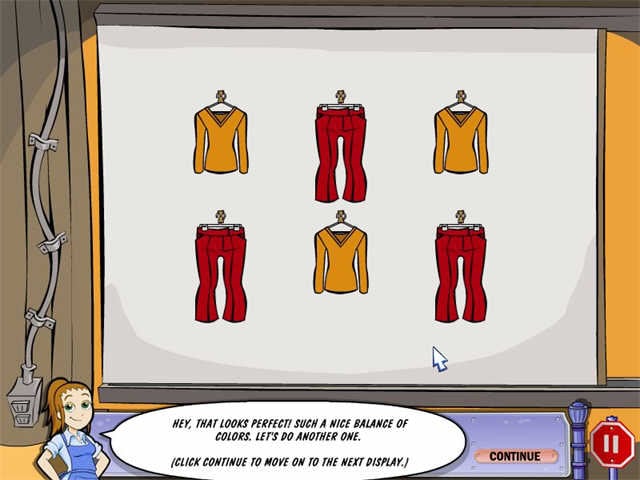
Scene 23: Bobbi’s Dress Shop
- Talk to Bobbi. Now that you have the beads, you can finish the dress.
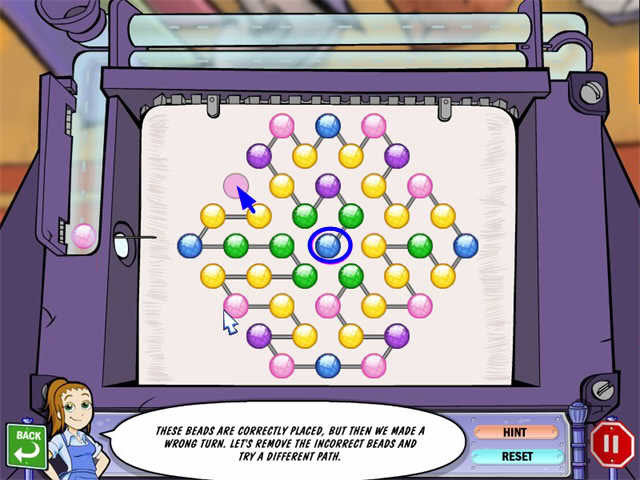
- Put the beads in the machine
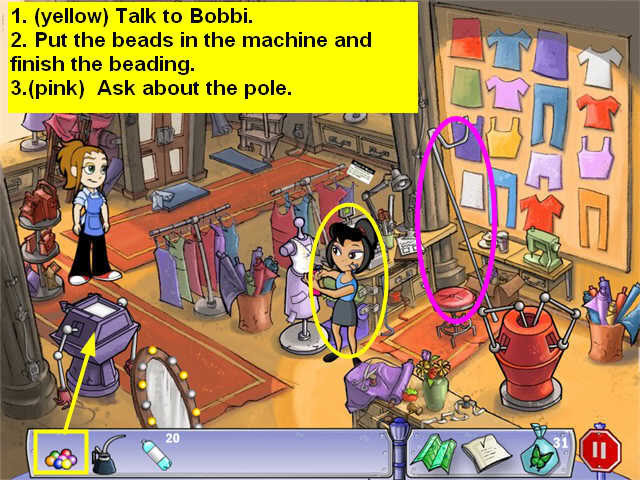
- Complete the beading.
- Ask Bobbi about the garment pole in the shop.
- This will turn out to be useful later. At the time I thought I might need it for the hair dye bottle.
- This will trigger another mini-game.
- At the end, Bobbi will let you take the pole.
- She still needs lace to finish the dress, though.
- When you come out, go left, back towards the diner.
Scene 24: Outside the Diner
- Knock on Diane’s door again until she comes down.
- Give her the oil for the window.
- She will go back upstairs and get you the hair dye.
- Head back to the Beauty Salon.
Scene 25: The Beauty Salon
- Give Betty the Hair Dye.
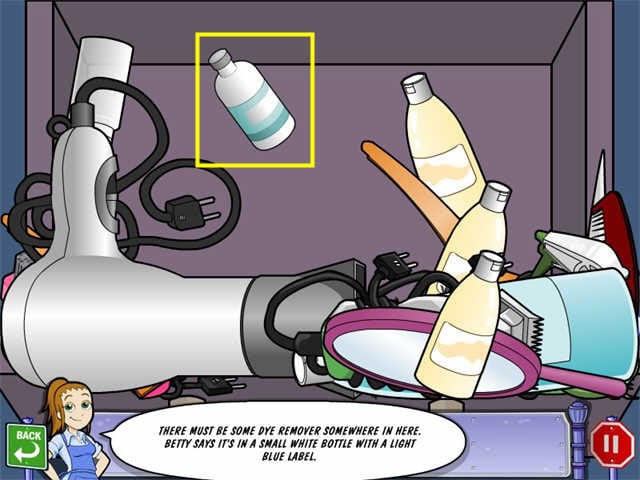
- She will let you look around the shop to find the dye remover for Snookums.

- Click on the drawers in the front of the central stand and a zoom scene will open.
- Find the dye remover and take it.
- Look around the salon. You could use those curtains for the lace for the wedding dress!
- Talk to Betty. She will eventually agree to let you take the curtains.
- Use the garment pole to get them down.
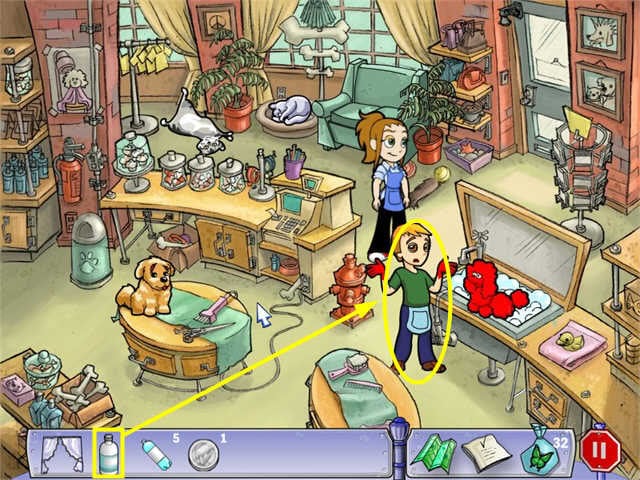
- Go back to the Pet Spa so Walter can get started on Snookums.
Scene 27: The Pet Spa
- Give Walter the dye remover. He will shampoo Snookums.
- Now back to the dress shop.
Scene 28: The Dress Shop
- Give Bobbi the lace for the dress.
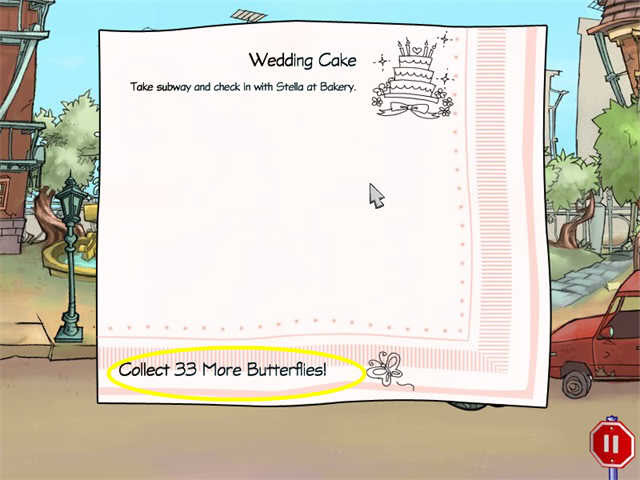
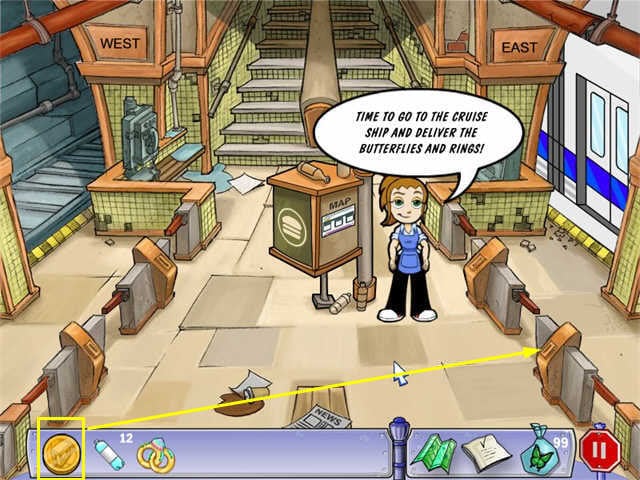
- This completes all the tasks for this neighborhood.
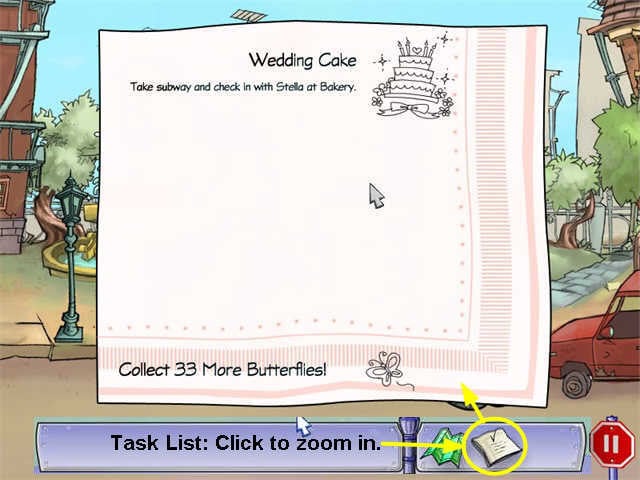
- You will get a new task list. The first thing you have to do is take the Subway to talk to Stella about the cake.
- Note that you also have to collect 33 more butterflies. There are 33 butterflies in each of the 3 neighborhoods.
- From the Dress Shop, go right, then turn left onto Spendalot, the same direction as Aunt Ethel.
Scene 29: Outside the Subway
- Now you can make good use of all those bottles you’ve been collecting.
- Click on the Token machine to zoom in.
- Drag the bottles to the machine. It will take 15 and give you a Subway token.

- Go down the Subway steps.
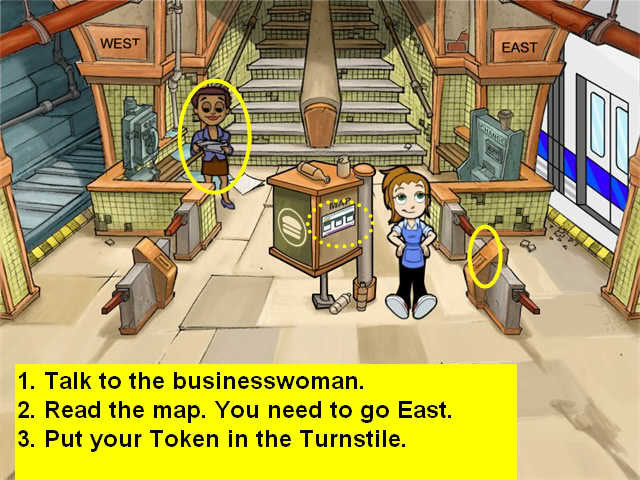
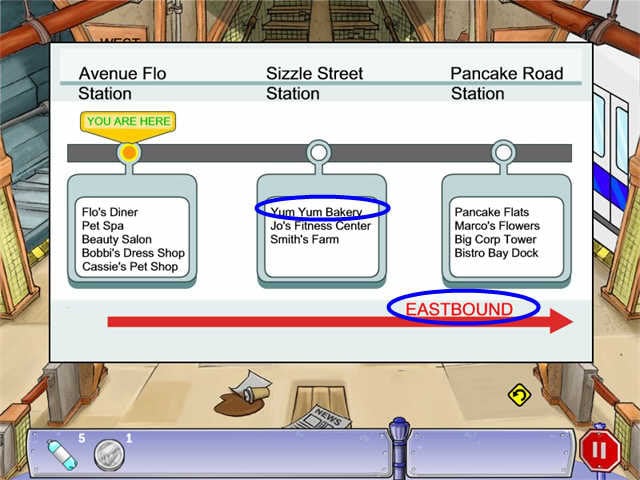
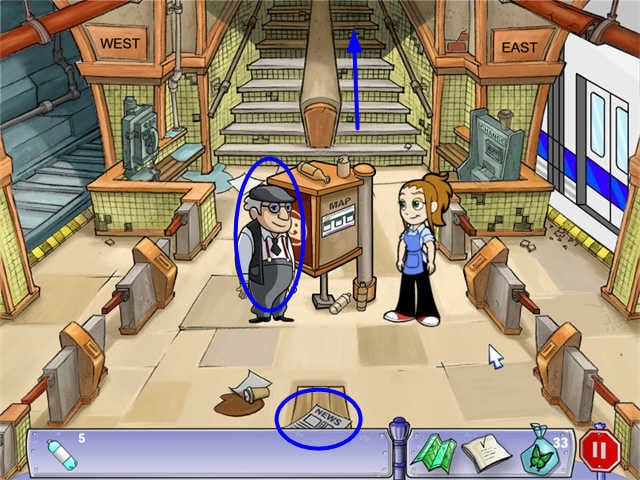
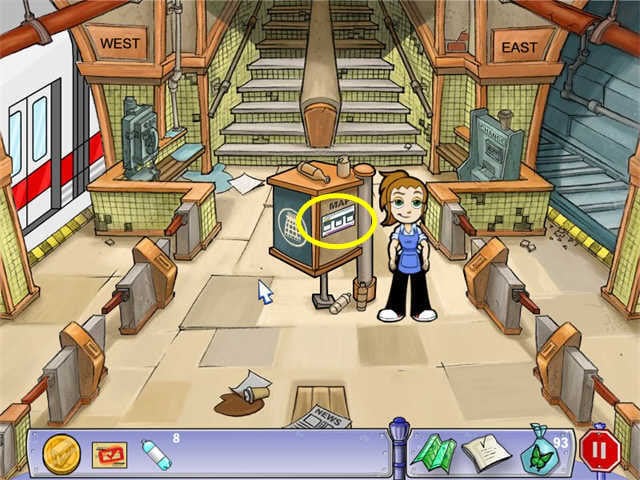
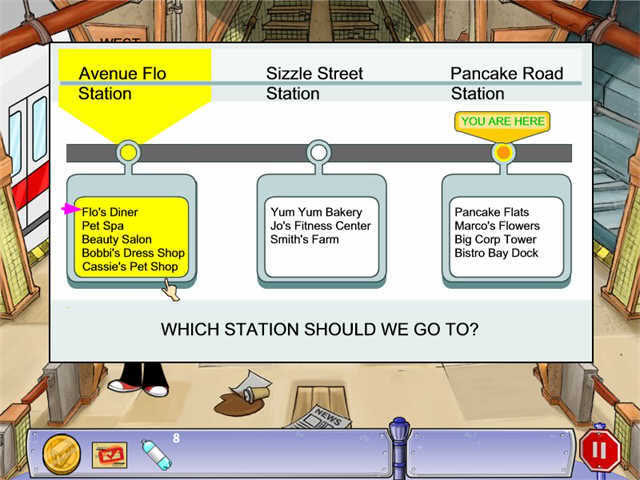
Scene 30: The Subway, Avenue Flo Station
- Talk to the businesswoman.
- Read the map on the kiosk. OK, you have to go east.
- Put your token in the turnstile on the East side of the platform.
Scene 31: The Subway, Sizzle Street Station
- Talk to the man.
- Examine the newspaper.
- Go up the steps.
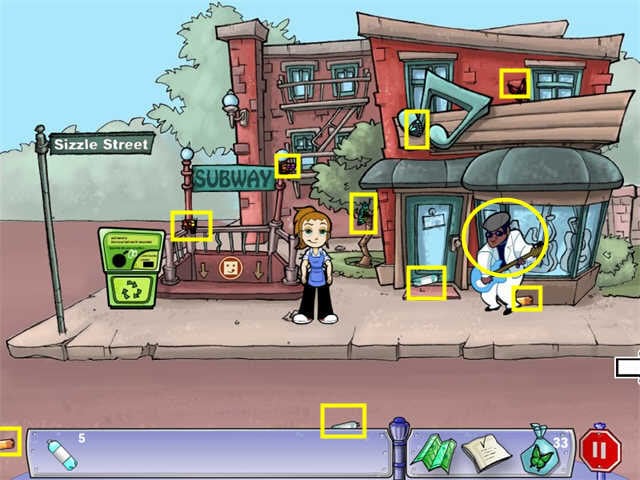
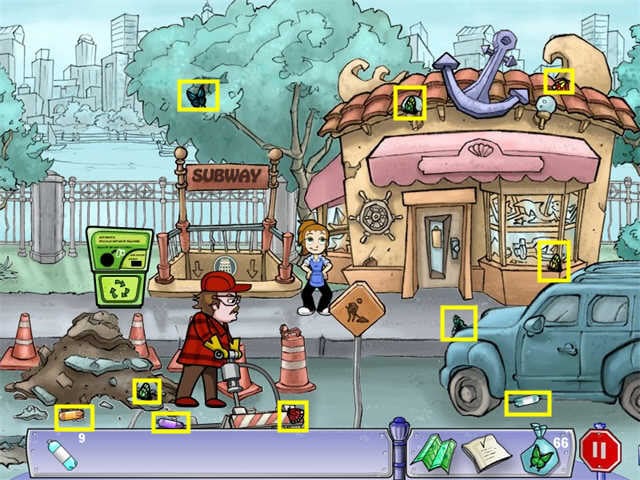
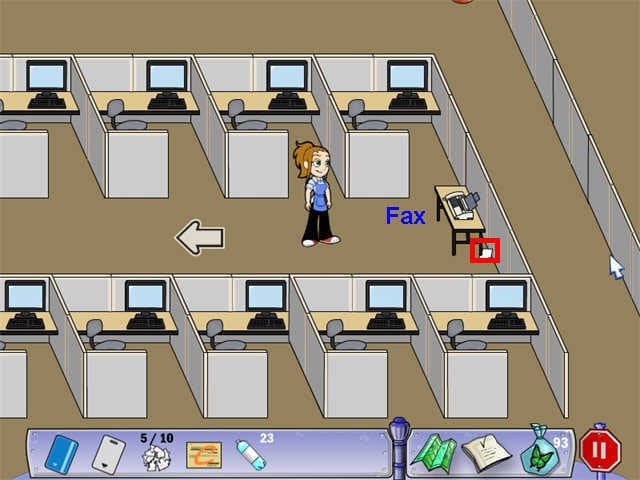
Scene 32: Outside the Subway
- Collect bottles and butterflies.
- Note that there is another token machine here-you will need it later.
- Talk to Tony the musician.
- Go right.
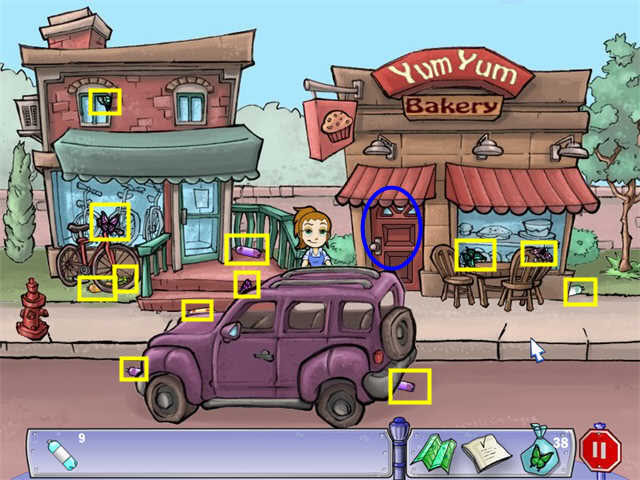
Scene 33: Outside the Bakery
- Collect bottles and butterflies.
- Go into the Bakery.
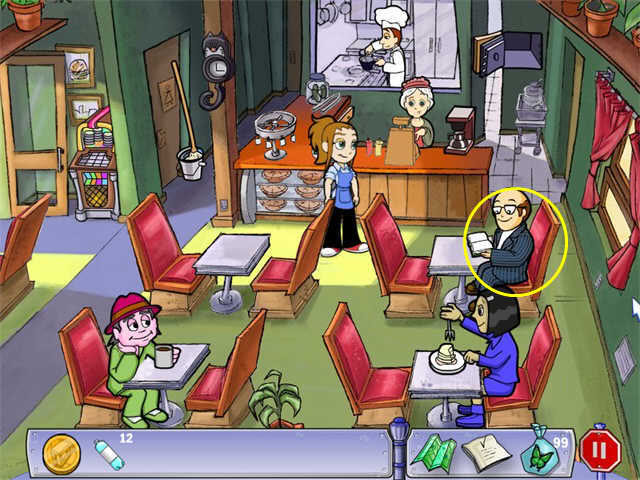
Scene 34: Yum Yum Bakery
- Talk to Stella. Her cake machine is broken and she has lost her box of recipes.
- Find the box in front of the counter on the floor.
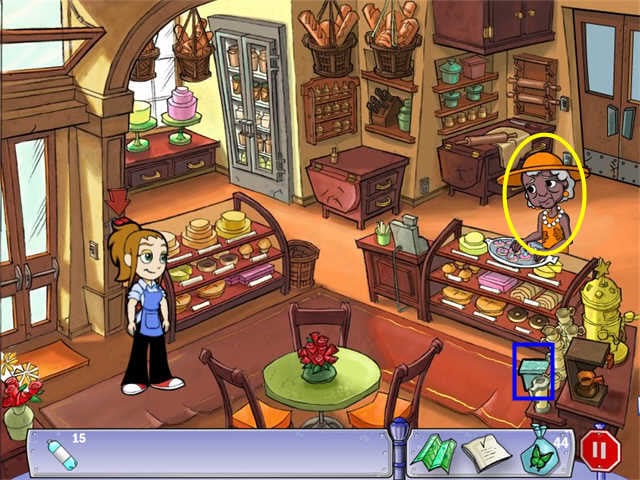
- This will open a puzzle.
- There are many possible solutions.
- Here is the one I used:
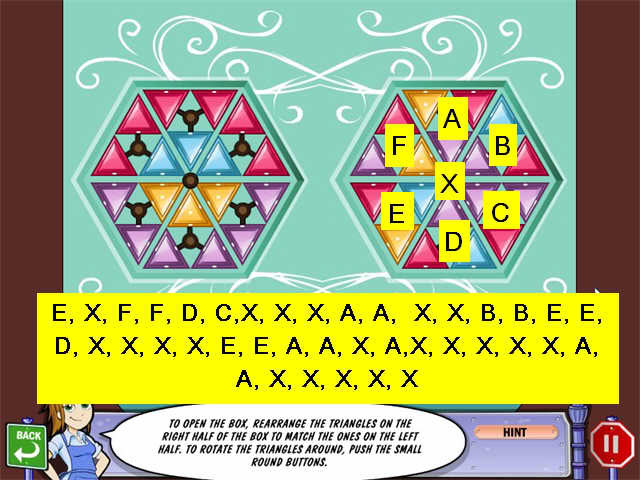
- Once you get the box open and take the recipe, you have to go through the doors behind Stella into the Kitchen.
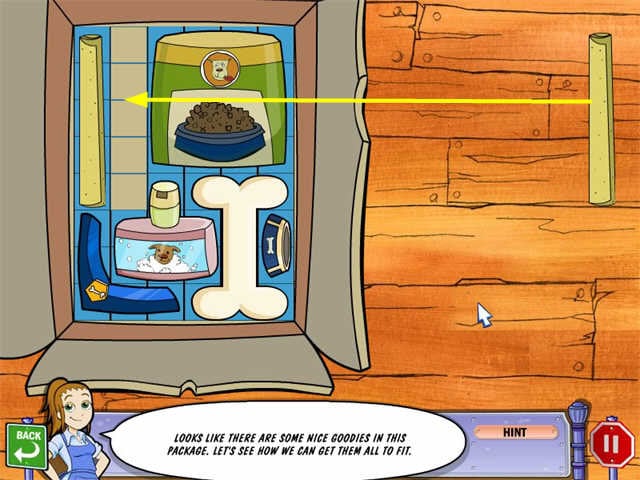
Scene 35: Kitchen
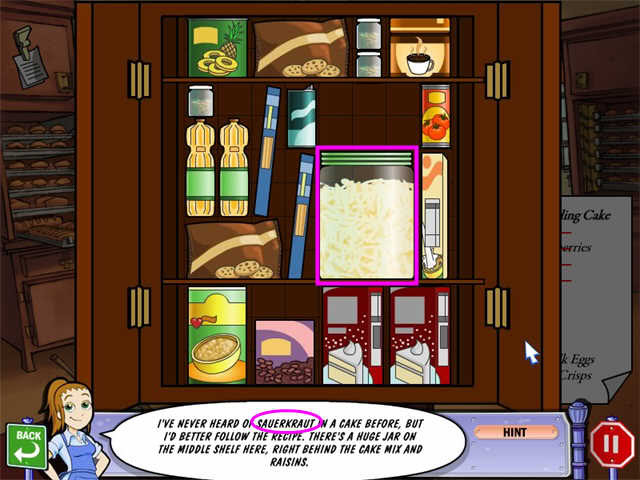
- You need to find all of the ingredients to get the cake, plus find the instructional video.
- Start by looking at the shopping list in the top left corner. OK, there are two items on the list, so you’ll have to get those later.
- Now just about every cabinet has a puzzle behind it which will give you one ingredient.
- I have marked all the positions in the screenshot.
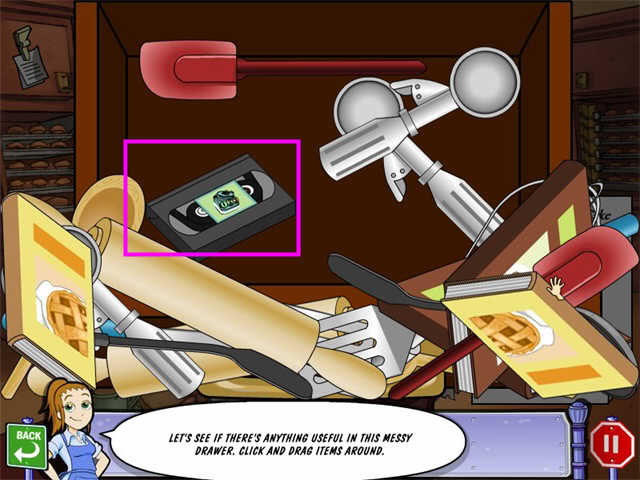
- The drawer also has a puzzle that will give you the video.
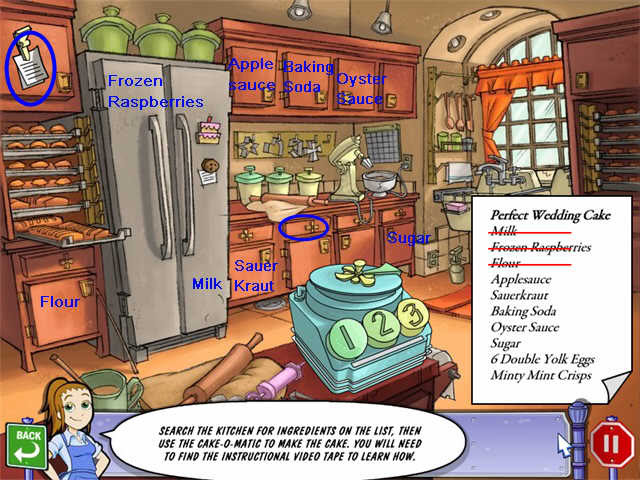
- You may want to review the General Tips section on solving these puzzles before continuing.
- Here are the solutions for the puzzles. You can do these in any order.
- Milk
- Frozen Raspberries
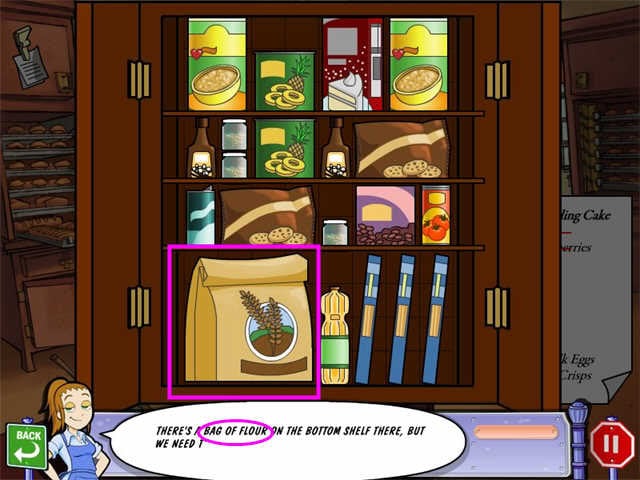
- Flour
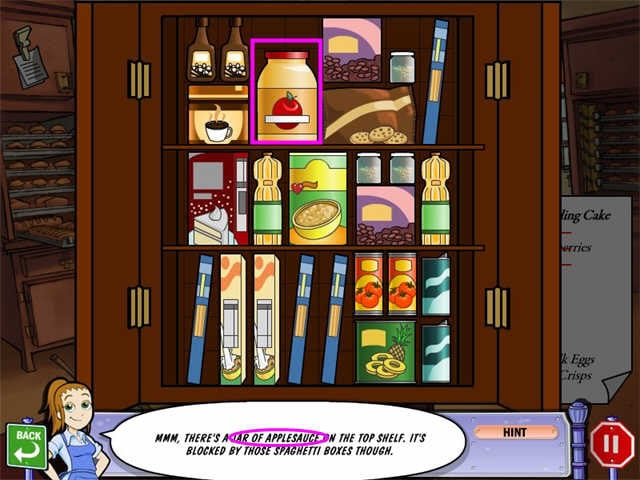
- Applesauce
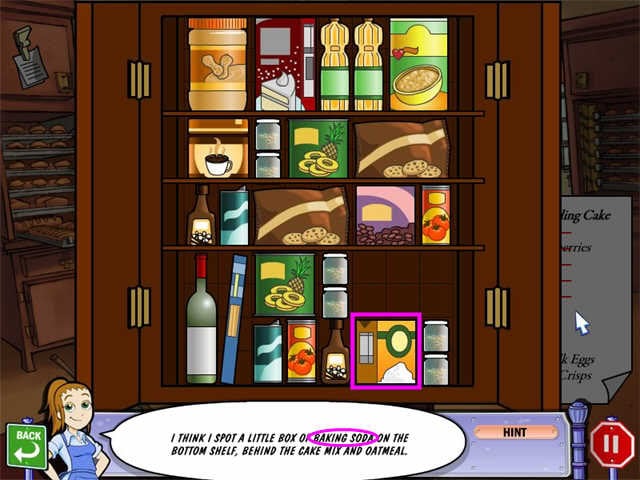
- Baking Soda
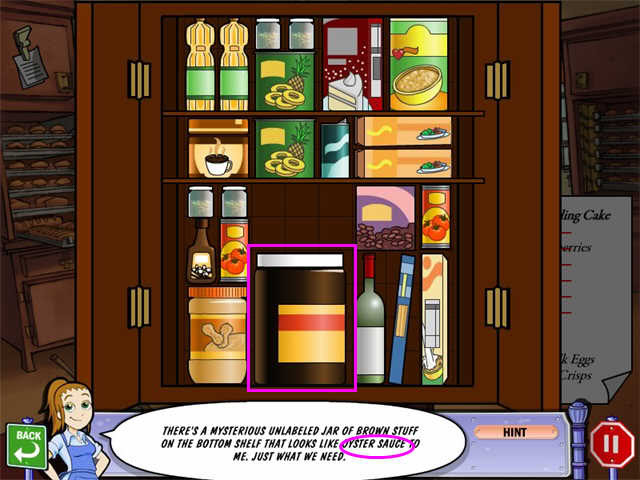
- Oyster Sauce
- Sugar
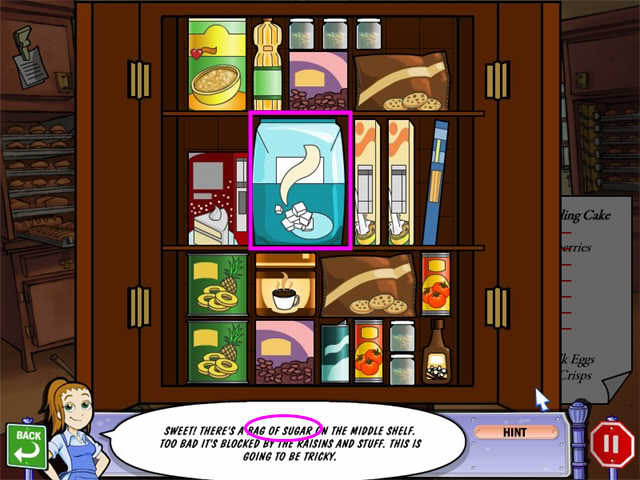
- Videotape
- Sauerkraut
- OK, that’s as far as we can go for now. You need to buy double egg yolks and cookies, and find a place to play the video.
- Talk to Stella again, then leave the bakery.
- Turn right.
Scene 36: Intersection of Sizzle Street and Sunny Side
- Talk to the firefighter.
- Collect bottles and butterflies.
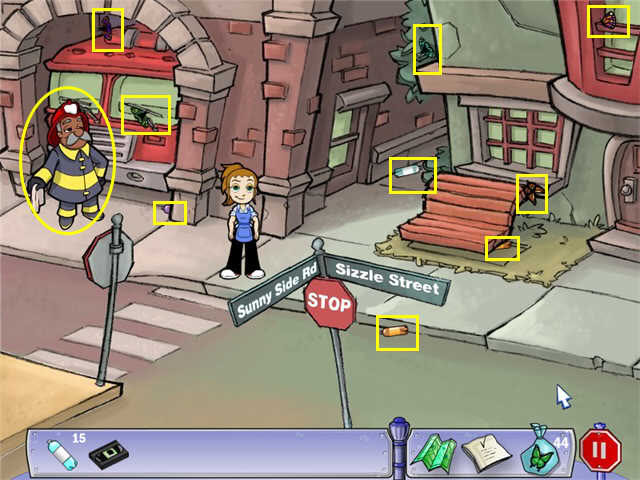
- Go to the right.
Scene 37: Bus
- Talk to the bus driver. He’s dropped the lug nuts.
- Collect bottles and butterflies.
- Collect lug nuts.
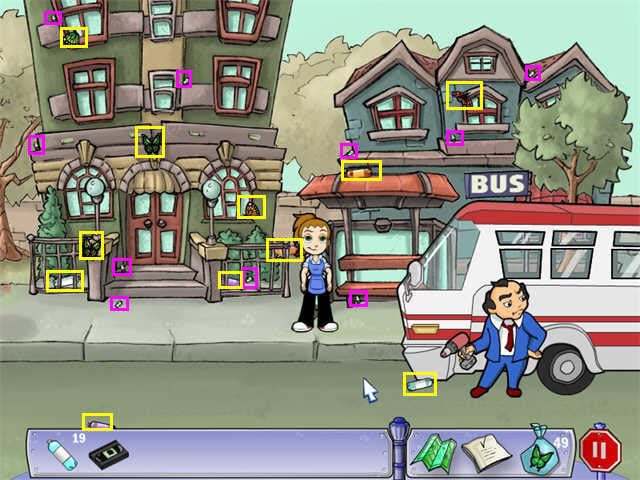
- Give them to the bus driver.
- The bus driver can take you to buy the double yolk eggs, but you need a token.
- Back to the Subway station.
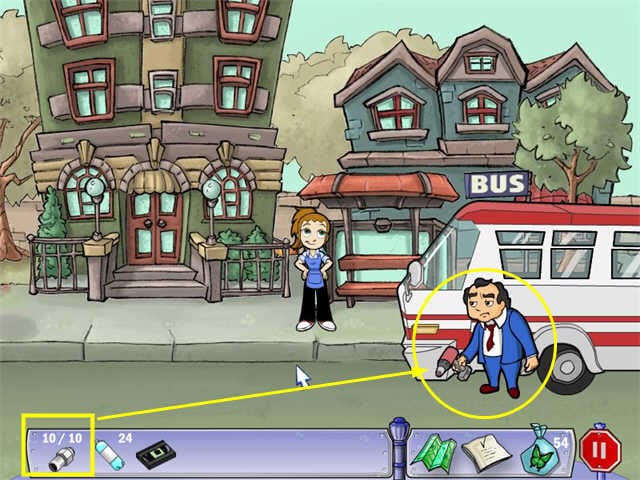
Scene 38: Outside the Subway Station
- Get a token.

- Back to the Bus.
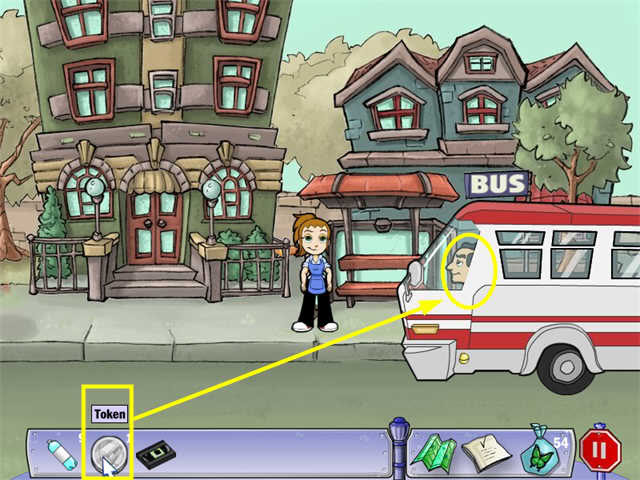
Scene 39: Bus
- Give the token to the Bus driver. It will be good for a round trip.
- He will take you to the farm.
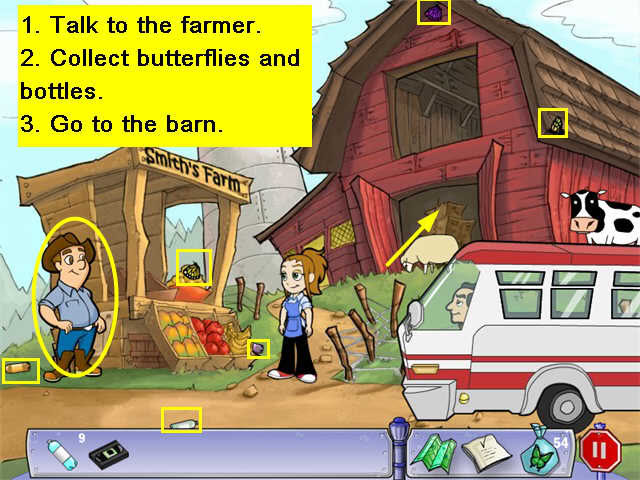
Scene 40: Farm
- Talk to the farmer.
- Collect bottles and butterflies.
- Go into the barn.
Scene 41: The Barn
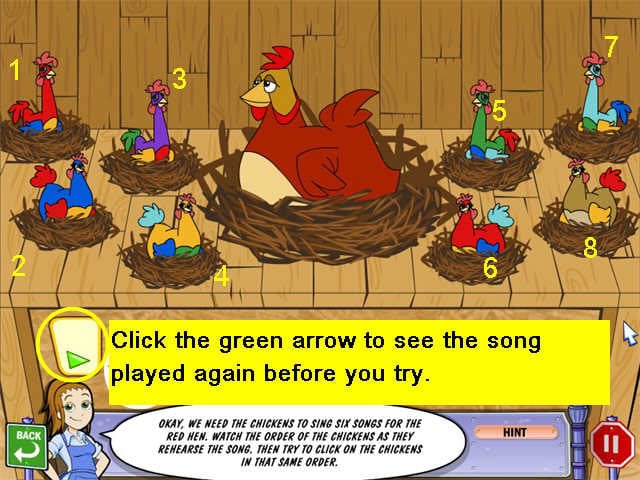
- Talk to the chicken. She wants a chorus.
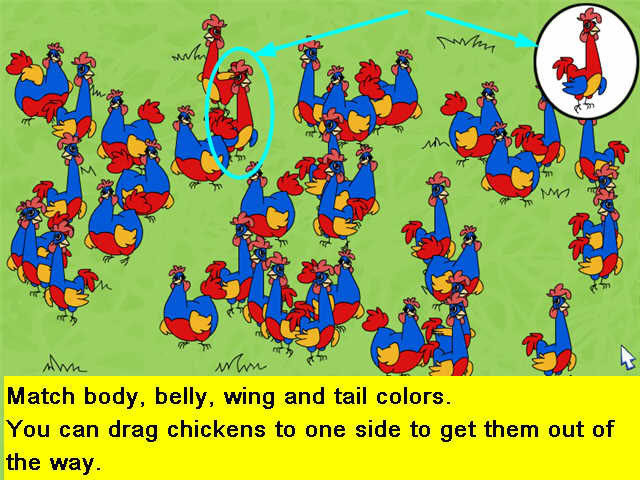
- Go out to the "chicken fields" to find the singers.
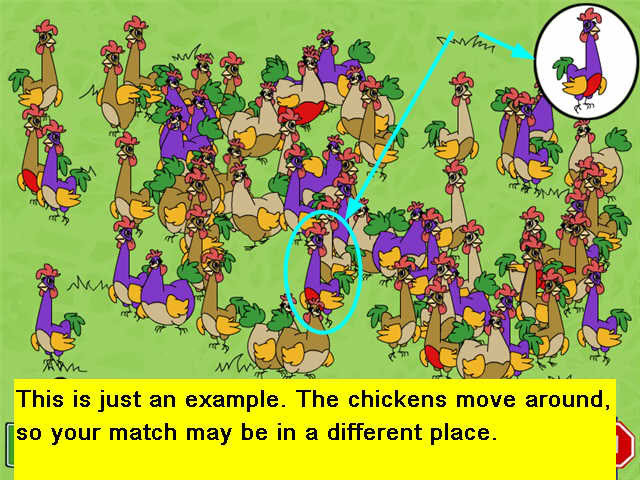
- Now you will have to find a chicken who matches the target picture.
- Check body, belly, wing, and tail colors.
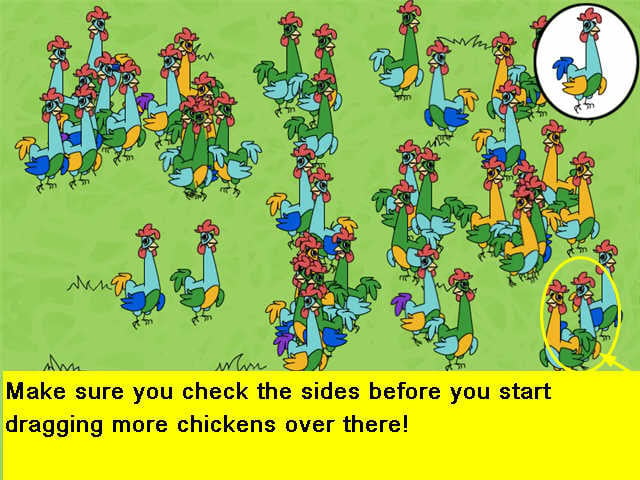
- The chickens move around and can stand behind each other, but you can drag some to each side to get them out of the way if they don’t match what you’re looking for.
- Here are some examples.
- Once you have the chorus together, the chickens will sing 6 songs. You have to repeat each one.
- After the chickens sing a song, you can click on the green arrow to replay it as many times as you want.
- Here are the 6 songs.
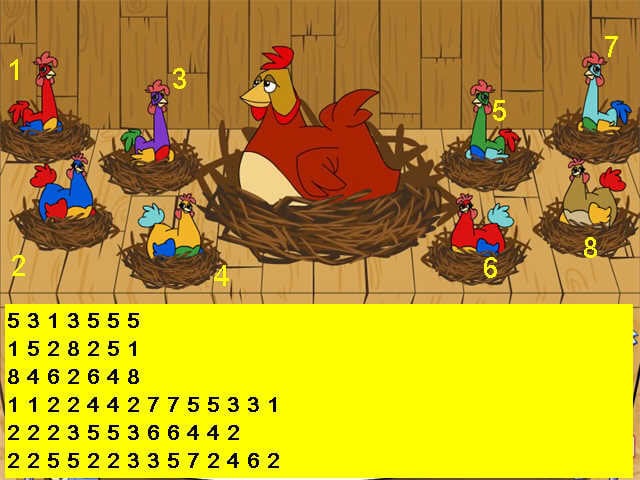
- Go back out to the yard.
Scene 42: The Farm
- Talk to the Farmer again.
- Get back on the bus, and he will take you back to town.
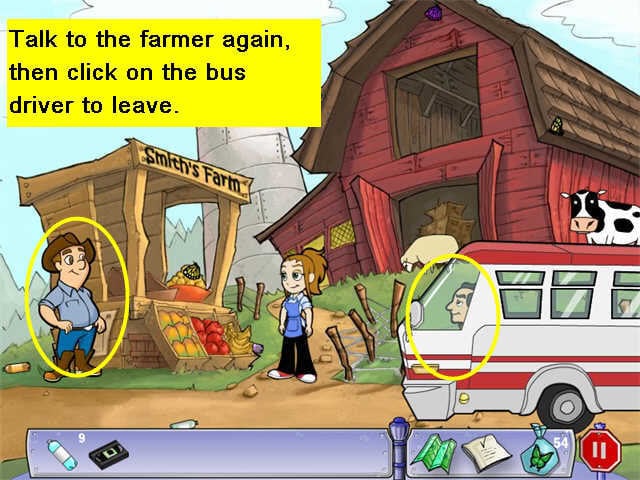
- Once you are back in town, walk left to the intersection, then walk down until you get to the gym.
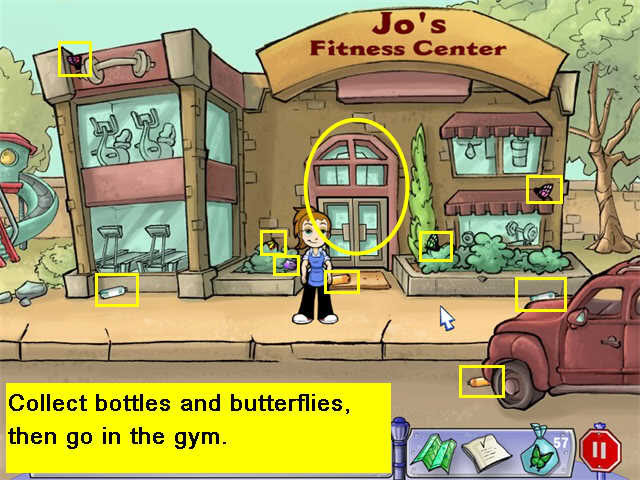
Scene 43: Outside the Gym
- Collect bottles and butterflies.
- Go into the gym.
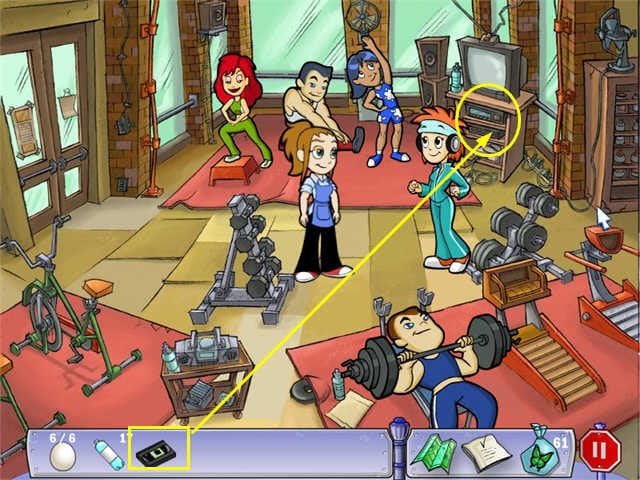
Scene 44: The Gym
- Did you remember you’re looking for a VCR to play that video tape?
- Jo has one, but first she wants you to teach an aerobics class.
- Walk to the exercise mat. This will trigger a mini-game.
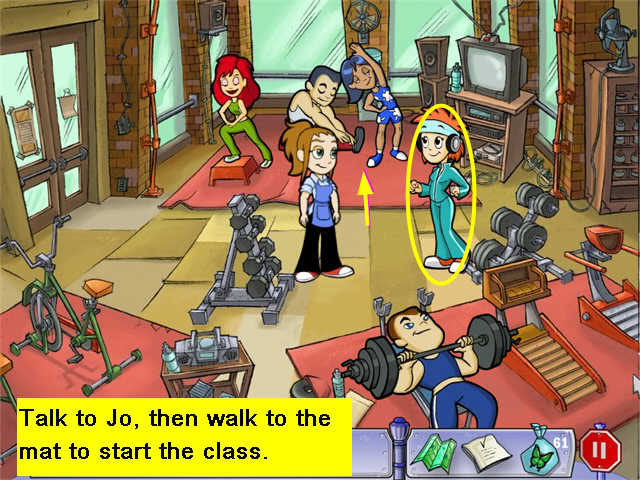
- Be warned: this game requires fast reflexes and there is no way to skip it.
- The exercise bubbles will move along the conveyor belt at the top of the screen.
- Whenever a bubble gets to the silver target plate, you have to click on the symbol on the big wheel that matches it.
- You can look ahead and see what’s coming to get ready.
- You get more points if it’s perfectly centered over the target plate (a "Great!") then if it’s slightly off to one side (a "Good!")
- On most levels it’s possible to beat the target score, but you do have to be a quick clicker.
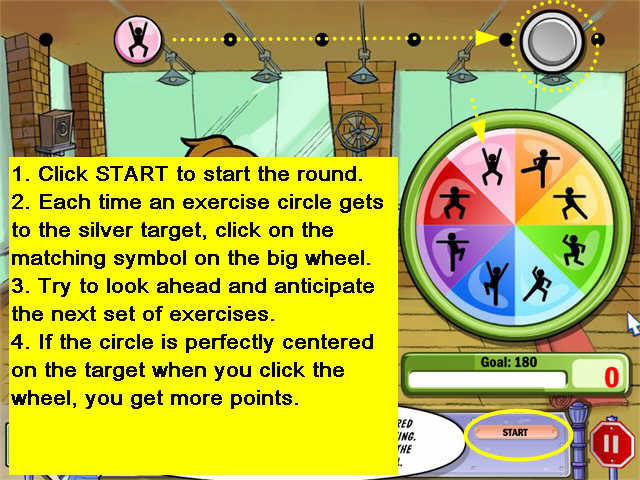
- Talk to Jo again, then put the video tape in the VCR.
- The code for the Cake Machine will automatically be written onto your task sheet.
- Leave the gym.
- Walk to the left down the street until you see the girls selling cookies.
Scene 45: The Sprout Girls
- Collect bottles and butterflies.
- Talk to the girls. They will sell you cookies.
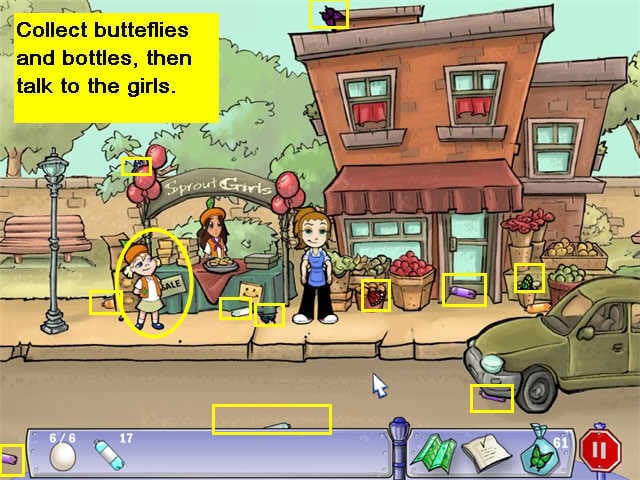
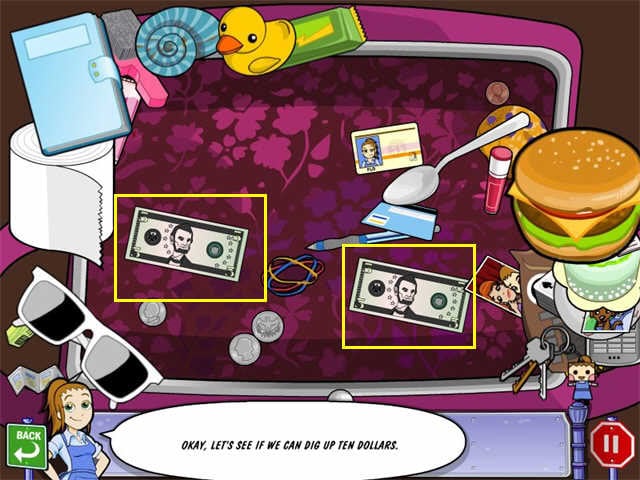
- Look through your purse to find the money. You need to find two $5 bills.
- When you give the girls the money, their cash will blow all over the scene. Collect it again.
- Return to Yum Yum Bakery.
Scene 46: Yum Yum Bakery Kitchen
- Talk to Stella, then walk through into the kitchen.
- Put the eggs and the cookies into the cake machine.
- Enter the code from the video tape (it’s also on your task list).
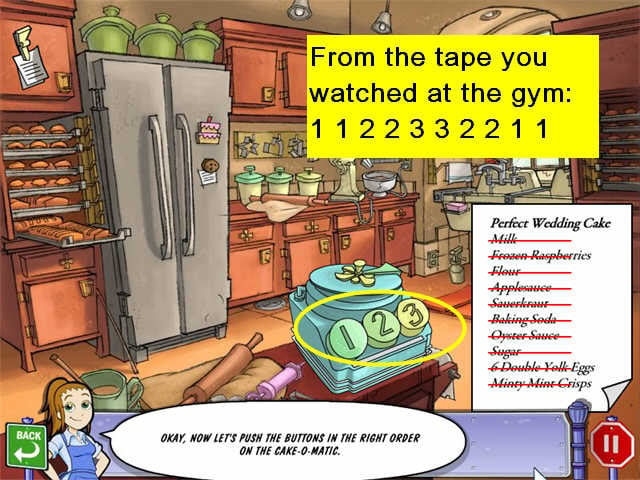
- Ta dah! Cake!
- Now you will get a new task list. You need to go to Pancake Road and check on the Flowers.
- Also note that you’ll need to get 33 more butterflies in the next neighborhood.
- Head back to the Subway.
Scene 47: Outside the Subway
- Click on the Token machine.
- Put bottles in and get a token.
- Talk to the musician again.
- Go down the steps to the Subway.
Scene 48: Sizzle Street Subway Station
- Check the map. You need to go east.
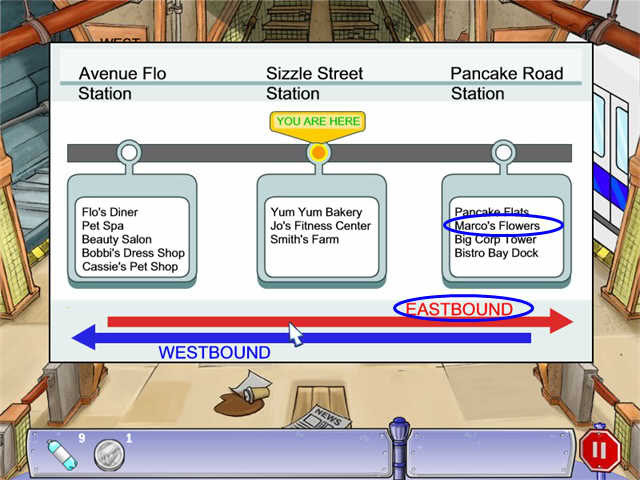
- Talk to the old man.
- Put the token in the east turnstiles.
Scene 49: The Subway, Pancake Road Station
- Go up the steps.

Scene 50: Outside the Subway
- Collect bottles and butterflies.
- Note that there is another token machine here-you will need it later.
- Note that there is a glitch in the storyline here.
- Flo’s apartment is off to the left of the Subway. Much later in the story she will need to go to the apartment for something, but for right now she has no reason to go that way. However, as soon as you talk to Hal, the construction guy, you will start getting tasks involved with getting a Resident’s Pass so Flo can get to her apartment. Just go with it.
- Talk to Hal the construction worker. You find out about the pass.
- Go right.
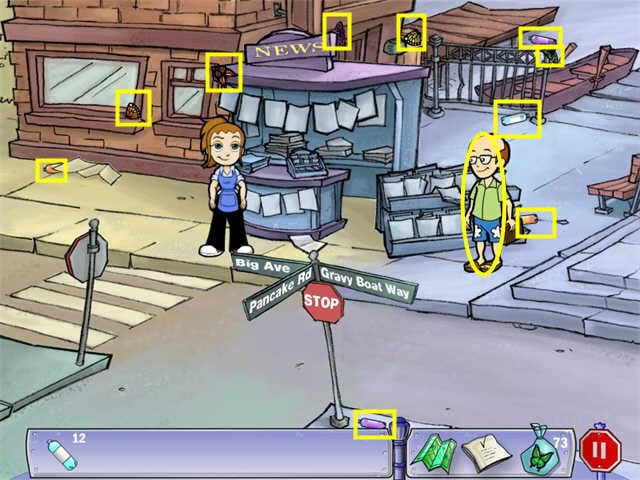
Scene 51: The Newsstand
- If you have been paying attention to the dialog up to now, you know that Bernie is in love with Miss Big, so he’s a major suspect when it comes to who’s been sabotaging the wedding.
- Talk to Bernie. He denies it.
- Collect bottles and butterflies.
- Go left.
Scene 52: Outside the Flower Shop
- Collect bottles and butterflies.
- Go in the flower shop.

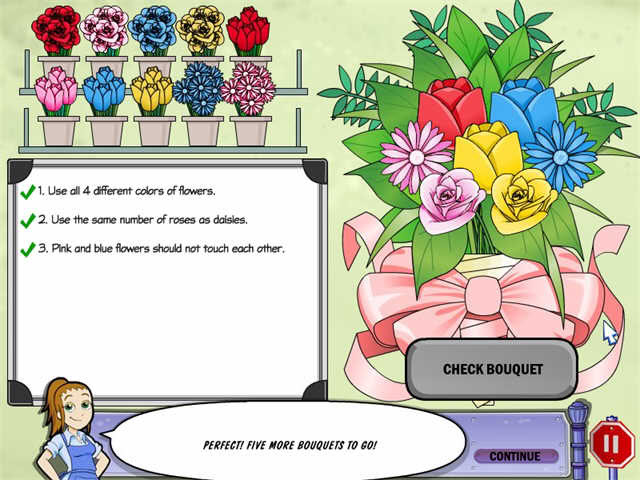
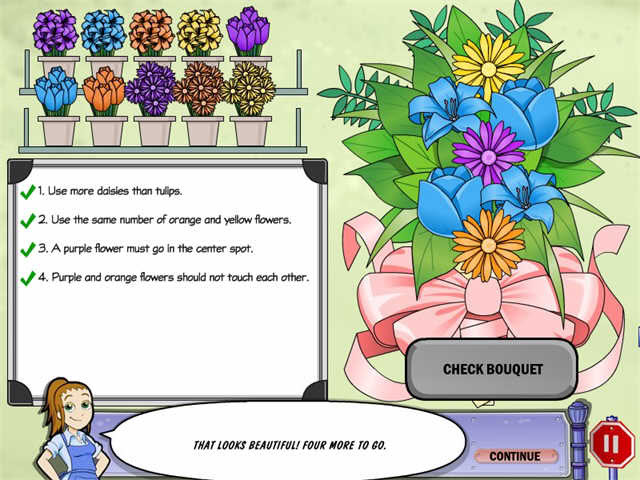
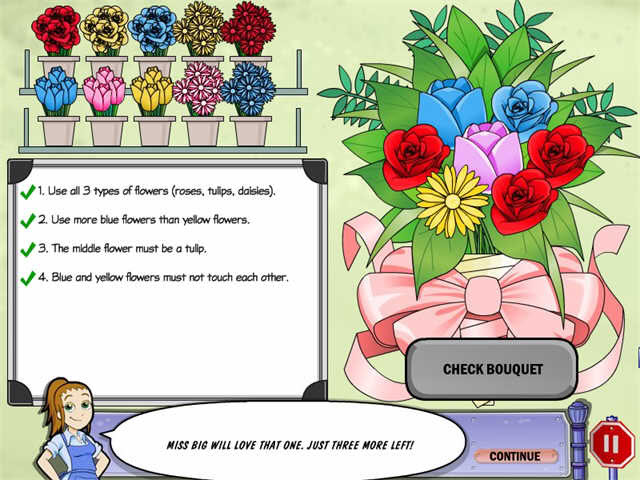
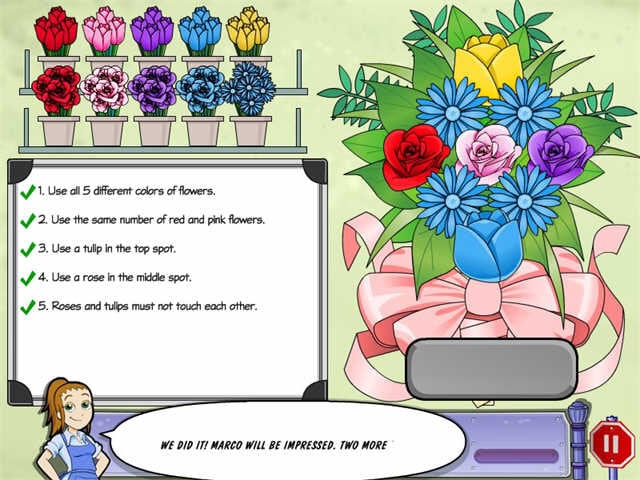
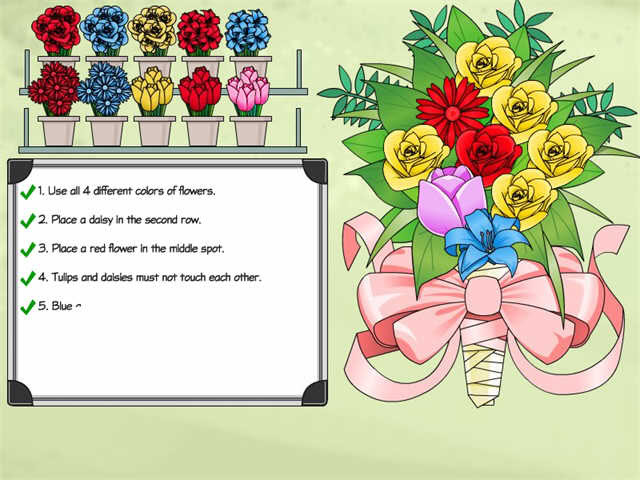
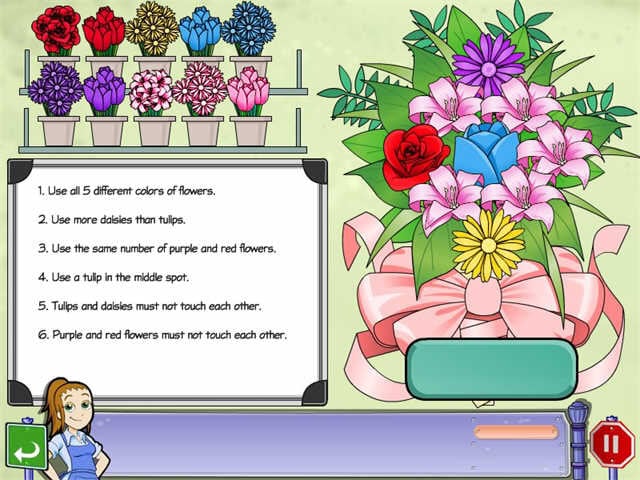
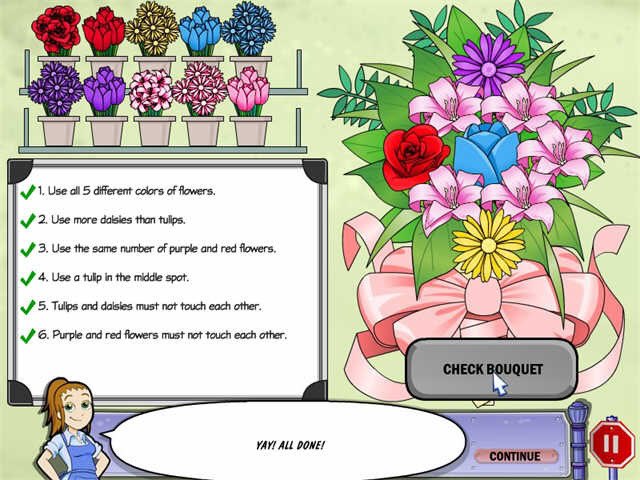
Scene 53: The Flower Shop
- Talk to Marco.
- You have to collect roses and tulips for him.
- Note that as you collect these flowers, they’ll go into the buckets by the window. This confused me at first because I kept trying to pick them up from the buckets again.
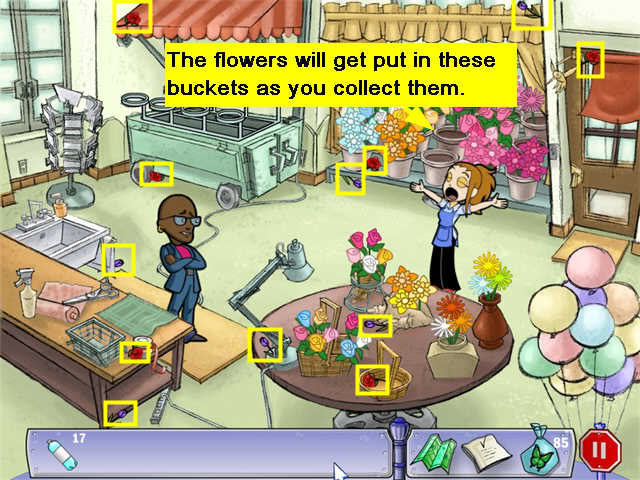
- Now you need to help with the flower arrangements.
- There are many different possible solutions. Here are the ones I used.
- Go back to the newsstand.
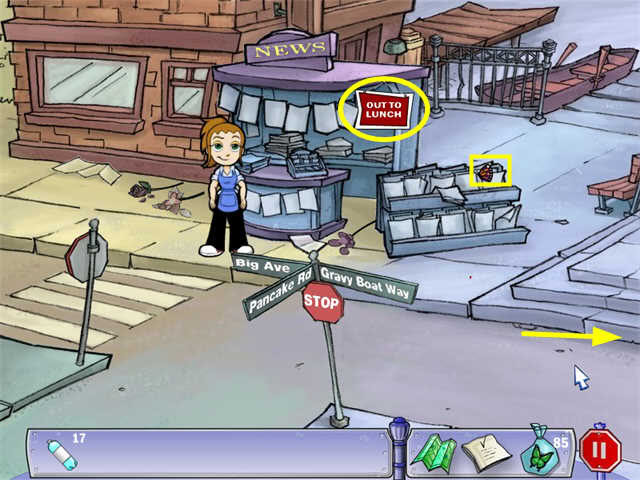
Scene 54: The Newsstand
- Bernie has gone to lunch.
- Collect any bottles and butterflies you haven’t gotten yet.
- Head right.
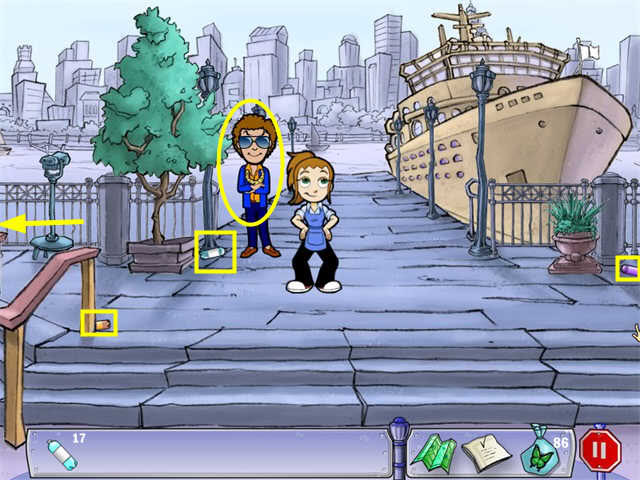
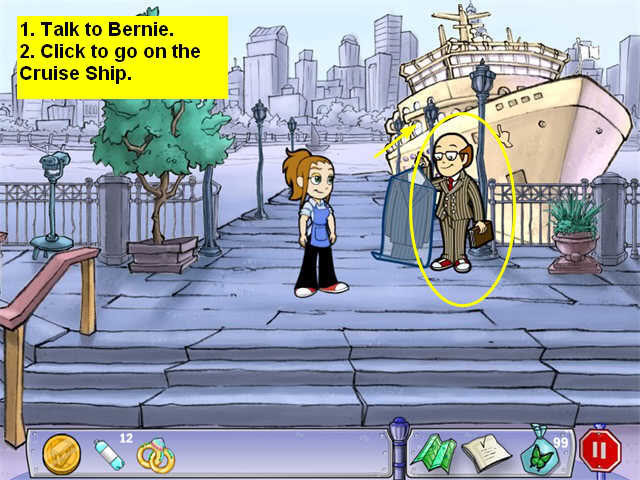
Scene 55: In Front of the Cruise Ship
- Talk to the celebrity.
- Collect bottles and butterflies.
- Go back to the left. When you get to the intersection, keep going to the left up Big Avenue until you come to the Big HQ building.
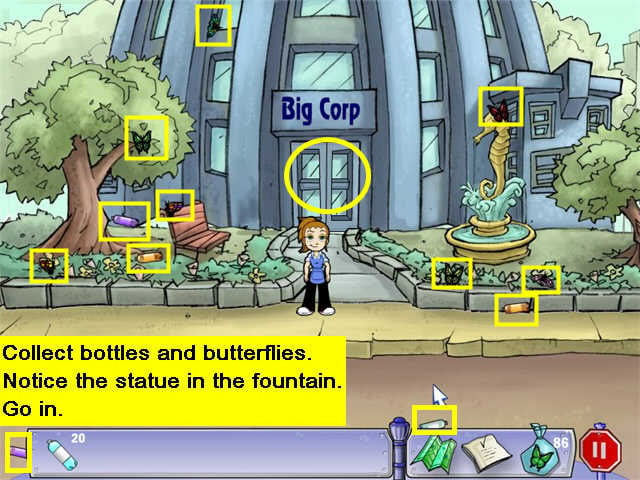
Scene 56: Outside Big HQ
- Collect bottles and butterflies.
- Notice the seahorse statue in the fountain.
- Go on in.
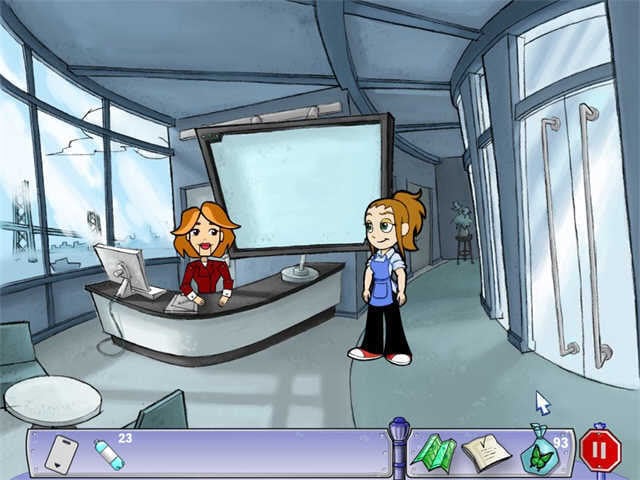
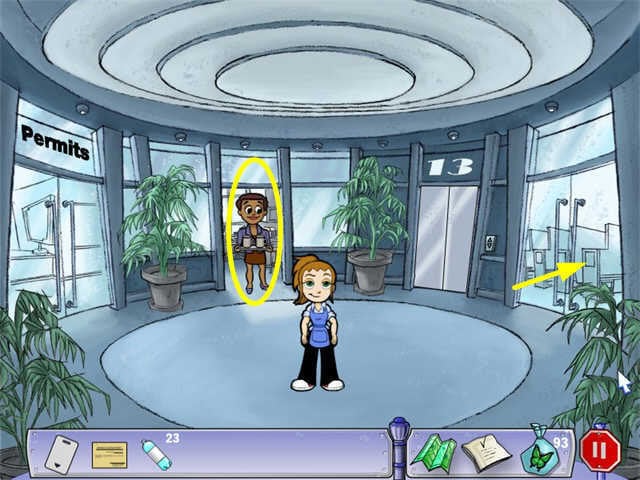
Scene 57: Inside Big HQ, Ground Floor
- Mr. Big will be there talking to the receptionist. Notice that his suit looks too small.
- He leaves to go to the wedding.
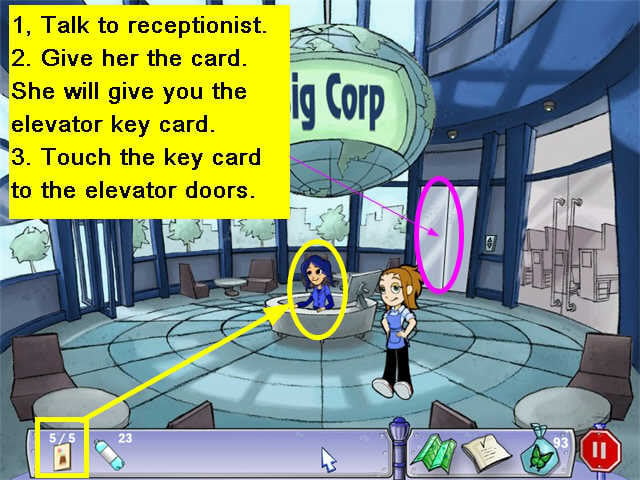
- Talk to the receptionist. You are trying to get your resident’s pass.
- She will lend you her key card for the elevator, but only if you can get 5 signatures on Mr. Big’s birthday card first.
- Go through the glass doors at the back.
Scene 58: Ground Floor Maze
- This is a maze. There are basically three columns of desks, but some of the connections are blocked.
- You need to find 5 employees.
- There are many ways to solve this. Here’s one.


Scene 59: Big HQ, Ground Floor
- Give the signed birthday card to the receptionist.
- She will give you an elevator key card.
- Touch the key card to the elevator doors and you will be able to go up.
Scene 60, Big HQ< Permits Department
- Go through the door marked PERMITS on the left.
- There is a robot receptionist there.
- She will ask you a series of trivia questions about the neighborhood.
- Answers:
Q. Name of construction worker? A. Hal
Q. Name of newspaper? A. Downtown Daily Scoop
Q. Name of guy at newsstand? A. Bernie
Q. Name of street with Cruise Ship? A. Gravy Boat Way
Q. Name of TV show the celebrity is in? A. Hospital Blues
Q. Statue in the Big HQ Fountain? A. Seahorse
Q. Item NOT on nautical store? A. Starfish
Q. Creature on building to the right of Marco’s Flower Shop? A. Crab
- You may retake the quiz if you miss one.
- Once you score 100%, the robot will give you the permit, but you still have to get it signed on floor 50.
- Go back to the elevator.
Scene 61: Big HQ, 13th Floor
- Talk to the businesswoman.
- She will lend you the blue elevator keycard you need to get to the 50th floor if you help her collect 10 mugs.
- Go into the glass doors on the right.
Scene 62: 13th Floor Maze
- This maze is similar to the ground floor. There are again 3 columns of desks, but many avenues are blocked.
- There are many possible solutions.
- This shows one possible path to pick up all 10 mugs.
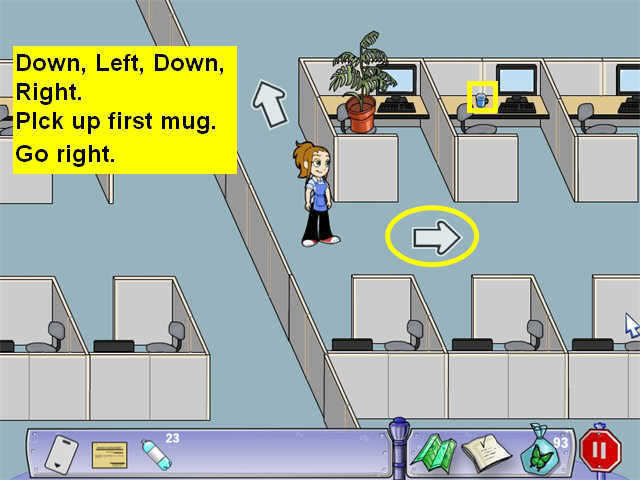

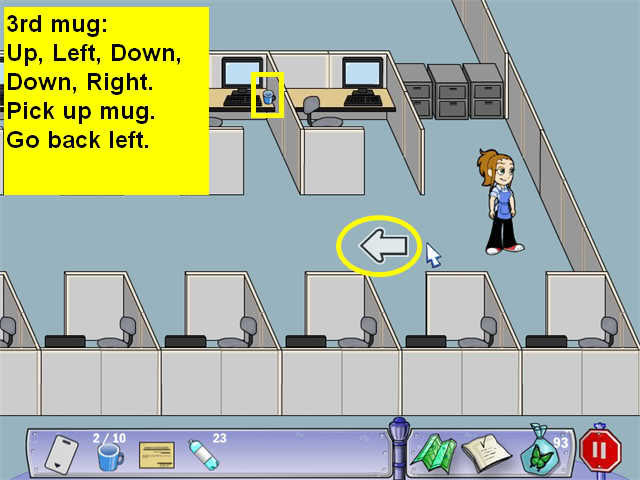
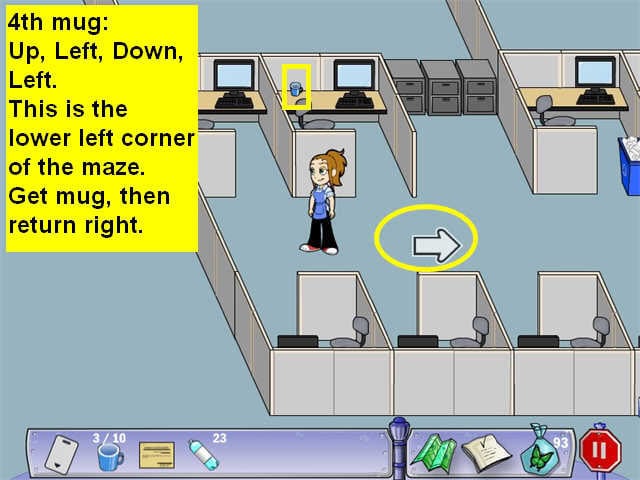
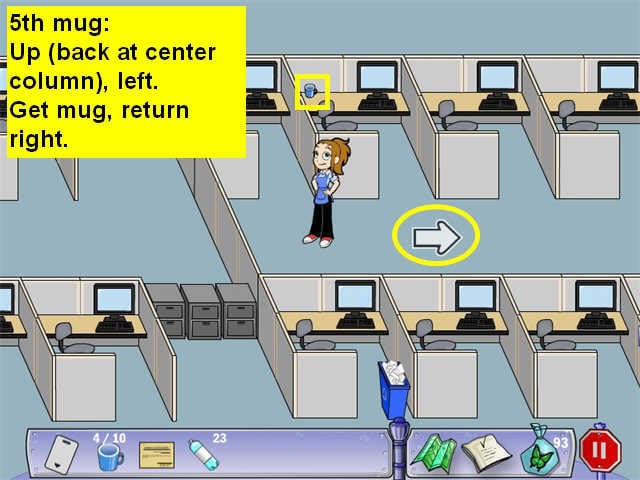
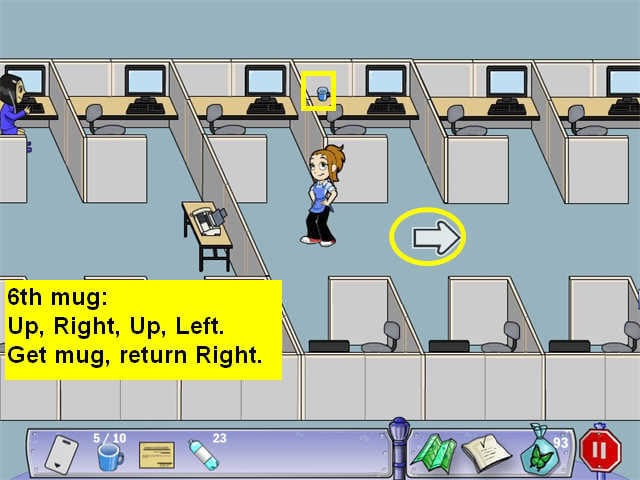
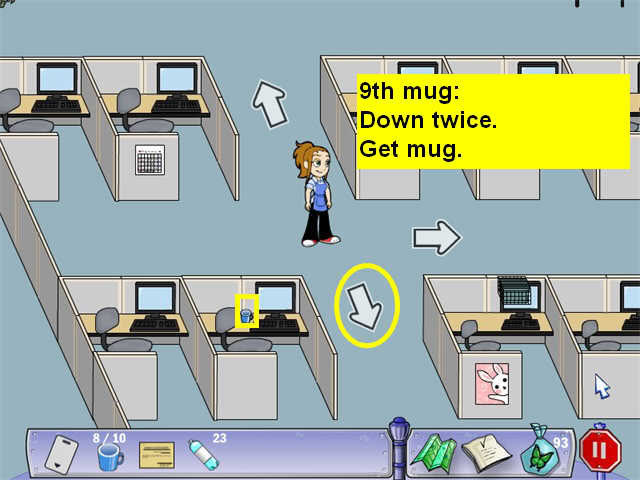
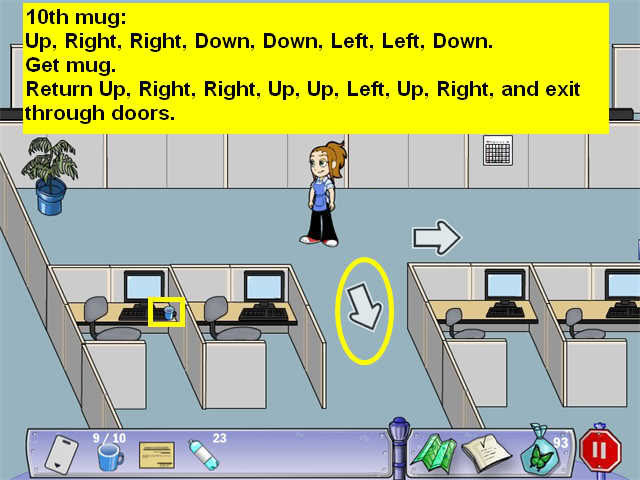
- Exit through the doors.
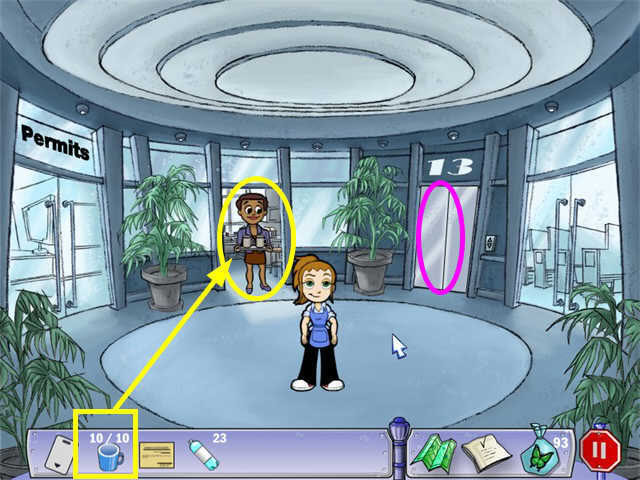
Scene 63: Big HQ, 13th Floor
- Give the mugs to the businesswoman.
- She will give you the blue elevator keycard.
- Touch the blue card to the elevator doors and you will go up to the 50th floor.
Scene 64: Big HQ, Signatures Office
- Go through the door marked Signatures on the left.
- Try talking to the guy. He will ignore you.
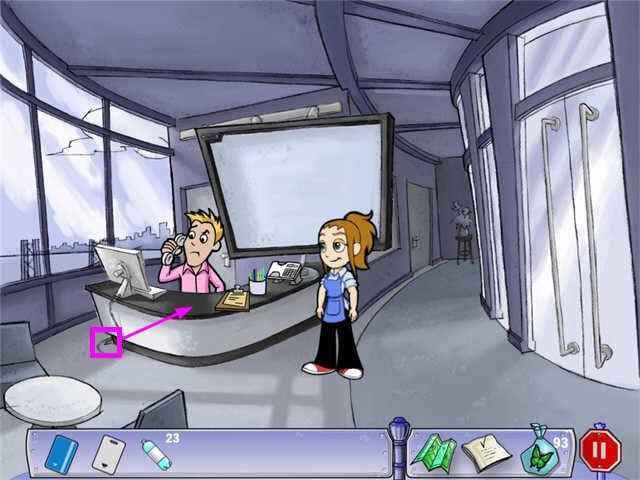
- Click on the phone on his desk. This will give Flo the idea to call in.
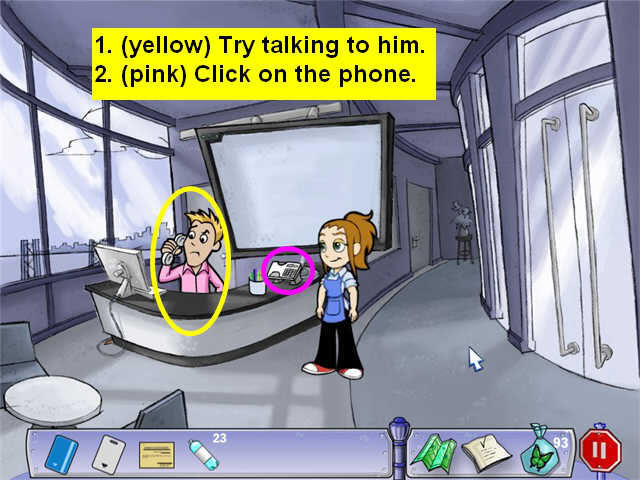
- A zoom view of her purse will pop up. Find the cellphone by dragging the other items out of the way.
- Now you can talk to the guy, but he needs an orange pen.
- Take the pen from the floor and put it on the desk.
- He will sign the permit and give it back to you.
- Now you need to find Mr. Big’s secretary.
- Go back by the elevator and on through the glass doors on the right.
- Oh, good, another maze!
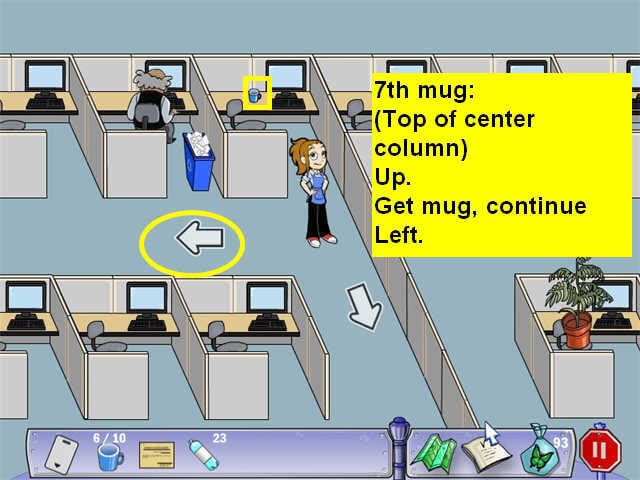
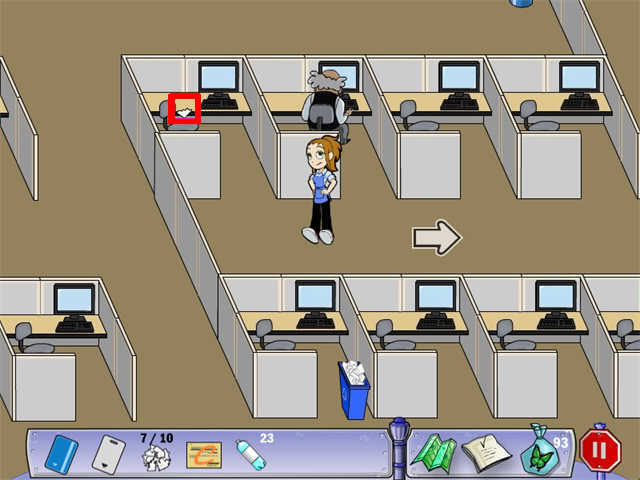
Scene 65: 50th Floor Maze to find Mr. Big’s Secretary
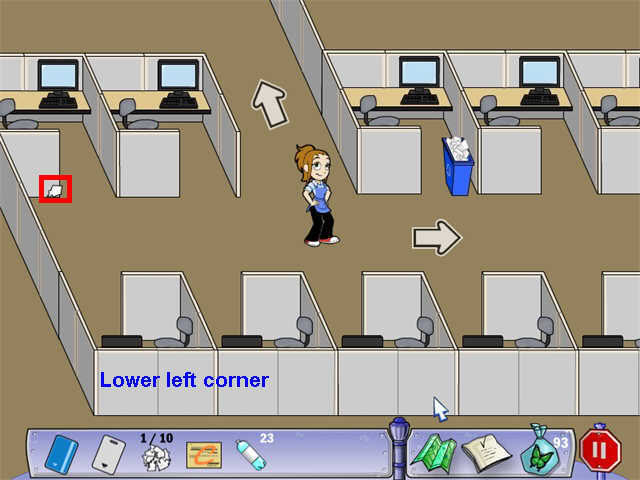
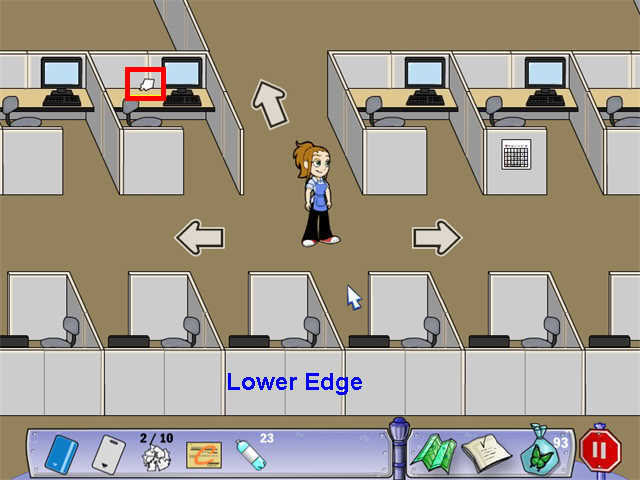
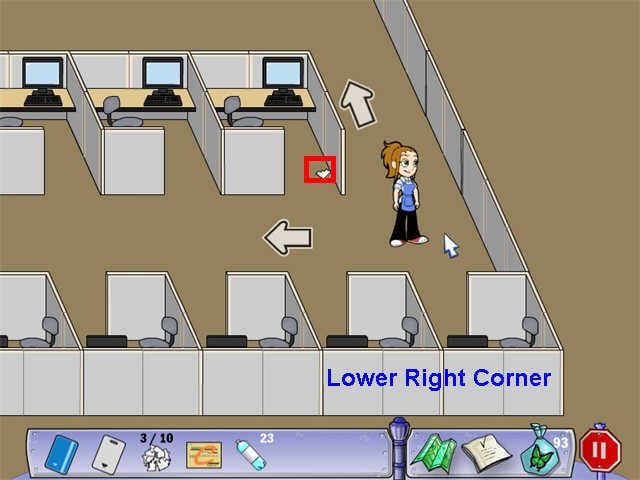
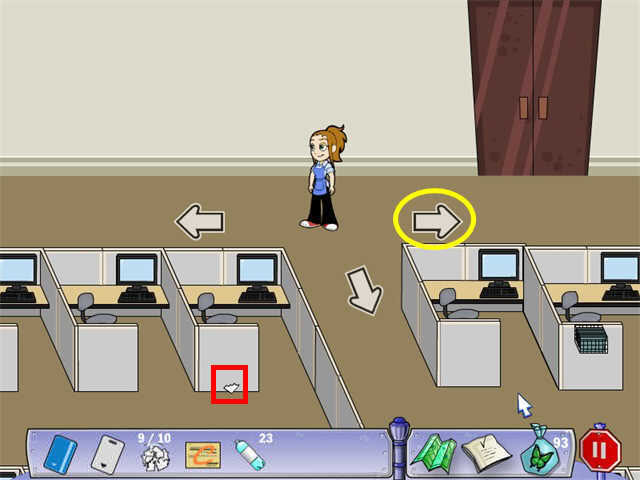
- Same basic layout, except Mr. Big’s Secretary is in the top left corner where the breakroom was in the last maze.
- You will start out by going left. You’ll see the secretary immediately, but can’t talk to her until you get on the other side of the wall, which means going down the central column, cutting over to the left, and then coming back up.
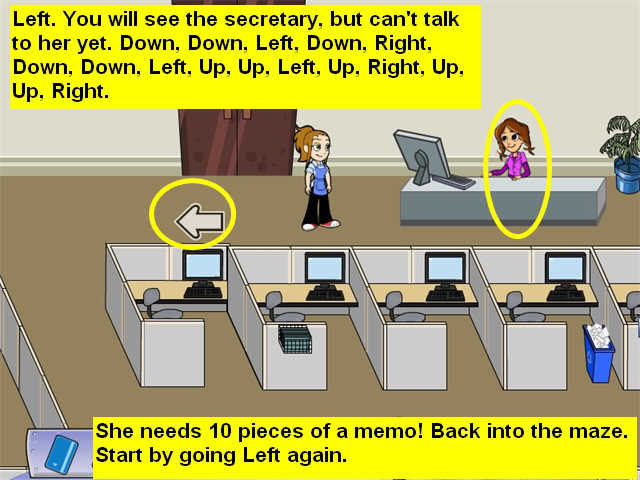
- She won’t stamp your permit! You need to collect 10 pieces of a torn up memo, make a copy of it, and bring it back to her.
- Back into the maze. Start by going left from her desk.
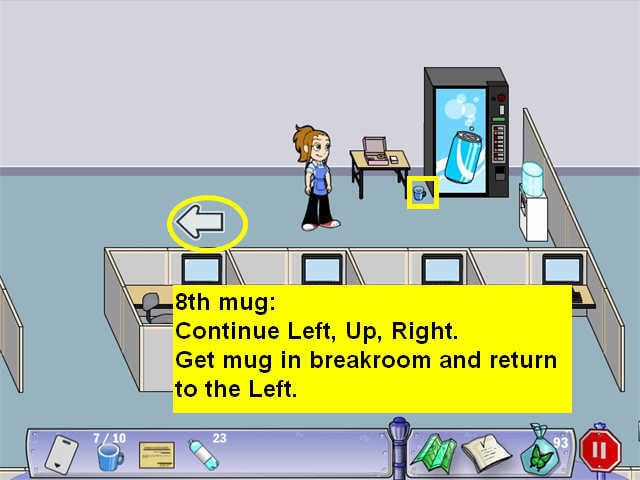
- Then get the 10 pieces from the locations shown.

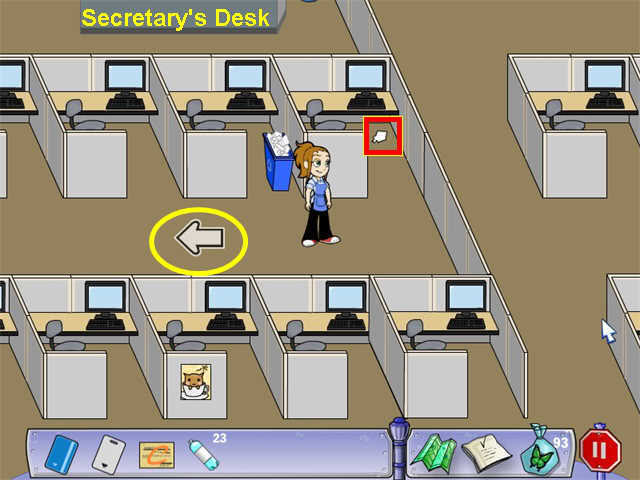
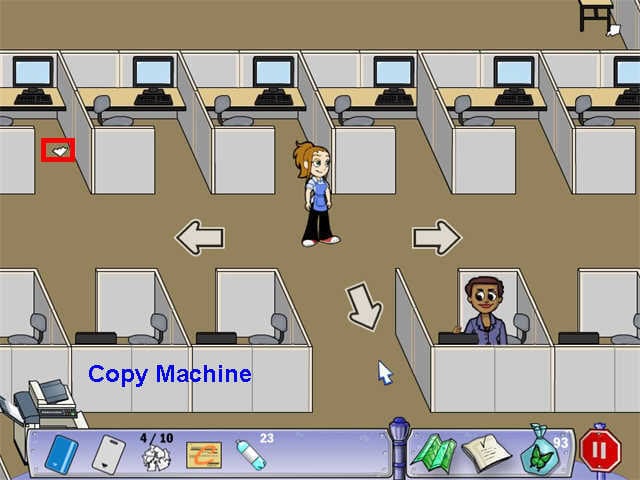
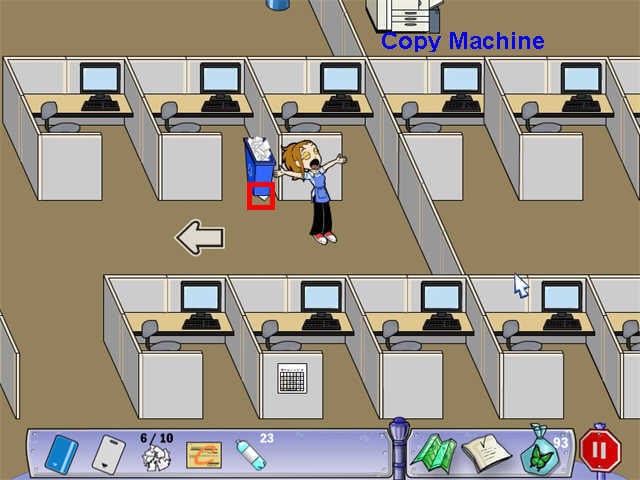
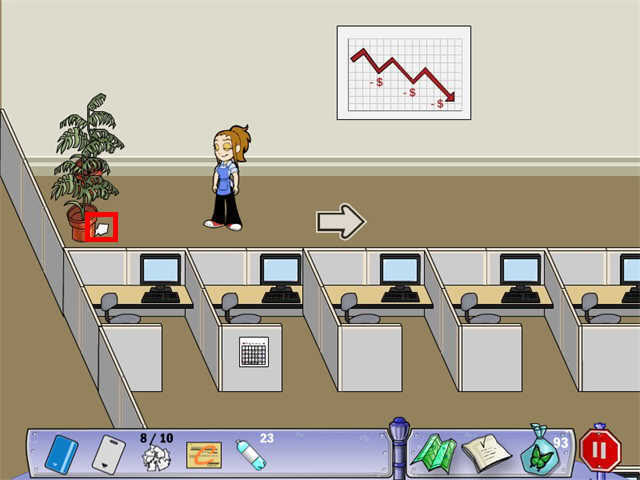
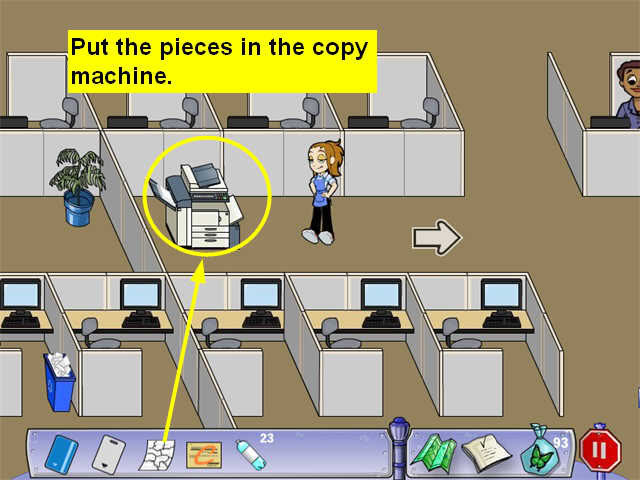
- Put the 10 pieces in the Copy Machine to make a copy.
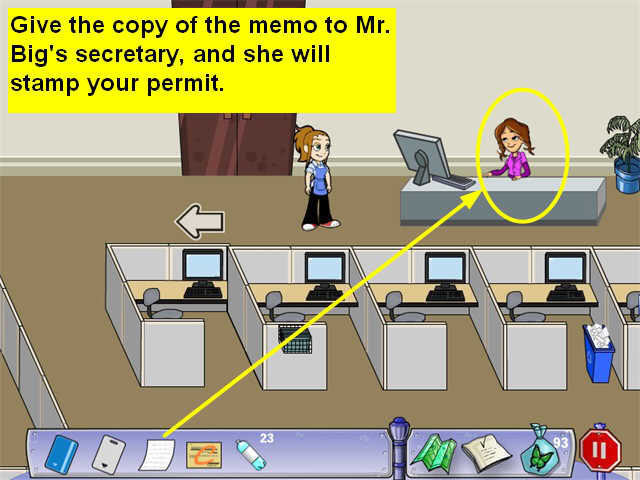
- Give the photocopy to Mr. Big’s secretary, and she will stamp your resident’s pass.
- You will immediately be back outside the building.
- You can use the Resident’s Pass now, so you might as well look for more butterflies.
Scene 66: The Street outside the Subway Station
- Give the Resident’s Pass to Hal. He will let you go on to the left.
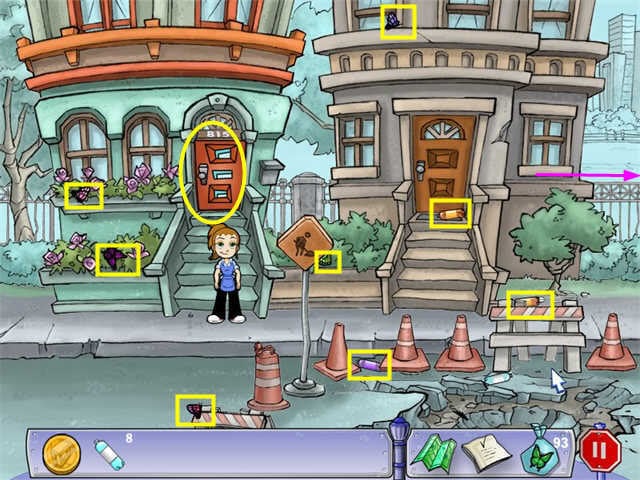
Scene 67: the Street outside Flo’s Apartment
- Collect bottles and butterflies.
- Go back right to the Subway Station.
Scene 68: The Street outside the subway Station
- Use the token machine.
- You got a gold token! This gives you unlimited travel from now on.
Scene 69: The Subway Station
- Click on the Map and choose a station to go back to Flo’s Diner.
- Put the Gold Token in the turnstile on the West side of the platform.
Scene 70: Flo’s Diner
- Go back to the diner and confront Bernie.
- He denies everything.
- You do notice that this suit doesn’t fit. Who else have you seen today wearing a pinstriped suit that didn’t fit?
- While you are talking to Bernie, the rings fall out onto the counter!
- Grandma locks them in the safe, but you don’t have the combination!
- You’ll have to go back to Flo’s apartment to get it.
- Take the subway back to Pancake Road, then walk right from the subway station to Flo’s apartment.
Scene 71: Outside Flo’s Apartment
- Find your keys.
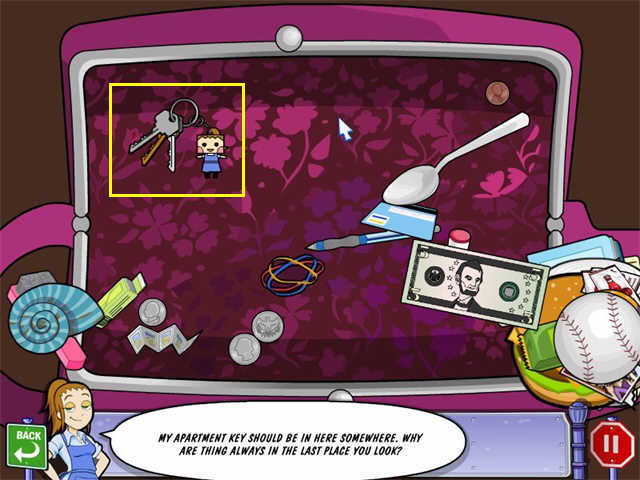
- Go in the apartment.
Scene 72: Flo’s Apartment
- Now to find the combination!
- Take the key from the top of the television and use it to open the small drawer by the phone.
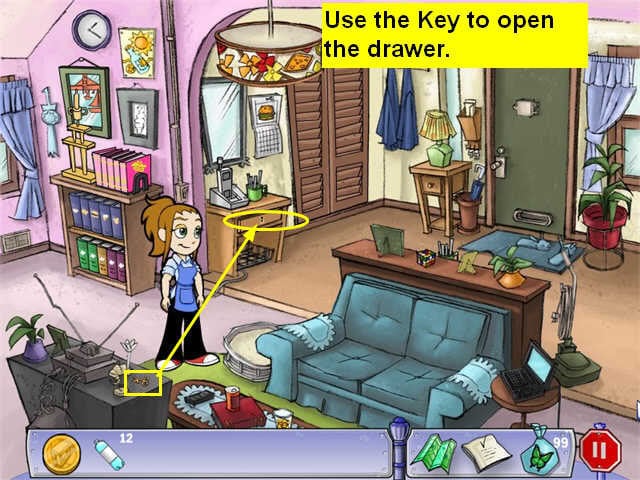
- Now you have the blank paper.
- Take the revealer pen out of the green cup next to the phone, and use it on the paper.
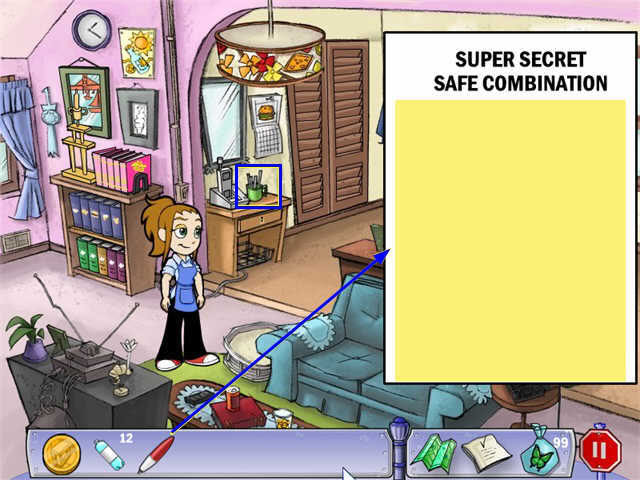
- More clues!
- As you look around the room, you will find numbers that match the clues on the paper. Use the arrows by the clue to set the number correctly.
- Quinn’s shoe size is on the fancy shoes in the closet: 6
- Grandma’s birthday is on the calendar: 6
- WDTN is a TV station listed on the remote: 4
- Dial Darla is on the phone: 2
- Number of sailboats requires counting the boats in the picture: 7
- Burger Bonanza is the position of the cookbook on the shelf: 3
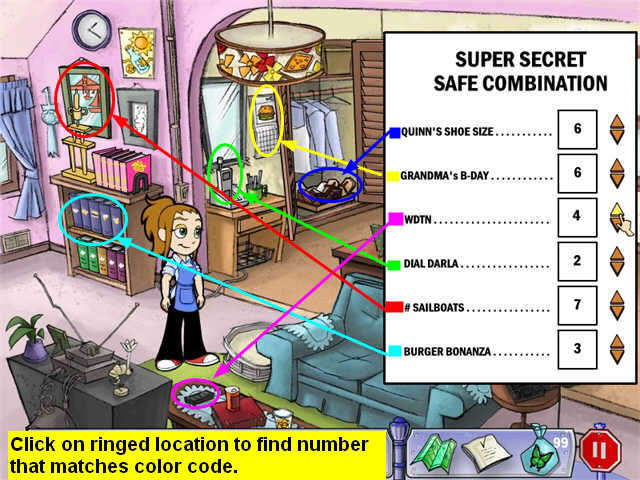
- Once you have everything, go back to the diner.
Scene 73: Flo’s Diner
- Click on the safe, then enter the code to get the Rings.
- Back to the Subway station.
Scene 74: Avenue Flo Subway Station
- Head East to Pancake Road to go to the Cruise Ship.
Scene 75: The Street in front of the Cruise Ship
- Talk to Bernie. He’s not guilty!
- The dry cleaners switched suits, so the rings were in the pocket of Mr. Big’s suit!
- Complete the conversation, then click on the Cruise Ship to go aboard.
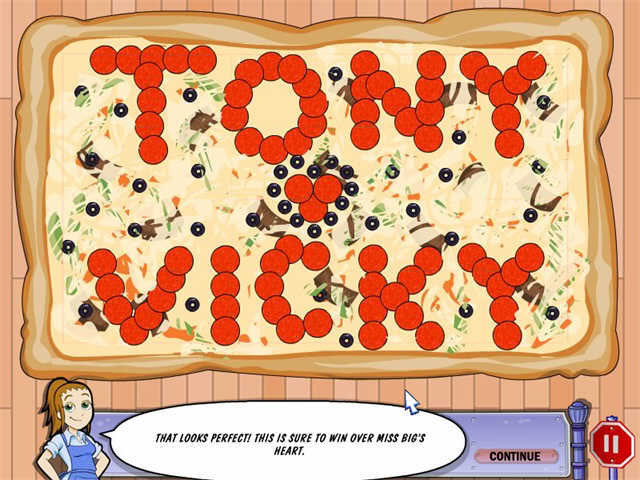
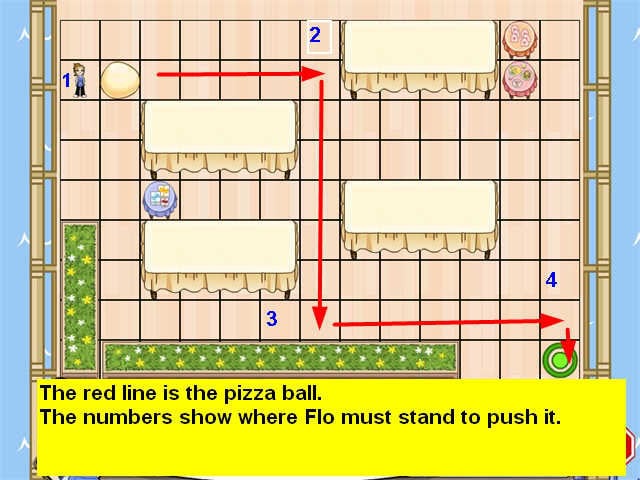
Scene 76: The Cruise Ship, Pizza Puzzle
- This is a jigsaw puzzle
- Swap two pieces at a time.
- When a piece is in the correct spot, it will lock in place and you won’t see a border around it anymore.
- Solution:
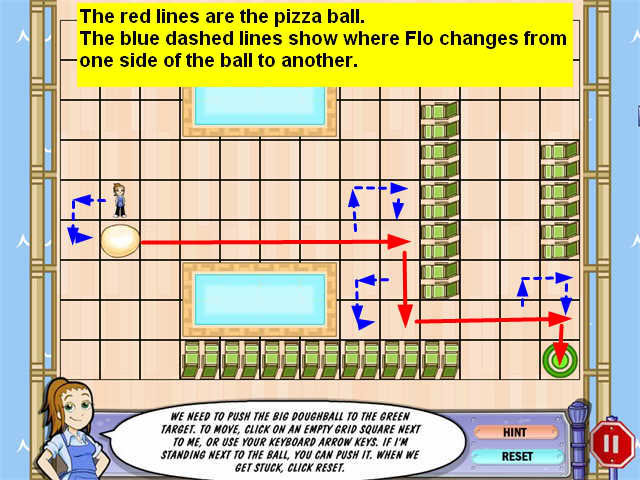
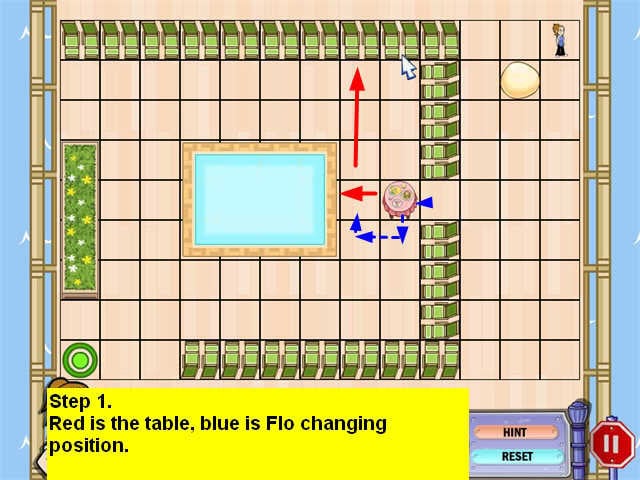
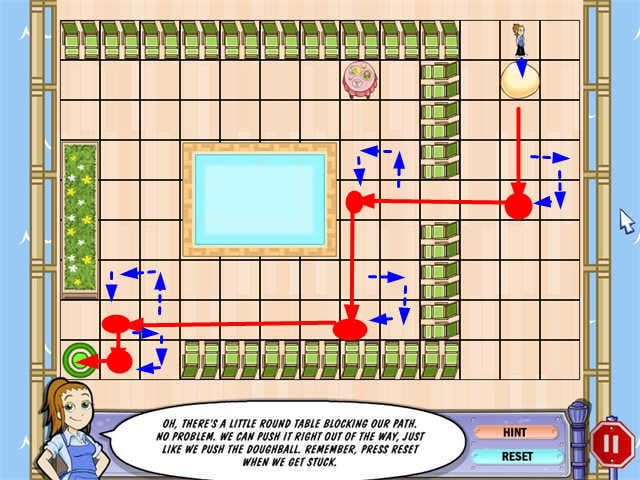
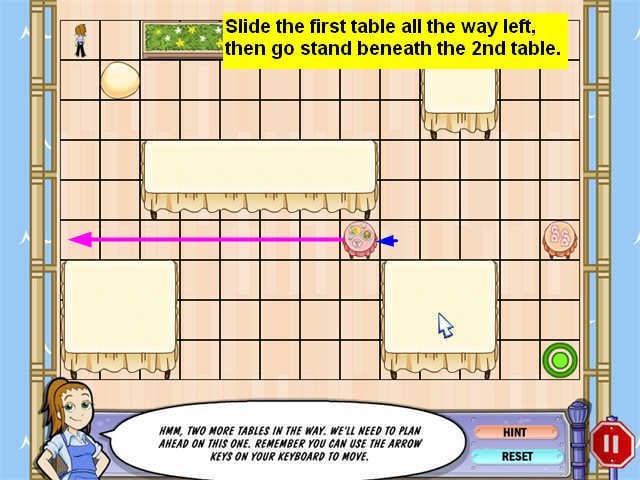
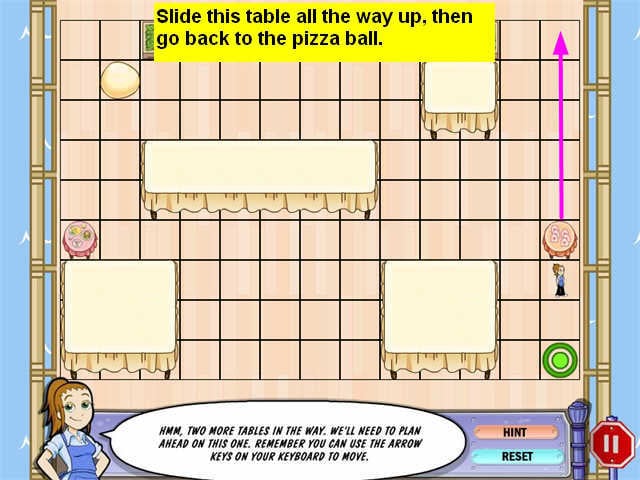
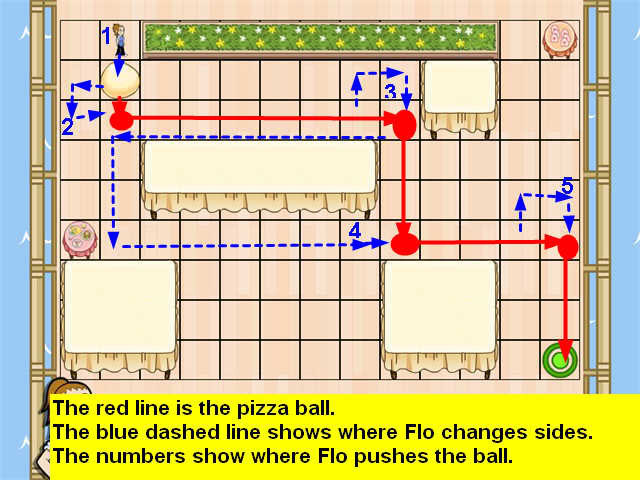
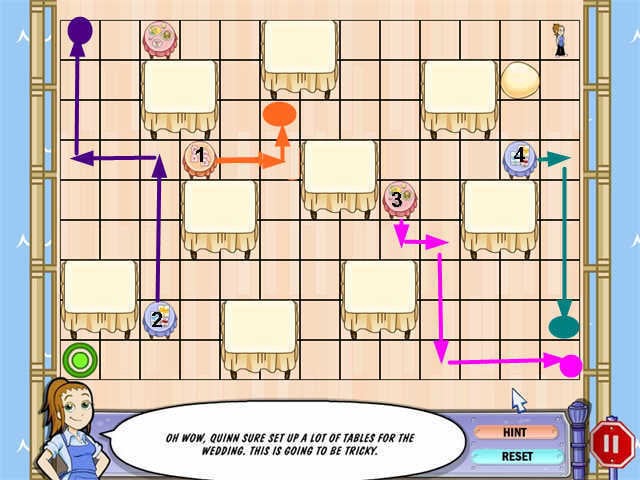
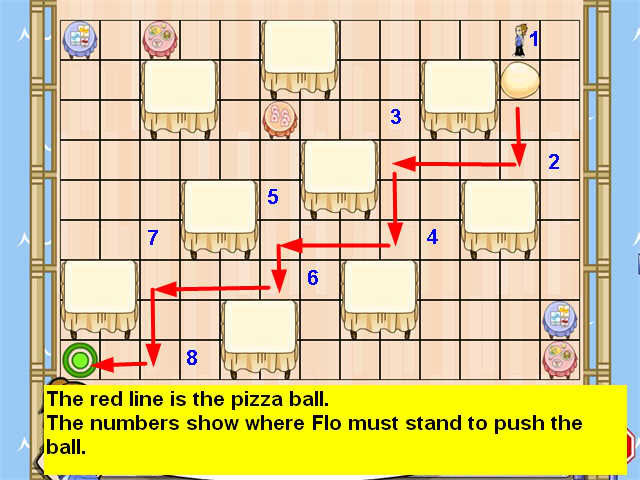
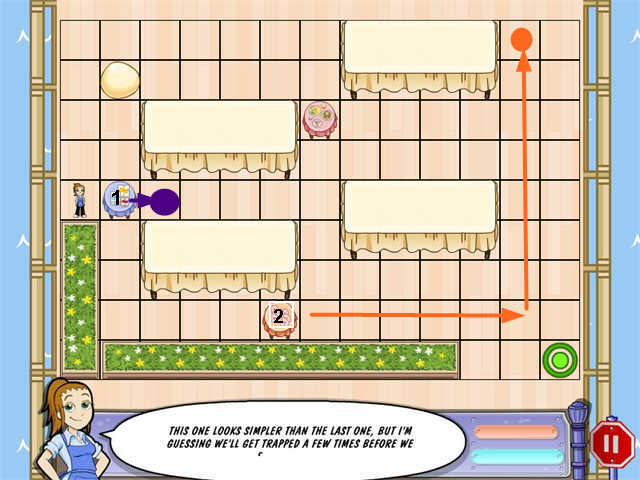
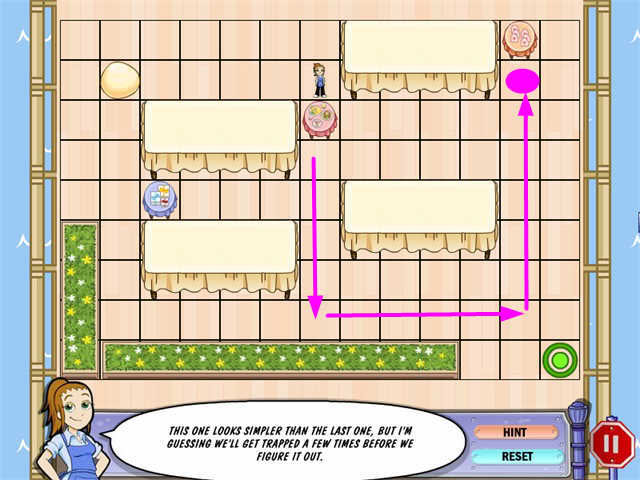
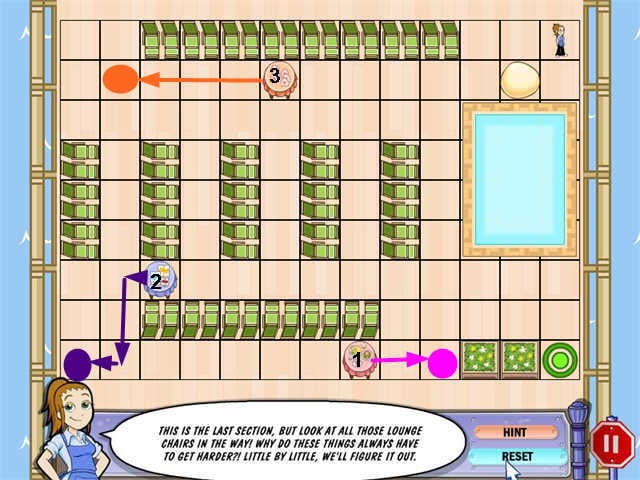
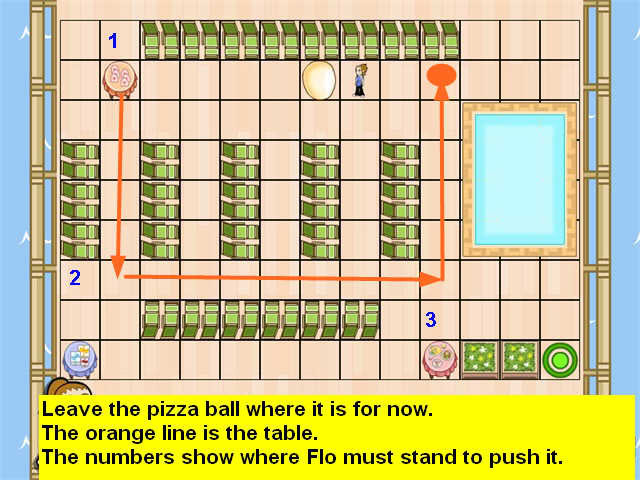
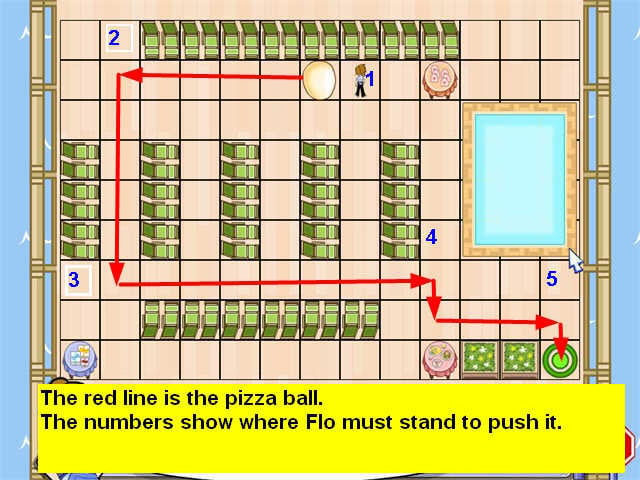
Scene 77: The Cruise Ship, Pizza Dough
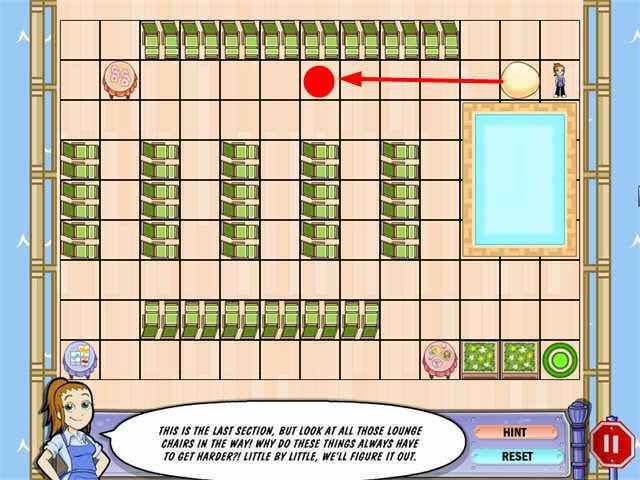
- There are 6 of these puzzles.
- The only thing tricky about it in the beginning is remembering to leave a square for Flo to stand on when she needs to change direction.
- Later on the obstacles will make it trickier.
Solution 1:
Solution 2:
Solution 3:
Solution 4:
Solution 5:
Solution 6:
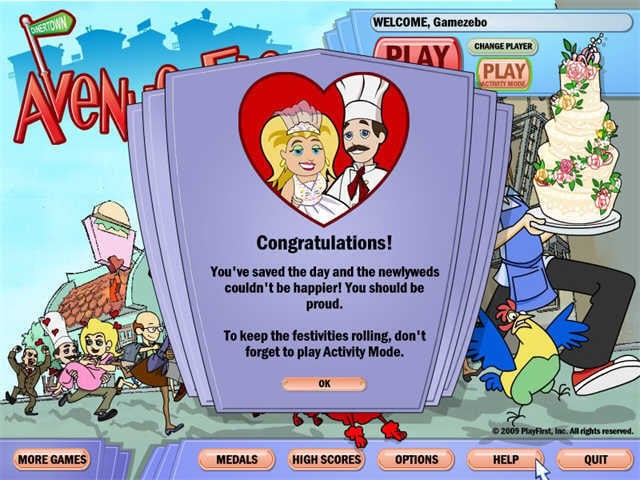
- Watch the ending
“;

More articles...
-
Grow A Garden 2 Base Price List
What's the most valuable crop? -
Evomon Best Starter [Leafbun, Blazpup, or Bubble?]
Grass-type, Fire-type, or Water-type? -
Evomon Tier List [META and BEST Evomon]
The Evomon dream team.