- Wondering how to get Monopoly GO! free rolls? Well, you’ve come to the right place. In this guide, we provide you with a bunch of tips and tricks to get some free rolls for the hit new mobile game. We’ll …
Best Roblox Horror Games to Play Right Now – Updated Weekly
By Adele Wilson
Our Best Roblox Horror Games guide features the scariest and most creative experiences to play right now on the platform!The BEST Roblox Games of The Week – Games You Need To Play!
By Sho Roberts
Our feature shares our pick for the Best Roblox Games of the week! With our feature, we guarantee you'll find something new to play!All Grades in Type Soul – Each Race Explained
By Adele Wilson
Our All Grades in Type Soul guide lists every grade in the game for all races, including how to increase your grade quickly!
Autumn’s Treasures: The Jade Coin Walkthrough
Welcome to the Gamezebo walkthrough for Autumn's Treasures: The Jade Coin. Let's help Autumn cross the globe and discover her grandfather's mysterious treasures. GENERAL GAMEPLAY This is a hidden object game where you look for pieces of objects based on the silhouettes that are in your inventory area. The pieces combine in inventory as they are found. The items are then used in the scene to move you through the game. The inventory is located at the bottom of the screen. As…
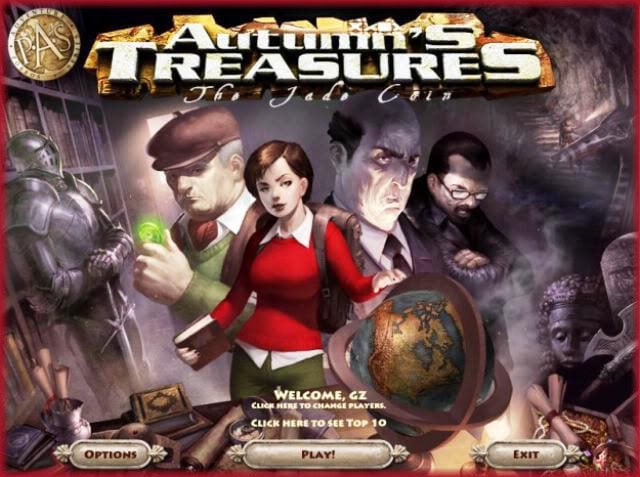
Welcome to the Gamezebo walkthrough for Autumn’s Treasures: The Jade Coin. Let’s help Autumn cross the globe and discover her grandfather’s mysterious treasures.  GENERAL GAMEPLAY
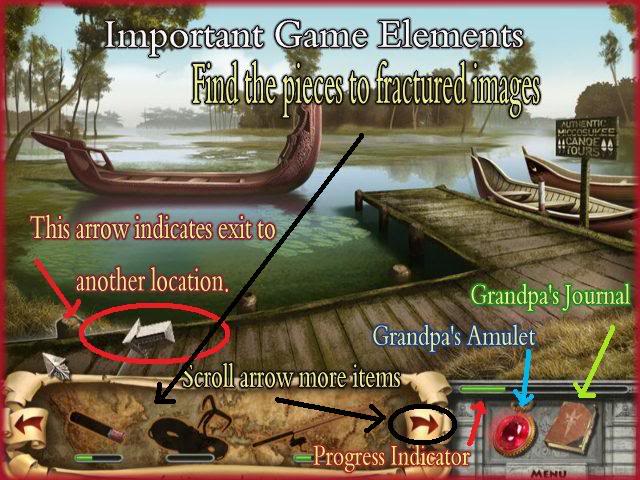
- This is a hidden object game where you look for pieces of objects based on the silhouettes that are in your inventory area. The pieces combine in inventory as they are found. The items are then used in the scene to move you through the game.
- The inventory is located at the bottom of the screen. As inventory items are completed and used new item silhouettes will appear in your inventory until you complete the level. If you have more than three items in your inventory there will be red arrows on either side of the inventory so you can scroll to see other items in your inventory.
- The item pieces are generally located in more than one area, so you are required to move between locations quite often. New item pieces will appear in locations that you have previously visited when new item silhouettes become available in your inventory area.
- Your cursor will change to a magnifying glass when there is an area where actions are needed.
- Passage ways between scenes are highlighted and a moving arrow will appear when you mouse over a passage way.
- There is a green progress bar in the lower right corner of your screen. It will let you know how far you have progressed in each location.
- When you have completed an entire location you will automatically travel to a new location.
- Your score in the game is based on your cumulative time playing the game. Using a HINT or a SKIP will add 5 minutes to your time.
Hints and Skips 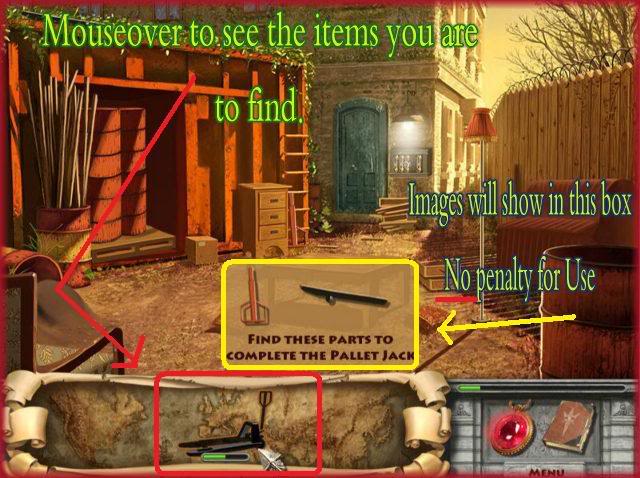
- When you mouse over a silhouette in your inventory, a picture of the pieces that are left to be found for that item will be shown. This is very useful and there is no time penalty.
- The HINT button is Gramp’s Amulet in the lower right corner. The Amulet will be red when it is fully charged and ready to use. You click on it, and then click on an incomplete inventory item and a circle of sparkling red lights will surround the area where a piece of the item will be found. The piece will be in the center of the area indicated by the red lights. The hints are unlimited but the HINT button takes some time to recharge after you use it. When you use a HINT, 5 minutes will be added to your cumulative time for the game.
- Gramp’s Journal will be available to help you in the game. The Journal will be in the lower right corner of the screen. The Goals listed in the Journal are very helpful in letting you know where and how to use completed inventory items.
Mini-games 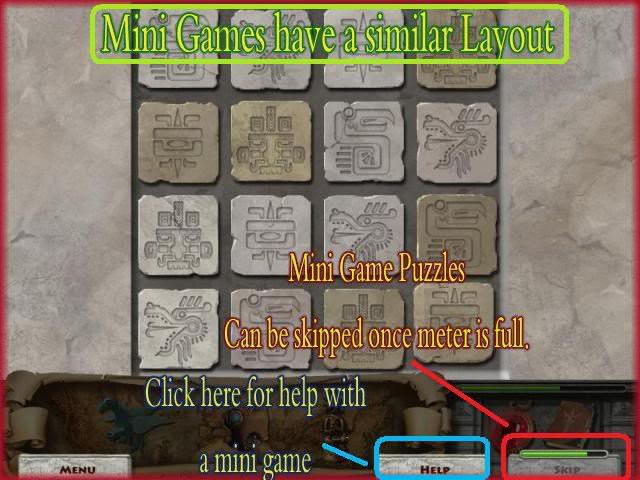
- There is a SKIP option for each mini-game. The SKIP will take some time to charge up before it will be available for you to use. When you use a SKIP, 5 minutes will be added to your cumulative time for the game.
- There is a HELP button in the lower middle of the screen on each mini-game. This button will give you basic information about your goal for the mini-game.
- When you complete a mini-game without using a SKIP 2 minutes will be taken off your cumulative time.
WALKTHROUGH
- There is a lot of movement back and forth between the scenes and new items appear almost every time you revisit scenes.
- The mini-games or puzzles will have screen shots of the solutions. Some games have varying solutions.
- The first few scenes in the game will step you through a basic tutorial.
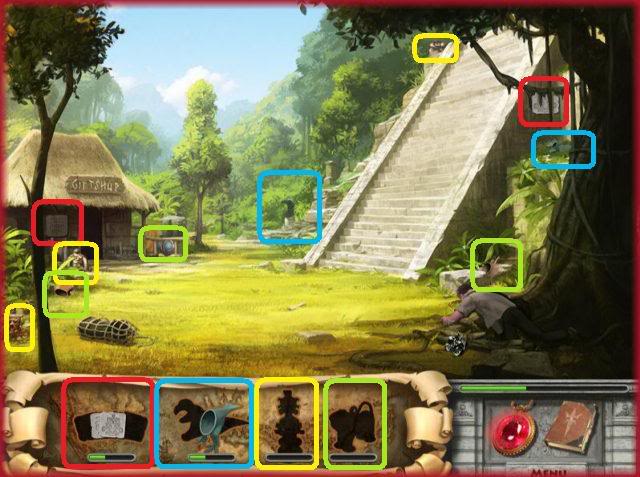
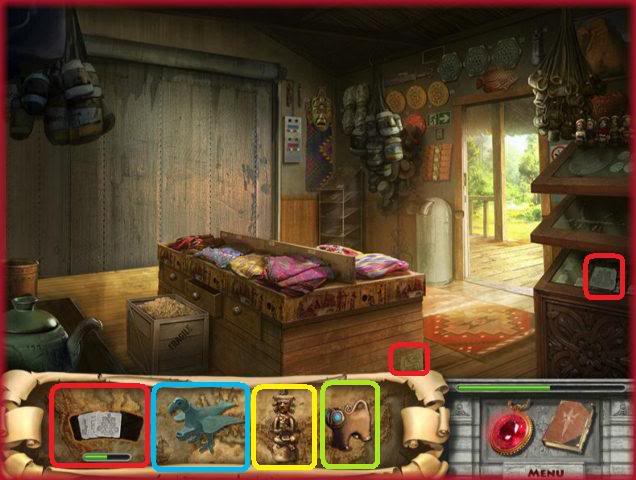
- ***NOTE – Hidden objects are color coded in this walkthrough. To locate a hidden item refer to the color around the picture in inventory and look for items circled with the same color to find its corresponding pieces.
Location 1: Gramp’s Antique Shop – Seattle, USA 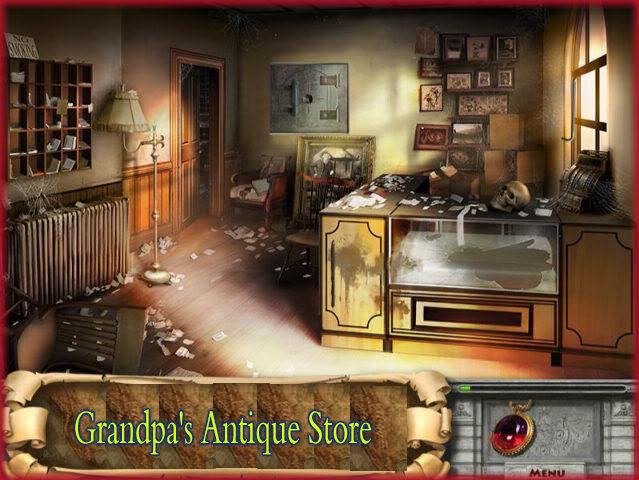
- Click on the hammer head and it will go into your inventory.
- Go through the highlighted door to Gramp’s office.
- Follow the tutorial and see how to use a HINT. This first hint is free but future hints will add 5 minutes to your cumulative time.
- Click on the hammer handle and it will go into your inventory.
- Go back to the antique store front room.
- Click on the hammer in your inventory and use it on the picture in the center of the back wall to reveal a safe.
- New silhouettes of a coat hanger and a journal will appear in your inventory.
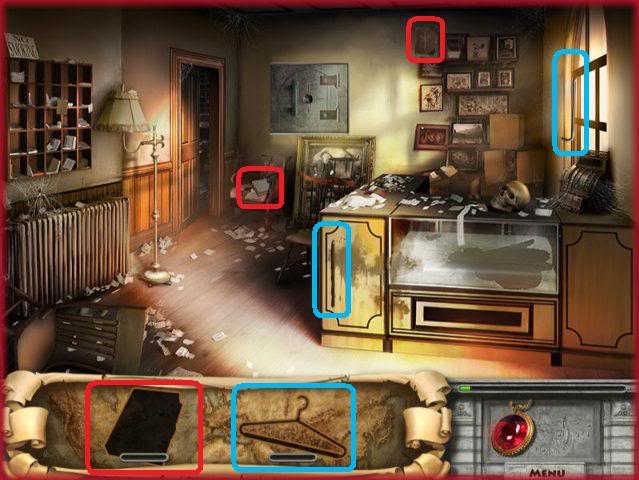
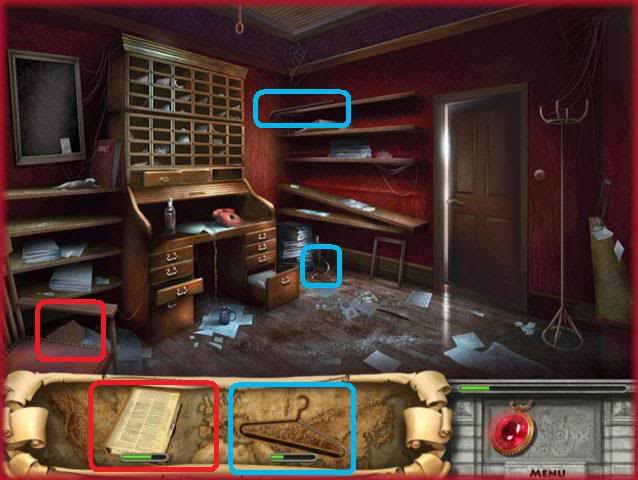
- Search for the coat hanger and the journal in both the antique store front room and Gramp’s office.
- When the journal is complete it will go to the lower right of the screen. You can refer to Gramp’s Journal during the game for Goals and Journal Entries.
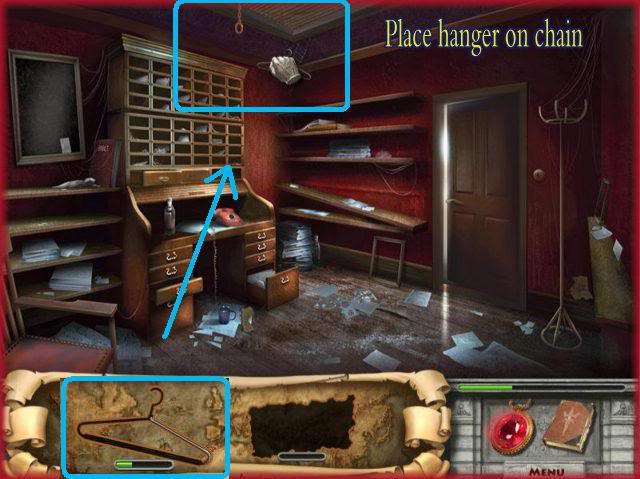
- Click on the coat hanger in your inventory and use it on the round handle on the chain in the center of the ceiling to open the vent. Pieces of litter will fall onto the floor.
- New silhouettes of a paper and a broom will appear in your inventory.
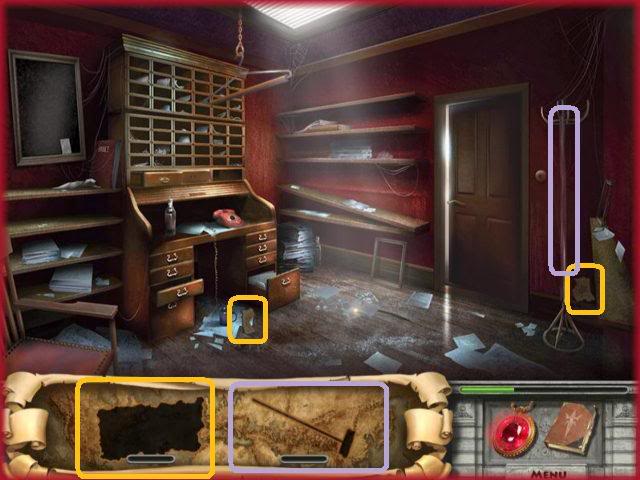
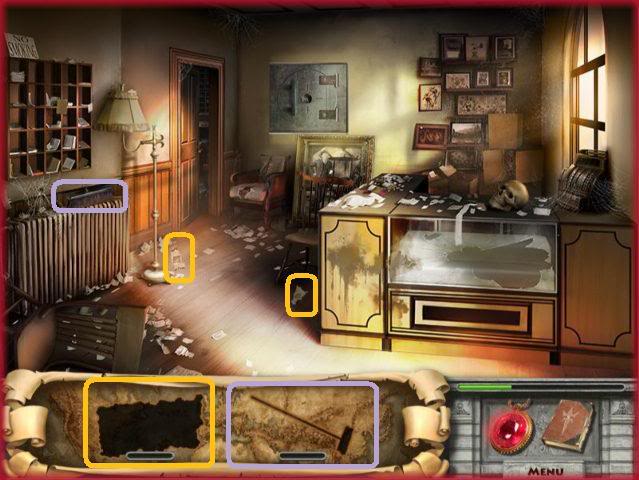
- Search for the pieces of the broom and paper in both the antique store front room and Gramp’s office.
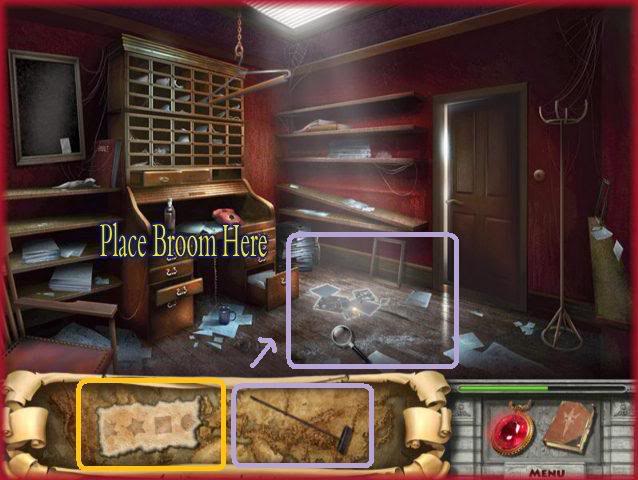
- When the broom is complete go back to Gramp’s office and use the broom on the litter.
- The litter will fall through the cracks in the floor.
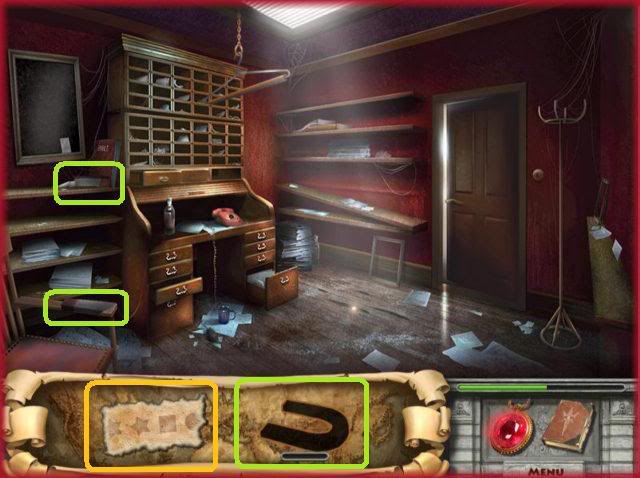
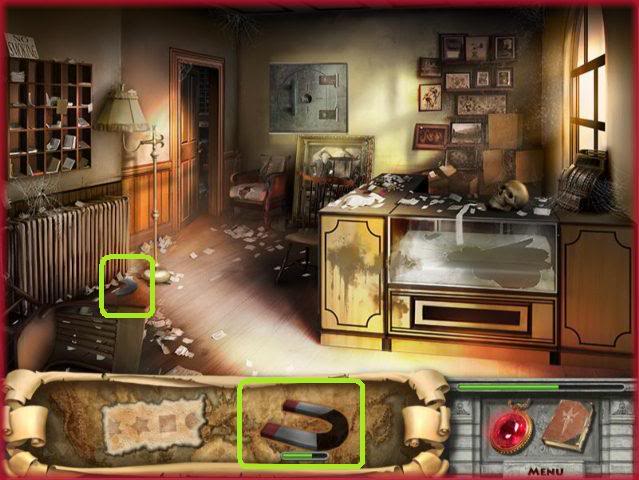
- A new silhouette of a magnet will appear in your inventory. You will need the magnet to get a piece of metal that fell through the floor with the litter.
- Find the two pieces of the magnet that are in Gramp’s office.
- Go back into the antique store front room to find the third piece of the magnet.
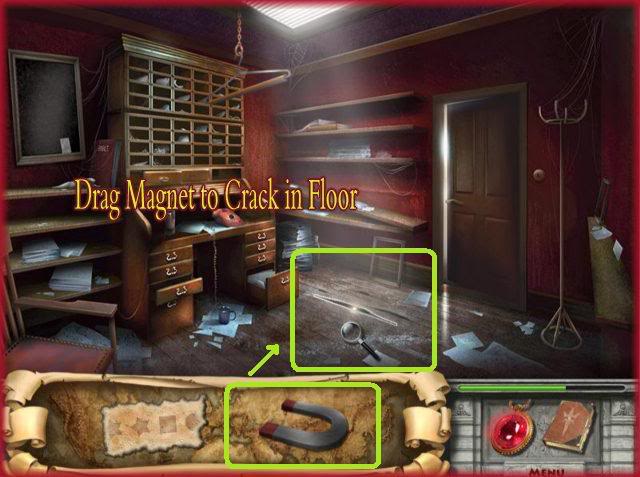
- Go back to Gramp’s office and use the magnet on the cracks in the floor. A piece of a special key will be revealed and a new silhouette for the key pieces will appear in your inventory.
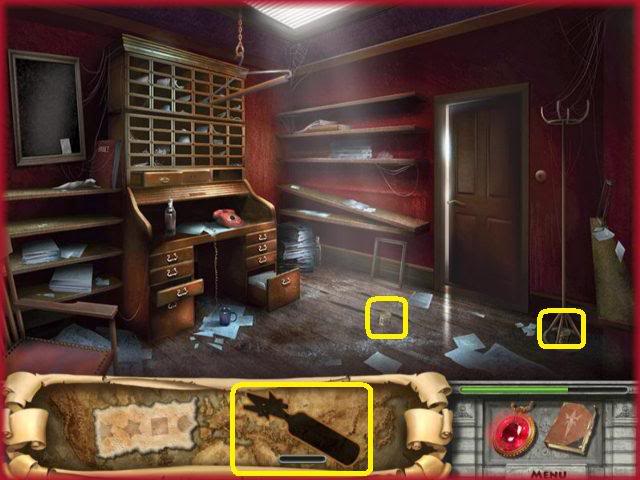
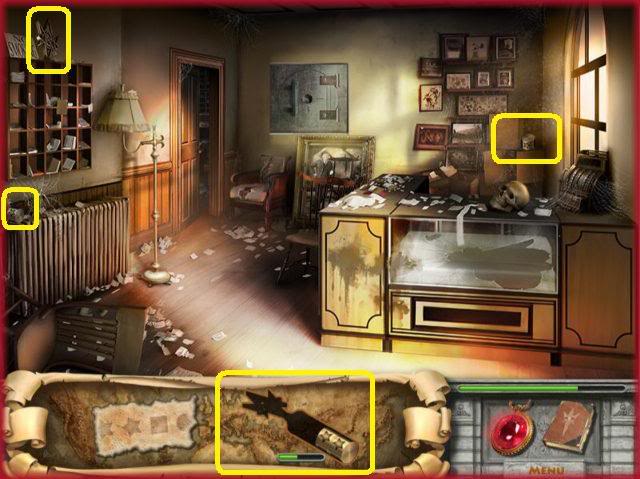
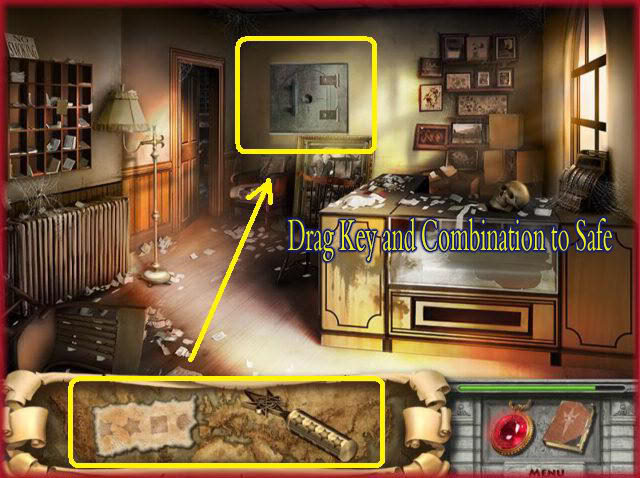
- Find the two pieces of the key that are in Gramp’s office.
- Go back into the antique store front room to find the other pieces of the key.
- Put the special key and the paper with the Star, Star, Square, Circle on the safe on the back wall to reveal a puzzle.
Special Key puzzle 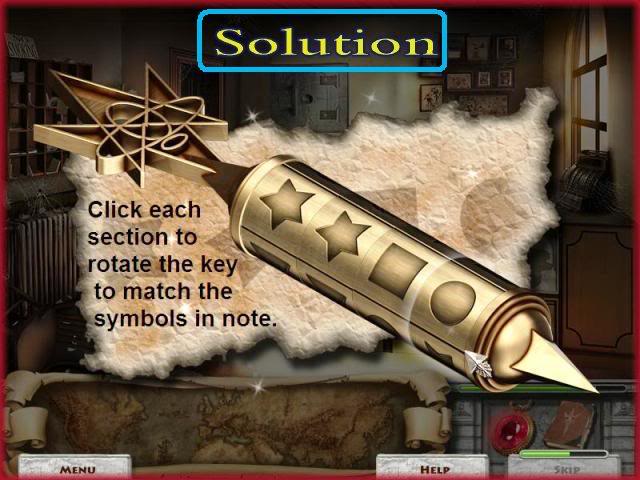
- Click on each section of the special key to rotate it. Match the Star, Star, Square, Circle symbols that are on the note to open the safe.
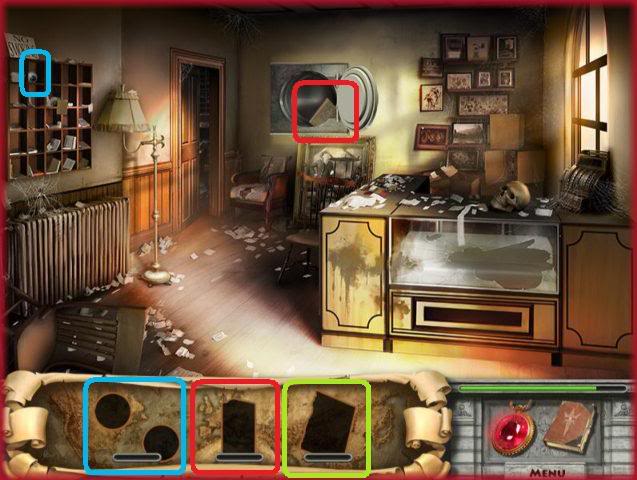
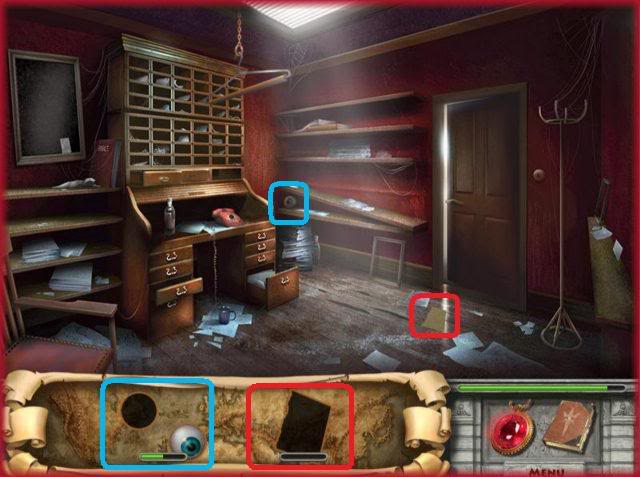
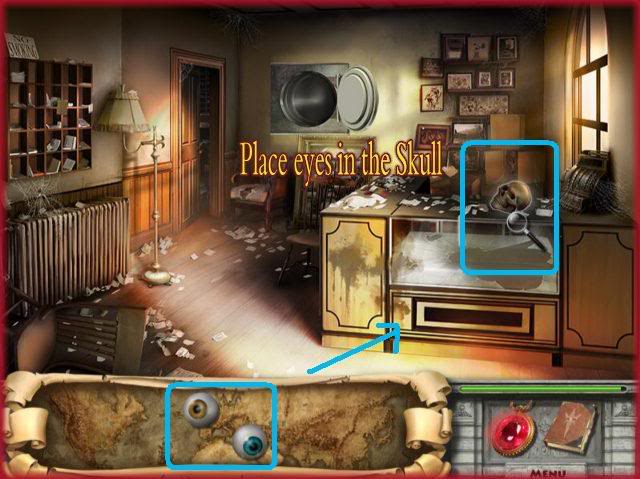
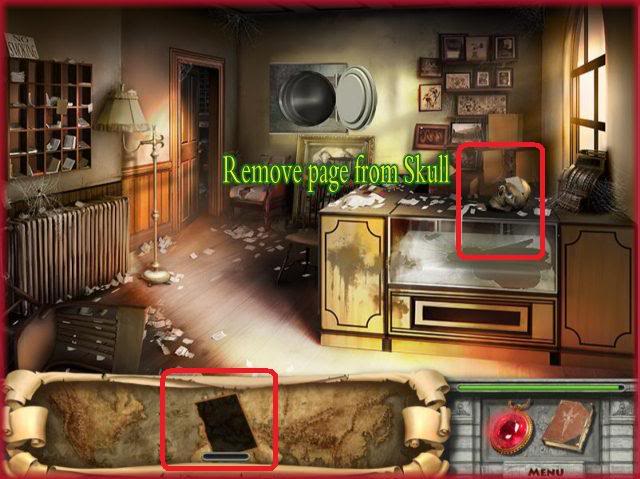
- New silhouettes will appear in your inventory of a pair of eyes and journal pieces.
- Search for pair of eyes and journal pieces in both the antique store front room and Gramp’s office.
- When the eyes are found use them on the skull on the right counter to reveal a journal page in pieces.
Torn journal pieces puzzle 1 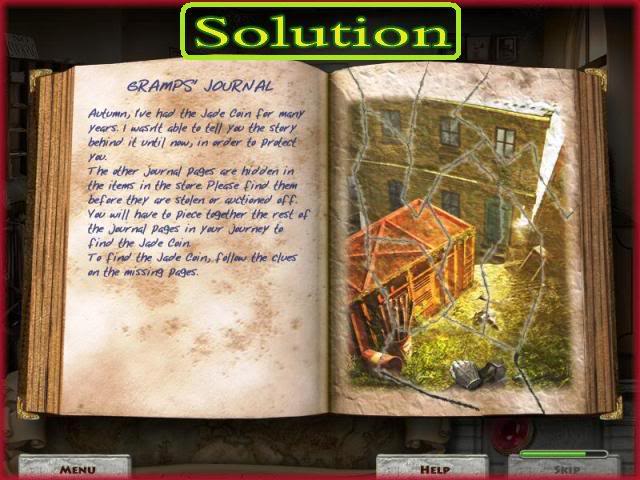
- Drag the pieces of the torn journal page to their proper place to restore the picture.
- Each piece will lock in place when it is in the proper place.
- Please look at the screen shot to see the completed picture.
- When the puzzle is complete you will travel to the location in the picture.
Location 2: Cyril’s Heritage Barn – Brooklyn, USA 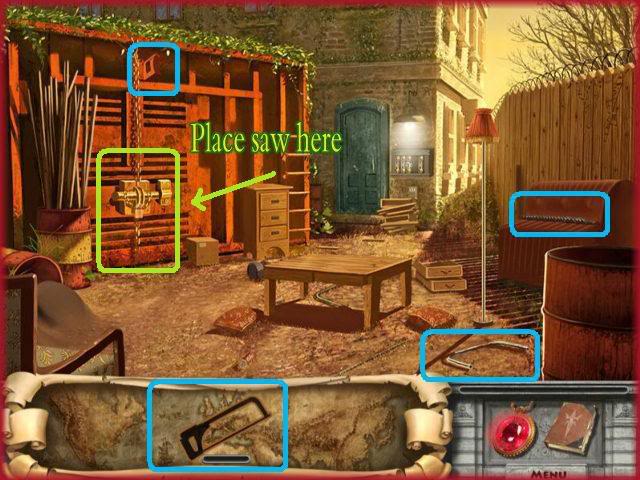
- After Autumn is thrown out of Cyril’s Heritage Barn look around the scrap yard and find the pieces of the hacksaw.
- Use the hacksaw on the padlock on the chains on the left of the screen.
- The lock will release to reveal some barrels.
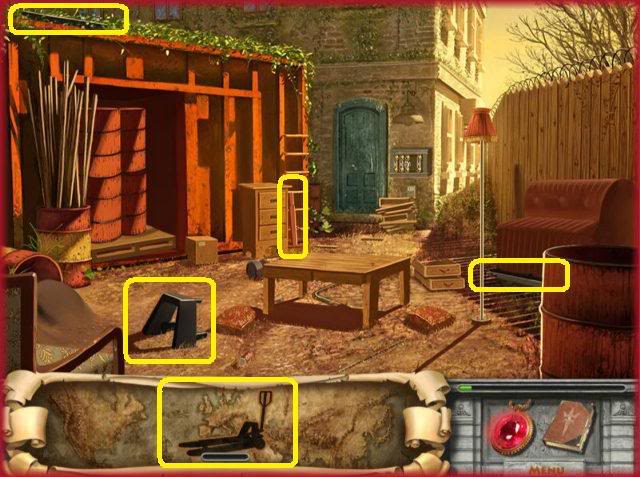
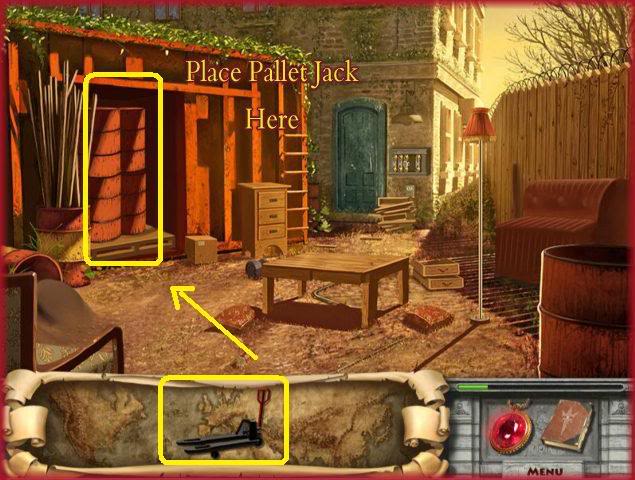
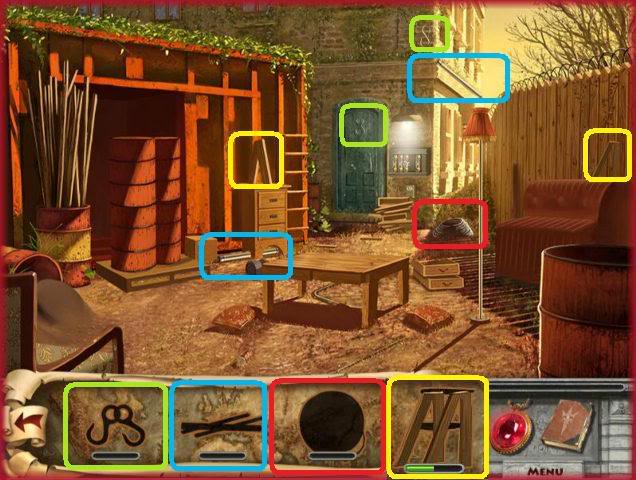
- Find the parts of the pallet jack.
- Use the pallet jack on the barrels to reveal freight car storage behind them.
- New item silhouettes will appear in your inventory. Before you go into the freight car, search the scrap yard for pieces of the ladder, hooks, florescent light and extension cord.
- Use the red arrows on either side of the inventory to scroll through the inventory if you can’t see all of the items.
- Go into the freight car.
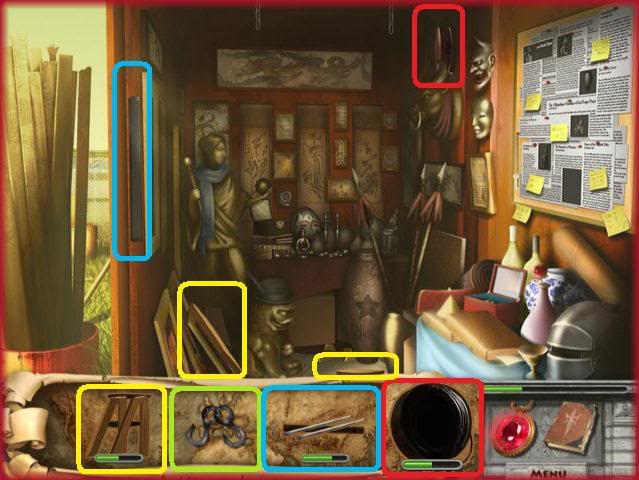
- Find the remaining pieces of the ladder, hooks, florescent light and extension cord.
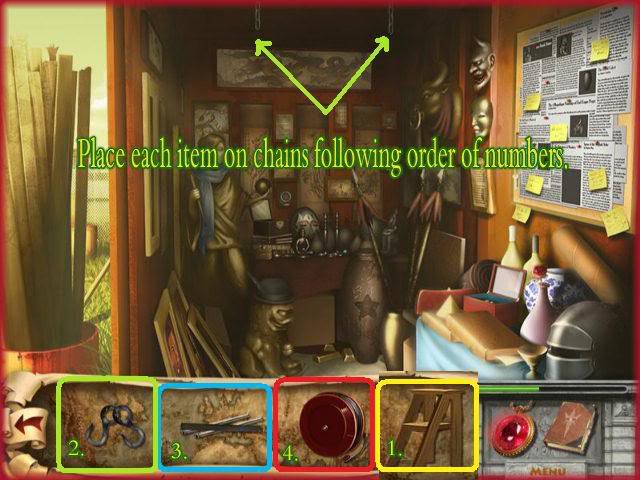
- Place the completed inventory items at the top of the freight car between the chains that are hanging from the ceiling in this order: ladder, hooks, florescent light and extension cord.
- A new item silhouette of a fuse will appear in your inventory.
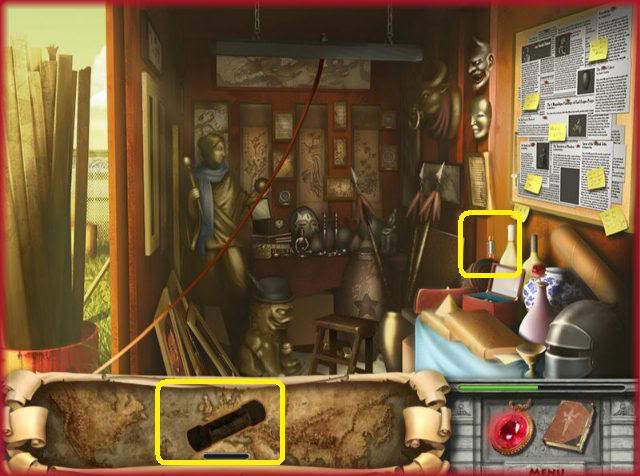
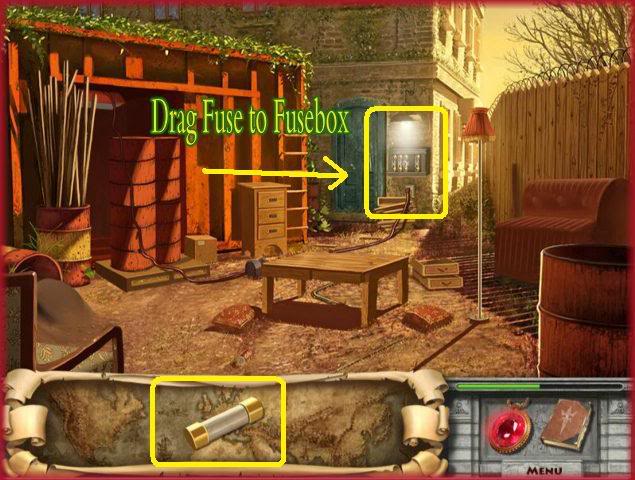
- Find the fuse in this scene then go back to the scrap yard.
- Insert the fuse in the fuse box on the building under the blinking light.
- A new item silhouette of a clay star will appear in your inventory.
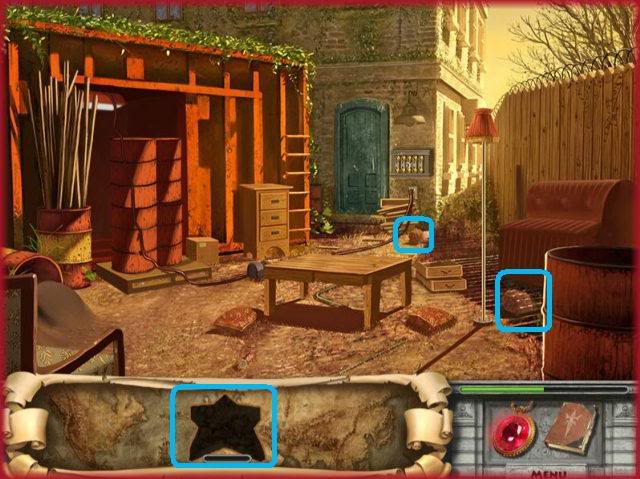
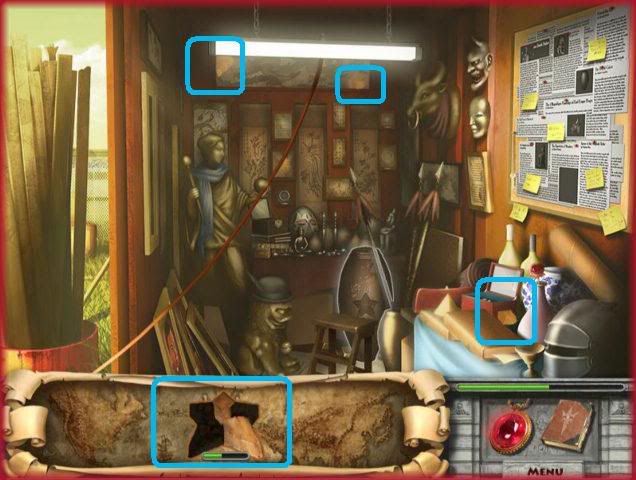
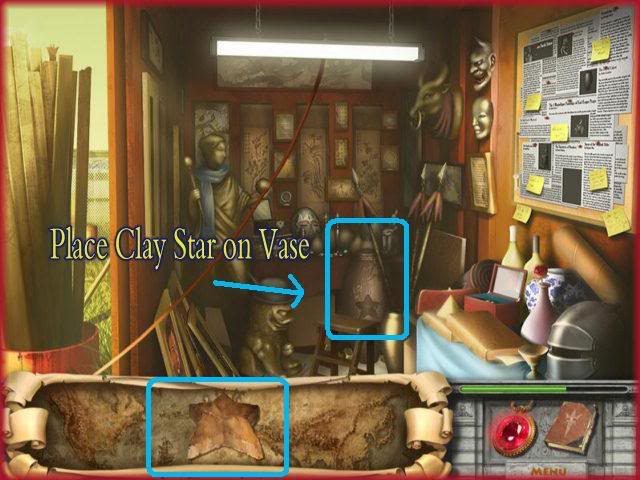
- Find the clay star parts in the scrap yard then go back into the freight car.
- Find the clay star parts in the freight car.
- Place the clay star in the clay pot and a puzzle will open.
Jar lid mini-game 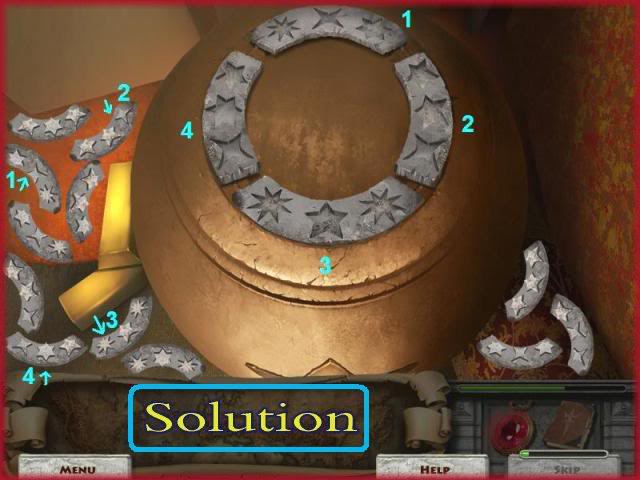
- The object of this mini-game is to place some of the pieces in the lower left and right corners on the jar lid to unlock the jar. The pieces you place must have the same symbols that are on each section of the jar lid.
- The pieces lying around the jar are lying facing up. When choosing a piece you must visualize how it will fit when it is flipped over and placed on the jar lid facing down.
- Look closely at the number of points on each star. The stars with five and six points can look very similar at first glance.
- Please look at the screen shot for the correct placement of the pieces.
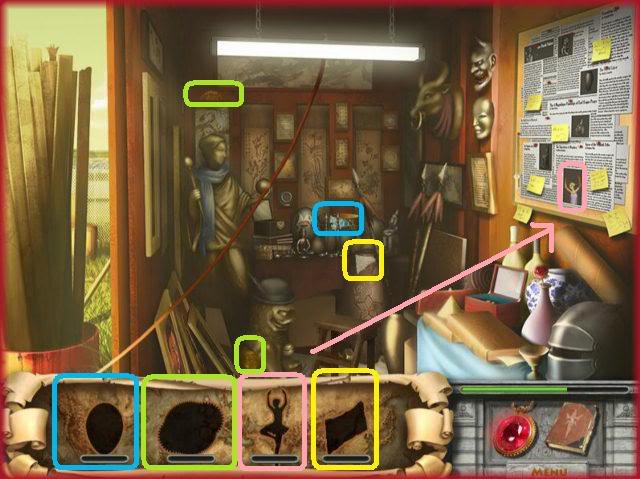
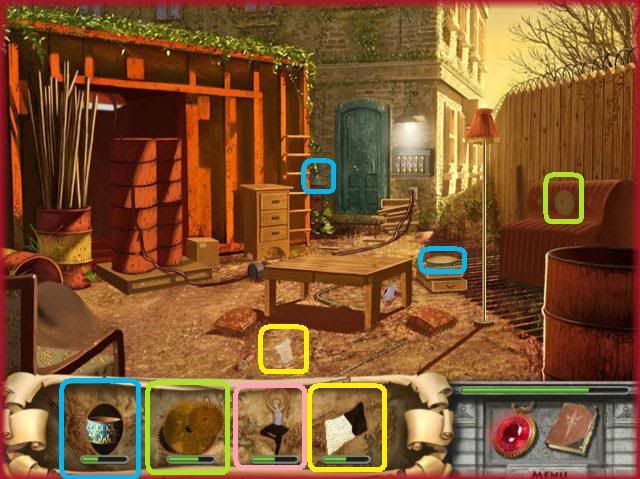
- New silhouettes of a Faberge egg, music gears, a ballerina, and a journal page will appear in your inventory.
- The pieces will be in both the scrap yard and the freight car.
- When the pieces are complete go back to the freight car.
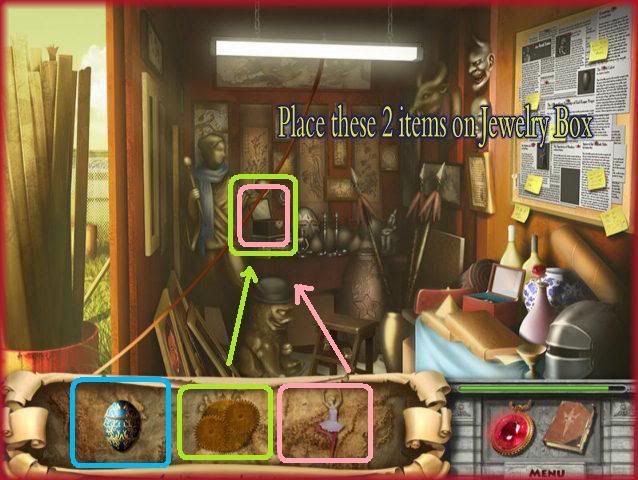
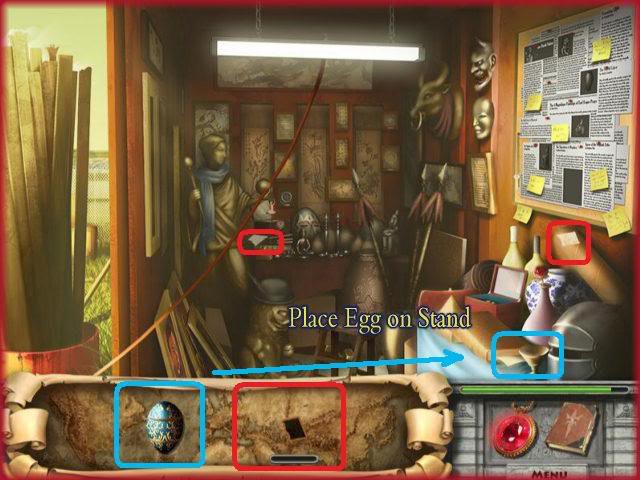
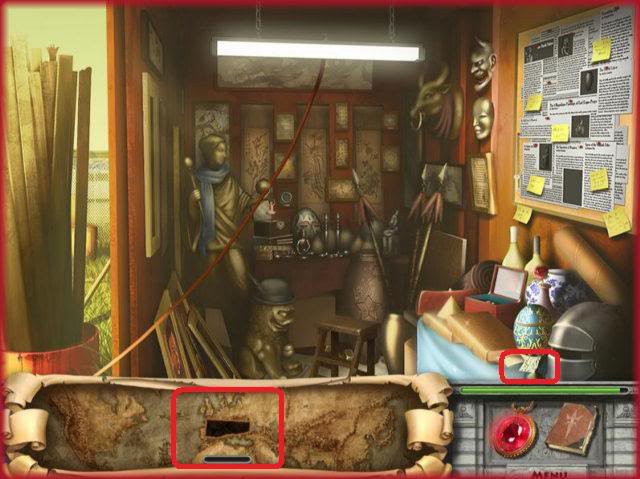
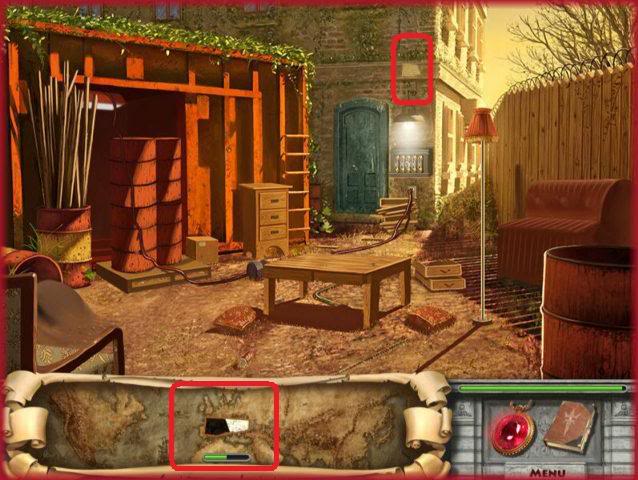
- Place the completed inventory items where they fit. A magnifying glass will appear over each area where an inventory item should fit.
- When the items are placed new silhouettes of journal pages will appear in your inventory.
- The pieces will be in both the scrap yard and the freight car.
- When the last journal piece is found the journal will open to reveal a journal page in pieces.
Torn journal pieces puzzle 2 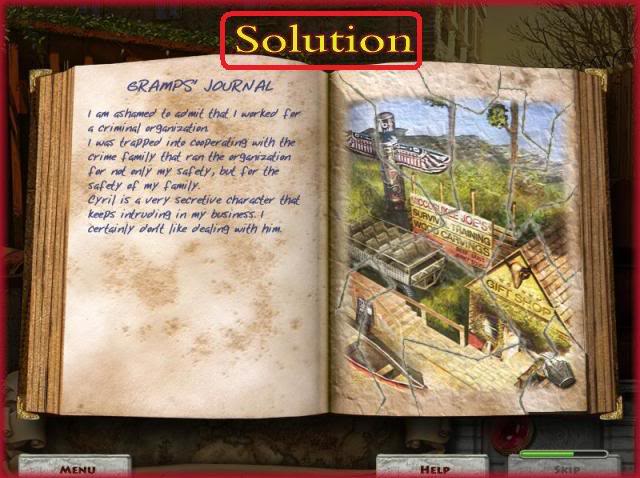
- Drag the pieces of the torn journal page to their proper place to restore the picture.
- Each piece will lock in place when it is in the proper place.
- Please look at the screen shot to see the completed picture.
- When the puzzle is complete you will travel to the location in the picture.
Location 3: Crazy Joe’s – Everglades, USA 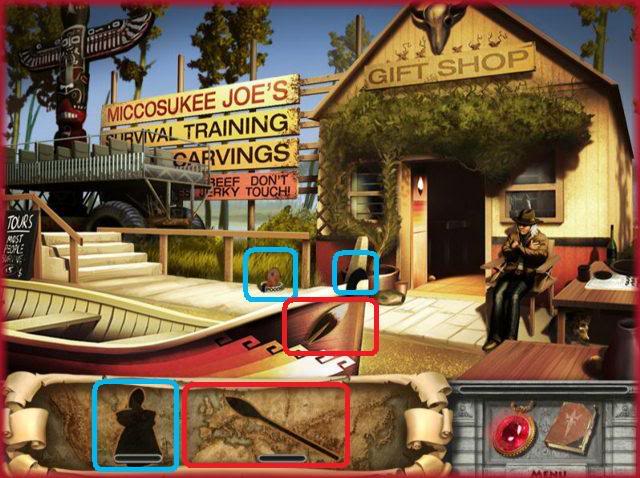
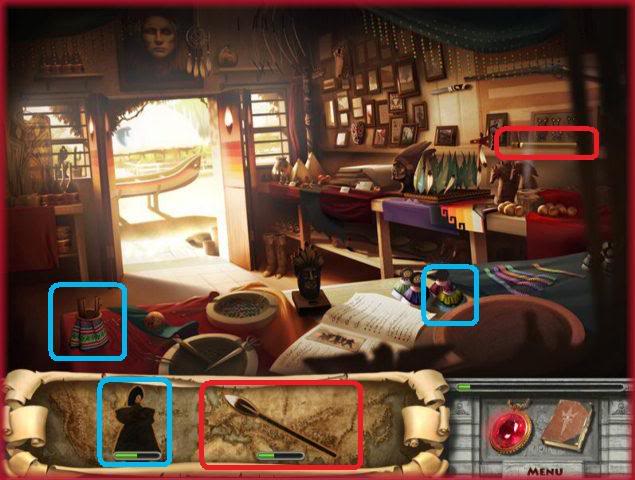
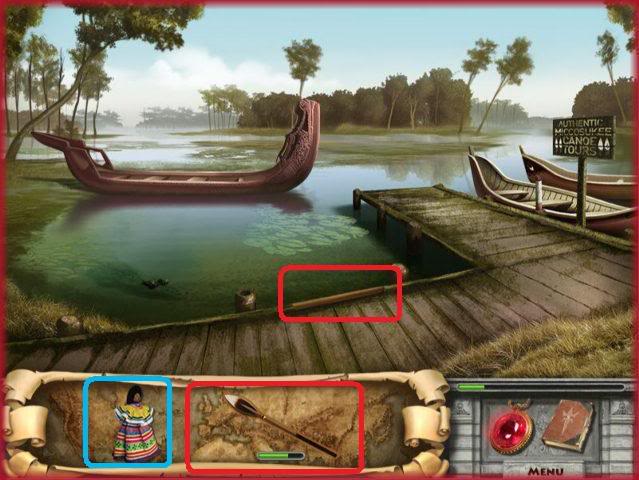
- New silhouettes of an Indian doll and an oar will appear in your inventory.
- The pieces will be at the storefront, the gift shop and the docks.
- Search the store front for items.
- Go into the gift shop to search for items.
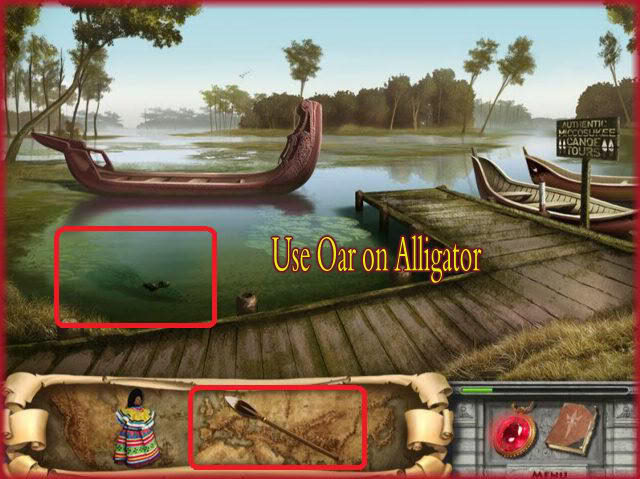
- Go to the left to the docks and search for pieces.
- Use the completed oar on the alligator in the water.
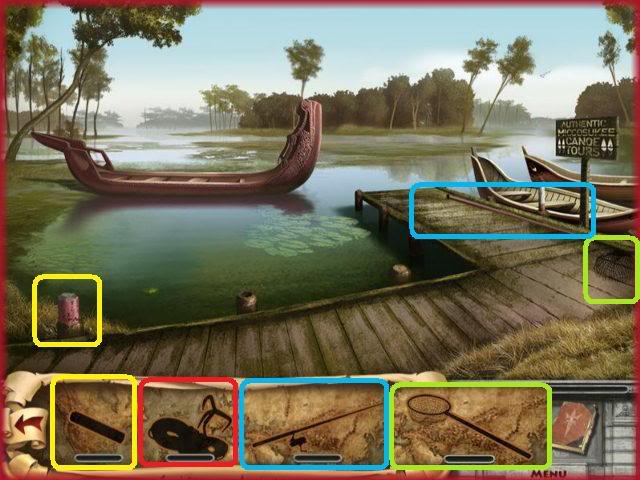
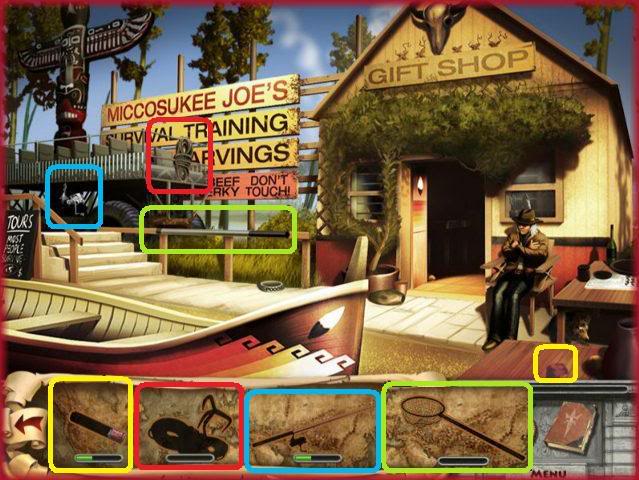
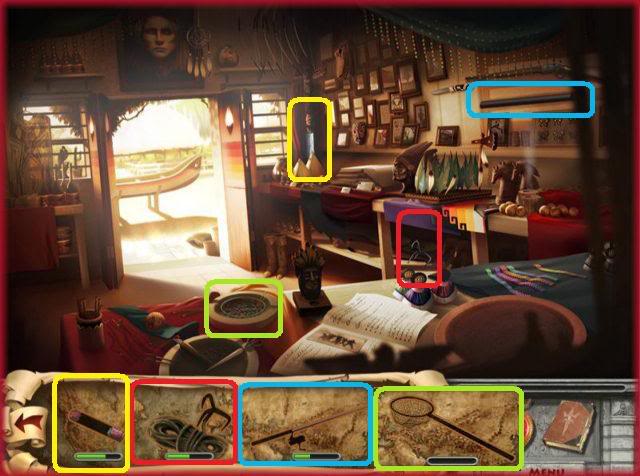
- New silhouettes of a fishing rod, a grappling hook, a fishing net and a tether post will appear in your inventory.
- The pieces will be at the storefront, the gift shop and the docks.
- Search each location for the pieces.
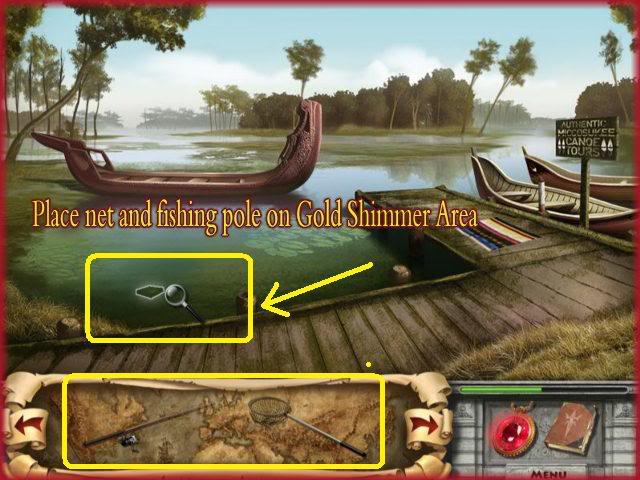
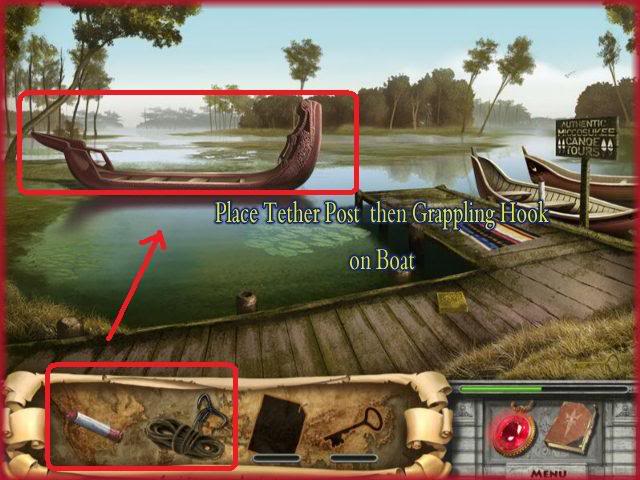
- Go to the docks.
- Use the fishing rod and then the fishing net on the gold shimmer in the water.
- Use the tether pole and then the grappling hook on the canoe.
- New silhouettes of a blue heron feather, a long spear, arrowheads, a gold key and a journal page will be in your inventory.
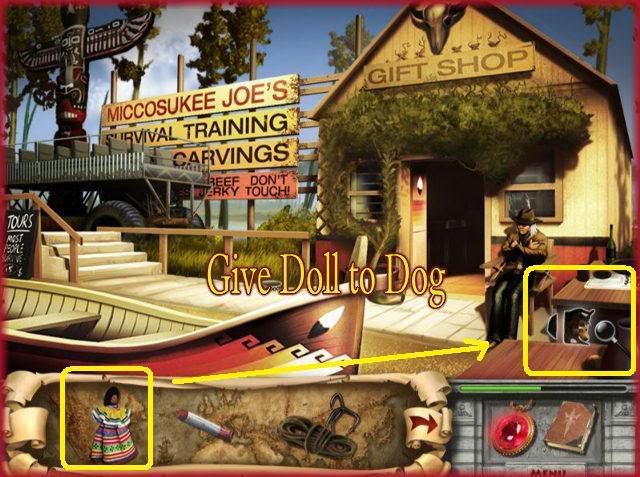
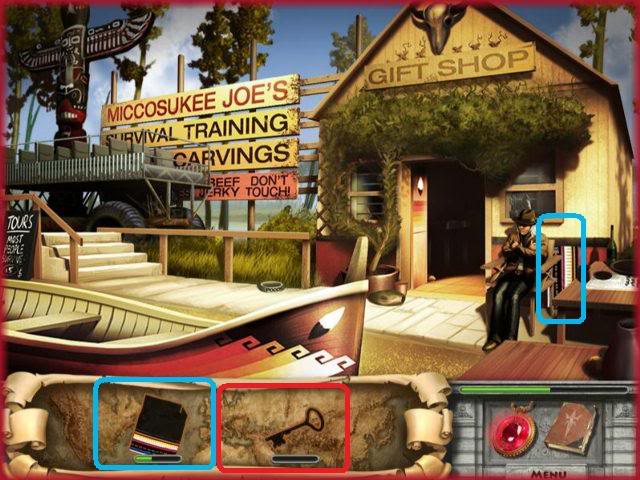
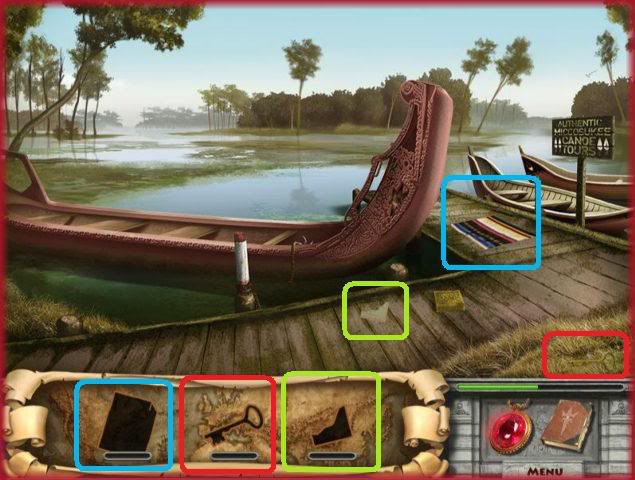
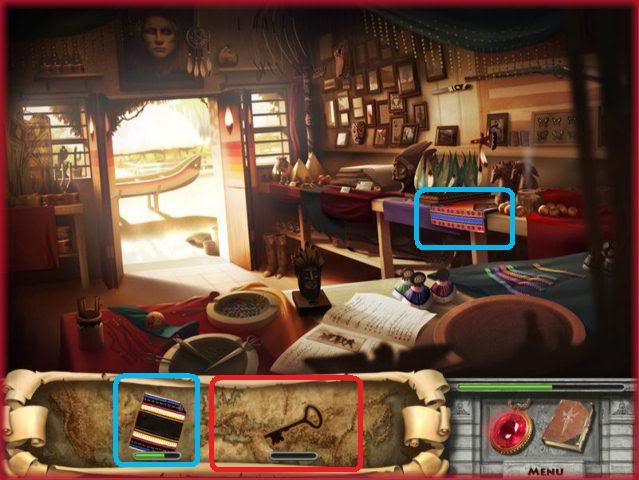
- Give the completed doll to the dog under the table on the lower right.
- Search for the pieces at the storefront, the gift shop and the docks.
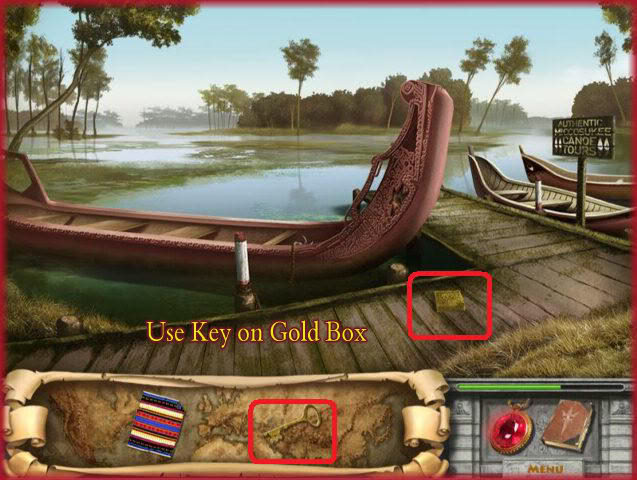
- Find and use the gold key in the gold box on the dock to reveal a silver box.
- A new silhouette of a silver key will appear in your inventory.
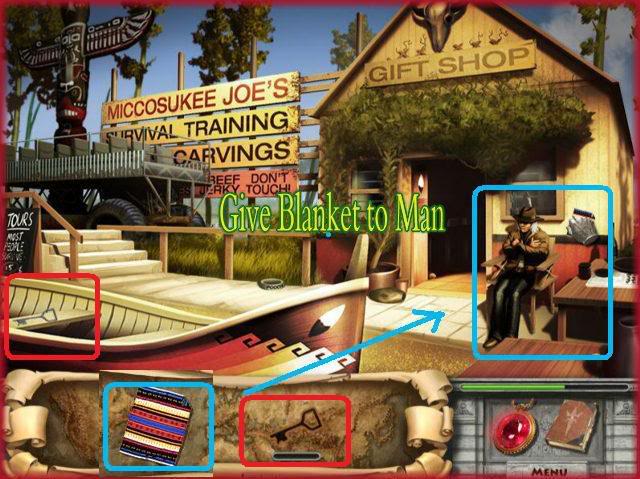
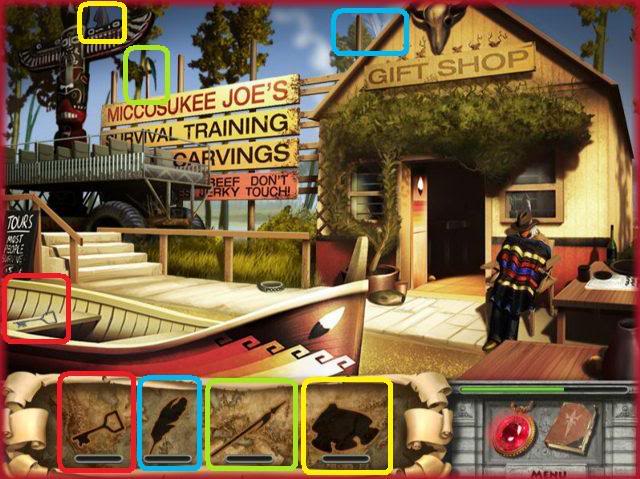
- Give the Indian blanket to the storekeeper.
- Go to the storefront and search for pieces.
- Go inside the gift shop and search for pieces.
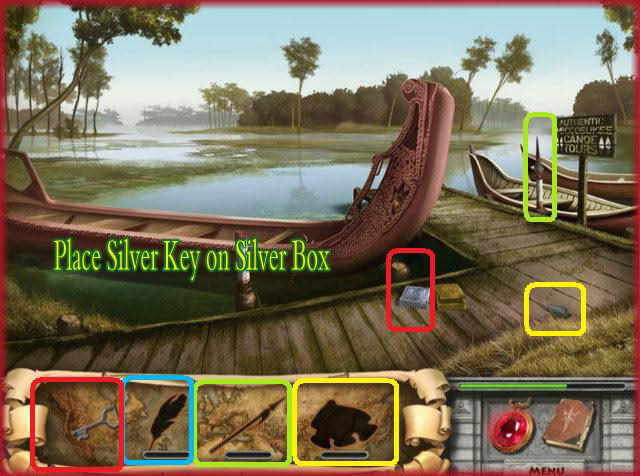
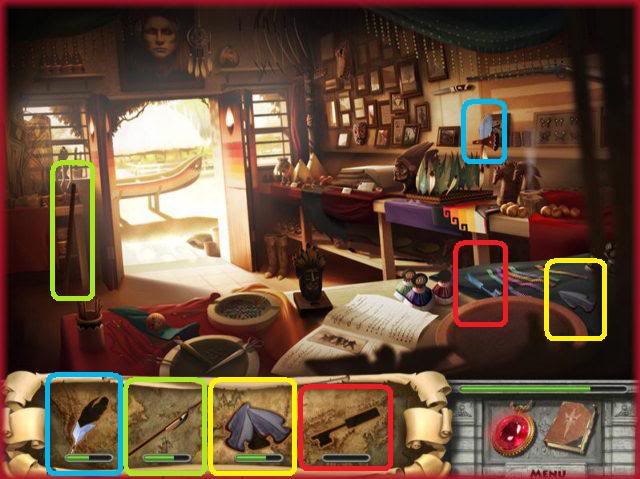
- Use the Silver Key on Silver Box.
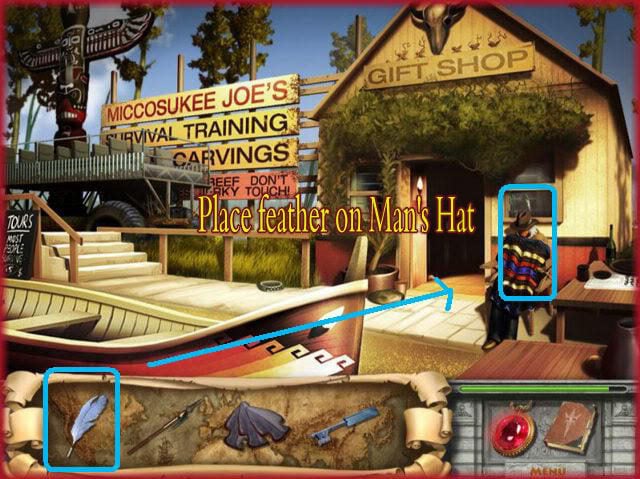
- Go to the storefront and put the blue heron feather on the hat of the storekeeper.
- Go inside gift shop search for items.
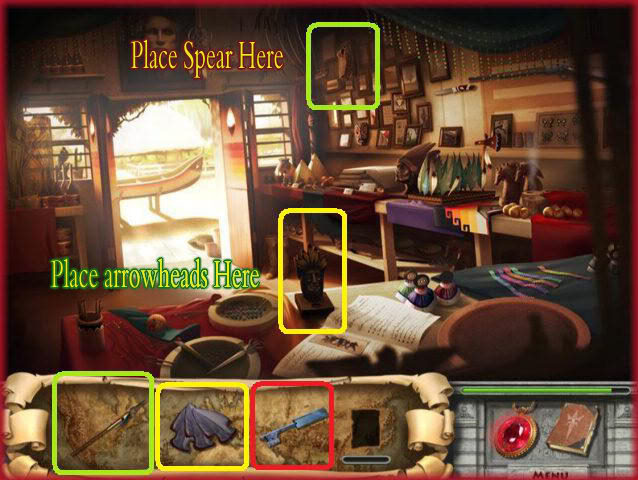
- Use the completed long spear in the alligator skull on the right wall near the ceiling.
- Use the arrowheads on the Indian head carving on the table in the lower center of the scene.
- A mini-game puzzle will open.
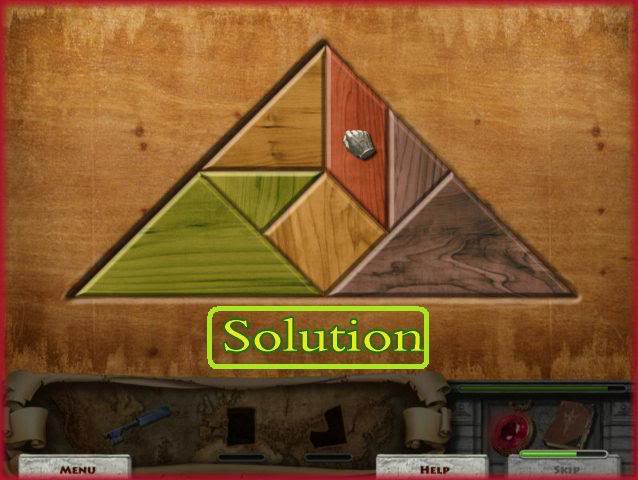
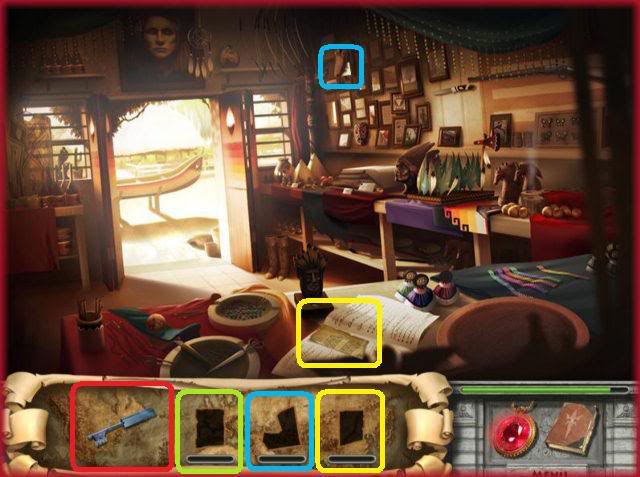
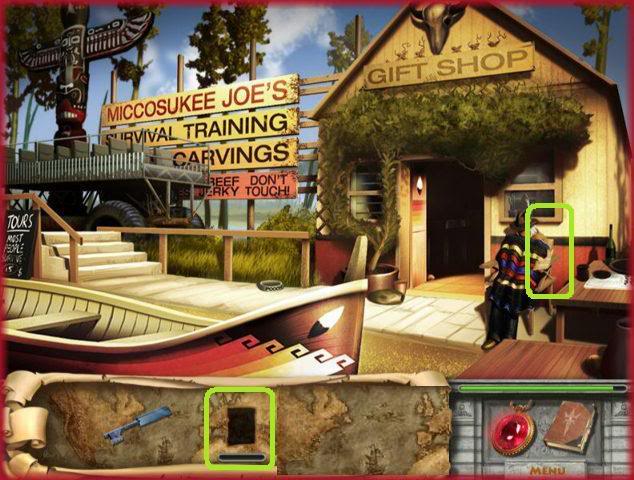
- Drag the pieces into the large triangle and arrange them to fill in the large triangle outline.
- A new silhouette of a journal page will be in your inventory.
- The piece will be in the gift shop.
- A new silhouette of a journal page will appear in your inventory.
- After finding the journal page, go to the dock.
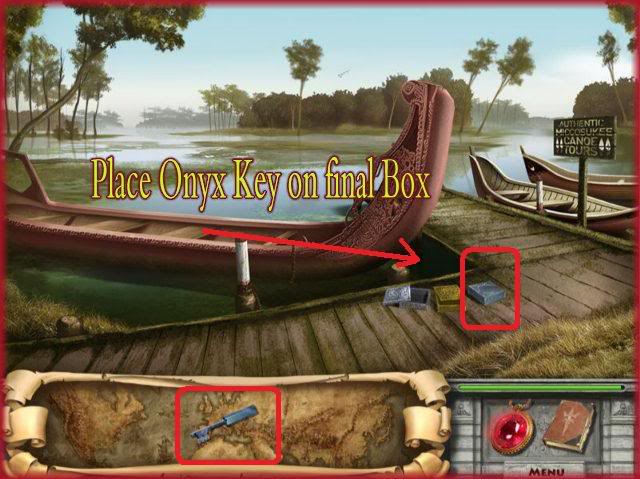
- Use the silver key on the silver box on the dock.
- A new silhouette of an onyx key will appear in your inventory and an onyx box will appear on the dock.
- Go to the gift shop and find the onyx key.
- Go back to the dock. And use the onyx key to open the onyx box.
- Another journal page silhouette will appear.
- Pick up the journal page and the journal will open to reveal a journal page in pieces.
Torn journal pieces puzzle 3 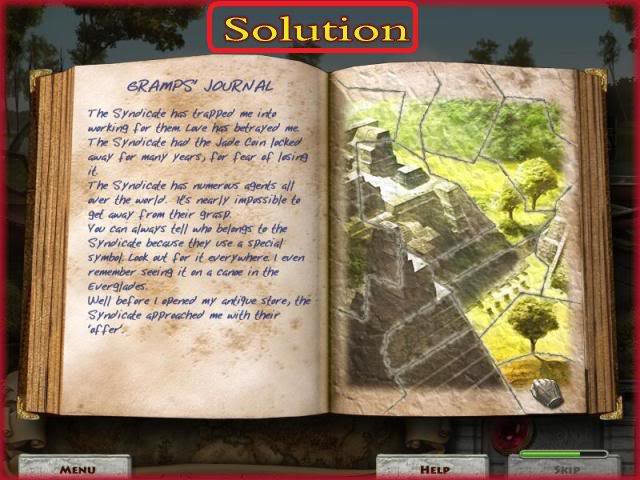
- Drag the pieces of the torn journal page to their proper place to restore the picture.
- Each piece will lock in place when it is in the proper place.
- Please look at the screen shot to see the completed picture.
- When the puzzle is complete you will travel to the location in the picture.
Location 4: Mayan Ruins – Guatemala 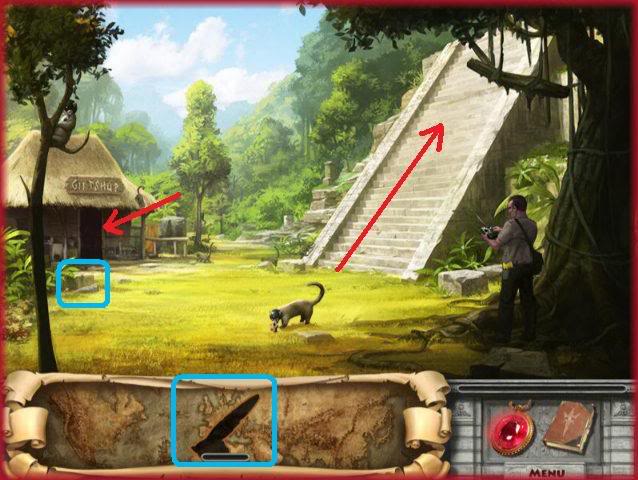
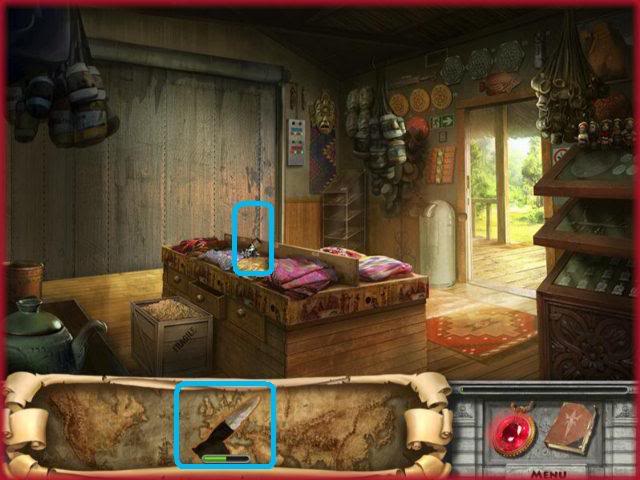
- A new silhouette of a Mayan knife will be in your inventory.
- The pieces will be here at the ruins and in the gift shop.
- After completing the knife go back outside and go to the upper ruins.
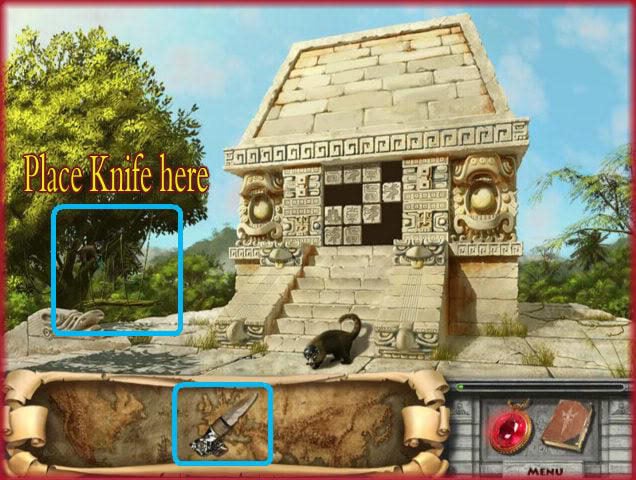
- Use the Mayan knife on the branch on the left middle of the scene and it will fall on the tour guide below.
- Go back down to the lower ruins.
- A new silhouette of a taser gun will be in your inventory.
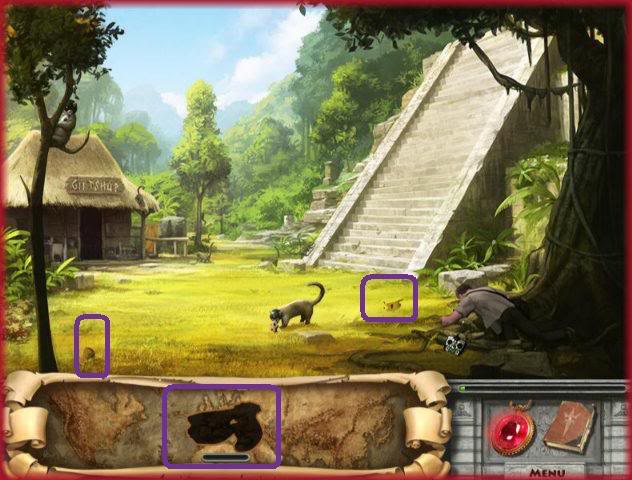
- The pieces will be here at the lower ruins.
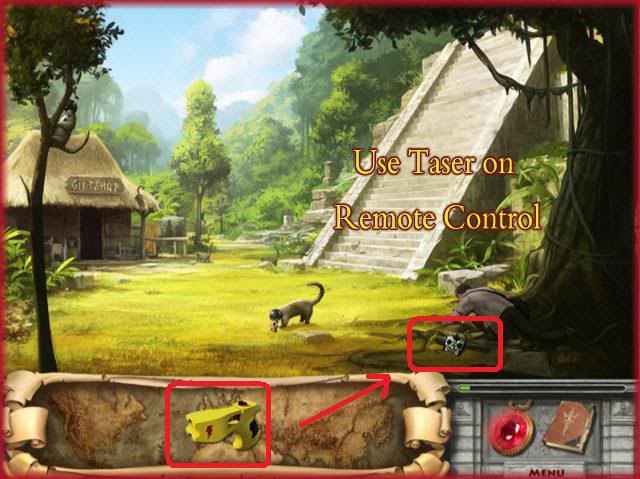
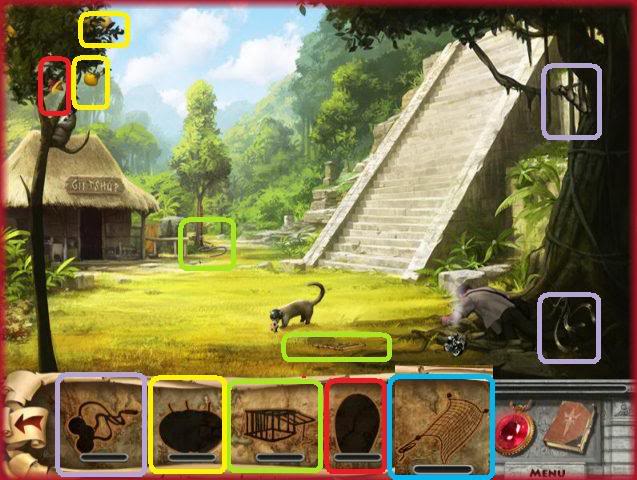
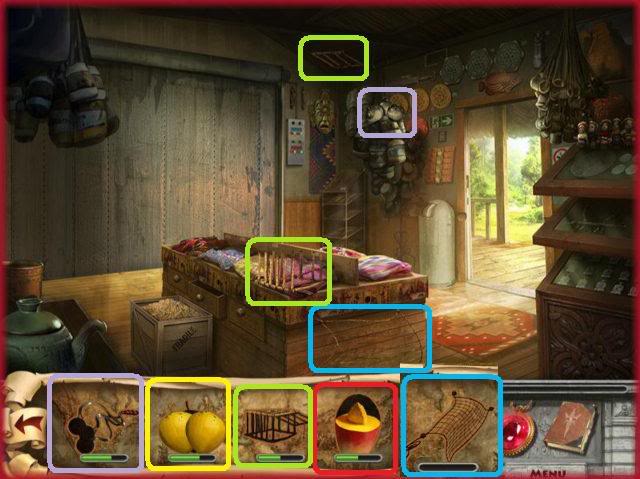
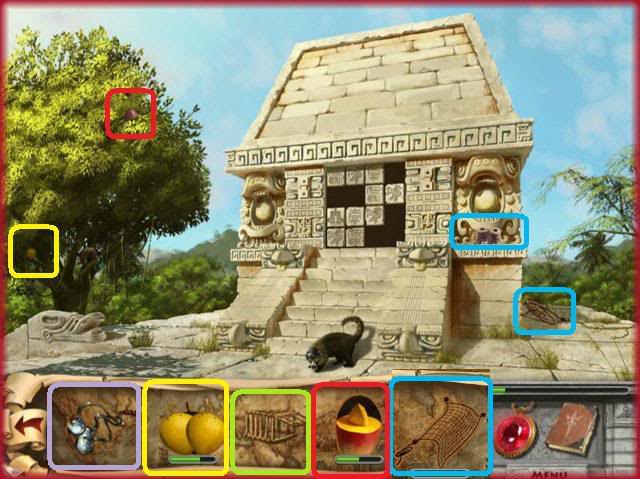
- Use the completed taser gun on the remote control to destroy it.
- New silhouettes of a bola, a net, egg fruit, a cage and a mango will be in your inventory.
- The pieces will be at the ruins, the gift shop and the upper ruins.
- When all pieces are found go back to the ruins and the upper ruins and use the items to catch the coati.
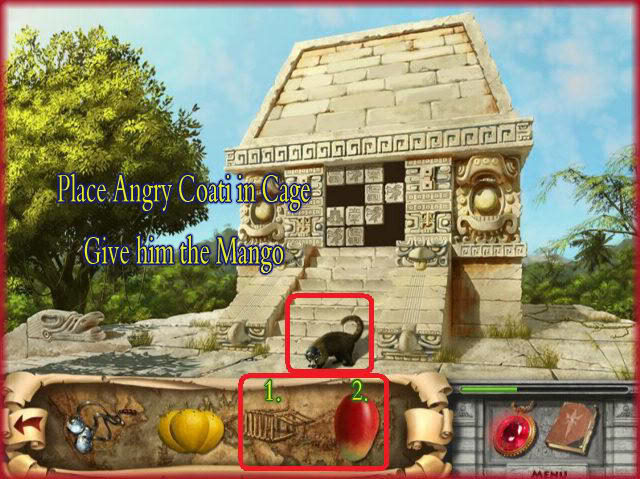
- Use the mango and the cage on the angry coati.
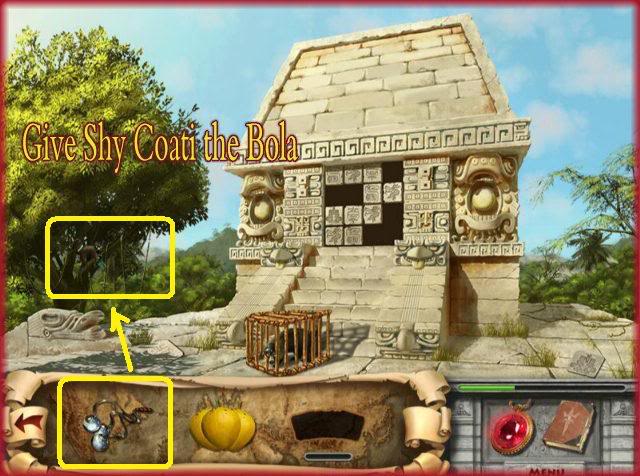
- Use the bola on the shy coati.
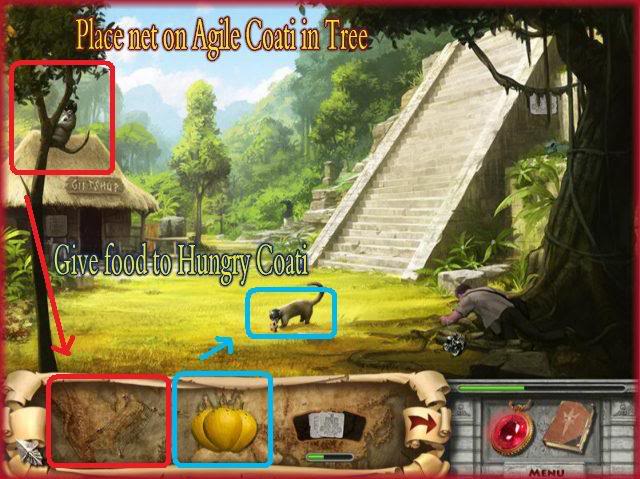
- Use the net on the agile coati.
- Use the egg fruit on the hungry coati
- New silhouettes of a clay figure, a Persian box, a haltern lamp and tiles will be in your inventory.
- The pieces will be at the ruins, the gift shop and the upper ruins.
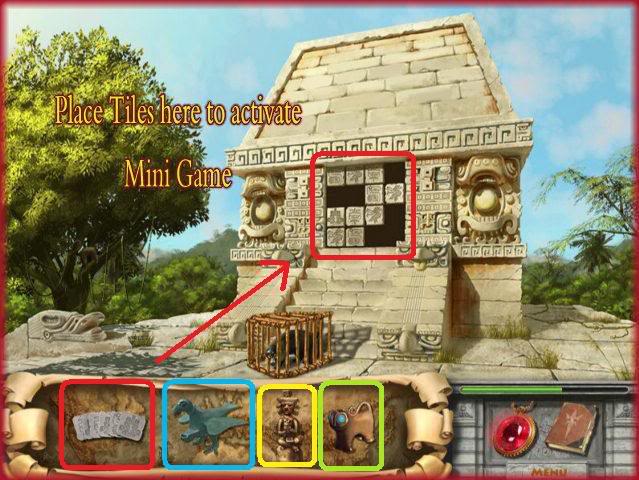
- When all the tiles are collected click the tiles on the puzzle in the middle of the upper ruins.
Tiles on the upper ruins puzzle 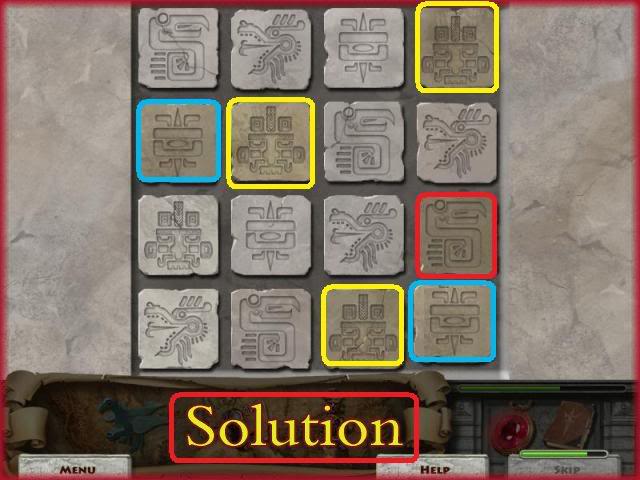
- This is a Sudoku type puzzle where none of the same tiles can be in the same row or column.
- Please look at the screen shot to see the completed puzzle.
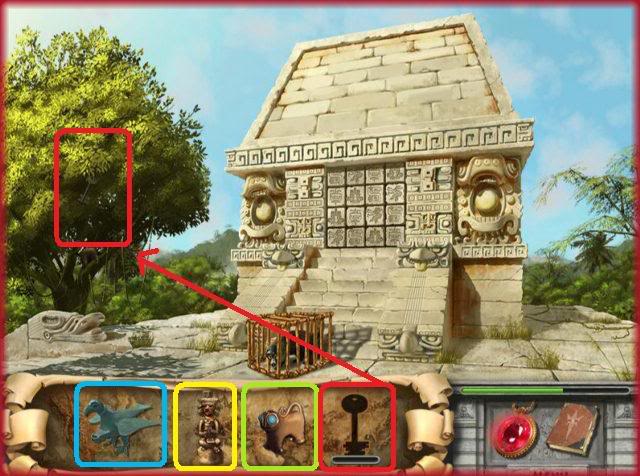
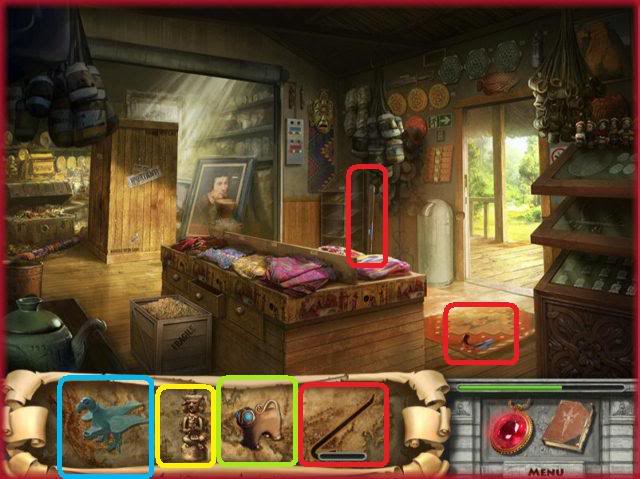
- When the puzzle is solved a key can be found in the center of the tree leaves on the left.
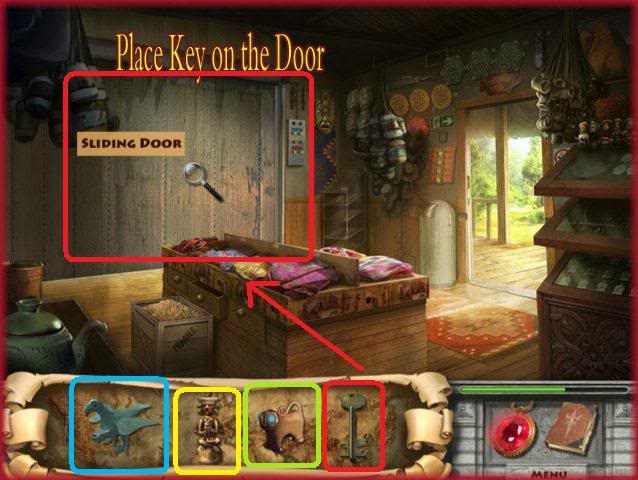
- Get the key and go back to the gift shop.
- Use the key on the sliding door in the gift shop to open a new area.
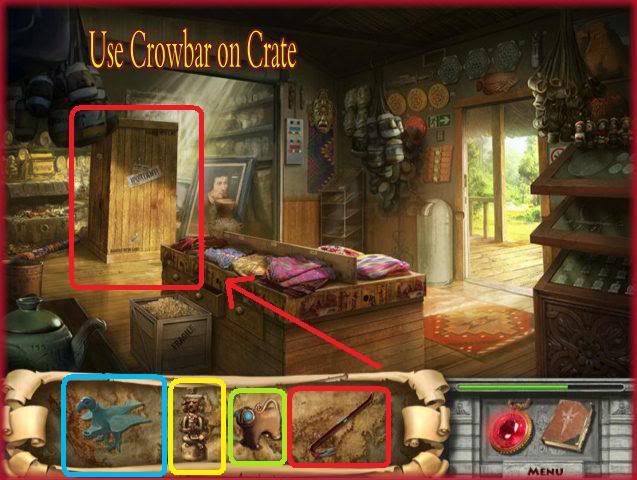
- Locate the crowbar and use the crowbar to open the wooden crate to reveal a large metal box.
- A new silhouette of a drill is in your inventory.
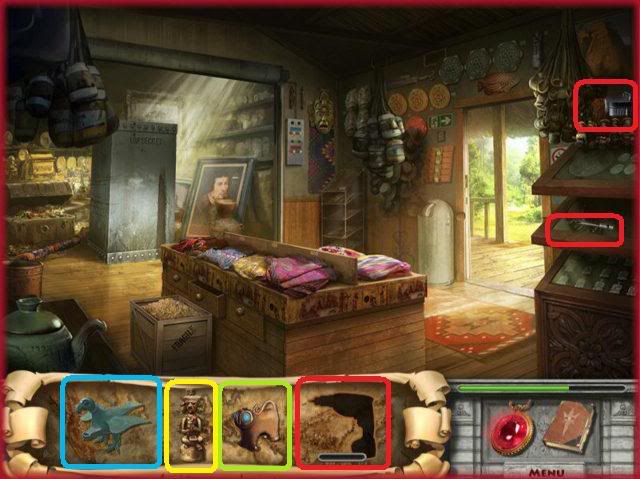
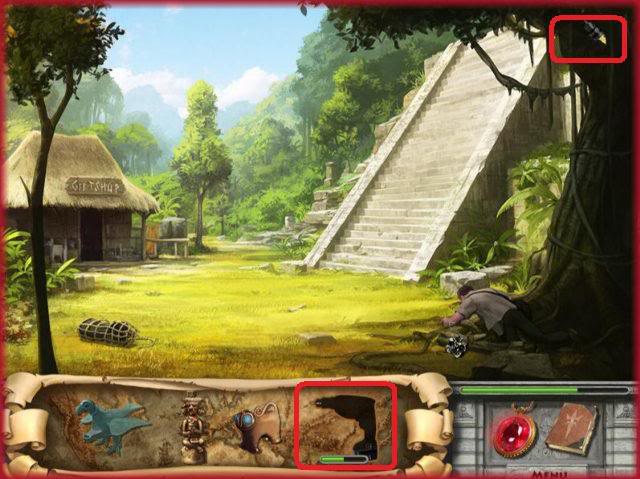
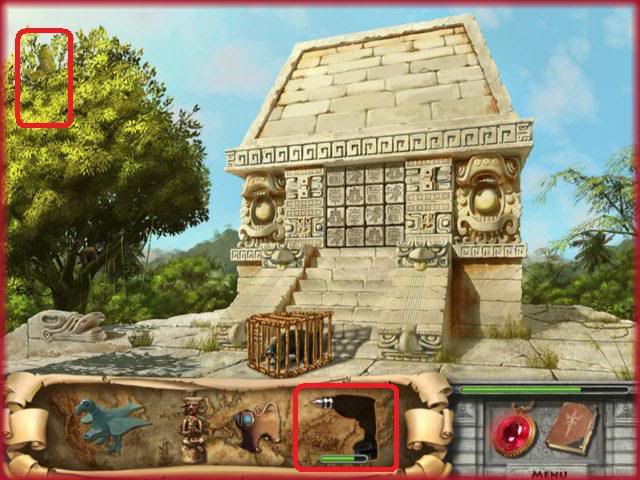
- The pieces will be at the ruins, the gift shop and the upper ruins.
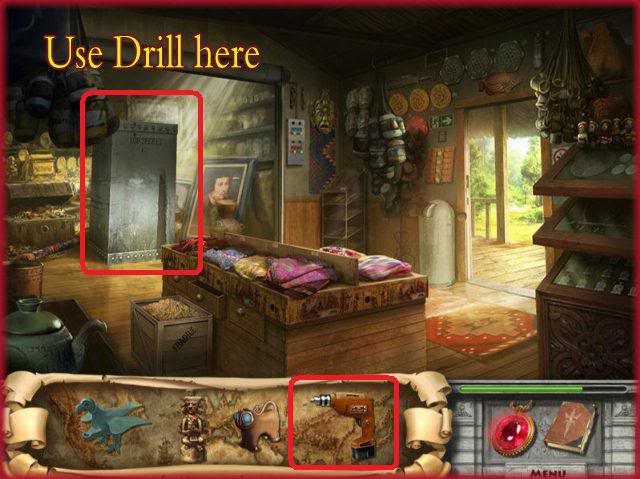
- Locate the pieces and use the drill on the large metal box to reveal a statue.
- New silhouettes of an iron helm and an iron sword are in your inventory.
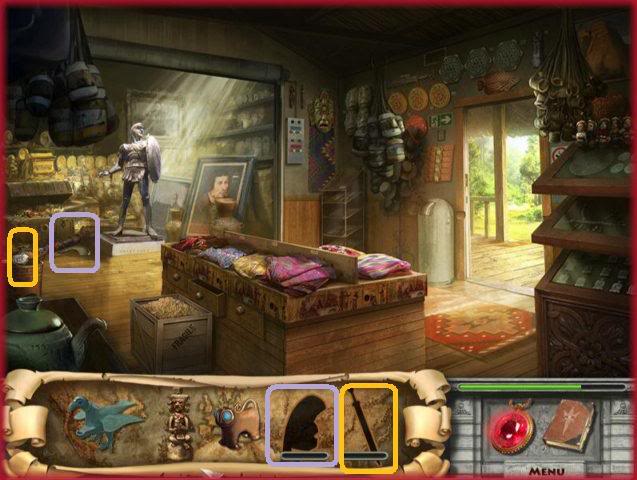
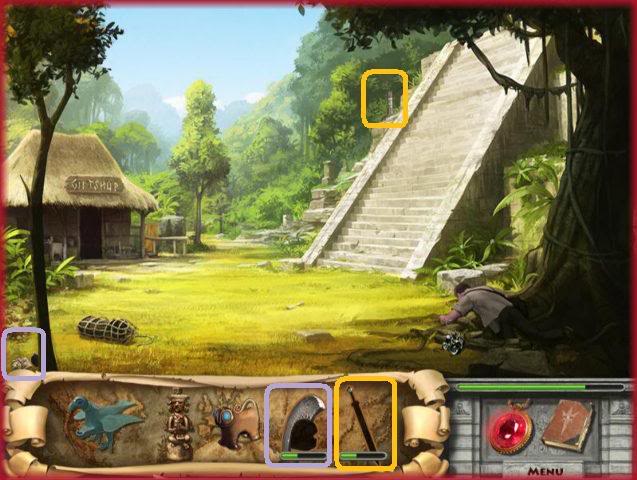
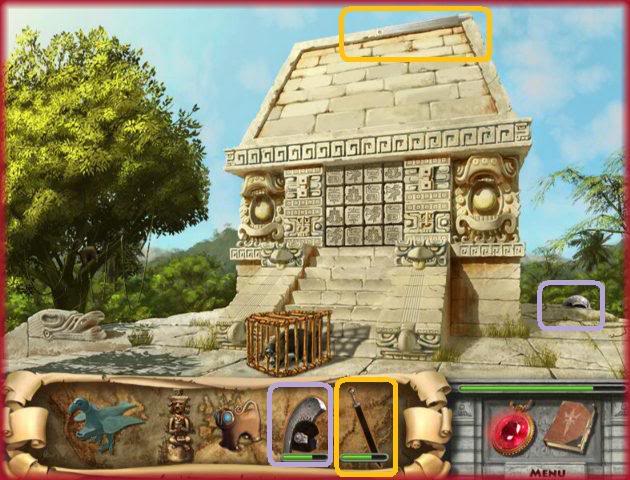
- The pieces will be at the ruins, the gift shop and the upper ruins.
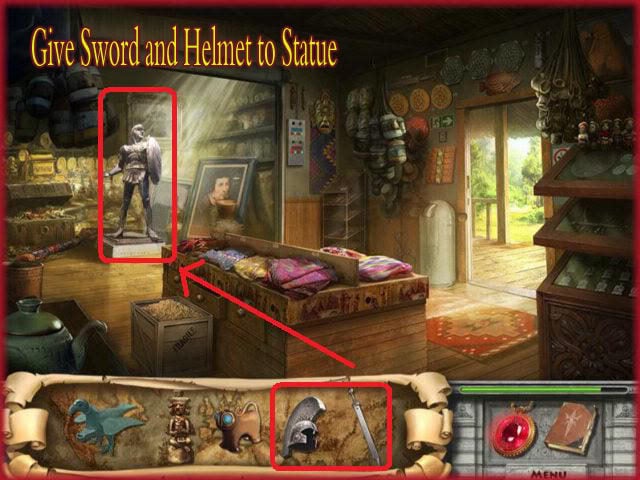
- Locate the pieces and put the helm and the sword on the statue.
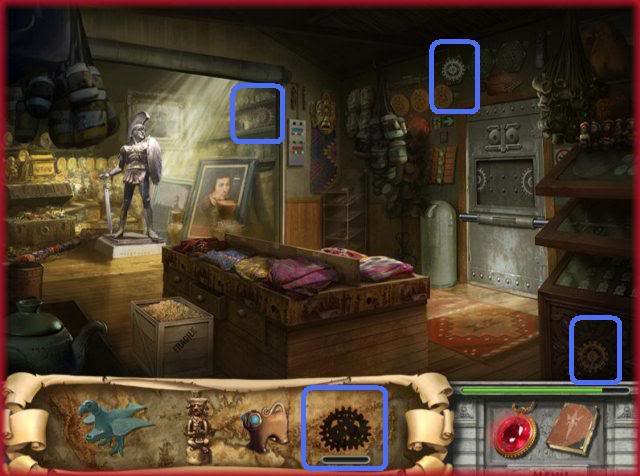
- The door will be locked and a new silhouette of gears will be in your inventory.
- Please look at the screen shot to see the locations of the pieces in the scene.
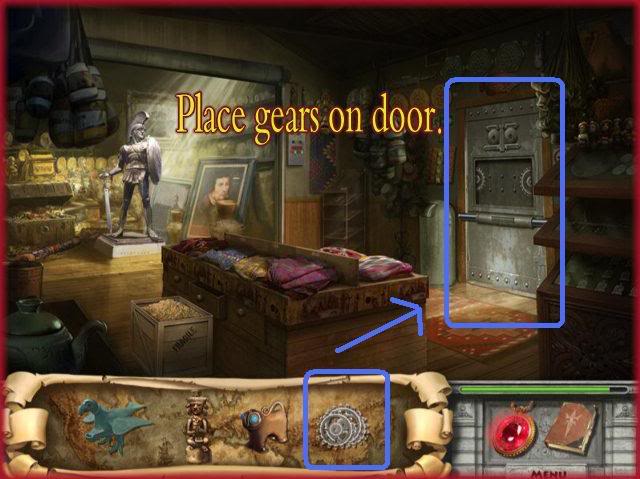
- When you have the three gears, put them on the door to open a puzzle.
Unlock the door puzzle 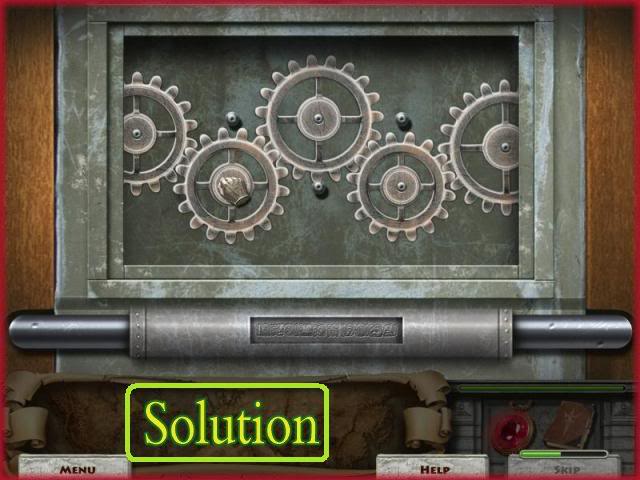
- This is a gears puzzle where you have to fit the gears in the proper place to open the door.
- Please look at the screen shot to see the completed puzzle.
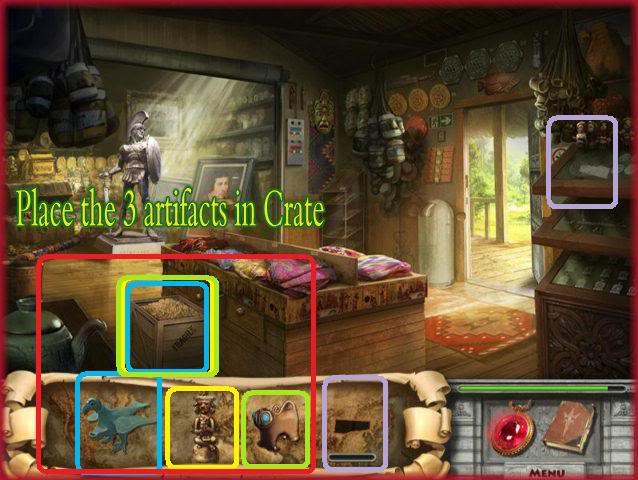
- Put the haltern lamp, a Persian box and the clay figure in the crate in the gift shop
- Locate the rest of the journal pieces.
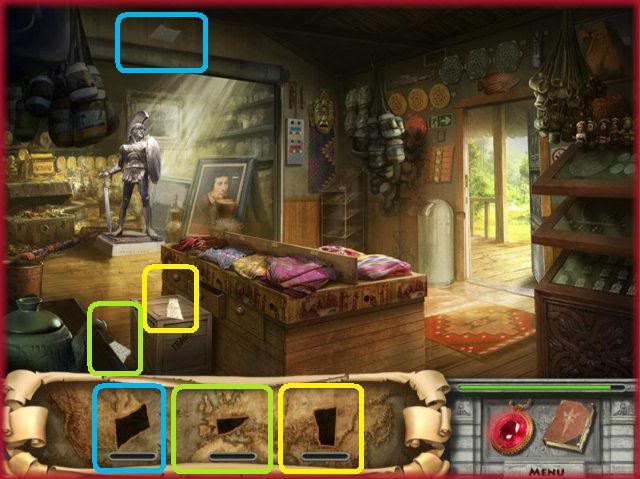
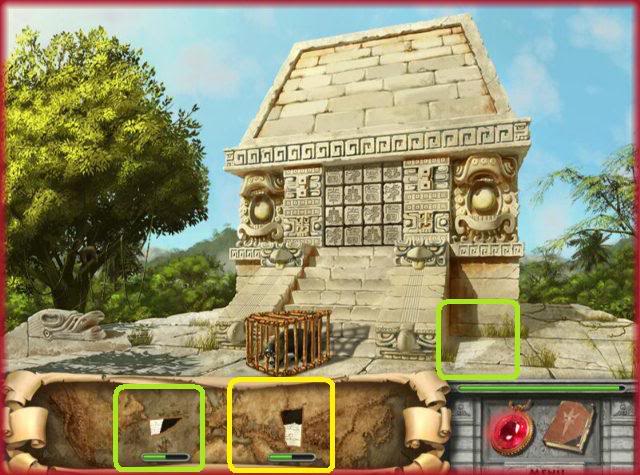
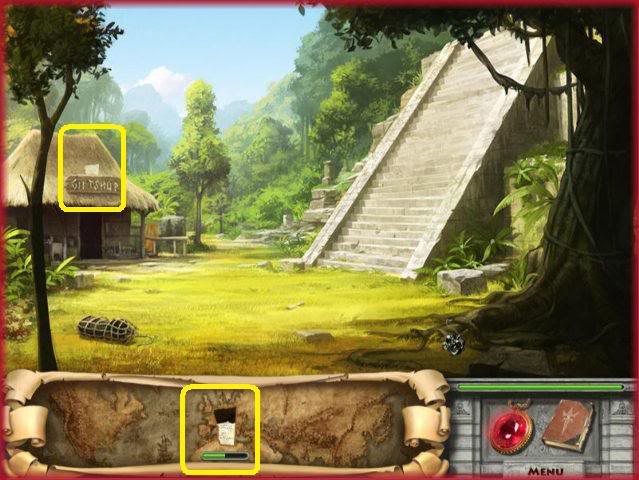 Torn Journal Pieces Puzzle 4
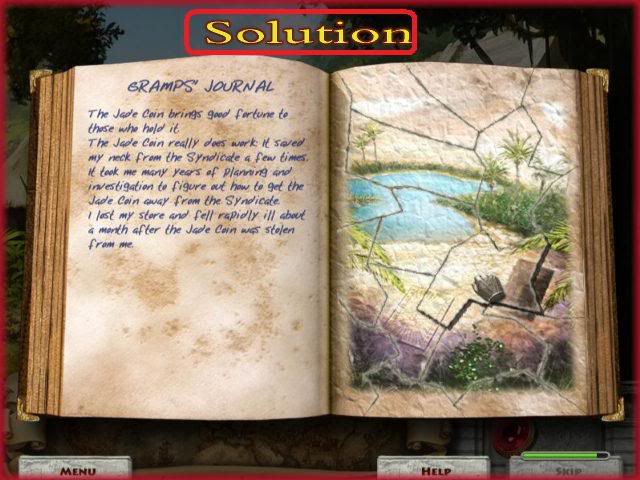
- Drag the pieces of the torn journal page to their proper place to restore the picture.
- Each piece will lock in place when it is in the proper place.
- Please look at the screen shot to see the completed picture.
- When the puzzle is complete you will travel to the location in the picture.
Location 5: Egypt 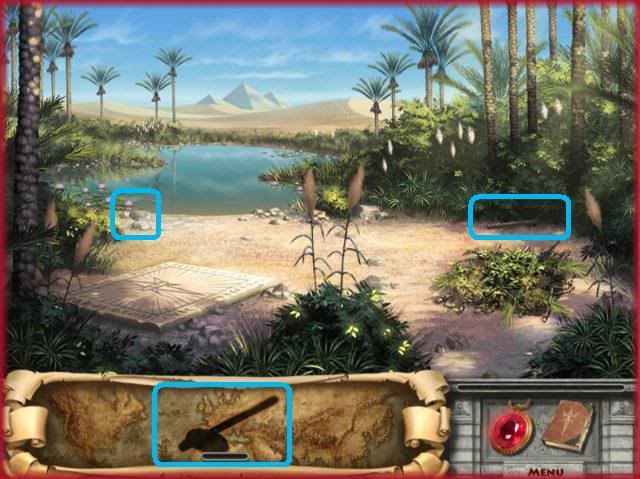
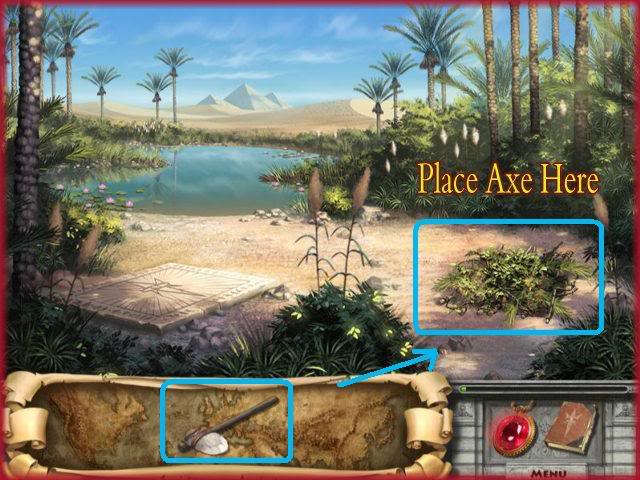
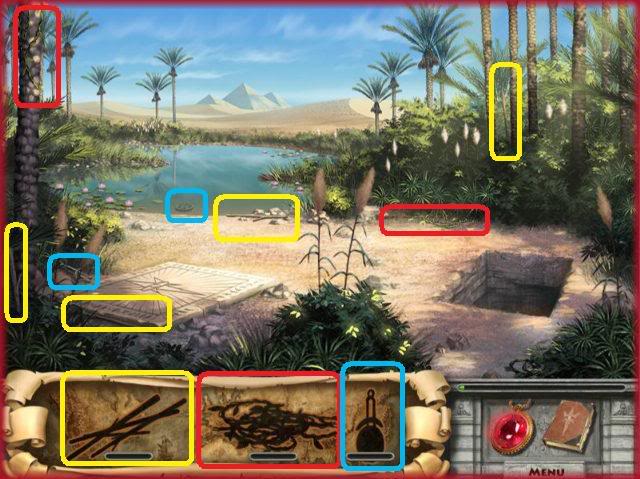
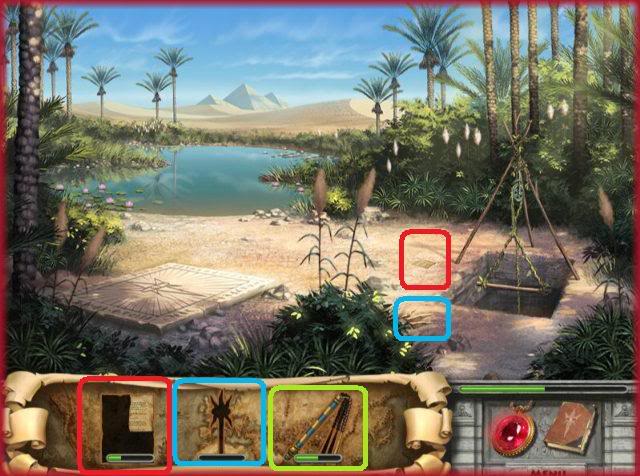
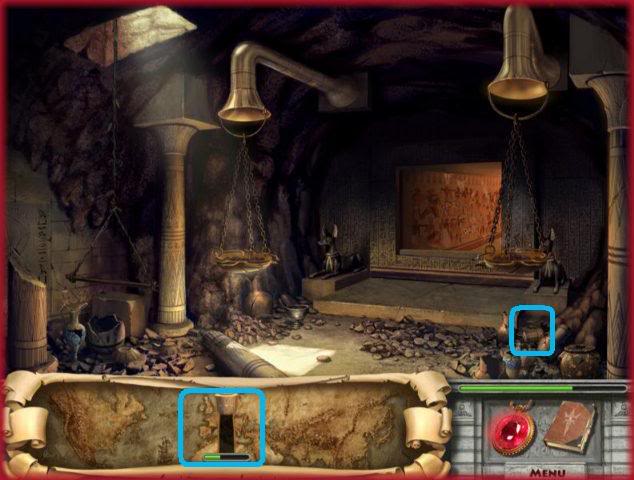
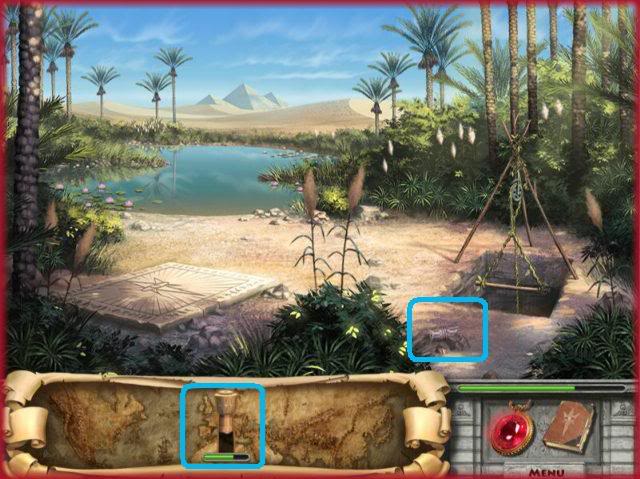
- Locate the 2 pieces of the axe.
- Place the axe on the area of brush shown in image and it will reveal an entrance to an underground pit.
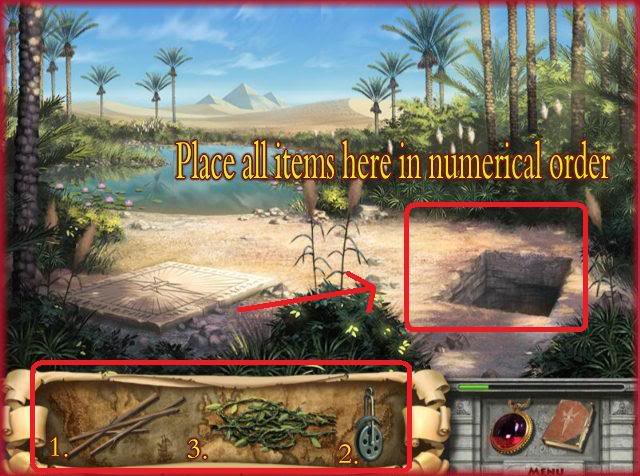
- You now have silhouetted items in your inventory of vines, pulley, and wooden branches or sticks.
- Find all of the items and then place them in the order shown on image. 1. Sticks, 2. Pulley, 3. Wooden Sticks.
- Now you can proceed down into the pit.
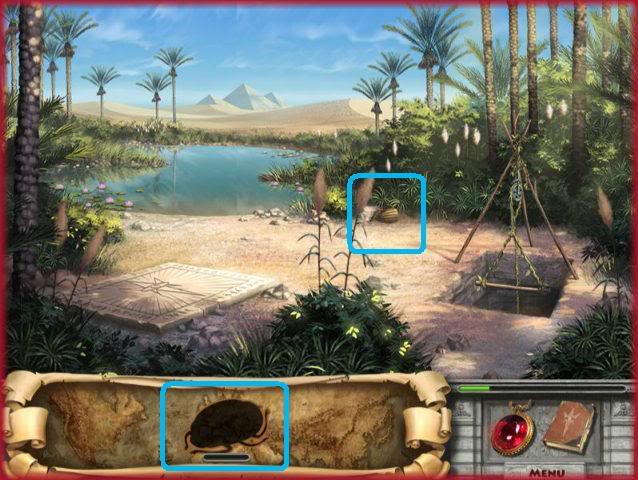
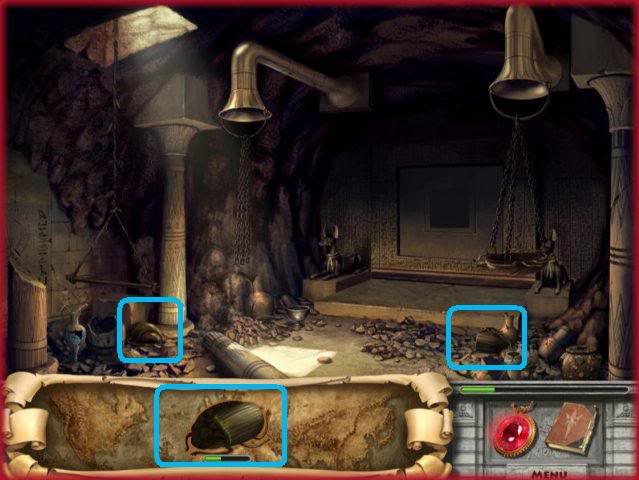
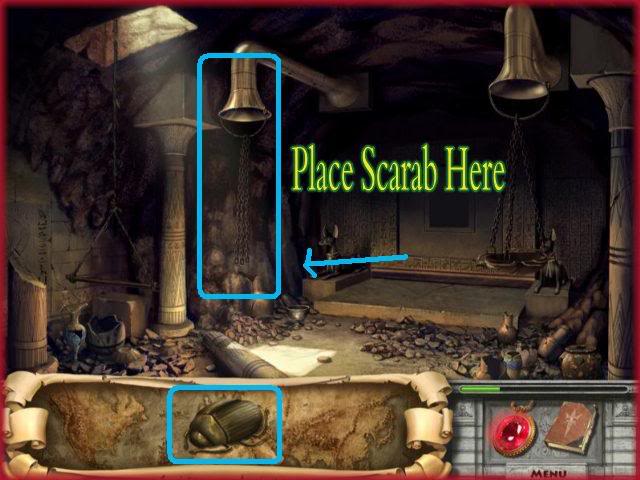
- Now you are asked to find a scarab which you will find one piece outside and two pieces inside the pit.
- Collect all pieces then place the scarab on the chained area as indicated in image.
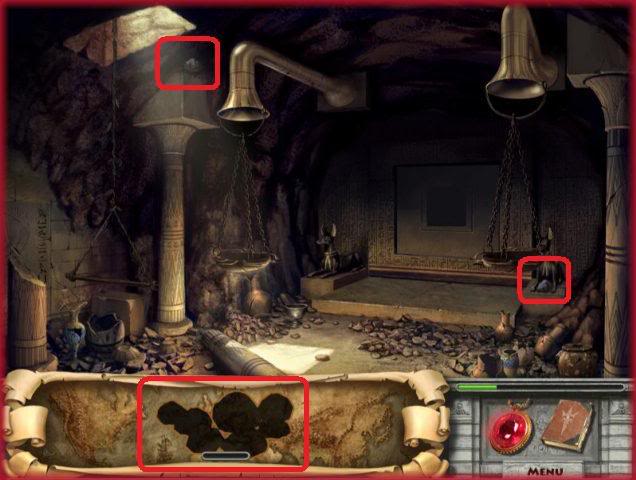
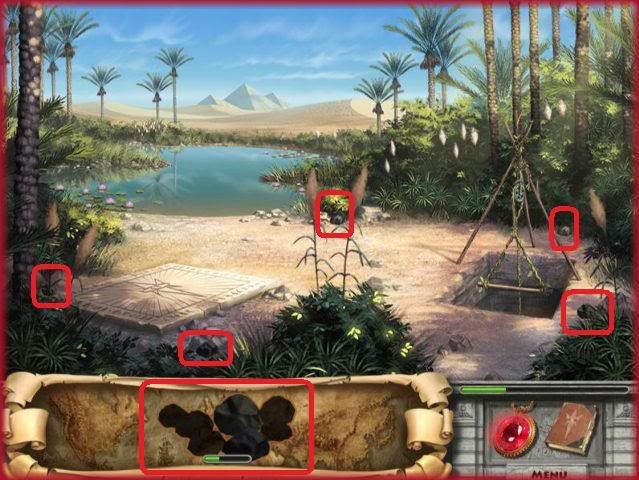
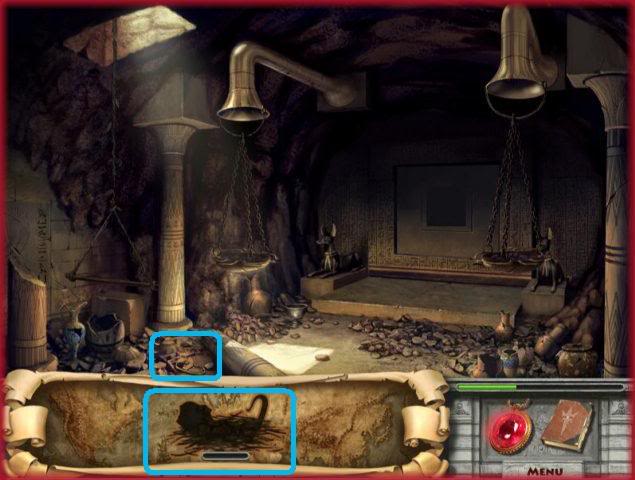
- Now you will be required to locate pieces of coal. Look in the areas above.
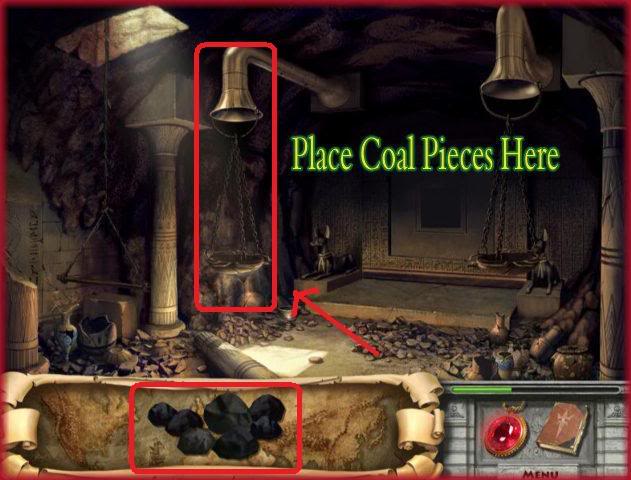
- Once all the coal is found, place it in the fire-pit shown above and new items will appear in inventory.
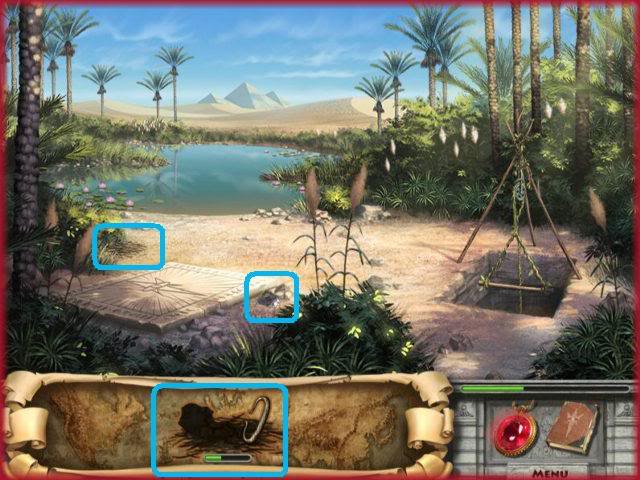
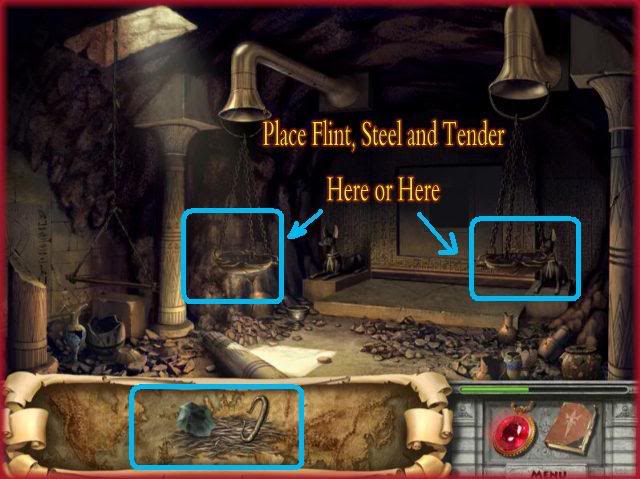
- Now you will be required to locate flint, tinder and steel.
- Search the areas above.
- Once you find all items place in either of the two fire-bowls shown and you will be required to find clay tiles.
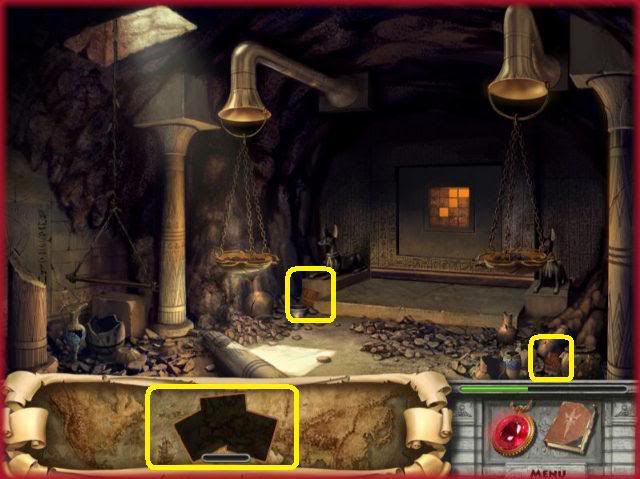
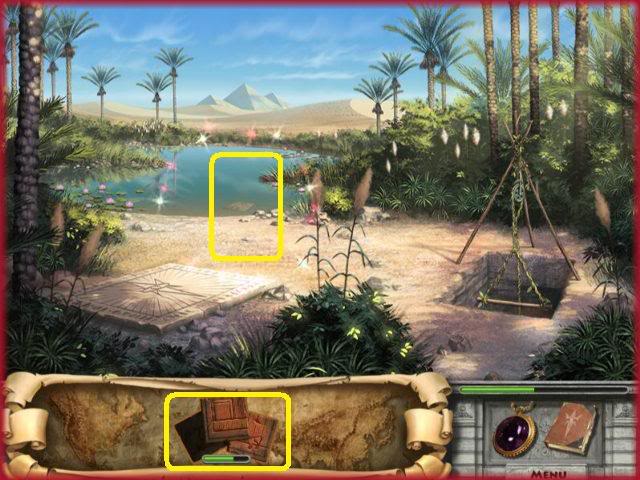
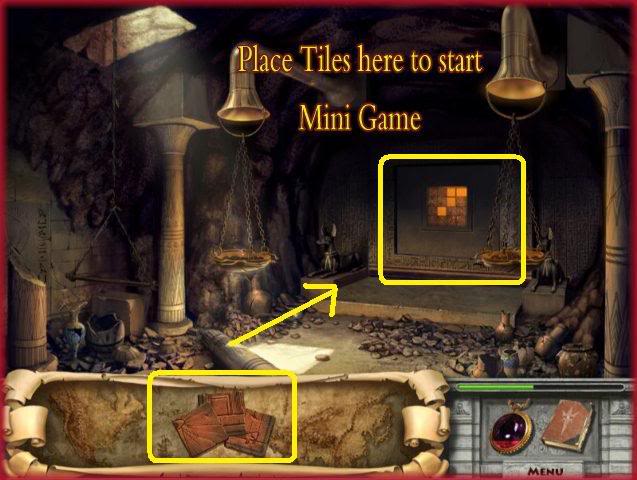
- Locate all the clay tile pieces in the two locations shown above.
- Once you find them all, place them against the back wall as shown and a mini game will begin.
Clay Tile Puzzle 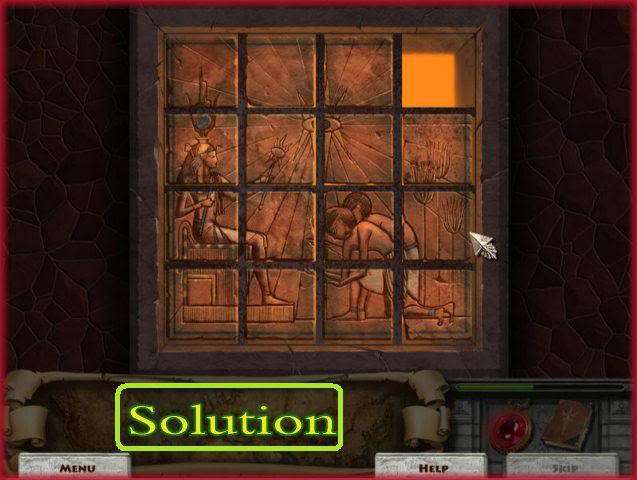
- The goal of this puzzle is to slide the puzzle pieces until you form the picture seen above.
- You must leave the upper right corner empty to solve the puzzle.
- Once you complete this puzzle you will be able to access a new location – The Tomb.
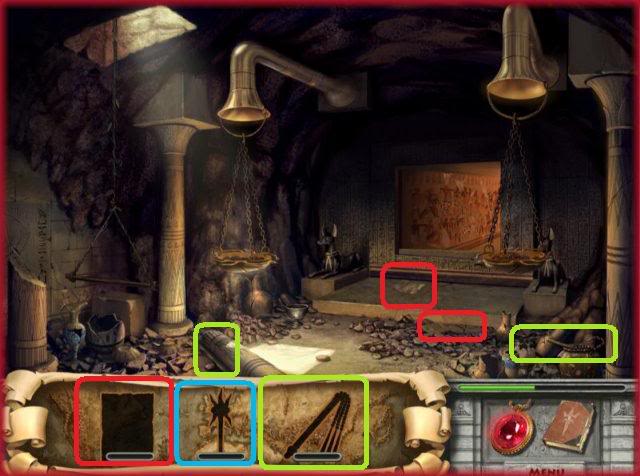
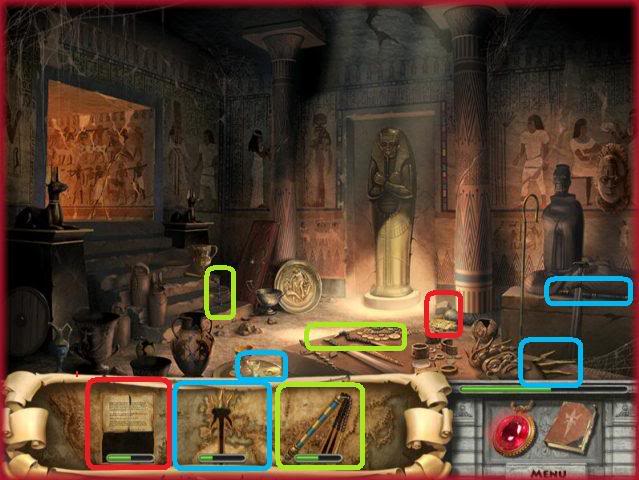
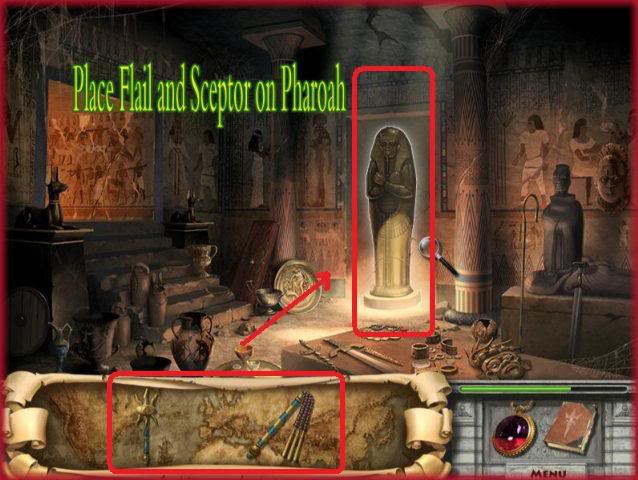
- Find the silhouetted Journal, Flail and Septor in the various locations above.
- Once you find all the items, place the flail and septor with the Pharaoh statue.
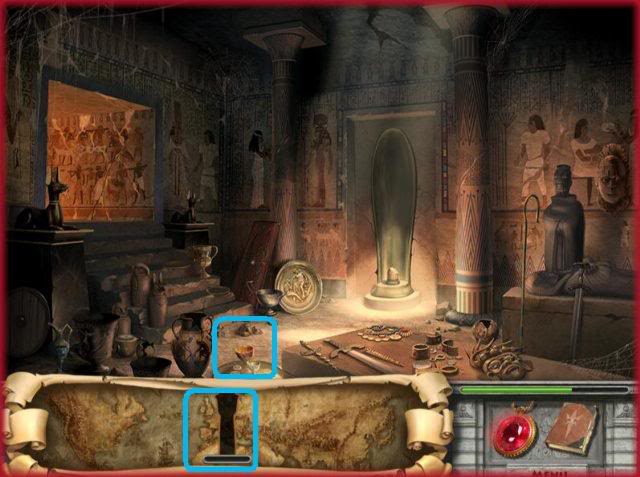
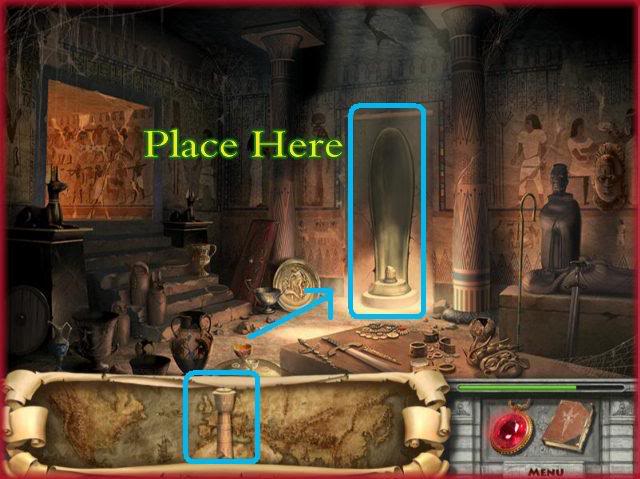
- Locate the pieces of the column shown in the images above.
- Once you find them all place the column on the Pharaoh.
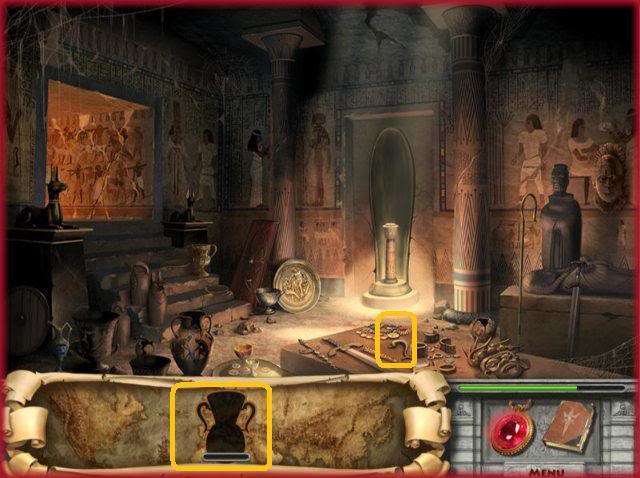
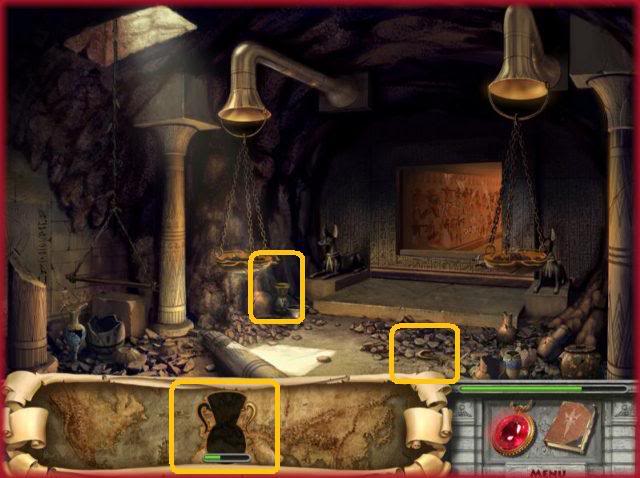
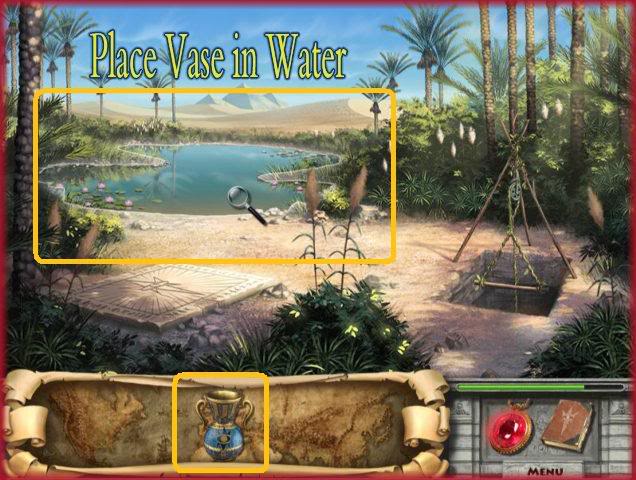
- Locate the pieces to the vase.
- Once it is completed, take the vase and place it in the water.
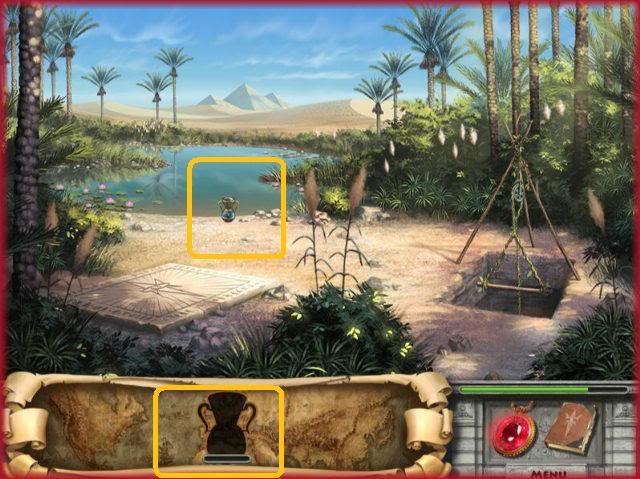
- Locate the vase filled with water and put back into inventory.
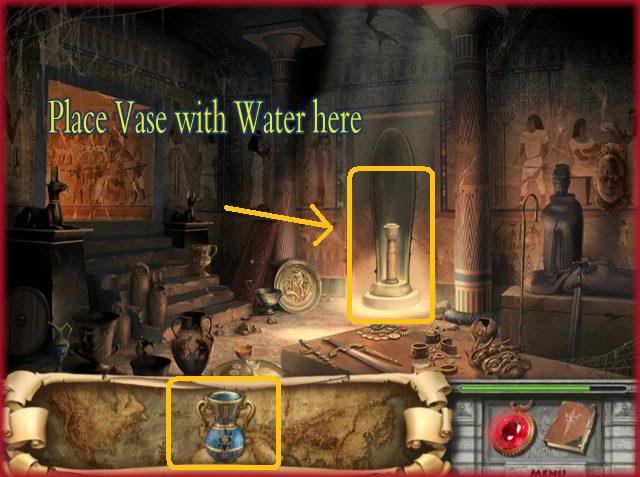
- Bring vase with water to Pharaoh location again and put in place on column trigger.
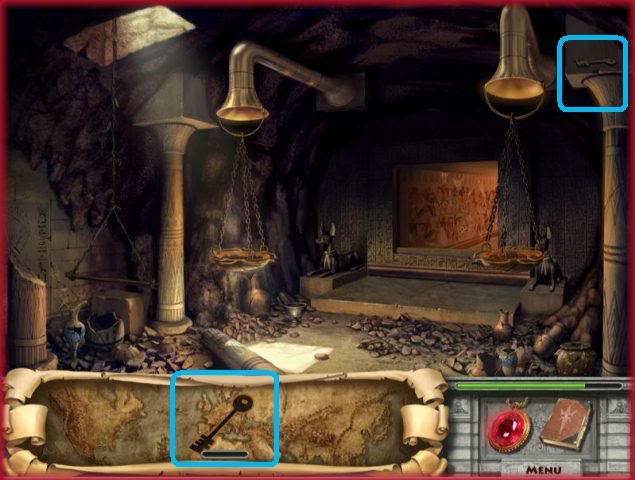
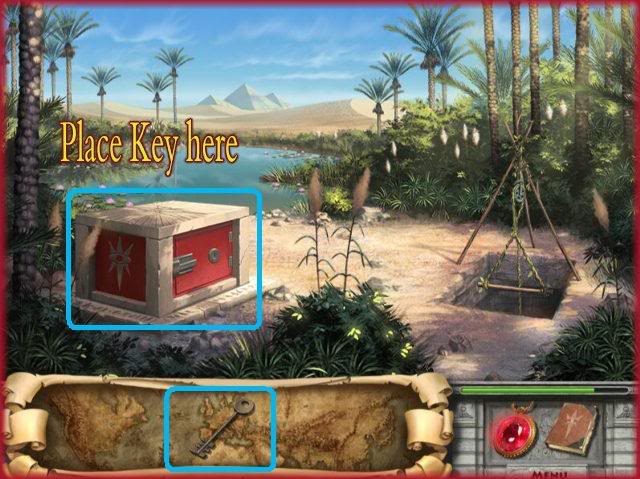
- Find the key then return to the Island.
- There is now a box that has emerged. Place the key on the box.
- Now you will be required to find coins.
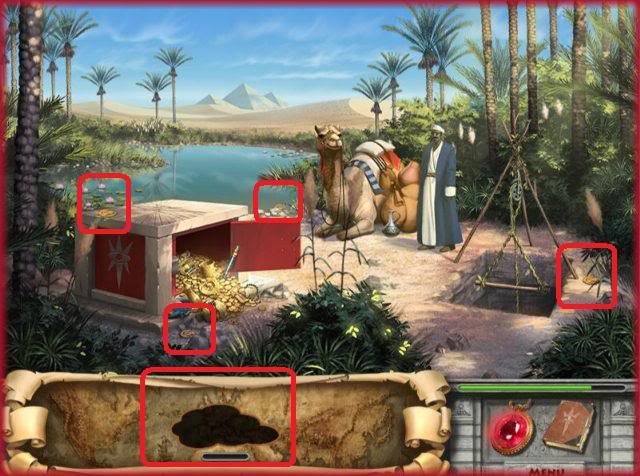
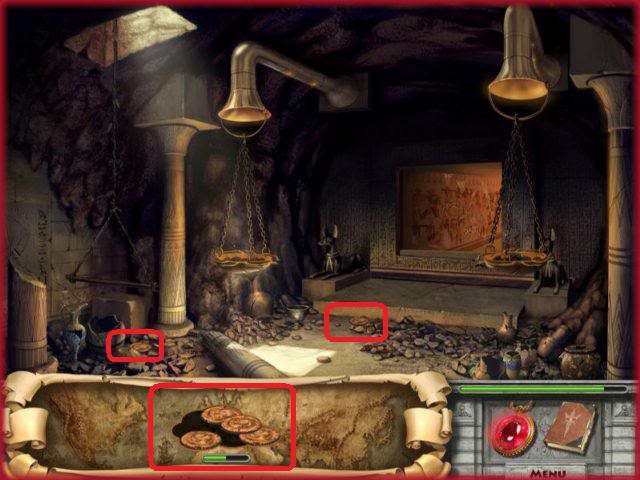
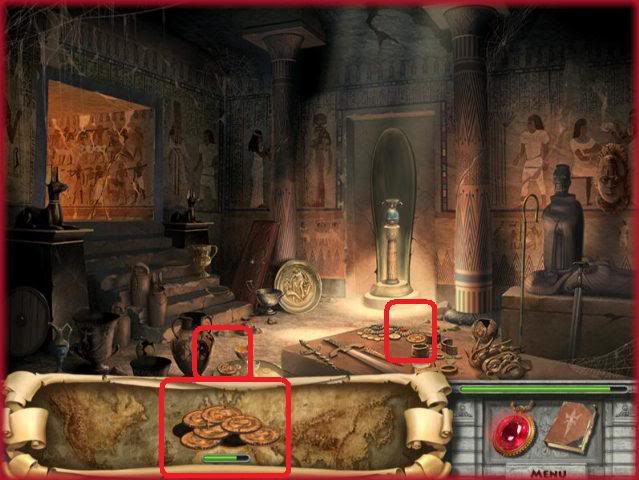
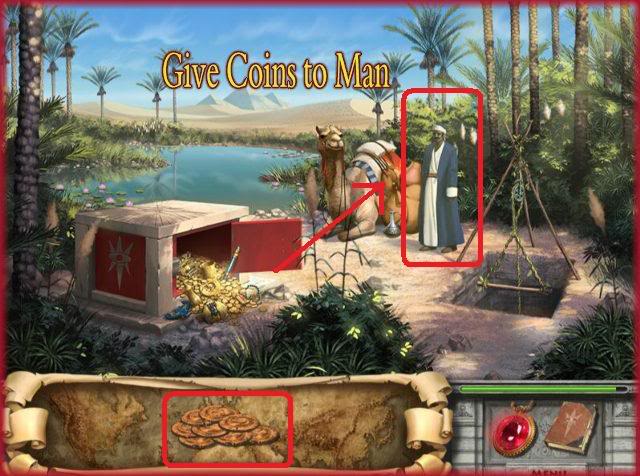
- Find all of the rare coins in the locations above.
- Once you find them all, give them to the man standing on the Island.
- Now you will be required to find journal pages.
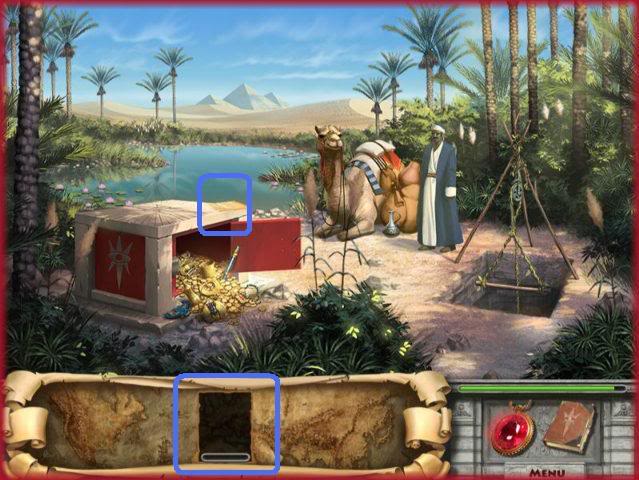
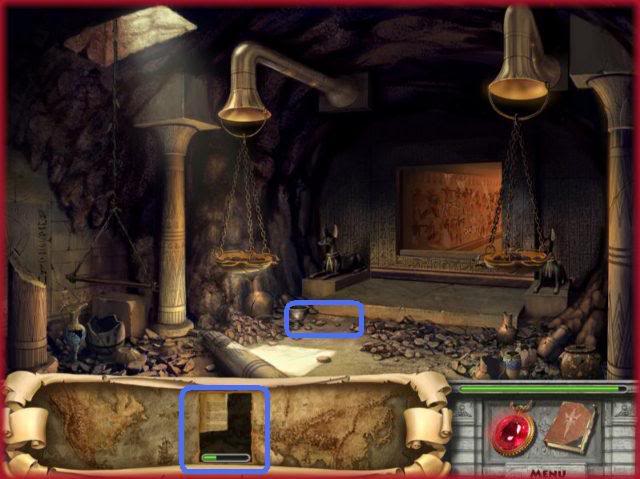
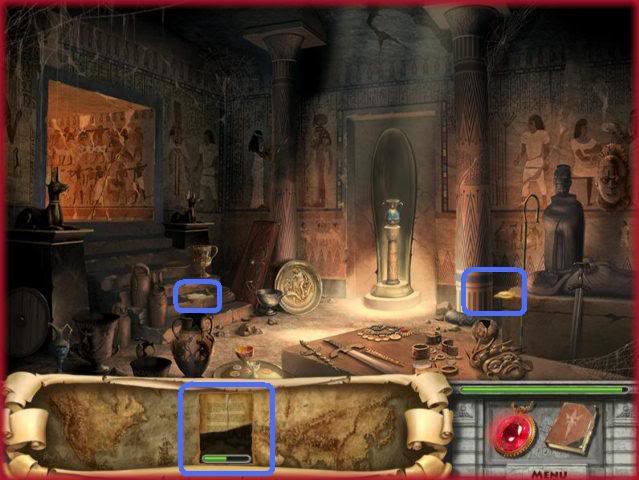
- Find all of the journal pages at locations above and complete the journal puzzle.
Torn Journal Pieces Puzzle 5 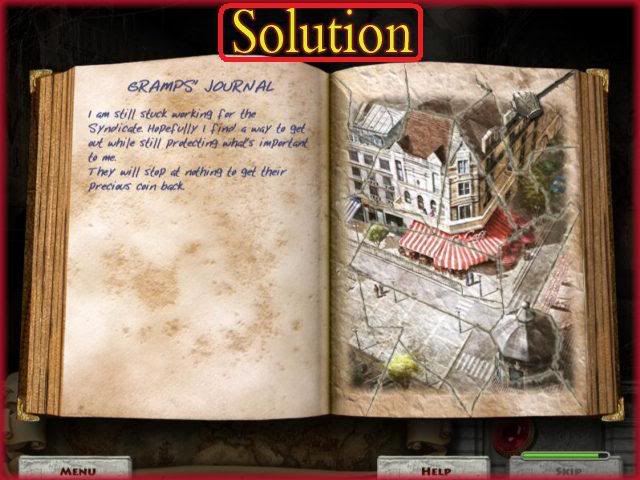
- Drag the pieces of the torn journal page to their proper place to restore the picture.
- Each piece will lock in place when it is in the proper place.
- Please look at the screen shot to see the completed picture.
- When the puzzle is complete you will travel to the location in the picture.
Location 6: Paris, France. 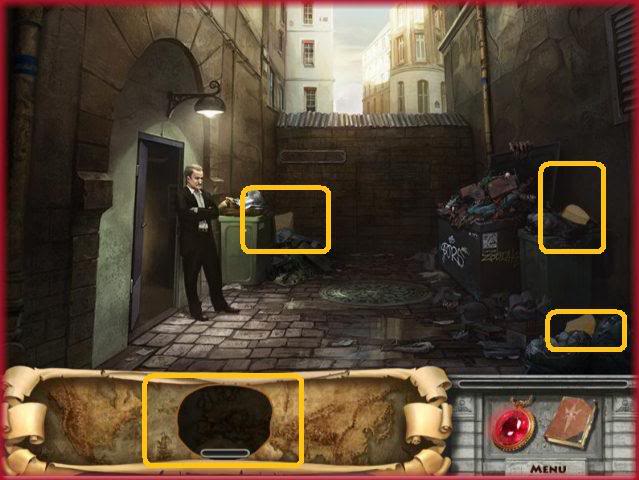
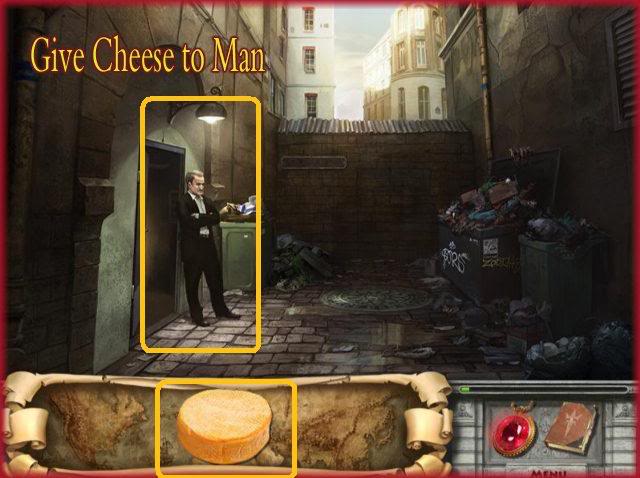
- Find all the cheese pieces in the image.
- Give them to the man and he will leave the area.
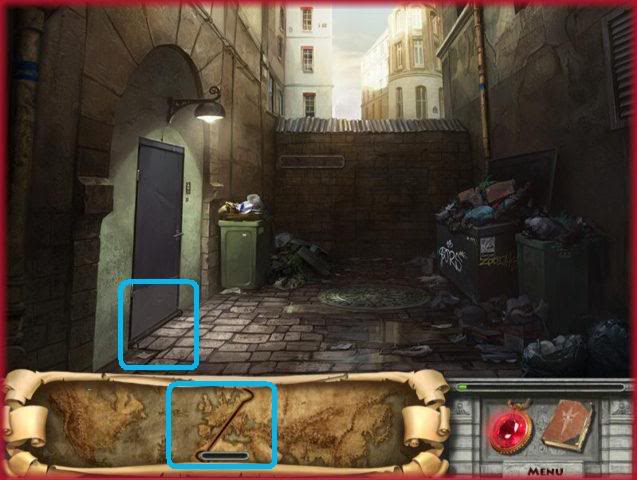
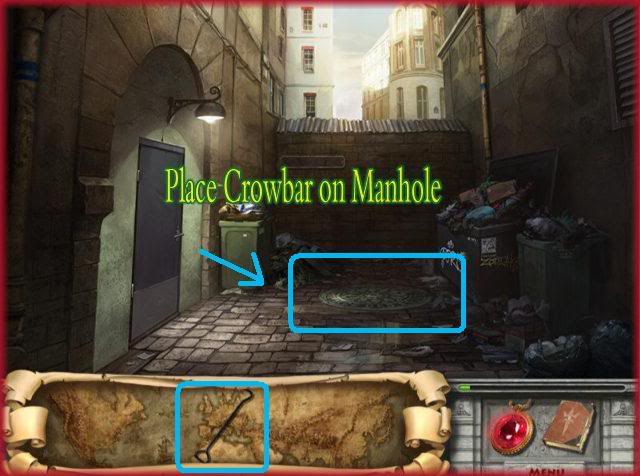
- Locate the crowbar.
- Use the Crowbar on the manhole.
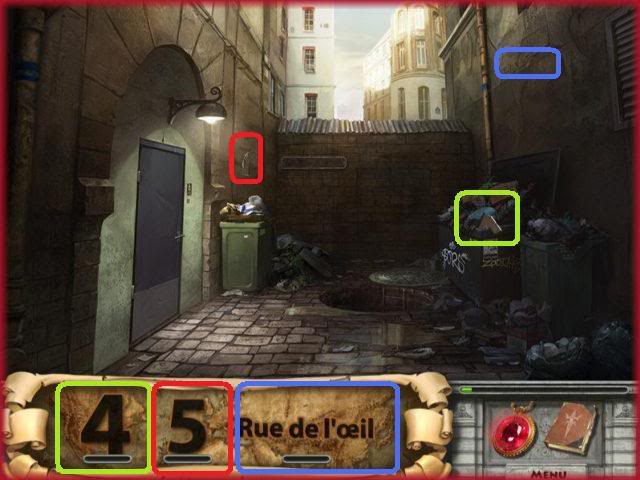
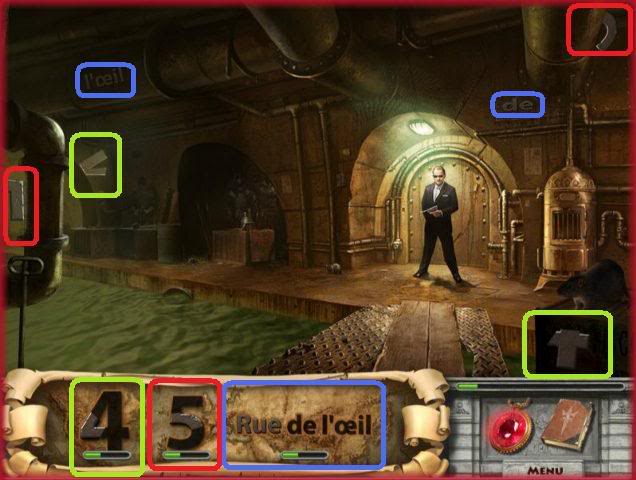
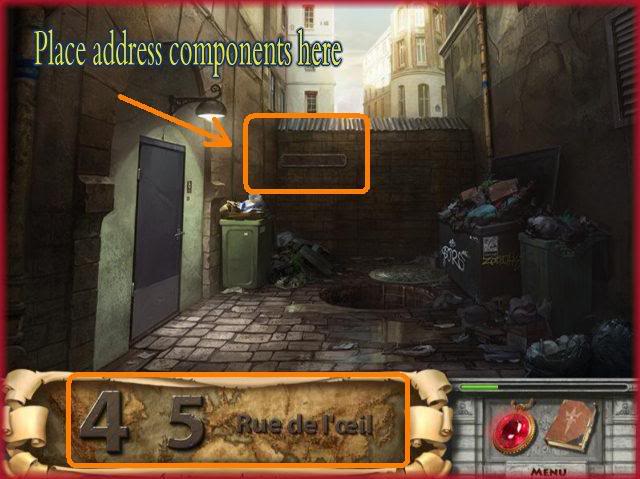
- Locate all of the fragments of the address.
- Once you find them all, place them in the area circled above.
- Now you will find a lighter and pieces to a heater.
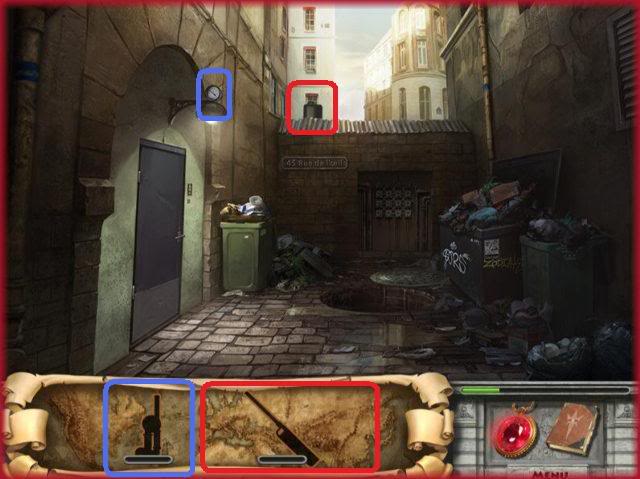
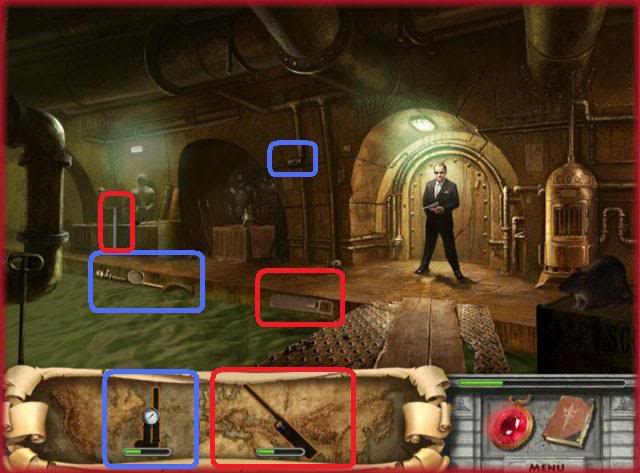
- Find all of the pieces in location above.
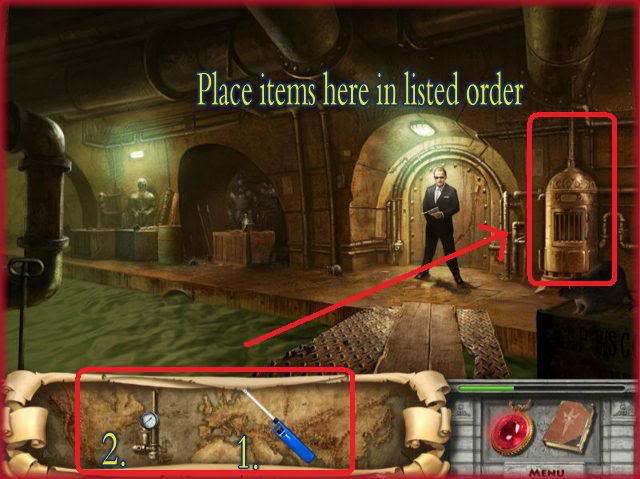
- Once you have them all use them on the heater in the scene as shown placing lighter first then heater part.
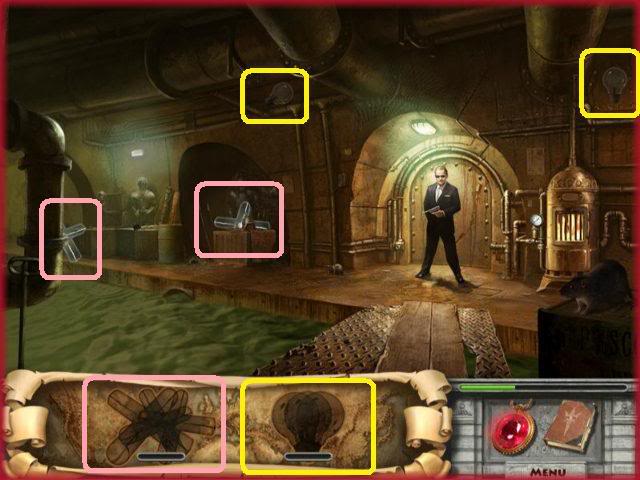
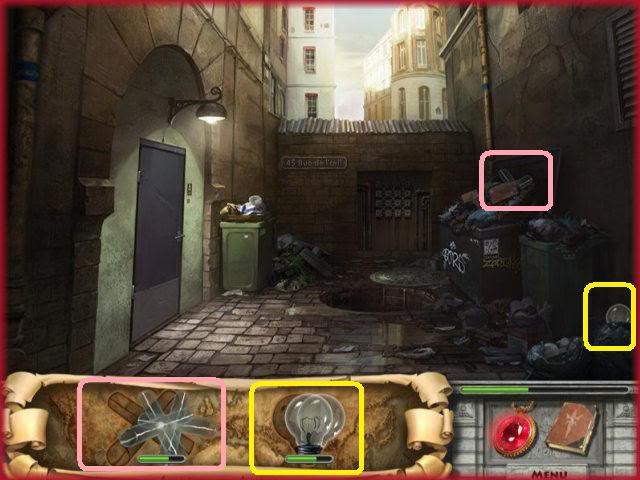
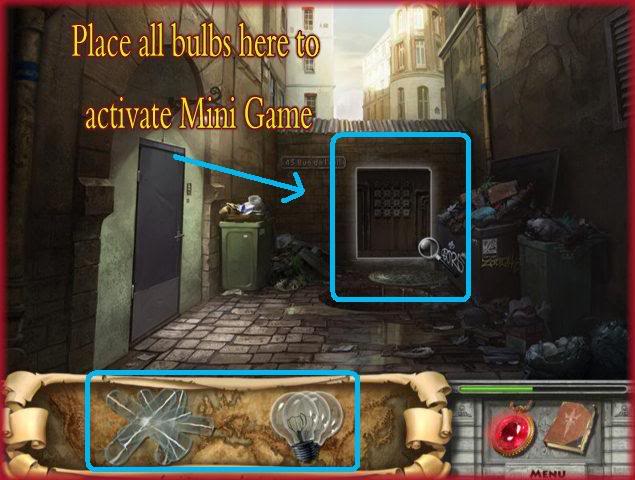
- Find all of the circuit lights and circuit pipes.
- Once you locate all of them place them on the back wall in the scene to start a mini game.
Valve Puzzle 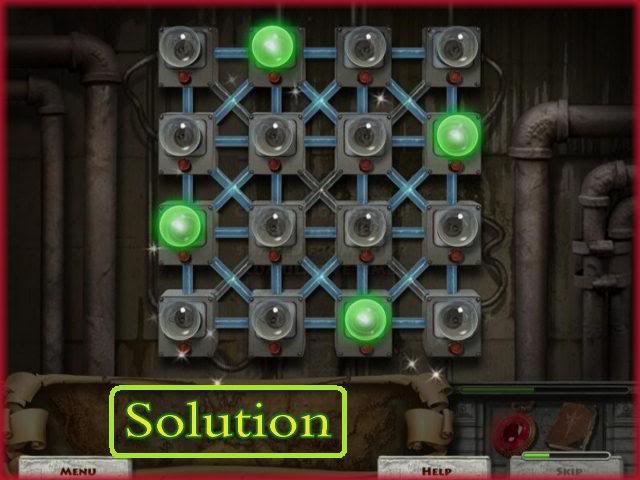
- The goal of this puzzle is to open four valves without having any of the water cross the other valves.
- If you make a mistake you will see a red light and will have to start over.
- A green light indicates a correct move.
- Once you click on a valve you will see water escape in the pipes and you must make sure it does not cross another.
- See the solution to the puzzle above.
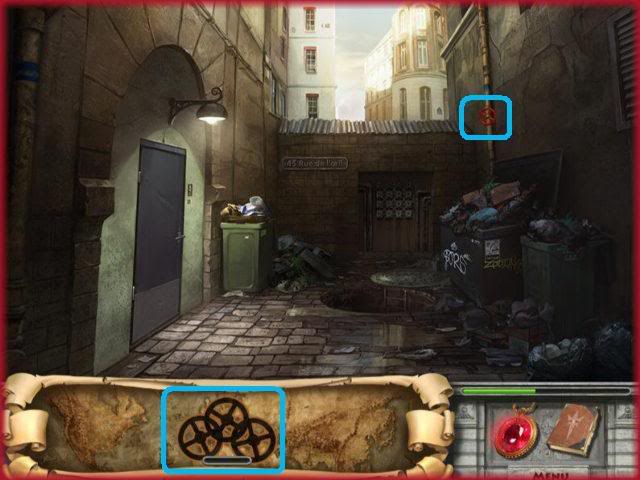
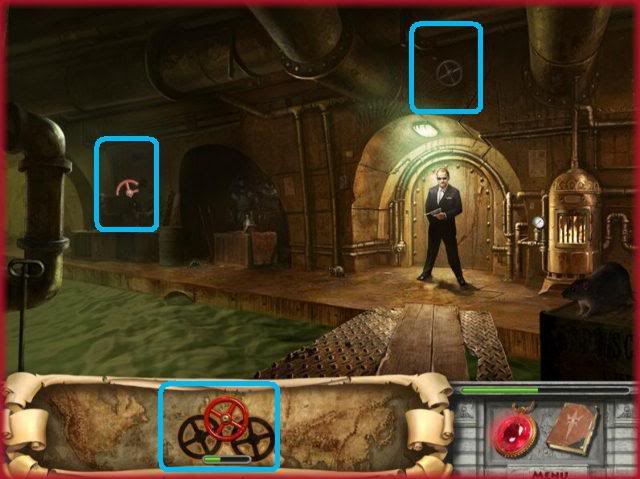
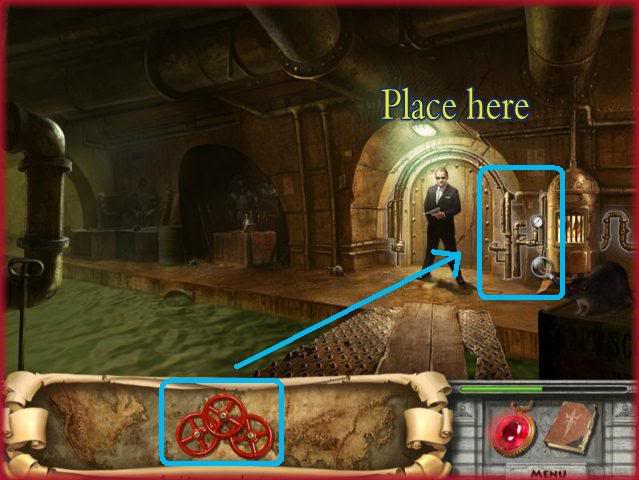
- Find all of the water valve handles.
- Once you find all of them, place them on the pipes as shown above.
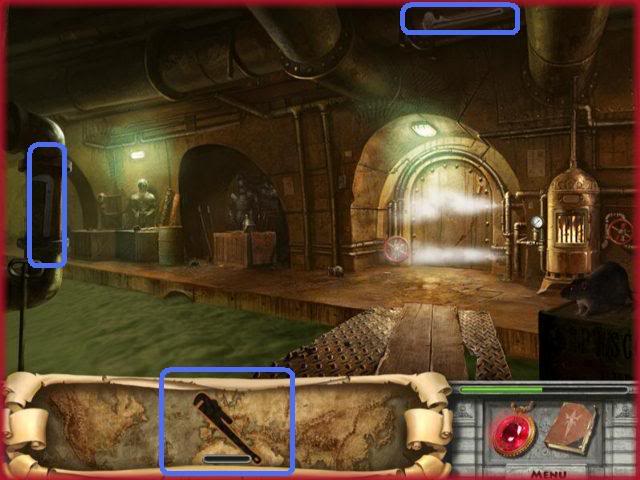
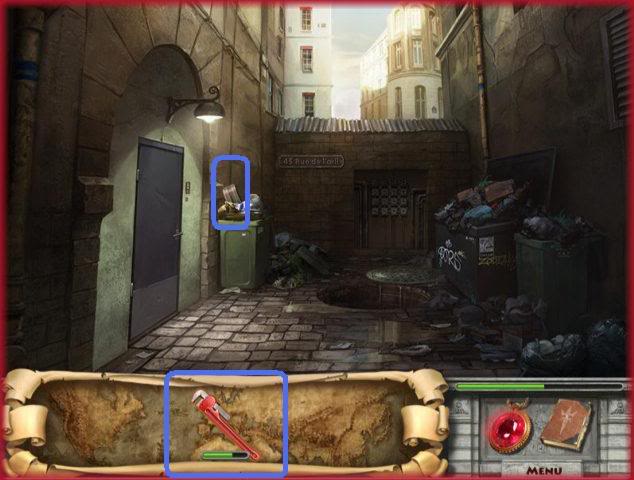
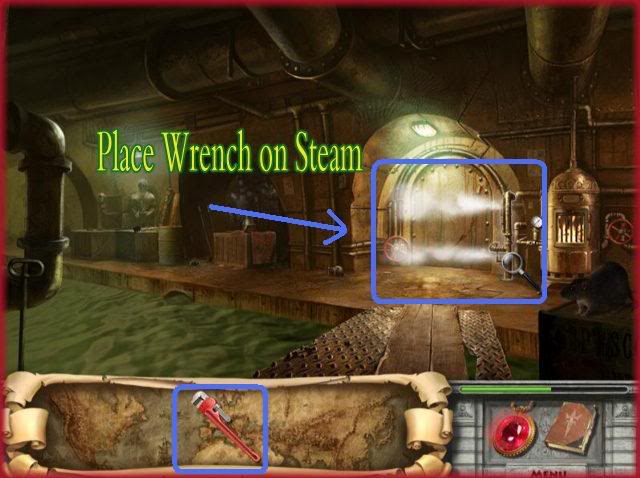
- Locate the pieces to the wrench.
- Once you have completed the wrench, place it on the area where you see steam in the picture above.
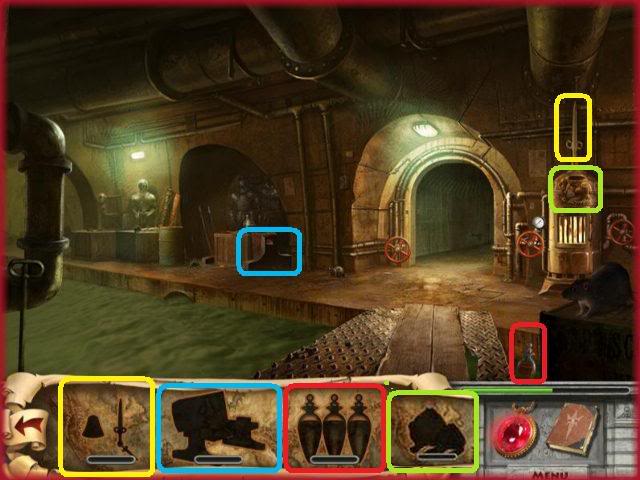
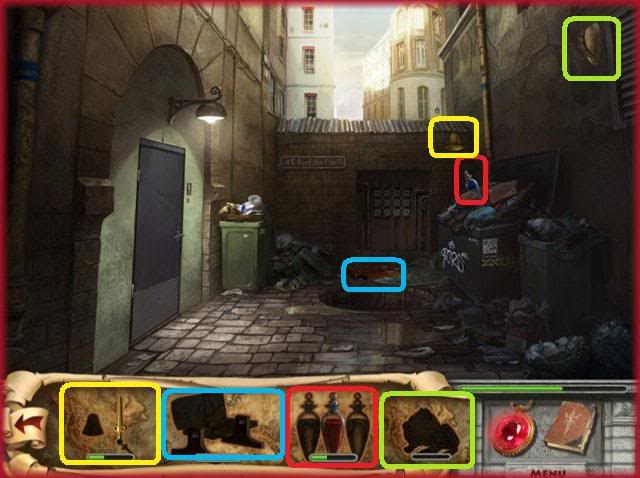
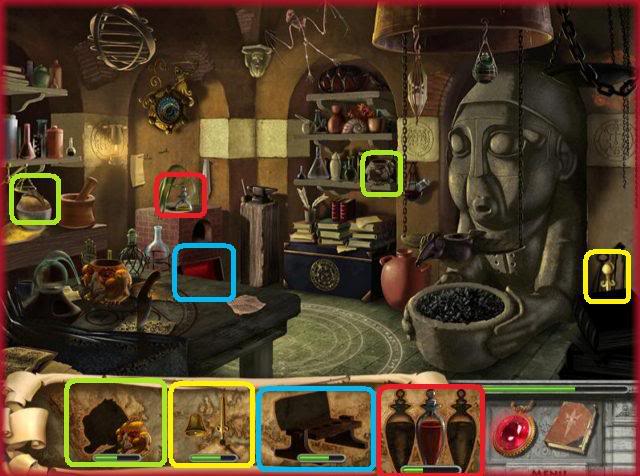
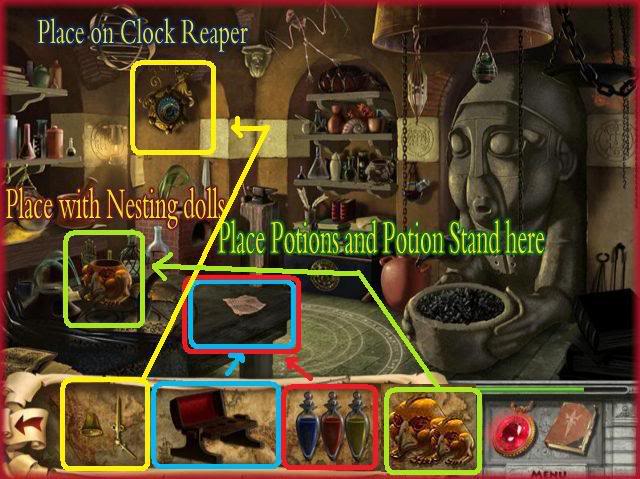
- Locate the pieces to the Potion Stand, Potion vials, nesting dolls and clocks in images above.
- Once you find them all place them using the diagram above.
- Clock pieces to part on wall, Potion bottles and holder on end of table, nesting doll on table with others.
- Once you place these items you will have many new ones in inventory.
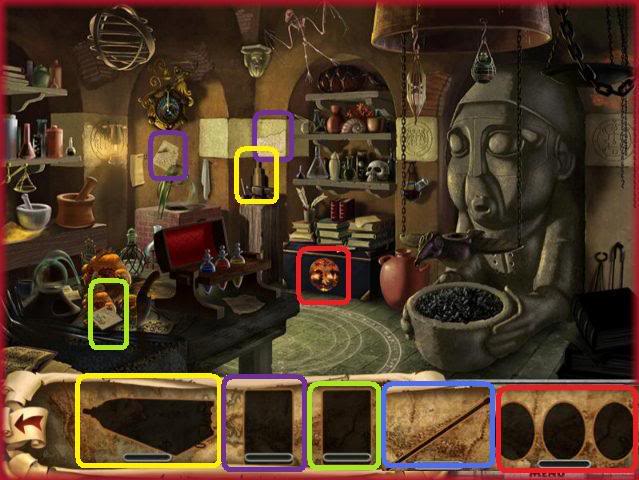
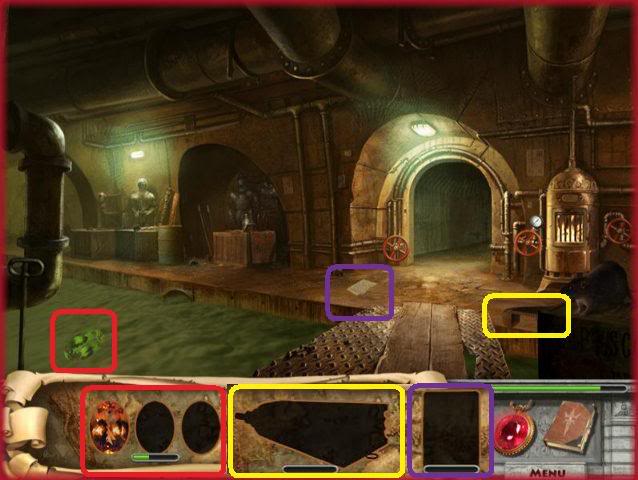
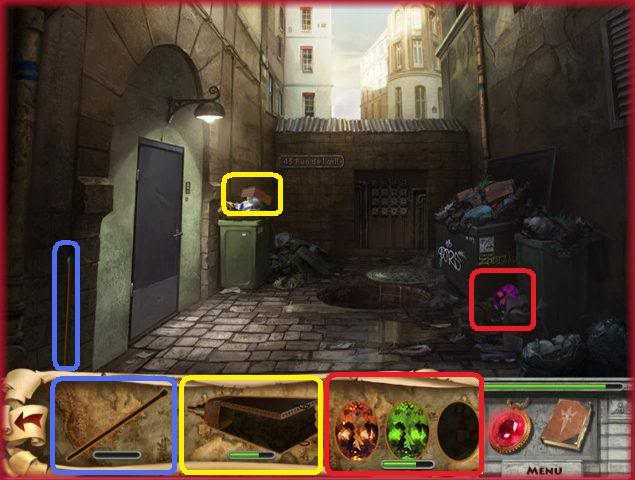
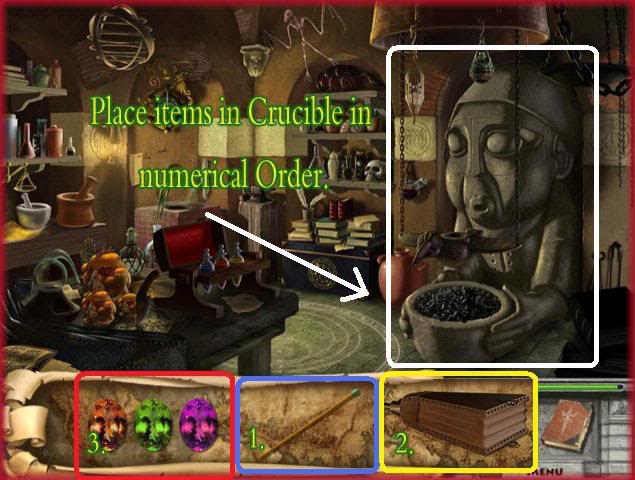
- Find all the pieces to the match, bellows, gems and journal pages.
- Once you find them you will place all of the items in a specific order into the Crucible in the lab.
- First, match, then bellows, then gems.
- Once you place all of the items it will start a mini game.
Gem Puzzle 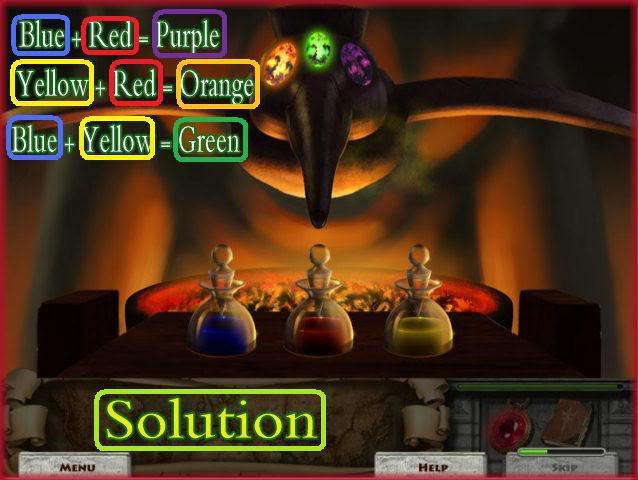
- The goal of this puzzle is to mix the correct colors that are asked of you to match the color gem which will be either orange, purple or green.
- Here are the answers. Blue and Yellow = Green, Red and Blue = Purple, Red and Yellow = Orange.
- Once you answer correctly, a gem will appear at the top of the statue.
- Click on a vial, then another vial to mix colors. If it is correct, a gem will light up. If incorrect you will be prompted to try again.
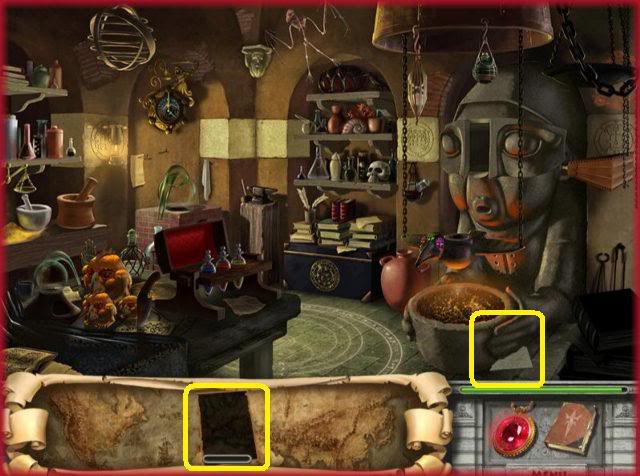
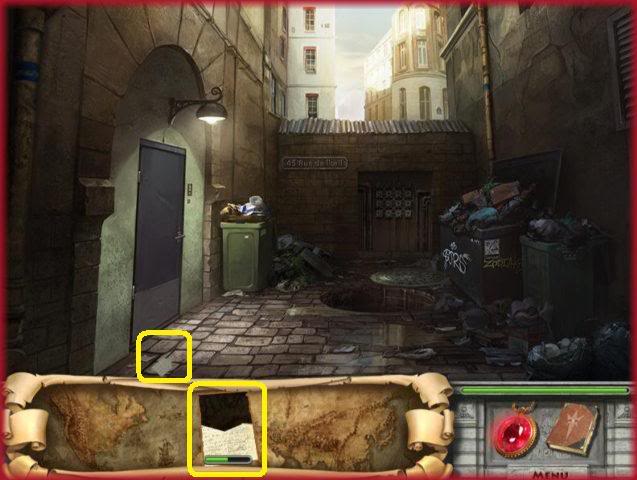
- Find the remaining pieces of journal pages in images and locations above.
- Once you find them all you will be taken to a mini game.
Torn Journal Pieces Puzzle 6 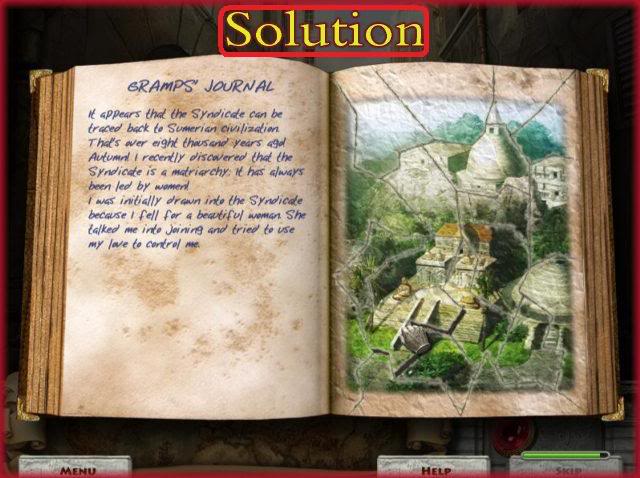
- Drag the pieces of the torn journal page to their proper place to restore the picture.
- Each piece will lock in place when it is in the proper place.
- Please look at the screen shot to see the completed picture.
- When the puzzle is complete you will travel to the location in the picture.
Location 7: Sri Lanka 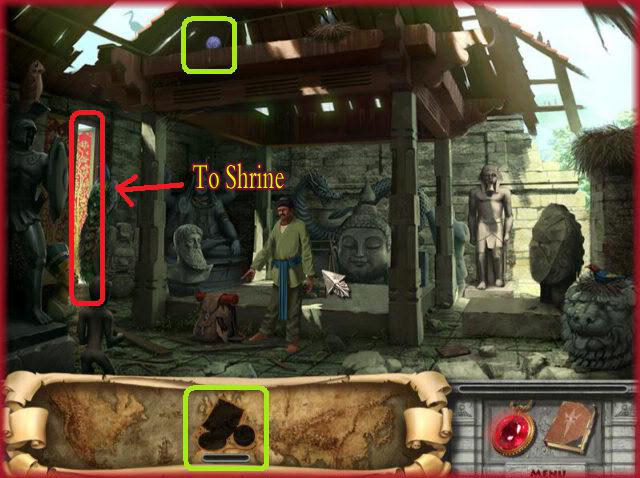
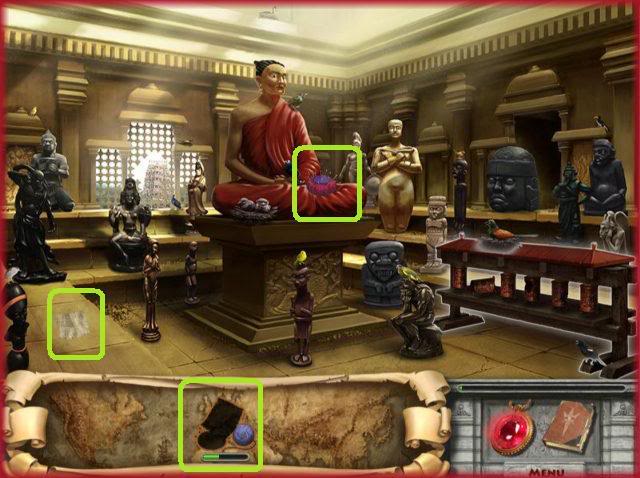
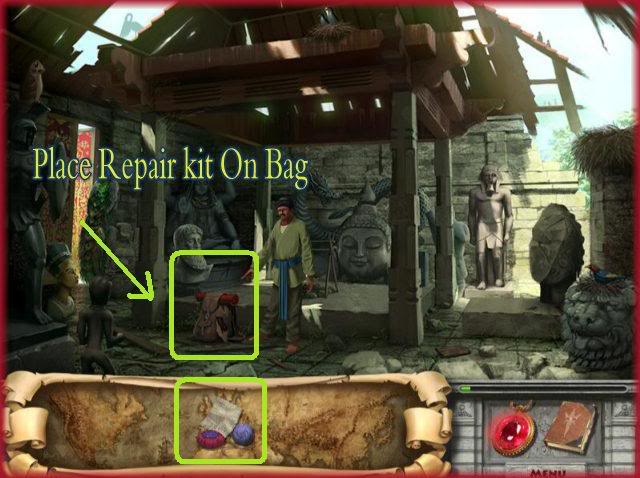
- Collect all the pieces to the repair kit.
- You can access the Shrine by clicking on the doorway to the left of screen.
- Once you have all the pieces take the kit and place it on the backpack.
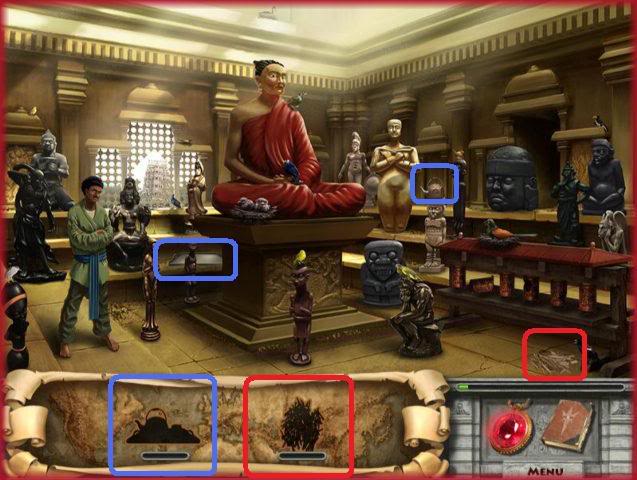
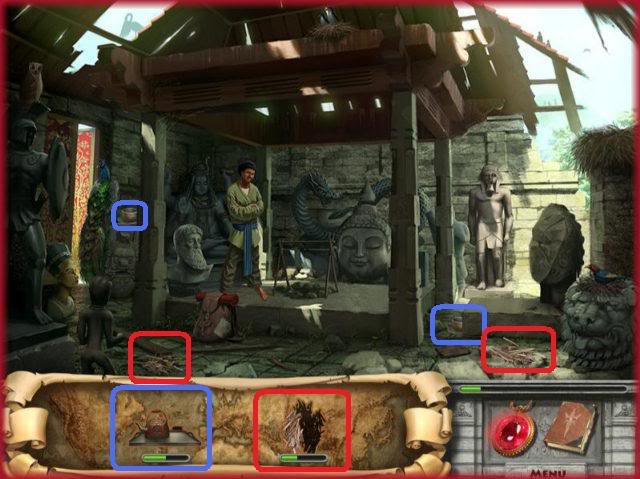
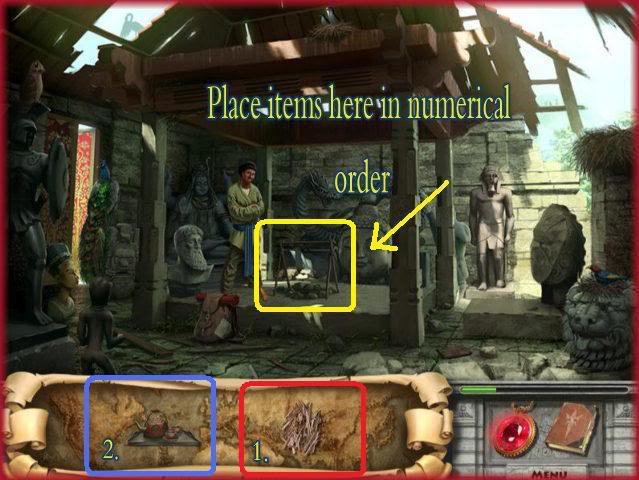
- Locate all of the pieces of kindling and the tea service.
- Once you have completed finding them, place them on the fire as shown in image above.
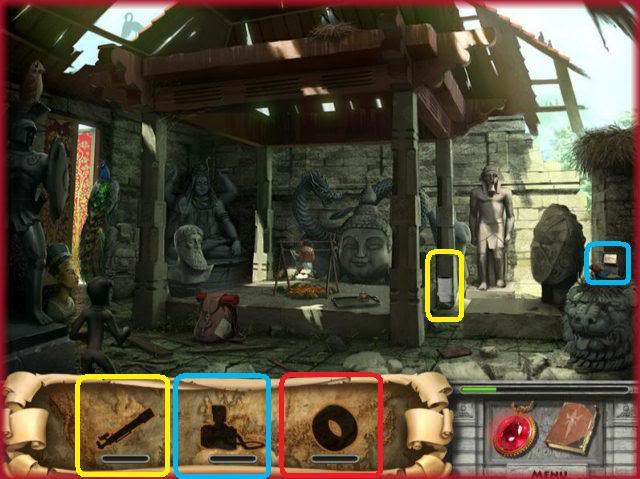
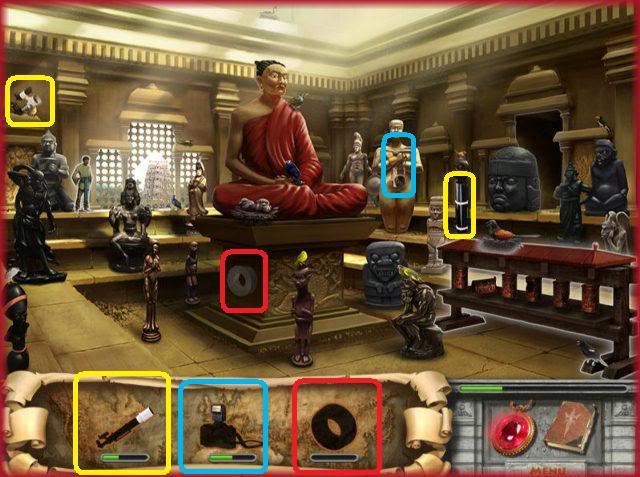
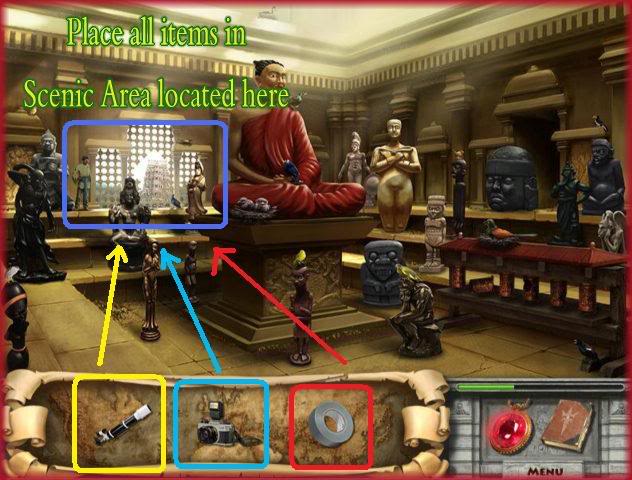
- Locate all the pieces of the duct tape, camera and telescope.
- Once you have them all completed, drag all the items to the scenic view in the back of the room which will trigger a mini game.
Camera Mini Game 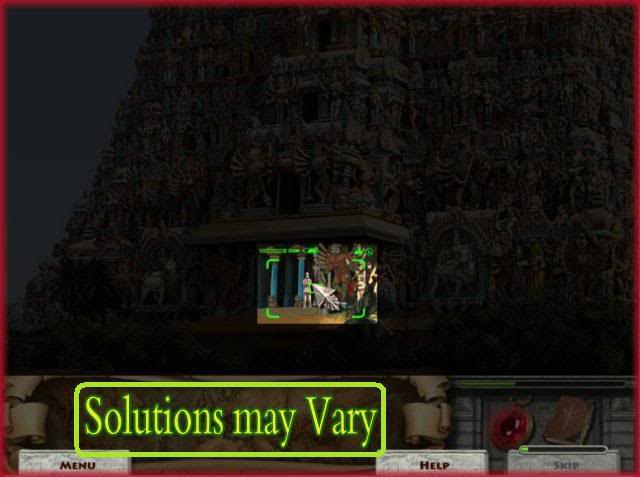
- In this game you must use your camera to scan the area and take pictures of the mysterious little man.
- As you run your mouse along you will see areas with red and areas with green which are the view finder of your camera.
- You can take pictures if the area is green but make sure there is a man in view as he will leave after a few seconds.
- This puzzle varies so I can not give you the answers but I have posted an example so you can see what the mysterious man looks like in the frame.
- Once you have five correct images such as the one above you will win the mini game.
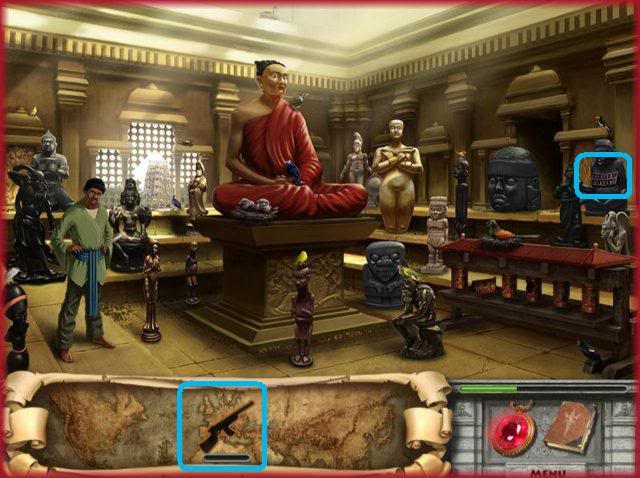
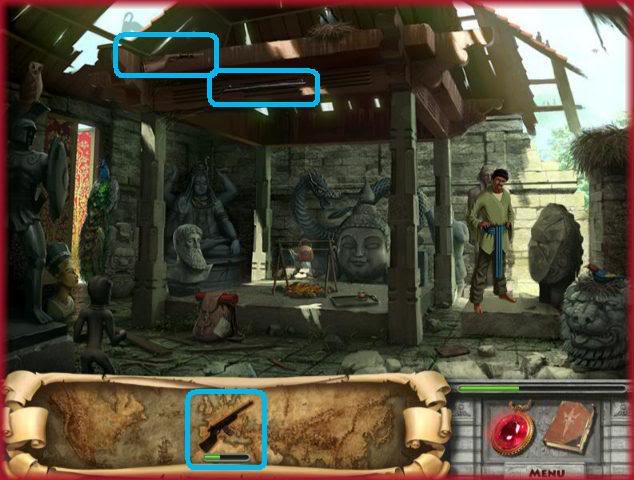
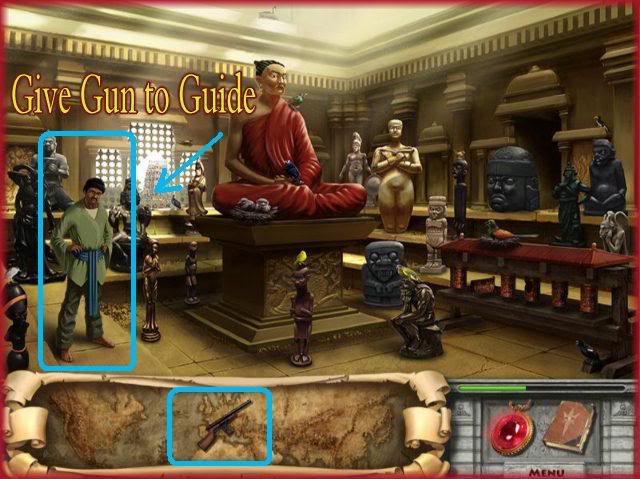
- Locate all the pieces to the tranquilizer gun.
- Once you have it completed give it to the guide standing in the shrine that is circled.
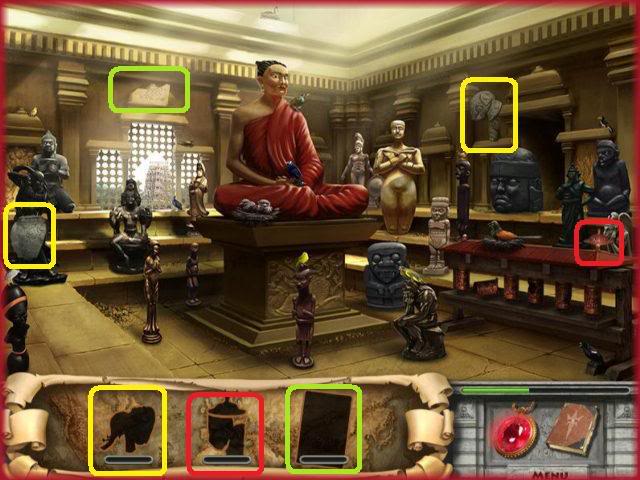
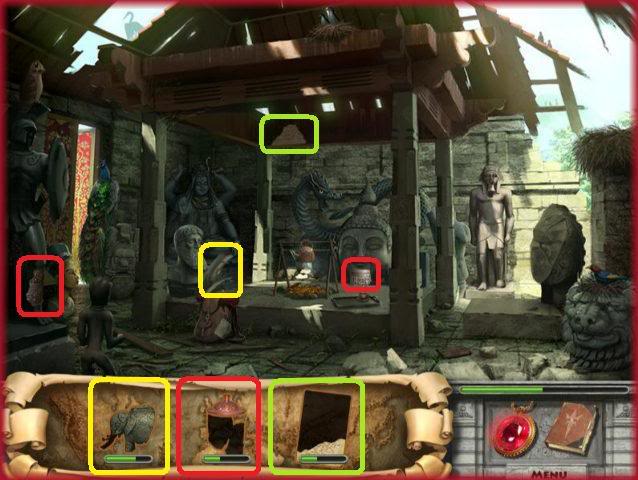
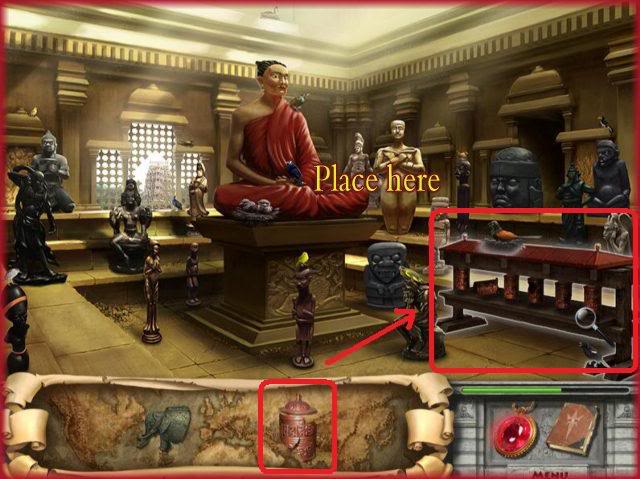
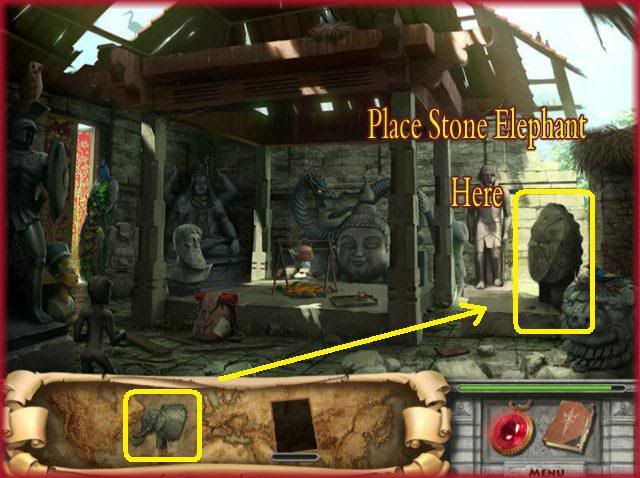
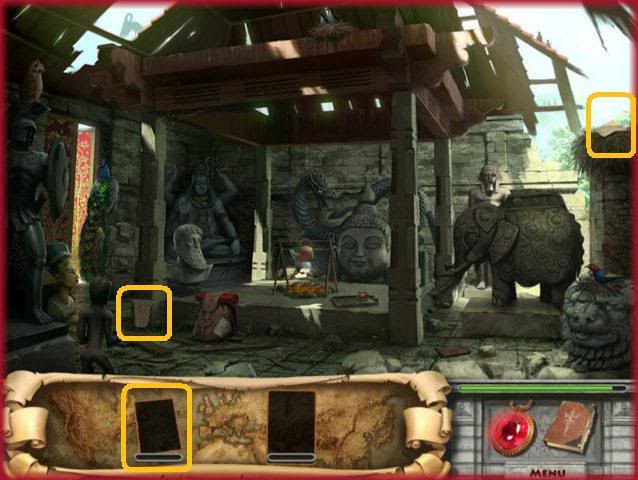
- Here you will locate the pieces to the prayer wheels, a stone elephant, and more journal pieces.
- Once you find all of them place them as shown in the image above on the wheel frame in the shrine.
- Next place the stone elephant on the right side of the page as seen above.
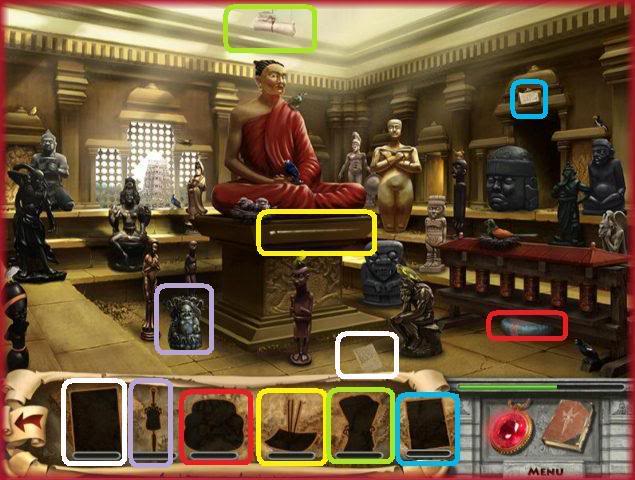
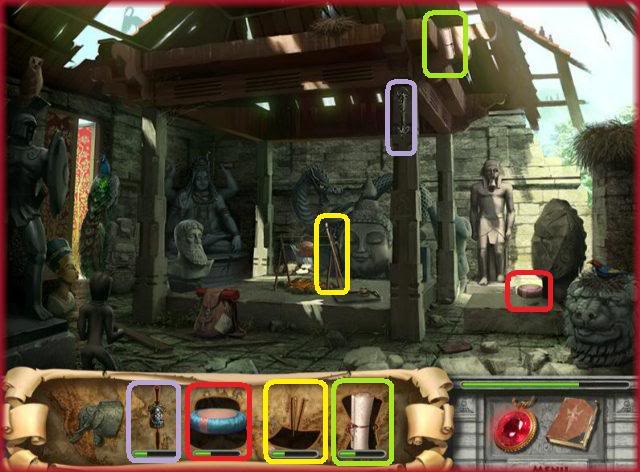
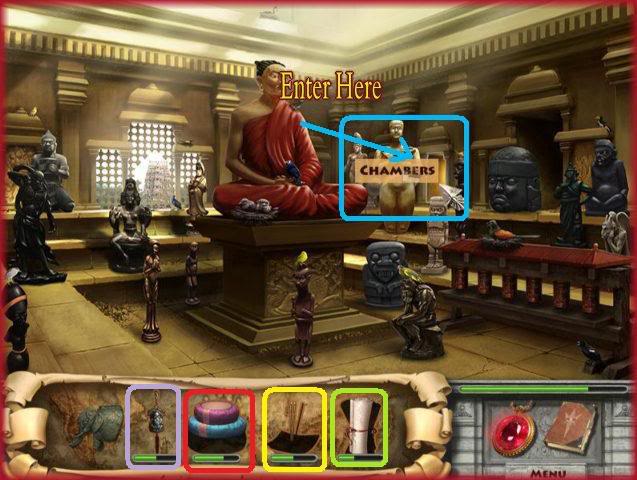
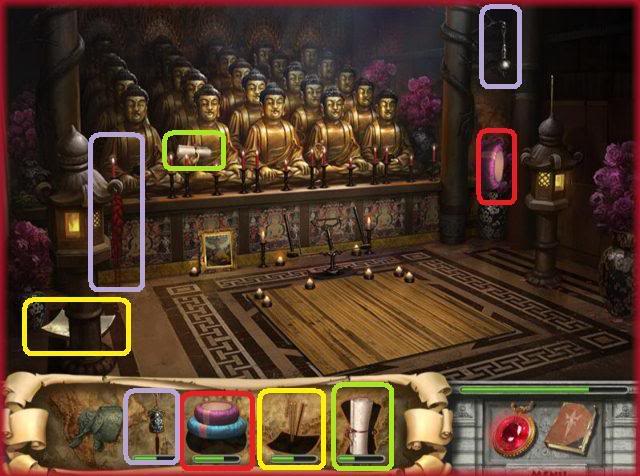
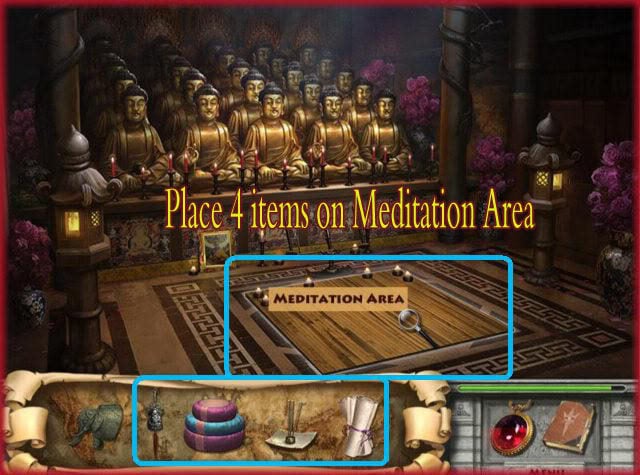
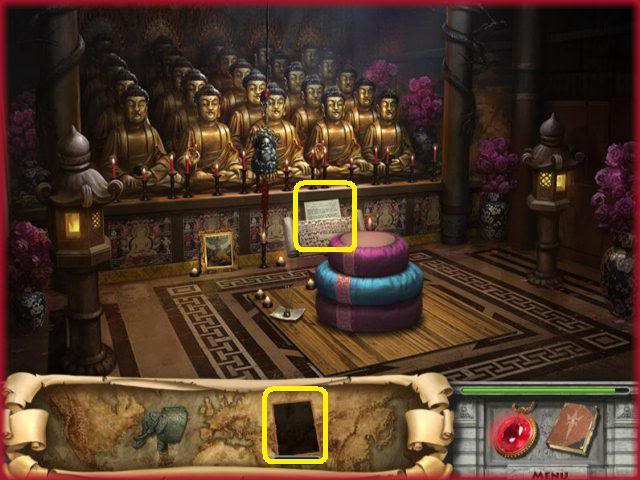
- In these images you will find the incense, bell, cushions, scrolls, and journal pages.
- Once you find them all you will place each item in the meditation area in any order.
- This will unlock the next mini game.
Zen Grandpa Mini Game 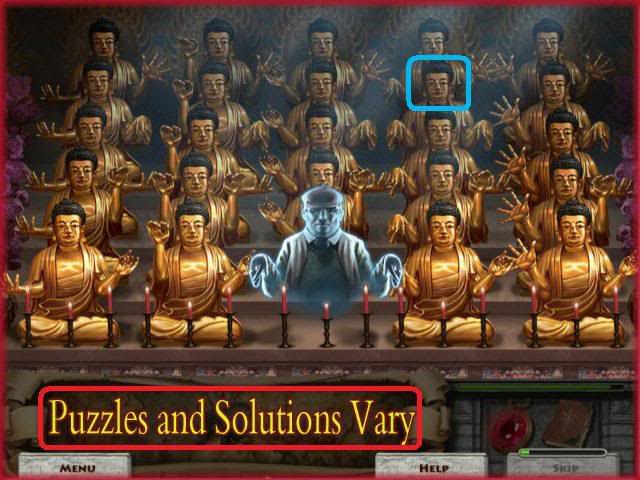
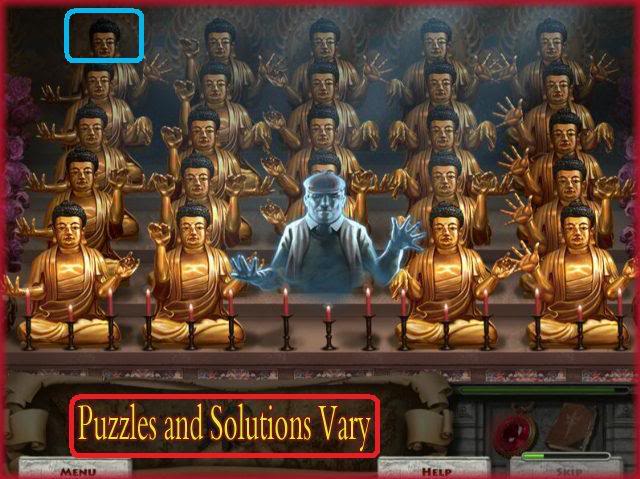
- The goal of this game is to click on the Buddha that is in the same exact pose as Grandpa.
- The key to this puzzle is to look at the hands as they are the only differing element.
- This puzzle various so there is no solution to give you but I have an example posted for you with correct answers.
- If you are correct Grandpa goes into another pose immediately.
- Once you have correctly mimicked six poses you have won the game.
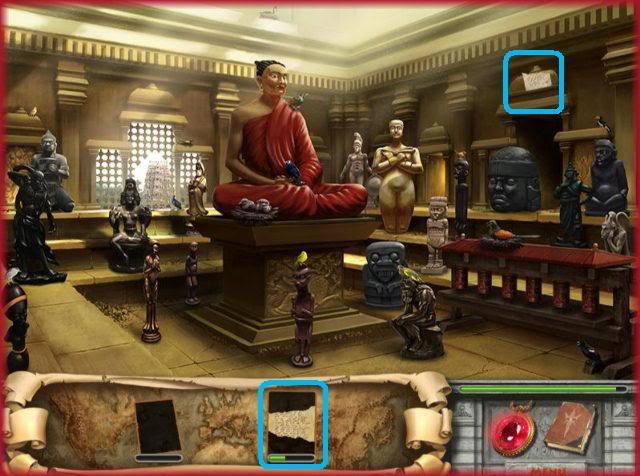
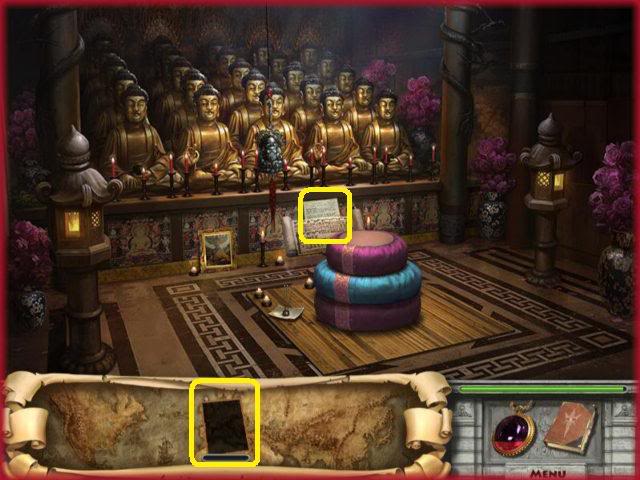
- Collect all the remaining journal pages from areas listed above.
- Then proceed to mini game and next location.
Torn Journal Pieces Puzzle 6 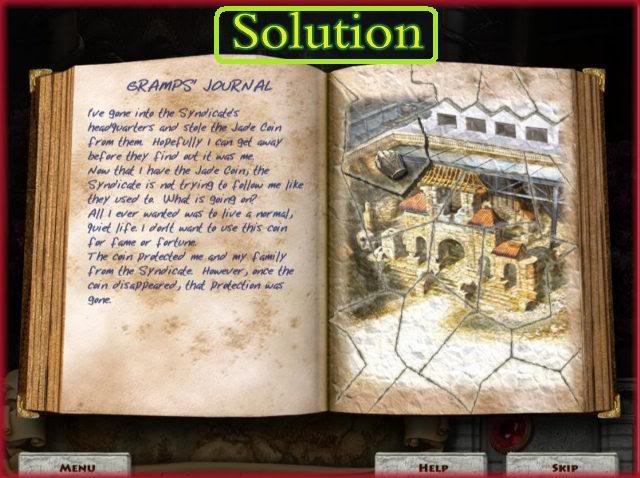
- Drag the pieces of the torn journal page to their proper place to restore the picture.
- Each piece will lock in place when it is in the proper place.
- Please look at the screen shot to see the completed picture.
- When the puzzle is complete you will travel to the location in the picture.
Location 8: Nanchang, China 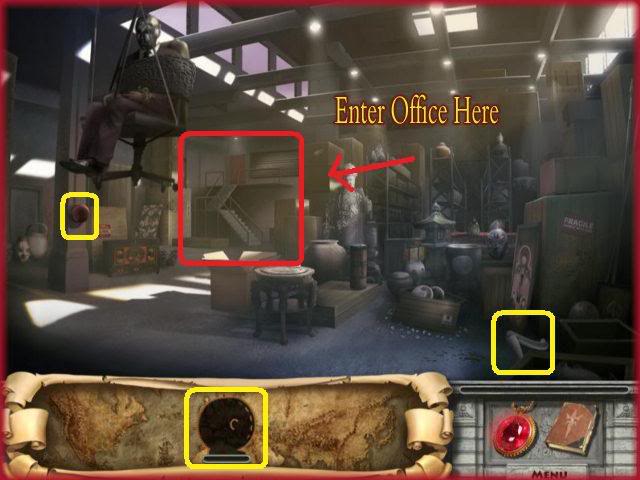
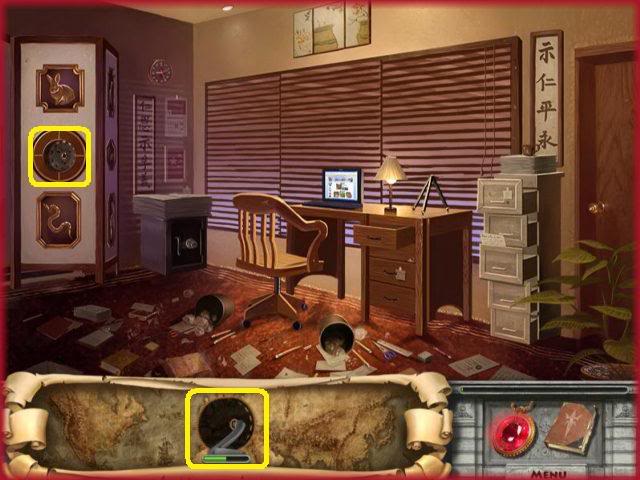
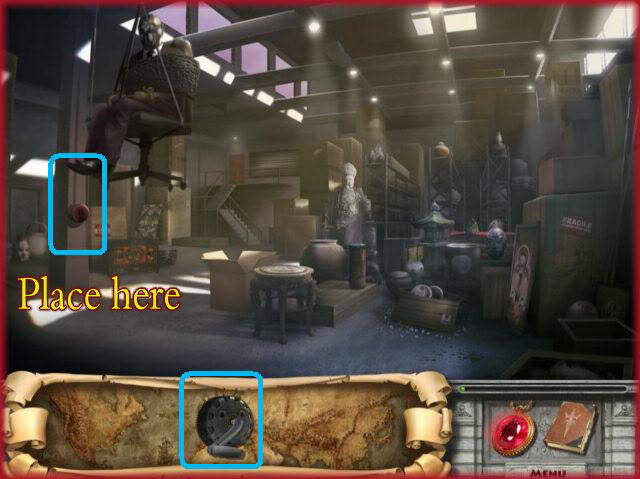
- Locate all the winch pieces in the images above.
- You can also enter the office at this time by clicking on doors in the background.
- Once you have all of them place the winch on the gear as shown.
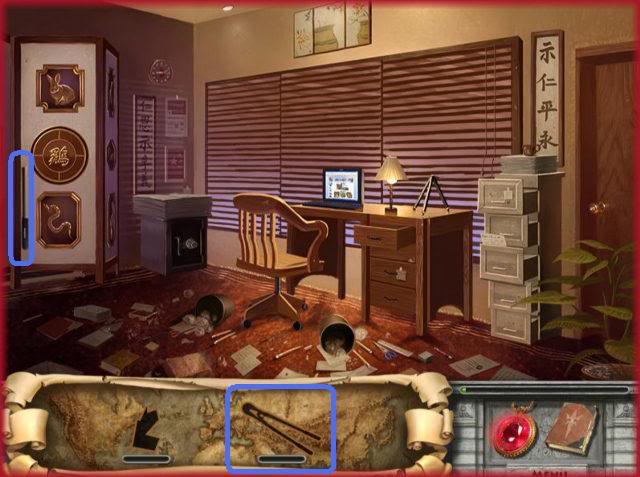
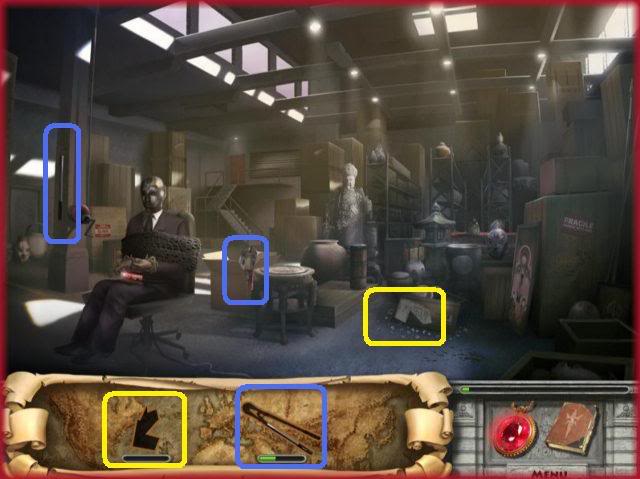
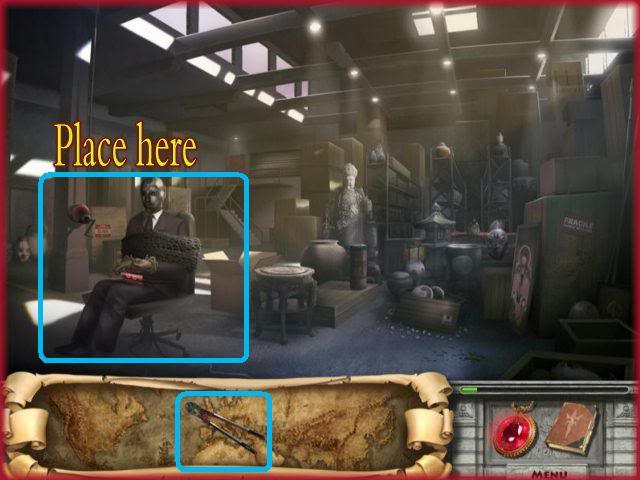
- Find all of the pieces to the bolt cutters and journal pages.
- Once you have all pieces to bolt cutters place on the man in chains to free him.
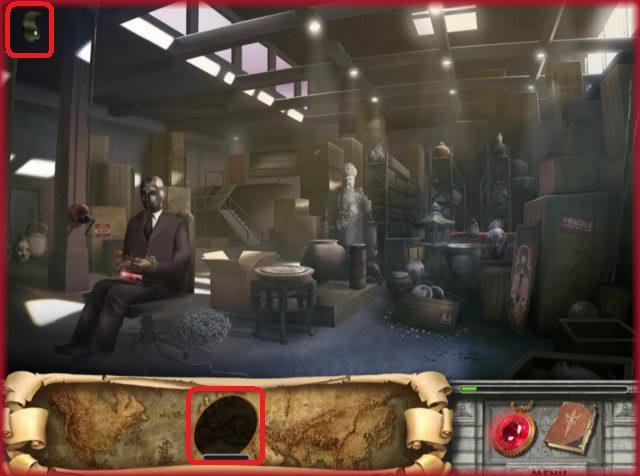
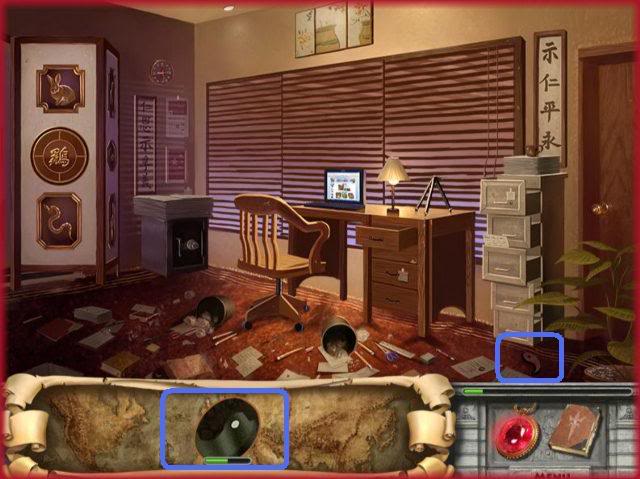
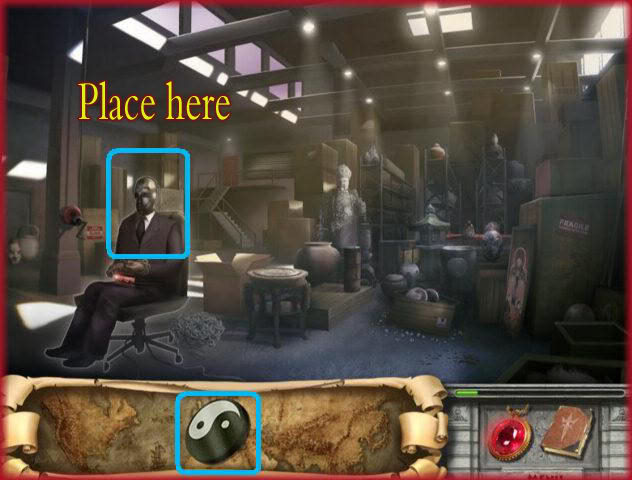
- Find all the pieces to the mask key.
- Once you have them place the mask key on the mask the man is wearing to free him.
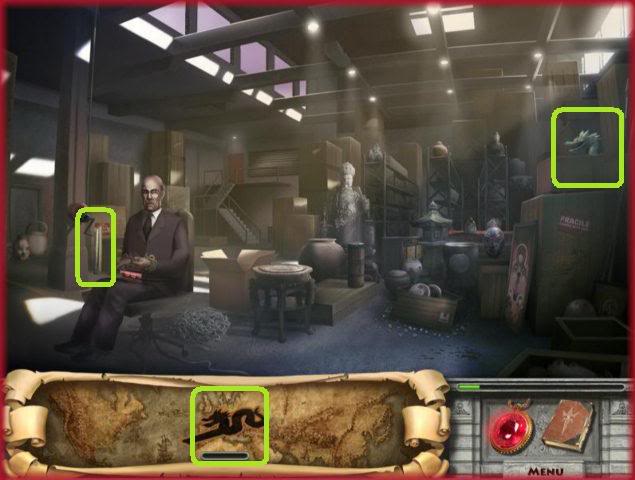
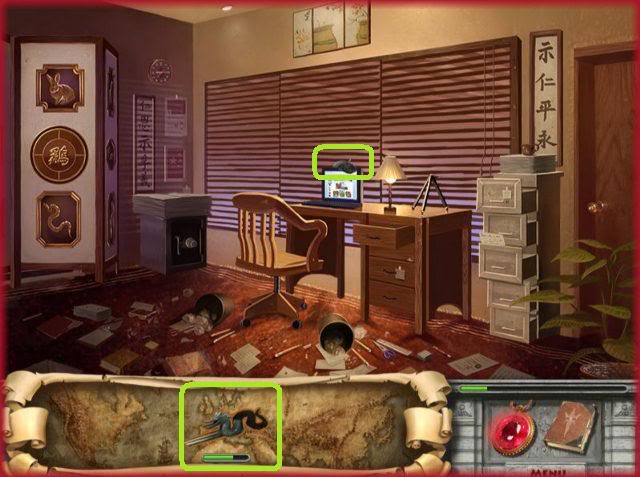
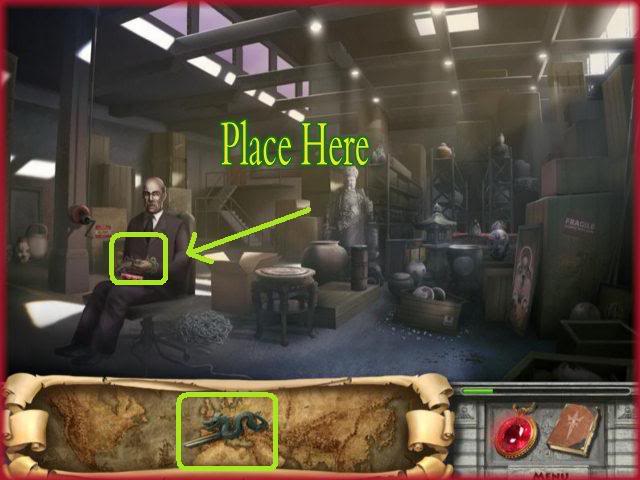
- Find all the pieces to the manacle keys.
- Once you have them place on the manacles the man is wearing to free him.
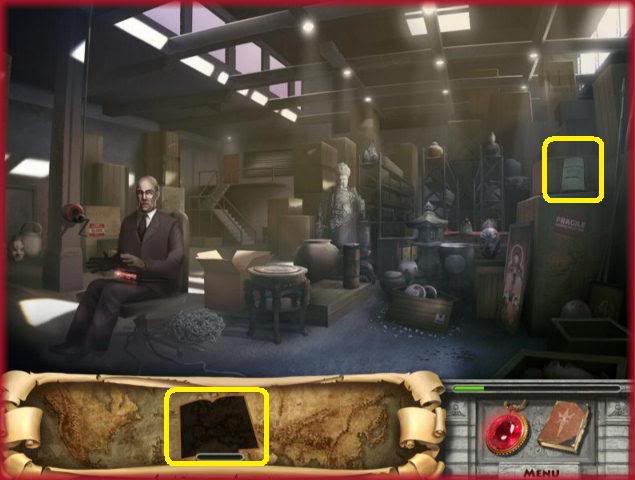
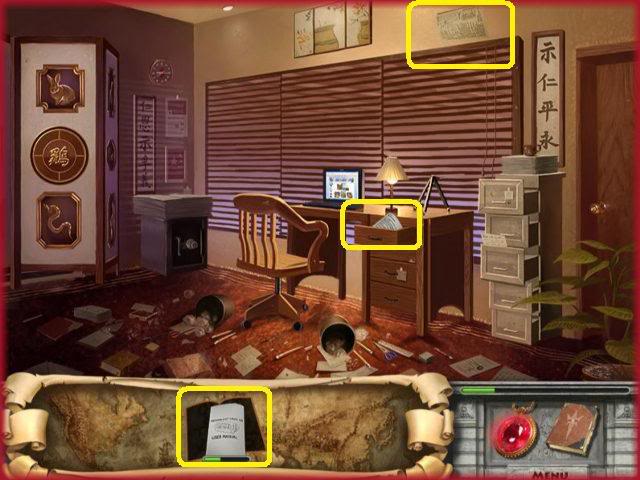
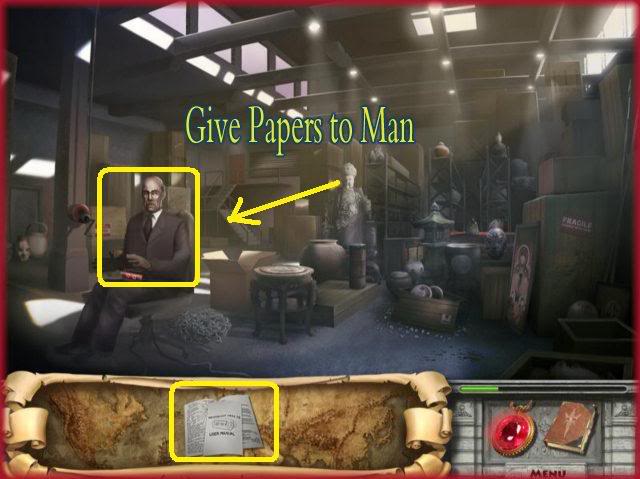
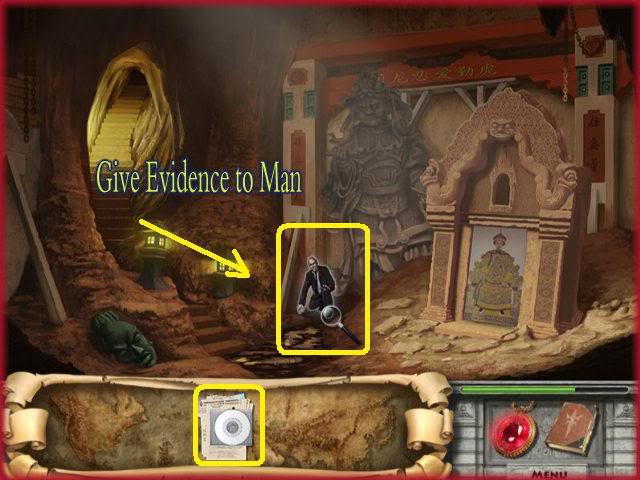
- Find all the evidence pages.
- Once you have collected all the evidence give it to the man.
- You now have to keep the bomb from exploding and will start a mini game.
Diffuse the Bomb 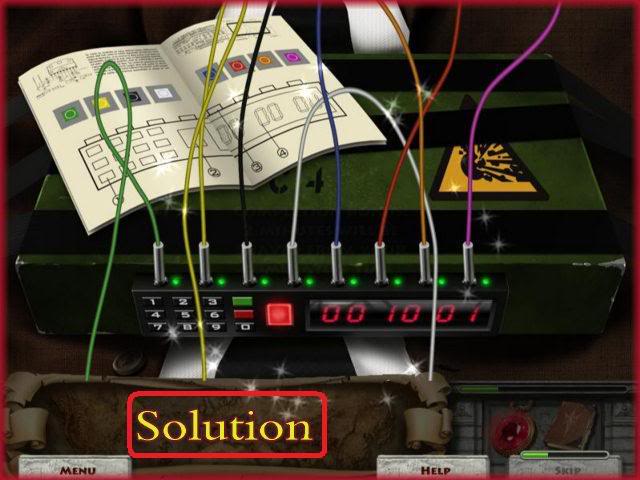
- The object of this game is to diffuse the bomb by placing the wires in the correct order.
- The booklet shows you the order of the wires.
- When you click on one wire it will lift up, click on another and they exchange positions.
- When you have the wires in the order shown above you will diffuse the bomb successfully.
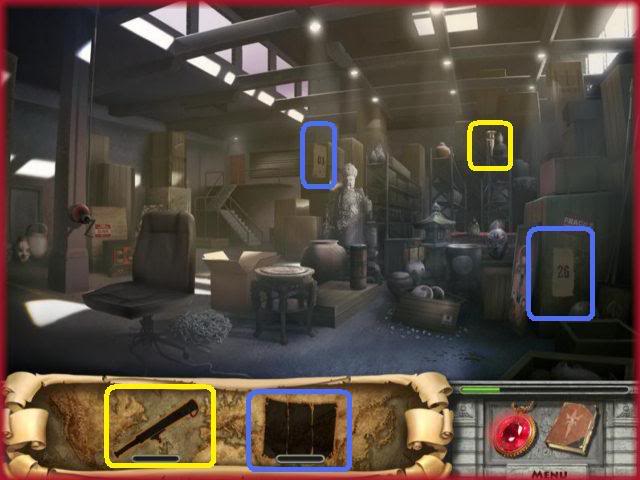
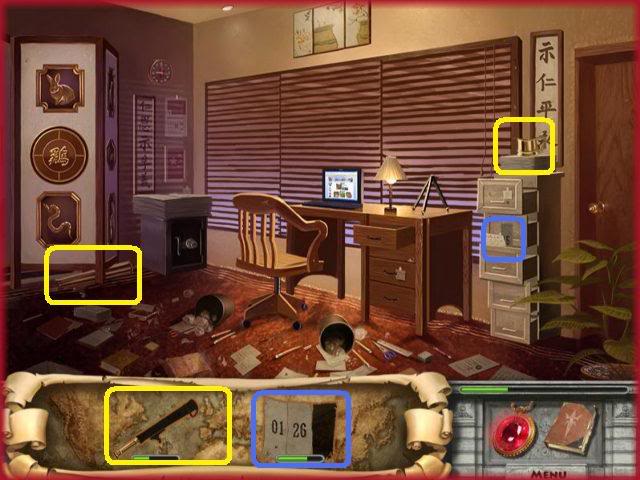
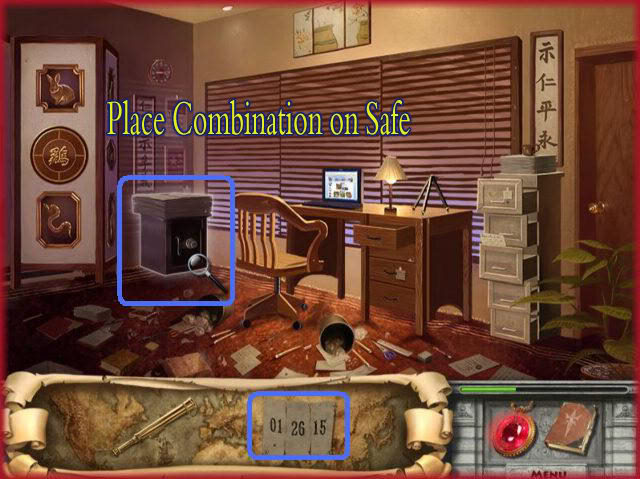
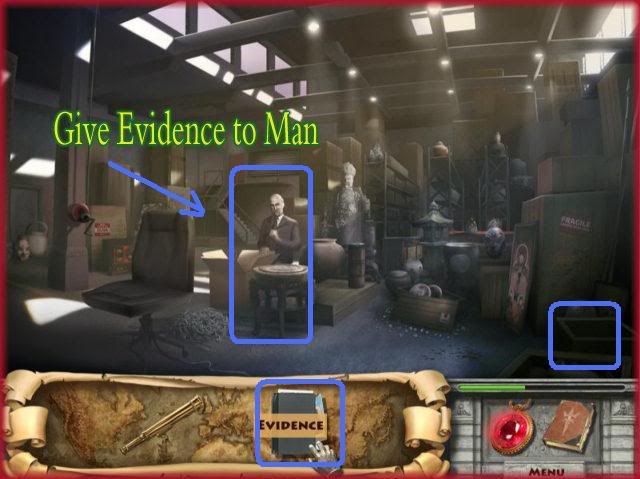
- Here you must locate pieces to the safe combination and telescope.
- Once you have located these items place the combination on the safe and it will open.
- It will ask you to find more evidence and journal pages.
- Once you find all of the evidence and pages give it to the man in the image above.
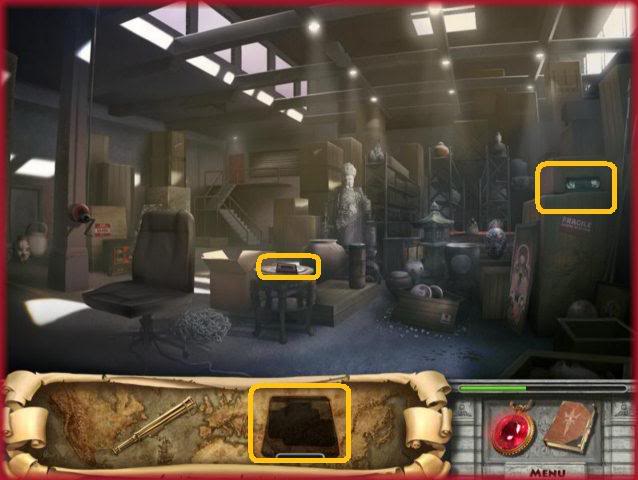
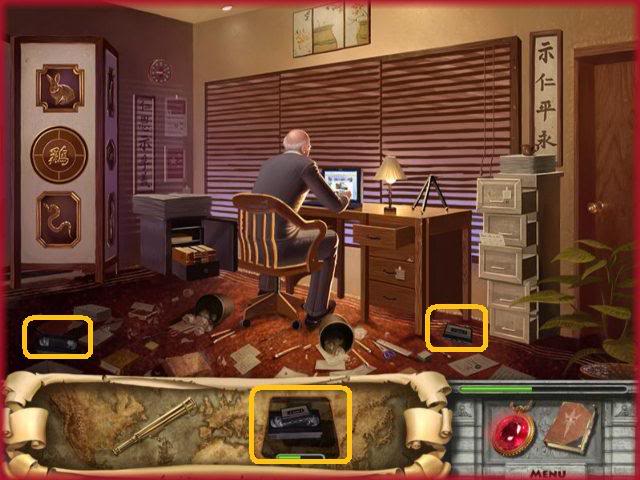
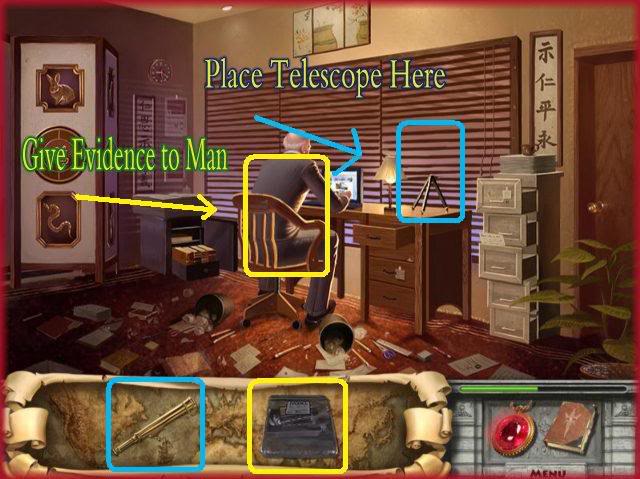
- Find the rest of the evidence and give it to the man.
- Take the telescope and place it on the holder located on the desk in front of the window in the office. It will fall into place.
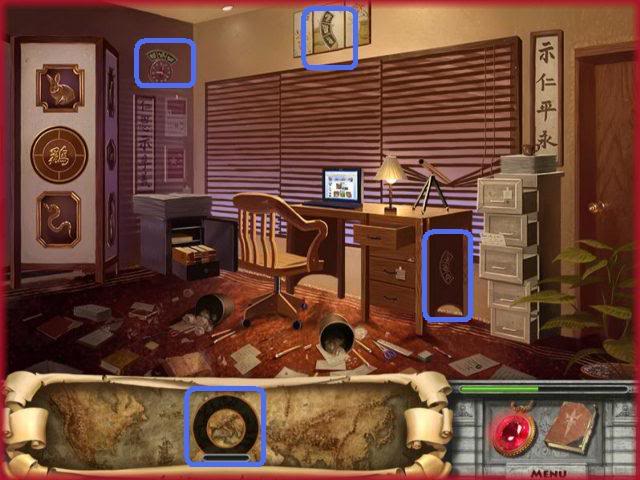
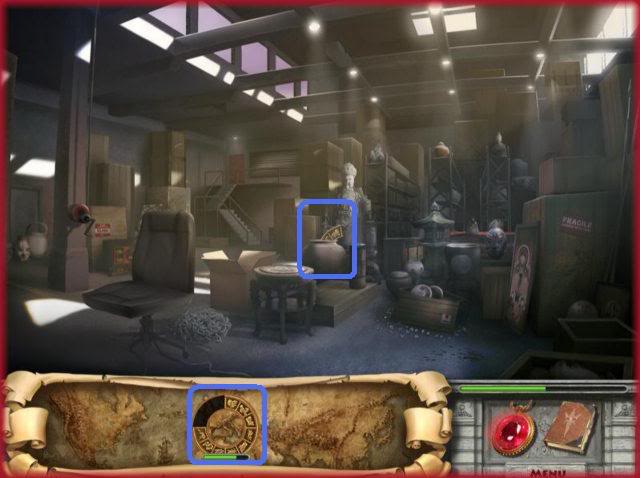
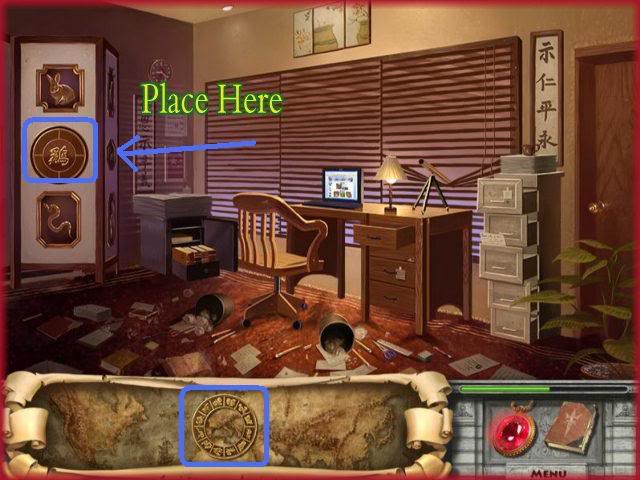
- Now you will need to find the Constellation pieces from various areas.
- Once you have the constellation ring, place it on the screen at the far left in the office.
- This will open up a secret passageway with a lantern above it that needs fireflies to activate and open.
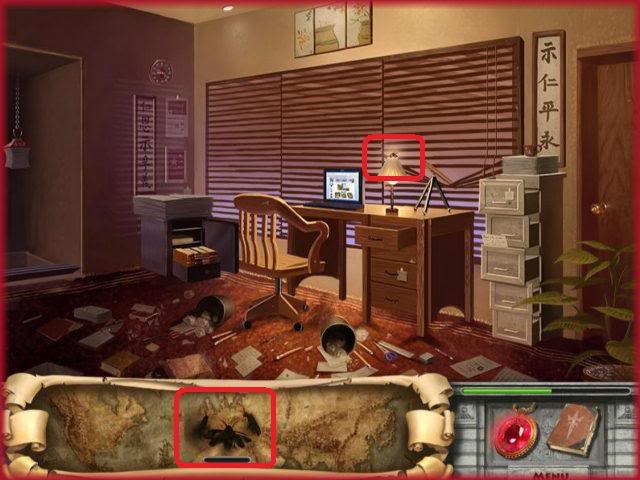
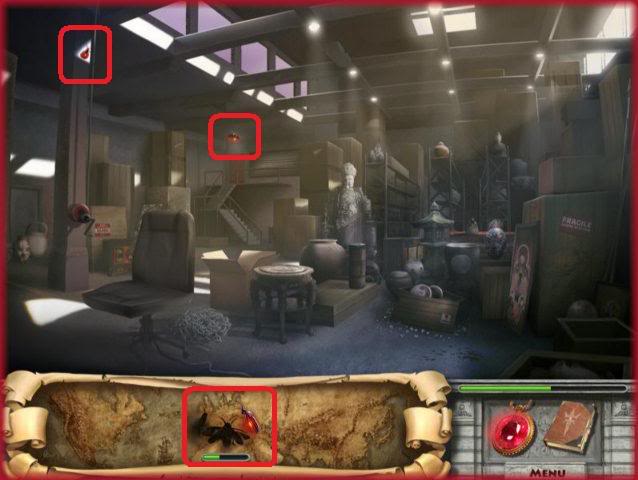
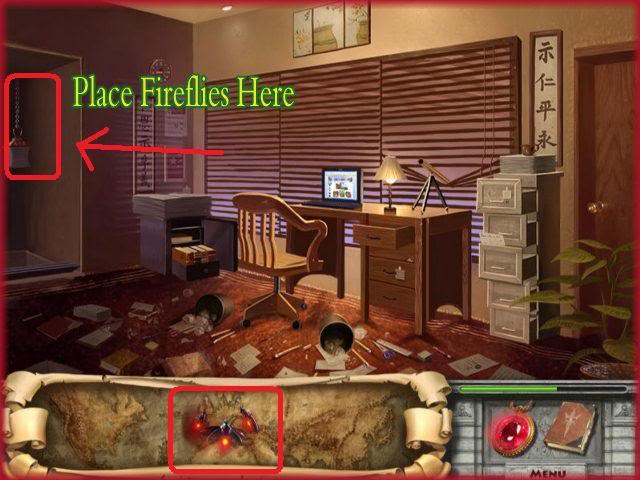
- Locate all of the fireflies as seen in images above.
- Once you have all of them place them on the lantern to open secret passageway.
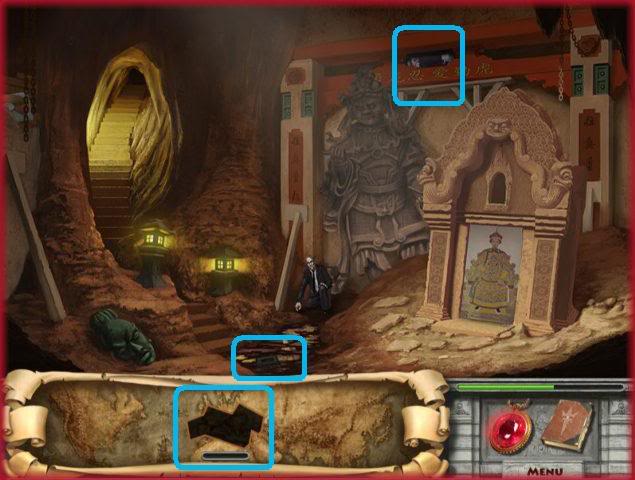
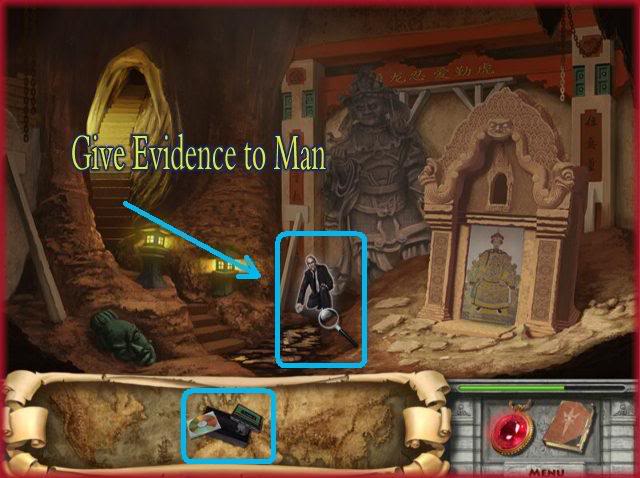
- Locate the evidence in locations above.
- Give to man.
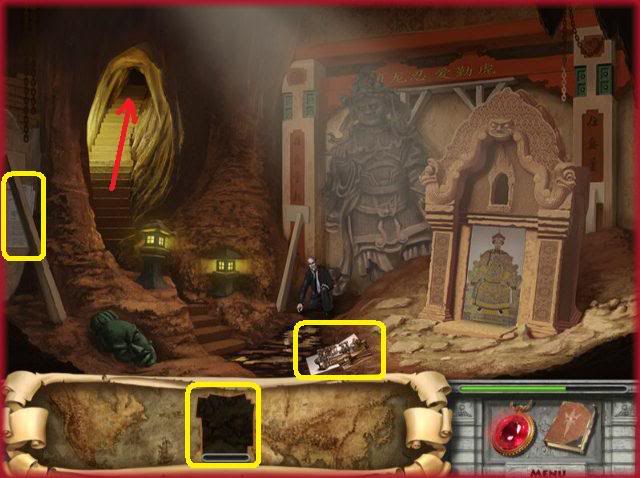
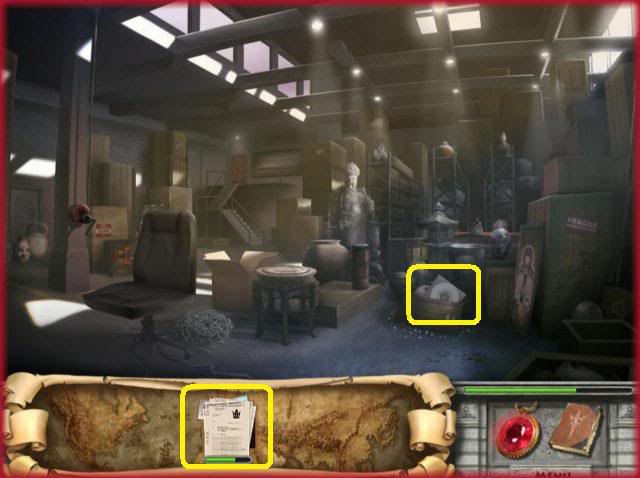
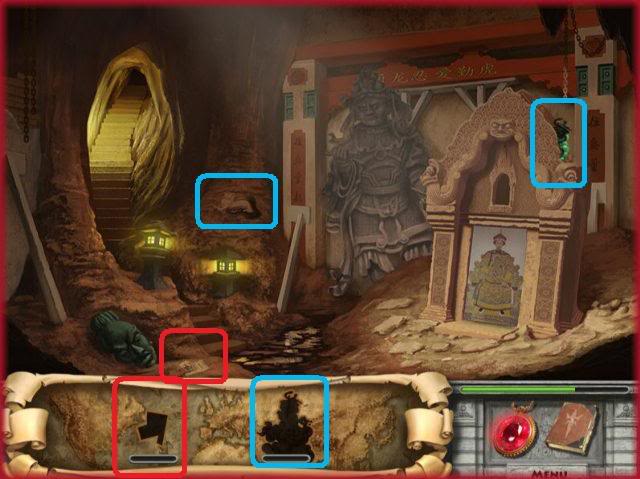
- Locate the evidence in the areas above.
- Give evidence to the man again.
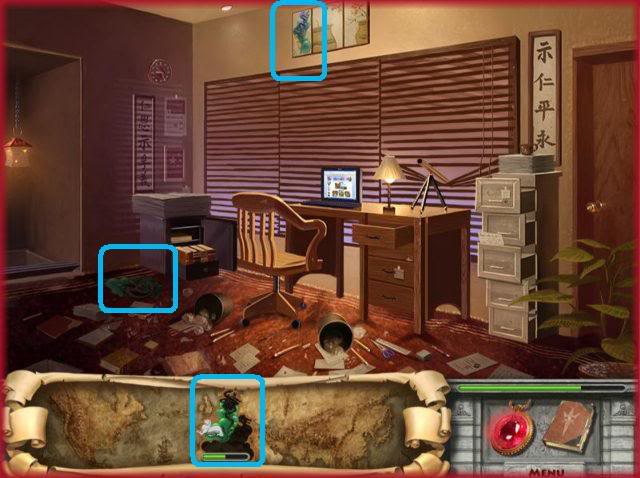
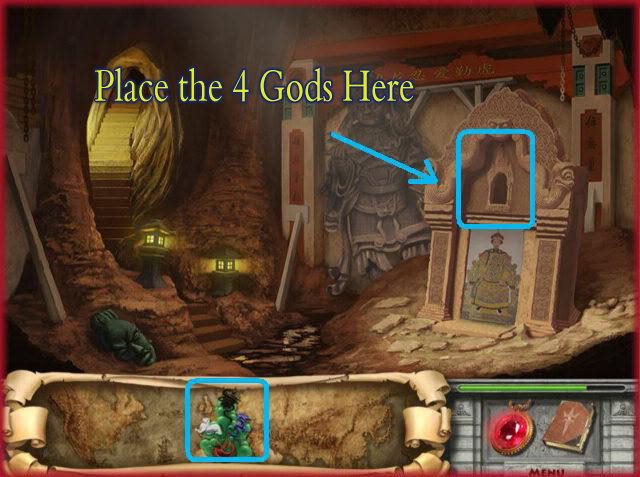
- Collect pieces to the 4 Gods and journal pages.
- Once you have the 4 Gods place them at the alter as shown.
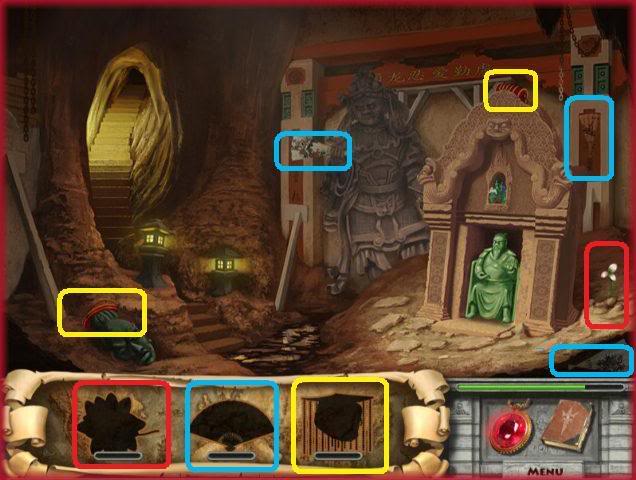
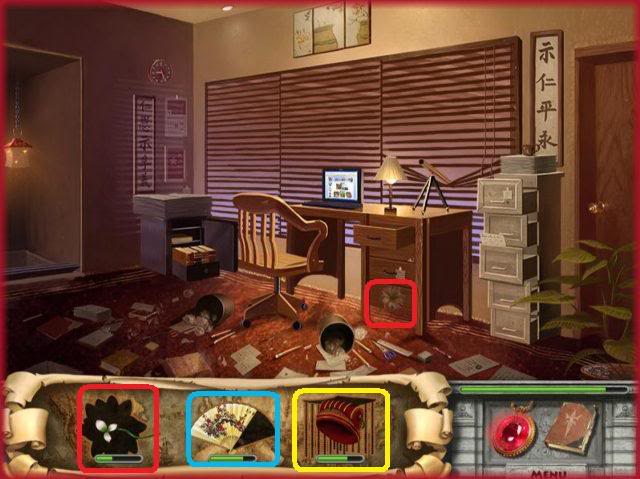
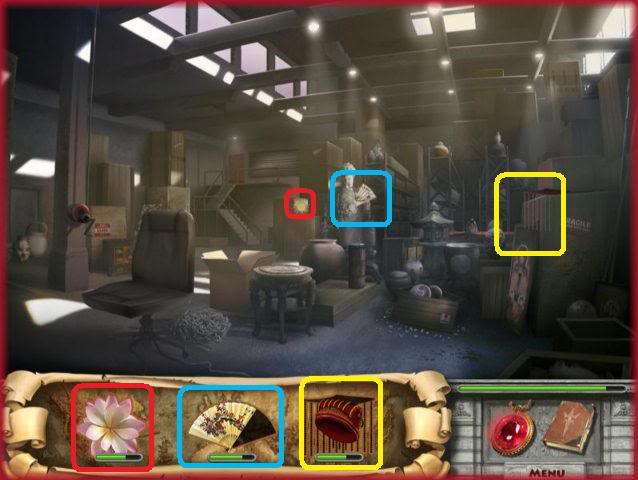
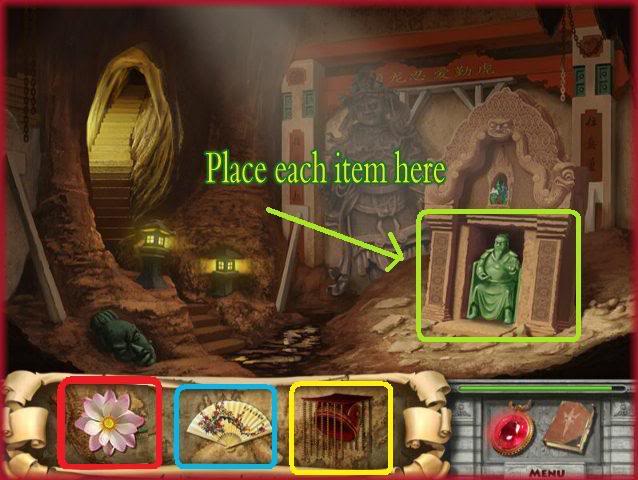
- Locate all the pieces of the lotus flower, fan, and Crown.
- Once you find all pieces you will give each item to the Jade Emperor inside the Temple as shown.
- This will trigger a mini game.
Mahjong Tile Puzzle 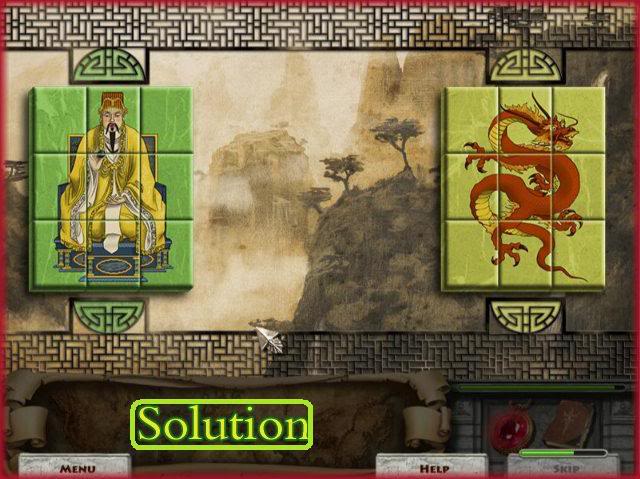
- There are two puzzles here that must be completed by placing the tiles in the correct location.
- The green tiles go to the left and the yellow to the right.
- Once you have the pictures completed as shown above you have won the game.
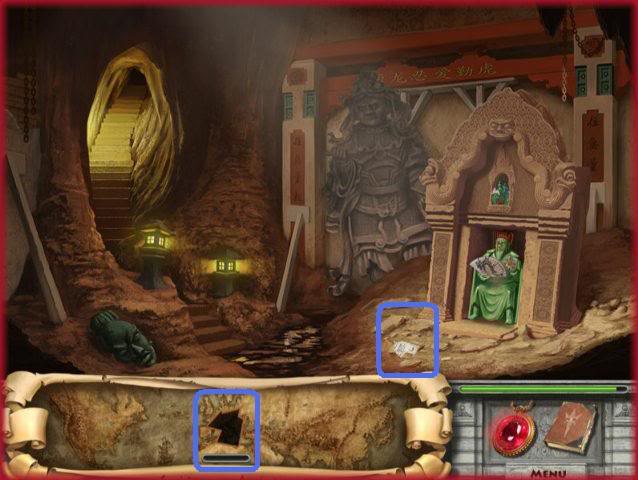
- Find the journal piece located in image above.
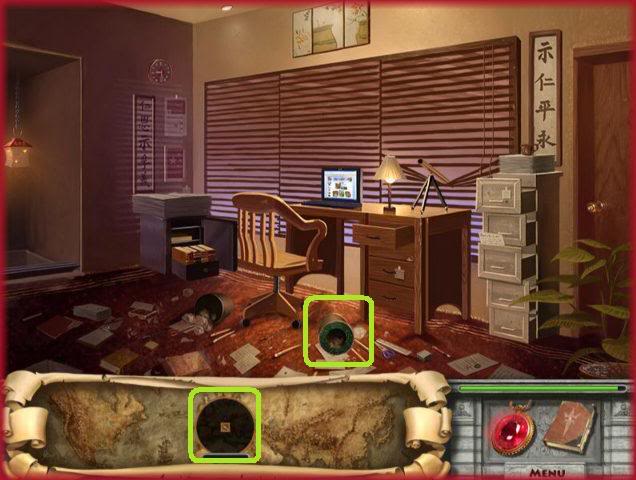
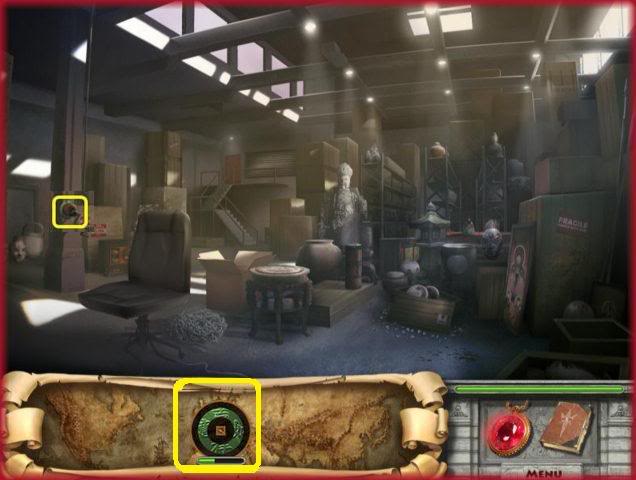
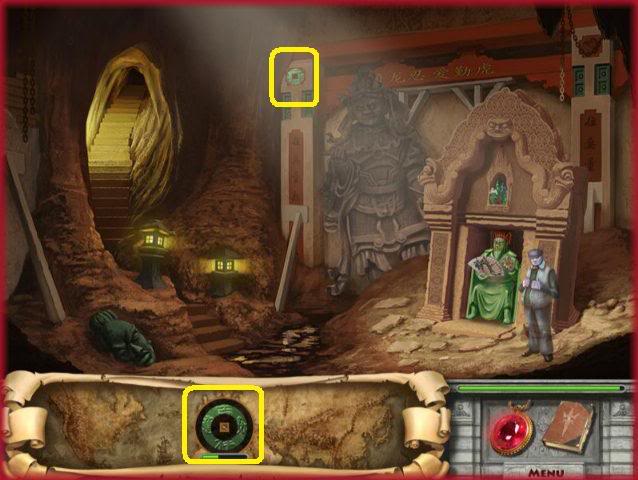
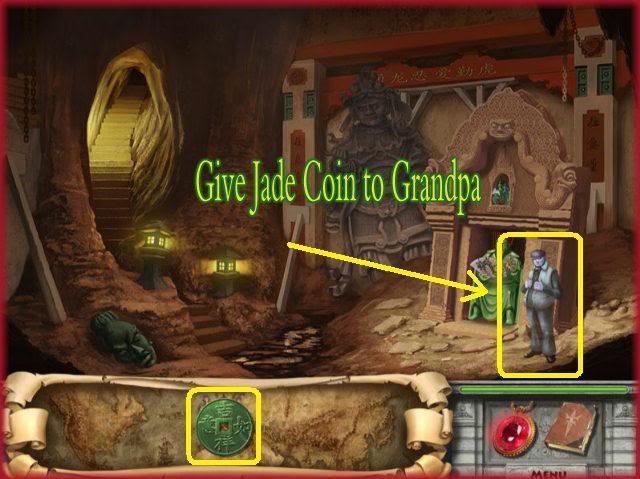
- Locate the pieces of the Jade coin.
- Once the coin is completed give it to Grandpa’s ghost as seen in image above.
- Watch the scene play out.
NOTE – Here the storyline continues and the game actually states “THE END” but the game is not over. Once you reach the end of the game you will learn that it has still not ended and states, “To be continued.” Location 9: Boston, Massachusetts, USA 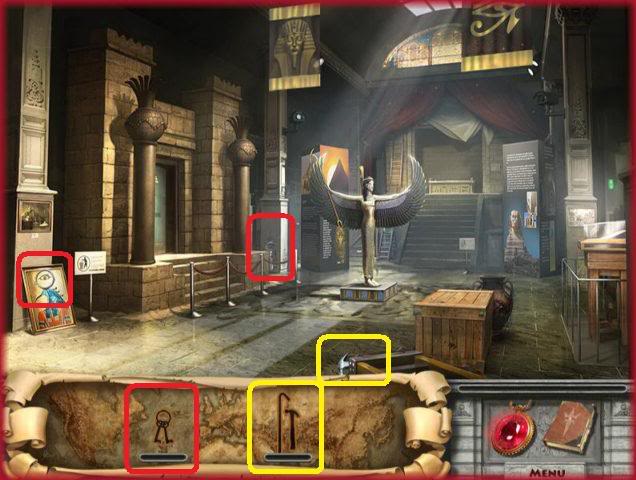
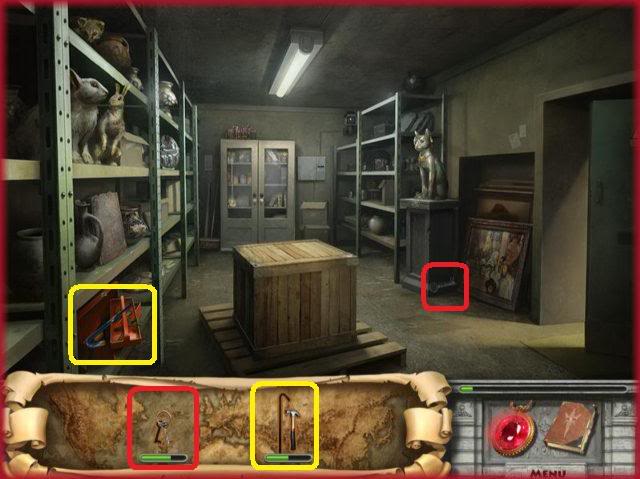
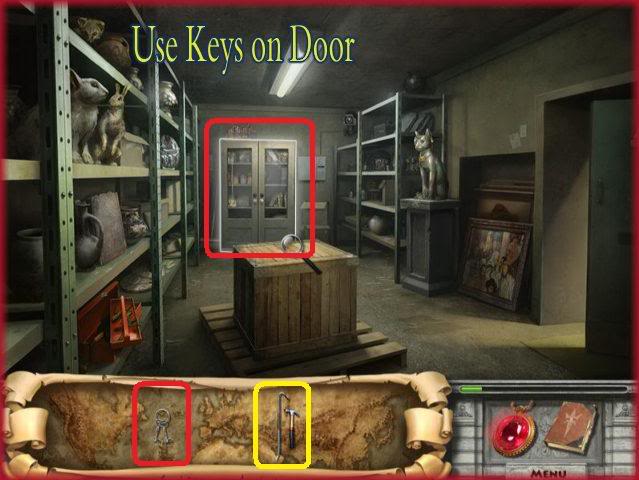
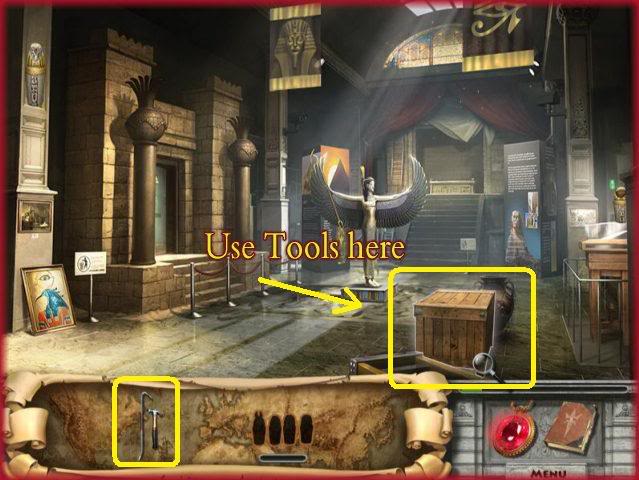
- Here you will find the pieces to the Crowbar, Hammer and Keys.
- Once you find all of these items you will use the keys on the door as shown above.
- Then you will use the crowbar on the crate in the main room.
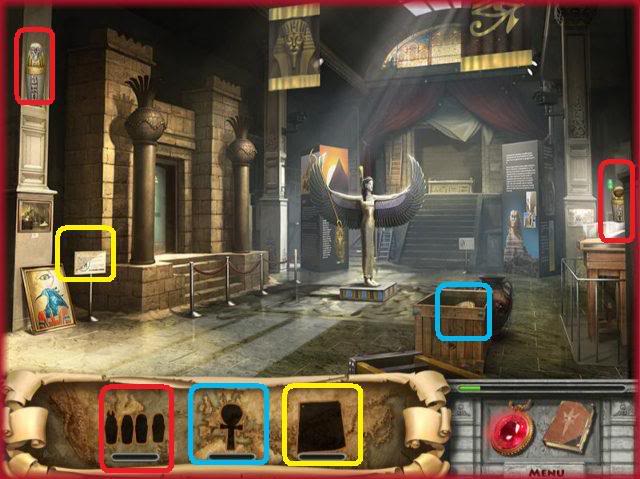
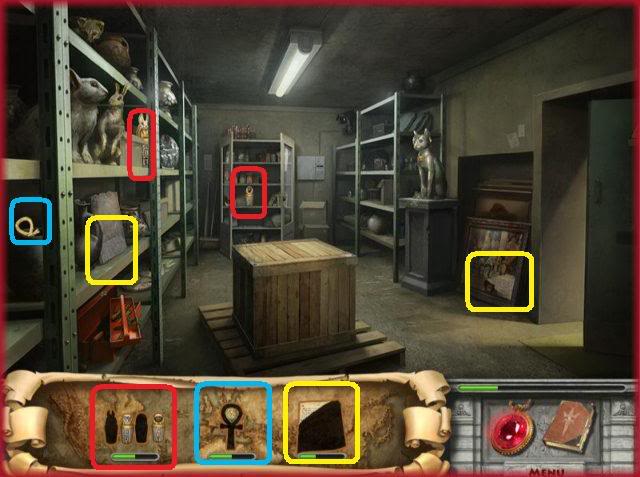
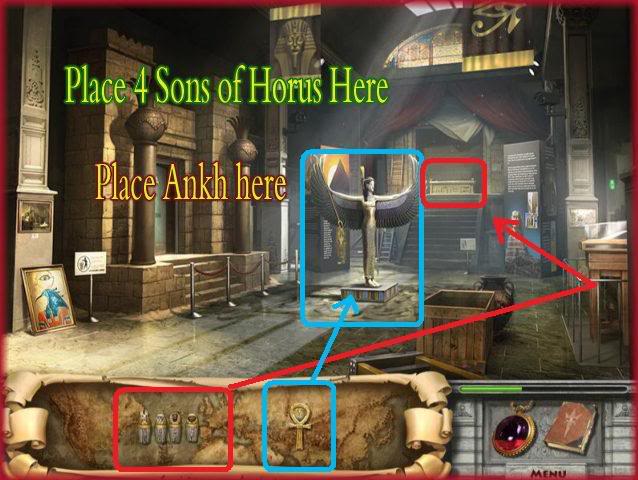
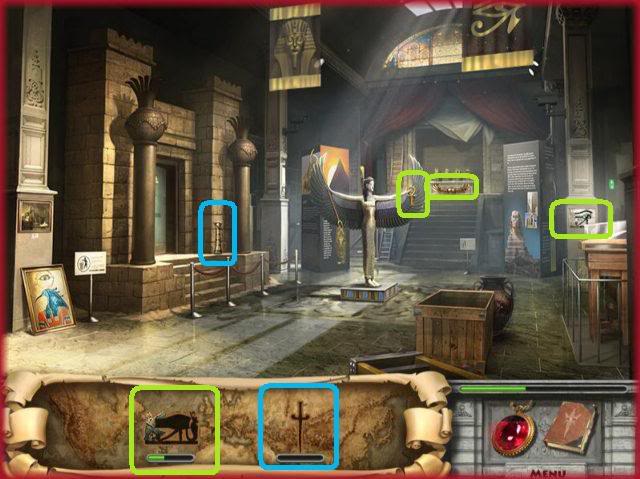
- Here you will find the “4 Sons of Horus”, the Ankh, and more journal pages.
- Once you find all items circled above you will move the 4 sons of Horus to the alter at the back area of main room as shown.
- The Ankh should be placed with the statue of a woman in the main room.
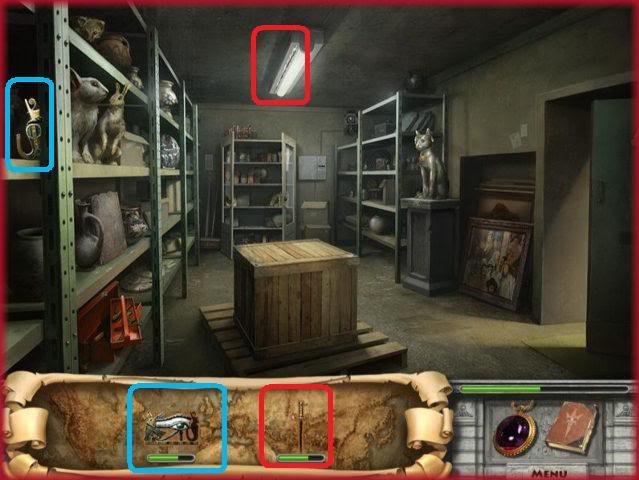
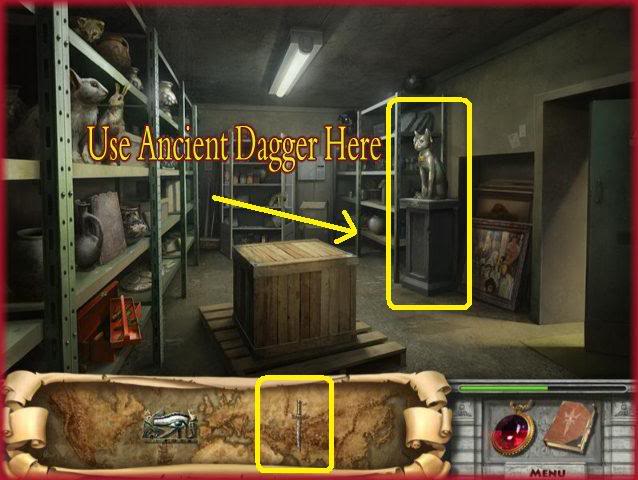
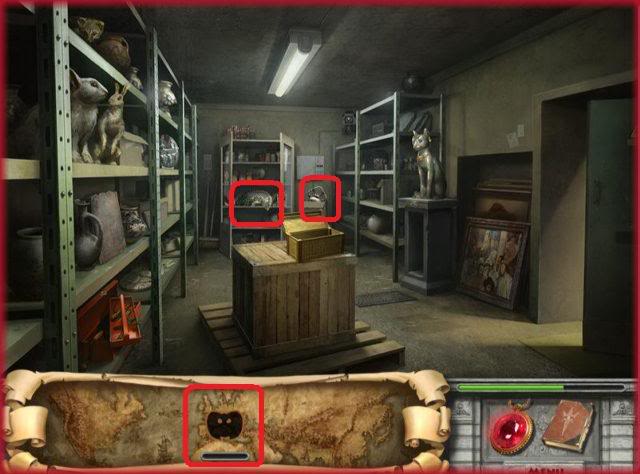
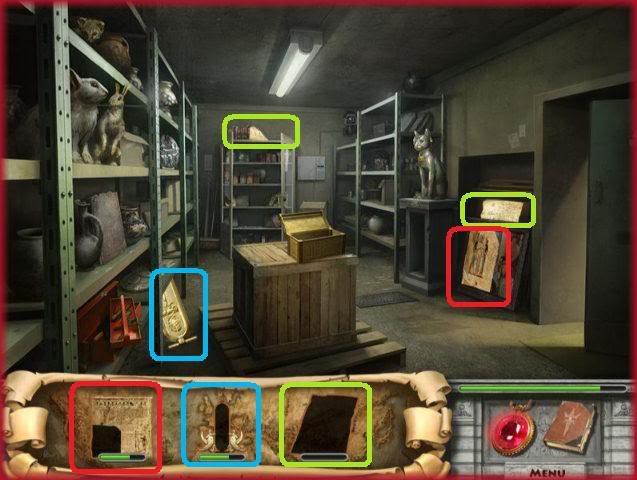
- Here you must find the jade amulet pieces and the Ancient Dagger.
- Once you find all items you must use the Ancient Dagger on the statue of the Cat with a cabinet in the storage room.
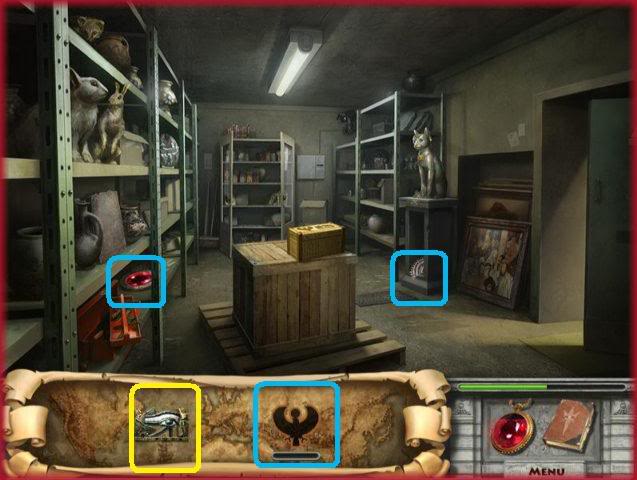
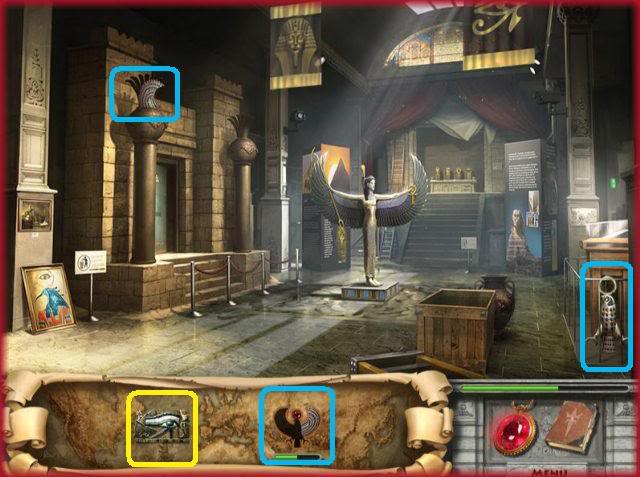
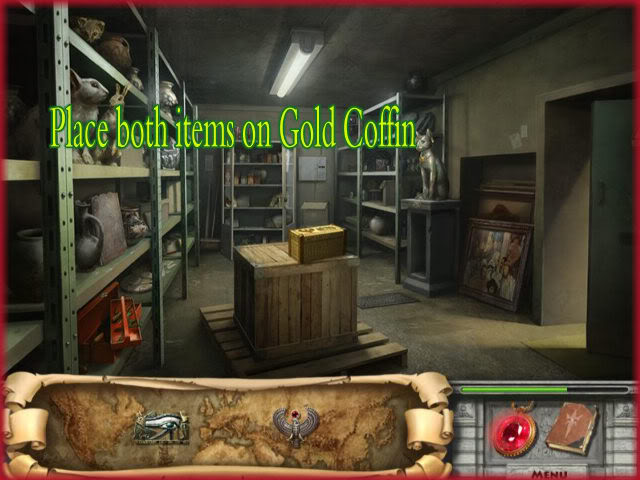
- Here you will complete the jade amulet and find pieces to the Golden amulet.
- Once you have both amulets you will place them on the gold coffin that is on the crate in the storage room.
- After you place the amulets a mini game will begin.
Triangle Box Puzzle 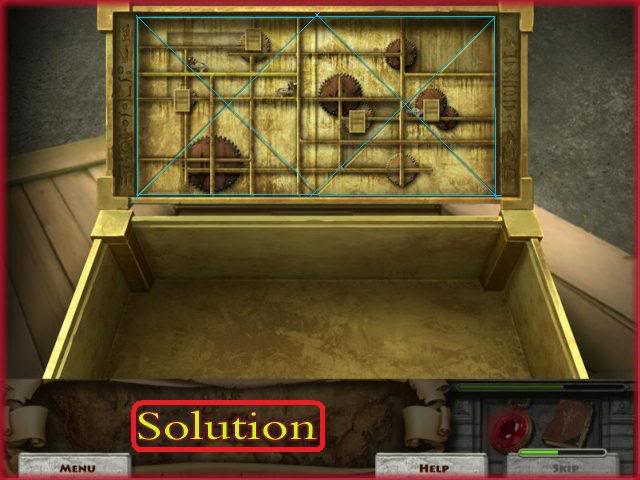
- The goal of this puzzle is to put the triangles together in such a way as to have them all fit and form the image seen in the solution above.
- The edges have been traced in blue to help you see the positions of the triangles.
- Think of placing 4 triangles in a square formation and having 2 squares side by side. (See above image)
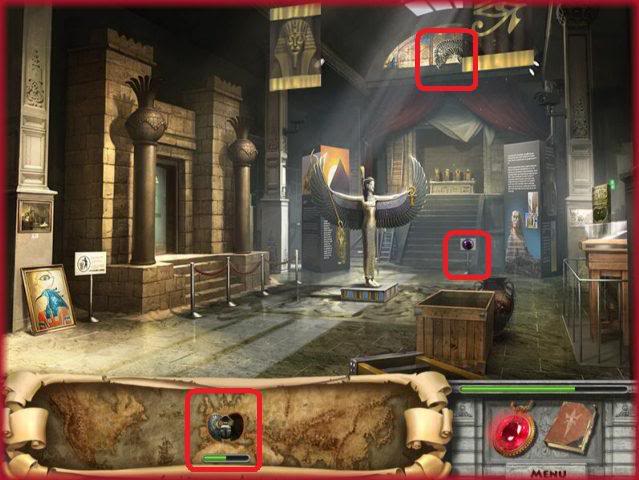
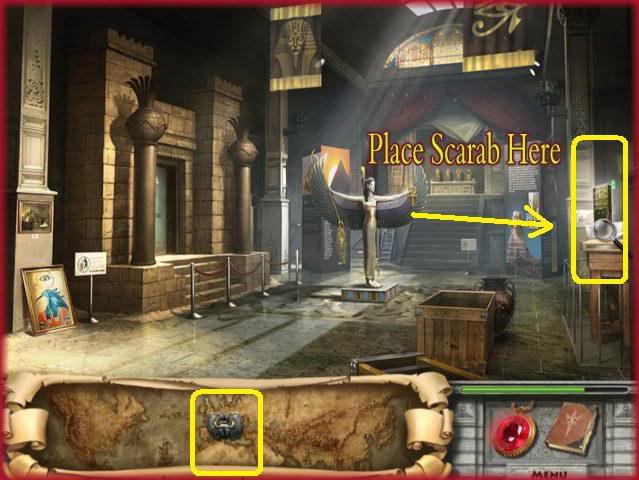
- Here you must find the scarab pieces.
- Once you have the scarab place it on the book on the right edge of the desk in the main room.
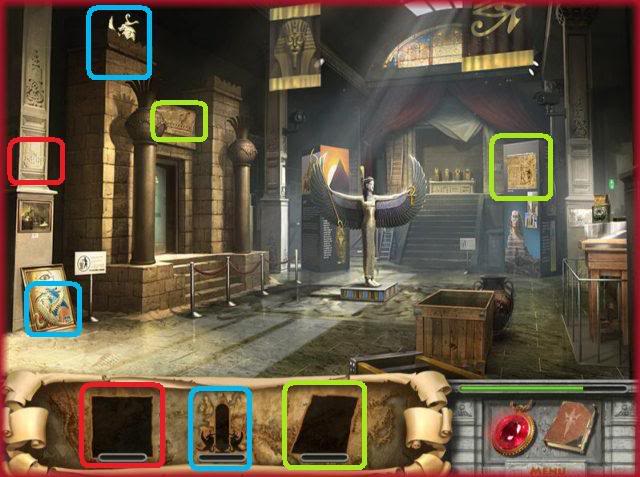
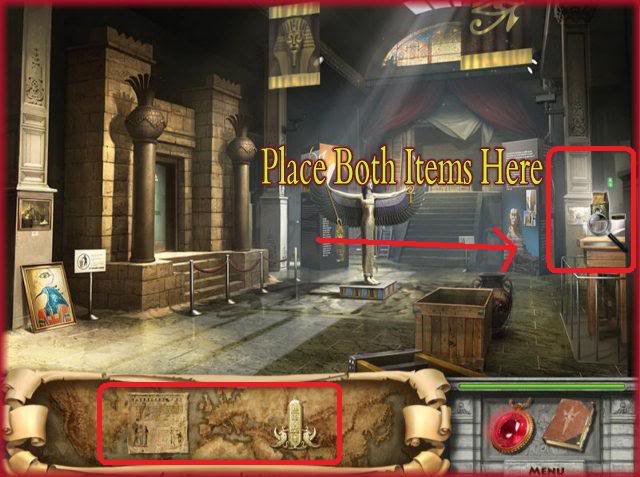
- Here you must find the papyrus pieces, cartouche and letter from Grandpa.
- Once you find these items Autumn will read the letter then you are to place the other items on the book in the main room.
- The storyline will play out and you will learn the story is “To be Continued”
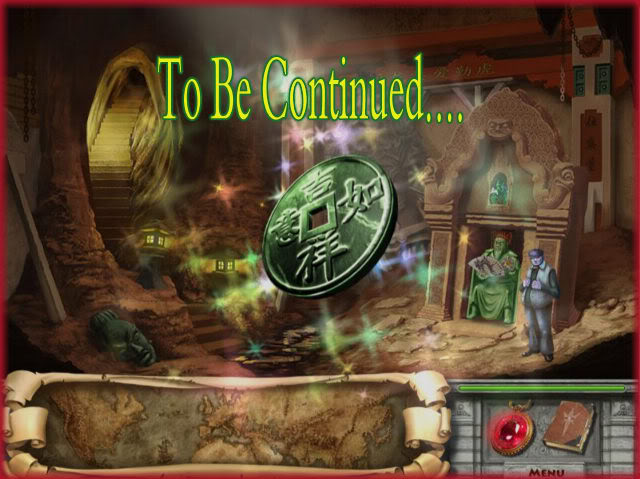
- THE END! Great job! Check back soon for the sequel to Autumn’s Treasures – The Jade Coin.
“;
More articles...
Monopoly GO! Free Rolls – Links For Free Dice
By Glen Fox
Wondering how to get Monopoly GO! free rolls? Well, you’ve come to the right place. In this guide, we provide you with a bunch of tips and tricks to get some free rolls for the hit new mobile game. We’ll …Best Roblox Horror Games to Play Right Now – Updated Weekly
By Adele Wilson
Our Best Roblox Horror Games guide features the scariest and most creative experiences to play right now on the platform!The BEST Roblox Games of The Week – Games You Need To Play!
By Sho Roberts
Our feature shares our pick for the Best Roblox Games of the week! With our feature, we guarantee you'll find something new to play!All Grades in Type Soul – Each Race Explained
By Adele Wilson
Our All Grades in Type Soul guide lists every grade in the game for all races, including how to increase your grade quickly!


