
Grow A Garden 2 Base Price List
What's the most valuable crop?![Evomon Best Starter [Leafbun, Blazpup, or Bubble?]](/wp-content/uploads/2026/06/evomon-best-starter.jpg "Evomon Best Starter [Leafbun, Blazpup, or Bubble?]")
Evomon Best Starter [Leafbun, Blazpup, or Bubble?]
Grass-type, Fire-type, or Water-type?![Evomon Tier List [META and BEST Evomon]](/wp-content/uploads/2026/06/evomon-tier-list.jpg "Evomon Tier List [META and BEST Evomon]")
Evomon Tier List [META and BEST Evomon]
The Evomon dream team.
![[Roblox] Evomon Shiny Hunting Guide – Including Prismatic and Pris Shinies!](/wp-content/uploads/2026/06/evomon-shiny-hunting-guide.jpg "[Roblox] Evomon Shiny Hunting Guide – Including Prismatic and Pris Shinies!")
Asguaard Walkthrough
Welcome to the Asguaard walkthrough on Gamezebo. Asguaard is role-playing game created by Aldorlea Games for PC. This walkthrough includes tips and tricks, helpful hints, and a strategy guide to complete Asguaard.


- Prefer Gamezebo on Google

Introduction and General Tips
Welcome to the Asguaard walkthrough on Gamezebo. Asguaard is role-playing game created by Aldorlea Games for PC. This walkthrough includes tips and tricks, helpful hints, and a strategy guide to complete Asguaard.
All maps in this walkthrough were provided by Surfergranny, Drakov and Dee227, and are used with permission. Also many thanks to everyone on the Aldorlea forums who helped compile the lists of secret rooms – I couldn’t have found all of them without your help!
Introduction
Glen, a human like you and me, wakes up in a new and unknown world. Surprisingly for him (but perhaps not so much for us) he soon finds out that he is chosen to save this world from pending doom. Help him and his friends Grom, the dwarf, Rayanne, a fellow human, and Luby the unicorn find a way to stop the evil Thanatos from releasing the seven plagues from Pandora’s box and save the beautiful world of Asguaard.
General Gameplay
As RPG’s go, this game is pretty straightforward to navigate. It’s a big game, with vast world maps and endlessly sprawling dungeons, but it was kept simple by having only one main quest that you are guided through step by step. There are no sidequests to distract you from your goal.
If you get lost and don’t remember what the next step is in your quest, go into Grom’s skills menu and select his Talk skill. This will give you a summary of where you are and where you need to go.
You can navigate the maps either with your mouse or with the arrow keys on your keyboard. If you’re using the keyboard, you can talk to characters, open doors etc. by hitting your space bar or your enter key. With the mouse – just click on them!
Menus
The menus are also pretty standard and easy to use. You can access the menu by clicking your right mouse button or hitting the Esc key. Similarly, you can leave the menu again with these actions.

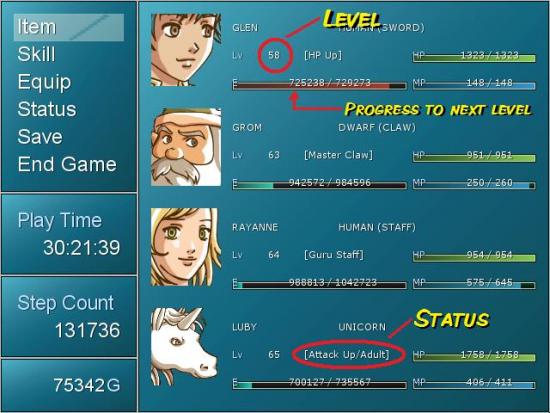
The menu is divided into the usual items, skill, equip, status, save and end game options. On the right hand side you see your party, their health points (HP) and mana points (MP), their current level and progress toward the next level, and any additional status they may have.
The items menu contains all the items you currently have in your pack. This includes all your armor. Items that you can use out of battle are listed in white, while items you can’t use right now are grayed out. Go to this menu when your characters have been injured or are ill to find healing and curing items. Select an item from the list and then select the character you want to use it on.
The skills menu shows you all the skills a character currently has, and how many MP each skill requires to use. Select the skills menu and then select the character you’re interested in. As with the items menu, the skills listed in white can be used right now, the ones in gray can either be used in battle or indicate skills that are automatic. Don’t forget that some of your characters have healing skills that you can use out of battle.
The equip menu shows all the equipment a character is wearing (top right), the equipment you own that these can be replaced with (bottom right), and the status change that the new equipment will give to that character (left). Whenever you have found or bought new equipment, don’t forget to equip it on a character! It’s no use when it’s sitting in your backpack. Select the equip menu and then the character of your choice.
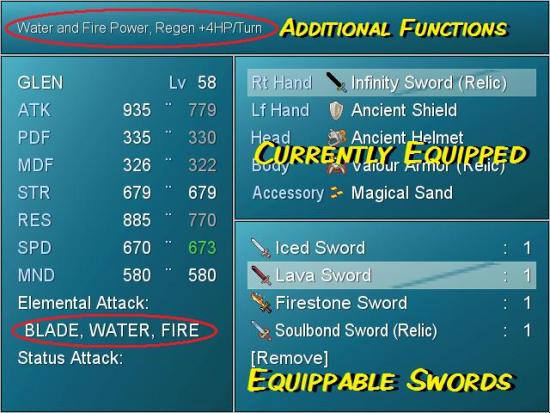
In the example above, Glen currently has the Infinity Sword equipped. If you exchange this for the Lava Sword, his ATK (hit power), PDF (physical defense), MDF (magical defense) and RES (resistance go down), although his SPD (speed) goes slightly up. His STR (strength) and MND (mind power) are unchanged.
In general, it wouldn’t be good for Glen to use the Lava Sword rather than the Infinity Sword because of all its stats decreases. However, the lava sword comes with a bonus that, next to standard blade attack, it also has water and fire attack. So if you encounter an enemy who’s sensitive to those attacks, the Lava Sword may be useful. In addition, the Lava Sword gives some HP regeneration each turn.
The status menu is pretty self explanatory. It shows everything there is to know about a character: their current equipment and various statuses, some fight stats and the number of experience points required to reach the next level.
In the save menu you can save your game at any time, except when you’re in a dungeon. Inside dungeons there are green save fairies where you can save your game. You get 15 save slots.
If you end the game you can either select to go to the main menu, so you can restart, or simply quit the game altogether. Note, however, that you will not be asked to save your game! So you need to remember to do this before exiting.
Skills
An important aspect to this game is the character skills. You can buy all kinds of skills at many locations in the game. Most skills can be bought from characters in villages and cities, though there are a few scattered throughout the dungeons and hidden locations.
There are three levels for each skill: expert, master and guru. Not every character can learn every skill, and not every character can learn all levels of a skill.
A full list of skills and where to buy them is provided at the end of the document. Most skills improve your battle strategies, but there are a few that impact general gameplay. I recommend getting as many skills if you can. You often won’t be able to get everything that’s on offer in a new place, but do go back later when you have the money and required previous levels. I will highlight a few of the skills that I think you should get as soon as you can:
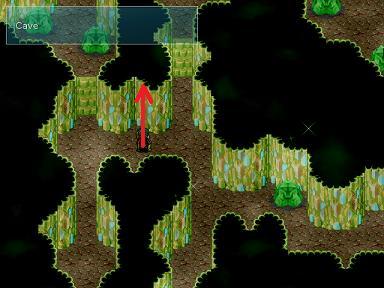
Path Finding: if there is one thing you can say about Asguaard, it’s that it is BIG. There are many dungeons that are made up of many maps. It can be hard to find your way around! With the Path Finding skill for Grom you will get little green arrows on your map that will direct you to where you need to go. Each level will provide directions for new maps. Arrows are only provided on the maps for the main route; side maps have no arrows.
Enemy Knowledge: Grom’s Enemy Knowledge skill will give you important information about how to defeat enemies in battle. Higher levels of the skill will give you information about higher level enemies, and will also give you more detailed information. You can turn the Enemy Knowledge skill on and off in Grom’s skills menu.
Botany: Botany, which can be taught to Grom and Rayanne, allows you to extract potions and powders from plants, which you can use to cure ailments or make you stronger etc. In order to extract the materials you need to have empty bottles with you. Bottles only cost 1g each, so try and carry as many of them with you as you can!
Telekinesis: Rayanne’s telekinesis skill allows you to get to items that are far away. Items you can get with telekinesis are indicated with little blue arrows. Higher levels of telekinesis allow you to get to items that are further away.
Learning: The Learning skill, which everyone can get, allows you to get more experience from a fight. This will help you level up faster.
Hidden Locations and Magical Rooms
As with most Aldorlea games, there are many secret rooms scattered throughout this game. They are divided into Hidden Locations (99) and Magical Rooms (51). These are essentially the same, but Hidden Locations are on world maps while Magical Rooms are in dungeons.
The secret rooms can contain all kinds of useful goodies, ranging from simple potions to essential skills. I will only mention the rooms with essential skills or items in this walkthrough, but a full list will be provided at the end.
Always check any objects lying around inside the locations, as well as the plants, as they often hide more goodies. Some goodies can only be reached with Rayanne’s telekinesis skill.
Walkthrough – Snow Mountain & Roya Mountains
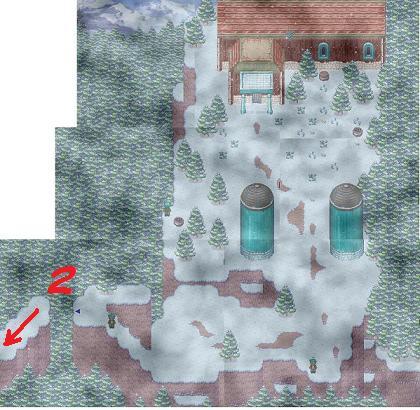
You wake up and have no idea where you are. The objects around you are all unfamiliar and books and notes are written in a language you don’t understand. Go out the door. In the next room is a bench where you can rest to heal up. There is also a wooden branch on the floor. Pick it up – it will automatically be equipped as a weapon (note, however, that this is the only time something is equipped automatically. After this you have to equip everything manually). Now go outside.
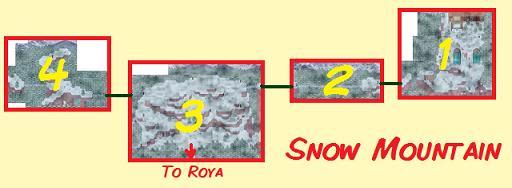
You’re on a snowy peak. The open barrels outside contain a fur hat (which you do need to equip) and some coins. Go south and west and exit by the blue arrow.
Snow Mountain 1
Snow Mountain 2
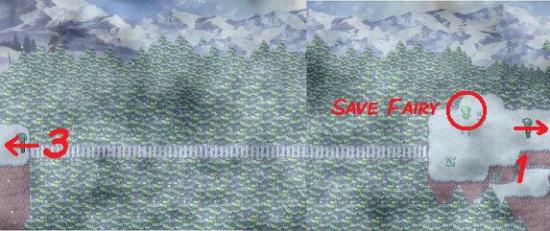
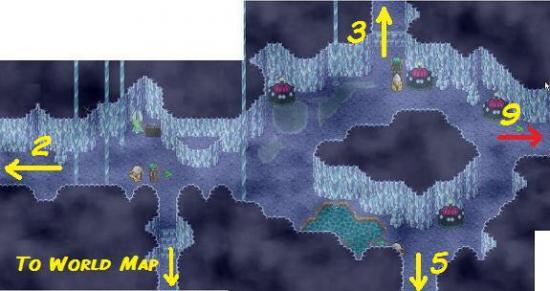
On the next screen you will find a green fairy where you can save and heal, if you like. Healing costs half of your gold, though! Cross the bridge and go on to the next screen.
Snow Mountain 3
There you get a cutscene – you can see a village down the hill. You want to find it so you can find out what happened to you! Explore this screen, but don’t yet go to the south exit as you won’t be able to come back when you do.
Inside the cave is a chest with an ice shield. Also check the statue for a powder. Cross the bridge to the west and go to the next screen (map 4).
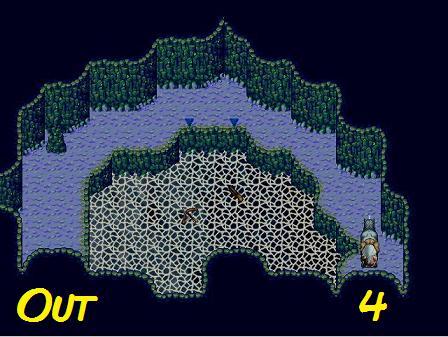
Snow mountain 4
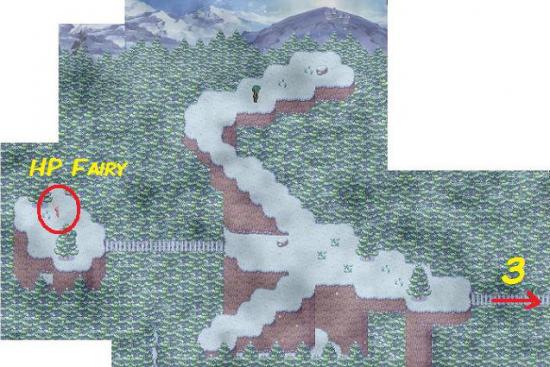
Here you’ll find a red fairy – touching red fairies gives you +5HP and full HP restore. Now go back to map 3 and take the south exit.
You will get a cutscene in which you wake up in a house filled with dwarves. They ask your name – you can select any name you like, but in this walkthrough I will use the default name of Glen. So remember, Glen is you.
The dwarves tell you they summoned you from your own world to Asguaard. They tried to summon a human before, but it didn’t work. They tell you they’re in danger and need a human to help them, as they need someone with a soul and dwarves don’t have a soul. Pandora’s Box was opened and soon the plagues will be released on the country.
You first have to go to Kandara. Grom will come with you. Outside he will teach you how to fight. You can select axe or claw fighting for Grom, and sword or knife fighting for you. It doesn’t really matter which one you pick – I tried all options and each have their advantages and disadvantages.
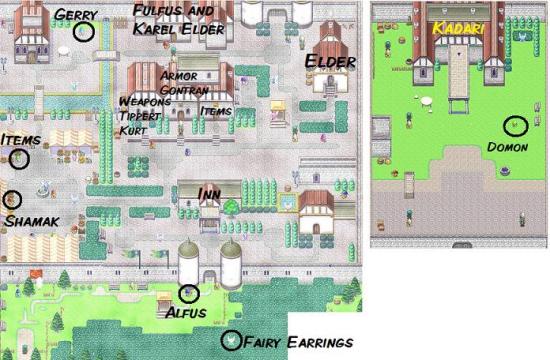
Roya Village

Explore the village. There are many characters in the village that will be able to teach you valuable skills. For each skill you need to learn the expert level first, then the master level, then guru. See the skills list at the end of the document. You won’t be able to get all the offered skills right now, so you may want to come back later when you have more money.
Go and buy a knife or sword for Glen in the weapons shop. Grom will have a claw or an axe to start with, but you have to equip it. Also buy some armor and heal up. Then leave the village on the south side and arrive on the Roya World Map.
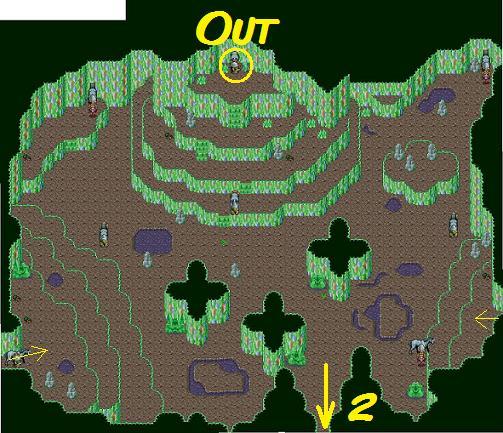
Roya World Map
Enter the cave to the east of Roya to get to Roya Mountains
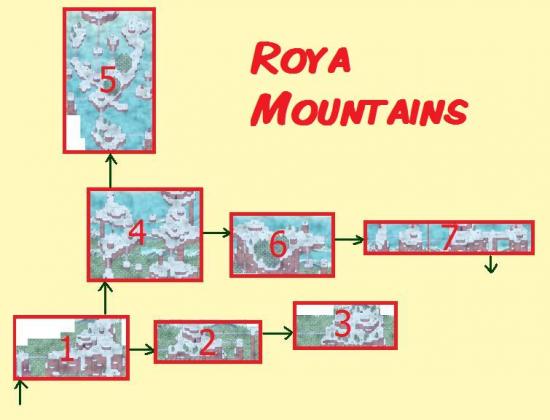
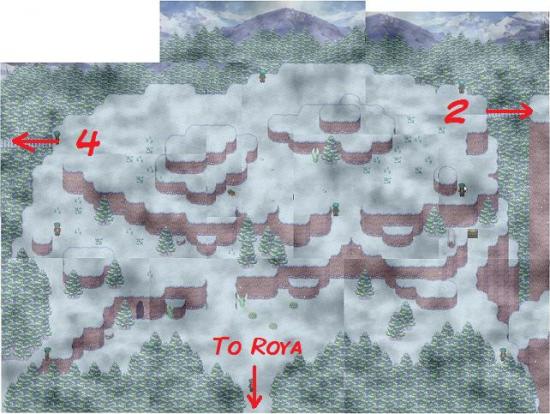
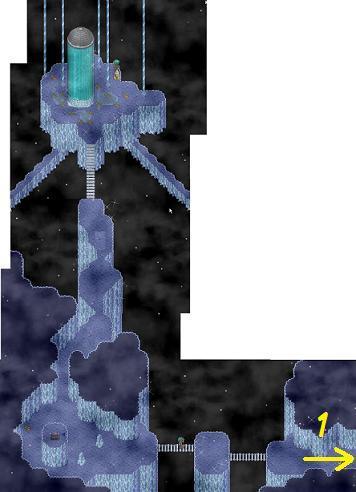
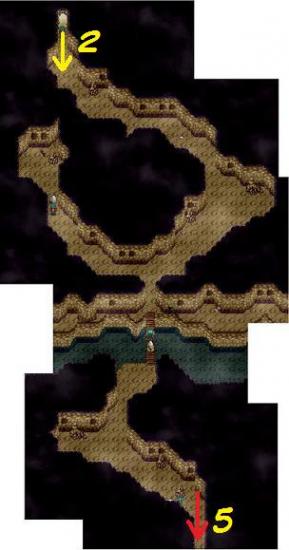
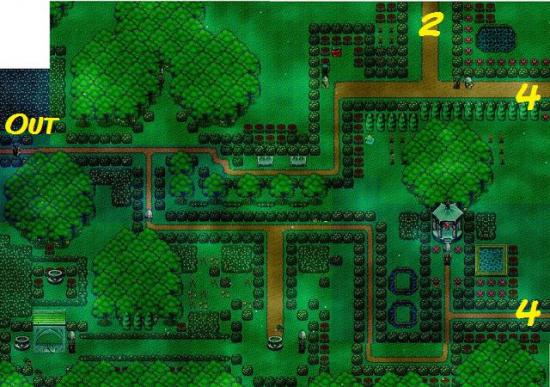
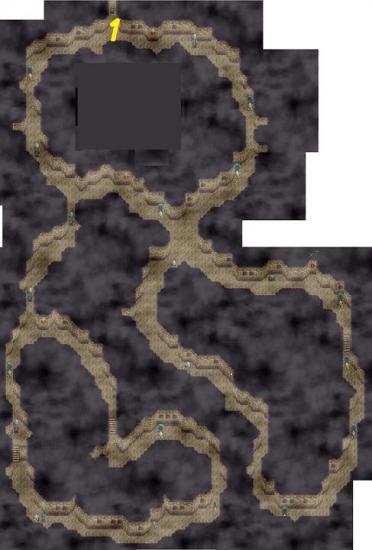
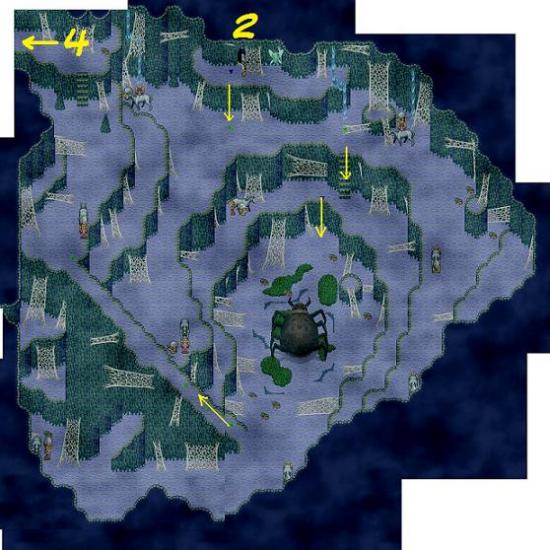
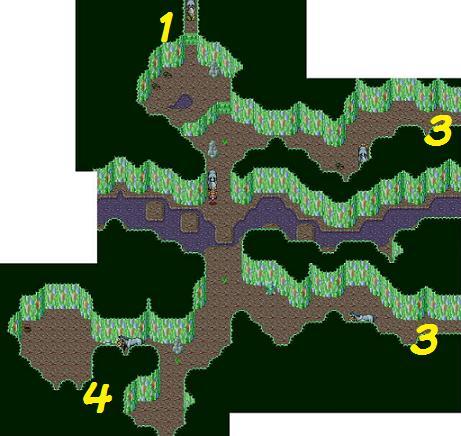
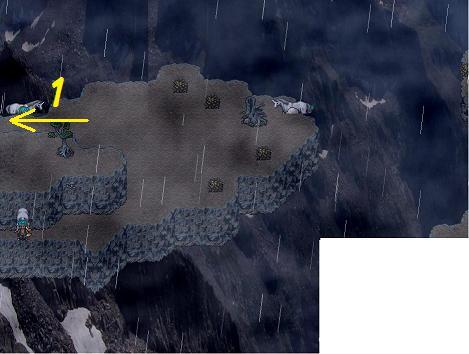
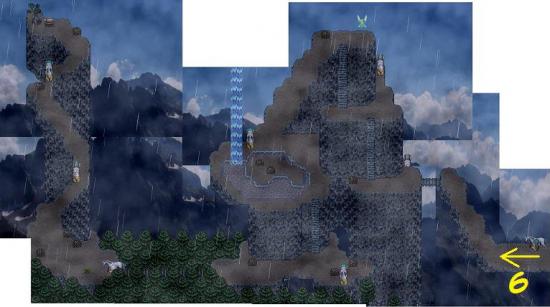
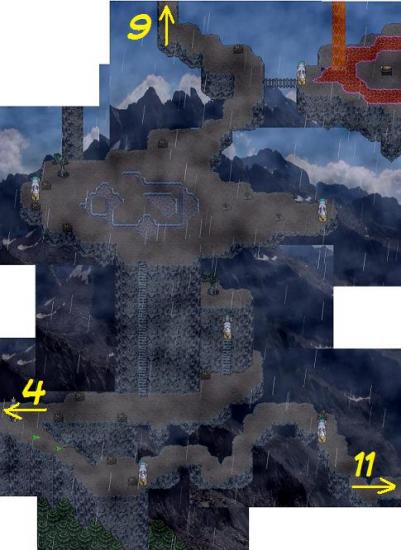
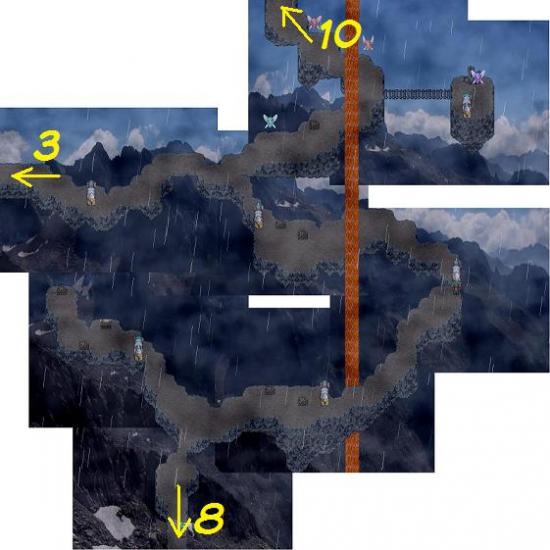
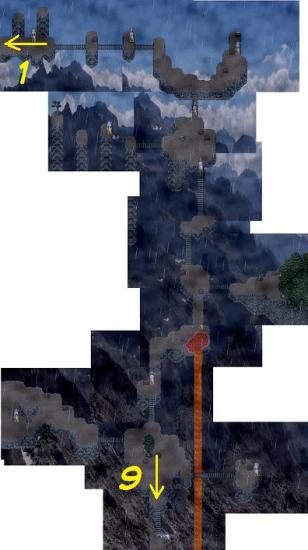
You’re now in Roya Mountains. The numbers on the maps indicate which map that exit will take you to.
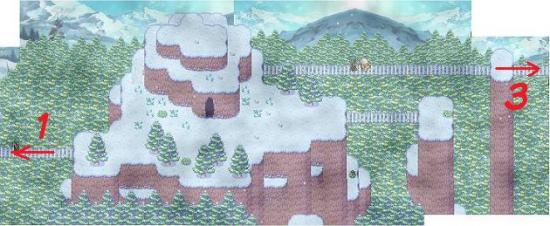
Roya Mountains 1
You can go east first if you like (maps 2 and 3), but there is nothing much there for you right now. There are a few goodies lying around, but you can’t get to most of them at the present.
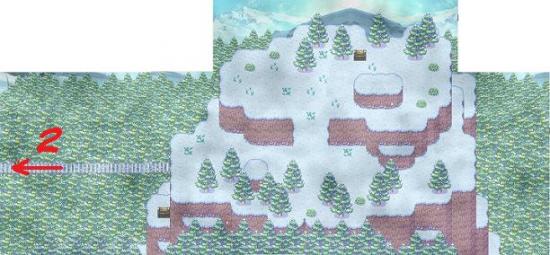
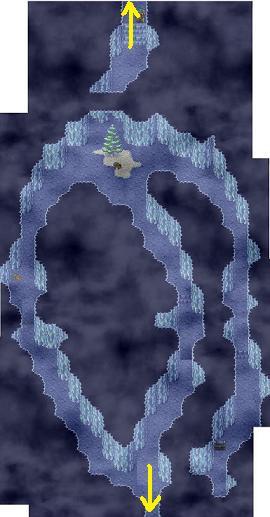
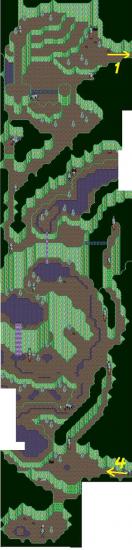
Roya Mountains 2
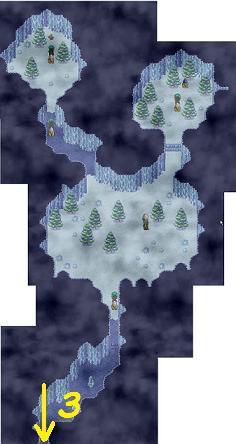
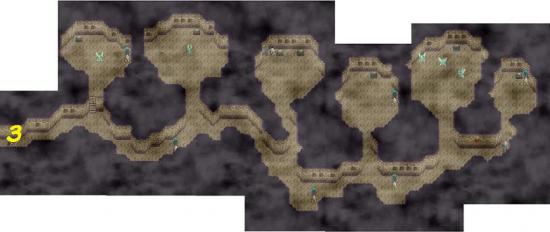
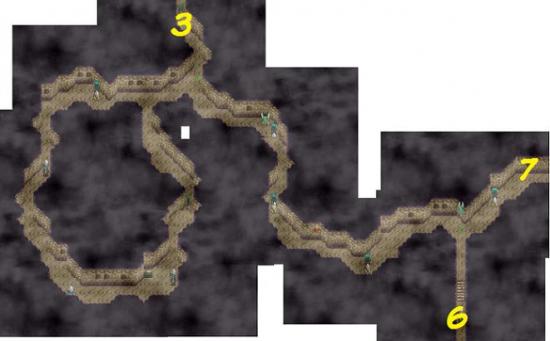
Roya Mountains 3
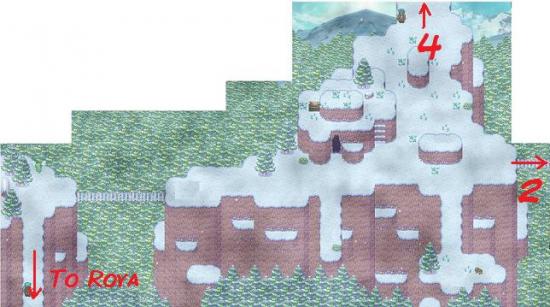
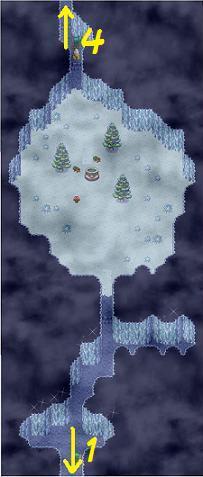
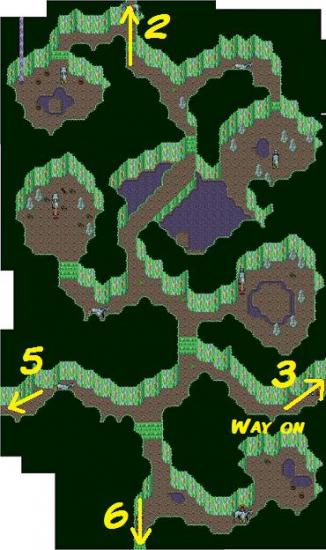
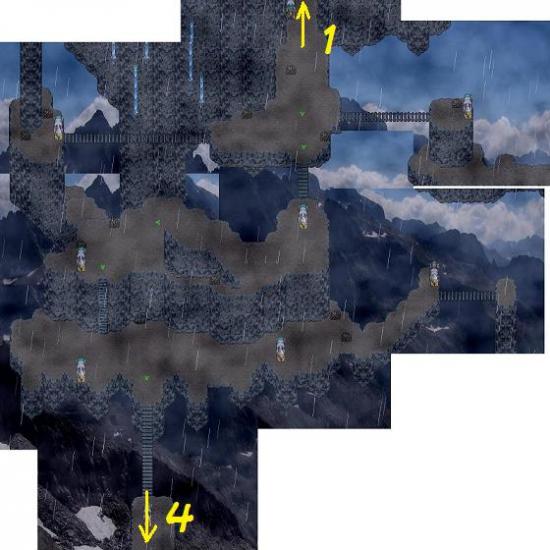
Go north (map 4). The cave has a few stats powders.
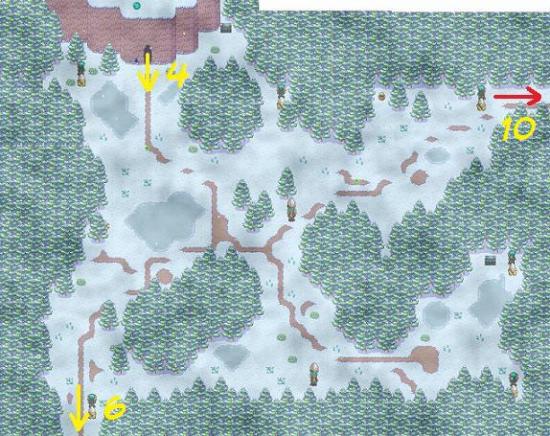
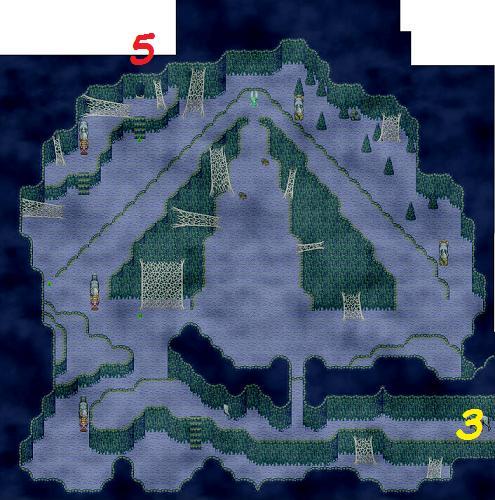
Roya Mountains 4
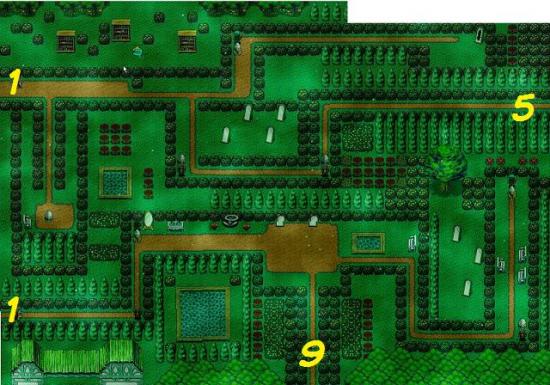
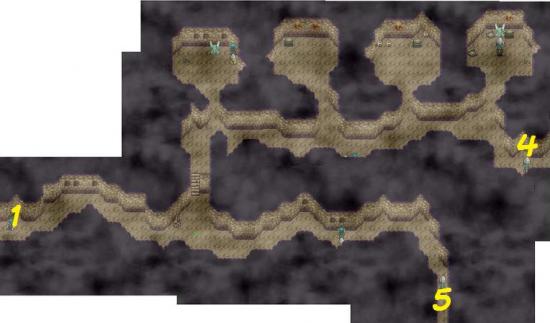
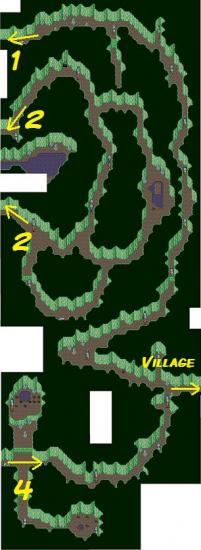
From this map you can go north again (map 5), but there is nothing for you there but an MP fairy.
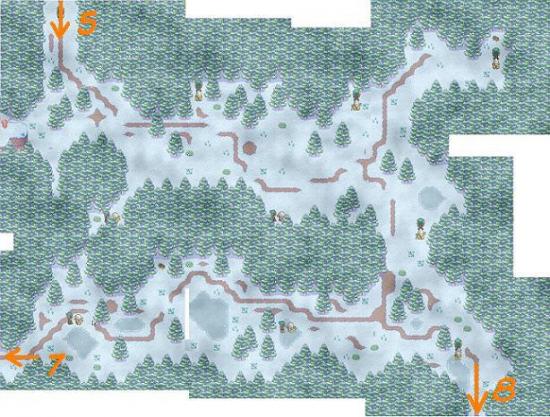
Roya Mountains 5
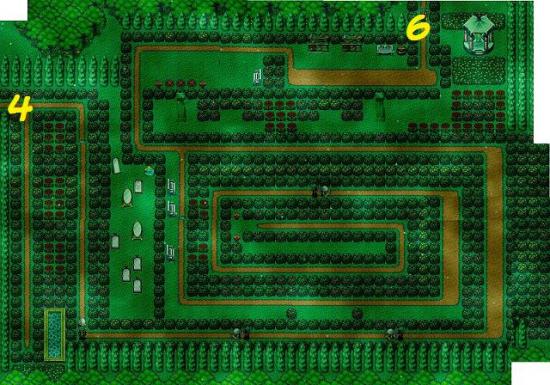
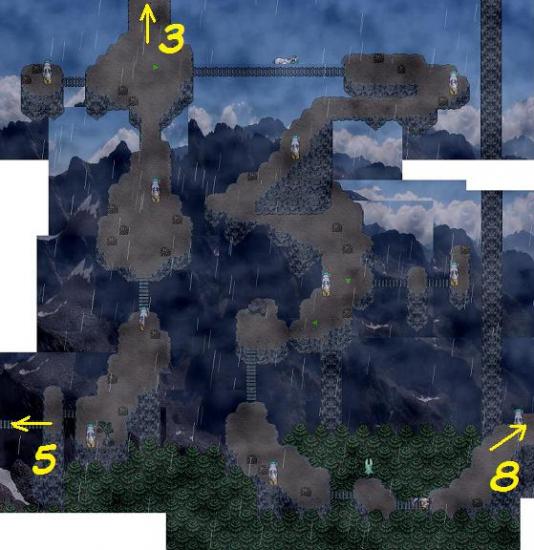
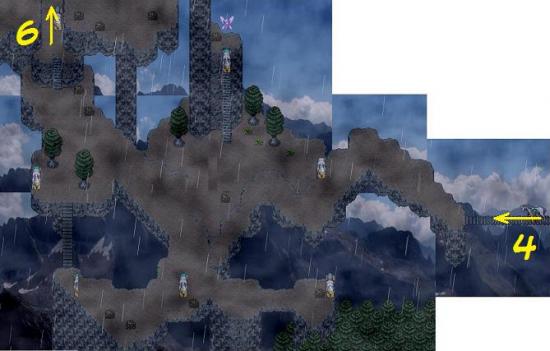
Go east (map 6) and east again (map 7).
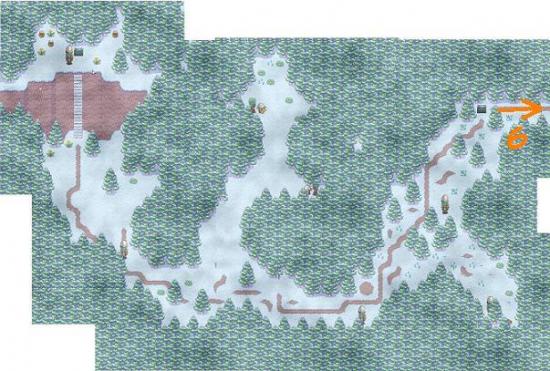
Roya Mountains 6

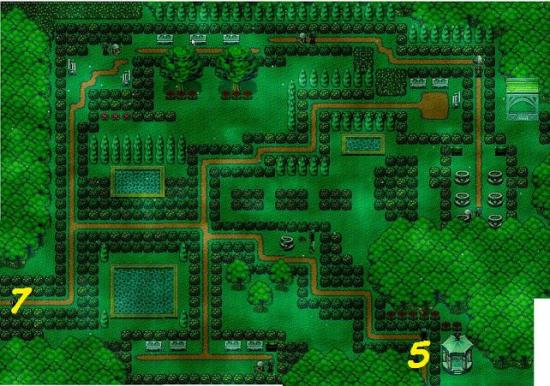
Roya Mountains 7

Here you will get another little cutscene. Grom wants you to do more learning before you go to Kandara.
When you try to walk past the cave, Glen sees a light coming from the cave. You need to go in. Inside is a girl overcome with cold. In a cutscene, you will take her to Grom’s friend’s house on the other side of the mountains. Her name is Rayanne, and she is the first human the Dwarves tried to summon. The Dwarves though the summoning had gone wrong, but Rayanne has been stuck in the cave ever since. She will come with you. She gets to pick staff or bow for fighting.
Leave the map and Grom will tell you you need to go to Fang in the east. Go explore the world map first, if you like, or go back to Roya for some more skills and equipment for Rayanne.
There are many little side areas on the main world maps, such as Roya Graveyard and Tulla Woods. These are all small and easy to navigate. I will leave you to explore those on your own and we’ll regroup in a few minutes when I will lead you to a few places of interest.
Ready? In the north is Roya Graveyard. In the graveyard are catacombs that have some money bags. Note that in the catacombs you have to walk into the niches in the south wall to get to the rooms with the money. The rats in the catacombs can make you ill, which you can’t cure right now. It doesn’t matter too much; it just reduces your strength somewhat. You will find cures later.
On the way to Fang in the east you will pass the Crystal Graveyard. To get into the house you will need to find the key, which is inside the blue pillar. Inside you’ll find some money bags and a dark pendant.
Go into Fang. Go into the inn and go downstairs. In the cave under the inn you will find an items shop and Grom’s friend Ghred, who will teach Glen and Rayanne magic. However, Glen can’t learn it, which annoys him greatly! Rayanne, on the other hand, learns her first four spells.
Before going on to Kandara, take some time to explore the rest of the Roya world map. There are 15 hidden locations on this map, some of which have some useful skills you should get (see hidden locations list at the end of the walkthrough).
Give either Grom or Rayanne the expert botanist skill from Mellyn in hidden location #007. Then go back to Roya to buy some empty bottles (they’re only 1G each so get 99 if you can) and revisit some locations (in particular the Roya Mountains and Tulla Woods) to get potions and powders from plants.
Another good skill to get is expert pathfinding for Grom, from Ghert in hidden location #013. This will give you little green arrows on the maps through the main dungeons so you know where you’re supposed to go. This comes in handy in complex cave systems such as the Crystal Caves.
Also get expert enemy knowledge for Grom from hidden location #002, which will give you vital information for fighting some hard to beat monsters.
When you’re done with the Roya world map, take a deep breath and go into the Crystal Caves to the northeast of Fang.
Crystal Caves
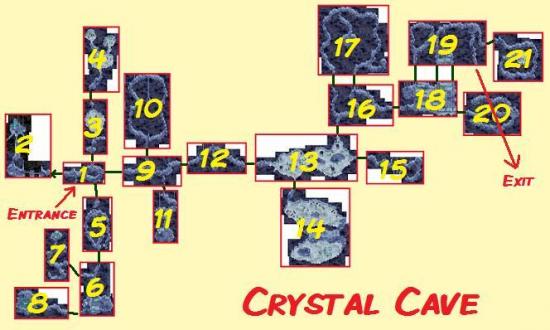
As Grom will tell you, the Crystal Caves will be a great training ground as they are very big and therefore you will encounter many monsters. If you’ve got the pathfinder skill, follow the green arrows for the fastest route through the caves. For all dungeons I will describe a route that will get you through all the maps, not just the ones on the way through.
Crystal Cave 1
Crystal Cave 2
Then go back to map 1 and exit northeast for maps 3 and 4.
Crystal Cave 3
Crystal Cave 4
On map 4 you will find Garu, who can teach Rayanne telekinesis for 500g. This is a good skill to get as it allows you to get to some of the goodies that were out of reach before – they will be indicated with pale blue arrows. As with all other skills, there are three levels, so you still won’t be able to get to them all.
Once again go back to room 1 and then go south.
Crystal Cave 5
Crystal Cave 6
Crystal Cave 7
Crystal Cave 8
Go back to map 1 (last time, I promise!) and follow the green arrow east.
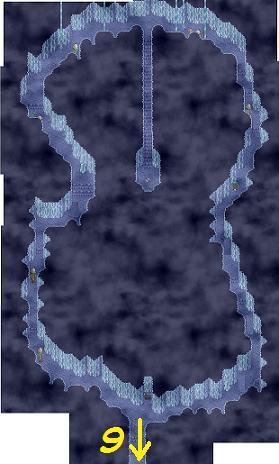
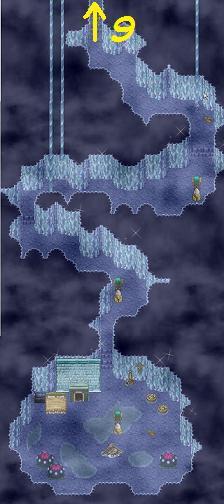
Crystal Cave 9
Crystal Cave 10
Crystal Cave 11
Crystal Cave 12
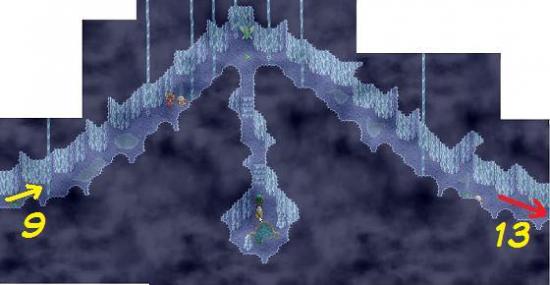
Crystal Cave 13
Crystal Cave 14
Go back to map 13 and east to map 15.
Crystal Cave 15
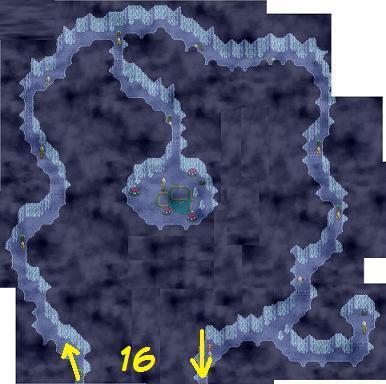
Then go back to map 13 and north to map 16.
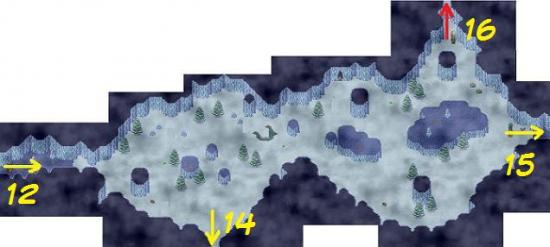
Crystal Cave 16
Map 17 is to the north of map 16. There are two routes between map 16 and 17, so you can walk a little loop.
Crystal Cave 17
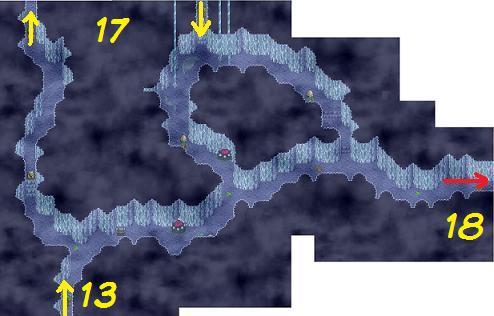
Crystal Cave 18
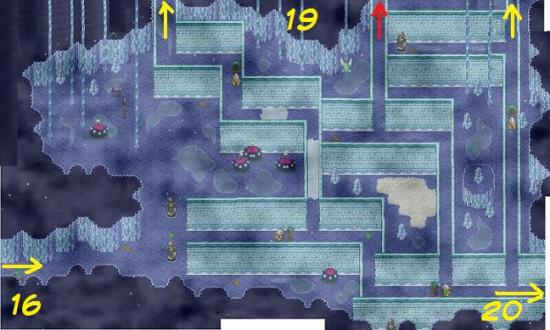
Now it gets a little complex as there are three exits on map 18 that go to three different areas on map 19. The left exit goes to a dead end on map 19. The top right exit does too. The middle north exit goes to the part of map 19 that will lead you further.
Crystal Cave 19
Crystal Cave 20
Crystal Cave 21
From map 19 you can exit onto the world map, where you will get a long cutscene in which Rayanne laments being taken away from her normal life and there is more talk of souls.
Kandar / Barton Woods
Small Kandar World Map
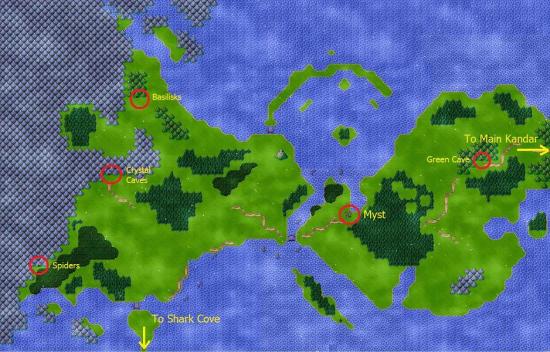
You are now on the Small Kandar World Map. There are five hidden locations on this map (see below). There are also two caves with monster bosses: one in the northwest with two basilisks in it, and one in the southwest with some spiders in it – both of these are likely too strong for you now, so come back later when you’re bigger and uglier! Also ignore the path to the south, which goes to Shark Cove. The sharks there are too much for you to handle right now.
So that leaves nothing for us to do but to cross the bridge and enter the city of Myst to get some rest, some more skills and better weapons. There’s nothing else to do here right now.
Make your way east to the Main Kandar World Map. Pop into the Green Cave on your way there to get some more goodies – the green vines in the cave are full of potions.
Main Kandar
Main Kandar World Map
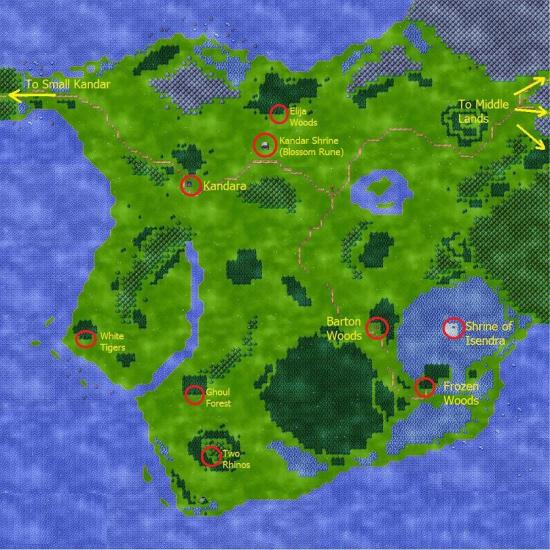
There are eight hidden locations on the Main Kandar World Map, but for the sake of the story, we’re going straight to the city of Kandara. There is a green fairy wandering around in the southeast corner outside the city walls. If you manage to catch it (it will eventually come out of the shrubs), you will receive some fairy earrings.
Kandara
Do some shopping in Kandara if you like, and then go to the house of the Elder, which is by the northeast gate of town. The Elder will tell you that the Pandora Box can’t be harmed. Anyone who tries to strike it or its owner will be turned to dust. The only way to stop its power is by finding the three stones of Passion, Origin and Soul and placing them around the box. The first stone, the Stone of Passion, is in Isendra Shrine in the Frozen Woods. The Elder will give you 1000G for your journey.
So, we better listen to what the man says and go find those Frozen Woods. It is in the southeast. On your way down, pop into Barton Woods for more skills, if you have the dosh. If your Rayanne is an archer, there are also some good bows for her in Barton Woods.
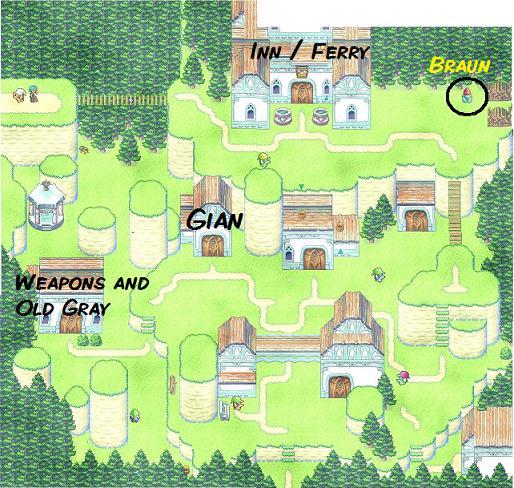
Barton Woods
Other places of interest are:
- Elija Woods – there are just some more goodies here, but Aldorlea fans will meet a familiar face there!
- In Ghoul Forest there is a Zombie king in the little graveyard in the northeast. He’s sensitive to fire, and Rayanne’s Flare spell should finish him off quite quickly.
- In Hidden Location #021 you will find Clarine, who can teach you master fortune. If you get master fortune from her, there will be lots of moneybags on the way down.
- In the cave in the far south are two rhinos. They’re quite strong, so you may want to come back for those later. They’re sensitive to light, acid and axe.
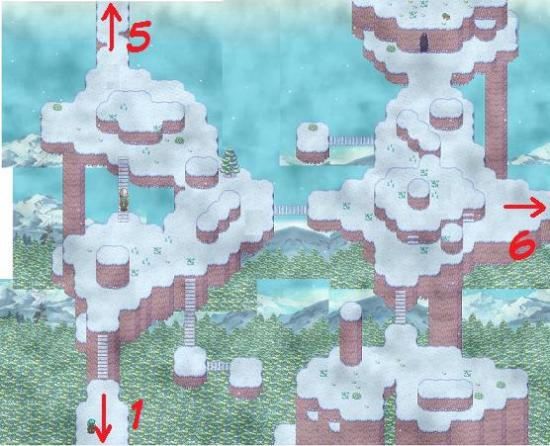
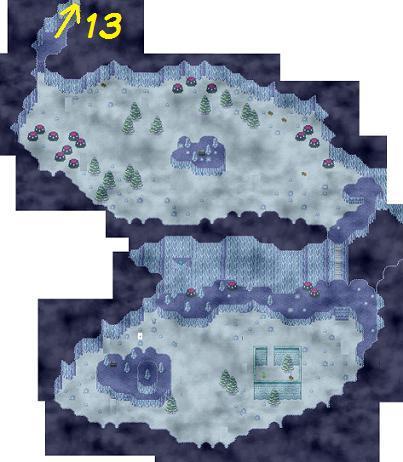
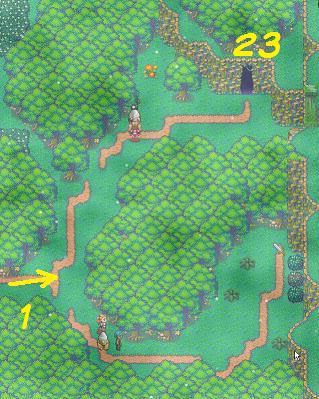
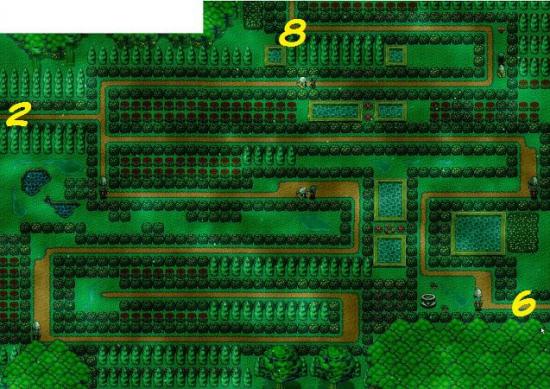
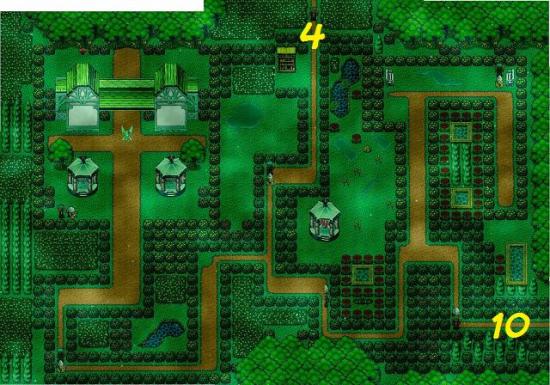
Frozen Woods
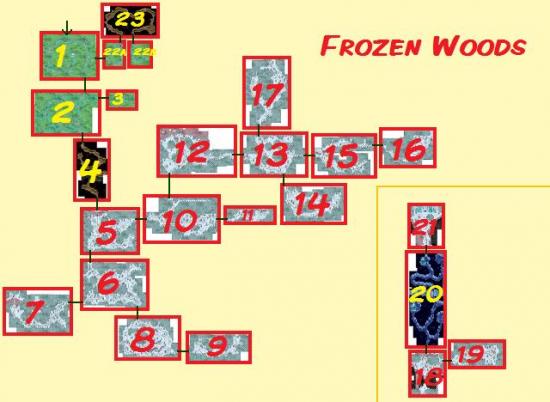
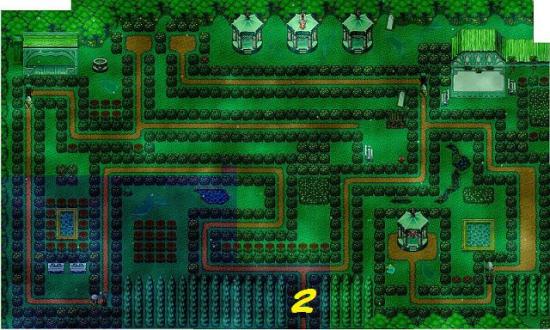
Enter the Frozen Woods. The path to the east goes to some elaborate gardens (maps 22 and 23 go towards the gardens). The garden maps are shown further down.
Frozen Woods 1
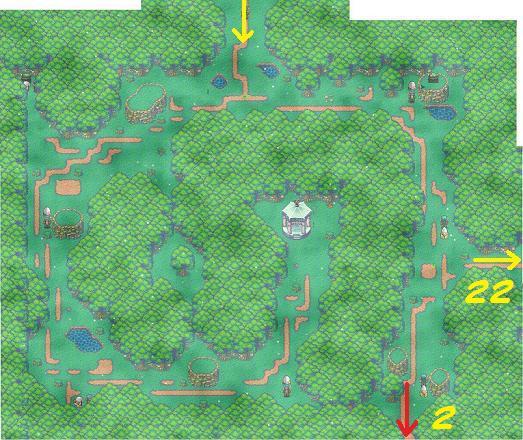
Frozen Woods 2
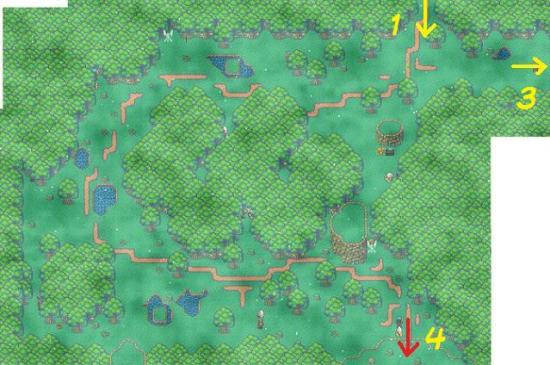
Frozen Woods 3
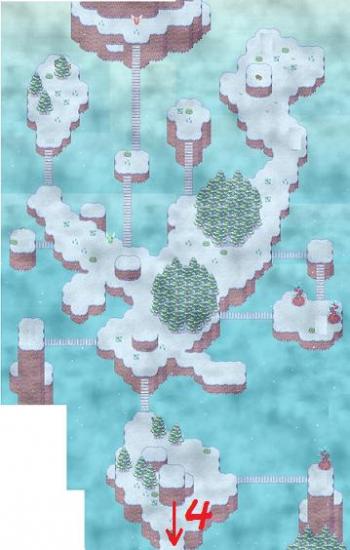
Then make your way around map 2 and exit south.
Frozen Wood 4
Go through the cave and come out on map 5.
Frozen Wood 5
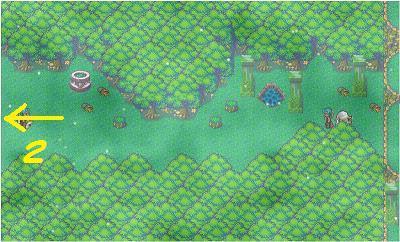
The path goes on to the east, but there are a couple more maps with goodies down south. So go south to map 6 and west to map 7.
Frozen Woods 6
Frozen Woods 7
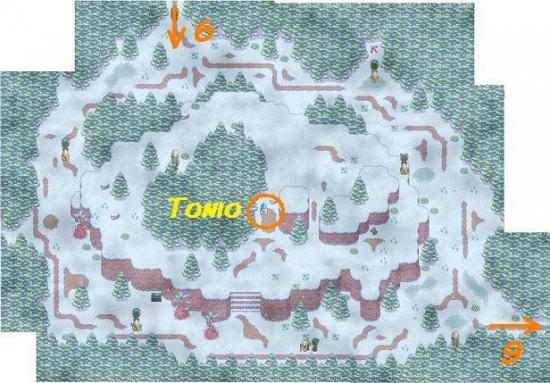
Then go back to map 6 and take the southeast exit to map 8, which goes on to map 9 to the east. On map 8 you will find Tonio, who will be able to teach Grom Expert Pathfinding, if you didn’t get that yet.
Frozen Woods 8
Frozen Woods 9
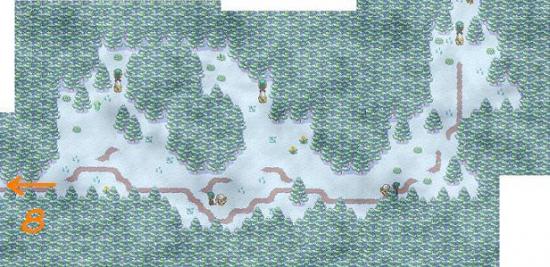
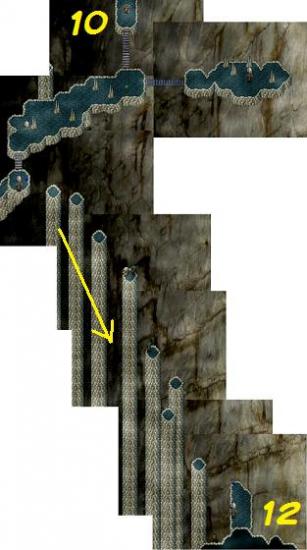
Retrace your steps to map 5 and take the northeast exit to map 10.
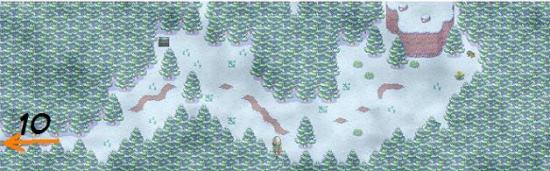
Frozen Woods 10
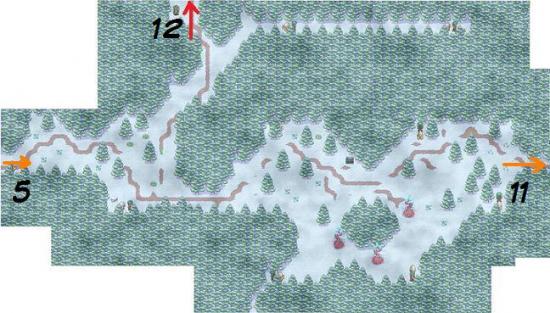
Frozen Woods 11
Frozen Woods 12
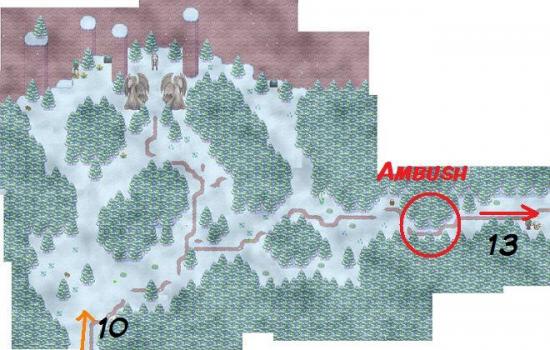
There is a statue of a unicorn in the north of this map. Make your way east from here and save at the save fairy. As you make to exit the map to the east, you will be ambushed. This will be a tough fight and Grom won’t have enemy information if you’re only at expert level Enemy Knowledge. But Glen’s sword attacks, Grom’s freeze and Rayanne’s flare and light attacks worked well for me.
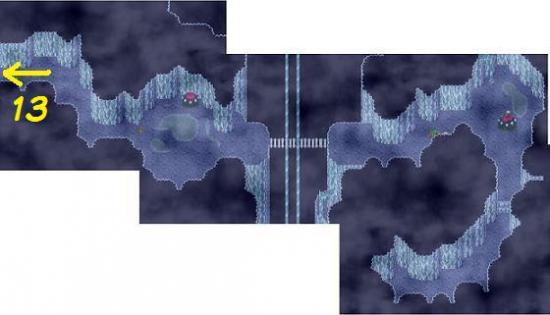
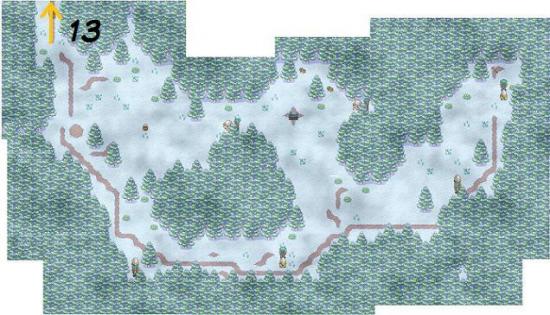
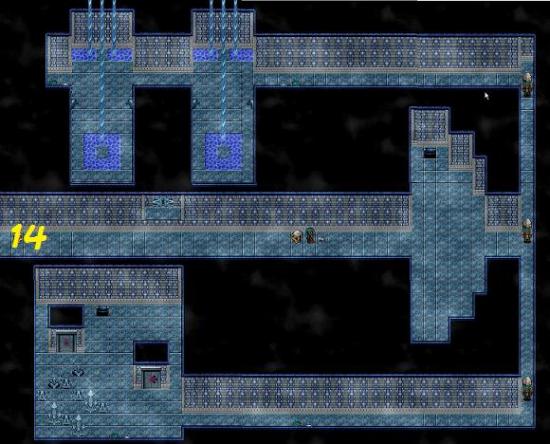
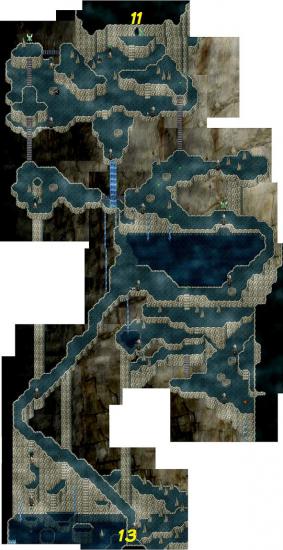
Frozen Woods 13
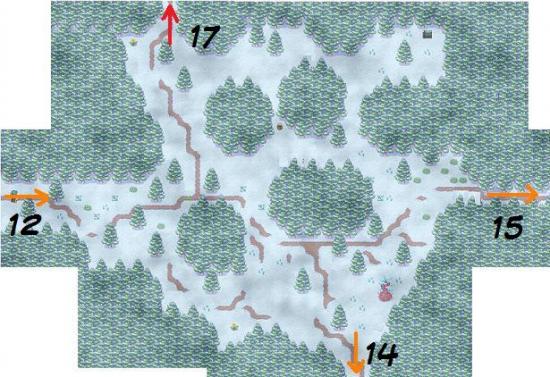
There are 4 exits on this map: the one you just came from, one south to map 14, one east to maps 15 and 16, and north to map 17.
Frozen Woods 14
Frozen Woods 15

Frozen Woods 16
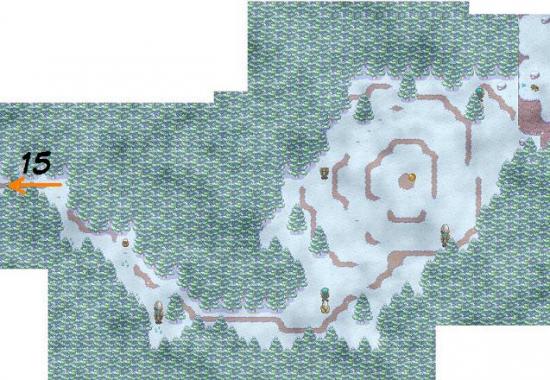
Explore the goodies on the side maps and go north to 17.
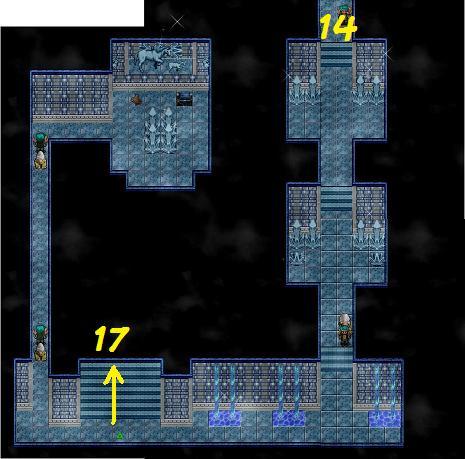
Frozen Woods 17
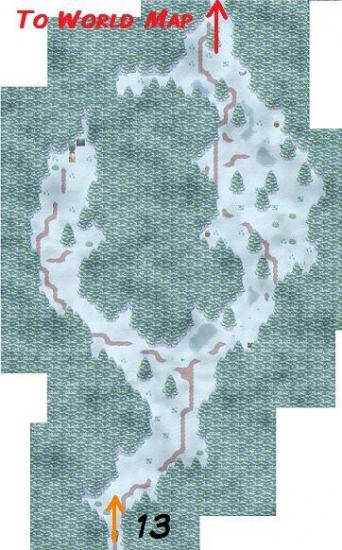
Exit north and you’re back on the world map.
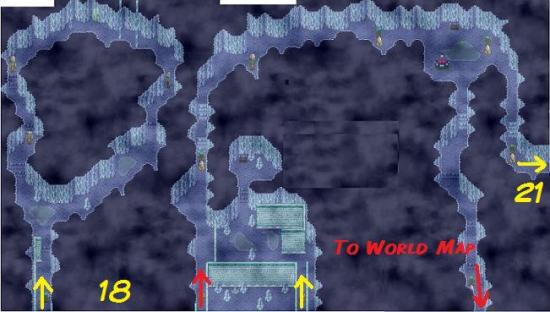
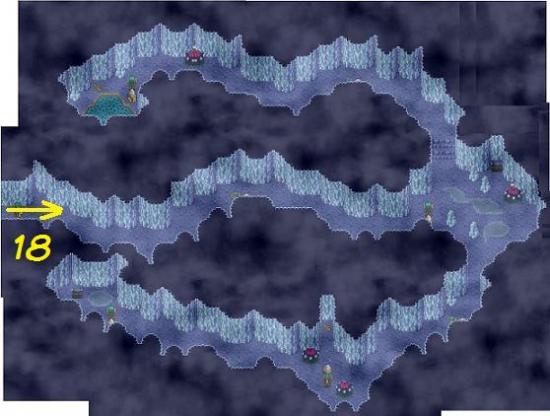
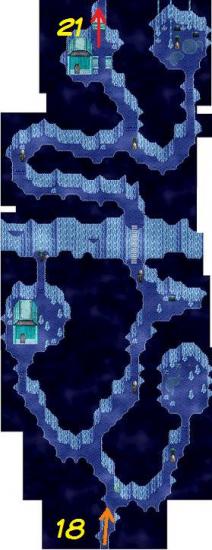
On the world map, go into the little house for part II of the Frozen Woods. This will get you to map 18.
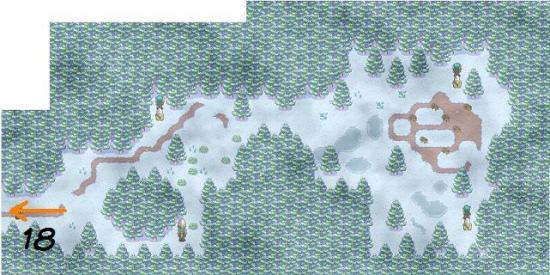
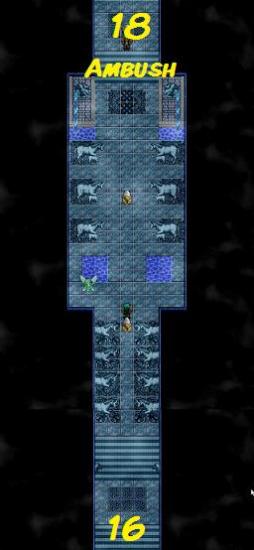
Frozen Woods 18
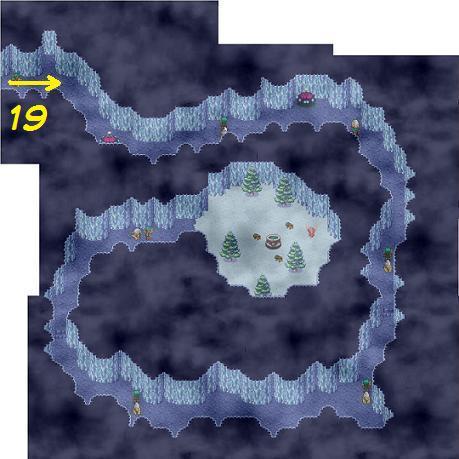
There is one side map (map 19) off to the east.
Frozen Woods 19
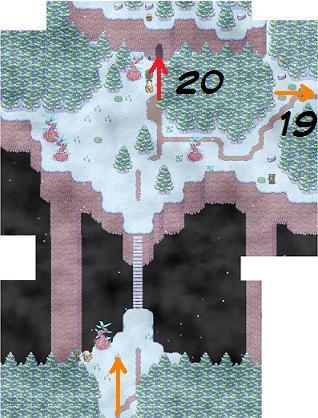
Then go north to maps 20 and 21, exit and you’re at the Shrine of Isendra.
Frozen Woods 20
Frozen Woods 21
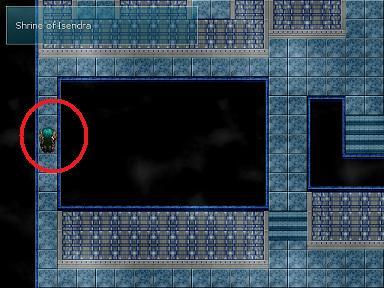
Shrine of Isendra / Gardens
Shrine of Isendra
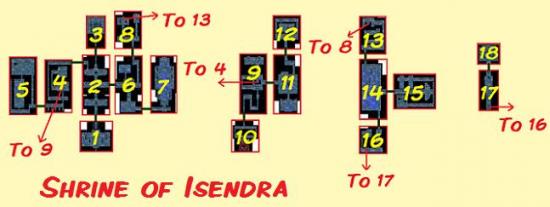
Shrine of Isendra 1
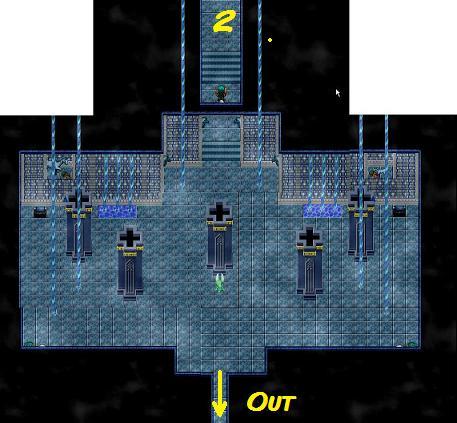
Shrine of Isendra 2
The path we have to go goes off to the east, so let’s explore the west wing first. Go one more screen north to map 3.
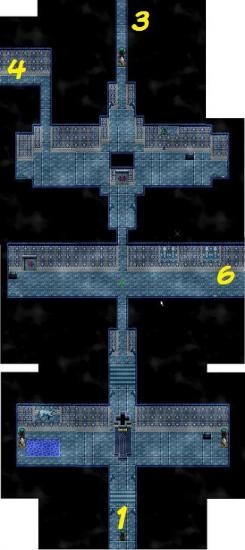
Shrine of Isendra 3
Then go back to map 2 and take the west exit to map 4.
Shrine of Isendra 4
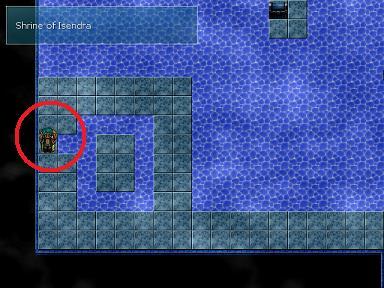
In the center of this map are stairs to the first floor, so let’s walk around the south and exit west first to explore map 5.
Shrine of Isendra 5
Now go back to map 4 and go up the stairs to the first floor. Don’t forget to check the area northwest of the stairs for a chest with an Isendra Helmet. Up the stairs you’ll arrive on map 9 (sorry about the silly numbering!).
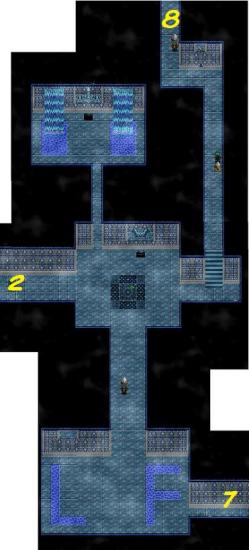
Shrine of Isendra 9
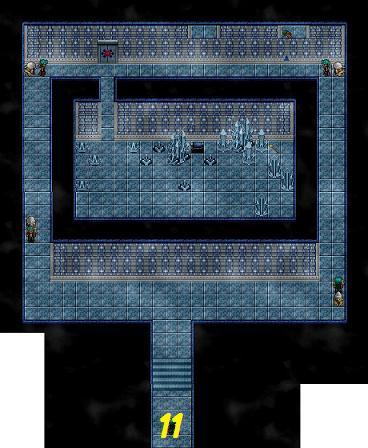
Shrine of Isendra 10
Shrine of Isendra 11
Explore map 12 to the north for more goodies and then make your way all the way back to map 2.
Shrine of Isendra 12
Now follow the green arrow and take the east exit to map 6.
Shrine of Isendra 6
Shrine of Isendra 7
Shrine of Isendra 8
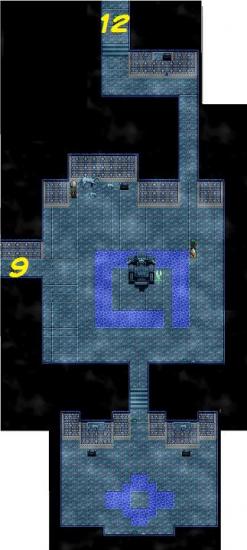
At the north end of map 8 go up the stairs and arrive at map 13.
Shrine of Isendra 13
Shrine of Isendra 14
Quickly detour to map 15 on the east and come back to map 14.
Shrine of Isendra 15
Shrine of Isendra 16
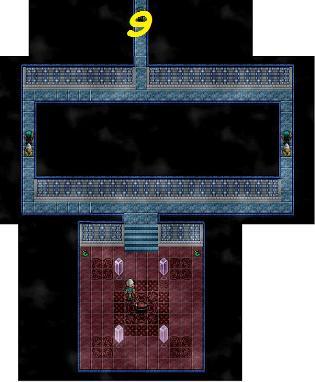
At the bottom of map 16 go up the stairs to map 17.
Shrine of Isendra 17
Don’t forget to save at the save fairy as you’re about to meet a boss! When you leave map 17 at the north end, you will get a series of fights, the second of which has a boss. First round I used Glen’s Power spell and Grom’s Protection Sphere and then Rayanne’s Acid Rain to wipe out all the Iron Shields. Then I kept attacking with Glen’s melee, Grom’s Freeze All and Rayanne’s Light Prism, healing when necessary.
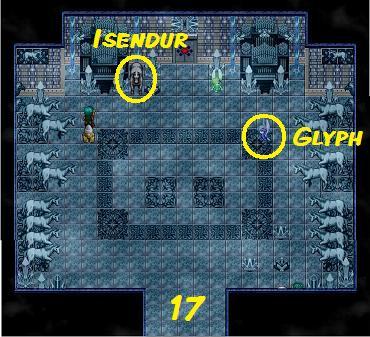
Once you’ve won the battle, make your way north to the Nef of Isendra. Talk to the unicorn there, Isendur, who will tell you they haven’t had the Stone of Passion in a long time. He is the second to last of his race and about to die, and he asks you to take care of Luby, his baby. Rayanne promises they will take care of her, and Luby joins your party. You’ll have to go back to the Elder in Kandara without the stone.
Don’t forget to talk to the blue fairy on the right, as Glen will gain a new skill: Summon Glyph, which he can use during battles to summon a healing fairy. Then make your way out of the temple and back to the snowy valley on the world map. There you will get a cutscene in which Rayanne asks Glen to take care of Luby for a moment, and as he agrees, the Stone of Passion is revealed.
On the way out through the Frozen Woods, go explore the Kandara Gardens that we skipped earlier on. From map 1 of the Frozen Woods, go east to map 22a.
Frozen Woods 22a
Go into the cave and through the tunnel system of map 23.
Frozen Woods 23
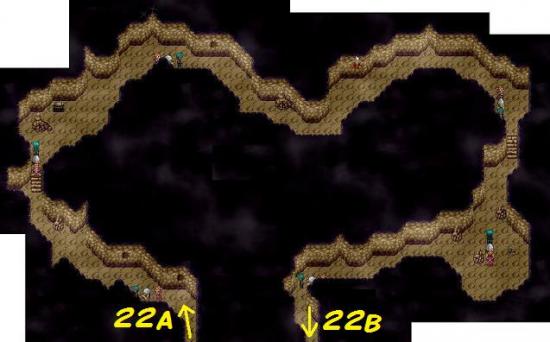
On the other end you come out on map 22b.
Frozen Woods 22b
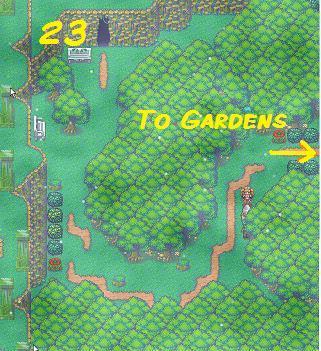
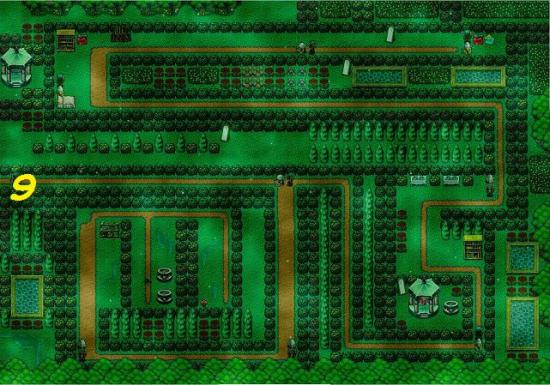
Go east to Kandara Gardens. There are quite a few goodies lying around, and the shrubs are also full of powders.
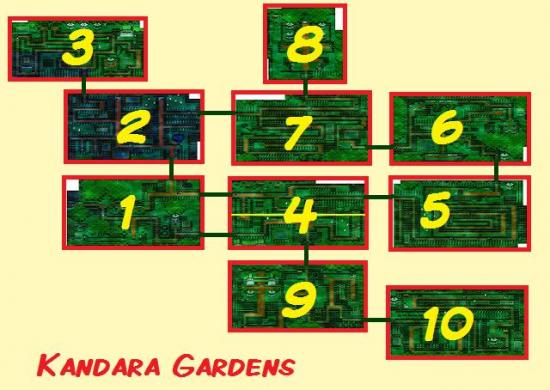
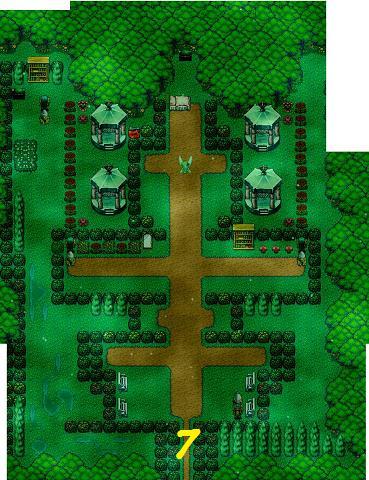
Gardens 1
There is a little loop you can walk through the gardens. I numbered the maps a bit awkwardly (again), so we’re first taking the northeast exit to the top half of map 4.
Gardens 4
From here you can go east to map 5.
Gardens 5
Take the exit on the north side, by the little gazebo, to map 6.
Gardens 6
From here you can go west to map 7.
Gardens 7
The path on this map is quite annoyingly zigzaggy, but when you go north, go north, until you come out on map 8.
Gardens 8
Map 8 is a dead end, so when you’re done here, go back south to map 7 and take the west exit to map 2.
Gardens 2
Way in the northwest of this map is the exit to map 3, which is another dead end.
Gardens 3
When you’re done on map 3, go back to map 2 and take the south exit, by the bookcase, which will take you back to map 1.
Now take the southeast exit to the south side of map 4. In the southeast of this map is the exit to map 9.
Gardens 9
In the southeast of this map you can go to map 10.
Gardens 10
And that’s it for the gardens!
Let’s go back to the Elder in Kandara to show him the Stone of Passion. He tells you that next you need to go find the second stone, which is in the Hyperbole Caves in the Middle Lands. You need to go east and find the town of Astany, then go south.
At the same time, a demon sends his cronies, Bone Breaker and Dodo, to stop Glen’s party from succeeding.
Do what you need to do on this map and then make your way east to the signpost on the world map. There are three routes on to the next map (two where the roads are and one just south of the lower road), each of which goes to a different area on the next map. Ignore the top and bottom routes for now and take the lower road to the Middle Lands.
Middle Lands / To Hyperbole
Middle Lands World Map

The track you’re on is surrounded by mountains, and you can’t go anywhere but east, to the entrance of the Kandara Cave.
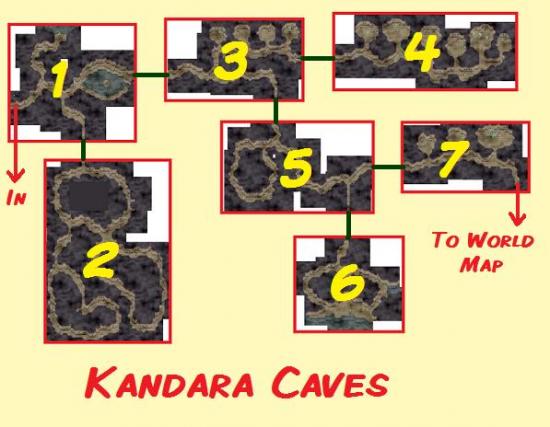
Enter the caves. Many of the holes in the cave walls contain goodies, so make sure you check them all!
Kandara Cave 1
Kandara Cave 2
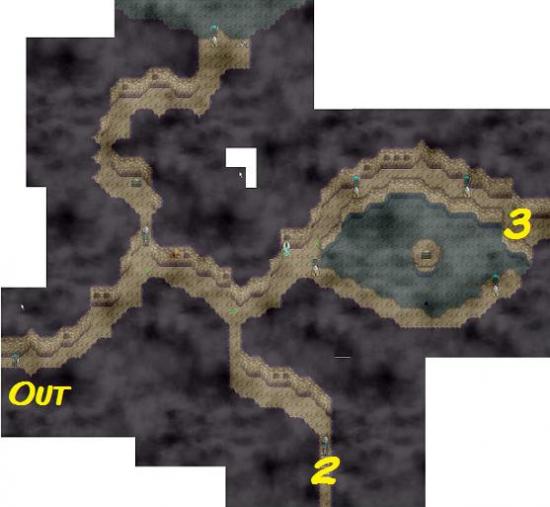
When you’re done here, go back to map 1 and make your way east (around the north edge of the little lake) to map 3.
Kandara Cave 3
First take the north route on this map and go east to map 4.
Kandara Cave 4
Then go back to map 3 and take the lower route to the south exit to map 5.
Kandara Cave 5
Make a detour to map 6 in the south.
Kandara Cave 6
Then go east to map 7.
Kandara Cave 7

On this map you will find the exit to the other side of the Middle Lands World Map. This part of the world map has two Hidden Locations.
Just south of the cave exit is the village of Astany. There isn’t all that much to do there, but you can buy better weapons and sleep in the inn, and there are some goodies in the crates and barrels around town.
Astany
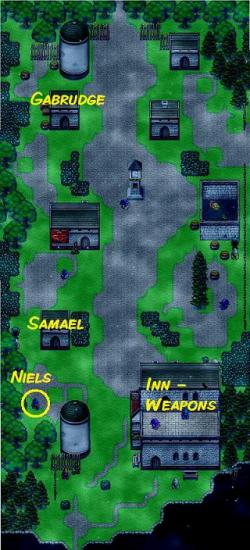
Hyperbole Cave is in the south, so go to the bridge. However, when you try to cross the bridge, you’ll notice that it’s broken and you have to find another way south. For this you need to first go on to the next world map, so follow the road east.
The area north of Astany goes to the Ancient Lands, but the beasties there are much too strong for you now. Just forget about that area now and come back later.
Just north of the road is Muzar Volcano, but you’re also better off avoiding this for now as you will be ambushed by an Opinicus Dragon, who can wipe you out in one blow. I was at level 28 by this time and I lucked out as Grom’s Predator Claw kept putting the dragon to sleep, but deeper into the volcano you get ambushed again, this time by TWO Opinicus Dragons, and you really want to be stronger and have the Master Enemy Knowledge skill for Grom before you tackle those.
So, just go east onto the next map, and you’ll find yourself on the Tartarian Cape World Map. Explore a bit, if you like, but you’ll come back here later.
Tartarian Cape World Map

To go to Hyperbole, you need to follow the path that goes down to the southeast. At one point it stops when you reach a large forest. You will have to make your way around the north side of the forest until you can go south again. Follow the road southwest between the two mountain ranges until you reach another signpost and then go west back to the Middle Lands World Map.
On the Middle Lands World Map follow the path south to a bridge, cross the bridge and walk west along the water. On your way you will pass a Dragon Lair, which contains a Holy Opinicus – if you struggled with the other Opinicus Dragons earlier, don’t even think about tackling this one now!
Further west is another cave, with two giant spiders. They’re sensitive to claw and blade. I could beat these at level 28, and you will definitely be able to beat them once you come back from Hyperbole.
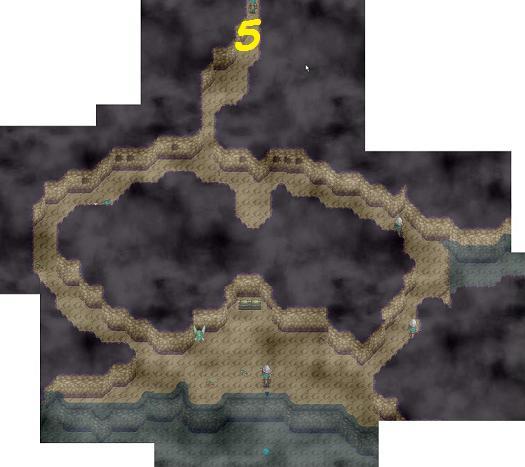
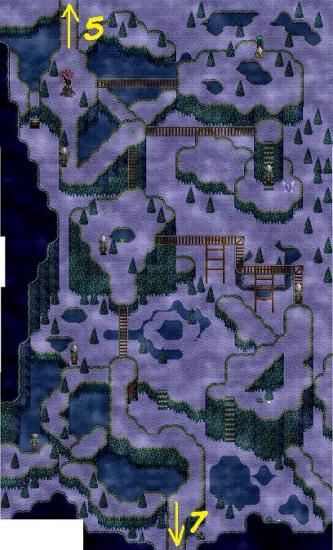
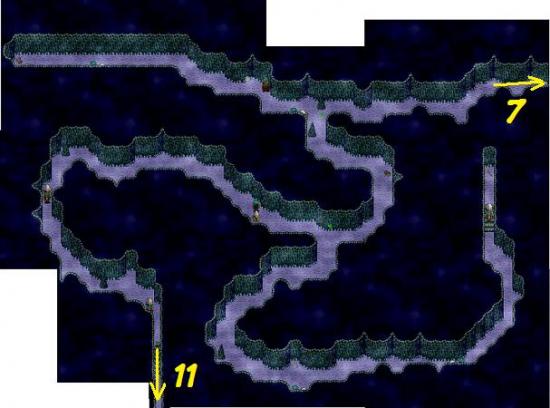
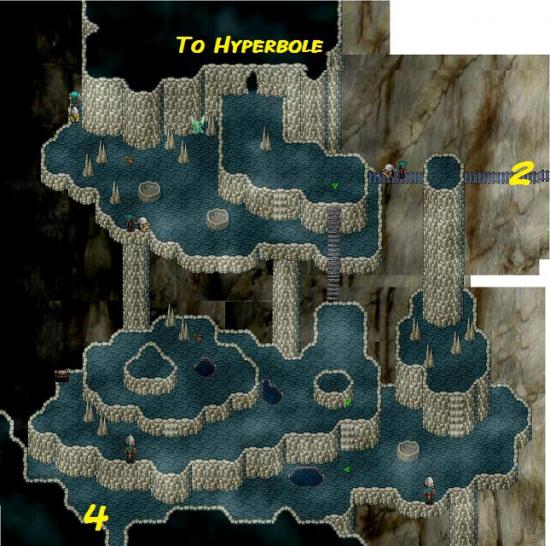
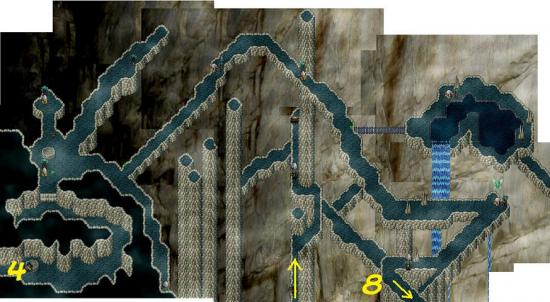
Hyperbole Cave
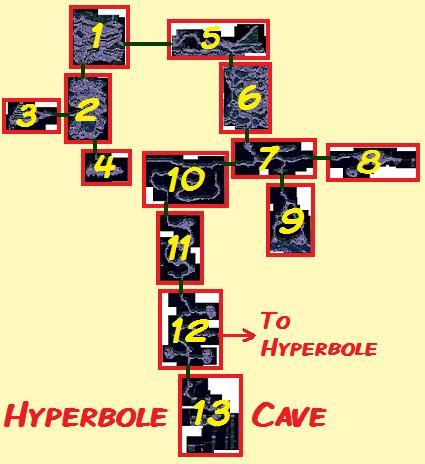
Make your way all around the map until you’ll reach another bridge in the far south. Then go east until you reach another bridge, and go north to Hyperbole Cave.
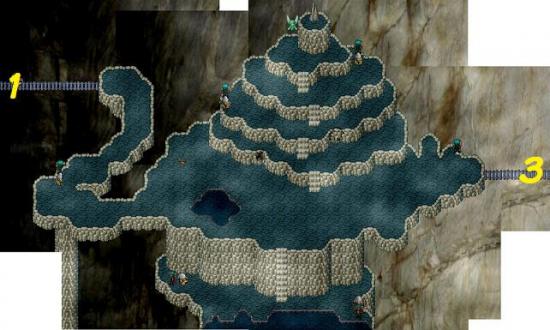
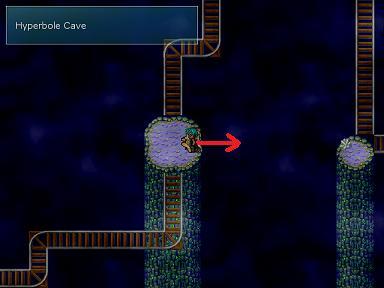
Hyperbole Cave 1
Enter Hyperbole cave and first go south to maps 2, 3 and 4.
Hyperbole Cave 2
Hyperbole Cave 3
Hyperbole Cave 4
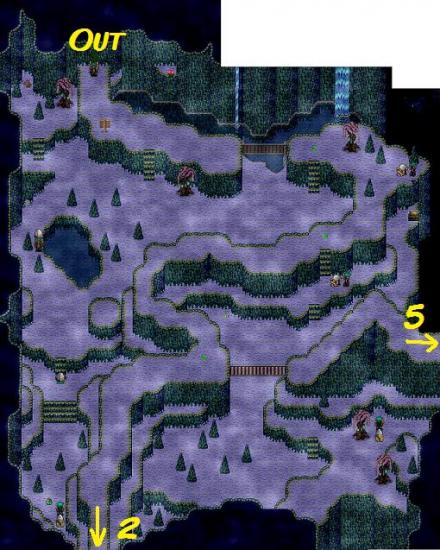
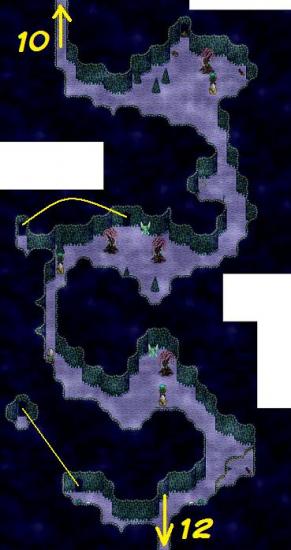
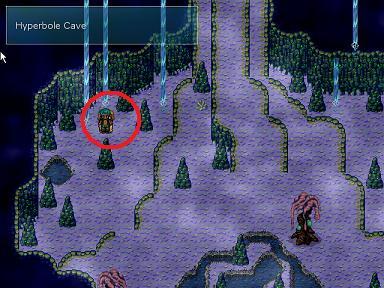
Now go back to the entrance and follow the green arrows east to map 5.
Hyperbole Cave 5
Make your way across map 5 and exit south to map 6. On map 6 you will find Farfalle, who can teach Grom Master Path Finding. I recommend getting this now.
Hyperbole Cave 6
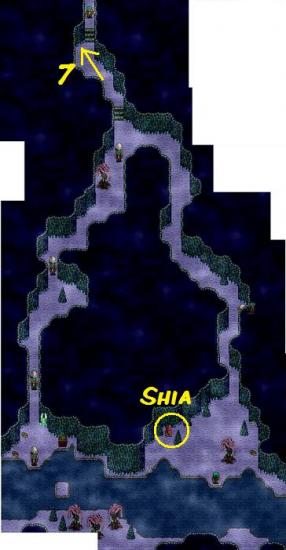
Hyperbole Cave 7
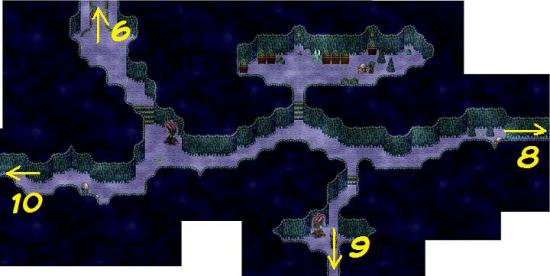
Hyperbole Cave 8
Go back to map 7 and then south to map 9. On this map you will find Shia who can teach you expert heroism, in case you didn’t get that one yet.
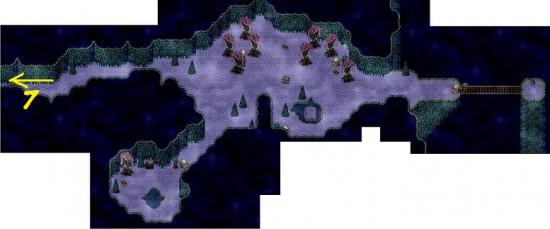
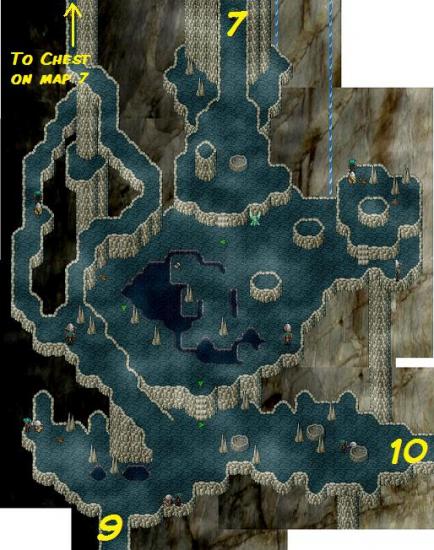
Hyperbole Cave 9
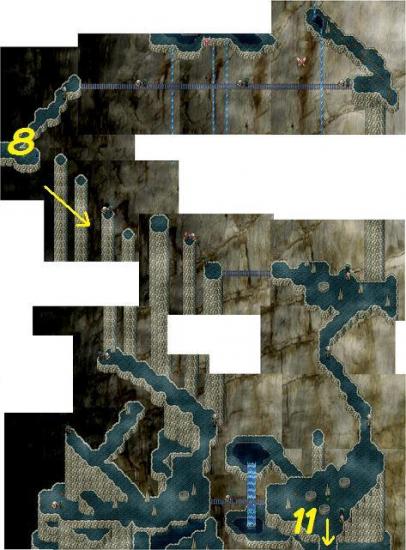
Back to map 7 and take the west exit to maps 10 and 11.
Hyperbole Cave 10
Hyperbole Cave 11
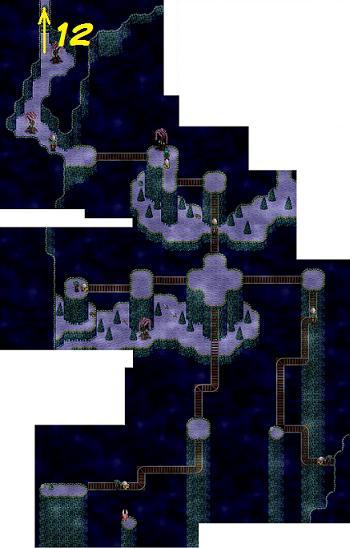
There are several caves on this map that house Cyclops. You can try fighting them now (save before you try!!), but you will get back here later – you should definitely be able to kill them on your way back. Go into each cave after you’ve killed the Cyclops for some goodies. Go south to map 12.
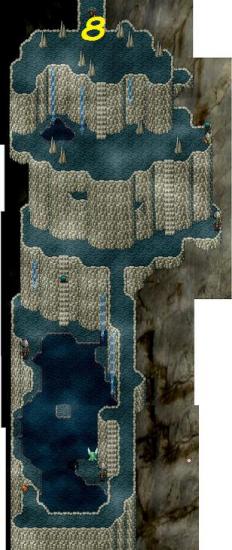
Hyperbole Cave 12
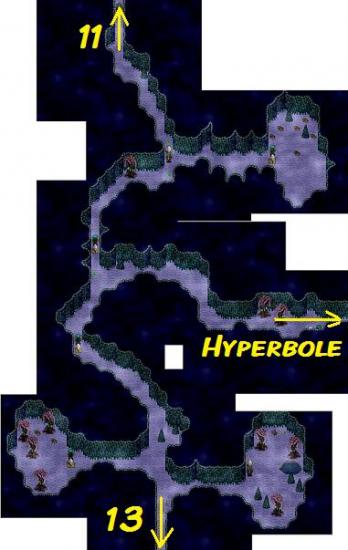
The exit to Hyperbole is on this map, but first quickly go on to map 13 in the south.
Hyperbole Cave 13
Now go back to map 12 and exit east to the underground city of Hyperbole.
Hyperbole
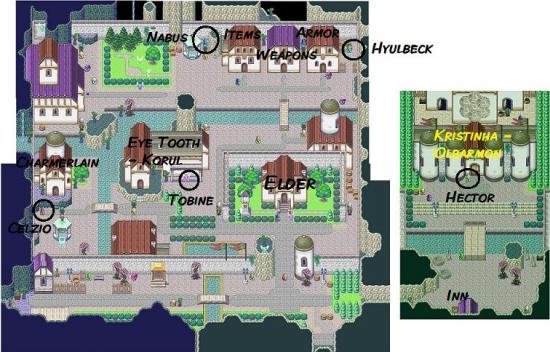
Walk along the Hyperbole city wall to the gates. Note that there are two exits in the southeast corner of the city, but you can’t go into either right now as your priority is to go see the Elder of Hyperbole. His house is the first house behind the city gates. Go in.
While Glen and Rayanne are running some errands, Grom will go talk to the Elder alone. The Elder tells Grom that the Pandora Box was opened by a demon named Thanatos. He’s the evil side of the divine spirit. You already know about the first plague, but plagues 2-5 are:
2: Winter will cover the land
3: All land will be corrupted
4: Nature will go wild and attack
5: Everything and everyone will freeze
Right now the city of Kremdjir is unreachable, suggesting that plague 3 has already been released. You need to find the Stone of Origin in the center of the earth. To get there, you need to go through the Silver Cave.
Explore Hyperbole, including the east part of town, do your shopping, sleep in the inn, save up and then make your way to the Silver Cave in the southeast of the main part of Hyperbole.
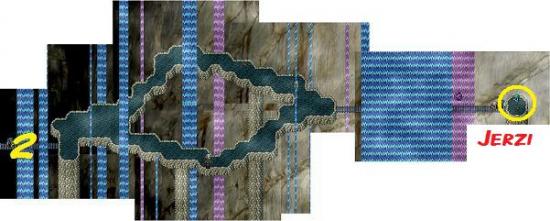
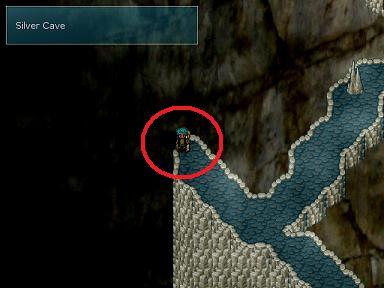
Silver Cave
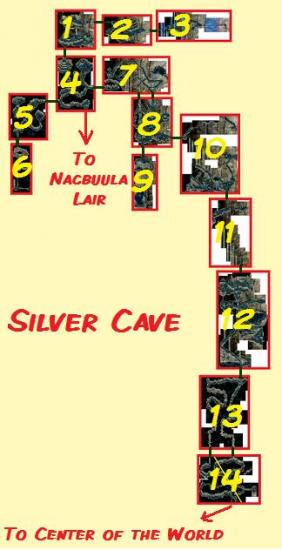
First go east and then east again to clear out maps 2 and 3. On map 3 you’ll meet Jerzi, who can teach Glen Guru Knife when you’re ready.
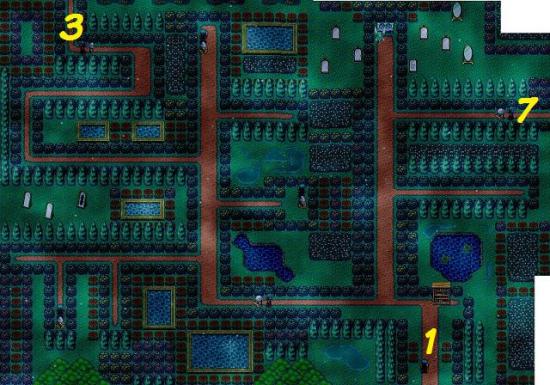
Silver Cave 1
Silver Cave 2
Silver Cave 3
Go back to the entrance and then go south to map 4.
Silver Cave 4
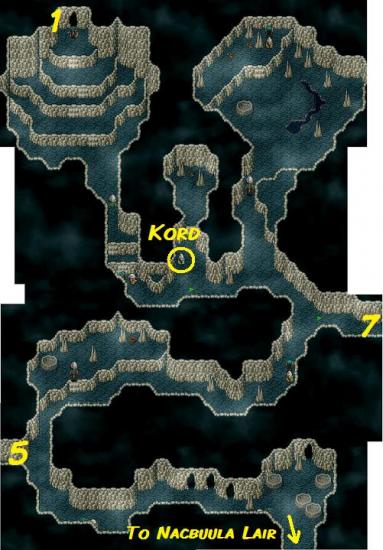
On your way south you will meet Kord, who warns you for a big spider in the south. If you continue going south you will find your way is blocked. So ignore this path for now, you will be able to go back later. In the series of caves on the way to the spider lair you’ll encounter some spiders, and LOTS of gold. You can probably kill them now. Go on, have a go!
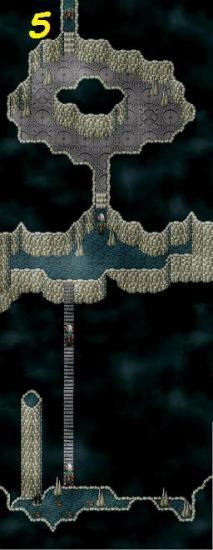
To the west of map 4 are maps 5 and 6.
Silver Cave 5
Silver Cave 6
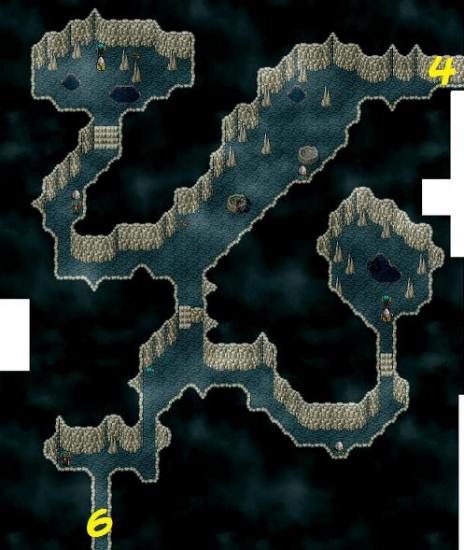
From map 4 follow the green arrows east to map 7.
Silver Cave 7
Just follow the green arrows here – there isn’t that much else on this map. You will see a chest somewhere that you can’t get to, but you will be able to access this from the next map. So go on south to map 8.
Silver Cave 8
From map 8 you can take another route back up to map 7, which will get you to that locked chest. Do go back for it as it contains some good equipment.
There is one more map to the south, map 9.
Silver Cave 9
The route we want to take goes off to the east from map 8 – on to map 10.
Silver Cave 10
Keep going south, exploring everything on the way, until you’re on map 13.
Silver Cave 11
Silver Cave 12
Silver Cave 13
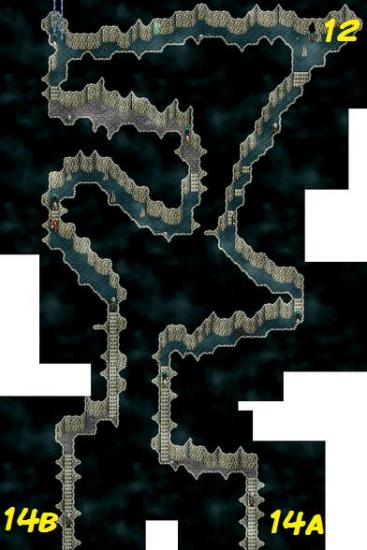
There are two south exits on this map, each of which goes to a different section on map 14. Take the east one first (to 14a), then come back up to map 13 and take the exit to 14b. Save up at the fairy because you’re going to have to fight soon!
Silver Cave 14
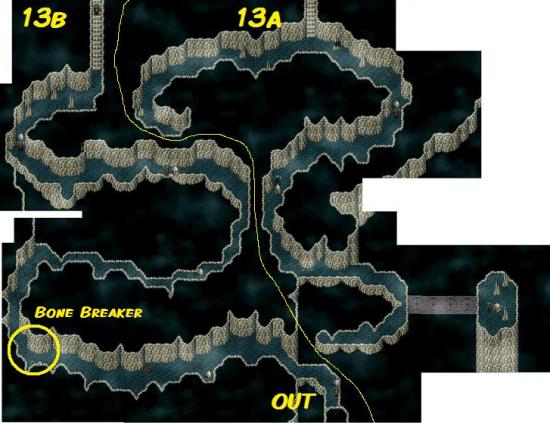
Keep walking until you encounter Bone-Breaker. A good strategy to fight him is to use Glen’s Power and Rayanne’s Soul Blast skills. Unfortunately, Bone-Breaker retaliates, as does Glen, so they will keep hitting each other until, most likely, Glen is dead. So you may have to revive him a couple of times. After the fight Bone-Breaker tries to take the Stone of Passion, but Luby intervenes and they both turn to stone. You have to go on without Luby! Exit map 14 and jump down the big steps until you’re in the Center of the World.
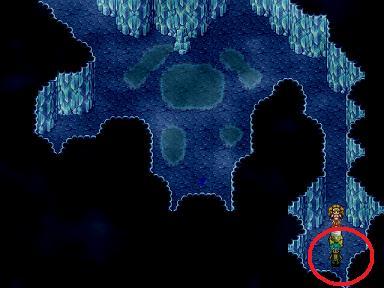
Center of the World
Center of the World World Map
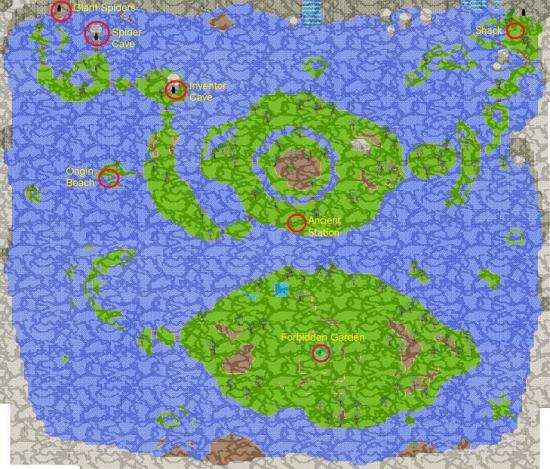
Walk into the stone with the blue arrow and you’re in the Shack. Talk to everyone there – you can heal up and get some more skills. You now need to go find the Temple of Origin, as the next stone will be in there. Leave the shack and go south.
Follow the bridges until you’re on the central island. On this island is the Ancient Station, which has a boss fight (Unit R Armor). At level 33 he was a bit hard to fight, but I lucked out with Glen’s Power skill. You might want to come back for him later.
Keep following the bridges. Somewhere in the west is Origin Beach. There are just some goodies there and you can sleep there for free. If you equip the Magical Sand you find on the beach your character will gain a lot of HP.
Keep going until you reach the Inventor Cave. Go in and talk to Sterling. He will tell you the Temple of Origin is on another island and you can only get there by air. He will lend you his flying machine if you find him materials to fix it. You need to find him 3 nuggets of zinc and three nuggets of diamond from the Spider Cave to the west. Don’t forget to explore the rest of the Inventor Cave.
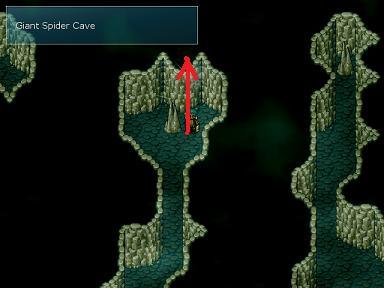
Go west and north to get to the Giant Spider Cave. This is only a small cave and the items you need are easy to find, but you will encounter a series of boss fights with some big spiders. I found that Grom’s inventor claw with acid action works really well on the boss spider in the west arm.
Collect your diamonds and zincs and take them back to Sterling. He will fix his machine, which turns out to be a zeppelin, and you can embark. You can summon the zeppelin with F6 and disembark with F7.
You can now fly across the world map and go to previously inaccessible locations! There are some hidden locations, and the cave in the north wall holds a series of giant spiders and a lot of gold. When you’re done, go to the big island in the south and jump down the hole in the center. You have to enter from the left hand side to be able to get to the center of the Forbidden Garden. Once you’ve reached the center, you arrive at the Apostles of Origin.
Make your way through and go to the Temple of Origin. You can find the Dal’baah ring here, which inflicts attack up. You also get a series of ambushes, but they’re not too hard. Go through the blue arrow in the tent and the door behind it. In the area behind it you will find Aeroch, who will settle in Glen’s blade for 150g. This gives Glen an extra spell.
Behind this area is the Origin of the World. Go to the center of the island via the north bridge and interact with the stone in the middle. The Stone of Origin has been changed into a little character called Komoko. He will come with you. You now need to find a way back to Hyperbole so you can talk to the Elder.
When leaving the Temple, Rayanne asks Komoko if he knows a way to help Luby. He asks you to take him to her. Go a little bit further and you’ll encounter Sterling again, who will take you back to the Silver Cave in his zeppelin.
Go back to Luby. Komoko will offer to exchange his life for Luby’s. When he does, you will need to fight Bone-Breaker again, who will be joined by Dodo. However, you won’t have to fight him till the end as he will escape before the battle is over. Luby is now fully grown and will rejoin your party.
Time to go back to Hyperbole! Glen suggests going back to Sterling to take his zeppelin out. Do this, and then follow the green arrows out from where Sterling drops you off.
Nacbuula Lair / Edelweyss
Back in Hyperbole Glen goes to talk to the Sage while the rest of the team go get a bite to eat. You agree to see each other again in 10 minutes. Take Glen to the Sage’s house and go in. He is attacked by Dodo, an edelweyss and a goblin! They paralyze Glen and kill the Sage, then make it look like Glen killed the Sage!
When Rayanne and Grom get tired of waiting, they decide to go into the Sage’s house to see what happened, taking the two guards Gerhalt and Eliane with them. They find Glen with the bloody knife. Although Eliane protests that she saw someone else in the room, Glen is arrested and taken for sentencing.
After a farce of a trial, Glen is found guilty and sentenced to death. The rest of the party turn to Eliane for help. Eliane goes back to the Sage’s house and ‘senses’ that a goblin and an edelweyss was involved. She suggests going to find the guilty edelweyss in Edelweyss village.
In the meantime, Thanatos orders Dodo to go and kill his accomplices, the goblin and the edelweyss.
It is time to take your party, sans Glen, to Edelweyss village. Heal up and do some shopping if you need to (make sure you have a good supply of melt moths), and go back into the Silver Cave. Keep following the green arrows in until you reach Kord the dwarf again, who is now blocking the way. He’s got some personal experiences with the Hyperbole justice system and promises to help you. However, all he knows is that Edelweyss village is behind the spider’s lair.
Go one screen south to the room that was blocked off before. You will now be able to bash your way through the barrier and go in.
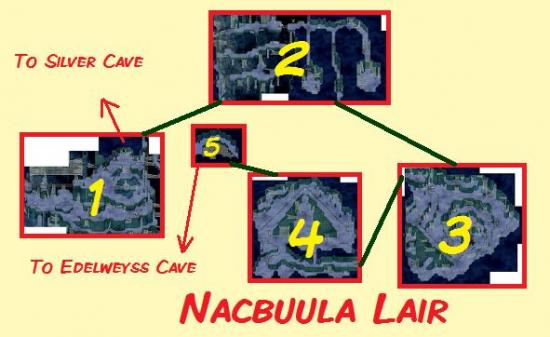
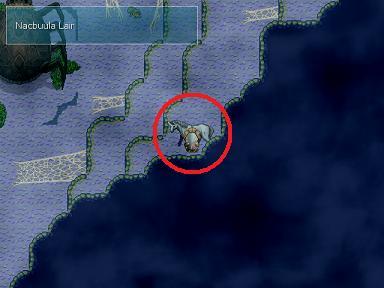
Nacbuula Lair 1
To get through map 1 you need to circle it anti-clockwise until you can exit in the northeast to map 2.
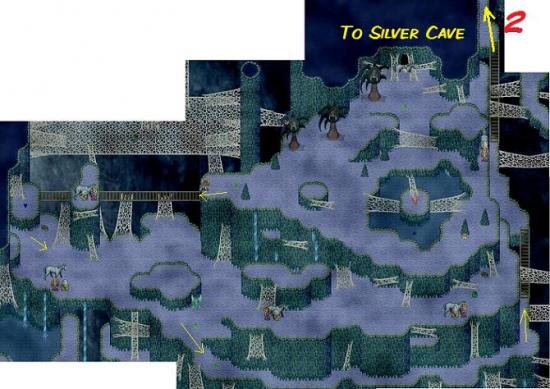
Nacbuula Lair 2
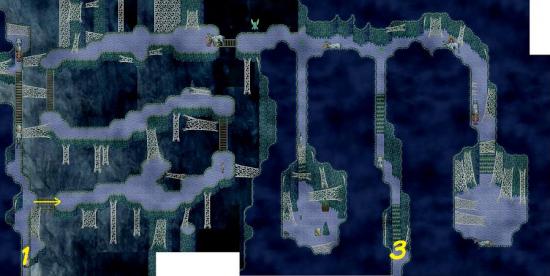
Nacbuula Lair 3
Save and heal and go into the center to fight Nacbuula, who is sensitive to fire but resistant to water. Use Grom’s Protection Sphere and Rayanne’s Flare. Luby’s melee attack also works quite well. I was at level 37 when I killed it, and it wasn’t too bad.
Follow the green arrows to the northwest and out to map 4.
Nacbuula Lair 4
Then go on to map 5, which is only a small passageway.
Nacbuula Lair 5
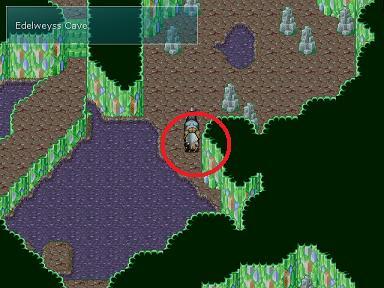
Exit on the other end and you’re in Edelweyss Cave.

Edelweyss Cave 1
Edelweyss Cave 2
From this map you can access a small part of map 3 via two pathways.
Edelweyss Cave 3
South of map 2 is map 4.
Edelweyss Cave 4
Go west to the very large map 5, which has an exit at the top to a part of map 1 that you couldn’t access before.
Edelweyss Cave 5
Go back to map 4 and go south to clear map 6.
Edelweyss Cave 6
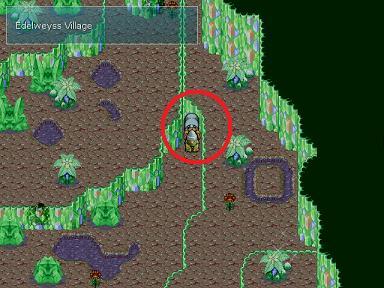
Then go east from map 4 to the main part of map 3. Like map 5, this map has an exit to a part of map 1 you couldn’t access before. When you’ve cleared map 3, go east and you’re in Edelweyss Village.
Interact with the plants in the village for some nice powders. The edelweyss you’re after is at the north end of the village. When you interact with it, you have to fight the Steel Machine that Thanatos sent to kill the edelweyss. Rayanne’s Soul Blast works well on him.
Rayanne bullies the edelweyss into confessing, and records the confession. Now you need to take the edelweyss and the recorded confession back to Hyperbole before Glen’s death sentence is carried out!
Make your way back through Edelweyss Cave, Nacbuula Lair and the Silver Cave – just follow the green arrows. When you’re nearly back, the exit is blocked by the Steel Machine. Your new friend Kord will sacrifice himself to disarm the Machine, and you’re taken back to Hyperbole Judgment Room just in time to prove Glen’s innocence and save him.
As an apology for the injustice you receive the Hyperbole Rune, and you’re told to go to Savioropolis to find the third stone. You need to show the Sage in Savioropolis the Hyperbole Token so he will know what to do.
Thanatos is very displeased and sends yet another of his cronies, the two-headed Nawell, after your little rescue party.
Go back out through Hyperbole Cave. If you hadn’t killed the Cyclops in the little side caves yet, do so now – you should be fine killing them at this stage.
Back on the world map, you can try killing the dragon in the Dragon Cave again. He’s still quite hard to beat at this stage, and Master Enemy Knowledge doesn’t tell you his weaknesses, but you may luck out. I just hit him hard with Rayanne and Luby and kept healing and reviving. He drops a LOT of gold when you do kill him, though!
Make your way back across the Middle Lands the way you came in, and back to the Tartarian Cape.
Savioropolis and the Temple of Savior
Explore the Tartarian Cape map, if you like. There are a few caves with bosses, but they’re all relatively easy and you should be able to defeat them at this stage. Then go all the way east along the north end of the map until you get to Apple Road.
Apple Road
On the other side of Apple Road is Port Siren.
Port Siren
Port Siren is all but deserted, but you can heal up and get a few more skills if you like. When you’re done, go all the way east in Port Siren and talk to Lennan in the house at the end. He will instantly take you to the Crescent Island and Savioropolis.
Savioropolis
Explore the town, do your shopping and learning and exit east up some stairs to go to the Tower of Elder. In there, talk to the Elder, who will tell you that the final stone is in the Temple of Savior near the town.
Crescent Island World Map
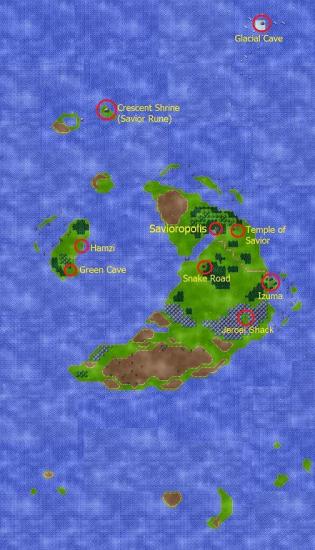
Leave Savioropolis on the south end of town and you will find yourself on the Crescent Island world map. There are a LOT of hidden locations on this world map and a few of them have some amazing goodies like relic weapons, so go explore! Southeast of Savioropolis is the village of Izuma, where you can find a few more skills. The hollow tree south of Savioropolis goes to Snake Road, but the evil bunnies there will probably kill you in one blow at this stage, so just remember this place and come back later. You also can’t reach the house in the mountains at this stage.
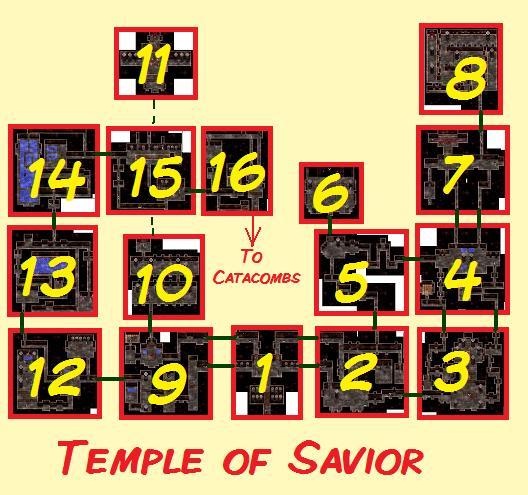
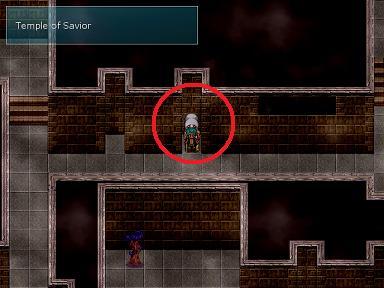
So when you’re done exploring, enter the Temple of Savior east of Savioropolis. There are a few rooms in the Temple that you need to access from different locations to get to all the parts of it – like we had in Edelweyss Cave.
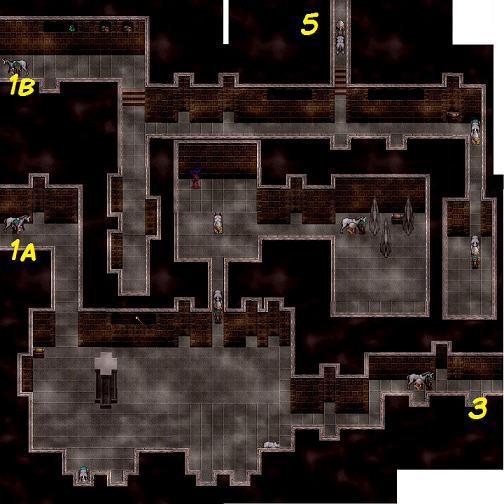
Temple of Savior 1

First take the south path east to explore the east wing.
Temple of Savior 2
Temple of Savior 3
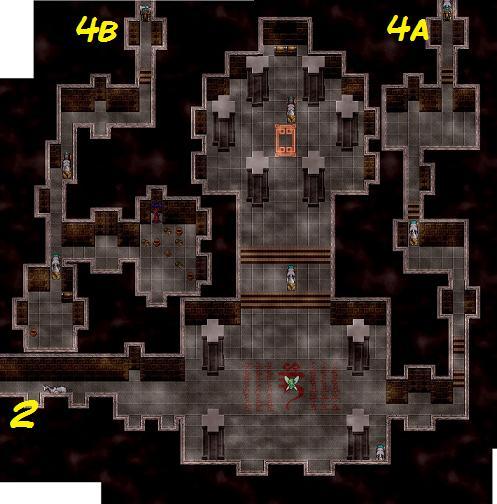
Temple of Savior 4
On the west side of this map you can go south again to a little bit of map 3 that you couldn’t access before. Straight east goes to map 5.
Temple of Savior 5
On map 5 you can go south to access the north end of map 2. North from map 5 is map 6, which is a dead end.
Temple of Savior 6
Go back to map 4 and go north – either path is fine. You’ll end up on map 7.
Temple of Savior 7
North from there is map 8, where you can get Guru Heroism for Glen and Rayanne.
Temple of Savior 8
This is it for the east wing of the Temple, so go back to the entrance. From there, first take the northwest exit to the north end of map 9.
Temple of Savior 9
North from there are maps 10 and 11.
Temple of Savior 10
Temple of Savior 11
Now go back to the entrance and take the southwest exit to the south end of map 9. Now explore the west wing.
Temple of Savior 12

Temple of Savior 13

Temple of Savior 14
Temple of Savior 15
Temple of Savior 16
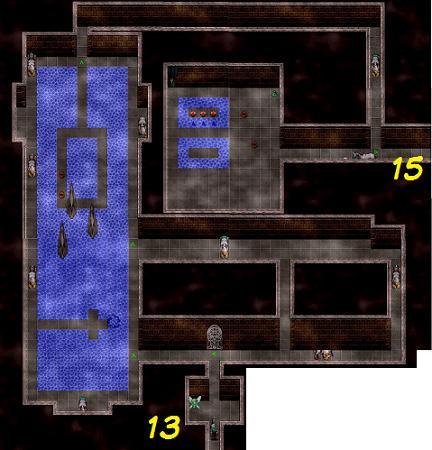
Then go south and you’re in the catacombs.
Save at the save fairy because you will be ambushed by the Dragon God when you try to go through the door. He is sensitive to light, thunder, water and blade. Use Glen’s Power and Grom’s Protection Sphere, then use Rayanne’s Light Prism or Soul Blast spells and keep hitting with the rest of the party. It shouldn’t be too hard. Then enter the rest of the catacombs.
Catacombs 1
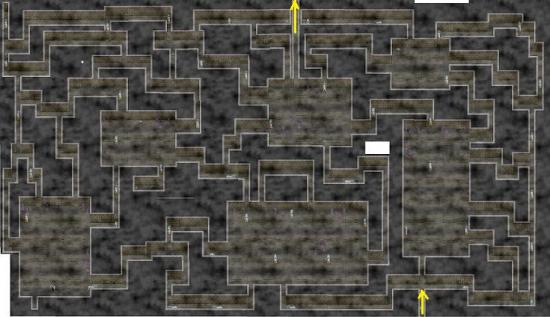
The next room is absolutely enormous, and a bit frustrating to navigate as it is such a maze. But there are some goodies scattered around (don’t forget your botany skill) and you can spend some time fighting and gaining more experience. It would be a very good idea to level up a bit here, because you will shortly encounter the biggest, nastiest boss ever and you’re going to need your strength! The quickest way through this map is to go straight north as much as you can from where you came in.
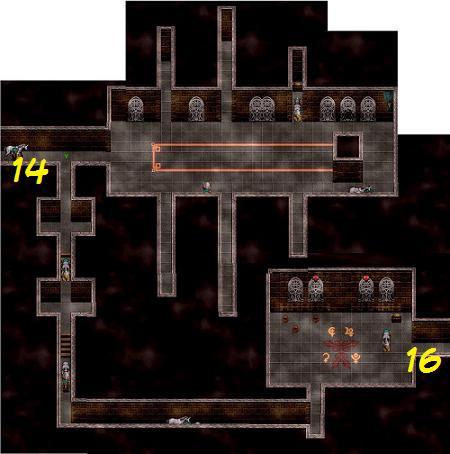
Catacombs 2
Go north to the next room. Don’t miss Magical Room #033 because it has a lot of experience baskets, which you’re really going to need! Talk to Tarkan the dwarf to let you through. He will tell you about the sixth and seventh plague. Then go north again.
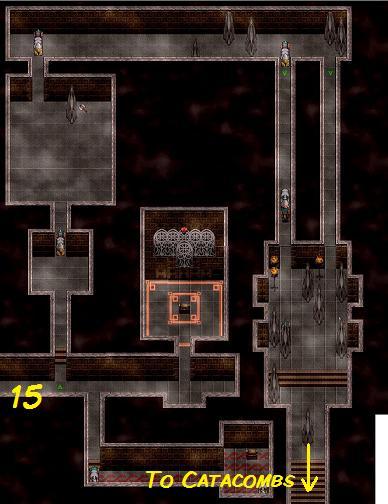
Catacombs 3
Explore the east side of this map and then go to the northwest corner.
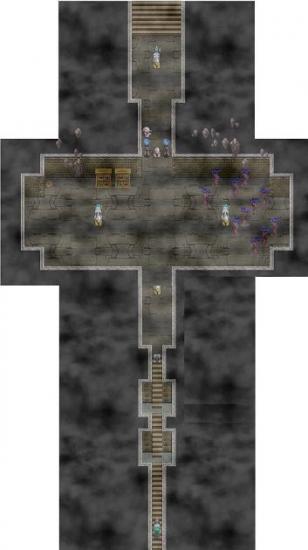
!!!STOP!!!
Think carefully before you decide to enter the next room (the Shrine of Savior NEF) through the big black hole, as the ONLY way out of the next room is by killing this seriously evil boss! I was at level 48 (Rayanne and Grom – Glen was lagging a bit at 42) when going in, and I definitely needed all those levels!
Turn back while you still can! Do some more fighting! Find those last Magical Rooms! You don’t like the mindless grind of leveling up you say? Well, suit yourself, but don’t come crying and say I didn’t warn you!
So, now you’ve been forewarned, enter the NEF of the Temple of Savior. There are MANY goodies scattered around this room. Get them all and don’t forget to feed the powders to your party members. On the east side of the room is a fairy called Sila, who will take up residence in Glen’s sword and give him another spell to use during battle.
Now heal up, make sure everyone has their best fighting gear on, save at one of the fairies in the center of the room, take a deep breath and interact with the red stone in the center.
You will be attacked by the God of Watchers. He is sensitive to light and water only, and resistant to pretty much everything else. Use Grom’s Protection Sphere and Glen’s Power spell. Rayanne can keep hitting with Light Prism or Soul Blast. I used Luby to heal, heal, heal. (Glen may hit less hard if you’re using knives for him rather than swords. In that case, try using him to heal and try Luby’s Lightning spell.) Revive your party members as soon as they’re knocked out because if you let it linger your fight may be over in the next blow. Just keep hanging in there. Take your time. Healing is more important than hitting! Aren’t you glad you listened to me now and took your time to level up, eh!
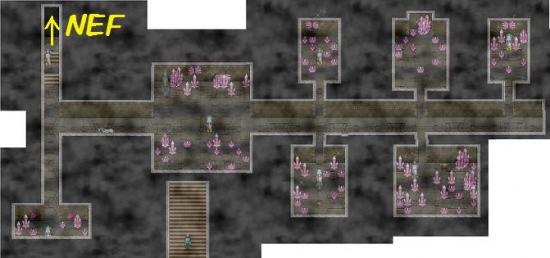
Once you’ve defeated the God of Watchers, interact with the red stone again and you’re taken to the next room. At the north end of this room is a teleportation crystal, which will take you to the room in the center. Talk to Halo. He will tell you there is no Stone of Soul! Oh no! You have to go back to Savioropolis and talk to the Elder again.
You’re taken back to the entrance to the Temple. Walk back down the path. You will be stopped by Thanatos’s two-headed Nawell. He is sensitive to light, thunder and blade. Again, use Glen’s Power, Grom’s Protection Sphere and Rayanne’s Soul Blast. Luby’s Lighting works well too.
Do everything you want to do on Crescent Island now, because as soon as you talk to the Elder in Savioropolis again you won’t be able to get back there in a while. Then go to Savioropolis and tell the Elder about the stone. All you can do is just go to the Kremdjir with the two stones you have and just wing it!
The Elder will take you to the Glacial Cave to talk to Karangor, a friend of his. Karangor will teach Rayanne a spell that will keep her warm when the rest of the world freezes. You’re then taken to the volcano for some more magic spheres and even more power for Rayanne. Exit the volcano and the cave and leave on the boat.
Marajulen Swamp
Go back to the Middle Lands. Sterling will catch up with you again. He’s managed to get the zeppelin out of the cave, and you can now use it to go to previously inaccessible locations (and to get around fast without having to fight and beasties). Use F6 to get on the zeppelin and F7 to get off. You can summon it at any location. However, you need to get off the zeppelin to be able to traverse between world maps.
I used this time to explore the bits of the world maps I couldn’t get to before and clear out all the caves. You can also go to Shark Cove now, if you like, and the Ancient Lands, although there isn’t that much to do there except to find some hidden locations and a few areas with goodies.
Shark Cove World Map
Ancient Lands World Map
I also took the teleportation crystals back to Roya to get some skills I missed, and to Savioropolis to find some more hidden locations on the Crescent Island world map with my shiny new zeppelin.
When you’re done playing, go back to the Middle Lands and take the balloon to the road through the mountains in the north. It doesn’t matter if you take the west or east road onto the Marajulen Swamp world map. I took the west one first.
Marajulen Swamp World Map
You will be ambushed by a whale when you make your way north. Luby’s Lightning spell wiped him out in one blow for me. There isn’t that much to do on this side of the swamp – just some hidden locations and a few shacks. You can get some new skills too.
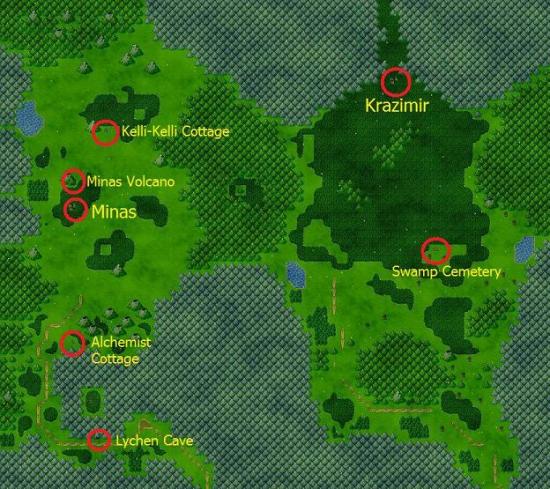
When you’re done exploring take your balloon east across the mountains. Explore the area and when you’re done go to Krazimir in the north.
Krazimir
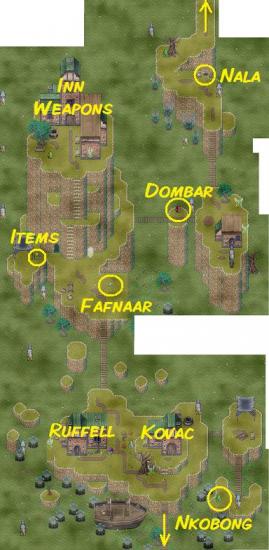
Do your shopping (there is a VERY good sword for Glen in one of the shops) and exit to the north map.
Krazimir North
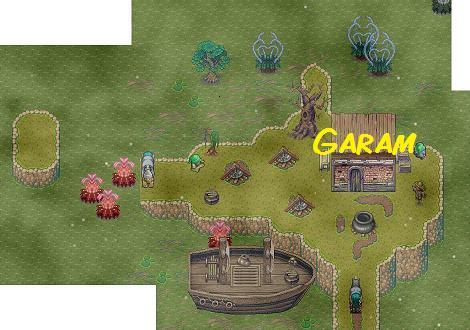
Talk to Garam in the house there and he will take you across the river.
Krazimir Across the River
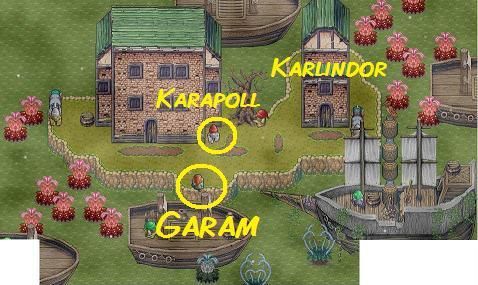
Make sure you get Guru Path Finding for Grom from Karapol when you’re on the other side.
Then go into the house on the right and talk to Karlindor. He won’t take you across the swamp – it’s far too dangerous. But after some pressure from Rayanne he decides to take you as far as the dark spire.
Dark Spire
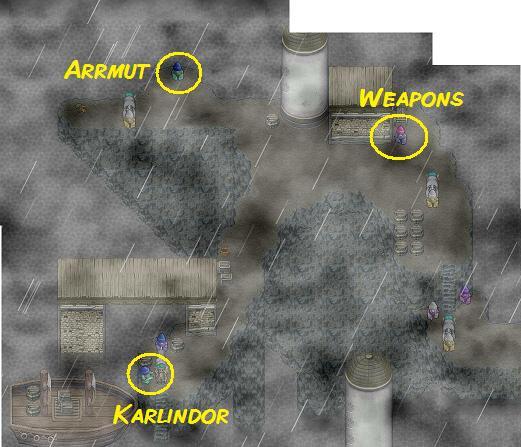
If you’ve got the moolah and Grom uses claw attack, get the Bahamut Claw from Arrmut there. Then exit east and you’re on Kremdjir Continent.
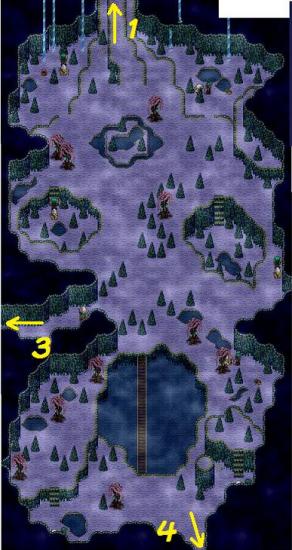
Kremdjir Continent
Kremdjir Continent World Map
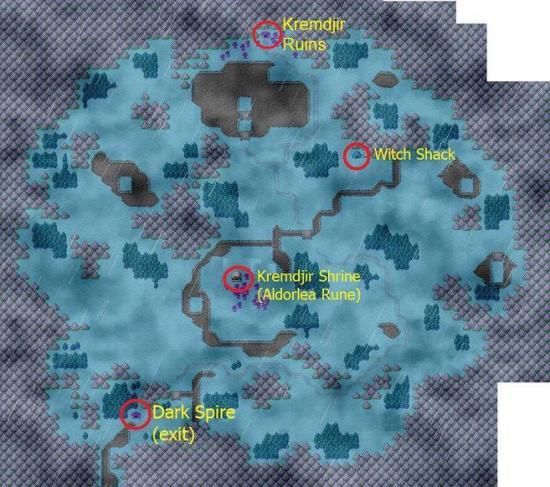
Explore the continent. There are lots of hidden locations on this map. You will also get a few nasty ambushes, but if you’ve diligently been collecting battle skills and you do what the Enemy Knowledge tells you, you should manage.
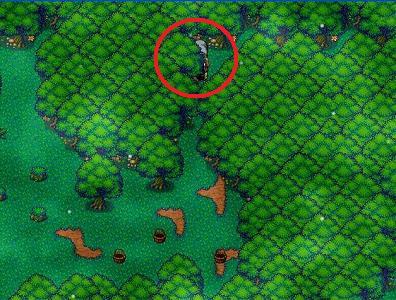
Now, from here on there are no more teleportation crystals, and although there is still a fair bit to explore between here and the end of the game, I recommend doing everything else you want to do in this game before you go on into Kremdjir Ruins. You can go onward if you like, and I will warn you again before you reach the point of no return, but the Kremdjir Ruins are biiiiig and, like I said: no teleportation crystals so you’ll have to trudge all the way back through the ruins!
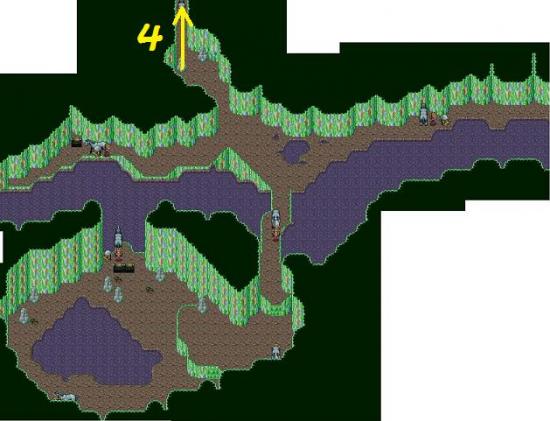
Anyway, when you’re ready to go on, go north and enter the hole in the purple tree to get to Kremdjir Ruins.
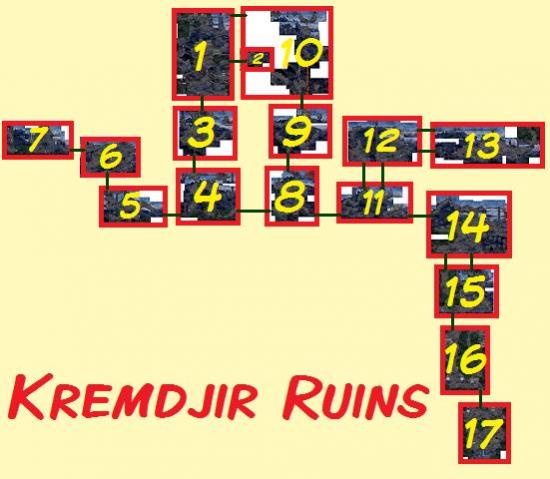
Kremdjir Ruins 1
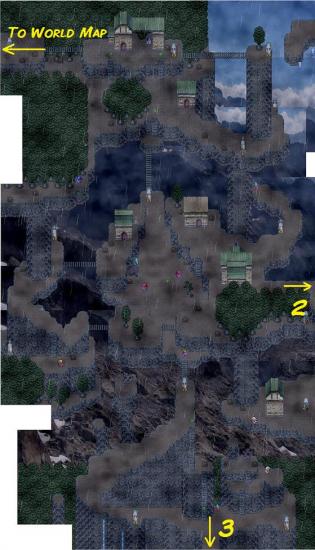
From map 1 there is a small side map to the east. There is nothing much to do there.
Kremdjir Ruins 2
Return to map 1 and exit on the south side to get to map 3 and onwards.
Kremdjir Ruins 3
Kremdjir Ruins 4
On map 4, first go straight south and exit on the southwest side to explore maps 5, 6 and 7.
Kremdjir Ruins 5
Kremdjir Ruins 6

Kremdjir Ruins 7
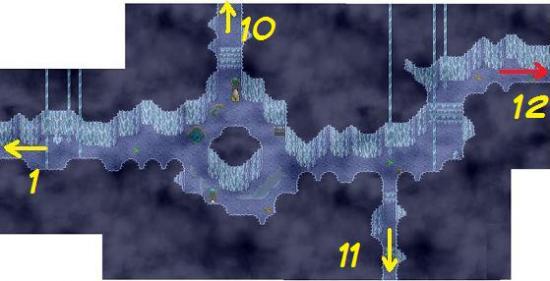
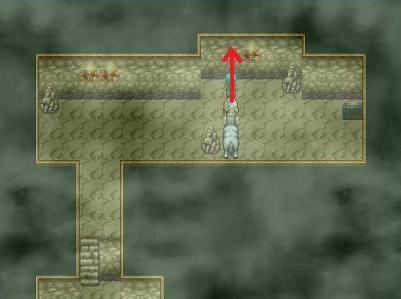
When you’re done in the west, go back to the top of map 4 and take the east way down until you can exit to map 8.
Kremdjir Ruins 8
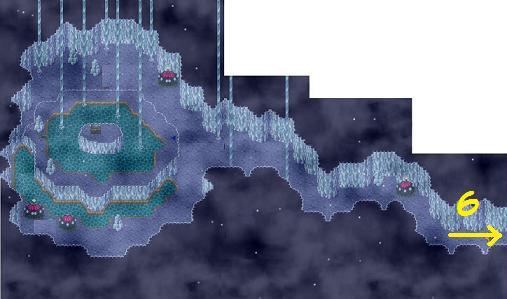
On map 8 you can go north to map 9, which has a path back to a small section of map 3.
Kremdjir Ruins 9
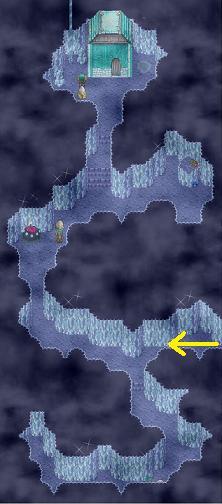
On the north side of map 9 you can go on to map 10, which has a path back to a section of map 1.
Kremdjir Ruins 10
Then go back to map 8 and take the south path east to map 11.
Kremdjir Ruins 11
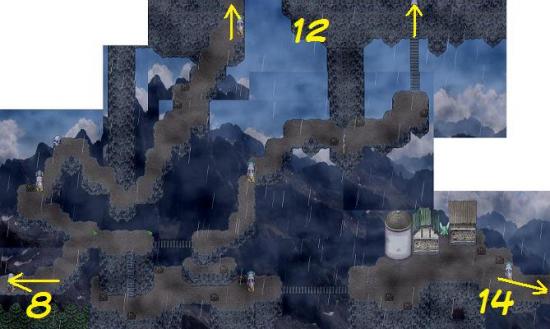
Ignore the north end of this map right now and first make your way southeast to map 14.
Kremdjir Ruins 14
Now map 14 has me puzzled, as (at least in the version I’m playing) there are two bridges on this map that I can’t cross, meaning I can’t get to the money bags and the axe in the southeast of the map. If you know how to get there, please let me know!
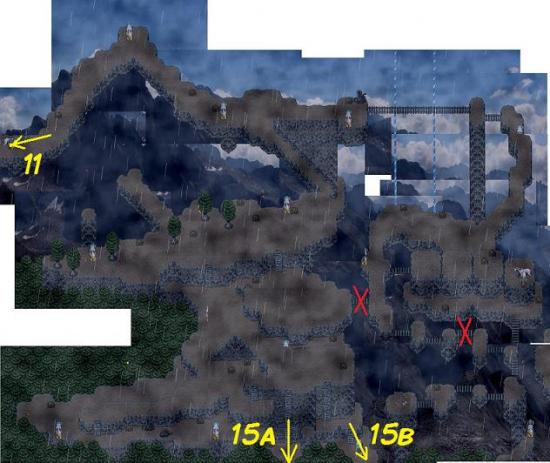
There are two paths down from map 14, each going to a different part of map 15. The way on is the west road, which is indicated on the image as 15a.
Kremdjir Ruins 15
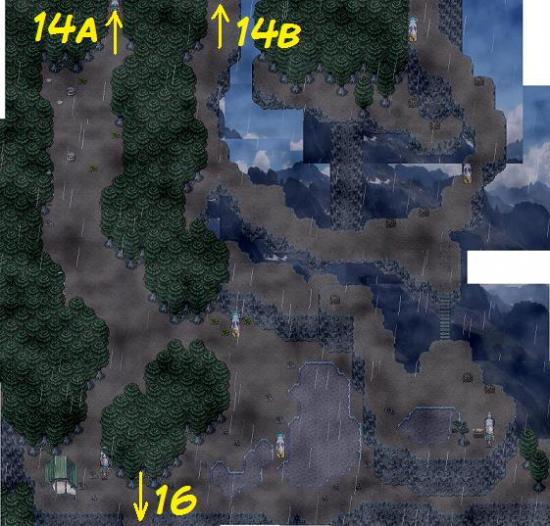
On map 15, if you’ve entered from 14b, you can go back up to map 15 east of 14b. However, even this doesn’t get you to that axe! To continue onwards, go south on side 15a, and move on to map 16.
Kremdjir Ruins 16
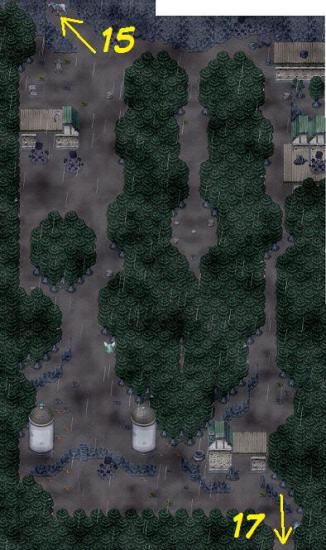
There are loooots of lovely money bags on map 16! Exit south to go to map 17 for our final destination in this leg of the journey.
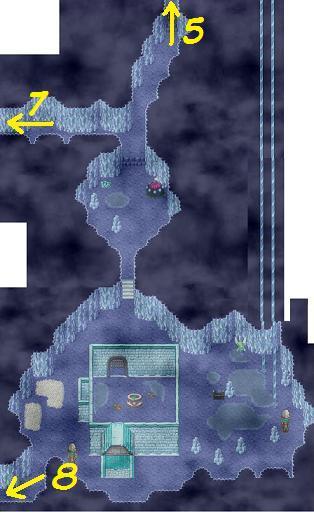
Kremdjir Ruins 17
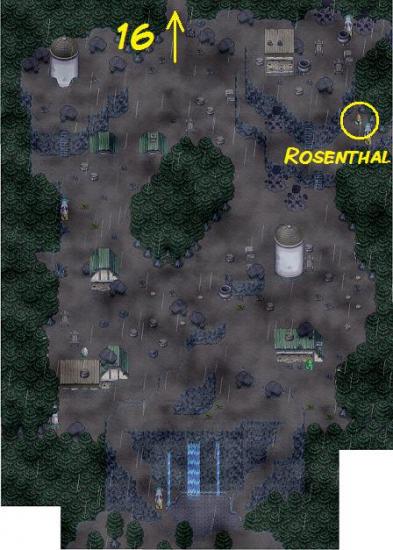
On map 17 you’ll find Rosenthal, who can teach you Guru Adrenalyn Rush (yes, spelled like that).
Ok, now we’re done wasting our time on these side maps, let’s go back to map 11 and go north. You can take the east way or the west way around; it doesn’t matter.
Kremdjir Ruins 12
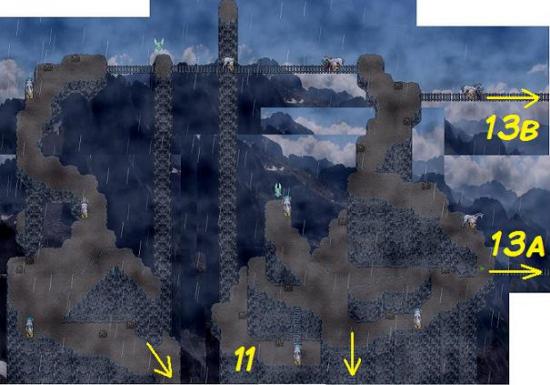
On map 12 you can take two routes to map 13, but only 13a will allow you to continue on.
Kremdjir Ruins 13
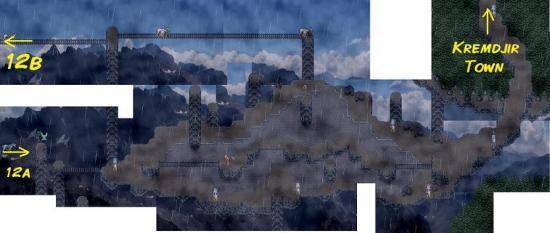
When you make your way across map 13 you will once again be ambushed by Bone-Breaker and Dodo. He should be small change for you by now, right? When you’re done playing with him, continue onwards and exit map 13 to arrive at Kremdjir Town.
Kremdjir Town
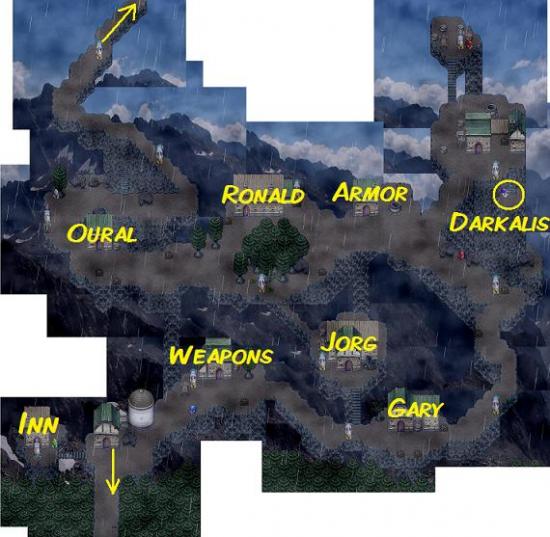
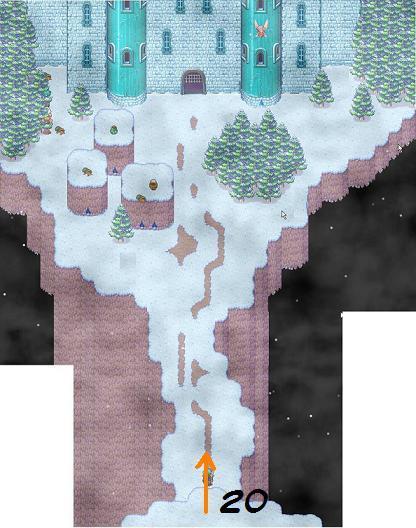
Make your way north to the north part of town
Kremdjir Town North
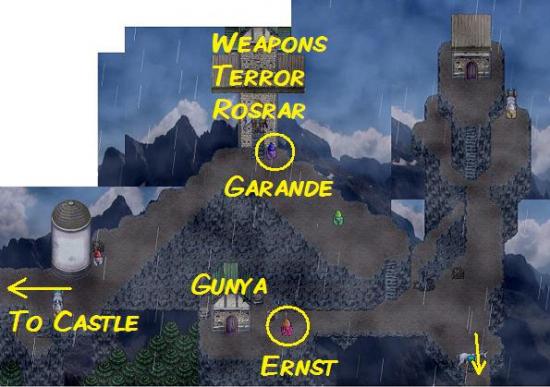
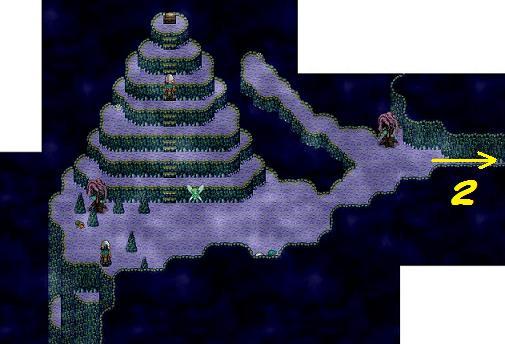
Then go east, make your way up the winding path and enter Asguaard Castle.
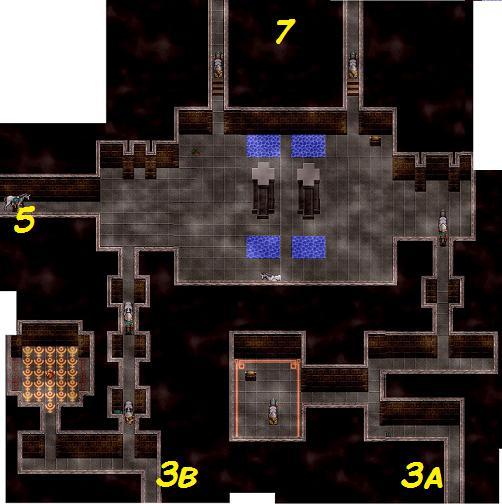
Asguaard Castle
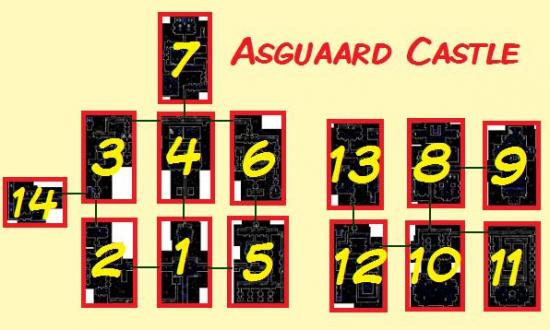
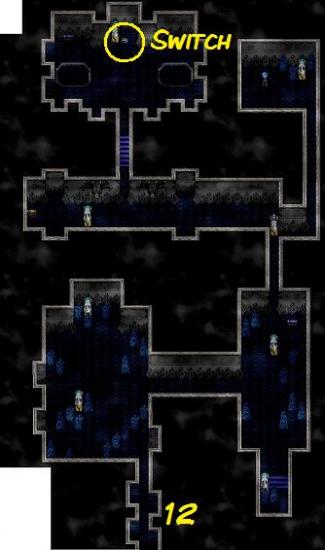
Asguaard Castle is a bit of puzzle as well as a dungeon. You need to flick switches to open new pathways etc.
Asguaard Castle 1
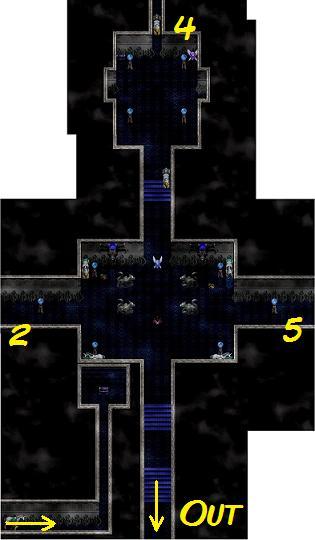
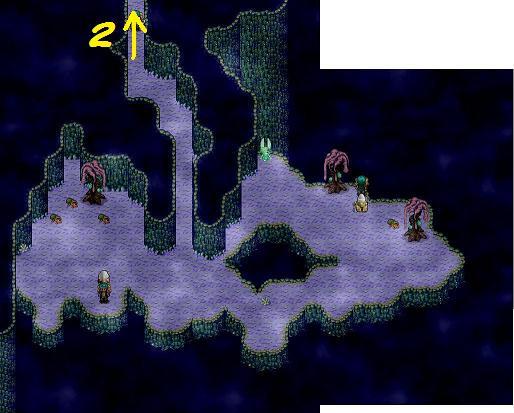
First make your way west to map 2.
Asguaard Castle 2
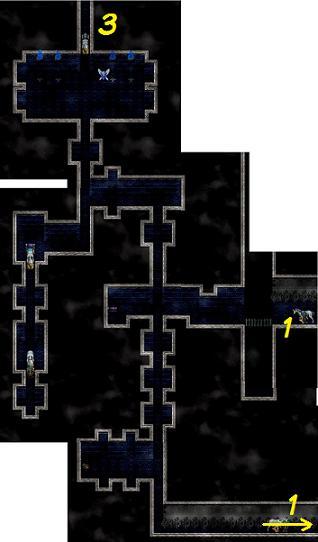
If you take the first path south, you will be able to access a chest on map 1 that you couldn’t get to from the other side. Then go north to map 3.
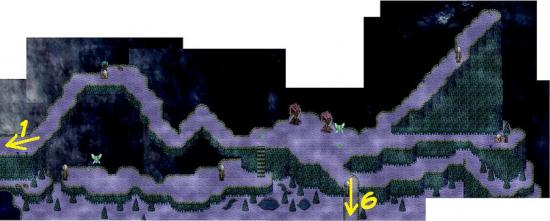
Asguaard Castle 3
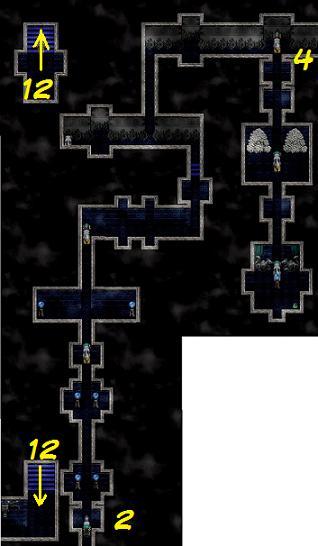
On map 3 you will see some areas that you can’t access right now, but you will be able to get to them from the top floor. Make your way east to map 4.
Asguaard Castle 4
You can’t go far on map 4, because your path is blocked by spikes. Pull the lever on the switch that’s there. You should get a message saying “ON”, and the spikes that were blocking you will go down. Unfortunately, some other spikes will pop up so you still can’t go on!
Go back to map 1. You can go north to another area on map 4, which also doesn’t let you continue on. So when you’re done clearing that area, go east from map 1 to map 5.
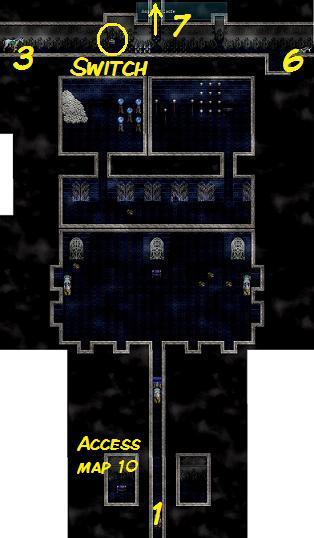
Asguaard Castle 5
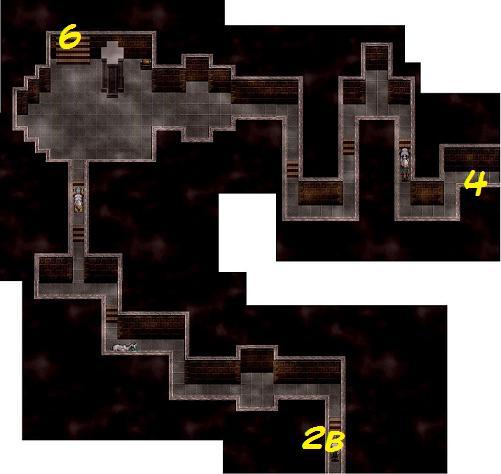
Explore map 5 and make your way north to map 6.
Asguaard Castle 6
When exploring map 6 you’ll find some stairs blocked by more spikes. Ignore them and just walk past. Go all the way to the northwest of the map and exit to the east side of map 4. You can now go past the spikes and make your way north to map 7.
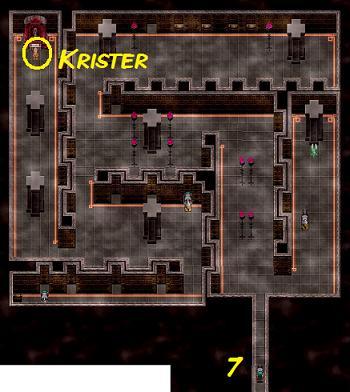
Asguaard Castle 7

Make your way to the northeast of the map (take the right path) and flick the switch so it says “ON”. Then clear the area just southwest of the switch, which was previously blocked by spikes. Then flick the switch again so it says “OFF”, go back south and take the left path north. Go all the way north and go up the steps to map 8 on the second floor.
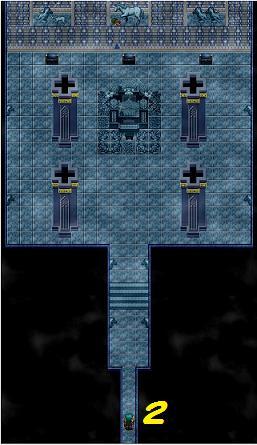
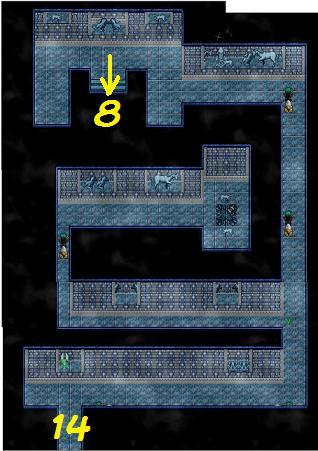
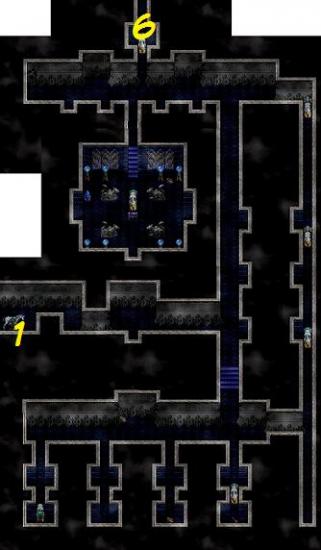
Asguaard Castle 8
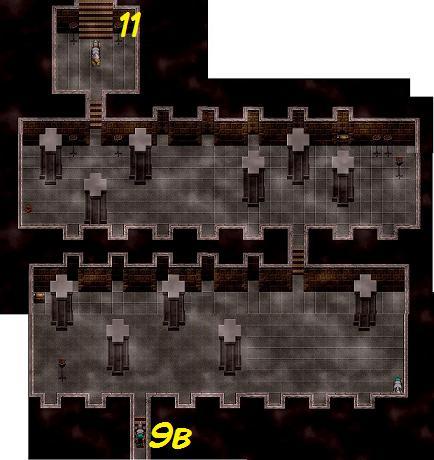
First go a little bit south and exit east to map 9.
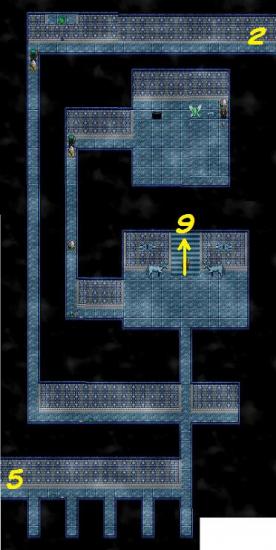
Asguaard Castle 9
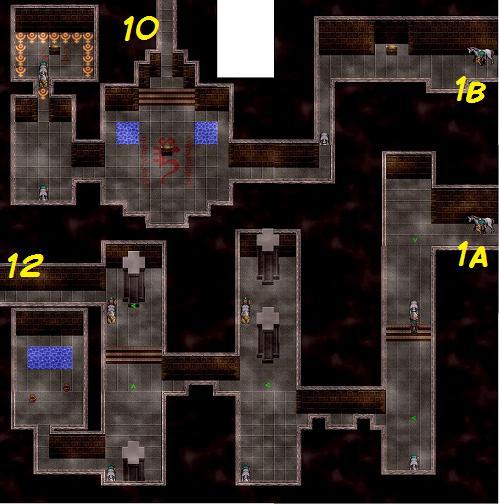
In the northeast of this map you’ll find another switch. This one lowers the spikes in front of the stairs on map 6. You can go back for those in a bit. Let’s first go on to map 10, which is south of map 8.
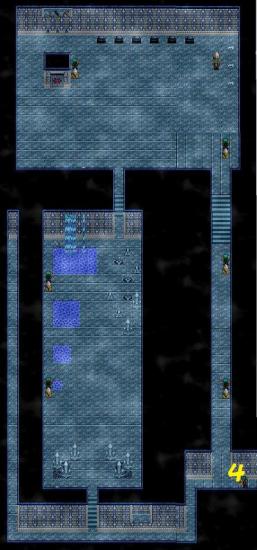
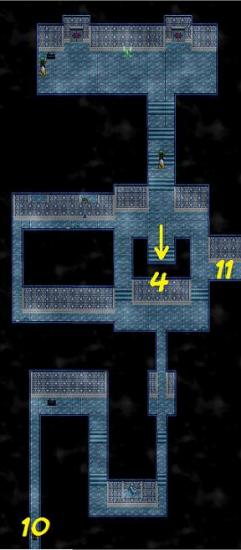
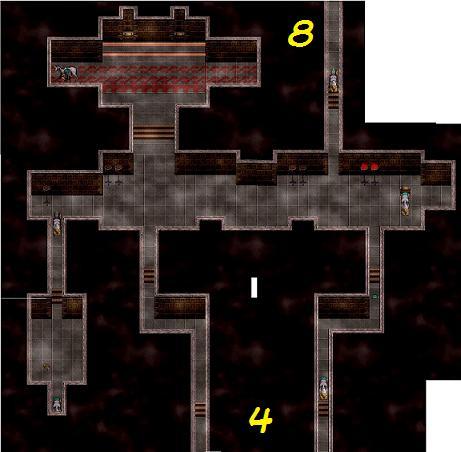
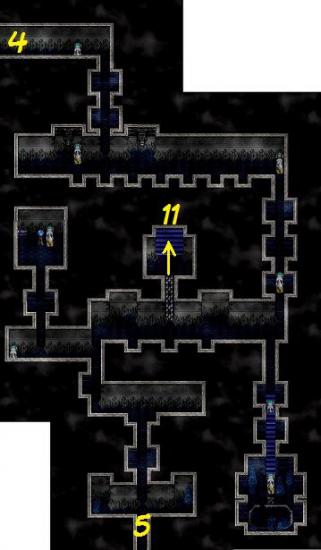
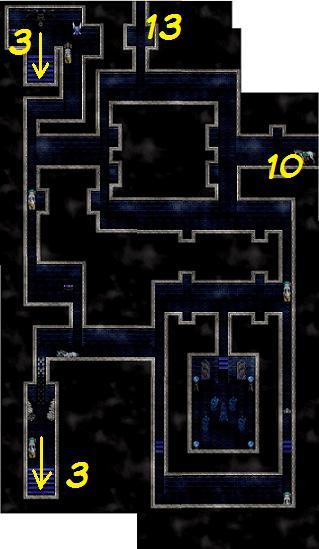
Asguaard Castle 10

First go east to map 11.
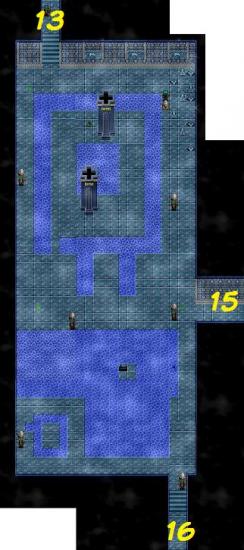
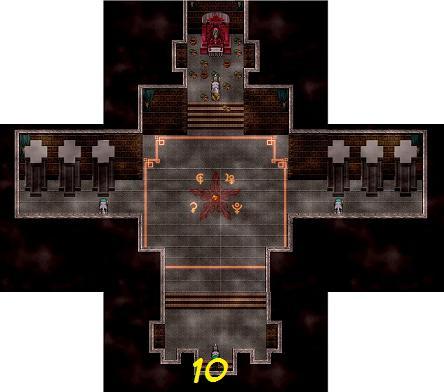
Asguaard Castle 11
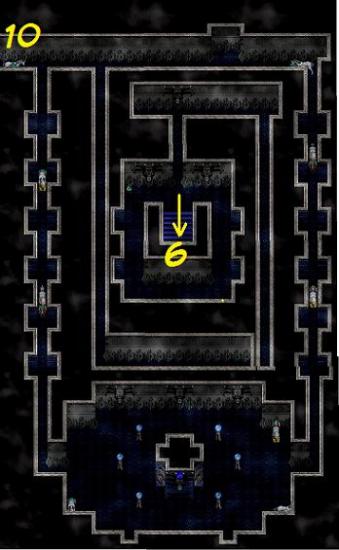
In the center of map 11 is the area at the top of the stairs from map 6. When you’re done, go back to map 10 and explore the south area of the map.
Now be careful as there are two big black holes in the floor that you will fall through when you walk into them. They will get you to the areas on either side of map 4. The only way I have been able to find to get out of these holes is by using Grom’s Egress skill. This will take you back to the start of the dungeon. The hole on the left contains a chest, so it’s worth falling into that one and then going back to the start, but try and avoid the one on the right, unless you like pointless walking around.
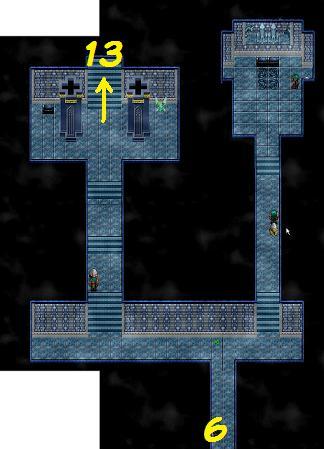
When you’re on your way back up, make sure to go up the stairs on map 6 to clear that area on map 11. Then go back to map 10 and go west to map 12.
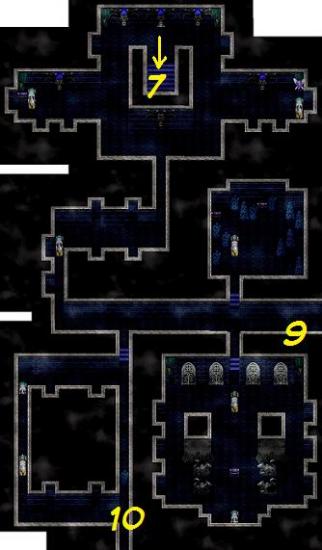
Asguaard Castle 12
On map 12, in the northwest, you can take the stairs down to the northwest corner of map 3. In the southwest of map 12 is a path blocked by spikes. So we need to go north to map 13.
Asguaard Castle 13
On the north end of map 13 is another switch. Switch it on and go back to the stairs on map 12 that were blocked off with spikes. You can now go down. You’ll end up on a corner of map 3 again. You can only go further west, onto map 14.
Asguaard Castle 14
Go north and you’ll end up in the castle catacombs.
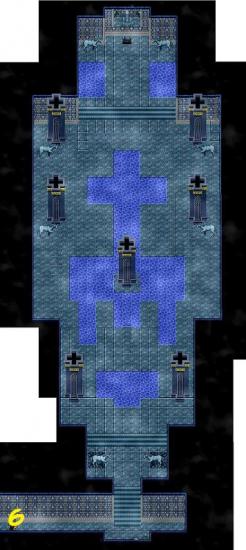
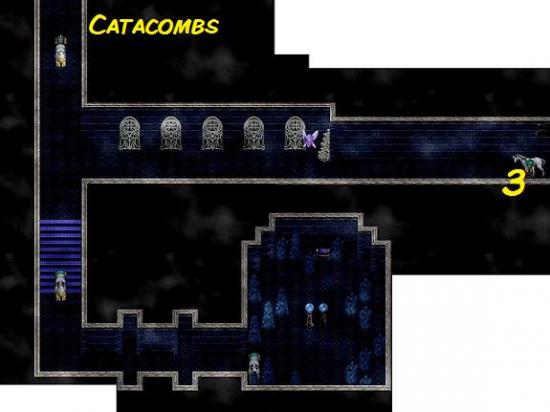
Asguaard Castle Catacombs 1
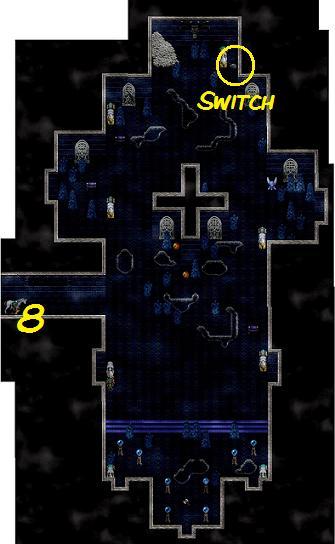
Go west and enter the door on the other end of the corridor to get to the second part of the castle catacombs.
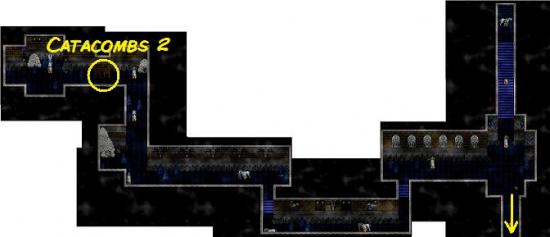
Asguaard Castle Catacombs 2
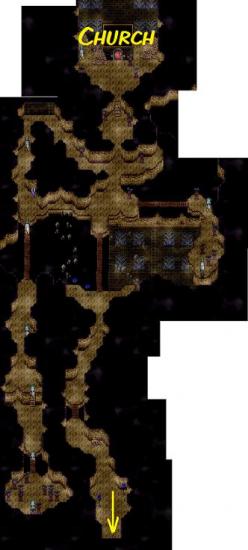
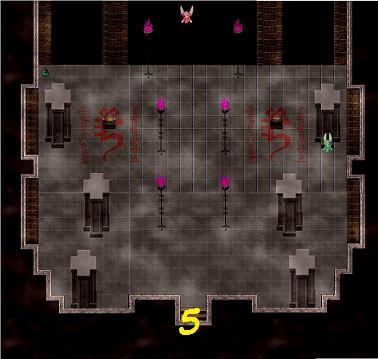
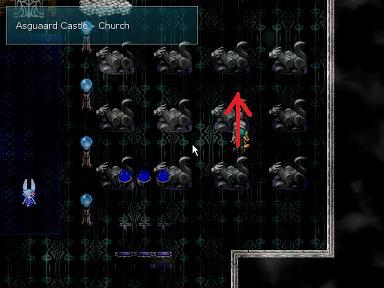
Make your way all the way north and enter the church.
IMPORTANT: When you interact with the door at the end of the church (under the scary bull’s head masks) you will be taken to the final battle and the end of the game. So, explore the church, save at the fairy, and then leave and do more shopping, get those last skills, find those last secret locations and runes etc. because you won’t be able to do this after the final battle!
When you’re ready, interact with the door and watch the events unfold. I won’t tell you how things end, just that you will have to fight Thanatos without Rayanne. I didn’t seem to get any enemy information on him, but I just used the standard strategy of using Glen’s Power and Grom’s Protection Sphere spells, then just hitting him hard with Luby healing people when needed. It took a wee while to kill him, but with hits of more than 1000hp a pop, it wasn’t too bad.
The End!
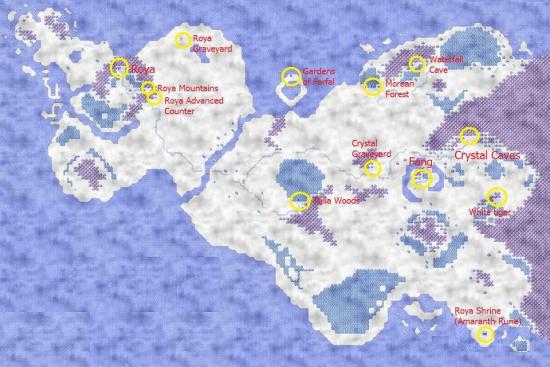
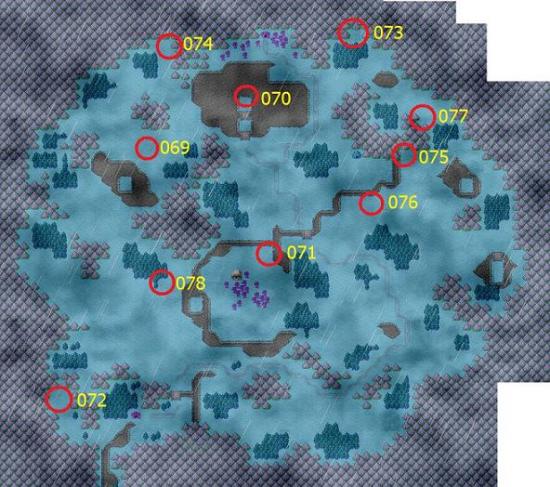
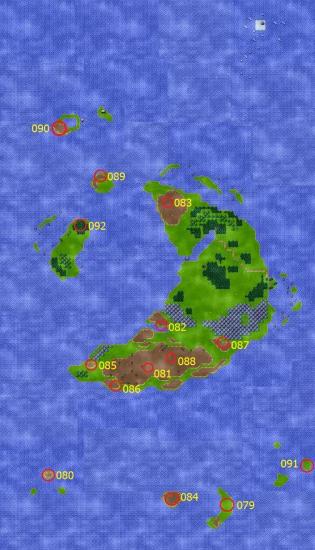
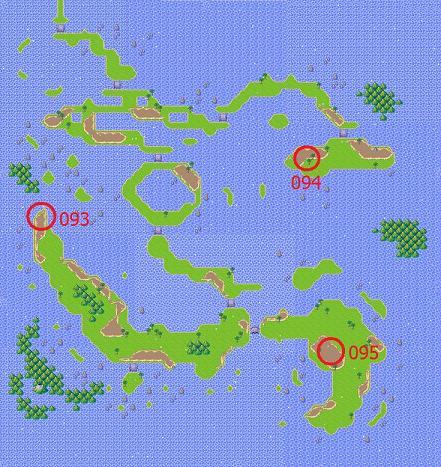
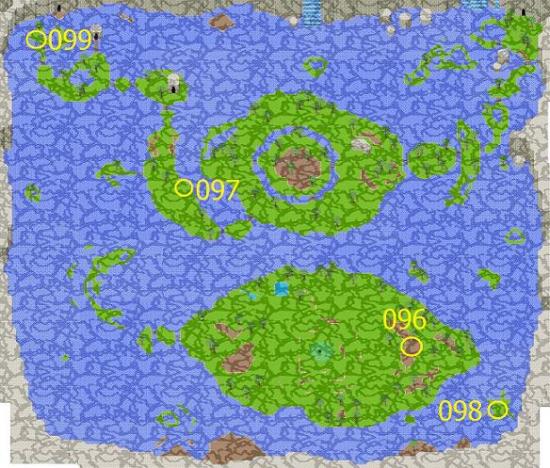
Hidden Locations
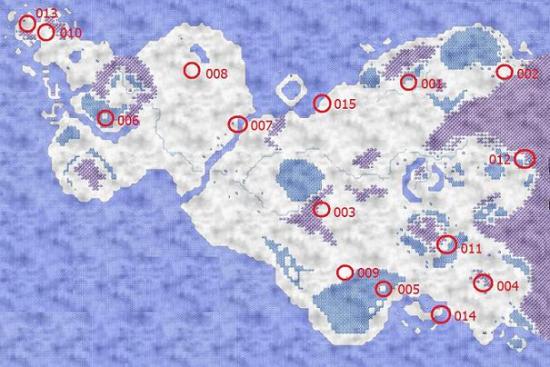
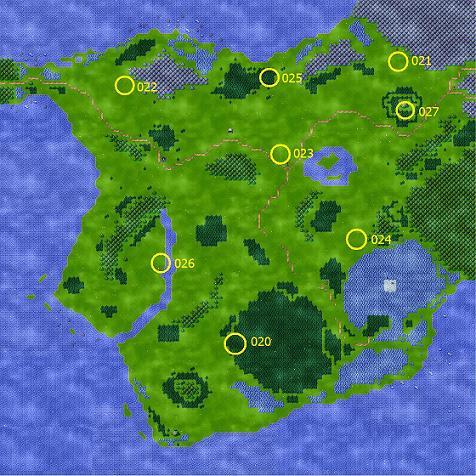
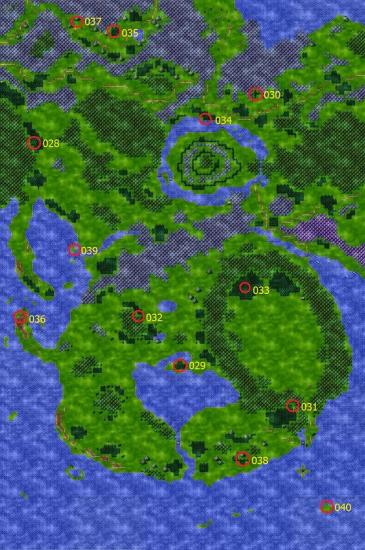
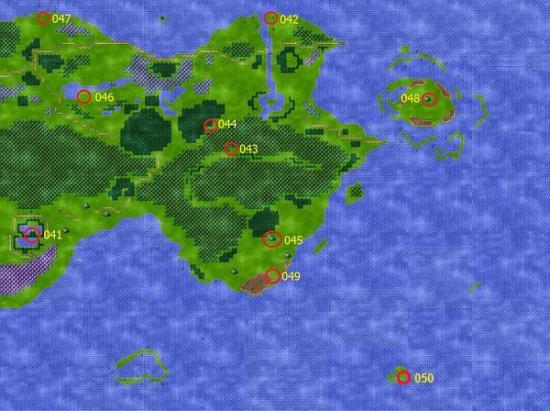
I won’t list each hidden location individually, but I have marked rough location of all of them on the world maps below. Just walk around in the circled areas and you should find them.
Hidden Locations Roya 1-15
Hidden Locations Small Kandar 16-19

Hidden Locations Main Kandar 20-27
Hidden Locations Middle Lands 28-40
Hidden Locations Tartarian Cape 41-50
Hidden Locations Ancient Lands 51-56
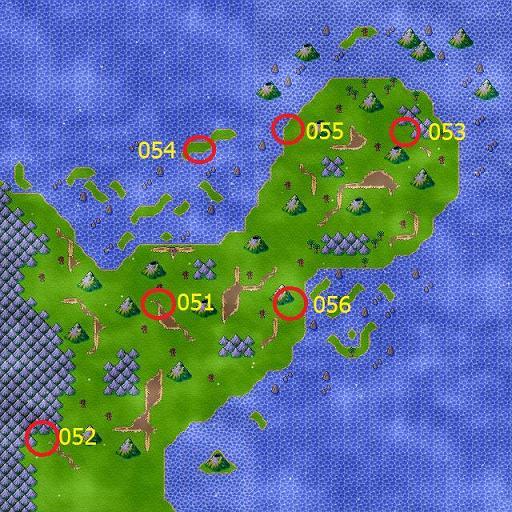
Hidden Locations Marajulen Swamp 57-68
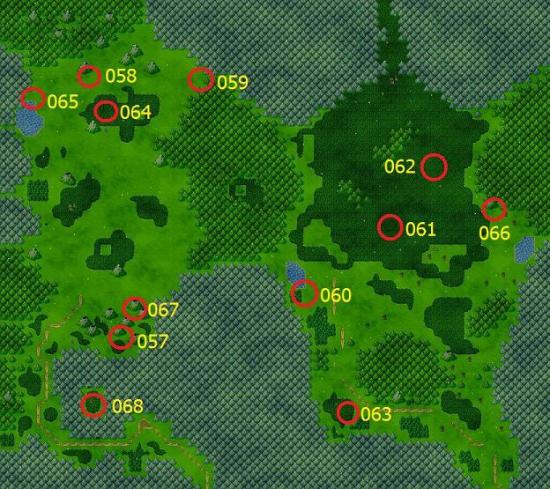
Hidden Locations Kremdjir Continent 69-78
Hidden Locations Crescent Island 79-92
Hidden Locations Shark Cove 93-95
Hidden Locations Center of the World 96-99
Magical Rooms
1. Crystal Cave map 14

2. Inside room 1, right hand side
3. Frozen Woods map 12, crack in wall behind unicorn statue
4. Frozen Woods map 23, sparkling wall, right of brown chest
5. Frozen Woods map 17, path to the west just before exit to world map
6. Shrine of Isendra map 5
7. Shrine of Isendra map 11
8. Shrine of Isendra map 11, inside organ
9. Shrine of Isendra map 9
10. Shrine of Isendra map 1, waterfall in southwest corner
11. Shrine of Isendra map 14
12. Kandara Cave map 2, sparkling wall/lit candle just north of stairs in eastern loop
13. Hyperbole Cave map 9, edge of water southeast of Shia
14. Hyperbole Cave map 8, rock in middle of cave
15. Hyperbole Cave map 13
16. Hyperbole Cave map 2
17. Silver Cave map 5, in alcove just north of exit 6
18. Edelweyss Cave map 4
19. Edelweyss Cave map 5, southernmost end, rock pillar
20. Edelweyss Village

21. Edelweyss Village
22. Silver Cave map 10
23. Nacbuula Lair map 3
24. Nacbuula Lair map 2, next to save fairy
25. Nacbuula Lair map 5, in center north wall
26. Temple of Savior map 4, in water behind left pillar
27. Temple of Savior map 6, in black wall left of red fairy
28. Temple of Savior map 2
29. Temple of Savior map 15, middle north alcove
30. Temple of Savior map 14, wrought iron door directly north of entrance
31. Temple of Savior map 12, in bottom left pillar in area with save fairy
32. Temple of Savior map 7, walk right along red markings on floor
33. Temple of Savior Catacombs map 2, left of bookcases
34. Asguaard Castle map 5, left alcove on south end of map
35. Waterfall Cave on Roya World Map
36. Elija Woods on Main Kandar World Map
37. Swamp Cemetery on Marajulen Swamp World Map
38. Izuma, southwest house, middle of south wall
39. Shack, Center of the World, in cupboard
40. Cave inside Inventor Cave, Center of the World
41. Giant Spider Cave, Center of the World
42. Asguaard Castle Catacombs map 1, at the top of staircase
43. Elder Tower in Savioropolis
44. Elder Tower in Savioropolis, outside, right of tower
45. Krazimir, in left hand wall below little table in cave
46. Asguaard Castle Church
47. Myst, Alvar Residence, walk into south wall, left side
48. Old Fortress on Middle Lands World Map, room northwest of entrance, in back wall two tiles left of the chest
49. Alchemist Cottage on Marajulen Swamp World Map, room left of entrance, bottom left corner
50. Witch Shack on Marajulen Swamp World Map, northwest corner
51. Inside Zeppelin, alcove in south wall
Runes
To find the runes you need the Rune Finder skill. Only the Hyperbole Rune can be found without the skill. To find runes, look out for the symbol shown in the image below.
Runes have several functions. They open the various shrines and they each have specific functions that can be used in battle. Some may be morphed into rings that can be equipped by characters. You can do this by selecting them from the items menu and selecting “morph into ring” from the window that pops up.
Hyperbole Rune
– Receive as reward in Hyperbole
– Opens Hyperbole Shrine on Middle Lands World Map
– Can be used to restore HP
Dreamer Rune
– Found in Hidden Location #046
– Casts sleep on all enemies
Blossom Rune
– Found on Blossom Island
– Opens Kandar Shrine on Main Kandar World Map
– Casts Revive All, can be morphed into ring
Amaranth Rune
– Found in Barton Woods
– Opens Roya Shrine on Roya World Map
– Casts Raise Tunder Arcs, can be morphed into ring
Divine Rune
– Found in Garden of Farfal
– Casts Vitality
Aldorlea Rune
– Found in Kremdjir Ruins map 17
– Opens Kremdjir Shrine on Kremdjir Continent World Map
– Casts Attack Up, Speed Up, Remove Mad, Frozen, Sleep, can be morphed into ring
Savior Rune
– Found in Temple of Savior Catacombs
– Opens Crescent Shrine on Crescent Island World Map
– Casts Restore MP
Asguaard Rune
– Found in Garden of Farfal
– Opens Asguaard Shrine on Middle Lands World Map
– Casts Shield
Skills List
Adrenaline Rush – Act if your HP drops below 25%
– Expert: Gerry – Kandara
– Master: Jorg – Kremdjir
– Master: Dardale – Hidden Location #039
– Guru: Rosenthal – Kremdjir Ruins
Axe
– Expert: Garoll – Fang
– Master: Ax God – Hidden Location #056
– Master: Azpae – Inventor Cave (Center of the World)
– Guru: Garande – Kremdjir
Botany – Make potions from flowers
– Expert: Mellyn – Hidden Location #007
– Expert: Merlyn – Ghoul Forest
– Expert: Kovack – Krazimir
– Master: Areni – Izuma
– Master: Merlyn – Zombie Woods
– Master: Zafiro – Hidden Location #024
– Guru: Nkobong – Krazimir
Bow
– Expert: Gian – Roya
– Master: Karel – Hidden Location #017
– Master: Dombar – Krazimir
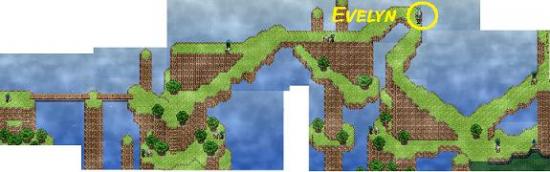
– Guru: Evelyn – Port Siren (Apple Road)
Claw
– Expert: Goonda – Minas
– Master: Ferry – Barton Woods
– Master: Tzar (dog) – Hidden Location #032
– Guru: Rosrar – Kremdjir Town
Endurance – Heal yourself better during long fights
– Expert: Braun – Barton Woods
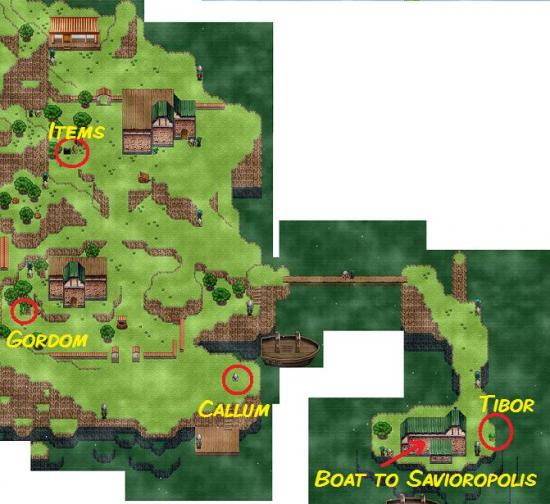
– Master: Callum – Port Siren
– Guru: Barack – Hidden Location #059
Enemy Knowledge – Gives information about all enemies
– Expert: Glen – Hidden Location #002
– Expert: Korul – Hyperbole
– Master: Balam – Inventor Cave (Center of the World)
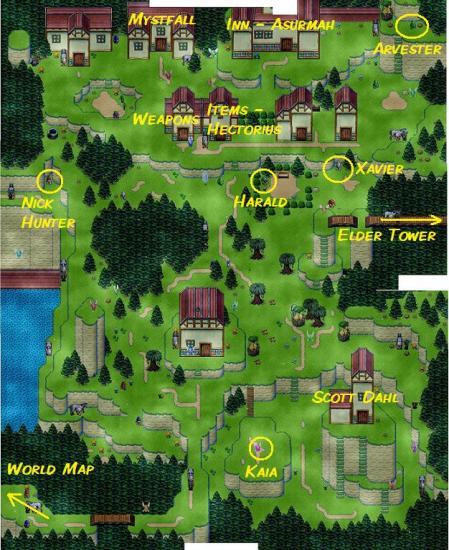
– Guru: Xavier – Savioropolis
Energy Burst – Strike with bigger chance of critical hit
– Expert: Tippert – Kandara
– Master: Fafnaar – Krazimir
– Guru: Isoldar – Fang
Energy Leech – Gives Leecher skill
– Expert: Nabus – Hyperbole
– Master: Zack – Jeroel Shack (Crescent Island)
– Guru: Emmar – Alchemist Cottage (Marajulen Swamp)
Eye of the Tiger – Increases chances of attacking immediately
– Expert: Grenna – Roya
– Expert: Alfus – Kandara
– Master: Tibor – Port Siren
– Guru: Gudendard – Kremdjir Ruins
Fortune – Get more money from money bags
– Expert: Titoune (spider) – Myst
– Master: Clarine – Hidden Location #021
– Guru: Greta – Crescent Island
Heroism – Act heroic during difficult fights
– Expert: Daemon – Hidden Location #020
– Expert: Shia – Hyperbole Cave
– Master: Greter – Hidden Location #081
– Master: Ronald – Kremdjir Town
– Guru: Ramzorback – Temple of Savior
– Guru: Krister – Asguaard Castle
Iron Will – Start regenerating HP and MP during long fights
– Expert: Gontran – Shack (Center of the World)
– Master: Ganael – Roya
– Guru: Samael – Astany
Kindness – Raises friendship skills
– Expert: Old Gray – Barton Woods
– Gabrudge – Astany
– Master: Harald – Savioropolis
– Guru: Elder – Roya
Knife
– Expert: Gian – Barton Woods
– Master: Ruffnel – Krazimir
– Master: Sven – Kandara Cave
– Guru: Jay – Astany
Learning – Increases XP gain after fights
– Expert: Wiseghud – Fang
– Master: Olbarmon – Hyperbole
– Guru: Scott Dahl – Savioropolis
Magic Regeneration – Gives magic regeneration skill
– Expert: Tobin – Hyperbole
– Master: Kristhina – Hyperbole
– Guru: Cecillia – Savior Tower (Savioropolis)
Meditation – Increase the power of your spells
– Expert: Karel Elder – Kandara
– Master: Vernal – Savioropolis
– Master: Zubar – Hidden Location #057
– Guru: Giles – Roya
Mercantile – Sell items at better prices
– Expert: Goofy – Roya
– Expert: Shamak – Kandara
– Master: Hectorius – Savioropolis
– Guru: Kadari – Kandara
Monster Looting – Earn more gold from dead monsters
– Expert: Petrus – Myst
– Expert: Niels – Astany
– Master: Erick – Minas
– Guru: Nick Hunter – Savioropolis
Musculation – Increases HP
– Expert: Ghalford – Roya
– Master: Gordon – Port Siren
– Guru: Omlabamadon – Temple of Origin (Center of the World)
– Guru: Terror – Kremdjir Town North
Path Finder – Green arrows to guide your way
– Expert: Ghert – Hidden Location #013
– Expert: Tonio – Frozen Woods map 8
– Master: Farfalle – Hyperbole Cave
– Guru: Karapoll – Krazimir
– Guru: Arvester – Savioropolis
Perception – Find secrets in the form of black smoke
– Expert: Fulfus – Kandara
– Master: Celzio – Hyperbole
– Guru: Gavroche – Izuma
Regeneration – some HP recovered each round
– Expert: Alvar – Myst
– Master: Mystfall – Savioropolis
– Master: Gavadriel – Hidden Location #027
– Guru: Hyulbeck – Hyperbole
– Guru: Gunya – Kremdjir Town
Rune Finder
– Expert: Marwell – Center of the World (after getting zeppelin)
– Expert: Kazan – Izuma
– Master: Gollum – Roya
– Guru: Kaia – Savioropolis
Scout – Raise chances to avoid enemy ambushes
– Expert: Domon – Kandara
– Master: Noldu – Minas
– Guru: Gustave the Watcher – Shack (Center of the World)
– Guru: Jaryd – Izuma
Slayer – Receive stat boost when facing enemies you hate
– Expert: Galisgar – Hidden Location #020
– Master: Marguerite – underground
– Guru: Oural – Kremdjir Town
Staff
– Expert: Gerald – Kandara
– Master: Hector – Hyperbole
– Master: Lamint – Izuma
Guru: Asuramah – Savioropolis
Stalker – Ambush Enemies
– Expert: Khamar – Minas
– Master: Nala (spider) – Krazimir
– Guru: Alakazam – Hidden Location #078
Survival – Be immune to various conditions
– Expert: Zan – Hidden Location #008
– Expert: Gekk – Morean Forest
– Expert: Alstoff – Myst
– Master: Sabajul – Marajulen Swamp
– Master: Gary – Kremdjir
– Guru: Desmond – Hidden Location #076
Sword
– Expert: Kurt – Kandara
– Master: Via – Izuma
– Master: Darran – Temple of Savior map 13
– Guru: Darkalis – Kremdjir Town
Telekinesis – Reach far away objects (with blue arrows)
– Expert: Garu – Crystal Cave
– Expert: Charmerlain – Hyperbole
– Master: Eye-Tooth – Hyperbole
– Guru: Lazy Bone – Savioropolis (Elder Tower)
War Master – Take less damage when defending, counter hits and have first strike
– Expert: Gontran – Kandara
– Master: Karim – Ancient Land
– Guru: Ernst – Kremdjir Town

More articles...
-
Grow A Garden 2 Base Price List
What's the most valuable crop? -
Evomon Best Starter [Leafbun, Blazpup, or Bubble?]
Grass-type, Fire-type, or Water-type? -
Evomon Tier List [META and BEST Evomon]
The Evomon dream team.