![Digimon UP Tier List [Supports, Buddies, and Partners]](/wp-content/uploads/2026/07/digimon-up-tier-list.jpg "Digimon UP Tier List [Supports, Buddies, and Partners]")
Digimon UP Tier List [Supports, Buddies, and Partners]
These Digimon will get you UP the leaderboard.


![Haze Seas Boss Drops [Chances, Locations, and How to Spawn]](/wp-content/uploads/2026/07/haze-seas-boss-drops.jpg "Haze Seas Boss Drops [Chances, Locations, and How to Spawn]")

Check out our strategy guide for Art of Murder: FBI Confidential. (Read the review here.) GENERAL TIPS CONTROLS 1. Single left click to walk or double left click to run. 2. Single click when the cursor is over a hotspot to perform actions. Walking, talking and taking objects requires a left click while examining objects requires a right click. The type of action varies depending on the icon that is shown. Refer to the icons section below for more help. 3. Left click to skip a line o…

a:1:i:0;a:2:s:13:”section_title”;s:36:”Art of Murder: FBI Confidential Tips”;s:12:”section_body”;s:45528:”
Check out our strategy guide for Art of Murder: FBI Confidential. (Read the review here.)
GENERAL TIPS
CONTROLS
1. Single left click to walk or double left click to run.
2. Single click when the cursor is over a hotspot to perform actions. Walking, talking and taking objects requires a left click while examining objects requires a right click. The type of action varies depending on the icon that is shown. Refer to the icons section below for more help.
3. Left click to skip a line of dialogue.
4. Press escape or select the menu button at the bottom-right corner of the screen to access the in-game menu. From here, you can resume the game, load, save, change game settings or quit the game.
5. Select the magnifying glass at the bottom-right corner of the screen to display hotspots for exits and objects that can be seen close-up.
ICONS
The cursor can change to any of the following icons in the game:
1. Mouse: Move within a location.
2. Arrow: Move to a new location or see a close-up of an object.
3. Eye: Examine an object.
4. Hand: Take an object.
5. Speech bubble: Talk to a character.
SAVING AND LOADING
1. To save, press ESC to bring up the menu and then click Save Game. Select one of the blank thumbnail images to save. A thumbnail of the current location is given to saved games.
2. To load, press ESC to bring up the menu and then click Load Game. Select the thumbnail image of the game you would like to load.
INVENTORY
All items that are picked up are added to the inventory at the bottom of the screen. Left click to take an object from the inventory or right click to examine the object.
PDA

Some buttons on the PDA only become active at certain points in the game. There are five buttons on the PDA:
1 – Phone: Numbers can be entered manually here. Use the numbers to enter digits, press the left arrow button on the panel to erase numbers and press the phone icon to make the call.
2 – Notepad: Any important comments that Nicole makes are stored here.
3 – Camera: Take photographs at certain points in the game.
4 – Photo album: View photographs that have been taken.
5 – Phone numbers: Phone contacts are stored here.
WALKTHROUGH
Day 1
FBI Office
The game starts in the study. Talk to Chaser: He needs a hardcopy of the report. Select the door to exit the study. Walk south-east to the agents’ offices and then open the left door to go out to the mezzanine.
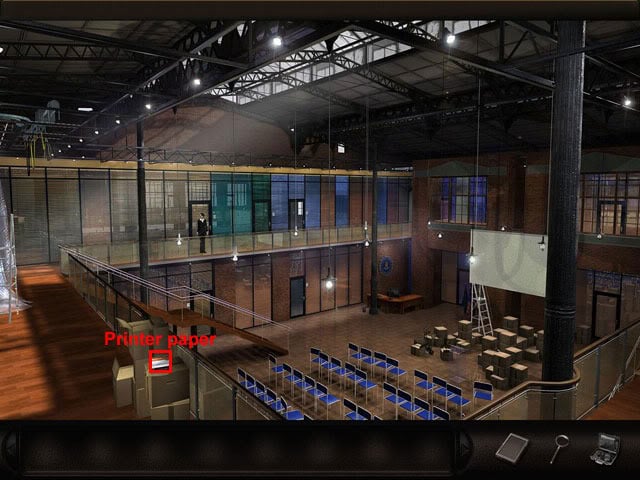
Run to the bottom-left corner of the mezzanine and take the printer paper on top of the box. Return to the agents’ offices.
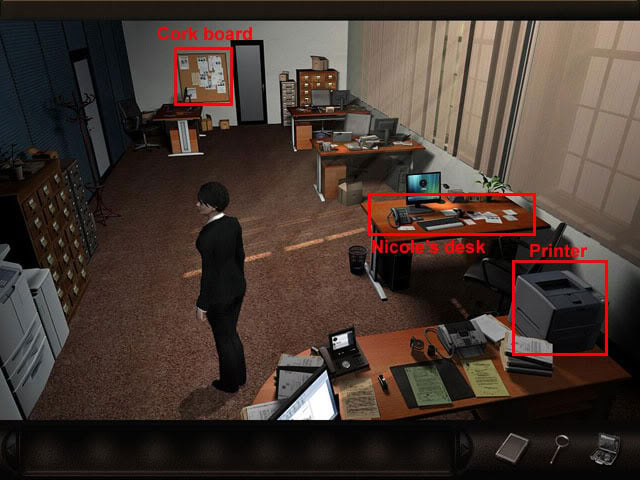
Examine the printer on the bottom-right desk to see a close-up view. Open the paper feeder at the bottom of the printer. Use the ream of printer paper on the paper feeder and then close the paper feeder. Exit the view of the printer. Examine the cork board at the back of the office to see Nick’s phone number. Open the PDA in the inventory, select the phone number book (bottom icon) and then select Nick to try and call him: Nobody will answer. Run south to the front office.
Talk to Ruth and she will e-mail Nick’s new phone number to Nicole’s computer. Return to the agents’ offices and use Nicole’s desk to see that the e-mail from Ruth has arrived. Open the PDA and select Nick from the phone number book to call him: He sends a text message to Nicole saying he will explain later. Exit the PDA.
Use the keyboard to write the report. Select the printed report on the computer screen to print it. Exit the view of the desk. Examine the printer and take the printout. Return to the study and give the report to Chaser: He wants Nicole to investigate a new case. Talk to Chaser twice: He mentions three new murders and gives Nicole a drawing of a knife he wants her to look into.
Return to the mezzanine and go downstairs to the lower levels. Go out the right door to the street. Select the black car to see the map.
Museum of Pre-Columbian Art
Open the door to enter the museum hall. Talk to the porter: He agrees to let Nicole into the exhibition room. Enter the exhibition room to meet Director Warren. Examine the display case to see the knives. Run to the mummy at the back of the room and take the fire extinguisher on the right.
Return to the entrance hall and try to go down to storage to be stopped by the porter. Talk to the porter twice to get Warren’s phone number. Open the PDA and select Warren from the address book to call him: He has switched off his phone. Talk to the porter and he will agree to let Nicole down to the storage room. Run down to the storage room.
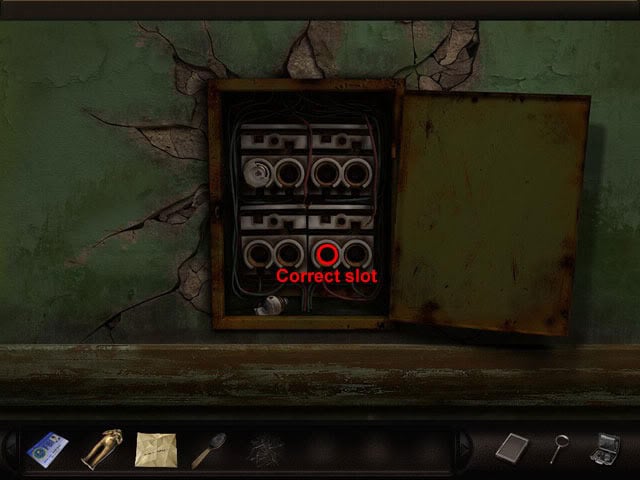
Open the light switch casing to see the light switches. This puzzle is random so it is not possible to give an exact solution. The aim now is to move the switches so that the dark storage room is lit up. You can either have all five lights lit up, or two lights on the left and two lights on the right in the order shown below:
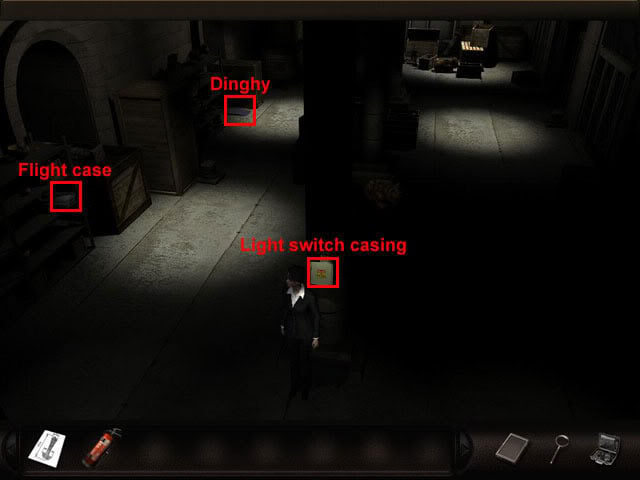
Once the correct lights are on, take the flight case from the shelf at the bottom-left corner of the room and the dinghy on the floor at the top-left corner of the room. Run north at the right side of the room to the furthest part of storage. Open the flight case from the inventory and then select it to take a portable x-ray scanner. Use the dinghy on the gap between the crates at the top-right corner of the room:
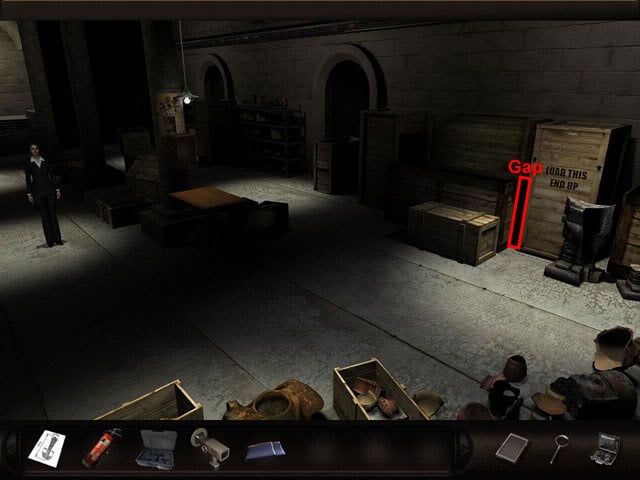
Use the fire extinguisher on the folded-up dinghy to move the small crate. Use the portable x-ray scanner on the crate above the dinghy to reveal a set of knives with one empty space where a knife with a curved handle is missing. Press the red button to turn off the scanner. Run back to the other side of the storage room.
Combine the portable x-ray scanner with the empty case in the inventory. Use the flight case on the little area for various cases on the middle shelf at the bottom-left corner of the room. Run south to the hall. Talk to the porter to tell him about the missing ritual knife. Exit the museum and wait a few seconds to receive a message from Nick about a new murder of a stock broker named John Rudolph. Use the car.
Stockbroker’s Villa
Talk to the policeman: Rudolph was killed on the pool table. Enter the villa. Examine the table in the middle of the room to see a close-up. Move the right armchair. Exit the view of the armchair to see that a card has been revealed on the floor below the right armchair. Take the business card. Examine the business card to add Allan Branford to the address book. Run west to the annexe and take the umbrella at the top-left corner of the room.
Return to the lounge and run north-east to the pool table room. Examine the pool table. Take the blue ball from the slot. Use the blue ball on each pocket until something blocks the ball. Use the umbrella in the inventory to make a spoke. Use the spoke from the umbrella in the pool table pocket and a new object will roll into the slot. Take the figurine. Exit the table view. Return to the lounge. Exit the villa and use the car to complete the first day.
Day 2
FBI Office
Enter the headquarters. Nicole mentions that she should place the figurine in the evidence deposit room, but the room requires a magnetic key card to enter. Go upstairs and enter the agents’ offices. Examine Nicole’s desk and take the origami at the top-right corner of the desk. Open the origami in the inventory to see a city plan. Back away from the desk. Run south to the front office and take the magnetic key card on Ruth’s desk.
Enter the study and talk to Chaser twice to tell him about the figurine and the card: He tells Kate to return to the museum to check for the second knife and Warren’s alibi. Talk to him again to tell him about the business card. Exit the study, return to the mezzanine and go downstairs. Use the magnetic key card on the door to the evidence deposit. Use the head of the figurine on the deposit shelf:
Exit the evidence deposit. Use the PDA to call Branford (if Branford is not on the list of contacts, examine the business card from the villa): Nobody will be there. Use the PDA to call Warren: He agrees to meet Nicole at the museum, and says that Branford will be at the museum as well. Exit the headquarters and use the car.
Museum of Pre-Columbian Art
Enter the museum and run north into the exhibition room. Talk to Warren six times: He says that he was at a concert when Rudolph was killed yesterday and that Allan Branford can confirm this. Run east through the doorway to enter the orangery. Talk to Allan five times: He says that the music Warren mentioned was not played in the concert at the Lincoln Centre yesterday and also mentions the word Huaquero, which he says means grave robber. Return to the exhibition room.
Examine the golden figurines in the display case to see that one is missing a head. Back away from the case. Talk to Warren: He will let Nicole borrow the figurine if she shows the proper paperwork. Exit the museum and use the car.
FBI Office
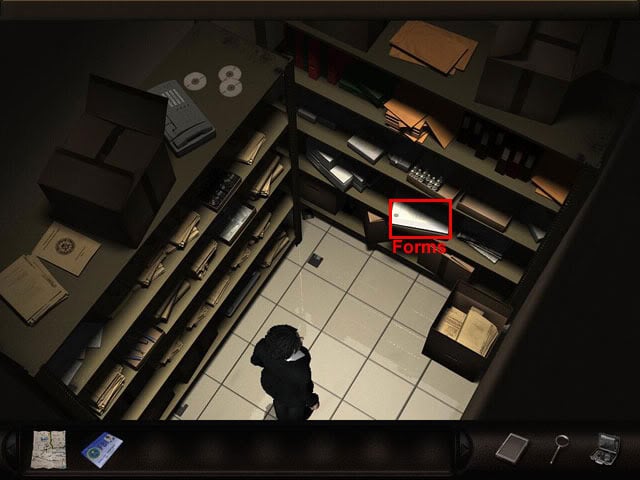
Enter the headquarters. Run upstairs and return to the front office: Ruth tells Nicole to take the form from the closet. Go south-east to the agents’ offices and open the door to the storage room at the right side of the cork board. Take a form on the second shelf from the bottom in front of Nicole:
Return to the front office and give the blank form to Ruth: The chief needs to sign it. Enter the study and talk to Chaser: He tells Ruth to approve the form. Exit the study and take the blank form on the desk. Exit the headquarters and use the car.
Museum of Pre-Columbian Art
Enter the museum. Enter the exhibition room and give the completed form to Warren: The porter will help remove it from the display case. Run south to the hall and talk to the porter: He agrees to open it. Return to the exhibition room and examine the golden figurines. Open the display case door and take the right gold figurine. An object of equal weight to the gold figurine must now be put into the display case to stop the alarm from going off or else the porter will not let Nicole leave the museum. Exit the view of the display case and run right to the orangery.
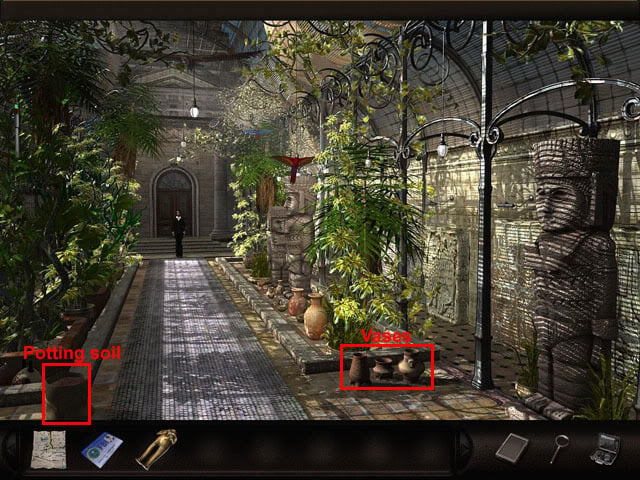
Examine the vases at the bottom of the room and take one. Take a handful of potting soil from the bottom-left corner of the room. Combine the potting soil with the vase to fill it. Take some more potting soil. Return to the exhibition room and examine the golden figurine display case.
Use the vase on the display case and watch the alarm light. If the light flashes red, take the vase back, add some more potting soil to it and then put the vase back on the display case. If the light continues to flash red, take the vase, return to the orangery, examine the vases, put the vase on the terracotta, take a different vase, take some potting soil, combine the potting soil with the vase, take some more potting soil, return to the exhibition room, examine the golden figurine display case and try the new vase on the display case. If the alarm light stays red, add more potting soil to the vase, and try again. If the second vase doesn’t work, try the whole process again with the third vase. When the light has turned green, exit the museum and use the car.
Abandoned House
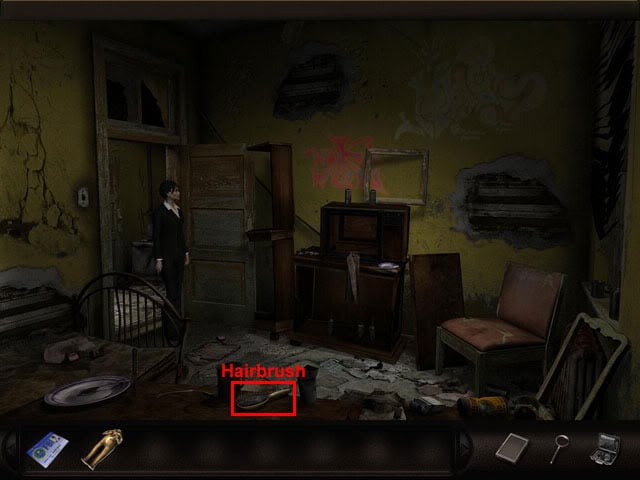
Enter the building and run west to the corridor. Go through the top-right door to enter the kitchen. Take the bottle of whisky in the refrigerator. Run through the doorway to the corridor. Go through the top-left door to enter the apartment. Run north through the doorway to the bathroom. Take the rubber plug on the floor below the sink. Back out of the bathroom and run west to the bedroom. Take the wire hairbrush on the table:
Exit the bedroom and run east to the corridor. Run south one screen and go through the doorway to number 9. Go through the doorway to meet Tatum. Talk to Tatum three times: He needs body fluids. Give the whisky to Tatum: He doesn’t like bourbon. Take the empty bottle under the small table at the left side of the screen. Exit number 9 and return to the kitchen. Examine the kitchen sink and then use the plug on the sink. Use the empty bottle on the sink. Turn the faucet on to fill the sink with water. Take the whisky label. Combine the whisky label with the whisky bottle.
Return to Tatum’s room and give him the whisky bottle to get an origami bird. Open the origami bird in the inventory to see a message from Nick. Try leaving the room and Tatum will leave. Take the burnt-out fuse on the couch. Exit number 9. Examine the fuse box on the wall. Select the wire brush in the inventory to pull out a handful of bristles. Combine the bristles with the burnt-out fuse to repair the fuse. Use the fuse on the bottom row, second from right slot:
The fuse will burn out. Take the burnt-out fuse. Return to the kitchen. Examine the kitchen table to see a burnt plug. Use the flattened origami paper on the plug to remove it. Combine the bristles on the burnt-out fuse in the inventory again. Return to the fuse box outside number 9 and examine it. Use the fuse on the same slot as last time and then exit the view to see that a light has appeared on the stairs on the left.
Run west one screen to the staircase view and then go upstairs. Look more closely at the floor near the radiator to see a mobile phone below a crack in the floor. Use the wire brush on the mobile phone to lift up the floorboard. Take the mobile phone. Exit the abandoned house and use the car.
FBI Office
Enter the headquarters. Use the magnetic key card on the evidence deposit door to enter the evidence room: Nicole notices that the head of the golden figurine is missing. Examine the box of James’s things on the bottom-right shelf and take James’s ID. Exit the view of the box. Examine the box of tailor’s supplies on the bottom-left shelf and take the scissors. Exit the evidence room and go upstairs.
Move the ladder at the left side of the room and examine the hanging wires above it. Use the scissors on the cables to take them. Move the ladder back to its original place. Return to the front office and talk to Ruth: The golden figurine head was covered in Nicole’s prints. Return to the mezzanine and open the right door to enter the laboratory. Take the jar with swabs on top of the trolley. Select the swabs in the inventory to get a clean swab. Combine the clean swab with James’s ID to clean it. Return to the agents’ offices and open the door to the storage room.
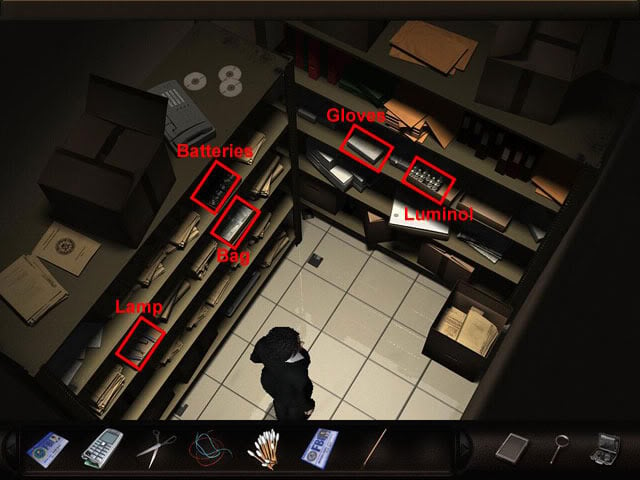
Take the lamp, a battery from the box, and plastic bag from the left shelf. Take the luminol and gloves from the right shelf. Exit the storage room. Examine Nicole’s desk and use the damaged mobile phone, cable and battery on the bottom-left corner of the desk to turn the mobile phone on. Examine James’s ID to see the code 8673.
Enter the number 8673 on the phone and then press the blue OK button. Press the top-right blue button if you make a mistake to delete a digit. When the code has been entered, use the screen of the phone to transfer the photographs to the computer: The phone burns out. Exit the view of the phone and select the photo on the monitor to see Huaquero. Exit the headquarters and use the car.
Thugs’ Hideout
Run left to the alley and go up one screen toward the car. Take the crowbar by the back-left wheel of the car. Enter the car and push the handbrake to move the car forward. Exit the car. Use the crowbar on the ladder above the car to pull it down: Nicole will automatically climb up the ladder. Examine the air conditioner and use the crowbar on the fan blades to stop the fan: One of the thugs will open a window. Exit the view of the air conditioner and use the open window to listen to the thugs talking inside: One of them mentions a knife in the drawer. Examine the window and climb through into the room.
Keep clicking at the side of Nicole’s feet to move her over to the left side of the boxes near the door. Open the PDA and select the camera icon to take a picture of the bag on the bed. Select the photo album on the PDA to see a picture of the bag containing the note. The note is upside-down, and the selection of numbers after the 555 is random each time. Select the phone from the PDA, enter the number from the note and then select the phone icon to call the thug: He will leave the room to answer his phone. Go through the doorway to the next room.
Open the wardrobe at the right side of the room and examine the back of the closet to reveal a hidden passage. Go through the passage to enter the hidden room: The game will automatically save the game here. Examine the chest of drawers and open the second drawer from the top. Take the ritual dagger from the drawer to be caught by the thugs.
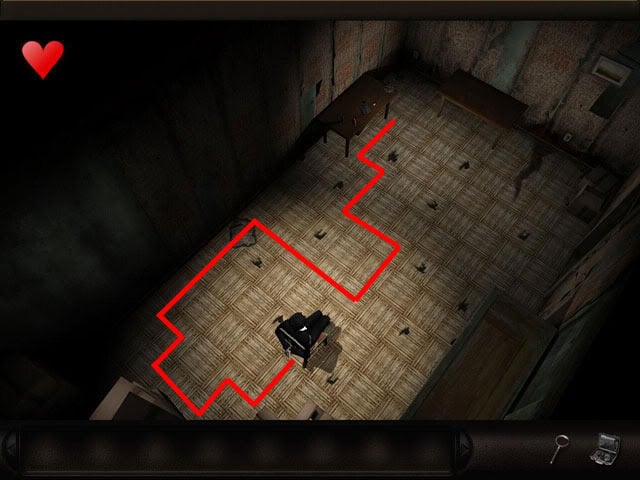
Save the game at this point. The aim now is to cross to the top-left corner of the room by moving on the correct tiles. You are only allowed to make two mistakes before the game must be restored and the puzzle is also timed, so be sure to move quickly. Move back twice, left once, back once, left twice, forward once, left once, forward four times, right four times, forward twice, left twice, forward twice, left once and forward twice:
Open the wardrobe and go through to the hidden room again. Examine the chest of drawers. Use the luminol, the lamp and the gloves on the ritual dagger to take it. Exit the view of the chest of drawers. Move the top-left carpet corner to reveal a trapdoor. Try to open the trapdoor: It is jammed. Examine the second painting from the left on the wall and then move the painting to see a hidden lever. Move the lever and then exit the view of the painting. Open the trapdoor and go down to the storage room.
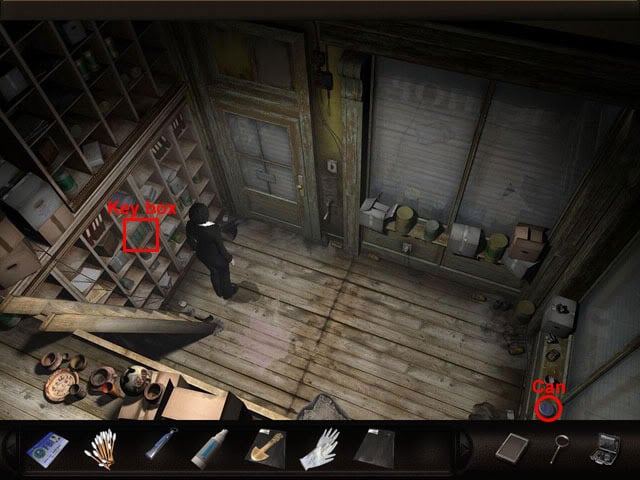
Take the can on the shelf at the bottom-right corner of the room. Open the can in the inventory to see money inside. Select the open can to take a coin. Examine the key box on the middle shelf at the side of the ladder. Use the coin on the key box. Take one key and Nicole will take the rest of the keys. Exit the view of the key box.
Approach the exit door. Use the fifth key from the left on the locked door handle. Use the door handle to open the door. Examine the roller-blind mechanism and then use the coin on all four of the screws to remove the cover. Use the sixth key from the left on the broken ratchet. Back out of the view of the mechanism. Move the crank below the mechanism to go outside. Take the gun at the right side of the thug. Run right one screen to complete the second day.
Day 3
FBI Office
Talk to Chaser twice: He needs more evidence on Huaquero. Exit the study and return to the laboratory.

Take the victim’s blood test results on the trolley. Examine the analyzer on the desk at the back of the room. Take an empty test vial. Select the group of clean swabs from the inventory to get a single clean swab. Combine the clean swab with the knife in the plastic bag to get the dirty swab. Combine the dirty swab with the vial. Use the vial with the swab on the sample testing equipment. Press the flashing transfer switch on the blue screen to send the test results to Nicole’s computer. Take another empty test vial. Exit the laboratory.
Return to the agents’ offices and examine Nicole’s desk to see the test results. Use the blood test results from the inventory on the test results on the monitor: Henry’s blood is identified on the knife. Run south to the front office to tell Chaser about the test results. Return to the mezzanine, go downstairs and use the magnetic key card on the evidence deposit door. Examine the box of James’s things and take the key from the key chain. Exit the view of the box.
Take the golden figurine and the head of the golden figurine on the shelves. Combine the head of the figurine with the golden figurine in the inventory to open a compartment in the head. Select the head of the figurine in the inventory to take the bag. Exit the evidence deposit, go upstairs and enter the laboratory. Examine the sample analyzer. Select a clean swab from the inventory and combine it with the bag.
Combine the swab with a sample on the empty vial. Use the vial on the sample area to identify the powder as heroin. Return to the agents’ offices and examine Nicole’s desk. Use the keyboard three times to examine Huaquero’s photo: Nicole identifies the room in the photo as the museum. Exit the headquarters and use the car.
Museum of Pre-Columbian Art
Enter the museum and talk to the porter: Nicole needs a court order if she wants to look around. Enter the exhibition room and run to the mummy at the back of the room. Take the bowl on the right wall. Return to the front of the exhibition room and open the doors on the left to enter the archive.

Take the aluminium foil on the floor at the left side of the blue and yellow drawers. Take the laboratory magnifying glass on the table. Exit the archive.
Return to the exhibition room and run right to the orangery. Use the bowl on the base of the statue at the bottom-right corner of the room. Use the aluminium foil and the laboratory magnifying glass on the bowl to set off an alarm. Return to the exhibition room to talk to the porter: He is going to do a round of the floor.
Return to the entrance hall and go downstairs to the storage room. Run to the furthest part of storage to see the poster from the photograph. Examine the poster. Use James’s key on the cabinet below the poster to open it. Select a swab from the inventory and use it on the scale to get a sample. Back out of the view to receive a message from Nick about a new victim at the subway. Exit the museum and use the car.
Subway
Run north to the tenement and take the wire in front of the door. Run east to the subway entrance. Take the cola bottle on the floor at the right side of the door. Go through the doorway to the platform. Examine the old benches at the right side of the screen and take the lighter on the floor.
Back out of the view and run south one screen to the end of the tunnel. Examine the scaffolding and take the gas can and the newspaper on the floor. Examine the grid on the back wall. Use the coke bottle on the grid to pour coke over the four screws. Take off all four of the screws. Take off the grid. Select the newspapers in the inventory to roll them. Use the rolled-up newspapers on the empty champagne bottle to cover it. Combine the gas can with the gas lighter. Use the lighter on the newspapers to light them.
Take the empty champagne bottle. Combine the wire from the tenement with the champagne bottle to find a roll of paper. Select the roll of paper to reveal Tatum’s diploma of fine art. Exit the subway and use the car to complete the third day.
Day 4
FBI Office
Enter the headquarters. Go upstairs and enter the laboratory. Examine the analyzer and take an empty test vial. Combine the sample with the vial. Exit the view of the analyzer. Examine the sample analyzer and use the vial with a swab on the sample area to identify heroin on the swab. Return to the front office and talk to Ruth twice: Nicole suggests checking out the library. Exit the headquarters and use the car.
Library
Enter the library. Run south to the back of the hall and open the left door to enter the reading room. Take the glasses on the bottom-right table. Examine the counter to meet the librarian. Give the glasses to the librarian and then talk to her twice: She agrees to help if Nicole brings the correct books. Back out of the counter view. Examine the library shelves at the left side of the door. Take the 1986 NYU student yearbook from the third row from bottom, third slot from left:
Return to the counter and give the yearbook to the librarian. Talk to the librarian three times: She unlocks all the drawers in the microfilm room. Return to the hall and open the door on the right to enter the microfilm room. Examine the cabinet: There are too many microfilms. Return to the reading room and talk to the librarian: She gives Nicole a catalogue number. Return to the microfilm room and examine the cabinet. Open the fourth drawer from the top on the left line of drawers:

Take the boxed microfilm. Return to the reading room and examine the microfilm reader on the table to the right side of where Nicole is standing. Take the left reel from the spindle. Combine the boxed microfilm with the reel and then use the reel of microfilm on the spindle. Push the switch at the left side of the microfilm reader to turn it on. Select the reader screen to see that there is no lens.
Exit the reader view and talk to the librarian twice: She will put a focal lens on the desk. Take the focal lens. Return to the microfilm reader and use the focal lens on the microfilm reader between the two spindles. Examine the reader screen to read about a team of students that have gone to the jungle in Peru.
Examine the screen again to write down the list of expedition members. Examine the reader screen again: Nicole suggests checking the alibis of Warren and Branford. Return to the librarian and talk to her: Nicole will call a patrol car for the librarian. Exit the library and use the car.
Museum of Pre-Columbian Art
Enter the museum. Run into the exhibition room and open the left door to return to the archive room. Show the list of exhibition members to Warren. Talk to Warren twice: He mentions a man named Juan Alvarado and Huaquero were also involved in the expedition. Go outside the museum and talk to Allan four times: He received a letter from Alvarado but lost it. Select the museum doors and Nicole will call Ruth to check on Juan Alvarado.
Go to the archive room and talk to Warren four times: He told Chaser about Huaquero. Go to the orangery and take the photo at the bottom-left corner of the room. Exit the orangery to receive a call from Ruth: Alvarado already left the country for Peru. Exit the museum and use the car.
FBI Office
Enter the headquarters and go to the front office to talk to Ruth: The flight to Peru has been arranged. Enter the study and talk to Chaser four times: He won’t let Nicole go to Peru. Exit the study and talk to Ruth twice. Exit the headquarters to fly to Cusco.
Day 5
Cusco, Peru
Talk to Diego four times: He says that Alvarado won’t see anyone. Examine the closet on the right wall and take the camera. Exit the closet view. Examine the table at the right side of the closet and take the coca leaves and the buckthorn.
Exit the table view. Go out the left doorway to the street. Run right to the San Martin plaza and approach the door to the archeologist’s home. Examine Juan Alvarado’s house to knock on the door: Nobody is in. Return to the courtyard of the hotel and talk to Diego five times: He wants Nicole to rent his stolen jeep from Jose and adds that money will need to be paid up front. Go out to the street.
Examine the cash machine on the wall and use the card on the card slot. Press any button on the keypad to get money. Run right to the plaza and go down the alley at the left side of the house to the workshop. Talk to Jose on the bench in front of the house: He says he has no jeeps. Return to the hotel courtyard and talk to Diego: He says Jose hides the jeep in the garage.
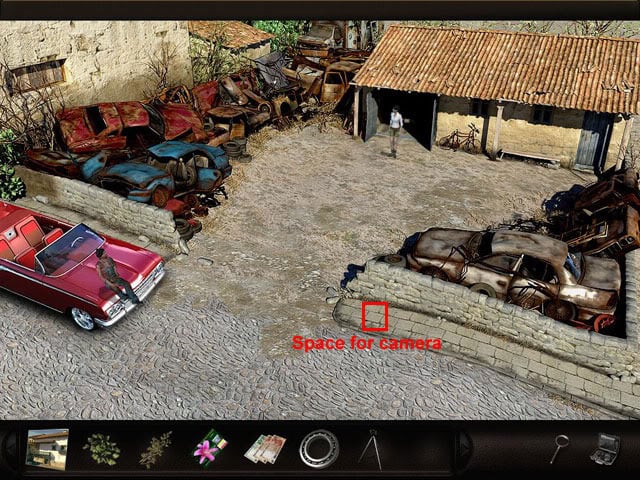
Return to the workshop and talk to Jose three times: He will open the garage. Open the garage doors to enter the garage. Take the bearing at the bottom-left corner of the screen and the tripod in the garage. Back away from the garage. Combine the camera with the tripod on the space for a camera at the bottom-left corner of the right brick wall:
Nicole will take a picture of herself and Jose. Take the camera from the tripod. Talk to Jose four times: Nicole can rent the jeep tomorrow morning for 100 dollars. Combine the money with the bearing. Use the cash on a bearing on the bench in front of the house to leave the money for Jose.
Return to the hotel courtyard and talk to Diego four times: Nicole needs to put the photo in the gap in Alvarado’s door and needs to meet Alvarado at eight. Return to the plaza and examine the archeologist’s home. Use the photo on the gap in the door.
Try to enter the house: Alvarado wants the ID. Combine the buckthorn with the leaves in the inventory to mix them. Give the mix to the Inca on the bench: He will leave and Nicole will show her ID through the window. Enter the house. Open the right door to enter Juan’s room. Talk to Juan eight times: He tells the story of the expedition and Nicole persuades him to take her to Akakor. Run south to the corridor and go out the exit. Run south to the plaza to complete the fifth day.
Day 6
Cusco, Peru
Run west to the hotel entrance and talk to Diego to get a sandwich. Run east to the plaza and examine the archeologist’s home to see that the Incan is not on the bench. Enter Juan’s house and open the right door to enter his room. Examine the fireplace at the right side of the room and take the knife.
Use the knife on the slot in the fireplace at the right side of where the knife was taken to open a secret panel. Take the map and the four crystals: A scene will be shown where the police arrive outside. Back away from the fireplace, run south to the corridor and go through the top doorway to the courtyard.

Take the board at the left side of the balcony to put it across the gap. The amphoras must now be placed against the wall above the roof in order to make a ladder. Take the second amphora from left (1) on the middle row and use the amphora on a space for an amphora on the floor at the right side Nicole.
Take the second amphora from left (2) on the bottom row and use the amphora on the wall at the left side of the area. Take the second amphora from right (3) on the bottom row and use it on the wall. Take the right amphora (4) on the bottom row and use it on the wall. Take the left amphora (5) on the top row and use it on the wall. Take the remaining amphora (6) on the bottom row and use it on the wall.
Climb up over the wall to exit the courtyard and return to the workshop. Talk to Jose: He wants money for the petrol. Return to the hotel entrance and examine the cash machine. Use the card on the card slot and the machine will keep the card. Run back to the workshop and talk to Jose: He will accept the camera as payment. Return to the hotel courtyard to see Diego talking to a policeman. Enter the kitchen at the left side of the hotel. Take the matches on the table at the bottom-right corner of the room. Examine the fireplace.
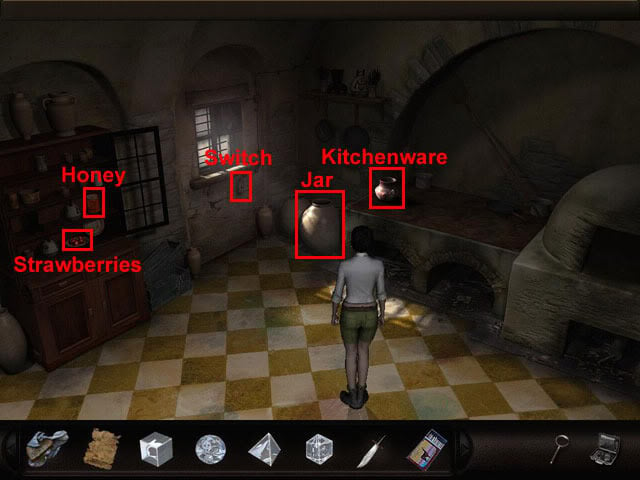
Take the kitchenware on top of the stove. Take the strawberries and honey from the cabinet at the left side of the room. Use the jug from the inventory on the jug at the left side of the stove to fill it with dough. Use the jug full of dough on the metal sheet on top of the stove.
Use the strawberries and the honey on the kitchenware on top of the stove. Press the switch below the window at the left side of the room to turn the fan on. Use the matches on the stove: The policeman will walk away. Enter the hotel courtyard. Examine the closet and take the camera. Return to the workshop and give the camera to Jose to get the gas can. Use the gas can on the fuel tank above the visible back wheel of the jeep to complete the sixth day.
Day 8
Somewhere in the Andes
Run across the bridge to the temple entrance. Take the tube on the floor in front of the tunnel to see that it is a crowbar. Run west to the rope bridge and south-west to the jeep. Examine the old wreck and take the chair from inside the jeep. Use the tube on the crate in the back of the jeep to open it. Take the pulley and the jack from the crate.
Run north-east to the rocky ledge, east to the rope bridge and north to the entrance: The bridge will fall down. Take the cable on the ground. Combine the pulley with the ropes in the inventory. Combine the chair with the pulley to make the chair and pulley. Use the chair and pulley on the cable above Nicole. Use the chair with pulley to cross over the chasm. Use the knife on the lianas above the tunnel. Use the jack on the tunnel to open the door. Enter the tunnel.
Akakor
Go south to the main square and run to the small pyramid. Enter the pyramid. Examine the tomb and take the cap on the floor. Exit the small pyramid, run south to the main square and enter the temple on the right. Examine the hole in the wall at the left side of the hall to see a panel.
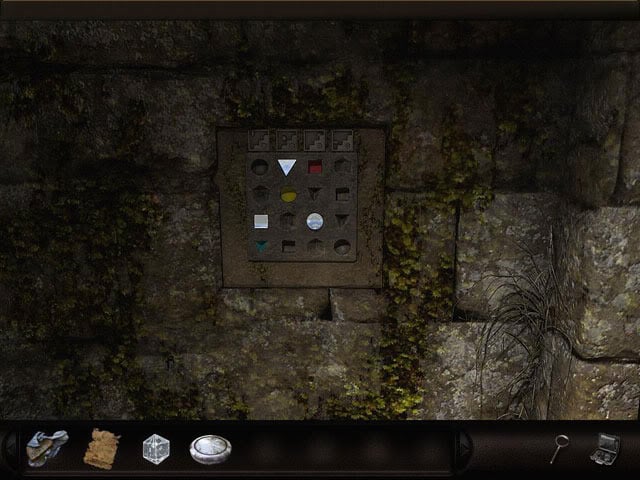
Put the square crystal on the slot above the blue triangle. Put the tetrahedral crystal on the slot above the yellow circle. Put the spherical crystal on the slot below the red square to see the lock. Put the dodecahedral crystal on the left slot in the lock to open the door.
Run north through the doorway to the temple. Take the sword at the bottom-right corner of the room. Use the sandwich on the flies above where the sword was found to cover the sandwich in flies. Exit the temple and return to the small pyramid.
Examine the tomb. Use the sword on the tomb interior at the top-left corner of the tomb and then use the sword to open the tomb. Take the jaw from the skull and the watch from the hand. Exit the small pyramid and return to the temple. Go through the doorway on the left to see an airplane. Take the jar at the bottom-left corner of the screen. Combine the fly-covered sandwich with the jar. Run north to return to the temple.
Examine the hole in the wall at the left side of the doorway. Use the jar of flies on the spider to catch the spider in the jar. Take the funnel from the hole in the wall. Select the funnel in the inventory to reveal notes. Examine the notes. Go back through the old passage to return to the airplane.
Examine the metal cover above the wing of the plane to see a snake. Use the jar of spiders on the snake and it will leave. Back out of the metal cover view. Examine the hood of the plane and take the filter. Run north to the road to town and then exit the temple.
Run south toward the sun pyramid and approach the blocked entrance. Use the jar without a cap on the water in the leaf to fill it. Return to the airplane. Examine the metal cover and use the jar of water on the battery. Exit the metal cover view. Examine the hood of the plane. Select the filter from the inventory to clean it. Use the filter on the hole. Exit the hood view. Use the propeller on the front of the plane to complete the eighth day.
Day 10
FBI Office
Enter the headquarters. Return to the front office and talk to Ruth: Nick called for Nicole earlier. Enter the study and talk to Chaser five times: Nicole is taken off the case and suspended from active duty. Exit the headquarters and use the car.
Library
Enter the library and run to the reading room. Approach the counter and talk to the librarian twice: Professor Dickinson’s widow gave all the notes to Warren. Exit the library to receive a text message from Nick. Use the car.
Stockbroker’s Villa
Enter the villa and run west to the annexe. Examine the wall. Move the bottom picture frame to reveal a photo behind it:
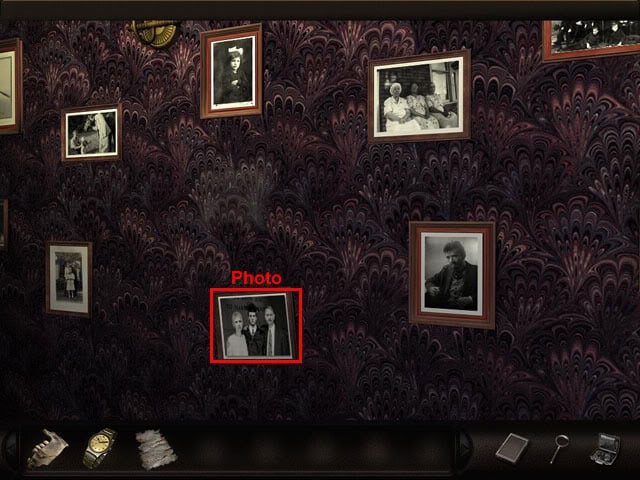
Take Raches’ photo. Select the photo in the inventory to see a note from Raches. Exit the villa and use the car.
Museum of Pre-Columbian Art
Enter the museum and talk to the porter. Enter the exhibition room and open the left door to the archive. Examine the bookcase. Examine the box full of Professor Dickinson’s papers and journals on the bottom-right shelf. Take the dental records. Combine the dental records with the jaw bone to identify the remains as being Professor Dickinson. Back out of the view of the box and the bookcase. Exit the museum to see Warren. Talk to Warren four times: He believes that Raches is the killer. Use the car.
Subway
After Nicole follows Warren to the subway, Chaser calls and demands to see the report. Nicole automatically returns to the FBI headquarters.
FBI Office
Use Raches’ photo with the ruling on Nicole’s desk to compare the signatures of Chaser and Raches. Return to the front office and talk to Ruth: She says that she is going home. Enter the study. Examine the desk. Examine the cabinet to see a safe.
The aim now is to spell the word RACHES. The numbers on the dial represent the letters: 1 being the first letter, 2 being the second and so on. Point the dial to 1, then move the letter to R by clicking at the top of the dial. Select 2 and move the letter to A. Do the same thing for the other letters until RACHES is spelt. Move the lever to open the safe. Select the sheep of paper, photos and the ticket. Exit the headquarters and use the car.
Subway
Run toward the subway doors at the right side of the screen and then go through to the platform. Run to the scaffolding at the other end of the tunnel and take the isolated pliers on the plank of wood. Exit the platform and return to the square. Run north to the tenement. Open the door to enter the first floor.
Go upstairs to the second floor and examine the electrician’s notes at the left side of the elevator: Switch box 20/07WB needs to be bypassed. Back away from the view. Take the uninsulated wire at the right side of the elevator. Go upstairs to the engine room. Examine the box at the left side of the engine. Combine the pliers with the uninsulated wire. Use the pliers gripping a piece of wire on switch box 20/07 WB. Back out of the view. Go downstairs to the first floor, open the elevator door and then enter the elevator to descend to the basement.
Take the skewer on the crate at the bottom-left corner of the room. Run through the doorway to the boiler room. Use the pliers on the knob at the right side of the boiler to take it. Use the skewer on the barrel to empty it: Nicole will automatically move it below the ladder. Climb up the ladder to the abandoned platform. Enter the passenger cabin of the train. Use the knob on the brake. Use the brake to complete the game.
“;
