- Wondering how to get Monopoly GO! free rolls? Well, you’ve come to the right place. In this guide, we provide you with a bunch of tips and tricks to get some free rolls for the hit new mobile game. We’ll …
Best Roblox Horror Games to Play Right Now – Updated Weekly
By Adele Wilson
Our Best Roblox Horror Games guide features the scariest and most creative experiences to play right now on the platform!The BEST Roblox Games of The Week – Games You Need To Play!
By Sho Roberts
Our feature shares our pick for the Best Roblox Games of the week! With our feature, we guarantee you'll find something new to play!All Grades in Type Soul – Each Race Explained
By Adele Wilson
Our All Grades in Type Soul guide lists every grade in the game for all races, including how to increase your grade quickly!
Angela Young 2: Escape the Dreamscape Walkthrough
Welcome to Gamezebo's walkthrough for Angela Young 2: Escape the Dreamscape. GENERAL TIPS Options- Sound and Music volume, as well as cursor and screen settings can be changed from the Options menu. This menu can be accessed via the Main Menu, or during gameplay in the upper lefthand corner of the screen.Hints- Hints are available during gameplay. Click the "Hint" button to have an object revealed to you. Once you click the Hint button, you will need to wait a sh…
a:1:i:0;a:2:s:13:”section_title”;s:49:”Angela Young 2: Escape the Dreamscape Walkthrough”;s:12:”section_body”;s:40010:”
Welcome to Gamezebo’s walkthrough for Angela Young 2: Escape the Dreamscape.
GENERAL TIPS
- Options- Sound and Music volume, as well as cursor and screen settings can be changed from the Options menu. This menu can be accessed via the Main Menu, or during gameplay in the upper lefthand corner of the screen.
- Hints- Hints are available during gameplay. Click the "Hint" button to have an object revealed to you. Once you click the Hint button, you will need to wait a short while before you can use it again. It should be noted you can not use the Hint button during tasks or while looking for specific task-related items. However, most task-related items will sparkle when the mouse is toggled over them.
- Current Task- Your current objective can be checked by clicking the "?" button at the bottom left corner during gameplay.
- Episodes- This option available in the main menu allows you to replay any area of the game.
- Randomized Objects- It should be noted, the objects you will need to find during the game are almost always the same: every possible solution will be circled in the screenshots below, but the game will leave one out each time.
- Choices- During one or two parts of the game, you will be able to choose which path/area to take. This does not change the game outcome or the levels/items, it just allows you to play in a different order.
- Mini-games- These puzzles can be skipped provided you have not solved the puzzle within the alotted amount of time.
WALKTHROUGH
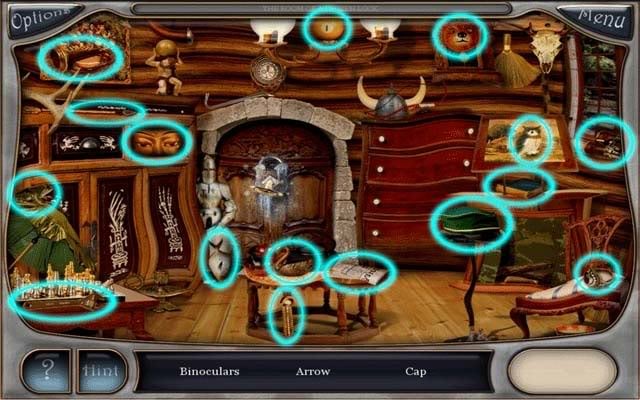
Level 1- The Room of a Frozen Lock
- Starting the game, you will be introduced briefly to a story and a few characters. When asked which path to take, take the left one (otherwise known as the one pointed out in the dialogue).
- 15 objects will be listed in this scene for you to find: there are 16 possible (circled below)(Note: You cannot "find" an object until it is on the item list at the bottom of the screen).

- Once you’ve found all the objects, you’ll need to find a way to unlock the frozen lock.
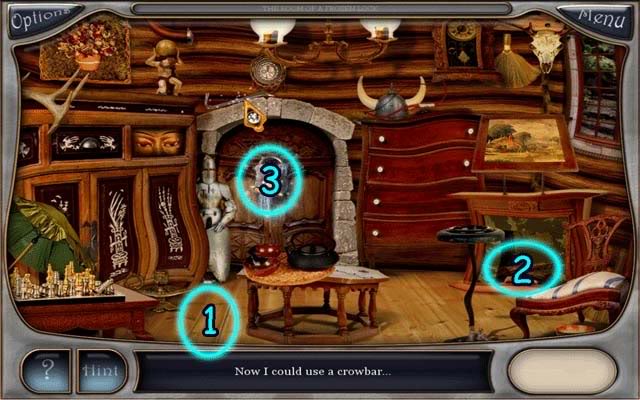
1. Pick up the Crowbar, and use it on the Loose Floorboard to find Matches.
2. Use the Matches on the Fireplace to warm up the room and melt the ice on the lock.
3. Click on the Lock to open the door (the key is already inside).
Level 2- The Attic
- 15 objects will be listed of 16 possible to find. Below are all 16 possible objects.
- Note: "Pegion" listed in the game should be "Pidgeon"
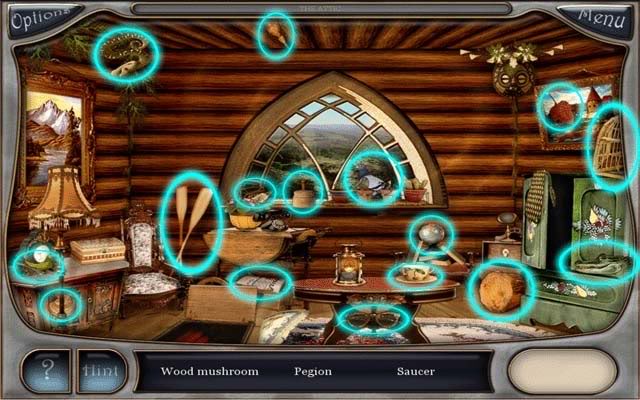
- Once all the objects have been found, you’ll need to find a Key and a missing Script.
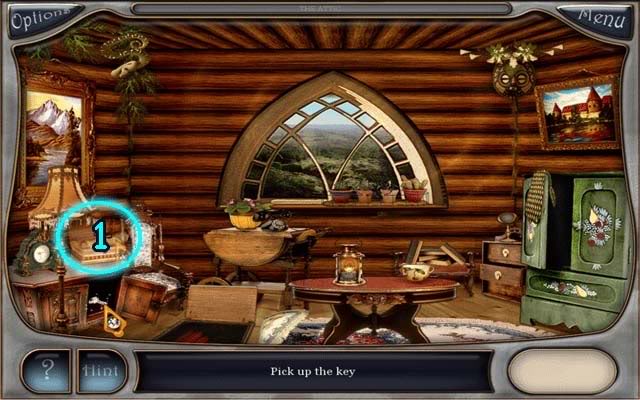
- Click on the wooden cupboard to open it and find the key inside.
- 1. Pick up the Key and use it on the jewelry box on top of the cupboard to find the missing Script. The Script will give you a hint as to where you should be heading next.
Level 3- The Room of a Sleeping Spider
- Note: Before reaching the next area, you have the ability to choose Angela’s path by either clicking "Deep Well" or "Spider’s Den".
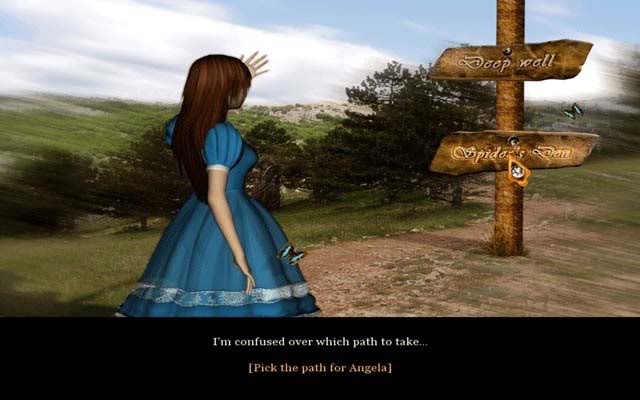
- Clicking "Spider’s Den" (as done in this guide) will take you to the next area and the one mentioned in the Script. Clicking "Deep Well" will take you to the Bottomless Well Mini-game first.
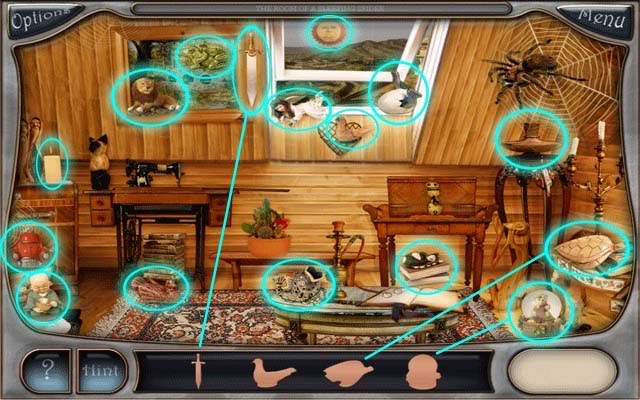
- Once in the Room of a Sleeping Spider, you will need to find 15 of 16 possible objects shown below. Instead of looking for objects by name, this time you will be looking for objects via matching silhouette at the bottom of the screen. Don’t worry, it’s not as hard as it seems. A few example lines have been drawn from silhouette to matching object below to show you just how simple it is.
Level 4- The Room of a Sleeping Spider (Part 2)
- Once you’ve found all the objects by matching silhouettes, now you will need to look for 15 of 16 possible objects by name. All the possible solutions are circled below:
- Note: "Energy Cell" refers to the Battery, and the Mammoth can easily be mistaken for a bear: it’s located inside the book.
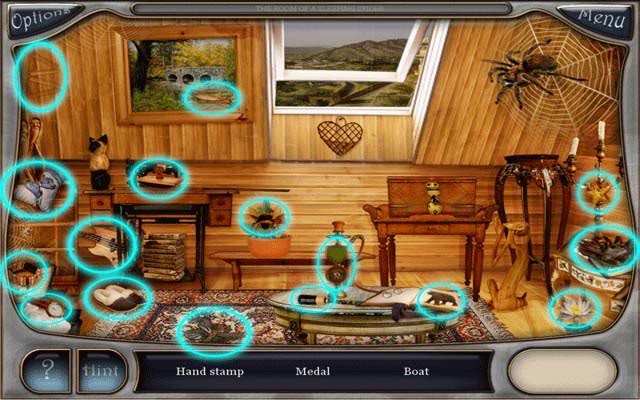
- Once all the objects on the list have been found, you’ll need to look for a key.
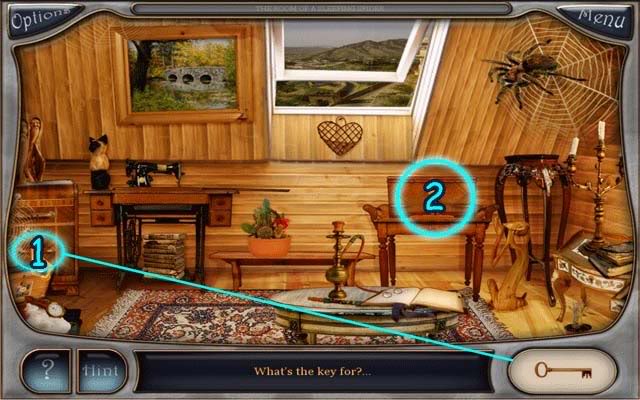
1. Click the Key (behind the spider web on the left) to add it to your inventory.
2. Use the Key on the Toy Chest to access the next area.
- Once you’ve opened the Toy Chest, you’ll have a new list of objects to find. You will need to find 10 of 11 possible objects.
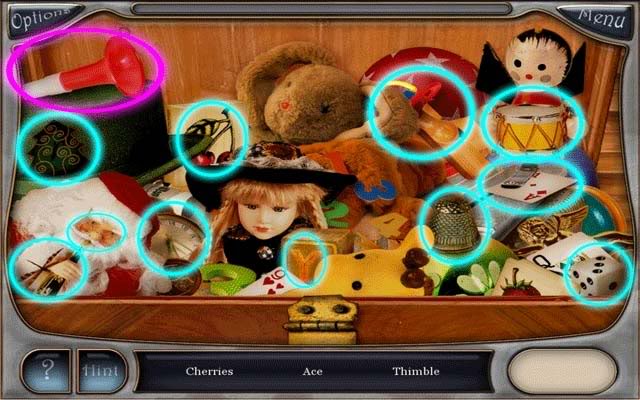
- Once you find all the objects, pick up the Noise Maker (circled in purple).
- Now back in the previous room, click on the Noise Maker in your inventory and use it on the large sleeping Spider (top right, by clicking on it). Waking up the Spider allows to you move on to the next area.
Level 5- Mini-game 1: The Bottomless Well
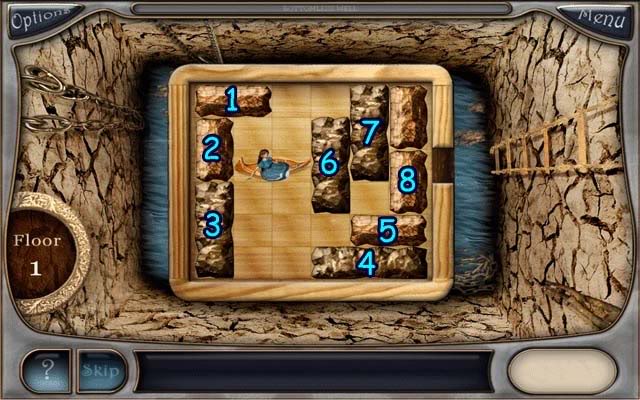
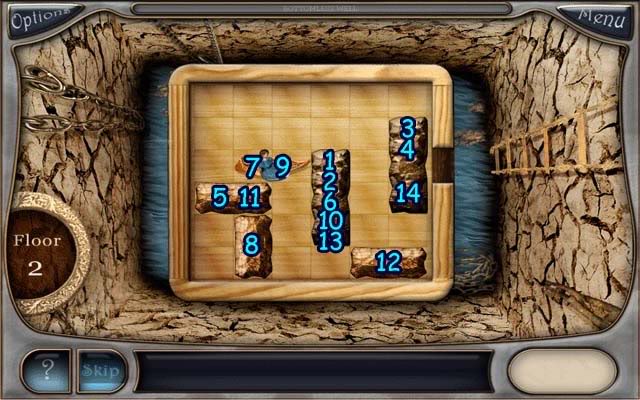
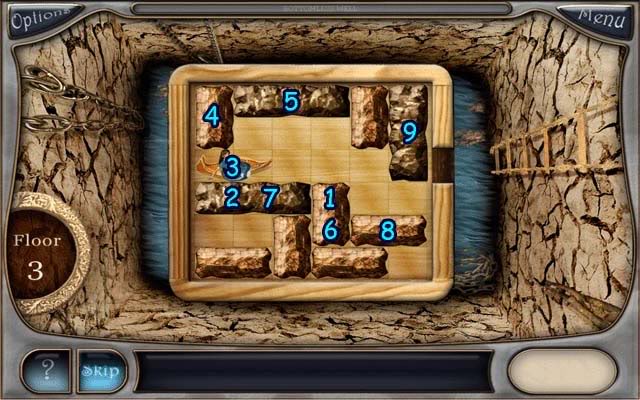
- This is a sliding puzzle minigame, the object being to allow Angela to escape to the ladder and out of the well. All objects can only move vertically or horizontally depending on their shape/position. Clicking on an object will make it move as far as it can until it runs into something: not on a square-by-square basis. Occasionally an object will need to be clicked on multiple times to solve the puzzle. The puzzle solutions below are numbered according to the order of which the stones should be clicked (of course, the last number being followed by clicking Angela). Here are the solutions:
Floor 1:
Floor 2:
Floor 3:
Level 6- Abandoned Fountain
- The goal of this area/puzzle is to find a specific number of particular items listed, i.e. 5 Brushes. Each group of items you’ll need to find has a designated color listed below:
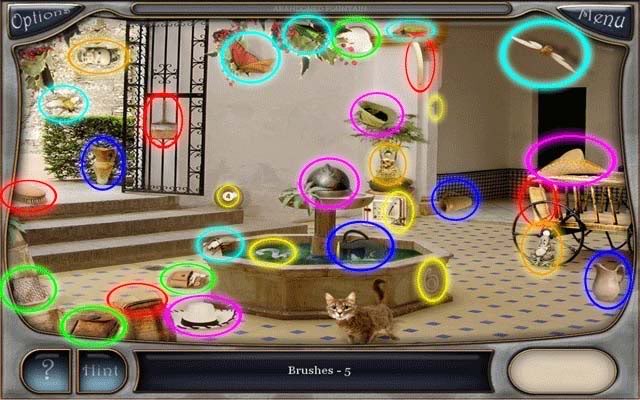
- -Red= Brushes x5
-Green= Money Purses x4
-Yellow= Digits x5
-Cyan= Insects x6
-Purple= Hats x4
-Orange= Buddhas x3
-Blue= Pitchers x4
Note: Object order may be randomized.
Level 7- Abandoned Fountain (Part 2)
- In this second part, you’ll need to find the objects by name. You will need to find 15 of 16 possible objects, all solutions are shown below:
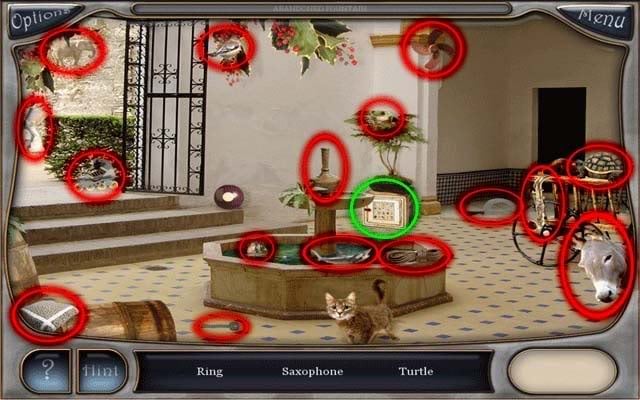
- Once you’ve found all the objects on the list, click on the puzzle safe (circled in green) to access Minigame 2: Tile Puzzle.
Mini-game 2: Tile Puzzle
- The goal of this minigame is to arrange the tiles into the order in which they should be. A select handful of tiles cannot be moved: they are slightly more reddish in color and act as guides to give you hints as to what order and placement the tiles should be. The sequences start at the top and end at the bottom, from left to right the column themes are: eaten to whole, old to modern, near to far, stunned to happy, and newborn to adult. The final puzzle solution looks like this:
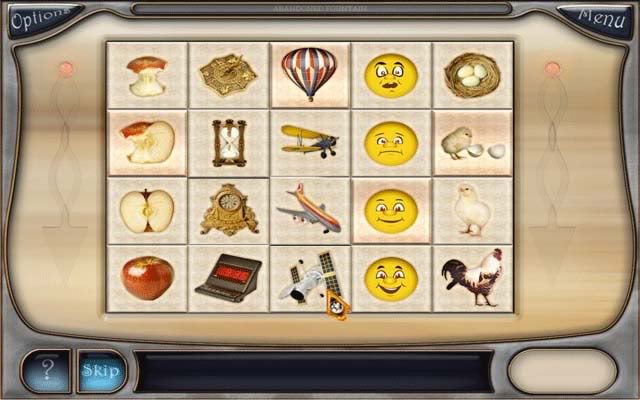
- Upon completing the puzzle, pick up the Script from inside the safe to get directions to the next area.
Level 8- The Area of a White Vase
- Upon reaching this area, your first task is to find two items that match exactly, i.e. 2 Zebras. There is a more varied combination of pairs for this level, but below you can find all the solutions:
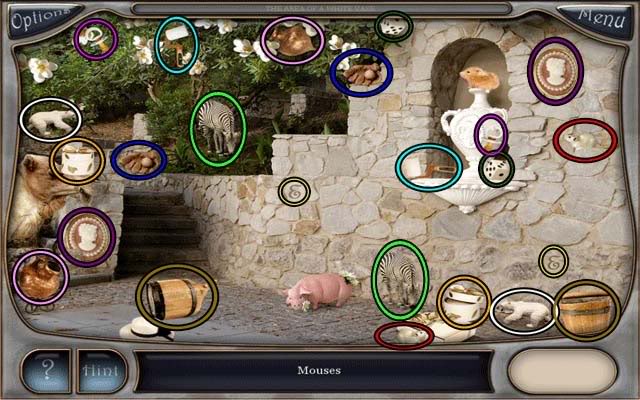
- -Red= Mice (Mouses in game)
-Orange= Round Boxes
-Goldenrod/brown= Buckets
-Yellow= Letters
-Bright Green= Zebras
-Dark Green= Dice
-Cyan= Roll Brushes
-Blue= Baseball Gloves
-Magenta= Pacifiers
-Power Pink= Pitchers
-Purple= Cameo Brooches
-White= Polar Bears
Level 9- The Area of a White Vase (Part 2)
- Time for part 2 of this level. You will need to find 15 of 16 possible objects, all solutions shown below:
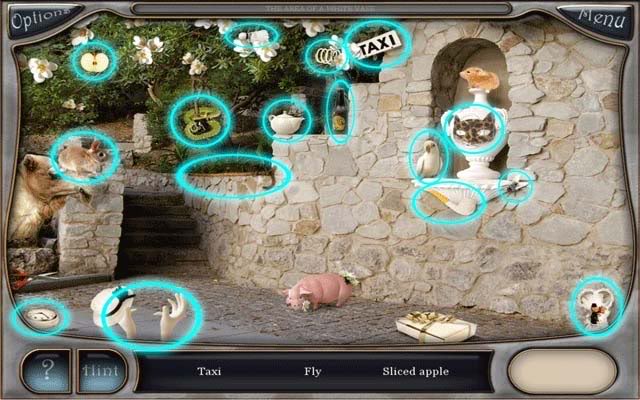
- After you find all the objects:
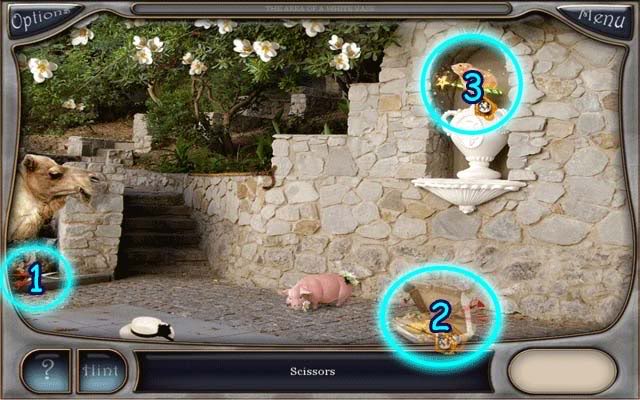
- 1.Pick up the Scissors
2.Use the Scissors on the gift box. Pick up the Cookies.
3.Use the Cookies on the hamster to earn the Magic Wand.
Level 10- The Entrance to a Mystery Cave
- This time you’ll need to match 15 of 16 possible objects to their silhouettes. All possible solutions (and a couple bonus example matches) are listed below:
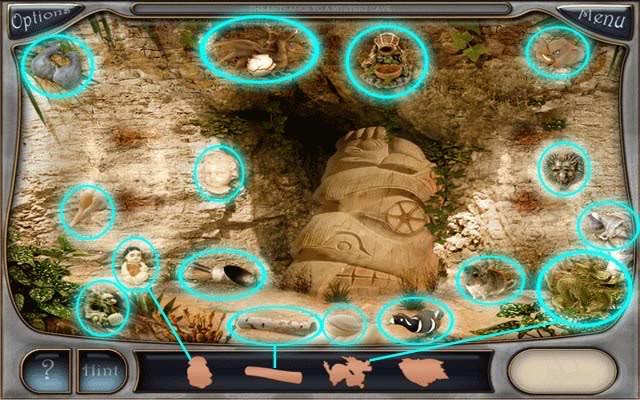
Level 11- The Entrance to a Mystery Cave (Part 2)
- This time you’re finding objects by name. You’ll be finding 15 of 16 possible objects, all listed below.
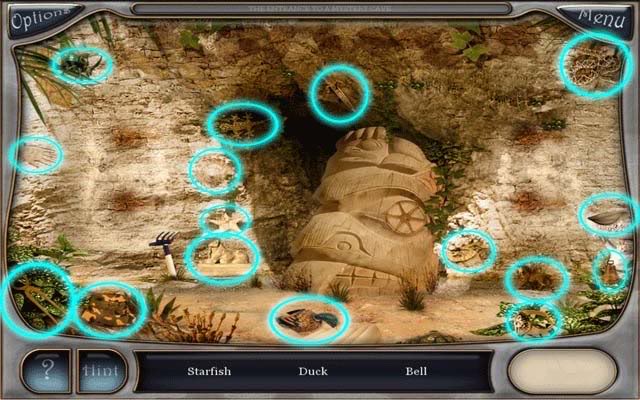
- Once you’ve found all the objects:
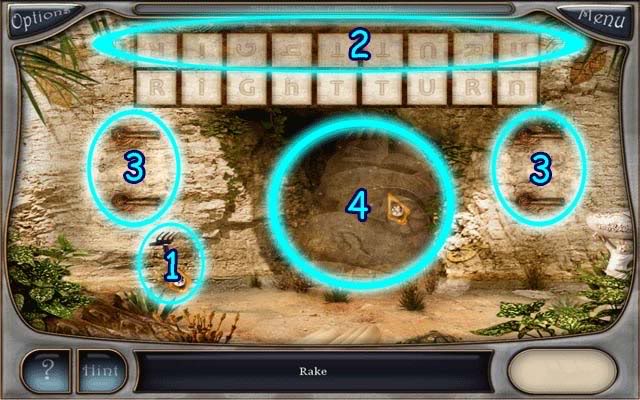
1.Pick up the Rake
2.Use the Rake to uncover a hidden puzzle. Click the letter tiles to flip them into their proper position: the correct solution is shown right below.
3.Upon solving the puzzle, 4 levers will appear. Turn each to the right.
4.Now the cave is unblocked. Enter.
Level 12- Mystery Cave
- Find 15 of 16 possible objects by name. All solutions are shown below:
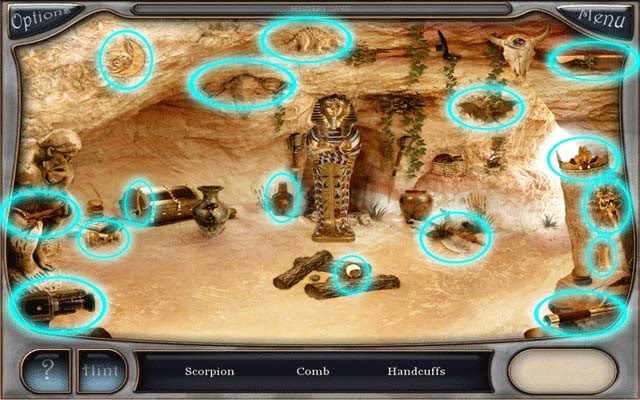
- Once you’ve found all the objects, do the following:
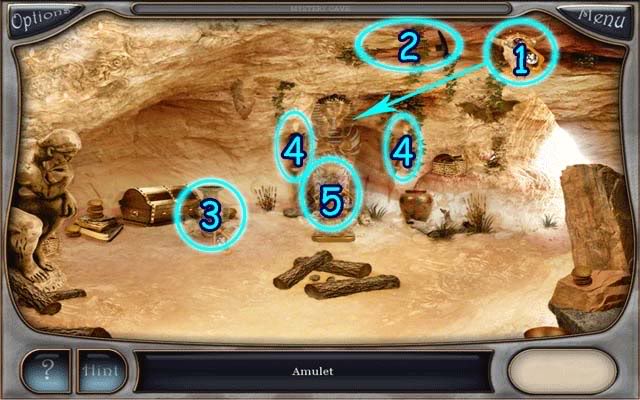
1.Pick up the Amulet and use it on the Sarcophagus: it will disappear
2.Pick up the Hammer
3.Use the Hammer on the vase and pick up the Lighter inside
4.Use the Lighter to light the torches
5.Click the Orb (twice) to access the next area.
Level 13- Mini-game 3: Lonely Frog Pond
- The object here is to restore the pond/pattern by clicking the various rings. Don’t forget to align the outermost one first! The finished solution looks like this:
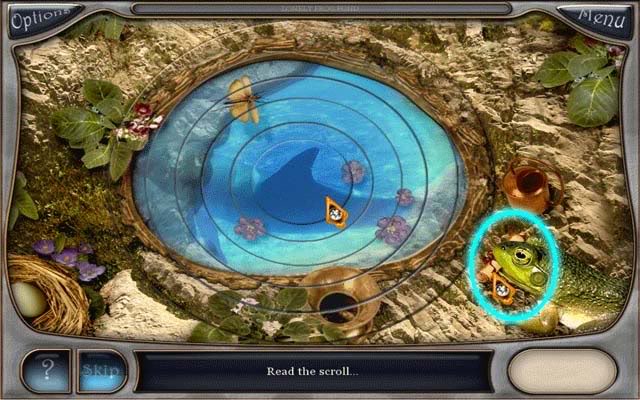
- Once the puzzle is successfully complete, pick up the Script (circled in blue) in the frog’s mouth to proceed to the next location.
Level 14- Lord of Nightmare’s Safe
- Here you’ll need to find 15 of 16 possible objects. The solutions can be found below:
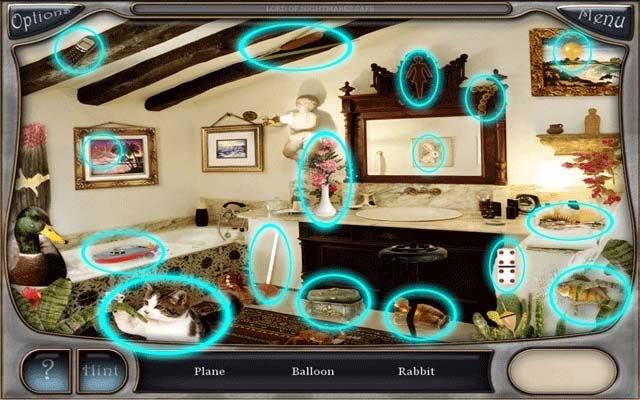
- After finding all the objects, you’ll need to look for the safe. Click on the picture to the immediate left of the cupid.
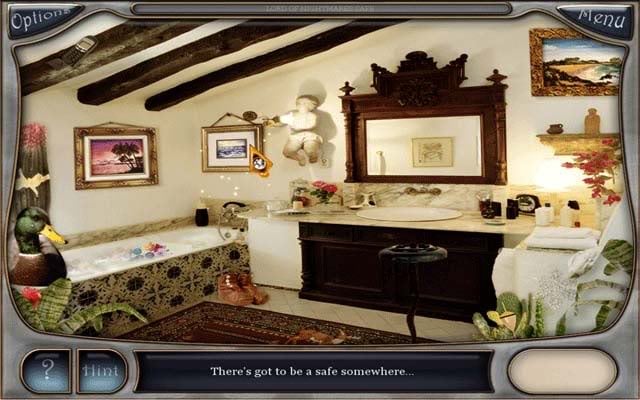
- Click on the exposed safe to ensue mini-game.
Mini-game 4: Three-Tile Combination
- The point of this mini-game is to pick three tiles with all 9 pictures without repeating. Though the position of the tiles may be randomized, the combination will always be 4-2-9.
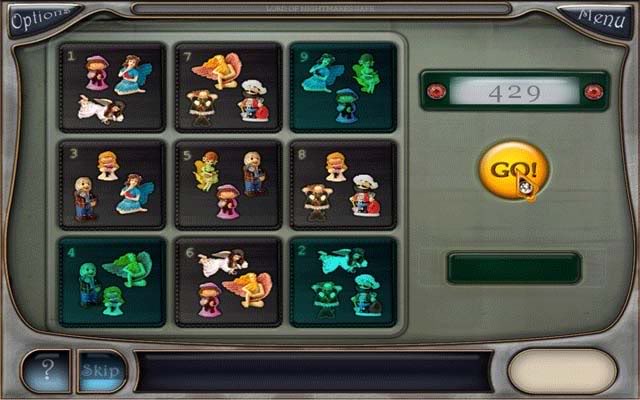
- Upon completing the puzzle, you’ll be taken back to the Lord of Nightmares Safe. Pick up the Feather inside the safe and use it on the duck at the far left corner of the screen. The duck will reveal an egg/baby eagle. Pick it up to complete the level.
Level 15- The Area of Angry Bees
- Find 15 of 16 possible objects. All solutions are listed below:
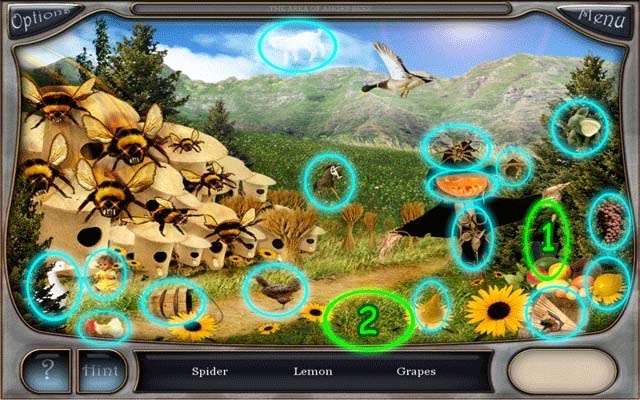
- Once you’ve found all the objects on the list:
1.Pick up the Shovel
2.Use the Shovel on the dirt to uncover a puzzle. Click on it.
Mini-game 5: Tile Swap
- Swap the tiles by clicking on them to reveal the true puzzle picture. You can swap any tile with any other tile. The finished result should look like this:
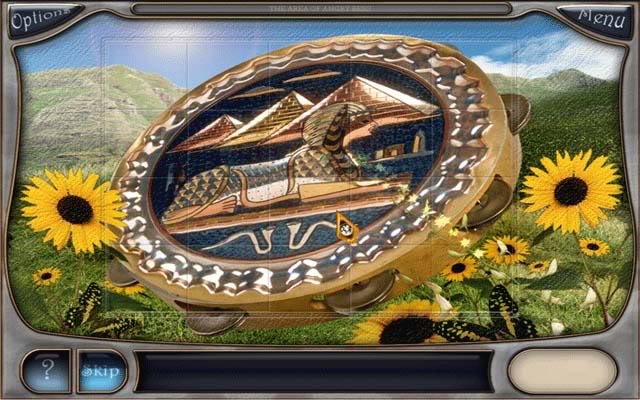
- Upon finishing the puzzle, the drum/tambourine will be added to your inventory and you’ll be taken back to the area of angry bees.
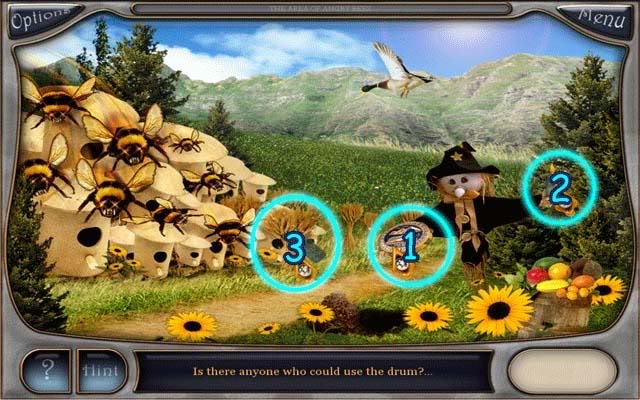
1.Use the instrument in your inventory on the Scarecrow’s leftmost (right) hand.
2.Pick up the Candle that appears in the Scarecrow’s left hand
3.Use the Candle on the brush in front of the bee hives. This will allow you to scare the bees away and complete the area.
Level 16- White Street
- Before continuing on, Angela must choose which path to take: the one to White Street or the one to House of Matches. White Street was chosen in this particular walkthrough.
- There are numerous pairs of objects to be found. All possible pairs are listed below:
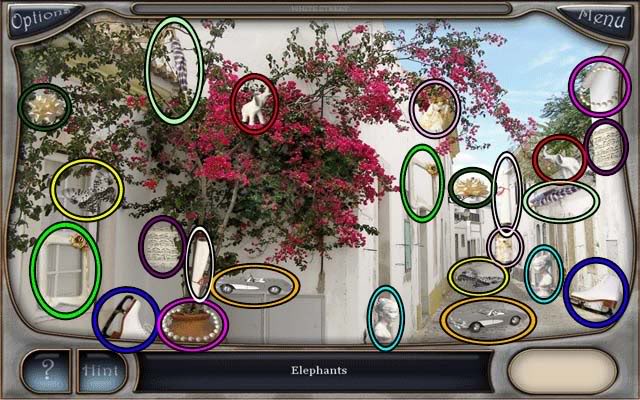
- -Red= Elephants
-Orange= Cars
-Yellow= Butterflies
-White= Scrolls
-Powder Pink= Angels
-Powder Green= Umbrellas
-Bright Green= Picture Frames
-Dark Green= Bows
-Pink= Necklaces
-Purple= Note Sheets
-Cyan= Busts/Head Sculptures
-Blue= Skates
Level 17- White Street (Part 2)
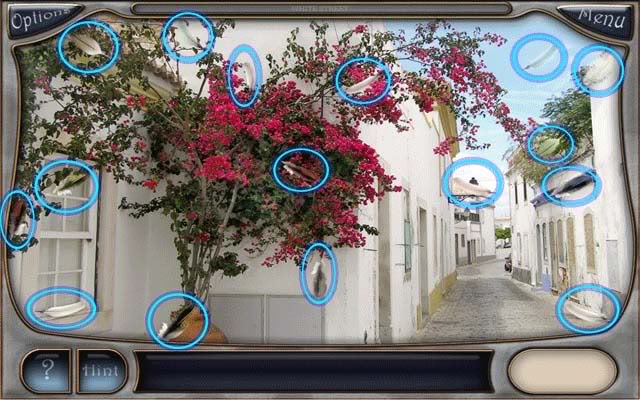
- After finding the object pairs, you will need to find 16 feathers.
Level 18- The Room of Scattered Matches
Mini-game 6: The Match Square Game
- The goal here is to take 8 matches away and leave two squares. Here’s the solution:
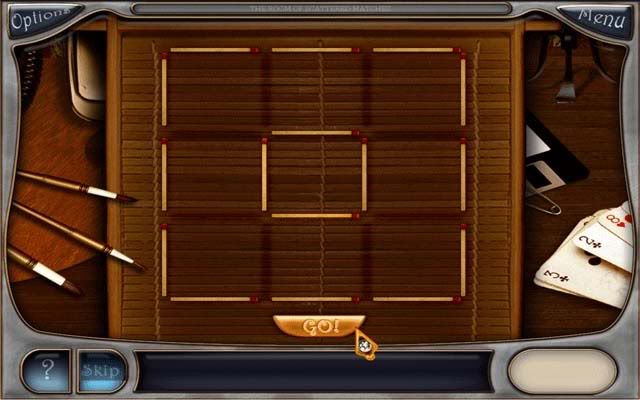
Level 19- The Room of Astrology
- You’ll be looking for objects by name here: 15 of 16 possible to be exact. All possible objects are circled below:
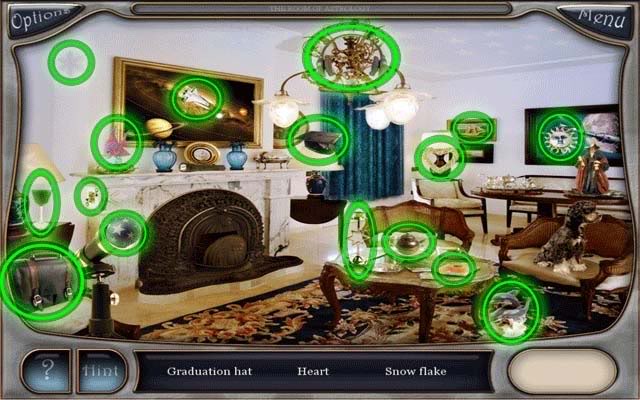
- After finding all the listed objects:
1.Click on the Fireplace.
2.Pick up the Flashlight (on the mantle of the fireplace below the large painting)
3.Use the Flashlight on the Fireplace and pick up the Scroll.
- Upon picking up the Scroll, a mini-game will ensue.
Mini-game 7: The Zodiac
- The goal for this mini-game is to put the signs of the Zodiac in their proper order. The solution is as follows:
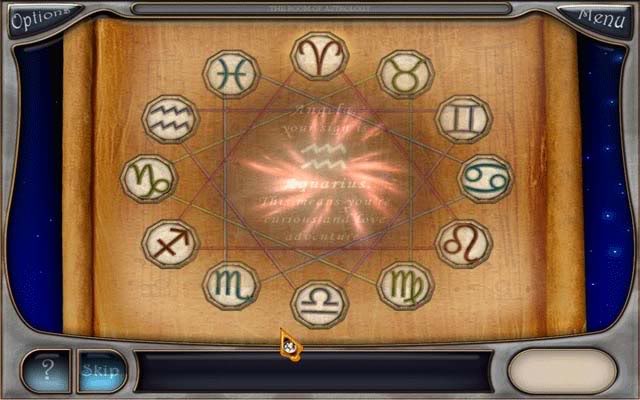
- Upon returning to the main room, many Zodiac signs will appear. You’ll need to pick the correct one. The correct one looks like this:
///
/// and is located on the lamp in the far corner of the room: Aquarius.
Level 20- Mystery Kitchen
- Find 15 of the 16 possible objects listed. All possible solutions are shown below:
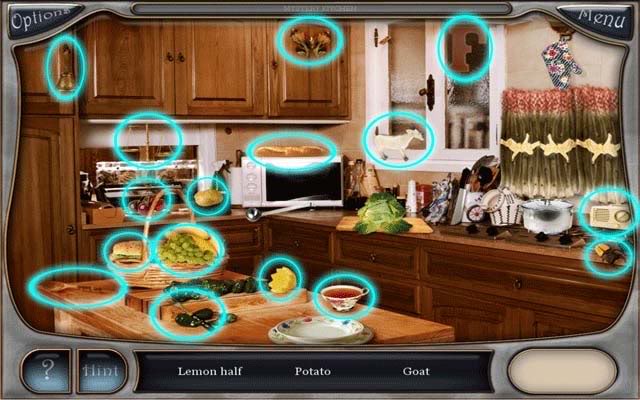
- Once you’ve found all the objects, you’ll need to help Angela prepare dinner.
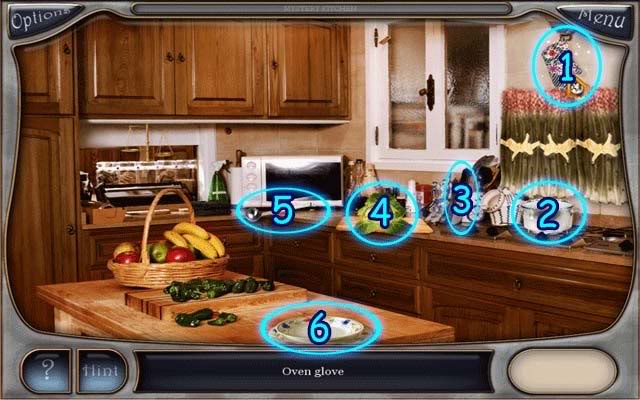
- In order to prepare dinner…
1.Pick up the Oven Mitt
2.Use the Oven Mitt to open the lid of the Pot
3.Pick up the Knife
4.Use the Knife on the Cabbage to cut it, then put the sliced Cabbage into the Pot
5.Pick up the Ladle and use it on the Pot
6.Take the Ladle with Soup and use it on the Soup Bowl
Level 21- Lonely Bench
- You will need to find exact pairs of items here. There are many combinations that may be different when you play, but all are shown and listed below:
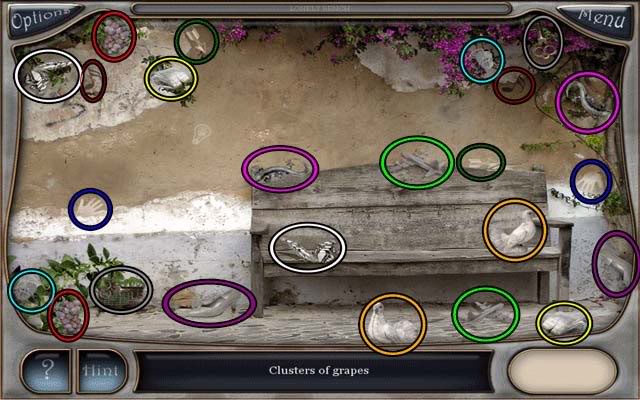
- -Red= Clusters of Grapes
-Orange= Birds
-Yellow= Money Purses
-White= Butterflies
-Grey= Keys
-Bright Green= Planes
-Green= Arrows
-Cyan= Rats
-Blue= Handprints
-Pink= Lizards
-Purple= Shoes
-Dark Red= Music Notes
Level 22- Lonely Bench (Part 2)
- Find 15 of 16 possible objects circled below:
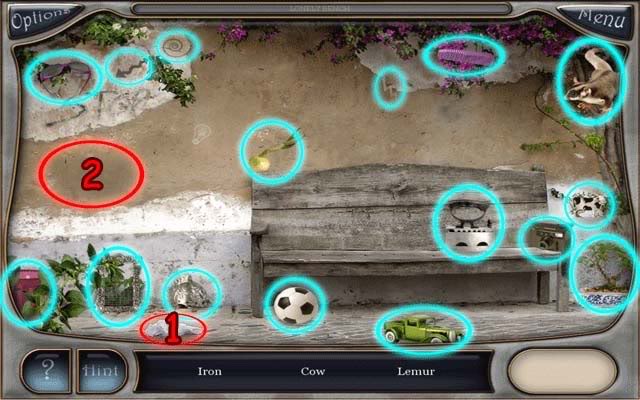
- Once you’ve found all the objects:
1.Pick up the Rag
2.Use the Rag on the Wall to reveal a hidden message.
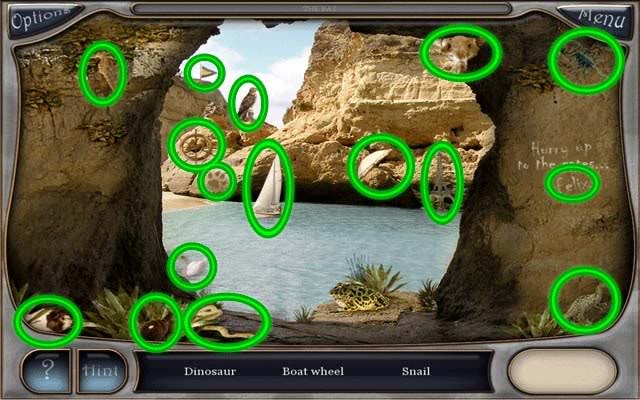
Level 23- The Bay
- Here you’ll need to find 15 of the 16 possible objects via silhouette matching. All possible objects are circled below:
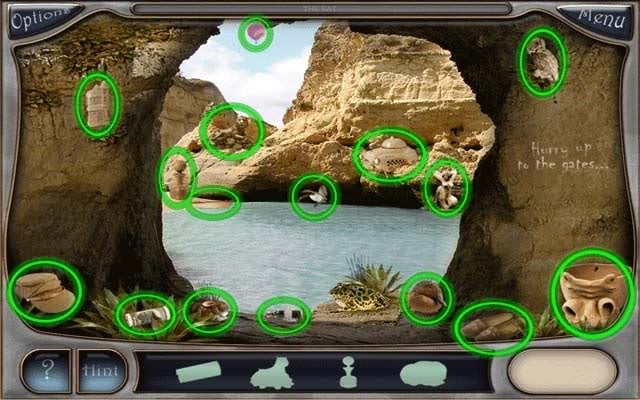
Level 24- The Bay (Part 2)
- Find 15 of 16 possible objects listed via name. All possible solutions are marked below:
Level 25- The Room of Mirror Reflections
- Here you’ll need to find pairs of exact objects. There are numerous combinations, all shown and listed below:
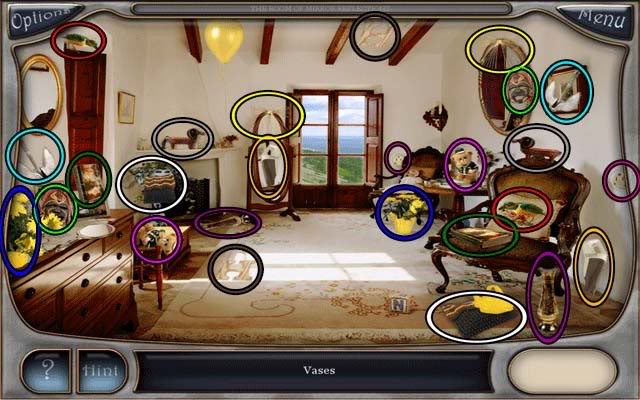
- -Red= Birds
-Magenta= Power Plugs/Sockets
-Bright Pink= Bears
-Purple= Vases
-Orange= Vacuums
-Yellow= Bows
-White= Purses/Money Bags
-Grey= Figures/Statues
-Brown= Letters
-Cyan= Anchors
-Blue= Flowers
-Bright Green= Masks
-Green= Books
Level 26- The Room of Mirror Reflections (Part 2)
- Find 15 of 16 possible objects by name. All possible solutions are shown below:
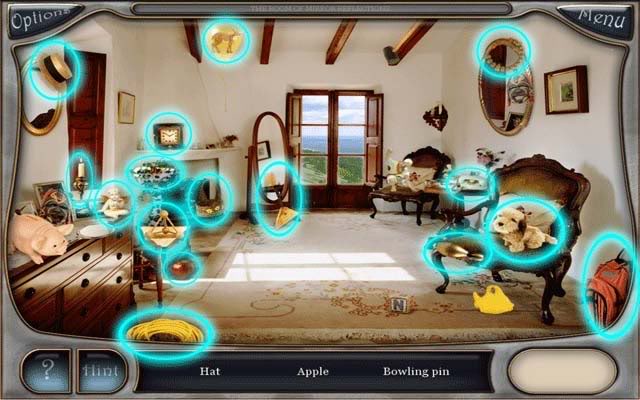
- After you find all the objects:
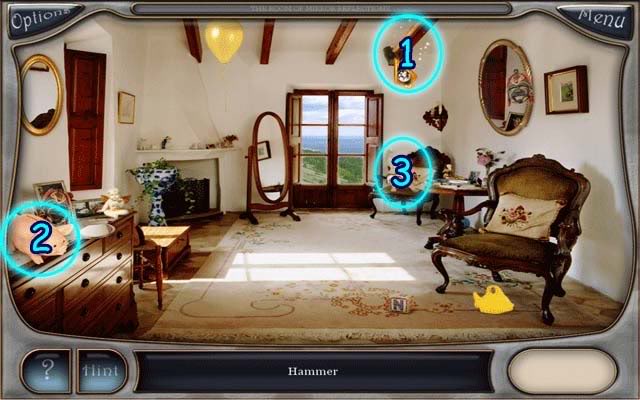
1.Pick up the Hammer
2.Use the Hammer on the Piggy Bank. Pick up the Coins.
3.Use the Coins on the Statue.
Level 27- To Build a Bridge
- Here you’ll need to find pairs of exact objects. There are numerous combinations, all shown and listed below:
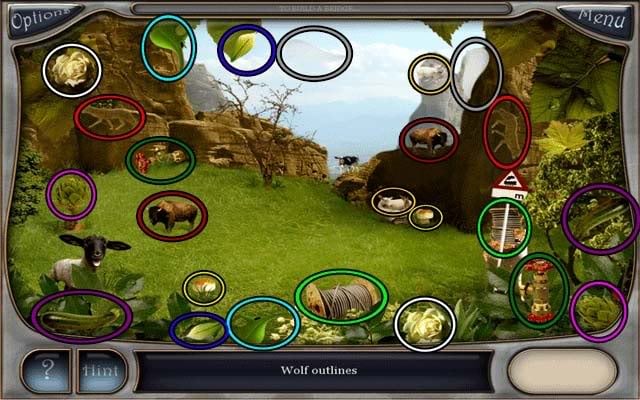
- -Red= Wolf Outlines
-Dark Red= Buffalo
-Orange= Sheep
-Yellow= Mushrooms
-Pink= Artichokes
-Purple= Zucchinis
-Bright Green= Wire Spools
-Green= Water Taps
-Cyan= Watering Cans
-Blue= Feathers
-White= Roses
-Grey= Wings
Level 28- To Build a Bridge (Part 2)
- Find 15 of 16 possible objects by name. All solutions are shown below:
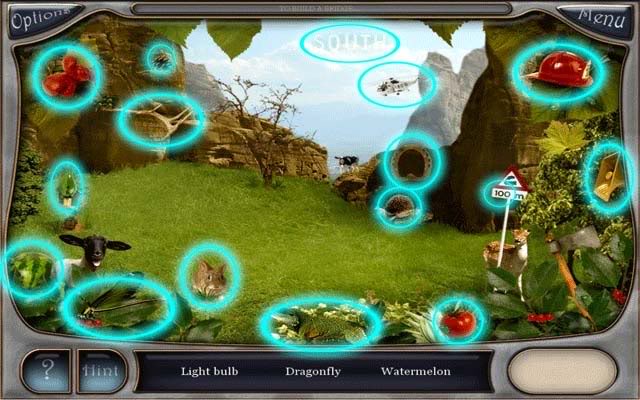
- After finding all the objects:
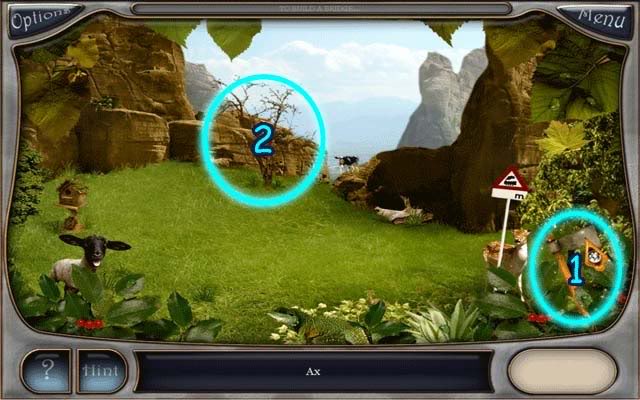
1.Pick up the Axe
2.Use the Axe on the Tree
Level 29- The Room of a Hidden Power
- Angela’s thirsty and needs something refreshing as she reaches a fork in the roads. Click to continue to the Elixir House.
- Find 15 of 16 possible objects by name, the solutions are shown below:
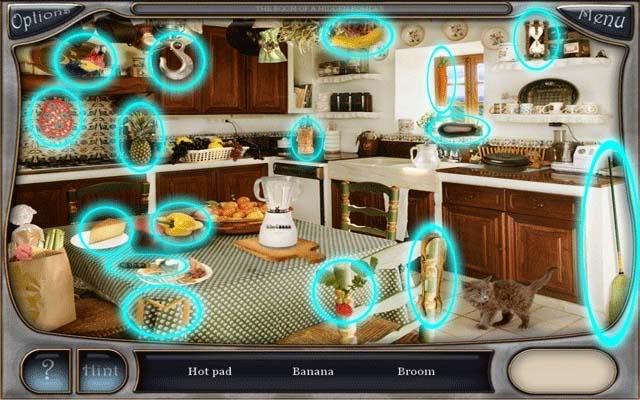
- Once you’ve found all the objects, it’s time to help Angela make something refreshing:
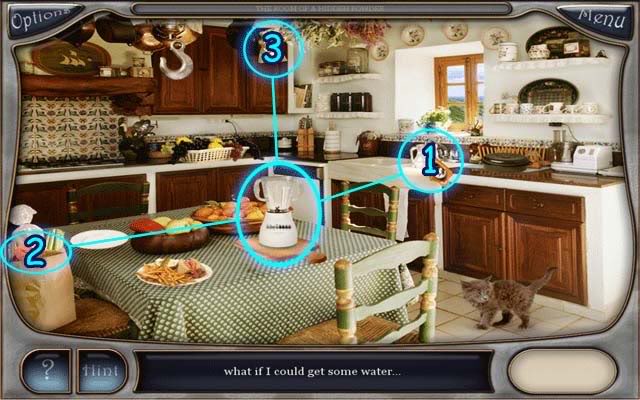
1.Click on the Water Pitcher to fill it with water. Use it on the Blender.
2.Pick up the Ice Cream and use it on the Blender.
3.Pick up the Magic Powder and use it on the Blender.
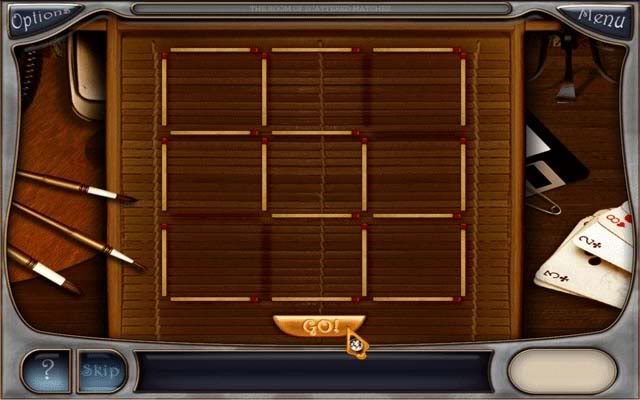
Level 30- The Room of Scattered Matches (Mini-game 8)
- The goal in this puzzle is to remove 4 matches to create 3 small squares, 2 medium squares, and 1 large square. Here’s the solution:
Level 31- The Area of Abundant Vegetation
- In this scene, you’ll need to find groups of objects. They won’t exactly match and they’re in different numbers, the solutions being below:
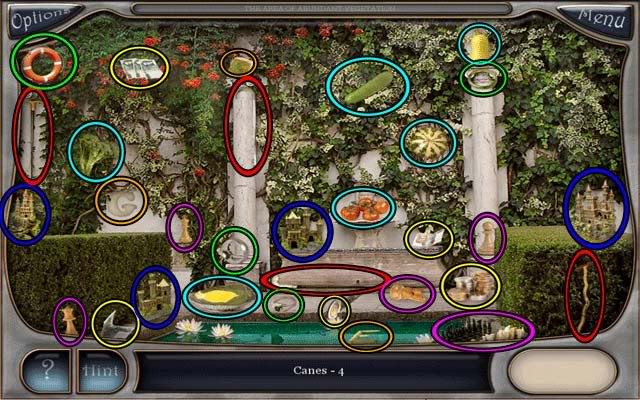
- -Red= Canes x4
-Orange= Letters x3
-Yellow= Money x5
-Green= Rings x4
-Cyan= Vegetables x6
-Blue= Castles x4
-Purple= Chess Pieces x5
Level 32- The Area of Abundant Vegetation (Part 2)
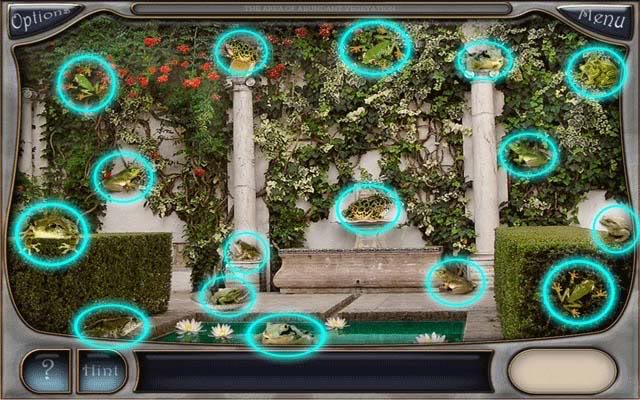
- Find 16 Frogs.
Level 33- Behind the Gate (Mini-game 9)
- Rotate the pieces of the puzzle by clicking on them until they’re in the right position to complete the picture. Here’s what the solution/finished puzzle looks like:
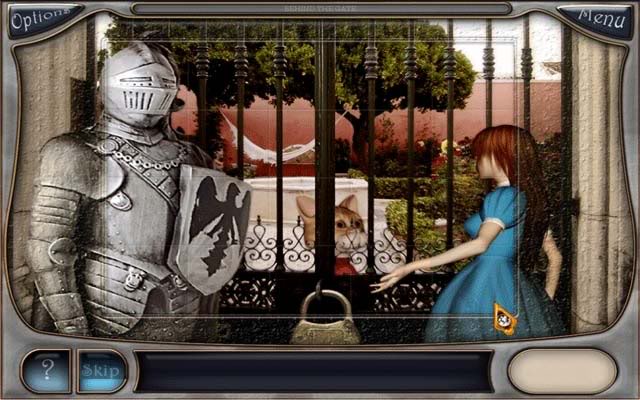
Level 34- The Area of an Everlasting Tree
- Find 15 of 16 possible objects by name. All solutions are shown below:
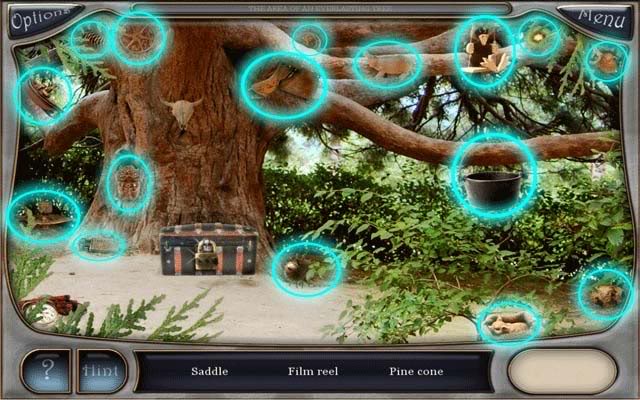
- After you’ve found all the objects, pick up the Dynamite in the bottom left corner of the screen and use it on the treasure chest. Pick up the keys inside the open chest to enter the next area/mini-game.
Level 35- The Room of Eleven Keys (Mini-game 10)
- The goal of this mini-game is to take away keys, but not to end up taking the last key. Each turn you can take 1-3 keys, and your opponent can take 1-3 on each of their turns.
- Turn 1: Take 2 keys
- Turn 2: If your opponent took 2 keys, take two. If your opponent took 3, take one. If your opponent took 1, take three. You want to take all but 5 keys.
- Turn 3: Take all the keys remaining except one, and you’ll win the game.
Level 36- The House of Sunny Weather
- Find 15 of 16 possible objects by name. All solutions are shown below:
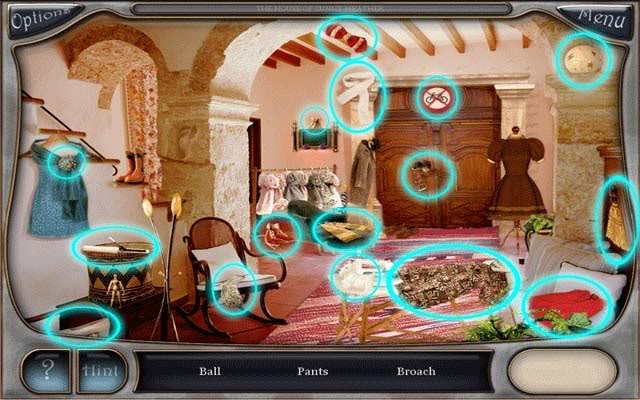
- Once you’ve found all the objects, click on the Brown Dress to the right of the door. Click on it and Angela will appear nearby. Click on the Brown Dress to have her wear it.
Level 37- The House of Sunny Weather (Part 2)
- Find the 16 hidden cards.
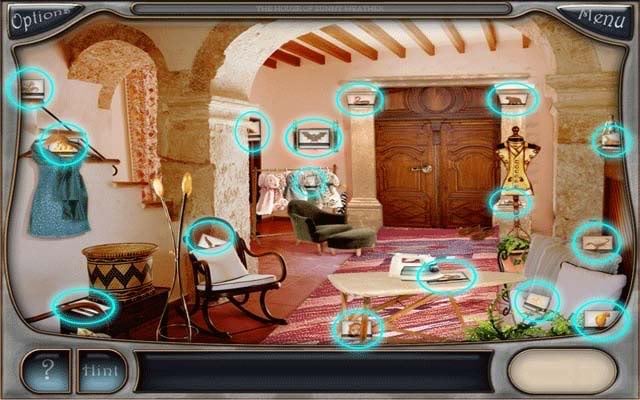
Mini-game 11: Matching Cards
- Click on the cards to reveal the picture underneath: you can try to match/reveal two at a time. Once you match a pair, the pair will be removed from the screen. The point is to match all the cards and leave one left: the Scorpion Card, which doesn’t have a match. Once you match all the other cards, the Scorpion Card will be added to your inventory. It’s a good idea to start from the corners and work your way over while attempting to match cards.
- Once you’ve finished the mini-game, use the Scorpion Card on the screen to the left of the door to open it and proceed to the final area.
Level 38- Mini-game 12: Tile Swap
- Put the picture together by swapping tiles: you can swap any tile with any other tile. Finishing the picture successfully will result in the game’s final cutscenes.
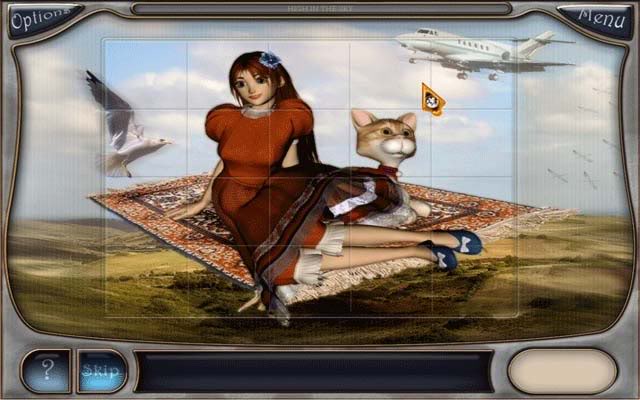
Congratulations, you’ve finished the game!
“;
More articles...
Monopoly GO! Free Rolls – Links For Free Dice
By Glen Fox
Wondering how to get Monopoly GO! free rolls? Well, you’ve come to the right place. In this guide, we provide you with a bunch of tips and tricks to get some free rolls for the hit new mobile game. We’ll …Best Roblox Horror Games to Play Right Now – Updated Weekly
By Adele Wilson
Our Best Roblox Horror Games guide features the scariest and most creative experiences to play right now on the platform!The BEST Roblox Games of The Week – Games You Need To Play!
By Sho Roberts
Our feature shares our pick for the Best Roblox Games of the week! With our feature, we guarantee you'll find something new to play!All Grades in Type Soul – Each Race Explained
By Adele Wilson
Our All Grades in Type Soul guide lists every grade in the game for all races, including how to increase your grade quickly!


