- Wondering how to get Monopoly GO! free rolls? Well, you’ve come to the right place. In this guide, we provide you with a bunch of tips and tricks to get some free rolls for the hit new mobile game. We’ll …
Best Roblox Horror Games to Play Right Now – Updated Weekly
By Adele Wilson
Our Best Roblox Horror Games guide features the scariest and most creative experiences to play right now on the platform!The BEST Roblox Games of The Week – Games You Need To Play!
By Sho Roberts
Our feature shares our pick for the Best Roblox Games of the week! With our feature, we guarantee you'll find something new to play!Type Soul Clan Rarity Guide – All Legendary And Common Clans Listed!
By Nathan Ball
Wondering what your odds of rolling a particular Clan are? Wonder no more, with my handy Type Soul Clan Rarity guide.
Ancient Secrets: Mystery of the Vanishing Bride Walkthrough
Welcome to the Ancient Secrets: Mystery of the Vanishing Bride walkthrough on Gamezebo. Ancient Secrets: Mystery of the Vanishing Bride is a Hidden Object Game played on the PC created by GameHouse. This walkthrough includes tips and tricks, helpful hints, and a strategy guide on how to complete Ancient Secrets: Mystery of the Vanishing Bride.
Ancient Secrets: Mystery of the Vanishing Bride – Game Introduction
Welcome to the Ancient Secrets: Mystery of the Vanishing Bride walkthrough on Gamezebo. Ancient Secrets: Mystery of the Vanishing Bride is a Hidden Object Game played on the PC created by GameHouse. This walkthrough includes tips and tricks, helpful hints, and a strategy guide on how to complete Ancient Secrets: Mystery of the Vanishing Bride.
General Tips
This hidden object game requires visiting several locations and using inventory items to advance play. This game differs from most hidden object games, as there are not hidden object areas with lists. Items to find are added as you play. The objects may be in a main scene or an interactive area.
- Play is generally non-linear but some areas or tasks must be complete to open another area.
- CAPITALIZED inventory items are meant to make it easier to find where this guide may differ from your own play.
- Always move the cursor around a scene. Watch the cursor to see if it changes into a symbol indicating an area of interest. To minimize the amount of back-and-forth required, access and acquire all items needed for a scene before you begin looking for a set of objects.
- Hints are in the form of coins. Coins appear in scenes until you have collected a maximum of five. Coins assist in finding hidden objects. One coin is deducted for each assistance. If there are no objects in the scene, no coin is used. Three coins are needed to skip a puzzle. If you have an insufficient number of coins, a skip bar will fill.
Beginning Play:
- Profiles – Create or delete player profiles.
- Options – Change music and sound effects volume. You may select or deselect full screen and custom cursor play.
Navigation:
- Items to Find – Graphic depictions of the objects needed to accomplish a task are shown at the bottom of the screen. An area or object must be clicked for objects to be added.
- Items – Collected items display in a panel on the right side of the screen. Click the Items tab to see your inventory.
- Menu – Continue, Options, Help or Exit.
- Goal – View current tasks, review conversations or notes.
Symbol Meanings:
- Finger – Indicates an interactive area.
- Magnifying Glass – Zoom in on interactive area.
- Hand – Interact with an object: pick up an item, open a door, move an object.
- Lips – Have a conversation with a character.
- Hammer and Anvil – Perform an action with an inventory item.
- All symbols and their meanings can be found by clicking the Help tab from the main menu.
Walkthrough
A short clip explains the background and introduces the story line for play.
You may play the optional tutorial to learn how to interact with objects and characters.
Chapter 1: The Assignment

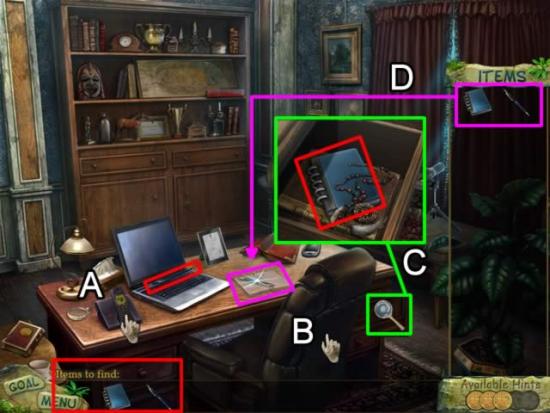
- Answer the telephone (A) and have a conversation with Stephen.
- A PEN and NOTEBOOK appear at the bottom of the screen in the Items to find box. A silhouette of them also appears on the desk in front of the laptop.
- Pick up the PEN, located on the computer (red).
- Move the cursor over the chair until a hand icon appears (B). Click to move the chair to the left. You can now see a set of desk drawers.
- Move the cursor over the top drawer. It turns into a magnifying glass. Click to open the drawer. Remove the NOTEBOOK (C).
- Both Items are now in the Items box.
- Click to select or drag and drop both items on to their silhouette on the desk (D). Stephen’s information is recorded in the notebook. The page is added to the Items box.
Prepare for the trip.
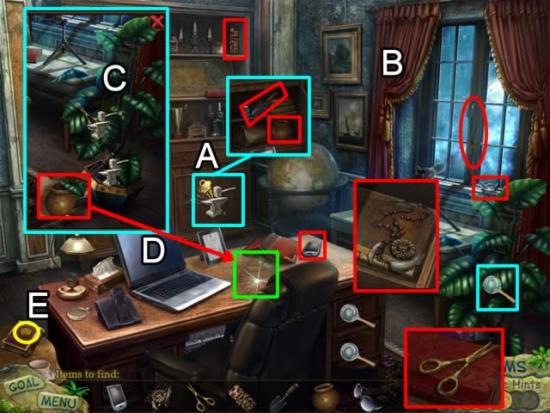
- Collect the CELL PHONE from the desk, the TOTEM from the top cabinet shelf, the AMULET from the top desk drawer and the SCISSORS from the bottom drawer.
- The cursor changes to a hand when placed over the cabinet door indicating an interactive area (A). Click the door. It is locked. A new object, a KEY, appears in the items to collect.
- Click the curtains (B) to open them. Pick up the SUNGLASSES and the KEY.
- Use the KEY to unlock the cabinet. Collect the TROWEL and POT.
- New objects appear in the Items to find box and a silhouette of a potted seedling appears on the desk.
- Click the potted plant in the lower right corner to open the area (C).
- Use the TROWEL (listed as a shovel in the items list) to collect SOIL from the plant. Use the SCISSORS to cut off a SEEDLING.
- Place the POT in the silhouette on the desk. Add the SOIL and SEEDLING in the pot. Click to add this valuable plant to your inventory items.
- Pick up the GOLD COIN (E). The coin is added to an Available Hints slot.
Pack for the trip.
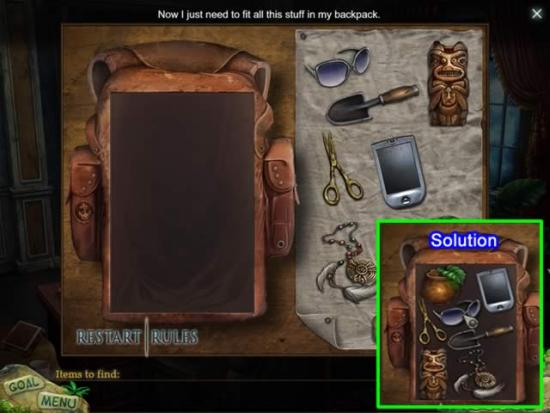
- Put each item in the backpack so that none overlap or touch the side of the pack.
- View one solution in the above inset.
Chapter 2: The Lighthouse
View the cut scene while flying to the Kunha Islands.
Upon landing, speak to the Chief to seek information about Stephen.
- Follow the arrow to the Jungle.
- Vines block the path. Click the vines. A MACHETE appears in the Items list. Pick up the Gold Coin on the rock. Return to the village and speak to the Chief again.
- Play the mini game to get the MACHETE.
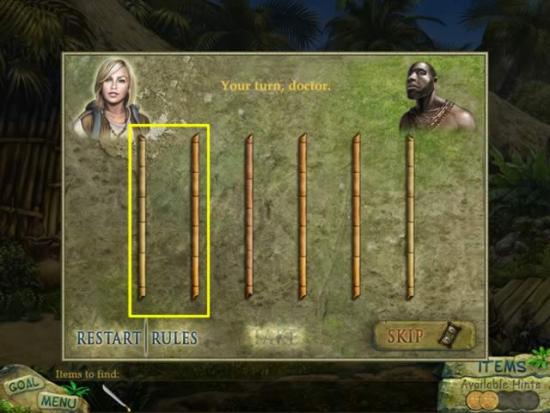
- The goal is to be the person taking the last stick(s) off the board. You can take one, two or three sticks each turn. There are twenty sticks to begin with.
- Count the number of sticks left after each round. The Chief will generally try to keep the count at an odd number. The best way to win this game is to try to have only six sticks available toward the end. By taking two, you will win.
- Return to the Jungle.
- With MACHETE in hand, move the cursor around the vine area and click each time an action icon appears.
- Continue along the path to the bridge. Attempt to cross the bridge to the lighthouse. The bridge collapses.
- Return to the vine area in the Jungle.
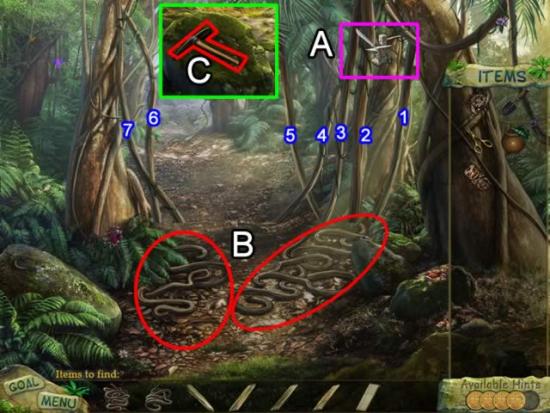
- Use the MACHETE (A) to cut the seven vines numbered above. They can be used as ROPE.
- Collect the ROPES (B) and return to the village.
- Speak to the Chief about collecting the necessary boards.
- Play the Find-the-Pearl game. (SPOILER ALERT: if the shells move too quickly for you to follow, I played the game three times while writing this guide and noticed the pearl was always under the center shell in round one and under the third shell for rounds two and three.)
- A PICK AXE appears in the Items list.
- Return to the bridge. Click the rock to remove the debris covering the PICK AXE (C).
- Return to the village.
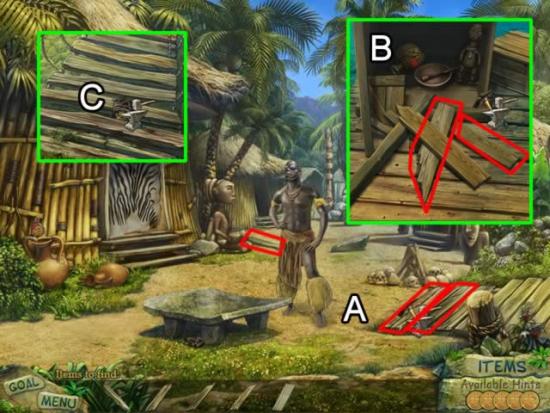
- Collect the three BOARDS in the village (A).
- Go to the Dock. Use the PICK AXE to smash open the crates. Collect the remaining BOARDS.
- Return to the bridge (C). Repair the bridge with the BOARDS and ROPES. Cross to the Lighthouse.
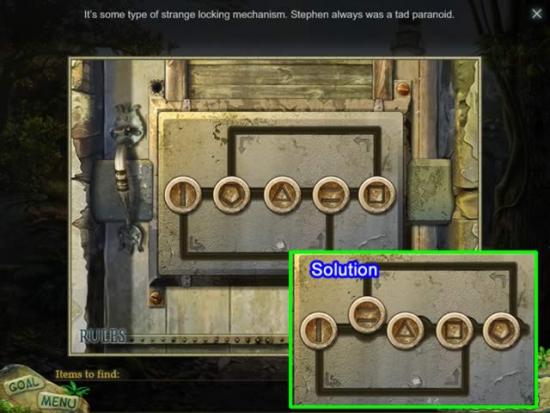
- Unlock the door by sliding the tabs into numerical order from left to right.
- Clicking a tab to follow the top path shifts all but the first tab to the left.
- Clicking a tab to follow the bottom path shifts all but the last tab to the right.
- See the solution inset or watch the video.
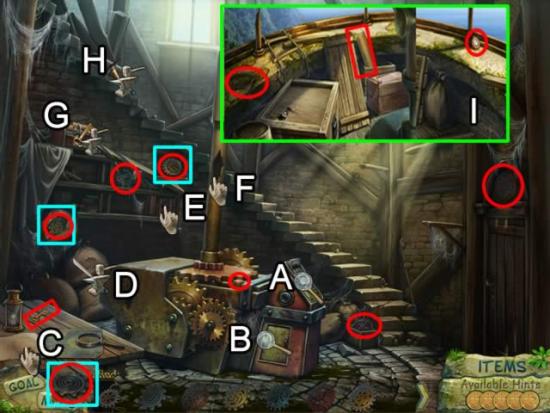
- Access the telescope’s control panel (A). Two DIALS need collecting. Pick up the first DIAL (circled in red to the left of the letter (A) by the big gear.)
- Click the circle on the side of the control panel (A). A HANDLE is missing.
- Access the mechanical panel (B). Eight GEARS need collecting.
- Collect the GEARS by the door, beside the steps and on the top right of the shelf.
- Move the piece of paper (C). Pick up the GEAR underneath it.
- Use the MACHETE to cut the sack (D). Pick up the GEAR hidden inside.
- Move the books (E). Get the GEAR.
- Click the interactive area on the pipe (F). Two PIPE pieces and WIRE need collecting.
- Click the lock on the trunk (G). Move the lantern on the desk and pick up the needed KEY.
- Use the KEY to open the trunk. Collect the HANDLE for the side of the control panel (A).
- Use the PICK AXE on the boards blocking the stairway (H).
- Go up to the telescope area (I). Collect the WIRE, PIPE piece and second DIAL.
- The only items left to collect should be one GEAR and a PIPE section.
- Return to the Village and speak with the Shaman. Contact Sam back on the satellite telephone to find the needed information to appease the Shaman.
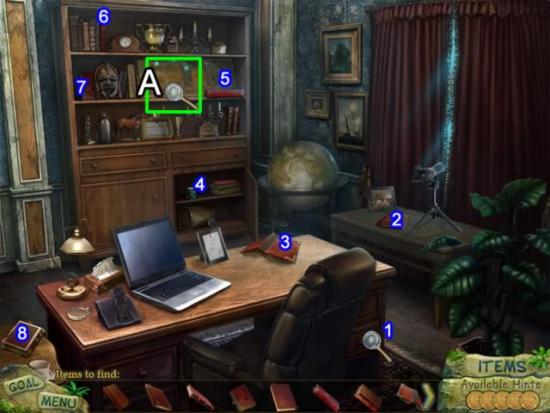
- The location of eight of the needed nine RED BOOKS is shown above.
- Book (1) is in the bottom drawer of the desk. Open the cabinet door to obtain book (4). Click the mask on the second shelf to move it and collect book (7).
- Once all the books are collected an interactive area (A) begins to gleam. Click to open a slider puzzle.
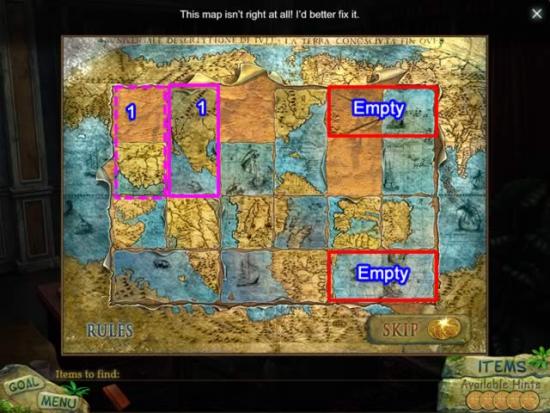
- Reconstruct the map by sliding the pieces to the correct position.
- It’s easiest to start at the left side. Match colors and patterns as you work your way around the map. There are two empty spots (see above screenshot) on the completed map.
- Placement of the first piece is shown above. See the next screenshot for the solution.
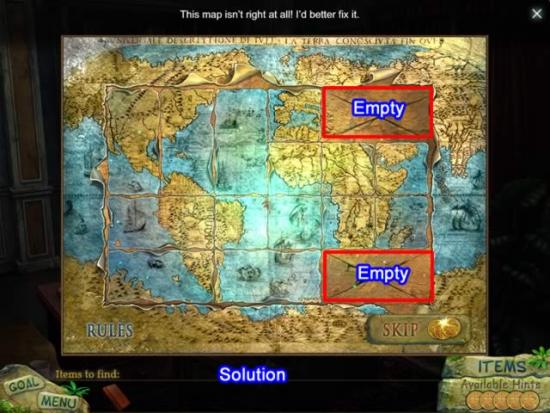
- Completing the puzzle pops the top of the globe in the corner.
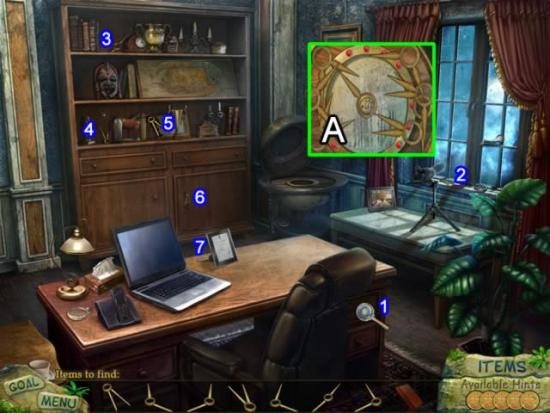
- The location of the seven CLOCK HANDS is shown above.
- Hand (1) is in the top drawer. Move the book inside to reveal it. Hand (3) is behind the clock. Hand (4) is behind the jar, hand (5) is behind the plaque. Close the cabinet door to locate hand (6). Move the frame on the desk to find hand (7).
- Access the globe (A).
- Place the hands so each light on the outside turns green. View the video solution if you would like help.
- Collect the last BOOK.
- Return to the Shaman and impress him with your Island knowledge.
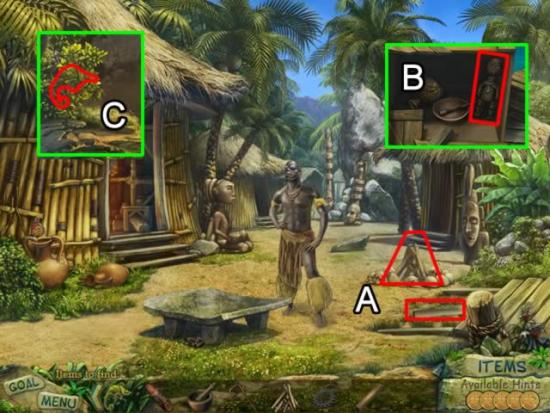
- Exit the Shaman’s hut and begin the search for his objects.
- Pick up the last PIPE section and the FIREWOOD (A).
- On the pier, get the IDOL from the crate (B).
- Return to the bridge to the Lighthouse. Get the CHAMELEON from the tree (C).
- Cross to the Lighthouse.
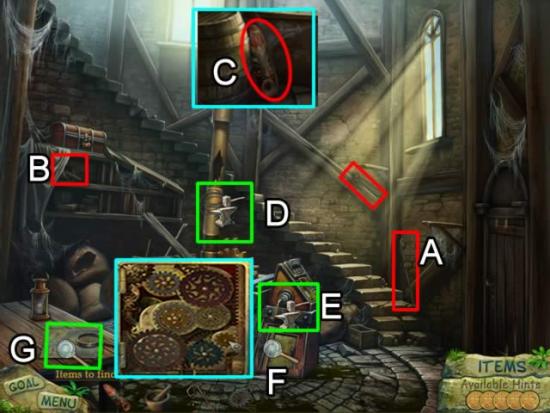
- Pick up the last three items for the Shaman (A, B and C from upstairs).
- Place the PIPES and bind them with the WIRE (D). Pick up the PLIERS (on the hand railing above the stairs) and tighten the wire so the pipes stay in place.
- Affix the HANDLE to the control panel (E).
- Open the gearbox (F). Connect the GEARS so all are rotating. The solution is shown above.
- Examine the map of the island (G). A copy is added to the smart phone.
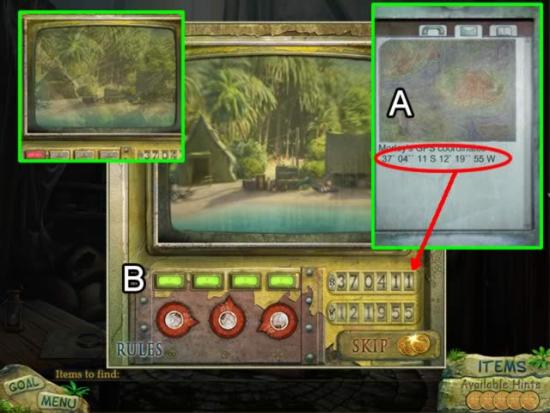
- Access the telescope’s control panel. Add the two missing DIALS.
- Enter the coordinates stored in the smart phone to point the telescope.
- Each button is initially red. Use the three dials to focus, rotate and zoom the images until the its light turns green. Repeat the process until all lights are green (B).
- Return to the Village. Give the Shaman the collected items and the IDOL (listed as a statuette in the inventory list).
- Go to the dock. Discover the plane has been vandalized. Use the PICK AXE to open the door and survey the damage. Report the incident to the Chief. Visit with the Shaman again.
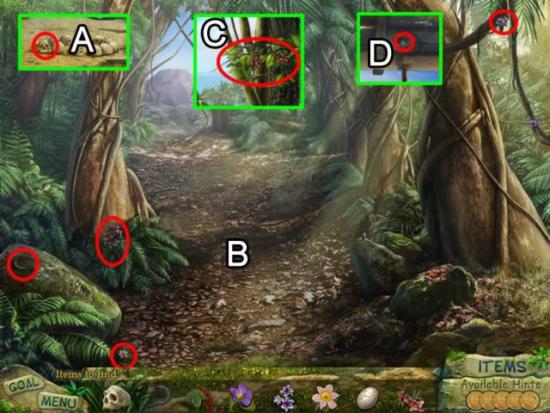
- Exit the Shaman’s hut. Collect the SKULL from the fire ring (A).
- Enter the Jungle. Collect four items in the clearing (B).
- Find the next in the tree to the right of the bridge (C).
- Go to the top of the lighthouse to get the final item (D).
- Give the Shaman these ingredients for the cleansing ritual.
- Call Sam to get the plans for building a canoe.
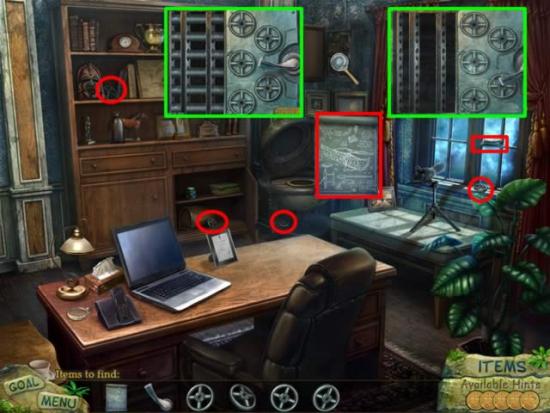
- Access the safe behind the picture.
- Collect the missing parts. Turn the dials until all the bars are retracted. (If you are going to skip any puzzle, this would be a good one to spend three coins on. I cracked it twice but could not find a pattern.)
- Collect the BLUEPRINT.
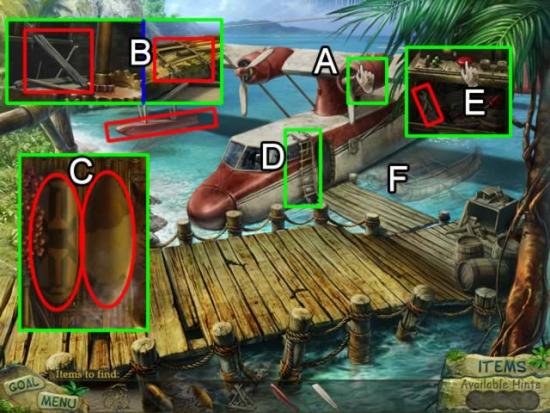
- The items needed to construct the canoe appear. Access the damaged propeller (A) to add the ROPE LADDER to the necessary items.
- Return to the Lighthouse (B). Collect the WOOD downstairs from atop the telescope control housing. Get the ROPE LADDER from the window on the second floor.
- Return to the Shaman’s hut (C). Retrieve the two SHIELDS.
- Attach the ROPE LADDER to the plane to reach the propeller (D).
- Enter the cockpit (E). Press the red button to open the tool box. Retrieve the WRENCH.
- Use the WRENCH on the propeller and pontoon.
- Place the collected objects on the silhouette of the canoe (F). Set sail for Nightengale Island.
Chapter 3: Nightengale Island
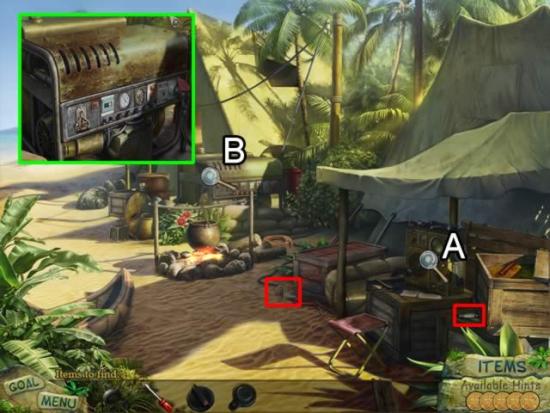
- Fill the list of items by accessing the radio (A) and generator (B).
- Pick up the PULL CORD (generator area) and FUNNEL (in sand). Pick up the FUSE for the radio. The other parts for the radio are on the plane.
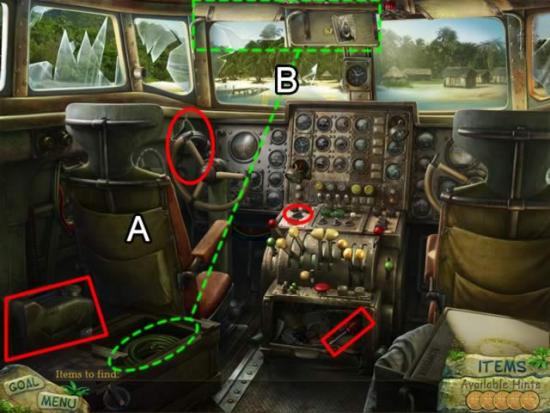
- Collect the SCREWDRIVER, DIAL, HEAD PHONES and EMPTY GAS CAN.
- You will need to syphon gas from the plane. On the outside of the plane, click the gas cap lock.
- The KEY is hidden on the underside of the sun visor. Click the lid on the crate behind the pilot’s seat to get the HOSE. Use the key access the gas tank. Place the HOSE and EMPTY GAS CAN on the area. Receive a FULL GAS CAN.
- Return to the camp. Connect the generator components, fill it with gas and pull the cord to start it. Time to fix the radio.
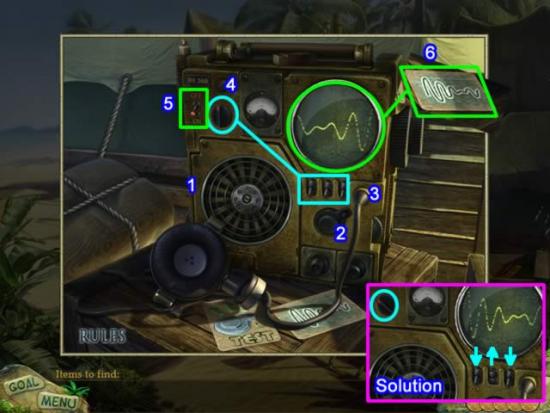
- Use the SCREWDRIVER to open the plate (1). Place the FUSES in their slots and replace the plate.
- Insert the KNOB (2), HEAD PHONES (3) and DIAL (4).
- Flip the switch (5) to ON.
- Using the knob and switches (aqua), match the oscillating pattern on the screen with the frequency pattern (6).
- The solution shows the position of the switches and knob.
- Once the radio is working, go to the Ruins. The entrance is blocked by rubble. Return to camp.
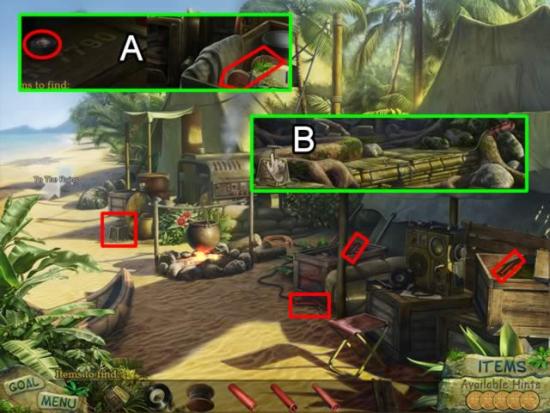
- Pick up the DETONATOR and three sticks of DYNAMITE.
- Return to the plane (A). Collect the TAPE and SPOOL OF WIRE.
- Return to the Ruins (B).
- Place the DETONATOR in its silhouette on the walkway. Attach the SPOOL OF WIRE, add the DYNAMITE to the existing sticks and secure them with the TAPE. Press the DETONATOR. Nothing happens.
- Zoom in on the DETONATOR. Use the SCREWDRIVER to remove the plate. It needs new wiring.
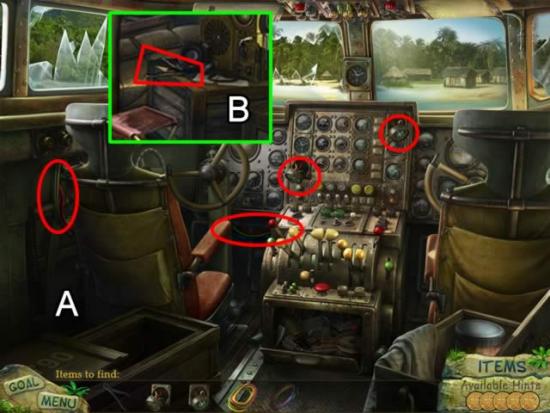
- Paddle to the plane to get the wiring (A). Discover you need pliars to remove the wires. Paddle back to Nightengale Island (B) and retrieve the PLIARS from the crate with the radio. Once on board the plane (again), use the PLIARS to remove the WIRING.
- Return to the Ruins.
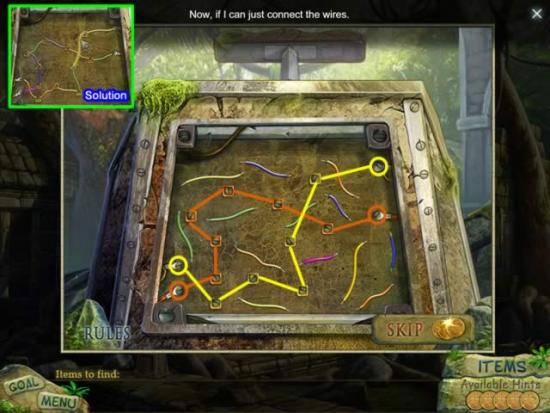
- Use the wires to connect the color-coded eyelets on each side of the box to each other. Route the wires through their matching color connectors. The color of the wires is not important. Place them based on shape.
- The above screenshot shows the paths for both colors. See the solution in the inset.
- Try the detonator again. This time it works. Enter the Structure.
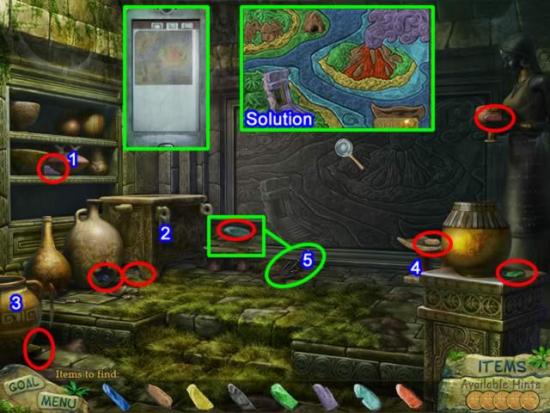
- If you examined Island map when you were at the Lighthouse, it is stored in your smart phone. Although not a particularly distinct image, it gives an idea of the colors.
- Collect the colored chalk. The numbers in the above screenshot indicate you need to move the object to access the chalk. See the solution in the inset.
- Exit the structure. Return to the canoe and head for Forbidden Island.
Chapter 4: The Temple
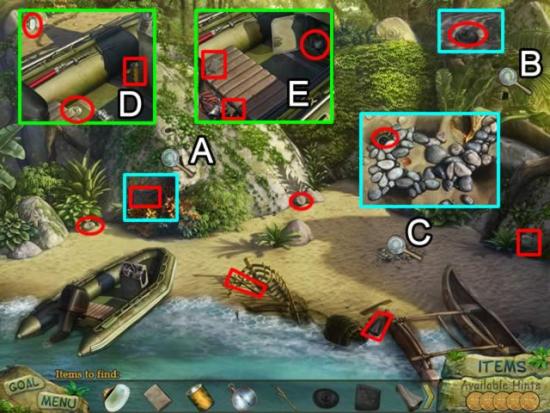
- Zoom in on the areas marked A, B and C to get the list of items to find.
- The areas outlined in aqua contain collectable items found in the interactive area closest to their location.
- Collect the all objects on the beach area and the two statue areas.
- Access the boat (D). Collect the three items indicated. Click the locked box to add a KEY to the list. Click the seat to move it forward (E). The KEY is at the bottom of the inset screenshot. Collect the LIGHTER on the seat. Use the KEY on the lock. Collect the COMPASS.
- The crab has its claws around an EYE. Use the SHELL, LIGHTER, CAN and COMPASS to block its exits to trap it. An item will stay in place if it is the correct item for the exit. If the item goes back to inventory, try another exit point. Once all exits are blocked, use the STICK to get the EYE from the crab.
- Access the statue area (A). Place the EYES, TOOTH and PLUG. Access area (B). Place its EYES, NOSE and TOOTH. Exchange the statue eyes until all four are green.
- Enter the secret entrance to the Jungle.
- Attempt to approach the Temple. Four RUNES are needed to deactivate the spears.
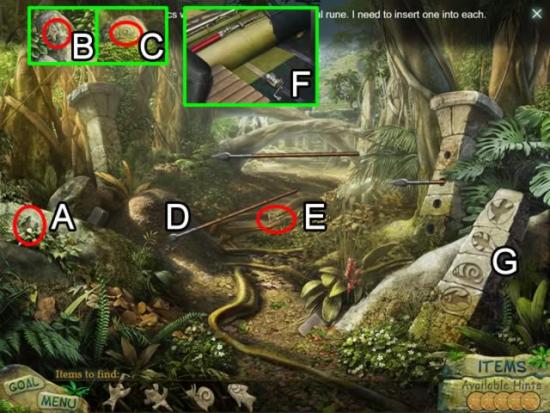
- Collect the first RUNE (A).
- Return to the Beach. Collect the second RUNE (B) on the rocks to the left of the boat. Attempt to collect the third RUNE (C) atop the entrance arch. It is beyond reach. A SPEAR is needed to retrieve it.
- Return to the Jungle. Grab the SPEAR (D). Ouch! Fire ants! Return to the boat. Get the pair of GLOVES from the cabinet. Go back to the Jungle. Use the GLOVES to get the SPEAR.
- Before returning to the Beach to get the Snail RUNE (C), try to get the RUNE further down the path (E). Nope. You need fishing gear.
- Return to the Beach. Use the SPEAR to get RUNE (C). Get the ROD, REEL and HOOK from the boat (F). Use the fishing gear to snag the final RUNE on the path.
- Place the RUNES in their appropriate hieroglyph (G). Continue to the Temple.
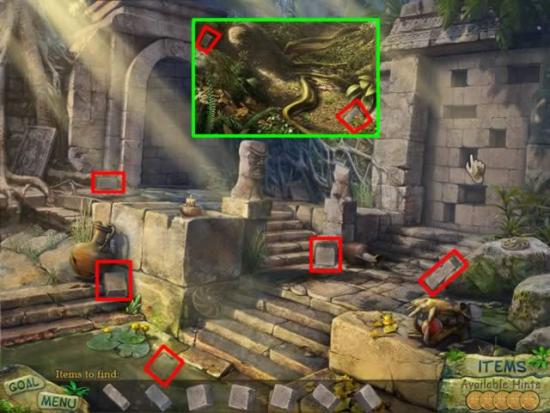
- Click the wall to get the list of items needed.
- Collect the five BRICKS in the courtyard. Return to the Jungle for the remaining two.
- Place the BRICKS in the wall. Click the bricks until all remain in the wall. The
Temple door opens. - Enter the Temple.
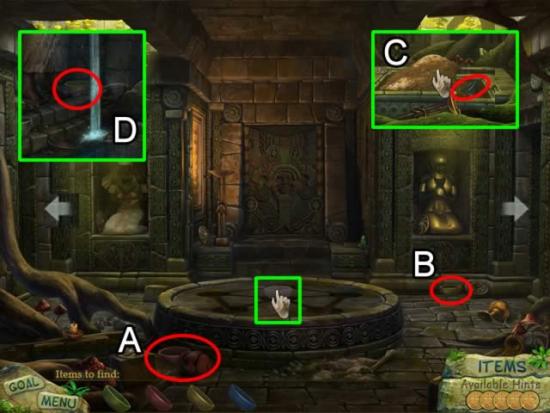
- Click the bowl in the center of the altar to get the list of items.
- Move the jar (A) and retrieve the first BOWL. Collect the second BOWL (B) and enter the room to the right. Use the SHOVEL to unearth another BOWL (C). Proceed to the room to the left in the antechamber. Collect the last BOWL (D) at the feet of the statue pouring water.
- Return to the antechamber and place the BOWLS on the round altar. A red eye lights up on the Fire Temple door behind the altar. The torch on the left of the door bursts into flame.
- Touch the Fire Temple door to receive a list of two items. Collect the FIRE HOLDER from the room on the right. Its location shows in inset (C) above in front of the dirt garden. The TORCH is in the water room on the tiles just inside the door.
- Place the FIRE HOLDER on the right side of the Fire Temple door. Light the TORCH from the flame already burning on the left. Place the TORCH in the FIRE HOLDER.
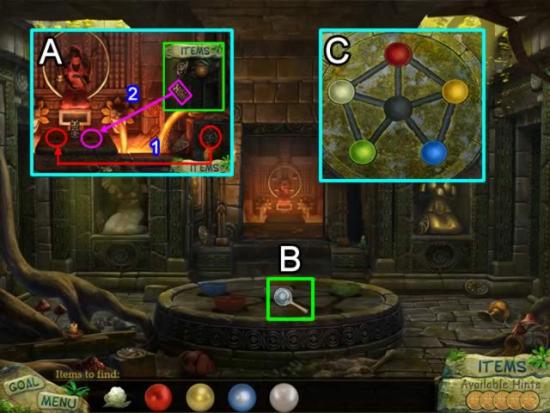
- Enter the Fire Temple (A). Collect the Tekkan TOTEM on the right side of the screen (1) and place it in the circled slot. Get the other Tekkan TOTEM from inventory (2) and place it in the other slot. The totems sink down and the path appears.
- Return to the antechamber. Zoom in on the altar bowls (B). Orbs are needed to fill the offering bowls.
- Enter the Earth Temple on the right.
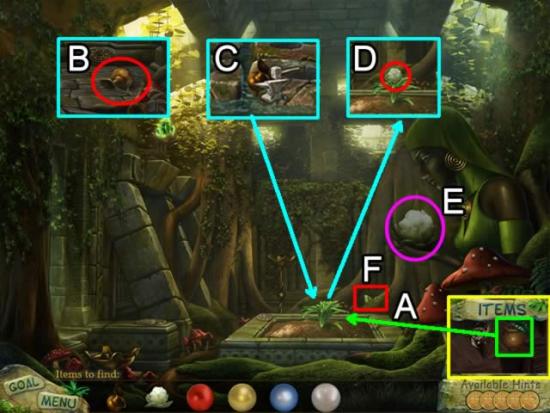
- Take the SEEDLING from inventory and plant it (A). It needs watering. A PITCHER appears on your list.
- Return to the antechamber (B). Pick up the EMPTY PITCHER and proceed to the Water Temple (C). Fill the pitcher.
- Return to the Earth Temple. Pour the PITCHER WITH WATER on the plant. The plant blooms (D). Pluck the blossom; it is an uncharged orb. Place the ORB in the goddess’s hand (E). Five CRYSTALS now need collecting. Your first one is at the back of the room (F).
- Go to the Water Temple.
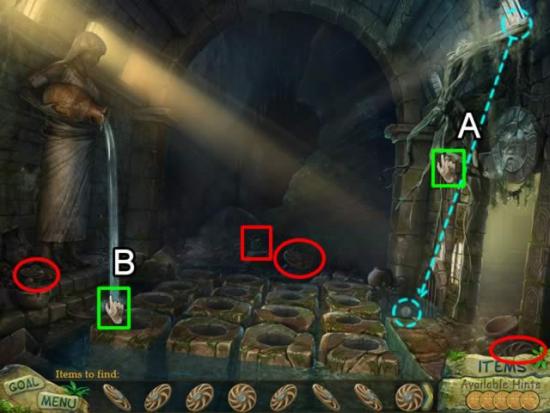
- The white ORB is on the ledge above the entrance. Click the branches until the orb is dislodged and drops into the water (A). Retrieve it.
- Click the goddess (B). Sixteen DISKS now need collecting. Pick up the three DISKS and one CRYSTAL. Return to the antechamber.
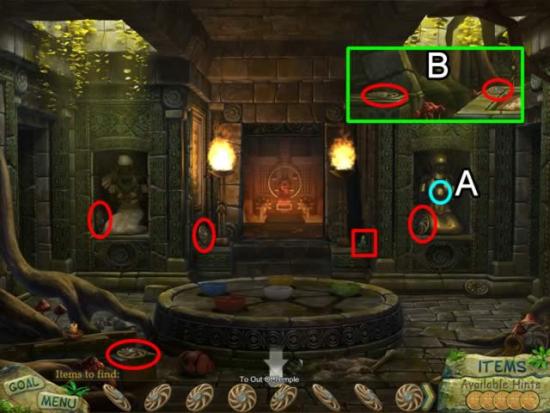
- Collect the gold ORB (A). Pick up the four DISKS and one CRYSTAL from this room.
- Go to the Earth Temple (B). Collect two more DISKS.
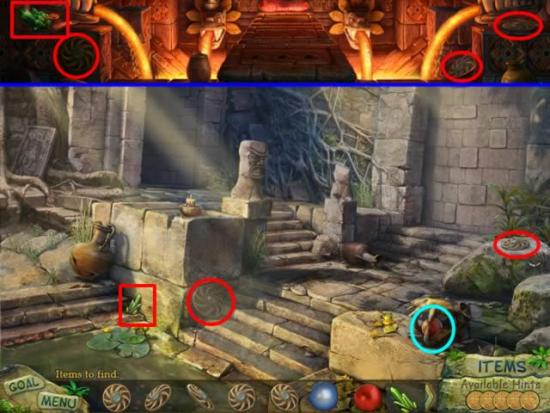
- Enter the Fire Temple. Collect the three DISKS and CRYSTAL.
- Exit the Temple. Pick up the red ORB, two DISKS and a CRYSTAL.
- Go to the Water Temple.
- Place the DISKS on the stone steps. To cross the water, click a disk. If the disk lights up, that is a correct move. If it sinks, try again. Repeat the process until eight disks remain lit. See the next screenshot for the solution.
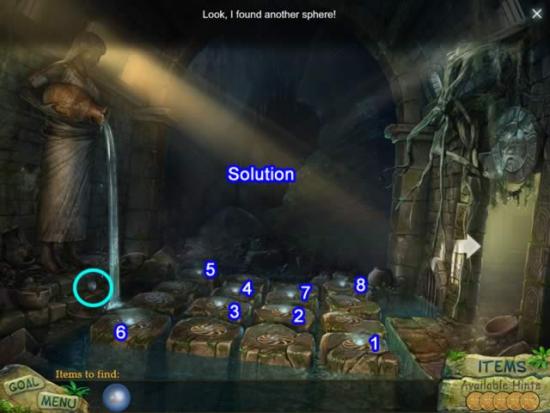
- Pick up the blue ORB.
- Return to the Fire Temple.
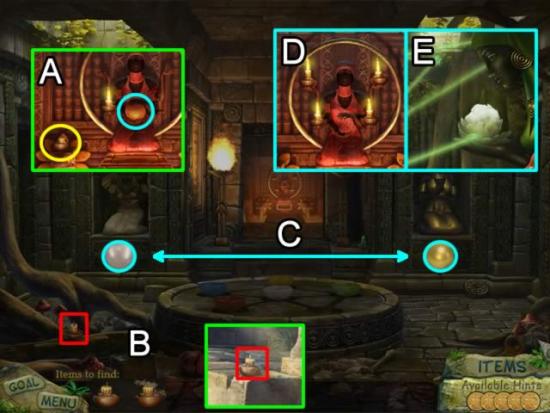
- Place the red ORB in the goddess’s hands (A). Three CANDLES need collecting. The first is right below the goddess. Exit to the antechamber.
- Pick up the second candle (B) in the antechamber and the third in the Temple courtyard.
- Charge the ORBS: Place the white and gold orbs in the slots (C). Give the CANDLES to the Fire Goddess (D). Give the CRYSTALS to the Earth Goddess (E). The blue orb is already charged.
- Access the circular altar. Place the CHARGED ORBS in the offering bowls. Slide them to the correct slot. The solution is shown in the next screenshot.
- Enter the portal.
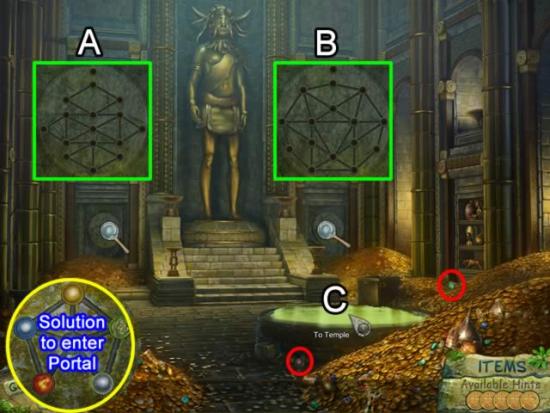
- View the betrayal scene and speak with Raja Zula. Give him the Tekkan Amulet.
- Access the puzzles (A) and (B). Collect the two BALLS needed to play them.
- Place the ball in the empty top slot. Choose any circle in the pattern as the starting point. Move the ball from circle to circle forming a continuious path through the puzzle. Complete the puzzles by highlighting all lines without doubling back.
- Here is the video solution for puzzle (A).
- Here is the video solution for puzzle (B).
Receive the Tekkan Mask from Raja Zula. Return to the Temple (C).
Chapter 5: The Reunion
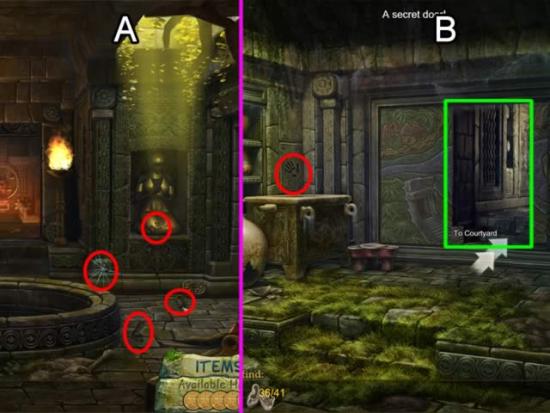
- Follow hand and foot prints to Lulapay’s location. Click a print and the next one appears. Here are the locations and the number at each location:
- Temple: 4
- Temple Courtyard: 7
- Jungle Path: 5
- Beach: 7
- Nightengale Island Beach: 4
- Ruins: 5
- Mural Room: 4. Clicking the last hand print opens a secret door in the mural (B).
- Courtyard: 5. Meet Lulapay.
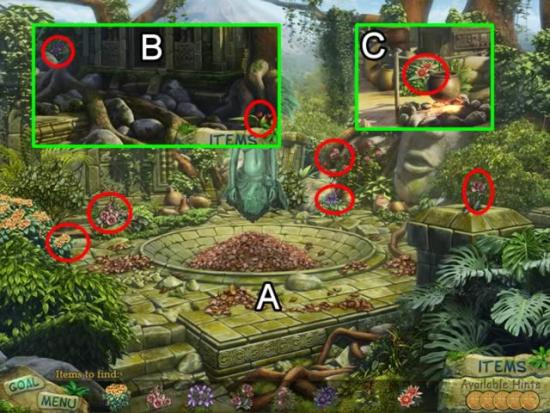
- Collect the flowers for the wedding wreath from the Courtyard, the Ruins(B) and the Beach (C).
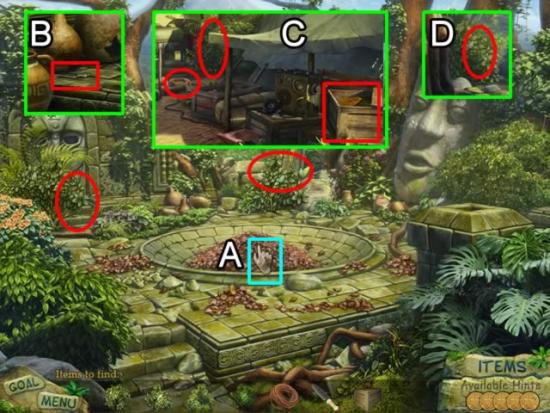
- To retrieve Lulapay’s remains, click the debris pile (A) to acquire the list of items.
- Return to the Mural Room (B). Pick up the KNIFE.
- Go to the Beach (C). Pick up the ROPE and CRATE. Use the KNIFE to cut the LEAVES.
- Return to the Ruins (D). Use the KNIFE to cut the LEAVES.
- Return to the Courtyard. Use the KNIFE on the two bushes indicated.
- Use the LEAVES to brush away the debris pile. Lulapay’s skeleton is at the bottom of the pit. Use the CRATE for the remains.
- Return to the Beach and head for Forbidden Island. Disaster strikes again.
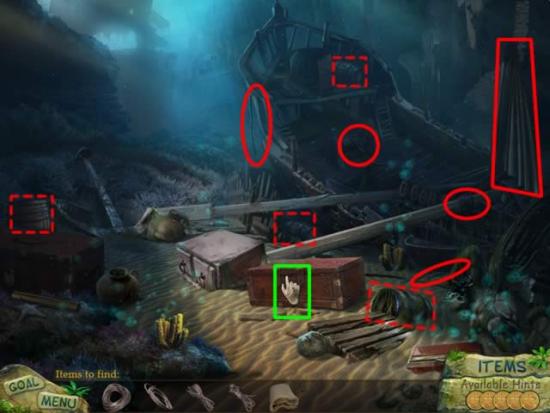
- Click the chest to see the items needed to raise it to the surface.
- Collect the four ROPES and SAIL.
- Place the SAIL on the chest. It slide underneath it. Place the ROPES on the cloth. They attach themselves to the four corners.
- Four BARRELS appear in the item list. They are indicated in the above screenshot by dashed lines.
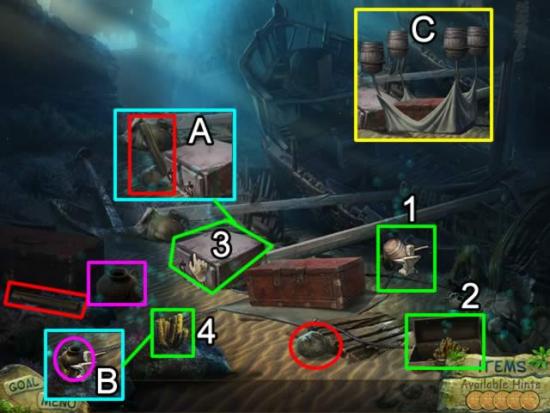
- Fill each BARREL with air for buoyancy.
- Place the first barrel over the air vent (1). Attach it to the rope next to the air vent.
- Click the case at the bottom of the screen (2) to open it. This is another air vent.
- Dislodge the case to uncover air vent (3). Click the case. A BOARD and ROCK are required for leverage. Collect them (red). Placed them on the chest (A) to access the air vent.
- Click air vent (4). Collect the BROKEN JUG (pink) and place it over the coral (B) to concentrate the air.
- Place the remaining three barrels over an air vent and attach to a rope.
- The chest rises to the surface (C).
Watch the remaining action scenes and the reunion of Raja Zula and Lulapay.
Congratulations! You have completed Ancient Secrets: Mystery of the Vanishing Bride.
More articles...
Monopoly GO! Free Rolls – Links For Free Dice
By Glen Fox
Wondering how to get Monopoly GO! free rolls? Well, you’ve come to the right place. In this guide, we provide you with a bunch of tips and tricks to get some free rolls for the hit new mobile game. We’ll …Best Roblox Horror Games to Play Right Now – Updated Weekly
By Adele Wilson
Our Best Roblox Horror Games guide features the scariest and most creative experiences to play right now on the platform!The BEST Roblox Games of The Week – Games You Need To Play!
By Sho Roberts
Our feature shares our pick for the Best Roblox Games of the week! With our feature, we guarantee you'll find something new to play!Type Soul Clan Rarity Guide – All Legendary And Common Clans Listed!
By Nathan Ball
Wondering what your odds of rolling a particular Clan are? Wonder no more, with my handy Type Soul Clan Rarity guide.


