
Best Horror Games On Itch.io – July 2026
Across a bounty of subgenres.![Haze Seas Accessories Tier List [Best Accessories to Equip]](/wp-content/uploads/2026/07/haze-seas-accessories-tier-list.jpg "Haze Seas Accessories Tier List [Best Accessories to Equip]")
Haze Seas Accessories Tier List [Best Accessories to Equip]
The accessories with the best stat buffs in Haze Seas.
![[Roblox] Evomon Shiny Hunting Guide – Including Prismatic and Pris Shinies!](/wp-content/uploads/2026/06/evomon-shiny-hunting-guide.jpg "[Roblox] Evomon Shiny Hunting Guide – Including Prismatic and Pris Shinies!")

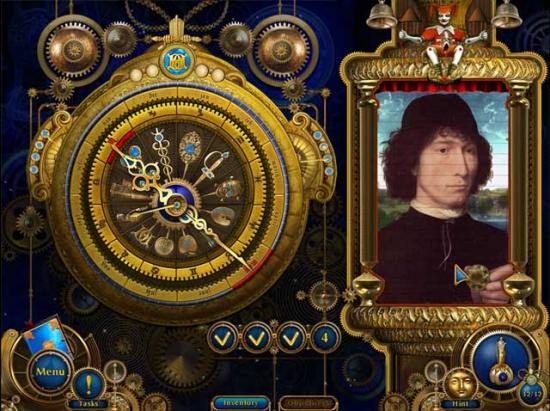
Amulet of Time: Shadow of la Rochelle Walkthrough
Welcome to the Amulet of Time: Shadow of La Rochelle walkthrough on Gamezebo. Amulet of Time is a hidden object adventure game published by Big Fish Games. This walkthrough includes tips and tricks, helpful hints, and a strategy guide for how to complete Amulet of Time: Shadow of La Rochelle.


- Prefer Gamezebo on Google

Game Introduction – Amulet of Time: Shadow of La Rochelle
Welcome to the Amulet of Time: Shadow of La Rochelle walkthrough on Gamezebo. Amulet of Time is a hidden object adventure game published by Big Fish Games. This walkthrough includes tips and tricks, helpful hints, and a strategy guide for how to complete Amulet of Time: Shadow of La Rochelle.
General Tips
- Upon starting a new game, you can choose from one of two difficulties: Easy or Difficult. Easy allows the Hint and Skip buttons to recharge quickly, in addition to active zones being highlighted with special effects. Difficult limits the Hint and Skip buttons to recharge more slowly, and active zones are not highlighted.
- KEY ITEMS, aka Inventory Items, are identified with CAPS in the guide below. They are also circled in red in screenshots.
- Hidden object areas are not randomized. As such, all of the hidden objects of the game are circled for you below, though note that the KEY ITEM(s) are circled in red.
- Puzzles may be skipped after a certain amount of time has passed.
- Hints are unlimited, though they require time to recharge. They may be used both inside and outside hidden object areas.
- Excessive clicking will result in the cursor being temporarily disabled.
- The Menu button is located in the lower left corner of the screen. Click on it to save and quit your game, or access any other menu options, such as returning to the title screen.
- The Tasks! button is located in the lower left corner of the screen. Click on this to keep track of what you need to do.
- Also in the lower left corner of the screen is the Journal. This will keep track of important events that occur and characters you meet.
- The Hint button is located in the lower right corner of the screen.
- In the bottom right corner of the screen is a small button: #/12. This keeps track of how many Amulet pieces you’ve collected out of the12 you need.
- Also located in the bottom right corner of the screen is the Elixir button. Use this when necessary to use an elixir.
- At the bottom of the screen, you can choose between viewing your Inventory, which contains KEY ITEMS you’ve collected, or viewing your current Objectives. Objectives lists objects that you will need to keep an eye out for.
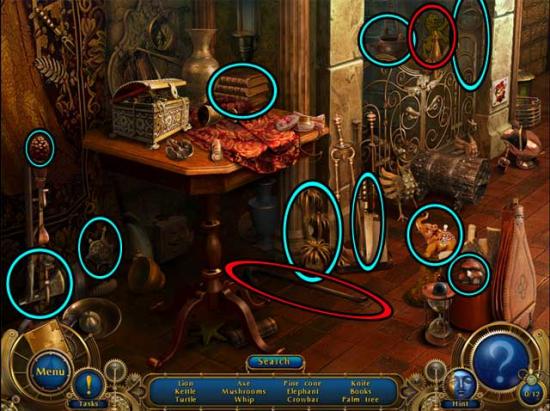
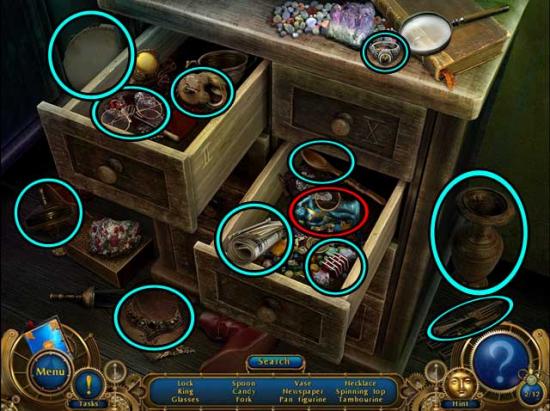
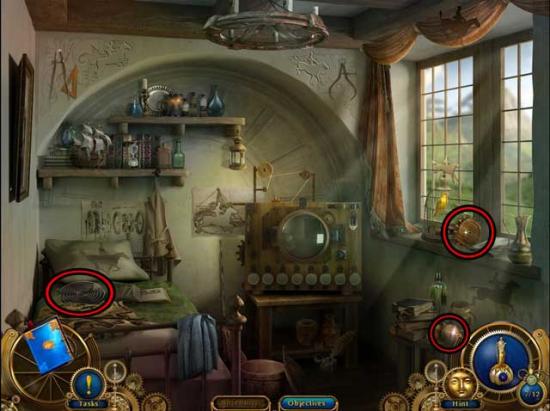
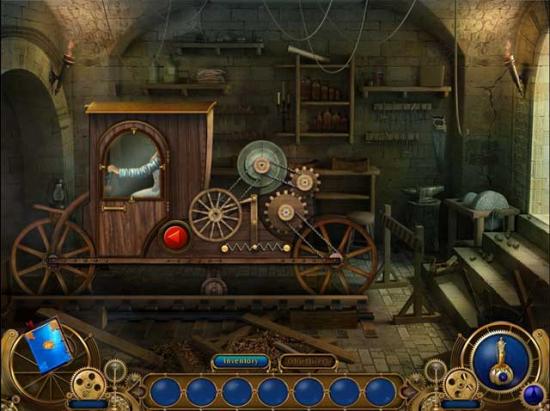
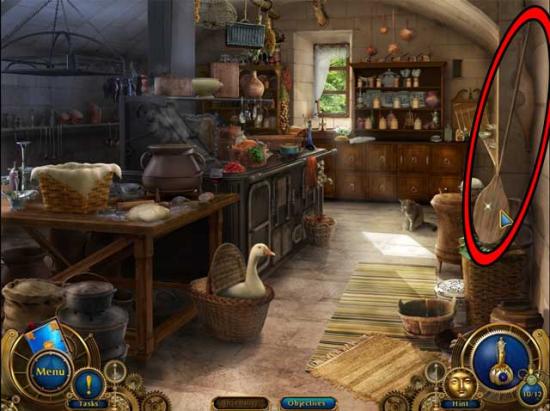
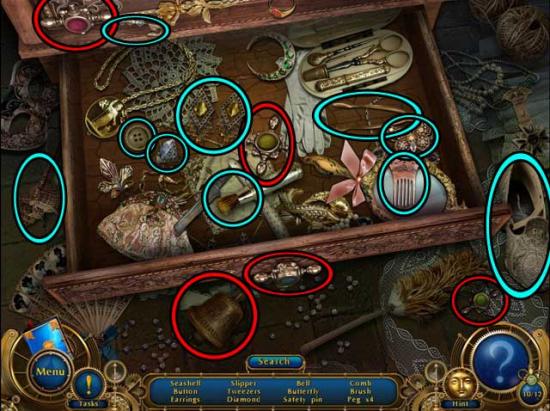
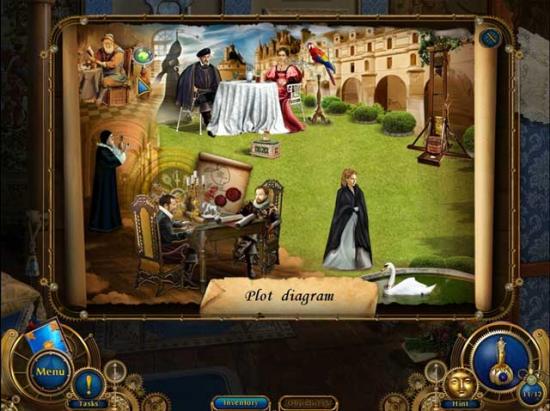
Chapter 1: The Secret Room
Secret Room
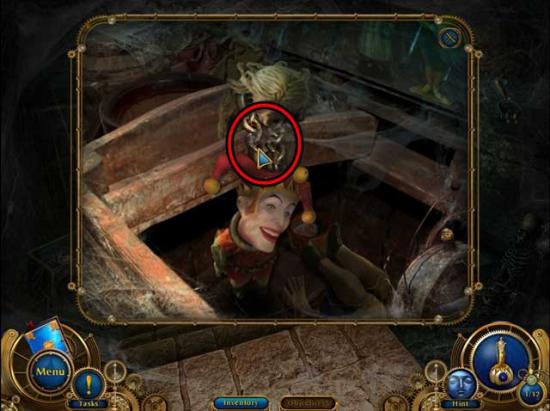
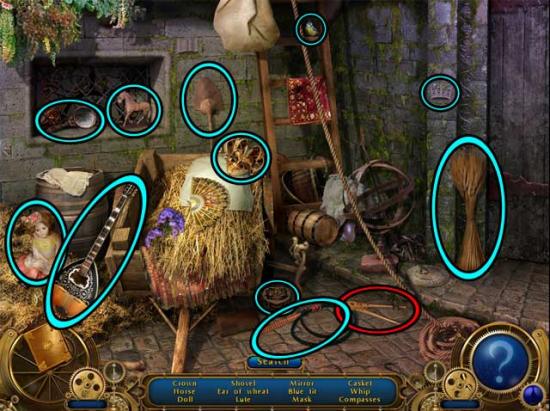
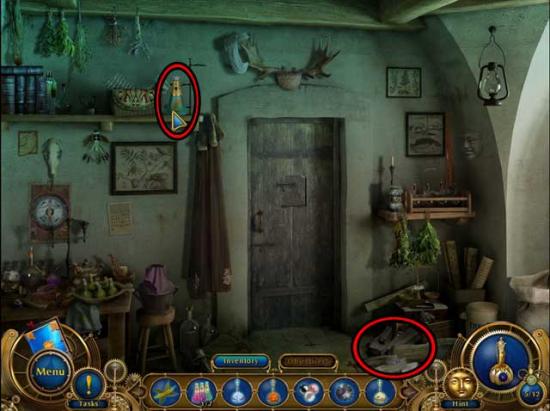
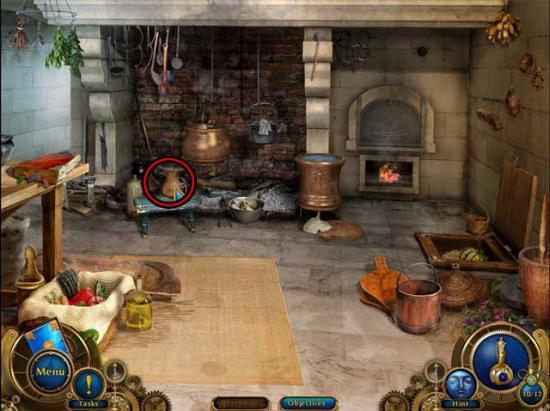
- Click on the hidden object area over the small table to the left of the fireplace.
- Find the objects listed at the bottom of the screen: they’ve been circled for you in the screenshot below. Inventory Item(s) are circled in red.

- Upon completing the area, the LION (1) and the CROWBAR will be added to your inventory.
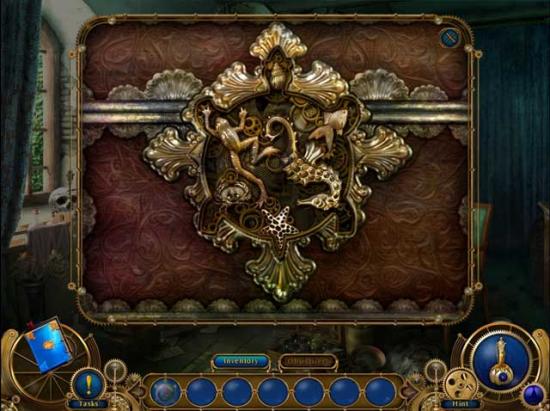
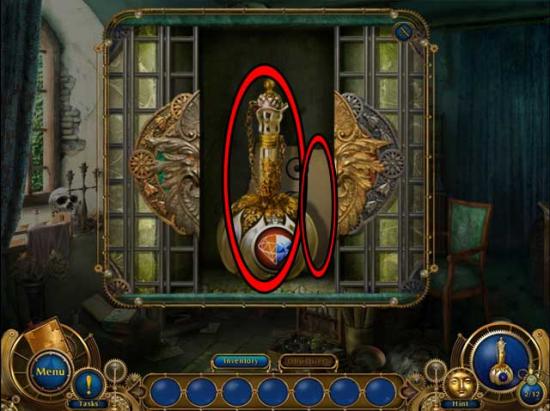
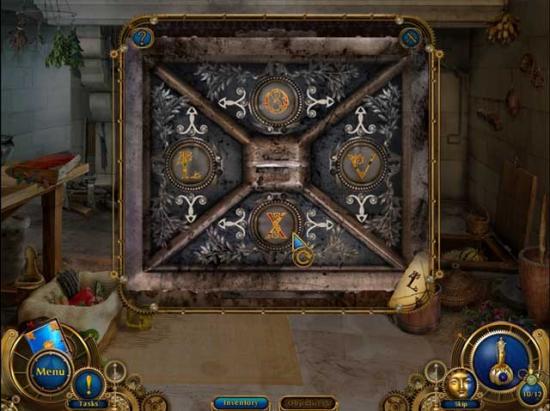
- Take a closer look at the small pedestal in front of the door on the right to trigger a puzzle.
- Open the chest by using the pieces to put together the figure on its cover. The solution is shown below.
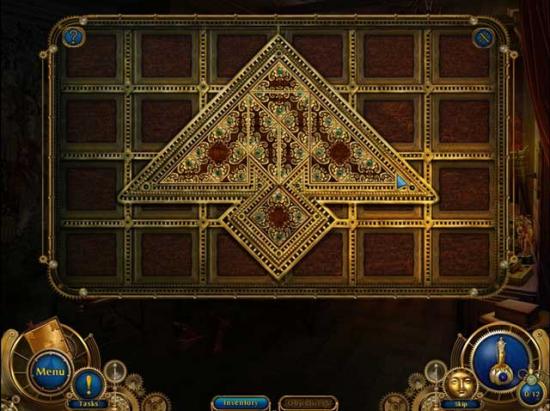
- Upon completing the puzzle, a new hidden object area will be revealed.
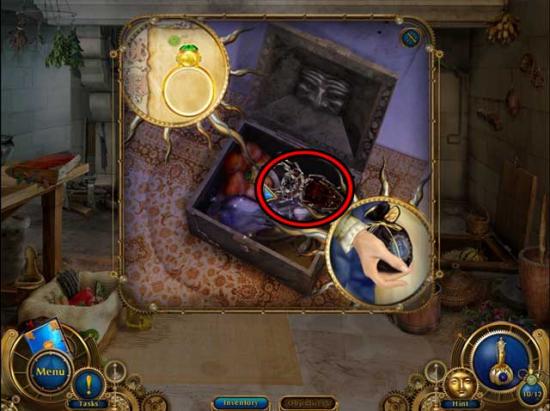
- Find the objects listed at the bottom of the screen: they’ve been circled for you in the screenshot below. Inventory Item(s) are circled in red.

- Upon completing the area, the LION (2) and the CROWN will be added to your inventory.
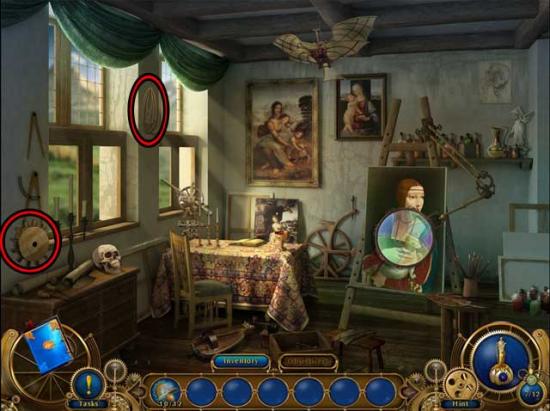
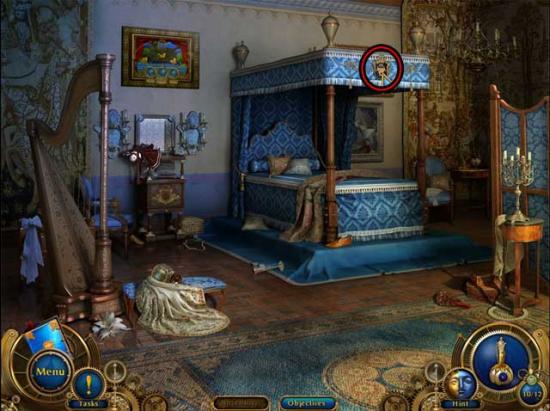
- Take a closer look at the emblem above the tapestry at the far end of the room. Note the pieces that are missing.
- Proceed left to the Entry.
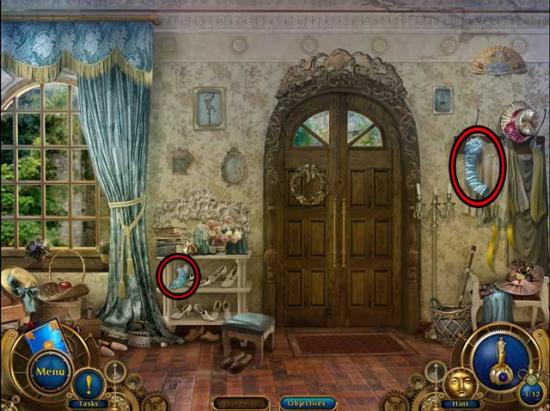
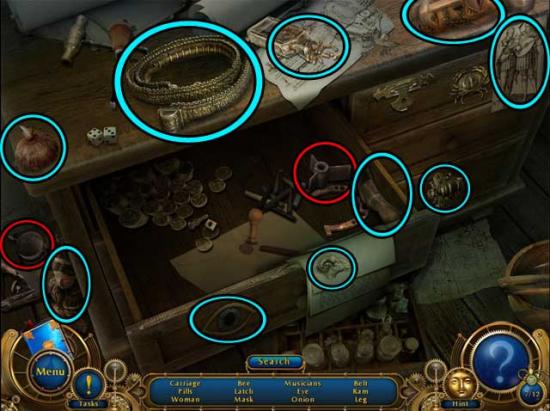
Entry
- Find the objects listed at the bottom of the screen: they’ve been circled for you in the screenshot below. Inventory Item(s) are circled in red.

- Upon completing the area, the TRIDENT and the UNICORN will be added to your inventory.
- Also, the La Rochelle Fortress Amulet Piece will be acquired upon completing the area.
- Return to the Secret Room.
Secret Room
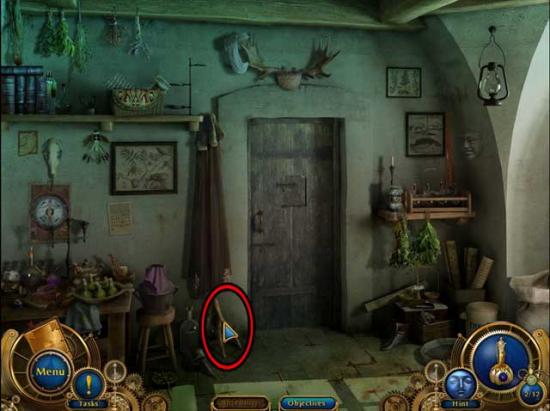
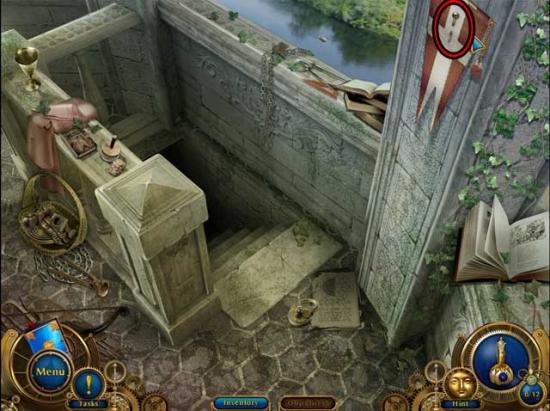
- Take a closer look at the door at the back of the room. Use the CROWBAR on the door to open it, then proceed through to the next area.
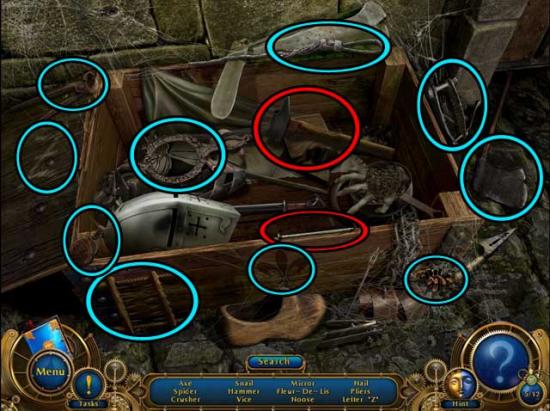
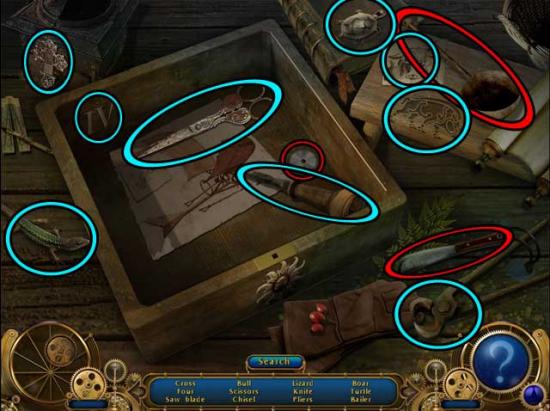
Cell
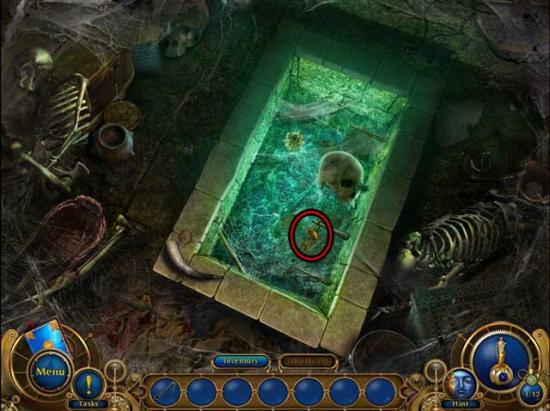
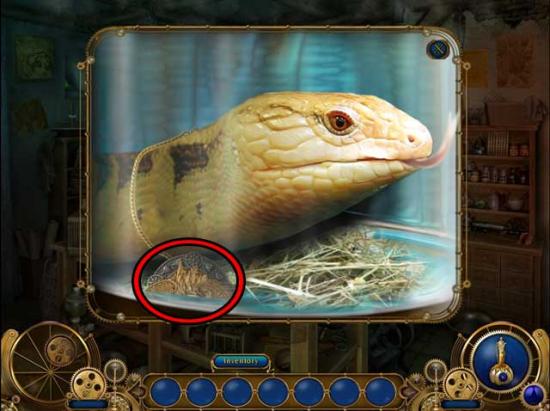
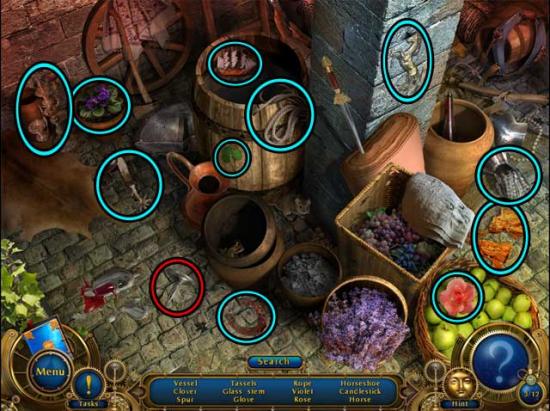
- Click on the hidden object area over the torture chair.
- Find the objects listed at the bottom of the screen: they’ve been circled for you in the screenshot below. Inventory Item(s) are circled in red.
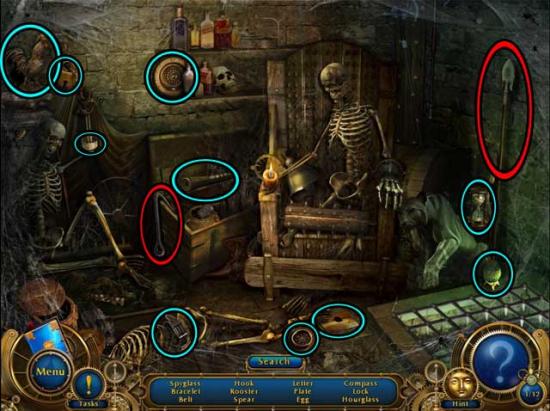
- Upon completing the area, the HOOK and the SPEAR will be added to your inventory.
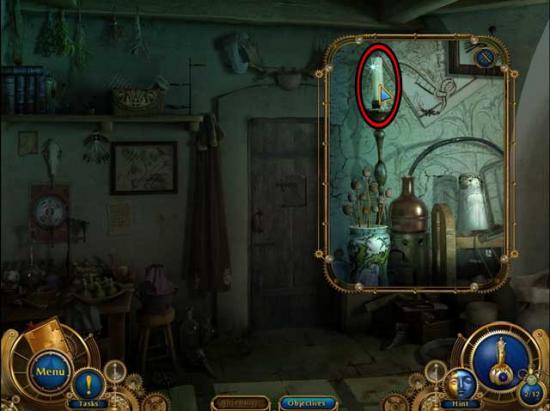
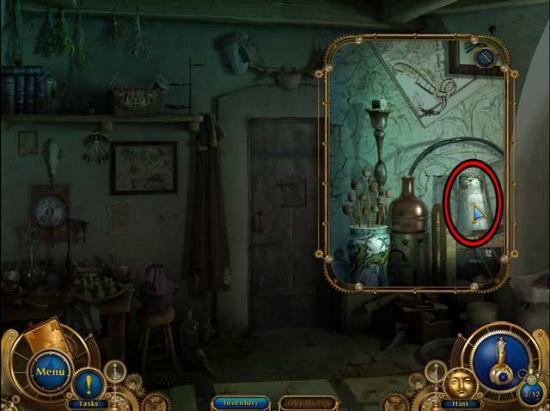
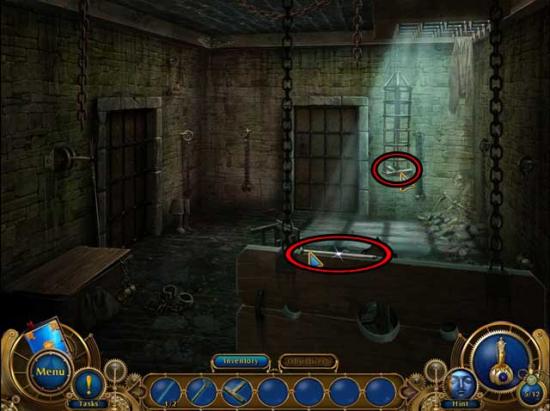
- Take a closer look at the grate in the floor. Note the Key.
- Return to the Secret Room.
Secret Room
- Take a closer look at the emblem above the tapestry on the far wall. Place the LIONS (1-2), CROWN, UNICORN, TRIDENT, and SPEAR into their correct locations as shown below.
- Upon completing the emblem, take a closer look at the secret exit revealed behind the tapestry. Note the locked door, then return to the Cell.
Cell
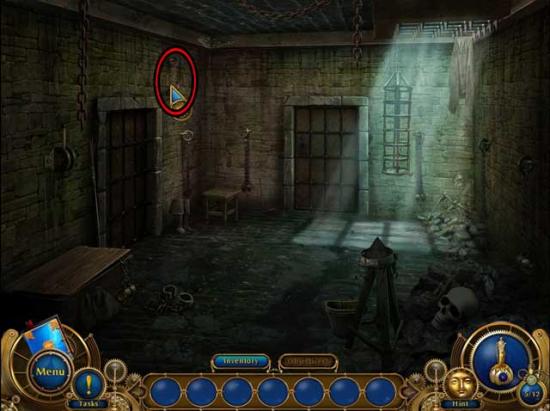
- Take a closer look at the box on the left. Click on the CHAIN to add it to your inventory.
- Examine the grate on the right again. Use the CHAIN on the grate, then exit the close up back to the main view of the room. Click on the lever on the wall above the grate to lift it.
- Examine the well in the floor again. This time, use the HOOK on the KEY to obtain it and add it to your inventory.
- Return to the Secret Room.
Secret Room
- Examine the secret exit behind the tapestry again. Use the KEY on the lock to open the door, then proceed through to the next area.
Chapter 2: The Seamstress’ Shop
Courtyard
- Your Tasks! menu will update. Once done, proceed down to the Plaza.
Plaza
- Enter the Seamstress’ Shop (the middle door).
Shop Entrance
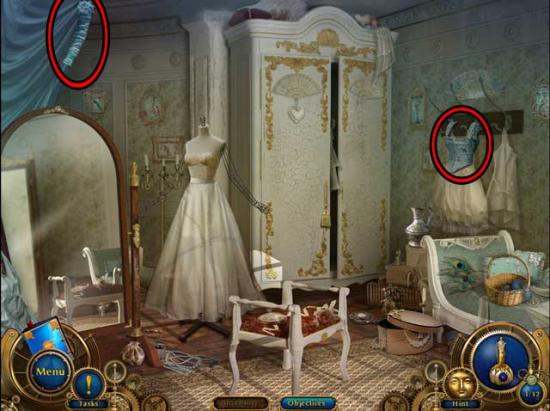
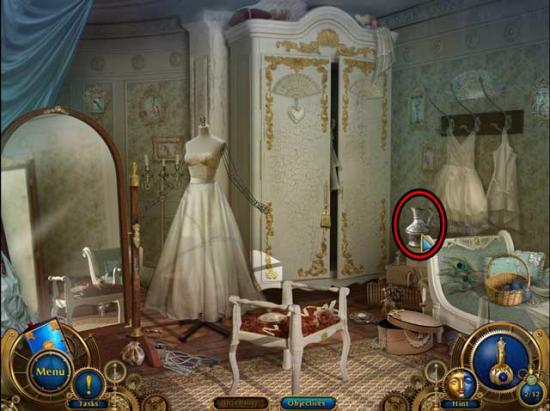
- Proceed left to the Mannequin.
Mannequin
- Click on the mannequin to discover you’ll need to find 15 dress pieces.
- Click on the DRESS PART (1-2) to add them to your inventory.
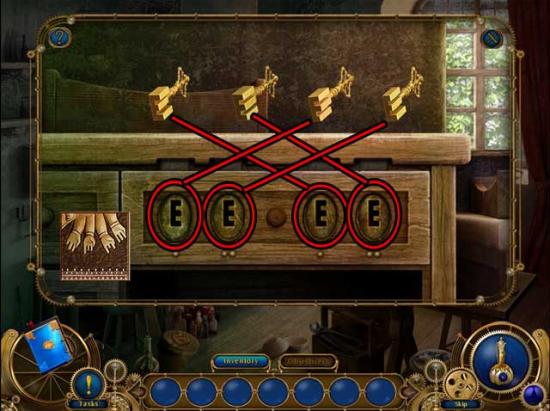
- Click on the button/hat box on the floor towards the right for a closer view.
- Untangle the threads by moving the buttons. They shouldn’t cross. The solution is shown below.
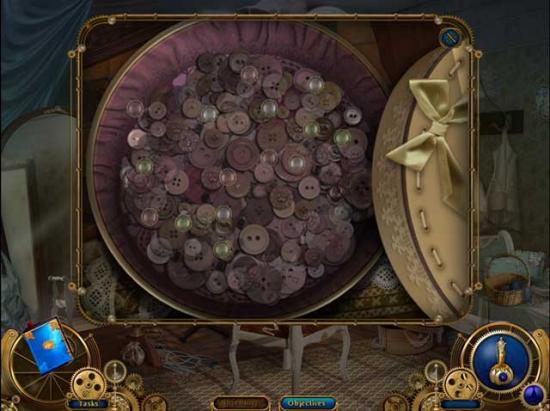
- Upon completing the puzzle, DRESS PART (3) will be collected.
- Return to the Shop Entrance.
Shop Entrance
- Click on the DRESS PARTS (4-5) to collect them.
- Proceed right to the next area.
Dressing Area
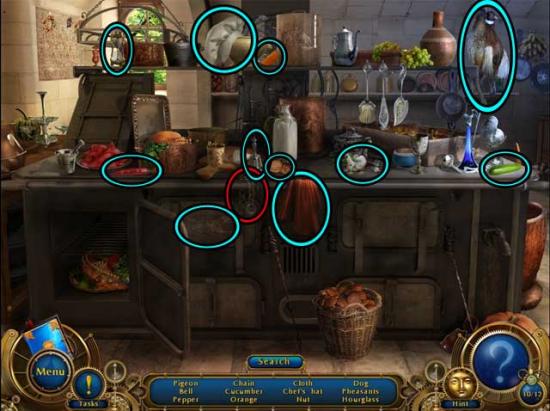
- Click on the hidden object area over the chest, to the right of the dressing mirrors.
- Find the objects listed at the bottom of the screen: they’ve been circled for you in the screenshot below. Inventory Item(s) are circled in red.
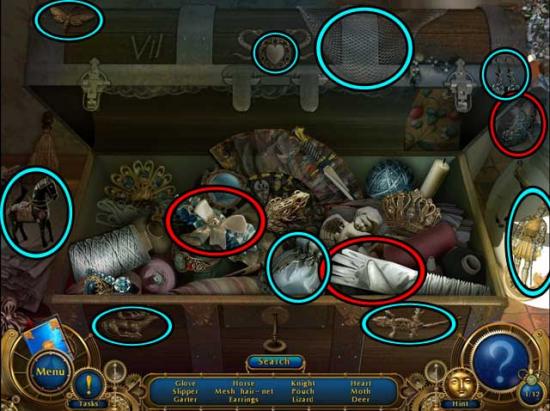
- Upon completing the area, the DRESS PARTS (6-8) will be added to your inventory.
- Click on the hidden object area over the dresser towards the right.
- Find the objects listed at the bottom of the screen: they’ve been circled for you in the screenshot below. Inventory Item(s) are circled in red.
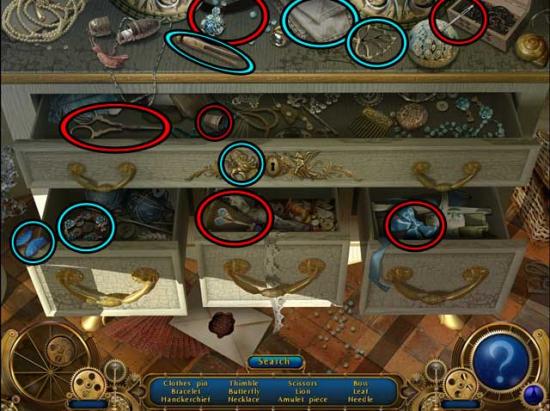
- Upon completing the area, the DRESS PARTS (9-13) will be added to your inventory.
- Also upon completing the area, the *Seamstress’ Room Amulet Piece (2/12)* will be collected.
- Collect the remaining two DRESS PARTS in the room.
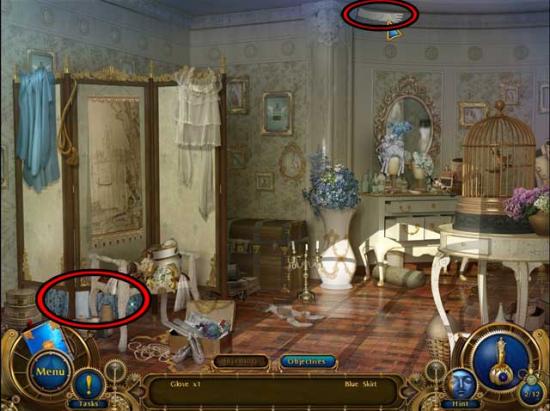
- Return to the Mannequin.
Mannequin
- Use the DRESS PARTS 15/15 on the mannequin, then click on the dress to put it on.
- Exit the Seamstress’ Shop.
Chapter 3: The Pharmacy
Plaza
- Enter the door on the left to enter the Pharmacy.
Shop Entrance
- Proceed right to the Window.
Window
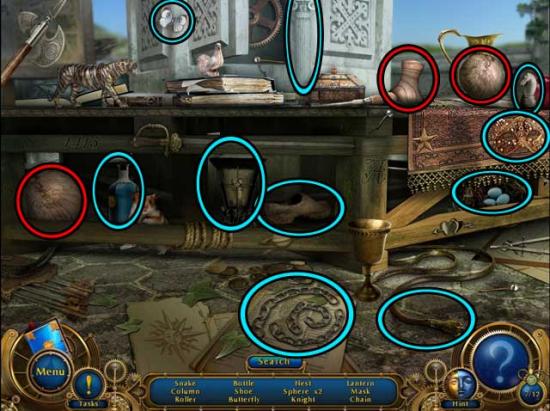
- Take a closer look at the small chest/box sitting on the stand against the left wall. Note the intricate lock and the pieces missing.
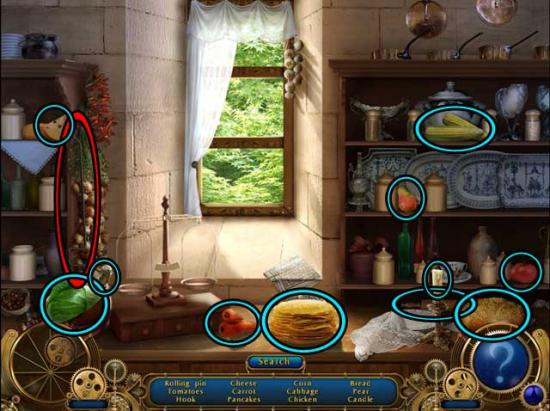
- Click on the hidden object area that appears in the bottom left corner.
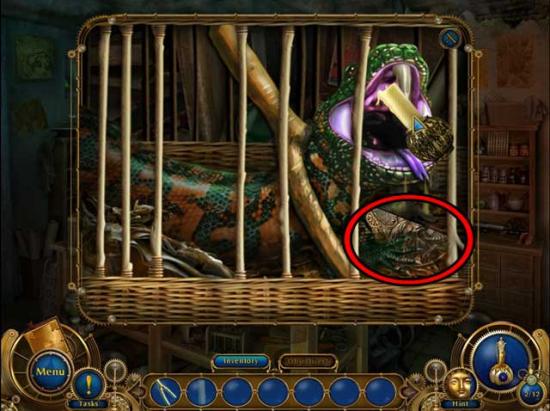
- Find the objects listed at the bottom of the screen: they’ve been circled for you in the screenshot below. Inventory Item(s) are circled in red.
- Upon completing the area, the FISH and the CRAB will be added to your inventory.
- Proceed left to the Shop Entrance.
Shop Entrance
- Click on the hidden object area over the shelf.
- Find the objects listed at the bottom of the screen: they’ve been circled for you in the screenshot below. Inventory Item(s) are circled in red.
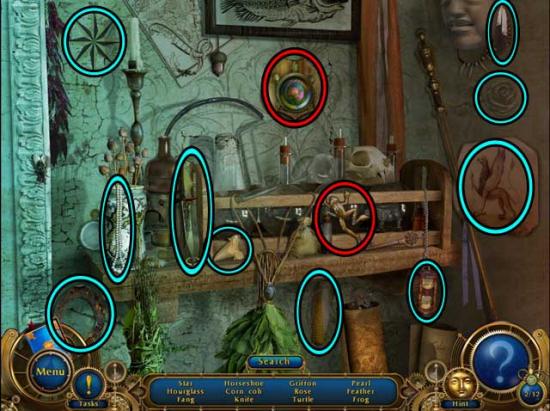
- Upon completing the area, the FROG and the TURTLE will be added to your inventory.
- Proceed left to the Laboratory.
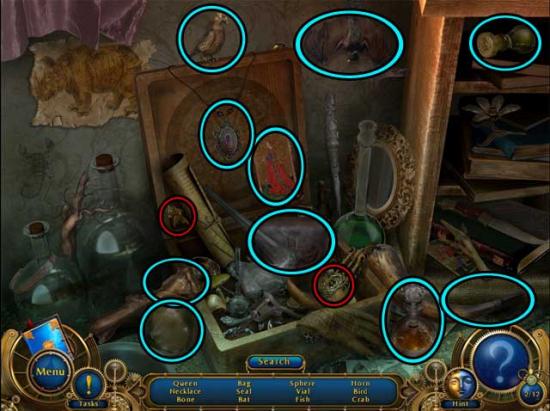
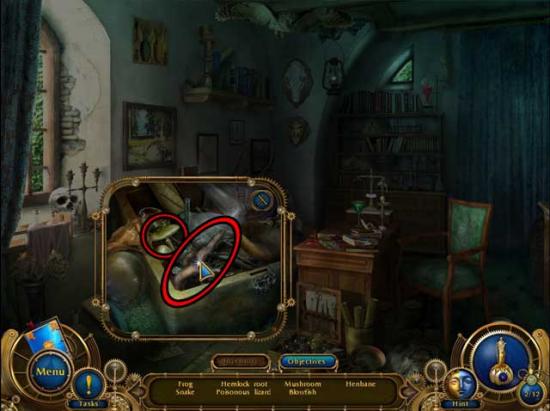
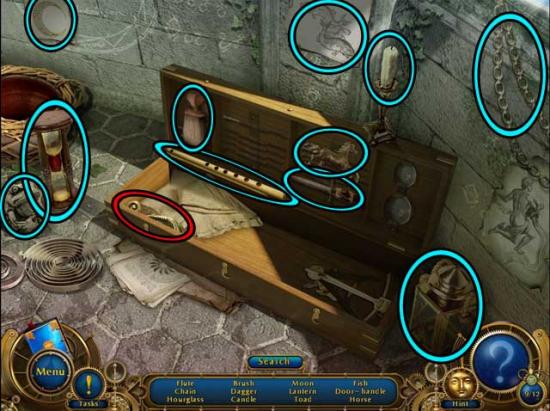
Laboratory
- Click on the hidden object area over the cabinet drawers on the lower right.
- Find the objects listed at the bottom of the screen: they’ve been circled for you in the screenshot below. Inventory Item(s) are circled in red.
- Upon completing the area, the SHELL and the SEAHORSE will be added to your inventory.
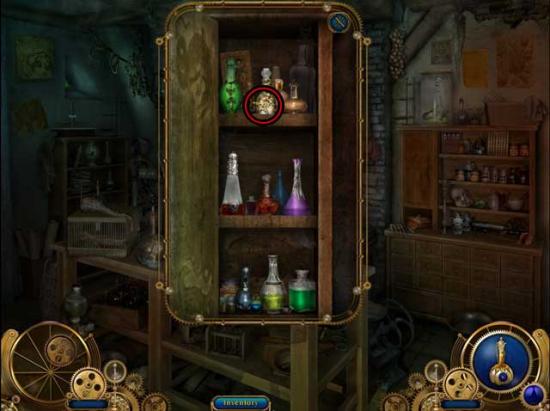
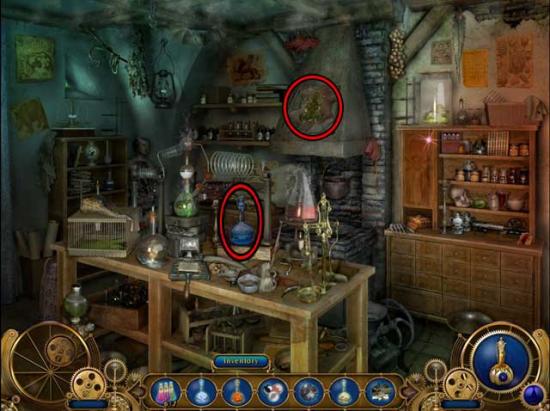
- Open the cabinet above the hidden object area. Note all the poisons. Click on the STAR to add it to your inventory.
- Return to the Window.
Window
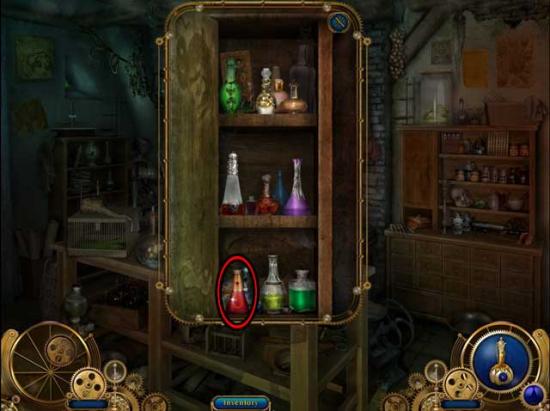
- Take a closer look at the small chest again. Use the CRAB, the FISH, the FROG, the SEAHORSE, the SHELL, and the STAR on their correct locations first, then use the TURTLE above them all last.
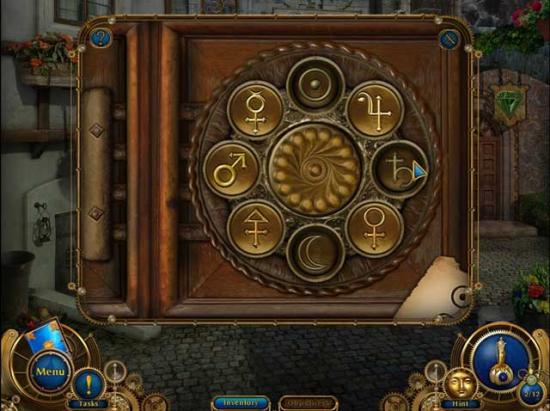
- Once the TURTLE is placed, a puzzle will be triggered.
- Rotate the circles to put together the emblem and open the lock. The solution is shown below.
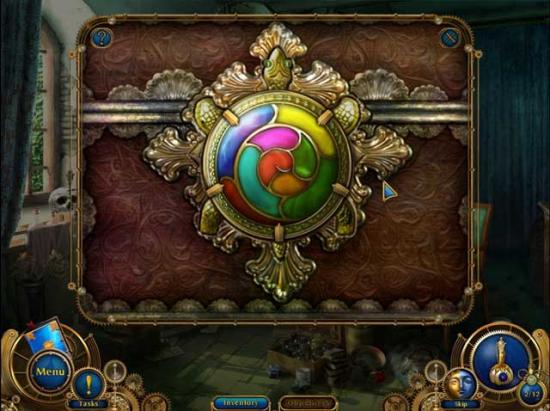
- Upon completing the puzzle, click on the NOTE to add it to your inventory.
- Examine the book on the stand to the left of the small chest. Use the NOTE on the recipe book to conjure a list of items you’ll need to find.
- Take a closer look at the box on the floor next to the desk. Click on the HEMLOCK ROOT and the MUSHROOM to add them to your inventory.
- Return to the Laboratory.
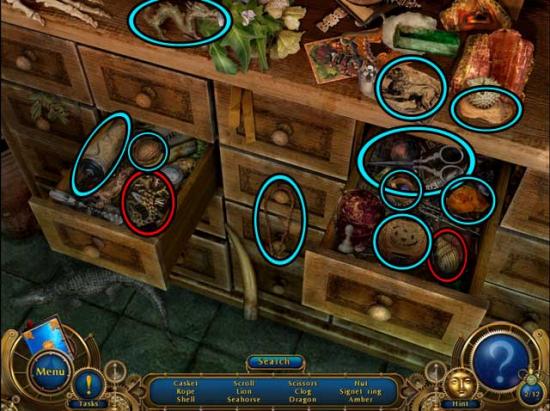
Laboratory
- Click on the hidden object area over the cabinet drawers on the lower right.
- Find the objects listed at the bottom of the screen: they’ve been circled for you in the screenshot below. Inventory Item(s) are circled in red.
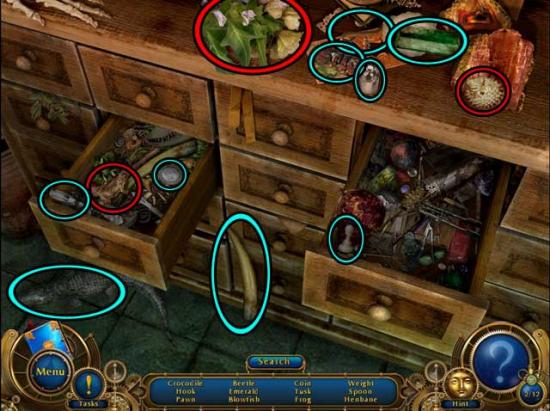
- Upon completing the area, the FROG, the HENBANE, and the BLOWFISH will be added to your inventory.
- Return to the Window.
Window
- Take a closer look at the painting hanging on the wall to the right of the window. Use the FROG, the MUSHROOM, and the HEMLOCK ROOT on their correct locations as shown below.

- Take a closer look at the cage revealed behind the painting. Note the missing lock pieces.
- Return to the Laboratory.
Laboratory
- Take a closer look at the snake jar on top of the cabinet on the right. Note the lock piece inside.
- Take a closer look at the lizard cage sitting on the left end of the tablet. Note the lock piece inside.
- Return to the Shop Entrance.
Shop Entrance
- Click on the FORK to add it to your inventory.
- Return to the Laboratory.
Laboratory
- Take a closer look at the lizard cage on the table again. Use the FORK to pin the lizard, however you’ll need something to stop the flow of poison.
- Return to the Shop Entrance.
Shop Entrance
- Take a closer look at the shelf to the right of the door. Click on the CANDLE to add it to your inventory.
- Return to the Laboratory.
Laboratory
- Return to the lizard cage. Use the CANDLE on the dripping fang to stop the poison. Click on the LOCK PIECE (1) to add it to your inventory.
- Return to the snake jar. Use the FORK to pin the snake, however you’ll need to collect the poison.
- Return to the Shop Entrance.
Shop Entrance
- Take a closer look at the shelf to the right of the door. Click on the GLASS to add it to your inventory.
- Return to the snake jar.
Laboratory
- Back in a close-up view of the snake jar, use the GLASS to collect the poison. Click on the LOCK PIECE (2) to add it to your inventory.
- Return to the Window.
Window
- Take a closer look at the cage behind the painting on the wall again. Use the LOCK PIECES (1-2) on their appropriate slots to open the cage, then click on the MATERIALIZATION ELIXIR and the DOOR ACCESS CODE to collect them.
- Exit the Pharmacy.
Chapter 4: The Jeweler’s Shop
Plaza
- Enter the Jeweler’s Shop via the door on the far right. But first, you’ll need to open the door.
- Use the DOOR ACCESS CODE on the door to trigger a puzzle. Open the door lock using the clue you’ve found. Click on the symbols in order to open the door.
Shop Entrance
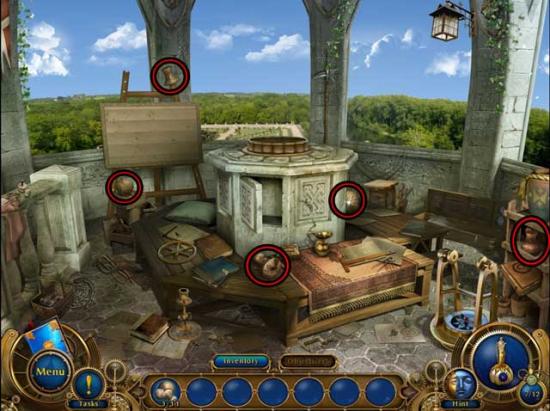
- Proceed right to the Furnace.
Furnace
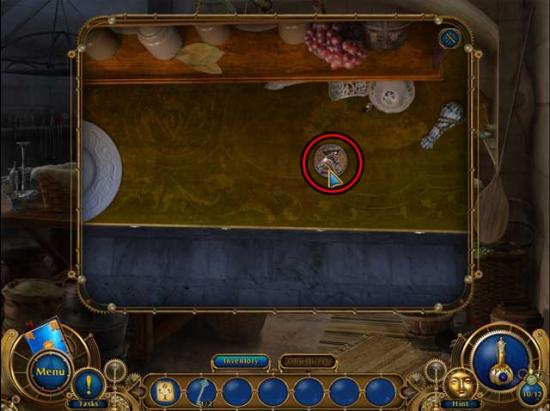
- Take a closer look at the drawer in the cabinet in the corner of the room. Note the item(s) you’ll need to find.
- Examine the box hanging on the wall on the left. Press the chips to move them and assemble the picture. The solution is shown below.

- Upon completing the puzzle, click on the KEYS to add them to your inventory.
- Take a closer look at the drawer in the corner of the room again. Use the KEYS on the drawer to trigger a puzzle.
- Using the hint, install all the keys properly and rotate them the correct number of times. The number of dots below the key slots tells you how many times you need to rotate the key. The screenshot below shows which key belongs in which slot.
- Upon completing the puzzle, click on the book inside. The book will be transported to the nearby table. Click on it for a closer view and note what you’ll need.
- Exit the shop and return to the Seamstress’ Shop (the Dressing Area specifically).
Dressing Area
- Take a closer look at the cage on the right. Note how the bird needs water.
- Proceed to the area with the Mannequin.
Mannequin
- Click on the JUG to add it to your inventory.
- Return to the Dressing Area.
Dressing Area
- Take a closer look at the large vase with the flowers straight ahead. Use the JUG on the water inside to obtain the JUG OF WATER.
- Examine the bird cage again. Use the JUG OF WATER on the spoon to give the bird water. This will reveal a hidden alcove in the drawer beneath the cage. Click on the MONOGRAMS inside to add them to your inventory.
- Return to the Jeweler’s Shop (the Furnace specifically).
Furnace
- Click on the book on the table for a closer view, then use the MONOGRAMS on the book to trigger a puzzle.
- Find 5 differences in comparison with the sample. The solution is shown below.
- Click on the note that appears and note the items you’ll need. Exit the close-up to find a hidden object area over the desk beneath the window.
- Find the objects listed at the bottom of the screen: they’ve been circled for you in the screenshot below. Inventory Item(s) are circled in red.
- Upon completing the area, the RING MODEL and the PAN FIGURINE (1) will be added to your inventory.
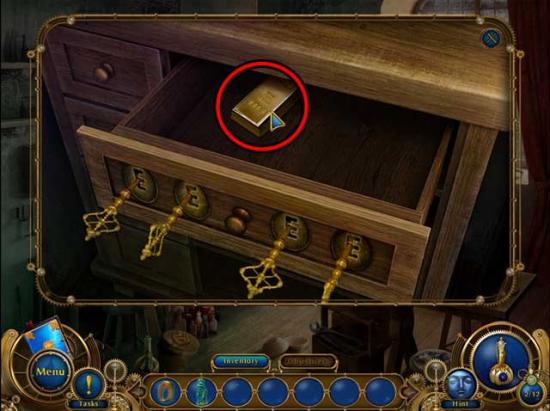
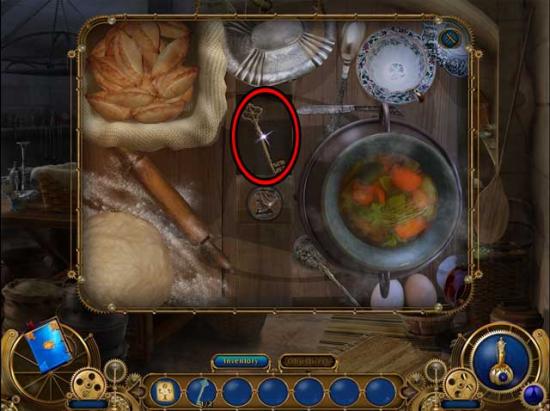
- Take a closer look at the drawer in the corner again, where you found the book. Click on the GOLD BAR inside to add it to your inventory.
- Return to the Shop Entrance.
Shop Entrance
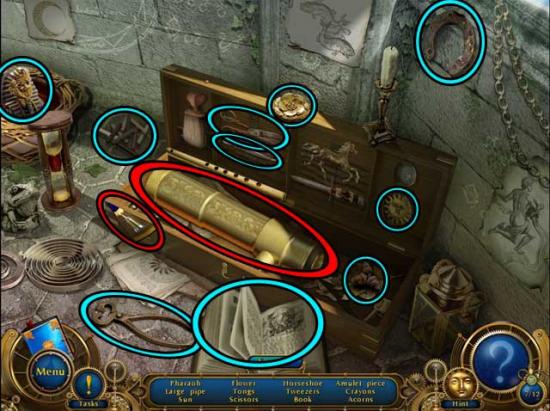
- Take a closer look at the chest up on the shelf on the left. Note the items you’ll need to open it.
- Proceed to the Work Bench on the left.
Work Bench
- Click on the hidden object area beneath the bookshelf straight ahead.
- Find the objects listed at the bottom of the screen: they’ve been circled for you in the screenshot below. Inventory Item(s) are circled in red.
- Upon completing the area, the PAN FIGURINE (2) will be added to your inventory.
- Click on the hidden object area over the bookshelf on the far left.
- Find the objects listed at the bottom of the screen: they’ve been circled for you in the screenshot below. Inventory Item(s) are circled in red.
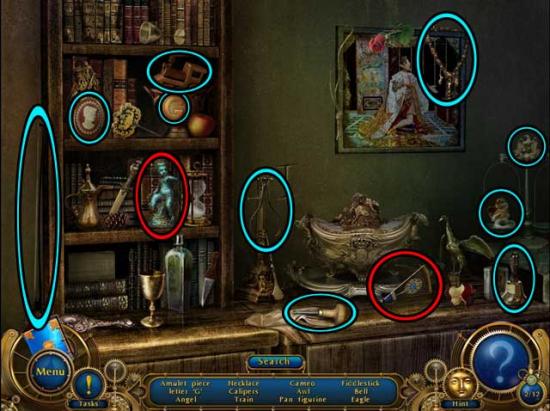
- Upon completing the area, the PAN FIGURINE (3) will be added to your inventory.
- Also upon completing the area, you will acquire the *Jeweler’s Workshop Amulet Piece (3/12)*.
- Take a closer look at the white elephant on top of the middle bookcase to trigger a puzzle.
- Assemble the picture by putting the pieces in the adjacent squares. The solution is shown below.
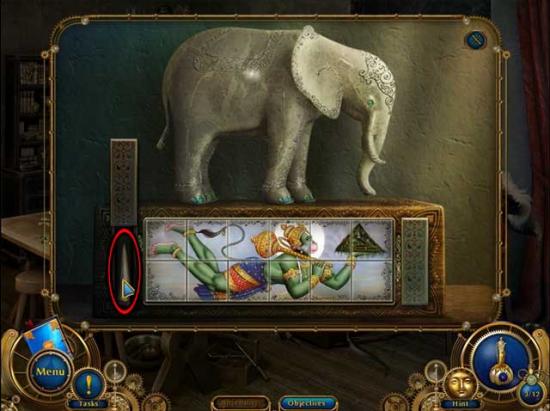
- Upon completing the puzzle, the IVORY will be added to your inventory.
- Return to the Shop Entrance.
Shop Entrance
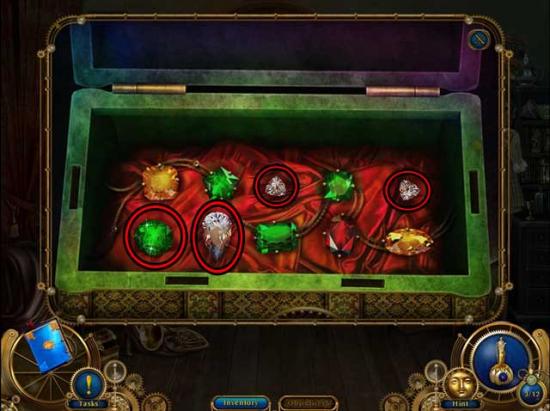
- Take a closer look at the chest on the upper left again. Use the PAN FIGURINES (1-3) in their correct locations (as shown below) to trigger a puzzle.

- Switch adjacent numbers to arrange them in the correct order. Click on the a number, then click on one of the highlighted numbers next to it to switch them. The solution is shown below.
- Once the chest is open, click on the EMERALD, the DIAMOND, and the BRILLIANTS 2/2 to add them to your inventory. They will combine with your other inventory items to create the MATERIALS FOR THE RING.
- Return to the Furnace.
Furnace
- Take a closer look at the book on the table. Use the MATERIALS FOR THE RING on the sketch inside, then use the MATERIALIZATION ELIXIR via the button on the lower right to reveal the ring.
- Exit the shop.
Chapter 5: The Fencing Hall
Plaza
- Return to the Courtyard.
Courtyard
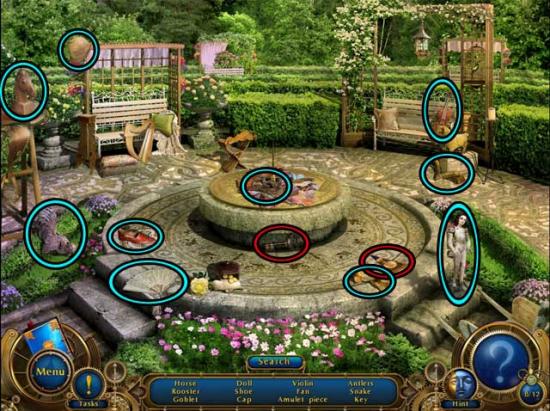
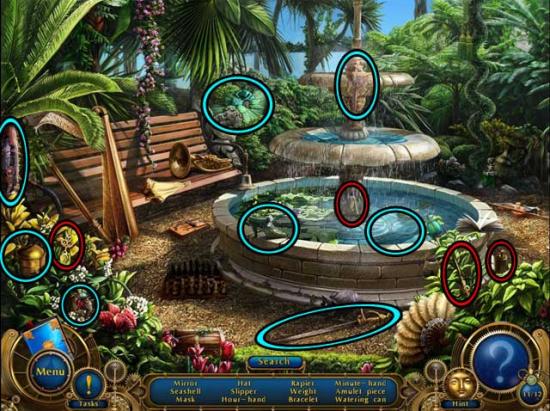
- Click on the hidden object area over the cart on the left.
- Find the objects listed at the bottom of the screen: they’ve been circled for you in the screenshot below. Inventory Item(s) are circled in red.
- Upon completing the area, the COMPASSES will be added to your inventory.
- Click on the hidden object area at the foot of the stairs on the right.
- Find the objects listed at the bottom of the screen: they’ve been circled for you in the screenshot below. Inventory Item(s) are circled in red.
- Upon completing the area, the GLASS STEM will be added to your inventory.
- Take a closer look at the small barrel sitting on the left edge of the fountain. Use the GLASS STEM on the tar, then click on it to add it back to your inventory (now very sticky).
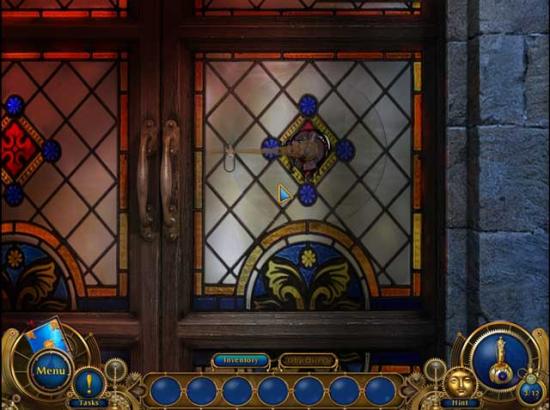
- Take a closer look at the stained glass door on the other side of the railing straight ahead. Use the GLASS STEM on the center of the red diamond, then attach the COMPASSES. Finally, place the DIAMOND in the U-shaped slot on the compass, then click on it to trace a hole in the glass.
- After watching the conversation, enter the Fencing Hall.
Fencing Hall
- Take a closer look at the chess board sitting on the table on the left. Note the items you’ll need to find.
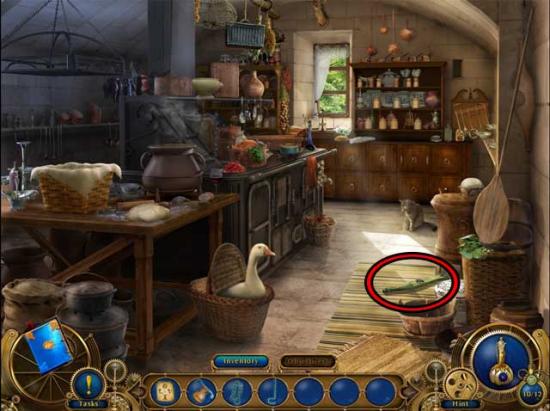
- A hidden object will appear over the small table to the left of the fireplace at the far end of the hall.
- Find the objects listed at the bottom of the screen: they’ve been circled for you in the screenshot below. Inventory Item(s) are circled in red.
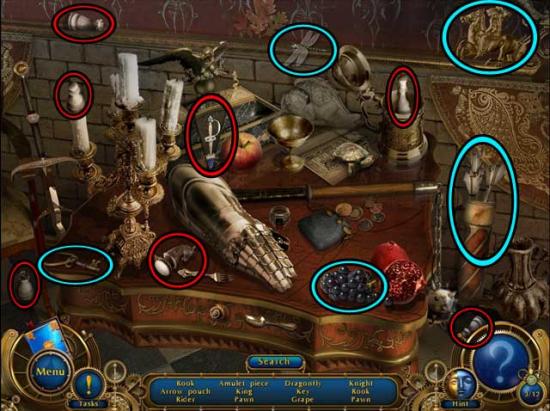
- Upon completing the area, the CHESS PIECES will be added to your inventory.
- Also upon completing the area, you will acquire the *Fencing Hall Amulet Piece (4/12)*.
- Take a closer look at the chess board on the left again. Use the CHESS PIECES on the board. You’ll need to figure out which piece goes where. Exit the close-up for now.
- Click on any of the large chess pieces in the room to trigger the next task.
- Return to the Pharmacy (the Window specifically).
Chapter 6: The Elixirs
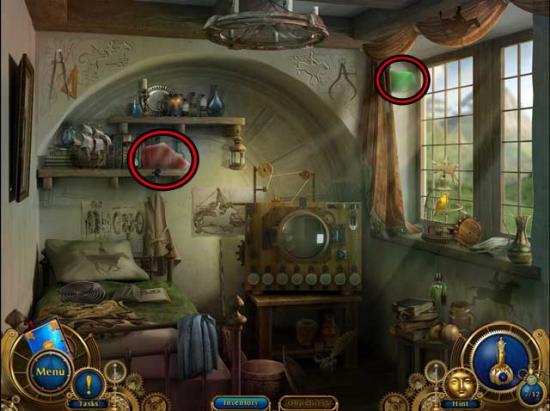
Window
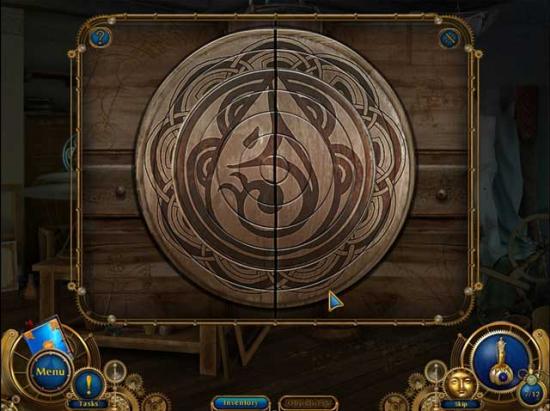
- Click on the curtain on the right side of the far end of the room to reveal a puzzle. Click on it for a closer view.
- Rotate the circles to put the pieces of the lock picture in the correct places. The solution is shown below.
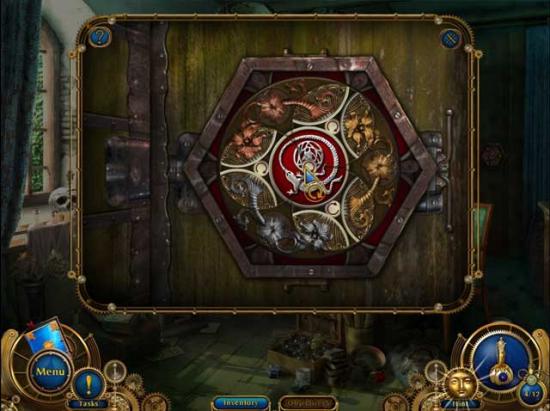
- Upon completing the puzzle, examine the magic picture revealed before exiting back to the main portion of the room.
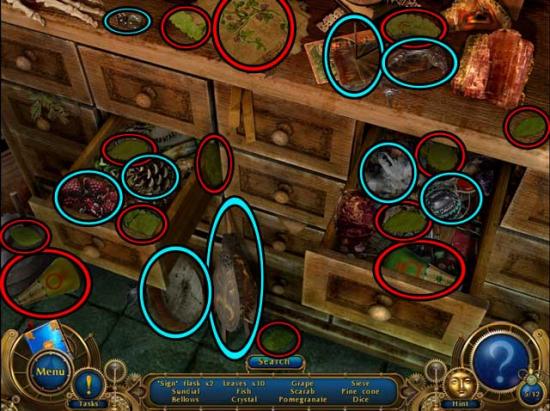
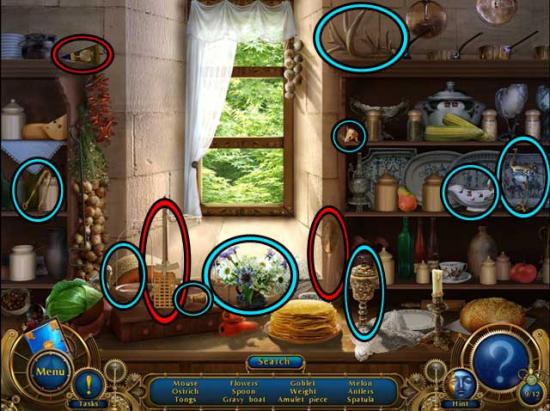
- Click on the hidden object area over the book and box in the lower left corner.
- Find the objects listed at the bottom of the screen: they’ve been circled for you in the screenshot below. Inventory Item(s) are circled in red.
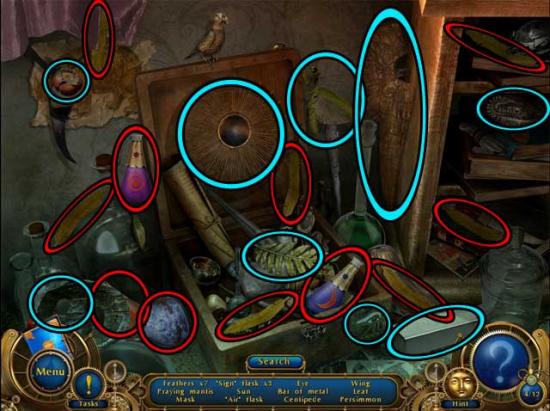
- Upon completing the area, the “SIGN” FLASKS 3/7, the YELLOW FEATHERS, and the “AIR” FLASK will be added to your inventory.
- Click on the “FIRE” FLASK to add it to your inventory.
- Proceed left to the Shop Entrance.
Shop Entrance
- Click on the hidden object area over the shelf to the right of the door.
- Find the objects listed at the bottom of the screen: they’ve been circled for you in the screenshot below. Inventory Item(s) are circled in red.

- Upon completing the area, the PEARLS, the BRILLIANT, and the “EARTH” FLASK will be added to your inventory.
- Also upon completing the area, you will acquire the *Pharmacy Amulet Piece (5/12)*.
- Click on the “SIGN” FLASK 4/7 and the FIREWOOD to add it to your inventory.
- Proceed left to the Laboratory.
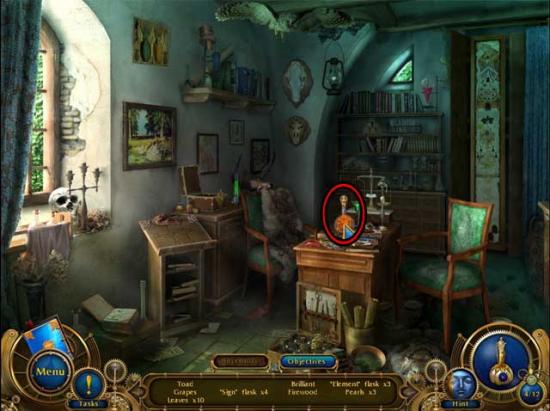
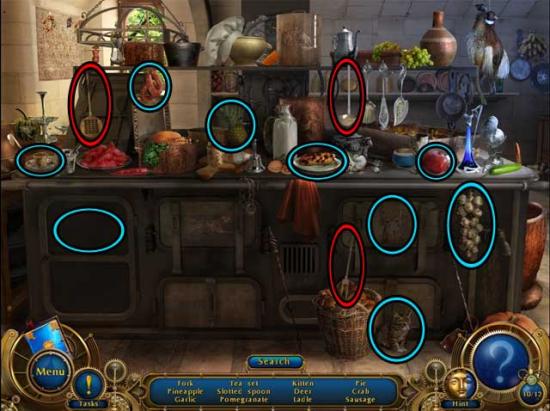
Laboratory
- Click on the hidden object area over the drawers at the bottom of the cabinet on the right.
- Find the objects listed at the bottom of the screen: they’ve been circled for you in the screenshot below. Inventory Item(s) are circled in red.
- Upon completing the area, the LEAVES, the “SIGN” FLASKS 6/7, and the GRAPES will be added to your inventory.
- Click on the “WATER” FLASK and the FROG to add them to your inventory.
- Click on the cabinet marked “poison” (with the skull and cross bones) on the large cabinet on the right to open it for a closer view, then click on the “SIGN” FLASK 7/7 inside to add it to your inventory.
- Return to the Window.
Window
- Take a closer look at the magic picture behind the curtain again. Starting from the top, use the items on the slots in the following order to complete the picture:
1) BRILLIANT
2) YELLOW FEATHERS
3) FROG
4) “SIGN” FLASKS
5) FIREWOOD
6) LEAVES
7) GRAPE
8) “EARTH” FLASK, “WATER” FLASK, “FIRE” FLASK, “AIR” FLASK
9) PEARLS - Upon completing the picture, you will acquire the ELIXIRS (Night Vision, Levitation, and Reveal the Unseen). These will be added to your Elixirs button in the lower right corner.
- Return to the Fencing Hall.
Chapter 7: Finding the Secret Passage
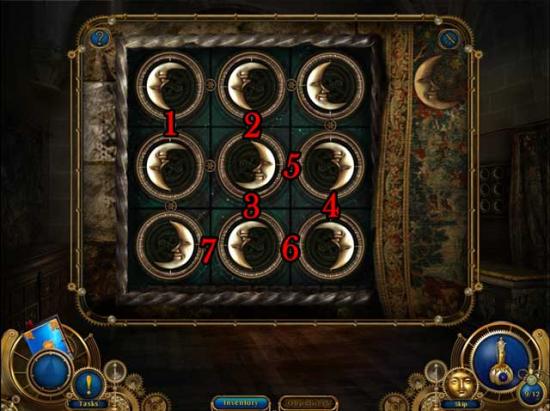
Fencing Hall
- Use the Levitation Elixir, then click on the portal that appears straight ahead. You will find yourself levitating over the floor and looking down. Note the positions of the various chess icons.
- Go back down and take a closer look at the chess board.
- Put the chess pieces in their places using the hint in the hall. The solution is shown below.
<AT55.jpg>
- Upon completing the puzzle, another puzzle will be triggered. Press the chips to move them and assemble the picture. The solution is shown below.
<AT56.jpg>
- A new item to be found will be added to your list of objectives. Take a closer look at the red portion of wall on the left. Click on the Unicorn, then note all the new items that appear on your objectives list.
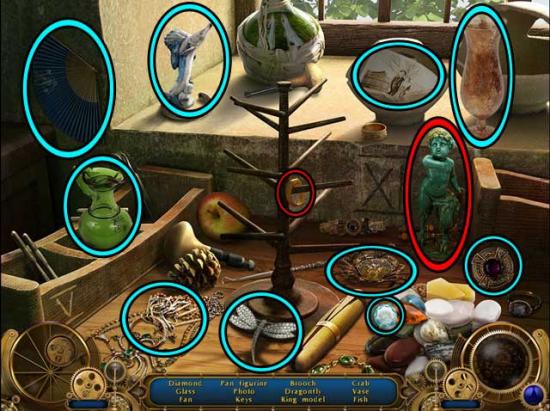
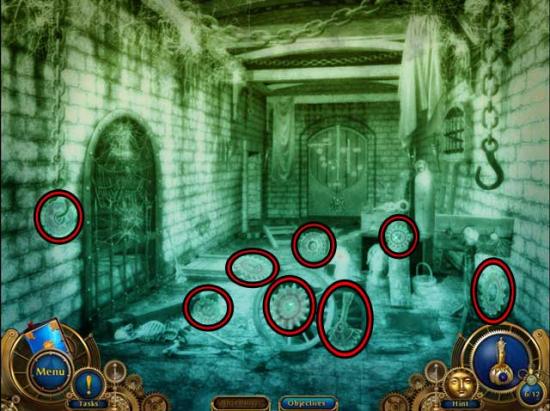
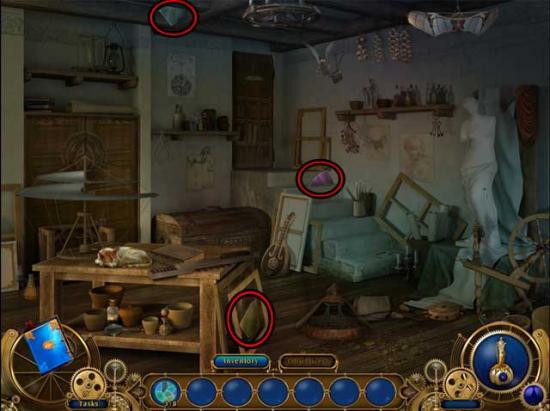
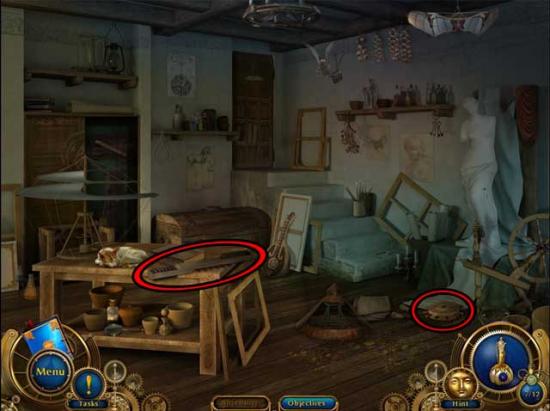
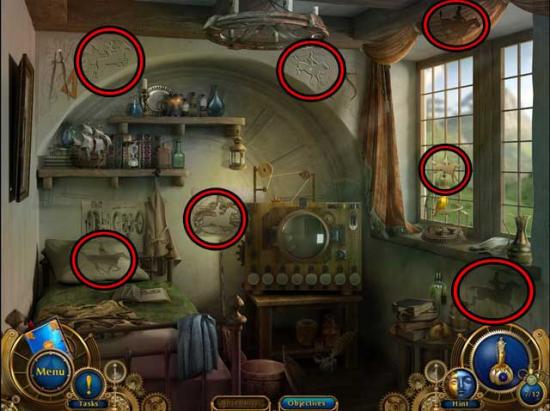
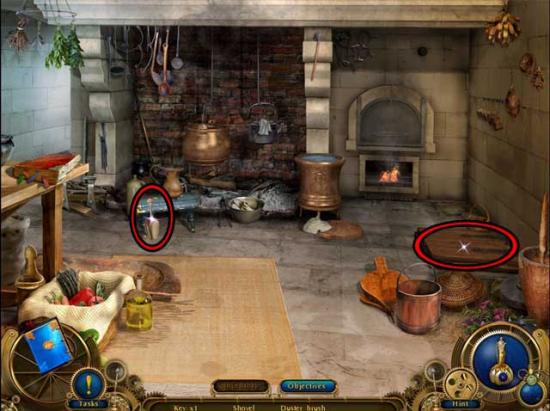
- Back in the main part of the room, click on the hidden object area over the small table to the left of the fireplace.
- Find the objects listed at the bottom of the screen: they’ve been circled for you in the screenshot below. Inventory Item(s) are circled in red.
<AT57.jpg>
- Upon completing the area, the SWORD and the FLAIL will be added to your inventory.
- Click on the hidden object area over the fireplace.
- Find the objects listed at the bottom of the screen: they’ve been circled for you in the screenshot below. Inventory Item(s) are circled in red.
<AT58.jpg>
- Upon completing the area, the MACE, the HAMMER, and the AXE will be added to your inventory.
- Exit back to the main area.
- Click on the CROSSBOW, the HALBERD, the SWORD, and the DAGGER to add them to your inventory.
<AT59.jpg>
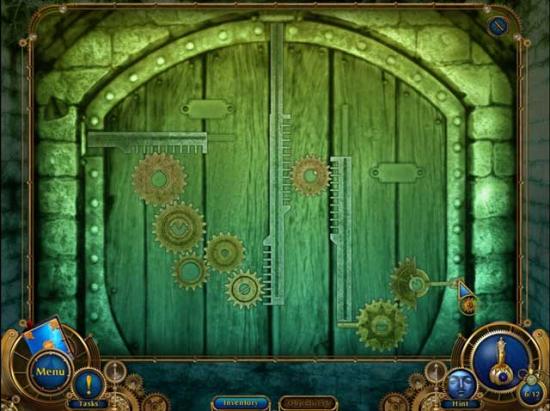
- Take a closer look at the red portion of wall on the left again.
- Use all the weapons from your inventory on their correct locations on the wall. The solution is shown below.
<AT60.jpg>
- Upon completing the area, click on the DART in the close-up to trigger a new objective.
- Back in the main area, take a closer look at the fireplace. Click on the 2 DARTS to collect them, then take a closer look at the knight on the right to collect the rest.
<AT61.jpg>
<AT62.jpg>
- Upon finding all the DARTS (10/10), take a closer look at the target hanging above the fireplace. Use the DARTS 10/10 on the target to trigger a puzzle.
- To open the latch fully, hit the yellow area of the target 5 times with the darts, stopping the vertical and horizontal sliders at the right time. An example of what you should be trying to do is shown below.
<AT63.jpg>
- Upon completing the puzzle, click on the wheel inside the target to open a secret passage within the fireplace. Enter.
Chapter 8: The Dungeon
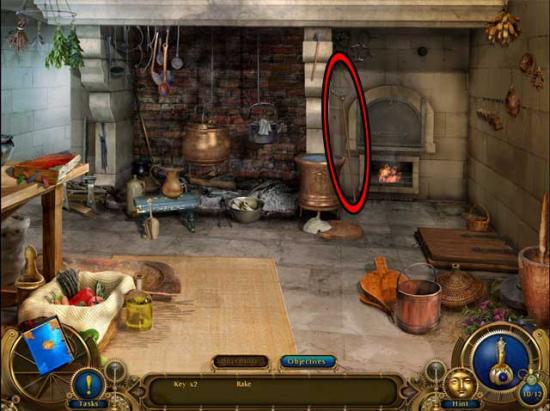
Dungeon
- Click on the lamp hanging above and to the right of the door on the left for more information: you will need a stool.
- Take a closer look at the stool lying on the ground. It’s broken, and will require some pieces in order to be fixed.
- Click on the hidden object area that appears over the coffin on the left.
- Find the objects listed at the bottom of the screen: they’ve been circled for you in the screenshot below. Inventory Item(s) are circled in red.
- Upon completing the area, the HAMMER and the NAIL 1/2 will be added to your inventory.
- Click on the lever on the wall on the left to lower a torture device. Click on the NAIL 2/2 and the LEG OF THE STOOL to add them to your inventory.
- Click on the lever again to raise the torture device, then take a closer look at the broken stool lying on the floor. Use the LEG OF THE STOOL, followed by the NAILS 2/2 and the HAMMER to restore the STOOL and add it to your inventory.
- Use the STOOL in the left corner of the room, then click on the LAMP hanging above to add it to your inventory.
- Proceed towards the door to the left.
Left Door
- Click on the door, then use the LAMP on the door (specifically the lock) to find it’s the exit door. Take a closer look at the lock to note a couple items you will need to find.
- Return to the Dungeon.
Dungeon
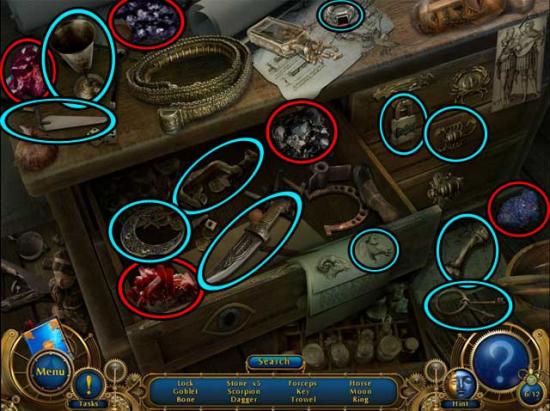
- Click on the hidden object area over the skeleton in the right corner of the room.
- Find the objects listed at the bottom of the screen: they’ve been circled for you in the screenshot below. Inventory Item(s) are circled in red.
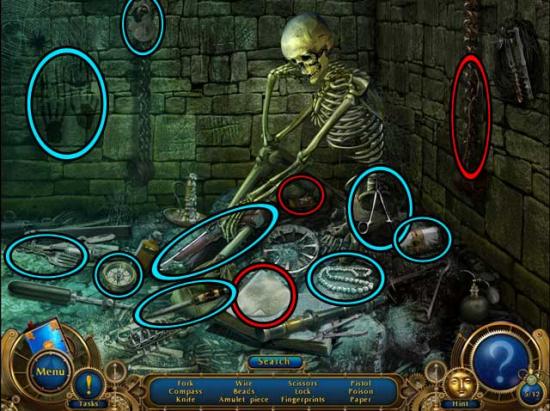
- Upon completing the area, the WIRE and the PAPER will be added to your inventory.
- Also upon completing the area, you will acquire the *Dungeon Amulet Piece (6/12)*.
- Return to the Left Door.
Left Door
- Use the PAPER underneath the door, then take a closer look at the lock. Use the WIRE on the lock to push out the key. Click on the paper beneath the door to pull it out, then click on the KEY to add it to your inventory.
- Use the KEY on the door lock to open it, then proceed forward to the next area.
Prison
- It’s very dark in here. Use the Night Vision Elixir to enable yourself to see.
- Take a closer look at the large door at the far end of the room. Note it’s missing 8 gears.
- Back in the main area, click on the GEARS x8 to add them to your inventory. Their locations are shown below.
- Take a closer look at the large door at the far end of the room again. Use each of the 8 GEARS on their correct location as determined by the shape in the middle of the gear and the peg on the door. Their correct locations are shown below.
- Once all the gears have been placed, click on the lever on the gear on the far right to open the door and trigger a puzzle.
- Walk through the labyrinth and escape from the dungeon. When you reach the bridge, wait for the entire structure to appear before crossing. The correct route is shown below.
Basement
- Upon completing the puzzle, you will arrive here. Proceed forward to the next area.
Chapter 9: The Artist’s Workshop
Painting Area
- Click on the white canvas to trigger a list of items that need to be found.
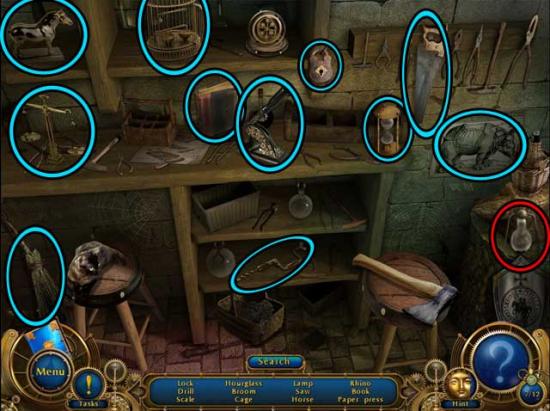
- Click on the hidden object area over the dresser on the left.
- Find the objects listed at the bottom of the screen: they’ve been circled for you in the screenshot below. Inventory Item(s) are circled in red.
- Upon completing the area, the PAINTING SUPPLIES 5/13 will be added to your inventory.
- Click on the hidden object area over the box at the center of the bottom of the screen.
- Find the objects listed at the bottom of the screen: they’ve been circled for you in the screenshot below. Inventory Item(s) are circled in red.

- Upon completing the area, the PAINTING SUPPLIES 8/13 will be added to your inventory.
- Also upon completing the area, the *Artist’s Workshop Amulet Piece (7/12)* will be acquired.
- Click on the two Stones and the Palette to acquire PAINTING SUPPLIES 11/13.
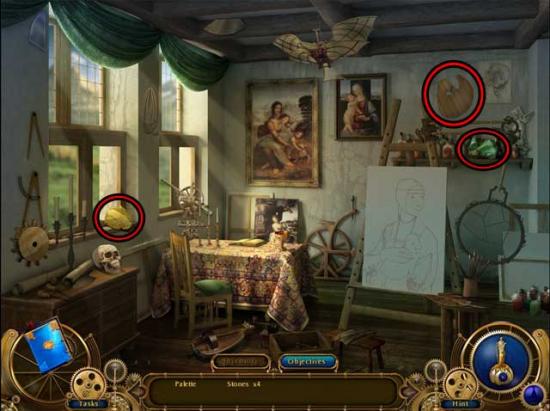
- Proceed right to the Sculpting Area.
Sculpting Area
- Click on the Stone to acquire PAINTING SUPPLIES 12/13.
- Proceed through the door to the Bedroom.
Bedroom
- Click on the Stone to acquire the PAINTING SUPPLIES 13/13.
- Return to the Painting Area.
Painting Area
- Use the PAINTING SUPPLIES 13/13 on the white canvas to trigger a puzzle.
- Complete the artist’s work using the brush and palette. Use the scroll with the example as a hint. The solution is shown below.

- Upon completing the puzzle, click on the lens that appears over the painting. You will need to find 8 pieces of glass.
- Back in the main area, click on the GLASSES 3/8 to add them to your inventory.
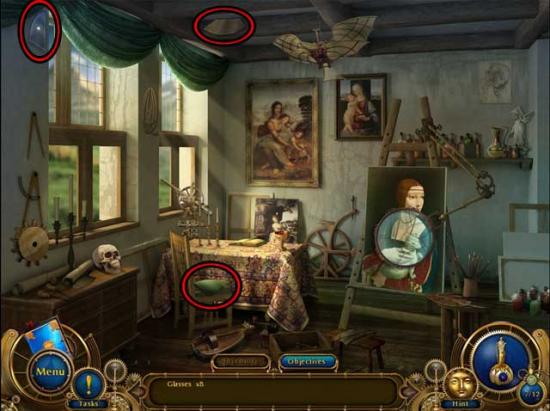
- Proceed right to the Sculpting Area.
Sculpting Area
- Click on the GLASSES 6/8 to add them to your inventory.
- Proceed forward into the Bedroom.
Bedroom
- Click on the GLASSES 8/8 to add them to your inventory.
- Return to the Painting Area.
Painting Area
- Take a closer look at the lens over the canvas again, then use the GLASSES 8/8 on the lens to repair it, revealing a secret mark.
- Go right to the Sculpting Area.
Sculpting Area
- Take a closer look at the glowing symbol on the cabinet to trigger a puzzle.
- Assemble the symbol by rotating its pieces. The solution is shown below.
- Upon completing the area, a new list of objects to be found will appear.
- Exit the close-up, then click on the CATAPULT PARTS 2/12 to add them to your inventory.
- Enter the Bedroom.
Bedroom
- Click on the CATAPULT PARTS 5/12 to add them to your inventory.
- Return to the Painting Area.
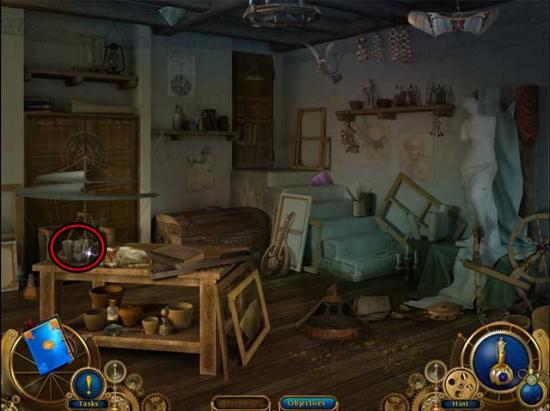
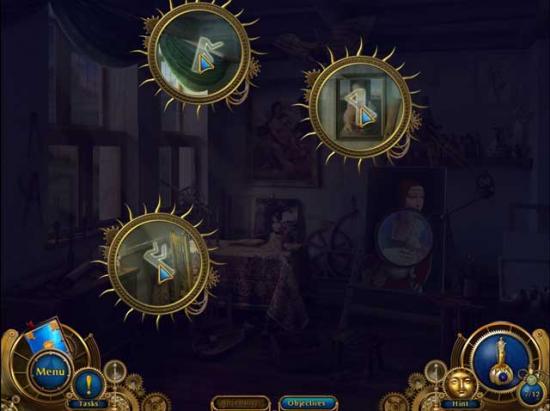
Painting Area
- Click on the hidden object area over the cabinet on the left.
- Find the objects listed at the bottom of the screen: they’ve been circled for you in the screenshot below. Inventory Item(s) are circled in red.
- Upon completing the area, the CATAPULT PARTS 7/12 will be added to your inventory.
- Click on the hidden object area over the box at the bottom-middle part of the screen.
- Find the objects listed at the bottom of the screen: they’ve been circled for you in the screenshot below. Inventory Item(s) are circled in red.
- Upon completing the area, the CATAPULT PARTS 10/12 will be added to your inventory.
- Click on the remaining CATAPULT PARTS 12/12 to add them to your inventory.
- Return to the Sculpting Area.
Sculpting Area
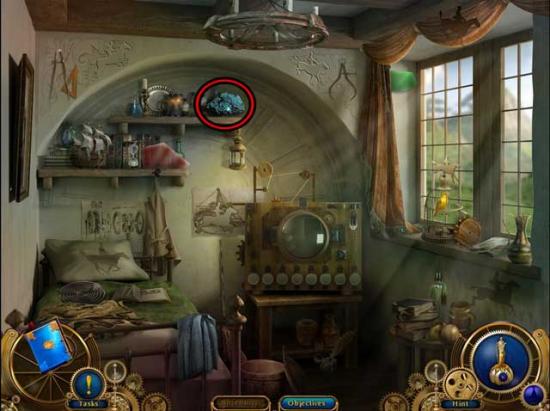
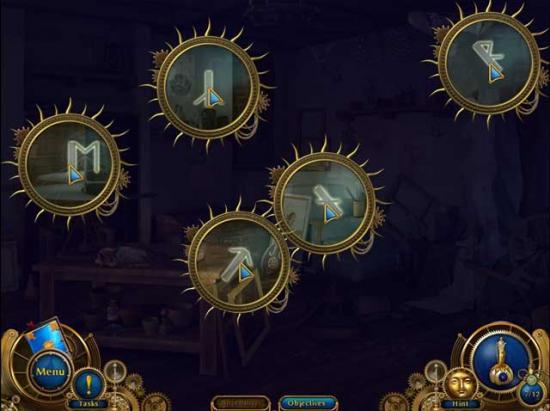
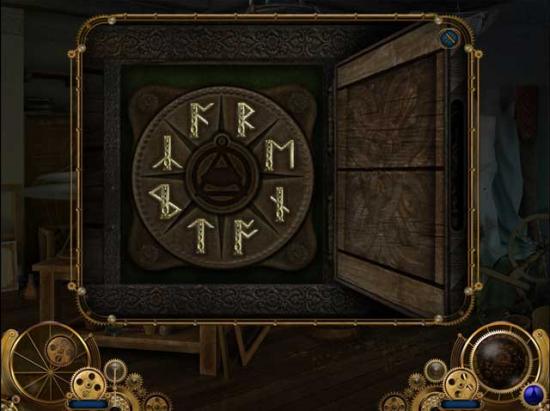
- Take a closer look at the open cabinet on the left. Use the CATAPULT PARTS 12/12 on the close-up. This will result in a sequence that will reveal a lock for the chest. Take a closer look at the chest lock, and note you’ll need to find 8 runes.
- Back in the main area, use the Reveal the Unseen Elixir. Click on the RUNES x5(of 8) to add them to your inventory. Their locations are shown below.
- Proceed to the Painting Area.
Painting Area
- Click on the Runes x3 (equaling 8/8) to add them to your inventory. Their locations are shown below.
- Return to the Sculpting Area.
Sculpting Area
- Take a closer look at the chest next to the stairs. Place each of the 8 RUNES in their correct locations as shown below.
- Upon placing all the runes correctly, another object will be added to your objectives.
- Return to the Bedroom.
Bedroom
- Take a closer look at the TV-like device sitting on the table. Note you’ll need to find 7 Horsemen.
- Back in the main area, click on the HORSEMEN x7 to add them to your inventory.
- Take a closer look at the device again. Arrange the horsemen in the correct order, step by step, to achieve the animation of a prancing horse. The solution is shown below.
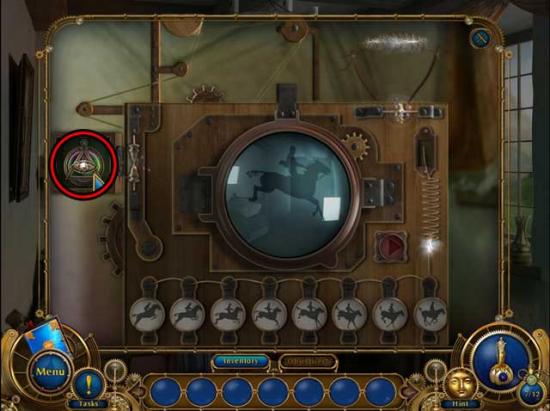
- Upon completing the area, click on the MEDALLION-KEY to add it to your inventory.
- Return to the Sculpting Area.
Sculpting Area
- Click on the chest next to the stairs for a closer view. Use the MEDALLION-KEY on the slot in the center of the runes to open the chest, revealing a secret passageway. Proceed down into the Cellar.
Cellar
- Click on the carriage to add a list of items to be found to your objectives.
- Click on the hidden object area that appears at the end of the carriage.
- Find the objects listed at the bottom of the screen: they’ve been circled for you in the screenshot below. Inventory Item(s) are circled in red.
- Upon completing the area, the LAMP will be added to your inventory.
- Return to the Sculpting Area.
Sculpting Area
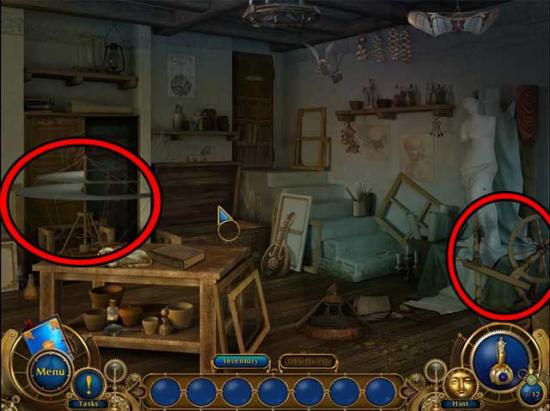
- Click on the SPINNING WHEEL and the HELICOPTER to add them to your inventory.
- Return to the Painting Area.
Painting Area
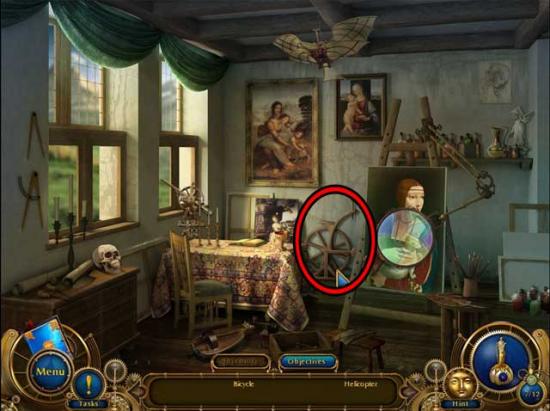
- Click on the BICYCLE to add it to your inventory.
- Return to the Cellar.
Cellar
- Use the SPINNING WHEEL, the BICYCLE, and the HELICOPTER on the carriage, then place the LAMP at the front to restore it. Click on the red button to activate it and proceed to the next area.
Chapter 10: The Tower
Crossroads
- Proceed forward to the tower.
Stairs
- Proceed left to the Observatory.
Observatory
- Take a closer look at the empty telescope stand straight ahead and note the items that need to be found.
- Click on the hidden object area over the front corner of the platform beneath the telescope.
- Find the objects listed at the bottom of the screen: they’ve been circled for you in the screenshot below. Inventory Item(s) are circled in red.
- Upon completing the area, the BALLS AND ROLLERS 3/11 will be added to your inventory.
- Click on the BALLS AND ROLLERS 8/11 scattered around to add them to your inventory.
- Return to the Stairs.
Stairs
- Click on the BALLS AND ROLLERS 11/11 scattered around to add them to your inventory.

- Take a closer look at the telescope stand. Use the BALLS AND ROLLERS 11/11 on it, then click to discover a new list of objects to find.
- Click on the hidden object area over the open case on the right.
- Find the objects listed at the bottom of the screen: they’ve been circled for you in the screenshot below. Inventory Item(s) are circled in red.
- Upon completing the area, the LARGE PIPE will be added to your inventory.
- Also upon completing the area, you will acquire the *Mark Tower Amulet Piece (8/12)*.
- Click on the WHEEL and the COMPASS to add them to your inventory.
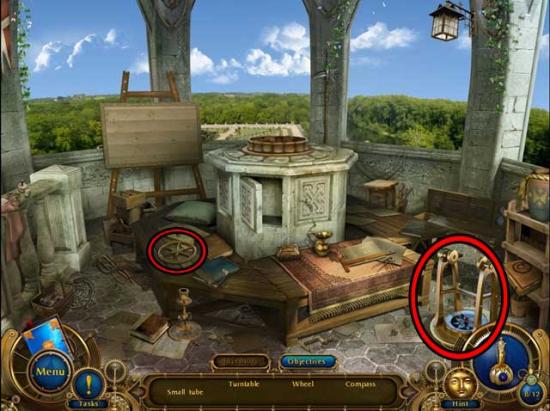
- Return to the Stairs.
Stairs
- Click on the SMALL TUBE and the TURNTABLE to add them to your inventory.
- Return to the Observatory.
Observatory
- Take a closer look at the telescope stand. Use the TURNTABLE, followed by the COMPASS, the LARGE PIPE, the SMALL TUBE, and the WHEEL on the stand in that order to reconstruct the telescope.
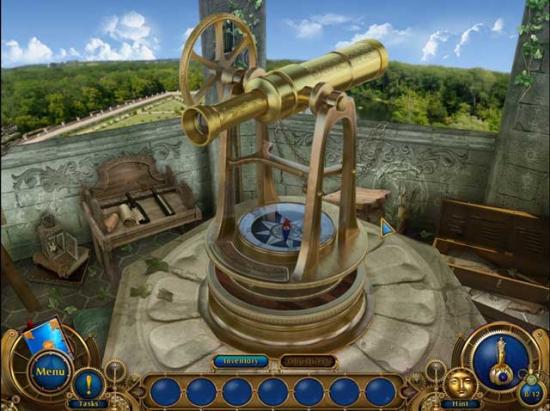
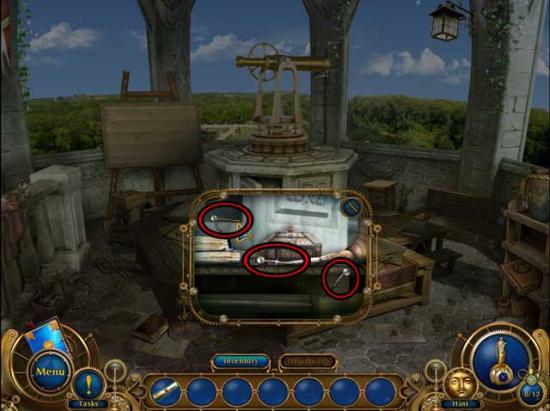
- Back in the main area, take a closer look at the telescope. Note the items you’ll need to find.
- Take a closer look at the open case on the right. Click on the MAP inside to add it to your inventory.
- Take a closer look at the gap beneath the front corner of the wooden platform. Click on the PINS 3/4 to add them to your inventory.
- Return to the Stairs.
Stairs
- Click on the PIN 4/4 to add it to your inventory.
- Return to the Observatory.
Observatory
- Take a closer look at the wooden board to the left of the telescope. Use the MAP AND PINS on the board, then note the numbers and locations.
- Take a closer look at the telescope. Using the coordinates marked on the map, examine the surroundings with the spyglass. Rotate the wheels to change the coordinates, then click on the eye button to look. Examine the Labyrinth (2,4) and the and the Pond in the Garden (2,3) to trigger a need to find the time.
- Return to the Crossroads.
Chapter 11: The Labyrinth
Crossroads
- Proceed right to the Labyrinth Entrance.
Labyrinth Entrance
- Click on the round insignia above the flames to trigger a puzzle.
- Switch the adjacent patterns of Aquarius’ picture to reassemble it. The solution is shown below.
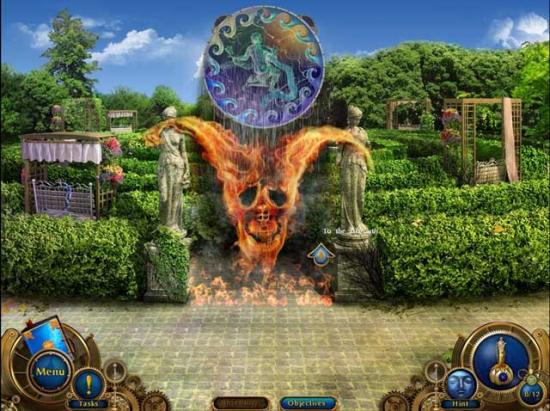
- Proceed forward into the Labyrinth.
Labyrinth
- Find the objects listed at the bottom of the screen: they’ve been circled for you in the screenshot below. Inventory Item(s) are circled in red.
- Upon completing the area, the KEY will be added to your inventory.
- Also upon completing the area, you will acquire the *Chenonceau Labyrinth Amulet Piece (9/12)*.
- Click on the sundial for a closer view. Clean the clock by removing the upper debris first, then the debris beneath. Upon clearing the sundial, you will find out what time it is.
- Return to the Observatory.
Observatory
- Take a closer look at the telescope. Make sure the setting is at (2,3), then take a look inside the telescope. You will witness an exchange.
- Back in the main area, click on the hidden object area over the open case on the right.
- Find the objects listed at the bottom of the screen: they’ve been circled for you in the screenshot below. Inventory Item(s) are circled in red.
- Upon completing the area, the DOOR-HANDLE will be added to your inventory.
- Return to the Crossroads.
Chapter 12: The Kitchen
Crossroads
- Proceed left to the Castle.
Castle
- Take a closer look at the front door. Use the KEY on the lock, then use the DOOR-HANDLE where the handle should be and open the door. Proceed through to the next area.
Entrance Hall
- Click on the tapestry on the right to move it aside, revealing a puzzle.
- Rotate the circles by using the buttons between them and set the pictures into the proper position. The solution is shown below (click on the buttons between the pictures in the order shown below).
- Upon completing the puzzle, click on the Scroll and the NOTE inside to collect them.
- Enter the Kitchen.
Kitchen
- Click on the LADDER on the right to add it to your inventory.
- Return to the Entrance Hall.
Entrance Hall
- Use the LADDER on the wall beneath the shutters up above, then take a closer look at the wooden shutters. Click to open them, then click on the lever. A door will open below.
- Return to the Kitchen.
Kitchen
- Proceed down to the Kitchen Window.
Kitchen Window
- Take a closer look at the cabinet drawers at the far end of the room. Note how one of the drawers requires two keys.
- Click on the hidden object area over the pantry next to the window.
- Find the objects listed at the bottom of the screen: they’ve been circled for you in the screenshot below. Inventory Item(s) are circled in red.
- Upon completing the area, the SPOON and the SPATULA will be added to your inventory.
- Also upon completing the area, you will acquire the *Chenonceau Kitchen Amulet Piece (10/12)*.
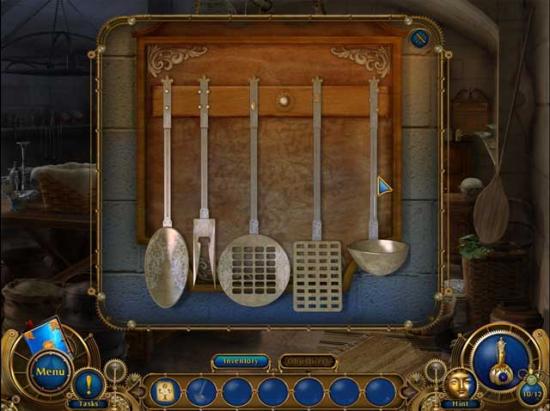
- Click on the hidden object area over the stove.
- Find the objects listed at the bottom of the screen: they’ve been circled for you in the screenshot below. Inventory Item(s) are circled in red.
- Upon completing the area, the FORK, the SLOTTED SPOON, and the LADLE will be added to your inventory.
- Take a closer look at the board hanging to the right of the pantry on the back wall. Place the SPOON, the SPATULA, the FORK, the SLOTTED SPOON, and the LADLE into their correct locations according to the shapes on the handles and the pegs. The solution is shown below.
- Click on the compartment that opens in the back wall to trigger another item to be found.
- Return to the Kitchen.
Kitchen
- Click on the RAKE to add it to your inventory.
- Return to the Kitchen Window.
Kitchen Window
- Use the RAKE on the compartment in the back wall to acquire the KEY 1/2 and add it to your inventory.

- Take a closer look at the counter beneath the window. Click on the spilled flour to trigger more items that need to be found.
- Return to the Kitchen.
Kitchen
- Click on the SHOVEL and the DUSTER BRUSH (beneath the wooden hatch) to add them to your inventory.
- Return to the Kitchen Window.
Kitchen Window
- Take a closer look at the spilled flour on the counter again. Use the SHOVEL and the DUSTER BRUSH on the flour to reveal the COIN. Click on it to add it to your inventory.
- Take a closer look at the table on the left. Use the COIN on the slot in the wood to reveal a hidden compartment. Click on the KEY 2/2 to add it to your inventory.
- Take a closer look at the drawers at the far end of the room. Use the 2 KEYS on the locked drawer to open it, then click on the Apple and the sketch that appears for more information.
- Return to the Kitchen.
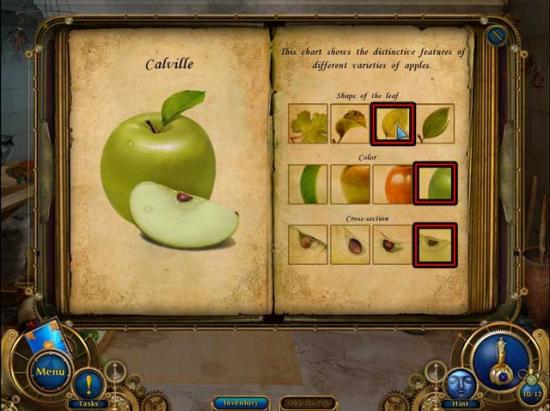
Kitchen
- Click on the Gardening Book on the edge of the table on the left for a closer view. Choose 3 specific features that match the piece of the apple that has been found. The solution is shown below.
- Try to open the furnace door. However, it’s too hot. Click on the JUG to add it to your inventory.
- Use the JUG on the bronze container of water next to the furnace to fill it (obtaining the JUG OF WATER), then use it on the fire beneath the furnace to extinguish it.
- Return to the Kitchen Window.
Kitchen Window
- Click on the hidden object area over the stove.
- Find the objects listed at the bottom of the screen: they’ve been circled for you in the screenshot below. Inventory Item(s) are circled in red.
- Upon completing the area, the CHAIN will be added to your inventory.
- Click on the hidden object area over the pantry at the far end of the room.
- Find the objects listed at the bottom of the screen: they’ve been circled for you in the screenshot below. Inventory Item(s) are circled in red.
- Upon completing the area, the HOOK will be added to your inventory.
- Click on the LEVER lying on the floor to add it to your inventory.
- Return to the Kitchen.
Kitchen
- Use the LEVER on the hole in the wall above the furnace to secure it, then use the CHAIN on the lever. Next, use the HOOK on the other end of the lever and click on it to open the furnace.
- Click on the object inside the furnace. However, you can’t get it just yet.
- Return to the Kitchen Window.
Kitchen Window
- Click on the BIG SHOVEL to add it to your inventory.
- Return to the Kitchen.
Kitchen
- Use the BIG SHOVEL on the object inside the furnace to pull it out. Use the JUG OF WATER on the casing to cool it, then click on it for a closer view. Use the NOTE on it to trigger a puzzle.
- Using the list of hints on the paper, put the correct letters into each cell. The solution is shown below.
- Upon opening the casing, examine the contents: the poison and the ring. Click on the BEETLE to add it to your inventory.
- Return to the Entrance Hall.
Entrance Hall
- Proceed through the open door at the back of the hall.
Chamber Stairs
- Take a closer look at the lock on the gate. Use the BEETLE on the slot to open it, then proceed forward into the next area.
Chapter 13: The King’s Fate
Parlor
- Click on the parrot sitting on the perch, and note how its bell is missing.
- Proceed to the right.
Bedroom
- Take a closer look at the small cabinet to the left of the bed. Note the missing pieces.
- Click on the SHIELD hanging at the top of the bed to add it to your inventory.
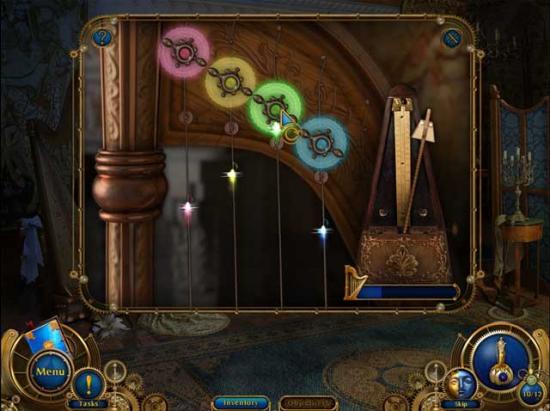
- Examine the harp on the left and note the missing pieces.
- Take a closer look at the painting hanging up on the wall above the small cabinet.
- Using the net, cage, and fishing rod, catch the butterfly, bird, and fish. Click on each component (i.e. net) and time it so that it catches each of the creatures. Once all have been caught, click on the METRONOME that is revealed to add it to your inventory.
- Proceed right to the Bathroom.
Bathroom
- Click on the hidden object area over the dresser.
- Find the objects listed at the bottom of the screen: they’ve been circled for you in the screenshot below. Inventory Item(s) are circled in red.
- Upon completing the area, the BELL and the ITEMS FOR HARP will be added to your inventory.
- Return to the Bedroom.
Bedroom
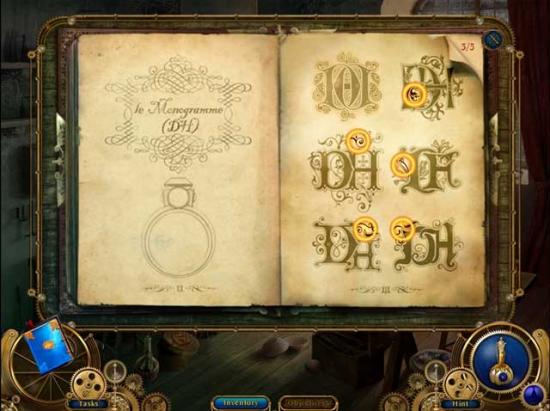
- Examine the harp on the left. Use the ITEMS FOR HARP on the harp to trigger a puzzle.
- Tune the harp by pressing the pegs at the moment the “sound” from the strings reaches them. An example is shown below. Repeat this process until all the strings are fully tuned.
- Upon completing the puzzle, click on the DH MONOGRAM to add it to your inventory.
- Return to the Parlor.
Parlor
- Click on the hidden object area over the large cabinet on the left.
- Find the objects listed at the bottom of the screen: they’ve been circled for you in the screenshot below. Inventory Item(s) are circled in red.
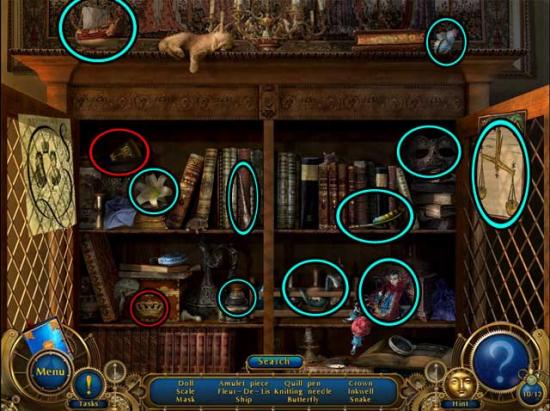
- Upon completing the area, the CROWN will be added to your inventory.
- Also upon completing the area, you will acquire the *Diane’s Bedroom Amulet Piece (11/12)*.
- Use the BELL on the bird’s perch to restore it, then click on it, followed by the apple, to learn more about the significance of this.
- Take a closer look at the apple on the table again and click on it to update your Tasks.
- Proceed right to the Bedroom.
Bedroom
- Take a closer look at the small cabinet again. Use the SHIELD and the CROWN, followed by the DH MONOGRAM on their correct slots as shown below.
- Click on the ring revealed to update your objective, then return to the Bathroom.
Bathroom
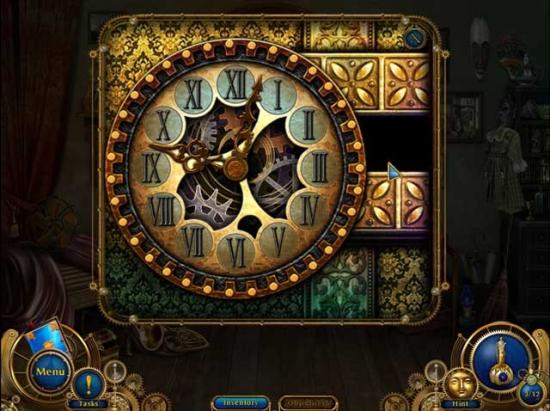
- Click on the scroll lying on the small table on the left to trigger a puzzle.
- Match the black and white participants’ pictures and the key items of the plot in the right places. The solution is shown below.
- Upon completing the puzzle, examine the clock on the dresser to learn of the time. Backtrack all the way back to the Crossroads.
Crossroads
- Proceed forward via the path to the right of the tower to the lawn.
Lawn
- Notice the base has no parrot. Go to the Aviary via the small path to the far right.
Aviary
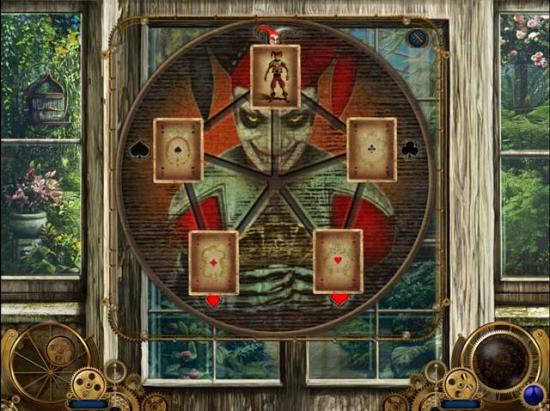
- Click on the emblem on the door to trigger a puzzle.
- Put the cards in their places by clicking on them to move them to the next empty slot. The solution is shown below.
- Now that the Aviary is open, click on the cage containing the parrot near the ceiling to trigger a hidden object area over the benches on the right.
- Find the objects listed at the bottom of the screen: they’ve been circled for you in the screenshot below. Inventory Item(s) are circled in red.
- Upon completing the area, the WEIGHT, the MINUTE-HAND, and the HOUR-HAND will be added to your inventory.
- Also upon completing the area, you will acquire the *Aviary Amulet Piece (12/12)*.
- Use the WEIGHT on the hanging scale on the left to bring the parrot cage within reach. Click on it to open it, then click on the PARROT inside to add it to your inventory.
- Return to the Lawn.
Lawn
- Use the PARROT on the stand.
Chapter 14: The Amulet
- Use the MINUTE-HAND and the HOUR-HAND on the amulet. This will trigger four numbers appearing at the bottom of the screen.
Number 1
- Click on the first number. Light the fire in the lantern by clicking on the candle located above the number 4 and moving it to the lantern the doll is holding.
- Next, click on the right foot of the doll numerous times in a row to fan the flame, revealing more and more of a message behind the doll. Do this until you can read the whole thing: May. A check mark should appear over the number 1.
Number 2
- Click on the second number. Untangle the constellation by moving the glowing green dots in such a way that none of the white strings cross. A possible solution is shown below.
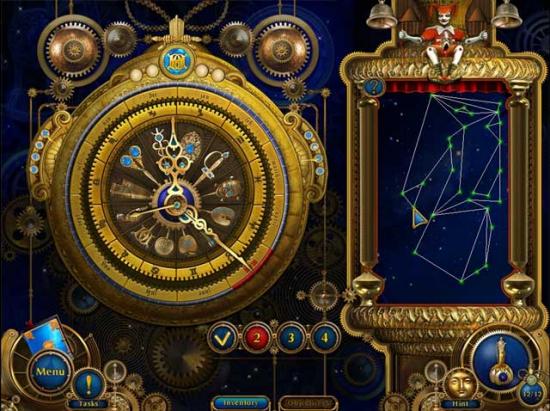
- Upon completing the puzzle, the sign Scorpio will be revealed. A check mark should appear over the number 2.
Number 3
- Click on the third number. Switch the parts to assemble the picture. The solution is shown below.
- Upon completing the puzzle, the lunar cycle Sun will be revealed. A check mark should appear over the number 3.
Number 4
- Click on the fourth number. “Beat” the enemy’s card with your own, corresponding in suit and kind. The solution of which cards you should choose from your hand are as follows: 1)Queen of Diamonds, 2)King of Hearts, 3)Queen of Clubs, 4)King of Spades.
- Upon completing the puzzle, the card case Spade will be revealed. A check mark should appear over the number 4.
- Watch the cutscene and click on the prompts that follow.
Congratulations! You’ve completed Amulet of Time: Shadow of La Rochelle!

More articles...
-
Best Horror Games On Itch.io – July 2026
Across a bounty of subgenres. -
Haze Seas Accessories Tier List [Best Accessories to Equip]
The accessories with the best stat buffs in Haze Seas.