
Best Horror Games On Itch.io – July 2026
Across a bounty of subgenres.
Grow A Garden 2 Base Price List
What's the most valuable crop?![Evomon Best Starter [Leafbun, Blazpup, or Bubble?]](/wp-content/uploads/2026/06/evomon-best-starter.jpg "Evomon Best Starter [Leafbun, Blazpup, or Bubble?]")
Evomon Best Starter [Leafbun, Blazpup, or Bubble?]
Grass-type, Fire-type, or Water-type?
![[Roblox] Evomon Shiny Hunting Guide – Including Prismatic and Pris Shinies!](/wp-content/uploads/2026/06/evomon-shiny-hunting-guide.jpg "[Roblox] Evomon Shiny Hunting Guide – Including Prismatic and Pris Shinies!")
Amanda Rose: The Game of Time Walkthrough
Welcome to the Amanda Rose: The Game of Time walkthrough on Gamezebo. Amanda Rose: The Game of Time is a Hidden Object game played on the PC and created by Alawar Games. This walkthrough includes tips and tricks, helpful hints, and a strategy guide on how to complete the Amanda Rose: The Game of Time.


- Prefer Gamezebo on Google

General Tips
• Hint Button takes about 45 seconds to refill.
• Click the Hint Button and any item on your list for a helpful hint.
• Click on the Hint Button and any section of the Scene for a helpful hint.
• Skip Puzzle timer takes approximately 45 seconds to fill.
• There is only one Game Modes
• Some items in Inventory can be combined to create a new item. Items able to be combined will feature a plus mark “+” in the upper right corner.
• Some Item can be combined to create a new Item.
• The Mouse Cursor will change when come across an interactive object.
• Hidden Objects are the same every time.
• Will have option to choose Tutorial at start of game. This will help you through the basics in the first scene.
• There are 15 Chapters.
Interface
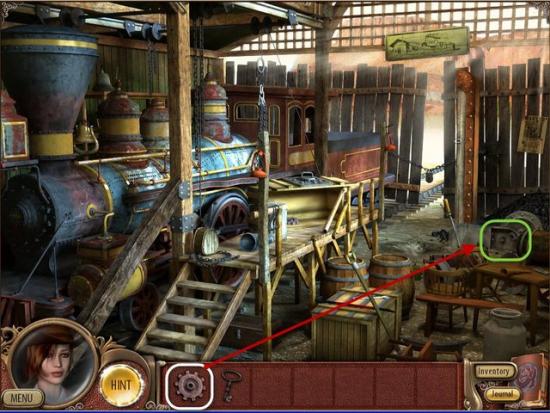
Menu – The Menu allows you access to the main functions.
Hint – Hint Meter is unlimited. Use as often as you like.
Journal – Contains Hints, Story Details, and Important Information.
Inventory – Contains your current items collected.
Skip Puzzle –The Skip Button is used to skip any Mini-Game.
Guide Tips
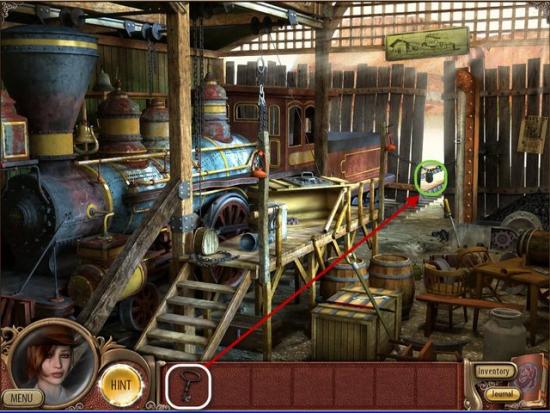
• Hidden Objects are highlighted in Yellow.
• Items are highlighted in White or Red.
• Items to combine are highlighted in Orange.
• Interactive Areas are highlighted in Green.
• Locations are highlighted in Blue.
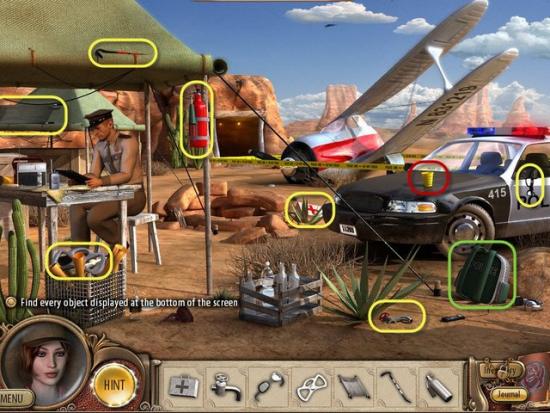
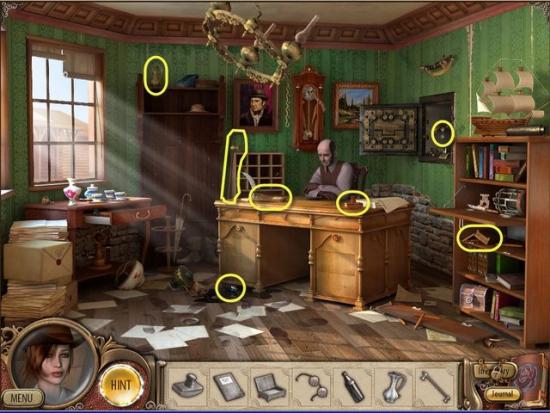
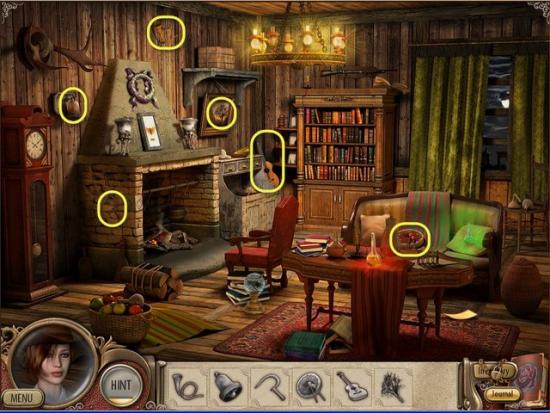
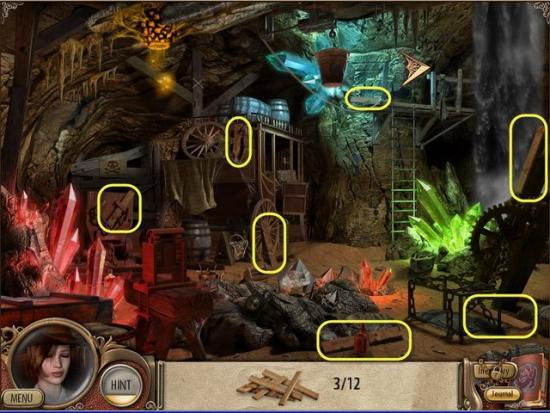
Chapter 1

Gather the Item highlighted in White.
Gather the Hidden Objects highlighted in Yellow.
Examine the Backpack highlighted in Green.
Gather the Walkie-Talkie and the Bottle of Water highlighted in White.
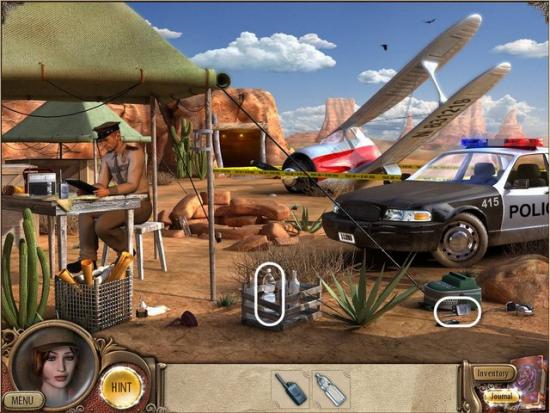
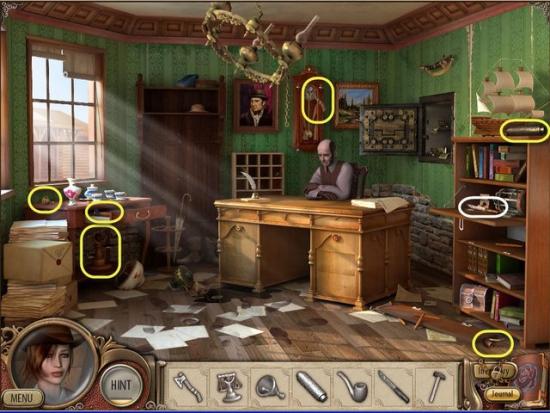
Open your Inventory.
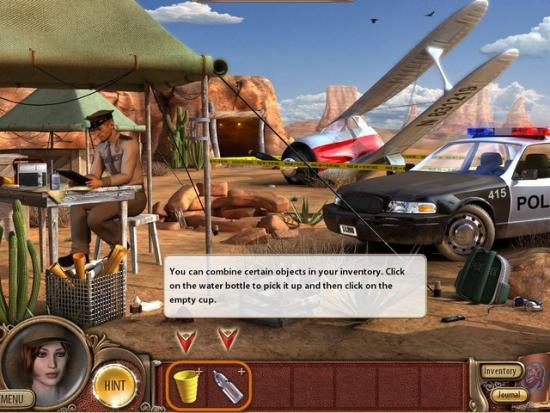
Combine the Bottle of Water with the Cup, highlighted in Orange.
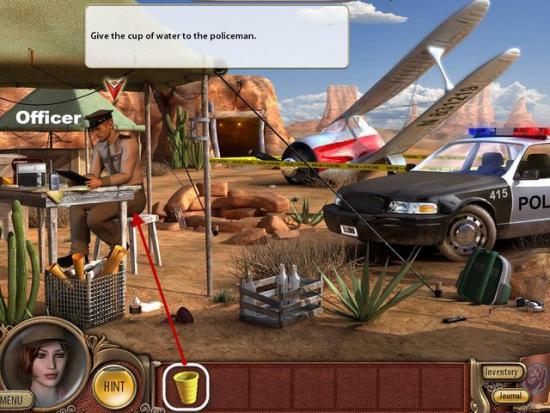
Give the Cup of Water, highlighted in White, to the Officer.
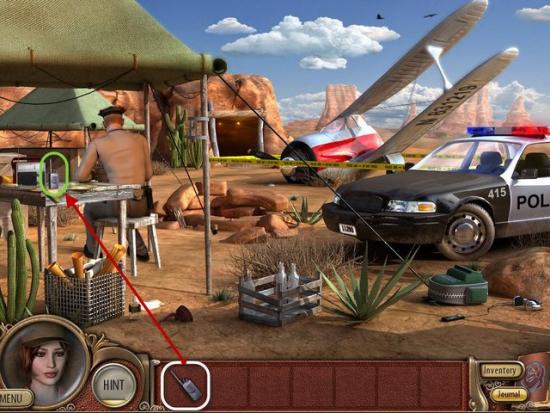
Switch the Walkie-Talkie from inventory, highlighted in White, with the Officers Walkie-Talkie, highlighted in Green,
Chapter 2
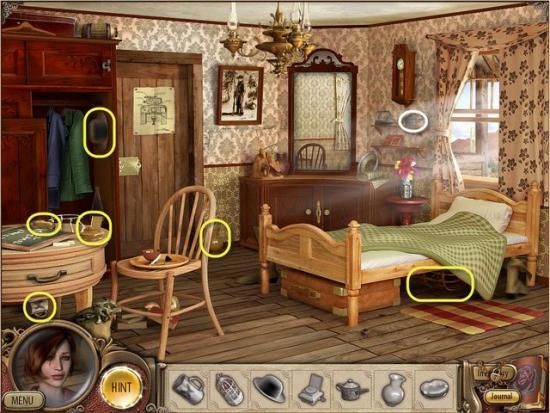
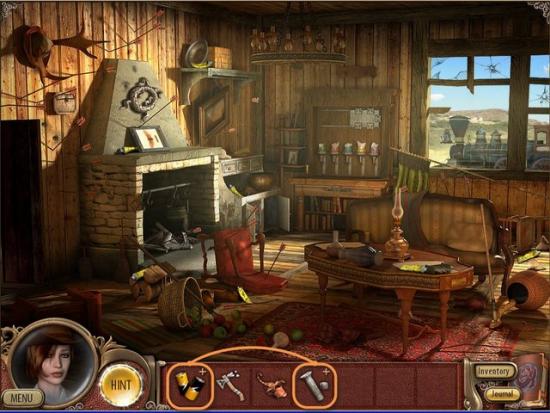
Gather the Item highlighted in White.
Gather the Hidden Objects highlighted in Yellow.
Gather the remaining Hidden Objects highlighted in Yellow.
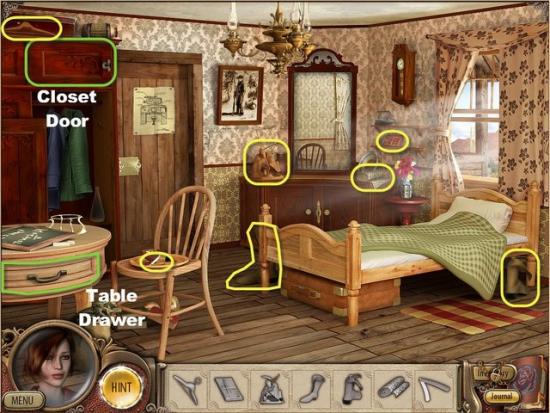
Open the Closet Door and Table Drawer highlighted in Green.
Gather the Items highlighted in White.
Examine the Painting highlighted in Green.
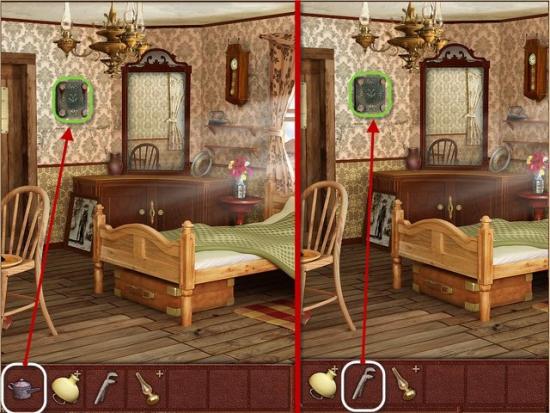
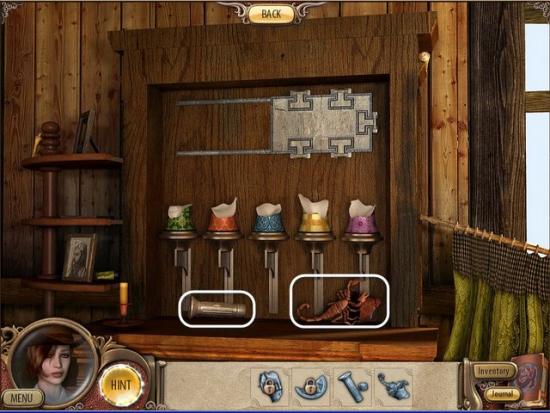
Use the Oiler, highlighted in White, on the Metal Plate, highlighted in Green.
Now use the Pliers, highlighted in White, on the Metal Plate.
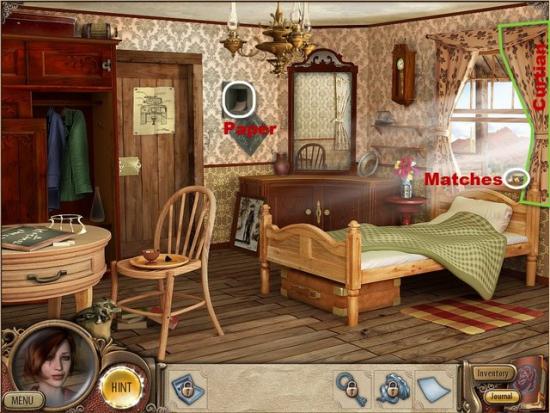
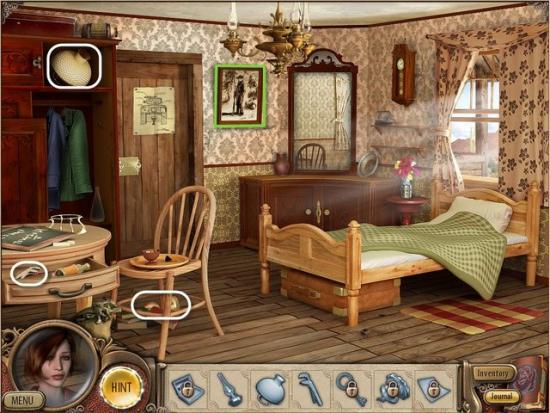
Gather the Paper highlighted in White.
Examine the Curtains highlighted in Green.
Gather the Matches highlighted in White.
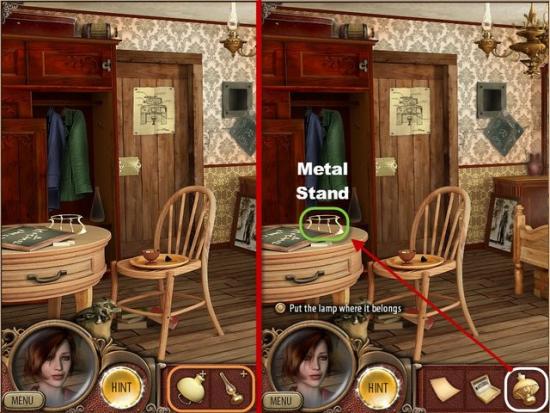
Open Inventory and combine the Oil Lamp with the Lamp Shade highlighted in Orange.
Now place the completed Oil Lamp, highlighted in White, on the Metal Stand highlighted in Green.
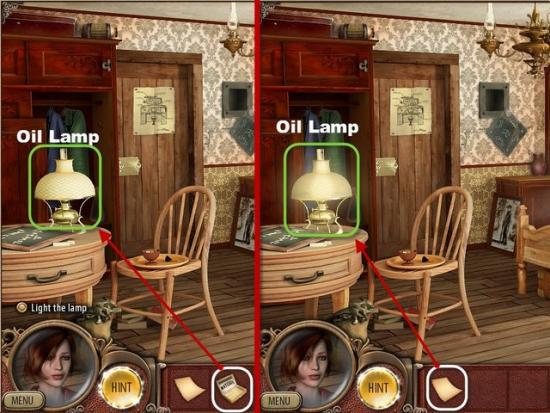
Use the Matches, highlighted in White, to light the Oil Lamp, highlighted in Green.
Now use the Paper, highlighted in White, on the Oil Lamp.
Will receive Code.
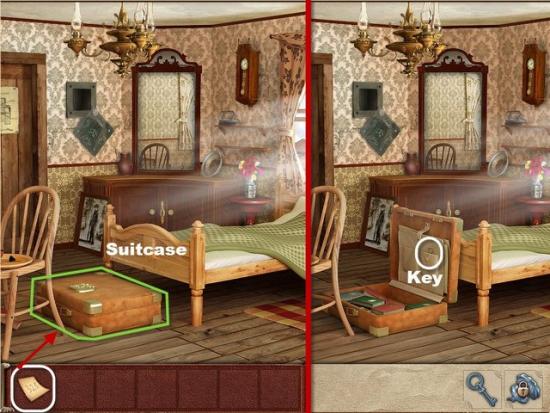
Examine the Suitcase highlighted in Green.
Use the Code, highlighted in White, on the Suitcase.
Gather the Key highlighted in White.
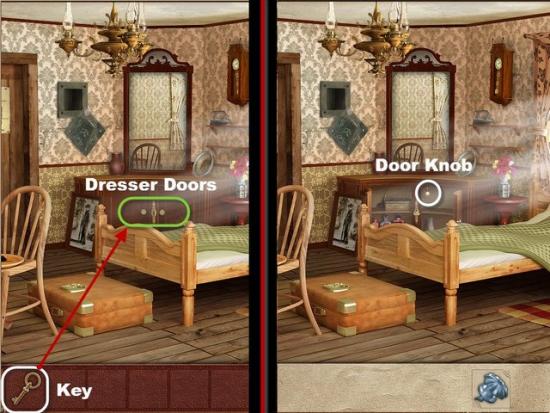
Use the Key, high in White, on the Dresser Doors, highlighted in Green.
Now gather the Door Knob highlighted in White.
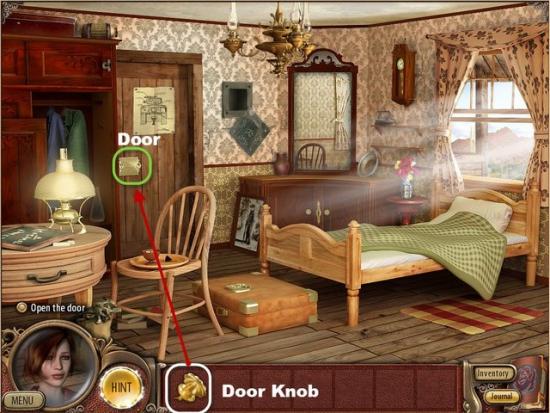
Now use the Door Knob, highlighted in White, on the Door, highlighted in Green.
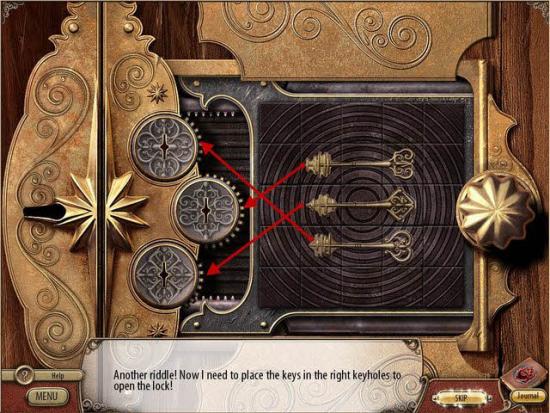
To solve this Mini-Game need to swap tile to assemble completed image.
Click on Tiles to swap positions until image is completed.
Finally match each of the Keys with the matching Key Hole.
Chapter 3
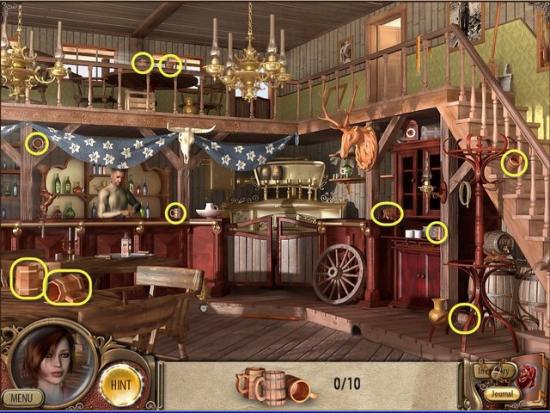
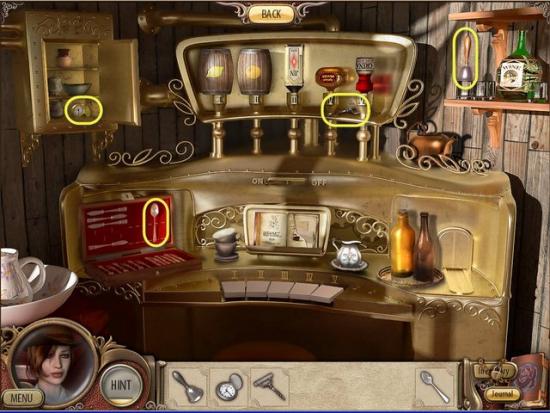
Gather the 10 Mugs highlighted in Yellow.
Gather the Hidden Objects highlighted in Yellow.

Gather the first five Hidden Objects highlighted in Yellow.
Move to the Bar highlighted in Blue.
Gather the two Items highlighted in White.

Gather the Item, Oranges, highlighted in Red
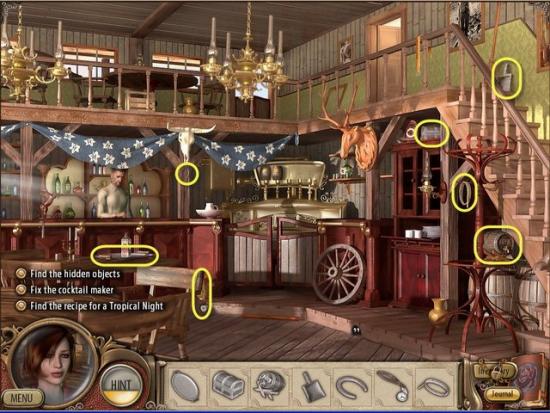
Use the “Back” Button to return to the Saloon.
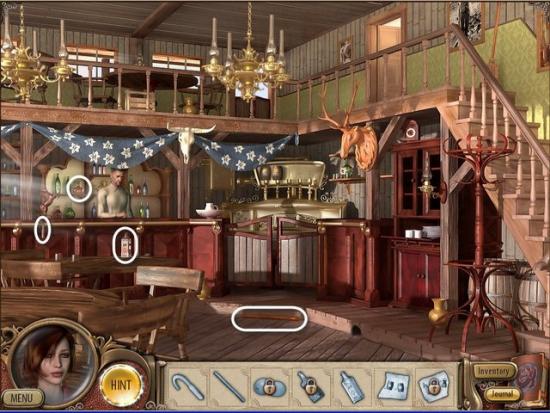
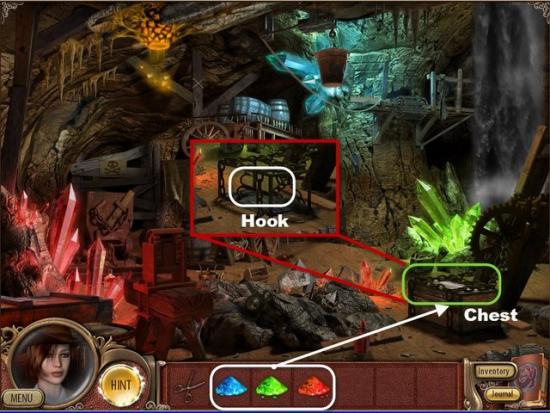
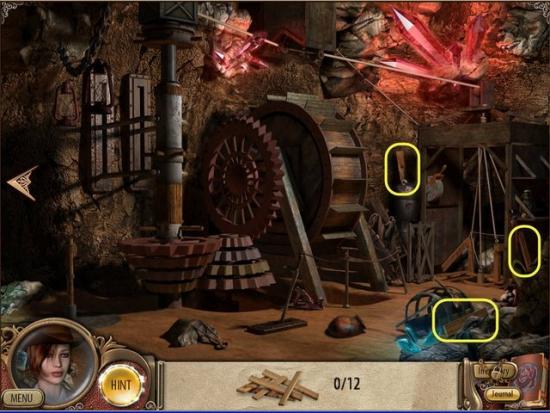
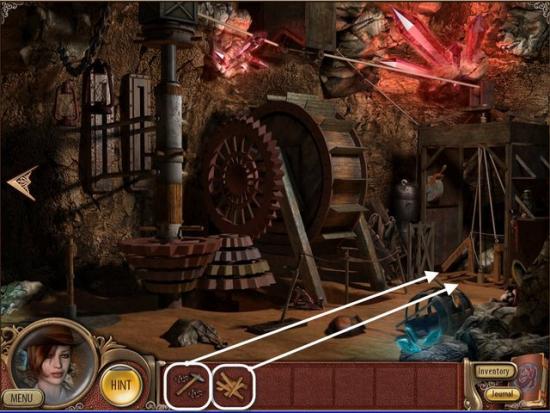
Gather the Pole, Hook, Gin, and Brandy highlighted in White.

Open Inventory and combine the Hook and Pole highlighted in Orange.
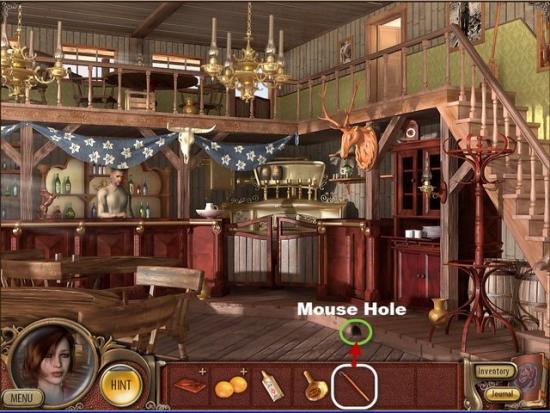
Use the Pole Hook, highlighted in White, on the Mouse Hole, highlighted in Green.
Gather the Key highlighted in White.
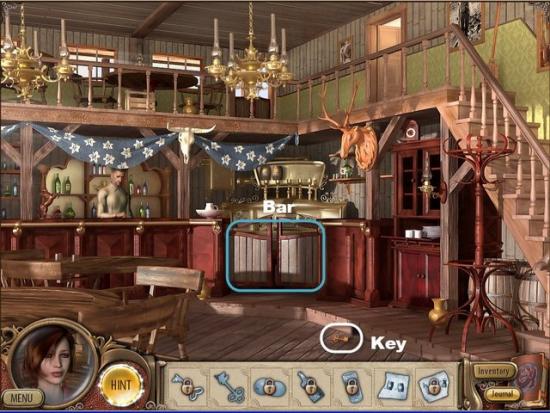
Gather the the Key highlighted in White.
Return to the Bar.
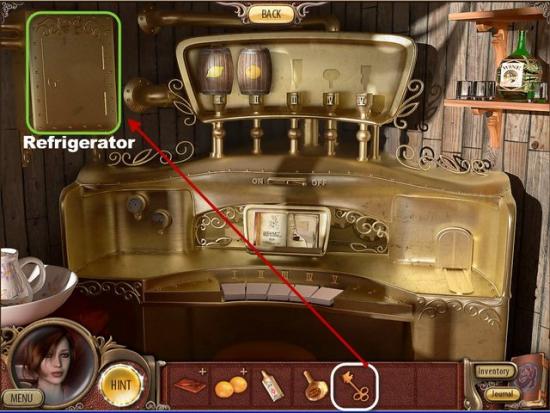
Use the Key, highlighted in White, on the Refrigerator, highlighted in Green.
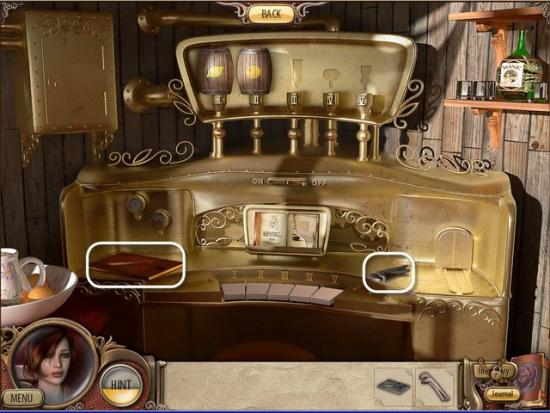
Gather the Lemon, Grenadine, and Recipe Part highlighted in White.
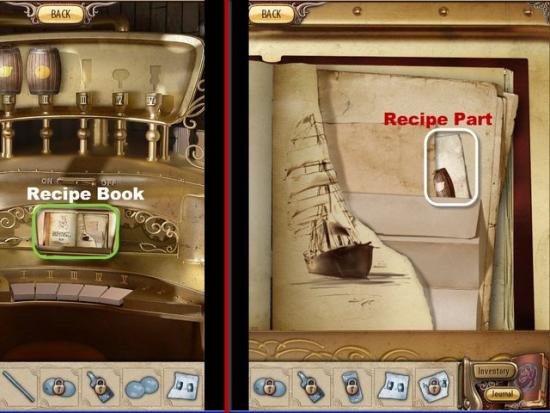
Examine the Drink Machine Recipe Book highlighted in Green.
Gather the Recipe Part highlighted in White.
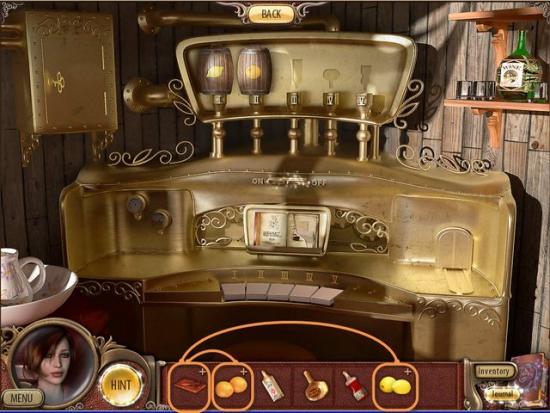
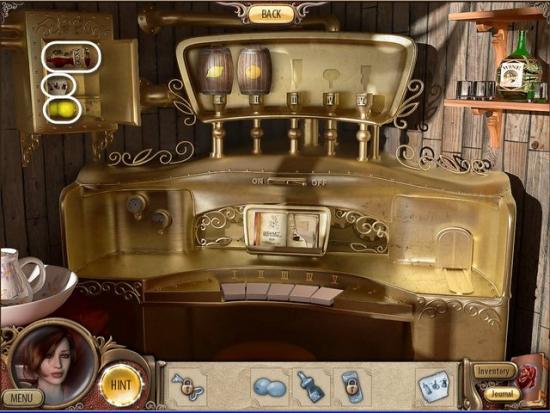
Open Inventory and combine the Orange and Cutting Board, as well as the Lemon and Cutting Board highlighted in Orange.
Add the ingredients to the Drink Machine.
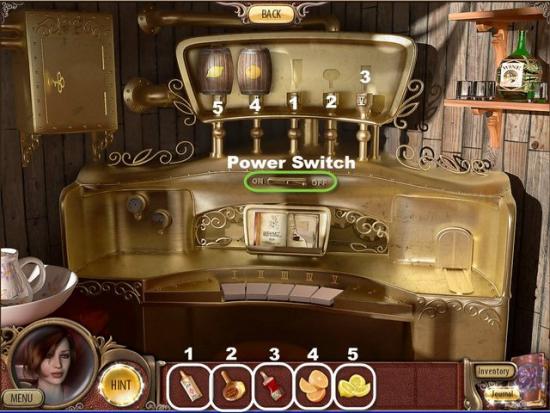
Turn on the Machine highlighted in Green.
Now press the Piano Keys in correct order to make the Cocktail.
See the Journal, under Notes, for the Recipe for the Cocktail
The correct order is: 3, 4, 5 ,2 , 1.
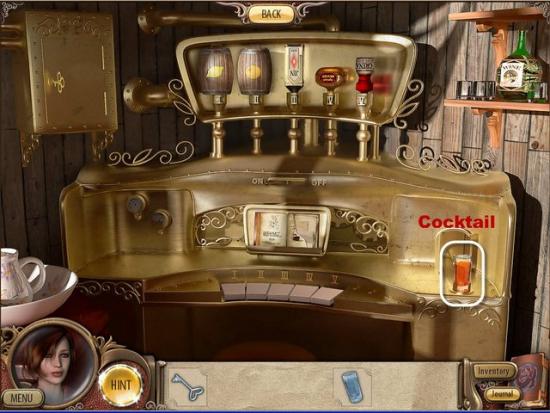
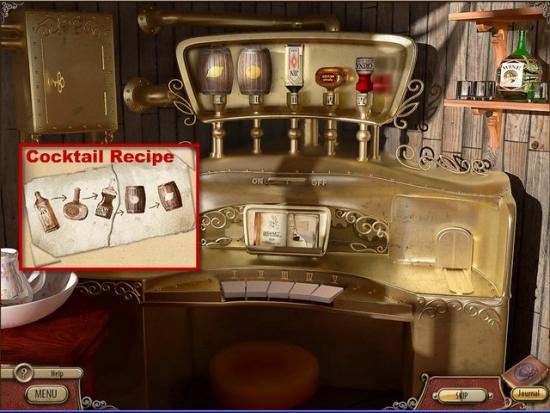
Gather the finished Cocktail highlighted in White.
Will receive a Key.
Chapter 4
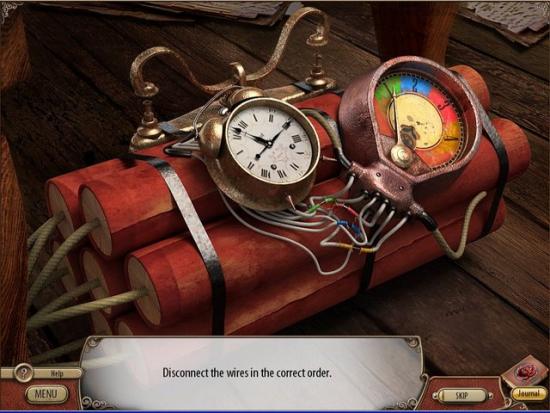
For this Mini-Game you need to cut the Wires in the correct order and timing.
Each Wire must be cut in order from 1 to 4 and when the Arrow is pointing at the correct number.
Solution:
• Cut the Green Wire when the Arrow points at the 1.
• Cut the Blue Wire when the Arrow points at the 2.
• Cut the Red Wire when the Arrow points at the 3.
• Cut the Yellow Wire when the Arrow points at the 4.
Gather the Hidden Objects highlighted in Yellow.
Gather the Hidden Objects highlighted in Yellow.
Gather the Knife highlighted in White.
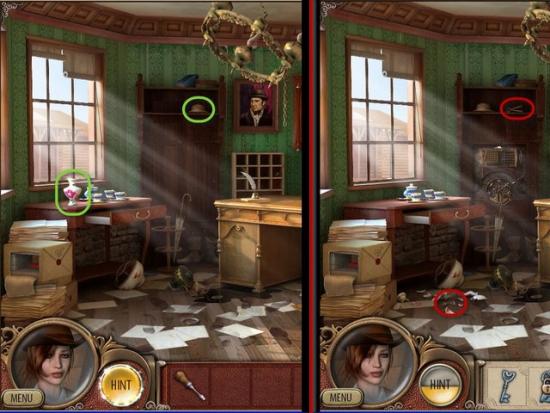
Move the Hat and Vase highlighted in Green.
Gather the Tongs and Key highlighted in Red.
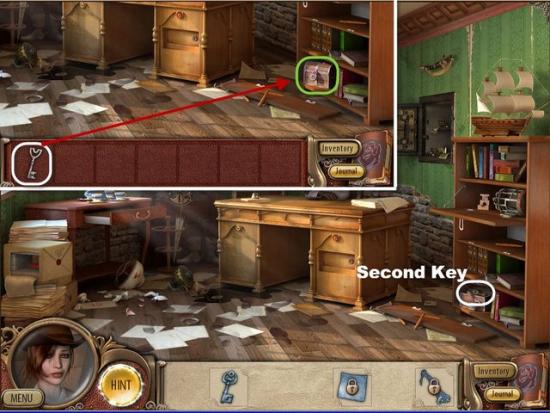
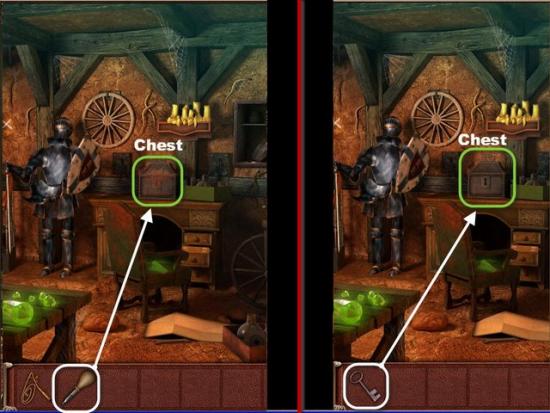
Use the Key, highlighted in White, on the Chest, highlighted in Green.
Gather the Second Key.
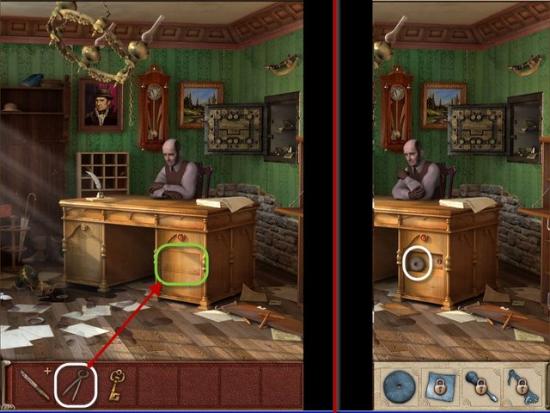
Use the Tongs, highlighted in White, on the Desk, highlighted in Green.
Gather the Grindstone.
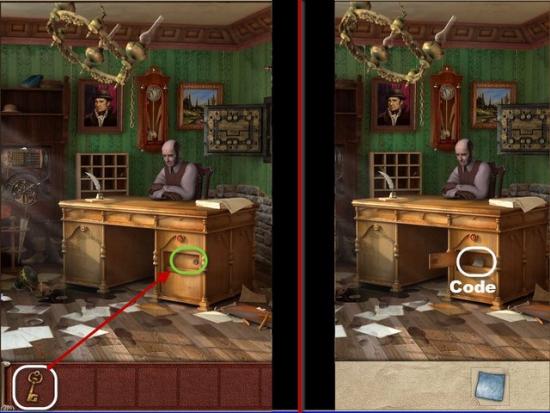
Use the second Key, highlighted in White, on the hole in the Desk, highlighted in Green.
Receive a Code.

Open your Inventory and combine the Grindstone and the Knife.
Receive a sharpened Knife.
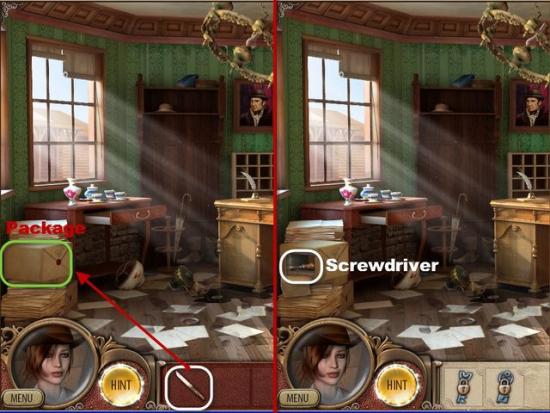
Use the Knife, highlighted in White, on the Package, highlighted in Green.
Gather the Screwdriver highlighted in White.

Examine the Cabinet highlighted in Green.
Use the Screwdriver, highlighted in White, on the Screwed Handle, highlighted in Green.
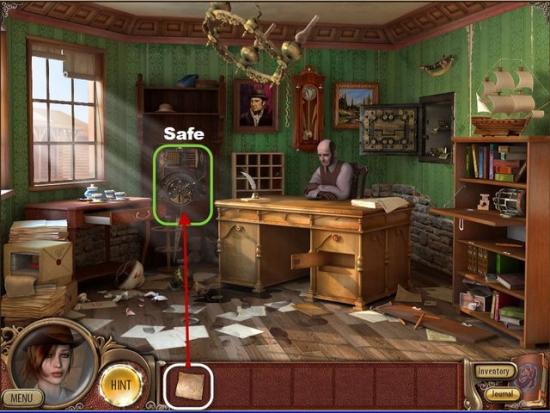
Use the Code, highlighted in White, on the Safe highlighted in Green.
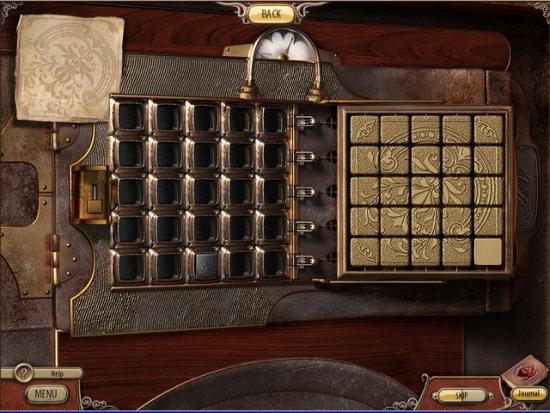
For this Mini-Game you must place each of the Tiles into the Grid.
Each row is done separately,
Each row must have the tiles added in correct order.
If a wrong tile is added to the next square in the row, the row will clear and you must restart the row again.
Complete all five Rows and unlock the Safe.
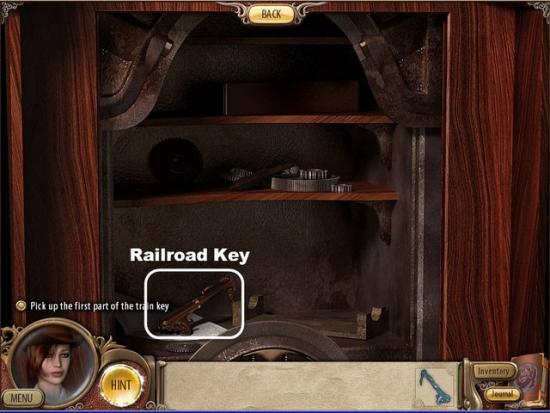
Gather the half Railroad Key.
Chapter 5
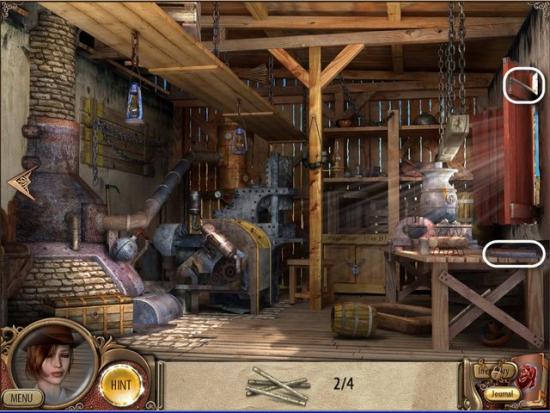
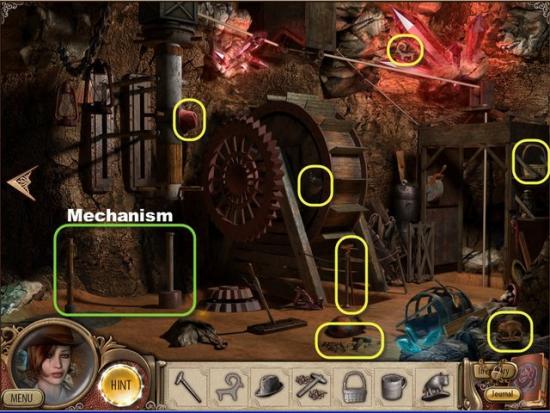
*This Chapter is spread over two screens. Screen 1 refers to the Forge and Screen 2 refers to the Workbench area.
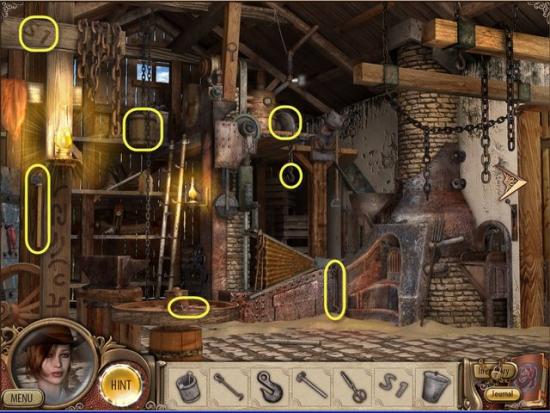
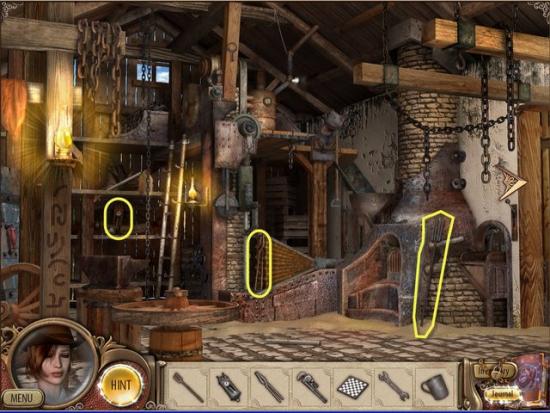
Screen 1: Gather the Hidden Objects highlighted in Yellow.
Screen 2: Gather the Hidden Objects highlighted in Yellow.
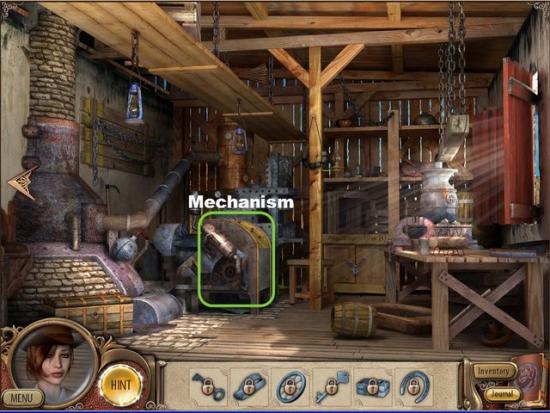
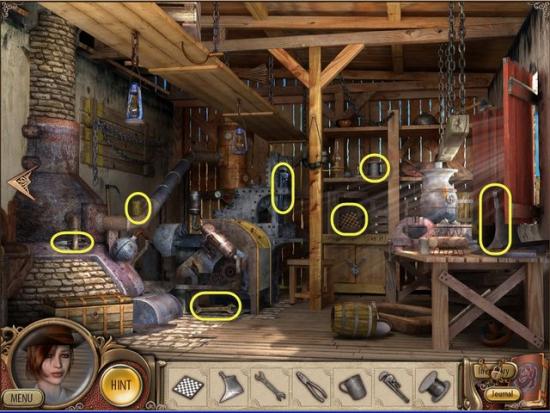
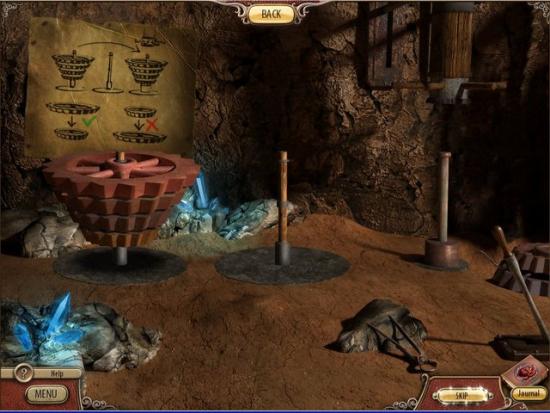
Examine the Mechanism highlighted in Green.
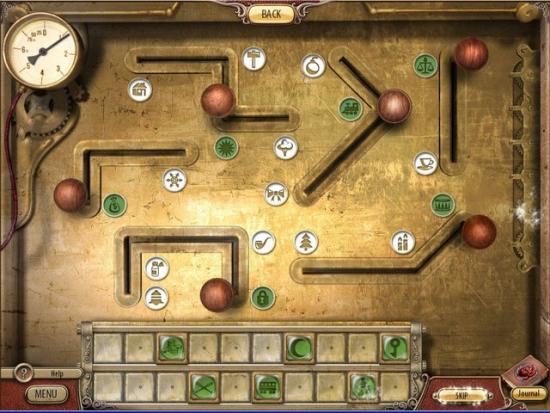
You need to compare the Icons at the bottom of the screen with the Symbols next to the Handles.
To solve this Mini-Game you must find a Symbol similar to the Icon.
Find a matching Symbol for each of the Icons to solve the puzzle.
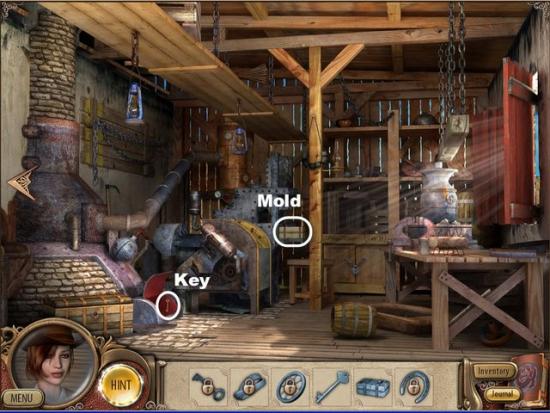
Take the Mold and the Key highlighted in White.
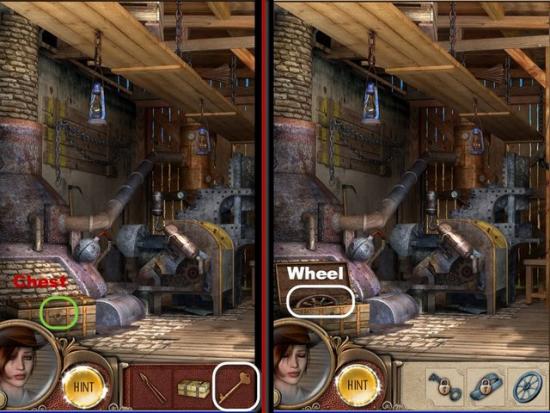
Use the Key, highlighted in White, on the Chest, highlighted in Green.
Gather the Wheel highlighted in White.
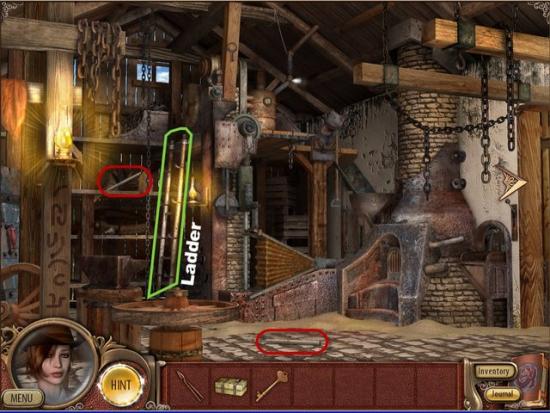
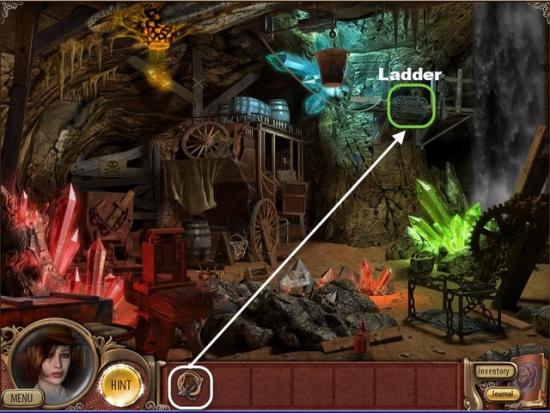
Scene 1: Examine the Ladder highlighted in Green.
Gather the Steps highlighted in Red.
Scene 2: Gather the last two Steps highlighted in White.
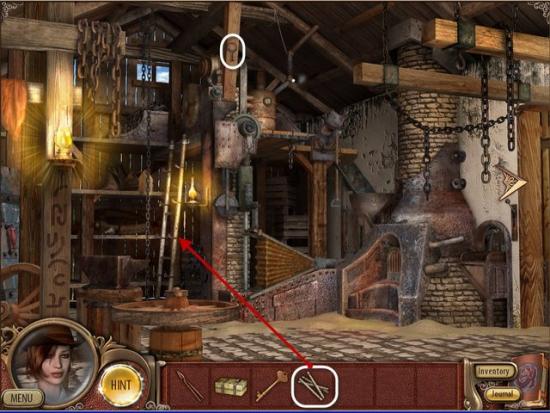
Scene 1: Place the Steps highlighted in White on the Ladder.
Gather the Key highlighted in White.
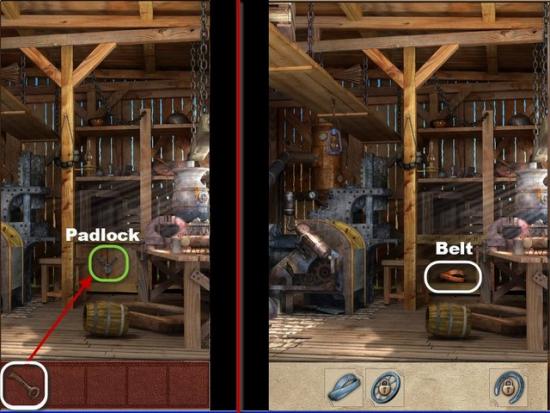
Scene 2: Use the Key, highlighted in White, on the Padlock, highlighted in Green.
Gather the Belt highlighted in White.
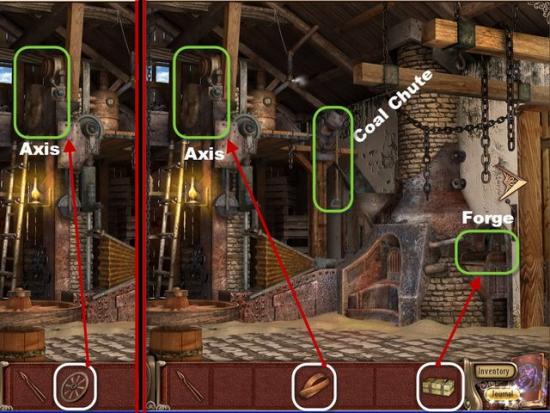
Scene 1: Place the Wheel and then the Belt on the Axis highlighted in Green.
Place the Mold in the Forge highlighted in Green.
Pull the Coal Chute highlighted in Green.
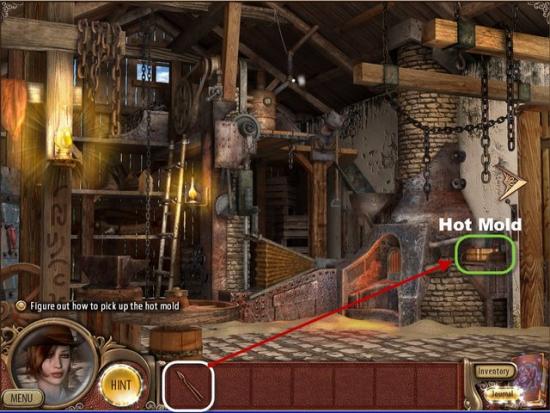
Use the Tongs, highlighted in White, to gather the Mold.
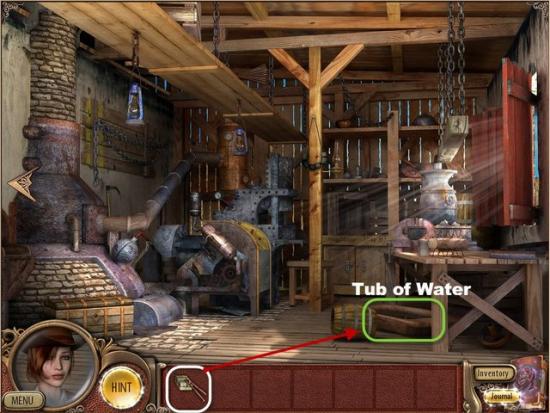
Scene 2: Place the Mold, highlighted in White, into the Tub of Water, highlighted in Green.
Will receive a Horseshoe.
Chapter 6
*This Chapter is spread over two screens. Screen 1 refers to the Office area and Screen 2 refers to the Jail area.
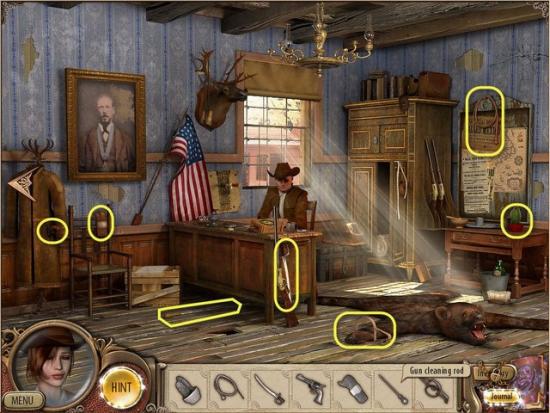
Screen 1: Gather the Hidden Objects highlighted in Yellow.

Gather the Hidden Objects highlighted in Yellow.
Scene 2: Gather the Hidden Objects highlighted in Yellow.
Receive the Brush.
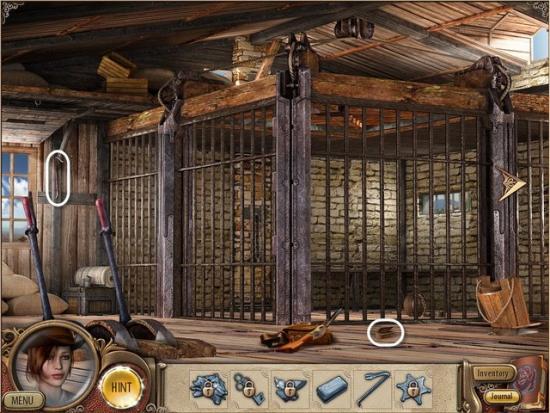
Gather the Matches and Crowbar, highlighted in White.
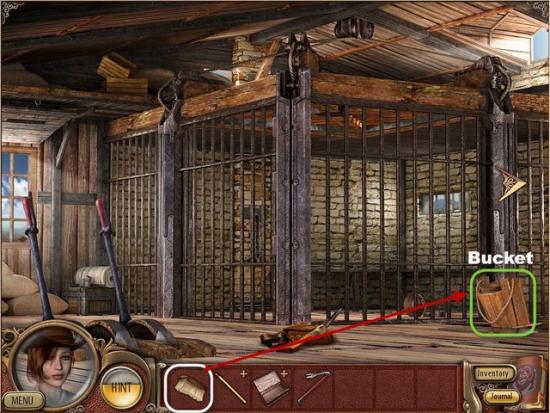
Use the Brush, highlighted in White, on the Bucket, highlighted in Green.
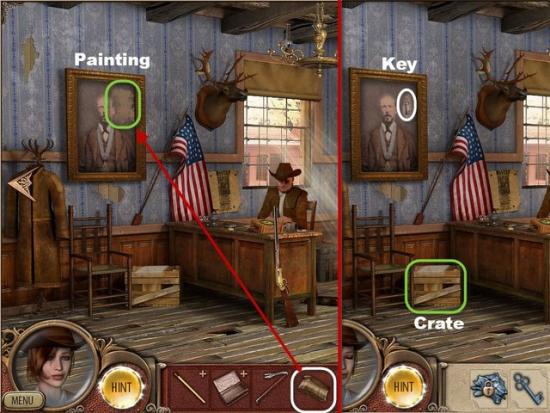
Screen 1: Use the Brush, highlighted in White, on the Painting, highlighted in Green.
Gather the Key.
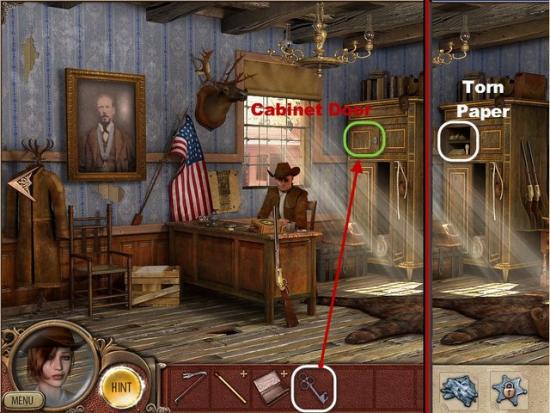
Use the Key, highlighted in White, on the Cabinet Door, highlighted in Green.
Gather the Torn Paper.
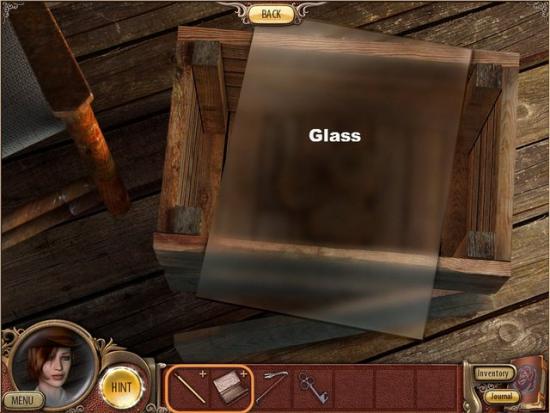
Examine the Crate, highlighted in Green.
Move the Glass.
Open your Inventory and combine the Match with the Matchbook, highlighted in Orange.
Receive a lit match.
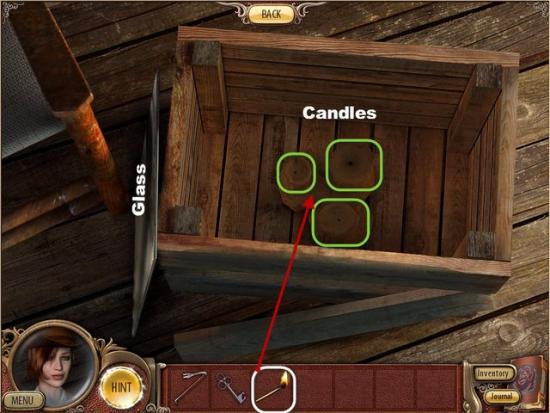
Use the Lit Match, highlighted in White, to light all three Candles, highlighted in Green.
Replace the Glass.
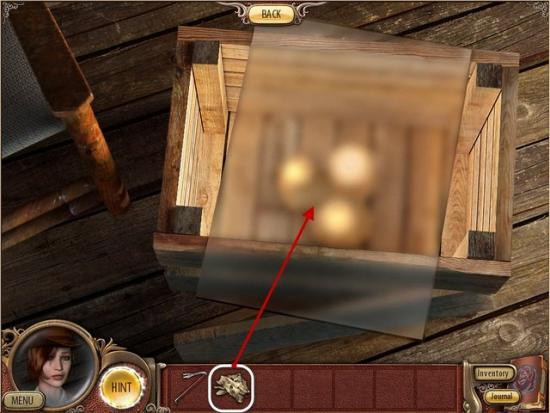
Place the Torn Paper, highlighted in White, on the Glass.
To solve this Mini-Game, piece all the pieces of the Torn Paper back together to complete the Image.
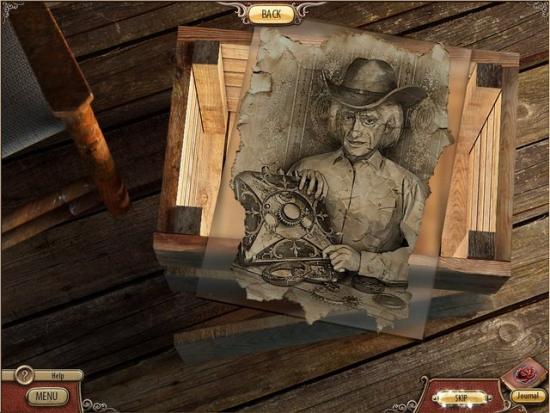
See Image for Solution.
Receive Clue.
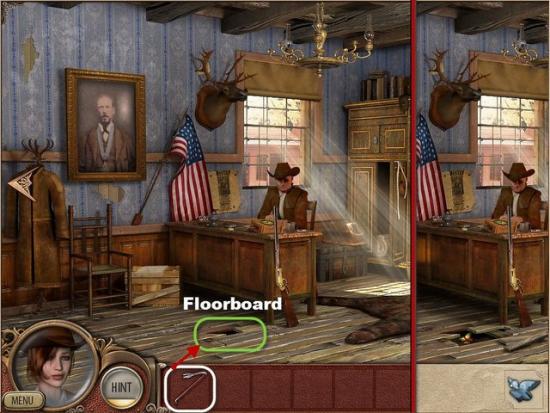
Use the Crowbar, highlighted in White, on the Floorboard, highlighted in Green.
Gather the Cuckoo.

Place the Cuckoo, highlighted in White on the Clock, highlighted in Green.
Receive a Lever.
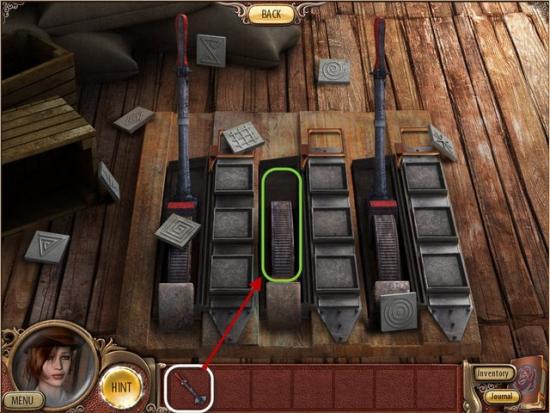
Screen 2: Place the Lever, highlighted in White, in the Center Slot, highlighted in Green.
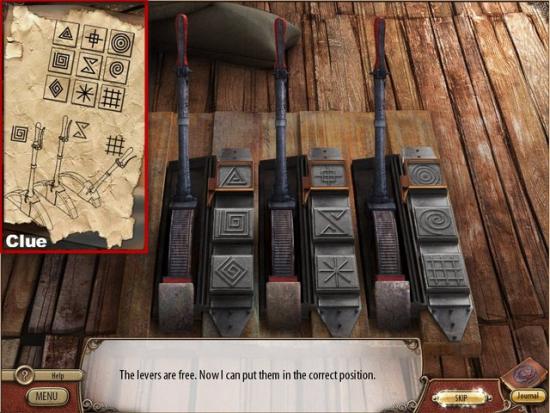
To solve this Mini-Game refer to the Clue you received earlier.
Pick up the Tiles and replace them into the Slots of the Levers in the correct order.
Then pull the Left Handle forward, once, tot he center position.
Next pull the Middle Handle, once, to the center position.
Finally pull the Right Handle, twice, to the full forward position.

Screen 1: Examine the Safe highlighted in Green.

To solve this Mini-Game you will need to rotate each of the three Rings till all three Rings lock in together.
Each ring features a White Tab, this Tab will extend when a lock has been achieved.

Gather the Badge highlighted in Red.
Pull the Lever highlighted in Green.
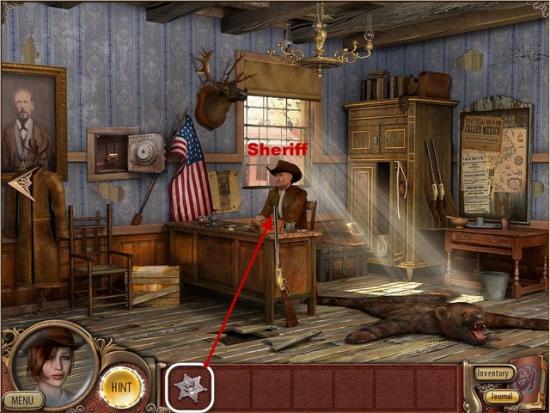
Give the Badge, highlighted in White, to the Sheriff.
Chapter 7

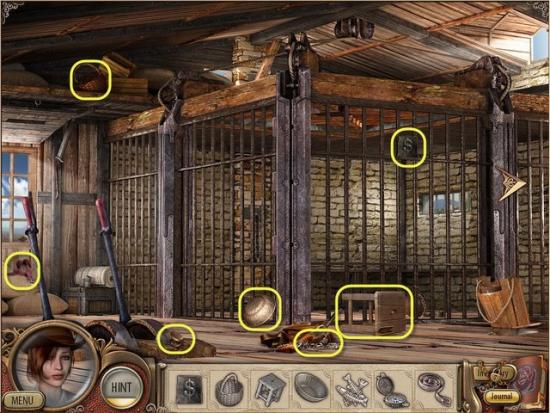
Gather the Hidden Objects highlighted in Yellow.
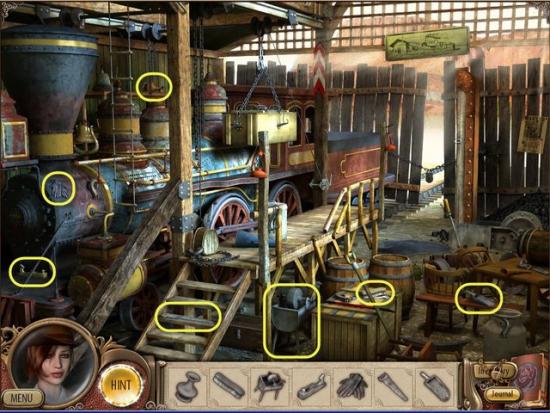
Gather the Hidden Objects highlighted in Yellow.
Gather the Hidden Objects highlighted in Yellow.
Receive the Mop.
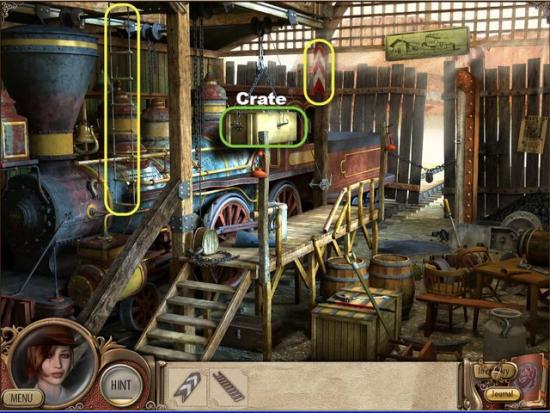
Examine the Crate highlighted in Green.
Examine the Lock on the Crate highlighted in Green.
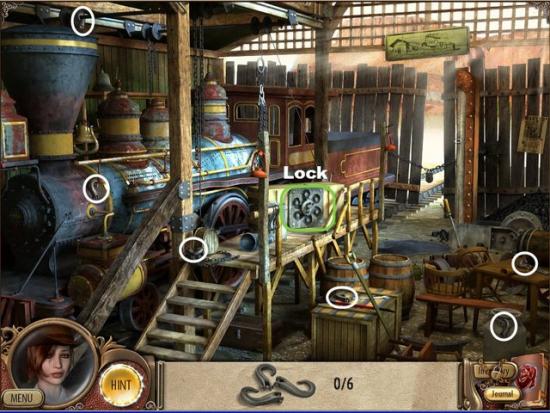
Find the six Hooks highlighted in White.
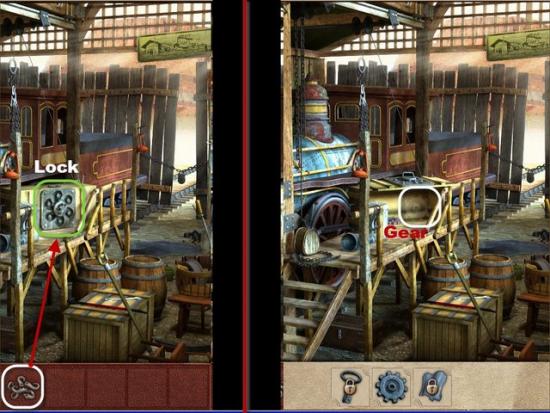
Use the Hooks, highlighted in White, on the Lock, highlighted in Green.
Gather the Gear highlighted in White.
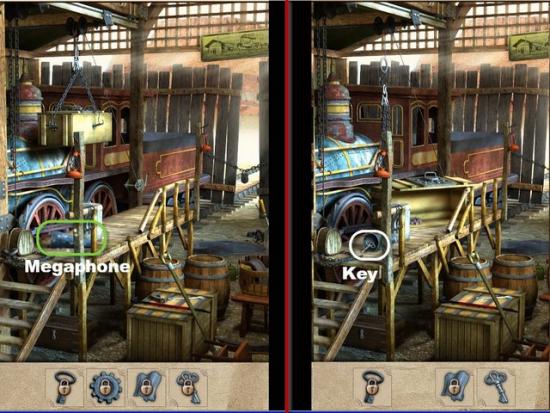
Examine the Megaphone highlighted in Green.
Gather the Key highlighted in White.
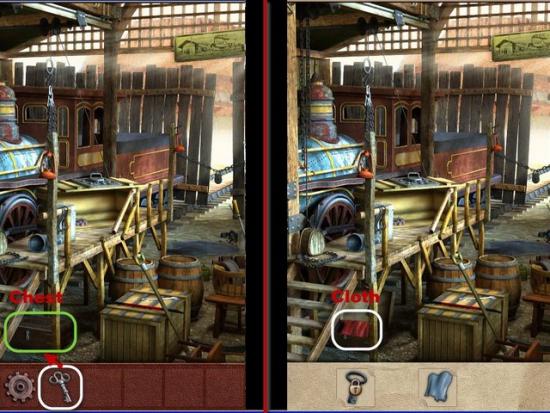
Use the Key, highlighted in White, on the Chest, highlighted in Green.
Gather the Cloth highlighted in White.
Open your Inventory, Combine the Mop and Cloth.
Receive Mop with Cloth.
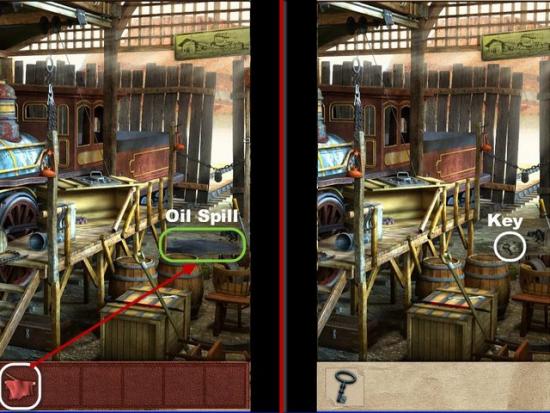
Use the Mop, highlighted in White, on the Oil Spill, highlighted in Green.
Gather the Key highlighted in White.
Use the Gear, highlighted in White, on the Coal Loader, highlighted in Green.
Use the Key, highlighted in White, on the Padlock, highlighted in Green.
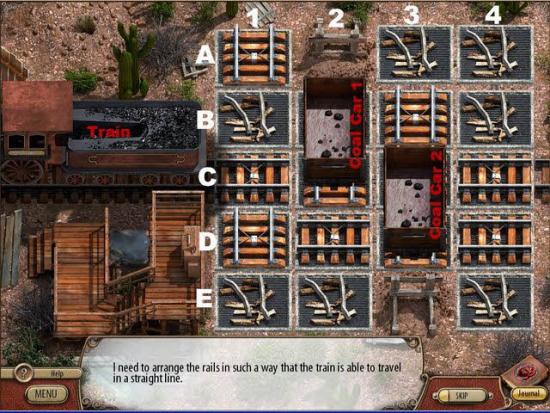
To solve this Mini-Game is a variation on the Traffic Jam puzzle.
Arrange Railroad Tiles so that the two Coal Cars can be moved, then rearrange the Tiles so the Train can leave the Station.
Click on Tiles to switch adjacent Tiles.
Using the Grid layout in the Image, here is the Solution to the Puzzle.
• D2-D1, A1-B1, B1-C1, C1-D1, D1-E1, E1-E2
• Move Coal Car 1.
• B3-B4, B4-A4, A4-A3, B2-B3
• Move Coal Car 2.
• C1-C2, B1-C1, C4-C3, D4-C4
• Move the Train out of the Station.
Chapter 8
*This Chapter is spread over two screens. Screen 1 refers to the Cabin and Screen 2 refers to the Basement area.
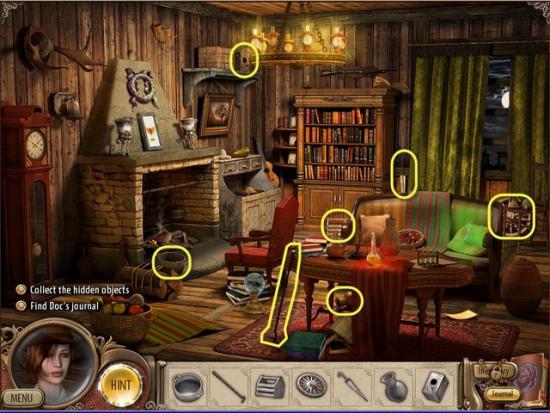
Gather the Hidden Objects highlighted in Yellow.
Gather the Hidden Objects highlighted in Yellow.
Receive the Fire Poker.
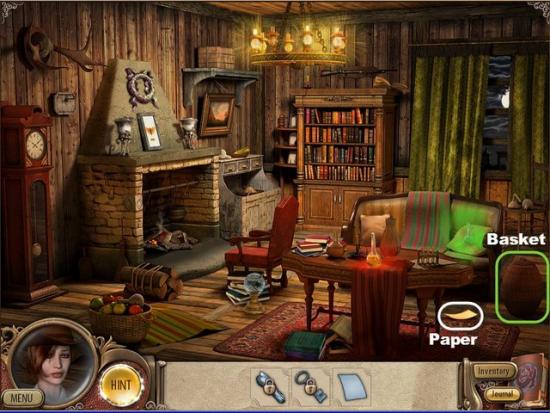
Gather the Paper highlighted in White.
Examine the Basket highlighted in Green.
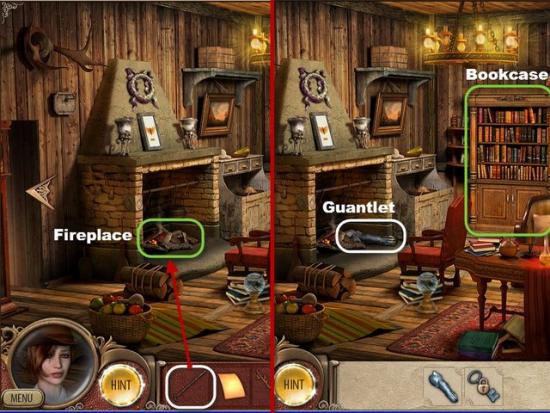
Use the Fire Poker, highlighted in White, on the Fireplace, highlighted in Green.
Gather the Gauntlet highlighted in White.
Examine the Bookcase highlighted in Green.
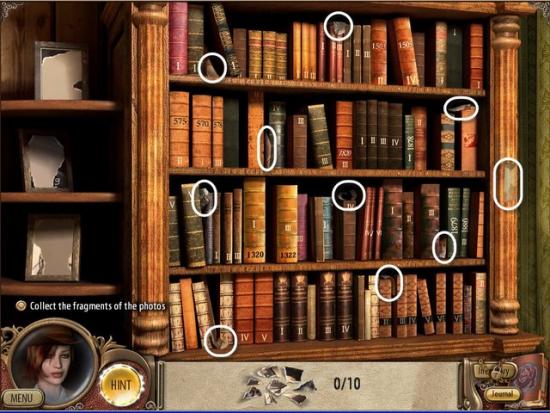
Gather the ten Photo Pieces highlighted in White.
Receive three Photos
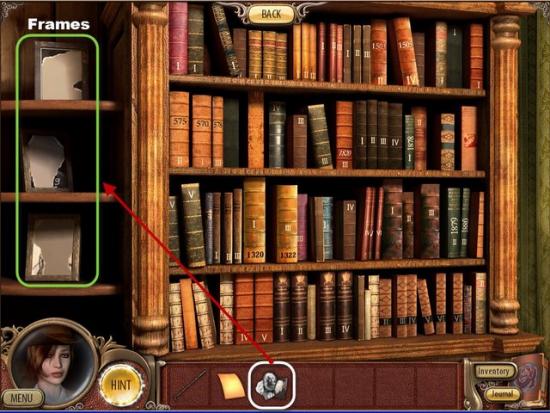
Place the three Photos, highlighted in White. in the Picture Frames, highlighted in Green.
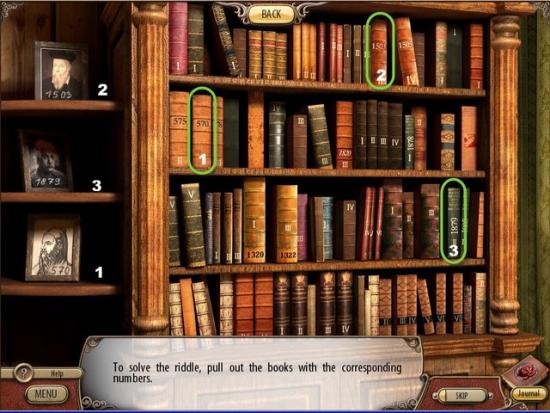
Find the three books with the corresponding dates listed on the Photo’s, highlighted in Green.
This will open the Basement, Screen 2.
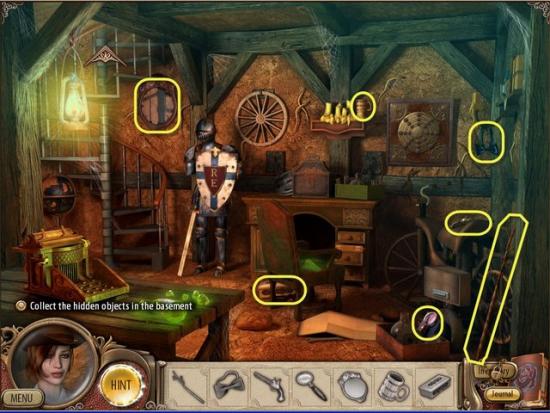
Screen 2: Gather the Hidden Objects highlighted in Yellow.
Gather the Hidden Objects highlighted in Yellow.
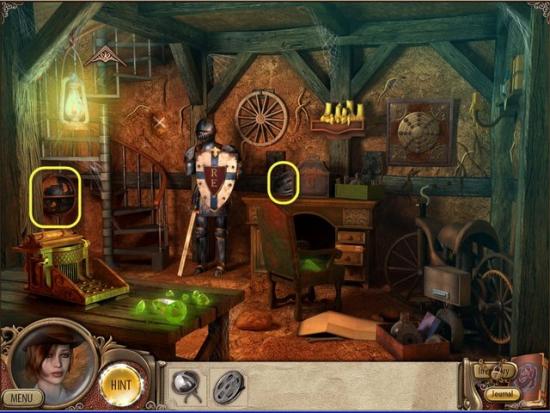
Receive the Branch.
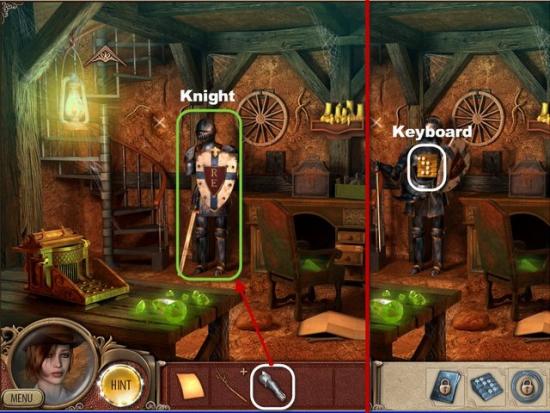
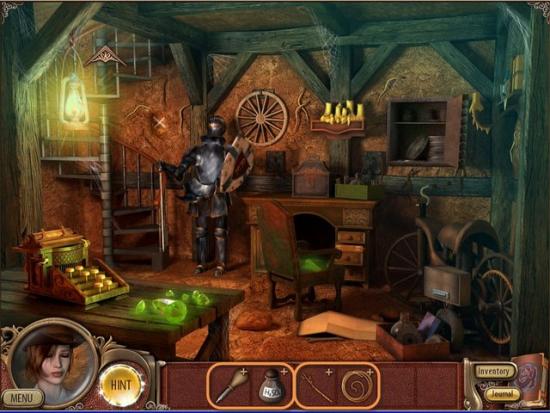
Place the Gauntlet, highlighted in White, on the Knight highlighted in Green.
Gather the Keyboard highlighted in White.
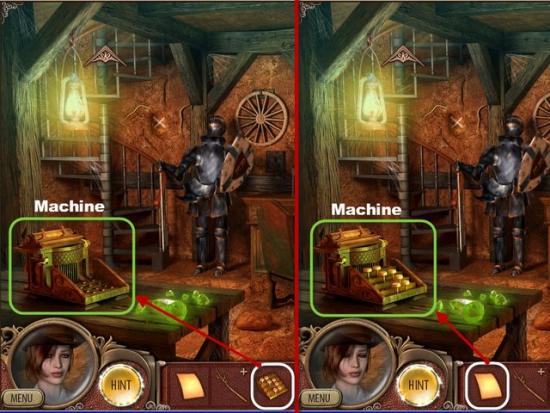
Place the Keyboard, highlighted in White, on the Machine, highlighted in Green.
Place the Paper, highlighted in White, into the Machine, highlighted in Green.
Receive Code.
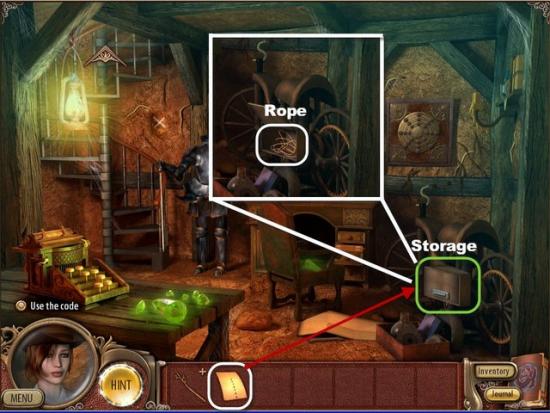
Use the Code, highlighted in White, on the Storage, highlighted in Green.
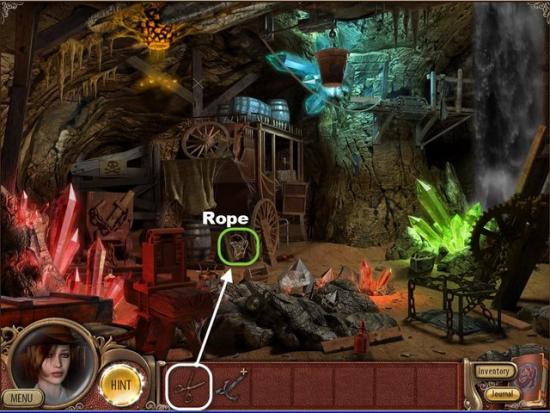
Gather the Rope.
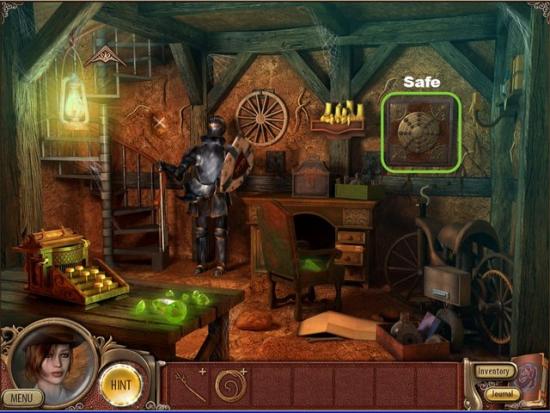
Examine the Safe highlighted in Green.
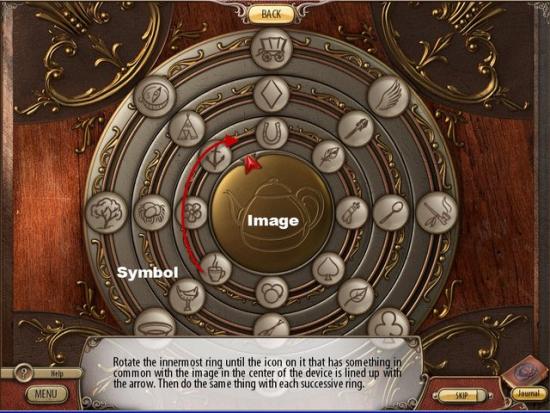
To solve this Mini-Game need to rotate each ring to align a Symbol related to the Image in the center.
Rotate the innermost Ring until a Symbol related to the Image in the center is lined up with the Arrow.
Click and Drag to move each Ring, release to set the Symbol.
If you choose the wrong Symbol, the board will reset and the center Image will change.
Once all three Rings are set correctly the Safe will open.
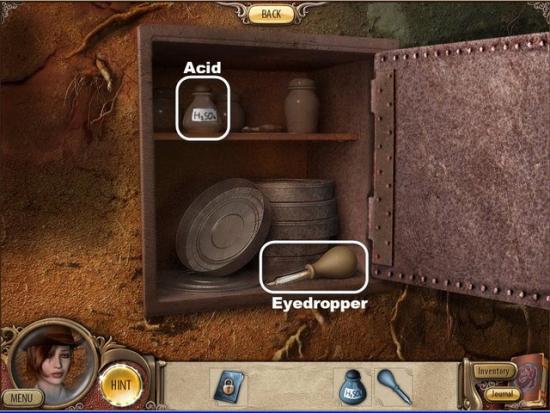
Gather the Acid and Eyedropper highlighted in White.
Open your Inventory and combine the Branch and Rope, highlighted in Orange.
Receive Fishing Pole.
Also combine the Acid and the Eyedropper highlighted in Orange.
Receive Eyedropper of Acid.
Return Upstairs.
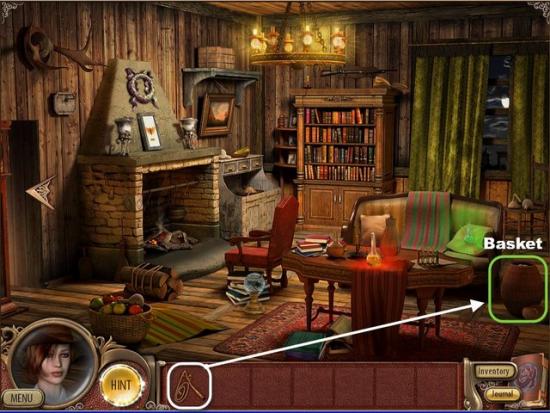
Examine the Basket highlighted in Green.
Screen 1: Use the Fishing Pole, highlighted in White, on the Basket.
Receive the Key.
Return to the Basement.
Screen 2: Use the Eyedropper, highlighted in White, on the Rusty Chest, highlighted in Green.
Use the Key, highlighted in White, on the Chest, highlighted in Green.
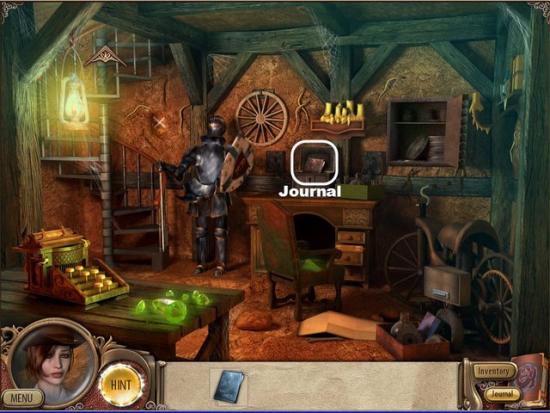
Gather the Journal highlighted in White.
Read the Journal.
Chapter 9
Gather the Hidden Objects highlighted in Yellow.
Gather the Hidden Objects highlighted in Yellow.
Move to the next Screen, with the Airplane.
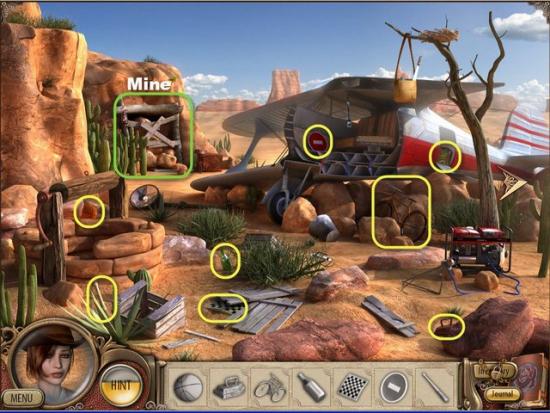
Gather the Hidden Objects highlighted in Yellow.
Examine the Mine highlighted in Green.
Gather the Hidden Objects highlighted in Yellow.
Receive the Saw.
Return to the Airplane.
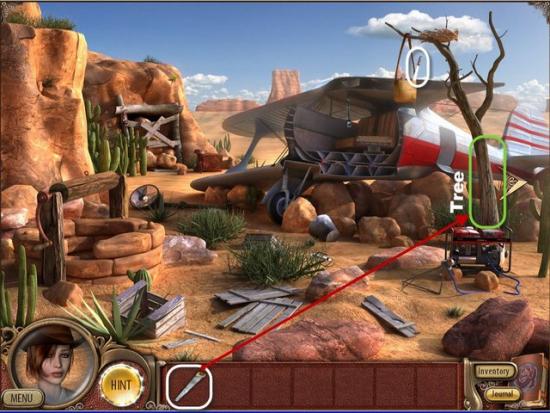
Use the Saw, highlighted in White, on the Dead Tree, highlighted in Green.
Gather the Machete highlighted in White.
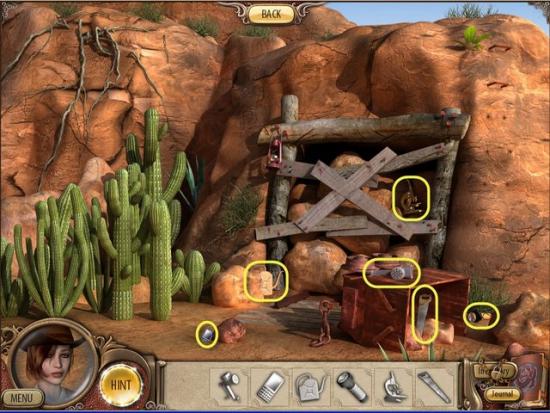
Return to the Mine.
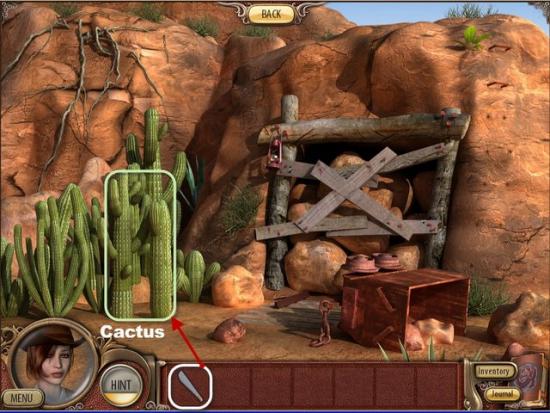
Use the Machete, highlighted in White, on the Cactus, highlighted in Green.
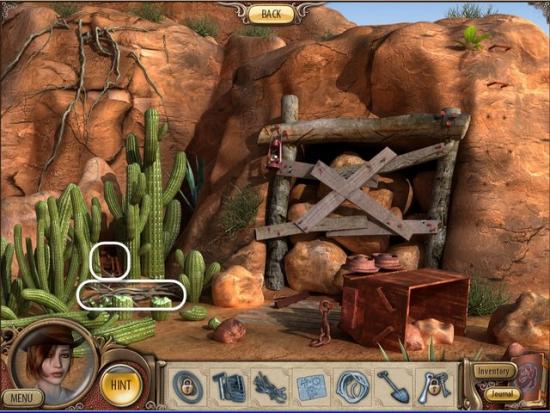
Gather the Firewood and Metal Steps highlighted in White.
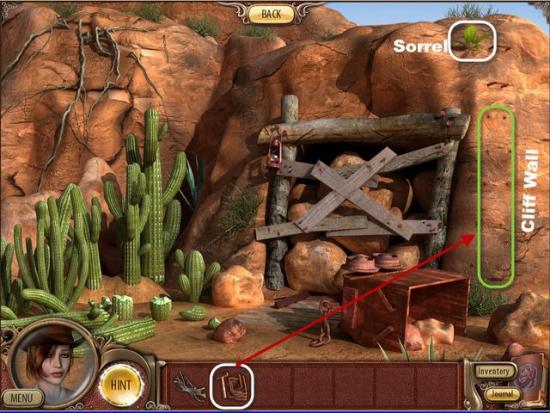
Use the Metal Steps, highlighted in White, on the Cliff Wall, highlighted in Green.
Gather the Sorrel plant highlighted in White.
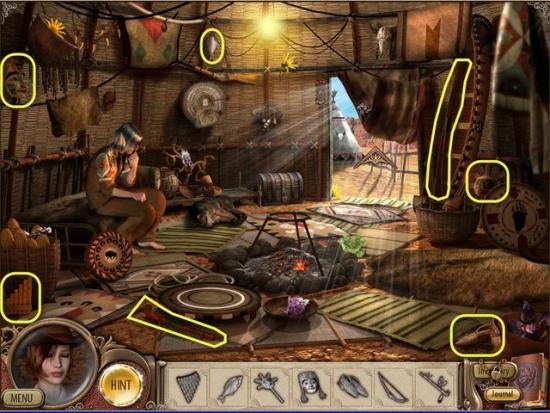
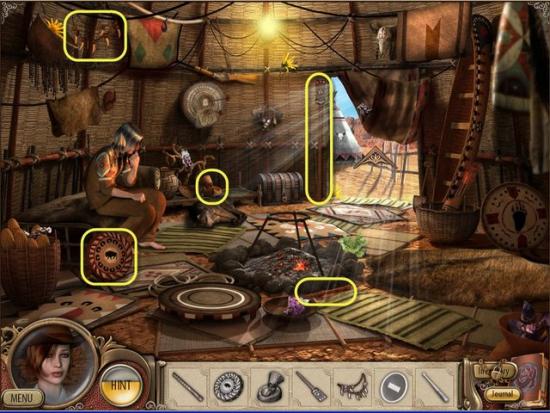
Return to the Teepee.
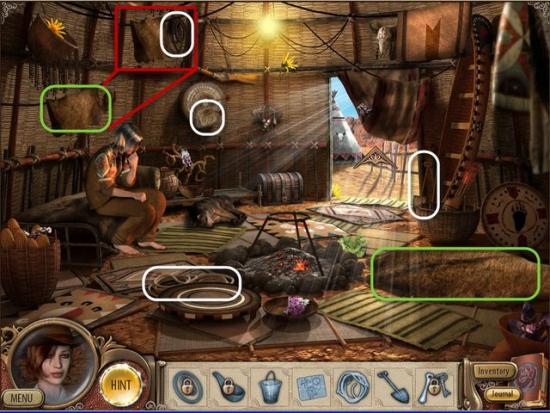
Examine the two Skins highlighted in Green.
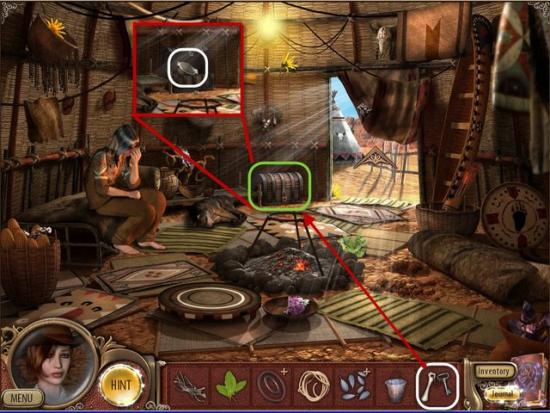
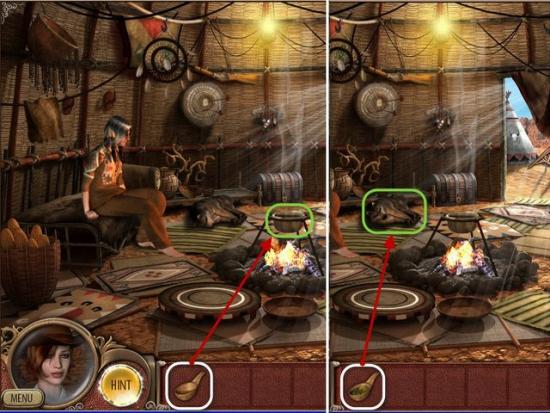
Gather the Rope, Metal Rings, Schematic, and Shovel highlighted in White.
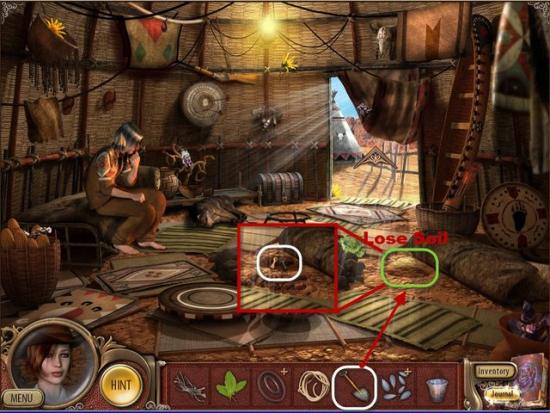
Use the Shovel, highlighted in White, on the Lose Soil, highlighted in Green.
Gather the Key highlighted in White.
Use the Key, highlighted in White, on the Chest, highlighted in Green.
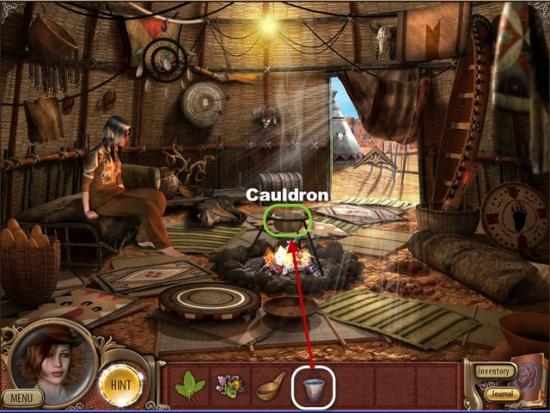
Gather the Cauldron highlighted in White.
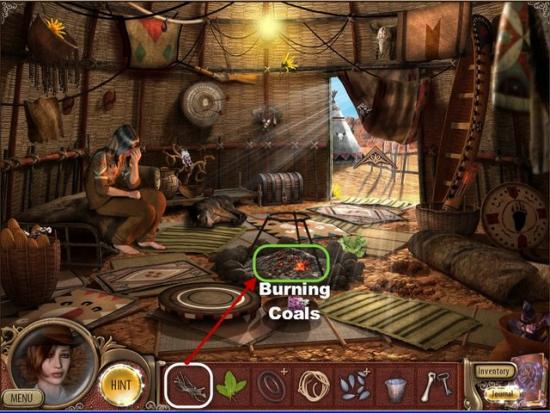
Use the Wood, highlighted in White, on the Burning Coals, highlighted in Green.
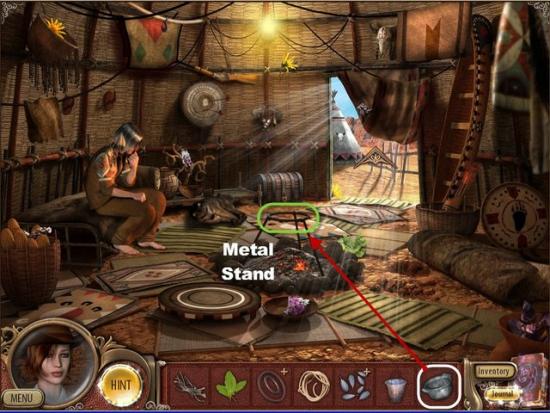
Place the Cauldron, highlighted in White, on the Metal Stand, highlighted in Green.
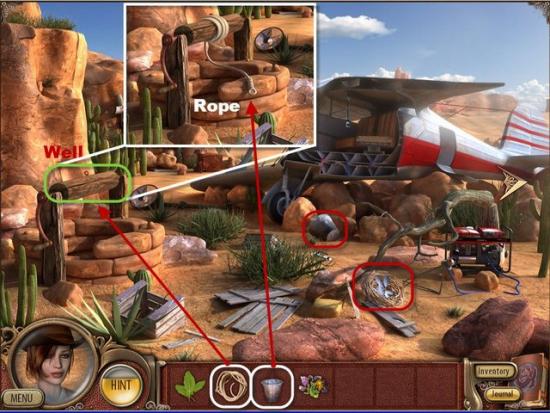
Return to the Plane.
Gather the Feathers and the Bucket highlighted in Red.
Use the Rope, highlighted in White, on the Well, highlighted in Green.
Next use the Bucket, highlighted in White, on the Rope.
Receive a Bucket of Water.
Return to the Teepee.
Open the Inventory and combine the Metal Rings and Feathers highlighted in Orange.
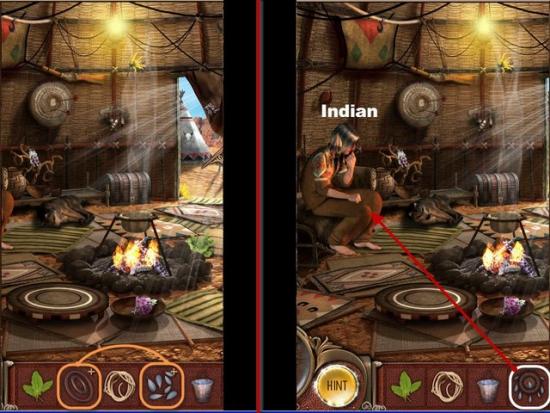
Receive the Dream-catcher.
Give the Dream-catcher, highlighted in White, to the Indian.
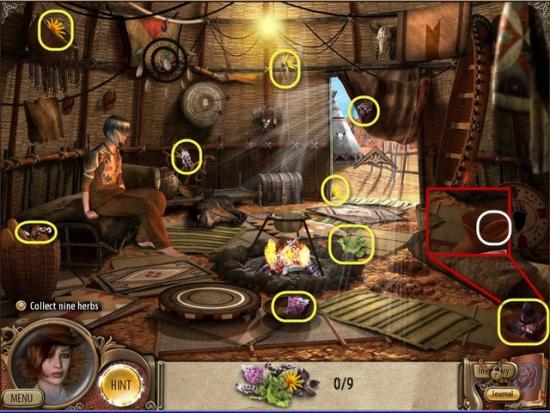
Gather the nine Herbs highlighted in Yellow.
Gather the Bowl highlighted in White.
Place the Water, highlighted in White, in the Cauldron, highlighted in Green.
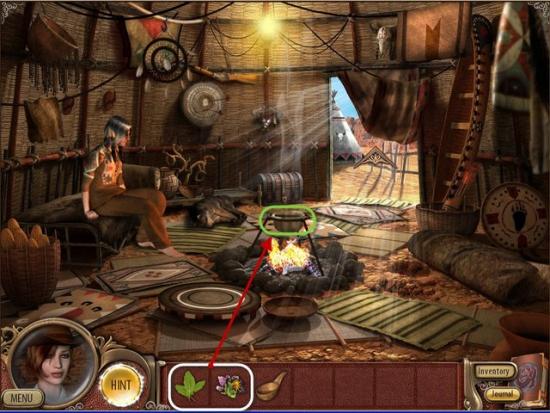
Add the Herbs and Sorrel, highlighted in White, to the Cauldron.
Use the Bowl, highlighted in White, on the Cauldron.
Receive the Potion.
Give the Potion to the Dog, highlighted in Green.
Receive Note.
Chapter 10
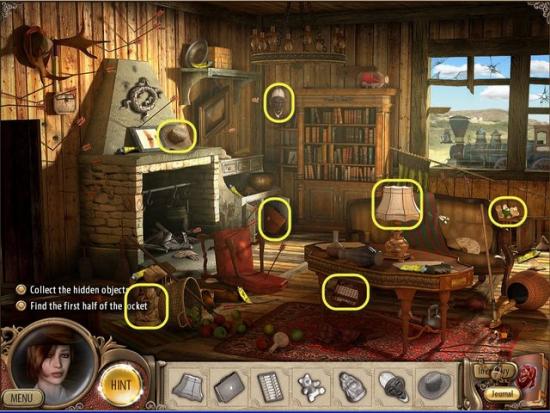
Gather the Hidden Objects highlighted in Yellow.
Gather the Hidden Objects highlighted in Yellow.
Receive a pair of Batteries.
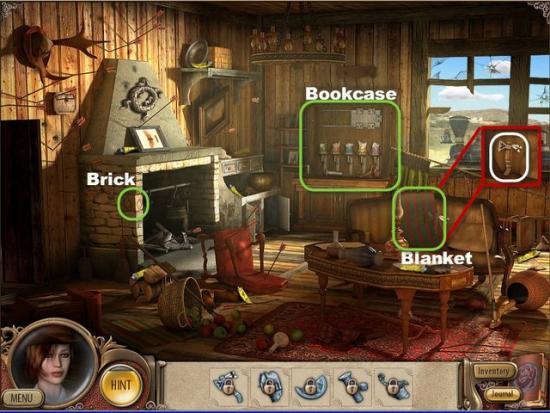
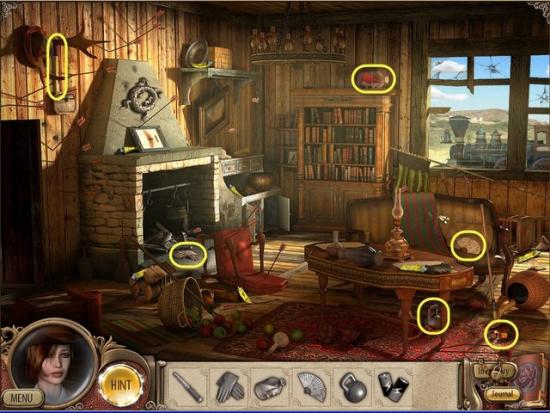
Examine the Blanket and Brick highlighted in Green.
Gather the Tomahawk highlighted in White.
Examine the Bookcase highlighted in Green.
Gather the Scorpion Figurine and Flashlight highlighted in White.
Open your Inventory and combine the Batteries and Flashlight highlighted in Orange.
Receive working Flashlight.
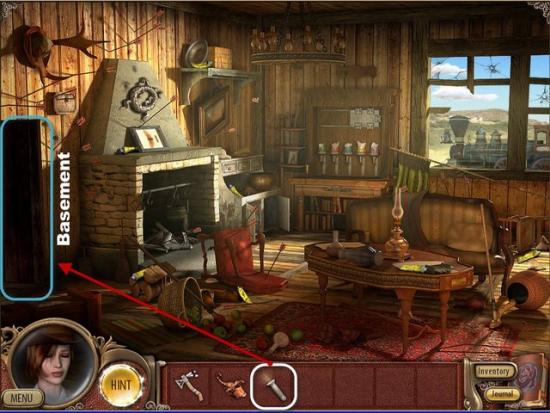
Use the Flashlight, highlighted in White, on the Basement, highlighted in Blue.
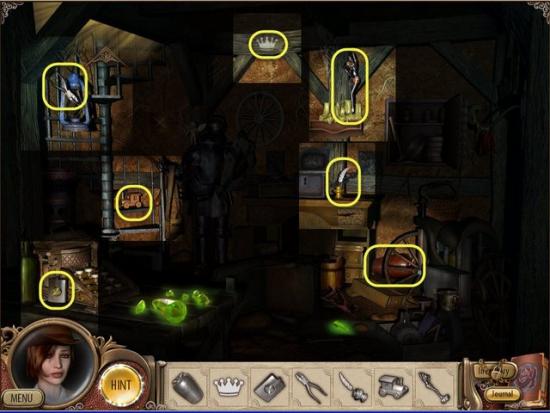
Gather the Hidden Objects highlighted in Yellow.
Gather the Hidden Objects highlighted in Yellow.
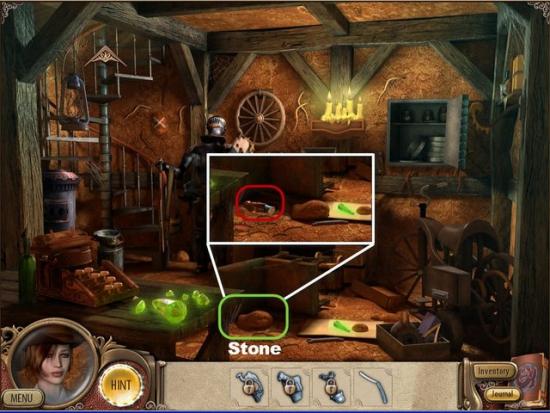
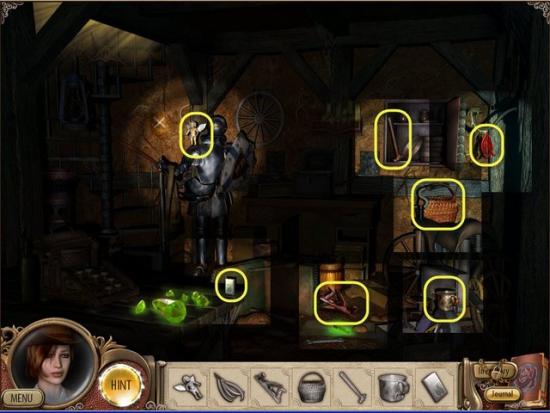
Examine the Stone, highlighted in Green.
Gather the Gorilla Figurine highlighted in Red.
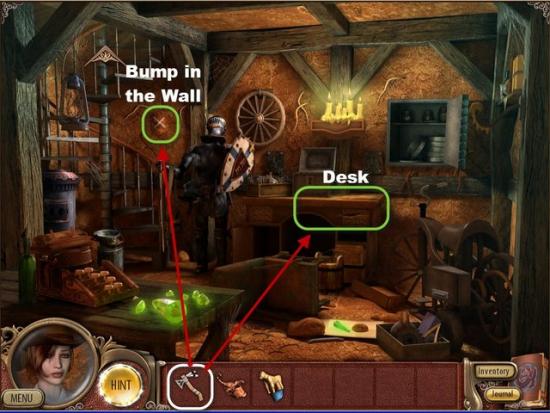
Use the Tomahawk, highlighted in White, on the Desk and the Bump in the Wall, highlighted in Green.
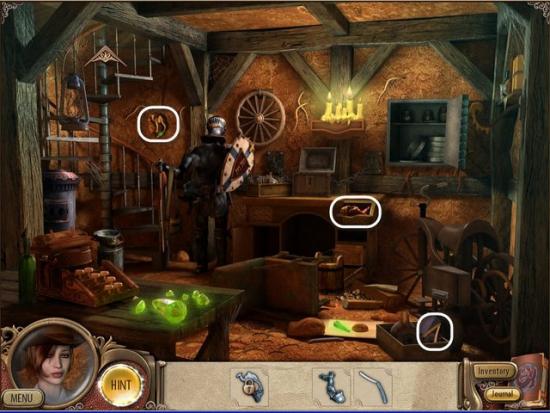
Gather the Camel and Horse Figurine highlighted in White.
Gather the Razor highlighted in White.
Return Upstairs.
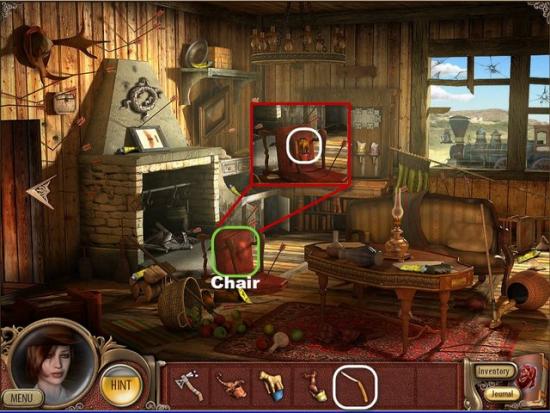
Use the Razor, highlighted in White, on the Chair, highlighted in Green.
Gather the Elephant Figurine.
Examine the Bookshelf.
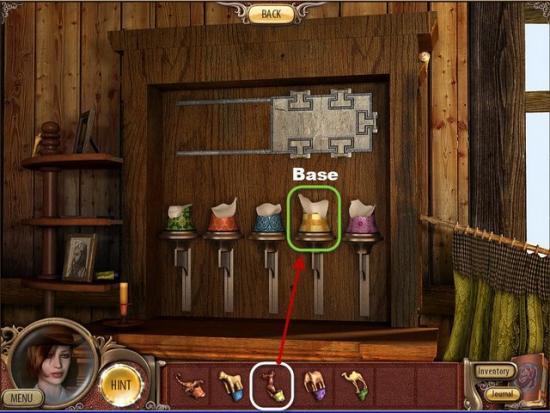
Try to place a Figurine on a Base.
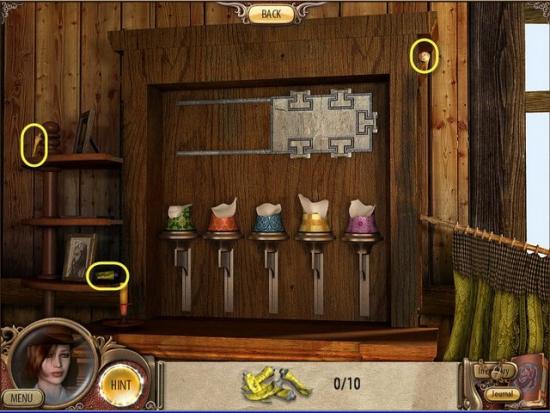
Gather the three Glue Tubes highlighted in Yellow.
Back to the Room.
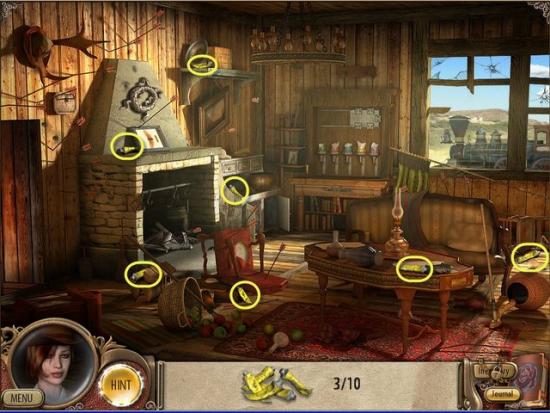
Gather the remaining Glue Tubes highlighted in Yellow.
Examine the Bookcase again.
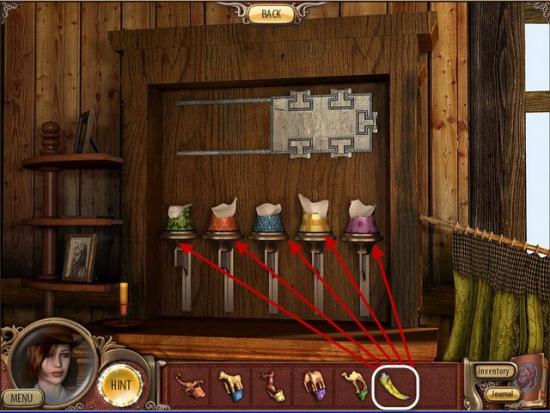
Apply the Glue, highlighted in White, to each of the Figurine Bases.
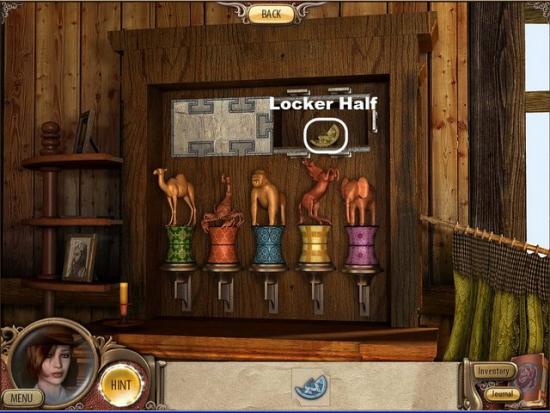
Place each of the Figurines to their matching Bases.
Gather the first Locker Half.
Chapter 11
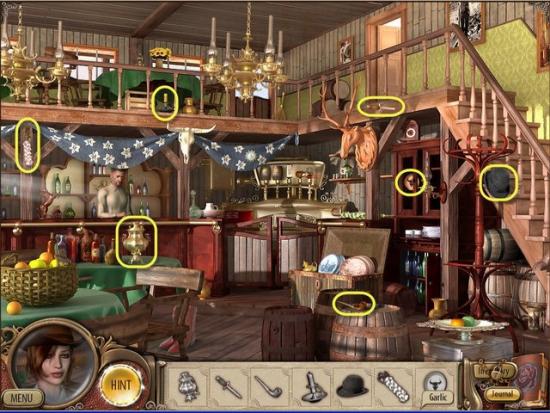
Gather the Hidden Objects highlighted in Yellow.
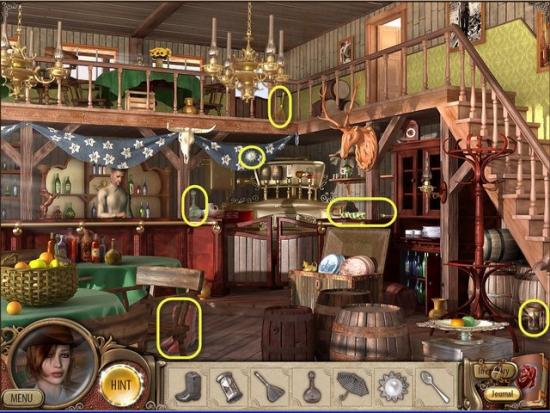
Gather the Hidden Objects highlighted in Yellow.
Go to the Bar.
Gather the Hidden Objects highlighted in Yellow.

Gather the Hidden Object highlighted in Yellow.
Gather the second Half Locket highlighted in White.
Chapter 12

Gather the Hidden Objects highlighted in Yellow.
Examine the Coach highlighted in Green.
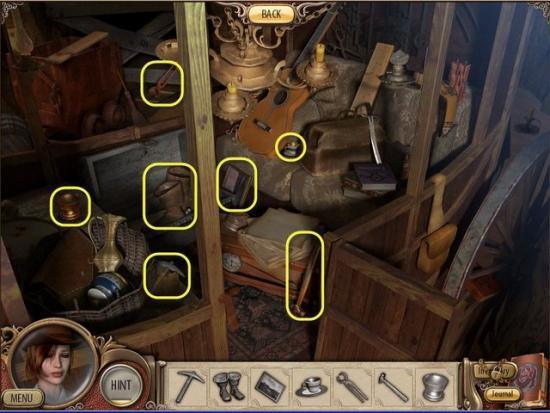
Gather the Hidden Objects highlighted in Yellow.
Receive the Pickaxe.
Gather the Scissors and Boomerang, highlighted in White.
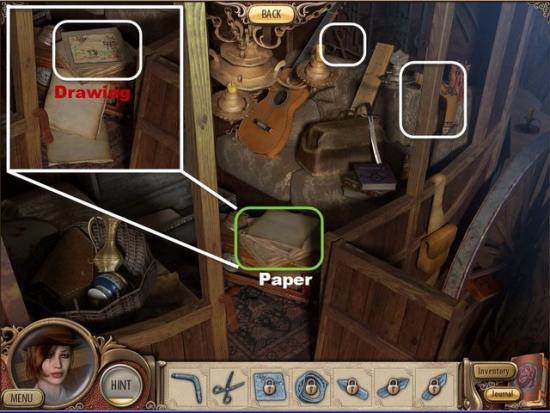
Examine the Paper highlighted in Green.
Gather the Drawing highlighted in White.
Return to Mine.
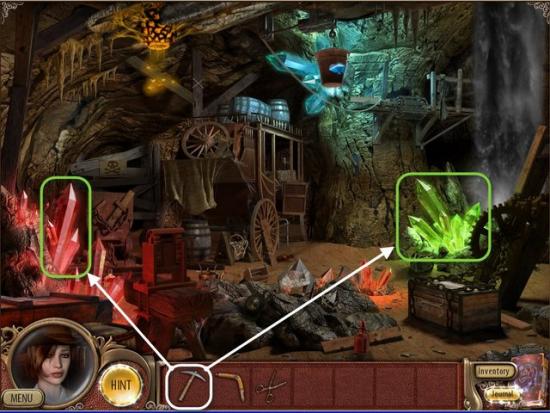
Use the Pick, highlighted in White, on the Red and Green Gems, highlighted in Green.
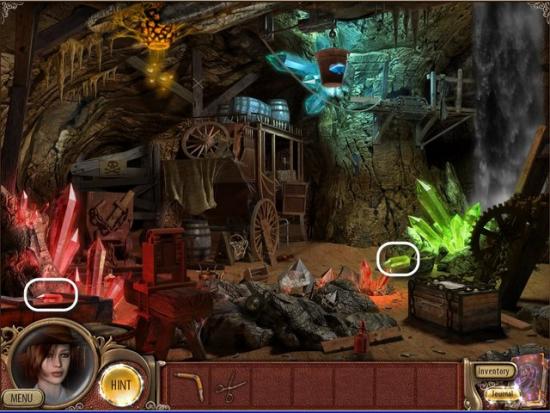
Gather the Red and Green Gems highlighted in White.
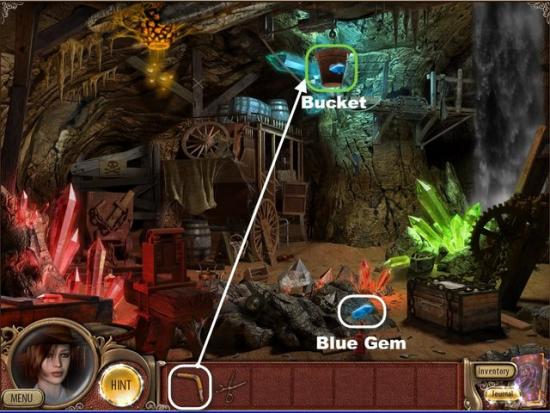
Use the Boomerang, highlighted in White, on the Bucket, highlighted in Green.
Gather the Blue Gem highlighted in White.
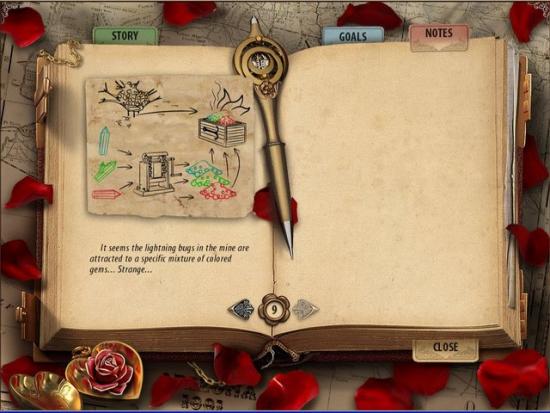
Open Journal and examine the Drawing.
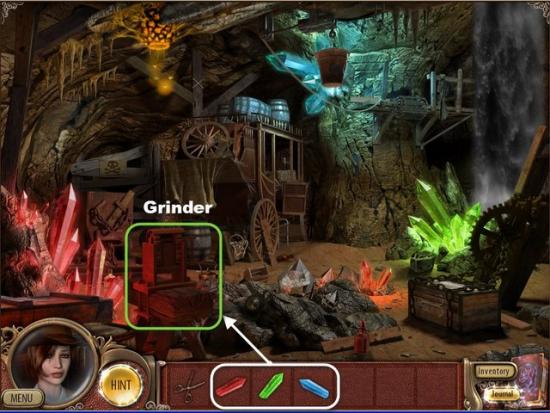
Place the Blue, Green, and Red Gems, highlighted in White, into the Grinder, highlighted in Green.
Receive Powdered Gem of each color.
Place the Powdered Gems on the Chest highlighted in Green.
After Firefly’s finish, gather the Hook, highlighted in White.
Use the Scissors, highlighted in White, on the Rope, highlighted in Green.
Open Inventory and Combine the Rope and Hook, highlighted in Orange.
Use the Grappling Hook, highlighted in White, on the Rope Ladder, highlighted in Green.
Climb Ladder.
Gather the Hidden Objects highlighted in Yellow.
Receive the Hammer/Nails.
Examine the Mechanism highlighted in Green.
For this Mini-Game you need to move all the gears from the Left Post to the Right Post.
You can only place larger Gears on smaller Gears.
Can not place smaller Gears on top of larger Gears.
Solution:
(Smallest Gear is “P”, next largest Gear is “S”, second largest Gear is “M”, the Largest Gear is “L”.
Left Post is “1”, Middle Post is “2”. Right Post is “3”
• L-3, M-2, L-2, S-3, L-1
• M-3, L-3, P-2, L-2, M-1
• L-1, S-2, L-2, M-3, L-3
• S-1, L-2, M-1, L-1, P-3, L-3
• M-2, L-2, S-3, L-1, M-3, L-3
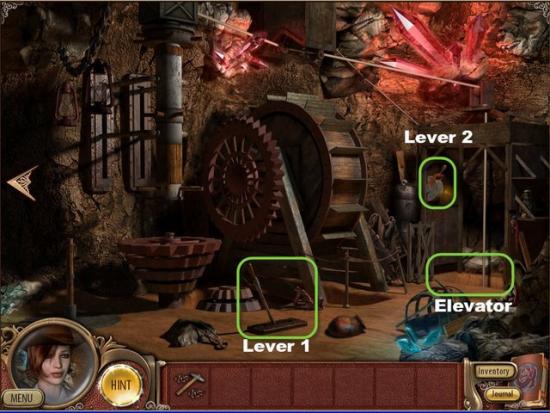
Pull Lever 1 highlighted in Green.
Pull Lever 2 highlighted in Green.
Examine the Elevator highlighted in Green.
Return Downstairs, examine the Coach.
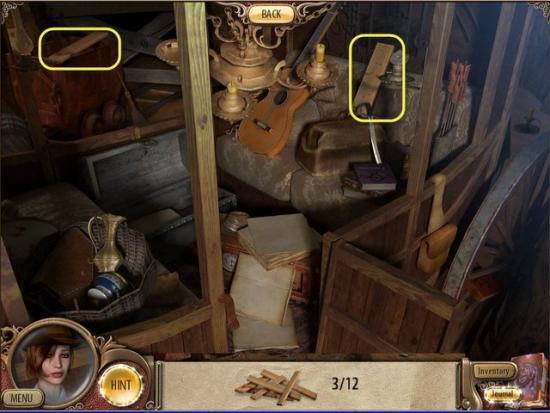
Gather the Planks high in Yellow.
Go Back to the Mine.
Gather the Planks highlighted in Yellow.
Return up the Ladder.
Gather the Planks highlighted in Yellow.
Receive Planks
Use the Planks, highlighted in White, on the Elevator.
Use the Hammer/Nails on the Elevator.
Chapter 13
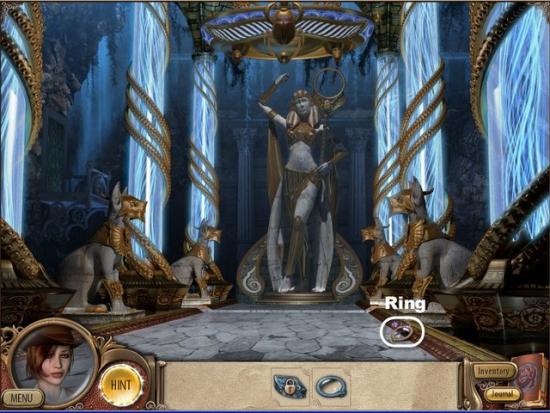
Gather the Ring highlighted in White.
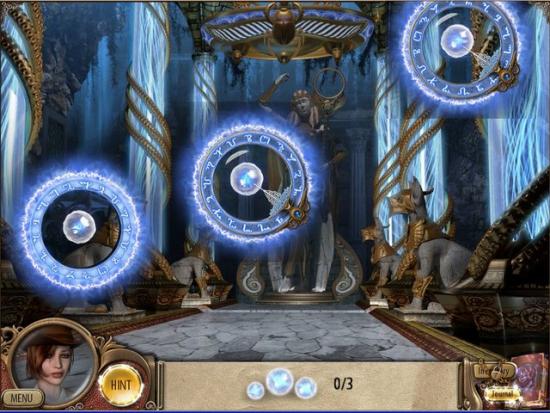
Find and Gather the three Hidden Bubbles.
Receive Ball of Energy.
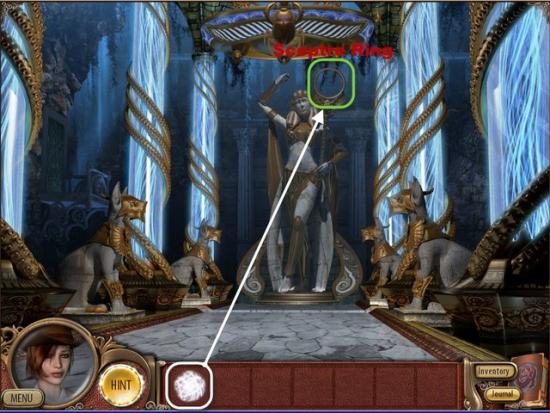
Use the Ball of Energy, highlighted in White, on the Sceptre Ring, highlighted in Green.
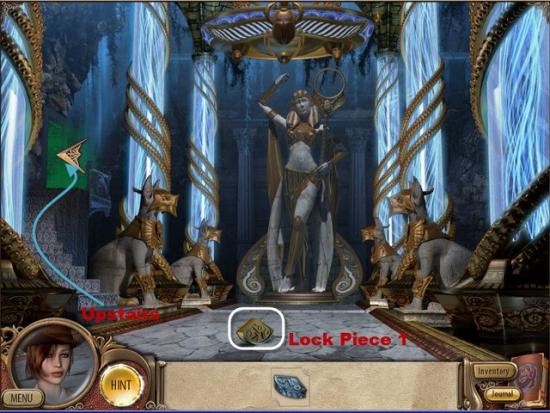
This Mini-Game is a simple Matching Tiles Puzzle.
Match all the Tiles and reveal Lock Piece 1.
Gather Lock Piece 1 highlighted in White
Climb the Stairs to next Area.
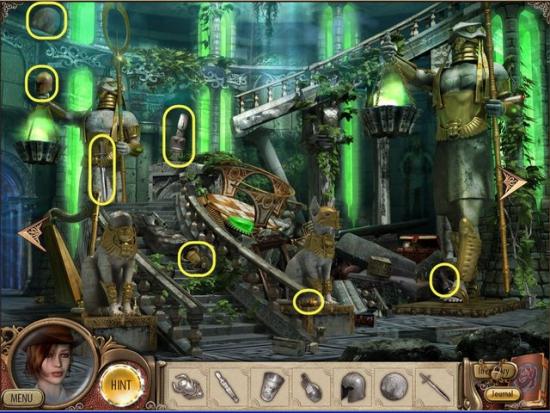
Gather the Hidden Objects highlighted in Yellow.
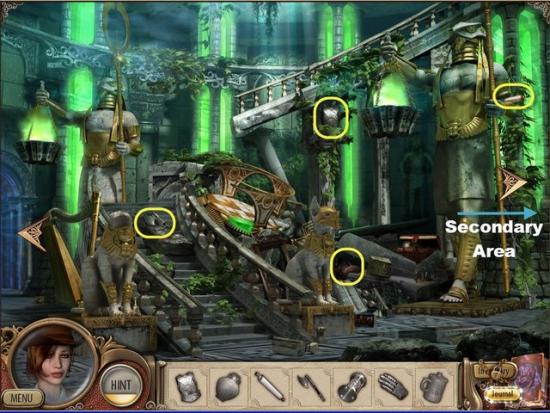
Gather the Hidden Objects highlighted in Yellow.
Move to the Right to the secondary Area.
Gather the Hidden Objects highlighted in Yellow.
Receive Jewelery Piece.
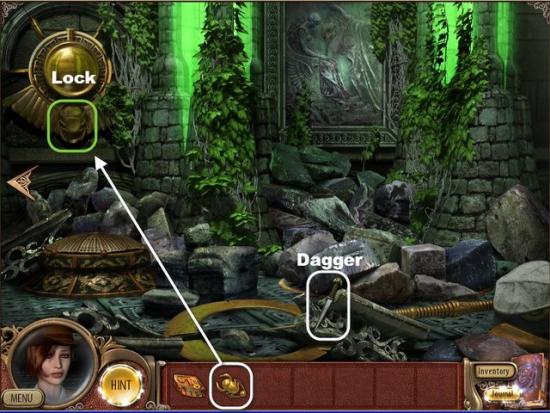
Gather the Dagger highlighted in White.
Place the Jewelery, highlighted in White, onto the Lock, highlighted in Green.
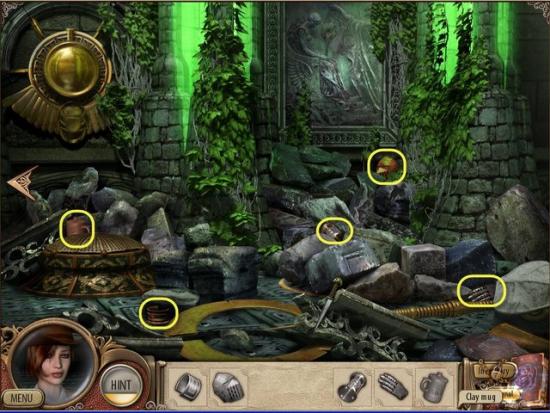
Gather the two Plate Pieces.
Return to previous Area.

Gather the three Plate Pieces.
Receive the Plate.
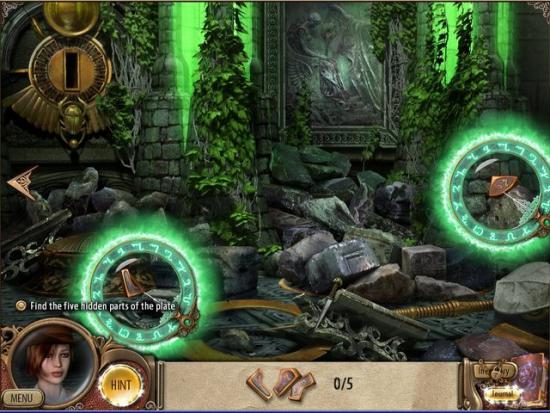
Return to the Secondary Area.
Place the Plate, highlighted in White, into the Slot, highlighted in Green.
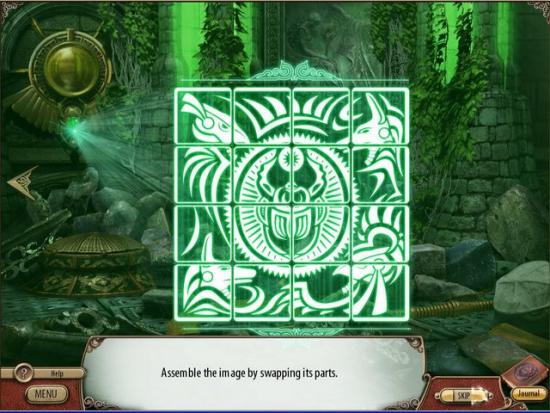
To solve this Mini-Game you need to complete the Image.
Click on Tiles to swap pieces.
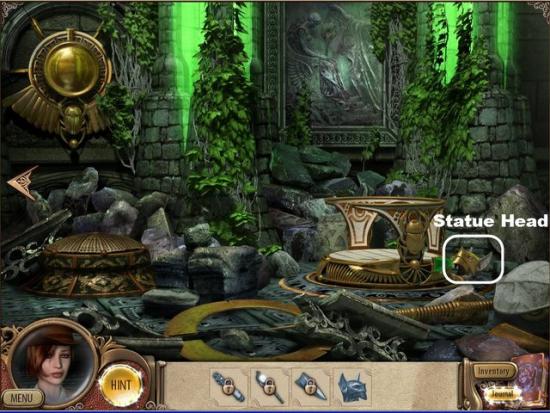
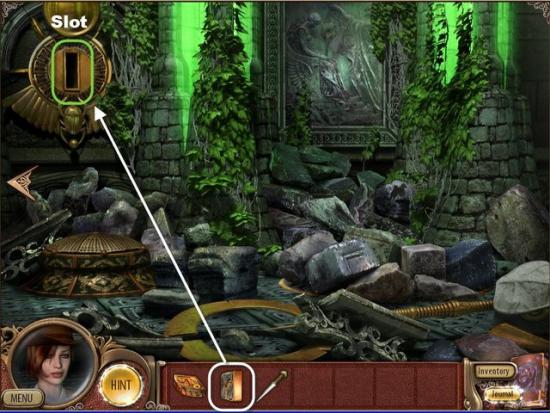
Gather the Statue Head highlighted in White.
Return to previous Area.
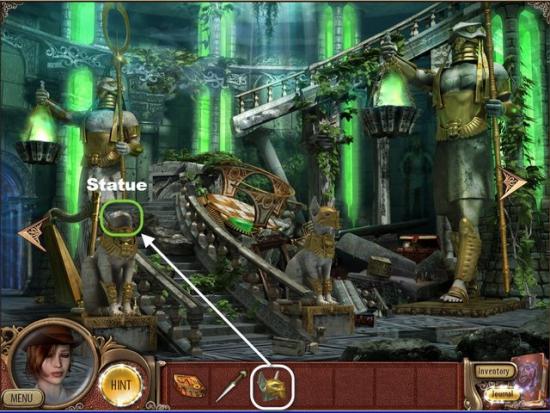
Place the Head, highlighted in White, on the Statue, highlighted in Green.
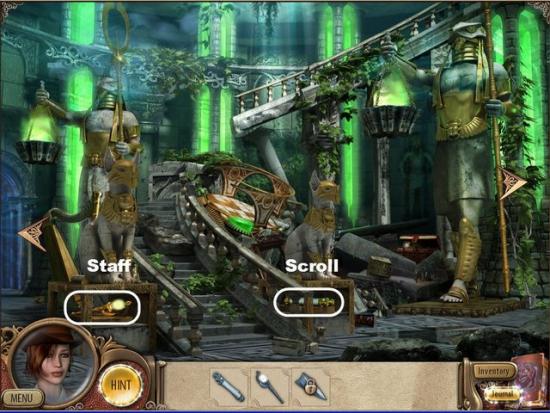
Gather the Staff and Scroll highlighted in White.

Use the Dagger, highlighted in White, on the Green Gem, highlighted in Green.
Receive the Green Gem.
Return to the Secondary Area.
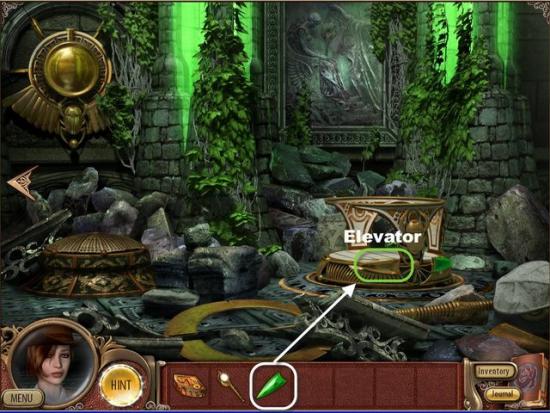
Use the Green Gem, highlighted in White, on the Elevator, highlighted in Green.
Take the Elevator Up.

Gather the Hidden Objects highlighted in Yellow.
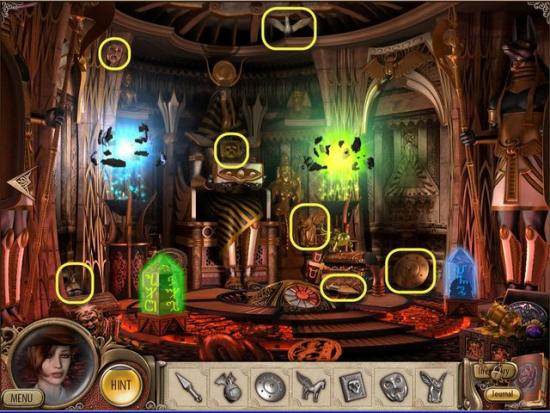
Gather the Hidden Objects highlighted in Yellow.
Receive the Artifact.
Chapter 14
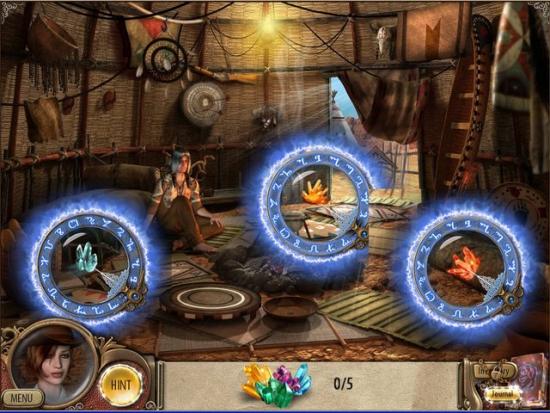
Gather the three Gems.
Leave Teepee.
Gather the two Gems.
Receive Key.
Chapter 15
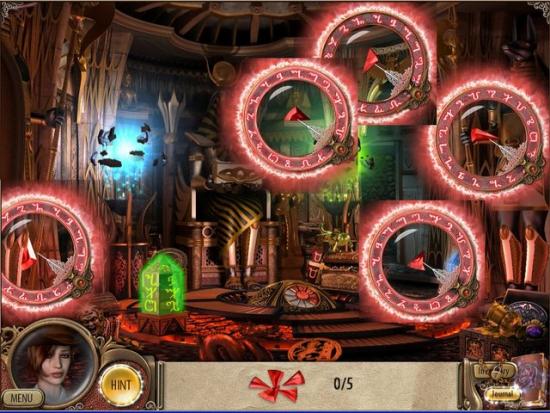
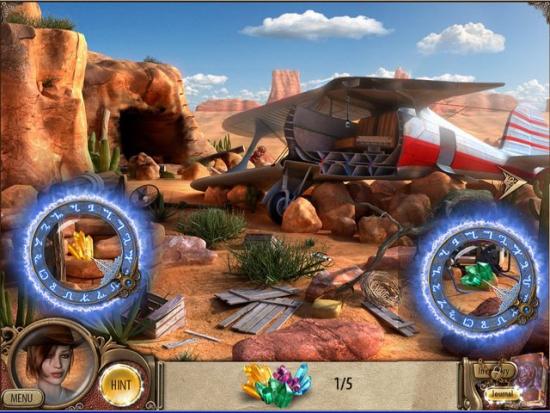
Gather the five Red Shards.
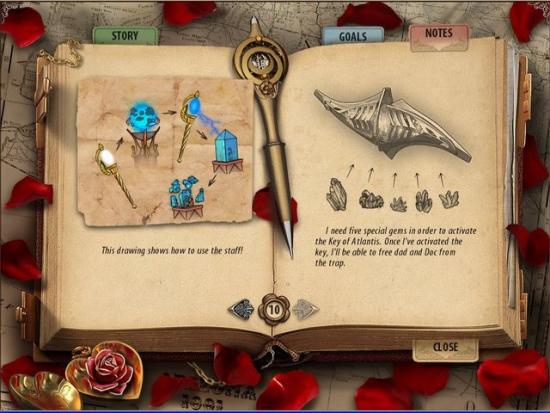
Open Journal and examine the Drawing.
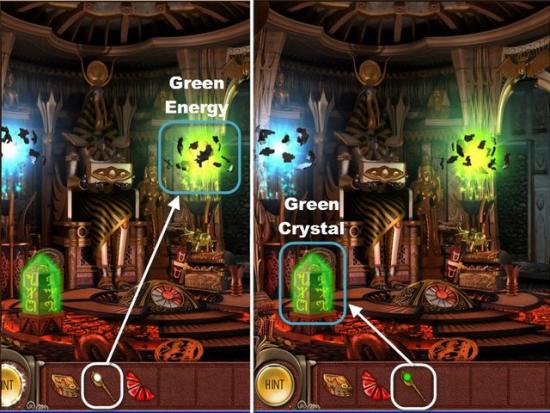
Use the Staff, highlighted in White, on the Green Energy, highlighted in Blue,
Next use the Green Energy filled Staff on the Green Crystal, highlighted in Blue.
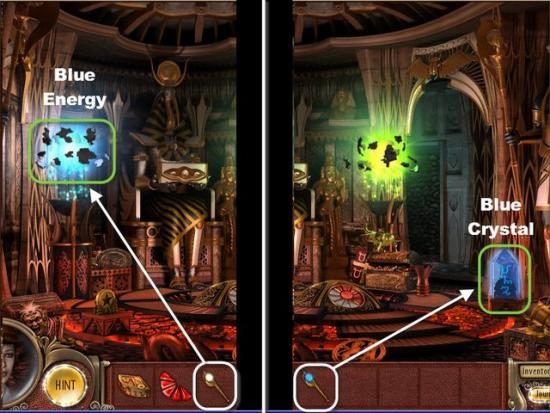
Use the Staff, highlighted in White, on the Blue Energy, highlighted in Green,
Next use the Blue Energy filled Staff on the Blue Crystal, highlighted in Green
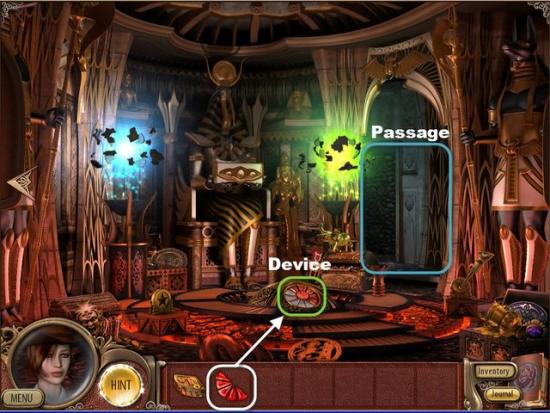
Use the Red Shards, highlighted in White, on the Device, highlighted in Green.
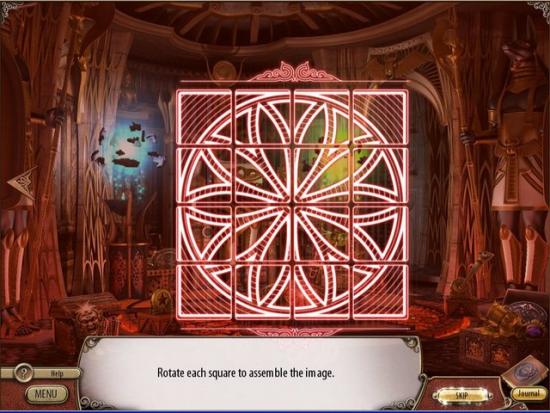
To solve this Mini-Game rotate each piece to complete the Image.
Enter the Passage to the right,
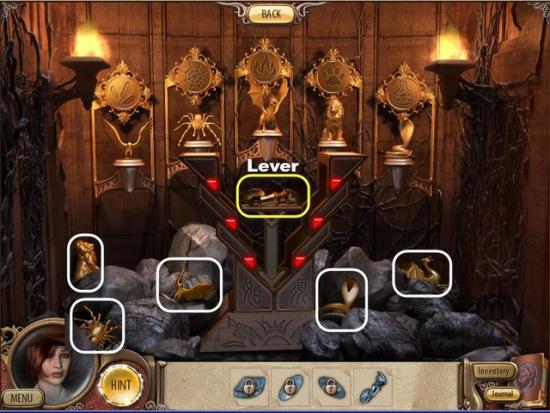
Place the figurines, highlighted in White, onto the corresponding Pedestals, as shown.
Gather the Lever highlighted in Yellow.
Return to previous Room.
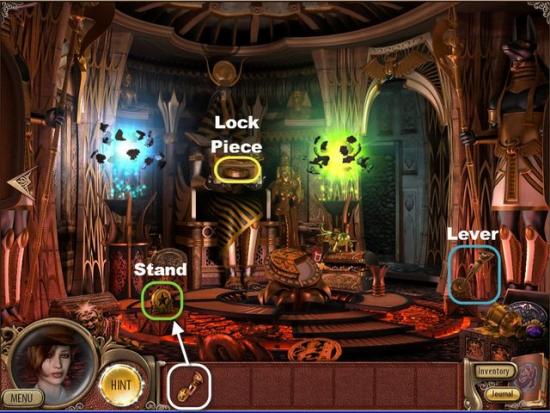
Place the Lever. Highlighted in White, on the Stand, highlighted in Green.
Pull the other Lever highlighted in Blue.
Gather the third Lock Piece.
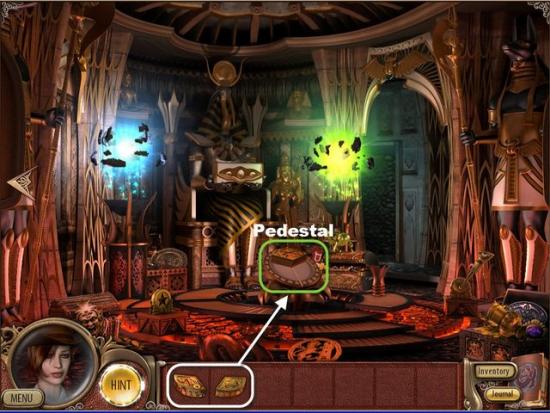
Place the remaining Lock Pieces, highlighted in White, onto the Pedestal, highlighted in Green..
Receive a Green and Red Gem.
Pull the Left Lever to Activate the Portal.
Return to the Starting Area.
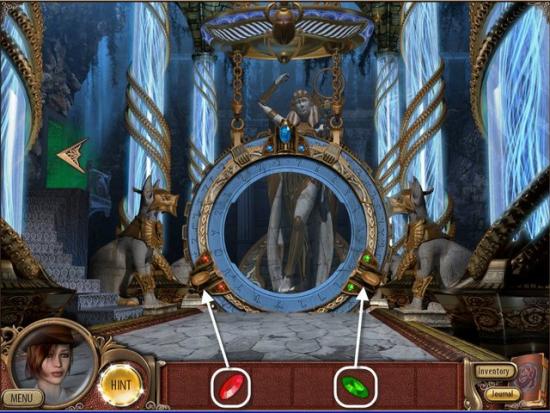
Place the Green and Red Gem, highlighted in White, into the Portal Spots, highlighted.
Examine the Platform.
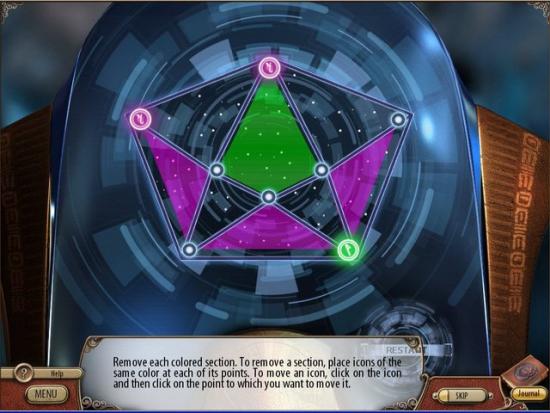
Finally solve the three Puzzles.
To solve these Puzzles you need to remove each colored section of the Image.
A Section can be removed by placing same color Icons at each of the corners of the Section piece.
Click on an Icon, then on where you wish to move the Icon.
Icons can only be moved along open paths.
If an Icon is blocked in you can not move it.
Each time you move an Icon another Icon gets added to the Board.
If you run out of moves or make an incorrect move the Board will reset.
Once you have solved all three Puzzles, the Game is complete.
Congratulations you just finished Amanda Rose: The Game of Time.

More articles...
-
Best Horror Games On Itch.io – July 2026
Across a bounty of subgenres. -
Grow A Garden 2 Base Price List
What's the most valuable crop? -
Evomon Best Starter [Leafbun, Blazpup, or Bubble?]
Grass-type, Fire-type, or Water-type?