- Wondering how to get Monopoly GO! free rolls? Well, you’ve come to the right place. In this guide, we provide you with a bunch of tips and tricks to get some free rolls for the hit new mobile game. We’ll …
Best Roblox Horror Games to Play Right Now – Updated Weekly
By Adele Wilson
Our Best Roblox Horror Games guide features the scariest and most creative experiences to play right now on the platform!The BEST Roblox Games of The Week – Games You Need To Play!
By Sho Roberts
Our feature shares our pick for the Best Roblox Games of the week! With our feature, we guarantee you'll find something new to play!All Grades in Type Soul – Each Race Explained
By Adele Wilson
Our All Grades in Type Soul guide lists every grade in the game for all races, including how to increase your grade quickly!
Alabama Smith in the Quest of Fate Walkthrough
Welcome to Gamezebo's walkthrough for Alabama Smith in the Quest of Fate. Controls This is a Point and Click Action Adventure game, so all you need is a Left click to interact with items that you can see, and your wits to solve puzzles. Click on the ‘Hint' [?] button on the menu bar to have a hint to get you through a puzzle or point you in the right direction. Main Menu: Play – Start a new game. Options: For a first time player, you are asked to enter your name. Music…
a:1:i:0;a:2:s:13:”section_title”;s:46:”Alabama Smith in the Quest of Fate Walkthrough”;s:12:”section_body”;s:48811:”Welcome to Gamezebo’s walkthrough for Alabama Smith in the Quest of Fate.
Controls
This is a Point and Click Action Adventure game, so all you need is a Left click to interact with items that you can see, and your wits to solve puzzles.
Click on the ‘Hint’ [?] button on the menu bar to have a hint to get you through a puzzle or point you in the right direction.
Main Menu:
Play – Start a new game.
Options:
For a first time player, you are asked to enter your name.
Music Volume – Adjust the volume of the music for the game.
Sound Volume – Adjust the volume for dialogue and sound effects.
Full Screen – Play the game in either full screen by checking the box or unchecking it to play in a windowed mode.
Custom Cursor – Turn this on to use the mouse cursor for Alabama Smith or turn it off to use your Operating Systems default cursor.
Trophies – Here you will find Trophies you have unlocked by completing specific tasks in the story mode. There are 18 in all.
Replay – Redo any sections of the game you have already completed
Quit – Exit the game
Changing the Difficulty:
When you are playing Alabama Smith, and you want an extra challenge, click the Menu icon and then click on Change Difficulty. Expert Mode and Casual Mode are your choices. This guide is written for Casual Mode.
Walkthrough
Game basics –
In order to progress throughout the game, you must find items that are hidden in rooms. Some of the items will be really easy to spot, while others will be harder to find.
Any of the puzzles in the game can be skipped and replayed at a later time, however completing them the first time around will earn you trophies.

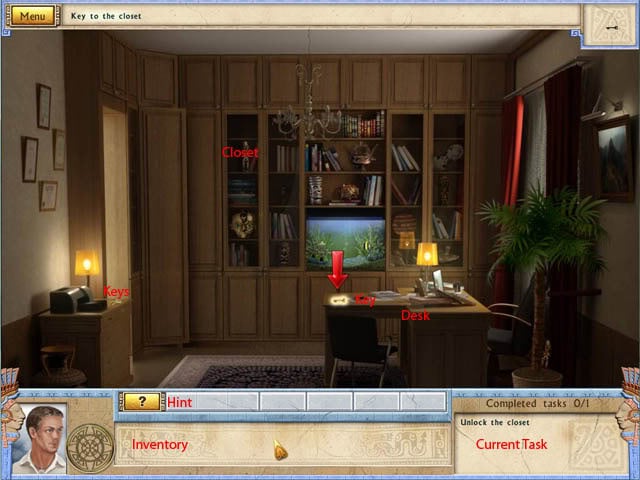
The game starts off in a small room, and your first task is to grab the key on the center desk. Left click to pick it up. Next, click the first key on your inventory to use it on the closet. The closet will glow when you have the key selected, so click on the closet and it will unlock. Next, click on the book that is sitting on the closet shelf. Click on the photos to hear your comments about them. Click the bottom right of the album to leave the screen.
You will now have an email, so click on your desk to view it.
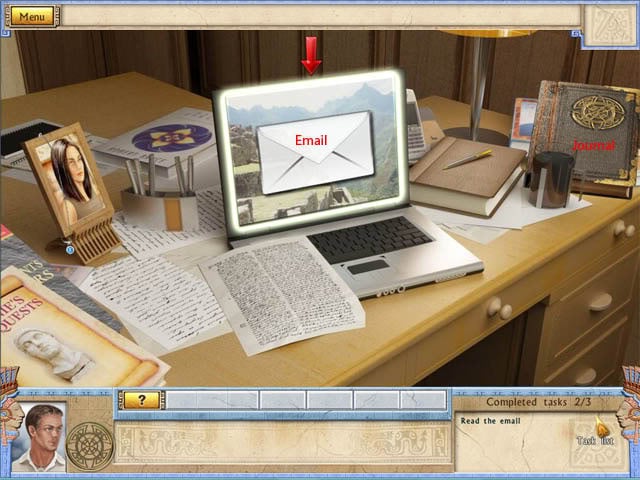
After checking your email, pick up the journal, it will be highlighted. Click on the papers on your desk to uncover the Access Card, and pick it up. Return to the room, and grab the keys on the left dresser next.
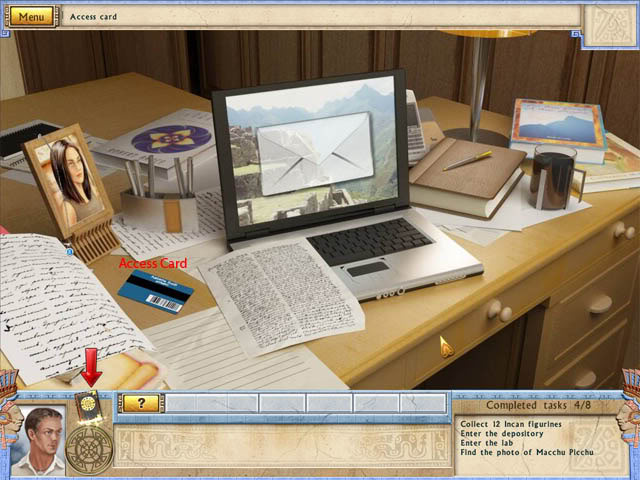
Your current objectives will be to gather 12 of the Incan Figurines, then enter the Depository. Collect the Figurines as outlined here:
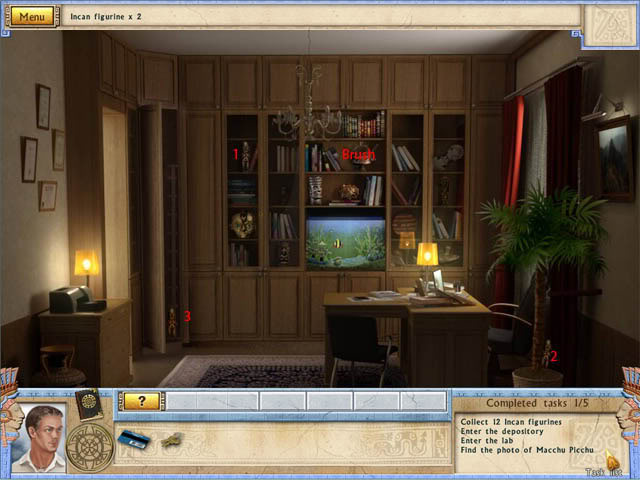
Open the closet by clicking on it to discover the 3rd statue.
Now, head out into the Corridor.
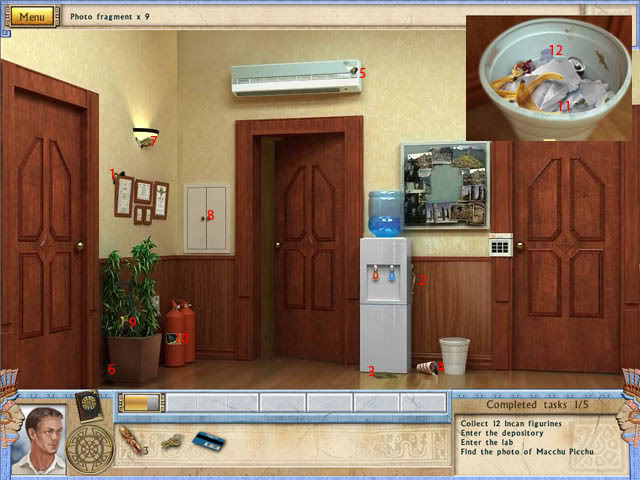
In the Corridor, there are photo fragments scattered about, 12 in all. Just click on them to pick them up. #8 is in the Cabinet, so click it to open, and two are in the trash bin. Once you have collected all 12, click on the Photo board, then drop the photo fragments from your inventory onto the board. You must reassemble them to form a complete picture, which looks like this:
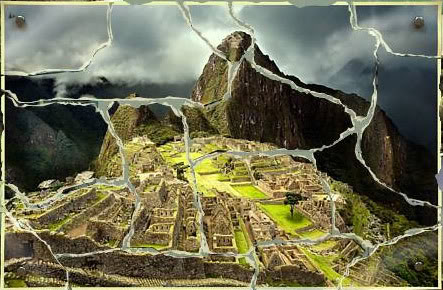
Once you have that done, you have to enter the lab. Click your keys, and then click on the leftmost door to open the lab.
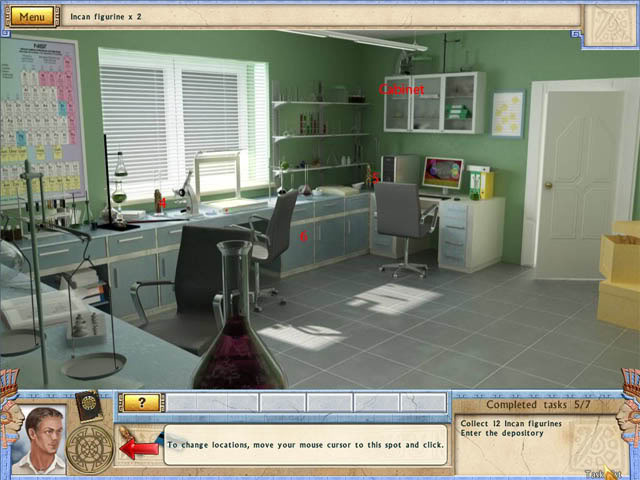
In the lab, collect the 3 Incan Figures, there are 2 on the table, one in the cupboard by the left chair (6). Once you have these, leave back to the Corridor.
Back in the hall, click on your Access Card then the keypad by the right door to open it. Enter the room.
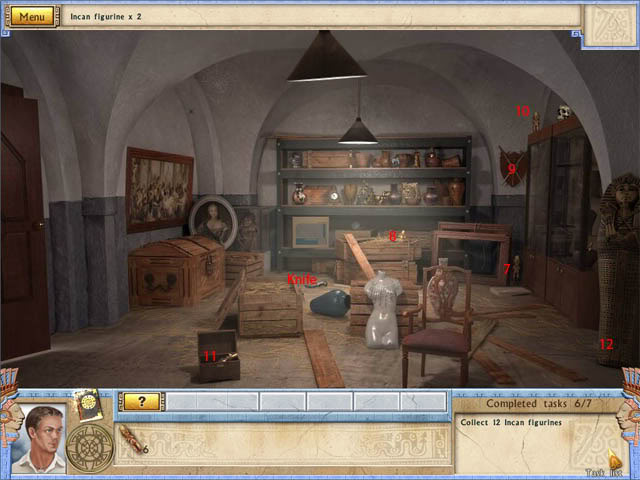
Pick up the two Incan Figures that you can reach, and then click on the sword (9) to open a hidden panel, then collect that Figure too. Next, click on the Sarcophagus on the very right to examine the Scarab Beetle, you have to position the legs like this:
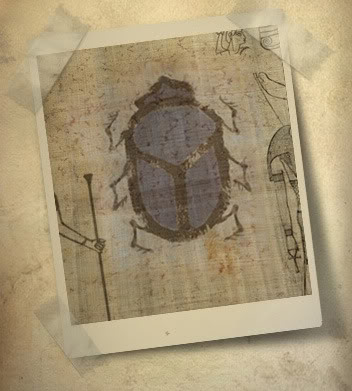
However, you can’t right now, so you will have to come back later with the jem that is supposed to go in its leg. Leave back to the corridor. Once back here, the plant on the left by the door has a secret, a crowbar that is blended in. Pick that up, then once again go to the Depository. If you tried to grab the Incan Figure in the little box on the floor and the lid shut, you will need to use the crowbar to open it. Equip your bar, then click on the box to open it (10), and grab the Figure. Once you have that, return to the Office.
In the Office, the Closet that you opened for Figure number 3, there is a ladder in there. Pick it up, then go back to the Depository again.
When you get back here, equip your ladder then click on the shelves to the right of the room. When you have done that, click on the statue on the top of the shelf (10), and it will fall down into a paint tray. You have to clean it off, so back to the Corridor. That cabinet that held Figure number 8 has a rag in it, so obtain that. Go to the Lab now and click on the cabinet at the far upper end of the room. You have to pick up all 9 items that are listed on the menu, and they are located here:
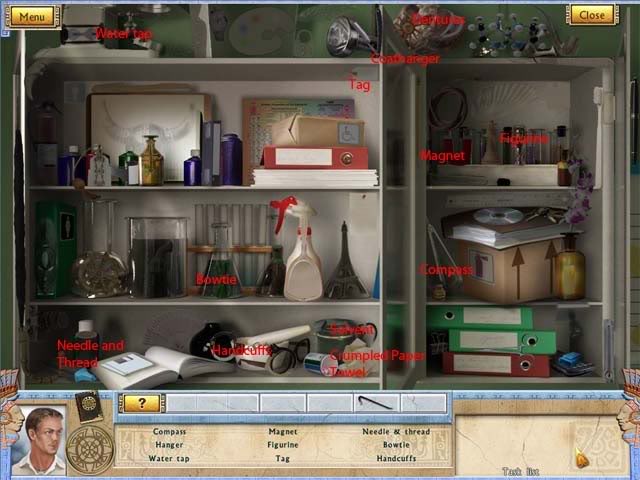
After you pick up the Solvent, go back to the Depository again to clean off that statue. Click on your Solvent and then on the Tray to clean it off, then use the Rag on the Tray to wipe the solvent off. Pick up your clean statue!
Our next task is to open the Sarcophagus, but we need a jem to do so. Remember back in the Office the gift for Anastasia? That is the jem we need, so go to the Office and examine the table. The Gift is on the picture frame, so click the jewel to pick it up. Once you have that, head back to the Depository again.
Click on the Sarcophagus, then click on the jewel then the missing spot on the Scarab Beetles leg. This allows you to move and rotate the legs. If you check your journal, the leg positions will be shown for you on the beetle. Rotate each leg as illustrated in the picture:

Once the legs are positioned like your journal, the Sarcophagus will open allowing you to get the last Figurine. When you pick up the last one (12), you can put them in the crate in the middle of the room. Click them in your inventory, then place them in the crate, and then click the crate to close it.
Apparently there is a fire going on in the building, so get to the hallway and pick up a fire extinguisher (where picture scrap number 10 was). Get to the Office and examine your desk. It is on fire, so equip your new extinguisher and click on each part of the fire to put it out. That was a close one!
You need some tools before you head out to Machu Picchu, and they are located in the cupboard in the Lab. The items are here:
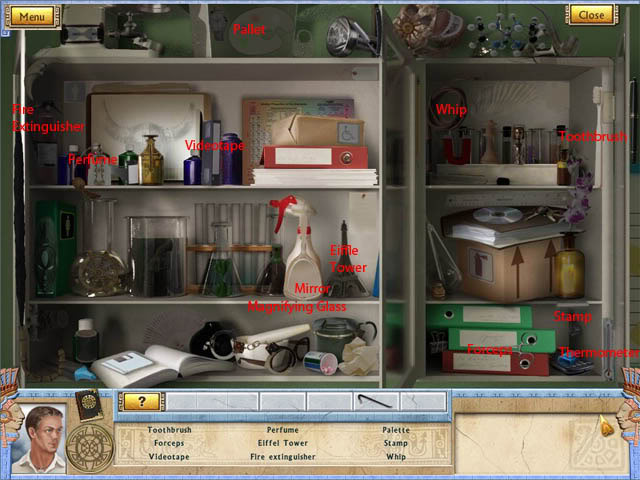
Once you pick up the Magnifying Glass, you will return to the room. You need to find a Knife and Brush, one is located in the Depository and the brush in the office. The knife is on the floor of the Depository, and the brush is on a shelf in the Office. Once you have both of those, it’s off to Machu Picchu!
Machu Picchu
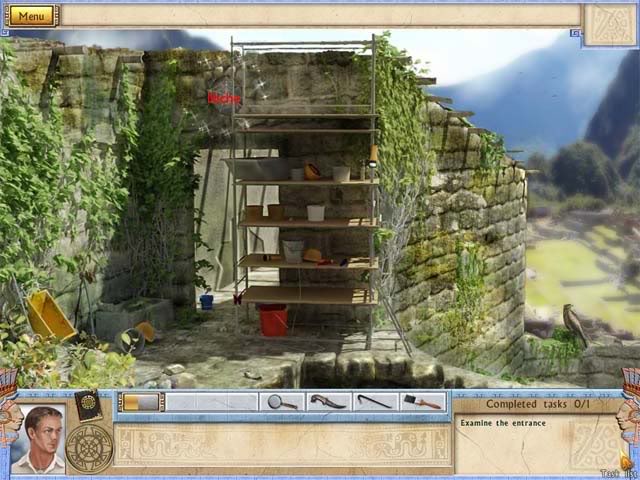
When we get here, the first thing we should examine is that Niche above the doorway. Use your Brush to dust away the spider webs. Next, head down to The House of Guardians on the right path. There is a trunk on the floor, so use your Crowbar to pry it open. It has a newspaper clipping from 1911. Next try and open the trunk on the right, which will need a code. The code is 1911, just like the newspaper clipping. Pick up the Part of the Symbol from the trunk and a cut scene will play. You will now have the Amulet which will allow you to travel to the past. Use it, and go to the House of the Guardians (In the past of course).
Here, there are a few things we must do. Click on the Talking Knots to uncover an Incan Secret. Next, click on the glowing objects in the hut. You must find the following items, and their locations are here:
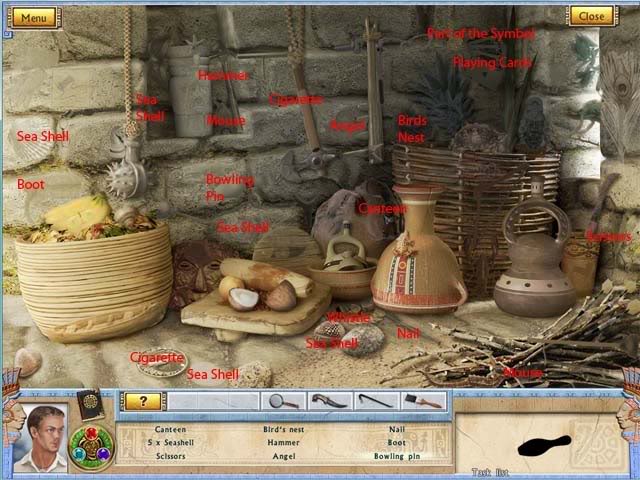
Obtain some coal from the fire pit by the hut. Click on the food by the jug to obtain the title, Harvester. Grab the Ear of Corn while you are at it. Once you have all of those items picked, you must head to the tomb. You can access this by the Amulet on your Inventory Bar. Click the Amulet to unlock a secret, Time Traveler.
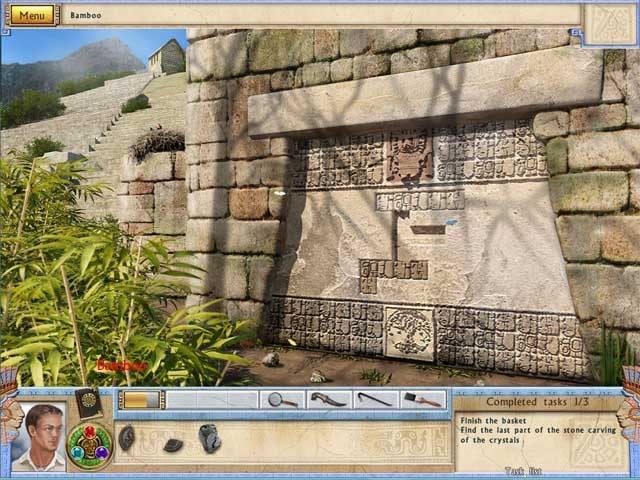
At the Tomb, click on your knife and then on the Bamboo to harvest some. This will be used to finish the basket. Now, click on the door for a puzzle.
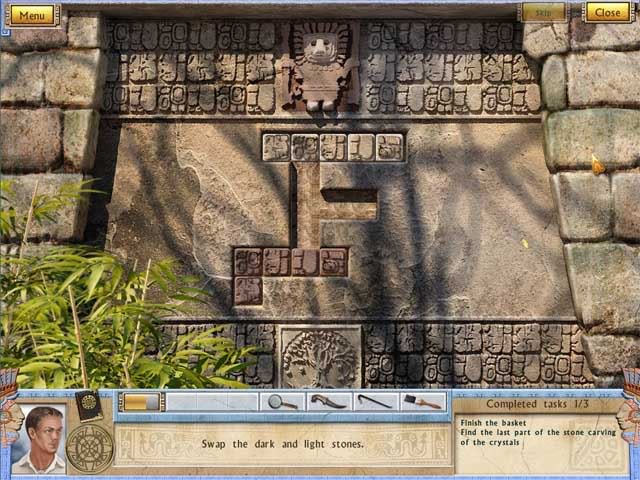
You must switch the light and dark stones, so they look like this:
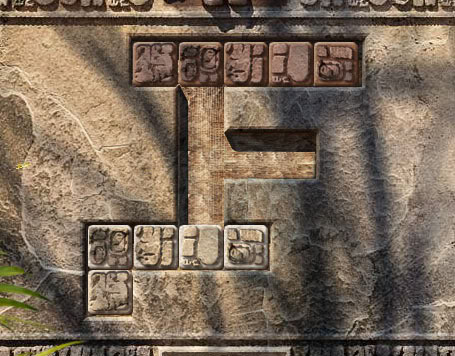
It is a bit tricky at first, but when you get the idea it is very simple. You must place the stones in their respective spots on the other side, starting from the long sides and working your way towards the middle. The symbols must be in the same spots as they left, so you can’t just switch the colors around and call it a day. Start by getting the white blocks in place first, so move them all down to the bottom half and arrange them properly by switching out their place for another white until it is all lined up. Once you have the white in order, shift the red bricks around until you get their proper symbol order. When you complete this puzzle, you can enter the tomb.
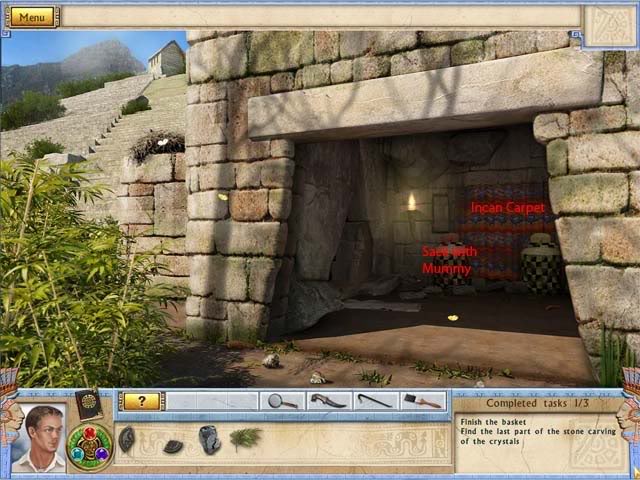
Use your knife on the Sack with a Mummy (The left one) to open it up and pick up its contents, which are a Golden Axe and Part of the Symbol.
Head back to the House of the Guardians.
Click on your Amulet to return to the present time. You will want to click on your bamboo then the Water Tank to make Wet Bamboo. When you have done this, go back to the Temple Entrance.
Click on your Amulet again to return to the past.
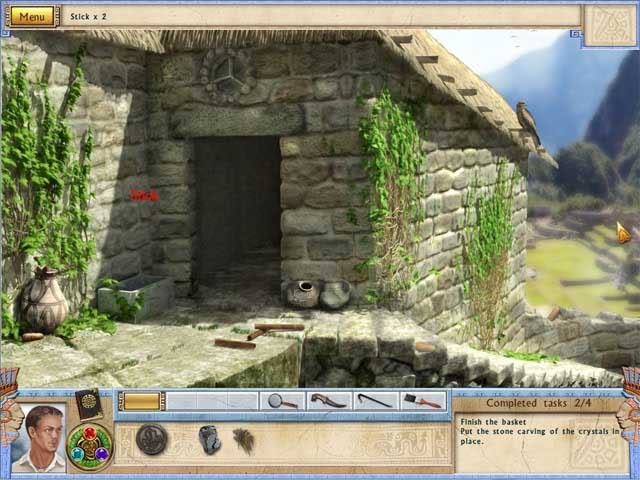
There is a stick in the corner, so use your Golden Axe on it to make small pieces, and pick those up. Return to the present by clicking on the Amulet. Return to the House of the Guardians, and go back in time again. Here, click your sticks then click that basket on the ground. Next, use the Bamboo in your inventory to finish the basket, then pick it up. Return to the present now. Go back to the Entrance of the Temple, and go back in time once again.
Place the basket in the door way, under the Niche. Use your Symbol on the Niche above the door now. Go back to the present by clicking on the Amulet. Go to the House of the Guardians, and again, go back in time. Click on the glowing items, and then find the ones listed. They are located here:
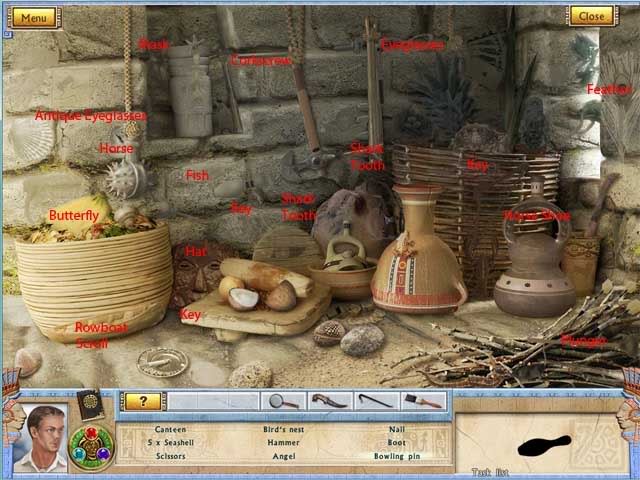
Go back to the Entrance and go back in time again. Use the Parchment on the Map, then use the Charcoal on the Parchment. Click all over the paper to discover the map. Go back to the present once you have your map. Go to the House of the Guardians, and again, go back in time. Walk down to the tomb, then use your knife on the Incan Carpet hanging from the wall. Examine the Faces on the Wall behind the fallen carpet. Click all the stones into the wall to unlock the Earth Element. Once you have that, a cut scene will play.
Temple of the Sun
The Temple has been ransacked centuries ago, so lets go examine it before it was robbed. Click on your amulet to go back to the past.
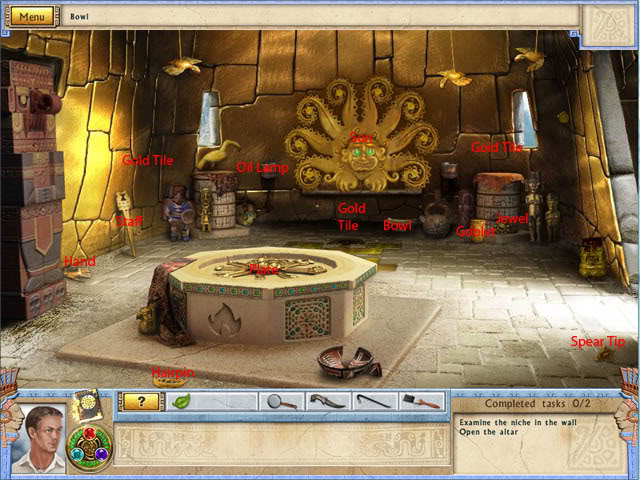
Pick up the Hairpin off the ground to get part of your Trophy, Prospector. Pick up the Hand and Spear Tip. Click on the Sun to make a bunch of poisonous spiders drop down. Grab the Staff against the wall. Next, return to the present day via your Amulet.
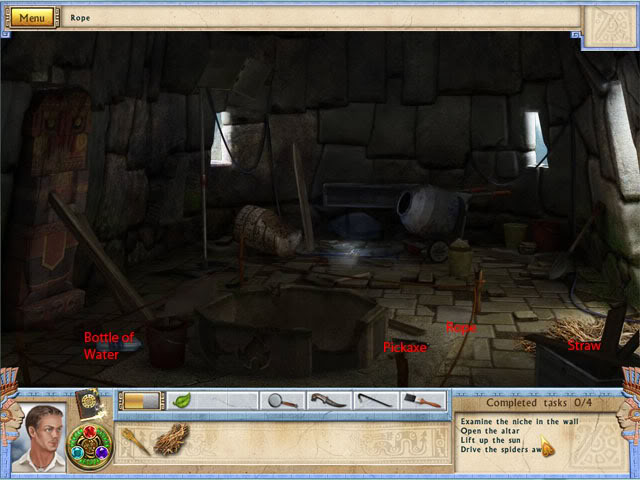
When you are back to the present, pick up some Straw off the floor. There is a rope on the floor, so use your knife to cut a piece off to use. This will make a torch when combined with the Staff. Use your Torch on the sparks on the floor to light it on fire, then return to the past. Use your burning torch on the oil lamp beside the Sun altar. Go back to the present time. Pick up the bottle of water on the ground, then go back again to the past.
Grab the Bowl on the floor under the altar, which will make a bowl of water. Again, go back to the present. Use the Bowl of Water on the sparking cable to return electricity to the room. Go back to the past again. (You should obtain a Trophy now, Time Traveler.) use your Crow Bar on the Gold Tile on the left wall to pry it open, and do the same for the Gold Tile under the Sun Altar. There is one more on the back wall to the right. Once you pry those three open, the Altar will move.
The puzzle here is this: You have to move the water symbols to the left, and the fire to the right. You can move any two symbols to the empty space by clicking on the slider to move them, then the empty space to place them there. You have 6 moves to finish it, so move them in this order:
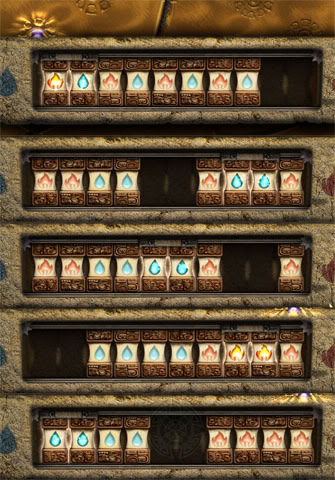
Once you complete this, go into the Passageway.
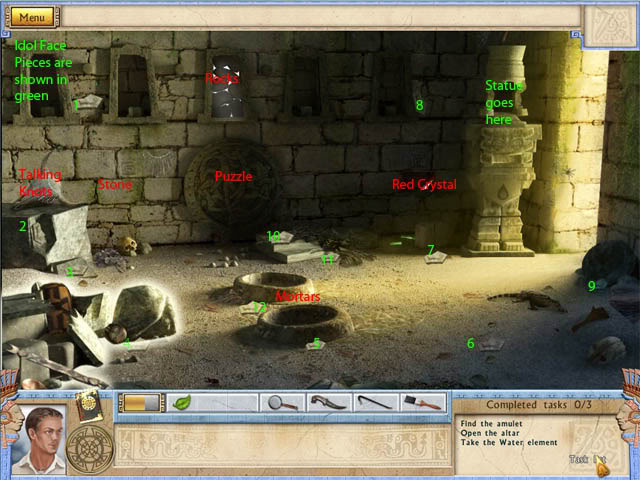
Anastasia dropped the Amulet, so you have to find it now. Click on the glowing objects, and you will have to find the listed objects. They are found here:
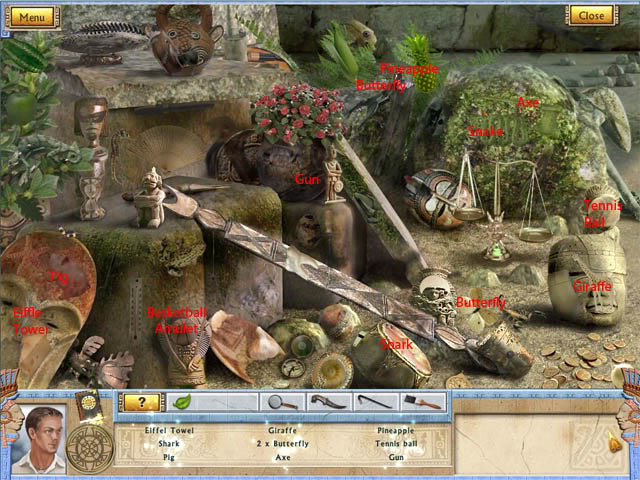
Once you get the Amulet, take the Talking Knots off the skull to the left. Gather the Statues face pieces around the room, there are 12 in all:

When you have it assembled, equip it and place it in the hole meant for it. Grab the Red Crystal from the wall. Next, examine the puzzle on the wall. Rotate the pieces from the outer ring inward, until you have this pattern:
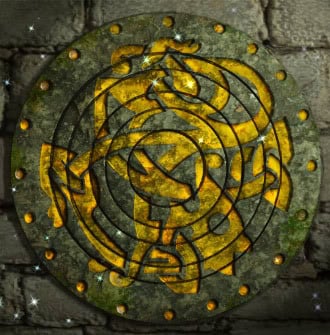
When you have that done, click the rocks blocking the window which is above the puzzle. Click them until they are all gone. Go back to the Temple of the Sun now, and go back to the present. There is a pickaxe lying on the floor, pick it up, then go back in time. Go back to the place where you found the Amulet and use the new pickaxe on the Stone to break it open. Take the Pink and Yellow Crystal, and with them all combined, place them on the left most open window. Use your Magnifying Glass to in place of the broken Crystal, and put it on the right window pedestal. Return to the Sun Room and grab that Goblet off the floor, (There is a Jewel as well beside it, grab that now) and go back to the previous room.
In this room, use the Goblet on the Idol’s tears, known as Heavens Tears. With this full, place it on the Mortars in the middle of the room, which will unveil two diamonds. Pick those up, and put them on the Idols Head. This will unlock its chest, and reveal a hole. Click on the Glowing Objects on the floor again, and another treasure hunt will start. The items are found here:
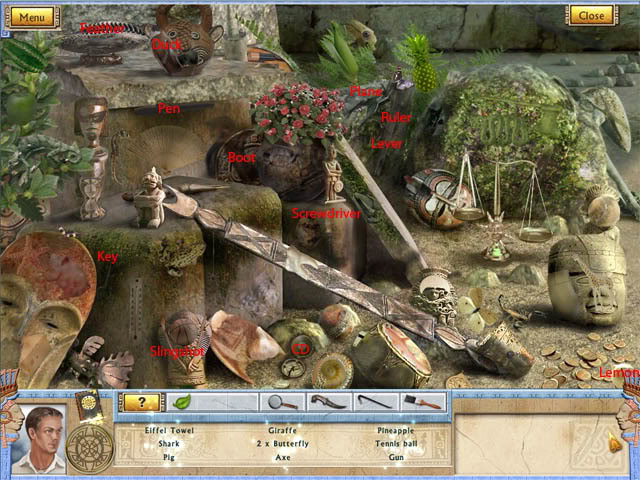
When you obtain the lever, use it on the Idol Breast to open it up, then click the switch that appears. Examine the hole that rises up, and take the Water Element! Take note of the pattern on that wall. Once you have the Element, go to the Sun Room and take a look at the central plate. You must arrange the colors of the sun’s rays like the diagram where the Water Element was found:
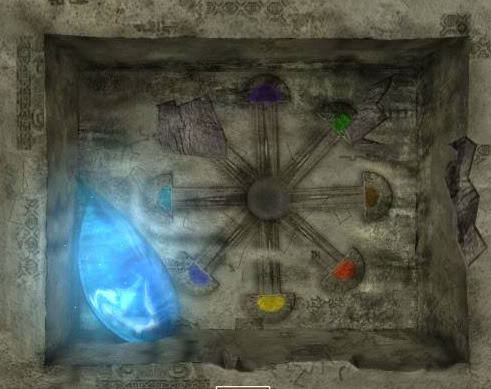
Just click the pieces of the rays to rotate them, and make them the correct color, like this:
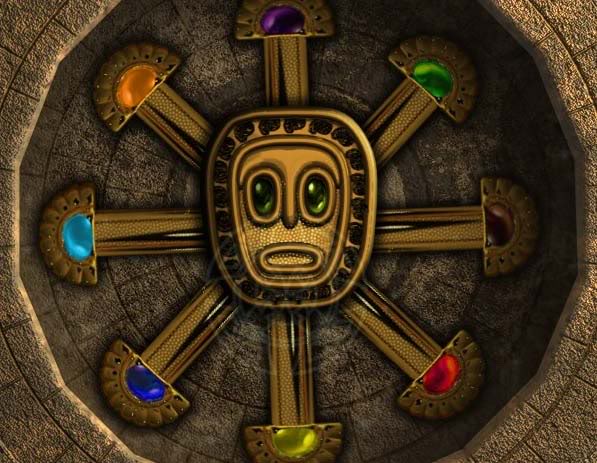
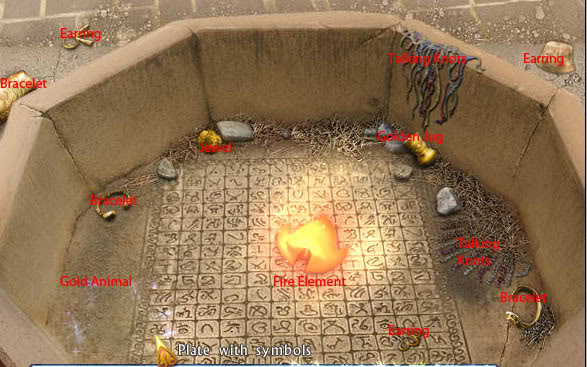
When you do this correctly, the plate will open. Grab all the items in the tomb before grabbing the Fire Element. When you grab the last Element, a cut scene will play.
Back to the Office
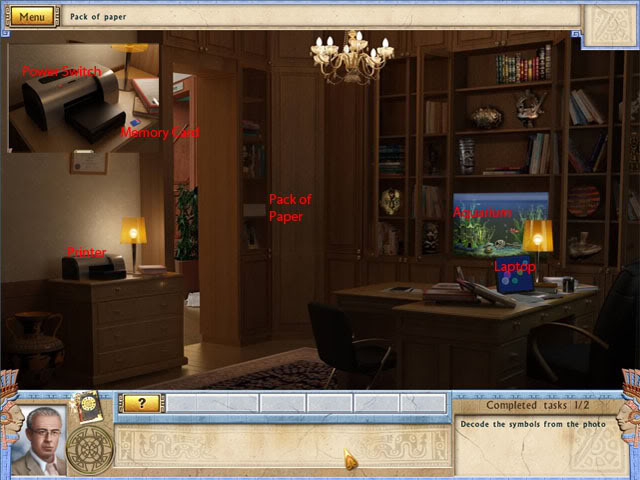
We must decode the Symbols, and we are in Alabama’s office. Check his laptop to view the symbols. If you try to print it, you won’t be able to without turning on the printer first. Examine the printer, and hit the switch. You need paper, which is located in the closet. When you have the paper, use it on the printer, and it will automatically print out the symbols. Pick up the printed photo. Head out of the office when you have your photo, and go to the Lab.
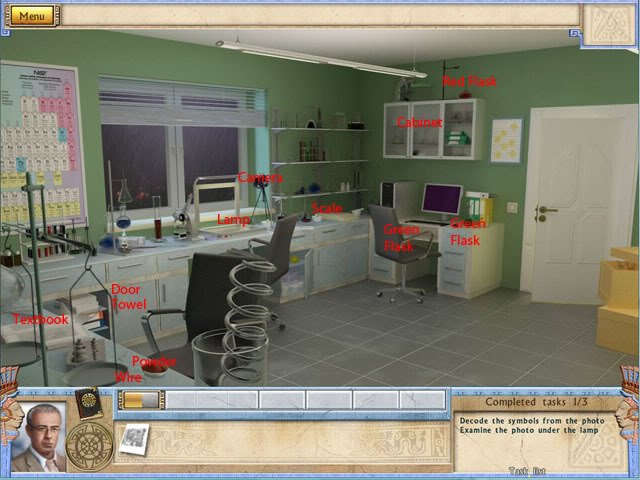
In the Lab, examine the Lamp by placing your photo on it. You need to find a few more symbols in the Depository, so head there.
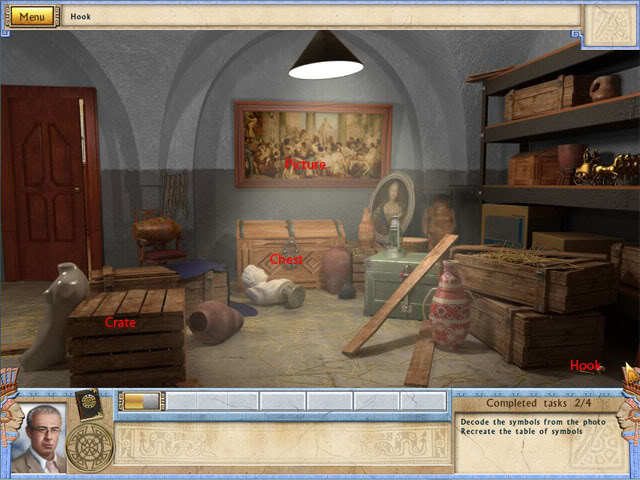
Examine the chest, then examine the crate. A panel will slide off, so click on the crate again. A key fragment is sitting there, pick it up. Go back to the Office and check the Aquarium. There is a key, and you need to fish it out. Check the desk and pick up the pen that is lying on the Notebooks.
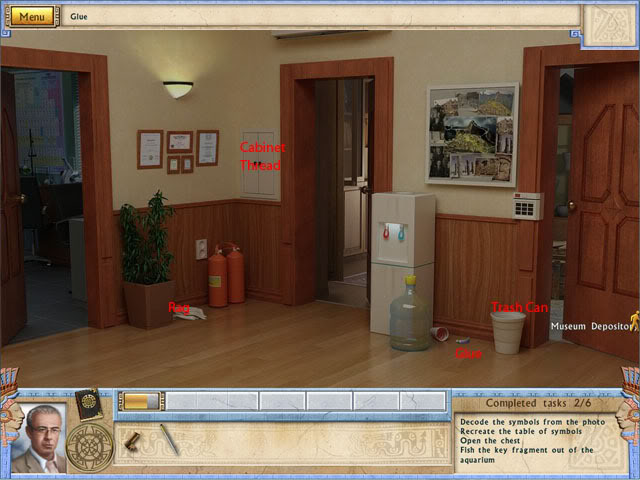
Go to the Corridor again, and click on the Trash Bin to move it, and take the glue that is on the floor. Open the Cabinet on the wall and take the thread from it. Go to the Depository once again and take the hook off the floor, which will make a homemade fishing rod. Again, go to the office. Use the homemade fishing rod on the Aquarium to get the Key Fragment. The two fragments with the glue will combine to make a Key. Use the Key on the Chest in the Depository. You will have another treasure hunt here, and the tiles you need are located in the following places:
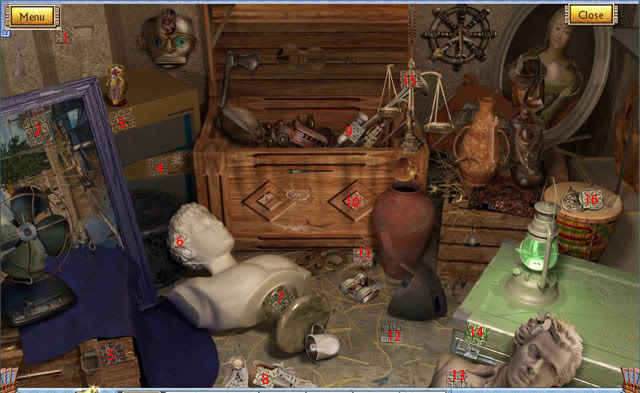
When you have all of them, go back to the lab. Use the Tiles on the Lamp, then find a rag in the Corridor. Go to the Office and put the rag in the Aquarium. Go to the Lab once again. When you enter, you will accidentally lock the door behind yourself and break some things. Pick up the Papers off the floor, then go back to the Lamp to work on the Tiles. Use the Wet Rag on each tile to clean them off. Unfortunately, they are still not clean enough, so we need a special solution. The formula is in the textbook on the counter, so read that. You need 4mL of Green Solution and 5mL of Red. Go to the Cabinet and another treasure hunt will begin. The items are located here:
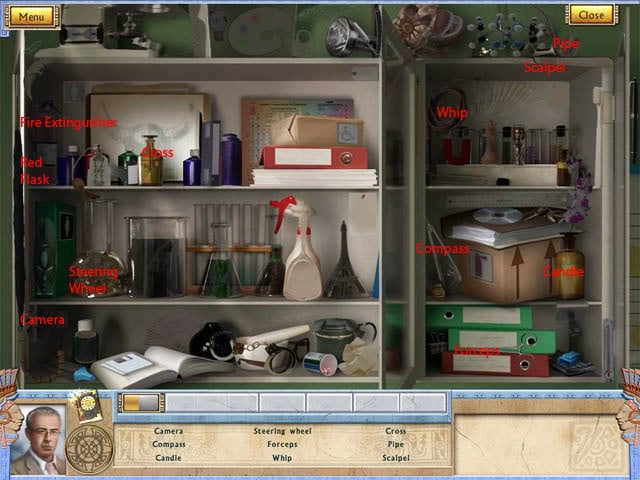
When you have the Red Solution, grab the Red Flask from the top of the Cabinet. There is a Green Flask on the desk by the computer, and one on the Chair (Click the chair to turn it around). When you have all 4 Flasks, place them on the Electronic Scale. You must weigh each flask, so empty the green one into the left flasks. When it is empty, make the red flask hold 9mL, and then put 4mL of green back in the flask, equaling a total of 13mL in weight. When you have the correct amount, pour the combination into the Powder sitting on the ledge.
Open the Cupboard Door and take out the Towel. Use the Towel on the Solution, and then return to the Lamp. Dab the wet Towel on the Tiles to finish cleaning them. You must now arrange the Tiles to complete the photo. Look at the symbols on the Tile and match them to the Photo by dragging them right over top of the picture. When you place them all down, it should look like this:
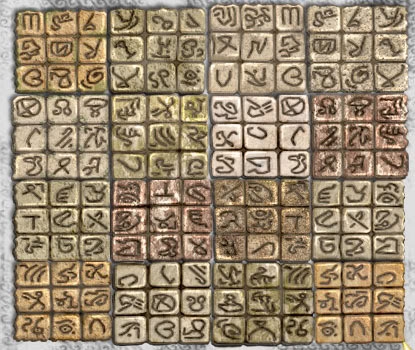
When you complete the puzzle, you need to take a picture. Examine the door, which will be locked. Slide the paper you have in your inventory under the door, then pick up the wire on the table by the Solution you made. Use the wire on the keyhole on the door, which will drop the key onto the paper. Pull the paper towards yourself to obtain the key. Pick up the key, then use it on the door.
Go back to the Office now, and pick up the Memory Card by the printer. Go back to the Lab again, and put the Memory Card in the Camera. Click the Camera to use it, and then click it again to retrieve your Card. Go to the Depository and examine the picture above the Chest, which will reveal a Safe. Click it to examine, but you won’t know the code. Take a look at the Chest again, something is hidden there. You must examine the items first, and their positions are here:
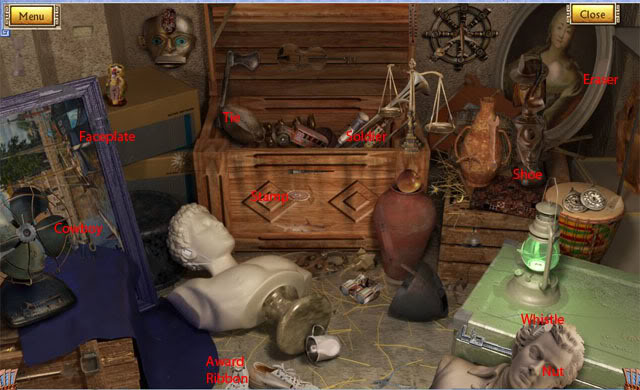
When you take the faceplate, use it on the safe by the numbers. The numbers on the safe must add up and subtract to make 44. The numbers are:
23 + 24 – 3 = 44
2 + 23 – 11 = 15
28 + 24 – 6 = 46
8 + 1 – 3 = 6
When you complete all of the equations, the safe opens up. Take the CD that is inside the Safe, and head to the Office and check out the Laptop. Click the Disk Drive on the Laptop, then place the CD in it. Close the Drive, then insert the Memory Card into the Laptop; now press Decode when it appears. The result is: The key for the crystals will be buried with the great ruler. Hit Ok.
Temple of the Sun
We are back at the temple again. It’s pretty dark and rainy, so we need a light. Pick up the light.
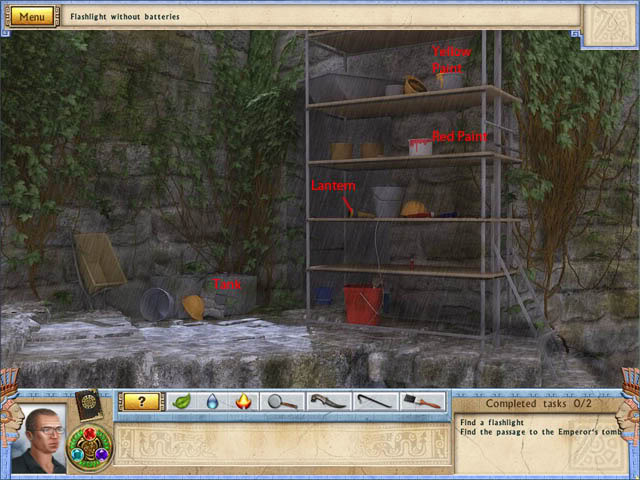
Unfortunately it is out of batteries, so we need some. One is a shelf down from the lantern, and another is sitting on the tank to the left.
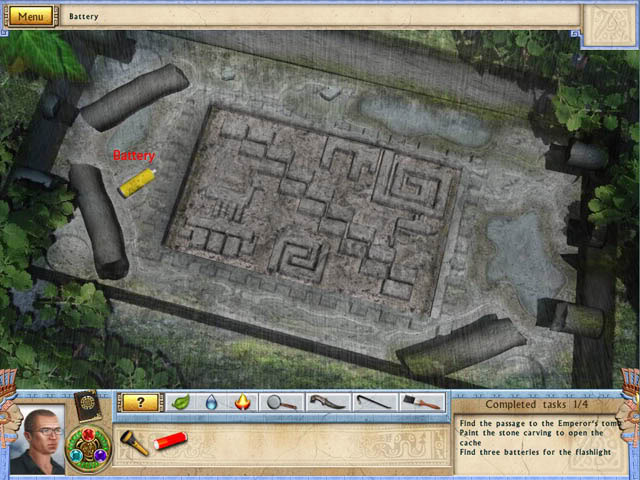
When you have that battery, walk down to the House of Guardians.
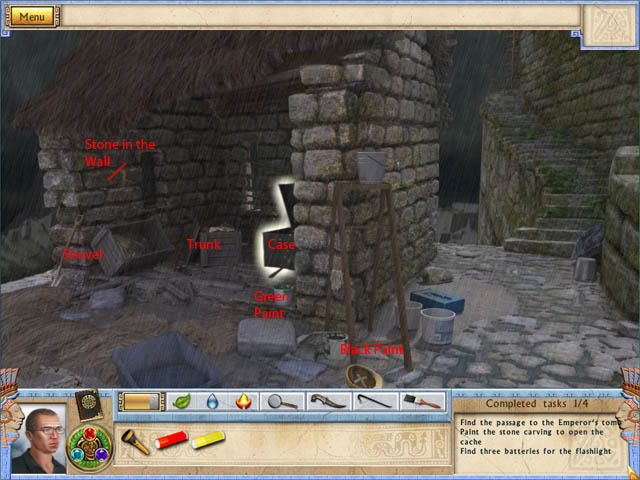
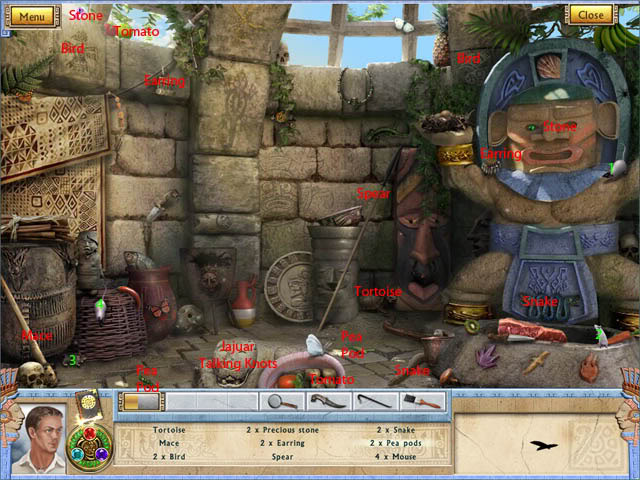
When you get down here, a treasure hunt awaits in the Case. The items locations are here:
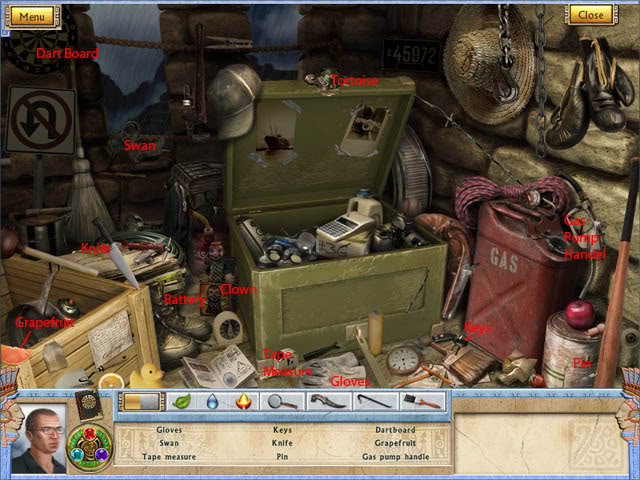
When you grab that last battery, all three will go into your torch. After it’s working, go back in time with your Amulet, then walk down to the Tomb. You need to dig through that dirt to get in deeper, and you can’t dig that much dirt with your bare hands. Head back up to the House of the Guardian, then return to the present. Take the shovel that is leaning against the wall, then return to the past, then walk down to the tomb.
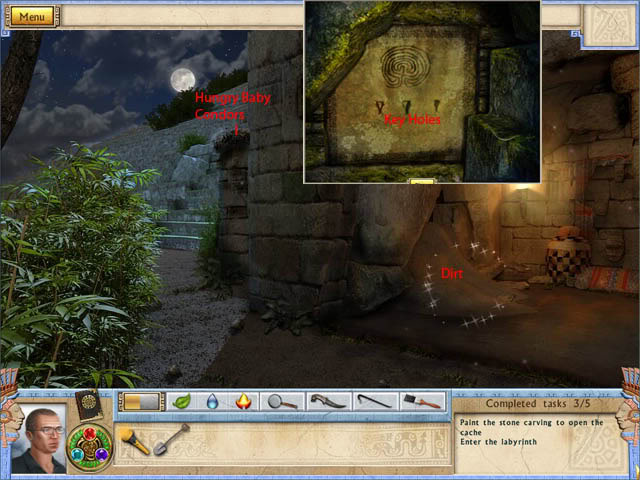
Use your shovel on the dirt, then equip your flashlight and examine the hole that you just dug out. You need a key it seems, so head back to the House of the Guardians.
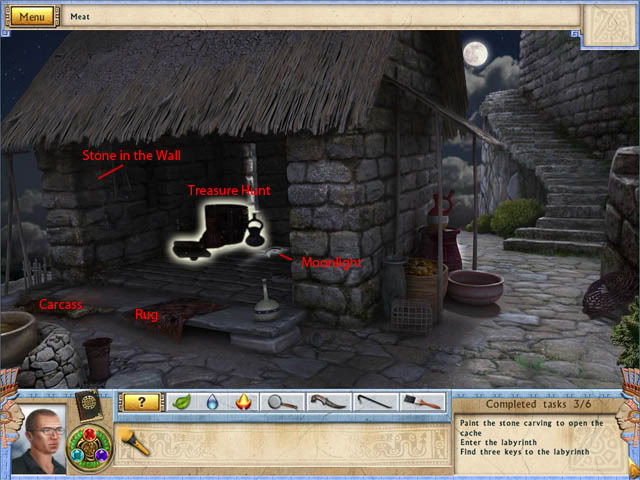
There is a Carcass lying on the ground, so take your knife and get some Meat by clicking on it. Return to the Tomb and use your meat on the Hungry Baby Condors. The baby birds will drop a Mirror shaped like the Moon, so pick that up. Return to the House and drop your Moon-Shaped Mirror on the spot that is beaming Moonlight. The light will reflect on a stone, but the stone is wedged very tight and won’t move. Maybe something in the pile of items can help you. The treasure hunt items are located here:
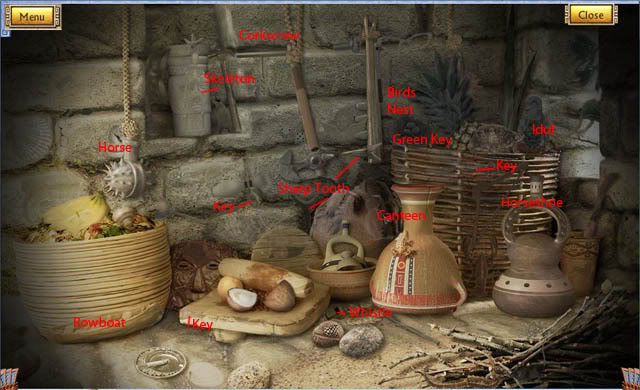
When you collect the Green Key, look at the rug on the ground, then head to back to the present time. The house will have aged enough to pry that stone loose, so take your crowbar and break it open. Take the Red Key that is sitting in the hole. Return to the past and head up to the temple Entrance.
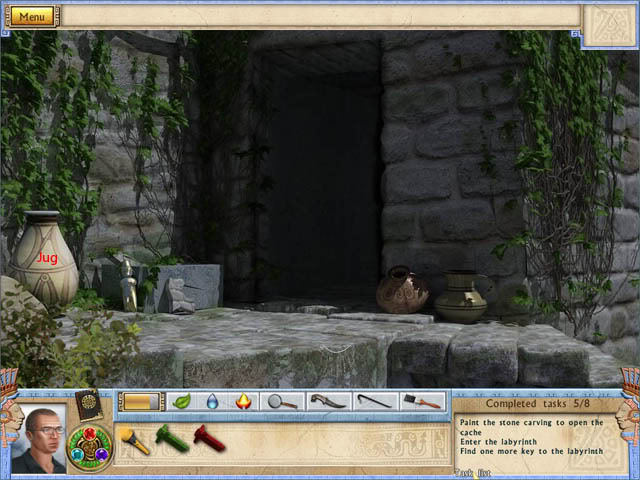
Smash the Jug with your crowbar to gain access to its contents, the Yellow Key. With these three keys in hand, walk down to the tomb, use your flash light, and place each the keys in their slots. This will slide the stone wall open. We are going to get fairly lost in this labyrinth, so we need a compass. It is located back at The House of the Guardians in the present time. It is in the case where a treasure hunt is located:
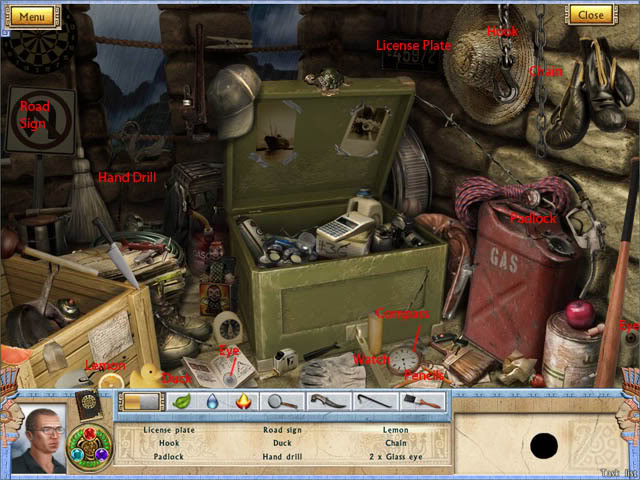
We aren’t quite done yet, head to the past and go to the Entrance and take a look at the tank, we need to paint the symbols with the paints found in the tank.
That rug we looked at had some clues, so check your journal. Each symbol in the Journal corresponds to a color on the rug, like this:
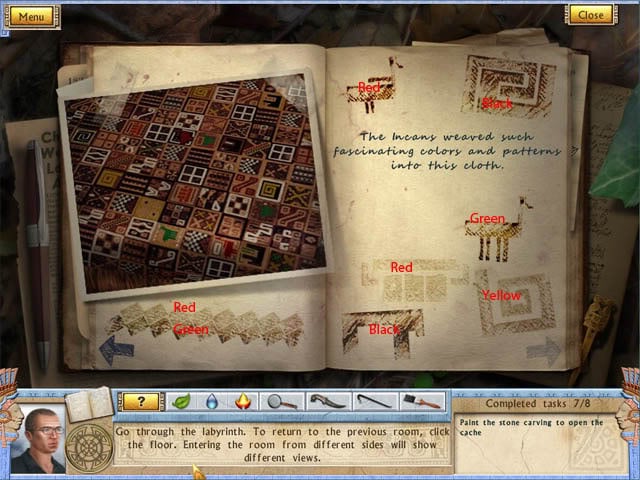
Right now we can’t do anything because of the grating in front of the puzzle. Return to the present time via Amulet, then grab the paint on the scaffolding.

Then go to the House and take the Green and Black paint’s off the ground.

This will help us solve the Painting Puzzle. Go back to the tank by the entrance and use your paints on the correct colors of stone. Take each bucket and place it in one of the 4 corner circles, black is the bottom left, green for the top left, yellow for the top right, and red for the bottom right. Take your brush and dab it in each color, then on the correct stone that belongs to a certain color. The results when done should look like this:
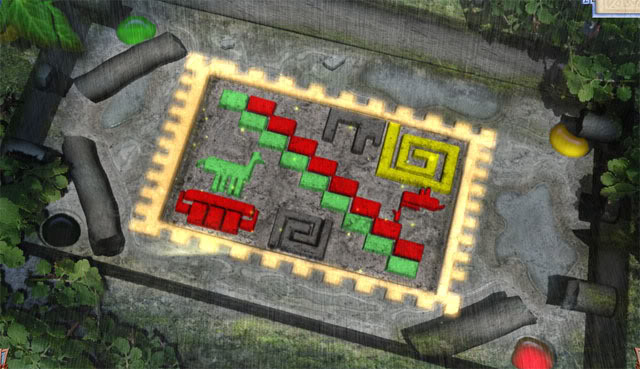
Go down to the House of the Guardian in the present time and look at the Trunk. Click on the news paper to discover some symbols and notes about them, compass directions!
So now let’s venture into the past and go to the Labyrinth with our new found compass.
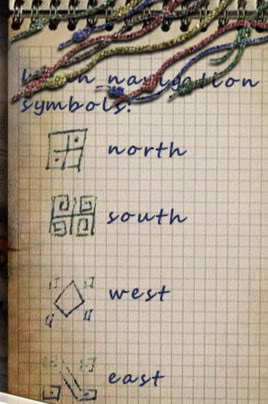
Those are the directions we need to use, and the actual direction we must go is illustrated in our journal:

Just follow the directions perfectly and you will get to the end. Remember, the direction you are currently heading will always be at the top of the compass. When you reach the end, a cut scene will play.
The Crystals of Fortune
Time to get into that temple. Since we know how to access it now, let’s get to solving these puzzles to unlock it!
You must place the elements on the ledge in front of you, but they are a bit dirty. Use your brush and sweep away the dirt from the inset, then place the Fire Element in it’s spot.
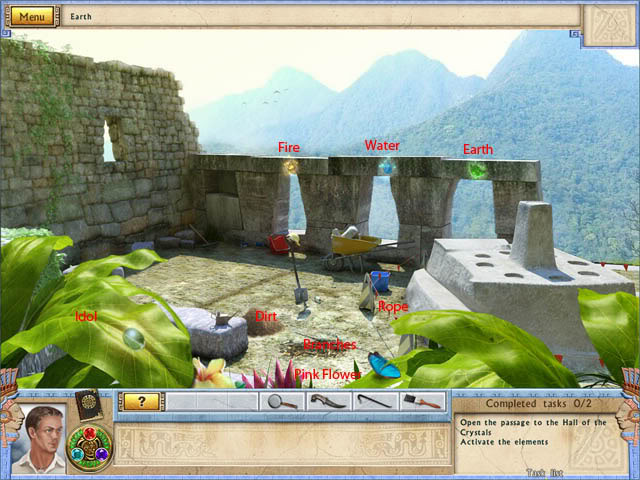
When all three are placed, go back in time with the Amulet.
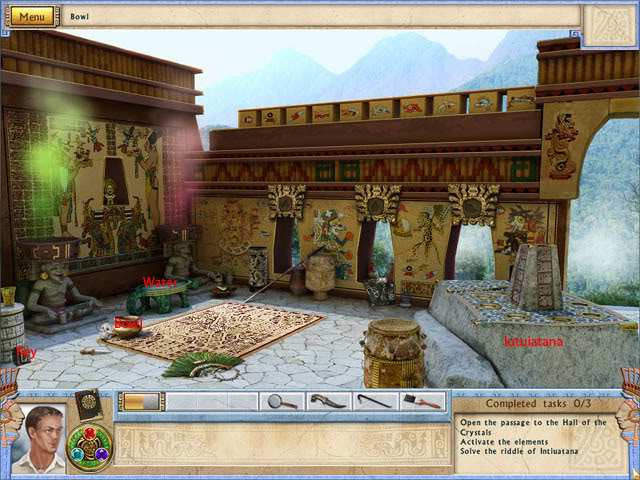
Take the Bowl off the ground, then use it on the Water. When you have a Bowl of Water, go back to the Present. Use the Bowl on the Water Element to activate it. Next, pick up some Dirt off the ground, then use it on the Earth Element. Our last task is to light the Fire Element, and there are some Branches on the ground. Use your Magnifying Glass to light them with the power of the Sun, then pick up a stick from the fire. Use that burning stick on the Fire Element to activate it. This will open a path to the Hall of Crystals.
In this room, click on the staircase to do a treasure hunt. The items are located here:
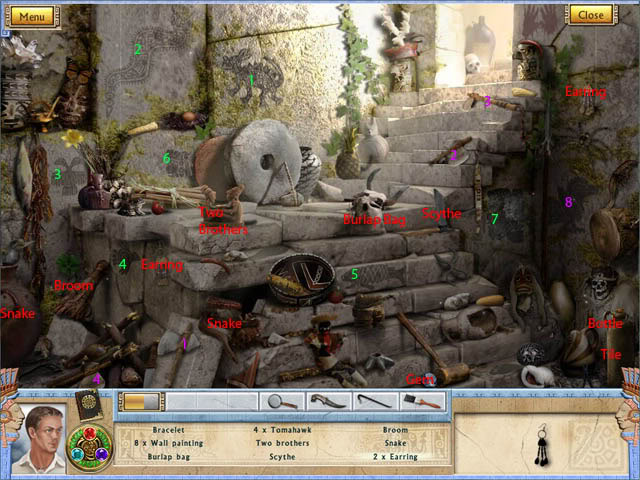
(The wall paintings are numbered in Green, and the Tomahawks in Purple)
When you get the tile, head upstairs and go back in time. Click on the Iutuiatana to start the next puzzle.
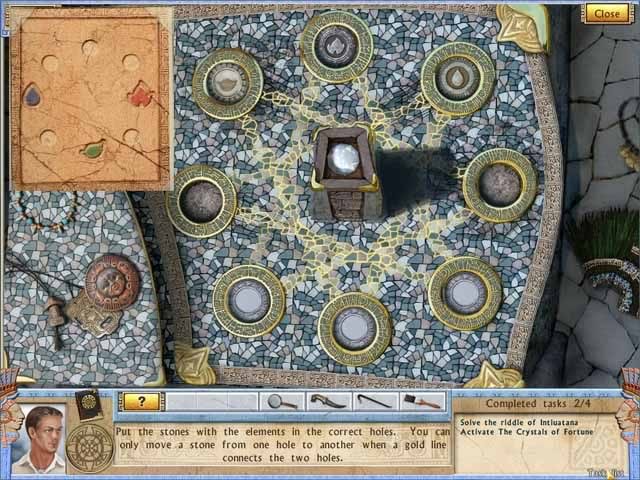
The objective here is to put the stones in their correct position as illustrated by your journal. You can only move the stones by the lines connecting them. Move the Water to its correct position first off, then move the stone under the water to the only open one it can go to. Move the Fire to the open space, then move the bottom middle tile up to the open space. Move the Earth tile down into the bottom slot. Move the very right tile to the left, then put the Fire tile in that place to finish the puzzle. When it is done it should look like your journal.
What that puzzle done, the Crystal of Fortune floats up. Grab it! Now return to the present to activate it. Go downstairs again and return to the Past.
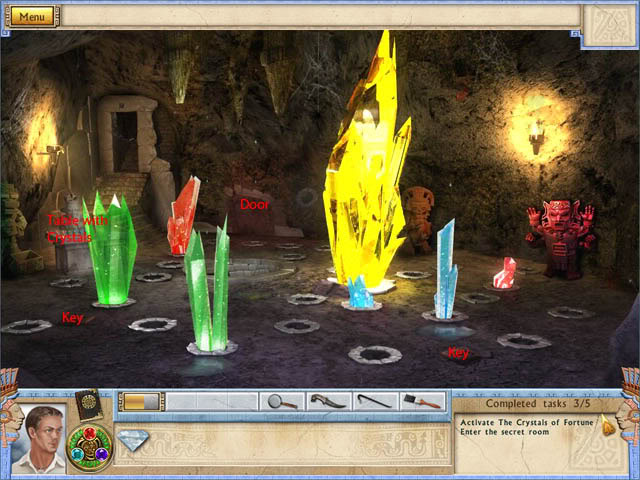
Examine the door at the end of the room. You can’t get through without 3 keys. Take the two keys off the floor in the room, then return to the Present. Go outside then go back to the past again. The last key is on the bottom left of the screen, take it and return to the Present again. Go downstairs, then go to the past again. Look at the door, then use your Keys on the slots. This will open the door, so go through the passage.
There isn’t too much to do here right now, so let’s head back outside. Return to the Present, head outside, then grab some Idol leaf with your knife. Return to the Chamber we just opened up.
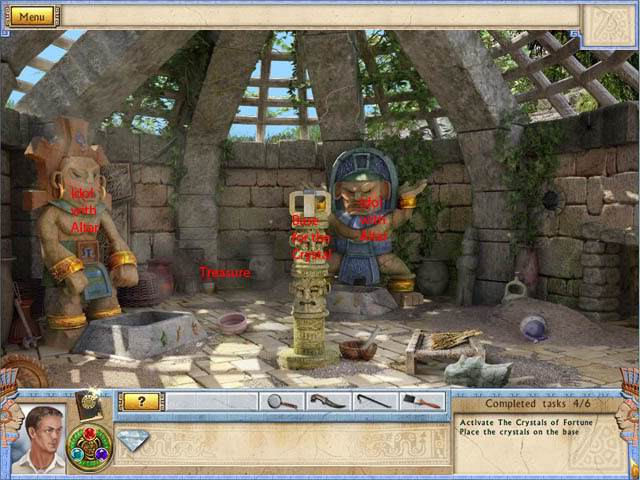
Examine the Idol with the Altar, then place the leaf in the bin in front of it. Use your knife on the plant to chop it up smaller, then return back to the Crystal hall. Return to the present, then go outside. Cut some of the Pink flower then once again go back down to that Altar in the basement. This time click the right Idol and place the Pink Flower in its basin, then cut it up with the knife. Go back to the surface and grab some branches that are on fire. Then go back again to the two idols in the basement. Use the fire branch on each of the plants you put in the bins to burn them. Place the Crystal on the Pedestal. Return to the Crystal Chamber, then go to the Present. Examine the Table with Crystals to activate a puzzle. The placement of the crystals is like this:
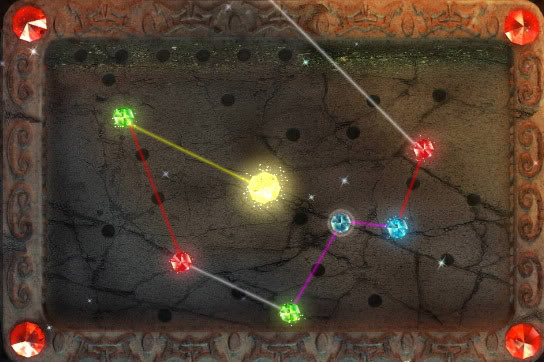
Once you have that done, sit back and enjoy the show!
Quite a surprising turn of events if I do say so myself. We have to save Anastasia, so let’s head back in time to save her! Go to the room with the two idols and click on the glowing Treasure to start a hunt.
(Mice are numbered in Green)
When you have the Talking Knots, go back to the Crystal Chamber and place them on the Table with Crystals, right on the center Jewel. You must place the jems so they are in the same position as the Knots.
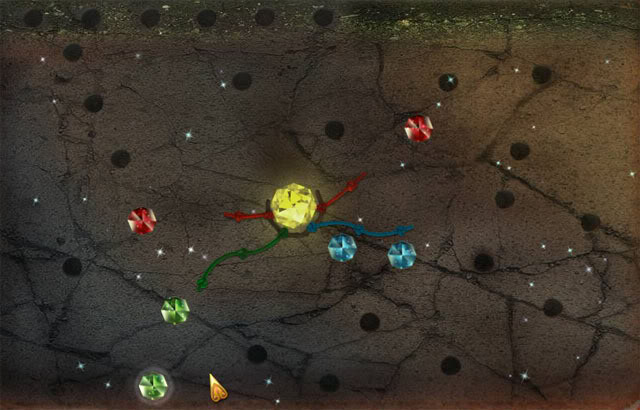
Success, the grate is closed so now Anastasia could never have fallen in the well! Let’s make a net though so we can catch her if she does. Return to the present and go outside. Cut some rope off the tether, the go back downstairs and go back in time. Examine the well, and place the rope over the grate like this:
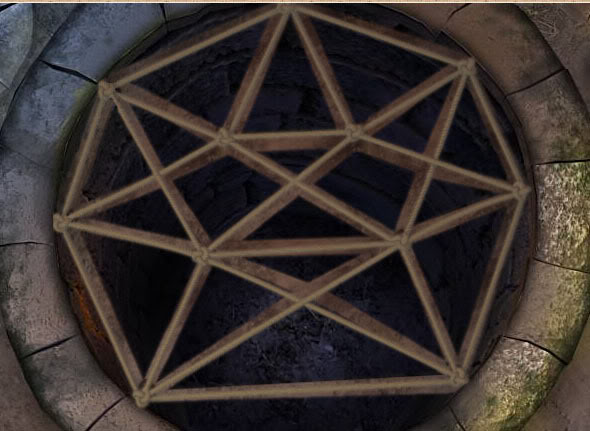
The easiest way to do it is to start from the middle and do symmetrical movements, what rope you place down one side try and do to the other. Leave the outer ring for last and start by placing ropes down in the middle. When you place all the rope down, click on your Amulet to check if Anastasia fell into your net!
“;
More articles...
Monopoly GO! Free Rolls – Links For Free Dice
By Glen Fox
Wondering how to get Monopoly GO! free rolls? Well, you’ve come to the right place. In this guide, we provide you with a bunch of tips and tricks to get some free rolls for the hit new mobile game. We’ll …Best Roblox Horror Games to Play Right Now – Updated Weekly
By Adele Wilson
Our Best Roblox Horror Games guide features the scariest and most creative experiences to play right now on the platform!The BEST Roblox Games of The Week – Games You Need To Play!
By Sho Roberts
Our feature shares our pick for the Best Roblox Games of the week! With our feature, we guarantee you'll find something new to play!All Grades in Type Soul – Each Race Explained
By Adele Wilson
Our All Grades in Type Soul guide lists every grade in the game for all races, including how to increase your grade quickly!


