
Best Horror Games On Itch.io – July 2026
Across a bounty of subgenres.![Haze Seas Accessories Tier List [Best Accessories to Equip]](/wp-content/uploads/2026/07/haze-seas-accessories-tier-list.jpg "Haze Seas Accessories Tier List [Best Accessories to Equip]")
Haze Seas Accessories Tier List [Best Accessories to Equip]
The accessories with the best stat buffs in Haze Seas.
![[Roblox] Evomon Shiny Hunting Guide – Including Prismatic and Pris Shinies!](/wp-content/uploads/2026/06/evomon-shiny-hunting-guide.jpg "[Roblox] Evomon Shiny Hunting Guide – Including Prismatic and Pris Shinies!")

Age of Oracles: Tara’s Journey Walkthrough
Welcome to Gamezebo's walkthrough for Age of Oracles: Tara's Journey.General Game Information This hidden object game has 22 Chapters each with 1-2 mini games per chapter. The game can only be played in relaxed mode. There are no points or score of any kind offered in this game; it is strictly for story completion.There are options to turn off the animations if your computer is running slower than usual. There are 2 hidden object screens per chapter, which are in list fo…


- Prefer Gamezebo on Google

a:1:i:0;a:2:s:13:”section_title”;s:42:”Age of Oracles: Tara’s Journey Walkthrough”;s:12:”section_body”;s:94548:”
Welcome to Gamezebo’s walkthrough for Age of Oracles: Tara’s Journey.

General Game Information
- This hidden object game has 22 Chapters each with 1-2 mini games per chapter.
- The game can only be played in relaxed mode.
- There are no points or score of any kind offered in this game; it is strictly for story completion.
- There are options to turn off the animations if your computer is running slower than usual.
- There are 2 hidden object screens per chapter, which are in list form. There are also logic puzzles for you to solve in each chapter requiring you to keep an inventory of items and using them in the correct time and manner.
- Hints are offered continuously in the game and have a short recharge time in between uses.
- Hints can be used when the peacock’s head in the lower left hand corner is upright.
- The game is totally randomized with hidden objects always in the same location but the list of items you are required to find will vary from game to game.
- Each hidden objects scene with the exception of 2, requires you to find 1 -2 special items which will be held in inventory for use at the end of the chapter.
- Whenever you are asked to draw cards in the game those cards will turn into a jigsaw puzzle you must put back together.
- The game can be saved from the point at which you exit.
Game Elements
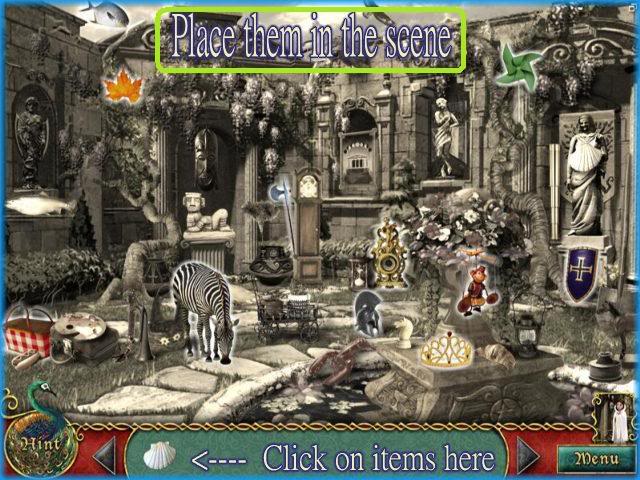
- At the beginning of each chapter you will see the storyline progress and then the scene will freeze into a black and white picture as seen above. There are 12 items along the bottom of the screen which are colorized that you must click on and place over their counterparts in the image. If you are correct the picture will snap into place and will have some highlighting around it as seen in the image. You must complete all 12 to progress to the next segment of the game.
- You can use hints as many times as you wish in this area but you must wait a few seconds between hints while they recharge.
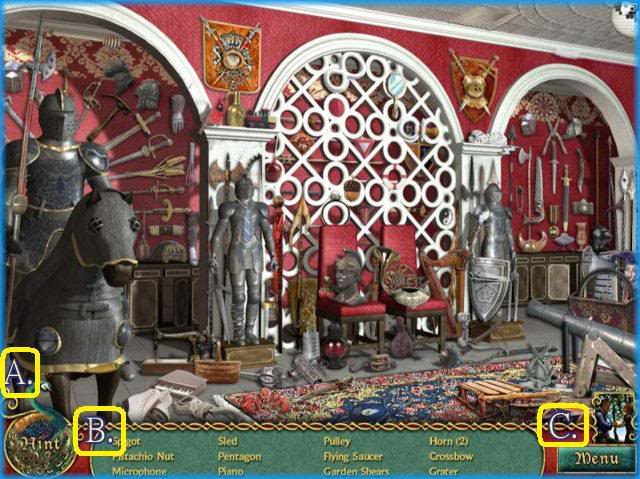
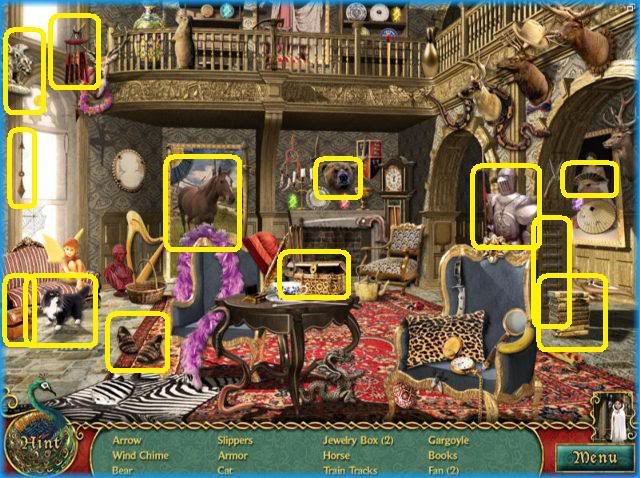
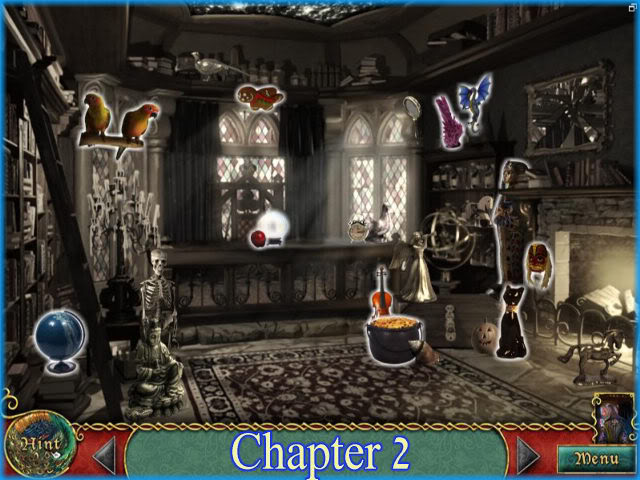
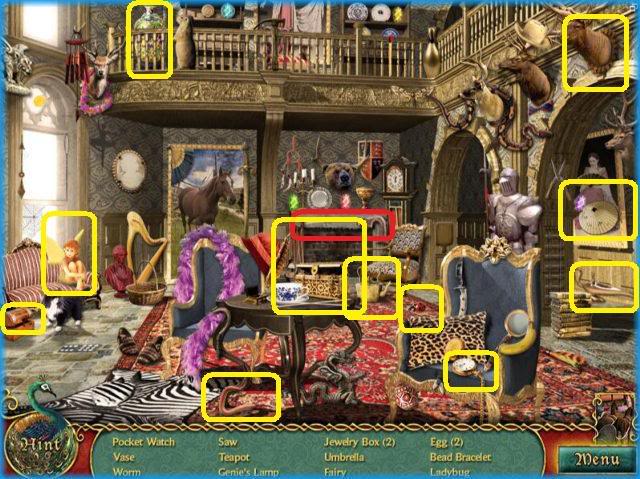
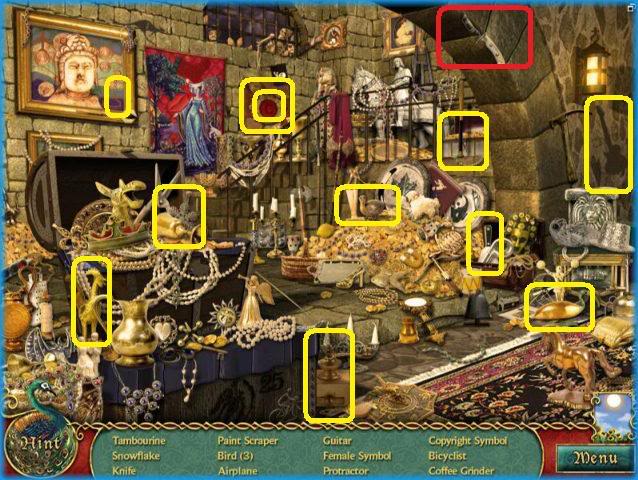
- This is a typical hidden object screen in the game.
- A. This is where hints are located at the bottom left of each screen. As long as the peacock’s head is upright you can click on it for a hint. It will stay down while recharging and then back upright when you can use it again.
- There are unlimited hints in the game and no penalty for using it.
- B. Here is where you find the list of items you are to find. This list varies from game to game.
- C. Here is the menu button. Click here to exit, pause, save or go to the game map.
- This is the interactive part of the game where you will be asked to complete a special task which will be listed at the top of the screen.
- As you find items in your hidden object screens you will see that one or two of those items are special items which will be in your inventory when you get to this part of the game.
- Run your mouse all over the screen without clicking and look for areas that highlight in yellow. These are the interactive areas. You will have to either click on these areas to get an item to move into your inventory OR you must click on an item in inventory and drag it to this area and click again to cause the item to interact.
- You will see that a text hint is given for each glowing area. These can be very helpful so be sure to read them first as this will save you time.
- If you are incorrect the item will simply move back into inventory.
- Sometimes you will use an inventory item more than once. As long as it is needed it will appear in the inventory list. If it disappears you are finished with that item.
- For purposes of the walkthrough the tasks will be numbered as seen above and color coded so you can see which item is to be used in a particular location.
- All tasks must be completed but the order they are performed will vary.
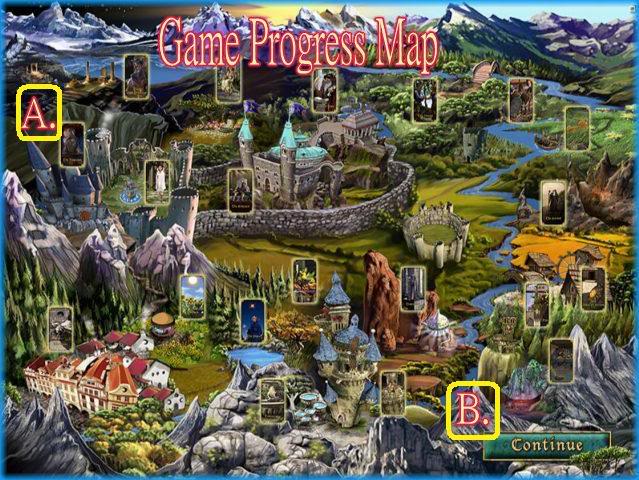
- This is the game progress map which you will see once you complete the first chapter of the game and in between each chapter.
- The icons appear with the chapter name once it is completed. You can enter back into a chapter and replay it if you wish before you finish the game.
Walkthrough
- This walkthrough covers all 22 chapters and the mini games.
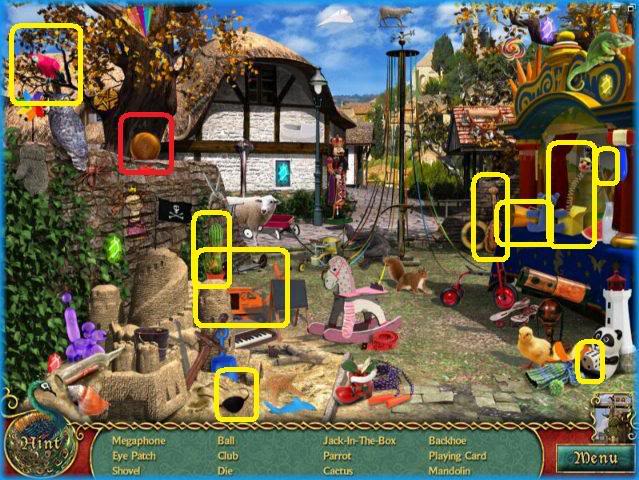
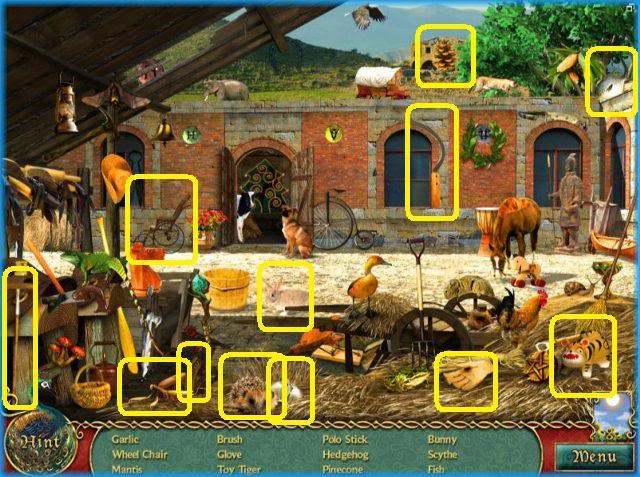
- Please note that every hidden object screen looks the same but will ask for a different list of items. I have circled the items in my game here but your game will most likely have different items.
- Anytime you are asked to choose cards you will have to assemble a jigsaw puzzle of those cards. You puzzle is based on the cards you choose and will vary from the ones seen in this walkthrough.
- Some of the variable mini games have variable answers and it will be posted when this is the case. There will be enough of an example to help you through any areas in which you become stuck.
- When you get to the portions of the chapter where you take items from inventory you will see they are written out in stages and numbered. The order I have chosen is one possible path and in this game there are many ways to come to the same conclusion.
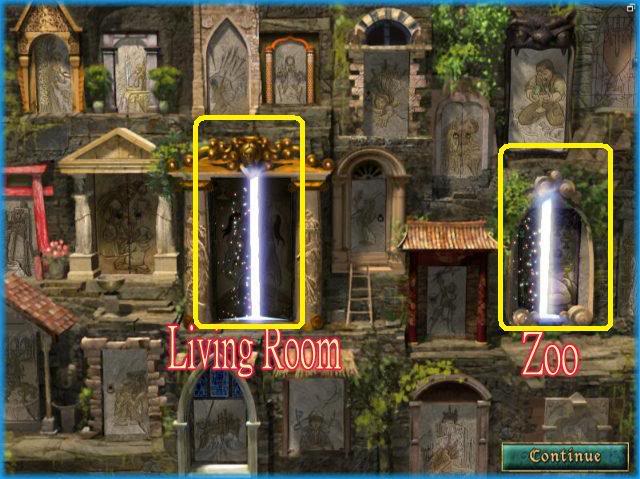
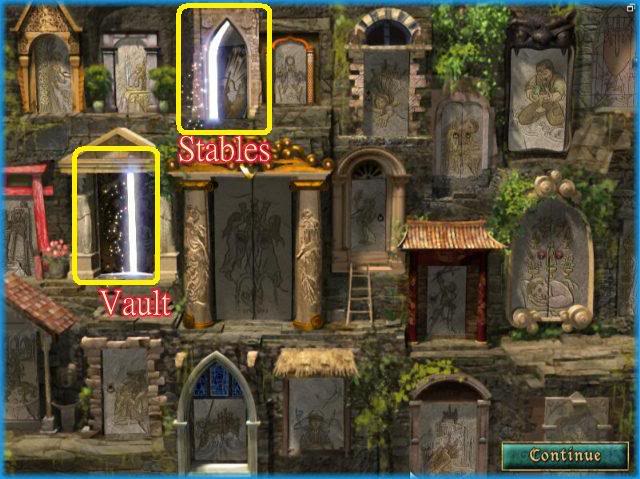
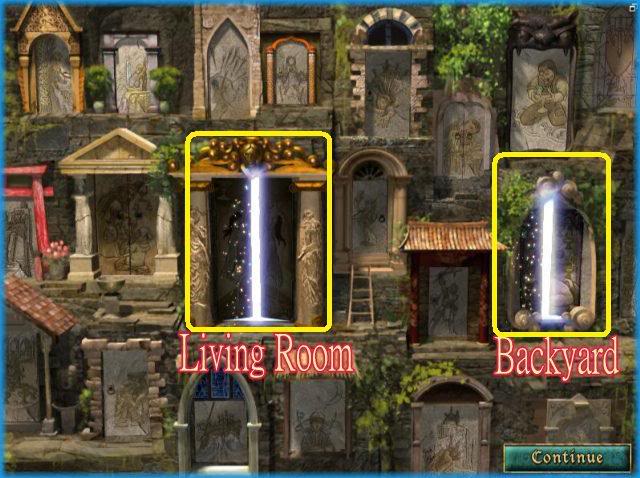
- Whenever you have doors to choose from in this game it does not matter which one you choose first as you must play through both locations before you can proceed. You can click on the door itself or the "Continue" button at the lower right hand corner of the screen and a location will be chosen for you.
CHAPTER 1 – "Tara’s Journey"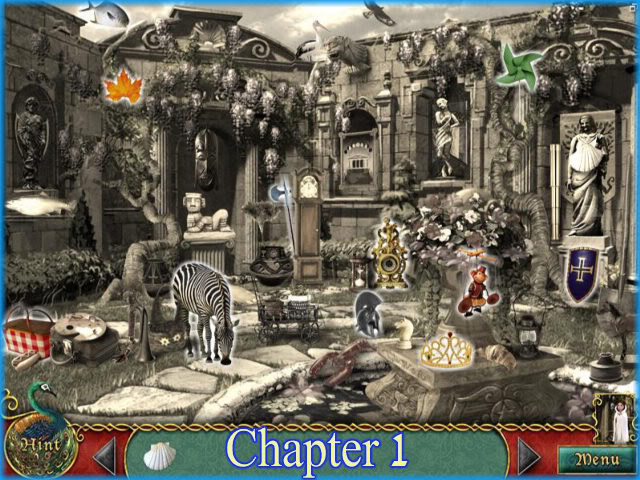
- Here you are move the 12 items in the list along the bottom and put them into the scene. Click on an item and then click on the area you see it in the picture and if you are correct it will lock into place.
- If incorrect it will move back into the list.
- You may access the hints by clicking on the peacock in the lower left hand corner as long as his head is showing you can access a hint.
- Once you use a hint you must wait a few seconds for the hint to recharge.
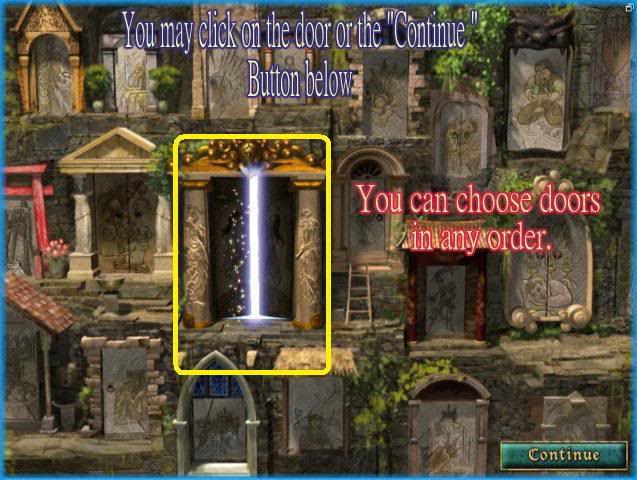
- This is the location map which you will see before each hidden object location.
- With the exception of this first menu there will always be 2 doors to choose from and it does not matter which order you choose as you must complete both before you can proceed.
- You may click on the door of the location you choose or click on "continue at the lower left and a location will be chosen for you.
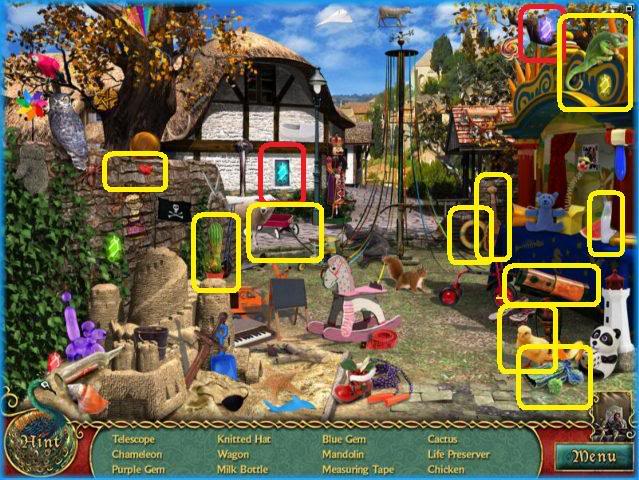
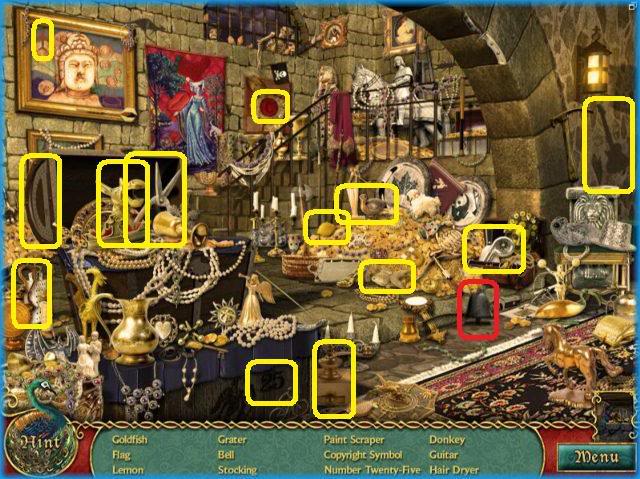
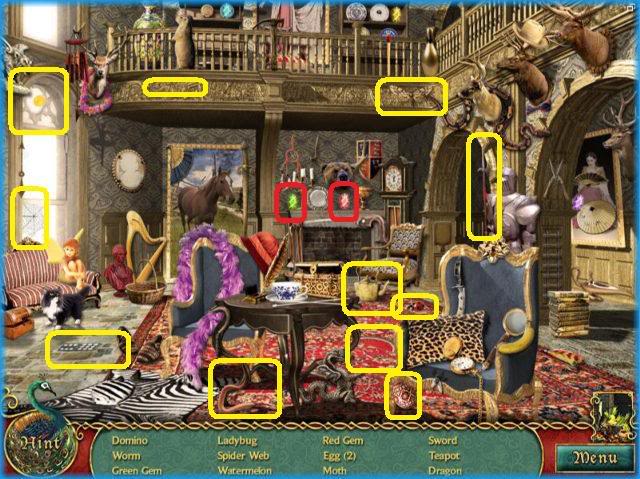
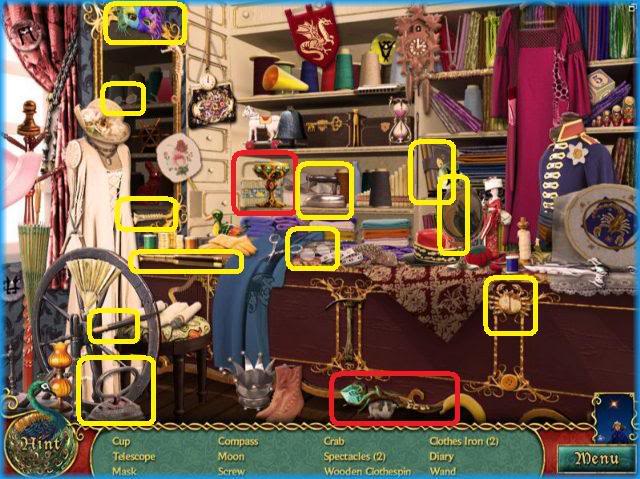
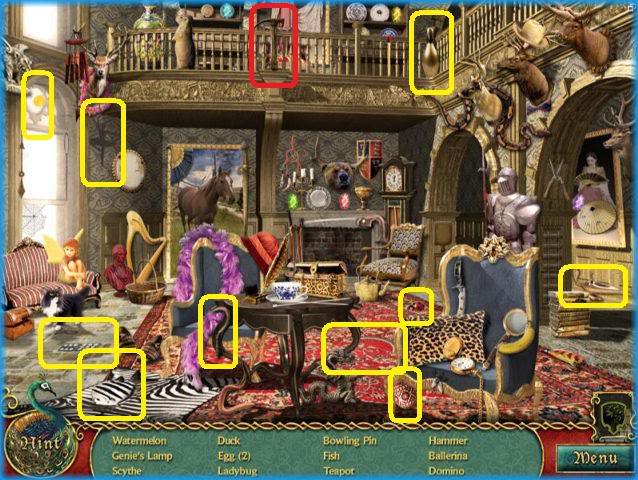
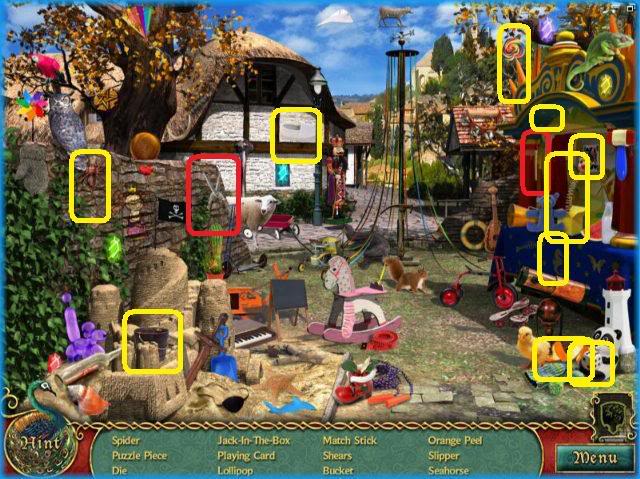
- Find the 14 items listed at the bottom of the screen.
- The items will most likely vary from the items in your list.
- Hidden objects are circled in yellow and special inventory items (if there are any) are circled in red.
- You may use the hint button at the bottom left if you become stuck.
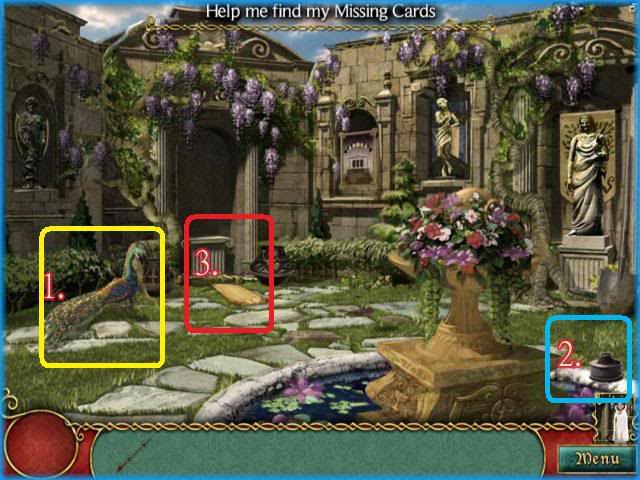
- TASK – "Help me find my missing cards."
- 1. Click on the peacock to take a feather.
- 2. Drag the peacock feather to the ink and it will go back into inventory.
- 3. Click on peacock feather covered in ink to the paper.
- Immediately after this the compass needle will appear in inventory as seen in image above.
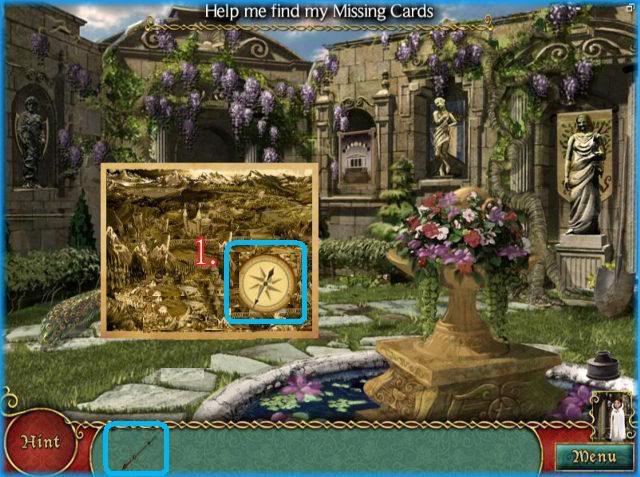
- 1. Place this compass needle on the compass when the image appears.
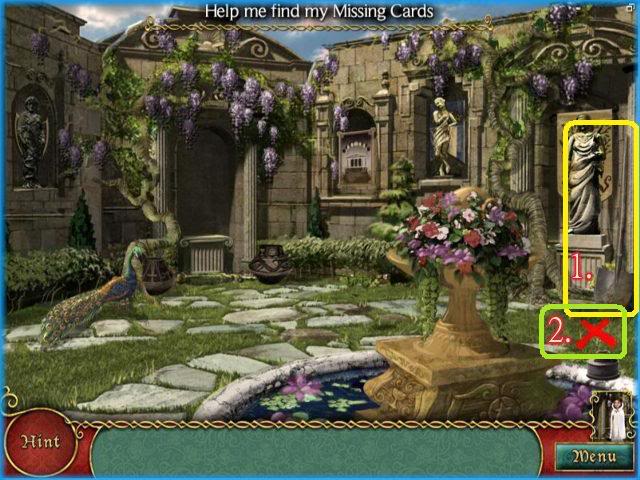
- Click on the compass and a red "X" will appear showing you where to dig.
- Click on the shovel and then drag it to the "X"
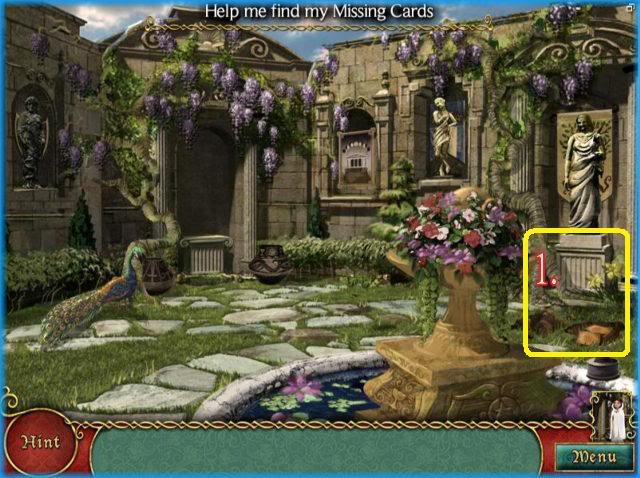
- Once the cards are exposed click on them to finish the task.
- The story will continue and you will be taken to a mini game.
Mini Game -Choose any 3 cards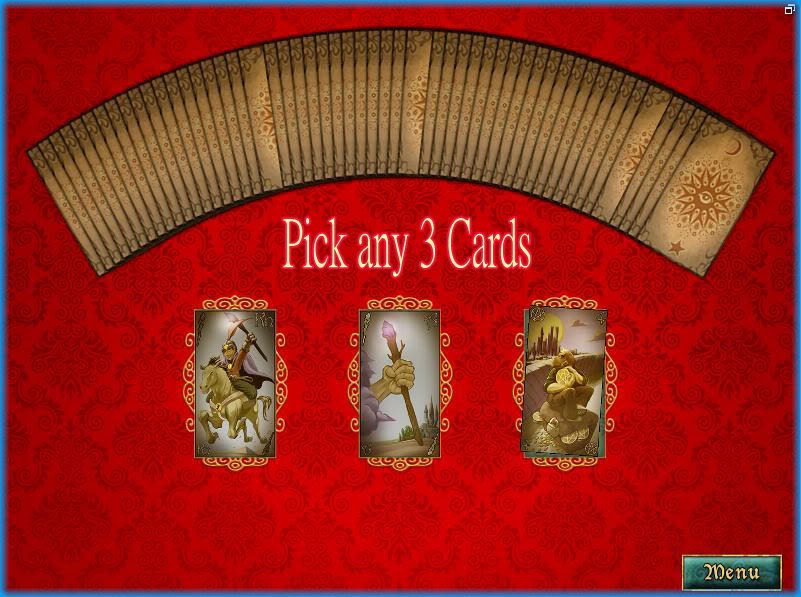
- Choose any 3 cards by clicking on them and they will appear face up briefly.
Mini Game -Jigsaw Puzzle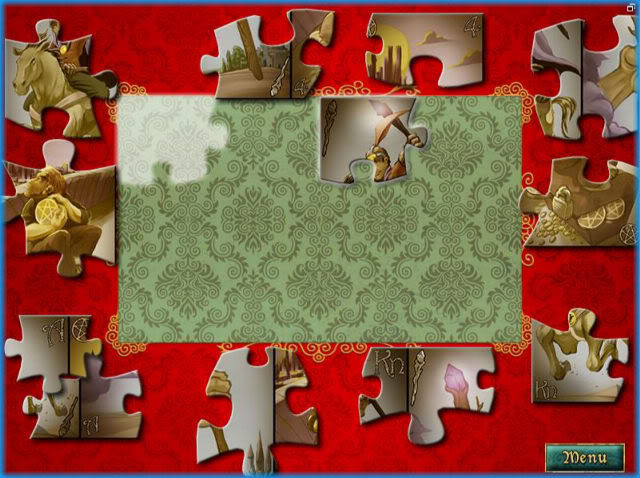
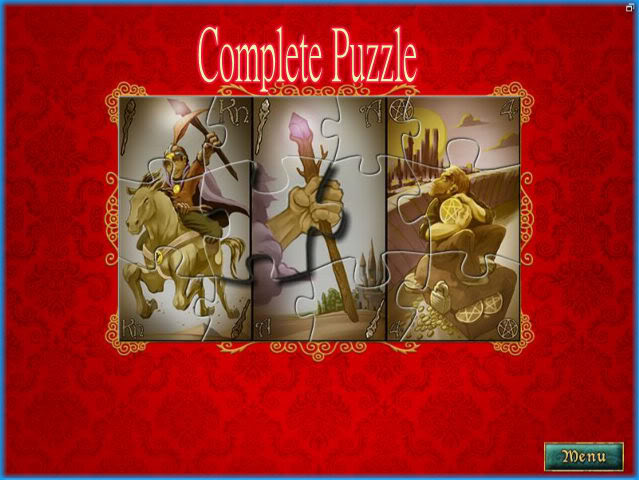
- The 3 cards you chose will form into a jigsaw puzzle.
- Note that when a puzzle piece is in the correct position it will lock into place.
- It is best to look for the flat edges and complete the outer edges of the puzzles first.
CHAPTER 2 – "The Magician"
- Place the items along the bottom into the scene.
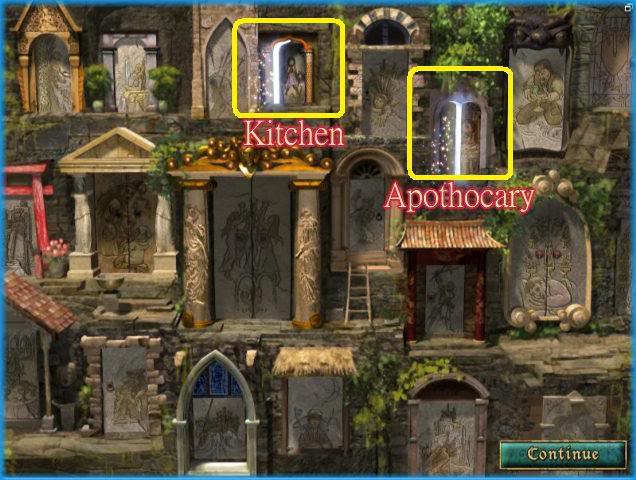
- Choose one of the two locations above.
- If following the walkthrough click on the Apothecary. (Door on the far right.)
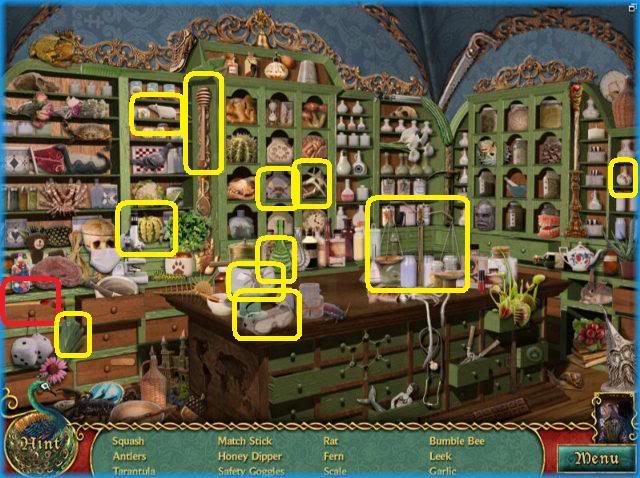
- Locate the 12 hidden objects listed at the bottom of the screen.
- The special item in this level is the "match stick" circled in red above.
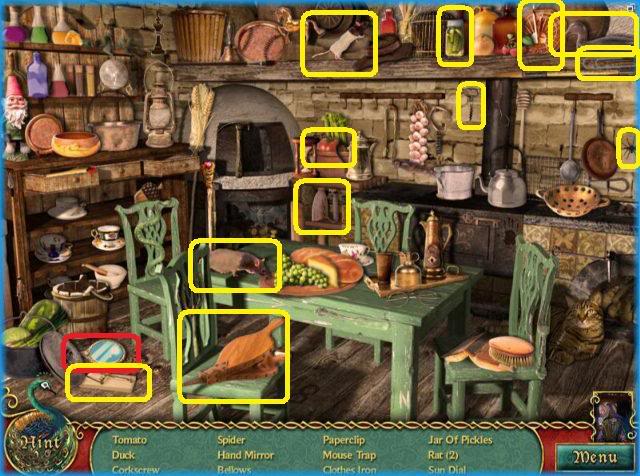
- Locate the 13 hidden objects listed at the bottom of the screen.
- The special item in this level is the "hand mirror" circled in red above.
TASK – "Find the key to my chest"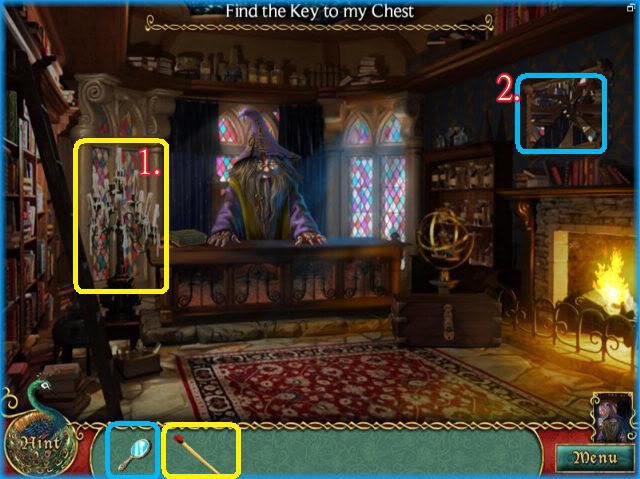
- 1. Use the match on the candelabra.
- 2. Use the hand mirror on the broken mirror to the right.
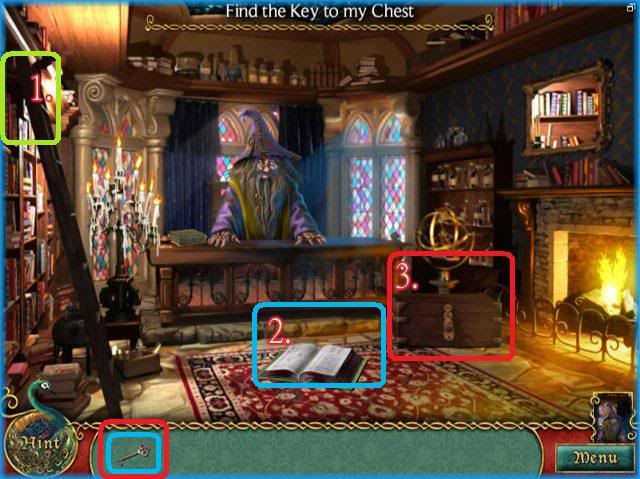
- 1. Click on the book up at the top shelf. It will fall on the floor open with a key inside.
- 2. Click on the key inside the book and it will move into inventory.
- 3. Use the key on the chest.
Mini Game – Match Pairs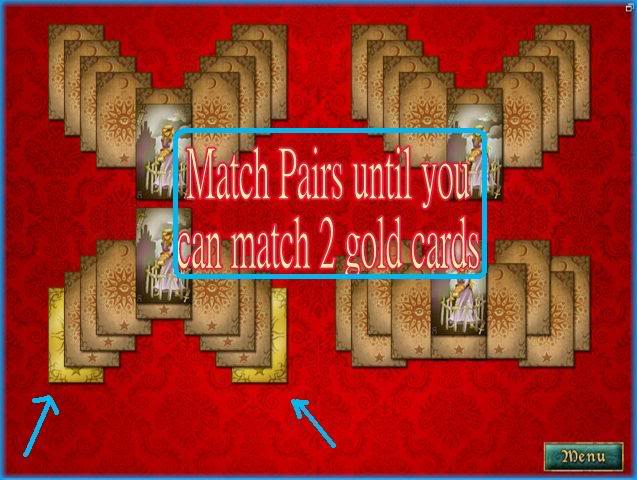
- Match pairs until they are all gone and only a pair of gold cards remain.
- Match the gold cards to complete the mini game.
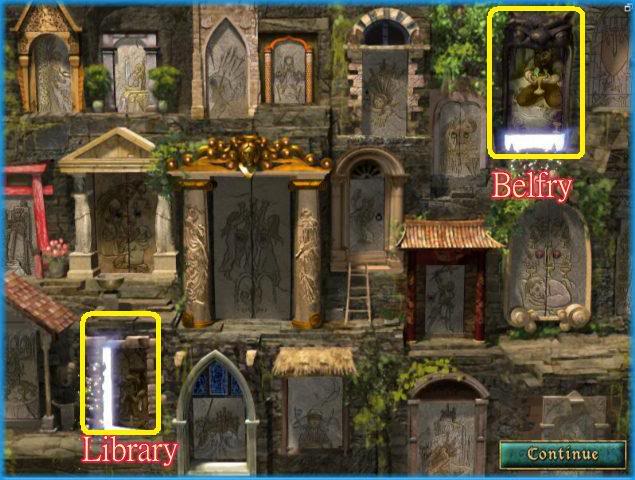
CHAPTER 3 – "The High Priestess"
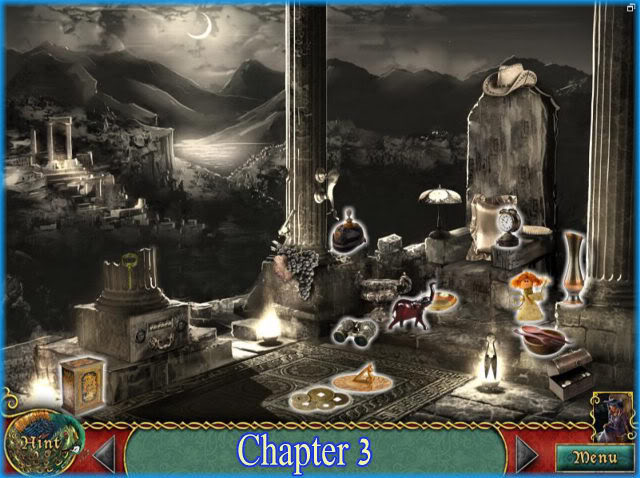
- Place the 12 items into their correct positions in the scene.
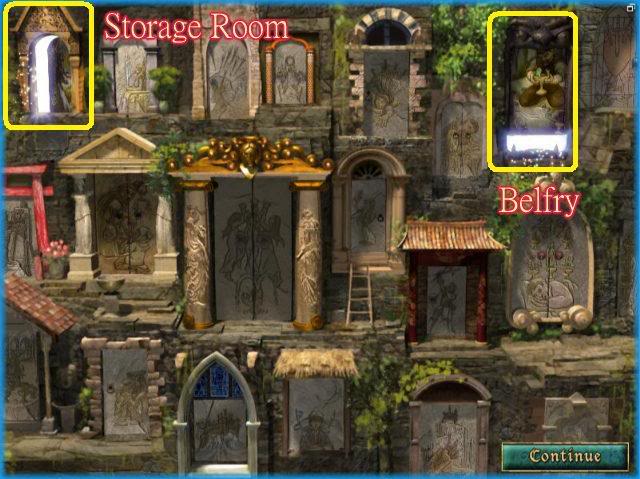
- Enter the Storage Room or Belfry.
- Choose Belfry if following walkthrough.
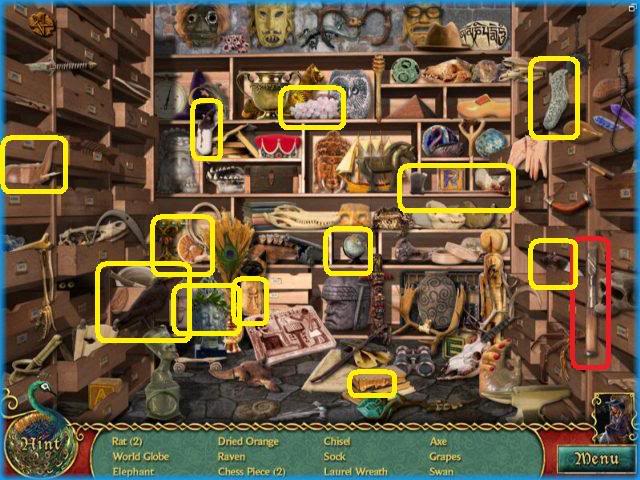
- Locate 14 items listed at the bottom of the page.
- Special item for Belfry is "Chisel" which is circled in red above.

- Locate the 12 items listed at the bottom of the page.
- Special items for this location include "tweezers" and "mortar and pestle" circled in red above.
TASK – "Find my Scrolls"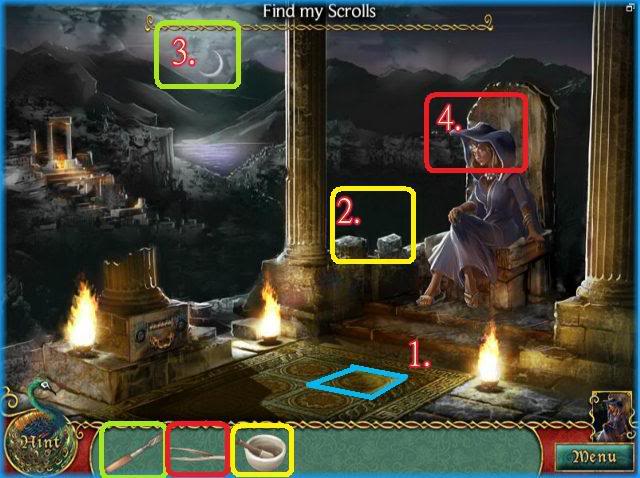
- 1. Click on the tile circled in blue above for instructions.
- 2. Use the mortar and pestle on the bricks.
- 3. Use the chisel on the moon for moon dust.
- 4. Click on the high priestess for a thread.
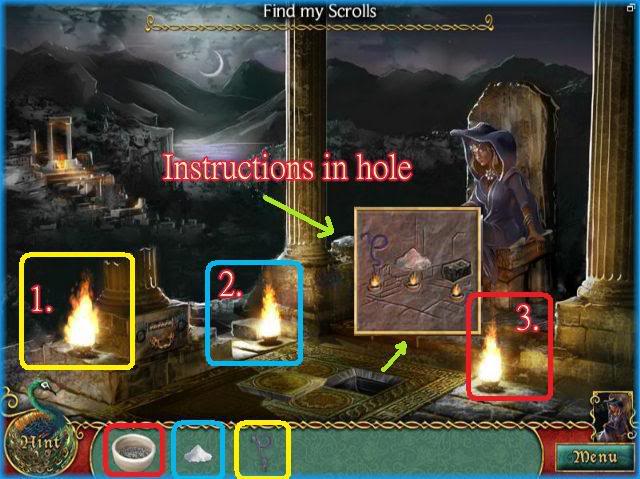
- Note the answer is color coded.
- Notice the 3 flames in the scene from left to right.
- 1. Place the ground brick on the 3rd flame.
- 2. Place the moon dust on the 2ND flame.
- 3. Place the thread on the 1st flame.
- Note that the flames are now colored and a number appears.
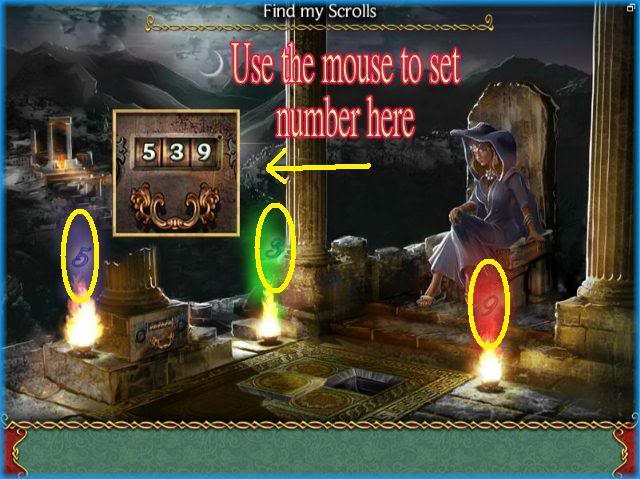
- The numbers form "539"
- Click on the machine in the scene and a dial will appear.
- Click on the dial to set the numbers to match those which are showing from the flames.
- Enter 5-3-9.
- Storyline continues.
Mini Game – Match Game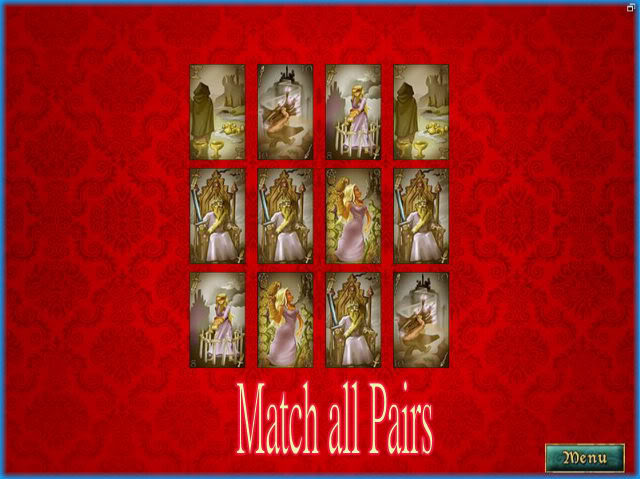
- Match all of the pairs until the cards are gone.
- You will be allowed to view the cards for a few seconds before they turn around so be ready.
- If there are no more matches the game will give you the option to shuffle the face cards.
CHAPTER 4 – "The Empress"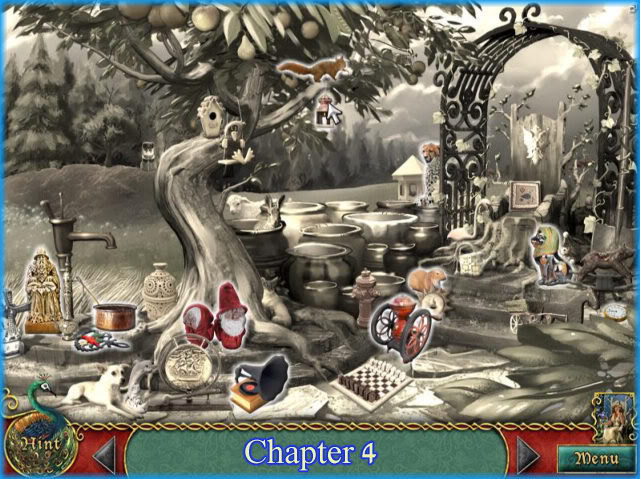
- Place the 12 items into the correct locations in the image.
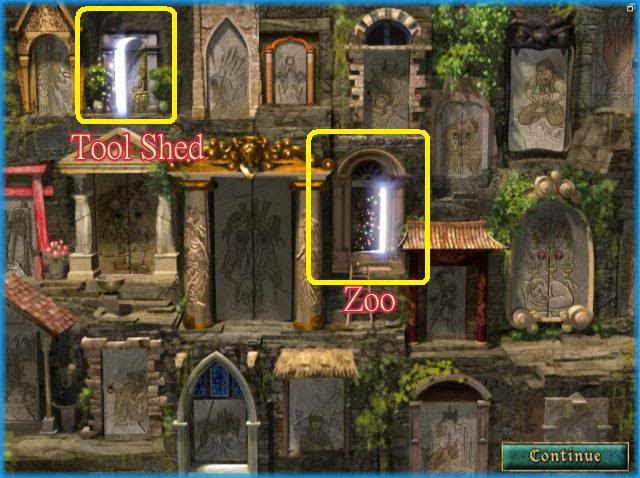
- Locations Tool Shed and Zoo.
- Choose in any order.
- Choose "Tool Shed" if following the walkthrough.
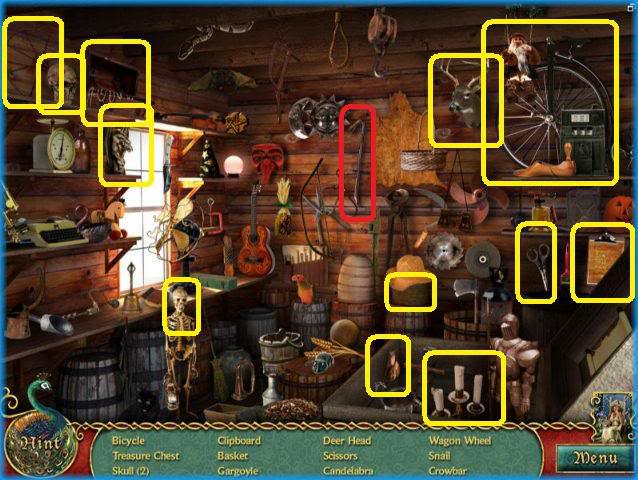
- Locate the 13 items listed at the bottom of the scene.
- The special item for this location is the "Crowbar."

- Locate the 13 items listed at the bottom of the scene.
- The special items for this location are the "Bucket" and the "Shears."
TASK – "Beautify my Garden"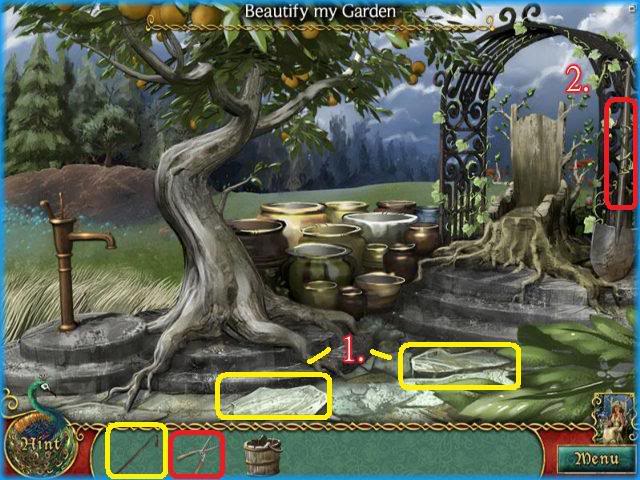
- 1. Click on each of the rocks as seen circled in yellow.
- 2. Use shears to cut vines around the shovel handle.
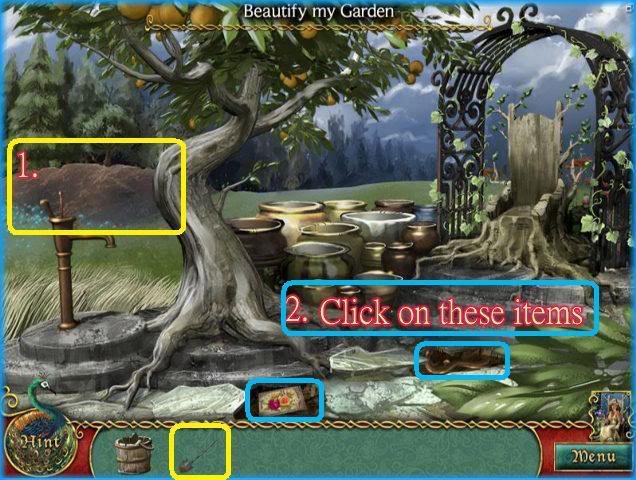
- 1. Use the shovel on the dirt pile.
- 2. Click on the items in the holes. (Seeds and handle)
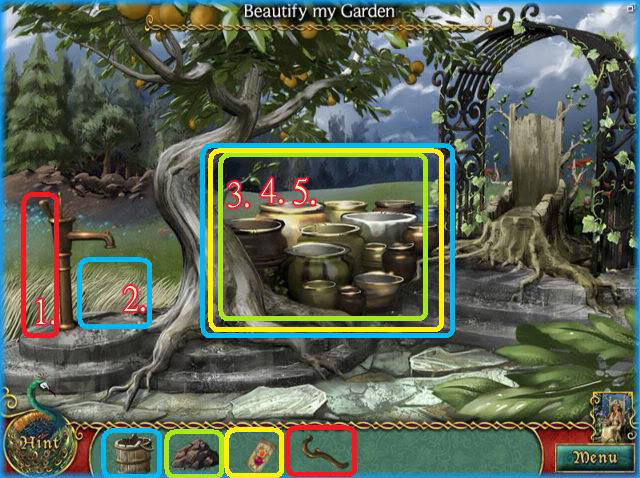
- 1. Place the handle on the water pump.
- 2. Place the bucket under the water pump and it will fill and a bucket of water will go into inventory.
- 3. Place dirt into pots, place seeds into pots, place water into pots and flowers will grow completing task.
Mini Game – Choose 3 cards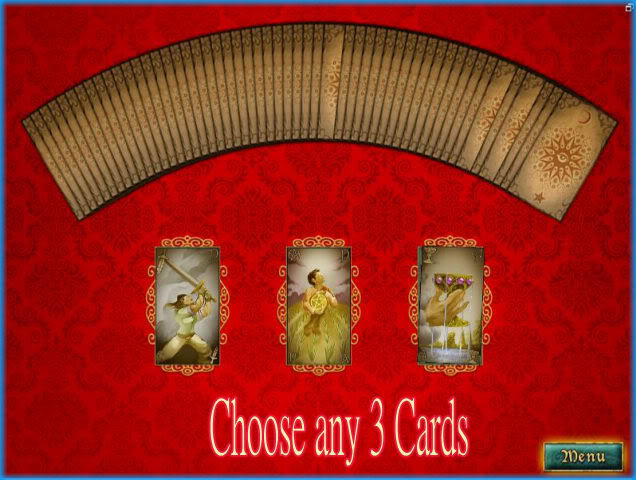
- Choose any 3 cards.
Mini Game – Jigsaw Puzzle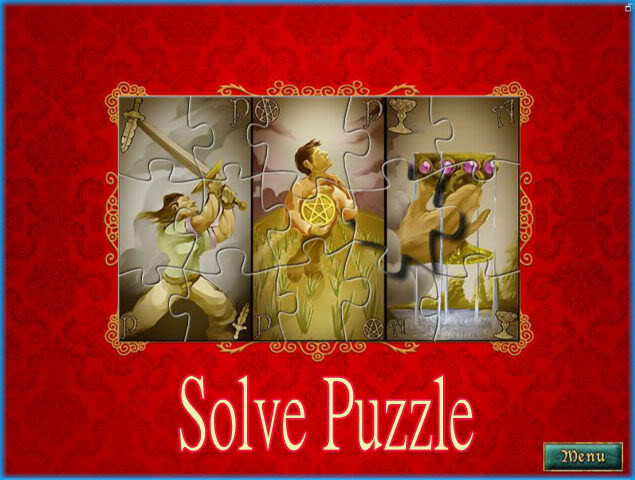
- Solve the jigsaw puzzle by finding the edge pieces first.
CHAPTER 5 – "The Emperor"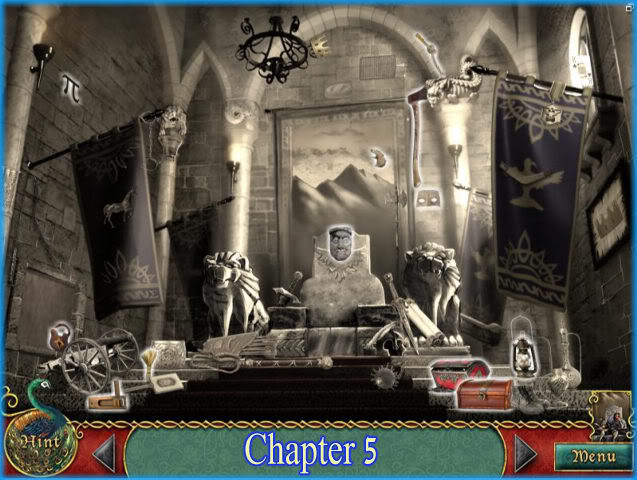
- Locate the 12 items and put them into the scene where they belong.
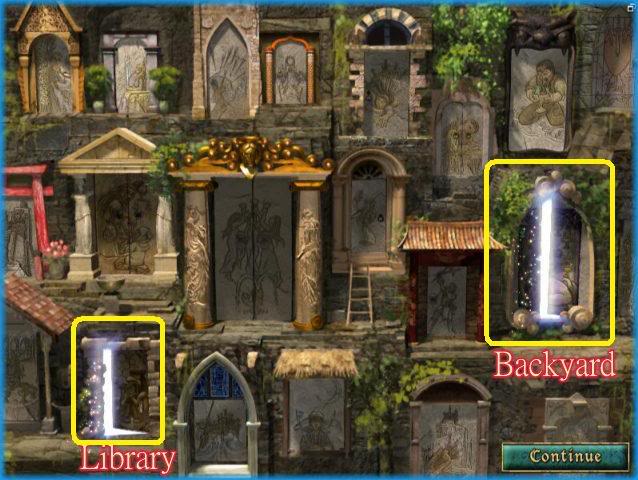
- Locations are "Library" and "Backyard"
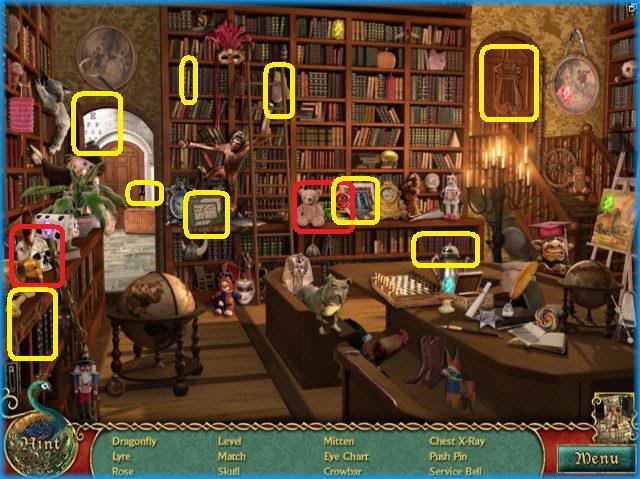
- If following the walkthrough, choose "library" first.
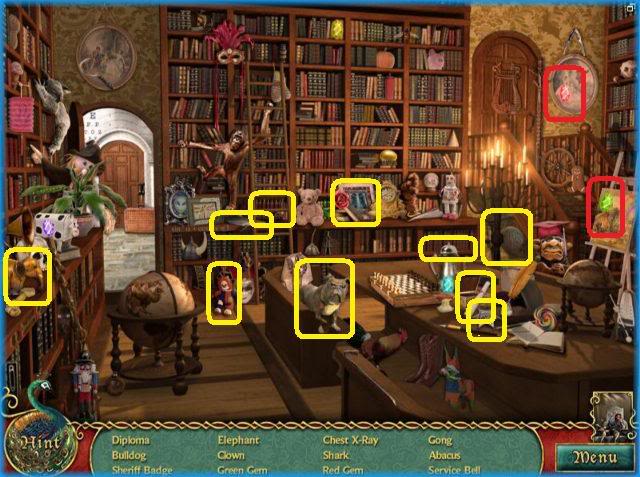
- Locate the 12 hidden objects listed at the bottom of the screen.
- The special items for this location are the "green gem" and "red gem."
- Locate the 12 hidden objects listed at the bottom of the screen.
- The special items for this location are the "Purple gem" and "blue gem."
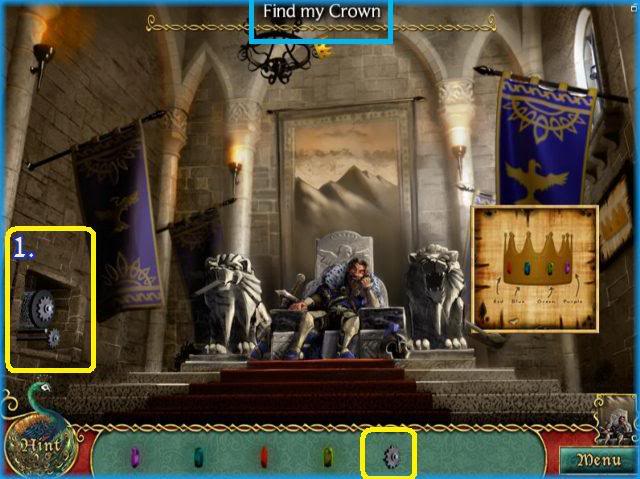
TASK – "Find my Crown"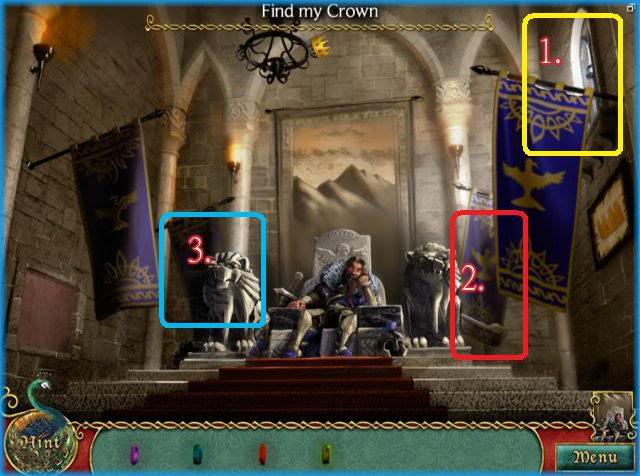
- 1. Click on the window to the far right and it will open and the wind will blow.
- The flag will blow aside and expose a piece of wood. Click on this wood and it will enter into inventory.
- 2. Click on the Lion’s tail and a gear will appear in its mouth. Click on the gear.
- 3. Place the wood piece into the lion’s mouth at the far left.
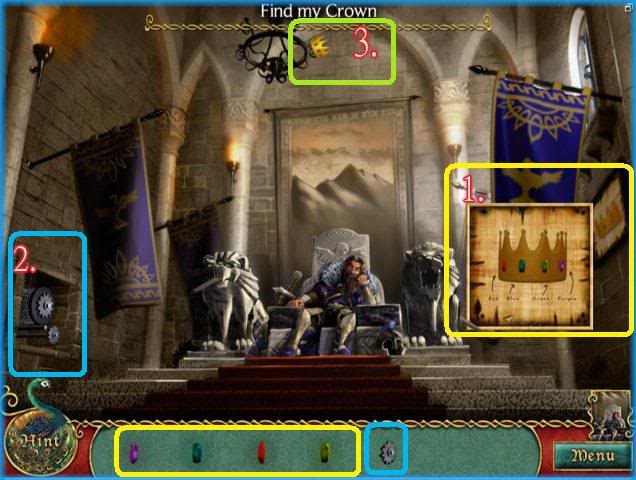
- 1. Click on the picture to the right wall and instructions for repairing the crown will appear for a few seconds.
- 2. Place the gear into the mechanism and the chandelier above will lower down.
- 3. Click on the crown.
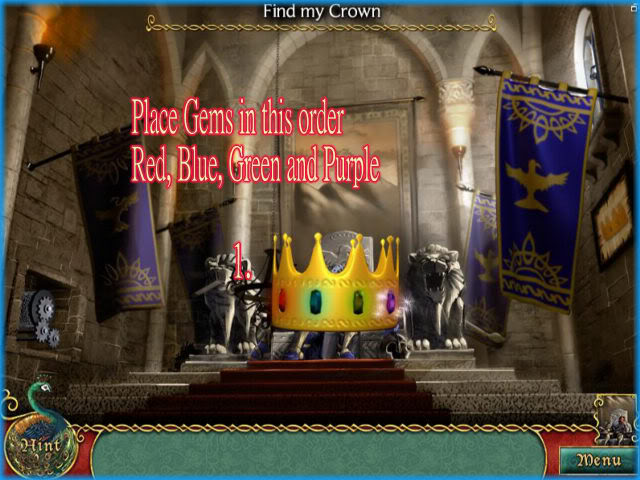
- 1. Once the crown is within reach click on it and place the gems in this order, "Red, Blue, Green, and Purple."
- Storyline continues.
Mini Game – Match Pairs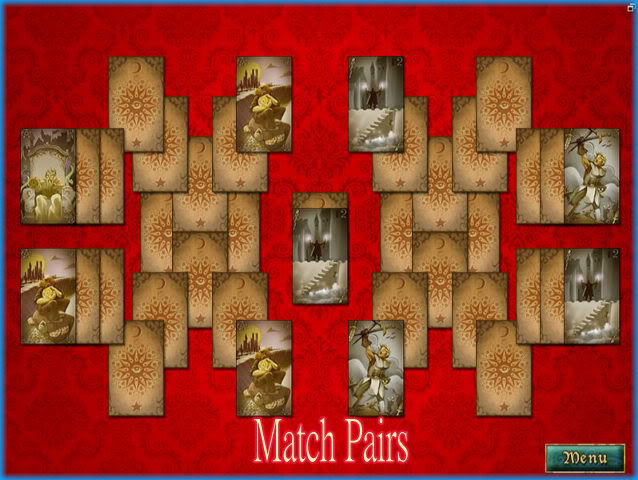
- Match the pairs of cards until they are all gone except 2 gold cards.
- Once you have 2 gold cards match them to complete the game.
- If you have no further matches you may shuffle or restart the game.
CHAPTER 6 – "The learned Man"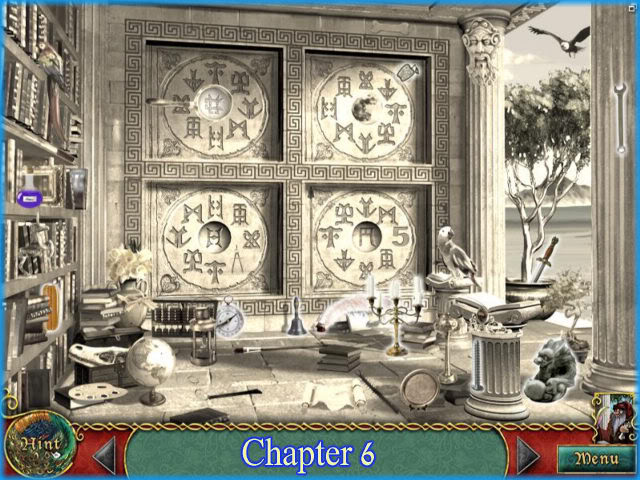
- Place the 12 items into the correct locations in the scene.
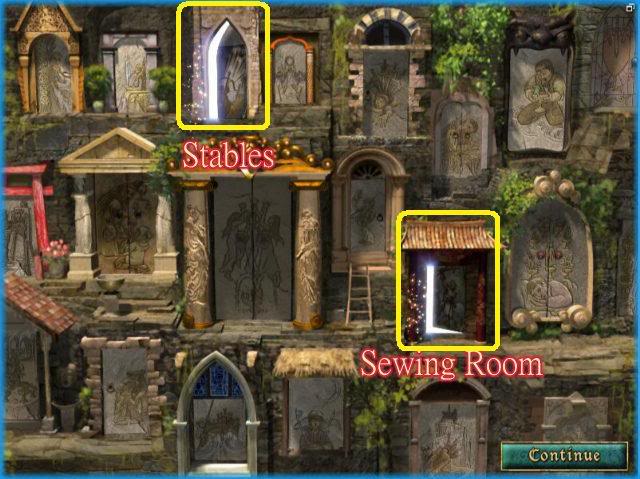
- The rooms for this location are, "Sewing room" and "Stables"
- If you are following the walkthrough click on "Stables."
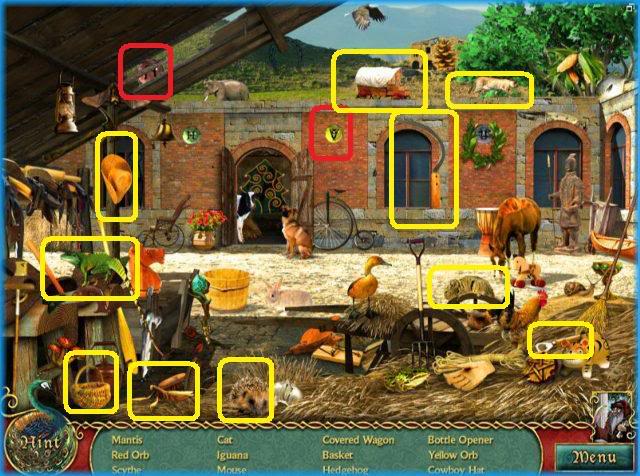
- Locate the 12 hidden objects listed at the bottom of the page.
- The special items for this location are the "Red Orb" and "yellow orb."
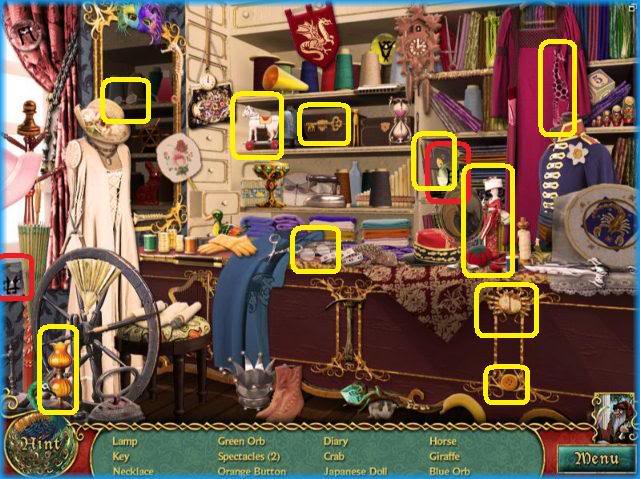
- Locate the 13 hidden objects listed at the bottom of the page.
- The special items for this location are the "Blue Orb" and "Green Orb."
TASK – "Solve the puzzles I set before you."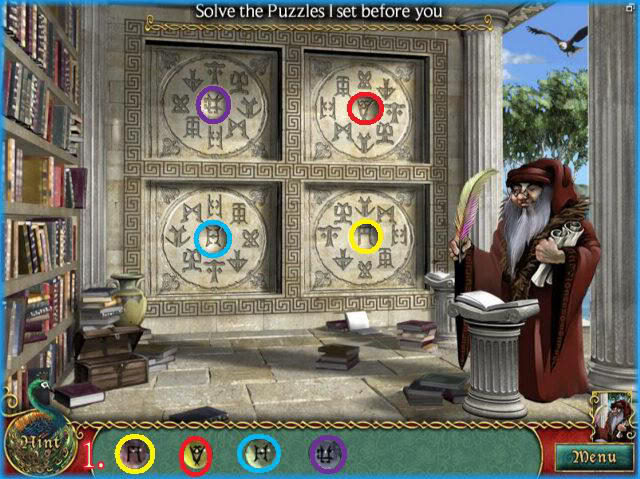
- Here you will place the orbs into the center of the wall as shown.
- Look at the symbols in the center of the orbs and match that to the symbols in the wall for correct placement.
- Each time you correctly place an orb you will be taken to a mini game.
- Images are color coded to help you with placement.
Blue Orb Mini Game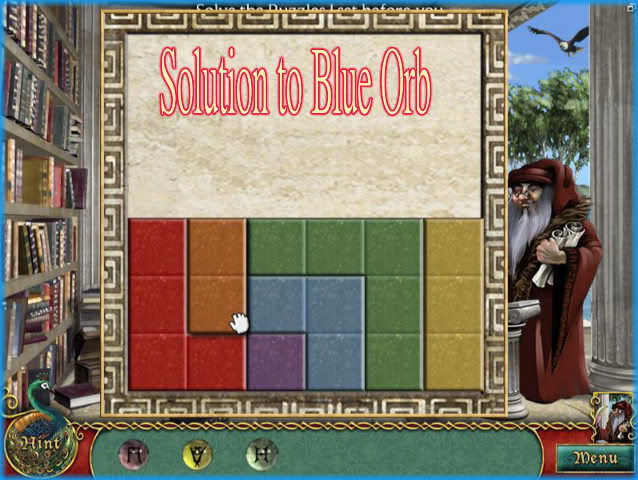
- Here you must fit all of the pieces into the allotted area without any spaces left over.
- You can not turn or rotate the pieces.
- There is more than one solution to this puzzle.
Yellow Orb Mini Game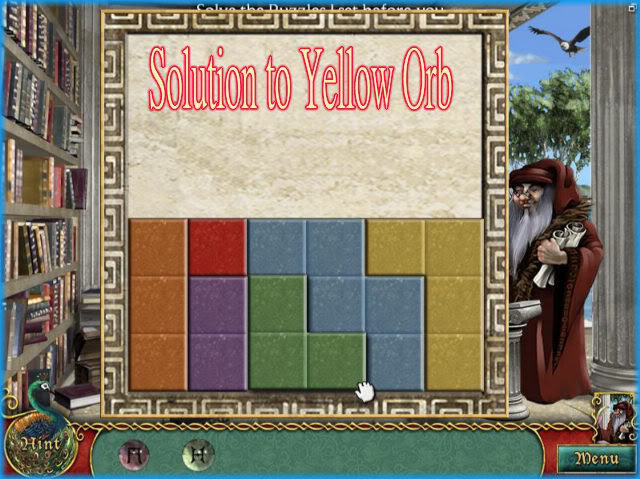
- Fit all of the pieces into the allotted space as shown above.
- There is more than one solution to this puzzle.
Green Orb Mini Game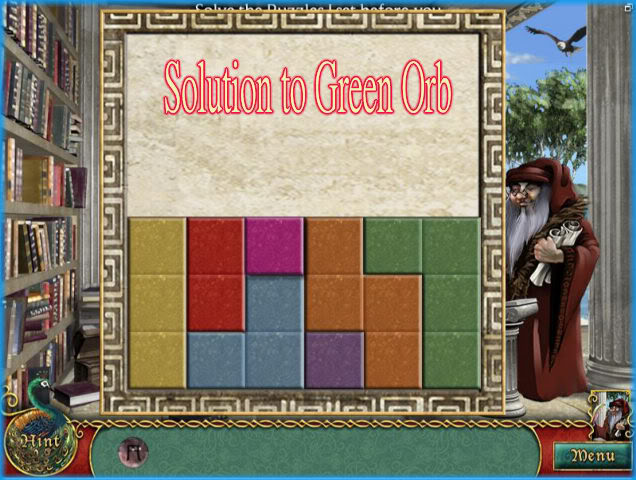
- Fit all of the pieces into the allotted space as shown above.
- There is more than one solution to this puzzle.
Red Orb Mini Game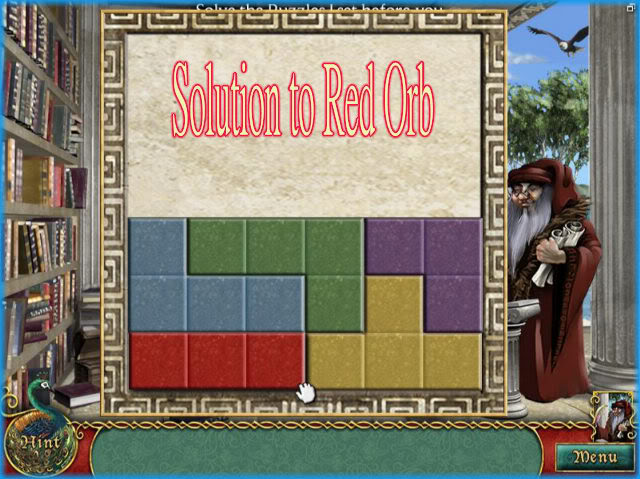
- Fit all of the pieces into the allotted space as shown above.
- There is more than one solution to this puzzle.
Mini Game – Match Pairs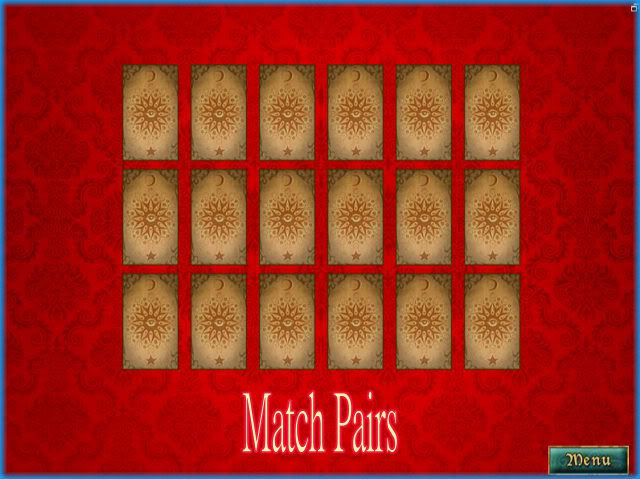
- Match pairs until they are gone.
- You may shuffle or restart if you become stuck and have no more matches to make.
CHAPTER 7 – "The Lovers"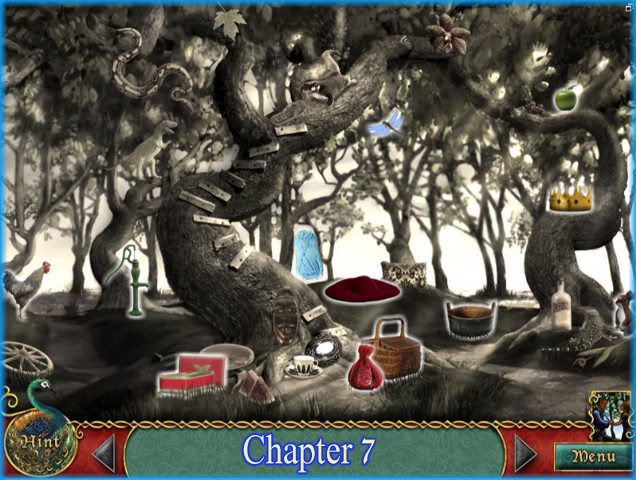
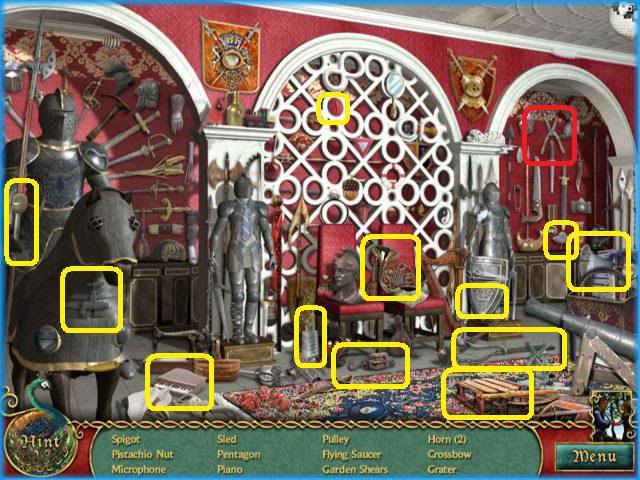
- Place the 12 items into the correct locations in the scene.
- The rooms for this location are "Vault" and "Armory."
- If you are following the walkthrough choose "Vault."

- Locate the 12 hidden objects listed at the bottom of the page.
- The 2 special items for this location are the "Basket" and the "hammer."
- Locate the 13 hidden objects listed at the bottom of the page.
- The special item for this location are "shears."
TASK – "Grant these lovers with a gift."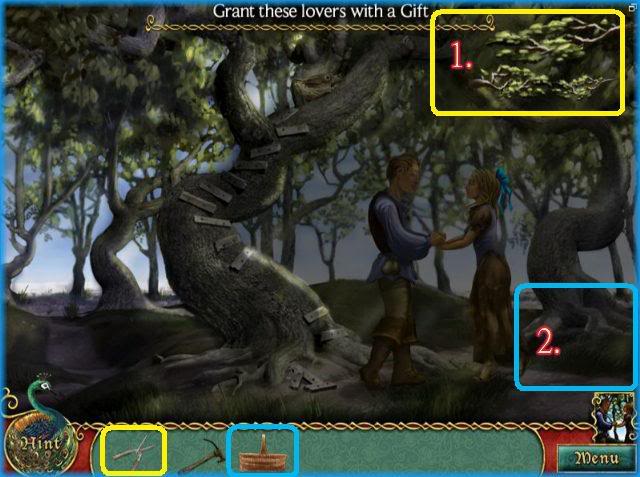
- 1. Use the shears to cut foliage above.
- 2. Use the basket to pick up leaves.
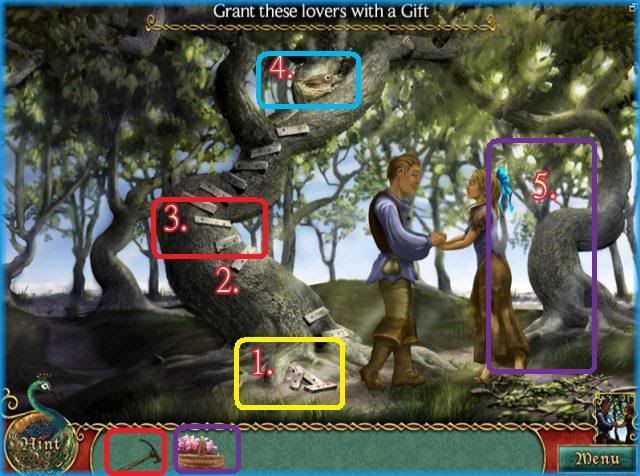
- 1. Click on the planks on the ground.
- 2. Put the planks on the tree.
- 3. Use the hammer on planks on tree.
- 4. Click on the bird and it will fly away and ribbon will drop.
- 5. Click on all items and garland wreaths will be formed.

- 1. Give wreaths to both lovers.
- Story will continue.
Mini Game – Choose 3 Cards.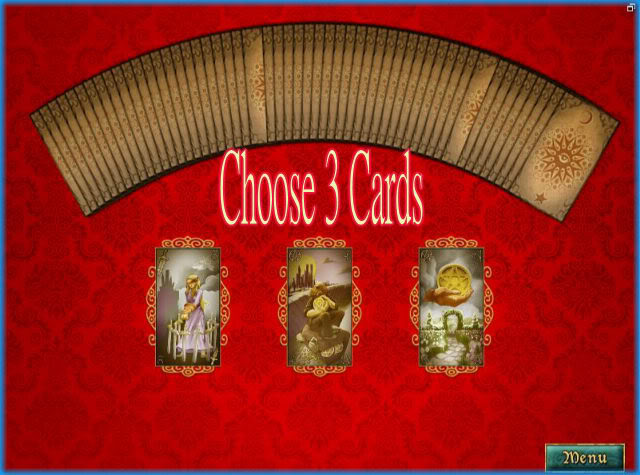
- Choose any 3 cards by clicking on them.
Mini Game – Jigsaw Puzzle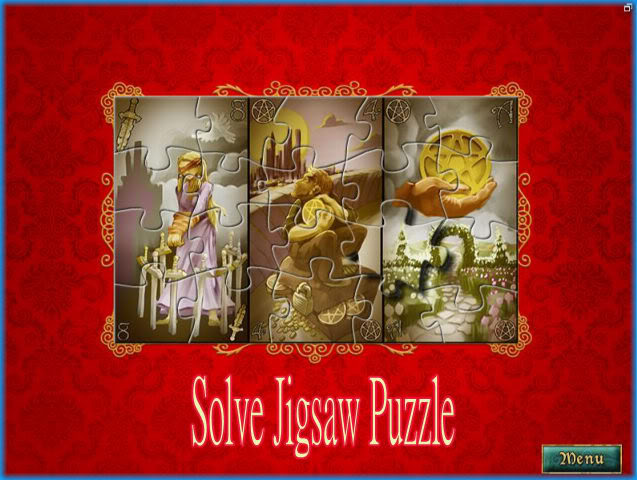
- Complete the jigsaw puzzle by finding the end pieces first.
CHAPTER 8 – "The Chariot"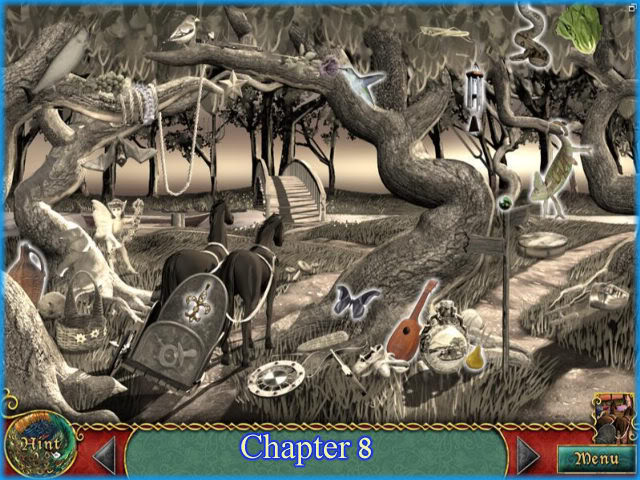
- Locate the 12 items and put them in the location they belong.
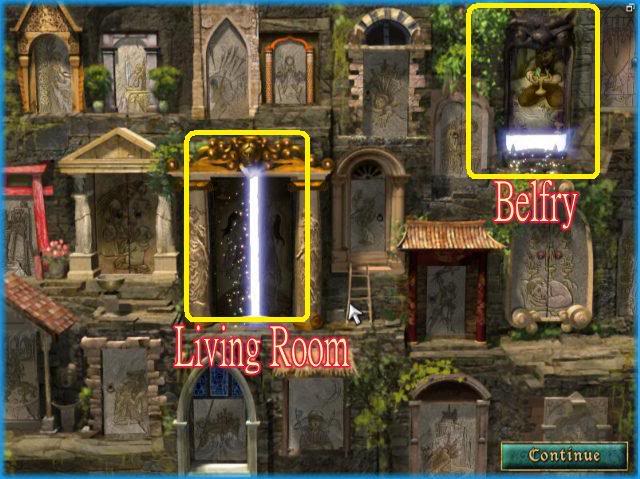
- The doors in this location go to the "living room" and the "Belfry."
- If you are following the walkthrough, choose the "living room."

- Locate the 12 hidden objects listed at the bottom of the page.
- The special item in this location is the "knife."
- Locate the 14 hidden objects listed at the bottom of the page.
- The special item in this location is the "saw."
TASK – "Repair my chariot."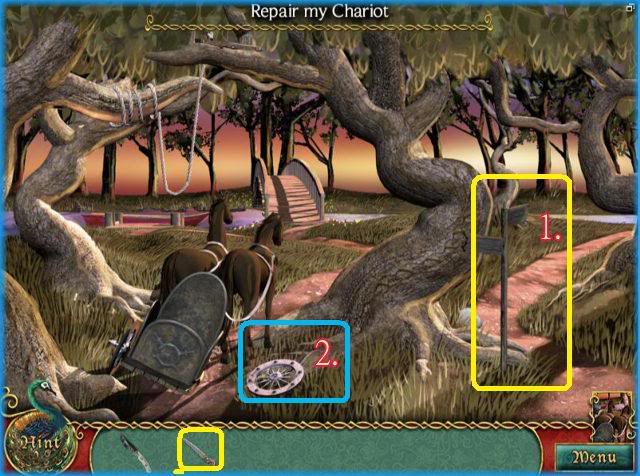
- 1. Use the saw on the signpost and wood will go into inventory.
- 2. Click on the wheel to enter it into inventory.
- 3. Use knife on the rope swings above.
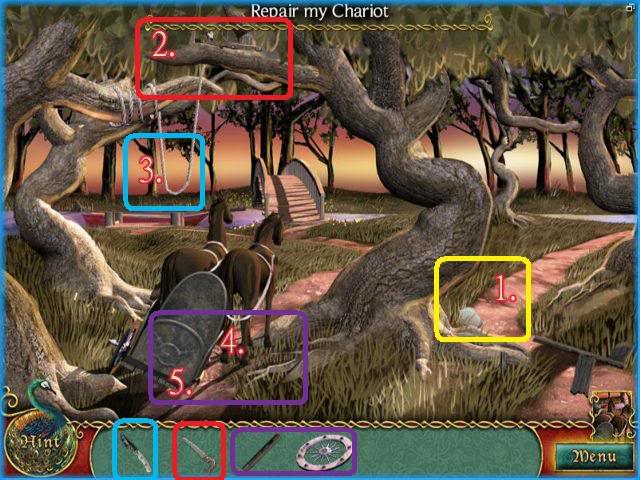
- 1. Click on the rock circled in yellow.
- 2. Use saw to cut down branch.
- 3. Use the knife to cut the rope.
- 4. Use the rock, wood, and wheel to repair the chariot.
Mini Game – Match pairs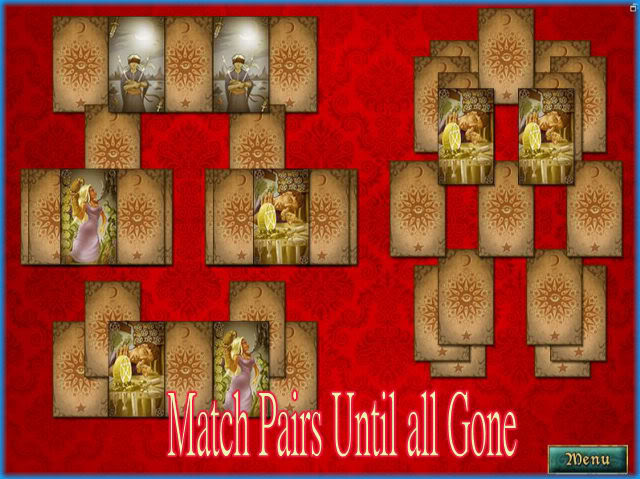
- Match all of the pairs until they are gone.
- If you can no longer make matches you may shuffle or restart the game.
CHAPTER 9 – "Strength"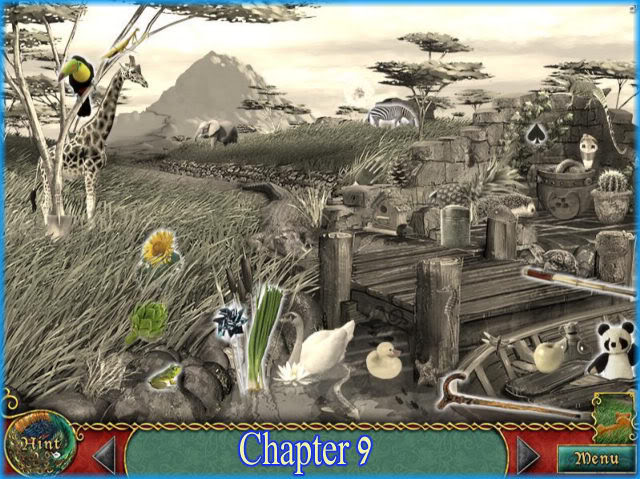
- Locate the 12 objects along the bottom of the page and place them where they belong.
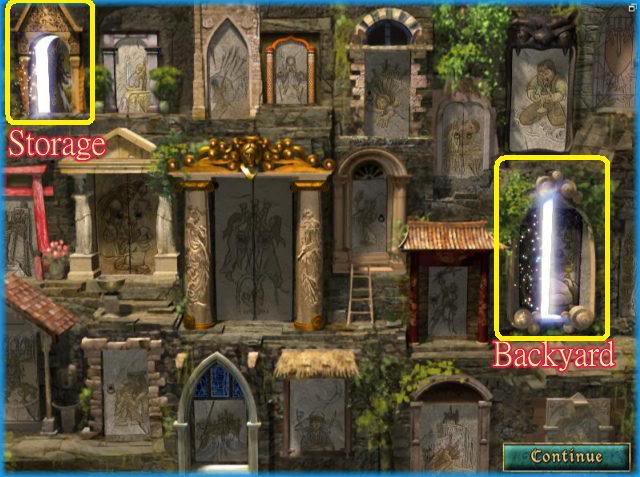
- The rooms in this location are the "Backyard" and "Storage."
- If you are following the walkthrough, choose "Storage."
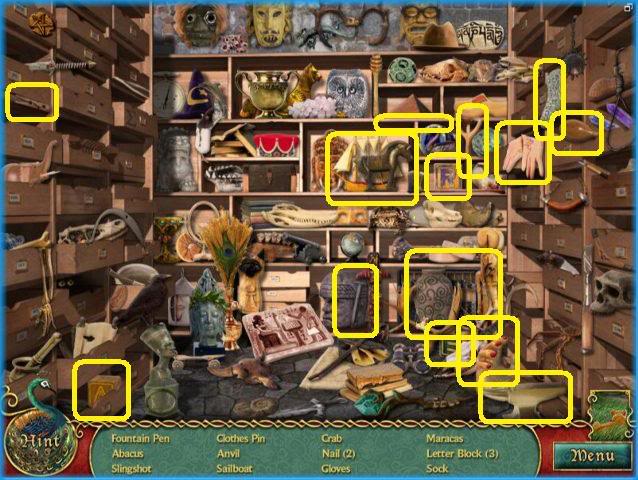
- Locate the 15 hidden objects listed at the bottom of the page.
- There is no special item in this location.
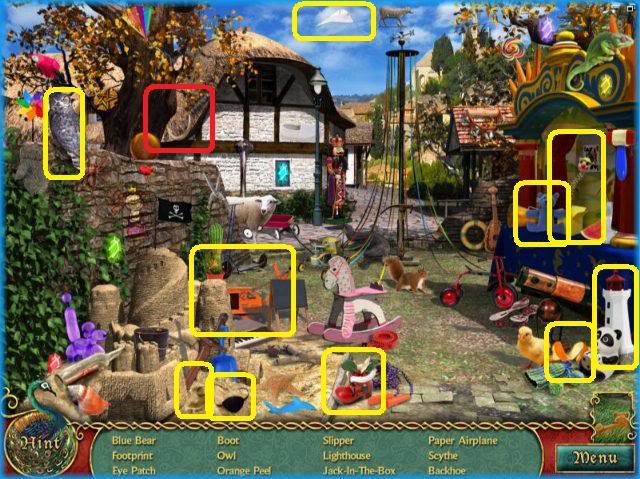
- Locate the 12 hidden objects listed at the bottom of the page.
- The special item in this location is the "Scythe."
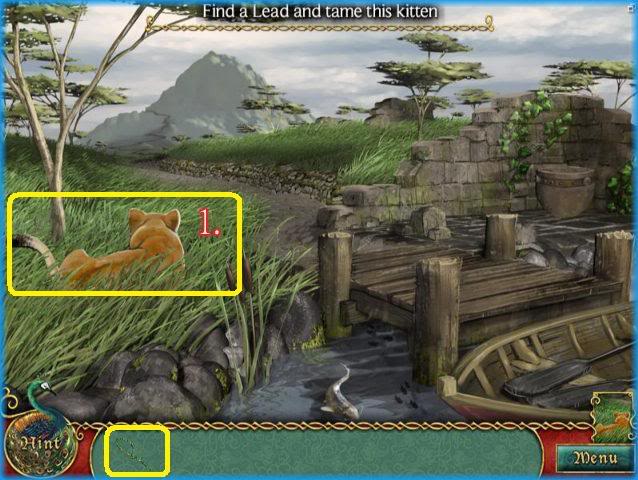
TASK – "Find a lead and tame this Kitten."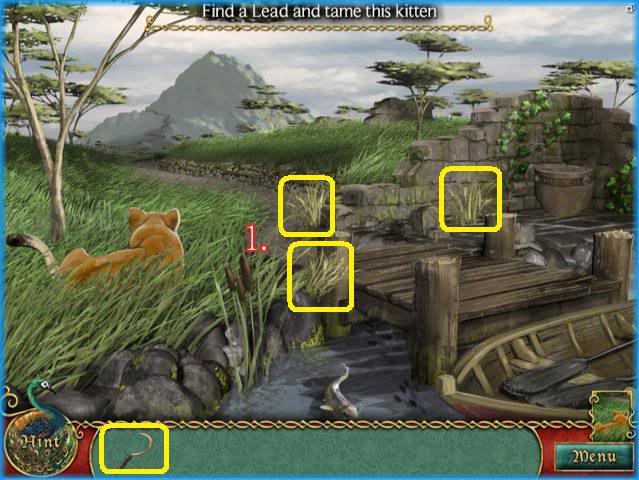
- 1. Use scythe on grass in the 3 locations shown circled above.
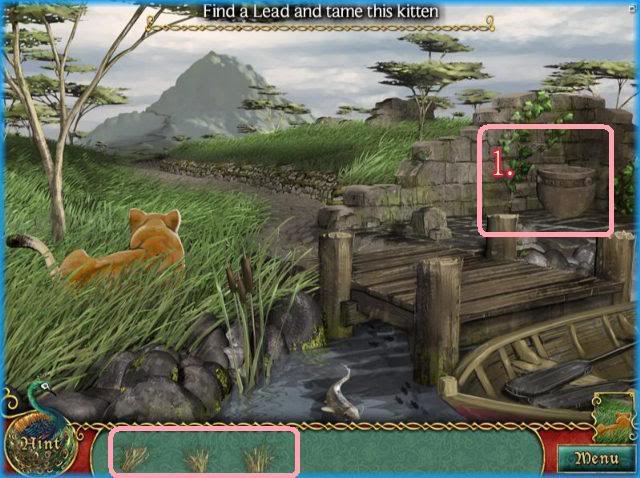
- 1. Put bundle of grass clippings in machine to activate a mini game.
Mini Game #1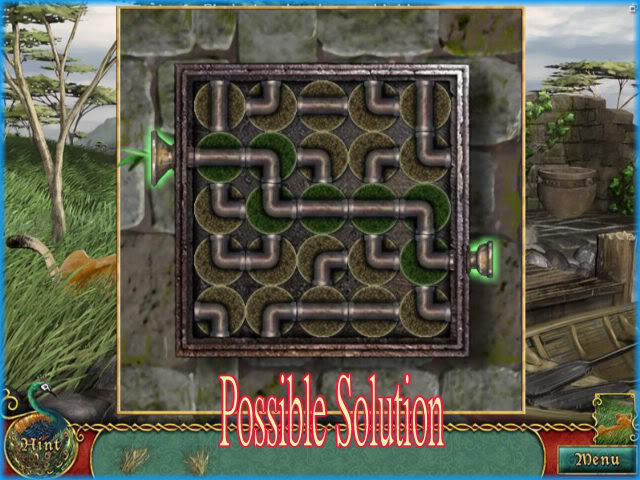
- Connect the pipes so that both ends have a connection.
- You do not have to use all of the pipes.
- This is one potential solution as there are many others.
- Once you go back place another pile of grass in the machine to activate next mini game.
Mini Game #2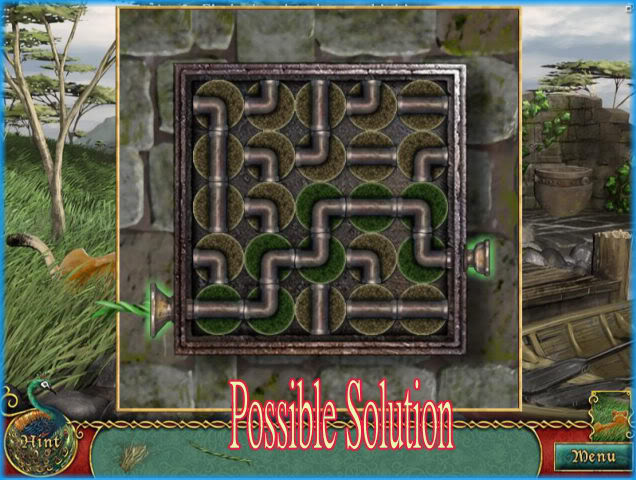
- Connect the pipes so that both ends are connected.
- You do not have to use all of the pipes to complete the puzzle.
- One potential solution is shown as there are many others.
- Once you go back to the lion, place the last bundle of grass clippings in the machine to activate the mini game.
Mini Game #3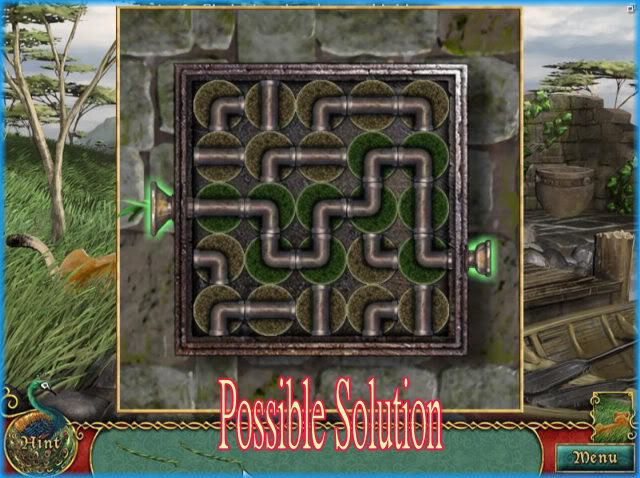
- Connect the pipes so that both ends are connected.
- You do not have to use all of the pipes.
- One potential solution is shown as there are many others.
- When you return to this scene there is a lead or leash in your inventory.
- Click on the lead and then on the lion to tame it and finish the scene.
- Storyline continues.
Mini Game – Match Pairs
- Match all of the pairs until there are none left.
- If you run out of moves you can shuffle the cards or restart the game.
CHAPTER 10 – "The Hermit"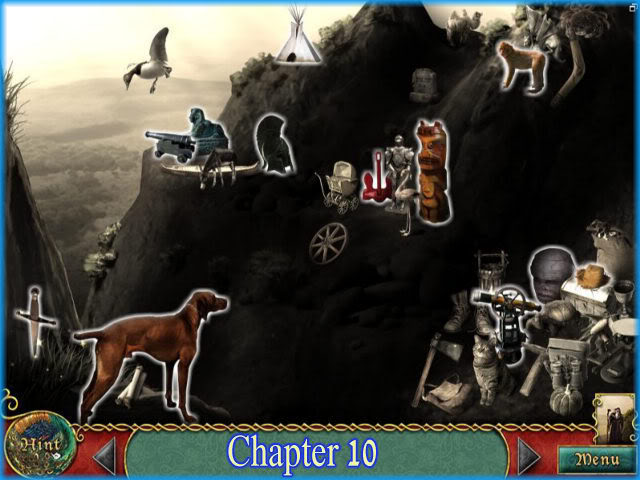
- Locate the 12 objects along the bottom of the screen and place them where they belong in the scene.
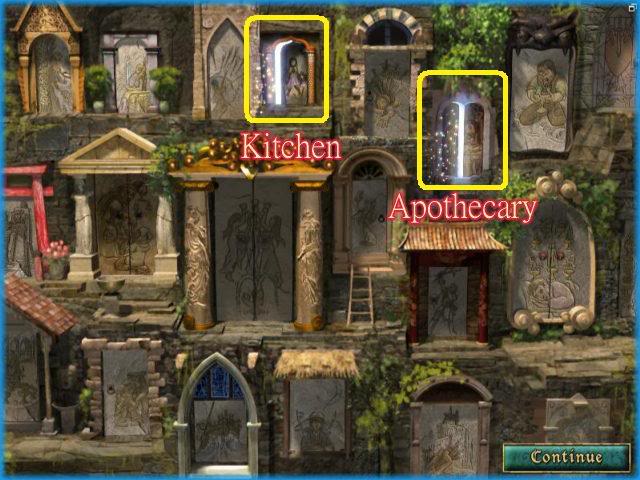
- The rooms for this location are "Kitchen" and the "apothecary."
- If you are following the walkthrough, click on "kitchen."
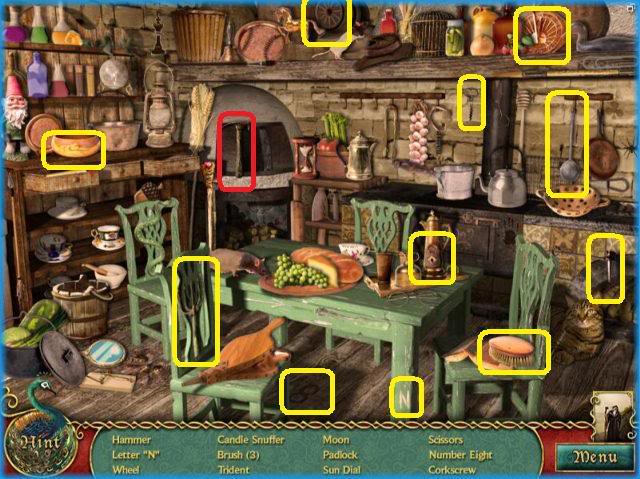
- Locate the 14 items listed at the bottom of the page.
- The special item for this location is the "hammer."
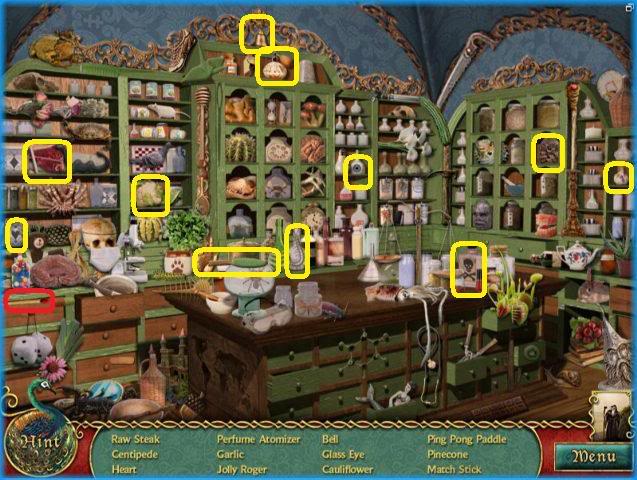
- Locate the 12 hidden items listed at the bottom of the page.
- The special item for this location is the "match stick."
TASK – "Lead the Lion to the Hermit"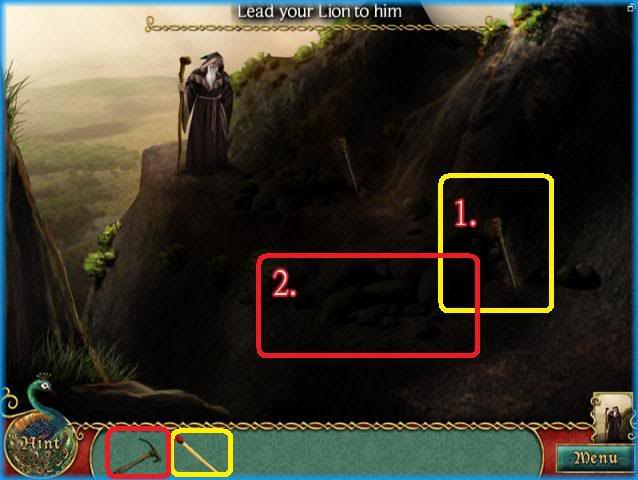
- 1. Bring the match to the torch on far right.
- 2. Use Hammer on the rocks.
Mini Game – Assemble the Rocks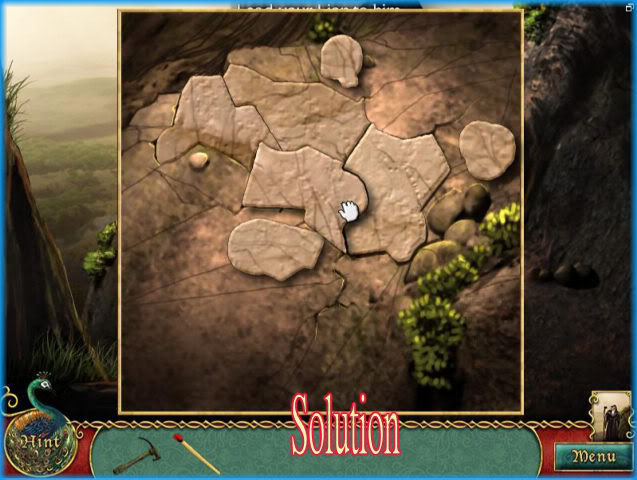
- Solution above.
- Back to task.
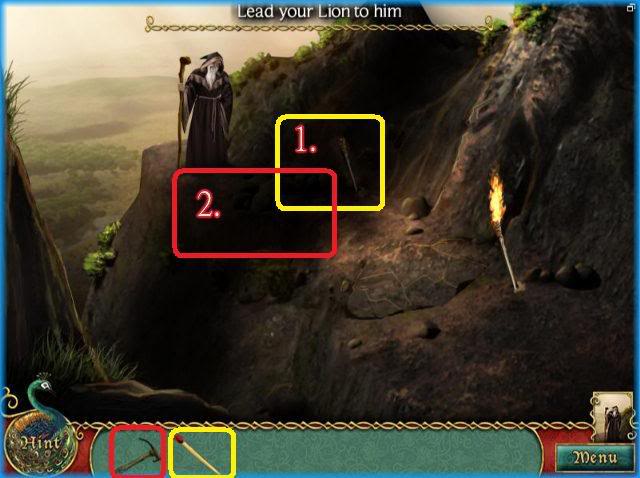
- 1. Bring the match to the torch closest to hermit.
- 2. Use the hammer to break away the rocks.
Mini Game "Assemble the rocks."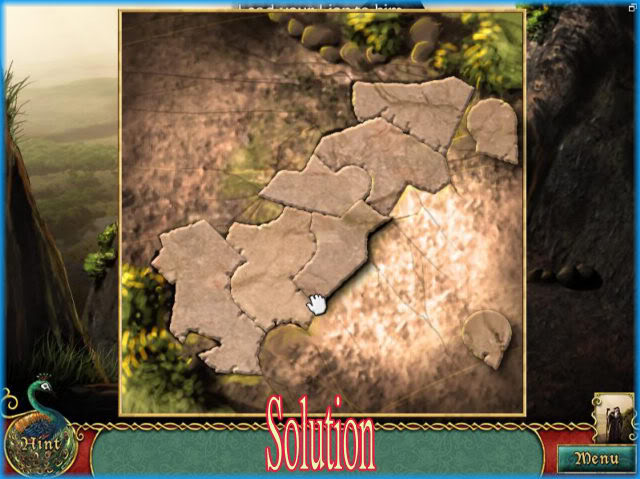
- Solution shown above.
- Return to task.
- Storyline continues.
Mini Game – Choose 3 Cards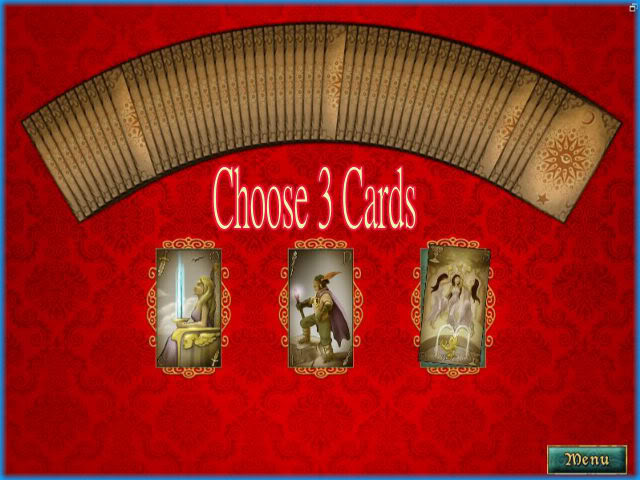
- Choose 3 cards from deck.
Mini Game – Jigsaw Puzzle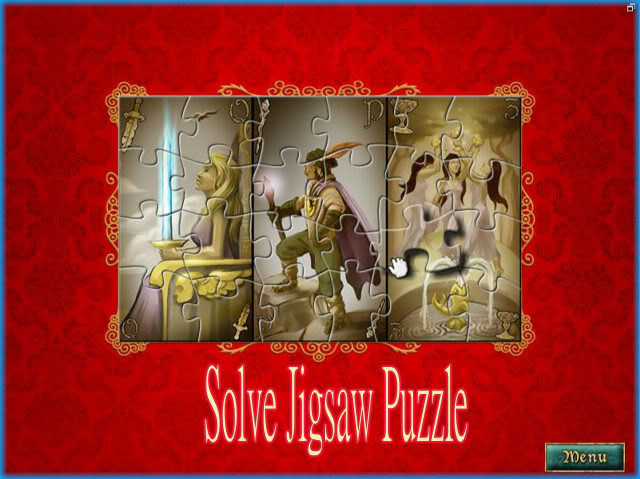
- The jigsaw puzzle is based on the 3 cards you have drawn.
- Assemble the puzzle by completing the outer edges first and working inward.
CHAPTER 11 – "The Wheel of Fortune."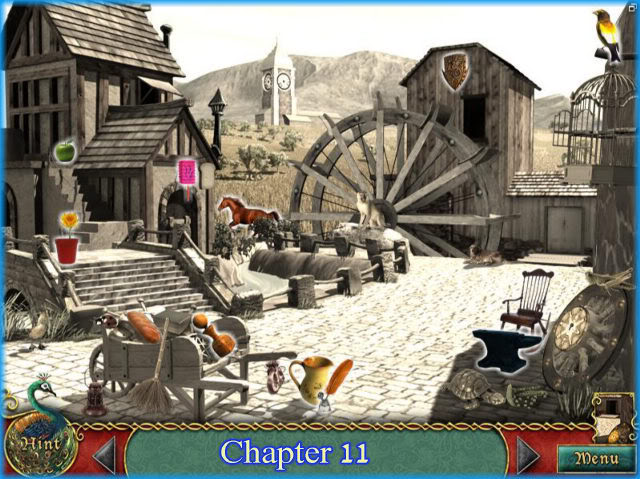
- Place the 12 items at the bottom of the page into the scene in their correct locations.
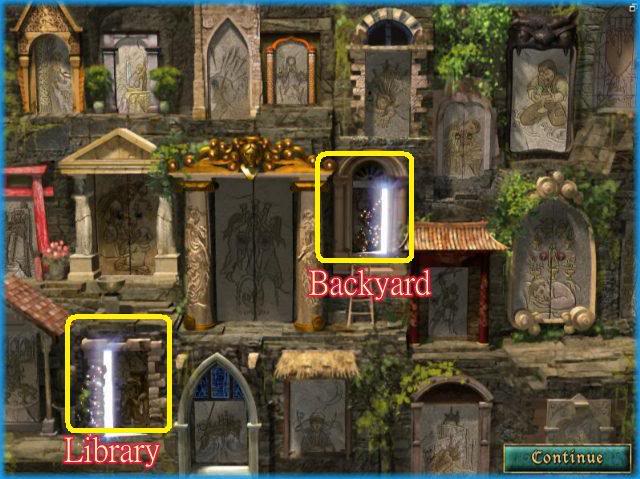
- The rooms for this location are the "Library" and the "Backyard."
- If you are following the walkthrough, choose the "Library."
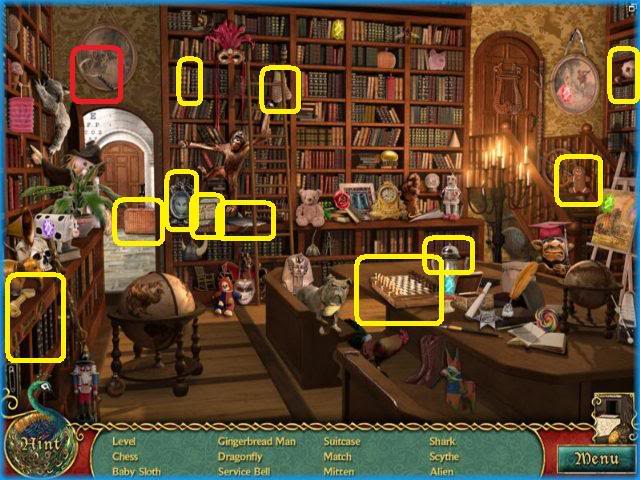
- Locate the 12 hidden objects listed at the bottom of the page.
- The special item for this location is the "Scythe."
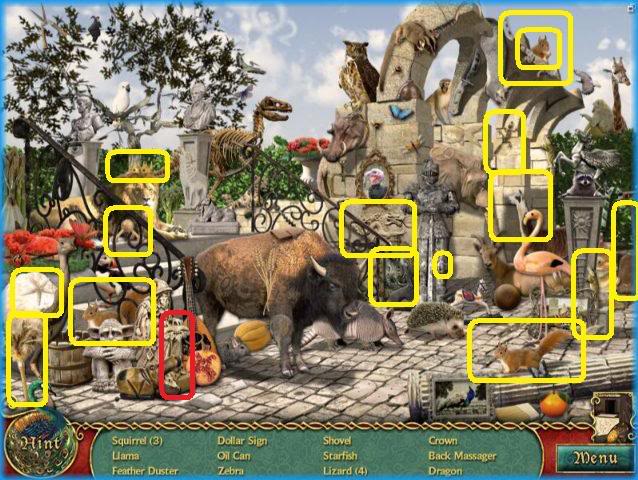
- Locate the 17 hidden objects listed at the bottom of the page.
- The special item for this location is the "oil can."
TASK – "Find the key to the wheel."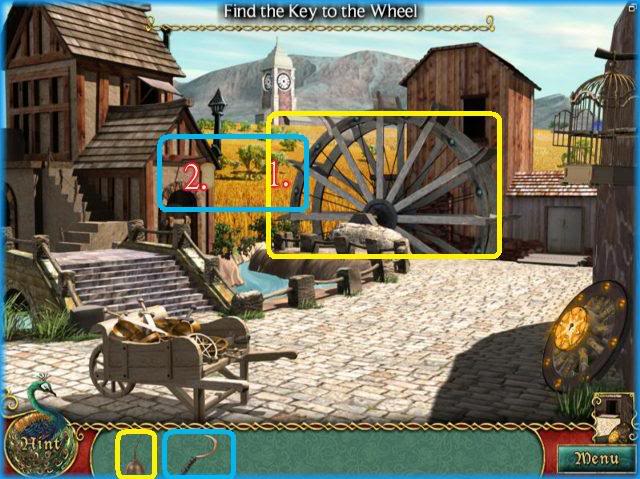
- 1. Use the oil can on the wheel.
- 2. Use the scythe on the wheat.
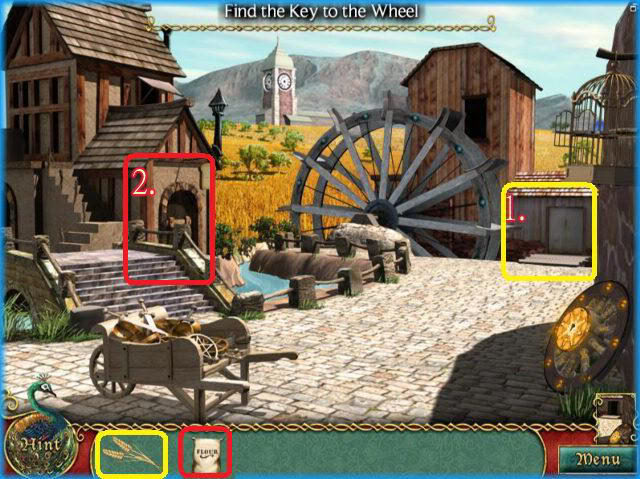
- 1. Take the wheat to the mill.
- 2. Take the flour to bakery.
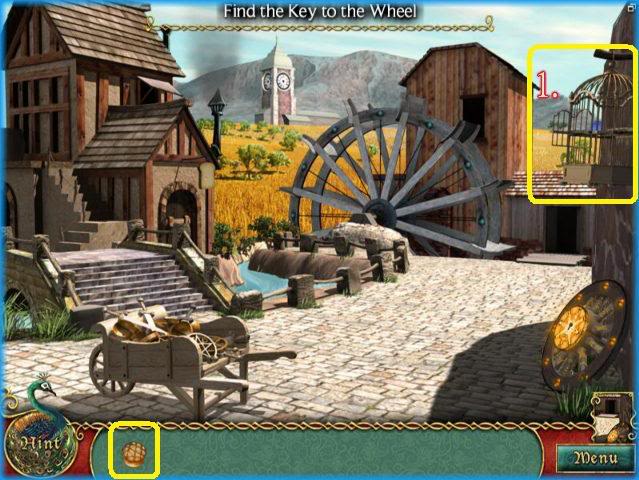
- 1. Place the muffin in the bird cage.
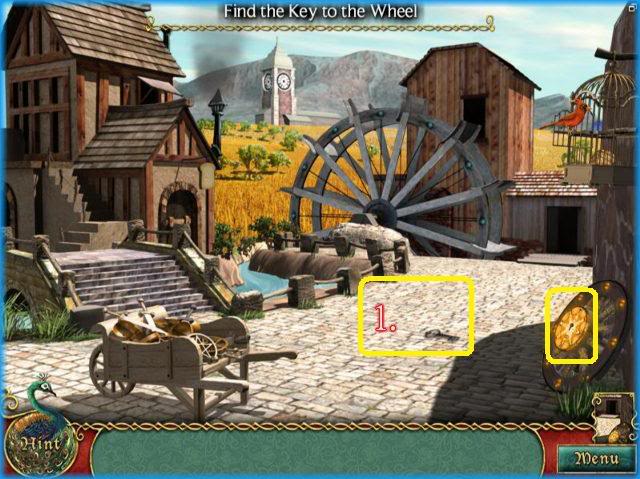
- 1. Pick up the key on the ground.
- 2. Place the key inside of the wheel.
- Storyline continues.
Mini Game – Match pairs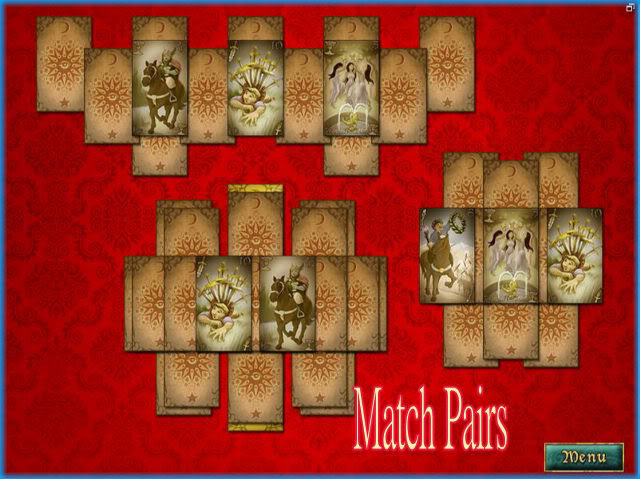
- Match all of the pairs until they are gone.
- You may shuffle or restart game if you run out of matches.
CHAPTER 12 – "Justice"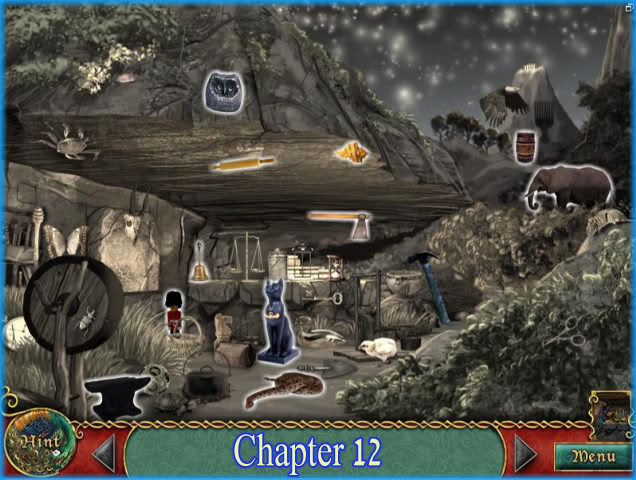
- Place the 12 items at the bottom of the page into their correct locations.
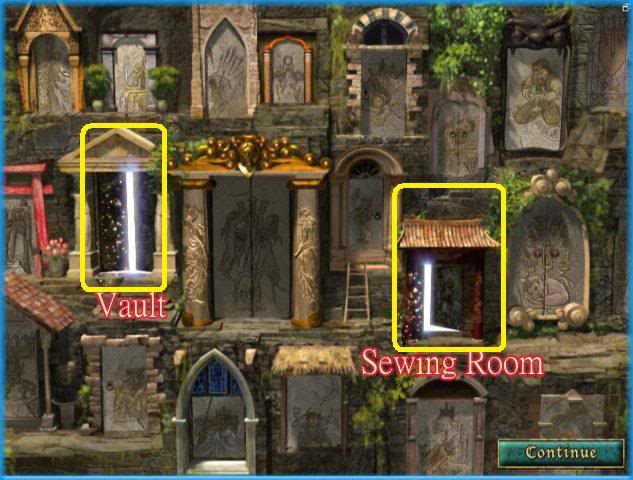
- The rooms for this location are the "Vault" and the "Sewing room."
- If you are following the walkthrough, choose the vault first.
- Locate the 14 hidden objects listed at the bottom of the page.
- The special item for this location is the "Garden Shears."
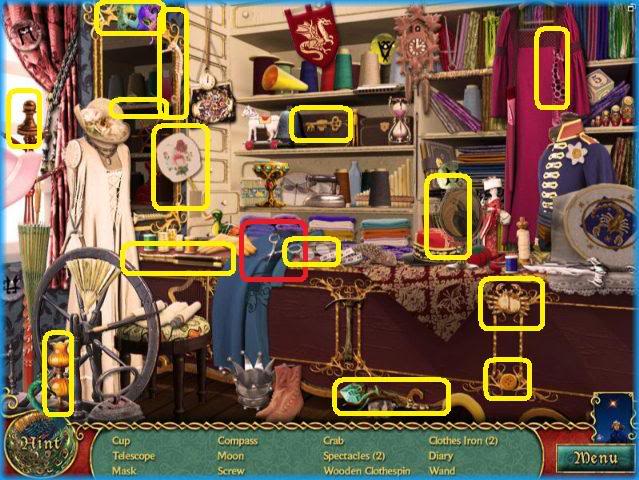
- Locate the 12 hidden objects listed at the bottom of the page.
- The special items for this location is the "Bell."
TASK – "Wake the Judge."
- 1. Use the garden shears on the foliage above in tree.
- 2. Click on the clock dial on the ground and it will enter into inventory.
- 3. Place the bell on the clock.
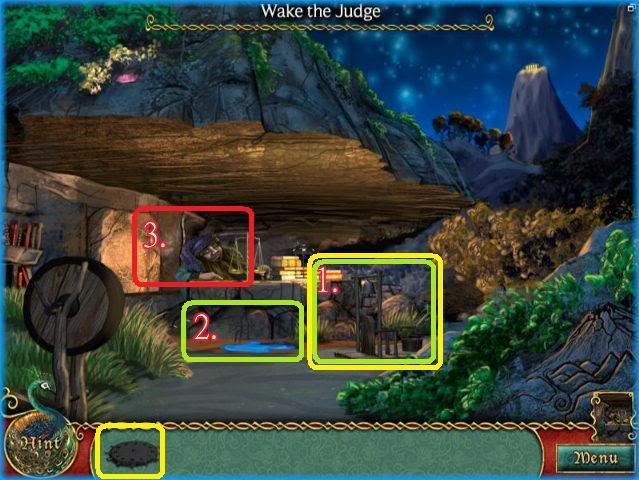
- 1. Place the clock dial on the clock.
- 2. Place the water clock on the puddle of water.
- 3. Click on the judge to get a hammer from him. (Hammer goes into your inventory.)
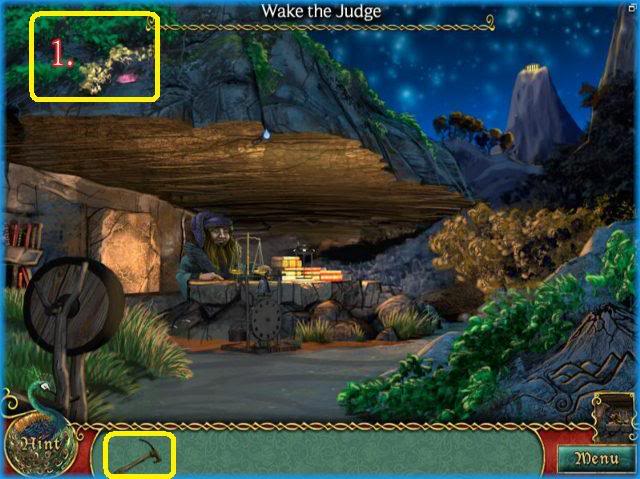
- 1. Use the hammer on crystal in tree.
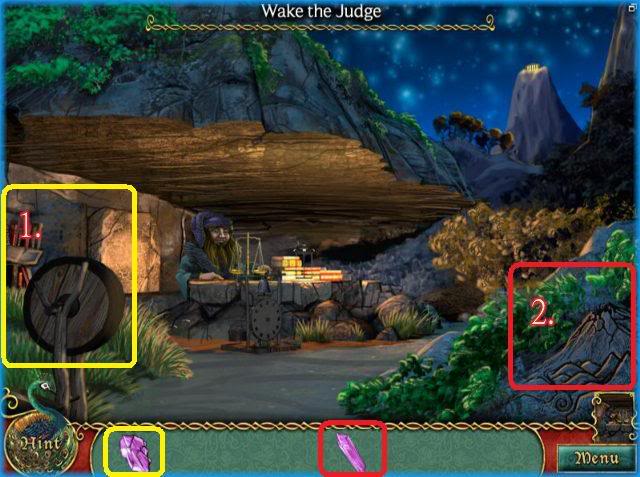
- 1. Grind the crystal on the wheel.
- 2. Place the crystal within the map.
- Storyline Continues.
Mini Game – Match Pairs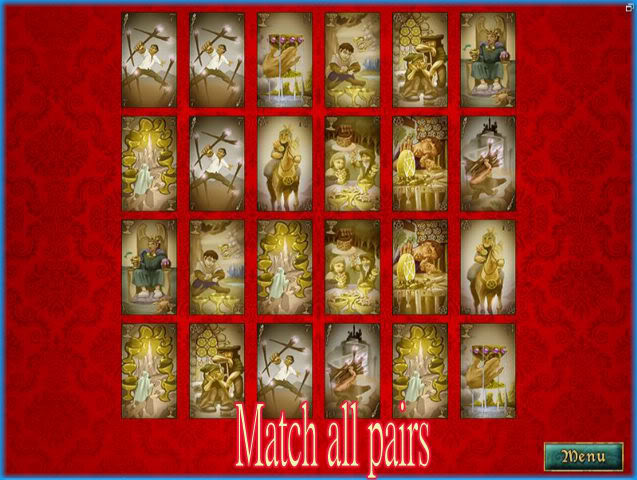
- Match all of the pairs until they are all gone.
- Note you will be allowed to see the faces of the cards for a few brief seconds and then they turn around so look quickly.
CHAPTER 13 – "The Hanged Man"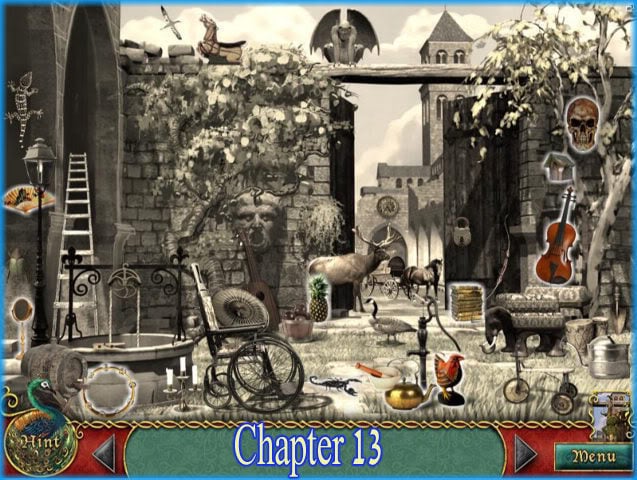
- Place the 12 items at the bottom of the page into their correct locations.
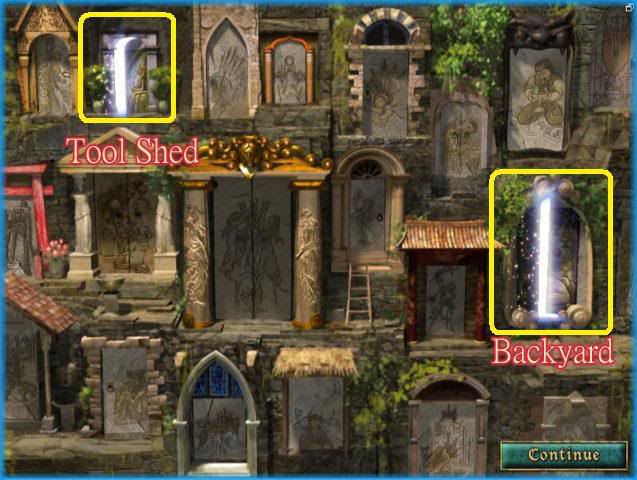
- The rooms for this location are the "tool shed" and the "backyard."
- If you are following the walkthrough choose the "tool shed" first.
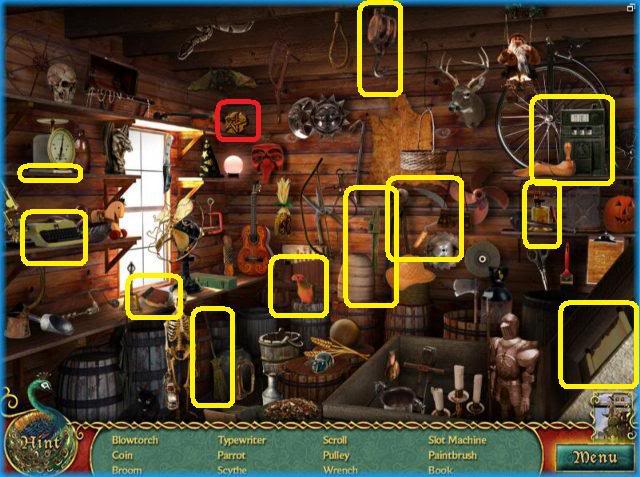
- Locate the 12 hidden objects listed at the bottom of the page.
- The special item for this location is the "coin."
- Locate the 12 hidden objects listed at the bottom of the page.
- The special item for this location is the "Ball" and the "club."
TASK – "Climb up beside the hanging man."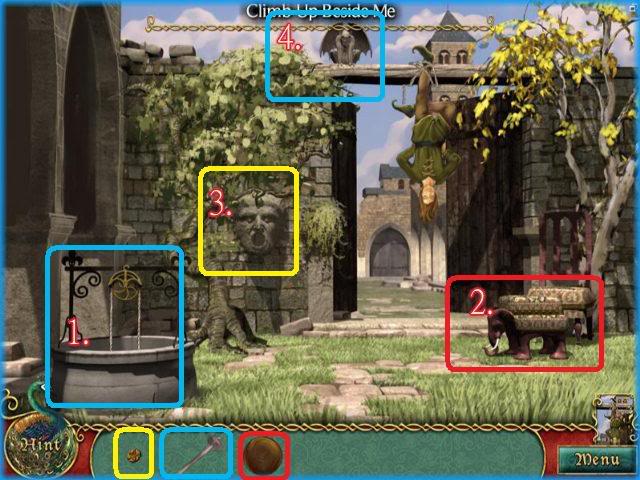
- 1. Click on the well to get the bucket.
- 2. Use the ball on the elephant stool to move it to the left.
- 3. Place the coin into the mouth of the sculpture.
- 4. Use the club on the gargoyle.
Mini Game – Choose 3 Cards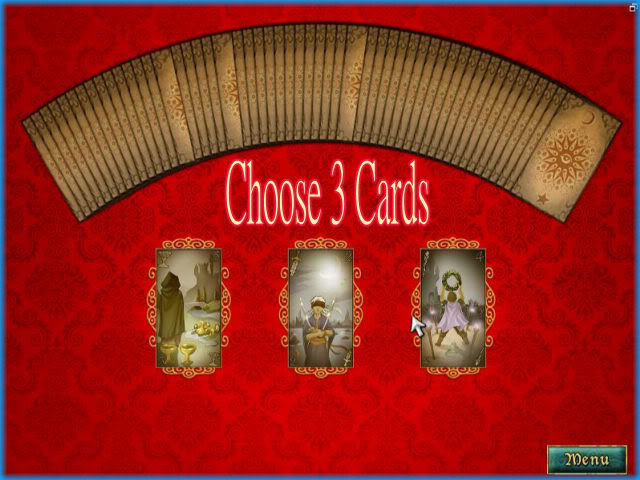
- Choose any 3 cards from the deck.
Mini Game – Jigsaw Puzzle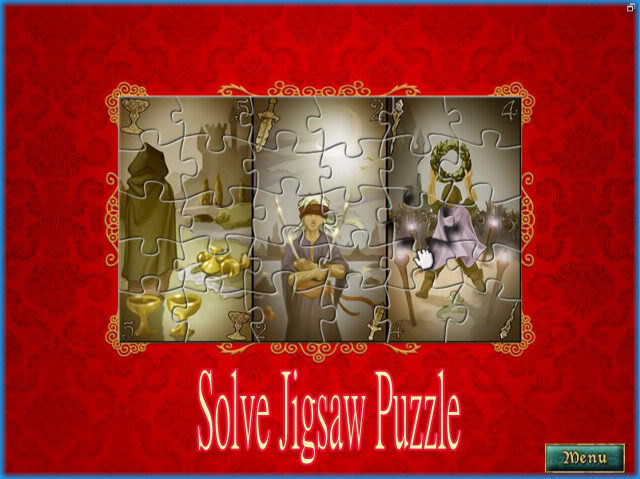
- Complete the jigsaw puzzle.
- Put together the outside edges first and then fill in the center pieces.
CHAPTER 14 – "Transition"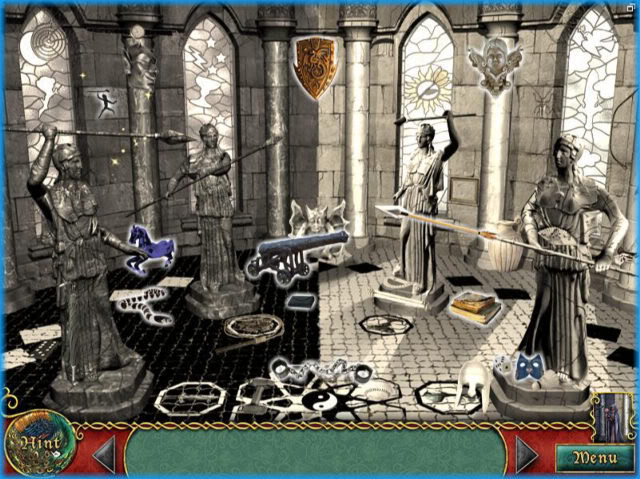
- Place the 12 items at the bottom of the page into their correct locations.
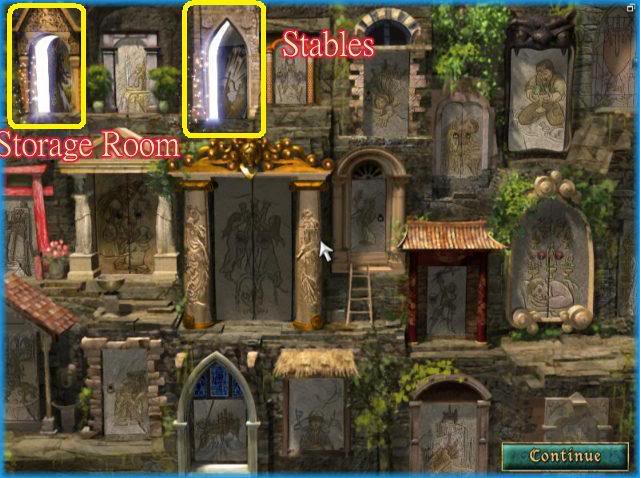
- The rooms for this location are the "Storage Room" and the "Stables."
- If you are following the walkthrough, choose the "Storage Room" first.
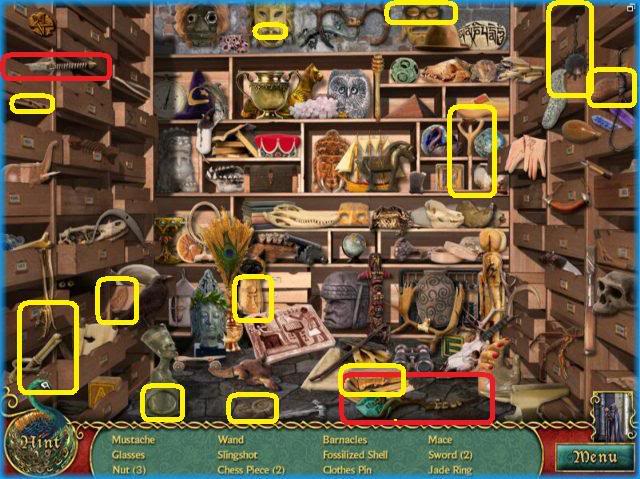
- Locate the 14 hidden objects listed at the bottom of the page.
- The special items for this location is the "Wand" and the "sword."

- Locate the 12 hidden objects listed at the bottom of the page.
- The special items for this location is the "coin" and the "cup."
TASK – "Calm your troubles to shed new light on the issue."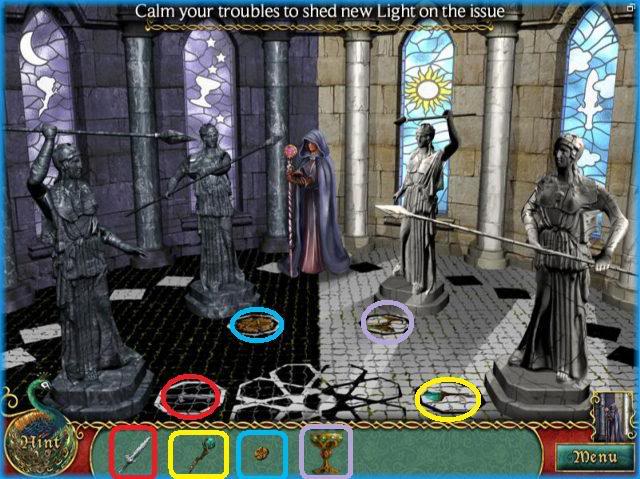
- 1. Place each item’s corresponding item on the picture on the floor.
- Items are color coded.
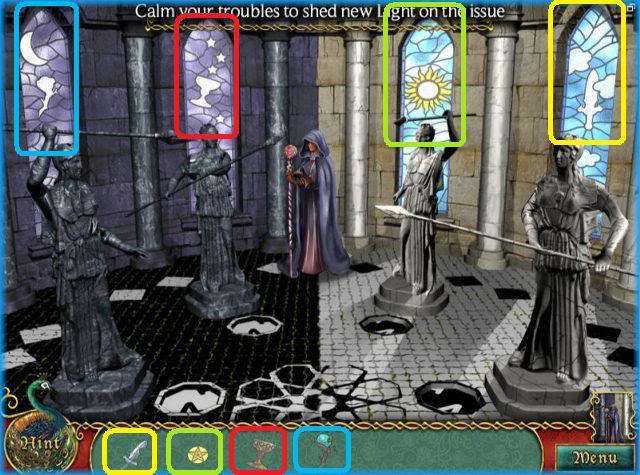
- 1. Place each item in the correct window.
- Items are color coded for ease.
Mini Game- Match Pairs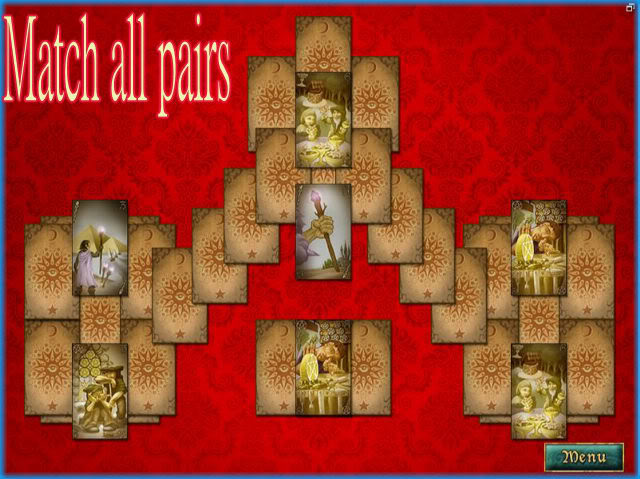
- Match all of the pairs until they are gone.
CHAPTER 15 – "Temperance"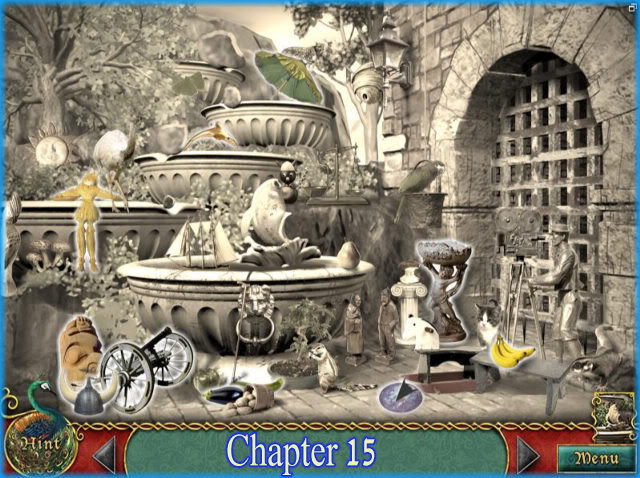
- Place the 12 items at the bottom of the page into their correct locations.
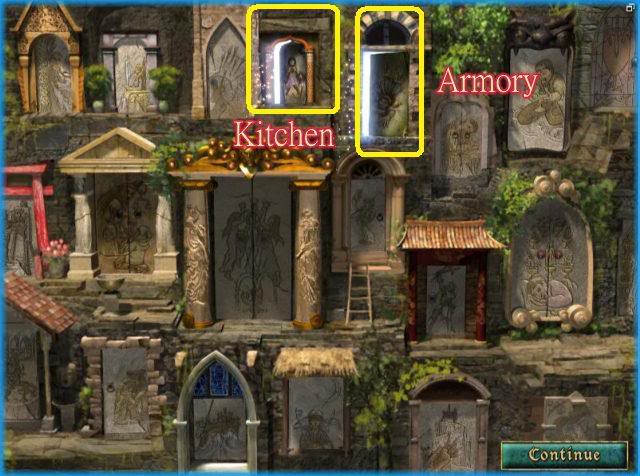
- The rooms for this location are the "Kitchen" and the "armory."
- If you are following the walkthrough choose the kitchen first.
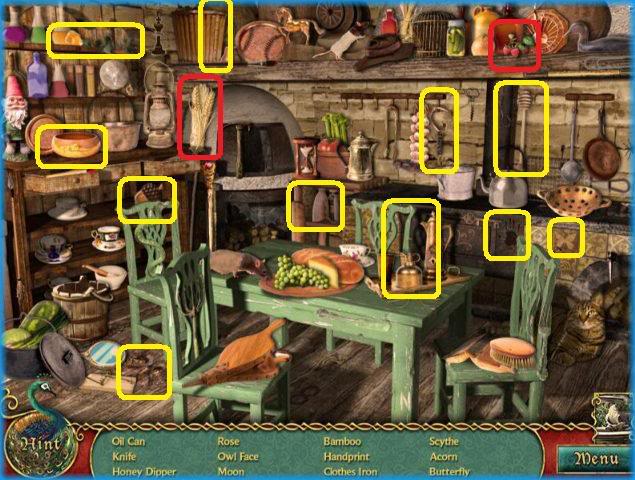
- Locate the 12 hidden objects listed at the bottom of the page.
- The special items in this level is the wheat and berries.
- Locate the 13 hidden objects listed at the bottom of the page.
- The special items in this level are the "Acorn" and the "honey dipper."
TASK – "Set the waters of knowledge running."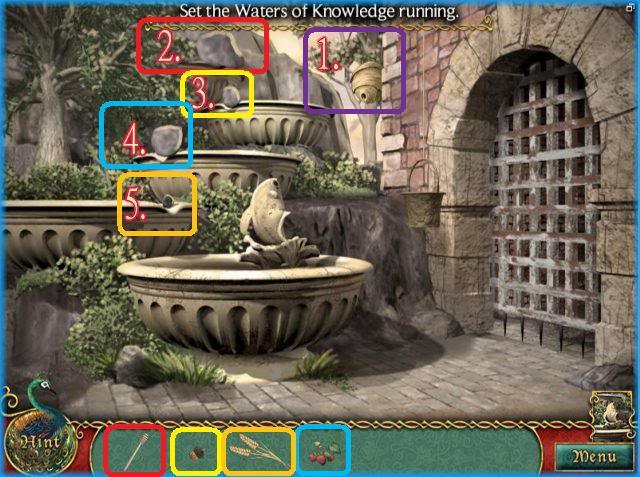
- 1. Place honey dipper on hive.
- 2. Place honey dipper with honey on it on the largest rock. (Circled in red)
- 3. Give the acorn to squirrel behind rock.
- 4. Give the strawberries to animal behind rock.
- 5. Give the wheat to the mouse behind rock.
- After all the animals are fed the water will fill up causing the door to open.
Mini Game – Match pairs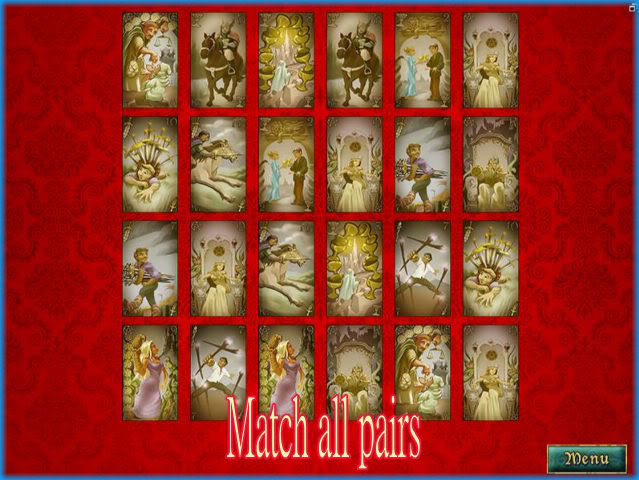
- Match all of the pairs until all gone.
- If you have no more matches you may shuffle the cards or start over.
CHAPTER 16 – "Indulgence"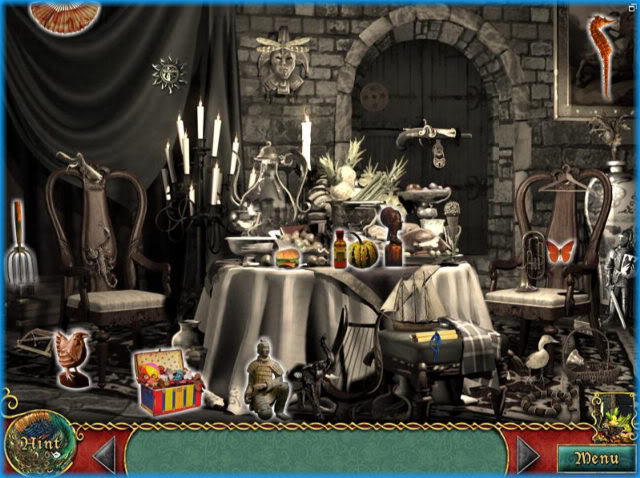
- Place the 12 items at the bottom of the page into their correct locations.
- The rooms for this chapter are the "living room" and the "zoo"
- If you are following the walkthrough, choose the "living room" first.
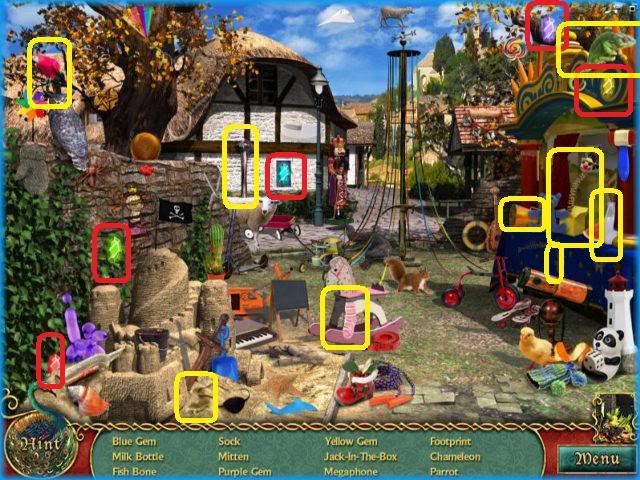
- Locate the 12 hidden objects in the list at the bottom of the page.
- The special items for this room is the "green gem" and the "red gem."
- Locate the 13 hidden objects in the list at the bottom of the page.
- The special item for this location is the "gem cluster." (Locate all gems in scene.)
TASK – "Be generous with your wealth."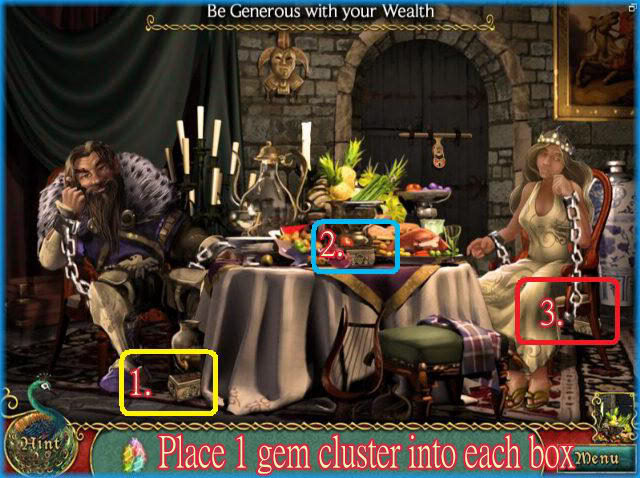
- 1. There are 3 boxes in the scene and you will need to place 1 gem cluster into each box.
- As you do this, there will be a mini game to complete for each gem you place into a box.
Mini Game – Match the Jewels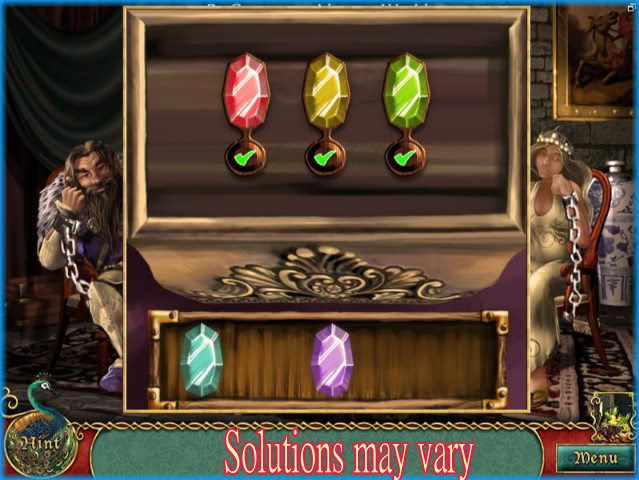
- In this game you will determine the correct order of the jewels by trial and error.
- X – not in sequence
- ? – Color is in sequence but not in correct location.
- A check mark – correct color and location.
- Three check marks means you have won.
- Please note that there are various solutions possible
- Go back to scene and place gem cluster in next box.
#2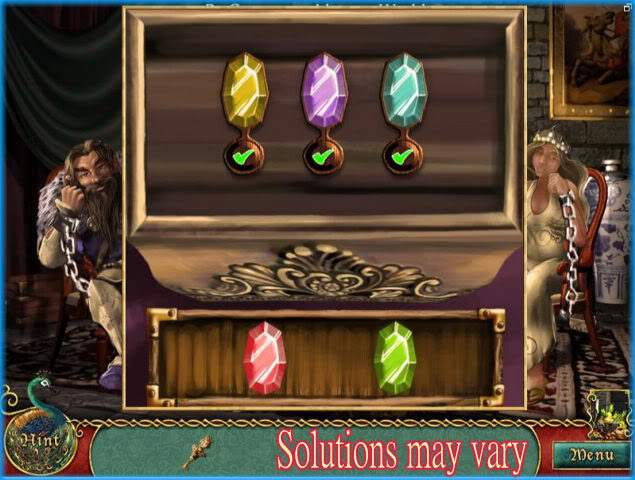
- Plays the same as the previous game.
- Solutions may vary.
#3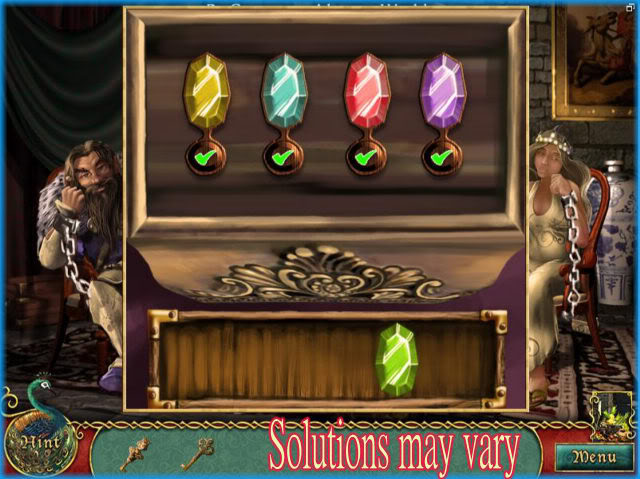
- Plays the same as previous 2 games except you now have 4 stones instead of 3 to determine.
- Solutions may vary.
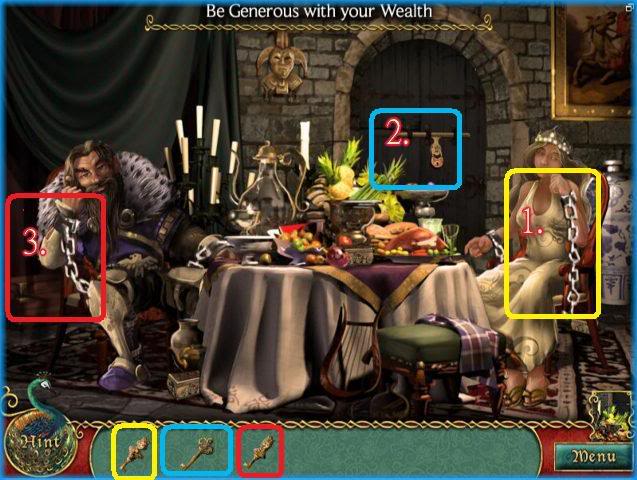
- Here you will finish the task by freeing the Emperor, The Empress’s and yourself from the room.
- The keys are color coded above.
- Use the key to unlock the chains and door lock to the room.
Mini Game – Choose 3 Cards.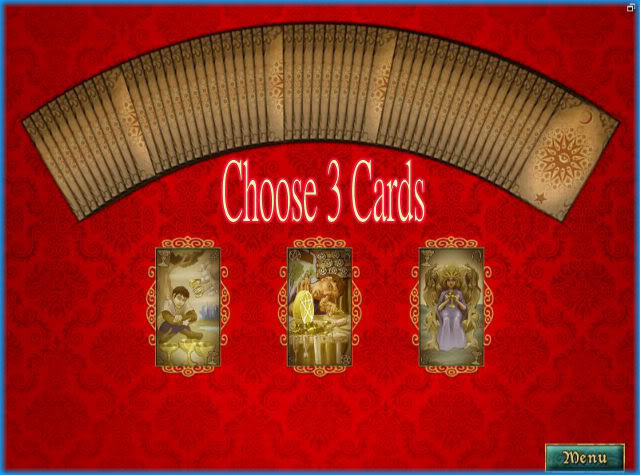
- Choose any 3 cards from the deck.
Mini Game – Jigsaw Puzzle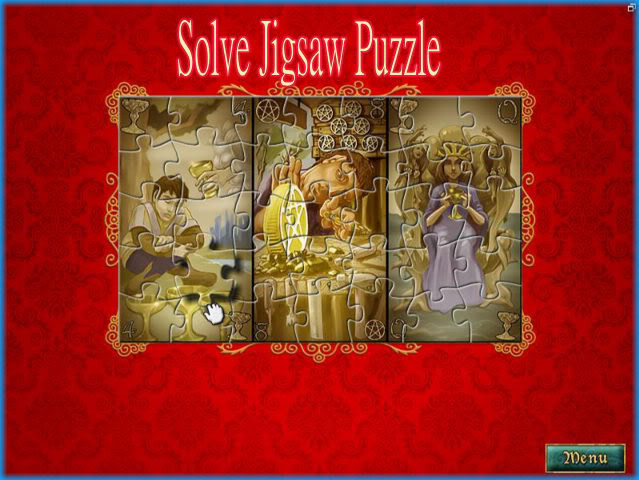
- Complete the jigsaw puzzle.
- HINT – Complete the outer edges first and work inward.
CHAPTER 17 – "The Tower"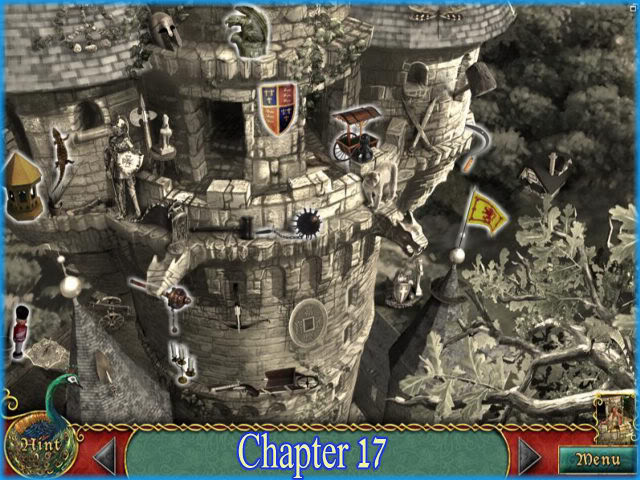
- Place the 12 items at the bottom of the page into their correct locations.
- The rooms for this location are the "library" and the "belfry."
- If you are following the walkthrough, choose the library first.
- Locate the 12 hidden objects listed at the bottom of the page.
- The special items for this location are the rose and the skull.
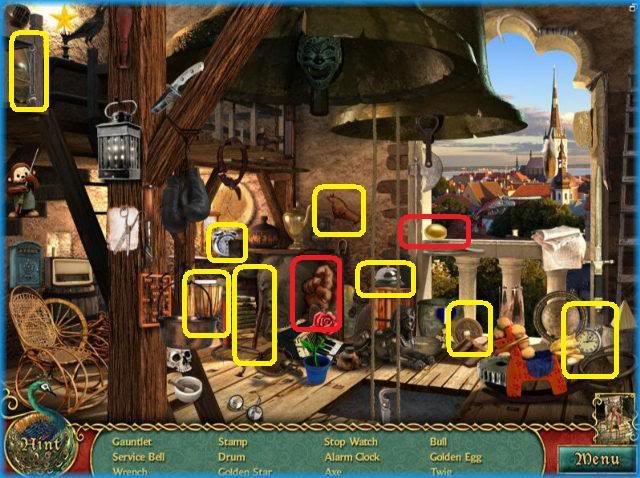
- Locate the 13 hidden objects listed at the bottom of the page.
- The special items for this location are the "gauntlet" and the "golden egg."
TASK – "Consider the birds of the air."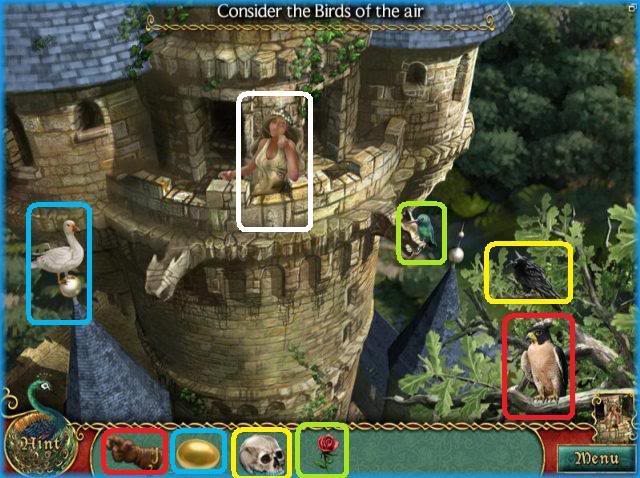
- Place one of the items into the Empress’s hand by clicking on it.
- Next click on the bird that is associated with that item.
- The items are color coded with the correct answers.
Mini Game – Match Pairs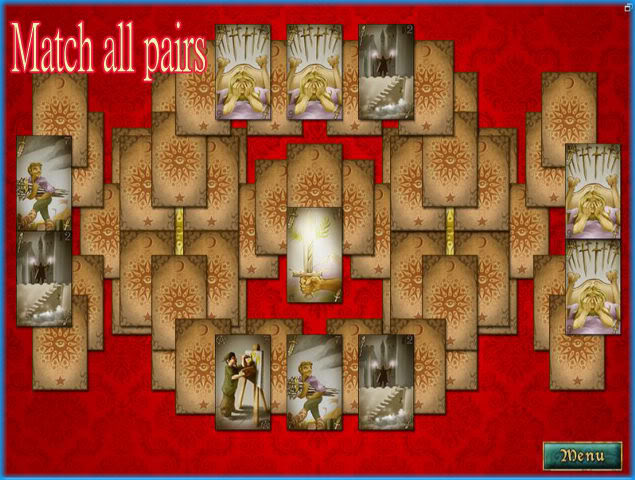
- Match all the pairs until there are no cards left.
- If you get stuck you may shuffle the face cards or restart game.
CHAPTER 18 – "The Star"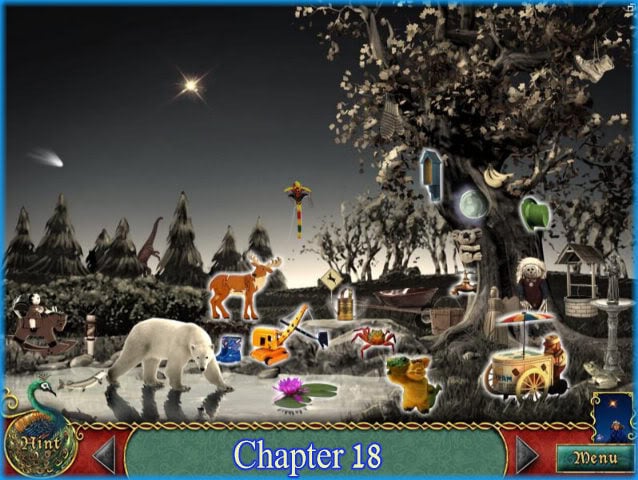
- Place the 12 items at the bottom of the page into their correct locations.
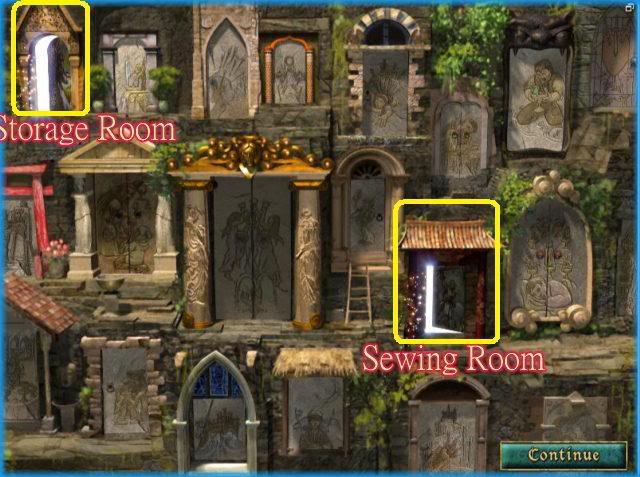
- The rooms for this location are the "Storage room" and the "Sewing Room."
- If you are following the walkthrough choose the storage room first.
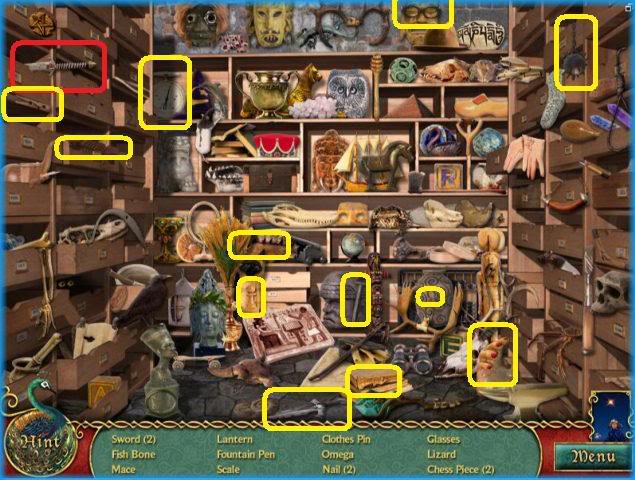
- Locate the 12 hidden objects listed at the bottom of the page.
- The special items for this location is the sword circled in red above.
- Locate the 13 hidden objects listed at the bottom of the page.
- The special items for this location are the wand and the cup.
TASK – "Alight the Heavens"
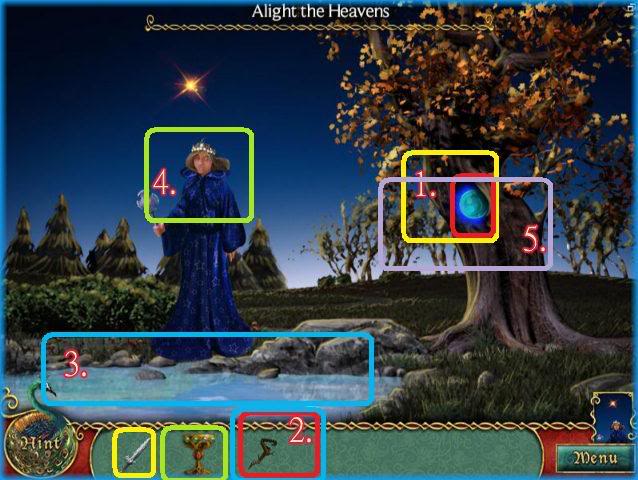
- 1. Use the knife on the orb in the tree.
- 2. Use the wand to retrieve the Orb and it is now repaired.
- 3. Use the repaired wand to thaw out the pond of ice.
- 4. Use the cup to give a drink of water to the woman.
- 5. Take the coins and place it in the tree where the blue orb was initially.
Mini Game – Match Pairs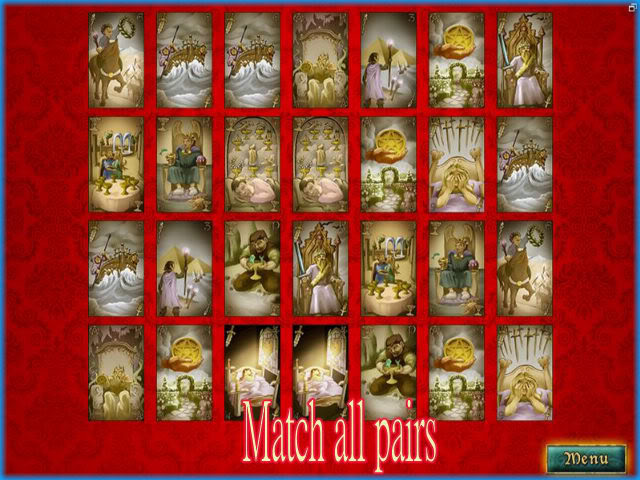
- Match all the pairs until there are no more cards.
- The cards will be shown face up for a few seconds and then turned around.
- If you can not make any matches you can shuffle the face cards or start over.
CHAPTER 19 – "The Moon"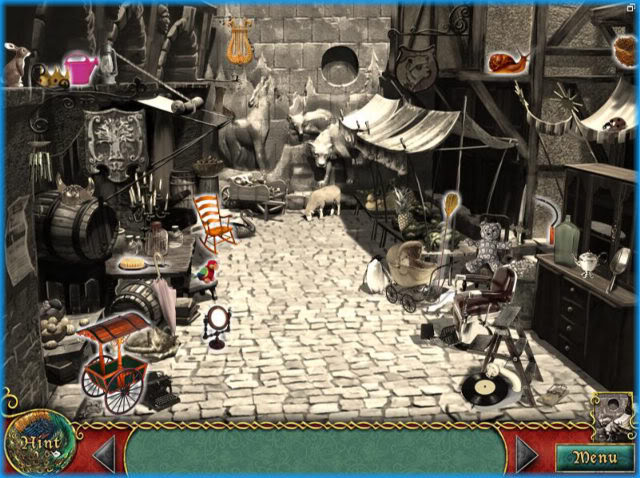
- Place the 12 items at the bottom of the page into their correct locations.
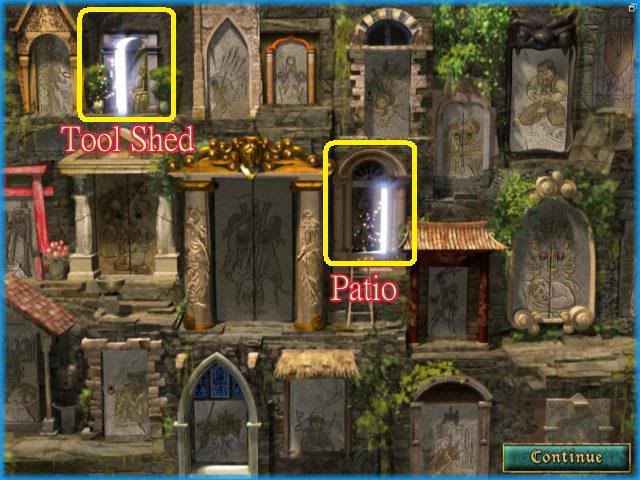
- The rooms for this location are the "tool shed" and the "Patio."
- If you are following the walkthrough, choose the tool shed first.

- Locate the 12 items listed at the bottom of the page.
- The special item for this room is the "knife."
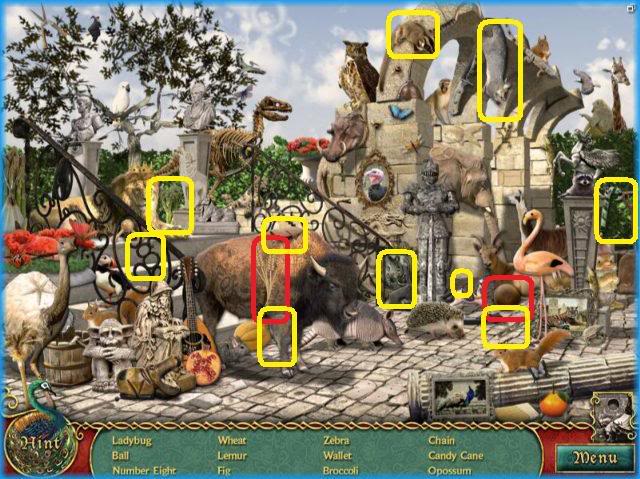
- Locate the 13 items listed at the bottom of the page.
- The special items for this location are the "wheat" and the "Ball."
TASK – "Their Moon is Missing"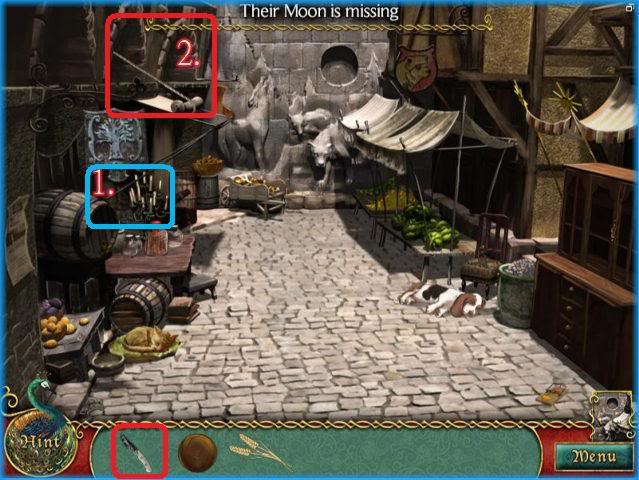
- 1. Click on the Candelabra
- 2. Use the knife to cut rope.
- 3. Click on the first moon piece it will go into inventory.
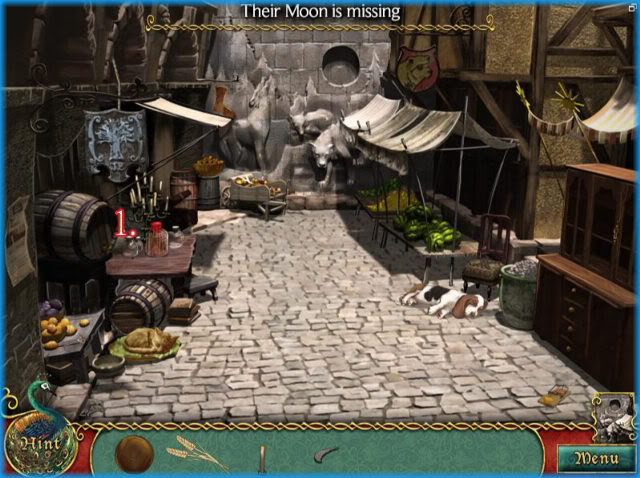
- 1. Place the lit candle on the bottle to form beef jerky
- 2. Click on jerky which goes into inventory.
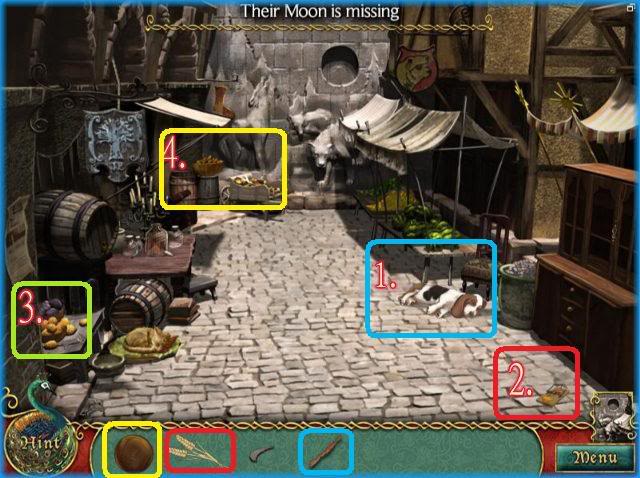
- 1. Give beef jerky to dog and click on moon piece which goes into inventory.
- 2. Use wheat to spring the mousetrap. Cat will stand up. Click on moon piece and it will go into inventory.
- 3. Pick up the key on counter and use it on cabinet across from it. Click on moon piece and it goes into inventory.
- 1. Use the ball to knock bowl over and click on 5th moon piece.
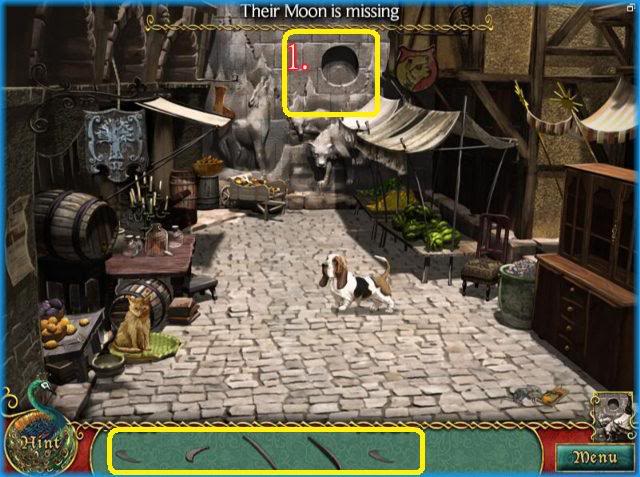
- 2. Place all the moon pieces into the slot on back wall.
- Storyline continues.
Mini Game – Choose 3 Cards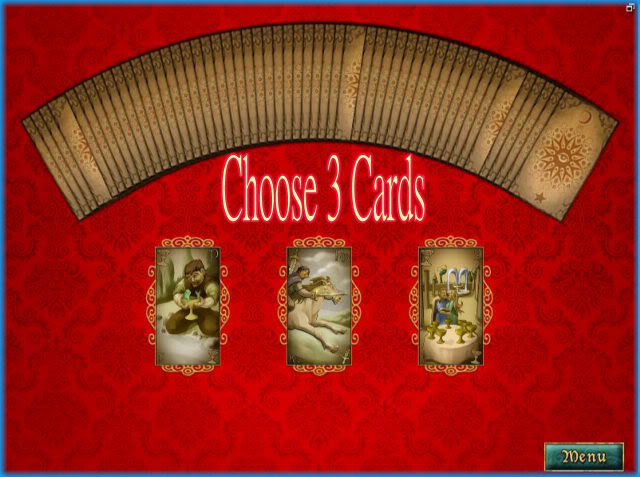
- Choose any 3 cards from the deck above.
Mini Game – Jigsaw Puzzle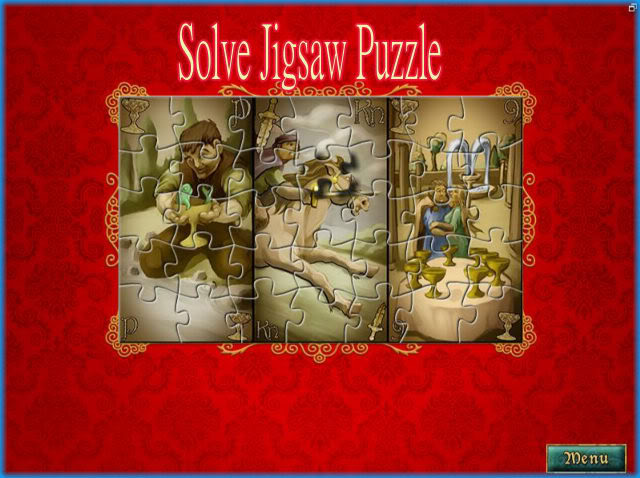
- Complete jigsaw puzzle.
- Complete outer edges and work toward the center.
- Solutions and puzzles will vary.
CHAPTER 20 – "The Sun"
- Place the 12 items at the bottom of the page into their correct locations.
- The rooms in this location are the "Vault" and the "Stables"
- If you are following the walkthrough choose the vault first.
- Locate the 14 items in the list at the bottom of the page.
- The special item in this location is the "knife"
- Locate the 13 items in the list at the bottom of the page.
- There are no special items in this location.
TASK – "Take a ride in the Fields."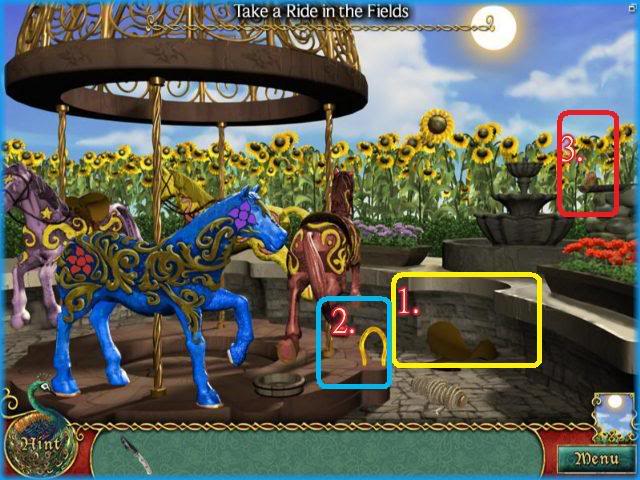
- 1. Click on the saddle to add it to inventory.
- 2. Click on the horse shoe to add it to inventory.
- 3. Click on the rock blocking the fountain.
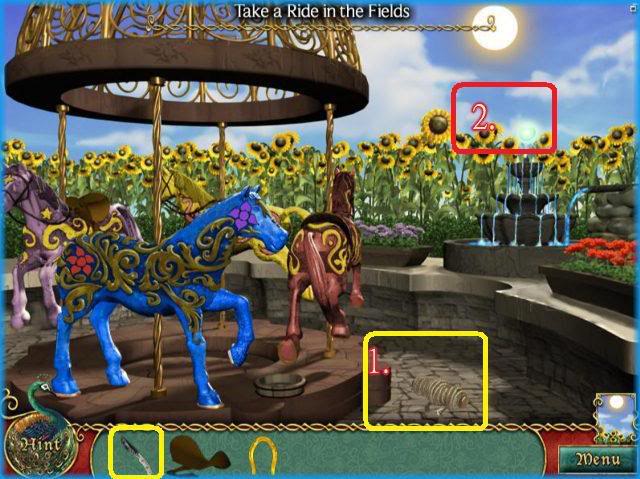
- 1. Use the knife on rope.
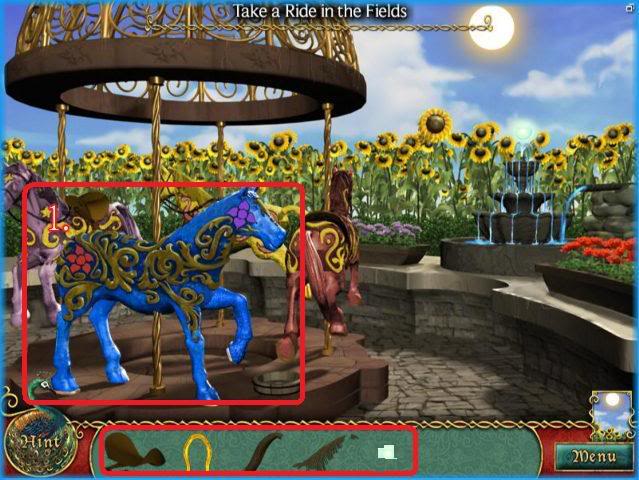
- 1. Place all the items on the blue horse. (Tail, Mane, Eye, Saddle, Horseshoe)
- Storyline continues.
Mini Game – Match Pairs
- Match all pairs until cards are all gone.
- You will be allowed to look at the cards for a few seconds before they turn them around.
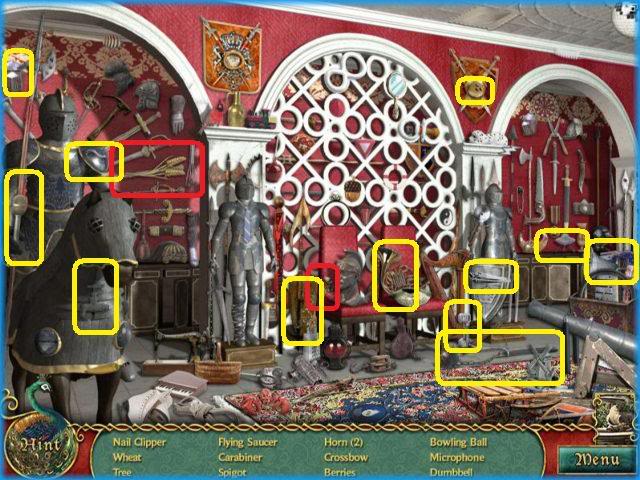
CHAPTER 21 – "Judgement"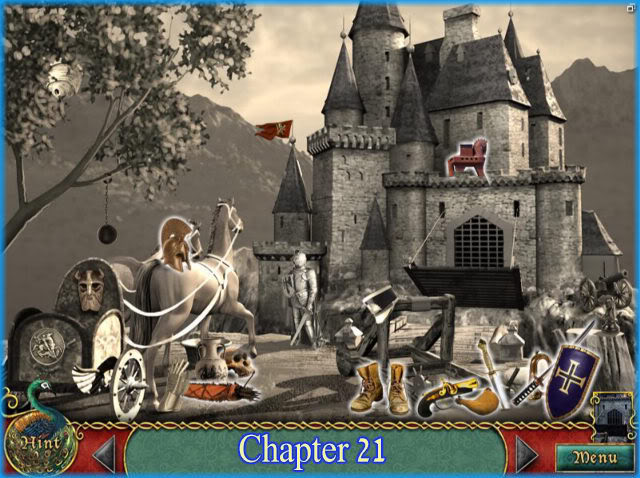
- Place the 12 items at the bottom of the page into their correct locations.
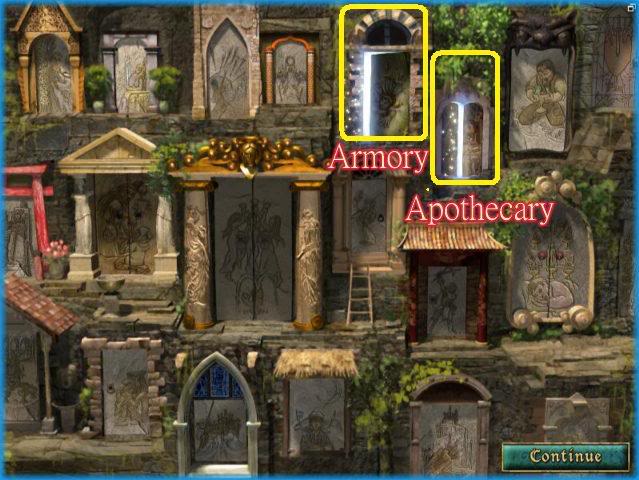
- The rooms in this location include the "Armory" and the "apothecary."
- If you are following the walkthrough choose the Armory first.
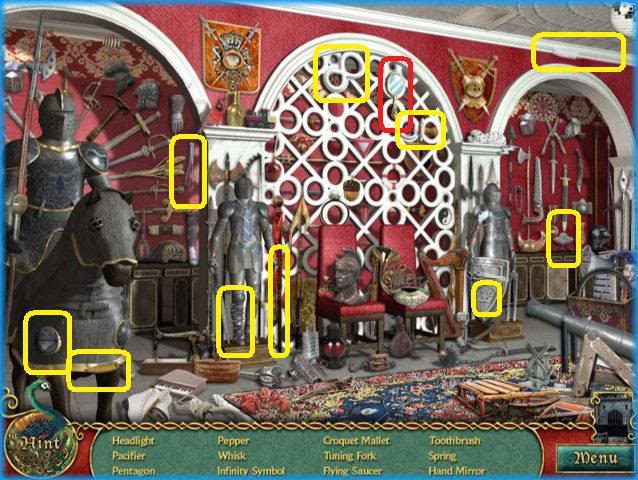
- Find the 12 hidden objects from the list at the bottom of the page.
- The special item from this location is the "hand mirror"

- Find the 13 hidden objects from the list at the bottom of the page.
- The special item from this location is the "saw."
TASK – "Find a way into the Castle."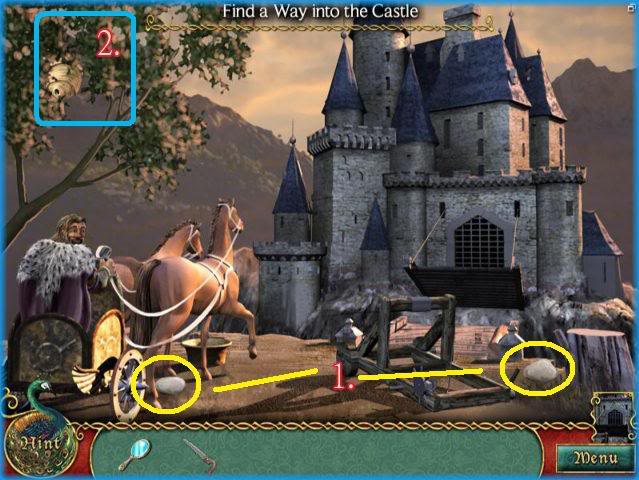
- 1. Click on each rock as shown in yellow above.
- 2. Click on the beehive and it will go into inventory.
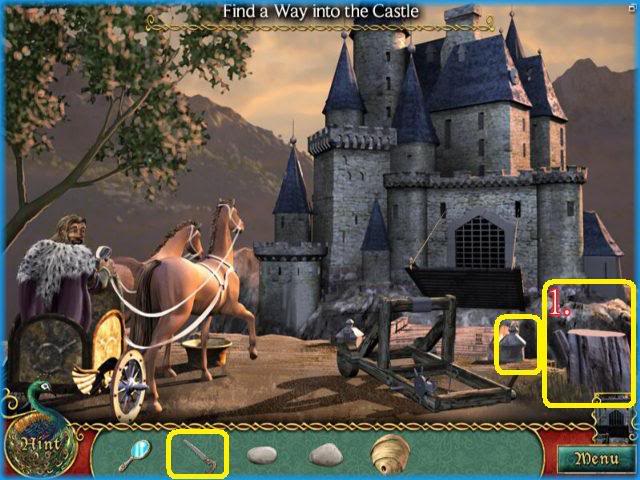
- 1. Use saw on wood stumps to make wheels which go into inventory.
- 2. Use saw here to make an arm for the catapult.

- 1. Place wheels, arm, and handle on catapult.
- 2. Place the rocks on the catapult and they will immediately fire at the castle.
- 3. Place mirror and beehive on catapult and beehive will catch on fire.
- It will launch toward the castle and the door will catch on fire.
- You now have access to the castle.
Mini Game – Match pairs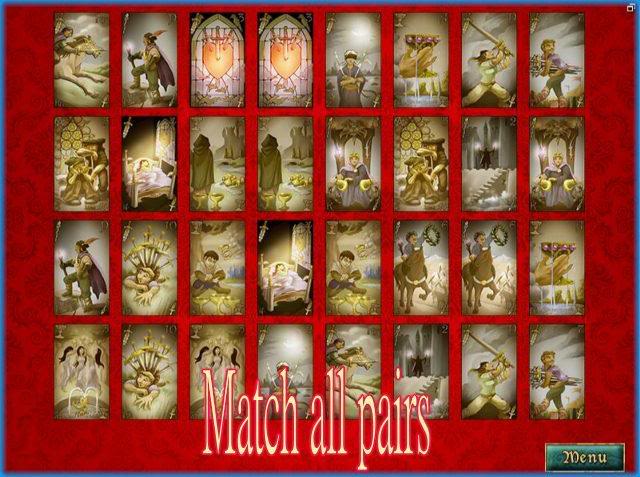
- Match all pairs until they are gone.
- If you run out of matches you can shuffle the face cards or start over.
CHAPTER 22 – "The World"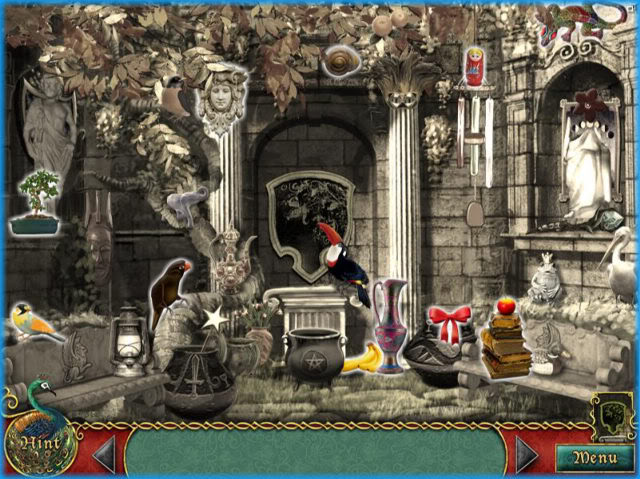
- Place the 12 items listed at the bottom of the page into their correct positions.
- The rooms at this location include the "living room" and the "backyard."
- If you are following the walkthrough choose the living room first.
- Find the 12 items listed at the bottom of the page.
- The special item for this location is the hammer.
- Find the 13 items listed at the bottom of the page.
- The special items for this location are the shears and the match stick.
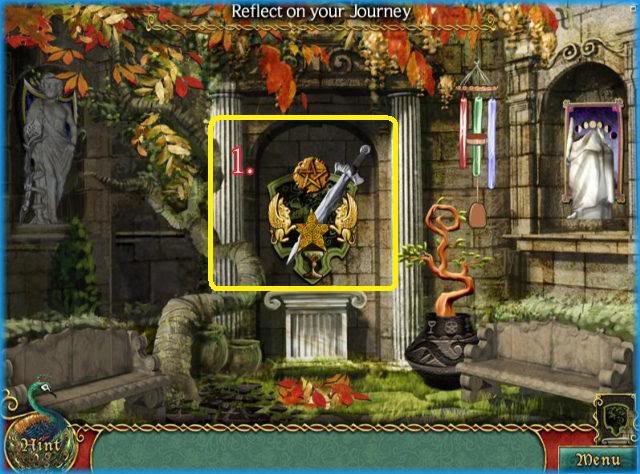
TASK – "Reflect on your Journey."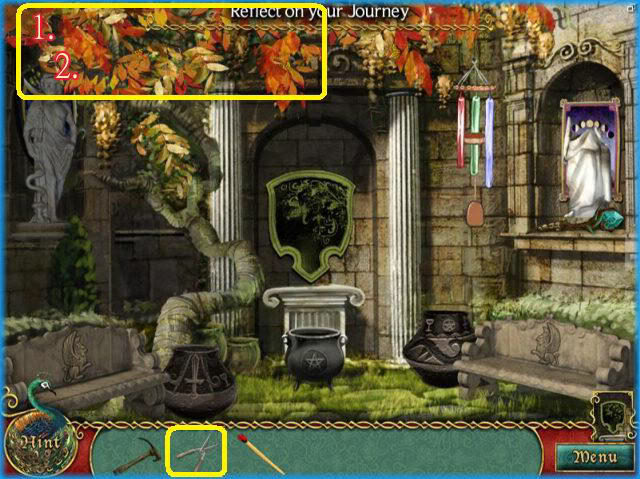
- 1. Use shears to cut the leaves upper right.
- 2. Click on the 5 gold pieces in the leaves.
- 3. Click on the 2 piles of leaves that have fallen for inventory.
- 4. Take the wand.
- Click on picture to the right to find directions for playing the wind chimes.
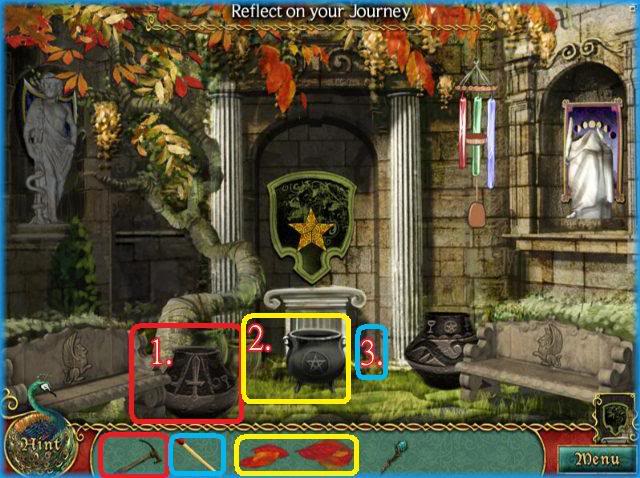
- 1. Use hammer to break pot.
- 2. Click on sword add to inventory.
- Place the leaves under the cauldron.
- Use match to light the fire under cauldron.
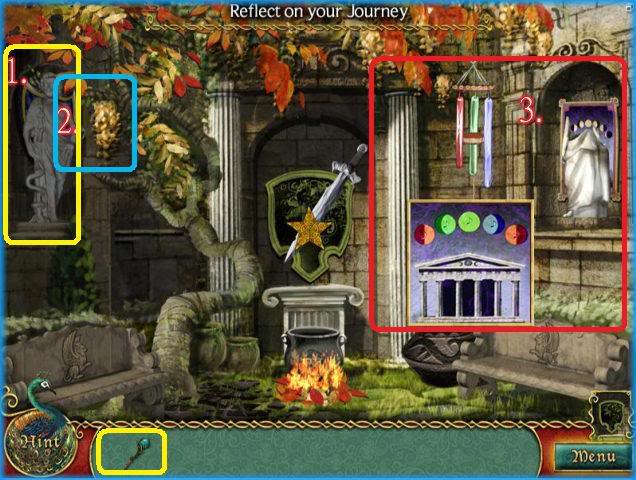
- 1. Use wand on statue.
- 2. Click on Goblet that appears under statue it will move to center.
- 3. Click on Golden Blossoms.
- 4. Click on wind chimes directions Click on chimes in this order – "Red, Green, Green, Blue, and Red"
- 5. Click on the coin and it will move to the center.
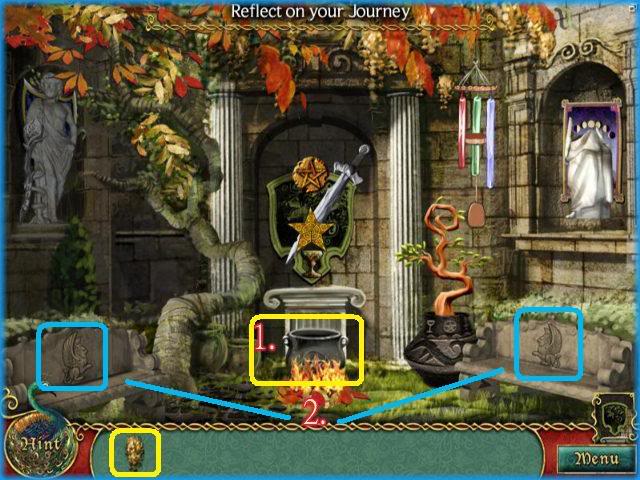
- Place Golden Blossoms into the Cauldron.
- Click on Cauldron.
- Pour gold onto lions on each bench seat in scene.
- Then click on each gold lion and it will move into the center scene.
- Click on center symbol.
- Click on the wand at left of statue.
- Storyline finishes out.
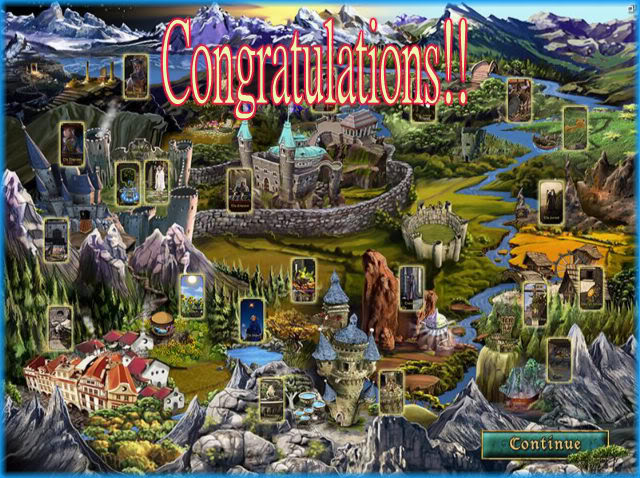
- CONGRATULATIONS!! You have finished the game!!
“;

More articles...
-
Best Horror Games On Itch.io – July 2026
Across a bounty of subgenres. -
Haze Seas Accessories Tier List [Best Accessories to Equip]
The accessories with the best stat buffs in Haze Seas.