
Best Horror Games On Itch.io – July 2026
Across a bounty of subgenres.![Haze Seas Accessories Tier List [Best Accessories to Equip]](/wp-content/uploads/2026/07/haze-seas-accessories-tier-list.jpg "Haze Seas Accessories Tier List [Best Accessories to Equip]")
Haze Seas Accessories Tier List [Best Accessories to Equip]
The accessories with the best stat buffs in Haze Seas.
![[Roblox] Evomon Shiny Hunting Guide – Including Prismatic and Pris Shinies!](/wp-content/uploads/2026/06/evomon-shiny-hunting-guide.jpg "[Roblox] Evomon Shiny Hunting Guide – Including Prismatic and Pris Shinies!")

Academagia: The Making of Mages Walkthrough
Welcome the Academagia walkthrough on Gamezebo. Academagia is a fantasy simulation game played on PC created by Black Chicken Studios. This walkthrough includes tips and tricks, helpful hints, and a strategy guide to how to complete Academagia.


- Prefer Gamezebo on Google

Academagia: The Making of Mages – Game Introduction
Welcome the Academagia walkthrough on Gamezebo. Academagia is a fantasy simulation game played on PC created by Black Chicken Studios. This walkthrough includes tips and tricks, helpful hints, and a strategy guide to how to complete Academagia.
Academagia is a fantasy simulation game in which you play a young teenager who goes to the Academy of Magic of Mineta for the first time. In this installment of the game, you play through your entire first year at school. You have to attend classes, study, make friends, go on adventures and much more.
This game is absolutely huge, and there are as many strategies for playing this game as there are people on the planet. Writing a complete walkthrough is therefore an impossible task. This document will outline the main aspects of the game and how they can be used. It is then up to you to explore the game by yourself and uncover a treasure-trove of exciting options and possibilities.
Creating Your Character
You start by picking a name and gender for your character. Then click “next”.
In the next few windows you can allocate 10 points to various character aspects. Most aspects cost 1 point, though there are a few that cost 2, and a few that actually award you extra points to spend.
There are many, many options you can choose from, and this can be a bit daunting at first – especially if you’re new to the game and don’t quite know yet what everything means. What I found useful was to make up a little story for my character: is the character a bit of a swot, who studies hard to get good grades, or are they more interested in socializing? Are they friendly or bullies? Do they like potion making, or are they more interested in plants and wildlife? Are they natural leaders or followers? Etc.
Then take a good look at the skill points that come with the various options and select the skills and preferences that you think will suit your character. They’re pretty intuitive. Don’t worry too much about it, though, as these skills will only give your character a starting point. You will be able to develop your character into the direction you prefer throughout the game.
First, you get to allocate a maximum of 5 points to the character’s natural strengths (which will be called attributes in the rest of the game). You don’t have to use all 5 points, though – it’s up to you. Skills you acquire while playing the game will ultimately increase these attributes. However, you will need to gain quite a few skills to gain a level in one of these attributes, so you might as well use your points now.
I have played with several radically different characters, which gave me quite a different playing experience each time (especially regarding social aspects of the game), but no options appeared to be substantially better than others. The only thing I found while playing around with character types is that it is a good idea to start your character off with at least level 2 fitness or you’ll end up spending a lot of time in the hospital wing.
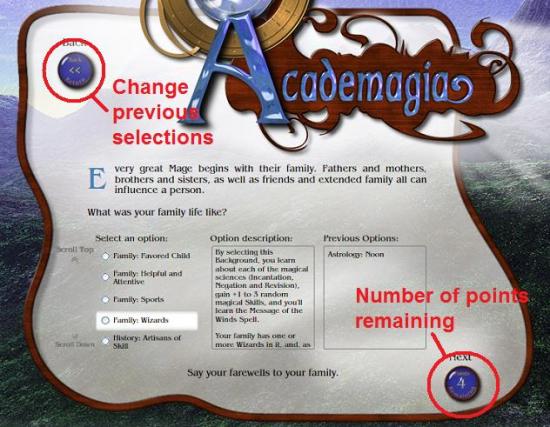
The rest of your points can be allocated in the next 7 screens. The blue circle in the bottom right of the window tells you how many points you can still allocate. This is also the “next” button that will advance you to the next screen.

You can scroll through the options by hitting “scroll up” and “scroll down”, or with your mouse wheel. Whenever you highlight an option, you will get a description of it in the middle panel. To read everything in the panel, click inside the panel and then scroll up and down with your mouse wheel.
When you select an option it will be listed in the “previous options” panel on the right. You can go back to your previous choices to change them by clicking the “back” button at any stage during the process of creating your character. Although your later selections will disappear from the “previous options” panel when you go back, they will be remembered and will re-appear when you move forward again.
You will probably have fewer points left than there are screens, so you won’t be able to select something in each category. Also, you can select more than one option from several of the categories – the options will be grayed out when you can’t select anything else in that window.
The categories you can choose from are:
- Where do you come from?
- What was your family like?
- What did you do in your childhood? Did you have an aptitude for a specific subject or a special skill?
- Did you have a previous education?
- Do you have your own familiar (see below)? If you don’t select a familiar here, one will find you during the game.
- Do you own any special items?
- Did you have anything exciting happen to you before you came to the Academagia? Note that some of the options in this category award skills to your familiar rather than to yourself.
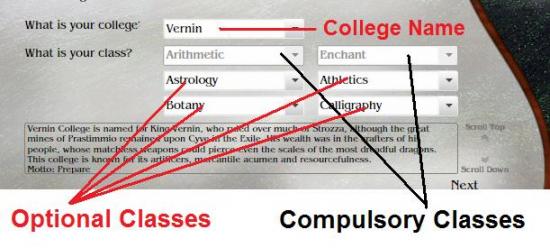
After you’ve gone through all the categories and have used up all your points, it’s time to select the college that will become your home during your stay at the Academagia, and the classes you will be attending in your first year. You need to select 6 subjects, but each college comes with 2 or more compulsory subjects specific to that college (these will be grayed out).
Finally you get to choose your avatar from 2 options, which vary per college. Click “next” to confirm your selections. If you’ve selected a familiar, a window will pop up in which you can name your familiar. Click “Close” (round button, top right) to confirm and you’re ready to start your year at school!
Left Panel Menus
Before we get started with playing the game, let’s first get to know the game windows. In the panel on the left hand side of the window you can find details about your character. They are subdivided into Attributes, Abilities and Actions, Skills and Research, Magic and Items.
Attributes
The Attributes menu shows your character’s main attributes. It shows the “natural ability” points you’ve given yourself at the start. These numbers will go up when the game progresses and you will get better at skills relating to these attributes.
There are also 4 new characteristics:
- Your Stress levels are affected by negative things that happen to you during the day. If your Stress level gets higher than [fitness level + best class skill], you will get ill and will have to go to the hospital wing for a day. There are various ways in which you can reduce Stress levels, but the easiest way is to rest for one part of a day – this resets Stress to 0.
- Daily events also affect your Vitality levels. For example, if you have a fall or a potion explodes and you get injured, your Vitality drops. Your maximum Vitality is related to your Fitness attribute – so to increase your Vitality you can train skills relating to Fitness. If your Vitality drops to 0, you will get ill and will be taken to the hospital wing for a day. As with Stress, your Vitality is reset by resting.
- Your Encumbrance level is determined by the items you carry. You can carry items up to twice your strength attribute. If your Encumbrance level is red, you will be reprimanded by your teachers. Best to leave those large items in your dorm! You can decide which items to carry in your inventory menu (treasure chest symbol next to your college coat of arms at the top of the screen).
- Concealment is determined by the nature of the items you’re carrying: big or illegal items increase your Concealment level and consequently your chance of getting on the wrong side of the teachers. As long as you keep your Concealment rating lower than your Finesse attribute, your items most likely won’t be discovered. Discovery of an illegal item may result in confiscation of the item and a reprimand.
Abilities and Actions
This menu lists all the abilities and actions you can choose when planning your day, with their descriptions. Note that this is simply a list, and you can’t actually use any of the actions here.
In addition, you will see any emotions your character may have (euphoria, depression etc.). Emotions are caused by the things that happen to you during the day and will affect your subsequent actions, be it positively or negatively. The description of the emotion will tell you what you can do to feel normal again (if desired).
Skills and Research
This menu lists all the skills you can currently train. They are divided into parent skills, each with several sub skills. You can only train the individual sub skills and not the parent skill itself. The maximum level to which you can train is 10, but you can temporarily increase your skill levels beyond 10 with various actions, spells or abilities. Your familiar can also contribute to your skills.
The over-all level of the parent skill is determined by the level of your third highest sub skill. For example, if you’re level 4 in archery, 3 in running, 2 in competition and 1 in both swimming and wrestling, your over-all athletics skill level is 2. If you have fewer than 3 sub skills, your parent skill level will remain 0 until you’ve unlocked more sub skills relating to that parent skill.
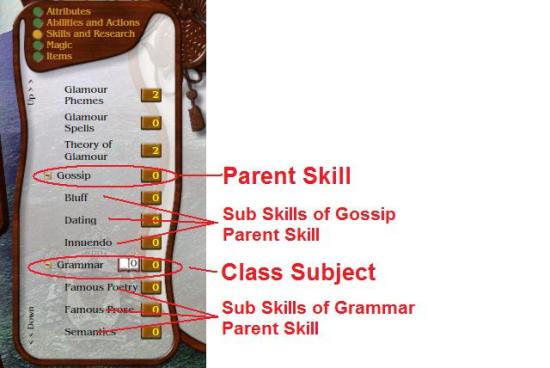
The description of each skill will tell you which main attribute (fitness, intelligence, charm, etc.) it contributes to. Increasing the skills relating to an attribute will ultimately increase the total level of that attribute.
You will note a little book icon next to 6 of your main skills. These are the classes you’ve selected. The number on the book is your study level in that subject. To increase your study level in each subject you need to select the study option in your calendar (See Exams for more info).
Research is mainly determined by the lores you gain during your daily activities. You can actively decide to research topics once you’ve gained the Research action, which is unlocked after your Study Habits skill (under School Survival) reaches level 2.
Magic
The Magic menu shows all the spells you’ve learned. As with the Abilities and Actions, this is just a list – you can’t use your spells here. Also note that you might not actually be able to cast spells on this list until you’ve gained a certain skill or item.
Below the spells you will find a list of all the phemes you know about. Phemes are the building blocks that spells are made of. Once you’re able to cast a spell, you will be able to try and attach new phemes to it, thereby subtly altering the effects of the spell.
Items
The items list simply shows all the items you currently own – both the ones in your knapsack and the ones you’re keeping in your dorm.
There is also a list of recipes you know. Click on a recipe to get information about it and find out about the ingredients for this recipe. To use a recipe, you will need to own all the ingredients and have the Artifice action.
Right Panel Menus
There is a second set of menus in the top right of the screen, looking like some kind of compass. Click on any of the tabs to get information on the menus in the panel on the right of the window.
Menu
Go to the menu to save or load games and to switch the music on or off.
Lore
The Lore menu gives you a list of all the known locations and information on each. Check the locations list to decide where to base your actions for the day.
In addition, the Lore menu shows you a list of lores, which is your knowledge base. Mainly, they are things you learn in class and simply add texture to the game. They aren’t really used for anything.
Context
The Context menu can only be accessed when you’re in your inventory (which is the image of the treasure chest next to the college coat of arms at the top of the window) and not from your calendar screen (your main action window – see below). It shows another list of all the items in your inventory and their details.
Relations
The Relations menu shows a list of all the NPCs in this game and your relationship level with each. You can sort them by name, by college or by strength of your relationship with them.
Clique
The Clique menu shows the people you have in your clique and their skills and attributes. Clique members may also have actions or abilities you will be able to use during the game, which are also listed in this menu.
Whenever other students start cliques of their own, they will also be listed in this menu.
Familiar
The Familiar menu shows the details of your familiar; their skills and attributes and the strength of the bond you share with them (see below).
Planning Your Day – Calendar Window
You will spend most of your time in the calendar window. The window shows you the days of the current week. Note that some weeks have more than 7 days – special holidays often don’t count as regular week days. You can scroll forward and back through the weeks if you like, to see if there are any upcoming events (like exams) or to go back and review details of a previous day.
Each day consists of 3 blocks for which you can select an action. You will see that the school has already entered their recommended actions for you for each block. These are mainly attending class and resting. However, you can change the actions for each block to your liking. You can skip class as much as you like, but just note that you will end up in detention if you skip class too much (see below)! Also, you do actually learn new things in class, so skipping too many classes may not be beneficial.
Although you can set actions as far ahead as you like, you really only play one day at a time. So just focus on tomorrow. Click on the gray dot next to the block you want to change for tomorrow and select one of the categories. Click on any of the options in the list to get a description of that action. When you’ve selected the desired action, either click “confirm the action” or hit the big blue button in the middle.
Throughout the game you will continually unlock new actions, spells, items and abilities to use. There are way too many to list here – just keep trying new options to see what happens! I’ll outline a few of the main options here.
Actions
- Adventure – this is where the fun happens! Each adventure will come in several stages, with increasing difficulty levels. If you fail at an adventure because you lack the required skills, you can come back to it later after you’ve increased your skill levels. You can have as many go’s at an adventure as you like.
- Befriend – use the Befriend action to add people to your clique (see below). This action is unlocked when your Social Skills (which is a sub skill of School Survival) are trained up to level 2.
- Compete – successfully competing against another college will increase your college’s merit rating. When your college keeps scoring high in the ratings, you will be awarded special privileges.
- Correspond – corresponding regularly with your parents will improve your parental approval rating (except when you’re a black sheep), which will increase your fortnightly allowance.
- Explore – exploring the Academy and its surrounds may unlock new locations for you.
- Gossip – choose the Gossip action to improve the relationship between two characters, one of whom may be yourself.
- Patrol – by patrolling you temporarily increase your patrol skill and the patrol skill of one of your clique members by 5. This is useful if you’re not on good terms with a rivaling clique or student.
- Rest – resting will reset your stress levels to 0 and your vitality to its maximum level.
- Study – to do well in your midterms and final exams, you need to study in your chosen subjects.
- Train – to increase a skill, use the Train option. Only skills currently known to you can be trained. New skills will be unlocked by the choices you make in Adventures and Events. Also, many skills are unlocked when other skills reach a certain threshold level.
- Train Familiar – similar to increasing your own skill set, you can increase the skills of your familiar (see below).
- Trial and Error – before you can use an item, you need to get information about it. You can do this with the Trial and Error action. Beware, though, that this may result in increased stress or decreased vitality if the thing blows up in your face. There will be more advanced (and safer) options for finding out about items later.
Spells
Only spells you can actually cast (meaning you need to have all required components for the spell) are listed here. Spells can be used for almost anything – improving or decreasing relationships, temporarily improving your skills, sabotage of other players – you name it. Once you learn about new phemes, you can try and cast a spell with additional phemes attached to alter the effect of the spell.
Items
As mentioned above, you can only use items after you’ve been informed about them. The method always available to you is the Trial and Error action, though this has some risks. Later on in the game you may unlock new, safer methods of finding out information on items.
Items can only be used if they’re in your knapsack (you can move items in and out of your knapsack in your inventory menu at the top of the screen) or on your paper doll (the empty spaces that appear next to your knapsack in your inventory menu. Note that these spaces only appear when you actually own items that can be carried on your paper doll).
Abilities
Like actions and spells, abilities can be used for a plethora of purposes. There are abilities that temporarily or sometimes permanently increase skills or that earn you some money, for example.
Once you’ve set all the actions for the next day, hit the clock button in the bottom right of the screen. On the right hand side of the calendar window you will get a new menu in which you can set the details of each action.
Options with a gray dot next to it can be changed. If you don’t change them, the default option is used. Red boxes need to be filled in before you can continue.
When you’re planning your actions for tomorrow, you will be able to select a location for most of the actions. The location you select will affect your chances of success. For example, the Dining Hall is great for socializing, so social actions will have a greater chance of success when located there. On the other hand, the Dining Hall is no good for studying. You’re better off choosing your own room to study. Each location has its specific advantages. To help you choose a location, refer to the list of all your known locations in your “Lore” menu.
Also note that some locations have a greater “chance of discovery” than others. If you’re skipping class, you might choose to do so in a location with a low chance of discovery, so as to avoid being caught and thrown in detention.
When you’ve set all the details of tomorrow’s actions, hit the red clock at the bottom of the details panel. If for some reason you need to leave this window before confirming your actions (for example to change to a different action or to check the details of a location), hit the “back” button under the red clock.
Events and Adventures
Throughout the game, a few times each week, you will encounter random events that will pop up after you’ve confirmed your actions for the day. In addition, you can choose to go on adventures, which have a similar format to the random events.
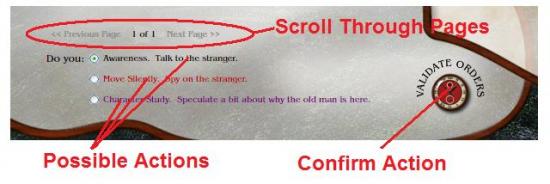
Events and adventures consist of a main window with the story and information of the event. Below the information in the main window you will see how many pages of story there are. You can scroll through them by clicking on the “Previous Page” and “Next Page” links. It is recommended to read all pages before going on to your options, though you don’t have to.
When you’ve finished reading all the pages, turn your attention to the options below. Note that sometimes you can scroll down to get more options – don’t forget those! The options will be listed in different colors. The colors indicate your chance of success. Green will pretty much ensure that that option will be successful, but you may not learn anything along the way. Red gives you a very, very low chance of success. Other colors are intermediate.
You will notice that many options will tell you which skill is required for that option. For example, in the image below the options require Awareness, Move Silently or Character Study. The colors of the options are mainly determined by how well versed you are in the skill relating to that option. The better you are at that skill, the higher your chances of success. You can check your skill levels in the Skills and Research menu on the left hand side of your window while you’re deciding.
There are some other modifiers that affect the success rate, such as a temporary increase in luck related to a certain roll.
Often it pays to select a purple or even a red option. You may not be successful, but you may unlock a new skill for you to train in. Additionally, some options may not give you an instant result, but will give you more information that may help you decide what to do next.
When you’ve made your selection, click the “Validate Orders” link in the bottom right to see the effects of your choice.
You only get one chance to succeed in an event (although it is possible that the random nature of the events will let you encounter an event more than once). However, as mentioned above, you can have as many go’s at an adventure as you like. This allows you to spend some time preparing for an adventure. For the earlier stages of an adventure, simply using the Train action to improve a required skill may suffice, but for later stages your skills need to be very high. Just training for them is quite laborious, so it pays to check if you have any spells, items or abilities that will temporarily increase the skill you’re interested in.
Daily Overview
After you’ve completed all your actions for the day, you will get an overview of your day. These are subdivided into
- Results of the day – how well did you do on your actions? Were you successful? If so, what were the effects? Did you learn anything new?
- Matters of concern – what’s your parental approval rate? Did anyone increase the merit rate of your college?
- Rumors of the Academy – this will tell you what other students have been up to that day.
- Collegiate merit – how does your college rate in the merits roll?
- Knapsack – you can see if there are any items of interest in the locations you’ve visited by clicking on the knapsacks at the bottom of the overview. Pick them up by dragging them from the location to your knapsack. You can also get rid of items by leaving them in this place if you like.
When you’re done with this window, once again hit the clock button at the bottom right of your screen.
You can go back to check on details of previous days by hitting the history scroll next to the completed day.
Friends, Enemies and Cliques
The social aspect is a large part of the game. There are more than 80 students at the Academy, and 20 or so teachers that you can form relationships with.
Many relationships are developed automatically when you engage in events and adventures. The outcome of the events will determine if your relationship with someone goes up or down. In addition, in your daily overview, under “matters of concern” you may find messages that someone tried to befriend you or bullied you etc. which will also alter your relationship with these people.
However, there are many, many ways in which you can actively affect relationships with people yourself. The first option that will be available to you is the “gossip” action. When you choose to use the Gossip action, you will be able to choose a location to gossip (the Dining Hall is a good place for social actions) and two people between whom you want to improve the relationship. One of the two may be, but doesn’t have to be, you yourself. A successful Gossip action will increase the relationship between the two people by 1 point. A higher Charm attribute will improve your chances of success.
When you really like someone, you may want to try and Befriend them. The Befriend action is unlocked when your Social Skills skill (under School Survival) reaches level 2. The better your relationship with a character, the higher your chances of success. Once you’ve successfully befriended someone, they will become part of your clique. If you wait long enough, someone may add you to their clique instead.
Sometimes your friendship level with someone may be high, yet they keep refusing to become part of your clique. This may be because your new friend doesn’t like someone already in your clique. To find out how much two people like each other, you need to use the Gossip action. Select the first character you want to gossip about, and the field for the second character will then show you the relationships between the first character and everyone else on the list. A successful gossip action between two characters will improve the relationship between those two characters. If your new friend has a relationship of about 5 with everyone in your clique, your chances of adding them to your clique should be quite good.
There are several benefits to having a clique. One of them is that the students you befriend may have actions or abilities that will become available to you. Another is that you can choose the “sacrifice a member” option during adventures. Whenever you’re struggling to get your skills at the right level for the successful completion of an adventure you can choose “sacrifice a member” to continue with the adventure. This clique member does not need to have any of the required skills. However, note that your relationship with that clique member will take a hit and you can only sacrifice each member once during the entire game. At some point you will also obtain new adventures related to people in your clique.
You can get rid of one of your clique members by lowering your relationship with them. However, this is risky business as it may result in fights within your clique, and you may be forced to choose sides as your whole clique disintegrates. Later on in the game you may unlock some advanced (and safer) options to deal with clique members that have outstayed their welcome.
As well as making friends, you can also make enemies. There are many options that will decrease your relationship with others: you can ruin someone’s homework, spread rumors about people, bully them, extort them etc. At some point, when your relationship with someone is bad enough, you can enter into a Vendetta with them. This will unlock a new adventure that will allow you to duel with them.
You can also gain the Challenge to Duel action when you train up your Schoolyard Education (under School Survival Skills). Once you have this action, you can challenge someone who has been bullying you or that you have a low relationship with to a duel. Win the duel and the bully should be off your back.
As with all aspects of this game, there are endless options and possibilities relating to your social interactions. Just have a go at trying them out! You never know what you may discover.
Familiar
When you set up your character at the start of the game, you will get the option to use one of your character points on bringing a familiar to school. A familiar is a kind of magical pet with its own set of skills and attributes. You can select one of the default familiars, a random exotic one or you can choose not to bring a familiar. If you don’t bring a familiar, one will most likely find you during your year.
It is perfectly possible to play the game without ever looking at your familiar. It is entirely up to you how you make use of them. But the use of having a familiar is that their skill set will add to your own, meaning that you will be able to increase skills that you share with your familiar to more than 10. You can train your familiar’s skills in the same way you can train your own: by selecting the “Train Familiar” action and then selecting the skill you want to improve.
However, how much you gain of your familiar’s skills is a bit confusing. This is the gist of it:
- For you to make use of your familiar’s skills, you need to have a good bond with them. You can increase the bond between you and your familiar with several actions, such as grooming or selecting Bond under the Train Familiar action. The greater the bond, the higher the maximum skill you will be able to obtain from your familiar.
- Although you can train your familiar’s skill to 10 regardless of the strength of the bond you share, you can only use the number of skill points up to the bond level. So, if your bond with your familiar is 8, but you’ve trained their skill to 10, you will only be able to use 8 points of that skill. If your bond is 8 and the skill is, 6, you will be able to use all 6 skill points.
- Finally, you only receive 50% of the skill points that are available to you. So, if your bond is 8 and their skill level is 10, you will get 50% of the 8 points you can use – so 4 points. This means that you can add a maximum of 5 skill points to your own.
Exams
During your first year at school, you will encounter two sets of exams: your midterms and your final exams. Studying will determine how well you do in your exams. However, just studying won’t get you there – you need to train the sub skills as well. Your average skill level of the sub skills determines the maximum score you can get on an exam. Your study level roughly decides the percentage of the maximum score you can get.
The developers recommend you should be at approximately level 5 by your midterms, but even then you may only score about 30%. Make sure you’re trained up to the max by your finals, though, as your final exams weight heavier in your over all score.
Before exam days, check if you have any abilities, spells, items or actions you can use to boost your skill levels in your chosen subject for the coming few days. This way, you can even increase your skills to greater than 10 and score more than 100% in exams. You can also smooch up to some of the teachers to get a little higher score.
The table below shows the dates on which the exams for each subject are set.
Midterms (Cheimare) | Finals (Kaliri) | |
Arithmetic | 15 | 23 |
Astrology | 17 | 16 |
Athletics | 11 | 26 |
Botany | 4 | 24 |
Calligraphy | 1 | 10 |
Dialectic | 6 | 15 |
Enchant | 19 | 19 |
Geometry | 5 | 11 |
Glamour | 9 | 22 |
Grammar | 12 | 8 |
History | 8 | 17 |
Incantation | 3 | 20 |
Music | 18 | 9 |
Negation | 10 | 12 |
Revision | 2 | 13 |
Rhetoric | 16 | 18 |
Zoology | 13 | 25 |
Dealing with Detention
Finally, a word or two should be spent on the concept of Detention. It is almost inevitable that you will spend some time in detention at some point during the game. Many things can tick the teachers off, such as getting caught in a location where you shouldn’t be (so set your locations for your actions carefully), carrying illegal or over-sized items to class (always check your concealment and encumbrance levels), and of course skipping class.
It is perfectly fine to skip class every once in a while, but do it too often and teachers will start to notice. And once they’ve marked you as a rebel, they will keep a closer eye on you and you stand a much higher chance of being found out.
It is possible for a teacher to set you detention once a week for the rest of the year. If that happens, make sure to find out which teacher you’re in detention with (you can find this in your daily overview). Then check the teacher’s details in your Relations menu to find out what specific skills they are interested in. You can train these skills to get back on the teacher’s good side and eventually get out of detention.

More articles...
-
Best Horror Games On Itch.io – July 2026
Across a bounty of subgenres. -
Haze Seas Accessories Tier List [Best Accessories to Equip]
The accessories with the best stat buffs in Haze Seas.