- Wondering how to get Monopoly GO! free rolls? Well, you’ve come to the right place. In this guide, we provide you with a bunch of tips and tricks to get some free rolls for the hit new mobile game. We’ll …
Best Roblox Horror Games to Play Right Now – Updated Weekly
By Adele Wilson
Our Best Roblox Horror Games guide features the scariest and most creative experiences to play right now on the platform!The BEST Roblox Games of The Week – Games You Need To Play!
By Sho Roberts
Our feature shares our pick for the Best Roblox Games of the week! With our feature, we guarantee you'll find something new to play!All Grades in Type Soul – Each Race Explained
By Adele Wilson
Our All Grades in Type Soul guide lists every grade in the game for all races, including how to increase your grade quickly!
Abandoned: Chestnut Lodge Asylum Walkthrough
Welcome to the Abandoned: Chestnut Lodge Asylum walkthrough on Gamezebo. Abandoned: Chestnut Lodge Asylum is a hidden object adventure game created by Lazy Turtle Games. This walkthrough includes tips and tricks, helpful hints, and a strategy guide to how to complete Abandoned: Chestnut Lodge Asylum.
Game Introduction – Abandoned: Chestnut Lodge Asylum
Welcome to the Abandoned: Chestnut Lodge Asylum walkthrough on Gamezebo. Abandoned: Chestnut Lodge Asylum is a hidden object adventure game created by Lazy Turtle Games. This walkthrough includes tips and tricks, helpful hints, and a strategy guide to how to complete Abandoned: Chestnut Lodge Asylum.
General Tips
- Upon starting a new game, and accessible at any time in the Options menu, you can select your game difficulty: Casual Mode or Expert Mode. Casual mode is designed for novice players, or players who want to play at their own pace. Expert mode is designed for experienced players. Hints recharge slower and most hints are unavailable.
- In the lower left corner of the screen is the Journal. This will keep track of valuable clues and hints as you uncover them in the game.
- Also located in the lower left corner of the screen is the Menu. Click on this to exit your game, access options, etc.
- In the lower right corner of the screen is the Hint button. Hints are unlimited, though they require time to recharge. Once the meter is fully filled, you can use a hint again. The Hint button will become the Skip button during puzzles, though it must be filled before you can use it.
- In the lower right corner of the screen as well is the Tasks pad. This will keep track of tasks you have yet to finish.
- Hidden object areas have randomized objects. Therefore, only Inventory items and items listed in blue (which aren’t randomized) will be circled in the guide below.
- Inventory items are shown at the bottom of the screen. Inventory items are identified with CAPS and circled in red in the guide below.
- In many hidden object areas, there will be items listed in blue. These require a combining action of some sort to become the item needed on the list. These items are outlined in blue in the guide below.
- Also shown in the guide are the locations of the Morphing objects. These are shown in green in the guide below.
- An important note: While the game is non-linear, and you can explore and gather items in a different order than the one outlined in the guide below, it is highly encouraged you follow the order stated below. In some rare cases, it is possible for items you will need to acquire to disappear entirely/become unobtainable if you do not encounter them in the right order, i.e. you may get the MAGNET before the EMPTY GLASS, which will result in you being unable to progress further in the game without starting over.
Chapter 1: Chestnut Lodge Asylum
Front Gate
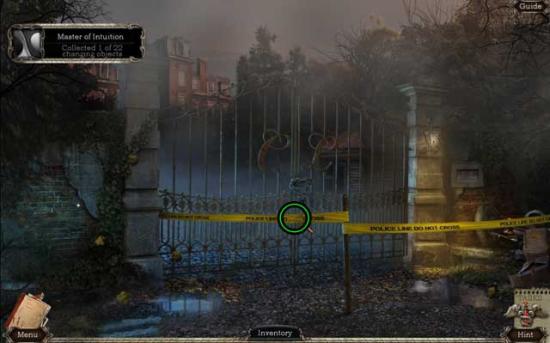
- Click on the Morphing Object to collect it.

- Examine the brick wall on the left. You’ll need something to break through it. Exit the close-up to see a hidden object area appear on the right.
- Find the objects listed at the bottom of the screen. The Inventory Item is circled in red. Objects listed in blue are shown below in blue.
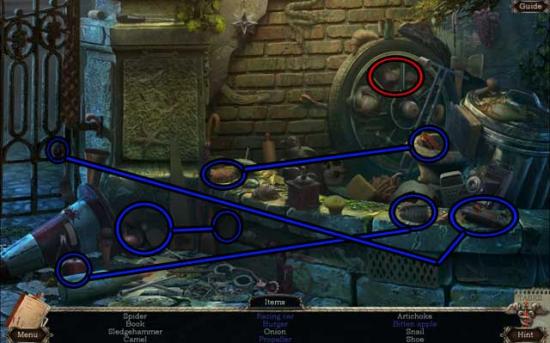
- Upon completing the area, the SLEDGEHAMMER will be added to your inventory.
- Examine the brick wall on the left again. Use the SLEDGEHAMMER to break through the wall, then continue through the hole to the next area.
Parking Lot
- Click on the Morphing Object to collect it.
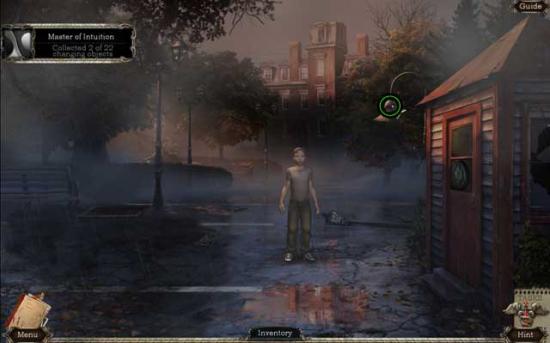
- Talk with the boy in front of you. Once he’s gone, examine the license plate on the ground between the two parking spaces. It will be noted down to your Journal.
- Proceed forward to the next area.
Park
- Click on the Morphing Object to collect it.
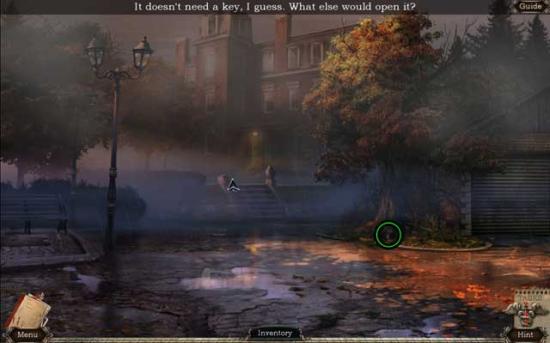
- Proceed to the left.
Fountain
- Click on the hidden object area over the fountain.
- Find the objects listed at the bottom of the screen. The Inventory Item is circled in red. Objects listed in blue are shown below in blue.
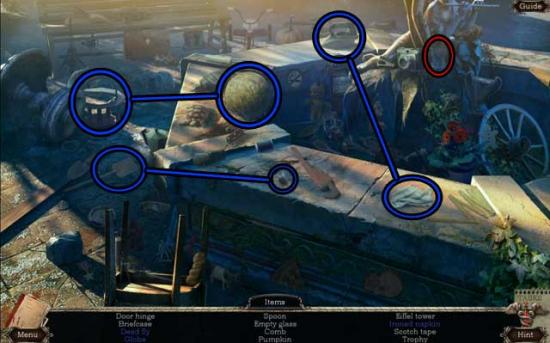
- Upon completing the area, the EMPTY GLASS will be added to your inventory.
- Click on the Morphing Object to collect it.
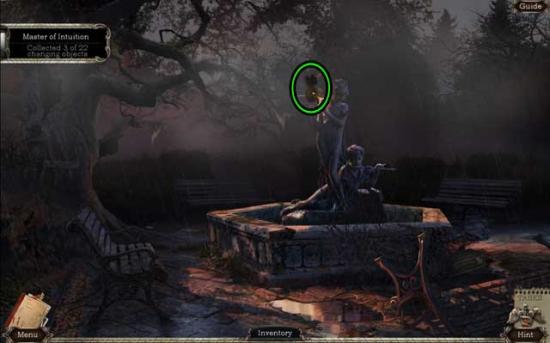
- Return to the Park.
Park
- Proceed up the steps to the next area.
Asylum Entrance
- Click on the Morphing Object to collect it.
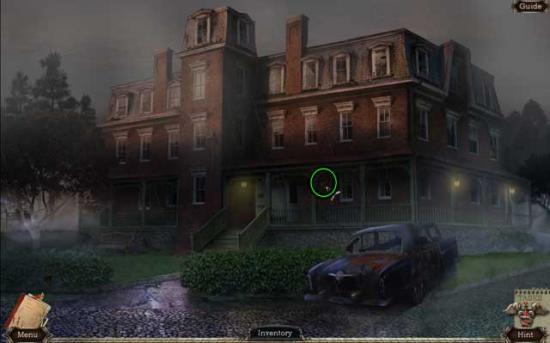
- Note the trunk of the car on the right, and the flashlight on the ground on the path towards the asylum, then continue forward.
Porch
- Attempt to enter the Asylum, only to have the door slam shut. This will trigger a hidden object area on the right.
- Find the objects listed at the bottom of the screen. The Inventory Item is circled in red. Objects listed in blue are shown below in blue.
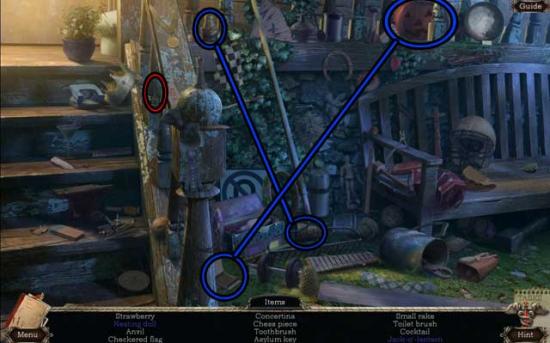
- Upon completing the area, the ASYLUM KEY will be added to your inventory.
- Take a closer look at the front door. Use the ASYLUM KEY on the lock to unlock the door, then proceed inside.
Reception
- Click on the Morphing Object to collect it.
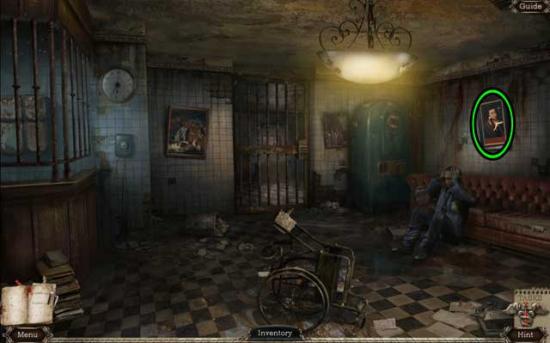
- Speak with the police officer. He needs a glass of water (we’ll come back to this later).
- Take a closer look at the barred door ahead. Input the code “6281” (the number on the license plate) to open the door.
- Proceed through to the next area.
Dining Room
- Click on the Morphing Object to collect it.
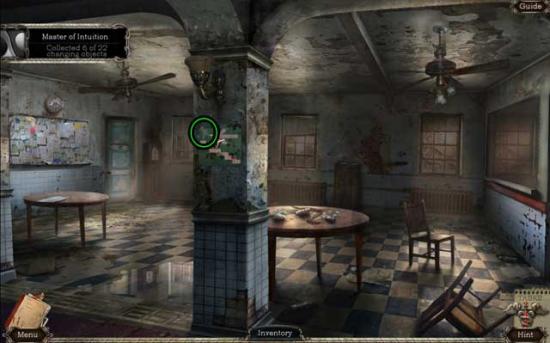
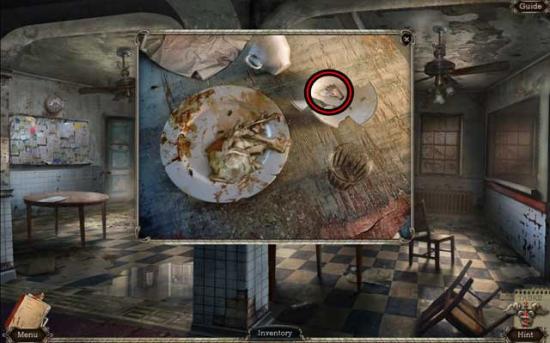
- Examine the first table for a closer view. Click on the PAPERCLIP to add it to your inventory.
- Examine the door in the far left corner. Attempt to open it and note that the hinges are rusted.
- Proceed left to the next area.
Stairwell
- Click on the Morphing Object to collect it.
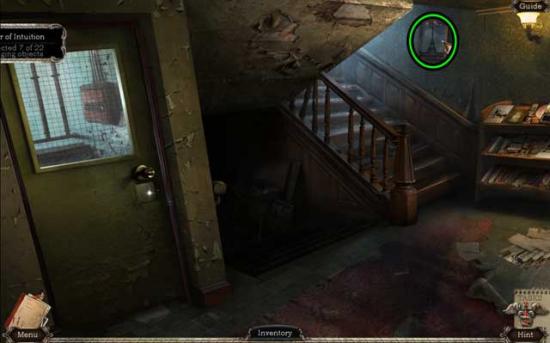
- Examine the magazine rack on the right. Click on the Chestnut Lodge Mental Hospital brochure to open it and note the number “962” inside (this will be added to your Journal), then click on the MOTH to add it to your inventory.
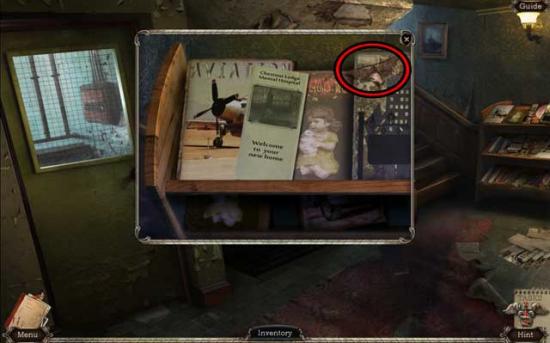
- Take a closer look at the small square panel beneath the door handle on the left. Click on it to open it, triggering a puzzle.
- Arrange the chip parts by swapping them until all are aligned correctly. The solution is shown below.
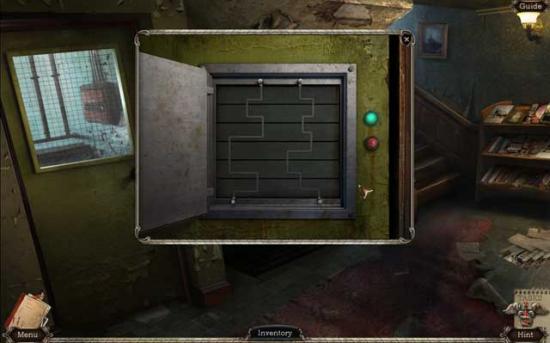
- Upon completing the puzzle, the door will open and a hidden object area will be revealed inside.
- Find the objects listed at the bottom of the screen. The Inventory Item is circled in red. Objects listed in blue are shown below in blue.
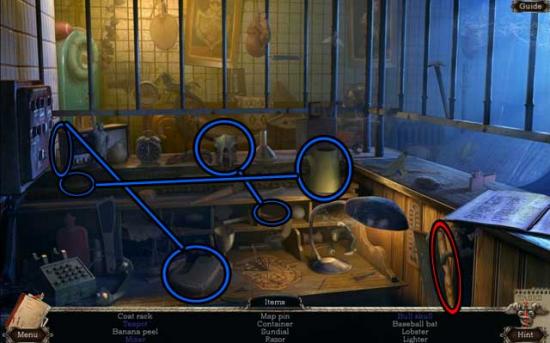
- Upon completing the area, the BASEBALL BAT will be added to your inventory.
- Proceed up the stairs to the next area.
Upstairs Foyer
- Proceed through the open doorway on the right to the next area.
Study
- Click on the Morphing Object to collect it.
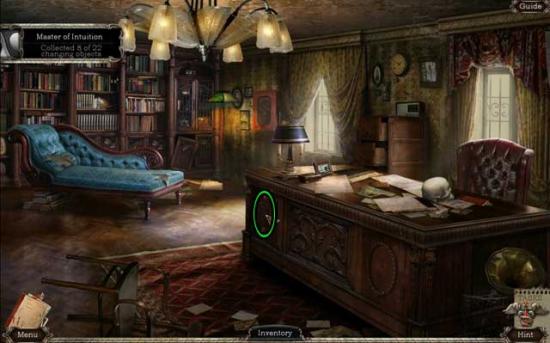
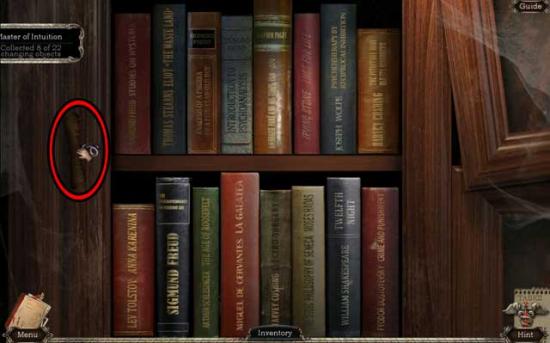
- Examine the bookcase on the back wall. Click on the CORKSCREW to add it to your inventory.
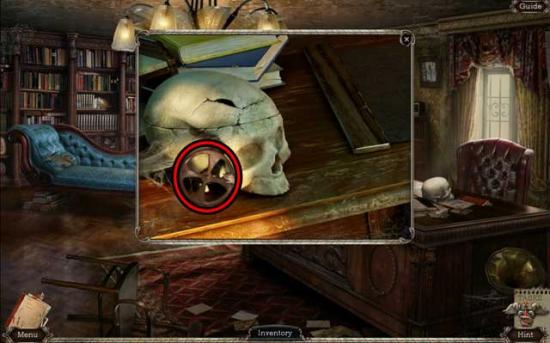
- Take a closer look at the skull on the desk on the right. Click on the VALVE to add it to your inventory.
- Return to the Stairwell.
Stairwell
- Proceed down the stairs to the next area.
Pool
- Click on the Morphing Object to collect it.
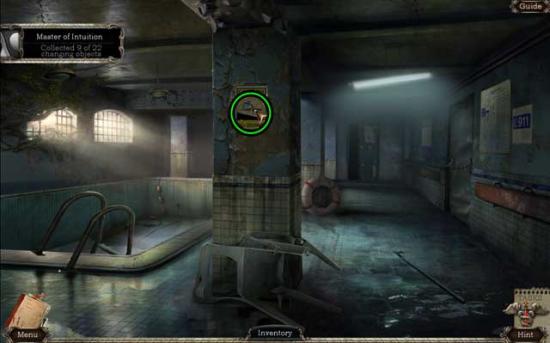
- Take a closer look at the door on the right. Use the PAPERCLIP on the lock to pick it, triggering a puzzle.
- Click and hold the lock bars with the paperclip until you find the correct position for each bar. The solution is shown below.
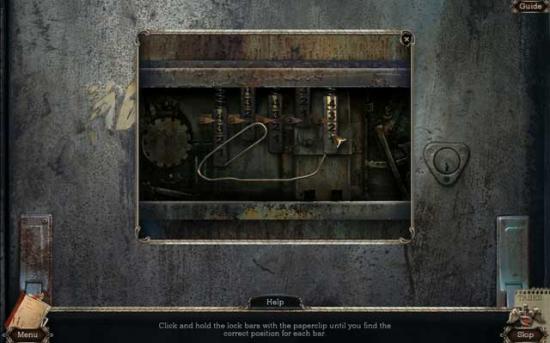
- Upon completing the puzzle, the door will open. Proceed inside to the next area.
Morgue
- Click on the Morphing Object to collect it.
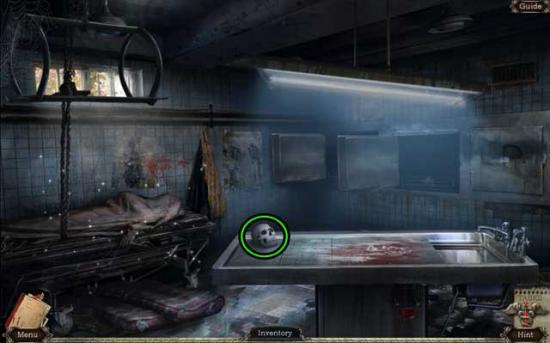
- Click on the hidden object area over the gurney on the left.
- Find the objects listed at the bottom of the screen. The Inventory Item is circled in red. Objects listed in blue are shown below in blue.
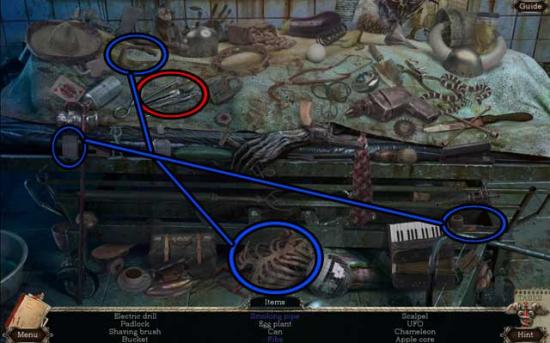
- Upon completing the area, the SCALPEL will be added to your inventory.
- Exit the Morgue and return to the Asylum Entrance.
Chapter 2: The Asylum Grounds
Asylum Entrance
- Proceed right to the next area.
Cottage
- Click on the Morphing Object to collect it.
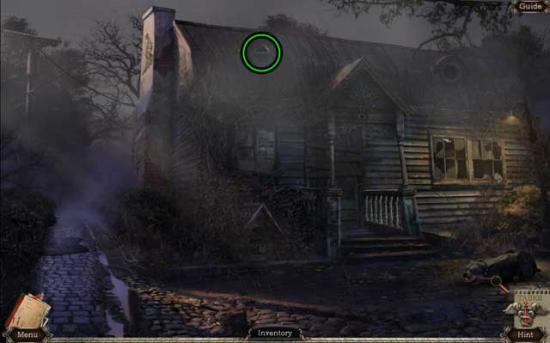
- Examine the dog on the right, as well as the front door of the cottage.
- Proceed down the path on the left to the next area.
Alley
- Click on the hidden object area over the dumpster on the left.
- Find the objects listed at the bottom of the screen. The Inventory Item is circled in red. Objects listed in blue are shown below in blue.
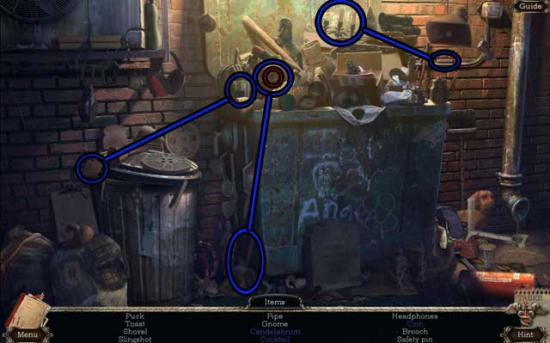
- Upon completing the area, the COIN will be added to your inventory.
- Make your way back to the Reception.
Reception
- Examine the vending machine in the corner on the right. Use the COIN on the slot, then use the EMPTY GLASS on the machine and press the red button to fill it with water. Click on it to obtain the GLASS OF WATER.
- Talk with the officer on the right. Give him the GLASS OF WATER. He will give you the LAMP CHAIN in return.
- Make your way down to the Pool.
Pool
- Proceed forward through the door at the far end of the room.
Boiler Room
- Take a closer look at the light on the ceiling, above the ladder. Use the LAMP CHAIN on the light, then click on it to turn the lights on.
- Examine the panel on the right. Note you’ll need instructions on how to operate it.
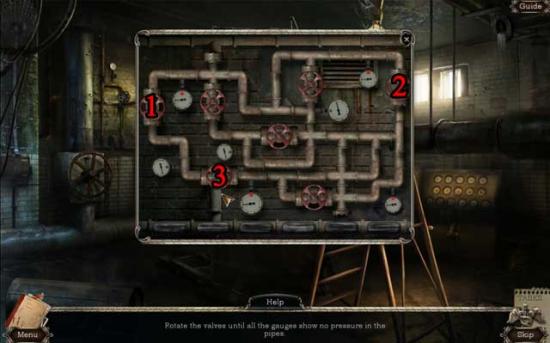
- Take a closer look at the pipes with the gauges towards the upper left. Use the VALVE on the unoccupied peg to trigger a puzzle.
- Rotate the valves until all the gauges show no pressure in the pipes. Click on the valves in the order shown in the screenshot below to solve the puzzle.
- Upon completing the puzzle, return to the Study.
Study
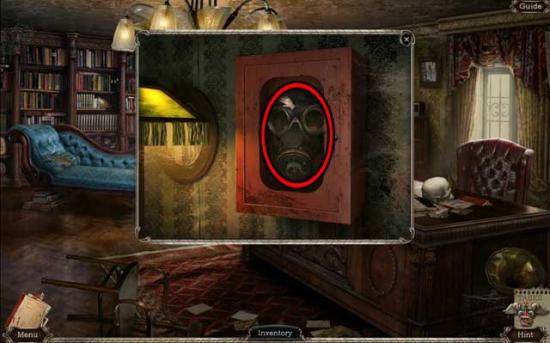
- Take a closer look at the red box handing on the wall towards the corner with the bookshelves. Use the SCALPEL to remove the glass, then click on the GAS MASK inside to add it to your inventory.
- Make your way back to the Dining Room.
Dining Room
- Examine the window on the right. Use the BASEBALL BAT to break open the window.
Kitchen
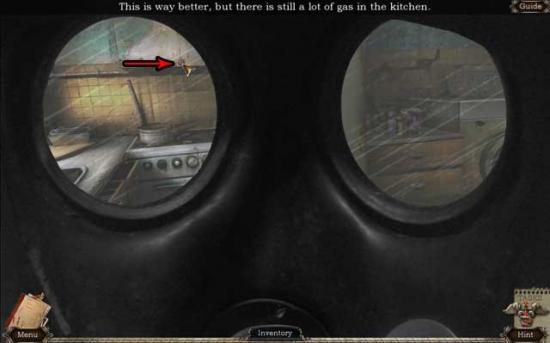
- Use the GAS MASK, since you’ve noticed the gas leak. Click on the red button over the stove to shut it off, then click on the mask to remove it.
- Click on the Morphing Object to collect it.
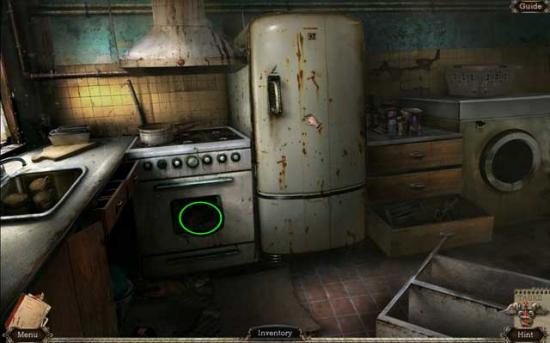
- Click on the refrigerator to open it, revealing a hidden object area.
- Find the objects listed at the bottom of the screen. The Inventory Item is circled in red. Objects listed in blue are shown below in blue.
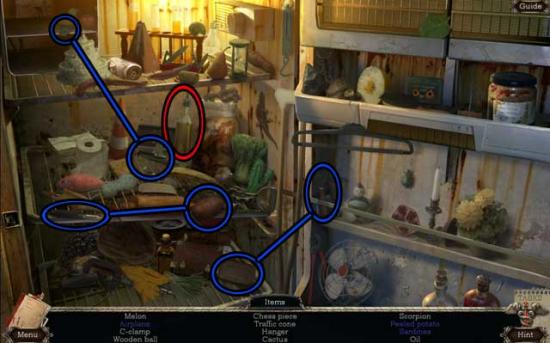
- Upon completing the area, the OIL will be added to your inventory.
- Examine the washing machine on the right. Click on the red switch in the upper left corner to finish the cycle, then open it and click on the TOWEL inside to add it to your inventory.
- Examine the pot on the stove. Click on the BONE inside to add it to your inventory.
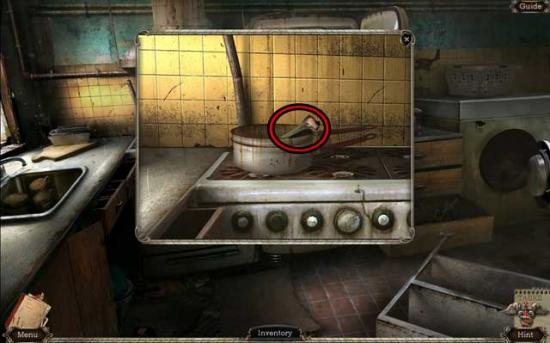
- Go back to the Dining Room.
Dining Room
- Examine the door in the left corner again. Use the OIL on the rusty hinges, one at a time, to restore them to working order, then click on the door to open it.
- Proceed through the newly opened door to the next area.
Basketball Court
- Click on the basketball on the right and use it on the hoop, knocking down a bundle caught inside.
- Take a closer look at the fallen bundle beneath the basket. Click on the PIANO KEY to add it to your inventory.
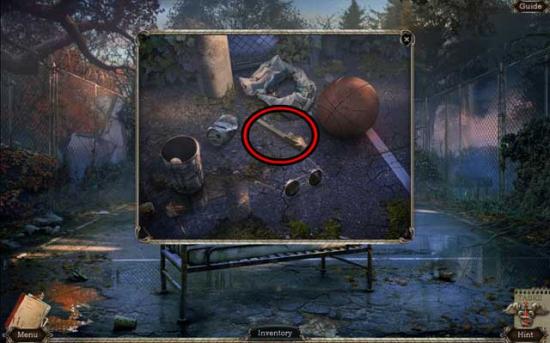
- Examine the left corner of the fence around the court. Click on the doll’s head three times until the EYE rolls out, then click on it to add it to your inventory.
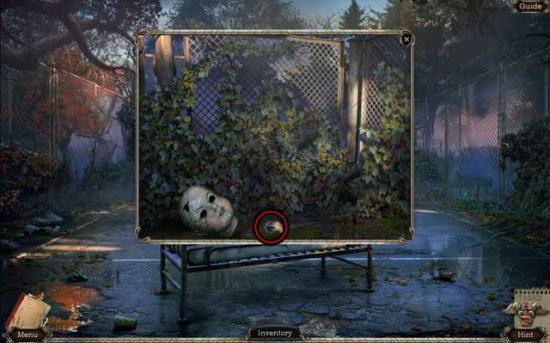
- Still in the close-up, click on the leaves and brush in the corner until they’re all cleared away, revealing a hole in the fence.
- Make your way back to the Cottage.
Cottage
- Take a closer look at the dog on the right. Give the dog the BONE to distract him, then proceed right to the next area.
Graveyard
- Click on the hidden object area on the right.
- Find the objects listed at the bottom of the screen. The Inventory Item is circled in red. Objects listed in blue are shown below in blue.
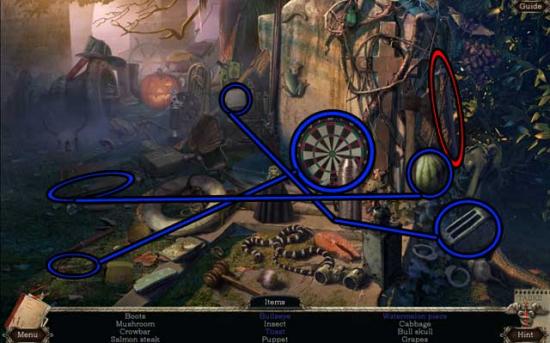
- Upon completing the area, the CROWBAR will be added to your inventory.
- Examine the open grave and the nearby cross on the left and made a mental note of both.
- Click on the Morphing Object to collect it.
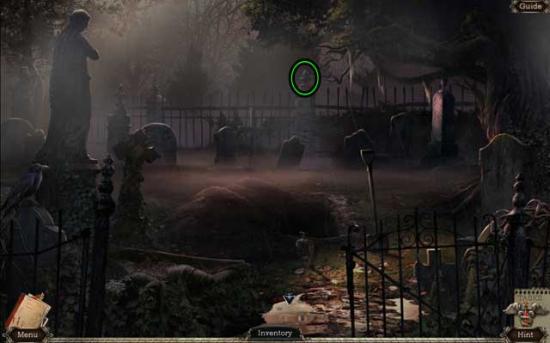
- Return to the Cottage.
Cottage
- Examine the front door of the Cottage. Use the CROWBAR to remove each of the boards covering the door. Note the door is missing a handle.
- Return to the Asylum Entrance.
Asylum Entrance
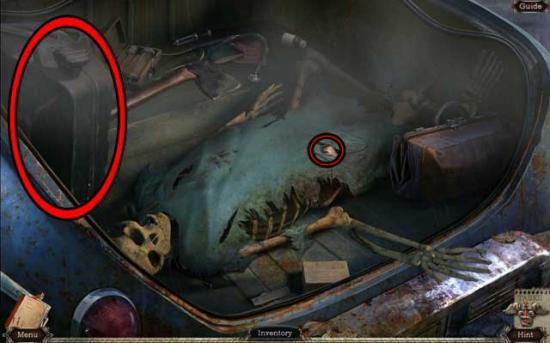
- Take a closer look at the old car, then examine the trunk. Use the CROWBAR to pry it open.
- Inside the trunk, click on the Quote Scrap in the pocket to add it to your Journal, then click on the EMPTY CONTAINER to add it to your inventory.
- Go to the Porch.
Porch
- Click on the hidden object area on the right.
- Find the objects listed at the bottom of the screen. The Inventory Item is circled in red. Objects listed in blue are shown below in blue.
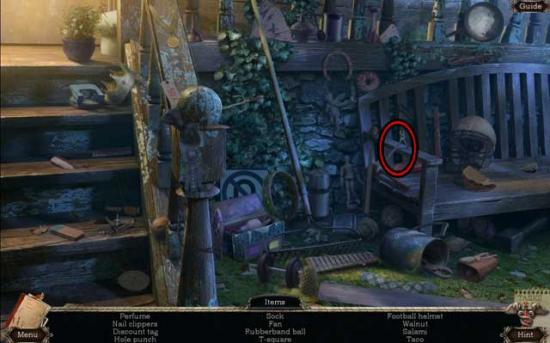
- Upon completing the area, the NAIL CLIPPERS will be added to your inventory.
- Make your way to the Upstairs Foyer.
Upstairs Foyer
- Proceed towards the grated window on the left.
Window
- Use the NAIL CLIPPERS on the wire holding the window grate shut to cut it, then use the TOWEL on the power line to slide down to the next area.
Shed Roof
- Examine the small addition to the roof. Use the CROWBAR on each piece of wood to remove them all, then click on the SPIDERWEB inside to add it to your inventory.
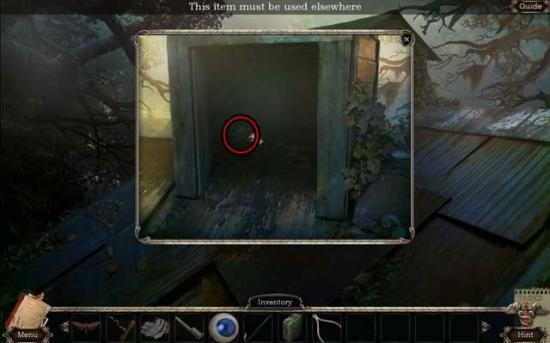
- Out of the close-up, use the CROWBAR on the large METAL PLATE in front of you to pry it up and add it to your inventory, then proceed down through the opening and into the Shed.
Shed
- Talk with the boy inside the Shed. He will give you the SOLDIER, and a hidden object area will be triggered to the right of the door.
- Find the objects listed at the bottom of the screen. The Inventory Item is circled in red. Objects listed in blue are shown below in blue.
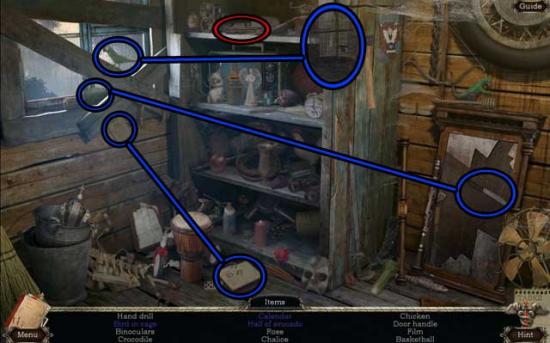
- Upon completing the area, the DOOR HANDLE will be added to your inventory.
- Exit the Shed to the Alley.
Alley
- Click on the Morphing Object to collect it.
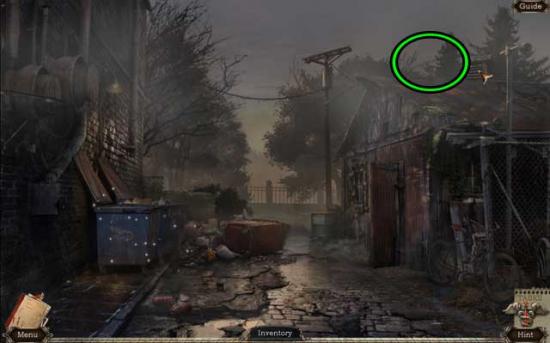
- Click on the hidden object area over the dumpster on the left.
- Find the objects listed at the bottom of the screen. The Inventory Item is circled in red. Objects listed in blue are shown below in blue.
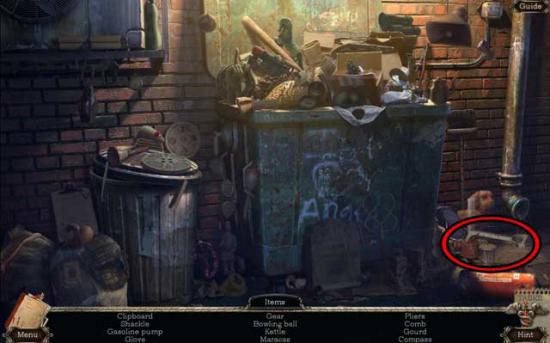
- Upon completing the area, the GASOLINE PUMP will be added to your inventory.
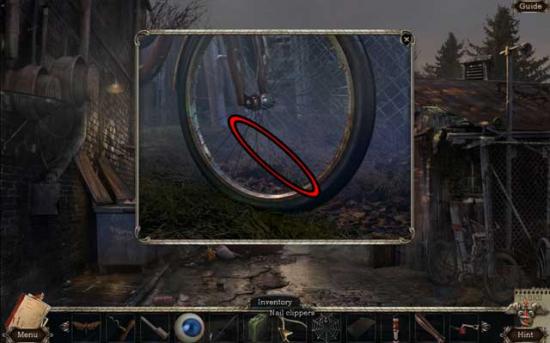
- Back in the main area, examine the bike on the right. Use the NAIL CLIPPERS to remove the SPOKE and add it to your inventory.
- Go to the Cottage.
Cottage
- Take a closer look at the front door. Use the DOOR HANDLE on the empty socket in the door, then click on it to open it and proceed inside.
Chapter 3: The Cottage
Middle Room
- Click on the Morphing Object to collect it.
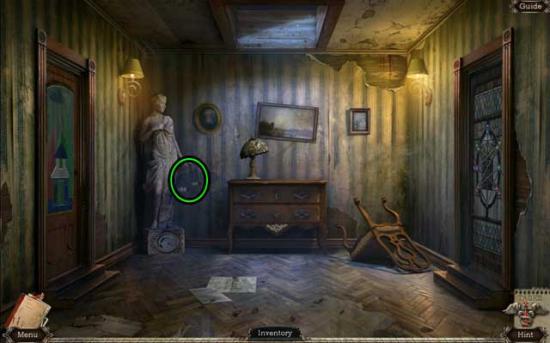
- Examine the base of the statue on the left to trigger a puzzle.
- Find the correct position for each disc. The solution is shown below.
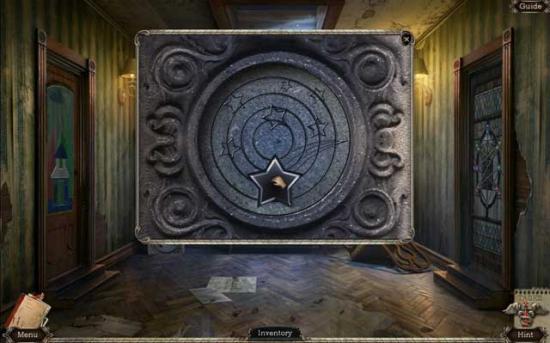
- Upon completing the puzzle, click on the STAR to add it to your inventory.
- Take a closer look at the door on the left to trigger a puzzle.
- Swap the glass tiles so that no two tiles of the same color are adjacent. A possible solution is shown below.
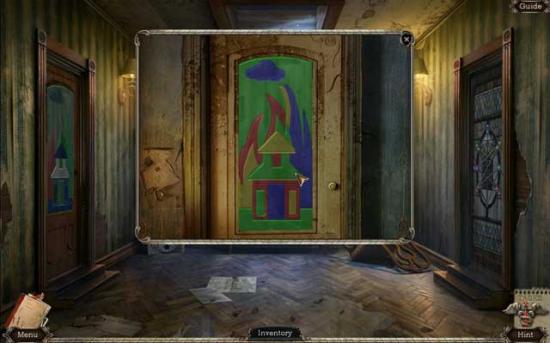
- Upon completing the puzzle, the door will open. Proceed into the next room.
Left Bedroom
- Click on the Morphing Object to collect it.
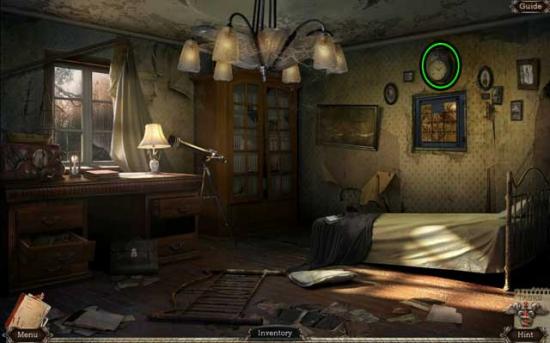
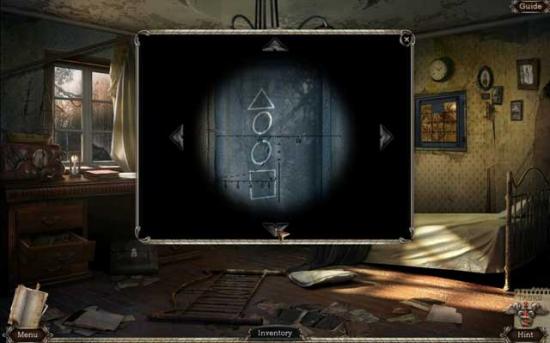
- Note the locked bag at the base of the desk, then take a closer look at the telescope. Use the arrow keys to toggle around until you find the clue shown below. It will be added to your notebook.
- Examine the picture frame with the tiles on the right.
- Move the tiles to restore the original image. The solution is shown below.
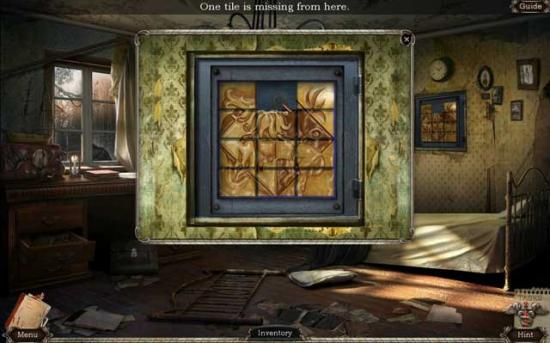
- Upon completing the puzzle, note one tile is still missing.
- Return to the Middle Room.
Middle Room
- Examine the door on the right to trigger a puzzle.
- Place the spiders into their correct positions. Click on the spiders/positions as numbered in the screenshot below to complete the puzzle.
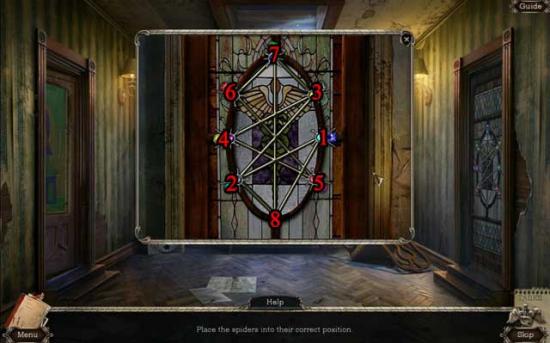
- Upon completing the puzzle, enter the room on the right.
Right Bedroom
- Click on the hidden object area over the dresser.
- Find the objects listed at the bottom of the screen. The Inventory Item is circled in red. Objects listed in blue are shown below in blue.
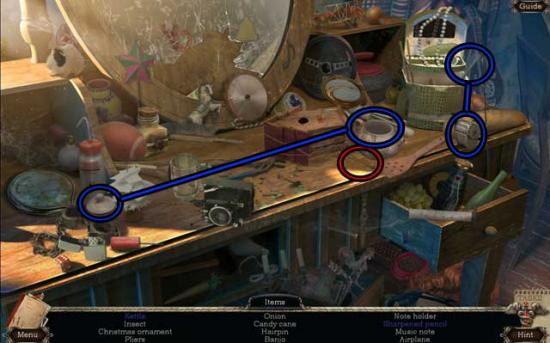
- Upon completing the area, the HAIRPIN will be added to your inventory.
- Note the wooden box in the cabinet on the right and the teddy bear on the bed.
- Click on the Morphing Object to collect it.
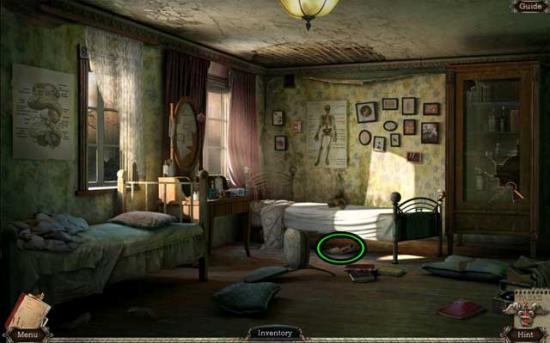
- Return to the Left Bedroom.
Left Bedroom
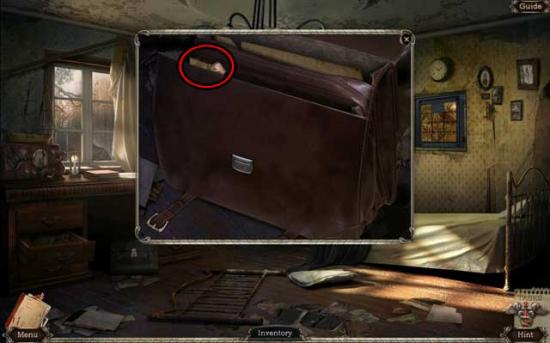
- Examine the bag lying at the base of the desk. Use the HAIRPIN on the lock to open it, then click on the paper inside for a closer view of a picture of a spider. This will be added to your Journal. Then, click on the PUZZLE TILE to add it to your inventory.
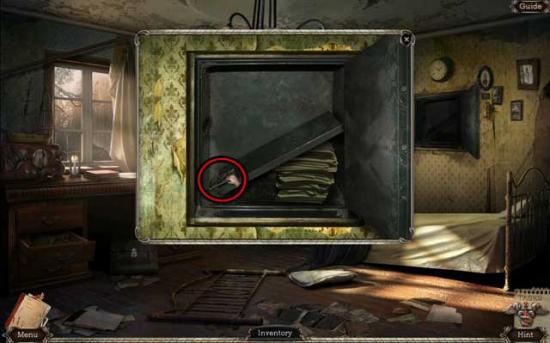
- Examine the puzzle on the wall on the right again. Use the PUZZLE TILE on the empty slot to complete the picture, revealing a hidden safe. Click on the CHIP inside to add it to your inventory.
- Make your way back to the Asylum, to the Upstairs Lobby.
Upstairs Lobby
- Examine the door in the back left corner for a closer view. Use the SPOKE on the keyhole to knock the key out.
- Backtrack to the Fountain.
Fountain
- Click on the hidden object area over the Fountain.
- Find the objects listed at the bottom of the screen. The Inventory Item is circled in red. Objects listed in blue are shown below in blue.
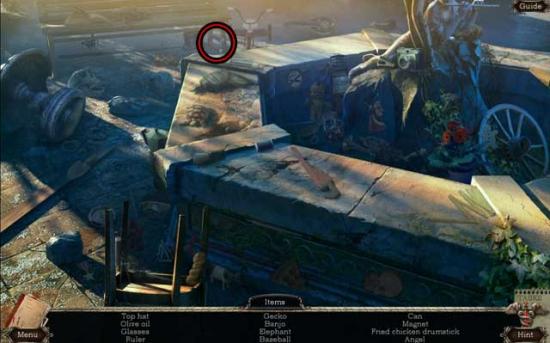
- Upon completing the area, the MAGNET will be added to your inventory.
- Examine the suitcase lying on the ground to the right of the Fountain. Input the code “962” according to the clue in the brochure earlier to open it. Click on the REMOTE CONTROL inside to add it to your inventory.
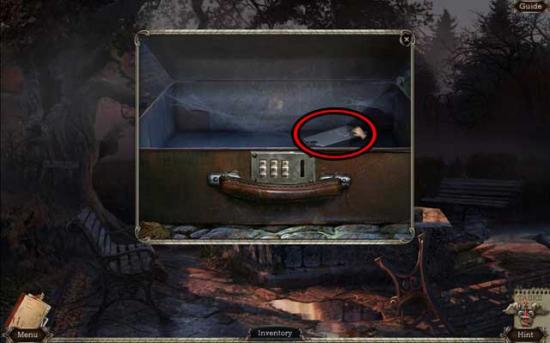
- Go back to the Park.
Park
- Use the REMOTE CONTROL on the garage on the right to open it, then proceed inside.
Garage
- Click on the hidden object area on the left.
- Find the objects listed at the bottom of the screen. The Inventory Item is circled in red. Objects listed in blue are shown below in blue.
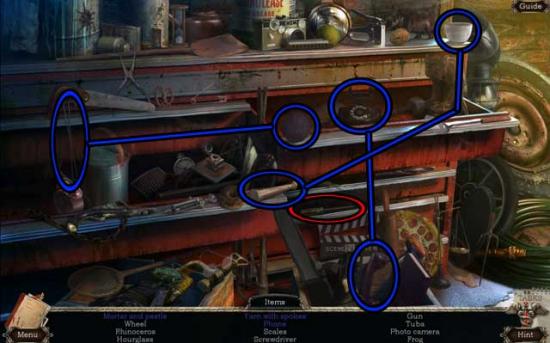
- Upon completing the area, the SCREWDRIVER will be added to your inventory.
- Click on the front door of the van to open it, then take a closer look inside. Click on the Morphing Object, the LOCK PART, and the MIRRORED NOTE to collect them.
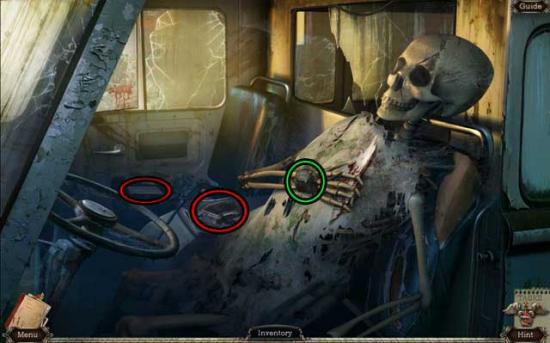
- Exit the close-up, then take a closer look at the rear portion of the van. Click on the gas cover to open it, then use the EMPTY CONTAINER and the GASOLINE PUMP on it. Click on the pump to pump gas into the container, then click on the CONTAINER OF GAS to add it to your inventory.
- Back in the main area, click on the Morphing Object to collect it.
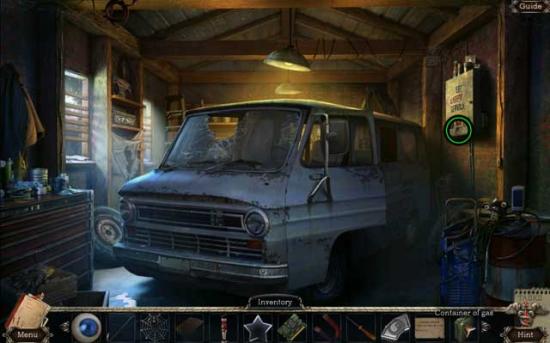
- Return to the Upstairs Lobby.
Upstairs Lobby
- Proceed forward to the Elevator.
Elevator
- Take a closer look at the elevator panel on the right. Use the SCREWDRIVER on each of the two screws holding the small rectangular plate on the panel, then click to remove it. Place the CHIP in the slot, then click on the button to summon the elevator.
- Once the elevator arrives and the doors open, note there’s no floor inside. Use the METAL PLATE to create a floor for the elevator, then enter it.
Below the buttons inside the elevator, there are three shapes. Click on the shapes in the following order according to the clue you discovered earlier: Triangle, Circle, Circle, Square. This will activate the floor buttons. Click on the “2” to proceed up to the 2nd floor, then exit the Elevator.
Chapter 4: Clowns, Spiders, and Mirrors
Corridor
- Enter the first door on the left.
Bathroom
- Click on the curtain on the right to move it aside, revealing a hidden object area.
- Find the objects listed at the bottom of the screen. The Inventory Item is circled in red. Objects listed in blue are shown below in blue.
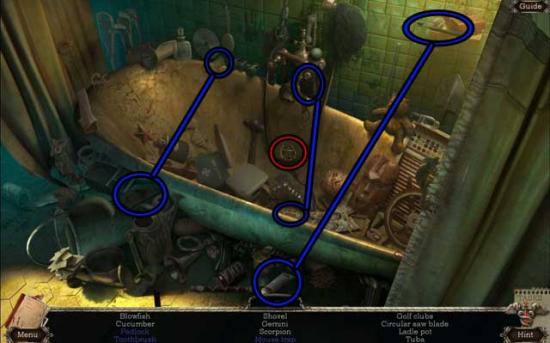
- Upon completing the area, the GEMINI will be added to your inventory.
- Examine the first sink on the left, and the puzzle on the wall to the left of the window before exiting the room.
Corridor
- Return to the Upstairs Lobby.
Upstairs Lobby
- Examine the door in the back left corner again. Use the MAGNET to retrieve the NURSES ROOM KEY from under the door and add it to your inventory.
- Use the NURSES ROOM KEY on the lock and click on it to open the door, then proceed inside.
Nurses Room
- Click on the hidden object area over the broken cabinet on the left.
- Find the objects listed at the bottom of the screen. The Inventory Item is circled in red. Objects listed in blue are shown below in blue.
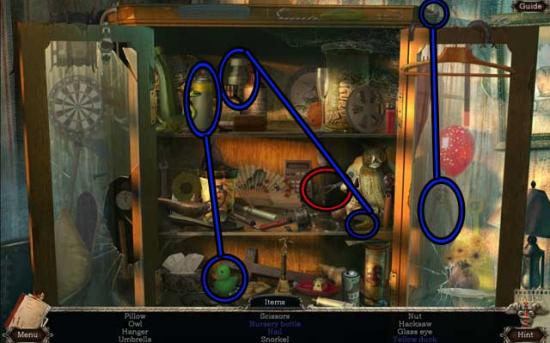
- Upon completing the area, the SCISSORS will be added to your inventory.
- Click on the Morphing Object and the LOCOMOTIVE to collect them.
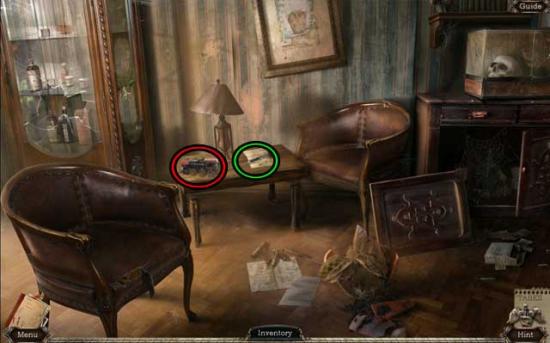
- Examine the reptile tank on the right and note the scorpion.
- Make your way back down to the Morgue.
Morgue
- Take a closer look at the closed door panel on the wall on the right. Use the MAGNET to open the door, revealing a puzzle.
- Arrange the skulls on the pillars according to their weight. The solution is shown below.
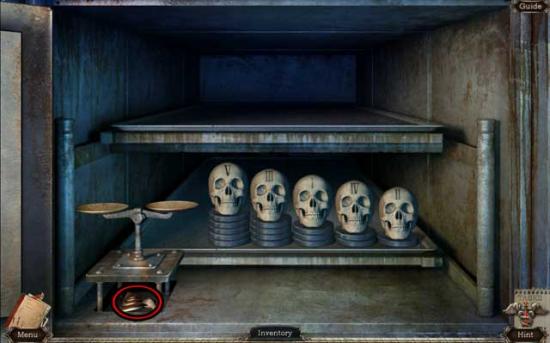
- Upon completing the puzzle, click on the TRIANGLE that’s revealed beneath the scales to add it to your inventory.
- Make your way back to the Right Bedroom of the Cottage.
Right Bedroom
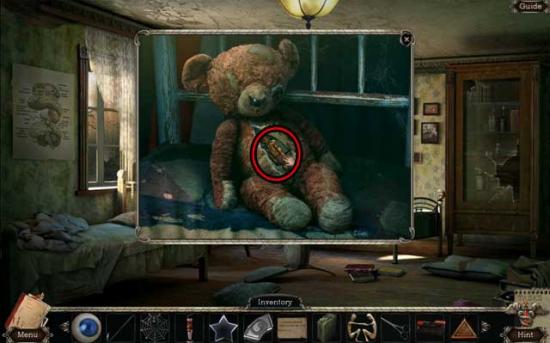
- Take a closer look at the teddy bear sitting on the bed at the back wall. Use the SCISSORS to cut open the stitching on its tummy, then click on the CANDY inside to add it to your inventory.
- Examine the broken cabinet on the right again. Click on the legs of the mechanical spider to arrange them into the correct position, mirror that of the sketch you found earlier in the Left Bedroom. The solution is shown below.
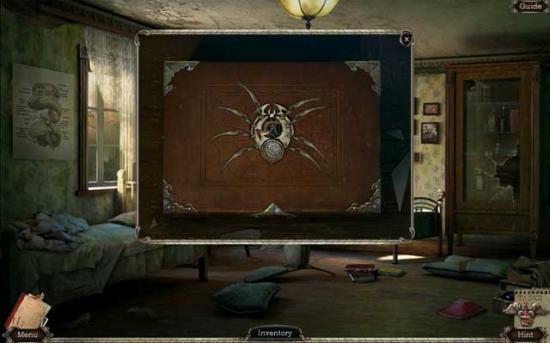
- Upon completing the puzzle, click on the BUTTERFLY inside the box to add it to your inventory.
- Return to the Corridor.
Corridor
- Examine the first door on the right. Place the SOLDIER, the CANDY, and the EYE in their respective slots to open the door, then proceed inside.
Clown Room
- Examine the toy railway on the ground. Use the LOCOMOTIVE on the railroad car to the right of the toy station. When it emerges from the tunnel, a toy will be stuck on the front. Take a closer look at the toy and click on the TOY KEY protruding from its back to add it to your inventory.
- Backtrack to the Parking Lot.
Parking Lot
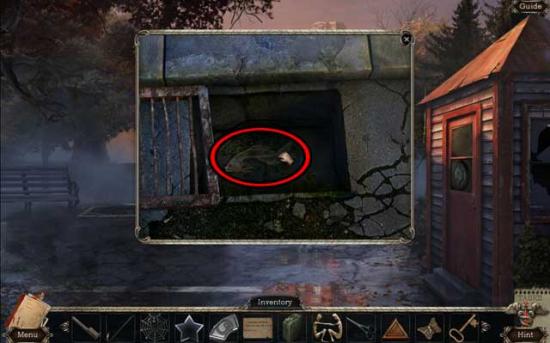
- Examine the storm drain to the right of the bench on the left. Use the CROWBAR to lift the grate, then click on the FISH inside to add it to your inventory.
- Return to the Nurses Room.
Nurses Room
- Click on the hidden object area over the cabinet on the left.
- Find the objects listed at the bottom of the screen. The Inventory Item is circled in red. Objects listed in blue are shown below in blue.
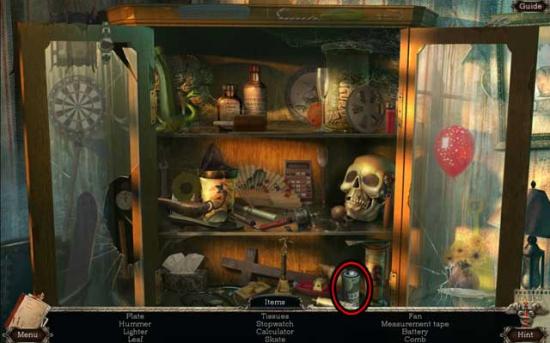
- Upon completing the area, the BATTERY will be added to your inventory.
- Return to the Asylum Entrance.
Asylum Entrance
- Examine the flashlight lying on the ground, on the walkway that leads up to the asylum. Use the BATTERY on the flashlight, then click on the back cover to replace it. Click on the restored FLASHLIGHT to add it to your inventory.
- Go right to the Cottage.
Cottage
- Take a closer look at the small doghouse on the left side of the Cottage. Use the TOY KEY on the lock to remove the chains, then use the FLASHLIGHT on the dark interior to see what’s inside.
- Inside the dog house, click on the LOCK PART (2), the BALLOON, and the TWEEZERS to add them to your inventory.
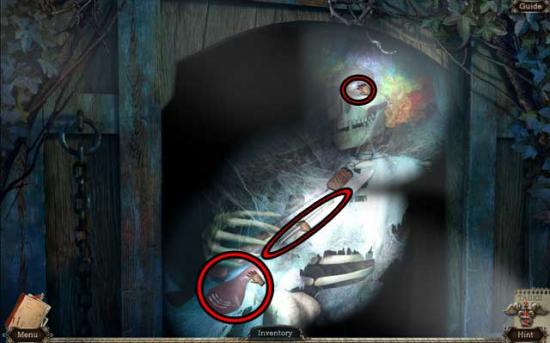
- Return to the Nurses Room.
Nurses Room
- Examine the reptile tank on the right again. Use the TWEEZERS to retrieve the AMBER safely and add it to your inventory.
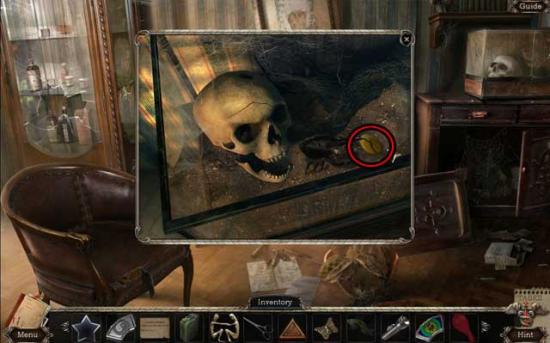
- Make your way back outside to the Shed.
Shed
- Click on the hidden object area in the corner next to the door.
- Find the objects listed at the bottom of the screen. The Inventory Item is circled in red. Objects listed in blue are shown below in blue.
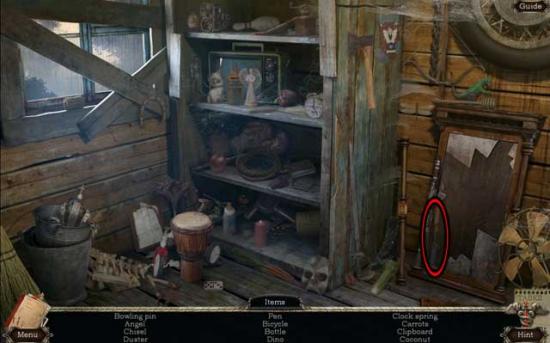
- Upon completing the area, the CHISEL will be added to your inventory.
- Examine the pump under the table on the right. Use the BALLOON on the hose, then click on the pump to inflate it. Click on the Inflated Balloon to add the clue to your Journal.
- Return to the Corridor.
Corridor
- Examine the third door on the right. Place the BUTTERFLY, the AMBER, and the SPIDERWEB into their correct slots to unlock the door, then proceed inside.
Spider Room
- Take a closer look at the chair. Click on the GLASS CUTTER to add it to your inventory.
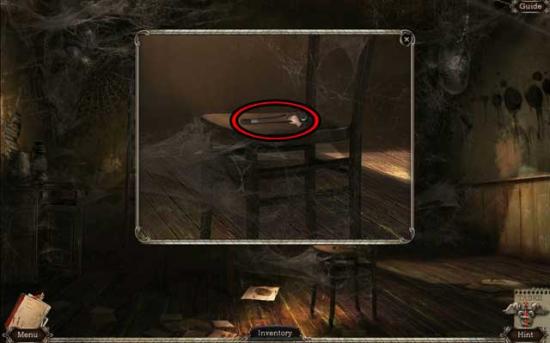
- Note the large spider in the upper left corner of the room. Use the MOTH on the spider to feed it, then click on the LADDER below to add it to your inventory.
- Return to the Middle Room of the Cottage.
Middle Room
- Use the LADDER on the hole in the ceiling to gain access to the Attic.
Attic
- Take a closer look at the skeleton lying on the floor in the lower right corner. Click on the LOCK PART (3) to add it to your inventory.
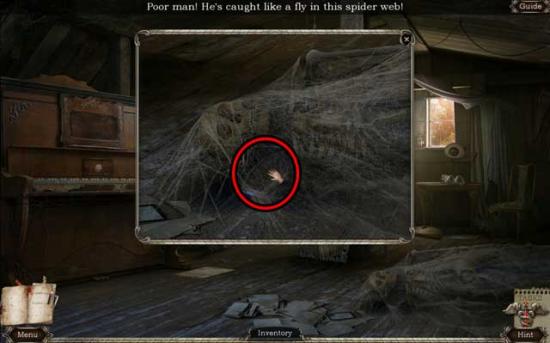
- Click on the blanket covering the mirror leaning up against the support beam to remove it, then take a closer look at the base of the mirror. Use the GLASS CUTTER to remove and obtain the GLASS KEY.
- Take a closer look at the piece of paper lying on the floor between the piano and the mirror. Click on it to add the Boiler Control Panel Directions to your Journal.
- Examine the piano on the left. Use the PIANO KEY on the missing key space to trigger a puzzle.
- Try to repeat the piano sequence. The keys are numbered in the screenshot below according to the order in which they should be pressed.
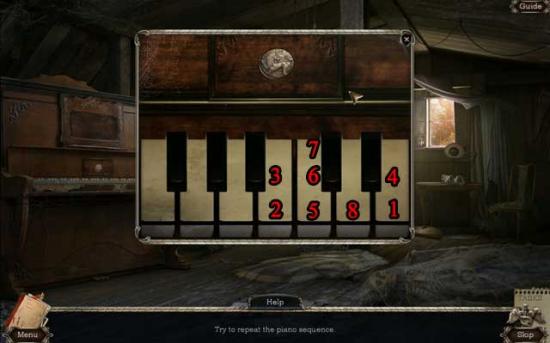
- Upon completing the puzzle, click on the Quote scroll that appears to add it to your Journal.
- Make your way back down to the Boiler Room.
Boiler Room
- Examine the control panel on the right for a closer view. Click on the cap on the right to remove it, then use the CONTAINER OF GAS on it to refill the panel.
- Click on the various components of the machine as shown and stated below to restore it to working order. Refer to the screenshot as reference to the steps.
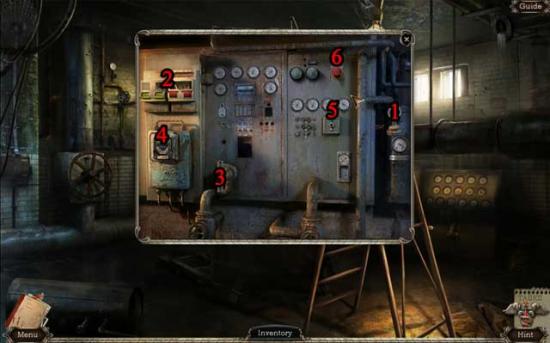
1) Fill the tank with gas.
2) Switch the fuses to the correct positions: the left panel should be down, and the right up.
3) Use the hand pump to remove air bubbles.
4) Turn the voltage knob to the right.
5) Flip the ignition switch into the down position.
6) Click on the red button to start the boiler.
- Upon having restarted the boiler, make your way back to the Bathroom.
Bathroom
- Examine the sink on the left. Click on the faucet to run hot water, revealing a code on the mirror (Down, Left, Up, Right).
- A hidden object area will appear on the right.
- Find the objects listed at the bottom of the screen. The Inventory Item is circled in red. Objects listed in blue are shown below in blue.
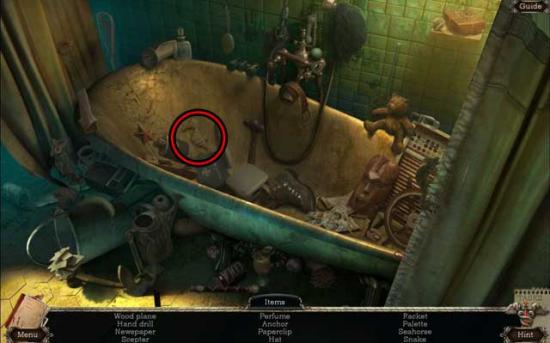
- Upon completing the area, the SEAHORSE will be added to your inventory.
- Examine the puzzle panel on the back wall to the left of the window to trigger a puzzle.
- Click on the tiles to restore the original ornament. The solution is shown below.
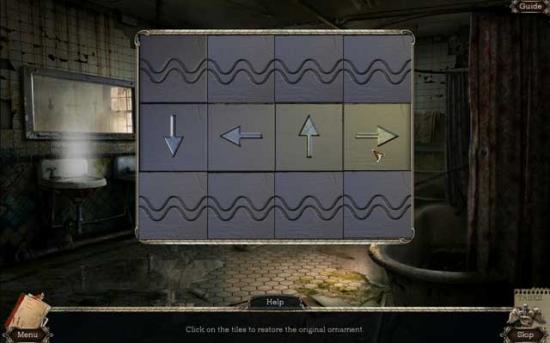
- Upon completing the puzzle, click on the YIN-YANG to add it to your inventory.
- Return to the Corridor.
Corridor
- Examine the second door on the right. Use the YIN-YANG, the GEMINI, and the GLASS KEY on their respective slots to unlock the door, then proceed inside.
Mirror Room
- Click on the HOSE lying on the floor to add it to your inventory.
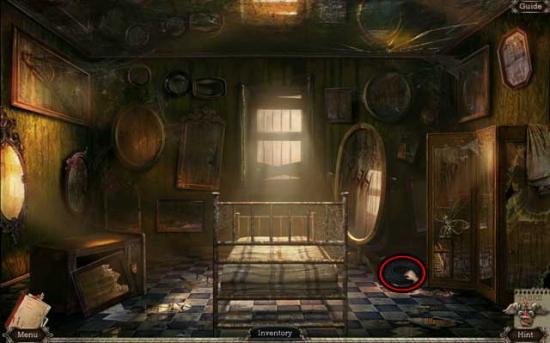
- Examine the first mirror to the immediate left of the window. Use the MIRRORED NOTE on the mirror to obtain the Quote for your Journal.
- Backtrack to the Graveyard.
Chapter 5: Water, Wire, and Light
Graveyard
- Click on the hidden object area on the right.
- Find the objects listed at the bottom of the screen. The Inventory Item is circled in red. Objects listed in blue are shown below in blue.
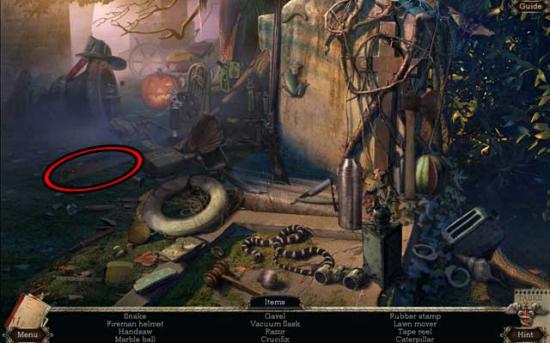
- Upon completing the area, the HANDSAW will be added to your inventory.
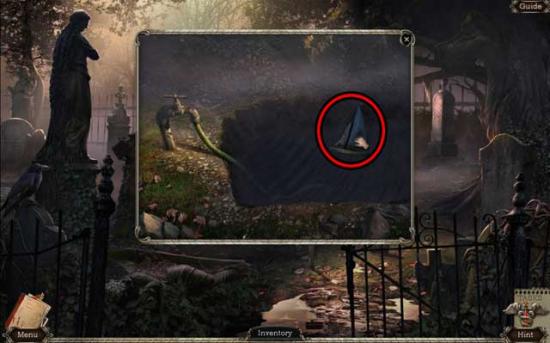
- Examine the open grave. Use the HOSE on the spigot, then click on it to fill the grave with water. Click on the BOAT to add it to your inventory.
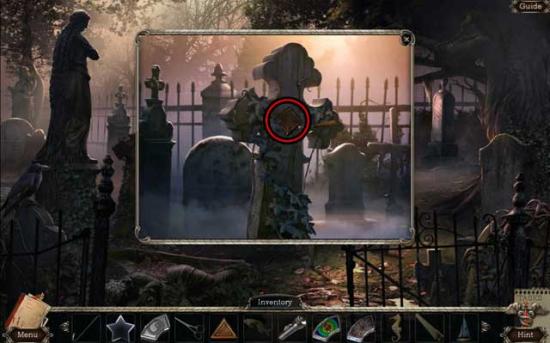
- Examine the cross on the left. Use the CHISEL on the DIAMOND to add it to your inventory.
- Return to the Corridor.
Corridor
- Examine the second door on the left. Use the SEAHORSE, the BOAT, and the FISH on their respective slots to unlock the door, then proceed inside.
Water Room
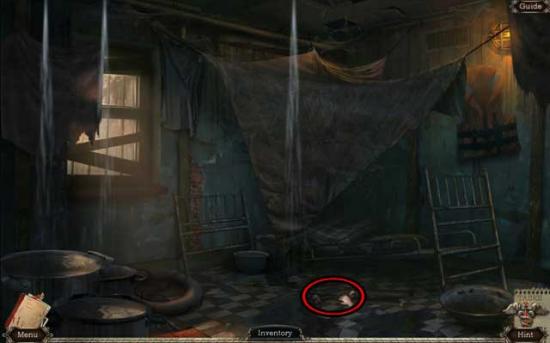
- Use the HANDSAW on the makeshift wooden pole support to cut it in half, then click on the WRENCH that falls to the floor to add it to your inventory.
- Make your way down to the Pool.
Pool
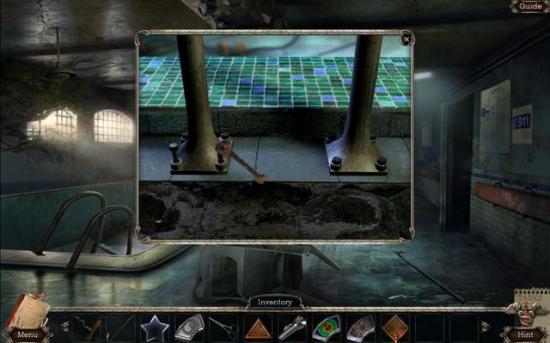
- Examine the pool on the left. Place the bolts back into their slots, then use the WRENCH on each one to tighten them.
- Go down into the Pool for a closer view.
Pool Interior
- Click on the CIRCLE and the LOCK PART (4) to add them to your inventory, then use the CORKSCREW on the bottle to open it and click on the Quote inside to add it to your Journal.
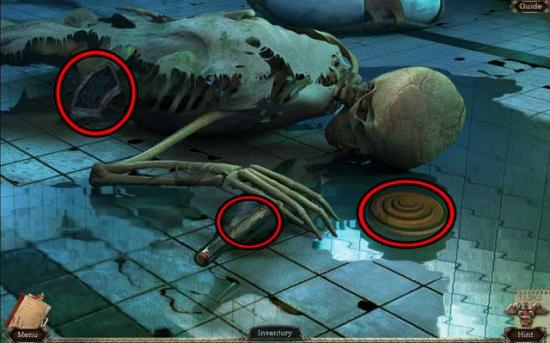
- Go back up to the Corridor.
Corridor
- Click on the third door on the left for a closer view. Use the DIAMOND, the CIRCLE, and the TRIANGLE on their respective slots to open the door, then proceed inside.
Wire Room
- Use the SCISSORS on the pillow on the floor to cut it open, then click on the SKELETON KEY inside and the BURNING CANDLE on the chair to add them to your inventory.
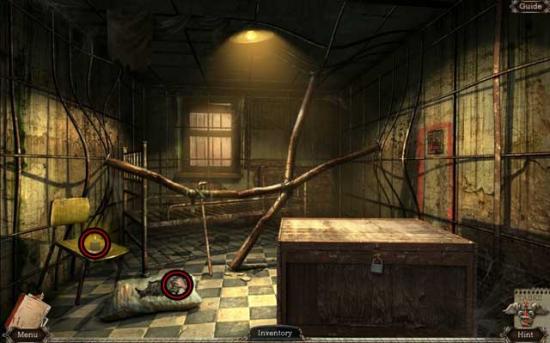
- Use the SKELETON KEY on the lock on the chest to open it, revealing another inside.
- Click on the red puzzle on the right wall.
- Clear a path for the brick with the key. A step by step solution is shown below.

- Upon completing the puzzle, click on the SKELETON KEY to add it to your inventory.
- Use the SKELETON KEY on the lock on the chest to open it, revealing yet another inside.
- Examine the puzzle on the wall to the upper right of the window.
- Move the key alongside the wire so that the key doesn’t touch it. The best way to complete this puzzle is just to take it slow. Upon completing the puzzle, the SKELETON KEY will be added to your inventory.
- Use the SKELETON KEY on the lock on the chest to open it, then click on the LOCK PART (5) inside to add it to your inventory.
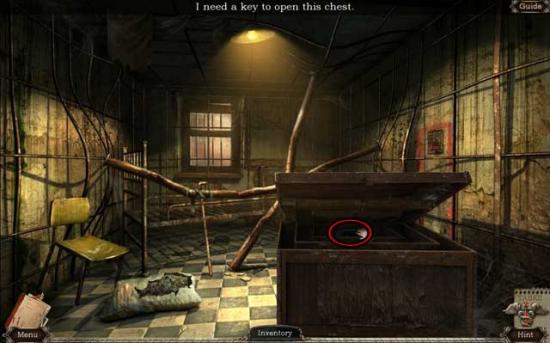
- Return to the Study.
Study
- Click on the hidden object area over the desk.
- Find the objects listed at the bottom of the screen. The Inventory Item is circled in red. Objects listed in blue are shown below in blue.
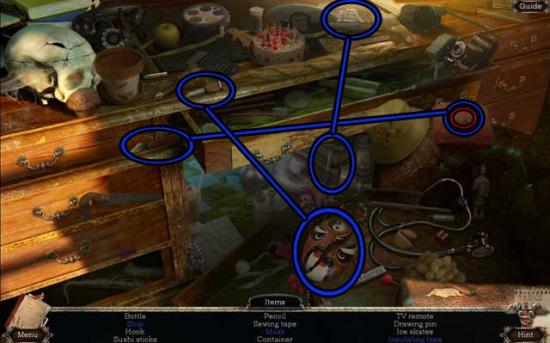
- Upon completing the area, the INSULATING TAPE will be added to your inventory.
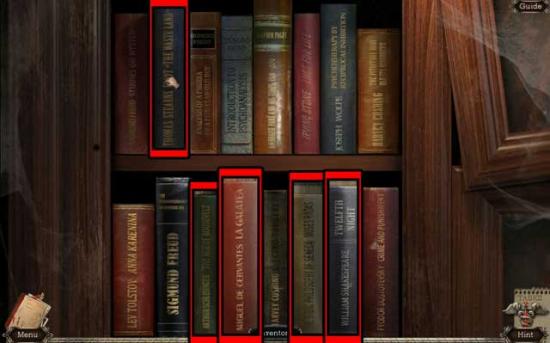
- Examine the back bookshelf for a closer view. Click on the books pertaining to the Quote clues you’ve found. The correct books to pull are shown below.
- Enter through the secret doorway to the next room.
Treatment Room
- Take a closer look at the black frame on the close segment of wall on the left. Use the INSULATING TAPE on the exposed wires on the right to restore them, then note the symbols shown on the X-ray. They will be added to your Journal.
- Examine the base of the chair in the middle of the room. Use the WRENCH to remove the two bolts holding it down. The chair will move, revealing another secret passage.
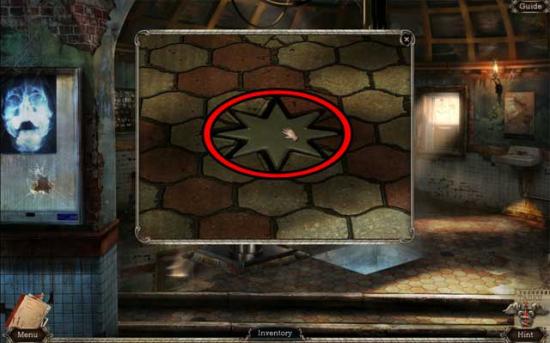
- Take a closer look at the sun-like shape on the floor to the left of the chair. Use the BURNING CANDLE on the shape, then click on the resulting SUN to add it to your inventory.
- Return to the Upstairs Lobby.
Upstairs Lobby
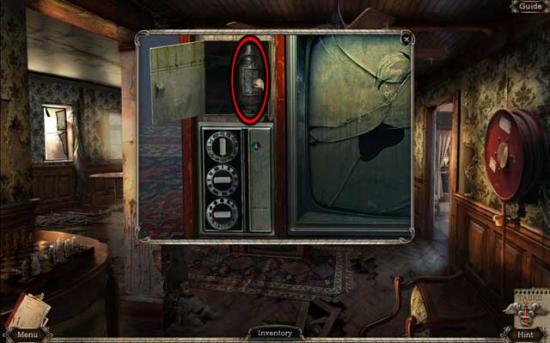
- Take a closer look at the TV on the floor. Click on the dials on the left so that they match the symbols found on the X-ray. The solution is shown below. Click on the LAMP that’s revealed to add it to your inventory.
- Return to the Corridor.
Corridor
- Examine the door at the very end of the Corridor. Use the LAMP, the STAR, and the SUN on their respective slots to open the door, then proceed inside.
Light Room
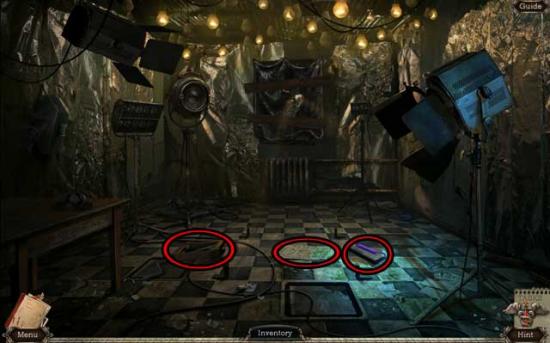
- Click on the BLACK LIGHT and the LEVEL lying on the floor to add them to your inventory, and the Escape Plan to add it to your Journal.
- Use the CROWBAR to remove the two boards covering the window at the back of the room, then click on the cover to remove it and let the light in. After a brief cutscene, click on the resulting PLANK (x2) lying on the floor to add them to your inventory.
- Take a closer look at the window. Proceed through, and you’ll end up in the Basketball Court outside.
Chapter 6: The Escape
Basketball Court
- Exit the court and make your way back to the Porch.
Porch
- Click on the hidden object area on the right.
- Find the objects listed at the bottom of the screen. The Inventory Item is circled in red. Objects listed in blue are shown below in blue.
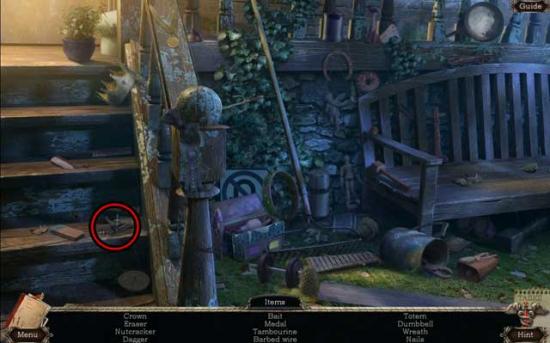
- Upon completing the area, the NAILS will be added to your inventory.
- Return to the Fountain.
Fountain
- Take a closer look at the tree on the left. Use the PLANK (x2) on the tree, then use the NAILS on the planks.
- Make your way back to the Stairwell inside the Asylum.
Stairwell
- Click on the hidden object area over the doorway on the left.
- Find the objects listed at the bottom of the screen. The Inventory Item is circled in red. Objects listed in blue are shown below in blue.
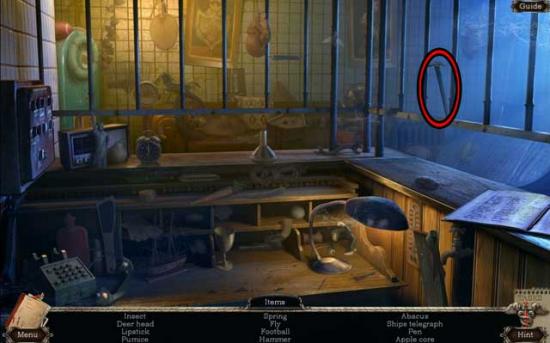
- Upon completing the area, the HAMMER will be added to your inventory.
- Return to the Fountain.
Fountain
- Take a closer look at the tree on the left again. Use the HAMMER on each of the planks to secure the nails, then go forward into the tree.
Tree
- Click on the ROPE and the LOCK PART (6) to add them to your inventory.
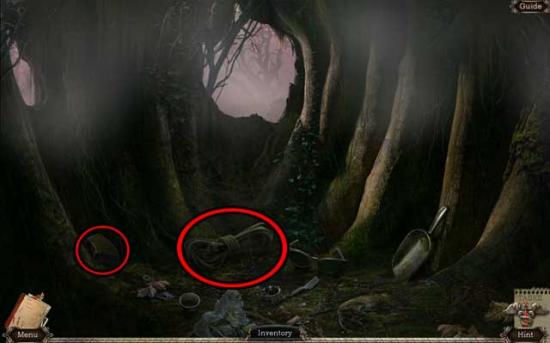
- Return to the Elevator.
Elevator
- While facing the closed elevator, use the LEVEL to pry the doors open, revealing a hidden object area.
- Find the objects listed at the bottom of the screen. The Inventory Item is circled in red. Objects listed in blue are shown below in blue.
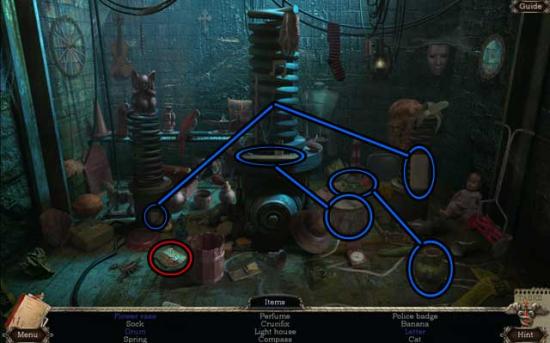
- Upon completing the area, the POLICE BADGE will be added to your inventory.
- Click on the POLICE BADGE in your inventory. Note there is also an entry with it in your Journal, revealing the badge number 8497.
- Return to the Treatment Room.
Treatment Room
- Use the ROPE on the hole in the floor, then proceed down into the next area.
Security Room
- Take a closer look at the desk. Click on the NEWSPAPER PIECE above the keypad to add it to your inventory.
- Click on the SKELETON HAND to knock it loose, then once it falls to the floor, click on it to add it to your inventory.
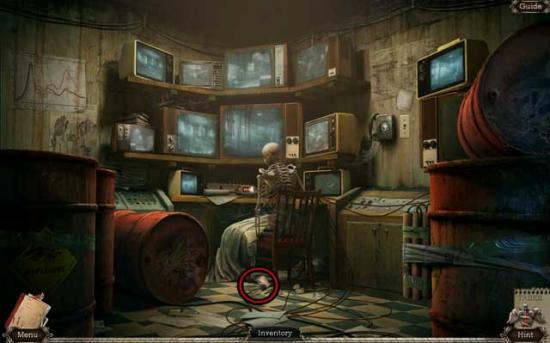
- Turn off the light switch next to the phone on the right, then use the BLACK LIGHT on the room. There’s a clue written on the cabinet towards the right, which will be added to your Journal.
- Make your way back to the Park.
Park
- Examine the newspaper lying on the ground. Use the NEWSPAPER PIECE on the torn section on the right to restore it, and read the rest of the article.
- Proceed to the Parking Lot.
Parking Lot
- Take a closer look at the door of the post on the right. Use the LOCK PARTS x6 and the SKELETON HAND on the lock to open it.
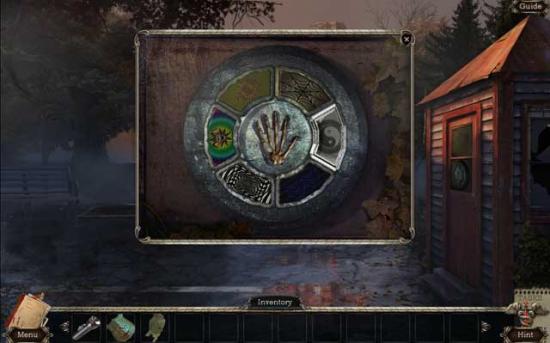
- Enter the small building.
Guard Post
- Click on the Morphing Object to collect it.
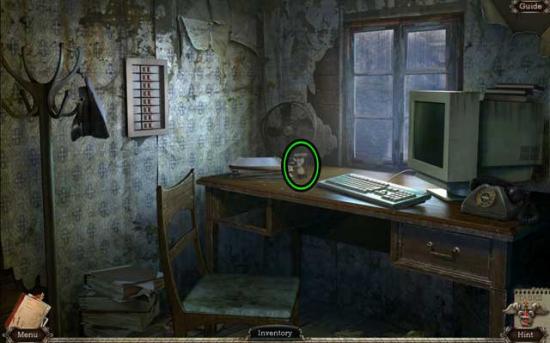
- Open the drawer on the right. Click on the PATTERN inside to add it to your inventory.
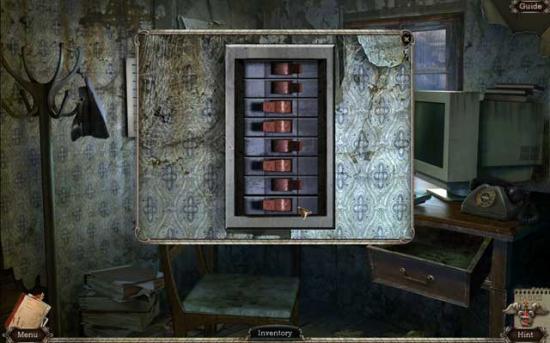
- Take a closer look at the panel on the wall on the left. Flip the switches as shown in the screenshot below to restore power to the computer.
- Examine the computer for a closer view. Input the badge number 8497 according to the clue in your Journal. Then, use the PATTERN on the numbers that appear on the screen to obtain the code “19101978”, which will also be written down in your Journal.
- Return to the Security Room.
Security Room
- Examine the desk again. Input the code “19101978” on the keypad.
- Once the code has been put in, quickly proceed to the outside of the Asylum as fast as possible.
Congratulations! You’ve completed Abandoned: Chestnut Lodge Asylum!
More articles...
Monopoly GO! Free Rolls – Links For Free Dice
By Glen Fox
Wondering how to get Monopoly GO! free rolls? Well, you’ve come to the right place. In this guide, we provide you with a bunch of tips and tricks to get some free rolls for the hit new mobile game. We’ll …Best Roblox Horror Games to Play Right Now – Updated Weekly
By Adele Wilson
Our Best Roblox Horror Games guide features the scariest and most creative experiences to play right now on the platform!The BEST Roblox Games of The Week – Games You Need To Play!
By Sho Roberts
Our feature shares our pick for the Best Roblox Games of the week! With our feature, we guarantee you'll find something new to play!All Grades in Type Soul – Each Race Explained
By Adele Wilson
Our All Grades in Type Soul guide lists every grade in the game for all races, including how to increase your grade quickly!


