- Wondering how to get Monopoly GO! free rolls? Well, you’ve come to the right place. In this guide, we provide you with a bunch of tips and tricks to get some free rolls for the hit new mobile game. We’ll …
Best Roblox Horror Games to Play Right Now – Updated Weekly
By Adele Wilson
Our Best Roblox Horror Games guide features the scariest and most creative experiences to play right now on the platform!The BEST Roblox Games of The Week – Games You Need To Play!
By Sho Roberts
Our feature shares our pick for the Best Roblox Games of the week! With our feature, we guarantee you'll find something new to play!Type Soul Clan Rarity Guide – All Legendary And Common Clans Listed!
By Nathan Ball
Wondering what your odds of rolling a particular Clan are? Wonder no more, with my handy Type Soul Clan Rarity guide.
1001 Nights: The Adventures of Sinbad Walkthrough
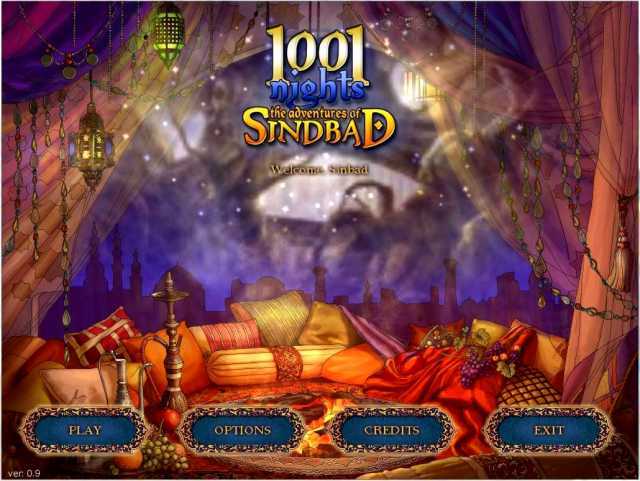
Welcome to Gamezebo's strategy guide and walkthrough for 1001 Nights – The Adventures of Sinbad.You might have heard about the exploits of Sindbad the Sailor, but now in this new hidden object adventure you find out how he met his one true love and saved her from a fate worse than death.GENERAL TIPS From the Main Menu you can choose a number of profiles, play or exit the game. The game does not have a timer and you will come upon an amulet that will become your hint system. Once you use it …
a:1:i:0;a:2:s:13:”section_title”;s:49:”1001 Nights: The Adventures of Sinbad Walkthrough”;s:12:”section_body”;s:62099:”
Welcome to Gamezebo’s strategy guide and walkthrough for 1001 Nights – The Adventures of Sinbad.
You might have heard about the exploits of Sindbad the Sailor, but now in this new hidden object adventure you find out how he met his one true love and saved her from a fate worse than death.
GENERAL TIPS

- From the Main Menu you can choose a number of profiles, play or exit the game.
- The game does not have a timer and you will come upon an amulet that will become your hint system. Once you use it you will have to wait a very long time for it to replenish itself before you can use it again.
- Your progress is saved if you exit to the Main Menu, except when you come upon a Mini Game. If you quit in the middle of a Mini Game, you will have to start over.
- The game has a "Pause" feature. If you are playing Windowed mode and touch the desktop, it will pause. If you are playing full screen, you can pause it from the Menu button which is sometimes located at the top of the screen and sometimes at the bottom.
- When you click "Play" you will have a choice of resuming your game or starting a new one or going back to the Main Menu – be careful not to click "New Game" unless that is really what you want to do because the buttons are close together.
- If you see a slight sparkle on something in a scene, click on it because it is an item you are looking for.
- You can skip the Mini Games once the "Skip" button is full.
- The yellow bar across the top of a scene shows your progress.
- There is a box on the opposite side of the screen from the Menu button which is blank to begin with and will then be called "Bridge".
- If you need to find more items at a location than what is shown in the first scene, like maybe scrolling to the right to find more, I will be putting all of the items on the same screen shot so you can see them all at one time.
- The amulet you find becomes a talisman that enables Chalida and Sinbad to communicate.
BRIDGE AND BUGS
- The Bridge is actually the "Hold" of the ship that Chalida is part of and vice versa.
- You can access the Bridge to see the map of your current location or the place the bugs you have captured.
- At the beginning of each location you will be taken to the Hold and will have the opportunity to place your bugs or play the game.
- Although we find out that we need to collect the bugs, there are no instructions as to how many are available and where.
- Chalida says at one point in time that it takes a long time to collect enough bugs to power the talisman but with every bug the power of the talisman grows and that is all we know.
- I can’t show your where ALL the bugs are without knowing what is expected but I have shown all the ones I’ve managed to find.
OPTIONS
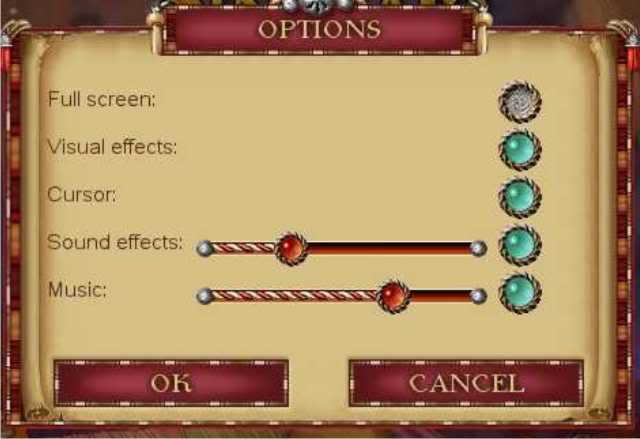
- Options will give you the opportunity of selecting sound effects and music volume or to decide if you wish to use visual effects or a custom cursor and choose full screen or window mode.
BACKGROUND
Hard times came to Sinbad’s country which was taken over by a wizard who oppressed his people. Although Sinbad was just a poor fisherman, he worked hard so fate led him to a treasure which he shared with his people but the wizard became angry and threw him into the sea. There he came upon Chalida who was the heir to the throne of Basra until the day of her coronation when she was attacked by a sea demon who said the crown of the seven gems belonged rightfully to him and not her. The crown breaks and the gems are scattered across the sea. Chalida is encased in wood by the demon until the gems are returned.
It is your task as Sinbad to help Princess Chalida locate the seven gems of her royal crown and break the curse that has entrapped her.
THE SUNKEN SHIP
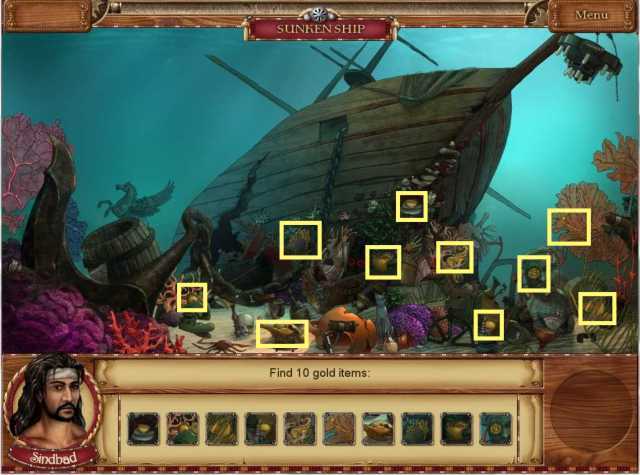
- Find the 10 gold items – mini pictures in the taskbar show you their locations.
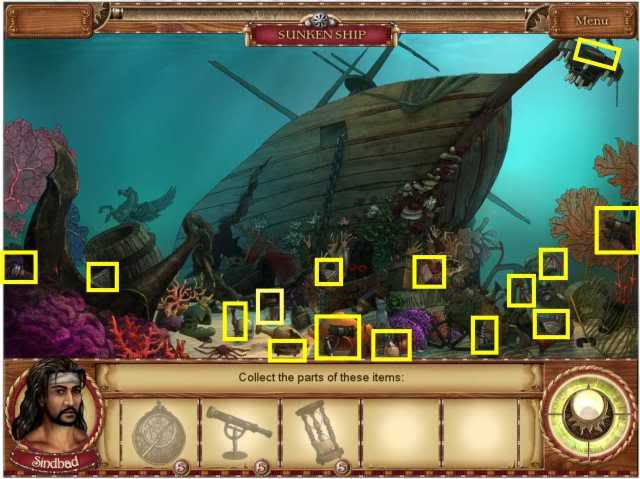
- Find the 5 pieces of each of the 3 items in the taskbar.
SHIP’S HOLD
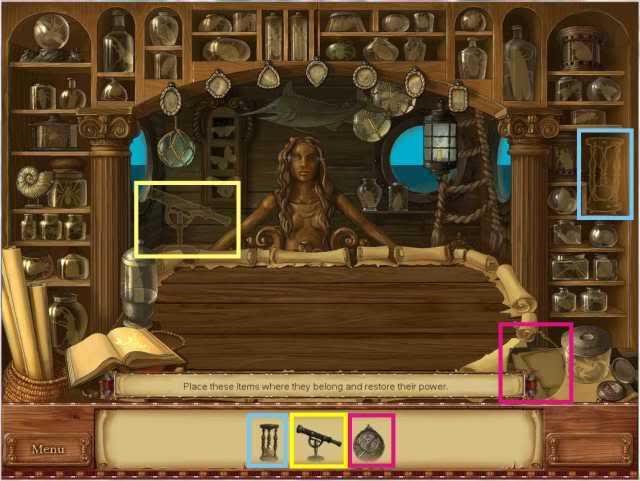
- Place the 3 items you assembled where they belong in the hold – they are color coded.
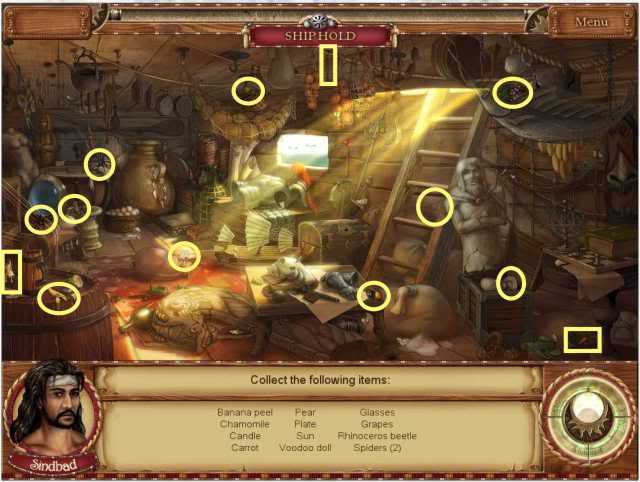
- Collect the items listed on the taskbar.
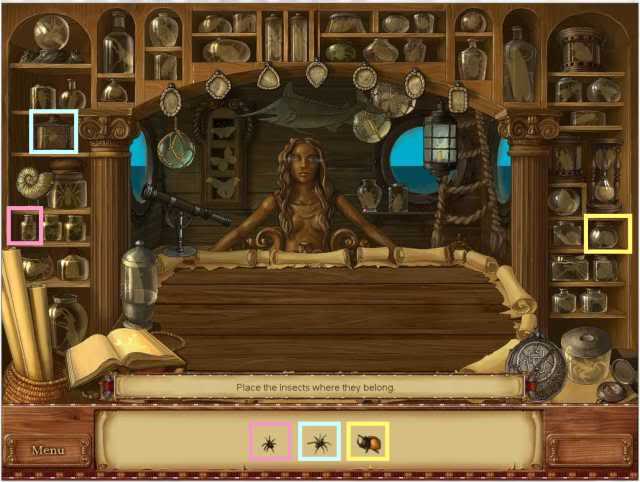
- Place the bugs you have found so far in their jars as shown by the colors – I found 3 but have no clue without directions as to how many there should be and where.
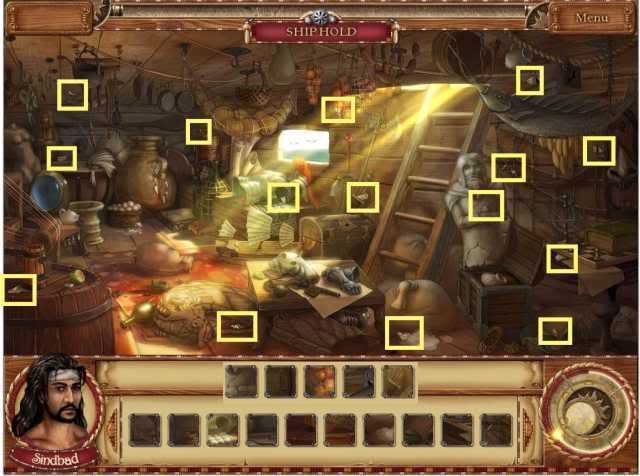
- Find all the map pieces so it can be assembled – I’ve included all 15 on the taskbar.
MAP MINI GAME
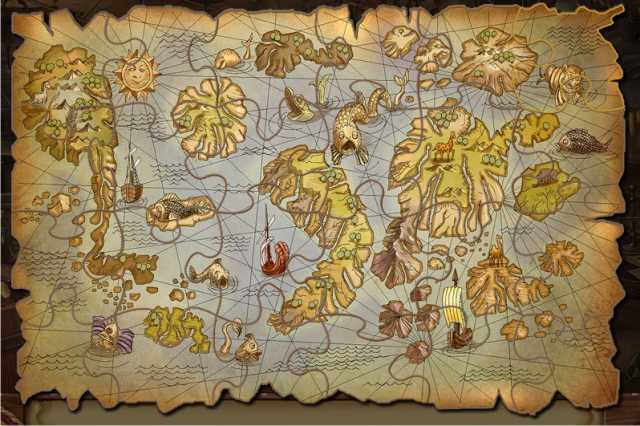
- This is a classic jigsaw puzzle – put the pieces of the map together so that it looks like this.
FISH ISLAND: PENINSULA
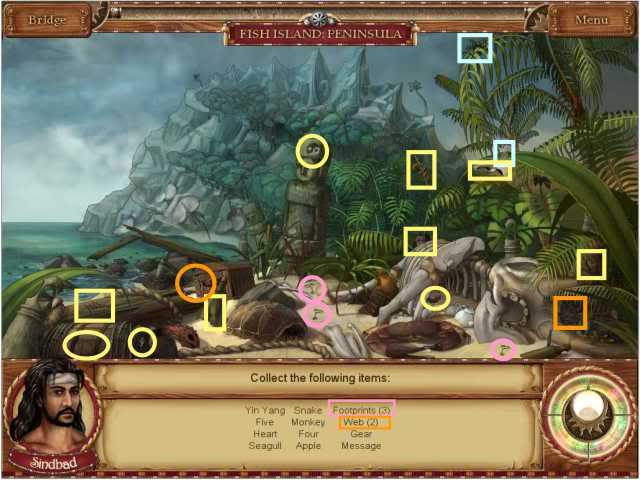
- Find the items in the taskbar.
- There 2 little blue squares in this scene which turn out to be bugs – when you click on them they go into the "Bridge" in the upper left corner.
FISH ISLAND: JAGGED ROCKS
S11
- Find the items on the list, including 2 bugs marked in blue.
- The last sword is behind the skull on the other side of the inlet so I’ve shown it in the insert.
S12
- Collect all the fragments of the sun gems at this location.
FISH ISLAND: PENINSULA
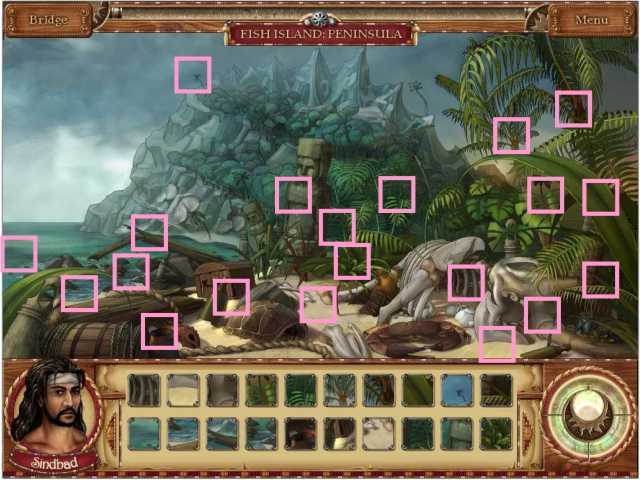
- Find more fragments of the sun gems at this location by gathering them at the picture locations shown on the taskbar.
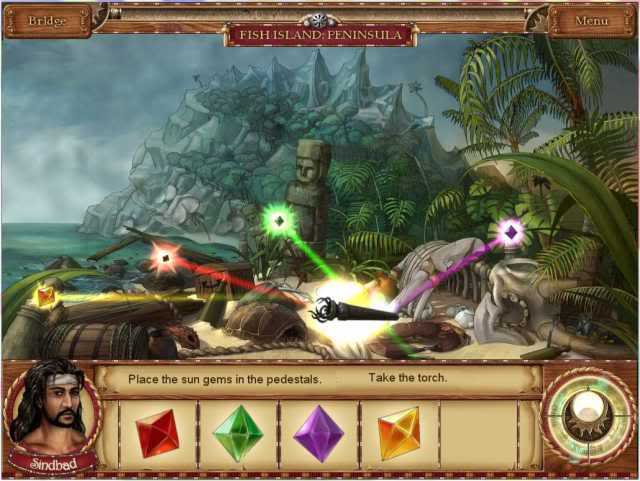
- Place the sun gems in the pedestals as shown and they will start glowing.
- You have found the torch so click on it to pick it up.
FISH ISLAND: JAGGED ROCKS
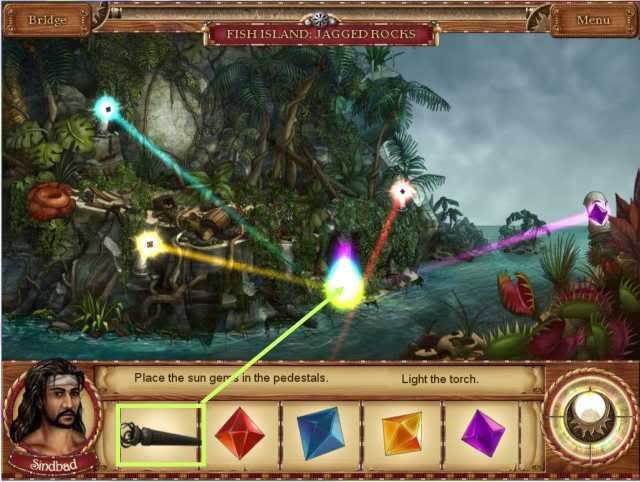
- Once again place the sun gems in the pedestals as shown and they will start glowing.
- Light the torch by placing it in the sun spot in the middle of the scene.
FISH ISLAND: MYSTERIOUS CAVE
Chalida feels that the gem of power is inside a chest in the cave so you need to find a way to reach it using your torch.
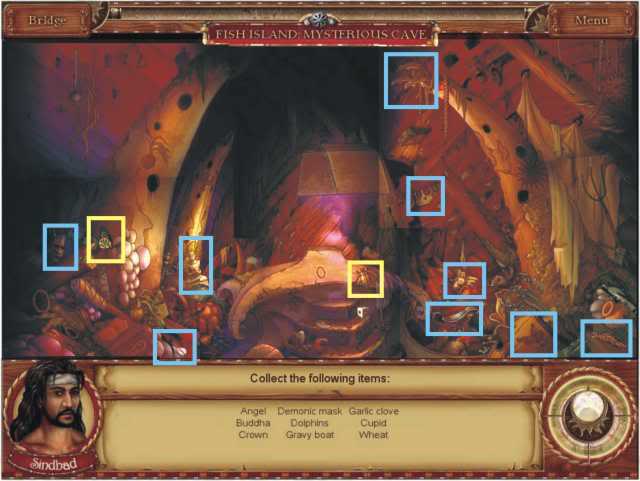
- I lightened it so you can see where the items are but you will have to use your torch.
- There are also 2 more bugs in this scene.
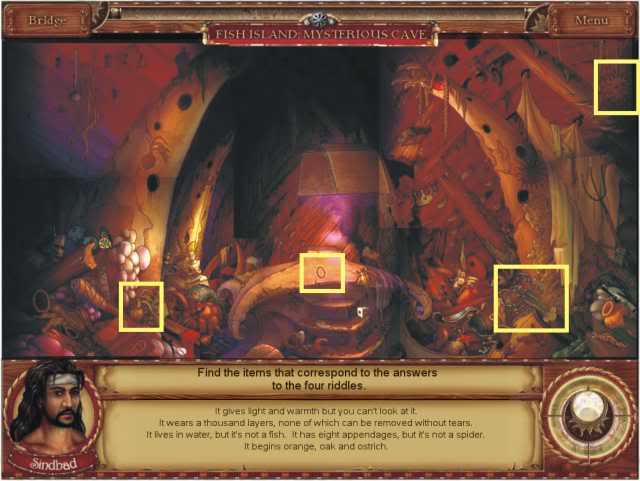
- There are 4 riddles to solve for the same scene but you will have to use your torch to find the objects.
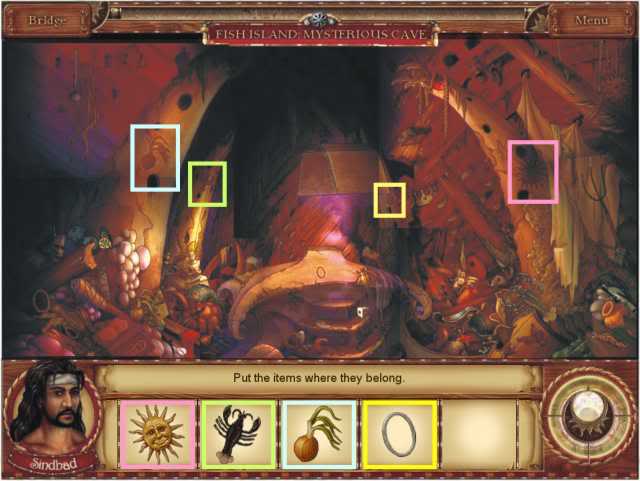
- Place the 4 objects where they belong using your torch and the scene will get lighter.
- The chest lowers but it is locked.
MINI GAME TO UNLOCK THE CHEST
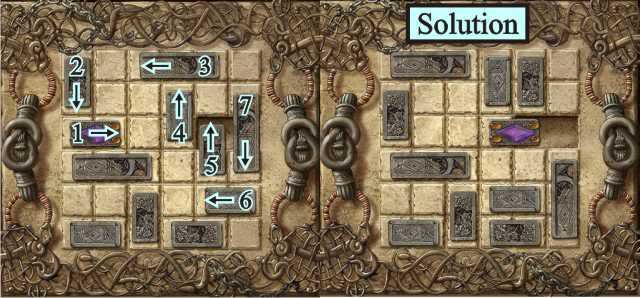
- This is a slider game and your goal is to get the purple gem to the hole.
- There are multiple layers to the lock – follow the numbers to get to the solution.
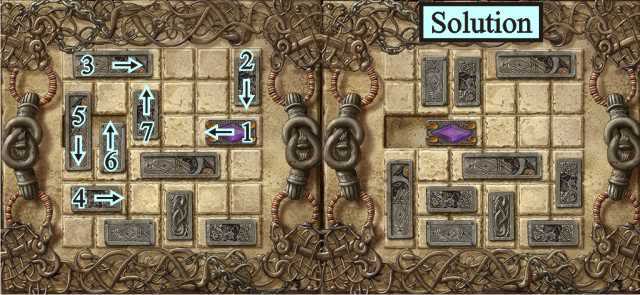
- Layer 2 of the lock – slide the blocks by the numbers to achieve the solution on the right.
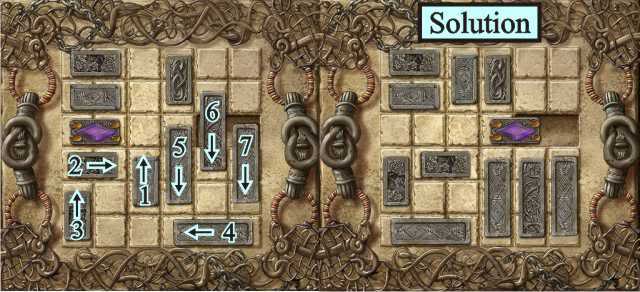
- Layer 3 of the lock is numbered and the solution is on the right.
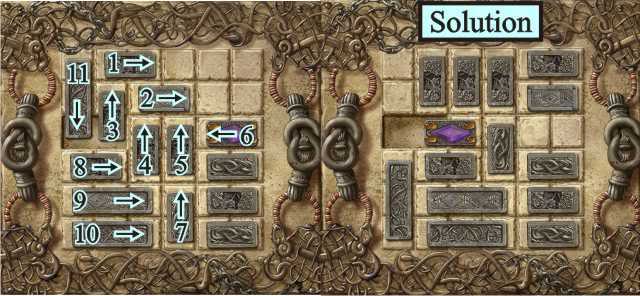
- Layer 4 is slightly more complicated – follow the numbers to the solution on the right.
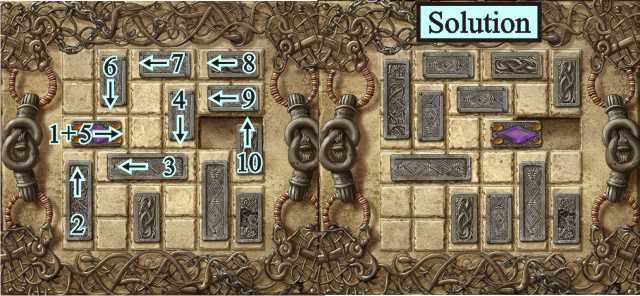
- Layer 5 requires 2 moves for the purple gem block before it gets to the hole – be sure to follow the number order.
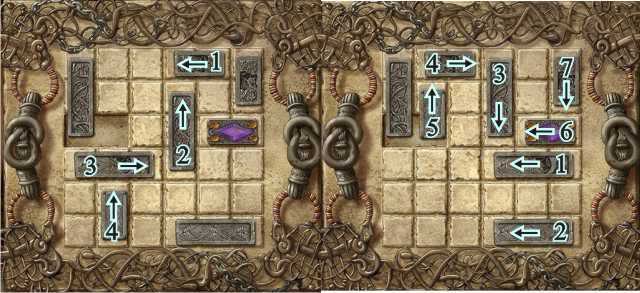
- Layer 6 comes in 3 sections before we get to the solution.
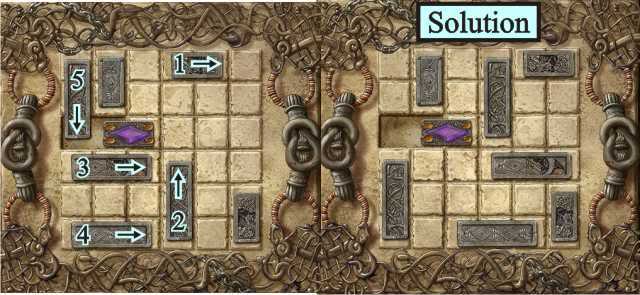
- This is the continuation of Layer 6 along with the solution.
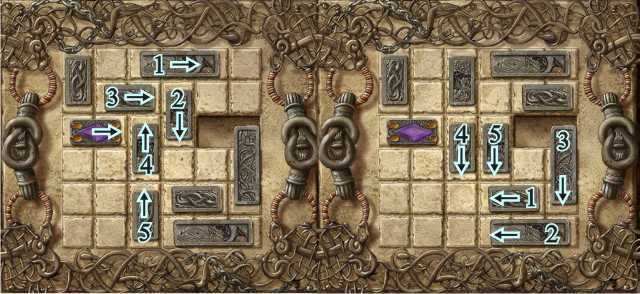
- The final layer to open the chest needs your help so follow the numbers.
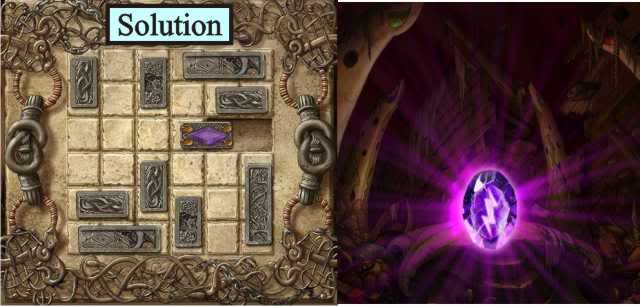
- Once you follow the numbers and unlock the chest you will find the Gem of Power – take the gem.
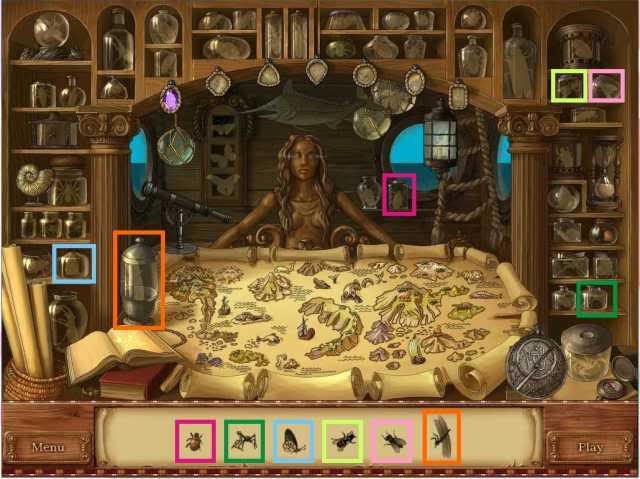
- Chalida says it is once again time to place the bugs collected along the way.
RUHH ISLAND: SHIPYARD
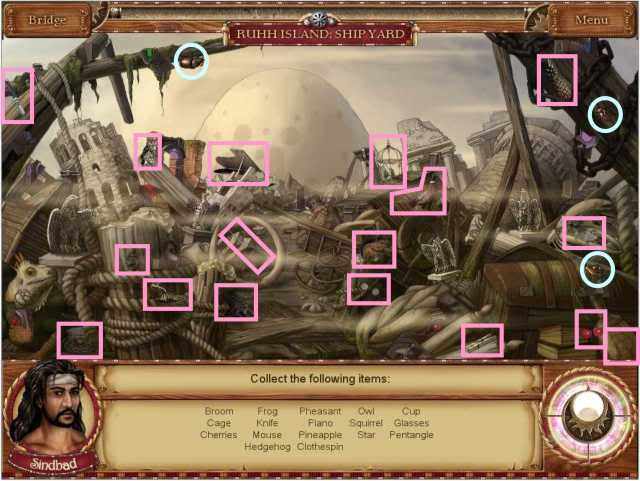
- Find all the items on the list including 3 bugs marked in blue.
RUHH ISLAND: THE PEAK
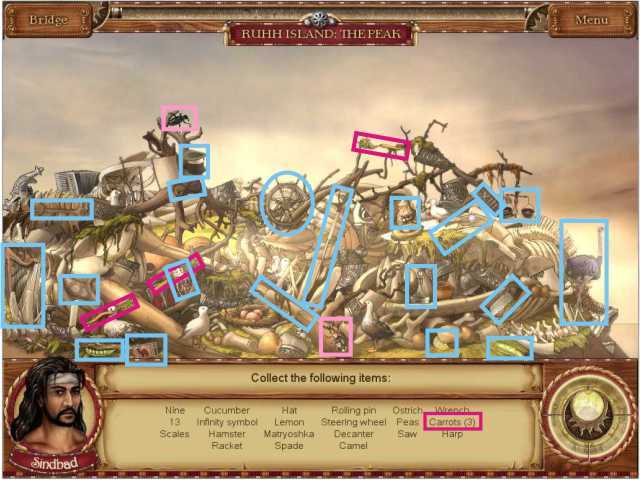
- Find all the items on the list including 2 bugs marked in pink.
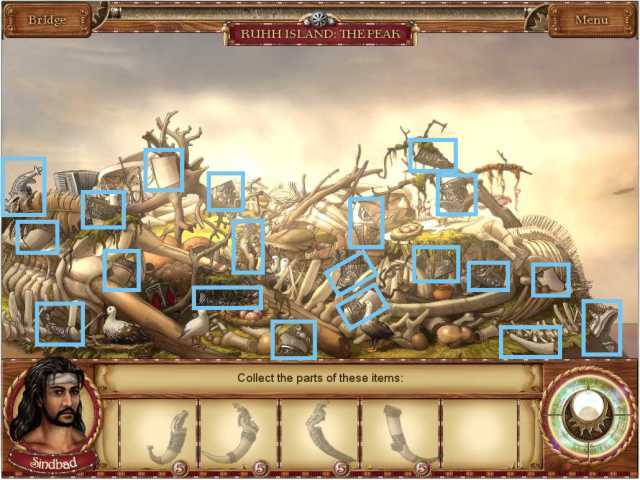
- Find all the parts of the objects in the taskbar.
RUHH ISLAND: SHIPYARD
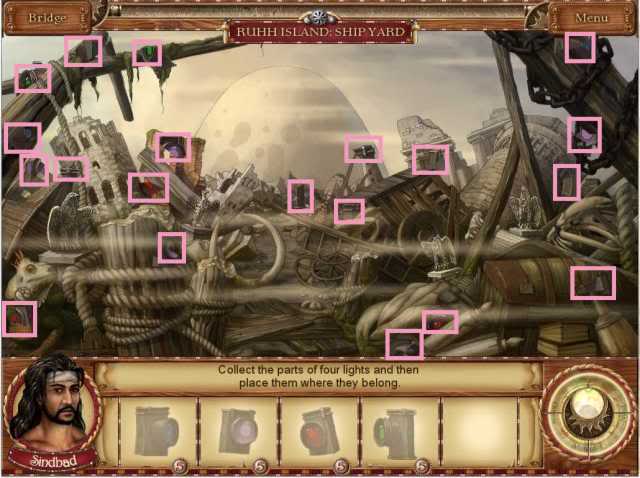
- Find the 5 parts for each of the 4 lights.
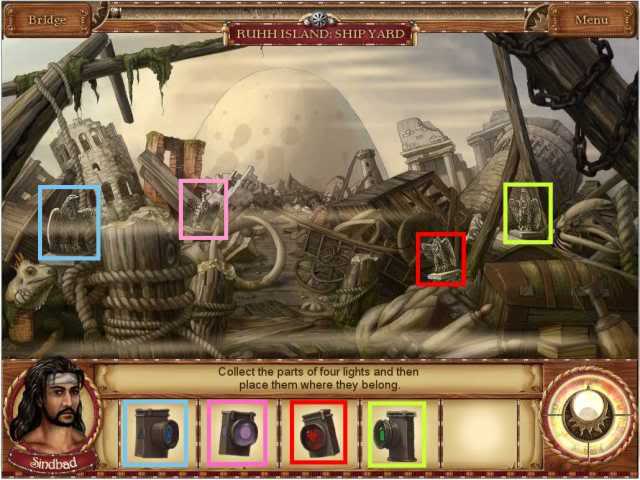
- Place the lights where they belong in order to summon the guardian.
RUHH ISLAND: GUARDIAN
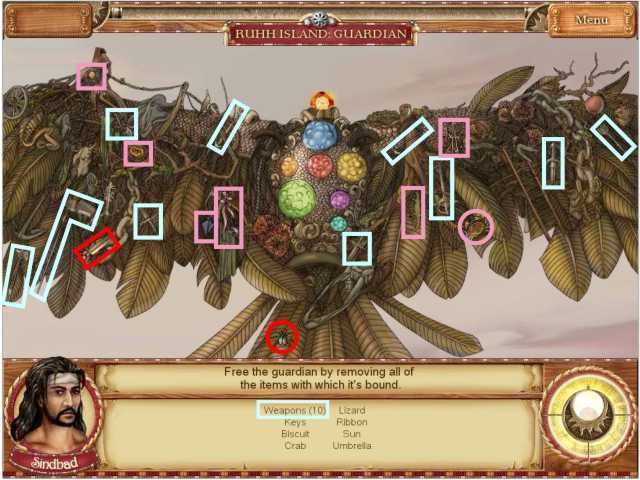
- Find all the items on the list and I located 2 bugs.
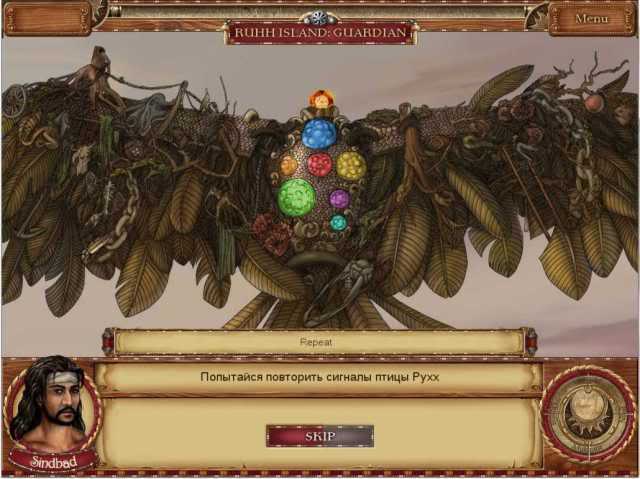
- Repeat the sequences of the lights on the bird – they are random so I can’t help you with the order.
- There are 9 sequences starting with one light and adding another light each time.
- The sequences repeat with the same lights so when in doubt write down the colors.
- When you are finished collect the Gem of Freedom and Wind.

- Place the bugs you’ve found – I have 7 this time.
JABBAH ISLAND: MYSTERIOUS MOORS
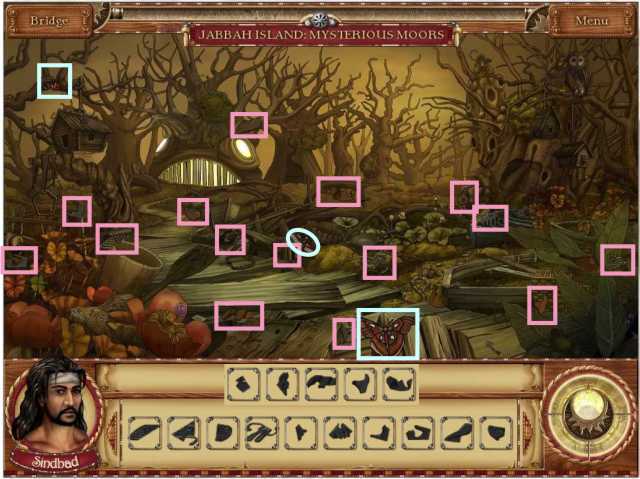
- Find all the totem parts and the 3 marked bugs.
JABBAH ISLAND: OMINOUS TEMPLE
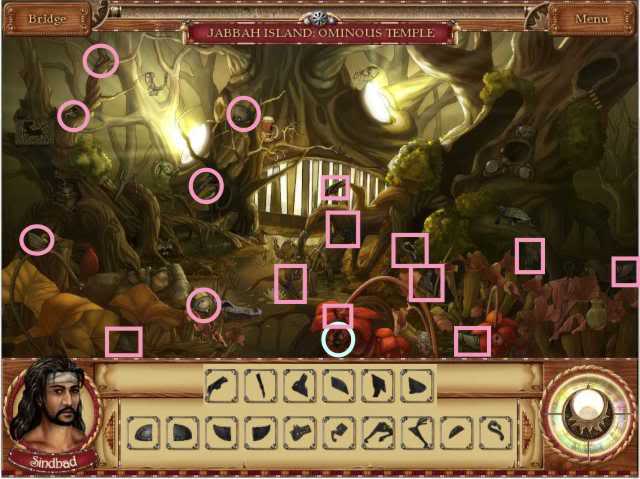
- Find more totem parts and 1 bug.
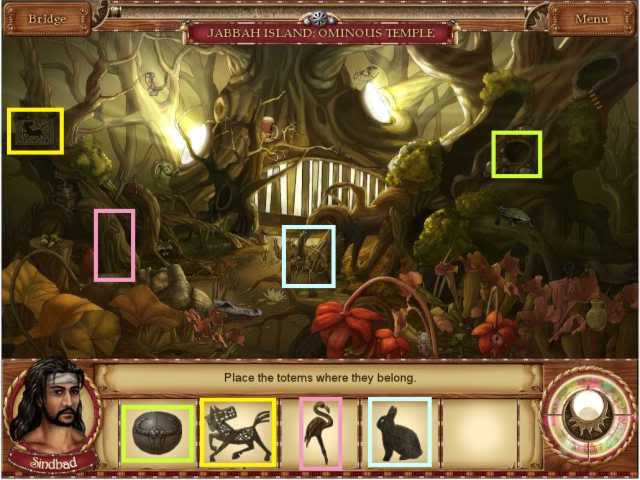
- Place the totems to partially open the temple gate.
JABBAH ISLAND: MYSTERIOUS MOORS
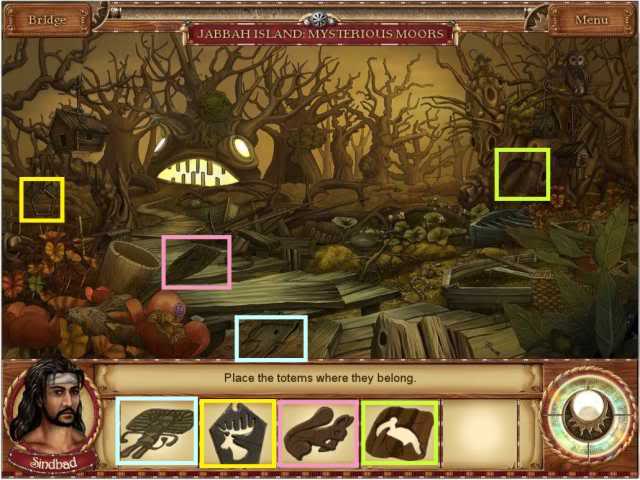
- Place the rest of the totems where they belong in this scene.
JABBAH ISLAND: TEMPLE
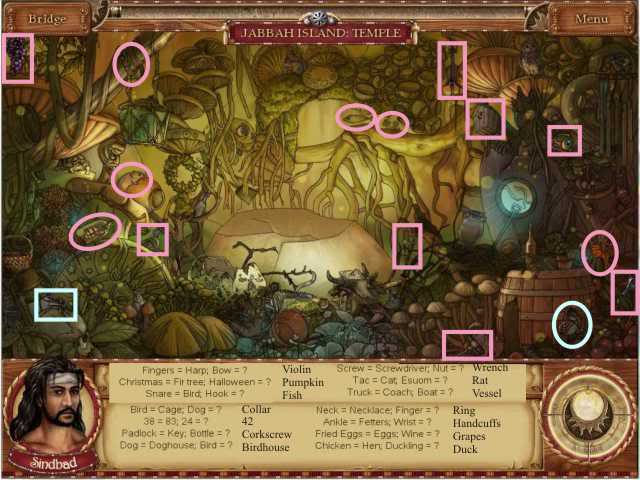
- Find the objects that are the solutions to the puzzles:
1. Dog = Collar
2. 24 = 42
3. Bottle – Corkscrew
4. Bird = Birdhouse
5. Finger = Ring
6. Wrist = Handcuffs
7. Wine = Grapes
8. Duckling = Duck
9. Halloween = Pumpkin
10. Nut = Wrench
11. Boat = Vessel
12. Esuom = Rat
13. Bow = Violin
14. Hook = Fish
- I found 2 bugs.
JABBAH ISLAND: MYSTERIOUS MOORS
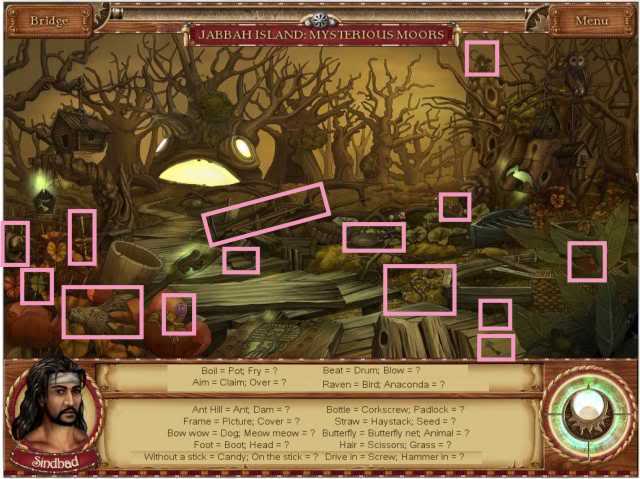
- Find more objects that answer the puzzles.
1. Dam = Beaver
2. Cover = Book
3. Meow meow = Cat
4. Head = Hat
5. Padlock = Key
6. Seed = Sunflower
7. Animal = Trap
8. Grass = Sickle
9. On the stick = Lollipop
10. Anaconda = Snake
11. Hammer in = Nail
12. Blow = Flute
13. Over = Clover
14. Fry = Frying Pan
JABBAH ISLAND: OMINOUS TEMPLE
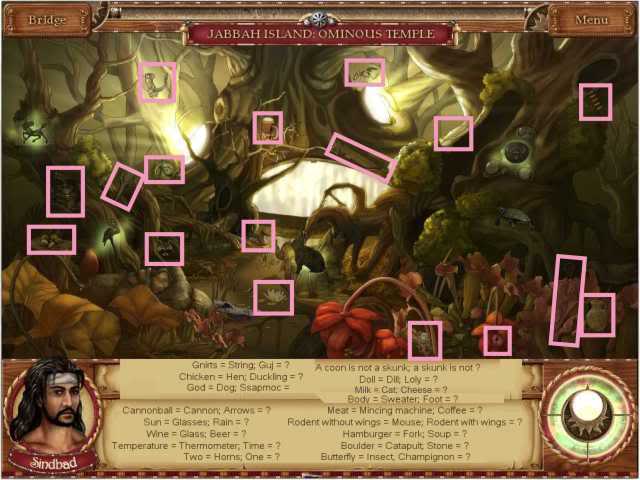
- Find more puzzle objects in this location.
1. Arrows = Bow
2. Rain = Umbrella
3. Beer = Stein
4. Time = Pocket Watch
5. Coffee = Grinder
6. Rodent with wings = Bat
7. Soup = Spoon
8. Stone = Slingshot
9. One = Horn
10.Champignon = Mushrooms
11.Guj = Jug
12. A skunk is not a = Racoon
13. Loly = Lily
14. Duckling = Duck
15. Cheese = Rat
16. Ssapmoc = Compass
17. Foot = Sock
MINI GAME TO FIND THE GEM OF WISDOM
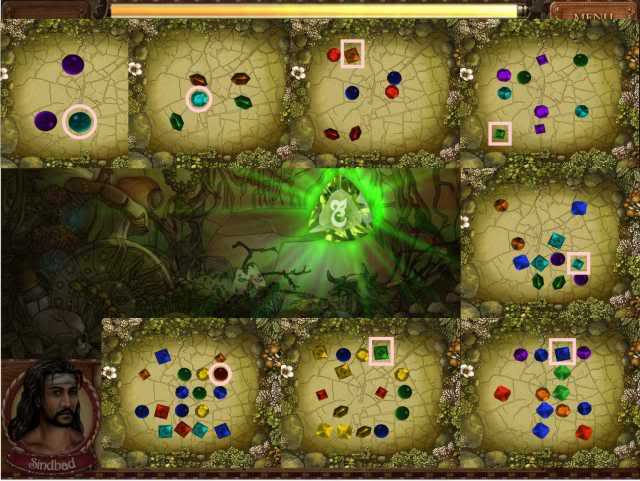
- The gems are random – there are 8 sequences a shown in the inserts along with the Gem of Wisdom.
- Choose the gem that doesn’t match the rest of the gems as marked in pink.
- If you choose the wrong gem, you will have to start over again.
- At the end of the game take the Gem of Wisdom.
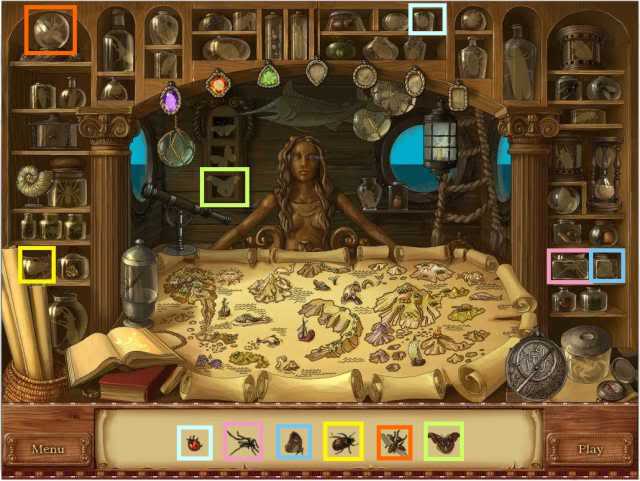
- When you get back to the ship place the bugs you have collected.
VOLCANO: FIERY VALLEY
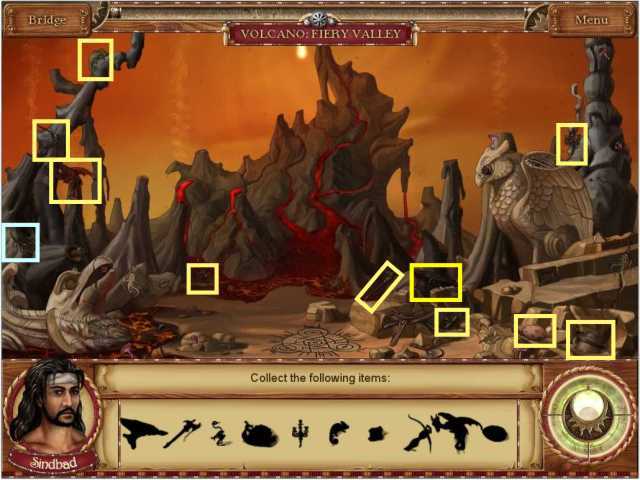
- Chalida says she cannot help Sinbad because of the heat from the volcano but she provides him with silhouettes of objects to find.
- I also found 1 bug.
VOLCANO: FLAMING HEART
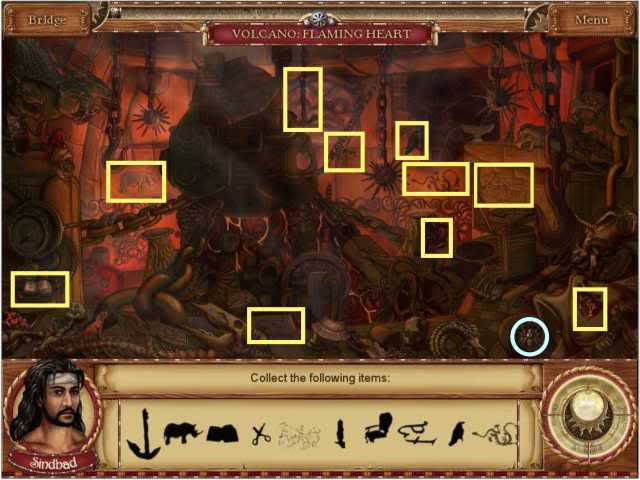
- Find the items in silhouette and the 2 bugs circled in blue.
VOLCANO: BOTTOMLESS PIT
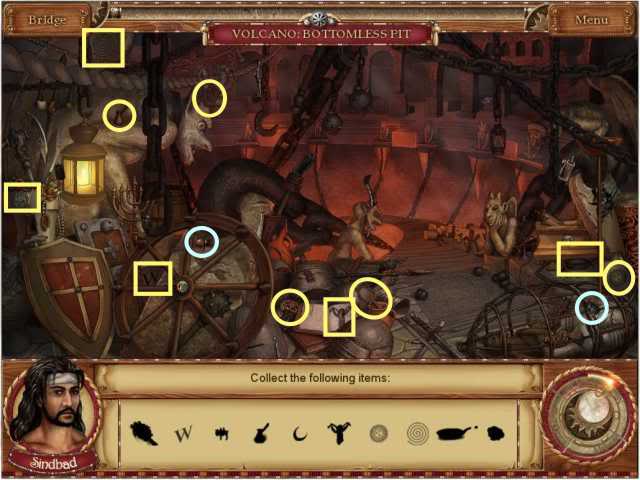
- Collect the silhouettes and the 2 bugs.
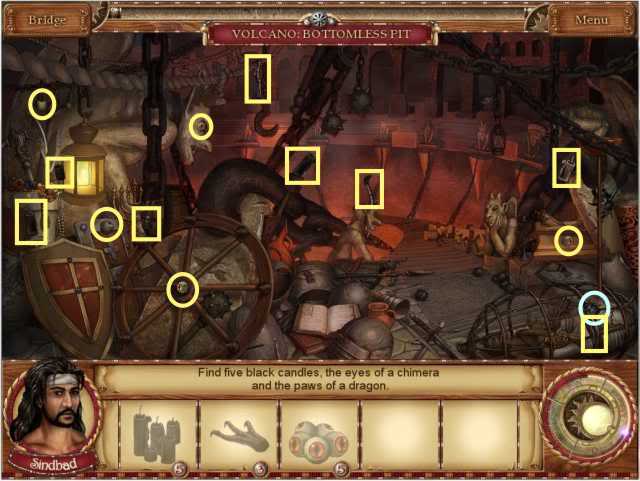
- Collect the 5 parts of each of the 3 items needed for the magic plus the one bug I found.
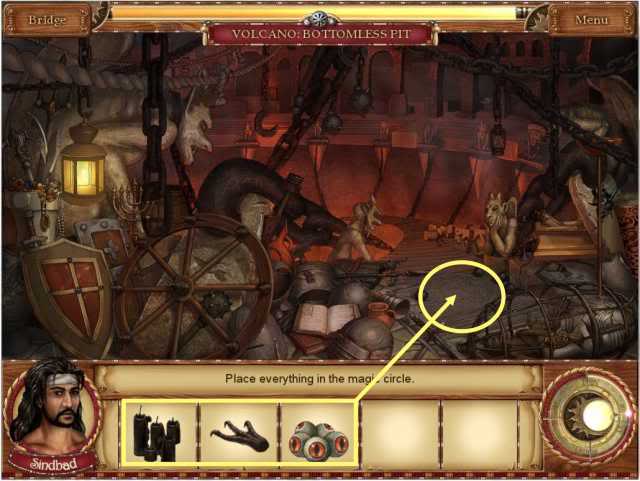
- Place the completed items you found in the Magic Circle.
VOLCANO: FIERY VALLEY
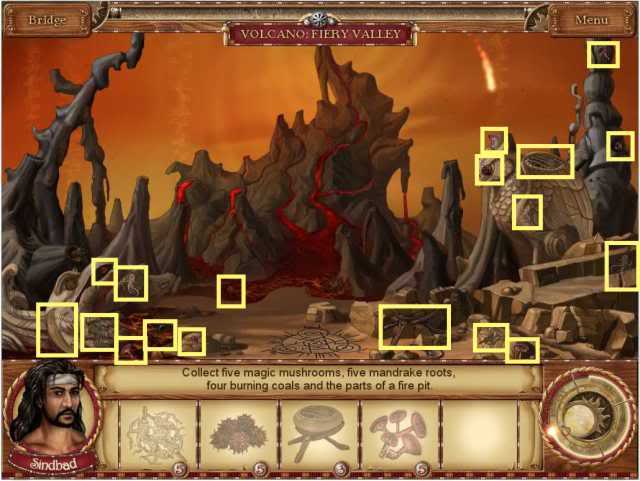
- Collect the 5 magic mushrooms, the 5 mandrake roots, the 4 burning coals and the 3 parts of the fire pit.
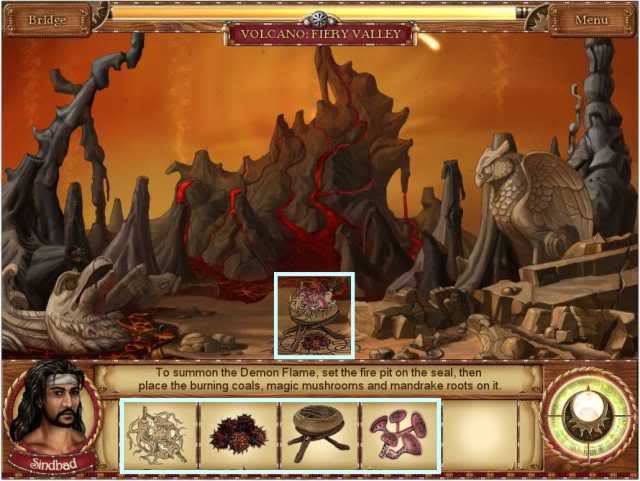
- Place the fire pit on the seal, the burning coals under it and the mushroom and mandrake on top.
VOLCANO: FLAMING HEART
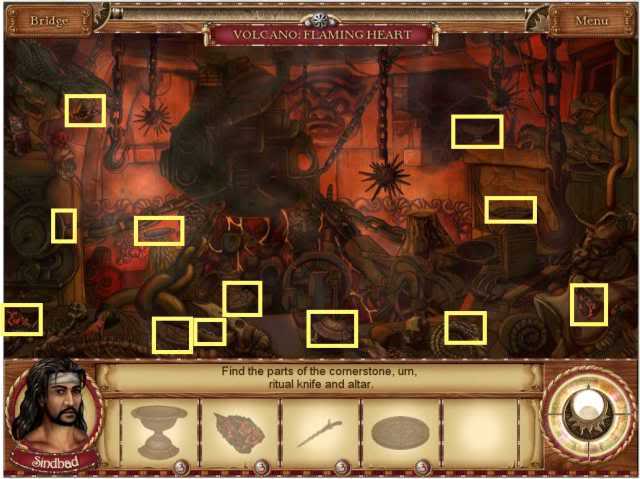
- Find all the pieces of the altar, cornerstone, urn and ritual knife.
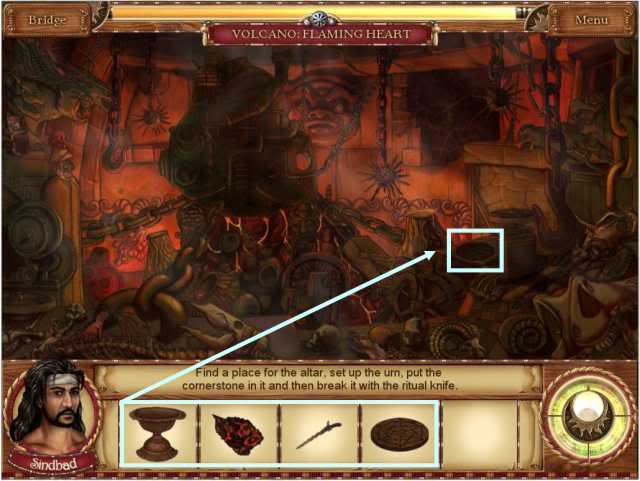
- Place the altar and set the urn on top of it.
- Put the cornerstone in the urn and use the ritual knife on it in order to get the blood from the cornerstone.
VOLCANO: BOTTOMLESS PIT
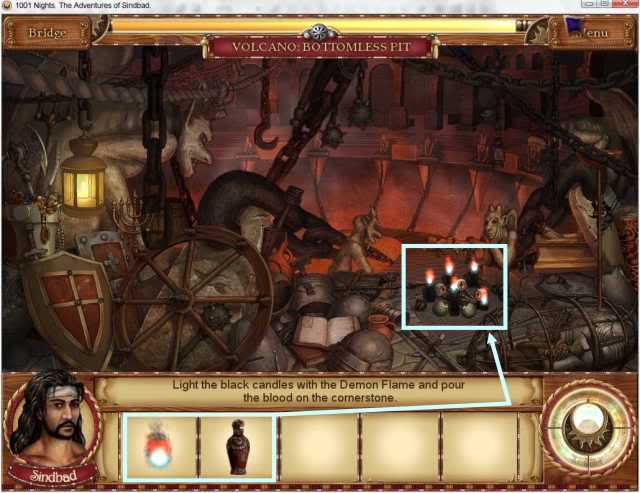
- Light the black candles and pour the blood on the cornerstone.
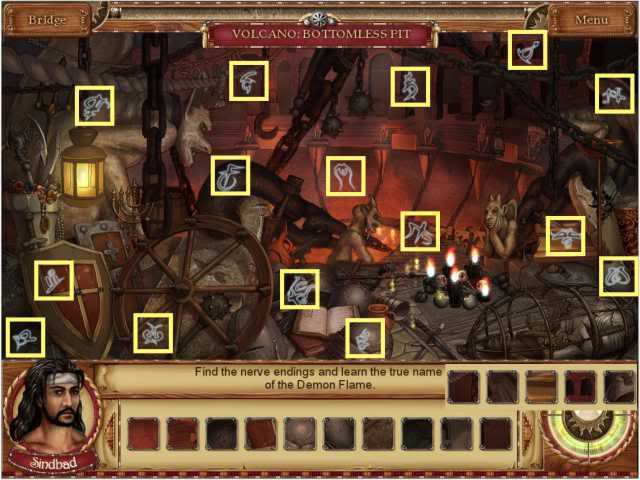
- Find the nerve endings and learn the true name of the Demon Flame.
VOLCANO: FIERY VALLEY
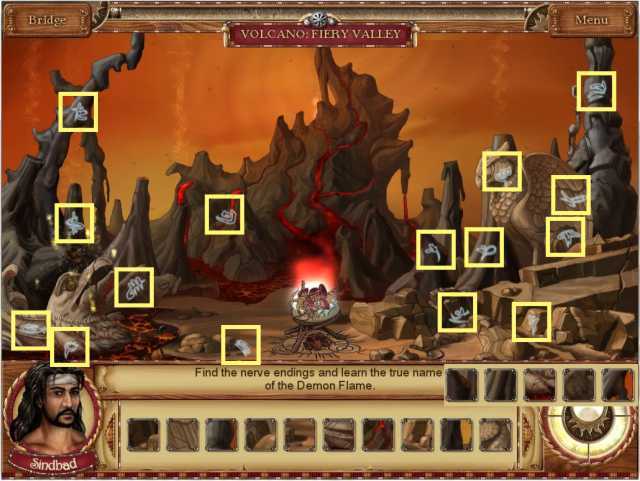
- Find the nerve endings and at this location.
VOLCANO: FLAMING HEART
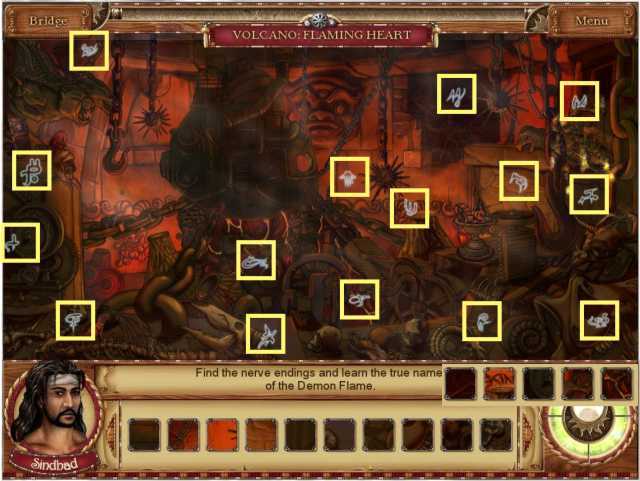
- Find the rest of the nerve endings at this location.
- The heart of the volcano is opening so you will find the Gem of Flames there.
MINI GAME TO CURE THE HEART OF THE VOLCANO
- Your job is to cure the heart of the volcano by connecting its veins so the blood runs through all layers without running into the body.
- This is a connect-the-pipes type game which probably has more than one solution but I will be showing one solution that worked for me.
- There are 5 levels to the game – once you connect the beginning and ending lights press "Start" for the blood to flow through the veins.
- The solution to each level in shown on the right.
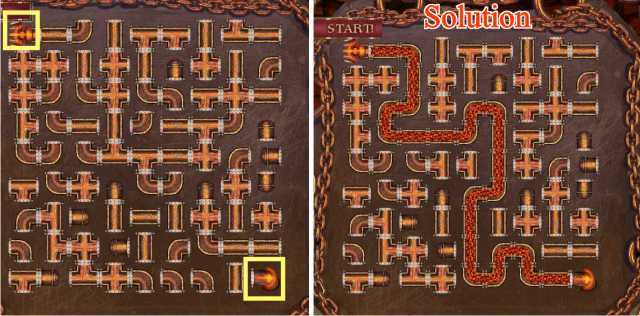
- Level 1 has one vein to connect .
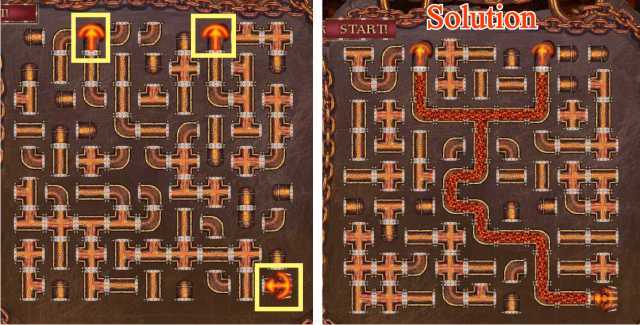
- Level 2 has 3 endings.
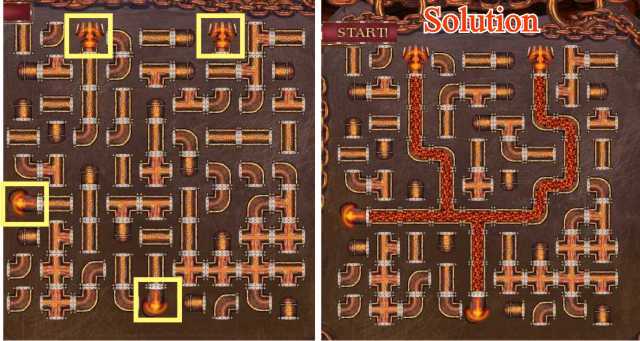
- Level 3 has 4 endings with separate veins that need to be connected.
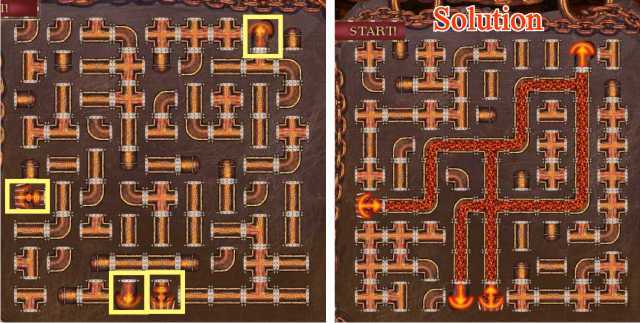
- Level 4 has 4 endings with separate veins.
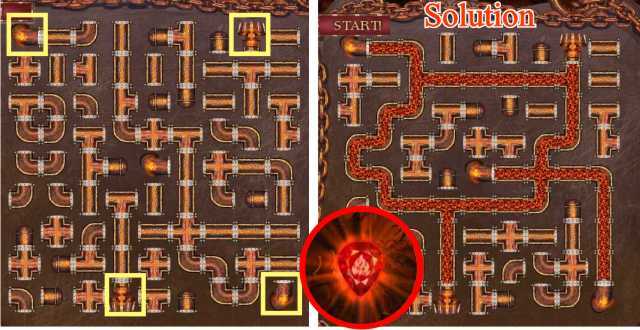
- Level 5 has 5 endings and many veins to connect.
- When you have completed the game you will get the Gem of Flame – take it.
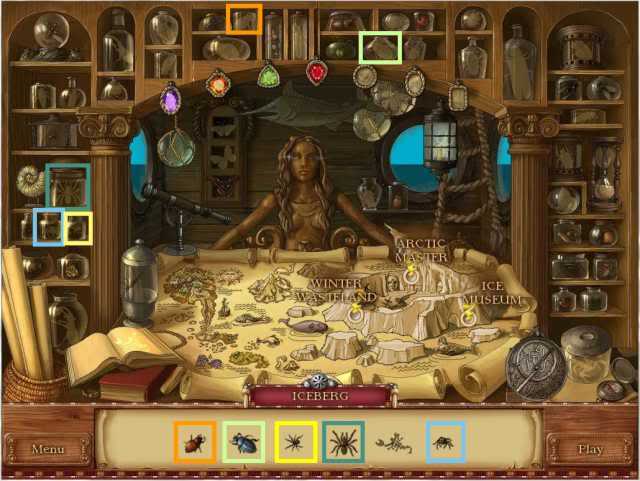
- Place the bugs you have collected.
- Notice there is one that is not marked – there is no direction as to where this scorpion like thing goes.
- I have blown up the shot and tried to place it in everything available so I’m going to assume that it is for some reason being left for later.
ICEBERG: WINTER WASTELAND
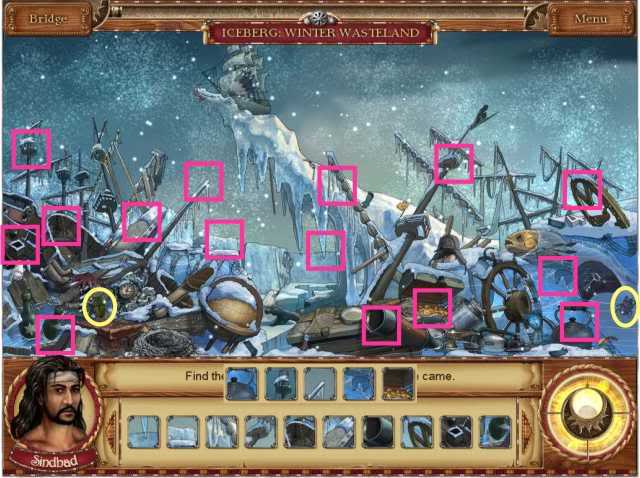
- Find the bits of the scene so Chalida can determine where the voice is coming from – there are 2 bugs marked in yellow.
ICEBERG: ICE MUSEUM
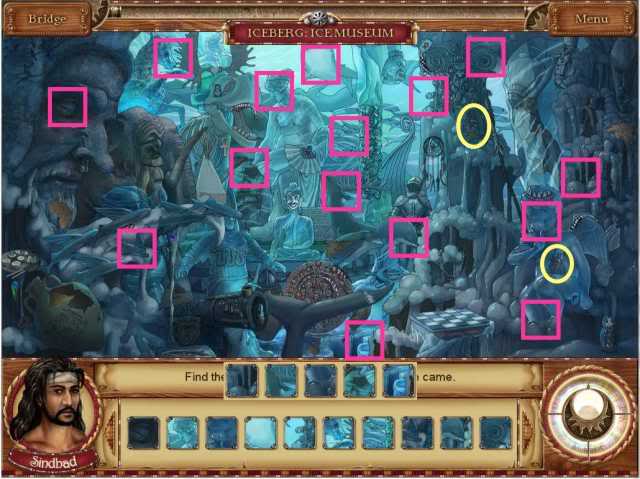
- Find more pieces of the scene here plus the 2 bugs.
ICEBERG: ARCTIC MASTER

- Find the items that do not belong in each of the 4 choices plus 2 bugs.
- Tortoise – Hammer – Elephant – Kettle – 4 – Horn – 9 – Ice cream – Trap – Mermaid – Boomerang – Polar bear – Goat – Horse
ICEBERG: WINTER WASTELAND
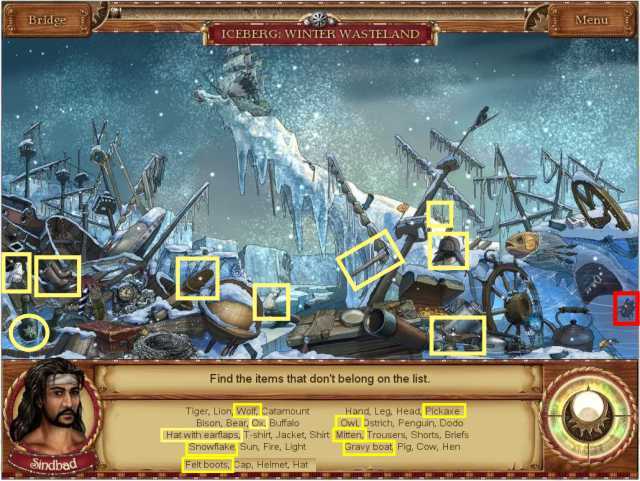
- Find the items that do not belong in each of the 4 choices plus a bug.
- Wolf – Pickaxe – Ox – Owl – Hat with earflaps – Mitten – Snowflake – Gravy Boat – Felt boots
ICEBERG: ICE MUSEUM
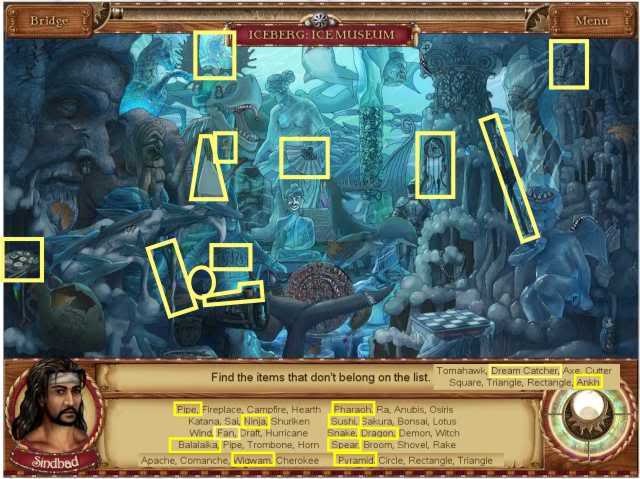
- Find the items that do not belong in each of the 4 choices.
- Pipe – Pharaoh – Ninja – Sushi – Fan – Dragon – Dream Catcher – Ankh – Balalaika – Spear – Wigwam – Pyramid
ICEBERG: ARCTIC MASTER
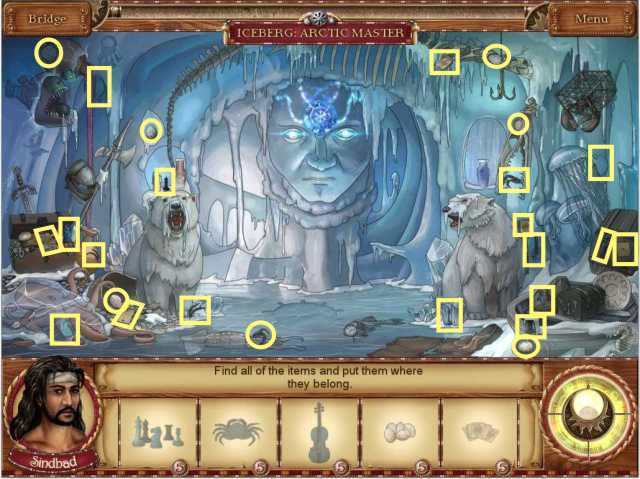
- Find the 5 parts for each of the 5 items.
ICEBERG: WINTER WASTELAND
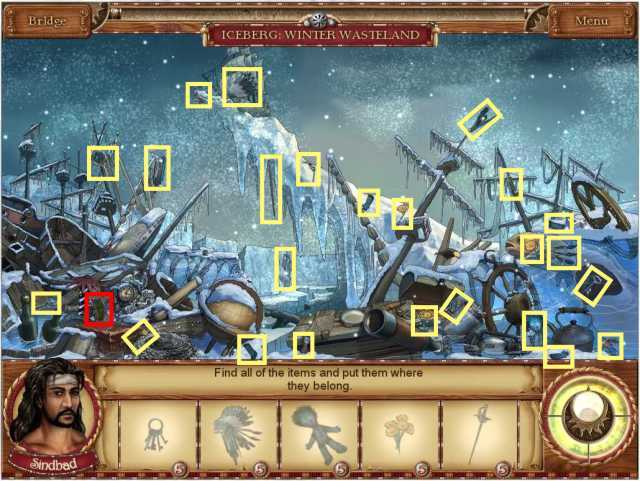
- Find the 5 parts for each of the 5 items plus I found a bug.
ICEBERG: ICE MUSEUM
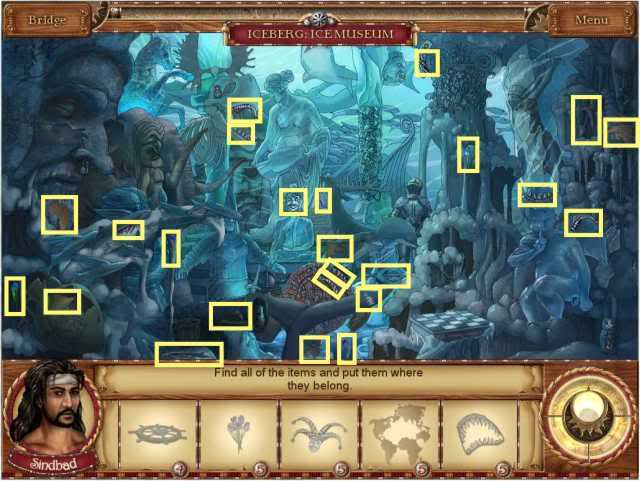
- Find the 4 parts of the wheel and 5 parts of the rest of the items.
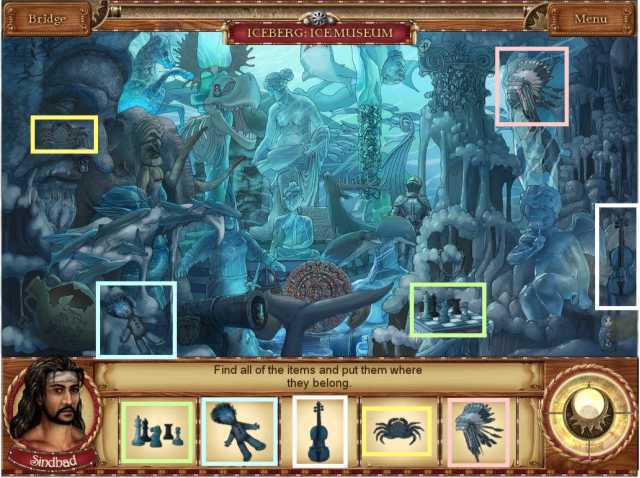
- Place the 5 items where they belong.
ICEBERG: WINTER WASTELAND
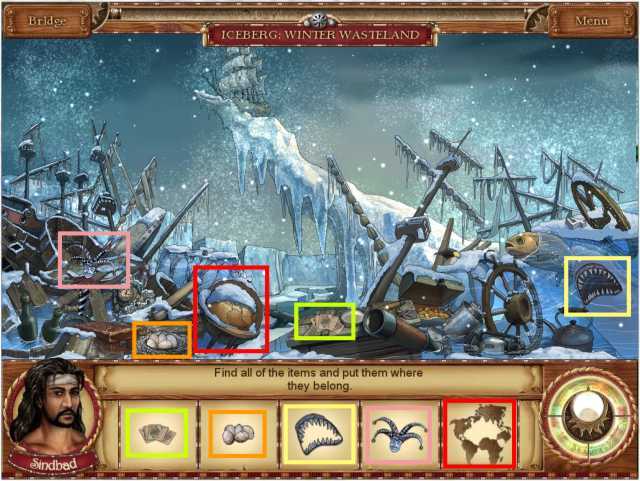
- Place the 5 items where they belong.
ICEBERG: ARCTIC MASTER
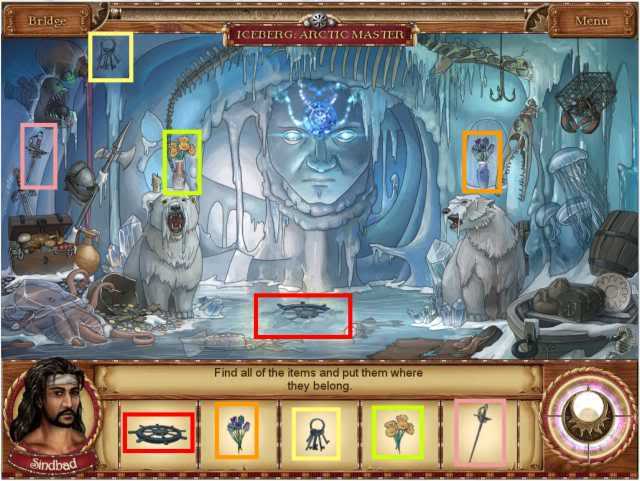
- Place the 5 items where they belong.
MINI GAME TO OPEN THE GATE AND GET THE GEM OF COURAGE
- Unlock the layers of the gate by finding the differences in the 2 sides.
- The game won’t show you what has changed – it merely changes the item that is different on the other side.
- It can be something missing or a different color.
- There is also no indication as to how many items you are looking for but it appears to be 10 for each gate.
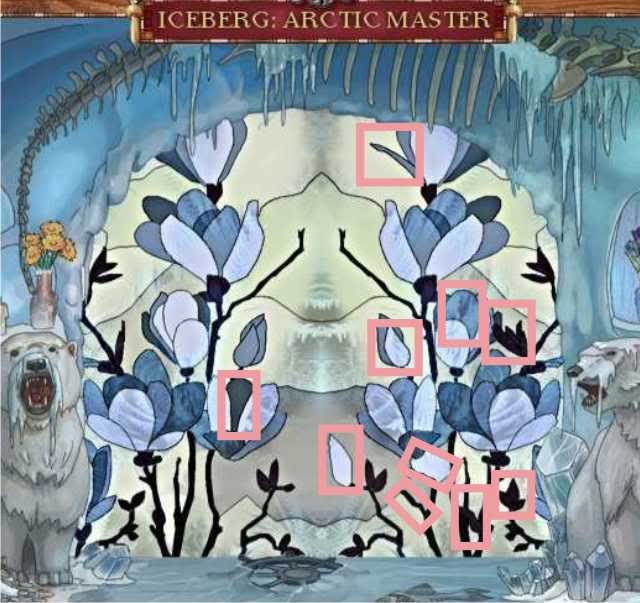
- There are 3 gates – this is the first one.
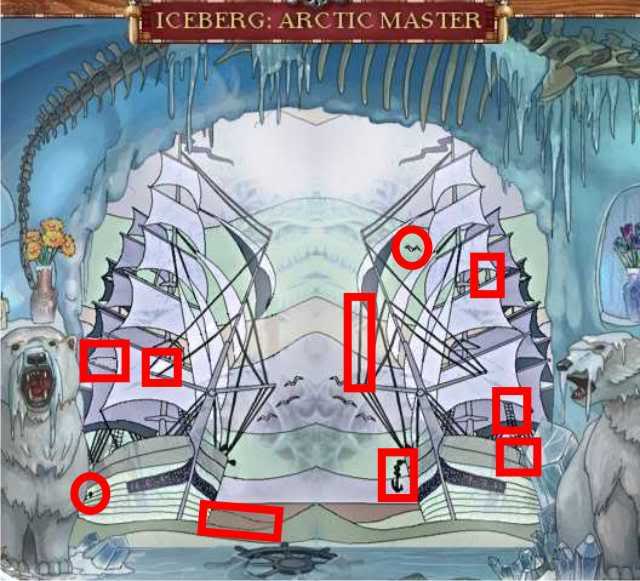
- Find the differences in Gate 2 to unlock it.
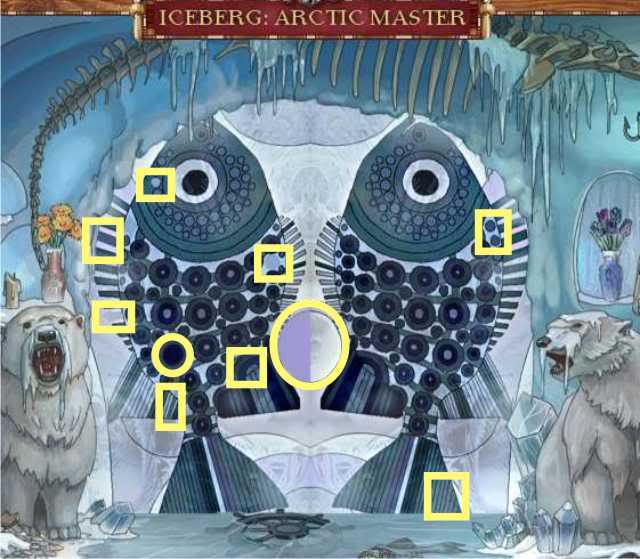
- This is the final gate to unlock – once it is unlocked Sinbad must retrieve the Gem of Courage from the Artic Master’s head.
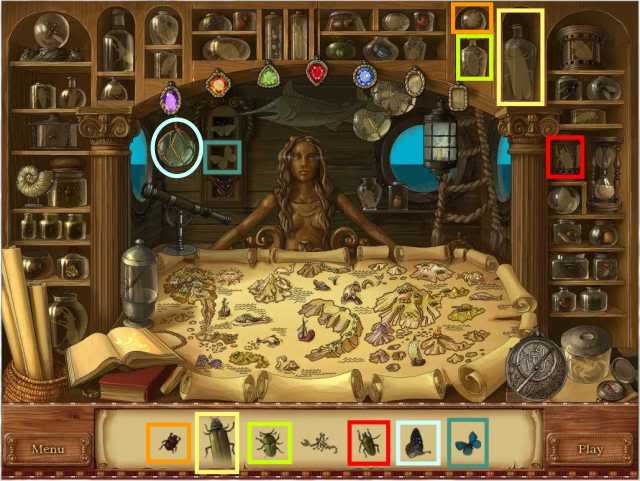
- Once again place the bugs you have gathered.
- The same scorpion still seems to be unable to be placed so we shall continue the saga to see what happens.
STONE SHIP: BASE
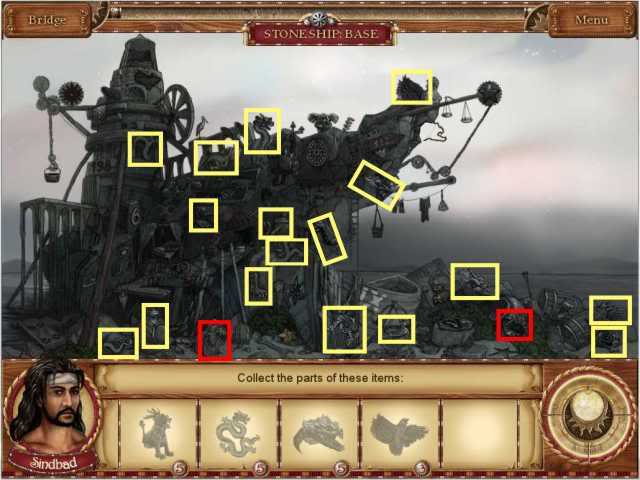
- Collect all the parts to the items and a couple bugs.
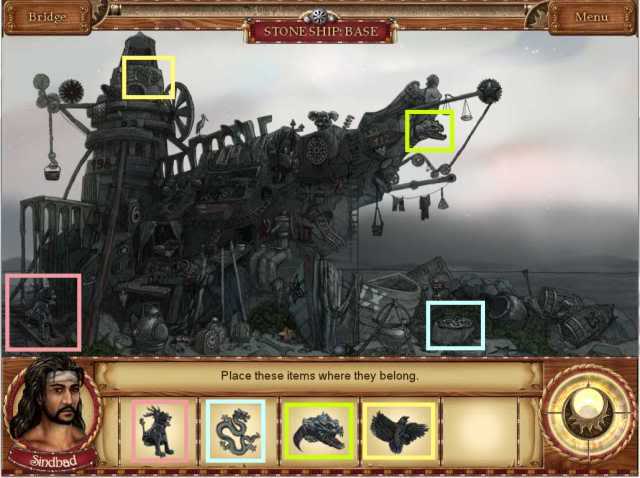
- Place the 4 items where they belong.
STONE SHIP: BELL TOWER
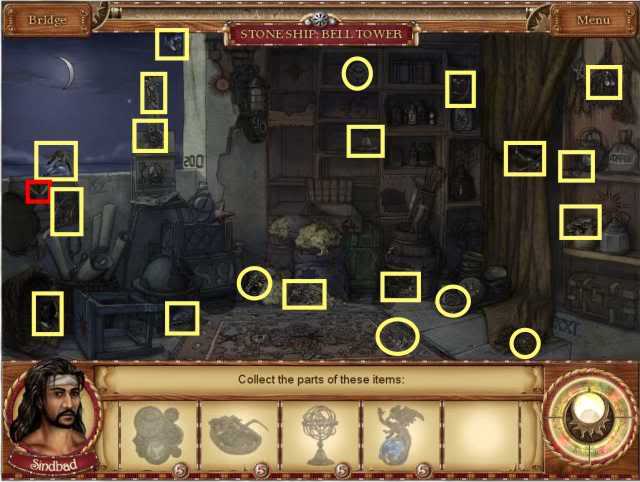
- Collect the bug and all the parts to the items pictured.
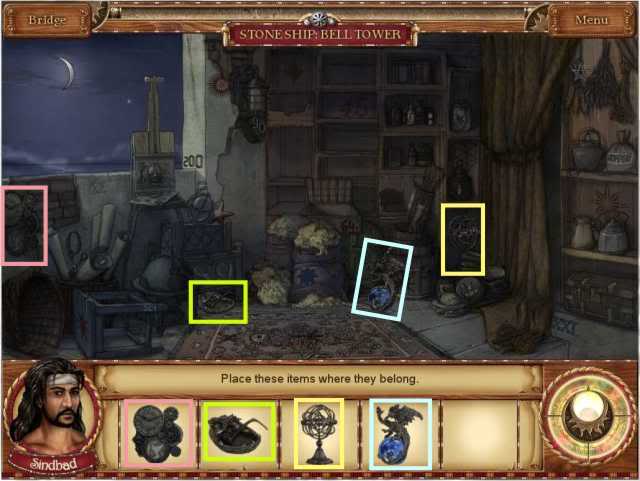
- Place the items where they belong.
STONE SHIP: LABORATORY
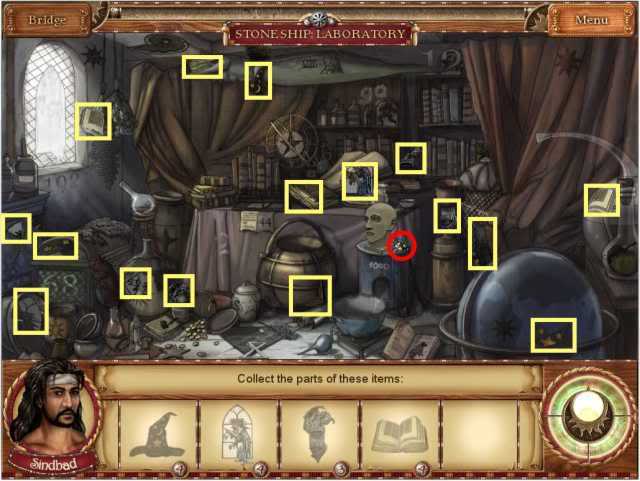
- Collect all the parts of the items and a bug.
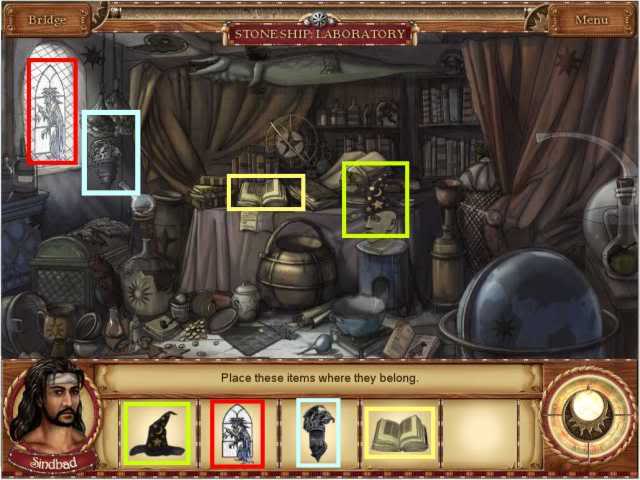
- Place the items where they belong.
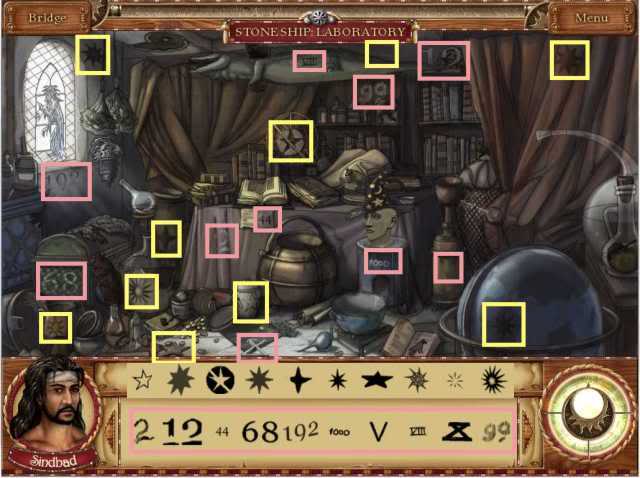
- Collect all of the stars and numbers – the numbers are pink and I’ve added the stars which are in yellow.
STONE SHIP: BELL TOWER
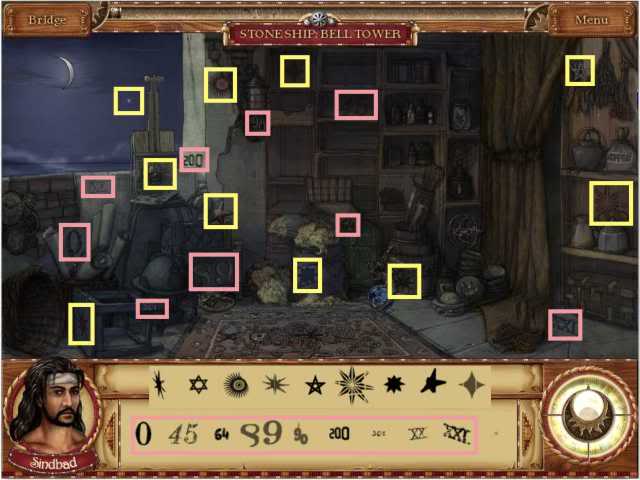
- I’ve combined the stars with the numbers at this location – stars are yellow and numbers pink.
STONE SHIP: BASE
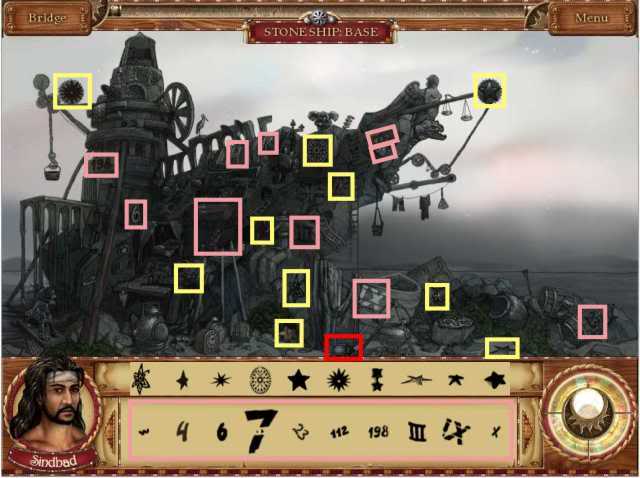
- Collect all the stars and numbers at this location as well as the bug.
MINI GAME PUZZLE TO JOIN THE WORLDS AND GET THE GEM OF CHANGES
- Swap the pieces of the puzzle by choosing 2 pieces anywhere in the puzzle.
- The puzzle keeps changing scene as you play it so you’ll have to work fast to get a couple pieces changed.
- There are 3 different scenes from locations you have visited but the locations for each puzzle are random.
- When you find a piece that is in the right place it will no longer move.
- The following are samples of some of the puzzles and the finished locations – I’ve lightened them so you can see what’s going on to compare them.

- This is the Bell Tower at Stone Ship.
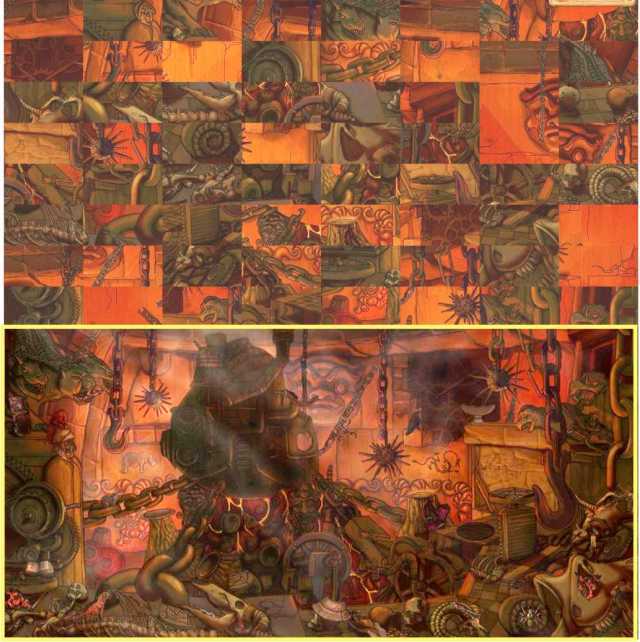
- This scene is the Flaming Heart of the Volcano.
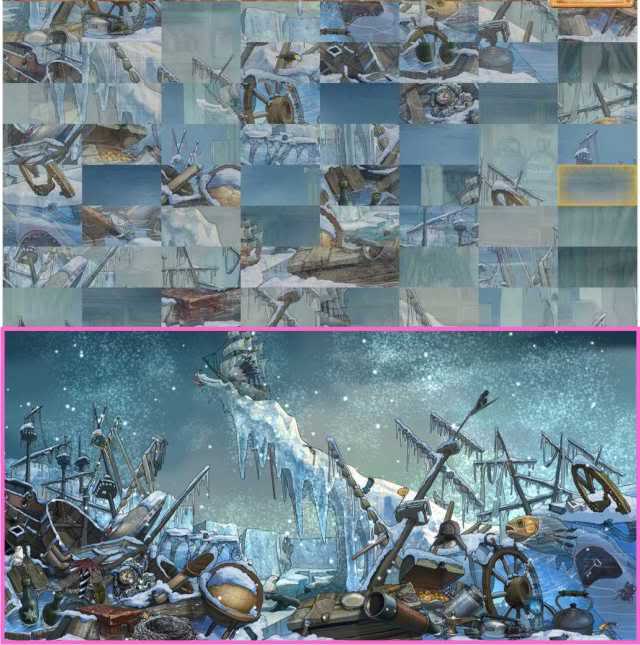
- Iceberg Winter Wastland.
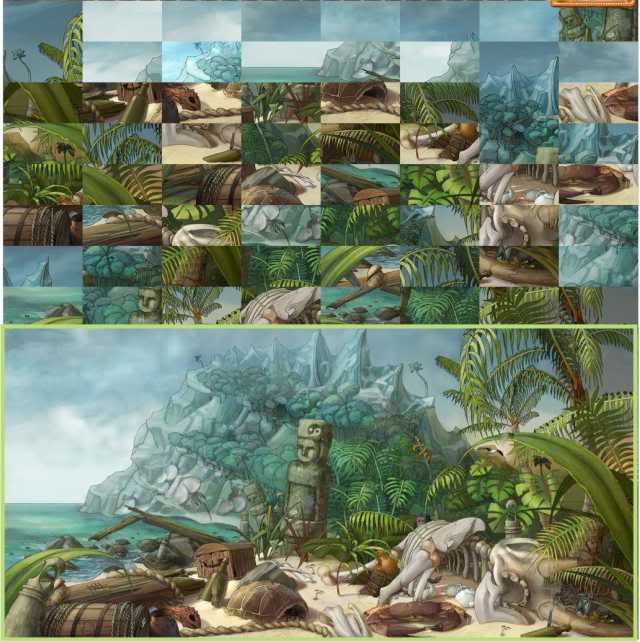
- The Peninsula at Fish Island
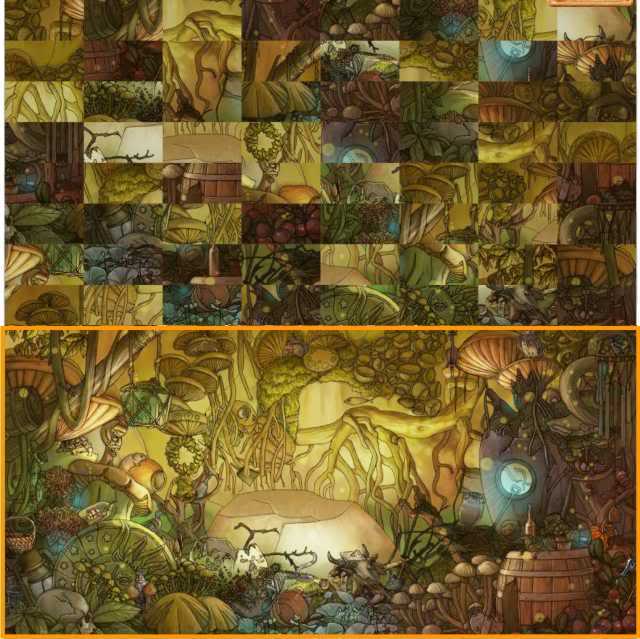
- The Temple on Jabbah Island.
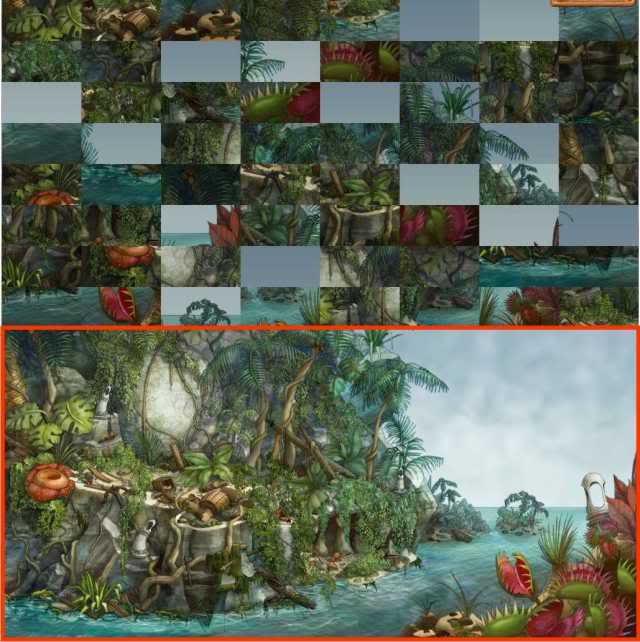
- The Jagged Rocks on Fish Island.
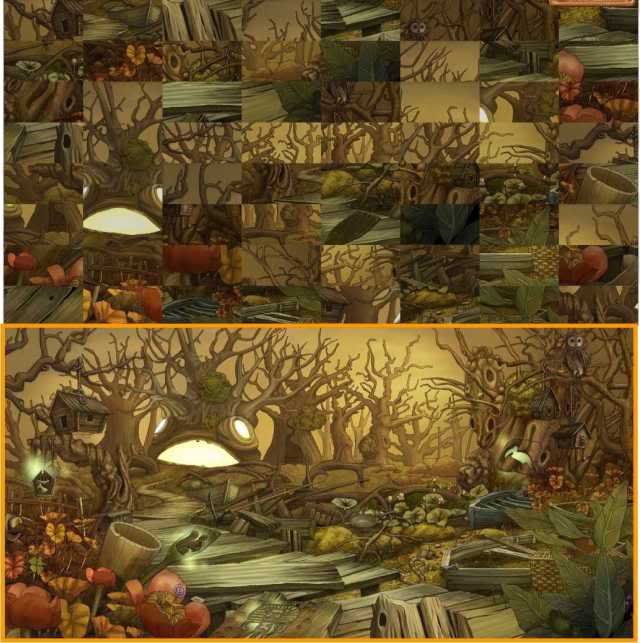
- The Mysterious Moors on Jabbah Island.
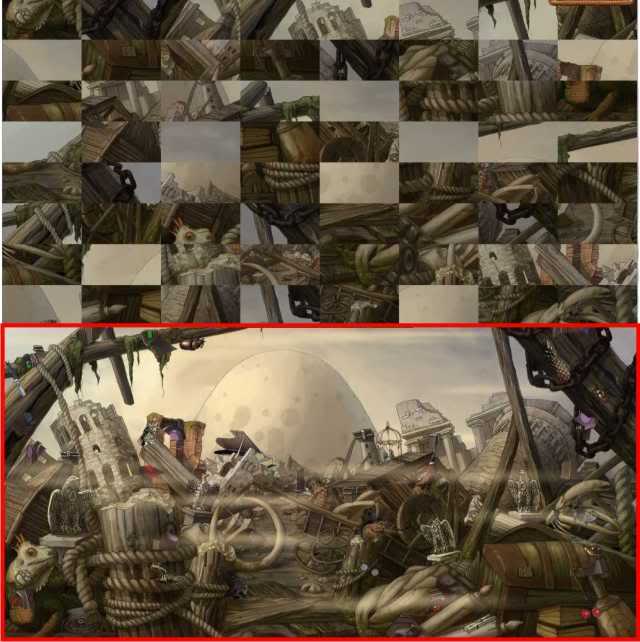
- The Shipyard on Ruhh Island.
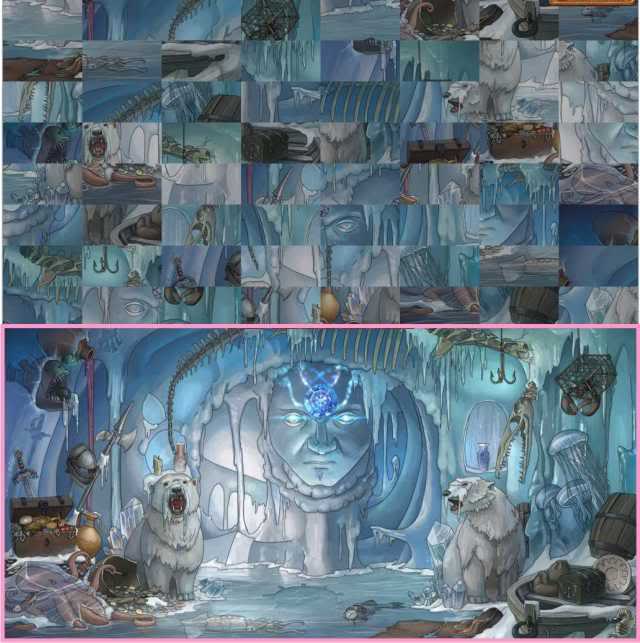
- The Arctic Master’s chambers on the Iceberg.
- Once you have completed the puzzle the bell will swing for you to take the Gem of Changes.
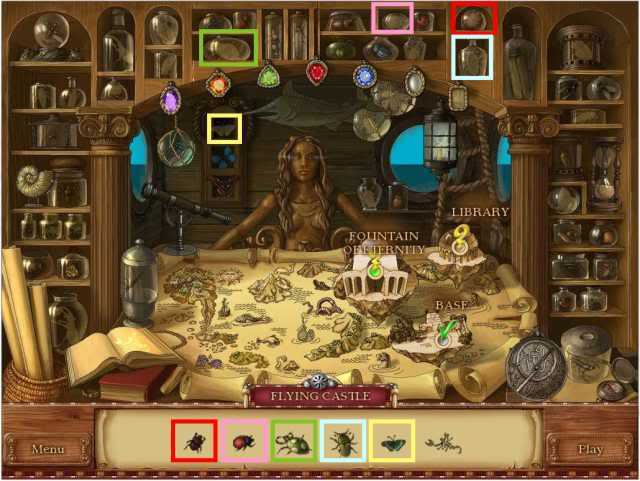
- Place the bugs you’ve found – once again I’m left with a lonely scorpion.
FLYING CASTLE: BASE
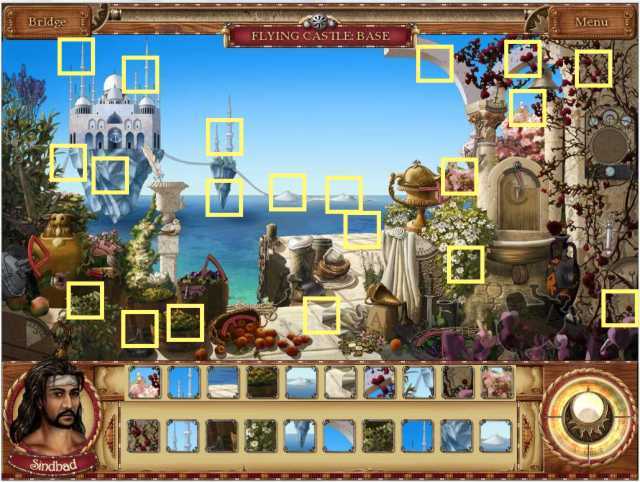
- Find all the mini pictures in this location.
FLYING CASTLE: FOUNTAIN OF ETERNITY
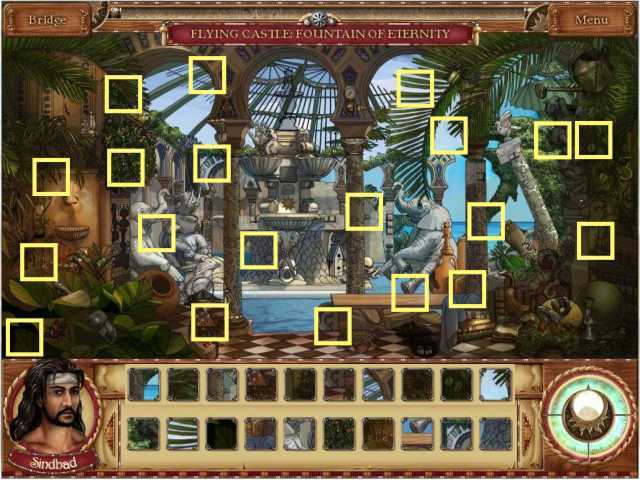
- Find all the small shots shown in the taskbar.
FLYING CASTLE: LIBRARY
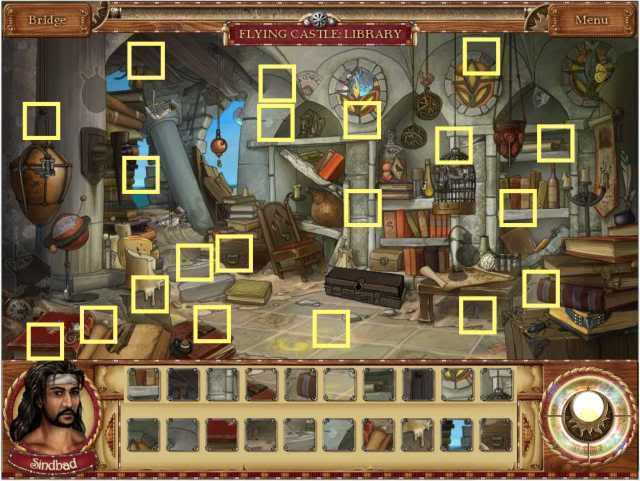
- Find all the small parts of the scene shown in the taskbar.
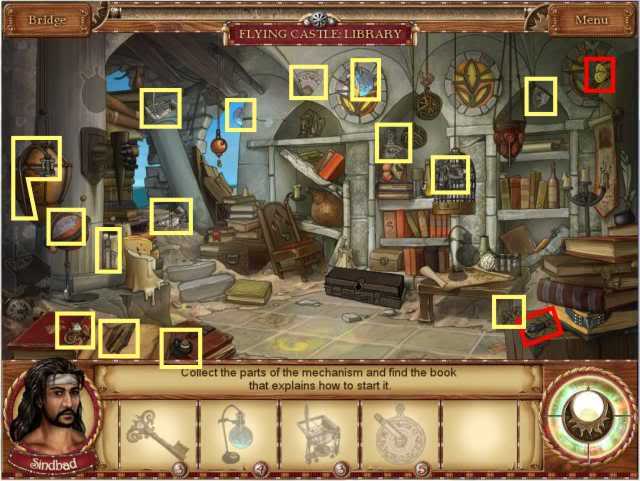
- Collect the parts of the items shown plus the 2 bugs
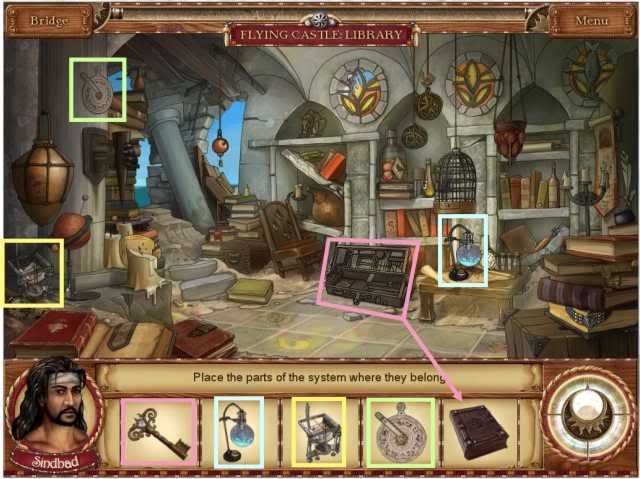
- Place the objects where they belong.
- The key will open the chest and you will get a book.
FLYING CASTLE: BASE
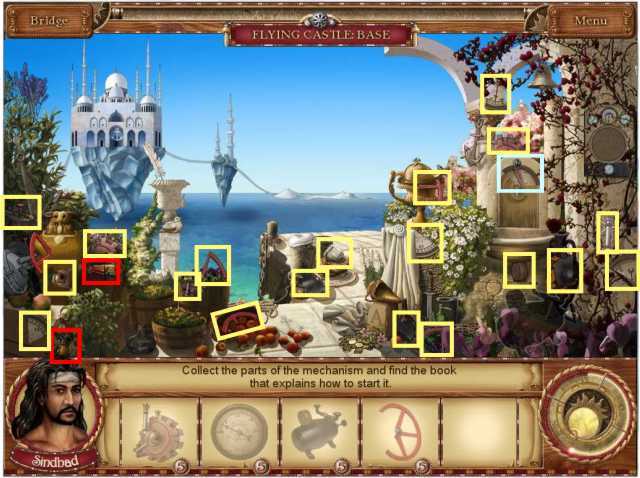
- Collect the pieces of the items plus 2 bugs.
- The blue square at the right of the scene has 2 pieces – one for each of the first two items.
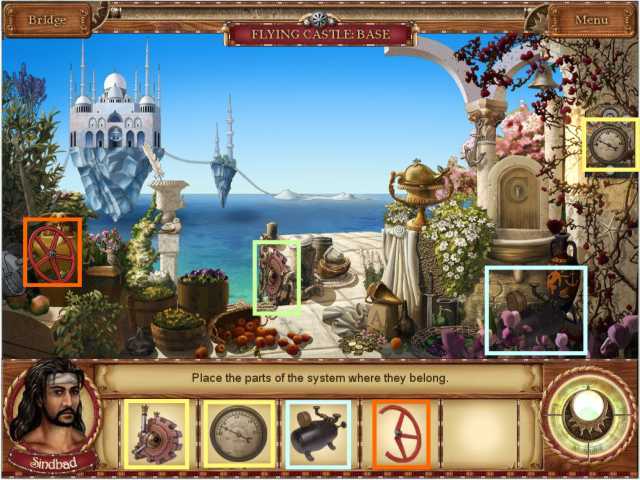
- Place the objects where they belong.
FLYING CASTLE: FOUNTAIN OF ETERNITY
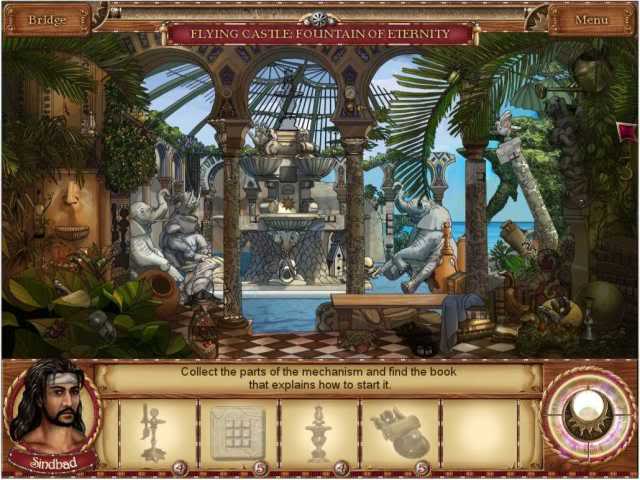
- Collect the pieces of the objects.
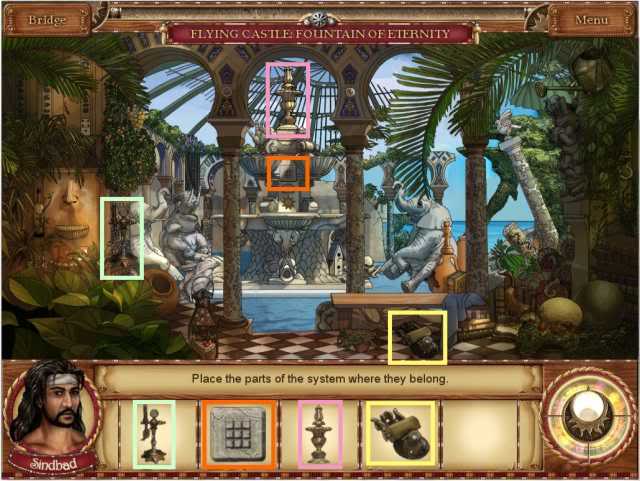
- Place the objects where they belong.
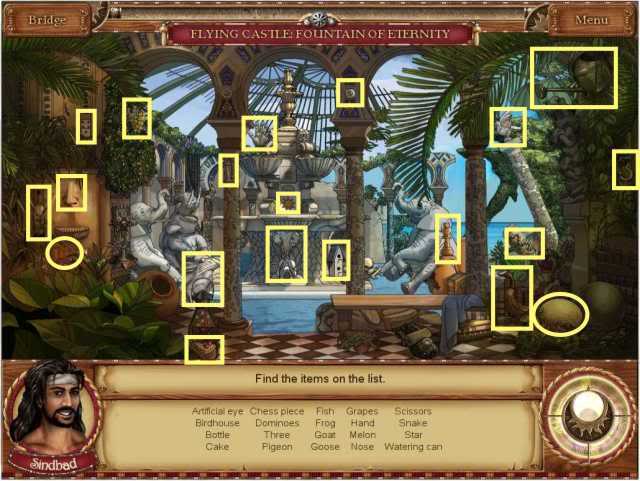
- Find everything on the list.
FLYING CASTLE: BASE
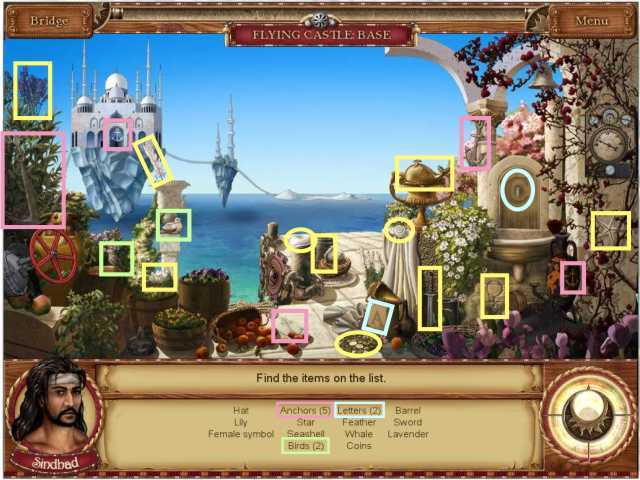
- Find all the items on the list.
FLYING CASTLE: LIBRARY
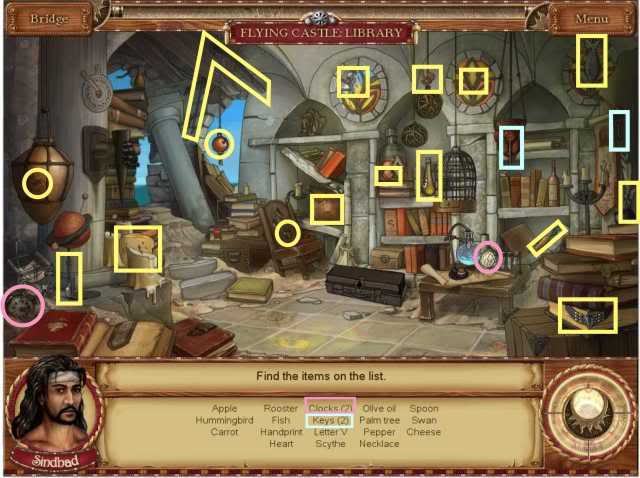
- Find everything on the list.
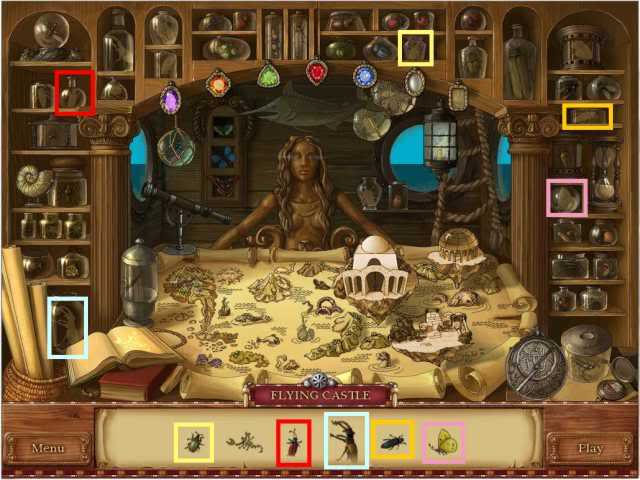
- Place the bugs you have collected – still nothing to do with the lone scorpion.
TABLET MINI GAME
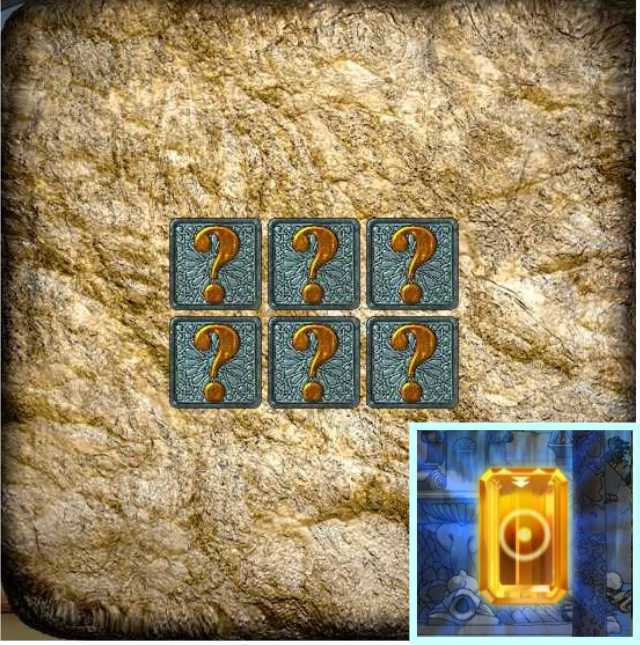
- There are 7 steps to start the fountain. Each panel represents one step and gets increasingly more complicated as more "?" are randomly added.
- It is a concentration game with 2 pictures to match until the board is cleared – the pictures to match are random. Step 1 is pictured above.
- Possibly you might encounter a few quirks along the way as I did on one of my segments:
- § At the end of Step 2 I was rewarded with a new bug.
- § At the end of Step 3 the last two didn’t match but I ended up with a new bug and the tablet cleared.
- § Step 4: Everything matched and I got a new bug.
- I’m assuming that if we’ve missed any bugs along the way that this is a way we make up for it.
- At the completion of the game you will receive the Water Gem shown in the insert – take it.
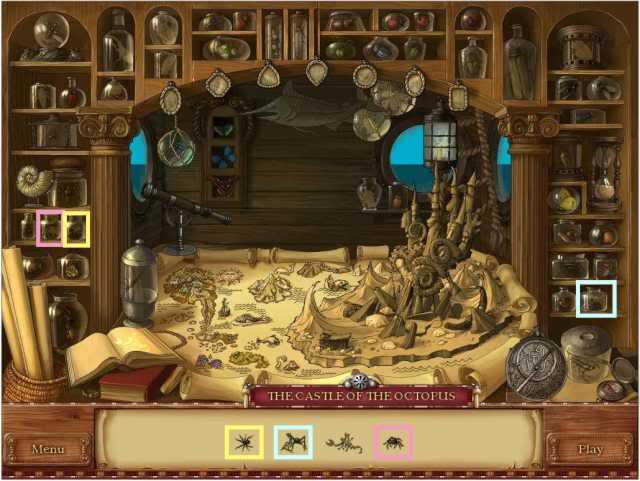
- Place whatever bugs you have.
OCTOPUS CASTLE: BOTTOMLESS PIT
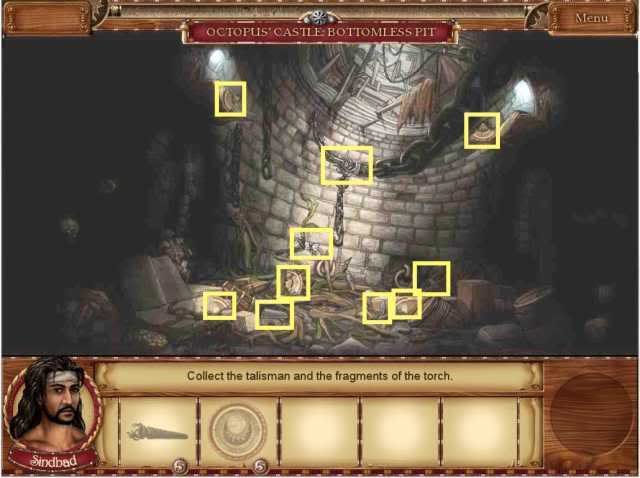
- The talisman and torch fell apart when Sinbad fell into the pit so find the parts to put them back together.
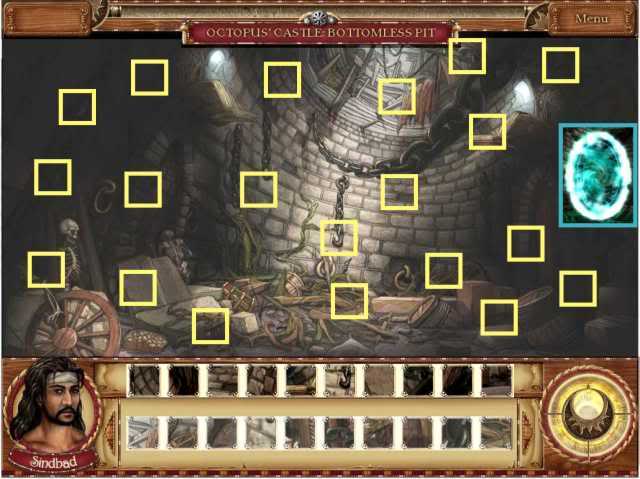
- Find all the secret buttons to open the portal which will appear in the middle of scene but is shown in the insert.
- The buttons are actually mini parts of the scene which I have lightened to help you see where they are located.
OCTOPUS CASTLE: WASTLAND
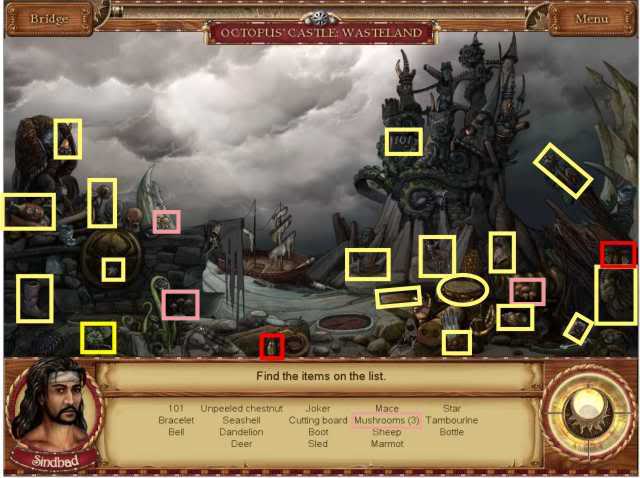
- Collect everything on the list plus a couple bugs.
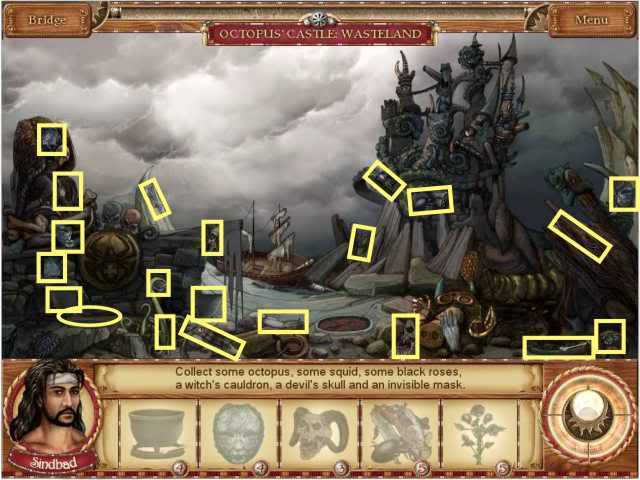
- Find all the parts to the 5 objects.
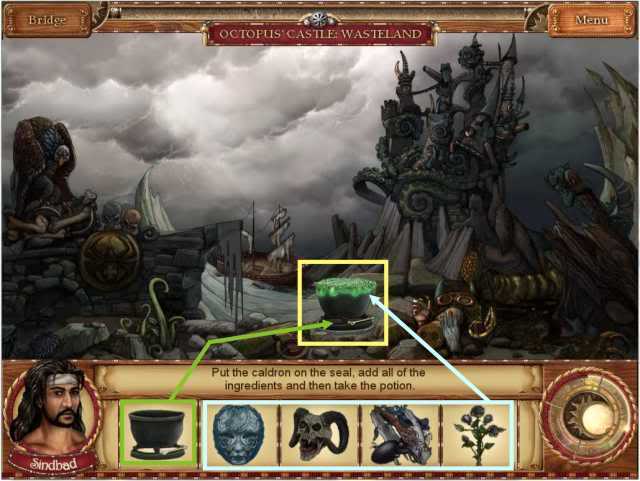
- Place the caldron on the seal and add all the ingredients.
- Take the potion you have made.
OCTOPUS CASTLE: TORTURE CHAMBER
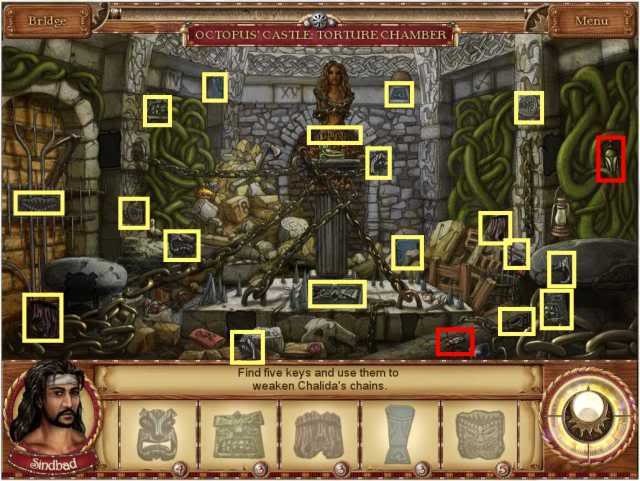
- Find the 5 keys to loosen Chalida’s chains.
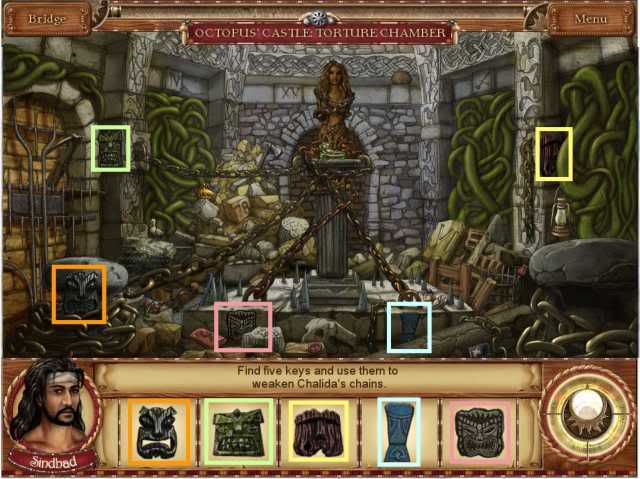
- Place the keys where they belong as shown.
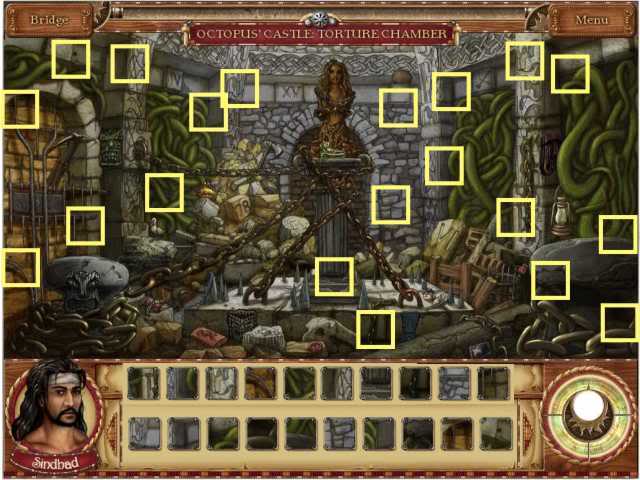
- Collect all the mini pictures of the scene to find the hidden buttons and break the chains.
OCTOPUS CASTLE: THRONE ROOM
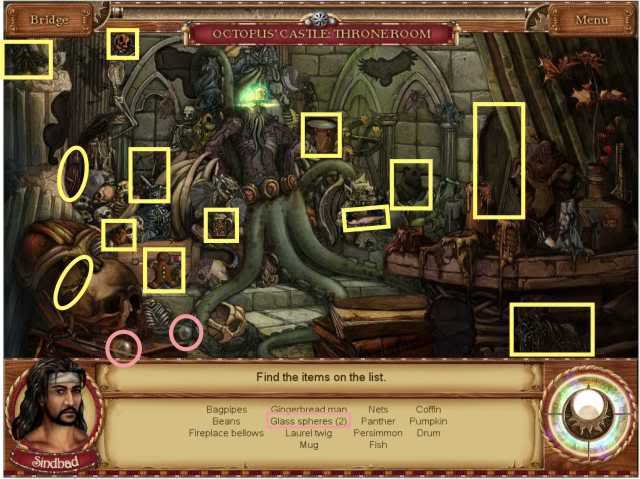
- Collect all the items on the list.
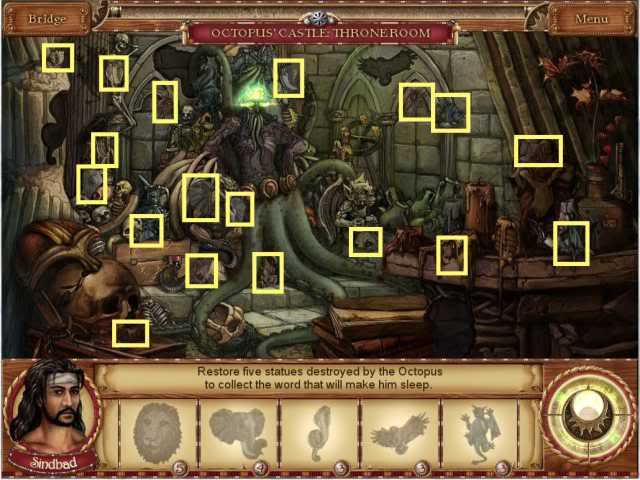
- Find all the pieces of the statues.
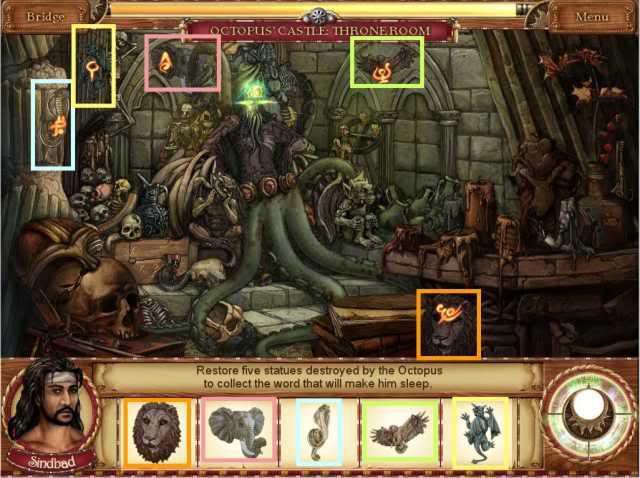
- Place the restored statures where they belong to collect the word to make the octopus sleep and get the crown.
OCTOPUS CASTLE: TREASURY
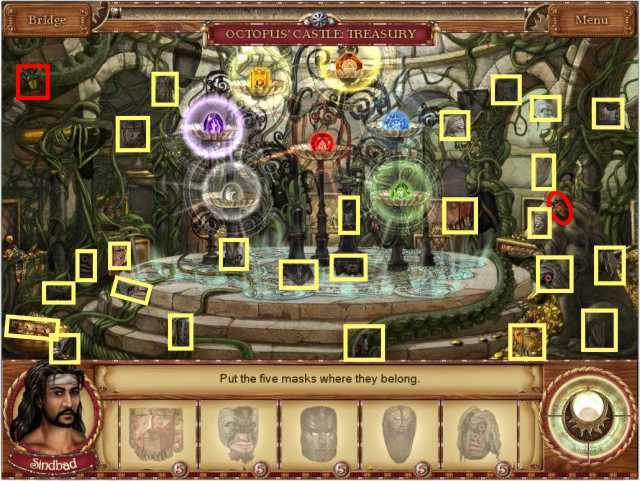
- Find all the pieces of the masks plus 2 bugs.
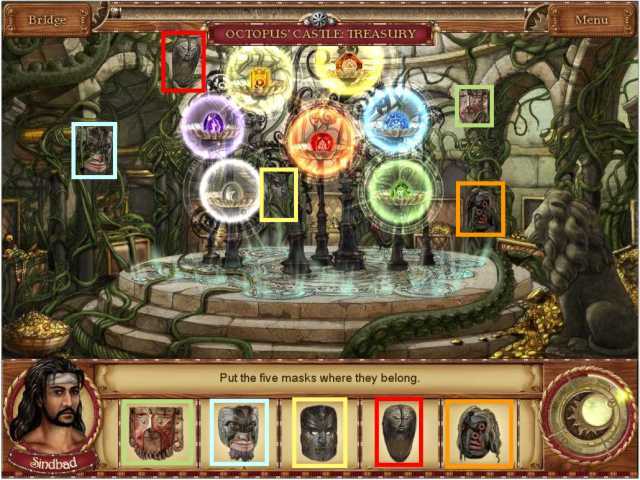
- Place the masks where they belong.
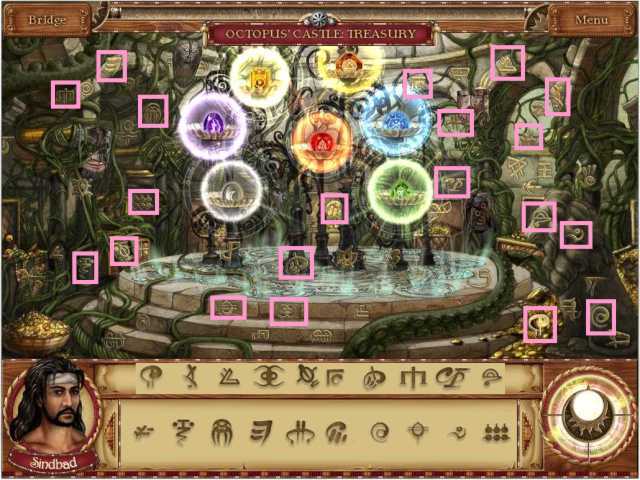
- Find all the ancient letters which are the words of Chalida’s gems.
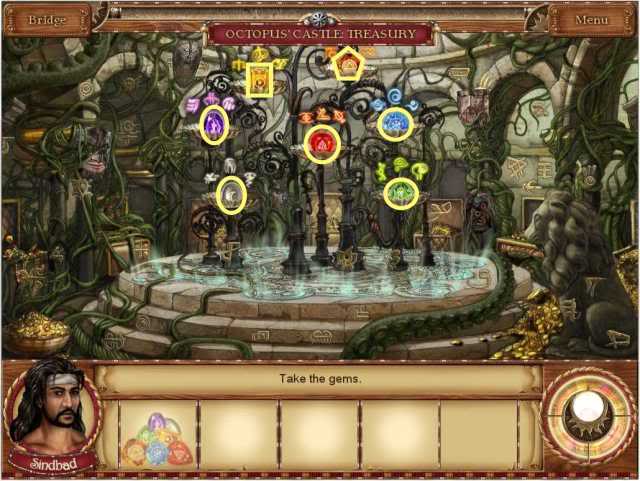
- Collect the 7 gems.
OCTOPUS CASTLE: TORTURE CHAMBER
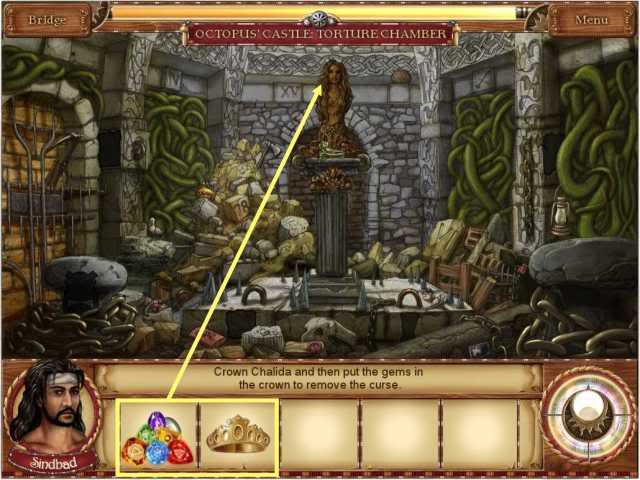
- Place the crown on Chalida’s head and then put the gems in the crown to remove the curse.
CONGRATULATIONS. . . . . . . . . . CHALIDA IS FREE AND A NEW STORY CAN BEGIN.
“;
More articles...
Monopoly GO! Free Rolls – Links For Free Dice
By Glen Fox
Wondering how to get Monopoly GO! free rolls? Well, you’ve come to the right place. In this guide, we provide you with a bunch of tips and tricks to get some free rolls for the hit new mobile game. We’ll …Best Roblox Horror Games to Play Right Now – Updated Weekly
By Adele Wilson
Our Best Roblox Horror Games guide features the scariest and most creative experiences to play right now on the platform!The BEST Roblox Games of The Week – Games You Need To Play!
By Sho Roberts
Our feature shares our pick for the Best Roblox Games of the week! With our feature, we guarantee you'll find something new to play!Type Soul Clan Rarity Guide – All Legendary And Common Clans Listed!
By Nathan Ball
Wondering what your odds of rolling a particular Clan are? Wonder no more, with my handy Type Soul Clan Rarity guide.


