
Best Horror Games On Itch.io – July 2026
Across a bounty of subgenres.![Haze Seas Accessories Tier List [Best Accessories to Equip]](/wp-content/uploads/2026/07/haze-seas-accessories-tier-list.jpg "Haze Seas Accessories Tier List [Best Accessories to Equip]")
Haze Seas Accessories Tier List [Best Accessories to Equip]
The accessories with the best stat buffs in Haze Seas.
![[Roblox] Evomon Shiny Hunting Guide – Including Prismatic and Pris Shinies!](/wp-content/uploads/2026/06/evomon-shiny-hunting-guide.jpg "[Roblox] Evomon Shiny Hunting Guide – Including Prismatic and Pris Shinies!")

10 Days to Save the World Walkthrough
Welcome to Gamezebo’s walkthrough for 10 Days to Save the World.


- Prefer Gamezebo on Google

10 Days to Save the World Walkthrough
Welcome to Gamezebo’s walkthrough for 10 Days to Save the World.
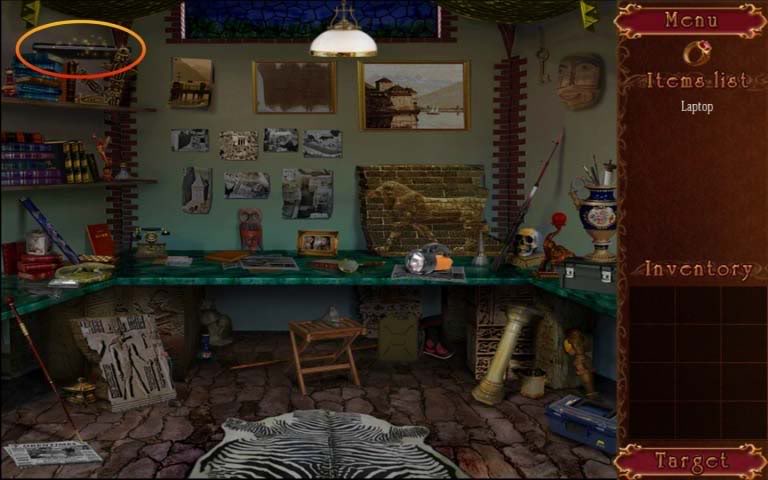
Professor Salinger’s office
Find the laptop, and zoom in to turn it on.

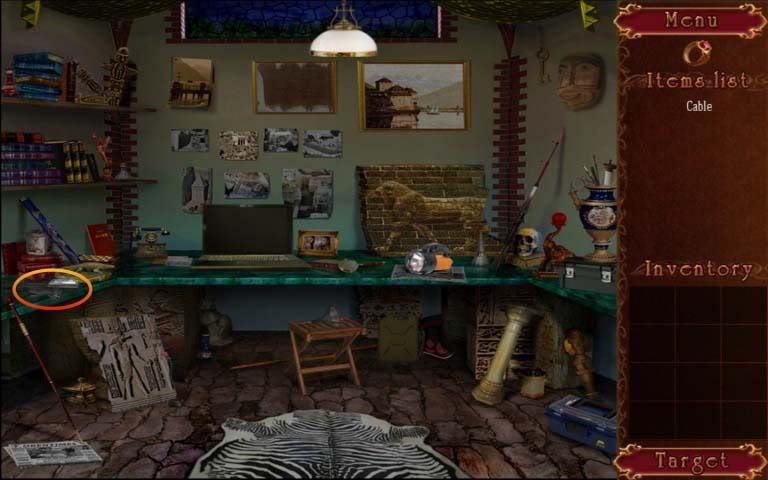
Grab the cable, and then move it from the inventory to the laptop
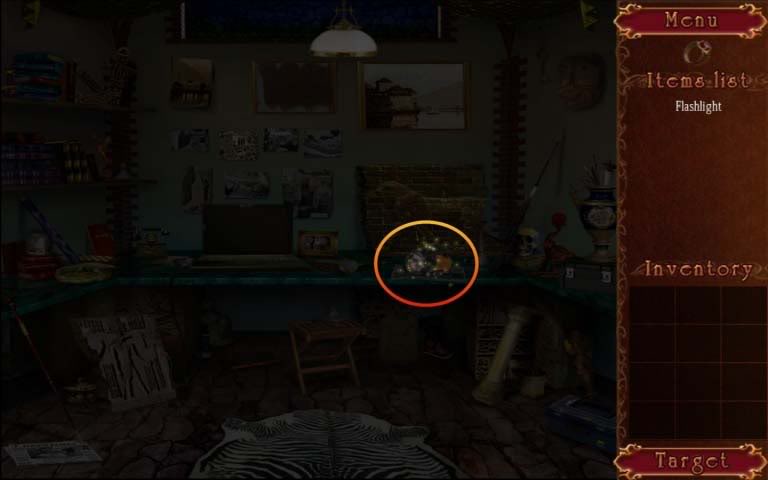
Click on the laptop again, and when the light goes out, find the flashlight.
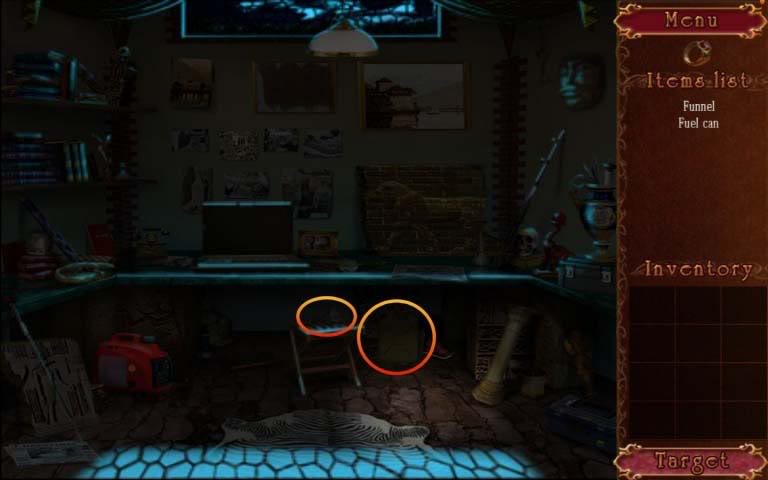
Move the plate under the desk, and click on the generator.

Find a fuel can and a funnel. Then move the funnel to the generator, followed by the fuel can.
Now zoom in on the generator again, and press the big button to turn it on.
Now that the electricity is back on, turn on the computer again.
Find the save behind the big lion stone on the desk, take the key and then open it.
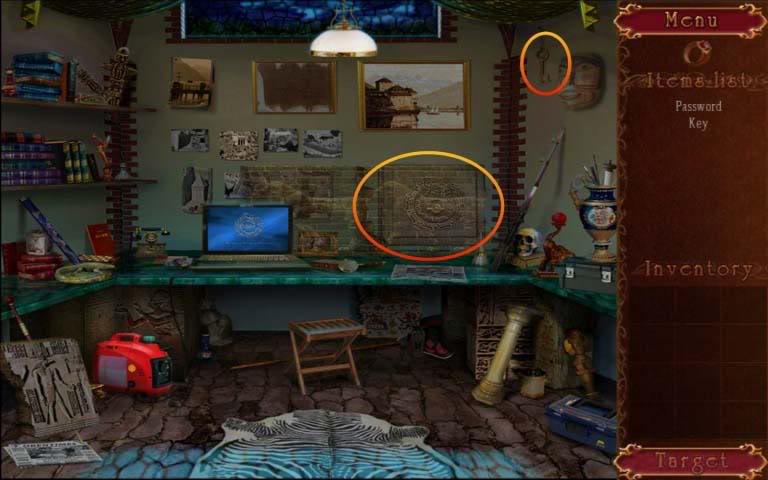
Inside the safe, swap stones to assemble the picture. If you have trouble doing so, you can also wait until the SKIP-button has filled up, and you can skip the puzzle. When you’re done with the picture, click on the crank to open the safe, and take the password.

Zoom in on the computer again, and you’ll see the password you need to enter on your left.
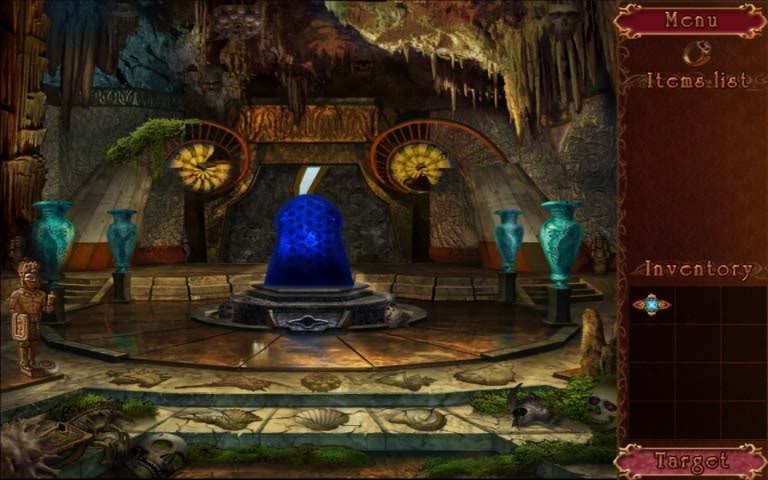
Excavation site
Click on one of the idols to examine them, to find that pieces are missing.
Click on the stairs in the background to go to the excavation site.
First, find a spade, and use it to dig in the dirt. Pick up the idol burried in the ground, and find the other 3 idol parts.
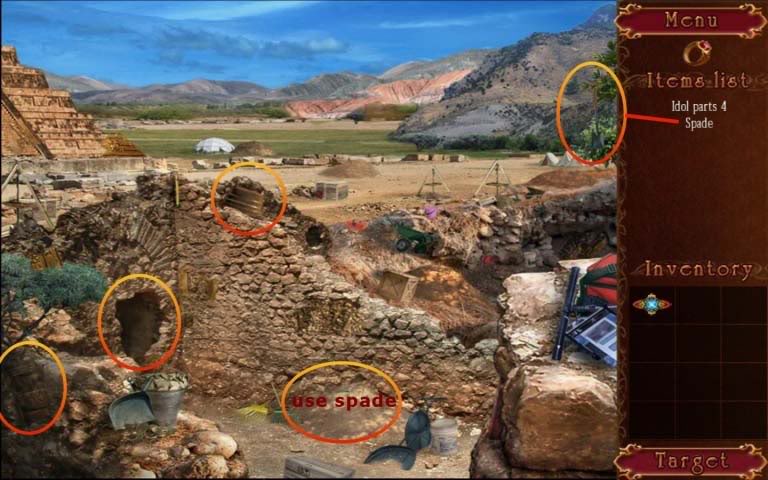
Return to the first screen, and match the missing parts with the idols.
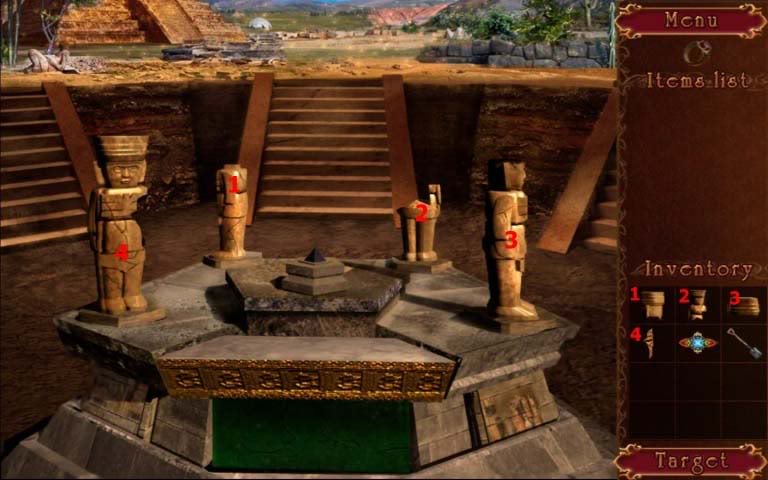
Doing so will make the platform rise.
Now you will need to click on the idols in the correct order, so they will all send their beams to the center of the platform.
The correct order is:
– click idol 2 twice
– click idol 3 twice
– click idol 1 once
– click idol 4 twice
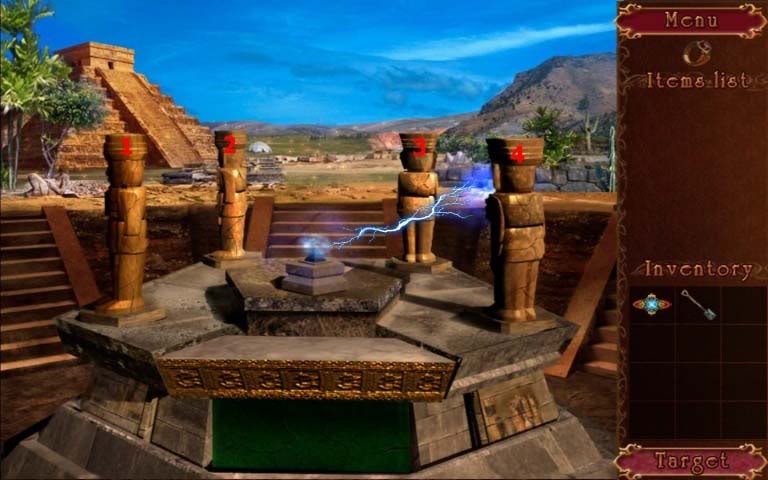
A large green stone slab will come up. Examine it, and then return to the excavation site.
Here, find the pieces of the mosaic; dig one up using the spade.
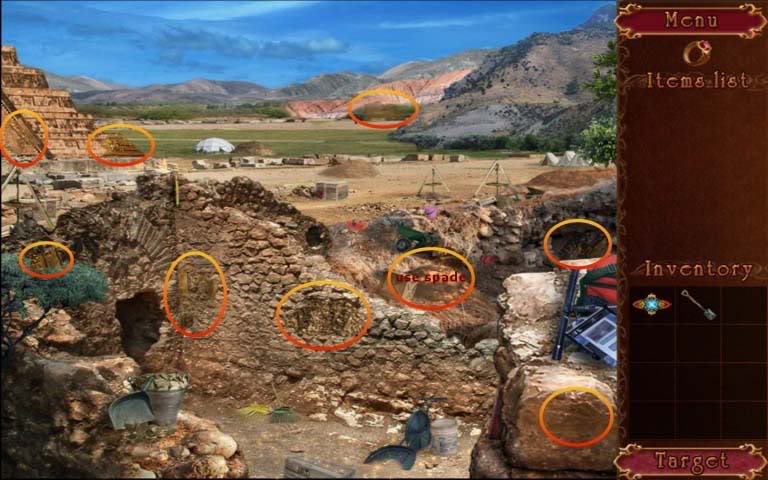
Return to the idols, and put the mosaic parts on the green stone and put the mosaic back together. It’s quite easy, since you see the outlines of the parts on the green stone.
When you’ve put it back together, a slot opens in the top; take the amulet from your inventory, and put it on the top slot.
The stone slab will open up, and show a skeleton holding a piece of stone. Take it, and ready for your next journey.
Prepare for the trip
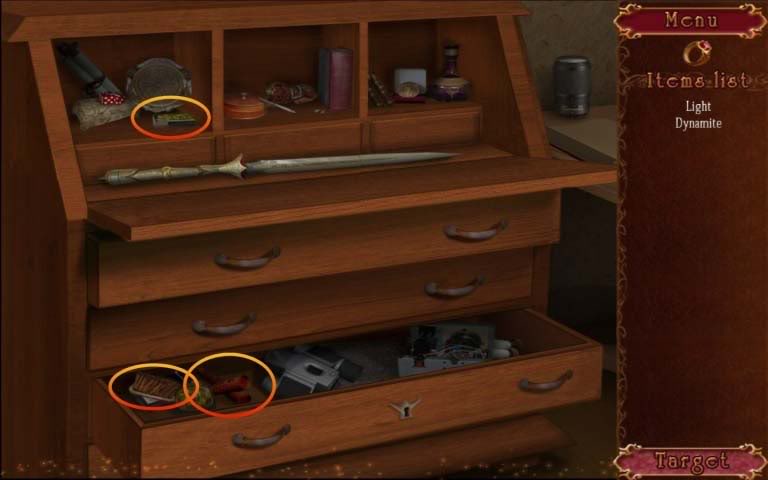
Click on the desk, and open the top drawer. Click on the locked drawer, and return to the room overview.
First click on the microscope in the back, then click on the teddy bear, and then pick up the knife in front of the teddy bear.
Cut open the teddy bear to find the key, and return to the desk drawer
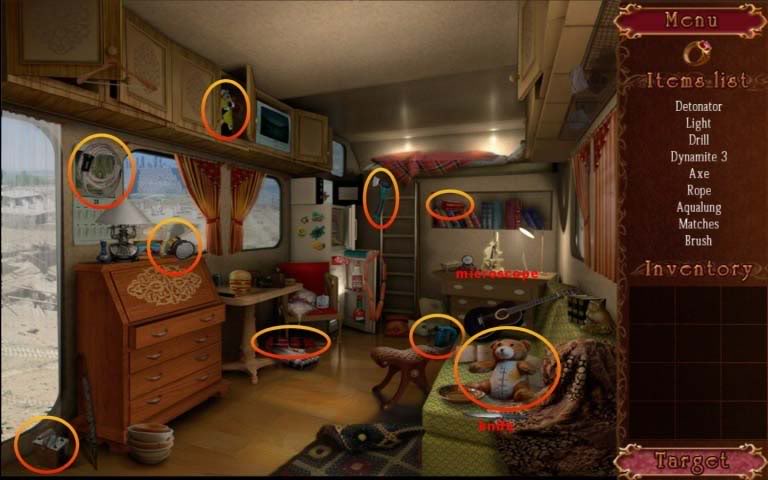
Take the key and use it to open the drawer, and take all the listed items from the drawer.
Now return to the room overview, and find all other items.
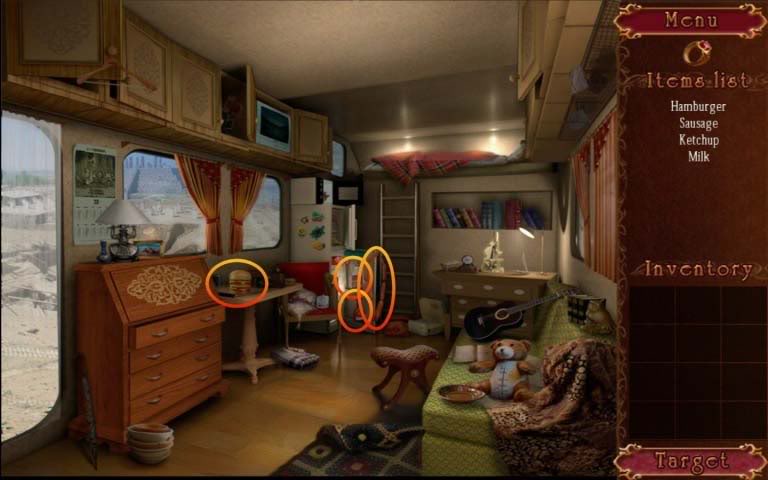
Last before you leave, find 4 food items.
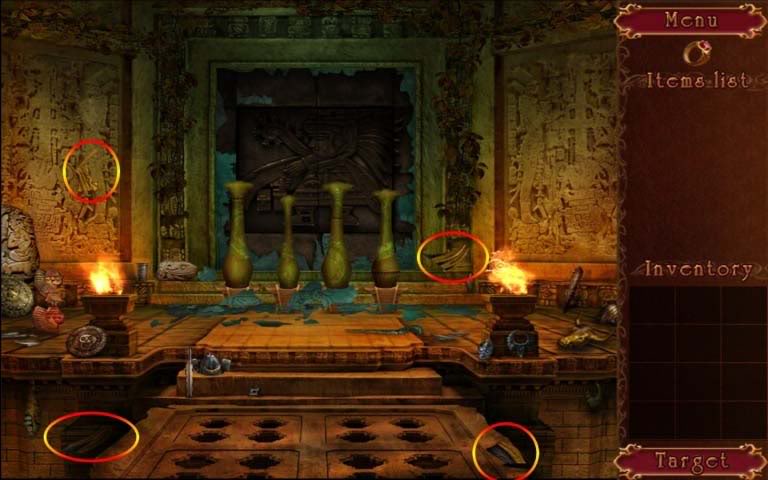
Temple door
Use the sword to slash away the vines from the door.
Pick up the 3 colored key-stones.
Use the hammer to break the green statue to find the 4th key stone.
Use the sword on the purple flowers to find the 5th key stone.
Move the mask in front of the door to find the 6th key stone.
Place the key stones in their corresponding slots on the door.
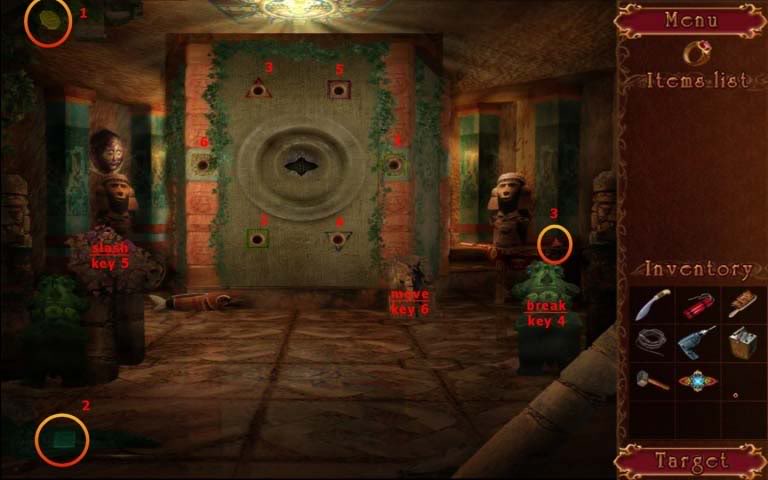
Now zoom in on the center slot, and use the brush to dust it off.
Place the amulet in the center slot, and the door will open… only to fall shut again.
Use the drill on the door to drill holes, and put dynamite in the holes.
Put down the detonator and connect a cord to it; now blow up the door.
Inside the temple
Go through the door.
Pick up the pitcher of lamp oil, and use it to fill the oil lamps on the wall.
Now use the matches to light the oil lamps.

Slash away the vines on the right, in the back, to reveal a plaque.
Find 4 masks, and place them on their corresponding pedestals.
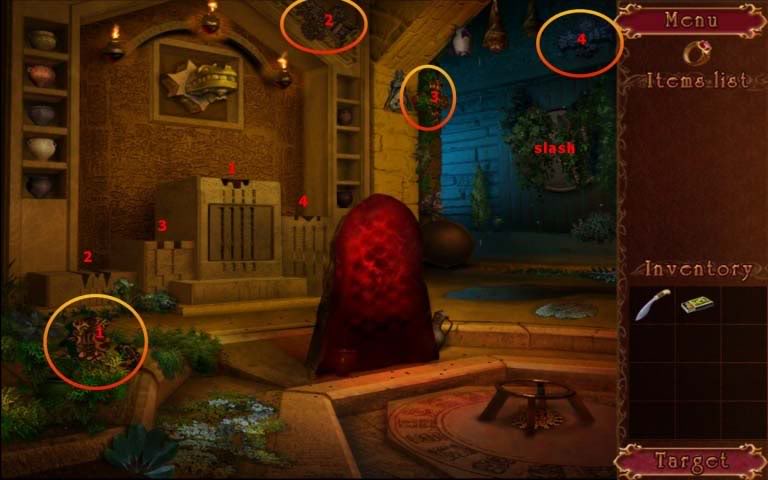
Inspect the pedestal slot that just opened, and find all the ingredients and pots for the rite.
Use the pitcher on the puddle of water in the back to fill it.
Place the kettle in front, and light the fire under it.
Put the water in the kettle, followed with the herbs and the pots.
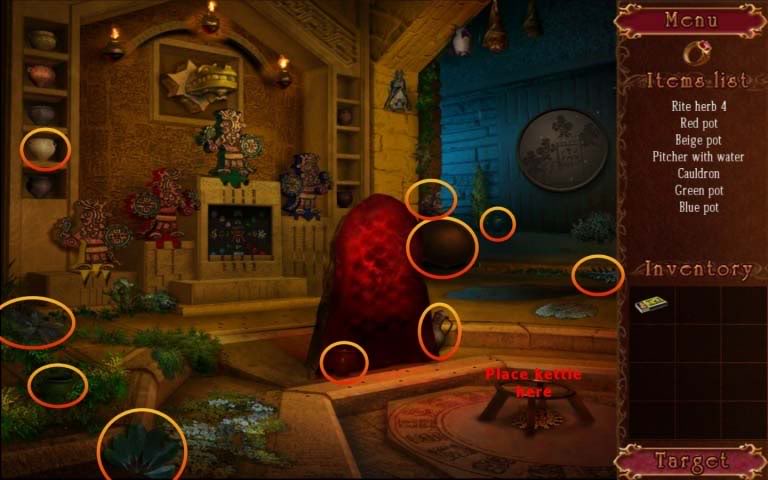
Click on the red stone in the middle, and play a matching mini-game to finish the chapter.
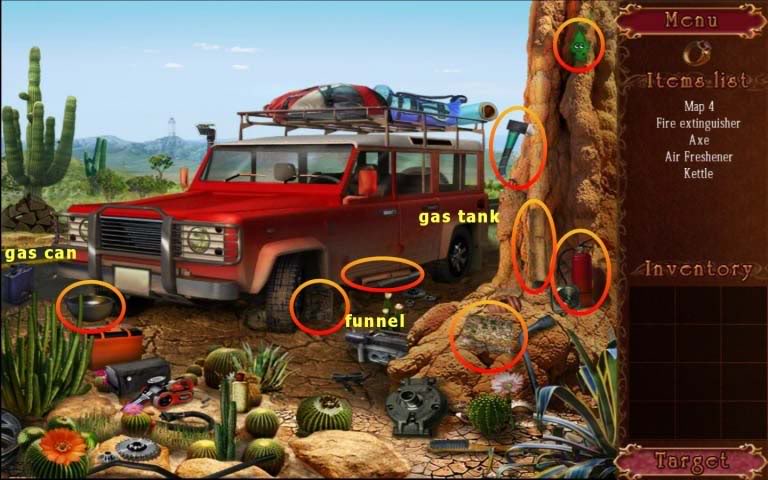
Texas
Find all the car parts lying around.
Take the air pump, and use it to pump up the flat rear tire.
Click on the back packs, and then on the bee hive.
Get the logs and the water, and place the logs under the beehive, and light it with the matches.
Throw the water over the fire, and the smoke will scare off the bees.
Now take the bee hive, and click on the back packs to lure the ants away, and grab the bag packs.
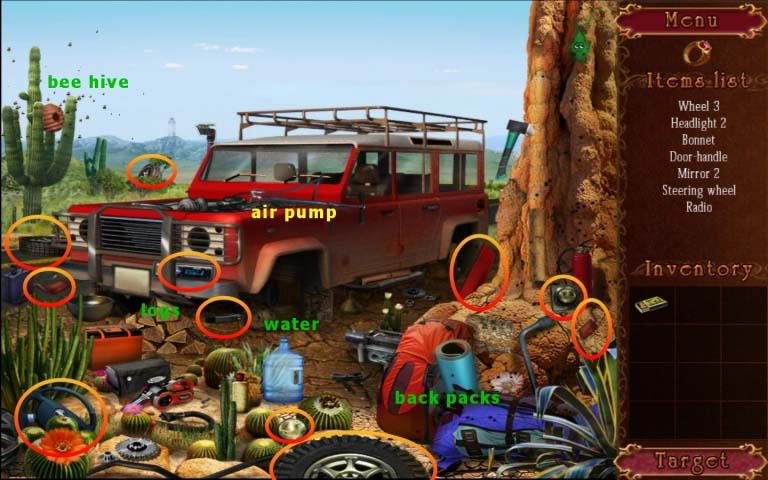
Find all your items lying around.
Click on the car to try and start it.
Now take the gas can and the funnel, put the funnel on the gas tank of the car and refill the car.
You will now be given a puzzle with the spark plugs of the car.
The sollution below is the so many-th plug from the left, recounting for every step.
5, 3, 4, 2, 3, 1, 2, 3, 4, 6, 5, 3, 4, 2, 3, 4, 5, 6, 4, 5, 3, 4
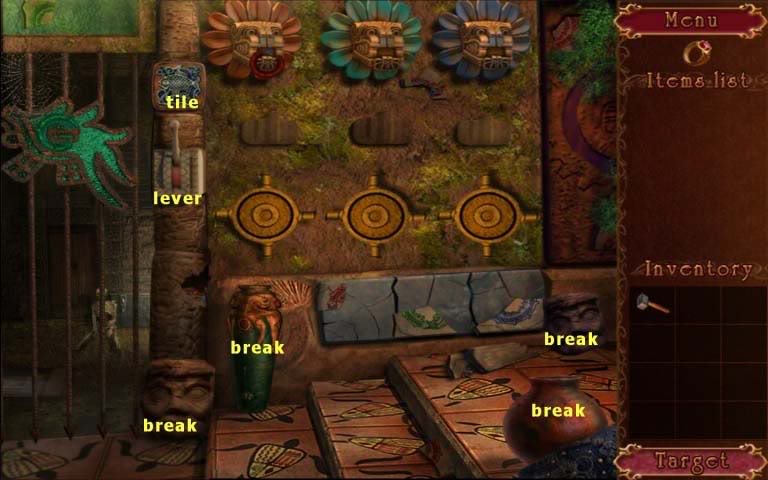
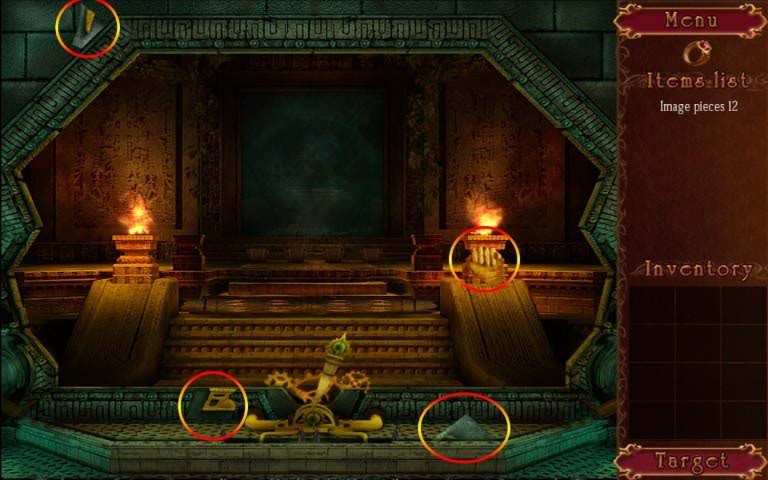
Pilot town temple
Use the hammer to break the 4 pots.
Click on the tile next to the door, and pull the lever.
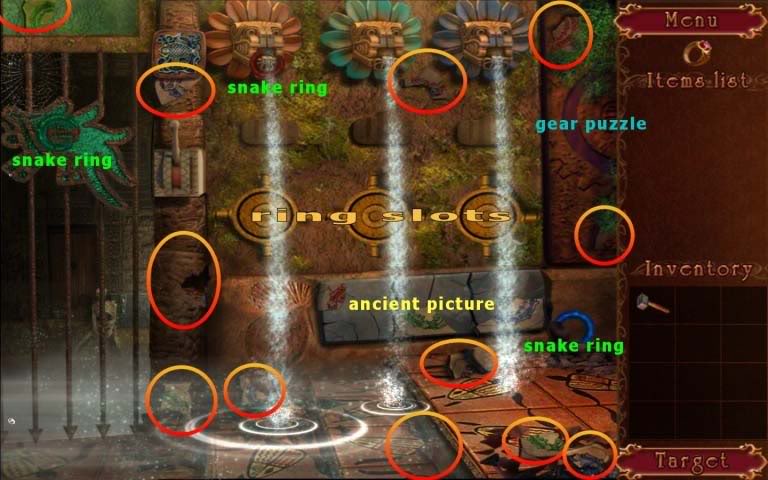
Inspect the ancient picture, find the 12 missing parts and place them back.
Now find the 3 snake rings, and place them in the ring slots: first red, second green and third blue.
Turn the red snake ring wheel 6 times, the green wheel 4 times, and the blue wheel 6 times.
Now that you’ve stopped the waterflow, try the lever again; it doesn’t work.
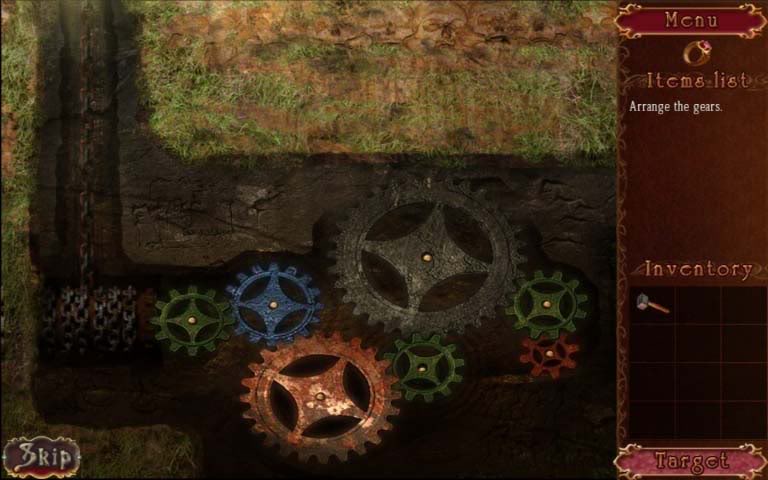
Click on the right side to start a gear puzzle.
Re-arrange the gears to get the mechanism working.
Go through the gates.
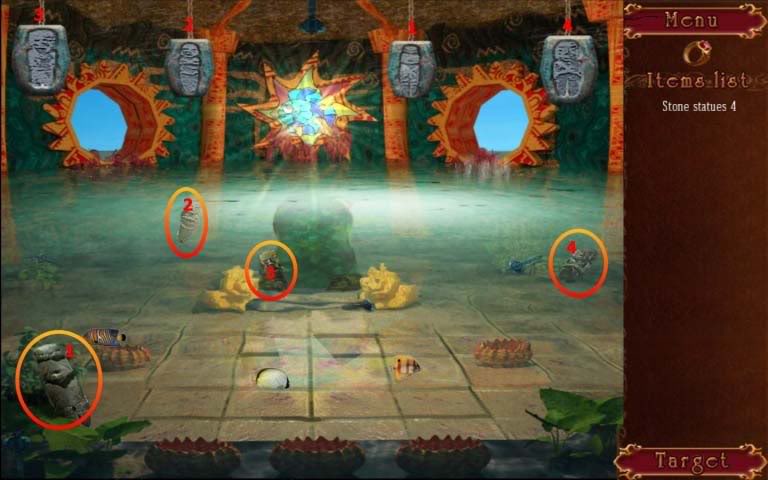
In the next room, click on one of the stones hanging from the ceiling, and locate the 4 stone statues.
When you’ve found the 4 statues, combine them with their corresponding stones.
Now click on one of the bowls, and find all the levers. These will automatically be combined with the bowls.
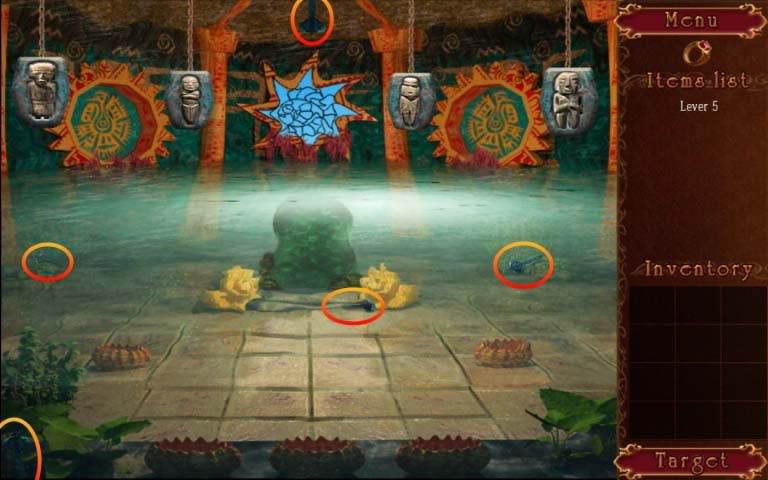
In the mini-game that is activated, click on the second and the fifth lever (from left to right), to darken all the floor tiles.
Find 15 grits (stained glass pieces) and click on the broken stained glass window.
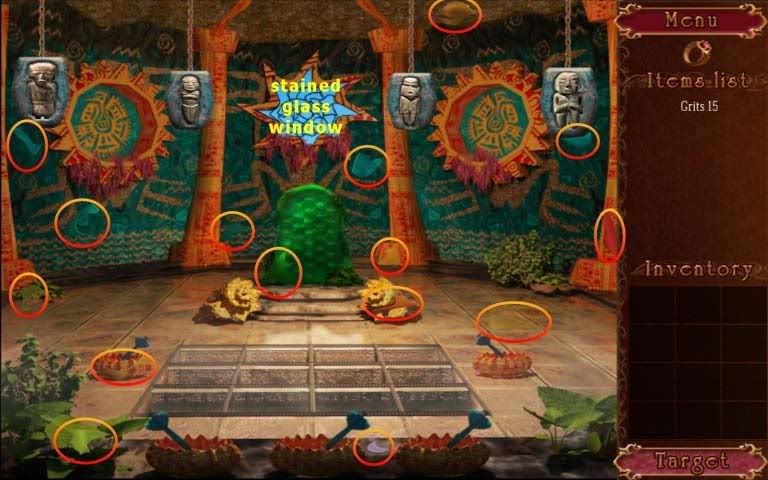
Now put the broken stained glass window together.
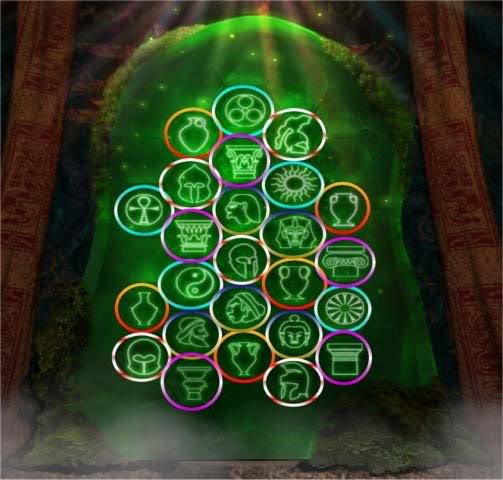
Go back, and click on the large green stone in the center.
The goal of this mini-game is to group the items together in groups of 5.
So click each 5 items of group, group by group.
In the sollution below, each group is indicated by a number; so first find all the 1’s, then all the 2’s, etc..
Atlantean treasurey
Use the machette to cut away the plants that are blocking your way, and pick up your baggage from the boat.
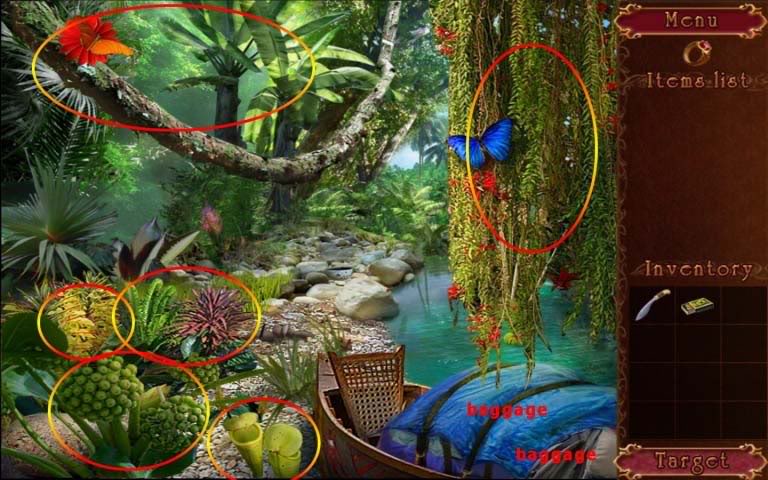
Find all the items listed, and then use the air pump to pump up the air bed.

Find the items needed to make a fire and boil water.
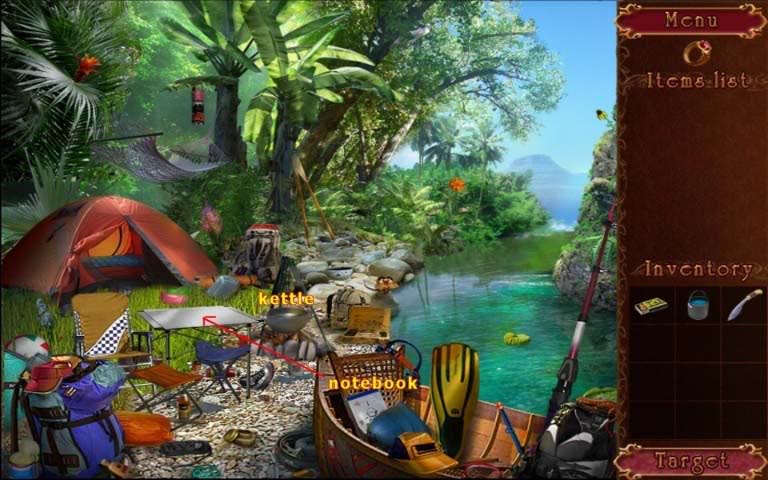
Take the bucket and fill it with water from the lake.
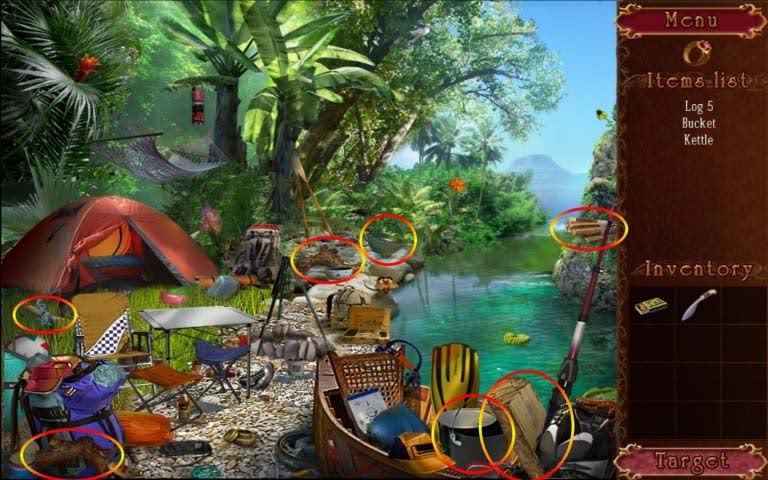
Use the bucket of water to fill the kettle, and then light the wood on fire.
Find the notebook, and when it moves to the table, read it to read the recipy.
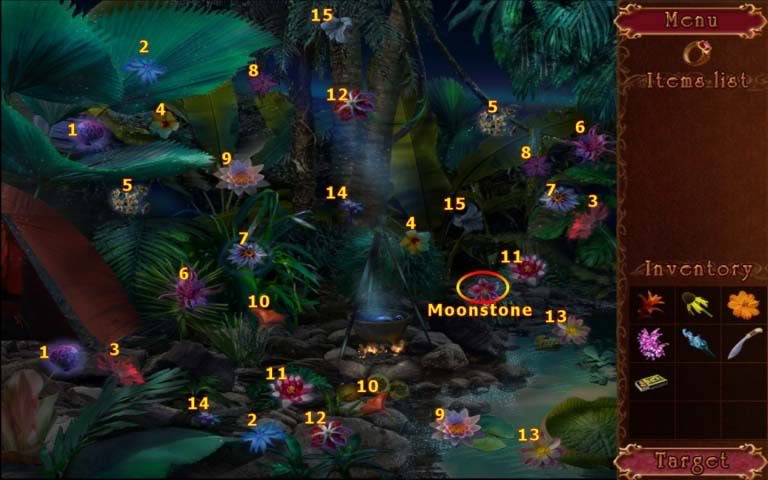
Find 5 flowers.
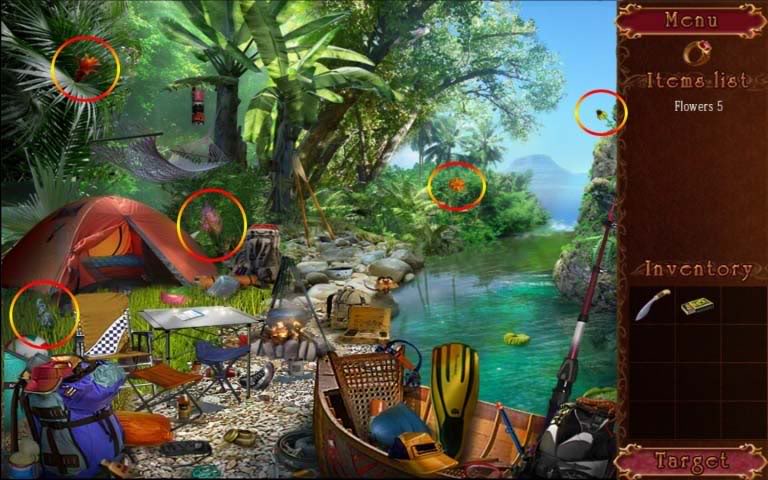
Put the 5 flowers in the kettle to start a mini-game.
Match the pairs of flowers, until only the moon flower is left.
Take the moon flower and add it to the kettle as well.
Temple
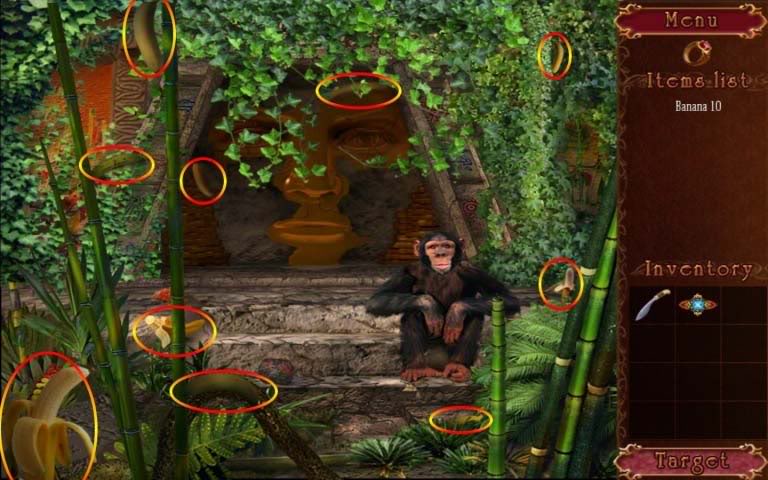
Find the monkey 10 bananas, and feed them to him.
Use the machette to cut your way through all the plants blocking your path.
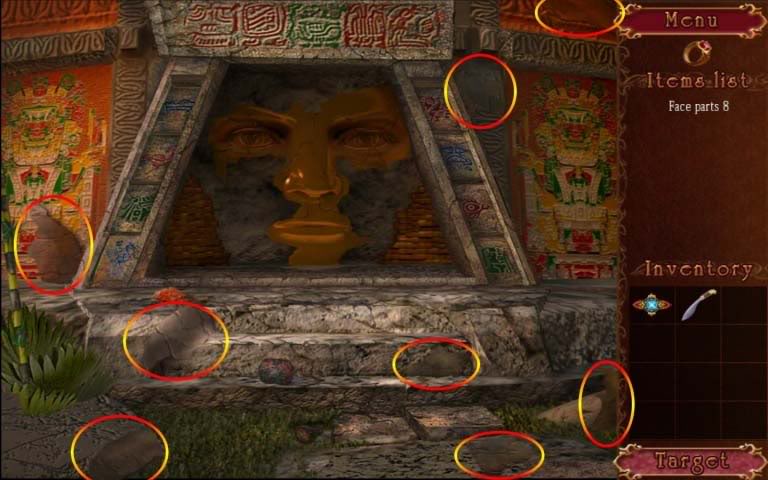
Now find the 8 face parts, and put them back on the face on the door.
Now you will be given a memory mini-game to play.
Mimic the way the buttons are being pressed.
Using the image below as a reference, the correct sequences are:
first sequence: 3 – 2 – 5 – 6
second sequence: 1 – 2 – 4 – 3 – 5
third sequence: 3 – 8 – 4 – 6 – 5 – 7 – 3
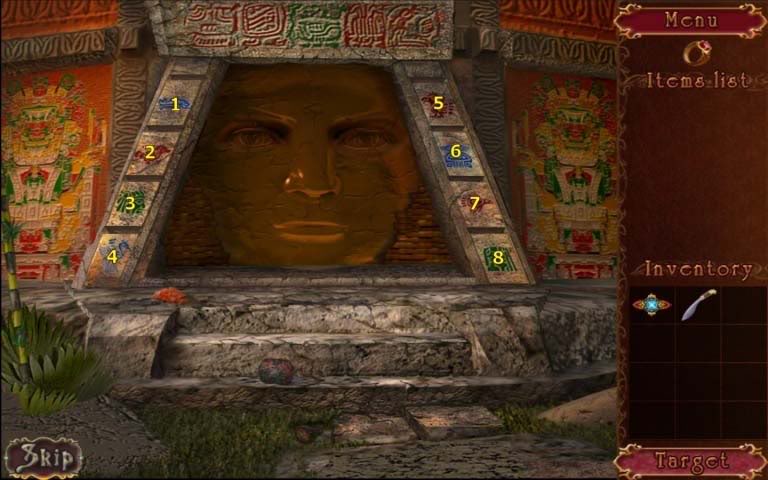
When you’ve completed the mini-game, the door will open its mouth.
Put the amulet in its mouth to open the door, and enter the temple.
It’s dark inside. Use matches on the torches, as marked below.
When the lights are on, zoom in on the shrine to look at the scripts.
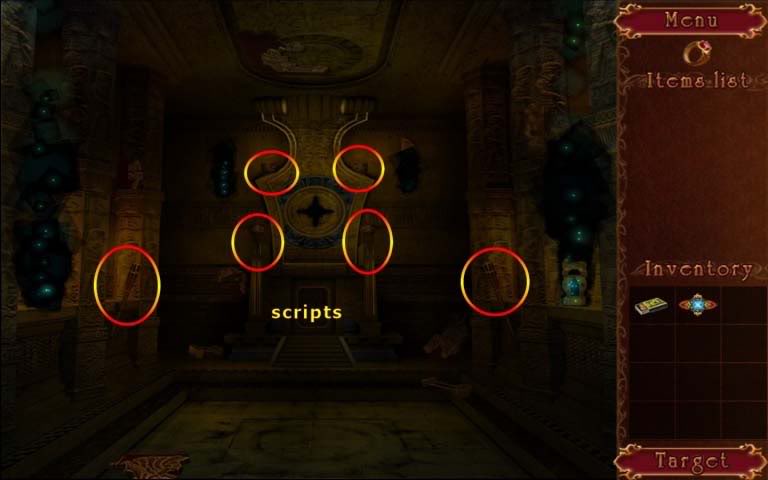
Find all the mosaic pieces, and click on the mosaic to puzzle them back together.
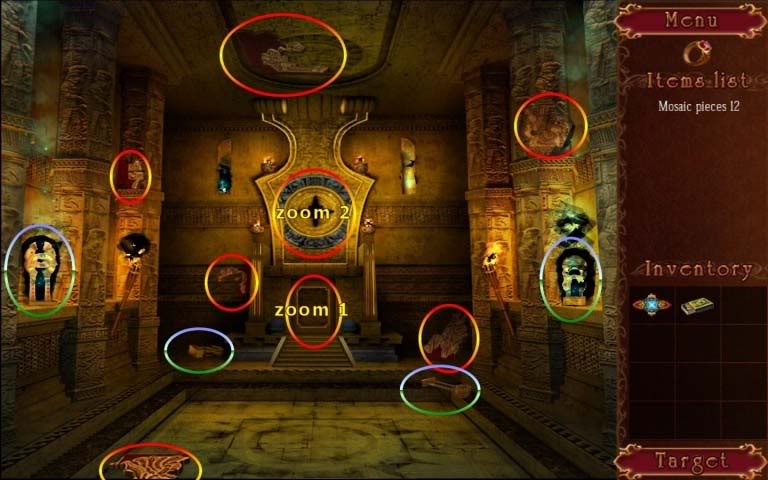
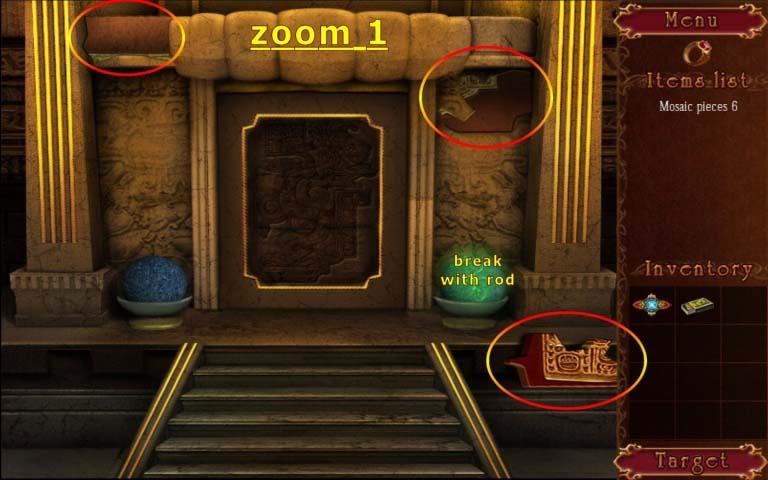
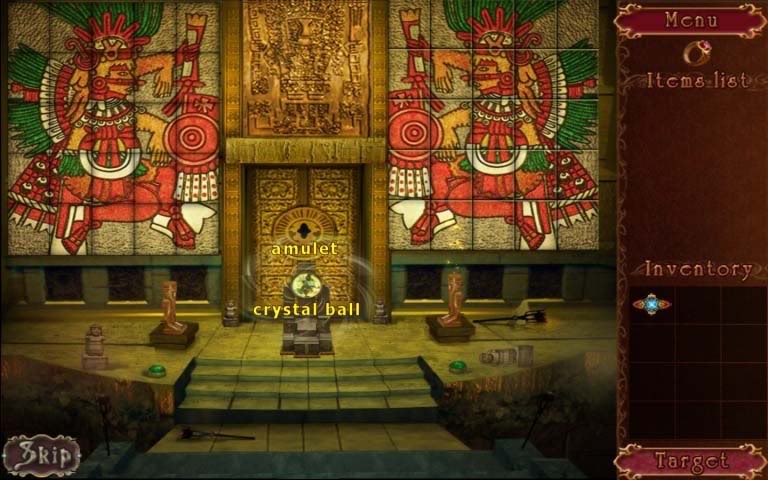
When the mosaic door opens, grab the rod and the star.
Break the orb on the right, and grab the crystal ball inside.
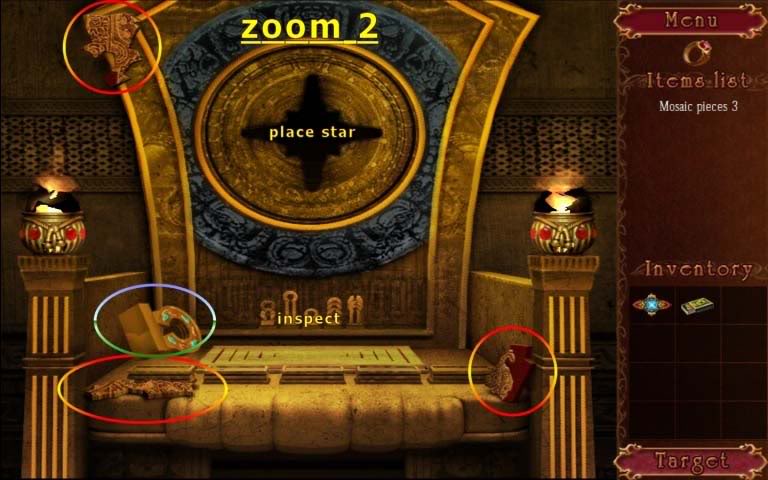
Go back up (to zoom 2) and have a look at the statues below the slot.
Now find the 5 statues lying around in the temple (marked in blue/green).
Go back to zoom 2, and order the statues as depicted in the back.
Place the crystal ball on the steps that raise, and place the star in the slot above.

You will be taken back to the main temple scene.
Go down the stairs that have just appeared.
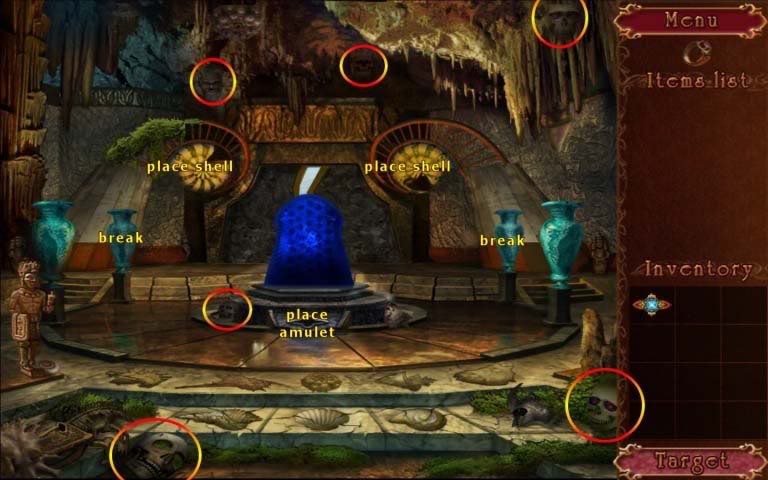
Check the shells on the floor, and collect the 8 shells lying around.
Place them in their corresponding slots on the floor, and a mini-game will reveal on the right side of the scene.
Rotate the rings to complete the image, and the skulls will glow up. You need not worry about how the image is tilted, just line up the rings.
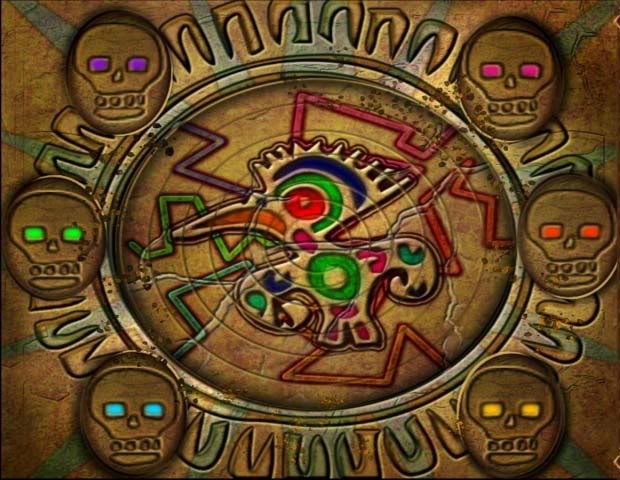
Go back to the main scene, and find the 6 skulls.
Now return to the mini-game, and place the 6 skulls in their corresponding colored slots.
Grab the magic hammer that is revealed, and go back to the main scene.
Use the magic hammer to break the vases, and grab the shells, and return them to their places.
Place the amulet in the slot under the blue stone, and click on the blue stone to start a mini-game.
Find the matches, and finish the chapter.
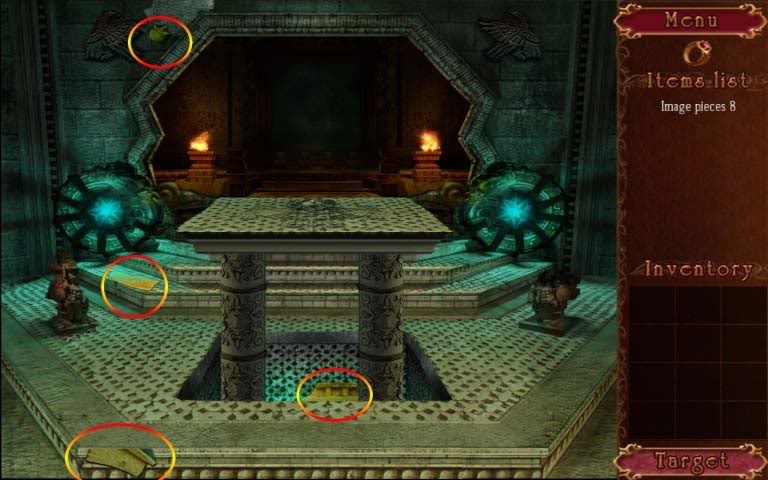
Temple of the moon and the sun
To open the temple, find the matching tiles.
Check the indentation in the floor, find the fret and put it in to create a set of stairs.
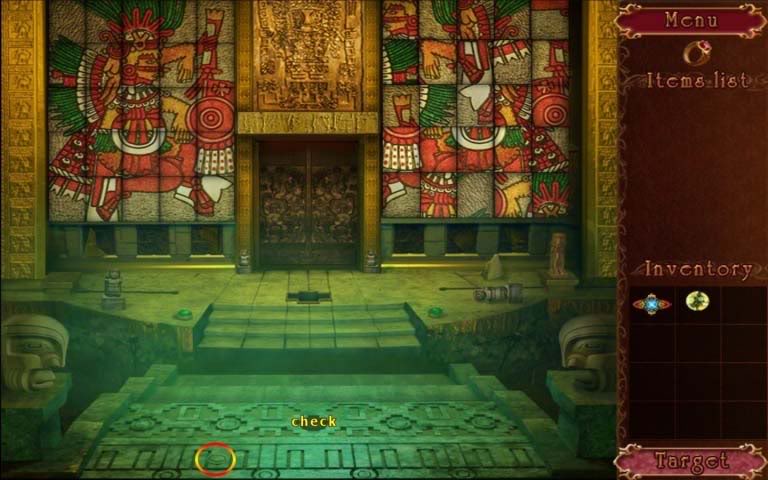
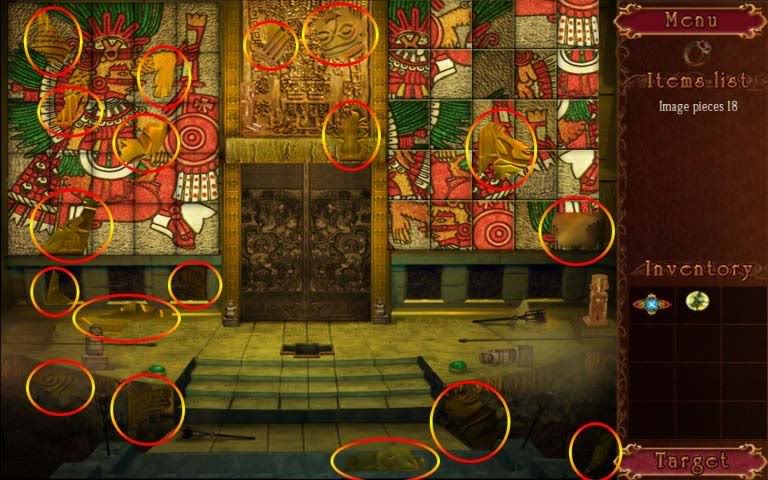
Go down and check the double doors.
Find the 18 image pieces and place them on the door to start a mini-game.
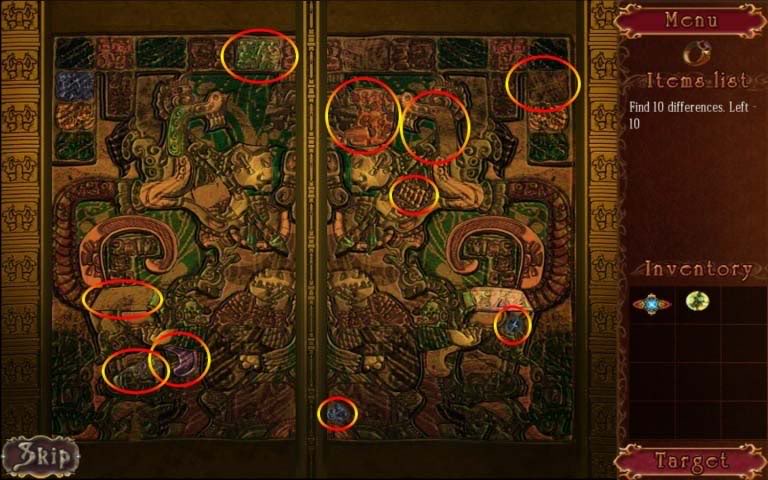
Find 10 differences between the left side and the right side.
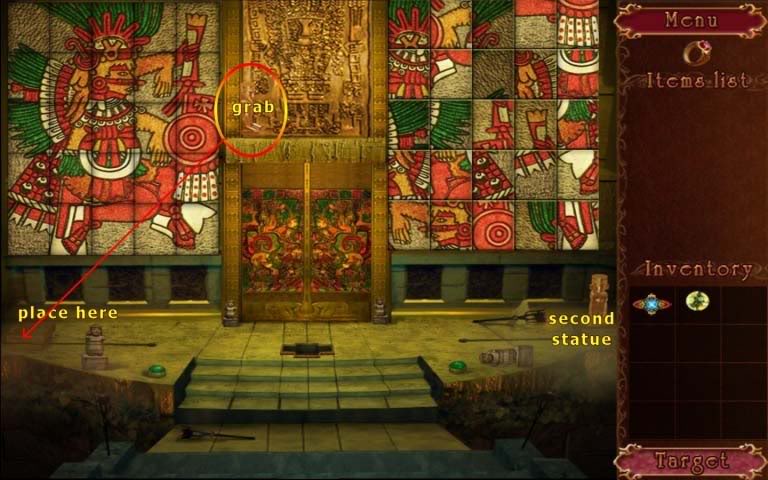
Go back to the main scene, and get the statue from above the doors.
Place it on the left, and turn it once. Turn the second statue three times, so that they face eachother, and a stand will appear in the middle.
Place the crystal ball on the stand, and re-assemble the picture on the right to be correct.
Place the amulet in the slot in the doors and when it has opened, go through.
Use the fire extinguisher on the flames, and continue.
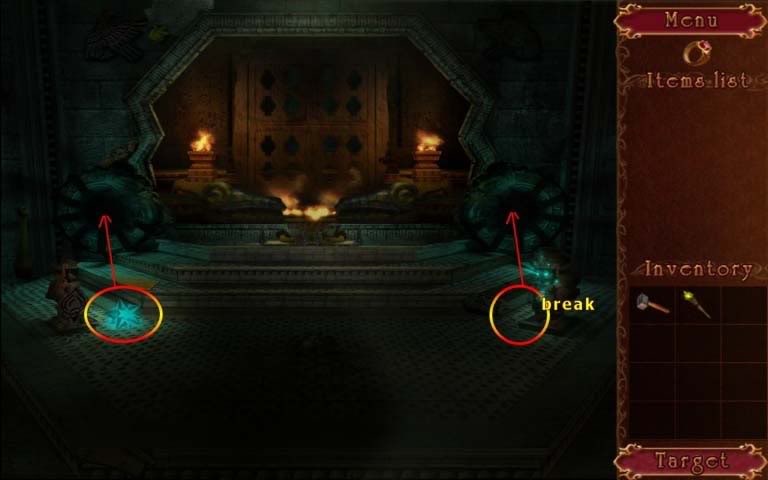
In the dark room, click on the right statue, and gates will raise.
Use the magic hammer to break the right statue, and pick up both glowing stones.
Place them in the slots next to the gates to light up the room.
Click on the floor in the middle of the room, and an altar will raise.
Get the stone eagle half from it, and place it on the wall on the top right.
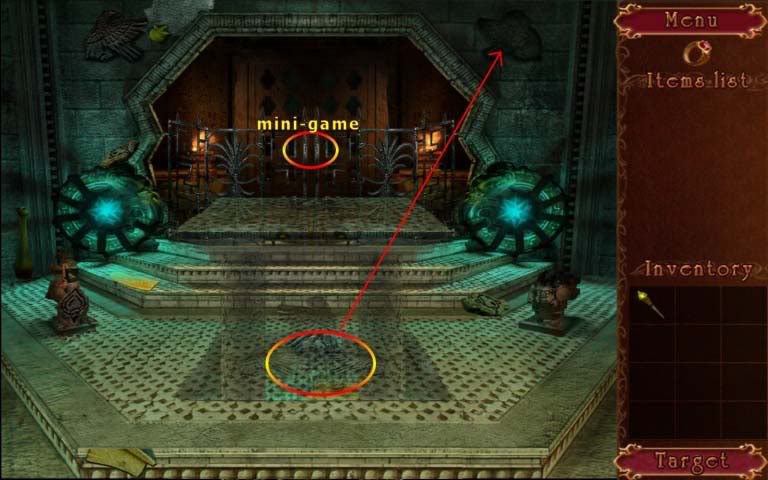
Zoom in on the gate in the back, to start another mini-game.
Click on the top-left lever, the bottom-left lever, and the bottom-right lever, to open the gate.
Use the magic rod on the gears to stop the fire breathing dragons.
Take the chrystal fish and check the door.
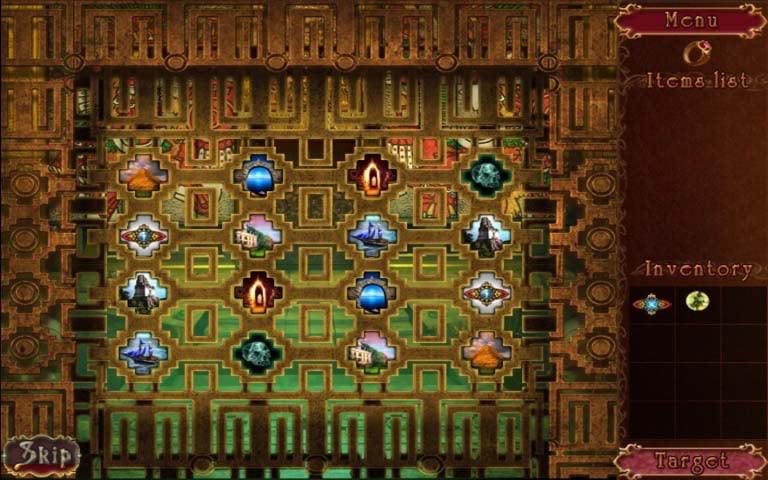
You will need to find 12 puzzle parts: first, find 4 in this scene.
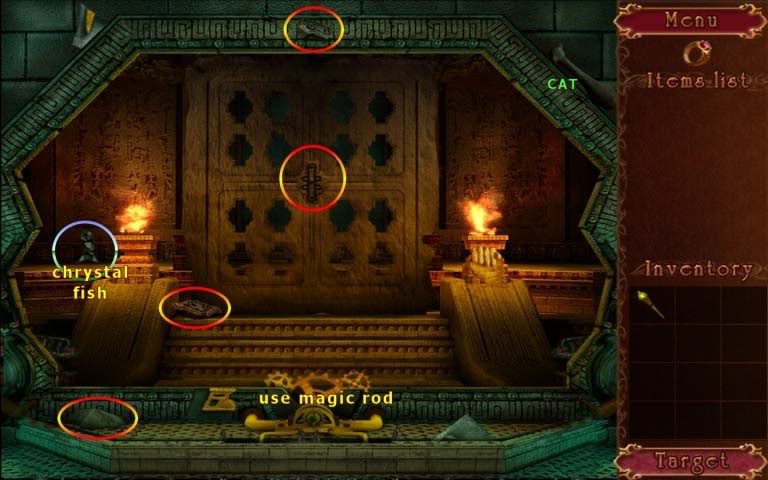
Go back to the second scene, raise the floor again, and find 4 more puzzle parts.
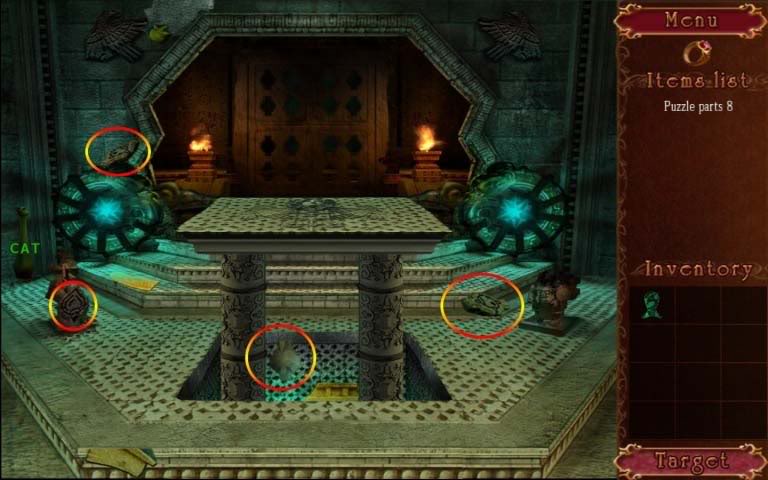
Finally go back to the first room, and place the chrystal fish in the statue on the left, and find the last 4 puzzle parts.
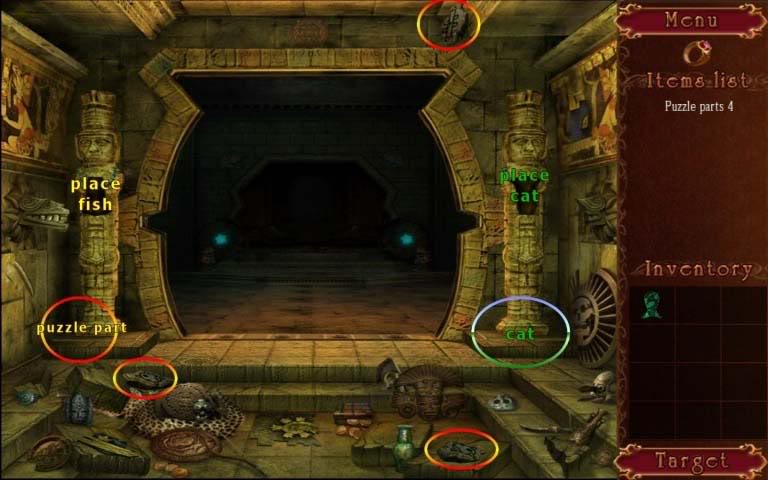
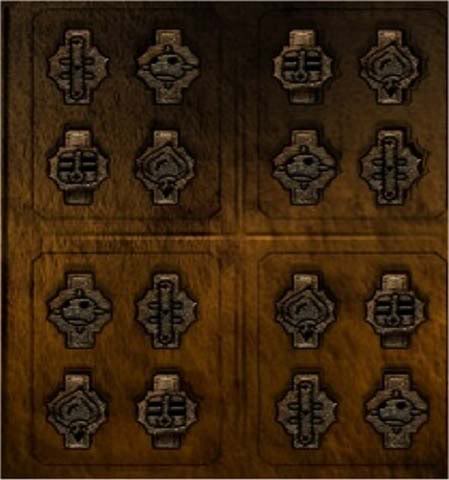
Go back to the door, and put the puzzle parts in the door.
Then arrange them according to sudoku rules: no picture should be repeated in the same row, column, or square. Click on an empty slot to select which stone you want to use there.
When the door has opened, go through.
Pick up the chrystal cat, and go back to the previous rooms, to find 4 cat statues.
In the first room, place the chrystal cat in the right statue, to find the 4th cat statue.
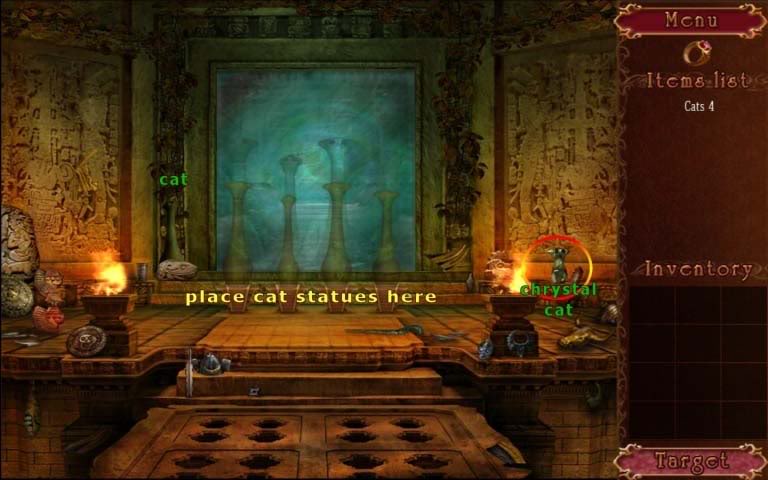
Return to the mirror room, and place the cats on their spots in front of the mirror.
The mirror will explode, revealing another mosaic. Check the mosaic.
Find the 12 image pieces in all the rooms.

Now return to the mosaic, and move the pieces to it to start the last mini-game.
Piece together the mosaic to finish the game.


More articles...
-
Best Horror Games On Itch.io – July 2026
Across a bounty of subgenres. -
Haze Seas Accessories Tier List [Best Accessories to Equip]
The accessories with the best stat buffs in Haze Seas.