
Best Horror Games On Itch.io – July 2026
Across a bounty of subgenres.![Haze Seas Accessories Tier List [Best Accessories to Equip]](/wp-content/uploads/2026/07/haze-seas-accessories-tier-list.jpg "Haze Seas Accessories Tier List [Best Accessories to Equip]")
Haze Seas Accessories Tier List [Best Accessories to Equip]
The accessories with the best stat buffs in Haze Seas.
![[Roblox] Evomon Shiny Hunting Guide – Including Prismatic and Pris Shinies!](/wp-content/uploads/2026/06/evomon-shiny-hunting-guide.jpg "[Roblox] Evomon Shiny Hunting Guide – Including Prismatic and Pris Shinies!")

1 Moment of Time: Silentville Walkthrough
Welcome to the 1 Moment of Time: Silentville walkthrough on Gamezebo. 1 Moment of Time: Silentville is a hidden object game created by 2 Monkeys. This walkthrough includes tips and tricks, helpful hints, and a strategy guide on how to complete 1 Moment of Time: Silentville.
Share this


- Prefer Gamezebo on Google

Game Introduction – 1 Moment of Time: Silentville
Welcome to the 1 Moment of Time: Silentville walkthrough on Gamezebo. 1 Moment of Time: Silentville is a hidden object game created by 2 Monkeys. This walkthrough includes tips and tricks, helpful hints, and a strategy guide on how to complete 1 Moment of Time: Silentville.
General Tips
- You can choose casual or challenging mode. In challenging mode, interactive spots are not indicated with sparkles and the hint and skip buttons take longer to charge.
- An eye icon means you can inspect an object more closely.
- A hand icon means you can pick up an item for your inventory.
- A rotating gears icon indicates an interactive place that requires an action.
- An ornate arrow shows where you can exit to another scene. Note that doors need to be open before you can move through them. Hover your cursor over a door to open it, then click to walk through.
- The journal in the bottom left of the screen keeps track of your progress. You can also refer to the journal for some extra hints on things you need to do.
- Early on in the game you will find an interactive map, which will be placed next to your journal in the bottom left of the screen. Areas you haven’t yet explored will be covered with clouds. Moving your cursor over the map will show you the main areas of the game. Each of those areas consists of several different scenes. Clicking on one of the areas will take you to the first scene of the area. You will still need to walk to the other scenes yourself.
- In this game, hidden object scenes (HOS) are very interactive. Most items require some kind of action; for example you need to put two items together (like knitting needles and a ball of yarn to make a scarf) or you need to alter the object (like setting the hands on a clock). Items that can be picked up for use are indicated with a hand icon. Those that need to have another item used on them are indicated with the gears icon. Note that some items still need to be manually picked up after you’ve completed them. Items listed in blue are complete and can be picked up. However, they could still be hidden inside a drawer or a cabinet.
- Clicking the hint button will instantly take you to a location that requires the next action. Simply moving to another area does not “use up” the hint and you won’t need to wait until it recharges. A hint is only used up if you use it to find the interactive place in your current scene.
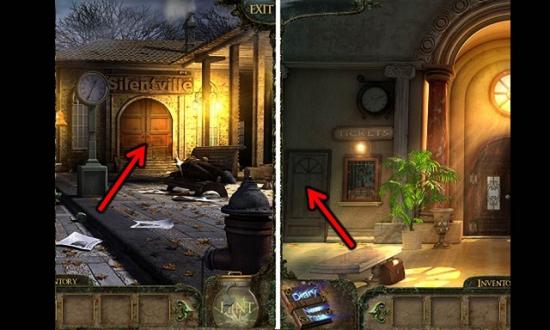
The Train Station
- Click anywhere on the screen to get some lightning and a scene where you look at your hands.
- Explore the platform, but you won’t be able to do anything here until the end of the game.

- Put your cursor over the station doors to open them and then click to open.
- Talk to the security guard.
- Open the door to the ticket office and go in.
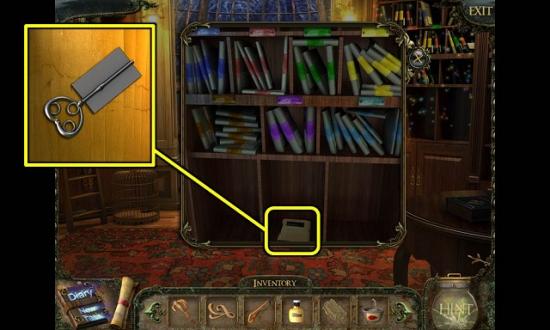
- Play the HOS in the cupboard.
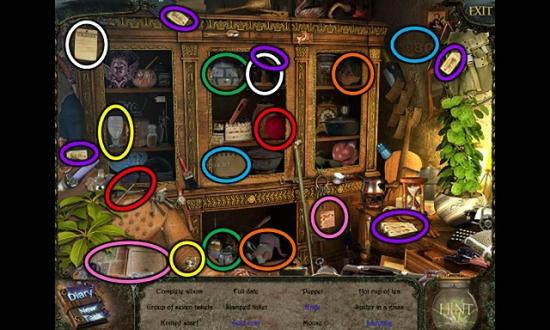
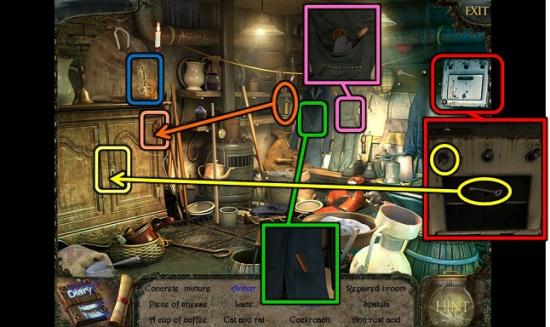
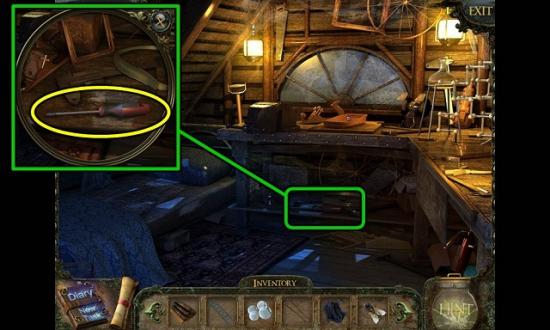
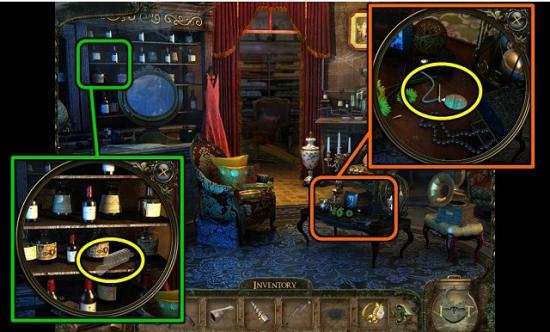
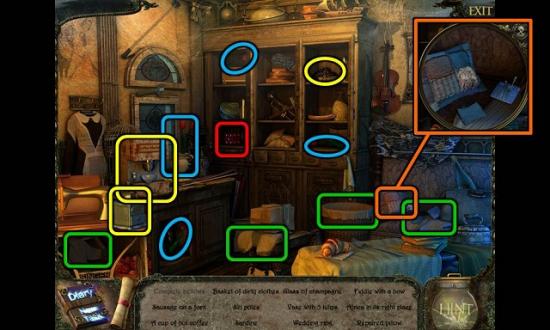
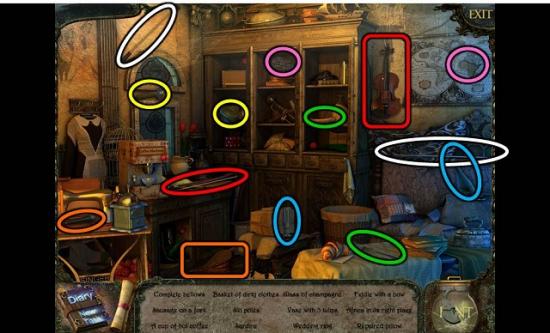
- The gold coin is on the leather chair. The ladybug is in the plant. The mouse is inside the umbrella on top of the cabinet. Put the stamp on the album to complete the album (pink). Put the spider in the glass (yellow). Put 1980 on the calendar (blue). Put the knitting needles on the ball of yarn in the middle cabinet to knit a scarf (red). The knife is in the same cabinet. Pick up the kettle in the middle top compartment and use it on the cup in the middle bottom compartment (green). Put the doll’s head from the top right compartment on the puppet body in the middle bottom compartment (orange). Stamp the ticket with the stamp from the top middle compartment (white). Finally, find all the tickets and put them together on the desk (purple).
- When you’re done you get a KNIFE.
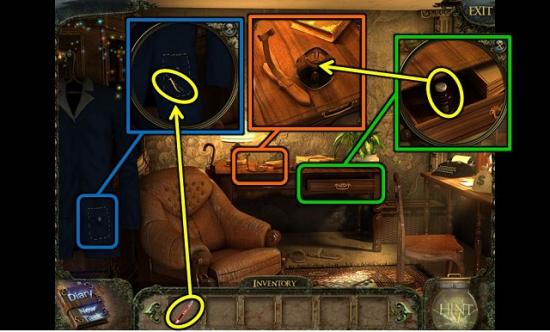
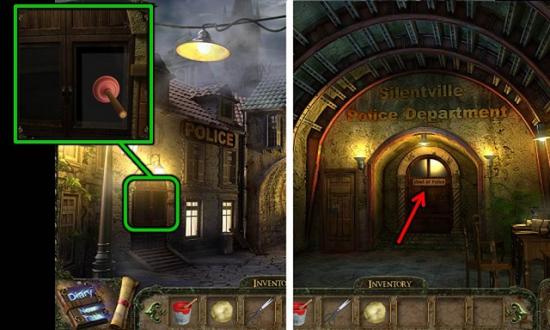
- Zoom in on the coat pocket and use the KNIFE to open it.
- Take the STORAGE KEY.
- Open the right drawer and take the INK.
- Zoom in on the desk and put the INK in the empty bottle.
- Back out to the hall and go right into the waiting area.
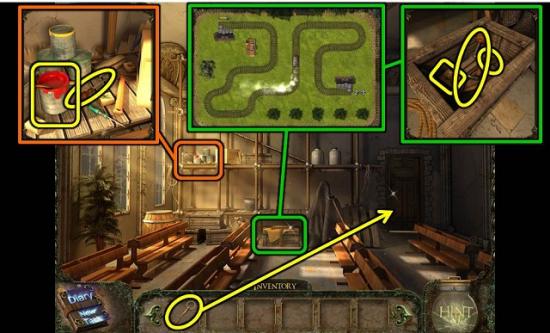
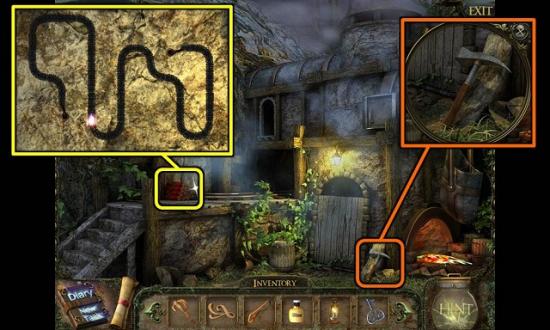
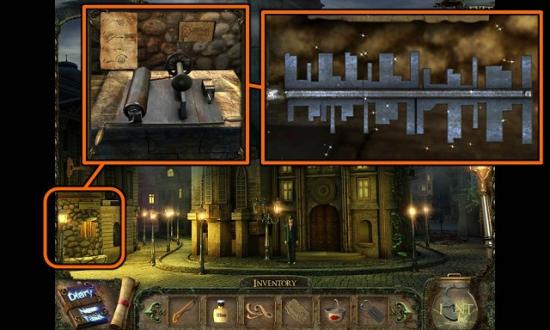
- Zoom in on the crate on the floor and click on the puzzle.
- Turn the segments of the railway until they make one long track.
- Click on the map covering the crate to get your game map, which will appear next to your journal.
- Inside the crate are SCREWS a WIMBLE and a DOORHANDLE.
- On the shelf you can find a CHISEL and some PAINT.
- Zoom in on the door and use the STORAGE KEY to open it.
- Go through the door for another HOS.
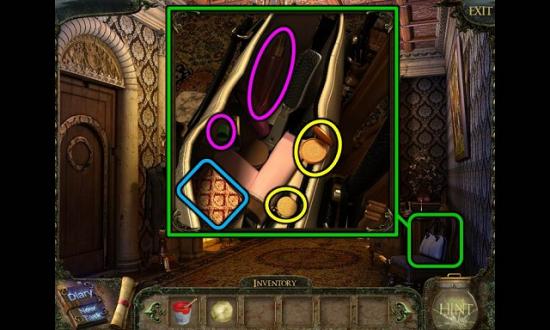
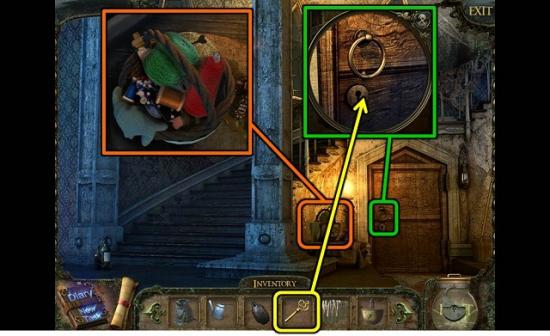
- The comb is tucked inside the coat (green); the spatula is in the pocket of the dungarees (pink). Zoom in on the strange locker top right (red), put the coin in the slot and pull down the left handle for a key (yellow). Pick up the key from the floor and use it on the cabinet door. Find the bottle of anti-rust acid (orange) and use it on the hinges of the cabinet. Pull the string on the sack of grain to spill the grain on the floor.
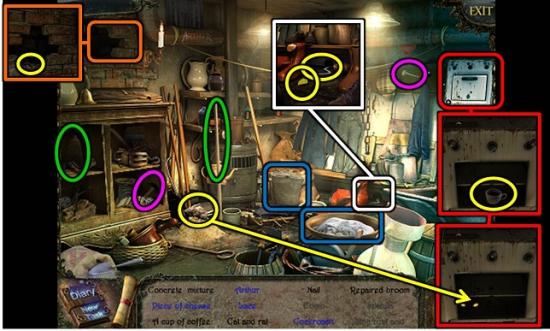
- If you’ve emptied the sack of grain the rat is now distracted so you can get the piece of cheese and lace (white). The cockroach is behind some bricks in the wall (orange). Access the locker (red) again and pull down the middle handle for the cup of coffee and the right handle for a cat. Put the rat with the cat. Use the hammer in the right side of the cabinet on the nail in the wall (pink). The broom head is in the left cabinet (green). Combine the water with the concrete in the trough (blue).
- When you’re done you get the ANTI-RUST SOLUTION.
- Back out to the hall and zoom in on the large doors.

- Take off the doorknob. Place the DOORHANDLE, put the SCREWS on it and use the WIMBLE to tighten them.
- Zoom in on a rusty hinge and use the ANTI-RUST SOLUTION on it.
- Open the door and exit to the street outside the police station.
The Police Station
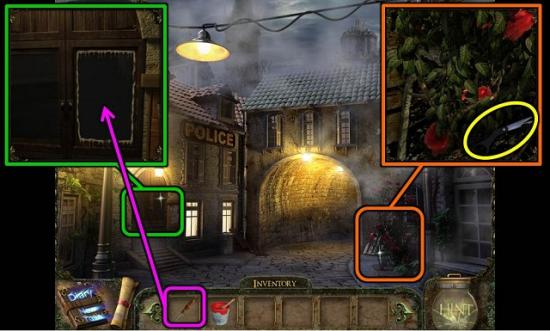
- Zoom in on the roses and pick up the SCISSORS.
- Zoom in on the door to the police station and remove the PUTTY with your CHISEL.
- Go through the arch to the square by the town hall.
- Talk to the security guard – he needs a ticket to let you into the town hall. So let’s go get one.
- Back out to the station hall and go right to the waiting room.
- Play the new HOS behind the door (this is triggered by taking the putty off the police station window).
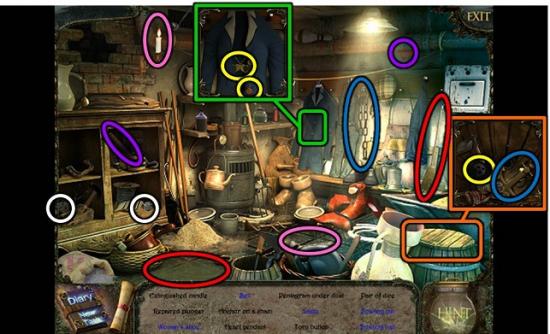
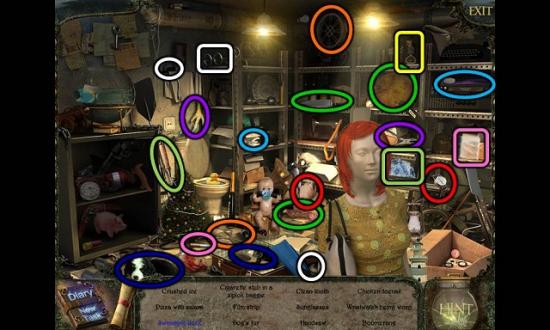
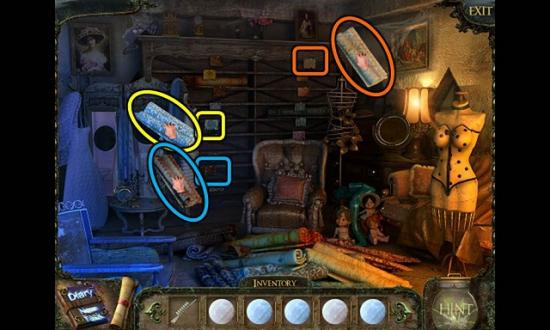
- The heart pendant and torn button are both with the blue coat (green). The bowling ball is inside the barrel (orange). Inside the barrel you will also find the anchor, which needs to be attached to the chain in the main scene (blue). Extinguish the candle with the snuffer (pink). The plunger handle is behind the right cabinet door (purple). Pick up the die in the left side of the cabinet, close the door and put it with the die in the right compartment (white). Clean the dust off the floor by the pile of grain with the broom (red).
- When you finish the scene you get the PLUNGER.
- Go back to the hall and out through the doors to the police station.
- Zoom in on the door and take down the window pane with the PLUNGER.
- Go into the police station.
- First go through to the chief of police’s office in the back.
- Play the HOS.
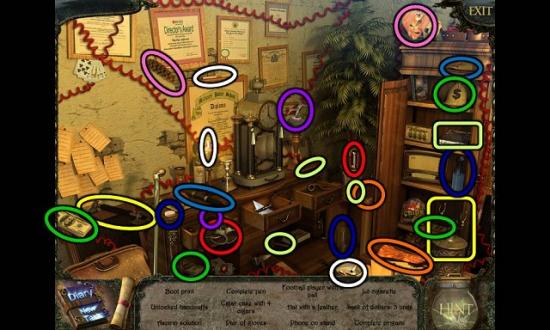
- Move the boot for the boot print. Unlock the handcuffs with the key by the plant (red). Put the two bits of pen together (light blue); combine the two gloves (orange); put the feather on the hat (pink); give the ball from the left drawer to the football player on the trophy (purple); put the receiver on the phone (yellow). Light the cigarette on top of the painting with the candle, then pick it up from the ash tray (white). Open the drawers and doors. Put three lots of cash in the money sack (green); open the cigar box and put three more cigars in it (light green). Put the aspirin in the glass and add water from the blue bottle (dark blue). Click on the origami in the middle drawer three times to complete it.
- When you finish the scene you get an EMPTY PEN.
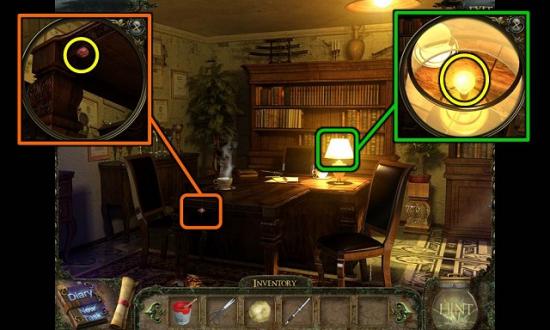
- Zoom in on the desk lamp and take the LIGHTBULB.
- Zoom in under the desk and take the CHEWING GUM.
- Back out one room.
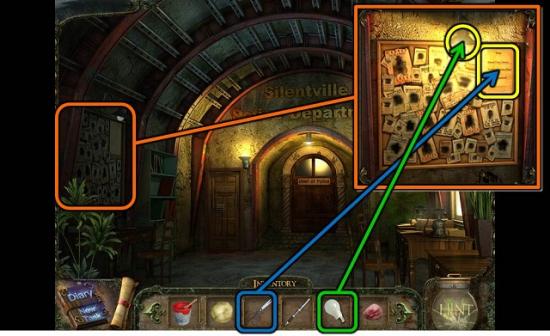
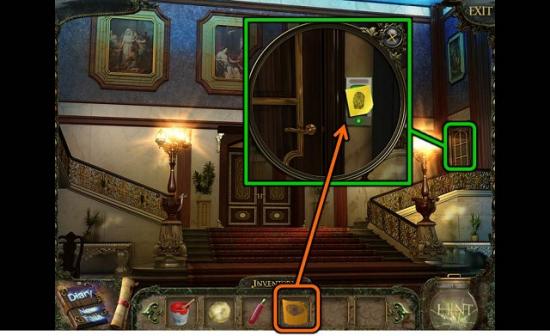
- Zoom in on the notice board.
- Remove the broken bulb and replace it with your LIGHT BULB.
- Use the SCISSORS to take down the PASS FORM from the top right corner.
- Back out two scenes to the station hall and go into the ticket office.
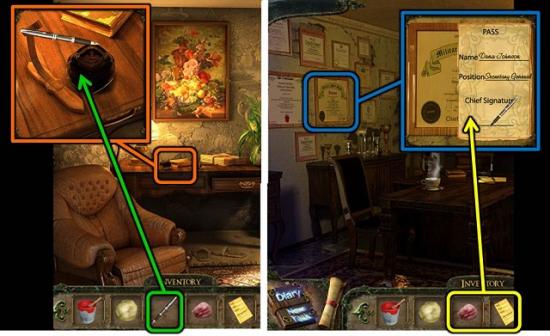
- Zoom in on the desk and fill the EMPTY PEN in the ink bottle on the desk.
- Go back to the chief of police’s office in the police station.
- Zoom in on the diplomas on the wall.
- Put the CHEWING GUM on the diploma.
- Stick the PASS FORM on the diploma.
- Use the PEN WITH INK to copy the signature.
- Take the PASS.
- Back out to the street and go through the archway.
- Give the PASS to the security guard.
The Town Hall
- Go into the town hall.
- Go through the big doors.
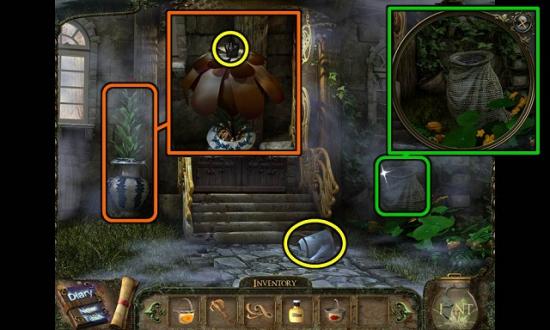
- Open the bag on the chair. Put the two parts of the MAKEUP KIT together (yellow), put the cap on the DETERGENT bottle (pink) and open the little box for a STICKER (blue).
- Go through the doors to the Mayor’s office.
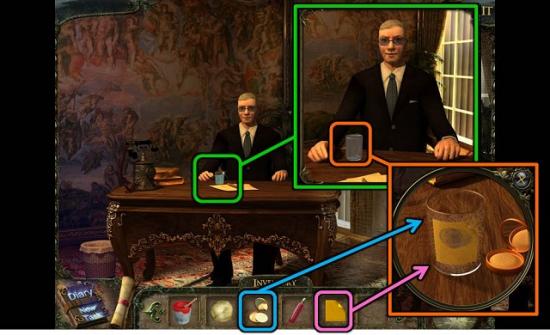
- Talk to the Mayor.
- After the conversation click on the Mayor again so he will drink the water.
- Zoom in on the glass.
- Use the MAKEUP KIT on the glass.
- Then put the STICKER on it.
- Take the FINGER PRINT.
- Back out to the stairs.
- Zoom in on the door on the right and use the FINGER PRINT on the scanner.
- Go into the archives.
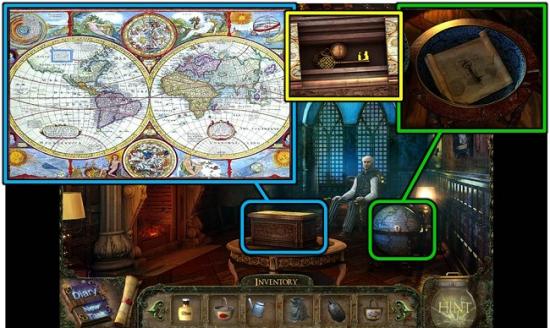
- Play the HOS.
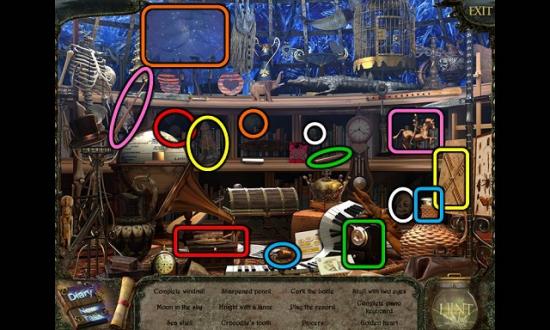
- Most items in this scene just need to have two parts combined. See the screenshot for reference.
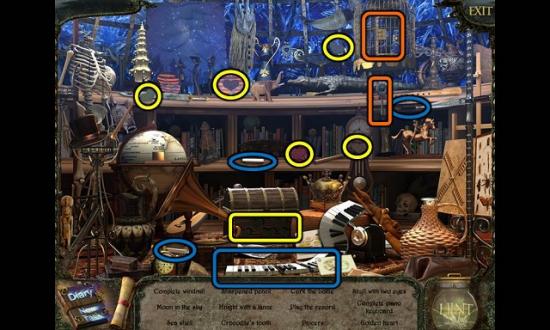
- For the piano keyboard you need to find two white keys and one black one (blue). Open the cage with the key hanging under it (orange), click on the cobra to make it go away and pick up the sea shell from the cage. The pincers are inside the globe. Find the five colored hearts and put them on the chest to find the golden heart (yellow).
- When you complete the scene you get TWEEZERS.
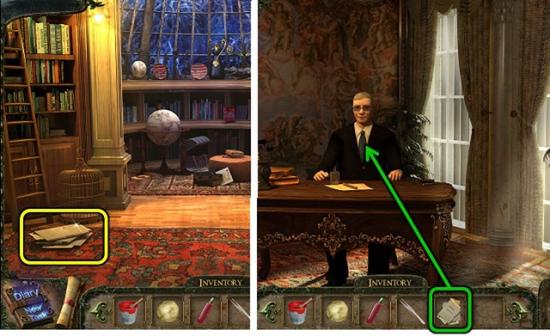
- Pick up the DOCUMENTS from the archives floor.
- Go back to the Mayor and give him the DOCUMENTS.
- Back all the way out to the police station and enter the station.
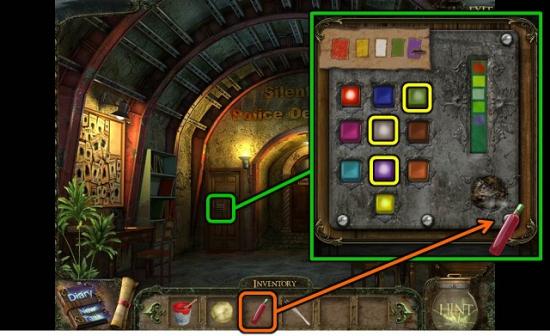
- Zoom in on the locked door.
- Clean the keys with the DETERGENT.
- Enter the code that was given to you by the Mayor (it should appear at the top of the lock). The first two colors have already been entered, so you just need to click white, green and purple. Then click the round button.
- Open the door for another HOS.
- The swimming duck is inside the loo. Open the safe with the key on the top shelf (yellow) to find the hand saw and boomerang. Slice the salami with the knife and put it on the pizza (green). Clean the tooth with the toothbrush (blue). Cut the roll of film with the scissors (orange). Brush the puppy with the brush (dark blue). Put the wristwatch on the severed hand (red). Put the two lenses in the sunglasses (white). Put the cigarette stub in the ziplock bag (pink). Cut the chicken toenail with the cutters (don’t forget to pick it up after cutting it) (purple). Crush the ice with the ice pick (light green).
- After completing the scene you get a HANDSAW.
The Lighthouse
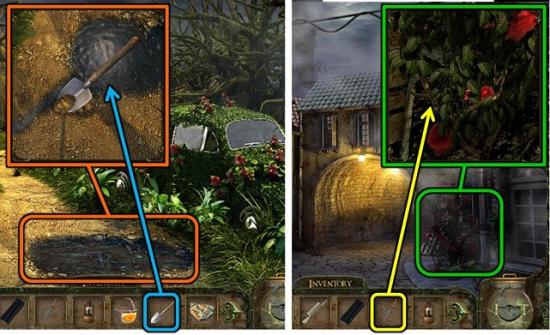
- Exit to the street, go through the archway and zoom in on the gate on the right.
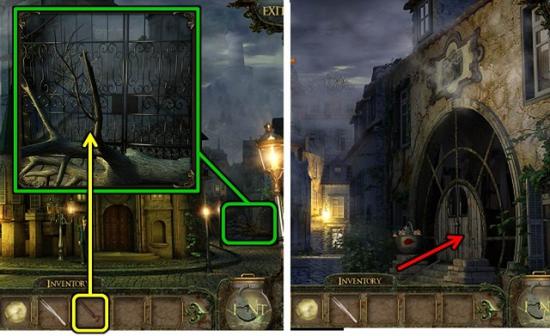
- Use the HANDSAW to cut down the tree.
- Go through the gate.
- Go into the photo studio.

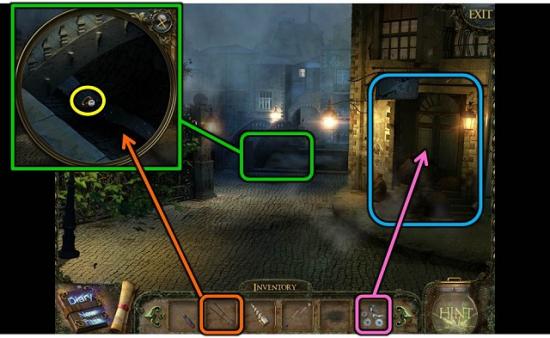
- Zoom in on the chest and take the COMPASS.
- Let’s leave the back of the shop for later. Now first exit out and go to the back of the street.
- By the big tree, go left to the lighthouse keeper’s house.
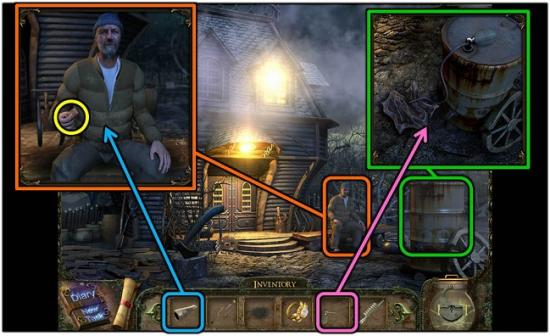
- Talk to the lighthouse keeper.
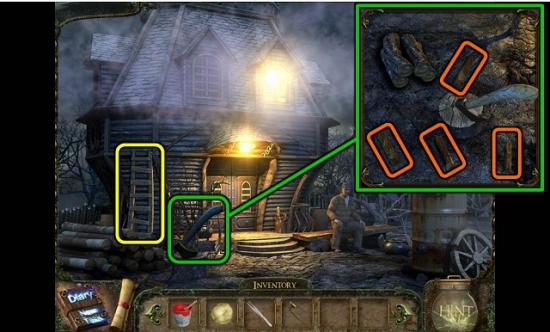
- Take the LADDER.
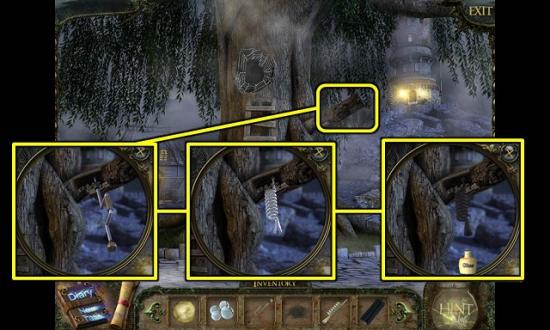
- Zoom in on the chopping block and axe. Click on the logs and then on the axe to chop the log into pieces. Pick up the pieces, then repeat with the other logs. Each log is chopped into four pieces and some are quite hard to see, so scan the window carefully with your cursor. You can chop all the wood before you decide to pick them up, just know there are twenty pieces of wood in total. You get the FIREWOOD.
- Go into the house.
- Zoom in on the table and pick up the LENSES.
- Zoom in on the bucket on the left and pick up the DRY RAG and PAIR OF TONGS.
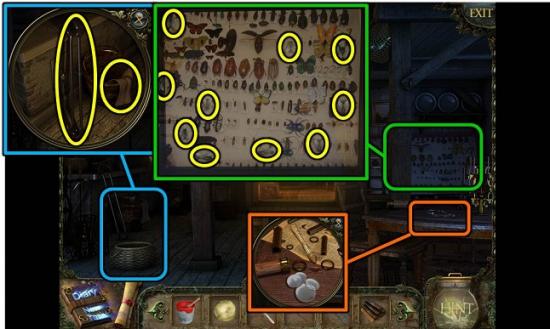
- Zoom in on the board of insects in the back. You need to find and click on all the actual living flies – there are 10. You get a FLY.
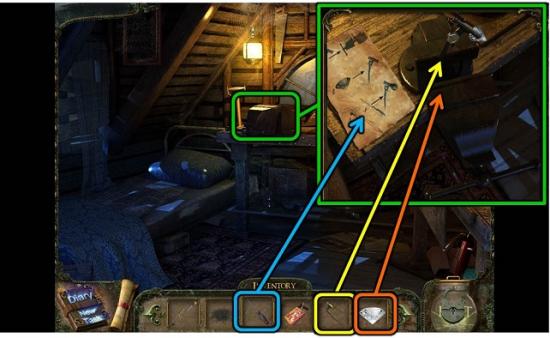
- Go into the back room.
- Zoom in under the table and take the SCREWDRIVER.
- Let’s leave everything else here for later and back all the way out to the big tree.
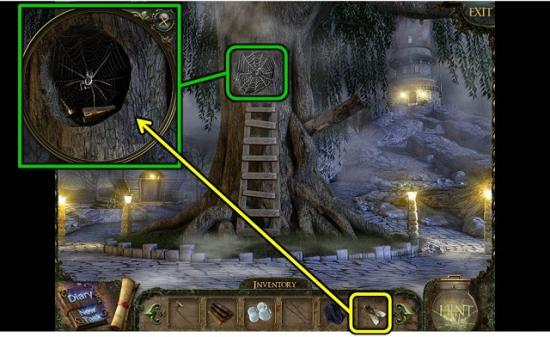
- Put the LADDER against the big tree.
- Inspect the spider web and put the FLY on the web.
- Pick up the PIPE’S MOUTHPIECE and SCREW.
- Go right to the lighthouse.
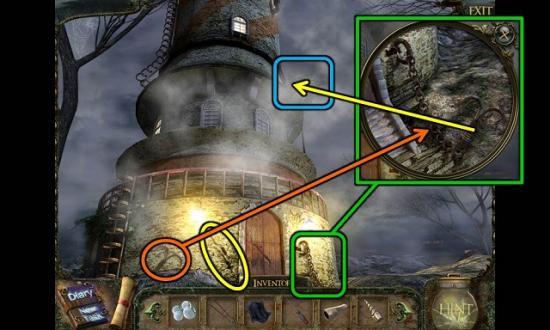
- Pick up the HAND DRILL and ANCHOR.
- Zoom in on the chain and put the ANCHOR on it.
- Exit the window with the anchor, then pick up the anchor and put it on the nest at the top of the lighthouse.
- Take the NEST.
- Go into the lighthouse.
- Go up the stairs.
- Zoom in on the left and take the ROPES AND PULLEYS.
- Back all the way out to the town hall (or use your map) and go left.
- If you haven’t been here yet, when you try to go through the gates they will close and you will need to find another way in.
- Zoom in on the bridge and use the PAIR OF TONGS to get the diamond RING.
- Zoom in on the door and place the ROPES AND PULLEYS to trigger a mini game.
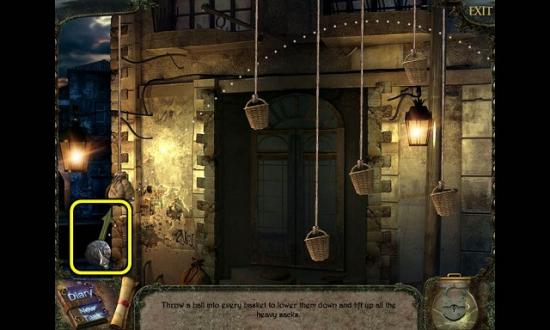
- Click on the ball on the left and hold to charge. The bigger the green arrow, the greater the speed. Try and shoot a ball into each of the baskets. This is quite hard, but what worked best for me was to shoot quite steeply up so you get a tall, narrow curve.
- Enter the boutique.
- Zoom in on the little table and pick up the SPRAYER.
- Zoom in on the shelves and take the GLASS TUBE.
- There is lots more to do here later, but first go back to the lighthouse keeper’s house.
- Give the PIPE’S MOUTHPIECE to the lighthouse keeper.
- Take his MATCHES.
- Zoom in on the barrel and put the SPRAYER on it.
- Put the DRY RAG on the ground by the sprayer and click on the balloon.
- Pick up the KEROSENE SOAKED RAG.
- Go into the house and through to the back room.
- Zoom in on the flask with acid.
- Put the RING in the acid.
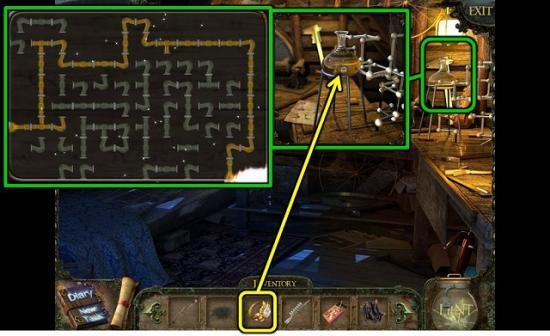
- When the gold has dissolved, click on the flask for a mini puzzle.
- Turn the pipes until the two endings are connected. You don’t need to use all pieces.
- Use the TWEEZERS to take out the DIAMOND.
- Zoom in on the vice on the bench.
- Put the COMPASS in the vice.
- Put the DIAMOND on the compass, connect them with the SCREW and use the SCREWDRIVER to tighten the screw.
- Congratulations, you now have a GLASS CUTTER!
- Go back to the boutique (to the left of the town hall – use the map).
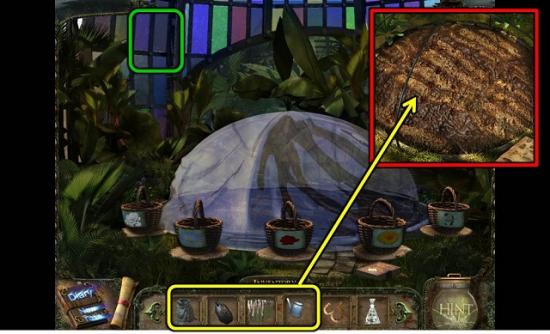
- Inside the boutique are five MIRRORS you need to cut with the GLASS CUTTER – two in the front of the shop and three in the back.
- Now, the carpet puzzle is a bit tricky. Click on the pile of rugs on the floor to pick one up. Look closely at the pattern on the rug and then find the shelf where it needs to go. Click directly on the little square on the shelf that matches the color of the rug you’ve picked up. I’ve shown a few examples in the image above, but they come up at random. Keep going until you can pick up the THICK BLACK FABRIC.
- Go to the lighthouse and go up the stairs.
- Put the five MIRRORS in their frames.
- Zoom in on the bowl in the middle.
- Put the FIREWOOD in the bowl and cover it with the KEROSENE SOAKED RAG.
- Light it with the MATCHES.
You can now go through the gates by the boutique.
The Park and Mines
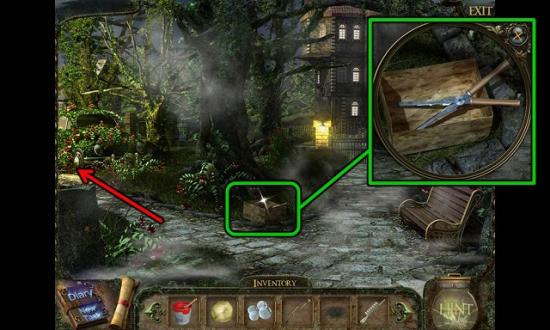
- Zoom in on the crate and pick up the GARDEN PRUNER.
- Go left.
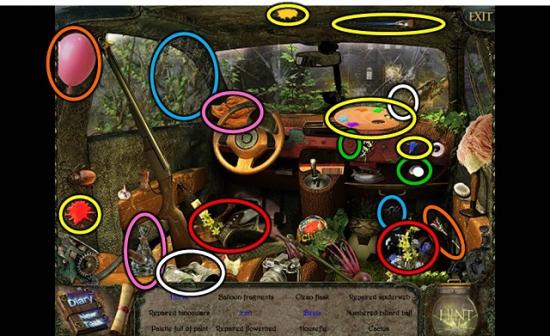
- Play the HOS in the VW Bug.
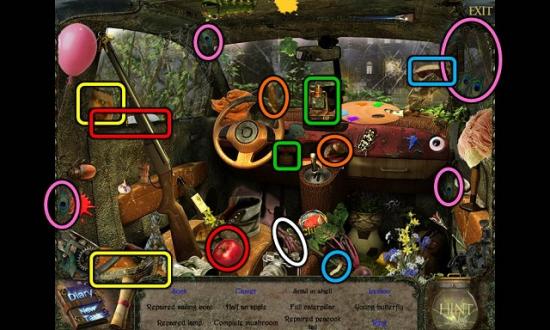
- Put the sail on the boat (yellow), the mushroom hood on the stem (blue), the snail house on the snail (orange) and the lamp on its base (green). Cut the apple in half with the knife (red). Wait until the caterpillar has eaten and then pick it up. The second caterpillar will turn into a butterfly. The ring is on the chicken leg (white). Put the three peacock feathers on the tail (pink).
- When you’re done you get an EMPTY LAMP.
- Go on to the house.
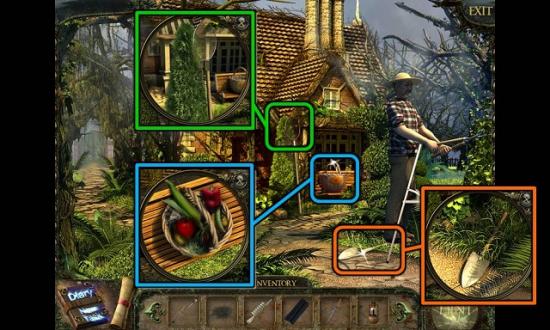
- Talk to the gardener.
- Pick up the BUTTERFLY NET and the SHOVEL.
- Zoom in on the BASKET on the bench and take all the vegetables out.
- First go left to the greenhouse. There’ll be much more to do here later, but right now all you need to do is look at the book on the ground to trigger the lily pad puzzle.
- Back out to the gardener and go right to the lily pond.
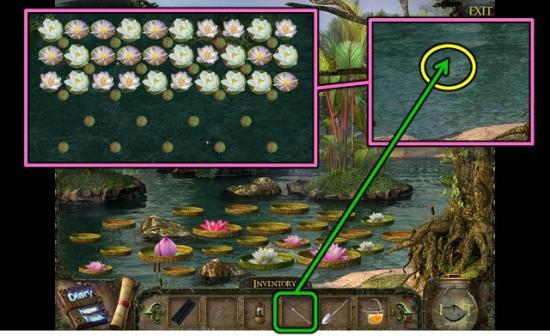
- Click on the pond to trigger a mini game.
- Keep moving the lilies around until they are all in three rows at the top.
- Zoom in on the water and take the MOSAIC PIECE with the BUTTERFLY NET.
- Back out to the VW Bug
- Zoom in on the puddle.
- Dig a channel with the SHOVEL so you can take the MYSTERIOUS SYMBOL.
- Go all the way back to the street outside the police station.
- Zoom in on the rose bush.
- Use the GARDEN PRUNER to cut off one of the ROSE’S THORNS.
- Go into the police station and play the new HOS.
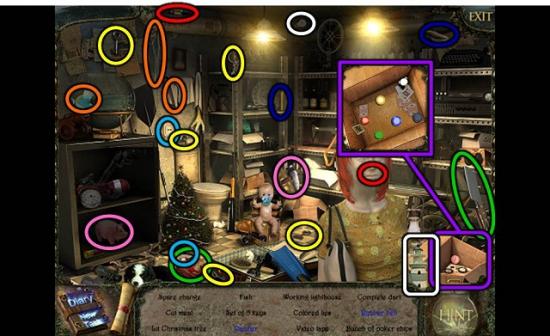
- Pick up the hammer, open the safe and smash the piggy bank to get the spare change (pink). Cut the meat with the cleaver (green). Plug in the Christmas lights (blue). Find four more keys to put on the key ring (yellow). Put the hook on the fishing line and use it to catch the fish (orange). Zoom in on the video player and hit the green button. Use the lipstick on the mannequin (red). Pick up all the poker chips inside the cardboard box (purple). Put the lightbulb on the lighthouse (white). Put the feather on the dart (dark blue).
- You get a RUBBER BELT.
- Go into the office at the back and play yet another HOS.
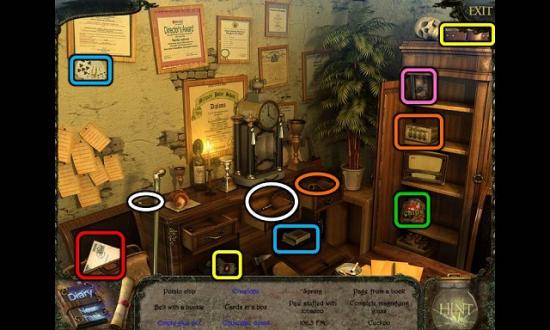
- Put the buckle on the belt (yellow). The potato chip is in the bag in the cupboard (green). The envelope is inside the doctor’s bag (red). Put the playing cards in the box (blue). Inside the cupboard is a box with tobacco; put the tobacco in the pipe (orange). Click on the book (pink) to tear out a page). Put the lens in the magnifying glass.
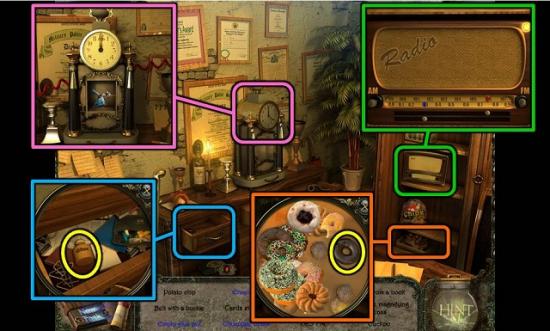
- Set the clock to 12 to get the cuckoo and the spring (the spring will fall onto the surface of the cabinet). To set the radio, push in the FM button and click on the sliders at the bottom until they point at the right numbers. Move the donuts in the box aside until you can pick up the chocolate one. The glue bottle is in a drawer.
- You get an EMPTY GLUE BOTTLE.
- Go to the tree by the lighthouse.
- Zoom in on the branch.
- Use the HAND DRILL to drill a hole in the branch, put the GLASS TUBE in it and collect the resin in the EMPTY GLUE BOTTLE. Take the bottle with GLUE.
- Go to the lighthouse keeper’s house.
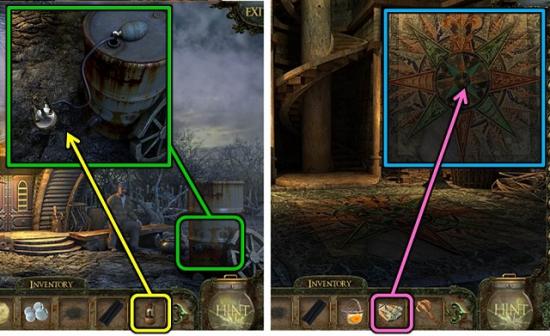
- Zoom in on the barrel of kerosene and fill the EMPTY LAMP with kerosene.
- Now go to the lighthouse itself.
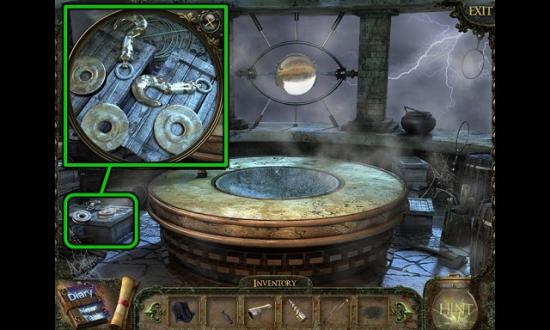
- Zoom in on the floor and put the MOSAIC PIECE on the floor.
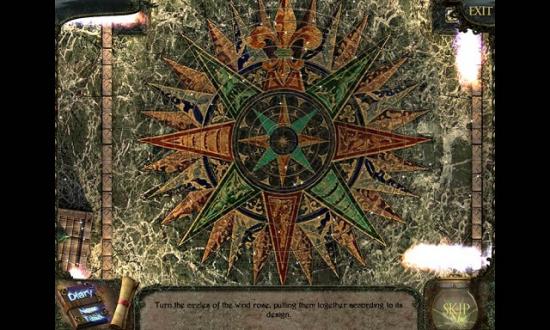
- Rotate all the discs to complete the mosaic. When two discs are matched up correctly they will stay together. The trickiest part is to match the inner rings to the other ones as there doesn’t appear to be a visual clue to it. Just keep turning the middle rings until they click into place.
- Pick up the second MYSTERIOUS SYMBOL.
- Go up the stairs.
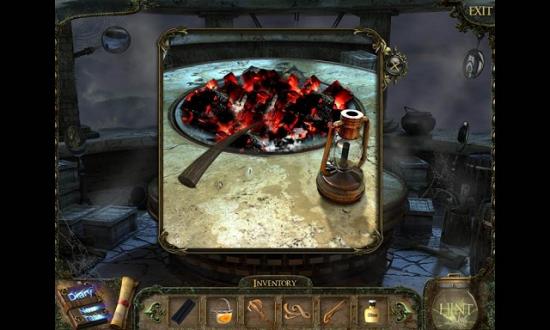
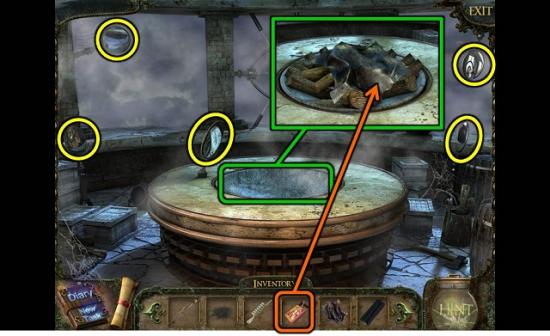
- Zoom in on the embers.
- Put the FULL LAMP by the embers and use the ROSE’S THORN to get a LIGHTED LAMP (sic).
- Go to the park – if you click on the park on your map you should be taken to the scene with the bench.
- Go straight on to the gates.
- Go right to the mines.
- Pick up the ROCK HAMMER.
- Click on the dynamite for a mini game.
- This game is similar to the railroad one you played earlier – just rotate the pieces of the gunpowder trail until you light the fuse at the end.
- Click on the tunnel.
- Light the torch with the LIGHTED LAMP.
- Enter the mine.
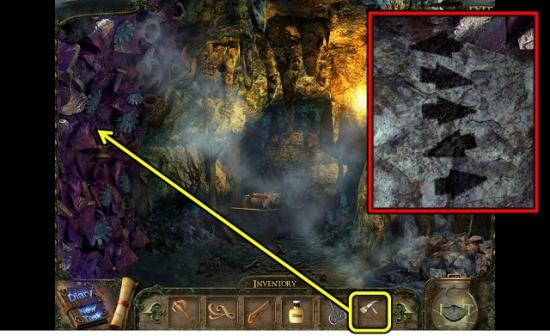
- Use the ROCK HAMMER on the wall on the left.
- Pick up a piece of MAGNETIC ORE.
- Zoom in on the wall and memorize the directions as you will need them to go through the mines: left, right, right, left, right.
- Go deeper into the mine and take route according to the directions. Scenes where you can only go one way do count – if the path goes right when you should be going left at this point you know you’re in the wrong place! If you make a wrong turn you will be taken back to the mine entrance.
- Pick up the FILM CARTRIDGE.
- Back out to the gates to the mansion.
- Zoom in on the path and pick up the PIECE OF KEY.
- Zoom in on the lock and use the MAGNETIC ORE to take out the second PIECE OF KEY.
- Go to the lighthouse keeper’s house and go into the back room.
- Put the PUTTY in the tray and press the two PIECES OF KEY into the putty. I had trouble doing this until I realized that the key handle goes into the bottom half of the tray and the other bit in the top half.
- Take the KEY IMPRINT.
The Photo Studio and Mansion
- Go to the street outside the photo studio.
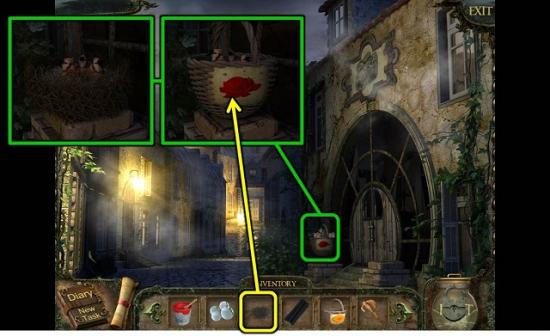
- Zoom in on the birdies in the basket and give them the NEST.
- Take the BASKET.
- Go into the studio and into the back room.
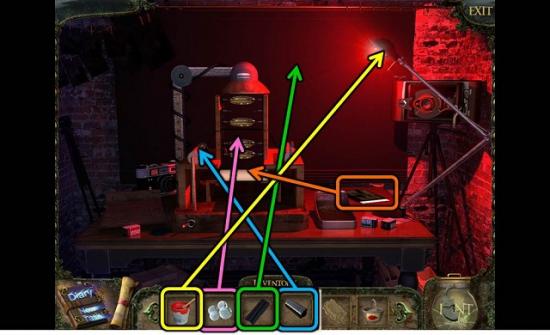
- Use the PAINT to color the lamp red.
- Cover the window with the THICK BLACK FABRIC.
- Put the LENSES in the device.
- Pick up the PHOTO PAPER and also put it on the device.
- Finally, put the FILM CARTRIDGE on the device and flick the switch.
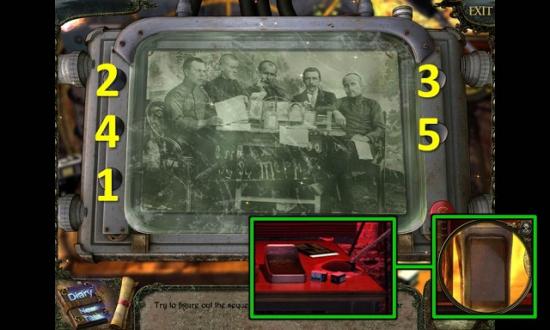
- Now click on the five black buttons until you have a sharp image. Each time you click on the correct button the picture should become quite a lot clearer. So if it doesn’t, you’ve clicked the wrong one. You can reset with the red button on the right.
- Zoom in on the tray on the left and put the UNDEVELOPED PHOTO PAPER in it.
- Take the PHOTO.
- Go into the town hall and through the big doors.
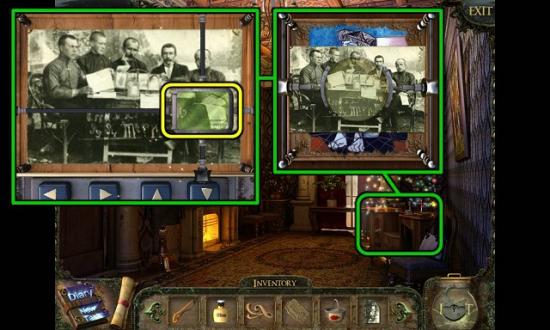
- Zoom in on the table and put the PHOTO on the device.
- Click on the photo again for a mini game.
- Use the arrow keys until you’ve found some very small writing.
- Back out to the stairs and go right into the archives.
- Zoom in on the shelves for a mini game.
- Click on the stack of folders on the lower shelf and put them in the correct section until you’ve archived everything.
- Click on the remaining folder and take the BLANK KEY.
- Back out to the street outside the town hall and enter the key cutter’s on the left.
- Put the KEY IMPRINT on the wall, the RUBBER BELT between the two wheels and the BLANK KEY in the holder.
- Turn the handle to play a mini game.
- Move the pieces of the key around until it matches the example on the wall. Each time you click on a piece it moves to the end. Start by clicking the far left piece until the correct section is on the far left. Then click on the second piece from the left until that one is correct, etc.
- Get the MANSION KEY.
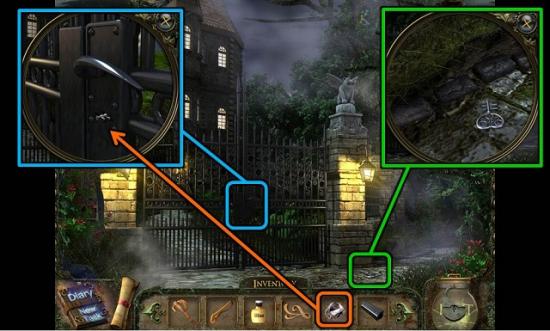
- Go to the park and on to the gates.
- Unlock the gate with the MANSION KEY.
- Go through the gates.
- Pick up the EMPTY WATERING CAN and FERTILIZER.
- Click on the flower on the left until you can take its SEEDS.
- Enter the mansion.
- Go up the stairs.
- Talk to the rich man.
- Zoom in on the box on the table and click on it for a puzzle.
- Swap the pieces around to recreate the image.
- Open the box and take the KEY.
- Zoom in on the globe and open it with the KEY.
- Unwrap the paper and take the KITCHEN KEY.
- Also look at the instructions that are under the key.
- Go into the bathroom on the left.
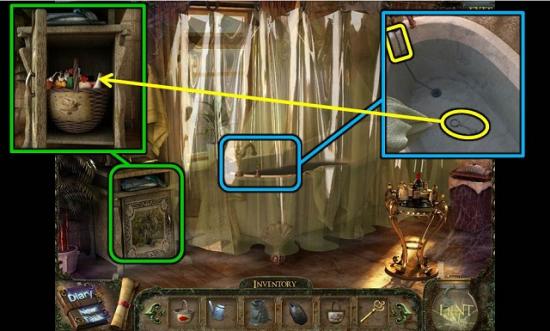
- Take the PLASTIC CURTAIN.
- Zoom in on the bath and pull the chain to drain the water.
- Take the KEY.
- Zoom in on the cabinet by the bath and unlock it with the KEY.
- Open the cabinet, empty the basket and take the BASKET.
- Back out to the staircase.
- Zoom in on the basket by the stairs.
- Take all the items out of the basket and pick up the BASKET.
- Zoom in on the door and unlock it with the KITCHEN KEY.
- Play the HOS.
- Grind the coffee beans in the coffee grinder and then put the ground coffee into the machine (yellow). There are three items of clothing to put in the basket (green). Find three tulips and put them in the vase (blue). Put the patch on the cushion and sew it together (orange). The ring is inside the box (red).
- Match all the other items as in the image above.
- You get BELLOWS.
Silentville 068
- Pick up the MAGNET PIECES from the table.
- Zoom in on the fridge and put the MAGNET PIECES on the magnet.
- Complete the jigsaw to find a code: 24108.
- Zoom in on the stove.
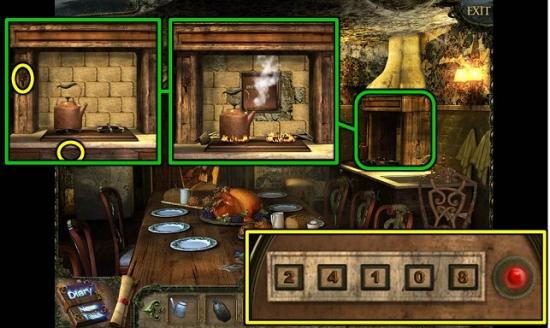
- Click on the switch to turn on the gas and on the switch to the left to close the flue.
- When the place is full of steam, click to remove all loose tiles.
- Open the flue again.
- Zoom in on the hidden safe and enter 24108.
- Take the third MYSTERIOUS SYMBOL.
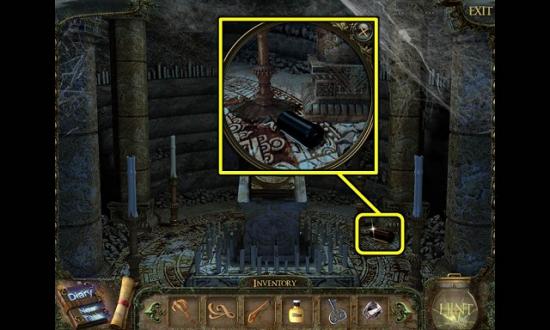
- Go back up the stairs.
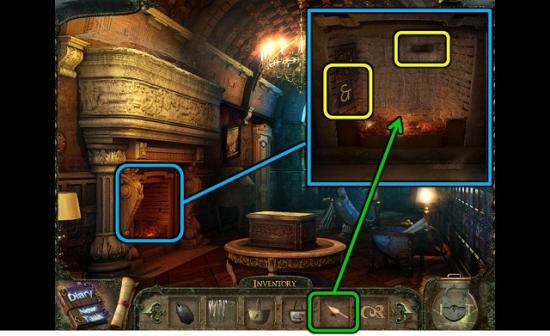
- Zoom in on the fireplace and use the BELLOWS to stir up the fire.
- Push in the loose brick and find the last MYSTERIOUS SYMBOL.
The Flower Essence
- Now it’s finally time to go to the greenhouse!
- Exit to the park bench and go left to the car.
- Play the new HOS.
- Put the 8 from the dashboard on the billiard ball in the glove compartment (green). Use the dart to pop the balloon (orange). Use the brush to pick up the blue, red and yellow paints and put them on the palette (yellow). Click on the flower pot and remove the plants until you get the cactus. Put the spider on his web for both the web and the fly (blue). Clean the flask with the rag (pink). Put the lens on the binoculars (white). Put the flowers in the shoe (red).
- You get an EMPTY FLASK.
- Go left to the house and right to the pond.
- Fill the EMPTY WATERING CAN in the pond.
- You get a FULL WATERING CAN.
- Back out and go again to the greenhouse.
- Put your four BASKETS on the tiles.
- Zoom in on the soil.
- Put the SEEDS in the soil, put the FERTILIZER on it and use the FULL WATERING CAN to water the flowers.
- Cover the flowerbed with the PLASTIC CURTAIN.
- Zoom in on the window for a mini game.
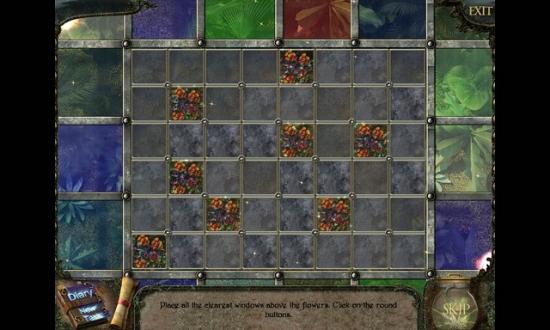
- You need to rotate the groups of four window panes by clicking on the round buttons until all clear windows are over a flowerbed.
- Zoom in on the bed again for another game.
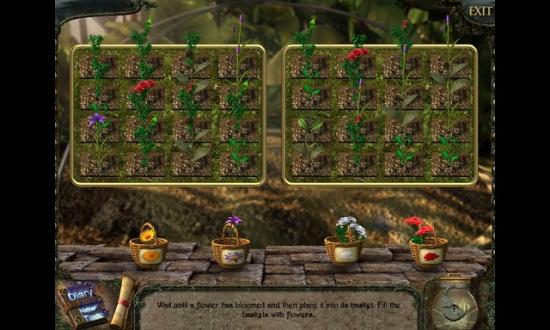
- Wait until the flowers bloom and then quickly pick them before they wilt again. This goes quite fast so take your time and wait by a flower until it blooms and then quickly pick it and put it in the correct basket. Fill the four baskets.
- Take the four BASKETS OF FLOWERS.
- Back out to the boutique.
- Enter the boutique and zoom in on the table on the right.
- Put a BASKET OF FLOWERS in the grinder, turn the handle and pick up the FLOWERS’ FLOUR. Do this for all four baskets.
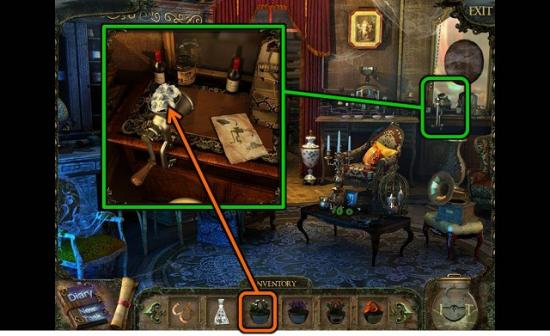
- Now zoom in on the middle table.

- Put the four lots of FLOWERS’ FLOUR in the bowls.
- Now look at the chart on the right. You need to make solutions of the correct amounts of the colored powders, according to the chart. It doesn’t matter in which order you do the powders.
For example, put three lots of the purple powder in the bowl at the top (A). Turn the knob on the left (B, green) to fill the mechanism with water. Then turn the knob under the bowl (C, red) to put the powder in the water. If done correctly, the water should turn purple (for all colors of flowers, not just the purple ones).
When the water is bubbling purple, find the correct knob to turn on the main compartment (D, blue) to fill one of the small bottles at the front. When you’ve done all four powders, put the EMPTY FLASK under the tap and turn the knob above it (E, pink) to mix the potion.
If you made a mistake with the powders you can empty the bowl with the knob to the right of the bowl (F, orange). If your water bubbles black instead of purple you can empty the system with the knob on the right of the main compartment (G, white).
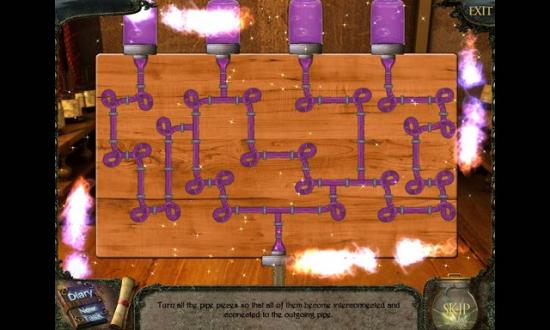
- When you’re mixing the potion you will need to play another circuit puzzle. Turn all the pieces until everything is connected and the potion can flow through all the tubes.
- Take the FLASK OF ESSENCE.
- Back all the way out to the train platform at the start of the game.
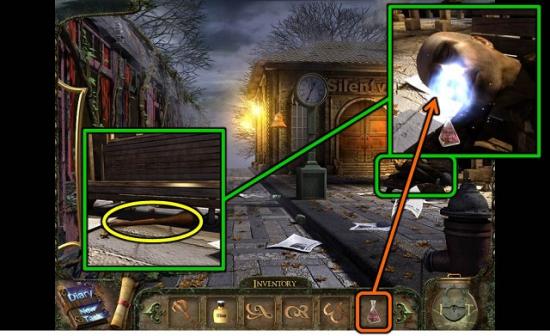
- Zoom in on the sleeping man and put the FLASK OF ESSENCE under his nose.
- Look under the bench and take the CLAPPER.
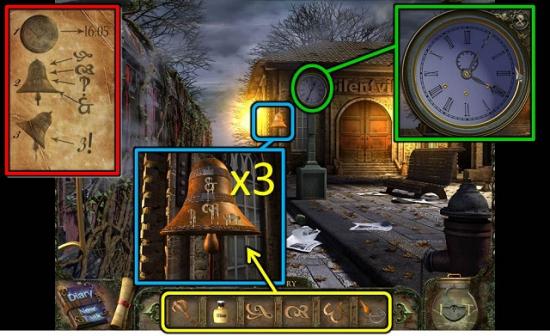
- According to the instructions from the globe in the mansion, we first need to set the clock to 16:05. So, zoom in on the clock and put the small hand on the 4 and the large hand on the 1. I don’t know what it is with this game, but it’s really finicky every time you have to rotate something!
- Zoom in on the bell.
- Put the CLAPPER on the bell and outlines of symbols appear.
- Put the GLUE and all four MYSTERIOUS SYMBOLS on the bell.
- Ring the bell three times.
- Open the book and watch the ending.

More articles...
-
Best Horror Games On Itch.io – July 2026
Across a bounty of subgenres. -
Haze Seas Accessories Tier List [Best Accessories to Equip]
The accessories with the best stat buffs in Haze Seas.