- Wondering how to get Monopoly GO! free rolls? Well, you’ve come to the right place. In this guide, we provide you with a bunch of tips and tricks to get some free rolls for the hit new mobile game. We’ll …
Best Roblox Horror Games to Play Right Now – Updated Weekly
By Adele Wilson
Our Best Roblox Horror Games guide features the scariest and most creative experiences to play right now on the platform!The BEST Roblox Games of The Week – Games You Need To Play!
By Sho Roberts
Our feature shares our pick for the Best Roblox Games of the week! With our feature, we guarantee you'll find something new to play!All Grades in Type Soul – Each Race Explained
By Adele Wilson
Our All Grades in Type Soul guide lists every grade in the game for all races, including how to increase your grade quickly!
Skymist: The Lost Spirit Stones Walkthrough
Welcome to the walkthrough for Skymist: The Lost Spirit Stones on Gamezebo. Skymist: The Lost Spirit Stones is a hidden object game for the PC by Mutant Arcade Inc. This walkthrough includes tips and tricks, helpful hints, and a strategy guide to complete Skymist: The Lost Spirit Stones.
Skymist: The Lost Spirit Stones – Game Introduction
Welcome to the walkthrough for Skymist: The Lost Spirit Stones on Gamezebo. Skymist: The Lost Spirit Stones is a hidden object game for the PC by Mutant Arcade Inc. This walkthrough includes tips and tricks, helpful hints, and a strategy guide to complete Skymist: The Lost Spirit Stones.
General Information
- The Play button starts the game with the currently selected profile.
- Profiles can be created, selected or deleted by selecting the white text at the bottom of the menu screen.
- The Options button displays a window where there are slider bars to adjust sound, music volume and level brightness. There is also an option to switch between full screen and windowed mode.
- The Help button opens a five page tutorial on the basics of the game. Scroll through the pages by clicking the previous or next buttons.
- The Quit button exits the game without a prompt.
Main Scenes
- Any collectable objects that are found in the main scenes will be added to the inventory. The inventory window is opened by moving the mouse cursor to the bottom of the screen. Objects that are selected from the inventory can be used on other objects in the main scene or can occasionally be combined with another object in the inventory.
- The default mouse cursor in the game is the grey arrow. Move the mouse cursor around until it changes. A question mark next to the cursor means that the object can be clicked for a description. A magnifying glass icon means that clicking the object will open a hidden object scene. When an inventory item is selected and moved over an object that it can be used on, the mouse cursor will change into a gears icon.
- Blue sparkling areas indicate hidden object scene. There is usually one sparkling area available at the start of each main scene, and sometimes you will need to solve puzzles or use an inventory item on an object before a new sparkling area becomes available.
- After completing the bedroom area near the start of the game, the journal can then be selected from the bottom-right corner of the screen. Helpful notes images and images are added to the journal as you progress through the game.
Hidden Object Scenes
- The aim in the hidden object scenes is to find all of the objects that are displayed in the list window. The list of objects to find is not random each time the game is played, so it is possible to give the exact locations for all hidden objects. You will occasionally need to find a set number of a certain type of object (for example, find 25 acorns), or matching pairs of objects.
- After all of the listed objects have been found, one or more objects will need to be found or have an object used on them in the scene. These objects are identified with a blue outline in the guide.
- Clicking too quickly in the wrong area causes the screen to become blurry and the cursor to be fixed in place for five seconds.
- The blue hint bottle button can be selected at the bottom-left corner of the screen to highlight a hidden object. After using a hint, 45 seconds needs to pass before another hint can be used.
- To back out of a hidden object scene, move the mouse cursor over the object list and click.
Mini-Games
- Mini-games are found by examining the purified discs once they have been placed on the lock outside the castle. There are three mini-games that need to be completed in the main game.
- The question mark bottle at the bottom-right corner of the screen will give information on the rules of the mini-game.
- The skip button to automatically complete the mini-game will become active after one minute has passed.
Walkthrough – Part 1
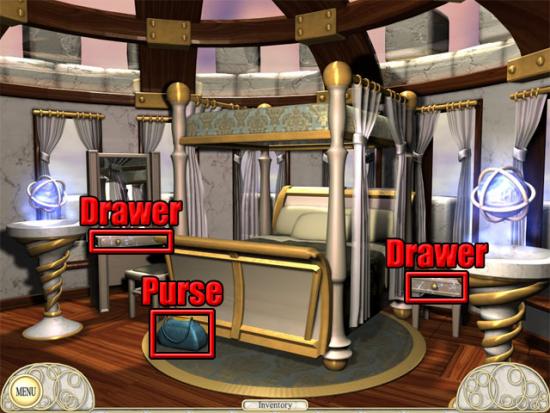
Bedroom
The game starts in the bedroom. The following hotspots are available:

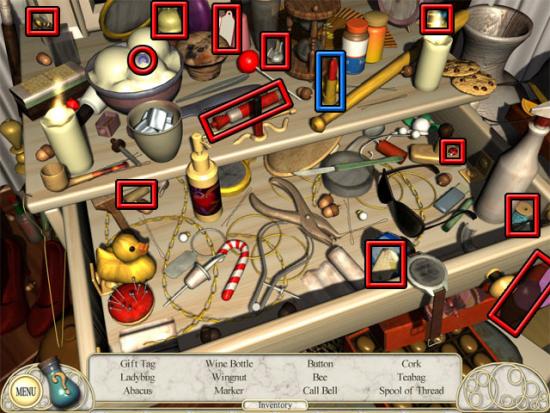
Select the left drawer to open a hidden object scene. Find all of the listed objects and then take the lipstick:
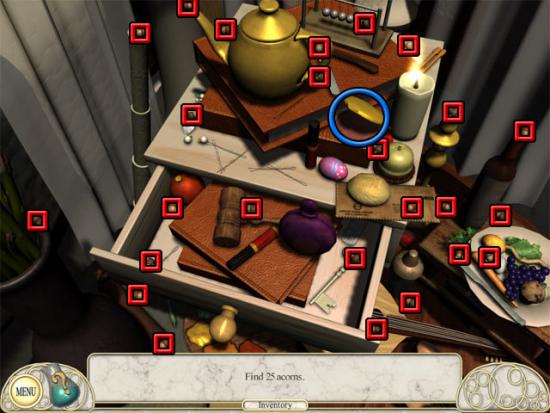
Select the right sparkling drawer to open another hidden object scene. Find the 25 acorns and then select the blush compact:
Move the mouse cursor to the bottom of the screen to open the inventory window. Select the lipstick from the inventory and then select the blue handbag on the floor. Add the blush compact to the handbag in the same way.
Fountain
The following hotspots are available:
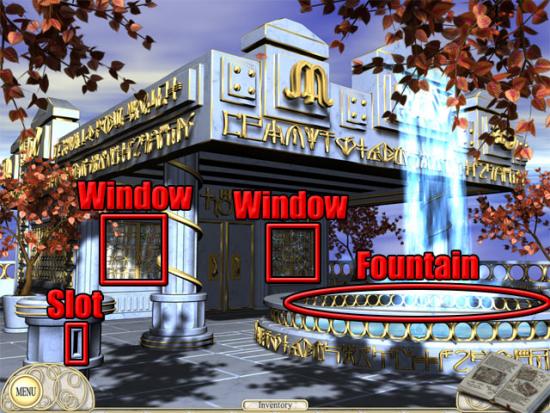
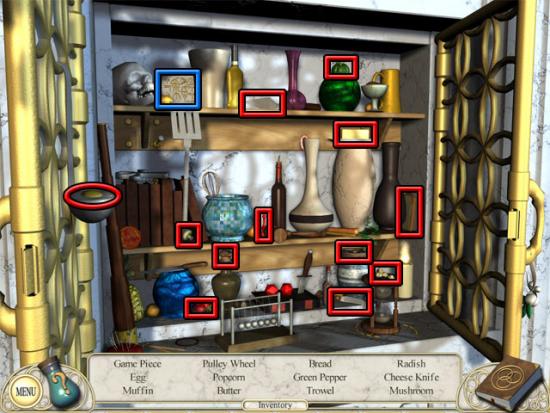
Examine the left window. Find all of the listed objects in the scene and then select the tablet:
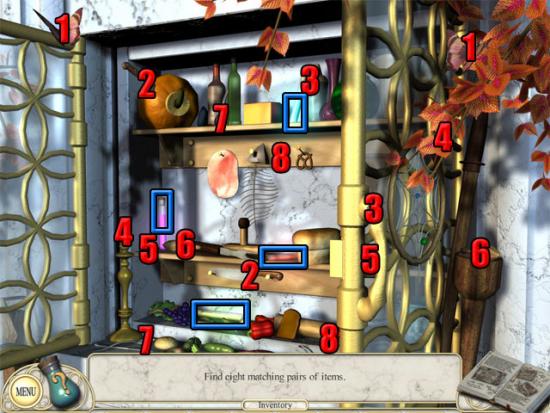
Examine the right window. Find the eight matching pairs of items and then select the four magical vials:
Use the stone tablet on the slot and an empty jar will appear. Take the empty jar from the holder. Use the empty jar on the fountain to fill it. Combine the jar of water with the magical vials in the inventory to make the jar of purple goo. Use the jar of purple goo on the holder.
Gas Station
The following hotspots are available:
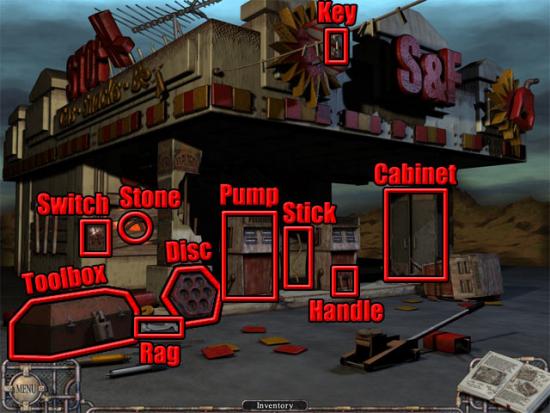
Take the switch handle and the disc. Use the switch handle on the switch and then select the switch to turn on the lights. Take the dirty rag and the long stick. Examine the pump to enter a hidden object scene. Find all of the listed objects and then take the handle:
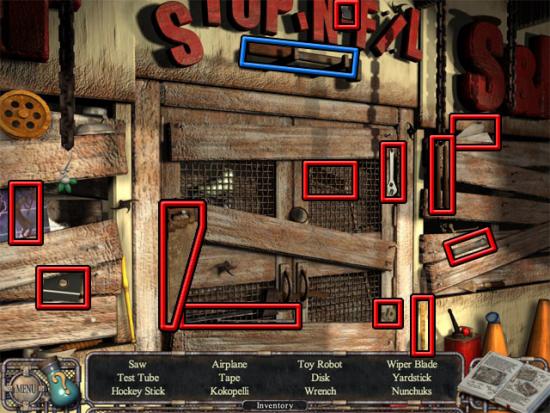
Examine the cabinet. Find all of the listed objects and then take the matches:
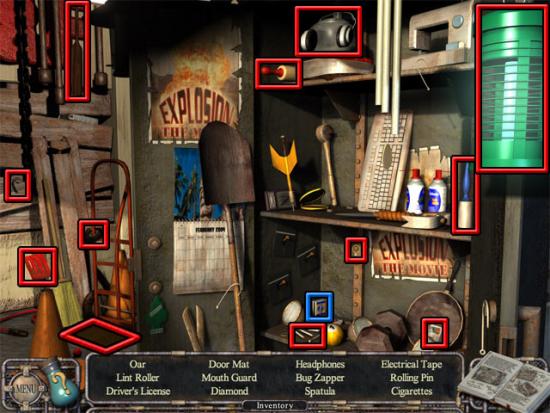
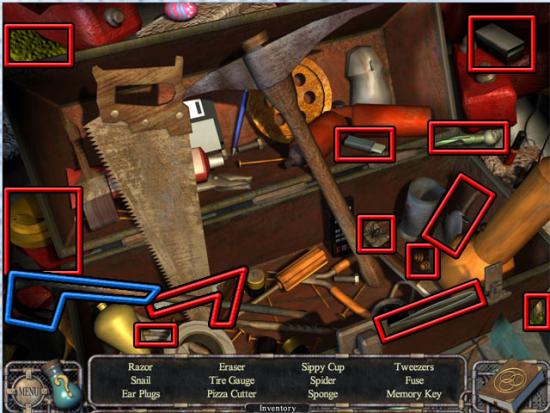
Combine the long stick with the dirty rag in the inventory to make the dry torch. Use the pump handle on the socket that was revealed when the stone disc was taken. Select the handle and gasoline will come out. Use the dry torch on the puddle of gasoline. Combine the lit match with the soaked torch in the inventory to make the burning torch. Use the burning torch on the key near the top of the area. Take the key and use it on the toolbox. Examine the toolbox. Find all of the listed objects and then take the crowbar:
Use the crowbar on the boarded up window three times and then take the spirit stone.
Bowling Alley
Take the bowling ball and use it on the second chute from the left:
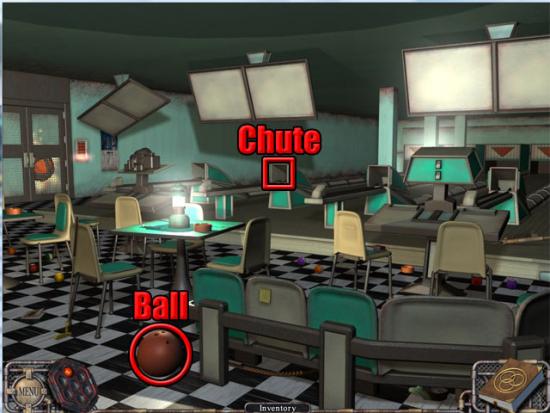
Select the gum on the ball that rolls out of the second chute from the right. Select the new sparkling area on the projector to enter a hidden object scene. Take the screwdriver and use it on the four screws on top of the projector. Find all of the listed objects and then take the slide and the projector bulb:
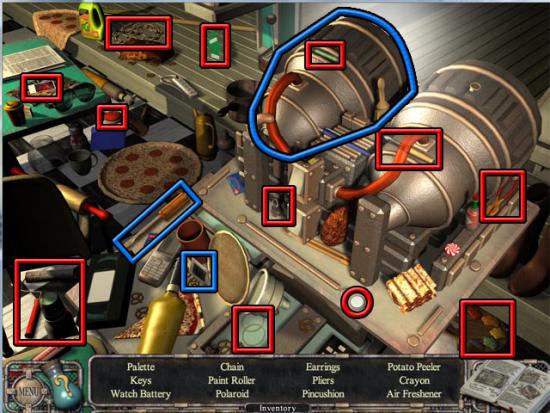
Examine the new sparkling area and find thirteen sandwiches:
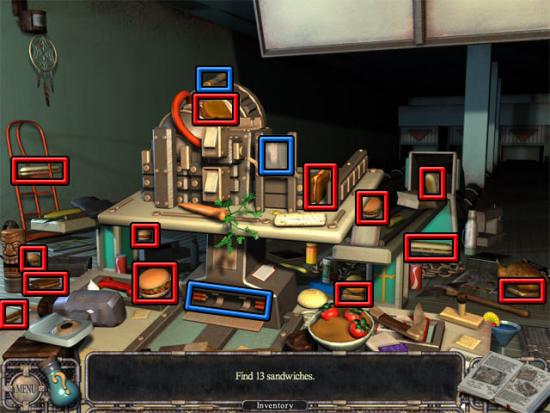
Combine the used gum with the slide in the inventory to make the sticky slide. Use the sticky slide on the slide mount. Take the fuse and use it on the fuse holder. Use the projector bulb on the projector to complete the hidden object scene. Select the keypad at the right side of the door and then take the spirit stone.
Downstairs
The following hotspots are available:
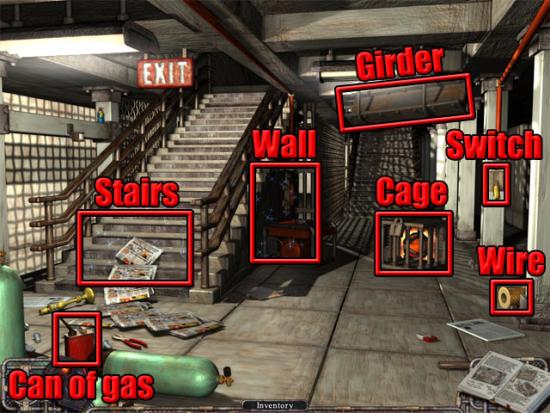
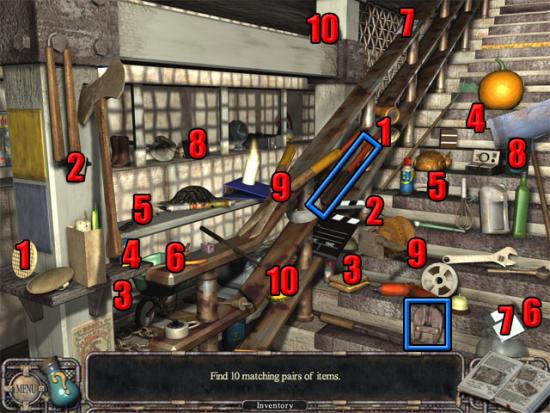
Take the can of gas and the copper wire. Examine the bottom of the stairs to enter a hidden object scene. Find the ten matching pairs of items and then take the arms and head of the bolt cutters:
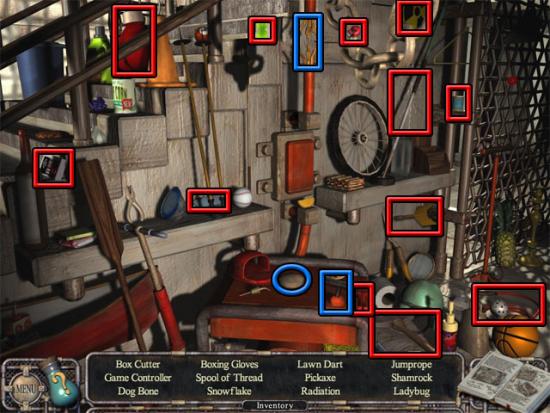
Examine the wall to enter a hidden object scene. Find all of the listed objects:
Use the copper wire on the broken wire. Use the crowbar on the cap. Use the can of gas on the hole. Select the handle three times and the generator will start. Combine the bolt cutter head with the bolt cutter arms to make the bolt cutters. Pull the switch and the girder will be lowered. Use the bolt cutters on the girder and then take the spirit stone.
Bus Station
The following hotspots are available:
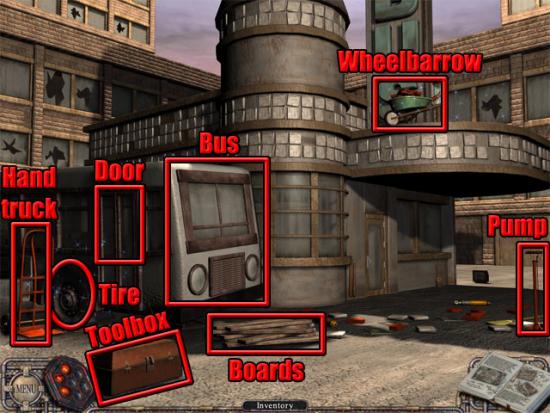
Examine the sparkling area on the door of the bus to enter a hidden object scene. Find all of the listed objects:
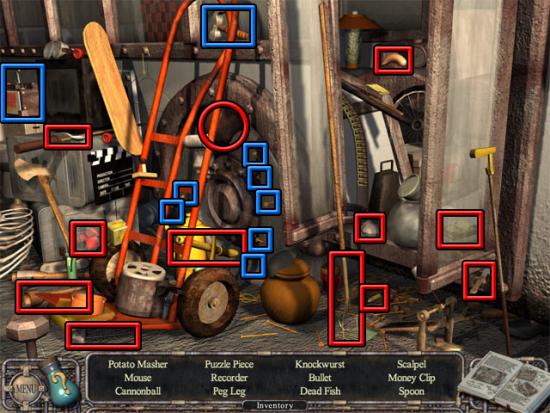
Take the hammer and use it on the seven nails on the tire. Take the bus battery to complete the hidden object scene. Take the hand truck, the pile of boards and the air pump. Combine the pile of nails with the pile of boards in the inventory to make the boards and nails. Combine the hammer with the boards and nails to make a ladder. Use the ladder on the roof below the wheelbarrow. Select the sparkling area on the wheelbarrow to enter a hidden object scene. Find the ten pieces of kitchen equipment:
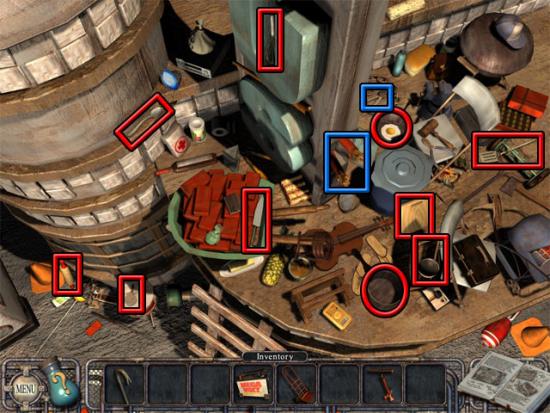
Use the battery on the wires to charge it. Take the keys. Use the air pump on the bus. Use the crowbar on the panel on the front of the bus. Use the charged battery on the panel. Use the keys on the bus and it will rock backwards. Use the hand truck on the cage with the spirit stone inside. Examine the wheelbarrow object scene again and use the crowbar on the bricks in the wheelbarrow. Take the spirit stone.
Walkthrough – Part 2
Restaurant
The following hotspots are available:
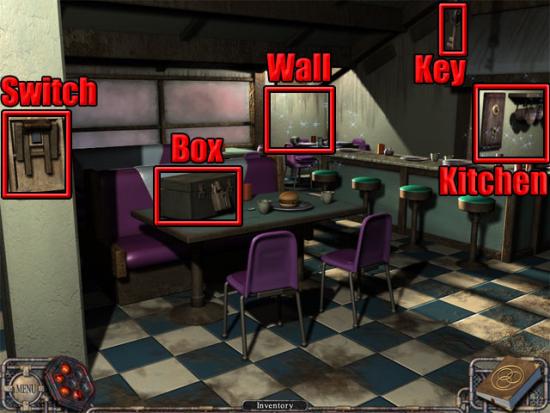
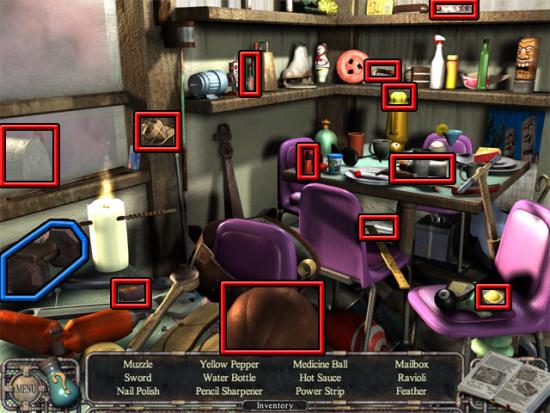
Examine the wall to enter a hidden object scene. Find the listed objects and then take the dumbbell:
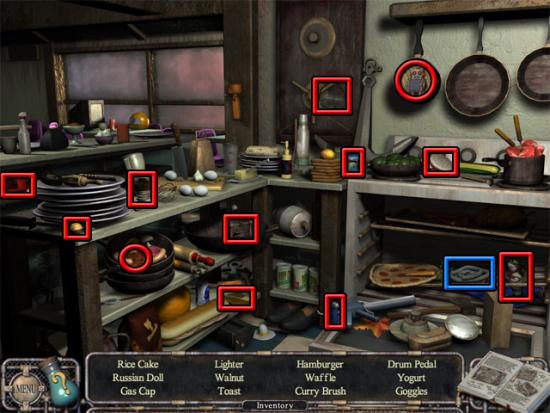
Examine the kitchen to enter a hidden object scene. Find the listed objects and then take the plastic tubing:
Combine the plastic tubing with the dumbbell in the inventory to make the tied dumbbell. Use the tied dumbbell on the switch to lower the key. Take the key and use it on the box to reveal the spirit stone. Select the spirit stone.
Cinema
The following hotspots are initially available:
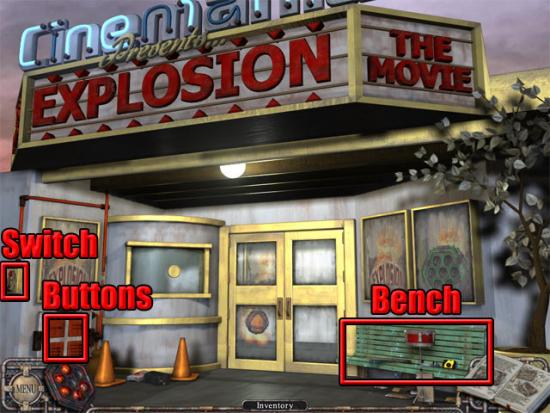
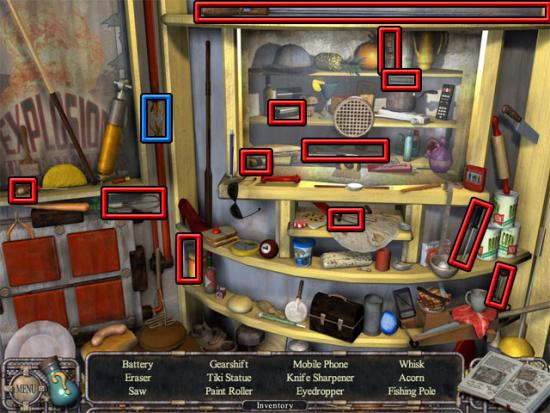
Examine the bench and find all of the listed objects. Use the crowbar on the glass and take the spirit stone disc. Take the electrical tape:
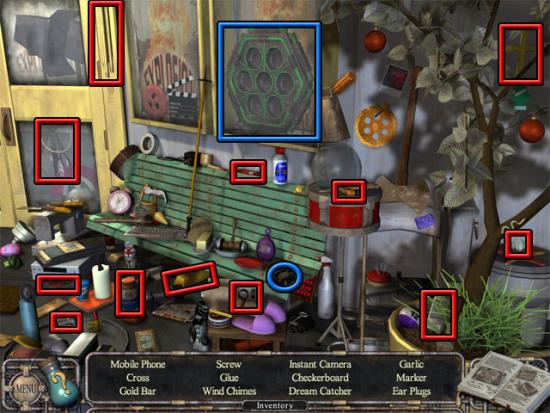
A new sparkling area will become available below the ticket window. Examine this sparkling area to enter another hidden object scene. Find all of the listed objects and then use the electrical tape on the broken wire:
Select the switch at the left side of the area. The aim now is to use the buttons on the panel to light up all of the letters on the word “explosion”. The buttons move the letter selector between 1 and 4 spaces depending on the number of arrows on the button. After a button has been pressed, all of the buttons must be pressed before it can be used again. If the selector reaches a letter that is already lit, it will become dark again. After all of the letters have been lit, select the spirit stone from the opened door.
Red Ring
Select the spirit stone in the middle of the ring and three sparkling areas will become available. Examine the sparkling area in the middle of the ring. Find all of the listed objects and then take the three control gems:
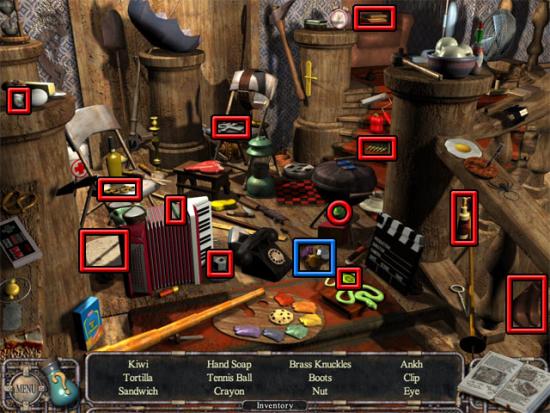
Examine the sparkling area at the bottom of the stairs. Find all of the listed objects and then take the three control gems:
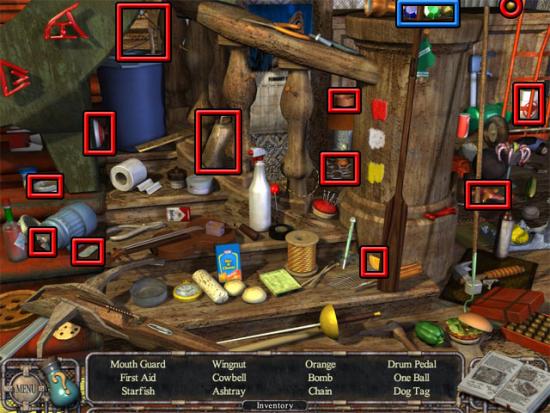
Examine the remaining sparkling area. Find all of the listed objects and then take the three control gems:
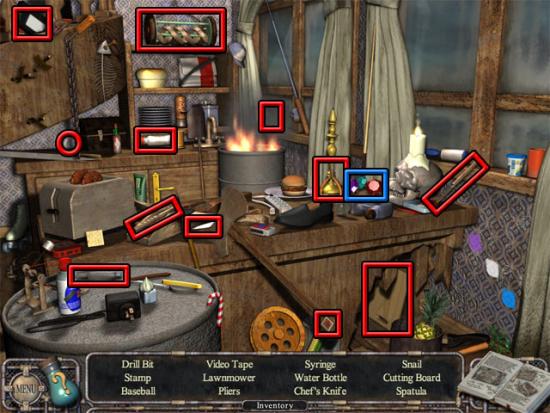
Select the device on the stairs in front of the ring and it will appear at the bottom-right corner of the screen. Use the three sets of the gems on the device. Examine the journal to see the order that the gems need to be pressed. Press the gems in the following order:
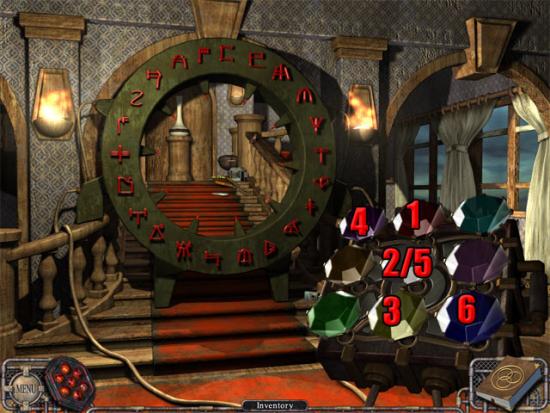
Select the middle of the ring to place the spirit disc. Press gems 1, 2 and 3 again and then take the purified disc from the middle of the ring.
Outside the Castle – Red Lock
Select the disc in the middle of the gate to play a mini-game. The aim is to remove all of the red discs by jumping over them with another red disc, and then jump the blue disc over the remaining red disc. The following movements will complete the mini-game:
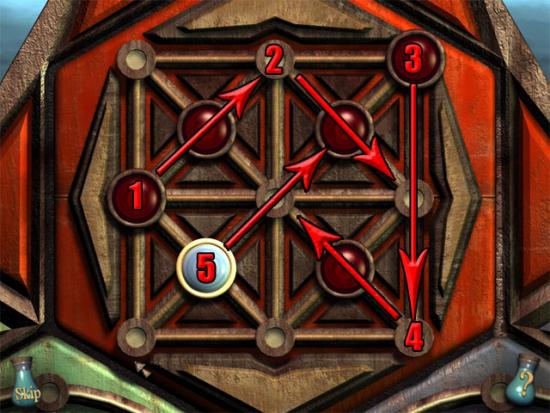
Use the purified disc on the lock.
Office
The following hotspots are available:
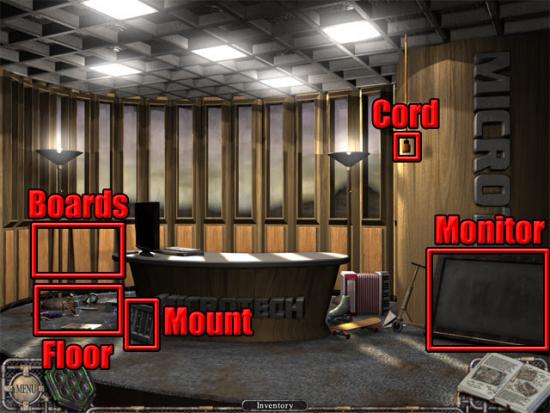
Take the monitor and the monitor mount. Examine the floor to enter a hidden object scene. Find the listed objects and then take the saw and the power drill:
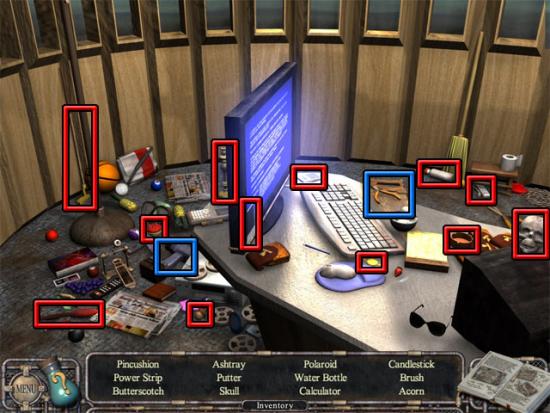
Use the saw on the boards. Examine the new sparkling area at the right side of the desk. Find all the listed objects and then take the five screws:
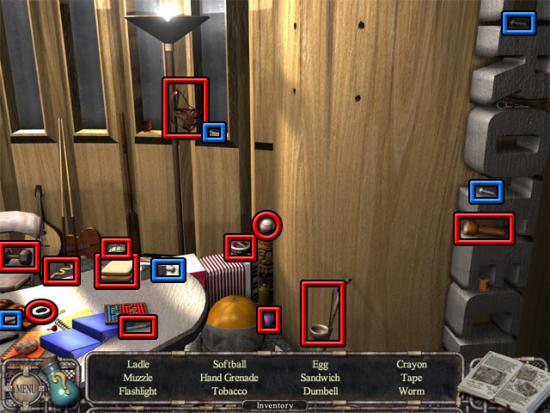
On the wall, use the boards, drill, monitor mount, pile of screws and the monitor. Select the cord to plug in the monitor. Select the monitor and then select the spirit stone.
Billiard Hall
The following hotspots are initially available:
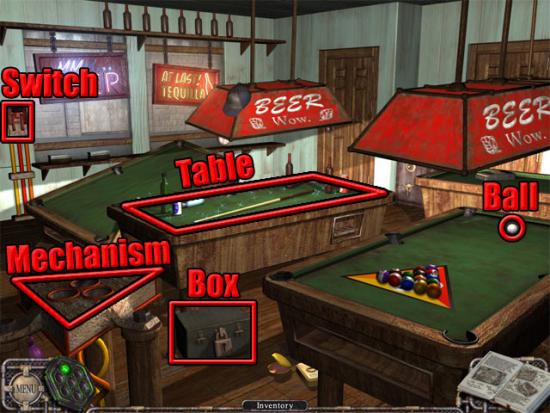
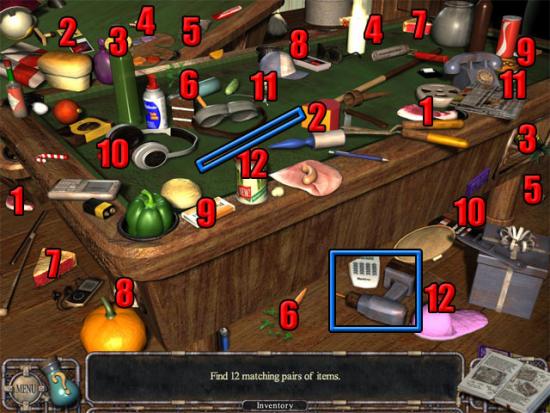
Examine the billiard table. Find the twelve matching objects and then take the pool cue and the drill:
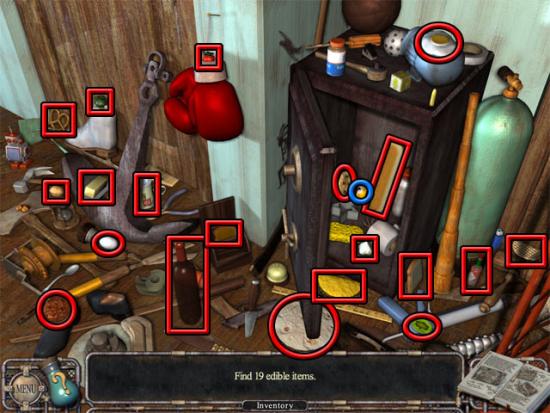
Examine the new sparkling area on the safe to enter a hidden object scene. Use the drill on the safe to open it. Find the twenty edible items and then take the 1 ball:
Use the pool cue on the white ball. Take the three and five balls on the right table. Combine the one ball with the three and five balls in the inventory and then use the pool balls on the triangle mechanism. Select the switch to reveal a code consisting of Xs and Os. Select the switch again to turn the lights on. The aim now is to select the bottles on the shelf that were in the same positions as the Os in the code. Select the bottles shown below:
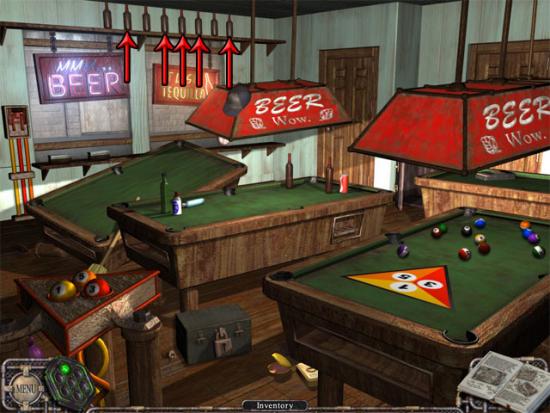
Take the key that appears from the pocket on the right table and use it on the lock on the box. Select the spirit stone.
The Daily Rag
The following hotspots are available:
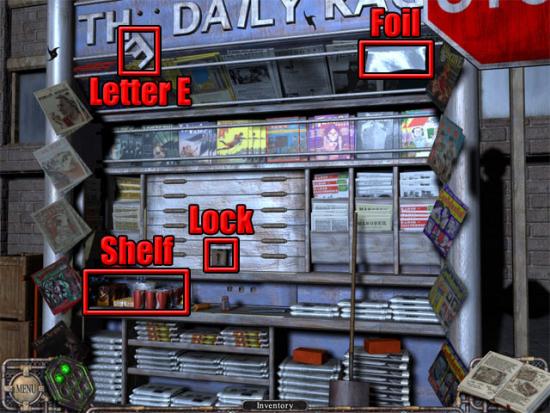
Take the foil. Examine the sparkling area on the shelf to enter a hidden object scene. Find the listed objects and then take the remote control and the wrench:
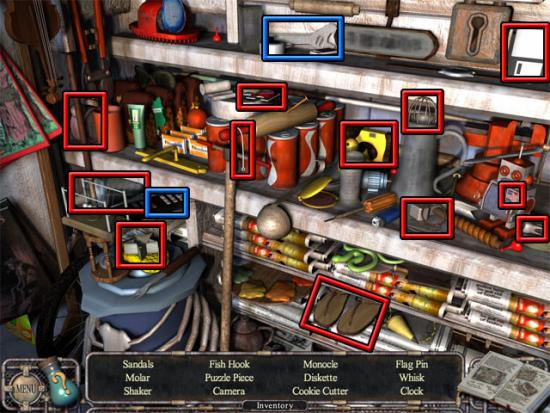
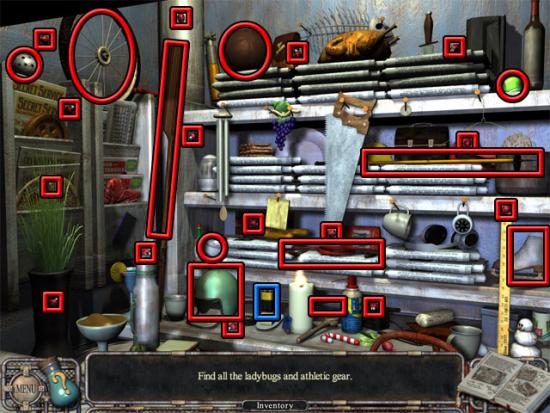
Use the wrench on the letter E to take it. Use the letter E on the three small openings below the lock. Select the letter and then take the key. Use the key on the lock and select the panel to open it. Examine the new sparkling area to enter a hidden object scene. Find all of the ladybugs and athletic gear, then take the battery:
Combine the battery with the dead remote in the inventory. Use the remote control with the television to turn it on. Use the aluminum foil on the television aerial. Select the spirit stone on the television and then select the spirit stone again to complete the area.
Walkthrough – Part 3
Hardware Store
The following hotspots are available: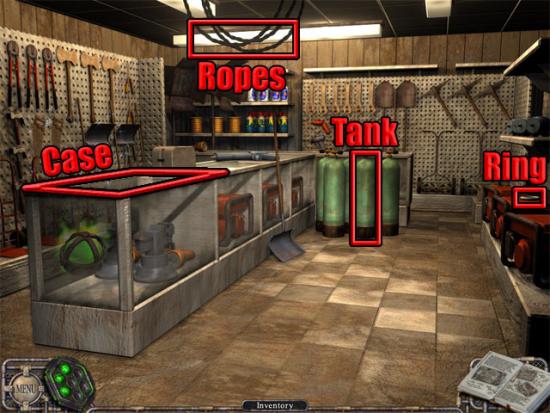
Examine the counter to enter a hidden object scene. Find all of the listed objects and then take the hoe: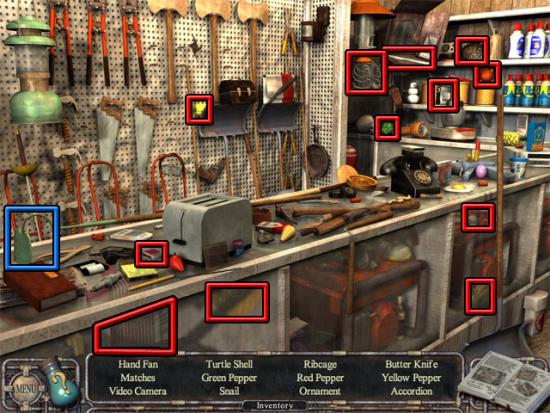
Use the hoe on the ropes. Examine the new sparkling area on the wall to enter a hidden object scene. Find all of the listed objects and then take the rubber band: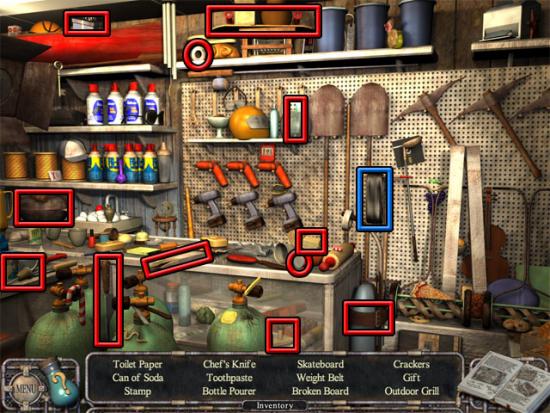
Take the air tank and the metal ring. Use the metal ring on the rope. Use the rubber band on the metal ring. Use the air tank on the rubber band. Select the air tank and it will break the display case. Select the spirit stone.
Bar
Examine the sparkling area to enter a hidden object scene. Find all of the listed objects and then take the wrench and tape: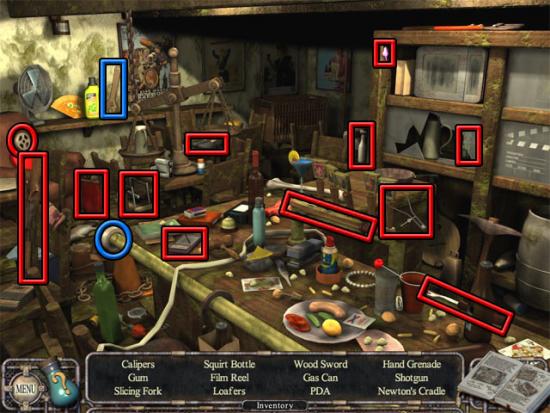
Examine the new sparkling area at the right side of the bar to enter a hidden object scene. Find all of the listed objects and then take the keg pump handle: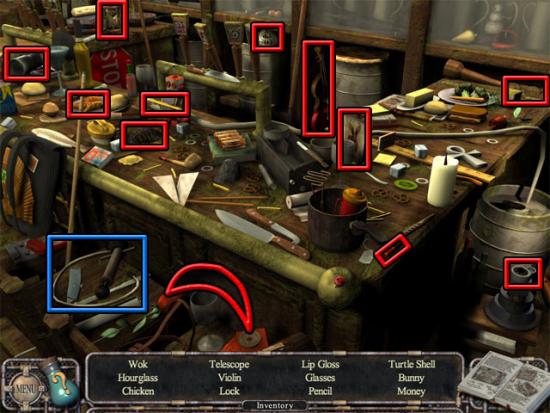
Use the keg pump handle on the keg at the left side of the bar. Examine the scale at the left side of the bar. Take the empty mug and use it on the taps: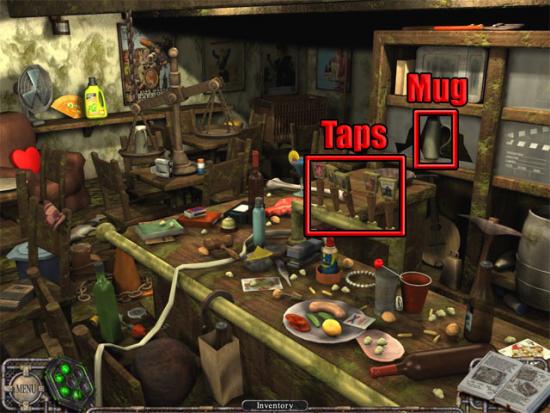
Take the half full mug. Use the wrench on the leg keg to take the keg pump handle. Examine the right side of the bar and use the keg pump handle on the top of the keg. Use the tape on the tear in the hose. Use the half full mug on the taps and then take the mug of beer. Examine the left side of the bar and use the mug of beer on the scale to lower the key. Take the key and use it on the box to reveal the spirit stone. Select the spirit stone.
Fountain 2
The following hotspots are available: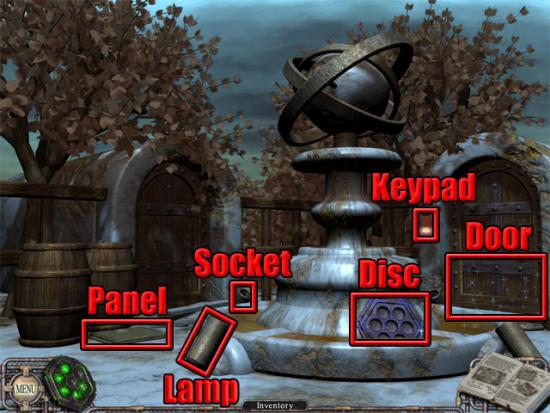
Examine the sparkling area on the door to enter a hidden object scene. Find all of the listed objects and then take the four light bulbs: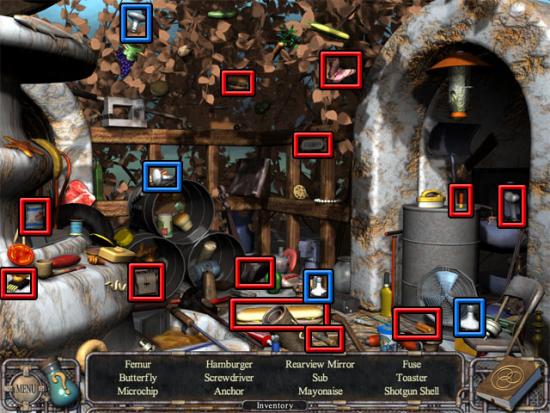
Use the light bulbs on one of the lamps around the fountain. Examine the new sparkling area to enter a hidden object scene. Find all of the listed objects and then take the fuse: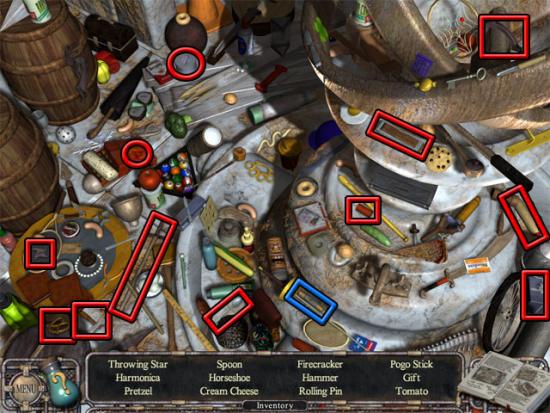
Select the panel and a box will appear. Use the fuse on the box and then select the switch to turn on the lights. Select the switch again and a code will appear on the sphere above the fountain. Select the keypad to enter the code. Open the right door and then select the spirit stone.
Green Ring
Take the spirit stone in the middle of the ring. Examine the new sparkling area to enter a hidden object scene. Find all of the listed objects and then take the connector cable: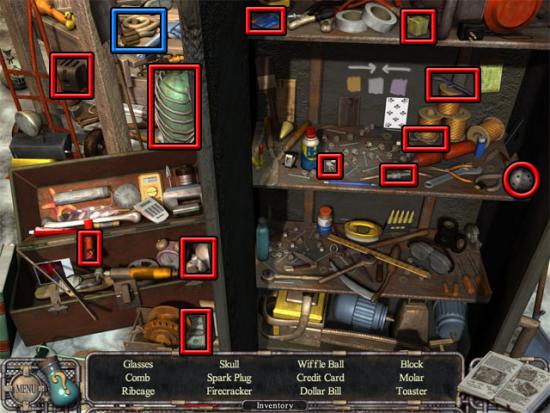
Examine the new sparkling area in the middle of the ring. Find the thirteen matching pairs of food and then take the connector cable: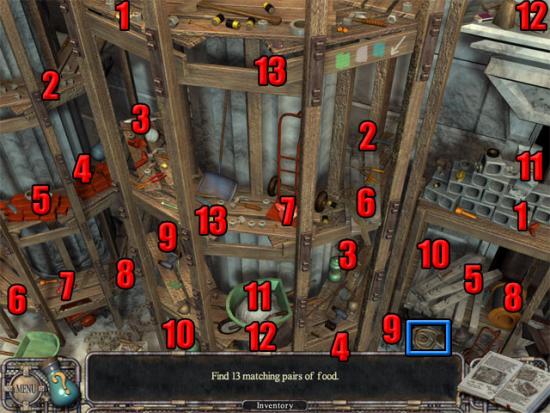
Use the connector cables on the slots at either side of the ring. Select the gem device and it will appear at the bottom-right corner of the screen. Examine the journal to see the order that the gems need to be pressed. Press the gems in the following order: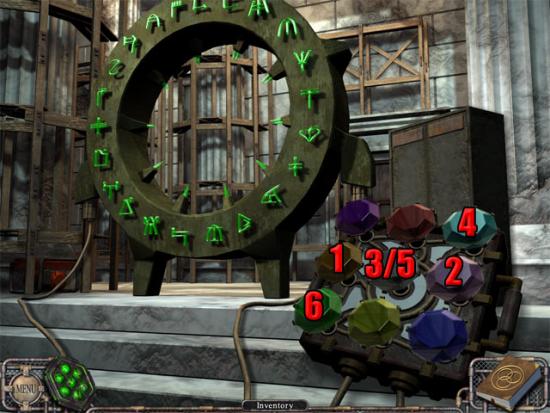
Select the middle of the ring to place the spirit disc. Press gems 4, 5 and 6 again and then take the purified disc from the middle of the ring.
Outside the Castle – Green Lock
Select the disc in the middle of the gate to play a mini-game. The aim is to switch adjacent stones to complete the pattern. Start by switching the stones to complete the pattern around the outside of the puzzle to start with, and then move the inner stones to complete the pattern with the white stone in the middle. The completed pattern is shown below: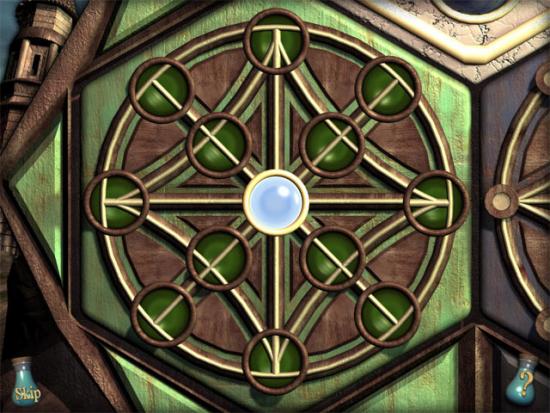
Use the purified disc on the lock.
Art Gallery
Examine the sparkling area on the fruit painting to enter a hidden object scene. Find all of the listed objects and then take the sticky note: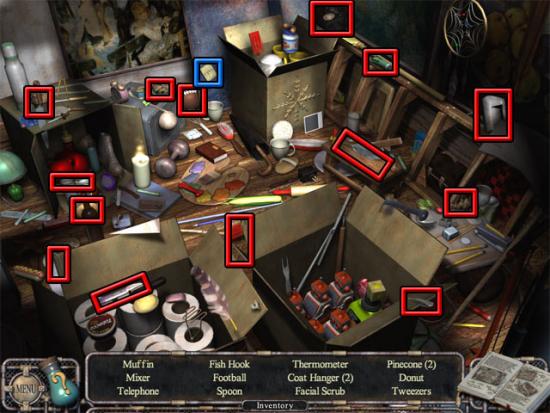
Use the sticky note code on the keypad and then pull the switch to turn off the lasers. Examine the doorway to enter another hidden object scene. Find the thirteen clubs and then take the sticky note and the box cutter: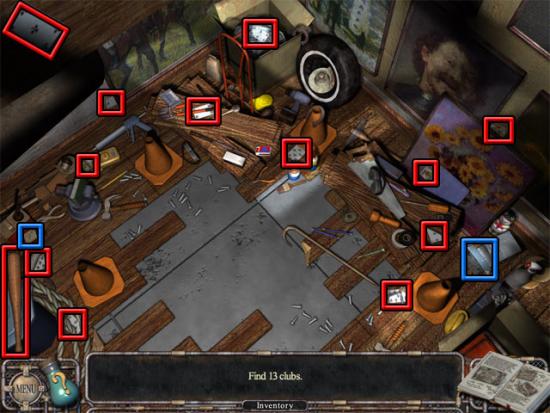
Use the box cutter on the painting of the safe. Use the sticky note code on the safe and select the spirit stone.
Sofa Castle
Examine the sparkling area at the left side of the room to enter a hidden object scene. Find the fifteen pool balls and then take the metal key: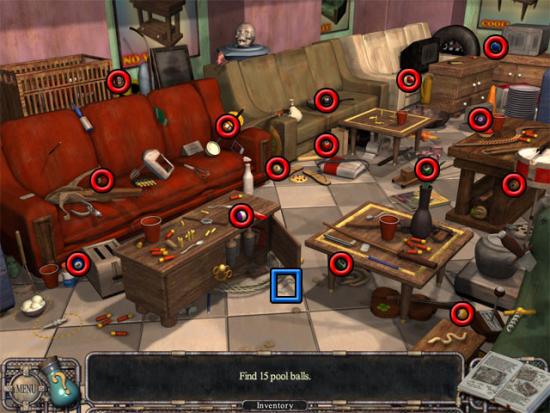
Use the metal key on the locked chest to remove the chains. Examine the chest to enter a hidden object scene. Find all of the listed objects and then take the yellow connector cable: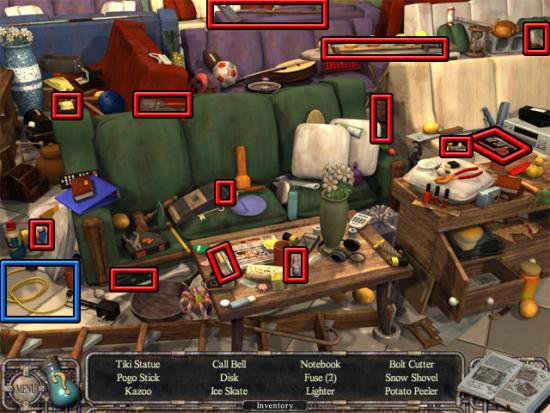
Use the yellow connector cable on the yellow control device. Select the control device and press the green button to drop the demolition ball. Select the spirit stone.
Sports Shop
The following hotspots are available: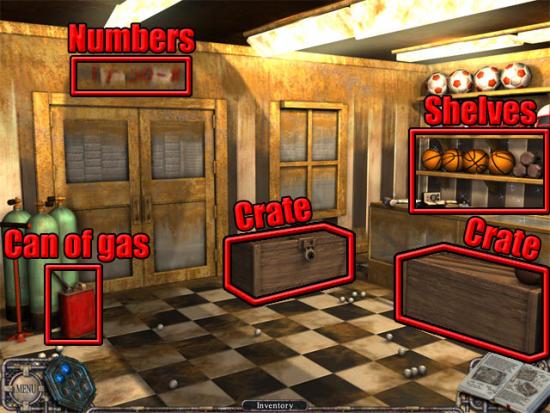
Examine the shelves to enter a hidden object scene. Find all of the items that don’t belong and then take the drill and the sanding bit: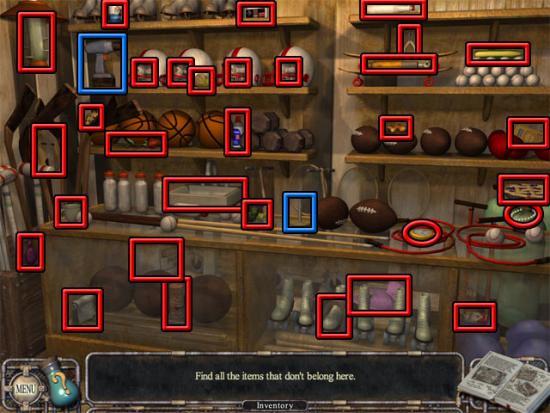
Combine the sanding bit with the drill in the inventory to make the power sander. Use the power sander on the numbers above the door. Take the instant camera on the counter below the shelves and use it on the blank area above the door to take the combination photo. Use the combination photo on the locked crate to open it. Examine the crate to enter a hidden object scene. Find all of the listed objects and then take the chainsaw: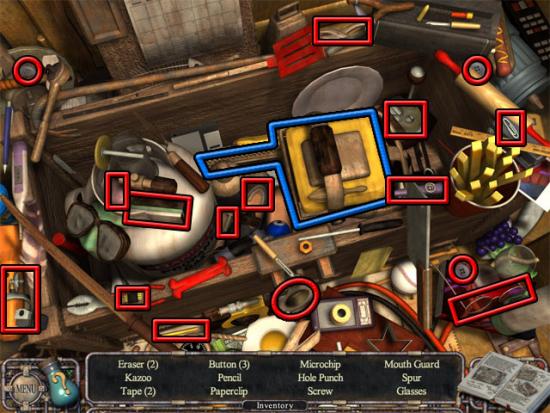
Take the can of gas. Combine the can of gas with the chainsaw in the inventory and then use the chainsaw on the right crate. Select the spirit stone.
Construction Site
Examine the sparkling area at the bottom-right corner of the screen to enter a hidden object scene. Find all of the listed objects and then take the crowbar: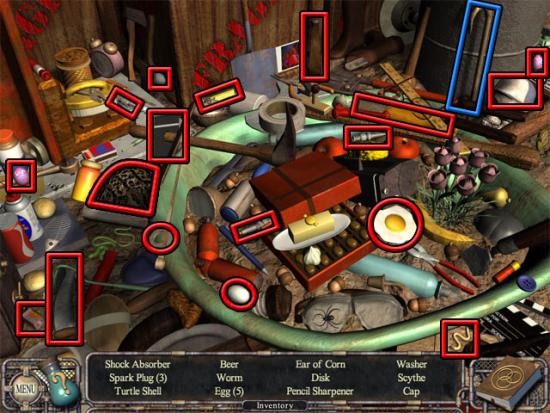
Use the crowbar on the crates at the left side of the area. Take the propane tank from the crate. Examine the new sparkling area on the ladder. Find all of the listed objects, then take both propane tanks and the hand grenade: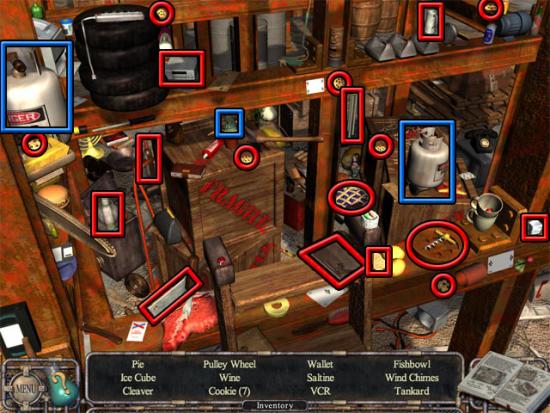
Use the three propane tanks on the wheelbarrow and it will move below the spirit stone. Use the grenade on the wheelbarrow and then select the spirit stone.
Factory
Examine the sparkling area on the containers to enter a hidden object scene. Find the twenty flowers and then take the coiled rope: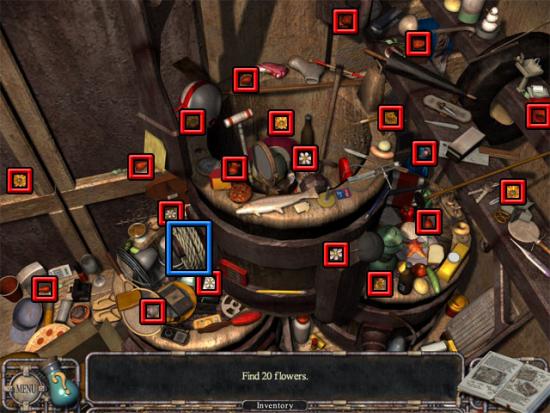
Use the coiled rope on the wooden platform. Select the left lever on the control panel to move a container onto the platform. Select the new sparkling area on the platform to enter a hidden object scene. Find all of the listed objects and then take the control panel handle: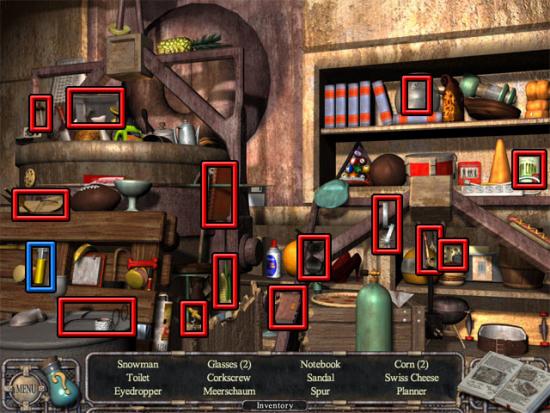
Use the missing handle on the control panel. Move the lever at the right side of the area to fill the container with molten metal. Select the rope attached to the wooden platform to move the container. Select the middle lever on the control panel to grab the container. Select the right lever on the control panel to break the door. Select the spirit stone in the doorway.
Walkthrough – Part 4
Warehouse
Examine the sparkling area at the right side of the room to enter a hidden object scene. Find all of the listed objects and then take the valve wheel:
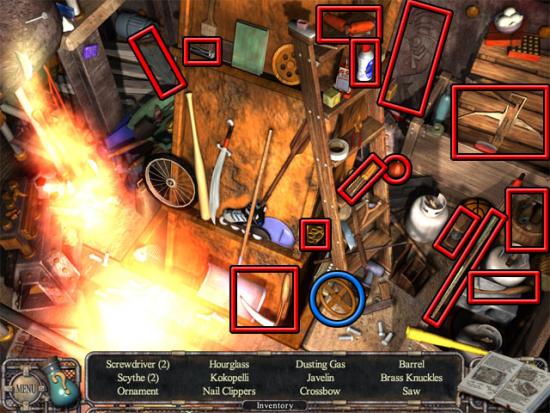
Use the valve wheel on the valve peg on top of the pipe. Select the valve wheel and the flame will stop coming out of the pipe. Select the sparkling area on the spirit stone to enter a hidden object scene. Find all of the listed objects, then take the coil of rope and the fire extinguisher: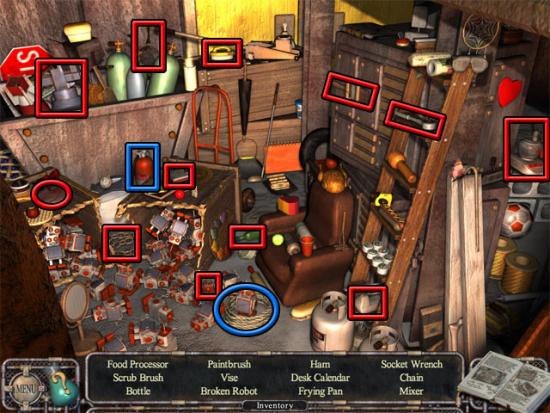
Use the fire extinguisher on the fire. Use the coil of rope on the pipe above the spirit stone and then select the spirit stone.
Blue Ring
Take the spirit stone in the middle of the ring. Examine the sparkling area in the tickets hut to enter a hidden object scene. Find all of the listed objects and then take the three control gems: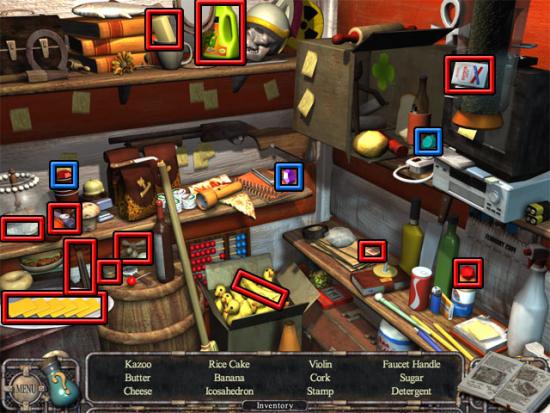
Examine the sparkling area in the snacks hut to enter a hidden object scene. Find all of the listed objects and then take the three control gems: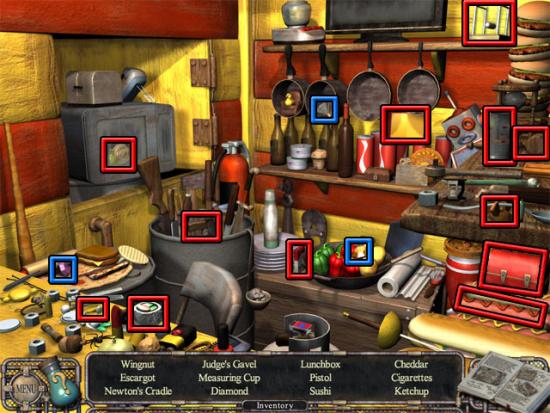
Take the cable and the control gems on the snacks counter. Use the cable on the control panel and then use the three sets of control gems on the control panel: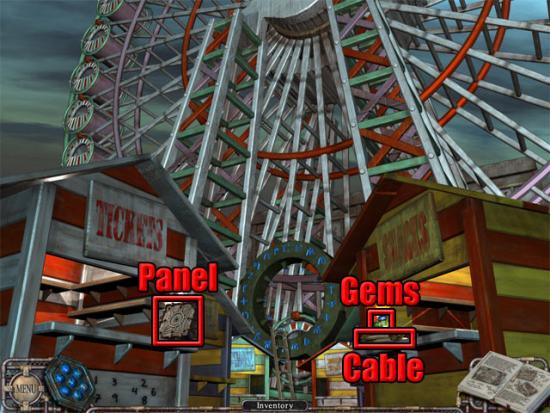
The gems are placed in the following order: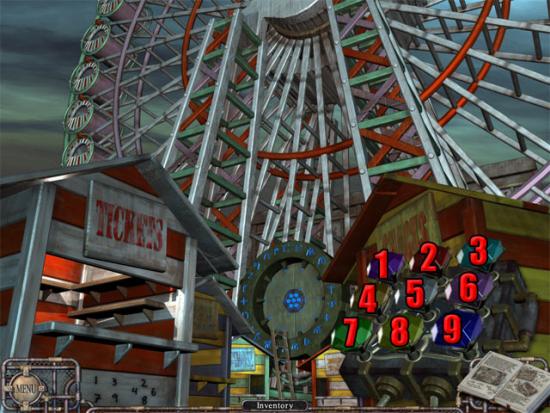
Press gems 1, 3, 7 and 9 and the ring will close. Select the middle of the ring to place the spirit disc. Press gems 2, 4, 6 and 8 to purify the disc. Take the purified disc from the middle of the ring.
Outside the Castle – Blue Lock
Take the wand below the lock. Select the disc in the middle of the gate to play a mini-game. The aim is to switch the stones so that all of the edges are the same color. The completed pattern is shown below: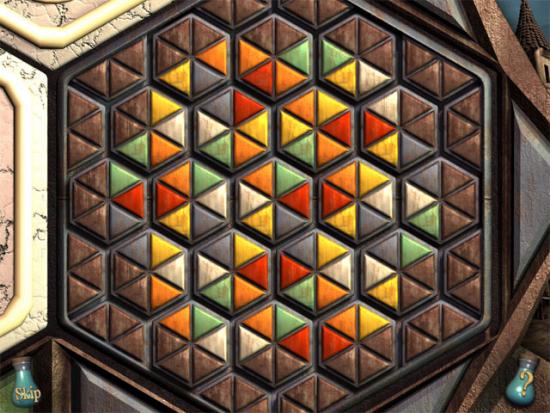
After completing the mini-game, Golemicus will appear. When he opens his arms, use the magic wand on the targets that are revealed. You will need to hit the target that glows yellow in order to deal any damage. Keep doing this until Golemicus is defeated and then use the purified disc on the lock to complete the game.
More articles...
Monopoly GO! Free Rolls – Links For Free Dice
By Glen Fox
Wondering how to get Monopoly GO! free rolls? Well, you’ve come to the right place. In this guide, we provide you with a bunch of tips and tricks to get some free rolls for the hit new mobile game. We’ll …Best Roblox Horror Games to Play Right Now – Updated Weekly
By Adele Wilson
Our Best Roblox Horror Games guide features the scariest and most creative experiences to play right now on the platform!The BEST Roblox Games of The Week – Games You Need To Play!
By Sho Roberts
Our feature shares our pick for the Best Roblox Games of the week! With our feature, we guarantee you'll find something new to play!All Grades in Type Soul – Each Race Explained
By Adele Wilson
Our All Grades in Type Soul guide lists every grade in the game for all races, including how to increase your grade quickly!


