- Wondering how to get Monopoly GO! free rolls? Well, you’ve come to the right place. In this guide, we provide you with a bunch of tips and tricks to get some free rolls for the hit new mobile game. We’ll …
Best Roblox Horror Games to Play Right Now – Updated Weekly
By Adele Wilson
Our Best Roblox Horror Games guide features the scariest and most creative experiences to play right now on the platform!The BEST Roblox Games of The Week – Games You Need To Play!
By Sho Roberts
Our feature shares our pick for the Best Roblox Games of the week! With our feature, we guarantee you'll find something new to play!All Grades in Type Soul – Each Race Explained
By Adele Wilson
Our All Grades in Type Soul guide lists every grade in the game for all races, including how to increase your grade quickly!
Portal of Evil: Stolen Runes Collector’s Edition Walkthrough
Welcome to the Portal of Evil: Stolen Runes walkthrough on Gamezebo. Portal of Evil: Stolen Runes is an Adventure Game with puzzles and hidden object scenes created by 8 Floor Games. This walkthrough includes tips and helpful hints and is a strategy guide to complete Portal of Evil: Stolen Runes.
Game Introduction – Portal of Evil: Stolen Runes
Welcome to the Portal of Evil: Stolen Runes walkthrough on Gamezebo. Portal of Evil: Stolen Runes is an Adventure Game with puzzles and hidden object scenes created by 8 Floor Games. This walkthrough includes tips and helpful hints and is a strategy guide to complete Portal of Evil: Stolen Runes.
General Tips
- Play is mostly linear with a few options for the order in which to explore locations and find inventory items.
- This guide completes tasks in the most efficient way possible. Not all inventory items are picked up when first encountered; tasks are completed when all required items have been assembled.
- To make it easier to find where this guide may differ from your own play, inventory items are CAPITALIZED and highlighted in white with a blue border in the screenshots.
- If you don’t have an item referenced in this guide, press and hold the “Ctrl” key while pressing the “F” key. This opens a Find area in your web browser. Type in the name of the object as it appears in this guide. Press the “Enter” key to find references to the item.
- Consult the game diary for story information, playing hints and tips to solve puzzles.
Options
- Adjust the music, sounds and ambient audio volumes.
- Toggle the windows cursor, full- or wide-screen on or off.
- Adjust the screen resolution.
Difficulty Modes
- There are two playing modes: Casual or Expert.
- Casual mode offers the most assistance during play. Interactive locations are highlighted with sparkles; hint and skip buttons recharge within 30 seconds.
- Hard mode is the most challenging way to play. Interactive areas are not indicated; hint and skip buttons fill within one minute.
- The playing mode may be changed only by creating a new profile from the main menu and restarting the game.
- This guide used the casual mode of the Collector’s Edition.
Cursors
- The default custom cursor is an arrow. It can change into the following icons:
- A tapping finger indicates a character or an area requiring interaction.
- A magnifying glass means an interactive area requiring closer inspection.
- A hand indicates an area may be opened or an item picked up.
Hidden Object Scenes
- There are two types of hidden object scenes: list and item placement.
- Items listed in red require interacting with the scene to reveal or create the item.
- Items listed in purple indicate they are hidden in an interactive area.
- Cursor icons in these scenes are the same as in the rest of the game.
- Each hidden object scene is played twice: once as a list and once as an item placement.
- Only interactive and inventory items are highlighted in this guide.
Hint and Skip Buttons
- The hint button is in the lower right corner of the screen.
- How much assistance the hint provides depends on the play mode selected.
- The hint button can also be used in a hidden object scene to locate an item.
- Puzzles may be skipped once the skip button has charged.
Diary, Map and Messages
- The diary icon is in the lower left of the screen and is updated regularly with story information and hints for solving puzzles.
- The interactive map is collected early in the game.
- A green button shows your current location. Red buttons indicate a location with actions that can be completed.
- Hint: Deselect the “Show” check mark to reveal only the current location. This is a good option for players who like to use the map for movement but do not like to see the “spoilers” of areas containing objectives.
- Locations are added as they are discovered.
- A Message cylinder is added above the diary early in the game. Fifteen message containers can be found during the game and added to the cylinder for later review.
Chapter 1: Answers to some Questions

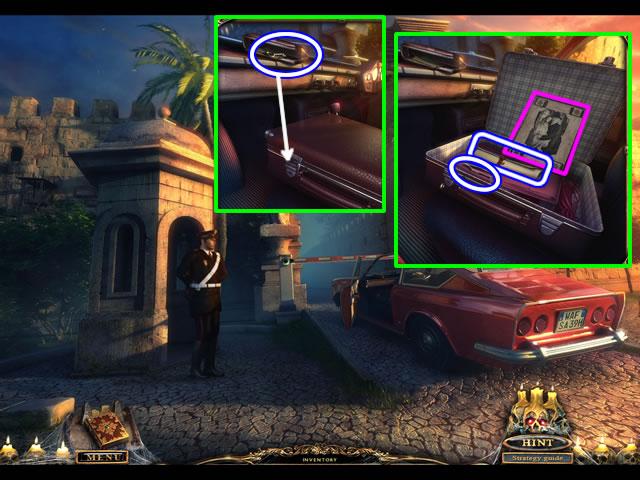
- Speak to the guard.
- Open the car door and zoom in on the area.
- Open the case on the dashboard; take the KEY.
- Insert the KEY in the briefcase lock.
- Pick up the photograph. Puzzle and story information is added to the diary for later use.
- Take the INVITATION and TWEEZERS.
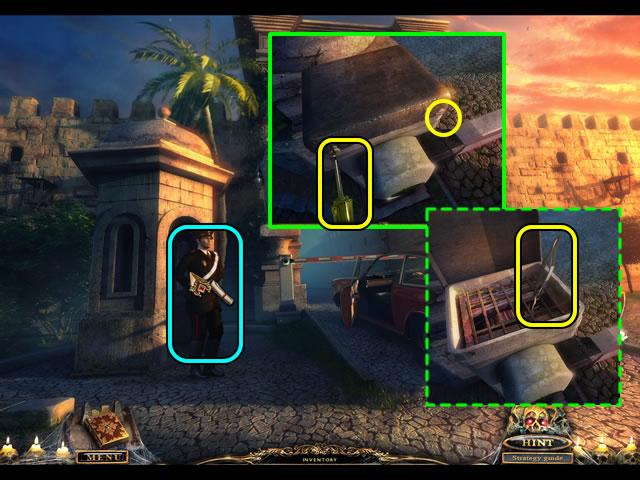
- Give the INVITATION to the guard; receive a SCREWDRIVER.
- Examine the barrier mechanism.
- Use the SCREWDRIVER to remove the two screws; open the box.
- Use the TWEEZERS to remove the twig and raise the barrier.
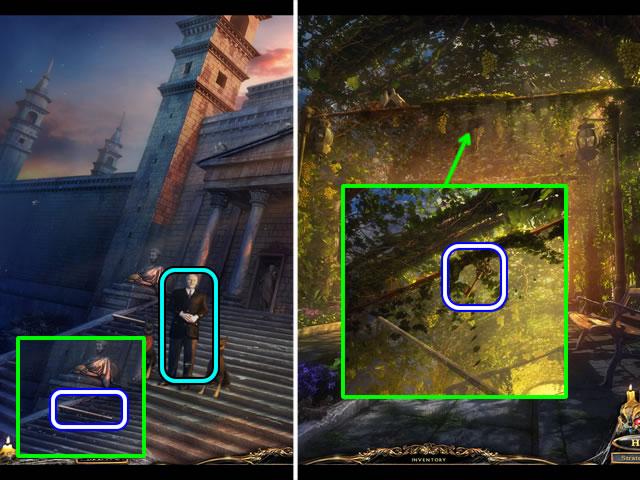
- Go right to the cathedral steps.
- Speak to the character.
- Pick up the STICK after the man leaves.
- Go down.
- Zoom in on the middle of the grape arbor.
- Use the STICK to knock down the key.
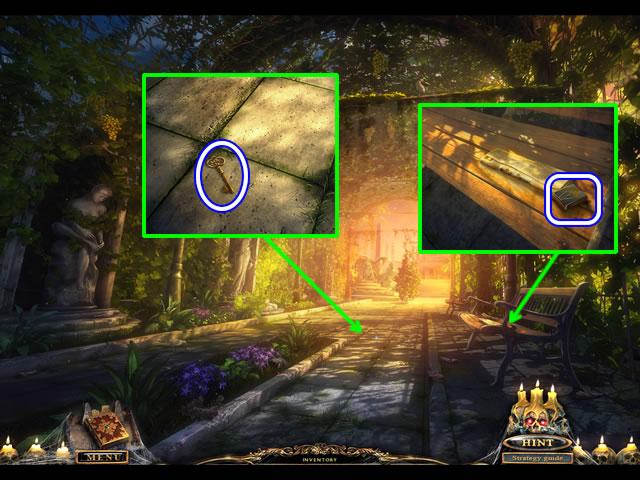
- Look closer at the path.
- Pick up the KEY.
- Look at the bench.
- Read the paper; pick up the BOX OF MATCHES.
- Go right.
- Use the KEY to unlock the cathedral doors.
- Enter and go forward.
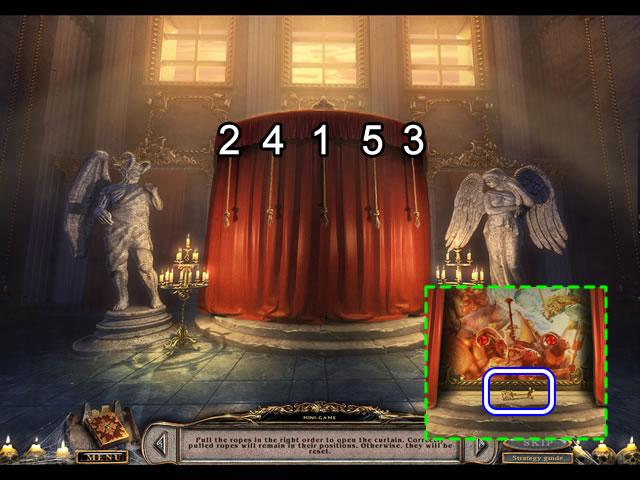
- Pull the ropes in the order shown to open the curtains.
- Pick up the CROSS KEY.
- Go down three times; go left.
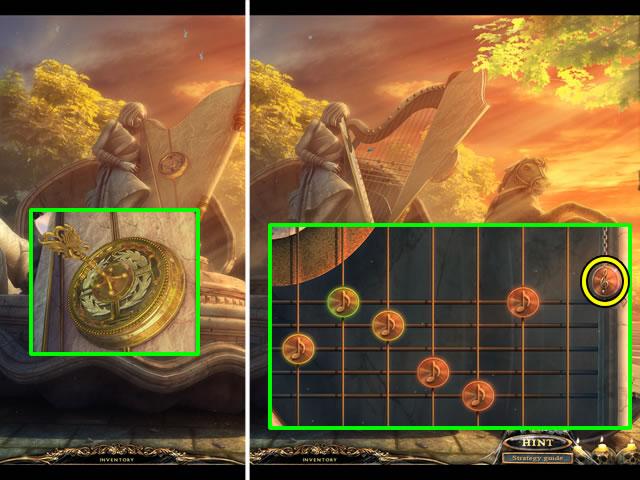
- Zoom in on the statue.
- Insert the CROSS KEY in the slot to open the harp.
- Inspect the harp to open a puzzle.
- The goal is to place the notes in the correct positions on the strings.
- Slide the notes up or down. Pull the treble clef to test the positions. Notes highlighted in red are incorrectly placed; yellow highlights mean the note is off by one position. Green highlights mean the note is in the correct position.
- The solution is shown in the next screenshot.
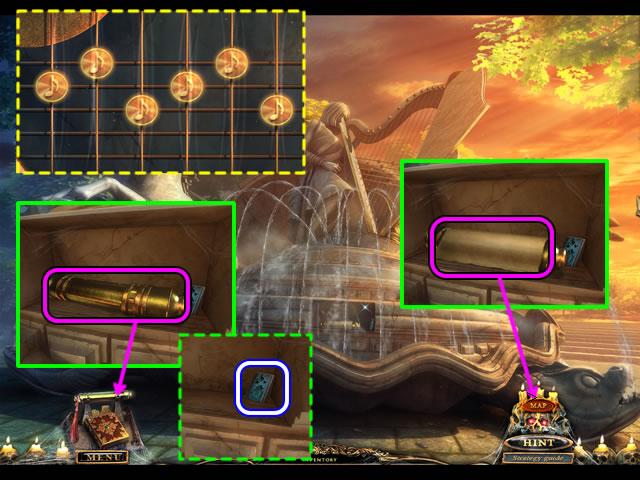
- Correctly solving the puzzle (yellow dashed inset) activates the fountain and opens a compartment.
- Zoom in on the compartment.
- Pick up the paper to get the Map. Click the Map tab on the skull at any time to open the map.
- Take the gold holder to add the message holder to the screen and receive the first Message. Find messages throughout the game for additional story information.
- Take the PASSCARD.
- Go down.
- Play the hidden object scene by the statue on the left.
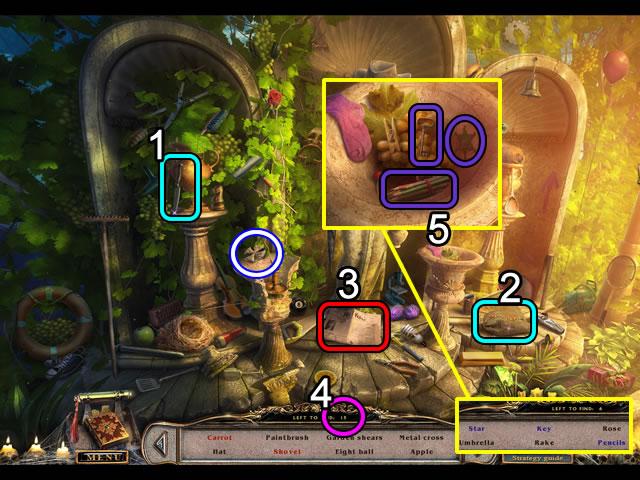
- Pick up the knife (1) and cut the sack (2); take the Carrot.
- Move the paper (3) to find the Shovel.
- As items are found, more are added. A running total of the number of items left to collect is shown (4).
- Look in the container (5) to find items listed in purple.
- Receive a CROSS.
- Go right.
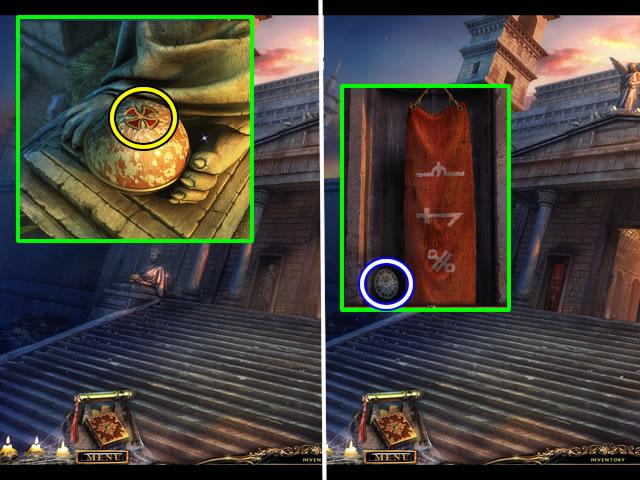
- Look at the statue at the top left of the stairs.
- Insert the CROSS in the slot.
- Look closer at the newly revealed compartment.
- The symbols on the banner are added to the diary; pick up the MOSAIC PART.
- Go forward.
- Zoom in on the floor.
- Insert the MOSAIC PART in the center to open a puzzle.
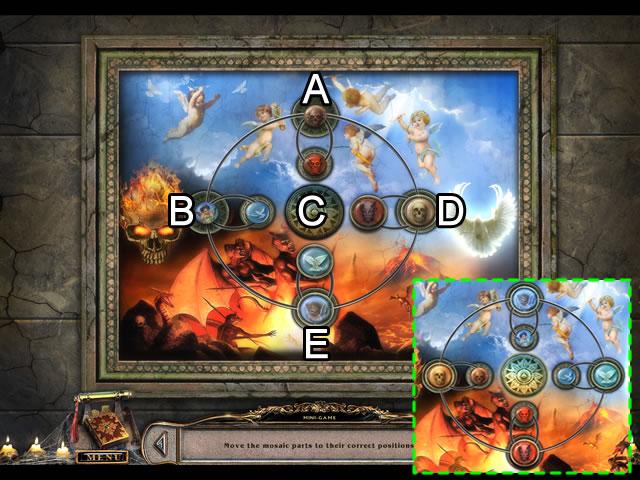
- The goal is to swap and rotate the images until the image pairs are aligned with their position in the background scene.
- Use the center circle to rotate the outer ring. Click an image on the ring to swap it. Position the disks so the larger sized image pairs are on the ring. The dashed inset shows the solution.
- There is no reset button but exiting and reentering will reset the puzzle.
- Solution. Click the disks in this order: C, A, B, E, C, C, B, D, E and C.
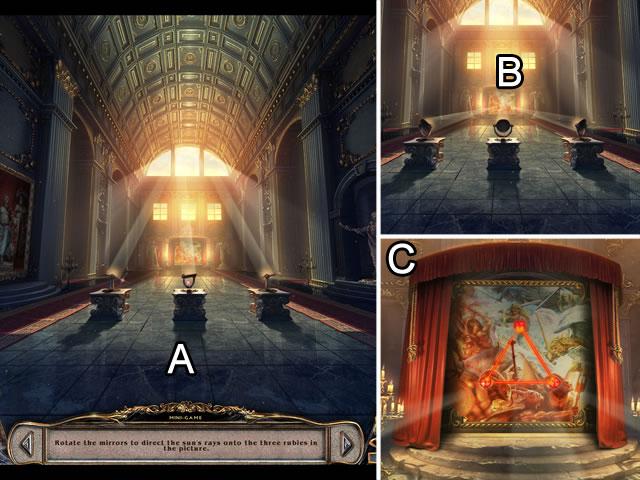
- Solving the mosaic puzzle raises three mirrors and opens another puzzle (A).
- Click each of the three mirrors to focus the rays on the painting at the far end (B).
- Go forward.
- Click each ruby so its ray focuses on another ruby to form a triangle (C).
- Go forward.
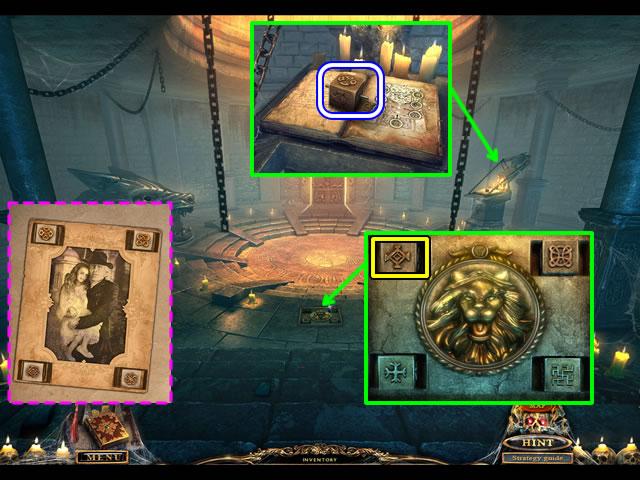
- Look at the bookstand.
- Pick up the CUBE; read the book.
- Zoom in on the patterned floor tile.
- Insert the CUBE in the empty slot to trigger a puzzle.
- The goal is to match the cube patterns with those shown in the photograph stored in the journal.
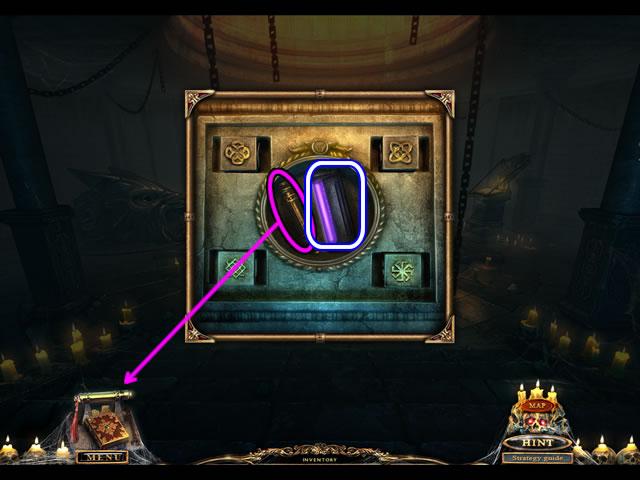
- Read the Message; take the UV LAMP.
- Go down twice.
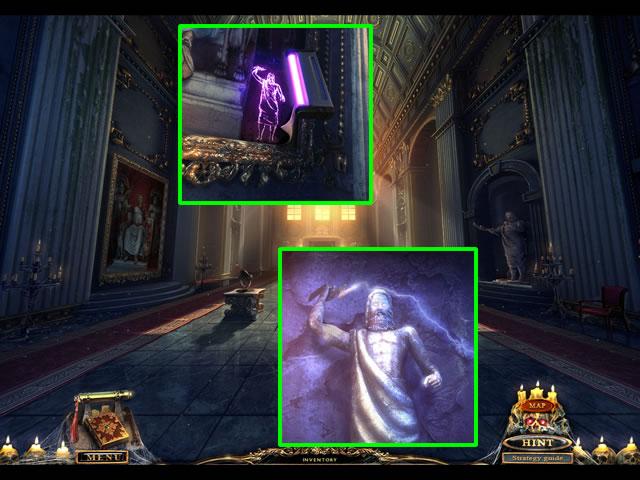
- Look at the painting.
- Examine the turned up corner.
- Use the UV LAMP to reveal the image.
- Zoom in on the statue.
- Solution: Position the statue’s arms and head so they match the image from the painting.
- Raise the arm with the lightning bolt, face the head forward and lower the other arm.
- Go right.
Chapter 2: Beneath the Cathedral
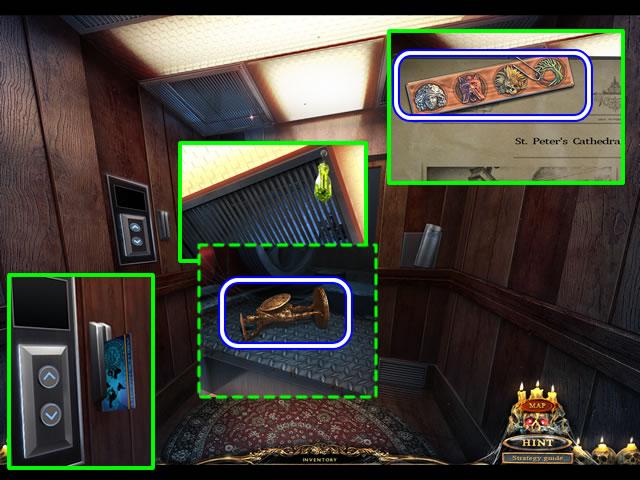
- Use the SCREWDRIVER to remove the four screws securing the ceiling grill.
- Take the STATUETTE.
- Pick up the newspaper; take the TEMPLATE.
- Swipe the PASSCARD through the reader to activate the elevator.
- Press the down button.
- Go forward.
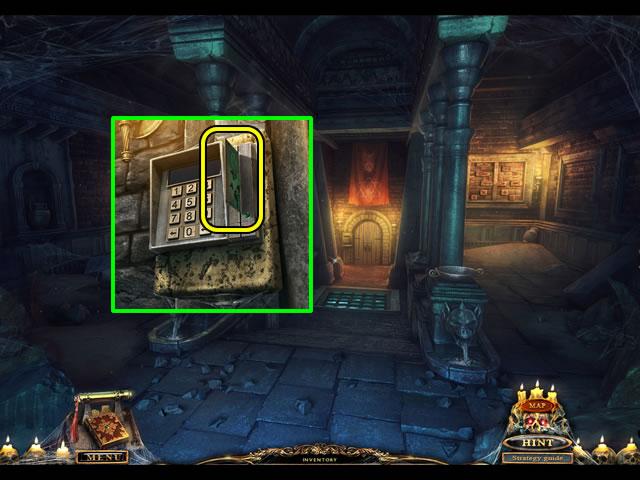
- Zoom in on the door.
- Swipe the PASSCARD through the reader.
- Go forward and right.
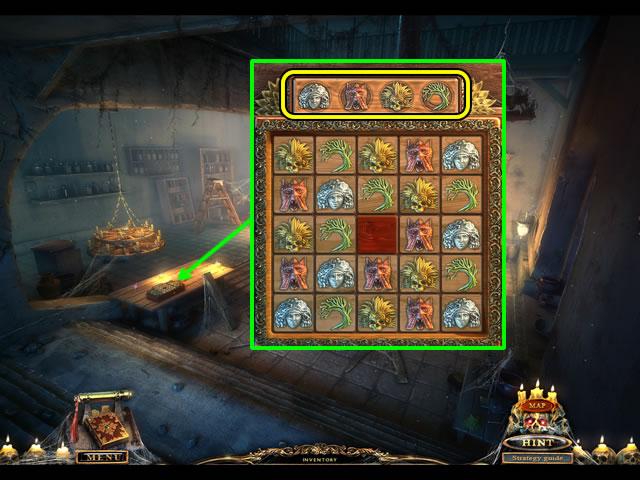
- Look at the box on the table.
- Insert the TEMPLATE in the slot on the top to open a puzzle.
- The goal is to find a path through the tiles by clicking the images in the same order shown in the template. The path must encompass all of the images.
- The next screenshot shows the solution.
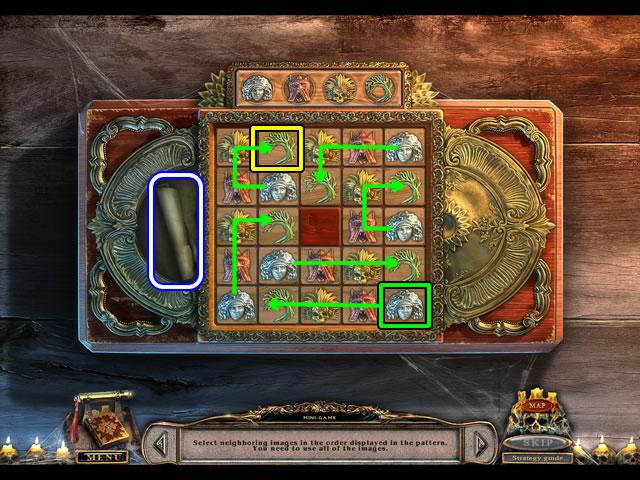
- Begin with the green-highlighted tile in the lower right corner.
- Click the images along the path of the arrows to reach the yellow-highlighted tile.
- Take the HALF OF THE DIAGRAM scroll from the side compartment.
- Completing the puzzle triggers a cutscene.
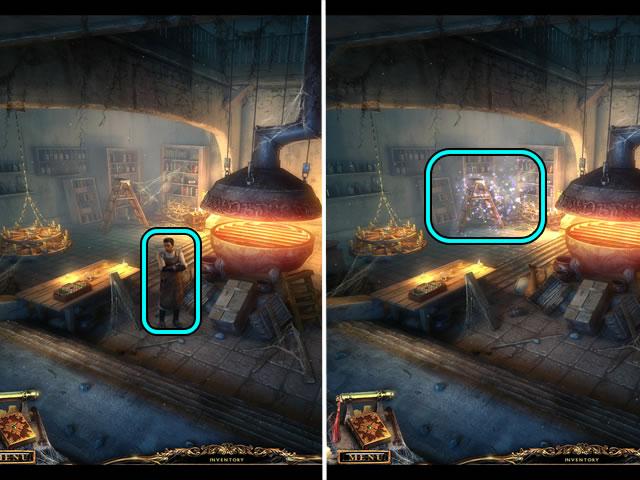
- Speaking to the character triggers a place-the-object scene in the corner.
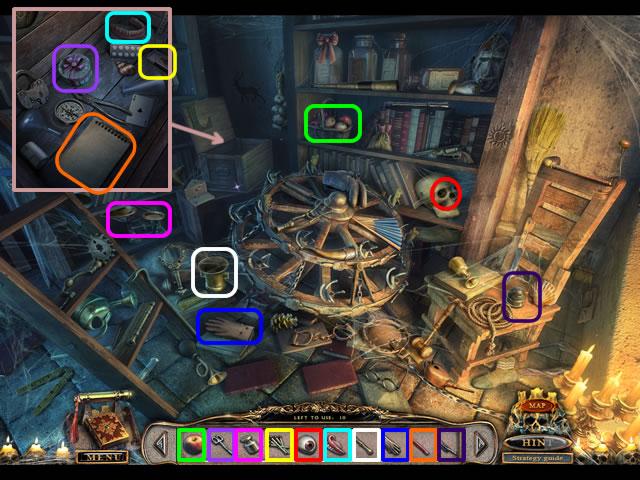
- Select the items on the bar and place them in the scene.
- Look inside the box for an additional placement area.
- The colored item outlines correspond to the same colored placement.
- Receive a KEY for inventory.
- Go down once.
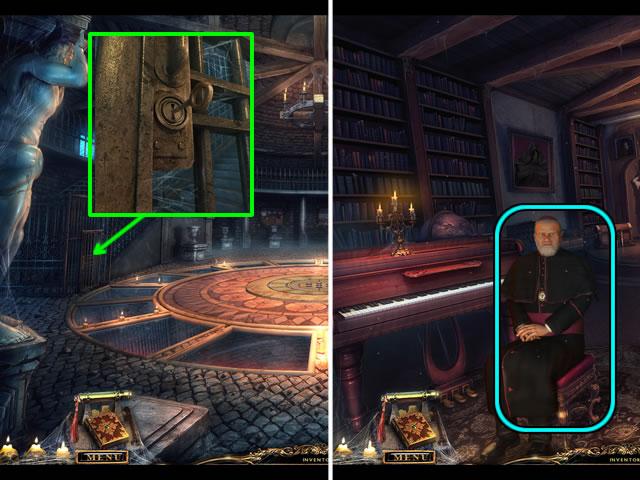
- Use the KEY to unlock the barred door.
- Speak to the character; receive a KEY.
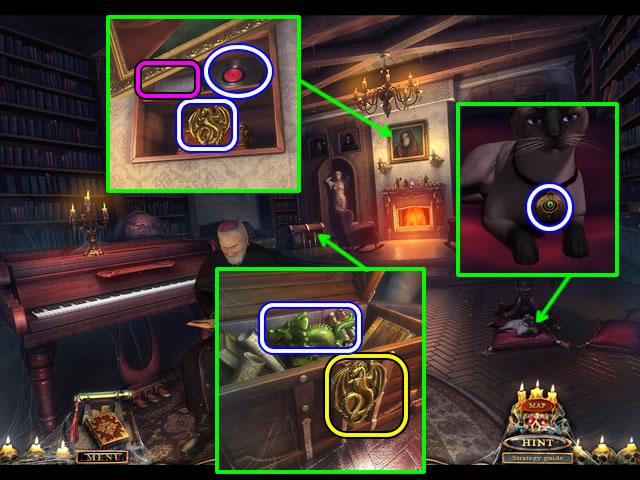
- Move the portrait aside.
- Read the note; take the VINYL RECORD and DRAGON from the niche.
- Look at the chest.
- Insert the DRAGON in the lock; take the JADE DRAGON FIGURINE.
- Inspect the cat; take the EYE.
- Go down twice and go left.
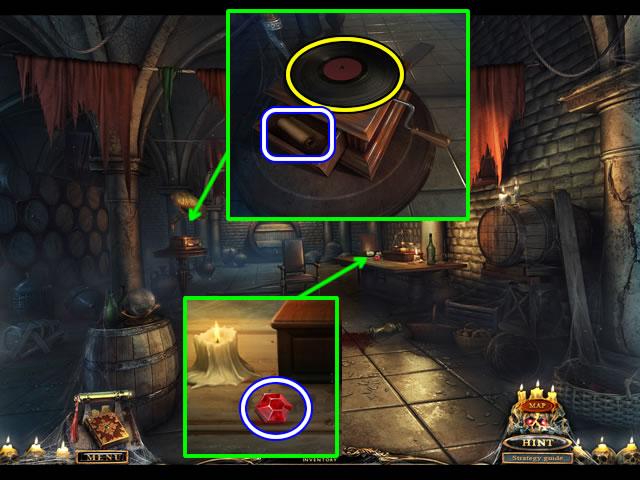
- Zoom in on the gramophone.
- Put the VINYL RECORD on the turntable; turn the handle.
- Take the HALF OF THE DIAGRAM from the compartment.
- Look at the table.
- Pick up the RUBY (1/6).
- Go down and forward.
- Look at the floor.
- Add the two HALF OF THE DIAGRAM pieces to open a puzzle.
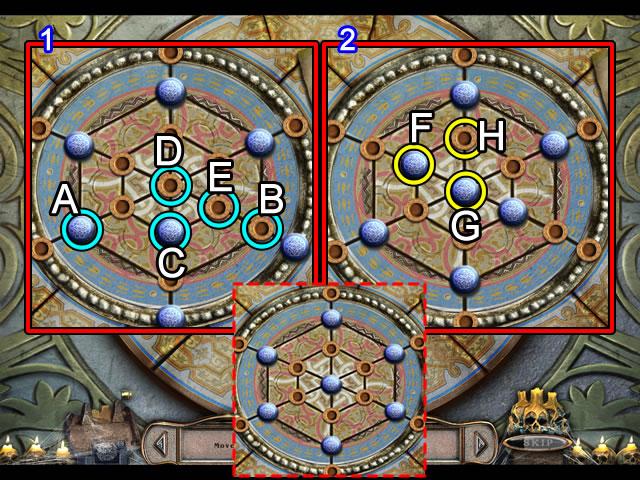
- The goal is to move the disks to the same position shown on the diagram.
- Slide the disks along the tracks. Moving one disk moves all disks on that same track.
- Solution. Exit and reenter the puzzle if necessary to reset the disks. Refer to inset (1) for the following moves: A-right x3; B-diagonally up x4; C-up x2; C-right; D-down x3; E-left; C-up; D-diagonally down right.
- Inset (2) shows the result of the previous moves. Continue: F-right; G-diagonally up and left x3; H-left and F-diagonally right.
- The ending position is shown in the dashed inset.
- Go down the stairs.
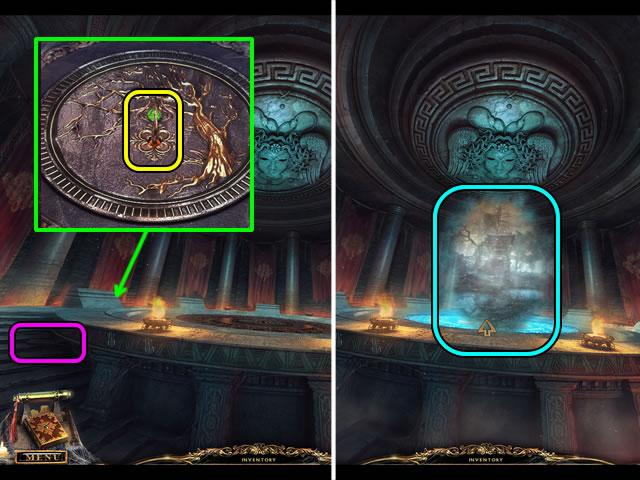
- Pick up the Message on the stairs on the left.
- Zoom in on the fire pot on the left.
- Insert the KEY in the slot.
- Enter the portal.
Chapter 3: Following the Hunchback
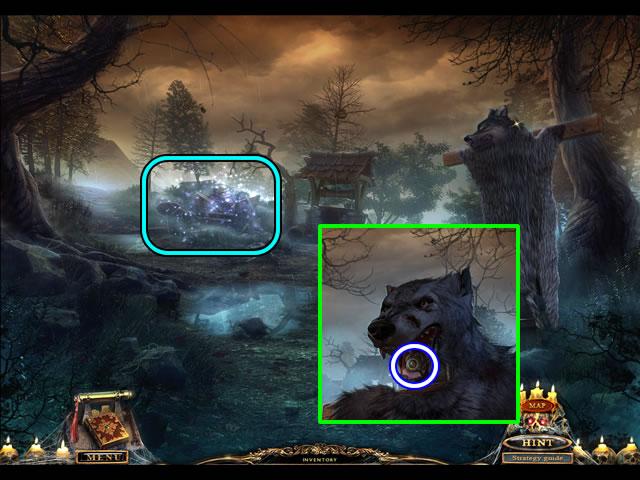
- Examine the wolf head.
- Open the mouth; take the RUNES.
- Play the hidden object scene to the left of the well.
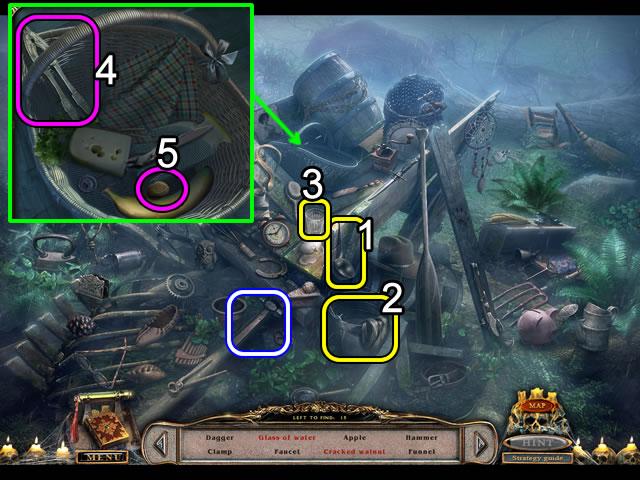
- Pick up the ladle (2) and put it in the bucket of water (2). Take the ladle of water and pour it in the glass (3). Take the Glass of water.
- Look in the basket.
- Use the nutcracker (4) on the nut (5); take the Cracked walnut.
- Find the rest of the listed objects; receive the HAMMER for inventory.
- Go forward twice.
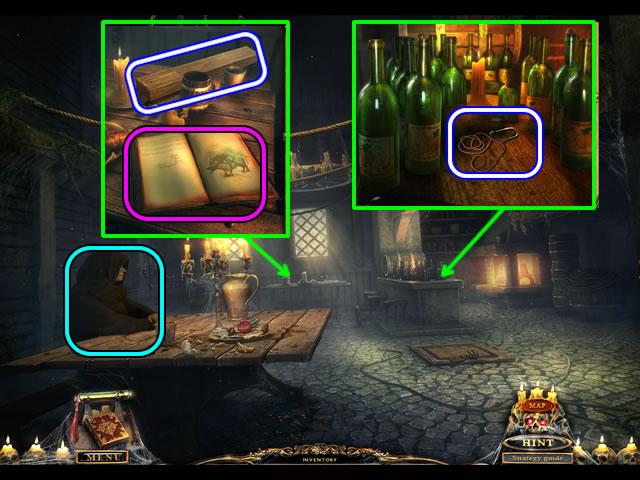
- Speak to the character.
- Look at the back table; pick up the book and take the RUNG (1/5).
- Look at the counter.
- Move the bottles to uncover a ROPE WITH HOOK.
- Go down twice and left.
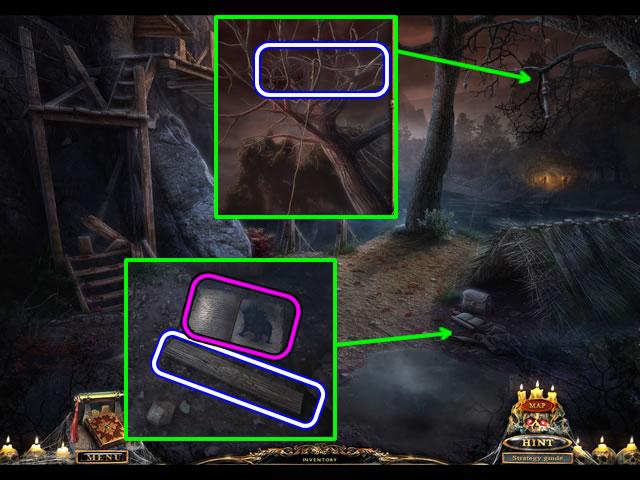
- Look at the tree branches.
- Use the ROPE WITH HOOK to retrieve the WHIP.
- Look at the tent entrance.
- Read the diary; pick up the RUNG (2/5).
- Go down and forward.
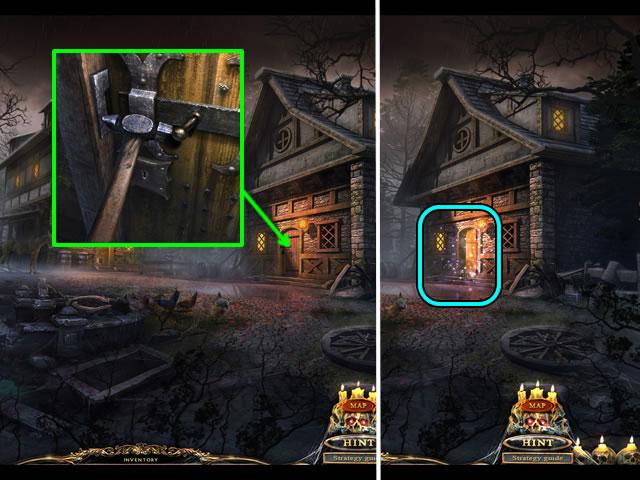
- Inspect the door of the building on the right.
- Use the HAMMER to move the bolt aside.
- Play the place-the-object scene in the doorway.
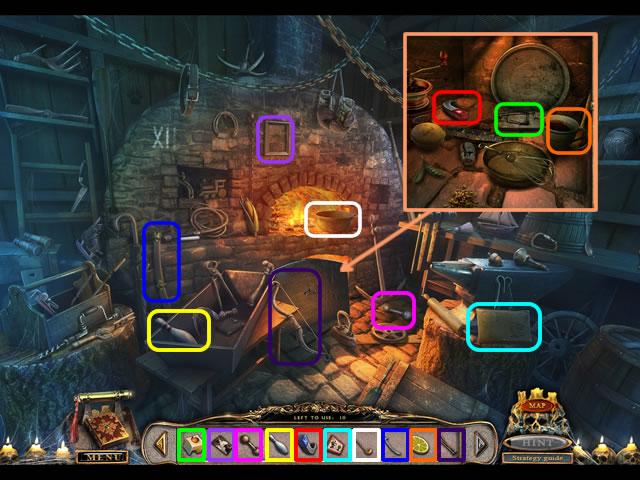
- Select the items on the bar and place them in the scene.
- Look inside the nook below the fire for an additional placement area.
- The colored item outlines correspond to the same colored placement area.
- Receive a MAGNET for inventory.
- Zoom in on the water trough.
- Add the MAGNET to open a puzzle.
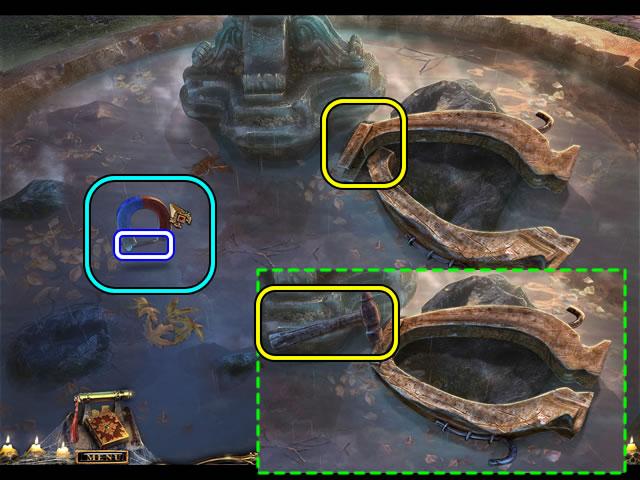
- Move the magnet over the surface of the water to find the NAIL.
- Click the yoke to position the arm. Insert the NAIL in the top plate; use the HAMMER to finish the repair.
- Take the YOKE.
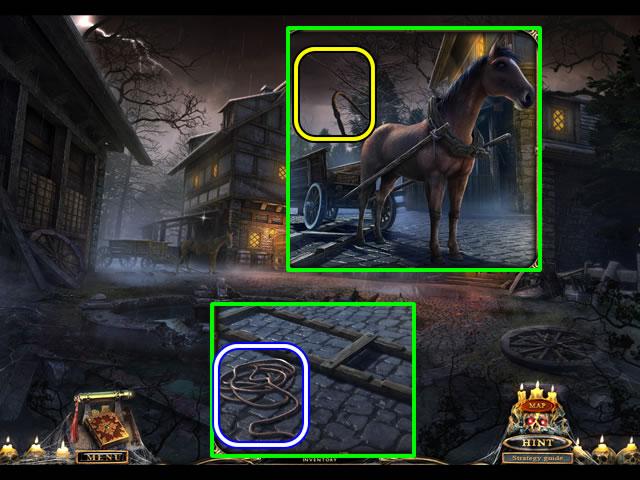
- Look closer at the horse.
- Put the YOKE on the horse and attach the traces.
- Use the WHIP to urge the horse onward.
- Look at the ground where the horse was standing.
- Pick up the ROPE.
- Go down.
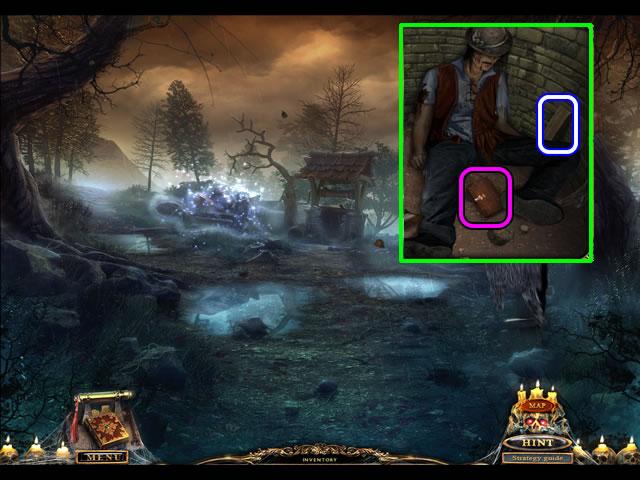
- Zoom in on the well.
- Fasten the ROPE to the top of the well.
- Read the diary; pick up the RUNG (3/5).
- Play the place-the-object scene on the left.
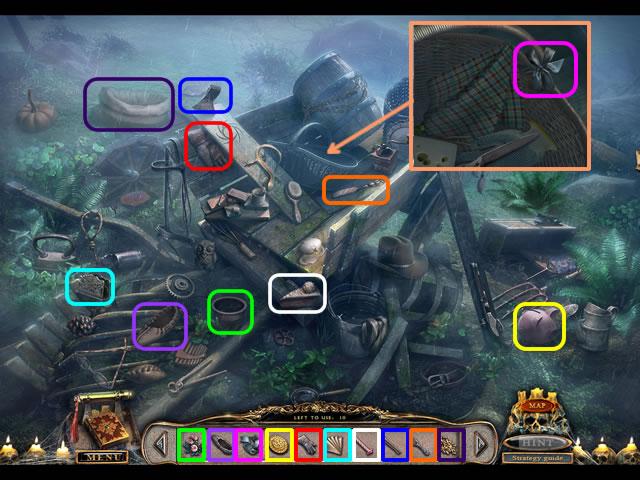
- Select the items on the bar and place them in the scene.
- Look inside the basket for an additional placement area.
- The colored item outlines correspond to the same colored placement area.
- Receive an AXE for inventory.
- Go forward twice.
- Speak to the woman; receive a RUBY (2/6).
- Go down twice and left.
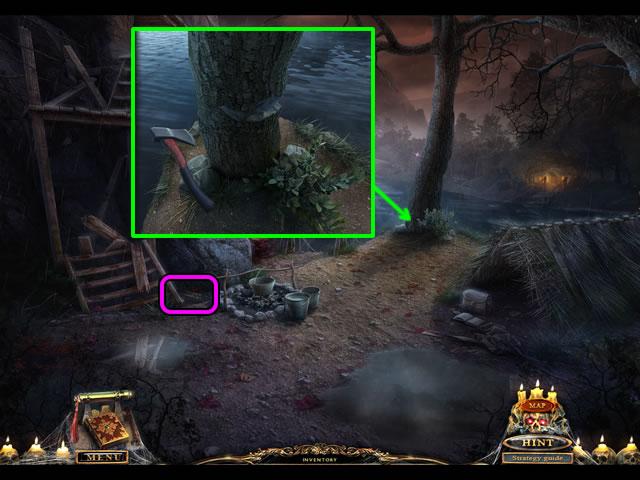
- Pick up the Message container from the gap between the rock and the broken steps.
- Look at the base of the tree.
- Use the AXE to chop down the tree.
- Go right across the tree.
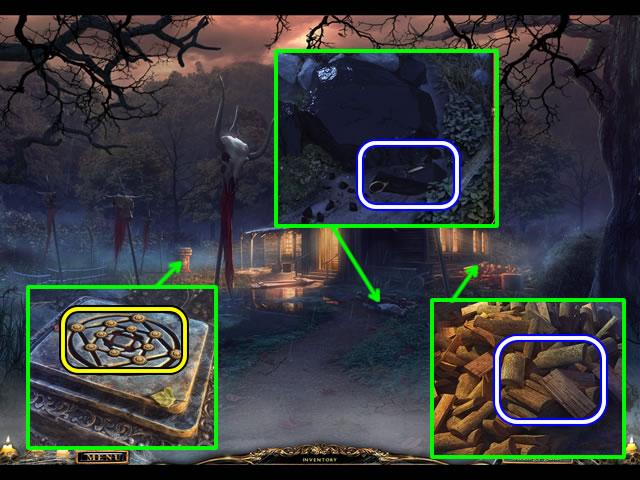
- Examine the rocks on the path.
- Use the HAMMER to get the TARRED OBJECT.
- Look at the woodpile; take some WOOD.
- Put the RUNES on the top of the pillar to open a puzzle.
- The goal is to connect all the runes without crossing an existing line.
- One solution is shown in the next screenshot.
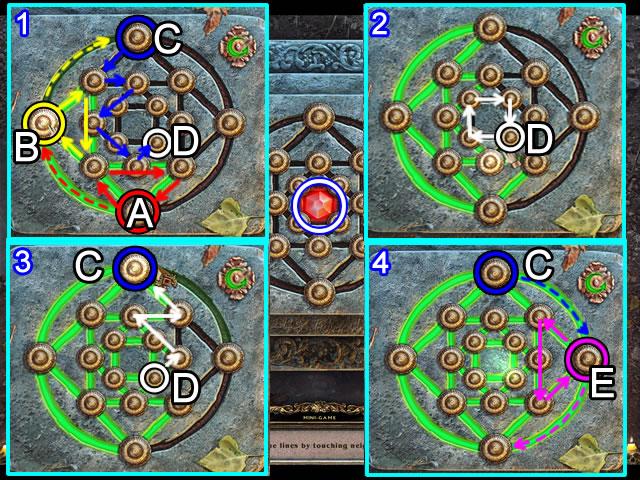
- Begin at point (A) as shown in inset (1). Follow the red arrows to trace the lower triangle. Go to point (B). Follow the yellow arrows to trace the triangle. Go to point (C).Follow the blue arrows to fill in the lines to point (D).
- The arrows in inset (2) complete the inner box around point (D).
- Inset (3) completes the zigzag from point (D) back to point (C).
- Continue from point (C) to point (E) as shown in inset (4). Trace the right rectangle and complete the puzzle.
- Pick up RUBY (3/6).
- Go forward.
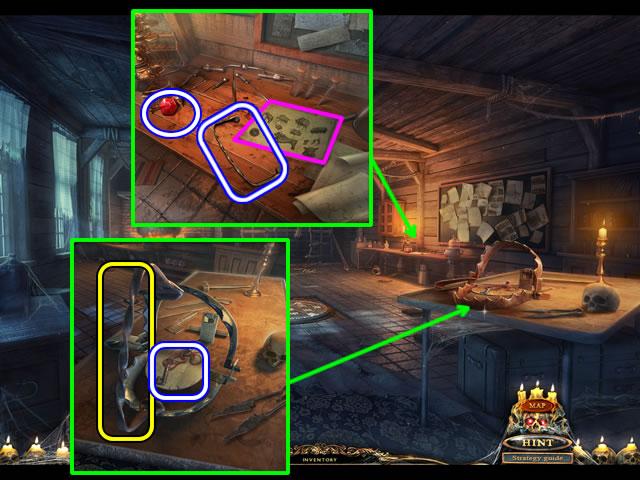
- Look at the table on the right wall.
- Read the document. Pick up the RUBY (4/6) and SPACER.
- Look at the front table.
- Use the SPACER to keep the trap open; take the LITTLE KEY.
Chapter 4: The Seal of the Beast
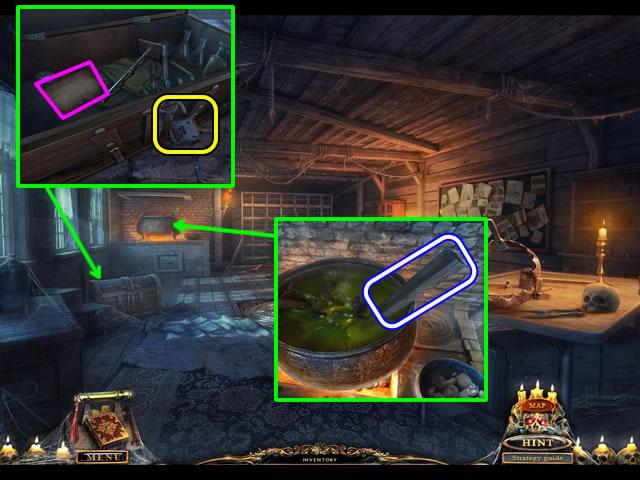
- Use the LITTLE KEY to open the padlock on the trunk.
- Read the document; take the NAILS that are uncovered.
- Look at the cauldron; pick up RUNG (4/5).
- Go down three times and forward.
- Play the hidden object scene in house door in the village square.
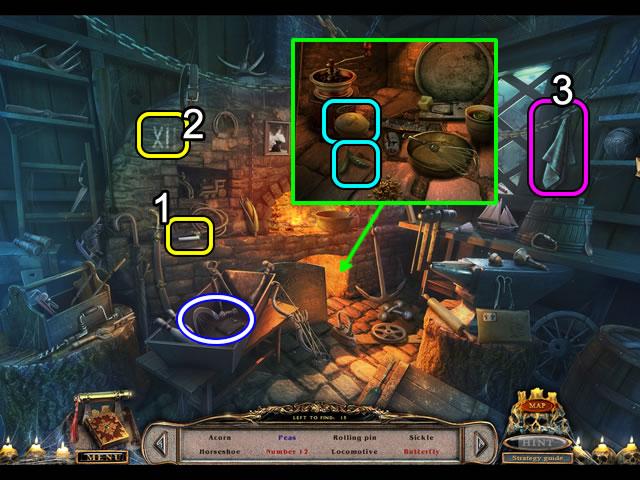
- Use the chalk (1) to complete the Roman numeral (2) Number 12.
- Move the cloth (3) to find an outline of a Butterfly.
- Look in the bottom of the hearth to find the Muffin and Peas.
- Find the rest of the listed objects; receive a SICKLE.
- Go down and left.
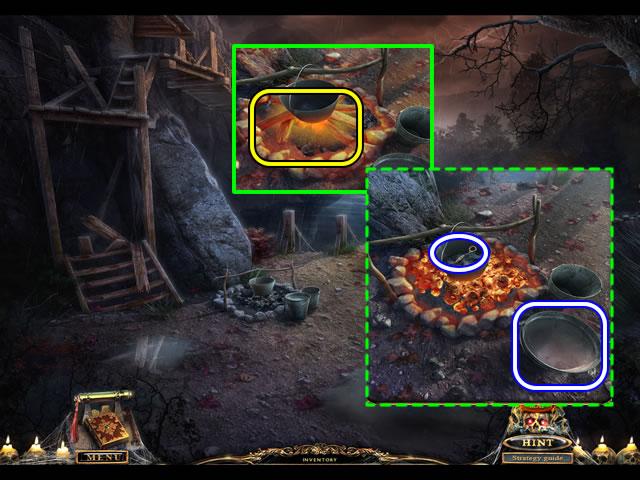
- Zoom in on the fire ring.
- Use the WOOD and BOX OF MATCHES to start a fire.
- Add the TARRED OBJECT to the pot; take the SCISSOR HALF.
- Pick up the BUCKET OF WATER.
- Go right across the tree.
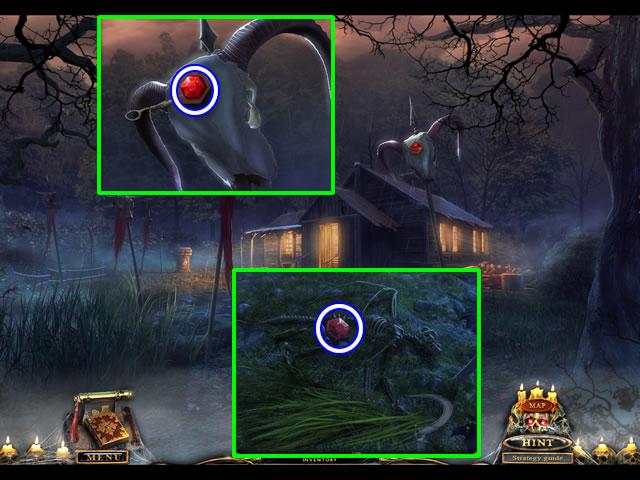
- Examine the skull.
- Use the SCISSOR HALF to pry out the RUBY (5/6).
- Look at the grass thicket.
- Use the SICKLE to cut the grass and uncover RUBY (6/6).
- Go forward.
- Zoom in on the trapdoor in the floor.
- Add the six RUBIES to open a puzzle.
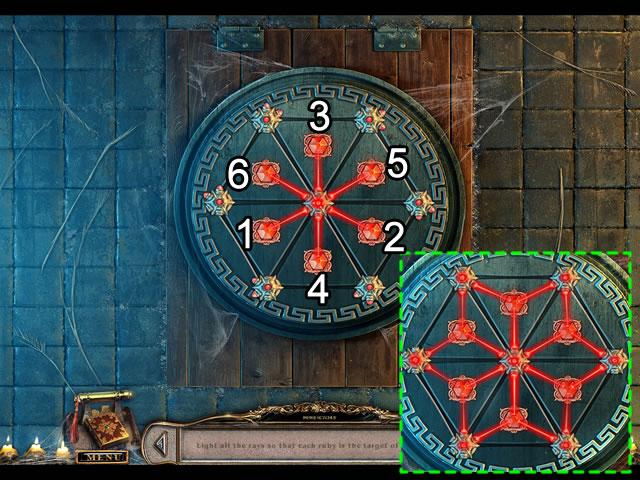
- The goal is to redirect the rays until each ruby is intersected by three rays.
- Exit and reenter the scene to reset the puzzle.
- Press the rubies in the order shown above to solve the puzzle.
- Solving the puzzle opens the trapdoor.
- Look down the opening; take RUNG (5/5).
- Go down three times and forward.
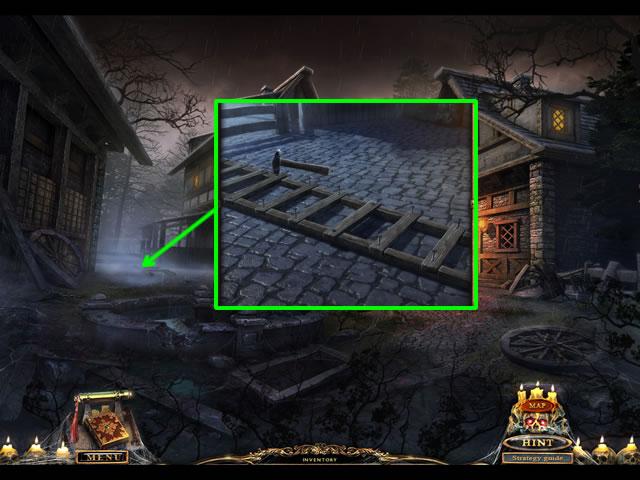
- Zoom in on the ladder frame.
- Add the RUNGS (5/5) and NAILS.
- Use the HAMMER to repair the LADDER.
- Go down and left.
- Lean the LADDER against the side of the mountain.
- Climb up the ladder.
- Approach the cave entrance for a cutscene.
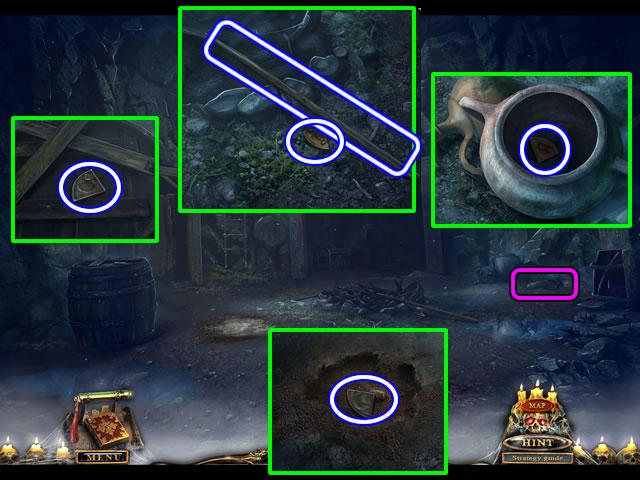
- Take the LOCK PART from the top of the barrel.
- Look at the fire ring; take the STICK and LOCK PART.
- Unearth the LOCK PART from the loose dirt.
- Pick up the Message next to the jugs.
- Pluck the LOCK PART from the jug.
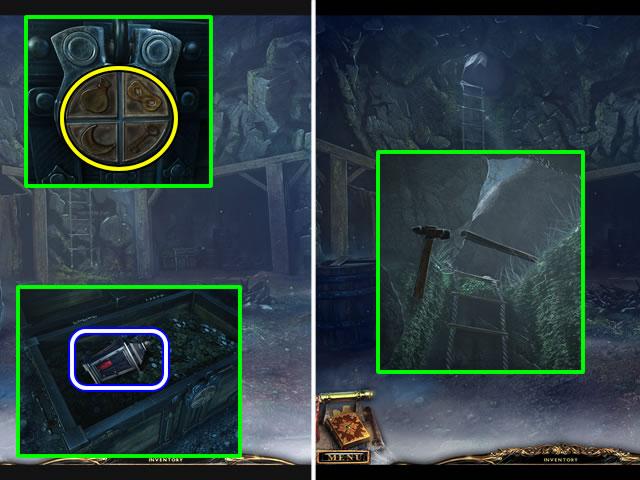
- Peer into the recess at the trunk.
- Match the pattern on each LOCK PART to the inset on the lock.
- Open the trunk and take the LANTERN.
- Look at the opening at the top of the rope ladder.
- Put the STICK under the rock; use the HAMMER to wedge the stick under the rock.
- Click the stick to roll the rock away.
- Exit the pit; go down and forward twice.
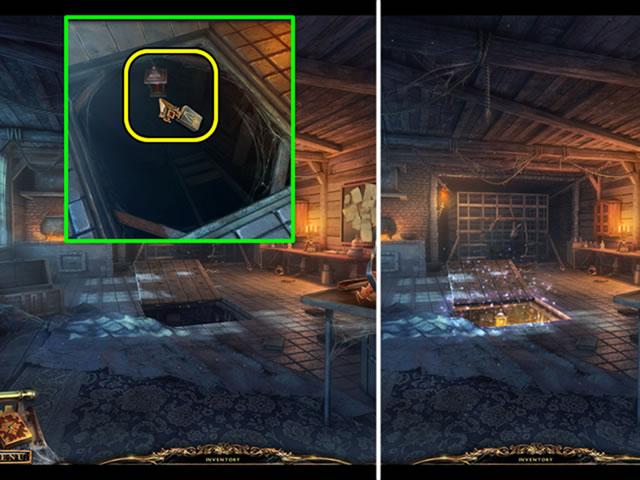
- Zoom in on the trapdoor opening.
- Hang the LANTERN and use the BOX OF MATCHES to light the area.
- Play the place-the-object scene in the opening.
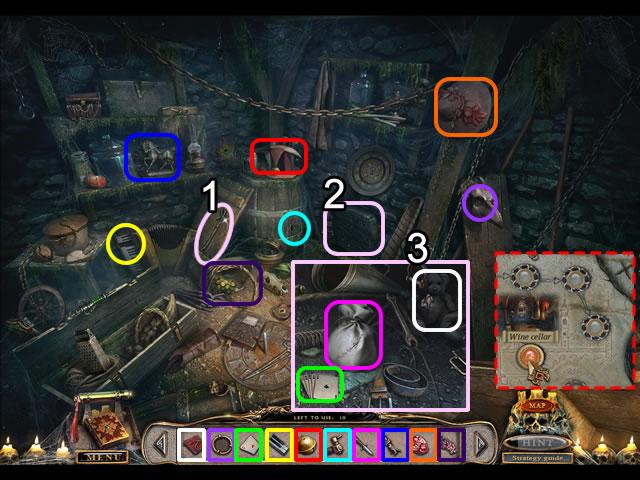
- Use the crowbar (1) to pry out the stone (2). Look inside (3) to find another item area.
- Select the items on the bar and place them in the scene.
- The colored item outlines correspond to the same colored placement area.
- Receive a CABINET HANDLE for inventory.
- Open the Map to go directly to the Wine cellar.
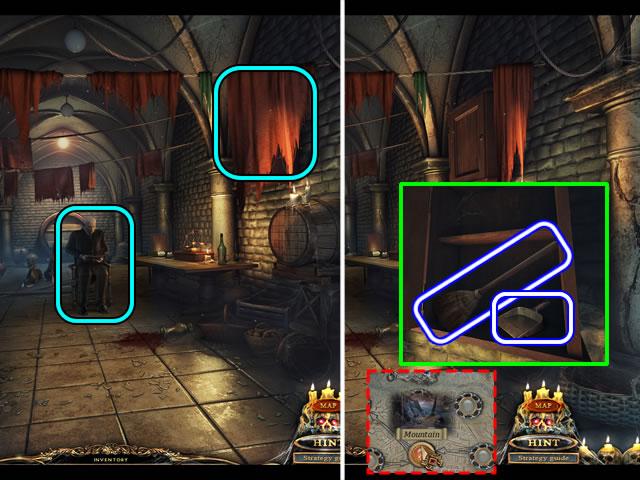
- Speak to the character.
- Move the cloth to uncover a cabinet.
- Attach the CABINET HANDLE to the cabinet door, open it and take the BROOM and DUSTPAN.
- Open the Map to go directly to the Mountain.
- Look at the fire ring.
- Use the DUSTPAN to scoop up some EMBERS.
- Go down and forward twice.
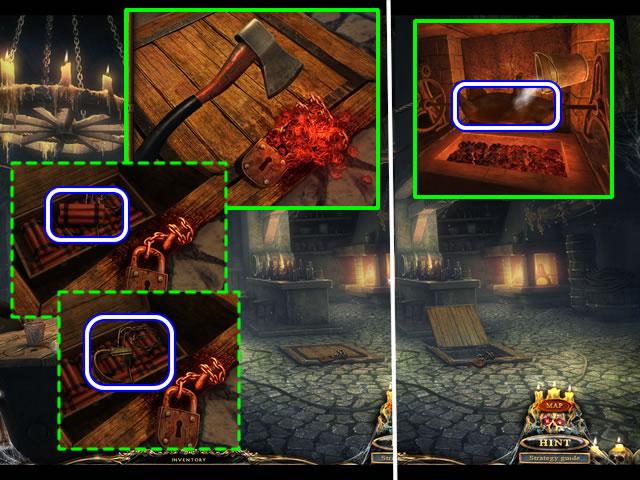
- Examine the floor hatch.
- Put the EMBERS on the chain; use the AXE to break the links.
- Take the DYNAMITE and TRAP from the compartment.
- Look at the cooking fire.
- Use the BUCKET OF WATER to extinguish the flames.
- Take the PIGLET.
- Go down twice, left and forward up the ladder.
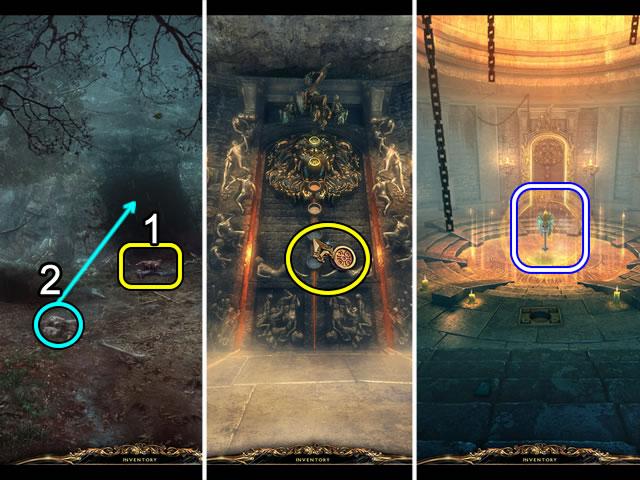
- Put the TRAP and PIGLET in front of the cave entrance (1).
- Pick up a rock (2) and throw it at the entrance.
- View the cutscene to see the use of the DYNAMITE and teleport with the SEAL to the Gates.
- Go forward.
- Put the SEAL anywhere to trigger a cutscene.
- Pick up the KEY for the next portal.
- Go down twice and right to enter the elevator.
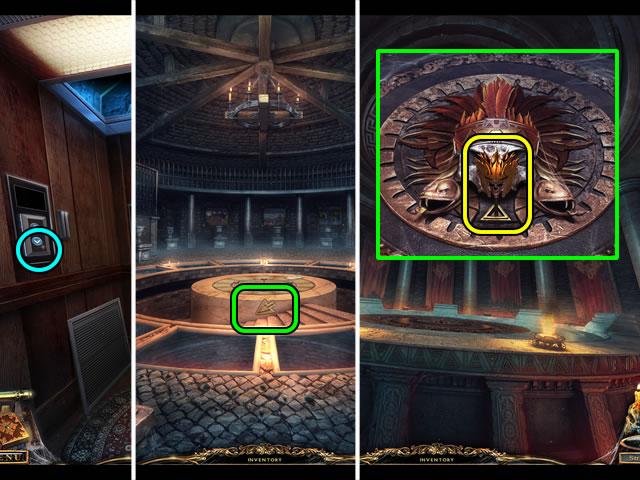
- Press the down arrow button.
- Go forward twice to the Round room.
- Go down the steps to the Portal room.
- Zoom in on the brazier on the right; insert the KEY in the slot to open the next portal.
Chapter 5: The Seal of Time
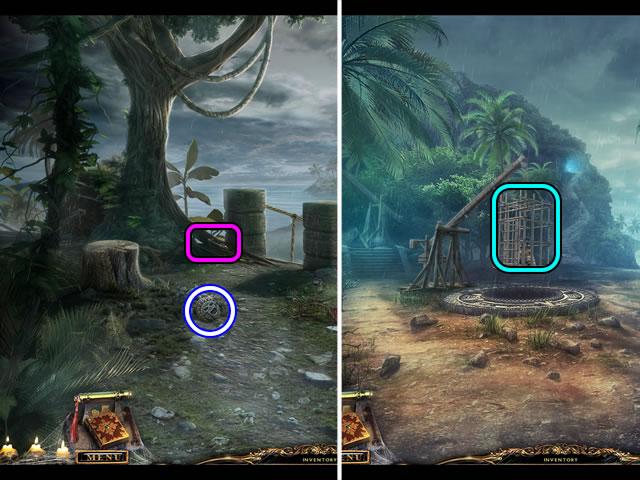
- Pick up the first STONE FIGURINE.
- Take the Message cylinder by the left bridge post.
- Go forward.
- Speak to the character in the cage; receive a TRANQUILIZER RECIPE.
- Play the hidden object scene on the stairs on the left, triggered by the conversation.
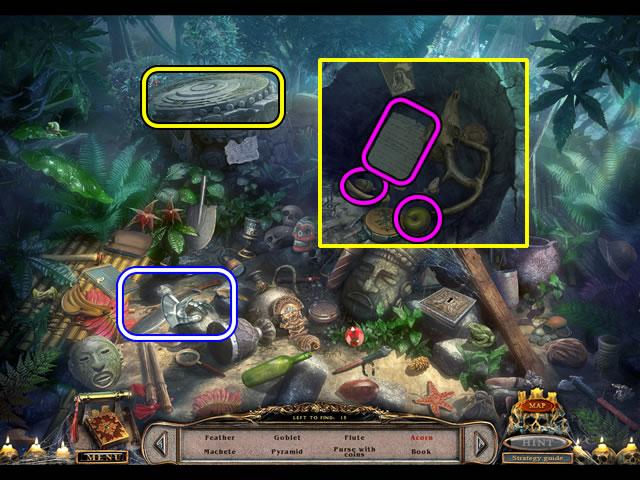
- Remove the cover to find the Acorn, Apple and Paper.
- Find the rest of the listed objects; receive the MACHETE.
- Go forward toward the pyramid.
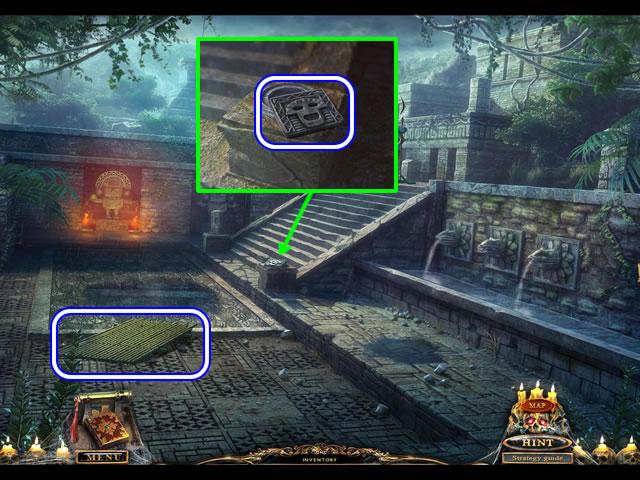
- Pick up the FENCE PART.
- Look at the stair post; take the second STONE FIGURINE.
- Go down.
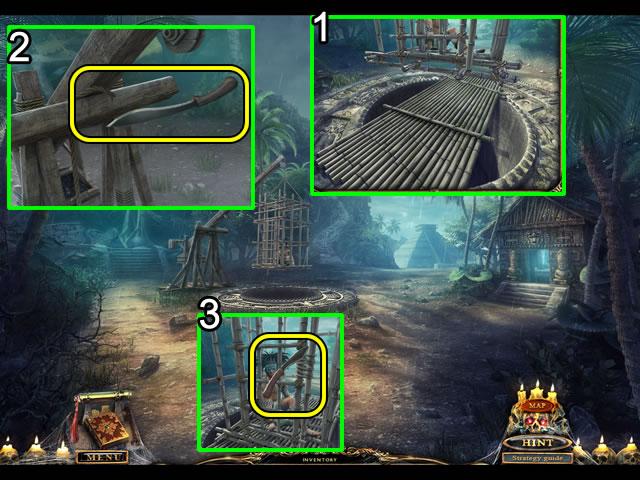
- Zoom in on the pit under the cage (1).
- Use the FENCE PART to cover the pit.
- Look at the suspension mechanism (2); use the MACHETE to cut the rope.
- Examine the cage (3); use the MACHETE to cut the rope.
- Receive a DART from the character.
- Go up the stone steps on the side of the mountain.
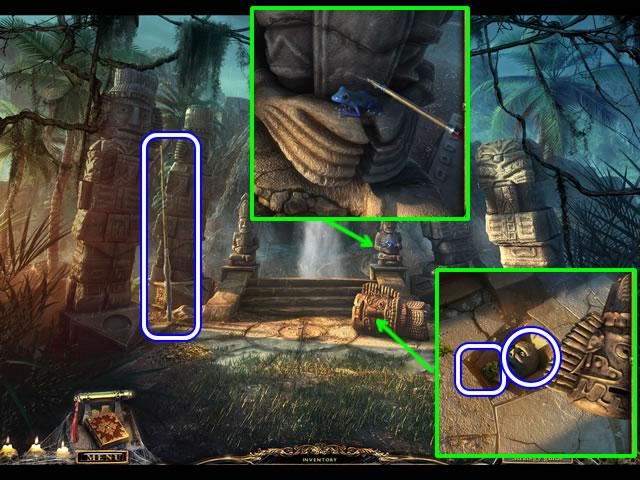
- Grab the SPEAR.
- Zoom in on the statue on the right side of the steps.
- Put the DART on the frog; get a POISONED DART.
- Use the SPEAR as a lever on the fallen head.
- Take the ROOT and SKULL (1/10).
- Go down.
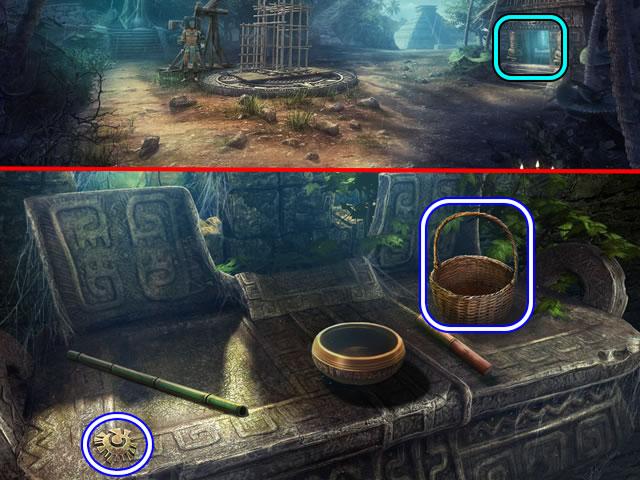
- Look at the table inside the hut.
- Pick up the SYMBOL and BASKET.
- Go down.
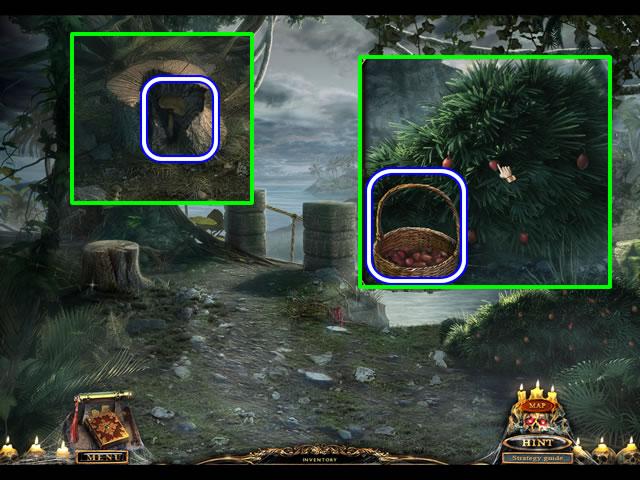
- Use the SPEAR to crack open the stump; take the MUSHROOM.
- Put the BASKET by the bush; click the bush to pick the BERRIES.
- Go forward.
- Zoom in on the worktable in the hut.
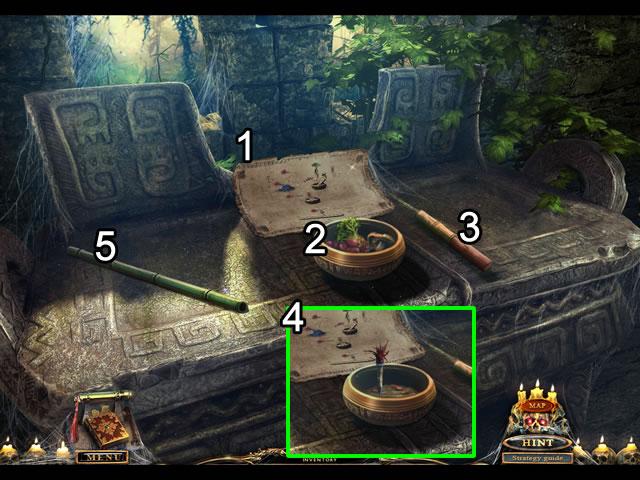
- Put the TRANQUILIZER RECIPE on the table (1).
- Add the MUSHROOM, ROOT and BERRIES to the bowl (2).
- Use the stick (3) to grind the ingredients.
- Dip the POISONED DART in the mixture (4) to make a TRANQUILIZER DART.
- Insert the TRANQUILIZER DART in the reed (5); take the BLOWGUN.
- Go forward toward the pyramid.
- Use the BLOWGUN to disable the temple guardian.
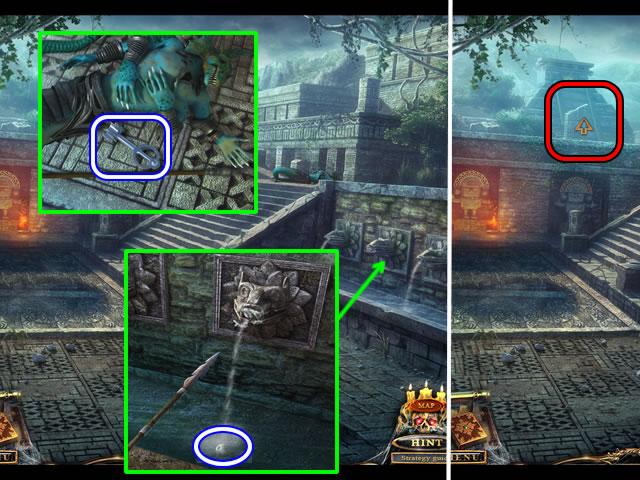
- Take the TEMPLE KEY from beside the guardian.
- Use the SPEAR to unclog the water spout; pick up the EYE.
- Go forward.
- Zoom in on the temple wall; use the TEMPLE KEY to open the door.
- Enter the temple and speak with the character.
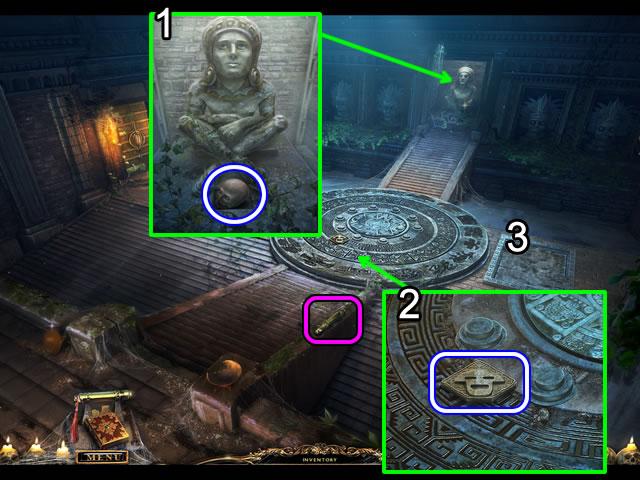
- Pick up the Message container.
- Look at the idol on the far wall (1).
- Insert the EYE just retrieved from the water and the EYE taken from the cat’s neck in the Archbishop’s chambers. Pick up the SKULL (2/10).
- Inspect the stone circle (2) to find the third STONE FIGURINE.
- Zoom in on the dusty square (3).
- Use the BROOM to remove the dust and open a puzzle.
- The goal is to find the matching images on the tiles.
- The next screenshot shows the solution.
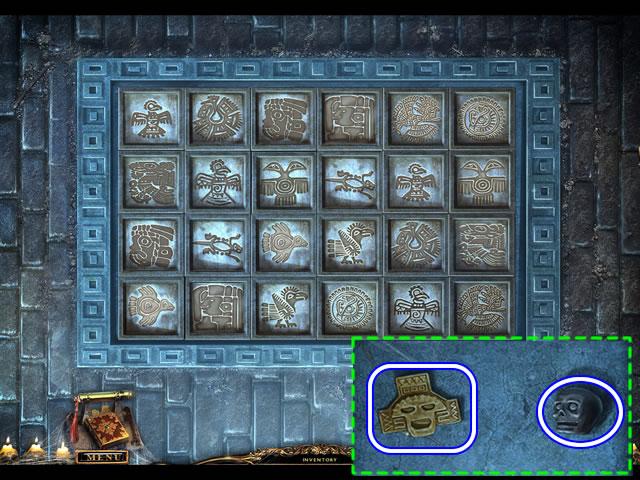
- Finding the matching images opens a compartment.
- Take the fourth STONE FIGURINE and the SKULL (3/10).
- Go down three times and up the stone steps in the mountainside.
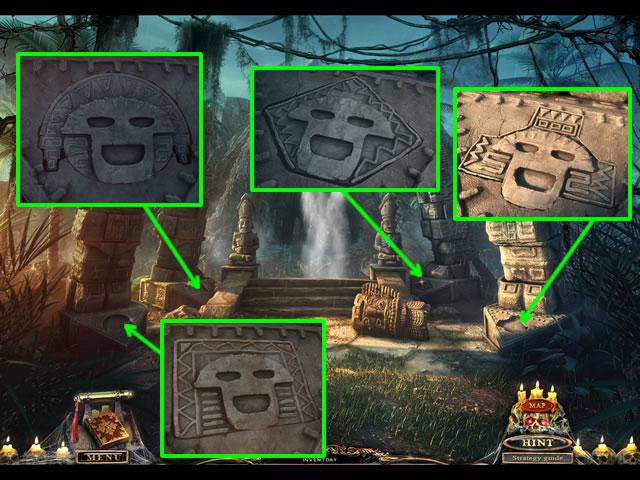
- Match the shape of each of the STONE FIGURINES to the outline inset in the base of the four stone totems to open a puzzle.
- The goal is to rotate the sections to form the correct pattern in order to raise the bridge.
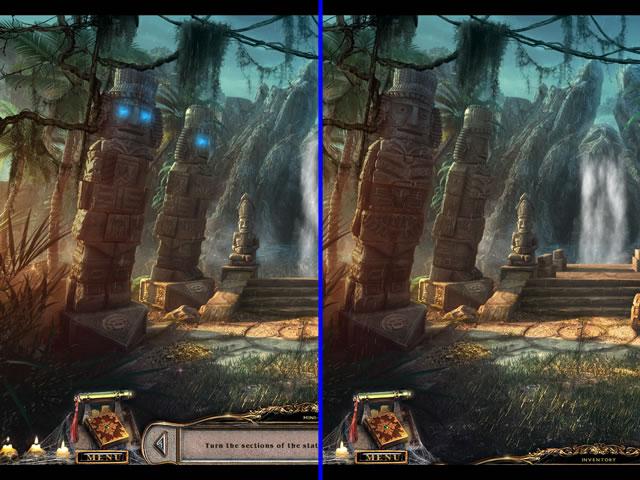
- Use the pattern on the head and feet to match the sections.
- Correctly positioning the sections turns off the blue lights and locks the sections.
- Hint: Match the top section and use it as a guide for positioning the lines for the arms.
- The solution for the first two totems is shown on the right.
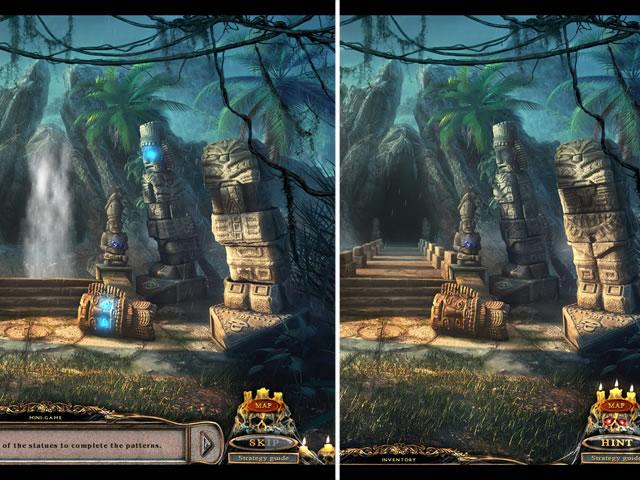
- The solution for the last two totems is shown on the right.
- Go forward.
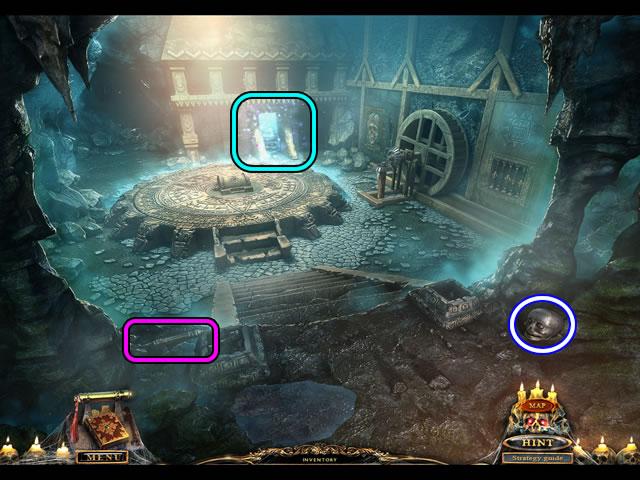
- Pick up the Message container and SKULL (4/10).
- Play the hidden object scene at the back of the cave.
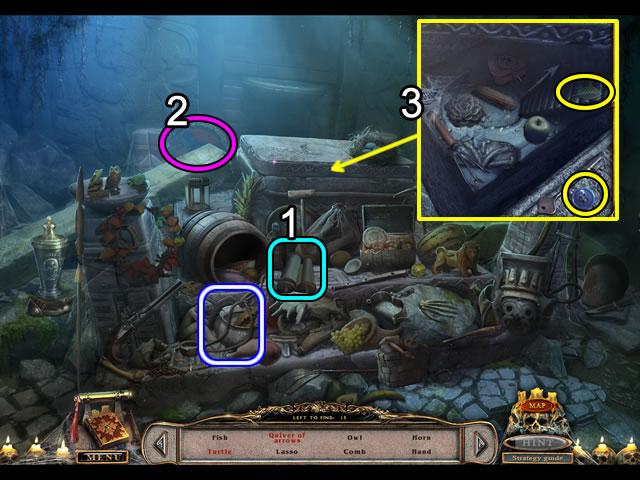
- Open the scroll (1) to find a Turtle image.
- Move the shield (2) to uncover the Quiver of arrows.
- Remove the stone cover (3) and peer inside to find the Leaf and Button.
- Find the rest of the listed items; receive a LASSO for inventory.
- Go down twice.
- Play the place-the-object scene in the village.
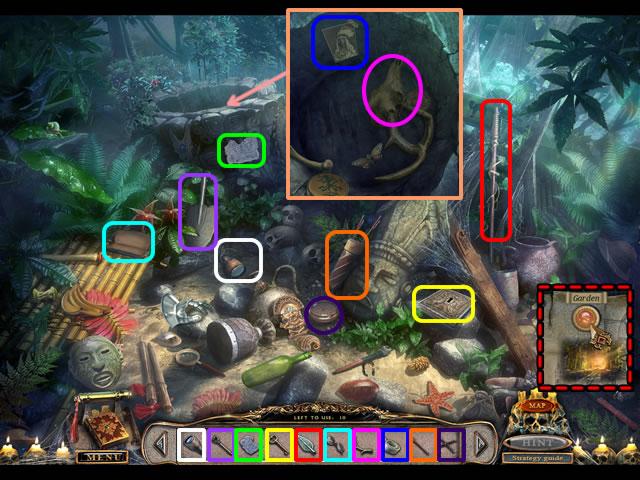
- Select the items on the bar and place them in the scene.
- The colored item outlines correspond to the same colored placement area.
- Look down the shallow well for an additional area.
- Receive BREADCRUMBS for inventory.
- Open the Map; Click the Garden location.
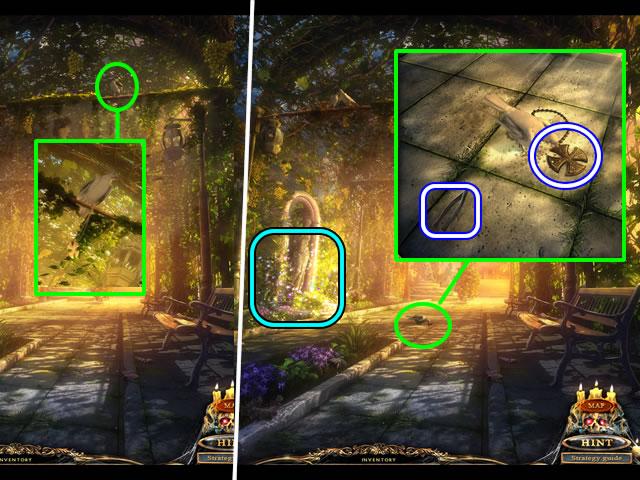
- Look at the dove perched above the bench.
- Put the BREADCRUMBS on the bird to lure it to the ground.
- Zoom in on the bird; pick up the TWEEZERS and CROSS.
- Play the place-the-object scene.
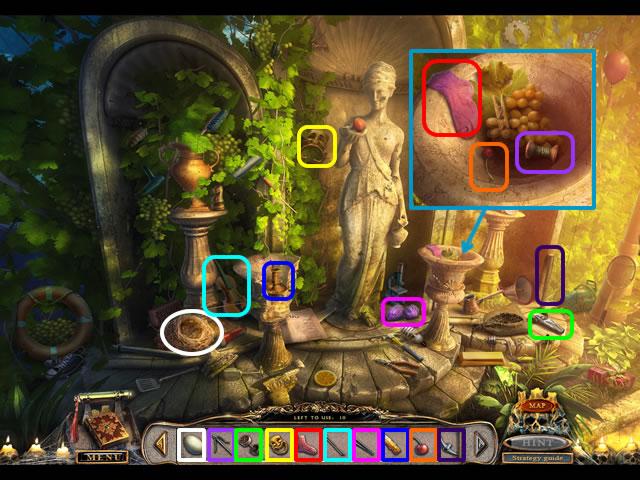
- Select the items on the bar and place them in the scene.
- The colored item outlines correspond to the same colored placement area.
- Look at the dry birdbath for an additional area.
- Receive a PICKAXE for inventory.
- Go right.
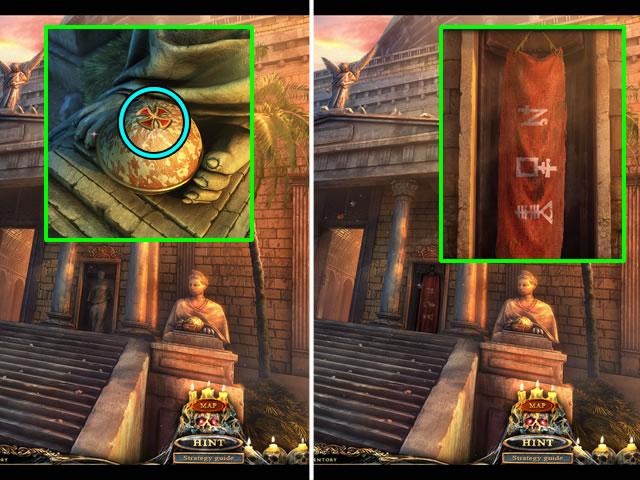
- Zoom in on the statue mechanism on the right.
- Insert the CROSS in the slot.
- Examine the symbols in the recess to add the information to the diary.
- Go forward and right to the elevator. Press the down button. Go forward.
- Speak to the character.
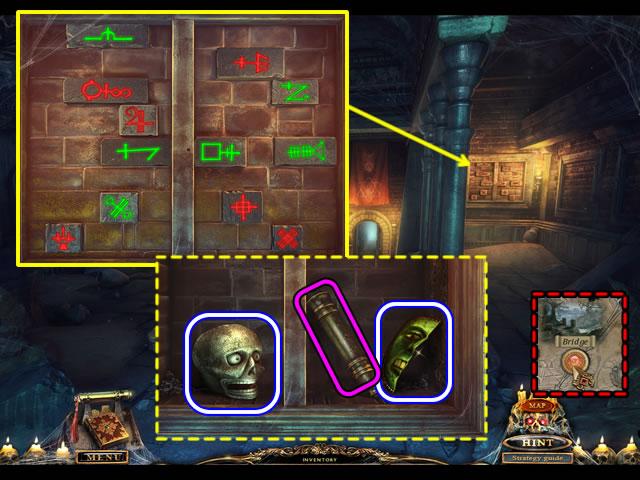
- Zoom in on the frame on the right back wall.
- Press the bricks with the symbols from the banners outside the cathedral.
- Take the SKULL (5/10), Message container and MASK HALF.
- Open the Map; go to the Bridge location.
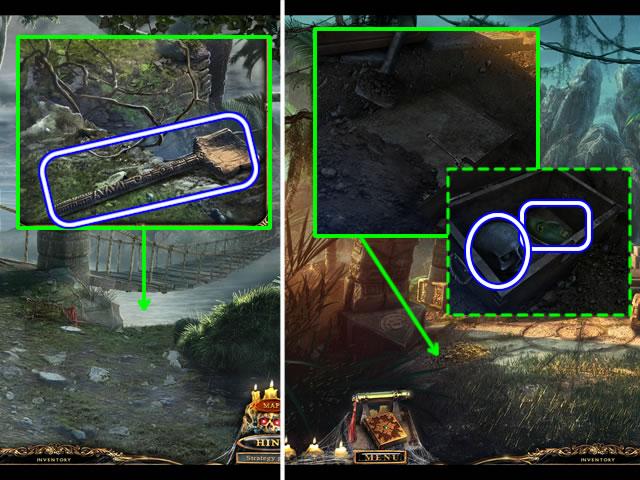
- Peer over the cliff edge.
- Use the LASSO to retrieve a SPADE.
- Go forward and up the stone steps on the mountainside.
- Examine the loose dirt at the base of the totem on the left.
- Use the SPADE to uncover a chest.
- Take the SKULL (6/10) and the second MASK HALF.
- Go forward
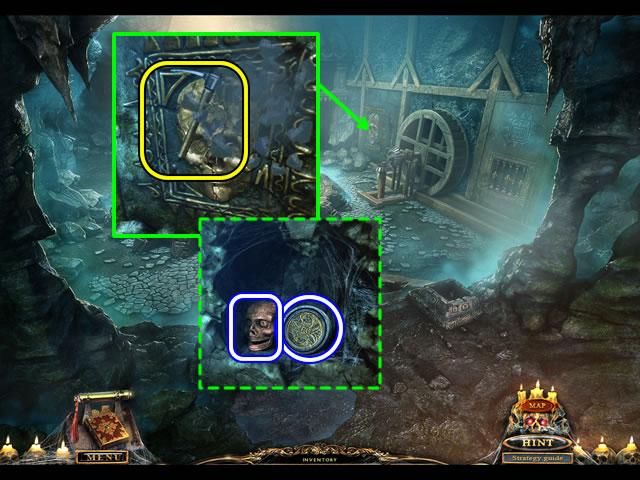
- Zoom in on the bas-relieve skull.
- Use the PICKAXE to smash the image; take the SKULL (7/10) and MEDALLION from the nook.
- Go down twice and forward three times.
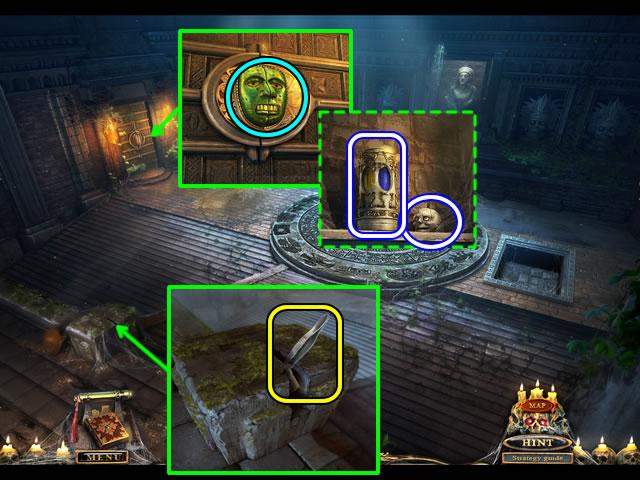
- Look at the door on the left.
- Insert the two MASK HALVES in the slots; take the CYLINDER and SKULL (8/10).
- Examine the cracked post.
- Use the TWEEZERS to extract the cylinder drawing for the diary.
- Go down twice.
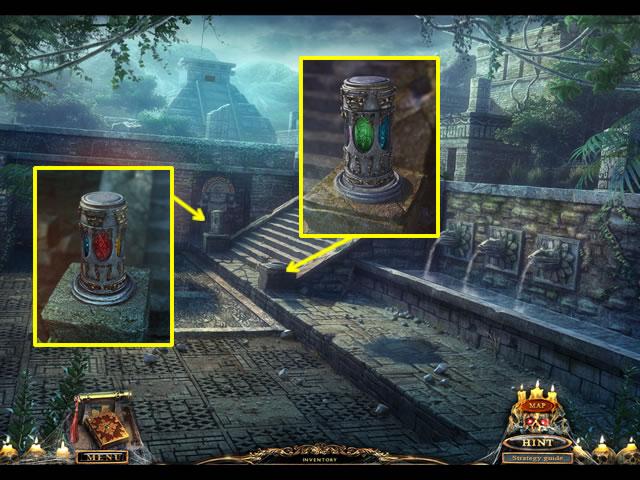
- Put the CYLINDER in the slot on the right post.
- Rotate the color to green.
- Look at the far cylinder.
- Rotate the color to red.
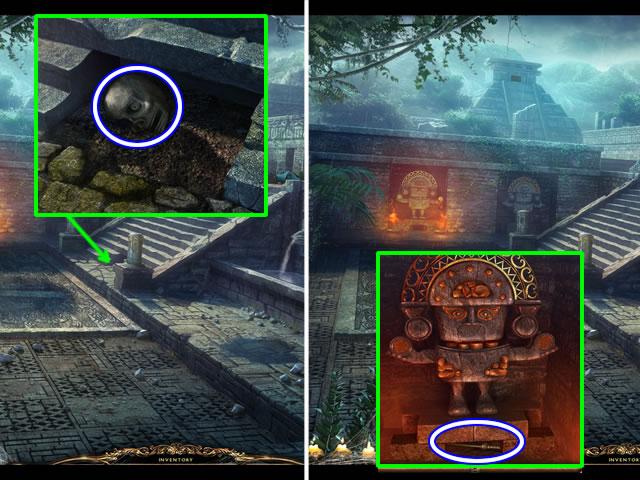
- Look at the broken stair; take the SKULL (9/10).
- Examine the idol in the recess.
- Put the MEDALLION on the idol; take the LEVER.
- Go down once and up the steps and forward.
- Play the place-the-object scene at the back of the cave.
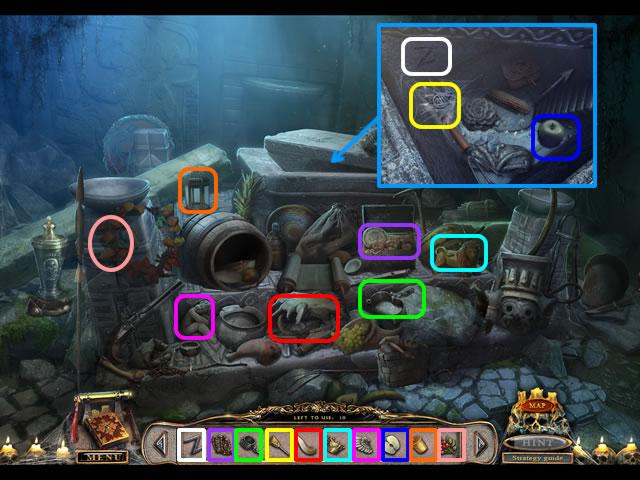
- Select the items on the bar and place them in the scene.
- The colored item outlines correspond to the same colored placement area.
- Look inside the stone box for an additional area.
- Receive a SYMBOL for inventory.
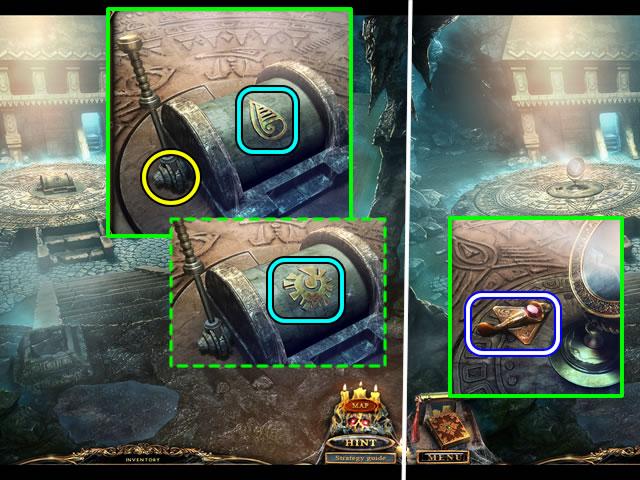
- Zoom in on the mechanism in the center.
- Insert the LEVER in the slot; pull to spin the drum.
- Insert the matching SYMBOL.
- Pull the lever twice; insert the second SYMBOL.
- Look closer at the mirror; take the AIRPLANE.
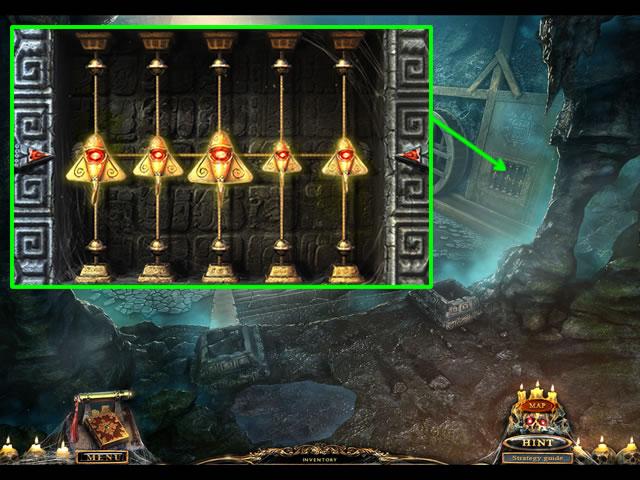
- Add the AIRPLANE to those on the right wall to open a puzzle.
- The goal is to slide the airplanes along the tracks until all are centered.
- Moving all but the fourth airplane affects itself and others. The gem in the center of the plane lights up when centered.
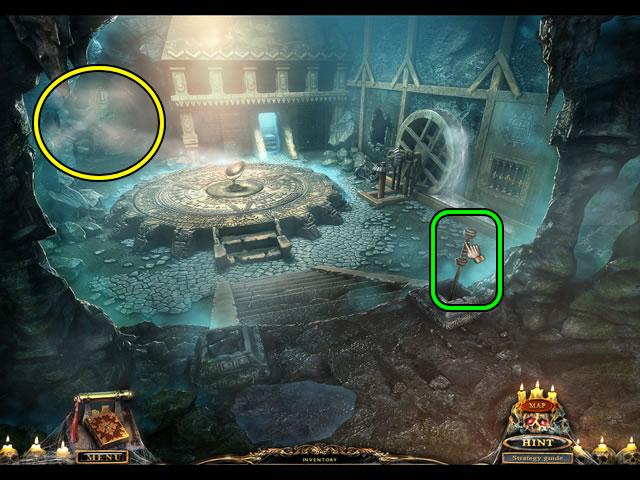
- Completing the puzzle sets the waterwheel turning and raises a lever.
- Pull the lever twice to reposition the mirror and focus the light rays on the far left corner.
- Zoom in on the area to open a puzzle.
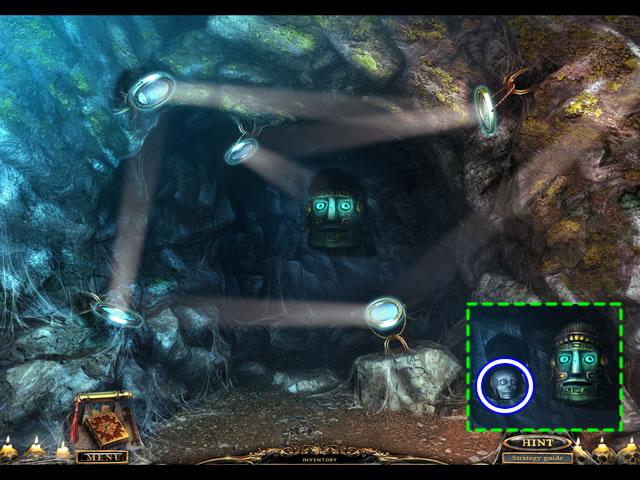
- The goal is to rotate the mirrors to direct the beam to the mask.
- The above screenshot shows the correct position.
- Solving the puzzle moves the mask aside; take the SKULL (10/10) from the hidden compartment.
- Go down twice and forward three times to return to the temple.
- Zoom in on the center circle.
- Put the ten SKULLS on the circle to open a puzzle.
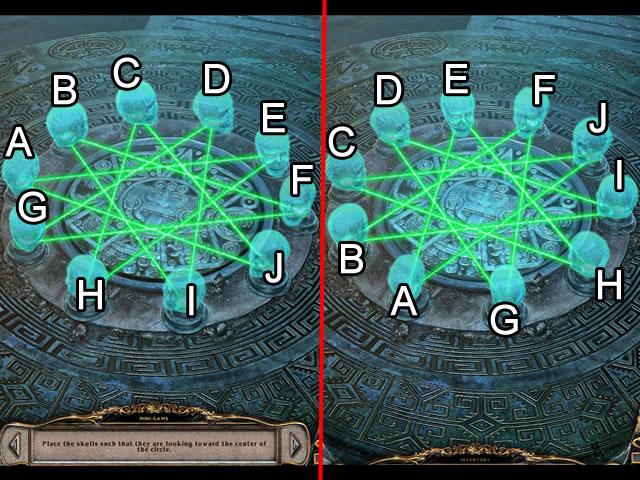
- The goal is to position the skulls until all are facing the center of the circle.
- Swap two skulls connected by a green beam.
- The beginning position is shown on the left and their ending letter is on the right.
- Receive the SEAL for solving the puzzle and teleport back to the Gates.
- Go forward.
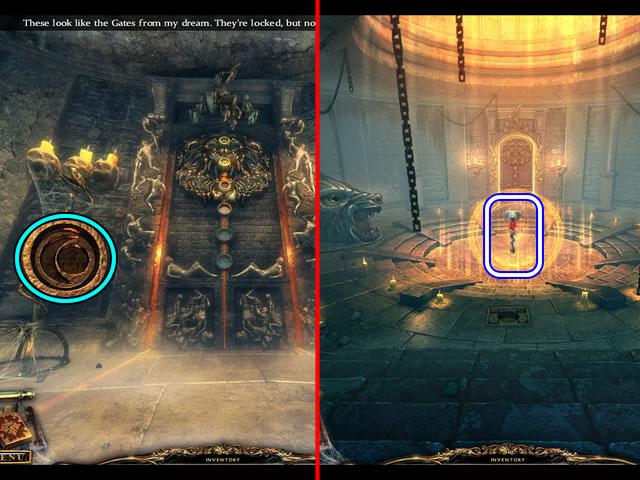
- Put the SEAL anywhere on the scene; take the KEY.
- Open the Map; go to the Portal room.
- Insert the KEY in one of the slots to open the next portal.
Chapter 6: To Purgatory and Back
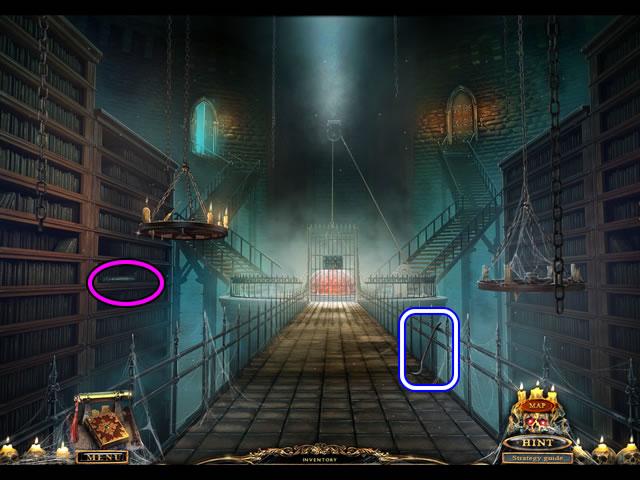
- Pick up the Message container.
- Grab the CROWBAR.
- Go down twice and right to the Laboratory.
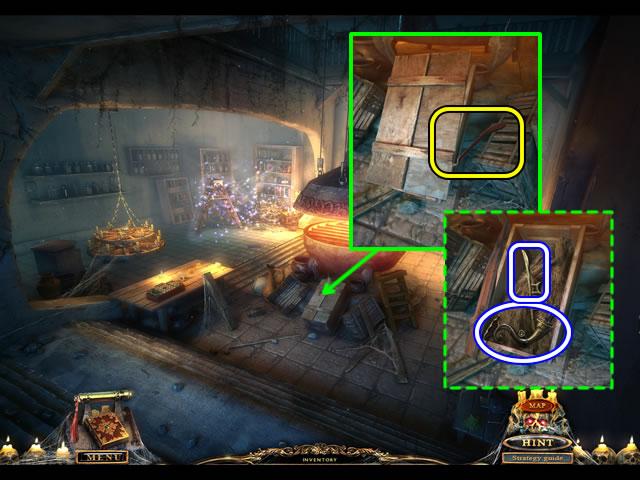
- Zoom in on the crates.
- Use the CROWBAR to pry off the box cover.
- Take the CANDLESTICK and FIGURINE WEAPON.
- Play the hidden object scene in the shelves on the left.
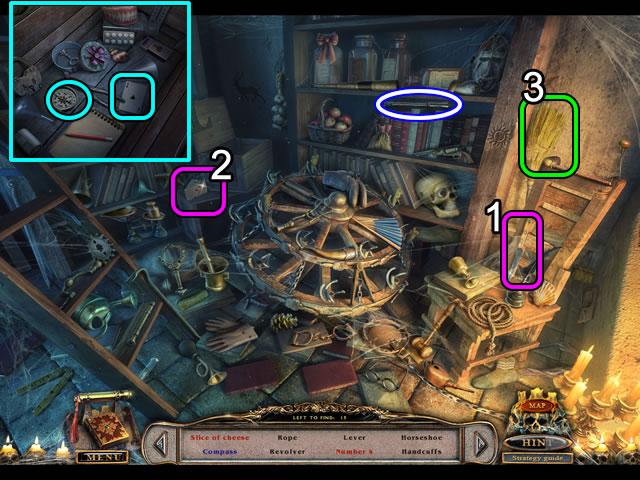
- Use the knife (1) on the cheese wedge (2) to get a Slice of cheese.
- Move the broom (3) to uncover the Number 4.
- Look in the box to find the Compass and Playing Card.
- Find the rest of the listed objects; receive the LEVER for inventory.
- Go down twice to the Basement.
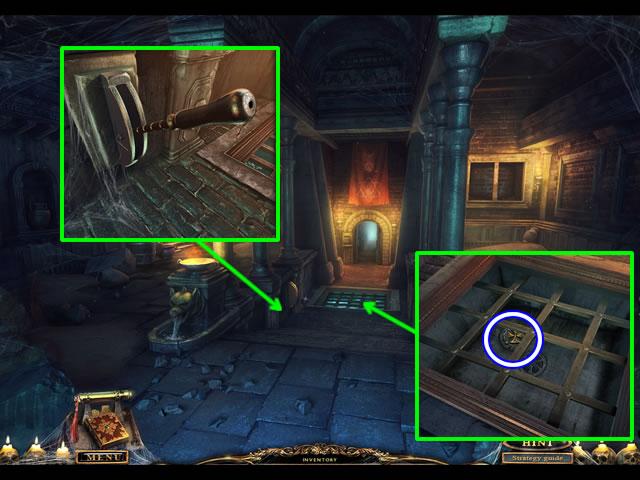
- Look at the mechanism.
- Insert and pull the LEVER to drain the water under the grate.
- Look closer at the grate; take the DEVICE PART.
- Go forward, down and forward to return to the Bridges.
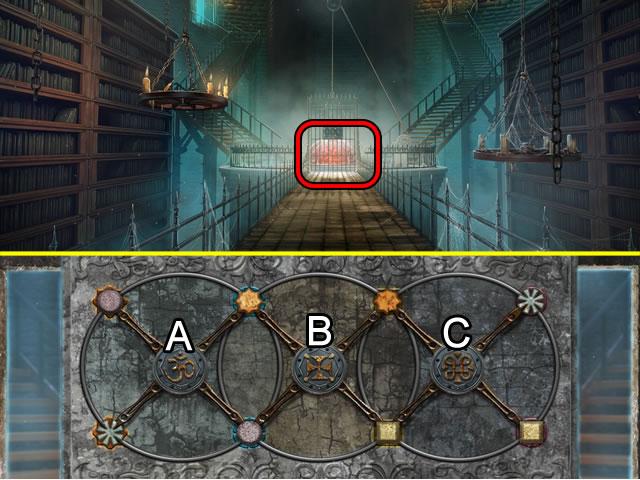
- Zoom in on the gate mechanism.
- Add the DEVICE PART to open a puzzle.
- The goal is to match the disks to their background images. Use three large disks to rotate the smaller disks.
- Solution: Exit and reenter the puzzle to reset the disks. Click the large disks in this order: B, A, A, C, B and C.
- Enter the open door on the left.
- Play the place-the-object scene at the back of the room.
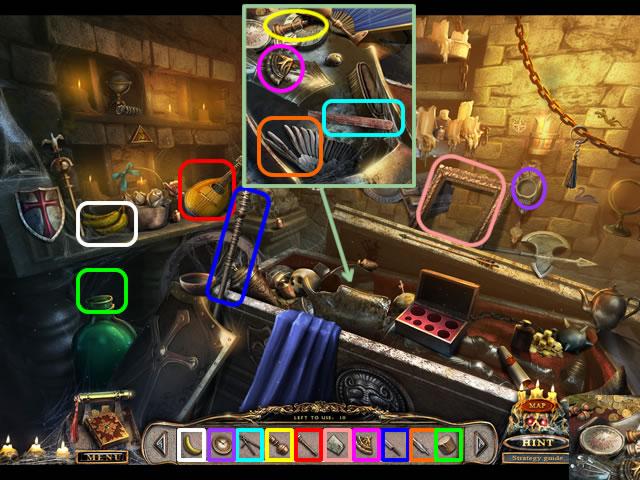
- Select the items on the bar and place them in the scene.
- The colored item outlines correspond to the same colored placement area.
- Open the armor plate and look inside for an additional area.
- Receive a MEDALLION HALF for inventory.
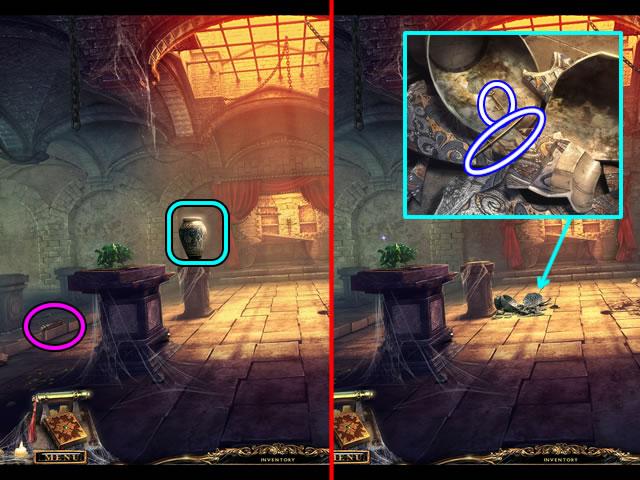
- Pick up the Message container on the left.
- Knock over the vase.
- Examine the vase shards; take the KEY and FIGURINE WEAPON.
- Go down.
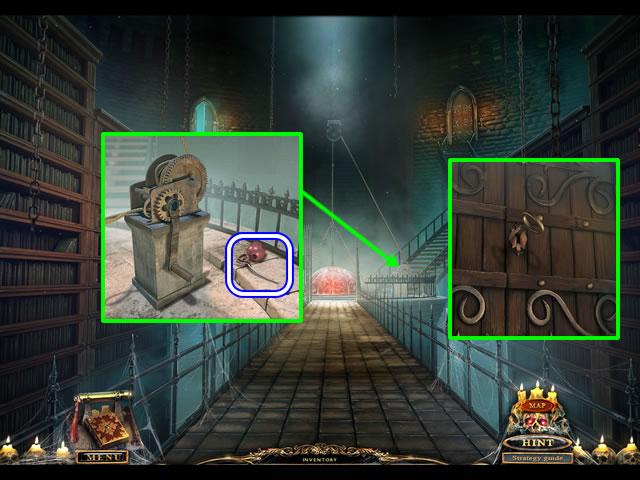
- Look at the winching mechanism; pick up the EMPTY OIL CAN.
- Examine the door on the right.
- Click the loose slat to reposition it and insert the KEY in the lock.
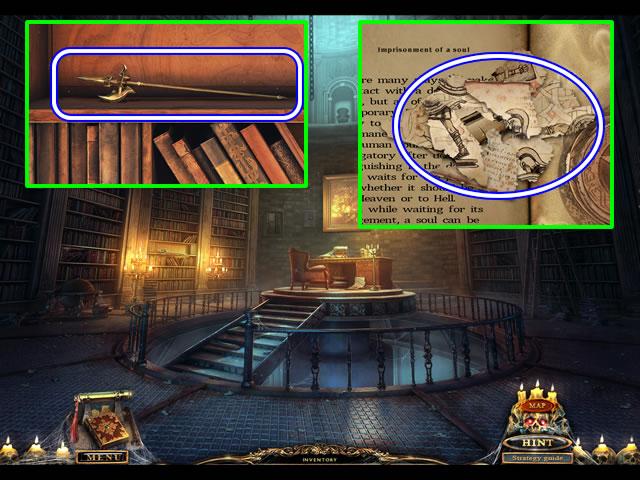
- Examine the bookshelves on the left.
- Pick up the FIGURINE WEAPON.
- Look at the desktop.
- Open the book; take the PARCHMENT FRAGMENTS.
- Return to the Archbishop’s chambers; speak to the character.
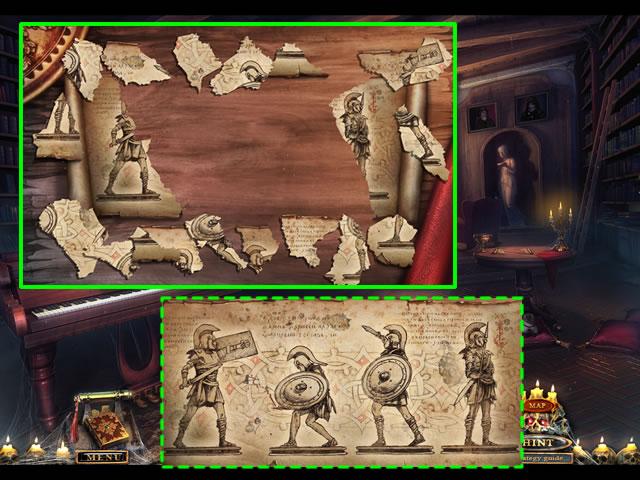
- Zoom in on the table.
- Put the PARCHMENT FRAGMENTS on the table to open a puzzle.
- The goal is to restore the scroll image by placing the fragments. Correctly placed fragments lock into position.
- The dashed inset shows the solution.
- Zoom in on the fireplace mantle; add the STATUETTE to the collection to open a puzzle.
- Rotate the statuettes until they match the scroll image.
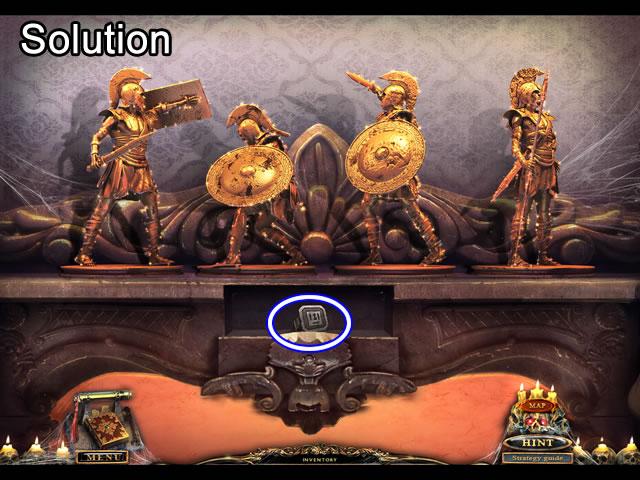
- Correctly positioning the statuettes opens a secret compartment.
- Take the SIGNET ring.
- Go down and right to the Laboratory.
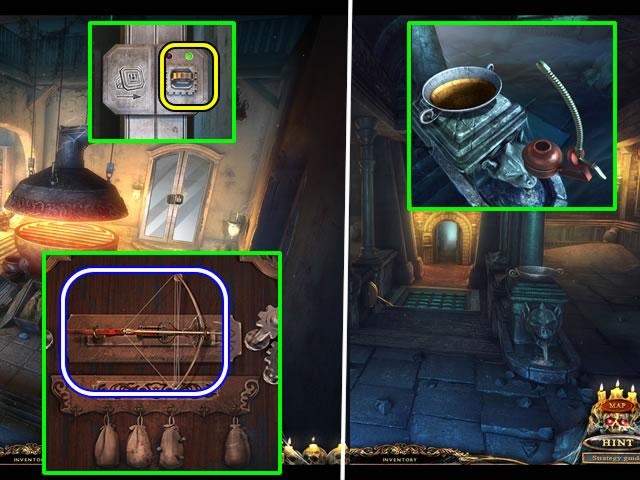
- Look at the double doors.
- Insert the SIGNET ring in the slot; take the CROSSBOW.
- Exit the scene and go down twice.
- Fill the EMPTY OIL CAN from the bowl of oil on the pedestal; receive a FILLED OIL CAN for inventory.
- Return to the portal Bridges.
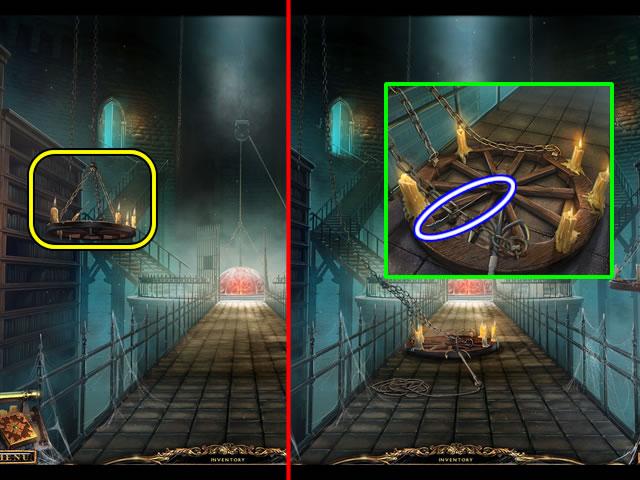
- Aim the CROSSBOW at the chandelier on the left.
- Tug the rope to pull down the fixture; pick up the FIGURINE WEAPON.
- Go left.
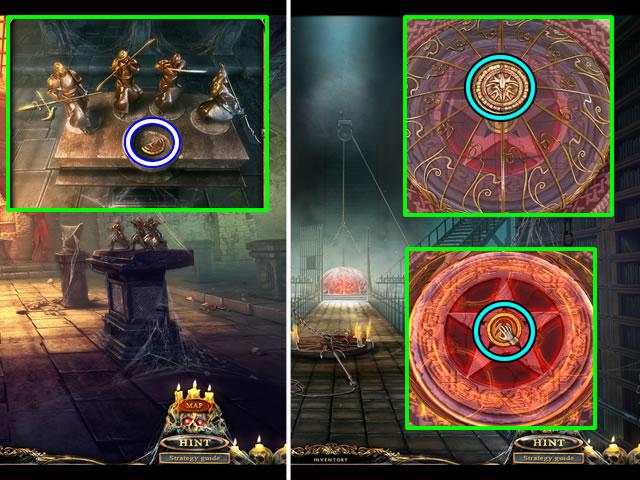
- Look at the first pedestal on the right.
- Add the four FIGURINE WEAPONS to the statuettes; take the MEDALLION HALF from the compartment.
- Go down.
- Zoom in on the dome.
- Insert each MEDALLION HALF in the slot; attempt to take the seal.
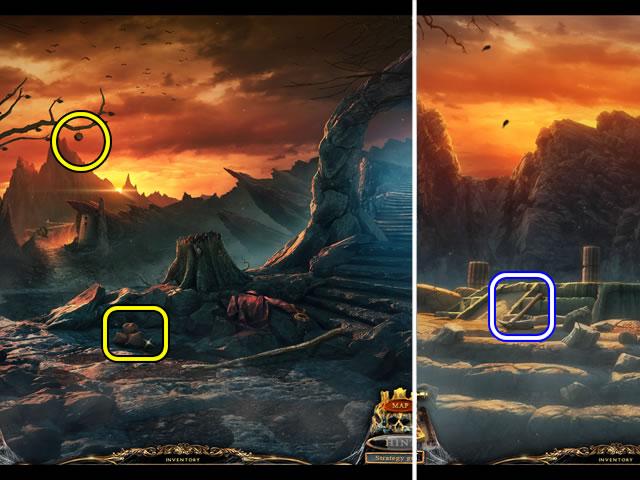
- Pick up a rock and throw it at the dangling rune; it takes all three rocks to knock down RUNE (1/10).
- Go up the steps on the right; grab the PICKAXE.
- Go down and follow the lower path.
- Speak with the guardian.
- Continue down the path.
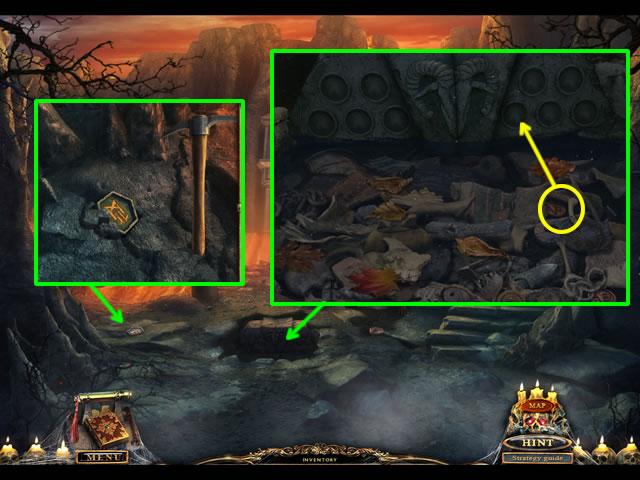
- Use the PICKAXE to unearth the RUNE (2/10) embedded in the rock.
- Look in the rocky basin to open a puzzle.
- Move the debris out of the way to find ten coins; insert the coins in the slots above the water.
- The next screenshot shows the locations of all the coins.
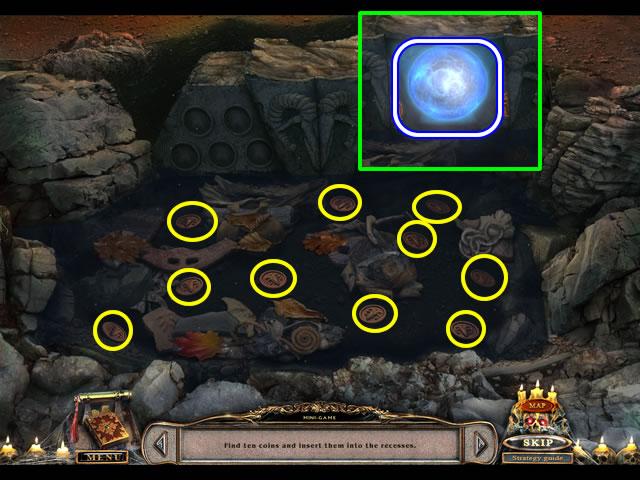
- Inserting all the coins opens the center compartment; take the BLUE ORB.
- Go down and up the stairs.
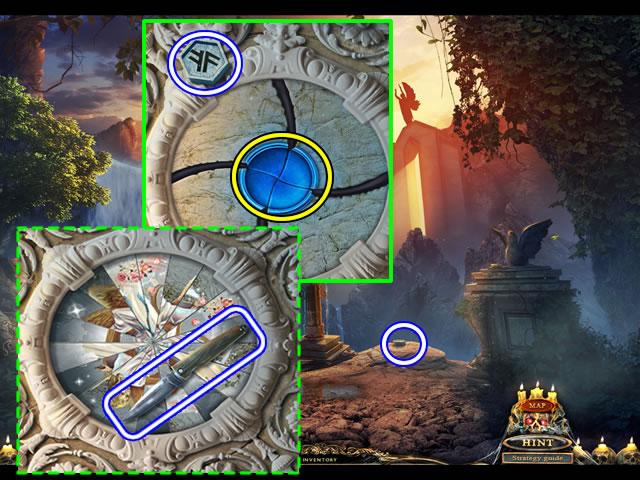
- Pick up the RUNE (3/10) from the rock outcrop.
- Look at the pedestal on the right.
- Take the RUNE (4/10).
- Put the BLUE ORB in the center slot; take the KNIFE to open a puzzle.
- The goal is to swap the image slices to restore the drawing.
- The solution is shown in the next screenshot.
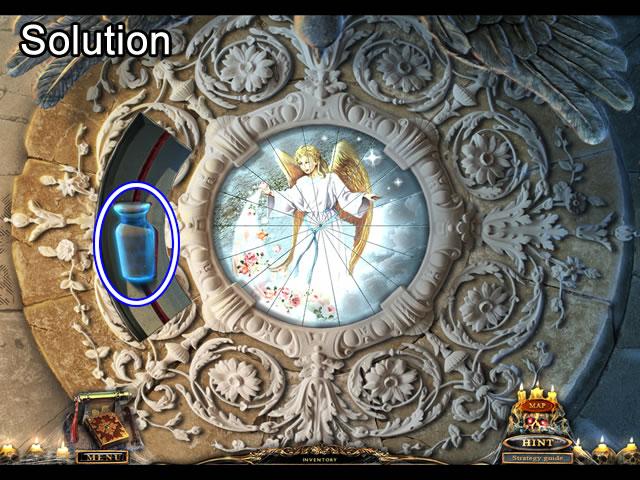
- Correctly restoring the image opens a compartment.
- Take the BLUE WEIGHT.
- Go down twice.
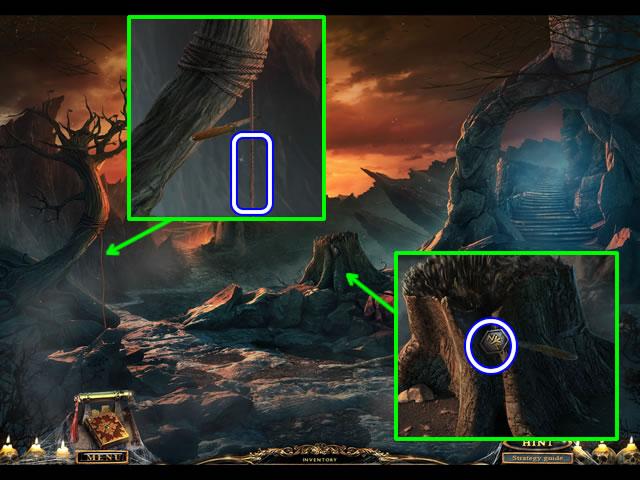
- Look at the dangling rope.
- Use the KNIFE to cut off a length of ROPE.
- Examine the stump.
- Use the KNIFE to pry out the RUNE (5/10).
- Take the path to the Crossroads.
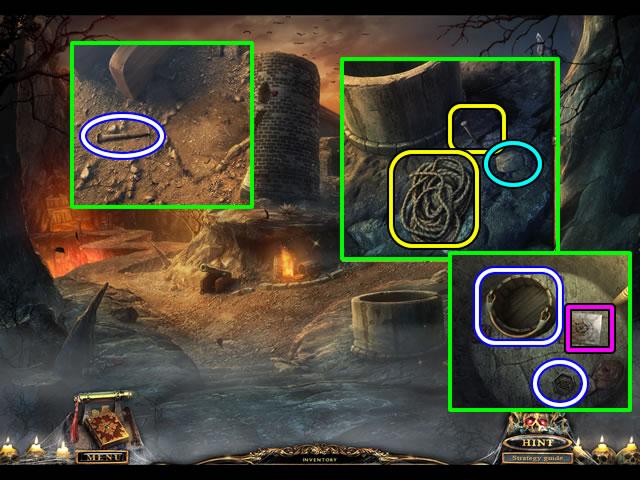
- Look at the base of the cannon.
- Pick up the PEG.
- Zoom in on the well.
- Put the ROPE on the rock; put the PEG in the rock crack.
- Pick up the rock and pound in the peg; attach the rope to the peg.
- Take the EMPTY BUCKET and RUNE (6/10) from the bottom of the well.
- Examine the diagram for puzzle information.
- Go up the steps on the right.
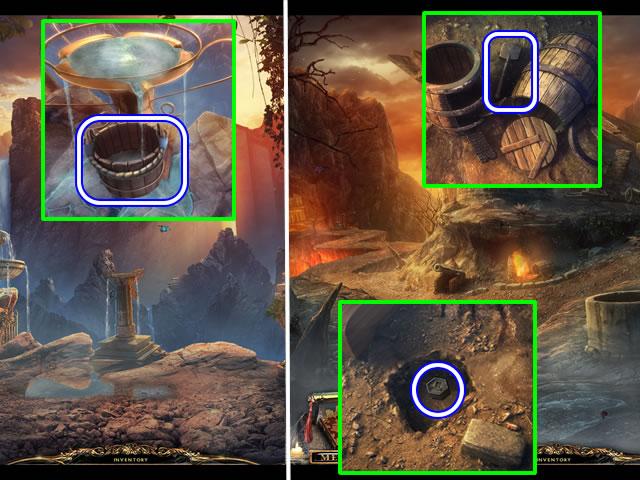
- Put the EMPTY BUCKET under the spilling water; receive a BUCKET OF WATER for inventory.
- Go down.
- Click anywhere to activate a cutscene; receive the OCARINA from the guardian.
- Look at the burning barrel.
- Pour the BUCKET OF WATER on the flames; take the SHOVEL.
- Look at the base of the cannon.
- Use the SHOVEL to uncover a RUNE (7/10) in the loose dirt.
- Go down the path.
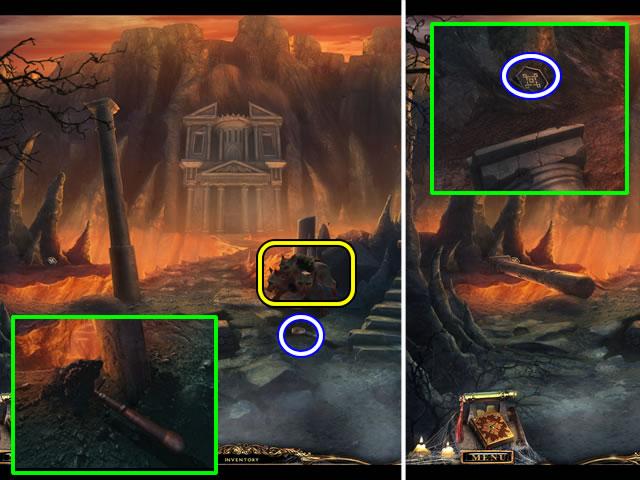
- Use the OCARINA to calm the Cerberus; pick up the RUNE (8/10).
- Look at the base of the column; use the SHOVEL to destabilize it.
- Pick up the RUNE (9/10) at the end of the fallen column.
- Go down twice.
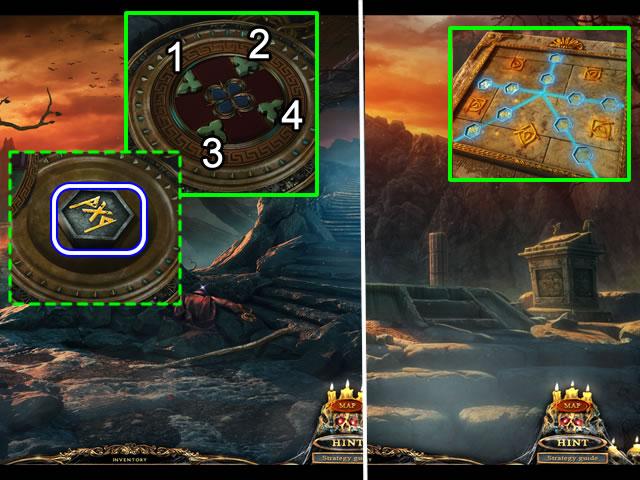
- Zoom in on the container by the stump.
- Based on the document in the well, depress the buttons in the order shown.
- Take RUNE (10/10) from the open container.
- Go up the steps.
- Put the ten RUNES on the device on the right to raise the Scales of Fate.
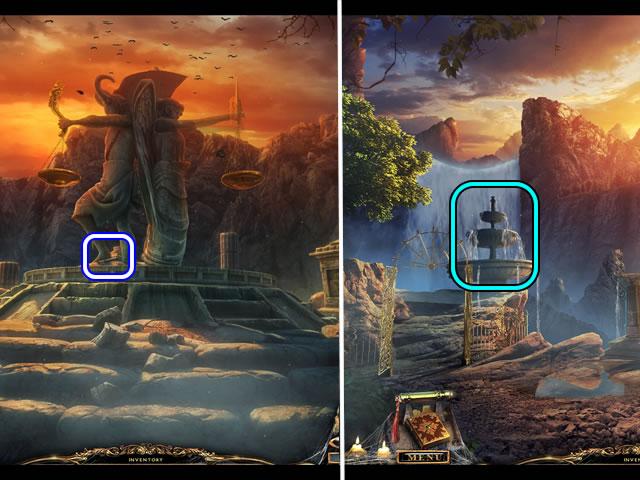
- Pick up the KEY by the feet of the statues.
- Go down to the Crossroads and up the steps.
- Use the KEY to unlock the gates.
- Zoom in on the fountain to open a move-the-debris puzzle.
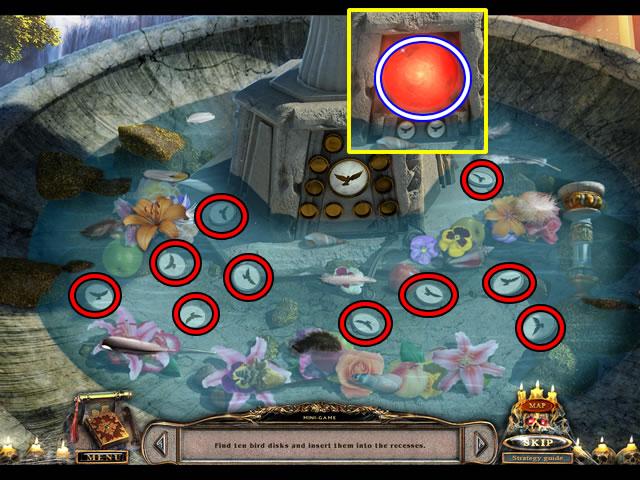
- Uncover the disks shown above and insert them in the slots; take the RED ORB.
- Go down to the Crossroads and continue on the path.
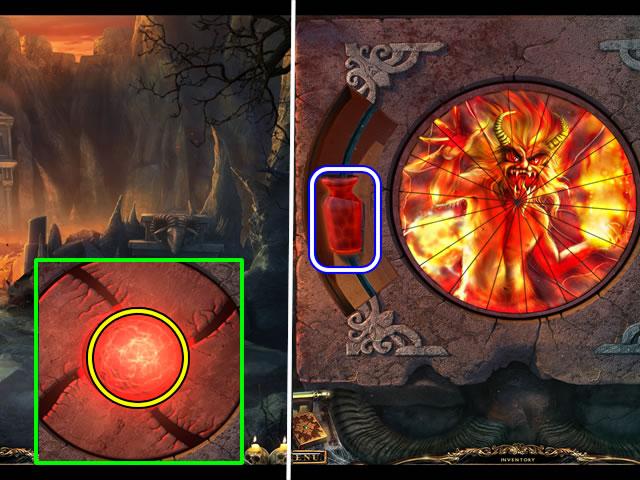
- Zoom in on the pedestal creature.
- Put the RED ORB in the center to open a puzzle.
- Swap the image slices to form the drawing.
- Take the RED WEIGHT.
- Go down twice and up the stairs to the scales.
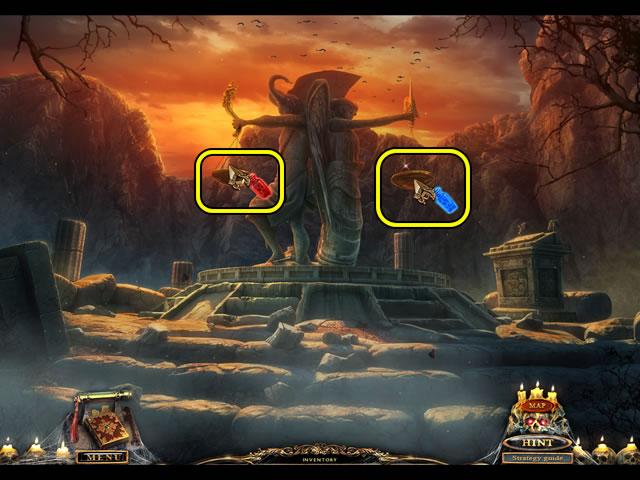
- Put the RED WEIGHT and the BLUE WEIGHT in the scale pans.
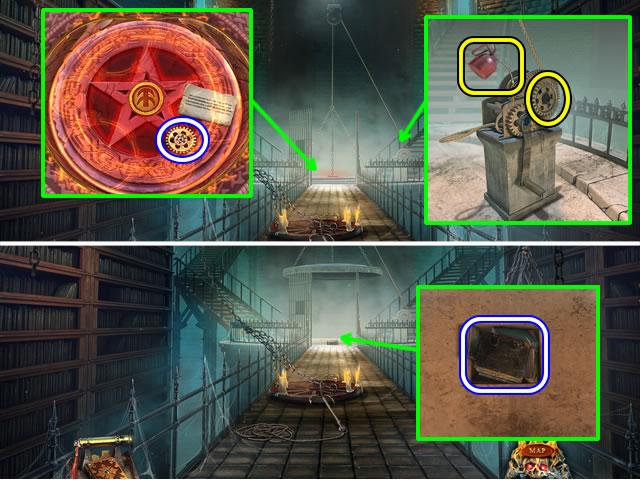
- Look at the dome.
- Pick up the GEAR and read the note.
- Examine the winch mechanism.
- Attach the GEAR and lubricate the mechanism with the FILLED OIL CAN; turn the handle.
- Zoom in on the area where the dome was and pick up the BOOKS.
- Go through the door on the right.
- Put the BOOKS on the bookshelves on the left to open a puzzle.
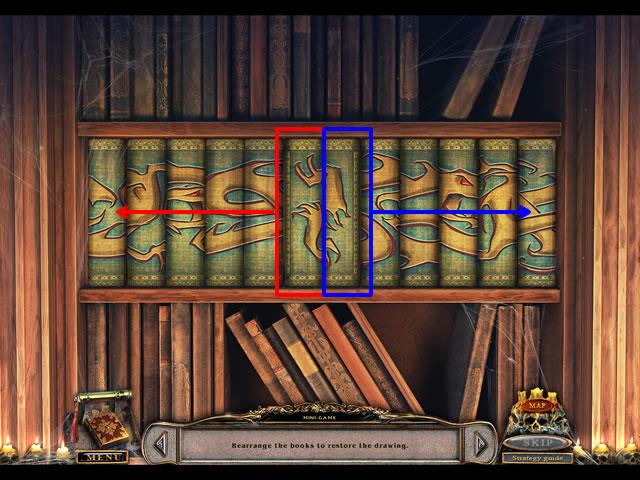
- Swap the books to form an image.
- Note the two center books have edges along the sides to show they are end books. Place these two first and build the pattern from there.
- Correctly placed books lock into place.
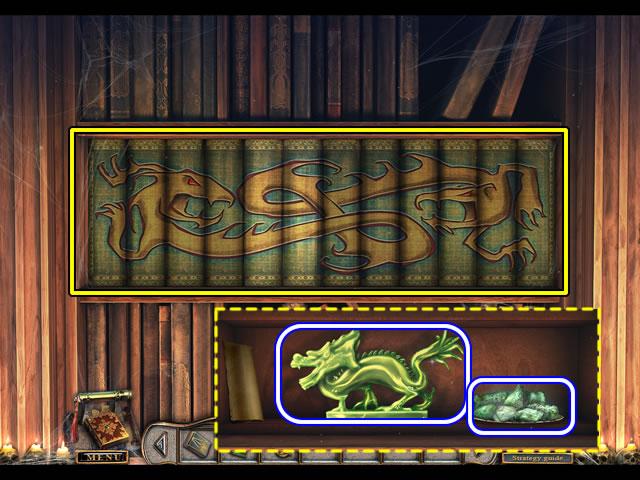
- The above screenshot shows the solution.
- Pick up the solvent recipe and take the JADE DRAGON FIGURINE and MINERAL dish.
- Go down and through the door on the left.
- Play the hidden object scene.
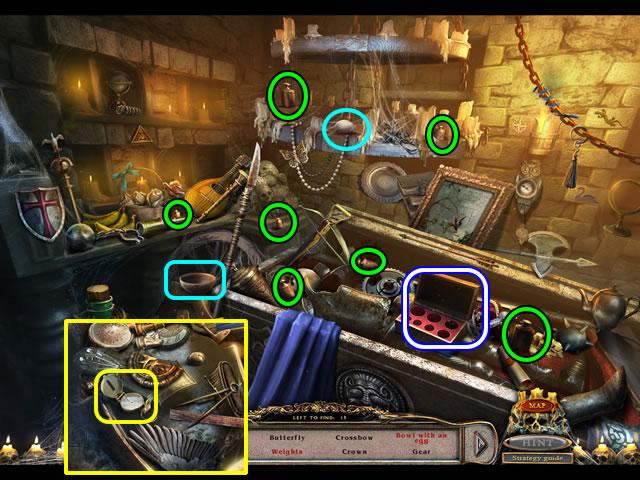
- Pick up the seven weights and put them in the box of Weights.
- Take the egg and put it in the bowl (aqua).
- Look inside the armor to find the Compass.
- Find the rest of the listed objects; receive the WEIGHTS for inventory.
- Go to the Wine cellar.
- Zoom in on the worktable.
- Add the WEIGHTS and MINERAL to open a puzzle.
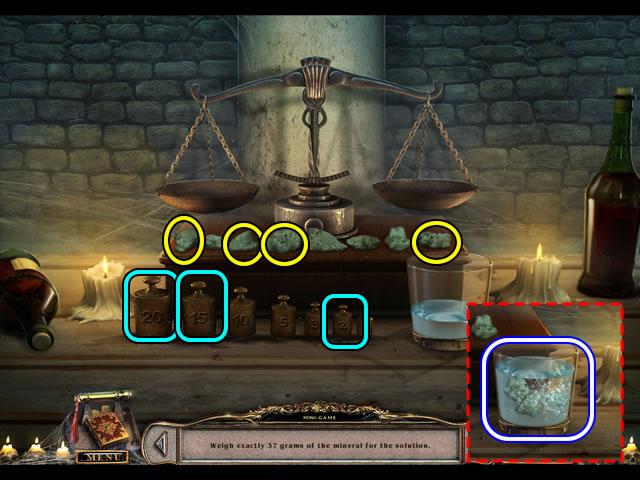
- The goal is to find the mineral rocks whose combined weight is 37 grams.
- Add the three highlighted weights to a scale pan and select the four circled rocks.
- Take the glass of SOLVENT.
- Go back to the Archives.
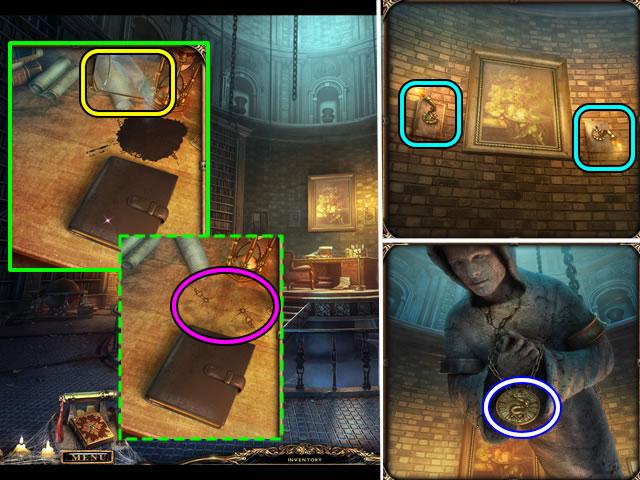
- Look at the desktop.
- Pour the SOLVENT on the stain to reveal two symbols.
- Zoom in on the back wall.
- Attach the CANDLESTICK to the empty sconce.
- Click the candlesticks to position them at approximately 10:00 and 4:00; pull down the painting to lower a figure.
- Take the MEDALLION from the figure.
- Go down and enter the door on the left.
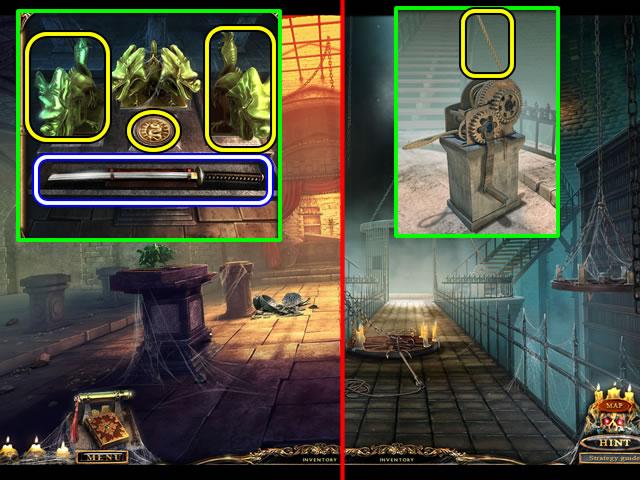
- Look at the pedestal on the near left.
- Put the two JADE DRAGON FIGURINES on each side and the MEDALLION in the center slot; take the SWORD.
- Go down.
- Zoom in on the mechanism.
- Use the SWORD to cut the rope; receive the SEAL and teleport back to the Gates.
- Go forward.
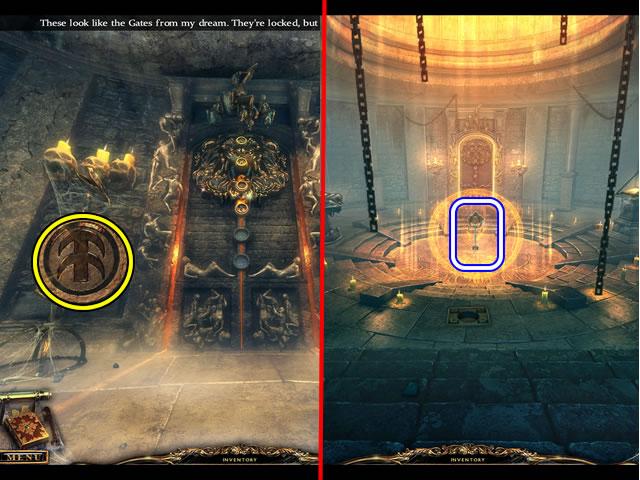
- Put the SEAL anywhere on the scene; take the KEY.
- Open the Map; go to the Portal room.
- Insert the KEY in one of the slots to open the next portal.
Chapter 7: The Last Seal
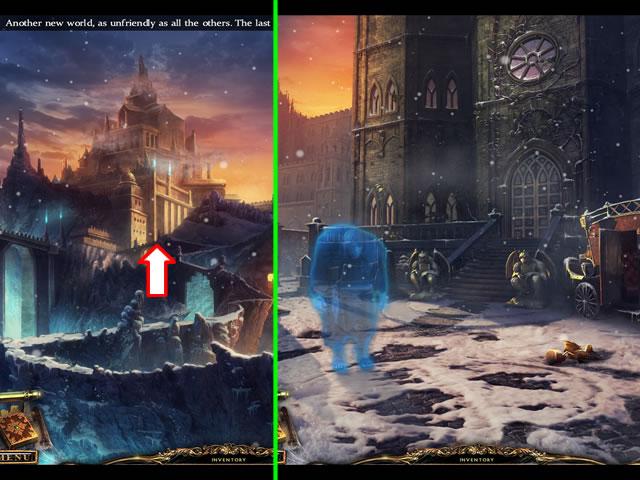
- Approach the castle.
- Speak to the hunchback to trigger a place-the-object scene in the carriage.
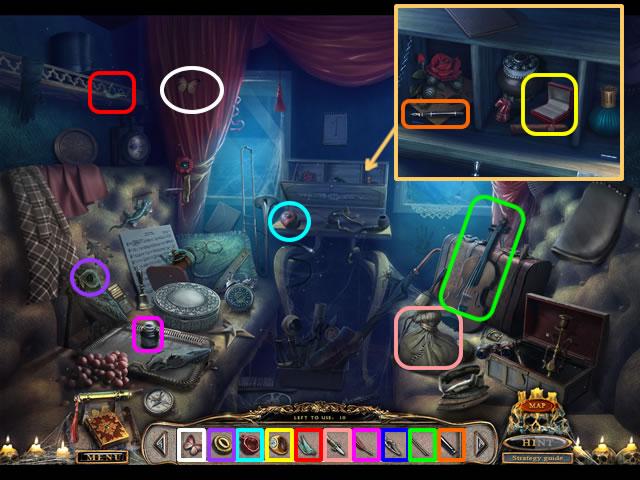
- Select the items on the bar and place them in the scene.
- The colored item outlines correspond to the same colored placement area.
- Open the desktop and look inside for an additional area.
- Receive a DOOR KNOCKER for inventory.
- Pick up the BAT FIGURINE (1/6) on the ground.
- Zoom in on the door.
- Attach the DOOR KNOCKER; knock to open a puzzle.
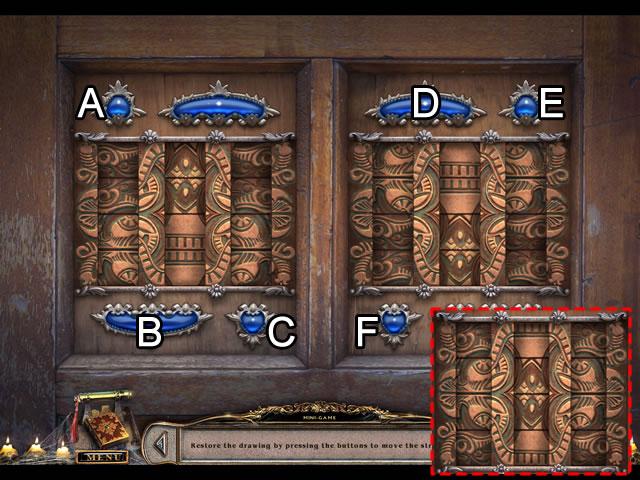
- The goal is to reconstruct matching images on both panels by using the scroll buttons.
- Use the fixed patterns as a guide.
- Solution: Exit and reenter the scene to reset the puzzle. Click the buttons in this order: B-A-A-C-C-C; D-F-F-E-E-E.
- Enter the castle and go forward and then left to the Main hall.
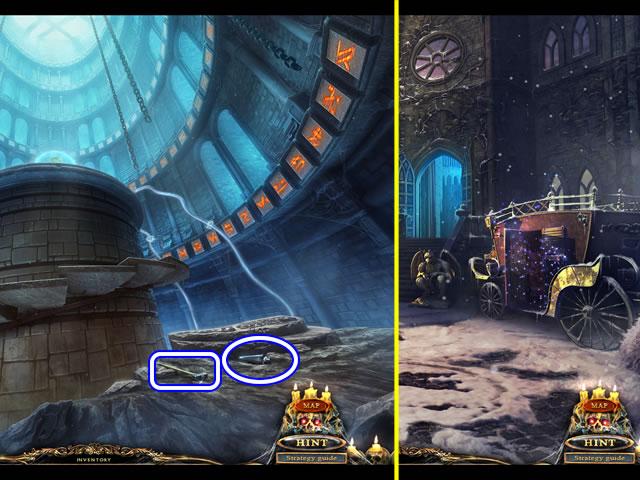
- Pick up the HAMMER and SPEAR HEAD.
- Go down three times to the Castle entrance.
- Play the hidden object scene in the carriage.
- Put the buckle (1) on the shoe (2) to create a Shoe with a buckle.
- Flip the page (3) on the pad to find the Number 2.
- Look in the desk to find the Notepad and Perfume.
- Find the rest of the listed objects; receive the JACK for inventory.
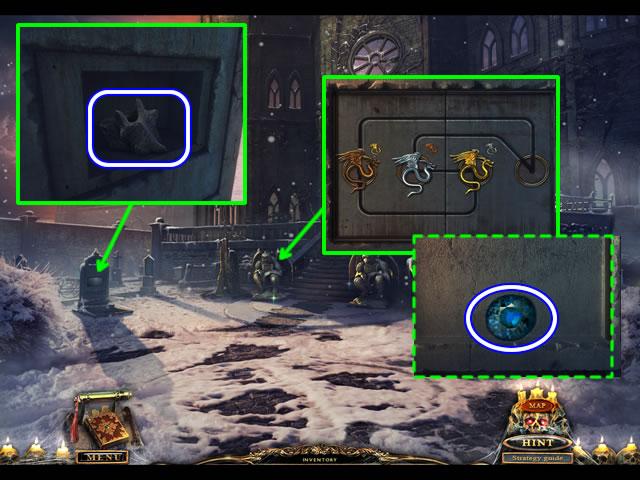
- Look at the tombstone.
- Use the SPEAR HEAD to pry off the plate; take the BACKBONE PART.
- Examine the statue at the left of the stairs.
- Move the serpents in this order: copper, gold, silver and copper.
- Take the JEWEL from the compartment.
- Go forward.
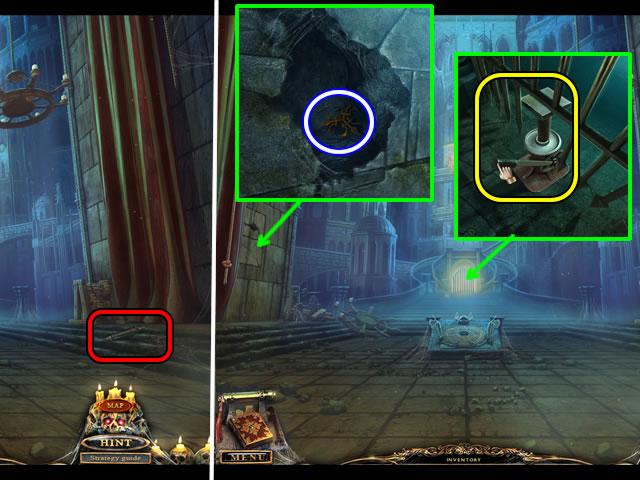
- Pick up the Message container on the right next to the winch mechanism.
- Pull the rope to open the curtain on the left.
- Use the HAMMER to smash the damaged wall; take the SYMBOL.
- Look at the gates at the end of the hall.
- Put the JACK under the gate; click to raise the gates.
- Go forward.
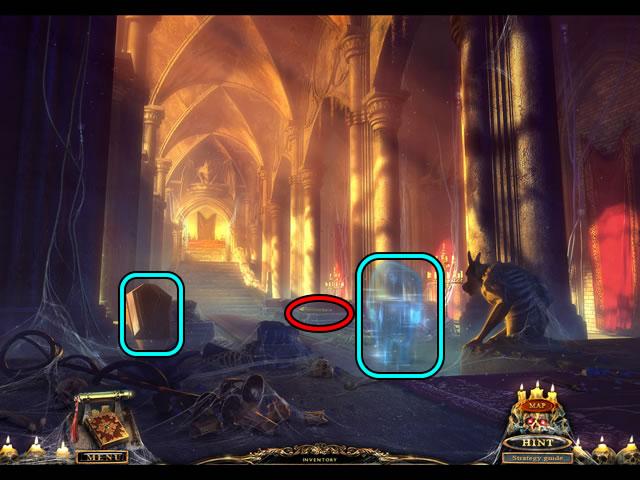
- Speak to the character.
- Pick up the Message container.
- Open the coffin to trigger a place-the-object scene.
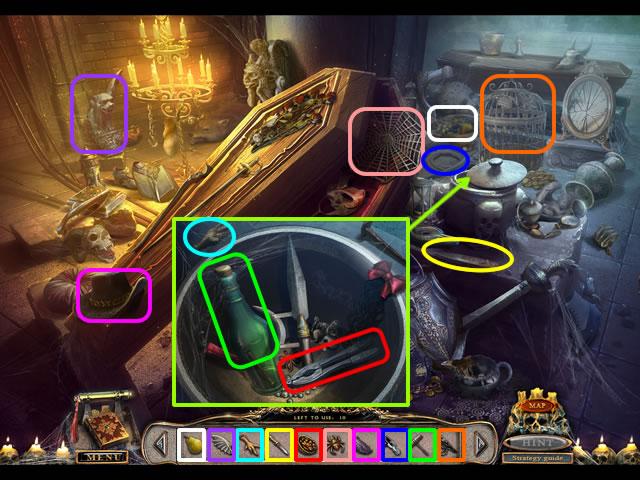
- Select the items on the bar and place them in the scene.
- The colored item outlines correspond to the same colored placement area.
- Remove the container lid and look inside for an additional area.
- Receive a GLASS CUTTER for inventory.
- Open the Map; go to the Wine cellar.
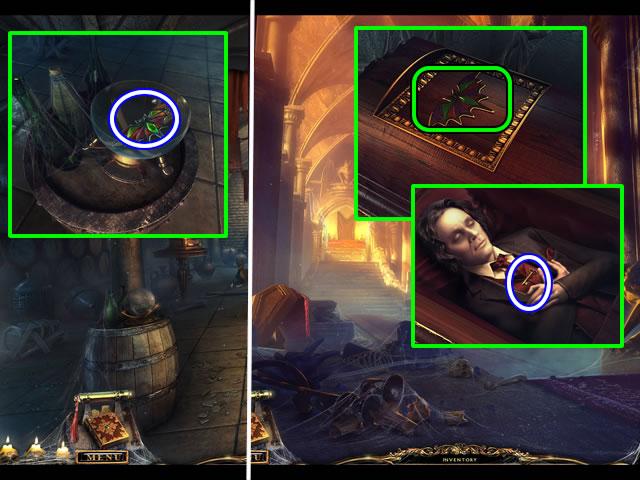
- Speak to the character.
- Examine the barrel.
- Use the GLASS CUTTER to open the globe; take the STAINED GLASS BAT.
- Open the Map; return to the Dungeon.
- Zoom in on the casket.
- Insert the STAINED GLASS BAT in the inset to open the casket; move the arms to uncover a KEY.
- Go down and up to the Stairway.
- Use the KEY to open the door.
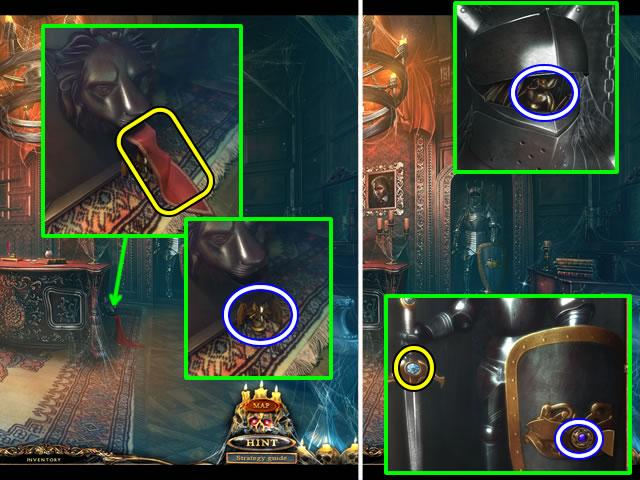
- Look at the side of the desk.
- Pick up the cloth for a cutscene.
- Zoom back in on the side of the desk; pick up the BAT FIGURINE (2/6).
- Open the visor on the armor helmet; take the BAT FIGURINE (3/6).
- Look at the armor shield; add the JEWEL to the sword; take the BUTTON from the shield compartment.
- Go down three times.
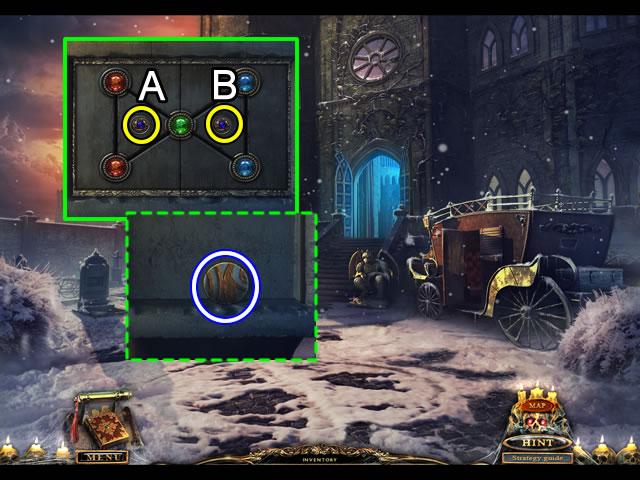
- Inspect the statue to the right of the steps.
- Insert the BUTTON to open a puzzle.
- The goal is to use the two small buttons to swap the position of the red and blue gems.
- Solution: A, B, A, B, A.
- Take the MOSAIC PART from the compartment.
- Go forward.
- Zoom in on the mosaic on the Hallway floor.
- Add the MOSAIC PART to open a puzzle.
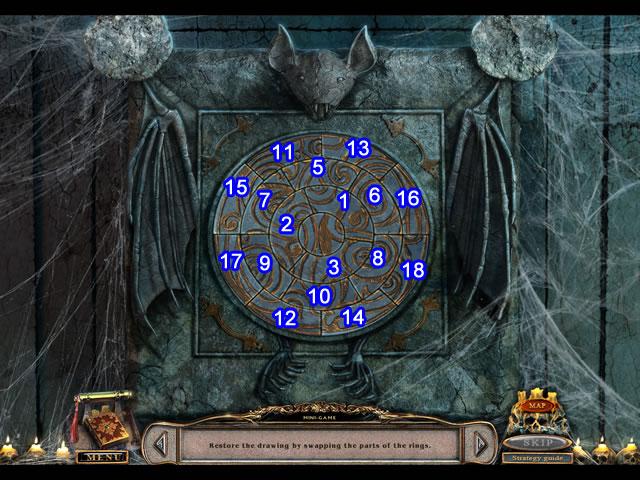
- The goal is to recreate the pattern by swapping segments within the three rings.
- Use the fixed center circle and match the pattern of the three inner segments first. Correctly positioned sections light up and lock into place.
- Solution: Swap the section pairs as follows: 1-2, 2-3; 5-6, 7-8, 9-10; 11-12, 13-14, 15-16 and 17-18.
- Take the PAINTING and BACKBONE PART from the center compartment.
- Go forward to the Dungeon and play the hidden object scene.
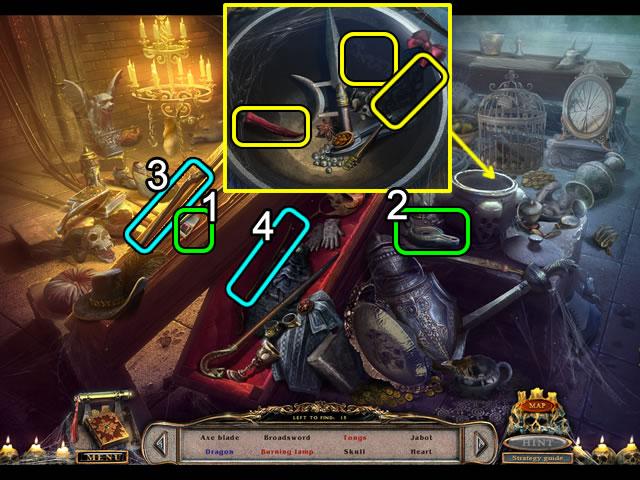
- Strike a match (1) to light the lamp (2). Take the Burning lamp.
- Drag the handle (3) to the other handle (4) and repair the Tongs.
- Look in the jar to find the Pepper, Dragon and Lock of hair.
- Find the rest of the listed objects; receive TONGS for inventory.
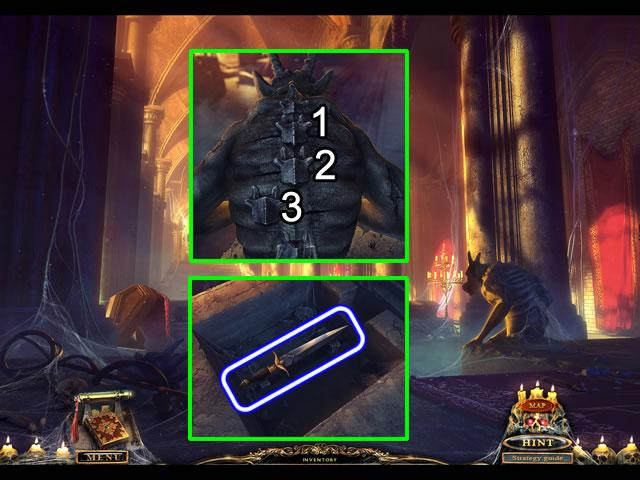
- Look at the statue on the right.
- Add the two BACKBONE PARTS to open a puzzle.
- The goal is to align the three backbone parts in the center.
- Click the three parts in the order shown to solve the puzzle; the statue slides to the right.
- Look at the base where the statue was; take the KNIFE.
- Go down, up and right to the Study.
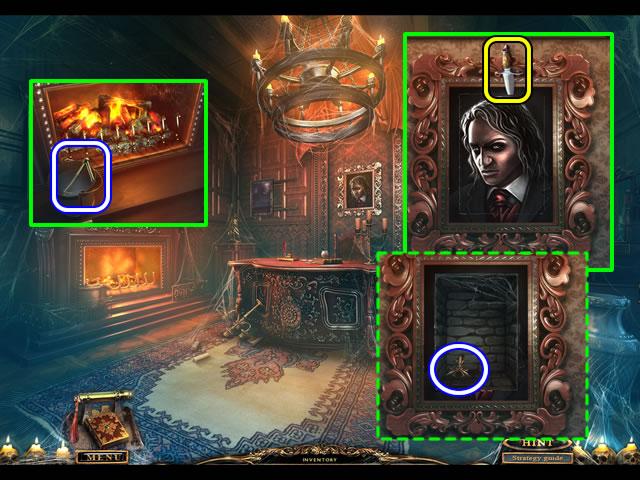
- Zoom in on the fireplace.
- Use the TONGS to extract the lever from the flames; take the LEVER from the bucket.
- Look at the painting on the right.
- Use the KNIFE to slit the painting; remove the Message canister and take the SYMBOL from the compartment.
- Add the PAINTING to the tracks supporting the painting on the left to open a spot-the-similarities puzzle.
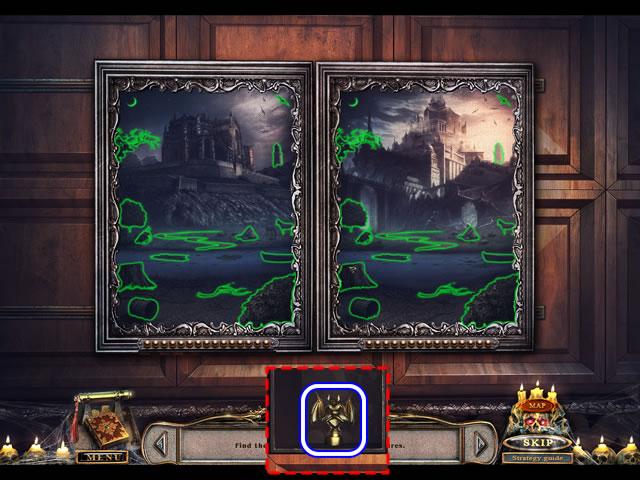
- Click either picture to highlight the similarities.
- Finding all the items opens a compartment; take the BAT FIGURINE (4/6).
- Go down twice.
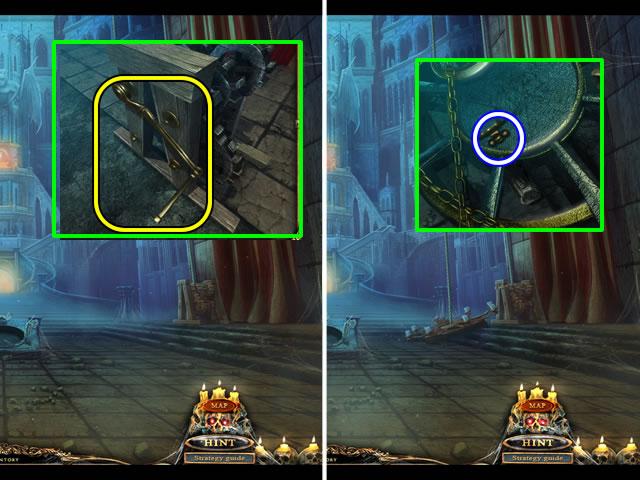
- Zoom in on the winch mechanism and attach the LEVER.
- Click the mechanism to lower the chandelier.
- Take the DRAWER HANDLE from the lowered fixture.
- Go up and right to the Study.
- Affix the DRAWER HANDLE to the dresser. Open the drawer and take the BRUSH.
- Go down.
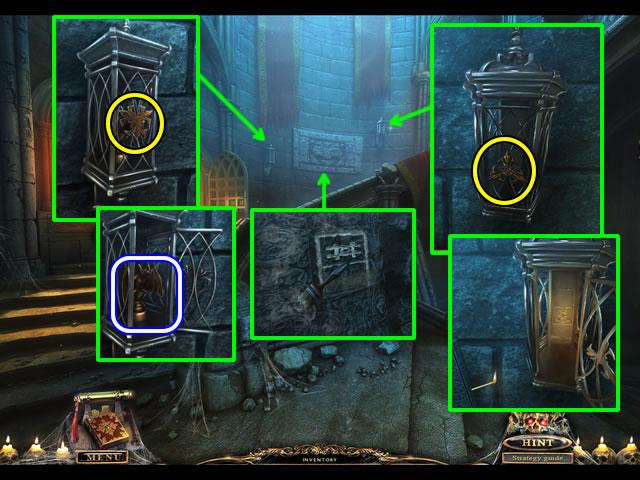
- Look at the lantern on the left.
- Insert the SYMBOL in the inset; take the BAT FIGURINE (5/6).
- Examine the carving.
- Use the BRUSH to remove the dirt and uncover a symbol. The diagram is saved in the diary.
- Look at the lantern on the right.
- Insert the SYMBOL in the inset; use the BOX OF MATCHES to illuminate the area. The symbol diagram is saved in the diary.
- Go right.
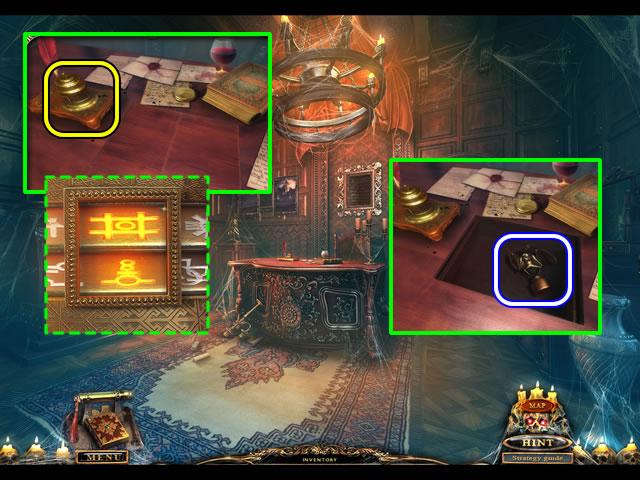
- Look at the desktop.
- Click the inkwell to open a puzzle.
- Rotate the top and bottom images until the symbols from the stairway are centered in the frame.
- Take the BAT FIGURINE (6/6) from the compartment.
- Go down and left.
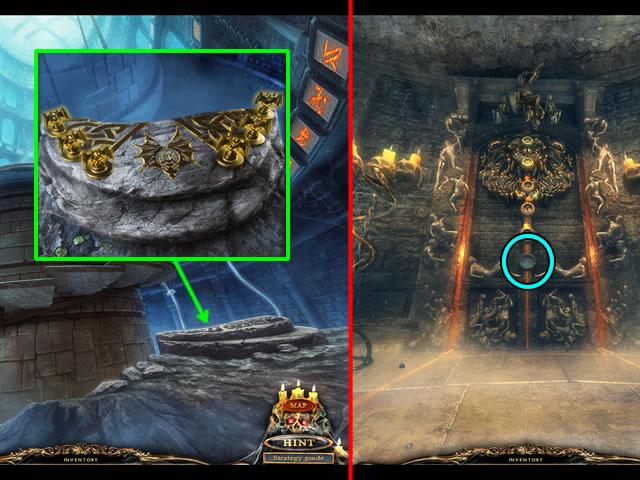
- Zoom in on the rock pedestal.
- Insert the six BAT FIGURINES in the slots to receive the last SEAL and teleport to the Gates.
- Put the SEAL anywhere on the scene to view the final cutscene.
Congratulations!
You have completed playing Portal of Evil: Stolen Runes. Be sure to check back often for game updates, staff and user reviews, user tips, forums comments and much more here at Gamezebo.
More articles...
Monopoly GO! Free Rolls – Links For Free Dice
By Glen Fox
Wondering how to get Monopoly GO! free rolls? Well, you’ve come to the right place. In this guide, we provide you with a bunch of tips and tricks to get some free rolls for the hit new mobile game. We’ll …Best Roblox Horror Games to Play Right Now – Updated Weekly
By Adele Wilson
Our Best Roblox Horror Games guide features the scariest and most creative experiences to play right now on the platform!The BEST Roblox Games of The Week – Games You Need To Play!
By Sho Roberts
Our feature shares our pick for the Best Roblox Games of the week! With our feature, we guarantee you'll find something new to play!All Grades in Type Soul – Each Race Explained
By Adele Wilson
Our All Grades in Type Soul guide lists every grade in the game for all races, including how to increase your grade quickly!


