- Wondering how to get Monopoly GO! free rolls? Well, you’ve come to the right place. In this guide, we provide you with a bunch of tips and tricks to get some free rolls for the hit new mobile game. We’ll …
Best Roblox Horror Games to Play Right Now – Updated Weekly
By Adele Wilson
Our Best Roblox Horror Games guide features the scariest and most creative experiences to play right now on the platform!The BEST Roblox Games of The Week – Games You Need To Play!
By Sho Roberts
Our feature shares our pick for the Best Roblox Games of the week! With our feature, we guarantee you'll find something new to play!Type Soul Clan Rarity Guide – All Legendary And Common Clans Listed!
By Nathan Ball
Wondering what your odds of rolling a particular Clan are? Wonder no more, with my handy Type Soul Clan Rarity guide.
Mystery Case Files: Escape from Ravenhearst Walkthrough
Welcome to the Mystery Case Files: Escape from Ravenhearst walkthrough on Gamezebo. Mystery Case Files: Escape from Ravenhearst is a Hidden Object/Adventure game played on PC created by Big Fish Games. This walkthrough includes tips and tricks, helpful hints, and a strategy guide on how to complete Mystery Case Files: Escape from Ravenhearst.
Mystery Case Files: Escape from Ravenhearst – Game Introduction
Welcome to the Mystery Case Files: Escape from Ravenhearst walkthrough on Gamezebo. Mystery Case Files: Escape from Ravenhearst is a Hidden Object/Adventure game played on PC created by Big Fish Games. This walkthrough includes tips and tricks, helpful hints, and a strategy guide on how to complete Mystery Case Files: Escape from Ravenhearst.
General Tips
- As with most games of this genre, the cursor will change into a magnifying glass when you can zoom in on something or inspect it more closely, directional arrows in places where you can move to a new scene and a hand with a pointed finger if you can interact with an item or pick it up
- Items you pick up will go into your inventory wheel, which pops up when you move your cursor to the bottom of the screen. You can scroll through the wheel with the little blue arrows on either side
- In the bottom left is your journal, or Case Report. It keeps track of the storyline and sometimes provides subtle hints on what needs to be done next. Unfortunately, the journal does not remember puzzle codes and solutions you find, so you will need to write those down yourself. The journal will open each time a new entry has been made
- Above the journal is a link to an in-game strategy guide. This guide is very different from those seen in other games as it only shows images of what needs to be done, but without any verbal explanation
- Instead of hidden object scenes, this game has morphing object scenes. You have to find items that change into something else every few seconds. The locket in the bottom right will show you how many items you need to find. When you’ve found all morphing objects in a scene, a ghost will direct you to something important you have to find
- Many puzzles and clues in the game are randomized, meaning that the solution shown in this walkthrough will be different from the solution for your game. However, the walkthrough will explain how puzzles can be solved and where you can find the required information
- Most puzzles can be skipped with the skip button in the bottom right, once the button has been charged
- The hint button in the bottom right only works in morphing object scenes
Standard or Collector’s Edition
- The Collector’s Edition of this game is a little different from other games. No bonus content such as extra chapters or hidden artwork is unlocked after you complete the game. Instead, most bonus content is actually scattered throughout the game. The bonus content consists of the following:
- Door Tokens: Each time you go to a new zone, you have to unlock a door. If you’re playing the Standard Edition, the door will simply unlock with the matching key. In the Collector’s Edition a series of “door tokens” will pop up that need to be activated and placed back on the door before you can move on. You can activate the door tokens by finding the scene that matches the image on the door token, lining them up and clicking on them
- Journal Morphing Objects Puzzle: In the Collector’s Edition there will be 31 morphing objects scattered throughout your game journal. If you find them all you will get two new journal pages with standard hidden object scenes
Zone 1: Ravenhearst Grounds

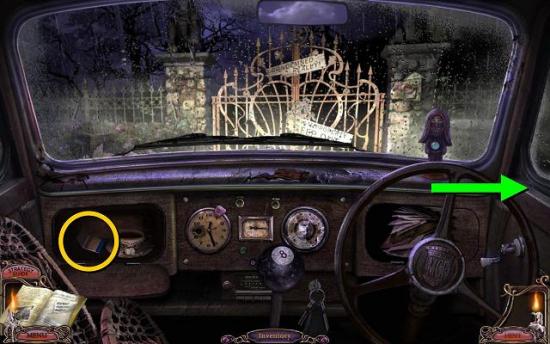
- Open the glove compartment and take the MATCHES
- Exit the car
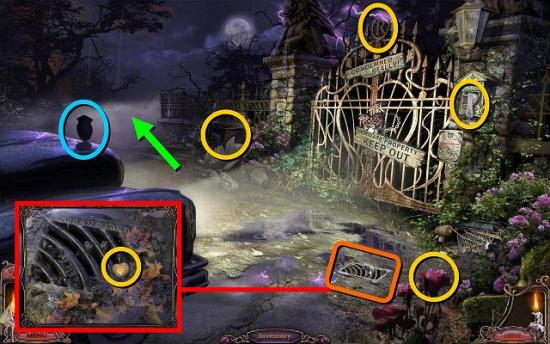
- Zoom in on the grate in the ground and take the locket
- A ghost will explain the new style of hidden object scene for this game
- Click on the shield on the hood of the car (blue) when the ghost tells you to
- Find four more morphing objects in this scene (pink)
- After you’ve found all objects, the ghost makes a lantern fall down and break. Zoom in on the lantern and find a BOTTLE OPENER
- Go down the path on the left
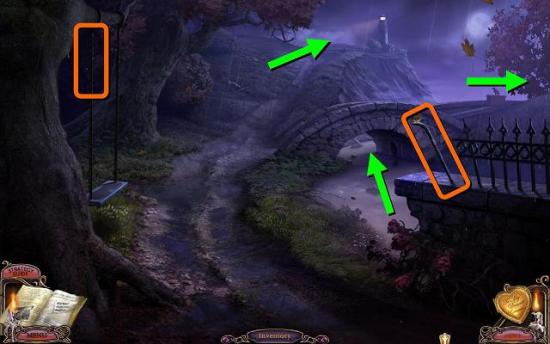
- Although there are a couple of interactive places on this map, there is nothing you can do right now other than making the little bird fly away, so get into the water under the bridge
- You can click on the grate in the wall and the water to get some spooky scenes
- Zoom in on the area with the mannequin for another morphing object scene. Find 11 items
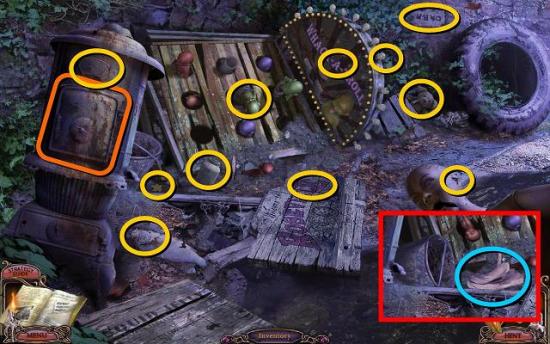
- When you’ve found all items, the ghost will knock over a bucket and a RAG appears
- Exit this scene until you’re back on the path and move forward to the lighthouse in the back
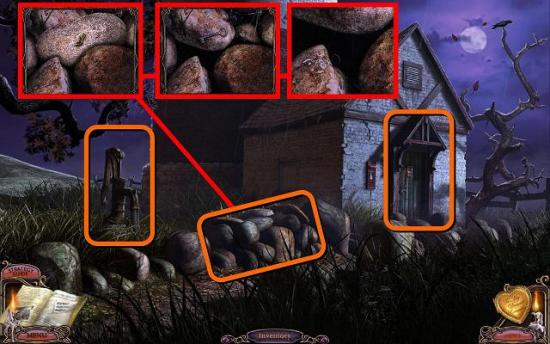
Getting into the Lighthouse
- Zoom in on the stones, use your BOTTLE OPENER on them and then move the top stone by hand
- The LARGE ROCK will go into your inventory
- Unfortunately, when you try to pick up the key, it falls down the hole and you can’t reach it
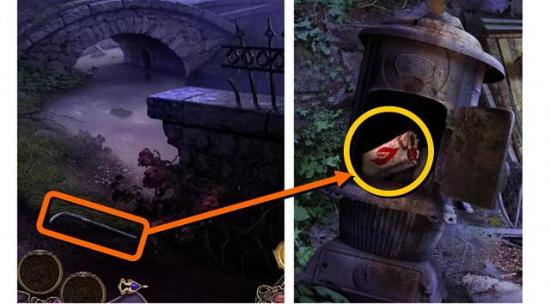
- Back out to the path again and use the LARGE ROCK on the last METAL BAR of the fence on the right until it comes off
- Go back into the water under the bridge, to where the morphing object scene was and open the door of the old stove with your METAL BAR to find LIGHTER FLUID
- Back out to the path and cross the bridge to the right
- Move towards the cottage and zoom in on the door
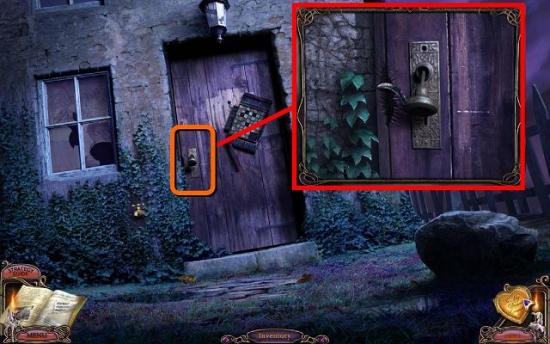
- Use the METAL BAR to prize the door open
- Go inside for another morphing objects scene. Find 12 items
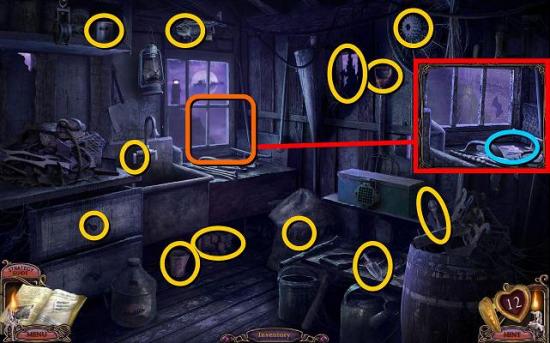
- The ghost will break the window, so zoom in on the window, smash it a little more and pick up the GLASS SHARD
- Note there’s puzzle box on the shelf. It will be a long time before you get to open it, though!
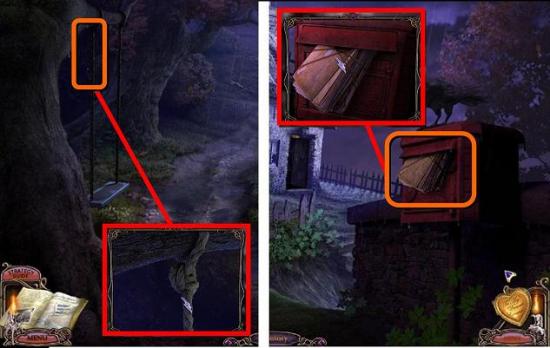
- Back out to the mailbox of the cottage and zoom in on it
- Use the GLASS SHARD to cut through the strings and a piece of TWINE will go into your inventory
- Back out to the path, zoom in on the left rope of the swing and cut the rope with your GLASS SHARD to get a ROPE
- Go back to the cottage and use the ROPE on the pile of junk with the hook on the left, and it will go around the pulley in the roof
- Click on the pile of junk again to raise it and pick up the CHAIN
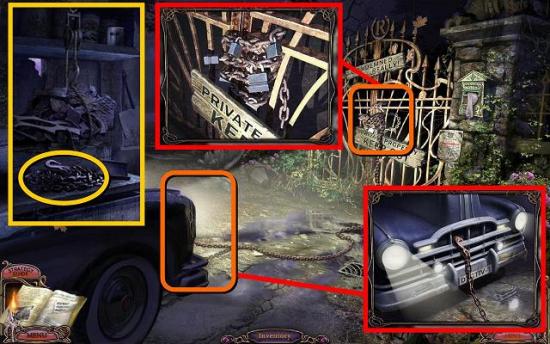
- Back out to the manor gate and the car
- Zoom in on the locks on the gate and put the CHAIN on them
- Now zoom in on the front of the car and click on the hook to hook it around the grill
- Get into the car and click on the gear stick to reverse and pull the gate down
- Get out of the car and go through the gate
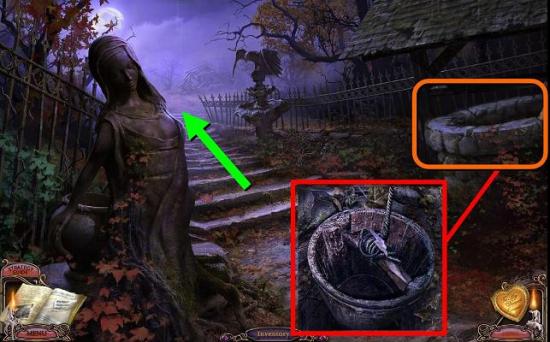
- Zoom in on the well and keep clicking on the bucket until it comes to the top
- Cut the ropes with your GLASS SHARD to get the BUCKET
- Walk on to the burnt-down manor house
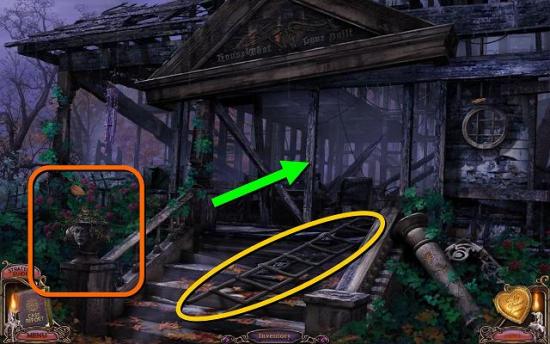
- Pick up the LADDER
- Zoom in on the left side of the stone steps for another morphing objects scene
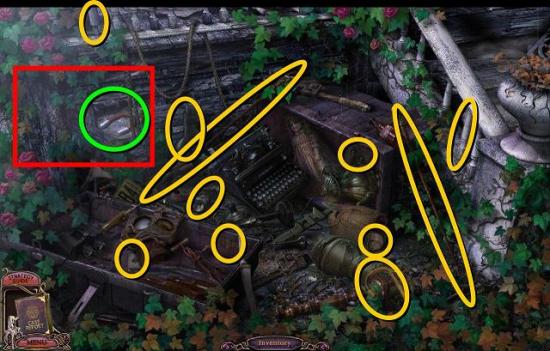
- The ghost will break the planks in the back and reveal a MAGNET (green)
- Now go into the manor house itself for the next scene. Don’t worry that it looks like it is about to cave in, as it won’t do that during this game
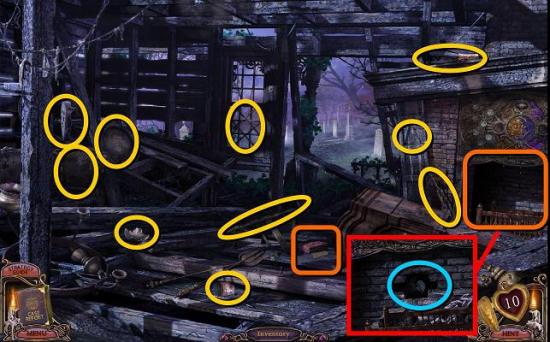
- After you’ve found all 10 objects, the ghost directs you to the fireplace
- Move the loose bricks and find the first V KEY (blue)
- On the floor of the manor house is a brick with a piece of a note underneath. It’s not much use to you now, but remember it’s there
- There’s also no point in going through to the next scene just yet, though if you do you will realize that there is a gravestone that is too dark to read, so you need to light it somehow
- Back out to the car and then go left again to the lighthouse
- Zoom back in on the stones
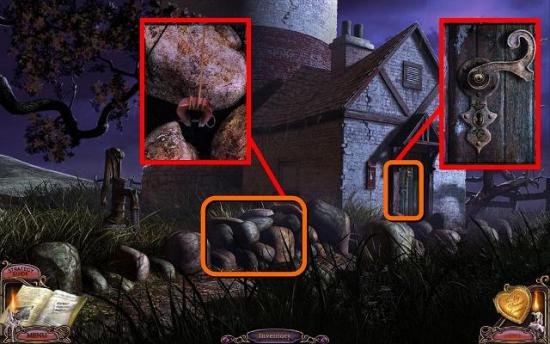
- Try to take the key with your MAGNET, but that doesn’t work and the magnet falls on the stones
- Use your piece of TWINE on the magnet and then click on it again to get the KEY
- Go to the door of the lighthouse and open it with the KEY
Inside the Lighthouse
- Go into the lighthouse, where it is very dark
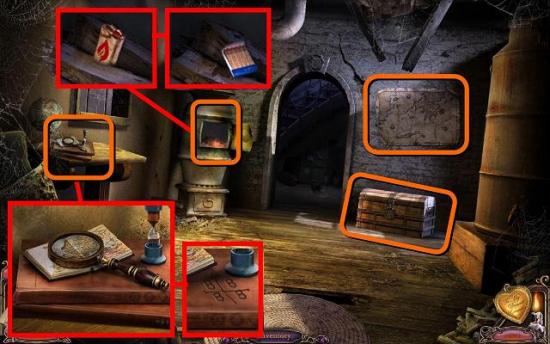
- Zoom in on the furnace, put the LIGHTER FLUID in it and then light it with the MATCHES
- Zoom in on the little desk on the left and take the MAGNIFYING GLASS
- Also take note of the code on the book – this code is different for every game
- Zoom in on the locked chest and use the + and – buttons to change the numbers on the lock to the code you saw on the book
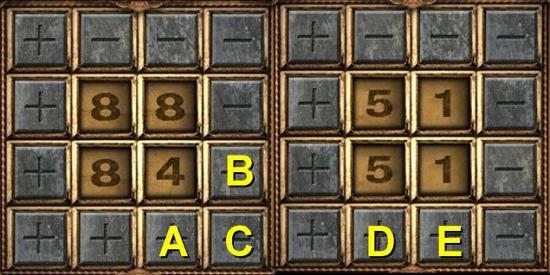
- What worked for me was to try and get three numbers the same, with the fourth number being bottom right. Then I kept clicking the keys in the bottom right corner consecutively (A, B, C, A, B, C etc) until I had two sets of matching numbers. After that you can click keys D and E to get the correct code. This worked for any set of numbers I tried
- Look at the notebook inside the chest and take note of the code in it, which is the same in each game: 5374
- Back out of the chest and look at the wall chart above the chest. Take note of the numbers and the compass directions they correspond with. These are also the same in every game
- Go to the next room
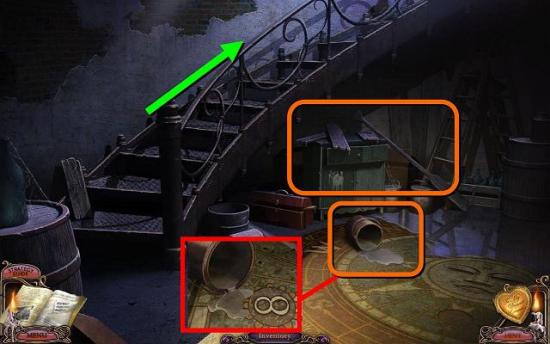
- Zoom in on the paint bucket that’s fallen over and mop up the paint with your RAG
- Note that the floor now shows the number 8, on the west side of the compass
- Zoom in on the back for another morphing objects scene
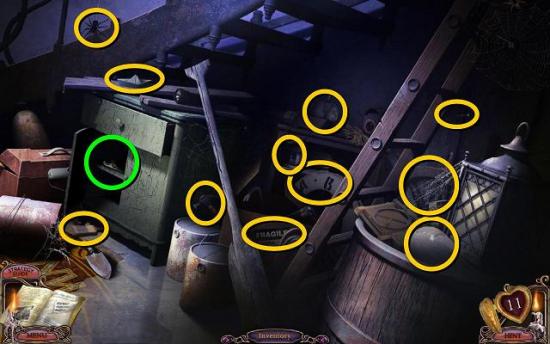
- When you’ve found all 11 objects, the ghost will open the cabinet so you can find a WRENCH (green)
- Go up the stairs and look at the code on the wall. It says NWSNw
- Go up the stairs to the next level
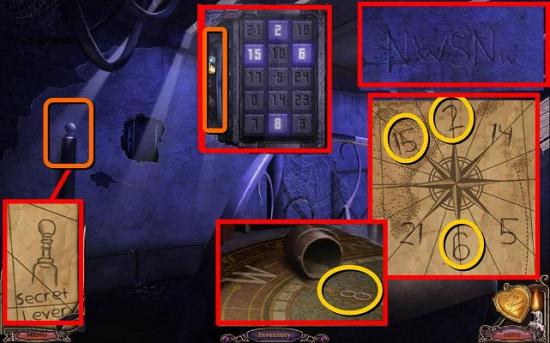
- Pull the “secret lever” on the left to reveal a key pad
- Enter the numbers matching with N, W, S and Nw – 2, 8, 6, 15, then pull the handle on the side. The trapdoor will open
The Lighthouse Override System
- Go up the ladder to the top level and zoom in on the light override
- Click on three random arrows and a fuse will blow, causing the light to go out
- Go back to the outside of the lighthouse
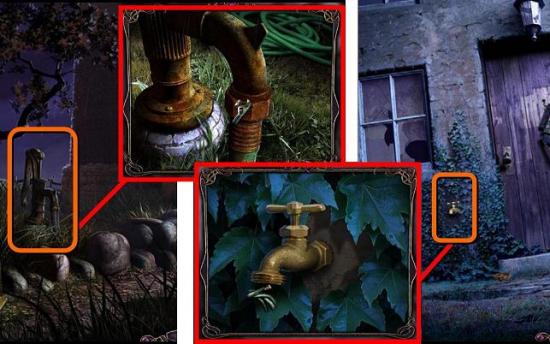
- Zoom in on the pump and use your WRENCH to take the GARDEN HOSE
- Backtrack all the way to the path by the bridge. On your way you will notice that the fuse box outside the lighthouse will have opened and is slightly smoking. We’ll get to that in a minute
- Go right towards the cottage
- Zoom in on the tap by the front door and place the GARDEN HOSE on the tap
- Follow the hose to the right and move down the cliff to get the SHOVEL
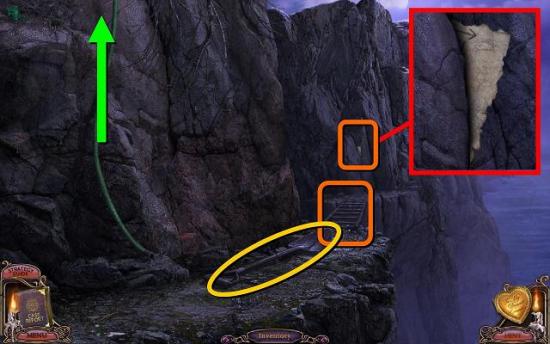
- Place the LADDER you found on the steps of the manor house across the gap in the cliff and find the CLUE FRAGMENT stuck between the rocks
- Go back to the bridge, into the water under the bridge and fill your BUCKET to get a BUCKET OF WATER
- Back out to the car and zoom in on the front
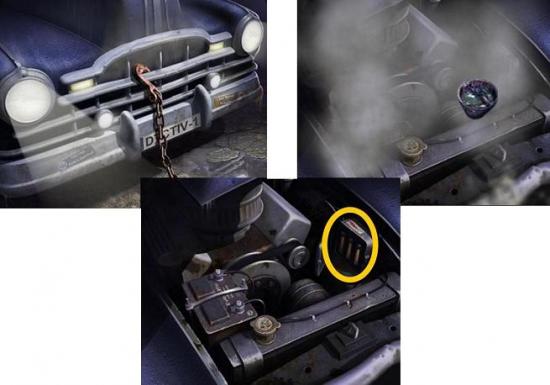
- Open the hood with your RAG
- Then pour the BUCKET OF WATER on it to cool down the engine
- On the right is a box you can open – take out the CAR FUSE
- Go back to the manor house, zoom in on the note under the brick and place the CLUE FRAGMENT on it
- Take note of the numbers and arrows on the note
- Go through the back of the manor house to the grave yard
- Zoom in on the grave in the back and write down the code, which is different in each game. In my game it was 23341, which I will use as an example
- Back out to the car and go back to the gate before the lighthouse
- Click on the smoking fuse box
- Place the CAR FUSE in the sparkles to bring the energy back on
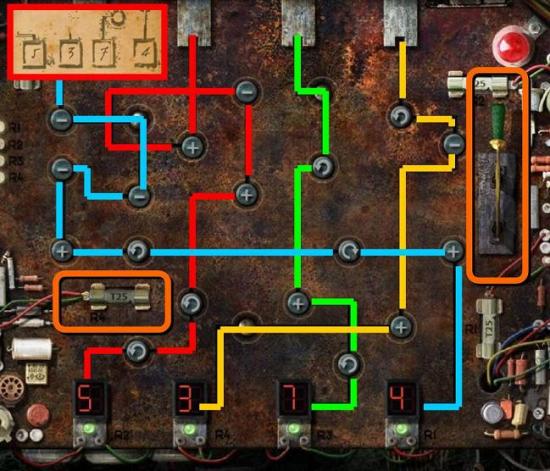
- Now, this game is a bit tricky. Essentially what you need to do is make the number 5374 (which you found in the locked chest in the lighthouse) appear at the bottom of the panel. When you pull the lever on the right, the blocks with numbers will move to the bottom of the panel. Each block has its own, distinct route and will go past a series of buttons that will increase or decrease the number, or rotate it left or right. You can change these buttons by clicking on them. It is best to focus on one block at a time: figure out its path and pay attention to the buttons it goes past. When it’s at the bottom, check if you need to increase, decrease or rotate the number on the block. Then change the buttons accordingly and try again. Keep doing this until all four blocks have the correct number and are the right way up. Unfortunately, the starting point is different in each game, so you have to find your own solution. The light in the lighthouse should go back on
- Go back to the lighthouse and make your way to the light override at the top
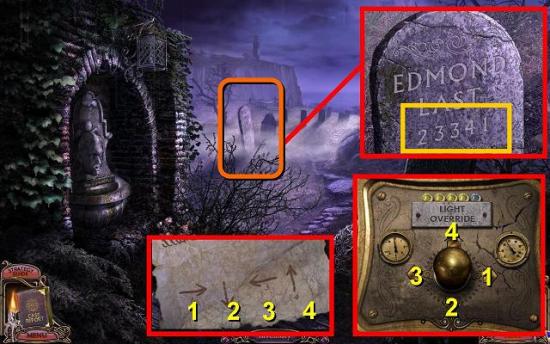
- Now remember the code you found on the gravestone and the numbered arrows from the note in the manor house: right=1, down=2, left=3 and up=4. Now click the arrow buttons on the light override in the order of your code. In my case the code was 23341, so click the down arrow, left arrow, left arrow, up arrow, right arrow. All five green lights should go on at the top of the panel.
- If you have trouble with this step, try the following: 1) make sure that you solved the fuse box puzzle correctly. You know this is the case if the light in the lighthouse went on again and the machine is turning again; 2) make sure you start entering the code when all the little green lights at the top of the override panel are off; 3) make sure you have the code from the gravestone in your game, not the walkthrough or strategy guide
- You will hear a lot of noise and the direction of the light changes
- Now make your way all the way back to the car and go through the gate to the manor house and on to the graveyard behind the manor house. The dark gravestone should now be lit up
- Dig in the dirt in front of the stone with your SHOVEL until you can read the stone. Uh oh…
- You should know better than to jump into freshly dug graves when you’re in a game like this, but I’m afraid there’s nothing for it, so go ahead and jump in. Say hello, Victor
Zone 2: The Hospital
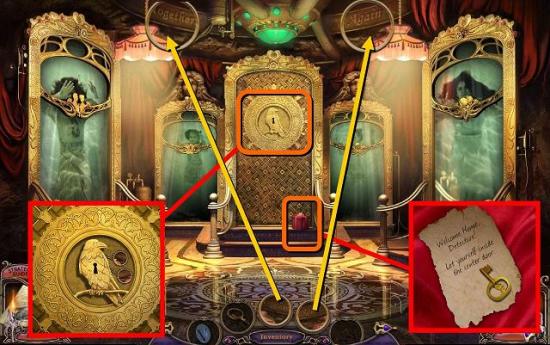
- When the video is over, zoom in on the present on the step and undo the ribbon to find the RAVEN KEY
- Zoom in on the door in the middle and use the RAVEN KEY on it. If you’re playing the Collector’s Edition, two door tokens will pop up. You need to take them out of their frames and activate them by lining them up with the matching part of the scene. Locations for these two tokens are in the current scene, but for the later doors you will have to trawl through the scenes to find the right locations. Once the tokens are activated they will sparkle and get a greenish tint. You can then put them back on the door in any order and the door will open. If you’re playing the Standard Edition, the doors will just open with the key
- Go through the door to the hospital
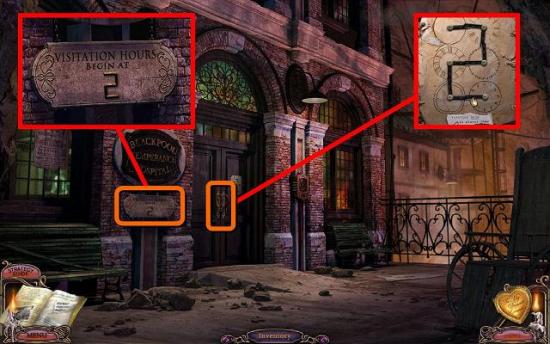
- Click on the sign under the name plate to find out that visiting hour starts at 2
- To the right of the door there’s an intercom you can zoom in on to listen to another message from your captor
- Zoom in on the door and move the hands of the clocks so they form the number 2
- Go through the doors to the reception area of the hospital
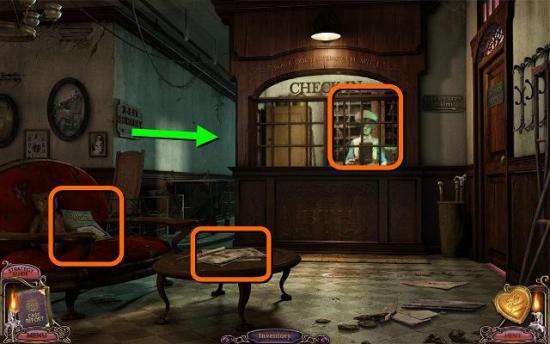
- Zoom in on the magazine on the table and take note of the dog food ad
- You can zoom in on the reception desk and the nurse mannequin if you like, but you can’t do anything here yet
- Zoom in on the magazine on the couch and play the hidden object puzzle
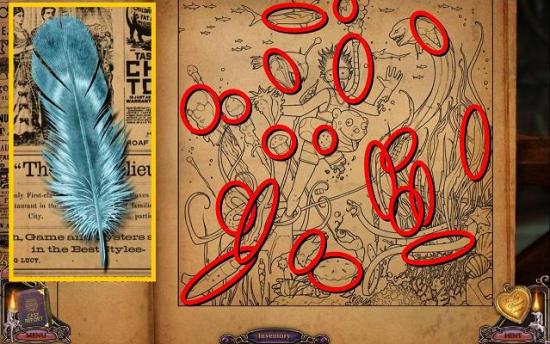
- When you’re done you’ll get a FEATHER
- Go into the corridor on the left
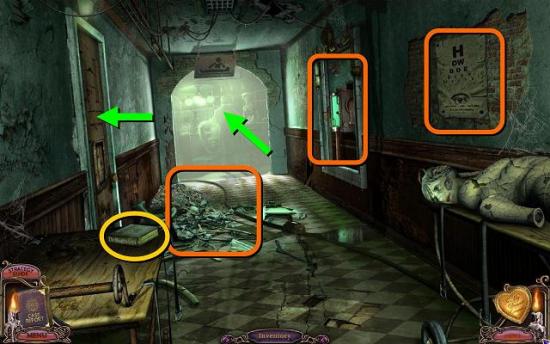
- Pick up the PARENTING BOOK from the table
- Zoom in on the pile of junk for another morphing object scene
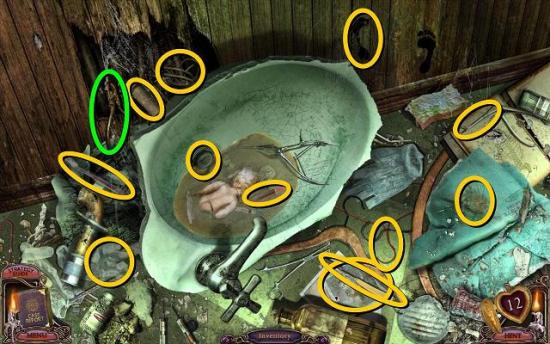
- When you’ve found all 12 items, the ghost will drop down some WIRE CUTTERS for you (green)
- Note the eye chart and the X-ray machine in the corridor – you will need them later
- Go into the surgery in the back
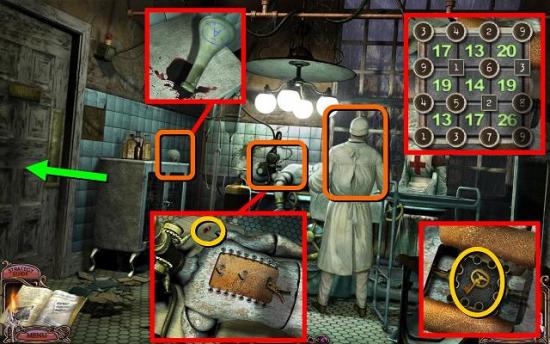
- Zoom in on the dummy on the table
- Pick up the RED PILL by his head on the table
- Use the WIRE CUTTERS to open his stitches and zoom in on the numbers puzzle on his back
- You need to change the small numbers so that each block of four numbers adds up to the large number inside the block. You can’t have the same number twice in one block. If that happens the numbers will turn red. The block will turn green if the four numbers add up to the right amount. However, this just means the answer is possible, but it doesn’t necessarily mean the answer is correct. You need to find the right combination to turn all blocks green. Several solutions are possible, but one is shown in the image. If the numbers in the image above are too hard to read, they are:
3429
9163
4528
1379 - Inside the dummy is the STORK KEY
- Note that there is a vial with blood knocked over on the cabinet by the wall. Remember this, as you will need it (much) later in the game
- Zoom in on the surgeon and click on him. He has something sewn into his surgical gown, but you can’t get to it while you’re being noisy
- Go left into the morgue
- Zoom in on the sink in the back for a morphing objects scene
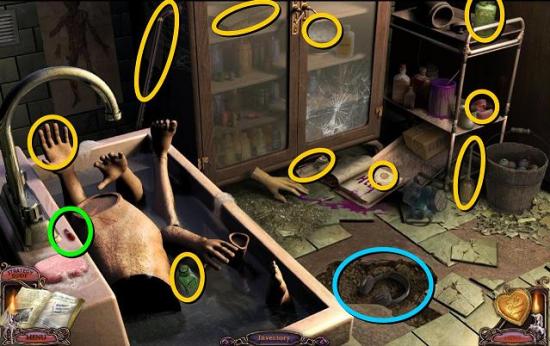
- When you’ve found all 10 items, the ghost will break the floor tiles and reveal HEADPHONES (blue)
- Make sure to also pick up the RED PILL in the scene (green)
- In the morgue are four dummies with toe tags that you can zoom in on. I will tell you what to do with those in a bit
- One of the fridge doors is locked with a number lock. In the middle of it is a note simply saying “speaker”
- Go back to the surgery and zoom in on the surgeon’s head
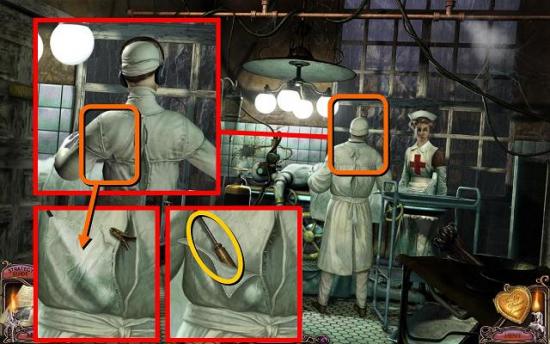
- Place the HEADPHONES on his head – you can now zoom in on his gown
- Use the WIRE CUTTERS to open the back of his gown and find a SCREWDRIVER
- Back all the way out to the outside of the hospital and zoom in on the intercom “speaker” outside
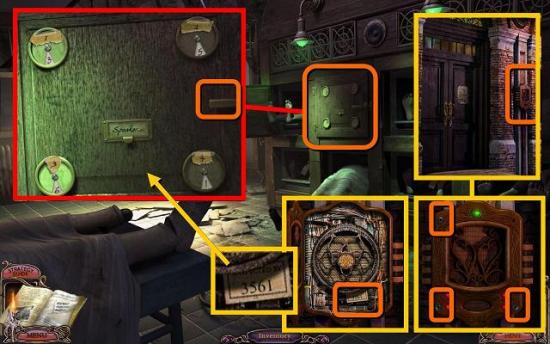
- Use the SCREWDRIVER to take out the three screws that hold the front panel in place
- Behind the panel is a note with a code. This code is different in every game. Write down the code
- Go back to the morgue, zoom in on the locked fridge and enter the code you just found. Then pull the handle
- A fifth dummy with a toe tag comes out
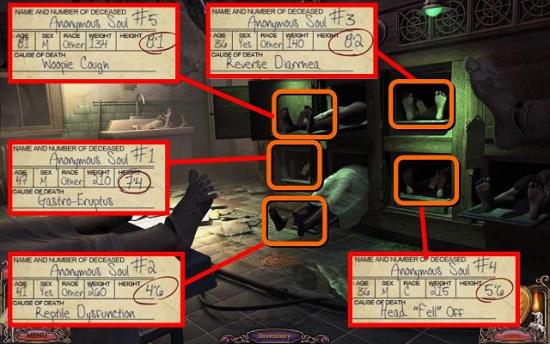
- Now look at the toe tags and write down the patient’s height and patient number for all five patients
- Go back out to the corridor and zoom in on the eye chart on the wall
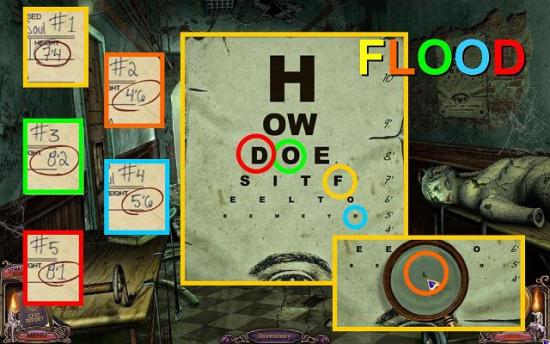
- You need to find the letters that correspond with the numbers on the toe tags. You can use your MAGNIFYING GLASS to read the bottom line. So, start with patient #1. In my game his height was 7’4″. So find row 7 on the chart and write down the fourth letter: F. Then go on with patient #2 etc. until you have a five letter word. Note that this is a randomized game, so your word is likely going to be different from mine. Known possibilities are: BLOOD, FLOOD, FEELY and LEFTY
- Now remember the word you found and go to the reception desk
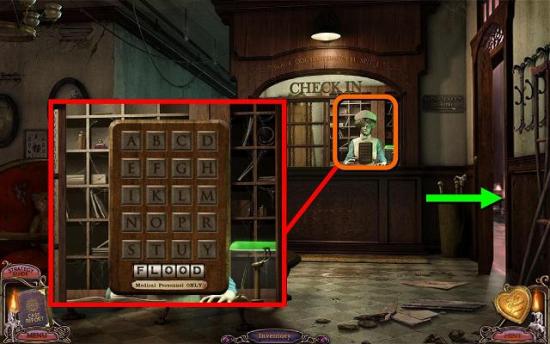
- Open the window, zoom in on the nurse and enter the word you found into the tablet
- The door to the maternity ward on the right will open
- Go into the maternity ward and click on the monitor for a message from Charles. He will explain you need to make all the mannequins’ bellies go up to get a “delicious treat”
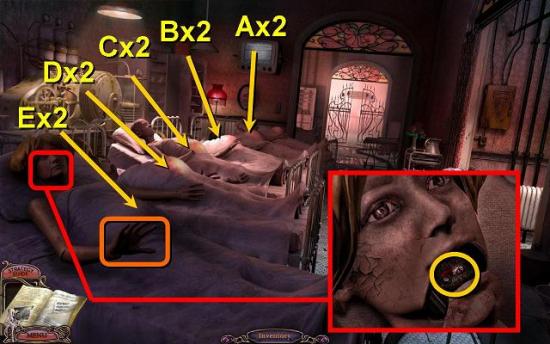
- To make all bellies go up, you need to click all of the dummies twice, starting with the second from the back and moving forward, until all bellies are up except the one in the front. Then push down the first dummy’s hand and her mouth will open for you to find another RED PILL
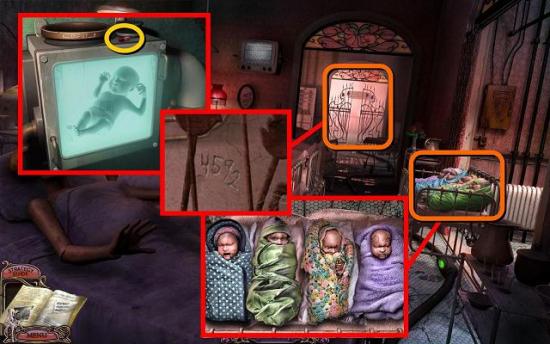
- Zoom in on the cot with the four babies and pick up all four babies
- Take the babies to the X-ray machine in the corridor
- On top of the X-ray machine is another RED PILL. You should have four by now
- Put the babies through the X-ray machine one by one, taking note of the numbers inside them. Make sure you remember which baby has which number (purple 2, blue 4, crochet 9, green 5)
- Go back to the maternity ward and zoom in on the locked gate in the back. A code has been scratched in the wall: 4592
- You need to place the babies back in the cot in the order according to the code on the wall: blue, green, crochet, purple
- The gate to the delivery room will open
- Go into the delivery room and watch Charles’s instructions on the monitor. You somehow have to deliver this baby
- Look around the room and find a panel with three slides saying D, N, A under the sonogram
- Go back to the corridor with the X-ray machine and click on the door on the left
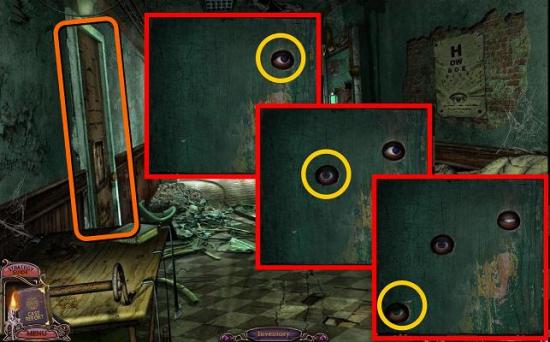
- Hit the green button to open the puzzle and poke in the eye behind the board. The puzzle will close and reopen and a second eye will appear. Poke in the new eye. Then poke in the third that will appear etc. If you poke an eye you’ve already poked before, you have to start over
- Go into the room and watch Charles on the monitor
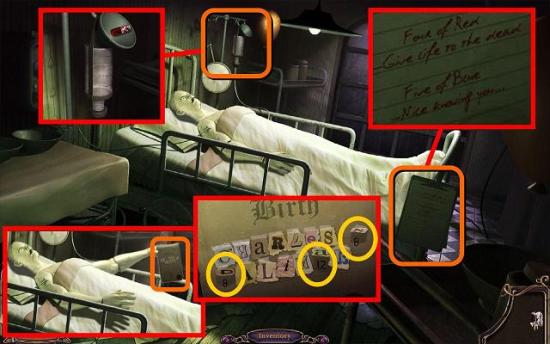
- Click on the patient’s chart and read the poem. He needs four of something red and five of something blue. You should have four red pills (1. surgery table, 2. morgue sink, 3. x-ray machine, 4. pregnant dummy)
- Zoom in on the patient’s i.v. drip and put your four RED PILLS in the bottle
- The patient will spasm and hold up his birth certificate
- Zoom in on the birth certificate and find the letters D, N and A. Click on them to reveal the numbers underneath. Write down these numbers (8, 8, 12)
- Go back to the delivery room
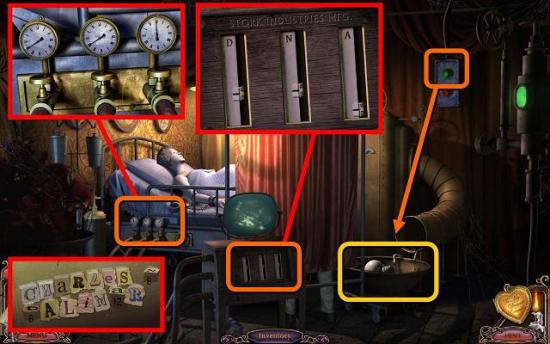
- Zoom in on the DNA machine and move the slides to the approximate positions of where you think the numbers you found on the birth certificate may be, with 12 at the bottom and 1 at the top
- Now look at the three dials on the side of the bed to check if the needles are pointing at the correct numbers. If not, go back to the DNA machine and adjust the slides until you have it right. Again, this is a random code, so the code in the walkthrough will likely not work for you
- When the three dials show the correct numbers, hit the green button by the shoot and “baby Charles” will come shooting out
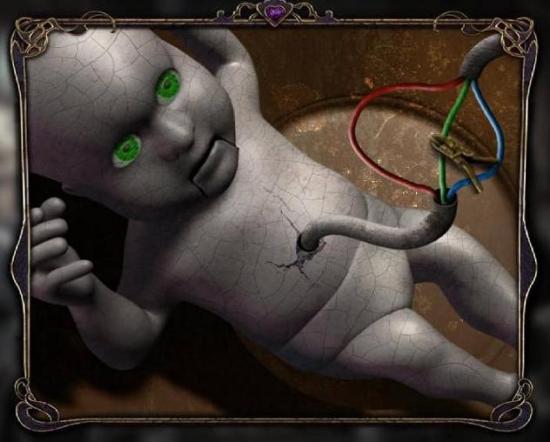
- Zoom in on the baby and click on him to activate. You need to cut the three colored wires with your WIRE CUTTERS at the time the baby’s eyes have the same color. So, when the eyes are green, cut the green wire etc. This is trickier than it sounds, as you need to hit the right spot on the wire to cut it. If you click on something that the game doesn’t consider a wire, the cutters will return to your inventory. Especially the blue wire is tricky as it is easy to hit the outside frame rather than the wire. Take your time to do this; you can let several colors go past before you cut. If you cut a wrong wire, the baby will explode and you have to hit the green button again for a new baby
- When the wires are cut, take BABY CHARLES
- Time to leave the hospital!
Zone 3: The Dalimar Home
- Back out to the room with the people in the water tanks. Let’s call these the water portals
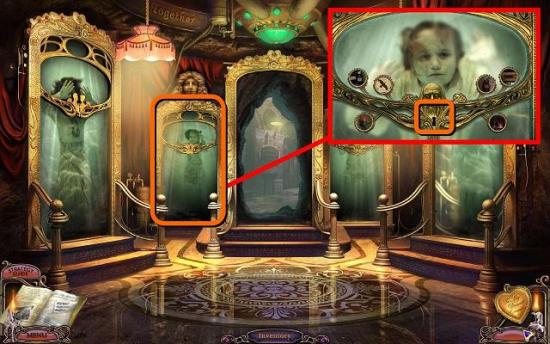
- Zoom in on the portal to the left of the middle and unlock it with the STORK KEY
- If you are playing the Standard Edition, the portal will open. If you are playing the Collector’s Edition, you will get six door tokens you need to activate before you can move on
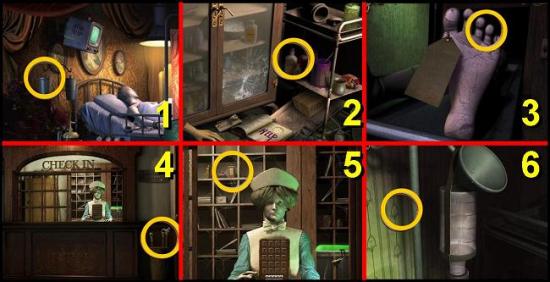
- 1) Delivery room; 2) Morgue sink; 3) Morgue, toe tag of soul on top row; 4) Reception; 5) Reception; 6) Charles Dalimar’s i.v. drip
- Go through the portal to the outside of the Dalimar house
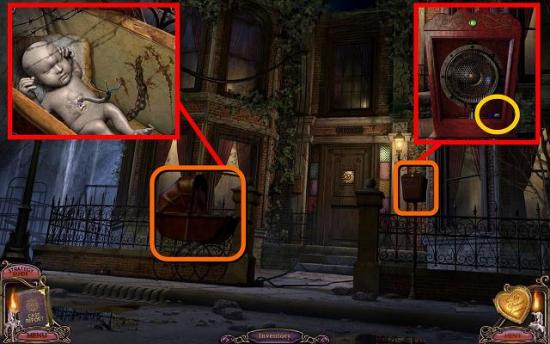
- On the right is another intercom speaker. Open it to listen to Charles and take the BLUE PILL
- Zoom in on the pram and put BABY CHARLES in it to open the front door
- Go through the door
- First go into the kitchen on the left for a morphing objects scene
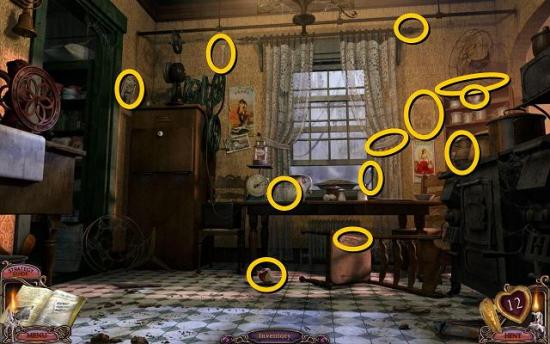
- When you’ve found all 12 items, the ghost will open the oven door for you to find another PARENTING BOOK and a can of SPARKY’S CHICKEN dog food
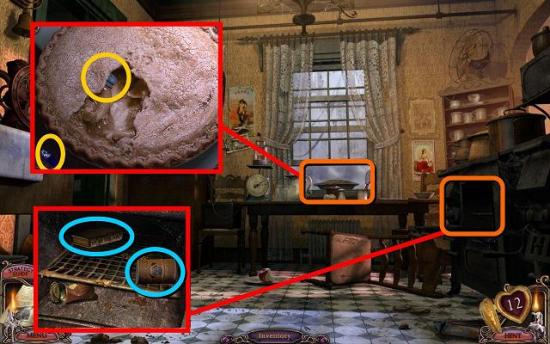
- Zoom in on the pie on the table and take the BLUE PILL that’s beside it. Dig around in the pie a bit until you find another V KEY
- You can go into the pantry on the left, but right now it’s too dark in there to do anything
- Back out to the hallway and go up the stairs
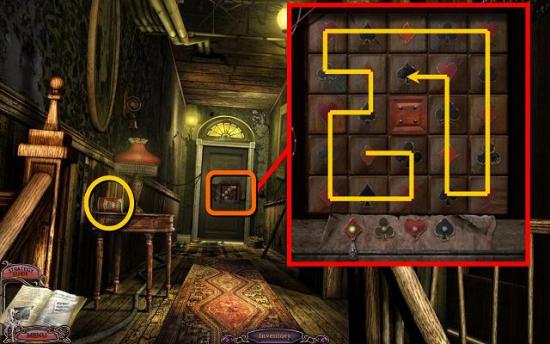
- On the little side table is a can of SPARKY’S LIVER dog food
- Zoom in on the door at the back of the corridor
- To solve this puzzle, you need to click on all the squares in one consecutive sequence, only being allowed to click squares that are horizontally or vertically next to the last one you clicked. You can also only click a square showing the suit that is lit up at the bottom. The sequence is always diamond, club, heart, spade. If you made a mistake, flick the switch on the left to restart
- Go through the door into momma’s bedroom
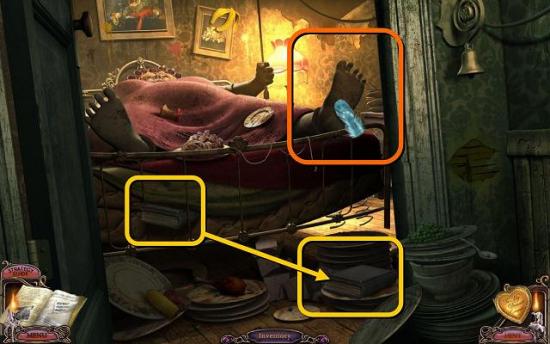
- There is another parenting book under her mattress, but you can’t get it out
- Use the FEATHER to tickle one of her feet and the PARENTING BOOK will fall out. You should have three parenting books now
- Go back downstairs and zoom in on the little bookshelf by the stairs
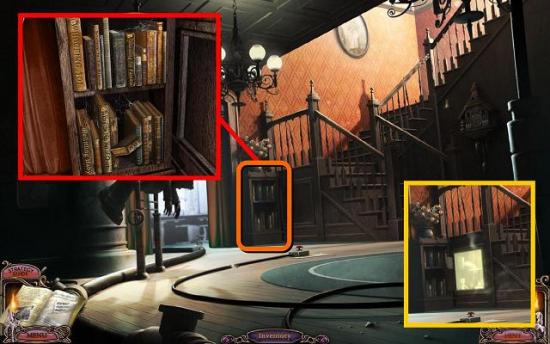
- Put all three PARENTING BOOKS on the shelf
- The cupboard under the stairs will open
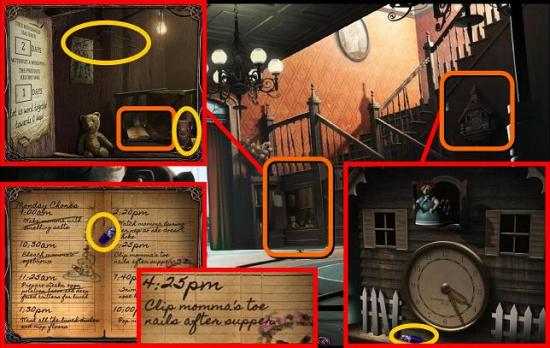
- Take out the can of SPARKY’S FISH dog food and the WIRE HANGER
- Open the chore book to find another BLUE PILL
- Note that the next note is to clip momma’s toenails at 4:25
- Zoom in on the cuckoo’s clock in the hall and find another BLUE PILL
- Set the time to 4:25
- Go upstairs and zoom in on the door on the right
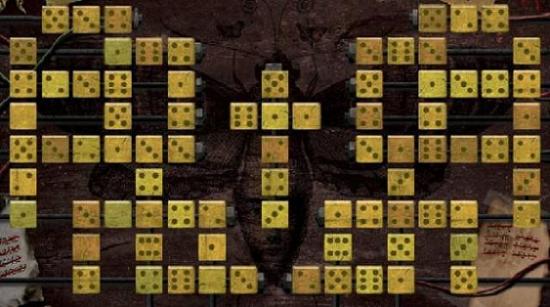
- This is a kind of numbers crossword (a crossnumbers?). You have to rotate the blocks to make up the numbers written on the little notes around the edges. Easiest is to start with the six digit numbers. There are only four of them, and if you look at the field, there are two six digit numbers intersecting on the left and two lots intersecting on the right. So figure out which of the numbers have intersecting digits and enter those. You can then fill in all the shorter numbers around it
- Go through the door into the bathroom
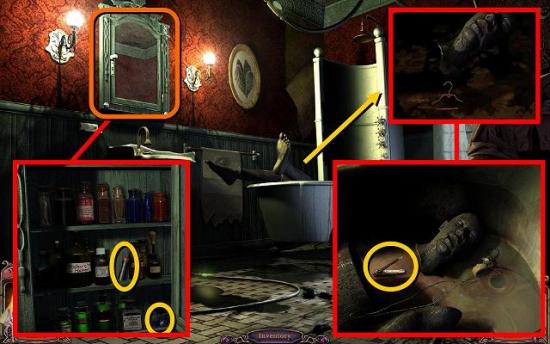
- Zoom in on the bath and use the WIRE HANGER to unplug it
- Pick up the NAIL CLIPPERS
- Zoom in on the cabinet above the sink and open it
- There are two bottles you can move to find a BATTERY and a BLUE PILL. You should have five blue pills now
- Go back to momma’s bedroom and zoom in on one of her feet
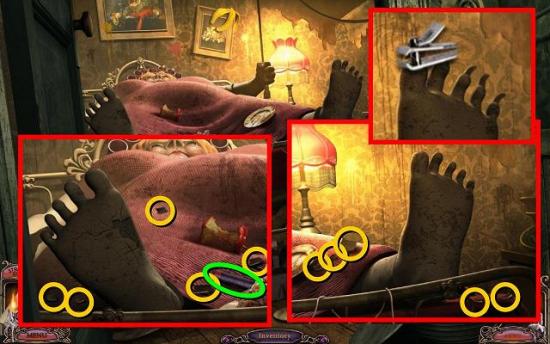
- Use the NAIL CLIPPERS to cut all five of her nails. Then pick up all five NAIL CLIPPINGS from the bed. Make sure you get them all. Then go to her other foot and do the same
- By momma’s right foot (left for you) is another BATTERY
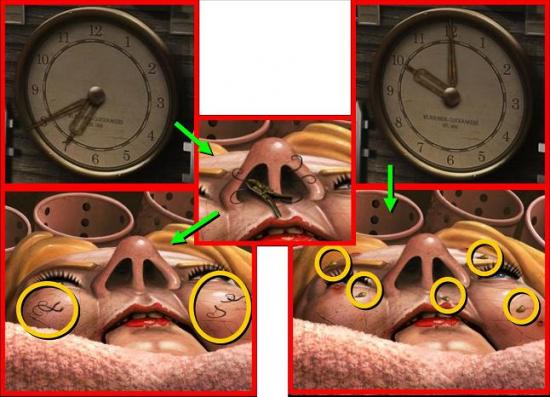
- Go back downstairs and set the clock to 7:40 for your next chore. You don’t need to look in the book again or get rid of the toenails first before this quest is triggered. So if nothing happens, make sure you have ten nail clippings and the clock is set at exactly the right time. The clock should chime and momma will shout at you to come trim her nose hairs
- Go upstairs to momma’s bedroom, zoom in on her head and trim her nose hairs with the WIRE CUTTERS. Make sure you pick up all the NOSE HAIRS, there should be five of them
- Go back to the clock and now set it to 10:00
- Go back to momma, zoom in on her head and pop her pimples
- Pick up the pimple puss – again, there should be five
- Now go back to the kitchen
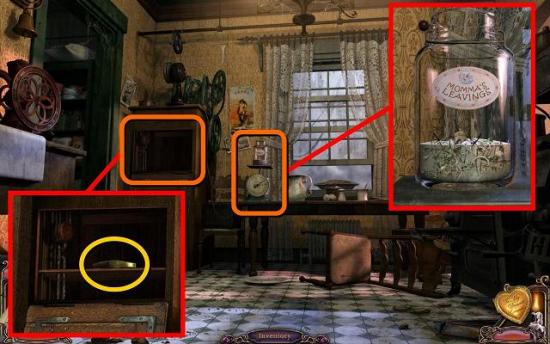
- Zoom in on the jar of “Momma’s leavings” on the scales
- Drop all NAIL CLIPPINGS, NOSE HAIRS and PIMPLE PUSS in the jar
- The door to the dumb waiter will open
- Zoom in on it, pull the rope and take the BOILER CRANK
- Go into the pantry on the left
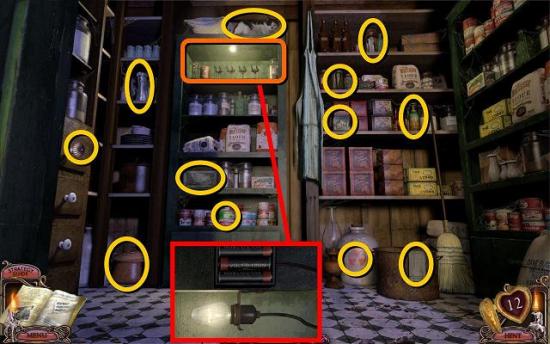
- Zoom in on the shelf with the dog food on it and place the two BATTERIES to switch on the light
- Back out to the pantry for a morphing objects scene
- When you’ve found all 12 objects, some boxes will explode, revealing a jar of SPARKY’S PORK dog food
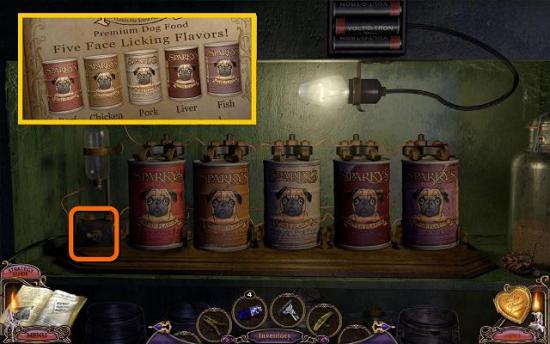
- Now, if you don’t remember what the dog food ad in the magazine in the hospital reception said, go back to the hospital and check it out. If you choose to go back to the hospital to check it out, you can do the blue pill thing (described below) while you’re there. The order on the ad says beef, chicken, pork, liver, fish
- Zoom in on the top shelf with the dog food and place all your dog food on the shelf, in the order of SPARKY’S BEEF, SPARKY’S CHICKEN, SPARKY’S PORK, SPARKY’S LIVER, SPARKY’S FISH
- Click the small switch on the left and the door to the basement will open
- Go down to the basement
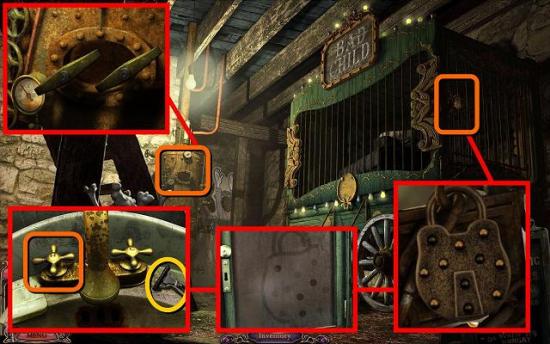
- There is a lock on the cage on the right, but it needs a code you don’t have
- Zoom in on the boiler and place the BOILER CRANK
- Then turn both cranks for the hot water to come on
- Go back to the bathroom, zoom in on the sink, take the RAZOR if you haven’t already done so, and turn on the hot tap
- Back out to the bathroom and notice that markings have appeared on the steamed-up mirror
- Zoom in on the mirror to get the lock code
- Go all the way back to the basement and enter the code in the lock on the cage
- Go into the cage
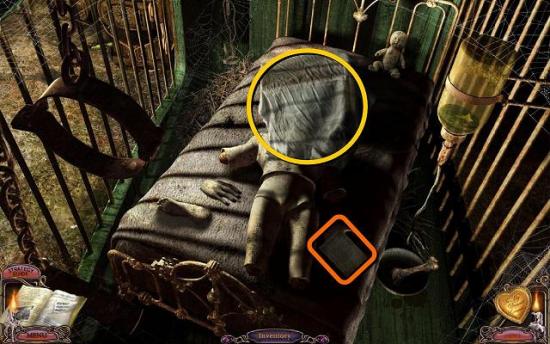
- Zoom in on the note
- Take the BED SHEET and watch Charles’s message on the monitor
- Back all the way out to the room with the water portals and go through the middle door to the hospital
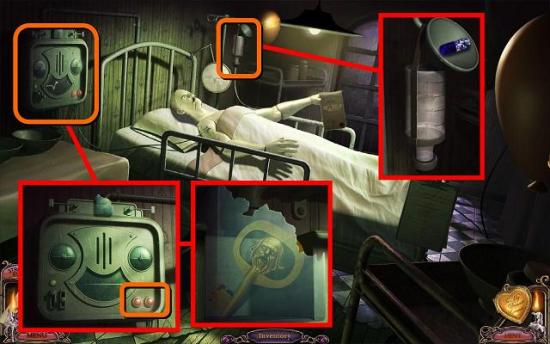
- Go back to the room to the left of the corridor with the X-ray machine and give the patient the five BLUE PILLS (All in the Dalimar house: In the mailbox, by the pie, in the chores book under the stairs, by the clock and in the bathroom cabinet).
- It appears that you have killed the patient, so zoom in on his heart monitor
- The two red lights in the bottom right are flashing, so hit them both
- The glass at the top will break, revealing the MADMAN KEY
Zone 4: The Asylum
- Back out to the room with the water portals and zoom in on the door to the right of the middle
- Unlock it with the MADMAN KEY
- Again, if you’re playing the Standard Edition you will go straight through, and in the Collector’s Edition you get a set of door tokens
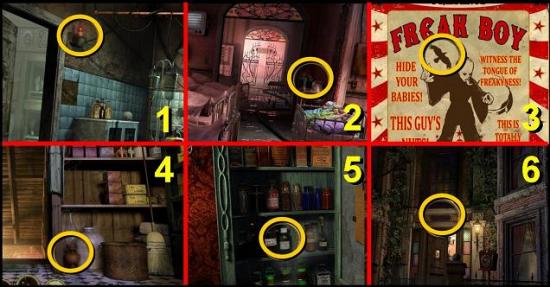
- 1) Hospital surgery; 2) Maternity ward; 3) Circus poster in basement of Dalimar house; 4) Dalimar house pantry; 5) Medicine cabinet in bathroom. Note that you have to move the bottle on the shelf; 6) Dalimar house street number
- Go through the door to the asylum
- First go right into the security cabin
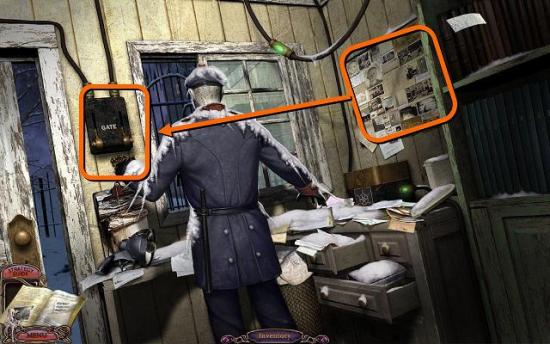
- Zoom in on the pin board on the wall for a morphing objects scene
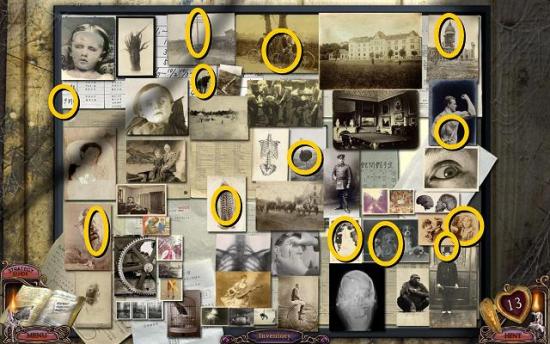
- After you’ve found all 13 items, the ghost will helpfully defrost the gate mechanism, so pull the lever
- Exit the cabin and go through the gate
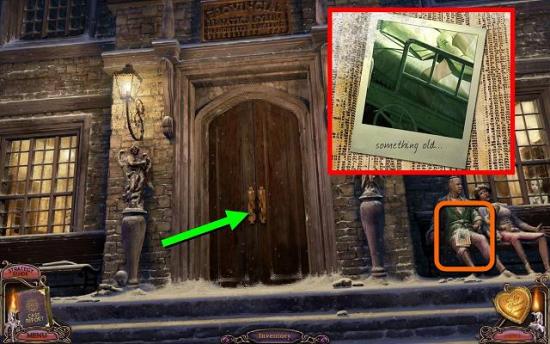
- Click on the newspaper on mannequin’s lap, to the right of the door
- It has a picture of a hospital bed with the comment “something old”. Make sure to click on the picture so you get a comment about it on screen. This is essential
- Go through the front doors
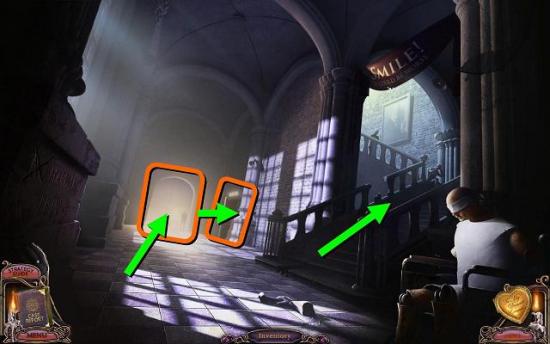
- First go to the door to the right at the end of the corridor, not the one straight in the back as there is nothing to do for you there right now
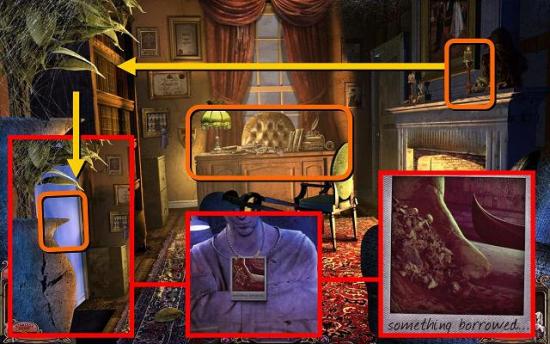
- Click on the right candlestick on the fireplace to move the bookcase
- Look through the window that the bookcase reveals
- You will find another picture, this one saying “something borrowed” – click on it to zoom in and again to get the comment
- Zoom in on the desk for a morphing objects scene
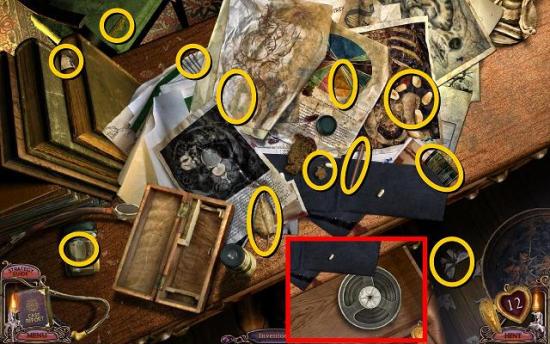
- When you’ve found all 12 items, a drawer will open with an audio REEL in it
- Go through the door on the right to the surveillance room
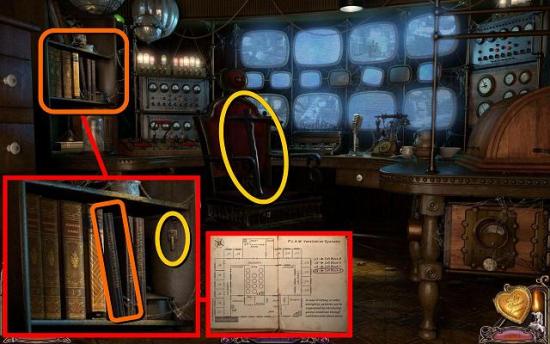
- Zoom in on the shelf on the left and find the CABINET KEY
- Also look at the book on the shelf, which tells you that riotous patients can be subdued by releasing gas through the air ducts
- Click on the chair to turn it around and find a PICK AXE
- Back out to the office
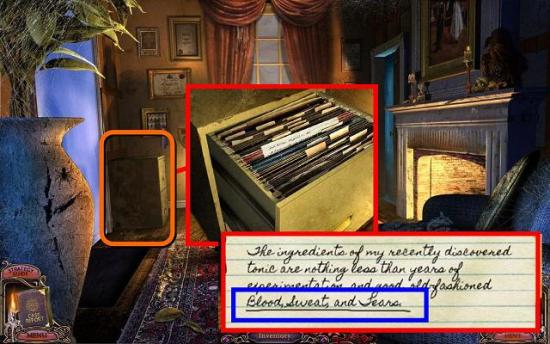
- Zoom in on the filing cabinet and open it with the CABINET KEY
- Look in the opened drawer and find a note with the recipe for a powerful relaxing agent. It requires blood, sweat and tears to make
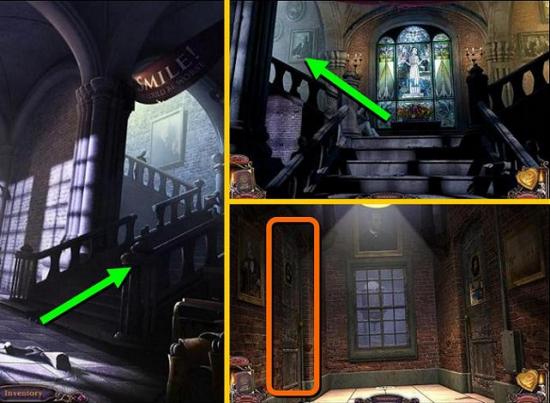
- Back out to the hallway, go up the stairs go up the left stairs. If you go up the stairs to the right you will find that the patients are rioting and won’t let you past! You need to find a way to sedate them
- First go into the laboratory on the left to find some more morphing objects
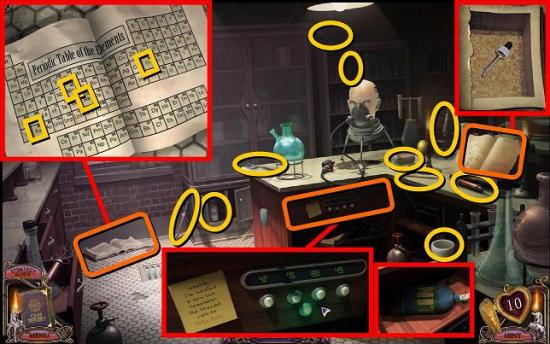
- When you’ve found all 10 items, the ghost will direct you to the book on the bench. Zoom in on it and tear off the top page to find an EYE DROPPER
- Zoom in on the little post-it on the side of the bench to find out that to open the lock you need MoRe RaIn, somehow
- Zoom in on the book on the floor to see an image of the periodic table of elements
- Find Mo, Re, Ra and In and write down their numbers: 42, 75, 88, 49
- Go back to the lock by the post-it note and enter those numbers
- Zoom in on the drawer that opens to find a tank of LIQUID NITROGEN
- Back out to the corridor and zoom in on the door on the other side for the silliest, most complex lock I’ve ever seen in any game
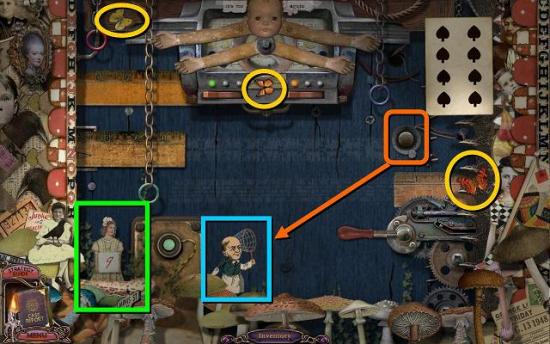
- Part 1: click on the three butterflies (yellow) to make them fly. Then click on the grey metal button on the right (orange) to move the little guy with the butterfly net at the bottom (blue). Try to catch all three butterflies. A figurine will pop up holding a red 9 (green)
- Part 2: Now focus on the 8 of spades in the top right. Behind each spade is a letter. The aim is to find out what the letters are and then to click on them in alphabetical order. However, the nasty trick is that each time you make a wrong move, the card flips over and you will look at it from the other side, meaning the locations of the letters are in mirror image. When you click the correct letter, it will stay red, when you click a wrong one, they will all go black again and you have to start again… but with the card flipped over. The letters are the same in each game, but they’re in random locations. So you must click them in the following order: E, G, I, J, L, N, O, Q. The card will flip over one more time and reveal a green 3
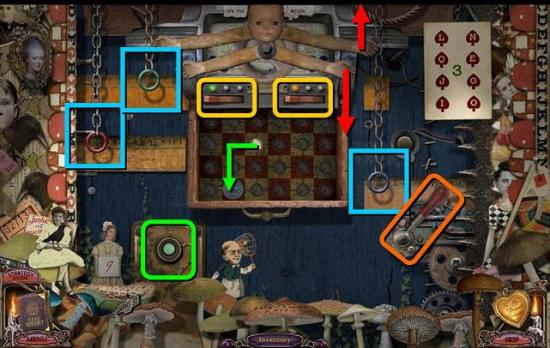
- Part 3: Hit the green button in the bottom left for a drawer to open. You need to move the coin across the board in knight move, as in chess, until all circles are lit up. Chess move is one across, two down, as shown by the green arrow, but can go in any direction. At times you will have to move to a circle that’s already been lit, meaning it will turn black again. However, you can use a circle as often as you like until they’re all white. When you’re done you will get a card with a blue 5
- Part 4: But we’re not done yet, oh no. Now you need to move the three chains and the three rulers until the red eye is over a 9 on a ruler, the blue eye is over a 5 and the green eye is over a 3 (blue squares). The switch on the left of the panel at the top selects which chain you can move, the switch on the right selects the ruler (yellow). You can move the chains up and down by pulling the small arms down or pushing the long arms up (red arrows). The rulers are moved by turning the handle on the right (orange). I found that the positioning was quite precise: the numbers have to be exactly in the middle of the eyes
- Go into the electric shock therapy room for more morphing objects
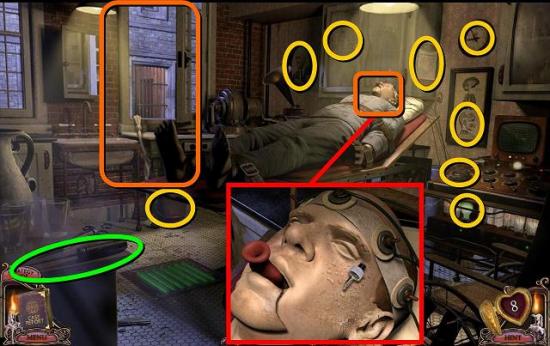
- Once you have found all eight items, the ghost will electrocute the mannequin on the table
- Zoom in on his head and use the EYE DROPPER to take some of his sweat
- Make sure to pick up the ICE PICK on the table by the door (green). It’s easy to miss, and you will need it
- Back out of the room and go to the lab across the hall
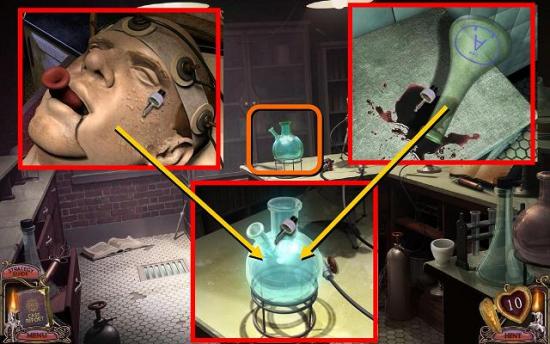
- Zoom in on the blue glass flask and put the DROPPER OF SWEAT on it
- Now you still have to find blood and tears
- To find the blood, back out to the water portals and go through the center door to the hospital
- Make your way to the surgery in the back and zoom in on the cabinet on the left
- Use your EYE DROPPER to get some blood
- Return to the asylum, go back up the stairs to the left and into the lab
- Put the DROPPER OF SWEAT on the flask
- The tears are a bit harder to find. Go back to the electric shock therapy room across the hall from the lab and open the window
- Use the BED SHEET on the window so you can climb out (if you don’t have the bed sheet, go back to the cage in the basement of the house), as shown in the image above
- Climb out the window to the courtyard
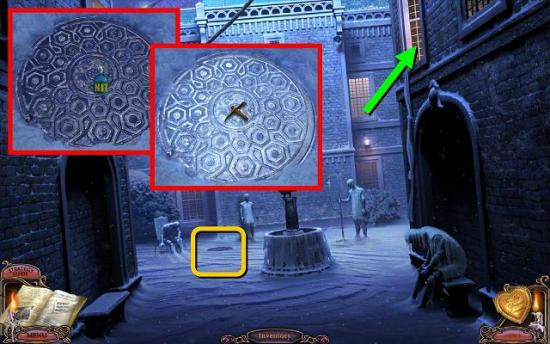
- Zoom in on the manhole cover, freeze it with the LIQUID NITROGEN and smash it with the PICK AXE
- Go down the hole into the cave. A-ha! I bet Charles didn’t expect you to do that!
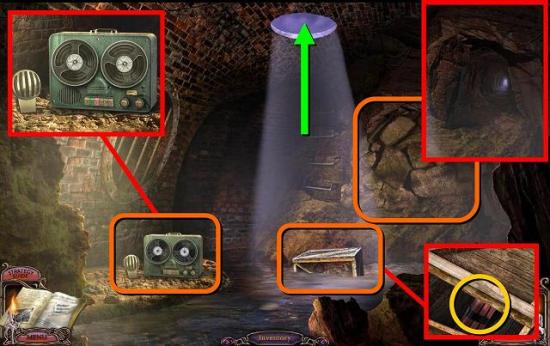
- Zoom in on the tape player, click the buttons to switch it off and take the reel off
- Place your own sound REEL from the drawer in the office and click the buttons again to play it
- Make sure you jot down the patient number that’s mentioned on the tape! It’s 7149, the same in every game
- Then zoom in on the wooden crate and click to open it (no tool required)
- Inside is DYNAMITE
- Use the PICK AXE a few times on the rubble in the back. You’ve uncovered a tunnel!
- Exit through the tunnel. Hurray! You’ve made it out! You’re back at the base of the cliff by the cottage
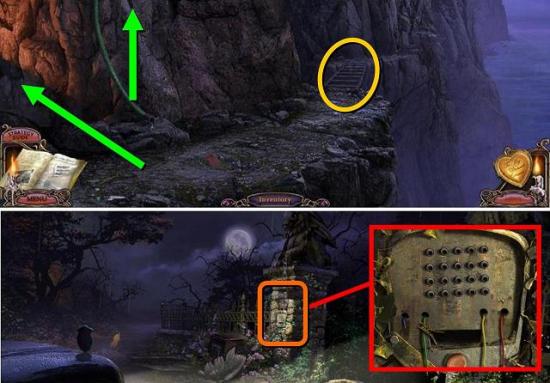
- Pick up the LADDER you placed across the gap earlier and climb up the garden hose to the cottage
- Back all the way out to the gate by the car and zoom in on the broken intercom
- Use your WIRE CUTTERS to cut off all the colored WIRES
- Now go back to the cottage, down the cliff, into the tunnel and up the manhole, climb through the window and then back out, out, out until you’re back in the room with the water portals
- Go into the portal to the Dalimar house and go into the house
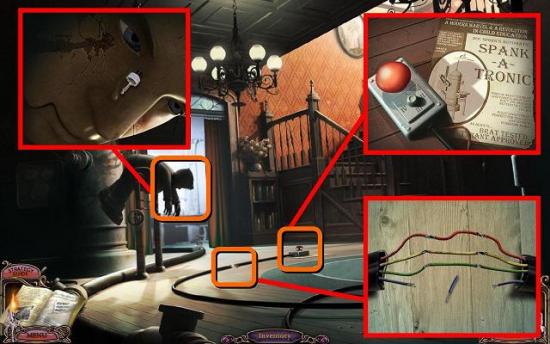
- Zoom in on the broken wires on the floor and place the colored WIRES you just found. This fixes that awful spanking machine
- Zoom in on the red button and hit the button. I don’t think it matters what setting it is on. I was kind and left it on 1
- Zoom in on the dummy on the spanking machine and use the EYE DROPPER to get some of his tears
- Back out of the house to the portals and go right to the asylum
- Go back up the stairs to the left and into the lab on the left and put the DROPPER OF TEARS on the glass flask
- After you’ve put in all three ingredients, it should foam up. Take the flask with the SLEEPING POTION
- Go back downstairs and now go into the rec room at the back of the corridor
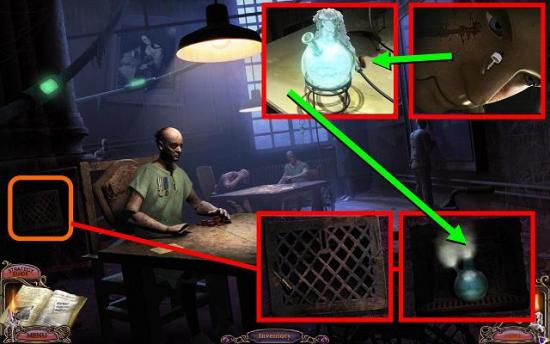
- Zoom in on the grate on the left and undo the screws with the ICE PICK
- Place the SLEEPING POTION in the vent
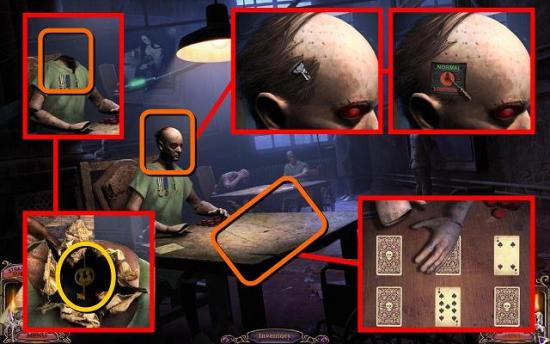
- While you’re there, zoom in on the card player. You need to pick a card that’s higher than his, but you can’t beat him! So you need to make him a little dumber
- Zoom in on his head, shave off the hair with the RAZOR from the bathroom in the Dalimar house, open the panel and use the ICE PICK to “lobotomize” the dummy
- Now play cards with him again and you will always win
- His head will explode when he’s lost, so zoom in on his neck and find the PROPOSAL KEY inside
- Go back to the hallway, go up the stairs and this time go right. The rioting patients have been sedated by your sleeping potion

- You will get a morphing objects scene, but this one is a little different as you need to zoom in on the four cell doors and find several objects in each cell. None of them are in the corridor
- When you’ve found all 12 items, the maximum security door in the back will explode
- Go through the door
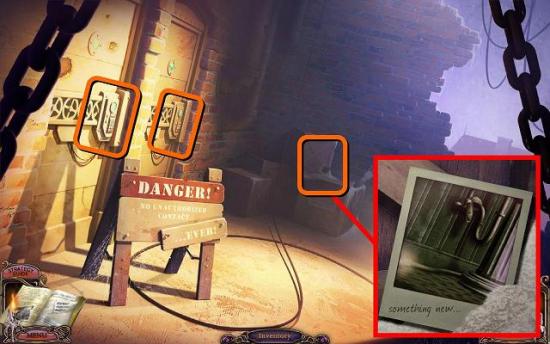
- Zoom in on the boxes to find a picture saying “something new”. Click on the picture so the game registers it
- You’ve now reached what’s probably the trickiest part of the game to figure out and get right. Click on one of the cell doors to get a close up of a lock with a colored timer at the top, ticking away. Both cells have the same mechanism. You need to go and find the codes to these cells, but the codes change every minute. The timers show how much time you have left before the code changes again: when the dial moves from red to green again it means the code has just changed
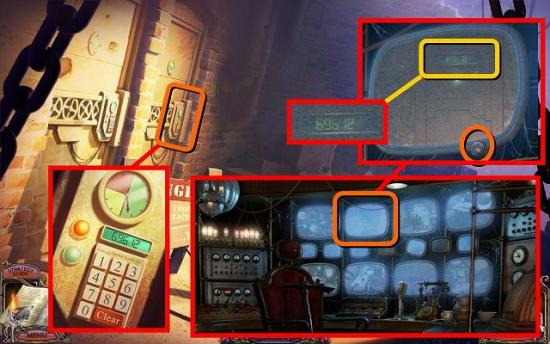
- First go back down the stairs and into the office on the right at the back of the corridor. Then go into the surveillance room with all the monitors
- You can zoom in on one of the monitors, which shows a feed of the hospital reception area. Click the button on the monitor to change the channel until you get a channel with a code
- To give yourself the maximum amount of time, wait until the code changes and write this code down or memorize it
- Run back upstairs to the locked doors
- Zoom in on the door on the right and then enter the code you just found before the dial moves from red to green. You have one minute to do this
- After you’ve been successful, enter the cell
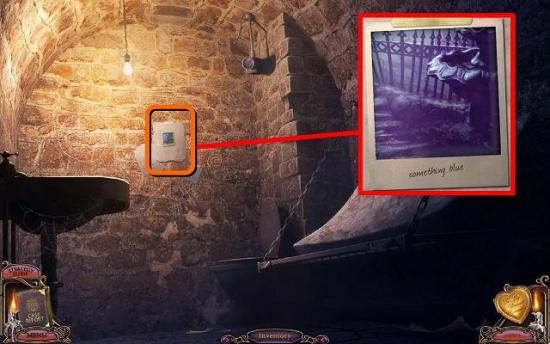
- Click on the picture on the wall to get the picture saying “something blue” – click on it to let the game know you have it. All four pictures should now be in your journal
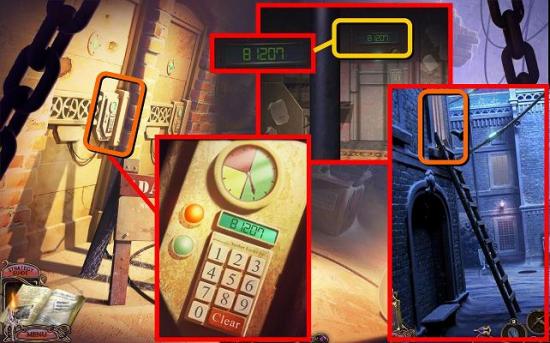
- Now you have to go find the code for the other door. To do this, go back to the left side of the stairs, to the electric shock therapy room and climb out the window to the courtyard
- Place the LADDER you picked up from the cliffs outside the cottage under the window on the left
- Climb the ladder and wait for the code to change
- Then run back to the locked cells and enter the code in the cell on the left.
- Enter the cell
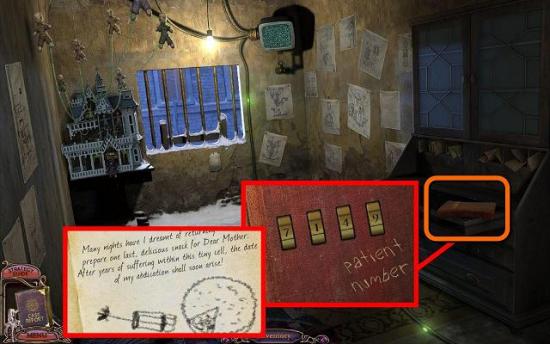
- Watch the monitor for another message from our friend Charles who, quite incredibly, still isn’t played by Ralph Fiennes
- Zoom in on the book on the desk and enter the patient number from the tape: 7149
- The book contains information on how to get rid of momma
- There are several other clickable places in the cell, but none of them appear to be essential
- Back out of the asylum and go back to the Dalimar house
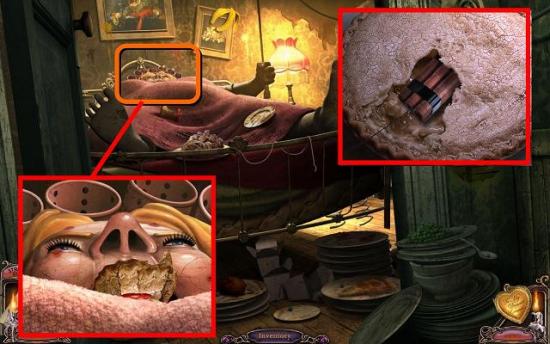
- Go into the kitchen, zoom in on the pie and put the DYNAMITE in the pie. Make sure you take the V key out of the pie first, though I don’t know if you will be able to get the dynamite in if you don’t. You definitely won’t be able to put the dynamite in the pie if you haven’t opened the book in the cell
- Take the PIE with the dynamite in it and go upstairs to momma’s room
- Zoom in on her head and stuff the pie down her mouth. You have to hit it a few times to make it go all the way in. You should get a message saying you should run for cover
- Exit to the downstairs hallway and wait until the dust settles
- After the explosion go back to momma’s room for a morphing objects scene
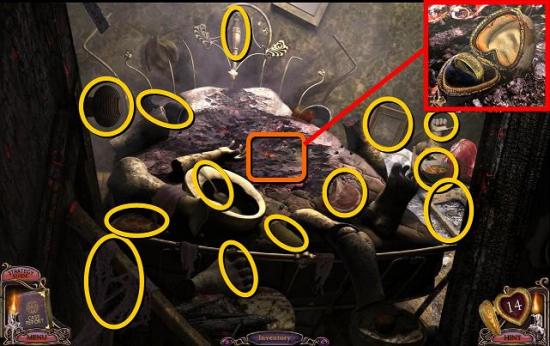
- When you’ve found all 14 items, the ghost will reveal a jewellery box among the ashes on the bed
- Zoom in on the box, open it and take out the WEDDING RING
Zone 5: The Island
- Time to do something about the “something old, something new, something borrowed, something blue” pictures – I sense a theme! Make sure at this point that you have a journal page showing all four pictures. I you don’t have that page, go back and see which picture you have missed
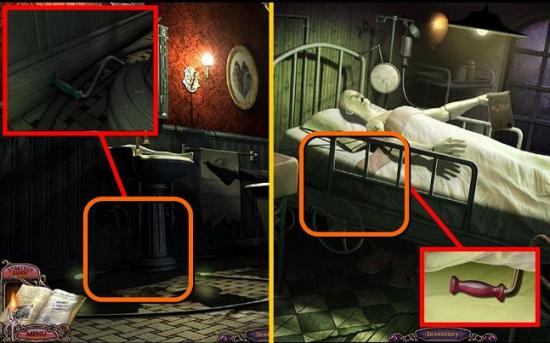
- Back out to the upstairs landing and go into the bathroom on the right
- If you’ve found and clicked on all four pictures, you should now be able to click on the base of the sink, as shown in the “something new” picture. If you can’t zoom in on the base of the sink, you need to go back to the area outside the locked cells in the asylum and find and click on the picture hidden among the boxes
- Find the GREEN HANDLE
- Back out and go to the hospital
- Go back to the dummy on the heart monitor that you “killed” and zoom in on the side of the bed as per the “something old” picture, move the sheets and find the RED HANDLE. If you can’t zoom in on the bed, you will need to go back to the asylum and find the picture by the mannequins sitting in the snow by the front door
- Back out to the water portals
- If you’re playing the Collector’s Edition, now is the time to get the door tokens for the door on the left, which opens with the PROPOSAL KEY, as that will save you a long trip later
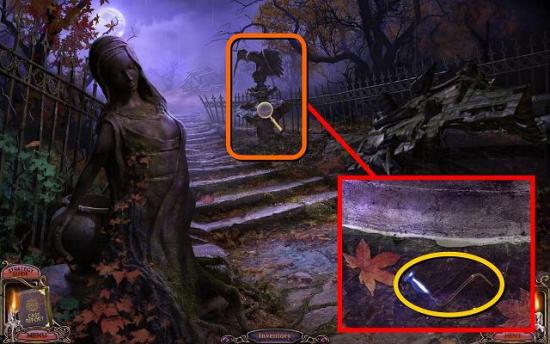
- Go to the asylum, up the stairs to the left, into the room on the right and climb out of the window. Go down the manhole and through the tunnel. Back out to the car and go through the gates
- Zoom in on the fountain as shown in the “something blue” picture to get the BLUE HANDLE
- Collector’s Edition players, go to the gates before the lighthouse to get the door token by the tree
- Go back to the cottage, down the cliff, into the tunnel, up the manhole and through the window. Then back out to the water portals
- Zoom in on the door on the left and open it with the PROPOSAL KEY. As always, Collector’s Edition players need to find the door tokens before you can go through
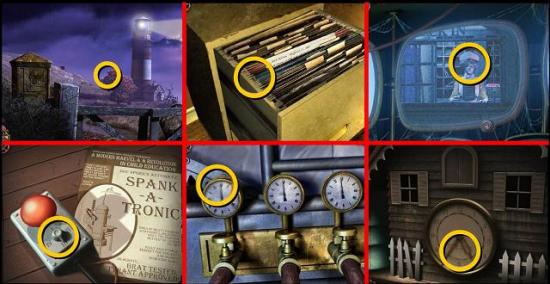
- 1) By the lighthouse fusebox; 2) Filing cabinet in the ground floor office of the asylum; 3) Security monitor in the surveillance room behind the office in the asylum; 4) Spank-O-Tronic in the Dalimar house. Make sure the dial is set to III; 5) Delivery room of the hospital. Make sure the slides on the DNA machine are set to 12; 6) Clock in Dalimar house. Make sure the time is set to 5:35 exactly
- Go through the door to the left and be greeted by a violin player
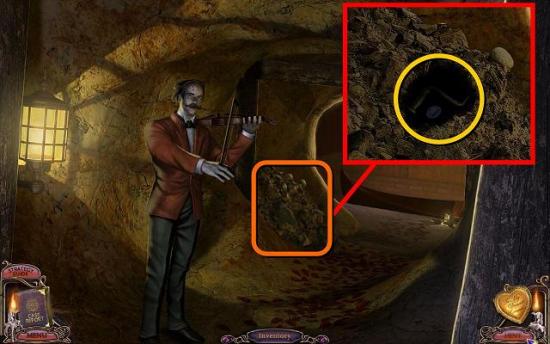
- Zoom in on the mound of dirt behind him and use your PICK AXE to find the YELLOW HANDLE, as shown in the “something borrowed” picture
- Also pick up the third V KEY
- Go to the gondola for more morphing objects
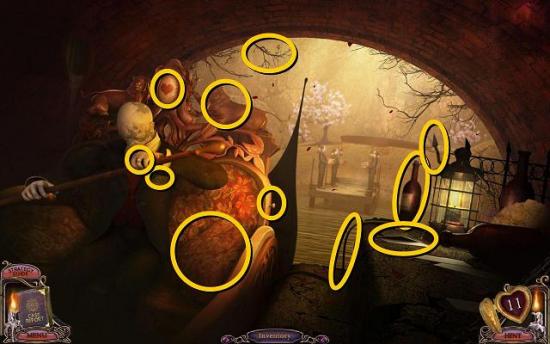
- When you’ve found all 11 items, the gondola will take you to the other side
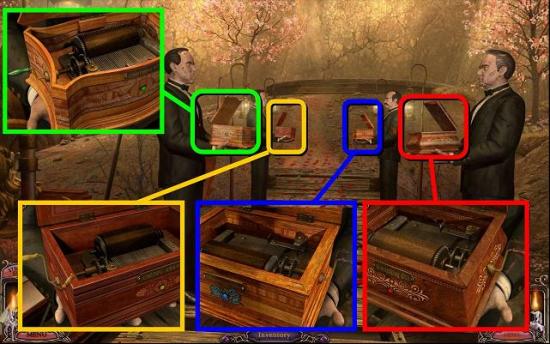
- On the dock are four mannequins with music boxes. Give each music box a handle. The box will show a colored gem and the phrase from the picture to help you figure out which handle goes where
- When you’ve placed all four handles, a gazebo will emerge in the background
- Go to the gazebo to get married!
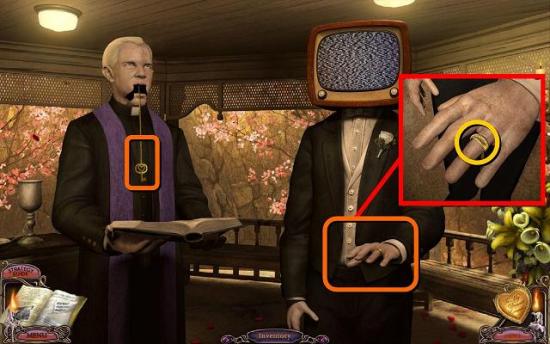
- Zoom in on the hand and place the RING
- Watch Charles’s declaration of love
- The HEART KEY will fall from the vicar’s mouth
- Back out to the water portals
Zone 6: Forever Home
- Open the last portal with the HEART KEY. Collector’s Edition players, door tokens, yadda, yadda
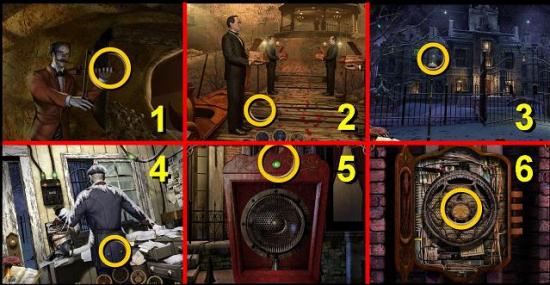
- 1) Violin player before the island; 2) Dock by the gazebo on the island; 3) Speaker box outside the asylum; 4) Guard house by the asylum; 5) Speaker box outside the Dalimar house; 6) Speaker box outside the hospital
- Before you go through the door, go back out through the window in the asylum and through the tunnel to the cottage. Remember that puzzle box we found right at the start of the game? It’s time to play it now. So go into the cottage and zoom in on the puzzle box
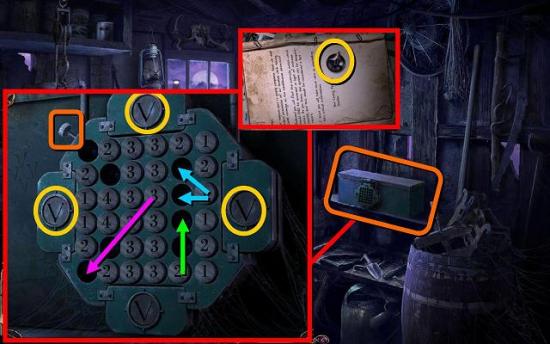
- Place the three V KEYS in the empty holes around the outside. If you missed one, they were 1) in the fireplace of the burnt-down manor house; 2) in the pie in the kitchen of the Dalimar house; 3) In the mound of rubble behind the violin player
- As you can see, they’re all turned, so you need to click on them to turn them so they’re all actual Vs
- The numbers will pop up and become buttons. To solve this puzzle, you need to make all numbers go down again. You can do this by clicking on a number and then jumping it to an empty spot. The number on the button will show you how far that button can jump – horizontally, vertically and diagonally. A #1 button can move one place (blue arrows), #2 buttons can move two places (green arrow), #3 buttons can move three places (pink arrow). Quite helpfully, blue lights will shine in the places your selected button can jump to. If you run out of moves, you can push the button on the outside of the lock to reset the puzzle
- Look inside the box and take out the OVERRIDE SWITCH
- Now go back down the cliff, through the tunnel etc. and go through the last water portal to the right
- Go towards the house and in through the front door
- Spend some time with Charles and Victor if you like, they’re not an unfriendly bunch, really, but when you’re done, go up the stairs on the right
- On the next level, go up the ladder
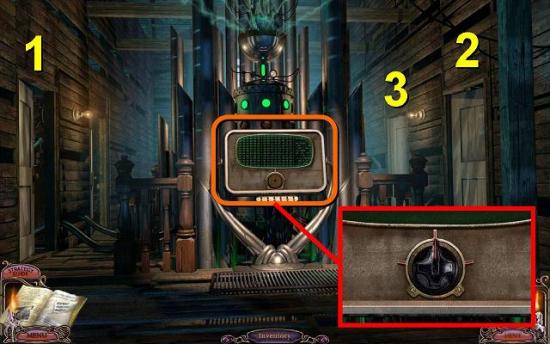
- Zoom in on the computer and place the OVERRIDE SWITCH
- You can turn the switch to get three different screens on which you have to enter codes
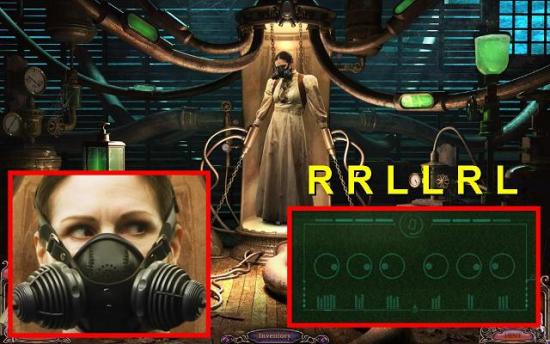
- Room 1: Go into room 1 on the left
- Zoom in on the woman’s face and look at her eyes. She will look left and right in a specific pattern. This pattern is the same for each game: R, R, L, L, R, L
- On the computer, enter this pattern on the screen with the circles
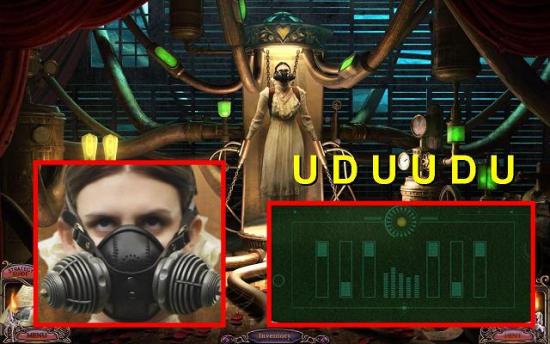
- Room 2: Go into room 2 on the right
- Zoom in on the woman’s face and look at her eyes. She will spell out a code of ups and downs. This code is also the same in each game: U, D, U, U, D, U
- Enter this code on the computer screen with the vertical bars
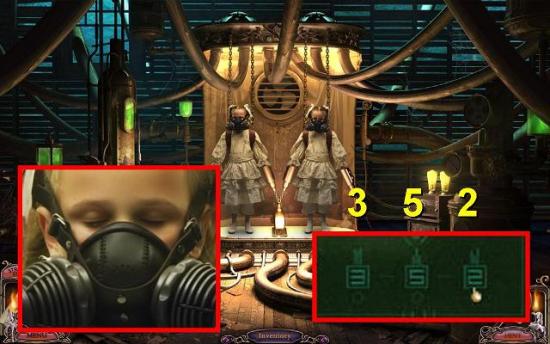
- Room 3: Go into room 3 at the back on the right
- Zoom in on the twins. The twin girl will blink a number of times. Write down how many times she blinks: 3, 5, 2.
- Enter this code by clicking on the numbers in the last screen of the computer
Collector’s Edition Journal Puzzle
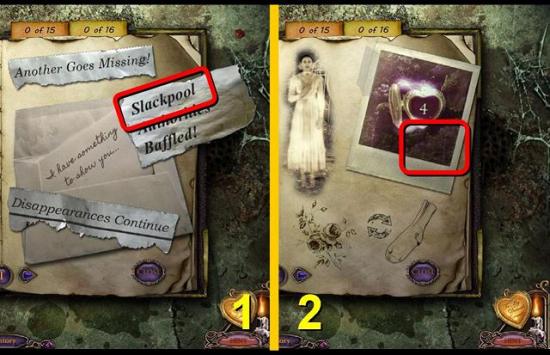
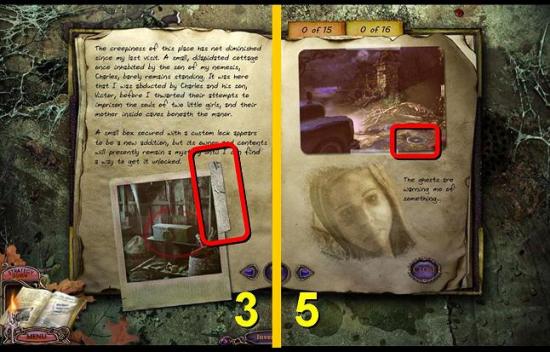
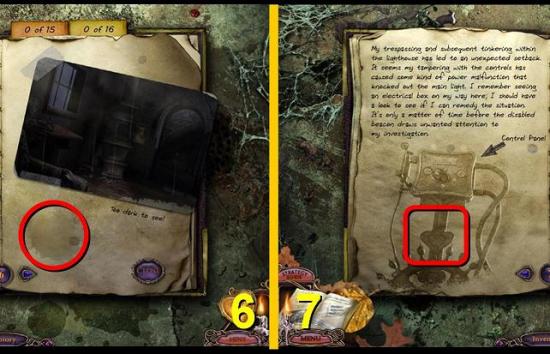
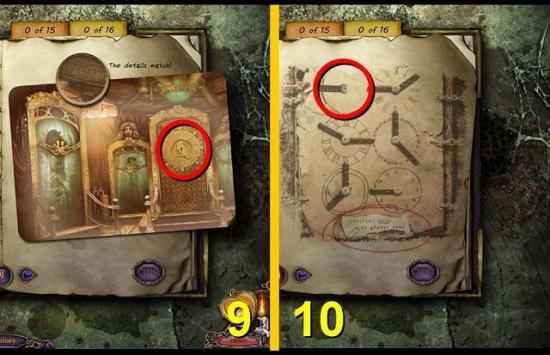
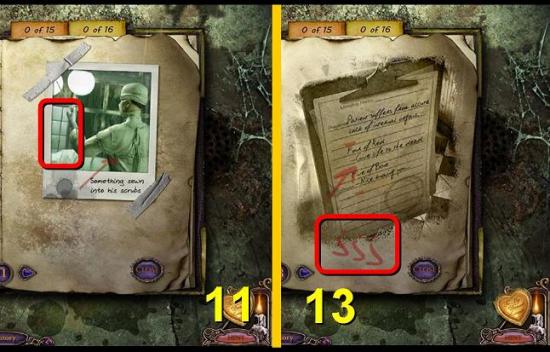
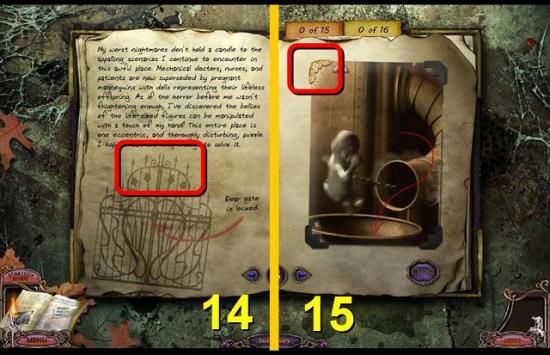
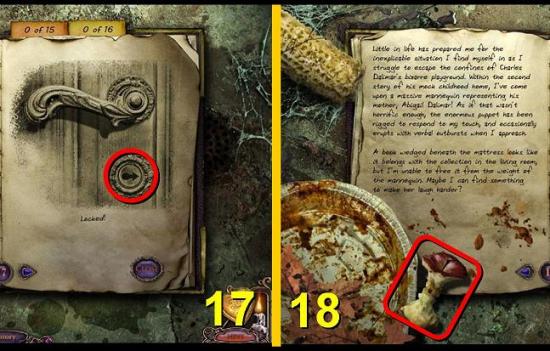
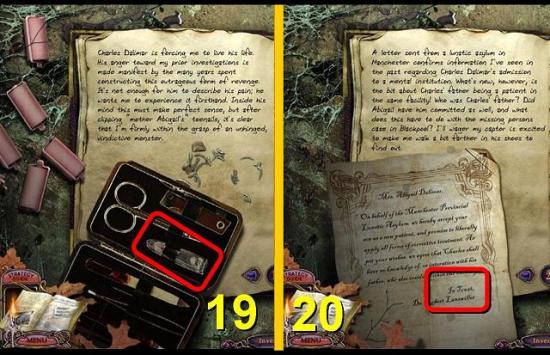
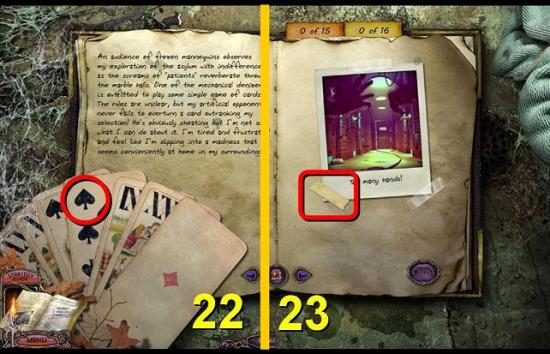
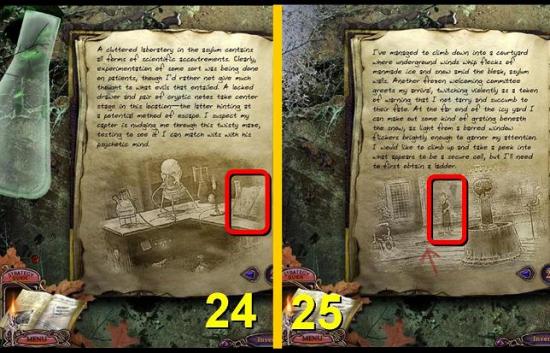
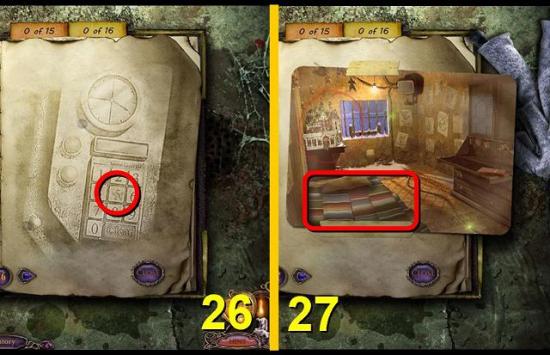
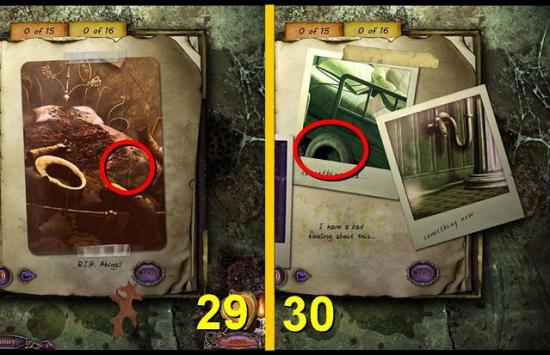
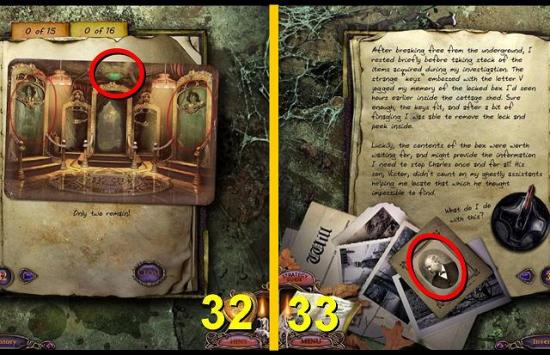
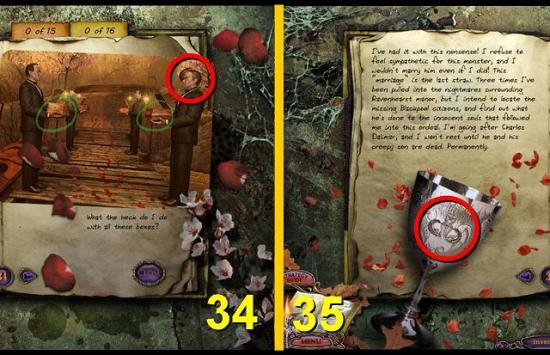
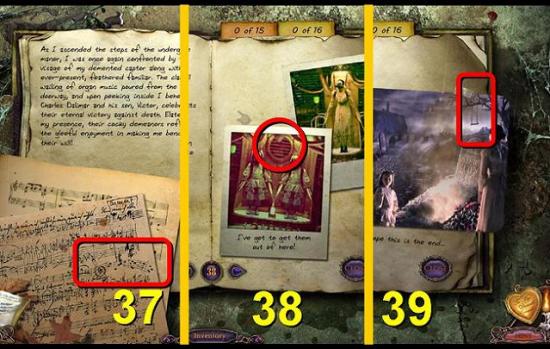
- In the Collector’s Edition of the game there are 31 morphing objects in the journal
- At the top of the journal are two tabs, an orange one and a yellow one, showing you how many objects you have found and how many you have left to find
- You will get a regular hidden object bonus game when you fill up each of the tabs
- Screen shots of all the morphing objects are given below, with the page number of the journal
- NOTE: while you’re playing the pages will be numbered in the order in which you find them. However, after you’ve finished the game and once again click “start” on the main menu, you will be taken back to the journal and the pages will be rearranged into a fixed order. The page numbers in the screen shots below correspond with that order. Any pages you missed during the game will also be added at this stage
More articles...
Monopoly GO! Free Rolls – Links For Free Dice
By Glen Fox
Wondering how to get Monopoly GO! free rolls? Well, you’ve come to the right place. In this guide, we provide you with a bunch of tips and tricks to get some free rolls for the hit new mobile game. We’ll …Best Roblox Horror Games to Play Right Now – Updated Weekly
By Adele Wilson
Our Best Roblox Horror Games guide features the scariest and most creative experiences to play right now on the platform!The BEST Roblox Games of The Week – Games You Need To Play!
By Sho Roberts
Our feature shares our pick for the Best Roblox Games of the week! With our feature, we guarantee you'll find something new to play!Type Soul Clan Rarity Guide – All Legendary And Common Clans Listed!
By Nathan Ball
Wondering what your odds of rolling a particular Clan are? Wonder no more, with my handy Type Soul Clan Rarity guide.


