- Wondering how to get Monopoly GO! free rolls? Well, you’ve come to the right place. In this guide, we provide you with a bunch of tips and tricks to get some free rolls for the hit new mobile game. We’ll …
Best Roblox Horror Games to Play Right Now – Updated Weekly
By Adele Wilson
Our Best Roblox Horror Games guide features the scariest and most creative experiences to play right now on the platform!The BEST Roblox Games of The Week – Games You Need To Play!
By Sho Roberts
Our feature shares our pick for the Best Roblox Games of the week! With our feature, we guarantee you'll find something new to play!Demon Piece Races – All Race Buffs
By Adele Wilson
Our Demon Piece Races guide details all of the buffs, rarities, and characteristics for each race in the One Piece Roblox game.
Twisted: A Haunted Carol Walkthrough
Welcome to the Twisted: A Haunted Carol walkthrough on Gamezebo. Twisted: A Haunted Carol is an interactive, Hidden Object game, played on PC, created by Gogii Games and available at Gogii Games and BigFish Games. This walkthrough includes tips and tricks, helpful hints, and a strategy guide for how to complete Twisted: A Haunted Carol.
Twisted: A Haunted Carol – Game Introduction
Welcome to the Twisted: A Haunted Carol walkthrough on Gamezebo. Twisted: A Haunted Carol is an interactive, Hidden Object game, played on PC, created by Gogii Games and available at Gogii Games and BigFish Games. This walkthrough includes tips and tricks, helpful hints, and a strategy guide for how to complete Twisted: A Haunted Carol.
General Information
- Enter your profile name and click OK. After the opening cutscene, you can return to the Main Menu by clicking on the Journal (lower left) or pressing the Esc key on your keyboard. Click on Quit to return to the Main Menu.
- Click on Options to adjust the Sound and Music volumes, turn Full Screen and Mute All Sound on and off and click on Credits to view information about the developers.
- Click on Change Player to add, edit or delete a profile.
- During dialogs, click the Continue button (if applicable), or anywhere in the scene, to advance the dialog. During cutscenes, click the Skip button (upper right) if you want to skip them. Note that you’ll miss the story elements if you do so.
- Once you begin the game, you’ll be given the opportunity to view the Tutorial. Click the Yes button if you need this information.
- Spectacles indicate an area or item you can examine for information, a Magnifying Glass indicates an item or area you can zoom into, a Hand indicates items you can pick up and the Arrows indicate areas navigation directions.
- The Hint button is located at the lower right and available during gameplay and object searches. During object searches, a random item will be highlighted. During gameplay, either a random area of interest will be highlighted or you’ll be told that there’s nothing more to investigate.
Gameplay and Guide Tips
- This guide assumes you’ve read the General Information, used the in-game Tutorial and/or Help features or otherwise familiarized yourself with gameplay.
- Item search lists are random and will be different for each player. Only Inventory Items will be indicated.
- This guide will indicate all Inventory Items in green, areas of interest in yellow and other colors as needed.
- When you add a new player, the game will automatically begin for that profile. You’ll need to watch the opening movie (or click the Skip button) and then return to the Main Menu to make any changes. Changing to an established profile will return you to the Main Menu where you can click Continue to resume your game.
- Initially, the Hint button will recharge very quickly (about 20 seconds the first time you use it). If you continue to use it, 5 seconds will be added to the length of the recharge time for a maximum of 45 seconds (this is based on my test of 10 consecutive uses, one after the other). If you don’t use the Hint button very often, the recharge time will be shorter. During minigames, the Skip button will charge in 45 seconds.
- Some inventory items can be combined. Click on one then the other to create a new item.
- Many items or areas can be clicked on for information. However, they aren’t necessary to trigger game progressions and this guide will only mention them if or when they become available to use.
- Dialogs and game progression information won’t be mentioned in this guide. It is assumed you’re reading them yourself.
Walkthrough
Watch the opening movie.
1 – Christmas Present
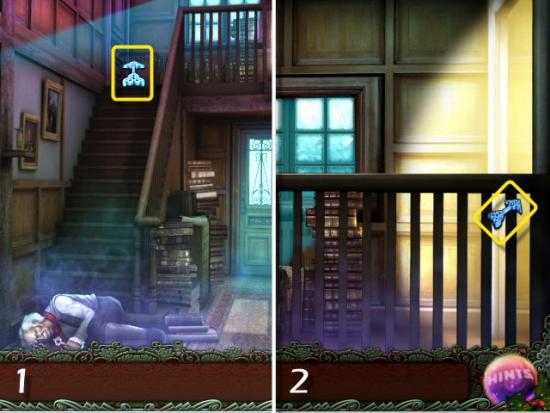
Click up (1) and then right (2), to enter the Attic.

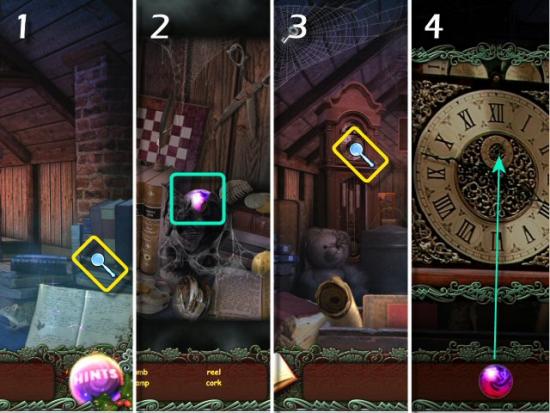
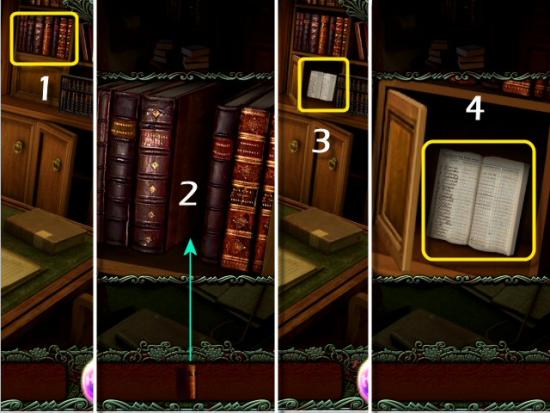
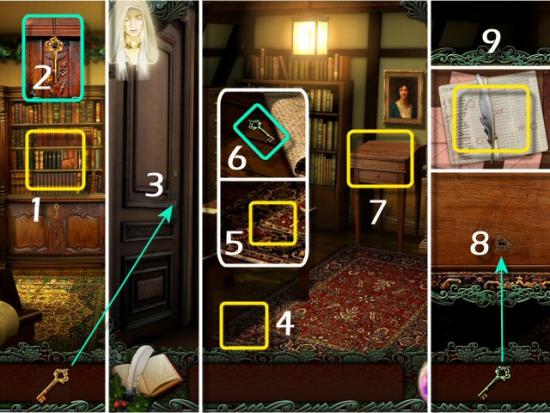
Click on the Books (1) and find all the items in the list. Inventory Item: Timestone (2 – located to the right of the books, near the center of the scene). Click on the Clock (3) and use the Timestone in the center (4).
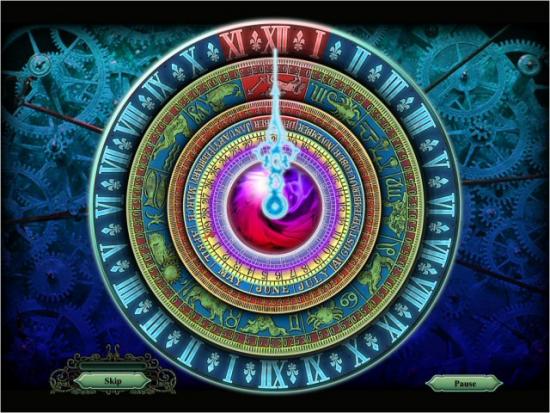
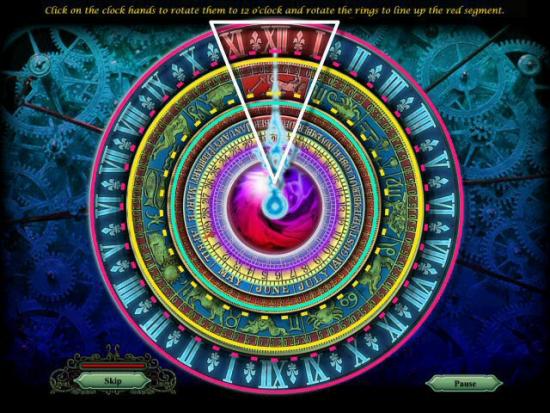
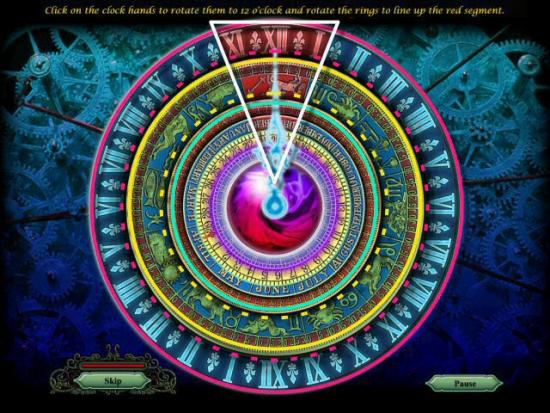
Activate the Time Clock. Click on each Hand to rotate them clockwise until they’re both pointing to 12 o’clock. Note that the solution is always the same, but the Hands will begin in different positions for each player. They will take more or fewer clicks to move them into position, depending on where they begin.
2 – Christmas Future
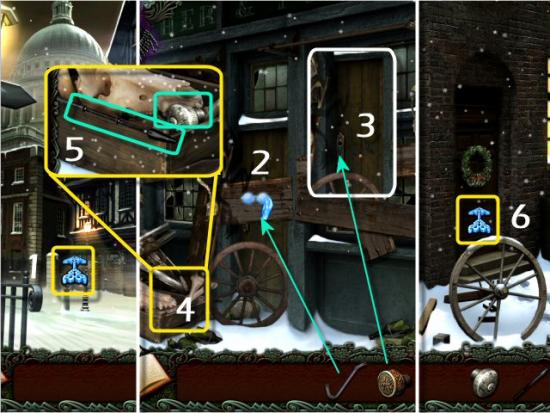
Click left (1) and then right (2), to enter the Side Street. Click on the Alley (3), collect the Crowbar and Door Knob (4) and then return to the Street (5).
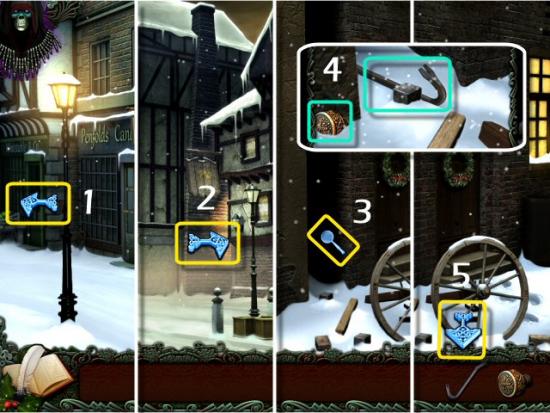
Click forward (1), use the Crowbar on the Boards (2 – click once) and then use the Door Knob on the Door to the Poultry Shop (3). Click on the Box of Bones (4), collect the Poker and Oven Door Knob (5), return to the Side Street (click back and then right) and then click on the Door to the Cratchit Home (6).
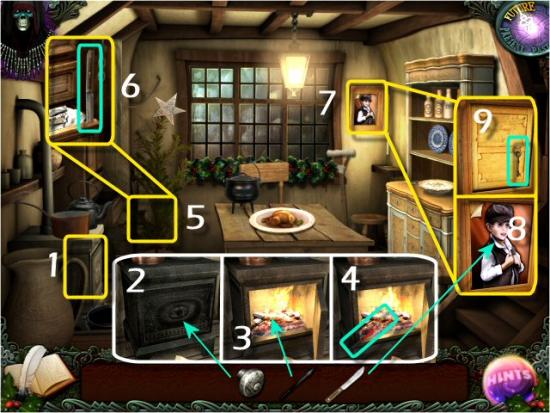
Click on the Stove (1), use the Oven Door Knob on the Oven Door (2), use the Poker in the Fire (3) and then collect the Red Hot Poker (4). Click on the Christmas Tree (5) and find all the objects in the list. Inventory Item: Knife (6 – embedded in the open drawer, on the right). Click on the Picture of Tiny Tim (7), use the Knife (8), collect the Outhouse Key (9) and then return outside (click back).
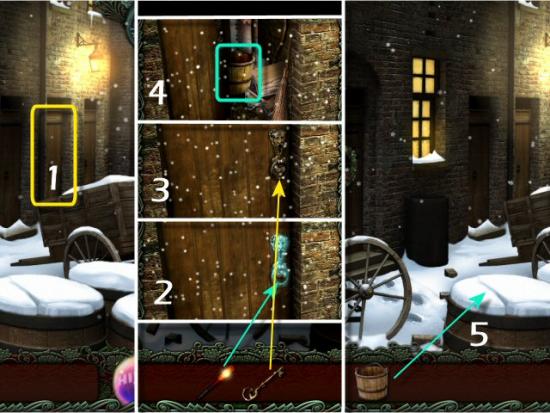
Click on the Outhouse Door (1), use the Red Hot Poker on the Frozen Lock (2), use the Key in the Lock (3), collect the Bucket (4), use the Bucket on the Snow (5), click on the filled Bucket and then return to the Cratchit Home.
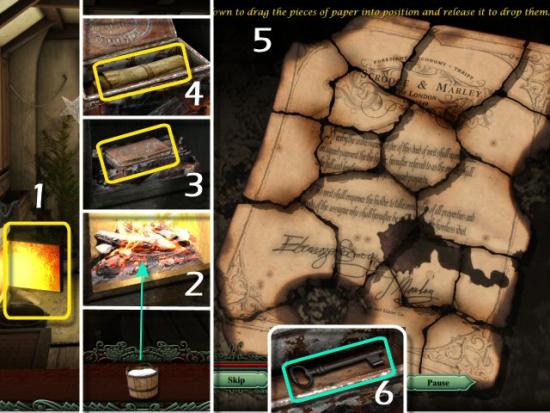
Click on the Stove (1), use the Bucket of Snow on the Fire (2), click on the Box (3) and then click on the Scroll (4). Reassemble Marley’s Will (5 – click and drag each piece into place), collect the Key (6) and then return to the Poultry Shop (click back twice and then forward).
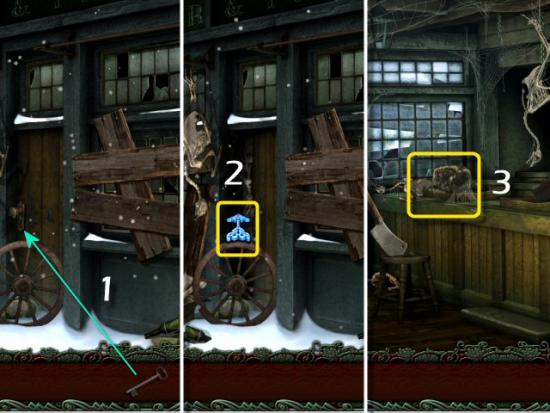
Use the Key in the Lock (1), enter the Shop (2) and then click on the Counter (3).
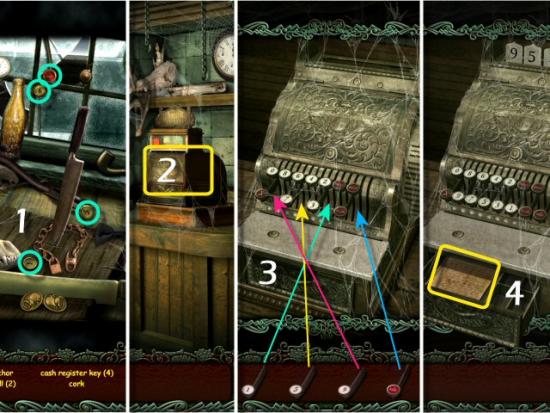
Find all the items in the list. Inventory Item: 4 Cash Register Keys (1). Click on the Cash Register (2), use the Keys (3) and then click on the Note (4).
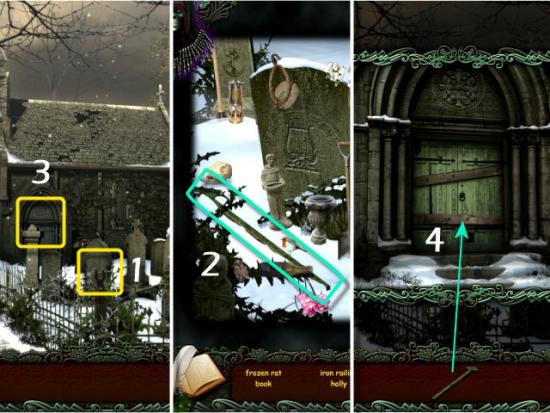
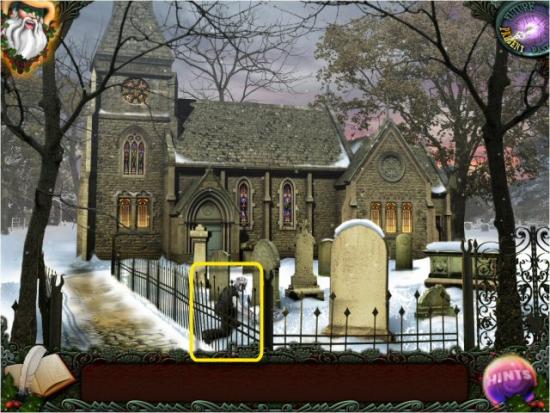
Click on the Gravestones (1) and find all the items in the list. Inventory Item: Iron Railing (2 – located at the lower left). Click on the Door of the Church (3) and use the Iron Railing (4).
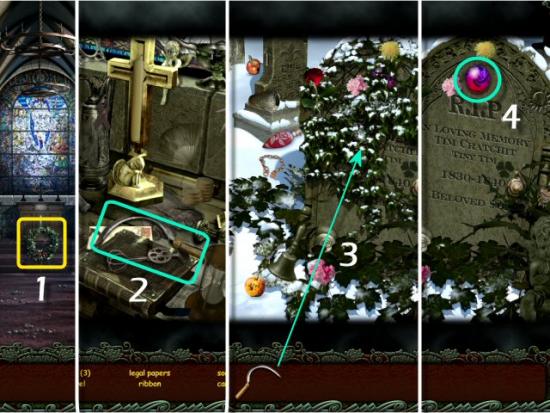
Click on the Wreath (1) and find all the items in the list. Inventory Item: Sickle (2 – located at the lower center). Return outside (click back), click on the Gravestones again, use the Sickle on the Vines (3) and then collect the Timestone (4).
Enter the Poultry Shop (1), click on the Clock (2) and then use the Timestone on the Clock (3).
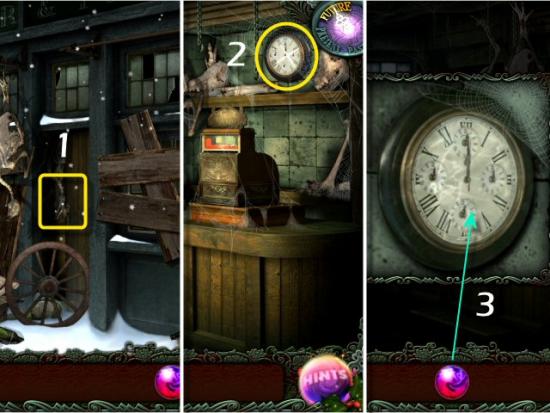
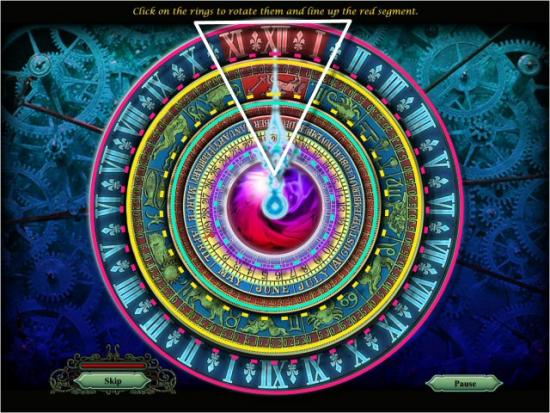
Activate the Time Clock. Click on the Rings to rotate them and line up all the Red Segments (white). Note that the solution is always the same, but the Rings will begin in different positions for each player. They will take more or fewer clicks to move them into position, depending on where they begin. It’s possible that you won’t need to click every Ring or click the Hands, at all.
3 – Christmas Present
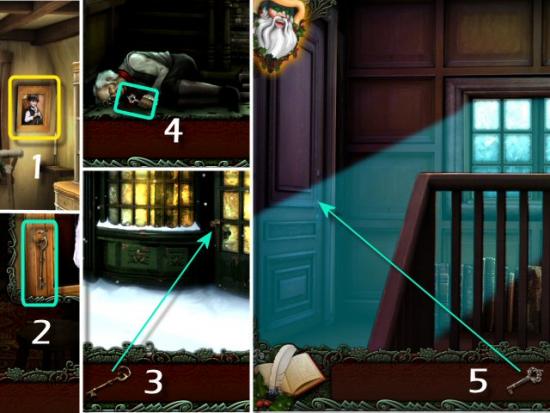
Return to the Cratchit Home (click back twice, right and then enter), click on the Picture of Tiny Tim (1) and collect the Office Key (2). Return to the Offices (click back three times), use the Key on the Door (3) and enter the Offices. Collect Marley’s Key (4), go Upstairs, use Marley’s Key on his Office Door (5) and then enter the Marley’s Office (click left).
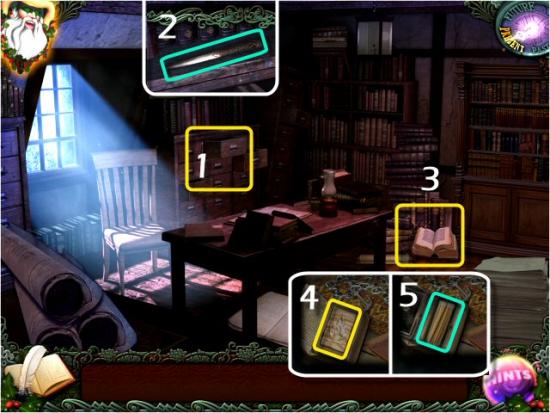
Click on the Filing Cabinets (1), collect the Letter Opener (2), click on the Books (3) and find all the items in the list. Inventory Item: Matches (5 – located at the lower left. Click on the Match Case (4) to reveal the Matches). Return to the Hallway and enter the Attic (click back, up and then right).
Click on the Books (1) and find all the items in the list. Inventory Items: Broom Head and Beeswax (2). Return to Marley’s Office (click back then left).
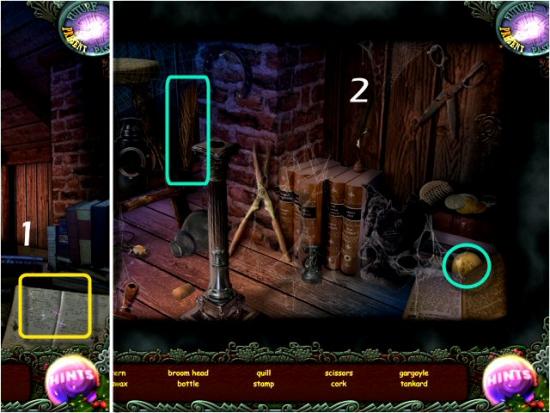
Click on the Filing Cabinets (1), use the Beeswax on the Jammed Drawer (2) and collect the Key to Scrooge’s Office (3). Return Downstairs (click back twice), use Scrooge’s Key on his Office Door (4) and then enter Scrooge’s Office (click right).
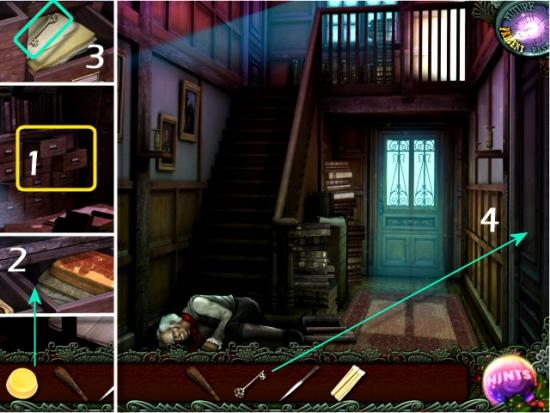
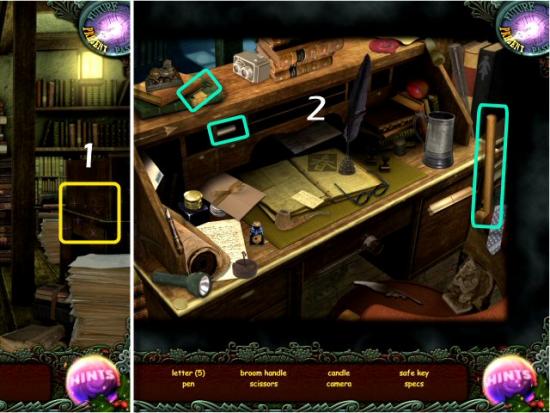
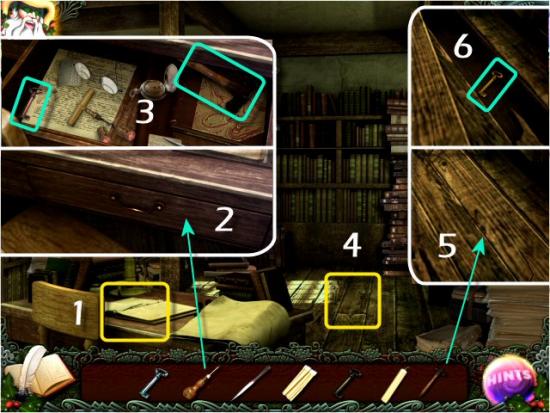
Click on the Desk (1) and find all the items in the list. Inventory Items: Candle, Safe Key (first of four) and Broom Handle (2). Return to the Attic (click back, up and then right). Note
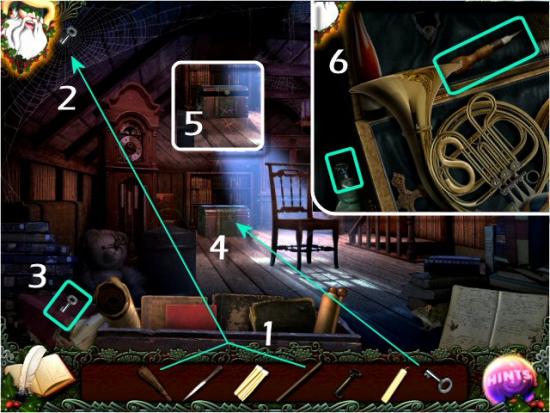
Create the Broom (1 – click on the Broom Head and Broom Handle, in any order, from your Inventory), use it on the Cobweb (2) and collect the Trunk Key (3). Use the Key on the Trunk (4), click on the Open Trunk (5) and find all the items in the list. Inventory Items: Screwdriver and Safe Key (6 – second of four). Return to Scrooge’s Office (click back twice and then right).
Click on Scrooge’s Desk (1), use the Screwdriver on the Drawer (2) and collect the Hammer and Safe Key (3 – third of four). Click on the Floorboard (4), use the Hammer on the Loose Board (5) and collect the Safe Key (6 – fourth of four). Return to the Foyer (click back).
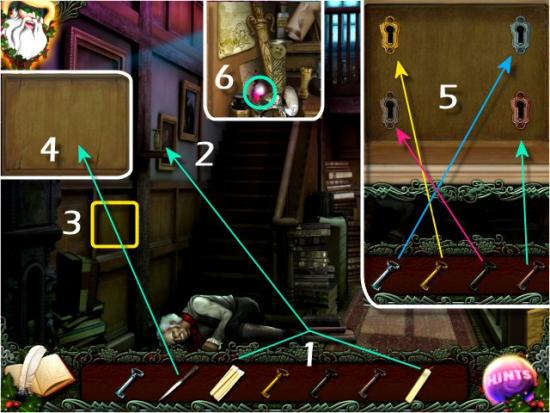
Create the Lit Candle (1 – click on the Matches and Candle, in any order, in your Inventory), use it on the Wall Sconce (2), click on the Panel (3) and then use the Letter Opener on the Panel (4). Use the Safe Keys in their matching colored Keyholes (5) and find all the objects in the list. Inventory Item: Timestone (6 – located at the lower left of the scene).
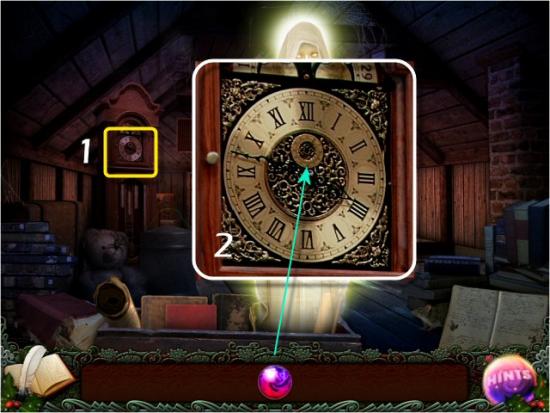
Return to the Attic (click up then right), click on the Clock (1) and use the Timestone on the Clock (2).
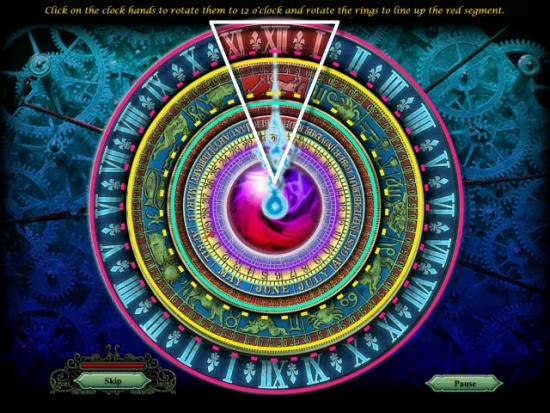
Activate the Time Clock. Click on the Rings and Hands to rotate them, line up all the Red Segments (white) and set the Clock to 12 o’clock. Note that the solution is always the same, but the Rings and Hands will begin in different positions for each player. They will take more or fewer clicks to move them into position, depending on where they begin. It’s possible
that you won’t need to click every Ring or click the Hands, at all.
4 – Christmas Past
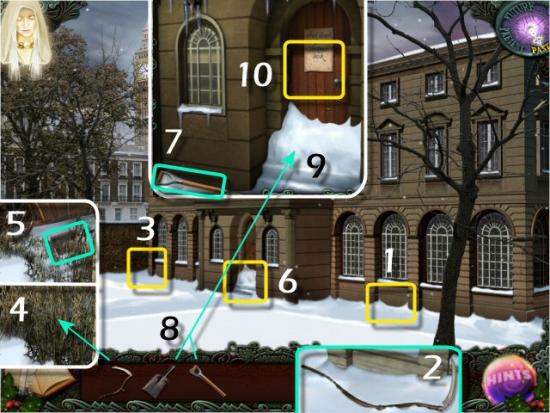
Click on the area below the second Window on the right (1) and collect the Scythe (2). Click on the left Corner of the Building (3), use the Scythe on the Weeds (4) and then collect the Shovel Head (5). Click on the Door (6), collect the Shovel Handle (7), create the Shovel (8 – click on the Shovel Head and Shovel Handle, in any order, from your Inventory), use it on the Snow (9) and then click on the Door (10).
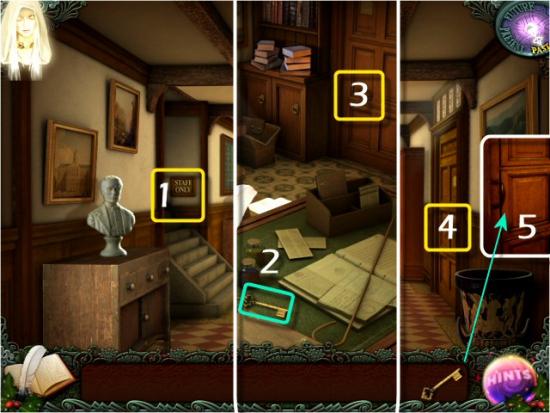
Click left to the Staff Office (1), collect the Key (2), return to the Hall (3) click on the Classroom Door (4) and use the Key on the Door (5).
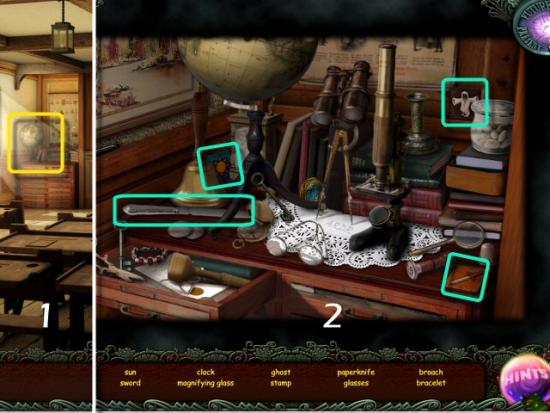
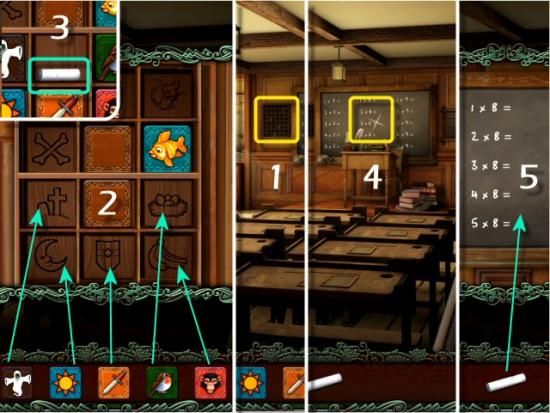
Click on the Globe (1) and find all the items in the list. Inventory Items: Paper Knife and Sun, Ghost and Sword Tiles (2). Return to the Staff Office (click back and then left).
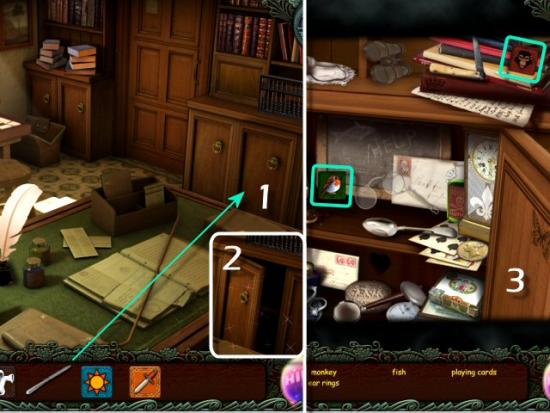
Use the Paper Knife on the Cabinet (1), click on the open Door (2) and find all the items in the list. Inventory Items: Bird and Monkey Tiles (3). Return to the Classroom (click forward and then right).
Click on the Cubbyholes (1), use the Tiles in their associated slots (2), collect the Chalk (3), click on the Blackboard (4) and then use the Chalk on the Board (5).
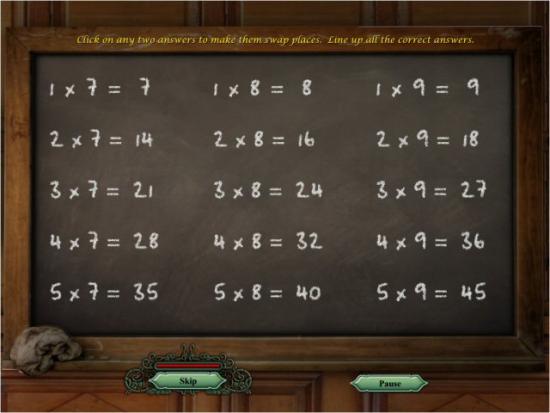
Correct all the Equations. Click on one of the Incorrect Solutions and then click on another to switch their places. If an Equation already has the correct Solution, click on it twice to correct it. Note that the initial arrangement of incorrect Solutions is different for each player.
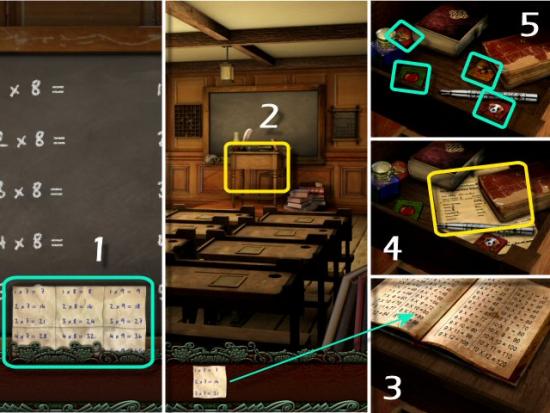
Collect the Solution Key (1), click on the Lectern (2), use the Solution Key on the Book (3), click on the School Report (4) and then collect the Cat, Apple, Dog and Bee Tiles (5).
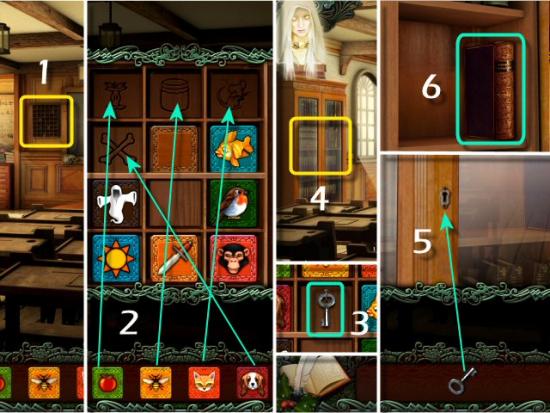
Click on the Cubbyholes (1), use the Tiles in their associated slots (2), collect the Key (3), click on the Bookcase (4), use the Key on the Keyhole (5) and then collect the Book (6). Return to the Staff Room (click back and then left).
Click on the Books (1), use the Book in the Empty Space (2), click on the Open Cupboard (3) and then click on the Class Register (4).
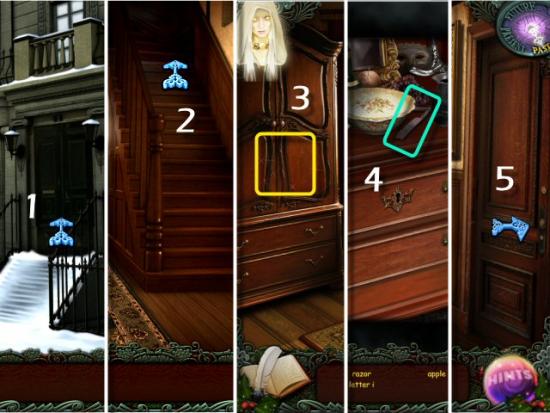
Enter the Scrooge Home (1), go upstairs to the Bedroom (2), click on the Armoire (3) and find all the items in the list. Inventory Item: Razor (4 – ). Return downstairs (click back) and enter the Parlor (5 – click right).
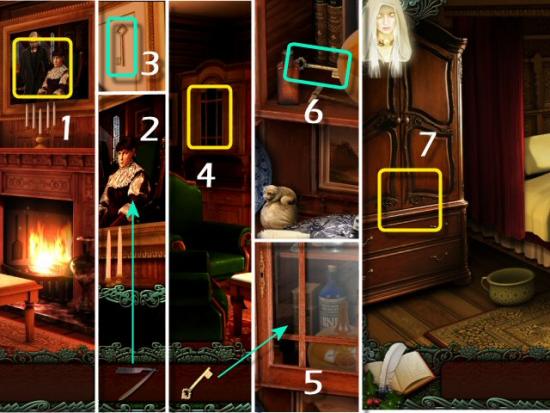
Click on the Portrait (1), use the Razor on the Canvas (2), collect the Key (3), click on the Hutch (4) and find all the items in the list. Inventory Item: Key (5 – located in the center section, on the bottom shelf). Return to the Bedroom (click back then up) and click on the Armoire (6).
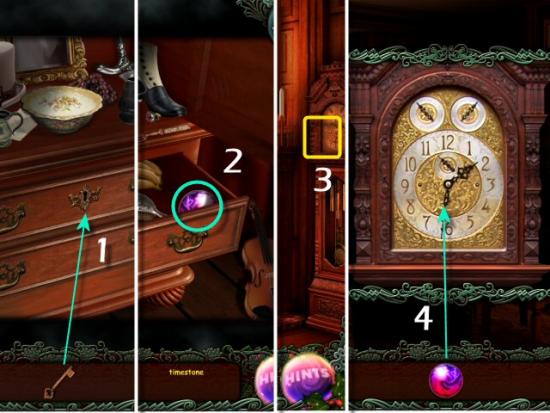
Use the Key on the Drawer (1) and find all the objects in the list. Inventory Item: Timestone (2). Return to the Parlor (click back then right), click on the Clock (3) and then use the Timestone on the Clock (4).
Activate the Time Clock. Click on the Rings and Hands to rotate them, line up all the Red Segments (white) and set the Clock to 12 o’clock. Note that the solution is always the same, but the Rings and Hands will begin in different positions for each player. They will take more or fewer clicks to move them into position, depending on where they begin. It’s possible
that you won’t need to click every Ring or click the Hands, at all.

5 – Christmas Present
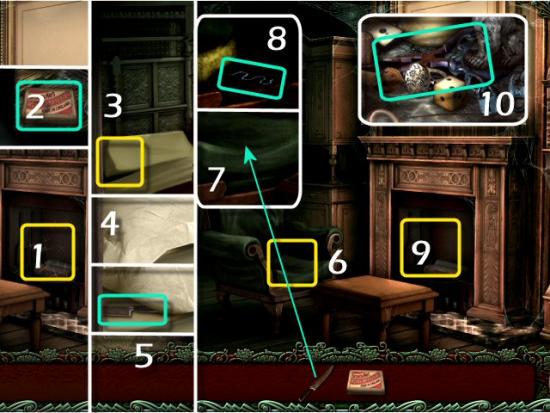
Click on the Fireplace (1) and find all the items in the list. Inventory Item: Box of Matches (2 – located at the lower left). Return to the Bedroom (click back then up), click on the Bed (3), click on the Pillow (4) and then collect the Knife (5).
Return to the Parlor (click back then right), click on the Chair (6), use the Knife on the Seat Cushion (7) and then collect the Spring (8). Click on the Fireplace (9) and find all the items in the list. Inventory Item: Pliers (10 – located at the center left, above the die). Return to the Bedroom (click back then up).
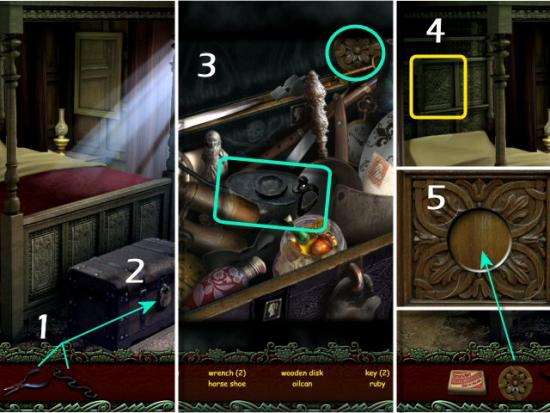
Create the Lock Pick (1 – click on the Pliers and Spring, in any order, from your Inventory), use it on the Trunk (2), click on the Trunk and find all the items in the list. Inventory Items: Wooden Disk and Oilcan (3). Click on the Headboard (4) and use the Wooden Disk (5).
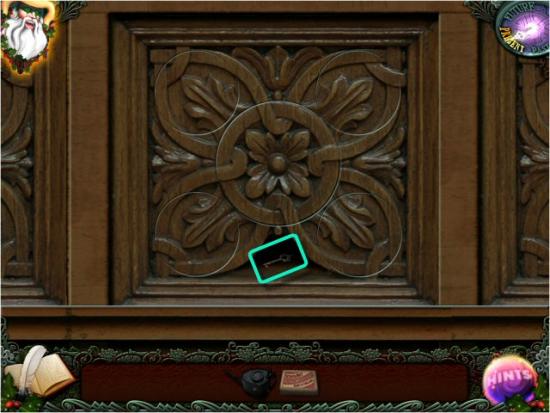
Align the Image. Click on the Circles to rotate them into place. The solution is always the same, but the images begin in different positions and the reaction of each circle is different for each player. A circle may also rotate another, or it may just rotate on its own. The reaction of each circle is randomly chosen. When complete, collect the Key and return downstairs (click back).
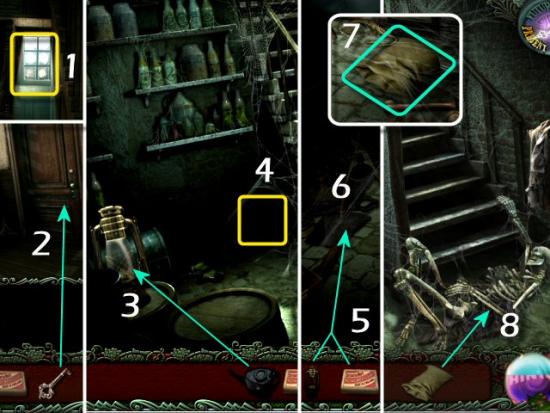
Click on the Window (1), use the Key on the Cellar Door (2), use the Oil on the Lantern (3), collect the Lantern and then click beneath the Stairs (4). Create the Lit Lantern (5 – click on the Lantern and Matches, in any order, from your Inventory), use it in the Scene (6 – click anywhere) and find all the items in the list. Inventory Item: Sack (7). Use the Sack on the Skeleton (8) and collect the Sack of Bones.
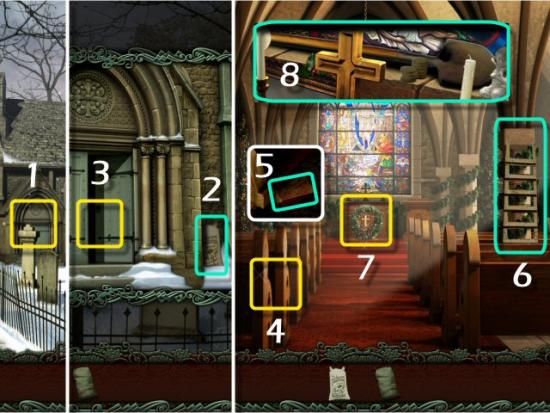
Click on the Door (1), collect the Bag of Salt (2) and then enter the Church (3). Click on the Pew (4), collect the Prayer Book (5), collect the Ladder (6), click on the Altar (7) and find all the items in the list. Inventory Item: Shovel (8). Return outside (click back).
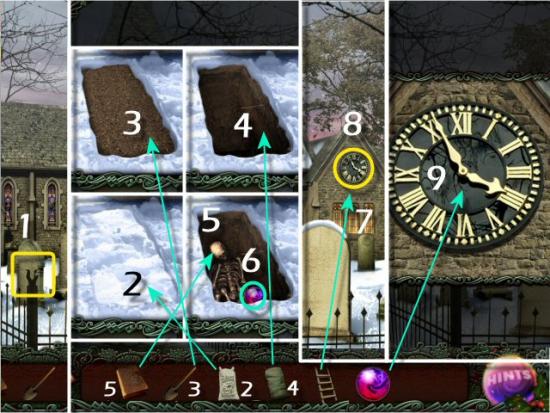
Click on the Gravestones (1), use the Salt on the Snow (2), use the Spade on the Dirt (3), use the Sack in the Grave (4), and then use the Prayer Book on the Head of the Skeleton (5). Collect the Timestone (6), use the Ladder on the Clock (7), click on the Clock (8) and then use Timestone on the Clock (9).
Activate the Time Clock. Click on the Rings and Hands to rotate them, line up all the Red Segments (white) and set the Clock to 12 o’clock. Note that the solution is always the same, but the Rings and Hands will begin in different positions for each player. They will take more or fewer clicks to move them into position, depending on where they begin. It’s possible that you won’t need to click every Ring or click the Hands, at all.

6 – Christmas Past
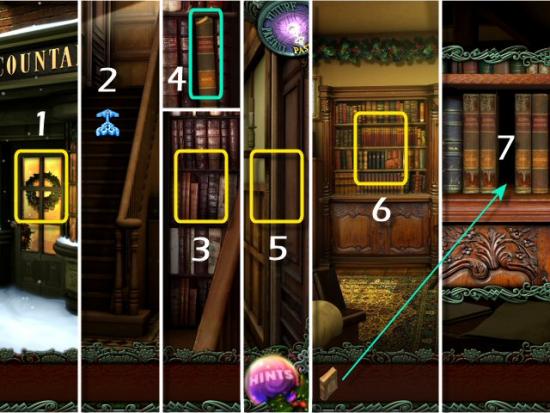
Click on the Door (1), go Upstairs (2), click on the Bookshelves (3), collect the Account Ledger (4) and then return to the Foyer (click back). Click on the Door (5), click right to enter Fezziwig’s Office, click on the Bookshelves (6) and then use the Account Ledger in the Empty Space (7).
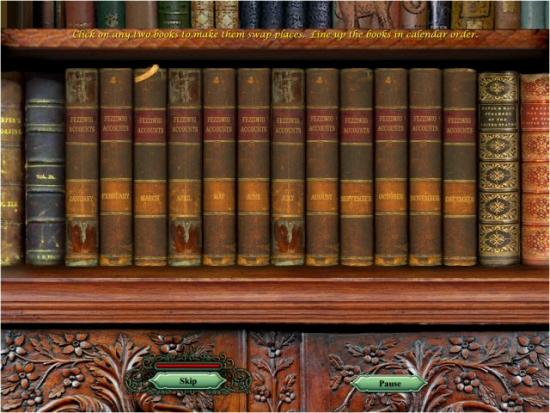
Arrange the Ledgers in Calendar order. Click on one Ledger and then click on another to switch their places. Arrange all the Ledgers in Calendar order, from January to December. If a Ledger is in the correct position, click on it twice to highlight it. Note that the initial arrangement of the Ledgers will be different for each player.
Click on the Bookshelves (1), collect the Key (2), return upstairs (click back then up), use the Key on the Door (3) and then click left to enter Scrooge’s Office. Click below the Desk (4), click on the Carpet (5) and collect the Key (6). Click on the Secretary (7), use the Key in the Lock (8) and click on the Ledger Pages (9). Return to Fezziwig’s Office (click back twice then right).
Click on the Tree (1), collect the Timestone (2), return to the Foyer (click back), click on the Clock (3) and then use the Timestone on the Clock (4).
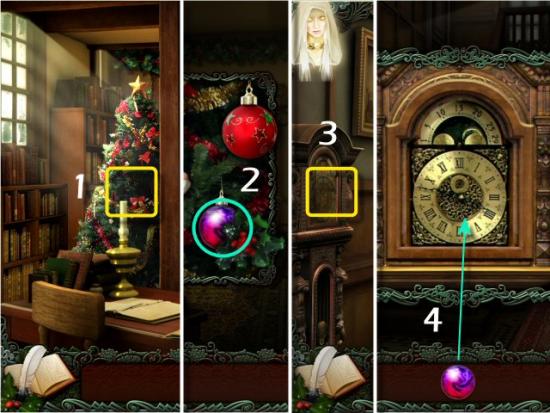
Activate the Time Clock. Click on the Rings and Hands to rotate them, line up all the Red Segments (white) and set the
Clock to 12 o’clock. Note that the solution is always the same, but the Rings and Hands will begin in different positions for
each player. They will take more or fewer clicks to move them into position, depending on where they begin. It’s possible
that you won’t need to click every Ring or click the Hands, at all.

7 – Christmas Present
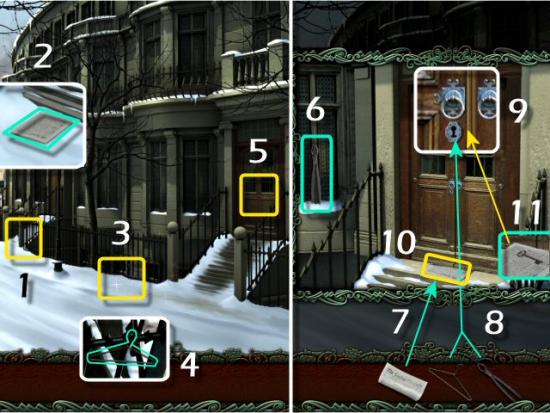
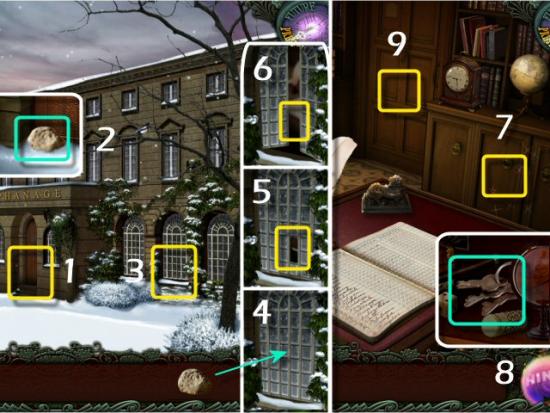
Click on the Neighbor’s Steps (1), collect the Newspaper (2), click on the Snow (3) and find all the items in the list. Inventory Item: Wire Hanger (4 – located at the lower right). Click on the Door (5), collect the Pliers (6) and then use the Newspaper on the Door (4).
Create a Straight Wire (8 – click on the Wire Hanger and Pliers, in any order, from your Inventory), use it on the Lock (9), click on the Newspaper (10) and collect the Key and then use the Key in the Lock (11).
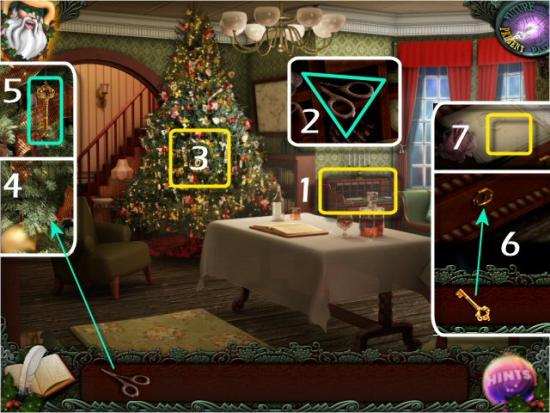
Click on the Desk (1) and find all the items in the list. Inventory Item: Scissors (2 – located at the upper right, in the cubbyhole). Click on the Tree (3), use the Scissors on the Branch (4) and collect the Key (5). Click on the Desk again, use the Key in the Drawer (6) and click on the Deed (7).
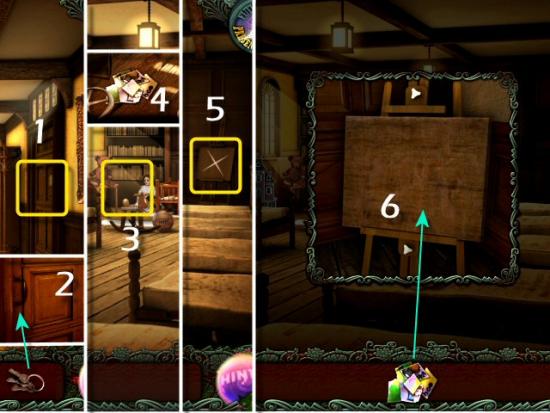
Click on the Door (1), collect the Rock (2), click on the Window (3) and use the Rock on the Window (4). Click on the Broken Pane (5) and then enter Belle’s Office (6). Click on the Cabinet (7) and find all the items in the list. Inventory Item: Keys (8 – located in the center of the top shelf). Exit the Office (9).
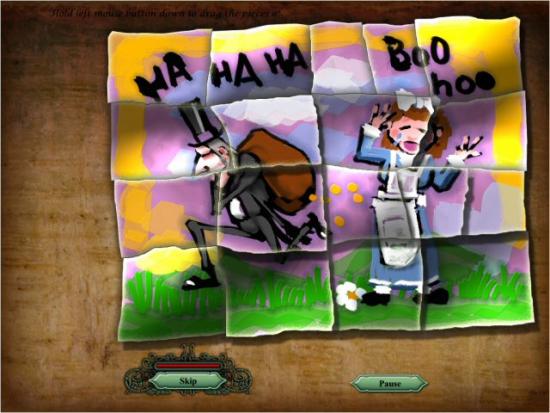
Click on the Door (1), use the Keys (2), click on the Shelves (3) and find all the items in the list. Inventory Item: Torn Painting (4 – located at the lower part of the scene, to the right of the valve wheel). Click on the Easel (5) and use the Pieces on the Board (6).
Reassemble the Painting. Click and drag each piece into place.
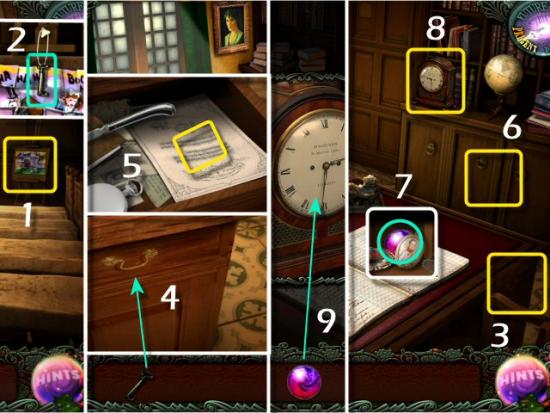
Click on the Easel (1), collect the Key (2) and return to Belle’s Office (click back then left). Click on the Desk (3), use the Key on the Drawer (4), click on the Contract (5), click on the Cabinet (6) and find all the items in the list. Inventory Item: Timestone (7 – located at the upper middle of the scene). Click on the Clock (8) and use the Timestone (9).
Activate the Time Clock. Click on the Rings and Hands to rotate them, line up all the Red Segments (white) and set the
Clock to 12 o’clock. Note that the solution is always the same, but the Rings and Hands will begin in different positions for
each player. They will take more or fewer clicks to move them into position, depending on where they begin. It’s possible
that you won’t need to click every Ring or click the Hands, at all.
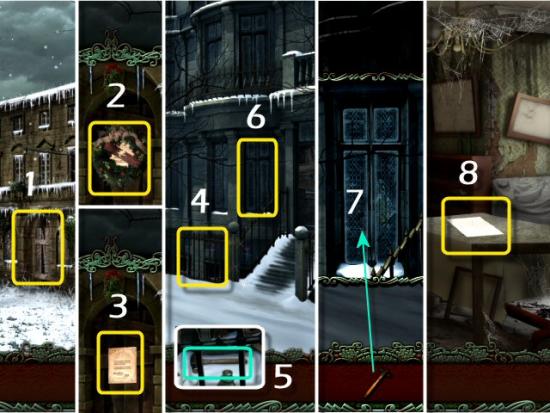
8 – Christmas Future
Click on the Door (1) and then click on the Wreath (2) and Notice (3). Click on the Fence (4) and find all the items in the list. Inventory Item: Hammer (5 – located at the center, lying on the snow). Click on the Window (6), use the Hammer (7), enter the House and click on the Note (8 – click twice).
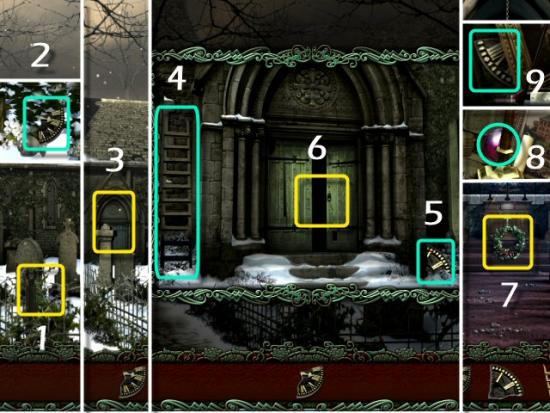
Click on the Gravestones (1) and find all the items in the list. Inventory Item: Clock Fragment (2 – first of three, located in the center of the scene). Click on the Door (3), collect the Ladder (4) and Clock Fragment (5 – second of three) and then enter the Church (6). Click on the Wreath (7) and find all the items in the list. Inventory Items: Timestone (8 – located at the center right) and Clock Fragment (9 – third of three, located at the lower left). Exit the Church (click back).
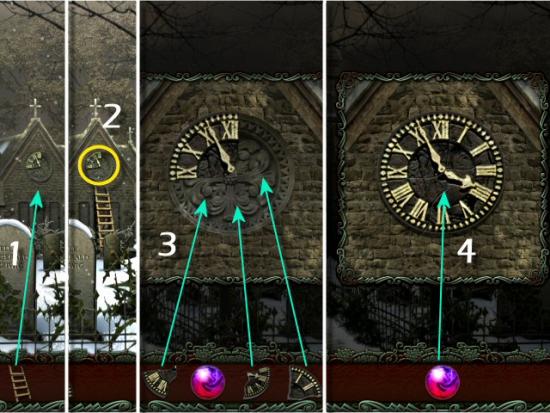
Use the Ladder on the Clock (1), click on the Clock (2), use the Clock Fragments on the Clock Face (3) and then use the Timestone on the Clock (4).
Activate the Time Clock. Click on the Rings and Hands to rotate them, line up all the Red Segments (white) and set the
Clock to 12 o’clock. Note that the solution is always the same, but the Rings and Hands will begin in different positions for
each player. They will take more or fewer clicks to move them into position, depending on where they begin. It’s possible
that you won’t need to click every Ring or click the Hands, at all.
9 – Christmas Present
Click forward, towards Scrooge.
Watch the ending movie. Congratulations! You’ve completed Twisted: A Haunted Carol.
More articles...
Monopoly GO! Free Rolls – Links For Free Dice
By Glen Fox
Wondering how to get Monopoly GO! free rolls? Well, you’ve come to the right place. In this guide, we provide you with a bunch of tips and tricks to get some free rolls for the hit new mobile game. We’ll …Best Roblox Horror Games to Play Right Now – Updated Weekly
By Adele Wilson
Our Best Roblox Horror Games guide features the scariest and most creative experiences to play right now on the platform!The BEST Roblox Games of The Week – Games You Need To Play!
By Sho Roberts
Our feature shares our pick for the Best Roblox Games of the week! With our feature, we guarantee you'll find something new to play!Demon Piece Races – All Race Buffs
By Adele Wilson
Our Demon Piece Races guide details all of the buffs, rarities, and characteristics for each race in the One Piece Roblox game.


