- Wondering how to get Monopoly GO! free rolls? Well, you’ve come to the right place. In this guide, we provide you with a bunch of tips and tricks to get some free rolls for the hit new mobile game. We’ll …
Best Roblox Horror Games to Play Right Now – Updated Weekly
By Adele Wilson
Our Best Roblox Horror Games guide features the scariest and most creative experiences to play right now on the platform!The BEST Roblox Games of The Week – Games You Need To Play!
By Sho Roberts
Our feature shares our pick for the Best Roblox Games of the week! With our feature, we guarantee you'll find something new to play!Demon Piece Races – All Race Buffs
By Adele Wilson
Our Demon Piece Races guide details all of the buffs, rarities, and characteristics for each race in the One Piece Roblox game.
The Dragon Dance Walkthrough
Welcome to The Dragon Dance walkthrough on Gamezebo. The Dragon Dance is a Hidden Object game played on the PC and created by HSA Studios. This walkthrough includes tips and tricks, helpful hints, and a strategy guide on how to complete The Dragon Dance.
The Dragon Dance – Game Introduction
Welcome to The Dragon Dance walkthrough on Gamezebo. The Dragon Dance is a Hidden Object game played on the PC and created by HSA Studios. This walkthrough includes tips and tricks, helpful hints, and a strategy guide on how to complete The Dragon Dance.
General Tips, Guide Tips and Interface
General Tips
- Hint and Skip Buttons take approximately one minute to refill.
- Click to Advance Dialog and Cut Scenes.
- Hidden Object lists will vary to a degree with each play but the majority of the lists are very similar.
Guide Tips
- Hidden Objects are highlighted in Yellow.
- Missing Items are highlighted in Red.
- Interactive areas are highlighted in Blue.
- Locations are highlighted in Green.
- On areas of matching color the areas will be highlighted in an alternative color where indicated in Guide.
Interface

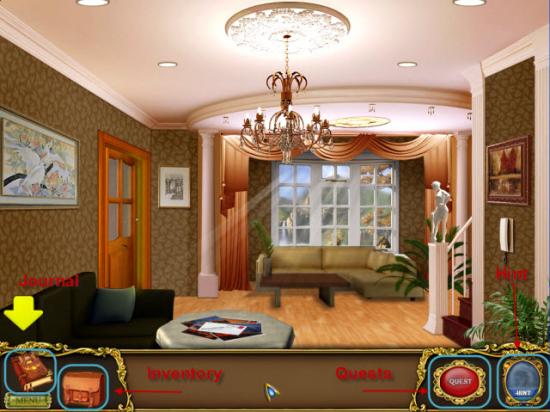
Journal – The Journal contains information on clues and items as you advance through the game. You will often refer back to this for solving puzzles.
Inventory – All Items you gather will be found here.
Quests – When unsure of what to do next or unsure where to go, check the Quests section. It will show your current goals and objectives.
Hint – The Hint meter will take approximately 1 minute to refill. You will know when it is ready, when a little dragon alights on top of the Hint Button. When used, the little dragon swoops off till the Hint Button has refilled.
Chapter 1
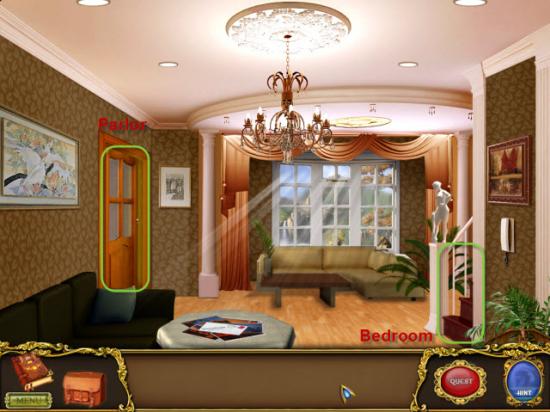
Enter the Den.
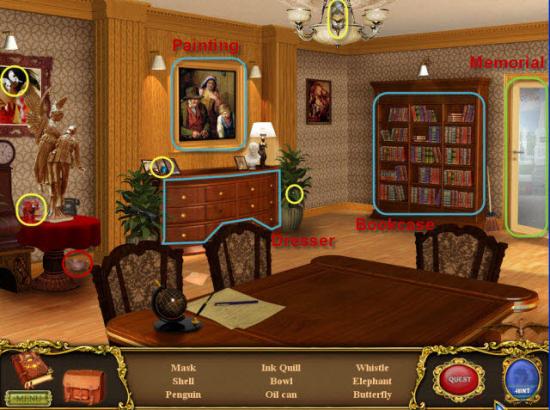
Gather the Hidden Objects highlighted in Yellow and the Bowl highlighted in Red.
Click to Zoom in on the Bookcase.
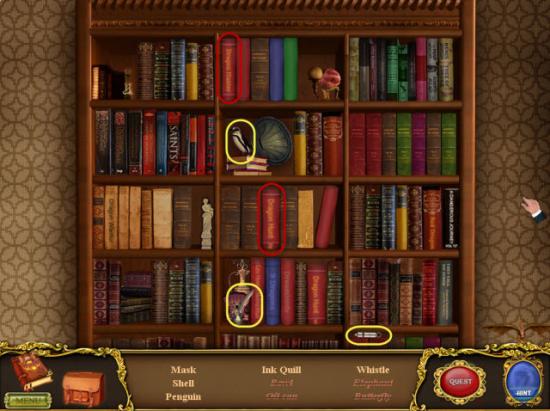
Gather the remaining Hidden Objects highlighted in Yellow.
Next gather the two Books highlighted in Red.
Now return to the Dresser highlighted in Blue.
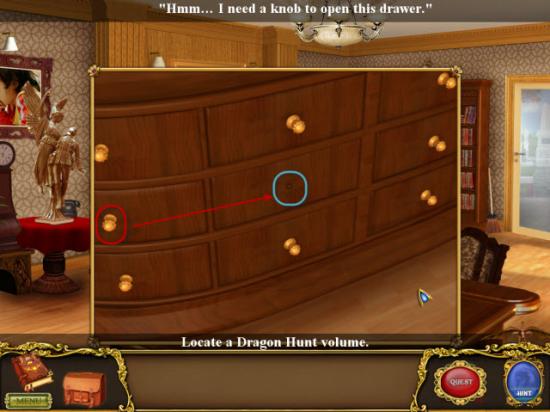
Move the Knob highlighted in Red to the Empty Spot highlighted in Blue.
Now open the Drawer.
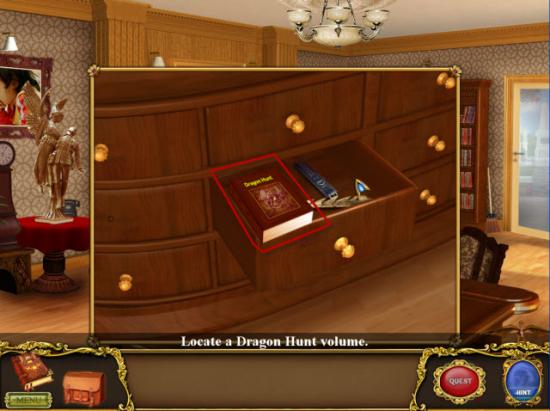
Gather the third Book highlighted in Red.
Return to the Parlor.
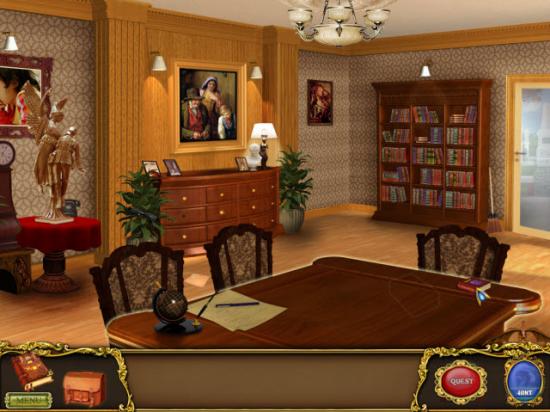
Open you Inventory and place the 3 Red Books on the Table.
When you hover over the Table a light outline will appear, as seen in the above Image, to show where to place the Book.
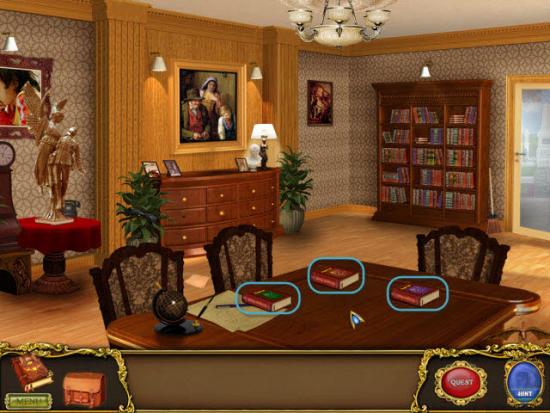
After placing the 3 Red Books, click on each Book to receive a Clue for future use.
DD9
Click on the Photo on the wall, highlighted in Blue.
Click on the revealed Safe.
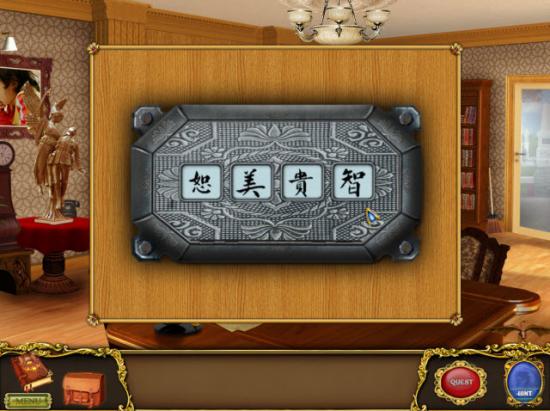
Refer to you Journal for the code to the Safe.
Enter the corresponding Symbols in the correct order to open the Safe, as shown in the Image.
Click on the Red Button that is revealed.
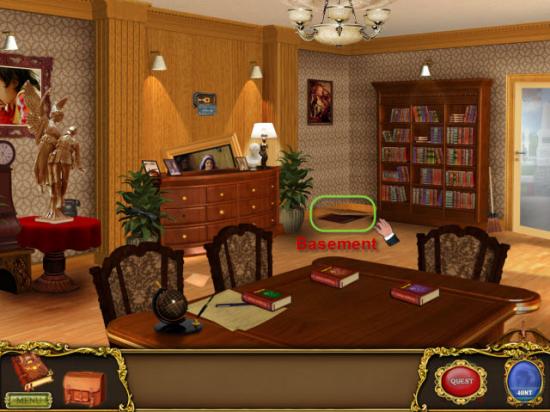
This reveals a Trap Door in the Parlor Floor.
Enter the Trap Door to move into the Basement.
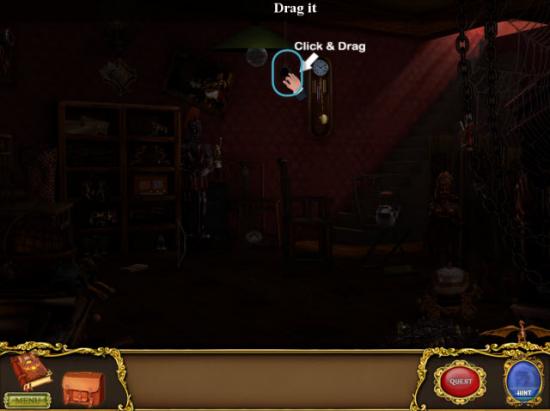
Click on the Hanging String, highlighted in Blue, and drag it downward to light up the Basement.
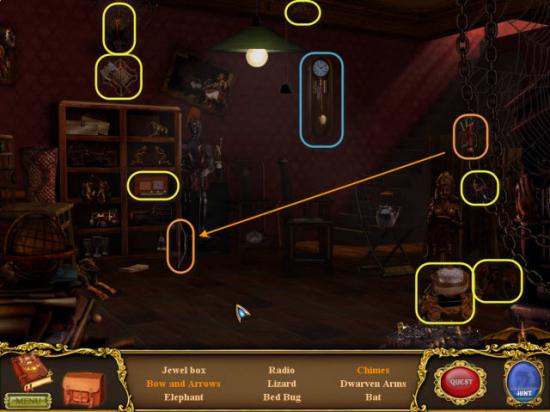
Gather the Hidden Objects highlighted in Yellow and the Items highlighted in Red.
The Orange colored words in the Hidden Objects lists require an extra step.
Click on the Arrows, highlighted in Orange, and drag them over to the Bow, highlighted in Orange, to receive the Bow and Arrows Hidden Object.
Click on the Clock highlighted in Blue to find the last Hidden Objects.
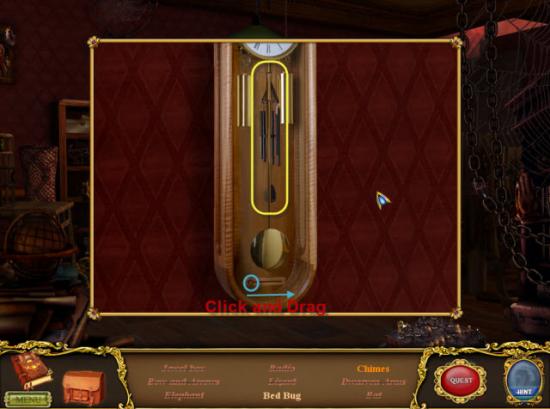
Click and Drag the Dial, highlighted in Blue, and then gather the last Hidden Object highlighted in Yellow.
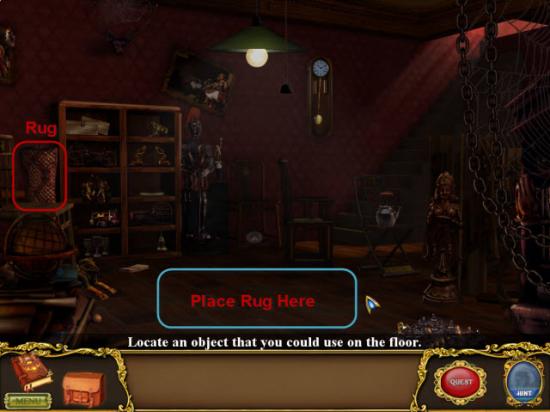
Gather the Rug highlighted in Red and place it on the Floor.
Return to Parlor and back to the Living Room, starting area, and head Upstairs.
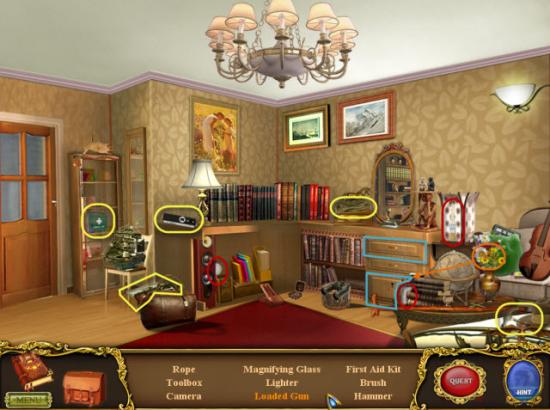
Gather the Hidden Objects highlighted in Yellow, and the three Item highlighted in Red.
Click on the Key, highlighted in Orange, and click on the lower Drawer, highlighted in Blue.
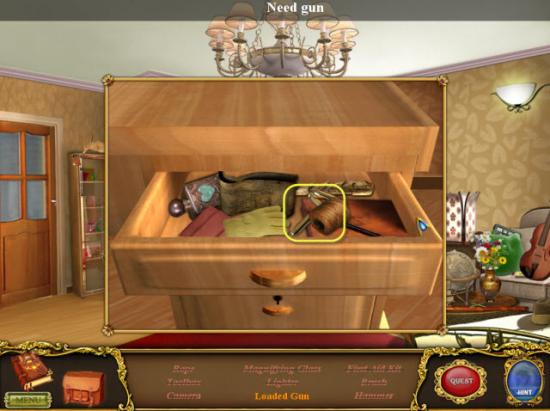
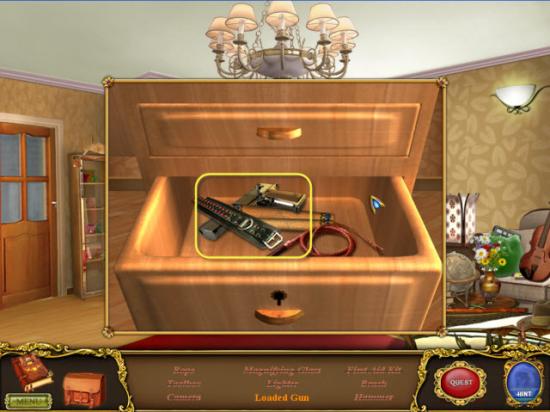
Close the Bottom Drawer.
Open the Top Drawer and gather the Bullets highlighted in Yellow.
Close the Top Drawer.
Reopen the Bottom Draw and click on the Gun highlighted in Yellow.
Return to the Basement.
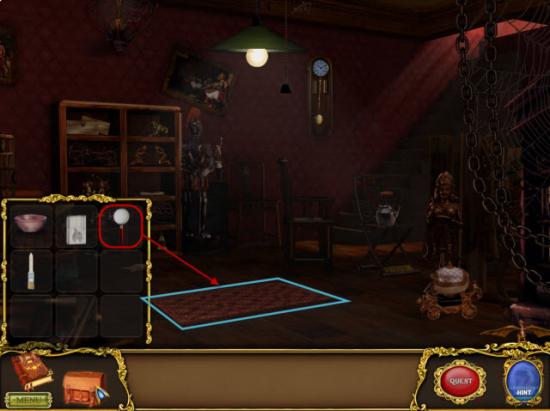
Use the Magnifying Glass, highlighted in Red, on the Carpet, highlighted in Blue.
This will reveal the phrase: “A Dangerous Journey, Vol. 12”.
Return to the Parlor, back to the Bookcase.
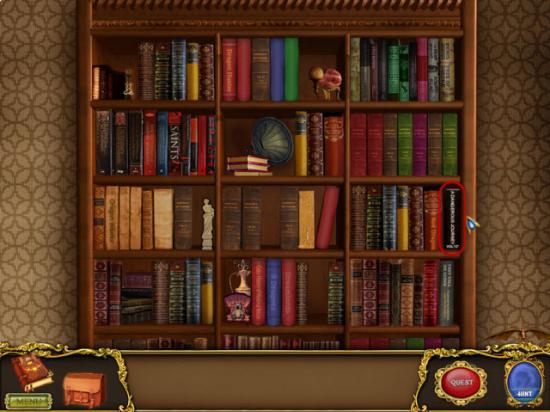
Gather the Book highlighted in red.
Return to the Parlor and the Table.
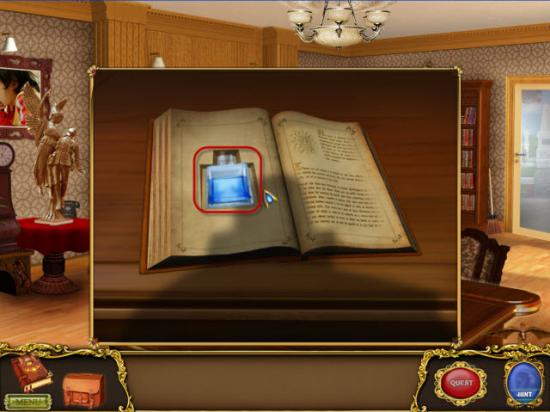
Place the Book you just picked up and place on the Table like the previous three Books.
Open the Book.
Gather the Vial of Liquid highlighted in Red.
Return to the Basement.
Turn the Carpet over.
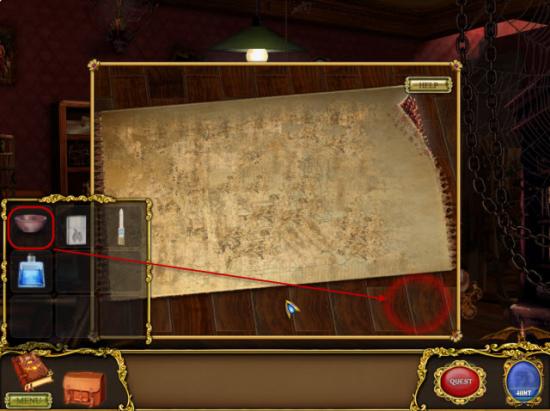
Place the Bowl, highlighted in Red, in the reddish circle.
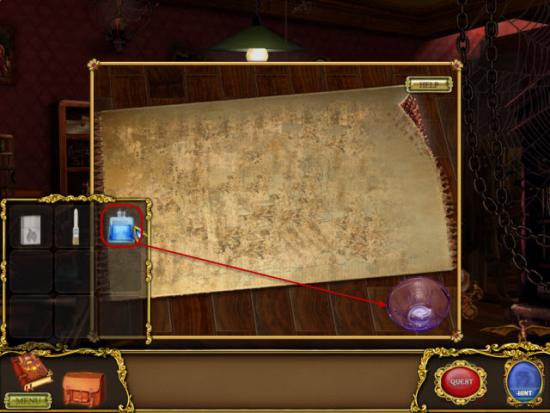
Next add the Blue Liquid, highlighted in Red, and pour into the Bowl.
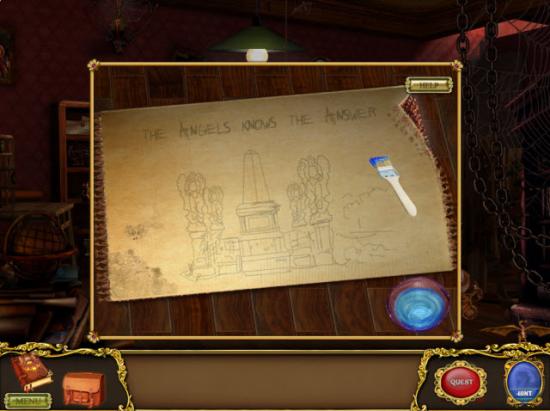
Next dip the Brush, highlighted in Red, then Drag the Brush around the Carpet backing to reveal an image.
This will take several applications.
Return Upstairs to the Parlor and exit to the Memorial.
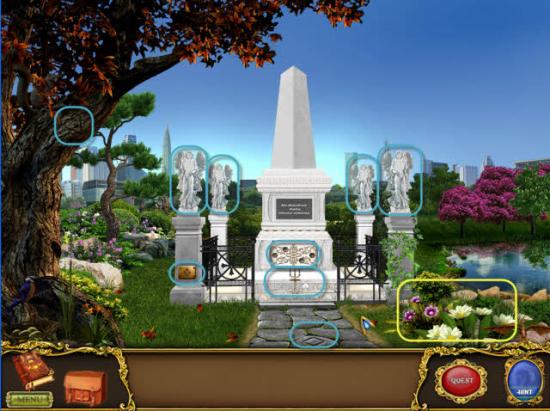
Start by examining each of the four Angel Statues highlighted in Blue.
Next examine the Area highlighted in Yellow.
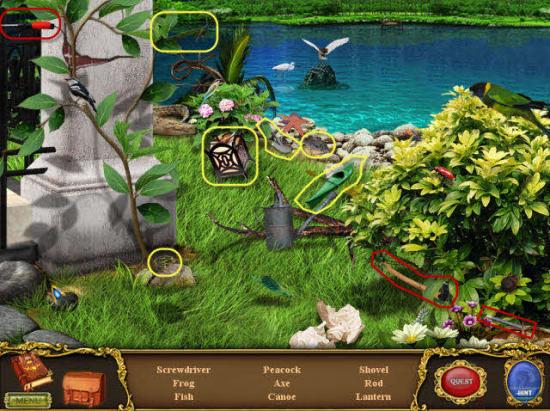
Gather the Hidden Objects highlighted in Yellow and the three Items highlighted in Red.
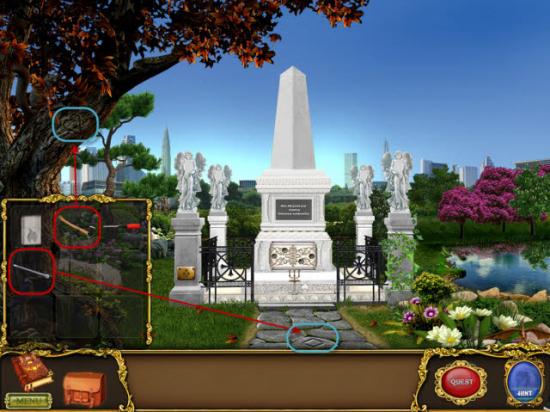
Use the Axe, highlighted in Red, o the Tree where the Heart Symbol is found.
Gather the Stone Disc that is revealed.
Next use the Rod, highlighted in Red, on the Path, near the Diamond.
Gather the Stone Disc that is revealed.
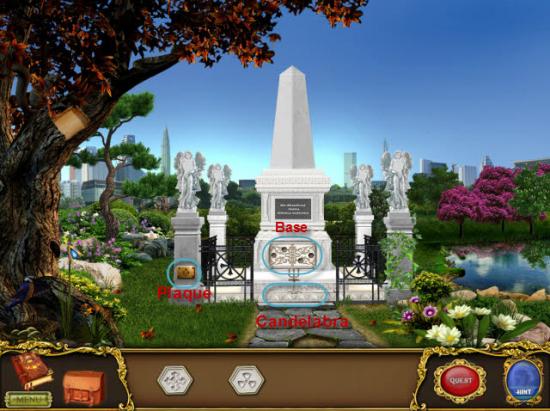
Examine the Plaque highlighted in Blue.
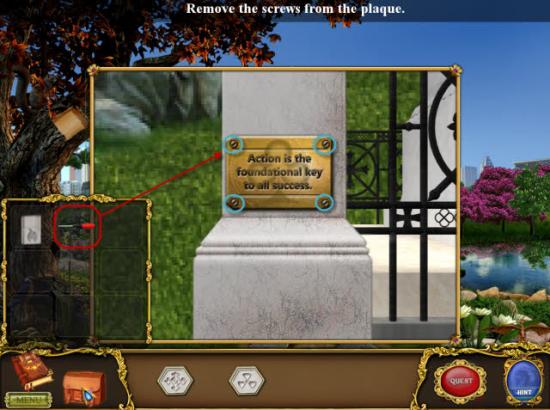
Use the Screwdriver, highlighted in Red, on each of the four Screws, highlighted in Blue, to reveal another Stone Block.
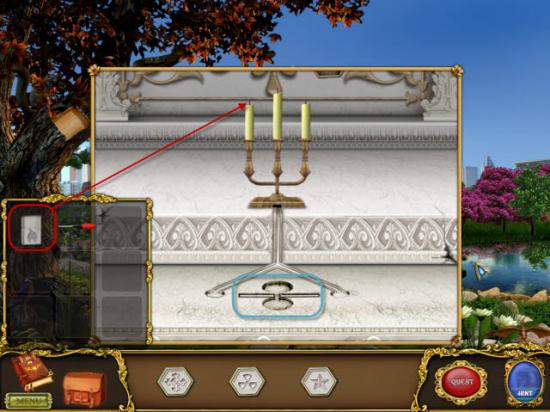
Examine the Steps just below the Candelabra.
Use the Lighter highlighted in Red on the Candelabra.
Wax will pour into the Impression in the Step highlighted in Blue.
Click on the Wax Impression to reveal the final Stone Block.
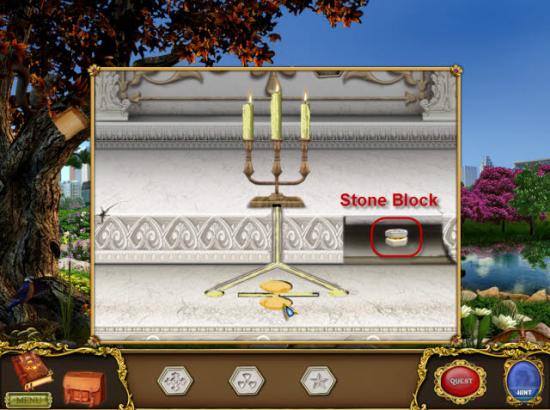
Gather the fourth and final Stone Block highlighted in Red.
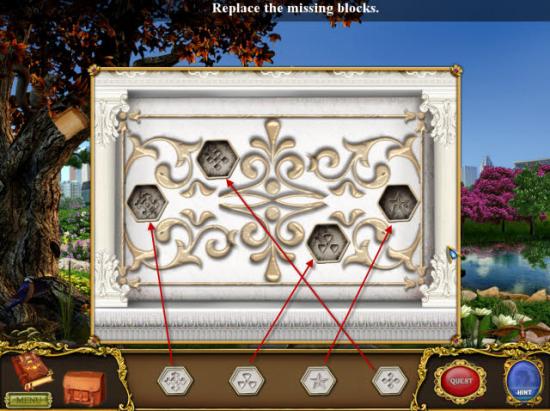
Now Examine the Base of the Monument.
Place the four Stone Blocks in their matching depressions in the Base.
This will reveal a Secret Compartment.
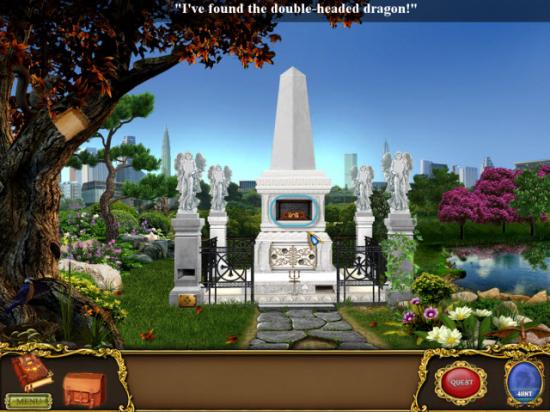
Click on the Puzzle Box highlighted in Blue.
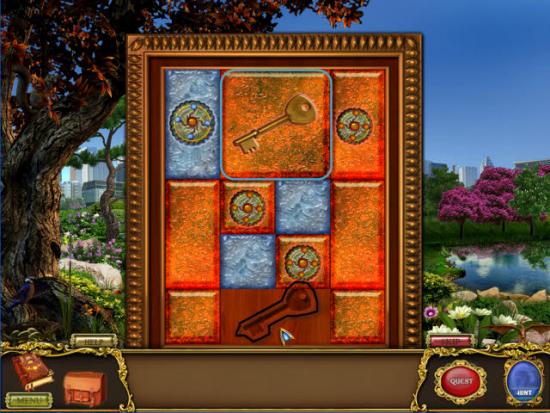
This Puzzle is a classic Traffic Jam type Puzzle.
Your goal is to move the Key Block, highlighted, to the bottom area, on top of the Key Impression in the wood.
To move a Block click on the edge of the Block in the direction you wish to move the Block.
Gather the Map Fragment that is revealed after solving the Puzzle.
Chapter 2
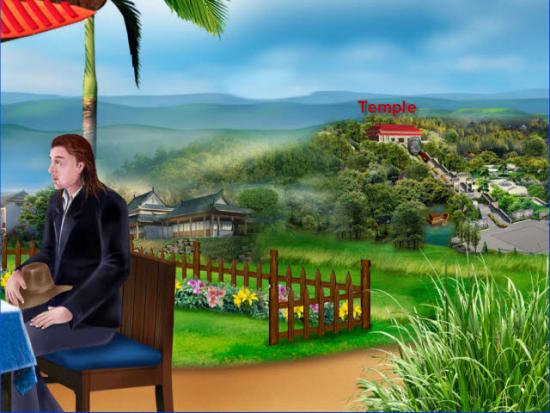
Click on the Screen to advance the Dialog.
Click on the Temple in the background.
Enter Temple.
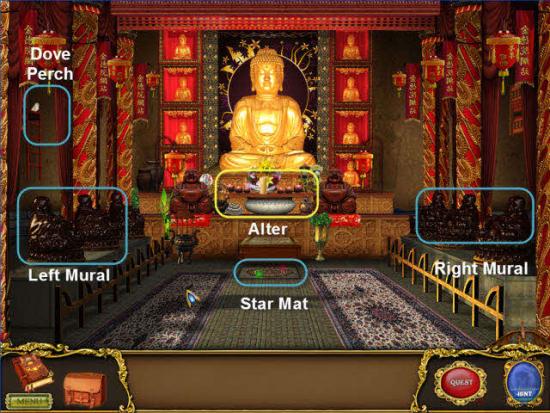
Click on the Star Mat highlighted in Blue.
Need to find 5 Coins.
Click on the Alter highlighted in Yellow.
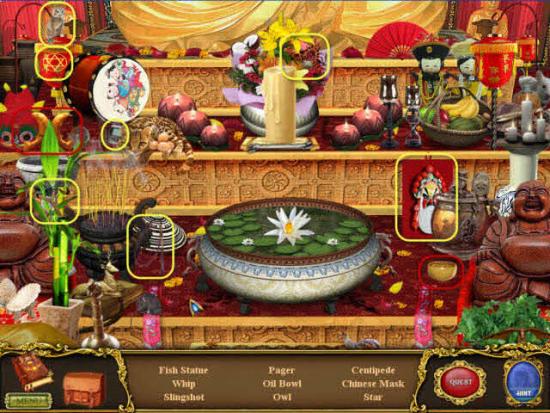
Gather the Hidden Objects highlighted in Yellow and the two Items highlighted in Red.
Click on the Left Mural showing clues to the location of three of the Coins.
Click on the Dove Perch
Return to Temple Room.
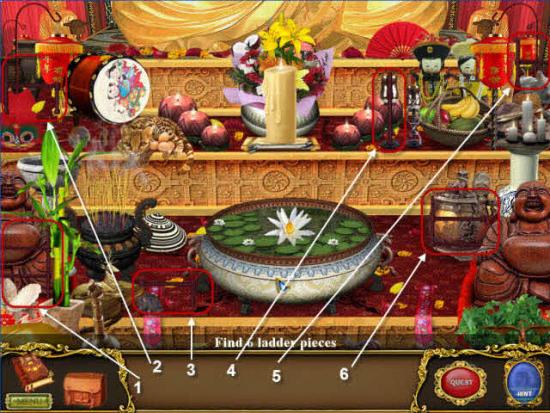
Click on the Alter once again.
Gather the six Ladder Pieces highlighted in Red.
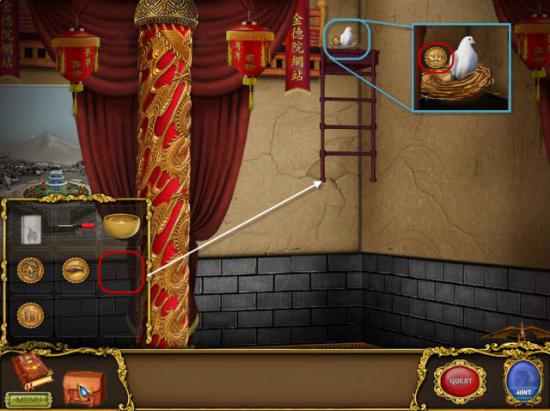
Move back to the Dove Perch.
Use the Ladder, highlighted in Red, from Inventory on the partial ladder on the wall.
Climb the Ladder and get the Coin highlighted in Red.
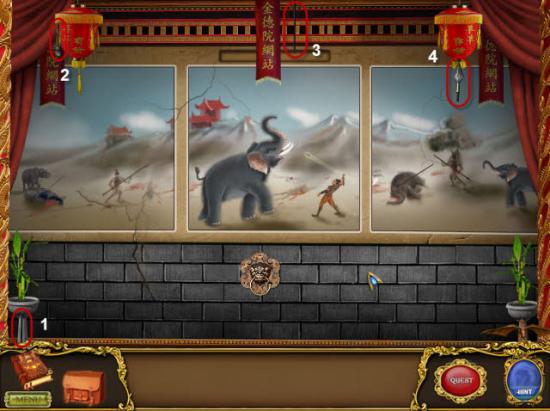
Click on the Right Mural and gather the four Spear Pieces highlighted in Red.
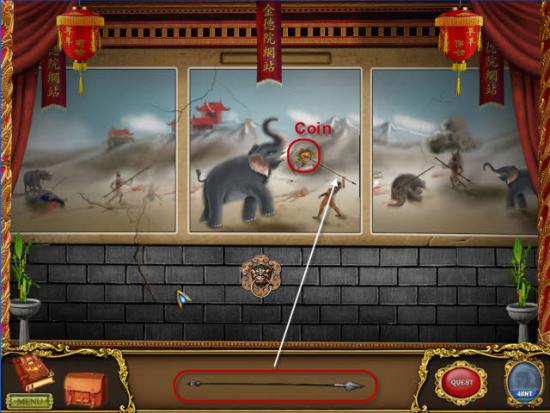
Place the Spear, highlighted in red, in the Mural, revealing the next Coin highlighted in Red.
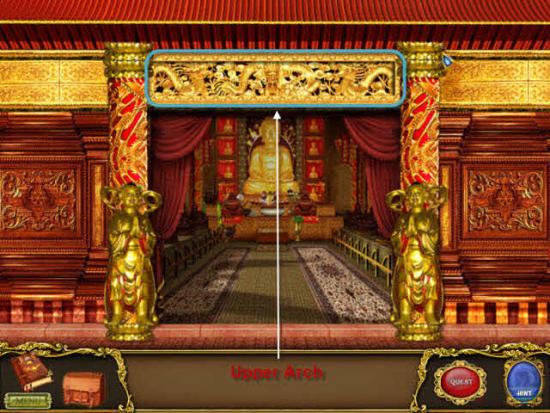
Exit the Temple, to the Temple Entrance.
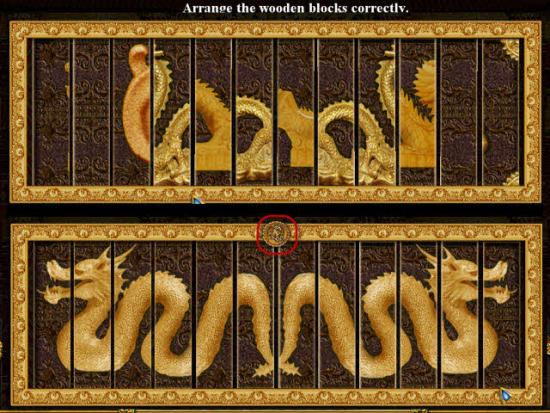
Click on the Upper Arch, highlighted in Blue, over the Temple Door for the next Puzzle.
Click the Individual Blocks to rotate the pieces to form a completed image of a Dragon.
Once the image is completed, see bottom half of image, the Coin will be revealed.
Gather the Coin highlighted in Red.
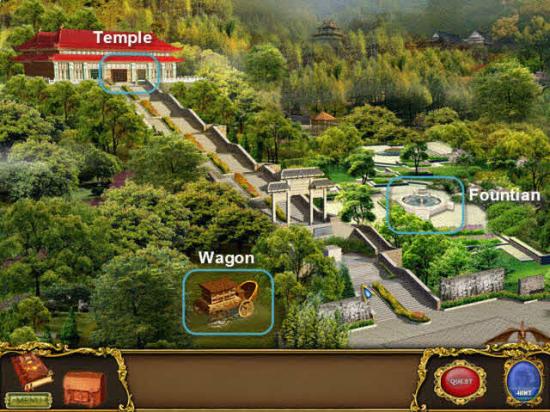
Exit to the overview shown above.
Move to the Wagon next.
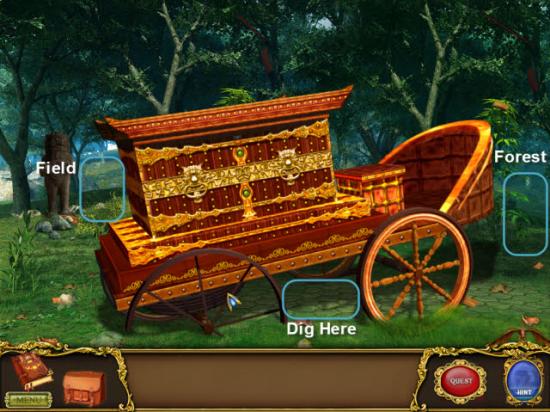
Click under the Wagon to find out you need to find a Shovel first.
Move to the Field, highlighted in Blue, on the left.
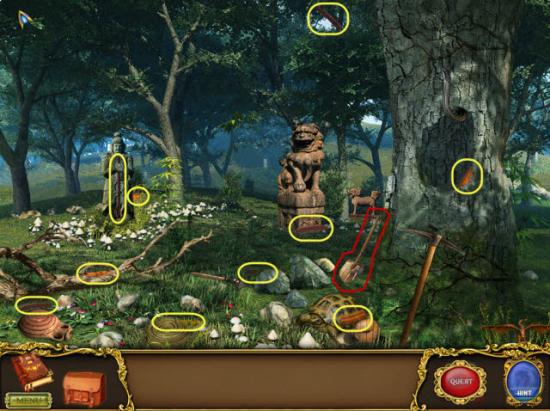
Gather the Shovel highlighted in Red.
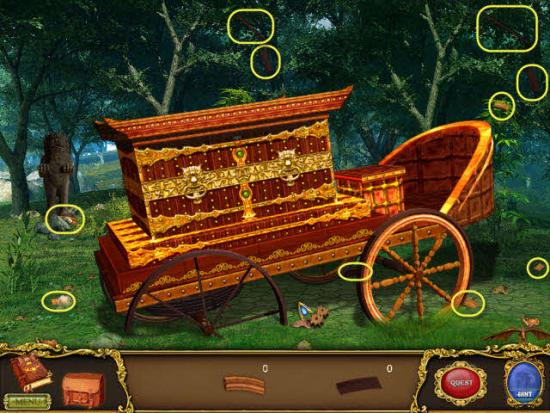
Return to the Wagon, try and dig under the Wagon once again.
Next you will need to fix the Wheel so you can move the Wagon.
Gather the Wheel Pieces highlighted in Yellow.

Return to the Field and gather the Wheel Pieces highlighted in Yellow.
Now return to the Wagon and move to the Forest on the right.
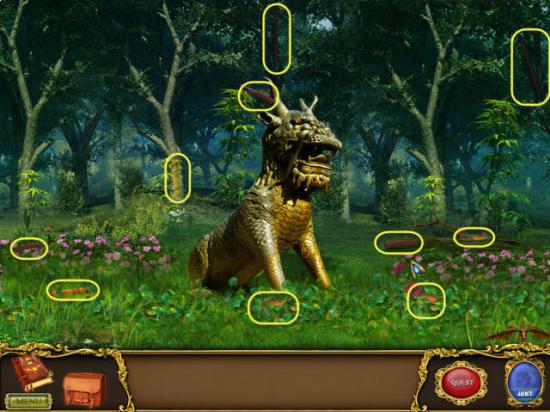
Gather all the Wheel Pieces highlighted in Yellow.
Once again return to the Wagon.
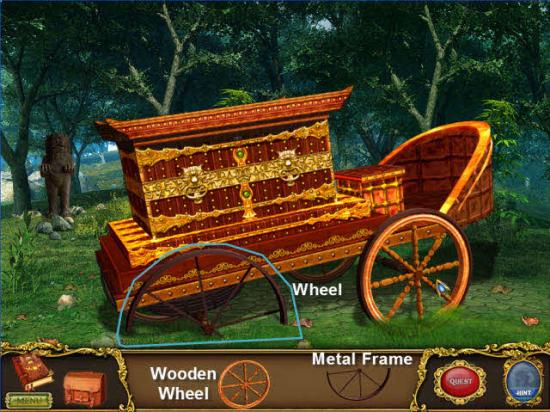
First add the half Metal Frame to the Wheel and then the full Wooden Piece to the Wheel.
Now click the Wagon to move it out of the way.
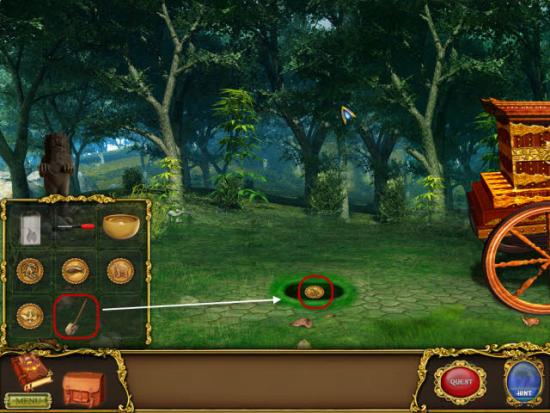
Use the Shovel, highlighted in Red, on the Ground where the Wagon used to stand.
Gather the Coin that is uncovered highlighted in Red.
Return to the Overview of the Area.
Next visit the Fountain.
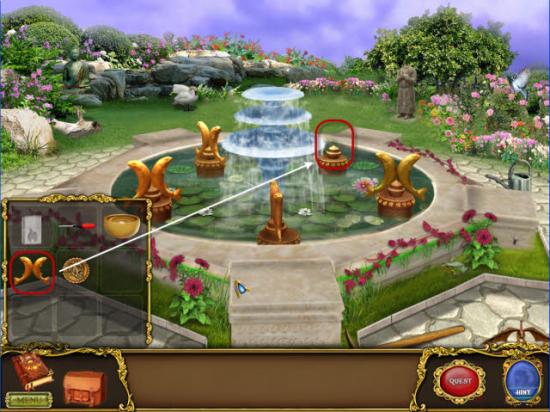
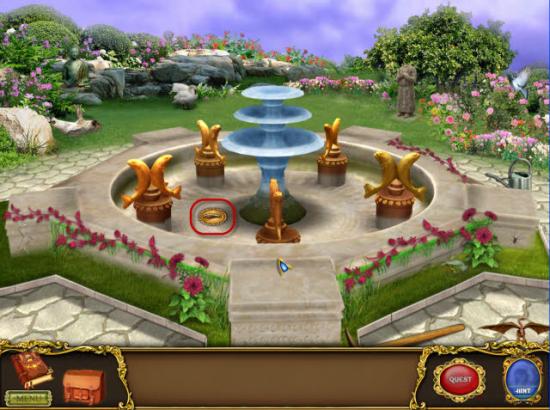
Use the Fish Statue piece, highlighted in Red, on the Fountain, replacing the missing piece.
The Fountain will drain, now gather the Coin highlighted in Red.
Finally return to the Temple.
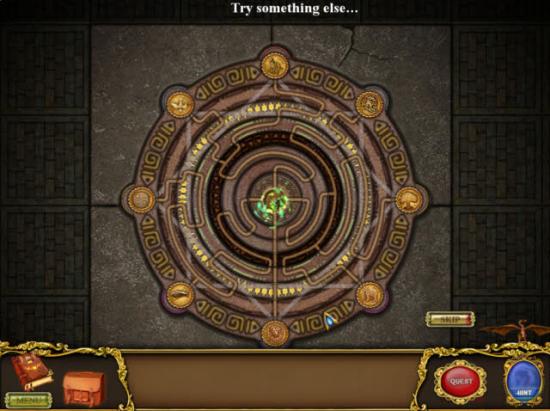
Click on the Star Mat and place the five Coins you have gathered on their corresponding matching image spots.
Next click on the Rings and orientate them so the lines all interconnect from the center to the outer ring of Coins.
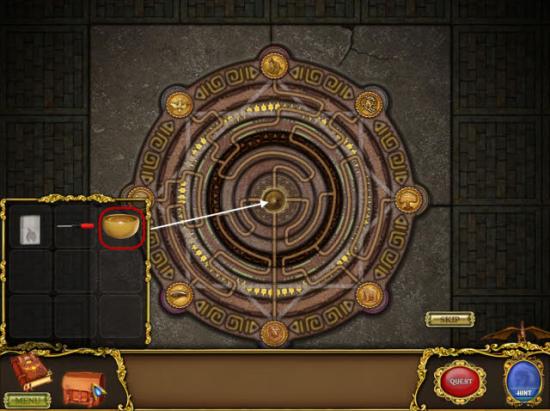
Next use the Bowl of Oil, highlighted in Red, on the center of the Star Mat.
Click the center of the Star Mat again to light the Oil.
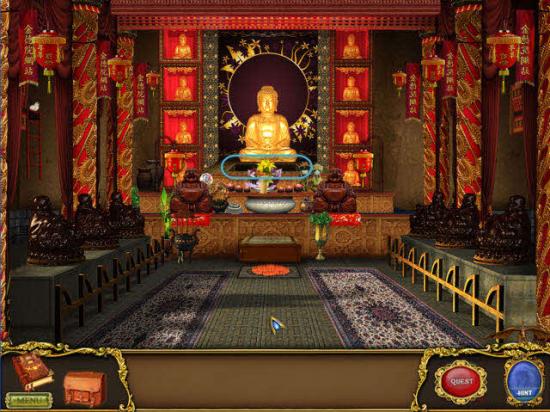
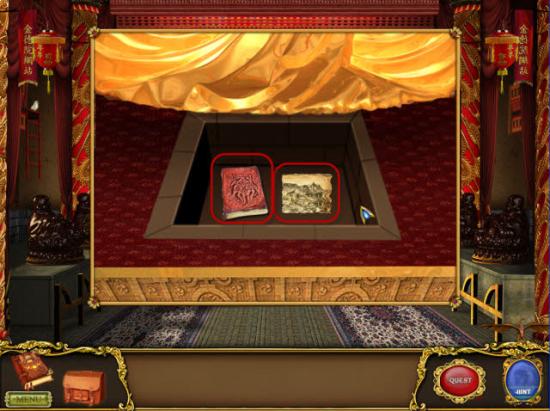
Click on the revealed Secret Compartment under Buddha, highlighted in Blue.
Gather the second Map Piece and the Book highlighted in Red.
Chapter 3
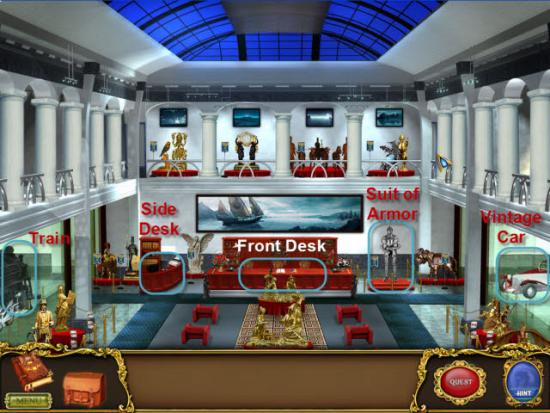
Click on the Suit of Armor highlighted in Blue.
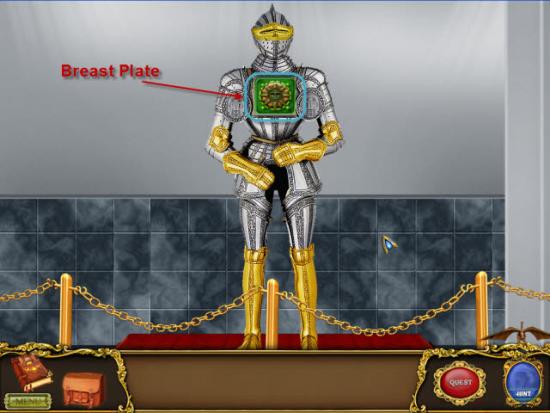
Click on the Breast Plate on the Suit of Armor for your next Puzzle.
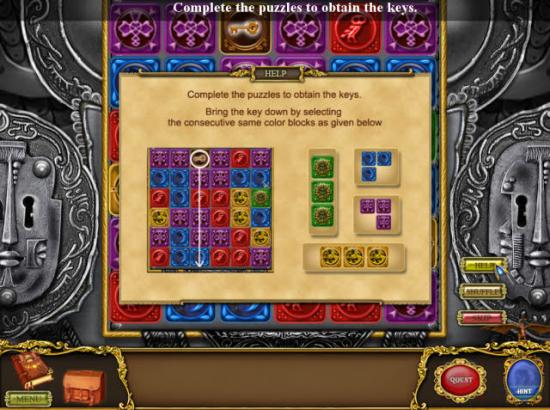
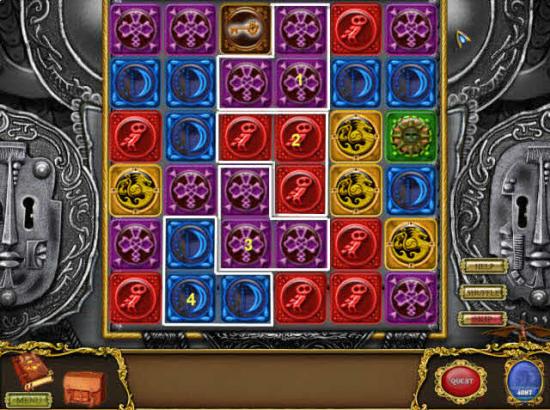
For this Puzzle you need to remove sets of same colored Blocks to allow the Key Block to reach the bottom of the screen.
Sets of Block must be in sets of three of same colors.
Sets must be either three blocks diagonal/horizontal or as three blocks in a corner shape, as seen in the image above.
If run out of matches or get stuck you can use Shuffle to get a new layout of Blocks and Colors or Skip the Puzzle after the Skip Button has filled up.
See above image for an example.
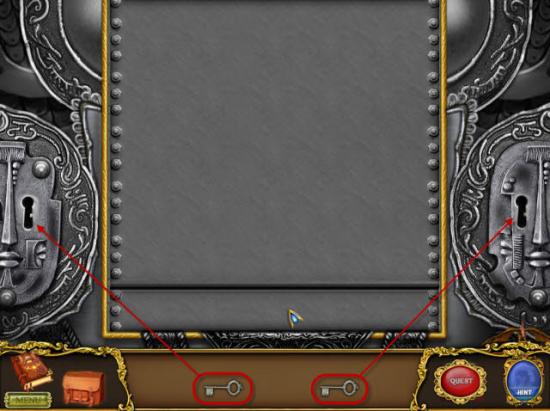
Once you have received two Keys, highlighted in red, place the corresponding Keys in the Locks on either side of the Breast Plate.
Gather the Gold Coin that is revealed.
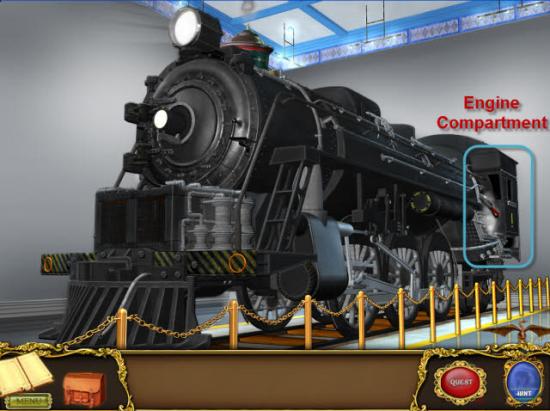
Examine the Train next.
Zoom in on the Engine Compartment highlighted in Blue.
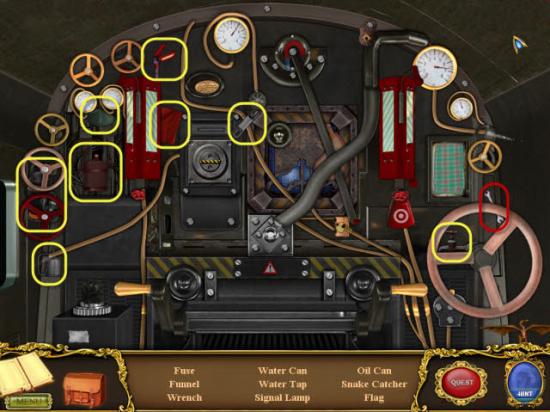
Gather the Hidden Objects, highlighted in Yellow, and the Wrench, highlighted in Red.
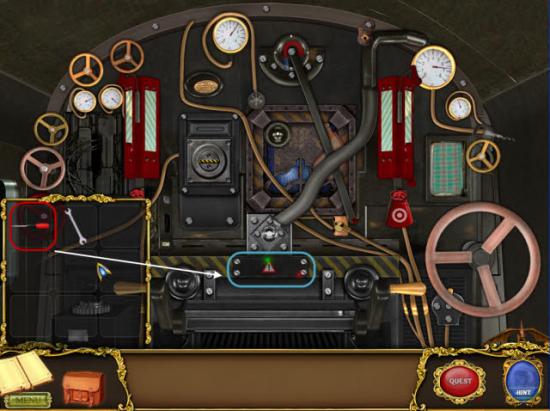
Use the Screwdriver, highlighted in Red, on the four screws on the Caution Plate highlighted in Blue.
Gather the Scroll of Paper revealed.
Return to the Foyer.
DD65
Examine the Front Desk next.
Start by opening all the Cabinet Doors.
Gather the Hidden Objects, highlighted in Yellow, and the five Items highlighted in White.
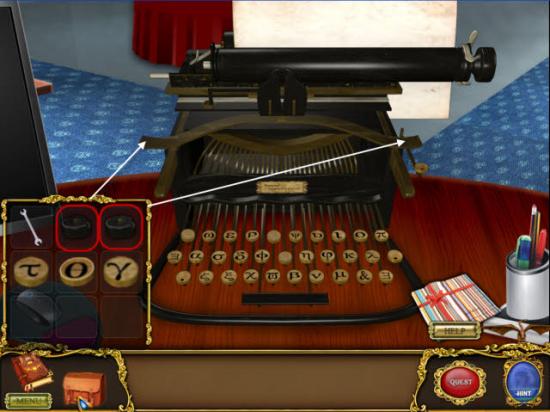
Examine the Side Desk next.
Place the two Carbon Disks, highlighted in Red, on either side of the Typewriter.
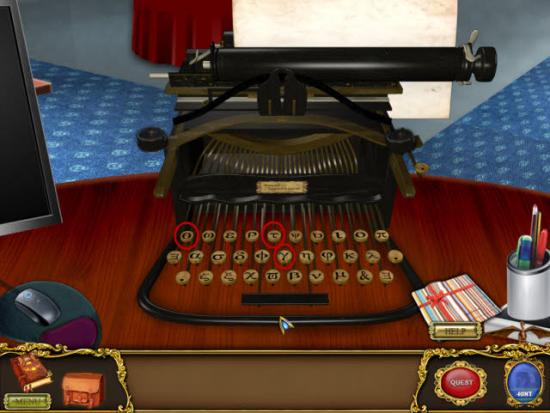
Next place the three missing Typewriter Keys in the according spots highlighted in Red.
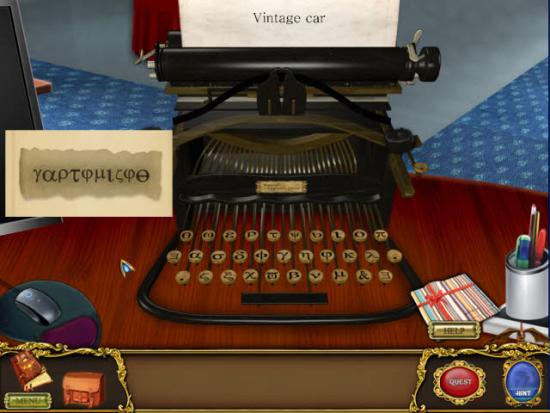
Now type in the phrase, on the Typewriter, you found on the Paper Scroll from the Train to spell your next clue.
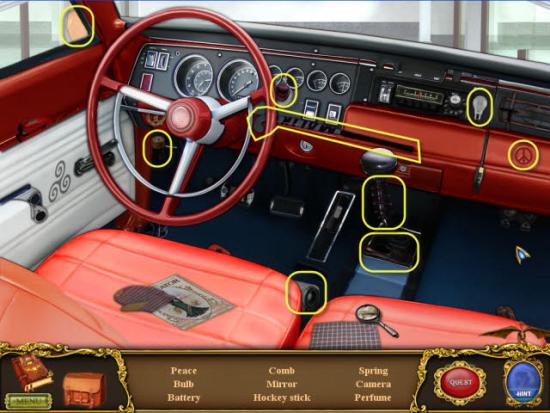
Now examine the Vintage Car.
Focus on the Interior of the Car
Gather the Hidden Objects highlighted in Yellow.
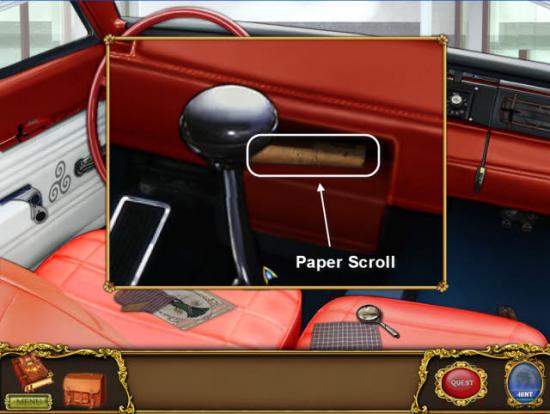
Examine the Compartment behind the Shift Stick.
Gather the second Paper Scroll highlighted in White.
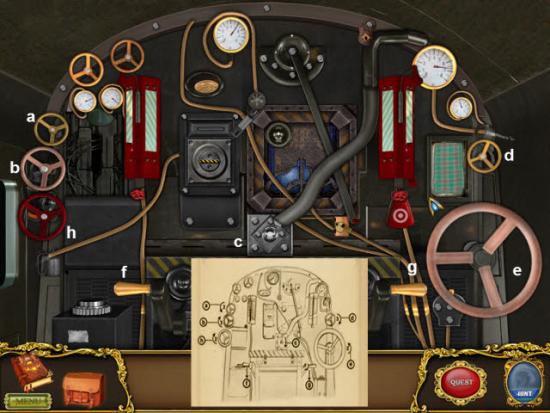
Return to the Trains Engine Compartment.
To turn off the Train refer to the Diagram you found on the second Paper Scroll.
Turn Wheel “a” counter-clockwise two times.
Turn Wheel “b” clockwise three times.
Flip Switch “c” down.
Turn Wheel “d” clockwise three times.
Turn Wheel “e” counter-clockwise two times.
Flip Handle “f” down.
Flip Handle “g” down.
Finally, turn Wheel “h” clockwise two times.
Return to full view of Train.
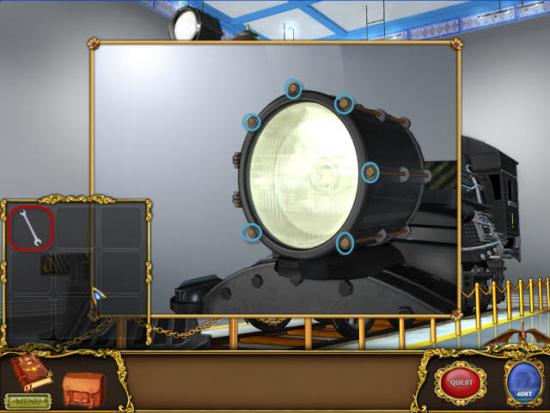
Examine the Head Lamp on the front of the Train.
Use the Wrench, highlighted in Red, on each of the Bolts, highlighted in Blue, around the Head Lamp.
Gather the third Map Piece that is revealed.
Chapter 4
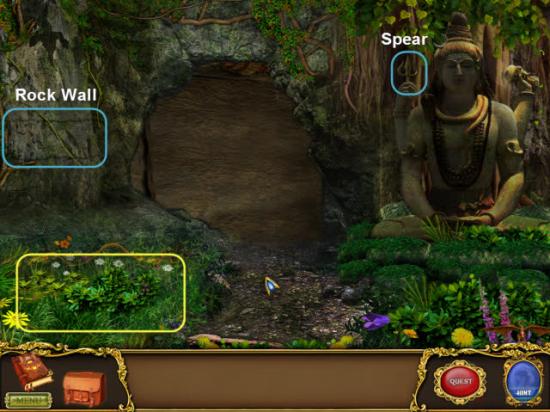
Examine the Area highlighted in Yellow.
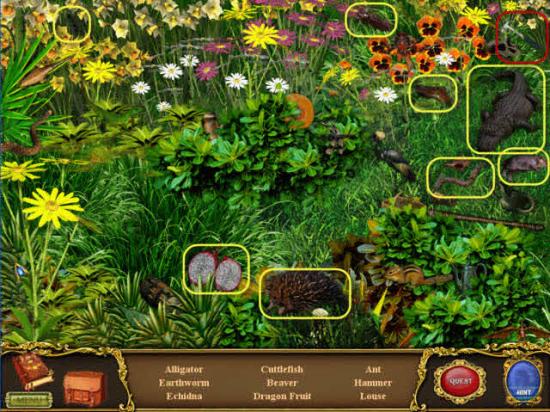
Gather the Hidden Objects, highlighted in Yellow, and the Item highlighted in Red.
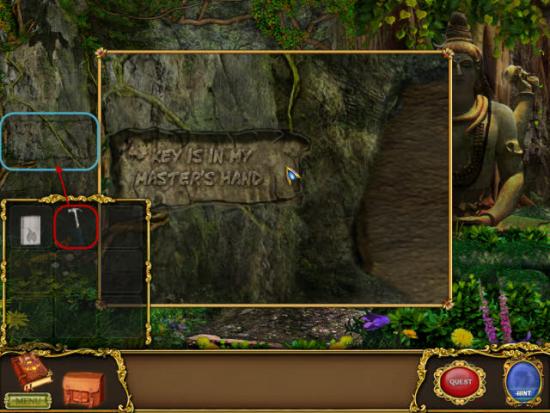
Use the Hammer, highlighted in Red, on the Rock Wall, highlighted in Blue.
This will reveal a message/clue to your next objective.
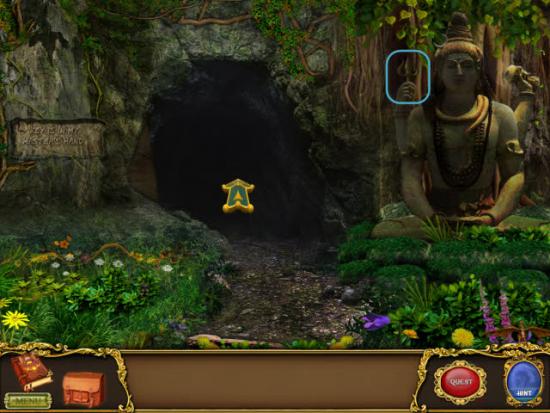
Click on the Spear, highlighted in Blue, in the Statues Hand several times to open the Cave Entrance.
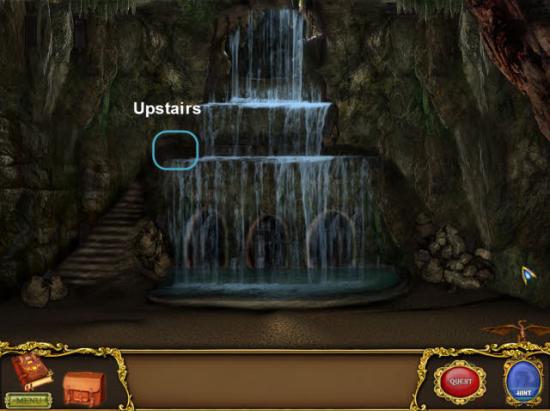
Examine Upstairs on the Waterfall.
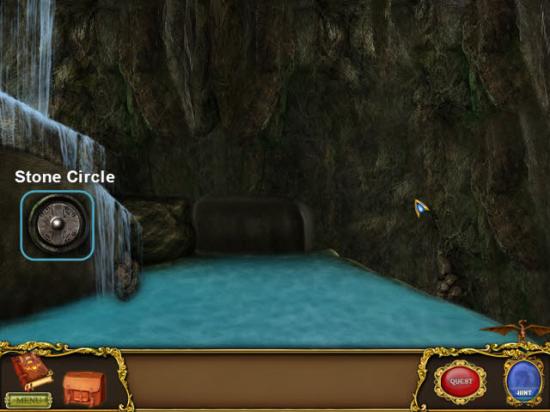
Examine the Stone Circle highlighted in Blue.
Return to Main Cavern.
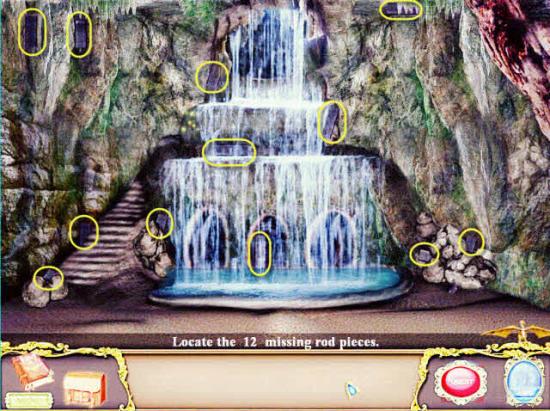
Gather the 12 missing Rod Pieces highlighted in Yellow.
Return to Upstairs of the Waterfall.
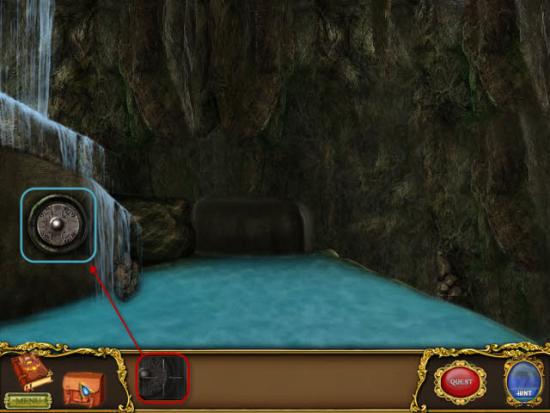
Open Inventory and use the Rods, highlighted in Red, on the Stone Circle, highlighted in Blue.
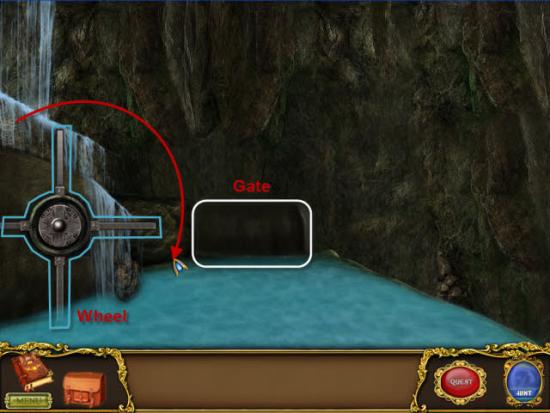
Click the Wheel, highlighted in Blue, clockwise, until the Gate, highlighted in White is fully open.
Return to the Main Cavern.
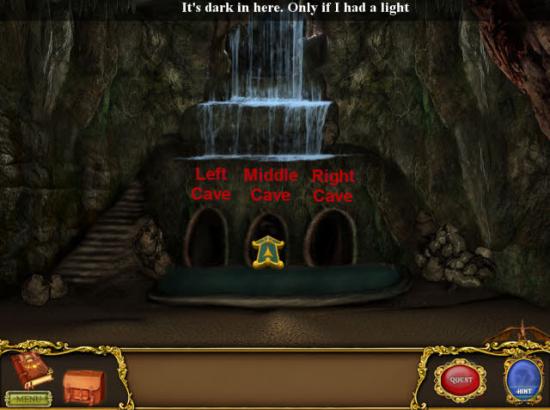
Enter Left Cave first.
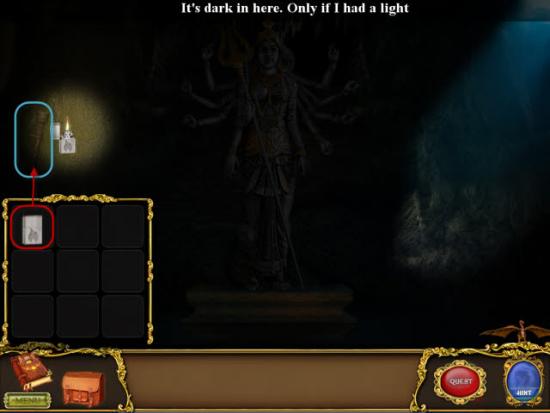
Use the Lighter, highlighted in Red, on the Wall Torch, highlighted in Blue, to light room.
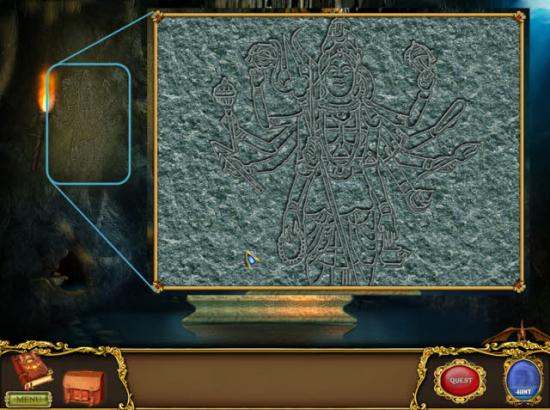
Examine the Wall Mural highlighted in Blue.
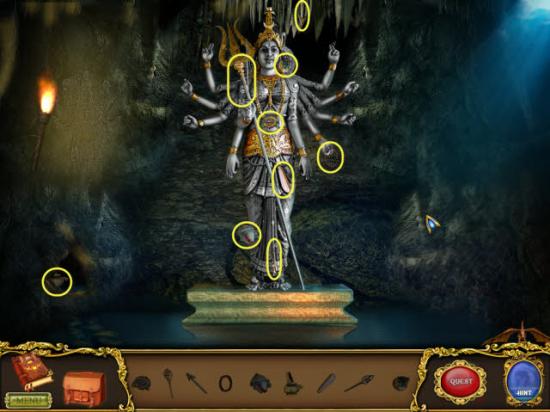
Find the Hidden Objects highlighted in Yellow.
Return to the Main Cavern.
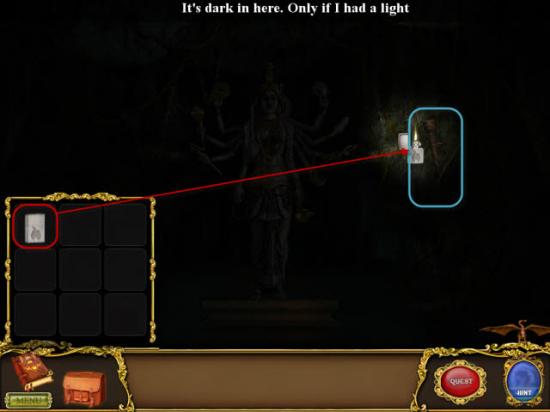
Enter the Middle Cave.
Use the Lighter, highlighted in Red, on the Wall Torch, highlighted in Blue.
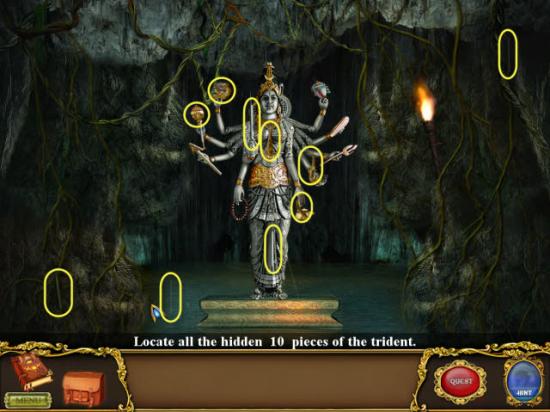
Find the ten Spear Pieces highlighted in Yellow.
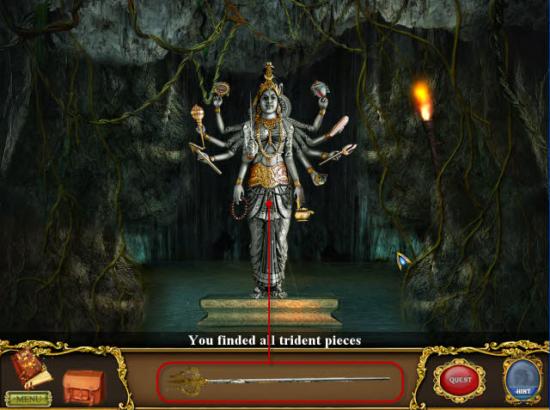
Place the completed Trident, highlighted in Red, on the Statue.
Return to the Main Cavern.
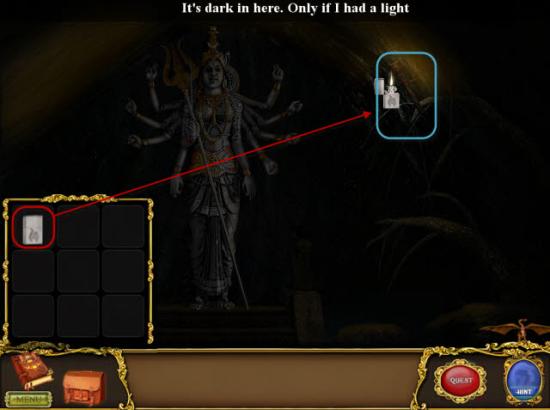
Enter the Right Cave.
Use the Lighter, highlighted in Red, on the Wall Torch, highlighted in Blue.
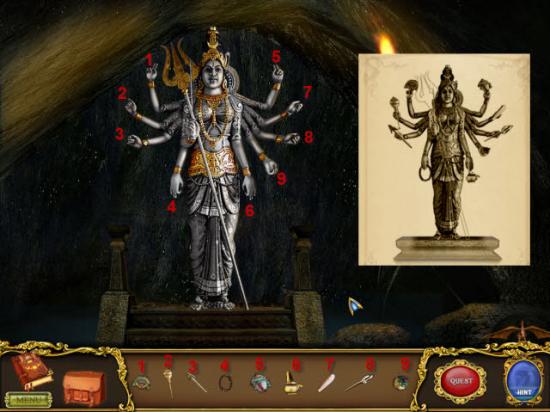
Use the example Photo from your Journal to replace all the Objects to the correct Hands on the Statue.
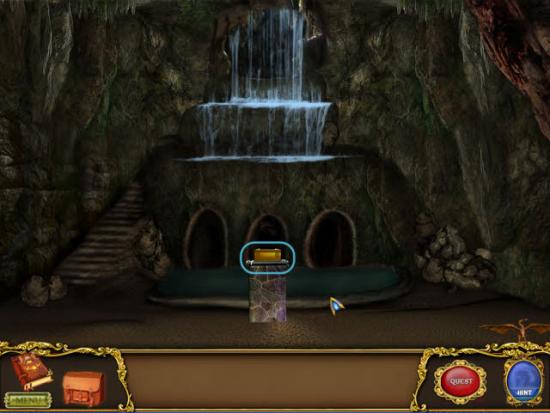
Return to Main Cavern and examine the Gold Chest highlighted in Blue.
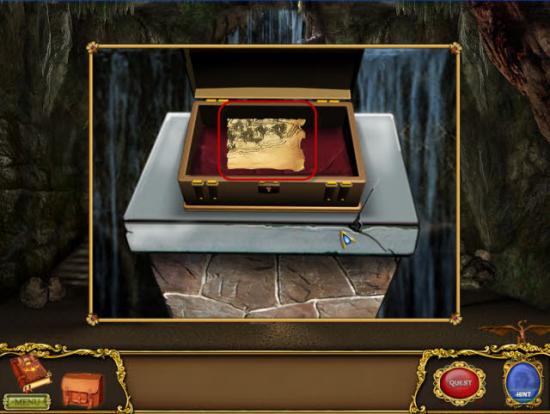
Gather the fourth and final Map Piece, highlighted in Red.
Chapter 5
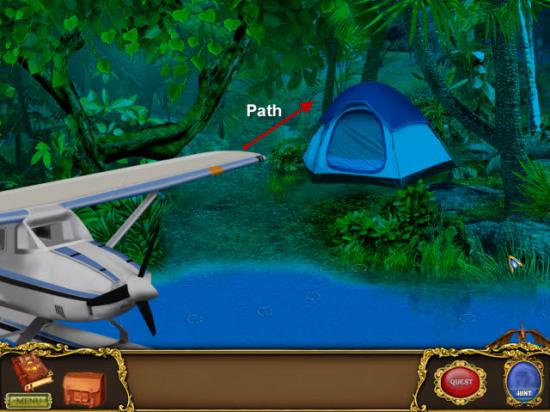
Follow the Path into the Jungle.
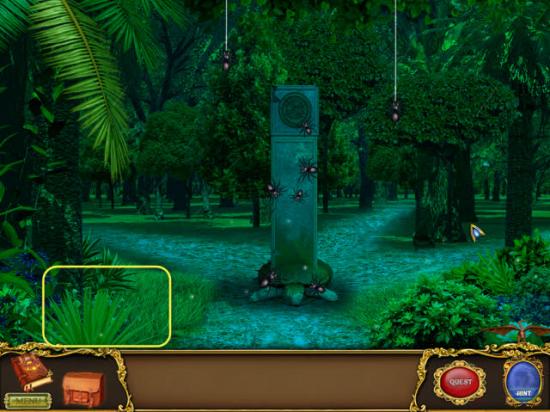
Examine the Area highlighted in Yellow.
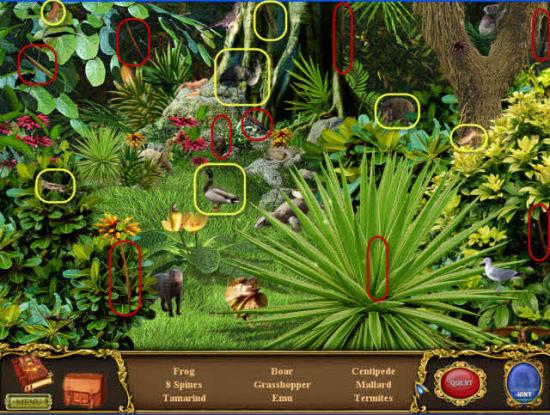
Gather the Hidden Objects, highlighted in Yellow, and the Items, highlighted in Red.
Return to the Spider Covered Post.
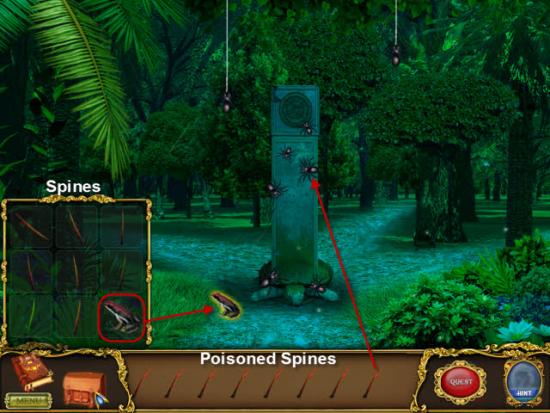
Place the Frog, highlighted in Red, from your Inventory, onto the Ground in Front of the Spider Post.
Next take each of the eight Spines and use them on the Frog to make Poisonous Spines.
Finally take each Poisoned Spine and kill the eight Spiders covering the Post.
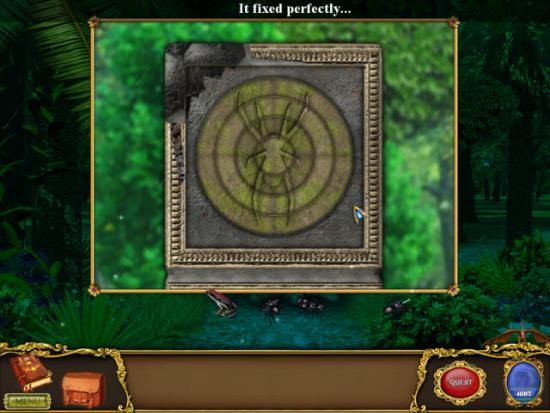
Examine the Post once all the Spiders are dead to reveal a Circle Puzzle.
Click to rotate the Circular Pieces until the Image of a Spider is formed.
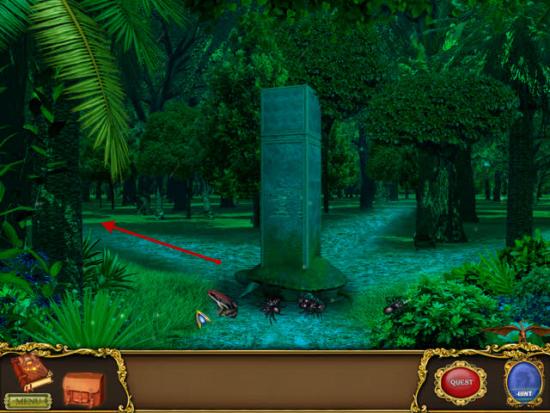
Take the Path the Turtle is now pointing.
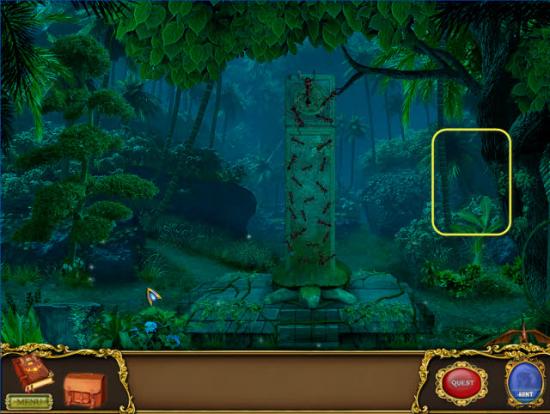
Examine the Area highlighted in Yellow.
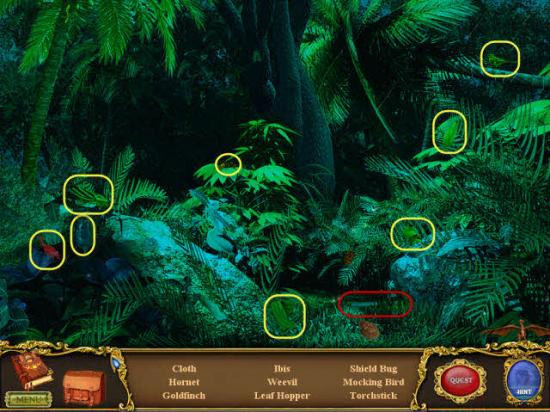
Gather the Hidden Objects, highlighted in Yellow, and the Torchstick, highlighted in Red.
Return to Ant Covered Post.
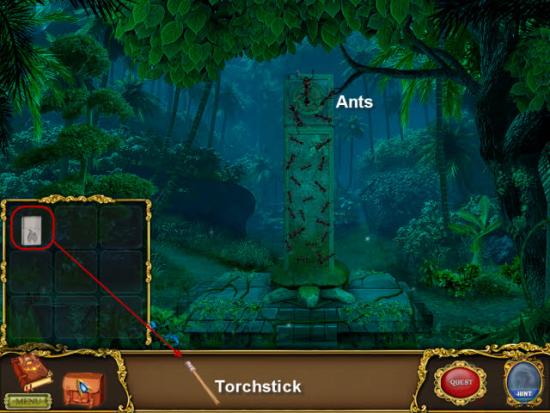
Click on the Torchstick, next use the Lighter, highlighted in Red, on the Torchstick.
Now use the Lit Torchstick to burn the Ants off the Post.
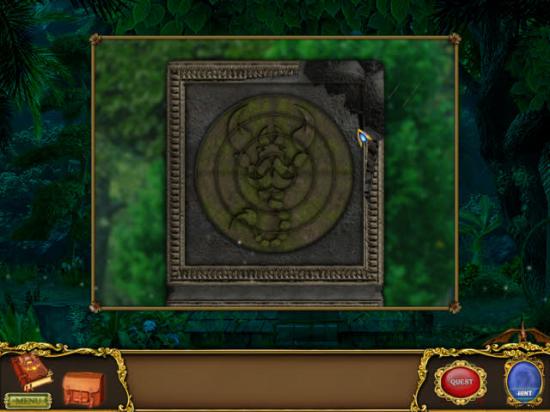
Now click on the Post and solve the next Circle Puzzle.
This Puzzle is an Image of a Scorpion.
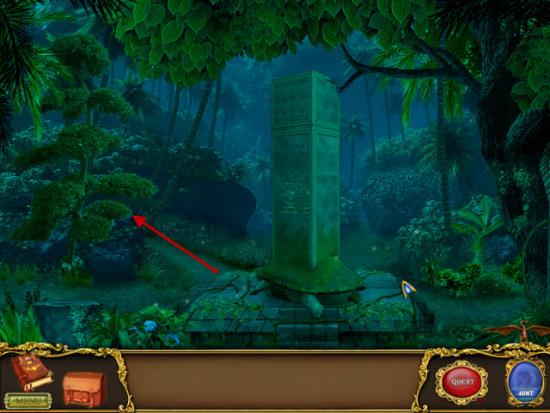
Again, follow the new direction the Turtle is pointing.
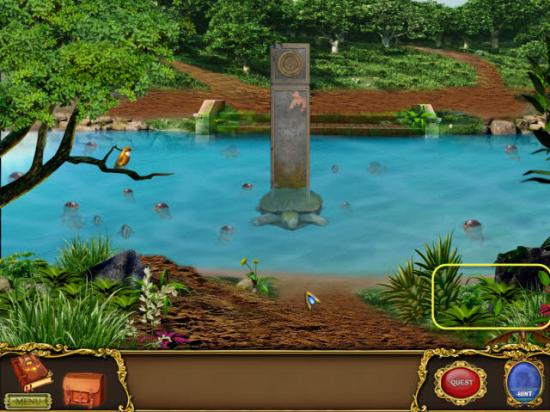
Examine the Area highlighted in Yellow.
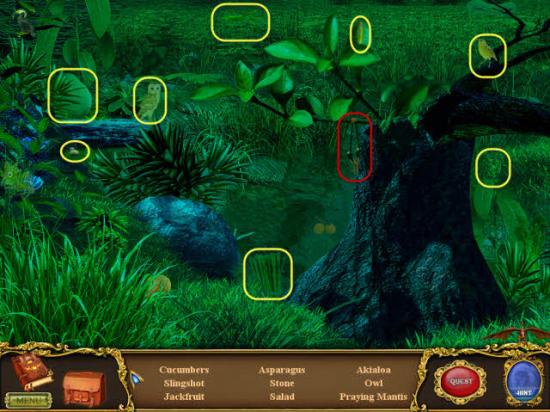
Gather the Hidden Objects, highlighted in Yellow, and the Slingshot, highlighted in Red.
Return to the Piranha filled River.
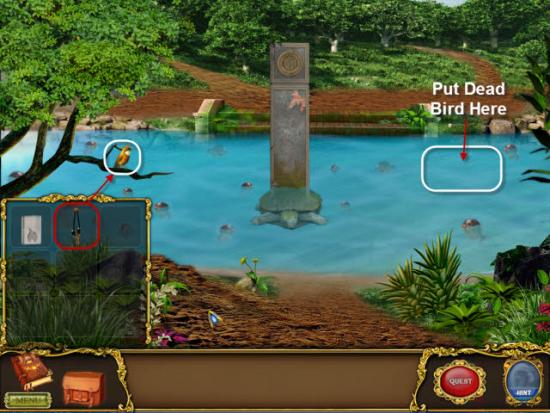
Use the Slingshot, highlighted in Red, on the Yellow Bird, highlighted in White.
Gather the Dead Bird and toss it into the River.
Once the Piranhas have attacked the Dead Bird, examine the Post in the middle of the River.
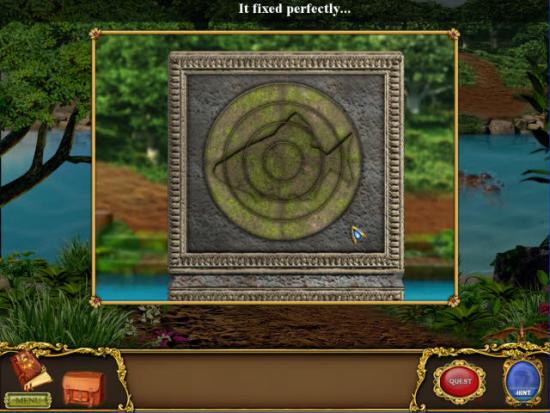
Solve this Circle Puzzle portraying a Fish image.
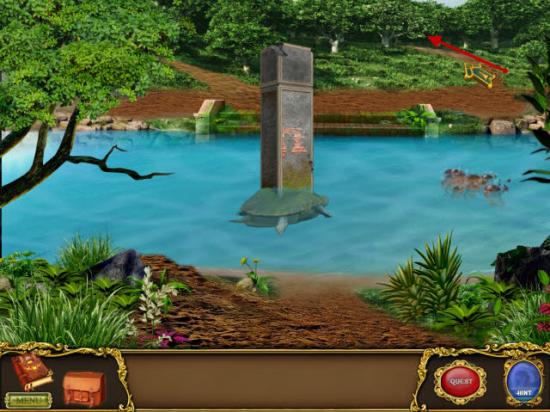
Follow the Path that the Turtle Statue is now pointing toward.
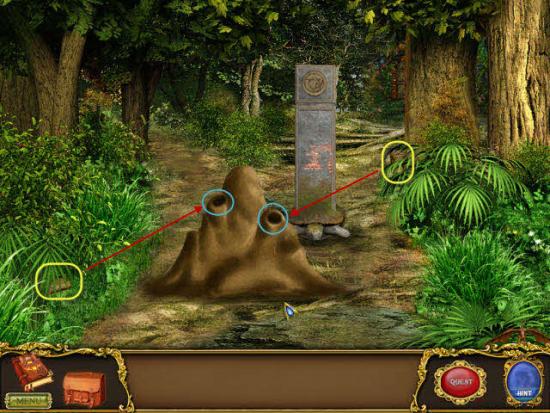
Gather the two Logs highlighted in Red.
Place the two Logs in the holes of the Mound to lock the Snake inside.
Examine the Post to find the last Circle Puzzle, this one depicting a Snake.
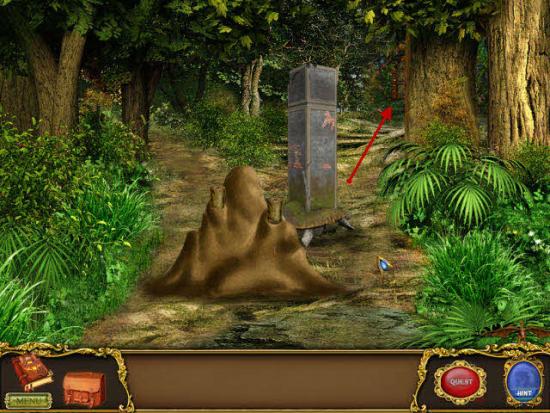
Follow the Path that the Turtle Statue is now pointing toward.
Chapter 6
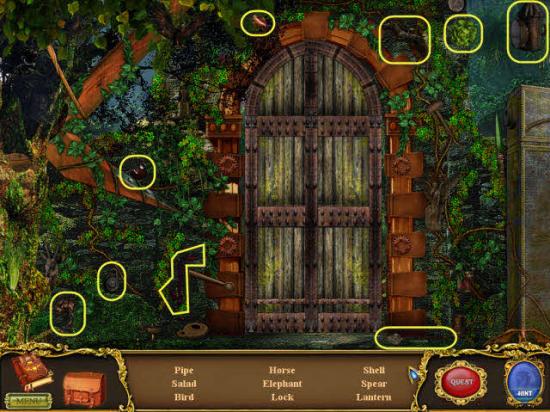
Gather the Hidden Objects highlighted in Yellow.
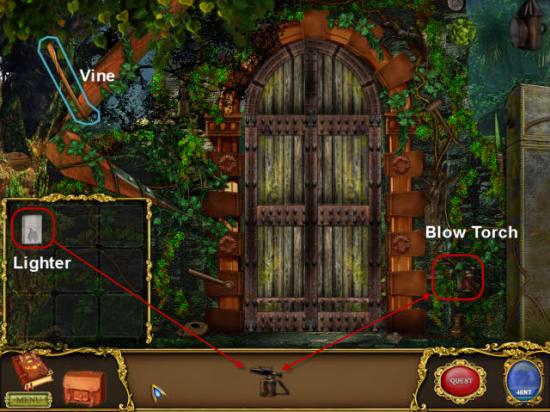
Gather the Blow Torch highlighted in Red.
Use the Lighter, highlighted in Red, on the Blow Torch to light it.
Then use the Blow Torch on the Vine highlighted in Blue.
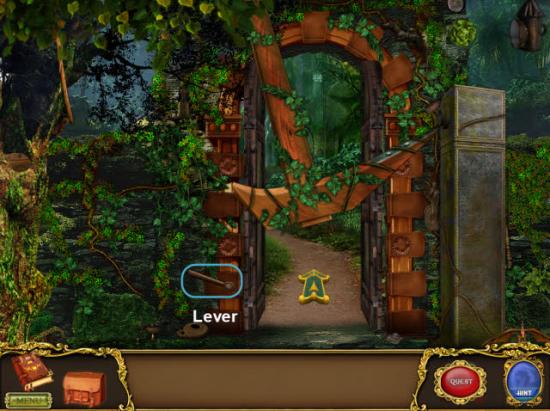
Pendulum is now swinging free.
Crank the Lever, highlighted in Blue, to move the Stone Pillar.
Keep Cranking the Lever till the Pendulum strikes the Stone Pillar.
Now you can enter through the Door.
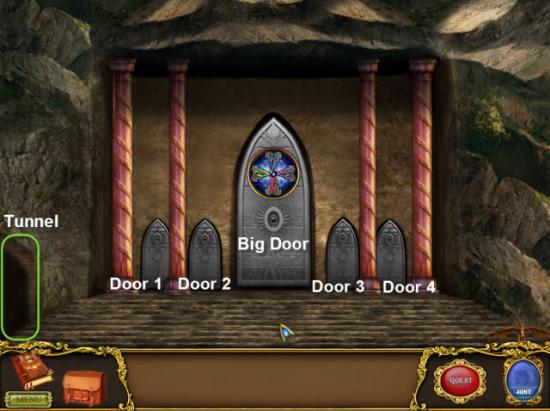
Enter the Tunnel on the left, highlighted in Green.
Examine the Alcove at the end of the Tunnel.
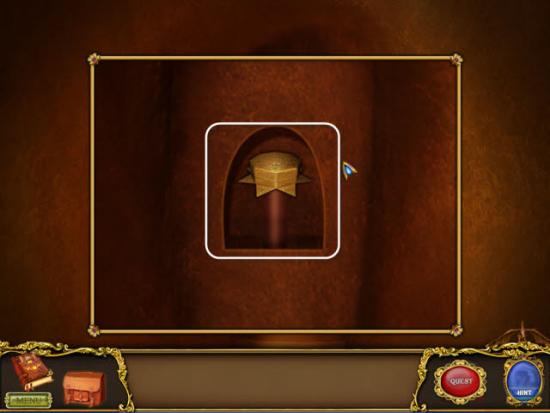
Gather the Star Key highlighted in White.
Return to the Doors.
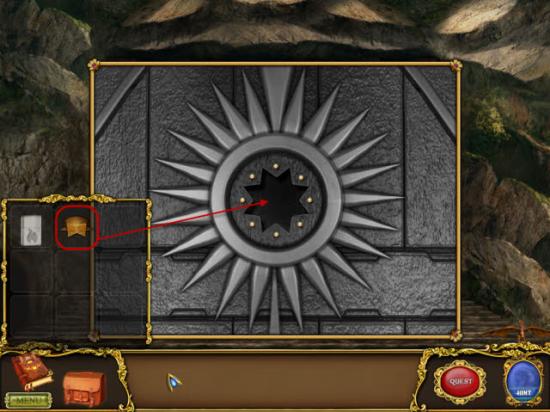
Examine Door 1.
Use the Star Key, highlighted in Red, on the Lock, to open Door 1.
Enter through Door. 1
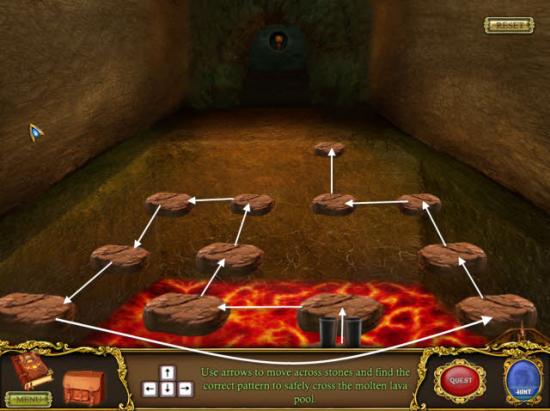
For this Puzzle you need to cross the Lava stepping on each Stone once.
Once across a Bridge will appear.
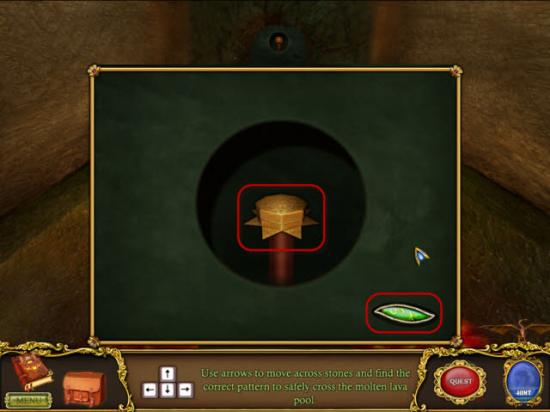
Examine the Alcove.
Gather the two Items highlighted in Red.
Return to the Doors.
Use the new Star Key on Door 2.
Enter Door 2.
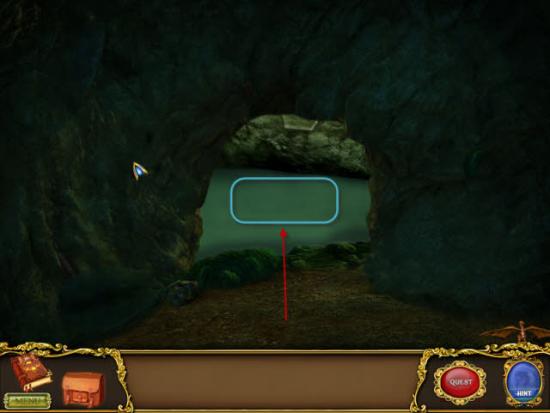
Pass through the Tunnel to the Lake.
Examine the Lake.
Need to find the six missing Gears.
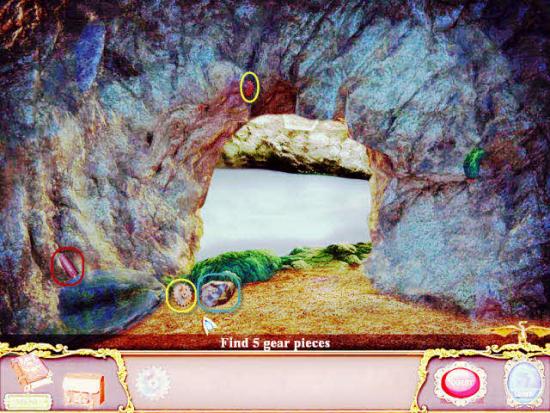
Exit the Water and return to the Tunnel.
Move the Rock highlighted in Blue.
Collect the Gears highlighted in Yellow, and the Item highlighted in Red.
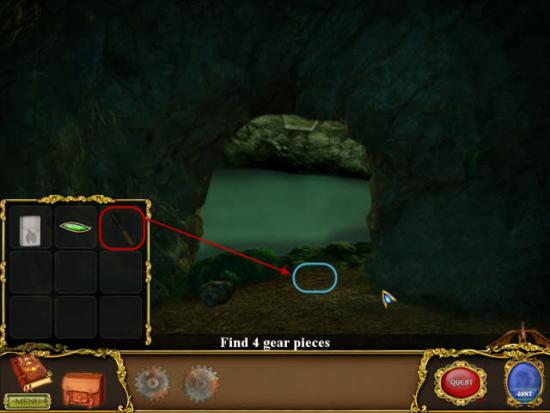
Use the Shovel, highlighted in Red, on the Ground, highlighted in Blue.
Gather the third Gear.
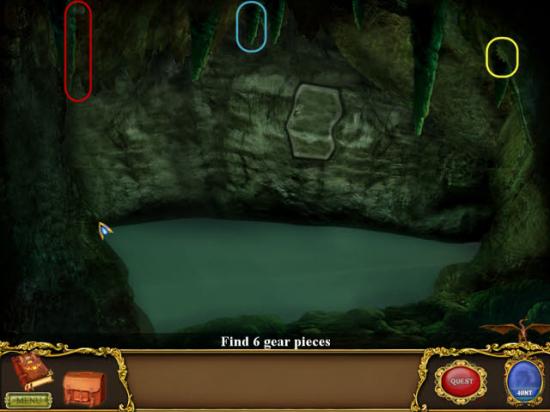
Return to the Lake.
Gather the Gear highlighted in Yellow.
Move the Stalactite, highlighted in Blue, to find Gear number five.
Gather the Item highlighted in Red.
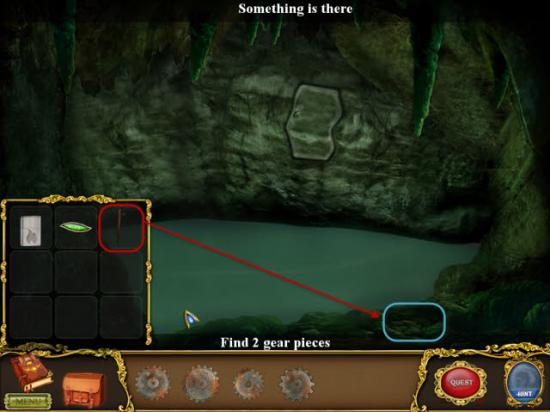
Use the Item, highlighted in Red, on the Rocks, highlighted in Blue.
Gather the sixth and final Gear.
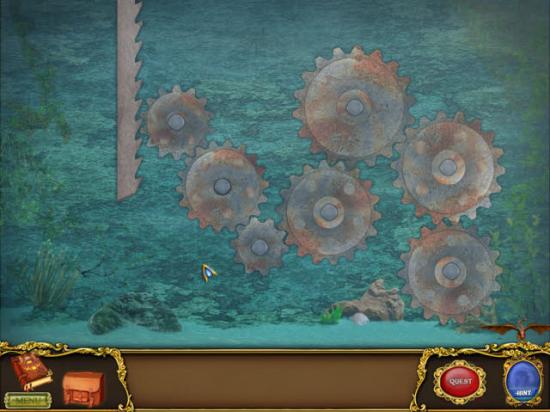
Enter the Lake again and place the six Gears to lower the Metal Bar.
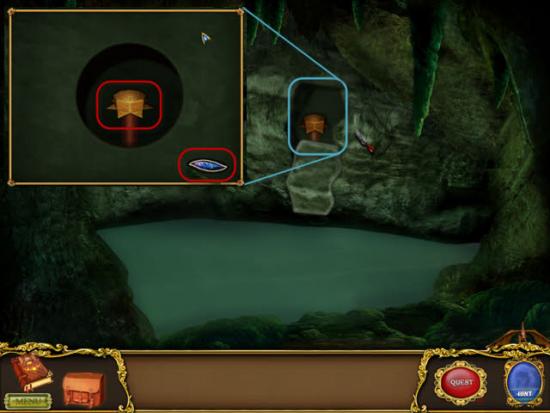
Exit Lake and Examine the Cave Wall Opening highlighted in Blue.
Gather the two Items highlighted in Red.
Return to the Doors.
Use the Star Key on Door 3.
Enter Door 3.
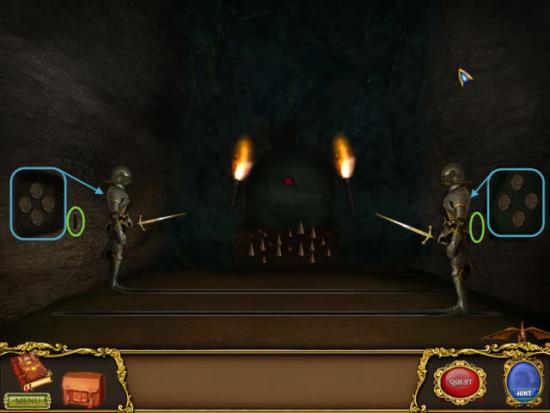
To solve this Puzzle you need to move the Knights into position to turn off the Spikes.
Use the Stone Buttons on the Wall highlighted in Blue.
The Top Button will move the Knight Forward.
The Bottom Button will move the Knight Backward.
The Side Buttons will move the Sword Up and Down.
Your Goal is to move each Knight across the Path to the opposite Wall and line up their Swords to fit in the Notches in the Wall, highlighted in Green.
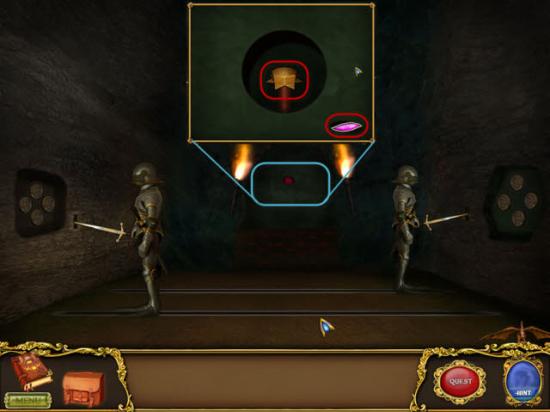
Once the Knights are lined up the Spikes will lower into the Floor.
Examine the Alcove, highlighted in Blue, and gather the two Items highlighted in Red.
Return to the Doors.
Use the Star Key on Door 4.
Enter Door 4.
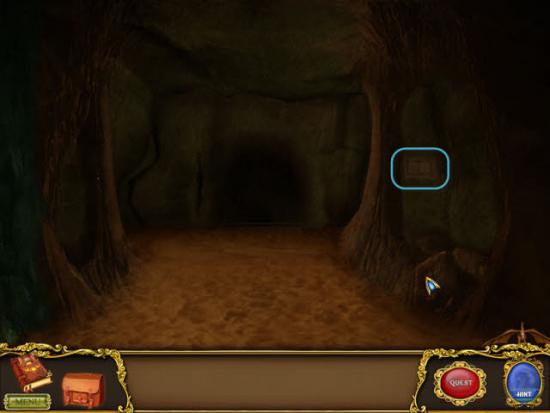
To get pass the Sink Hole; examine the Puzzle on the Wall, highlighted in Blue.
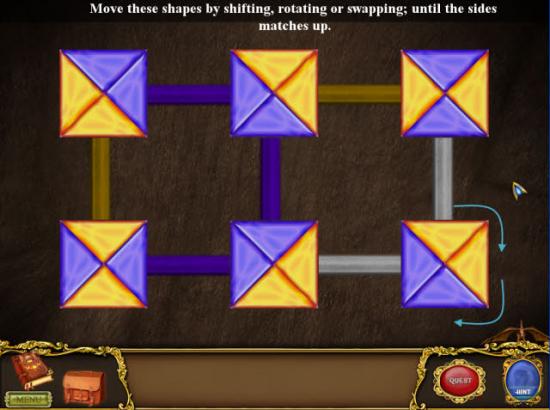
To solve this Puzzle you need to rotate the Blocks until each color side is facing a like colored side.
i.e. Yellow to Yellow and Purple to Purple.
Example: Rotate the lower right corner Block twice to match the two sides.
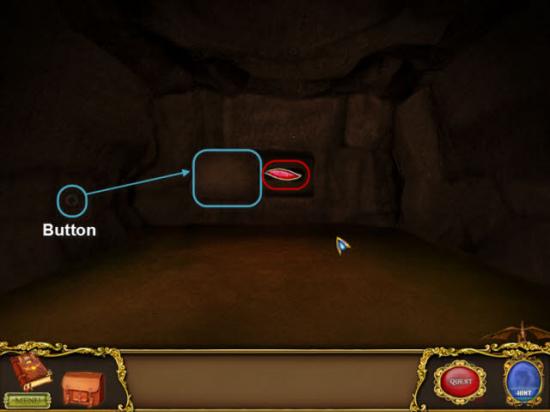
Click the Button, highlighted in Blue, twice to open the Stone Alcove.
Gather the Item highlighted in Red.
Return to the Doors.
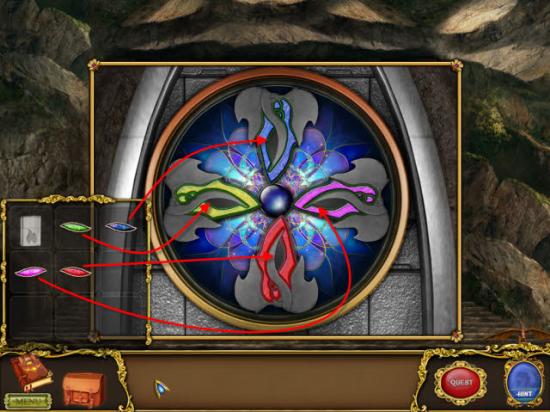
Examine the Big Door.
Place the Colored Pieces in their matching slots on the Stained Glass Display.
This will open the Big Door.
Enter the Big Door to continue.
Chapter 7
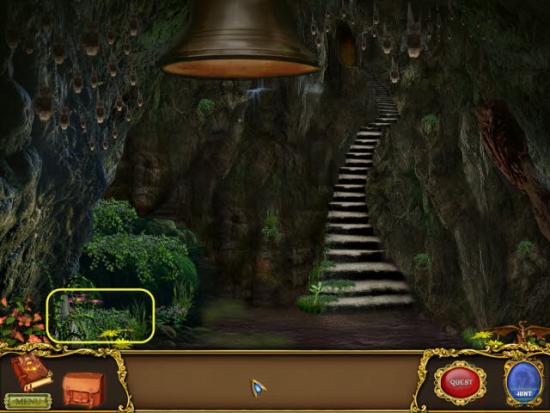
Examine the Area highlighted in Yellow.
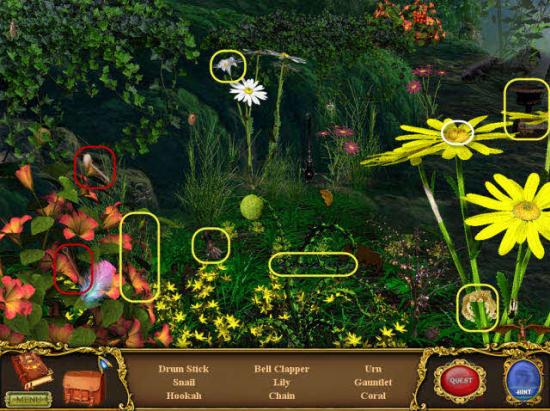
Gather the Hidden Objects, highlighted in Yellow, and the two Items, highlighted in Red.
Return to the Bat filled Cave.
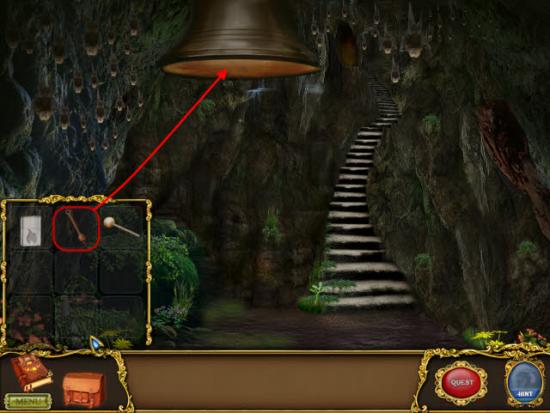
Attach the Bell Clapper, highlighted in Red, to the Bell.
Grab and pull the Clapper to the side of the Bell, to ring the Bell, do this till the Bats leave the Cave.
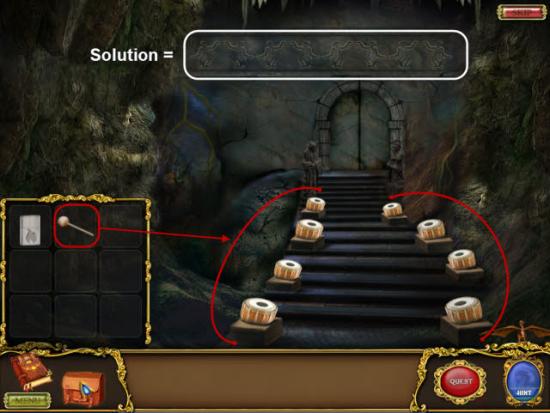
Climb the Stairs.
To Solve the Drum Puzzle; use the Drumstick highlighted in Red, on the Drums lining the Steps.
Each Drum effects one of the Carvings above the closed Stone Door.
Arrange the Carvings in the Pattern shown to open the Stone Door.
Enter through the Stone Door.
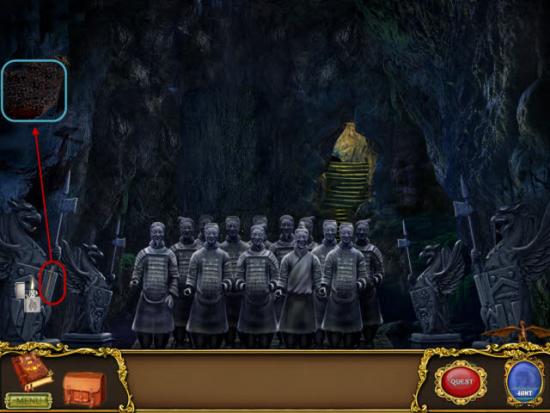
Open Inventory and equip the Lighter.
Use the Lighter on the Torch highlighted in Red.
Now use the Torch on the Beehive above highlighted in Blue.
Gather the Key, where the Beehive used to be.
Grab the Weapon and drag the Weapon downward.
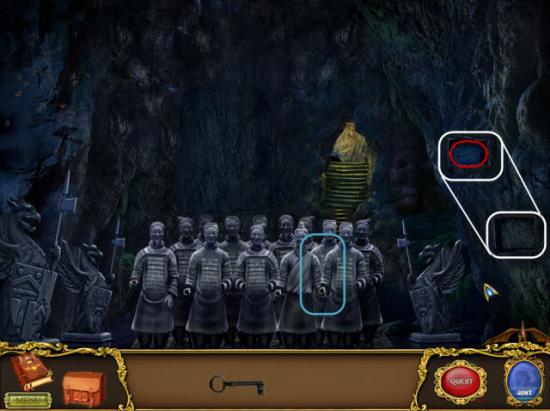
Click on the Alcove revealed to remove the Stone Covering.
Gather the Key, highlighted in Red, which is revealed.
Next, click on the Stone Statues on the Right, highlighted in Blue, to reveal next Puzzle.
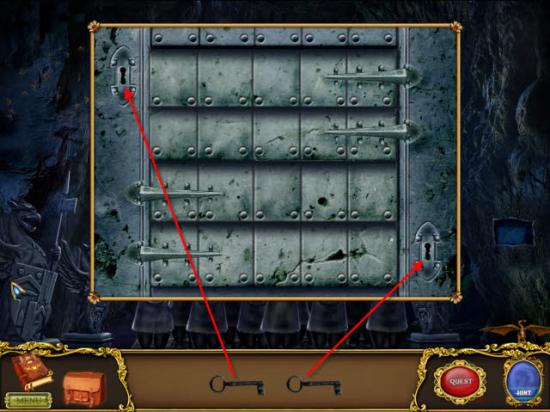
Insert the two Keys into the Key Holes on either side of the Puzzle.
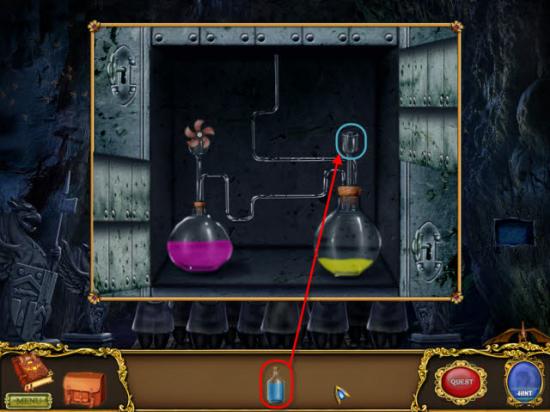
Gather the Blue Potion from behind the Vial of Purple Liquid.
Use the Blue Potion on the Glass Piping above the Yellow Liquid.
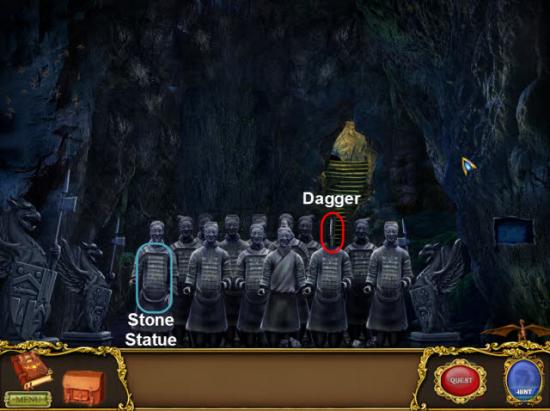
Gather the Knife, revealed, highlighted in Red.
Next examine the Stone Statue on the far right highlighted in Blue.
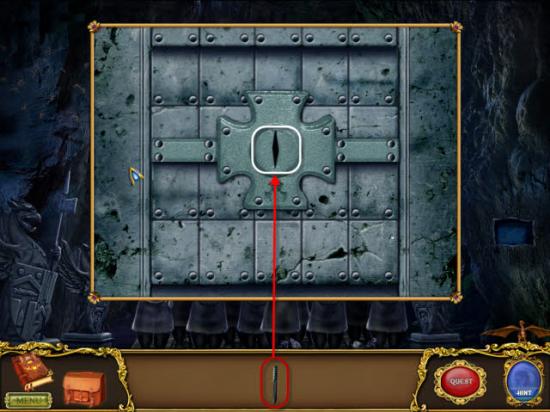
Insert the Knife, highlighted in Red, into the Slot.
Stone Statues will disappear.
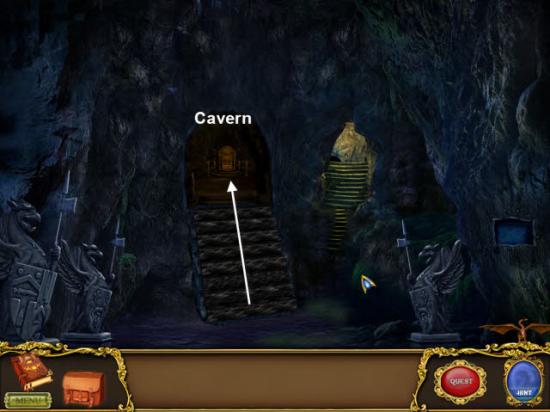
Enter the revealed Cavern.
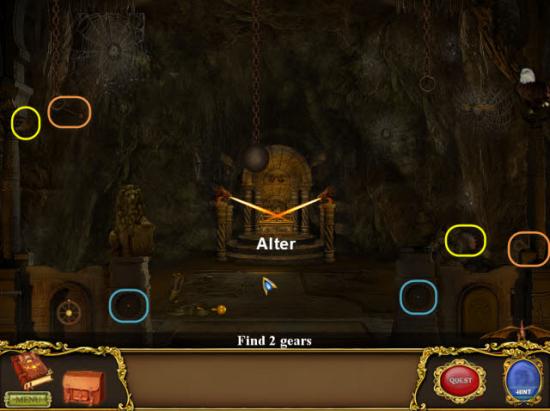
Examine the Alter.
Return to Room View.
Examine the area highlighted in Blue.
Gather the two Gears highlighted in Yellow.
Next, gather the two Rods highlighted in Orange.
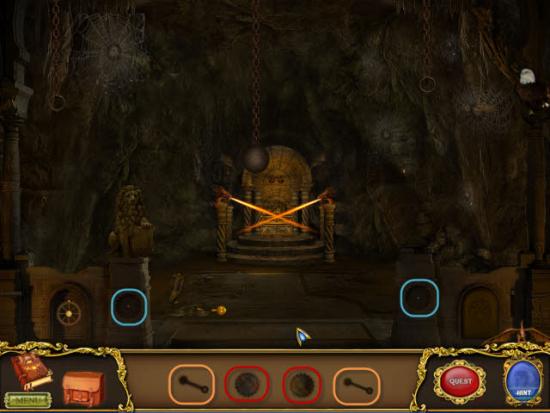
Place the Gears, highlighted in Red, into the depressions highlighted in Blue.
Next add the Rods, highlighted in Orange, to the Gears.
Click both Gears to start them turning.
Examine the Alter again.
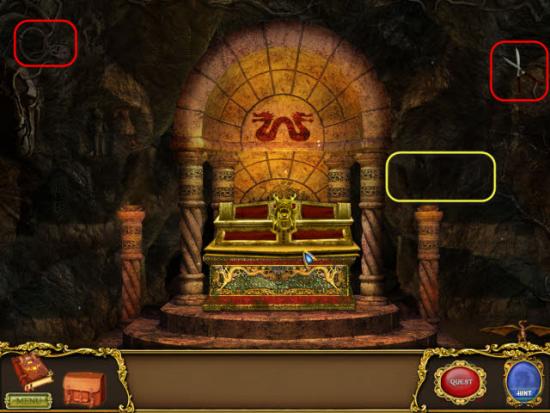
The front two Dragon posts will lower into the ground.
Gather the two Items highlighted in Red.
Examine the Chest.
Next, examine the Area highlighted in Yellow.
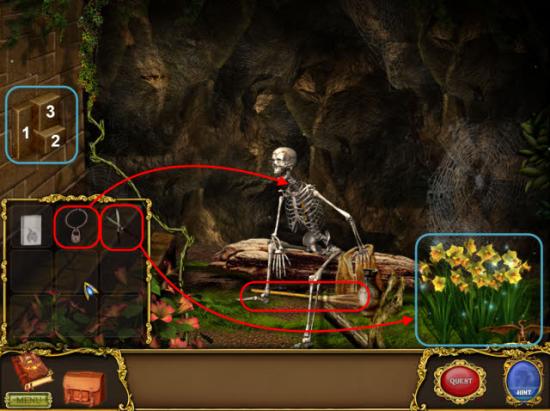
First, remove the three Blocks highlighted in Blue.
Gather the first Key.
Next, use the Hedge Clippers, highlighted in Red, on the Flowers, highlighted in Blue.
Gather the second Key.
Next, use the Padlock, highlighted in Red, on the Skeletons Neck, Skeleton will topple over.
Gather the third Key.
Gather the Broom, highlighted in Red, at the Skeletons Feet.
Return to Room View.
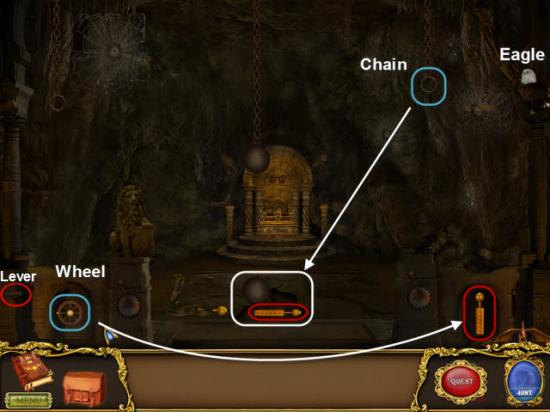
Turn the Wheel, highlighted in Blue, three times revealing the fourth Key, highlighted in Red.
Gather the fourth Key highlighted in Red.
Next, pull on the Chain, highlighted in Blue, till the Metal Ball reached the roof and drops, revealing the fifth Key.
Gather the fifth Key highlighted in Red.
Finally, gather the Lever, highlighted in Red.
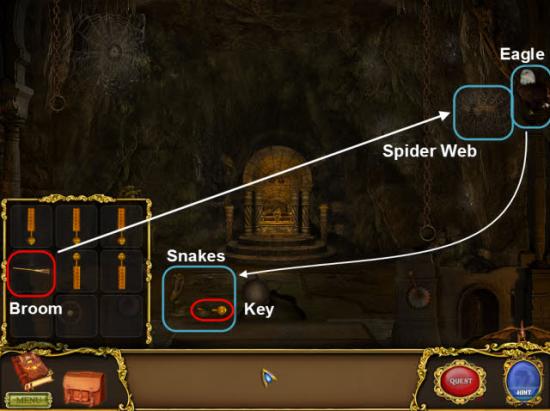
Use the Broom, highlighted in Red, on the Spider Web, highlighted in Blue.
Clear away the Spider Web and gather the sixth Key.
Next, click on the Eagle, highlighted in Blue, to have it chase off the Snakes, highlighted in Blue.
Gather the seventh Key highlighted in Red.
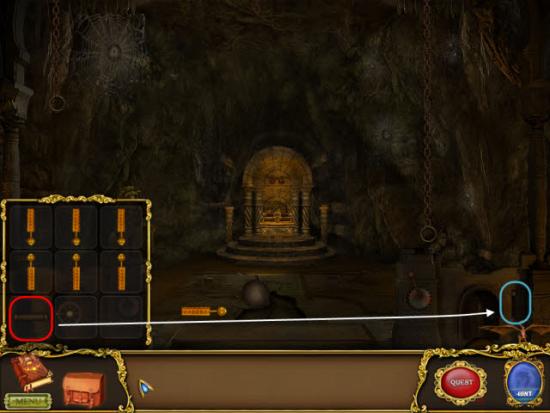
Use the Lever, highlighted in Red, on the Rod, highlighted in Blue.
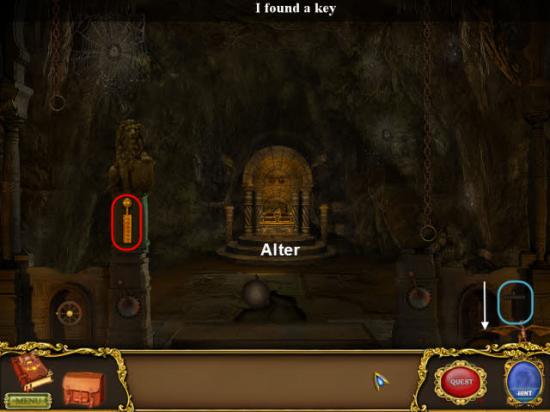
Pull down the completed Lever, highlighted in Blue, to reveal the eighth Key.
Gather the eighth Key highlighted in red.
Focus on the Alter once again.
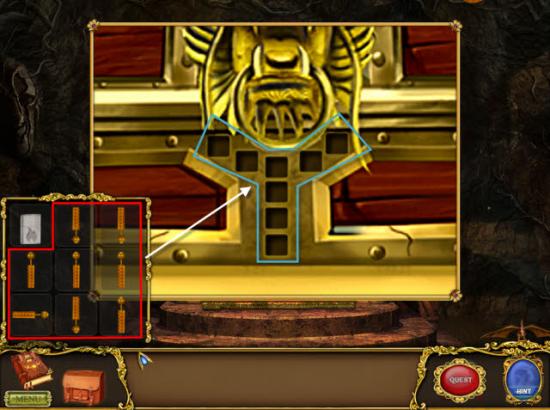
Examine the Chest.
Insert each of the eight Keys into the square Key Holes.
The Chest will open.
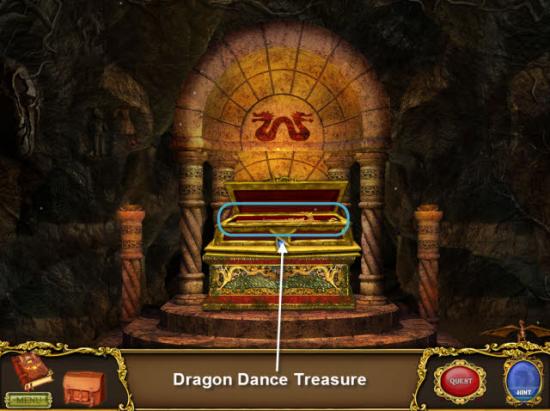
Gather the Dragon Dance Treasure highlighted in Blue.
Congratulations you have completed The Dragon Dance game.
More articles...
Monopoly GO! Free Rolls – Links For Free Dice
By Glen Fox
Wondering how to get Monopoly GO! free rolls? Well, you’ve come to the right place. In this guide, we provide you with a bunch of tips and tricks to get some free rolls for the hit new mobile game. We’ll …Best Roblox Horror Games to Play Right Now – Updated Weekly
By Adele Wilson
Our Best Roblox Horror Games guide features the scariest and most creative experiences to play right now on the platform!The BEST Roblox Games of The Week – Games You Need To Play!
By Sho Roberts
Our feature shares our pick for the Best Roblox Games of the week! With our feature, we guarantee you'll find something new to play!Demon Piece Races – All Race Buffs
By Adele Wilson
Our Demon Piece Races guide details all of the buffs, rarities, and characteristics for each race in the One Piece Roblox game.


