- Wondering how to get Monopoly GO! free rolls? Well, you’ve come to the right place. In this guide, we provide you with a bunch of tips and tricks to get some free rolls for the hit new mobile game. We’ll …
Best Roblox Horror Games to Play Right Now – Updated Weekly
By Adele Wilson
Our Best Roblox Horror Games guide features the scariest and most creative experiences to play right now on the platform!The BEST Roblox Games of The Week – Games You Need To Play!
By Sho Roberts
Our feature shares our pick for the Best Roblox Games of the week! With our feature, we guarantee you'll find something new to play!Demon Piece Races – All Race Buffs
By Adele Wilson
Our Demon Piece Races guide details all of the buffs, rarities, and characteristics for each race in the One Piece Roblox game.
Valerie Porter and the Scarlet Scandal Walkthrough
Welcome to Gamezebo’s strategy guide for Valerie Porter and the Scarlet Scandal.
a:1:i:0;a:2:s:13:”section_title”;s:50:”Valerie Porter and the Scarlet Scandal Walkthrough”;s:12:”section_body”;s:64882:”
Welcome to Gamezebo’s strategy guide for Valerie Porter and the Scarlet Scandal.
Navigation:
I. Prologue
II. Chapter 1: 5 Weeks Earlier
III. Chapter 2: The First Assignment
IV. Chapter 3: The Proud Prizefighter
V. Chapter 4: The Starlet Scarlet
VI. Chapter 5: The Director
VII. Chapter 6: Today
VIII. Chapter 7: Love, Longing, Loss
IX. Chapter 8: The Tramp and the Tease
X. Chapter 9: The Baton and the Bottle
XI. Chapter 10: A Woman Scorned
XII. Chapter 11: The Big Story
General Tips:
- When starting the game, the main menu is located on the left on the newspaper.
- Hints come in the form of Batteries. There are two hidden in every scene, circled in yellow, unless otherwise noted. They can be used as general hints or to help you with puzzle solutions. They may also be used to recharge hints faster. They may even be used on the timed Subway levels.
- Subway levels are the only actual timed levels. There are no bells or batteries in these levels, and there’s only 1 per chapter.
- Objects listed with a "x#" are in multiples. Click and hold, dragging the cursor to another object of the group to combine the objects and thus achieve a higher score. You can do this with however many objects of the multiple are available.
- You can click the "Recap" button to view your current progress as well as clues from previous chapters. There are 11 Chapters in reality: the Prologue is also counted as a chapter however, thus game progress is shown in 12 chapters.
- There are 5 Bells hidden in each area: you can tell if there are any bells remaining if the icon in the top right corner is golden. If it’s silver, all the Bells for that area have been found.
- Item names in red require some form of action: it may require a simple opening of a drawer or interaction with an inventory item.
- Clicking on an object on the Find List will allow you to see a silhouette of it on the left.
- In areas that apply, when you hear/see footsteps, click the light switch in that area to avoid being caught. You may turn the light back on when/if Valerie says it’s safe.
I.Prologue
The Gint Joint Alley
- When talking to the Police Officer, select the correct response "Valerie Porter from the Informer".
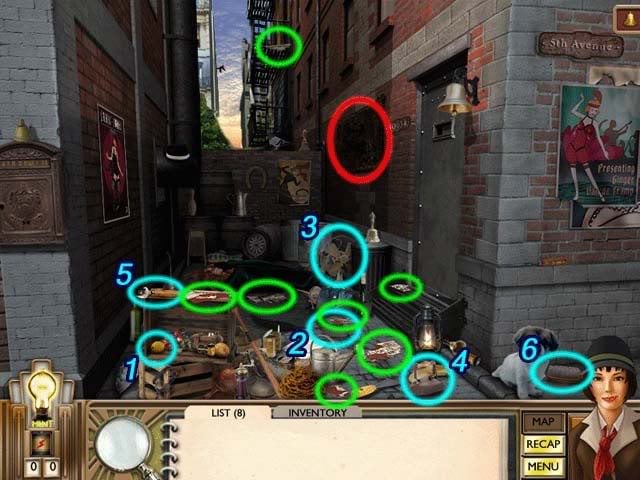
- Find the following items listed and numbered in the screenshot:

1.A sour fruit
2.A foot warmer
3.An old rusted fan
4.A wrinkle’s worst enemy
5.A can opener
6.Something to scrub the sign
7.Torn up evidence x7 (circled in green instead of numbered)
Note: Click and hold the mouse button down over an item, dragging it to other pieces of torn up evidence to achieve combination chains.
8.United Industries sign (circled in red instead of numbered)
- Use the Brush from your inventory on the United Industries sign (circled in red) to reveal it and cross it from the list.
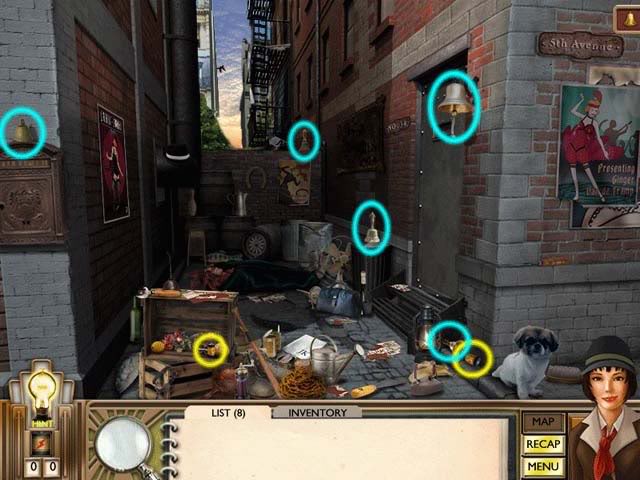
- Batteries (x2) are circled in yellow.
- Bells (x5) are circled in blue.
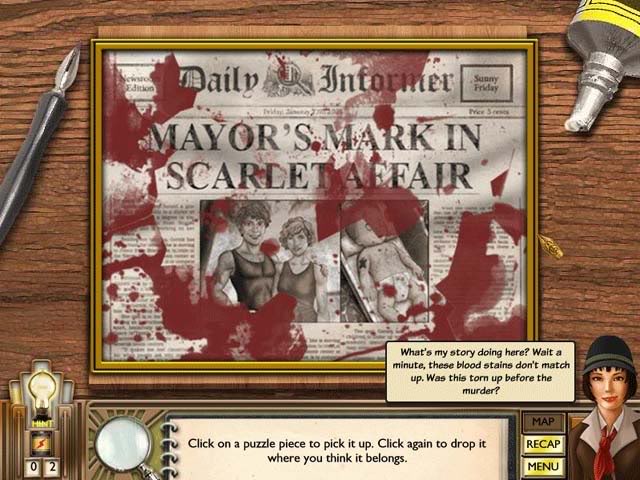
Jigsaw Puzzle
- Click on and move the various pieces to reassemble the original article. The solution is shown below:
II.Chapter 1: 5 Weeks Earlier
Valerie’s Home
- Click on the phone circled in red to begin. Batteries are circled in yellow and the Bells are circled in blue.
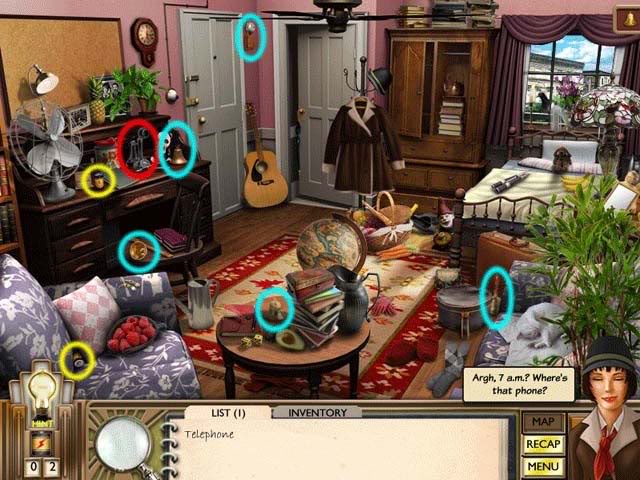
- Find the following items listed and numbered in the screenshot:
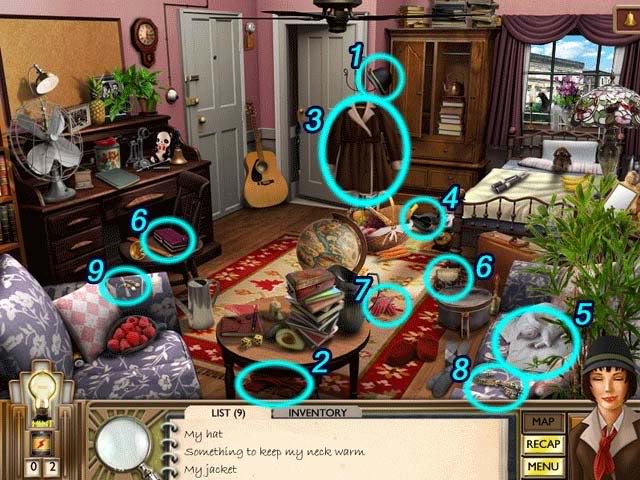
1.My hat
2.Something to keep my neck warm
3.My jacket
4.Adds an inch to my height
5.White blouse
6.A woman’s money bag x2
7.Hand warmers
8.An ornament for my neck
9.Ornaments for piercings
Valerie’s Bathroom
- Find the following items listed and numbered in the screenshot:
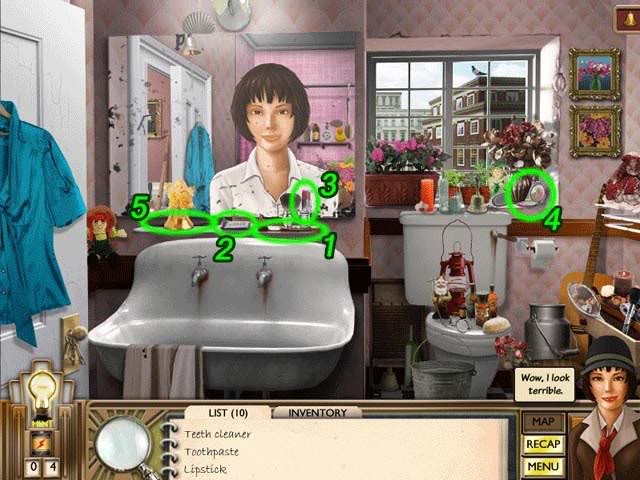
1.Teeth cleaner
2.Toothpaste
3.Lipstick
4.Blush
5.Eyeliner
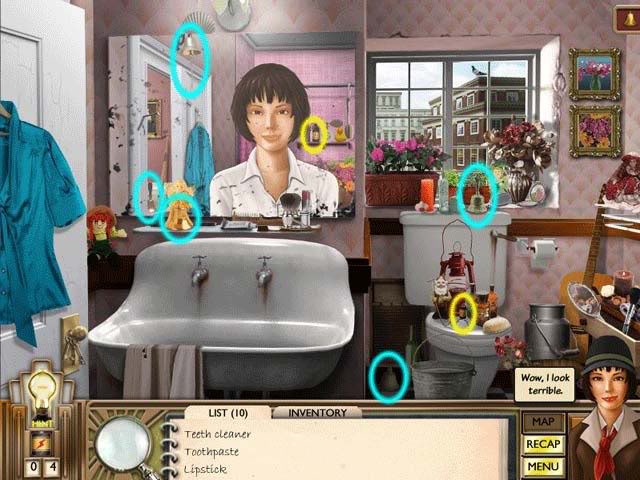
- Using the inventory tab, place all the inventory items (above items, scarf, and hat) on Valerie’s reflection in the mirror. Batteries are circled in yellow and the Bells are circled in blue.
Subway Map
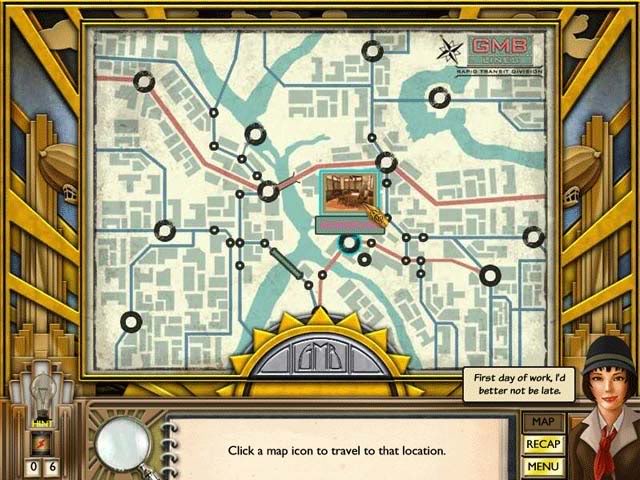
- Click on the Newsroom to travel to your new job.
Subway
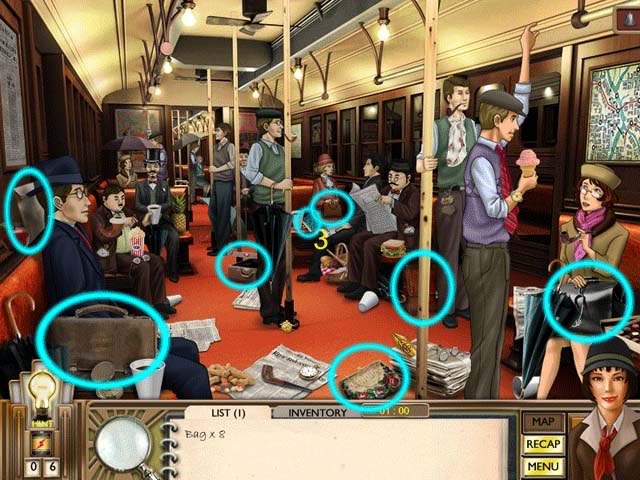
- There are 8 bags hidden throughout the scene, of which you have 1 minute to find. Chain them all together for the highest possible bonus. The locations are shown below:
Editor’s Office
- Find the following objects shown in the screenshot below:
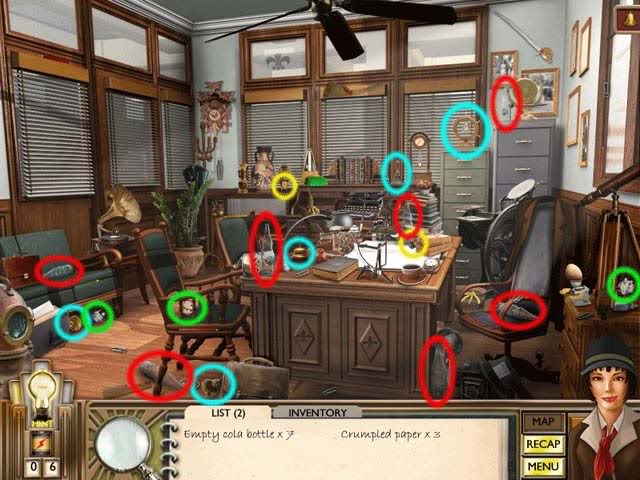
1.Empty cola bottle x7 (circled in red)
2.Crumpled paper x3 (circled in green)
-Bells are circled in blue and Batteries are circled in yellow.
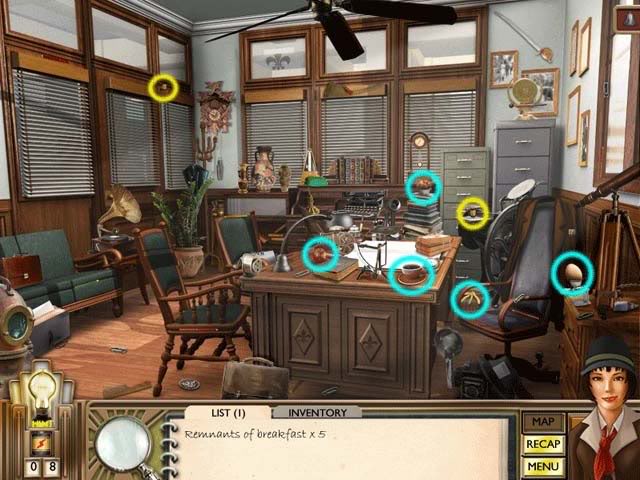
- Find the 5 remnants of breakfast circled in blue. Batteries are circled in yellow.
Crossword Puzzle
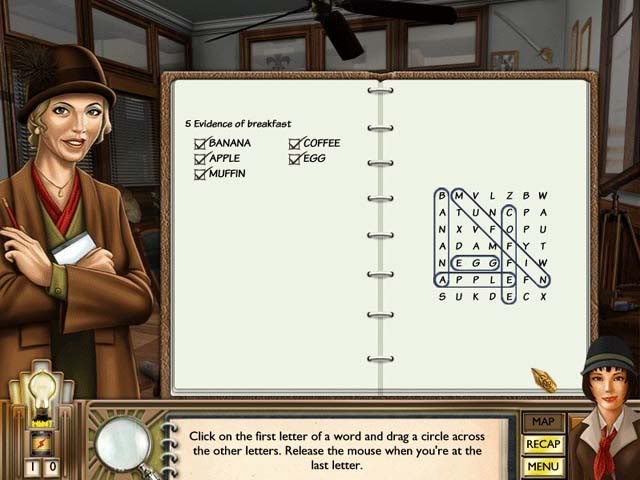
- Find the names of the 5 items the editor ate for breakfast in the crossword puzzle to check them from the list. The locations are shown below:
Memory Fill-in Puzzle
- Choose one of the words from the list on the right to fill it in correctly in the article on the left. The full article and solution are shown below:
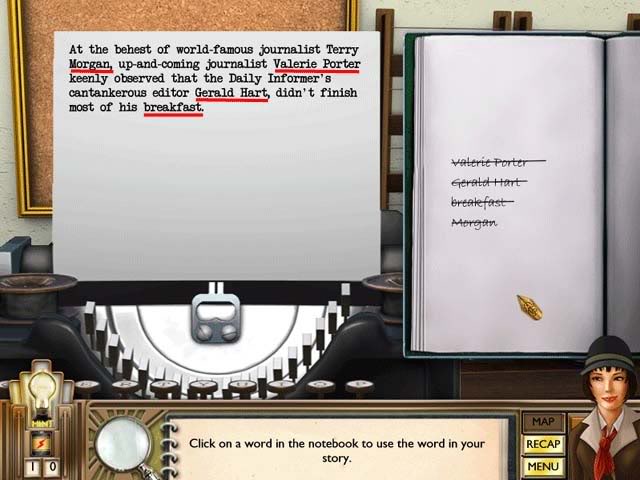
III.Chapter 2: The First Assignment
File Room
- Find the following objects shown and numbered in the screenshot below:
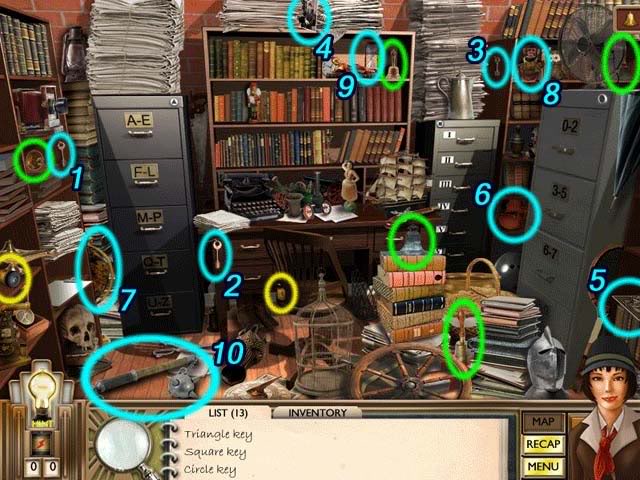
1.Triangle key
2.Square key
3.Circle key
4.Photo 2
5.Photo 1
6.Violin
7.Globe
8.Monkey
9.Hourglass
10.Mace
-Bells are circled in green and Batteries are circled in yellow.
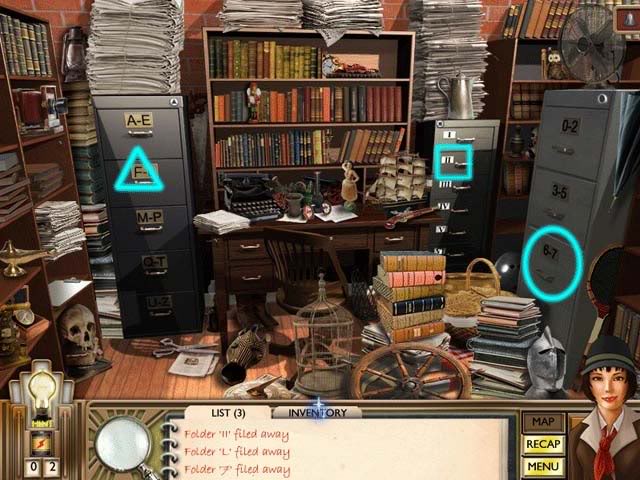
- Use the keys on their proper cabinets and file the folders away. The screenshot below shows which fil cabinet belongs to which key, as well as which drawer each folder should be placed in.
Hot Dog Stand
- When talking to the vendor, select the correct response "Your hot dogs are the bees knees!"
- Find the following objects shown in the screenshot below:
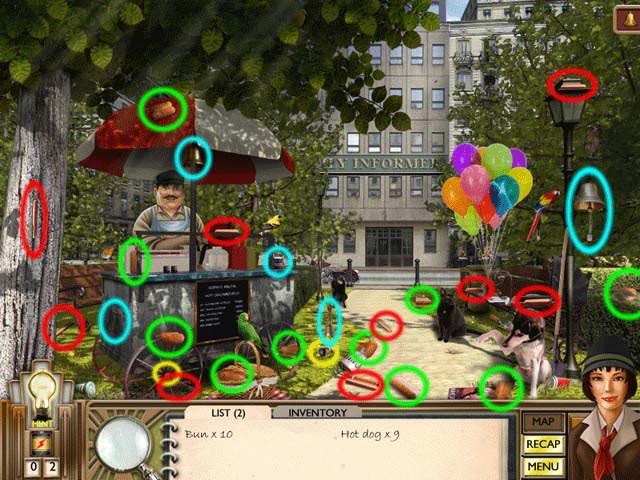
1.Bun x10 (circled in green)
2.Hot dog x9 (circled in red)
-Batteries are circled in yellow and Bells are circled in blue. Both the buns and the hot dogs can be chain-connected.
Terry’s Office
- Find the following objects shown and numbered in the screenshot below:
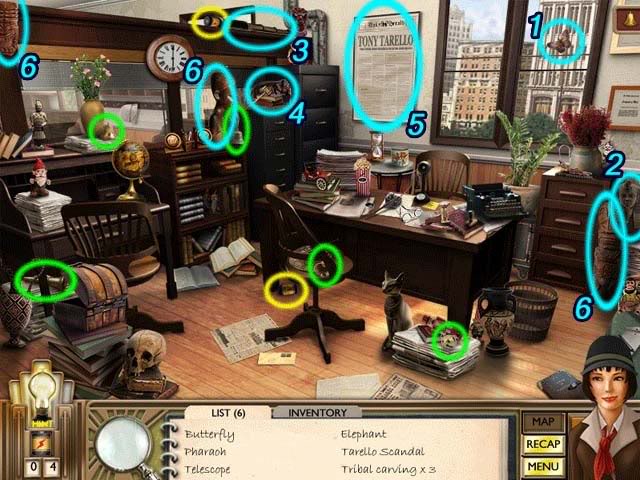
1.Butterfly
2.Pharaoh
3.Telescope
4.Elephant
5.Tarello Scandal
6.Tribal carving x3
-Batteries are circled in yellow and Bells are circled in green.
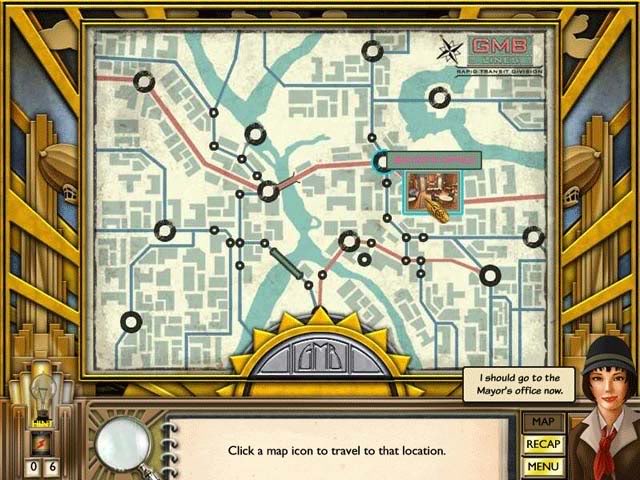
Subway Map
- Click on the Major’s Office to travel to that location.
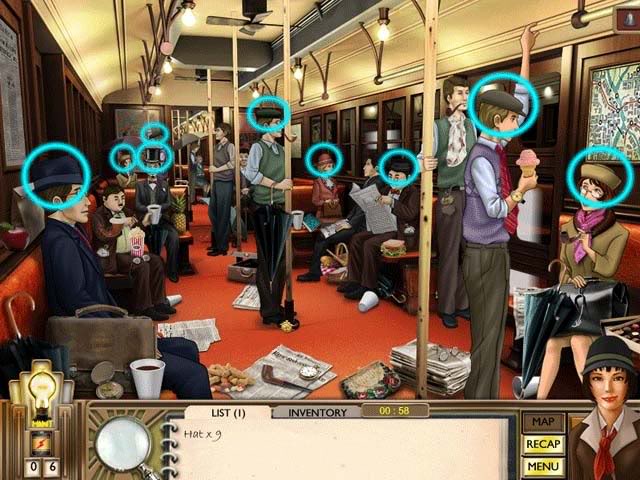
Subway
- There are 9 hats hidden throughout the scene, of which you have 1 minute to find. Chain them all together for the highest possible bonus. The locations are shown below:
Mayor’s Office
- Find the objects circled in the screenshot below:
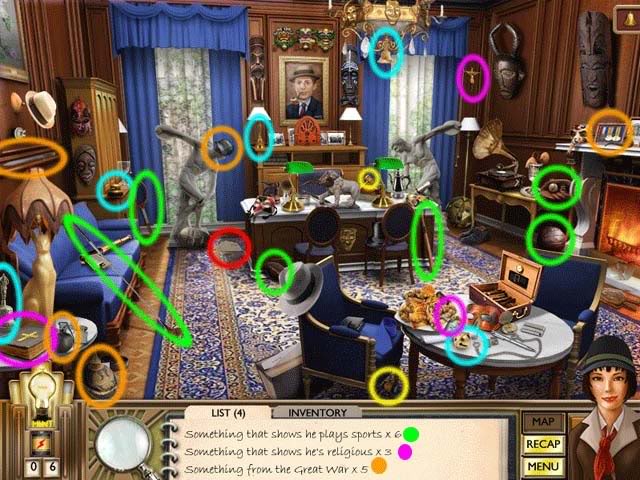
1.Something that shows he plays sports x6 is circled in green
2.Something that shows he’s religious x3 is circled in magenta
3.Something from the Great War x5 is circled in orange
4.Envelope is circled in red
-Batteries are circled in yellow, and Bells are circled in blue.
Crossword Puzzle
- Find the 6 words based on objects from the previous scene to complete the puzzle and check them off the list. The solution is shown below:
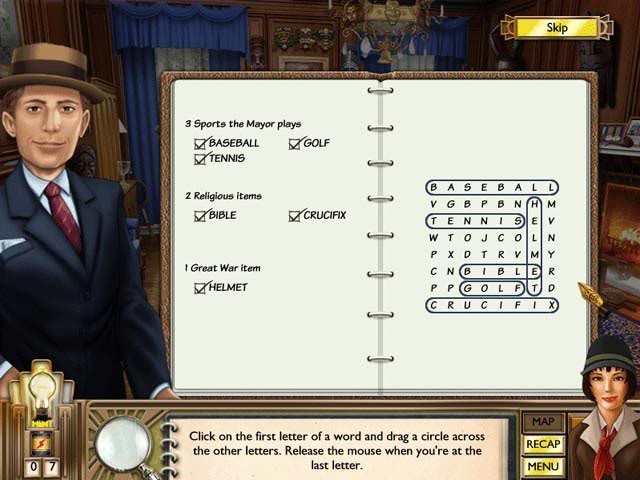
- When using the Persuasion Tactic on the Mayor, select the reponse "What should women voters know about you?"
Terry’s Office- Reassembling the Typewriter
- Find the items shown and numbered on the list below. There are no Batteries or Bells in this area:
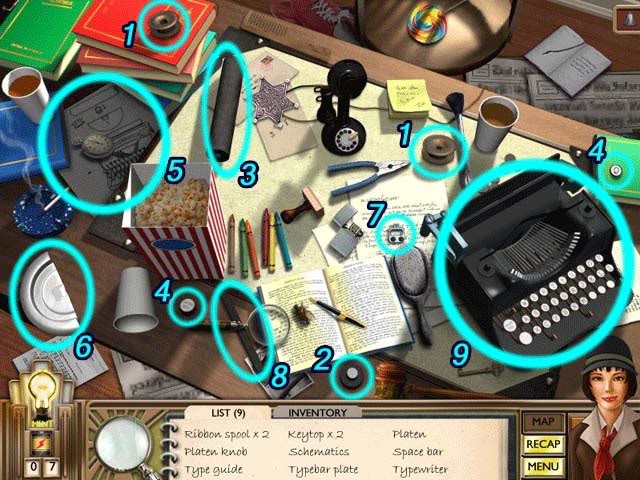
1.Ribbon spool x2
2.Platen knob
3.Type guide
4.Keytop x2
5.Schematics
6.Typebar plate
7.Platen
8.Space bar
9.Typewriter
Reassembling the Typewriter Puzzle
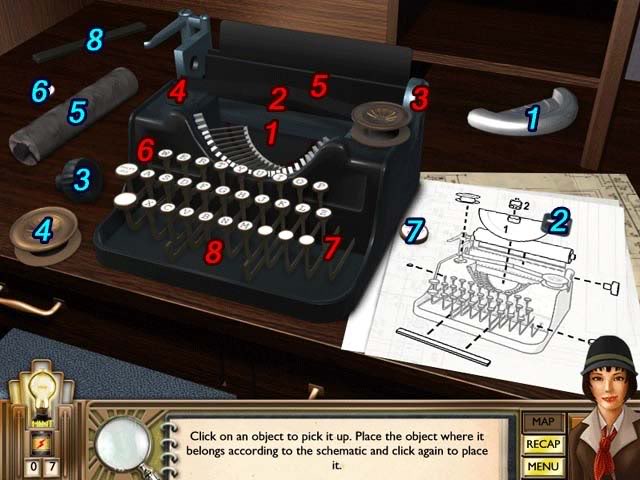
- Reassemble the typewriter according to the schematic. The screenshot below has numbered pieces (in blue) that match numbered areas (in red) showing where everything belongs.
Memory Fill-in Puzzle
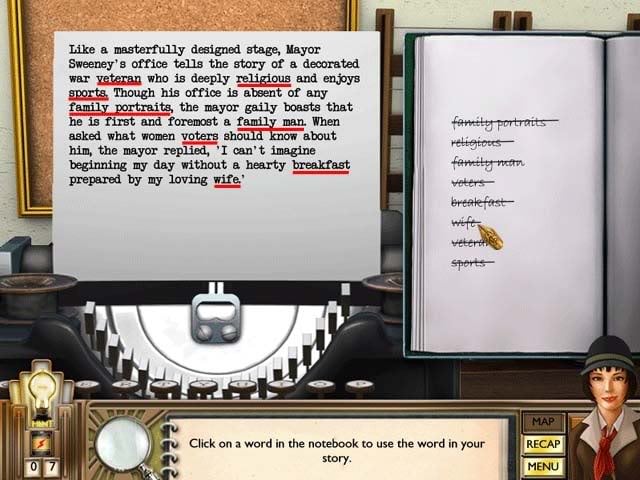
- Choose one of the words from the list on the right to fill it in correctly in the article on the left. The full article and solution is shown below:
Headline Puzzle
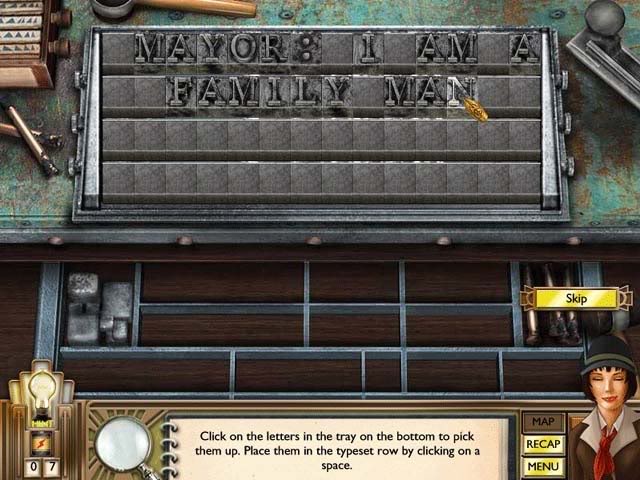
- Place the type set so that you use all the letters and come up with a headline. The solution is "Mayor: I am a Family Man"
IV.Chapter 3: The Proud Prizefighter
Informer File Room
- Find the items shown and numbered on the list below.
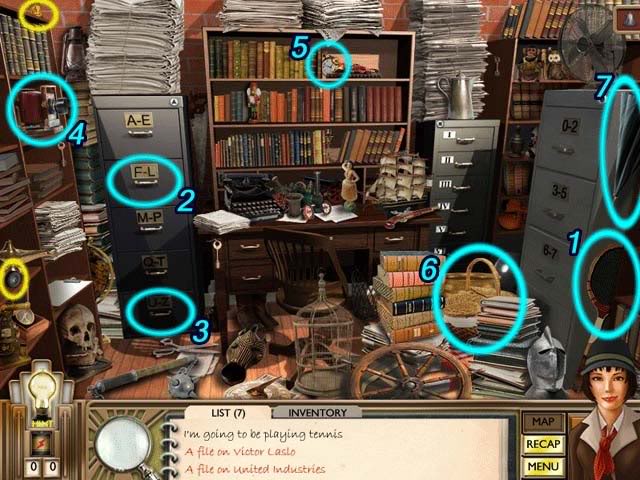
1.I’m going to be playing tennis
2.A file on Victor Laslo
3.A file on United Industries
4.We’ll be taking pictures
5.I’ll need something to keep track of time
6.I should pack a picnic
7.And what if it rains?
Subway Map
- Select Boxing Gym as your destination
Subway
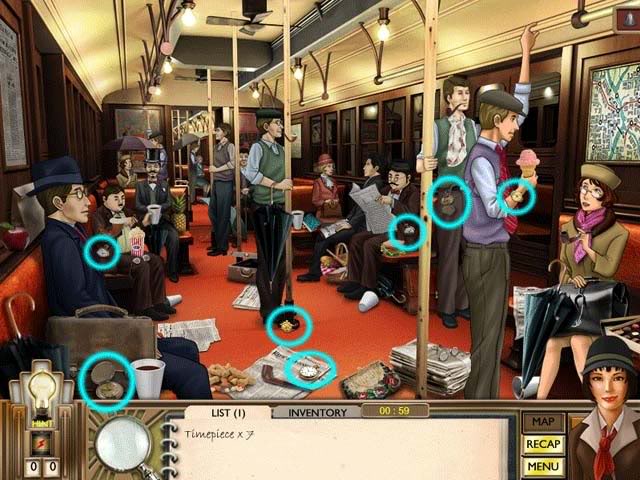
- Find 7 Timepieces in one minute. You can chain them for a higher score.
Boxing Gym
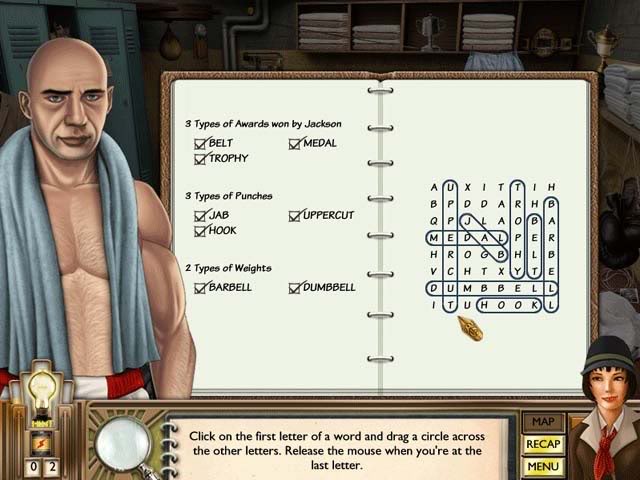
- Find the items shown and numbered on the list below.
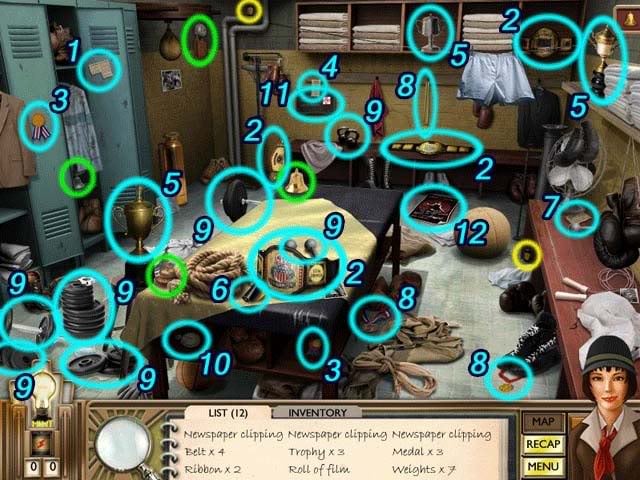
1.Newspaper clipping
2.Belt x4
3.Ribbon x2
4.Newspaper clipping
5.Trophy x3
6.Roll of film
7.Newspaper clipping
8.Medal x3
9.Weight x7
10.Stopwatch
11.First aid
12.Poster
-Batteries are circled in yellow and Bells are circled in green.
Crossword Puzzle
- Find the 8 words based on objects from the previous scene to complete the puzzle and check them off the list. The solution is shown below:
Editor’s Office
- Find the items shown and numbered on the list below:
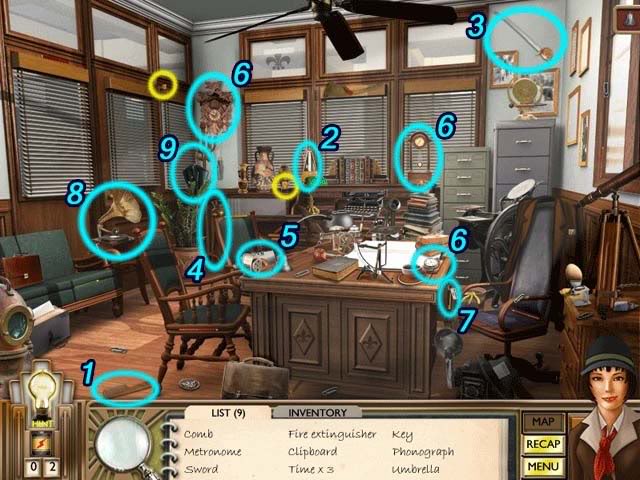
1.Comb
2.Metronome
3.Sword
4.Fire Extinguisher
5.Clipboard
6.Time x3
7.Key
8.Phonograph
9.Umbrella
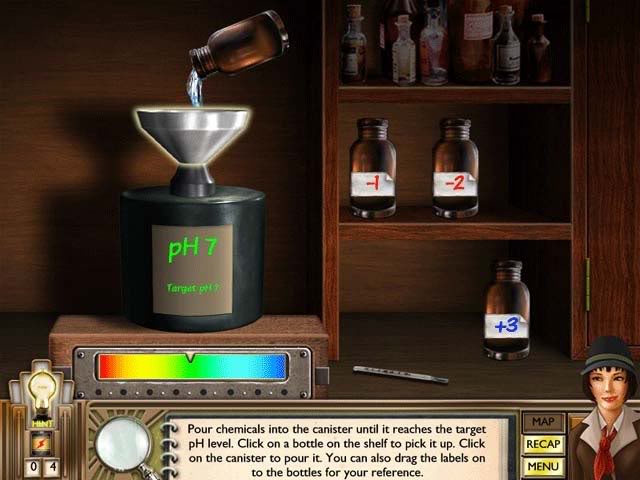
Darkroom Puzzle
- Use the different bottles provided to achieve the proper pH content. Bottles are randomized, but your possibilities are -1, -2, and +3. You may place labels on the bottles once you know which is which to make solving the puzzle easier.
Picture Focus Puzzle
- Use the buttons on the right to align and focus the photograph. The topmost ^ and v buttons are used for zooming.
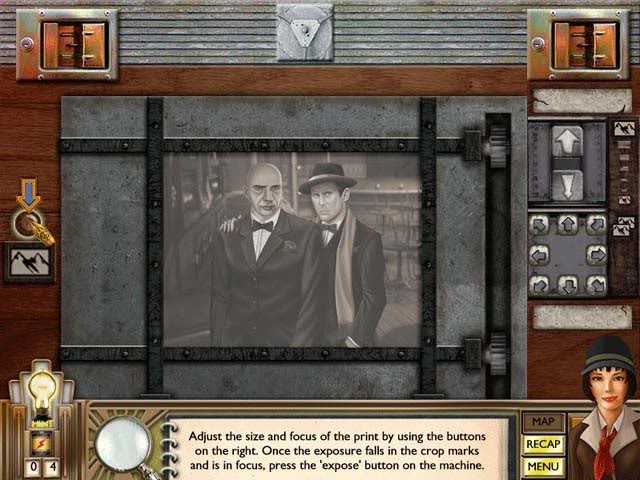
- Press the button on the left once the picture is properly focussed and aligned to complete the puzzle. You may use a hint to automatically align and focus the picture perfectly.
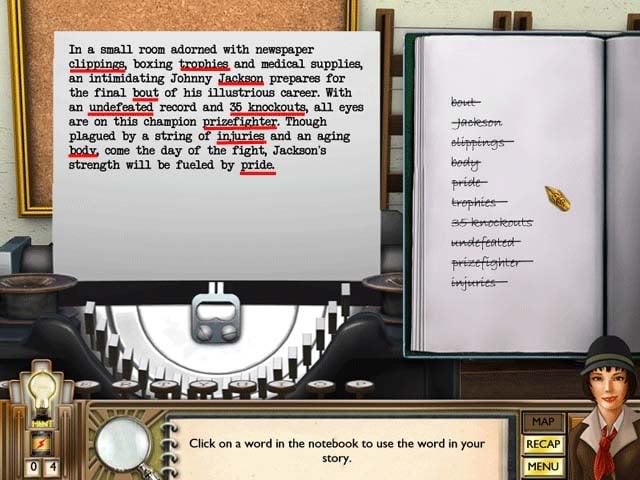
Memory Fill-in Puzzle
- Choose one of the words from the list on the right to fill it in correctly in the article on the left. The full article and solution is shown below:
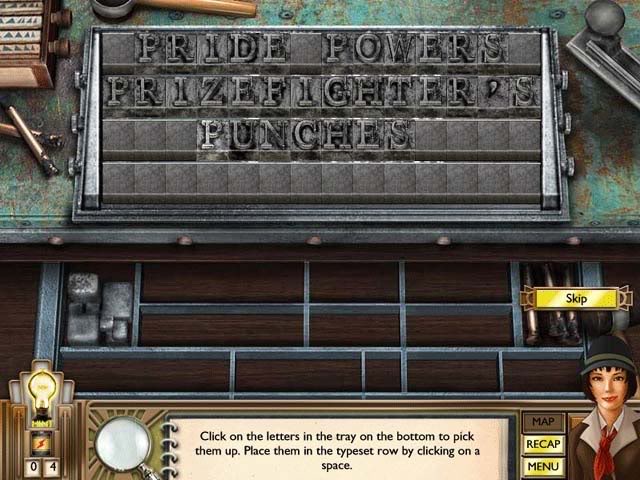
Headline Puzzle
- Place the type set so that you use all the letters and come up with a headline. The solution is "Pride Powers Prizefigher’s Punches"
V.Chapter 4: The Starlet Scarlet
Terry’s Office
- Pick up the Phone circled in red. Batteries are circled in yellow.
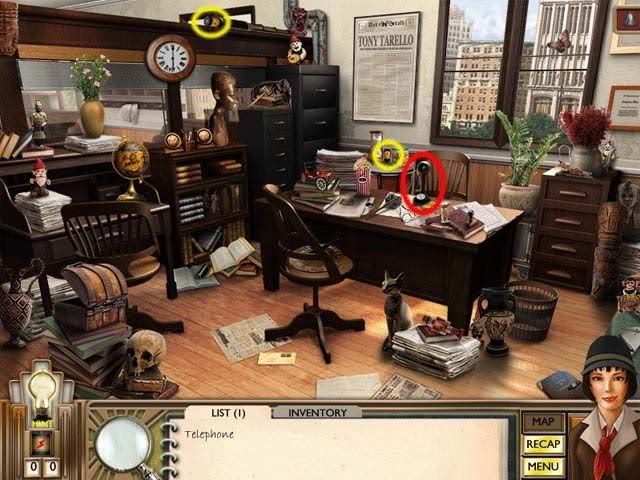
- On the phone, select the right response, "Jackson tells me great things about you"
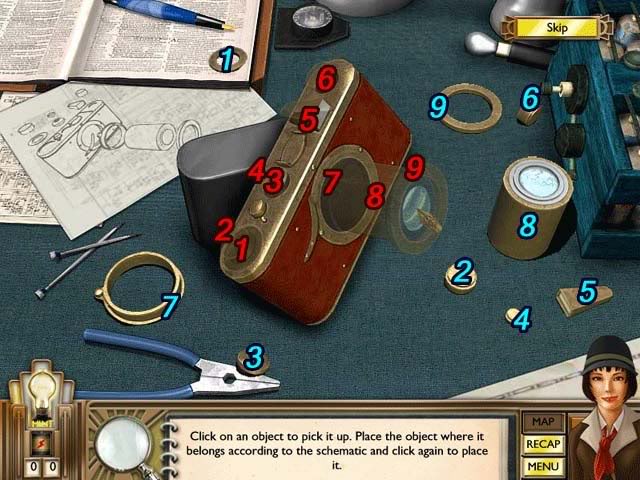
Reassemble the Camera
- Find the 11 Camera parts scattered around the desk. There are no Batteries in this area.
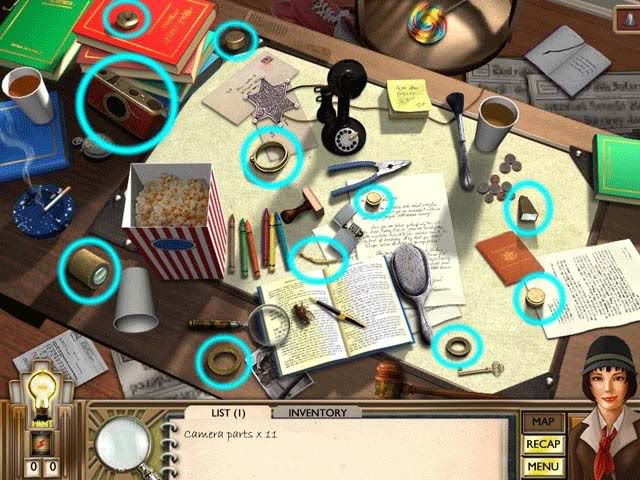
- Reassemble the camera according to the schematic. Parts are numbered in blue, with their corresponding locations numbered the same in red. The solution is as follows:
Subway Map
- Select "Scarlet’s Apartment" as the destination
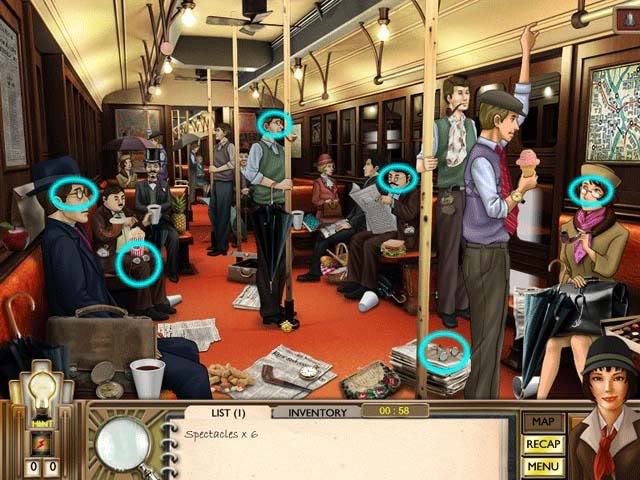
Subway
- Find 6 Spectacles in one minute. You can chain them for a higher score.
Scarlet’s Apartment
- Find the objects numbered and listed below. Batteries are circled in yellow and Bells are circled in green:
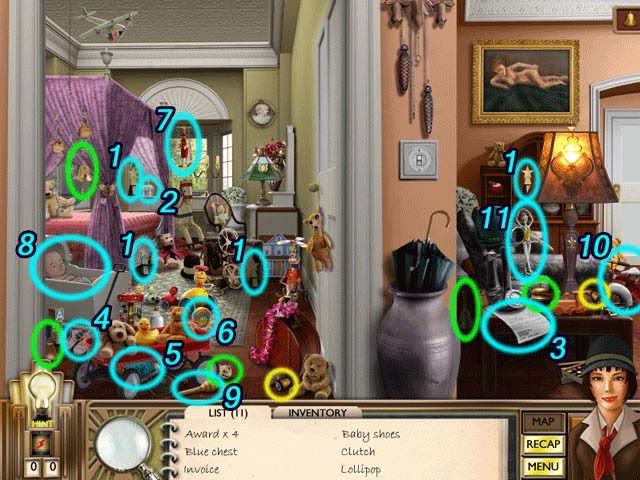
1.Award x4
2.Blue chest
3.Invoice
4.Baby shoes
5.Clutch
6.Lollipop
7.Marionette
8.Picture of Scarlet’s baby (take the Camera from inventory and use it on the baby, which is circled and numbered)
9.Rattle
10.Tricycle
11.Ballerina
Subway Map
- Select Sanitarium as the destination.
Sanitarium
- Find the objects numbered and listed below. Batteries are circled in yellow and Bells are circled in green:
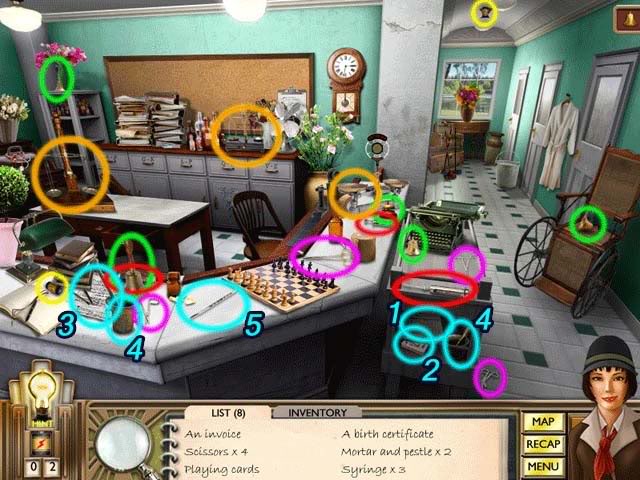
1.An invoice
2.Scissors x4 (circled in magenta)
3.Playing Cards
4.A birth certificate
5.Mortar and pestle x2
6.Syringe x3 (circled in red)
7.Termometer
8.Scale x3 (circled in orange)
Subway Map
- Select Mayor’s Office as the destination
Mayor’s Office
- Find the objects numbered and listed below. Batteries are circled in yellow.
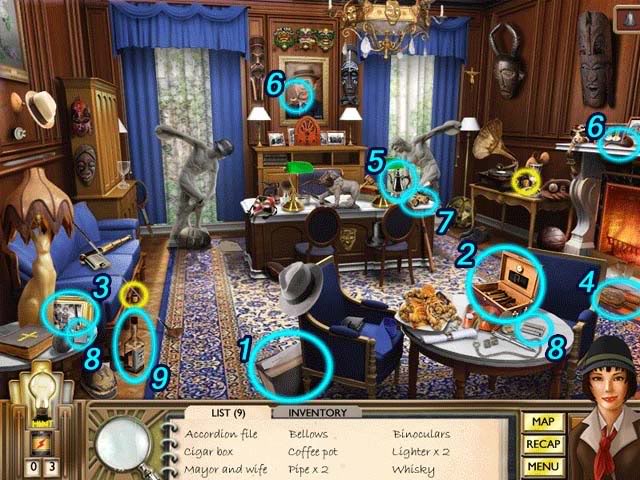
1.Accordian file
2.Cigar box
3.Mayor and wife
4.Bellows
5.Coffee pot
6.Pipe x2
7.Binoculars
8.Lighter x2
9.Whisky
Subway Map
- Select Newsroom as the destination
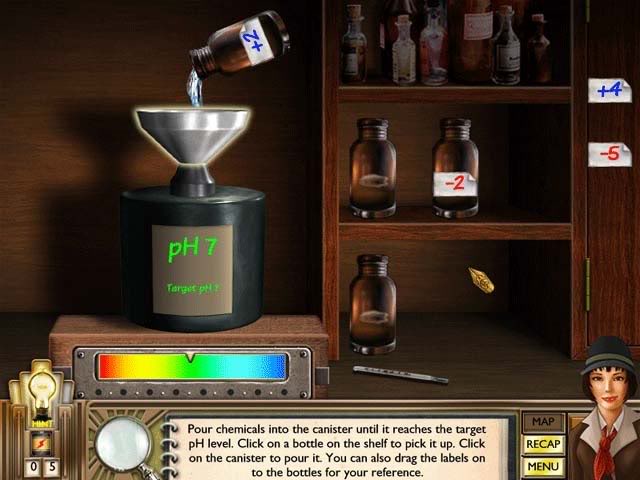
Darkroom Puzzle
- Use the different bottles provided to achieve the proper pH content. Bottles are randomized, but your possibilities are -2, -5, +2, and +4. You may place labels on the bottles once you know which is which to make solving the puzzle easier.
Picture Focus Puzzle
- Use the buttons on the right to align and focus the photograph. The topmost ^ and v buttons are used for zooming.
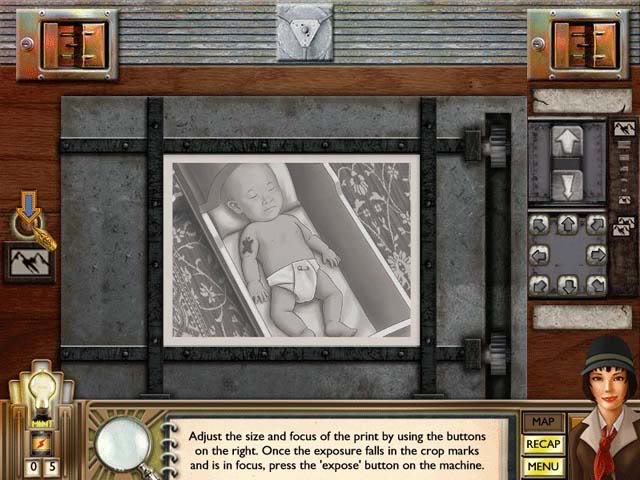
- Press the button on the left once the picture is properly focussed and aligned to complete the puzzle. You may use a hint to automatically align and focus the picture perfectly.
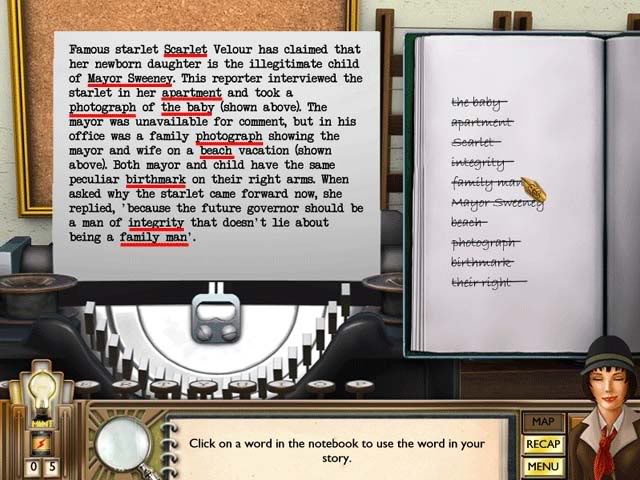
Memory Fill-in Puzzle
- Choose one of the words from the list on the right to fill it in correctly in the article on the left. The full article and solution is shown below:
Headline Puzzle
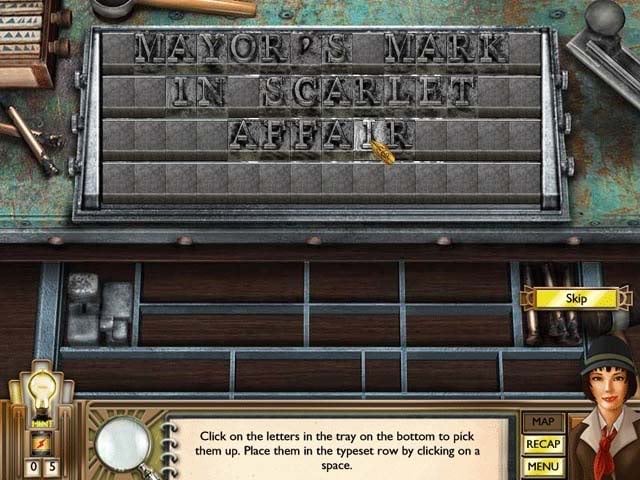
- Place the type set so that you use all the letters and come up with a headline. The solution is "Mayor’s Mark in Scarlet Affair"
VI.Chapter 5: The Director
Subway Map
- Select Sanitarium as the destination.
Subway
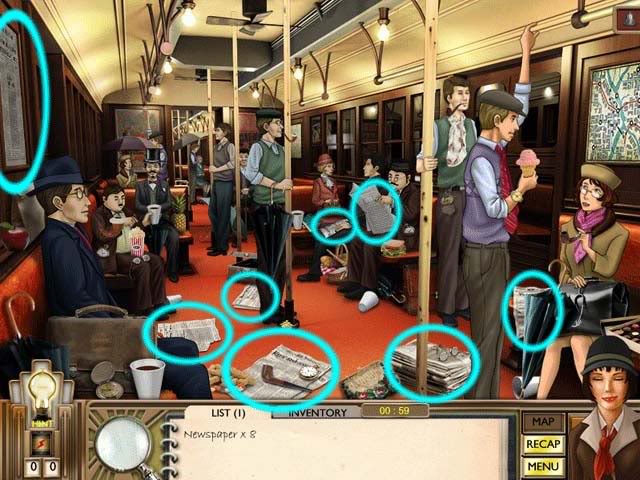
- Find 8 Newspapers in one minute. You can chain them for a higher score.
Sanitarium
- When speaking with the nurse, select the correct response, "Ted Sweeney sent me."
- Find the objects shown and numbered below. Batteries are circled in yellow.
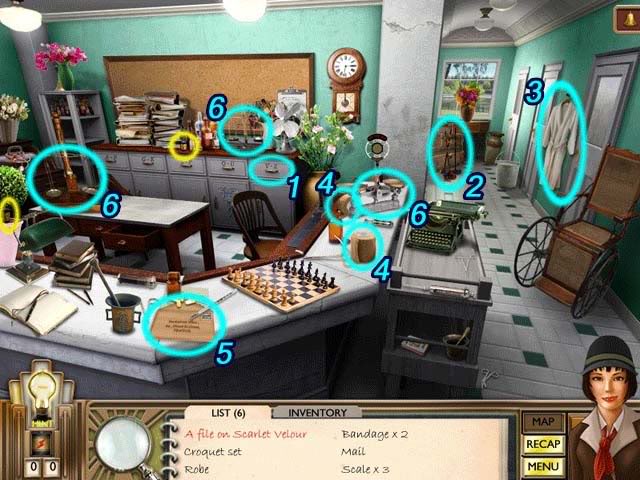
1.A file on Scarlet Velour
2.Croquet set
3.Robe
4.Bandage x2
5.Mail
6.Scale x3
Tara Sommer’s Room
- Find the objects shown and numbered below. Batteries are circled in yellow and Bells are circled in green.
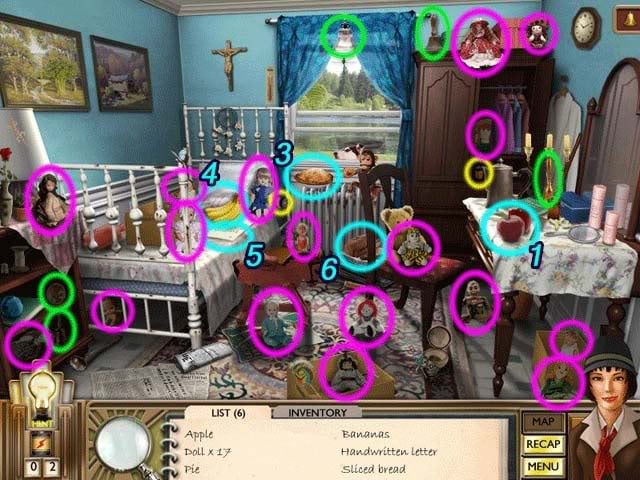
1.Apple
2.Doll x17 (circled in magenta)
3.Pie
4.Bananas
5.Handwritten letter
6.Sliced bread
Subway Map
- Select Boxing Gym as the destination.
Boxing Gym
- Find the objects shown and numbered below. Batteries are circled in yellow.
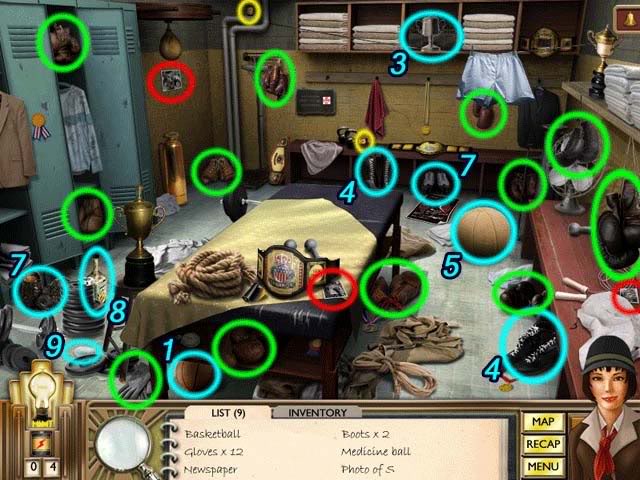
1.Basketball
2.Gloves x12 (circled in green)
3.Newspaper
4.Boots x2
5.Medicine ball
6.Photo of Scarlet x3 (circled in red)
7.Shoes x2
8.Whisky
9.Soap
Subway Map
- Select Kauffman’s Penthouse as the destination.
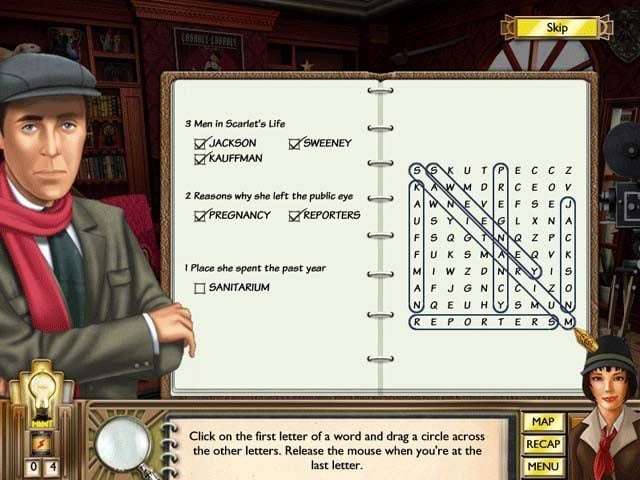
Kauffman’s Penthouse- Crossword Puzzle
- Find the 6 words based on objects from the previous scene to complete the puzzle and check them off the list. The solution is shown below:
Kauffman’s Penthouse
- Find the objects shown and numbered below. Batteries are circled in yellow and Bells are circled in green.
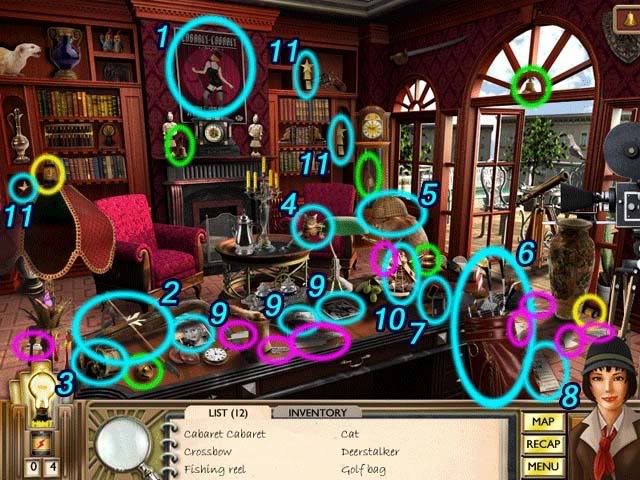
1.Cabaret Cabaret
2.Crossbow
3.Fishing reel
4.Cat
5.Deerstalker
6.Golf bag
7.Lighter
8.Newspaper
9.Photo x3
10.Sextant
11.Trophy x3
12.Torn letter x9 (circled in magenta)
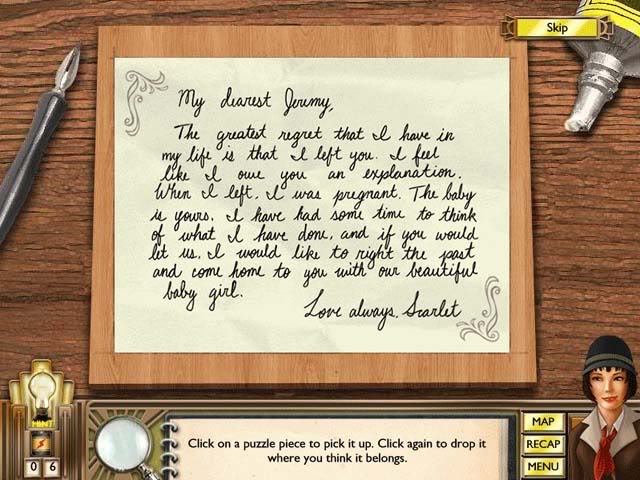
Jigsaw Puzzle
- Reassemble the torn letter to reveal the original message. The solution is shown below.
Subway Map
- Select Newsroom as the destination.
Terry’s Office
- Find the objects listed below. Batteries are circled in yellow.
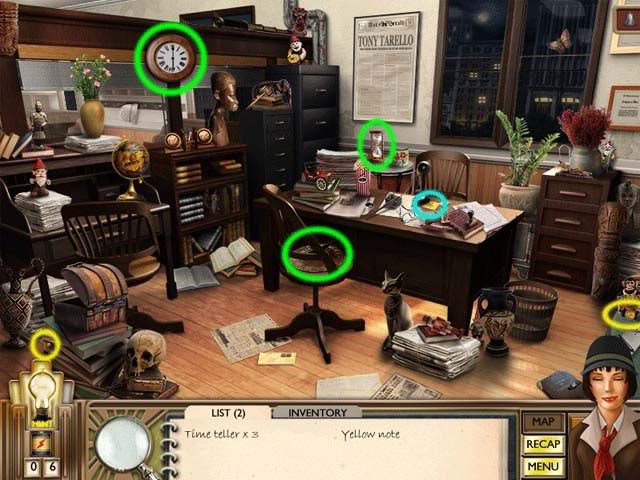
1.Time teller x3 (circled in green)
2.Yellow note (circled in blue)
VII.Chapter 6: Today
Subway Map
- Select Gin Joint as your destination.
Subway
- Find 7 Ties or Scarves in one minute. You can chain them for a higher score.
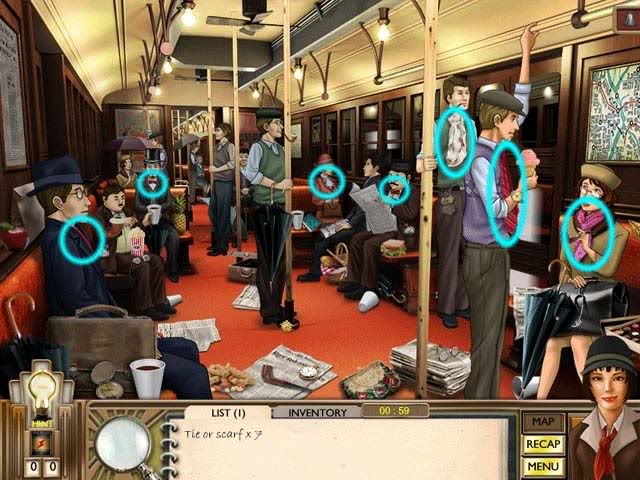
Gin Joint Alleyway
- Find the objects shown and numbered below. Batteries are circled in yellow. (Note: in case you didn’t collect the bells the first time around, you can collect them now. Refer to the top portion of the guide "Prologue").
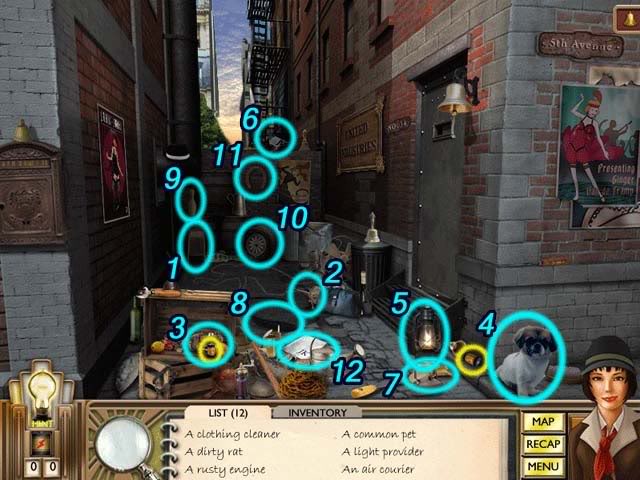
1.A clothing cleaner
2.A dirty rat
3.A rusty engine
4.A common pet
5.A light provider
6.An air courier
7.Discarded fruit peel
8.From a black bird
9.It gets bowled over
10.One of four from a car
11.Something for luck
12.Something with initials
- When speaking with the man in the alley and he asks for your name, the solution is entirely randomized, so you’ll need to follow the lines to find the correct one. The easiest way to find the solution is to start from "correct" on the right and follow the line backwards to the right name.
Gin Joint
- Find the objects shown and numbered below. Batteries are circled in yellow and Bells are circled in green.
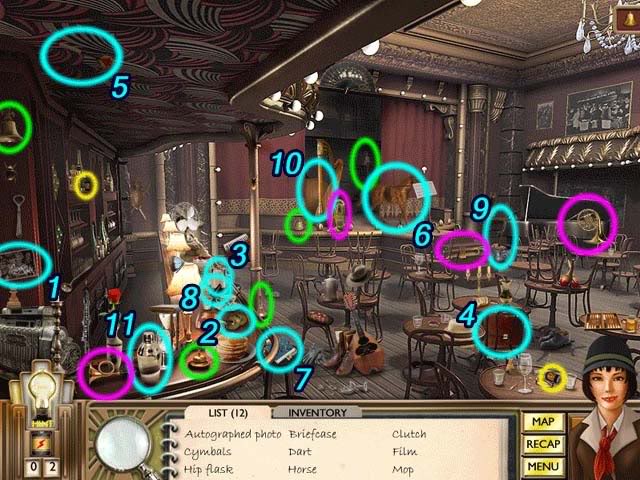
1.Autographed photo
2.Cymbals
3.Hip flask
4.Briefcase
5.Dart
6.Horse
7.Clutch
8.Film
9.Mop
10.Pumpkin
11.Shaker
12.Horn x4 (circled in magenta)
- When speaking with Van de Tramp, select the reponse "I found this feather in the alley."
Gin Joint Storeroom
- Find the objects shown and numbered below. Batteries are circled in yellow and Bells are circled in green.
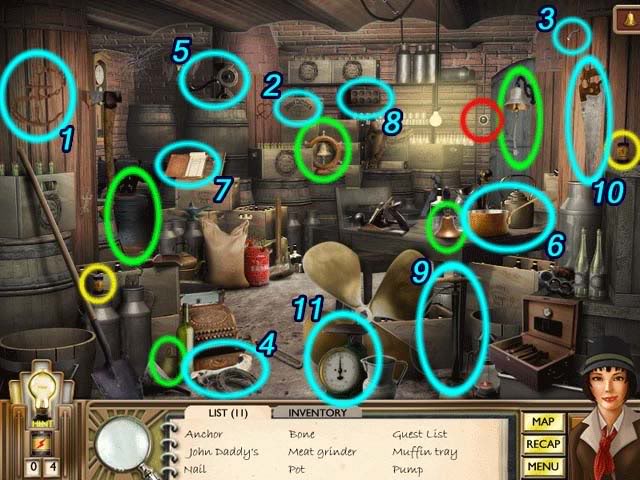
1.Anchor
2.John Daddy’s
3.Nail
4.Bone
5.Meat grinder
6.Pot
7.Guest list
8.Muffin tray
9.Pump
10.Saw
11.Scale
- If someone appears while you’re in the Storeroom (footsteps will appear), click on the light switch circled in red to switch the lights off.
Subway Map
- Select Police Station as the destination.
Police Station
- Find the objects shown and numbered below. Batteries are circled in yellow and Bells are circled in green.
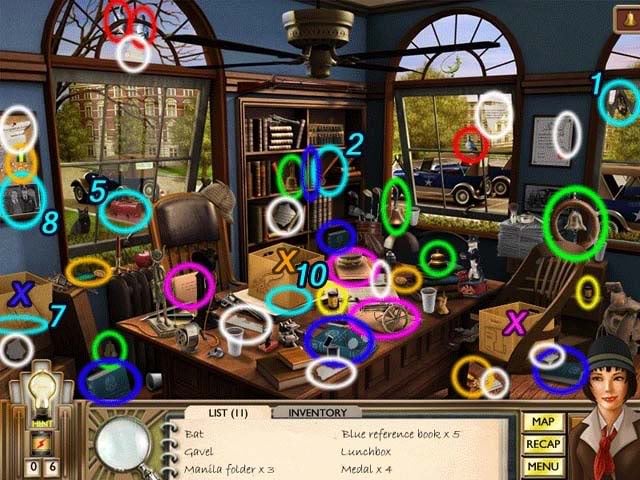
1.Bat
2.Gavel
3.Manila folder x3 (circled in magenta)
4.Blue reference book x5 (circled in dark blue)
5.Lunchbox
6.Medal x4 (circled in orange)
7.Photo from crime scene (under box)
8.Photo of chief with Hart
9.Pigeon x3 (circled in red)
10.Police report (under box)
11.Torn paper x11 (circled in white)
- You will need to organize the Medals, Reference Books, and Folders into their proper boxes. They’ve been marked with an "X" of the corresponding color.
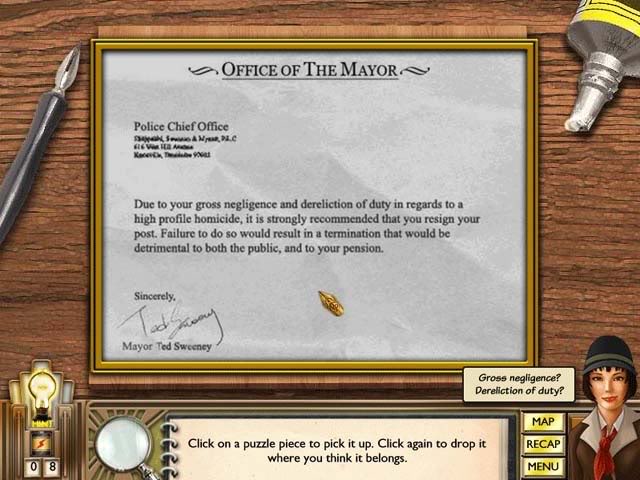
Jigsaw Puzzle
- Reassemble the note to reveal the original message. The solution is shown below.
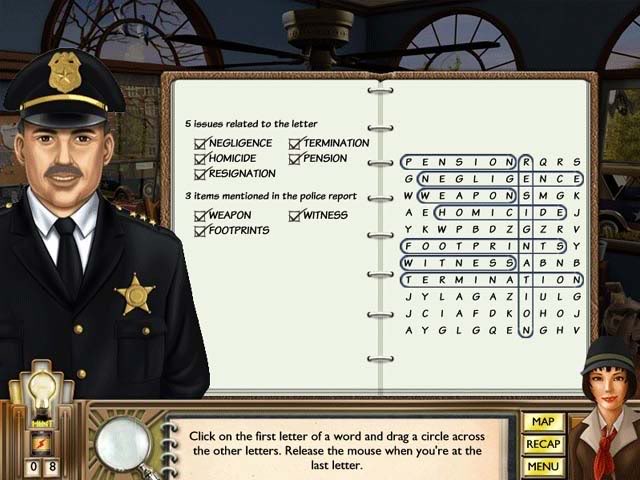
Crossword Puzzle
- Find the 8 words based on objects from the previous scene to complete the puzzle and check them off the list. The solution is shown below:
Johnny’s Cell
- Find the objects shown and numbered below. Batteries are circled in yellow and Bells are circled in green.
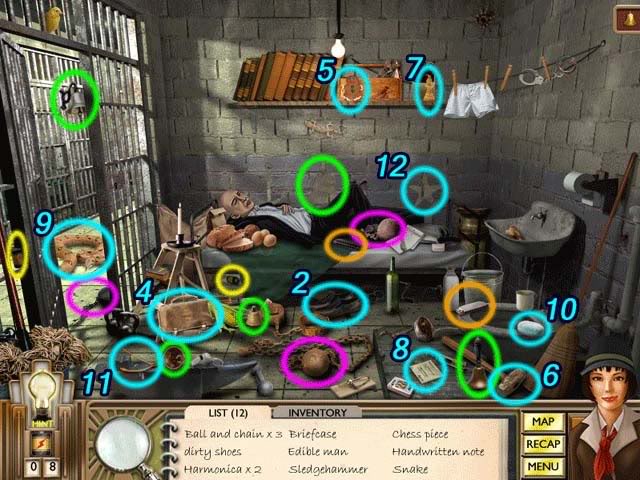
1.Ball and chain x3 (circled in magenta)
2.Dirty shoes
3.Harmonica x2 (circled in orange)
4.Briefcase
5.Edible man
6.Sledgehammer
7.Chess piece
8.Handwritten note
9.Snake
10.Soap
11.Wishbone
12.Star
Subway Map
- Select Newsroom as your destination.
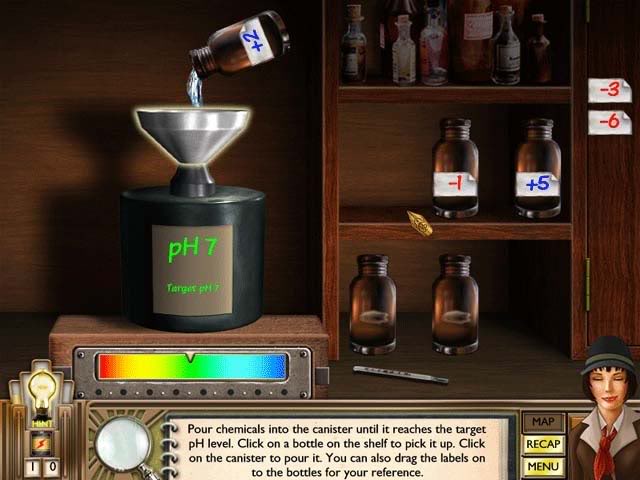
Darkroom Puzzle
- Use the different bottles provided to achieve the proper pH content. Bottles are randomized, but your possibilities are -1, -3, -6, +2, and +5. You may place labels on the bottles once you know which is which to make solving the puzzle easier.
Picture Focus Puzzle
- Use the buttons on the right to align and focus the photograph. The topmost ^ and v buttons are used for zooming.
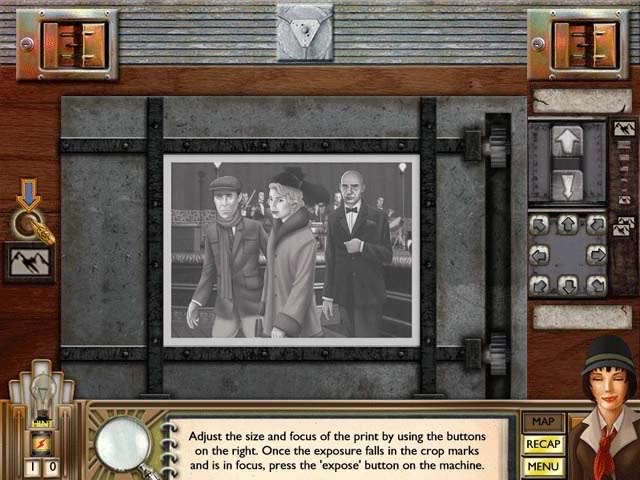
- Press the button on the left once the picture is properly focussed and aligned to complete the puzzle. You may use a hint to automatically align and focus the picture perfectly.
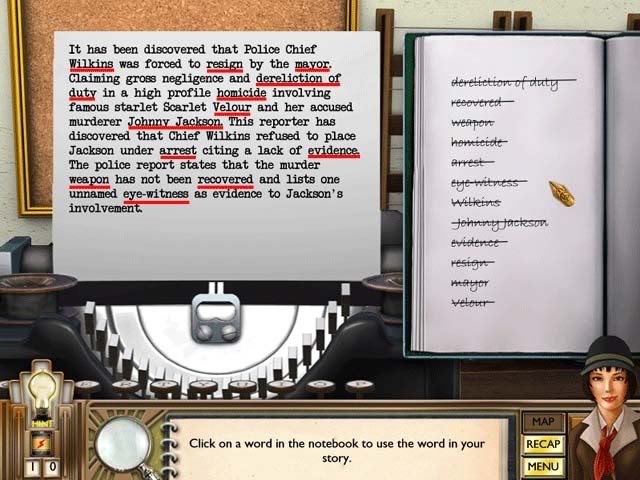
Memory Fill-in Puzzle
- Choose one of the words from the list on the right to fill it in correctly in the article on the left. The full article and solution is shown below:
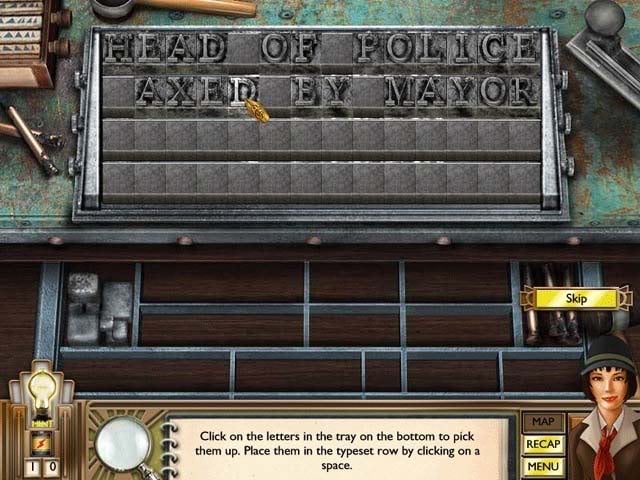
Headline Puzzle
- Place the type set so that you use all the letters and come up with a headline. The solution is "Head of Police Axed by Mayor"
VIII.Chapter 7: Love, Longing, Loss
Hot Dog Stand
- Find the objects shown and numbered in the screenshot below. Batteries are circled in yellow.
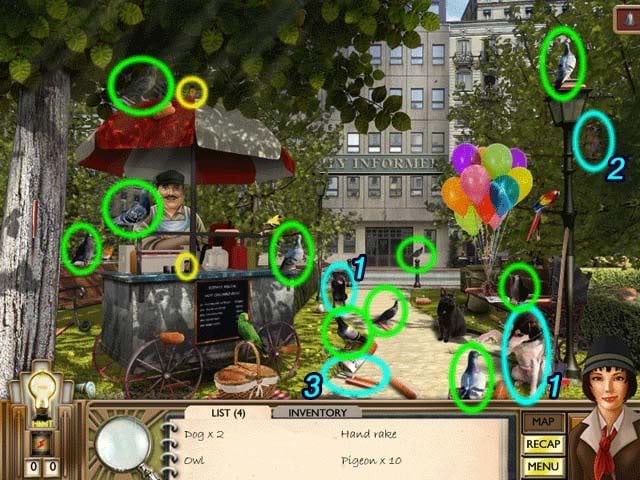
1.Dog x2
2.Owl
3.Hand rake
4.Pigeon x10 (circled in green)
Subway Map
- Select Kauffman’s Penthouse as the destination.
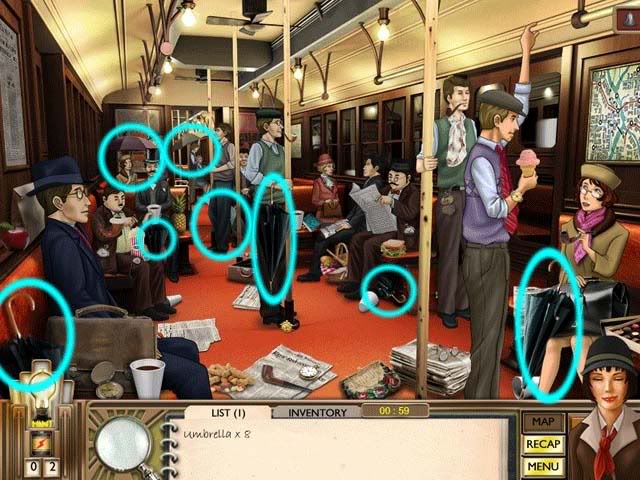
Subway
- Find 8 Umbrellas in one minute. You can chain them for a higher score.
Kauffman’s Penthouse
- Find the objects shown and numbered below. Batteries are circled in yellow.
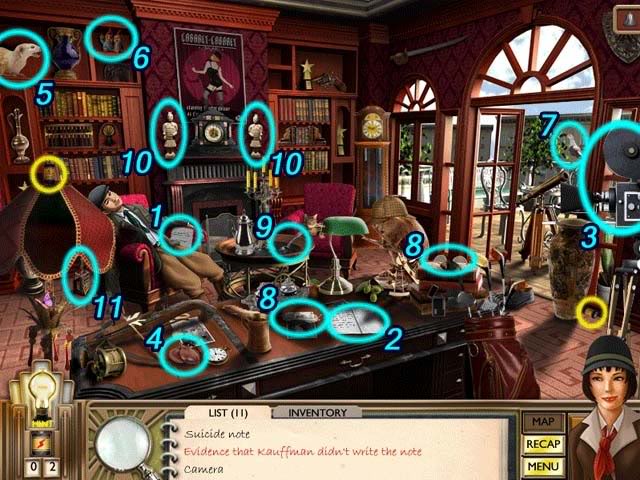
1.Suicide note
2.Evidence that Kauffman didn’t write the note (use Suicide Note on it)
3.Camera
4.Castanets
5.Ferret
6.Gnomes
7.Seagull
8.Spectacles x2
9.Spoon
10.Warrior x2
11.Whisky bottle
Subway Map
- Select Police Station as the destination.
Jackson’s Cell
- Find the objects shown and numbered below. Batteries are circled in yellow.
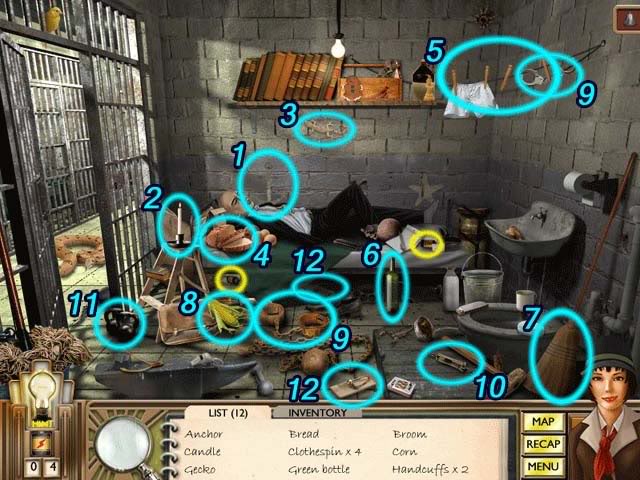
1.Anchor
2.Candle
3.Gecko
4.Bread
5.Clothespin x4
6.Green bottle
7.Broom
8.Corn
9.Handcuffs x2
10.Syringe
11.Kettle weight
12.Mousetrap x2
- When talking with Jackson, select the response "You were given the same bottle."
Subway Map
- Select Scarlet’s Apartment as the destination.
Scarlet’s Apartment
- Find the objects shown and numbered below. Batteries are circled in yellow.
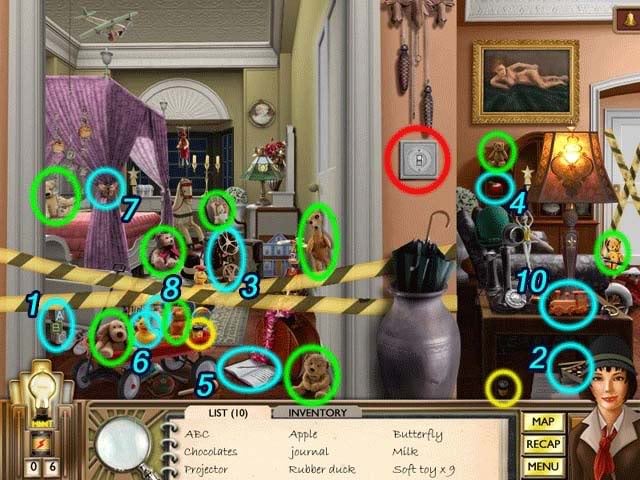
1.ABC
2.Chocolates
3.Projector
4.Apple
5.Journal
6.Rubber duck
7.Butterfly
8.Milk
9.Soft toy x9 (circled in green)
10.Train
- Note: when/if you hear footsteps, click on the light switch circled in red.
Subway Map
- Select the Gin Joint as your destination.
Gin Joint
- Find the objects shown and numbered below. Batteries are circled in yellow.
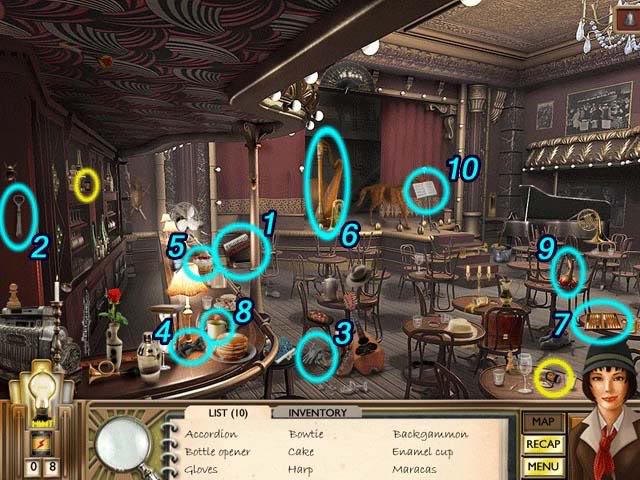
1.Accordion
2.Bottle opener
3.Gloves
4.Bowtie
5.Cake
6.Harp
7.Backgammon
8.Enamel cup
9.Maracas
10.Sheet music
Ginger’s Dressing Room
- Find the objects shown and numbered below. Batteries are circled in yellow and Bells are circled in green.
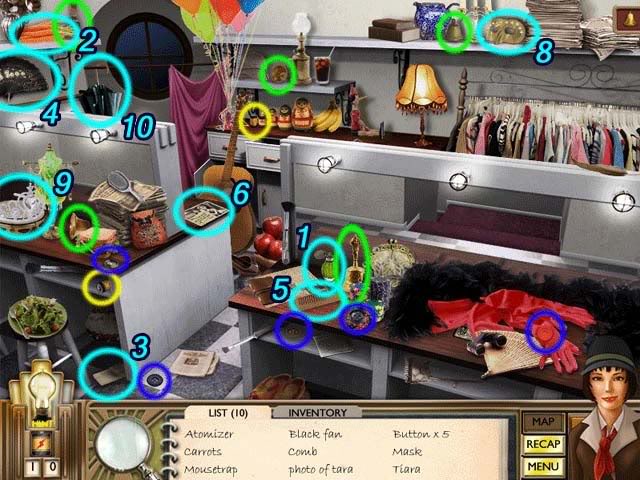
1.Atomizer
2.Carrots
3.Mousetrap
4.Black fan
5.Comb
6.Photo of Tara
7.Button x5 (circled in dark blue)
8.Mask
9.Tiara
10.Umbrella
Gin Joint Storeroom
- Find the objects shown and numbered below. Batteries are circled in yellow.
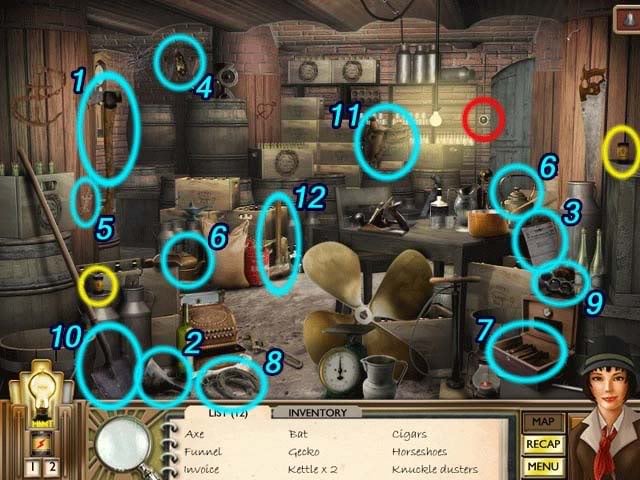
1.Axe
2.Funnel
3.Invoice
4.Bat
5.Gecko
6.Kettle x2
7.Cigars
8.Horseshoes
9.Knuckle dusters
10.Shovel
11.Saddle
12.Sledgehammer
- If someone approaches/you see footsteps, click on the light switch circled in red.
Subway Map
- Select Newsroom as your destination
Memory Fill-in Puzzle
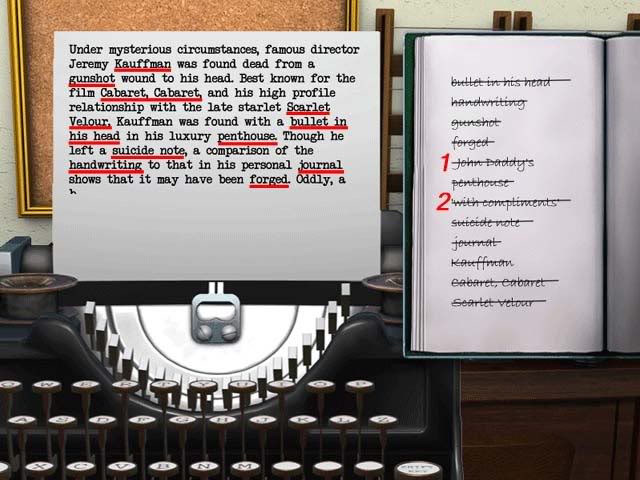
- Choose one of the words from the list on the right to fill it in correctly in the article on the left. The full article and solution is shown below. Two words have been cut accidentally from the screenshot: those last words have been numbered according to the order in which they should be used:
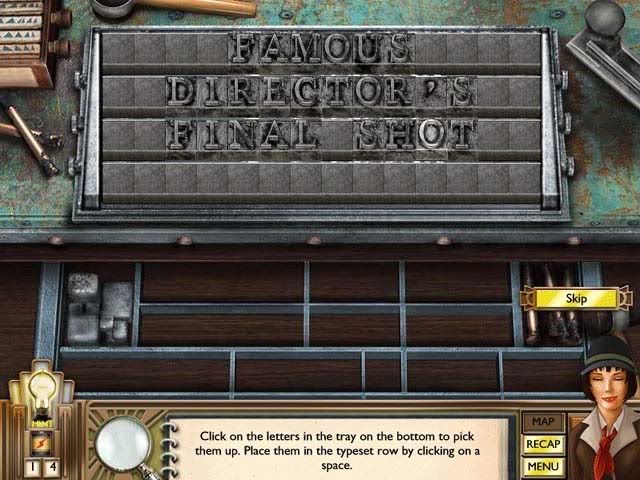
Headline Puzzle
- Place the type set so that you use all the letters and come up with a headline. The solution is "Famous Director’s Final Shot"
IX.Chapter 8: The Tramp and the Tease
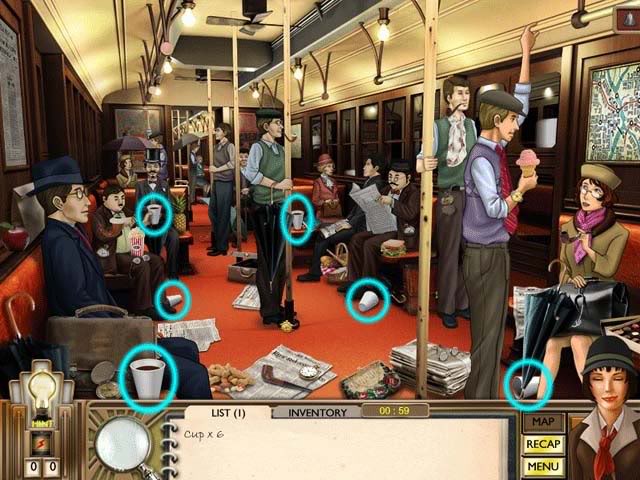
Subway
- Find 6 Cups in one minute. You can chain them for a higher score.
Subway Map
- Select United Industries as the destination.
United Industries Office
- Find the objects shown and numbered below. Batteries are circled in yellow and Bells are circled in green.
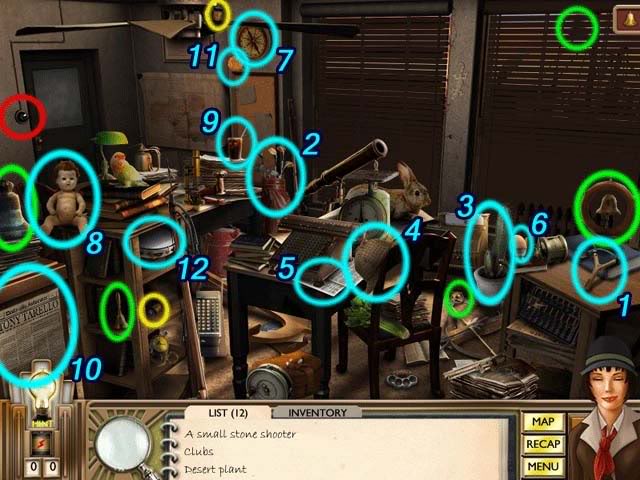
1.A small stone shooter
2.Clubs
3.Desert plant
4.Famous detective hat
5.Financial ledger
6.Hard boiled egg
7.Points north
8.Scary doll
9.Refreshing drink
10.Tarello story
11.Swirly candy
12.Tambourine
- If and when footsteps appear, click on the light switch circled in red.
Subway Map
- Select Mayor’s Office as the destination.
Mayor’s Office
- Find the objects shown and numbered below. Batteries are circled in yellow.
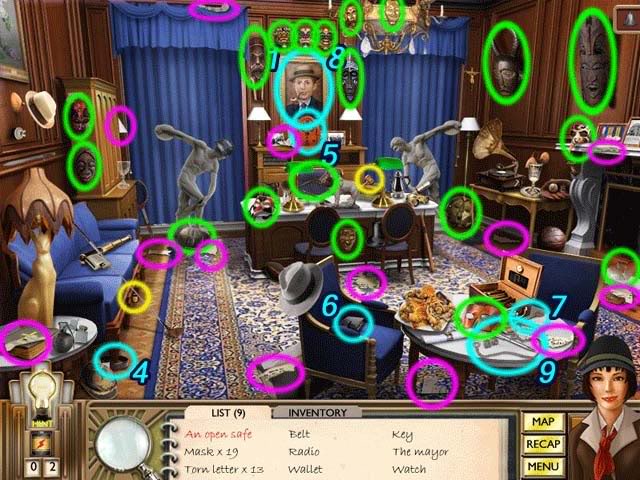
1.An open safe (find object #8 The Mayor first to uncover the Safe)
2.Mask x19 (circled in green)
3.Torn letter x13 (circled in magenta)
4.Belt
5.Radio
6.Wallet
7.Key
8.The mayor
9.Watch
- Reassemble the torn note. The solution is shown below:
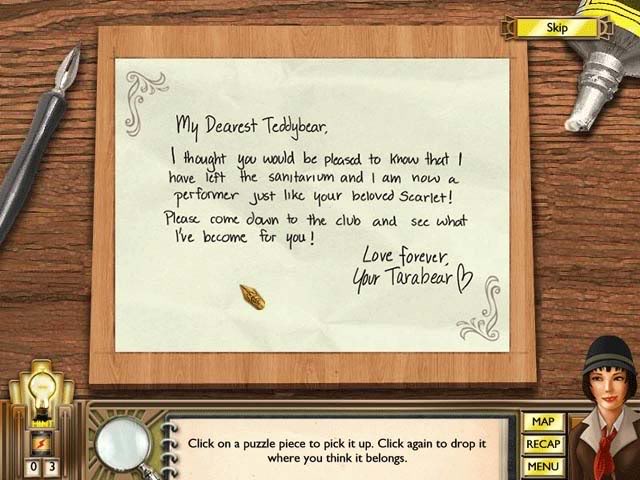
Mayor’s Safe
- Find the objects shown and numbered below. There are no Batteries or Bells here.
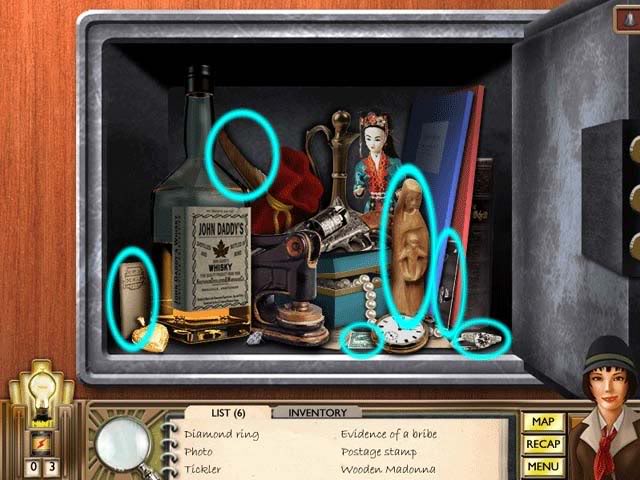
1.Diamond ring
2.Photo
3.Tickler
4.Evidence of a bribe
5.Postage stamp
6.Wooden Madonna
Subway Map
- Select Sanitarium as the destination.
Tara Sommer’s Room
- Find the objects shown and numbered below. Batteries are circled in yellow.
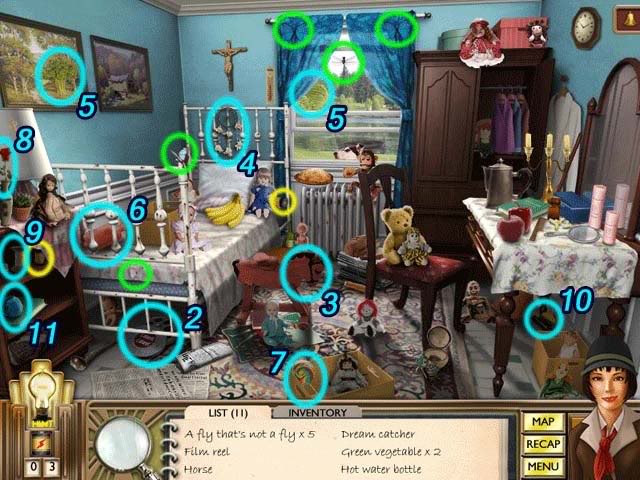
1.A fly that’s not a fly x5 (circled in green)
2.Film reel
3.Horse
4.Dreamcatcher
5.Green vegetable x2
6.Hot water bottle
7.Lollipop
8.Rose
9.Spool
10.Still camera film
11.Yarn
Sanitarium
- Find the objects shown and numbered below. Batteries are circled in yellow.
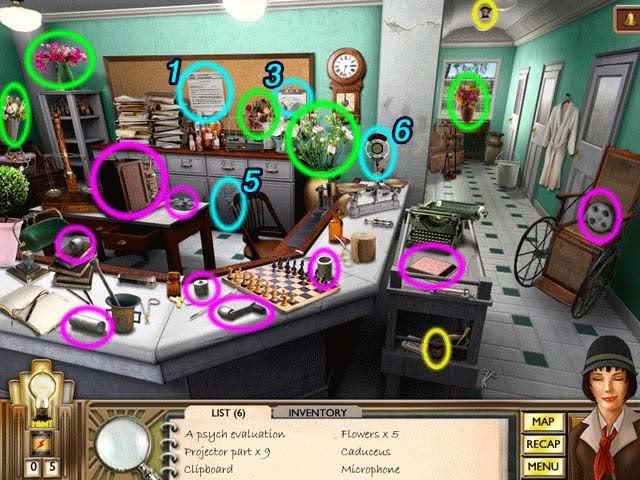
1.A psychiatric evaluation
2.Projector part x9 (circled in magenta)
3.Clipboard
4.Flowers x5 (circled in green)
5.Caduceus
6.Microphone
Reassemble the Projector Puzzle
- Reassemble the projector according to the schematic. Pieces are numbered in blue, with their corresponding locations numbered in red. The solution is shown below:
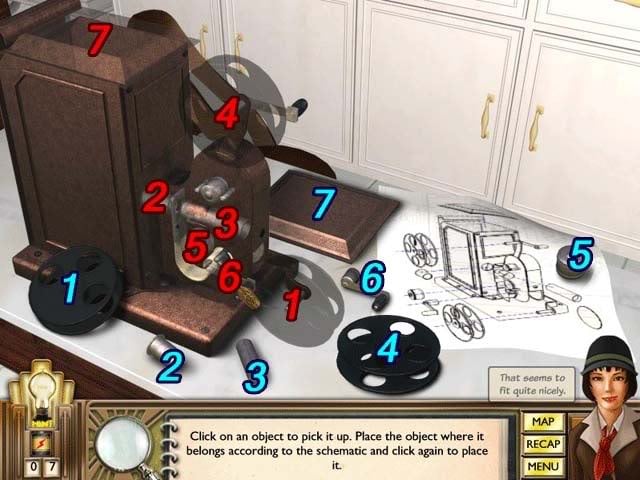
- Once finished with the puzzle, use the Film Reel from your inventory on the reassembled projector in the main Sanitarium room.
Subway Map
- Select Newsroom as the destination.
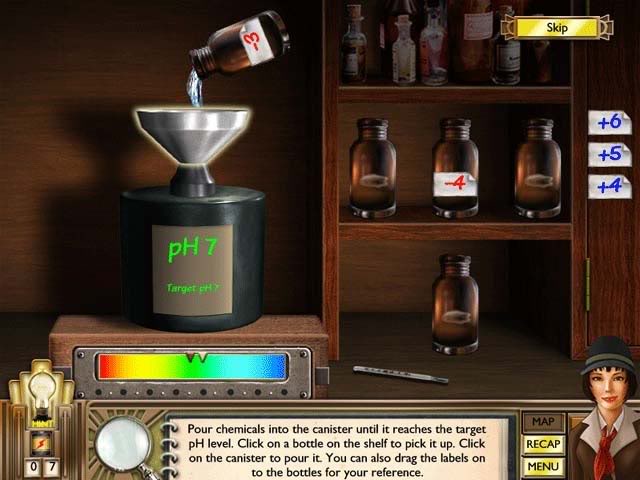
Darkroom Puzzle
- Use the different bottles provided to achieve the proper pH content. Bottles are randomized, but your possibilities are -3, -4, +4, +5, and +6. You may place labels on the bottles once you know which is which to make solving the puzzle easier.
Picture Focus Puzzle
- Use the buttons on the right to align and focus the photograph. The topmost ^ and v buttons are used for zooming.
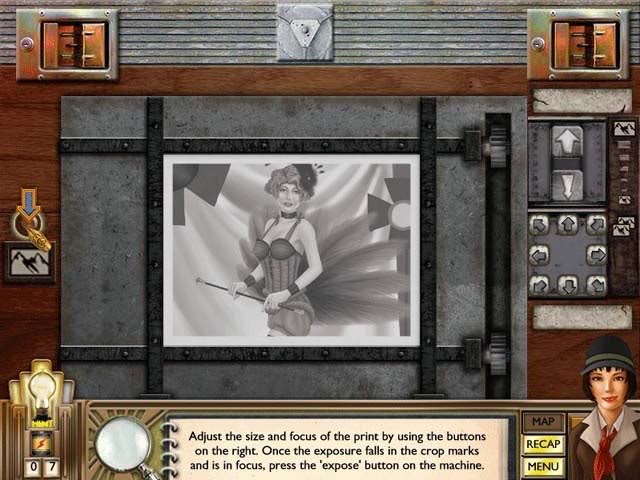
- Press the button on the left once the picture is properly focussed and aligned to complete the puzzle. You may use a hint to automatically align and focus the picture perfectly.
Valerie’s Apartment
- Find the objects shown and numbered below. Batteries are circled in yellow.
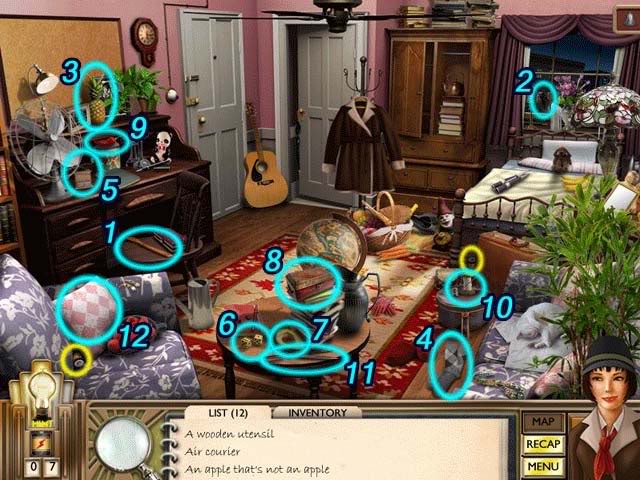
1.A wooden utensil
2.Air courier
3.An apple that’s not an apple
4.Argyle socks
5.Coffee grinder
6.Gambling cubes
7.Key guacamole ingredient
8.Ornate wooden box
9.Red chili
10.Sewing kit
11.Something to cut the cushion
12.Evidence sewn into the armchair (use the sewing kit, scissors, and evidence from your inventory on the cushion).
X.Chapter 9: The Baton and the Bottle
Subway
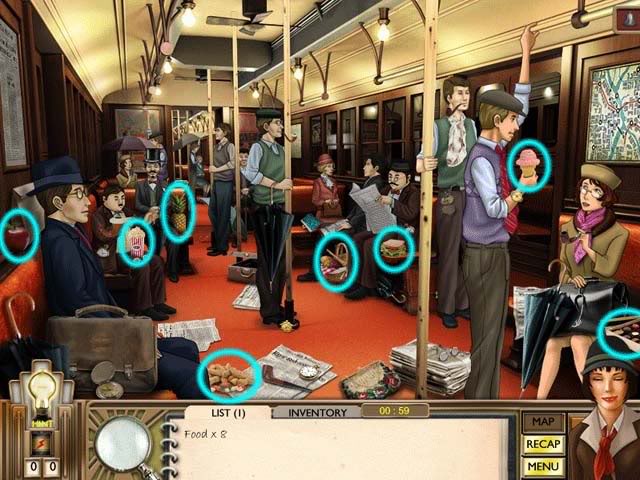
- Find 8 Food items in one minute. You can chain them for a higher score.
Subway Map
- Select Gin Joint as the destination
Ginger’s Dressing Room
- Find the objects shown and numbered below. Batteries are circled in yellow.
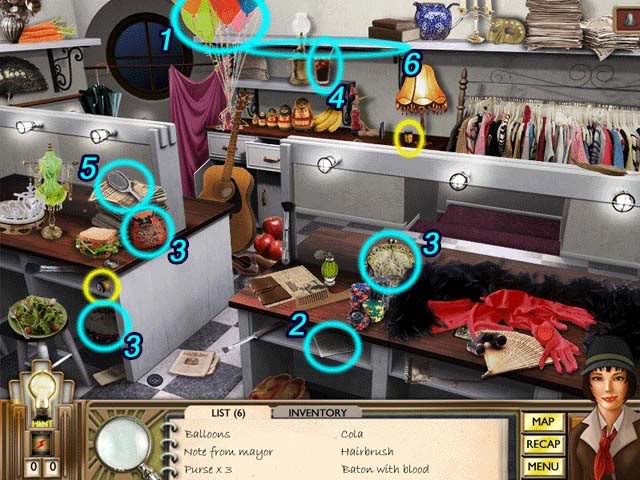
1.Balloons
2.Note from mayor
3.Purse x3
4.Cola
5.Hairbrush
6.Baton with blood
Subway Map
- Select Police Station as the destination.
Police Station
- Find the objects shown and numbered below. Batteries are circled in yellow.
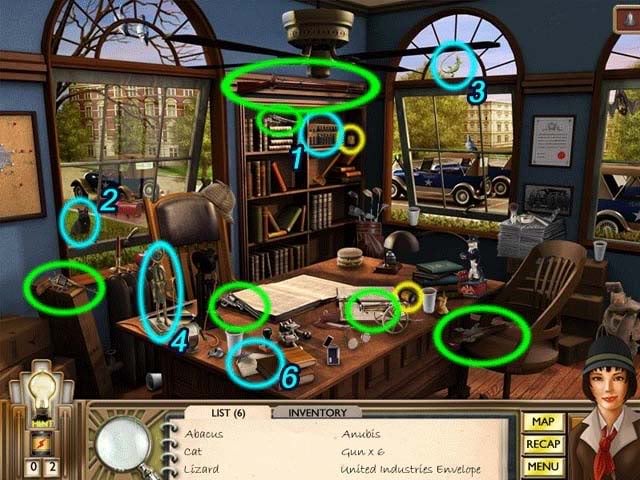
1.Abacus
2.Cat
3.Lizard
4.Anubis
5.Gun x6 (circled in green)
6.United Industries Envelope
Johnny Jackson’s Cell
- Find the objects shown and numbered below. Batteries are circled in yellow.
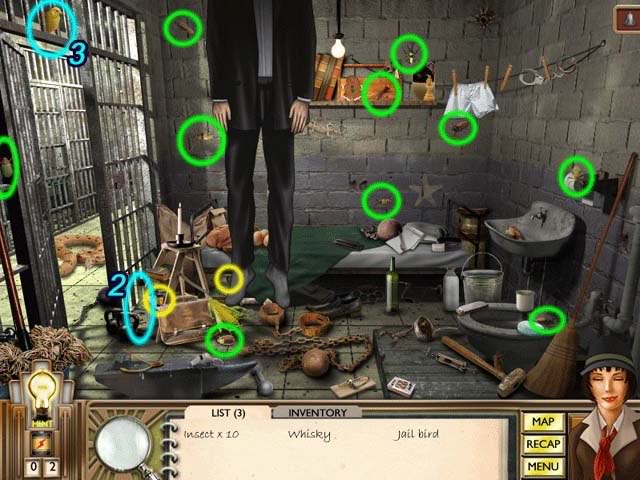
1.Insect x10 (circled in green)
2.Whisky
3.Jail bird
Subway Map
- Select Newsroom as the destination.
Terry’s Office
- Find the objects shown and numbered below. Batteries are circled in yellow.
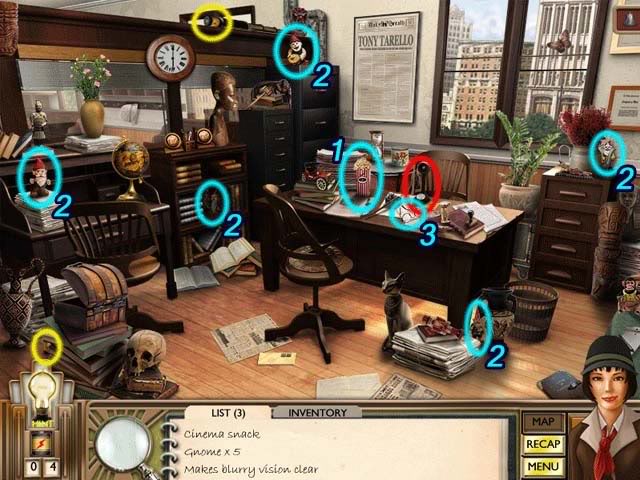
1.Cinema snack
2.Gnome x5
3.Makes blurry vision clear
- Once you’ve found all the objects, click on the phone circled in red when it starts to ring.
Memory Fill-in Puzzle
- Choose one of the words from the list on the right to fill it in correctly in the article on the left. The full article and solution is shown below:
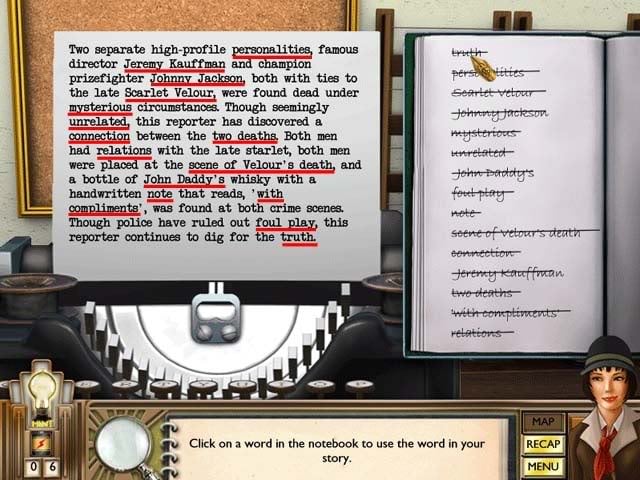
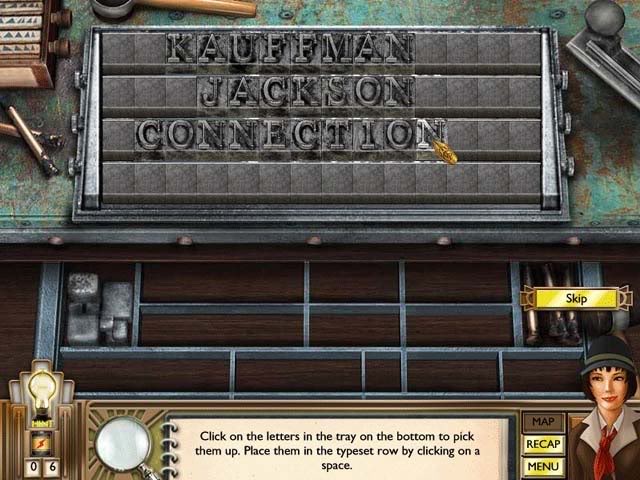
Headline Puzzle
- Place the type set so that you use all the letters and come up with a headline. The solution is "Kauffman Jackson Connection"
XI.Chapter 10: A Woman Scorned
Editor’s Office
- Find the objects shown and numbered below. Batteries are circled in yellow.
1.Card in a pocket
2.Fleur-de-lis x3
3.Flash bulb x2
4.Gong
5.Letter
6.Paper clip x7 (circled in green)
7.Pencil sharpener
8.Call the Police Chief (click on the Card in your inventory and then the phone to dial)
File Room
- Find the objects shown and numbered below. Batteries are circled in yellow.
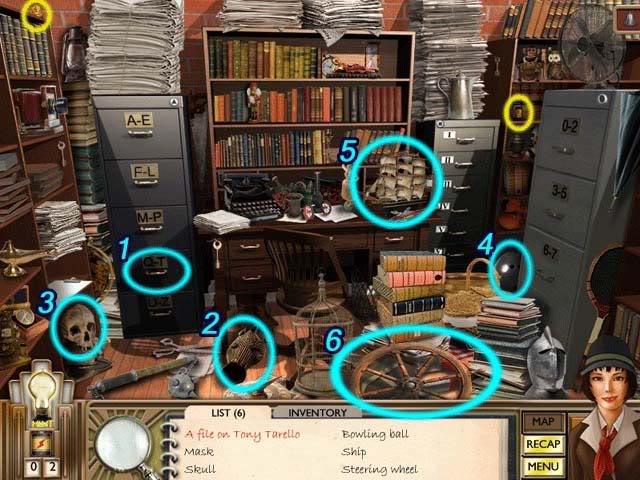
1.A file on Tony Tarello
2.Mask
3.Skull
4.Bowling Ball
5.Ship
6.Steering wheel
Subway Map
- Select Valerie’s Apartment as the destination.
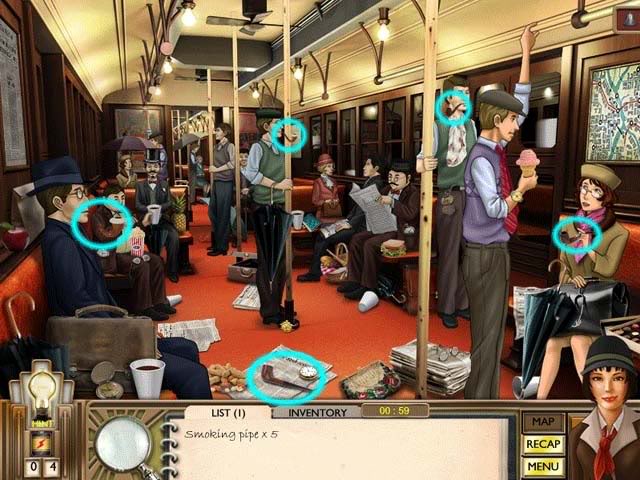
Subway
- Find 5 Smoking Pipes in one minute. You can chain them for a higher score.
Valerie’s Apartment
- Find the objects shown and numbered below. Batteries are circled in yellow.
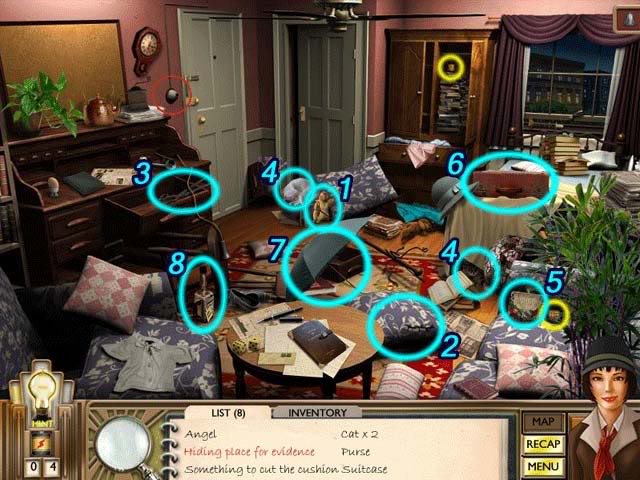
1.Angel
2.Hiding place for evidence (use the Scissors from your inventory [#3]on this to then collect the envelope)
3.Something to cut the cushion
4.Cat x2
5.Purse
6.Suitcase
7.Umbrella
8.Whisky
- If and when you hear footsteps, click on the light switch circled in red.
- When using the persuasion technique on Ginger, select "You killed Scarlet for the Mayor".
Memory Fill-in Puzzle
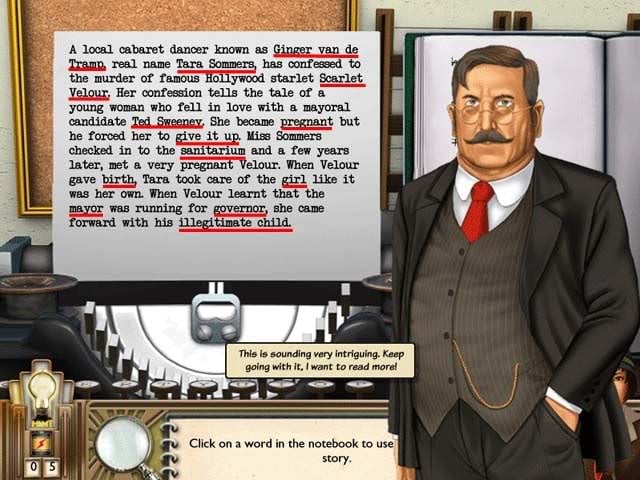
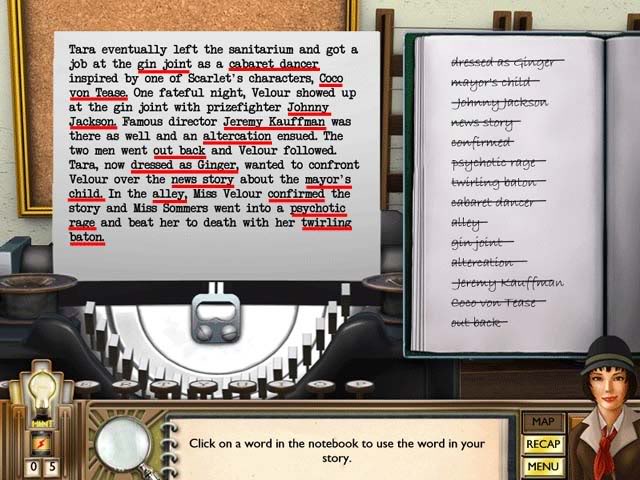
- Choose one of the words from the list on the right to fill it in correctly in the article on the left. The full article and solution are shown below. There are two pages this time.
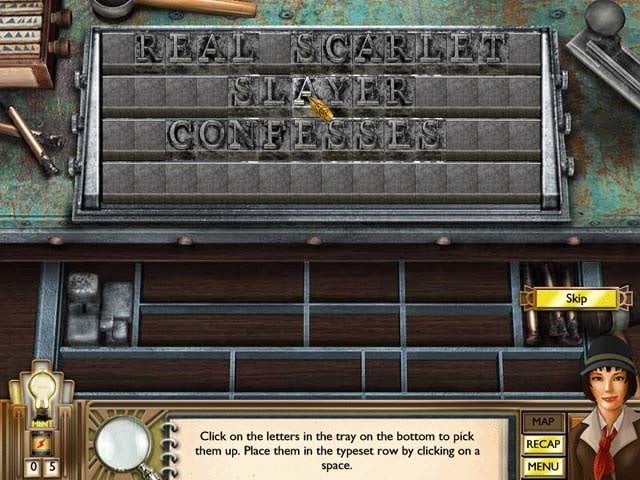
Headline Puzzle
- Place the type set so that you use all the letters and come up with a headline. The solution is "Real Scarlet Killer Confesses"
XII.Chapter 11: The Big Story
Subway Map
- Select United Industries as the destination.
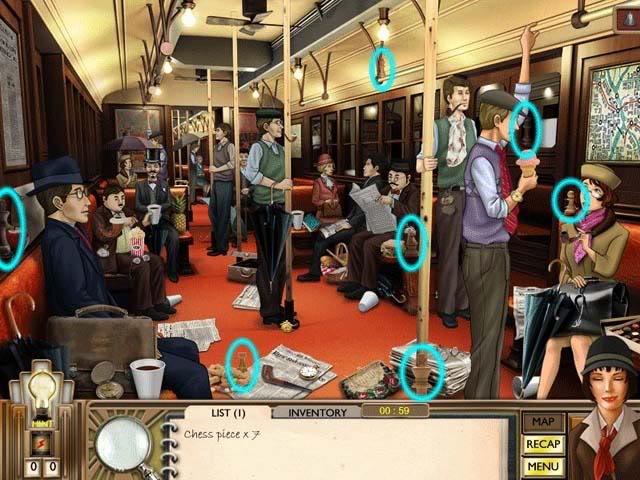
Subway
- Find 7 Chess Pieces in one minute. You can chain them for a higher score.
United Industries Office
- Find the objects shown and numbered below. Batteries are circled in yellow.
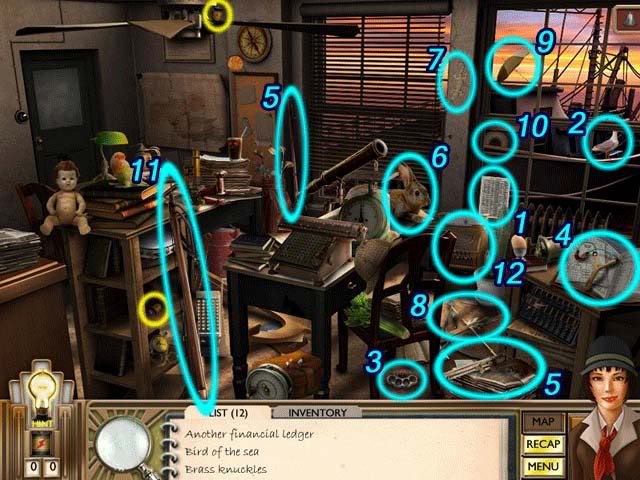
1.Another financial ledger
2.Bird of the sea
3.Brass knuckles
4.Charter of incorporation
5.Firearm x2
6.Furry hopper
7.Little lizard
8.Mechanical arrow shooter
9.Rain cover
10.Saves a drowner
11.Shoots fish mainly
12.Stores money
Docks
- Find the objects shown and numbered below. Batteries are circled in yellow and Bells are circled in green.
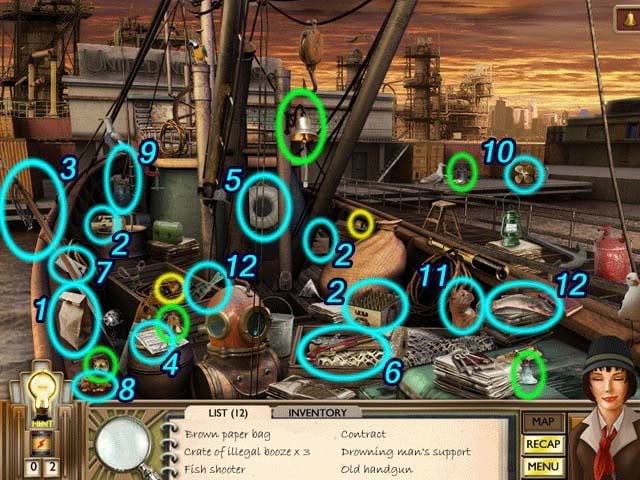
1.Brown paper bag
2.Crate of illegal booze x3
3.Fish shooter
4.Contract
5.Drowning man’s support
6.Old handgun
7.Butcher’s tool
8.Ground nuts
9.Janitor’s equipment
10.Propels a ship forward
11.Striped tabby
12.Underwater inhabitant x2
Mayor’s Office
- When using the persuasion technique on Mayor Sweeney, select the following response: "You’re going down with Laslo."
Docks
- Find the objects shown and numbered below. Batteries are circled in yellow.
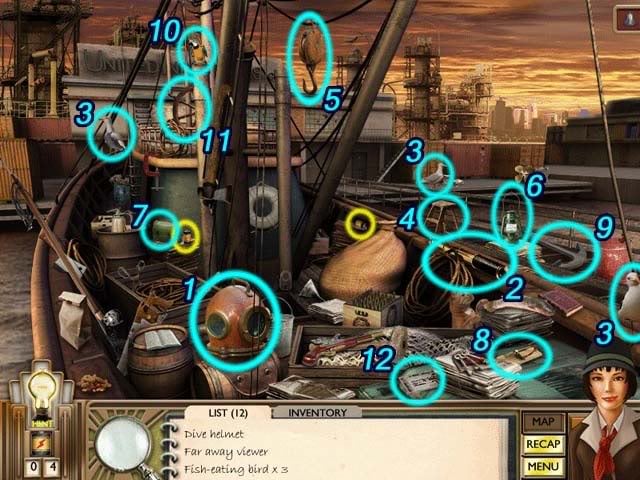
1.Dive helmet
2.Far away viewer
3.Fish-eating bird x3
4.Height booster
5.Hook and pulley
6.Light provider
7.Metal lunch carrier
8.Mousetrap
9.Parks a ship
10.Pirate’s Polly
11.Ship’s wheel
12.Something that Laslo wrote
Memory Fill-in Puzzle
- Choose one of the words from the list on the right to fill it in correctly in the article on the left. The full article and solution are shown below.

Headline Puzzle
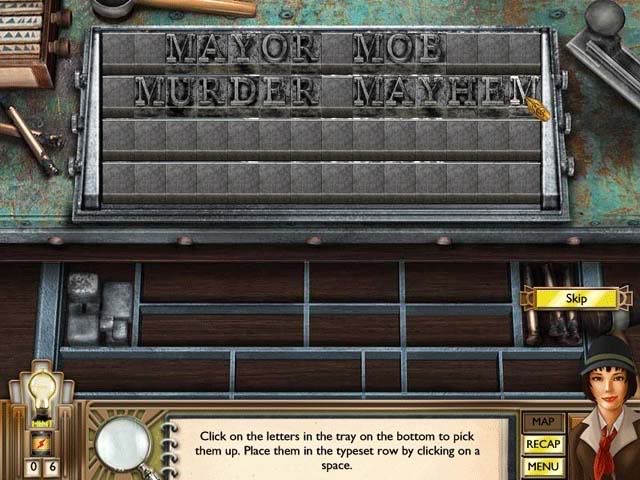
- Place the type set so that you use all the letters and come up with a headline. The solution is "Mayor Mob Murder Mayhem"
Congratulations, you’ve completed the game!
“;
More articles...
Monopoly GO! Free Rolls – Links For Free Dice
By Glen Fox
Wondering how to get Monopoly GO! free rolls? Well, you’ve come to the right place. In this guide, we provide you with a bunch of tips and tricks to get some free rolls for the hit new mobile game. We’ll …Best Roblox Horror Games to Play Right Now – Updated Weekly
By Adele Wilson
Our Best Roblox Horror Games guide features the scariest and most creative experiences to play right now on the platform!The BEST Roblox Games of The Week – Games You Need To Play!
By Sho Roberts
Our feature shares our pick for the Best Roblox Games of the week! With our feature, we guarantee you'll find something new to play!Demon Piece Races – All Race Buffs
By Adele Wilson
Our Demon Piece Races guide details all of the buffs, rarities, and characteristics for each race in the One Piece Roblox game.


