- Wondering how to get Monopoly GO! free rolls? Well, you’ve come to the right place. In this guide, we provide you with a bunch of tips and tricks to get some free rolls for the hit new mobile game. We’ll …
Best Roblox Horror Games to Play Right Now – Updated Weekly
By Adele Wilson
Our Best Roblox Horror Games guide features the scariest and most creative experiences to play right now on the platform!The BEST Roblox Games of The Week – Games You Need To Play!
By Sho Roberts
Our feature shares our pick for the Best Roblox Games of the week! With our feature, we guarantee you'll find something new to play!Demon Piece Races – All Race Buffs
By Adele Wilson
Our Demon Piece Races guide details all of the buffs, rarities, and characteristics for each race in the One Piece Roblox game.
PuppetShow: Mystery of Joyville Walkthrough
Welcome to Gamezebo's walkthrough for Puppetshow: Mystery of Joyville. General Game Information The game has 13 chapters with 18 mini games and multiple interactive scenes. There are no points awarded and the game is played for story completion only. There is an optional tutorial at the beginning of the game. The game has no timed mode or penalty for successive clicking on the hidden object scenes. You can save at any point and will be brought back to that locatio…
a:1:i:0;a:2:s:13:”section_title”;s:43:”PuppetShow: Mystery of Joyville Walkthrough”;s:12:”section_body”;s:98471:”Welcome to Gamezebo’s walkthrough for Puppetshow: Mystery of Joyville.

General Game Information
- The game has 13 chapters with 18 mini games and multiple interactive scenes.
- There are no points awarded and the game is played for story completion only.
- There is an optional tutorial at the beginning of the game.
- The game has no timed mode or penalty for successive clicking on the hidden object scenes.
- You can save at any point and will be brought back to that location upon resuming your game.
- Throughout the game you will be asked find 12 to 18 objects within each hidden object screen and one or more of those objects will be stored in inventory to be used at a future location.
- All mini games can be skipped once a certain amount of time has gone by which can be seen in the lower left hand corner of the screen.
- Hints are freely given but you must wait several moments for it to recharge before you can use it a second time.
- There are several types of cursors in the game to help you determine what you can do at certain levels.
- There is no specific order to the locations you visit but most of the time you must visit one location to obtain a tool to use at another.
- All areas must be visited before the game is complete.
- If you become stuck run your mouse all over the screen and look for the mouse to change and click on that area. Any area you click on you can back out of and come back to at a later time.
- Each time you play the game you will be asked to find the same items which are always located in the same place each game.
Game Elements
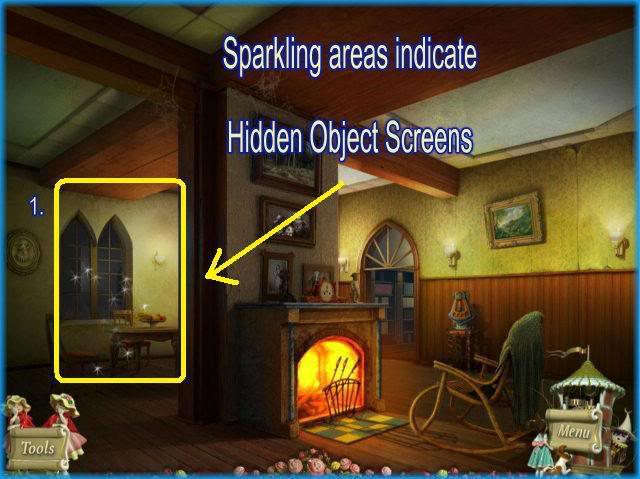
- Before you start searching for hidden objects you will be in a location such as the one in the image above where there are multiple things to do. Sometimes the order does matter. If you find yourself in a puzzle that you can not finish because you need something put your cursor at the bottom of the screen and back out.
- You can back out of any scene if you choose and return to it later.
- NOTE – If you back out of a puzzle before it is complete you will reset it.
- If you see an area with sparkles such as the area circled in yellow above click on it as this indicates a hidden object screen.
- In every hidden object screen there is at least 1 item that you must find to use in another location. In this walkthrough those items will always be circled in red. All listed hidden objects will be circled in yellow.
Hidden Object Screen
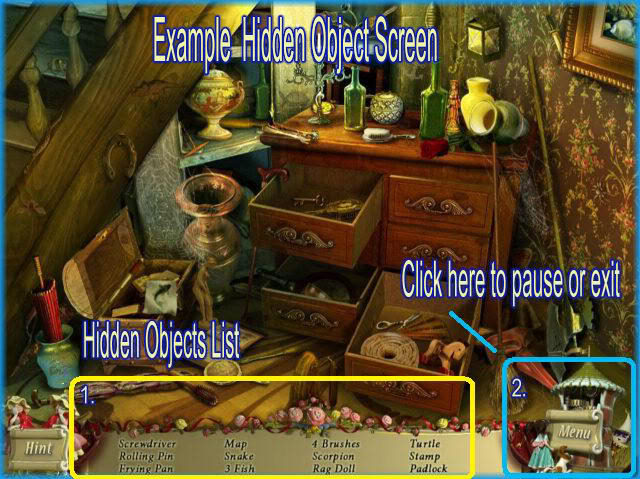
- This is an example of a hidden object screen.
- 1.The items you are to find are listed at the bottom and the amount always varies. When you find an item click on it and a line will draw through the word in your list.
- Several scenes will require you to interact with it such as pulling a curtain or opening a drawer.
- If you see the cursor change to a hand this indicates you need to click on that item. There may be hidden objects behind these areas so it is best to check for these areas right away when you begin a new hidden object scene.
- When you locate the special item it will go into your inventory which is marked "Tools" at the bottom left of your screen.
- 2. If you get stuck or need to pause or exit the game click on this image in the lower right corner.
Inventory/Tools
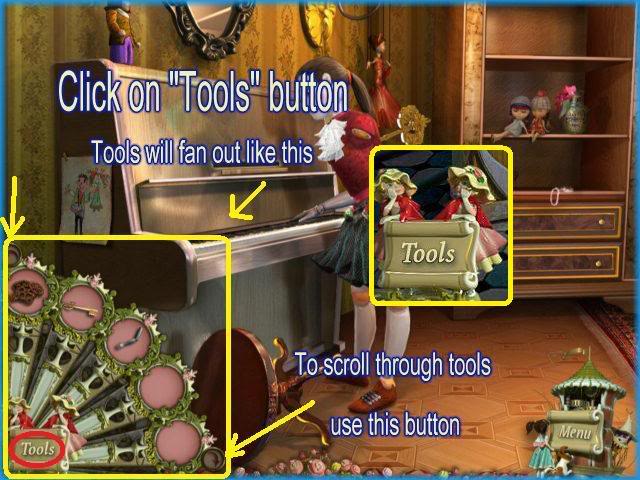
- In each hidden object screen there is at least one item that will go into your inventory or tools.
- 1. In the lower left hand corner click on "Tools" and it will open and fan out as seen in image above.
- Note that there are buttons at the top and bottom so you can scroll through the items in your inventory.
- To use an item click on it and drag it to the desired destination.
Hints
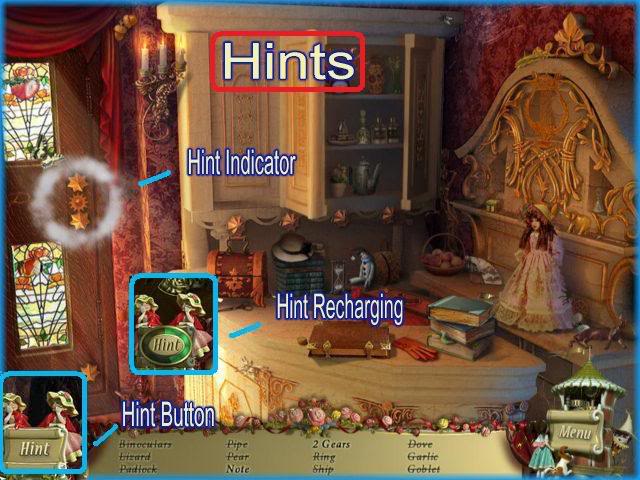
- If you need help there is a hint button at the lower left of the screen.
- Note that you can only click on the button if it is recharged.
- Watch for the green circle to redraw and this indicates you can use a hint.
- In image above a hint is being used. Note there is a circle of smoke around the gear. The circle of smoke does not stay long so pay close attention when you use a hint.
- There is no penalty for using a hint.
- When you choose to use a hint, a random item from the list will be revealed to you,
Cursors
Magnifying glass cursor

- This is known as the magnifying glass cursor.
- Whenever you see this cursor it means you can click on an item to have a closer view of it or to interact with it in some way.
- NOTE – It’s a good idea to run your mouse all over a scene carefully before you do anything else to determine which items need to be completed.
Grabbing Hand Cursor

- Whenever you see this cursor you can interact with the scene.
- Usually you will be asked to open drawers, cabinets, doors, or to pick up items.
Globe Cursor
- Whenever you see this cursor you can click and move to another location.
- In most images of this walkthrough you are shown where this icon can be used.
- If you are not sure how to exit a scene place your cursor at the very bottom and usually this will back you out into the previous scene.
Single Sparkle

- Whenever you see this single sparkle in a scene it’s an indicator that you need to click on that area.
- Usually it is a picture, note, or something to further the storyline.
- If you see a sparkle in an interactive scene it usually indicates the location you should place something.
Mini Games
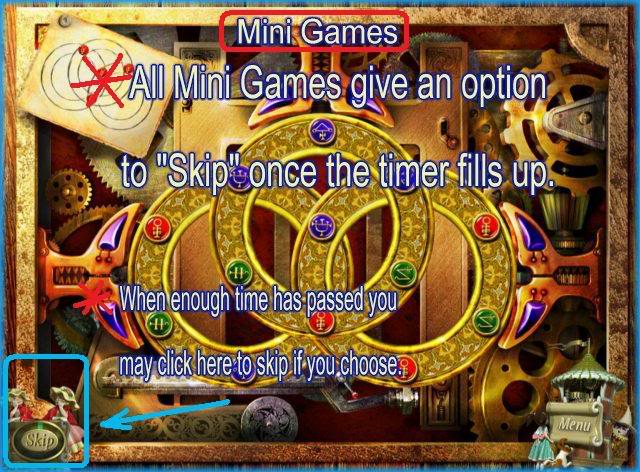
- Here is an example of a mini game.
- A few of the mini games in this walkthrough have multiple solutions and at least one will be provided in this walkthrough.
- You have the option to skip a puzzle if you wish by clicking on the "skip" button at the lower left corner of the screen. You must wait until it recharges which takes a few minutes.
- There is no penalty for skipping a puzzle.
- You should be able to find answers in this walkthrough for each mini game puzzle.
WALKTHROUGH
- This walkthrough is one example of how this game can be played. The order in which you choose locations is up to you but note that you can’t proceed in some areas until you have located a tool to use in it, so you may find you have to back out and return to areas at a later time. The order I have chosen minimizes the amount of backing out you will have to do.
- All areas must be visited and completed to finish the game.
- In the hidden object scenes all items in the list are circled in yellow, the item for inventory/tools will be circled in red, and any areas you need to look closer at in a scene are circled in blue.
- There is an option at the beginning of the game to play a tutorial which basically contains the elements listed above and takes several minutes so you may wish to choose to skip the tutorial.
CHAPTER 1
The Hotel Lobby
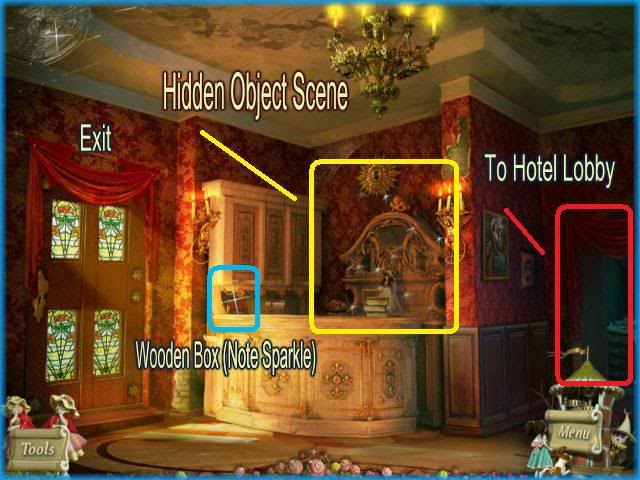
- Here is your first scene you can choose to skip the tutorial if you wish.
- Note the sparkling area click on this to go to the hidden object scene.
- There is a large sparkle on the wooden box on the right of the counter. You will need a key to open it so feel free to take a look but you will have to back out and come back to this later when you have the key.
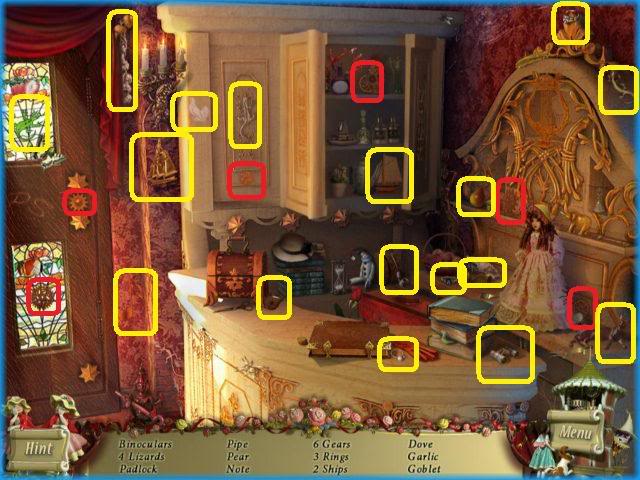
- In this scene the first thing you should do is note the sparkle on the cabinet and click on it. The cabinet door will open as seen in the image. (Mousing over a scene right away is a wise practice.)
- There are 23 items to locate and 6 of them are gears which will go into your inventory for later use in a puzzle.
- The regular items are circled in yellow and the 6 gears are circled in red.
- Once you are finished you will go back to the previous scene.
- Click on the doorway to the right which will take you into the hotel’s lobby.
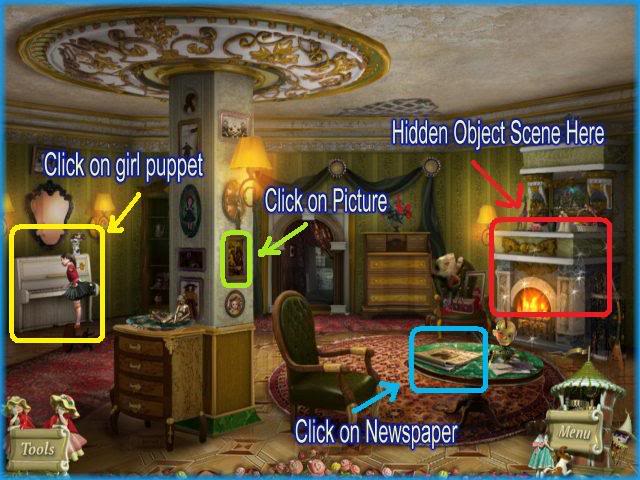
- This is the hotel lobby and there are many things to do in this scene.
- If you click on the mechanical spider puppet on the table it will run away.
- The first thing to do is to click on the newspaper on the table for a closer view and you will see a gold key next to it. Click on the key and it will add to your inventory for later use .
- Next, there is a picture circled in green on the banister. Click on it and it will reveal a note written by a child that states, "I love you Grandpa" love Simon your Grandson."
- Click on the hidden object scene which can be seen right in front of the fireplace.
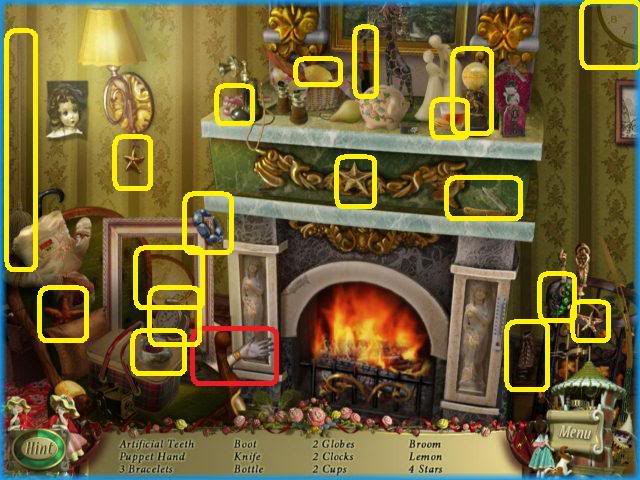
- Here there are 20 items you must locate.
- Inventory item is a wooden arm circled in red, and the rest of the items are circled in yellow.
- Once finished you will go back into the lobby.
- Click on the piano at the left side of the room for a closer view.
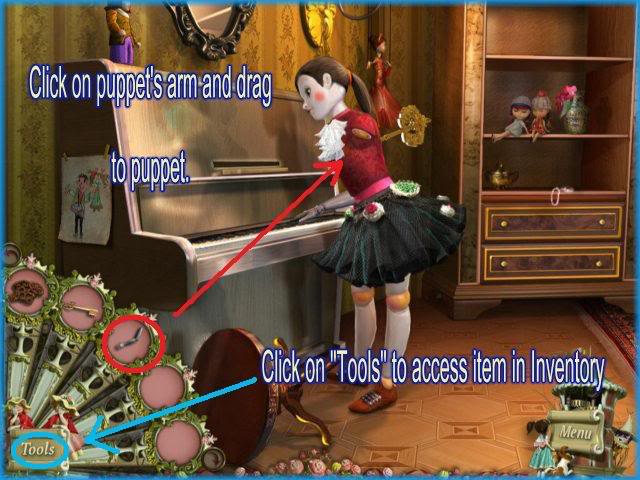
- In this scene you will need to click on the "Tools" button at the bottom left
- Drag the puppet arm to the area where the puppet’s arm is missing and it shall re-attach.
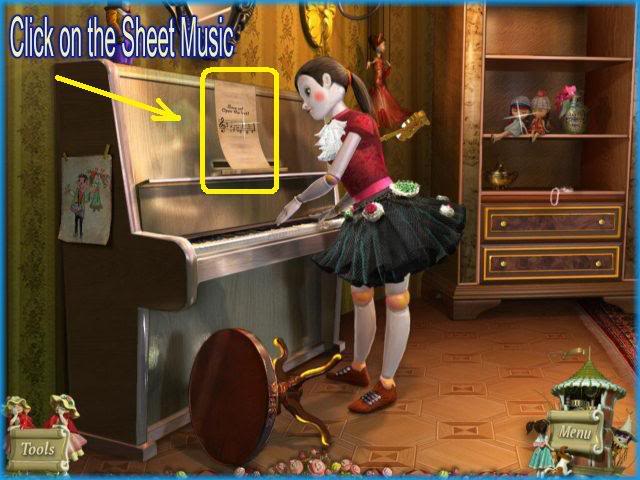
- The puppet girl will begin to play a song on the piano and a piece of music will come out of the slot near the top.
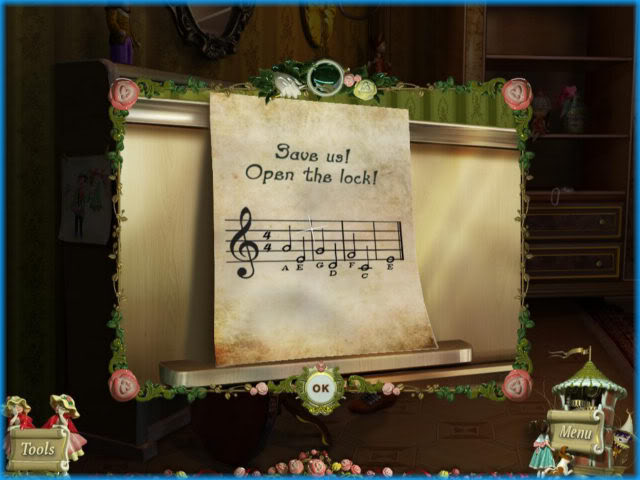
- Click on this music and it will go into your inventory and will stay there until the end of the game.
- Next, click on the door on the far left and go back into the hotel’s front room.
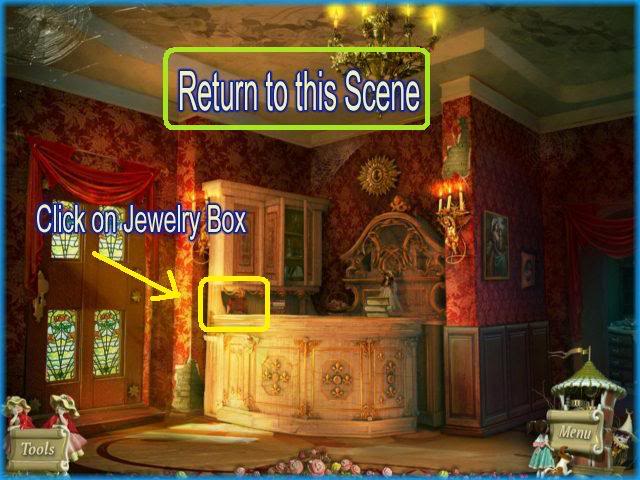
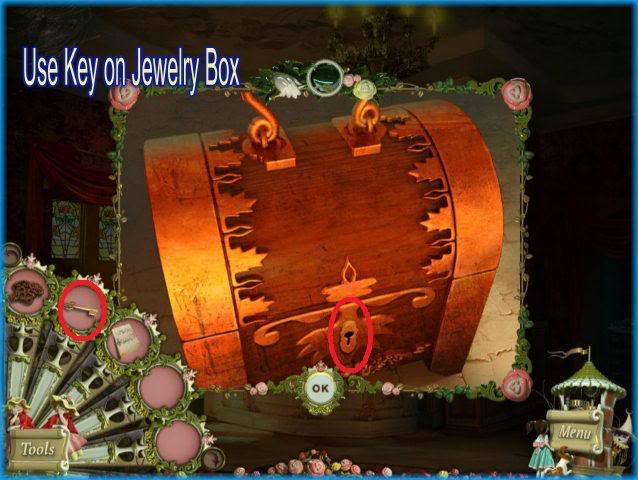
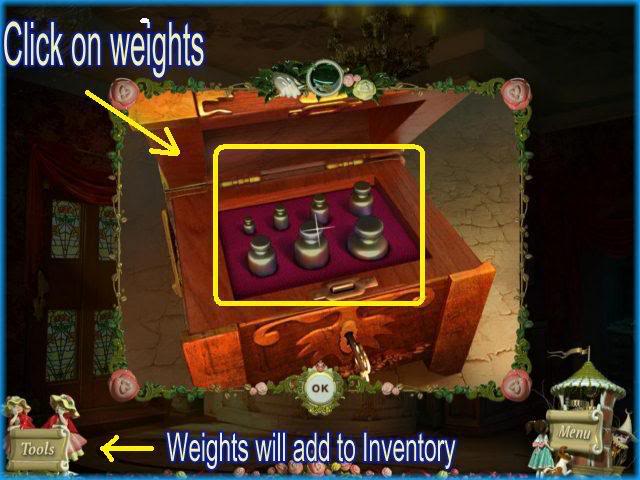
- Click on the wooden box on the counter for a closer view.
- Click on the "Tools" button and drag the key to the box to open it.
- Once open click on the weights inside and they will enter into your inventory for use in a future puzzle.
- Click on the door to exit the hotel.
On the Street corner
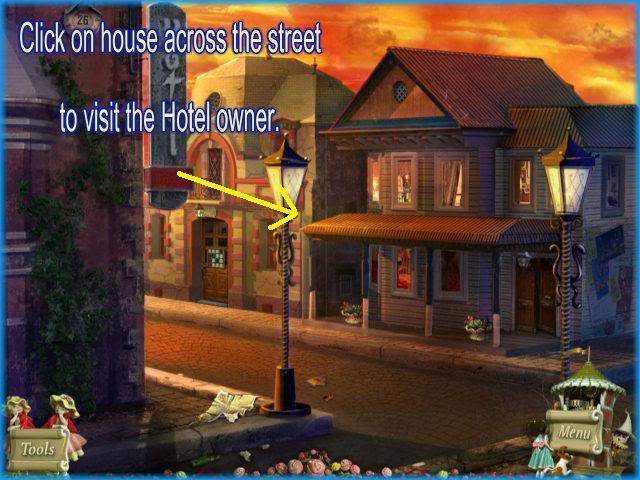
- In the storyline, you agreed to visit the hotel owner and his daughter after you settled in at the hotel.
- Click on the house across the street.
CHAPTER 2 – The Hotel Owner’s Home
Hotel Owner’s House
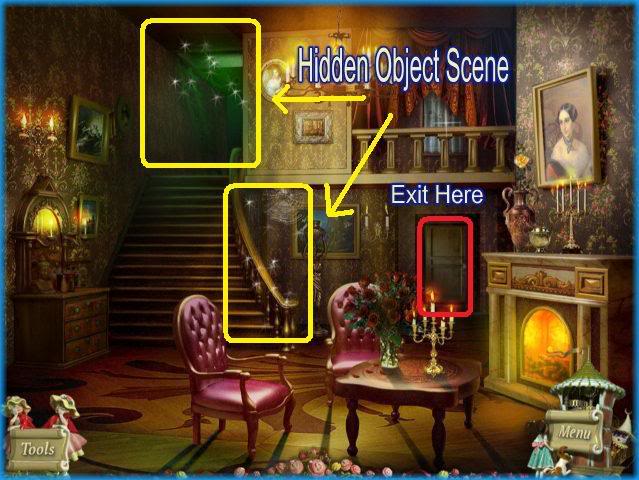
- Here there are 2 hidden object scenes.
- Click on the one at the very top of the stairs first.
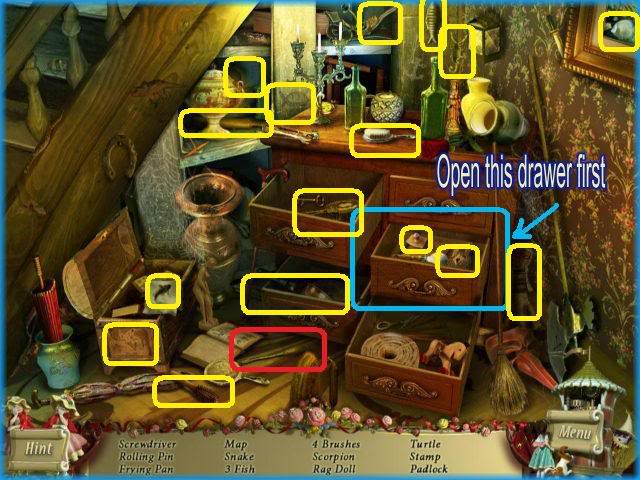
- Click on the drawer as indicated in the image above to open it.
- Locate the 17 items on the list circled in yellow.
- The screwdriver is the item that will go into inventory. It is circled in red.
- Once finished with this location, go back to the main room and click on the second hidden object scene located along the banister of the stairs.
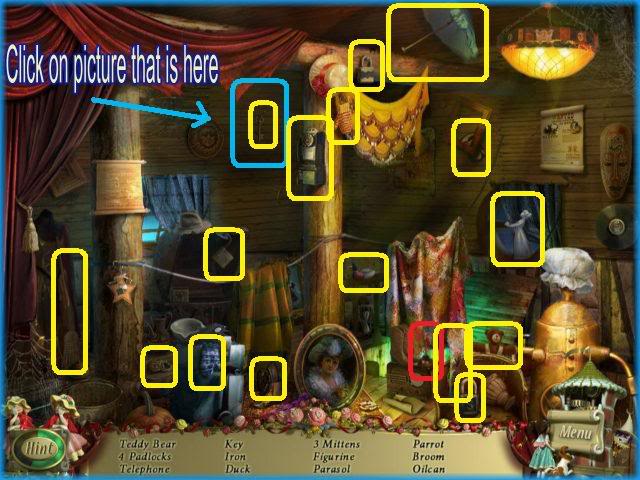
- In this scene there is a picture on the back wall which is circled in blue above.
- Click on the picture and it will fall to the ground. Click on the key that remains hanging on the wall. It will move into your inventory.
- Locate the 18 items on the list which are circled in yellow.
- The special item in this scene is the oil can which is circled in red. Click on it and it will go into your inventory.
- Once finished with this scene you will be back in the main room again.
- Click on exit to go back out to the street.
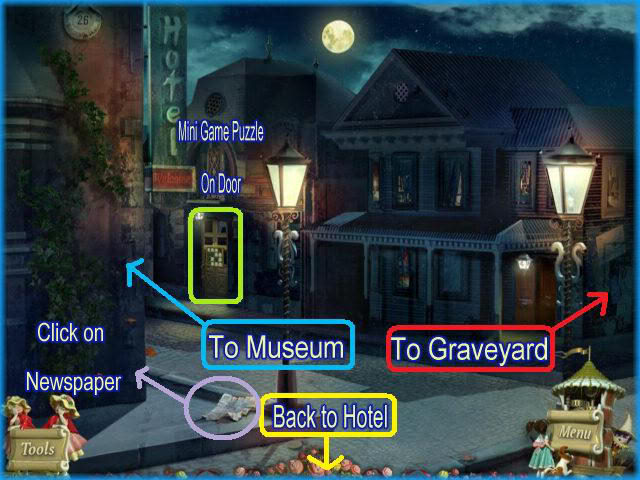
- Notice now it is evening.
- The spider puppet is there and he quickly runs away.
- There are many things to do at this location.
- First read the newspaper that is circled in purple in the picture and read about the Joyville museum closing after 50 years.
- There is a puzzle on the door of the building next to the hotel owner’s house but a piece is missing so we will come back to it later.
- You have the option of going to the right which is the graveyard or to the left which is the museum.
- For walkthrough purposes choose to go to the right to visit the Graveyard.
CHAPTER 3 – The Graveyard
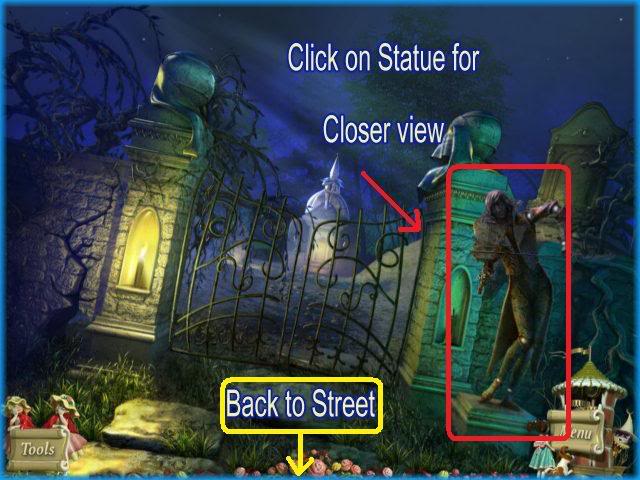
- Now you are at the front gate of the graveyard.
- Click on the statue on the right for a closer view.
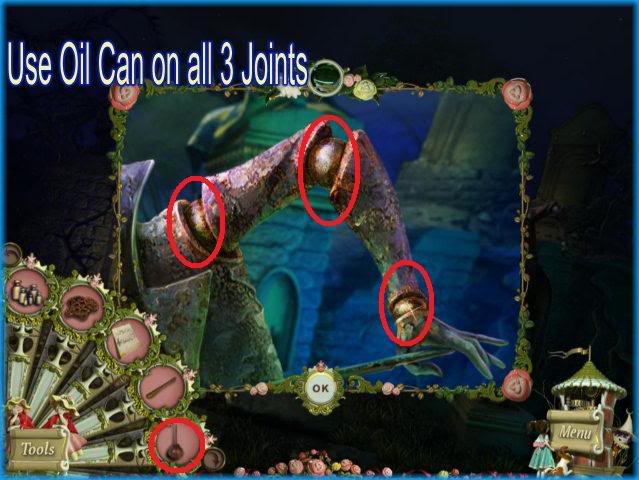
- Here you will see the statue’s arm is very rusty.
- Click on "Tools" and drag the oil can to all 3 joints and click on them to place the oil.
- The joints will become shiny and new looking and this will activate the gate to open.
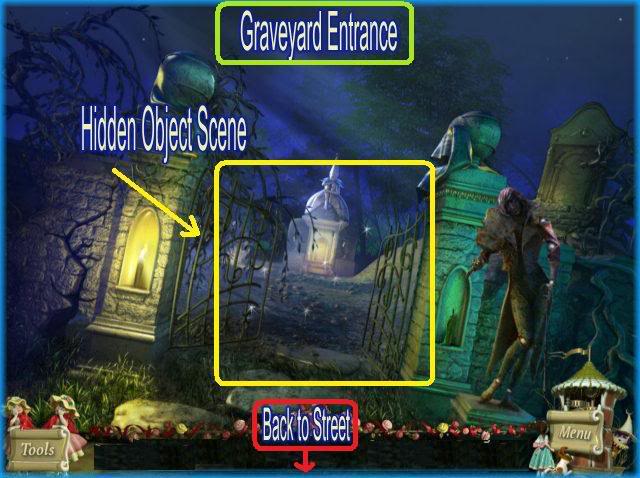
- Click on the sparkles to access the hidden object scene here.
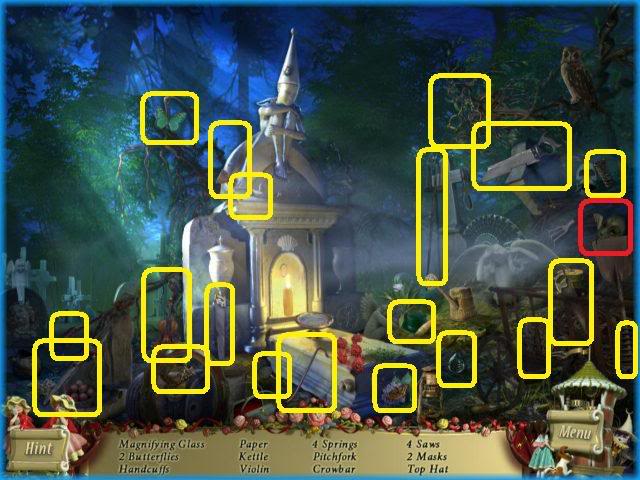
- Locate the 20 items on the list which are circled in yellow above.
- The special item for inventory is a mask which is located at the center right of the screen circled in red.
- Once you finish go back to the street and click on the door to the Library to access the mini game.
Mini Game – Masks
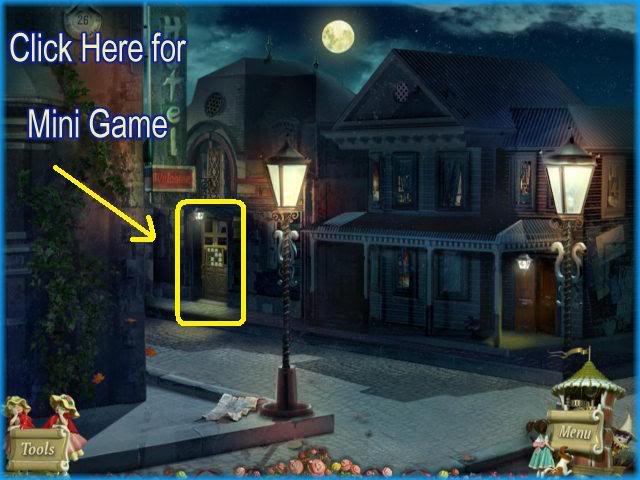
- Click here to access the mask mini game.
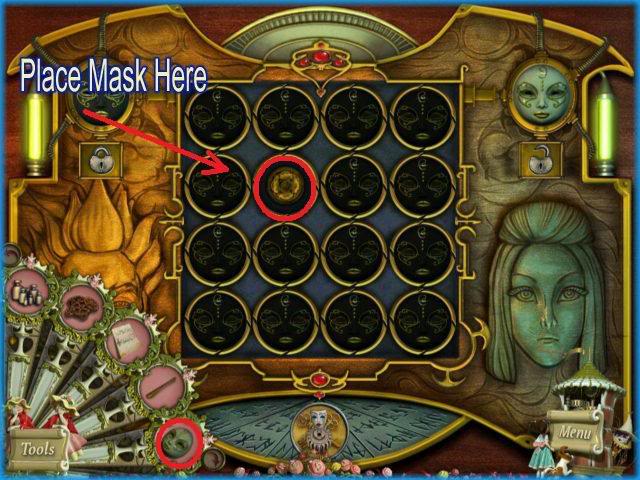
- Once you enter the game click on your inventory/tools button and drag the mask to the area where one is missing.
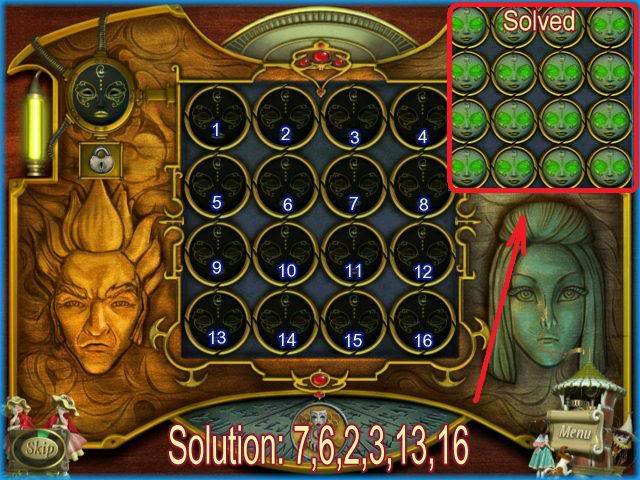
- The object of this game is to click on the masks so that all the masks will be white instead of black which will open the door to the Library.
- When you click on one mask several move along with it.
- You may click on white masks or black masks.
- The masks are numbered 1 through 16 top to bottom and left to right.
- Click on the numbers in this order to solve the puzzle – 7,6,2,3,13 and 16.
- Once they are all white the eyes will glow green as shown in insert of image above.
- After the puzzle is complete the door to the Library is open and you can go inside.
Library
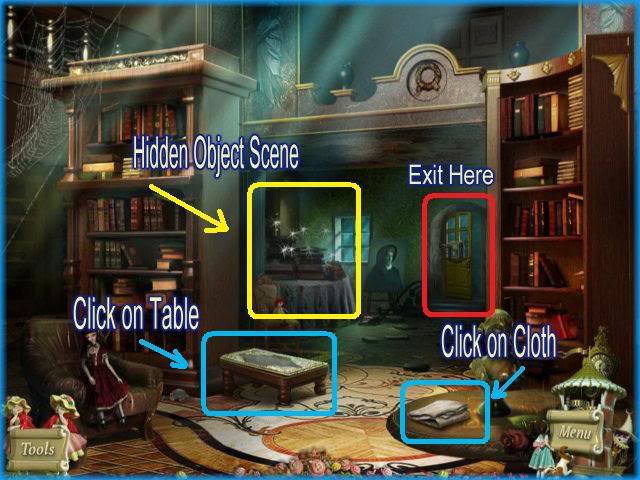
- Once inside the Library there are several things to do.
- First click on the cloth at the bottom right circled in blue and it will go into your inventory/tools.
- Next click on the sparkling area at the back left to access the hidden object scene.
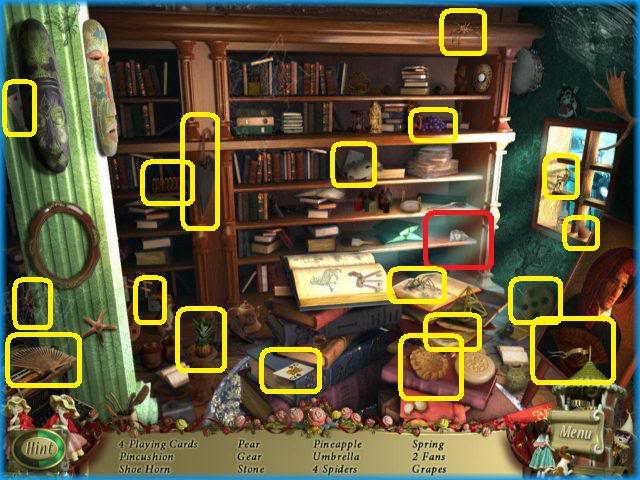
- Locate the 19 items in the scene listed at the bottom and circled in yellow.
- The special item for inventory/tools is the "heavy stone" and it is circled in red in the image above.
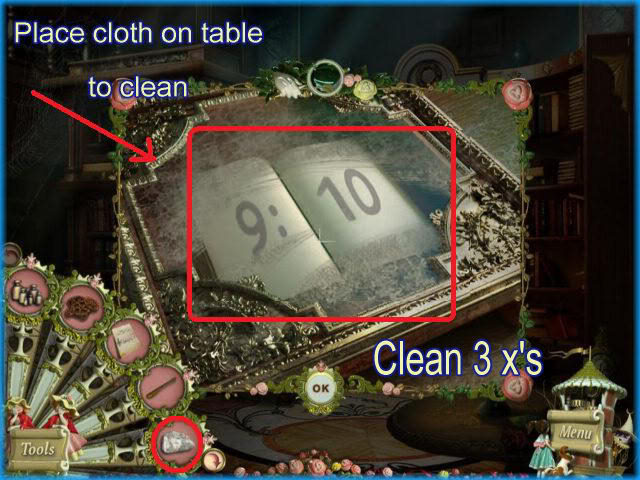
- Click on the table to get a closer view.
- Next click on the "Tools" button and drag the cloth to the table to clean it 3 times. Then you will see the numbers "9:10" appear.
- Take note of this for a future puzzle.
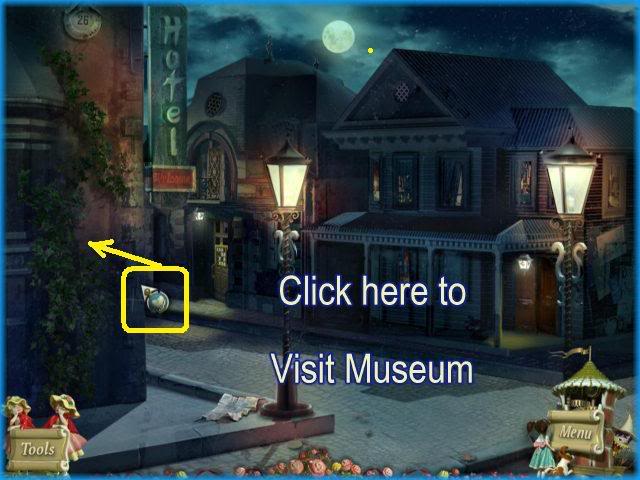
- Next you will exit back into the street.
- Click on the left side toward the museum as shown in image above.
CHAPTER 4 – Museum
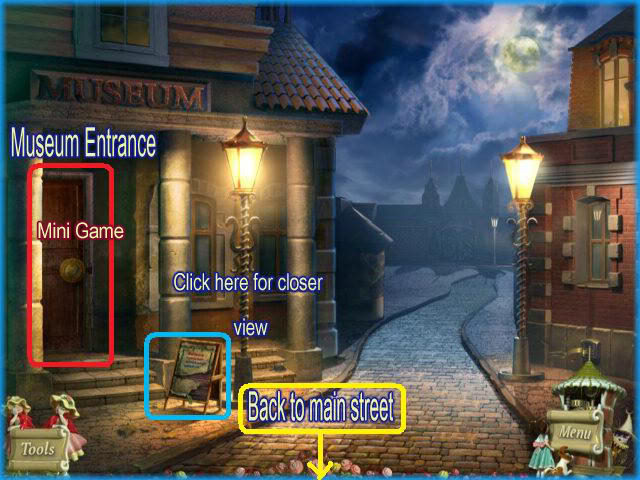
- Now you are in front of the museum.
- Click on the sign which is circled in blue in the image above for a closer look.
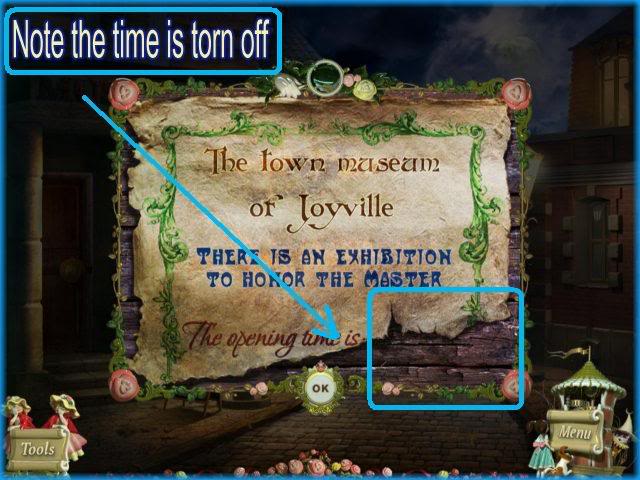
- The sign states there will be an exhibition to honor the puppet master.
- Note that the time of the occasion has been torn off.
Museum Door Puzzle
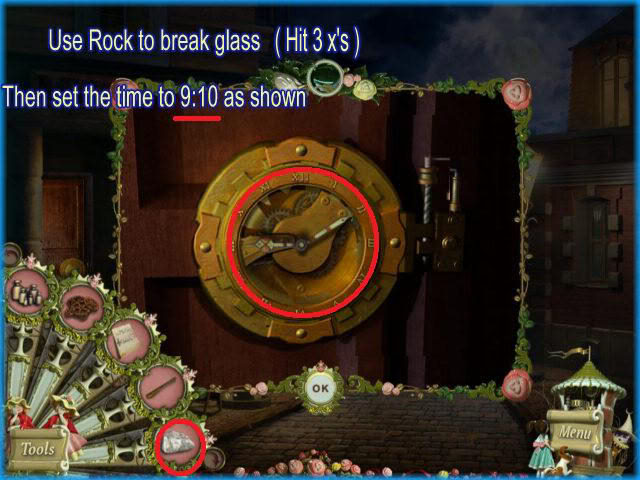
- Click on the door to the museum to access the puzzle.
- Click on inventory/tools and drag the heavy stone to the clock and hit it 3 times to break the glass.
- Once you can access the hands of the clock set them to "9:10" the time you saw on the table at the Library.
- Go inside the museum.
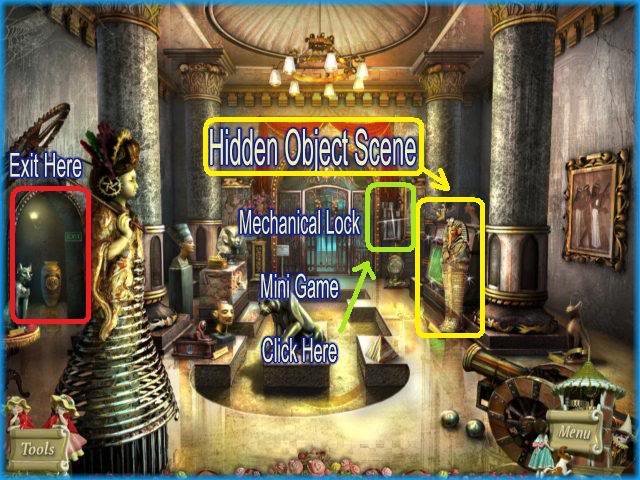
- Inside the museum there is a hidden object scene and a mini game puzzle to open a door.
- First access the sparkling area circled in yellow to the right in the image above.
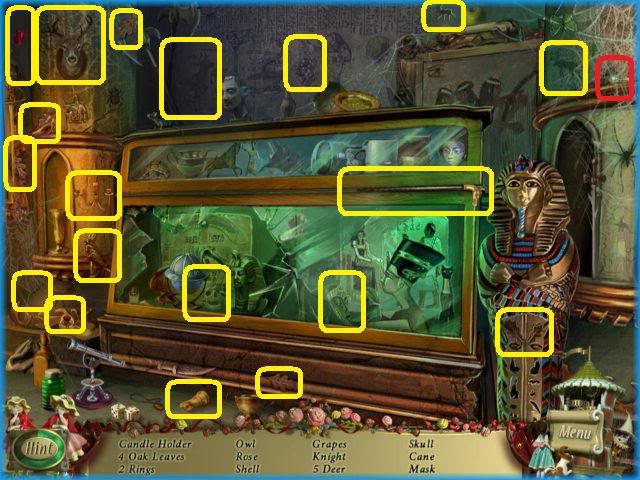
- Locate the 20 hidden objects listed at the bottom and circled in yellow above.
- The special item for inventory/tools is the diamond ring located at the upper right and circled in red above.
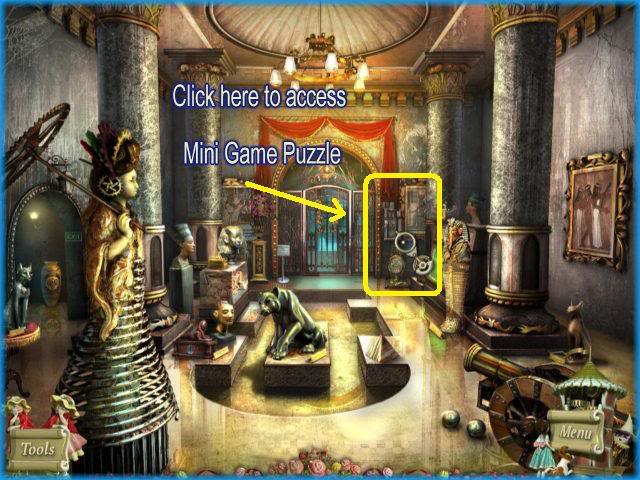
- Once you finish the hidden object scene click on the door puzzle seen above.
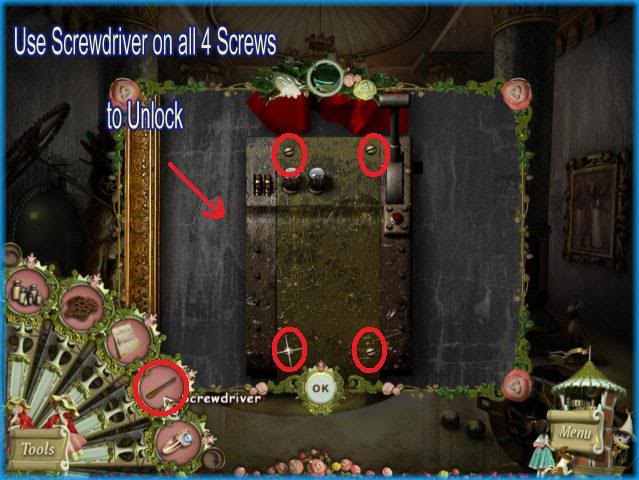
- Click on the puzzle to get a closer view.
- Open the inventory/tools area and drag the screwdriver to the 4 screws on the mechanism.
- Once they are loose you will be able to see inside.
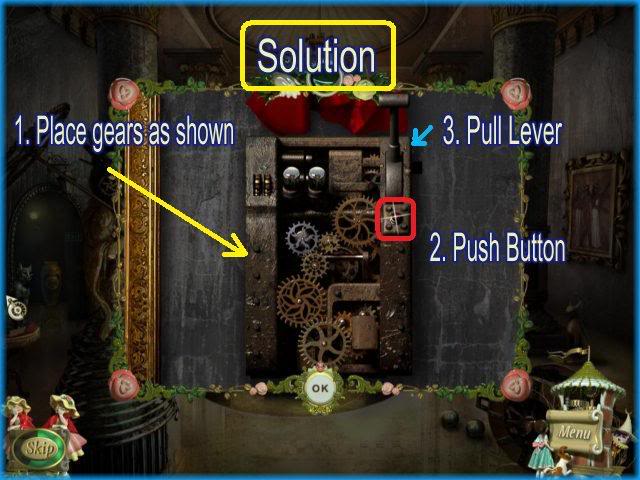
- Once the mechanism is open you will drag the gears from the inventory area that you found in the first location and they will be laid out on each side.
- 1.In the image above you will see how to place the gears inside the mechanism.
- If a gear is place correctly it will lock into place. If placed incorrectly it will move back to its starting position.
- 2.After the gears are placed, push the button circled in red.
- 3. Finally, pull the lever and the door will open.
Chapter 5 -The Hall/Outside Puppet Theater Gate
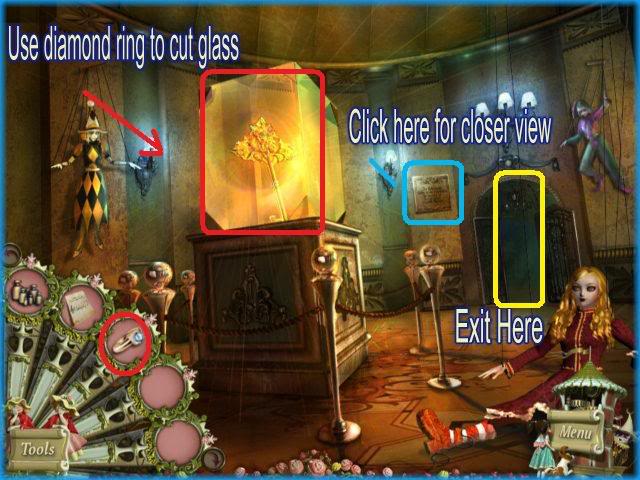
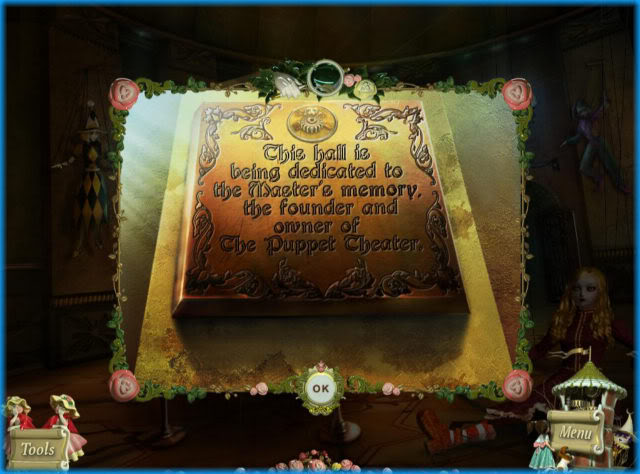
- Once inside this hall you will see a key inside a huge block of glass, and a plaque on the wall.
- Click on the plaque circled in blue for a closer look. You will read that the hall is dedicated to the puppet master’s memory for founding the puppet theater.
- Next you will open the inventory/tools area and drag the diamond ring to the glass and cut it until you are able to free the key which is the key to the theater gate.
- The key will go into your inventory for future use.
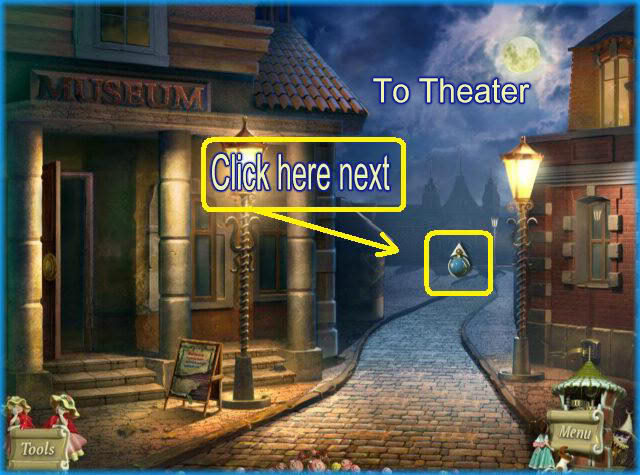
- Place your cursor in the position seen in the image above to proceed.
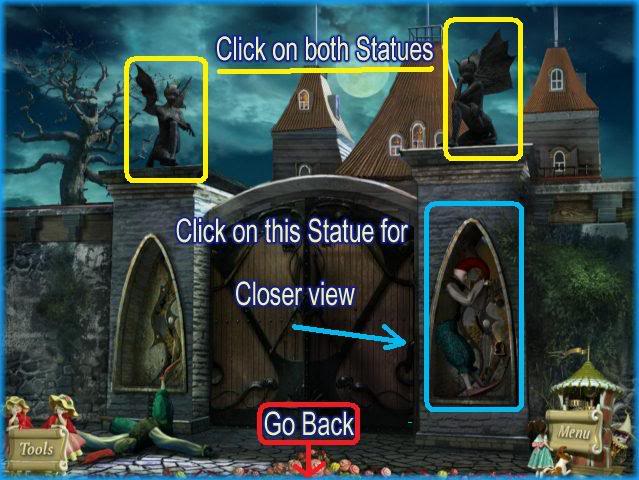
- Once here click on the 2 statues at the top of the gate.
- Next click on the larger statue at the right circled in blue for a closer view.
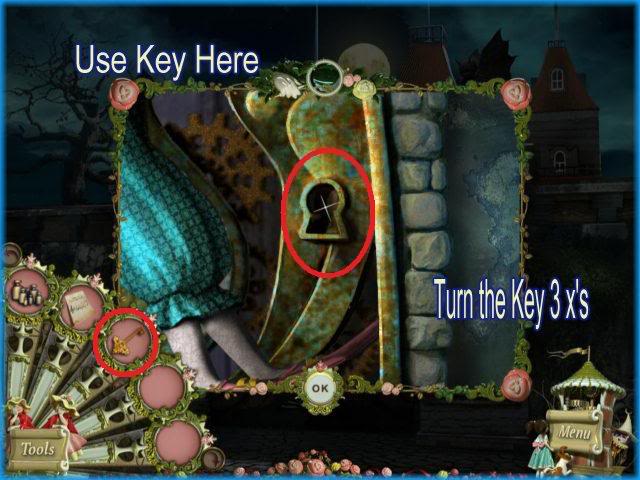
- Open your inventory and drag the theater gate key to the lock and turn 3 times. (Click on it 3 times)
- Once open proceed to the Puppet Theater.
CHAPTER 6 – Areas outside the Puppet Theater
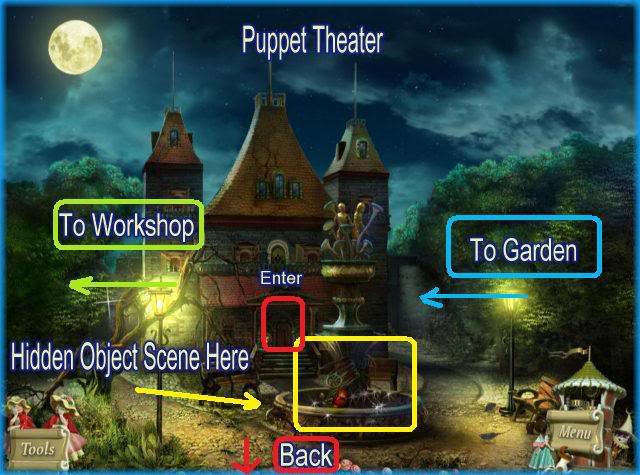
- In this scene there are many places you can access.
- If you click to the right you can access the garden and to the left you can access the workshop.
- In the center is the fountain and the sparkling area is your hidden object scene.
- Click on the hidden object scene circled in yellow in the image above first.
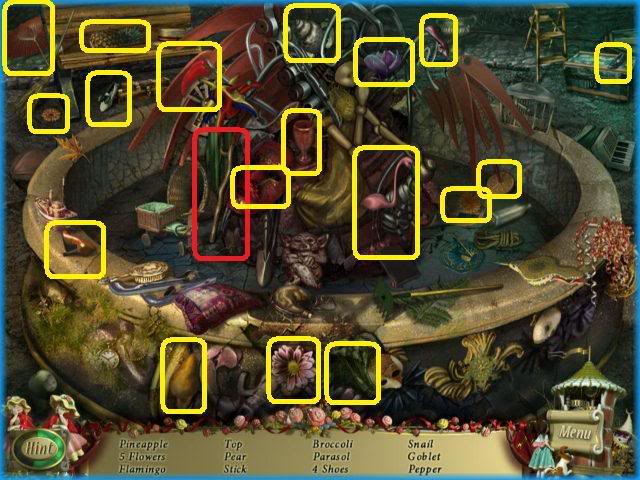
- Locate the 19 hidden objects in the scene circled in yellow.
- The special item for your inventory is the twig and it is circled in red.
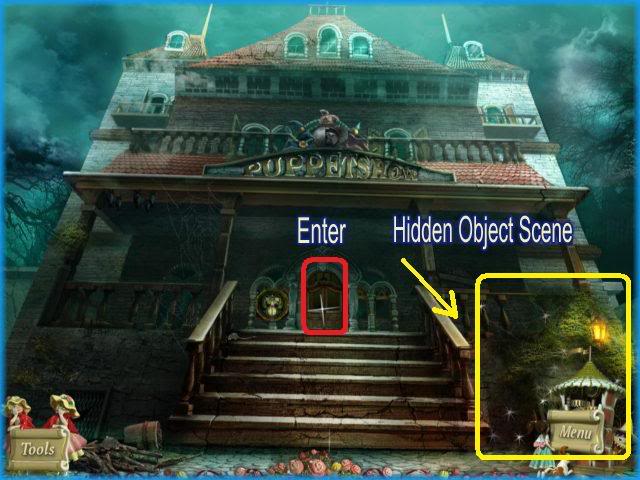
- Now you are in front of the puppet theater.
- Click on the sparkling area to the right circled in yellow.
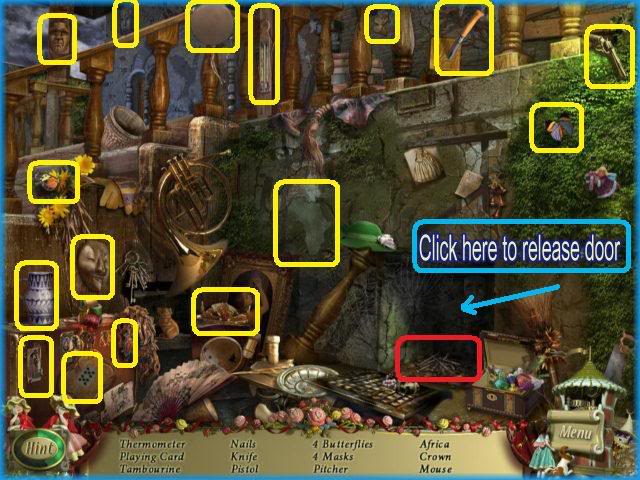
- In this scene you will need to first click on the vent that is circled in blue in the image above. The door will fall and you will see the nails inside which happen to be your inventory item circled in red.
- Find the additional 19 items circled in yellow.
- Once you finish proceed to the left side of the house to the workshop.
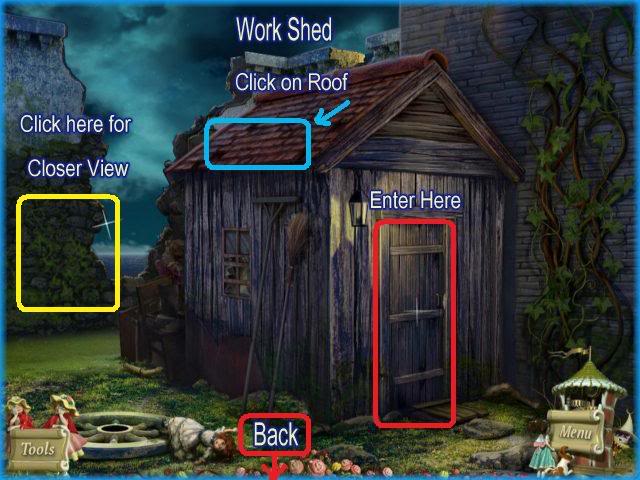
- In this scene click on the roof and several of the roof tiles will fall to the ground.
- Next click on the area to the far left.
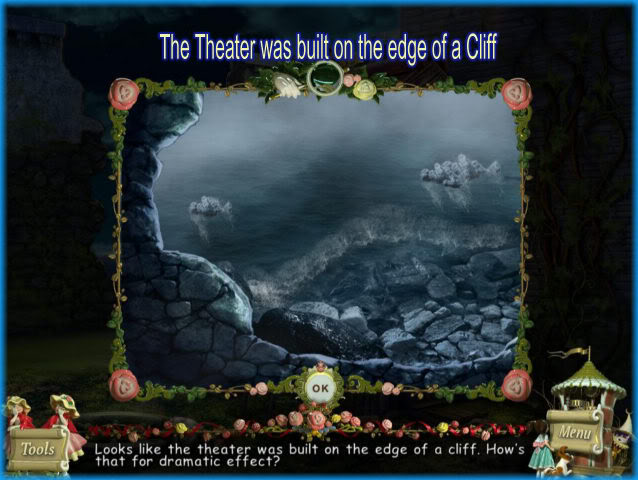
- Clicking on the far left will reveal that the theater has been built along a very steep cliff.
- Read and close this scene out.
- Next click on the door to the workshop and go inside.
Inside Workshop
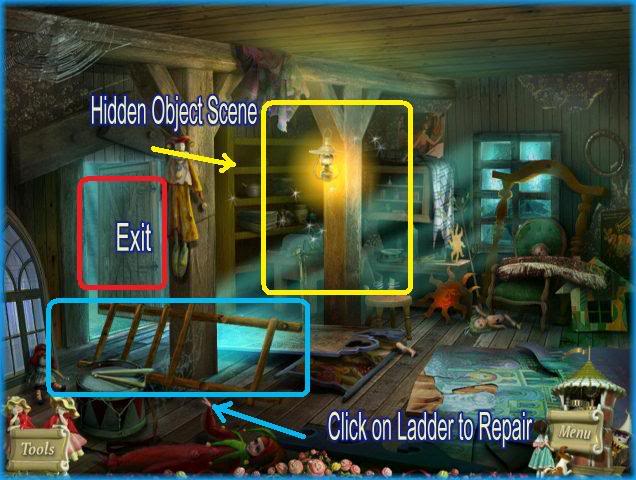
- First click on the sparkling area circled in yellow above to access the hidden object scene.
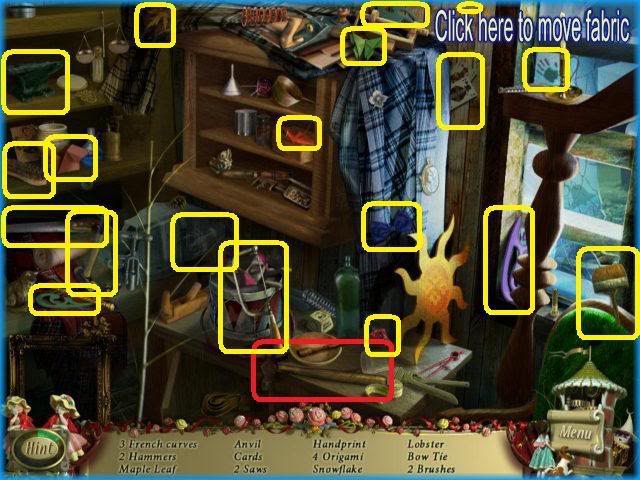
- First click on the blue plaid fabric at the upper right and it will move out of the way and reveal more hidden objects.
- There are 20 items that need to be found in this scene and 19 of them are circled in yellow above.
- The inventory item is circled in red and is a hammer located near the front center on the table.
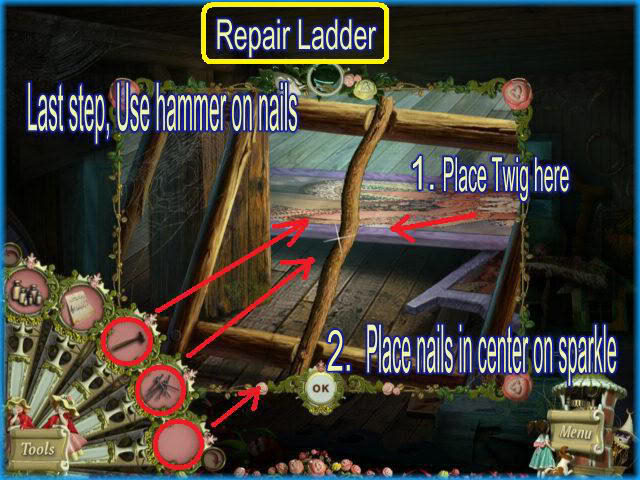
- Once finished with hidden object scene click on the ladder to get a closer view.
- You will need to repair the ladder with items in your inventory.
- First take the twig and place it in the missing area.
- Next you will need to drag the nails to the scene. NOTE drag the nails to the center of the twig where you see the single sparkling area.
- Next take the hammer and hammer in all of the nails.
- Once the ladder is repaired it will go into your inventory.
- Next go outside the workshop and head to the Garden on the other side of the theater. Go back to the front of the theater and click on the far right to access the garden.
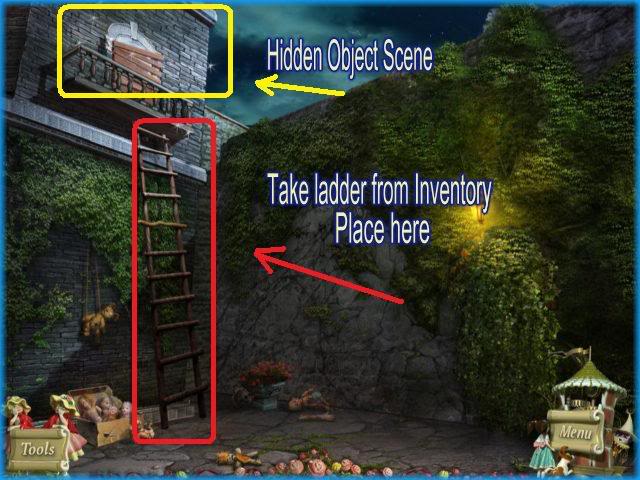
- Once at the garden take the ladder out of your inventory and place it under the boarded window and balcony as shown in image above.
- Click on the sparkling area to access the hidden object scene.
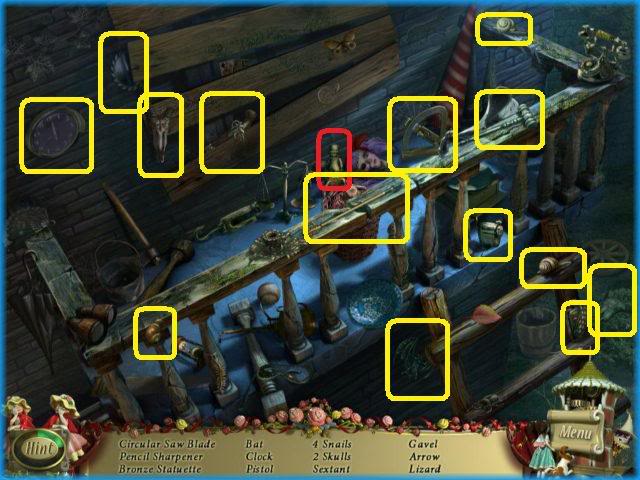
- There are 16 hidden objects in the scene above 15 of which are circled in yellow.
- The inventory item is the bronze statuette which is circled in red above.
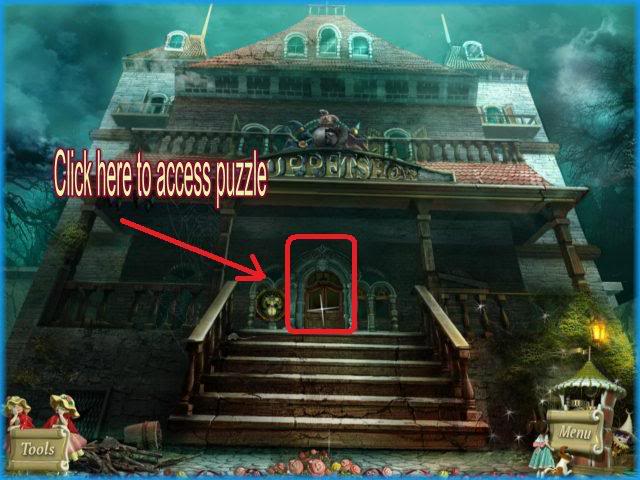
- Go back to the front of the puppet theater and click on the front door to access door lock puzzle.
Door Lock Puzzle
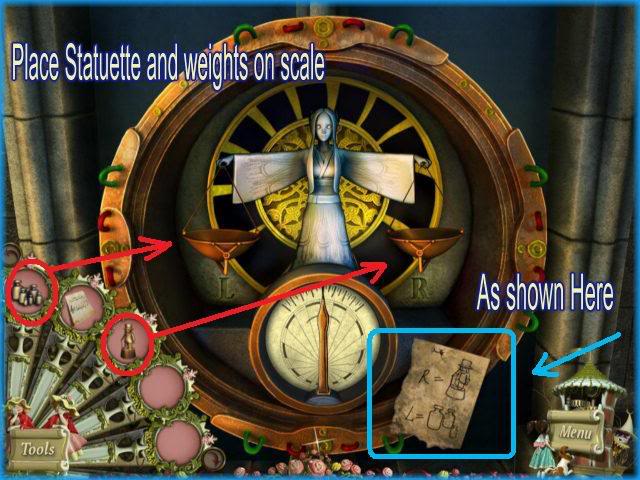
- Click on the puzzle for a closer view.
- Click on the inventory/tools button and drag the weights and the bronze statuette to the scene.
- The bronze statuette will be on the right side of the scale and the weights will assemble underneath as shown because you must choose the correct weights to balance with the bronze statuette.
- Note at the bottom right there is a paper with instructions as to how to solve this puzzle.
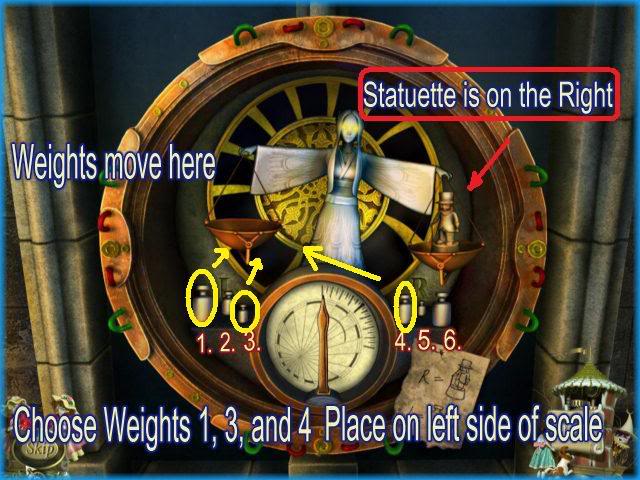
- The weights have been numbered 1 through 6 and the diagram shows you need 1 small, 1 medium and 1 large weight to solve the puzzle.
- Choose weights numbered 1,3, and 4 and place on the left side of the scale.
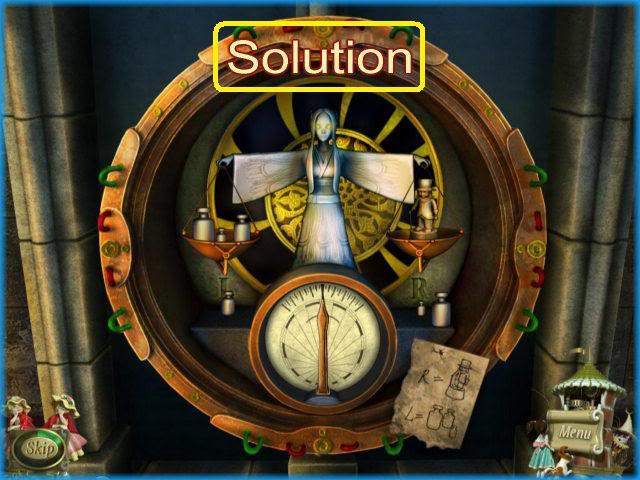
- Once both sides are balanced the door will open.
CHAPTER 7 – Inside the Theater
Inside the Puppet Theater
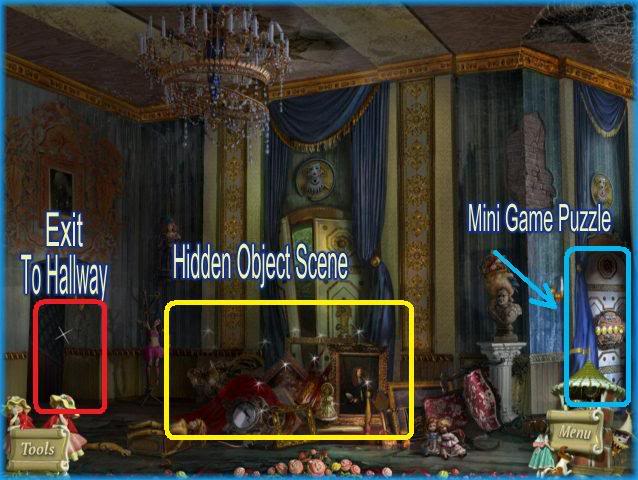
- Once you are inside the theater click on the sparkling area first to access the hidden object scene.
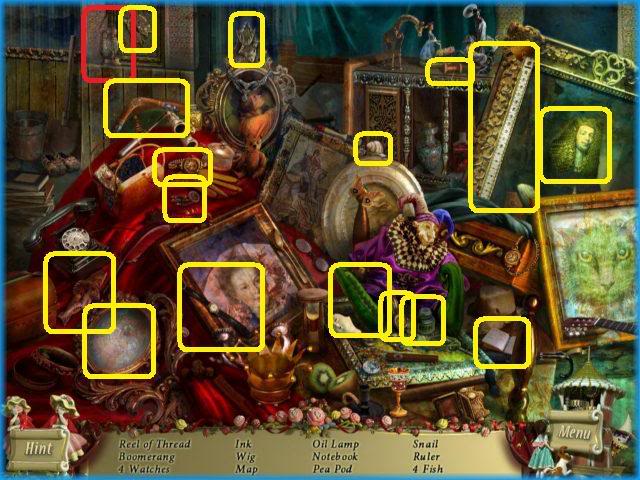
- There are 18 hidden objects to find in this scene and 17 of them are circled in yellow above.
- The item you need to find for inventory is circled in red and is an oil lamp.
- Once you are finished exit out the door to the far left which takes you into the corridor.
Turn on the Lights/Unlock the Door
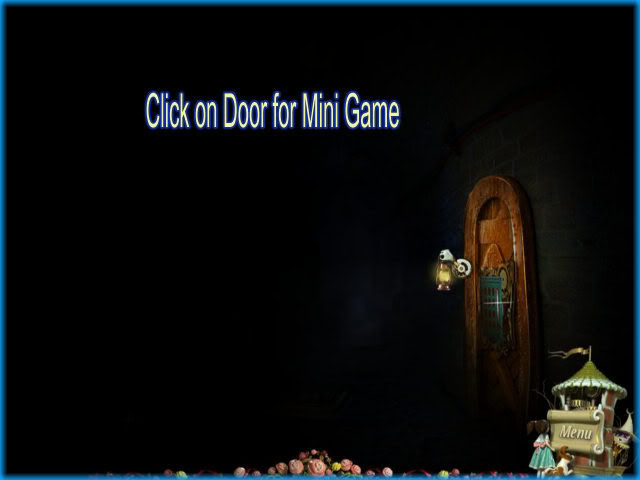
- When you enter this hallway you will find the lights are out.
- The oil lamp from you inventory will automatically be in your hand and will light a small area as seen in image above.
- Bring the lamp over to the far right to see the door you will need to unlock.
- Click on the door to activate the puzzle.
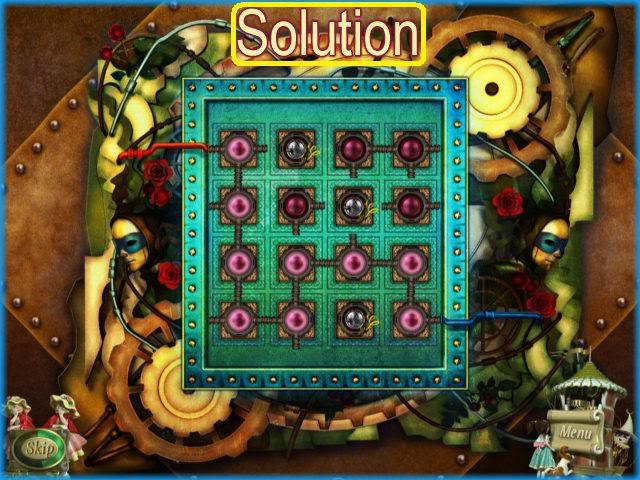
- In this puzzle you simply click on the squares to cause the red and blue wires to connect to each other.
- You may have to click each square multiple times until the connection is made.
- Once possible solution is seen in the image above but there may be multiple solutions to this puzzle.
- Once door opens go inside.
Boiler Room/Generator
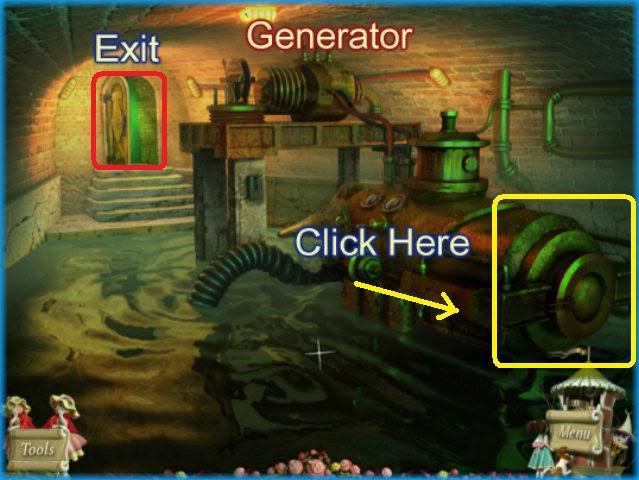
- Once inside this room you will see that it is flooded.
- Click on the end of the machine as shown in image circled in yellow for a closer view.
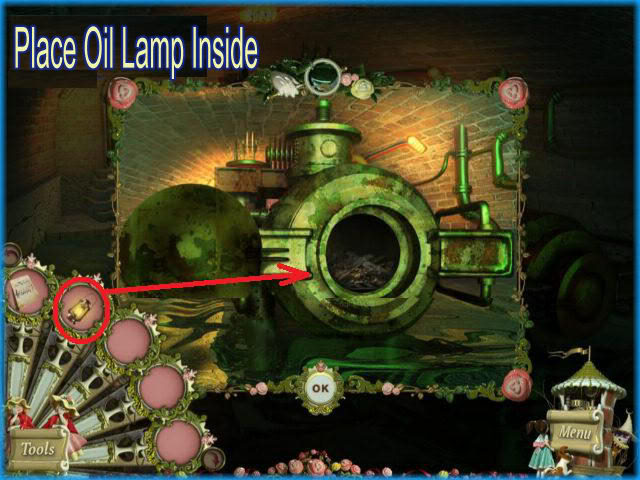
- Click to open the lid and note that there is coal inside but it is not lit.
- Place the oil lamp inside to start a fire in the furnace.
- Once the furnace is lit the water will dry up and you will need to click on the hidden object scene.
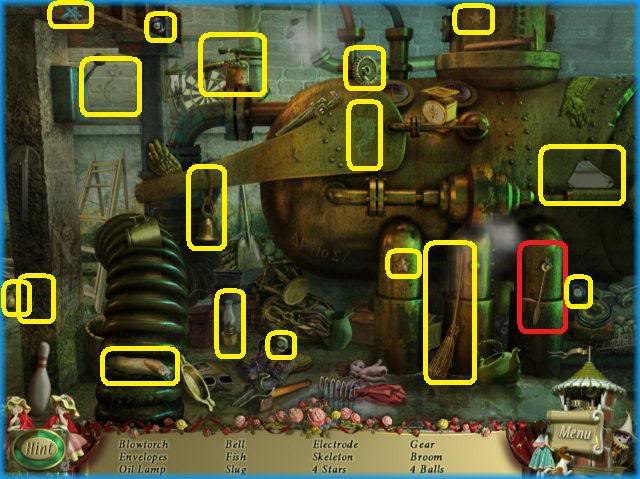
- There are 18 items to find in this scene 17 of which are circled in yellow above.
- The item for inventory is the electrode and it is circled in red above.
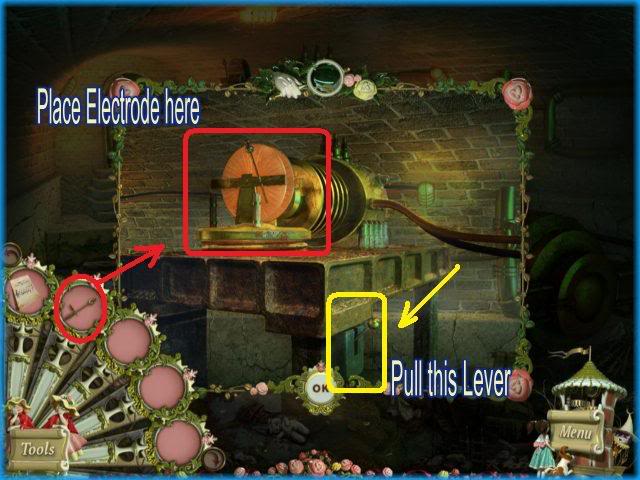
- Once finished with the hidden object scene click on the generator for a closer view.
- Open the inventory/tools and drag the electrode to the correct location as seen in the image above then pull the lever.
- This will restore the lights in the corridor.
- Go back into the corridor.
Corridor
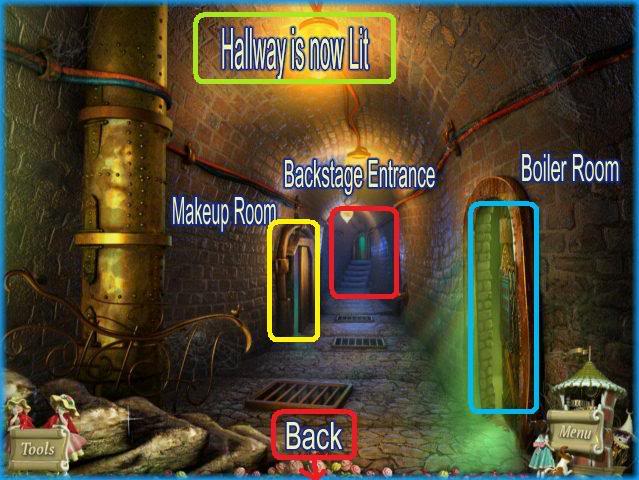
- Note there are several locations you can access from this screen.
- If you go straight back you will access backstage of the theater. To the right you can go back into the boiler room but there is no need for you to do this.
- If you take the door to the left you will enter the makeup/dressing room.
- Go into the dressing room next.
Dressing Room
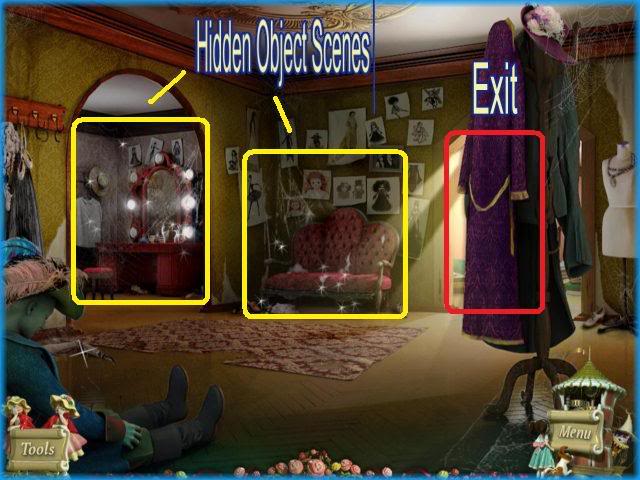
- Inside this room there are 2 hidden object scenes to access.
- First click on the one at the far left with the mirror.
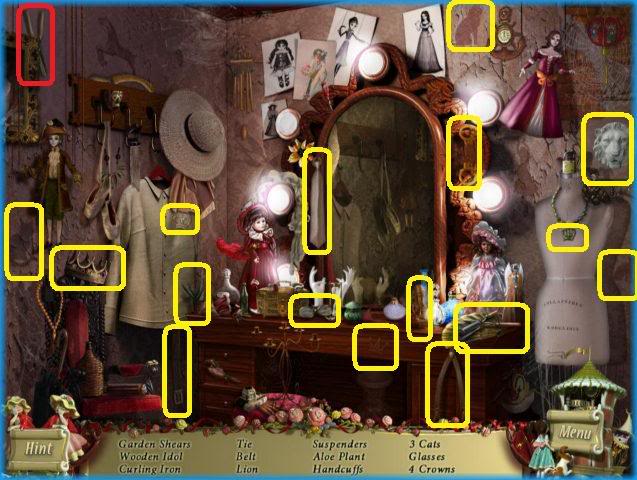
- In this scene there are 17 items to locate 16 of which are circled in yellow.
- The inventory item you are to locate are the garden shears which are at the top left corner and circled in red.
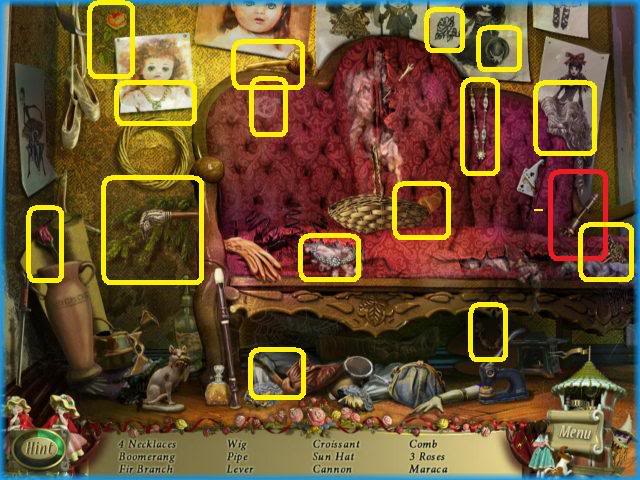
- In this scene there are 17 items to locate, 16 of which are circled in yellow.
- The inventory item you are to locate is the lever which can be found at the far right of the sofa and is circled in red.
- Once you are finished here exit the room and head to the very back of the corridor to the backstage area.
Chapter 8 – Backstage
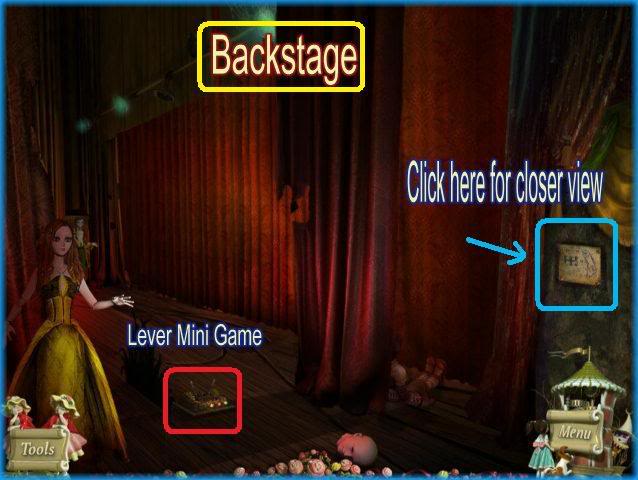
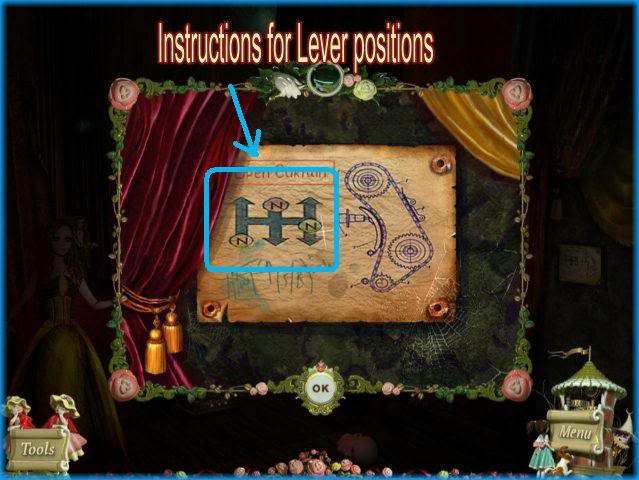
- Once backstage click on the paper at the far right for a closer view. Here you will see the instructions for the lever puzzle located on the floor in the scene.
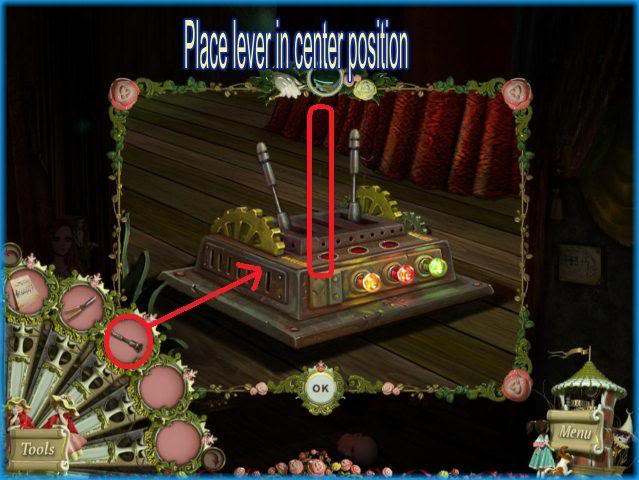
- Click on the levers on the stage for a closer view.
- To solve this puzzle you must first click on your inventory/tool area and drag the lever in place.
- Once you have 3 working levers place them in the correct positions according to the drawing seen on the wall.
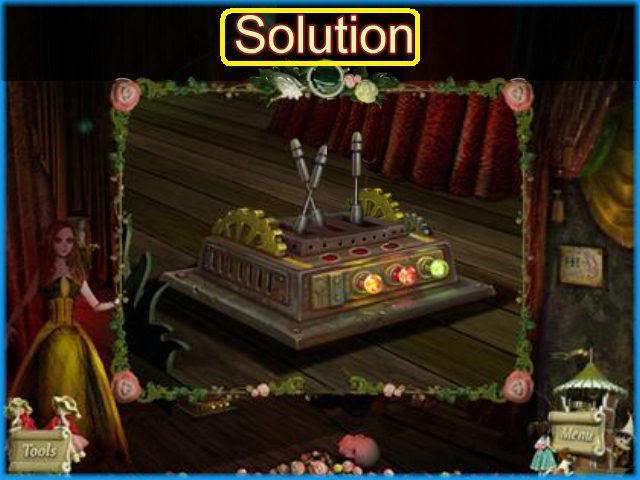
- The first lever should be all the way down, the second should be all the way up and the third should be almost all the way down.
- The instant you are correct the scene changes and the puppets will start to move on stage.
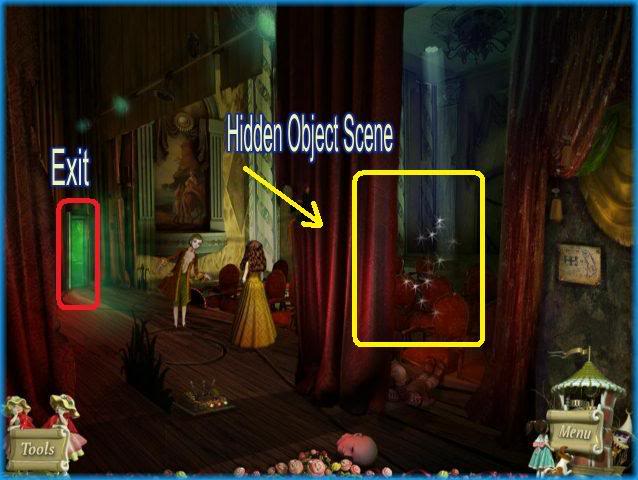
- Next you will see a new scene.
- Click on the sparkling area for the next hidden object scene.
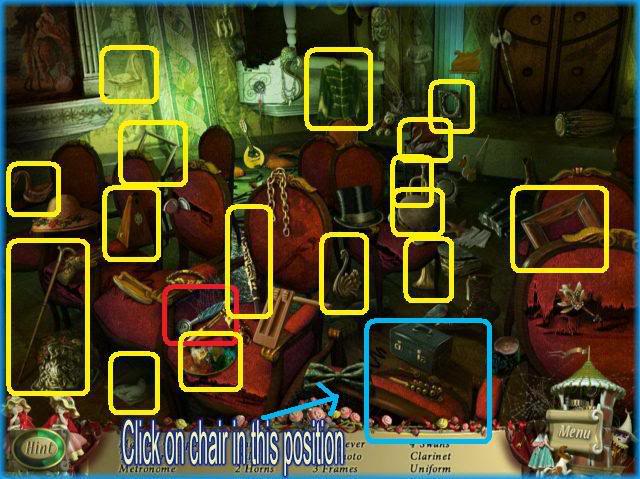
- When you begin count the chairs in the first row from left to right. When you get to chair number 5 click on it and it will disappear. This area is circled in blue in the image above.
- There are 18 items in this scene to locate of which 17 are circled in yellow.
- The inventory item you need to find is the blue lever which is located on the 4th seat of the front row and circled in red.
- Once finished click on the door at the back left to access the back room.
Back Room
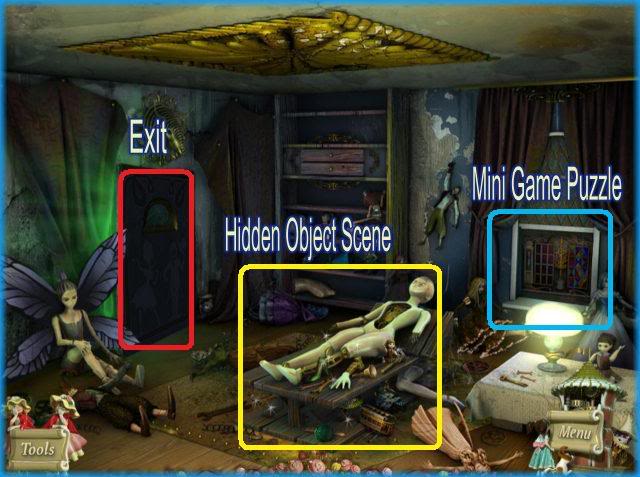
- In this room you will see a hidden object scene and a window which will lead to another puzzle.
- Click on the hidden object scene first.
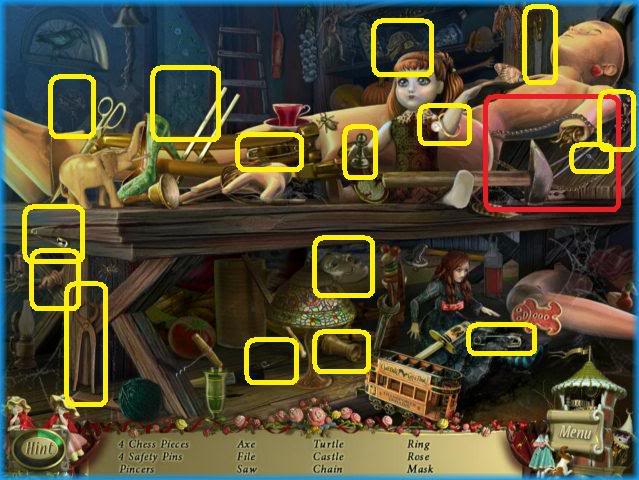
- There are 18 items to locate in this scene of which 17 are circled in yellow.
- The inventory item you need to find is the chain and it is circled in red and located at the far right of the scene.
Stained Glass Puzzle
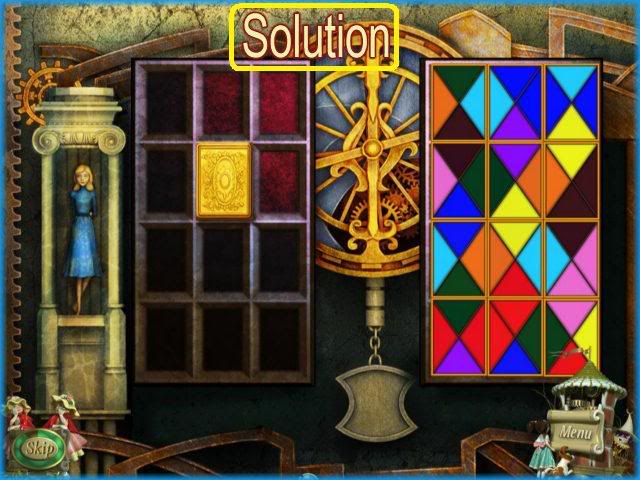
- Click on the window at the far right of the scene to initiate the puzzle.
- In this puzzle you must move all the tiles from the left to the right in the correct locations.
- The key is to have the same colors touch from end to end.
- If you have correctly placed a tile it will lock into place.
- See the solution above.
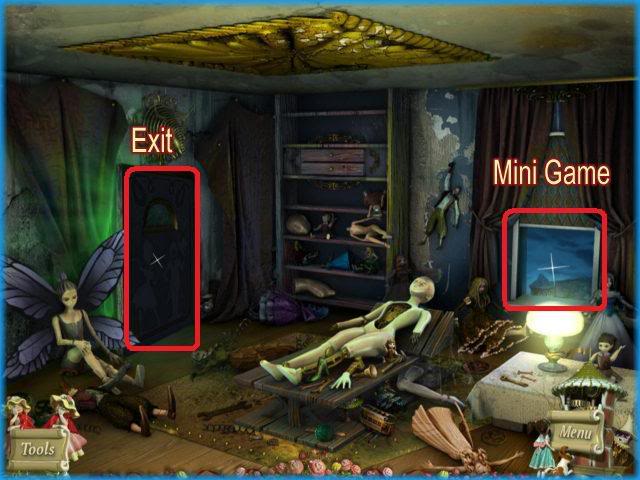
- Once puzzle is complete you are free to click on the window and look outside.
Pick up the Red Rune
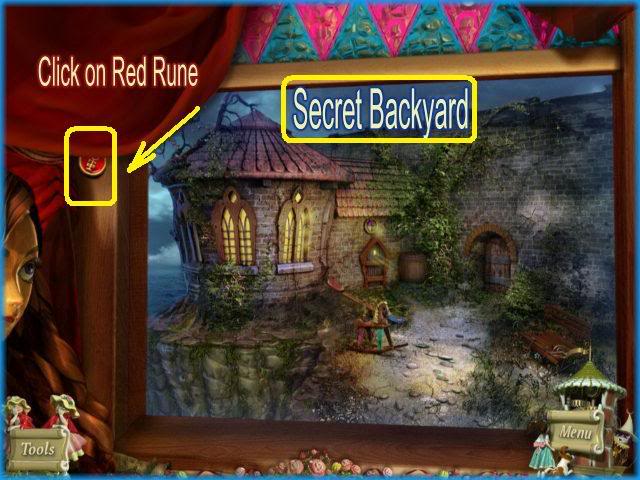
- When you look outside you will learn that there is a secret backyard that is dangerously close to the edge of the cliff.
- It looks as if someone has recently played with the toys outside.
- The spider puppet will see you and run away quickly. As soon as he is out of sight the curtain will move and there is a red rune coins located at the left of the screen.
- Click on the red rune and it will go into your inventory for a later puzzle.
- Go back into room and click on puppet in center of room.
Repair Puppet/Obtain Puzzle Piece
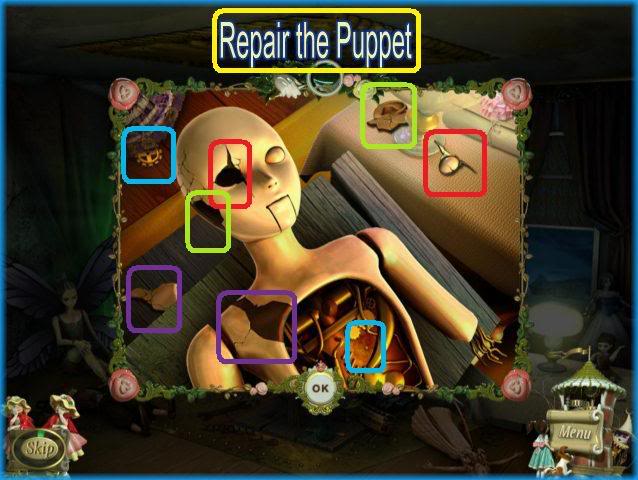
- Click on puppet for closer view.
- Here you will see the puppet is broken and the pieces are laying all around it.
- Place the 4 pieces in the correct locations. The solution is color coded above.
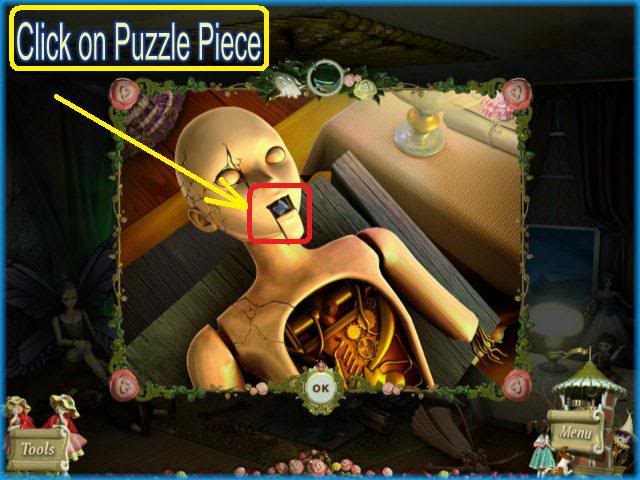
- Once the puppet is repaired the mouth will open and there is a puzzle piece inside.
- Click on the puzzle piece and it will go into your inventory.
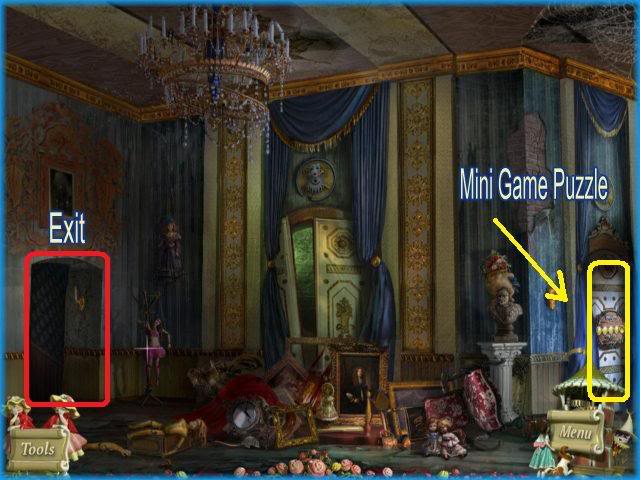
- Once finished leave the room go down 2 times and you will be back in the first room.
- Click on the puzzle to the far right.
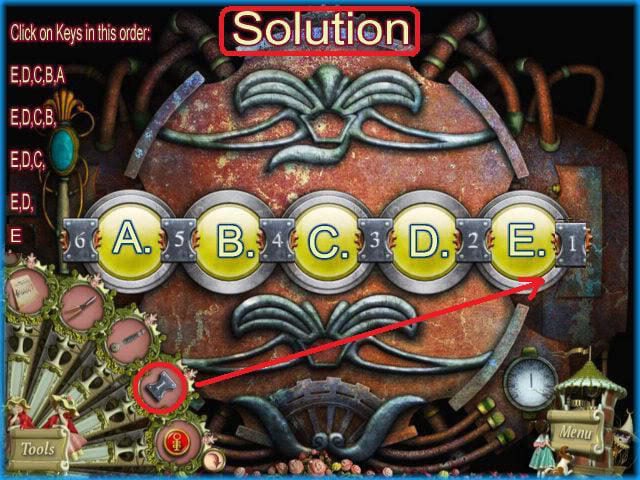
- Click on the door to get a closer view of the puzzle.
- Open the inventory and place the missing puzzle piece where it belongs.
- Note that the numbers are listed from left to right as 6-5-4-3-2-1.
- The goal of this puzzle is to move the pieces so that the numbers are in order as 1-2-3-4-5-6.
- The keys have been labeled from left to right with A,B,C,D,E,F
- Click on the keys in this order to solve:
- E,D,C,B,A
- E,D,C,B
- E,D,C
- E,D,
- E
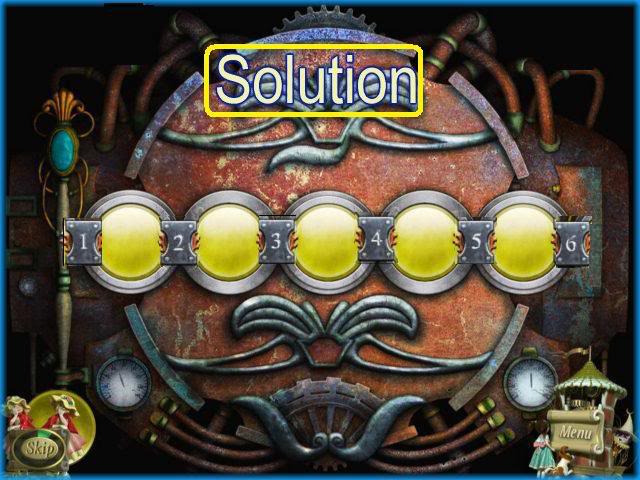
- See solution to puzzle above.
- The numbers should read 1 to 6 from left to right.
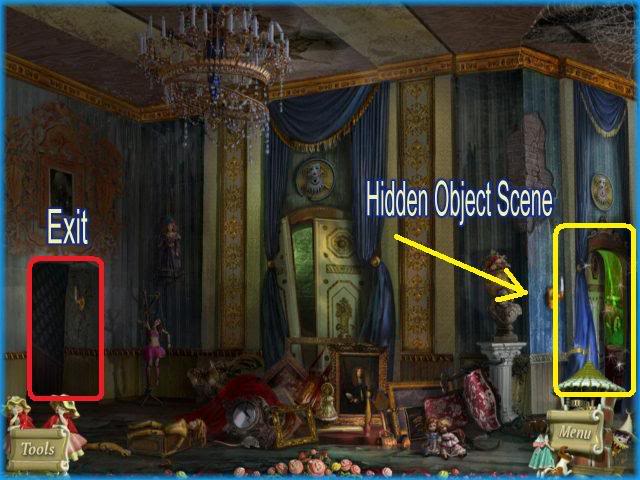
- Now the door is open and there is a hidden object scene.
- Click on the scene first.
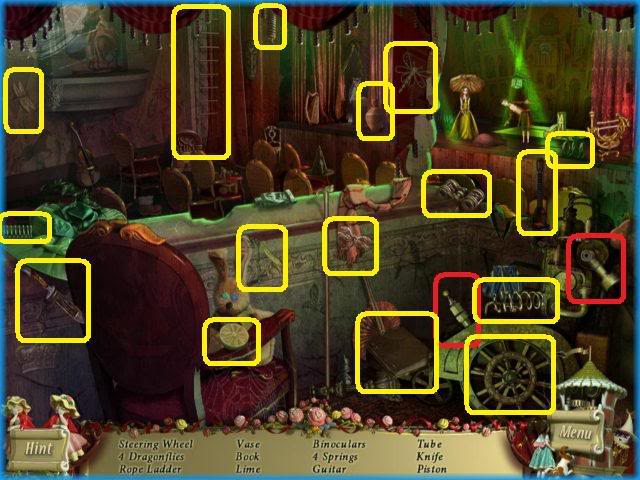
- There are 18 item to locate 17 of which are circled in yellow above.
- The item you need to find for your inventory is the piston and it is circled in red above.
- Once finished place your cursor at the bottom of the screen twice and you should be outside in front of the fountain.
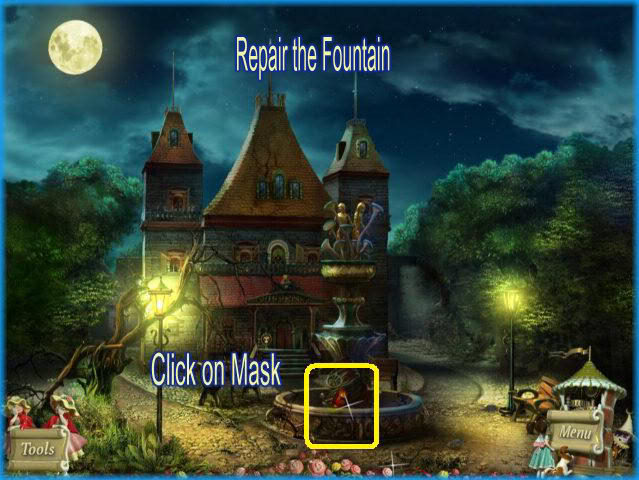
- Note the sparkle area in the fountain.
- Click on the red mask.
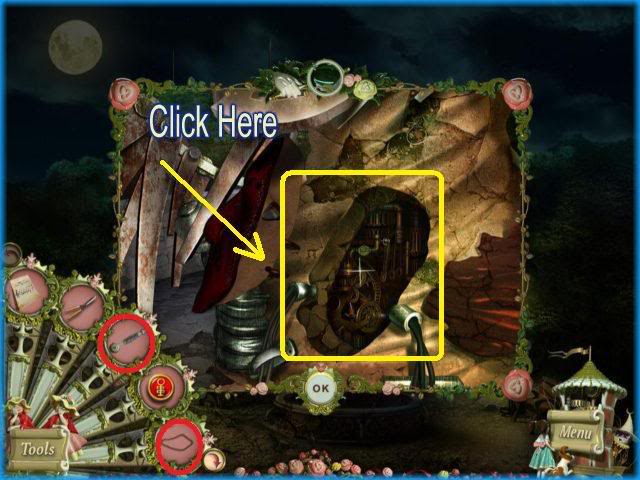
- Click on the mask for a closer view.
- Next click on the inside to access the mechanism and repair it.
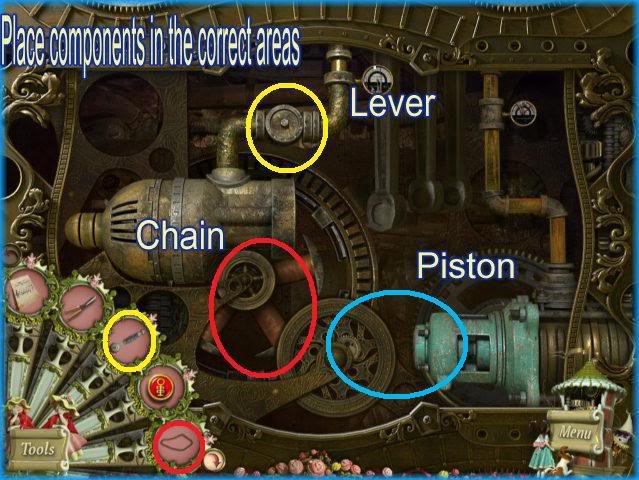
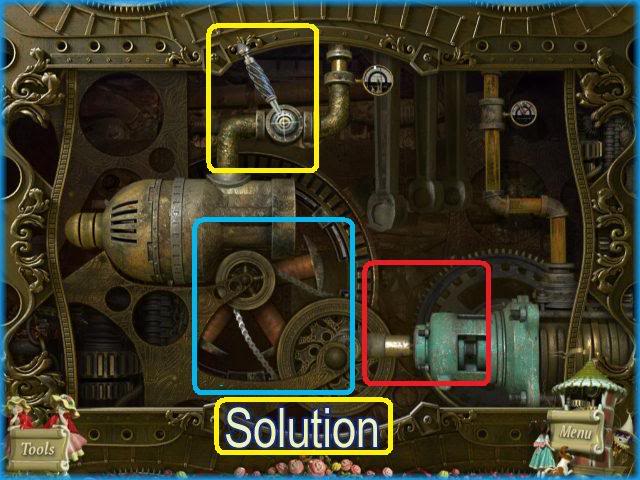
- Open the inventory/tools and place the following items in their correct locations – Chain, Piston and lever.
- See images above for solution.
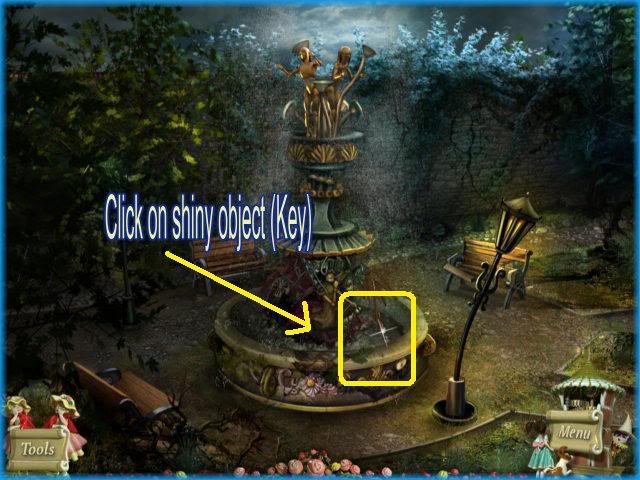
- Once you are finished you will be outside of the fountain again.
- Click on the shiny object inside which is a key.
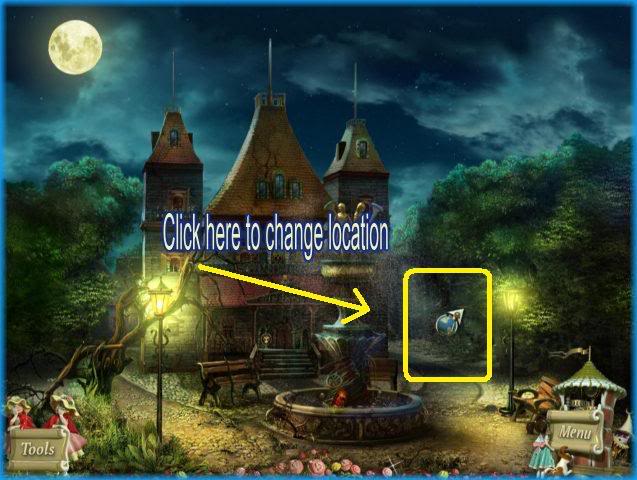
- Next click on the far right of the scene to access the Garden.
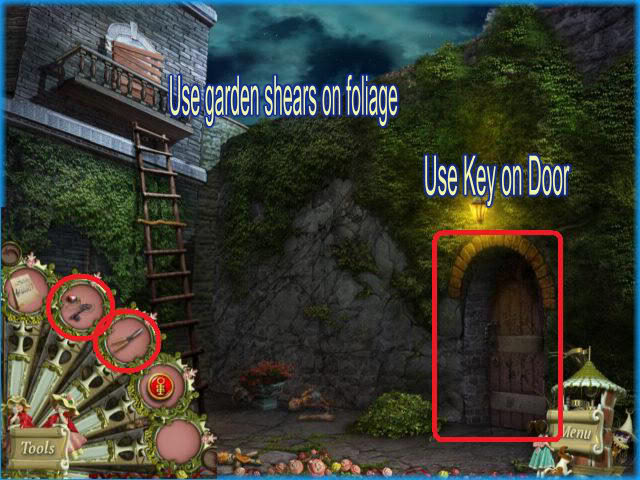
- Once here you will see the foliage has grown all over the wall.
- Take the shears out of inventory and place them along the right side of the wall.
- The foliage will be cut away and you will see the door.
- Next take the key from inventory and place it on the door to unlock it.
- Go through the door.
CHAPTER 9 – Secret Backyard
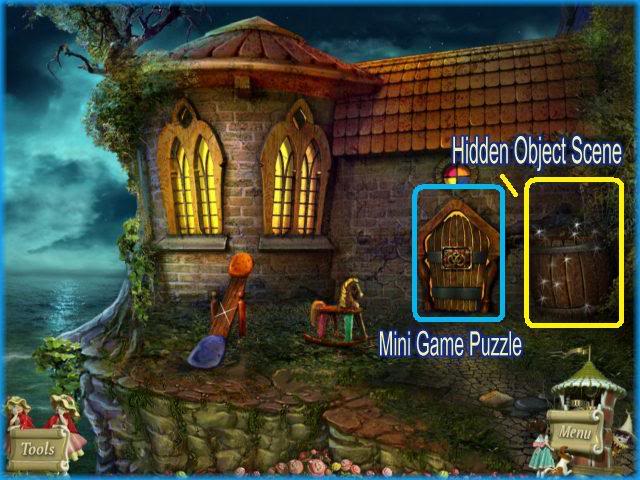
- You are now inside the secret backyard.
- Click on the hidden object scene circled in yellow first.
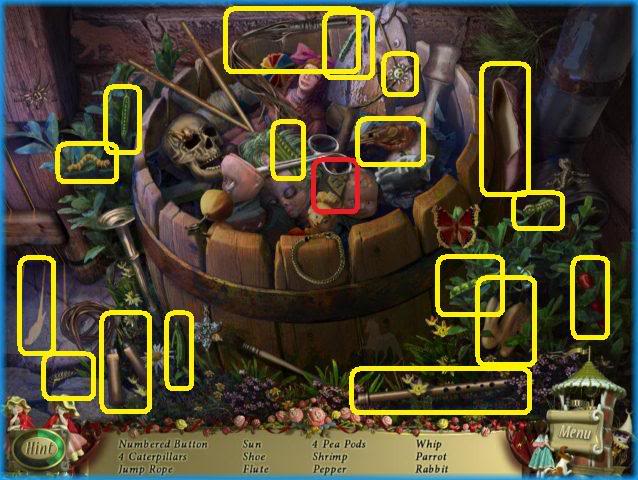
- There are 18 items to find in this location of which 17 are circled in yellow.
- The inventory item you need to find is the numbered button which is in the center of the scene and circled in red.
- Once finished click on the window to activate the puzzle.
Solving the Rune Puzzle
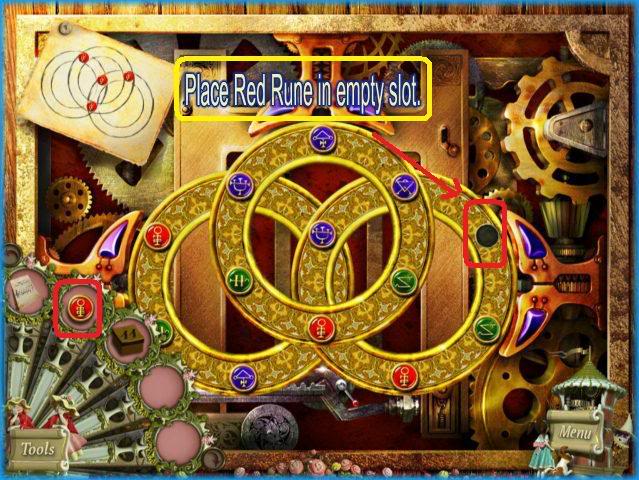
- This is the rune puzzle.
- Click on the inventory/tool button and place the red rune button in the empty slot as seen in image.
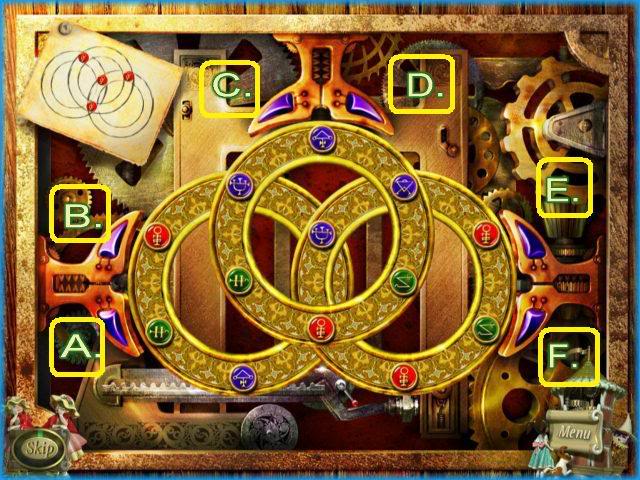
- In this puzzle the goal is to rotate the rings so that the red rune coins are in the position shown in the picture at the top left of the screen.
- You will move the rings using the six purple arrows surrounding the rings.
- Each arrow has been labeled with a letter A through F.
- Click on the arrows in this order to solve the puzzle – DD,F,DD,FF,BBBB,FF,DDD,FF,D,FFF,DDDD,BBB
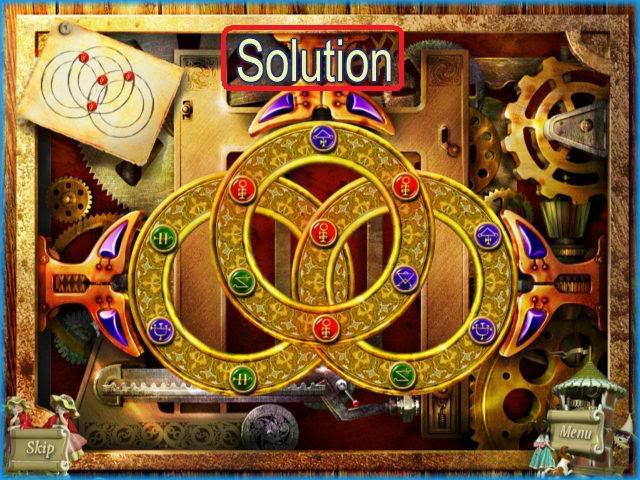
- This is the way the puzzle should look once solved.
- Once the door is open go through it.
Chapter 10
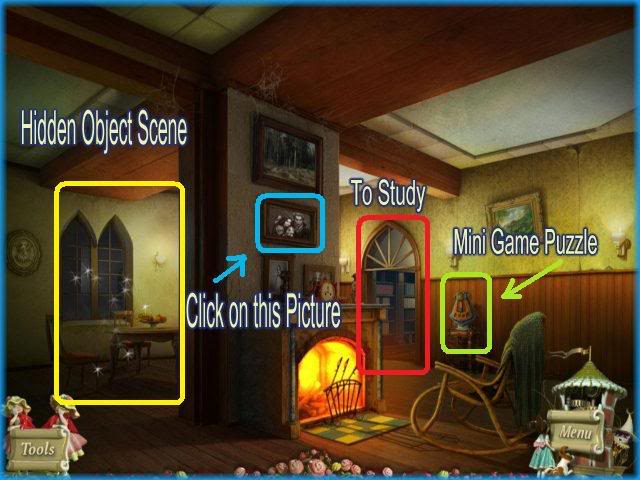
- Once in this location there are multiple things you can do.
- First click on the picture on the center banister which is circled in blue. You will see a picture of the puppet master and his wife and baby.
- Next click on the hidden object scene to the far left.
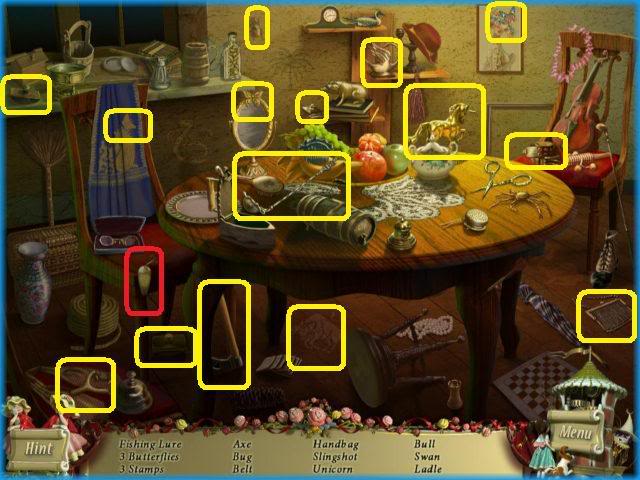
- There are 16 items to locate in this scene of which 15 are circled in yellow.
- The inventory item you need to find is the fishing lure which is located at the bottom left of the scene and circled in red.
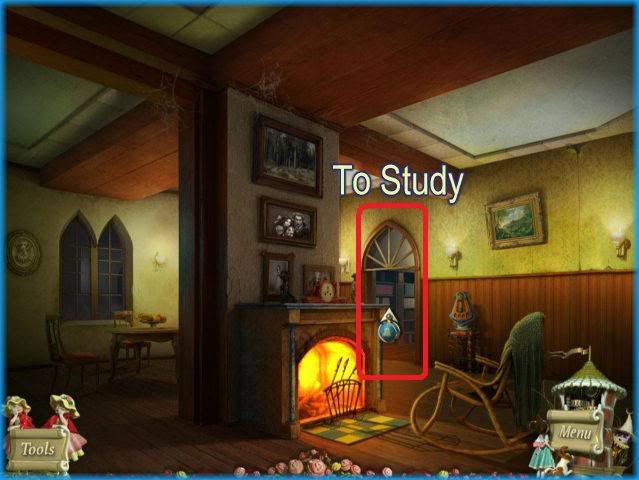
- Next go through this door to enter the Study.
Study
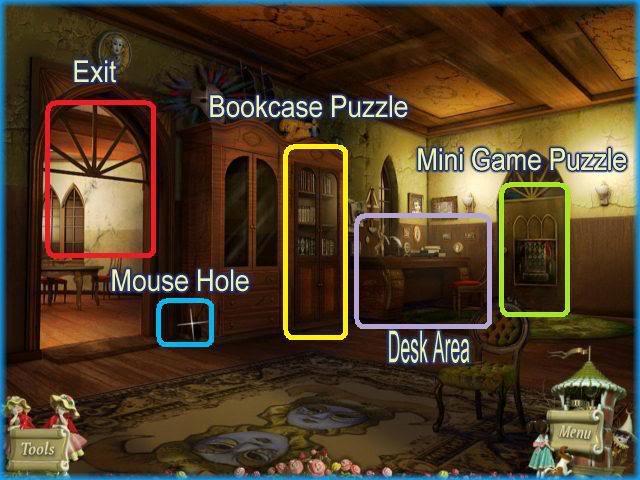
- Inside the study there are many things to do.
- First click on the mouse hole circled in blue in the image above.
Mouse Hole Puzzle
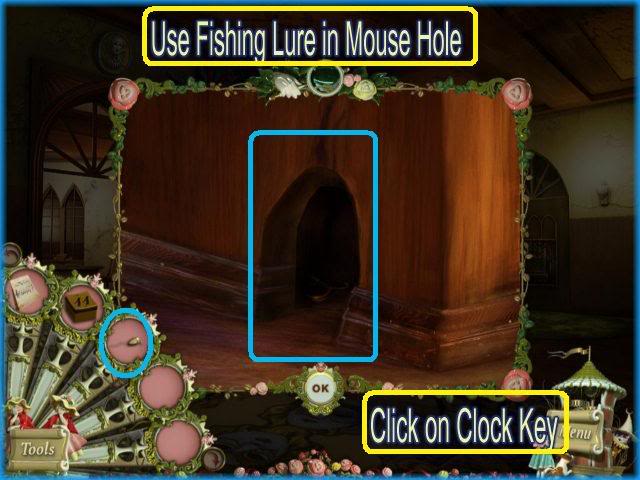
- Once you click on the mouse hole you will have a close up view.
- Open your inventory/tool items and place the fishing lure inside the mouse hole.
- You will now have access to a clock key.
- Click on the key and it will enter into your inventory for future use.
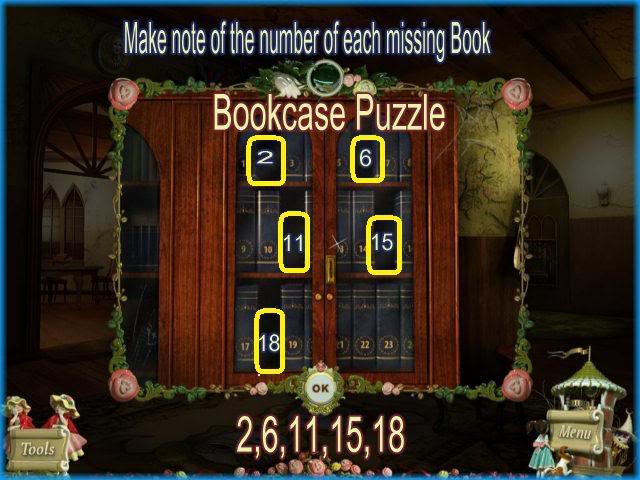
- Next click on the bookcase.
- You will see several books missing.
- Make note of the numbers of the books that are missing which are 2,6,11,15, and 18.
- Next click on the clock mechanism to the far right.
Clock Puzzle
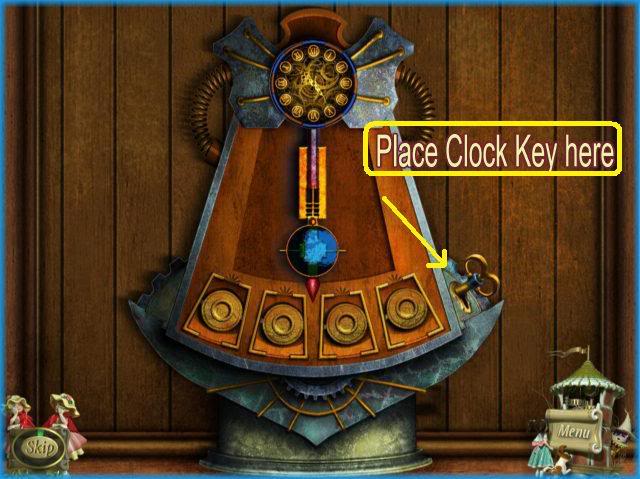
- Open inventory and place the clock key as shown in image above.
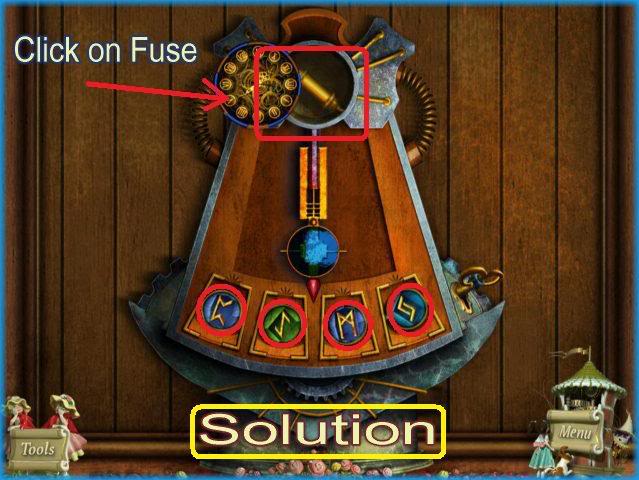
- In this game you will need to click on the pendulum of the clock at the exact moment the arrow at the bottom hits between the arrows which are located in the 4 segments along the bottom.
- If you do this correctly a rune token will appear along the bottom.
- Keep doing this until there are 4 as seen in the image above.
- Once you have all 4 in place the top of the clock will open up and a fuse will be inside.
- Click on the fuse and it will go into your inventory for the next puzzle.
- Make note of the runes in the picture as you will need them for a future puzzle.
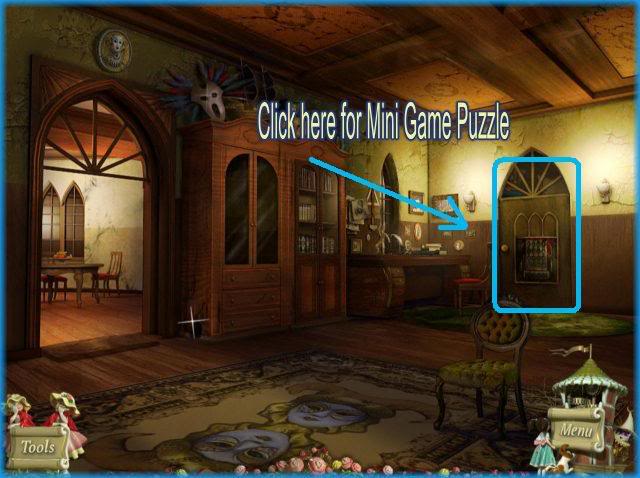
- Click on this door to access the next puzzle.
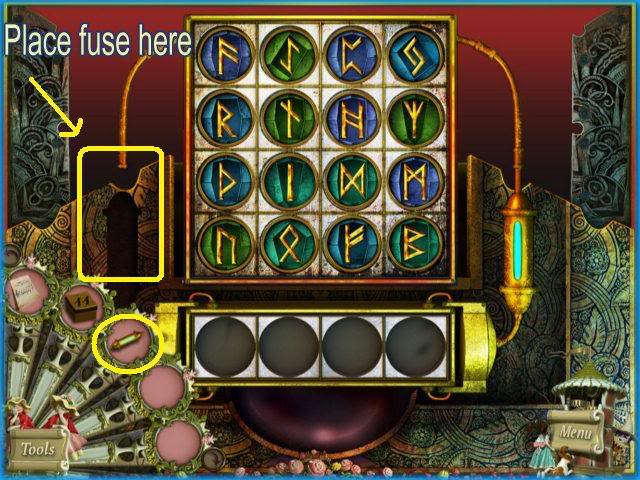
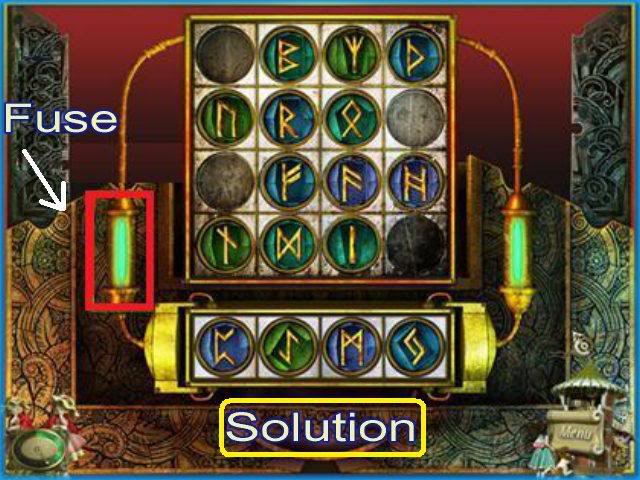
- In this puzzle you first need to open the inventory/tools area and place the fuse in the area at the left of the mechanism.
- Next you will need to click on the symbols you saw in the previous clock puzzle and place them in order at the bottom as seen in the image above.
- Once they have all been placed correctly the door will open.
- Proceed into the next room.
CHAPTER 11
Girl’s Room
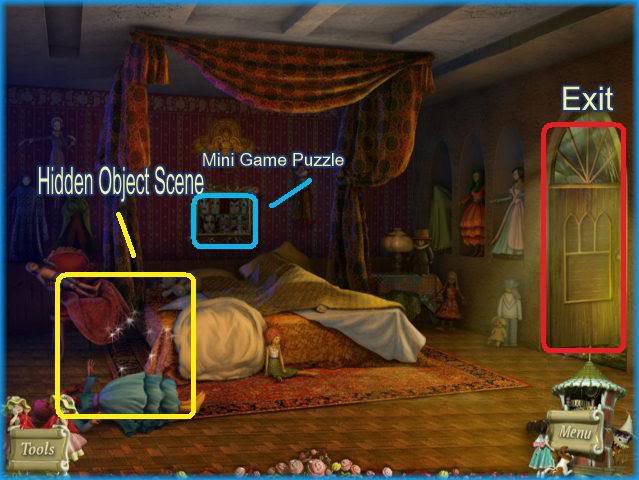
- Once inside the girl’s room there is a puzzle and a hidden object scene.
- Click on the hidden object area circled in yellow first.
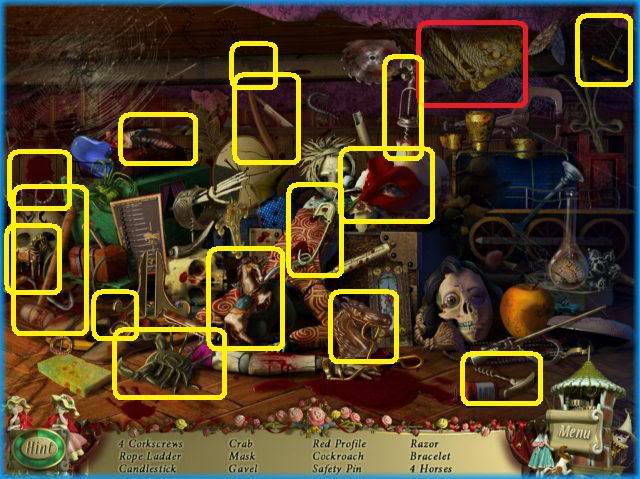
- There are 17 items to locate in this scene of which 16 are circled in yellow.
- The inventory item you need to find is circled in red and is a rope ladder.
- Next click on the area over the bed circled in blue.
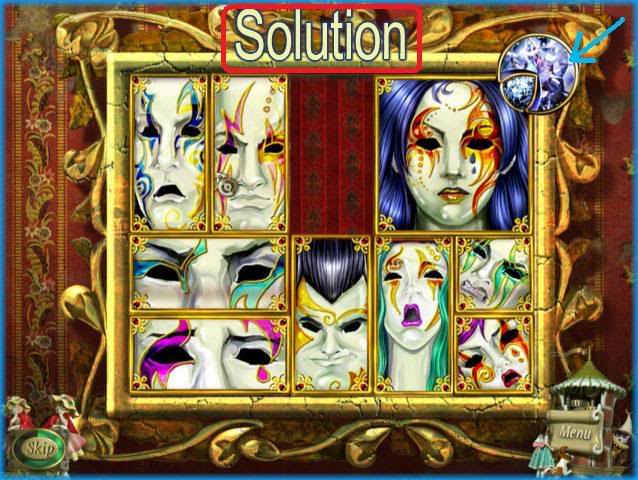
- Here you have a slide the tile puzzle in which the goal is to simply move the tile that has the blue gem attached to it to fit into the space at the upper right hand corner.
- There are several possible solutions to this puzzle.
- The solution is seen above.
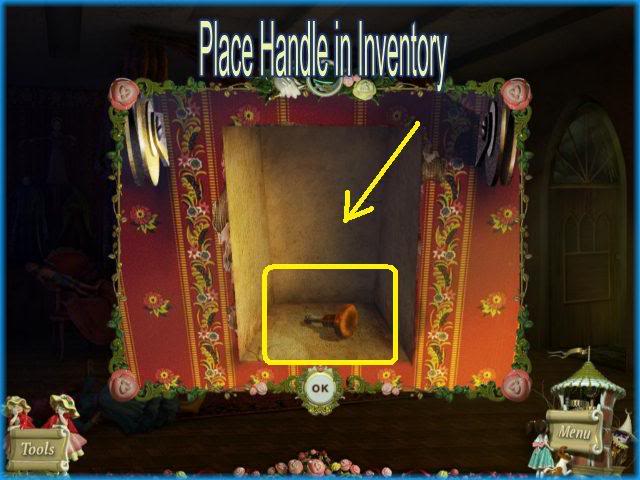
- Once the puzzle has been solved the door opens and there is a handle inside.
- Click on the handle and it will move into your inventory for a future puzzle.
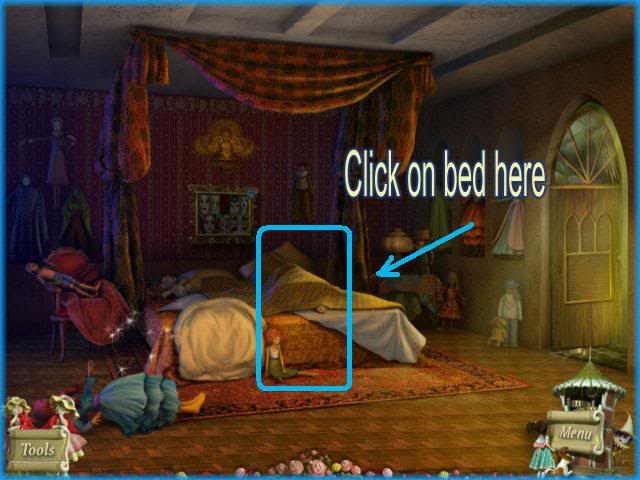
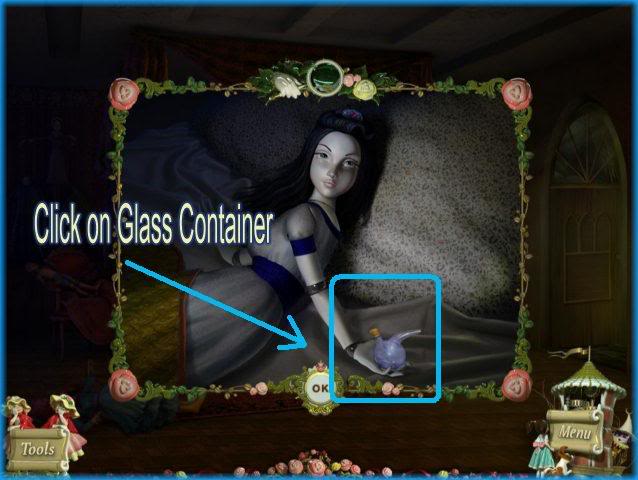
- Click on the bed and you will see an image of a girl with a glass container.
- Click on the glass container and it will move into your inventory for future use.
- Next go back out of the room and click on the desk.
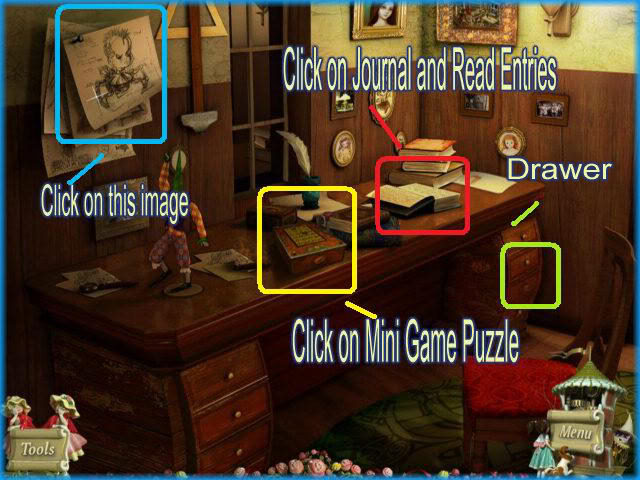
- Once you click on the desk you will see there are many things to do here.
- First click on the journal on the desk.
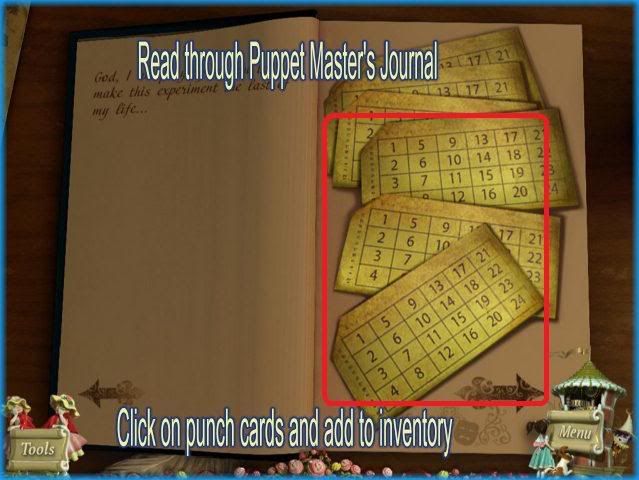
- Once you open the journal you will want to read all of the entries which explains the storyline in great detail.
- At the last page there are several punch cards. Be sure to click on these and they will enter into your inventory.
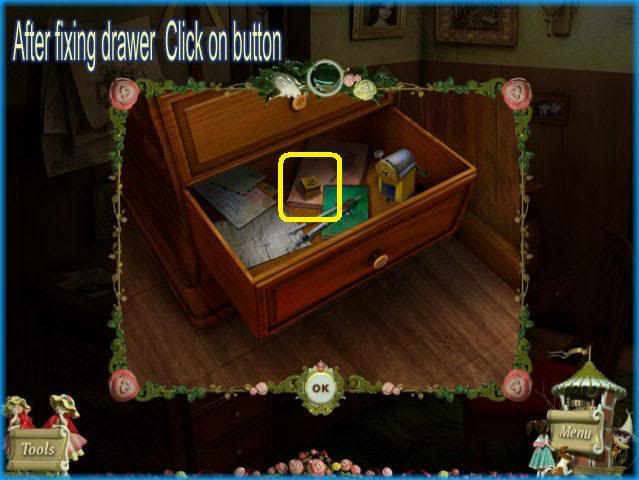
- Next you will click on the drawer to the far right.
- Take the handle out of the inventory and place it on the drawer and open it.
- You will find a numbered button inside. Click on it and it will enter into your inventory for future use.
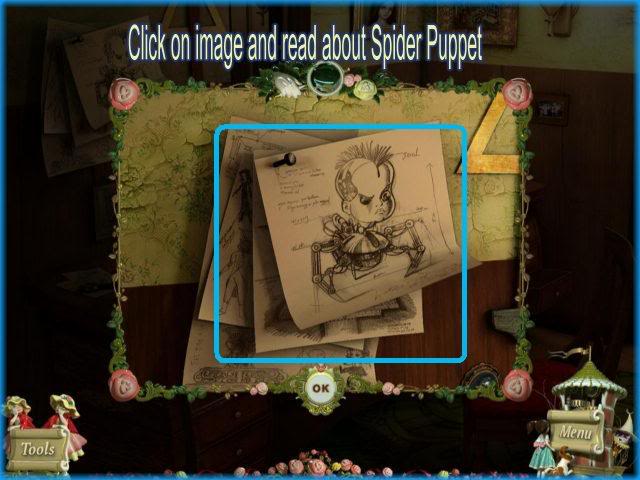
- Next click on the picture to the far upper left of the scene.
- Here you will see a detailed drawing of the spider baby puppet that has been moving through scenes throughout the game.
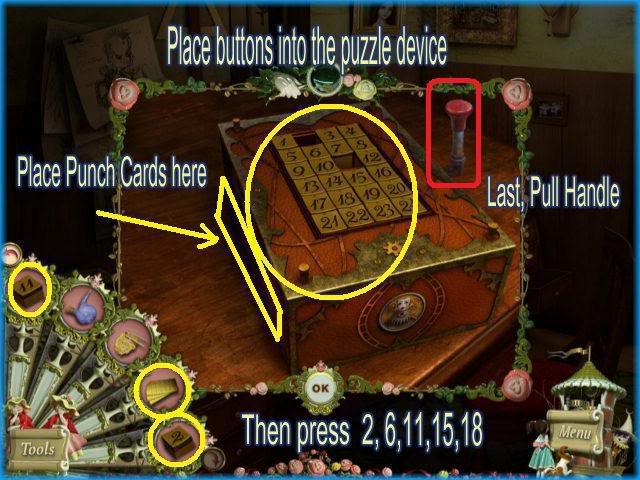
- Next click on the box with the keys on it which is next to the journal on the desk.
- Open your inventory and place the 2 numbered keys in the empty spots as shown above.
- Next you will click the buttons of the numbers seen earlier in the missing books. 2,6,11,15 and 18.
- After this you will take the punch cards from inventory and place them in the slot on the left side of the device.
- They will return to your inventory with holes punched in the correct areas.
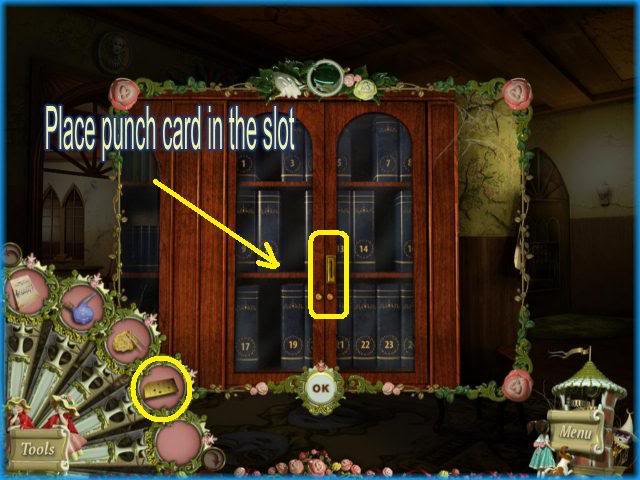
- Next click on the bookcase again.
- This time you will place the punch card with the holes in it inside the slot in the center.
- This acts as a key for the secret passageway at the bottom of the bookcase.
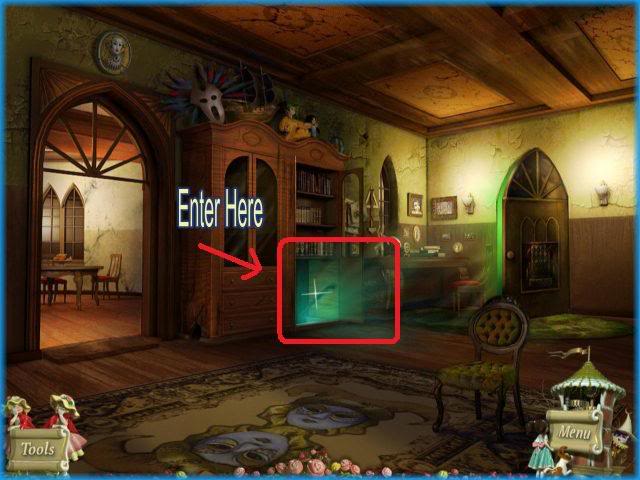
- Enter the secret passageway.
Chapter 12 – Secret Passageway
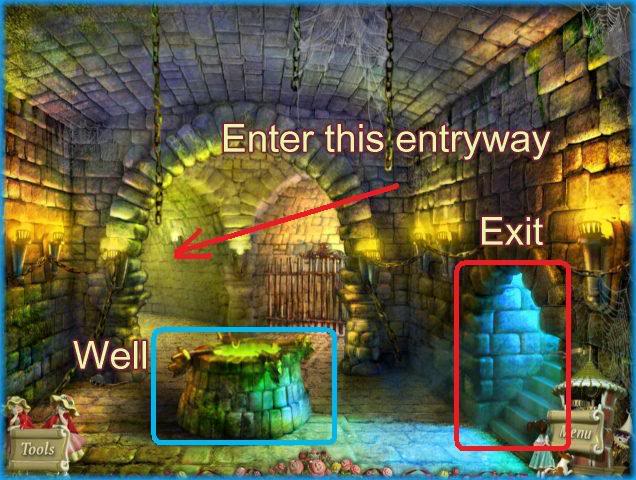
- In this area you will see a well and 2 directions you can travel. Which are left or right.
- You can not go down the right side so move down the left side.
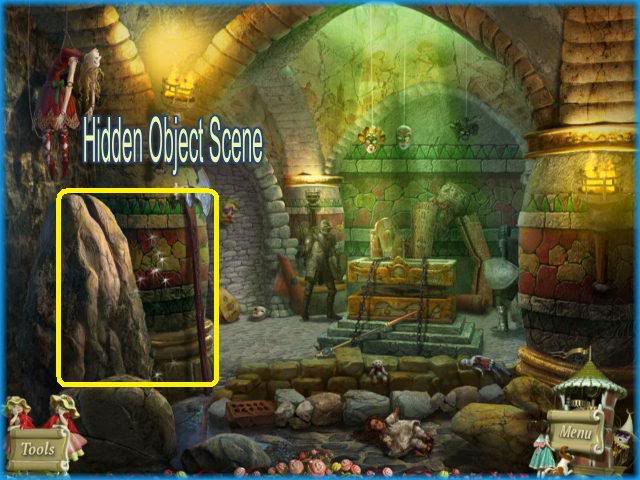
- Here you will see another scene.
- Click on the hidden object area.
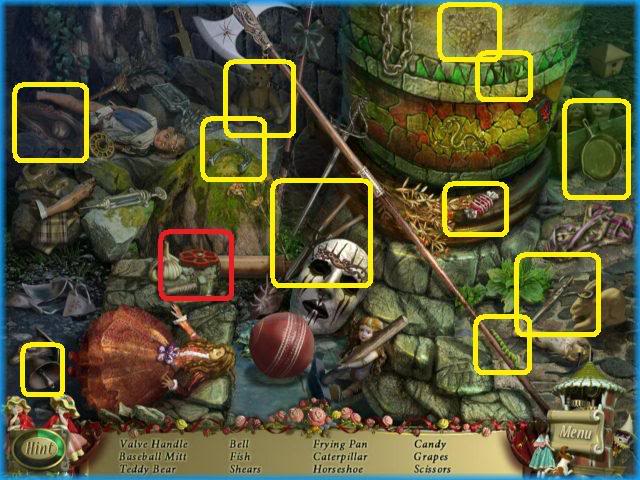
- Here you will need to locate 12 items of which 11 are circled in yellow.
- The inventory item you need to find is the valve handle which is located in the center left and circled in red.
- Once finished go back to the area with the well.
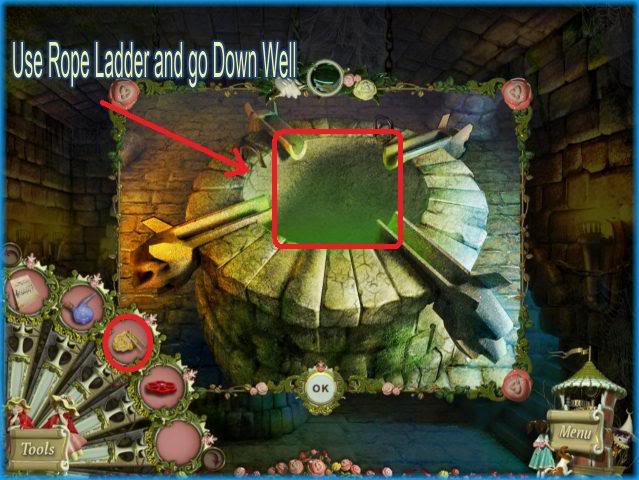
- Click on the well to get a closer view.
- Open the inventory/tools and place the rope ladder in the center of the well.
- Now you can go down into the well.
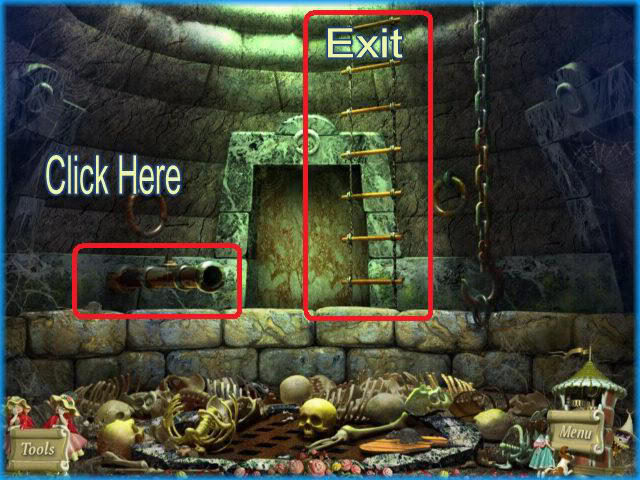
- Once in this location note that you can go back up the ladder to leave the area.
- Click on the pipe to the left for a closer view.
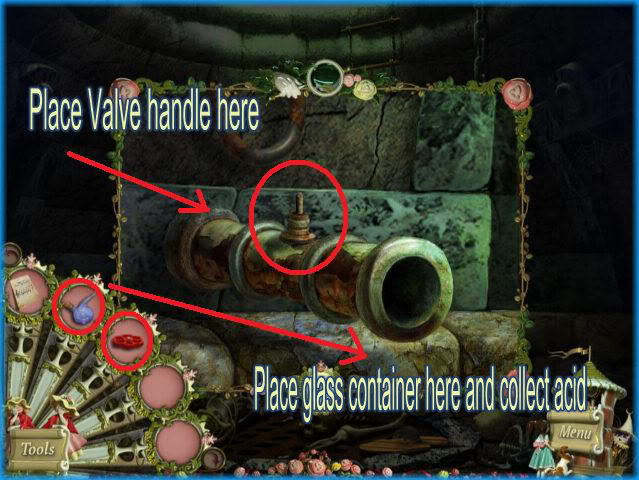
- Open the inventory and place the red valve handle where it belongs and then take the glass container and place it under the spout.
- Click on the handle and the container will fill with acid.
- It will then go back into inventory for future use.
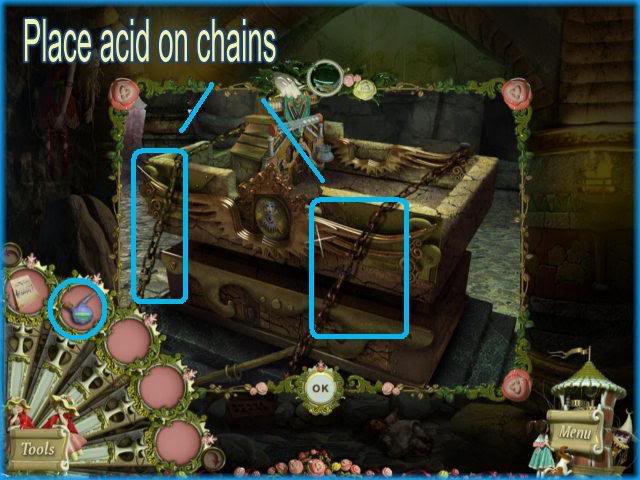
- Go back to the room where you had the hidden object scene by clicking your cursor to the far left.
- Once here you will open inventory and place acid on the 2 chains to dissolve them.
- Once you do this you will activate a mini game.
Switch the Balls
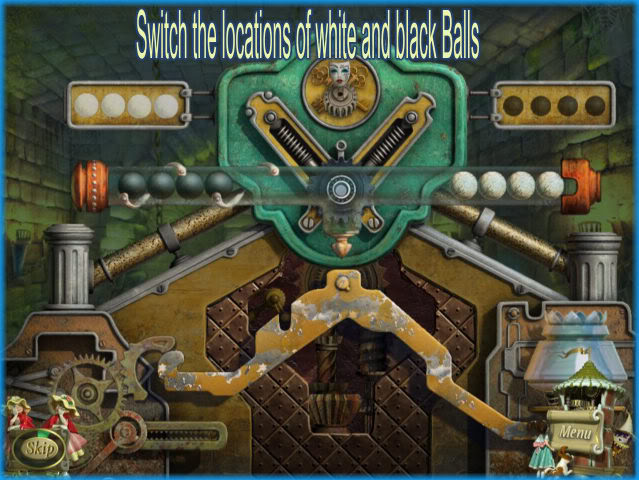
- In this game the goal is to switch the locations of the white and black balls.
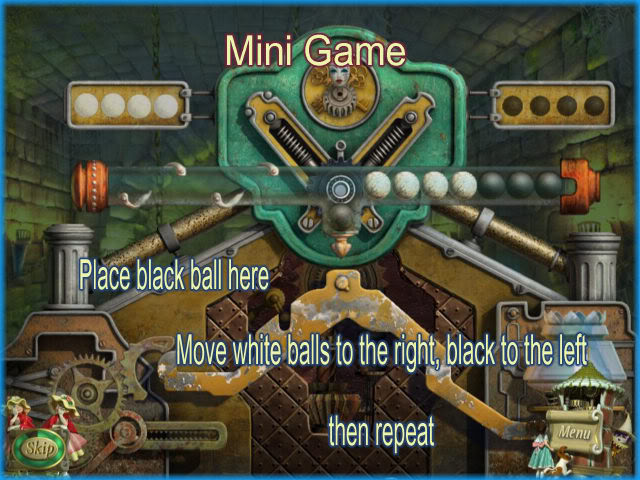
- The key to solving this puzzle is the reservoir at the center of the device.
- Place a black ball in the center holding spot.
- Next move all 4 white balls to the right.
- Then move the ball in the holding area to the left.
- Next move all 4 white balls back to the left again.
- Next place another black ball from the right into the reservoir holding area and repeat the process 3 more times until all the balls have switched locations.
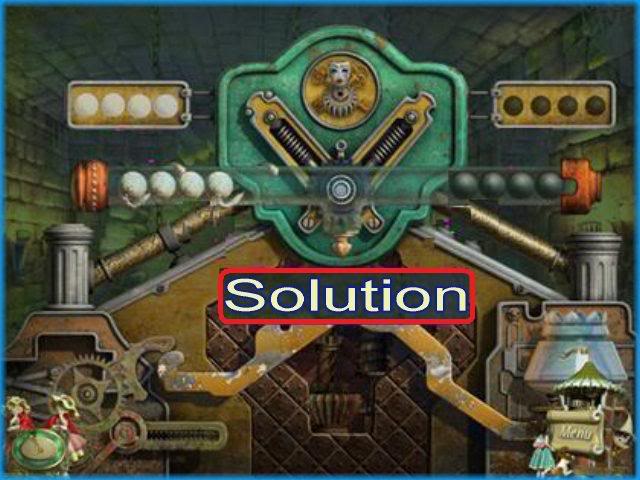
- Solution to puzzle.
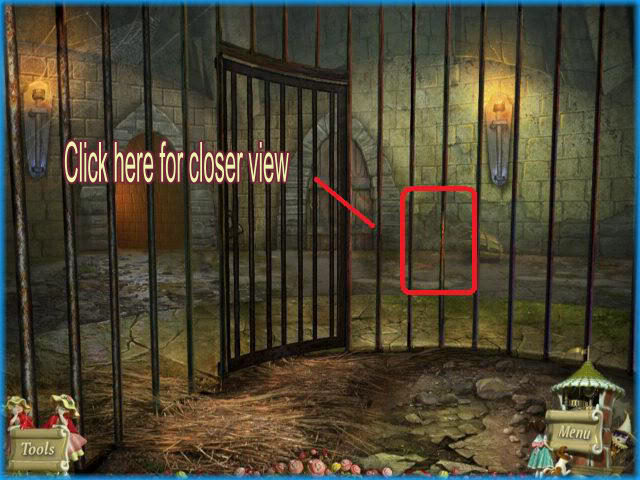
- Once you complete the puzzle the storyline continues and you are captured.
- You wake up inside of this cell.
- Click on the rusty part of the bars as shown in image above circled in red.
- Click on it for a closer view.
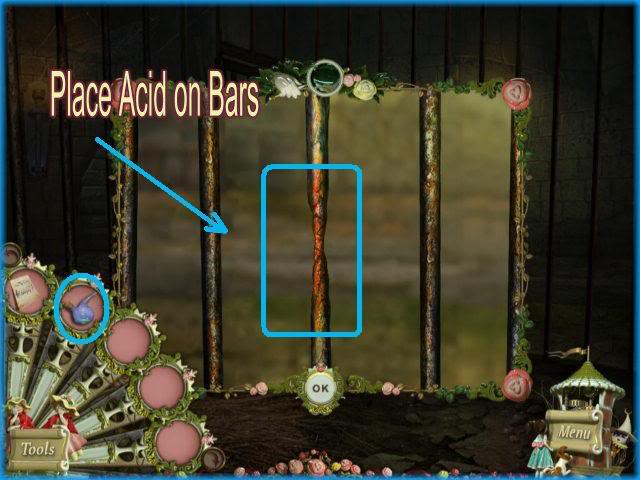
- Open your inventory and place acid on the bars which will eat away and you can escape.
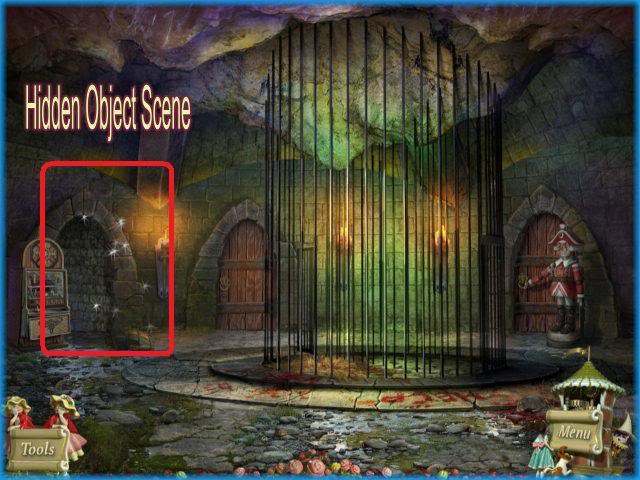
- Once out of the cage there is a hidden object screen available.
- Click on the sparkling area shown circled in yellow above.
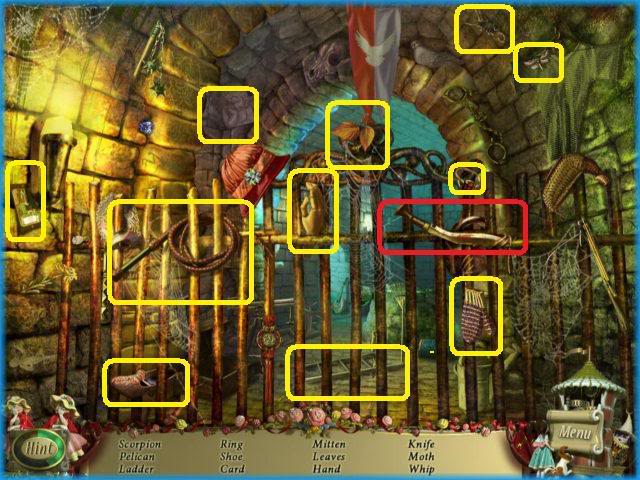
- There are 12 items to locate in this scene of which 11 are circled in yellow.
- The inventory item you must locate is a knife which is on the upper right side of the gate and circled in red.
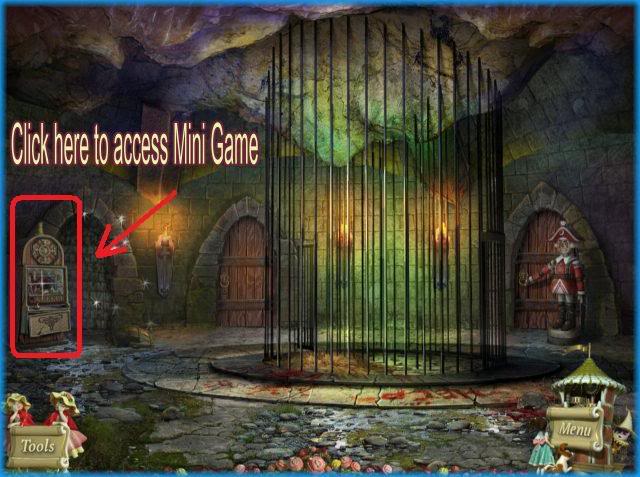
- Click here to access the next puzzle.
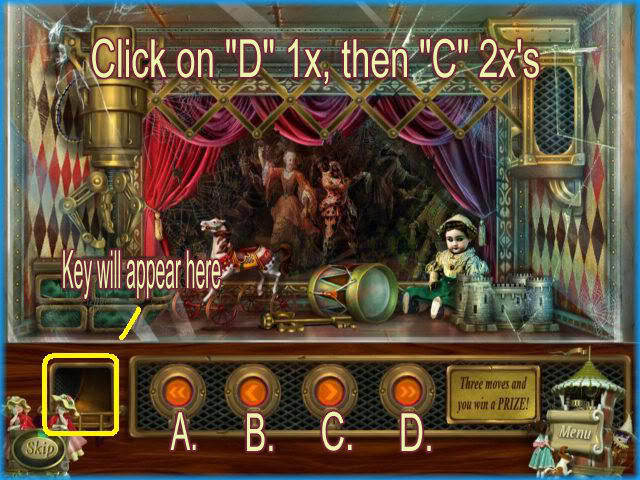
- In this puzzle you must click on the correct combination of buttons to release the key.
- The buttons have been labeled A through D.
- Click on D 1 time and C 2 times.
- The key will release at the bottom left slot.
- Click on it and it will go into inventory.
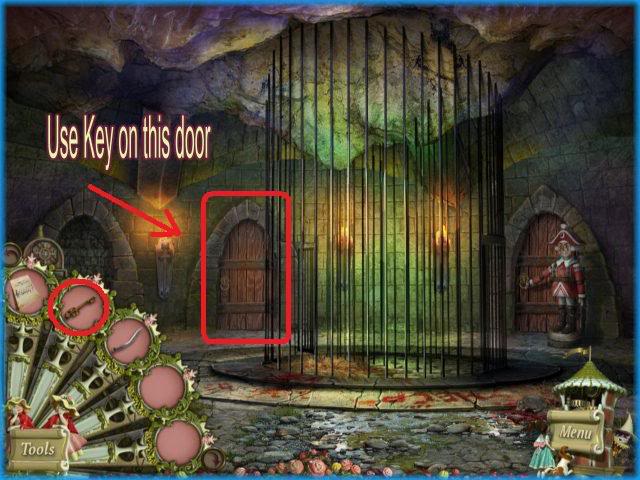
- Use the key on this door.
Chapter 13 – The Puppet Master’s Fall
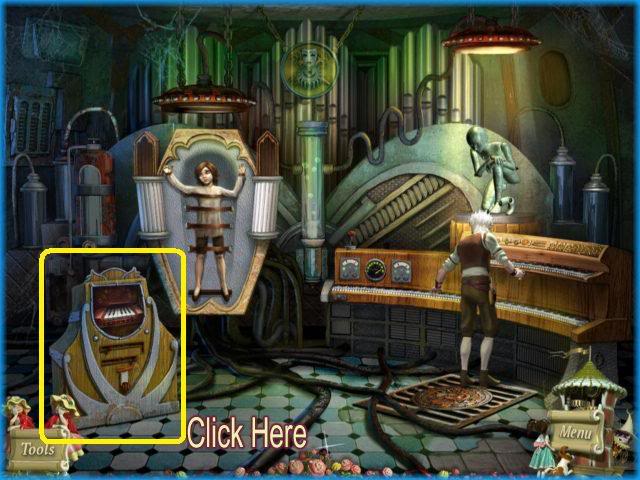
- Now you are inside the puppet master’s workroom and he has Simon trapped and is ready to turn him into a puppet.
- Click on the machine at the bottom left of screen.
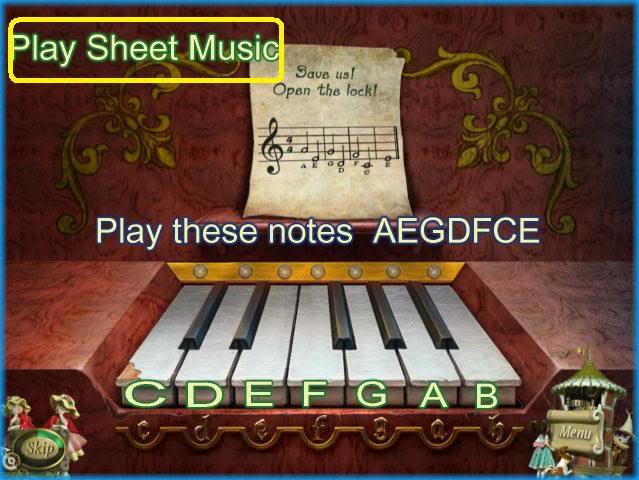
- In this puzzle you must play a musical lock to free Simon.
- Play the sheet music you have been carrying in your inventory since the beginning of the game.
- If you do not know how to read music the answer is listed for you in the image above.
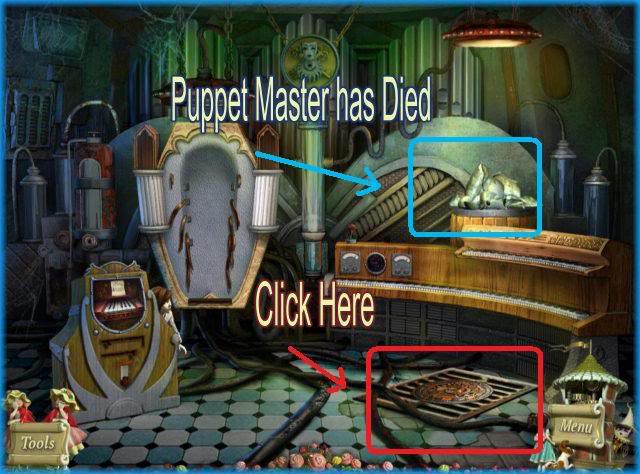
- After Simon is freed the machine backfires and the puppet master becomes a puppet.
- Someone has tampered with the puppet and he shortly dies.
- Click on the grate on the floor to the lower right for a puzzle.
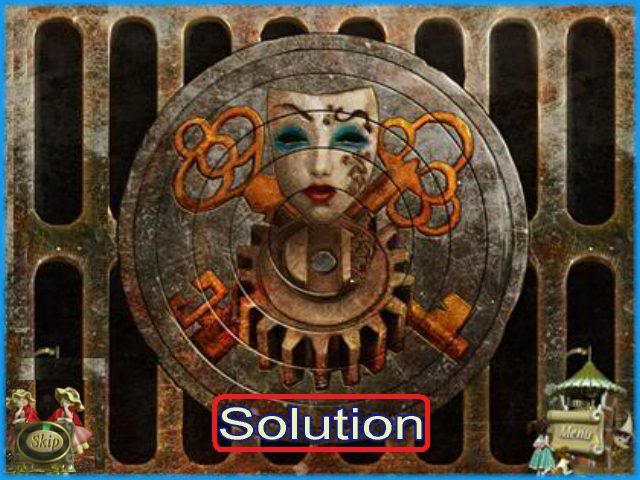
- This is a puzzle where you slide the rings into position to complete a picture.
- The solution is shown above.
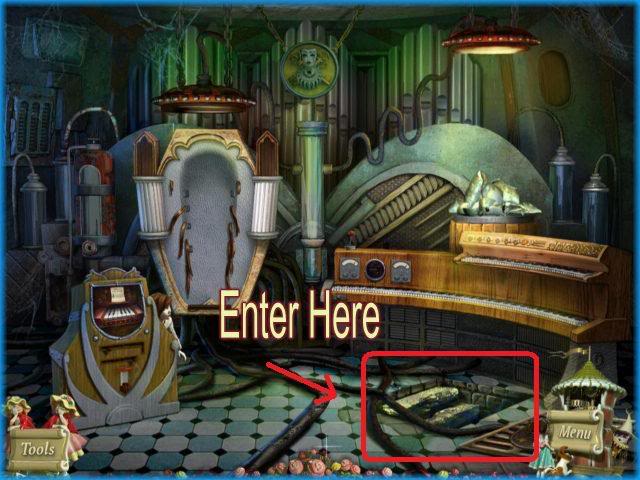
- Once you finish the puzzle a secret trap door opens up.
- Go through the doorway.
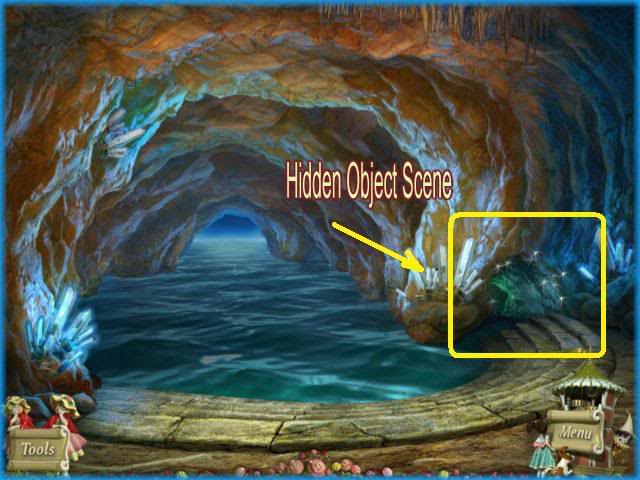
- Click on the sparkling hidden object scene here.
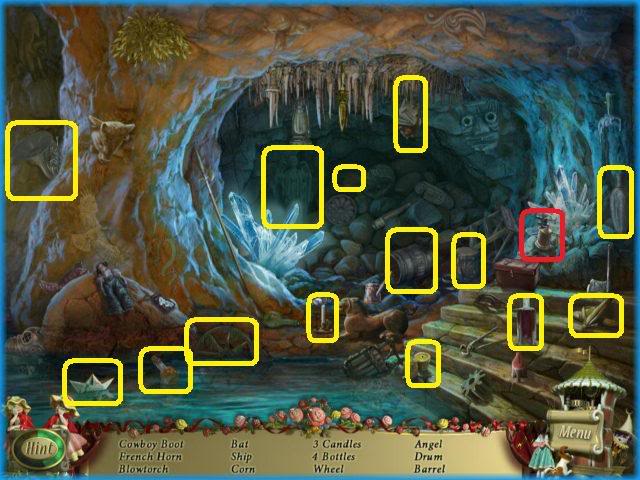
- Locate the 17 items in this scene which are circled in yellow.
- The inventory item you need to find is the blowtorch which is located at the upper right and is circled in red.
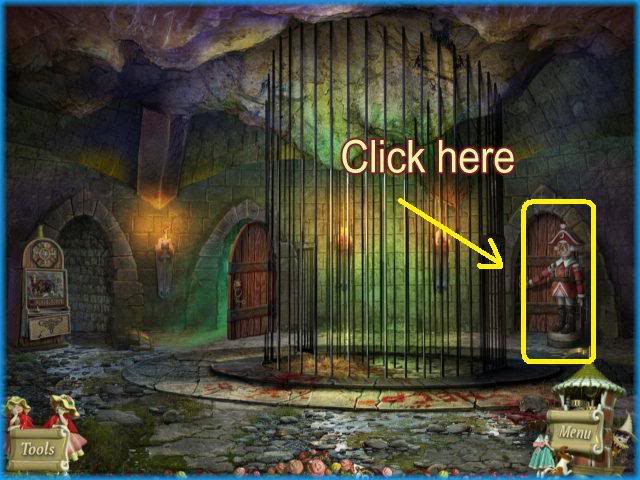
- Go back to the room with the Jail Cell and click on the uniformed soldier puppet at the far right.
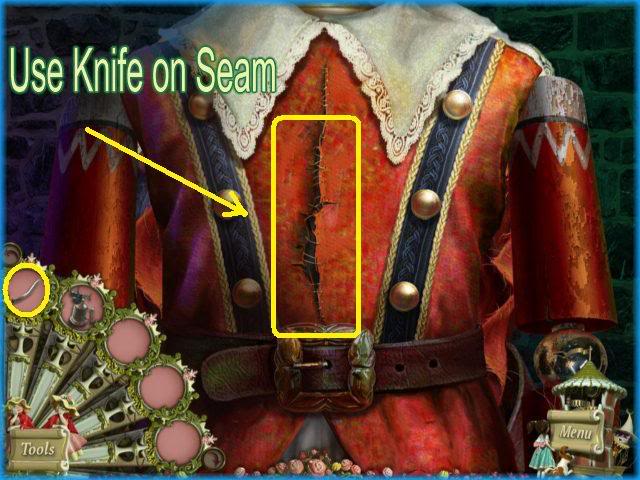
- Open your inventory/tools and drag the knife to the seam in the center of the uniform to open it.
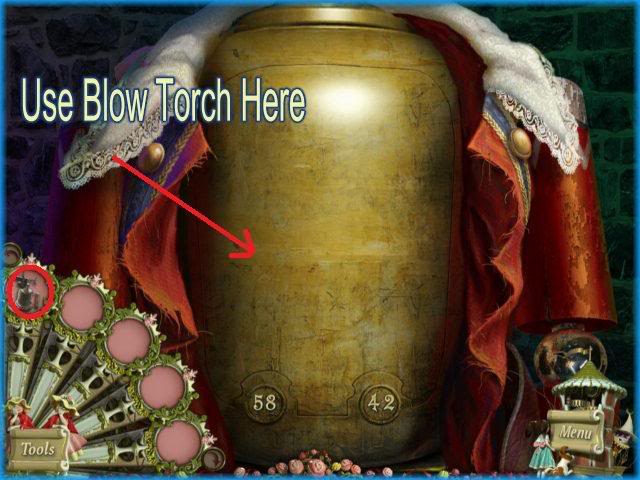
- Open your inventory/tools and drag the blowtorch to the cover.
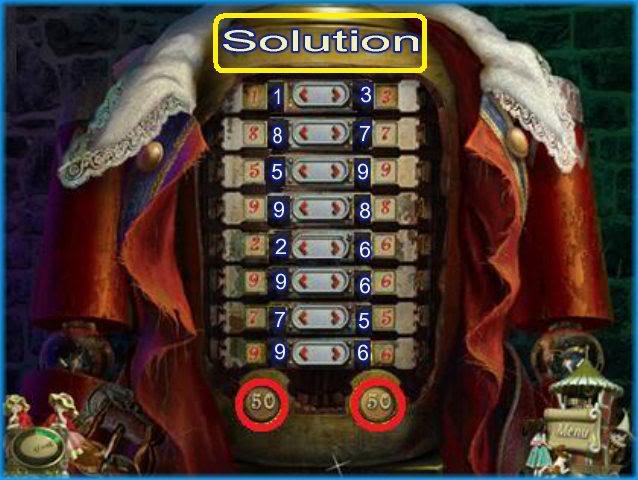
- To solve this puzzle you must click on the arrow next to each row of 2 numbers which switches their positions.
- You must move all the numbers so that when they are added up vertically they both equal "50"
- The solution is shown in the image above.
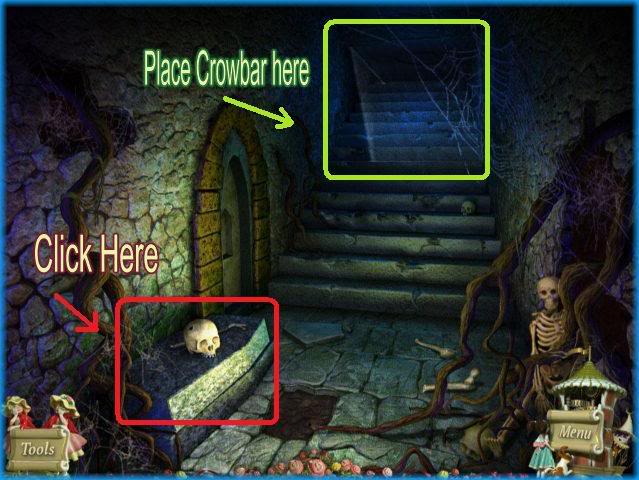
- Enter the doorway and you will see this scene.
- Click on the crowbar next to the skull at the bottom left.
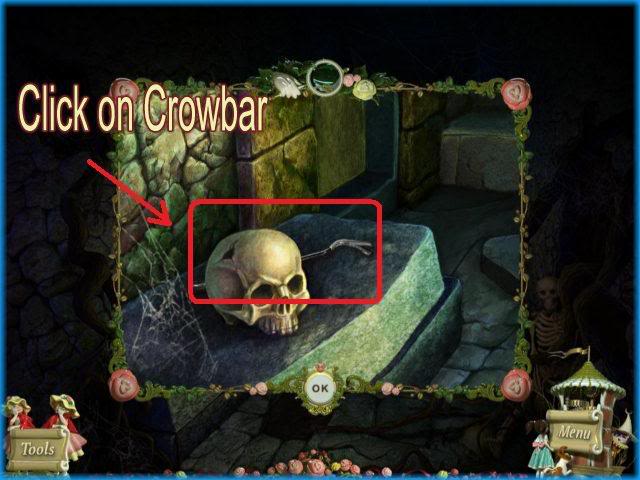
- You will have a closer look.
- Click on the crowbar and it will go into inventory for future use.
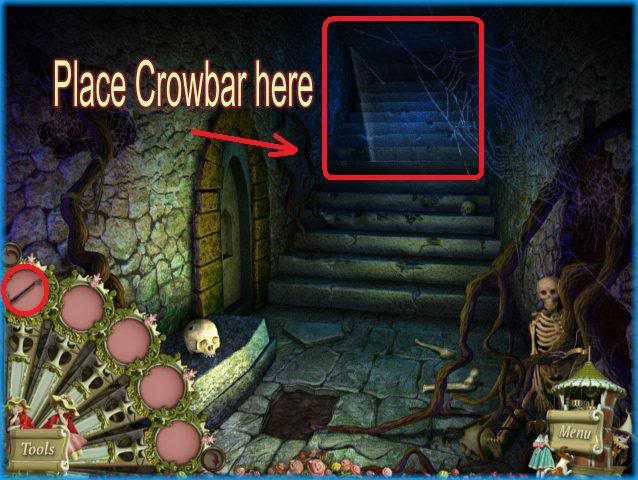
- Open your inventory/tools and use the crowbar at the top of the scene to open it.
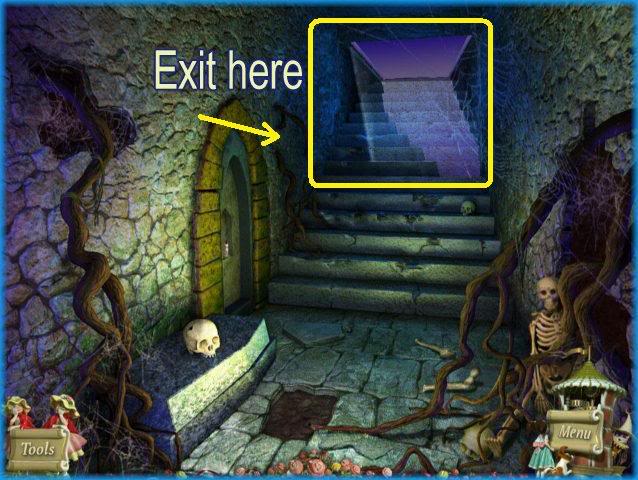
- Exit through this opening.
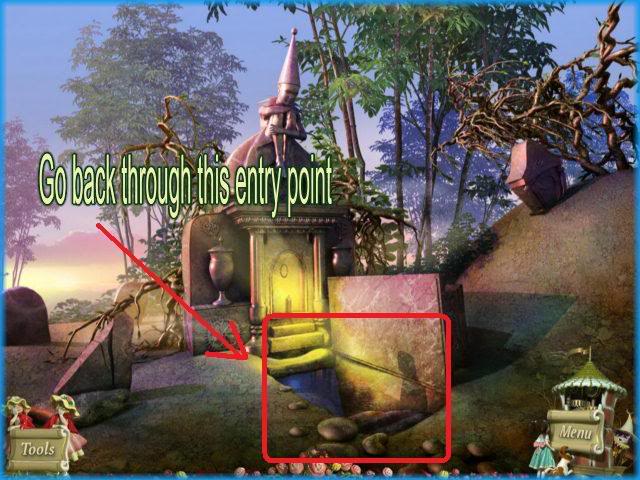
- Once Simon runs to safety you will need to go back inside to stop the puppet master’s daughter.
- Go back through this opening.
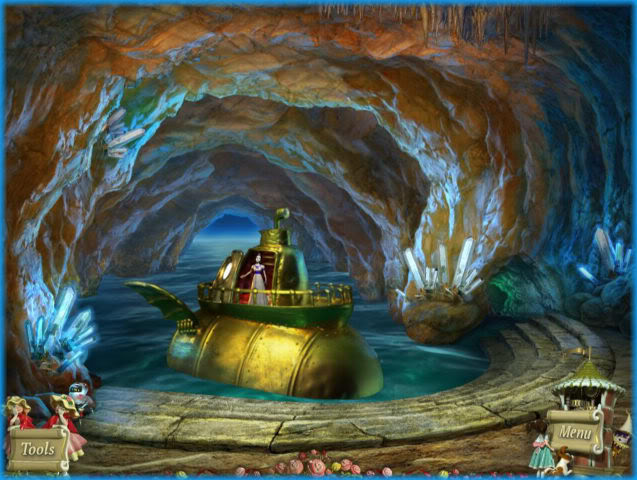
- Go back inside and the storyline will finish out with the puppet master’s daughter escaping.
- It is announced the story will be continued.
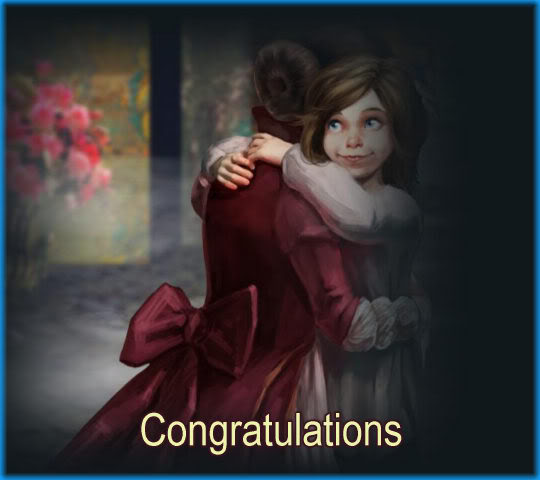
- Simon is finally home with his family!
- CONGRATULATIONS! You have completed the game!
“;
More articles...
Monopoly GO! Free Rolls – Links For Free Dice
By Glen Fox
Wondering how to get Monopoly GO! free rolls? Well, you’ve come to the right place. In this guide, we provide you with a bunch of tips and tricks to get some free rolls for the hit new mobile game. We’ll …Best Roblox Horror Games to Play Right Now – Updated Weekly
By Adele Wilson
Our Best Roblox Horror Games guide features the scariest and most creative experiences to play right now on the platform!The BEST Roblox Games of The Week – Games You Need To Play!
By Sho Roberts
Our feature shares our pick for the Best Roblox Games of the week! With our feature, we guarantee you'll find something new to play!Demon Piece Races – All Race Buffs
By Adele Wilson
Our Demon Piece Races guide details all of the buffs, rarities, and characteristics for each race in the One Piece Roblox game.


