- Wondering how to get Monopoly GO! free rolls? Well, you’ve come to the right place. In this guide, we provide you with a bunch of tips and tricks to get some free rolls for the hit new mobile game. We’ll …
Best Roblox Horror Games to Play Right Now – Updated Weekly
By Adele Wilson
Our Best Roblox Horror Games guide features the scariest and most creative experiences to play right now on the platform!The BEST Roblox Games of The Week – Games You Need To Play!
By Sho Roberts
Our feature shares our pick for the Best Roblox Games of the week! With our feature, we guarantee you'll find something new to play!Demon Piece Races – All Race Buffs
By Adele Wilson
Our Demon Piece Races guide details all of the buffs, rarities, and characteristics for each race in the One Piece Roblox game.
Youda Legend: The Curse of the Amsterdam Diamond Tips Walkthrough
Welcome to Gamezebo's strategy guide for Youda Legend Amsterdam. This hidden object game takes you on a tour of Amsterdam as you collect clues to a historic mystery. The game is divided into 19 scenes. This guide is divided into sections: General Tips (no spoilers)Scene by Scene Walkthrough GENERAL TIPS (no spoilers) When you set up your character you can choose male or female, but I think that only matters for some languages. It doesn't change the story or the graphics. On …
a:1:i:0;a:2:s:13:”section_title”;s:53:”Youda Legend: The Curse of the Amsterdam Diamond Tips”;s:12:”section_body”;s:36542:”
Welcome to Gamezebo’s strategy guide for Youda Legend Amsterdam. This hidden object game takes you on a tour of Amsterdam as you collect clues to a historic mystery.
The game is divided into 19 scenes.
This guide is divided into sections:
- General Tips (no spoilers)
- Scene by Scene Walkthrough
- When you set up your character you can choose male or female, but I think that only matters for some languages. It doesn’t change the story or the graphics.
- On the Main Menu if you look at statistics, you can see your time, the number of diamonds you have found, and other things that affect your score.
- There is no timer.
- Once you find the compass in the first scene, it will provide hints for objects in the Hidden Object scenes. The number of hints is unlimited but the compass has to recharge each time.
- When you find the diamonds in each scene, they will give you extra points and help the compass recharge faster. Some of the diamonds look clear. Some look blue, yellow, black or green, which might just be reflection.
- As you collect diamonds they will be stored in the border around the scene, This can be a little confusing, but you get used to it.
- Each diamond you collect is worth 300 points. There are approximately 200 diamonds in all.
- To quit the game, click on the word MENU at the top left.
- The hidden object Find list is randomly generated, so some objects will be different for different players.
- However, each scene also has some Key Objects which every player must find because you will need them later in the game. You can view most of the Key Objects by clicking on the trunk on the lower left of the screen. Just click on the trunk again to close it.
- If you pick up a regular object, it will dissolve. If you pick up a Key Object, it will stay solid and go into the trunk.
- Some objects may be behind other objects. If you can’t find an object on the list right away, just go onto the next one, then come back later.
- Because each item must either dissolve or go into the trunk, it may seem like nothing is happening if you click on several items in the scene at once. Just be patient and the list will catch up with you.
- Objects can be any size so there might be a 10 foot lettuce and a 1 foot bus. Colors are usually lifelike.
- You will visit some locations, like your hotel room, more than once in the story. On the second visit all the nonkey items will be in the same place, but there will be new key items introduced and new diamonds.
- You cannot skip any of the mini-games.
- The mini-games do have some hints, but they’re random and may be for parts of the game you already solved.
- Using hints costs points.
To keep things from getting too crowded, I will give you a separate screenshot showing the optional diamonds that you use to get faster hints, and then one showing the key objects that every player has to find. Remember your find list might be different except for the key objects. There are also screenshots for the puzzles.
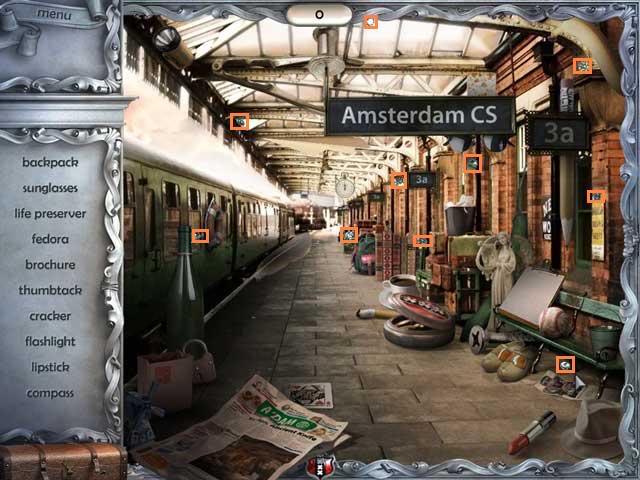
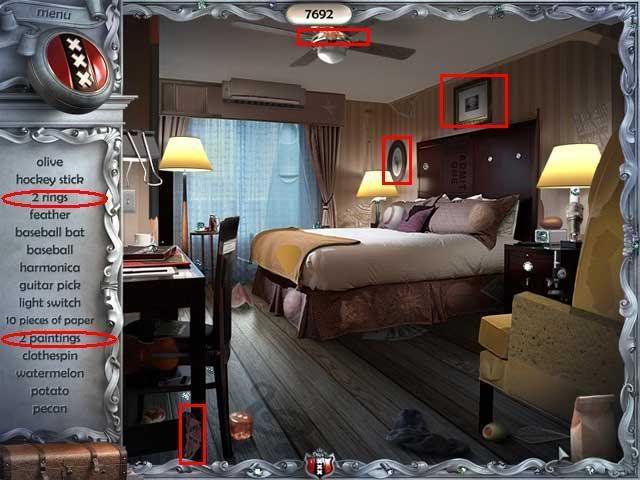
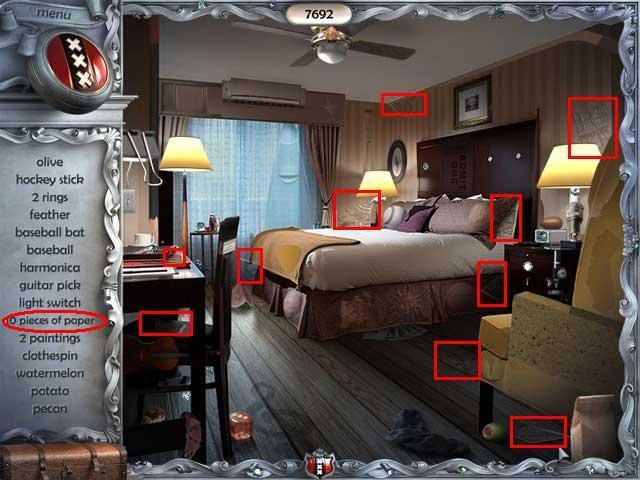
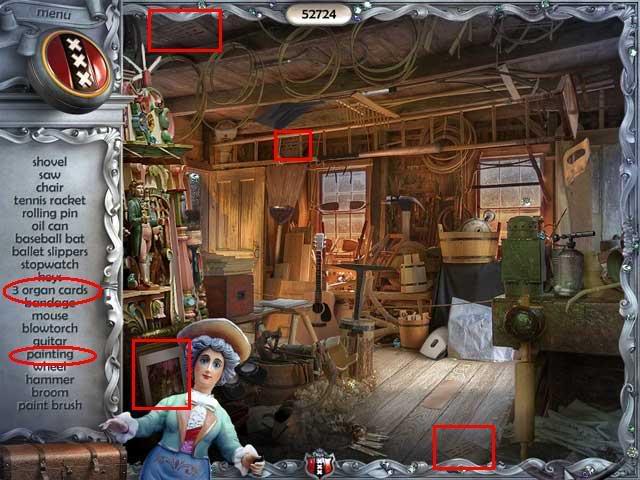
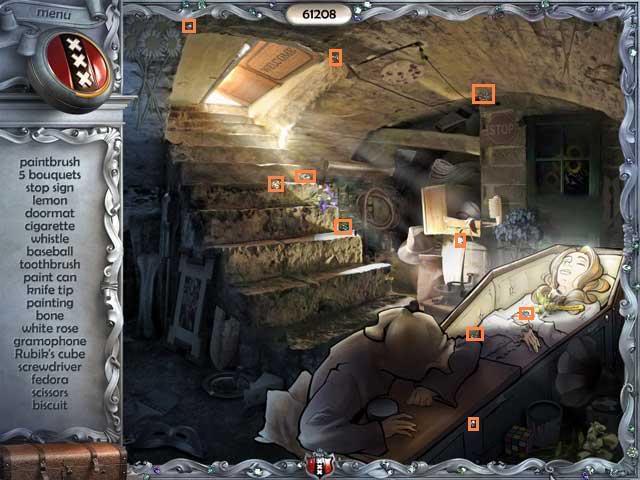
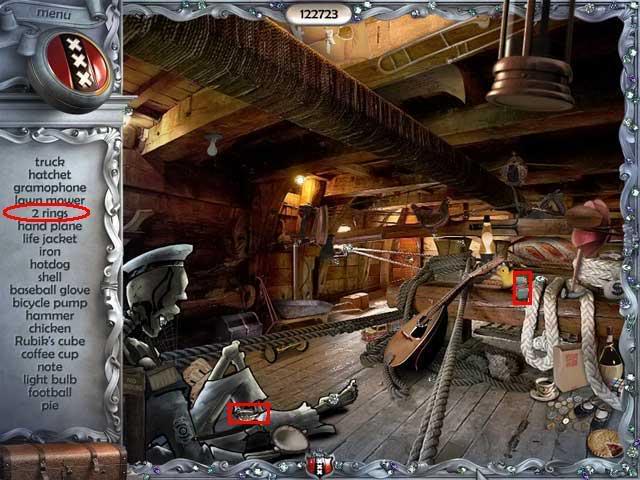
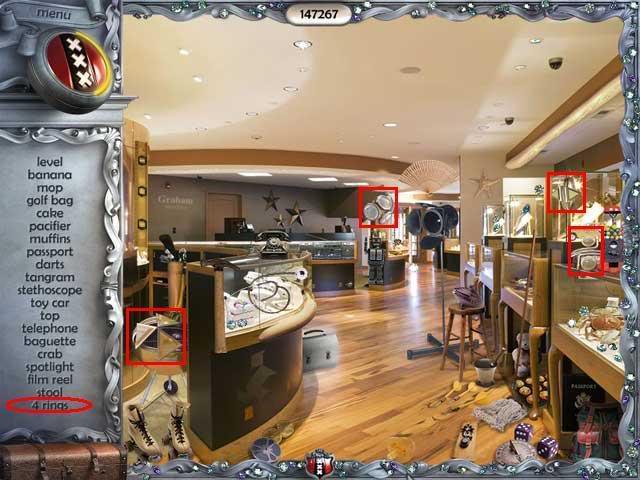
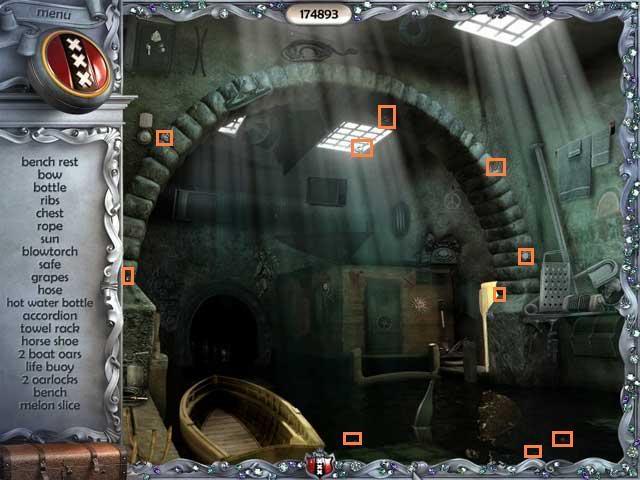
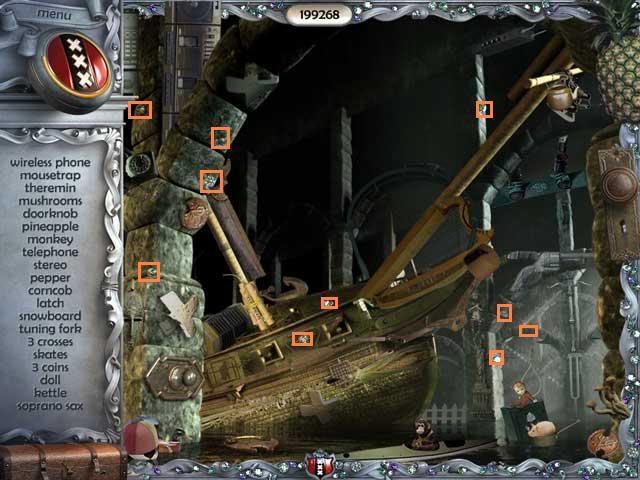
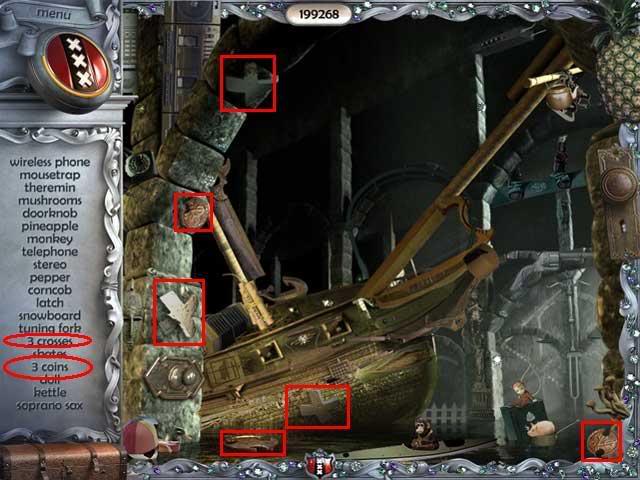
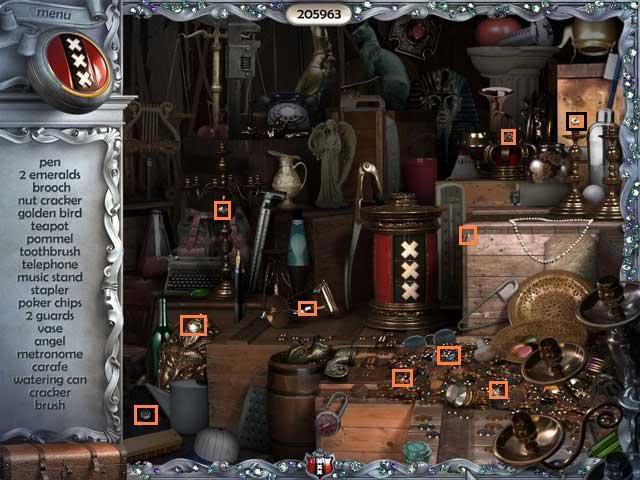
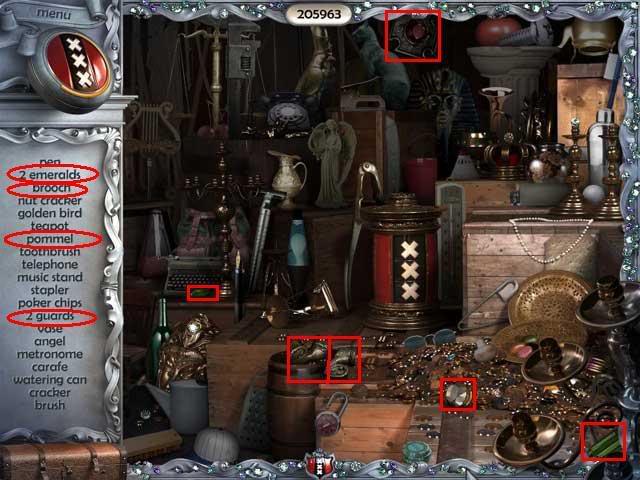
Diamonds are marked in orange. Key items are marked in red. Places where you have to click to interact with the scene are marked in blue.
Index to Major Puzzles:
Scene by Scene Walkthrough Scene I: Amsterdam Train Station
Diamonds

Key Object: Compass
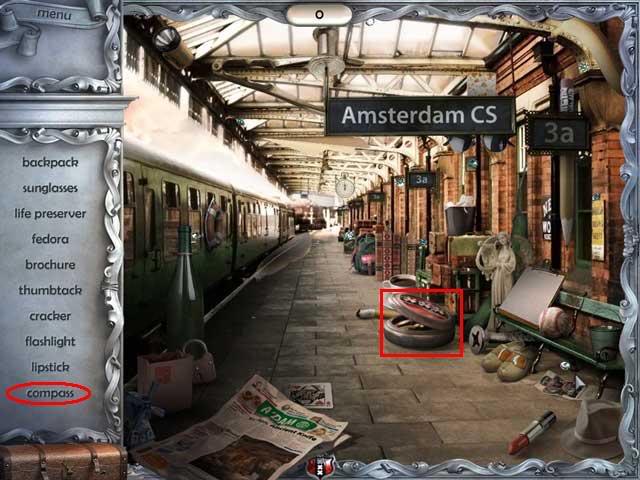
- Although the other key objects go into the trunk, the compass goes up to the top left of the screen.
- From now on you can click it when you need a hint to locate an object.
- It is fully charged when the yellow line on the cover is a full circle.
- As you collect more diamonds, it will recharge faster.
- The compass will draw a large orange circle around one of the items on the find list. The item will usually be near the center of this circle.
Scene 2: Your Hotel Room
Diamonds
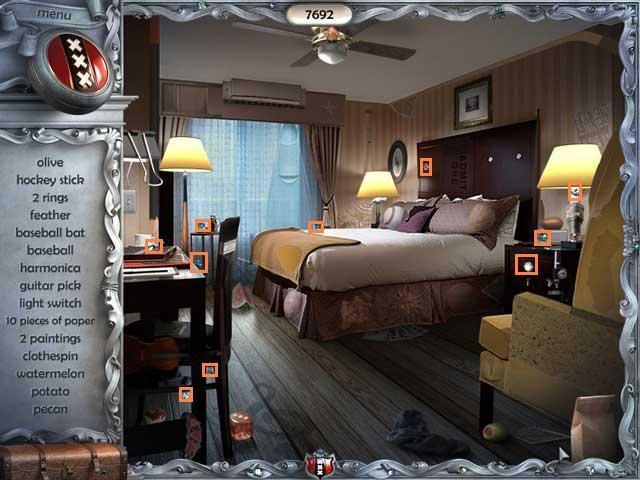
Key Objects: 2 paintings, 2 rings, 10 pieces of paper
Puzzle #1: Jigsaw Map
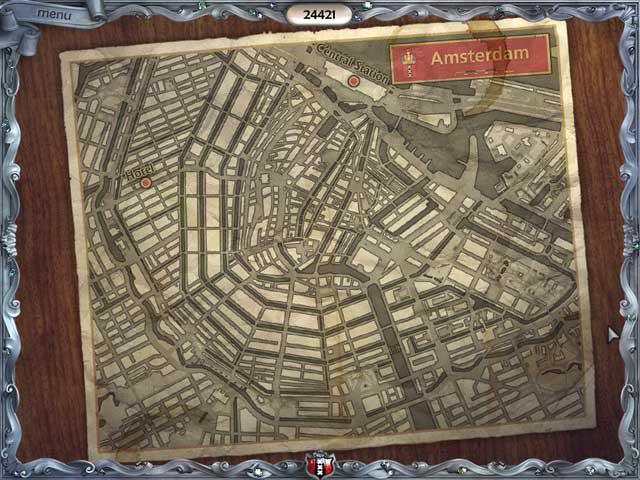
- This is just a regular jigsaw.
- The pieces do not rotate.
- You have to position them to fit the scratched in rectangle or they won’t count as being in the right position.
- Some pieces have torn white edges that will disappear when they are in the exact correct spot.
Solution:
Scene 3: Under the Bridge
Diamonds
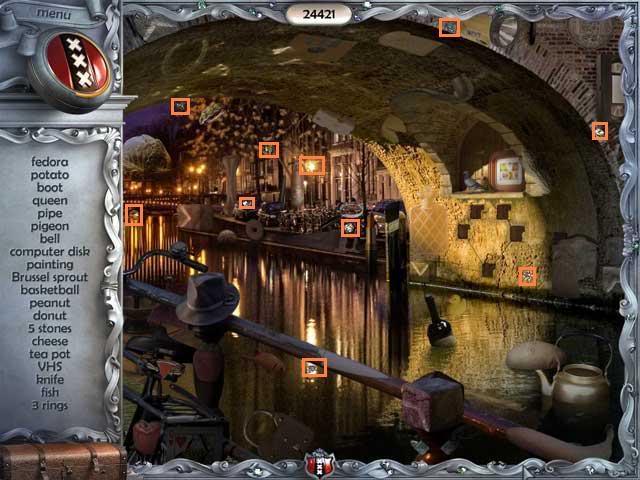
Key Objects: 3 rings, 5 stones with markings
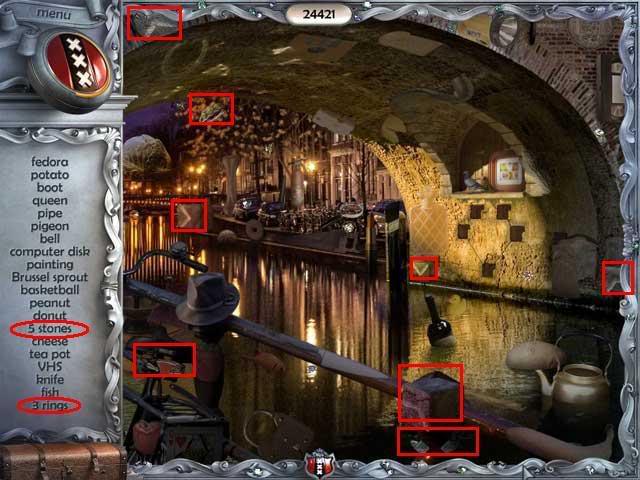
Puzzle #2: Stones in the Wall
- Just put the stones into the holes in the far wall so they make a solid figure.
Solution:
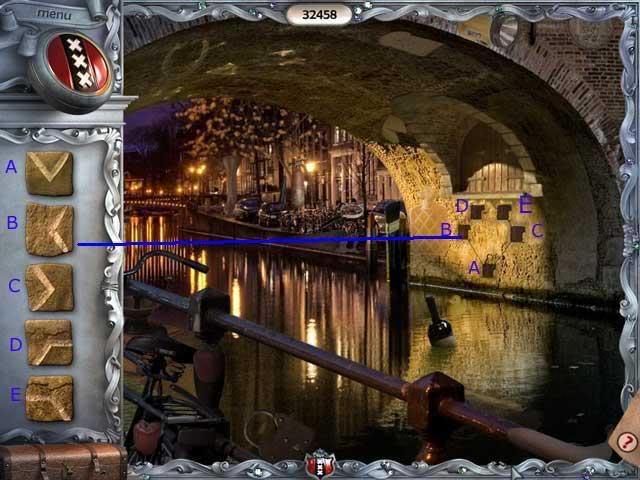
- The door above the figure will open and a set of keys will come out.
- Click on the keys to collect them.
- Look at the 3 scratches on the doorway. This tells you how to position the keys.
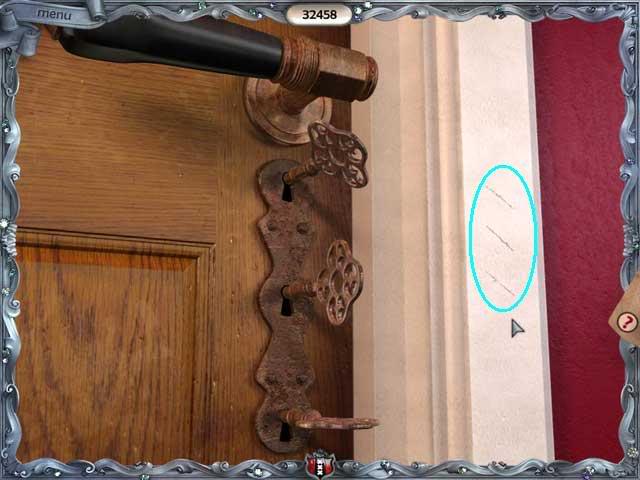
There are many solutions. This way worked for me:
Solution:
Turn the middle 3 times to the right.
Turn the bottom 2 times to the right.
Turn the top 7 times to the right.
Turn the bottom 2 times to the right.
Turn the top 2 times to the right.
Turn the middle 2 times to the right.
Turn the top 2 times to the right.
The door will open.
Scene 4: The Theater
Diamonds
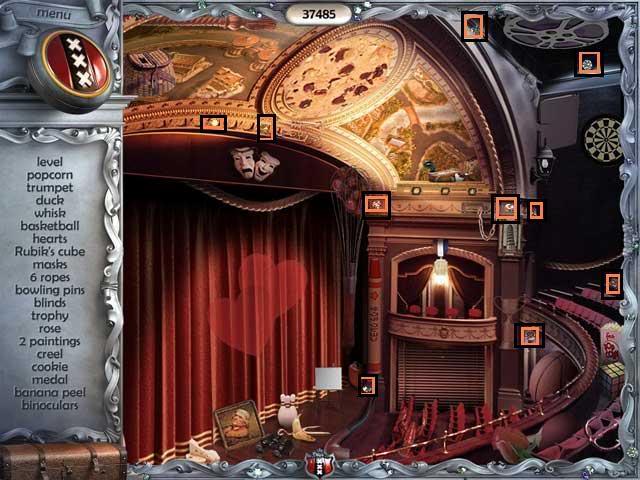
Key Objects: 2 paintings, 6 ropes
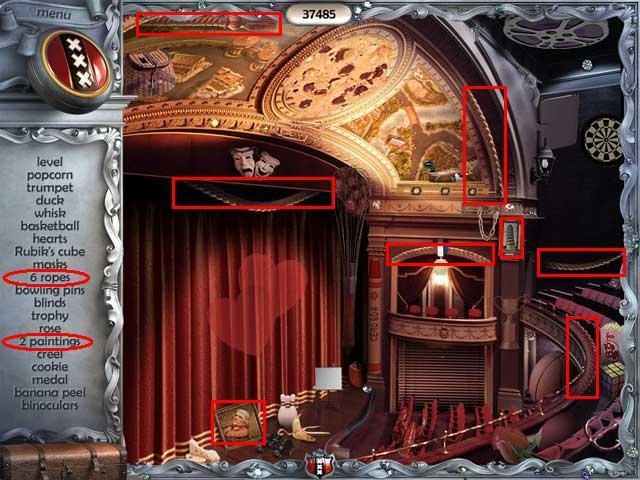
Puzzle #4: Rope in the Theater
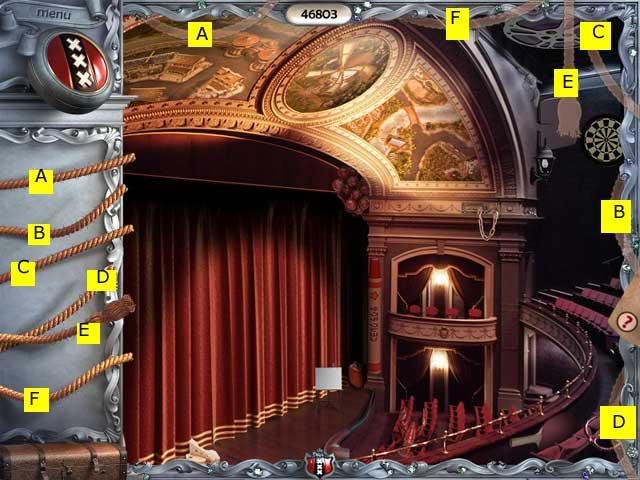
- After you find everything, the scene will reappear with 6 pieces of rope. The instructions say to "put the rope back together," but you just have to put them into 6 places in the scene marked by outlines.
- The rope fragments on the left are the correct size, but may be a different angle than the outline. You don’t have to rotate them. Just drag the rope piece to the right place and it will pop into place. See screenshot.
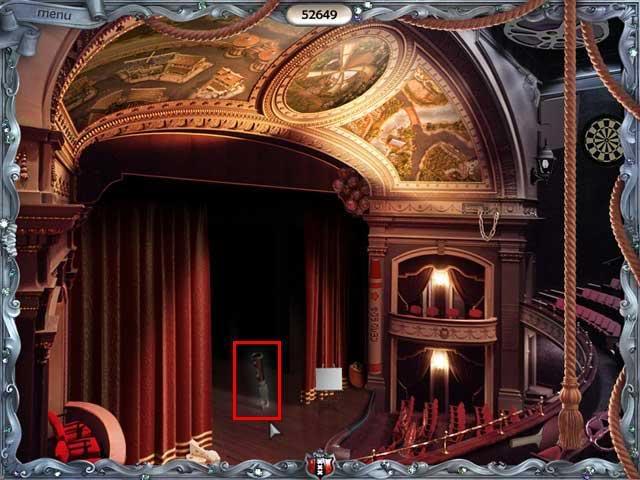
- Once you have put back all the rope pieces, the curtains will open and there will be a knife on stage. Click on it to pick it up.
Solution:
Scene 5: Organ Repair Shop
Diamonds
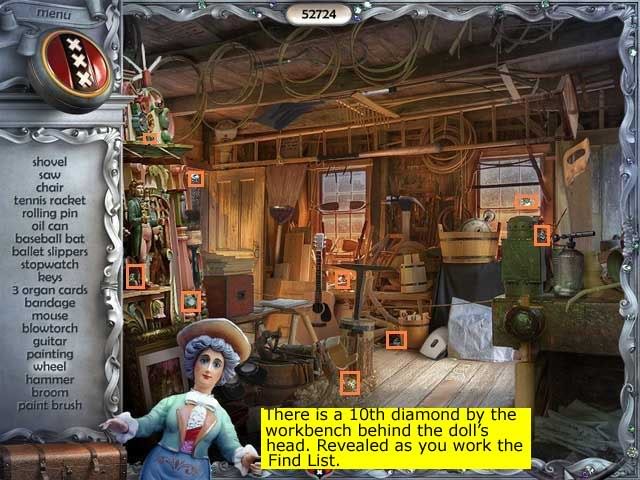
Key Objects: 1 painting, 3 organ cards
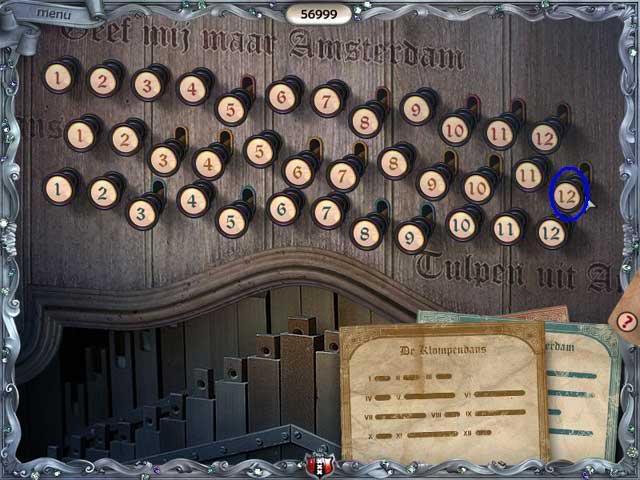
- Each pipe on an organ can be set to one of two positions. This is representing by pushing the numbered button in or out.
- A short dash means in. A long dash means out.
- So just push the buttons in that color row to match the card.
- The buttons for the red card are in the top row. The buttons for the yellow card are in the middle row. The buttons for the blue card are in the bottom row.
- When you get a whole row right, the music will play and that card will disappear.
Sample Solution (yellow card):
Scene 6: Crypt
Diamonds
Key objects: 1 painting, flower bouquets, knife tip
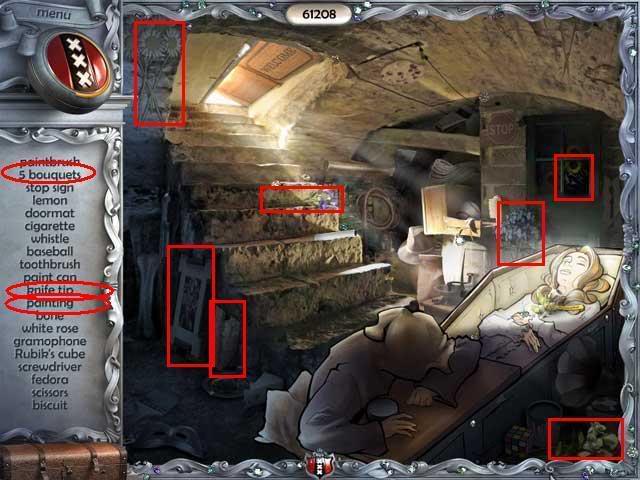
- Object tip: the "biscuit" on my find list was a chocolate chip cookie
Scene 7: Flower Shop
Diamonds
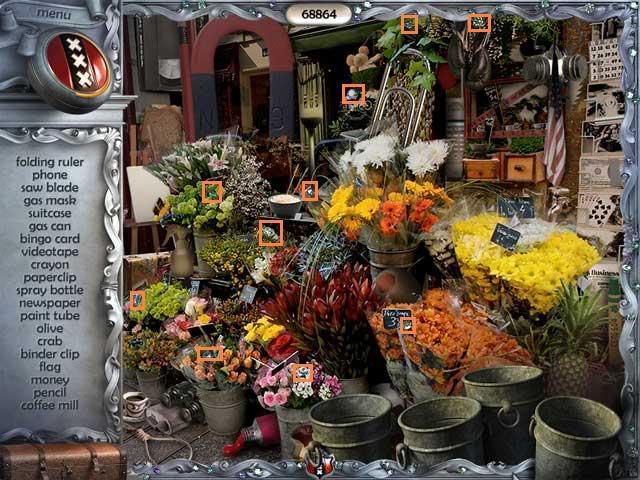
There are no key objects here.
- Calculate the price of each bouquet, then put it in the correct bucket. I don’t know if these are random or not.
- As you add flowers to a bucket, you will see the total of what you have so far in white.
- The easiest way to do this is to figure out what combination will give you the last digit in each price.
- In mine:
Solution:
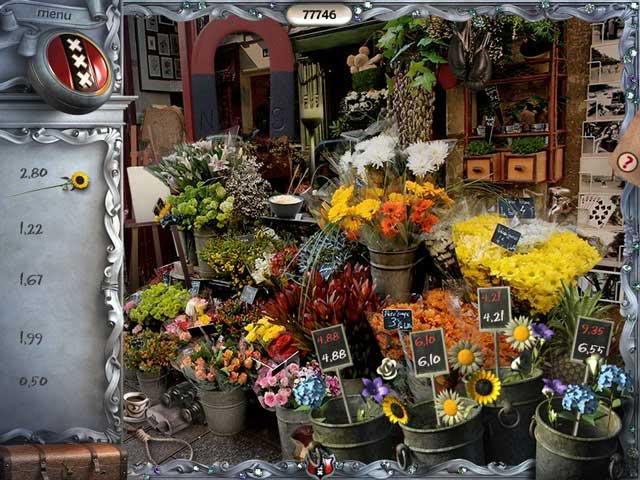
- Bucket 1: 1 blue, 1 white rose, 1 purple = 4.88
- Bucket 2: 2 sunflowers, 1 daisy = 6.10
- Bucket 3: 1 purple, 2 blue, 1 white rose, 1 sunflower = 9.35
- Bucket 4: 1 purple, 1 white rose, 2 daisies = 4.21
Scene 8: Museum
Diamonds
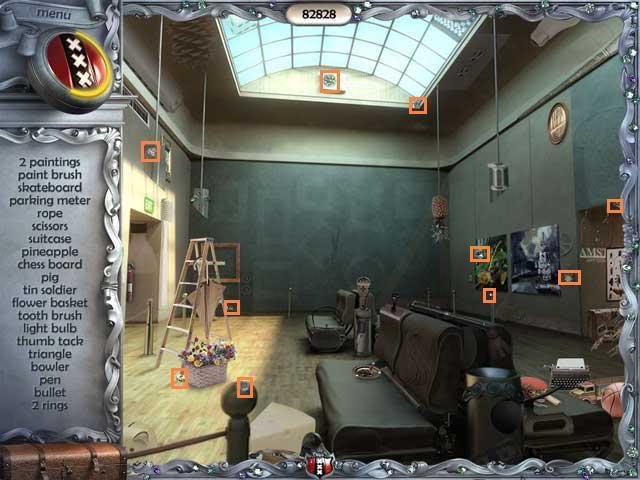
Key objects: 2 paintings, 2 rings
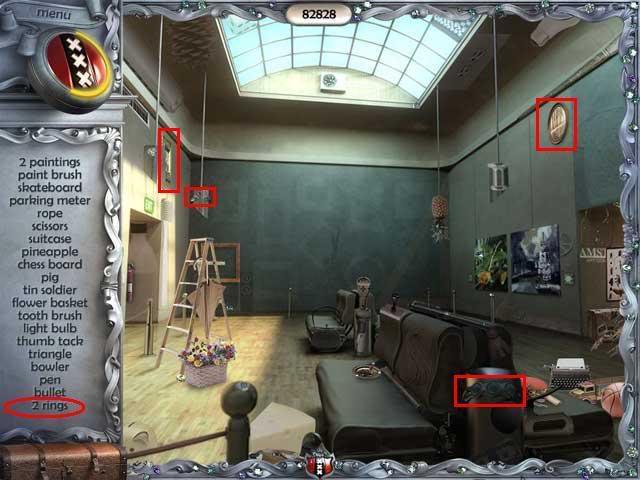
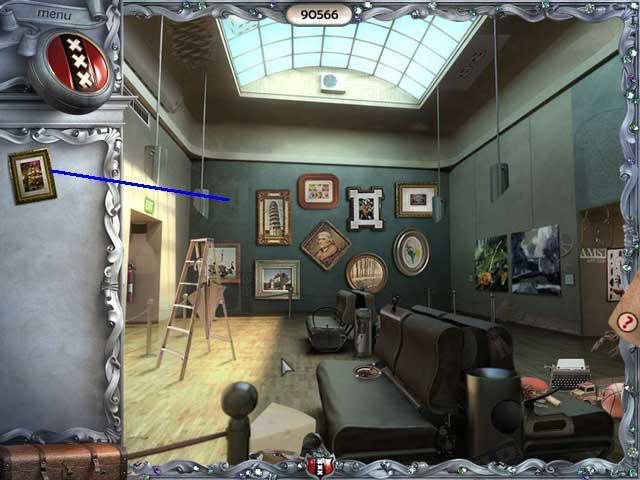
Puzzle #7: Paintings
- Just put the paintings onto the far wall where their frame matches the outline.
- One of the paintings has no frame, but there is an empty frame in place, so use that.
Solution:
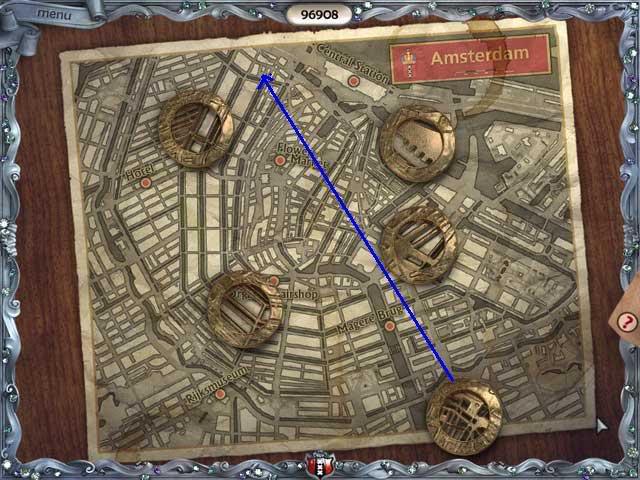
- First, the good news-when you get an amulet close to the right spot, it will glow and then lock into place. So this is a little easier than it looks.
- To find the right place, you have to find a spot where the amulet exactly fits over the lines, so that only whitespace will show through.
- Here’s a picture with the first 4 placed. They all go fairly close to where they start.
- The 5th one goes on the far side from where it starts:
Solution:
Scene 9: Maritime Museum
Diamonds
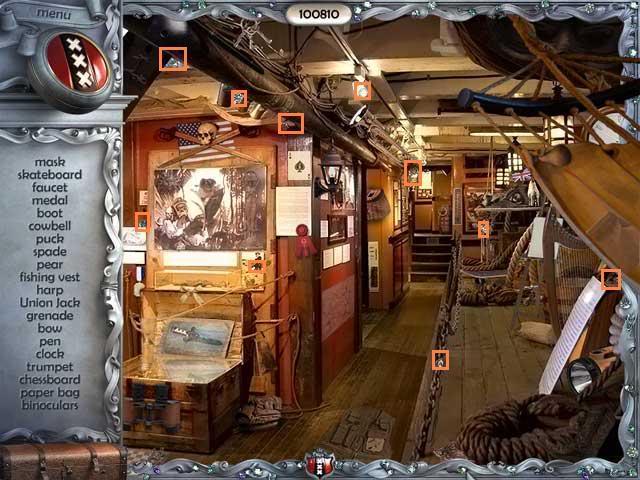
There are no key objects in this location.
Scene 10: Batavia (ship)
Diamonds

Key objects: 10 code snips
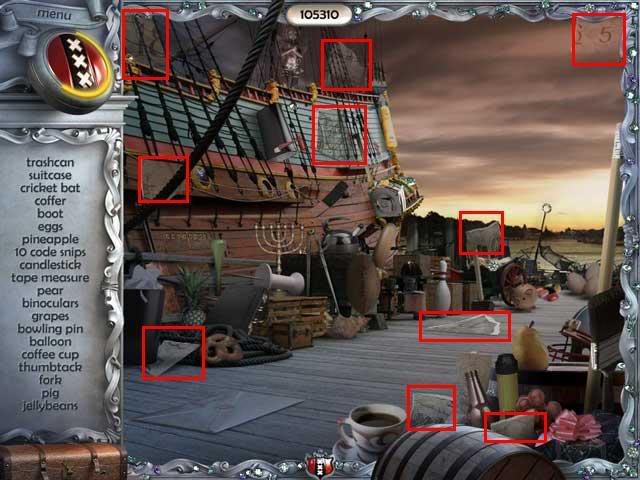
- First put together the jigsaw puzzle. You don’t need to rotate any pieces.
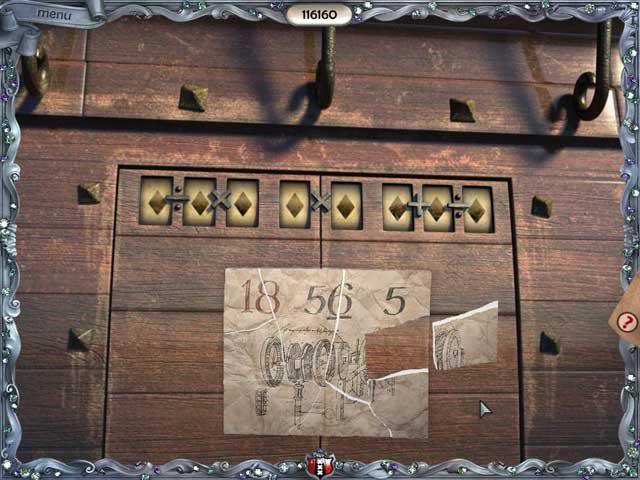
- This gives you 3 results.
- Now you need to set up 3 equations up above so that they equal the 3 results.
- You need to drag the number wheels to turn them. I found this harder than I thought it would be, but eventually you’ll get the feel of it.
Solution:
4/2 * 9 = 18
8 * 7 = 56
4+6 / 2 = 5
This will open the trap door to the cargo hold.
Scene 11: Cargo Hold
Diamonds
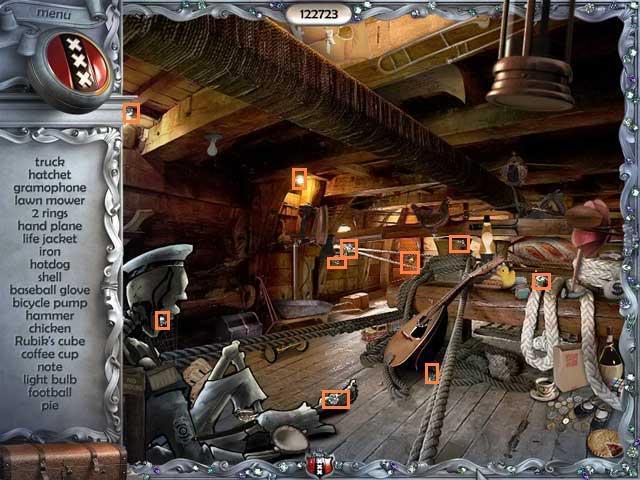
Key objects: 2 rings
Scene 12: Hotel Lobby
Diamonds
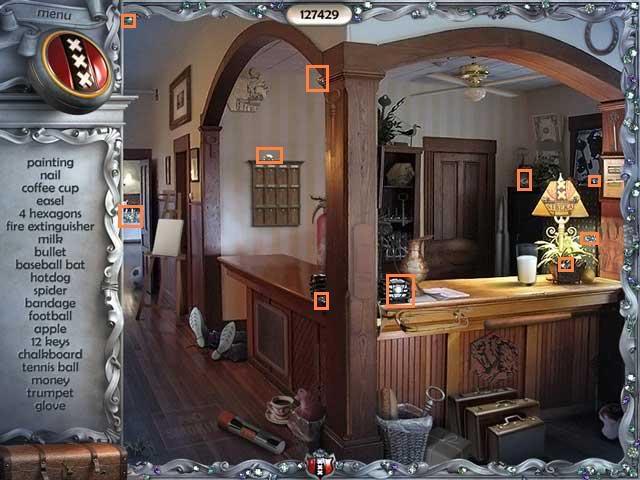
Key objects: 4 hexagons, 10 keys
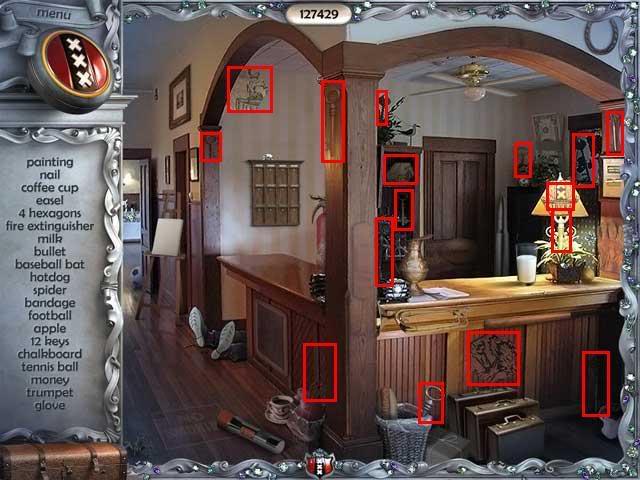
- Two tips for the find list: on mine, the "football" was a soccer ball. And the Nail is huge, like 6 feet long, and runs along the post of the reception desk.
Puzzle #10: Keys
- You just need to match each key to its silhouette in the key cabinet, the same way you did the paintings in the museum.
- The solution is random, so different players will have keys in different places.
- When you have all the keys in one column OR one row correct, those keys will glow for a moment. So after you put in the really obvious ones, work one column at a time until those keys glow, then move on to the next column.
- All the columns have 3 keys except for the third one over, which is missing a hook. So it only has 2.
Here is my solution, but yours might be different.
Solution:
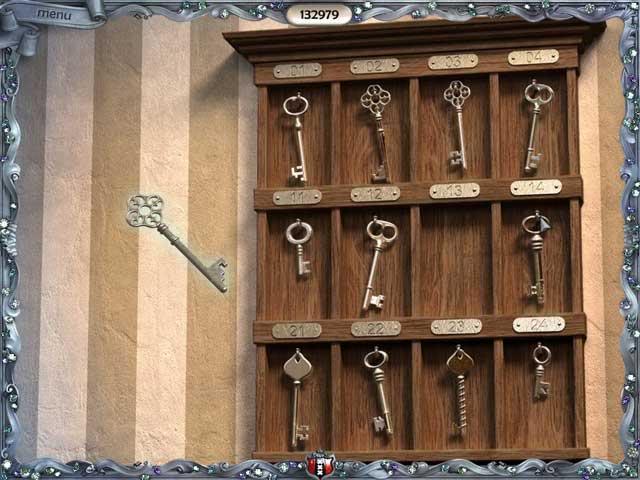
- Once you get all the keys correct, the leftover key will also glow. That is your room key. Pick it up.
Scene 13: Hotel Room (2nd visit)
Diamonds
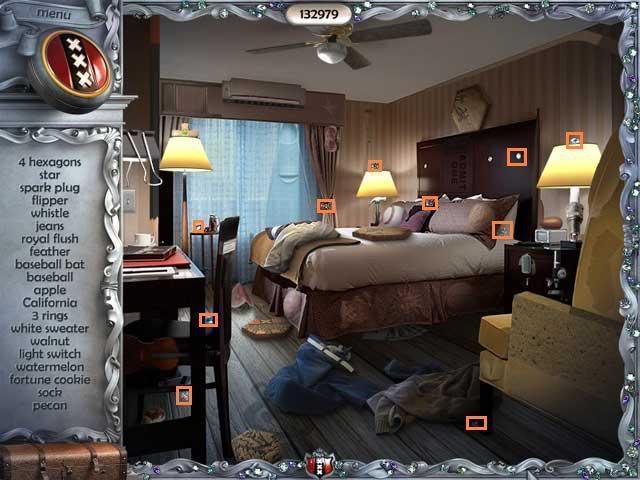
Key items: 4 hexagons, 3 rings
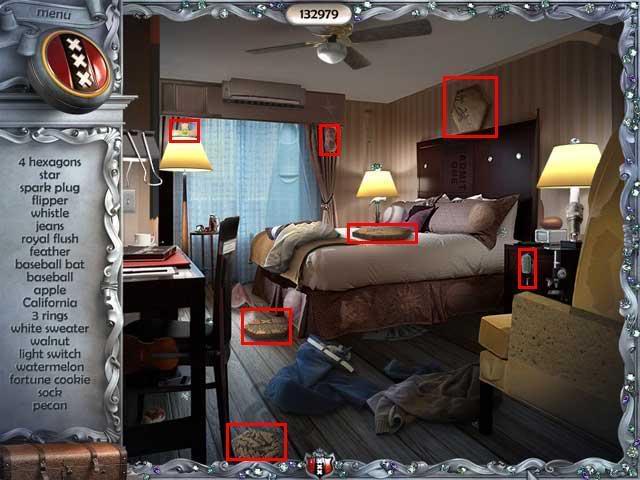
After you pick everything up, you will trigger a puzzle.
PUZZLE #11: Repair the Box
- This is a jigsaw puzzle, but this time the pieces can be rotated.
- To rotate a piece, first place it on the box. You will see 4 rotation arrows appear. Click on them to turn the piece.
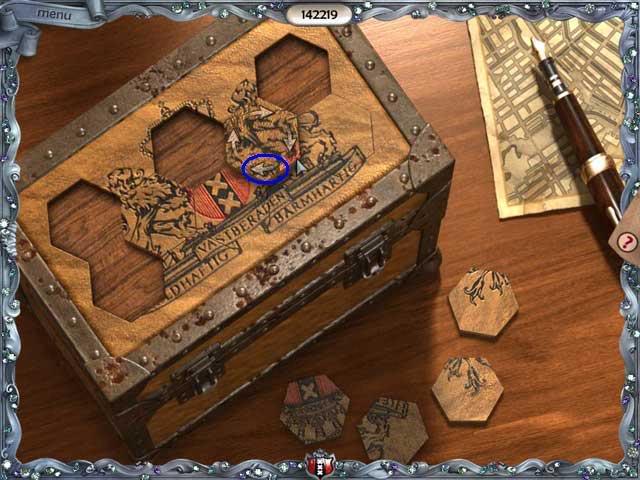
- To line up the pieces, look for the red edges that are part of the red shield in the center.
Solution:
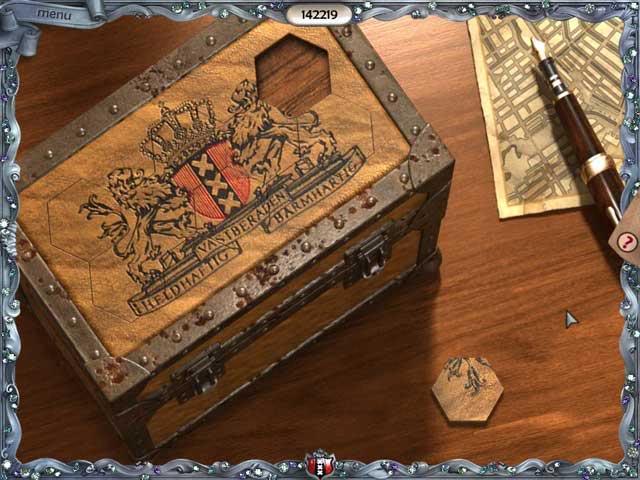
- When you have the puzzle right, a business card pops out of the box. Click on it to pick it up.
Scene 14: Jewelry Store
Diamonds
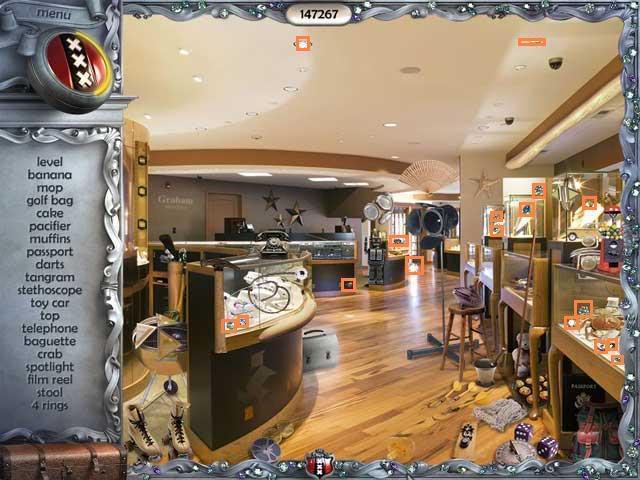
Key objects: 4 rings
To solve this, you must look at each space in the box as the intersection between its row and column. Any ring you put there must match the number from the row and the symbol from the column.
- So if you are putting a ring into the space that is the intersection of III and triangle, it must have 3 triangles.
- The blue rings must go into the blue column or row.
This screenshot shows how you would fit in the triangle column.
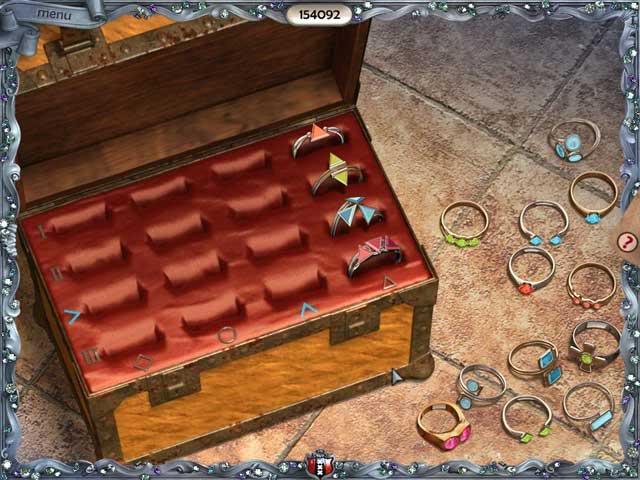
Top slot, 1 triangle: 1 orange triangle
2nd slot, 2 triangles: 2 green triangles
3rd slot, any number of blue triangles: 3 blue triangles
4th slot, 3 triangles: 3 pink triangles
- Remember that blue rings can only go in the blue row or column!
- So for example in the 2 circles slot in column 2, you have a choice between a ring with 2 pink circles or a ring with 2 blue circles. Since the blue ring can’t go there, it has to be the pink ring.
- When you have two blue rings that would match a slot, you may need one of them for another slot. For example, in the circles column you could use either the blue ring with 2 circles or the blue ring with 3 circles. But it turns out you will need the blue ring with 3 circles for the "3 blue" slot.
Solution:
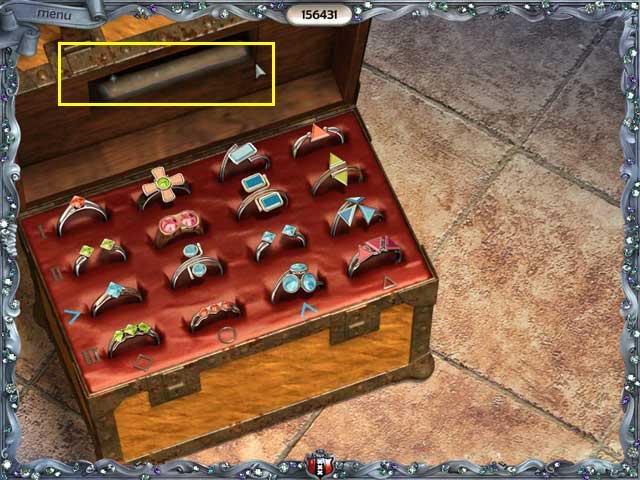
- Once you put the rings in the box correctly, a piece of paper starts glowing at the top. Click on it.
Scene 15: Church Tower
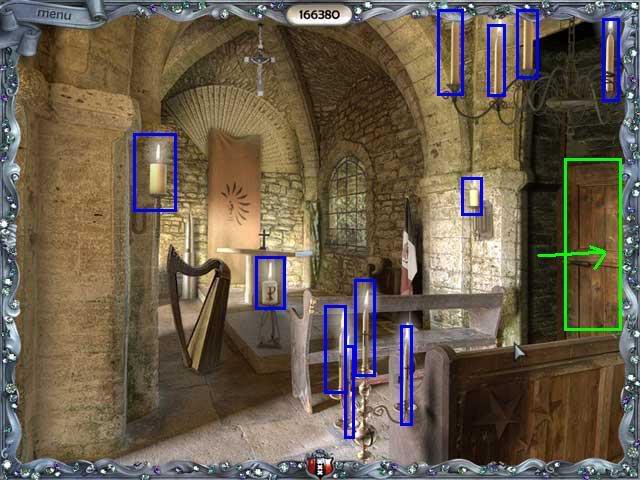
Diamonds
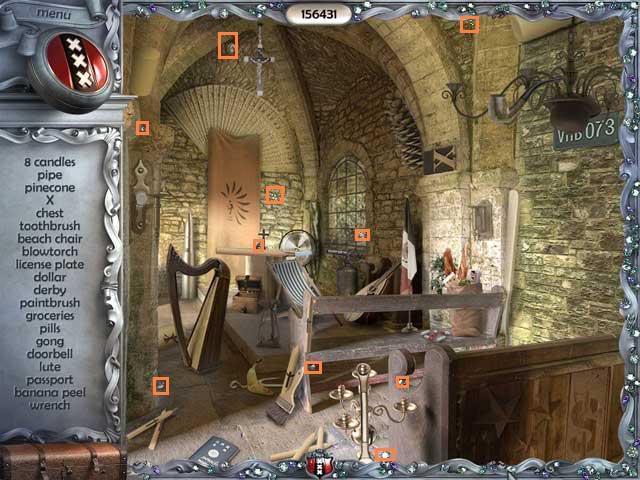
Key objects:
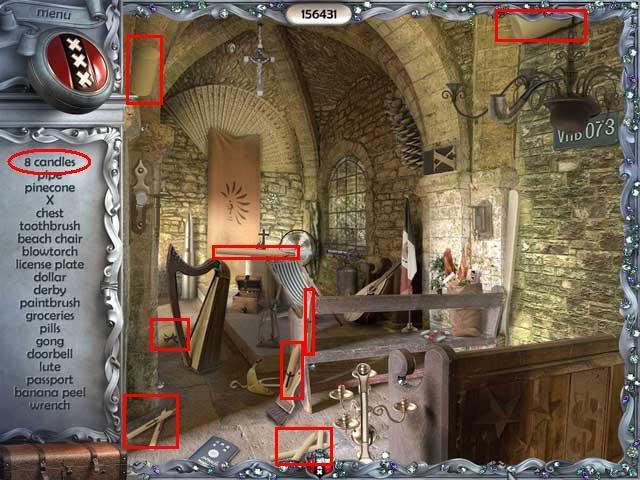
- Every group of candles touching each other counts as "1" towards the candle count on the find list. So a stack with 3 candles in it is still just "1" candle for the list. See the screenshot.
Puzzle #13: Put the Candles Back
This is just trial and error. Candles will only stick when they are in the right positions.
Once they are in the right position, they will burn and a secret door will open on the rightside.
Click on the door to open it.
Solution:
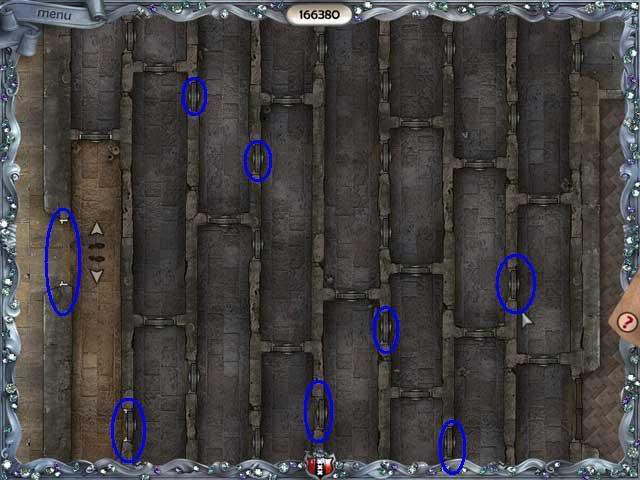
- This is a really weird puzzle, but it’s easy what you figure out what to do. First you have to build the maze. That’s right-you have to build the maze before you can go through it!
- For this point, you just have to slide each individual piece up or down until it’s in the right position. When it’s in the right position, it will lock into place and you can’t move it any more. That’s what makes it easy.
- To figure out what the right place probably is, just look at the door. For example, to start the maze, the piece all the way on the left has to have a brown wooden door right in front of the footprints.
- The little white brackets will hold a door piece. To build the maze, you need to decide which brackets should hold which door.
- Here’s a screenshot showing which brackets you have to fill to lock the pieces. Just try each door piece in the circled bracket for the piece you’re working on until it locks. Then you can move on to the next slider.
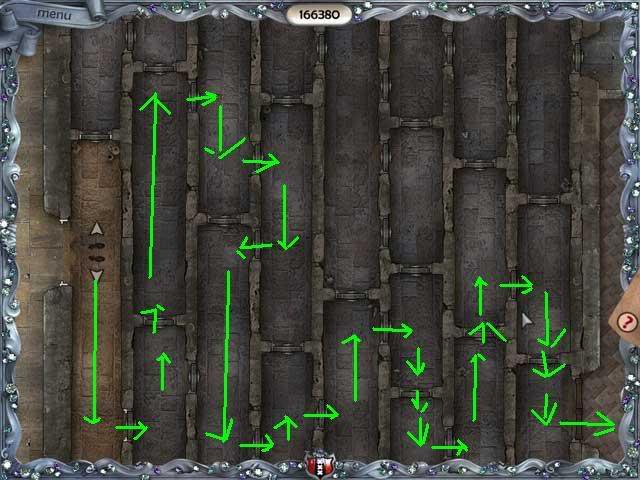
- Now the maze is built and your footprints have stepped inside. use the arrows to move the footprints the way you want to go. When you come to a door, click on it, and it will either be locked or it will open.
Solution:
Scene 16: Library
Diamonds
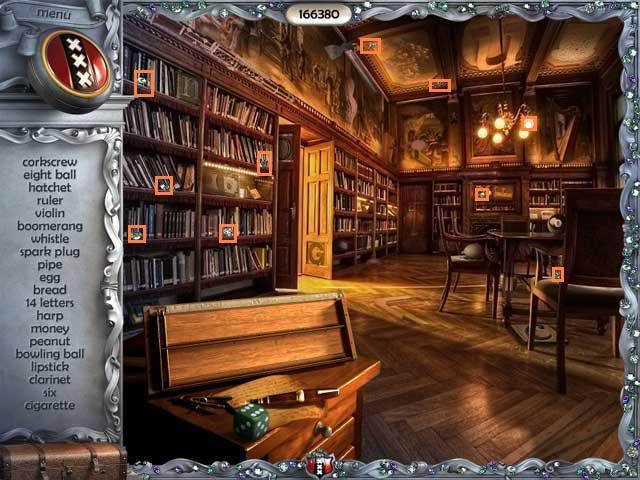
Key objects: 14 letters
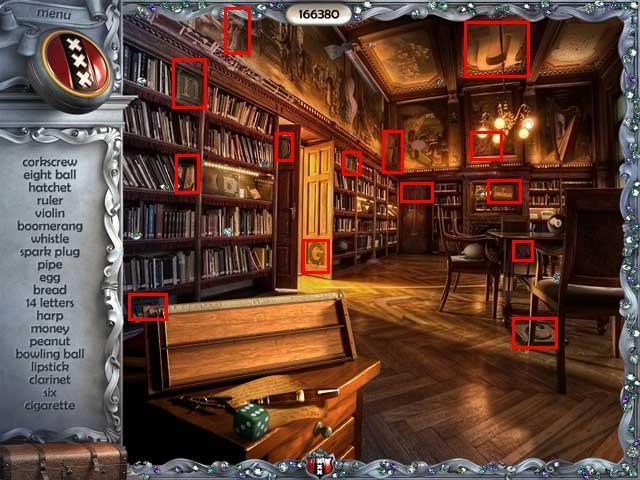
- Object tip: In my game, the item listed as "spark plug" was really a plunger
Puzzle #15: Scrambled letters
Solution:
Flying Dutchman
Scene 17: Wharf
Diamonds
Key objects: ribs, bench rest, bench, 2 oarlocks, 2 oars, rope, bow
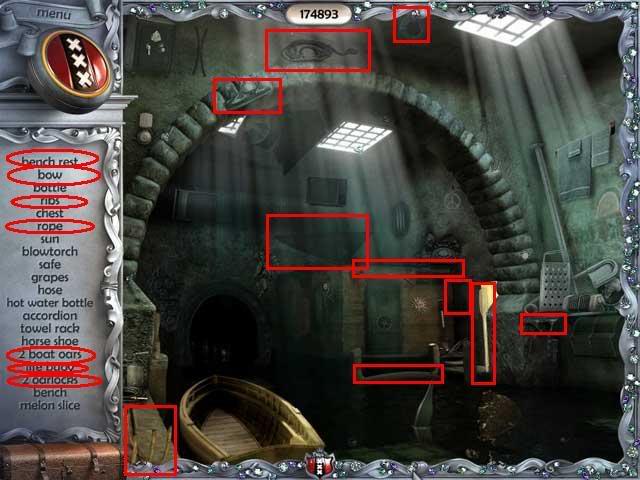
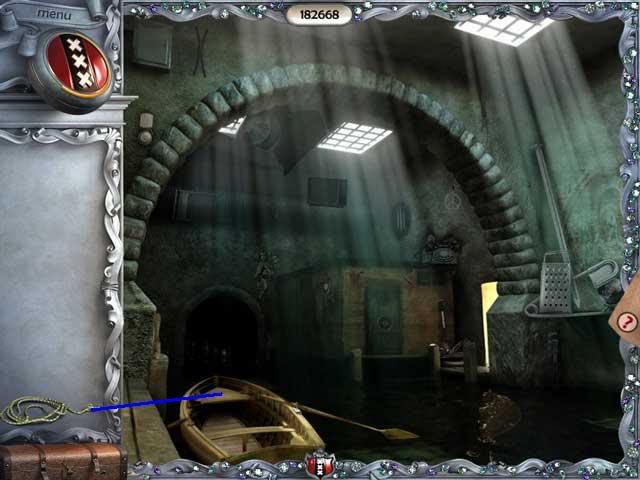
Once you’ve collected all the pieces of the rowboat, you can put it together.
Puzzle #16: Put Together the Boat
Solution:
- This is easier than it looks-most of the pieces can go in any order. Just put the ribs into the front of the boat first, and then the bench rest into the back (nearest the bottom of the screen).
- The bow goes in the front of the boat.
- The bench goes about halfway across the boat, so someone sitting there could work the oars.
- An oarlock goes on each side.
- An oar goes in each oarlock. This one can be a little fussy-just try different parts of the oar on the oarlock until it sticks.
- Finally put the rope on the bow.
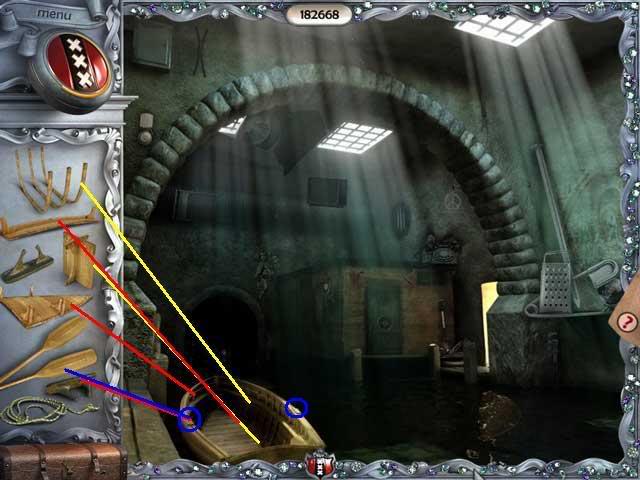
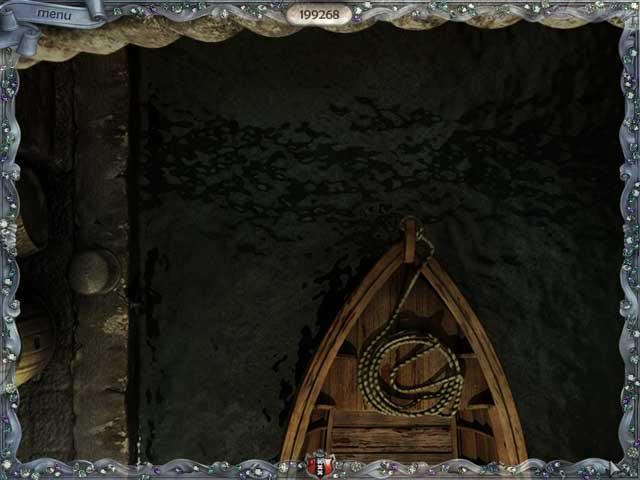
Puzzle #17: Boat Jigsaw
- You can swap any two pieces-they don’t have to be side by side. Just click on the one you want to move and then the one you want to swap it with.
- Once a piece is in the correct position, it will stick there and cannot be moved again.
Solution:
Scene 18: Shipwreck
Yes, here we have a ship that "looks like it has been here for ages." Why just look at how old that cellphone is! Not to mention the mechanical monkey and the statue of liberty souvenir. Yet more evidence that the artists don’t get to read the dialog for most games!
Diamonds
Key objects: 3 crosses, 3 coins.
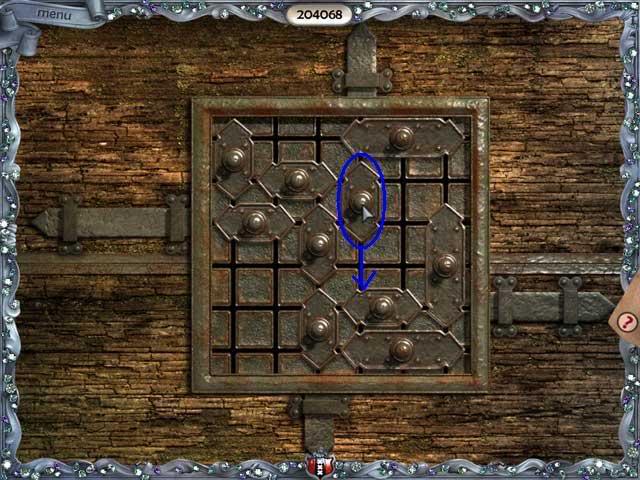
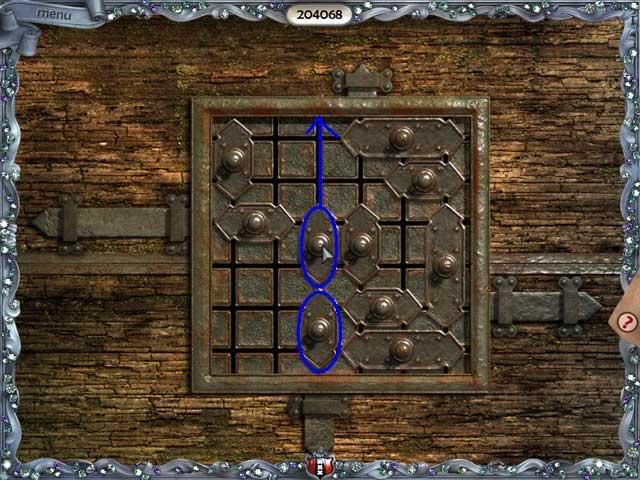
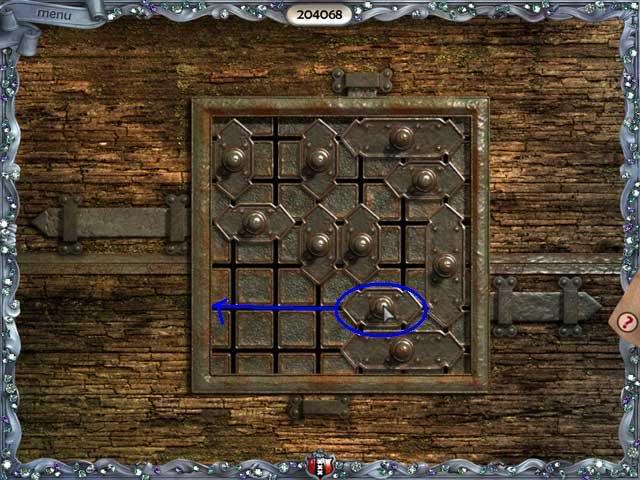
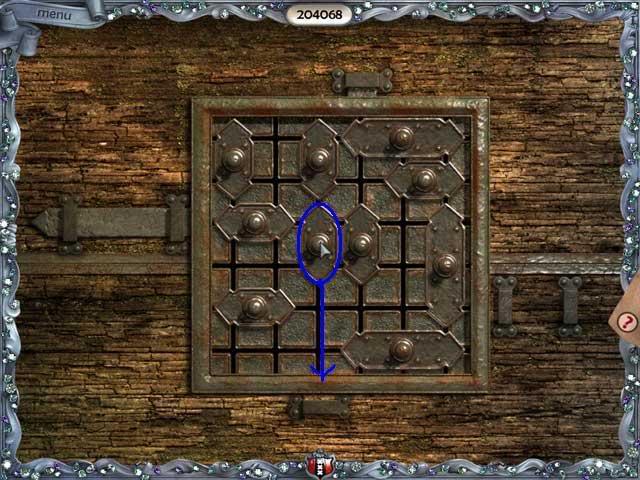
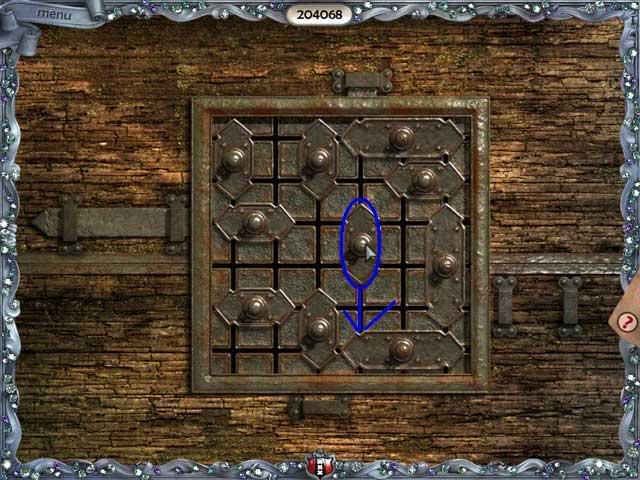
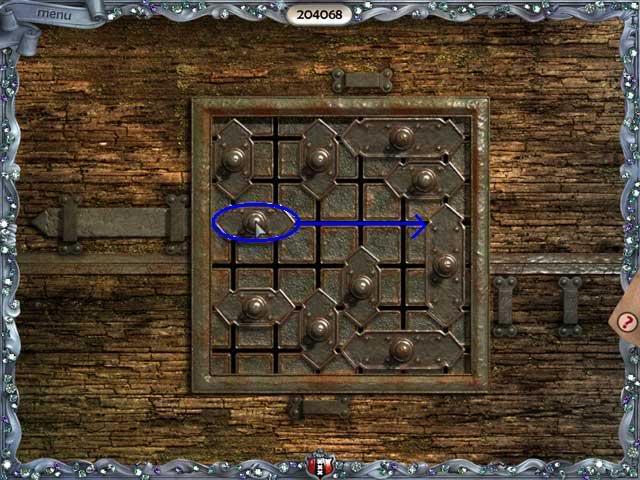
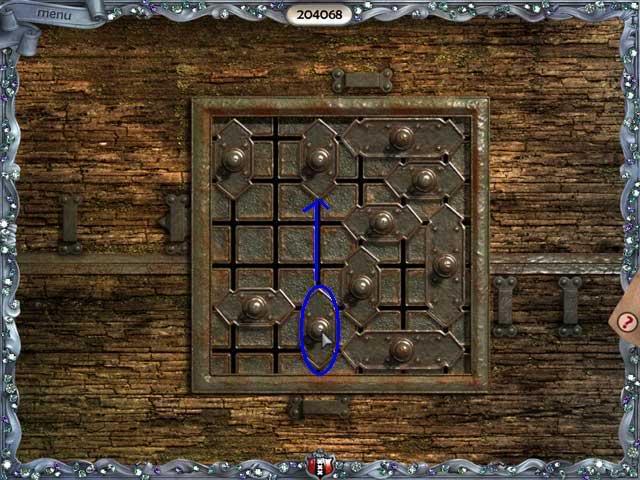
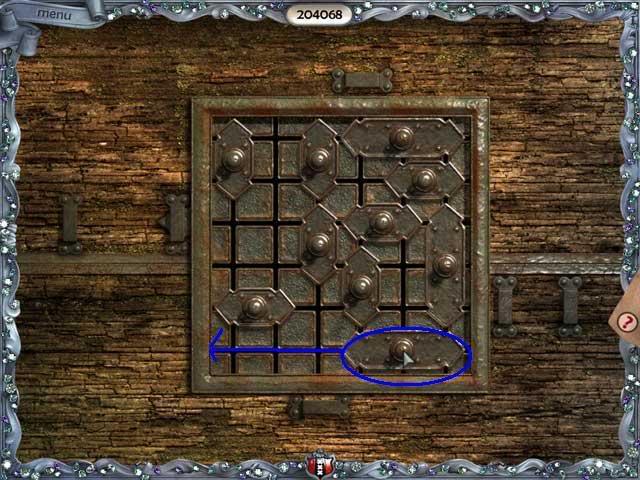
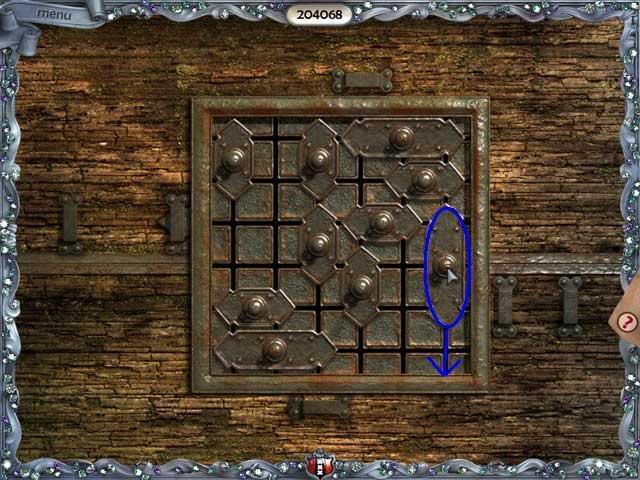
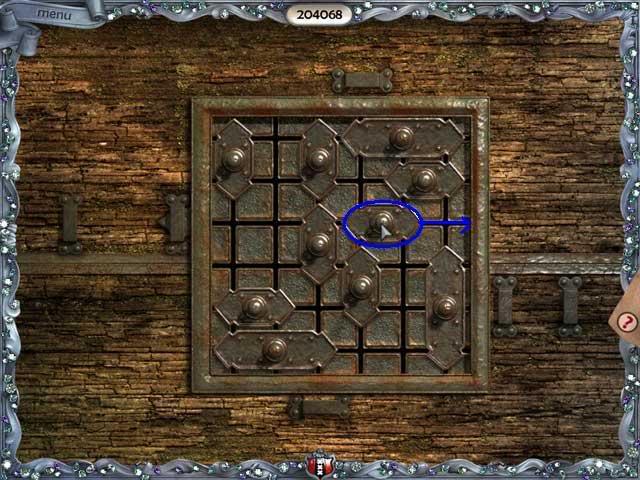
- Each of the four bolts has to be pulled in so you can open the lock.
- This is a slider puzzle. The only trick is that you have to have all 4 bolts "in" at the same time. There are several solutions. Here’s mine.
Solution:

Scene 19: Treasure Room
Diamonds
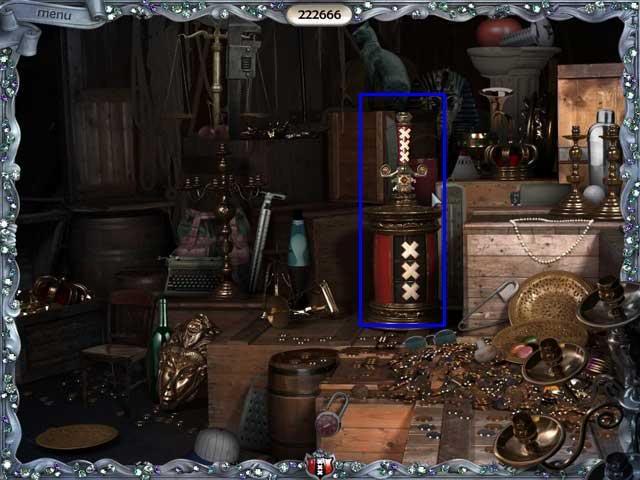
Key objects: 2 emeralds, 2 knife guards, pommel
Puzzle #19 Reassemble the Knife
Now you have all the parts of the knife. You will need to put it together in stages.
- Knife tip, 2 emeralds, 1 coin, and the pommel.
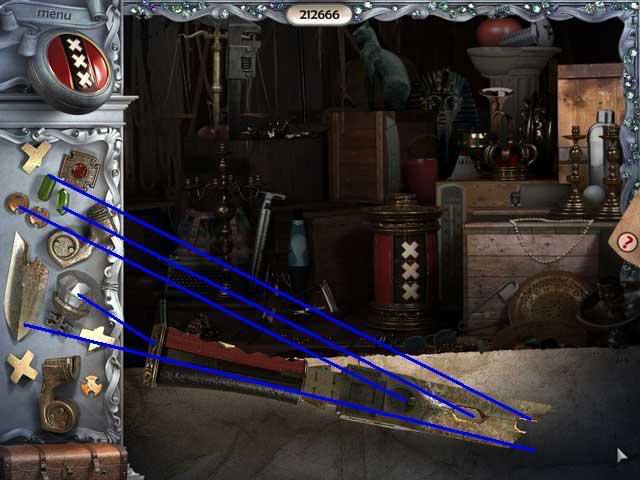
- The knife will rotate so you can put the 3 crosses on the hilt.
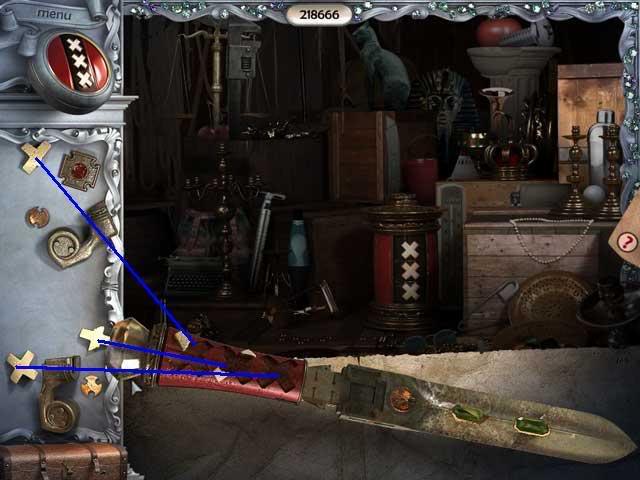
- The guard holders will pop out so you can put on the guards and the large cross.
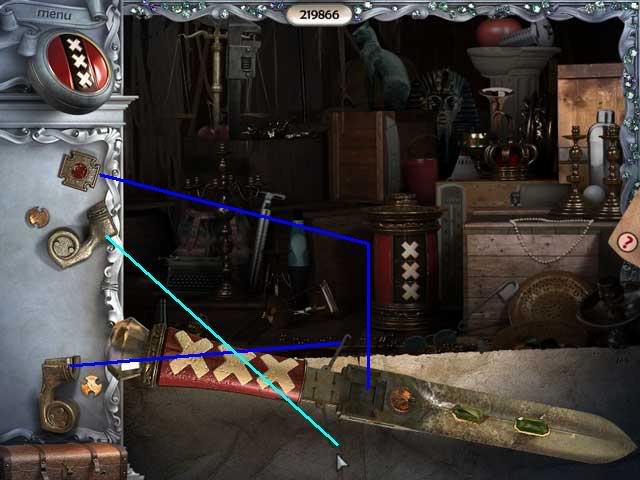
- Now put on the final coins, and the knife will be complete. It will go back into the stand.
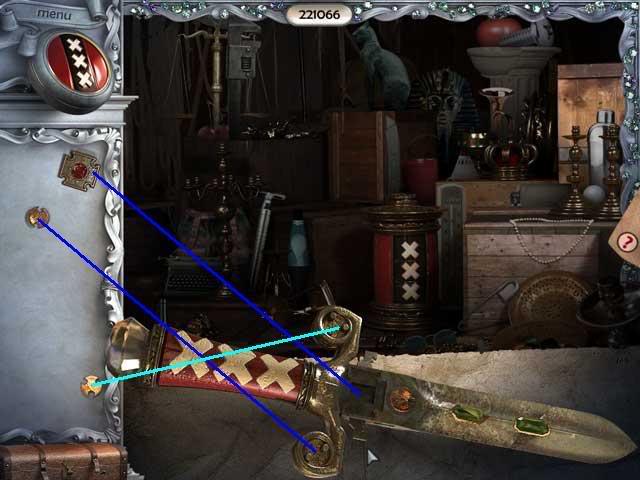
- Click on the knife, and receive your reward!
“;
More articles...
Monopoly GO! Free Rolls – Links For Free Dice
By Glen Fox
Wondering how to get Monopoly GO! free rolls? Well, you’ve come to the right place. In this guide, we provide you with a bunch of tips and tricks to get some free rolls for the hit new mobile game. We’ll …Best Roblox Horror Games to Play Right Now – Updated Weekly
By Adele Wilson
Our Best Roblox Horror Games guide features the scariest and most creative experiences to play right now on the platform!The BEST Roblox Games of The Week – Games You Need To Play!
By Sho Roberts
Our feature shares our pick for the Best Roblox Games of the week! With our feature, we guarantee you'll find something new to play!Demon Piece Races – All Race Buffs
By Adele Wilson
Our Demon Piece Races guide details all of the buffs, rarities, and characteristics for each race in the One Piece Roblox game.


