- Wondering how to get Monopoly GO! free rolls? Well, you’ve come to the right place. In this guide, we provide you with a bunch of tips and tricks to get some free rolls for the hit new mobile game. We’ll …
Best Roblox Horror Games to Play Right Now – Updated Weekly
By Adele Wilson
Our Best Roblox Horror Games guide features the scariest and most creative experiences to play right now on the platform!The BEST Roblox Games of The Week – Games You Need To Play!
By Sho Roberts
Our feature shares our pick for the Best Roblox Games of the week! With our feature, we guarantee you'll find something new to play!Demon Piece Races – All Race Buffs
By Adele Wilson
Our Demon Piece Races guide details all of the buffs, rarities, and characteristics for each race in the One Piece Roblox game.
Doctor Who Episode 1 – City of the Daleks Walkthrough
Welcome to the Doctor Who Episode One: City of the Daleks walkthrough on Gamezebo. Doctor Who Episode One: City of the Daleks is an adventure game played on the PC. This walkthrough includes tips and tricks, helpful hints, and a strategy guide for how to complete Doctor Who Episode One: City of the Daleks.
Doctor Who Episode 1 – City of the Daleks – Game Introduction
Welcome to the Doctor Who Episode One: City of the Daleks walkthrough on Gamezebo. Doctor Who Episode One: City of the Daleks is an adventure game played on the PC. This walkthrough includes tips and tricks, helpful hints, and a strategy guide for how to complete Doctor Who Episode One: City of the Daleks.
This game walkthrough is published in cooperation with GameHouse. Play Now on GameHouse.
General Tips
- Move the mouse around to look at the environment and use the right-click to move forward. You can change the direction the Doctor is moving or facing with the mouse while moving. Additionally, you can use the cursor keys instead of the mouse to move forward and turn, though you can still use the mouse to have a look around if you decide on this control scheme.
- When you approach an object of interest, it will glow. “Normal” objects will glow with a blue outline, while objects that contain Facts will glow with a violet outline. When you encounter one of these objects, an icon will appear indicating how you can interact with it, i.e. Climb, or Examine. This icon may also appear when you approach a non-glowing object, such as a ledge, and will allow you to climb it. You can do this by clicking the left mouse button, which will allow you to interact.
- Facts, when you find them, don’t count towards anything other than personal knowledge. As such, they are entirely optional.
- If you end up getting stuck at some point in the game, you can press the ESC key to view your current objectives.
- If you need a hint, you can talk with Amy (look at her then click to Talk once the blue outline appears). Amy often has more than one piece of advice, so make sure to talk with her thoroughly if you’re stuck for helpful clues regarding what to do next! Other characters and objects may also provide important information, so make sure to search the environment thoroughly.
- Throughout the game, a series of Collectables are hidden. Collectables appear as small, glowing blue “Doctor Who” icons you can approach and choose to Collect. Any and all Collectables you’ve obtained can be viewed at anytime by pressing the ENTER key.
- If you obtain a Collectable and die shortly afterward, not to worry– you will not have to collect it again. The game will automatically save your Collectables as you go.
- To access Inventory Items, simply click the middle mouse button or press the SPACE key, then select the item you wish to use. When you see a glowing object that could use an item on it, access your inventory. Once the Inventory Item is selected, left-click to use it on the object. Inventory Items will be written in all CAPS in the guide below (with the exception of the TARDIS).
- In the guide below, Key items are circled in red, while Collectables are circled in blue.
Act One
Objective: Find the Survivor
London 1963
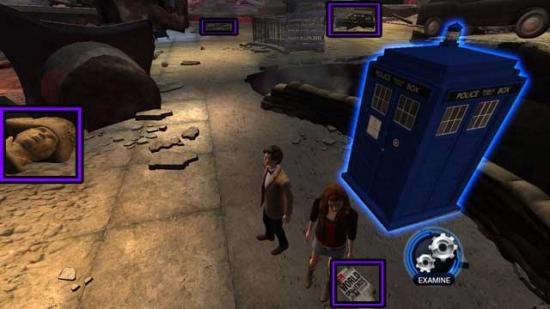
- After watching a cutscene and spotting what appears to be the last survivor on earth, you will find yourself standing outside of the TARDIS.
- There are a handful of Facts hidden nearby: they don’t count towards anything, but in case you’d like to view them anyway, their locations are shown below (Nelson’s Column, Newspapers, London Bus, and Hackney Carriages).

- With your back to the TARDIS as if you had just exited out the front door, turn right (towards the greater open area). As you continue forward, you’ll notice a gated entrance to the London Underground that’s covered with boards. You’ll have to find a way inside, but not just yet.
- Continue forward with your back to the TARDIS until you encounter the red-glowing pit (the London Bus fact is just in front of it). Look left and you’ll notice a Collectable. Collect it to obtain the Smiler Card.
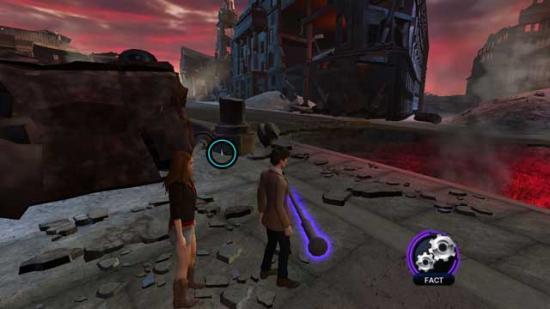
- If you just obtained the Collectable, turn around 180 degrees and continue forward. If you’re facing the red pit, turn right. Ahead you’ll see a semi-circle of sandbags with an opening in the middle and a few red Daleks in the distance. To the left of the opening in the middle is another Collectable. Collect it to obtain the Sisters of the Water Card.
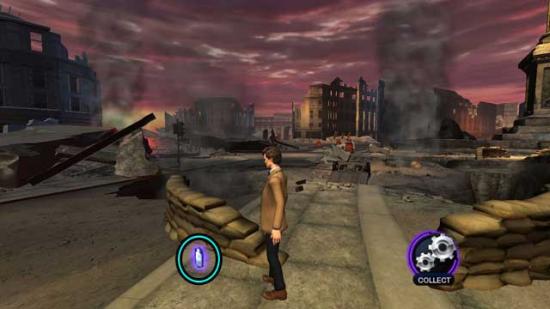
- Proceed through the opening in the sandbags and continue forward until you see an overturned car just ahead and just below you. Walk up to the ledge, then drop down onto the car.
- In the distance are three patrolling Daleks: one moving, and two stationary. Amy and the Doctor will go into Stealth mode. During Stealth, the Doctor and Amy will crouch down to avoid being seen. Pay attention to the safety icon that appears in the upper right: green=safe, yellow=detected, and red=danger. You will be able to see sweeping colored beams that indicate a Dalek’s sight range. If you are accidentally caught in one of these colored beams, the Dalek will spot you and all will be alerted. When this happens, run and hide! Be careful though: a moving Dalek will pursue you and can move outside its patrol pattern to try and find you. Stationary Daleks will remain stationary. If you die, you will have to start over again from the beginning of the area. Daleks cannot see past large barriers such as walls, debris, and sandbags. Pay attention to openings that appear that will keep you from being spotted by their search beams. It’s also a good idea not to talk with Amy while in Stealth mode.
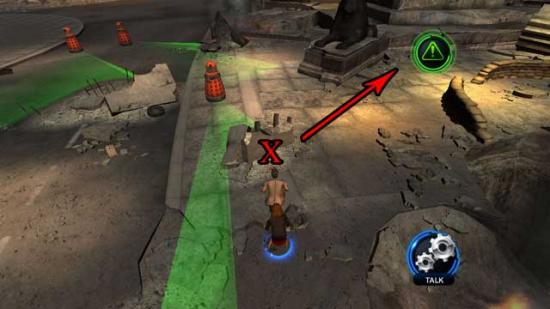
- Carefully move forward, referring to the screenshot above for the best route through the Dalek’s patrol. The best route through is to stop at the debris straight ahead marked as “X”, which will protect you from the Dalek’s gaze while it’s passing. Once it’s passed, quickly move behind the lion statue (following the red arrow in the screenshot above). While still in Stealth mode, you’re safe from the Daleks now. You should notice a wall of sandbags with an opening right next to you now, just like the ones at the beginning of the Stealth area.
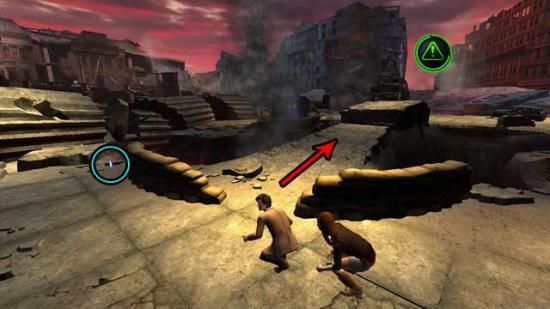
- On the far end of the sandbag wall, the end furthest from the Daleks, is another Collectable. Collect it to obtain the The Sixth Doctor Card, then proceed through the sandbag wall and up the hill, climbing a ledge before reaching the car.
- Push the car, with Amy’s help, to cause it to roll and break apart the boards blocking the entrance to the London Underground. You can now enter and try to find the survivor.
London Underground
- Walk forward to the gate blocking access to the platform, then access your inventory (middle-click or SPACE key) and select the SONIC SCREWDRIVER. Use it on the gate to open it and gain access to the platform.
- After a brief cutscene, you’ll be given the option to ask the survivor questions. Select each question that appears (i.e. “How did you survive?”) until you’ve gone through each one that appears, triggering another cutscene.
Objective: Escape the Underground
- Daleks will appear. The survivor will run on ahead, but the Doctor and Amy will have to be careful and sneak past the Daleks. You will go back into Stealth mode.
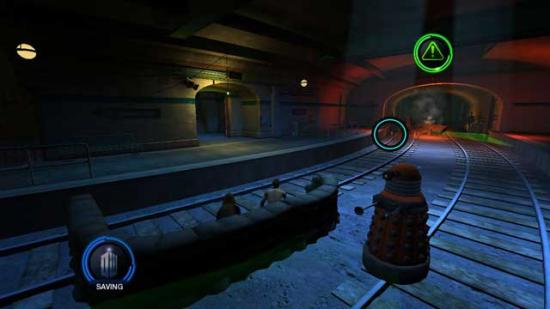
- At the red-glowing end of the tunnel from which the Daleks entered on the left, there is a Collectable. Wait until the patrolling Dalek passes, then head towards the Collectable. Be especially cautious of the stationary Dalek right next to the Collectable: the area between the mid-left of the track and the wall where the Collectable is, is safe, but you’ll have to be especially careful not to accidentally step into the sight beam. Collect the Collectable to obtain the Hath Card.
- Carefully make your way back to the first wall of sandbags where you were previously, being especially careful to avoid the patrolling Dalek. If you accidentally die, you will be taken back to the sandbags and the Collectable will be saved (so you don’t have to go get it again).
- Back at where you started, wait for the patrolling Dalek to pass, then follow it. Be careful not to talk with Amy or run into the Dalek, as it will occasionally stop. There are two immediately accessible sandbag bunkers up ahead: you can hide in either one to avoid the Dalek, but be careful to choose the one the Dalek is least likely to look at next (it follows a patrol pattern). Be especially careful not to hide at the openings, either, or the Dalek will spot you when it turns around.
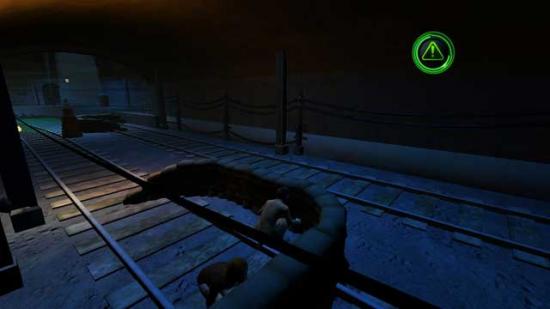
- Once you’ve hidden in one of the two bunkers, wait for the Dalek to turn around and pass you. Once it has its back to you and is headed in the other direction, quickly exit the bunker and continue towards the end of the tunnel (there is a final sandbag wall there, as well as fallen debris– you can’t miss it).
- Once you’ve reached the final sandbag wall, go around it and talk with the survivor. The tracks leading out of the Dalek-infested Underground are electrified.
- To the left of the electrified tunnel entrance is a Fusebox. Click on it once it’s glowing (icon will likely say “Use”) to manually rewire it, triggering a puzzle.
- The puzzle rules are as follows: wires must be positioned to connect two terminals of the same color, however, wires cannot cross. Move the mouse cursor over a colored terminal to turn the cursor arrow into a hand. Click and hold the left mouse button to drag out a wire: you must then connect it to the other terminal of the same color. You can disconnect wires by clicking on the end point and letting go. Puzzle solutions may vary slightly, but the same general solution layout applies. The solution to the puzzle is shown below:
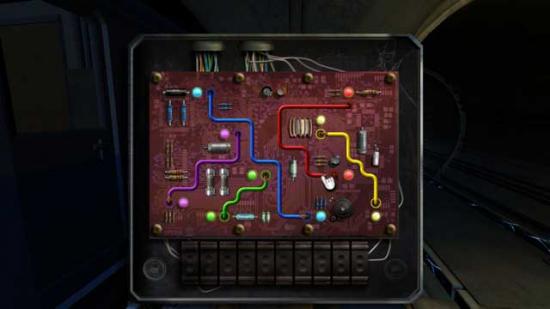
- Upon completing the puzzle, the power will be routed away from the tracks. They can now be walked on safely.
- Walk into the tunnel and continue straight ahead until you see a doorway on the right (the end of the tunnel is blocked by debris). Enter the doorway. You may notice and/or examine the explosive charges lining the doorway.
- Once in the room, proceed to the back and climb the ladder. Watch the cutscene that follows.
Objective: Return to the TARDIS
London 1963
- You’ll exit from the manhole where the survivor originally hid and find yourself back on the surface, this time with numerous more Daleks on patrol.
- Go forward until you see the upside-down car resting over the gap (the one you originally dropped down onto, just before your first encounter with Stealth mode). “Climb” the car and back onto the pavement, then stop at the gap between the two sandbag walls.
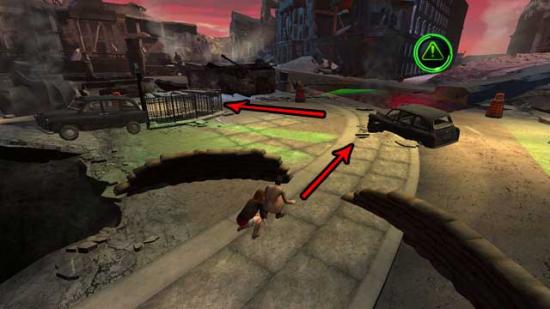
- Once at the gap, continue through and stop when you’re next to the car. (Note: As long as you stay on the curved “curb/sidewalk” portion between the gap and leading to the car, you will be safe. Use this as your visual reference.) The Dalek behind the gated Underground entrance has a wide sweeping range that changes according to where it’s looking, so wait until the Dalek is looking back towards the sandbags before continuing past the gated entrance and to the large pile of debris.(Refer to the screenshot above. You may also want to note there’s a small bench in front of the large debris which you can use as a good checkpoint. Refer to the screenshot below for its location.)
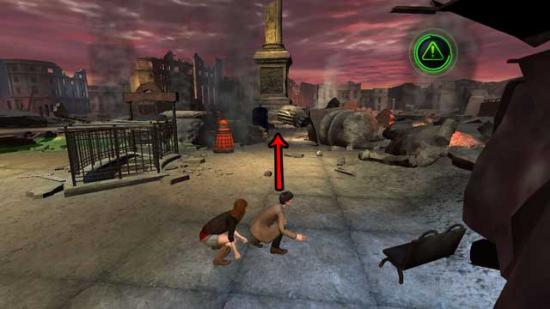
- Once you’ve reached the bench/escaped the view of the Dalek, continue forward (you’ll pass safely behind the Dalek) to the TARDIS and “Use”/Enter. Watch the cutscene that follows.
Act Two
Kaalann
Objective: Explore the Building
Docking Room
- Turn and look at the Dalek head part sitting on the crate in the middle of the room. It should contain an Internal Sensor. Use the SONIC SCREWDRIVER on the part to trigger a puzzle.
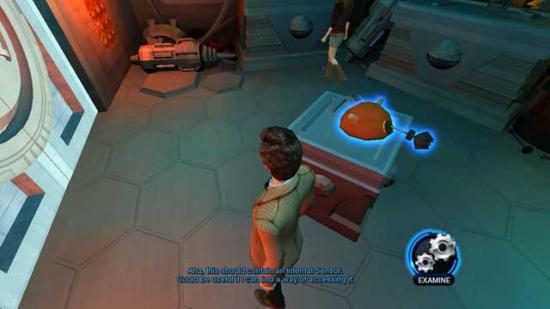
- Remove the Internal Sensor, which is protected by Dalek circuitry. Click on the Sensor and drag it through the maze. Be careful it doesn’t touch the electrified walls, or you will have to start over! You can release the mouse button at any time to drop the Sensor, then simply click to pick it back up. In the very middle of the puzzle is a small electrical current that moves in a circle: be careful not to touch it, or you will have to start over again. The solution is shown below.
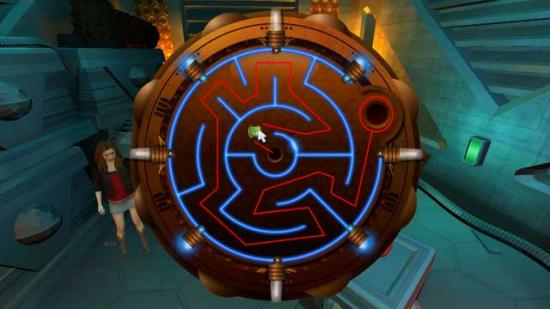
- Upon completing the puzzle successfully, the DALEK INTERNAL SENSOR will be removed and added to your inventory. Low security doors will now automatically open for you.
- Watch the cutscene that follows.
Objective: Create the Chronon Blocker
- The Doctor remarks the Production Facility must be nearby, and within it should be spare Dalekanium Coils and Kontron Crystals– the parts you need to create the Chronon Blocker.
- Proceed through the door and you’ll find yourself in a hallway with green lights in front of the doors on either end, and a tube-like structure (elevator) slightly to your right across from you. On the right is the Visualizer Room: this is not where you want to go however, and the Doctor will promptly turn around back into the hallway if you enter this room. Instead, from the door leading back to the TARDIS and Amy, turn left and enter the door at the end of the hall to reach the Production Facility.
Production Facility
- There are many Daleks here, but you’ll only need to worry about the ones on the ground: the ones being carried by on a machinery belt aren’t yet operative, and therefore can do you no harm.
- From just near the entrance doorway, you will have two options of where to go: straight ahead, or left. The area straight ahead has a stationary Dalek, while the area on the left has a patrolling Dalek. The area straight ahead has nothing to offer, so wait until the Dalek on the left comes out and faces the entrance wall before quickly sneaking behind it and up the left hall. You can also choose to hide around the corner of the middle wall divider, just be careful not to be spotted by the stationary Dalek if you do.
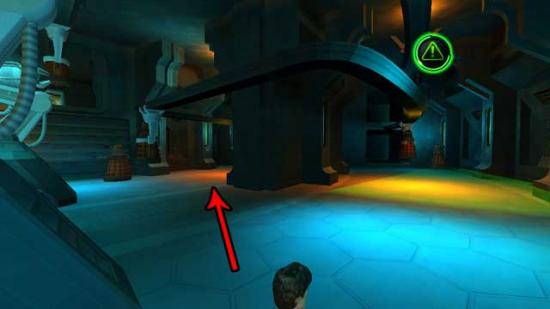
- Sneak up the left hall until you encounter a door with a yellow light in front of it on the left, and a blue Control Panel on the right. It’s not a good idea to stop production, so enter through the door with the yellow light on the left.
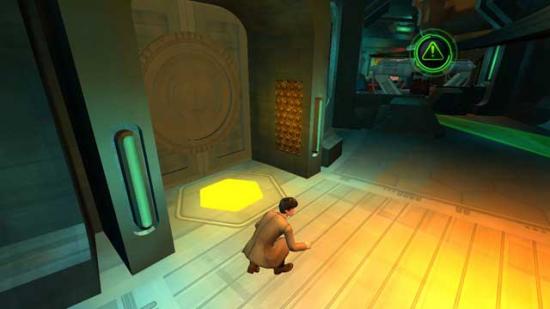
- It’s safe inside this room, so the Doctor will stand again. Go to the end of the right side of the room (the one with fewer crates) and turn/look around to spot a hidden Collectable. Collect it to obtain the Adipose Card.
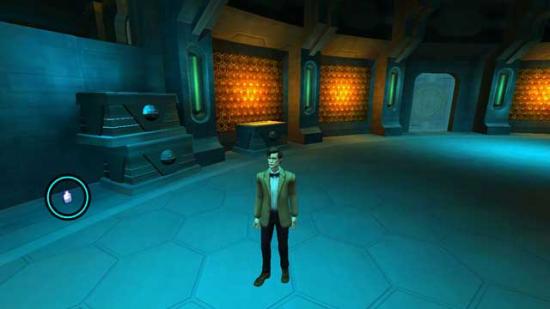
- Now go to the left/other end of the room with the numerous crates. Move the crate blocking your way into the midst of the crates aside (it’s light-colored), then walk over to the far wall. There is another moveable (light-colored) crate here. Push it against the back wall, then climb on top of it.
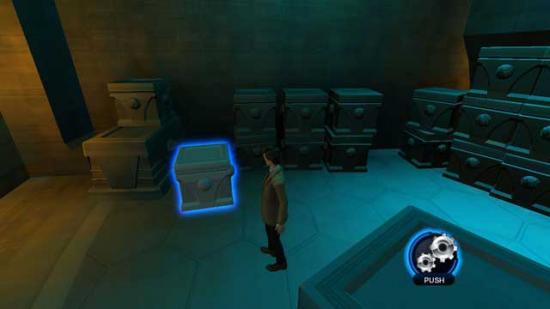
- Once on top of the crate, proceed forward on top of the other crates, climbing as necessary, until you reach the opening through which the Dalek parts are passing through (“X” in the screenshot below).
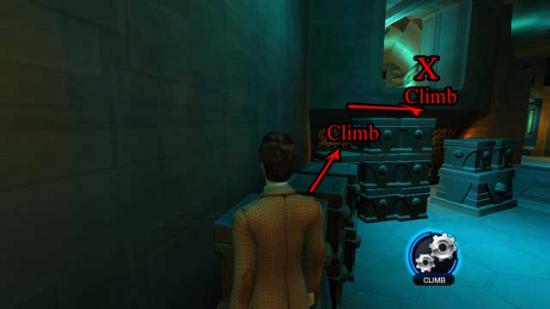
- Upon reaching the opening, the Doctor will drop down into the next room (the other side of the locked middle door upon entering).
- Rotate the camera so you can get a view of the area immediately behind the Doctor. A Collectable is hidden there. Pick it up to obtain the K-9 Card.
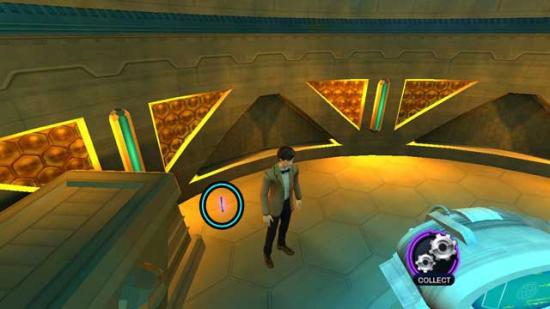

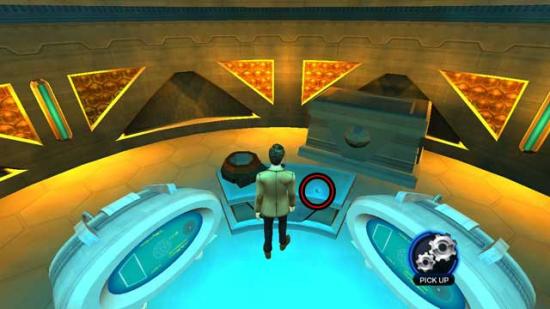
- to the blue-lit Control Panel circle in the middle of the room and pick up the KONTRON CRYSTAL lying on the counter to collect it. Now you’ll just need to find the Dalekanium Coil.
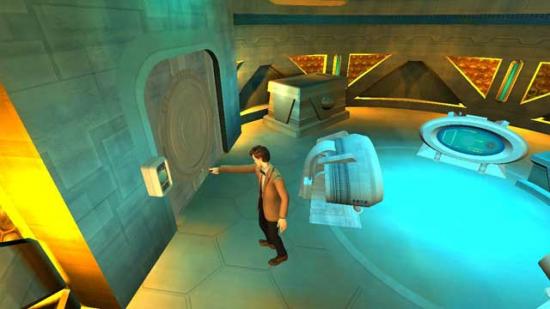
- Go to the door (the only one in the room), however it’s locked and the Dalek Sensor isn’t powerful enough to open it. Use the SONIC SCREWDRIVER on the Security Panel on the left side of the door to open it.
- Exit the room and proceed out the door straight ahead. You’ll find yourself standing on a familiar yellow light with a blue Control Panel across from you: we’re back in the main Production Facility.
- From here, continue left, being careful to avoid the patrolling Daleks, until you see a door with a red light on the floor in front of it. This door leads to another hallway.
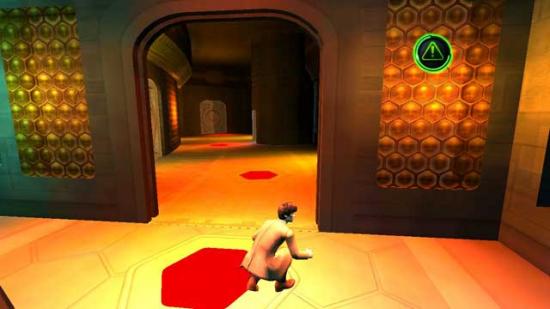
- Once inside the red hallway, enter the door on the left and you’ll find yourself in a sort of small storage room. On the right is a Collectable: pick it up to obtain the Daleks Card, then on the other end of the room is the DALEKANIUM COIL. Pick it up to obtain the last item needed for the Chronon Blocker.
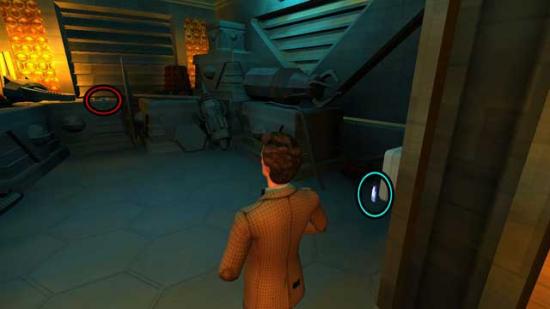
- Return to the red hallway. The door on the left at the far end is accessible, but the Doctor will remark he should return to Amy rather than explore. There is also an elevator in the middle of the hallway, but cannot be used currently. Instead, enter back through the door on the right through which you came, sneak back past the Daleks in the Production Facility, and once back in the green and yellow hallway, enter the door on the right to reach Amy.
Docking Room
- Talk to Amy to trigger a puzzle to assemble the Chronon Blocker. The same rules apply as the Internal Sensor: assemble the Chronon Blocker by moving the two components through the electrical field to the slots. Click on the components and hold the click to drag them to your slots: you can let go at any time. Make sure they don’t touch the electrified walls or you will have to start over again. Be especially careful to avoid the moving electrical currents: they move in a steady circle, but you will have to cross their path without touching them. Locations where you could potentially hit them on your way to the puzzle solution are marked with a “!” in the screenshot below. The entire solution is shown in the screenshot below: it doesn’t matter which component goes into which end slot.
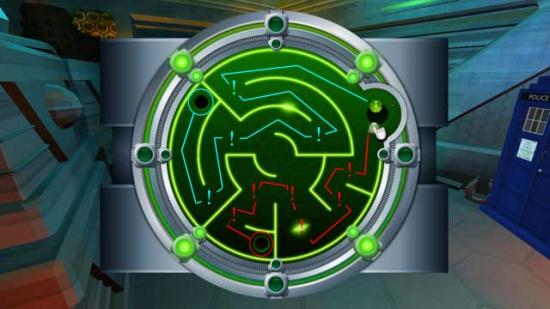
- Upon completing the puzzle, the Chronon Blocker will be successfully assembled and Amy will now be able to tag along again.
Objective: Gain Access to Security
- Exit through the door into the hallway, then turn right and enter through the door on that end of the hall (previously inaccessible).
- The new room is also a type of hallway, but with two large obstacles (Data Banks) on either side. These will turn out helpful, however, because there’s a stationary Dalek patrolling the middle of the room.
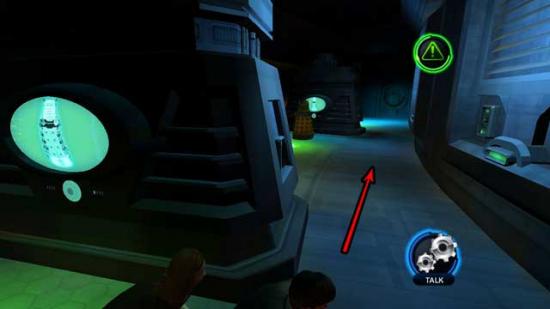
- Wait until the Dalek is facing the other side of the Data Bank from where you’re hiding and the beam is sweeping the opposite side of the room (as shown in the screenshot above) and quickly sneak past it to the other end of the room where it’s safe.
- The door on the far end of the room where you are now doesn’t open, however the one on the inner wall (near the Data Bank with the Dalek on the other side) does. Enter through it to gain access to the Visualizer Room.
Visualizer Room
- Inside this room is the large Visualizer Eye, which keeps constant check of the room with a large, sweeping orange beam. There are three green consoles in the room that can help deactivate the large orange security beam.
- Sneak along the outer right wall (to your right) until you reach the corner, then turn to see the first console.
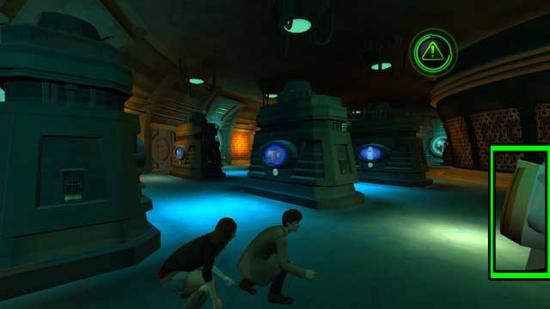
- Approach the console, then when it glows, use the SONIC SCREWDRIVER to gain access to it and trigger a puzzle.
- Reconfigure the console (along with the other two) to override the security system. Click on the Dalek symbol buttons to match those symbols that are incoming/scrolling. Click the button again as needed to rotate the symbol. If you fail with one symbol, you will have to start over again. You will successfully reconfigure the console once you’ve correctly matched ten symbols in a row. An example is shown below.
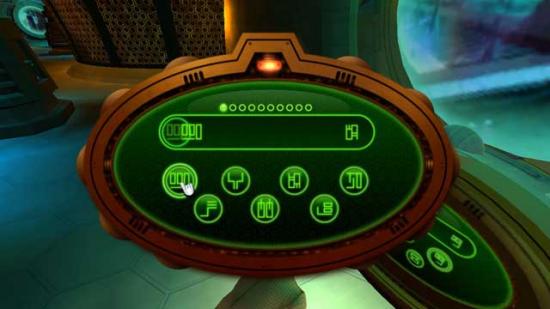
- Upon completing the puzzle successfully, the Visualizer security system will be partially reconfigured and the orange beam will narrow. However, the Visualizer Eye now moves faster.
- From here, it doesn’t matter which security console you access first of the two remaining. For the sake of this guide, the next closest was accessed: the one below the Visualizer Eye.
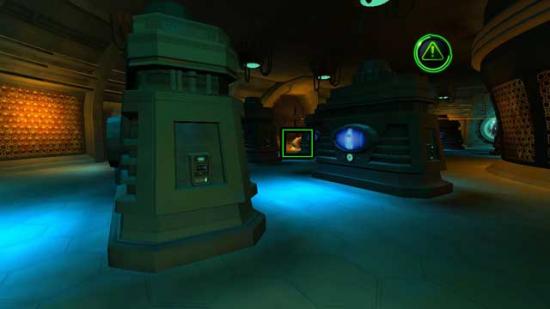
- Proceed towards the second console with caution, careful to avoid the orange beam. Once you’ve reached the console (holding as close to the front of it as possible) and are at the base of the Visualizer Eye, the orange beam should not be able to see you. (Note: If you are having difficulty with this, you may want to save this console for last.)
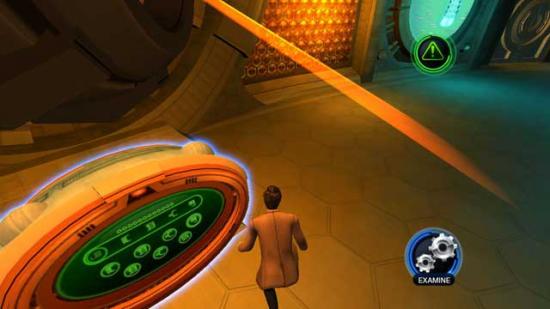
- Use the SONIC SCREWDRIVER on the console, adhering to the same rules as the previous one. The only difference now is that the symbols come faster. Once you’ve completed the puzzle, the beam will speed up and narrow again and only one console will remain. From the front of the console facing it, quickly and carefully exit immediately to the right, hugging the wall. Continue along the wall until you find the third console (it’s adjacent to the first).
- Once you find the third console, proceed a little further (if you weren’t hugging the wall) until you reach the far wall curving around the Data Banks, where a Collectable is hidden. Collect it to obtain the Captain Adelaide Brooke Card.
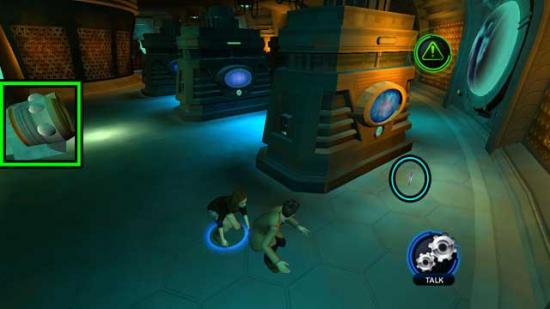
- Now go to the third and final console and use the SONIC SCREWDRIVER to access it. This time the symbols move much faster, but the same rules apply: press the button of the matching symbol and press it again to rotate as needed. Once you’ve completed the puzzle successfully, the security system will be reconfigured and the Visualizer Eye security system will be disabled. No more sweeping orange beam! (Note: You will automatically be taken to the console beneath the Visualizer Eye upon reconfiguring the final console, regardless of which it was).
- Watch the cutscene.
Objective: Discover the Source of the Daleks’ Power
- Exit the room via the door to the right when facing the Visualizer Eye.
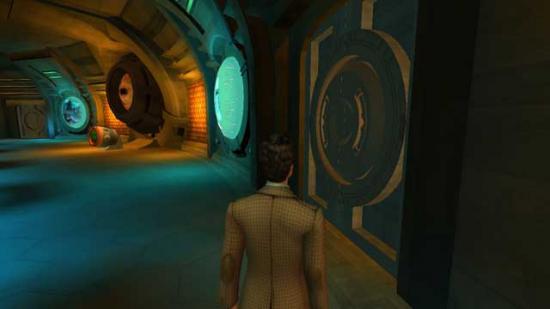
- You’ll find yourself in a red hallway with two Data Banks and a stationary Dalek to your right. Wait for the Dalek to face left/away from you, then quickly sneak past to avoid the green beam. Once at the other end of the room, enter through the door.
- You should find yourself in the “normal” red hallway, with a door on the other end and on the right inner wall, and elevator in the middle (you may remember this is the hallway where you accessed the storage room to find the Dalekanium Coil).
- Enter the elevator in the middle of the hallway to trigger a cutscene.
Supreme Council Chamber
- Once the option to ask a question emerges, click on each of the questions/topics (i.e. “Risk from disruption”) until you’ve explored each one of them, then watch the cutscene that follows.
Act Three
Kaalann (Past)
Objective: Prepare a Trap for the Daleks
- Turn around and examine the large Magnetic Field Generators in the middle of the room. They’re lacking power and will need to have it restored.
- Turn to the right: there’s DALEKANIUM WIRING lying on the floor. Pick it up to add it to your inventory.
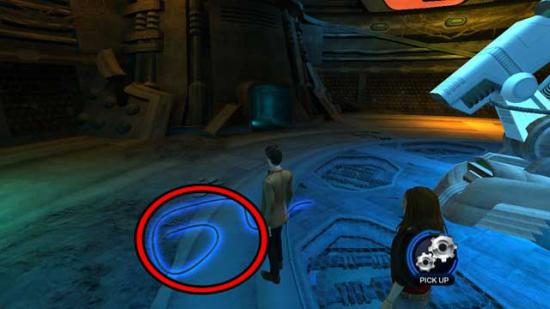
- Continue around the right side of the Magnetic Field Generators until you encounter the cracks in the floor containing acid. There’s a large fallen beam of Dalekanium lying in the pool.
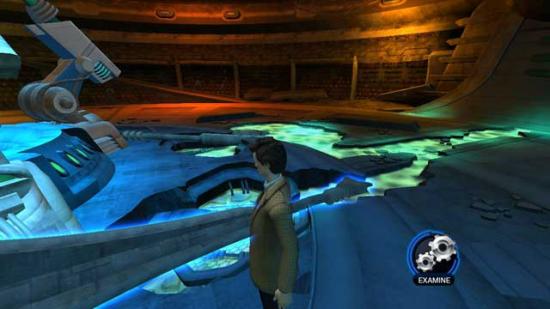
- Use the DALEKANIUM WIRING on the Dalekanium beam, then return to the front of the Magnetic Field Generators. Use the SONIC SCREWDRIVER on the console to activate the trap, then watch the cutscene that follows.
Objective: Gain Access to Security on the Lower Level
- Reach the second level of the room by climbing either of the ramps on either side of the room. Once you reach the top, look towards the control console (that used to control the Eye of Time) and the large circular catwalk above the center of the room to spot a Collectable.
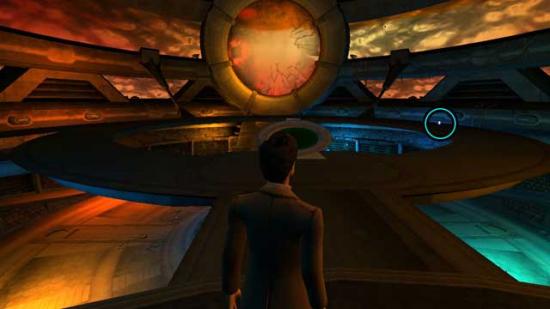
- Collect the Collectable to obtain The Fifth Doctor Card.
- Before leaving the elevated platform area, walk around the back of the ruins where the Emperor Dalek was previously to find another hidden Collectable. Collect it to obtain the Chocolate Card.
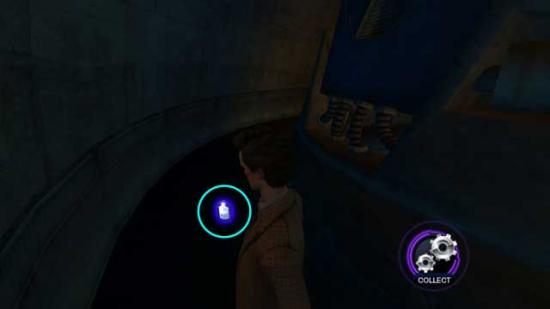
- Return to the ground floor, then proceed through the doorway (directly below the Emperor Dalek’s throne, the only one in the room).
- You’ll find yourself in a dim hallway. On the right is a door, however it cannot be opened. Proceed left until you encounter the Varga Plant sitting in the doorway.
- Varga Plants are a new type of enemy. They will lunge out of their protective cover and have a deadly sting that will kill you if you touch it. Carefully time when you’ll pass these plants. They cannot rotate or follow you, but they do flail around quite a bit when they move. Wait until the Varga Plant stops flailing, then quickly pass.
- Once you’ve passed through the doorway with the Varga Plant, you’ll find yourself in a rather empty hallway with nothing but a couple acid pools on the right and another open doorway with another Varga Plant straight ahead.
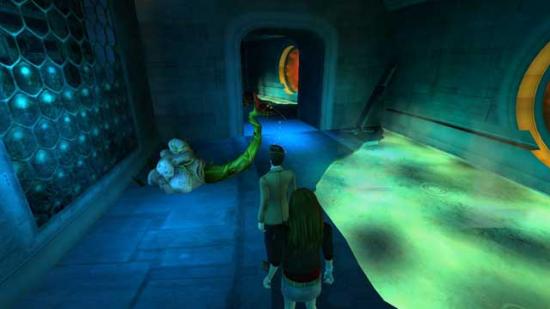
- Approach the Varga Plant and wait until it stops flailing before passing it. Be careful though! Just beyond the next doorway is another Varga Plant facing straight towards you. It’s easy to accidentally run into this one, so it’s best to stop once you’re in the doorway.
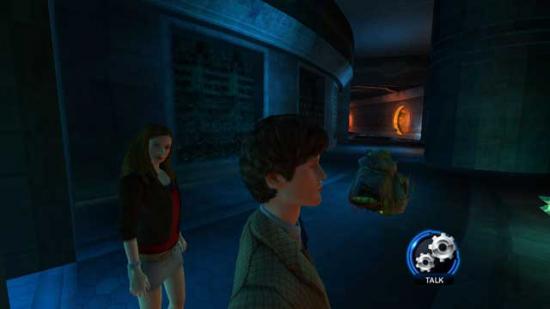
- Pass the Varga Plant, then continue past the open elevator. Just past the elevator on the right is a hole in the floor. This is where you need to go.
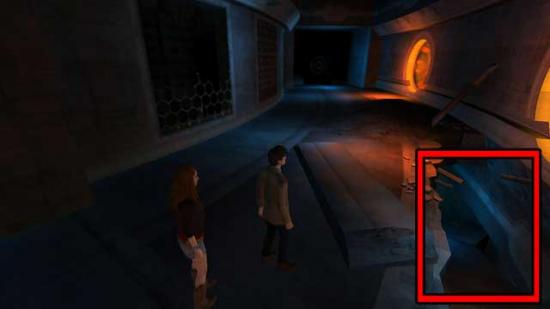
- Climb down the rubble and through the hole to the floor below. Once you reach the floor, turn right and you’ll notice a Collectable hidden between the wall and the ruined Data Bank. Collect it to obtain The Tenth Doctor Card.
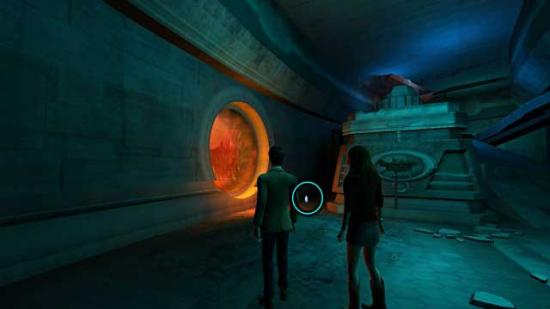
- Once you’ve obtained the Collectable, proceed through the open doorway and into the ruined Visualizer Room.
Visualizer Room
- Enter the room. Proceed forward until you’re standing between the first two Data Banks: there’s a Varga Plant just ahead on the right, and a broken security console straight ahead and to the left on the back wall.
- Follow the walls: you will eventually come to what appears to be a large circular screen or window. You may choose to examine it to read up on a Fact about the Daleks.
- Remember the large Visualizer Eye you shut down earlier, the one with the large sweeping beam? You’ll want to reach the console just below it.
- Face and proceed towards the center of the room. Depending on where you are, there should be an acid pool (likely on your left). Avoid the Varga Plants and make your way to the security console.
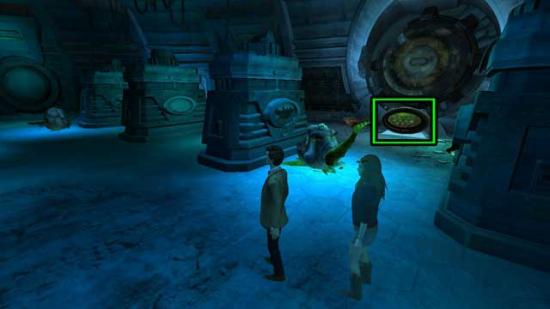
- Before examining the security console below the Visualizer Eye, turn so that the security console/Visualizer Eye are on your right, then proceed forward. Make your way towards the other end of the room (the direction you’re facing). You should notice the second broken security console and a couple Varga Plants, as well as a Collectable. Avoid the Varga Plants and obtain the Amy Pond Card.
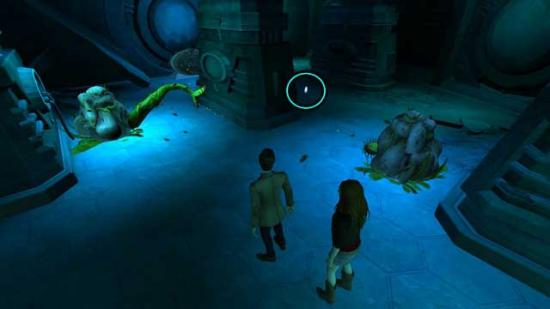
- Turn around and return to the console below the Visualizer Eye.
- Use the SONIC SCREWDRIVER on the console to restore power and watch the cutscene that follows.
Objective: Think of a Plan
- Pick up the Dalek Gizmo that falls on the floor nearby.
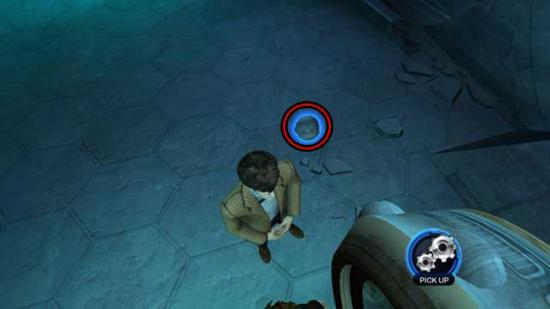
- The Doctor tells Amy he’ll need some parts from the Production Facility: a Dalek Gun and a Dalek Eye Stalk. He will then escort Amy to a nearby door asking her to retrieve the items, and you will take control of her.
Objective: Create the Vision Disruptor
- There’s something you should immediately note about Amy: she will continue to disappear and reappear, and she will do this in a pattern. As the game will soon point out, Amy can use this to her advantage and pass foes without being seen while invisible. She can, however, still be hurt when invisible, so do be careful!
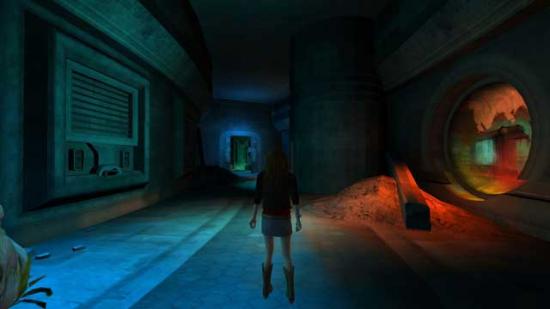
- From the doorway of the Visualizer Room, turn left into the hallway. Continue past the Data Banks and into the next hallway through the doorway at the end.
- Amy will briefly turn invisible as she passed through the door, causing the Varga Plant to fail to see her. Take note of this and use it to your advantage as you continue through the ruined hallway to the next doorway, where the door stands partially open.
Production Facility
- Enter through this door and you will find yourself in the Production Facility, though there are no Daleks being manufactured on an assembly line this time. There are, however, patrolling Daleks in addition to Varga Plants, so you’ll have to be especially careful.
- Note: If a Dalek spots Amy, even if she’s in immediate danger, if she turns invisible the Dalek will lose sight of her even if pursuing her. Use this to your absolute advantage to escape danger! A Dalek will not be able to spot Amy if she passes through its sight beam while invisible.
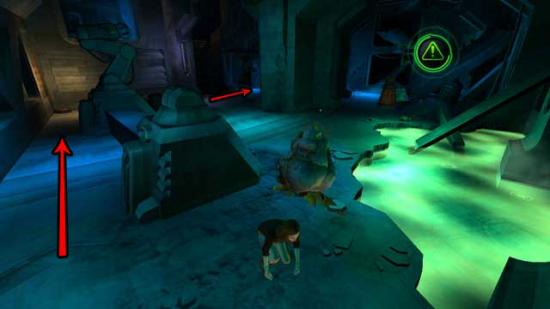
- Since the Varga Plant is blocking your way, go around the machinery to the corner of the room, then turn right and proceed up the left hallway. Be careful not to be spotted by the patrolling Dalek: wait until it turns around and goes up the right hallway before continuing into the left.
- Once in the left hallway, there is another Dalek on patrol. Follow it down the hallway, taking cover as necessary (past the blue control console), then once at the end of the hallway, try to use Amy’s invisibility to pass the Dalek or wait until it turns around and heads back (hide so it doesn’t spot you). At the end of the hallway are two Varga Plants.
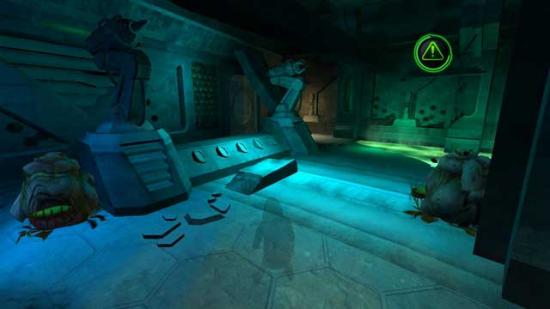
- Pass the Varga Plants while continuing to the right. Once you’ve passed the second, you’ll see a portion of a hallway on the right, and a closed door on your left. Continue right and go to the end of the ruined hall to find the DALEK GUN.
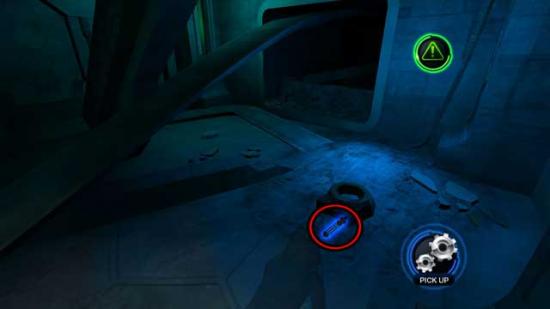
- Turn around, sneaking back past the two Varga Plants and back into the hallway with the patrolling Dalek. Carefully sneak around and/or follow the Dalek until you reach the mid-section of the hallway with the blue control console on the left, and a doorway on the right. Enter through the doorway.
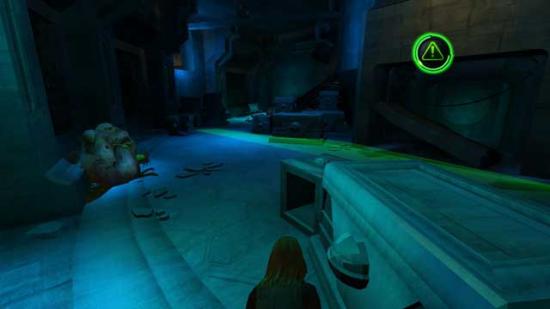
- This room is especially dangerous: there’s a patrolling Dalek that stays predominantly on the right side of the room, and two Varga Plants on the left. You’ll want to go left.
- Carefully go left when the Dalek turns back towards the right side of the room and avoid the Varga Plants. Make your way to the far corner.
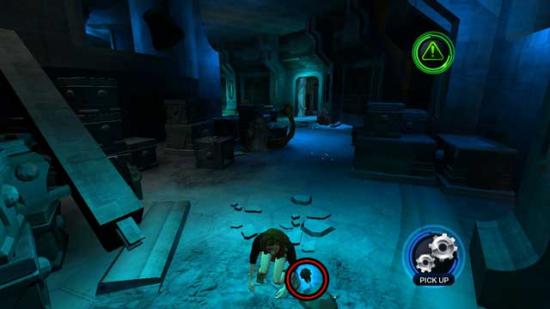
- On the ground in the corner is the EYE STALK. Pick it up.
- Return to the Doctor via the way you came: turn right when exiting the room, then continue forward and turn left to go around the machinery and access the door in the corner from which you first entered the Production Facility. Remember to be especially careful of the Daleks. From there, continue down the hallways while avoiding the Varga Plants until you reach the Visualizer Room.
Visualizer Room
- Upon entering the room, the Doctor can be found beneath the Visualizer Eye. Turn left and go forward to the Doctor: you don’t have to worry about encountering Varga Plants on this short route.
- Talk to the Doctor to trigger a puzzle.
- Assemble the Vision Disruptor. Move the components through the electrical field to the slots. Click on the components and hold the click to drag them to your slots: you can let go at any time. Make sure they don’t touch the electrified walls or you will have to start over again. Be especially careful to avoid the moving electrical currents: they move in a steady circle, but you will have to cross their path without touching them. Locations where you could potentially hit them on your way to the puzzle solution are marked with a “!” in the screenshot below. The entire solution is shown in the screenshot below: it doesn’t matter which component goes into which end slot.
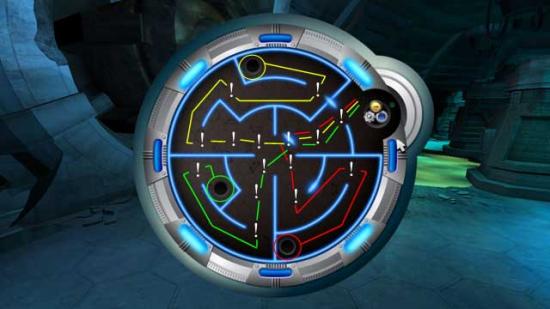
- Upon successfully completing the puzzle, the VISION DISRUPTOR will be added to your inventory.
- Watch the cutscene that follows.
Objective: Blind the Daleks
Supreme Council Chamber
- You’ll take control of Amy again. The room is absolutely infested with Daleks. Use Amy’s on-off invisibility to your advantage.
- First, head straight forward to the large structure used to hold the Eye of Time in the middle of the room. Make sure Amy is invisible while crossing through the Dalek’s security beam.
- Once you’re standing on the slightly-raised circular area in the middle of the room, you’ll actually be safe, even if the Daleks are aware you’re there. Use this to your advantage!
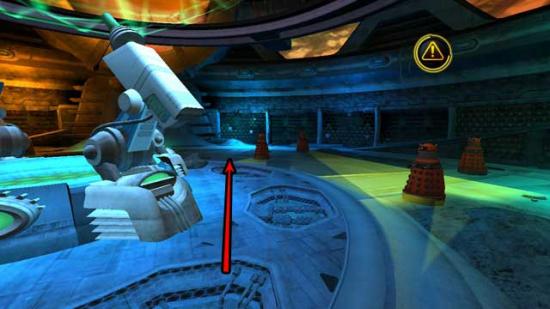
- Once you’ve reached the center area, take the shortest and easiest route around the Daleks as shown in the screenshot above. Once you’ve made your way around the Daleks and to the foot of the platform ramp, even if Amy is clearly visible, the Daleks won’t be able to see her as long as they’re looking the other way.
- Go up the ramp along the outer wall to the top, where you’ll be facing the throne of the Emperor Dalek. Go around the front of the throne and choose Climb once you reach the broken section.
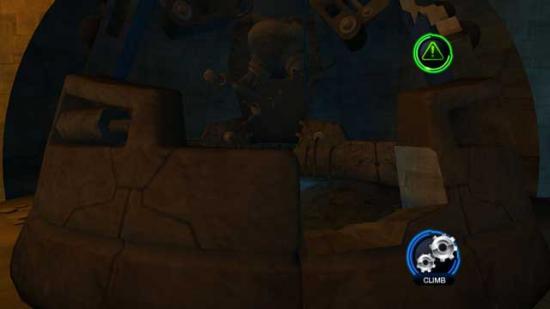
- Watch the cutscene that follows.
Objective: Reset the Eye of Time
- You’ll be in control of the Doctor again, and now the Daleks are blinded, so they won’t be able to see you. This does not, however, keep them from harming you– they will all be frantically firing their lasers all over the place. These firing patterns are consistent though, so as long as you know where you’re going, you don’t have to risk running through the chaos.
- Follow the route as specified in the screenshot below to reach the center console.
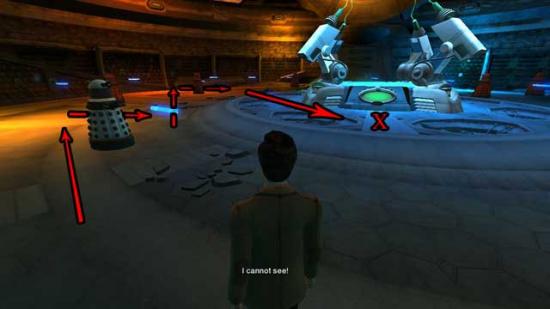
- Once you’ve reached the center generator console, use the SONIC SCREWDRIVER on it to overload it.
- Once the console has been overloaded, you will have a very limited time to reach Amy up near the Emperor Dalek’s throne, so you’ll need to be quick! If you die during this sequence, you will be reset at the console.
- Follow the route as specified in the screenshot below to avoid the Dalek fire and reach the platform ramp leading up. Remember to run!
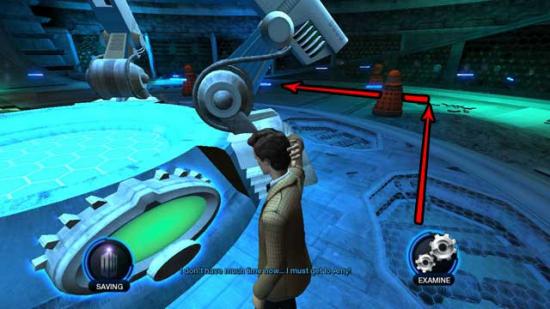
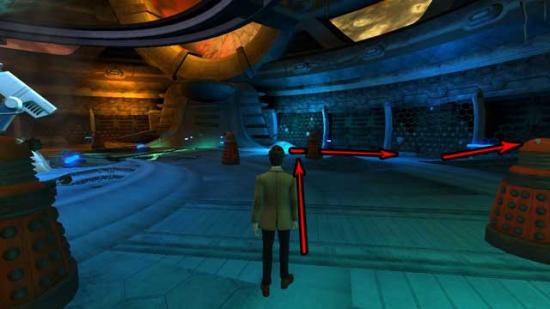
- Once you reach the top of the ramp, quickly talk to Amy, who’s standing in front of the Emperor Dalek’s throne.
- Watch the final cutscenes that follow.
Congratulations! You’ve completed Doctor Who Episode One: City of the Daleks! Alternatively play again to discover new collectibles.
More articles...
Monopoly GO! Free Rolls – Links For Free Dice
By Glen Fox
Wondering how to get Monopoly GO! free rolls? Well, you’ve come to the right place. In this guide, we provide you with a bunch of tips and tricks to get some free rolls for the hit new mobile game. We’ll …Best Roblox Horror Games to Play Right Now – Updated Weekly
By Adele Wilson
Our Best Roblox Horror Games guide features the scariest and most creative experiences to play right now on the platform!The BEST Roblox Games of The Week – Games You Need To Play!
By Sho Roberts
Our feature shares our pick for the Best Roblox Games of the week! With our feature, we guarantee you'll find something new to play!Demon Piece Races – All Race Buffs
By Adele Wilson
Our Demon Piece Races guide details all of the buffs, rarities, and characteristics for each race in the One Piece Roblox game.


