- Wondering how to get Monopoly GO! free rolls? Well, you’ve come to the right place. In this guide, we provide you with a bunch of tips and tricks to get some free rolls for the hit new mobile game. We’ll …
Best Roblox Horror Games to Play Right Now – Updated Weekly
By Adele Wilson
Our Best Roblox Horror Games guide features the scariest and most creative experiences to play right now on the platform!The BEST Roblox Games of The Week – Games You Need To Play!
By Sho Roberts
Our feature shares our pick for the Best Roblox Games of the week! With our feature, we guarantee you'll find something new to play!Demon Piece Races – All Race Buffs
By Adele Wilson
Our Demon Piece Races guide details all of the buffs, rarities, and characteristics for each race in the One Piece Roblox game.
Emma and the Inventor Walkthrough
Welcome to the Emma and the Inventor walkthrough on Gamezebo. Emma and the Inventor is a Hidden Object Game played on the PC created by Tricky Software for Big Fish Games. This walkthrough includes tips and tricks, helpful hints and a strategy guide on how to complete Emma and the Inventor.
Emma and the Inventory – Game Introduction
Welcome to the Emma and the Inventor walkthrough on Gamezebo. Emma and the Inventor is a Hidden Object Game played on the PC created by Tricky Software for Big Fish Games. This walkthrough includes tips and tricks, helpful hints and a strategy guide on how to complete Emma and the Inventor.
General Tips
This hidden object game requires visiting several locations and using inventory items to advance play.
- Play is mostly linear although there are some options for the order of investigating locations.
- CAPITALIZED inventory items are meant to make it easier to find where this guide may deviate from your own play.
- There are no penalties for multiple clicks in a scene.
- Always move the cursor around a scene. Watch the cursor to see if it changes into a pincer.
Main Menu:
- Play – Begin or resume a game.
- Options – Change music and sound effects volume. You may select or deselect full screen, custom cursor and the tutorial.
- Help – Describes how to interact with the game.
- Exit – Quit the game.
- Profiles – Click the “If this is not you, click here” link to create, delete or switch player profiles.
Screen Navigation:
- Hint System – Click the radio during play to see the current objective and receive a directional clue. Clicking in a hidden object scene will highlight a random object.
- Trays – Items collected are categorized as Objects, Fuel or Parts. Click the Tray button to rotate through the trays.
- Journal – Clicking a piece of paper or an object can add clues or information. The Journal glows when new information is added.
- Help – Shows the meaning of the custom cursors and how to use the inventory trays and hint system.
Symbol Meanings:
- Magnifying Glass – Zoom in on interactive area.
- Pincers – Pick up an item.
- Glints – Hidden object areas.
Walkthrough
A short clip explains the background and introduces the story line for play.
A brief tutorial is the default. Experienced players may toggle the option off under the main menu Options tab.
Only inventory items in hidden object scenes are shown in this guide. They are indicated by a blue and white circle or rectangle in the screen shot.
Chapter 1: Beginning the Search – The First Floor

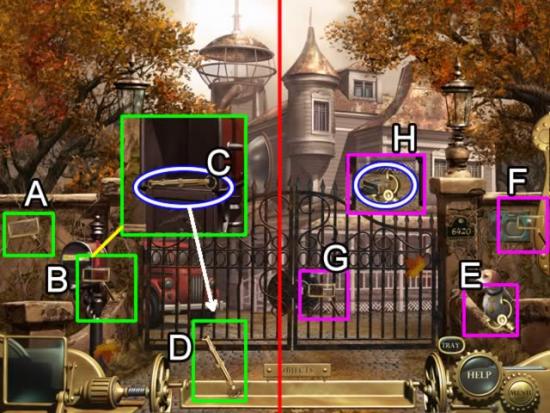
- Pick up the magnifying glass on the wall (A). This is the custom cursor used to access interactive areas. The mail box begins to sparkle. Place the cursor over the box (B). The cursor turns from an arrow to a magnifying glass. Click to zoom in on the mail box (C).
- Click to pick up WHISTLE. It is added to the Objects tray (D). Click the WHISTLE to blow it. A dog appears (E).
- Take the KEY from the dog’s collar. Zoom in on the intercom (F). View and/or listen to the conversation cut scene with Grandpa Jenkins.
- Zoom in on the gate lock (G). Use the KEY to open the gates and enter the estate.
- Pick up the broken radio (H). It is added to the bottom of the screen as the Hint/Objective tool.
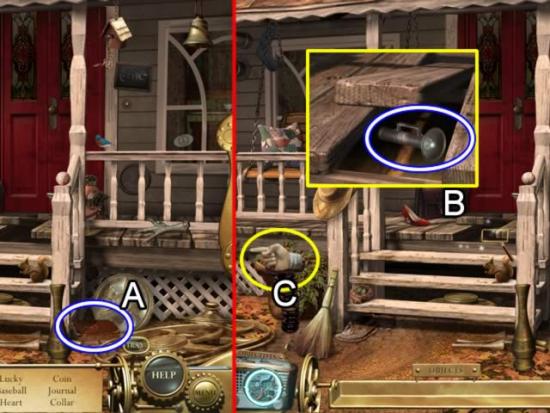
- The front porch is a hidden object scene. The Journal is added to the bottom of the screen. It is used to record clues and instructions. It glows when a new entry is added.
- Once all objects have been collected, the loose board on the porch glows (B). Zoom in and take the FLASHLIGHT. Note that the pointing hand on the spring is moving (C). Follow the hand and go left to the side porch.
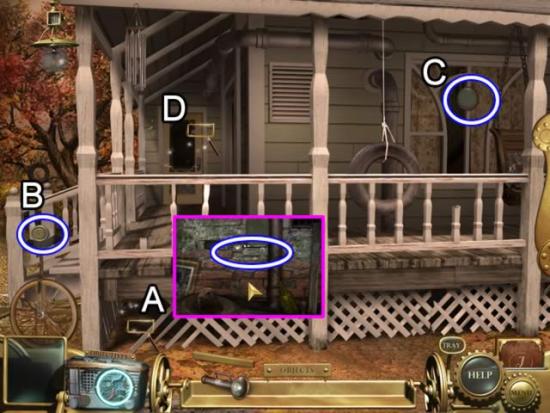
- Access the hidden object scene under the porch (A). Use the FLASHLIGHT to find the objects. The KEY is added to the Objects tray.
- Pick up the KNOB (B) and SCREEN (C).
- Use the KEY to unlock the door (D). Enter the Kitchen.
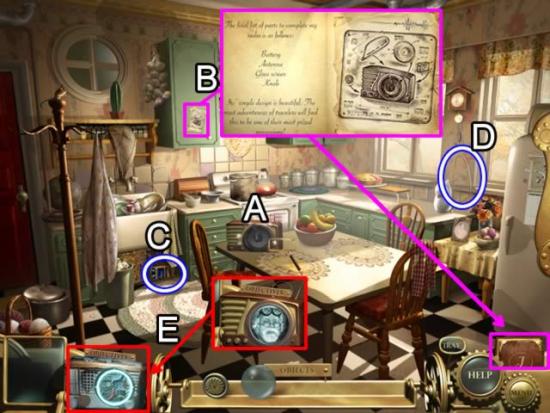
- Zoom in on the radio (A). Discover it is missing parts.
- Click the document on the cabinet door (B). These are the instructions to repair the radio and contains a list of missing parts. It goes immediately into the Journal.
- Pick up the BATTERY (C) and ANTENNA (D). Combine these two items with the KNOB and SCREEN from the Object tray to fix the radio. Click the working radio to replace the broken radio as the Hint system icon (E).
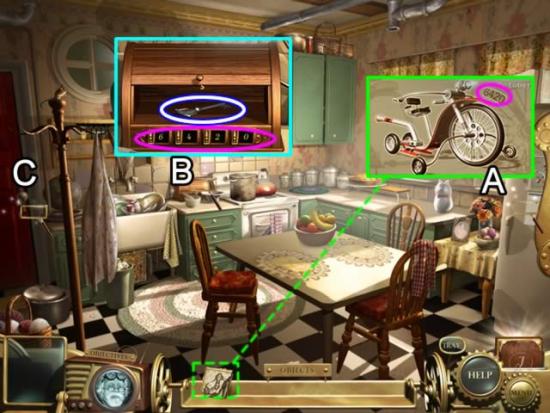
- Once the working radio is installed, the refrigerator door glows.
- Click the door to open a slider puzzle. Swap pieces with adjacent pieces to form the picture shown above (A). Solving the puzzle adds a MACHINE PIECE (1/9) to the objects tray. Note the numbers in the upper right-hand corner of the completed puzzle: 6420.
- Now the bread box glows (B). Click each tumbler on the lock until they form the combination 6-4-2-0. Note: Any area containing information, such as lock combinations, will continue to glow until the information has been used.
- Take the KEY from the bread box. Use it to open the foyer door (C).
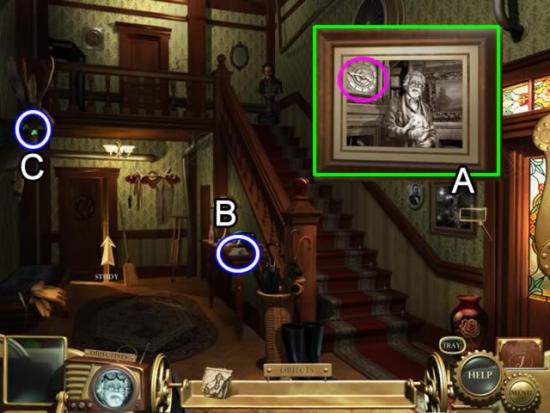
- Look at the picture at the base of the stairs of Grandpa Jenkins (A). Note the time on the clock in the background (3:45).
- Pick up the RECIPE PIECE (1/9) on the desk (B) and the GEM from the mounted trophy (C). Enter the study through the door at the back of the room.
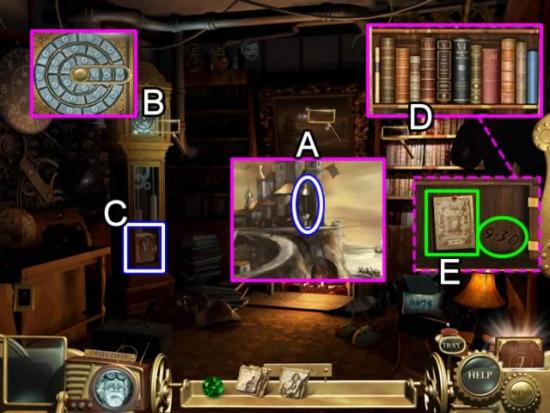
- Zoom in on the painting on the back wall (A) to open a hidden object scene. The FUSE is added to the Parts tray.
- Access the face of the clock (B). Rotate the disks until the numbers in the gold bar match those of the clock in the foyer picture (3-4-5). The glass door on the bottom of the clock opens. Collect BOOK V for inventory (C).
- Click on the glowing book shelf (D). Insert BOOK V in the empty space. Swap the books until they are in ascending numerical order. Books may be swapped directly with others. An alcove opens. The cooking instructions are added to the Journal. Note the time etched in the wall: 9:30.
- Go back to the clock face. Rotate the disks until they read 9-3-0. A bird pops out of the clock. Take the MACHINE PIECE (2/9) from its beak.
- Return to the kitchen (click down twice).
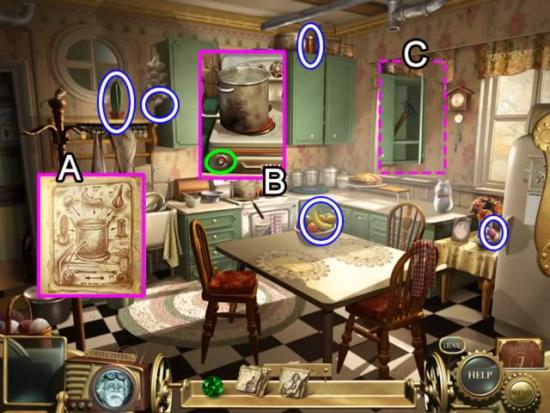
- Consult the Journal for the list of ingredients (A). Collect the CACTUS, GARLIC, BANANA, SPICES and EGG.
- Access the pot on the stove (B). Click the knob on the stove to turn on the burner. When the water boils, add the collected ingredients (order doesn’t matter). Receive a RARE SPICE (1/6) for the Fuel tray.
- The cabinet door opens (C). Take the SLEDGEHAMMER.
- Click the door on the left to return to the foyer. Go forward to return to the study.
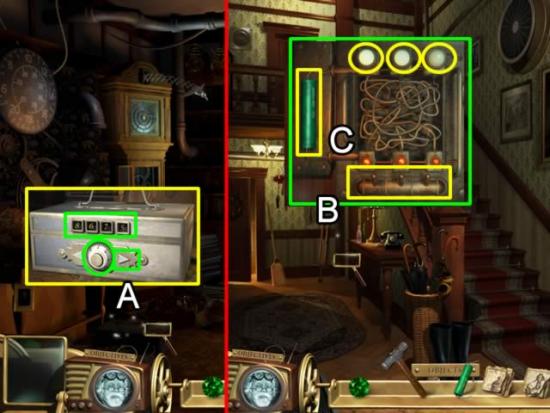
- Note the number on the pillow to the right of the fireplace (8675).
- Access the lock box (A). Click the dial to advance the numbers. Click the right arrow to move the active window to the next number. Enter the numbers 8-6-7-5. Take the CONNECTOR.
- Click down to return to the foyer.
- Examine the door panel (B). Place the CONNECTOR in the slot on the right (C). Flip the switches along the bottom in the correct sequence to illuminate the lights. My sequence was 2-1-3.
- Enter the basement.
Chapter 2: The Basement and Estate Grounds
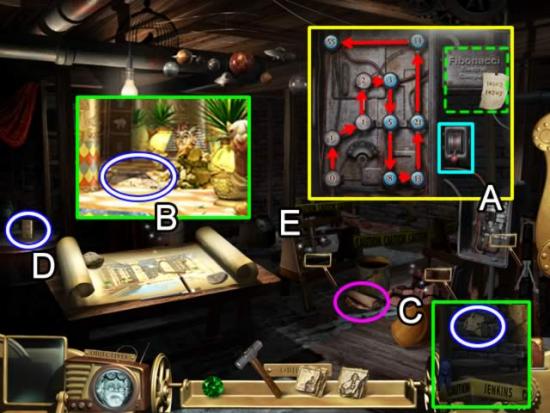
- Access a puzzle on the switch (A). The goal is to change the values of the blue connectors on the circuit board based on the Fibonacci number theory. The formula starts at zero and adds the next consecutive number (one). Next, take the second number (one) and add it to the sum of the first two numbers (one). Continue the pattern.
- Solution: 0+1=1; 1+1=2; 1+2=3; 2+3=5; 3+5=8; 5+8=13; 8+13=21; 13+21=34; 21+34=55. The buttons in the above screen shot show the correct numbers.
- Pull the switch to set off a charge that blows a hole in the brick wall.
- Play the hidden object scene by clicking on the drawing on the table (B). The clipping is added to the Object inventory as RECIPE PIECE (2/9).
- Pick up the scroll on the floor by the brick pile (C). The information is added to the Journal. Click the brick pile for another hidden object scene. This clipping is MACHINE PIECE (3/9).
- Take the LIGHTER (D). Use it to light the TORCH (E).
- Use the SLEDGEHAMMER to bash through the newly opened hole in the brick wall to the tunnel entrance.
- Use the TORCH on the first unlit torch at the tunnel entrance. The others will be lit for you.
- Enter the Catacombs.
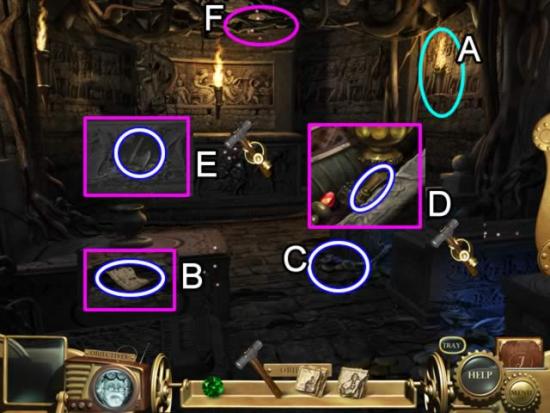
- Use the TORCH to light the first unlit torch (A). The others are lit for you.
- Click the casket on the left (B). It slides back revealing a MACHINE PIECE (4/9).
- Pick up the MUSHROOMS (C).
- Use the SLEDGEHAMMER to crack open the casket on the right (D) and open a hidden object scene. The COIL is added to the Parts tray.
- Use the SLEDGEHAMMER to open the casket against the far wall (E). Collect the AX to cut away the vines on the ceiling (F).
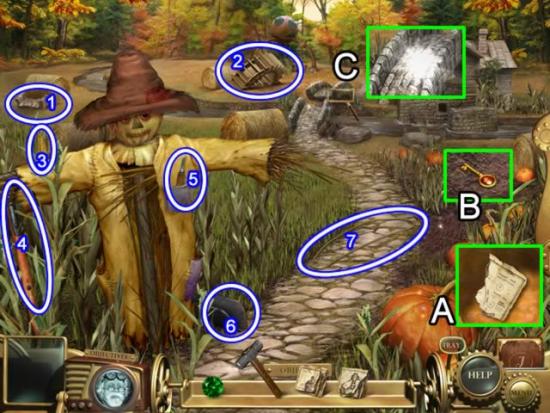
- Pick up the following inventory items: (1) BRIDGE PIECE, (2) MILL WHEEL, (3) CORN, (4) SHOVEL, (5) KNIFE, (6) FLUE and (7) BELT. The corn is added to the Fuel tray.
- Use the KNIFE to open the pumpkin (A) and get the RECIPE PIECE (3/9).
- Use the SHOVEL to dig up the KEY (B).
- Insert the BRIDGE PIECE (C) to repair the bridge.
- Proceed to the Mill.
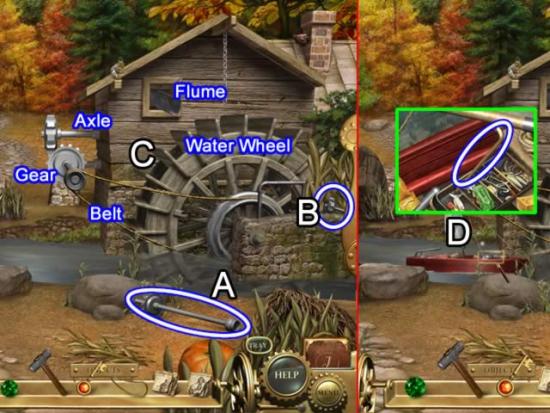
- Pick up the AXLE (A) and GEAR (B).
- Repair the Mill (C). Place the WATER WHEEL, FLUME, GEAR, AXLE and BELT.
- A small boat floats into view after the Mill is working (D). Access the boat for a hidden object scene. The PIPE is added to the Parts tray.
- Return to the house via the cobble stone path past the Mill.
Chapter 3: The Second Floor
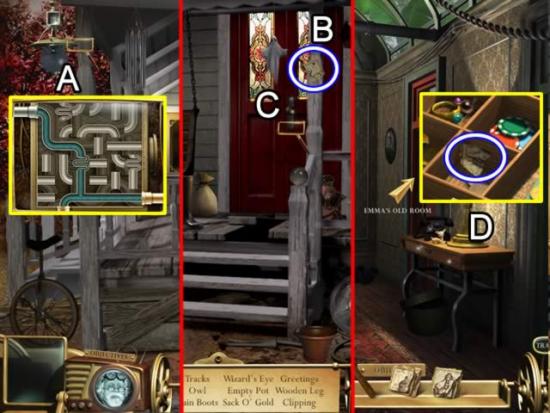
- Access the porch light (A) to open a puzzle. The goal is to swap the pieces of pipe to allow the water to flow. Not all pieces need to be used. One solution is shown above. Receive SNAKE VENOM.
- Click right to go to the front porch.
- Play the hidden object scene. The clipping (B) is MACHINE PIECE (5/9). Collect all items to enable the interactive area on the door (C). Use the KEY to open the door.
- Enter the foyer. Continue to the second floor hall.
- Inspect the hall table (D) to open a hidden object scene. The clipping is RECIPE PIECE (4/9).
- Enter Emma’s old room.
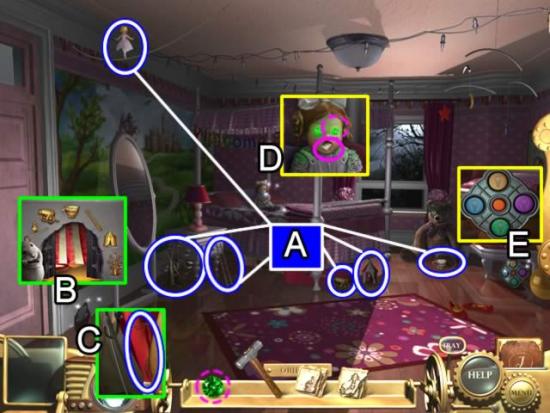
- Collect the objects scattered around the room (A). From top left: TIGHTROPE WALKER, FERRIS WHEEL, LADDER, CANON, TENT and TEA CUP.
- Access the mouse hole (B). Place each of the collected items in their corresponding outline around the mouse hole. Receive the CREST TOP.
- Enter the mouse hole for a hidden object scene (C). The HOSE is stored in the Parts tray.
- Click the doll on the bed (D). Place the GEM in her empty eye socket. Take the piece of paper for the Journal.
- Play the repeat-the-sequence puzzle (E) for five rounds. Click the red button in the center to begin. Obtain a RECIPE PIECE (5/9).
- Exit Emma’s room. Enter Grandpa’s bedroom.
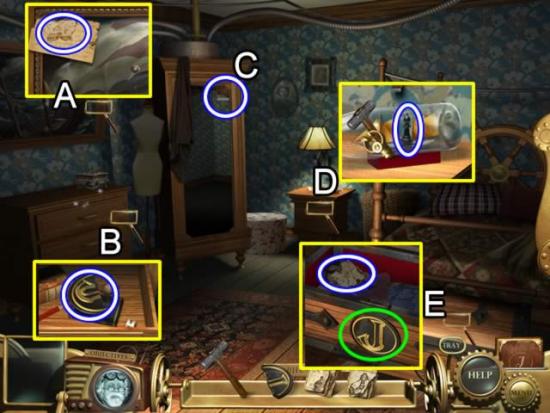
- Access the hidden object scene in the painting (A). The clipping is MACHINE PIECE (6/9).
- Open the top chest drawer (B). Pick up the CREST BOTTOM.
- Pick up the sketch of the machine (C) attached to the wardrobe mirror. The information is added to the Journal.
- Use the SLEDGEHAMMER to break the bottle on the nightstand (D). Get the KEY.
- Click the chest (E). Insert the CREST TOP and CREST BOTTOM in the circle (green). Take the RECIPE PIECE (6/9).
- Exit Grandpa’s bedroom. Go to the end of the hall. Use the KEY to open the door to the third floor hallway.
Chapter 4: The Third Floor
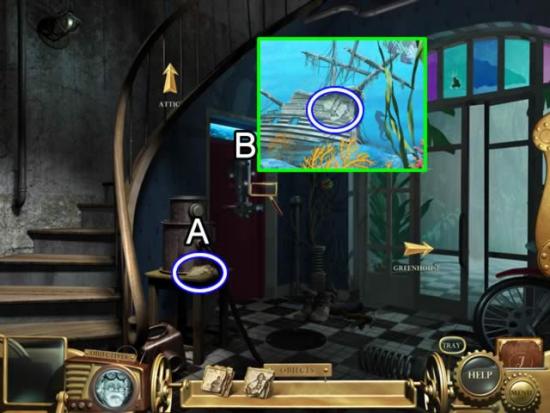
- Pick up the piece of paper (A) for the Journal.
- Peer through the periscope on the door (B) to enter a hidden object scene. The clipping is MACHINE PIECE (7/9).
- Go up the stairs to the attic.
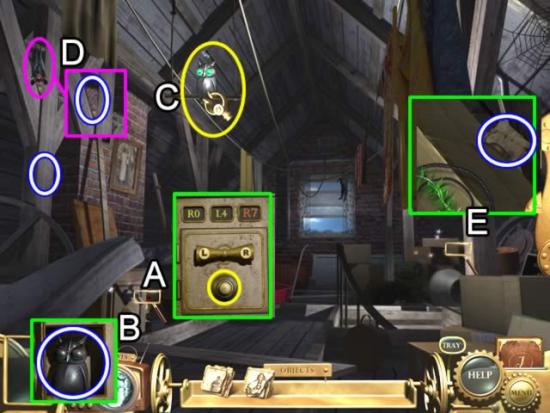
- Zoom in on the safe (A). The combination was obtained from the doll in Emma’s room and is stored in the diary. Click the lever labeled “R” until the number in the first window is “R0”. Click the circle to advance to the next window. Click the lever labeled “L” until the number in the second window is “L4”. Click the circle to advance to the last window. Click the “R” lever until “R7” appears. Take the OWL from the safe (B).
- Place the OWL on the perch (C). This scares away the bat (pink). Take the bat GUANO for the Fuel tray.
- Look at the box on the right side (E). Play the hidden object scene. The clipping is RECIPE PIECE (7/9).
- Descent to the hallway. Enter the greenhouse.
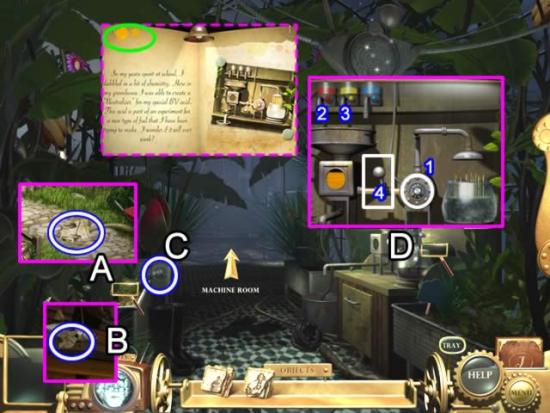
- Access the hidden object area by the leaves (A). The clipping is MACHINE PIECE (8/9). After all the items are collected, the door to the small house glows. Enter the house for another hidden object scene. The clipping on the fish above the door (B) is a RECIPE PIECE (8/9).
- Take the DIAL from the safe (C).
- Inspect the machine on the right (D). Place the DIAL on the pipe (1). Refer to the Journal to figure out the color for the neutralizing agent (dotted pink). Note the orange splotch on the page. Click the red (2) and blue (3) colors once. Click the lever (4) to pour the agent into the murky bowl of water. A DISH is added to the Parts tray.
- Enter the machine room. Click the cord hanging from the trapdoor in the ceiling. Go up to the observatory.
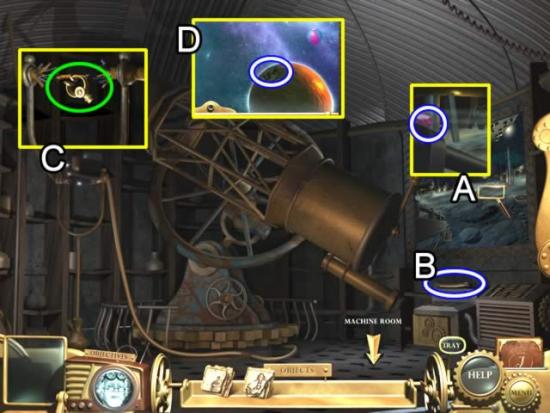
- Play the moon-scape hidden object scene on the right (A). The MOON CRYSTAL is added to the Parts tray.
- Pick up the WIRE PIECE (B). Use it to repair the telescope wiring (C). The roof of observatory opens and the telescope swings around. Click the telescope to get a hidden object scene (D). The clipping is the last RECIPE PIECE (9/9).
- Return to the machine room and proceed to the greenhouse.
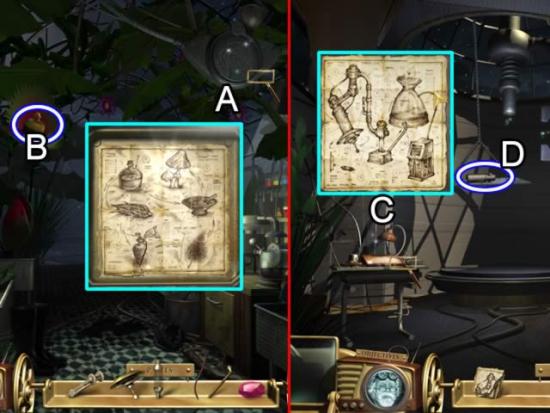
- Open the metal circle in the upper right corner (A). Click to remove the cover panel. Place the RECIPE PIECES in the work area to start a jig-saw puzzle. Place the pieces according to shape. They lock into place when correctly positioned.
- Solving the puzzle opens a plant (B). Take the STAR DUST.
- Return to the machine room.
- Zoom in on the desk (C). Click to remove the cover panel. Place the MACHINE PIECES in the work area to start a jig-saw puzzle. This is the same type of puzzle just encountered in the greenhouse.
- A tray containing a CANISTER descends (D).
- Begin assembling the machine.
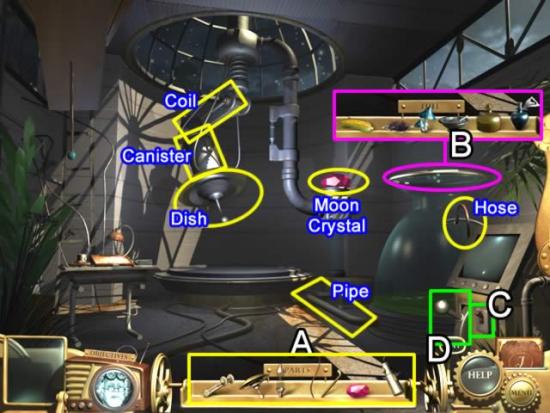
- Place the items from the Parts tray (A) as shown.
- Feed all of the fuel ingredients (B) into fuel tank. The CORN, RARE SPICE, MUSHROOM, SNAKE VENOM, GUANO and STAR DUST can be added in any order.
- Click the red switch (C) to turn on the monitor. Click the lever (D) to start the machine.
- Watch the cut scene.
Congratulations! You have completed playing Emma and the Inventor.
More articles...
Monopoly GO! Free Rolls – Links For Free Dice
By Glen Fox
Wondering how to get Monopoly GO! free rolls? Well, you’ve come to the right place. In this guide, we provide you with a bunch of tips and tricks to get some free rolls for the hit new mobile game. We’ll …Best Roblox Horror Games to Play Right Now – Updated Weekly
By Adele Wilson
Our Best Roblox Horror Games guide features the scariest and most creative experiences to play right now on the platform!The BEST Roblox Games of The Week – Games You Need To Play!
By Sho Roberts
Our feature shares our pick for the Best Roblox Games of the week! With our feature, we guarantee you'll find something new to play!Demon Piece Races – All Race Buffs
By Adele Wilson
Our Demon Piece Races guide details all of the buffs, rarities, and characteristics for each race in the One Piece Roblox game.


