- Wondering how to get Monopoly GO! free rolls? Well, you’ve come to the right place. In this guide, we provide you with a bunch of tips and tricks to get some free rolls for the hit new mobile game. We’ll …
Best Roblox Horror Games to Play Right Now – Updated Weekly
By Adele Wilson
Our Best Roblox Horror Games guide features the scariest and most creative experiences to play right now on the platform!The BEST Roblox Games of The Week – Games You Need To Play!
By Sho Roberts
Our feature shares our pick for the Best Roblox Games of the week! With our feature, we guarantee you'll find something new to play!Demon Piece Races – All Race Buffs
By Adele Wilson
Our Demon Piece Races guide details all of the buffs, rarities, and characteristics for each race in the One Piece Roblox game.
The Secret Legacy: A Kate Brooks Adventure Walkthrough
Welcome to The Secret Legacy: A Kate Brooks Adventure walkthrough on Gamezebo. The Secret Legacy: A Kate Brooks Adventure is a Hidden Object Game played on the PC created by Meridian 4 and White Birds Productions. This walkthrough includes tips and tricks, helpful hints, and a strategy guide on how to complete The Secret Legacy: A Kate Brooks Adventure.
The Secret Legacy: A Kate Brooke Adventure – Game Introduction
Welcome to The Secret Legacy: A Kate Brooks Adventure walkthrough on Gamezebo. The Secret Legacy: A Kate Brooks Adventure is a Hidden Object Game played on the PC created by Meridian 4 and White Birds Productions. This walkthrough includes tips and tricks, helpful hints, and a strategy guide on how to complete The Secret Legacy: A Kate Brooks Adventure.
General Tips
This hidden object game requires visiting several locations and using inventory items to advance play.
- Play is generally non-linear but some areas or tasks must be complete to open another area.
- This is not a timed game.
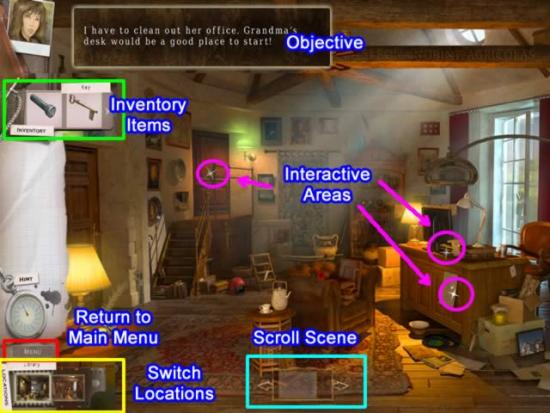
- Hidden object scenes require scrolling right or left of the centered screenshot to find all objects.
- Hints are unlimited and recharge quickly in normal play mode.
- Randomly clicking too many times will temporarily disable the cursor.
Beginning Play:
- Profiles – Create or delete player profiles.
- Options – Change music and sound effects volume. There is also a Brightness Control. I highly recommend you set this to maximum. You may select or deselect windowed mode.
- Help – Displays a list of icons used and their meaning.
- New Game – Choose play mode. Select “YES” to play Expert mode: Hints and skip bars take longer to charge. Interactive areas are not indicated. Select “NO” for regular play.

Navigation:
- Letters/Kate – Periodically, letters from Grandma are found. They are stored in the folder. Kate’s comments appear in dialogue boxes. Click inside the dialogue box to continue play.
- Inventory – Click the right-pointing arrow on the box to see all items in inventory.
- Items – Objects to find appear here in the form of a written list, object silhouette or object pieces.
- Hint – Clicking will show a random item from an itemized list or a part of an item.
- Menu – Click to exit the game and return to the main menu.
- Locations – This is a quick way to switch areas within the current location.
- Scene Scroll – Click on the left or right arrow to view more of the scene. The square in the middle indicates the current view.
Symbol Meanings:
- Magnifying Glass – Zoom in on interactive area.
- Gears – Interact with an object.
- Glint – Investigate this area.
- Dialogue Box – View a characters comments.
Walkthrough
Only inventory items or hard to access objects are shown in the screen shots. Inventory items are CAPITALIZED to make it easier to find where this guide may deviate from your own play.
A short clip explains the background and introduces the story line for play.
An optional tutorial is available for the first scene.
Chapter 1: Grandma’s Office
- Click the sparkling interactive area on Grandma’s desk.
- Collect the eight pieces of paper. They form the first letter from Grandma.
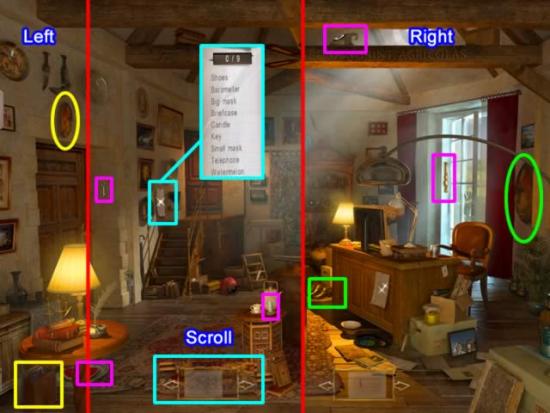
- Click the sparking interactive list on the back wall.
- A list of objects appears.
- Not all objects can be found in the default screen scene.
- In the above combined screenshot, those items that can be found from the center view are highlighted in pink.
- Scroll left to find the two objects not visible in the default view (highlighted in yellow).
- Scroll right to find the last two objects, highlighted in green.
- The KEY (center screenshot on left wall) is an inventory item.
There is a sparking list on the front of the desk. It cannot be accessed until all current objects are found.
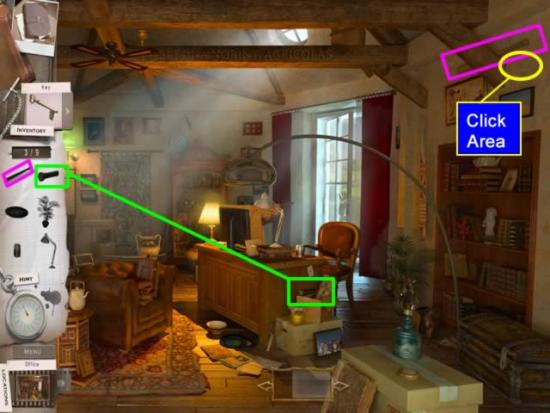
- Click the list of silhouette items to find (the sparkling sheet on the front of the desk).
- Scroll from side to side as needed to find all the objects.
- The FLASHLIGHT needed for inventory is highlighted in green.
- The baseball bat (highlighted in pink) may be hard to pick up. If you experience trouble getting this object when clicking the bat itself, click the area right below the bat next to the beam (circled in yellow).
The door at the top of the stairs leads to the Library.
- Use the KEY to unlock the door. Enter the library.
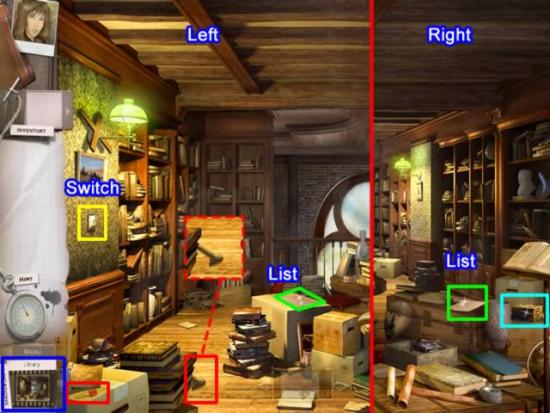
- The library is dark.
- Click the FLASHLIGHT to select it from inventory. Click it again to turn it on.
- Shine the beam from the FLASHLIGHT on the light switch on the wall on the left side of the room. Click to turn on the lights.
- Select the object list on the box. Scroll around the room as needed to find all the objects. Collect the CROWBAR, outlined in red and a dashed-red inset in the above screenshot, for inventory.
- Select the silhouette list (right side of room on chest). Find the objects based on their silhouette. The SMALL KEY is on the far left side of the room (outlined in red).
- Use the SMALL KEY on the box located on the right side. Collect the five TILE LOCK PIECES.
- Click the tab on the Location filmstrip (outlined in blue). Click the Office location.
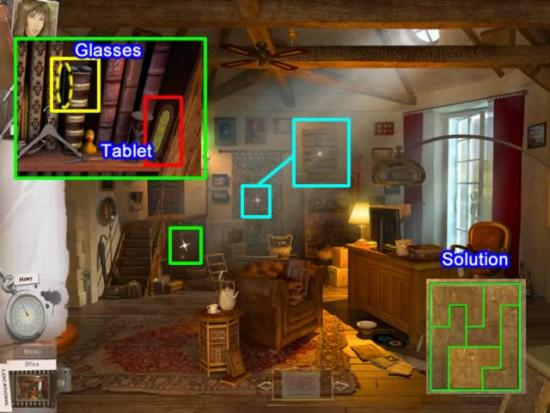
- Click the interactive area under the stairs.
- Find the objects listed. The FIRST EGYPTIAN TABLET is outlined in red.
- If your list contains “Glasses”, collect them by clicking on the side piece (dashed yellow), not the lenses.
- After all objects are collected, the scene switches to the storage area for the tablets. This EGYPTIAN TABLET goes into the first slot of the tablet case. You may read the story associated with this tablet or click the “X” at the bottom of the screen to close the box and return to the office.
- The carpet on the back wall falls away and reveals wooden planks covering a secret location.
- Use the CROWBAR to remove the boards.
- Place the TILE LOCK PIECES in the lock slot. Arrange them so each piece interlocks. The solution is shown in the above inset.
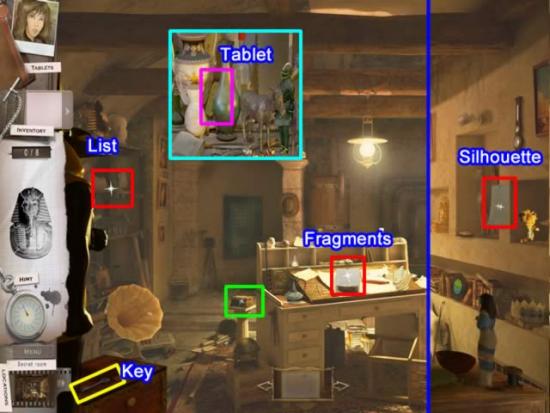
This scene incorporates all three of the types of hidden objects.
- Click the area on the far left of the screen. Find the objects listed. Obtain the SECOND EGYPTIAN TABLET. The location is shown in the above inset.
- Click the interactive area on the desk. Find all the fragments comprising the PHARAOH’S MASK.
- Access the Silhouette objects via the list on the far right wall. The MANOR’S KEY location is highlighted on the left side in yellow.
- Access a slider puzzle by clicking the small box (outlined in green).
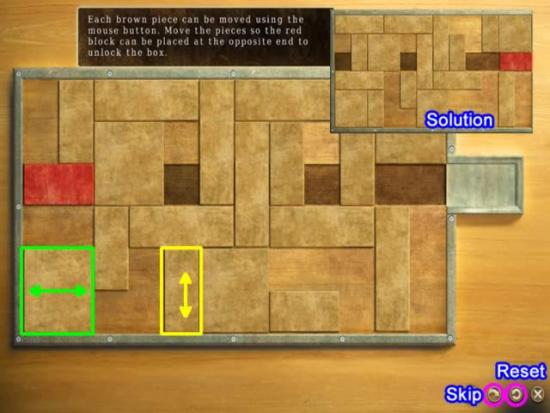
- Clear a path to move the red rectangle to the gray tray.
- Wide rectangles move horizontally. Narrow rectangles move vertically.
- Strategy tip: mentally work backwards from the tray to see the path. Use the Reset button rather than trying to un-do moves.
- One solution (inset above) shows the final position of the rectangles.
View the video to see the solution movements:
The box contains the second note from Grandma.
Chapter 2: Grandma’s Manor
A short video clip changes location. The MANOR’S KEY automatically opens the house and disappears from inventory.
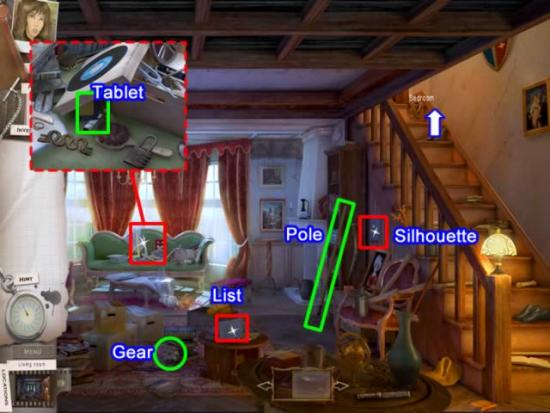
- Click the interactive area on the couch. Collect the THIRD EGYPTIAN TABLET.
- Click the list of objects on the low table. The POLE goes to inventory.
- Click the silhouette objects on the list by the stairs. The GEAR goes to inventory.
- Go to the Bedroom at the top of the stairs.
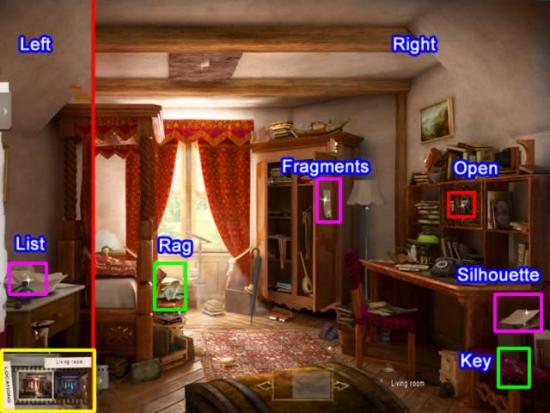
- Open the silhouette list on the far right side of the room. Collect the DUST RAG.
- Click the fragments list on the wardrobe door. Assemble the MIRROR.
- Open the object list on the washbasin on the far left side of the room. Collect the SMALL KEY.
- Use the KEY to open the small door on the desk. Find the 12 keys. One KEY is added to inventory.
- Open the Location filmstrip (highlighted in yellow). Click the Living Room location.
- Scroll to the far left side of the Living Room. Use the KEY to open the door to the Library.
- Enter the Library.
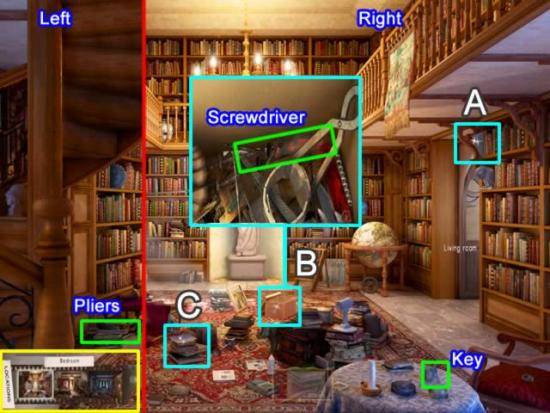
- Access the hidden object list (A). Collect the PLIERS.
- Access the hidden object area (B). Collect the SCREWDRIVER.
- Access the silhouette object list (C). Collect the TRAPDOOR KEY.
- Click the Location filmstrip (highlighted in yellow). Click the Bedroom location.
- Take the TRAPDOOR KEY from inventory. Click the key on the padlock on the trapdoor in the ceiling.
- The trapdoor opens. A cord with a ring attached is released.
- Take the POLE from inventory. Click the pole on the cord. The stairs descend.
- Enter the Attic.
- Click the seven cobwebs to remove them.
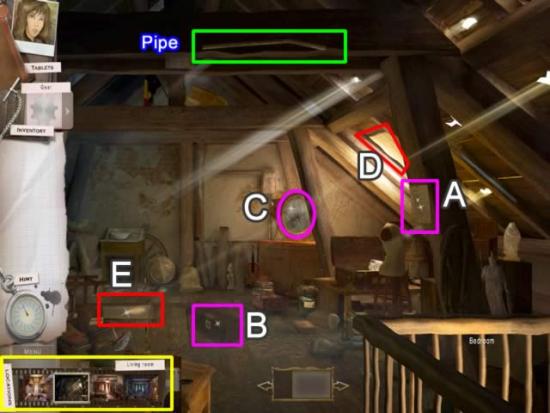
- Access the hidden object list (A). Collect the BENT PIPE.
- Click the GEAR in inventory. Place the GEAR on the safe (B) to open it.
- Collect the 12 gears. A number of GEARS are added to inventory.
- Use the DUST RAG from inventory on the dusty mirror (C).
- Click the paper covering the window (D) to remove it.
- Use the SCREWDRIVER from inventory on the screws securing the metal plate to the floor (E). An air duct to the living room is revealed.
- Click the Location filmstrip tab. Click the Living room location.
- Select the MIRROR from inventory.
- Place the MIRROR on the table beneath the air duct. Scroll across the Living Room to follow the beam of light.
- Enter the Library.
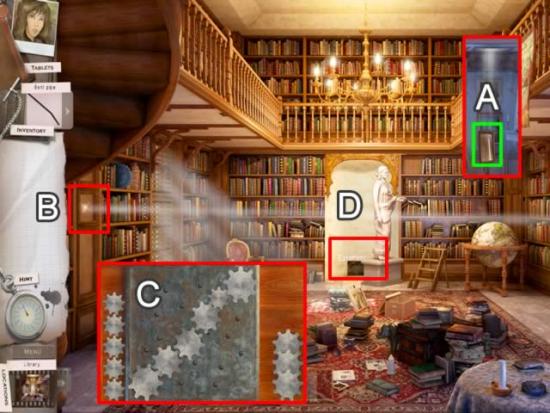
- Use the BENT PIPE on the panel (B) to pry it open. Click through the dialogue.
- Place the GEARS from inventory on the panel mechanism. A connect-the-gears puzzle pops up. One solution is shown above (C).
- The statue swings away from the wall. Enter the Basement (D) through the secret entrance.
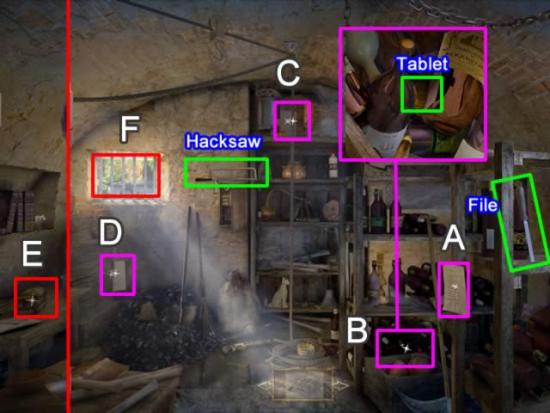
- Click the list (A). Find the fragments of an ANKH.
- Click the wine bottles (B). Collect the FOURTH EGYPTIAN TABLET.
- Access the hidden object list (C). Collect the HACKSAW.
- Open the silhouette list (D). Collect the FILE.
- Use the FILE on the small chest (E). Click through the dialogue if necessary. Collect another letter from Grandma, MAP PIECES and CRUISE TICKET.
- Use the HACKSAW and PLIERS on the window bars (F). Escape the Basement.
Chapter 3: Cairo, Egypt
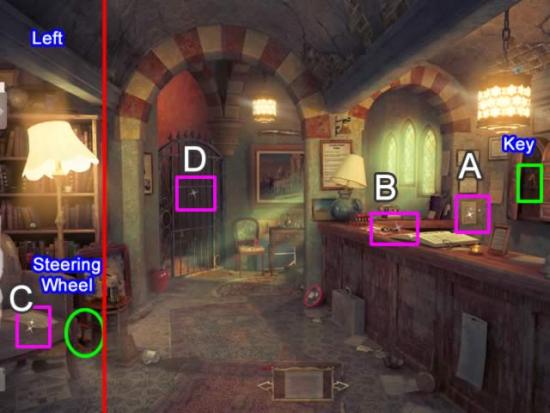
- Enter the Hotel.
- Access the silhouetted list items (A). Collect the ROOM KEY.
- Click the pile of paper on the desk (B). Find the seven MAP PIECES.
- Open the list of objects on chair on the far left side (C). Pick up the STEERING WHEEL.
- Use the ROOM KEY on the lock (D). Enter the Room.
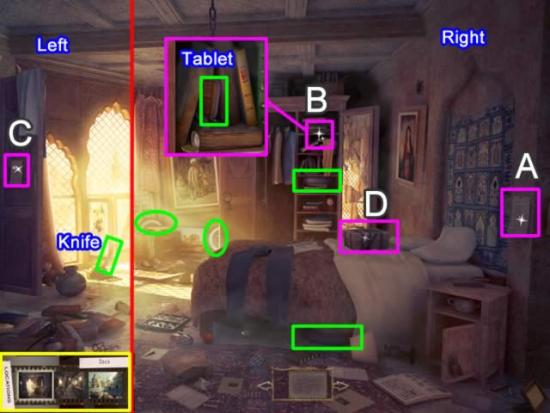
- Access the silhouetted list items (A). Pick up the KNIFE.
- Click the wardrobe (B). Collect the FIFTH EGYPTIAN TABLE.
- Open the list of objects on door on the far left side (C). Collect the 4 WHEELS.
- Use the KNIFE to open the box (D) on the bed. Add the MAP PIECES to the box.
- Assemble the map.
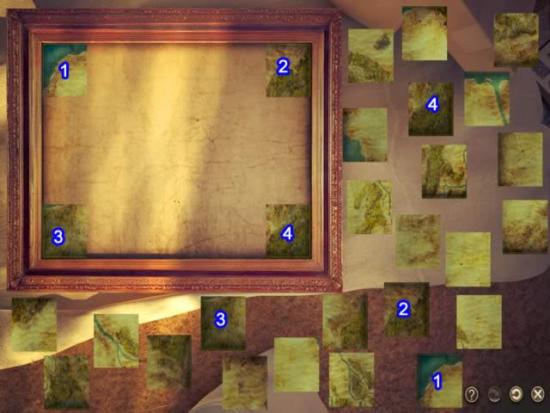
- Work from the outside in, matching patterns and colors.
- Each edge piece has a slightly darker border on the side where it fits into the map.
- Correctly placed pieces lock together.
- The four corner pieces are shown above.
- See the next screenshot for the solution.
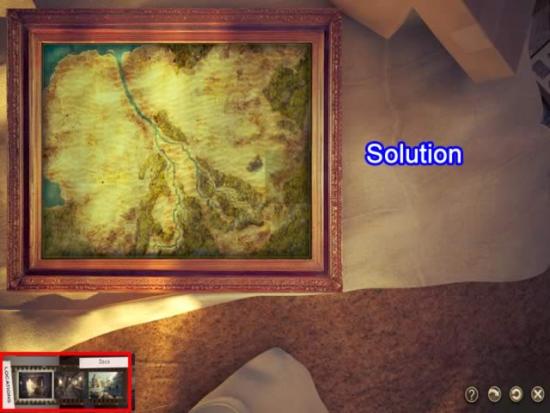
- After completing the puzzle, click the tab on the Location filmstrip.
- Click the Dock area.
- Place the STEERING WHEEL and the WHEELS on the abandon vehicle.
Chapter 4: Exploring the Tomb
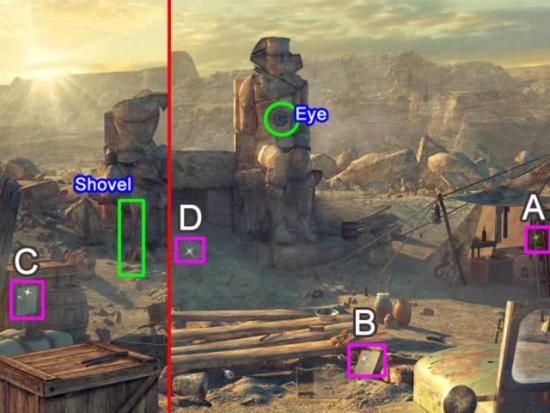
- Collect the eight SCARABS from the suitcase (A).
- Access the object list (B). Collect the EYE OF HORUS.
- Object list (C) contains the SHOVEL.
- Use the SHOVEL to remove the sand in front of the entrance (D).
- Place the EYE OF HORUS, PHARAOH’S MASK and ANKH in the slots above the entrance.
- Place the SCARABS on the inner door. Enter the Antechamber.
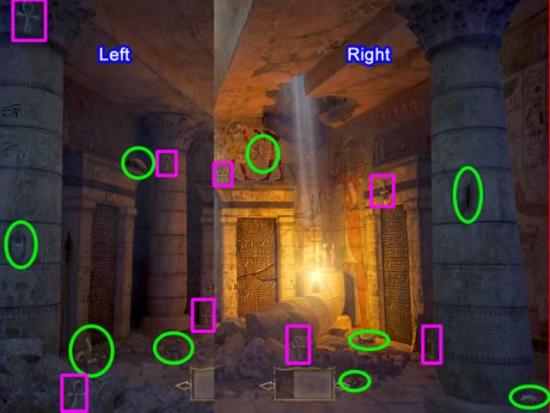
- Collect the nine dangerous creatures (green) and eight ANKHS (pink).
- Place the ANKHS in the center slot to open the door puzzle.
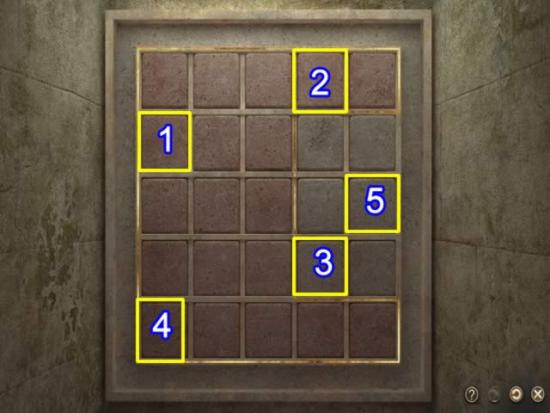
- Click the squares to recreate the pattern with red and gray squares.
- The above screenshot shows which squares to select and the order to press them to solve the puzzle.
- The door to the Anubis Statue opens. Enter the room.
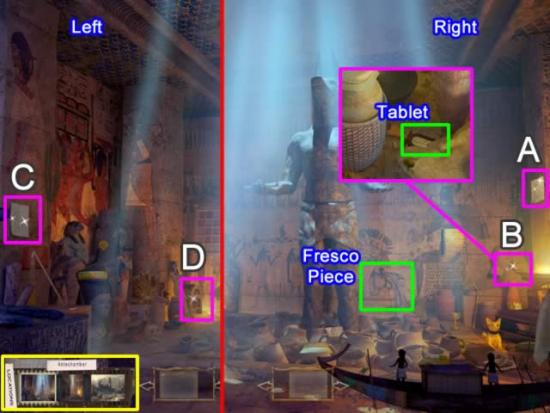
- Click the list on the right column (A). Collect the URN shards.
- Click the sphinx (B) to access the hidden object area. Collect the SIXTH EGYPTIAN TABLET.
- Scroll to the left side of the chamber.
- Click the list on the column (C). Collect the FRESCO PIECE.
- Click the chest (D) to access the hidden object area. Collect eight LEAD MARBLES.
- Return to the Antechamber.
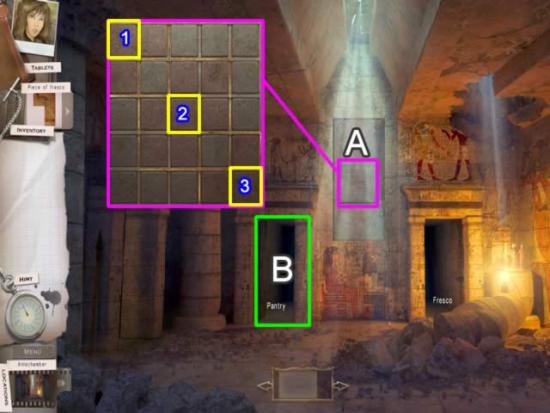
- Click the puzzle area (A) to access the door locks.
- Solve this puzzle by clicking the squares above: Row 1, Column 1; Row 3, Column 3; Row 5, Column 5.
- The doors to the Pantry (B) and the Fresco chambers open.
- Enter the Pantry.
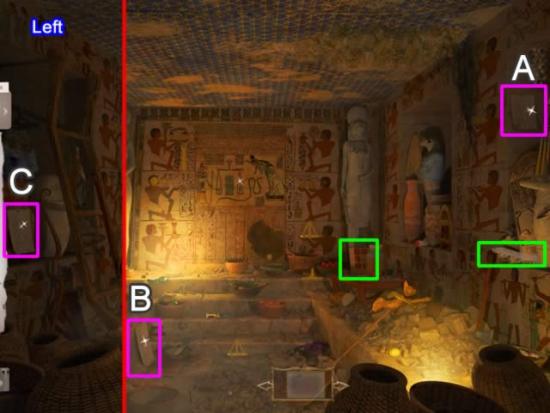
- Click the list on the right wall (A). Collect the SCALE fragments.
- Access the hidden object list on the floor (B). Collect the FEATHER.
- Access the silhouette list on the far left wall (C). Collect the PATTERN PIECE.
- Return to the Antechamber.
- Enter the door to the Fresco room.
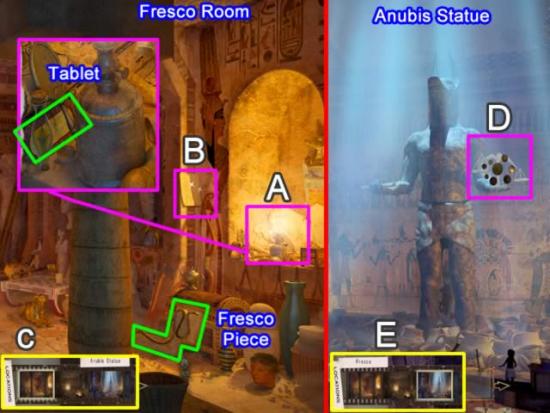
- Access the hidden object area (A). Collect the SEVENTH EGYPTIAN TABLET.
- Click the silhouette list (B). Collect the FRESCO PIECE.
- Click the tab on the Location strip. Select the Anubus Statue area.
- Place the SCALE and LEAD MARBLES in the empty hand (D).
- Collect the FRESCO PIECE from the other hand.
- Click the tab on the Location strip. Select the Fresco room.
- Place the two missing PATTERN PIECES in the pattern square.
- Return to the Antechamber
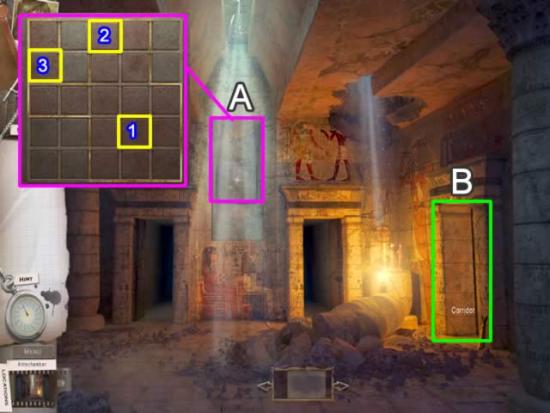
- Click the puzzle area (A) to access the door lock.
- Solve this puzzle by clicking the squares above: (1) Row 4, Column 4; (2) Row 1, Column 3; (3) Row 2, Column 1.
- The door to the Corridor opens.
- Enter the Corridor (B).
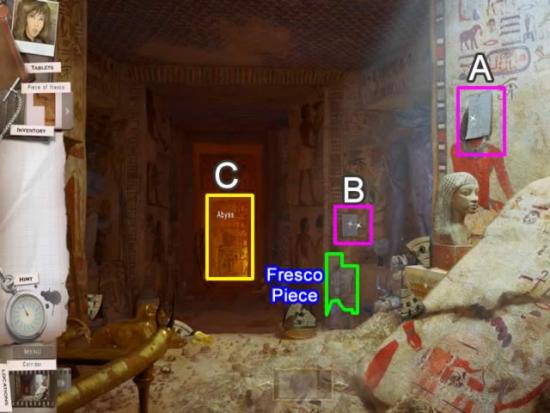
- Access the list (A). Find the WHEEL fragments.
- Click the silhouette (B) list. Collect the FRESCO PIECE.
- Enter the door to the Abyss (C).
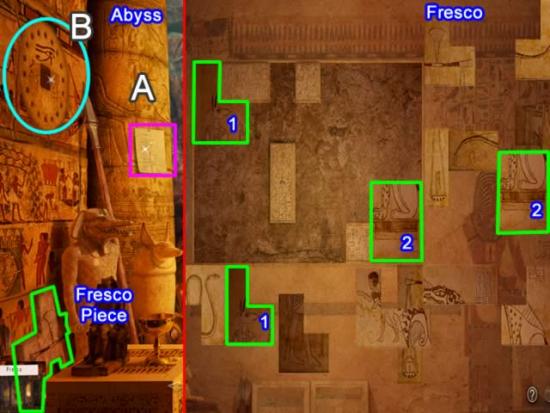
- Click the silhouette list (A). Collect the FRESCO PIECE.
- Place the WHEEL on the wall (B).
- Click the tab on the Location strip. Select the Fresco room.
- Click the back wall to access the fresco.
- Complete the fresco by placing the pieces according to pattern and content.
- The first two pieces are shown above.
- Correctly placed pieces lock into place.
- The solution is shown in the next screenshot.
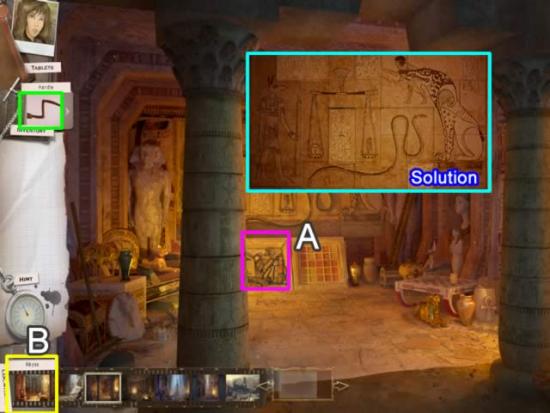
- Completing the fresco, opens the hidden object area (A).
- Collect the 12 BONE pieces. They form a HANDLE.
- Click the tab on the Location strip. Select the Abyss.
- Place the HANDLE in the center of the wheel placed on the wall in the above step.
- Return to the corridor and collect the eight HORUS EYES.
- Return to the Abyss. Click the handle on the wheel.
- A bridge rises to span the chasm.
- Cross the bridge to The Judgment.
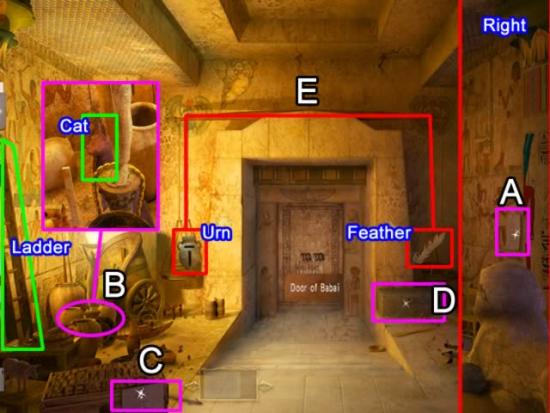
- Click the list on the right wall (A). Collect the fragments of a STONE KEY.
- Access the hidden object area (B). Collect the CAT STATUE.
- Click the hidden object list on the chest (C). Pick up the LADDER.
- Use the STONE KEY to open the stone chest (D). Find the 13 WOODEN LOGS.
- Place the URN and FEATHER on the weighing of the souls scale (E).
- The Door of Babai opens.
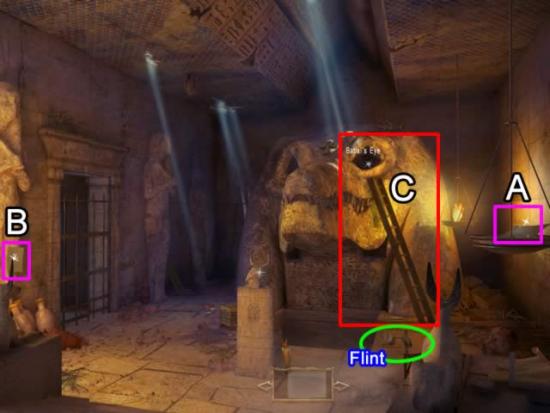
- Click the list on the scale (A). Collect the eight bunches of TWIGS.
- Click the object list on the left (B). Pick up the FLINT.
- Place the LADDER against Babai (C).
- Enter Babai’s Eye.
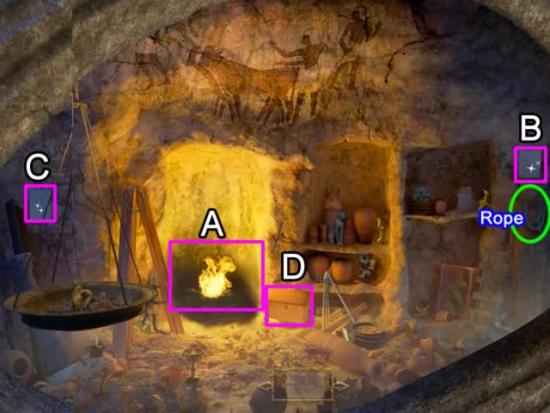
- Place the TWIGS and LOGS in the hearth (A). Use the FLINT to light the fire.
- Click the silhouette list on the right (B). Collect the ROPE.
- Access the list on the left (C). Collect the eight CHEST KEY fragments.
- Use the CHEST KEY to unlock the chest (D). Collect the eight MIRROR shards.
- Exit Babai’s Eye.
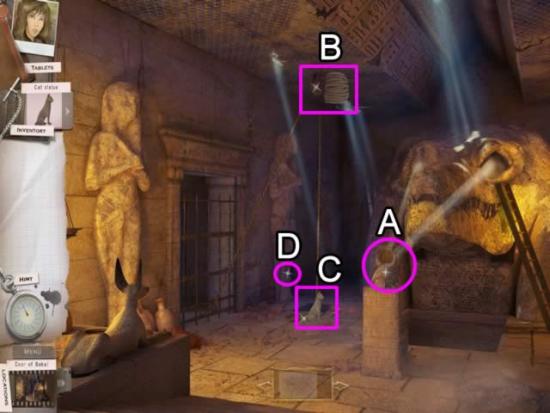
- Place the MIRROR on the rock python (A). A trap door opens in front of the gate.
- Place the ROPE on the pulley (B). One end attaches to the gate.
- Place the CAT on the other end of the rope (C) in front of the trap door.
- Click the area on the statue (D). The cat falls through the trap door. The gate opens.
Chapter 5: Escaping the Tomb
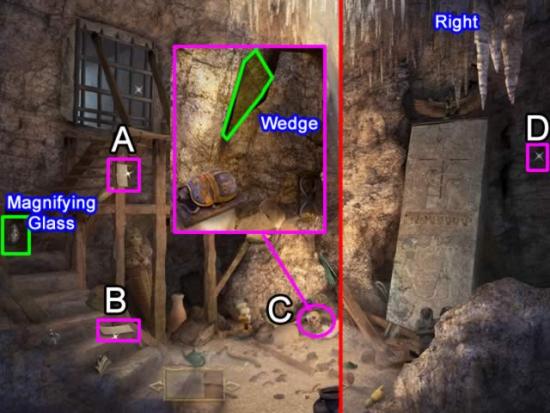
- Access the list on the scaffolding (A). Find the eight TORCH fragments.
- Click the list on the stairs. Pick up the MAGNIFYING GLASS.
- Click the hidden object area (C). Collect the WEDGE.
- Enter the Secret Room (D).
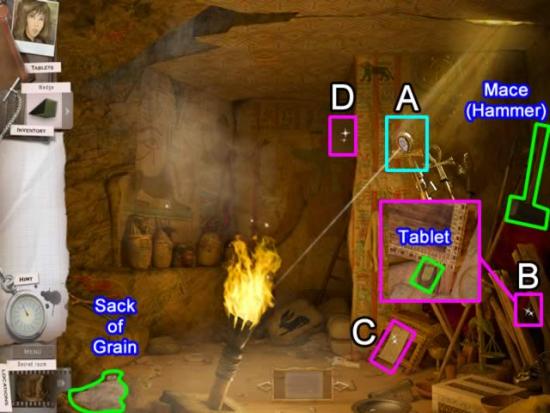
- Place the MAGNIFYING GLASS in the slot in the ankh (A).
- To light the room, place the TORCH by the beam created by the magnifying glass.
- Click the list by the boards (B) to open the hidden object area. Collect the EIGHTH EGYPTIAN TABLET.
- Click the list on the chest (C). Collet the SACK OF GRAIN.
- The list of objects (D) refers to a Hammer. The hammer goes to inventory as a MACE.
- Exit the Secret Room
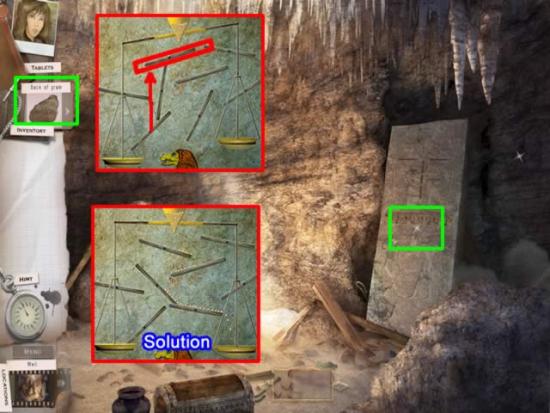
- Place the SACK OF GRAIN on the stone tablet to open the puzzle.
- Click and drag the sticks into position so the grain falls into the scale basket on the right.
- One solution is shown above.
- Place the WEDGE under the timbers at the top of the wooden platform.
- Use the MACE on the WEDGE to dislodge the timbers and open the Door of Babai.
- Enter the Tomb.
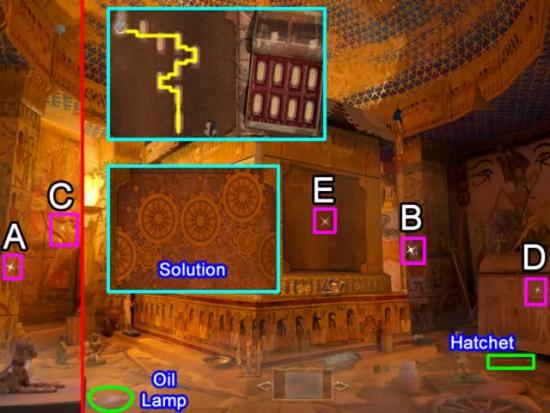
- Access the list on the left column (A). Collect the OIL LAMP.
- Click the list (B) to view the hidden objects. Collect the HATCHET.
- Use the HATCHET on the door (C). Obtain a KEY.
- Pour the oil from the OIL LAMP on the lock on the chest (D). Use the KEY to open the chest.
- Collect the six GEARS.
- Click the tomb (E) to access a puzzle. Match the background pattern and the marks on the tablets to form a path from the Pharaoh to Iseth. The solution is show in the inset above. The correct order for the tablets is 3, 4, 6, 2, 8, 7, 1, 5.
- The wall lowers revealing a gear puzzle. Place the GEARS on the puzzle and connect the two wheels. One solution is shown in the inset above.
View the final scene vindicating Kate’s Grandma.
Congratulations! You have completed The Secret Legacy: A Kate Brooks Adventure.
More articles...
Monopoly GO! Free Rolls – Links For Free Dice
By Glen Fox
Wondering how to get Monopoly GO! free rolls? Well, you’ve come to the right place. In this guide, we provide you with a bunch of tips and tricks to get some free rolls for the hit new mobile game. We’ll …Best Roblox Horror Games to Play Right Now – Updated Weekly
By Adele Wilson
Our Best Roblox Horror Games guide features the scariest and most creative experiences to play right now on the platform!The BEST Roblox Games of The Week – Games You Need To Play!
By Sho Roberts
Our feature shares our pick for the Best Roblox Games of the week! With our feature, we guarantee you'll find something new to play!Demon Piece Races – All Race Buffs
By Adele Wilson
Our Demon Piece Races guide details all of the buffs, rarities, and characteristics for each race in the One Piece Roblox game.


