- Wondering how to get Monopoly GO! free rolls? Well, you’ve come to the right place. In this guide, we provide you with a bunch of tips and tricks to get some free rolls for the hit new mobile game. We’ll …
Best Roblox Horror Games to Play Right Now – Updated Weekly
By Adele Wilson
Our Best Roblox Horror Games guide features the scariest and most creative experiences to play right now on the platform!The BEST Roblox Games of The Week – Games You Need To Play!
By Sho Roberts
Our feature shares our pick for the Best Roblox Games of the week! With our feature, we guarantee you'll find something new to play!Demon Piece Races – All Race Buffs
By Adele Wilson
Our Demon Piece Races guide details all of the buffs, rarities, and characteristics for each race in the One Piece Roblox game.
Death at Fairing Point: A Dana Knightstone Novel Walkthrough
Welcome to the Death at Fairing Point: A Dana Knightstone Novel walkthrough on Gamezebo.com. Death at Fairing Point: A Dana Knightstone Novel is an adventure puzzle game for the PC created by Boomzap.. This walkthrough includes tips and tricks, helpful hints, and a strategy guide on how to complete Death at Fairing Point: A Dana Knightstone Novel.
Death at Fairing Point – Game Introduction
Welcome to the Death at Fairing Point: A Dana Knightstone Novel walkthrough on Gamezebo.com. Death at Fairing Point: A Dana Knightstone Novel is an adventure puzzle game for the PC created by Boomzap.. This walkthrough includes tips and tricks, helpful hints, and a strategy guide on how to complete Death at Fairing Point: A Dana Knightstone Novel.
General Tips
- Settings: On the Main Menu, click on Settings to adjust the sound volume, music volume, and toggle between full screen or windowed display. You may default to the game’s custom cursor or use the system cursor instead. These options are also accessible from within the game by selecting the Menu button.
- Profiles: Click on Player to change the default name to your own. You may add, delete, or switch user profiles. Here, you can also track your total playing time.
- Bonus Content: After you complete the story, a bonus chapter will be unlocked, accessible from the main menu. This is available only in the Collector’s Edition.
- Cutscenes: To advance a line of dialogue at a time, click the right-mouse button. You may also choose to skip the whole cutscene entirely.
- Cursor Icons: Your cursor will change to various icons as you move your mouse around the screen. The speech bubble icon lets you speak to a person. The magnifying glass icon lets you zoom closer into an area. The hand icon means you can pick something up.
- Navigation: A directional arrow will appear over areas where you can move to another scene. When in a close-up view of an area, simply click anywhere outside a zoom window to close it, or on the bottom of the screen to exit.
- Inventory: Objects that you pick up will go into the inventory tray at the bottom of your screen. Only 8 objects are visible at a time, but you can store more than that. If you’ve picked up an item but it seems to be missing, look for it using the scroll arrows on the left and right of the inventory tray.
- Notebook and Goals: Your notebook can be accessed from the bottom left of the screen. It contains important clues and story notes, so make a habit of checking it regularly. Here you can access the Goals tab – this guides you on what to do next in order to progress in the game.
- Hints: If you’re stuck, click on the Hint button on the lower right of the screen. In hidden object scenes, it will point out a random item from the list; if you’re exploring, you’ll get a clue as to where to go. Hints get more specific the more you use them. You’ll need to wait for the Hint button to refill before you can use another hint.
- Skips: All puzzles may be skipped once the Skip meter is full. However, be aware that if you accidentally exit a puzzle and then re-enter it, the Skip meter will be reset.
- Clicking Penalties: In hidden object scenes, if you randomly click on wrong items, the cursor will spin around in a blue haze, making you unable to click for a few seconds.
- Tutorial: A guided tutorial is available at the start of the game. You may skip it, but when playing the game for the first time, we recommend that you take the tutorial.
Walkthrough
- This walkthrough is for the Standard Edition of the game. The Collector’s Edition contains a built-in strategy guide, accessible from within the game by clicking on the Menu button on the left.
- Please note that Death at Fairing Point: A Dana Knightstone is a non-linear game. Since you can explore locations freely, the order of tasks presented in this walkthrough may vary from what you encounter.
- If you need help with a specific task or item, hit Ctrl-F on your keyboard and type what you’re looking for. This will scan the walkthrough for all appearances of that word.
- In hidden object scenes, the item search lists may vary each time you play the game. The screenshots shown below are only an example; what you see on your screen may be different.
Chapter 1: Halward Manor
BEDROOM

- Speak to the concierge.
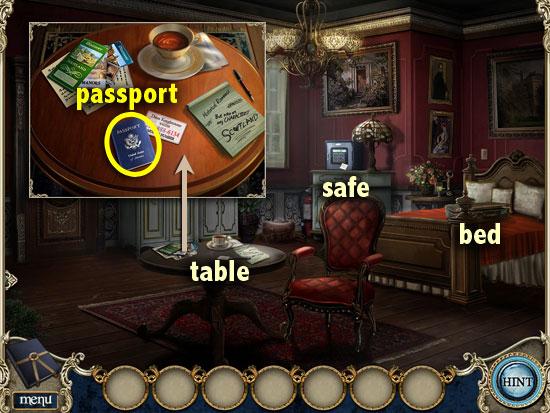
- Look closer at the table. Pick up the passport.
- Take note of the mobile number on your calling card.
- Click outside the pop-up frame to exit it.
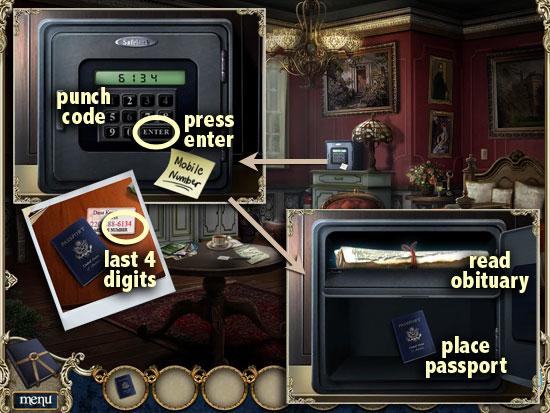
- Examine the safe. The sticky note says “mobile number”.
- On the keypad, punch in the last 4 digits of your mobile number and press Enter.
- Take the passport from your inventory and store it in the safe.
- Pick up the scroll that appears. Click outside the frame to exit the obituary.
- The window in the room suddenly opens; click on the window to shut it. Zoom in to discover that a latch is missing.
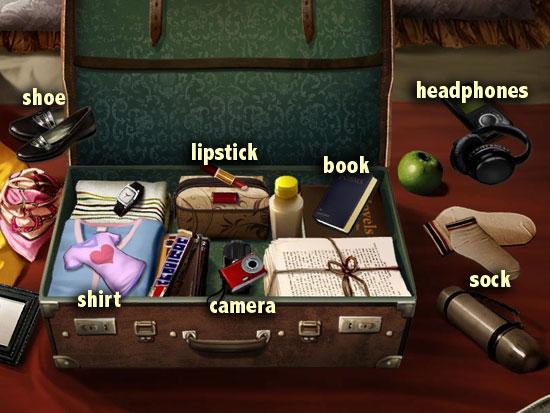
- Look closer at the bed.
- Take the items from the inventory bar and group them with related items above.
- When the suitcase closes, take the umbrella behind it.
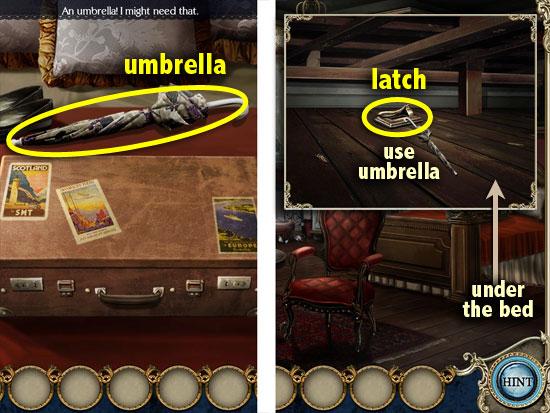
- Check under the bed. Use the umbrella to reach the missing latch.
- Look inside the armoire. Take the screwdriver and the dustpan.
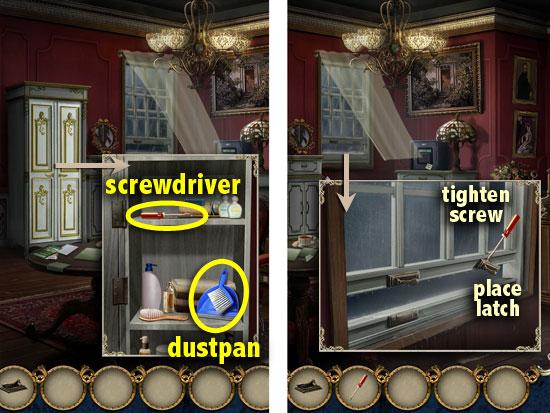
- Zoom into the window sill. Take the latch from your inventory and place it on the window.
- Tighten it with the screwdriver, and then click the window to close it.
- Examine the mirror pieces below the window.
- Use the dustpan to gather the 6 mirror pieces scattered around.
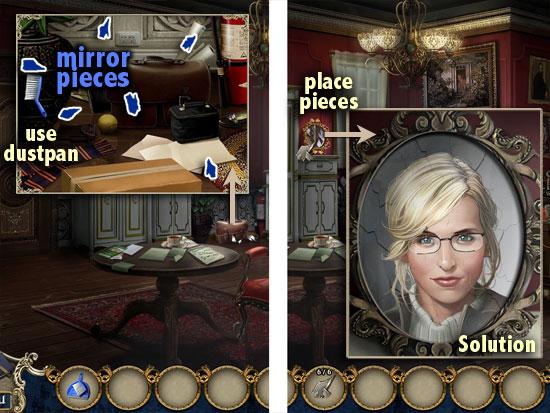
- Place the mirror pieces on the broken mirror.
- Drag and rotate the pieces to reassemble the mirror.
- When a piece is in the correct spot, it will lock into place.
- Click on the ghostly reflection, and then on David’s ghost.
- Walk out into the hallway.
SECOND FLOOR HALLWAY
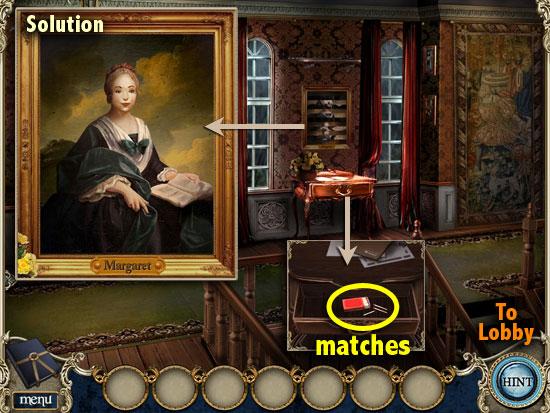
- Speak to the concierge.
- Check the side table. Take the matches from the drawer.
- Look closer at the painting.
- Swap the strips to complete the painting of Margaret.
- Exit the painting. Go downstairs to the lobby.
LOBBY
- Click on David’s ghost. He points at the parlor door, which opens.
- Follow him inside the parlor.
PARLOR
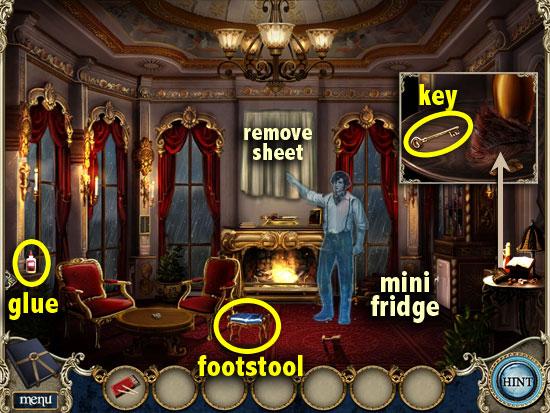
- Click on David’s ghost to see what he wants. Acknowledge by clicking on the white sheet. A painting is revealed underneath.
- Take the bottle of glue from the left ledge, and the blue footstool from the center of the room.
- Examine the side table on the right, and take the metal key.
- Look inside the mini-fridge on the right.
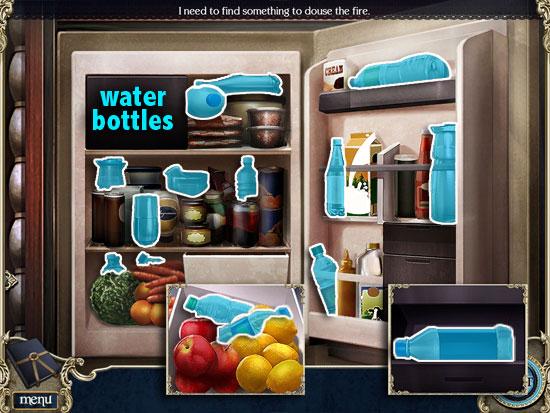
- Find 15 water bottles; 2 are hidden in the bottom tray, and 1 is in the door compartment.
- Click downwards to exit to the lobby. Go up the stairs to the hallway.
SECOND FLOOR HALLWAY
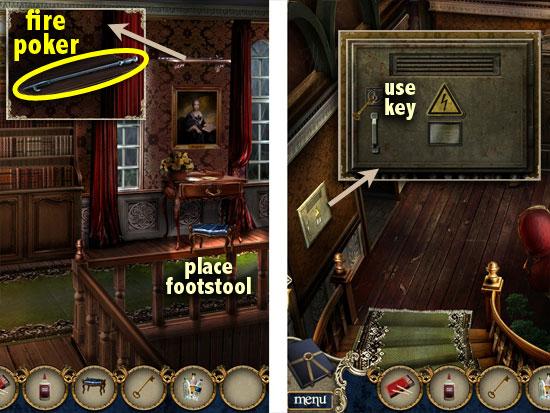
- Position the footstool on the lighted area below the desk.
- Check the shelf above the painting and take the fire poker.
- Return to the lobby.
LOBBY
- Look closer at the fusebox on the left wall.
- Unlock it with the metal key that you found in the parlor.
- Swap the fuses so that they are in the correct row and column.
- The middle column has a numerical value of 35; the rows from top to bottom are A, B, C, D and E.
- Start with the fuses that are clearly labeled; the remaining burnt ones will then be easier to sort.
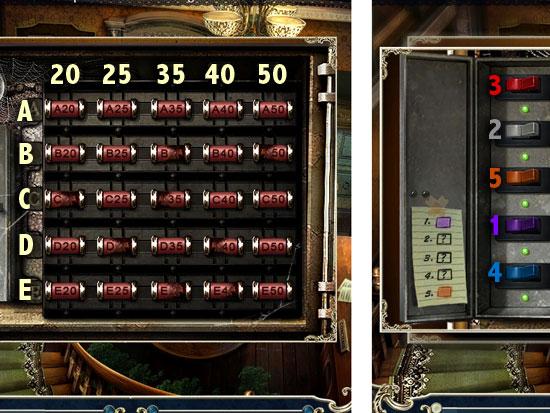
- Zoom in on the panel that opens up.
- Flip the switches in a specific order, using trial and error. Use the hints on the note to help you (purple first, orange last).
- If a switch is correct, it will turn green; if wrong, the switches will reset to the off position.
- The correct order is: purple, grey, red, blue and orange.
- Enter through the lighted doorway on the left, to the atrium.
ATRIUM
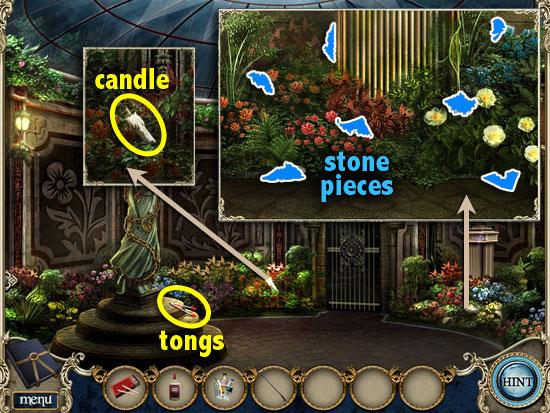
- Pick up the tongs at the foot of the statue.
- Check the bushes to the left of the gate and pick up the candle.
- Look closer at the bushes on the right of the gate. Pick up 7 stone pieces scattered among the bushes.
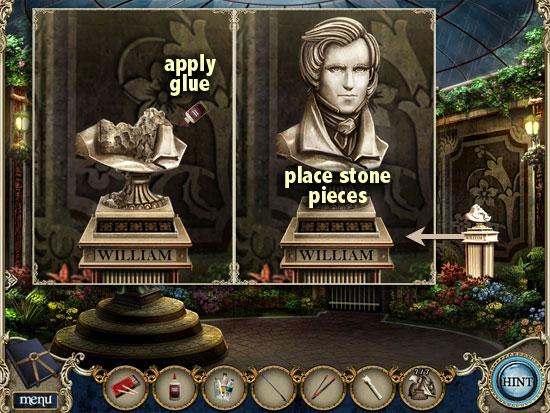
- Zoom in on the bust stand. Apply glue on the broken bust.
- Return the stone pieces and exit the bust.
- Go back to the parlor.
PARLOR
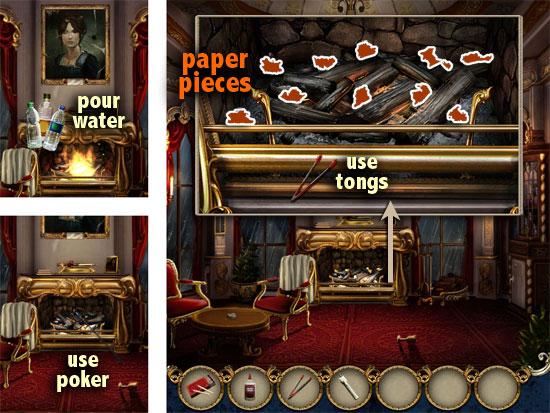
- Use the water bottles to douse the fire in the fireplace.
- Then, use the fire poker to sift through the ashes.
- Zoom in and use the tongs to retrieve the 10 pieces of paper.
- Look closer at the round table.
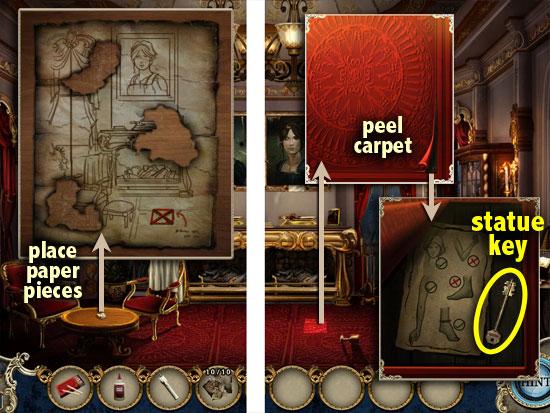
- Place the pieces of paper on the table.
- Drag and rotate the pieces to complete the burnt drawing. When done, note the location of the red X, and exit the diagram.
- Examine the lighted spot on the carpet corresponding to the red X in the diagram. Peel back the carpet.
- Note the statue drawing, take the statue key and exit the stash.
- Leave the parlor and go left to the atrium.
ATRIUM
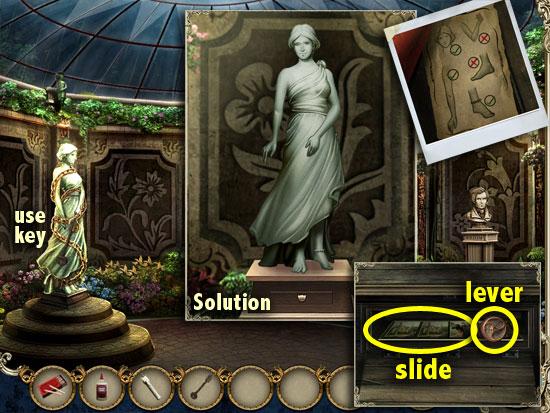
- Use the statue key on the chained statue.
- Click on the statue’s head, arms and feet according to the drawing in your notebook.
- Match the poses with green checkmarks, and don’t match the poses with red X’s.
- Take the lever and the slide from the compartment that opens up.
- Go back to the lobby.
LOBBY / MAGIC LANTERN BOOTH
- Examine the locked booth door.
- Insert the lever into the slot of the lever mechanism.
- Pull the lever and enter the booth.
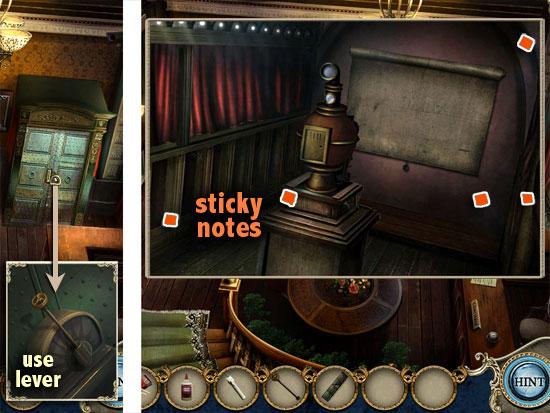
- Collect the 5 sticky notes around the booth.
- Exit the booth.
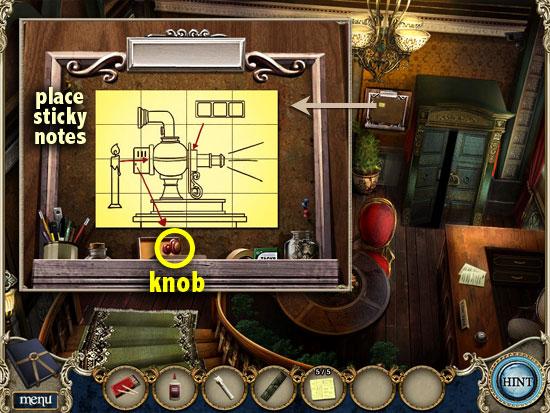
- Zoom in on the bulletin board. Place the sticky notes on the board.
- Swap the notes to complete the drawing. When a note is in the correct position, it will light up and lock into place.
- When done, take the knob from below the diagram and exit.
- Go inside the booth again.
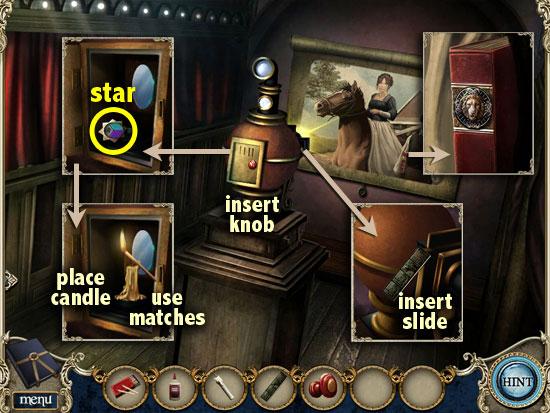
- Insert the knob into the tiny hole on the lantern door. Open the compartment and look inside.
- Take the star (1 of 5). Place the candle in the holder inside the compartment. Light it with the matches.
- The front of the projector pops up. Insert the slide into the empty slot. View the slide show.
- Get a closer look at the image of David on the projection wall. Note the red book with the lion crest.
- If you wish to view the slide show again, just click on the projector.
- Exit to the lobby and go upstairs to the hallway.
SECOND FLOOR HALLWAY
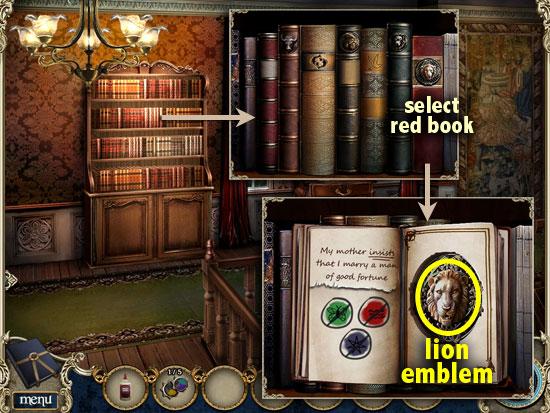
- Examine the bookcase. Select the red book with the lion crest.
- Take the lion emblem from the right page. Note the symbols on the left.
- Exit the book and go downstairs to the atrium.
ATRIUM
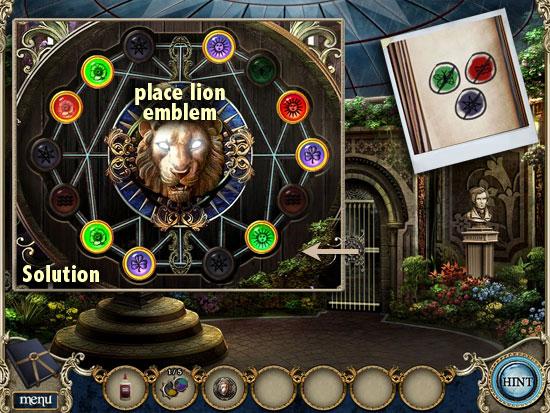
- Look closer at the gate.
Place the lion emblem on the recess in the center. - Refer to the clues in your notebook to see which symbols should not be selected. On the gate, turn on all the symbols except those.
- Enter through the gate to the conservatory.
CONSERVATORY / BALCONY
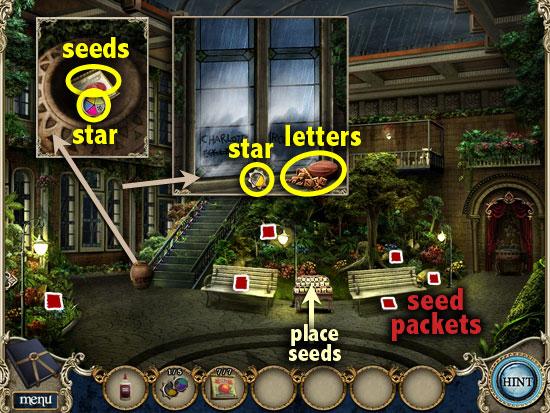
- Collect the 6 seed packets around the room.
- Examine the window on the left. Take the star (2 of 5) and the pouch of letters. Note the etched names on the glass.
- Check inside the big flower pot beside the stairs. Take the last seed packet (you should now have 7), and a star (3 of 5).
- Place the seed packets on the seed rack between the benches.
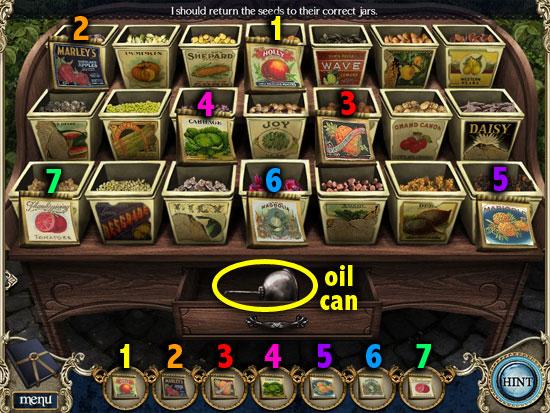
- Drop the seeds from the inventory bar into their correct seed containers.
- Take the oil can from the drawer that opens up.
- Open the sliding gate at the top of the stairs. Take a closer look at it.
- Use the can of oil on the 2 rusty wheels. Push open the sliding gate and enter the balcony.
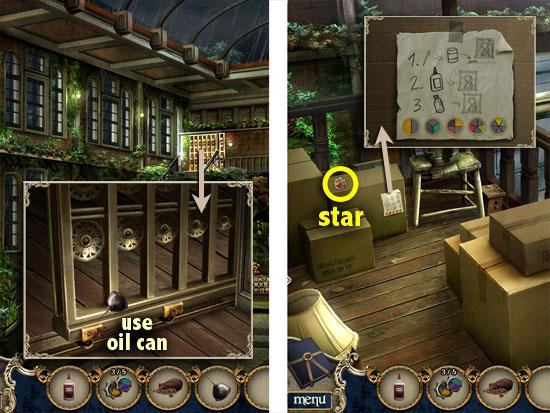
- Take the star (4 of 5).
- Examine the note stuck to the box.
- Go back down the stairs, down twice to the lobby, and forward to the parlor.
PARLOR
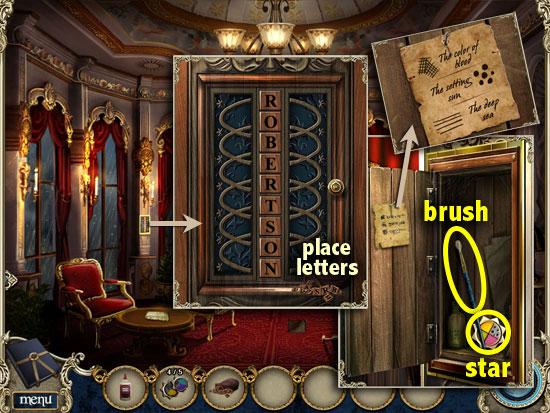
- Examine the box on the wall between the left windows. Place the pouch of letters on the empty squares.
- Click on the letters to form a word. Check your notebook for a clue: it’s one of the names carved on the conservatory window.
- When the box opens, take the brush and the last star (5 of 5).
- Read the note on the box door – it’s a clue to the next puzzle.
- Exit the room and go back to the conservatory.
CONSERVATORY
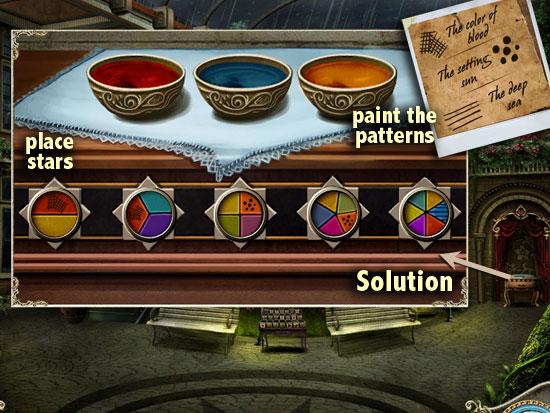
- Look closer at the side table on the far right.
- Insert the stars into the star-shaped slots.
- Refer to the pattern clue in your notebook. The color of blood refers to red, the setting sun refers to orange, and the deep sea refers to blue.
- Paint the patterns in the stars using those color references.
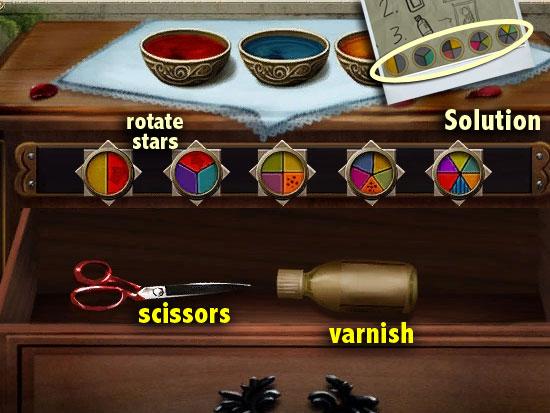
- Rotate each star to its correct orientation.
- Check the notebook for the clue titled ‘Restoring a painting.’ The diagram shows you the correct rotation for each star.
- When done, take the scissors and varnish from the drawer that opens up.
- Go up the stairs to the balcony.
BALCONY
- Use the scissors to cut open the sealed box. Take the solvent from inside.
- Go back down and to the parlor.
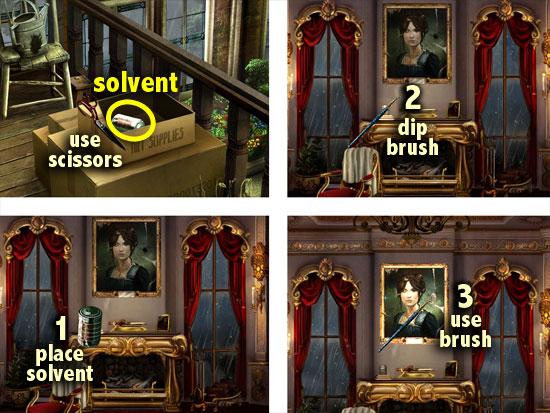
PARLOR
- Place the solvent on the empty space, on the left side of the fireplace mantel.
- Dip the brush into the solvent.
- Use the brush with solvent on the painting.
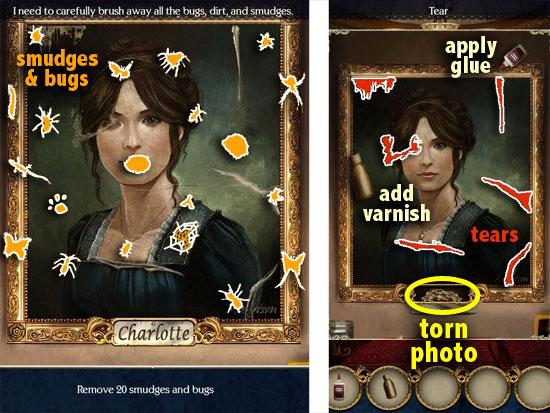
- Find 20 smudges and bugs.
- Apply the glue on 6 tears in the painting. Lastly, add varnish.
- Take the torn photo from behind the nameplate that opens up.
- Exit to the lobby.
LOBBY
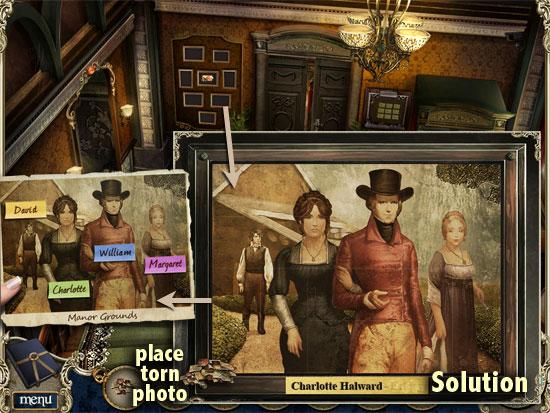
- Look closer at the photo frames on the wall. Place the torn photo on the remains of the photo.
- Swap the pieces to complete the photo. When a piece is in the correct position, it will light up and lock into place.
- Drag the labels to the empty boxes, so that each person in the photo is correctly named.
- When done, you will receive a photograph (1 of 6).
- Click on David’s ghost to wrap up your initial investigation.
Chapter 2: The Manor Grounds
OUTSIDE PUB
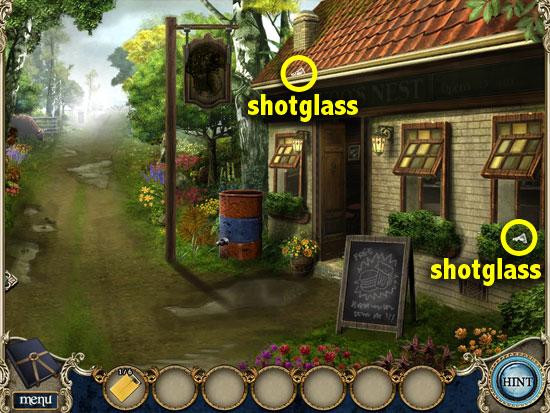
- Collect 2 shotglasses.
- Enter the pub.
PUB
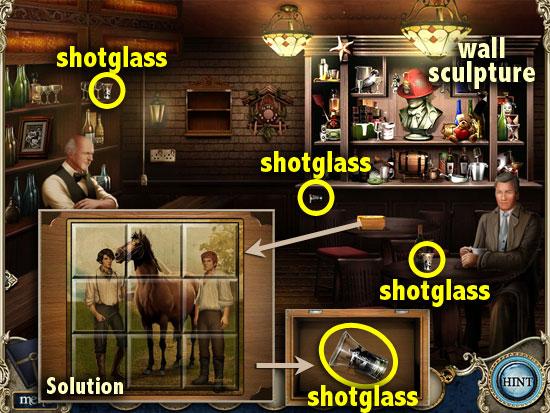
- Collect 3 shotglasses scattered around the room.
- Examine the puzzle box on the table.
- Swap and rotate the tiles to complete the picture. When done, take the shotglass from the box.
- Speak to the pub owner. Look closer at the wall sculpture.
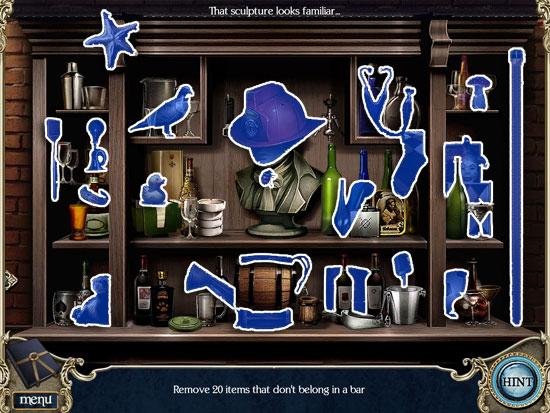
- Find 20 items that don’t belong in a bar. When done, reading glasses will go into your inventory.
- Give the reading glasses to the pub owner.
- Exit the pub and go forward down the road.
ROAD
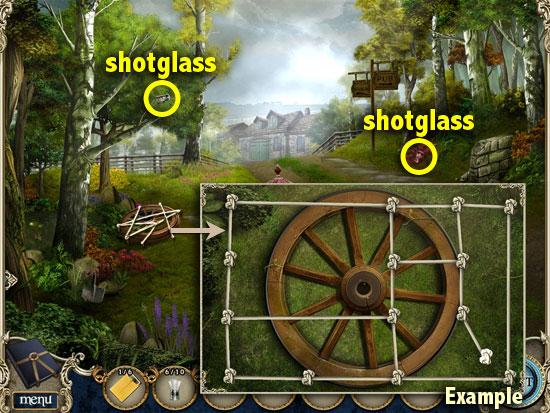
- Collect 2 more shotglasses.
- Look closer at the wheel on the ground.
- Untangle the ropes by moving the knots aside, until all the ropes are white. There are several ways to solve this; an example is shown here.
- When done, a wheel (1 of 2) will go into your inventory.
- Walk forward to the stables.
OUTSIDE STABLES
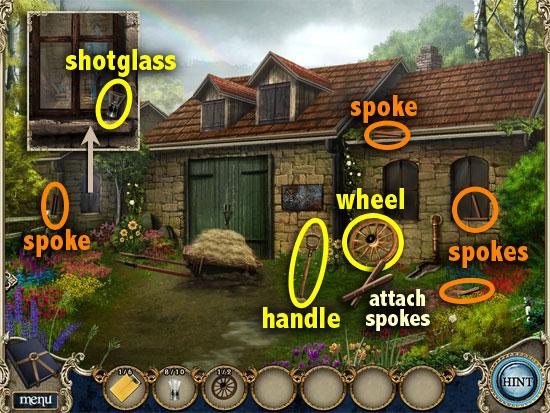
- Look closer at the leftmost window. Take the shotglass from the window sill.
- Take the handle from the ground.
- Collect 4 spokes around the area. Place them on the broken wheel. Take the wheel (2 of 2).
- Go back down the road.
ROAD
- Attach the handle to the shovel head wedged in the ground.
- Take the shovel.
- Return to the stables.
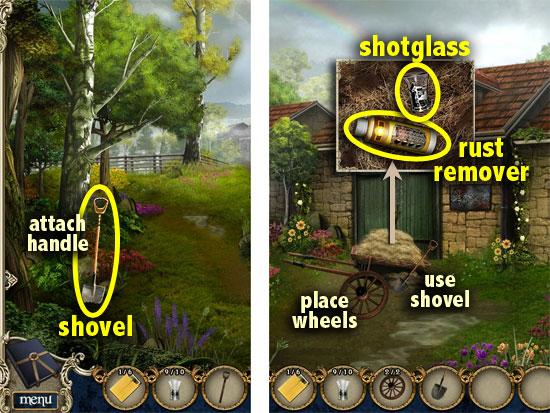
OUTSIDE STABLES
- Use the shovel to remove the mud under the wheelbarrow.
- Attach the wheels to the wheelbarrow. Push the wheelbarrow aside.
- Click on the ghost of the stablehand. Check inside the wheelbarrow.
- Take the rust remover and the last shotglass. You should now have 10 shotglasses.
- Return to the pub.
PUB
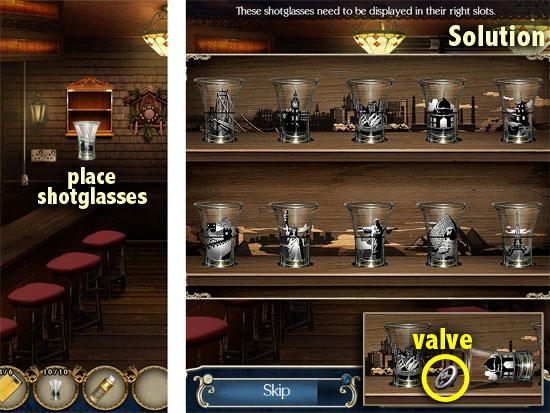
- Place the 10 shotglasses on the shotglass rack on the wall.
- Swap the tops and bottoms of the shotglasses so that their designs match the rack’s backgrounds.
- When done, take the valve that falls out from one of the shotglasses.
- Exit the pub.
OUTSIDE PUB
- Look closer at the faucet of the barrel.
- Attach the valve to the faucet. Turn the tap to drain the barrel.
- Look inside the barrel and take the box of metal letters.
- Go forward to the stables.
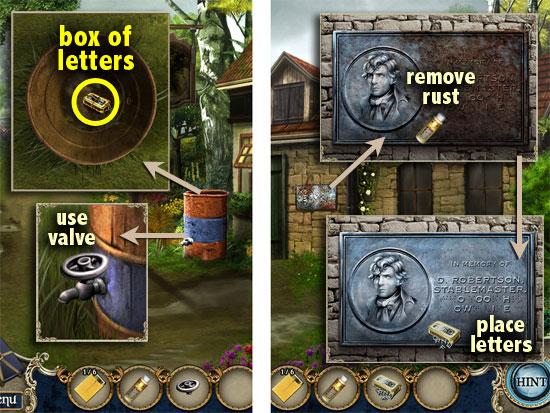
OUTSIDE STABLES
- Look closer at the wall plaque by the door.
- Use the rust remover to clear up the rust.
- Place the box of metal letters on the plaque.
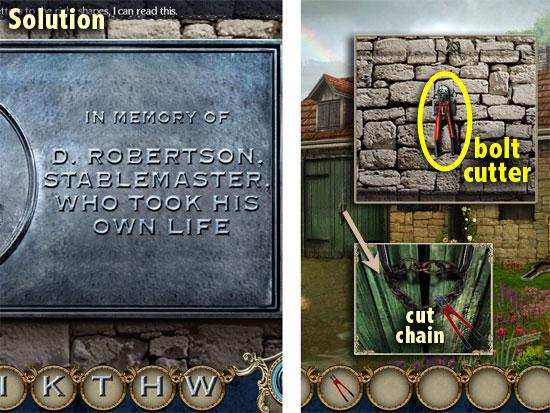
- split plaque / stables 2 popups bolt cutter, chains
- Use the letters from the inventory bar to complete the words on the plaque.
- Take the bolt cutter that appears. Exit the plaque.
- Look closer at the stables door. Use the bolt cutter to cut the chains. Enter the stables.
STABLES
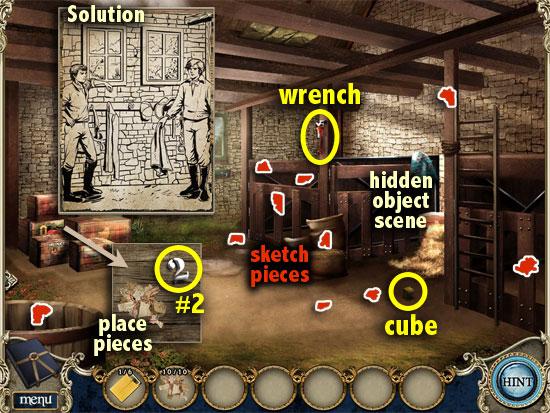
- Collect the 10 sketch pieces scattered around the room.
- Pick up the metal cube (1 of 3) from the floor. Also, take the wrench from the post.
- Examine the crates. Take the number 2 from the crate.
- Place the sketch pieces on the crate surface. Drag and rotate the pieces to reassemble the sketch.
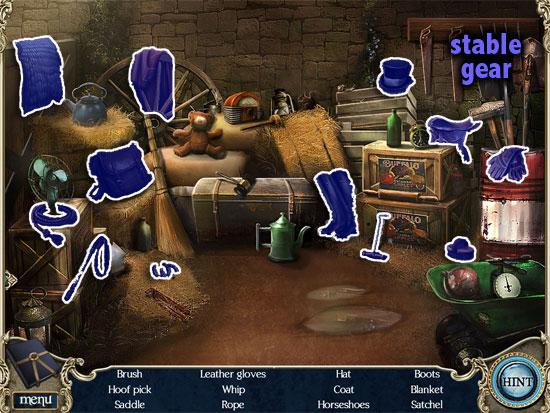
- Zoom in on the stall on the right to access a hidden object scene.
- Find the items on the list. When done, stable gear will go into your inventory.
- Hang the stable gear on the hooks below the windows.
- Open the bag and take the hammer and chisel from inside.
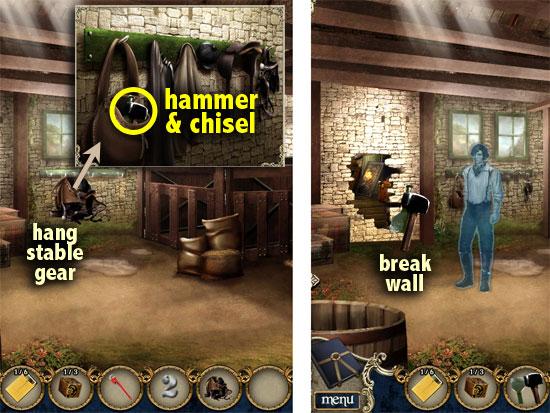
- Click on David’s ghost.
- Use the hammer and chisel 3 times on the brick wall, until a secret room is revealed.
- Enter the workshop.
DAVID’S WORKSHOP
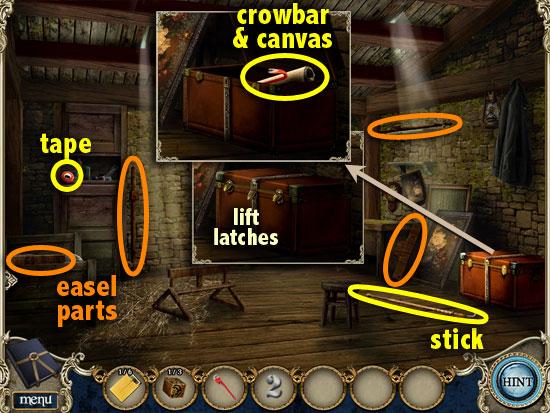
- Take the electrical tape from the shelf on the left. Pick up the long stick lying on the floor.
- Examine the trunk on the right. Lift the 3 latches. Take the crowbar and the old canvas from the trunk.
- Gather the 4 easel parts scattered around.
- Place the easel parts on the broken easel in the center of the room.
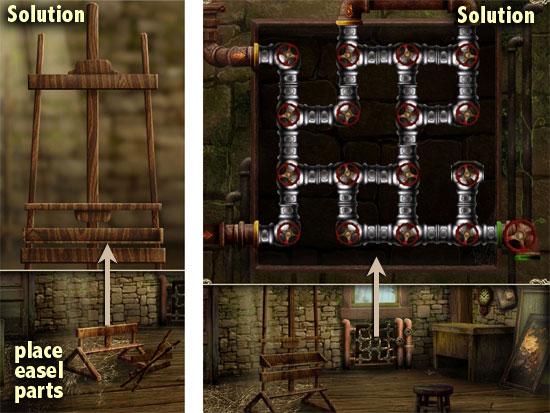
- Drag and rotate the easel parts to reassemble the easel.
- Check the pipes below the window.
- Rotate each pipe section so that all the pipes are connected, without any openings in the system.
- Exit the workshop.
STABLES
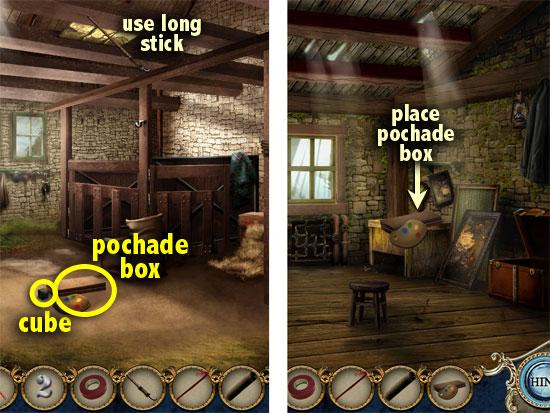
- Use the long stick to reach the loose boards in the ceiling. Click until all 3 boards are removed.
- Pick up the pochade box and the metal cube (2 of 3).
- Go back into the workshop.
DAVID’S WORKSHOP
- Put the pochade box down on the work desk, on the right.
- Find 20 painting supplies.
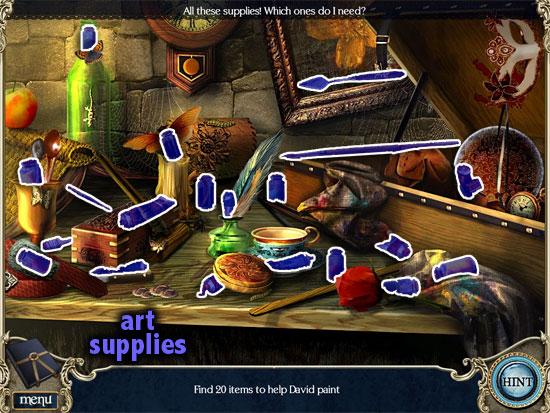
- When done, art supplies will go into your inventory.
- Place the old canvas on the easel, and the art supplies on the canvas.
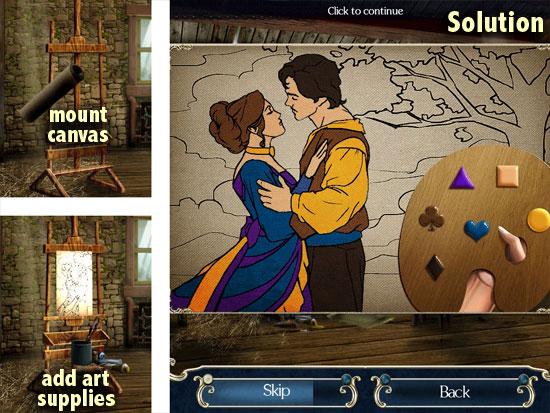
- Paint the picture by applying paint from the palette onto the corresponding symbols. It’s like painting by numbers, but using symbols.
- Click on David’s ghost. Inspect the cracked floorboard to the left of the easel.
- Use the crowbar to lift the boards.
- Read David’s note, and take it for your investigation.
- Pick up the red dry rag underneath.
- Leave the workshop and the stables.
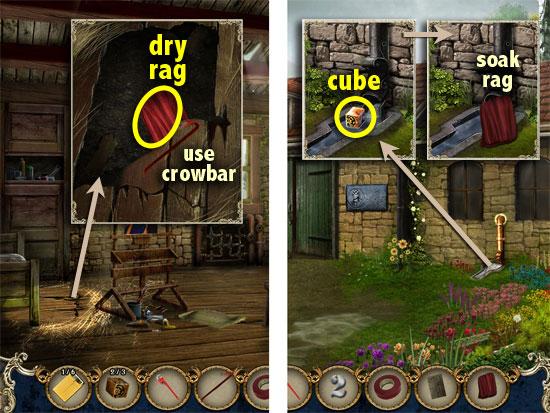
OUTSIDE STABLES
- Look closer at the faucet on the right.
- Take the last metal cube (3 of 3). Soak the dry rag in the water to obtain a wet rag.
- Go back down the road.
ROAD
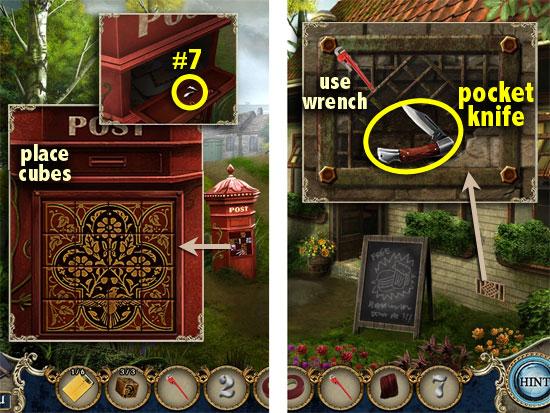
- Examine the mailbox. Place the metal cubes on the puzzle.
- Click each cube to select a design common to all the cubes, forming a complete picture.
- Take the number 7 from the mailbox door.
- Go down towards the pub.
OUTSIDE PUB
- Check the grate on the right, below the windows.
- Remove the 4 bolts with the wrench. Take the pocket knife from the niche.
- Go back to the stables.
STABLES
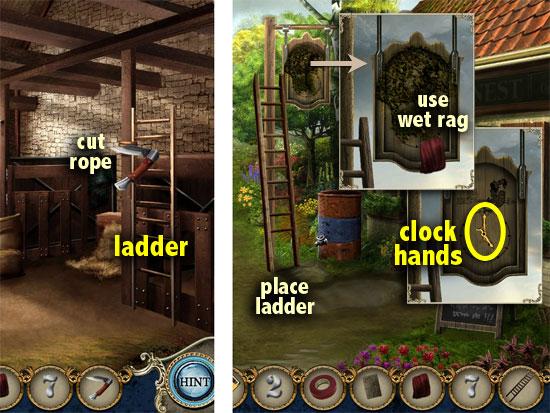
- Use the pocket knife to cut the rope securing the ladder.
- Take the ladder. Return to the pub entrance.
OUTSIDE PUB
- Perch the ladder against the pole with the sign.
- Examine the sign. Clean the dirty sign with the wet rag.
- Take the hour hand and the minute hand. Note the time indicated on the clock.
- Enter the pub.
PUB
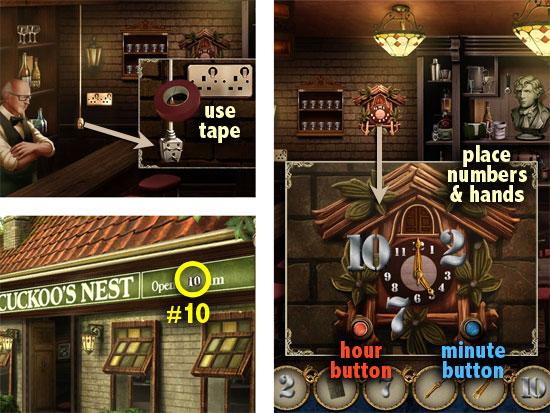
- Inspect the signage plug.
- Use the electrical tape on the frayed wire. Put the plug into the wall socket.
- Go outside to check the neon sign.
OUTSIDE PUB
- Take the number 10 from the right side of the sign, where it says ‘opens 10 am’.
- Go back inside the pub.
PUB
- Zoom in on the cuckoo clock.
- Place the hour hand, the minute hand, and the numbers 2, 7, and 10 on the clock face.
- Push the red hour button and blue minute button until the clock displays the time the rooster crows (see pub sign).
- View the photograph on the cuckoo bird. Take the photograph (2 of 6).
Chapter 3: Baltoun Village
TOWN HALL
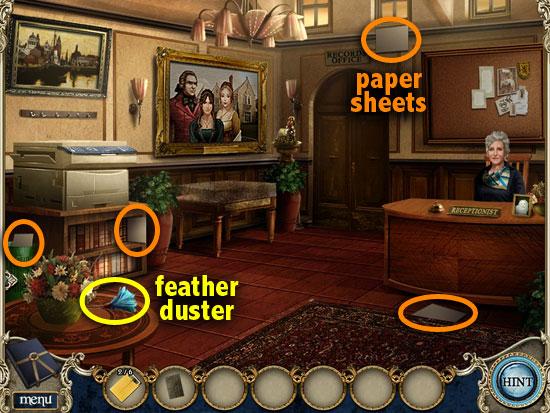
- Enter the town hall. Speak to the receptionist.
- Collect the 4 sheets of paper scattered around.
- Take the feather duster from the table on the left.
- Exit the town hall. Go right to the town square. Walk forward to the bridge.
BRIDGE
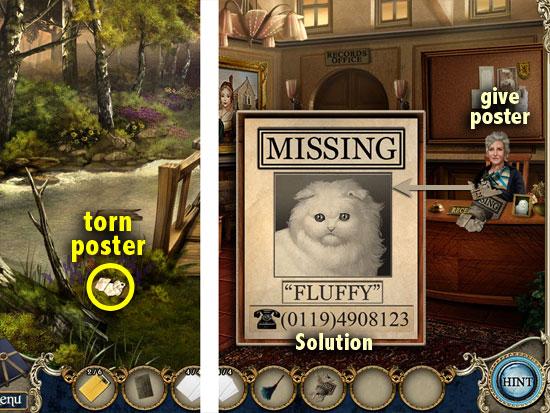
- Pick up the torn cat poster.
- Go back inside the town hall.
RECEPTION AREA
- Give the torn cat poster to the receptionist.
- Drag and rotate the pieces to reassemble the cat poster. When a piece is in the correct position, it will light up and lock into place. When completed, the cat poster will go into your inventory.
- Examine the photocopier. Untangle the wires by moving the plugs around, until all the cables are white. There are several ways to solve this; an example is shown here.
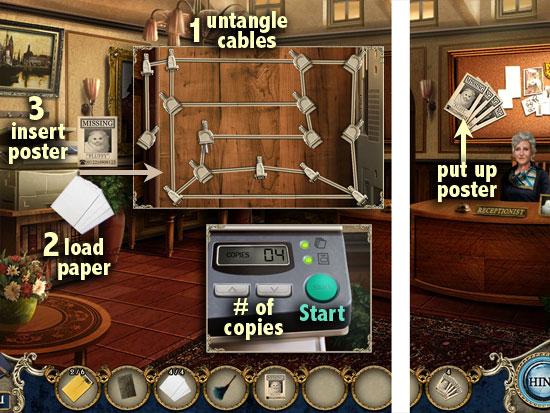
- Load the photocopier with the 4 sheets of paper.
- Lift the cover of the photocopier. Insert the cat poster under the lid.
- On the control panel, press the up arrow button to display 4 copies, and push the Start button. When done, you’ll have 4 cat posters in your inventory.
- Put up a cat poster on the bulletin board behind the receptionist.
- Exit the town hall.
OUTSIDE TOWN HALL
- Examine the brick wall to the left of the doorway.
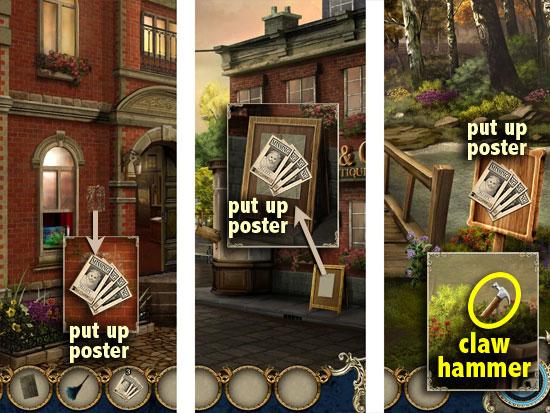
- Put up a cat poster on the notice area where a faded poster used to be.
- Proceed to the town square.
TOWN SQUARE
- Inspect the notice board on the right.
- Replace the notice with a cat poster.
- Go forward to the bridge.
BRIDGE
- Put up the last cat poster on the notice board on the right.
- Take the claw hammer that appears.
- Try to retrieve Fluffy, but she runs off.
- Go back towards the town hall.
OUTSIDE TOWN HALL
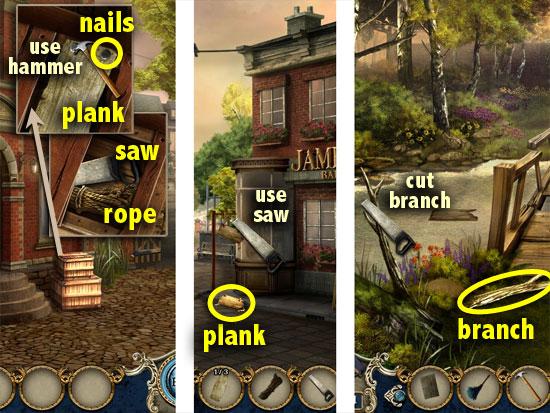
- Examine the crate by the steps.
- Use the claw hammer to remove the 4 nails from the wooden board.
- Take the loose wood plank (1 of 3). Inside the crate, take the hand saw and the rope.
- Walk to the town square.
TOWN SQUARE
- Cut down the broken sign with the hand saw.
- Pick up the fallen wood plank (2 of 3).
- Go forward to the bridge.
BRIDGE
- Cut off the tree branch on the left with the hand saw. Pick up the fallen branch.
- Use the branch to reach the floating plank in the creek. The wood plank (3 of 3) will go into your inventory.
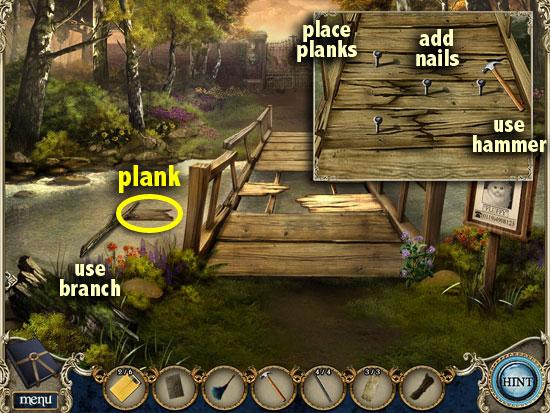
- Zoom in on the holes in the bridge. Place the wood planks on the holes.
- Fasten them with the nails. Pound each of the 4 nails in with the claw hammer.
- Go across the bridge.
GRAVEYARD GATE
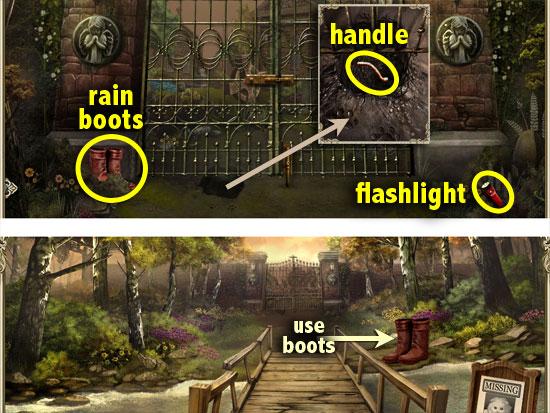
- Click on the ghost of the stablehand.
- Pick up the rain boots on the left, and the flashlight on the right.
- Examine the hole that Fluffy dug under the gate. Pick up the rod handle.
- Go back to the bridge.
BRIDGE
- Use the rain boots to wade through the mud on the right bank of the bridge. A stone puzzle pops up.
- The symbols on the stones correspond to numerical values. Refer to the code at the bottom showing the value of each symbol. Select the stones by pairs, starting from 1, and going up to 8.
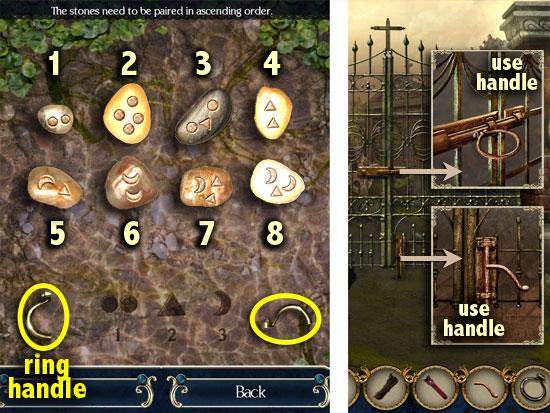
- The placement of the stones in this example may vary from what is on your screen, but the symbols on the stones will be the same.
- After the stones are gone, select the halves of the ring handle.
- Return to the gate.
GRAVEYARD GATE
- Inspect the top lock of the gate. Attach the ring handle to the sliding bar. Slide the lock open.
- Check the bottom lock of the gate. Insert the rod handle into the sliding rod. Lift up the rod.
- When the gate opens, go through it.
GRAVEYARD
- Click on the stablehand’s ghost.
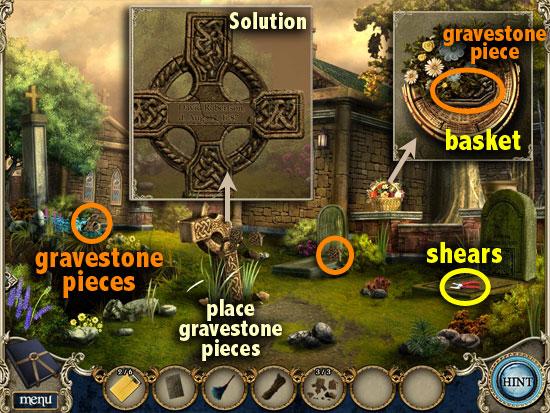
- Pick up the shears from the gravestone on the right. Collect the 2 gravestone pieces.
- Check the basket of flowers. Clear the flowers to find the 3rd gravestone piece. Also, take the basket.
- Place the gravestone pieces on the broken gravestone. Drag and rotate the pieces to complete the gravestone. Take note of the engraved date.
- Go back to the bridge.
BRIDGE
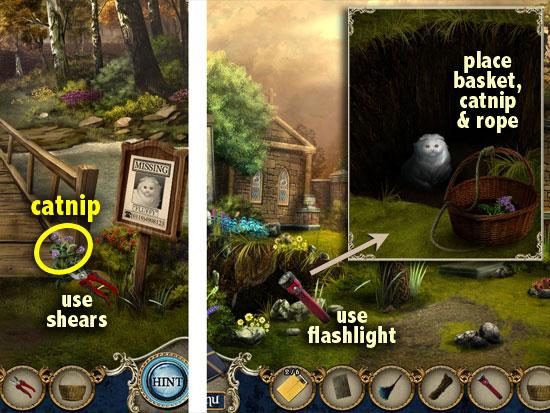
- Use the shears to cut some catnip from the catnip plant.
- Return to the graveyard.
GRAVEYARD
- Look inside the pit using the flashlight.
- Place the basket near the pit. Put the catnip into the basket.
- Tie the rope to the basket, and lower the basket down. Retrieve Fluffy.
- Go to the town hall.
TOWN HALL
- Return Fluffy to the receptionist.
- Go into the records office.
RECORDS OFFICE
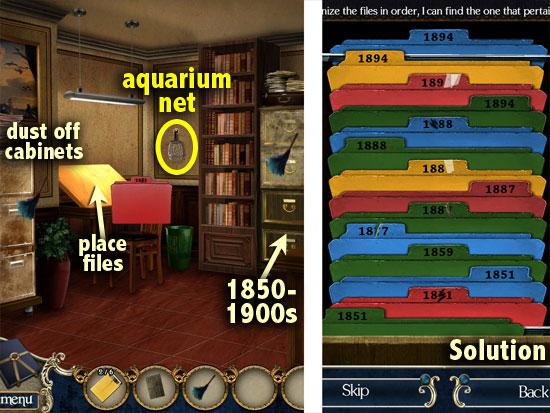
- Take the aquarium net hanging on the wall.
- Use the feather duster on the 3 filing cabinets. Check the filing cabinets. The middle cabinet is the correct one.
- Swap the folders to organize them by year and season, placing the earlier dates in front, and the latter ones at the back.
- For files of the same year, arrange them by season / color (green in front, then red, yellow and blue). Folders in the correct position will light up and lock into place.
- When done, you’ll have the 1887 file. Place the 1887 file on the drafting desk on the left.
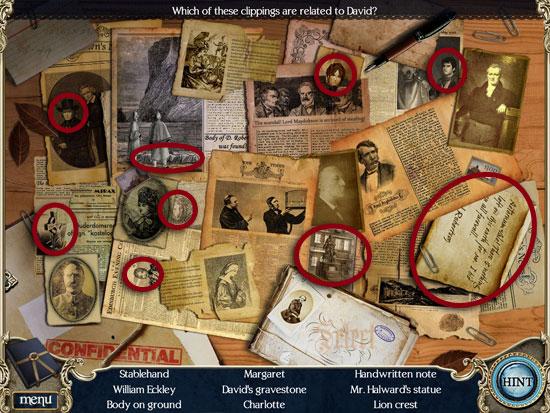
- Find the items on the list. When complete, the suicide note will go into your inventory.
- Zoom into the desk on the right.
- On the desk, place the suicide note and David’s note that you found in the previous chapter.
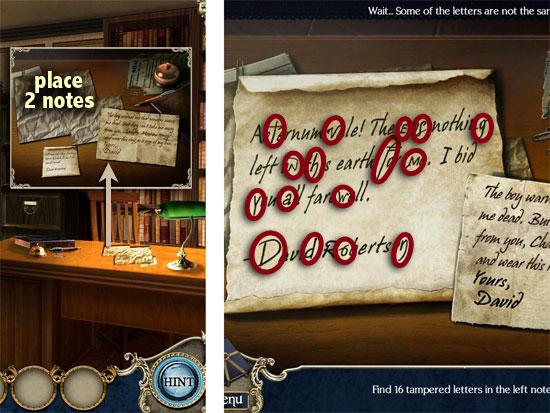
- Select 16 letter characters on the left note that are written differently from their counterparts on the right note.
- Click on David’s ghost. He reveals a briefcase.
- Leave the room and exit the town hall.
OUTSIDE TOWN HALL
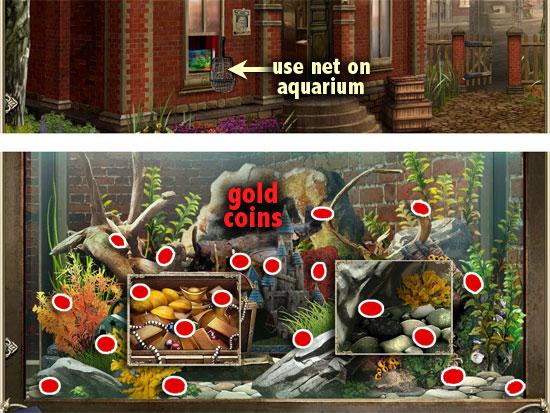
- Use the aquarium net on the fish tank in the left window.
- Find 20 gold coins in the aquarium. Zoom in on the treasure chest to find 3 coins. Look under the rock to find 2 coins. When done, you’ll have a bag of treasure.
- Enter the town hall.
RECEPTION AREA
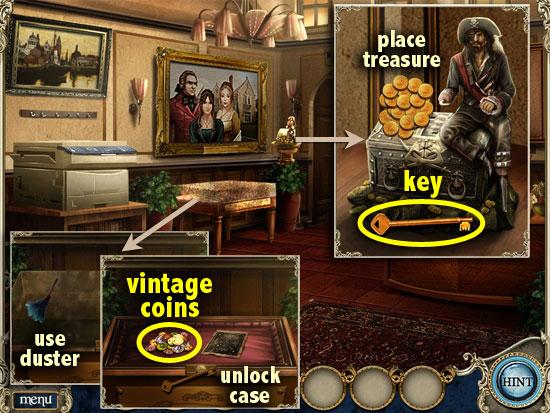
- Examine the pirate figurine.
- Put the bag of treasure into the treasure chest. Take the display case key that the pirate releases.
- Check the display case. Use the feather duster to remove the dust.
- Unlock the case with the display case key. Take the vintage coins and inspect the diagram.
- Go all the way to the graveyard.
GRAVEYARD
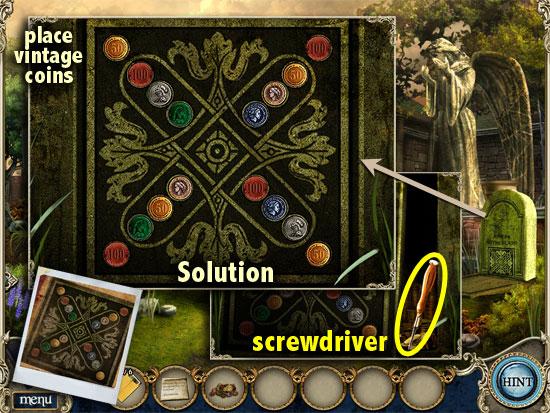
- Inspect the stablehand’s gravestone. Place the vintage coins on the holes on the gravestone.
- Swap the coins into the correct places so that the gravestone looks exactly like the diagram found in the display case. When a coin is in the right place, it will be fixed and immovable.
- When the niche opens, take the special screwdriver from inside it.
- Go back inside the town hall.
RECEPTION AREA
- Examine the family portrait on the wall. Take note of the date on the nameplate, in Roman numerals.
- Remove the 2 screws with the special screwdriver.
- Take the ink remover from behind the nameplate.
- Go into the records office.
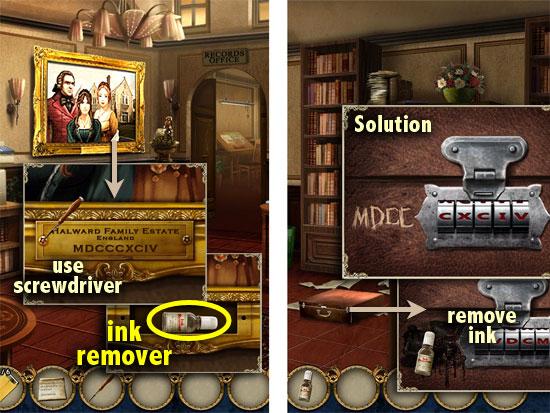
RECORDS OFFICE
- Inspect the briefcase.
- Use the ink remover on the ink stain.
- Click the dials to select the combination found on the nameplate of the family portrait.
- Take the medical report and the badge from the open briefcase.
- Go to the town square.
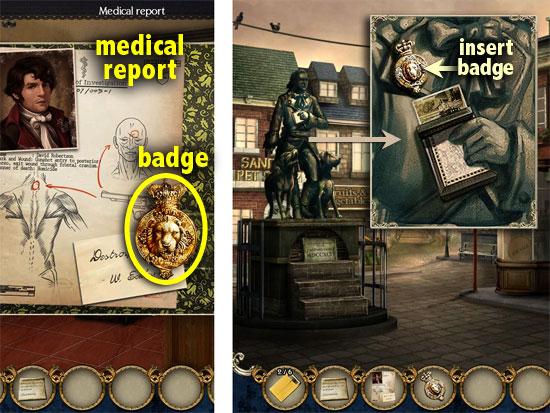
TOWN SQUARE
- Examine the Halward statue.
- Insert the badge into the hole on the statue’s lapel.
- View the photo that pops out, and click to add to your collection, another photograph (3 of 6).
Chapter 4: England
GATE TO HALWARD ESTATE
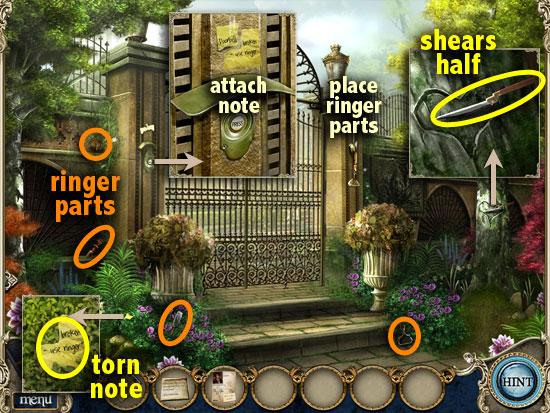
- Check the shrubbery on the left. Pick up the torn note.
- Examine tree bark on the right. Take the shears half (1 of 2).
- Inspect the doorbell. Connect the torn note to the rest of the note.
- Collect the 4 parts of ringer scattered around. Place the ringer parts on the old-fashioned ringer on the right side of the gate. Pull the ringer.
- Click on Charlotte’s ghost twice until the gate opens. Enter into the garden, and go through the doorway on the left.
FRONT DOOR
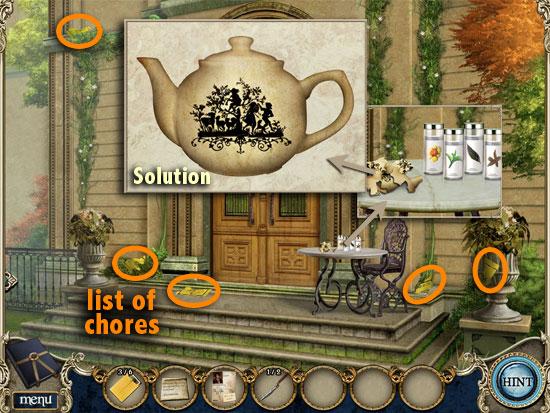
- Knock on the front door to talk to the butler.
- Collect the 5 pieces of a list of chores.
- Examine the tea table. Check the broken teapot.
- Drag and rotate the pieces to assemble the teapot. When done, the teapot will go into your inventory. Take note of the different types of tea.
- Go back to the garden.
GARDEN
- Inspect the bird bath on the right.
- Take the watering can.
- Go through the right doorway to the housekeeper’s cottage.
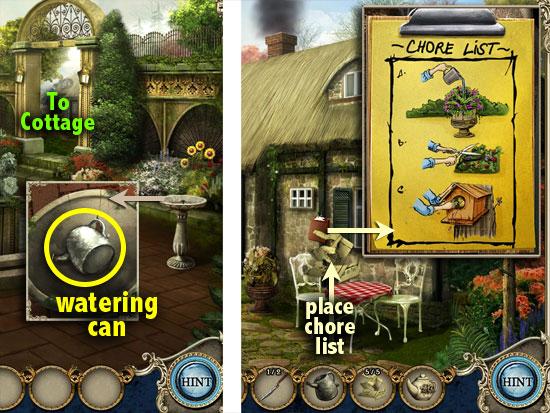
OUTSIDE COTTAGE
- Knock on the cottage door.
- Place the list of chores on the clipboard hanging above the table and chairs.
- Swap the strips to complete the chore list. When done, knock on the cottage door again to speak to the housekeeper.
- Enter the cottage.
HOUSEKEEPER’S COTTAGE
- Take the shears half (2 of 2) hanging by the pots and pans. You’ll now have a pair of shears in your inventory.
- Take the pool net hanging on the wall.
- Place the watering can under the faucet. You now have a filled watering can.
- Exit the cottage.
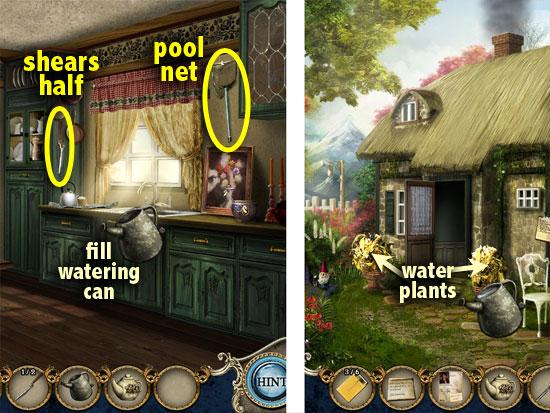
OUTSIDE COTTAGE
- With the filled watering can, water the 2 plants on the sides of the door.
- Go to the garden.
GARDEN
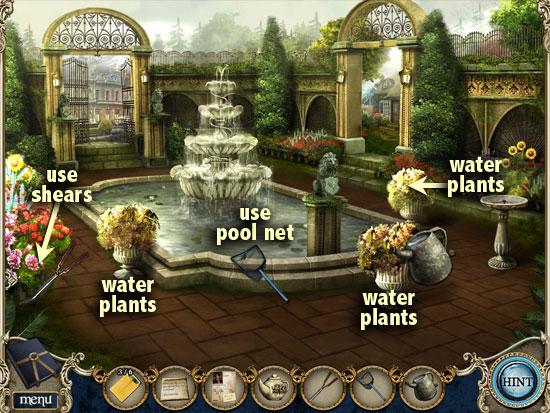
- Use the filled watering can on the 3 plants around the pool.
- Use the shears to cut some flowers from the flowerbed on the far left.
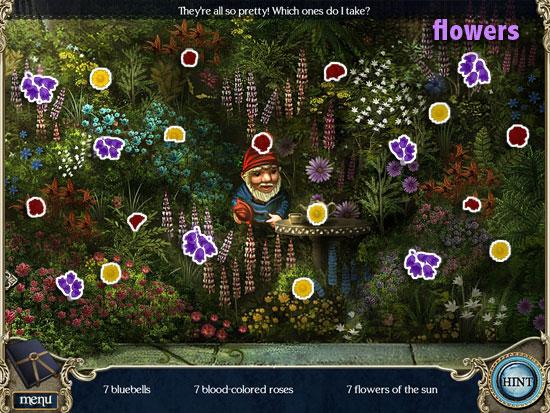
- Find the required flowers on the list. When done, flowers will go into your inventory.
- Use the pool net on the debris floating in the pool.
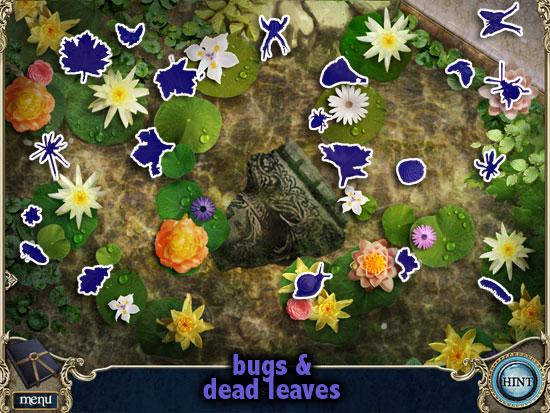
- Find the bugs and dead leaves. When done, you’ll obtain a carving piece.
- Go downwards to the estate gate.
GATE TO HALWARD ESTATE
- Water the 2 plants by the gate with the filled watering can.
- Examine the carving on the right side of the gate.
- Insert the carving piece into the empty spot.
- Take the sealant that appears from behind the wall carving.
- Go forward twice to the front door.
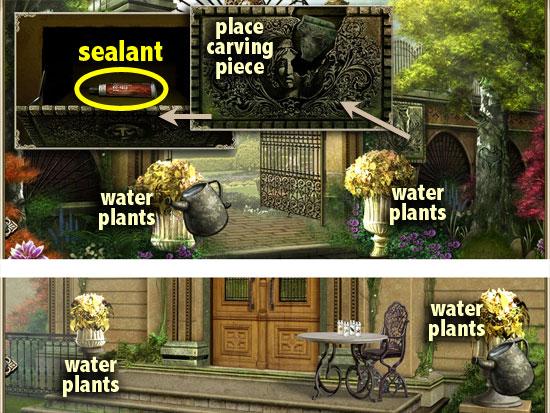
FRONT DOOR
- Water the 2 plants, one on each side, using the filled watering can.
- Return to the garden.
GARDEN
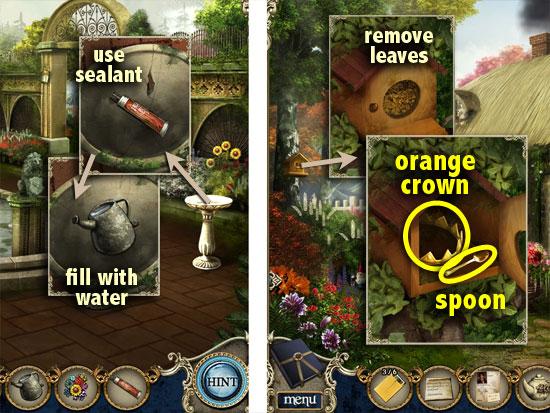
- Check the bird bath. Use the sealant to plug the hole in the bird bath.
- Pour water into the bird bath from the filled watering can.
- Exit the bird bath. The robin will then drop in.
- Go right towards the cottage.
OUTSIDE COTTAGE
- Check the nesting box.
- Open the box and remove the leaves.
- Take the orange crown and the dirty spoon.
- Enter the cottage.
HOUSEKEEPER’S COTTAGE
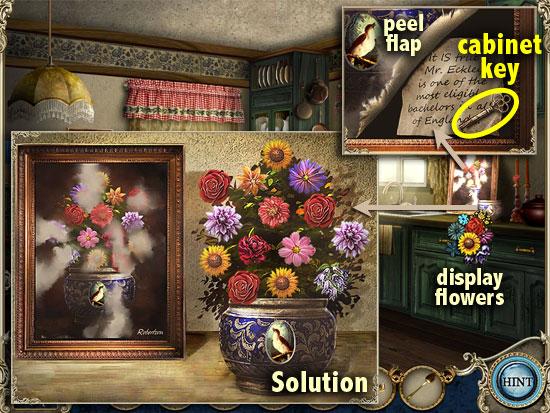
- Put the flowers into the vase on the right.
- Arrange the flowers so that they are a mirror image of the flowers in the painting.
- Click on Charlotte’s ghost. Check the painting of flowers.
- Peel back the corner flap of the painting. Take the cabinet key and read the note.
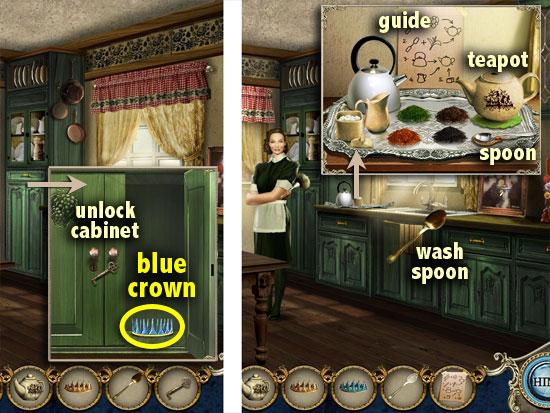
- Examine the cabinet in between the two windows. Use the cabinet key to open it. Take the blue crown from inside.
- Exit the cottage. The housekeeper appears. Follow the housekeeper inside, and speak to her. She gives you a tea guide.
- Wash the dirty spoon using the faucet. You now have a clean spoon.
- Inspect the tea tray on the counter. Place the teapot, the clean spoon, and the tea guide on the tray.
- Follow the picture instructions to prepare tea.
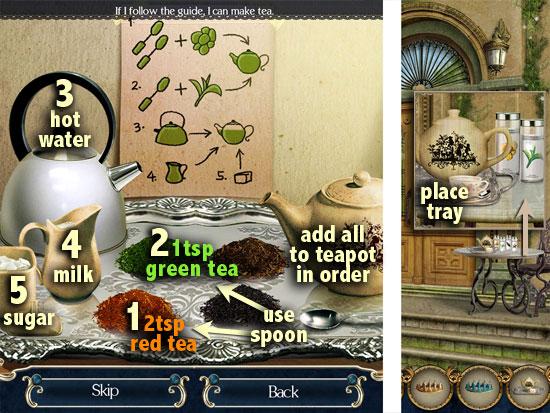
- Place two teaspoons of the red (orange) tea leaves, and one teaspoon of the green tea leaves into the teapot. Pour hot water into the teapot, add milk and sugar.
- You know you’re doing it right if the instructions turn green. If you get a step wrong, you’ll have to start over. When done, you’ll have hot tea.
- Exit the cottage, and go to the butler at the front door.
FRONT DOOR
- Zoom in on the tea table. Place the hot tea on the table.
- The butler appears and hands you a green crown.
- Head back to the garden.
GARDEN
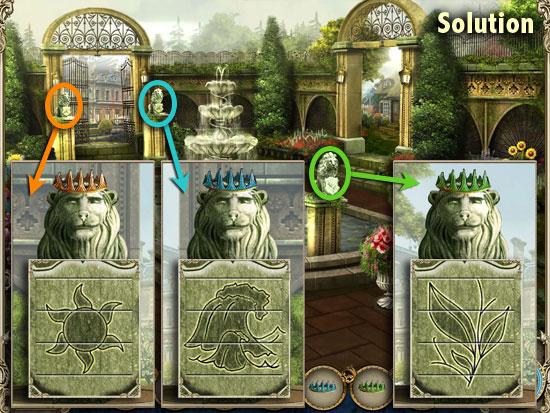
- Inspect the three lion statues around the garden. The instruction for each lion is the same. Zoom in on the shield puzzle below the lion.
- Swap and rotate the squares to form a complete picture. When a square is in the correct position, it will light up and lock into place. Then, on the lion’s head, place the crown whose color is identified with the picture on the shield.
- Lion statue on the left of the gate – sun shield, orange crown
- Lion statue on the right of the gate – water shield, blue crown
- Lion statue in the pool – plant shield, green crown
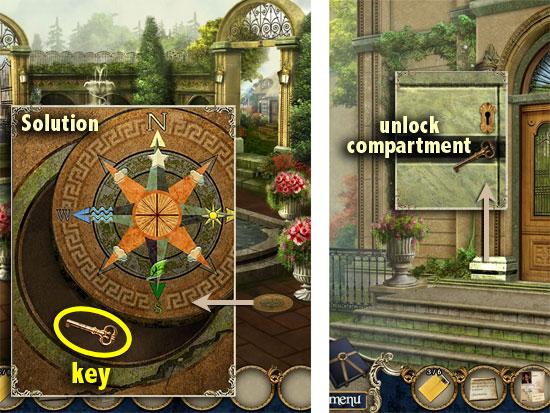
- Examine the compass that appears on the ground in front of the pool. Take the half of Charlotte’s letter.
- Click on the rings to complete the compass. When done, take the compartment key that appears. Go forward to the front gate.
FRONT GATE
- Look closer at the compartment at the foot of the front door, on the left side.
- Unlock it with the compartment key. View the photograph inside and take the photograph (4 of 6).
- Enter the estate.
Chapter 5: The Halward Estate
RECEPTION HALL
- Speak to the butler. Click on the ghost of Charlotte.
- Enter the open door on the left.
LIBRARY
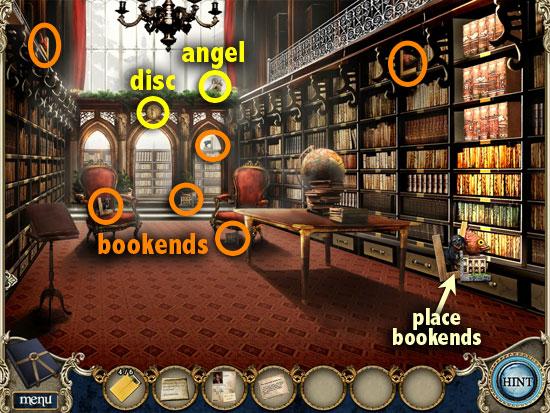
- Take the angel (1 of 4) from the plants, and the disc from over the doorway.
- Collect the 6 bookends scattered around the room.
- Place the bookends on the bookshelf on the right.
- Arrange the books to form pictures that fit the bookends on each shelf (a dachshund, a schoolhouse, a fish). When done, a book will go into your inventory.
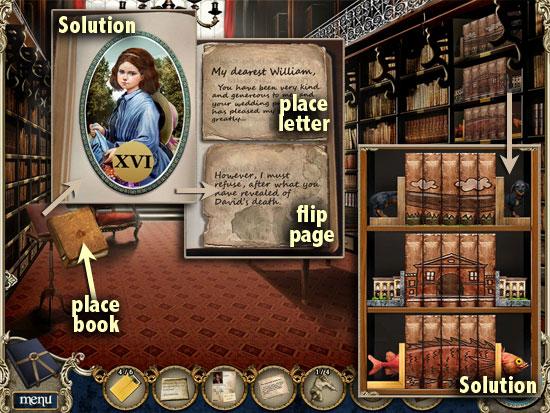
- Place the book on the book stand on the left.
- Drag and rotate the pieces to assemble the oval. When done, you’ll receive an oval (1 of 5).
- Turn the page of the book. Read the half of the letter. Place the other half of Charlotte’s letter on the page.
- Flip the letter around to view a riddle. Exit the library.
RECEPTION HALL
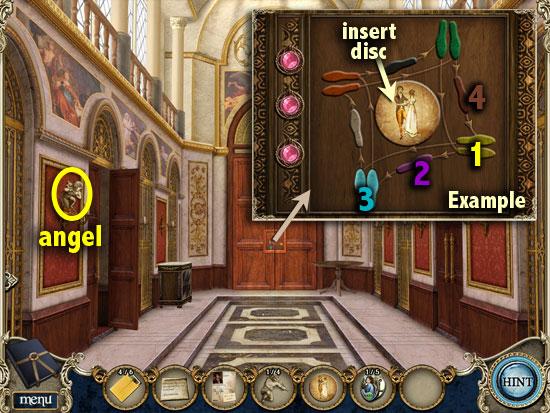
- Take the angel (2 of 4) from the wall sconce on the left.
- Look closer at the ballroom door.
- Insert the disc into the round slot in the center.
- Watch the sequence of colors carefully as they light up. When the sequence ends, repeat the pattern by clicking on the colored feet in the same order. There are 3 rounds to complete. If you misstep, you’ll have to start over.
- The first round is always yellow-purple-aqua-brown; the other rounds are random.
- Enter the ballroom.
BALLROOM
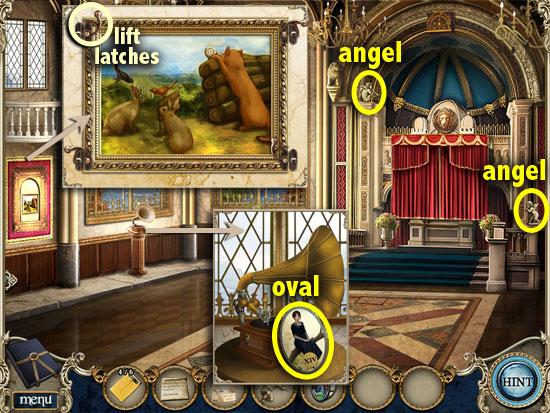
- Take the 2 angels surrounding the red curtain. You should now have 4 angels.
- Inspect the gramophone. Take the oval (2 of 5) resting on it.
- Look closer at the painting on the left. Take note of the animals that are curiously paired.
- Click the 4 latches on the corners to unlock them. Nudge the painting aside. Zoom in on the tile puzzle.
- Rotate the tiles so that each animal is beside its pair, as seen in the animal painting with the latches. Cats must be paired with snails; rabbits must be paired with birds. When the puzzle is solved, take the oval (3 of 5) that appears.
- Exit the ballroom.
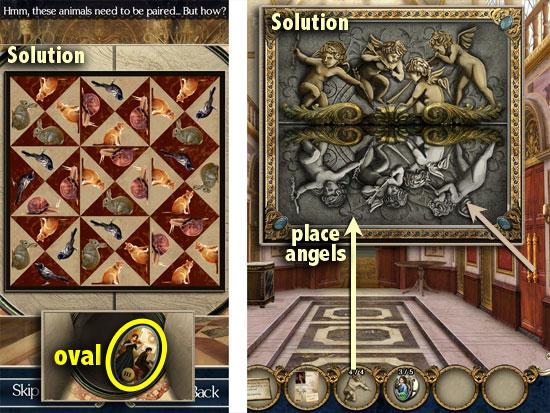
RECEPTION HALL
- Look closer at the door on the right. Place the angels on the recesses.
- Move the 4 angel’s heads so that they are aligned with their mirror images below.
- Go into the patio.
PATIO
- Look closer at the armoire on the left.
- Click the green knobs to rotate the circular discs, until they are aligned with the pattern on the armoire.
- On the screenshot, the green knobs are numbered 1 to 8. The discs are labeled A to H.
- 1 controls A; 2 controls C; 3 controls B; 4 controls G
- 5 controls E; 6 controls D; 7 controls F; 8 controls H
- When done, an oval (4 of 5) will go into your inventory.
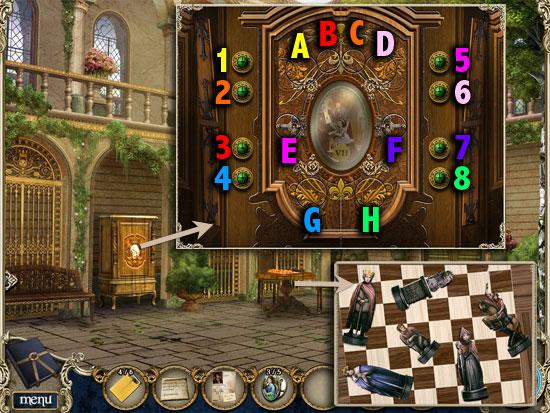
- Examine the chess table.
- Drag and rotate the pieces to complete the chess figures.
- Next, arrange the chess figures according to the riddle found in the book in the library.
- If you’re not able to move the chess pieces, it means you haven’t found the riddle yet, and you’ll have to go back to the library to get it first.
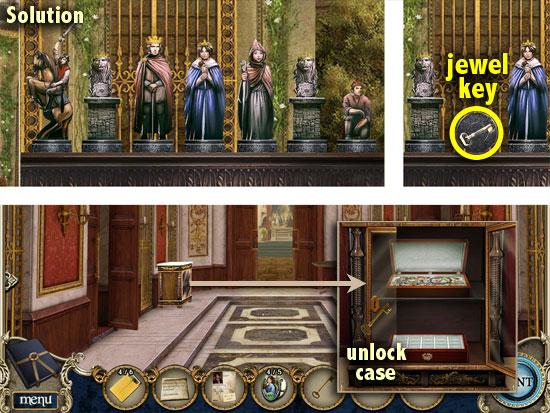
- The riddle clues are: the knight goes first; the poor are outside the castle, where the pawn is farthest from the knight. The queen comes before the mother; the king goes between the queen and her love.
- Take the jewel key that appears from under the king figure.
- Exit the patio.
RECEPTION HALL
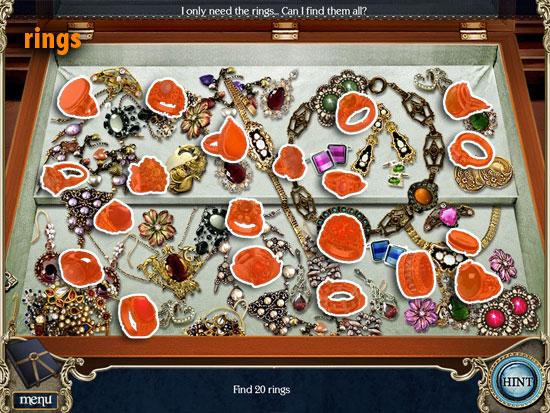
- Look closer at the jewelry display on the left.
- Unlock the display case with the jewel key.
- Examine the jewelry box on the upper shelf.
- Find 20 rings. When done, you’ll receive some rings.
- Place the rings into the ring holder on the lower shelf.
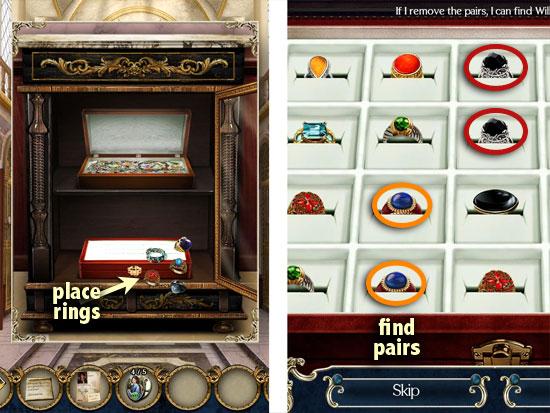
- Select the rings by pairs. Take the last remaining ring, William’s ring.
- Go right to the patio.
PATIO
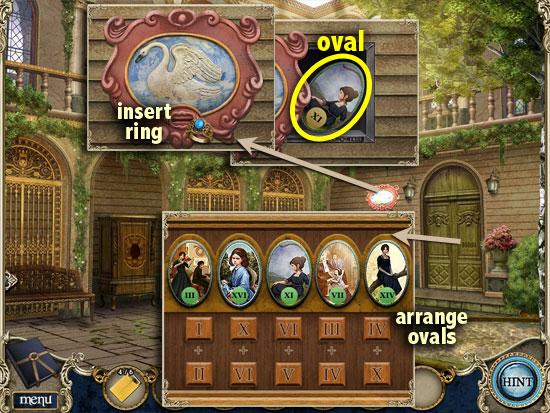
- Examine the wall sculpture to the left of the door. Below the carving of the swan, insert William’s ring into the slot.
- Move the carving aside. Read the letter, then click on it to put William’s letter into your inventory. Take the oval (5 of 5) from underneath the letter.
- Zoom into the door. Place the ovals in the empty slots. Arrange the ovals so that each oval equals the sum of the numerals below it.
- The door to the music room opens, but there’s not much you can do there yet.
- Go back to the library.
LIBRARY
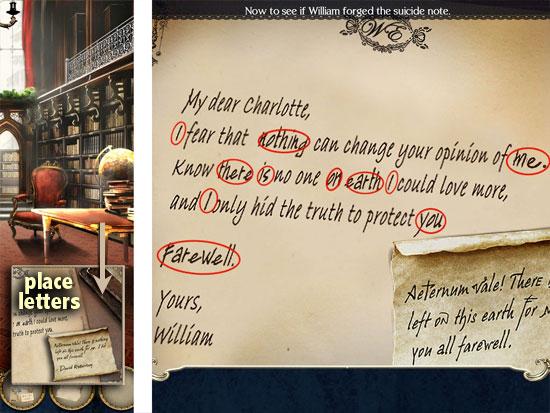
- Zoom in on the desk. Place William’s letter on the desk surface, and the suicide note alongside it.
- Select 11 words in William’s letter that also appears in the suicide note.
- Tip: the word “I” appears 3 times in William’s letter, so select all 3 instances of it.
- The butler tells you that there is a box for you to inspect in the reception hall. Exit the library.
RECEPTION HALL
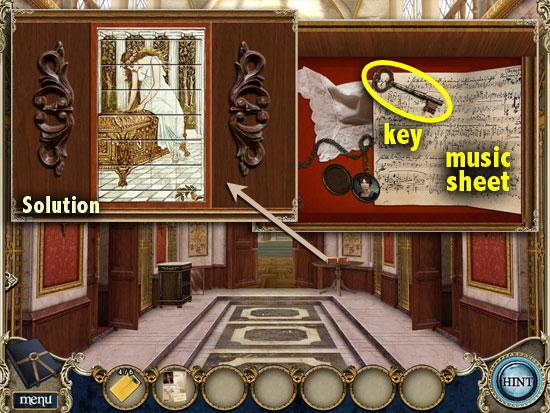
- Inspect Charlotte’s box on the side table, on the right.
- Rotate the tiles to complete the picture.
- When the box opens, take the key and the music sheet.
- Go right to the patio, and enter the music room.
MUSIC ROOM
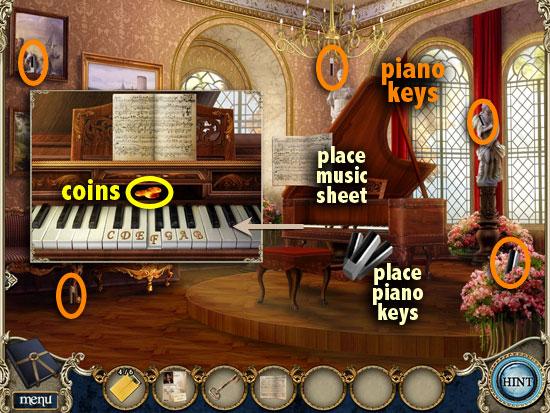
- Collect the 5 piano keys scattered around the room. Place the piano keys on the piano, and the music sheet on the stand.
- The piano will play a sequence. Repeat the sequence by pressing the piano keys in the same order.
- There are 3 rounds to complete. If you play a wrong key, you’ll have to start over. The first round is always DFEBA; the other rounds are random.
- When done, take the coins that appear from a secret compartment in the piano.
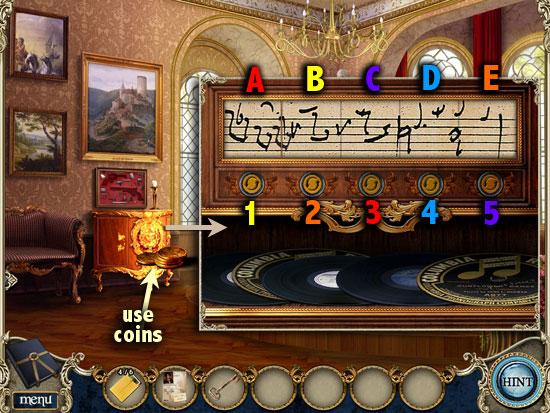
- Use the coins on the coin-operated record box on the left.
- Click the buttons to select a sheet common to all partitions, so that a complete music sheet is formed. However, a button does not control the partition directly above it.
- On the screenshot, the buttons are numbered 1 to 5. The sheets are labeled A to E.
- 1 controls B
- 2 controls E
- 3 controls A
- 4 controls D
- 5 controls C
- When done, a record will go into your inventory.
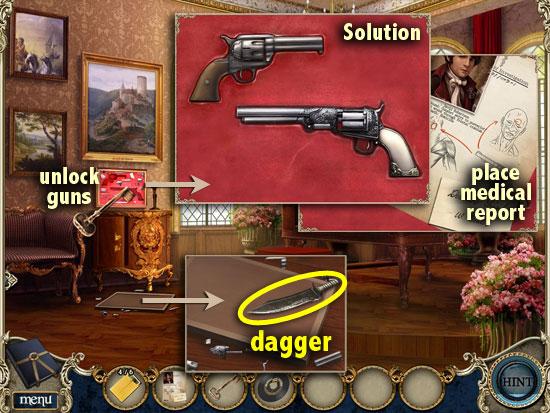
- Use the key to unlock the gun display below the paintings.
- Drag and rotate the parts to assemble the two guns. When done, place the medical report over the guns.
- Click on the police report, then on the ghost of Joseph the stablehand.
- Examine the broken gun display on the floor. Pick up the dagger.
- Exit the music room and go into the ballroom.
BALLROOM
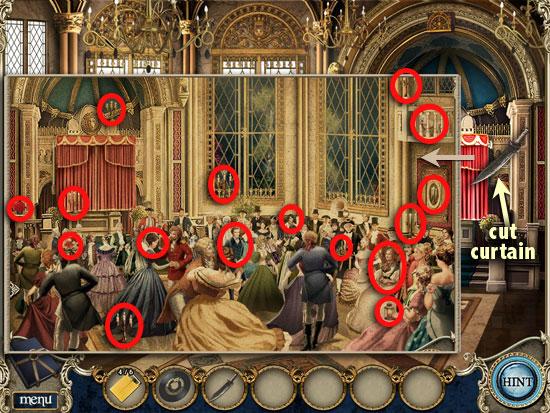
- Cut down the curtain with the dagger.
- Look closer at the mural.
- Find the items and characters on the list.
- Click on the ghost of Charlotte.
- Examine the pot with the plant, by the window.
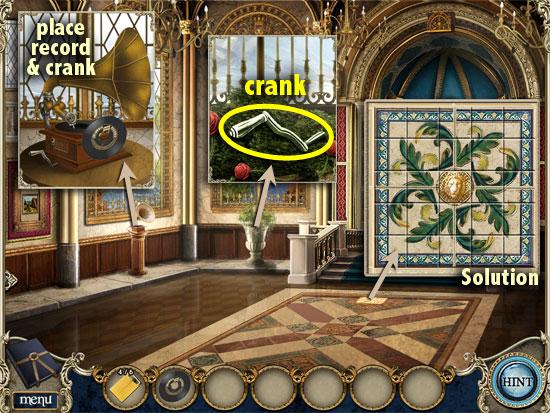
- Take the crank from the plant.
- Check the gramophone. Insert the crank into the hole on the side and place the record on the turntable. Turn the crank.
- Inspect the floor tile right in front of the steps. Rotate each tile so that the tiles form a complete pattern.
- View the photo that appears from beneath the tile. Take the photograph (5 of 6).
Chapter 6: France
OUTSIDE ALLEY
- Look inside the phone booth.
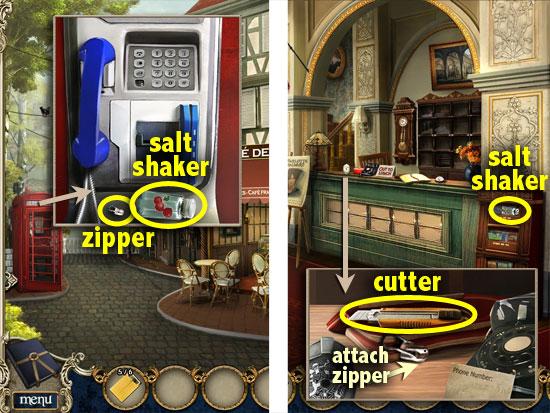
- Take the small zipper and the salt shaker (1 of 4).
- Go into the museum lobby.
MUSEUM LOBBY
- Click on the ghost of Charlotte.
- Take the salt shaker (2 of 4) from the brochure stand.
- Look closer at the counter.
- Attach the small zipper to the pencil case. Open the pencil case and take the cutter.
- Go upstairs to the exhibit.
EXHIBIT ROOM
- Click on Charlotte’s ghost.
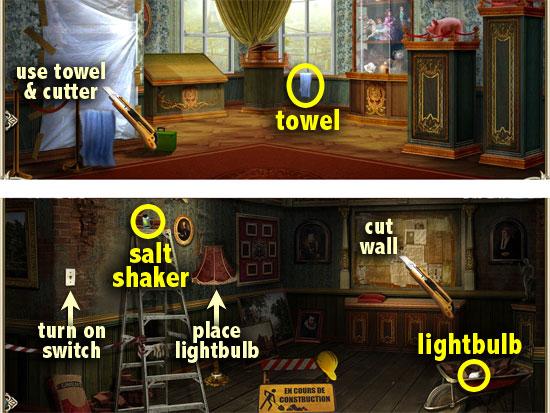
- Take the blue towel hanging below the window.
- Use the towel on the dusty plastic sheet on the left wall.
- Slice through the plastic sheet with the cutter. Remove the plastic sheet.
- Go through the hole in the wall.
GALLERY
- Take the light bulb from the wheelbarrow on the right. Place the light bulb on the broken lamp.
- Turn on the light switch on the left.
- Take the salt shaker (3 of 4) from the top of the ladder.
- Use the cutter on the newspaper-covered wall.
- Inspect Charlotte’s painting, but you’ll need a magnifying glass.
- Go downstairs and enter the gift shop on the right.
GIFT SHOP
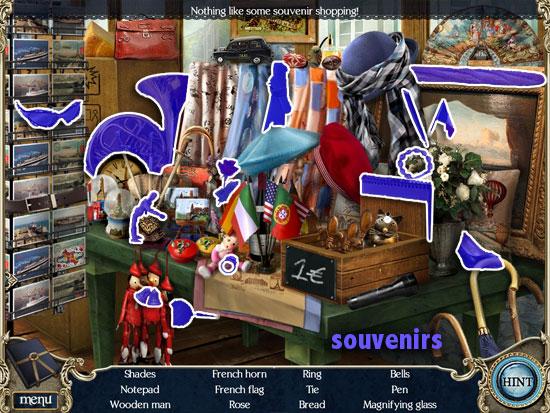
- Speak to the store clerk. Zoom in on the shop display on the right.
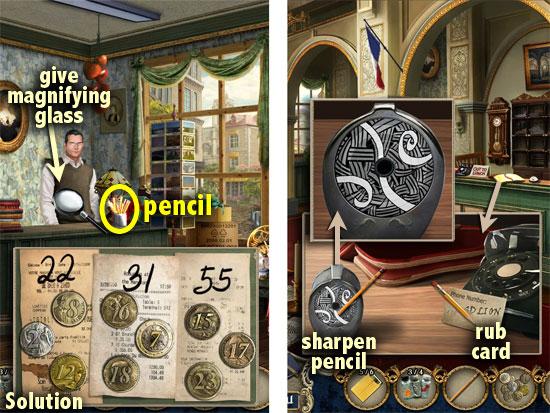
- Find the items on the list. When done, you’ll have a magnifying glass.
- You won’t be able to leave the gift shop without paying for the goods first. Hand over the magnifying glass to the store clerk.
- Swap the coins so that the 3 coins on each receipt add up to the number scribbled above them.
- When done, the clerk gives you loose change and your magnifying glass.
- Take an unsharpened pencil. Exit the gift shop.
MUSEUM LOBBY
- Zoom into the counter, and on the pencil sharpener.
- Rotate the rings to form a complete pattern. Start from the center going outwards.
- Sharpen the unsharpened pencil to obtain a sharpened pencil.
- Rub the sharpened pencil twice on the phone number card in front of the telephone. Take note of the phone combination.
- Go upstairs.
EXHIBIT ROOM
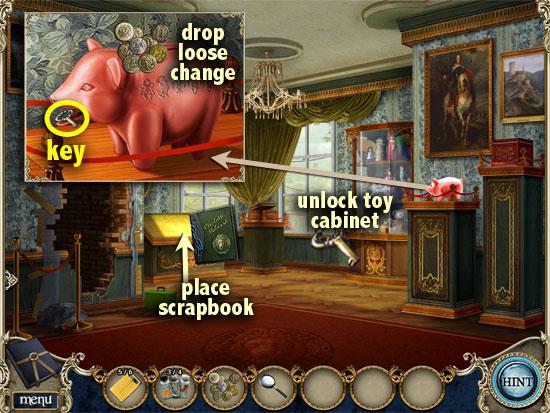
- Examine the piggy bank. Note the symbols on the pig’s surface.
- Drop the loose change into the piggy bank slot. Take the small key from the pig’s mouth.
- Use the small key to unlock the toy display cabinet.
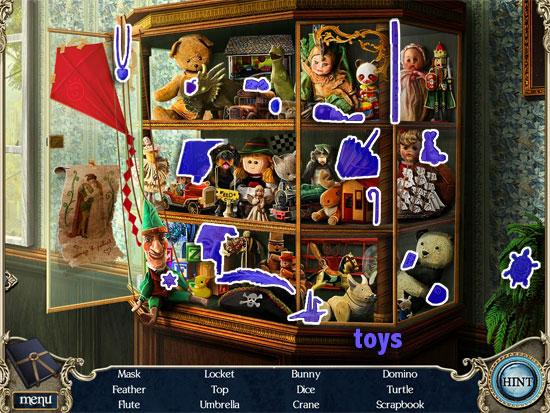
- Find the items on the list. When done, a scrapbook will go into your inventory.
- Put the scrapbook on the book stand below the window.
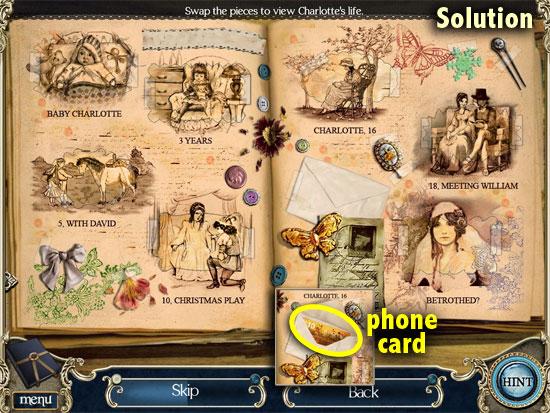
- Swap the picture pieces into the frames, to show the progression of Charlotte’s life.
- When done, take the phone card from the envelope in the scrapbook.
- Go downstairs and outside the museum.
OUTSIDE ALLEY
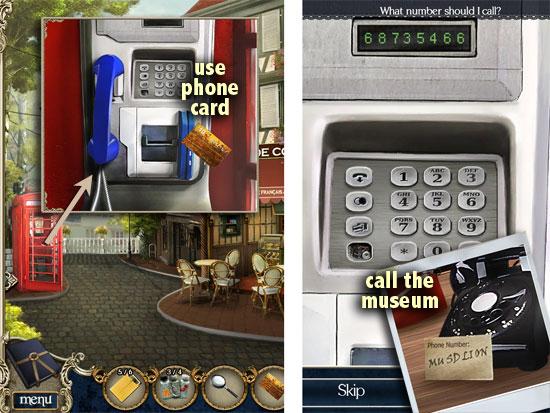
- Step into the phone booth.
- Insert the phone card into the payphone slot.
- Punch in the number / combination as shown on the card in front of the museum telephone.
- Enter the museum.
MUSEUM LOBBY / GIFT SHOP
- Click on the ringing phone, and the clerk will appear.
- Or, go directly to the gift shop, and the clerk will leave to answer the phone.
- At the gift shop, take the keycard from the memo board behind the counter.
- Exit the museum.
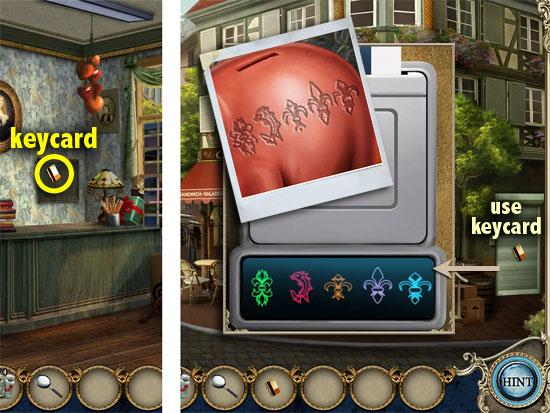
OUTSIDE ALLEY
- Use the electronic keycard on the back room door on the far right.
- Click on each symbol so that the combination is the same as the code shown on the piggy bank.
- Enter the storage room.
STORAGE ROOM
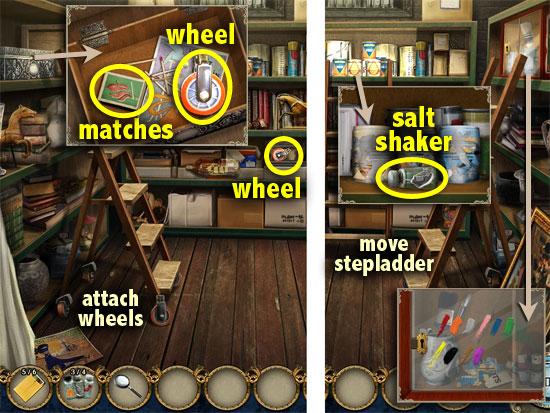
- Take the wheel (1 of 2) from the middle shelf.
- Look inside the silver box on the top left shelf. Take the other wheel (2 of 2) and a box of matches.
- Attach the wheels to the stepladder.
- Move the stepladder to the middle shelf. Examine the middle shelf. Take the salt shaker (4 of 4).
- Move the stepladder to the right shelf. Inspect the glass cabinet. Take note of the paint splatters’ colors.
- Go outside to the alley.
OUTSIDE ALLEY
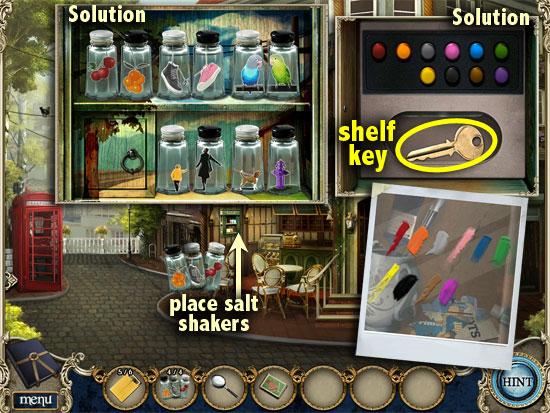
- Place the salt shakers on the salt shaker display, in the café. Look closer at the salt shaker display.
- Arrange the salt shakers to form pictures that blend with the shelf background.
- A box opens to reveal a combination lock with colored buttons.
- Click each button to display the colors in the paint splatter code that you saw in the storage room. Tip: the peach splatter translates to a pink button; and the purple splatter translates to a violet button.
- When done, take the shelf key from the compartment. Return to the storage room.
STORAGE ROOM
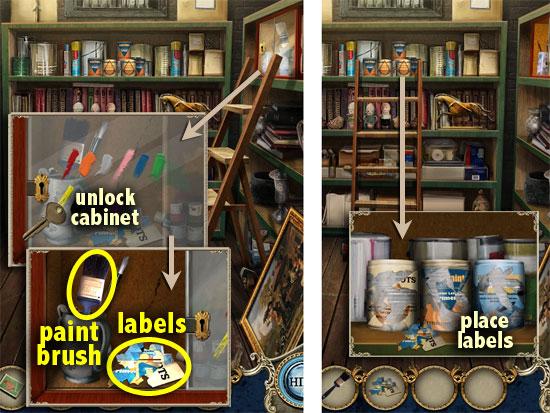
- Zoom in on the glass cabinet on the top right shelf.
- Open the cabinet using the shelf key. Take the paintbrush and the labels.
- Move the stepladder to the middle shelf. Examine the paint cans on the top middle shelf. Place the labels on the paint cans.
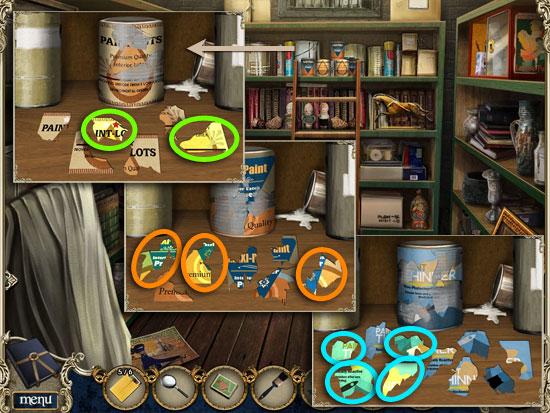
- For each paint can, select the label pieces that fit the empty spaces on the can. If your choices are correct, you’ll move on to the next paint can, with more missing labels. There are 3 cans to complete.
- When done, a can of paint thinner will go into your inventory. Go into the museum, upstairs and into the gallery.
GALLERY
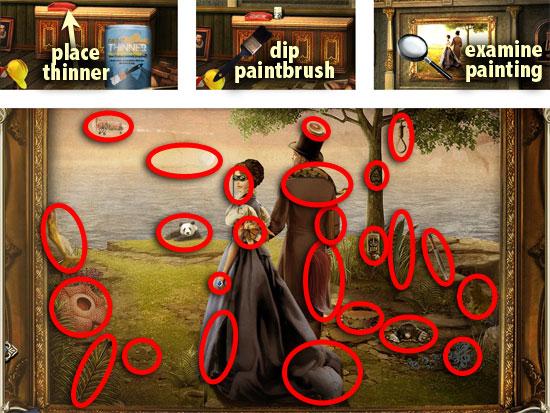
- Place the paint thinner on the desk.
- Dip the paintbrush into the red tray on the desk. You’ll have a dipped brush.
- Use the magnifying glass on Charlotte’s painting.
- Find 25 things that don’t belong.
- Apply the dipped brush twice on the tampered artwork until a new painting is revealed.
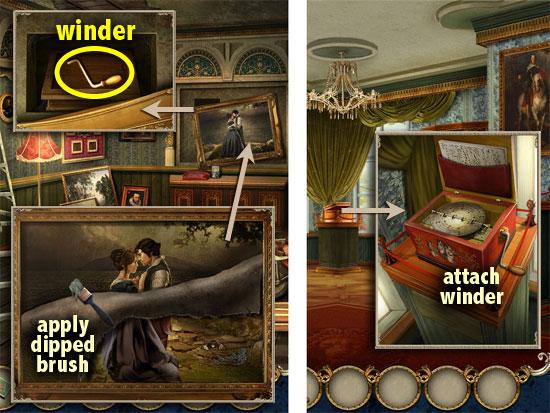
- Exit the painting, and click on Charlotte’s ghost.
- Check behind the painting. Take the winder. Exit the gallery.
EXHIBIT ROOM
- Examine the music box between the windows.
- Insert the winder into the music box.
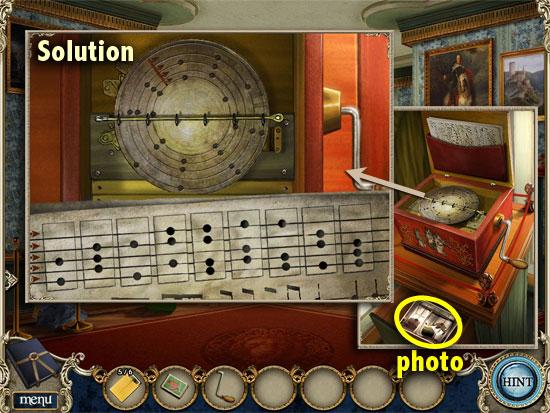
- Swap the parts so that the sheet music is the same as the spinning pattern. Imagine what the spinning sheet would look like if it were laid out horizontally, starting from the red arrows and going to the right.
- When done, view the photo in the drawer, and then take the photograph (6 of 6).
- Enter the gallery.
GALLERY
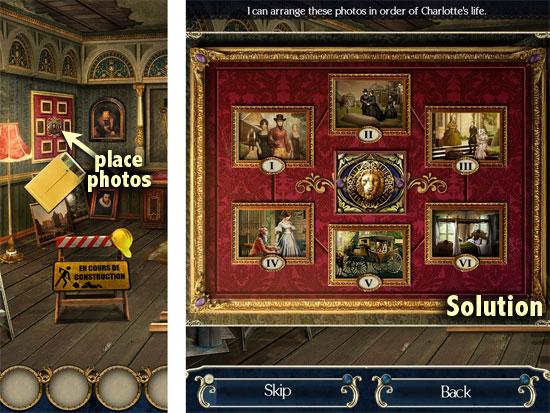
- Place the photographs on the empty picture frames on the wall.
- Arrange the photos in the order that the events occurred in the story.
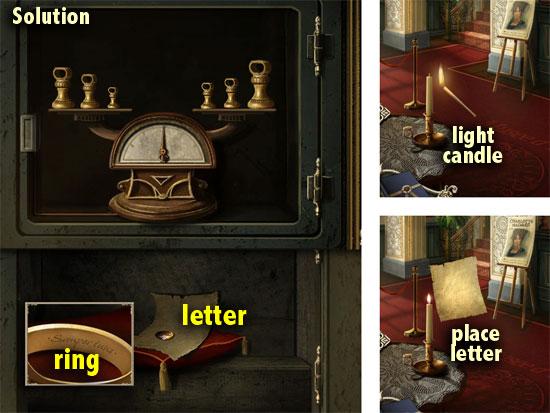
- Examine the scale. Swap the weights around so that the scale pointer is at the exact center.
- If the weights were numbered 1 to 6 from smallest to largest, 1-4-5 would be on one side, 2-3-6 would be on the other.
- The safe door opens. Inspect the ring. Read the inscription and take Charlotte’s ring. Take also the blank letter underneath it.
- Go downstairs to the lobby.
MUSEUM LOBBY
- Use the matches to light the candle on the left.
- Hold up the blank letter over the lit candle. Joseph’s letter is revealed. Take the invisible ink letter.
Chapter 7: Fairing Point
LOWER CLIFF
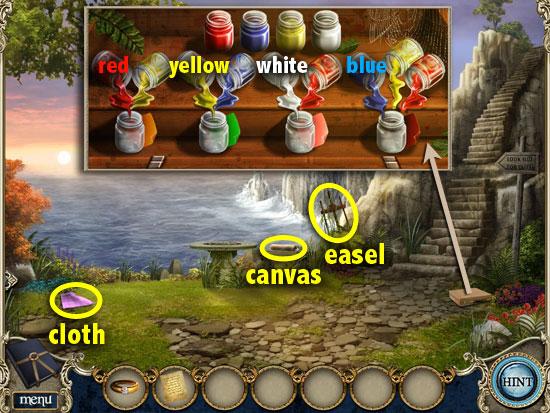
- Speak to the concierge. Pick up the purple cloth on the left.
- Take the half-painted canvas and the easel.
- Examine the pochade box on the right. Take the paint jars from the top and add them to the empty jars below, to create the colors indicated on the swatches. Tip: the rightmost color swatch is brown. When done, paint jars will go into your inventory.
- Climb the steps to the top.
CLIFF TOP
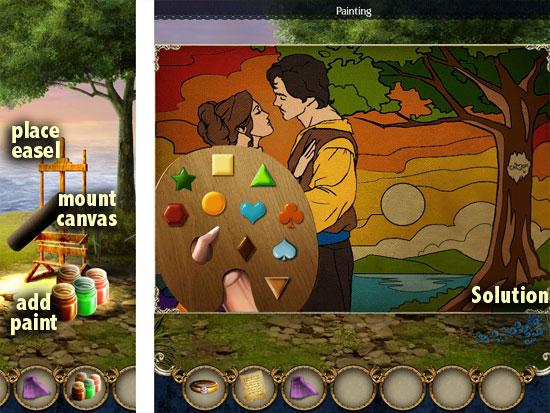
- On the clearing at the center, place the easel, and on that, put the half-painted canvas. Next, add the paint jars.
- Zoom in on the easel. Paint the picture by applying paint from the palette onto the corresponding symbols.
- When done, note the tree carving in the painting. Exit the painting and examine the tree.
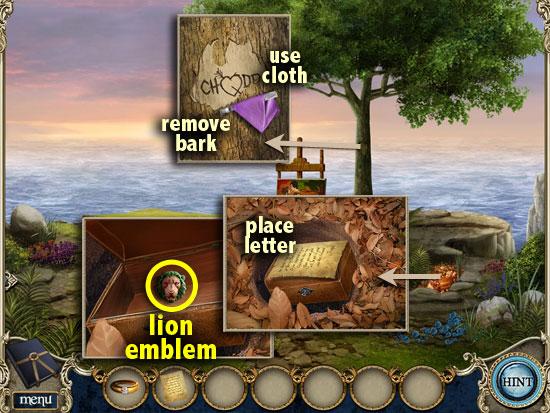
- Wrap the cloth around the carving knife, and grab it. The carving knife will go into your inventory.
- Use the carving knife on the tree bark. Keep chipping off the bark until the inscription is revealed. Note the arrow.
- Check the pile of leaves on the right. Clear the leaves to find a box. Place the invisible ink letter on top of the box, and exit.
- Click on David’s ghost and he will open the box. Examine the open box. Take the lion emblem from inside.
- Go down the steps.
LOWER CLIFF
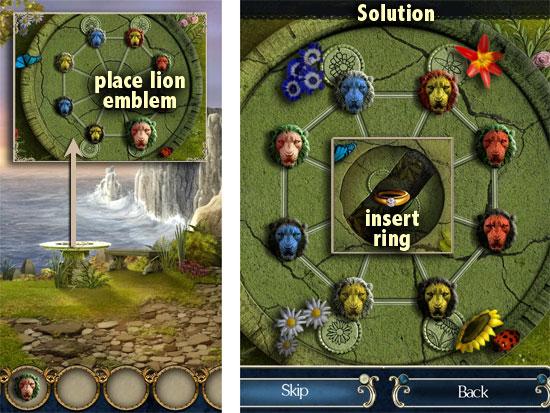
- Look closer at the stone table.
- Place the lion emblem on the missing spot.
- On the four tokens with the flower drawings, place the lions that have the same colors as the actual flowers outside the ring. Drag the lions along the lines to move them around. Only those four slots are important; the position of the other lions doesn’t matter.
- The stone table reveals a slot. Insert Charlotte’s ring into the slot.
- Click on Charlotte’s ghost. Follow her up to the top of the cliff.
CLIFF TOP
- Click on the lovers to reunite them.
THE END
- Congratulations! You have completed Death at Fairing Point: A Dana Knightstone Novel.
- If you need more help, post your question in the Forums by clicking on the grey “Forums” tab below the walkthrough title.
- Have tips of your own? Post your user tips in the User Tips + Cheats section.
More articles...
Monopoly GO! Free Rolls – Links For Free Dice
By Glen Fox
Wondering how to get Monopoly GO! free rolls? Well, you’ve come to the right place. In this guide, we provide you with a bunch of tips and tricks to get some free rolls for the hit new mobile game. We’ll …Best Roblox Horror Games to Play Right Now – Updated Weekly
By Adele Wilson
Our Best Roblox Horror Games guide features the scariest and most creative experiences to play right now on the platform!The BEST Roblox Games of The Week – Games You Need To Play!
By Sho Roberts
Our feature shares our pick for the Best Roblox Games of the week! With our feature, we guarantee you'll find something new to play!Demon Piece Races – All Race Buffs
By Adele Wilson
Our Demon Piece Races guide details all of the buffs, rarities, and characteristics for each race in the One Piece Roblox game.


