- Wondering how to get Monopoly GO! free rolls? Well, you’ve come to the right place. In this guide, we provide you with a bunch of tips and tricks to get some free rolls for the hit new mobile game. We’ll …
Best Roblox Horror Games to Play Right Now – Updated Weekly
By Adele Wilson
Our Best Roblox Horror Games guide features the scariest and most creative experiences to play right now on the platform!The BEST Roblox Games of The Week – Games You Need To Play!
By Sho Roberts
Our feature shares our pick for the Best Roblox Games of the week! With our feature, we guarantee you'll find something new to play!Demon Piece Races – All Race Buffs
By Adele Wilson
Our Demon Piece Races guide details all of the buffs, rarities, and characteristics for each race in the One Piece Roblox game.
MacGuffin’s Curse Walkthrough
Welcome to the MacGuffin’s Curse walkthrough on Gamezebo. MacGuffin’s Curse is a puzzle/adventure game created by Brawsome. This walkthrough includes tips and tricks, helpful hints, and a strategy guide on how to complete MacGuffin’s Curse.
Game Introduction – MacGuffin’s Curse
Welcome to the MacGuffin’s Curse walkthrough on Gamezebo. MacGuffin’s Curse is a puzzle/adventure game created by Brawsome. This walkthrough includes tips and tricks, helpful hints, and a strategy guide on how to complete MacGuffin’s Curse.
General Information
Main Menu
- The main menu is both mouse- and keyboard-controlled; you can scroll through the items with your arrow keys or just click on them
- Click on one of the three profile slots to start the game
- To erase a profile and start again, first click on “erase profile” and then select the profile you want to erase. Hit enter to confirm or Esc to cancel
- Hit Esc to quit the game, then hit enter to confirm or Esc again to cancel
Controls
This game is pretty much entirely keyboard-controlled. Apart from the arrow keys, which are used to walk around, there are six action keys:
- N – Main action key. Use it to interact with people and objects.
- M – “Move” key. Use it to push and pull crates and batteries as wolf. Hold down the M key while using the arrows to navigate.
- Esc – Menu. The menu contains an options section where you can change sound volumes and toggle between windowed and full screen mode. You can also use the menu to review your badges and the comics and evidence you’ve found. The most useful part of the menu is the interactive map, which you can use to quickly jump between locations you’ve previously visited. Finally, you can go to the menu to save and quit your game.
- Q – Quest log. Scroll through active and completed quests and check inventory items.
- R – Reset. Use this key to reset puzzles when you’ve messed up. On a non-puzzle map the R key gives you random funny comments about the map you’re on.
- Z – Hint. Use this key to call Detective Strump for help. Tell him you’re stuck and he will give you hints on how to solve the puzzle. You can call him a second time for a more detailed hint. If you really can’t solve the puzzle you can ask Strump to solve it for you. This means that he will simply unlock the next door without doing the puzzle. You can go back later and try the puzzle again if you like.
Lucas and the Werewolf
To solve the puzzles in this game, you frequently have to toggle between Lucas in his human and werewolf form. You can do this by walking into a patch of moonlight, either as a circle on the ground or through a window, and hitting N on your keyboard.
Occasionally there will be “change tiles” that also allow you to change form, but these tiles are one directional. A change tile with a gold wolf changes Lucas into a werewolf while a change tile with a silver wolf can change the werewolf back to Lucas.
Lucas and the wolf can execute very specific actions, so for each puzzle you need to figure out the specific sequence of actions to solve the puzzle.
Lucas can:
- Open safes
- Interact with consoles
- Open and close doors
- Swim
- Go through vortexes
Wolf can:
- Push and pull crates and batteries
- Push heavy crates
- Break rocks
- Dig
Chapter 1 – The Museum

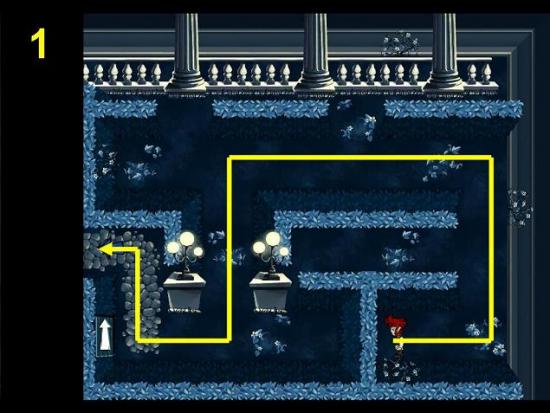
- Learn to move around by using your arrow keys
- Move to the exit on the left of the screen to map 2
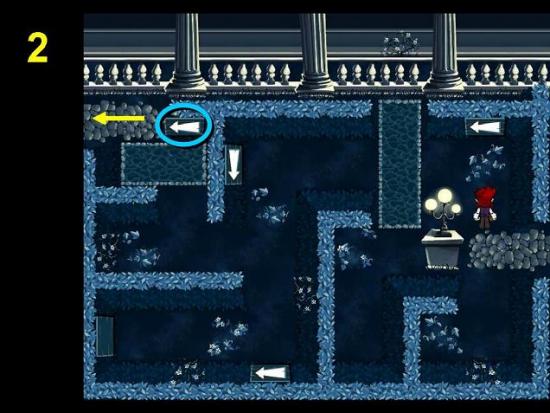
- Move to the top left of the screen
- Inspect the arrow at the top for some loot. Loot is indicated with white sparkles, so always scan new maps for more treasure to find
- Exit left
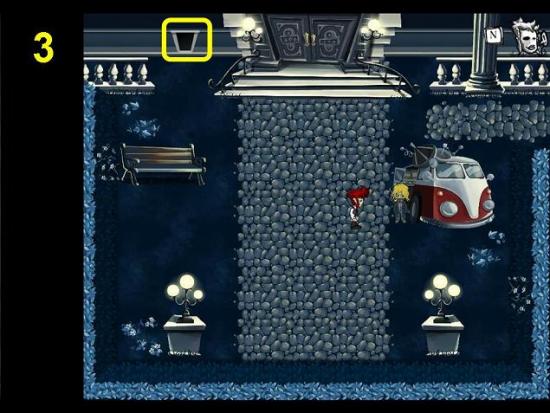
- Walk to the left and Detective Strump will talk to you
- Move to the window beside the door and use the N key to climb through it
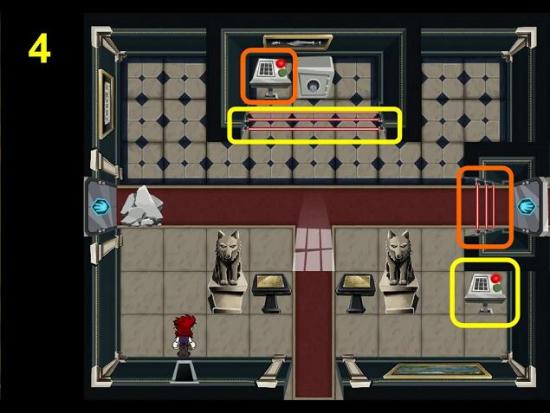
- Interact with the console on the right to switch off the lasers at the top
- Open the safe for some loot
- Interact with the second console to remove the lasers on the right
- Exit right
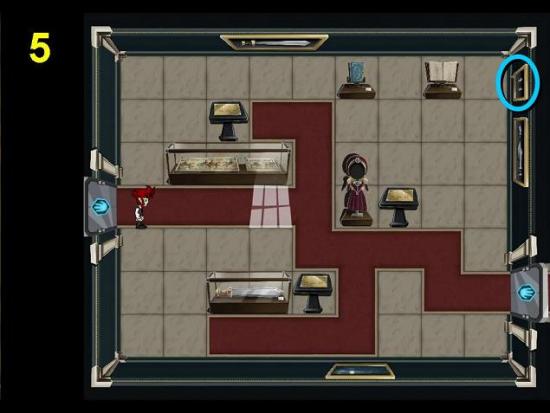
- Interact with the small painting in the top right corner for some loot
- Exit right
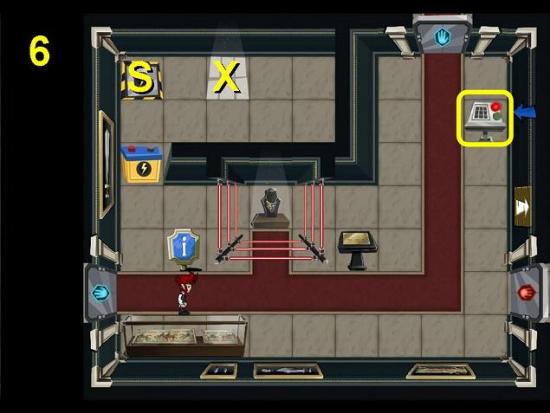
- Interact with the console to switch off the lasers
- Interact with the display behind the lasers
- As a werewolf, push the battery north to the station (S) using the M key on your keyboard
- Walk into the moonlight (X) and use the N key to change back to Lucas
- Exit through the north door
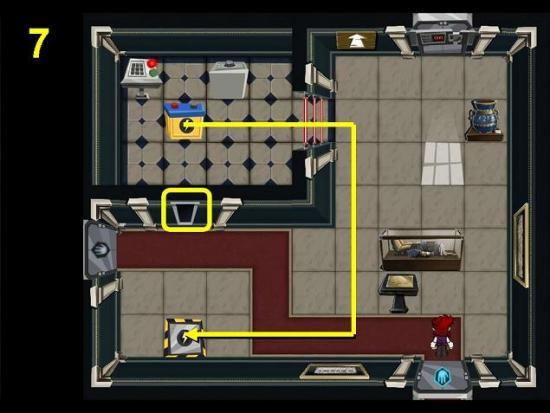
- Climb through the window and activate the console
- Change into a werewolf in the moonlight
- Move the battery to the right, then south, then left until it is on the station. Putting the battery on the station unlocks the door to the left
- Still as a werewolf, pull the safe down so you can access the front
- Change back to Lucas and open the safe
- Exit left
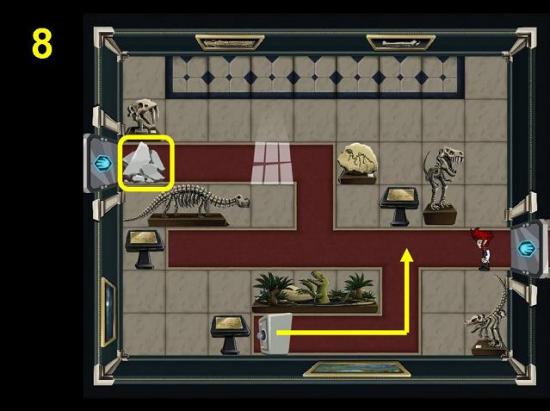
- Change to a werewolf in the moonlight
- Smash the rocks blocking the door
- Still as a werewolf, drag the safe to the right and then move it a few squares north so you can access the front
- Change to Lucas and open the safe
- Exit left
Museum Gardens
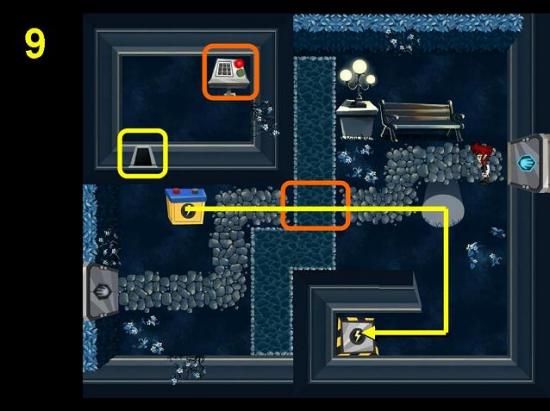
- Climb through the window and activate the console to create a bridge
- Climb back out and change to a werewolf
- Move the battery to the station
- Exit left
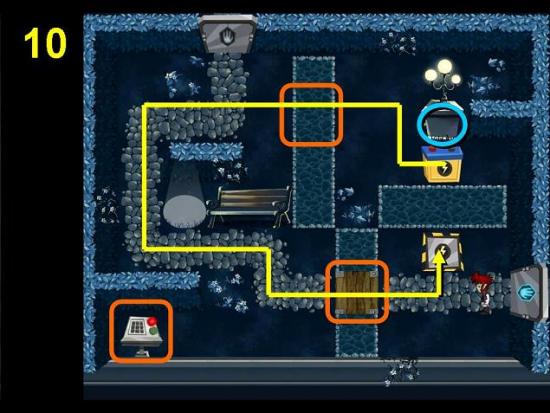
- Activate the console to move the bridge north
- Change to a werewolf and move the battery across the top bridge, all the way down and close to the water in the south
- Change to Lucas and turn the console back to red
- Change to the wolf and move the battery to the station
- Change to Lucas
- Before you exit, inspect the lamps for some loot
- Exit north
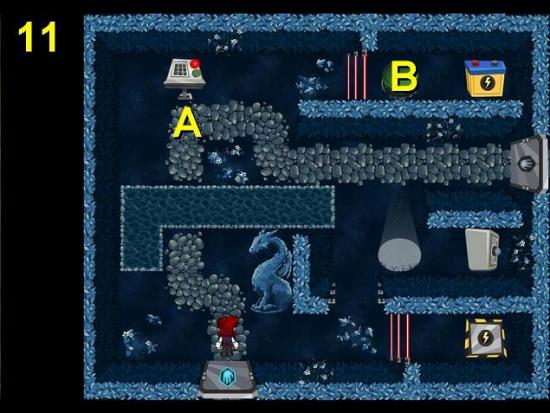
- Activate the console
- Change to wolf
- Move the battery to A
- Move the safe to the green button (B)
- Push the battery across the new bridge and onto the station
- Before you go, pull the safe back out, change to Lucas and open the safe for some loot
- Exit right
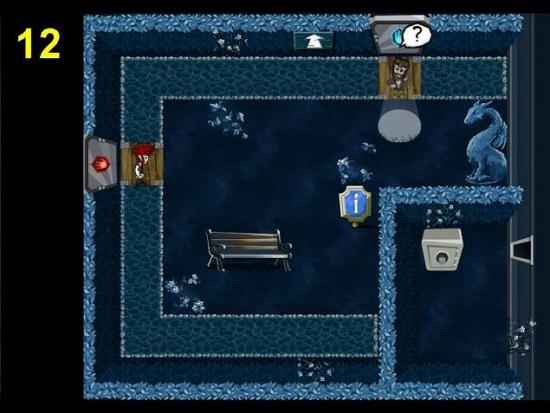
- Ignore the safe for now, you will get to it later
- Talk to Grim on the bridge – just keep going through all the options
- Change back to Lucas when you can and exit north
City Square
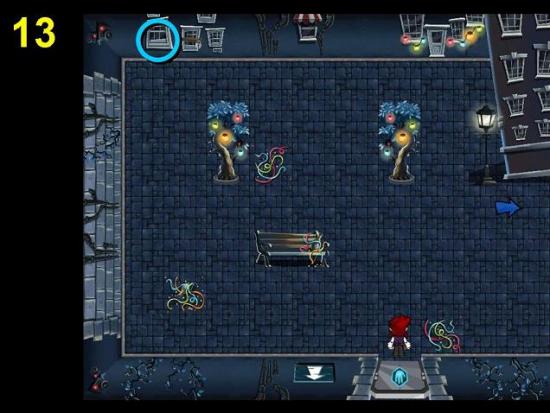
- Inspect the window in the top left for loot
- Walk to the right at the top of the screen for a hidden passage
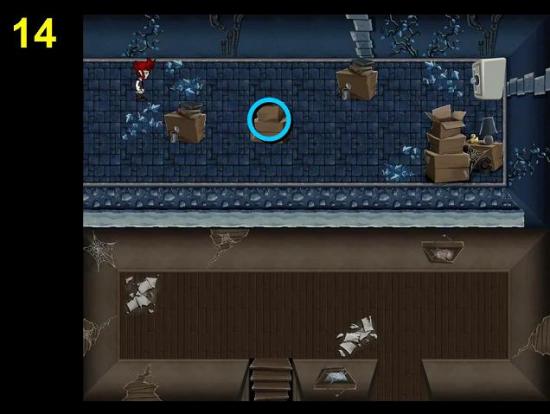
- There’s more loot in the safe and one of the boxes
- Go back one screen and exit right
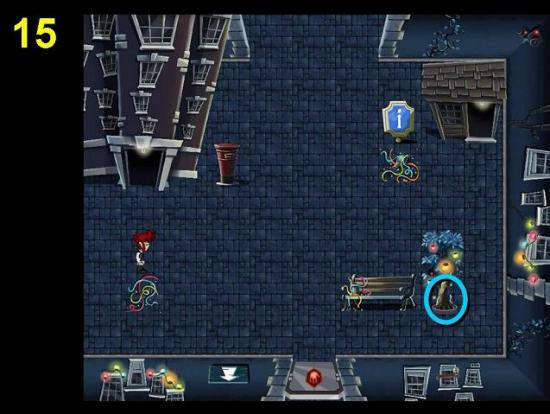
- From here on, loot will be indicated in the screenshots with blue circles but not mentioned separately in the walkthrough
- Go into the first house. This is your apartment
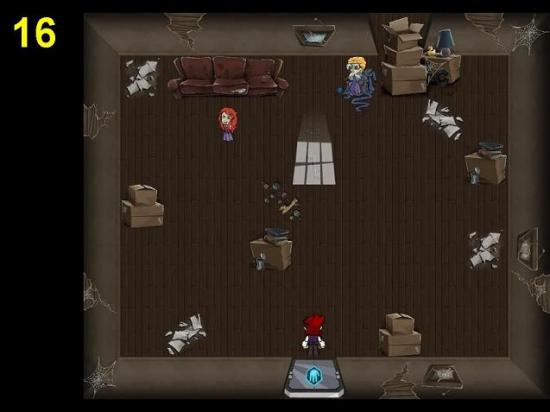
- Leave the apartment
- Go into the house on the right
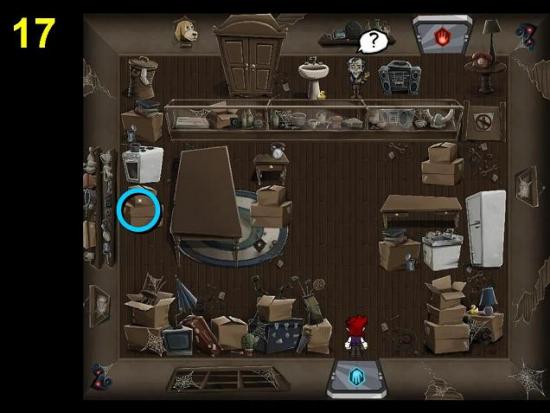
- Talk to Harvey
- Later on when you’ve bought some of Harvey’s merchandise you will be able to get to the loot in the box on the left
- Leave the shop and go to the north of the city square
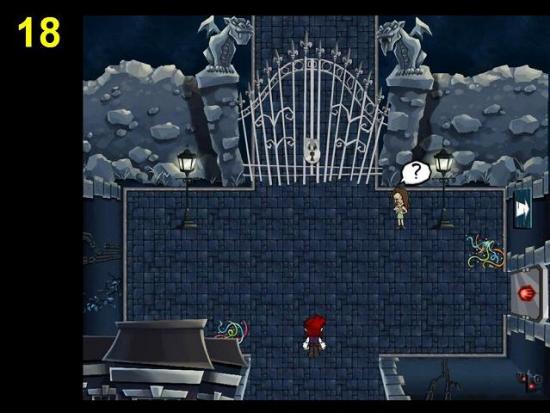
- Talk to Judy. When she asks you to do something for her, agree to do it. You need to find evidence that Alphonse is corrupt. She suggests Verde Park, the junkyard and the City Hall
Chapter 2 – Gypsy District
- From Judy, go south and south again
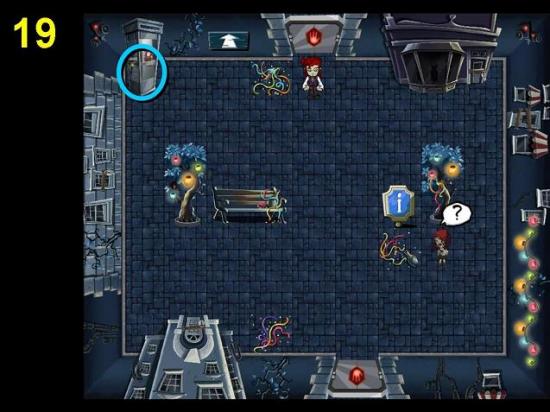
- Talk to the gypsy. She will give you a map
- Once you’re on the map, use your arrow keys to move back to the City Square
- Go south through the door again
- Talk to the gypsy again for a side quest. She lost her watch somewhere in Verde Park and wants you to find it for her (see below)
- Exit south
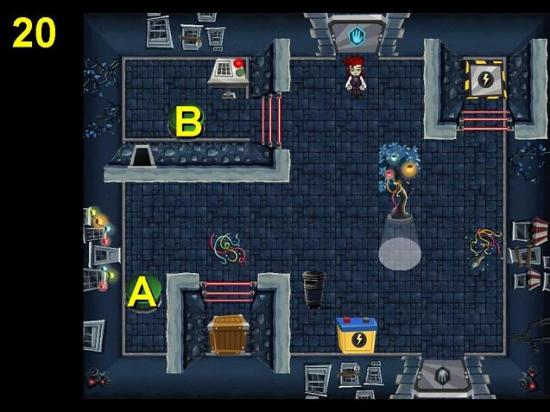
- Climb through the window and activate the console
- Change to wolf
- Move the battery onto button A
- Move the crate onto button B – make sure you push rather than pull it into the corner so you won’t get stuck
- Move the battery to the station
- Exit south
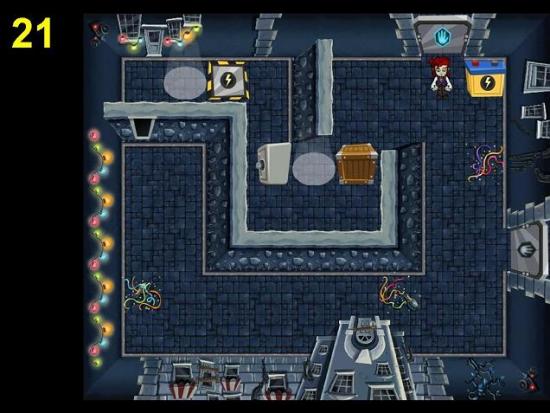
- Climb through the window
- Change to wolf
- Move both the crate and the safe well out of the way – somewhere along the right hand side of the map
- Move the battery to the square to the right of the station
- Change to Lucas
- Walk around and go through the window
- Change to wolf
- Pull the battery onto the station
- Change back to Lucas and go through the window
- Exit right
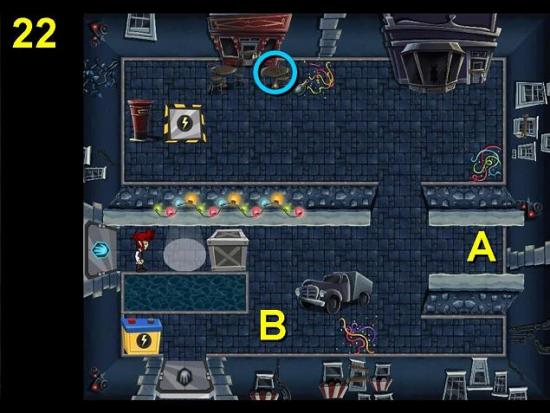
- Sometimes you may encounter heavy steel crates. These crates can only be pushed, not pulled, so be very careful when you move them
- Change to wolf
- Push the crate all the way to the right to A
- Pull battery to B
- Pull 1 up, push 1 up, pull 2 right
- Push up and left to station
- Exit south
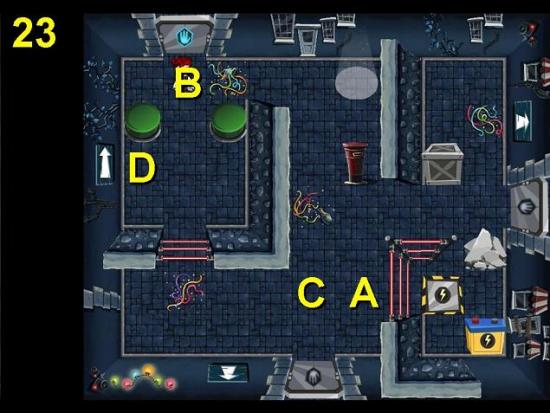
- Change to wolf
- Carefully push the steel crate 1 up
- Smash the rocks
- Pull battery up, left, down to A
- Pull battery 1 left and push to top
- Push left to B
- Pull battery 1 down and push onto right button
- Push steel crate down and left as far as possible
- Walk around and carefully push 2 down to C
- Push left to opening, up to middle of the corner and left to D below the green button
- Pull battery 1 left
- Push battery 1 up
- PULL battery out and down
- Push crate onto left button
- Move battery onto station
- Let’s first exit right to go to the junkyard
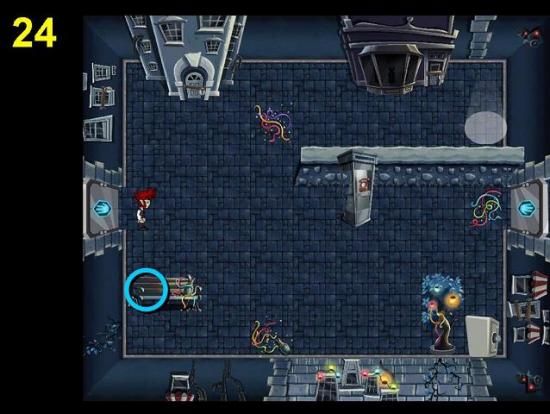
- Move and open the safe
- Exit right
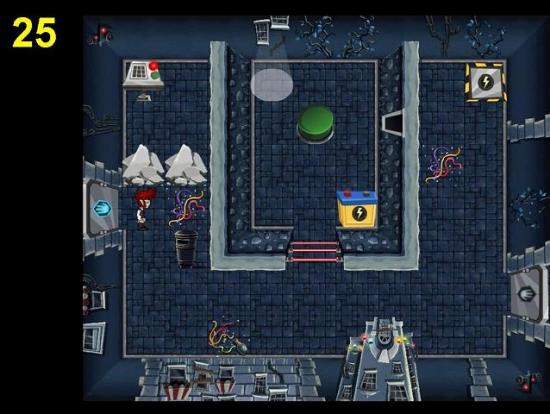
- Climb through the window
- Change to wolf and move the battery onto the button
- Smash the rocks
- Change to Lucas
- Activate the console
- Go back through the window, change to wolf
- PULL the battery out and move it onto the station
- Exit right
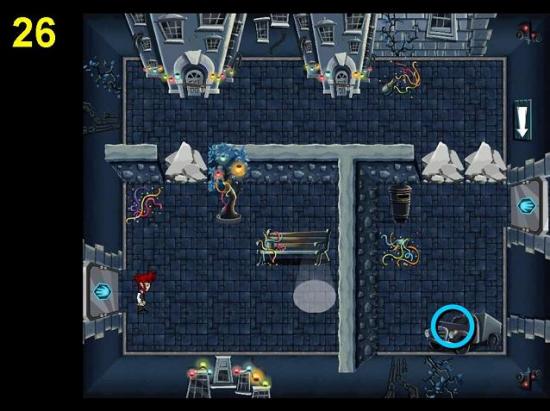
- Smash the rocks as wolf and exit right
Chapter 3 – Junkyard
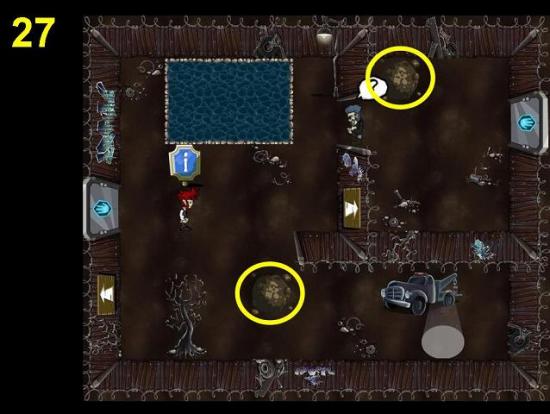
- Change to wolf
- Talk to the guy and intimidate him
- There are two places here where you can dig as the wolf. Always dig these spots to find loot or objects that will help you solve puzzles
- Exit right
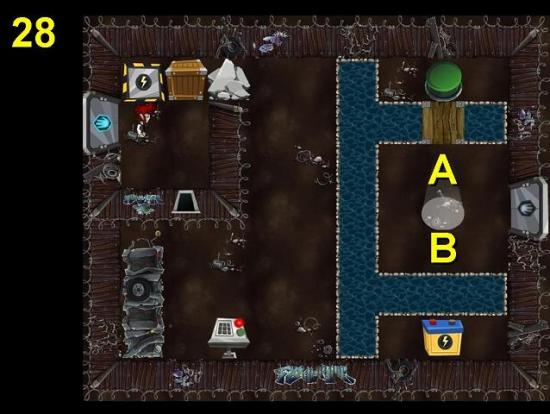
- Climb through the window and activate the console
- Change to wolf and move the battery to A
- Change to Lucas and change console back to red
- Change to wolf and push the battery onto the button
- Smash the rocks
- Pull crate out, across the bridge and to B
- Move battery down and aside
- Push the crate onto the button
- Move the battery to the station
- Exit right
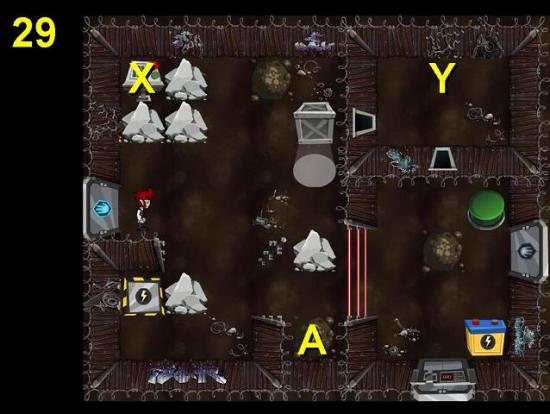
- Strump’s hints give you a different solution than the one in this walkthrough – I just found there’s an easier solution for which you don’t need to use the button at all
- Change to wolf and smash all the rocks
- Push the steel crate all the way down to A (dig before you do)
- Change to Lucas and turn console X green
- Climb through the window and turn the new console (Y) green
- Climb back and change to wolf
- Move the battery left, up and left to somewhere in the main area
- Change to Lucas
- Climb through window and turn console Y red
- Climb back, change to wolf and move the battery to the station
- Exit right
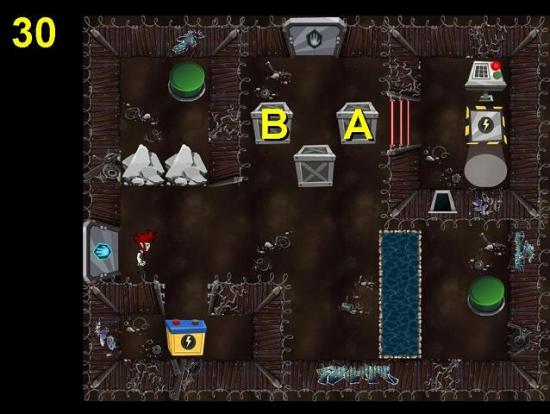
- Climb through the window
- Turn console green
- Change to wolf
- Push heavy crate A aside
- Smash the rocks
- Push crate B to the left button
- Push crate A to the right button
- Move the battery to the station
- Exit north
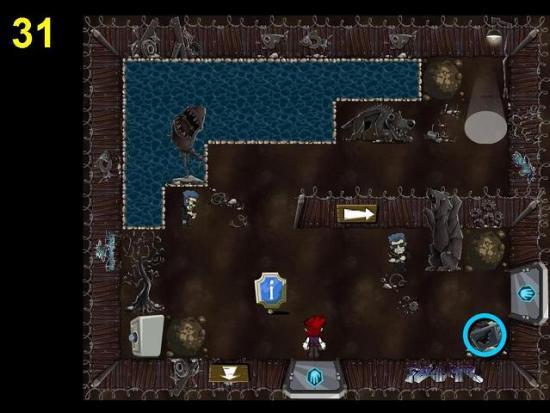
- Open the safe, dig for loot and exit right
Crows’ Hideout
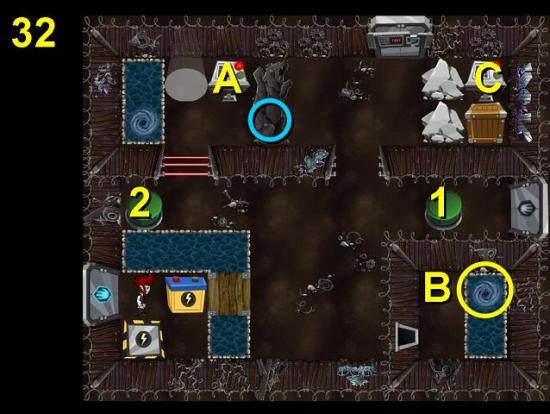
- Climb through the window and go down the vortex (circled) – you come out by console A
- Turn console A green so console B appears
- Go back down the vortex and turn console B green
- Go through the window and change console A back to red
- Change to wolf
- Move the battery to button 1
- Smash the rocks
- Change to Lucas and turn console C green
- Change to wolf and move the box out and to button 2
- Move the battery across the bridge
- Pull the box back out so you can push the battery onto the station
- Exit right
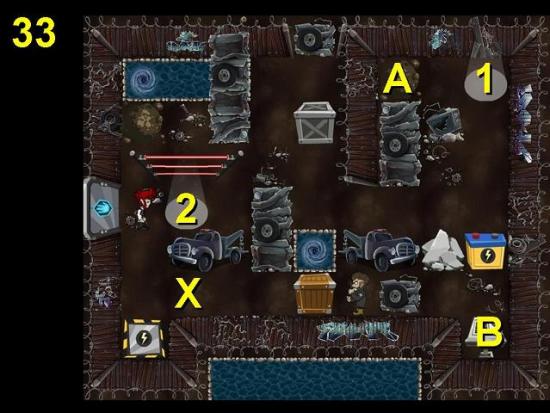
- Change to wolf in light 1 and push the crate back to Grim
- Smash the rocks and pull the battery down
- Dig in the top right (A)
- Change to Lucas in light 2 and turn console A green
- Change to wolf and pull the battery to the left as far as you can go (to X)
- Change to Lucas in light 2 and go through the vortex
- Change to wolf in light 1 and push the battery against the left wall
- Change to Lucas and go through the vortex
- Change to wolf in light 2 and push the battery onto the station
- Turn console B green
- Push the heavy crate against Grim
- Exit north
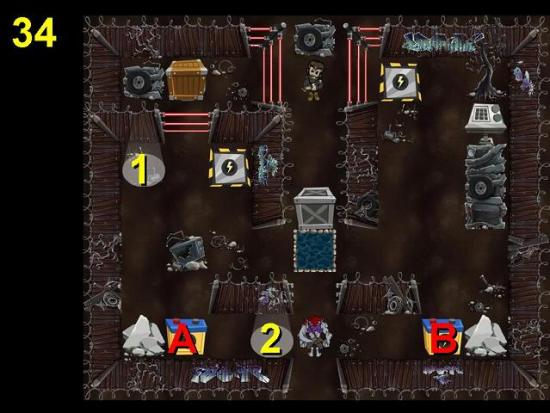
- Go to light 1 and change to wolf
- Smash the rocks bottom left
- Change back to Lucas, walk to light 2 and change back to wolf
- Pull battery A north
- Change to Lucas in light 1, walk to light 2 and change back to wolf
- Move battery A to the nearest station
- Pull the battery B to the left past light 2
- Change to Lucas in light 1, walk to light 2 and change to wolf
- Smash the rocks on the right
- Move battery B to the other station
- Change to Lucas
- Turn console green
- Change to wolf
- Pull the crate out from the top left
- Push the heavy crate against Grim
- Exit north
Grim’s Lair
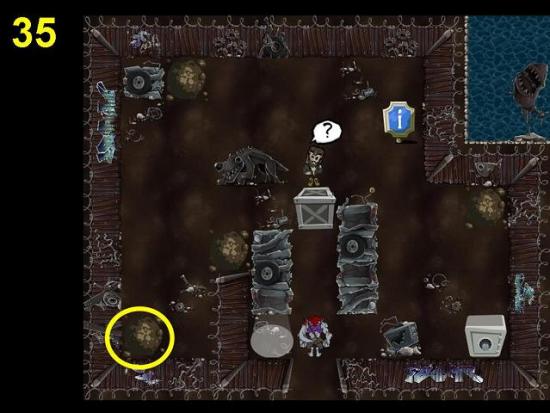
- Push crate to grim
- Dig bottom left to find evidence for Judy (circled)
- Talk to Grim for a side quest. He wants you to scare a couple of rogue Crows and bring him their jackets (see below)
Chapter 4 – Café District
- Go back to the room with the three doors in between the Gypsy District and the Junkyard
- This time exit south
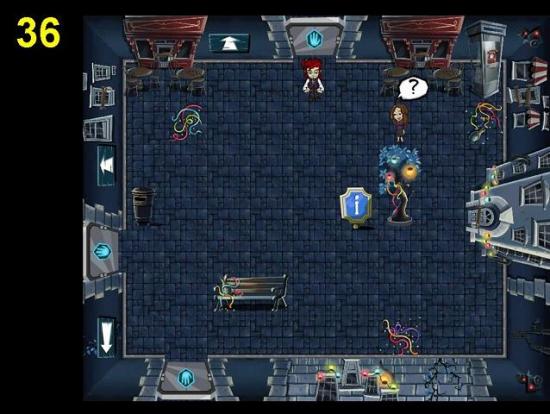
- Talk to Jane for a side quest. She lost her purse in one of the blue bins around the city (see below)
- Exit south
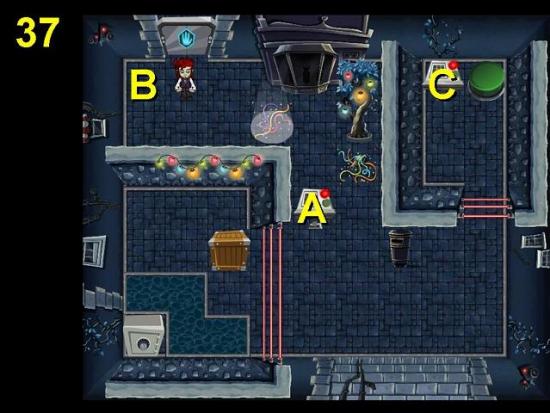
- Set console A to green
- Set console B to green
- Change console A back to red
- Set console C to green
- Move the crate onto the button
- Change to wolf and pull out the safe
- Change to Lucas and open the safe
- Return to Jane in the previous screen and exit left
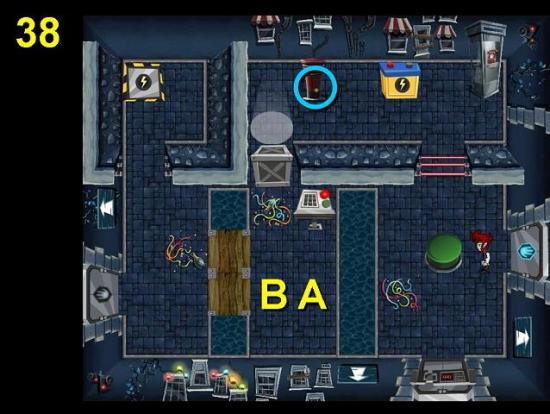
- Turn the console green
- Change to wolf
- Push the heavy crate to A
- Move the battery onto the button
- Push the crate to below the button
- PUSH the battery to the left (you’ll fall in the water if you pull it)
- Push the crate onto the button
- Move the battery 1 south, then push it 3 left to B
- Push the crate down off the button – don’t block the path to the north
- Change to Lucas and change the console to red
- Change to wolf and move the battery onto the station
- Exit left
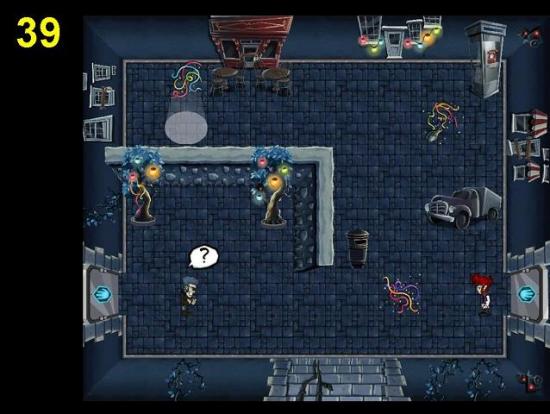
- If you activated the Scare Crows side quest by talking to Grim, change to wolf and talk to the thug (see side quests below). You will get his jacket
- Exit left
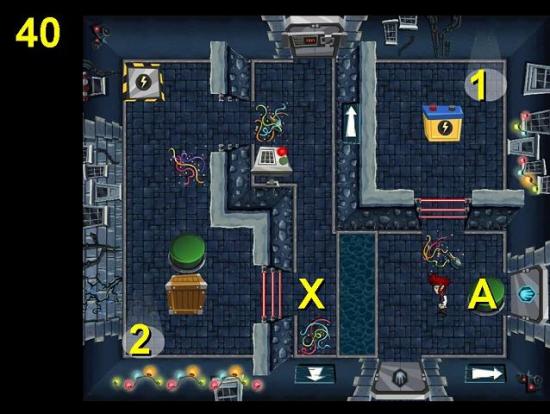
- Turn console green
- Change to wolf in light 1 and move the battery onto button A
- Change to Lucas and turn the console red
- Change back to wolf in light 2
- Push the crate up, right and south to X
- Change to Lucas and turn the console green again
- Change to wolf in light 1
- Pull the crate across the bridge, move the battery off button A and the crate onto button A
- Push the battery across the bridge
- Change to Lucas in light 1 and turn the console red
- Change to wolf in light 2
- Pull the battery up, left and down, then push it against the left wall and north to the station
- Exit south
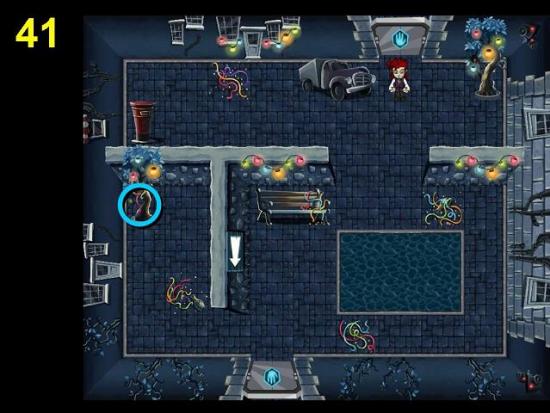
- Exit south
Chapter 5 – Verde Park
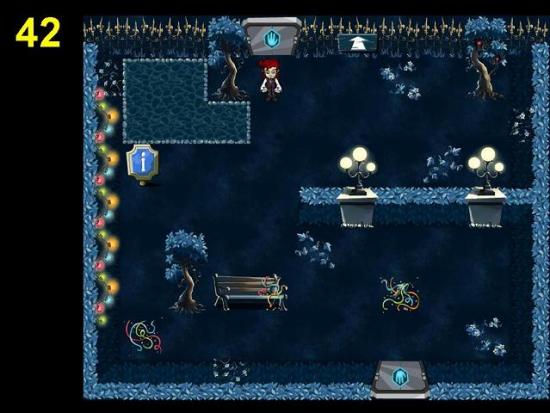
- Exit south
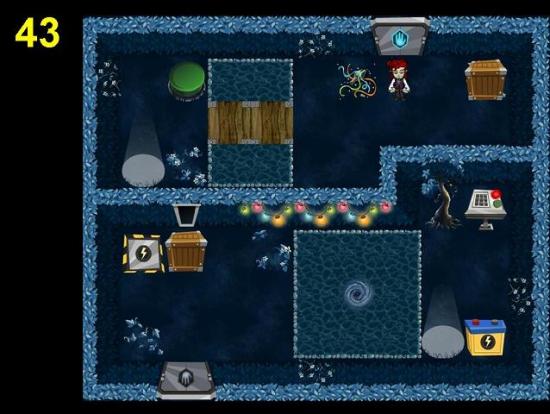
- Change to wolf and move the crate onto the button
- Change to Lucas and go through the vortex
- Switch console to green
- Change to wolf and move the battery onto the station
- Exit south
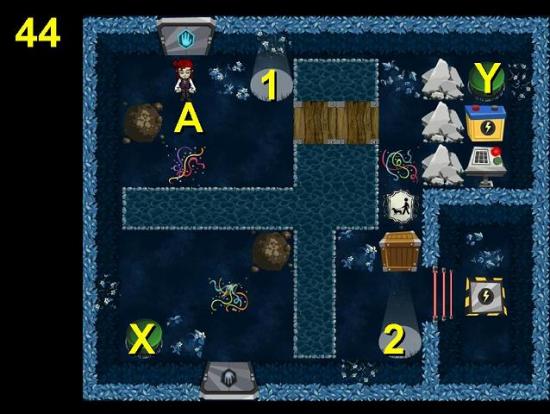
- Change to wolf and smash the rocks
- Pull the battery to A
- Change to Lucas and turn console green
- Change to wolf in light 2 and move the crate onto button X
- Move the battery across the bridge, take the crate off the button and put the battery on it
- Move the crate north and east across the bridge onto button Y
- Change to Lucas and turn the console red
- Move the battery to the station
- Exit south
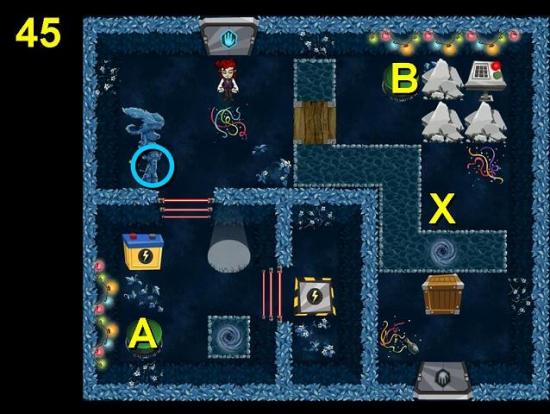
- Go through the vortex
- Change to wolf and move the battery onto button A
- Smash the rocks
- Change to Lucas and turn the console green
- Go through the vortex
- Change to wolf and move the battery to button B
- Pull the crate to X
- Move the battery to the top left corner of the map
- Move the crate up, left across the bridge and south onto button A
- Change to Lucas, go through the vortex and change to console to red
- Change to wolf and move the battery to the station
- Exit south
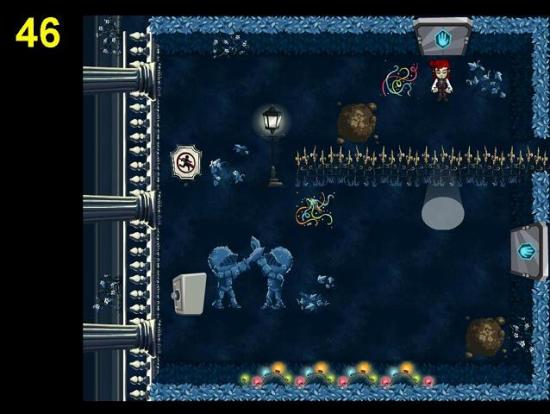
- Exit right
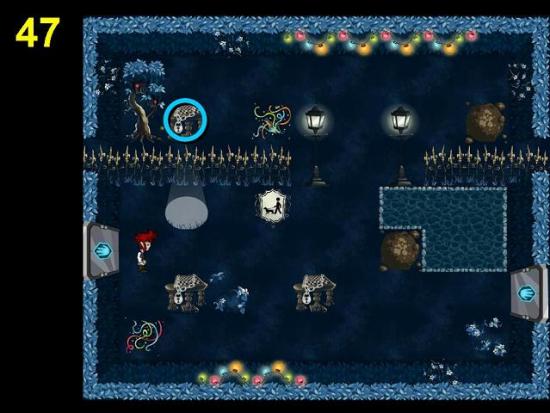
- Exit right
Playground
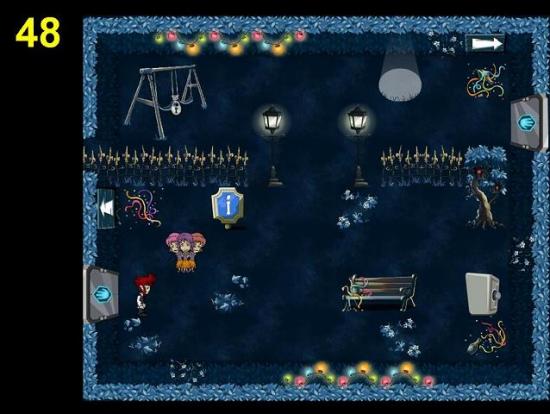
- Exit right
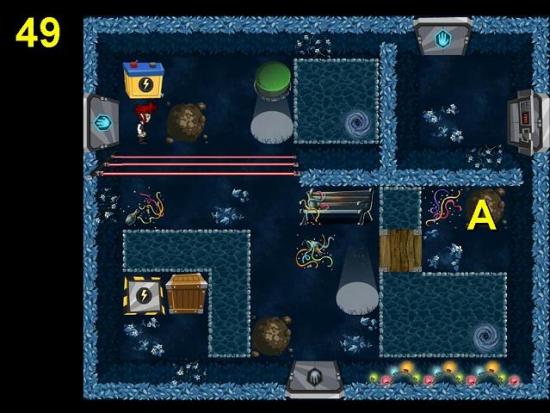
- Go through the vortex
- Change to wolf and dig up console A
- Change to Lucas and turn console A green
- Change to wolf and move the battery onto the button
- Pull the crate to the right and swap it with the battery
- Move the battery to the station
- Exit south
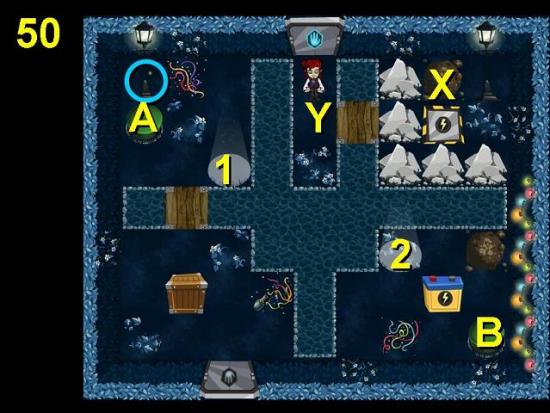
- Change to wolf and move the crate to button A
- Move the battery to button A
- Move the crate to button B
- Smash all the rocks and dig top right to uncover console X
- Change to Lucas and turn the console green
- Change to wolf in light 1 and push the battery to Y
- Change to Lucas and turn the console red
- Change to wolf in light 2 and move the battery to the station
- Exit south
King Raff’s Statue
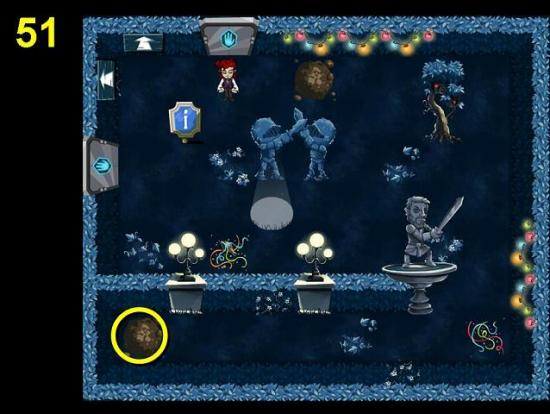
- Dig to find evidence for Judy (circled)
- Exit left
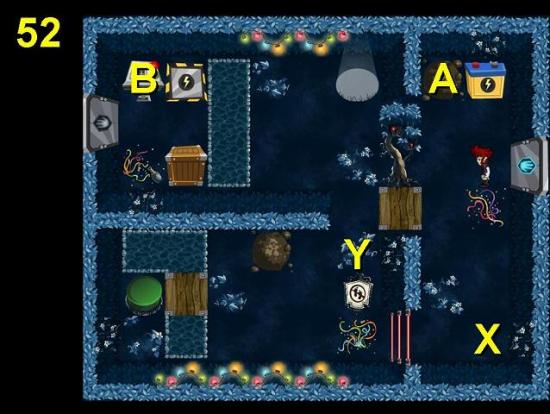
- Change to wolf and dig top right to uncover console A
- Move the battery all the way down to X
- Change to Lucas and activate the right console (in my game it stayed red, though)
- Change to wolf and move the battery through the lower gap and onto the button
- Change to Lucas and turn console B green
- Change to wolf and PUSH the crate through the gap to Y
- Change to Lucas and turn console B red
- Change to wolf and swap the crate and the battery around – crate to button, battery to Y
- Walk around and pull the battery north
- Change to Lucas and turn console B green
- Move the battery to the station
- Exit left
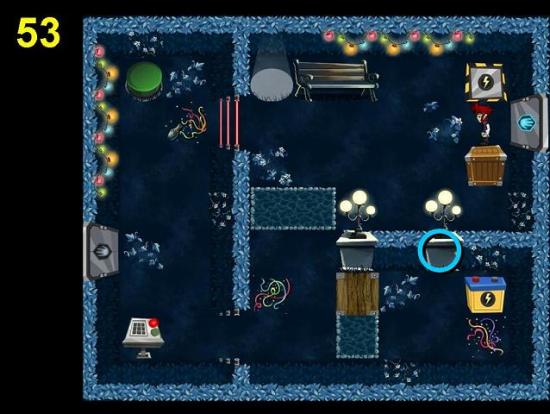
- Turn the console green
- Change to wolf and move the crate onto the button
- Change to Lucas and turn the console red
- Change to wolf and move the crate off the button to change the bridges
- Pull the battery out
- Move the crate back onto the button
- Move the battery to the station
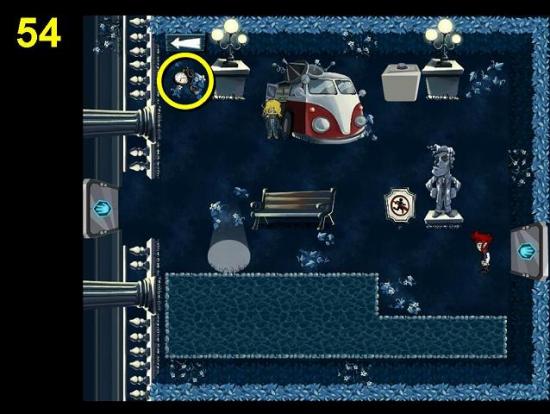
- Talk to Strump. You need to find four key cards in the City Hall
- If you have Gypsy’s side quest, find her watch in the top left corner
- Go left into the City Hall
Chapter 6 – City Hall
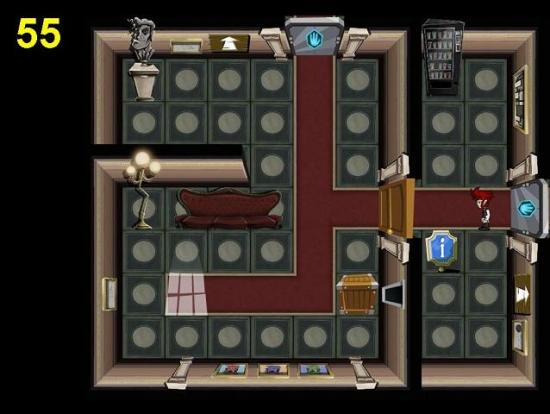
- Open the door and exit north
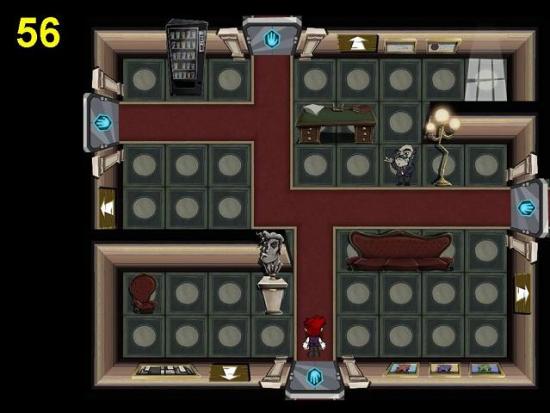
- Exit right
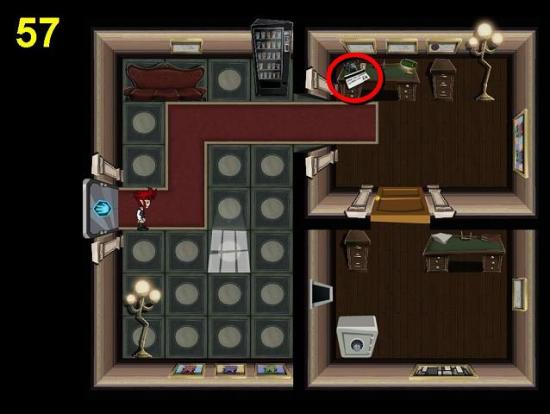
- Take key card 1/4
- Climb through the window, then open the door from the inside
- Change to wolf and pull the safe through the door
- Change to Lucas, go through the window and open the safe
City Hall West Wing
- Go back to the room where the Mayor is and exit left
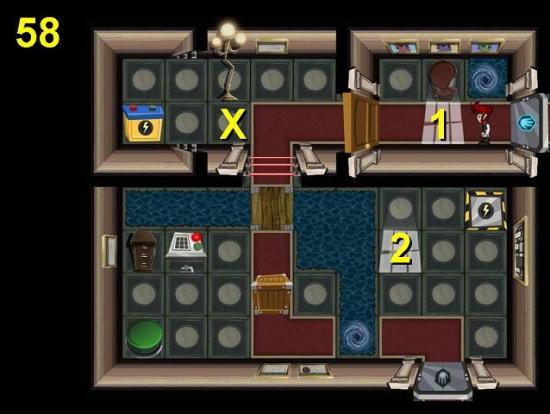
- Go through the vortex and switch the console to green
- Change to wolf and move the crate onto the button
- Change to Lucas and open the door
- Change to wolf in light 2 and move the crate off the button
- Change to Lucas and switch the console to red
- Go through the vortex and change to wolf in light 1
- Pull the battery to X
- Change back to Lucas, go through the vortex and switch the console to green
- Change to wolf and push the crate back onto the button
- Change to Lucas, turn the console red
- Change to wolf in light 1 and move the battery south
- Change back to Lucas and turn the console green
- Change back to wolf and move the battery to the station
- Exit south
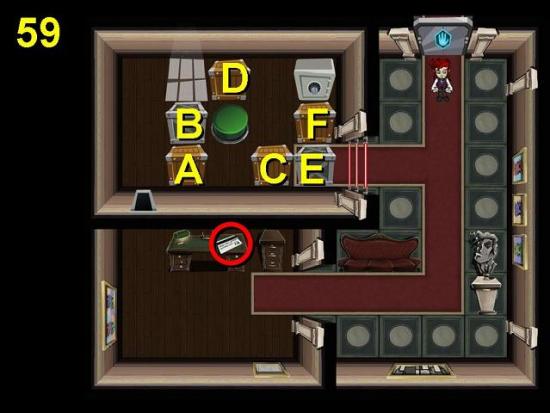
- Take key card 2/4
- Climb through the window and change to wolf
- Push crate A right and crate B up
- Pull crate A back to the left and push against left wall
- Do the same with crate C
- Pull crate onto D the button
- Push crate E out
- Push crate D to the far left and crate F onto the button
- Change to Lucas and open the safe
City Hall North Wing
- Go back to the room where the Mayor is and exit north
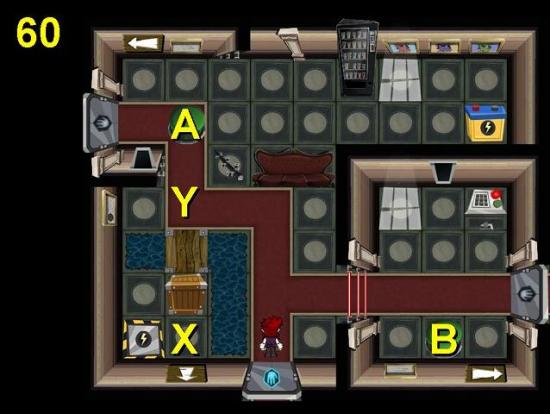
- Change to wolf and push the crate down to X
- Pull the battery onto switch A
- Change to Lucas, climb through the window and turn the console green
- Change to wolf and move the crate to button B
- Change to Lucas and turn the console red
- Climb through the window, change to wolf and push the battery to X
- Move the crate off the button
- Change to Lucas and switch the console back to green
- Change to wolf and move the crate to Y
- Change to Lucas, turn the console red and go through the window
- Change to wolf to pull the crate onto button A
- Change to Lucas, go through the window and turn the console green
- Change to wolf and push the battery onto the station
- Exit right
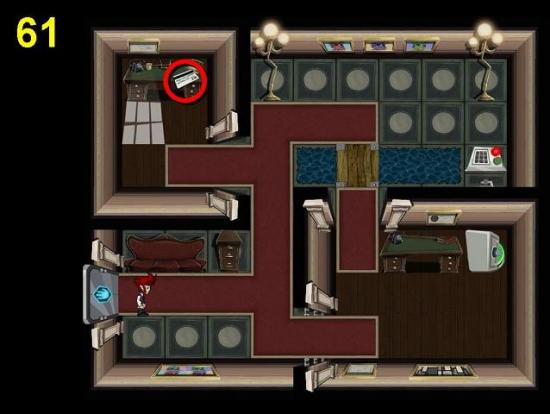
- Take key card 3/4
- Turn the console green
- Change to wolf to pull the safe down and left
- Change to Lucas to open the safe
- Go back to the previous room and exit left
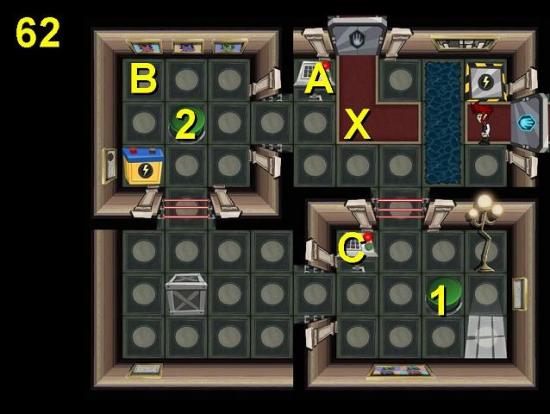
- Turn console A green
- Turn the console that appears at B green
- Change to wolf and push the heavy crate to button 1
- Move the battery out to X
- Change to Lucas and turn console A red
- Move the crate to button 2
- Change to Lucas and turn console C green
- Change to wolf and move the battery to the station
- Exit north
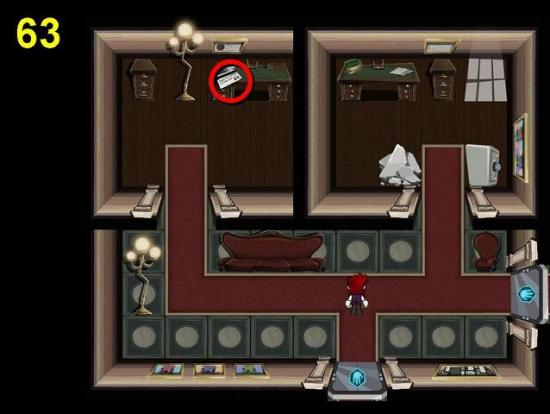
- Take key card 4/4
- Change to wolf, smash the rocks and pull the safe to the right
- Change to Lucas and open the safe
- Exit right
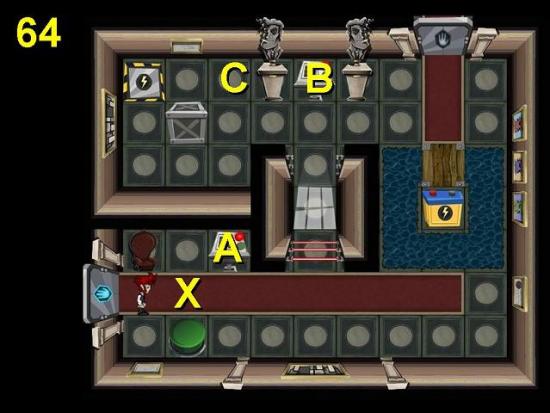
- Turn console A green
- Turn console B green
- Turn the console that appears at C green
- Change to wolf
- Pull the battery south and push it to the left to above the button
- With console A gone (console B must be green), move the battery onto the button
- Push the heavy crate all the way around, across the bridge and to the button
- Move the battery off the button and the crate onto it
- Push the battery across the bridge
- Change to Lucas and turn console B red
- Turn console A red
- Change to wolf and move the battery to the station
- Exit north
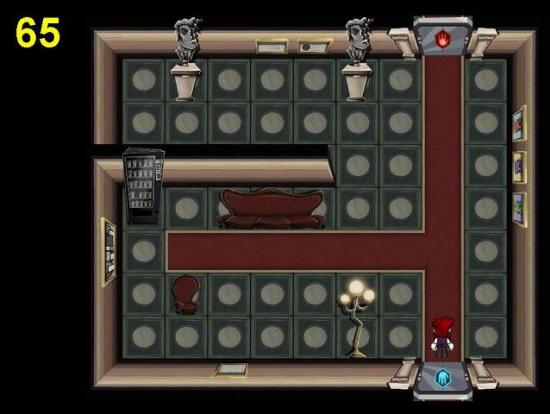
- If you have all four key cards, exit north
Mayor’s Office
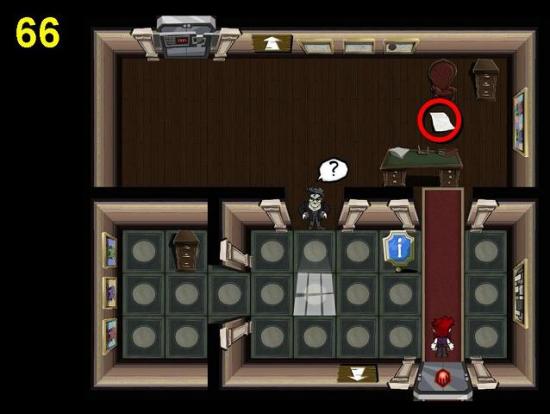
- Walk to the moonlight
- Keep going through all dialog options
- Pick up the paper
- You need to talk to Gypsy about the curse
- Go to the Gypsy District and talk to gypsy about the curse. She says you need to talk to the librarian to find out more about it
- Go north to the mansion gates and talk to Judy. Give her all the evidence you have. She will open the library doors for you, so you can find more evidence there
Chapter 7 – The Library
- Before you go into the library, it would be good to complete some of your side quests as this saves later trips to the library. In particular, complete Gypsy’s Lost Watch quest so you can get the Advanced Palmistry quest, and complete the Scare Crows quest so you can get the Lost Badge quest (see Side Quests chapter below)
- Go to Judy and go through the door in the bottom right corner
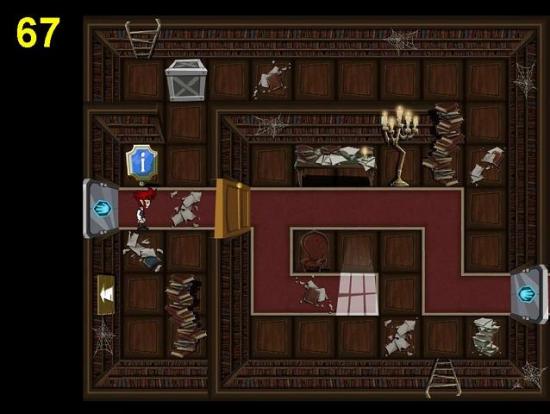
- Open the door and exit right
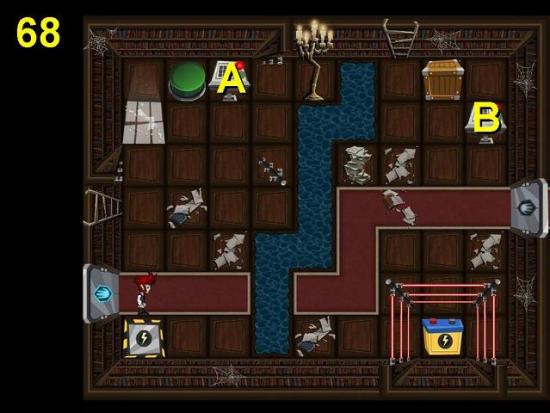
- Turn console B green
- Change to wolf and move the crate onto the button
- Change to Lucas and turn console A green
- Change to wolf and move the battery to the station
- Exit right
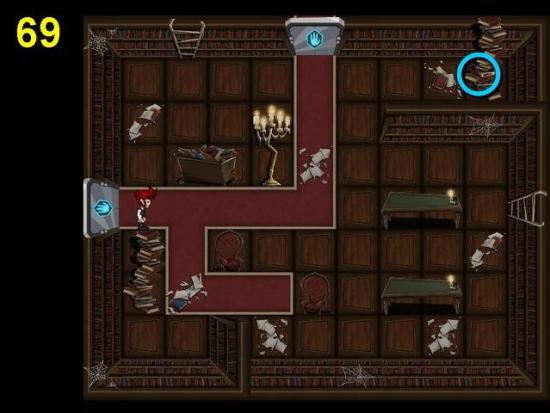
- Exit north
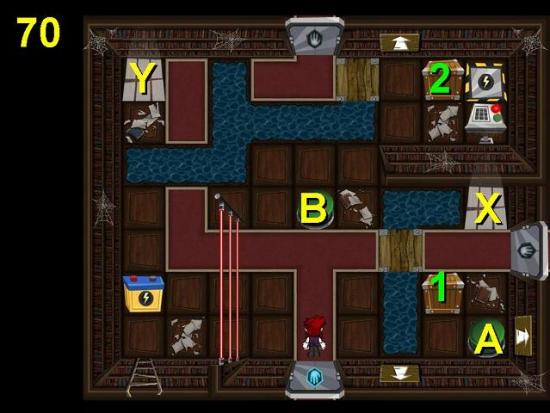
- Change to wolf in moonlight X
- Move crate 1 to button A. You will need to push it across the bridge to the left and back to make this work
- Change to Lucas and turn the console green
- Change to wolf in moonlight Y
- Move crate 2 left and down to the area near the battery
- Change to Lucas in light Y, then back to wolf in the light X
- Move crate 1 to button B
- Move crate 2 to button A
- Move the battery to directly below the upper door
- Move the crate off button A, the crate off button B and the right crate back onto button A
- Change to Lucas in moonlight X
- Change to wolf in moonlight Y
- Move the battery to the station
- Exit north
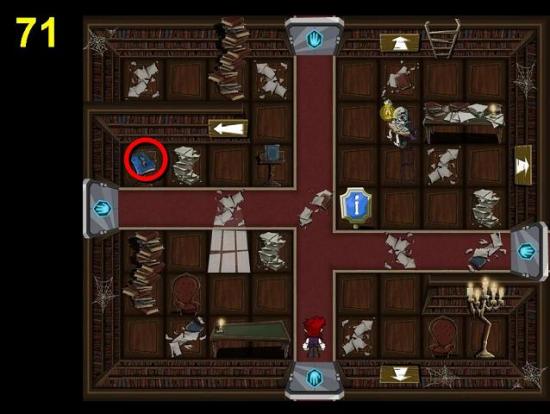
- The librarian only makes funny noises right now, so leave him be
- The book for the triplets is on the podium on the left (see Side Quests below)
Library East Wing
- From Professor Compton, exit right
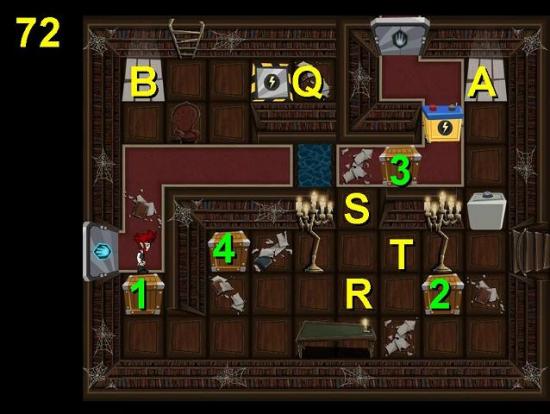
- Change to wolf and move crate 1 north and to Q. You will need to circle the chair a few times to get it there
- Walk to the right side of crate 2 and push it all the way to the left
- Pull the safe two squares down and one left to where crate 2 is in the image
- Move crate 3 one left and then all the way down to directly above the desk (R)
- Move the battery to the space in between the two bookcases (S)
- Move the safe to the square below moonlight A
- Change to Lucas in moonlight A, walk to the left and change to wolf in moonlight B
- Move the crate in spot R to the bottom right corner of the room
- Pull the lower crate of the two sitting below each other to the right and then up so it sits to the left of the right candelabra (T)
- Move the other crate (4) to below that candelabra (marked 2 in the image)
- Push the battery down to the desk (R)
- Change to Lucas in light A, then change back to wolf in light B
- You can now move the battery all the way to the station, but you will need to change back and forth and walk around a few times
- Exit north
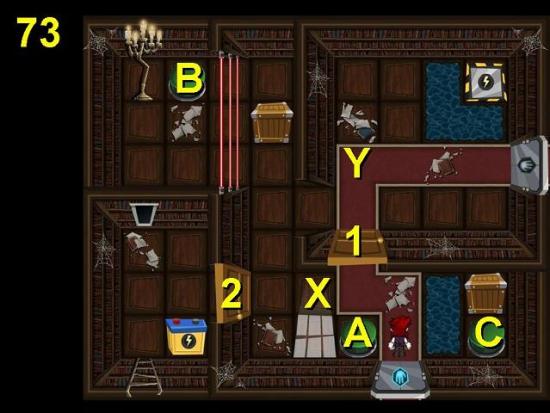
- Open door 1
- Change to wolf and pull the crate down and right until it sits below the door
- Push the crate through the open door until you can walk around it and push it back south onto button A
- Change to Lucas, climb through the window and open door 2
- Change to wolf and push the battery out to X
- Change to Lucas, climb back through the window and close door 2
- Change to wolf and move the battery to button B (you will need to move the crate off and back onto button A to be able to get to the right side of the battery)
- Push the crate from button A onto button C
- Pull the other crate out and move it through the door and back so you can get it onto button A
- Now pull the battery back down the corridor and through door 1 to Y (again, you will need to move the crate to be able to get around the battery)
- Pull the battery 1 right and 1 up so you can then push it to the station
- Exit right
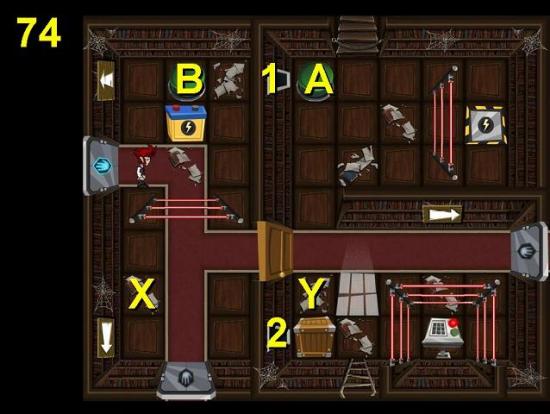
- Climb through window 1
- Change to wolf and move the crate to button A
- Change to Lucas and turn the console green
- Change to wolf and move the crate 1 down so it sits below button A and doesn’t block window 1
- Change to Lucas, climb through a window and open the door
- Change to wolf and move the battery to X
- Change to Lucas, climb through window 1 and close the door
- Change to wolf and pull the crate down to Y
- Change to Lucas, climb through the window and open the door
- Change to wolf and move the crate out and onto button B
- Move the battery to Y
- Change to Lucas, climb through window 1 and close the door
- Move the battery to the station
- Exit right
- After the dialog, return to Professor Compton. Turns out he needs coffee before he is coherent!
Library West Wing
- From Professor Compton, exit left
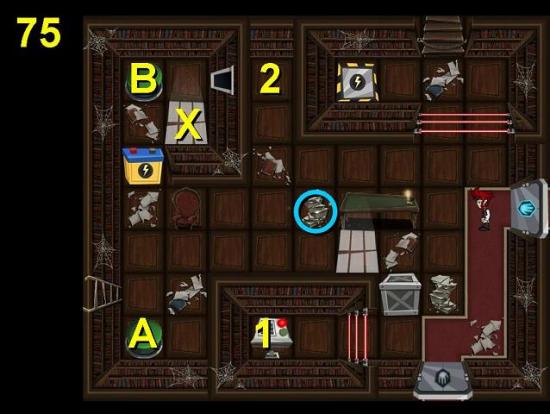
- Change to wolf
- Move the battery to button A
- Change to Lucas in light X, climb through the window and turn console 1 green
- Turn the console that appears at 2 green
- Push the crate to button B
- Move the battery to the station (the lasers disappear once the battery is off the button)
- Exit south
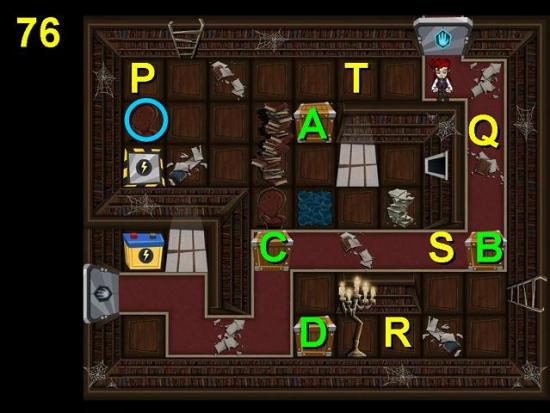
- Climb through the window
- Change to wolf and push crate A 1 up
- Move the right crate 1 down
- Walk around and push crate A to P
- Move crate B up to Q
- Pull crate C right and down and push into corner by candelabra (R)
- Pull crate B down to the carpet and 1 left (S)
- Walk around and move that crate next to the one at R
- Move crate D next to the other two
- Move the battery to the top right corner
- Walk around and pull it to the edge of the bookcase (T)
- Walk around again and push the battery to the station
- Exit left
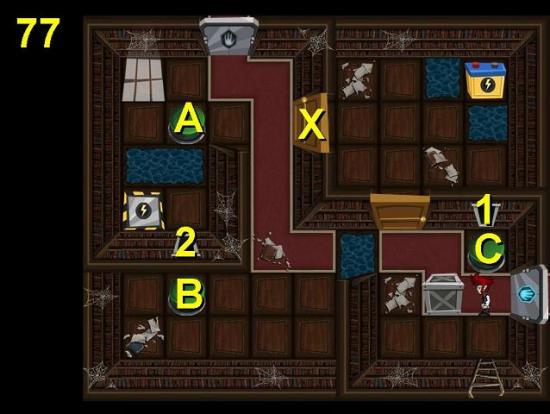
- Climb through window 1 and open both doors
- Change to wolf and move the crate to button A
- Change to Lucas and climb through window 2
- Close both doors
- Change to wolf and move the crate to button B
- Change to Lucas, climb through window 1 and open door X
- Change to wolf and move the battery to button A
- Change to Lucas, climb through window 1 and close door X
- Change to wolf and move the crate to button C
- Move the battery to the station
- Exit north
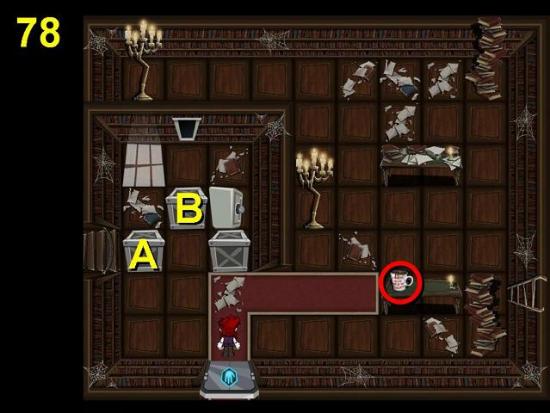
- Take coffee 1/4
- Climb through the window and change to wolf
- Push crate A far down
- Push crate B up
- Pull the safe left and down
- Change to Lucas and open the safe
Library North Wing
- Return to Professor Compton and exit north
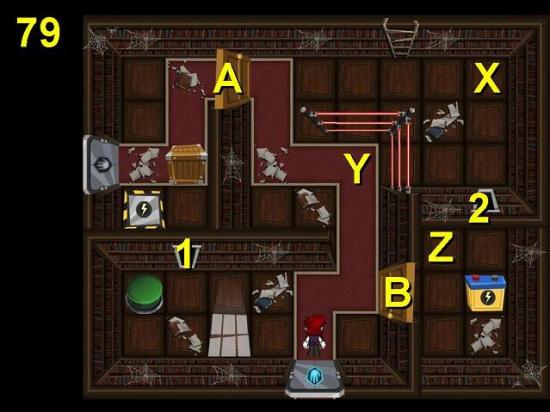
- Climb through window 1
- Open door A
- Climb through window 2
- Open door B
- Change to wolf and move the battery onto the button
- Change to Lucas, climb through a window and close door B
- Change to wolf and move the crate to X
- Change to Lucas and close door A
- Change to wolf and move the crate to just below the lasers (Y)
- Change to Lucas, climb through window 2 and open door B
- Change to wolf and move the battery to Z
- Change to Lucas, climb through window 2 and close door B
- Change to wolf and move the crate to the button
- Change to Lucas, climb through window 2 and open door B
- Change to wolf and move the battery out
- Change to Lucas and climb through window 1
- Open door A and close door B
- Change to wolf and move the battery to the station
- Exit left
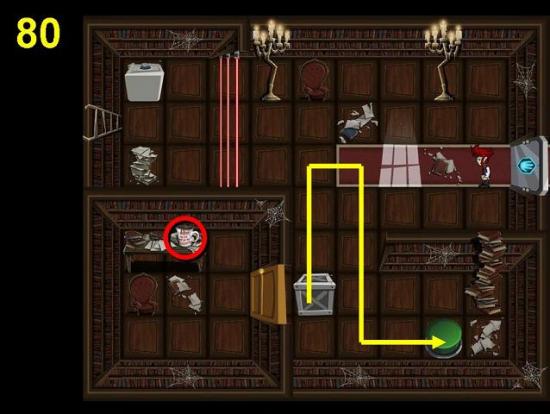
- Change to wolf
- Move the crate 2 up, 1 right, down and onto the button
- Pull the safe down
- Change to Lucas, open the safe, open the door and take coffee 2/4
Library Southeast Wing
- Go back to Professor Compton, exit south to map 70 and then exit right
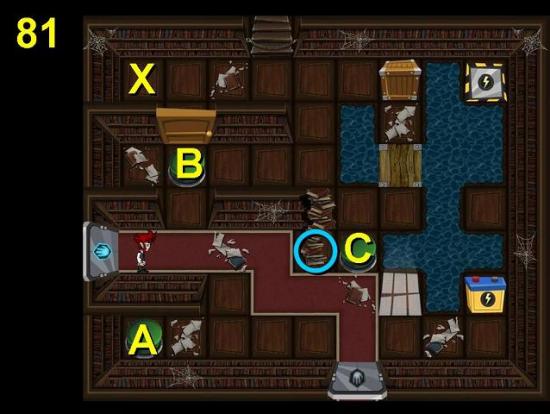
- For this level you have to walk around the bookcases a lot to move the crate and battery as described below
- Walk around and open the door
- Change to wolf
- Move the crate to button A
- Push the battery across the bridge
- Move the crate to button B
- Move the battery across the new bridge
- Push the crate 1 up so it sits between the bookcases
- Move the battery to the far top left corner (X)
- Move the crate to button C
- Move the battery to the station
- Exit south
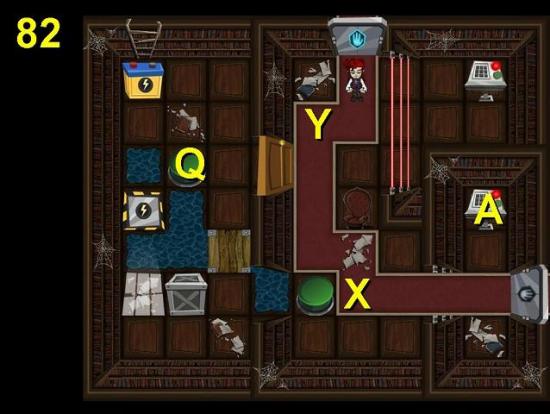
- Set console A to green
- Change to wolf
- Push the crate to X
- Walk around, push the crate onto the switch and then to Y
- Change to Lucas and change console A back to red
- Open the door
- Change to wolf and push the crate 1 down and left to button Q
- Move the battery to the station via the south
- Exit right
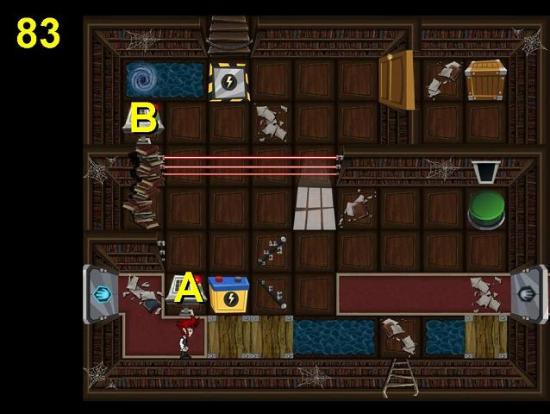
- Set console A to green
- Climb through the window, open the door and set console B to green
- Change to wolf and move the crate through the door, south and to the button
- Change to Lucas and turn console B back to red
- Go through the vortex and turn console A back to red
- Change to wolf and push the battery 2 north
- Move the crate 1 left
- Change to Lucas, climb through the window and change console B to green
- Change to wolf and move the battery to the station
- Exit right
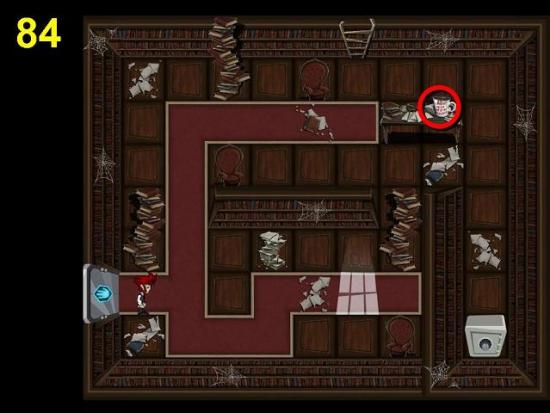
- Take coffee 3/4 and do whatever you need to do to open the safe
- Go back to Professor Compton
- Go back through the East Wing until you get to the room with 3 doors (map 74)
- This time exit south
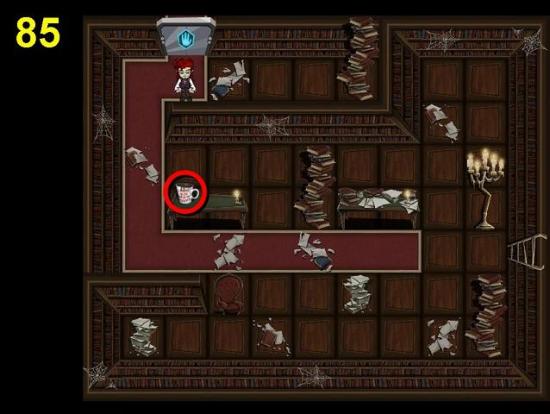
- Take coffee 4/4
- Go back to Professor Compton and give him the coffee. He will unlock the restricted section for you
- Talk to him again for a side quest: you need to return your library books
- Also talk to him about King Raff’s Memoirs
- Go back to map 74 in the East Wing and exit right, or take the map to the restricted Section
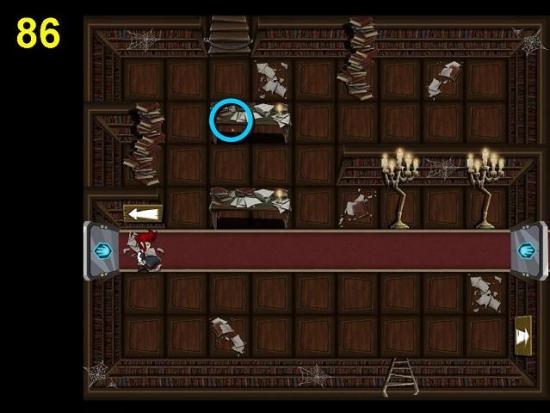
- Go through the red door
Restricted Section
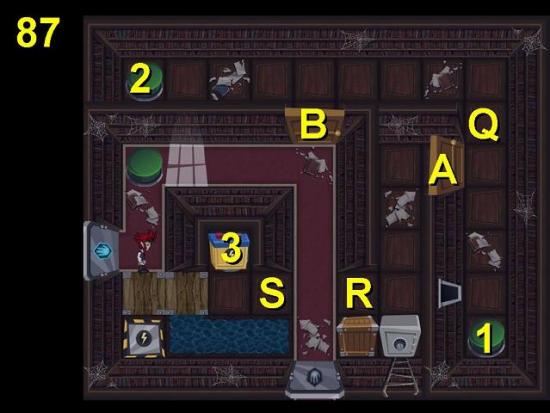
- Walk around and open both doors
- Change to wolf and move the safe north and right to Q
- Change to Lucas and climb through the window
- Close door A and climb back through the window
- Change to wolf and push the safe onto switch 1
- Change to Lucas and open door A again
- Change to wolf and move the crate to button 2
- Pull the battery south and right to R
- Move the crate to S
- Move the battery through the right corridor to button 2
- Move the crate to button 3
- Move the battery right and south
- Change to Lucas and close door B
- Change to wolf and move the battery to the station
- Exit south
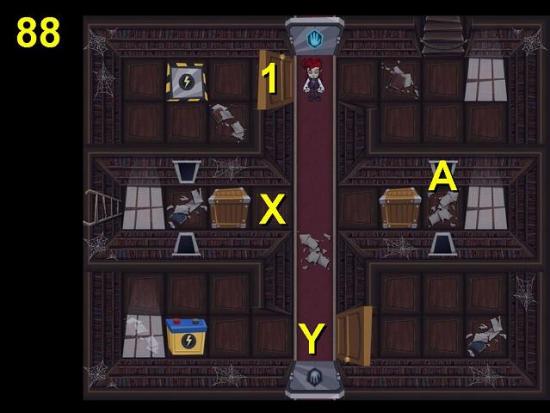
- Go through window A
- Change to wolf and move the crate left next to the other one (X)
- Push the battery out to the right (Y)
- Change to Lucas, go through the two windows on the left and open door 1
- Go through window A and close door 1
- Now by changing back and forth between Lucas and the wolf and climbing through window A whenever necessary, move the battery into the top right compartment
- Go north through the windows on the left to open door 1
- Change to wolf and move the battery to the station
- Exit south
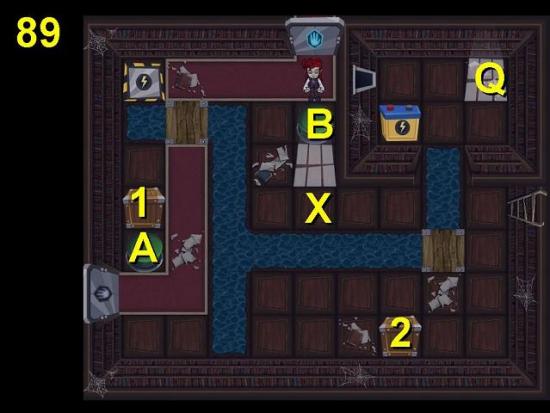
- Change to wolf and move crate 1 onto button A
- Move crate 2 to X
- Push crate 1 off the button
- Move crate 2 onto button B
- Push the left crate back onto the left button
- Move the battery right and south
- Change to Lucas and climb out through the window
- Change to wolf and pull the battery left
- Change to Lucas, walk around and change to wolf in moonlight Q
- Push the battery further left
- You can now move the battery to the station by walking around and moving crate 1 on and off the button each time you walk past to change the bridges
- Exit left
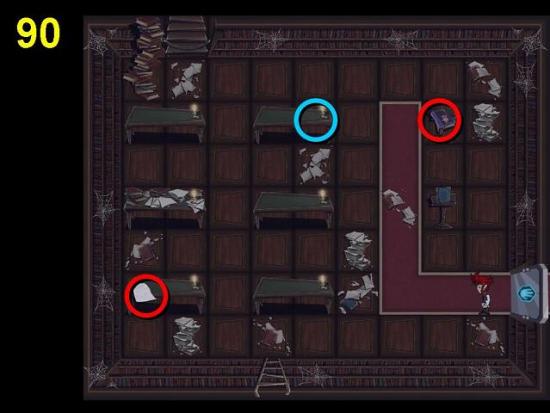
- Pick up the evidence from the bottom left desk
- If you have the Advanced Fortune Telling quest pick up the palmistry book from the top podium
- Bring the evidence to Judy in the Town Square
Chapter 8 – Museum Archives
- After you returned the first lot of evidence, Judy opened the entrance to the museum archives for you
- Go to the Lupin Twine Amulet Exhibition (map 6)
- Exit right through the red door
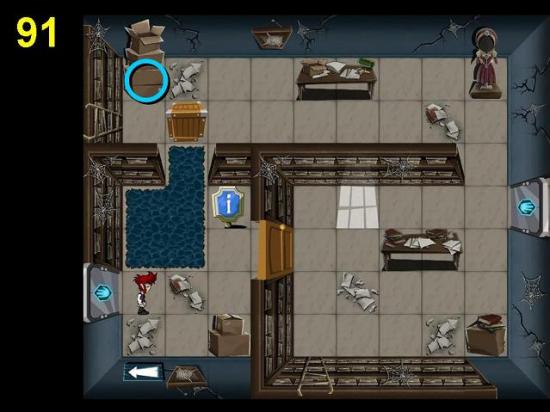
- Exit right
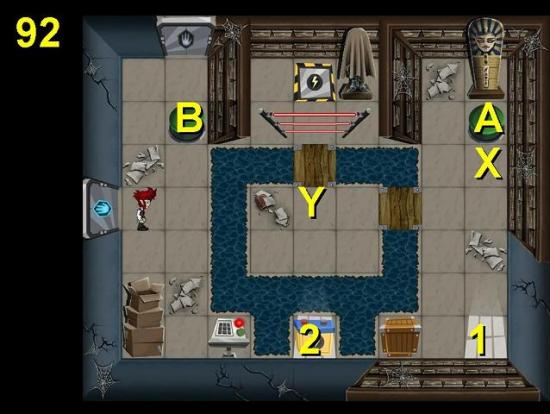
- Turn the console green
- Change to wolf and pull the battery across the bridge
- Change back to Lucas in light 1 and then change back to wolf in the moonlight where the battery was (2)
- Move the battery to the square below button A (X)
- Push the crate to Y
- Push the battery onto button A
- Change to Lucas in light 1 and back to wolf in light 2
- PULL the crate across the bridge and onto button B
- Change to Lucas and turn the console red
- Change to wolf in light 1 and move the battery to the station
- Exit north
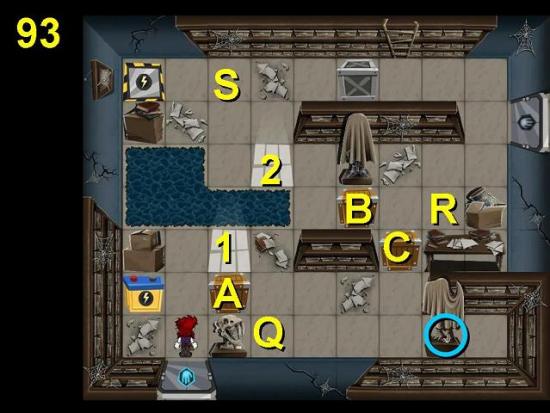
- Change to wolf and push crate A to Q
- Change to Lucas in moonlight 1, walk to moonlight 2 and change to wolf
- Push crate B right to R
- Push crate C down against the wall and next to the crate on Q
- Pull crate B 1 left
- Change to Lucas in light 1 and back to wolf in moonlight 2
- Pull crate B down
- Change back to Lucas, back to wolf and push crate B down against the wall
- Carefully push the heavy crate 3 left to S
- You can now move the battery to the station around the outside. You will need to walk around a fair few times. When the battery is close to the station, push the heavy crate right again to make room for the battery
- Exit right
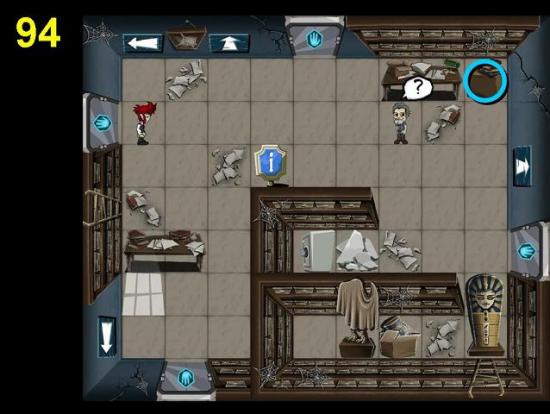
- Do what you need to do to open the safe
- Talk to John for the Cheer up Ex-Guard side quest
Archives South Wing
- From the archives guard, exit south
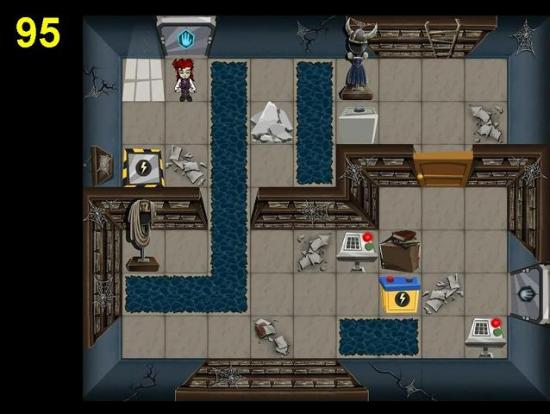
- Turn both consoles green
- Change to wolf and smash the rocks
- Push the safe to the far right
- Change to Lucas and open the door
- Change to wolf and move the safe through the door and against the south wall
- PUSH the battery across the bridges to the station
- Exit right
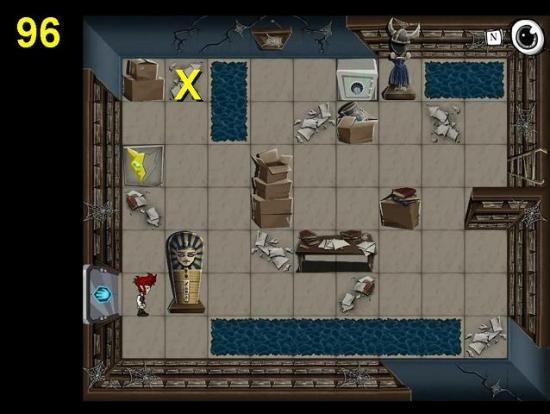
- Change to wolf
- Move the safe all the way around to X before you can change back to Lucas and open it
Archives North Wing
- Go back to John the archives guard and exit north
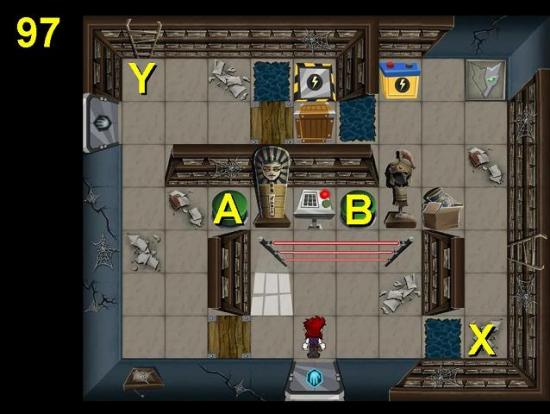
- Change to wolf
- Move the crate to button A. You will need to pull it across the south bridge, walk around it and pull it back to be able to get it to the button
- Change to Lucas and set the console to green
- Change to wolf and move the battery to the bottom right corner (X)
- Change to Lucas on the tile in the top right
- Walk around, change to wolf in the light and pull the battery across the bridge
- Change to Lucas, set the console to red and change back to wolf
- Move the crate back to Y, via the bottom as before
- Move the battery to button A
- Move the crate to button B
- Move the battery to the station
- Exit left
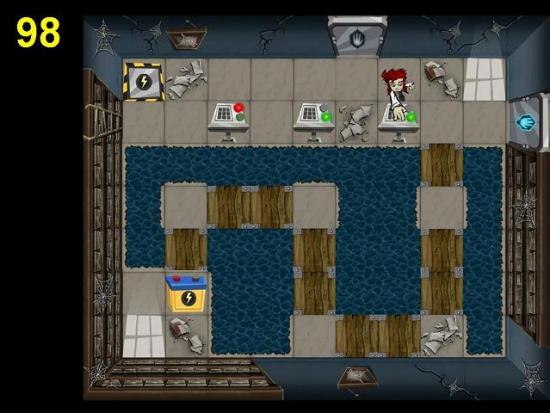
- This puzzle is quite simple but tedious
- Set the right and middle consoles to green
- Push the battery across the bridges to the station by constantly walking around and changing back and forth
- Exit north
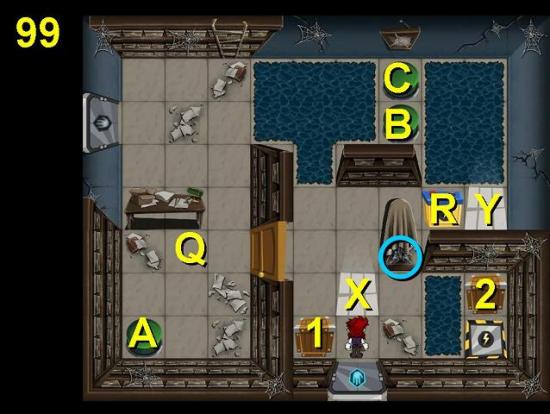
- Open the door
- Change to wolf and move crate 1 to button A
- Change to Lucas in light X, walk around and change to wolf in light Y
- Move the battery onto button B
- Change to Lucas at Y and back to wolf at X
- Move crate 2 through the door to Q
- Change to Lucas and close the door
- Change to wolf at Y and move the battery to button C
- Move crate 2 north and PULL it onto button B
- Pull the battery out and south to R
- Move the crate onto button C
- Move the battery to Q
- Pull the crate right and move it to button B
- Change to Lucas at Y
- Open the door
- Change to wolf and move the battery to the station
- Exit left
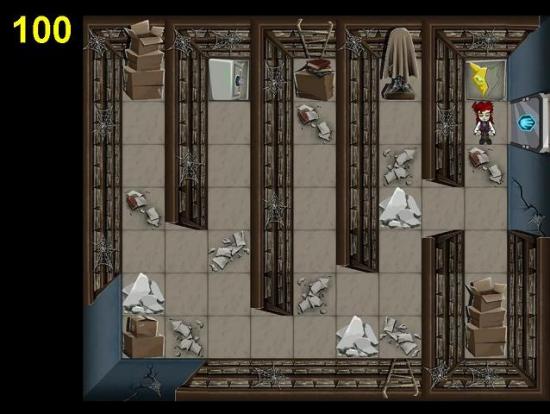
- Change to wolf and smash all rocks
- Pull the safe down and left to access it
Archives East Wing
- Go back to John the archives guard and exit right
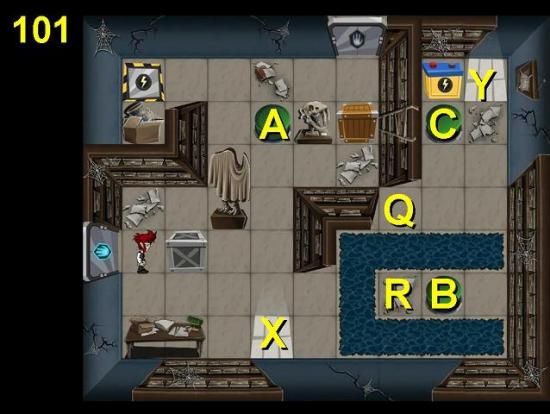
- Change to wolf
- Move the brown crate far south against the wall
- Push the heavy crate onto button A
- Change to Lucas at X and back to wolf at Y
- PUSH the battery onto button B
- Change to Lucas at Y and back to wolf at X
- PUSH the brown crate across the bridge, next to the battery
- Change to Lucas at X and back to wolf at Y
- Pull the battery onto button C
- Pull the crate onto button B, across the bridge and left to Q
- Push the battery back onto button B
- Move the crate onto button C
- Carefully PUSH the battery 1 square left to R
- Move the crate back to button C
- Change to Lucas at Y and back to wolf at X
- Move the battery to the far left wall, below the door
- Push the heavy crate to the south wall and left against the desk
- Move the battery to the station
- Exit north
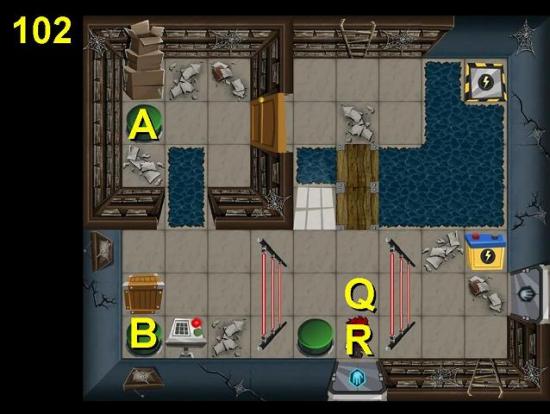
- Open the door
- Change console to green
- Change to wolf
- PUSH the crate right to Q
- Change to Lucas and turn console red
- Walk around and change to wolf
- PULL the crate across the bridge and push to button A
- Move the battery out and down (R)
- Move the crate back across the bridge
- Change to Lucas and turn console green
- Move crate to button B
- Change to Lucas and turn the console red
- Walk around and change to wolf
- Move the battery to the station. Make sure you PUSH it across the bridge
- Exit right
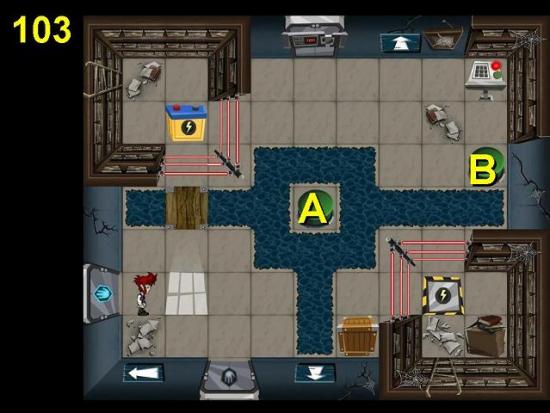
- Turn the console green
- Change to wolf and move the crate to button A
- Change to Lucas and turn console red
- Change to wolf and move the battery across the bridge
- Change to Lucas and turn console green
- Change to wolf and swap the crate and battery around
- Change to Lucas and turn the console red
- PULL the crate across the bridge and push it to button B
- Change to Lucas, turn console green
- Change to wolf and move the battery to the station
- Exit south
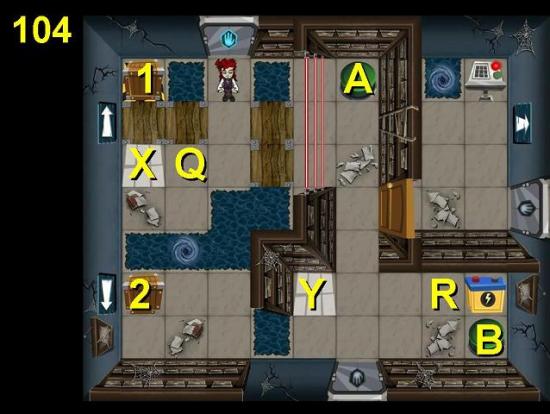
- Change to wolf and move crate 1 to Q
- Change to Lucas, walk to moonlight Y and change to wolf
- Move the battery to button A
- Move crate 1 to button B
- Change to Lucas and go through the vortex
- Turn the console green and open the door
- Change to wolf at X
- Move crate 2 to Q
- Change to Lucas and turn the console red
- Go through the vortex and close the door
- Change to wolf and push the crate at Q to the far right
- Change to Lucas, walk around and change to wolf at Y
- PULL the crate south and push 2 right to R
- Pull the battery south and push left to Y
- Move the crate at R to button A
- Move the battery to the station
- Exit south
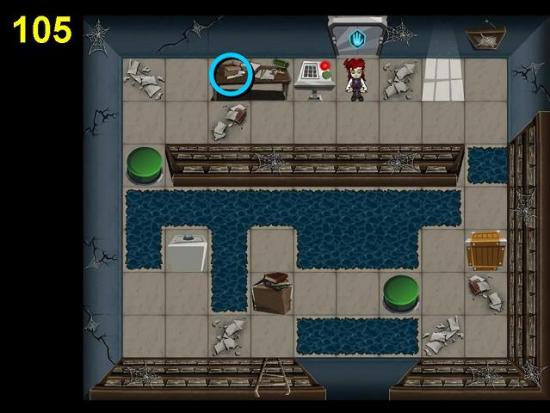
- Turn console green
- Change to wolf
- Ignore the switches, just walk around the right, push the crate out of the way and pull the safe down so you can open it
- Go back to the previous room and this time go through the vortex to the door on the right
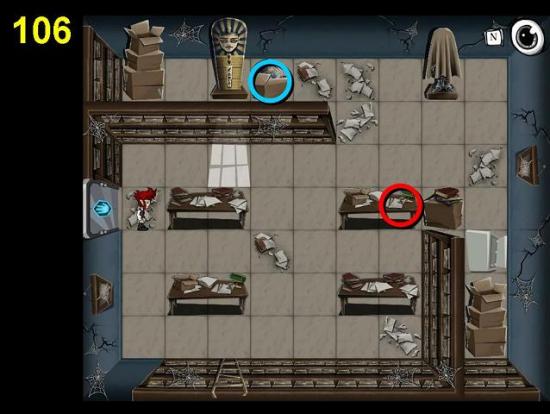
- There’s evidence for Judy on the desk (sorry, I’d taken the evidence before I took the screenshot, but I indicated its location in the image)
Chapter 9 – The Mansion
- Take all your evidence to Judy. She needs you to take all evidence to Strump
- Take the evidence to Strump, who will give you a crowbar to help get into the mansion
- If you go to the mansion right now, Rena the Gypsy will block your way. You need to find out how to break the curse before she will let you in
- Go to Grim’s Lair and talk to Grim about the Memoirs of King Raff. They’re in a wardrobe he sold to Harvey
- Go to Harvey and buy the wardrobe
- Go home. The pile of boxes to the right of Grandma has been cleared away, revealing a door to the back room
- Go through the back room and find yourself on map 14
- Go up the stairs
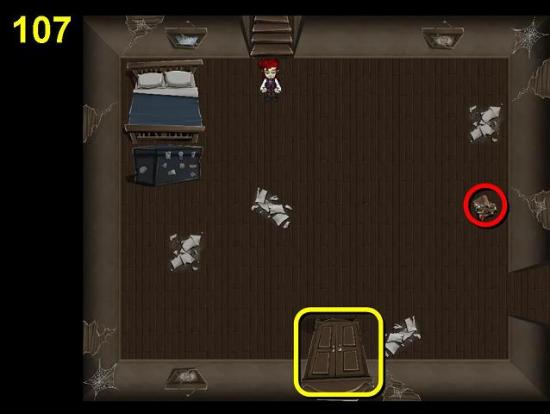
- If you got the Return Library Books side quest from Professor Compton you will find the books on the floor on the right
- The Memoirs of King Raff are in the wardrobe
- Exit right
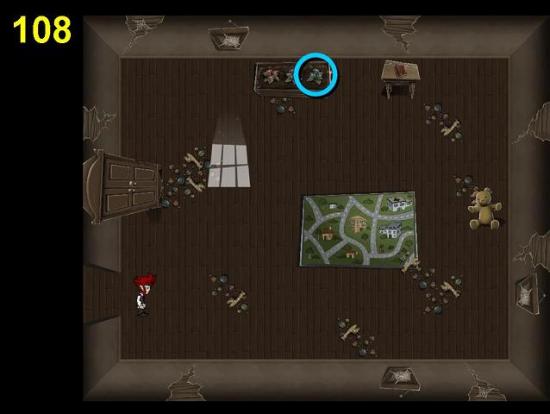
- Loot Ruby’s room. Bad daddy!
- Now go back to where Judy is and unlock the gate to the mansion with the high-tech, top-of-the-line custom security lock opener Strump gave you
- Go north to the courtyard
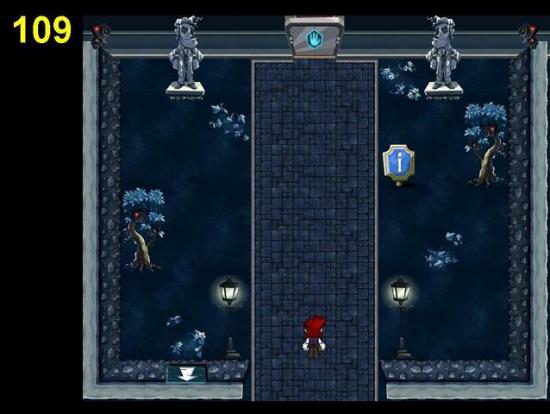
- Exit north
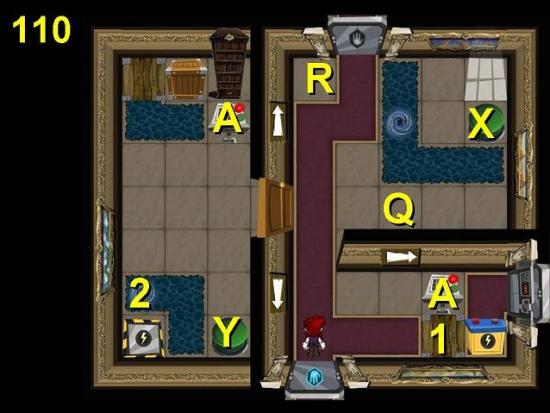
- Set console A to green
- Go through the vortex at 1
- Set console B to green
- Open the door
- Change to wolf and PUSH the crate out through the door to Q
- Change to Lucas, go through vortex 2 and close the door
- Change to wolf and move the crate to button X
- Move the battery to R
- Move the crate next to the battery
- Change to Lucas, go through vortex 1 and open the door
- Change to wolf and move the crate to button Y
- Move the battery to the station
- Exit north
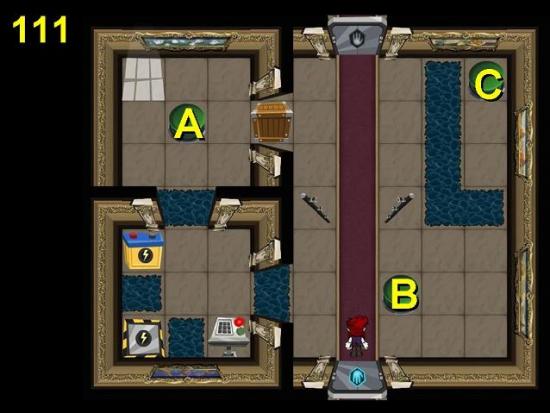
- Set the console to green
- Change to wolf and move the crate to button A
- Change to Lucas and set the console to red
- Walk around and change to wolf
- Walk around and pull the battery one square to the right
- Change back to Lucas and turn the console green again
- Walk all the way around and change to wolf
- Move the battery to button B
- Move the crate to button C
- Move the battery to the station, via the top
- Exit north
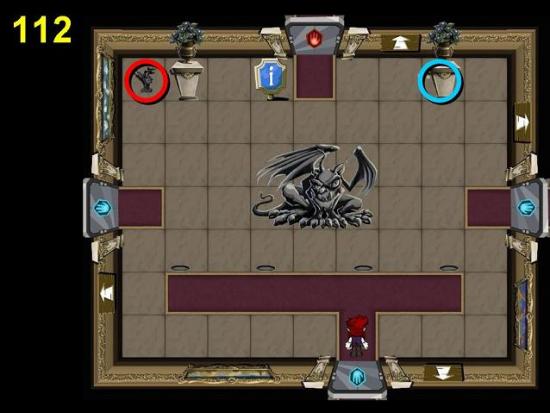
- Take knight statue 1/4 and exit right
Mansion East Wing
- Exit right from the Dragon Chamber
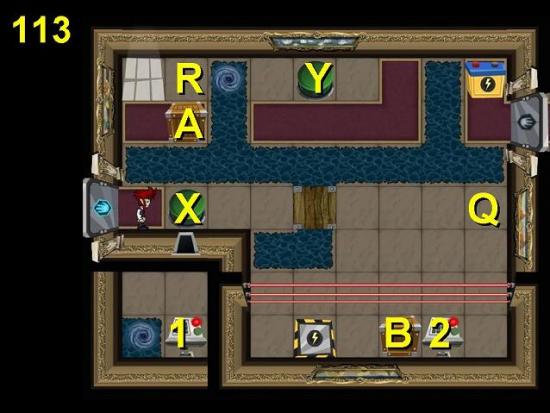
- Go through the window
- Set console 1 to green and climb back out
- Change to wolf and move crate A down
- Push the crate so far right that you can walk around it and then push it back onto button X
- Move crate B to Q
- Pull crate A out again, walk around it and pull it back to the button, then move it up to R
- PULL crate B onto button X
- Change to Lucas and turn console 2 green
- Change to wolf and move the crate at R onto button Y
- Pull the battery across the bridge
- Pull the back to R
- Change to Lucas and turn console 2 back to red
- Change to wolf and push the crate that’s on button X back to Q
- Move the crate in R onto button X
- Change to Lucas and turn console 2 green
- Change to wolf and pull the battery to R
- Change to Lucas and turn console 2 red
- Change to wolf, pull the crate out, walk around it and push it to the square to the left of button X
- Pull the battery 1 down, then pull the crate 2 up across the bridge
- Move the battery past the button to the right
- Pull the crate back to button X
- Move the battery to the station
- Exit right
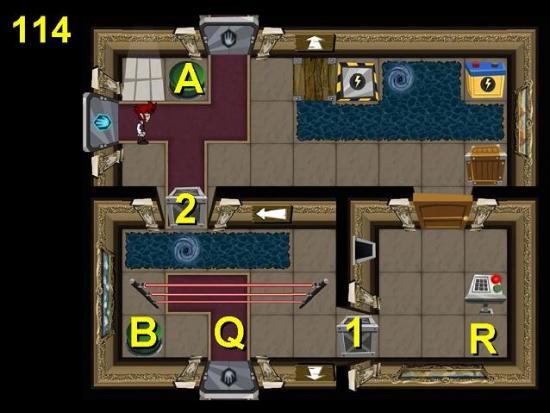
- Open the door
- Set the console to green
- Change to wolf and move the brown crate to button A
- Push heavy crate 1 to Q
- Push heavy crate 2 north to below button A
- Move the brown crate off button A and push heavy crate 2 onto button A
- Push the heavy crate at Q to R
- Move the brown crate to button B
- Move the battery down and to the left past the water
- Take the brown crate off button B move the battery to the station
- Exit north
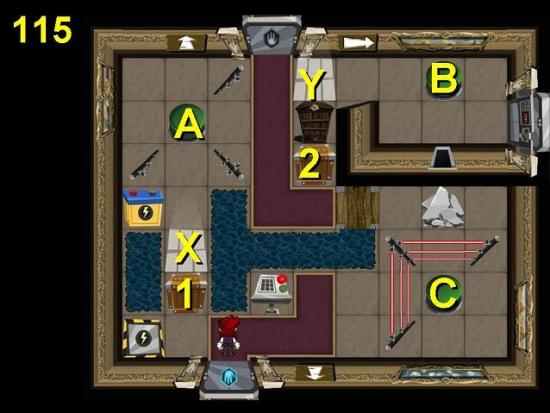
- Change to wolf and break the rocks by the window
- PULL crate 1 north to button A the push it onto the carpet to the right
- Change to Lucas and set the console to green
- Change to wolf and push the first crate north up against the wall
- Change to Lucas in light X and climb through the window
- Change to wolf in light Y and pull the first crate onto button B
- Pull crate 2 south across the bridge
- Change to Lucas at X and back to wolf at Y
- Push the crate off button B
- Pull the second crate 1 to the right
- Move the first crate back onto button B
- Push the second crate the square to the right of button C
- Push the crate on B as far left as it can go
- Change to Lucas at Y and climb through the window
- Change to wolf at X and pull the crate 1 down
- Pull the other crate onto button C
- Change to Lucas and turn the console red
- Change to wolf and pull the top crate between the lasers, to the right of button A. Careful now and don’t change on the lasers by accident!
- Change to Lucas at X and back to wolf at Y and push the crate onto button A
- Change to Lucas at Y and back to wolf at X and move the battery onto the station
- Exit north
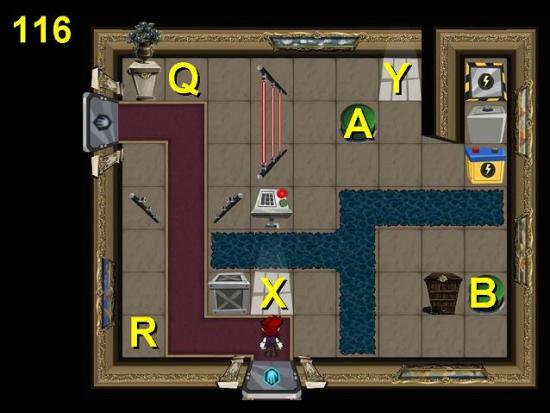
- Set the console to green
- Change to wolf at Y
- Move the battery to Q
- Change to Lucas and turn the console red
- Change to wolf at X and push the heavy crate to below the battery
- Change to Lucas and turn the console green
- Change to wolf at Y and push the heavy crate onto button A
- Change to Lucas and turn the console red
- Change to wolf at X and move the battery to button B
- CAREFULLY move the safe onto the bridge above B. If you accidentally knock the battery off the button you’re doomed!
- Now keep walking around, switching back and forth between Lucas and the wolf, moving the safe one square at a time until it is in the bottom left corner (R)
- Move the battery out of the way to the area near Q
- Move the safe onto button B
- Now move the battery to the station the same way as you moved the safe out just now, one square at a time
- Exit left
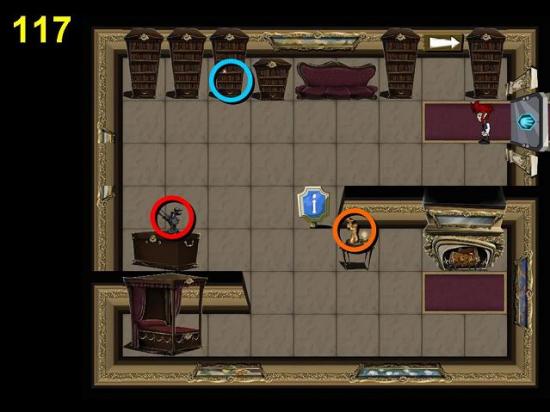
- Take knight statue 2/4
- Later on, when you have the Mansion Raid side quest for Harvey you will be able to take the first of the bronze idols here (1/3)
- Go back to map 114 and exit south
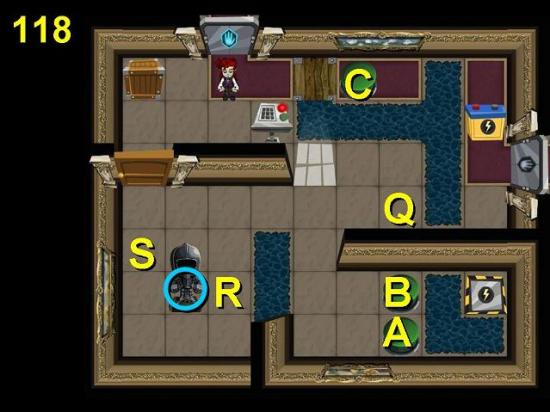
- Set the console to green
- Open the door
- Change to wolf and pull the crate to the far south
- Change to Lucas and close the door
- Change to wolf and move the crate to button A
- Push the battery north
- Move the crate to button B
- Change to Lucas and turn the console red
- Open the door
- Change to wolf and move the battery through the door
- Change to Lucas and close the door
- Change to wolf and move the battery to Q
- Change to Lucas, set the console to green and open the door
- Change to wolf and move the to R
- Change to Lucas and close the door
- Change to wolf and move the crate to S
- Change to Lucas, open the door and set the console to red
- Change to wolf and move the crate to button C
- Change to Lucas and set the console to green
- Move the battery to the station
- Exit right
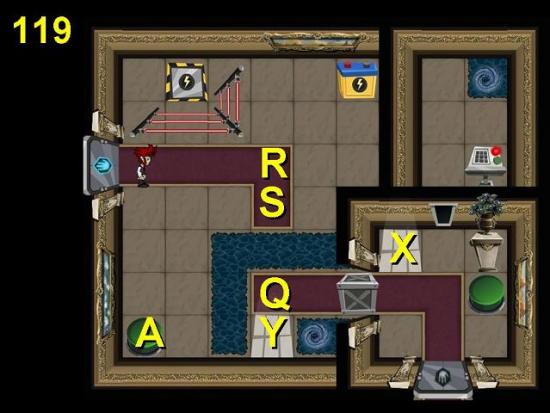
- Go through the vortex and set the console to green
- Climb through the window and change to wolf
- Push the heavy crate to Q
- Change to Lucas at X, then back to wolf at Y
- Push the crate to R, walk around and push it down to S
- Push the heavy crate to button A
- Move the battery to the station
- Exit south
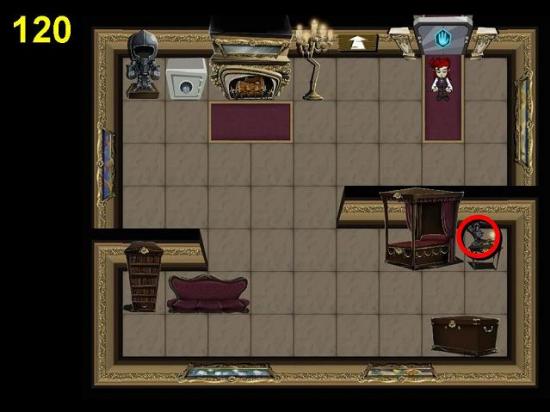
- Take knight statue 3/4
Mansion West Wing
- Go back to the Dragon Chamber and exit left
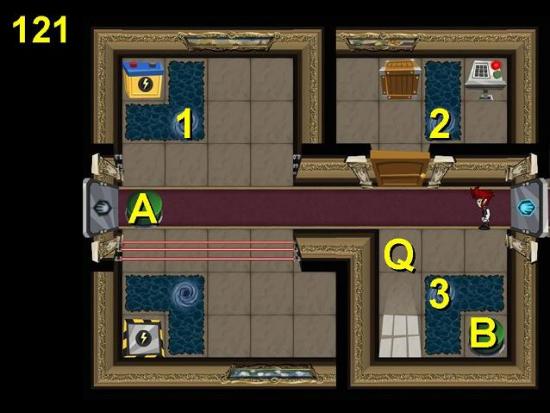
- Go through vortex 1
- Open the door
- Change to wolf and move the crate to Q
- Change to Lucas, go through vortex 2 and close the door
- Change to wolf and move the crate to button A
- Pull the battery across the bridge to the right
- Pull the crate off button A and move the battery onto button A
- Move the crate to button B
- Take the battery off button A
- Change to Lucas, go through vortex 1 and change the console to green
- Open the door and go through vortex 3
- Close the door, change to wolf and move the battery to the station
- Exit left
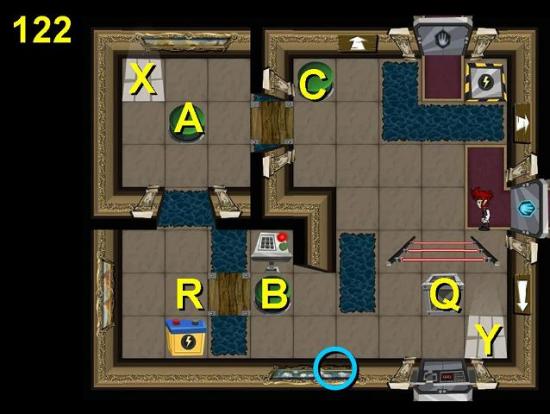
- Set the console to green
- Change to wolf at X and move the battery onto button A
- Change to Lucas and turn the console red
- Change to wolf at Y and move the heavy crate to button B
- Move the battery to Q
- Move the crate to R
- Change to Lucas at Y and turn the console green
- Change to wolf at X and move the crate onto button A
- Change to Lucas and turn the console red
- Change to wolf at Y and move the battery to button B
- Move the crate to button C (you need to walk around and change once to do this)
- Move the battery to R
- Change to Lucas and turn the console green
- Change to Wolf at X and move the battery to button A
- Change to Lucas and turn the console red
- Change to wolf and move the battery to the station
- Exit north
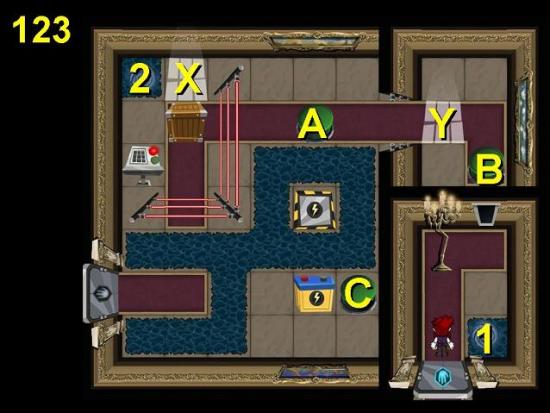
- The trick to this level is to move very carefully and never to step on button A at the top when Lucas is a wolf
- Go through vortex 1 and turn the console green
- Go through vortex 2 and climb through the window
- Change to wolf in light Y
- Now very carefully pull the crate 1 square to the right so it sits in between the lasers. Do NOT step on button A or you’re stuffed
- Walk around button A and change back to Lucas at Y
- Go through the window and vortex 1
- Change to wolf in light X and push the crate to the right side of button A
- Change to Lucas at X and go through vortex 2
- Climb through the window and change to wolf at Y
- Pull the crate between the lasers
- Do the loop back to X and move the crate onto button B, again making sure not to step on button A when you’re a wolf
- Move the battery to the square to the right of the console
- Pull the crate off button B
- Pull the battery 1 square north, to the corner of the carpet
- Change to Lucas at X, loop around and change back to wolf at Y
- Push the battery into the corner above the console
- Now you need to move the crate back to its starting point the same way you moved it to button B, by looping back and forth between X and Y and making sure never to step on button A
- Loop around one more time to X and push the crate next to the console
- Now you need to move the battery to button B like you moved the crate
- Move the crate to button C
- Move the battery to the station
- Exit left
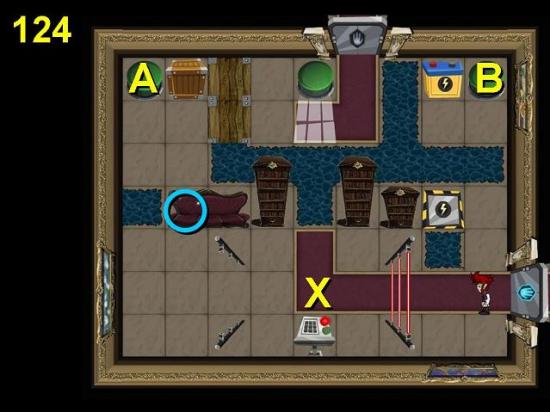
- Change to wolf and move the crate onto button A
- Change to Lucas and switch the console (it doesn’t change color in my game)
- Change to wolf and move the battery as far left as it will go
- Change to Lucas and flick the console again
- Change to wolf
- Now move the battery 2 left and 1 down
- Then push the battery back 2 right, walk around it and push it left against the wall
- Move the battery to X
- Move the crate as far right as it will go
- Change to Lucas and flick the console
- Change to wolf and move the crate onto button B
- Move the battery to the station
- Exit north
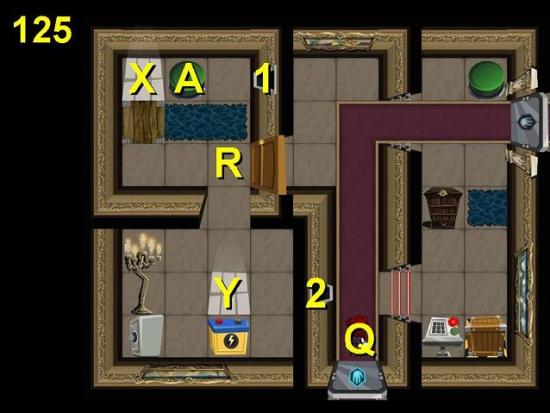
- Change the console to green
- Climb through a window
- Change to wolf and push the battery one square to the right
- Push the safe north to the square right of button A
- Change to Lucas at Y and climb through window 2
- Open the door and set the console to red
- Change to wolf at X and pull the safe onto button A
- Move the crate north, left through the gap and then push it all the way down to Q
- Change to Lucas in light X and climb through window 1 and back through window 2
- Close the door
- Change to wolf at Y and push the battery north to R
- Change back to Lucas at Y, climb out through window 2 and back in through window 1
- Change to wolf in light X and pull the battery one square left
- Change back to Lucas and climb out through window 1
- Open the door
- Change back to wolf and move the battery onto the station
- Exit right
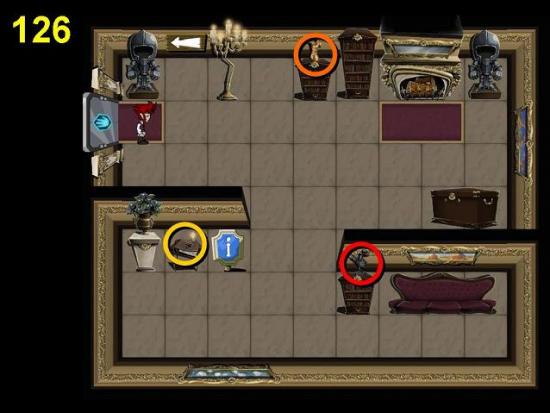
- Take knight statue 4/4
- Bronze idol 2/3 for the Mansion Raid side quest and the ledger for Grim you will need to get later are here too
Mansion North Wing
- Return to the Dragon Chamber
- Place the four knight statues onto the spaces in front of the dragon
- You can now go through the red door to the north
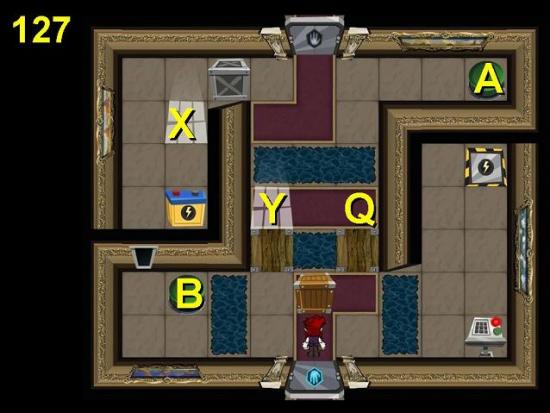
- Time for a nice easy one!
- Climb through the window and change to wolf in light X
- Push the heavy crate to button A
- Change to Lucas at X and back to wolf at Y
- Move the brown crate onto button B
- Change to Lucas and turn the console green
- Change to wolf and move the battery to Q
- Change to Lucas and turn the console red
- Change to wolf and move the battery to the station
- As soon as you exit north you will be taken to the end game. However, you will be able to keep playing and do all side quests and get all badges after the credits have rolled. So go on, play the end game now
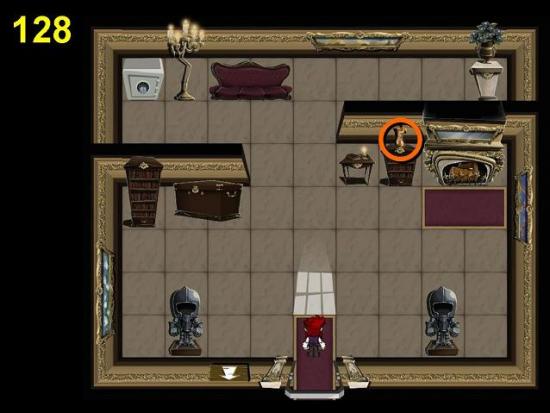
- You will meet Alphonse and go through several stages of conversation with him. For each stage he will be in a different location. Choose the correct options and he will come closer and closer. Choose the wrong option and he will jump a place back
- Stage 1:
DO say that she was quite a catch - Stage 2:
DON’T ask if she even liked magic
DO say “Anna was miserable around you” - Stage 3:
DON’T say she took your money
DO say she loved to laugh - Stage 3:
DON’T say she was materialistic
DON’T say she was under the grassy knoll
DO say “neither of us deserved Anna - The end… except not!
Chapter 10 – Security Doors
- Once you’ve taken all the main evidence to Judy, talk to her again for a quest to buy her some film. So go to Harvey, buy film and take it back to Judy
- Judy will reward you with a crayon that will somehow help you get through the security doors you’ve been seeing around the place
- Take the crayon to Ruby, who will give you a flower
- Take the flower to the triplets in the playground. They will give you a donut
- Take the donut to the thugs in the Crows’ hideout. They will give you a chain
- Take the chain to John the museum archives guard. He gives you a handkerchief
- Take the handkerchief to Jane in the café district. She will give you an apple
- Take the apple to grandma at home. She gives you a scarf
- Finally, take the scarf to Harvey and he gives you the pro thief kit, which allows you to access the security doors
Junkyard
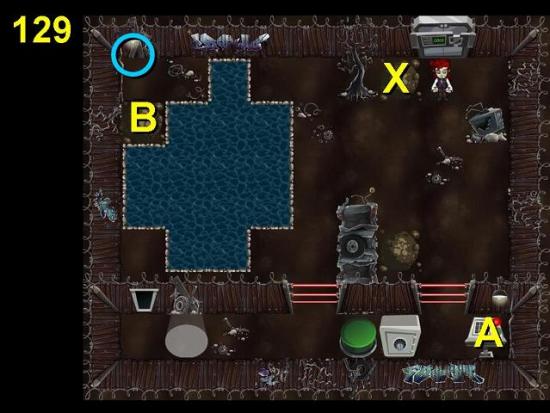
- Go to map 29, which is the third map of the junkyard, and interact with the funny looking door at the bottom of the screen
- Climb through the window
- Change to wolf and pull the safe onto the button
- Dig by the door for a wolf tile (X)
- Change to Lucas and turn console A green
- Change to wolf and dig in the top left corner for console B
- Change to Lucas and set console B to green
- Change to wolf and push the safe right to the opening
- Change to Lucas and climb through the window
- Change to wolf on the tile and pull the safe north so you can access it
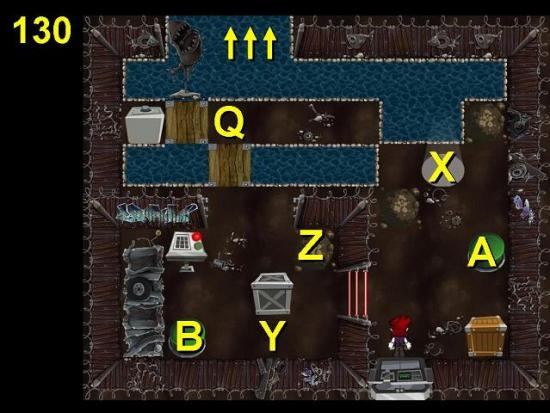
- Go to map 32, to the right of the Crows’ hideout, and open the security door
- Each time you change in the moonlight, the circle of light will move to the other side of the fence, so be careful when and where you change
- Change to wolf in light X
- Move the brown crate onto button A
- Dig inside the fence for a change tile (Z)
- Push the heavy crate out and onto button A
- Move the brown crate to button B
- Change to Lucas on tile Z. NOT in the moonlight!
- Turn the console green
- Change to wolf in the light inside the fence (Y)
- Pull the safe to the right across the bridge to Q
- Pull the brown crate off button B
- Pull the safe south across the bridge
- Change to Lucas on the tile and open the safe
- You can swim north to another map
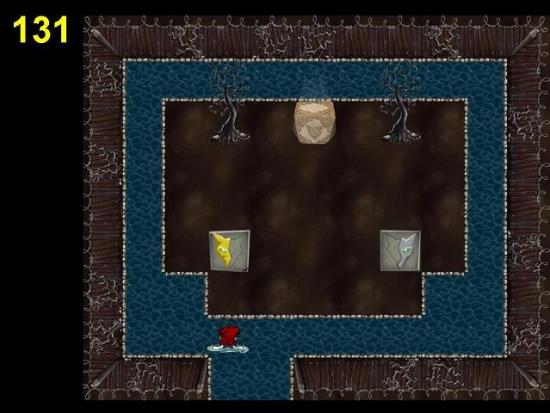
- Change to wolf and then to Lucas
- Loot the safe
Café District
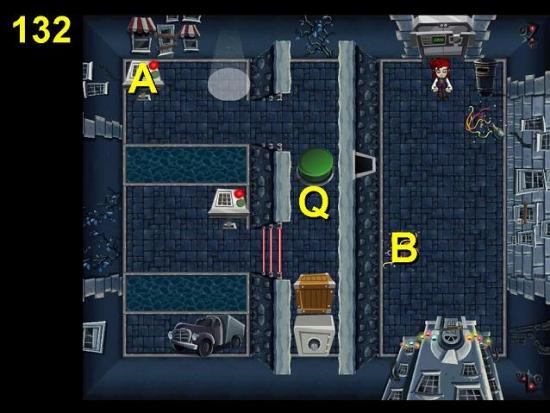
- Go to Jane in the café district and go one map left (map 38) to open the security door there
- Climb through the window
- Set console A to green
- Climb back through the window
- Set the new console (B) to green
- Climb through the window and change to wolf
- Move the crate onto the button
- Walk around and pull the safe north to the area in between the two openings (Q). This pushes the crate off the button
- Change to Lucas, walk around and open the safe
- Inside is evidence for Judy. Bring it to her and she will give you cash
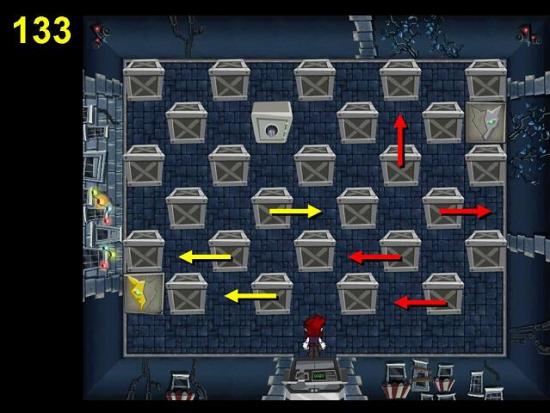
- Go three maps west of Jane (map 40) and go through the security door
- Clear a path to the grey tile and a path to the safe
City Hall
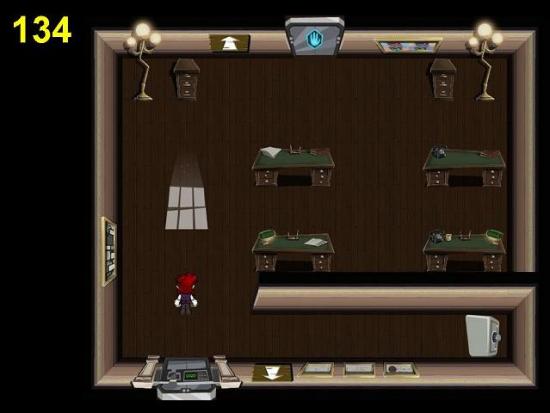
- Go to the Mayor’s office (map 66) and open the security door there
- Loot the safe
- The door north is a secret entrance to the mansion. You can open it but you can’t get further in from this side
Museum
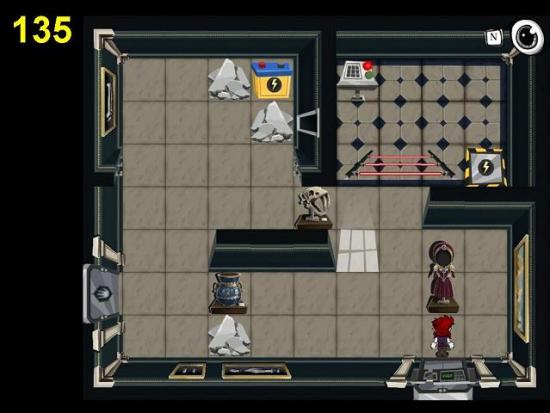
- Go to the Lupin Twine exhibition and go one map north (map 7). Go through the security door
- Change to wolf and break the rocks
- Move the battery south
- Change to Lucas, climb through the window and set the console to green
- Change to wolf and move the battery to the station
- Exit left
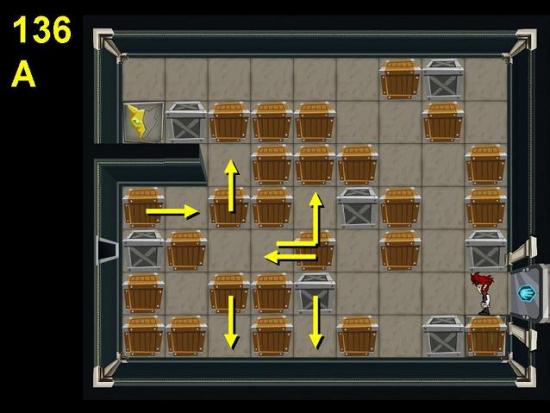
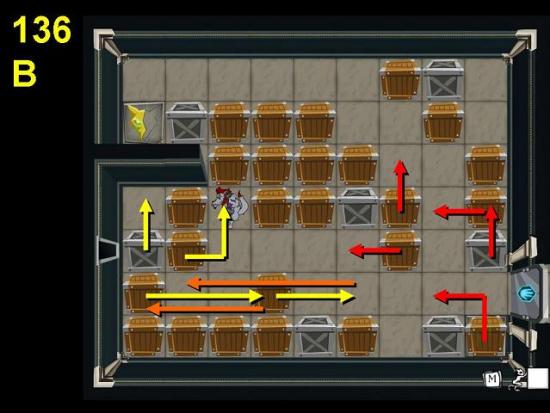
- Clear a path to the window on the left by following the yellow arrows
- Uncover the grey tile in the bottom right by following the orange arrows and then the red ones
- Climb through the window to the safe you saw in the garden on map 12. There is more evidence for Judy in it
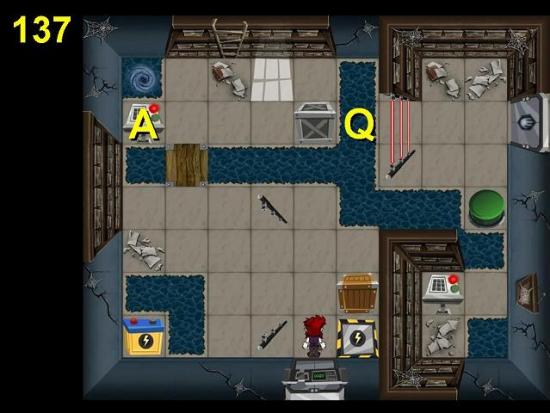
- Go to the museum archives guard and go through the security door on the third map of the east wing (map 105)
- Set console A to green
- Change to wolf and push the heavy crate onto the bridge (Q)
- Change to Lucas and change console A back to red so the heavy crate disappears into the water
- Change to wolf
- Move the brown crate to somewhere in the top left area
- Change to Lucas and set both consoles to green
- Change to wolf and move the brown crate to the button
- Change to Lucas and turn console A red
- Change to wolf and move the battery across the bridge
- Change to Lucas and turn console A green
- Change to wolf and move the crate off the button
- Change to Lucas and set both consoles to red
- Change to wolf and move the battery to the station
- Exit right
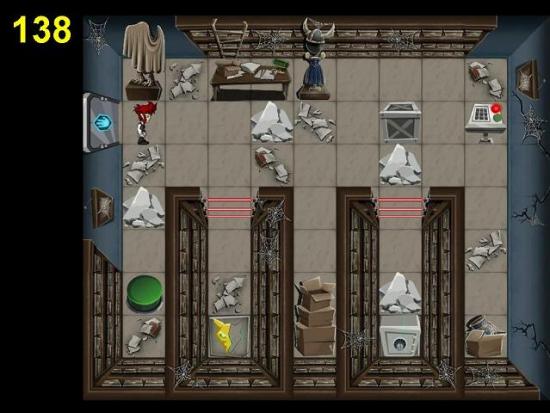
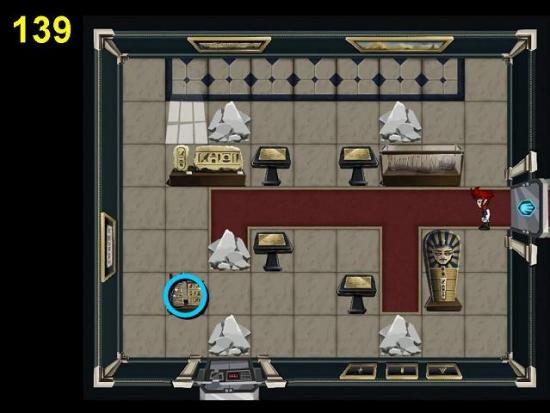
- Set the console to green
- Change to wolf and smash the rocks
- Push the heavy crate to the button
- Smash the rocks above the safe and pull the safe out
- Inside the safe is evidence for Judy
- Go back to the Lupin Twine exhibition and go left to the room you came in on at the start of the game (map 4)
- Change to wolf and smash the rocks
- Exit left
- Change to wolf and smash the rocks
- Open the security door
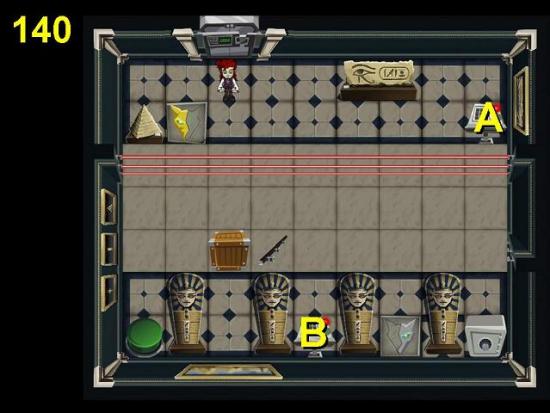
- Turn console A green
- Change to wolf
- Move the crate to the button
- Change to Lucas and turn console B green
- Change to wolf and pull the safe north
- Return the evidence to Judy
Mansion
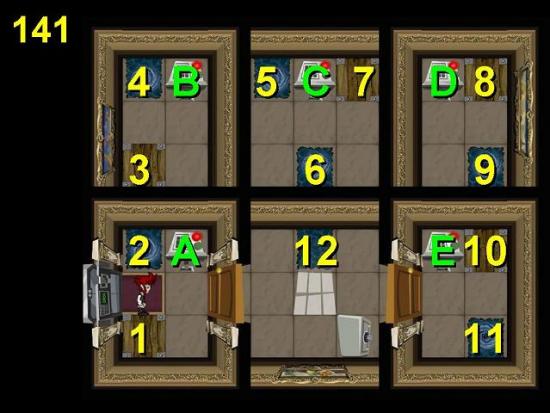
- Go to the mansion courtyard and go north into the first room. The security door is on the right
- Go through vortex 2 to come out at 6
- Go through 5 to come out at 4
- Turn console B green
- Vortex 4 to 5
- Vortex 6 to 2
- Console A green
- Vortex 2 to 6
- Console C green
- Vortex 7 to 10
- Console E green
- Vortex 10 to 7
- Console C red
- Vortex 6 to 2
- Vortex 1 to 8
- Console D green
- Vortex 8 to 1
- Vortex 2 to 6
- Console C green
- Vortex 7 to 10
- Console E red
- Vortex 10 to 7
- Console C red
- Vortex 6 to 2
- Console A red
- Vortex 2 to 6
- Vortex 5 to 4
- Vortex 3 to 12
- Change to wolf and move the safe
- Change to Lucas and open the safe
- Bring the evidence to Judy
Mansion East Wing
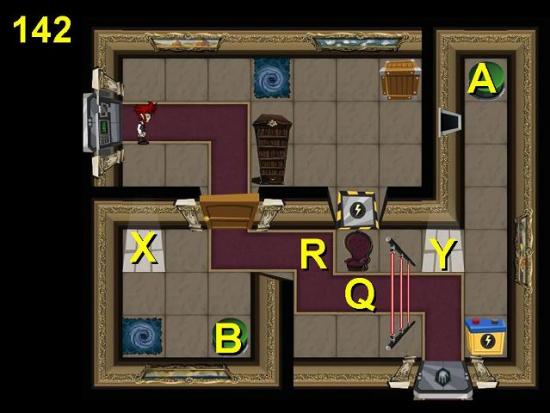
- From the Dragon Chamber, go two rooms east and one north (map 115) and enter the security door there
- Climb through the window and change to wolf in light Y
- Move the battery onto button A
- Change back to Lucas, climb back out and open the door
- Change to wolf in light X
- Move the crate to button B
- Change to Lucas, climb through the window to the right and close the door from the inside
- Change to wolf and move the battery to Q
- Change to Lucas at X and go through the vortex
- Climb through the window
- Change to wolf at Y and move the battery to R
- Do the window/vortex loop again and change to wolf at X
- Now swap the crate and the battery (battery to B, crate to R)
- Move the crate to button A by doing the vortex loop as required
- Change to Lucas, go through the window and open the door
- Change to wolf and move the battery to the station
- Exit south
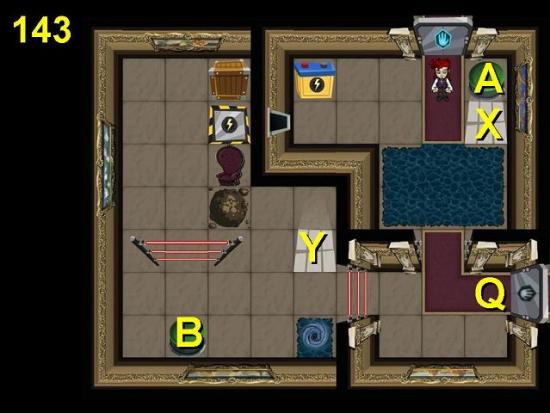
- For this puzzle it’s essential not to dig for the console until you really have to
- Change to wolf at X and move the battery to button A
- Change to Lucas and climb through the window
- Change to wolf at Y and move the crate to button B
- Change to Lucas, go through the window and change back to wolf at X
- Move the battery to Q
- Change to Lucas at X, go through the window and change to wolf at Y
- Dig the tile below the chair and make sure you step off to the right
- Change to Lucas and turn the console green
- Change back to wolf and swap the battery and the crate (battery to B, crate to Q)
- Change to Lucas and turn the console red
- Go through the vortex
- Change to wolf at X and move the crate to button A
- Change to Lucas, go through the window and change to wolf at Y
- Move the battery to the station
- Exit right
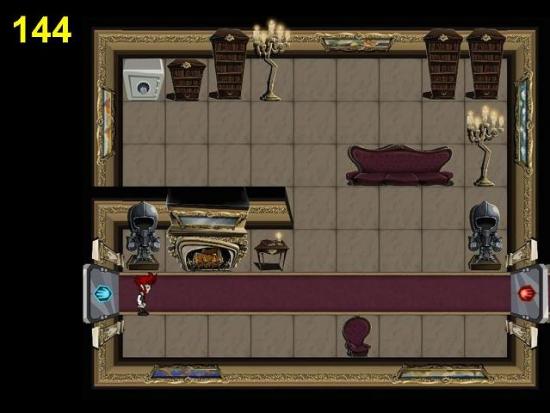
- Loot the safe and ignore the red door – it’s only a teaser!
Mansion West Wing
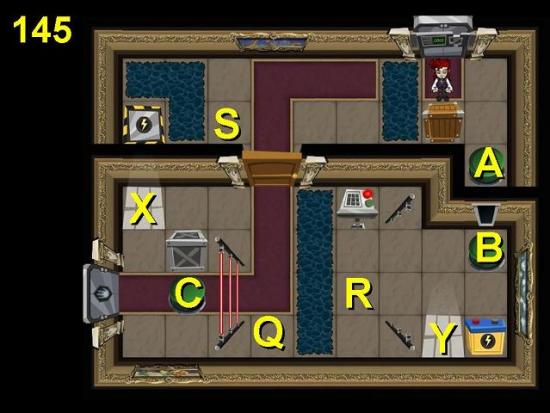
- From the Dragon Chamber go two rooms west and go through the security door
- This one is a real doozy!
- Open the door
- Change to wolf in light Y and put the battery on button B
- Push the crate left and though the door to Q
- Change to Lucas and turn the console green
- Close the door
- Change to wolf in light X
- Pull the crate one north and push it across the bridge to R
- Change to Lucas in light X and turn the console red
- Change to wolf in light Y
- Swap the crate and the battery: move the crate to button B and push the battery across the bridge to the tile above Q
- Change to Lucas in light Y and turn the console green
- Change to wolf in light X and push the battery to Q
- Change to Lucas at X and turn the console red
- Change to wolf at Y and move the crate off button B
- PULL the battery through the door and push it to S
- Move the crate to R
- Change to Lucas at Y and change the console to green
- Close the door
- Change to wolf at X and push the heavy crate onto button C
- Pull the brown crate onto the bridge
- Change to Lucas at X and change the console to red
- Change to wolf at Y and push the crate across the bridge
- Change to Lucas at Y and turn the console green
- Change to wolf at X
- Pull the crate 1 north
- Push the heavy crate 1 north
- Pull the crate 1 left, walk around and push it to X
- Push the heavy crate onto button C and then two to the right
- Move the brown crate onto button C
- Push the heavy crate across the bridge
- Change to Lucas in light X and turn the console red
- Change to wolf at Y and push the heavy crate against the right wall
- Change to Lucas at Y and turn the console green
- Change to wolf at X and move the brown crate to Q
- Change to Lucas and turn the console red
- Go through the window and open the door
- Change to wolf and push the heavy crate onto button B
- PULL the brown crate through the door and move it to button A
- Push the battery onto the station
- Exit left
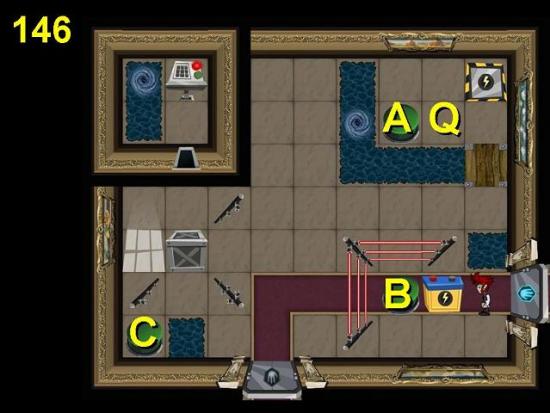
- Go through the vortex and turn the console green
- Go through the window
- Change to wolf and push the heavy crate over button A to Q
- Change to Lucas, go through the window and turn the console red
- Go back through the window (or the vortex) and change to wolf
- Push the heavy crate onto button A
- Pull the battery onto button B
- Push the heavy crate as far left as it will go and then on to button C
- Move the battery to the station
- Exit south
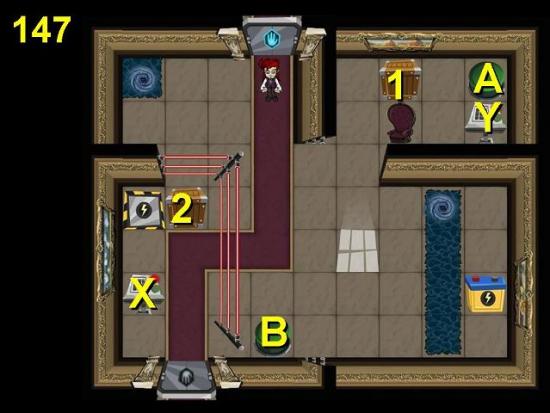
- Change to wolf
- Push crate 1 onto button A
- Change to Lucas and go through the vortex
- Turn console X green
- Go back through the vortex
- Turn console Y green
- Change to wolf and move the battery across the south bridge
- Pull crate 1 off button A
- Move the battery onto button B
- Move crate 2 to the right, move the battery off button B and move the crate onto button B
- Move the battery to the station
- Exit south
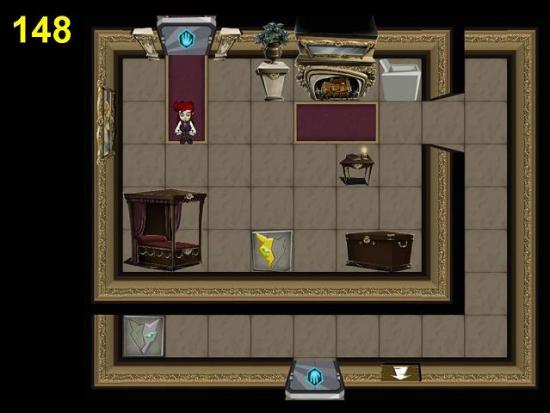
- Change to wolf
- Move the safe down
- Smash the rocks
- Change to Lucas
- Loot the safe
- Exit south – you’re now back in the hidden room at the City Hall
Side Quests
Find Gypsy’s Lost Watch
- After the Gypsy gave you the map, talk to her again. Ask about fortune telling and she will give you a side quest to find her watch, which she lost somewhere in Verde Park
- Go to the last map of the park outside the City Hall, where Strump’s van is
- The watch is in the top left corner of the screen
Scare Crows (Evidence Grim)
- Talk to Grim as a wolf and offer your help for a new quest (he will think you’re too puny for the quest if you talk to him as Lucas). He needs you to scare some of the Crows and bring him their jackets
- Go to the junkyard entrance and go three screens to the left
- Change to wolf, scare the thug and take his jacket
- Go to the Café District and go two maps to the left
- Change to wolf, scare the thug and take his jacket
- Return the jackets to Grim in his hideout
Find Lost Purse (Evidence Jane)
- Jane in the Café District needs you to find her lost purse, which is in one of the blue bins around the city. This is easy: go back to the Gypsy District (use your map) and go one screen south. Interact with the blue bin to find the purse and return it to Jane
Give Sealed Envelope to Judy
- Talk to Jane again after you’ve found her purse. This time she needs you to bring an envelope to Judy. So, take the map back to the City Square, go one screen north and give the envelope to Judy
Find Ruby’s Doll (Evidence Ruby)
- Some time after you’ve been to the City Hall your daughter Ruby will tell you she lost her bear in the playground
- Go to the playground and find the doll by the swing
- Return it to Ruby
Give Triplets the Mittens (Evidence Triplets)
- Talk to Grandma. She wants you to take some mittens to the triplets in the playground
- Go to the playground and give the mittens to the triplets
Find Lost Badge (Evidence Crows)
- Once you’ve been to Grim’s Lair, go back to the two thugs in the Crows’ hideout
- Talk to the Crow on the left as Lucas, then as the wolf, then as Lucas again
- Third time you talk to him he will tell you that he has lost Grim’s badge
- Take the map back to the playground
- Talk to the triplets about Grim’s badge. They will give you the badge if you bring them a library book
- The book (And the Dog Jumped) is on a pedestal in the room with Professor Compton
- Return the book to the triplets and they will give you the badge
- Return the badge to the Crow thug
Return Library Books (Evidence Compton)
- After you’ve given him his coffee, Professor Compton will scold you for not returning your library books
- After you’ve bought the wardrobe from Harvey for the main quest, go to your bedroom upstairs in the apartment
- The library books are on the floor to the right
- Return your library books to Professor Compton
Get Compton ‘The Truth’ (Evidence Judy)
- After you’ve returned the overdue library books, Professor Compton asks you to get a copy of Judy’s newspaper, The Truth
- Go to Judy in the City Square to get the paper and return it to Compton
Cheer up Ex-Guard (Evidence John) and Complete Census Form (Evidence Mayor)
- John the archives guard lost his job and the Mayor took his badge
- Go to the City Hall and ask the Mayor for John’s badge back
- The Mayor needs you to ask four women to sign his consensus form
- Take the form to Jane, Judy, Rena and grandma
- Return the petition to the Mayor
- Take the badge to John
Return Ruby’s Library Book (Evidence Wolf Lucas)
- After you’ve defeated Alphonse and returned to the apartment, Ruby will ask you to return her library books
- Go to Professor Compton and give him the books
Find Grim’s Ledger (Evidence Alphonse)
- When you get back from the mansion, talk to Grandma
- She tells you that you need to go see Grim again
- Go to Grim in his hideout and talk to him
- He needs you to return his ledger from Alphonse’s office
- Take the map straight back to Alphonse’s office in the mansion
- The ledger is on the table next to the information sign
- Bring it to Grim
Get a Cure from the Gypsy (Evidence Grandma)
- Another thing grandma asks after you’ve come back from the mansion is to get a cure for her ailment from the gypsy
- Go to the Gypsy Quarters and talk to Rena. She will give you some medicine
- Return the medicine to Grandma
Good Luck Charms for John (Evidence Rena)
- After you’ve asked Rena for the cure for Grandma she asks you to bring some good luck charms to John the archives guard
- Go to the archives guard and give John the charms (which happen to be in a cereal box)
Prevent the Apartment from Demolition (Evidence Mayor Bruce)
- Talk to grandma a second time after you’ve returned from the mansion and she will tell you that the apartment will be demolished soon
- Go to the Town Hall entrance and go north to the Mayor
- Change to wolf and scare the Mayor into giving in
Mansion Raid (Evidence Lucas)
- Grandma tells you that Harvey needs rent again soon
- Go talk to Harvey
- He needs you to bring him three bronze idols from the mansion, and he will forget about the rent
- The idols are in the master bedroom, Alphonse’s office and the room at the far north where you defeated werewolf Alphonse
- While you’re there, also loot the safe. This will give you evidence on werewolf Alphonse and a ton more cash you can use at Harvey’s
Advanced Fortune Telling
- After you’ve returned her watch, ask Rena the gypsy to read your fortune. She asks you to get a book on palmistry from the library
- The book is in the last room of the restricted section (map 90)
- Return the book to Rena
- Talk to her about advanced fortune telling and she will give you a riddle
Riddle 1
“To the south of a woman by the café, three of nature’s gnarled limbs show the way. Swipe where the fourth should be and a secret you will see”
- Go to Jane in the café district and go south to map 37
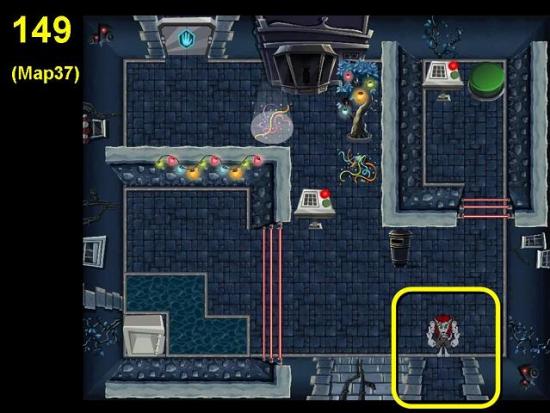
- Three of the walls have vines climbing up them, the south wall hasn’t
- Change to wolf
- Go to the southeast corner of the map and break the wall
- Make your way down the next two maps
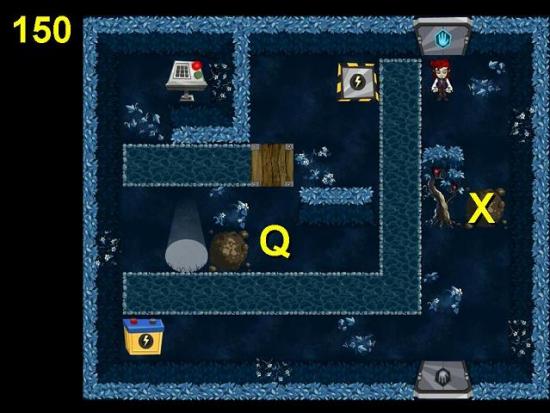
- Turn the console green
- Change to wolf and dig X
- Move the battery to Q
- Change to Lucas and turn the console at X green
- Change to wolf and move the battery to the station
- Exit south
- You now find yourself by the security door on map 49
- Go through the door
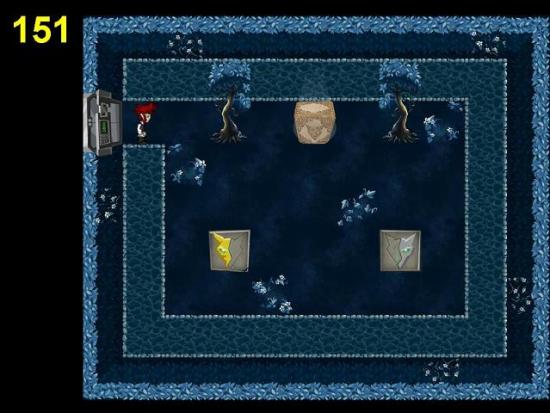
- Use both change tiles and empty the safe
- Go back to Rena for your second riddle
Riddle 2
“Ancient royalty shows the way in a sea of green. Swipe where he points and path will be seen.”
- Go to King Raff’s Statue (map 51)
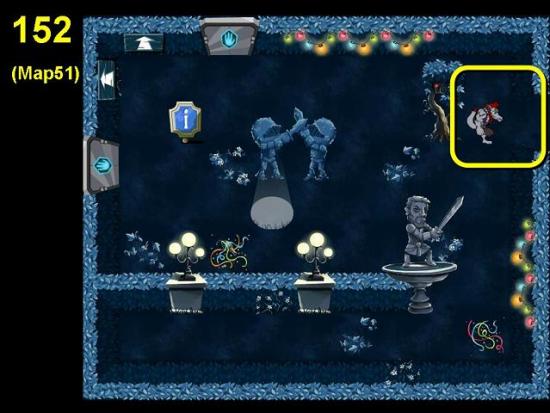
- Change to wolf and swipe to the right of the tree
- Use both change tiles again and empty the safe
- Go back to Rena for the third riddle
Riddle 3
“Far to the northwest of the tome-filled maze the path appears to cease. But swipe where the parchment lies and the truth will be revealed.”
- Go to Professor Compton and make your way to the end of the West Wing to map 78
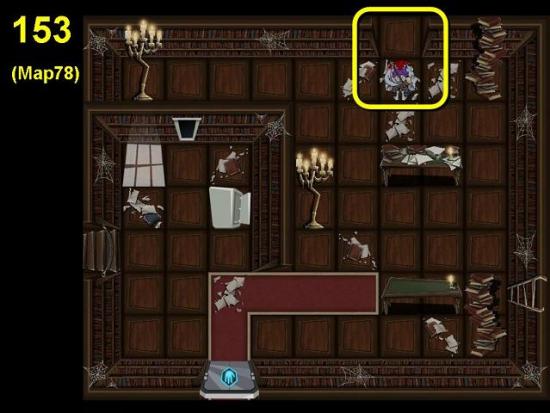
- Change to wolf and swipe in the top right corner
- Use both change tiles and empty the safe
- Go back to Rena for your fourth riddle
Riddle 4
“In the streets, protected by a steel army lies a belly of fortune. Swipe behind it and you shall be rewarded.”
- Go to Jane in the café district and go three maps west to map 40
- Go through the security door to map 133 – this map used to have a ton of steel crates (“army of steel”)
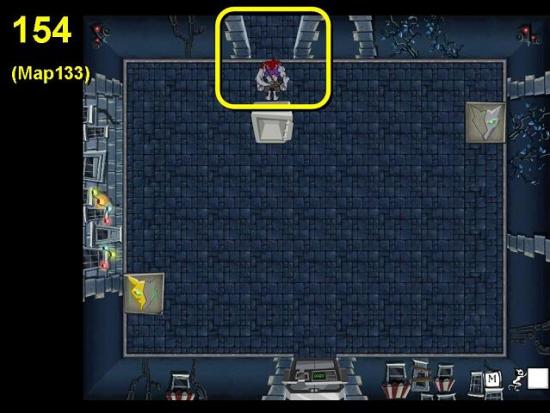
- Change to wolf and swipe the wall above the safe
- Use both change tiles and empty the safe
- Go back to Rena for your final riddle
Riddle 5
“Those who look to the right in the mansion’s baths will weep but a single tear.”
- Go to the mansion courtyard and go one map north
- Go through the security door on the right to the baths on map 141
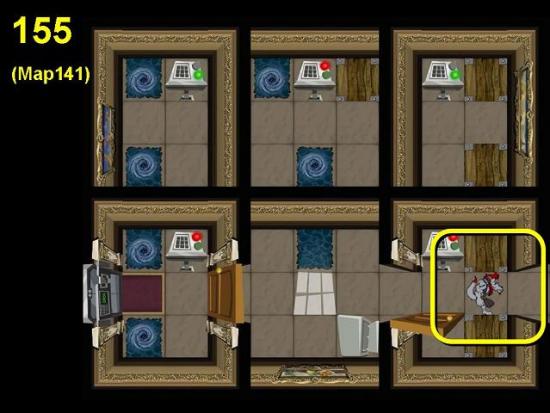
- Unfortunately, to get to the right hand wall you will have to follow all the steps for puzzle 141 again
- Open the door to the right and swipe the wall
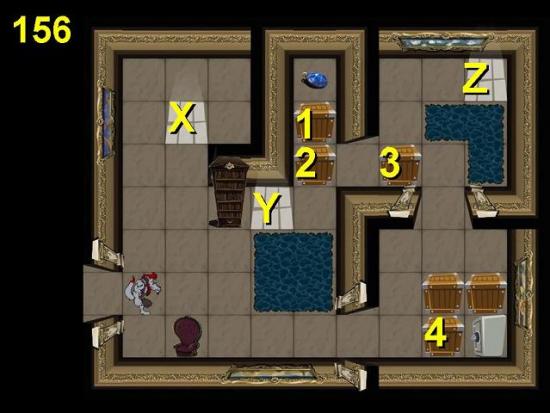
- Walk to the top right corner and change to wolf in light Z
- Pull crate 3 one north
- Change back to Lucas
- Change to wolf in light X
- Walk around and pull crate 2 two right
- Change to Lucas at X and back to wolf at Y
- Push crate 2 one right
- Change to Lucas at Y and back to wolf at X
- Pull crate 2 one south
- Change to Lucas at X and to wolf at Y
- Move crate 2 one more south
- Pull crate 1 one south
- Change to Lucas at Y and to wolf at X
- Push crate 2 one right – it should now be in the corner above the safe
- Pull crate 1 one right
- Change to Lucas at X and to wolf at Y
- Take the tear
- Change to Lucas at Y and to wolf at X
- Push crate 1 one left and pull crate 4 as far left as it will go
- Change to Lucas at X and to wolf at Y
- Push crate 1 one north
- Change to Lucas and open the safe
- Sell the tear to Harvey if you like
Badges
There are 15 badges you can collect. As you can’t reset your badges when starting a new game, I couldn’t replay them to get all the details, but below is what I have. Please send a private message to SeverineSnape if you have more info! Note that some of the badges get a new name after you’ve unlocked them.
- Wolfy Thief: Steal Lupin Twine Amulet from museum
- Fixated: Keep calling Detective Strump
- Cartographer: Explore all areas
- Postal Hassler: Check the mailbox outside the apartment numerous times
- The Ol’ Switcheroo: Turn Alphonse into a werewolf
- Not So Grim: Win Grim over by completing the Scare Crows quest
- What Great Footage:
- Puppy Love: Defeat Alphonse and give Ruby the puppy
- A Bit of a Stalker:
- Worst.Achievement.Ever: Find all comics
- Materialist: Clean out Harvey’s shop. You will need to empty the safe in the room where you defeated Alphonse to be able to do this
- Pro Thief:
- The Whole Story: Play the credits when you’ve completed 100% of the game. You can play the credits by interacting with the TV in the apartment
- SID-Tacular: Turn on the stereo upstairs in the apartment
- Retro-Active: Play the credits with the computer running. The computer is in Lucas’s bedroom
More articles...
Monopoly GO! Free Rolls – Links For Free Dice
By Glen Fox
Wondering how to get Monopoly GO! free rolls? Well, you’ve come to the right place. In this guide, we provide you with a bunch of tips and tricks to get some free rolls for the hit new mobile game. We’ll …Best Roblox Horror Games to Play Right Now – Updated Weekly
By Adele Wilson
Our Best Roblox Horror Games guide features the scariest and most creative experiences to play right now on the platform!The BEST Roblox Games of The Week – Games You Need To Play!
By Sho Roberts
Our feature shares our pick for the Best Roblox Games of the week! With our feature, we guarantee you'll find something new to play!Demon Piece Races – All Race Buffs
By Adele Wilson
Our Demon Piece Races guide details all of the buffs, rarities, and characteristics for each race in the One Piece Roblox game.


