- Wondering how to get Monopoly GO! free rolls? Well, you’ve come to the right place. In this guide, we provide you with a bunch of tips and tricks to get some free rolls for the hit new mobile game. We’ll …
Best Roblox Horror Games to Play Right Now – Updated Weekly
By Adele Wilson
Our Best Roblox Horror Games guide features the scariest and most creative experiences to play right now on the platform!The BEST Roblox Games of The Week – Games You Need To Play!
By Sho Roberts
Our feature shares our pick for the Best Roblox Games of the week! With our feature, we guarantee you'll find something new to play!Demon Piece Races – All Race Buffs
By Adele Wilson
Our Demon Piece Races guide details all of the buffs, rarities, and characteristics for each race in the One Piece Roblox game.
Dracula 4: The Shadow of the Dragon Walkthrough
Dracula 4: Shadow of the Dragon is a horror-adventure game developed by Microids. In this game, you will take on the role of Ellen Cross as she searches for a collection of stolen paintings and uncovers the dark secrets of their owner through exploration, item collection, and puzzle-solving. Gamezebo’s walkthrough will provide you with detailed images, tips, information, and hints on how to play your best game.
Game Introduction – Dracula 4: Shadow of the Dragon
Dracula 4: Shadow of the Dragon is a horror-adventure game developed by Microids. In this game, you will take on the role of Ellen Cross as she searches for a collection of stolen paintings and uncovers the dark secrets of their owner through exploration, item collection, and puzzle-solving. Gamezebo’s walkthrough will provide you with detailed images, tips, information, and hints on how to play your best game.
Quick Start Guide
Exploration and Interaction

- Dracula 4 utilizes a full 3D world. This means that instead of entering a “scene,” you enter rooms that can be explored in 360 degrees.
- To look around, hold down the left mouse button while moving the mouse.
- Areas that can be walked toward, whether for closer examination or to enter a new area, will be indicated by an arrow that points vertically.
- Hovering over an interactive object, person, or place will cause the cursor to change appearance. A person that can be spoken to will have a talking face; an object that can be examined will feature an eye; an object that can be interacted with will display a set of gears.
- Sometimes the same object will display different icons depending on your current state of interaction. For instance, an already solved puzzle might change from the gear icon to the eyeball.
Journal / Inventory
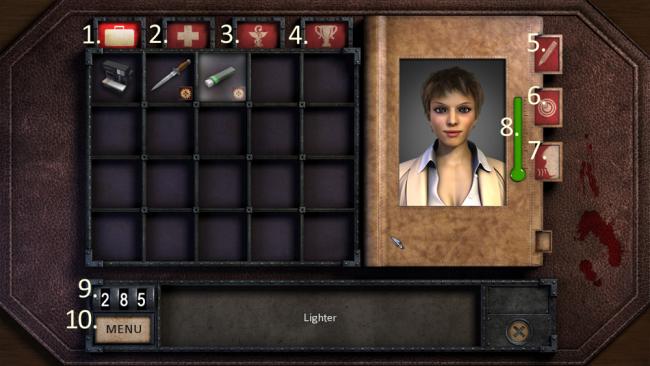
- Ellen’s inventory can be accessed by clicking the small yellow hand icon in the bottom-right corner. This is visible at all times, except in cutscenes or certain close-ups of objects or puzzles.
- The journal has multiple purposes. Each area is labeled in the image above and corresponds to the following uses:
- 1. Inventory -all the interactive items Ellen collects can be found here. Items with a gear on them, like the lighter and knife in this picture, can be combined with other items within the inventory by clicking and dragging one on top of the other.
- 2. Recovery inventory – all recovery items Ellen collects can be found here. To consume a recovery item, drag it from the recovery inventory to one of the three empty slots separated by plus signs and select “Swallow.” Ellen can take up to three recovery items at once, or fewer if preferred.
- 3. Dosage data – when Ellen uses a recovery item, its effects are listed here. The exact combination of items is listed, so if Ellen takes two Cikloprex plus a vitamin, this combination will appear as one entry in the dosage chart.
- 4. Achievements – all available achievements are listed here in gray. When an achievement is completed, it will receive a gold trophy and clicking on it provides a short description of the event.
- 5. Diary – all of Ellen’s notes on the events of the game are listed here. This is a useful way to catch up on the story if you haven’t played in awhile, or review hints to puzzle solutions. Flip the pages by clicking on the bottom corner of the left page (to go backward) or right page (to go forward).
- 6. Objectives – Ellen’s current tasks are listed here. Completed tasks will be crossed off. This is a good way to figure out where you need to go or what to do next. Flip the pages by clicking on the bottom corner of the left or right pages.
- 7. Dialogues – every dialogue you have experienced in the game is recorded here. Another helpful way to review the story or your objectives.
- 8. Health bar – Ellen’s illness causes her to have near-fainting episodes that could lead to something worse. When her health bar depletes into the yellow and red ranges, she needs to take medicine to recover. Note: health generally goes down in response to story-related events and is rarely a concern otherwise. You cannot die, but in very poor health Ellen will refuse to complete directives until she is healed.
- 9. Points total – the number of points you’ve earned in the game so far. You’ll earn points for completing objectives and puzzles and the total available points at the end of the game are 300.
- 10. Menu – return to the menu, where you can change options or load a different save file.
Casual / Adventure Modes
- Dracula 4 features two different game modes: Casual and Adventure. In Casual mode, interactive objects are automatically highlighted by icons before you hover over them and mini-game puzzles can be skipped after enough time has passed. In Adventure mode, no icons appear until your mouse is in the correct area and puzzles cannot be skipped.
- You can switch between these two modes at any time, so if you want to play in Adventure but a specific puzzle is giving you trouble, exit to the menu and switch to Casual temporarily.
- In either mode, you can skip cutscenes by clicking during them and selecting the “skip” dropdown at the top of the screen. You can also skip dialogue by clicking the dialogue box—this will skip one box of dialogue at a time.
Saving
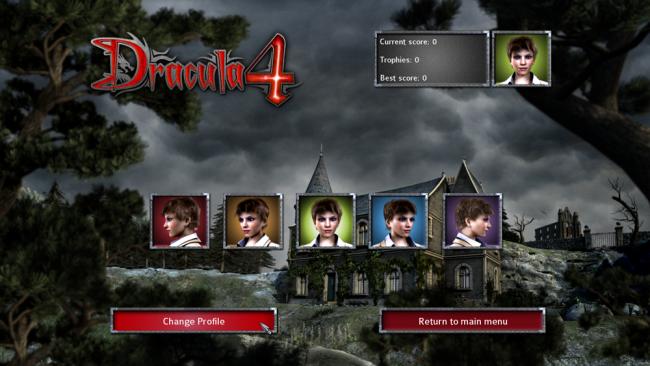
- Dracula 4 utilizes an auto-save feature that keeps track of your current status which can be accessed by choosing “Continue.” If you select “Load a game,” you’ll be given a list of auto-save checkpoints that are stored throughout your progress.
- If you load one of these checkpoints it will overwrite your main progress and you will start from this point if you choose “Continue.” These checkpoints are best used to jump back slightly to collect a missed achievement or only once you have completed the game.
- In addition to the different Continue / Load checkpoints, there are also 5 separate, color-coded profiles available to choose from. Each profile houses its own progress, load points, achievements, and score so that numerous players can enjoy the game simultaneously. To switch profiles, click on one of the profile boxes and select “change profile” at the bottom of the screen.
Achievements / Dosage List
- Please see the end of this walkthrough for two addendums: a list of available achievements and how to earn them, as well as a dosage list describing many of the effects of Ellen’s medicine and recovery items.
- Achievements will also be listed throughout the walkthrough as they can be acquired.
Chapter 1: Prologue/Tutorial
Overview: Ellen arrives in Budapest at the office of Inspector Lazlo. Lazlo has captured an art thief who was in possession of one of the stolen paintings. Ellen must authenticate the painting and investigate how this thief came to be in possession of it.
- After the cutscenes that explain Vambery and his collection of paintings were lost in a shipwreck, you take control of Ellen Cross in Budapest.
- Click on Inspector Lazlo to start a conversation.
- Scroll right and click on the painting.
- Open your inventory via the hand button at the bottom of the screen.
- Click on the ULTRAVIOLET LAMP and exit the inventory. Note: if you double-click an item, it will be selected and you’ll exit the inventory automatically.
- Use ULTRAVIOLET LAMP on the Turner painting to authenticate it.
- Achievement: “Expert Eye.” Earned automatically after authenticating the painting.
- Lazlo asks you to wrap, seal, and store the painting.
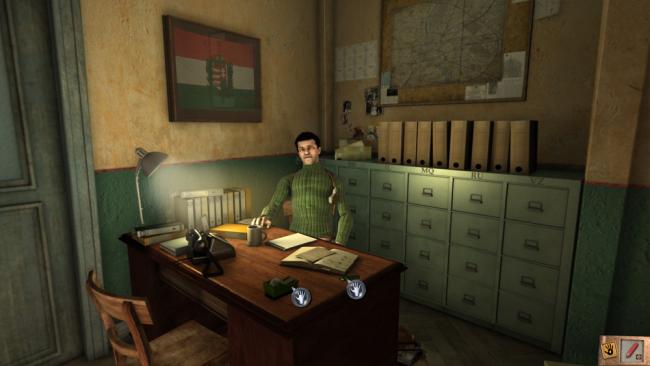
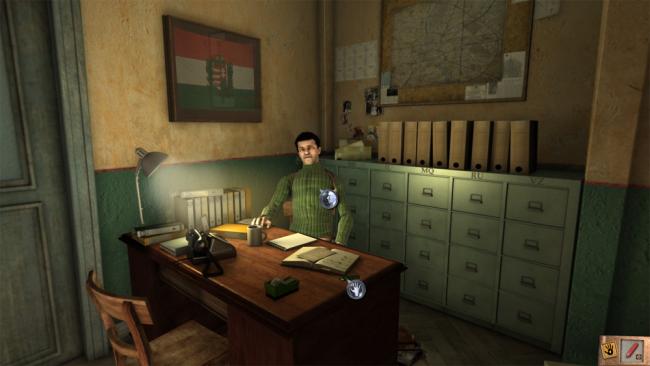
- Take SCOTCH TAPE and LIGHTER from Lazlo’s desk.
- Take the painting off the easel to receive FRAMED PAINTING.
- Turn right slightly.
- Take SEAL from on top of the safe.
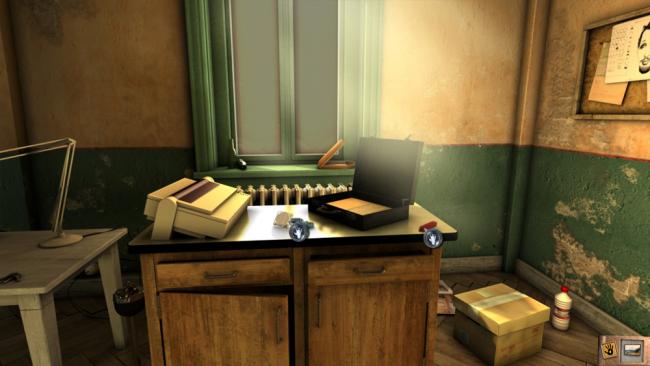
- Turn right and move to the wooden cabinet with a scanner on top.
- Take PLASTIC PACKING STRIP and WAX from the table.
- Return to the easel. Just to the left of the easel is a wooden crate.
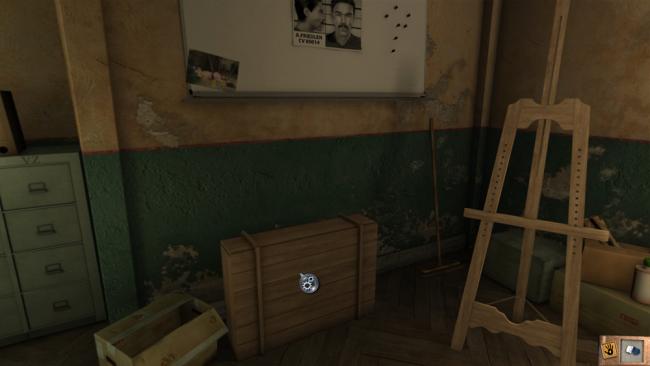
- Use FRAMED PAINTING on the wooden crate. The painting will be placed inside and the crate closed.
- Use PLASTIC PACKING STRIP on the wooden crate.
- Click on wooden case to enter a close-up view.
- In your inventory, drag LIGHTER onto WAX to get MELTED WAX.
- Use MELTED WAX on the close-up of the wooden box.
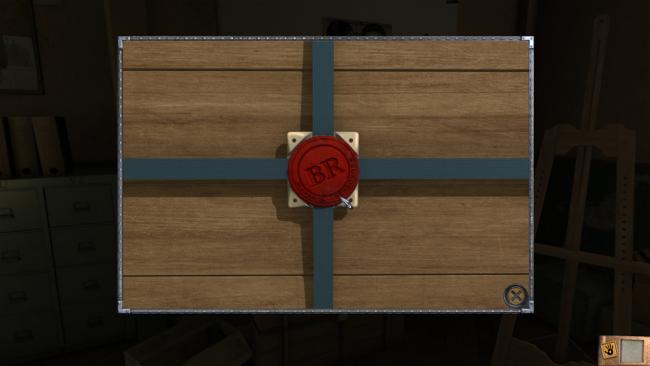
- Use SEAL on the waxy close-up.
- Exit the close-up and take SEALED CASE.
- Turn slightly to your right. Click on the green safe to open it.
- Use SEALED CASE on the green safe to lock the painting inside and complete your first objective.
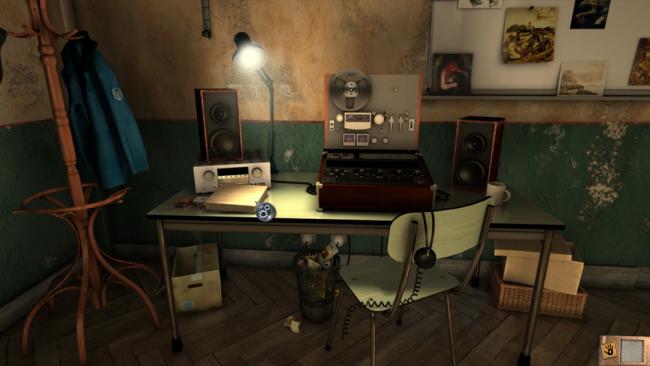
- Move to the corner of the room opposite Lazlo, where an audio recorder sits on a table.
- Use the recorder table to open a small box.
- Take DAMAGED AUDIOTAPE.
- In your inventory, drag SCOTCH TAPE onto DAMAGED AUDIOTAPE to make AUDIOTAPE.
- Use AUDIOTAPE on the tape recorder, then look at the tape recorder to enter a mini-game puzzle.
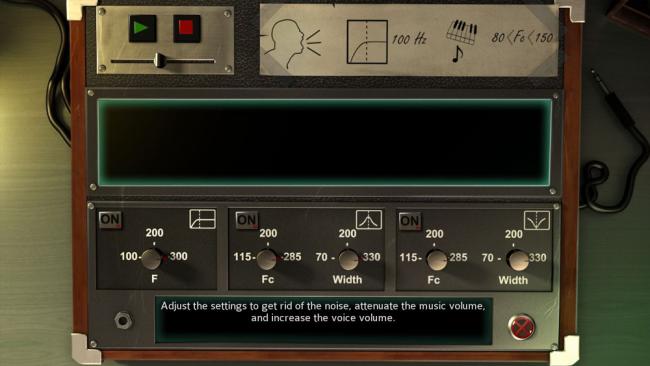
- To hear Friedlen’s audio recording, you’ll need to adjust the knobs properly to filter out the white noise. There are hints on a strip at the top of the recorder. The solution is as follows:
- Turn the left-most knob to 100.
- Turn both middle knobs to 200.
- Turn the right-hand FC knob to 115 and the right-most Width knob to 70.
- Turn on the machine via the upper left green “play” arrow and push the volume slider all the way to the right to hear clearly; your recorder should match the image below.
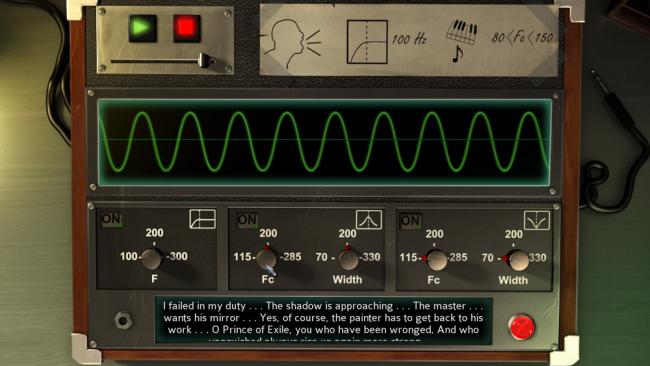
- Ellen will hear Friedlen’s mysterious ramblings about the Prince of Exile.
- When you’ve finished with the recording, Lazlo is gone.
- Move back to the easel and look at the picture of Friedlen on the bulletin board. Mentally note his record number: “CV 00014”
- Move back to Lazlo’s desk and look at the file cabinets behind it.
- You’ll enter a close-up of the cabinets.
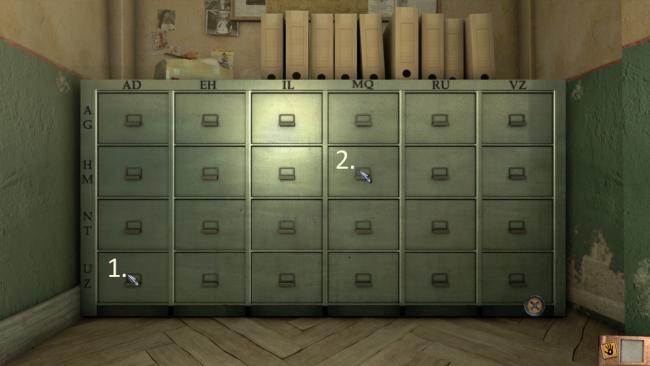
- Click on the bottom-left corner drawer, which equates to CV from the XY axis of letters on the cabinet.
- A close-up of the open drawer will appear. Click on the number 14 to retrieve Friedlen’s file.
- Within the file, take the STRIP OF PAPER WITH THE ENCODED MESSAGE.
- Note Friedlen’s accomplice is in file “NI 008.”
- Click the small tab on the upper-right corner to read the second set of pages. Close the file.
- Open the drawer four rows over and one row down for “NI.”
- Click on the number 8 to access Yacub’s file. His info will be added to your dossier.
- Exit the file and turn left to the open door. Move out the door to leave the office and enter Friedlen’s cell.
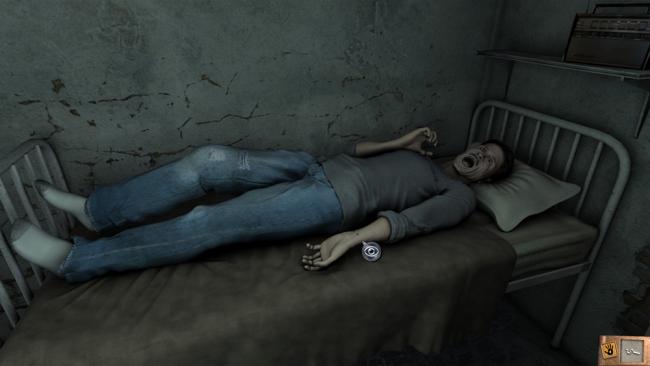
- Inspect Friedlen’s arm to discover a “tattoo” that looks like two small holes.
- Turn 180 degrees from Friedlen and examine the soap on the sink. Ellen will note that he must have written something with the soap; Lazlo will give you KEY to the supply cabinet.
- Exit the cell and turn to your left to view the supply cabinet.
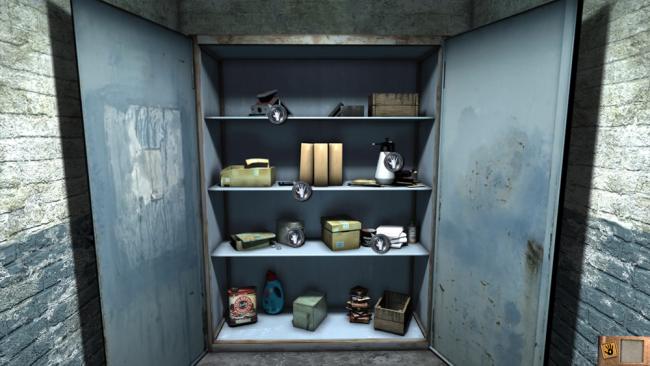
- Use KEY on the cabinet to open one door. Click on it again to open both doors.
- From the cabinet, take POLAROID CAMERA, EMPTY SPRAYER, BATTERIES, FILM, and FINGERPRINT POWDER.
- Turn left and enter Friedlen’s cell again.
- In your inventory, drag BATTERIES onto POLAROID CAMERA.
- Drag FILM onto POLAROID CAMERA to receive COMPLETELY EQUIPPED POLAROID CAMERA.
- Achievement opportunity: “Paparazzo. ” Take a photo of Inspector Lazlo with the camera.
- Drag FINGERPRINT POWDER onto EMPTY SPRAYER to get SPRAYER FILLED WITH POWDER.
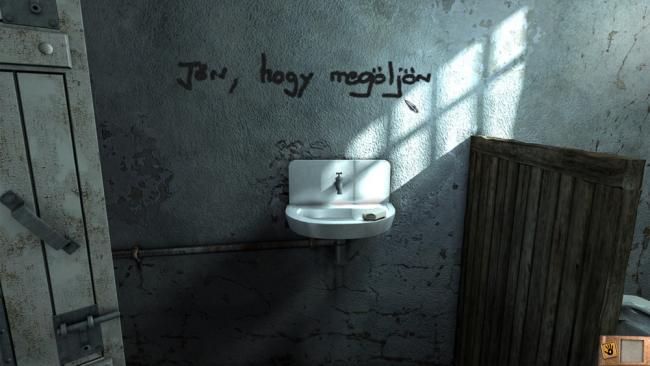
- Use SPRAYER FILLED WITH POWDER on the wall above the sink in three areas to reveal the phrase “Jön, hogy megöljön.” You may need to spray more than three times to reveal the phrase completely.
- Ellen and Lazlo will comment once it’s revealed successfully.
- Use COMPLETELY EQUIPPED POLAROID CAMERA on the newly revealed phrase. Center the camera on the phrase and click the focal point.
- Lazlo thanks you and asks for a photo of the body.
- Use COMPLETELY EQUIPPED POLAROID CAMERA on Friedlen’s corpse.
- After a final conversation with Lazlo, Ellen asks to call her boss.
- Exit Friedlen’s cell and move straight to the stairs.
- Ellen enters the office and feels woozy; she needs to take some medicine.
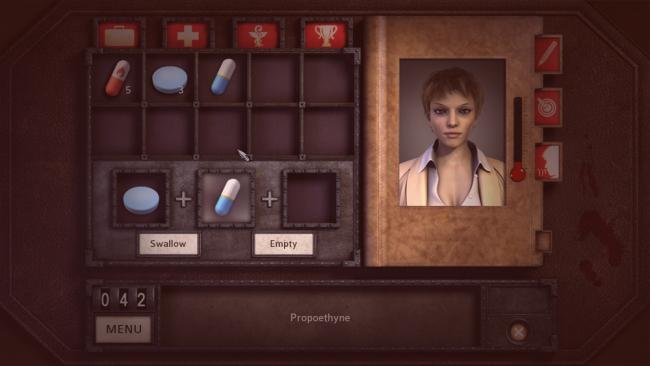
- Ellen starts off with five CIKLOPREX, four HEMAPROMAZINE, and two PROPOETHYNE. The results of taking a combination of drugs will not appear until you have tried them.
- You only have to take enough medicine to get Ellen out of the red to continue on.
- For now, take 1 Hemapromazine + 1 Propoethyne.
- Use the phone on Lazlo’s desk. Select Museum to call your boss.
- He has another mission for Ellen: finding out what the “extra” painting in Vambery’s collection was. Ellen decides to take the first flight to the UK to travel to Whitby.
- Achievement: “From Budapest with Love.” Earned automatically by completing the Prologue.
Chapter 2: Whitby/Vambery Manor
Overview: Ellen arrives in Whitby at Vambery Manor where Vambery’s assistant, Adam, is waiting for her. She’ll need to search Professor Vambery’s house and files to uncover details about the secret sixteenth painting.
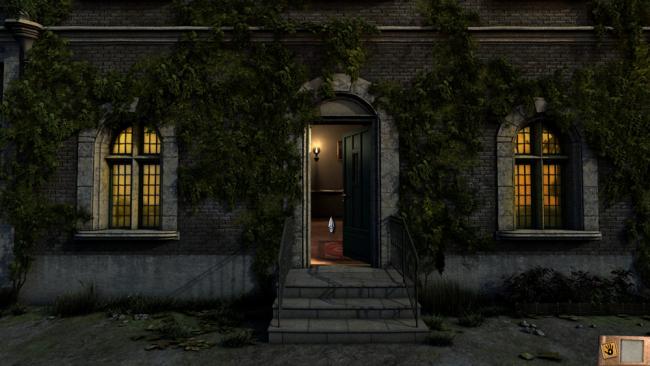
- Ellen now only has LIGHTER and STRIP OF PAPER WITH THE ENCODED MESSAGE in her inventory.
- Walk in the front door. Adam Stoker, Vambery’s assistant, introduces himself before leaving for the notary public.
- Enter the kitchen.
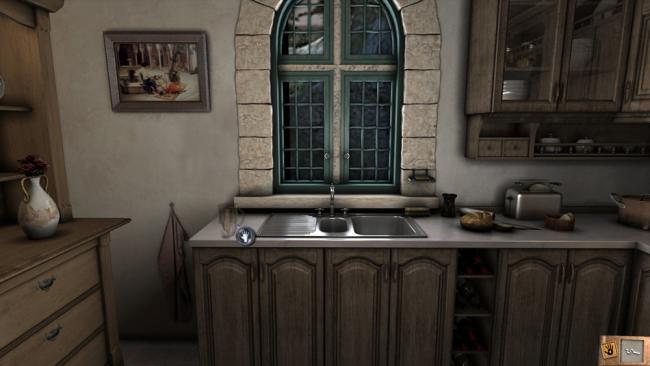
- Open the cabinet above the coffee maker.
- Take FLASHLIGHT and BLEACH.
- Turn left to the sink.
- Pick up CONTAINER.
- Use CONTAINER on the sink to get FULL CONTAINER.
- Turn to your left.
- Take PENETRATING OIL.
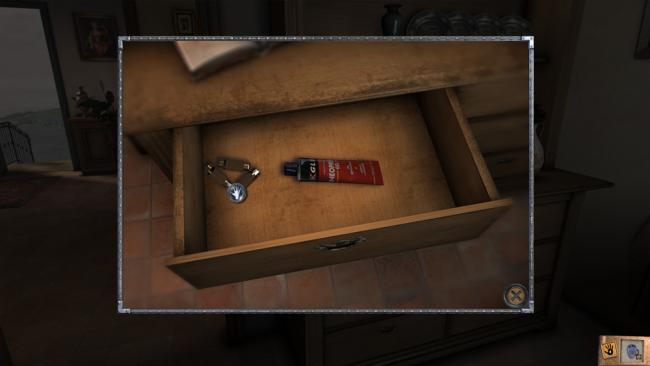
- Open the top-left drawer of the china hutch. Take FUSES and TUBE OF GLUE.
- Turn to your left again, toward the kitchen table.
- Take KNIFE.
- Use the fruit basket multiple times to receive APPLE(s) and PEAR(s). These are health items for Ellen; she can take 3 APPLES and 2 PEARS at one time. The basket is bottomless, though, and you can refill as much as needed.
- Achievement opportunity: “In Perfect Health.” Fill Ellen’s health bar to the max. With the endlessly-refillable fruit, you can feed Ellen apples and pears until her health is maxed out.
- Exit the kitchen.
- Turn right and click on the stairs to move to the second floor.
- Turn right and enter the bedroom.
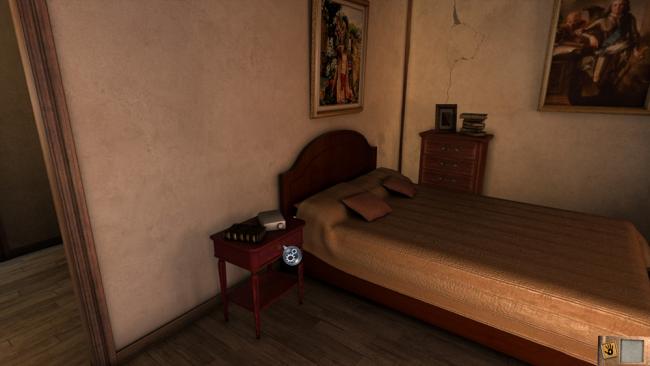
- Turn left and open the red nightstand drawer.
- Look in the drawer and take SLEEPING PILLS (health item for Ellen).
- Look at the green notepad in the drawer to learn about Vambery’s “secret passage” which is added to your tasks.
- Exit the bedroom, turn right, and move forward to enter the study.
- Move to the left near the curtain. Use the curtain to reveal a metallic box.
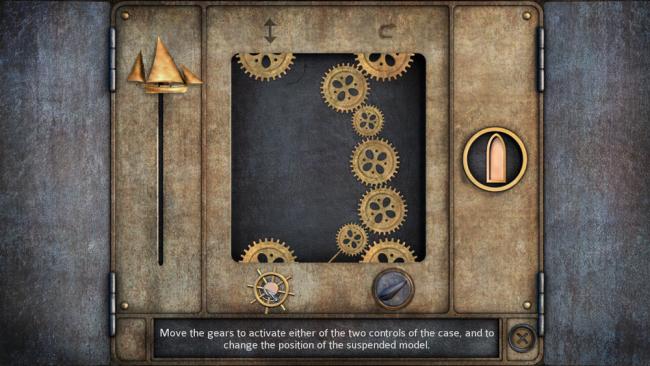
- Look at the box to enter a puzzle mini-game featuring gears.
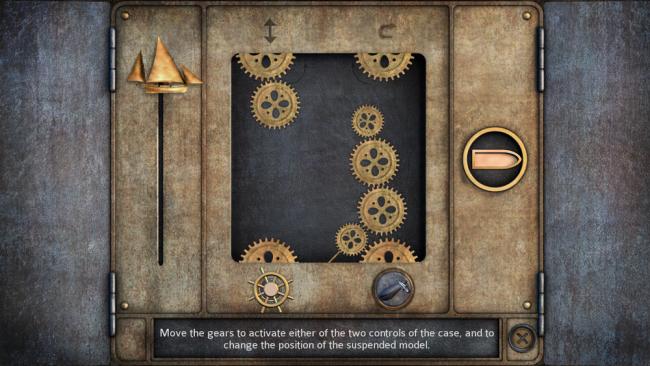
- Move the single gear from the left-hand column to the top of the right column.
- Press the wheel button (below the left-hand column of gears) to move the ship model to the right.
- Press the wheel three times total, until the bullet-shaped compass to the right is pointing up, as shown in the image below.
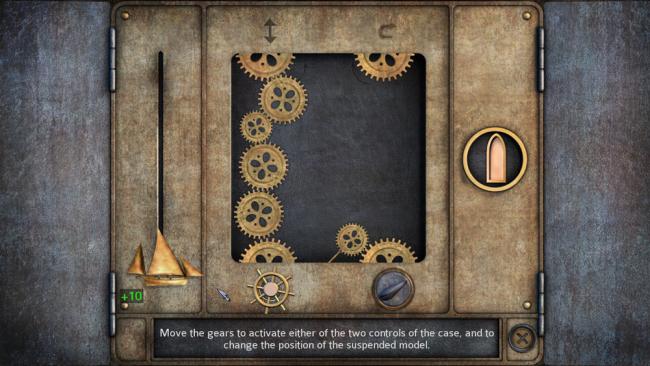
- Reposition the gears on the left-hand column without the bottom-most gear that is controlled by the blue switch.
- Then click the wheel button to bring the ship down to the living room level. Your final result should look like the image below. You’ll also receive the telltale ding of music and points to indicate you’ve succeeded.
- Go downstairs to the parlor and examine the ship.
- Take KEY from the lifeboat.
- Return back upstairs to the study.
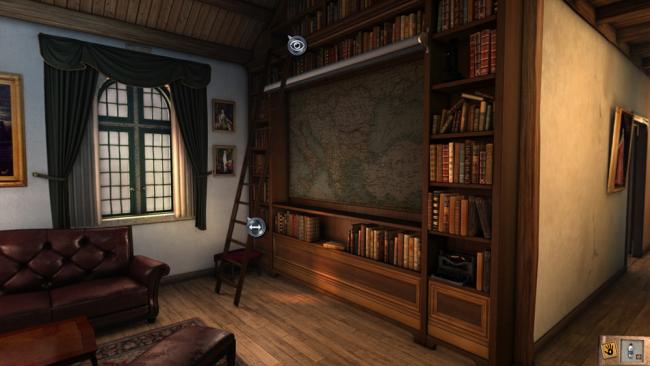
- Move to the corner with the curtain again. Turn around to Vambery’s desk.
- Examine the paper on the desk to review the painting list and add a note about call number “A III 07” to your task list.
- Move back to the entrance of the study.
- Move the ladder to the far left of the room by clicking on the shaking arrow bubble to the left of the ladder.
- Examine the top-left shelf to discover the book “C II 15” is in the spot “A III 07” should be. Click on “C II 15” and Ellen will comment.
- Move the ladder to the entryway.
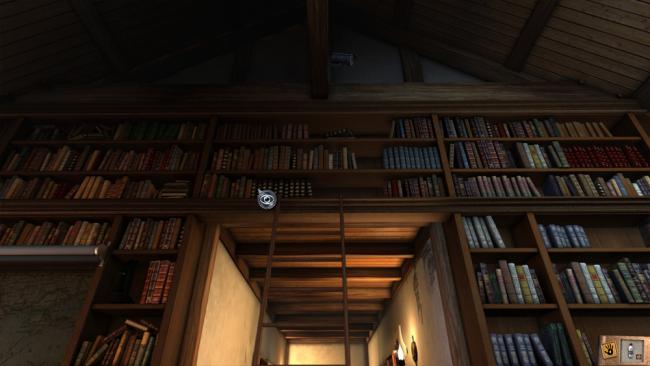
- Click on the books just above and to the left of the ladder—it’s very finicky and if you’re off by a hair, Ellen will say “I can’t be that far off.”
- When you get it right, a close-up of the books will appear. Click on “A III 07.” It’s A Guide to Building Model Ships (and a puzzle mini-game).
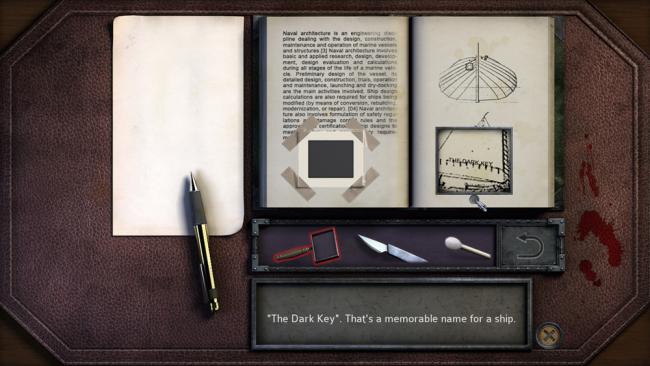
- Use the scalpel on the four pieces of tape adhered to the slide. Once it’s free, pick up SLIDE.
- Use the magnifier on the picture of the ship to reveal the name “The Dark Key.” Click on this name so Ellen will add it to her notebook.
- Now use the magnifier to find a secret code hidden in the text. Important letters or numbers will have a dot underneath them. When you have the magnifier hovering over one, click on it.
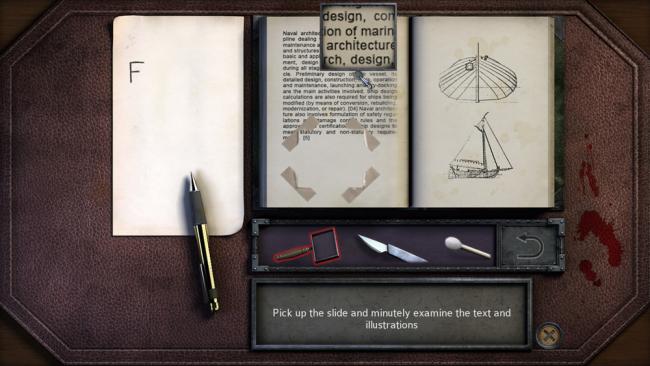
- The image above gives an example of one such coded letter: note the dot underneath “f” under the magnifier.
- In order, the code is found as follows:
- Line 3, “f” in “of.”
- Line 5, “l” in “applied.”
- Line 8, “v” in “vessel.”
- Line 14, “0” in “[04].”
- Line 19 (last line), “5” in “[5].”
- This code spells out “F IV 05” in the notebook, indicating another book we need to locate.
- Tip: if you get fed up with this puzzle, random clicking also works fairly well.
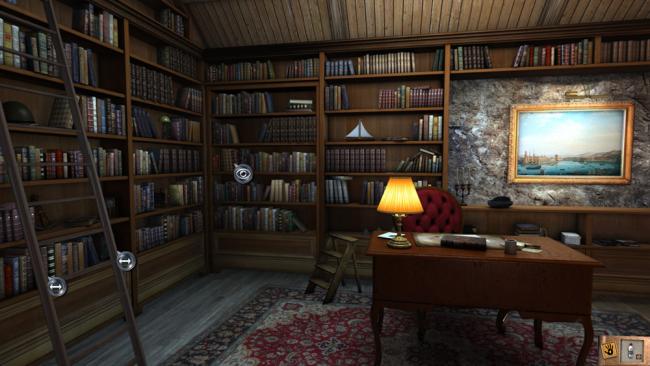
- The “F” books are to the left of the desk and the shelves are numbered from top to bottom.
- Click on the fourth shelf from the top to view a close-up.
- In the close-up, remove Dracula and the book next to it to reveal a keyhole.
- Use KEY from the model ship on the keyhole. Use the keyhole again to slide back the plate and reveal a numeric keypad.
- To find the code, move to the slide projector on the opposite side of the room.
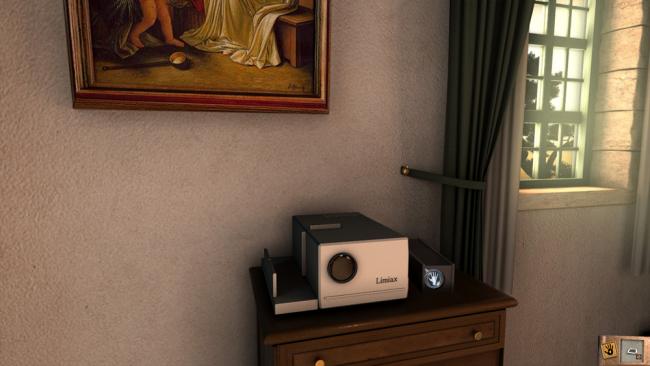
- Take SLIDE VIEWER RACK from the right of the projector.
- In your inventory, use SLIDE on SLIDE VIEWER RACK to get RACK WITH THE SLIDE.
- Use RACK WITH THE SLIDE on the slide projector.
- A map will appear on the wall with a small red dot on it.
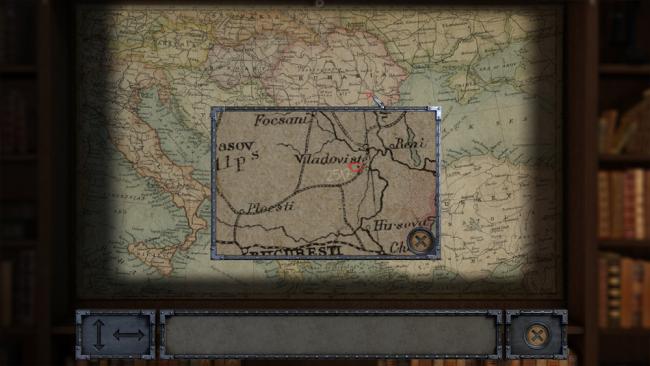
- Click the up arrow and then the right arrow.
- Click on the red dot to zoom in and reveal latitude “2517” which Ellen will note.
- Return to the keypad hidden behind the Dracula bookshelf.
- Enter the code “2517” to reveal a hidden room.
- Use FLASHLIGHT on the secret room to move into it. Ellen needs to find a way to get the lights on.
- Turn to your right, almost 180 degrees, until you see a fuse box just left of the doorway.
- Use FUSES on the small electrical box, then click on the larger fuse box to enter a mini-game.
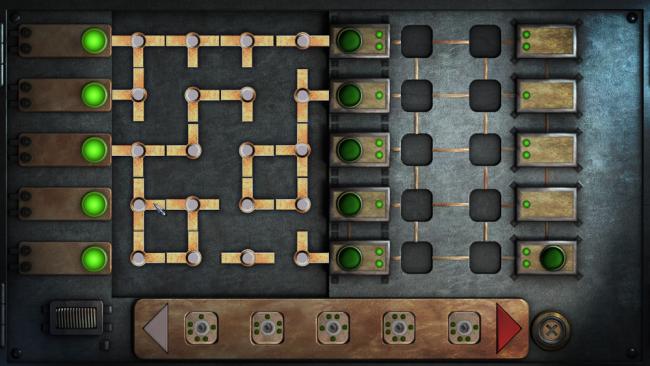
- This is a fun variation on the classic pipes game: click on the pipes to rotate them until there are no dead ends.
- Then insert the domino blocks so that they all touch same-numbered sides. For instance, a side with two dots must be adjoined by another two-dotted domino.
- Your final result should match the image below. Everything will light up green when correct.
- Achievement: “Amateur Detective.” Received for solving three puzzles. Will be received automatically unless you’ve skipped puzzles.
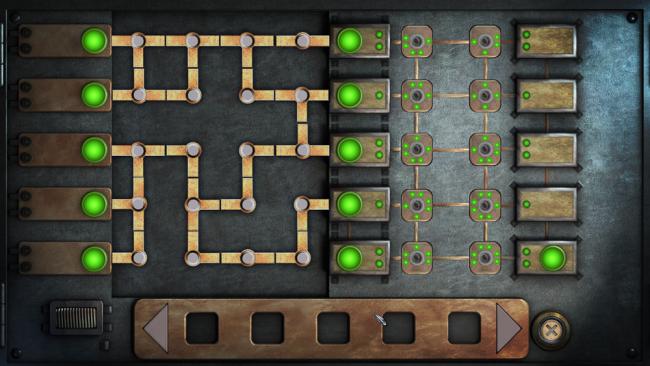
- Once completed, the lights will be turned back on and you can explore the room.
- Turn to your left and examine the cabinet door under the stereo.
- Take AUDIO CASSETTE and WHISKEY (health item for Ellen).
- Use AUDIO CASSETTE on the stereo. It’s a recording of Professor Vambery discussing the mystery painting: a portrait that has been haunting him.
- Turn left to the table.
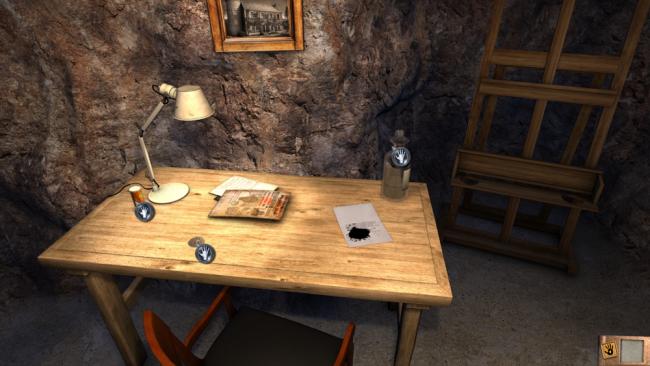
- Take HYDROGEN PEROXIDE, MEDAL OF SAINT BENEDICT, and VITAMINS (health item for Ellen).
- Examine the photograph of the manor above the desk. There’s something different about it…
- Look at the statue on the left side of the front of the house. Ellen makes a note to go see the statue later.
- Examine the ink-stained letter on the table. Ellen comments that she can probably make a solution to remove the ink and a close-up of the letter appears.
- In your inventory, drag BLEACH onto FULL CONTAINER to get DILUTED BLEACH.
- Drag HYDROGEN PEROXIDE onto DILUTED BLEACH to get INK REMOVER.
- Use INK REMOVER on the close-up of the ink-stained letter. You’ll have to use it twice to completely clean the letter, which Ellen reads automatically.
- Turn left and turn on the large TV by clicking its green button.
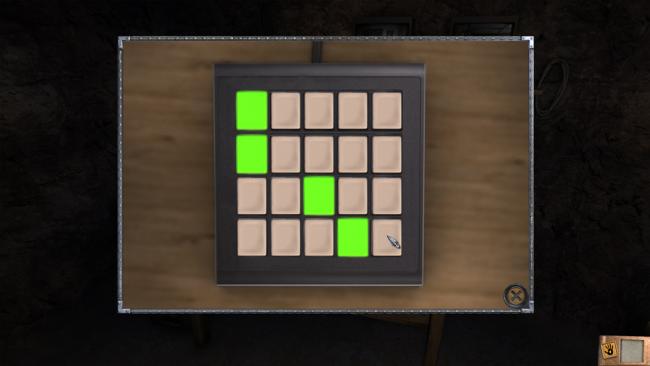
- Examine the white keypad next to the TV. These buttons correspond to different locations throughout the house and to each of the four TVs.
- On the keypad, click the second-to-last button on the bottom row. Exit and examine the large TV screen to learn about a strange engraving. Ellen comments Adam might know where this is located.
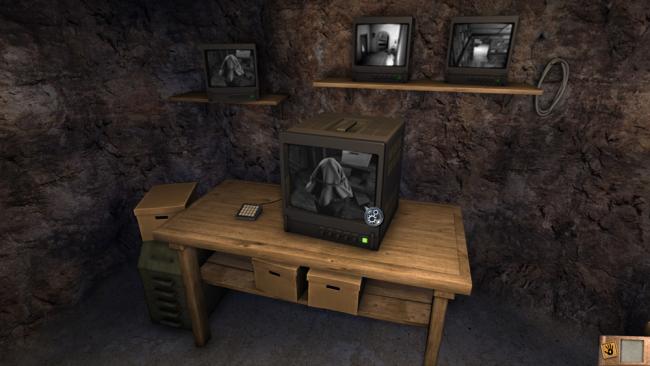
- On the keypad, click the last button on the bottom row. Exit and examine the large TV screen to learn about a secret vault.
- Exit the secret room and the study; go back downstairs.
- Use the phone in the entryway to call Adam. Ellen will ask him about the Latin engraving. Adam suggests it might be in the cemetery out back. You can check in with the doctor and museum while you’re here, but it’s not necessary.
- Go outside. If you try to examine where the angel statue was, Ellen comments it’s too high.
- Move to the right side of the house.
- Take the LADDER and SHEARS and move back to the left side of the house.
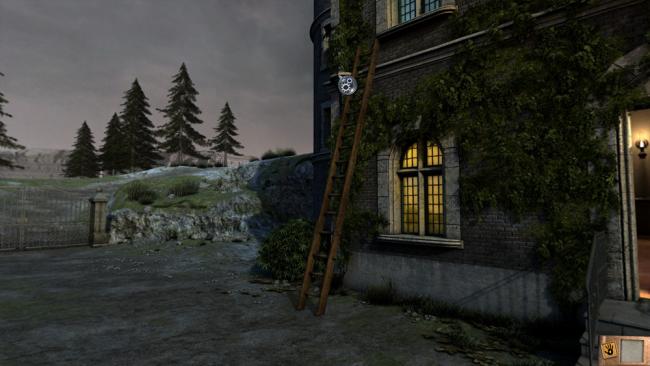
- Use LADDER on the spot where the angel statue should be.
- Use SHEARS on the ivy that has grown there.
- Examine the angel statue to get a close-up.
- Click on the statue to turn it around and reveal an indentation with a key.
- Take KEY and move back to the right side of the house.
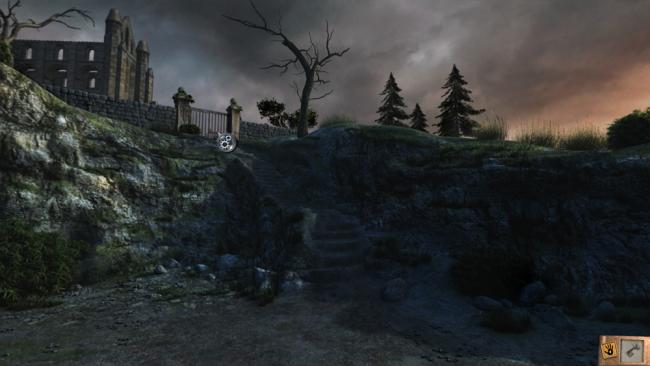
- Move up to the rusty gate at the top of the hill, you’ll enter a close-up. The lock on the gate is jammed.
- Use PENETRATING OIL on the lock. You’ll need to use it twice to turn the knob and open the gate.
- Move forward through the now-open gate, into the cemetery.
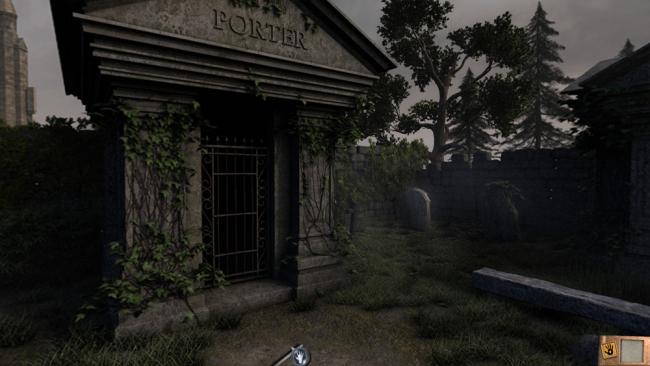
- Pick up METAL BAR off the ground when you enter the cemetery.
- Turn around and walk forward toward the small mausoleum covered in ivy. It says “Wanberger” across the top, the Professor’s parents’ name.
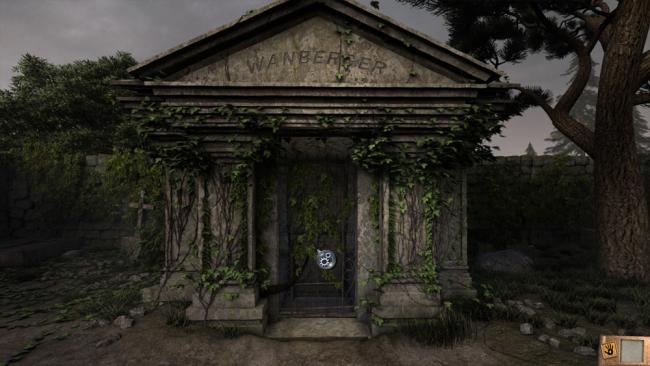
- Use SHEARS on the door to remove the ivy.
- Use KEY that you retrieved from the angel statue on the locked gate.
- Move forward into the tomb.
- Examine the Latin engraving in front of you; it’s the one Ellen saw on the security camera.
- Examine the three circles underneath the engraving to enter a puzzle mini-game.
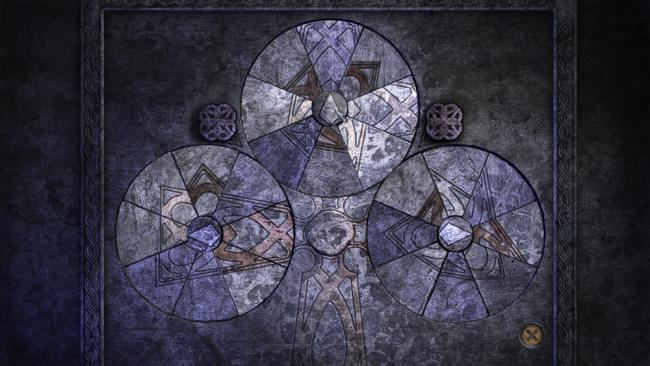
- The three circles need their correct pieces aligned. The criss-crossing buttons on the upper left and right will swap pieces and the button in the center of each circle will rotate the circle entirely.
- This is one of those puzzles you just have to keep at until you complete. Each circle should form a triangle pointing towards the other circles, with the tip cut off.
- The blue pieces go to the left, silver to the top, and brown to the right.
- The image below shows the final goal.
- Tip: focus on one circle at a time. Move all the brown pieces to the top circle and then put them in place one by one. Then move all the silver pieces to the left circle and put them in place on the top circle one by one. Since you only swap two pieces at a time, you’ll always be able to get back to your starting point this way.
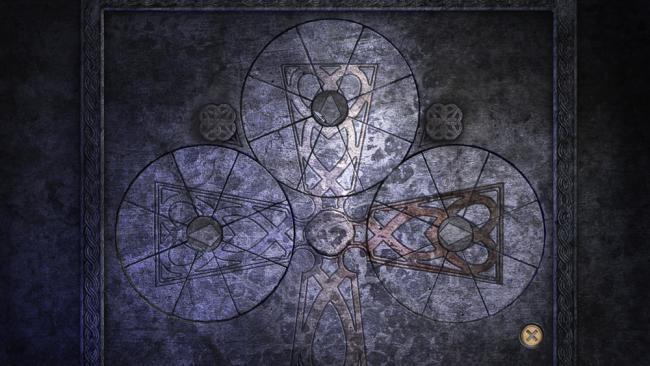
- When this is finally complete, the grave will open up. Ellen needs something to help her get underground.
- Use METAL BAR on the stone slab to Ellen’s left.
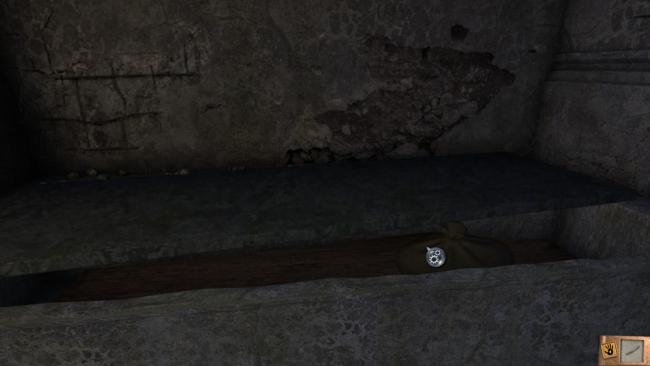
- The tomb will open; open the brown bag inside and take ROPE LADDER and PICK AXE.
- Use ROPE LADDER on the puzzle tomb you just opened.
- Move into the tomb.
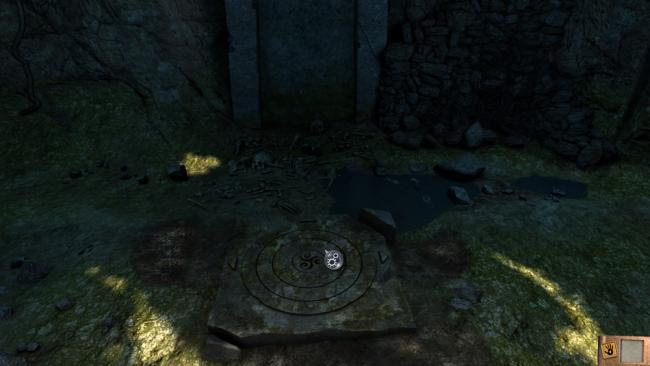
- Circle around the room while looking at the floor. There are four items you can collect: three STONE SNAKE(s), BONE, and TERRA COTTA POT.
- Use the STONE SNAKES on the stone full of symbols on the floor.
- Examine each of the three doorways in this room. A close-up of symbols above the doors will appear.
- Examine the symbols on the floor in front of you; Ellen will dust them off.
- Interact with the symbols on the floor again to enter a mini-game puzzle.
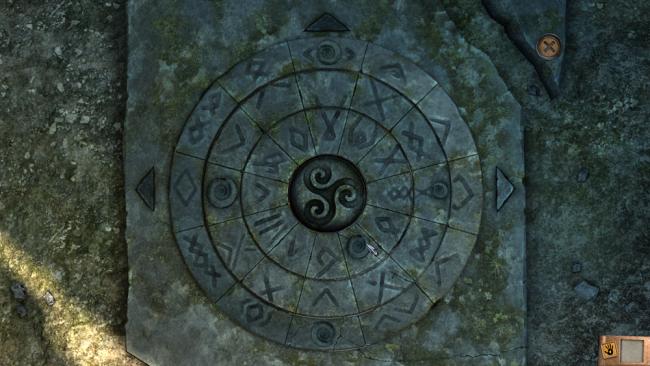
- This puzzle represents the doors around you. The arrows around the circle indicate which door you are opening—left arrow for left door, top arrow for middle door, right arrow for right door.
- Drag the symbol wheels by left-clicking and holding / dragging the wheel whatever direction you’d like.
- To open a door, you’ll need to input the symbols that were visible above it into the corresponding area of the wheel; left side of the wheel for left door, etc.
- When you enter the symbols for the door, it will automatically open and close any door that was previously open. You’ll be able to hear the sound of the door opening or closing.
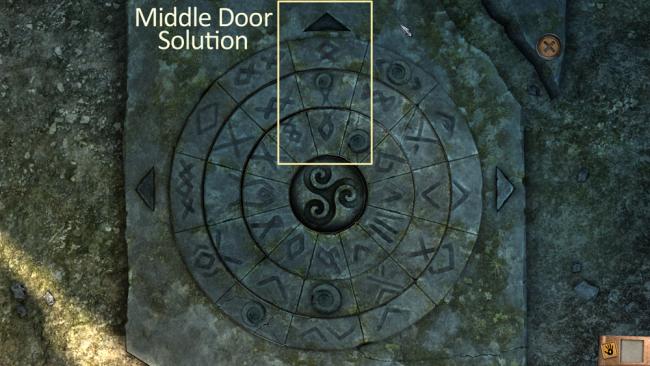
- To open the middle door, input the symbols as shown above; the important symbols are the three below the top arrow.
- Exit the puzzle and examine the now-open middle door.
- The middle door houses only an ossuary full of skulls. Return to the puzzle.
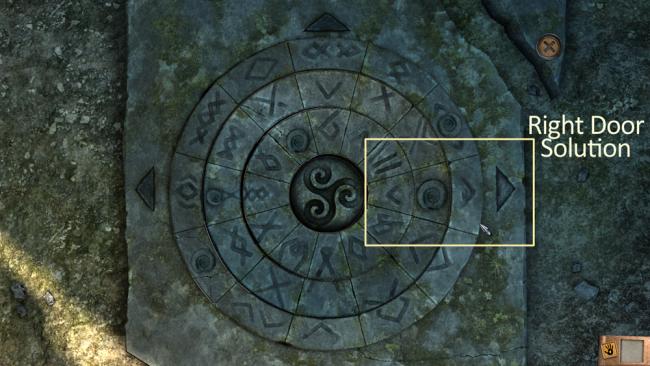
- To open the right door, input the symbols as shown above, focusing on the three symbols just left of the right arrow.
- Exit the puzzle and move to the right door.
- There’s a small snake sitting on a stone tomb.
- Use the TERRA COTTA POT on the snake.
- Take ANTIQUE FLASK CONTAINING OIL.
- Use KNIFE on the decayed skeleton to get STRIP OF TISSUE.
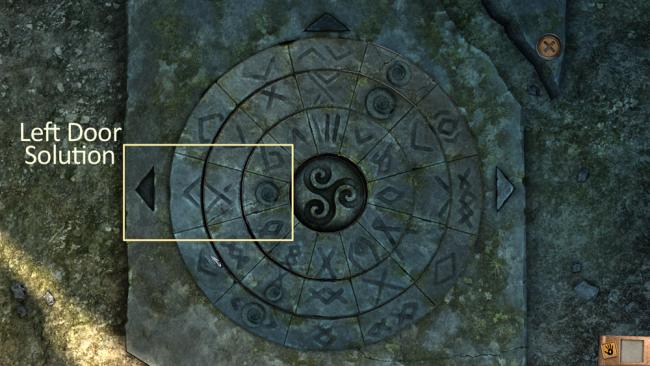
- To open the left door, input the symbols as shown above, focusing on the three symbols to the right of the left arrow.
- Exit the puzzle and move to the left door.
- Use Ellen’s flashlight to enter. It goes out immediately and she needs something else to light the way; you’re back in the central room.
- In your inventory, use STRIP OF TISSUE on BONE to make UNLIT TORCH.
- Use ANTIQUE FLASK CONTAINING OIL on UNLIT TORCH to make TORCH.
- Use LIGHTER on TORCH to make LIT TORCH.
- Now Ellen can explore the left passageway.
- Move forward into the passageway and forward again. You’ll be in front of a rusty door.
- Use your LIT TORCH on the sconce to the right of the door. Ellen will comment on the vault.
- Turn to the wall opposite the door and examine the dusty surface.
- Examine it again and Ellen will wipe away the dust and read the prayer written here.
- Turn around and examine the vault door mechanism to enter a close-up of the code wheel.
- Use MEDAL OF SAINT BENEDICT on the center of the wheel.
- If you click on the center of the wheel once the medal is inserted, you’ll see what the letters must correspond to.
- You can change the location of the letters in two ways: first, by rotating the entire wheel clockwise or counterclockwise by clicking on the arrows in the center.
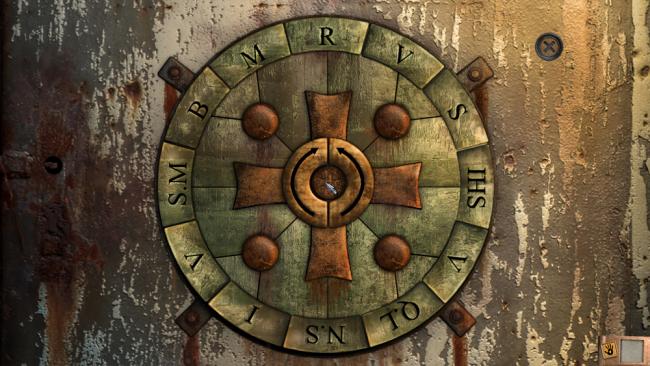
- Second, you can click on any of the round buttons to swap the two letters at that “corner.” In the above image, pressing the upper-right button would swap “V” and “S.”
- Arrange the letters on the door to match the letters that are on the outer ring of the MEDAL OF SAINT BENEDICT. These also match the first letter of the words of the prayer on the wall across the room.
- From the top, 12 o’clock position, the letters should be: IHS, V, R, S, N.S, M, V, S.M, Q.L, I, V, B. Your final result should look like the image below.

- Tip: it’s easiest to focus on the letters in order, working at the corners. You can move a letter up one space by getting it into a corner, swapping it, then rotating once and swapping it again. Continue this until the letter is in the exact spot you want.
- The door will open; enter the vault.
- Achievement: “Vambery’s Secrets.” Earned for making it into the vault.
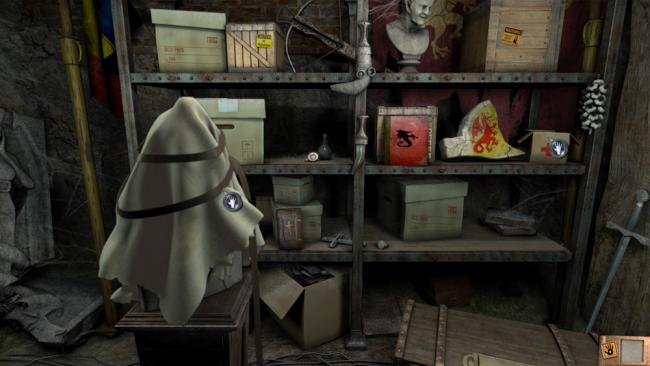
- Take VITAMINS (health item for Ellen) from the box marked with a red cross. You can take from this box twice at one time, and infinitely to fill up once you’ve eaten the vitamins. Another good chance to earn the “In Perfect Health” achievement.
- Take STRAP from the wrapped statue.
- Use the cloth on the statue and Ellen will remove it, revealing a bust of Vlad Tepes.
- Turn slightly to your left; take GRAPNEL from the floor left of the open coffin.
- Turn left again; take ROPE from the right of the open doorway.
- Turn back to the bust and the locked treasure chest on the floor. Examine this chest to enter a close-up.
- The chest is locked with a three-button color combination. There is a hint in this room—the flag in the corner.
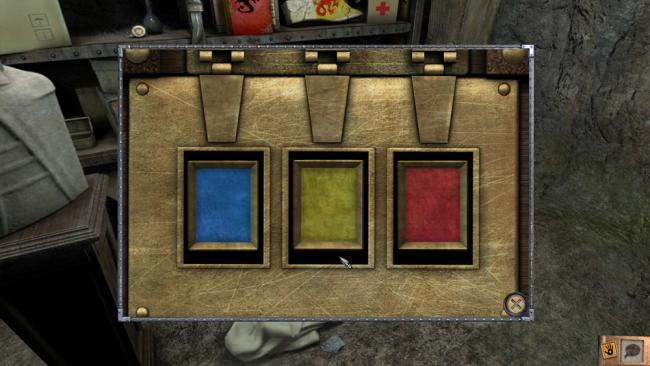
- Hold and drag each of the color slides up or down to change the color.
- The combination is Blue, Yellow, Red.
- When the chest opens, an alarm goes off and Ellen is locked inside the vault and feels woozy.
- Give Ellen enough medicine to feel better.
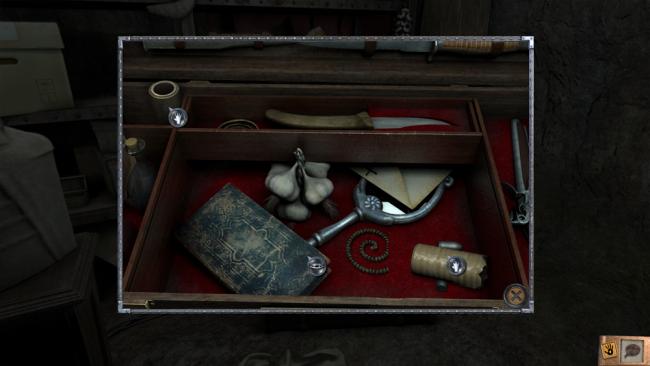
- Examine the open chest. Take SHORT PIECE OF STRING, LEATHER BOX, SILVER BULLETS, and BROKEN WAX CYLINDER.
- If you examine the brick wall, Ellen will comment an exit is probably available behind it.
- Use PICKAXE on the brick wall twice to open a small hole; Ellen will comment the pickaxe is insufficient alone.
- In your inventory, drag KNIFE onto SILVER BULLETS to get POWDER.
- Drag POWDER onto LEATHER BOX to get LEATHER BOX FILLED WITH POWDER.
- Drag SHORT PIECE OF STRING onto LEATHER BOX FILLED WITH POWDER to get EXPLOSIVE.
- Use EXPLOSIVE on the small hole in the brick wall Ellen just made; she’ll stick the explosive in it.
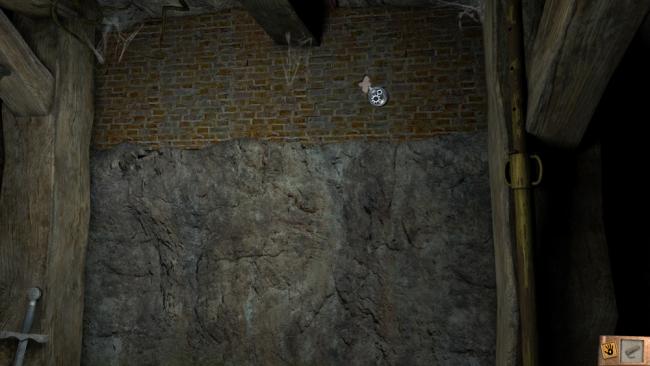
- Use LIGHTER on EXPLOSIVE in the brick wall. The hole in the wall will become slightly larger.
- In your inventory, drag GRAPNEL onto ROPE to make ROPE AND GRAPNEL TIED TOGETHER.
- Use ROPE AND GRAPNEL TIED TOGETHER on the slightly larger hole in the wall; Ellen will toss the grapnel into the hole. If you use the rope, Ellen will tug on it with minimal results.
- Turn to the bust of Vlad Tepes; use STRAP on the bust.
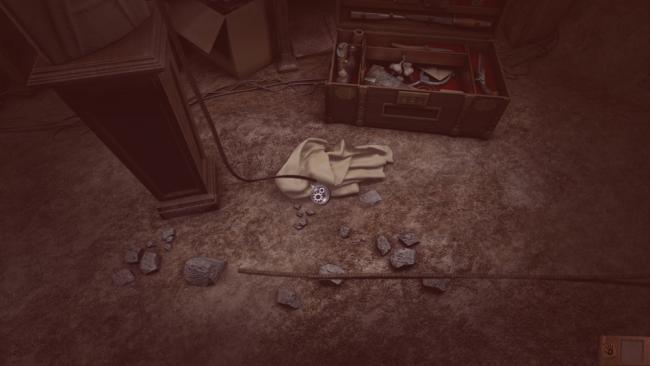
- Look at the floor and use the end of the STRAP; Ellen will tie it to the ROPE.
- Use the bust again; Ellen pushes it off the pedestal, taking the GRAPNEL and more of the wall with it.
- Move into the much larger hole in the wall to enter the upstairs bedroom and a dialogue with Adam.
- Achievement: “The Great Escape.” Earned for escaping Vambery’s vault.
- Ellen needs to report to the museum and listen to the wax cylinder found in the vault.
- First, let’s snoop around Adam’s room since we just blew a giant hole in the wall.
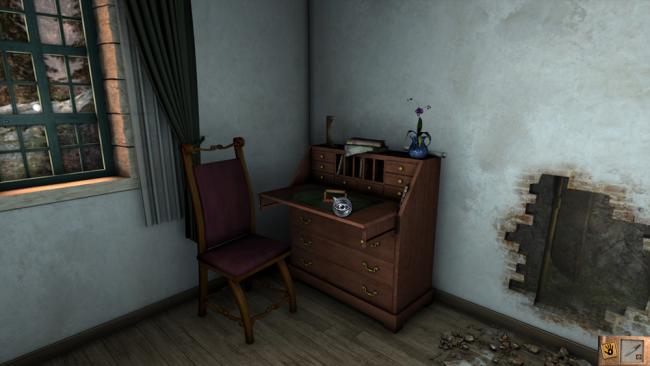
- Examine Adam’s desk to discover a scytale that is used to decipher messages.
- Use STRIP OF PAPER WITH THE ENCODED MESSAGE on the close-up of the scytale.
- Each side of the scytale contains a part of the message; click on it until you’ve seen each side. Ellen will note the address in her journal.
- Head downstairs and straight to the glass case just past the piano.
- In your inventory, combine TUB OF GLUE with BROKEN WAX CYLINDER to get WAX CYLINDER.
- Use the glass case to open it. Look at the case to enter a close-up view.
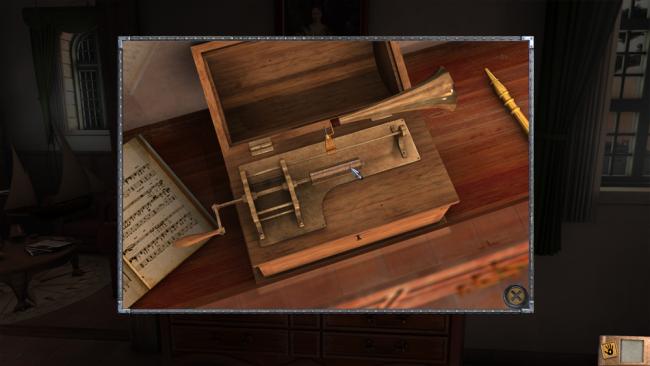
- Make sure the horn is lying near the top of the box; click on it to move it as necessary.
- Use the WAX CYLINDER on the center of the machine, and then click on the horn to lay it on top of the cylinder.
- Use the handle of the machine to play the recording. Listen to the long tale of the hunt for Dracula.
- Achievement: “The Voice from the Past.” Listened to the wax cylinder recording.
- Move back to the entryway and use the telephone to call the Museum. Ellen must go to Turkey to search for Yanek.
- Go back upstairs to the library and speak to Adam to say goodbye. Choosing “Goodbye” will send Ellen to her next destination: Istanbul.
Chapter 3: Istanbul/Yanek
Overview: Ellen arrives in Istanbul and begins this chapter in a hotel room with the phone ringing. She must seek out Yanek and hopefully uncover the missing, secret portrait that drove Vambery to distraction.
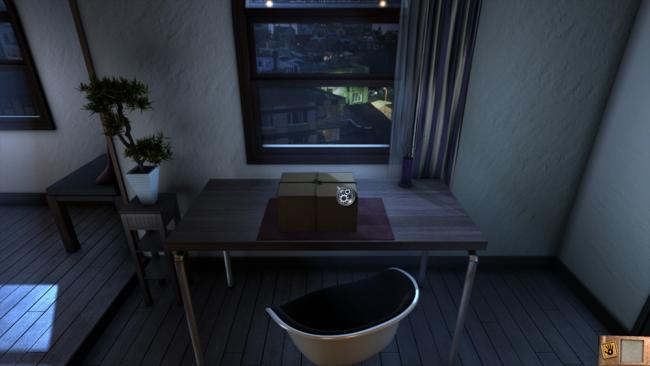
- Examine the package on the desk to enter a close-up.
- Use KNIFE on the string of the package.
- Examine the letter to learn it’s a package from the museum; a camera for documenting the painting and medicine from your doctor.
- Take CAMERA and PROPOETHYNE (health item for Ellen). Exit the package view.
- Turn 180 degrees to the closed door behind you and click on it to exit the hotel.
- Ellen automatically travels to Yanek’s address. Click on the slightly ajar door to open it, move forward to enter the building.
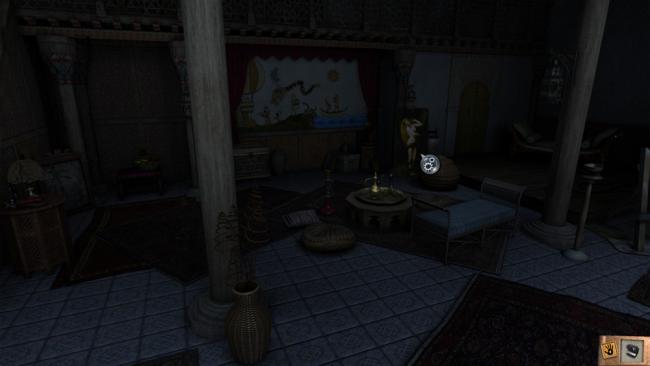
- The room is large and mostly empty; no one is home.
- Examine the painting of a woman near the center of the room. Ellen comments it’s a John Collier work from Vambery’s collection. She is startled by a man who appears and asks what she’ doing there.
- Select either dialogue choice: “Apology” to open up additional dialogue options with Yanek.
- Select “Friedlen.”
- Select “Avoid the question.”
- Achievement: “Diplomat.” Successfully talked around the issue with Yanek.
- If you don’t care about the achievement, select “Lilith painting” the first time to move the plot forward.
- Once Ellen leaves Yanek’s, move the dumpster across from his house and enter the small room hidden behind it.
- Ellen will hear Yanek leave, indicating she can now go back and examine the painting.
- Look out the window to see Yanek leaving.
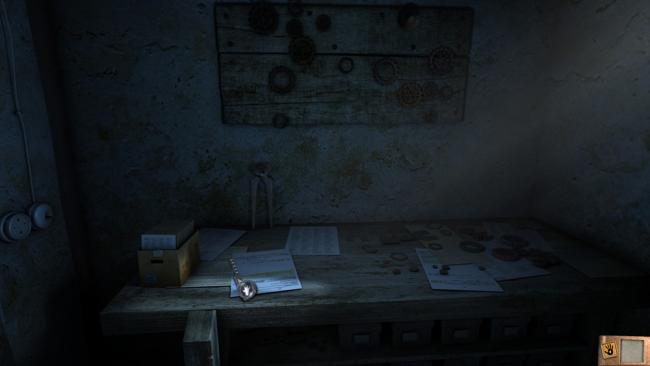
- In this small room, from the table to Ellen’s right take KNOTTED ROPE, LOCK-PICKING HOOK, and PLIERS.
- Turn around and take STRIP OF METAL from on top of a barrel on the floor.
- In your inventory, use PLIERS on STRIP OF METAL to get TENSION TOOL.
- Exit the room and move back to Yanek’s door.
- Examine the door to enter a close-up; the LOCK-PICKING HOOK and TENSION TOOL will already be in place in the keyhole.
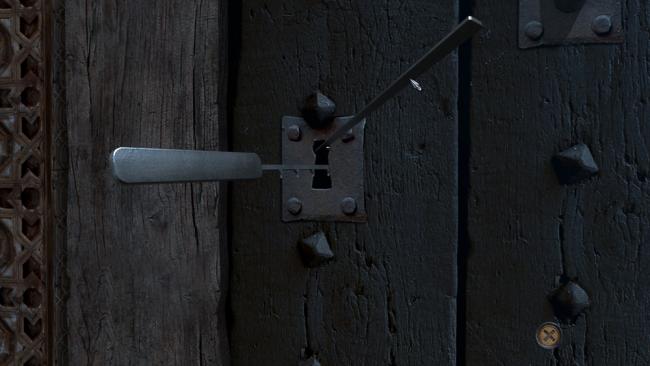
- You’ll need to move the LOCK-PICKING HOOK horizontally and TENSION TOOL vertically to find the right combination to unlock the door.
- Notes: the LOCK-PICKING HOOK moves freely while the TENSION TOOL will only move when you have the HOOK in the right location.
- Your goal is to move the TENSION TOOL from the top position to the bottom by dragging it when the LOCK-PICKING HOOK is in the right location.
- Sometimes it takes a few “drags” on the TENSION TOOL to get it to actually move. It’s very unresponsive; usually dragging from the middle is most successful. If you hear it click but don’t see any movement, just keep retrying to drag it down.
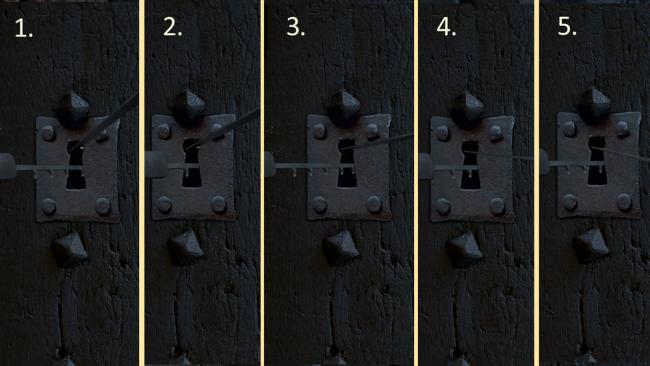
- To start, pull the LOCK-PICKING HOOK to the left until you see 4 teeth visible. Drag the TENSION TOOL down; it should move down a notch.
- Push the LOCK-PICKING HOOK so only 1 tooth is visible. Drag the TENSION TOOL down again.
- Pull the LOCK-PICKING HOOK so 5 teeth are visible. Drag the TENSION TOOL down again.
- Pull the LOCK-PICKING HOOK so 2 teeth are visible. Drag the TENSION TOOL down again.
- Pull the LOCK-PICKING HOOK so 3 teeth are visible. Drag the TENSION TOOL down again.
- The progression of the LOCK-PICKING HOOK is shown in the image below.
- The door will open and Ellen will step inside.
- Achievement opportunity: “Experienced Burglar.” Complete the lock-picking puzzle quickly (under 30 seconds).
- Turn around 180 degrees to the door. Flip the light switch to the right of the door. Now Ellen can explore.
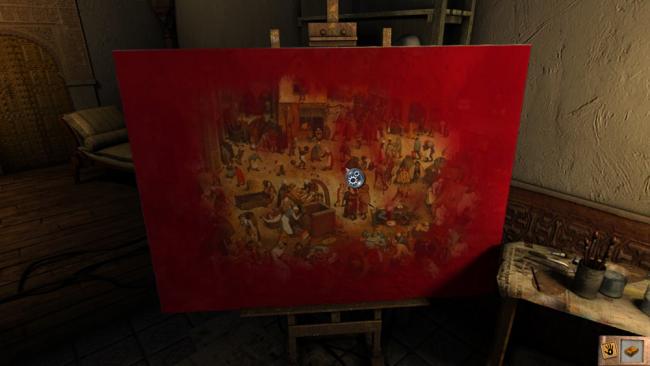
- Move to the right, near the red canvas. Turn to the table across from the canvas and take PAINT SOLVENT and SPONGE.
- In your inventory, drag PAINT SOLVENT onto SPONGE to make SPONGE WITH SOLVENT.
- Use SPONGE WITH SOLVENT on the red canvas twice to reveal a Brueghel painting, The Fight Between Carnival and Lent.
- Use CAMERA on the Brueghel painting—remember to focus the shot and click on the center circle to take the picture.
- Examine the large mural on the wall opposite the door. It’s a puppet theater.

- Use the knobs at the bottom of the puppet show to move each puppet.
- Use the far right knob to knock the last puppet off the stage. Ellen will exit the theater view.
- Pick up BROKEN PUPPET.
- Turn to your left; in a small bookshelf alcove are tools for repairing the puppet.
- First, make a note of the puppet in your inventory. He has an orange arm with a blue cuff.
- Examine the alcove where the puppet supplies are. You’ll enter a mini-game puzzle for repairing the puppet’s arm.
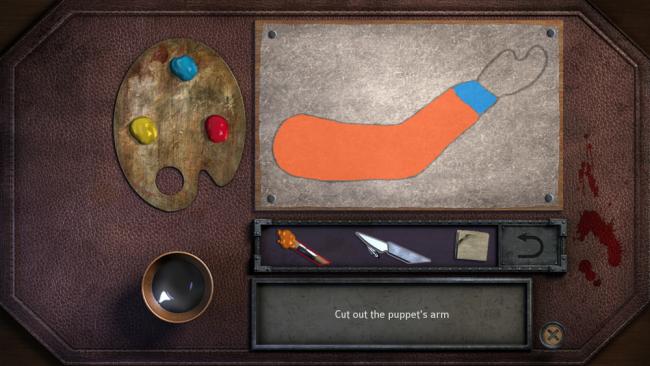
- Use the brush to select blue paint and paint the cuff blue.
- Clean your brush in the water dish and then put red and yellow on it to make orange. Paint the sleeve in orange.
- (If you mess up at any time you can use the towel square to clear a color you’ve painted.)
- Once it’s colored correctly (Ellen will comment), use the scalpel to cut out the arm.
- You’ll need to hold down the left mouse button while moving around the arm to create a seamless cut. If you let go of the mouse or mess up too much, you’ll have to start over.
- Tip: there are certain “pain points” that are least forgiving—try starting with the shoulder curve and moving along the top of the arm as it’s the most likely to cause a do-over.
- Tip: when in doubt, skew towards the inside of the arm and not the outside.
- Achievement opportunity: “Steady Hand.” Cut out the puppet’s arm without messing up.
- Once completed, you’ll receive MOVABLE ARM.
- In your inventory, use MOVABLE ARM on BROKEN PUPPET. This completes the puppet (although it has no name in your inventory).
- Use the fixed PUPPET on the puppet theater wall then examine the wall again.

- The goal of the puppet theater is to unlock the box underneath the hot air balloon.
- Each crank at the bottom of the theater controls the puppet above it.
- The solution is:
- Turn the fifth crank so the yellow-hatted puppet rocks the boat.
- Turn the sixth crank so the newly-fixed puppet knocks the sun and makes it night.
- Turn the second crank so the puppet with the knife cuts the balloon’s string.
- Turn the fourth crank so the drummer calls a dragon, who eats the second puppet.
- Quickly turn the first crank so the balloon rises into the air, turning the moon back into the sun and opening the keyhole to the box.
- Quickly turn the third crank so the puppet with the key walks into the keyhole.
- Tip: the last three actions must be done quickly because the second puppet—who is eaten by the dragon—will respawn after a few seconds. When he is present, he blocks the path to the keyhole.
- Note: The keyhole is only available during the day, but the dragon only comes out at night—hence why it must be night and then day.
- Unlocking the box reveals a secret room to the left of the puppet theater.
- Achievement: “Puppeteer.” Earned for solving the puppet theater puzzle.
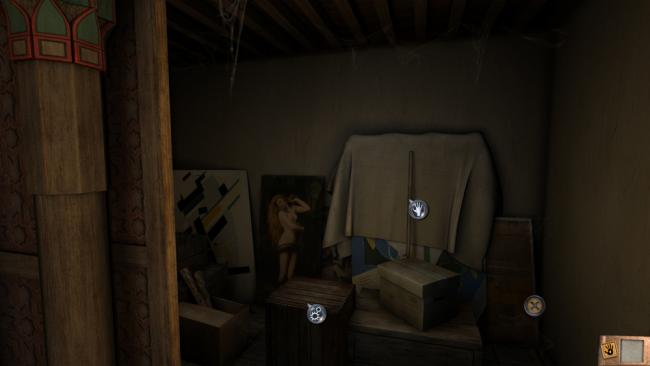
- Examine this room. Take ROD.
- Use CAMERA on the room to take a photo of the Lilith painting.
- Exit the room and use the folded privacy screen; Ellen will remove it, opening the stairway.
- Move up the stairs and move forward into the bedroom.
- Examine the wooden stand near the bed. This shows you a close-up of a mini-game puzzle with colored rings.
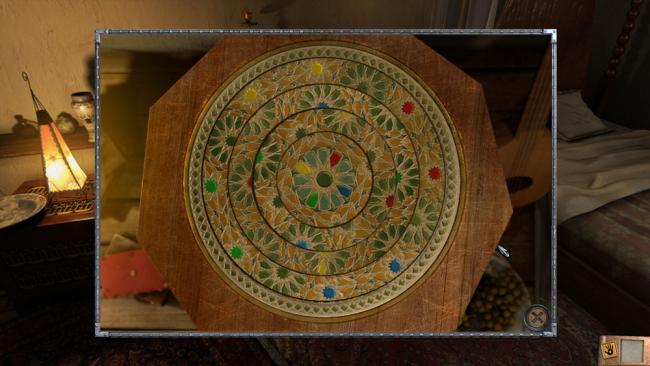
- The center circle of this stand does not move, but each outer ring moves the ring adjoined to its inside.
- The goal is to align the decorations on the rings so they are complete and match the colors on the inner ring: e.g. the red flowers go in the upper right, blue in the bottom right, etc.
- Work your way backwards from the outer ring so all rings line up except the very middle ring. Then use the outer ring to move all correctly adjoined rings to match the center, looking like the image below.
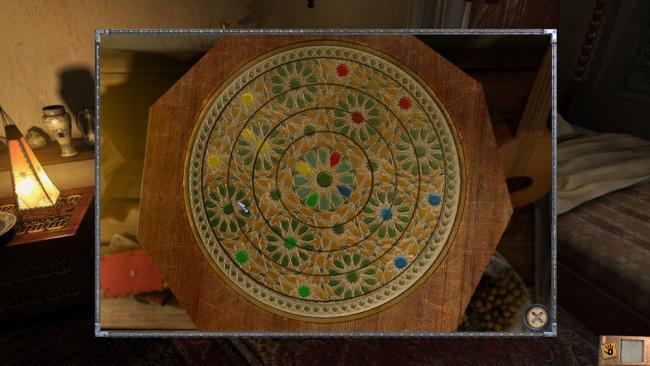
- When completed, you’ll exit this close-up and a door will open in the wooden stand.
- Take HOOK and YANEK’S REMEDY (health item for Ellen).
- Look up at the ceiling. In the left corner of the room, opposite the bed, there’s a door to the attic.
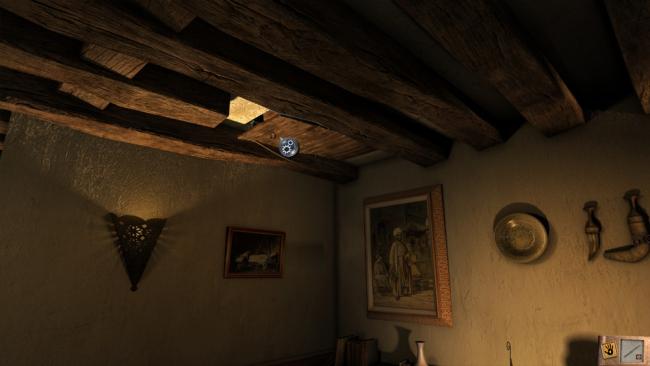
- In your inventory, combine HOOK and ROD to get ROD WITH HOOK.
- Use ROD WITH HOOK on the attic door to open it.
- Move upward into the attic.
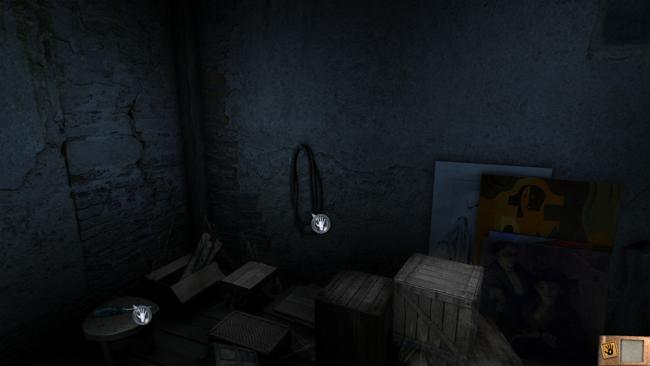
- Take ROPE and SCREWDRIVER.
- Turn about 180 degrees and examine the wooden case leaning against a wall. Ellen comments that this might be the portrait they’ve been looking for.
- Exit the close-up and click on the case again to take SEALED CASE.
- Turn right and examine the white blind with a hand sticking out from under it; Ellen lifts the blind to reveal a dead body.
- If you examine the man twice Ellen will comment his pockets are empty, and then note the dragon tattoo on his wrist.
- Use CAMERA on the dead man and take a photo of him. Ellen will hear Yanek returning downstairs.
- Look at the floor and click on the rope near the trap door to close it behind you.
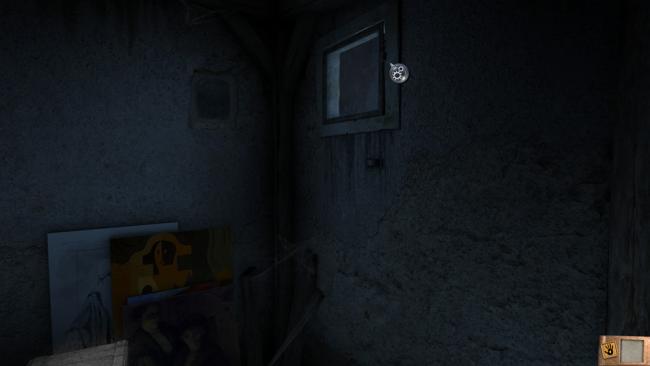
- Turn around and look at the largest window. When examined, there is a close-up of a lock keeping the window shut.
- Use your screwdriver on each of the two screws holding the padlock in place. Exit the close-up view.
- Use the window to open it.
- In your inventory, use KNOTTED ROPE on ROPE to create LONG ROPE.
- Use LONG ROPE on the window.
- Exit out the window. Ellen is now back in her hotel room with the sealed case in front of her.
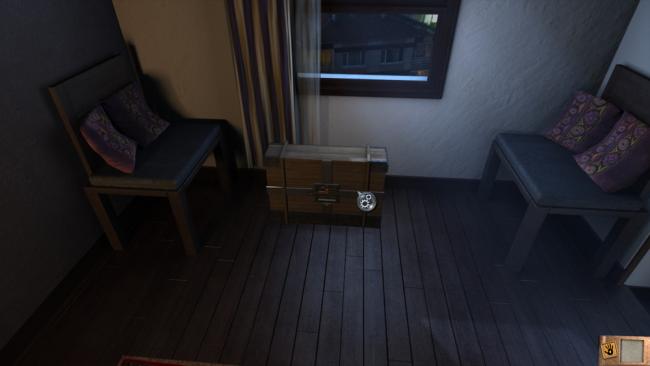
- Turn to your left and use the telephone to call the museum. You can also call the police but “all their lines are busy.”
- Examine the sealed case with the painting. You’ll be in front of the final mini-game puzzle.
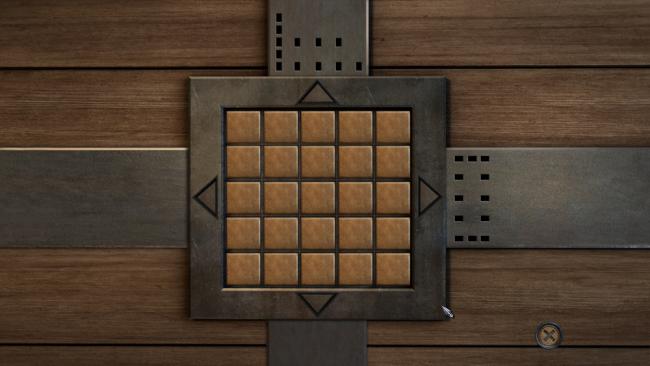
- This lock is similar to Sudoku. The notches on the top and right side indicate how many squares must be pressed and in what general locations.
- For instance, the column with five notches on the far right indicates all five of the left-hand squares must be filled in.
- Notches with a space between them mean the squares must also have at least one space between them.
- As you fulfill the requirements by pressing buttons, the lights on the top and right side will illuminate.
- The solution is available in the image below.
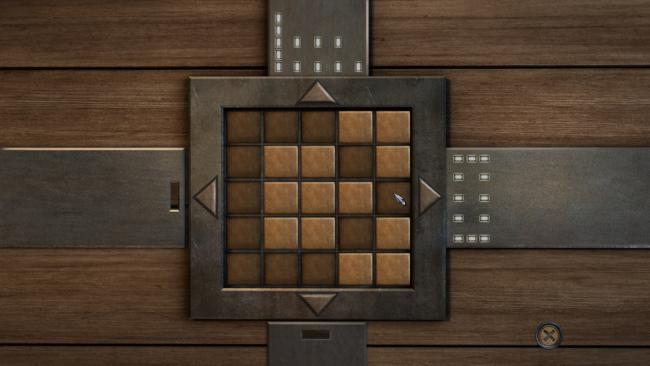
- Once Ellen unlocks the case, you’ll get to see the painting that is inside…and finish the game!
- Achievements: “The End” and “300.” “The End” is earned for finishing the game and “300” for receiving all 300 points.
Addendum: Achievements
Overview: The following is a quick rundown of the achievements available in Dracula 4, and a brief description of how to earn them. Story-based achievements are marked as “automatic” as you will receive them automatically. Achievements you must complete a specific action for are listed as “missable.”
- Expert Eye – (Automatic) – Authenticate the Turner painting in the Prologue with the ULTRAVIOLET LAMP.
- Paparazzo – (Missable) – Take a picture of Inspector Lazlo in Friedlen’s cell with the FULLY EQUIPPED POLAROID CAMERA.
- From Budapest With Love – (Automatic) – Complete the Prologue.
- Amateur Detective – (Automatic) – Solve three mini-game puzzles.
- Vambery’s Secrets – (Automatic) – Make it inside Vambery’s secret underground vault.
- Real Adventurer – (Automatic) – Solve six mini-game puzzles.
- In Perfect Health – (Missable) – Fill Ellen’s health to max.
- Reckless One – (Missable) – Take WHISKEY and SLEEPING PILLS together.
- Independent – (Missable) – Info forthcoming
- Kamikaze – (Missable) – Info forthcoming
- The Great Escape – (Automatic) – Escape from Vambery’s secret vault.
- The Voice From The Past – (Automatic) – Listen to the wax cylinder recording.
- Perfect Patient – (Missable) – Info forthcoming
- Diplomat – (Missable) – When talking to Yanek, select “Apology,” then “Friedlen,” then “Avoid the question.”
- Experienced Burglar – (Missable) – Complete the lock-picking puzzle quickly enough (under 30 seconds).
- Steady Hand – (Missable) – Cut out the puppet’s arm without making a mistake.
- Puppeteer – (Automatic) – Solve the puppet theater puzzle.
- Thank You – (Missable) – Go to Options from the menu and watch the credits all the way through.
- The End! – (Automatic) – Finish the game.
- 300!! – (Missable) – Earn all 300 points in the game. Note: most points-related activities must be completed to progress. An easy optional one to miss is the Brueghel painting in Yanek’s house.
Addendum: Dosage Information
Overview: Ellen needs to take medicine throughout the game to fight off her disease. There are a huge number of combinations possible for the different recovery items that are available; the following list provides some of these combinations. The higher the number, the more health the combination recovers.
- Note: The order you take combinations in does not matter: Apple + Apple + Pear will provide the same result as Pear + Apple + Apple.
- Note the names for the three medications Ellen is given by her doctor: Cikloprex = red and white capsule, Hemapromazine = solid blue tablet, Propoethyne = blue and white capsule.
- 1 Cikloprex = 2
- 1 Hemapromazine = 2
- 1 Propoethyne = 4
- 1 Cikloprex + 1 Cikloprex = 3
- 1 Hemapromazine + 1 Hemapromazine = 3
- 1 Propoethyne + 1 Propoethyne = 6
- 1 Cikloprex + 1 Hemapromazine = 6
- 1 Cikloprex + 1 Propoethyne = 4
- 1 Hemapromazine + 1 Propoethyne = 8
- 1 Cikloprex + 1 Hemapromazine + 1 Propoethyne = 6
- 1 Hemapromazine + 1 Hemapromazine + 1 Propoethyne = 9
- 1 Cikloprex + 1 Hemapromazine + 1 Hemapromazine = 8
- 1 Cikloprex + 1 Propoethyne + 1 Propoethyne = 5
- 1 Cikloprex + 1 Cikloprex + 1 Hemapromazine = 7
- 1 Hemapromazine + 1 Propoethyne + 1 Propoethyne = 7
- 1 Apple = 1
- 1 Pear = 1
- 1 Vitamin = 1
- 1 Apple + 1 Pear = 2
- 1 Apple + 1 Pear + 1 Vitamin = 3
- 1 Vitamin + 1 Vitamin + 1 Vitamin =2
- 1 Cikloprex + 1 Apple = 3
- 1 Hemapromazine + 1 Hemapromazine + 1 Apple = 4
- 1 Hemapromazine + 1 Pear = 3
- 1 Propoethyne + 1 Apple + 1 Apple = 6
- 1 Propoethyne + 1 Apple + 1 Vitamin = 6
- 1 Whiskey = -3
- 1 Sleeping Pills = -1
- 1 Whiskey + 1 Sleeping Pills = -6 (And an achievement)
- Yanek’s Remedy = 32
Congratulations!
You have completed Gamezebo’s walkthrough for Dracula 4: Shadow of the Dragon. Be sure to check back often for game updates, staff and user reviews, user tips, forums comments and much more here at Gamezebo!
More articles...
Monopoly GO! Free Rolls – Links For Free Dice
By Glen Fox
Wondering how to get Monopoly GO! free rolls? Well, you’ve come to the right place. In this guide, we provide you with a bunch of tips and tricks to get some free rolls for the hit new mobile game. We’ll …Best Roblox Horror Games to Play Right Now – Updated Weekly
By Adele Wilson
Our Best Roblox Horror Games guide features the scariest and most creative experiences to play right now on the platform!The BEST Roblox Games of The Week – Games You Need To Play!
By Sho Roberts
Our feature shares our pick for the Best Roblox Games of the week! With our feature, we guarantee you'll find something new to play!Demon Piece Races – All Race Buffs
By Adele Wilson
Our Demon Piece Races guide details all of the buffs, rarities, and characteristics for each race in the One Piece Roblox game.


