- Wondering how to get Monopoly GO! free rolls? Well, you’ve come to the right place. In this guide, we provide you with a bunch of tips and tricks to get some free rolls for the hit new mobile game. We’ll …
Best Roblox Horror Games to Play Right Now – Updated Weekly
By Adele Wilson
Our Best Roblox Horror Games guide features the scariest and most creative experiences to play right now on the platform!The BEST Roblox Games of The Week – Games You Need To Play!
By Sho Roberts
Our feature shares our pick for the Best Roblox Games of the week! With our feature, we guarantee you'll find something new to play!Demon Piece Races – All Race Buffs
By Adele Wilson
Our Demon Piece Races guide details all of the buffs, rarities, and characteristics for each race in the One Piece Roblox game.
Shadows: Price for Our Sins Walkthrough
On Halloween night a group of friends decide to play a board game and find they have opened a portal of evil which will trap their souls in a dimension between the living and the dead for eternity. It’s up to Devon (with your help) to figure out what really happened, and free her friend’s souls as well as the tortured souls of the past. Gamezebo’s strategy guide for Shadows: Price for Our Sins will provide you with detailed images, tips, hints, and information to help you play your best game.
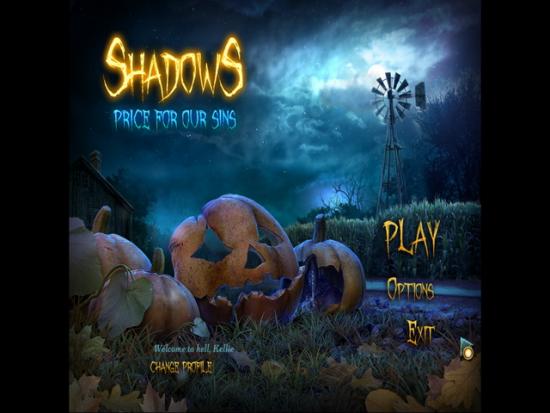
Game Introduction – Shadows: Price for Our Sins
On Halloween night a group of friends decide to play a board game and find they have opened a portal of evil which will trap their souls in a dimension between the living and the dead for eternity. It’s up to Devon (with your help) to figure out what really happened, and free her friend’s souls as well as the tortured souls of the past. Gamezebo’s strategy guide for Shadows: Price for Our Sins will provide you with detailed images, tips, hints, and information to help you play your best game.
General Tips
- Shadows: Price for our Sins may be found by clicking on “Buy Now” at the top of this page.
- This guide will give you the solutions to the game played in “Casual mode”
- This strategy guide is written to help you progress in the game with more detailed information than what is given in a general game tutorial. Images will be provided and key elements will be marked and/or color coded to help you understand them. You will be shown solutions to mini game puzzles and how to move from one location to the next. Note – There may be more than one way to complete this game in such that some steps can be taken in a different order. This walkthrough will show you how to get through the game from start to finish in a most efficient manner.
- Items in images will be marked with a letter or number and may also be color coded to help you keep your steps in sequence. Any key items to be placed in your inventory will be written in all capital letters. As you place items in your inventory, they will be shown along the bottom of the screen which activates by placing your cursor in that area which causes it to lift up from the bottom. Once the inventory menu lifts up you can use the arrows along the sides to scroll through your items.
- Whenever you encounter a new location in the game hover your cursor over the items to see if any turn into a hand as that means you need to pick up that item and place it into your inventory.
- If you see the cursor arrow with a spinning wheel inside this means you must take an item from inventory and act upon this area for the desired result.
- If you see a magnifying glass click on the area for a closer look.
- Click on an area more than once for a text hint to appear along the top of the screen. These can be valuable when you aren’t sure what to do next.
- Once you fill all the slots in the inventory area along the bottom arrows appear on each side allowing you to scroll through items.
- Hidden object scenes must be completed and rewards collected for you to complete tasks in the game.
- You may use hint buttons anytime in the game except during mini game puzzles. If you use a hint while traveling between locations a sparkling effect will appear showing you where to go.
- If you use a hint during a HOS it will show one sparkling circle around a black text item and two sparkling circles around a red text item since these items need to be combined. You may also have to move an item to see the hidden item in a red text object.
- If you get lost refer to the game map and look for locations that are highlighted in green with a “!” symbol. This means you have objects in your inventory that can be used in this location. This is a great way to figure out where you need to go next.
- Click on the journal to read the storyline if you have trouble understanding it.

Main Menu
- The main menu screen is shown above and here you can add/change players and adjust options.
- Simply click on “play” to begin and “Exit” when you are ready to stop and your game will be saved at the point at which you left it.
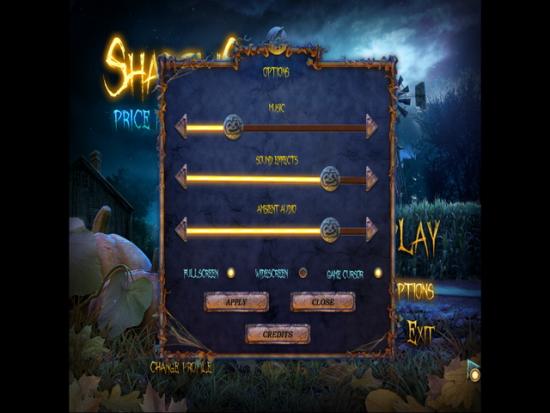
- “Options” – From the main menu click on the “Options” button where you can control the volume of game music, ambient sound effects, and character speech by dragging the button from left to right.
- You may also set the game to play in full screen or wide screened mode in this menu as well as choose a custom cursor if you wish.
- NOTE – You will not be able to choose game difficulty mode until you play into the game and see the first video cut scene. Once you choose the difficulty mode you cannot change it.
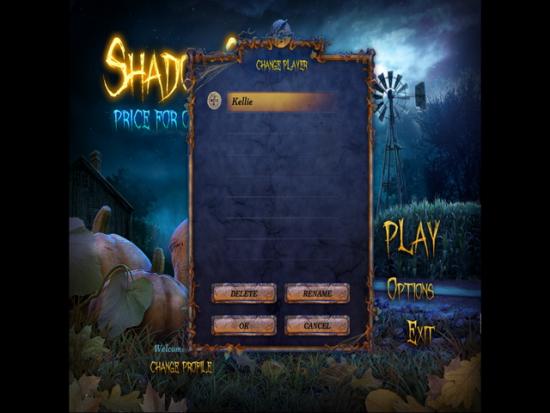
Create and Choose User Profile
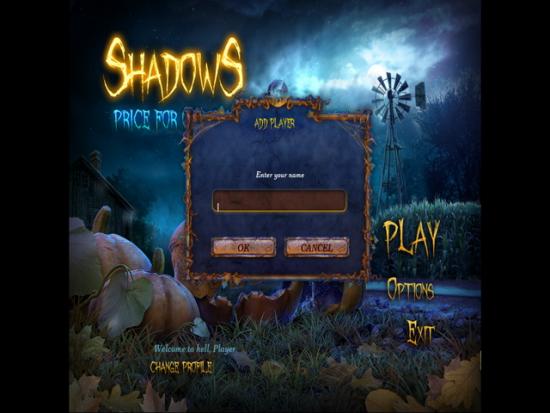
- Profile/Username – To begin enter a username of your choice with up to ten characters.
- The game will allow up to eight different profiles.
- The username/profile currently in use is located at the bottom left of the main menu when you load the game. Click on the username to go to the profile menu and create a new one or change it. Once you have the correct username simply click on the white “Play” button in the main menu to begin or continue where you left off.
- You have the option to play up to eight different games using different user profiles in different difficulty modes or you may delete a profile. Each time you exit the game it will be automatically saved and you will be brought back to that exact location and user profile when you resume game play.
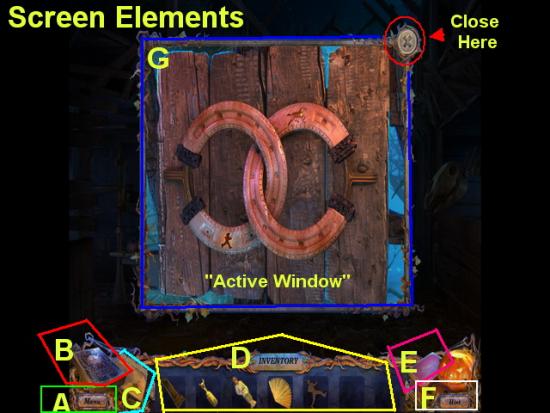
Screen Elements
- You will move your cursor around the screen looking for it to change as it passes over certain areas. You may be able to pick an item up, take a closer look, or read information about it.
(See “Cursors” below for more detailed information) - Click on an item and it will stick to your cursor, then click on the item you wish it to act upon.
- A. Main Menu – Click here when you are ready to return to the main menu to exit the game or change user profiles. Your game will save automatically when you return to the main menu.
- B. Game Box – As you collect game pieces you will need to place them in the game box. Each game character is composed of two pieces and once you place both pieces you will earn an item that will be placed into your inventory and used in the game. Tip – As soon as you gather a game piece be sure to automatically place it in the game box even if you don’t have both pieces. This way you can be sure you have the reward item when needed.
- C. Game Map – Click at the bottom left side of the screen under the game box to access the game map. (See below for more information.)
- D. Inventory – This menu lifts up from the bottom of the screen when you place your cursor in the general area. Here any item you collect will be placed for future use. Once all the slots have filled up arrows will be used on each side allowing you to scroll through your entire inventory items. Click on an item and it will stick to your cursor. If you need to release it just click on any area outside the screen and it will return to its inventory slot.
- You may hover your cursor over an inventory item to see what it is called if needed.
- Once items have been used up they will disappear from your inventory.
- E. Journal – The pink book will appear early in the game and allows you to read the storyline up until the point you have reached.
- F. Hint Button – Hints are provided for you at the lower right corner of the game screen under the jack o lantern if you get stuck. If you choose “Casual mode” there is a thirty second time limit for the hint to recharge. If you have chosen “Expert mode” the hint button refills at sixty seconds, and there are no sparkling effects to guide you in the game. You will see the hint button fill up with color as it recharges.
G. Active Window – When you click on areas which show a magnifying glass cursor you will open another window which is active for a closer look. You will be able to click on items in this window and act upon them in some way. These are found in regular scenes as well as hidden object scenes.
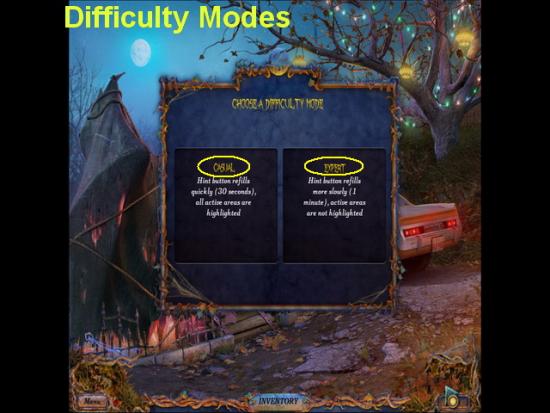
Difficulty Modes
- You may choose between two difficulty modes in the game and once you do you do not have the option to change your difficulty mode. If you wish to change it you will need to start the game over with a new user name and when prompted choose the mode you wish to play in.
- There is not an option to choose in the “Options” menu. After the first game video you will be asked which mode you wish to play in and you will stay in this mode until the end of this game.
- Casual Mode – This is best for beginners or those that want a little help along the way. The “Skip” and “Hint” buttons recharge every thirty seconds and are seen in the lower right corner of the game screen under the Jack o’ Lantern icon. Casual mode also gives you hint sparkles which guide you as to what to click on next. If you wait and watch the screen you will see these sparkles appear in the active zone areas you need to click on. You will need to move your cursor over any of these sparkling areas when you see them. This includes hidden object scenes and mini game puzzles.
- Expert Mode – The “Hint” and “Skip” buttons recharge at a rate of sixty seconds in this mode and the active zones do not have any sparkling effects to help you find them.
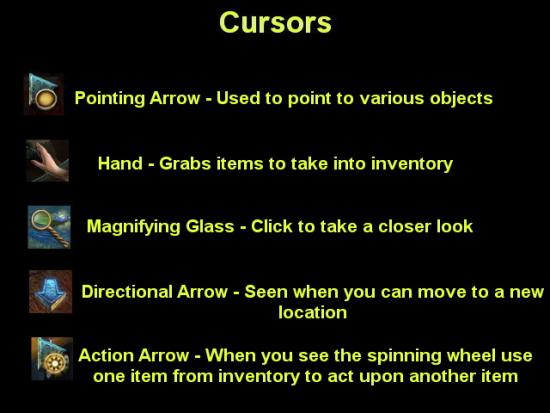
Cursors
- There are five different cursors used in the game and each one is very important in guiding your game play.
- Cursor Arrow – This cursor is simply a pointing arrow and can be changed to a custom cursor in the options menu if you would like to change it.
- Hand – When you place your cursor over an item and it changes to a hand you may click on an item and pick it up. The item will stick to your cursor and you can place it into your inventory or on another item to act upon it.
- Magnifying Glass – When you see this icon click on the area to get a closer look. Usually this will open another window which is active and you can click to find even more items.
- Navigational/Directional Arrow – You will see these flat blue arrows whenever you can enter a location on the screen. Once you see your cursor change to an arrow click on it and you will be taken to the new location.
- Action Arrow – When you see a moving spiral inside the circle on the end of an arrow this means that an action can be performed between an item from your inventory and something on the game screen. The combined items may turn into another inventory item or it may be a requirement to help you progress in the game.
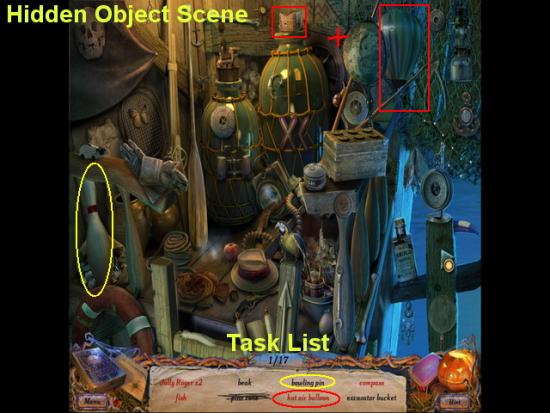
Hidden Object Scenes (HOS)
- The game has many hidden object scenes of which you will have to find at least 16-18 items. Not all items show up on the list at once and as you find an item it is crossed off the list and another one will appear.
- NOTE – An item cannot be removed unless it is actively showing as black or red text on the list. For example you may click on a bird and nothing happens because it isn’t on the list but it may appear on the list later and that bird is now a needed item and when you click on it the item will disappear and will be marked off of your task list.
- Black text items – Any item you see listed in black text is in the scene and you simply need to find it and click on it to remove it from your list.
- Red text items – The items shown in the red text require you to find another item from the scene to either combine with it or you must move an item out of the way to find it. Red text items always mean multiple steps. Glide your cursor around the scene and if you see a hand cursor over an item you will need to pick up that item and add it to another and once combined you can click on the completed item to remove it from your list. NOTE – Be sure to watch for text cues that may appear along the top of the screen to help you out. If you see a magnifying glass icon appear this means you must click on the item to open it up for a closer look and the items inside are items you must locate from your list.
- Note that items will frequently be moved out of the way, opened, or turned to help you find items on your list. Because of this and the fact that everyone’s list is different, in this walkthrough the red text items will be listed as they are the most difficult to figure out.
- There are many red text items on each hidden object scene and they can be very difficult. Whenever possible a description of how to find certain red text items will be included in this walkthrough.
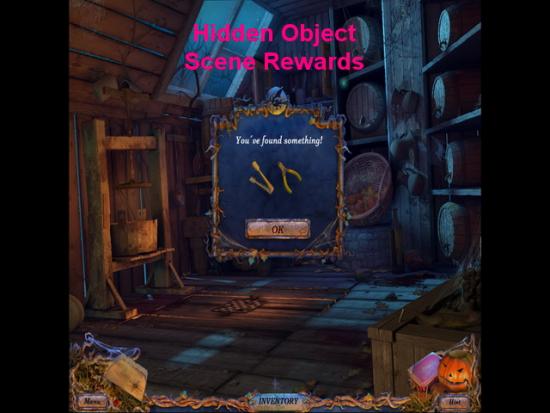
HOS Rewards
- At the completion of each HOS you will earn two items that will be added to your inventory for use in the game. You will need these items to progress in the game so all HOS must be completed to progress.
- Note – If you accidentally back out of a HOS you will not lose your progress so you can come back to it later if you choose.
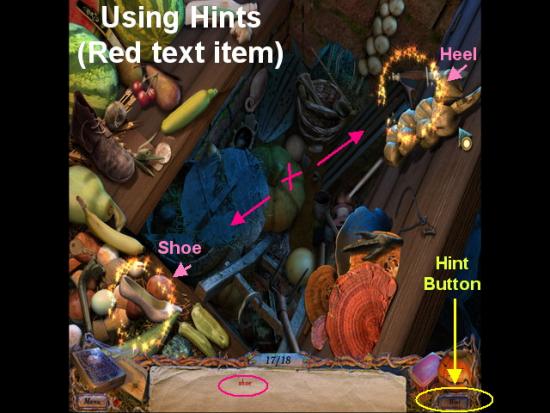
How to use Hints in the game and during HOS
- If you choose hint while in an HOS it will show you where one of the items on the list are located by showing a brief circle of light around the item(s). If more than one item is required which need to be combined you will see both items circled. NOTE – These circles only display for a few brief seconds. Click on one item and then the other to combine them and once you have the completed item click on it once to eliminate it from the list. Remember, the items requiring multiple steps are shown in red text on the list and you will see two circles when you use the hint button.
- Using hints outside of HOS – When not in a HOS you may be confused as to where to go next. If you use the hint button now you will see a sparkling circle appear somewhere in the scene and in your inventory list if you have the item needed. If you do not see a hint circle then you will need to refer to your game map to figure out where to go next. (See “Game Map” for detailed information)
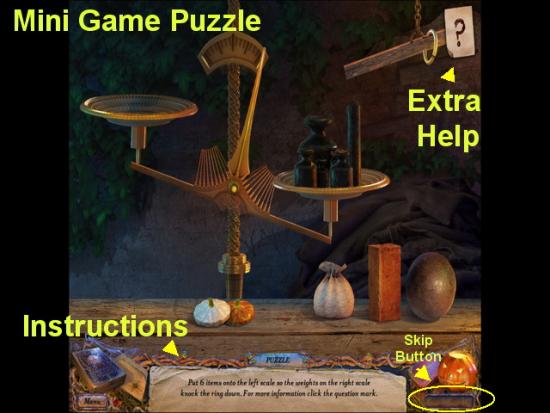
Mini games
- There are several mini games scattered throughout the game and many of them require items you find to be placed from your inventory on the board to activate the mini game. If you try to play it and it won’t work this means you need to exit out and find the required piece to activate the puzzle.
- Instructions for the mini game puzzle are shown along the bottom of the screen. If you need help there is a “?” button at the top of the screen that has more detailed instructions as well as hints to help you out. In this walkthrough all solutions to mini game puzzles will be shown when possible. In this guide you will be shown at least one possible solution for each mini game but note there is a possibility of more than one solution.
- Important Note – If you back out of a mini game puzzle it will automatically reset and you will lose your progress.
- Skipping Mini Games – You have the option to skip any mini game puzzle after sixty seconds unless you are playing in “Expert” mode. Skipping a puzzle will simply allow you to progress without penalty. The “Skip” button is located where the “hint” button is usually located in the lower right corner under the Jack o Lantern icon.
- Closing windows/Message screens – You can close a screen you have opened for a closer look by either clicking outside of it or look for the “X” in the upper right hand corner.
Character Dialogue/Cut Scenes/Videos
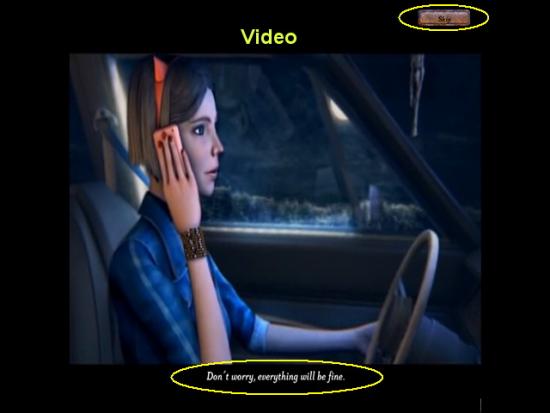
- At the beginning of the game and in between chapters you will see video that is critical to the storyline. Text appears along the bottom of the screen corresponding to the character’s voices. You have the option to skip this if you wish by clicking on the button at the upper right corner of the game screen.
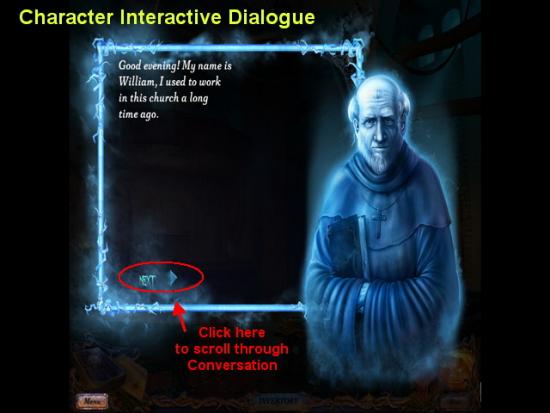
- As you play there will be several characters in the game you will have speak to you. These are ghosts and clicking on them will prompt the dialogue. Once talking you will need to hit the “next” button at the bottom right corner to move to the next sentence. You may also have to give items to these ghosts and they will give items to you. These will appear in your inventory once you finish the dialogue with the ghost. You may click on the “Skip dialogue” button at the top right and it will skip all the dialogue in that particular sequence. Each time you give an item to a ghost they will give you an inventory item in return. Make sure you take this item if it is handed to you and some will automatically add to your inventory.
Game Map
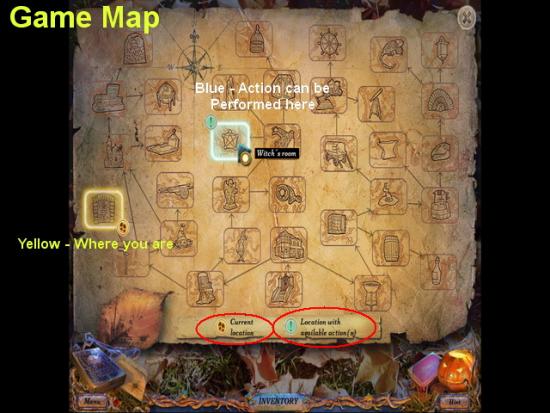
- At the bottom left of the game screen under the game box icon you can click on the map icon which will take you to the game map. The further along you progress the more helpful this map will become to you as it will allow you to move between locations faster and it will let you know if there are tasks you can complete there.
- There is a key along the bottom of the map which will tell you where you are, if tasks are available for completion in this location, and if an area is locked or unlocked. Click on an area to move to it right away. If you see a pair of footprints on a yellow highlighted area you are in that location. If you see a green highlighted location with a “!” this means you have the needed items to complete a task at this location.
Journal
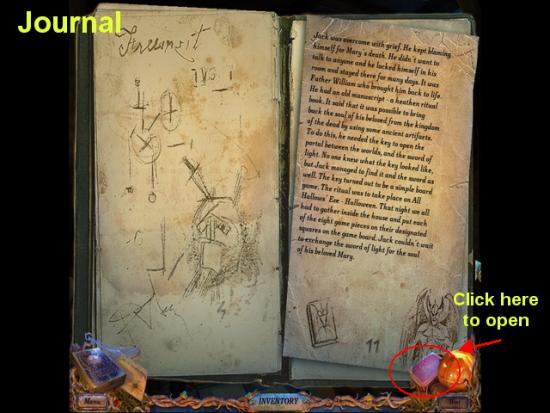
- The pink book on the bottom right corner near the hint button keeps a written account of all things that have been discovered in the storyline so far. If you feel confused it is a good idea to read through this information.
- You will also see key elements to the story shown in text which can give you clues.
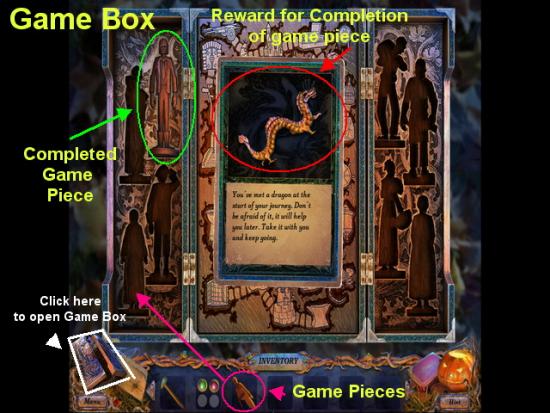
Game Box
- As you play the game the storyline will reveal to you that you must find game pieces and restore them in the game box. This game box is located at the lower left corner of the game screen and you can click on it at any time. Take the game pieces from inventory once you have them and place them in the correct indentations. Once you have a completed game piece you will be given a reward which is added to your inventory. You will need these to complete tasks in the game so it is best to immediately place these game pieces as soon as you collect them to ensure you have what you need.
Part One
- Once you begin the game you will be asked if you would like a brief tutorial showing you how to navigate and use the various cursors. This information is described above in greater detail. You have the option to turn this feature off.
- There are thirty five locations you must work through as you play the game. Many of these locations will need to be unlocked with various items you will find. Each time you unlock a new location it will appear on your map and you can use the map to travel to new locations which is very helpful because if the area is highlighted in green it tells you if you can perform an action there.
- You also have the option to place your directional arrow at the bottom of the screen and move down to return to your previous location or move through open doorways or stairways once you open them or clear the path to move forward. It is up to you how you wish to proceed. In this guide you will be told which location to move to. If you aren’t sure how to get there always refer to your map at the lower left corner of the game screen under the game box.
- Also watch for hints in various locations. You may see roman numerals etched onto a table or a color pattern. These could be solutions for future mini game puzzles.
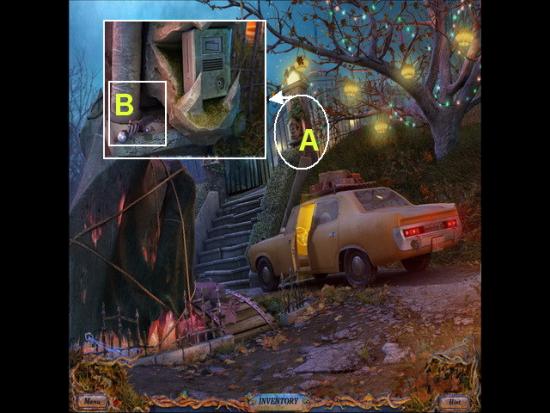
Front Gate
- Watch the introductory video and choose the game difficulty level. If you choose casual you will see sparkles in various areas giving you hints where to click on the screen. You will also have a hint available to use every thirty seconds. If you choose “Expert” mode you will have no sparkles in active zones and sixty seconds between hints and skip button activation.
- You may also click on the “Skip Tutorial” button at this time if you wish.
- A. Click on the intercom at the far right to zoom in.
- B. Take the DAGGER into inventory.
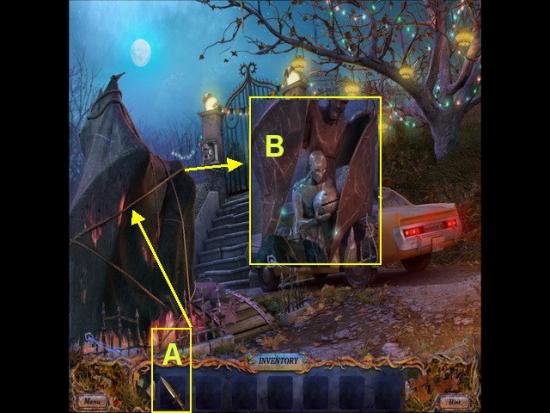
- A. Take the DAGGER and use it on the ropes on the canvas.
- B. When the statue appears you will see a blue sparkling effect. This indicates a hidden object scene or HOS. Click on the statue.
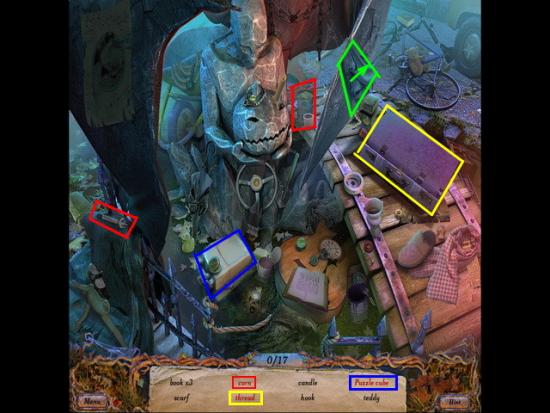
- Locate the hidden objects on the list shown in black text.
- Red text items can be found as follows;
- CORN – Take can opener circled in red and open can.
- PUZZLE CUBE – Move the fuel can circled in dark blue by clicking on it and cube is under it.
- TARGET – Shown circled in green. Click on the cloth to move it over and the target is under it.
- THREAD, PEAR, BUTTON/SUITCASE – Click on the purple suitcase and enter the code “421” to unlock it. Once open you will find the thread inside along with other black text items.
- Once you complete this HOS you will have LANTERN PARTS and a BUTTON added to your inventory.
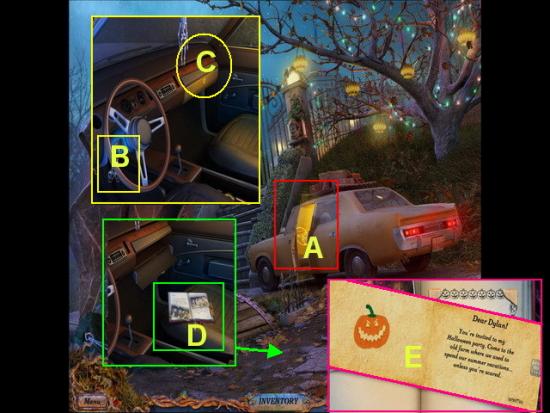
- A. Click on the CAR to zoom in.
- B. Take the CAR KEYS from the ignition.
- C. Use the KEYS on the GLOVE COMPARTMENT and the journal will fall on the seat.
- D. Read the pages of the Journal and take the INVITATION into inventory.
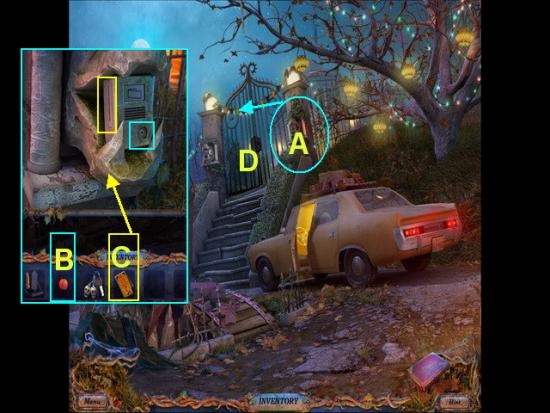
- A. Click on the RIGHT INTERCOM to zoom in.
- B. Take the BUTTON from inventory and place in the slot.
- C. Take the TICKET and place in slot.
- D. The gate will open go through the gates to the porch of the house.
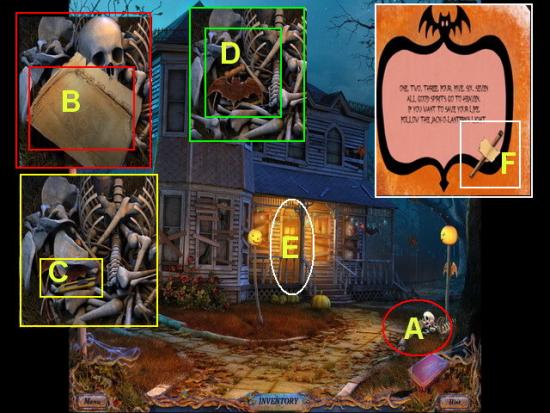
Porch
- A. Click on the SKELETON to zoom in.
- B. Take the MAP and it will add to the lower left corner of the game screen. You may now use this to navigate around the game as you unlock areas.
- C. Click on the bones to move them out of the way. Take the BOX CUTTER (LANTERN PART)
- D. Move more bones then take the rest of the LANTERN PARTS.
- E. Click on the FRONT DOOR twice to zoom in.
- F. Read the NOTE on the door. Take the MATCH into inventory.
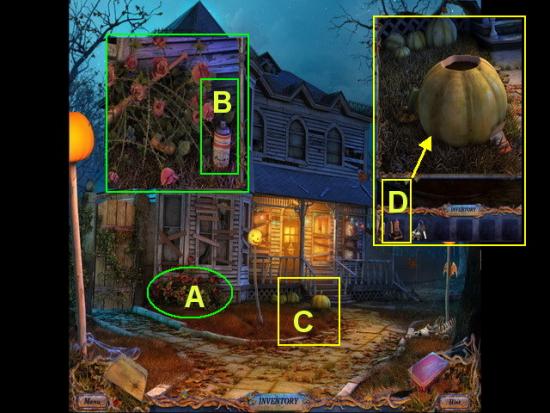
- A. Click on the ROSE BUSHES to zoom in.
- B. Take the PAINT (LANTERN PART) into inventory.
- C. Click on the JACK O LANTERN to zoom in for a mini game puzzle.
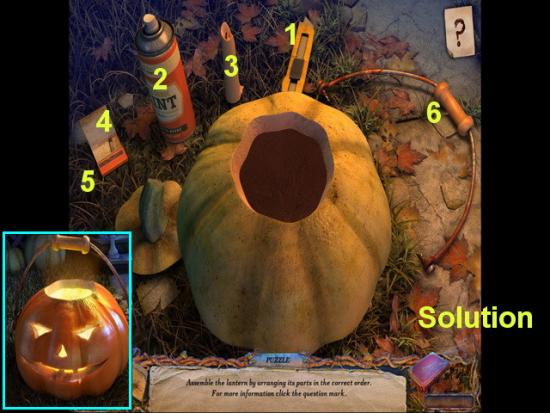
- Mini Game – Assemble the jack o lantern in the correct order as follows.
- 1. Use the KNIFE to carve the face.
- 2. Use the PAINT to spray it orange.
- 3. Place the CANDLE inside.
- 4. Take the MATCH out of container.
- 5. Strike the MATCH and LIGHT THE CANDLE
- 6. Place the HANDLE on top.
- Watch the video cut scenes.
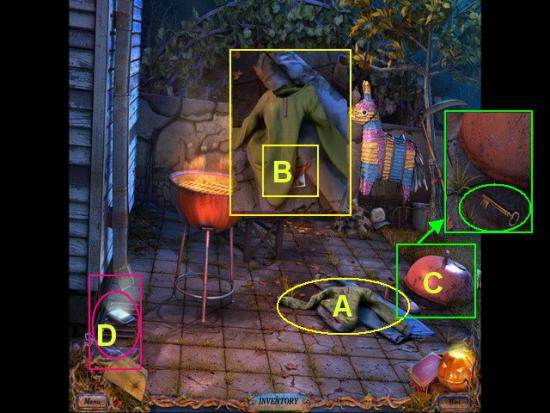
Barbecue
- A. Click on the CLOTHING to zoom in.
- B. Take the GAME PIECE and look at the picture.
- C. Move the GRILL LID on the ground to the far right over and take the KEYS.
- D. Click on the CELL PHONE and see that it is broken.
- Return to the front gate.
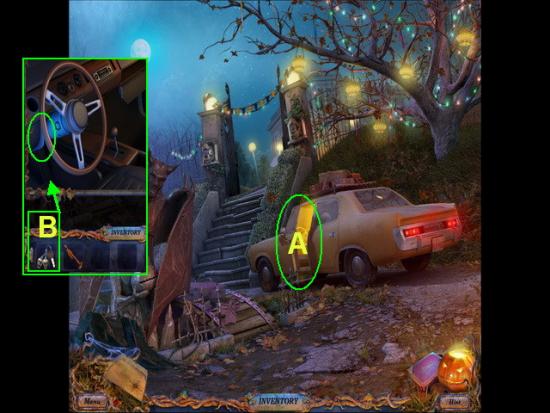
Front Gate
- A. Click on the CAR to zoom in.
- B. Place the KEYS in ignition.
- Watch the video play out.
- Take the SHARP FRAGMENT into inventory.
- Go back to the porch.
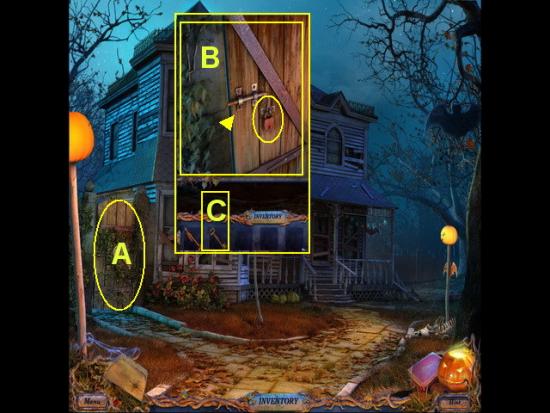
Porch
- A. Click on the DOOR to the far left side of the house.
- B. Take the SHARP FRAGMENT and remove the brush two times.
- C. Take the KEY from inventory and use it on the lock.
- D. Click on the LOCK and bar two times to remove it.
- You may now go through the door to the backyard.
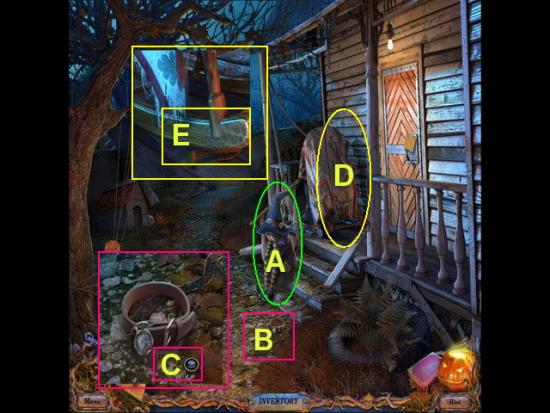
Backyard
- A. Talk to the LITTLE GIRL
- B. Click on the area near the collar and take the SKULL PIECE into inventory.
- C. Click on the ROCKING CHAIR to zoom in.
- D. Take the GAME PIECE into inventory.
- Return to the barbecue area.
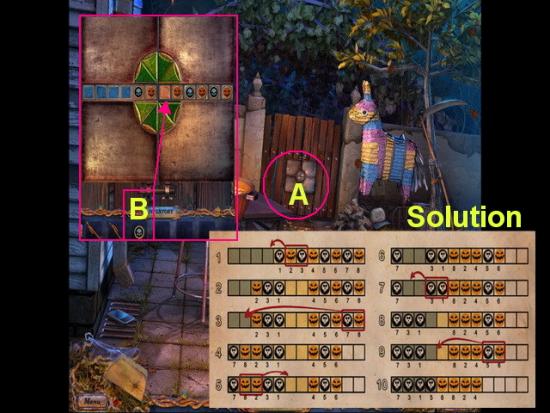
Barbecue
- A. Click on the back GATE to zoom in for a mini game puzzle.
- B. Take the SKULL PIECE and add to the game board which will activate the puzzle.
- Mini game – Your objective is to move the tiles so that all the skulls are on blue squares and all the pumpkins are on orange squares. You may only move them in pairs.
- Solution – The solution is shown step by step in the image above.
- Once you finish the game the gate will unlock.
- Proceed through the gate to the vineyard.
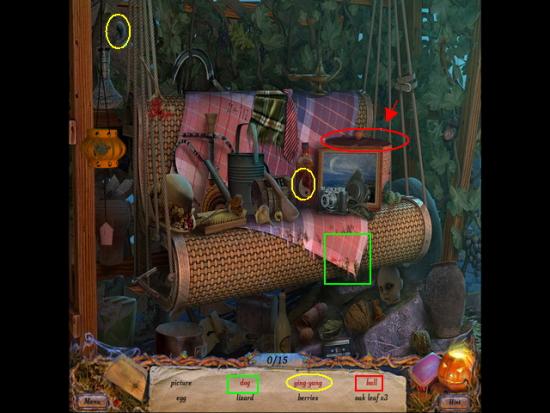
Vineyard
- Click on the blue sparkling area of the swing for a HOS.
- Locate the hidden objects in the scene with black text.
- Red text items are as follows;
- DOG – Lift up corner of pink fabric and dog is on underside shown circled in green.
- YING YANG – Look for half on the post at upper left side shown circled in yellow. Place it with the other half also circled in yellow on the bottle.
- BASKET – Take the top off of the basket shown circled in red and all remaining red text items are inside when scene zooms in.
- When you finish the HOS an EMPTY WATERING CAN and a TILE (1 of 2) will be added to your inventory.
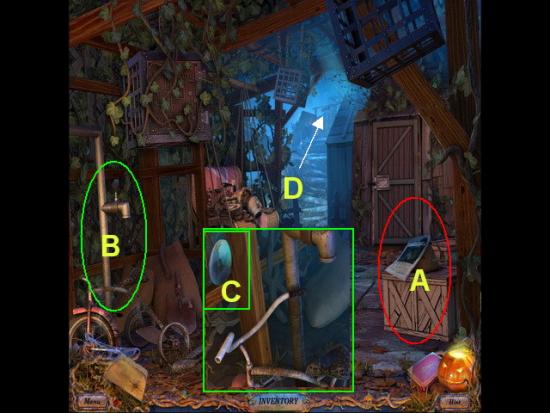
- A. Click on the BOX at far right to zoom in. Read the NEWSPAPER and look at the sack. You will need to come back here later.
- B. Click on the FAUCET to zoom in.
- C. Take the MIRROR into inventory.
- D. Exit forward to the river.
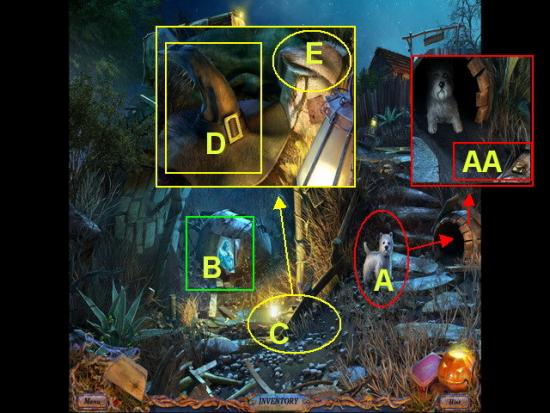
River
- A. Click on the DOG and he will run into the BARRELL.
- Click on the BARREL and take the TILE (2 of 2) into inventory.
- B. Click on the GHOST to zoom in and talk to him.
- C. Click on the area on the ground between the ghost and barrel to zoom in.
- D. Click on the HAT to move it and the SACK to open it. This will trigger a mini game puzzle.
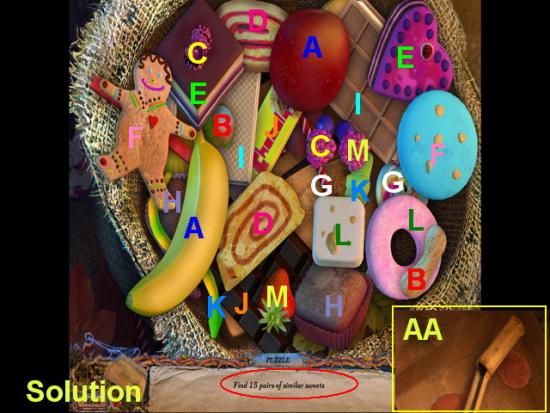
- Mini Game – Match the 15 pairs of candy by similarity
- Solution is shown in image above with letters marking the candies.
- A. Banana and Apple
- B. Nuts
- C. Strawberry and Raspberries
- D. Swirled Cakes
- E. Truffle square and truffle heart
- F. Gingerbread cookie and round blue cookie
- G. Lollipop and candy cane
- H. Muffins in paper
- I. Wafer cookies
- J. Chocolate bars
- K. Gummy Bear and Gummy Worm
- L. Torte and Donut
- AA. Click on the box and take the GUTTER into inventory.
- Go up the stairs along the right side of the scene.
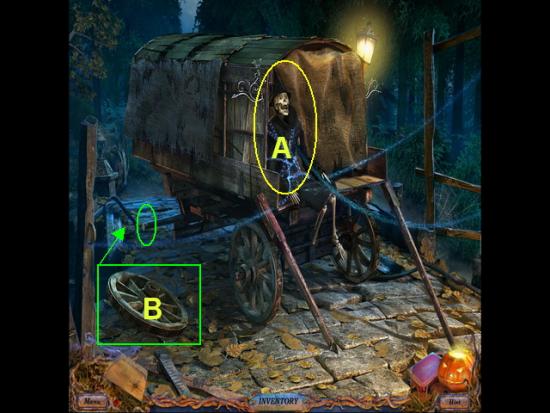
Bridge
- A. Click on “Javed” the ghost and talk to him.
- B. Click on the WAGON WHEEL and place on the back of the wagon where it is missing. You will have to come back here later.
- Go down twice until you are back at the vineyard.
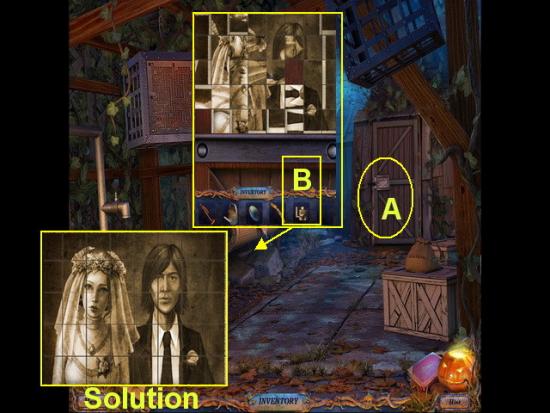
Vineyard
- A. Click on the door to the WINERY to zoom in.
- B. Take the 2 TILES from inventory and place on the board to trigger a mini game puzzle.
- Mini Game – Rotate the tiles by clicking on them until you complete the picture shown in the image above.
- You may now enter the unlocked door of the winery.
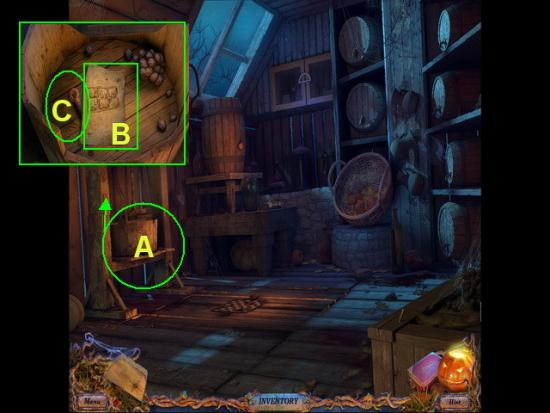
Winery
- A. Click on the WINE PRESS twice to zoom in.
- B. Take the paper which has a mini game puzzle hint on it and read through it.
- C. Take the VALVE into inventory.
- Exit down once.
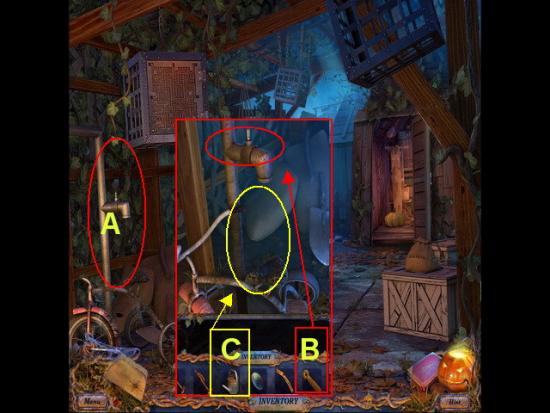
Vineyard
- A. Click on the FAUCET to zoom in.
- B. Place the VALVE on the top of the FAUCET.
- C. Place the empty WATERING CAN under the faucet and click to turn it on.
- Take the FILLED WATERING CAN into inventory.
- Go down once into the barbecue area.
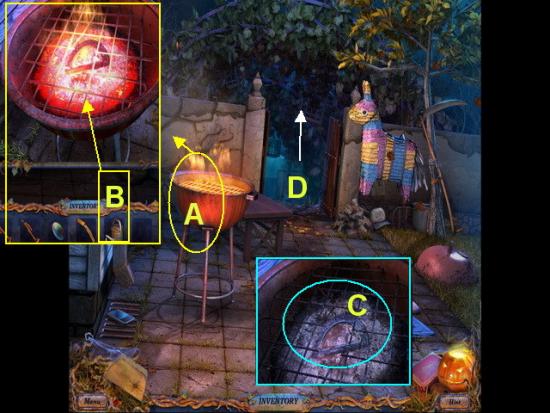
Barbeque
- A. Click on the BARBEQUE GRILL to zoom in.
- B. Take the FILLED WATERING CAN and pour it onto the coals.
- C. Take the WREATH HALF into inventory.
- D. Exit and go back into the winery building.
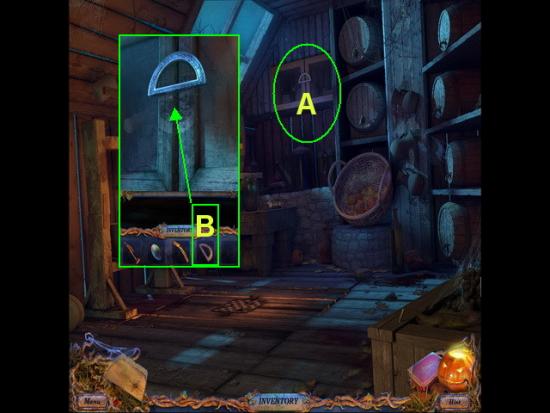
Winery
- A. Click on the CABINET at the top center of the room to zoom in.
- B. Place the WREATH HALF next to the other half and the cabinet will open.
- When the cabinet starts to glow blue and sparkle click on it for a HOS.
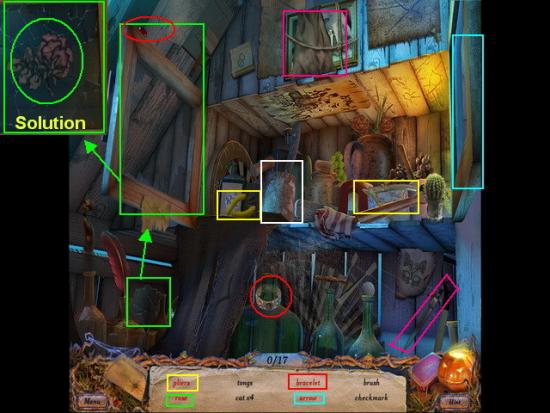
- Locate all the hidden objects on the list in black text.
- To find the red text items do the following;
- GLASS FRAGMENT – Click on the PICTURE FRAME and add fragment to it. This will trigger a mini game puzzle. Place the glass fragments in the frame. When you place them correctly they will lock into place. Once you complete the puzzle you may click on the ROSE to take it off your list. Shown circled in green above.
- PLIERS – Shown circled in yellow take the yellow plier handle and add it to the pliers.
- BRACELET – Shown circled in red above. Click on the red gem and add to the bracelet.
- CAT – Click on the dagger shown circled in dark pink and remove the cloth over the picture frame at the top of the scene. Click on the picture to zoom in and the cat is on it.
- LEAF – Click on the metal can which is shown circled in white. It will turn around and the leaf is on it.
- ARROW – Click on the wood frame at the top right of scene and it will open. The arrow is on it shown circled in light blue.
- Once you find all items in the scene a pair of WIRE CUTTERS and TONGS will be added to your inventory.
Barbecue
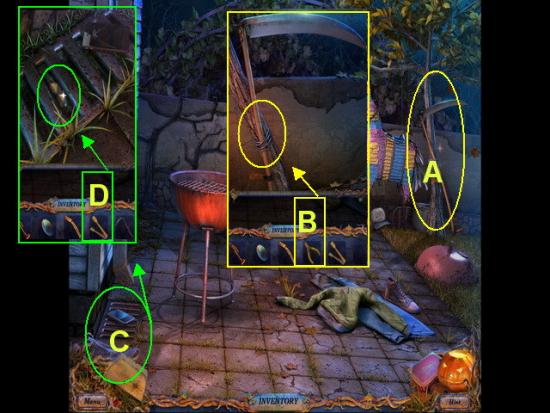
- A. Click on the TREE to the far right to zoom in.
- B. Use the WIRE CUTTERS to free the SCYTHE and take into inventory.
- C. Click on the GRATE where the broken cell phone sits to zoom in.
- D. Take the TONGS from inventory and remove the CHESS BOARD piece into inventory.
- Return to the front porch.
Front Porch
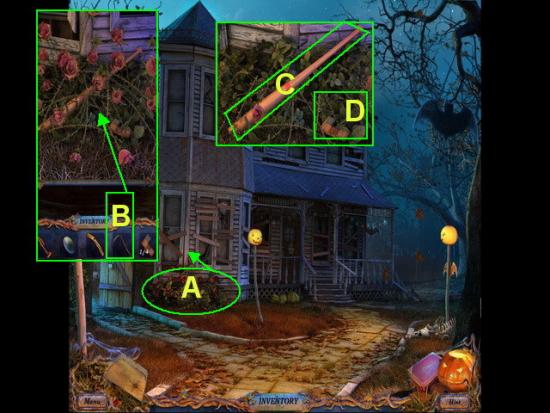
- A. Click on the ROSE BUSHES to zoom in.
- B. Take the SCYTHE from inventory and clear away all of the brush.
- C. Take the BASEBALL BAT into inventory.
- D. Take the CHESSBOARD PIECE into inventory.
- Return to the barbeque.
Barbeque
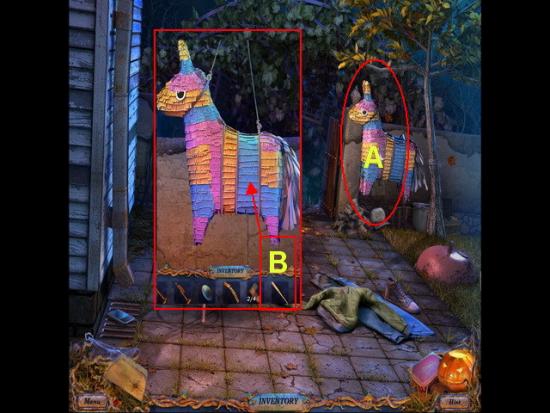
- A. Click on the PINATA to zoom in.
- B. Take the BASEBALL BAT and hit the PINATA three times until it breaks.
- The candy will spill to the ground and it will glow blue and sparkle. Click on it for a HOS.
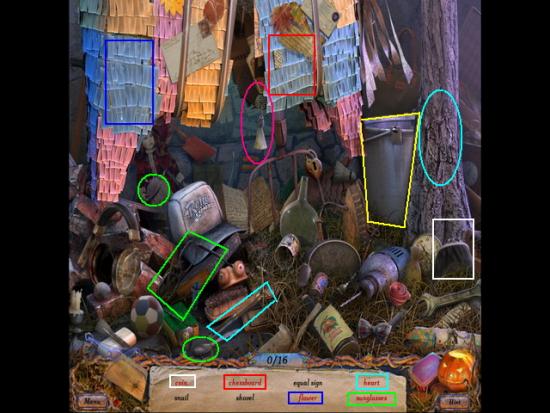
- Locate the hidden objects in the scene in black text.
- Objects in red text must be combined or items moved to locate them.
- Here are some of the red text items to find in this scene;
- SUNGLASSES – Look for the lenses circled in green and place in the sunglasses.
- HEART – Take the KNIFE in light blue and use it on the tree to the far right which will show a carved heart.
- FLOWER – Click on the dark blue area of the PINATA leg to remove it and expose the flower.
- CHECKERBOARD – Click on the right side of PINATA LEG circled in red to uncover flap which hides the checkerboard piece.
- BOX – Click on the CORD circled in dark pink to move the curtain and find the item on the list.
- BUCKET – Circled in yellow move the BUCKET to expose several hidden items.
- COIN – Click on the COIN PURSE to open it and remove the COIN. Shown circled in white.
- Once you locate all hidden items a SPADE and a CHECKERBOARD PIECE will be added to your inventory.
- Return to the river.
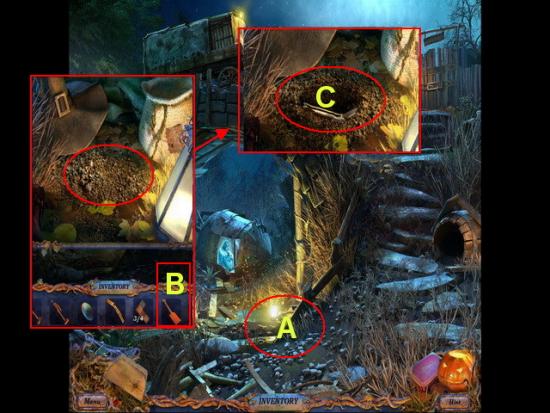
River
- A. Click on the area on the ground where you moved the hat earlier to zoom in
- B. Take the SPADE from inventory and use on the dirt.
- C. Take the PENKNIFE into inventory.
- Return to the vineyard.
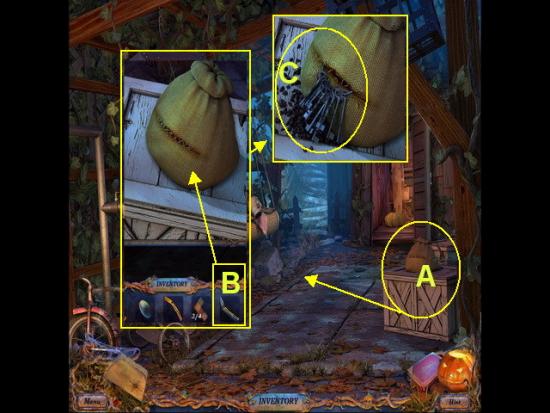
Vineyard
- A. Click on the box to the far right of the scene to zoom in.
- B. Take the PENKNIFE from inventory and open the sack.
- C. When the contents spill out take the BUNCH OF KEYS into inventory.
- Move forward back to the river front near the ghost and click on him.
- SP_46.jpg
- River
- A. Click on the GHOST to zoom in.
- B. Give the BUNCH OF KEYS to the ghost.
- C. Talk to the ghost which will trigger a mini game puzzle.
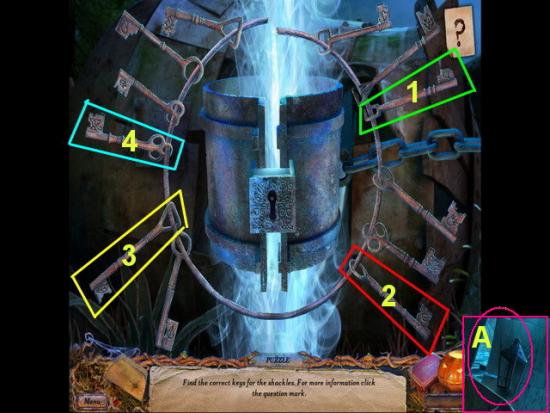
- Mini Game – The objective here is to choose the correct four keys to open the shackles. The ornamentation will match the designs on the keys to the lock.
- Solution – In the image above click on the keys marked as shown. The order really doesn’t matter. If you are incorrect in a key placement the puzzle will reset.
- When finished you will be able to take the LANTERN into inventory when the ghost leaves the area.
- Go up to the bridge
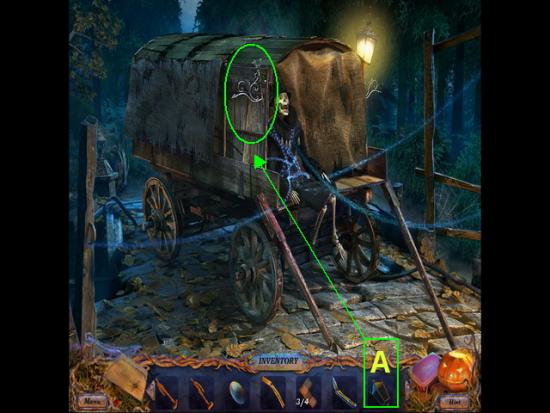
Bridge
- A. Take the CARRIAGE LANTERN and place on the spot next to the ghost.
- Talk to the ghost.
- You will have to come back here later to finish fixing the wagon wheel.
- The area will begin to sparkle blue. Click on this area for a HOS.
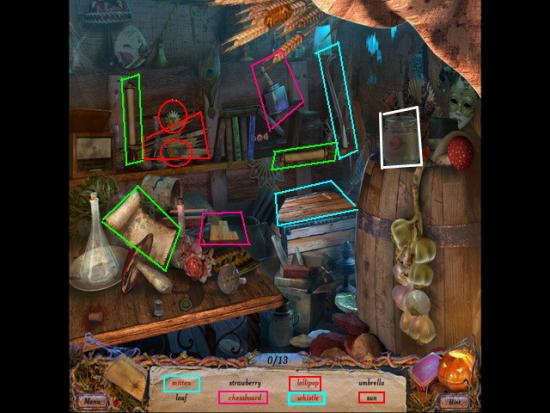
- Locate all of the hidden objects written in black text.
- Red text items must be assembled or found in multiple steps.
- Find the following red text items;
- SCROLL – Locate both of the ends of the scroll shown circled in green and place with the paper.
- SUN/LOLLIPOP – Move the wheat shown circled in red to reveal these two items.
- CHESSBOARD – These items are shown circled in dark pink. Find the glue and add it to the board.
- WHISTLE/MITTEN – This is shown circled in light blue. Take the CROWBAR and use it to open the box lid. Click on it and the inside of the box will zoom in where you will find these two items.
- PEPPER – Click on the Jar shown circled in white and the pepper is behind it.
- When you complete this puzzle you will be given a MITTEN and a CHESSBOARD PIECE (3 of 3) into inventory.
- Talk to GHOST
- Return to winery
Winery
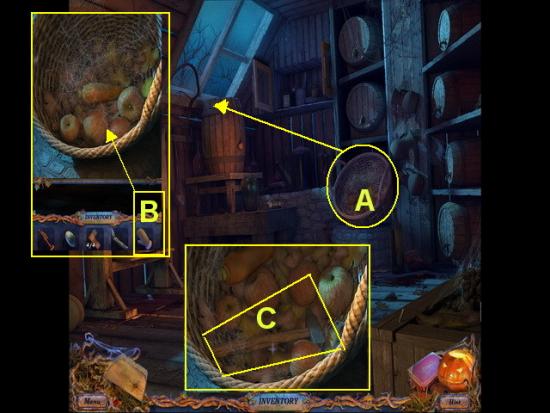
- A. Click on the BASKET to zoom in.
- B. Take the MITTEN from inventory and use it four times to clear away all of the spider webs.
- C. Take the HAMMER into inventory.
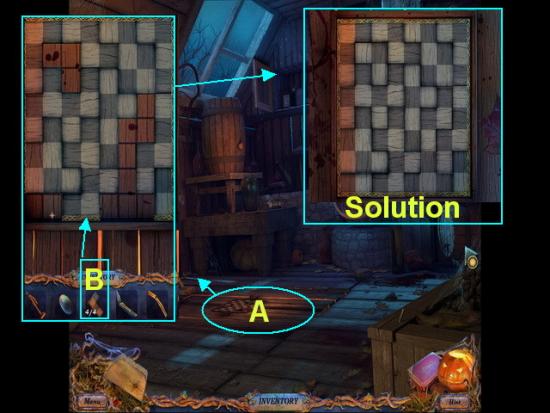
- A. Click on the TRAPDOOR on the floor.
- B. Add the four CHESS PIECES to the puzzle to activate a mini game
- Mini Game – Place the puzzle pieces in the grid until it looks like the solution shown in the image above. Note that clicking on the pieces will rotate them and once you place a piece correctly it will lock into place.
- Once you finish this puzzle the door is open and you may proceed down to the wine cellar.
- This is the end of part one.
Part Two
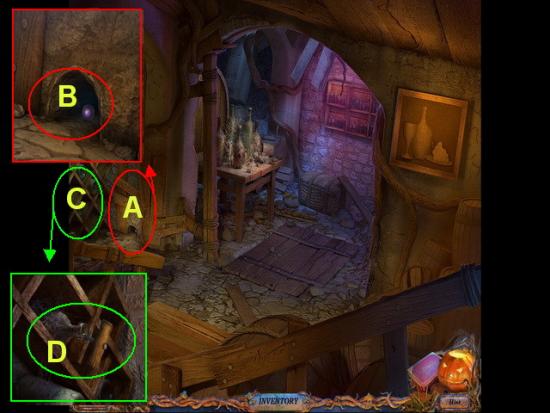
Wine Cellar
- A. Click on the MOUSE HOLE to zoom in.
- B. Take the BALL (1 of 4) and place in inventory.
- C. Click on the wine bottles to the far left of the mouse hole to zoom in.
- D. Take the corkscrew into inventory.
- Go back upstairs.
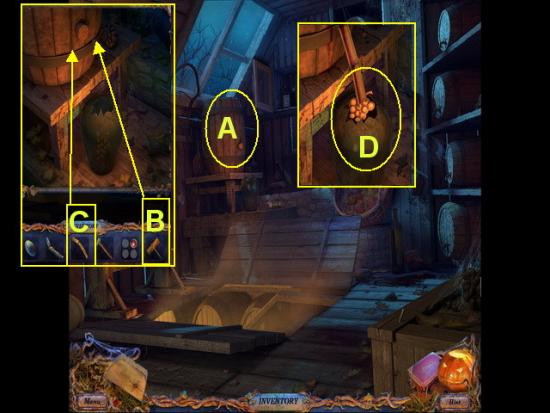
- Winery
- A. Click on the BARRELL under the window to zoom in.
- B. Take the CORKSCREW from inventory and use on the CORK.
- C. Take the GUTTER and place in the hole until the bottle fills up.
- D. Take the GRAPES into inventory.
- Go back downstairs to the wine cellar.
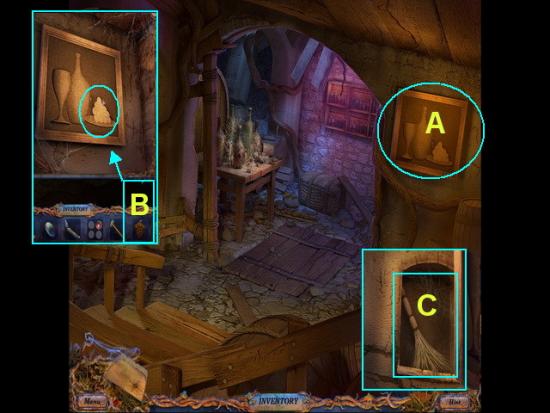
Wine Cellar
- A. Click on the PAINTING at the upper right corner of the room to zoom in.
- B. Take the GRAPES from inventory and add to the picture and the door will open.
- C. Take the BROOM from the cabinet and place in inventory.
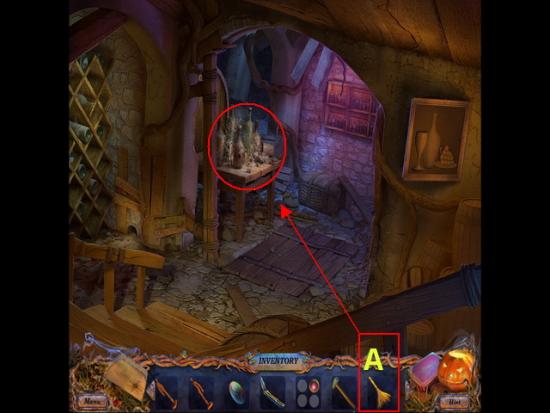
- A. Take the BROOM from inventory and use it on the table of bottles in the center of the room.
- This will cause the scene to glow blue and sparkle. Click here for a HOS.
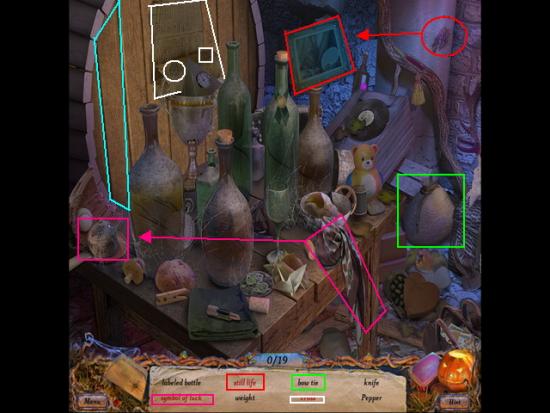
HOS
- Locate the hidden objects in the scene written in black text.
- The items written in red text will require the following actions;
- QUEEN/CORK/BOW TIE – Click on the sack and it will untie and open. Then click again for a closer view. Inside you will find the BOW TIE, the FINAL CORK and the QUEEN is on the playing card. This is shown circled in green.
- STILL LIFE – Take the GRAPES circled in red and add to the picture frame also shown circled in red.
- CROSS/SNOWFLAKE – Click on the map on the wall near center of the scene shown circled in white. You will find the cross under it and the snowflake on the outside of it.
- FEATHER – Click on the board at the far left shown circled in light blue. The board will move out of the way and the feather is inside.
- SYMBOL OF LUCK/ELEPHANT – Take the SCARF from the table and clean the small jar to the far left shown circled in dark pink. It will open up. Click on it to zoom in. The elephant is on the container and the four leaf clover is inside.
- Once you locate all the hidden items a WEIGHT and a BOTTLE will be added to inventory.
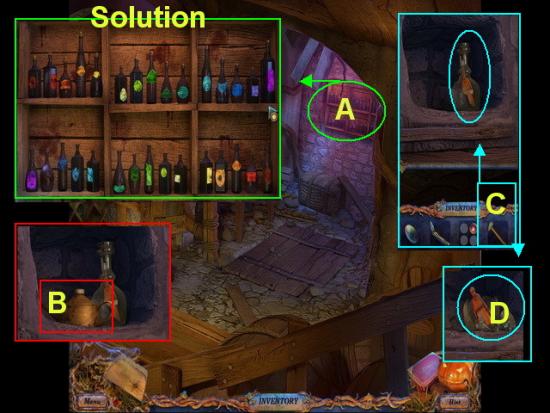
Wine Cellar
- A. Click on the cabinet at the back of the room to zoom in. Take the BOTTLE from inventory and add to the shelf to activate a mini game puzzle.
- Mini Game Solution – Place the bottles in order as shown in the image above. Place all the bottles with corks on the top shelf and place them in order starting with the labels that are purple and work from left to right placing them in a color spectrum of red, orange, yellow, green, purple on the first shelf and purple, blue, green, yellow, and red on the second shelf.
- B. When the panel opens take the CAN OF OIL into inventory.
- C. Next, take the HAMMER from inventory and use it to break the bottle.
- D. Take the GAME BOARD PIECE into inventory. (You may want to put it into the board at this point)
- Exit once into the vineyard.
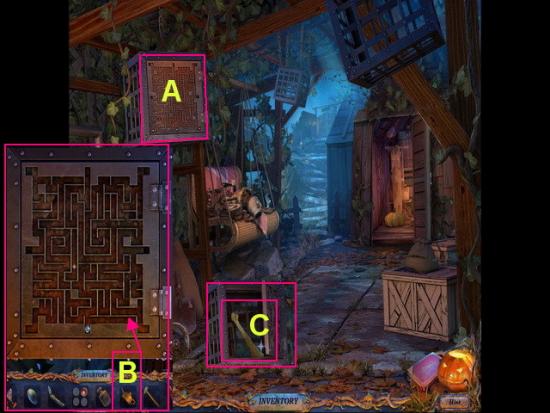
Vineyard
- A. Click on the large box at the top left of the tree twice to remove the vines.
- B. Take the CAN OF OIL and place it on the maze. Watch the ball move through the maze until the box opens.
- C. Take the BONE into inventory.
- Return to the river front.
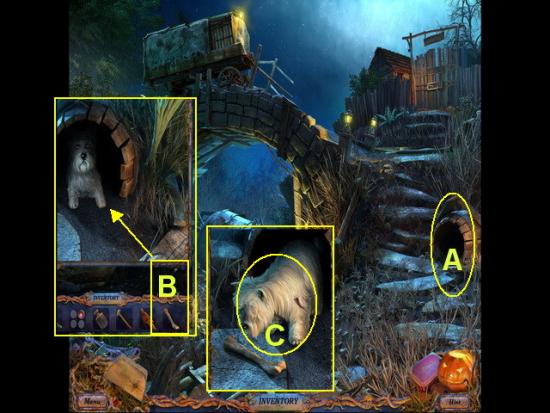
River
- A. Click on the BARREL to zoom in.
- B. Take the BONE from inventory and give to the DOG and he will walk out for it.
- C. Take the DOG into inventory.
- Return to the house where the little girl was crying.
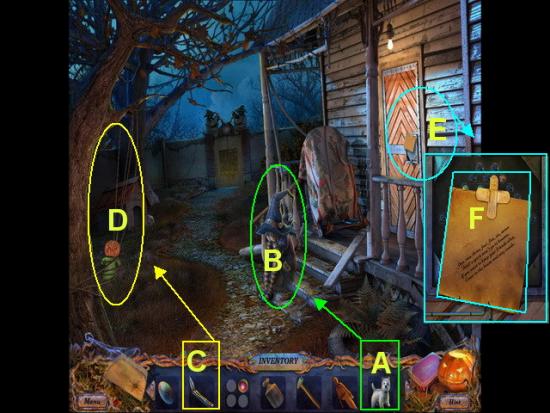
Backyard
- A. Take the DOG from inventory and give to the LITTLE GIRL.
- B. Talk to the girl and she will give you a FUSE for your inventory.
- C. Click on the ROPES above the figurine on the tree to the far left.
- D. Take the “JACK” figurine into inventory.
- E. Click on the DOOR and zoom in.
- F. Take the PAPER off of the door and read it. Now a mini game board has been exposed. Click on it to activate it.
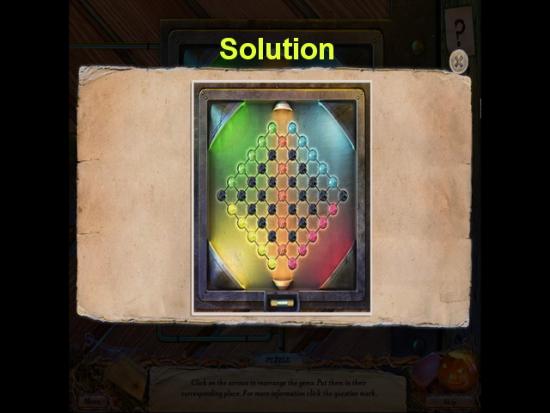
- Mini Game – The objective of this puzzle is to move the colored balls into the corresponding colored background areas by rotating them. When you click on a ball, they rotate in groups of four. This puzzle is very time consuming. Be sure to work from the center outward.
- Once you complete the mini game puzzle the door will unlock and you may go inside.
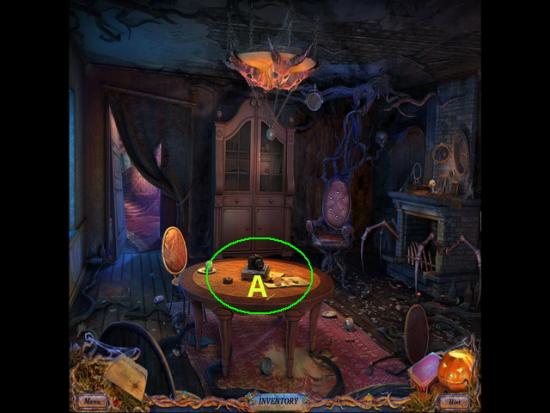
Lounge
- A. Click on the CAMERA on the table to zoom in.
- Click through all the pictures and read the text.
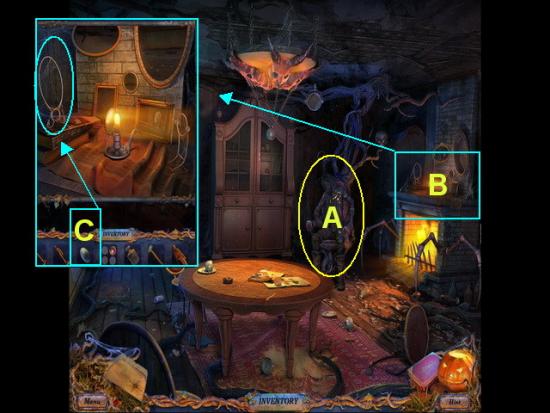
- A. Click on the GHOST and talk to him. He will need you to find him some fuel.
- B. Click on the MANTEL to zoom in.
- C. Take the MIRROR from inventory and place in the large frame to the left of scene.
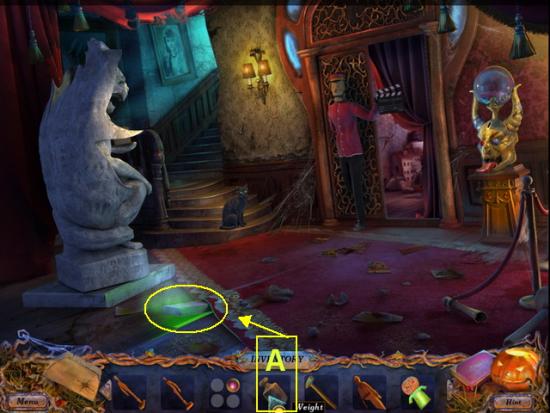
Hall
- A. Take the WEIGHT from inventory and place it on the floorboard.
- The bear will turn around.
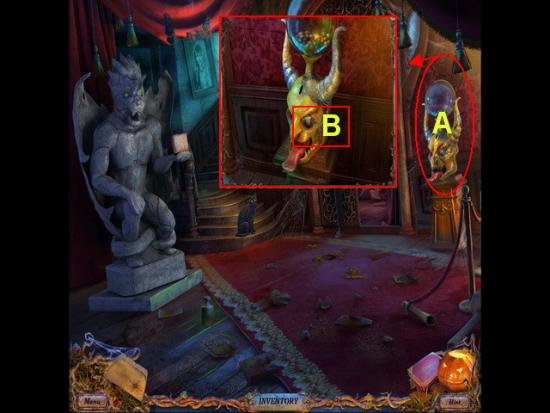
- A. Click on the CANDY MACHINE at the far right of scene.
- B. Take the MIRROR into inventory.
- Go back into the lounge.
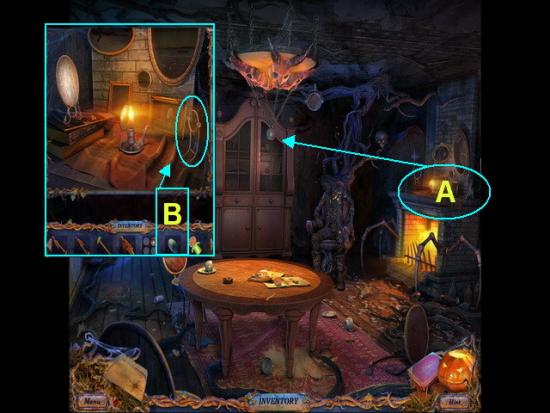
Lounge
- A. Click on the top of the MANTEL to zoom in.
- B. Take the second MIRROR and add to the smaller frame at the far right.
- This will cause the light rays to beam around the room and hit a spot on the floor.
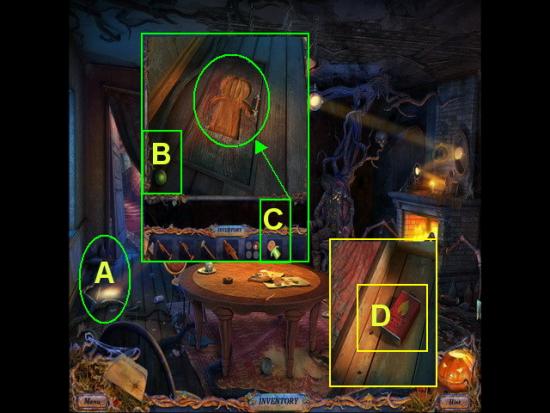
- A. Click on the TRAPDOOR to zoom in.
- B. Take the MARBLE and add to inventory.
- C. Take the JACK cutout and place into the indentation to unlock the door.
- D. Take the FUEL into inventory.
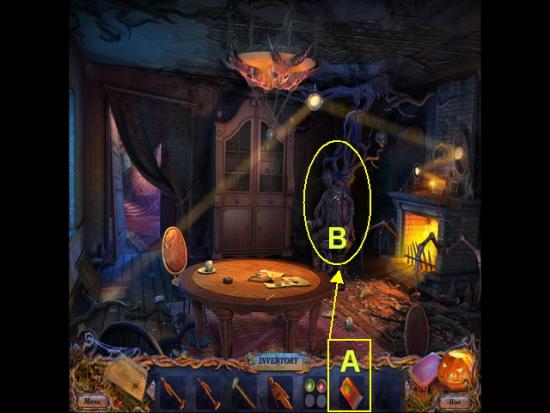
- A. Take the FUEL from inventory and give it to the GHOST.
- He will give you the GAME BOX which now appears at the bottom left of the game scene next to the game map. Click on it at any time to place game pieces when you find them.
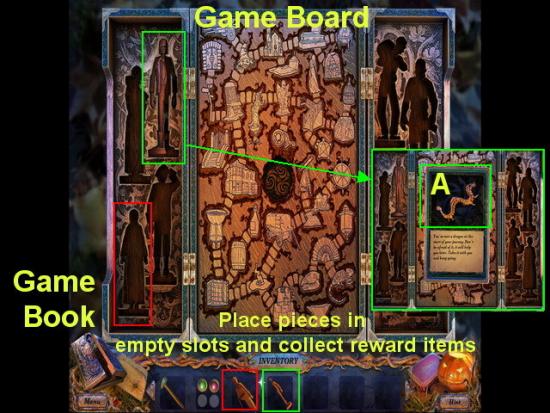
- Take all of the GAME PIECES you currently have in inventory and place in the empty slots.
- The character shown circled in green will be completed. Each time a character is completed you will be given a reward to be placed in inventory for use in the game.
- A. Take the DRAGON (1 of 2) into inventory.
- Return to the backyard.
Backyard
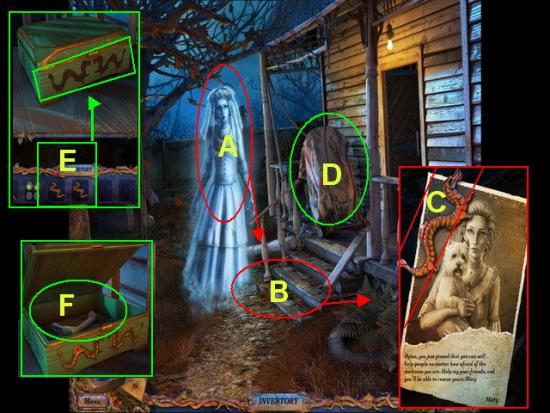
- A. Click on MARY’S GHOST and she will fly away.
- B. Pick up the PAPER she leaves behind and read it.
- C. Take the DRAGON (2 of 2) into inventory.
- D. Click on the ROCKING CHAIR and the blanket will move away exposing a green box. Click on the BOX to zoom in.
- E. Take the 2 DRAGONS from inventory and place in the indentations to unlock it.
- F. Take the HANDLE from inside the box into inventory.
- Return to the lounge.
Lounge
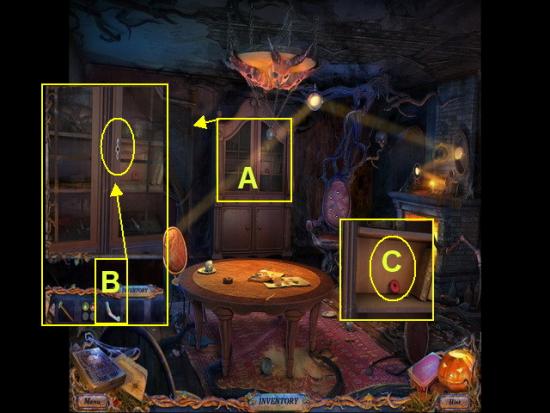
- A. Click on the CABINET in the center of the room to zoom in.
- B. Take the HANDLE from inventory and place on the cabinet.
- C. Collect the GAME BUTTON with spider on it into inventory.
- Return to the hall
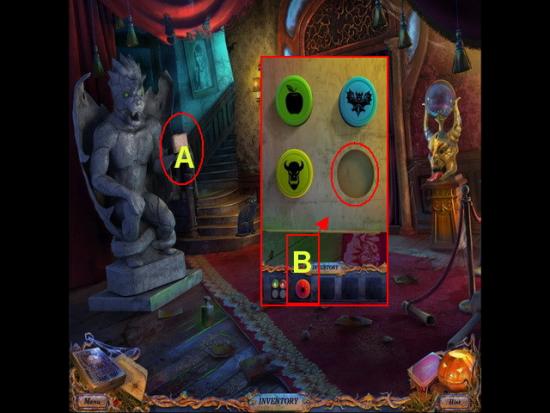
Hall
- A. Click on the BOX the statue is holding.
- B. Take the BUTTON from inventory and add to the box to trigger a mini game puzzle.
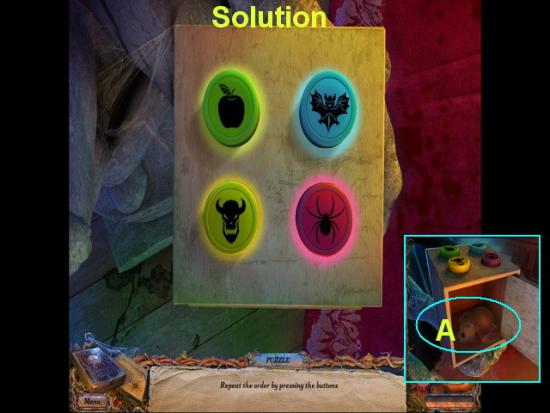
Hall
- Mini Game – Press the buttons in the order they light up. There are four sequences to complete.
- Sequence 1 – Green, Yellow, Blue, Red.
- Sequence 2 – Blue, Yellow, Green, Red, Blue.
- Sequence 3 – Red, Yellow, Blue, Green, Yellow
- Sequence 4 – Yellow, Blue, Green, Yellow, Red
- A. When the sequences are completed a WIND UP TOY will be added to your inventory.
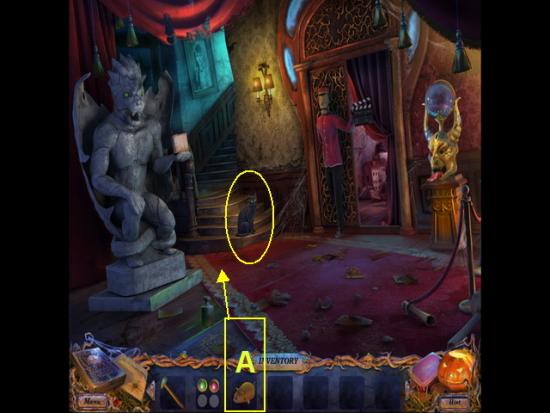
Hall
- A. Take the WIND UP TOY MOUSE from inventory and give it to the CAT.
- The cat will move out of the way and you may now move upstairs.
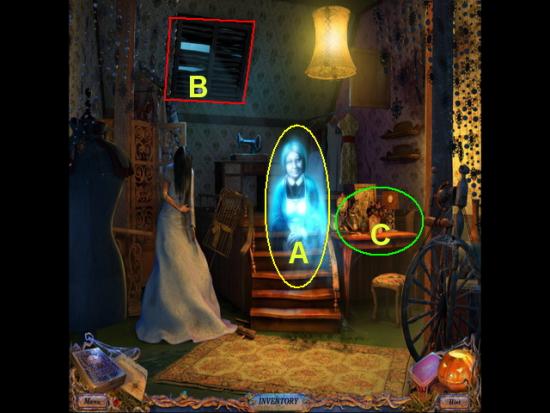
Nanny’s Room
- A. Click on the NANNY GHOST and talk to her.
- B. Click on the WINDOW once to open it.
- C. Click on the DRESSER to zoom in.
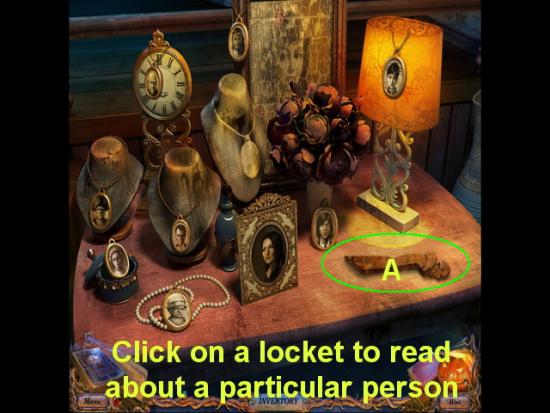
Nanny’s Room
- A. Take the GAME PIECE into inventory (Place it in game box if you wish or wait until you have both pieces)
- Click on each locket and read about each of the characters from the farm.
- Exit room and go upstairs to the ATTIC. Click on the sparkling blue chest for a HOS.
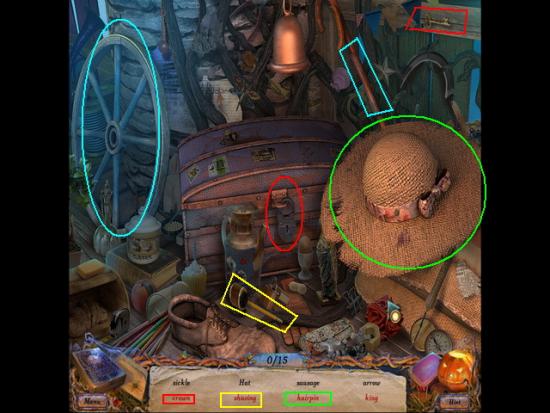
HOS
- Locate the hidden objects shown in black text.
- Red text items will need multiple steps or items will need to be combined in order to find them.
- The following red text items can be found as follows;
- HAIRPIN/STAINED GLASS PIECE – Click on the straw hat to remove it then click on the eyeglasses case to open it. The Hairpin is inside. This is shown circled in green.
- CROWN – Take the KEY from the upper right corner and use it on the chest. The crown is inside. This is shown circled in red.
- SHAVING – Take the pencil and place it in the sharpener. The shaving will appear below. This is shown circled in yellow.
- WHEEL – Take the missing spoke at the far right and place it on the wheel then you can click on it to remove it. This is shown circled in light blue.
- Once you find all of the items a STAINED GLASS PIECE and SICKLE are added to your inventory.
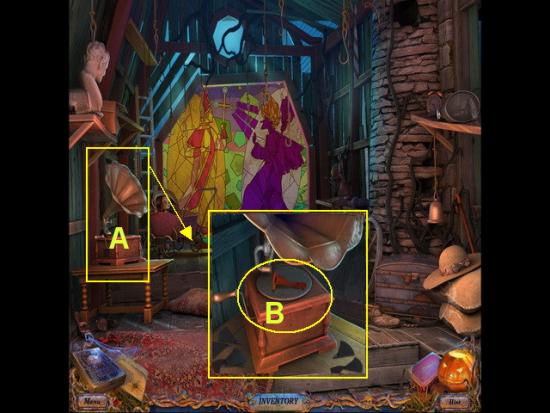
Attic
- A. Click on the GRAMOPHONE to zoom in.
- B. Click on the record pieces to remove them (four times) and take the GAME PIECE into inventory.
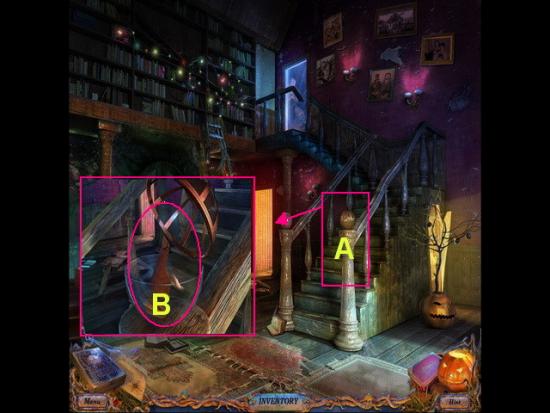
Second Floor
- A. Click on the right side of the BANISTER to zoom in.
- B. Click to open the dome and take the GAME PIECE into inventory.
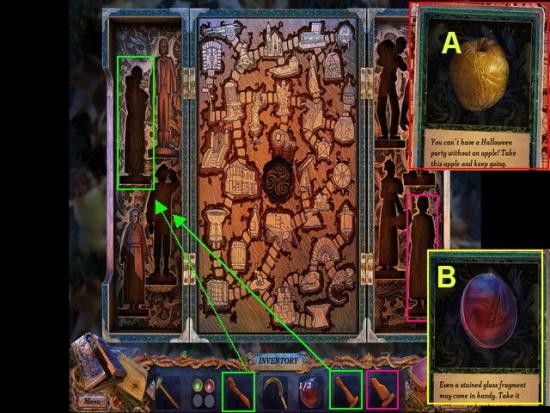
Game Box
- Click on the game box and add the four pieces. You should complete two game character pieces and will receive a reward for each one.
- A. Add the APPLE to your inventory.
- B. Take the STAINED GLASS FRAGMENT into inventory.
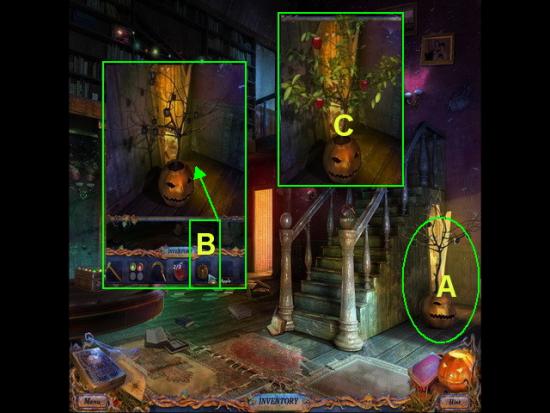
Hall
- A. Click on the APPLE TREE to the right of the stairs.
- B. Place the APPLE from inventory on the tree and it will become healthy.
- C. When the tree starts to glow and sparkle blue click on it for a HOS.
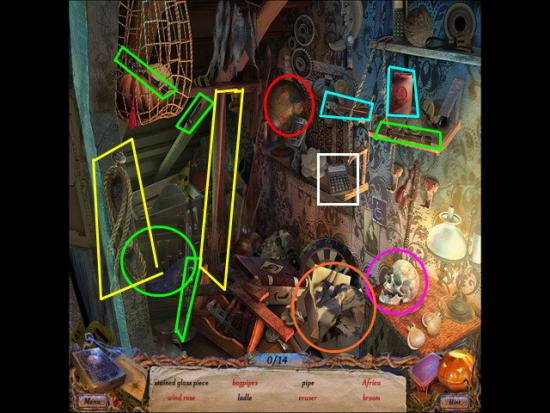
HOS
- Locate the hidden objects in the scene written in black text.
- The objects written in red text will require multiple steps as follows;
- BAGPIPES – You will need to locate all four pipes and assemble the bagpipes before you can click on them. These are shown circled in green.
- AFRICA/AMERICA – Click on the globe to turn it and you will find Africa and America. This is shown circled in red.
- BROOM – Take the rope off of the wall and add to the straw broom shown circled in yellow.
- STAINED GLASS PIECE – Take the glass cutter and cut it out shown circled in light blue.
- ERASER – Move the skull on the table to find the eraser shown circled in dark pink.
- POCKET WATCH/AIRPLANE – Move the scarf over the box and you will find these items inside. Shown circled in orange.
- “153” – Click on the calculator and key in these numbers shown circled in white.
- When you finish this HOS you will be given a STAINED GLASS PIECE and a BROOM in your inventory.
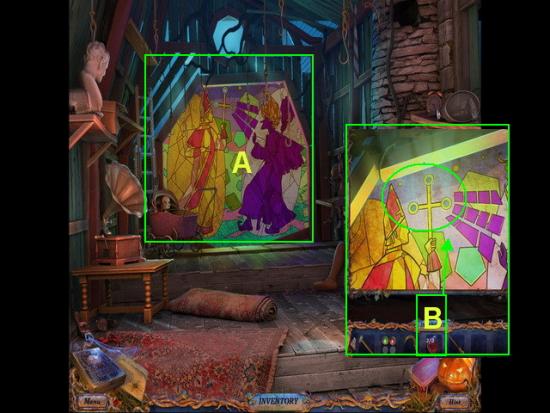
Attic
- A. Click on the stained glass window to zoom in.
- B. Take the STAINED GLASS PIECES (3) and add them to the window.
- The window will shatter. Walk through it.
- Now you are on the balcony.
- Click on the sparkly area for a HOS.
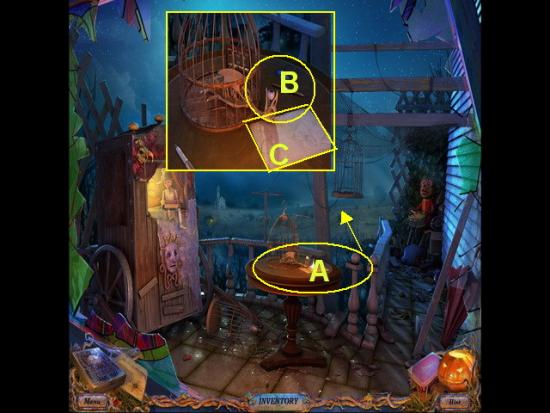
- Locate all the hidden objects listed in black text.
- Items listed in red text will need multiple steps.
- Look at the BUTTERFLY on the puppet’s chest.
- Click on the BOX the puppet is holding and click on the butterfly until it matches the one on his chest and it will open.
- You will now find the CLOVER and the BOW TIE in the box. This is shown circled in green.
- SCRAP – Take the scissors and cut the scrap from the curtain shown circled in yellow.
- CHERRIES/DOMINO – Move the mask to the far right circled in white and you will find the domino above the mask is the cherries.
- 10 – Take the black marker and write the “0” next to the one on the paper on the wall shown circled in red.
- Once you find all items a RECORD and a RAG will be placed in your inventory.

Balcony
- A. Click on the center TABLE to zoom in.
- B. Take the EYE into inventory.
- C. Read the note.
Attic
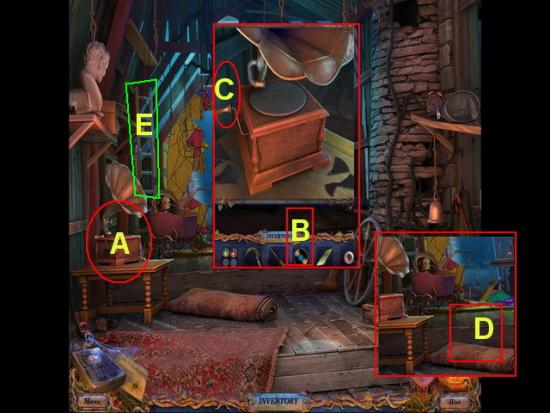
- A. Click on the GRAMOPHONE to zoom in.
- B. Take the RECORD from inventory and place it on the player.
- C. Click on the handle twice to start it.
- D. When the DRUMSTICK hits the floor take it into inventory.
- E. Take the LADDER into inventory.
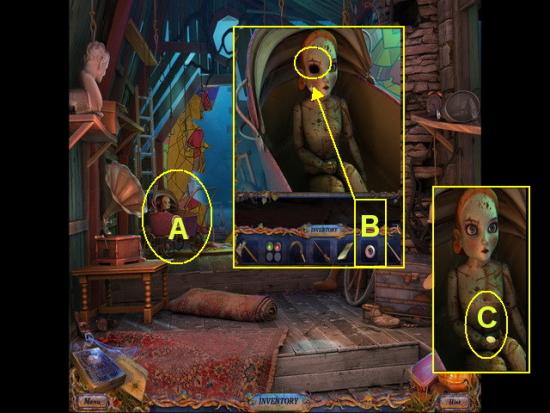
- A. Click on the BABY CARRIAGE to zoom in.
- B. Take the EYE from inventory and place in opening in doll.
- C. When the doll’s hand opens take the COIN into your inventory.
Balcony
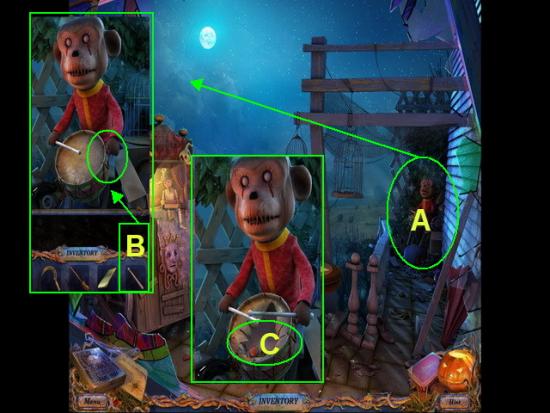
- A. Click on the MONKEY to zoom in.
- B. Take the DRUMSTICK and give to the monkey
- C. When the drum bursts open take the MARBLE into inventory.
- Go down twice to the second floor.
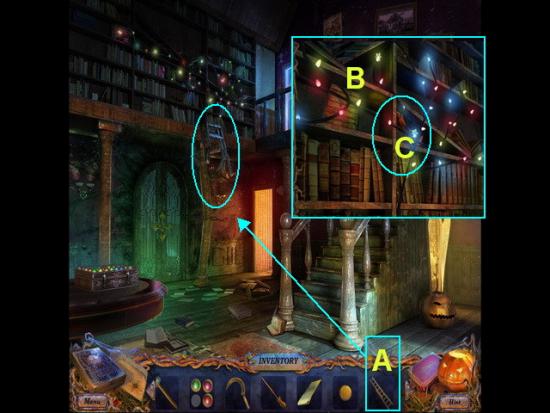
Second Floor
- A. Take the LADDER from inventory and use it on the BALCONY near the garland.
- B. Take the GARLAND and move it out of the way.
- C. Take the GAME PIECE into inventory.
- Return to the hall.
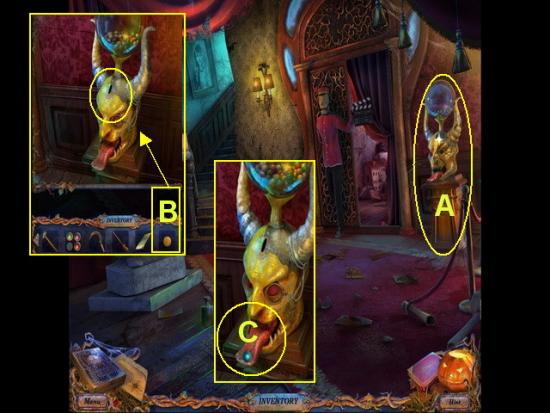
Hall
- A. Click on the candy dispenser to zoom in.
- B. Take the COIN from inventory and place in the slot.
- C. Take the MARBLE from his mouth and add to inventory.
- Go up to the second floor again.
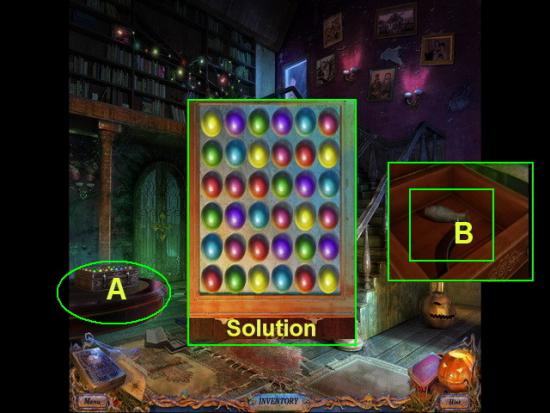
Second Floor
- A. Click on the GAME on the table to the far left to zoom in for a mini game puzzle.
- Mini Game – Take the four marbles and add to the game board to activate the puzzle.
- Your objective is to place each marble (36 altogether) on the board so that no two colors appear side by side directly in the same row horizontally or vertically. You must separate the same colored balls by at least one socket in the board. If you place a marble incorrectly it will glow red briefly.
- Once you complete this puzzle the box will open and a PART will be placed in your inventory.
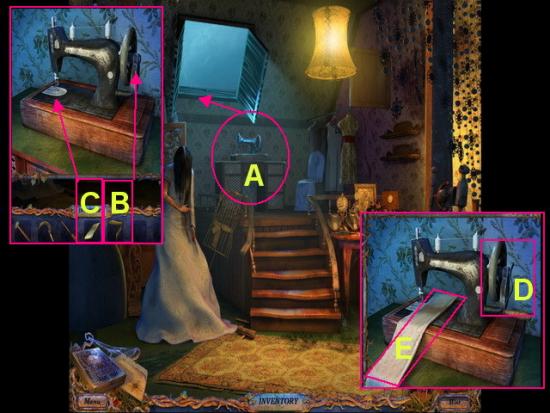
Nanny’s Room
- A. Click on the SEWING MACHINE to zoom in.
- B. Take the PART and place on the right end of the machine.
- C. Take the RAG from inventory and place under the needle and click on the wheel three times to sew the SLEEVE which is in your inventory.
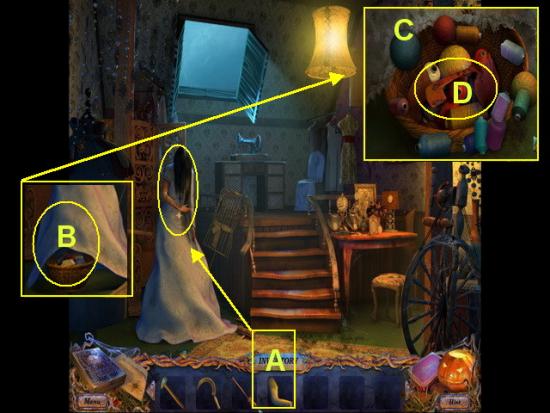
- A. Click on the SLEEVE in inventory and place it on the MANNEQUIN.
- B. When the dress lifts up click on the BASKET to zoom in.
- C. Click on the various THREADS ten times to move them out of the way.
- D. Place the MAILBOX FLAG into inventory.
- Go back outside to the front gate where you saw the car earlier.
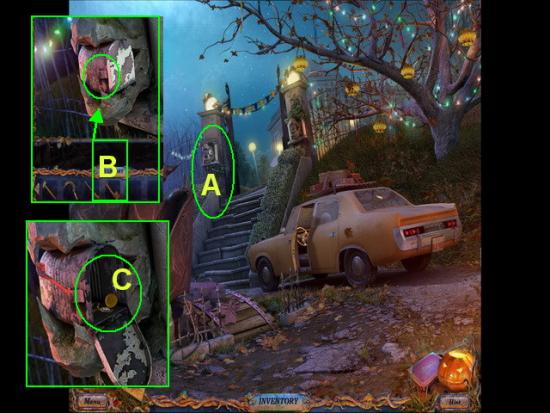
Front Gate
- A. Click on the left side of the gate to zoom in on the MAILBOX
- B. Take the FLAG from inventory and place on mailbox. It will open now.
- C. Take the LOCKET into inventory.
- Return to Nanny’s Room
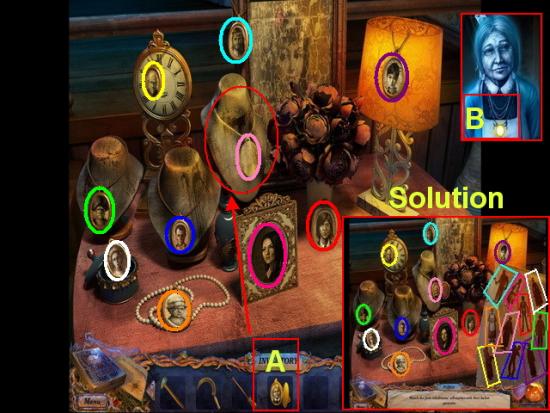
Nanny’s Room
- A. Take the LOCKET from inventory and place in the blank area in the center. This will trigger a mini game puzzle.
- Mini game – Match the locket to the correct character. The character will highlight if you are correct.
- The solution is shown above with the answers color coded.
- Take the note from the table and read it.
- B. Talk to NANNY’S GHOST and she will give you a LANTERN to place in your inventory.
- Go to the backyard.
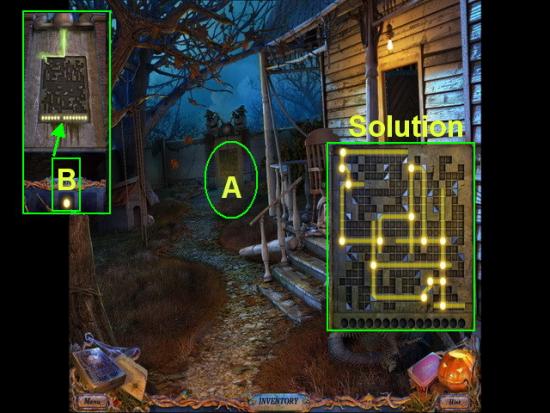
Backyard
- A. Click on the back GATE to zoom in.
- B. Take the LANTERN from inventory and add to the board. This will trigger a mini game puzzle.
- Mini game – The objective is to place the fifteen lanterns so that the mirrors in the puzzle will reflect the light out while staying connected.
- The solution is shown in the image above. Place the lanterns where you see the bright circles.
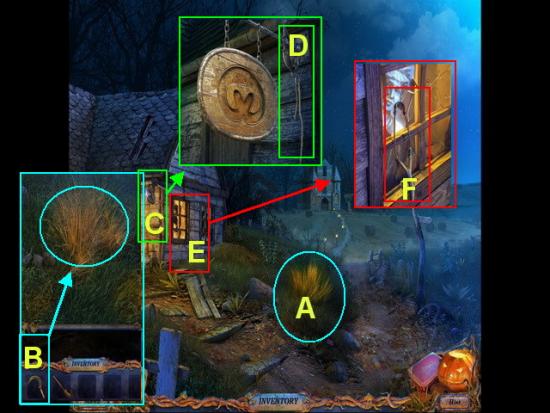
Field
- A. Click on the mass of STRAW to zoom in.
- B. Take the SICKLE from inventory and cut the straw. The STRAW is now in inventory.
- C. Click on the SIGN to zoom in.
- D. Take the LACE ROPE into inventory.
- E. Click on the side WINDOW to zoom in.
- F. Take the SLINGSHOT into inventory.
- Head right to the scarecrow area.
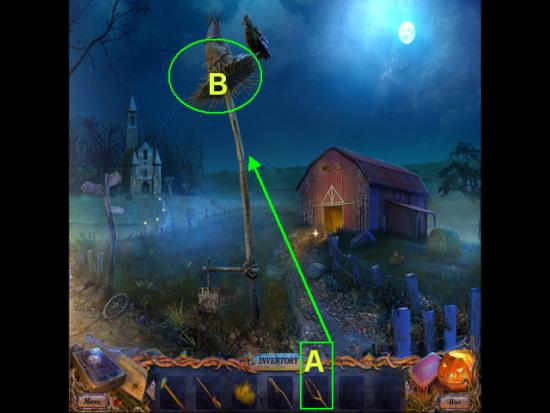
Scarecrow
- A. Take the SLINGSHOT and use it to scare away the CROW.
- B. Take the HAT into inventory.
- Go left then go forward once to the outside of the church.
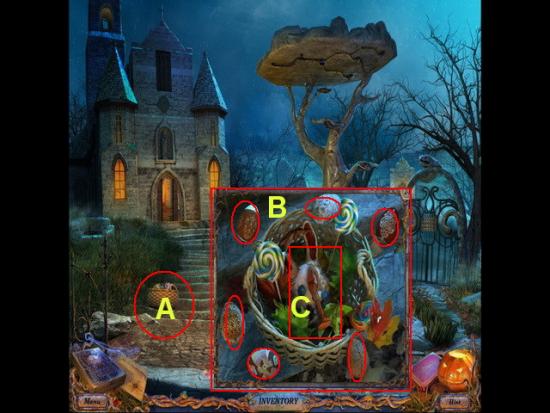
Outside Church
- A. Click on the BASKET to zoom in.
- B. Click six times to remove the FABREGE EGGS from the basket.
- C. Take the GAME PIECE from the basket and place in inventory or into the game box.
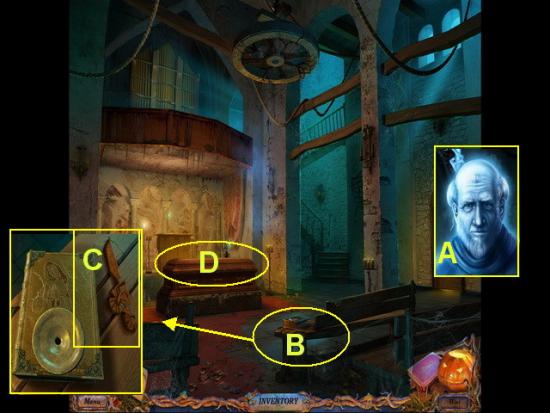
Church
- A. Talk to the GHOST. Watch the video cut scenes.
- B. Click on the BOX on the pew to zoom in.
- C. Take the GAME PIECE into inventory. You will have to return here later to deal with the book.
- D. Click on the COFFIN when you see the blue sparkling effect for a HOS.
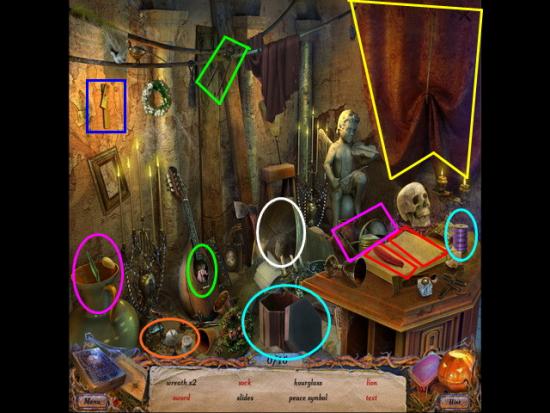
HOS
- Locate the hidden objects listed in black text.
- Locate the hidden objects listed in red text which will take more than one step to locate.
- The following red text lists can be found on the image above;
- SWORD – Lift up the red curtain at the top right corner and the sword is behind it. This is shown circled in yellow.
- GIFT – Take the gift ribbon and place it on the box in the center of the scene shown circled in light blue.
- TEXT – Take the red feather and it will write on the page of the book. Click on the page. Both are shown circled in red.
- TULIP – Take the watering can and use it to water the tulip to the far left of the scene. Once it grows click on it. These are shown circled in dark pink.
- SOCK – Click on the ball of yarn and a sock will knit in front of you. This is shown circled in orange.
- ELEPHANT/LION – Take the wire cutters from the top of the scene and use them to cut the wires on the guitar or musical instrument on the floor of the center of scene. Click on it again to zoom in. You will find a paper elephant and the mane must be placed on the lion first. These are shown circled in green.
- LILY – Click on the straw hat shown circled in white in the center of scene. The lily is inside the hat.
- GOLD CROSS – This is shown on the left side of the wall circled in dark blue. Click on the cross to repair it.
- Once you locate all the hidden objects SLIDES and a STEPLADDER will be added to your inventory.
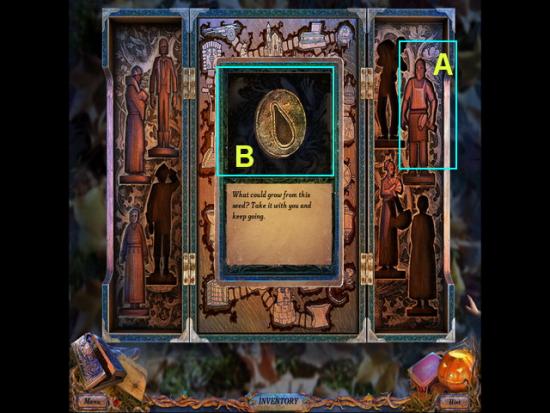
Game Board
- Click on the game board and add all the game pieces you have in inventory to the open slots.
- Each time you complete a game piece you will be given an item for inventory. You should receive a disc with a SEED on it for completing the blacksmith piece.
- Go upstairs to the bell tower next.
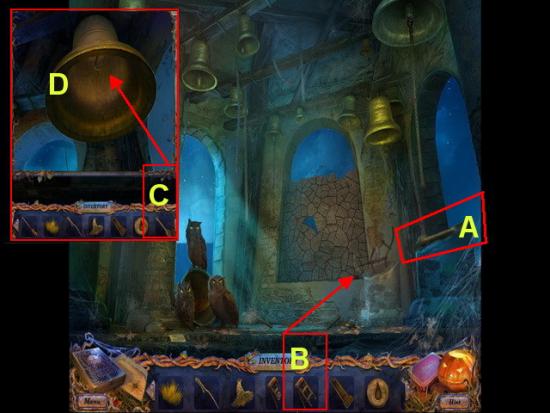
- Bell Tower
- A. Take the BELL CLAPPER and place in inventory.
- B. Take the STEP LADDER and place under the BELL at the far right.
- C. Click on the BELL to zoom in and add the CLAPPER. Click on the bell to ring it. This will frighten the owls away and the other bell will fall.
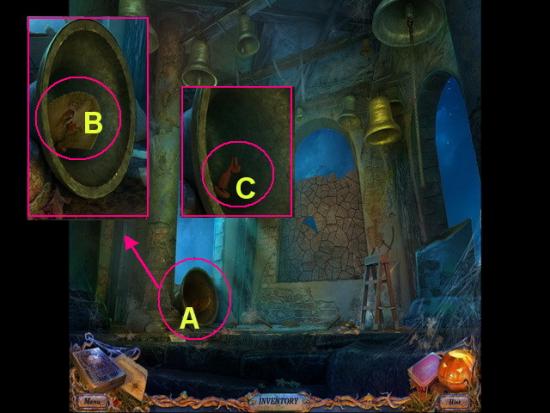
- A. Click on the fallen BELL to zoom in.
- B. Click on the FAN and take into inventory.
- C. Take the GAME PIECE into inventory.
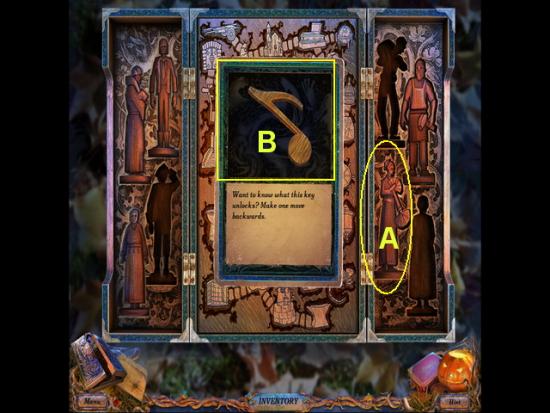
GAME BOX
- Click on the game box and place the game second piece to the Geisha character in place. Take the NOTE into inventory.
- Go back into the church.
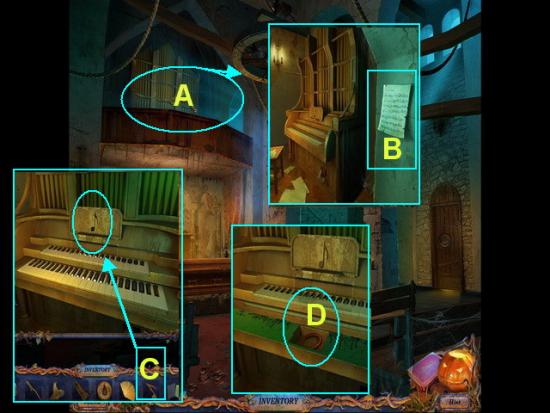
Upper Balcony
- A. Click on the UPPER BALCONY over the coffin to zoom in.
- B. Take the SHEET MUSIC into inventory.
- C. Take the NOTE from inventory and place in the indentation.
- D. When the panel opens up take the RING into inventory.
- Go to the barn.
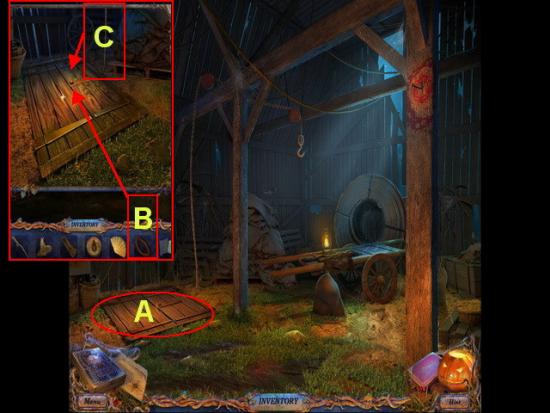
Barn
- A. Click on the CELLAR DOOR to zoom in.
- B. Take the RING from inventory and place on the hook.
- C. Take the ROPE and attach it to the RING.
- SP_108.jpg
- A. Lift the SACK from the ground.
- B. Place the SACK on the HOOK.
- C. When the DOOR opens it will begin to sparkle. Click on it for a HOS.
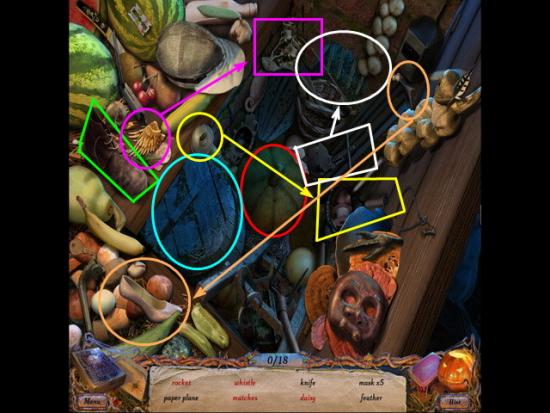
HOS
- Locate the hidden objects listed in black text.
- Locate the hidden objects listed in red text which take multiple steps to complete as follows;
- FOOTPRINT – Move the shoe and you will see the footprint. It is shown circled in green.
- WHISTLE – Move the squash and the whistle is underneath. This is shown circled in red.
- MASK /DAISY – Click on the blue barrel which is shown circled in light blue. Here you will have to click on each daisy petal and put it back on the flower. A mask is located here as well.
- RACKET – Click on the wire and restring the racket shown circled in yellow.
- HERMES SANDALS – Take the gold wings and place on the sandals. These are shown circled in dark pink.
- MASK/MATCHES/STONE SLAB – Take the metal piece and use it to bend the bars. You will then click to zoom in and will find these items. This is shown circled in white.
- SHOE – Take the heel and add to the woman’s shoe. This is shown circled in orange.
- When you find all items on the list a CROWBAR and STONE SLAB will be added to inventory.
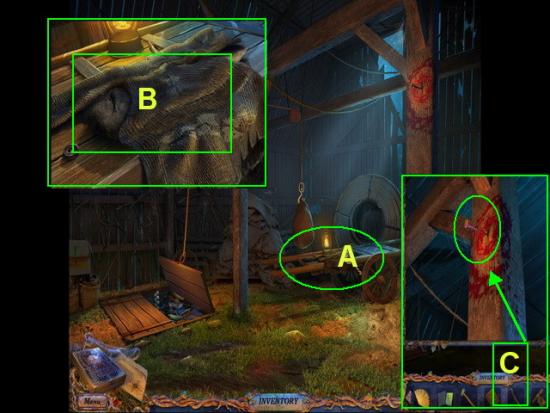
Barn
- A. Click on the WAGON to zoom in.
- B. Take the SHIRT into inventory.
- C. Take the CROWBAR from inventory and use it on the NAIL on the pole. Take the NAIL into inventory.
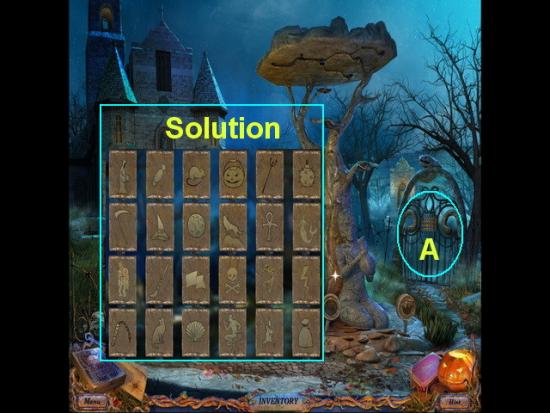
Porch
- A. Click on the GATE to zoom in for a mini game.
- B. Add the TABLET to trigger the mini game.
- Mini Game – There are twelve pairs of symbols that match. Locate the twelve pairs.
- The solution is shown in the image above.
- Note- The images do not match they are related items.
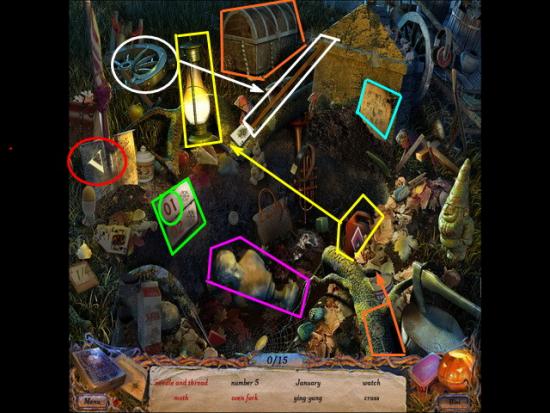
HOS
- Locate the hidden objects listed in black text.
- Locate the hidden objects listed in red text which may take multiple steps to complete.
- Locate the following red text items as follows;
- NUMBER 5 – This is the Roman numeral 5 shown as “V” circled in red.
- JANUARY/JUNE – Click on the calendar pages when you see “01” click on it for January and “06” click on it for June. This is shown circled in green.
- OVEN FORK – Take the handle and place it on the pole portion to complete the oven fork. This is shown circled in white.
- BONE – Move the bust to find the bone underneath. This is shown circled in dark pink.
- CLEF – Click on the paper on the tombstone to zoom in and the treble clef will be on the paper. This is shown circled in light blue.
- MOTH – Take the fuel and pour into the lantern. When it lights up a moth will fly to it. This is shown circled in yellow.
- EAGLE/NEEDLE AND THREAD – Take the key from the log and use it on the chest at top right of scene. Click on the chest to zoom in. You will find the eagle drawn on the lid, the thread to the right of the chest and the needle inside of it. This is shown circled in orange.
- Once you locate all hidden items in this scene a NEEDLE AND THREAD and a CROSS will be added to your inventory.
- This is the end of part two.
Part Three
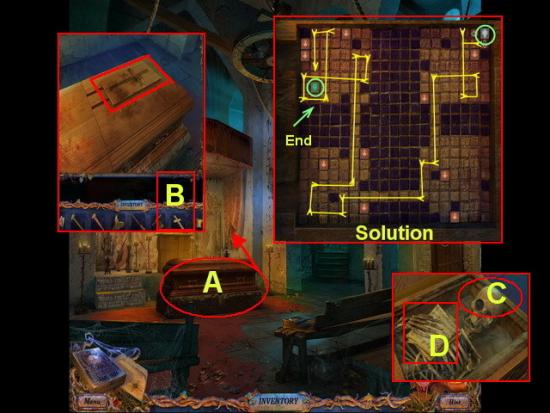
Church
- Go through the graveyard and into the church.
- A. Click on the COFFIN to zoom in.
- B. Take the CROSS and place in the indentation.
- When the board is exposed click on it to zoom in.
- This will trigger a mini game puzzle.
- Mini Game – The objective is to start with the game piece in the upper right corner with the cross on it and move it around the board until you move it to the upper left corner of the board with the green coffin without touching any of the demons. If you touch a demon the cross will go back to the starting position. There will be solid blocks the cross will land against.
- Solution – Start with the cross in the upper right hand corner and follow the yellow lines until you reach the green coffin near the upper left side of the board. Remember not to let yourself land right next to a demon.
- Once you complete the mini game puzzle the panel will open. Take the SHEET MUSIC and the BUTTON into inventory.
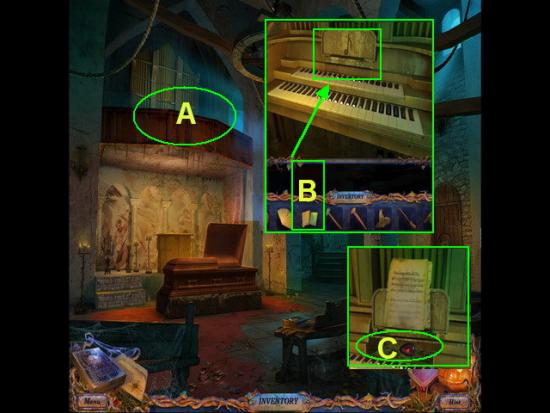
Balcony
- Return to the area over the coffin and click to zoom in.
- A. Take the SHEET MUSIC and place on the piano.
- B. When the panel opens take the RUBY into inventory.
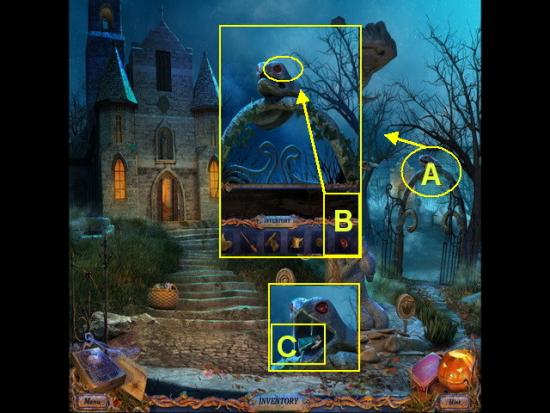
Outside Church
- A. Click on the GATE to the far right of the scene on the snake head to zoom in.
- B. Take the RUBY and place in the snake eye.
- C. When the mouth opens take the ANGEL into inventory.
- Return inside church
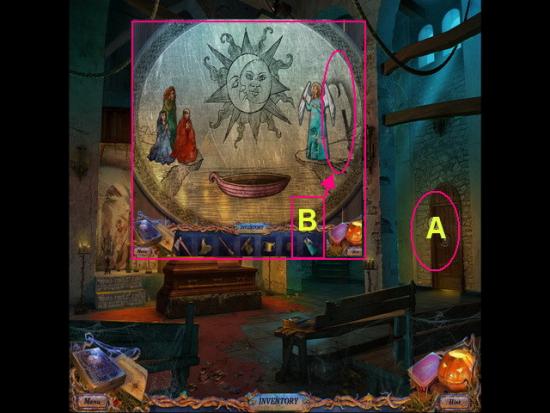
Church
- A. Click on the door to the far right of the scene.
- B. Take the ANGEL from inventory and place in the empty slot. This will open the door.
- Go through the door to the cell.
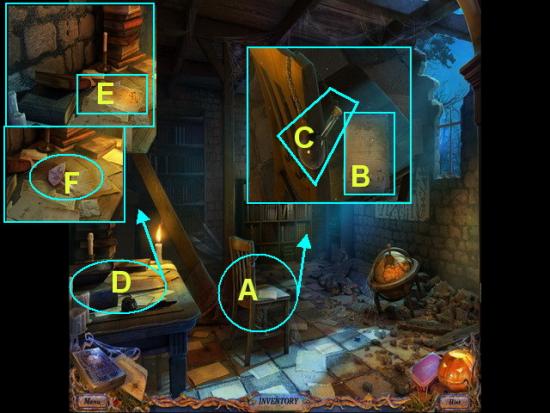
Cell
- A. Click on the CHAIR at center of room to zoom in.
- B. Click on the PAPER and read it.
- C. Click on the BOTTLE and add to inventory.
- D. Click on the DESK and zoom in.
- E. Click on the PAPER and read it.
- F. Click on the STONE PIECE and add to inventory
- Go to the bell tower.
Bell Tower
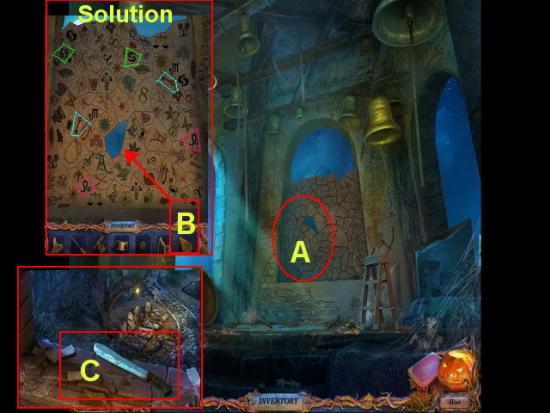
- A. Click on the center wall with the missing piece to zoom in.
- B. Take the TILE and add to the board to trigger a mini game puzzle.
- Mini Game – Match each pair until they are all gone. They can be different colors but must be the same design.
- C. Once all the tiles are gone click on the open are to zoom into the window and take the MACHETE into inventory.
- Return to the cemetery. When you see the area glowing blue and sparkling click on it for a HOS.
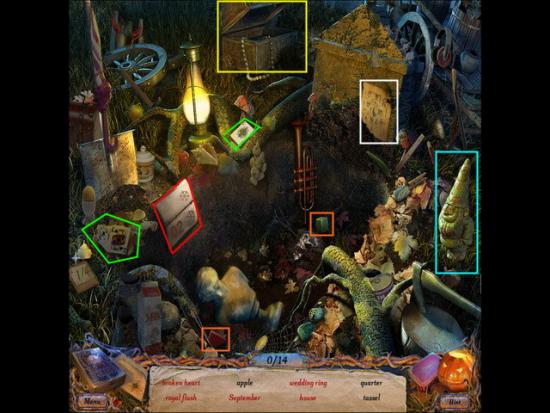
HOS
- Locate the hidden objects in black text.
- Locate the hidden objects written in red text which take multiple steps.
- ROYAL FLUSH – Take the ACE of SPADES PLAYING CARD and add to the others which are shown circled in green.
- SEPTEMBER – Turn the CALENDAR to “09” shown circled in red.
- BROKEN HEART – Click on the paper on the tombstone to zoom in. Take the ARROW and place it in the HEART. This is shown circled in white.
- 3D GLASSES/WEDDING RING – Click on the chest at the top right of scene place the lenses in the glasses and click on the ring case to open it and find the ring. This is shown circled in yellow.
- HOUSE – Take the green block and the red triangle block and stack them to make the house. This is shown circled in orange.
- CANDLESTICK – Move the gnome statue at the far right of scene and the candlestick is under it. This is shown circled in light blue.
- Once you find all of the hidden objects a RING and a TASSEL will be added to inventory.
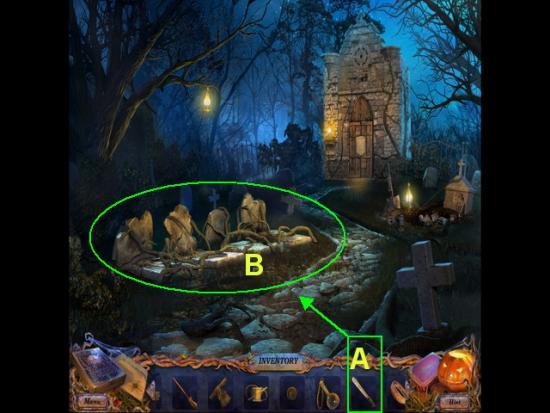
Cemetery
- A. Take the MACHETE from inventory and use it to cut away the vines from the gravestones.
- Go back up to the bell tower.
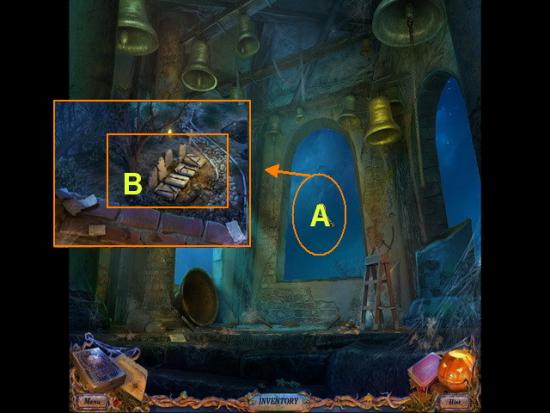
Bell Tower
- A. Click on the open WINDOW
- B. Look down and note that the tombstone letters spell “VITA” which is a clue to a mini game puzzle.
- Return to the cell.
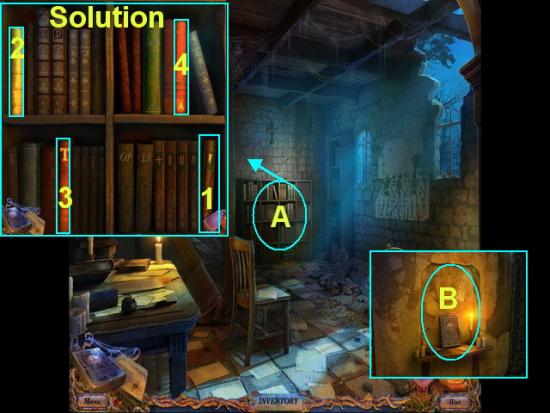
Cell
- A. Click on the BOOKCASE to zoom in.
- Mini Game – Click on the books in the order where you see “V”, “I”, “T”, and “A” and the bookcase will move away.
- B. Take the BOOK OF RITUALS into inventory.
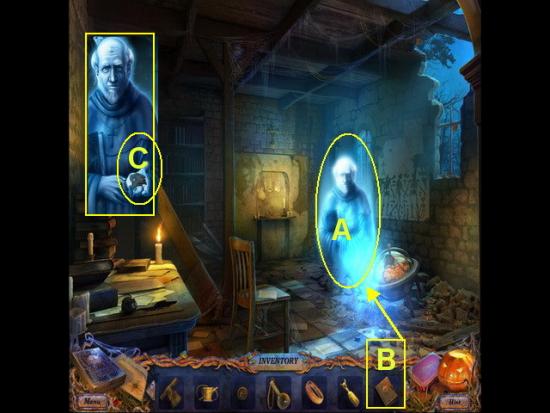
- A. When the GHOST appears talk to him.
- B. Give the BOOK OF RITUALS to the GHOST.
- C. Take the MAINLAND piece from the ghost into inventory.
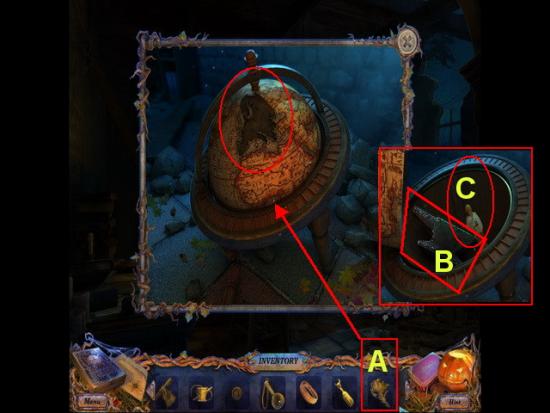
- A. Click on the GLOBE to zoom in and take the MAINLAND piece and place in the empty slot.
- B. Take the ANVIL into inventory.
- C. Take the PIRATE into inventory.
- Return to the inside of the barn.
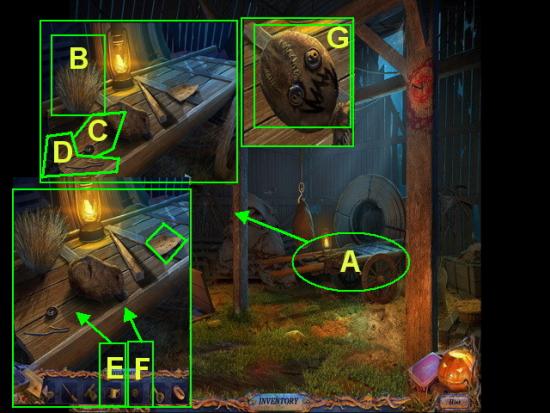
Barn
- A. Click on the WAGON to zoom in.
- Click on the paper to read what you need. As you add these items to the wagon it will cross off the list.
- B. Place the STRAW on the wagon.
- C. Place the BUTTON on the wagon.
- D. Place the LACE on the wagon.
- E. Place the NEEDLE AND THREAD on the wagon.
- F. Place the second BUTTON on the wagon.
- G. Once all these items are assembled take the SCARECROW HEAD into inventory.
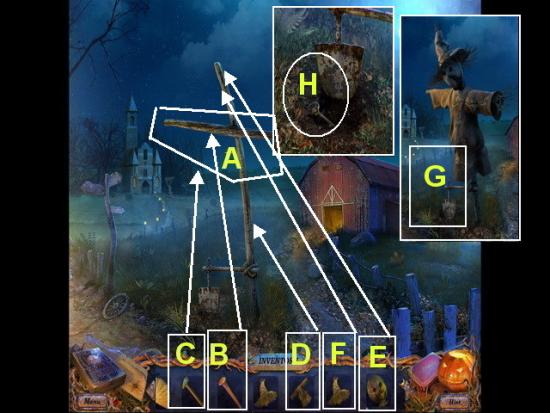
Scarecrow
- A. Take the BROOM and add to POLE.
- B. Take the NAIL and add to center of pole.
- C. Take the HAMMER and use on POLE.
- D. Place the OUTFIT on the POLE.
- E. Add the SCARECROW’S HEAD to the POLE.
- F. Add the HAT to the SCARECROW.
- G. Click on the area near the ground under the scarecrow to zoom in.
- H. Take the KEY into inventory.
- Return to the cemetery.
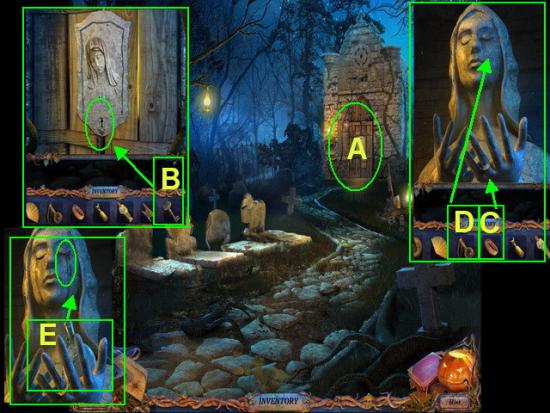
Cemetery
- A. Click on the CRYPT to zoom in.
- B. Use the KEY on the ANGEL plaque.
- C. Place the RING on the STATUE.
- D. When the statue starts crying place the BOTTLE under her eyes
- E. Collect the HOLY WATER into inventory.
- Return to the church.
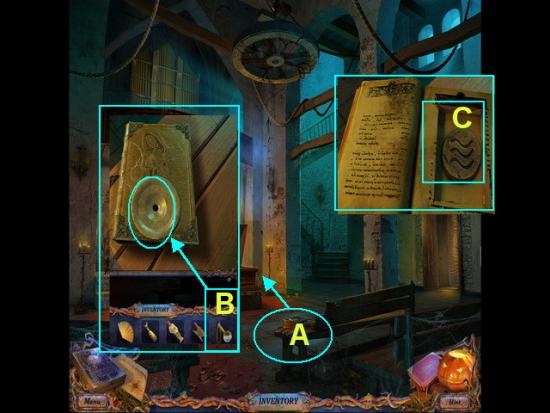
- A. Click on the BOOK on the PEW again to zoom in.
- B. Take the HOLY WATER from inventory and add to the hole in the book.
- C. Take the DISC from the BOOK when it opens.
- Go outside the church.
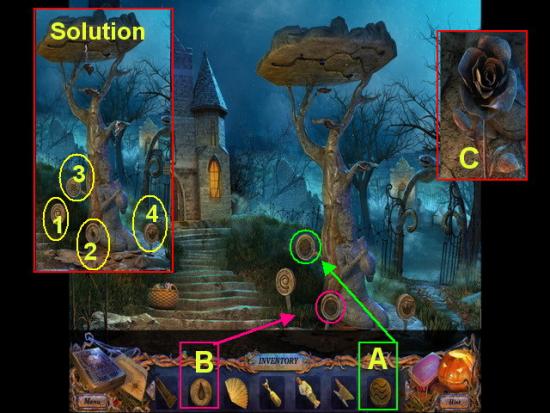
Stone Tree
- A. Take the STONE DISC with the waves and add it to the first opening shown circled in green.
- B. Take the STONE DISC with the SEED and add it to the circle shown circled in dark pink. (If you do not have the seed disc be sure to go into the game box and add all your game pieces)
- Solution – Next you have a mini game puzzle and must click on the discs in the correct order to grow a stone rose. Click on the stones in the numbered order shown above. First the SPIRAL, then the SEED, then the WATER, then the FLOWER.
- C. You will next see the STONE ROSE grow. Take it into inventory.
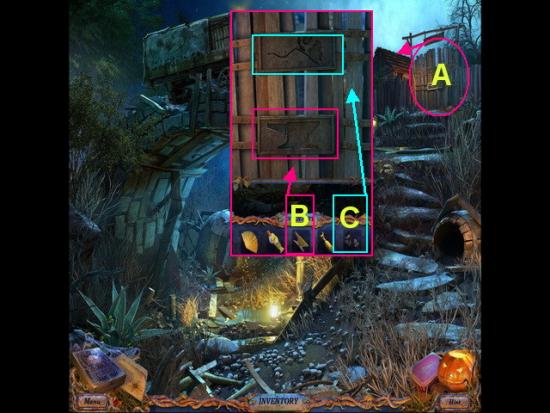
River
- A. Click on the DOOR at the upper right corner of the scene.
- B. Place the ANVIL into the indentation.
- C. Place the STONE ROSE into the indentation.
- The door is now open and you may enter.
- Go to the stable.
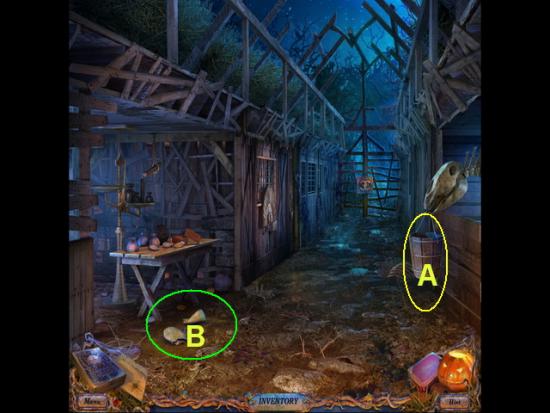
Stable
- A. Take the BUCKET into inventory.
- B. Take the EMPTY SACKS into inventory.
- Go outside to the well.
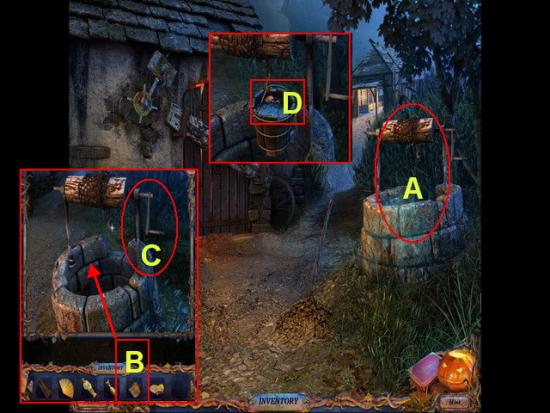
Well
- A. Click on the WELL to zoom in.
- B. Take the BUCKET and place in the water. Click on the HANDLE twice to move it down and back up.
- C. Remove the KEY from the bucket.
- Return to the stable.
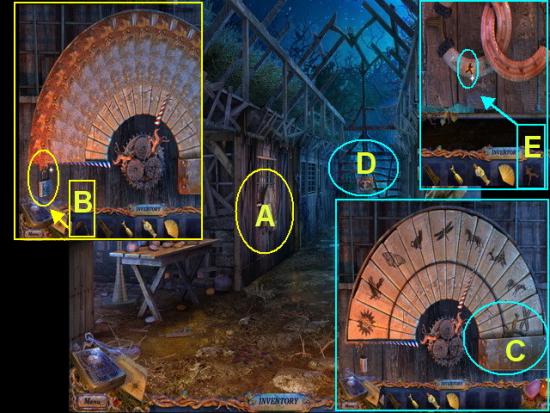
Stable
- A. Click on the door in the center of the stable with the fan shape and click to zoom in to the lock.
- B. Take the KEY from inventory and unlock the PADLOCK. Click to take it off.
- C. When the fan opens take the COWBOY piece at the far bottom right of the fan into inventory.
- D. Click on the DOOR to the back of the stable to zoom in.
- Click on the paper and read it.
- E. Take the COWBOY from inventory and use it on the lock in the cowboy indentation. When door opens go forward.
- When you see the sparkling blue area to your right click on it for a HOS.
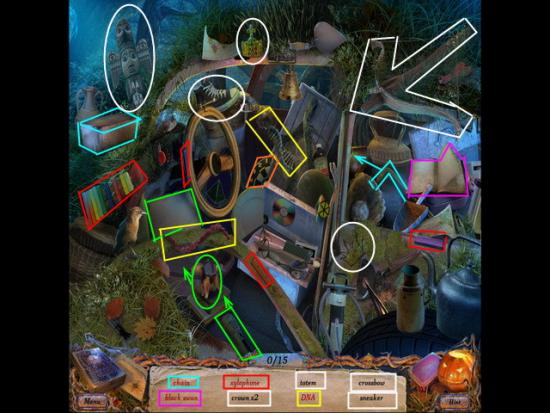
HOS
- Locate hidden objects written in black text. Some are shown circled in white in image above.
- Locate the hidden objects written in red text. They require more than one step to locate. The following red text items can be found and are shown circled in various colors as follows;
- DOG SHADOW – Click on the flashlight next to the dog at the bottom of the scene. When it turns on you will see the dog shadow on the small screen. These elements are shown circled in bright neon green.
- CHAIN/SPOON/KEY – Use the BLOWTORCH to remove the top of the box shown at the top left of scene. Click on the box to zoom in. Inside you will find the CHAIN, SPOON, and KEY. These elements are shown circled in light blue.
- DNA – Each side of the double helix can be found circled in yellow above. Combine them to complete the strand.
- BLACK SWAN/VICTORY – Click on the notebook shown circled in dark pink. When it opens, click on the pink pencil and use it to color in the swan for the black swan. Next use it to finish the “Tic Tac Toe” game and this will be your victory.
- XYLOPHONE – You must find the three keys that are missing and shown circled in red above. Once all are in place you may click on the xylophone. All keys and xylophone are shown circled in red above.
- DARTS – Click on the dart board in the center of the scene. It is shown circled in orange above.
- Once you find all items you will be given a MEASURING SCOOP and a LOADED CROSSBOW into your inventory.
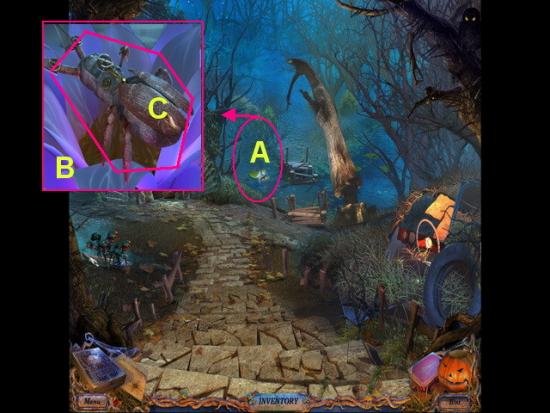
Garden Entrance
- A. Zoom on the LOTUS FLOWER to zoom in.
- B. Click on the PETALS several times to move them aside.
- C. Take the BEETLE into inventory.
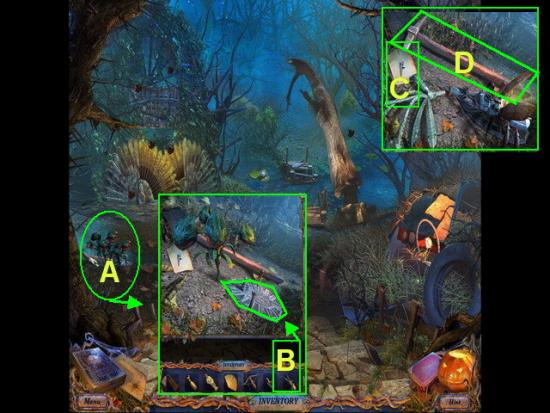
- A. Click on the PLANT MONSTERS under the tree to the left of scene to zoom in.
- B. Take the BEETLE and place on the metal plate.
- C. The BEETLES will destroy the plant monsters. Read the NOTE.
- D. Take the PICK AXE into inventory.
- Return to the outside of the forge.
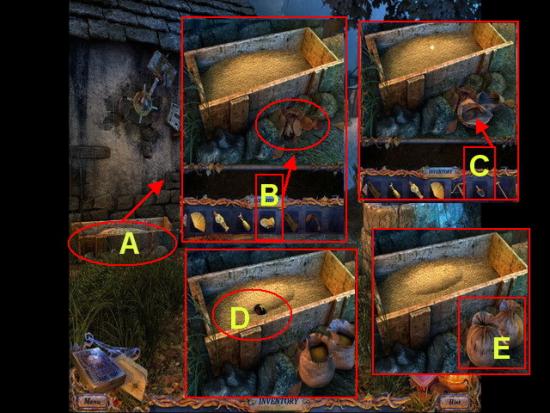
Forge
- A. Click on the SEED BOX to zoom in.
- B. Take the EMPTY SACKS from inventory and place next to box.
- C. Take the MEASURING SCOOP and use it to fill up the SACKS.
- D. Take the RUBY into inventory.
- E. Take the FILLED SACKS into inventory.
Well
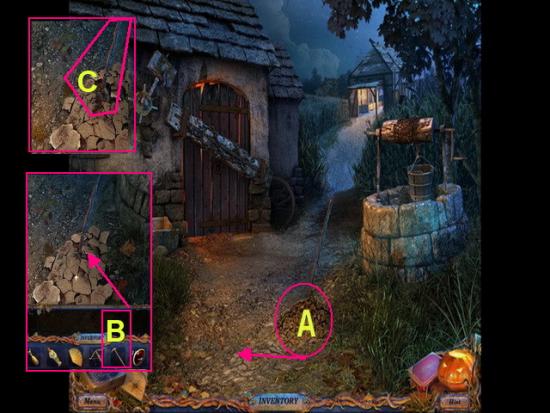
- A. Click on the BROKEN CONCRETE in front of well to zoom in.
- B. Take the PICK AXE from inventory and break the concrete.
- C. Place the OVEN HANDLE into inventory.
Forge
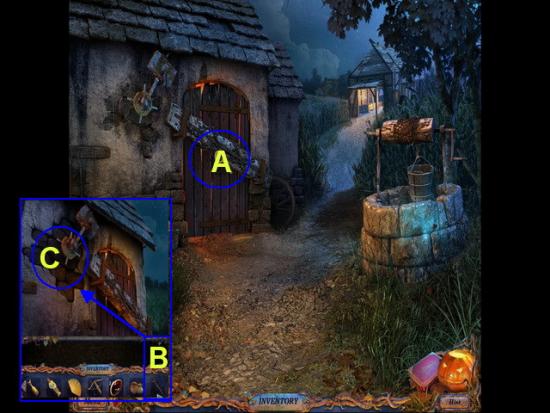
- A. Click on the FORGE door to zoom in.
- B. Take the OVEN HANDLE and use on the DOOR MECHANISM. Click once to open the door lock.
- Go inside the forge.
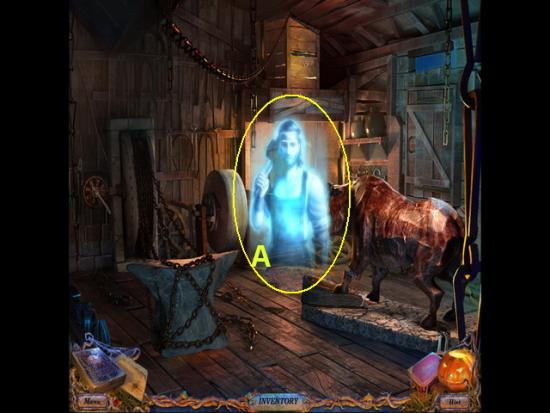
- A. Click on the GHOST and watch the cut scene video.
- Return to the stable.
Stable
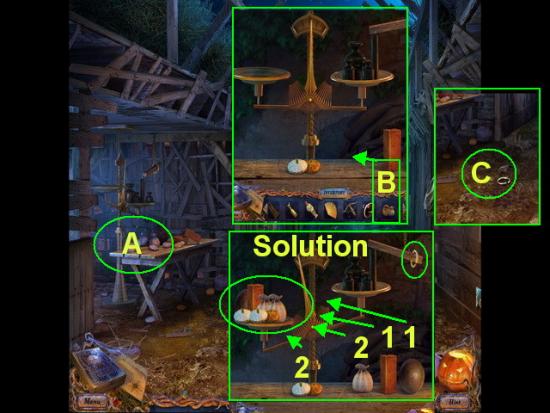
- A. Click on the TABLE to the far left of the scene to zoom in and trigger a mini game puzzle.
- B. Add the FILLED SACKS from inventory to the game board to activate.
- Mini Game – Objective is to place items on the left side of scale to weigh more than the right so the ring falls off onto the ground.
- Solution – 1 Brick, 1 Ball, 2 Sacks, 2 Squash on the left side of scale. (Click again to get a second item)
- C. Take the RING into inventory when it falls to the ground.
- Return to forge.
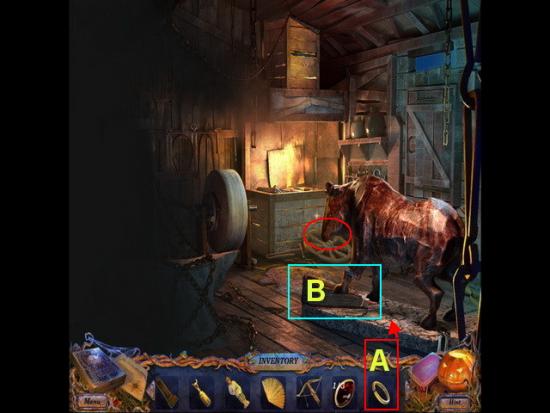
Forge
- A. Take the RING from inventory and place on the BULL’s NOSE.
- B. Click on the BELLOWS and take into inventory.
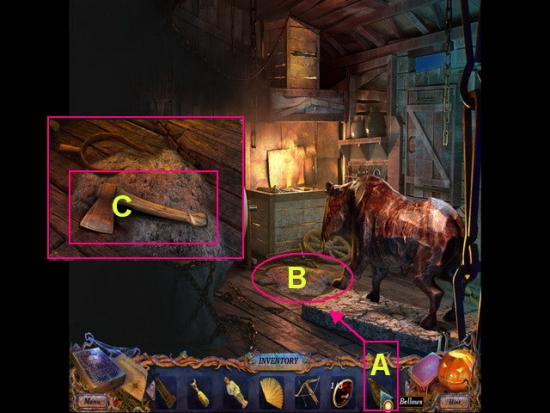
- A. Take the BELLOWS from inventory and use it on the ASHES.
- B. Blow away the ASHES with the bellows.
- C. Take the AXE into inventory.
- When the area starts to sparkle click on it for a HOS.
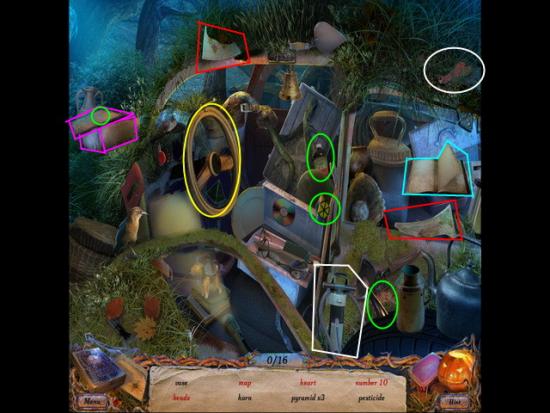
HOS
- Locate all hidden objects written in black text.
- Locate all hidden objects written in red text which take multiple steps to complete.
- The following red text items are shown circled in the image above.
- MAP – Take both pieces of the map and join them. They are shown circled in red.
- NUMBER 10/SQUARE/BEAR – Click on the notebook to zoom in. Take the pencil and draw a “+” sign between the “7” and “3” and click on the “10” when it appears. The square is on the other page along with the bear. The notebook is shown circled in light blue.
- TAMBOUR – This is located on the steering wheel of the car and shown circled in yellow.
- HEART – Click on the balloon and the air pump. Combine them and a heart balloon will appear. These items are shown circled in white.
- BEADS/YO-YO/PYRAMID – Click on the box at the top left of scene to open it. The yoyo is outside of it and the pyramid is on the lid. You must collect all the beads and string them together before you can click on them. This box is shown circled in dark pink.
- Once you locate all the hidden objects BUG KILLER and a HORN (1 of 2) will be added to inventory.
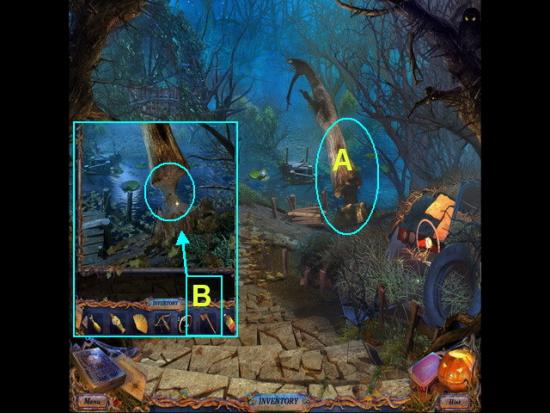
Garden
- A. Click on the ROTTEN TREE to zoom in.
- B. Take the AXE from inventory and chop down the tree to make a bridge.
- Go forward to the Pavilion.
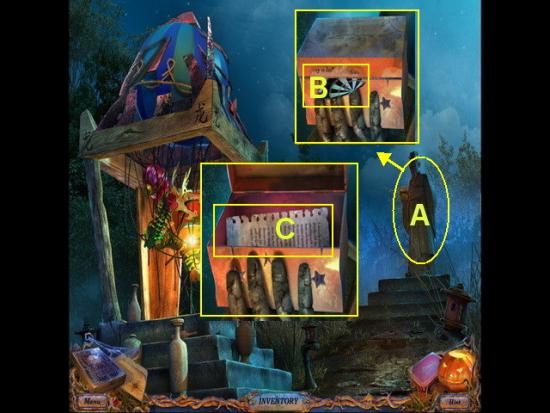
Pavilion
- A. Click on the STATUE to zoom in.
- B. Take the piece of TARGET paper into inventory.
- C. Read the NOTE inside the BOX.
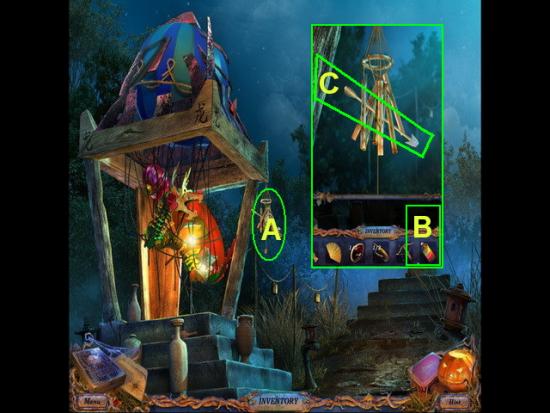
- A. Click on the WINDCHIMES to zoom in.
- B. Use the BUG SPRAY on the chimes.
- C. Take the ARROW into inventory.
- Return to the forge.
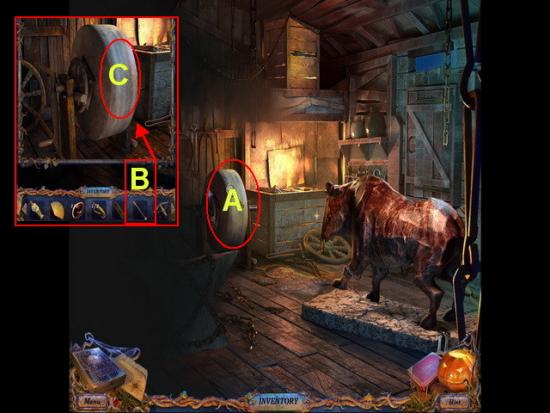
Forge
- A. Click on the GRINDING WHEEL to zoom in.
- B. Take the BLUNT ARROW from inventory and sharpen it on the wheel.
- C. Place the ARROW back into inventory and now you have a LOADED CROSSBOW in inventory.
- Return to the pavilion.
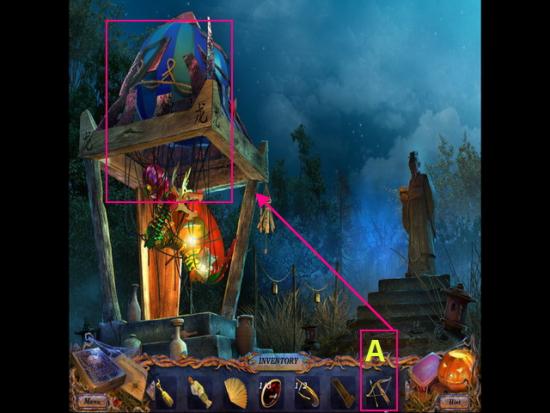
Pavilion
- A. Use the LOADED CROSSBOW on the BALLOON in the Gazebo.
- When the area turns blue and begins to sparkle play the HOS.
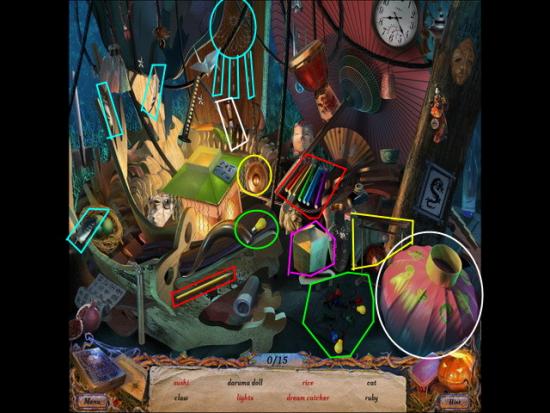
HOS
- Locate all hidden objects written in black text.
- Locate all hidden objects written in red text which take multiple steps to complete.
- The following red text items are shown circled in the image above.
- RAINBOW – Take the colored pencil and add to the group of pencils for a rainbow. This is shown circled in red.
- DREAMCATCHER – Locate the three feathers in the scene and add them to the dream catcher. These elements are circled in light blue.
- LIGHTS – Locate the yellow bulb and add to the lights. When the strand lights up you can click on it. These are shown circled in bright green.
- SUSHI/LAVENDER CIRCLE – Click on the Chinese food box to zoom in. Take the two colored discs and place the blue one on the red one. When it turns lavender click on it. Take the sushi and add it to the rice. This is shown circled in dark pink.
- CHOPSTICKS/RICE – Take the knife and use it to cut a hole in the pink lantern at the bottom right corner of the game screen. Click to zoom in and take the chopsticks and rice which are inside. These are shown circled in white.
- GONG – Add the gong to the frame shown circled in yellow.
- Once you locate all hidden objects you will be given the 2nd of 3 RUBY and the 2nd of 2 HORNS into inventory.
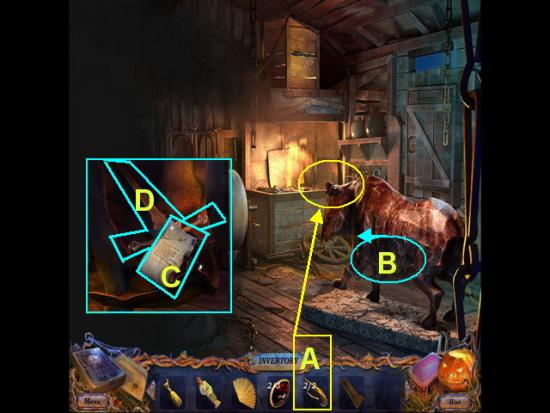
Forge
- A. Take the HORNS from inventory and place on the BULL.
- B. Click on the BULL’S STOMACH to zoom in and remove fur.
- C. Read the PAPER. Watch the cut scene video.
- D. Take the SWORD into inventory.
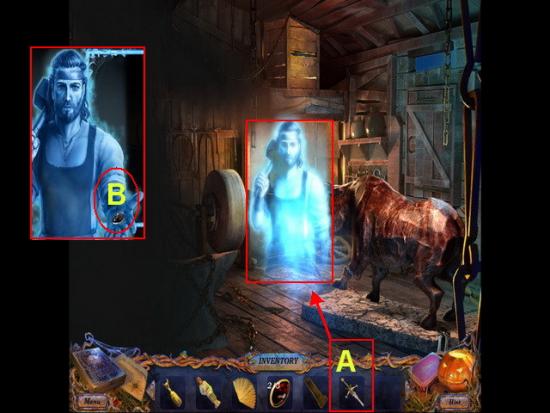
- A. Talk to the BLACKSMITH GHOST
- B. Give the SWORD to the ghost.
- C. Take the RUBY (3 of 3) from the ghost.
- Return to the garden.
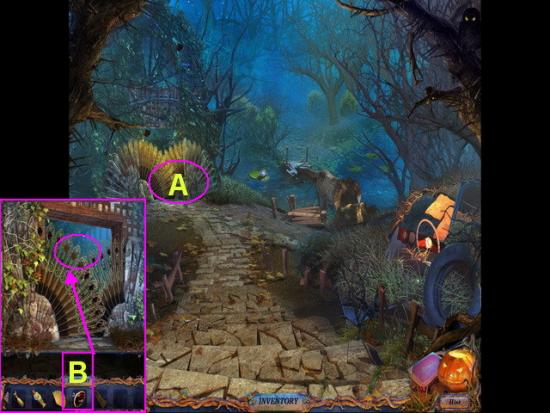
Garden
- A. Click on the PEACOCK FEATHER leaves to zoom in.
- B. Take the 3 RUBIES from inventory and add to the leaves.
- This will open the gateway.
- Go forward into the greenhouse.
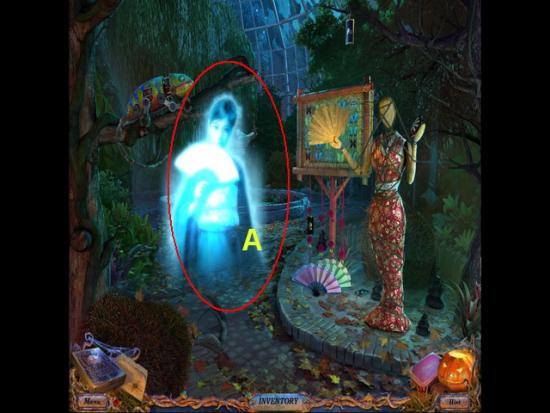
Greenhouse
- A. Click on the GHOST to talk to her.
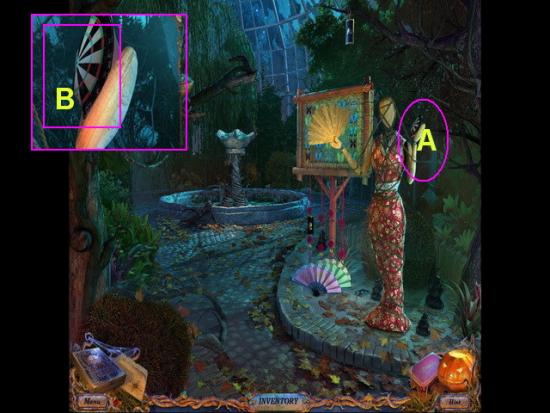
- A. Click on the GEISHA’S HAND to zoom in.
- B. Take the half of TARGET BOARD into inventory.
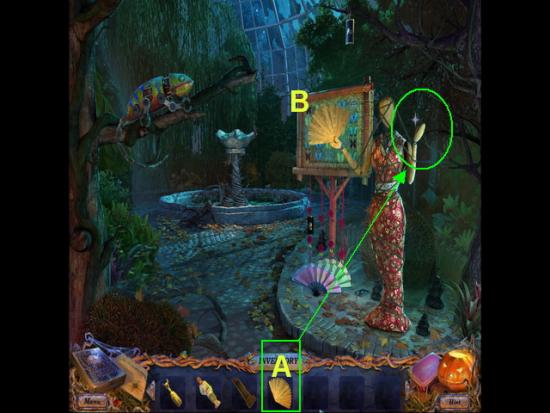
- A. Take the FAN from inventory and place in the GEISHA’S empty hand.
- B. This will cause both fans to move out of the way of the BUTTERFLY BOARD which triggers a mini game once you click on it.
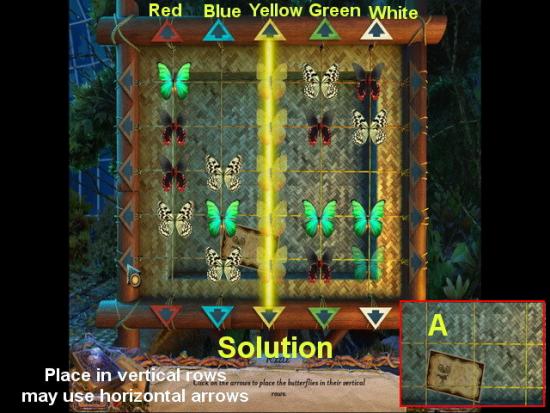
Mini Game
- The objective of this game is to move the butterflies into vertical rows matching the colors of the arrows along the top. You must do this one color at a time in any order.
- The arrows along the sides allow you to move the butterflies horizontally if needed.
- Each time you complete a vertical row of butterflies it will disappear.
- Once all butterflies are gone you will see a ticket on the board.
- A. Take the TICKET into inventory.
- Return to the hall.
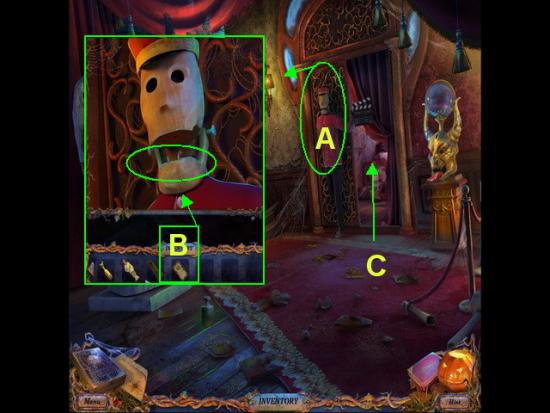
Hall
- A. Click on the PUPPET to zoom in.
- B. Take the TICKET from inventory and place in the PUPPET’S MOUTH to stamp it.
- C. The puppet will move the clap board and give you entrance to the projection room.
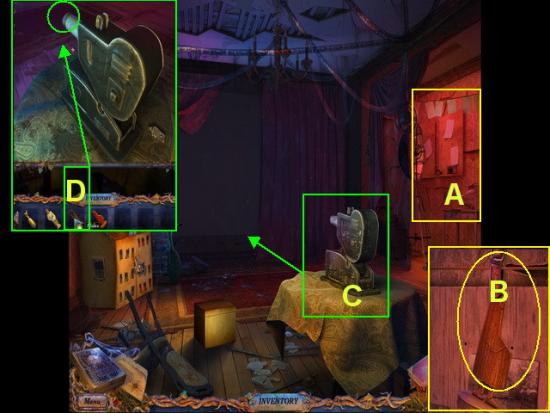
Projection Room/Theater
- A. Click on the SIDE ROOM along the right of the scene and scroll through the pictures and read all of the text.
- B. When you are done take the GAME PIECE into inventory.
- C. Click on the PROJECTOR to zoom in.
- D. Take the SLIDES from inventory and place them in the projector. You won’t be able to use it until you find the lens.
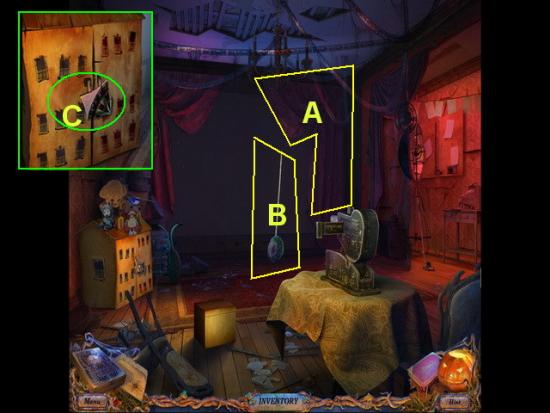
- A. Click on the CURTAIN and add the TASSEL from inventory to tie it back.
- B. Take the NET into inventory.
- C. Click on the DOLL HOUSE to zoom in. Take the TARGET PIECE into inventory.
- Return to the greenhouse.
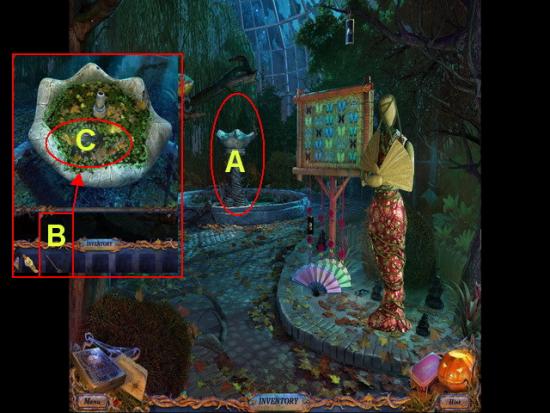
Greenhouse
- A. Click on the FOUNTAIN to zoom in.
- B. Take the NET from inventory and use it on the fountain.
- C. Place the STAR KEY in your inventory.
- Return to the Pavilion.
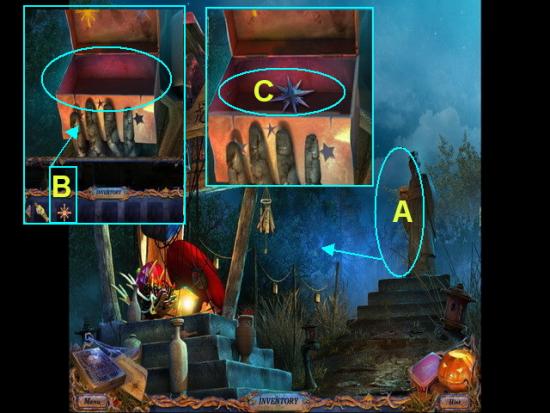
Pavilion
- A. Click on the BOX in the statue’s hand.
- B. Take the STAR KEY from inventory and place in the box. Close the box.
- C. Open the BOX and take the BLUE STAR KEY into inventory.
- When the area begins to sparkle by the gazebo click on it for a HOS.
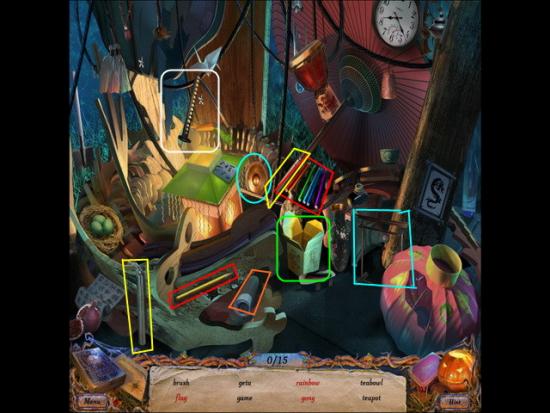
HOS
- Locate the hidden objects listed in black text.
- Locate the hidden objects listed in red text which will take multiple steps to complete.
- Red text items are as follows;
- RAINBOW – Take the yellow pencil and add to the others. These are shown circled in red.
- KATANA – This sword is found circled in white. You will need to click on it to lift it up.
- NUMCHUCKS – Shown circled in yellow place the two halves together.
- GONG – Circled in light blue place the gong and frame together.
- FLAG – The flag is rolled up and circled in orange.
- COMB/BRUSH – Click on the Chinese food package to zoom in. Both items are inside. The container is shown circled in green.
- Once you locate all hidden items a PAINT BRUSH and INK will be placed in your inventory.
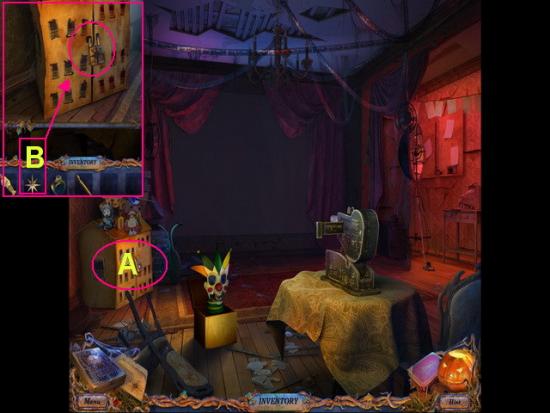
Projection room
- A. Click on the DOLL HOUSE to zoom in.
- B. Take the STAR KEY from inventory and use on the lock.
- Once the house opens it will start to sparkle. Click on it for a HOS.
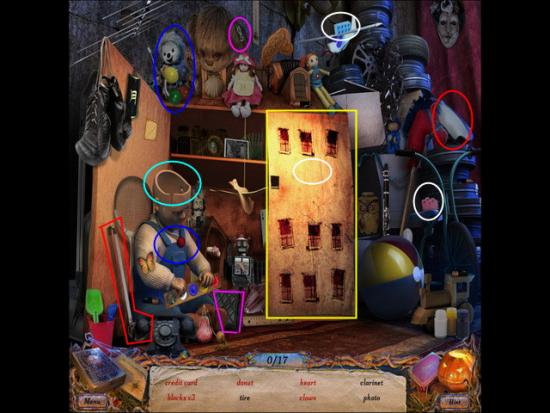
HOS
- Locate the hidden objects listed in black text. Click on the cabinet circled in yellow to find many of the black text items.
- Red text items require more than one step to locate.
- 3 BLOCKS – These are shown circled in white with one behind the cabinet shown closed and circled in yellow.
- HEART – Behind yellow circled cabinet door.
- DONUT – Take the ladle in red and place on the white area shown circled in red. A donut will form here.
- BULB – The bulb is inside the puppet’s head shown circled in light blue.
- CLOWN – Locate the nose and place it on the clown doll shown circled in dark blue.
- LIPSTICK/CREDIT CARD – Take the zipper and fix the purse. Both items are inside. Shown circled in dark pink.
- Once you find all hidden objects PAINTS and a JAPANESE CHARACTER will be added to inventory.
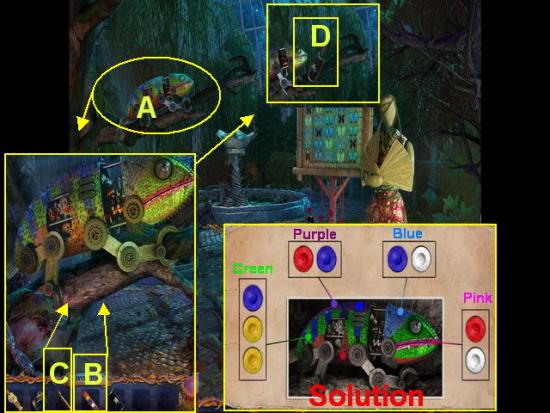
Greenhouse
- A. Click on the CHAMELEON to zoom in.
- B. Take the PAINTS and add to the scene.
- C. Take the PAINTBRUSH and add to the scene which will trigger a mini game.
- Mini Game – Paint the Chameleon the colors indicated. The solution is shown in the image above with the following color combinations.
- Purple – Blue and Red
- Pink – Red and White
- Light Blue – Blue and White
- Green – Blue and Yellow twice
- The bottom area clears your brush.
- Dip the brush into the color combinations and you will see it on the tip of the brush. Then color it as shown in the image above.
- D. Once you complete the chameleon he will activate and the JAPANESE FIGURINE will be taken from the tree to his face. Click on the JAPANESE FIGURINE and add to your inventory.
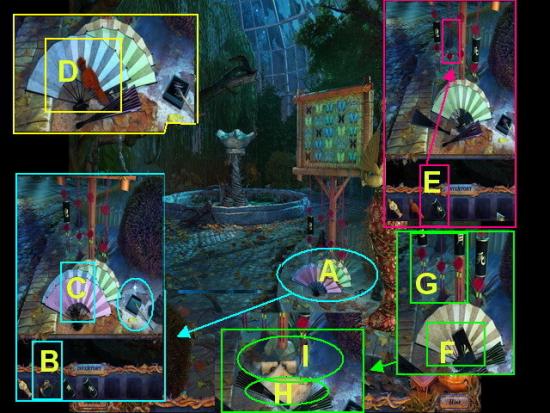
- A. Click on the FANS to zoom in.
- B. Take the INK from inventory and pour into bowl.
- C. Using the brush a symbol will paint on the fan.
- D. Take the GAME PIECE into inventory.
- E. Take the JAPANESE FIGURINE into inventory. Place on the CORD above.
- F. Take the second JAPANESE FIGURINE under the fans into inventory.
- G. Place the JAPANESE figurine on the final cord as shown.
- H. Read the note and watch the video scenes.
- I. Take the HYPNOTIC RECIPE into inventory.
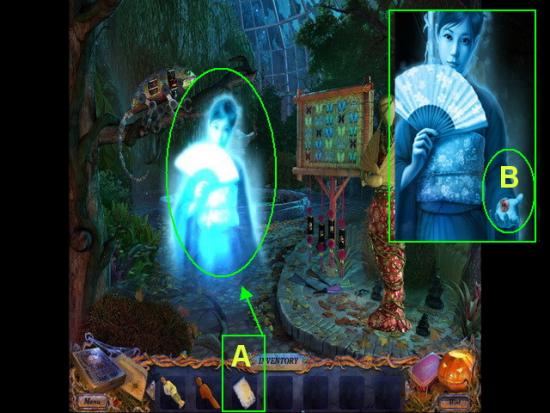
- A. Click on the GHOST and talk to her. Give her the HYPNOTIC RECIPE.
- B. Take the RED BELL from the GHOST.
- Return to the projection room.
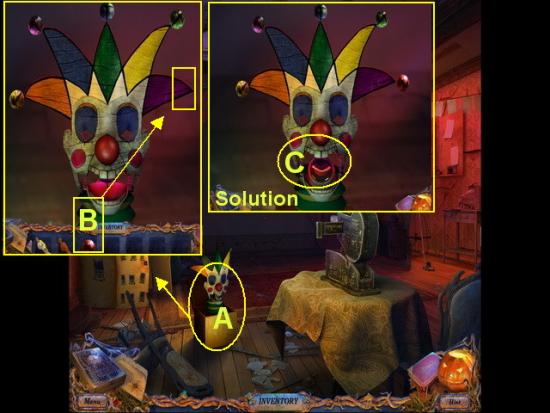
Projection Room
- A. Click on the JACK IN THE BOX to activate it.
- B. Take the RED BELL from inventory and place on the empty spot. This will activate a mini game puzzle.
- Mini Game – The objective here is to move the bells so they match the color of the triangles under them on the hat.
- You will have to slide the bells out down the lines to get them to the correct spot and there are several possible solutions to this puzzle.
- The solution is shown in the image above.
- C. When finished the mouth will open. Take the LENS into inventory.
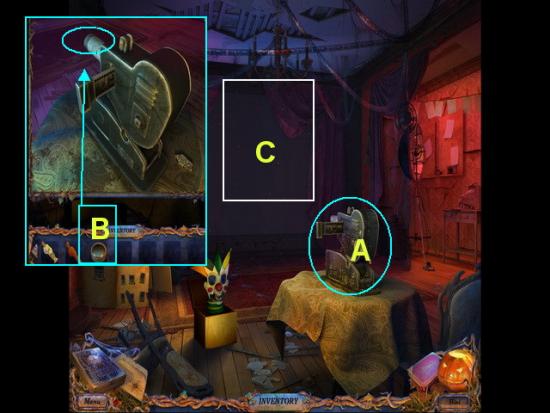
- A. Click on the PROJECTOR to zoom in.
- B. Take the LENS from inventory and place on front of projector.
- C. When the slide show begins scroll through the slides and take note of where the colored arrows point as this is the answer to a mini game puzzle.
- Click on the game book.
Game Box
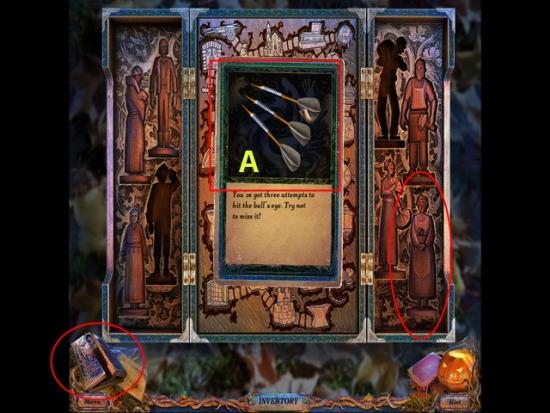
- A. Click on the GAME BOX in the corner and open it.
- B. Place the GAME PIECE in the open slot complete the COOK and take the ARROWS into inventory.
- Return to the stables.
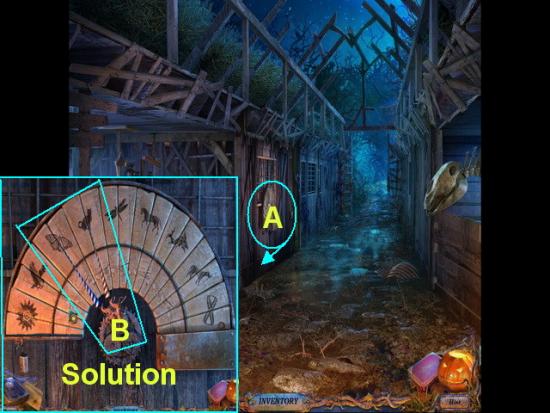
Stable
- A. Click on the center DOOR LOCK with the fan frame to zoom in.
- B. Place the RED ARROW on the BUTTERFLY and the BLUE ARROW on the CAT to unlock the lock.
- The door is now open and you may pass into the next area.
- When the area turns blue and sparkles click for a HOS.
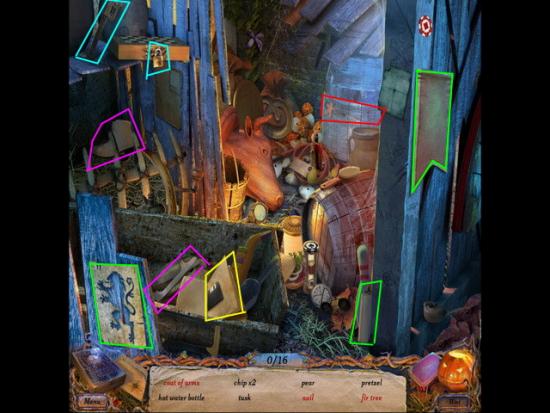
HOS
- Locate all the hidden objects listed in black text.
- Locate the items in red text that require more than one step to find.
- COAT OF ARMS – Take the lion stencil and place on the flag then take the can of paint and paint over the stencil to create the coat of arms. Shown circled in green above.
- ICE SKATE – Shown circled in dark pink attach the blade to the shoe.
- GARLAND – Shown circled in red click on the paper man and it will expand.
- NAIL – Use the wrench circled in light blue and open the box. Inside you will find the nail.
- BEADS – Click on the pages of the book shown circled in yellow and the beads are between the pages.
- Once you find all the hidden items a SALT SHAKER and a PRETZEL will be added to your inventory.
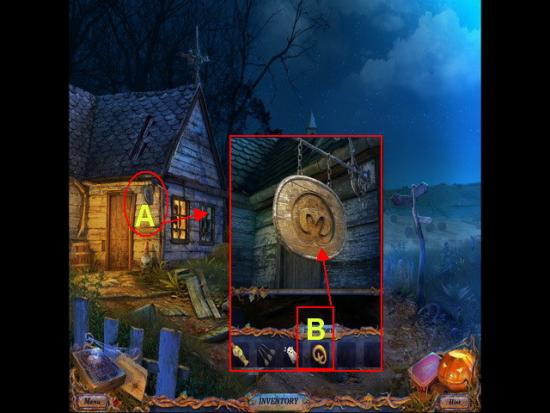
Field
- A. Click on the SIGN to zoom in.
- B. Take the PRETZEL and place in the indentation of the sign.
- The door is now open. Go inside house.
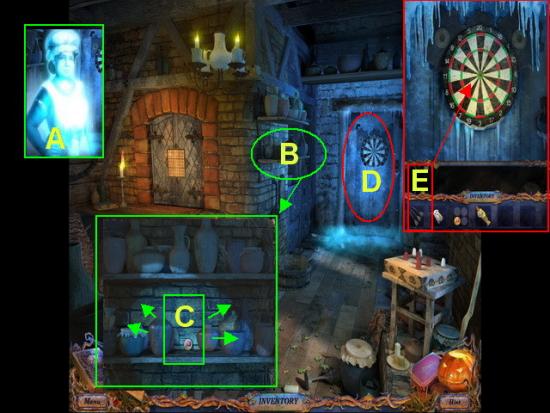
Bakery
- A. Click on the GHOST and talk to her.
- B. Click on the SHELVES to zoom in.
- C. Click on four of the JARS to move them out of the way. Take the TOKEN into inventory.
- D. Click on the DOOR to the FREEZER and place the TARGET from inventory on it.
- E. Take the DARTS from inventory and use on the board by clicking on it three times.
- The door will open and the room will sparkle. Click for a HOS.
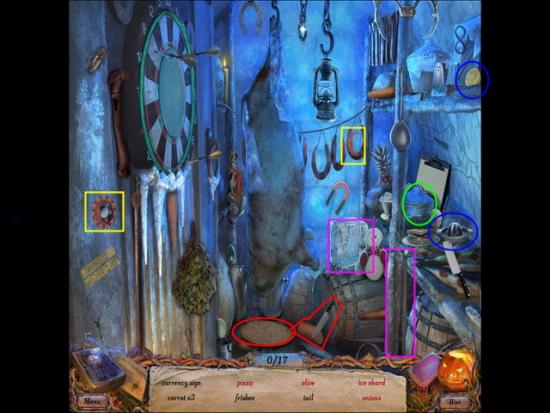
HOS
- Locate all the items written in black text.
- Locate all the items written in red text that require more than one step to complete as follows;
- EGG/OLIVE – Shown circled in green click on the blue canister and find the egg and olive inside.
- LEMON JUICE – Shown circled in dark blue take the lemon and place it on the juicer.
- NIGHT AND DAY – Take the moon symbol and place it with the sun symbol shown circled in yellow.
- ICE SHARD – Take the ice pick and use it on the block of ice shown circled in dark pink.
- PIZZA – Take the knife and slice the pepperoni and place on the pizza dough shown circled in red.
- Once you locate all the hidden objects a SALT SHAKER and ICE CUBE is added to inventory.
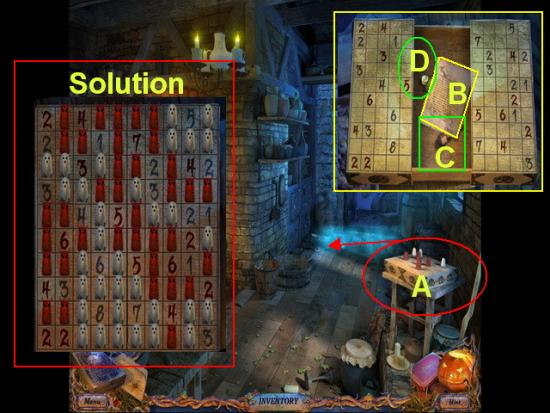
- A. Click on the table at the far right to zoom into the mini game.
- Mini Game – The objective is to click on the salt shakers and place them on the board to fill every empty cell on the board. The digits represent the number and color of salt shakers needed around those numbers.
- Solution – Click on the board and you will get a red shaker and click it again and it will toggle to white. If you click a third time it will leave the board. The solution is shown in the image above.
- Once you finish the game the board will open up.
- B. Take the NOTE and read it watch the video cut scenes.
- C. Take the WOODEN BOLT into inventory.
- D. Take the HYPNOTIC into inventory.
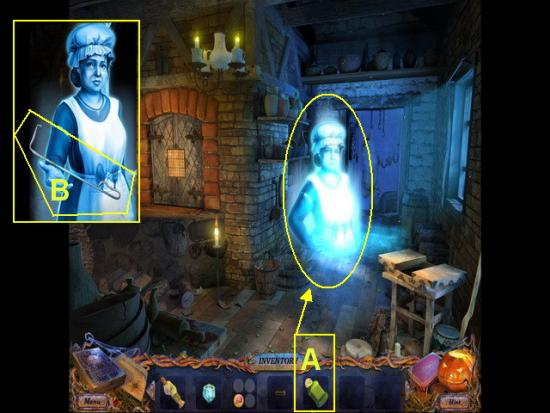
- A. Talk to the GHOST and give her the HYPNOTIC.
- B. Take the ROD from the GHOST and place in your inventory.
- Return to the forge
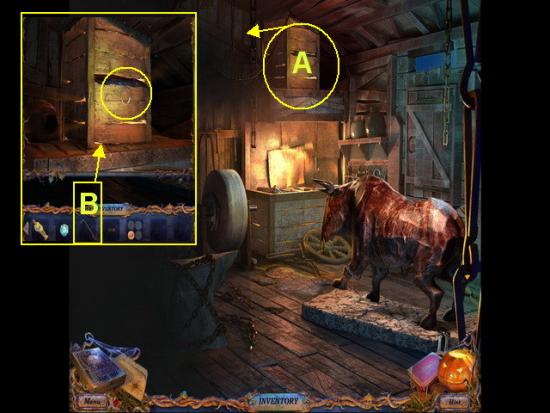
Forge
- A. Click on the area above the bull to zoom in.
- B. Take the ROD from inventory and use it to open the box.
- This will trigger a mini game puzzle.
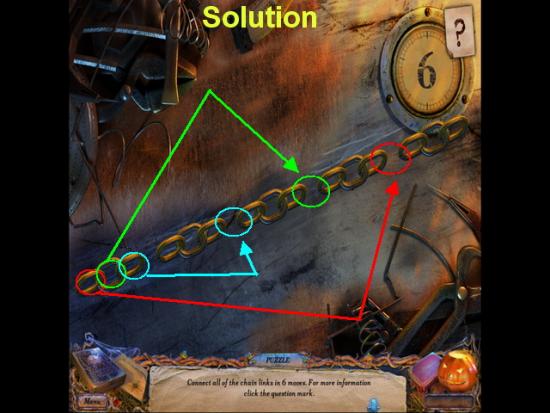
- Mini Game – The objective here is to move chain links so that all the chain links are connected.
- Solution – The solution is shown above and is color coded. Take the last three rings on the far left and place them in the empty slots to solve the puzzle.
- Once you finish this puzzle the large anvil stone will move out of the way.
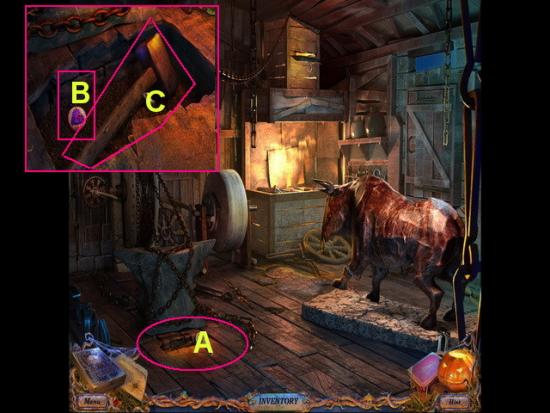
- A. Click on the open area on the floor to zoom in.
- B. Take the TOKEN into inventory.
- C. Take the HAMMER into inventory.
- Return to the bridge.
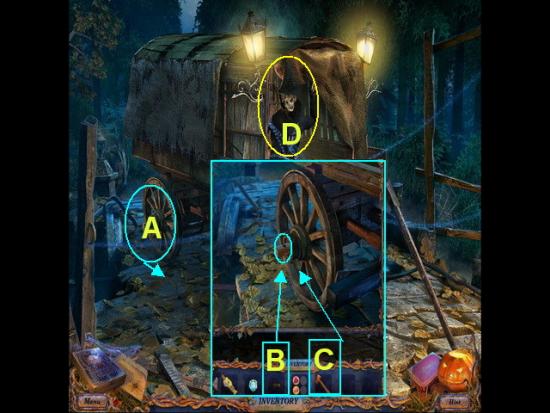
Bridge
- A. Click on the WHEEL to zoom in.
- B. Take the WOODEN BOLT from inventory and place on the broken wheel.
- C. Take the HAMMER and repair the wheel on the wagon.
- D. Talk to the GHOST. The Witch’s spell is broken and he will move off of the bridge allowing you to pass.
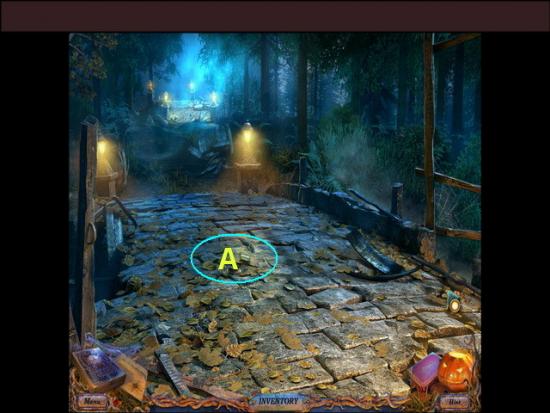
- A. Take the piece of CHALK from the bridge and place in inventory
- Go forward.
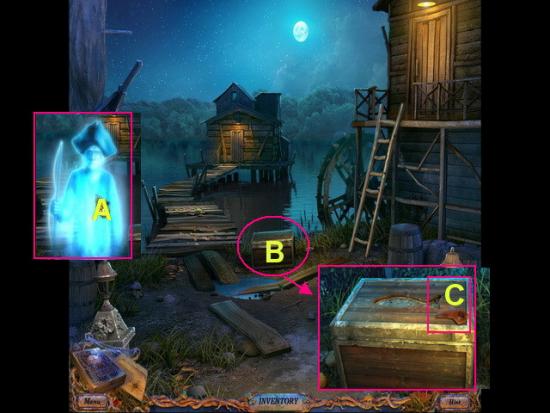
Shore
- A. Click on the GHOST to talk to him.
- B. Click on the CHEST to zoom in.
- C. Take the GAME PIECE into inventory.
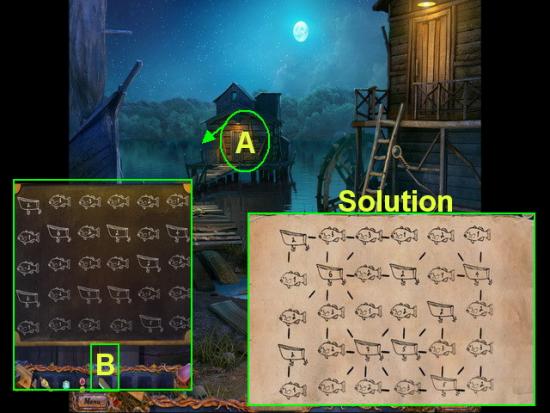
Fisherman’s House
- A. Click on the DOOR of the house to trigger a mini game.
- B. Take the CHALK from inventory and place on the game board.
- Mini Game – Take the fish and draw lines from them that match the number on each fish.
- Solution – The solution is shown in the image above.
- Once you complete the puzzle you may go inside the house.
- Once inside click on the sparkling area at the top right for a HOS.
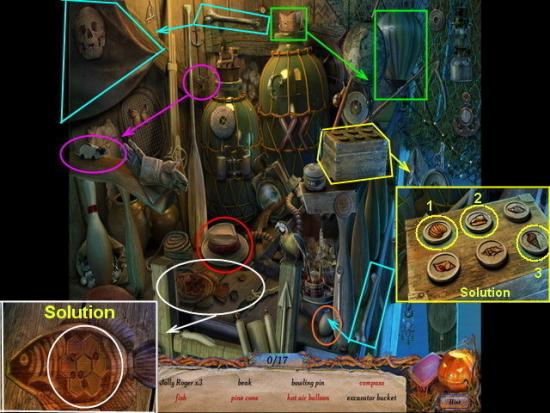
HOS
- Locate all the hidden objects written in black text.
- Locate all the hidden objects written in red text which may require multiple steps to complete.
- PINE CONE – Move the hat and the pine cone is underneath it. Shown circled in red.
- HOT AIR BALLOON – Take the basket and add to the balloon. This is shown circled in green at top of scene.
- JOLLY ROGER X 2 – Take the BONES from top and bottom of scene and add to the SKULL on FLAG in the upper left hand corner of the scene. This is shown circled in light blue.
- CLOCKWORK TOY – Take the spinner key and add it to the mouse. This is shown circled in dark pink.
- DUCK – Click on the EGG to break it and duckling is inside. This is shown circled in orange bottom right of scene.
- FISH – Click on the wooden fish to zoom in. Take the pieces scattered around it and complete the puzzle the solution of which is shown circled in white.
- SPINNER/COMPASS – Note the BOX shown circled in yellow. This is a mini game puzzle. You will also see three shells located in other areas of the scene (also shown circled in yellow) which are the answers to the puzzle box. Click these three shell buttons in the numbered order shown to open the box. Once it is open you will find the spinner inside which is fish bait that is silver in color, as well as the compass.
- Once you have located all the items a HOOK ON THE ROPE and a JOLLY ROGER will be added to inventory.
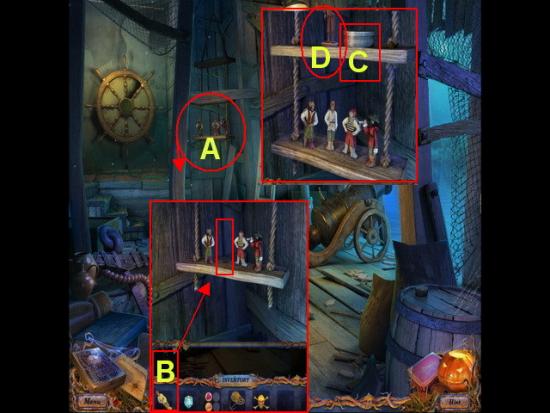
- A. Click on the SHELF with the figurines to zoom in.
- B. Take the PIRATE figurine and add to the empty space.
- C. Take the CLEANSING POWDER into inventory.
- D. Take the GAME PIECE into inventory.
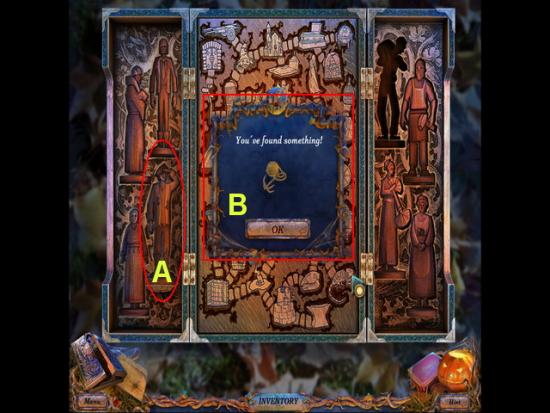
Game Box
- Click on the game box to zoom in.
- A. Take the game pieces and place in the empty slot.
- B. Take the HOOK AND ROPE into inventory.
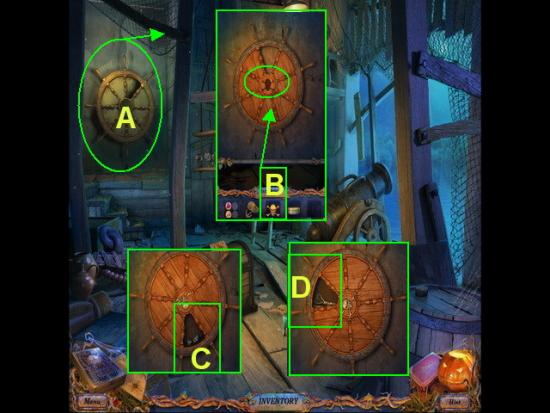
- A. Click on the SHIP WHEEL to zoom in.
- B. Place the JOLLY ROGER from inventory into the indentation.
- C. Click on the wheel twice and remove the SILICONE
- D. Click the wheel two more times and remove the SCISSORS
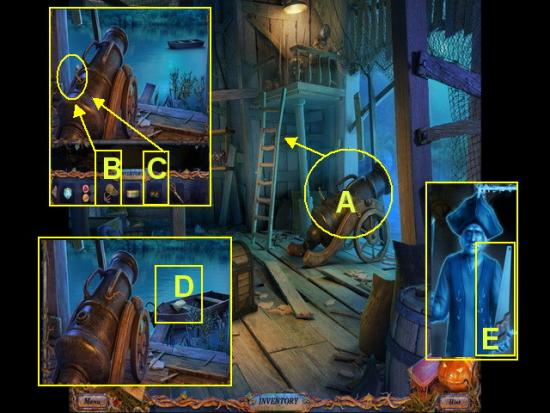
- A. Click on the CANNON to zoom in.
- B. Take the HOOK AND ROPE and add to the CANNON.
- C. Take the SILICONE and light the fuse
- D. When the BOAT is brought to the window click on the NOTE and read it.
- E. Talk to the GHOST and give him the BOAT. He will give you a SAW for your inventory.
- Go outside to the shore.
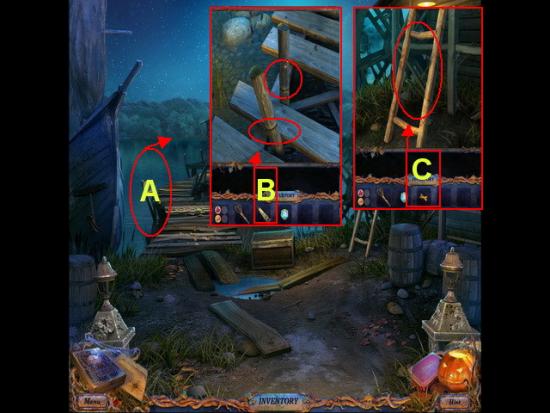
Shore
- A. Click on the area near the PIER to zoom in.
- B. Take the SAW from inventory and chop off the two wood posts.
- C. Place the planks and repair the ladder. Go up the ladder into the mill.
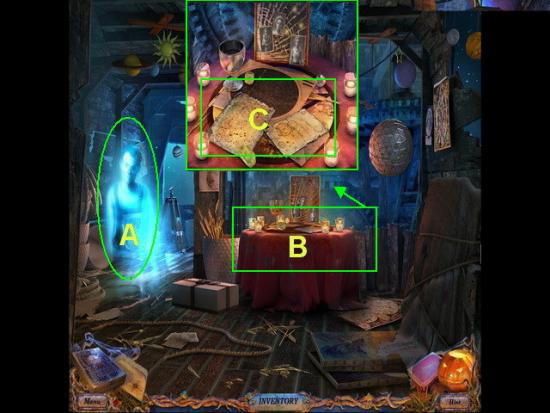
Mill
- A. Click on the GHOST and talk to him.
- B. Click on the TABLE to zoom in.
- C. Click on the papers and read them. The paper on the left is a hint and shows constellation patterns.
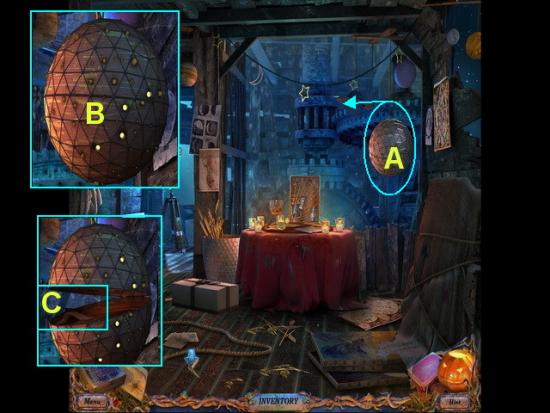
- A. Click on the large BALL at the top right of the scene to zoom in.
- B. Mini Game – Click on the lights in the pattern shown when it matches the ones on the paper the ball will open.
- C. Take the LOCK OF HAIR into inventory.
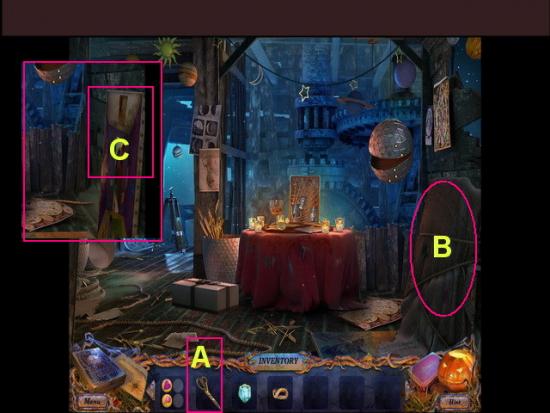
- A. Take the SCISSORS from inventory
- B. Use scissors to cut the ropes on the canvas.
- C. Take the RAG into inventory.
- This will trigger a mini game puzzle.
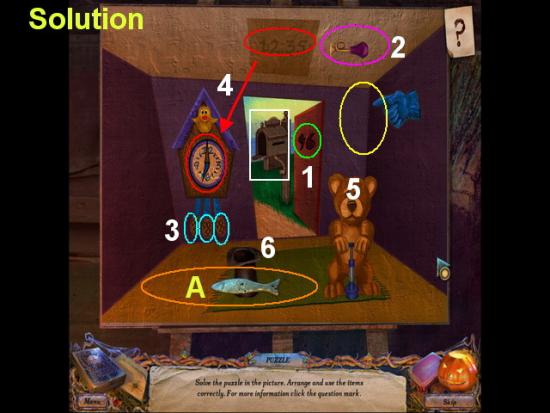
- Mini Game – Follow the steps to complete the puzzle.
- Steps are shown numbered in the image above.
- 1. Click on the “96” and place on the door
- 2. After door opens place envelope in mailbox.
- 3. In mailbox take the parts from the horn and assemble them with the ones on the roof.
- 4. Assemble the cat by placing all of its parts in the frame.
- 5. Wake the cat with the horn. He will run away revealing the time you need to set the clock to which is “12:35”
- 6. Place the weights on the end of the clock and set the hands to 12:35
- You will now get a balloon.
- Click on the teddy bear and he will inflate the balloon.
- The hand will pop the balloon.
- A magic wand will appear.
- Use it on the top hat.
- When the puzzle is finished take the FISH into inventory.
- Return to the shore.
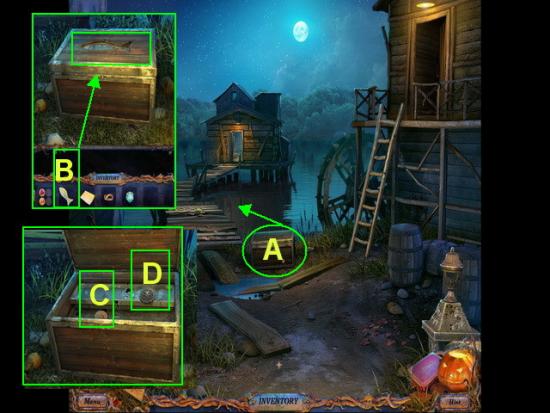
Shore
- A. Click on the CHEST to zoom in
- B. Take the FISH and place in the indentation to open the chest.
- C. Take the TOKEN into inventory.
- D. Take the DOUBLOON into inventory.
- Return inside the fisherman’s house.
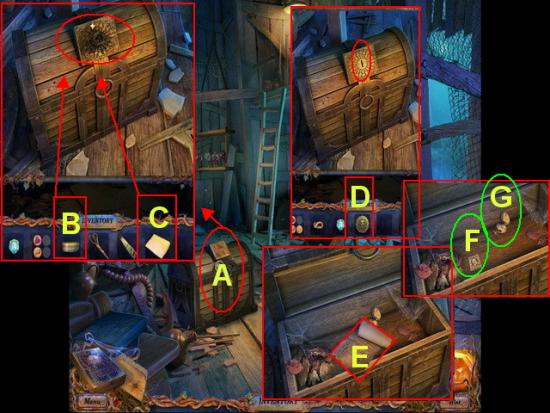
Fisherman’s house
- A. Click on the CHEST to zoom in.
- B. Take the CLEANSING POWDER and place on the top of chest.
- C. Take the RAG and clean the top.
- D. Take the DOUBLOON and place in the slot.
- E. Take the NOTE and read it. Watch cut scenes.
- F. Take the STAMP into inventory.
- G. Take the STOPWATCH into inventory.
- Return to the mill
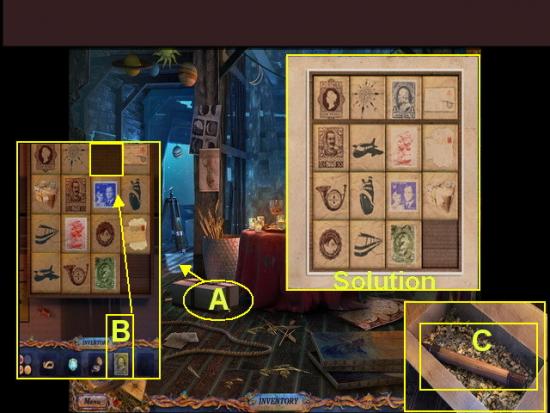
Mill
- A. Click on the BOX to zoom in for a mini game puzzle.
- B. Take the STAMP from inventory and add to the board.
- Solution is shown in image above – Place the stamps in vertical rows based on type and color.
- C. Take the SPYGLASS into inventory.
- Watch the cut scene videos.
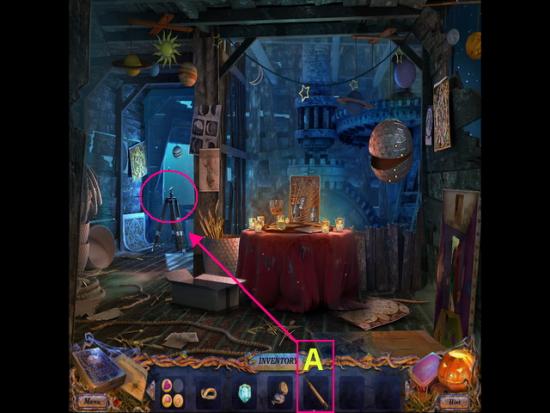
- A. Click on the SPYGLASS and place it on the TRIPOD.
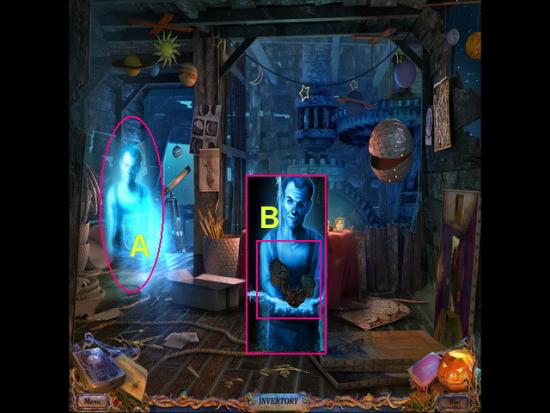
- A. Click on the GHOST to talk to him.
- B. Take the TALISMAN DOOR KEY from the ghost.
- Return to the second floor of the house.
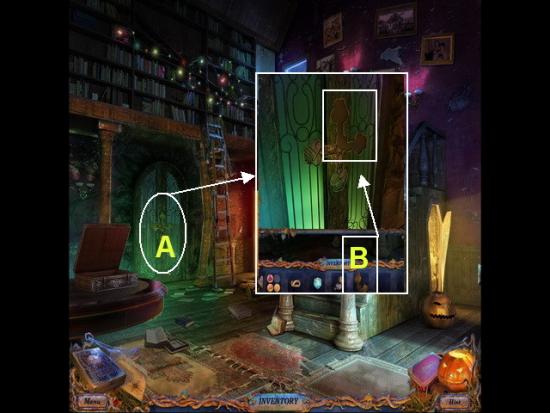
Second Floor
- A. Click on the WITCH’S ROOM DOOR to zoom in.
- B. Place the TALISMAN DOOR KEY from inventory into the slot.
- Go inside the Witch’s room.
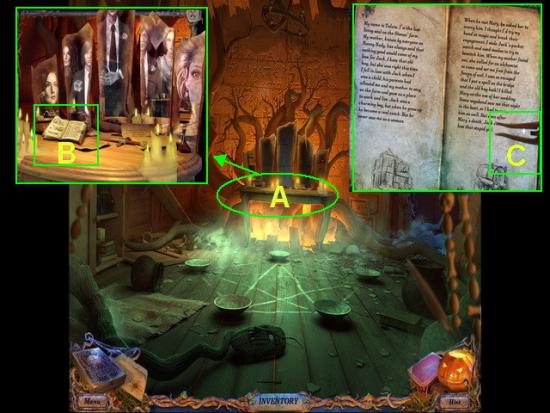
Witch’s Room
- A. Click on the TABLE to zoom in.
- B. Click on all the items on the table and read about them. Click on the DIARY to open it.
- C. Take the HAIRPIN into inventory from the diary page.
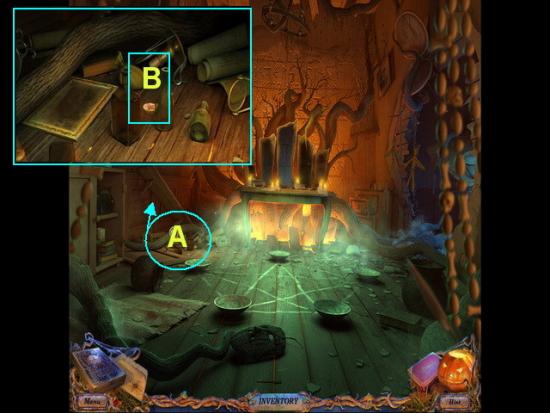
- A. Click on the BOTTLE to zoom in.
- B. Click to move the bottles then take the TOKEN into inventory.
- Return to the Bakery.
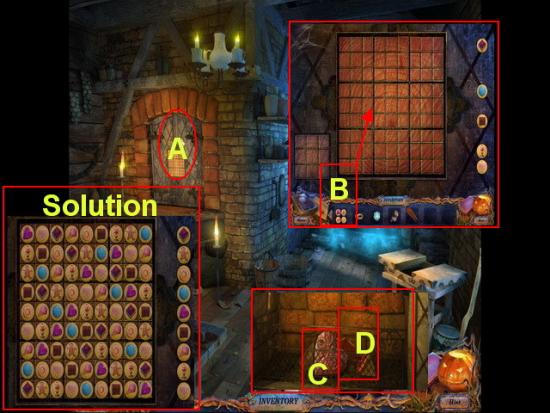
Bakery
- A. Click on the OVEN to zoom in.
- B. Take the 4 TOKENS from inventory and place on the game board to activate a mini game puzzle.
- Solution – Place the images in the grids which are “3 x 3”. You must have a different image in each square and you cannot have the same image in any vertical or horizontal row. Each set of nine images must be different.
- Take the tokens from the right side until they are all gone.
- There are multiple solutions to this puzzle. One is shown for you in the image above.
- Once you complete the puzzle a panel will open up.
- C. Take the HEART into inventory.
- D. Take the GAME PIECE into inventory.
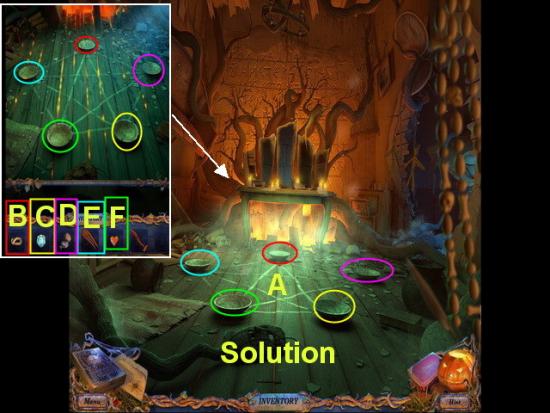
Witch’s Room
- A. Click on the BOWLS in the center of the floor to zoom in. Using the image above with the color coding place items in the bowl matching the following letters.
- B. Place the HAIR in the BOWL. (Red)
- E. Place the HAIRPIN in the bowl. (Yellow)
- F. Place the HEART in the bowl. (Pink)
- C. Place the ICE in the bowl. (Light Blue)
- D. Place the STOPWATCH in the bowl. (Green)
- Once all are filled the bowls will glow and items will appear in the center.
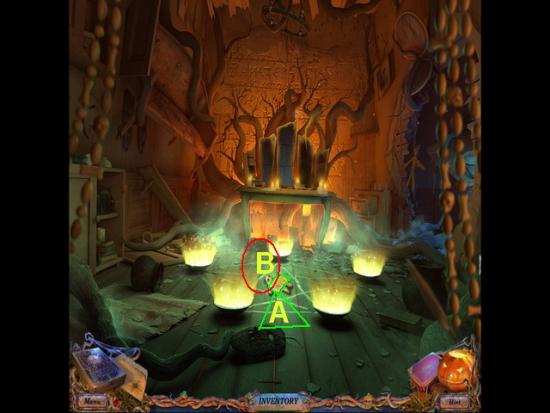
- A. Take the NOTE and read it watch the video cut scenes.
- B. Take the VOO DOO DOLL into inventory.
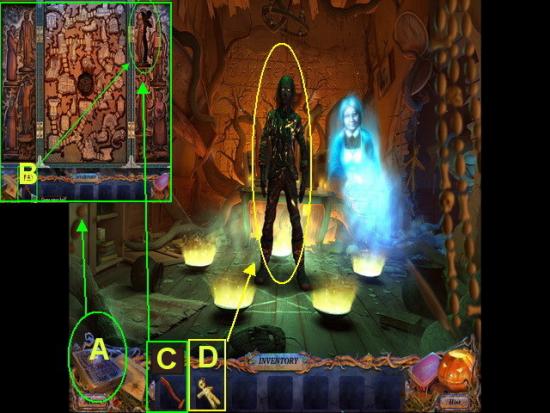
Game Box
- A. Click on the GAME BOX to open it.
- B. and C. Take all the final game pieces and add to the board.
- D. Give the VOO DOO doll to the BURNING GHOST.
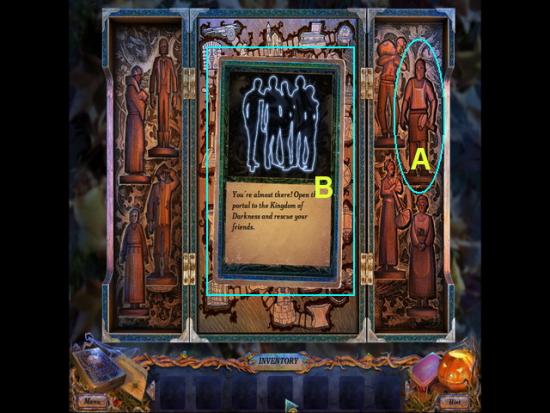
- The GHOST will give you the final GAME PIECE for inventory.
- A. Click on the GAME BOX to open and place the final piece.
- B. You now need to open the portal to free your friends.
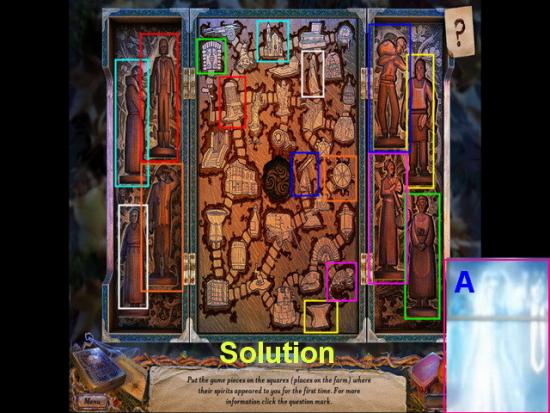
- A. Click on the GAME BOX to open.
- Mini Game – In the center of the game board is a map.
- Objective – Place the characters (Ghost’s you have met in the game) on the location where you first met them in the game.
- Solution is shown color coded and in text below.
- Green – Place COOK on the OVEN in the BAKERY.
- Red – Place JACK on the CHAIR.
- Pink – GARDENER on the CHAMELEON
- Yellow – BLACKSMITH on the FORGE
- Dark Blue – MILLER is on the SPYGLASS
- White – NANNY is on the MANNEQUINN
- Orange – FISHERMAN – HUT by RIVER.
- Light Blue – PRIEST is on the GRAVE.
- A. Watch the final cut scene video as the spirits are set free and Dylan’s friends are saved.
Congratulations!
You have completed Gamezebo’s walkthrough for Shadows: Price for Our Sins by 8 Floor Games. Be sure to check back often for game updates, Staff and user reviews, user tips, forum comments and much more here at Gamezebo.
More articles...
Monopoly GO! Free Rolls – Links For Free Dice
By Glen Fox
Wondering how to get Monopoly GO! free rolls? Well, you’ve come to the right place. In this guide, we provide you with a bunch of tips and tricks to get some free rolls for the hit new mobile game. We’ll …Best Roblox Horror Games to Play Right Now – Updated Weekly
By Adele Wilson
Our Best Roblox Horror Games guide features the scariest and most creative experiences to play right now on the platform!The BEST Roblox Games of The Week – Games You Need To Play!
By Sho Roberts
Our feature shares our pick for the Best Roblox Games of the week! With our feature, we guarantee you'll find something new to play!Demon Piece Races – All Race Buffs
By Adele Wilson
Our Demon Piece Races guide details all of the buffs, rarities, and characteristics for each race in the One Piece Roblox game.


