- Wondering how to get Monopoly GO! free rolls? Well, you’ve come to the right place. In this guide, we provide you with a bunch of tips and tricks to get some free rolls for the hit new mobile game. We’ll …
Best Roblox Horror Games to Play Right Now – Updated Weekly
By Adele Wilson
Our Best Roblox Horror Games guide features the scariest and most creative experiences to play right now on the platform!The BEST Roblox Games of The Week – Games You Need To Play!
By Sho Roberts
Our feature shares our pick for the Best Roblox Games of the week! With our feature, we guarantee you'll find something new to play!All Grades in Type Soul – Each Race Explained
By Adele Wilson
Our All Grades in Type Soul guide lists every grade in the game for all races, including how to increase your grade quickly!
Gemini Rue Walkthrough
Welcome the Gemini Rue walkthrough on Gamezebo. Gemini Rue is a point-and-click adventure game played on PC created by Wadjet Eye Games. This walkthrough includes tips and tricks, helpful hints, and a strategy guide to how to complete Gemini Rue.
Gemini Rue – Game Introduction
Welcome the Gemini Rue walkthrough on Gamezebo. Gemini Rue is a point-and-click adventure game played on PC created by Wadjet Eye Games. This walkthrough includes tips and tricks, helpful hints, and a strategy guide to how to complete Gemini Rue.
Controls
Moving Around
To walk around, simply click on the screen where you want to go. Sometimes it works better if you keep your mouse button pressed down (for example if you’re trying to avoid the stompers in Center 7).
At places where you can exit a map on the edge of the screen, your cursor “crosshairs” will change into a diamond shape and say “exit”. However, if you need to leave a map by going through a door, you either need to click inside the open door (if you need to walk straight north) or on the other side of the door (for walking east or west) to walk through. Your cursor won’t change in these cases.
Inventory
Your cursor will also change to a diamond shape when there’s an object or person you can interact with. Right click on the object to open your inventory.
Inside the inventory you will get various options to interact with the object you selected. The main four actions are:
- Eye: Using the eye can sometimes give you valuable information on something. It can also be used to open doors with retina scanners.
- Hand: The most commonly used option. This can be used to inspect things, manually open doors, open doors with thumb print scanners etc.
- Mouth: Use this to talk to people. Sometimes you can also call out to see if there’s someone behind a door etc.
- Foot: Can be used to kick things, step on ledges etc.
Below the main actions you will see the items you have in your inventory. Right click on an item to get information about it. This is sometimes essential to find information you need to unlock the next part of the game. Left clicking the object will use that object on the person or object you’re interacting with.
At times there will be a second character following your main character. You can use this character to do things by right clicking on them and then selecting the hand option. This will give you a message like “Use Sayuri on…” You can then left click the object you want Sayuri to interact with.
Communicator
Your communicator is an essential tool you can use to call people or look up information. You can access it by clicking the icon in the top left of your screen. Although it doesn’t exactly function to keep track of your quests, reading the notes on your communicator may help you remember what you’re meant to be doing next. Names, phone numbers and notes will be updated automatically each time you find out something essential to progress in the game.
Crates
In a few places there are bluish crates you can move around or climb on. To interact with these you first need to use the hand option on them. From there you can use the A and D keys to move the crate left or right, respectively. The W key makes your character climb onto the crate while the S key makes them come down and/or let go of the crate.
Terminals
The terminals on the street or the consoles in the apartments are useful for finding out essential information. For the terminals on the street you need an ID card to access them, so you need to steal or borrow one, generally.

In the right hand column you can check the news, a database and you can figure out where you are on the map. When you’re inside someone’s apartment you can also check their journal to find out essential information about them.
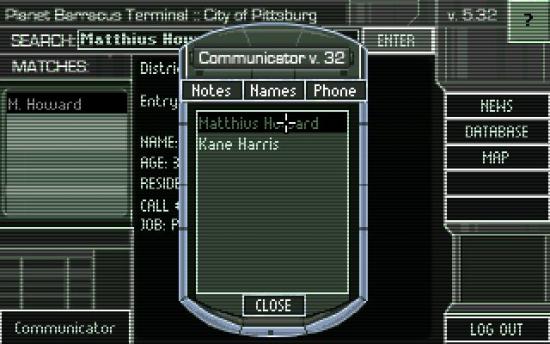
At the top is a search box. You can either type in the name of the person or place you’re interested in, or you can open your communicator in the bottom left corner and drag and drop the name into the search box and hit enter. If there are any hits, they will be listed on the left. Click on any of the hits to read more.
Combat
There is a little bit of combat in this game, and when you get to it, it is explained quite well. Essentially, you can only shoot at a target when you’re not in cover position. You can move out of cover to the left and right by hitting your A and D keys, respectively. S brings you back to cover. Whenever you can go out of cover to both your left and right side, your target will start shooting at the side where they saw you last. So keep alternating sides to avoid getting shot.
You can shoot randomly and hit your target in random places, or you can hold your breath to aim by hitting CTRL. When the little dial goes into the green zone, you will get a head shot and take your target out in one hit.
Targets generally move in and out of cover themselves, and you can only hit them when they’re out of cover. It pays to watch and time the pattern of your target, so you know when to move out of cover and start holding your breath to aim.
Finally, you can hit R to reload when you’re out of ammo (which can only be done when you’re in cover) and hit W to change targets if there’s more than one.
Walkthrough – Azriel: Matthius Howard
Your name is Azriel and you were supposed to meet a man named Matthius Howard, but he never showed up. You need to ask around if anyone knows anything.
Find out where Matthius lives
- Go one screen east and talk to the vendor. He suggests you check the database on the terminal.
- Go back west and interact with the terminal (hand option). It’s not working properly so you need to kick it (foot option).
- The terminal tells you that you need an ID card.
- Go back to the vendor and talk to him. No matter which option you choose, you will get his ID card.
- Go back to the terminal and use the ID card on the terminal.
- Inside the terminal, select your communicator in the bottom left of the screen, go to ‘names’ and drag Matthius Howard into the search box. Alternatively, you can type in the name. Hit enter.
- The terminal will tell you it has found one entry for Matthius Howard, so select that entry and read the information. Matthius lives in Hibiscus Highrise.
- Enter Hibiscus Highrise into the search box. The address is 4390 Brookview Avenue, which will be added to the notes on your communicator.
- Check the map on the terminal to find that 4390 Brookview Avenue is to the east.
- Go east until you reach 4390 Brookview Avenue. Interact with everything on the way, if you like.
Inside Hibiscus Highrise
- Talk to the receptionist. Whatever answer you choose he will not give you Matthius’s room number.
- Call Kane on your communicator. He asks you to find the phone number for the building.
- Interact with the business cards on the counter by the receptionist (hand). The number will be stored in your notes.
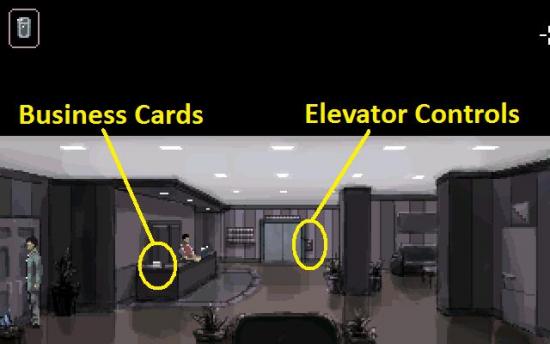
- Call Kane again, who will call reception and find out that Matthius lives in apartment 4E.
- Use the hand option on the control panel to the right of the elevator door to open the doors. Click on the open elevator to get in.
- Inside the elevator, use the hand option on the controls and select the 4th floor.
- Exit on the 4th floor and walk to the end of the corridor, to apartment 4E.
- Knock on the door, and get no answer. You need to find another way in.
Alternate Solution provided by Gamezebo Reader Alex: If you tell the receptionist that you are Matthius’s co-worker and you are PH engineer (as previously seen in terminal), receptionist will tell you the room number.
Breaking into 4E
- Go one door back, to 4C and pick the lock with the lock pick from your inventory. The door will open, but the pick will break.
- Enter the apartment and try to open the balcony door (hand). It’s stuck.
- The door is jammed with a stick that’s lying on the floor at the base of the door. Pick up the stick and open the door.
- Click on the balcony to go outside.
- Outside, climb the ladder, then climb over the railing to the left, move across the ledge, climb over the next railing and go down the ladder.
- The next balcony door is locked, and your pick is broken. Hit the window with the stick.
- The stick will get stuck, so kick it to make a hole.
- Stick your hand through the crack to unlock the door from the inside.
- Open the door and go in.
- Make to interact with the console in Mathius’s apartment, and the Boryokudan will knock on the door and threaten to come in. You need to flee from them before they see you and shoot you. If they do shoot you, you will automatically reload from the autosave.
- You need to leave through the balcony door and make your way all the way back to apartment 4C. When you go through the door back to the corridor, you will see the Boryokudan walk past and leave. You can now go back into 4E.
- Check the console and go to the profile to get Matthius’s phone number.
- Call Matthius on your communicator.
Delta Six: The Test Facility
Fight Training 1 and Fixing the Elevator
- Watch the scene. When prompted, click on the speaker and select the mouth option to answer.
- Pick up the gun.
- To use the gun, use the A and D keys on your keyboard to move in and out of cover. CTRL allows you to hold your breath until you have a good shot on your target. When you’re in the green, hit the space bar to shoot. Most targets will have a pattern in which they go in and out of cover. Time them carefully, so you can move out of cover and start charging when they are under cover, so you’re exactly in the green when they move out of cover and you can shoot before they shoot you.
- Pick up the meal tickets.
- Exit and go west, through the door and west again.
- Try the elevator controls. The elevator is broken.
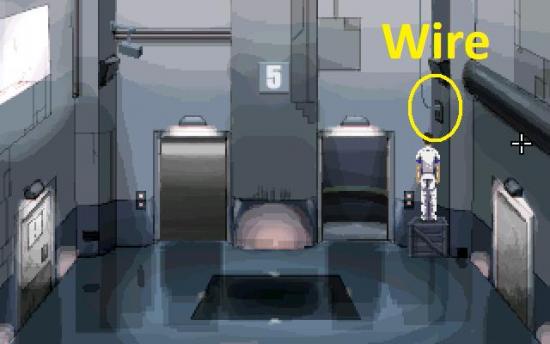
- Go to the box in the left corner and interact with it. Use A to move it left, D to move it right, W to stand on top of it and S to let go. Move the box to the far right corner and stand on it. Use the hand option on the wire hanging from the ceiling to fix the elevator.
Eat and Go to Bed
- Get into the elevator, interact with the controls and select the 4th floor -mess hall.
- When you leave the elevator, you get beaten up and your meal tickets get stolen.
- Go through the door on the right, and in the next room go south.
- Sit down at the table next to the girl, and then talk to her. Her name is Epsilon Five.
- Leave the mess hall. You will be told to go to your quarters, so get in the elevator and select the 2nd floor.
- Put your eye on the scanner beside the door on the left.
- Walk to cell D6 and put your hand on the scanner by the door.
- Enter and get into bed. There is a note under the bed.
Azriel: Take Matthius to the Extraction Point
- Shoot the two men like you learned to do in the test facility
- On the next screen, use the hand option on Matthius and then click on the box by the wall. Matthius will climb over the wall.
- Next, interact with the box and move it to the left corner.
- Get on the box and grab the drainpipe to climb over the wall.
- Shoot the lock on the gate to open it.
- Exit right.
- You need to avoid the agents or you will be shot and will have to start again at the previous autosave. To do this, move into the back alley behind the vendor, then exit right and on the next screen go south. Then you can go right again to Hibiscus Highrise.
- Inside, you need to avoid the Boryokudan. Select who you want to go first – it doesn’t matter who you pick.
- When the guard walks off to the right, quickly run to the door to the stairwell. You will be told when you’ve made it far enough.
- Do the same with the other character.
- Open the door and go into the stairwell and up the stairs to the second floor. Don’t go up any further or you will be seen by the Boryokudan and shot.
- On the second floor, go to the elevator and take it to the 6th floor.
- Go right and take out the guard when prompted.
- Go into the stairwell behind the last door, and close and lock the door.
- Go up the stairs and use the hand option on Matthius and click on the door. Select “push against the door”. While he’s pushing, kick the door to open it.
- Exit and watch the scene.
Delta Six: The Gun
You can now choose if you want to play with Delta Six first or with Azriel. This section describes the actions for Delta Six. You can change between the two players by clicking on their icon in the top right corner of the screen.
Fight Training 2
- Go to the mess hall on the 4th floor.
- Sit down and talk to Balder in the second room of the hall.
- Balder suggests you need to find Giselle and talk to her. Balder will be in the gym after testing when you need him.
- When you leave, the announcer says you need to go to the test chambers, so go to the 5th floor.
- Go through the door on the right and walk up to the third door, which is the blue one, and scan your eye on the scanner.
- Go through the blue door and scan your eye on the scanner by door 2.
- Go in and wait to be scanned. Then go through the door on the right.
- You will get more fighting training, which is a bit harder than before. You can move out of cover on the left with the A key and to the right with the D key. S gets you back into cover position. You can also change between targets with the W key. A red light on the pedestal will show which way the target will fire, so you need to get out of cover to the other side, and charge with CTRL and fire before the light moves and they shoot you. You need to score 5 points for each of the targets. A head shot is 2 points and a body shot is 1.
- When you’re done, get your meal ticket and leave.
Steal a Gun
- When you leave the testing room, you will run into Epsilon Five again, who wants to go to the mess hall together. So go to the mess hall and get a tray of food from one of the dispensers on the back wall. Talk to Epsilon Five if you like.
- Go to the gym on the 3d floor and talk to Balder again. Go through all the options. He will tell you that you need to find Giselle, who is on maintenance duty.
- While you’re there, interact with the weights on the shelves and get a 4 lb weight. You will need it later.
- Go back to the elevators and down to maintenance on the first floor.
- Use the mouth option on the door on the right and ask for Giselle.
- Ask her about escaping and she will open the door for you. Go in.
- Go through all the dialogue options and you will be told you need to steal a gun from the testing facility.
- Before you go, interact with the door to the tool shed on the right. Giselle gets cranky, but will agree to open the door for you if you get her some food.
- If you haven’t got the food already, leave and go to the mess hall on the 4th floor. Get a meal from one of the dispensers on the back wall.
- Take the meal back to Giselle. Remember you need to talk to the door on the maintenance level to get in. Give Giselle the meal and she will open the door to the tool shed.
- Interact with the contents of the shed and get a screwdriver.
- Talk to Giselle again and she will mention something about a secret stash in your toilet.
- Leave the maintenance level and go to the living quarters on the 2nd floor.
- Enter your own compartment and interact with the toilet. Then interact with the reservoir of the toilet and get a metal pipe from the inside.
- Now it’s time to go steal the gun, so go back to the testing facility on level 5, enter the blue door and room 2.
- Take the gun off the pedestal, and then place the 4 lb weight from the gym on the pedestal.
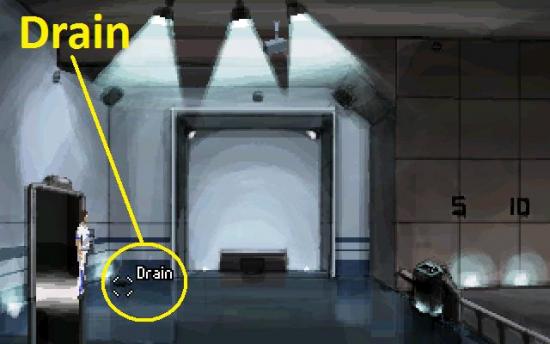
- Before you leave, use the screwdriver on the grate on the floor by the door to open the drain.
- Drop the gun down the drain. It falls down a bit and then sounds like it’s getting stuck, so you need to dislodge it on the lower levels.
Dislodge the Gun from the Drainpipes
- Go to level 4, enter the mess hall and use the screwdriver on the grate under the dispenser on the left.
- When the grate is open, stick your hand in it and then use the metal pipe on the flap to dislodge the gun
- Now go to the gym on level 3, use the hand option on Balder and click on the shelf unit on the left to get him to move it.
- Repeat the process of opening the grate with the screwdriver and dislodging the gun with the metal bar.
- Now, if you remember, the next floor down are the living quarters, but the quarters on the right are the women’s quarters, and you won’t be able to get in. So go to the mess hall and talk to Epsilon Five. Ask her for help and she will come with you.
- When Epsilon Five is following you, go back to the living quarters and use the hand option on Epsilon Five and then click on the scanner by the door to the women’s quarters to get her to open it.
- Go into the women’s quarters, walk to the end and repeat the process with the grates and metal bar to dislodge the gun again.
- Now go back to Giselle on the maintenance level. When you arrive, she will ask you to help her with the drains. Click on the machine she is working on to get a puzzle. You need to light 5 numbers between numbers 3 and 10 to unblock the pipes from top to bottom. The numbers that need to be lit are: 3, 6, 7, 8 and 10. One solution is to click, in order from reset: 3, 2, 5, 4, 3, 5, 8, 10.
- Now you need to get the gun to fall out of the pipe that’s hanging from the ceiling.
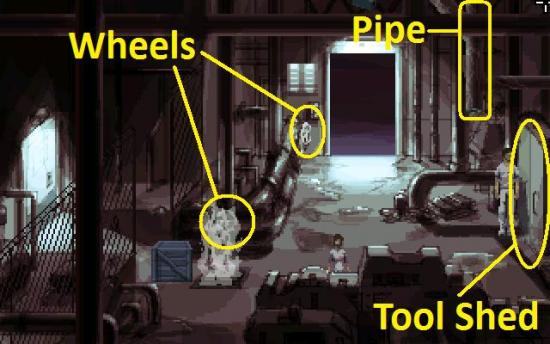
- To do this, you need to switch off the steam by turning one of the two wheels in the room. There is one to the left of the door and one behind the steam. It doesn’t matter which one you choose.
- Then interact with the crate and move it to the right until it’s under the pipe.
- Climb on the crate (W key) and hit the pipe with the metal bar. The gun will fall out.
- Get off the crate (S key) and move it to the left a bit to find the gun. Pick it up to give to Giselle.
Azriel: The Boryokudan and the Missing Transport
You start off with two objectives in this part of the game: fixing the lock pick and getting into the Boryokudan.
Fix the Lock Pick
- You need to find a Carbon Ray Stabilizer to repair your broken lock picks.
- Go to the screen east of the vendor and kick against the boards blocking the door on the right side of the screen.
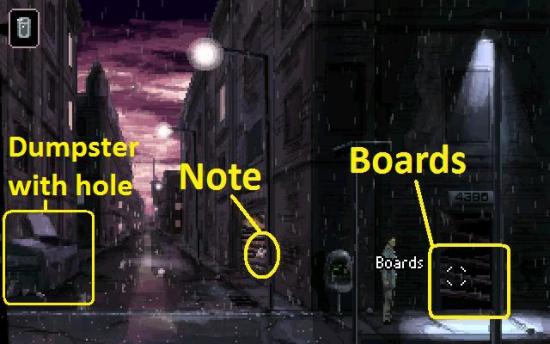
- Go through the hole under the boards.
- Inside, you can find a stack of boxes on the right, but they’re blocked by a fallen beam.
- Try to crawl through the hole under the beam, but you’re too big. You need to find someone smaller.
- Go into the alley behind the vendor and talk to the girl rummaging through the dumpster until she tells you that you need to help her find her ID card before she will help you.
- Leave the alley on the right and then exit to the south. Inspect the dumpster there (it is near the door with the boards).
- There is a hole in the bottom of the dumpster. Anything going in will fall through and float away with the water.
- Follow the stream of water to the east until you’re outside 4388 Brookview Ave.
- Kick the muck blocking the drain until you uncover an ID card.
- Pick up the card and bring it to the girl. She will follow you.
- Go back through the boarded up door. Use the hand icon on the girl and then click on the hole under the beam.
- Go through the boxes until you find the Carbon Ray Stabilizer. The girl will leave.
- Go into your inventory and right click on the Carbon Ray Stabilizer to repair your lock picks. Note that you have to do this inside, as it doesn’t work in the rain.
Getting into the Boryokudan
- To get into the Boryokudan, you need to find out a name of one of the members so you can pretend you’re a friend. Kane will tell you so when you call him.
- Go two screens west of the vendor into the trash heap. Climb down the ladder.
- There are three corpses among the trash. Kick the one on the far left so he rolls over, and then inspect his pockets to find his ID card.
- Go into your inventory and right click on the ID to find out his name, which is Winston Lucas.
- Exit and keep going east until you’re back outside 4388 Brookview Ave. Talk to the guy by the door until you can give him Winston’s name. Pick any of the name options for yourself – just select the one you like best.
- Give your gun to the man by the door and go in.
- Knock on the door by the stairs. Then use the hand option again to get in.
- Watch the scene.
Kenneth
- When you’re back outside, call Kenneth. He’s a bit touchy and will probably hang up on you numerous times. Keep calling until you can offer him a job as a pilot, and tell him it’ll pay enough to get him a ticket to Taurus and back. He tells you to meet him at apartment 3E at Hibiscus Highrise.
- Go back to Hibiscus Highrise (where Matthius lived) and take the elevator to level 3.
- Knock on the door at the end of the hall and go through the dialogue.
- Pick up the photo Kenneth drops.
- Leave the building and find one of the terminals. Use the photo on the terminal (don’t log on first, just use the photo directly on it).
- Zoom in on the photo until you find the serial number of the ship. Take a picture of the number and it will be recorded in your notes.
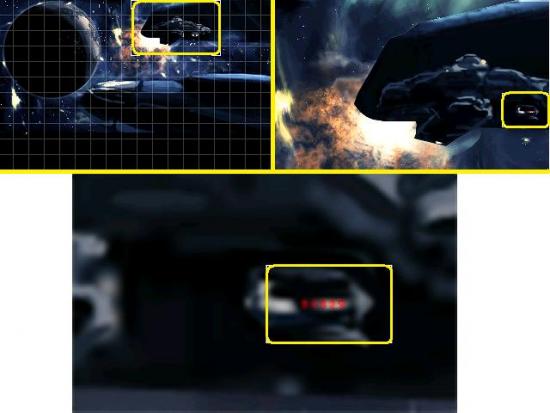
- Now log on to the terminal with the mafia ID card and enter the serial number to get the name Paul Erickson.
- Enter the name Paul Erickson to find out his phone number.
Finding Paul Erickson
- When you call the number for Paul Erickson, you get no answer. Instead, you decide to find him in person.
- Go back to the alley behind the vendor where the girl was rummaging through the dumpster.
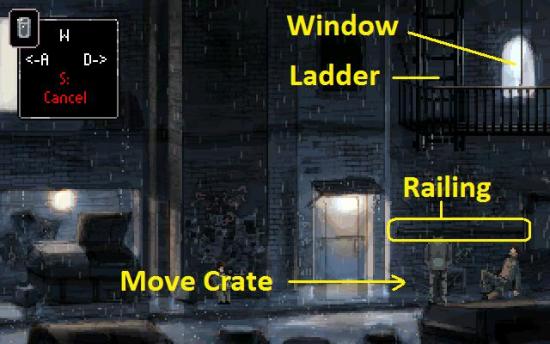
- Interact with the crate you find there and move it to the right until it’s under the fire escape ladder.
- Climb on the crate and then use the foot option on the railing on the wall.
- You can then grab the ladder and climb up.
- Kick in the window and enter.
- Take the stairs down to the lobby.
- There’s a note on the reception desk for Paul – he hasn’t been seen for 3 days.
- There is also a note on one of the mailboxes, again from the concierge wondering where he is. The note is on mailbox 2A.
- Go to the 2nd floor and pick the lock on door 2A.
- Enter and watch the scene.
Getting Meds for Paul
- Paul is a former freighter pilot and juice junky who is in serious need of meds. You can find this out by inspecting the various objects around the room and his journal entries on his console. You need to get him some meds.
- Leave the building and go back to the boarded up door. To the left is another door with a note on it. The note says to go to the door behind the vendor if you want meds.
- Go back to the vendor and use the mouth option on the door by the homeless man. Say you’re interested in meds, and find out you need to find Susannah in Hibiscus Highrise 2A.
- Go back to Hibiscus Highrise. If you take the elevator to the 2nd floor, you will find guards outside her door that won’t let you pass. I recommend trying various options as they’re quite entertaining.
- Instead, take the stairs to the second floor and go all the way to the right, to the end of the hall.
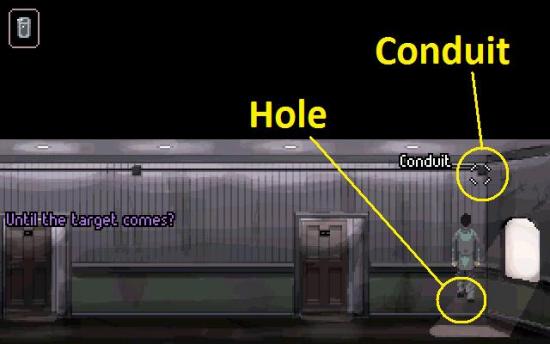
- Put your foot in the hole in the wall by the window.
- Use the lock picks on the conduit on the ceiling to turn off the lights.
- Now talk to the guard by door 2A to knock him out.
- Go through the dialogue.
- When you have the meds, return to Paul in the other apartment building (you need to go through the window by the fire escape again) and give him the meds.
Barry Adama
- Talk to Paul until he gives you the password to the console on the right.
- Access the console and keep talking to Paul until you have the name of the freighter plane pilot who flew the transport when it went missing. It’s Barry Adama.
- Leave and you will get a call from Kane.
- After this, check the name Barry Adama on one of the terminals. No match is found.
- Go to the vendor and ask him about Barry Adama. The vendor doesn’t know either and suggests you ask the locals.
- Go back to Hibiscus Highrise and talk to the receptionist. He will tell you Barry Adama lives in 4A.
- Go to 4A and use the lock pick to enter.
- Check the console and the journal entries.
- Leave and watch the scene.
Delta Six: Maintenance Duty
Maintenance Duty
- You wake up to be told you have maintenance duty on level 1.
- Take the card from your terminal.
- Go to level 1 and use the card on the door on the right.
- Use the wheel by the door to turn off the steam.
- Interact with the machine on the end. This time, you need to reset the pipes on the machine and turn them all on. One solution is to click, in order from reset: 3, 4, 5, 9, 10, 4, 1. Then hit “power”.
- Access the tool shed on the right to get pipes and a wrench.
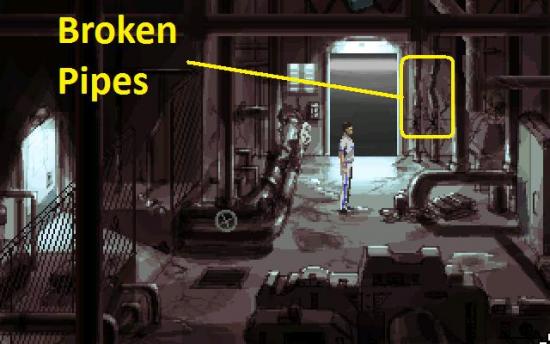
- There are 2 broken pipes to the right of the door. Use the wrench on each of them to loosen them, then use your hand to take them out.
- Put the two pipes from your inventory on the gaps where the old pipes were and use the wrench to tighten them.
- Turn the steam back on to test.
- Turn the steam back off and walk back to the machine to interact with it.
Escaping Balder
- Watch the scene with Balder.
- When you’re tied up, you need to try and escape and take out Balder.
- When he’s walking to the door, use your foot on a shard lying on the floor just to the left. You may need to try a few times, and you can only do this when he isn’t looking.
- Wait until he walks off again and use the shard on the ropes around your hands.
- The next bit requires precise timing. Remember where the steam came out of the pipes. Wait until Balder walks to the door again, and when he’s about halfway there, talk to him so he will stop walking. Then quickly interact with the wheel you’re sitting under to turn the steam back on. Balder will be knocked out.
Azriel: Inside the Weather Station
Repair the Conveyer
- Open the door of the shed and talk to Kane.
- Enter.
- There is a pipe wedged between two gears. Kick it and then pick it up.
- Go up the ladder and shoot the chain on the doors on the right (not the doors themselves).
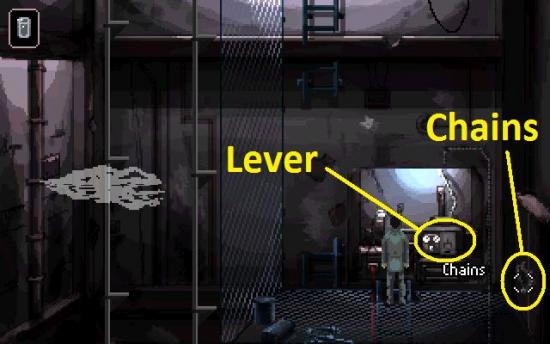
- Inspect the interior and get an extension cable.
- Go back down the ladder and go east.
- Climb on the crate underneath the ladder and hit the hinge of the ladder with the pipe to move the ladder down.
- Climb up the ladder and put the extension cable on the conduit.
- Grab the end of the plug and click on the hole on the left side of the ledge.
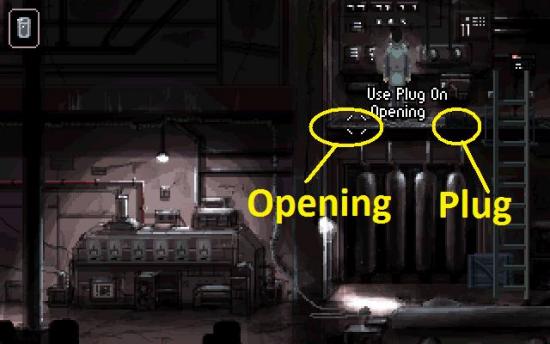
- Go back down the ladder and move the crate to the left until it is under the hole.
- Climb on the crate, pick up the end of the plug that’s lying on the floor and connect it with the plug hanging from the hole.
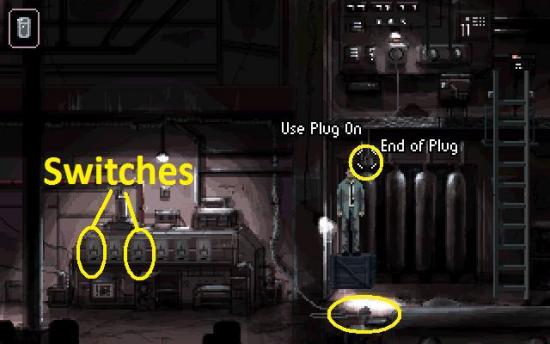
- Go back out to the first area and up the ladder.
- Pull the lever.
- Now go back down the ladder and east again and pull the first and third switch on the big machine by the entrance.
- If you go back to the first area, the conveyer belt should be moving.
- Step on the conveyer belt by using the hand icon on one of the moving bits of the conveyer. You will be transported to the top floor.
The Data Packet
- Get off at the top and exit to the west.
- Interact with the large container in the back and watch the scene.
- Shoot the two Boryokudan agents. One of them drops a data packet.
- Go back to the area at the top of the conveyer. The data packet is lying on the grate to the left of the conveyer. Try to grab it, and it will fall down.
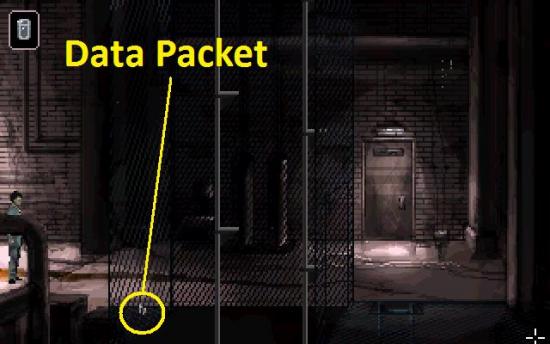
- Go back downstairs (use the ladders).
- The data packet is lying at the base of the conveyer, but you can’t get to it while it is moving. The only way to stop the conveyer again is by putting the metal pipe back between the gears.
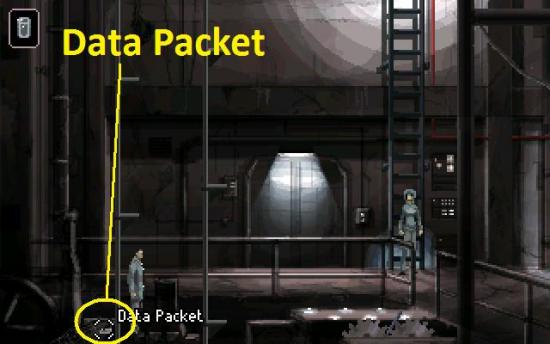
- Use the hand option on the conveyer to climb to the packet. Pick up the packet and use the hand option on the conveyer again to climb back out.
- Exit through the main doors and watch the scene.
Delta Six: The Escape
- You’re back in the testing facility. The director asks you to pick up the gun from the pedestal, but when you do you find there’s only the weight you left there.
- Replace the weight and leave until you run into Epsilon Five.
- Go to the mess hall and sit down next to Giselle and talk to her.
- Get up and go back to your cell in the living quarters on level 2.
- There is a note on the floor. Pick it up and read it.
- Leave your cubicle and talk to Balder.
- You hear that Epsilon Five is needed for maintenance duty, and you agreed to meet her and Giselle at the maintenance level when that happened. So go to level 1.
- Watch the scene, then enter the maintenance room.
- Interact with the door on the left and enter the code Giselle gives you, which is 63821. Hit R to enter. Security will be breached and they will be on to you.
- Shoot the door and then kick it to open it.
- Exit and follow Giselle to the exit to the west.
- You need to make it to the other side of the room without getting hit by the stompers. Start walking west as soon as the stomper starts moving upwards.
- On the other side, flick the switch and watch Giselle and Epsilon make their way to you.
- Exit west.
- Kill the guards and keep going west until you reach a locked door with a key pad.
- Use Epsilon Five on the key pad and go through the door.
- Use Epsilon Five on the key pad on the next door. Shoot the guards while she’s working.
- Watch the scene.
Azriel and Sayuri
- After the scene, follow Kane into the cockpit.
- Interact with the radar behind the console. Keep clicking left and up until the red dot is on the crosshairs.
- When the monitor goes all staticky, kick the console.
- Then interact with the radar again and keep moving the crosshairs until the red dot is exactly in the center.
- When you have a visual, Kane will dock. Leave the cockpit to the east and then go towards the hatch.
- Inside Center 7, go east. In the next room you can’t go on because of the electrified puddle.
- Shoot the light above the puddle to switch off the electricity, and go east and east again.
- When you’re by the door to the computer room, inspect the corpse to get his key card.
- Use the key card on the door and go through.
- Inside the computer room, use Sayuri on the computer to look for Azriel’s brother. Watch the scene.
- Go into the next room and repeat the procedure.
- Go into the next room and watch the scene.
Inside the Cell
- Inspect everything around. In particular, take off the grate on the right and stick your hand in. Then shout into it to talk to Kane, in the cell next door.
- You can now control Kane through Sayuri.
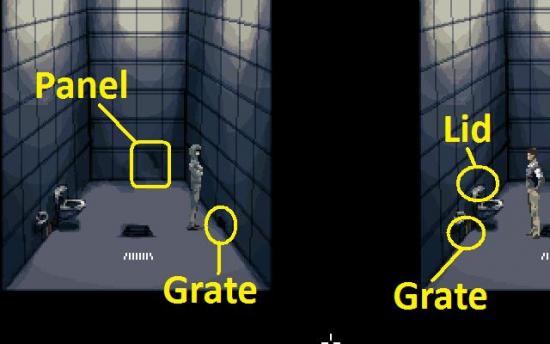
- Have him open the grate on the left.
- Then get him to open the lid on the back of the toilet.
- Have him inspect the interior. He takes out a pipe.
- Have him interact with the hole behind the grate to pass the pipe through to Sayuri.
- Pick up the pipe.
- Find a place on the back wall that says panel instead of wall and kick it.
- Then use the pipe on the bent panel and finally use the hand option on it to take it off entirely.
Sayuri
- When you have control over Sayuri, you need to liberate Kane from the cell next to her. The loose panel going to Kane’s cell is right behind the first stomper.
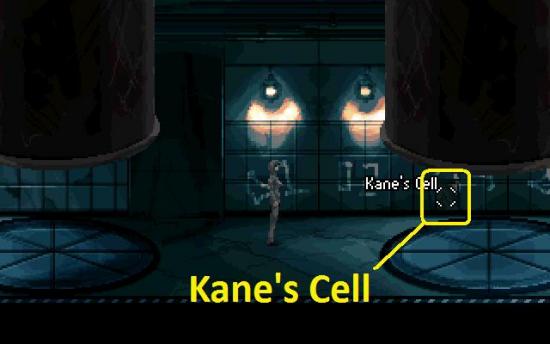
- Make your way past the first stomper and wait a moment to get the pattern of the stompers going down. You need to find a moment where they’re both either fully or halfway up. It’s basically about a second after the left stomper reaches its highest point.
- When you’ve got it, make your way past the second stomper and pull the switch on the wall when the stompers are both high enough to walk under.
- Go back to the first stomper and use the pipe on Kane’s cell to liberate him.
- Now go west and west again to the door of the computer room (by the corpse).
- Take Sayuri into the computer room and open the door to the next area with the computer on the left.
- In the next area you’ll find an ID card sticking out of the right console – take it.
- Go back out to where Kane is waiting.
- There’s a ramp down in the bottom left corner. Go down it and use the ID card on the door.
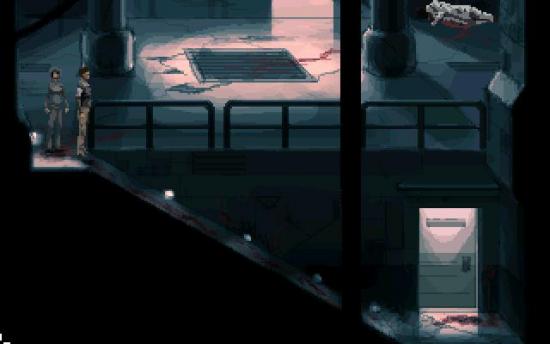
- Inside, get Kane to talk to Azriel. Kane will leave and Azriel will come.
- Go out and follow Kane all the way west.
- Open the next 2 doors with your key card.
- Make for the door and then watch the scene.
- Have Sayuri take the gas mask out of the locker by the door.
- Go back to the room with the console and the ladder down to the radioactive core. Use the ID card and go through the various options until you can release the cooling gas. Note that you can’t release the gas unless you have the gas mask from the locker.
- When Sayuri can move again, take her back to the computer rooms and through the last door, which is now open.
- Go through the next door until you’re in a room with a computer. Use the ID card on the computer and watch the scene.
- Take Azriel to the computer room. You will need to shoot someone on the way.
- When you’re in the room with Sayuri and the director, use the gun on the director. Then interact with Sayuri and watch the scene.
More articles...
Monopoly GO! Free Rolls – Links For Free Dice
By Glen Fox
Wondering how to get Monopoly GO! free rolls? Well, you’ve come to the right place. In this guide, we provide you with a bunch of tips and tricks to get some free rolls for the hit new mobile game. We’ll …Best Roblox Horror Games to Play Right Now – Updated Weekly
By Adele Wilson
Our Best Roblox Horror Games guide features the scariest and most creative experiences to play right now on the platform!The BEST Roblox Games of The Week – Games You Need To Play!
By Sho Roberts
Our feature shares our pick for the Best Roblox Games of the week! With our feature, we guarantee you'll find something new to play!All Grades in Type Soul – Each Race Explained
By Adele Wilson
Our All Grades in Type Soul guide lists every grade in the game for all races, including how to increase your grade quickly!


