- Wondering how to get Monopoly GO! free rolls? Well, you’ve come to the right place. In this guide, we provide you with a bunch of tips and tricks to get some free rolls for the hit new mobile game. We’ll …
Best Roblox Horror Games to Play Right Now – Updated Weekly
By Adele Wilson
Our Best Roblox Horror Games guide features the scariest and most creative experiences to play right now on the platform!The BEST Roblox Games of The Week – Games You Need To Play!
By Sho Roberts
Our feature shares our pick for the Best Roblox Games of the week! With our feature, we guarantee you'll find something new to play!Type Soul Clan Rarity Guide – All Legendary And Common Clans Listed!
By Nathan Ball
Wondering what your odds of rolling a particular Clan are? Wonder no more, with my handy Type Soul Clan Rarity guide.
Totem Tribe GOLD Walkthrough
Welcome the Totem Tribe Gold walkthrough on Gamezebo. Totem Tribe Gold is a strategy game played on PC created by Enkord Games. This walkthrough includes tips and tricks, helpful hints, and a strategy guide to how to complete Totem Tribe Gold.
Totem Tribe GOLD – Game Introduction
Welcome the Totem Tribe Gold walkthrough on Gamezebo. Totem Tribe Gold is a strategy game played on PC created by Enkord Games. This walkthrough includes tips and tricks, helpful hints, and a strategy guide to how to complete Totem Tribe Gold.
New Additions to the Game
Totem Tribe Gold is an unusual mix of updated versions of all (but one) of the levels of the previous Totem Tribe game and ten completely new levels. Most of the “old” levels have had a subtle makeover. Notoriously hard to find objects have been replaced with easier to see ones, or put in more visible locations. New quests have been added and a few frustratingly tricky tasks have been deleted altogether. Because of the changes, complete walkthroughs for all levels are provided in this walkthrough.
As gameplay is pretty much the same as in the previous game, please refer to our walkthrough for the original Totem Tribe for an explanation of the basics.
The previously next to impossible task of finding all the tiny colored gems in order to access the Guardian Moon level has been greatly improved in two ways. Firstly, you can now easily find out how many gems you’ve missed on each island. Just hover your cursor over the islands on the world map and you will get pop up messages telling you how many gems of each color you’ve missed.
Secondly, later on in the game you will be able to find a magnifying glass in two pieces. As soon as you have both pieces, the magnifying glass will appear next to your explore and attack flags in the bottom right of your screen. Click on it and a bright circle will temporarily appear around any remaining gems in your current view. If there are no gems left, you will simply get an error sound. The magnifying glass even works in the unexplored black areas of your map. After the magnifying glass has found a gem it will take a few minutes to recharge before it can be used again.
Your treasury (the treasure chest image on your world map view) now has two pages of items to find.
Finally, there is one completely new building available. On the Island of Yeti you will learn how to upgrade your towers to guard towers. Guard towers train defenders, who will patrol the area around the tower. They will not go after your attack flags, but will stay behind to defend your village when your army is away.
1. Tetala Island
Follow tutorial to build 3 huts and a scout lodge. Then follow the tutorial to find the tear of heaven. This will complete the main objectives for this island. However, instead of clicking “next”, click “continue” to stay on this island. Move your explore flag to explore the rest of the island and read the guide stones.
In the northwest of the island, beside the mountain, you will find a locked chest surrounded by a ring of pillars. You will need to find the 7 Gems of Power and put them on the pedestals to open the chest. These gems will be scattered over the different islands, so you will have to come back here once you’ve found them. On the second page of your treasury you will be able to see how many of the Gems of Power you’ve found. Once you have them all, come back here, place the gems on the pedestals one by one and receive the first part of the magnifying glass.
Once you’re done exploring, click “quit” in the top left corner of the screen to go back to the world map.
2. Mushroom Island
Build a barracks and a scout lodge. To speed things up, you can build a second hut first to get more workers. Set your scouts to explore the island.
Apart from colored gems you will also find gray and white striped stones that you will need for a task later on this island. Collect all 6.
Shortly after you’ve built your barracks you will be attacked by mushrooms. Your fighters will fight them off quite easily. Place your attack flag if you want the fighters to go to a specific location.
You’ll have to do more fighting later, so it’s wise to build a second barracks. There is very limited building space on this island, so be careful where you place your buildings. If necessary, go to your build menu, click on the symbol with the red X and then on a building to destroy it, if it’s in the way.
Once you have your 6 stones, select them from your inventory and click on the shallow crossing in the water on the southeast side of the island, by the guide stone that says “The Water Crossing”. You can now explore the other side of the water.
You will find a giant mushroom, spawning little killer mushrooms. Place your attack flag on the giant mushroom to get your fighters to destroy it. Inside is a wise man, named Guru, who will join you on your quest.
Explore the rest of the island and you’re done.
3. Dolphin Island
Build a scout hut and start exploring. On the west side of the island is a plain brown chest. Place your explore flag on it and one of your scouts will open it. It contains some gems.
One of the guide stones will tell you to build a tower by each dolphin statue. Towers will let you see a greater distance, and will be useful to look across the water. So, build towers on the building remains by the 4 dolphin statues around the coastline. Explore the new islands within the towers’ range.
In the south of the island is your first puzzle. Click on the segments of the circle until all parts are lit up. I honestly don’t know if there is a trick to this, I just click away until it’s done. As a reward you will get an Ancient Coin, which will go into your inventory.
On the east side of the island is a locked chest that needs 8 shells to open. Some of the shells will be on small islands offshore, which you will be able to see once you’ve built your towers. Collect them all and then put them in the chest. It contains the Diadem of Courage.
On an island in the southeast is a brown chest you can’t open right now (it contains the final 4 gems for this island). Remember this for later. On an island in the northeast you will find your firs totem: the Totem of Dolphin. Collect this to complete your main quest. Don’t forget to also look for gems on the small islands!
4. Monkey Island
Ok, now we’re properly getting started. Do as the instructions say and build a tower and barracks. Then build a scout lodge. You will be attacked by a horde of mushrooms, so set your fighters on them. Once you’ve built your scout lodge, you can now build a hunter camp. Also build a second barracks.
Once you’ve fought of the onslaught of mushrooms, start exploring the island. Your scouts will be attacked by thorn flowers in some places, so send your fighters to deal with those when you find them. Some of them drop chestnuts – collect those. You will need 9. One of the chestnuts is on an island in the northeast. Build a tower on the ruined remains on the east side of the village to get to it (the tower will attack the flower).
Just south of the village you will find 2 more giant mushrooms. Destroy them. One of them contains the Pendant of Nature Force.
Cross the bridge in the south and you will find the Monkey Tribe Village. Its fighters will join forces with you, which is a good thing as you will immediately be attacked by an evil shade and his minions from the west. Set your attack flag near him. As a reward for fighting off the shade you will receive the Totem of Monkey. This completes the main objectives, but you still have some exploring to do.
The mysterious shade will have dropped a piece of a monkey statue. Pick it up and give it to the chief of the Monkey Tribe to unlock Liana Island.
Just north of the Monkey Tribe you’ll find a building with a strange blue sphere. It’s inactive right now, but remember this for later, when you’ve found the Sphere of Clarity. Once you have the Sphere, click on the structure and it will show you the inside of a mountain ring where you can find more gems.
Further northwest you’ll find a chest that can be opened with your 9 chestnuts. It contains the second Ancient Coin.
4a. Liana Island
Giving the head of the monkey statue to the chief on Monkey Island will have unlocked Liana Island. Use your explore flag to move Nartas around. Collect the yellow fireflies on your way. Also collect the bananas that are scattered around. There are 6 in total. To the north is the broken monkey statue. You need to find all pieces.
To the northeast is the Deep Jungle, which is too dark for you to pass through. You need 20 fireflies to light it. Right now you should have 15.
On the coast just southeast of the Deep Jungle is a large, lone tree. Click on it several times until it falls over. You can use it to cross the water to the second island.

The remaining 5 fireflies are on the other island. You’ll also find a brown chest with the statue’s tail in it. Go back to the main island and release the fireflies in the Deep Jungle.
Northeast of the jungle is a locked chest surrounded by 5 pillars with monkey images on them. Some of the images are lit up, meaning they are in the correct place. All images on a pillar have to be the same, so click on the dark images to rotate them until they’ve all lit up. Do this for all pillars. Changing the images on some pillars will change things on the other pillars. If you do the central pillar first, then the far north one, then the south one, then the east one, then the west one, you won’t have to re-do anything. The chest contains the monkey statue’s right hand.
Northwest of the jungle you will find a locked chest surrounded by 12 pillars that each need a monkey statuette to open the chest. There are 10 statuettes in the areas on either side of the jungle. Then place your explore flag on the hole in the mountain in the northwest to get Nartas to move through it. There are 2 more statuettes on this side. Once you have all 12, put a statuette on each of the pillars and get the statue’s left hand.
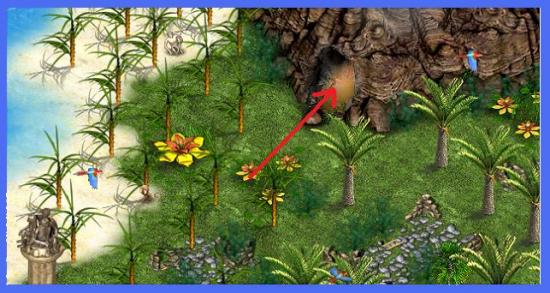
On the northwest corner of the island is another lone tree. Click on it and Nartas will climb up the tree so he can see a distant island. On the island is one of the monkey statue’s arms.
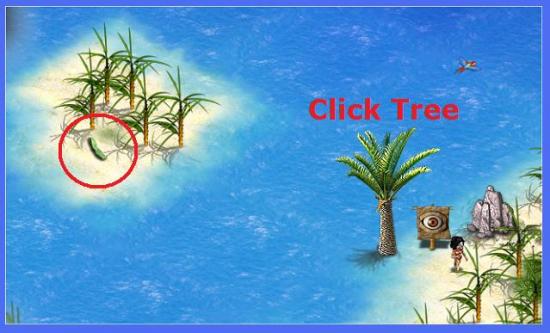
North of the mountains you will find another locked chest, which needs 6 monkey tokens. This is where your 6 bananas come into play. One of the guide stones will have told you to feed the hungry monkeys. Six of the wee monkeys running around will tell you they’re hungry when you click on them. You will recognize them as they actually sit still and they’re always in the same spot. Give them each a banana and they will reward you with a monkey token. Four are on the main island and 2 are on the second island. Put the tokens in the chest and you will get the statue’s torso.
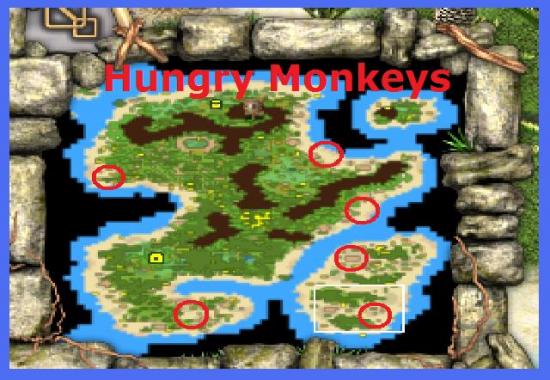
You can now put the statue together. Once you’ve done that, you will need to give the statue an offering of 24 bananas, which will now have appeared on the island. Most of them are quite easy to find, but if you’re missing one, look again in the deep jungle where the fireflies are – there is one mostly covered up by a tree at the foot of the mountain on the right. Give the bananas to the statue and you’re done.
Finally, place your explore flag on the hole in the mountain inside the little ring of mountains in the north. You will be transported to a third little island. This island just has some gems and a brown chest containing the orange Gem of Power.
5. Seagull Island
Build a scout lodge and barracks. Explore the island. Collect the acorns and walnuts.
Directly to the west are some ruined buildings. Only the workshop still stands. Find the 5 missing machine pieces. One is on the east edge of the forest, one in the stone circle south of the village, one near the workshop and one on the beach straight north. You will get the fifth one later.
In the forest you will find 2 locked chests, which can be opened with 12 acorns and 12 walnuts. The acorn one contains the Heart of Bull, which allows your people to heal themselves over time, and the walnut one contains the third Ancient Coin.
One of the guide stones tells you that a Gem of Power lives inside a hollow tree. There are several hollow trees in the forest. Just click on their holes to find the white Gem of Power. (Mine was in the one east of the locked chests.)
On the northeast side of the island is a hut. The hermit who lives there wants you to kill all the crows and return his 12 white pebbles that the crows stole from him. To kill flying targets, you need an archery range. To build an archery range you first need to get the workshop working. He will give you your fifth machine part. Put the parts in the machine, then build your archery range.
Once you have your archers, place your attack flag on each of the giant bird’s nests, kill all the crows and collect the pebbles they drop. When you have all 12, return
6. Red Rock Island
Your first challenge is to build 10 huts, so start building them. Don’t build all 10, though, as you’re going to have to fight almost as soon as you’re done. Also build a scout station, barracks, a workshop and an archery range. Start building towers around the perimeter of your village.
In the southeast is a totem that needs 8 cactus flowers to activate. Collect the flowers – some of them are north of the village – and put them on the idol. Click on the idol to charge it. When it’s charged, the Idol’s spell (Meteor Shower) will appear at the bottom of your screen. Click on the spell and then click on the block of ice north of the village to cast the spell, melt the ice and collect the Hunter’s Lucky Stone.
In the southwest is a sliding block puzzle to open a chest. I’m not very good with slide puzzles like this, but the general trick is to go row by row – top to bottom. The empty space will be in the middle. You will be rewarded with the red Gem of Power.
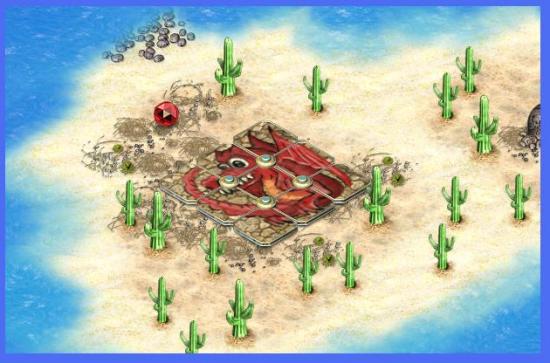
Destroy the lair in the northeast and get the first scarab.
As soon as you’ve built the final hut, you will get a few minutes to reinforce your defense by building more towers. First you will be attacked from all directions over land. Don’t forget to repair your buildings when they get damaged.
The next attack will be from the air. You will now be able to upgrade your towers to arrow towers. You will get a few minutes to do so. The attack will come from all diagonals.
The third and final attack will come both over land and through the air. If you struggled in any of the previous attack, quickly build more towers in your weak areas before the attack starts. Fend off all attacks and you’re done on this island.
7. Witch Island
All your people on Witch Island, except Aruku and Guro, are sick. You need to find a cure. Use your explore flag to explore the island with Aruku and Guro.
North of the village is a shack where a witch lives. She will help you to cure your people if you bring her 10 rare roots, which are scattered around the island. If you’ve played the original Totem Tribe: they are much easier to find this time! But here are the locations anyway:
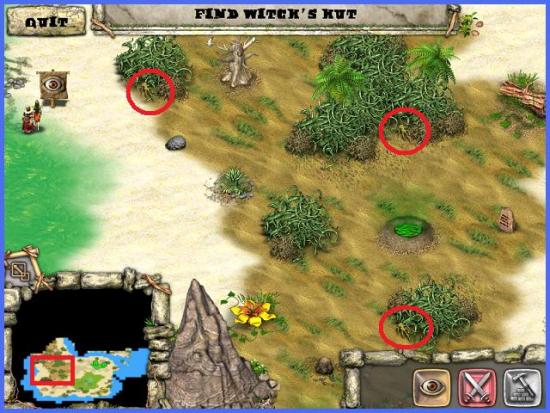
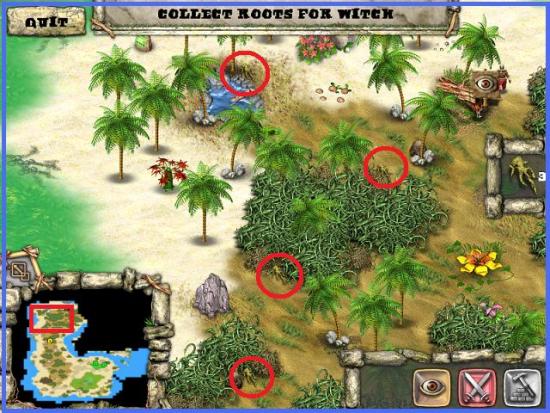
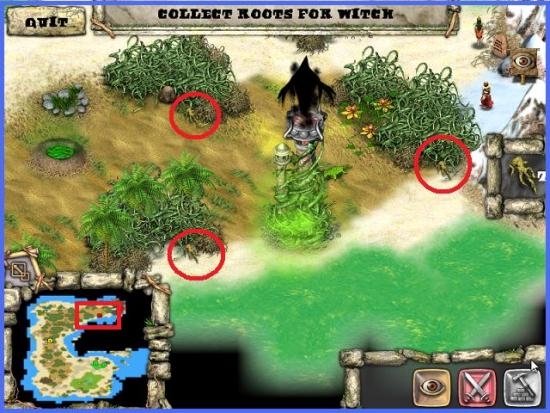
Once you have them all, give them to the witch and she will reward you with the witch doctor shack. Build one of those in your village and the witch doctors will start curing your people.
Your next objective is to destroy the source of the infection. Follow the island to the northeast and you’ll come across a tower with another shade on it. Build up your village with a barracks, workshop and archery range, and set an attack flag on the tower. The shade won’t put up much of a fight, and once he’s gone, you’re done here for now.
There is another Gem of Power here – the green one – in one of the green mud pools. Mine was in the one in the far south, I don’t know if it’s always in the same place.
Return Visit
You can’t access the northeastern part of the island on this visit. Come back later when you know how to build fire towers, have shamans or have learned to swim. Once you’re ready, either build a fire tower near the ice block (which needs a smithy, wise man’s house and laboratory), or get some shamans to attack it (for which you need a smithy, wise man’s house and shaman tent).
In the south part of the new section is a chest with another Ancient Coin. Also take note of the giant bird’s nest. To open the locked chest, click on the stones surrounding it until they all vibrate. You need to do this in a certain order, and if you make a mistake you need to start the order again. The order is:
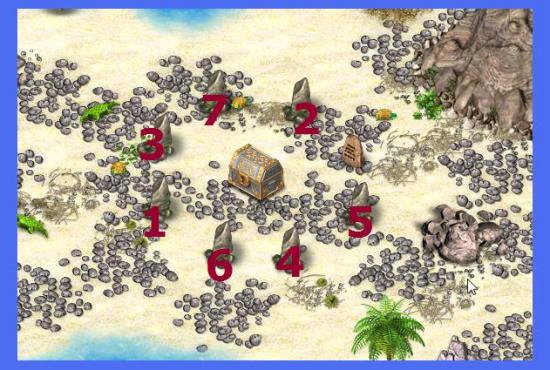
Inside the chest is the Sphere of Clarity. Now you have that, go back to Monkey Island.
7a. Blueberry Island
After you’ve been to Witch Island, you will have access to Blueberry Island. Explore the island until you reach the village. Then you’ll be told to collect fire wood. You will need 16 pieces. You also need to find the 4 pages of the recipe book that were carried away by the wind.
Once you have all wood, put it on the fire pit in the center of the village and put your cooking pot on top of it. The small shrubs on the west side of the island will now have sprouted different colored fruits. There are also brown and red mushrooms. Gather the fruits and the brown mushrooms (but don’t touch the red ones). The items will grow back after a while if you need more.
When you have all pages of the recipe book, click on the book and you will get most of a formula. As the pages were damaged by the water, you will have to make up the missing bits by trial and error. Each time you make a mistake, you will have to start the recipe again from scratch. The correct order of ingredients is:
1 red fruit
3 purple fruits
1 blue fruit
2 green fruits
3 red
2 purple
3 yellow
2 red
2 blue
3 green
8 mushrooms
1 yellow
1 purple
1 green
2 yellow
3 blue
Now all you’ve got left to do is deliver the 3 flasks of potion to the 3 hunter camps on the west side of the island and you’re done.
8. Skull Island
You can now build a smithy.
On this island, you will need to find 3 lairs of beasts and destroy them. You will start getting attacked almost straight away, but fortunately you have some fighters to start you off. Each time you kill an enemy, look carefully if they’ve dropped any bones, as you will need to find a lot of them (55, to be precise) and they are quite hard to see if they were dropped inside your village.
Build an extra hut, a scout lodge, barracks, workshop, archery range and smithy. Build a witch doctor shack if you like. Upgrade the armor and weapons in both the workshop and smithy. Protect your village with a few arrow towers. When you have your basic set-up, place an attack flag on the enemy dwelling south of the village. It’s a good idea to start building another barracks and archery range now too – maybe even a third.
North of your city is a wise man’s house. The wise man asks you to find his lost building plans. The plans are inside the enemy tower straight south of the village. Give them to the wise man and he will teach you how to build a wise man’s house, which will also allow you to build mud towers (which slow enemies down as well as doing them damage) and improve your basic towers and building speed.
If you build a tower on the ruined remains north of your village, you will be able to see a small island with an idol on it. It’s the Idol of Purification, which allows you to heal your tribe, and it needs 10 bones to be activated.
Build a tower on the ruins southeast of the first enemy tower to find an island with a locked chest on it. The chest needs 7 rusty keys to be opened and contains the fourth ancient coin. The first key is between the mountains directly south of the village.
Once you have a second barracks and archery range, start exploring the northeast of the island and destroy the enemy dwellings there. You will come past the Idol of Peace, which needs 20 bones to be activated. A second rusty key is just southeast of the Idol, a third is by the rocks south of the second enemy dwelling. The fourth key is inside the enemy hovel there.
Once you’ve dealt with the enemies in the northeast, move your army around the mountains to the northeast until they reach a bone chest. Have them attack and destroy it to find the second scarab.
Regroup your army near the Idol of Peace and then go and attack the enemy dwelling in the southeast. The fifth key is by the mountains on your way south. The last two keys are inside the enemy hovels in the southwest, as is the Totem of Lizard. There is also a chest there that needs 25 bones to open. It contains the Traveller’s Boots.
As soon as you’ve received the totem, a passage will open in the mountains to the east. Place your attack flag near the opening and fend off the attack. Once you’re done, regroup your army and then go through the passage to explore inside the mountains. You will meet another shade and his minions. Destroy them and hey presto, you’re done here.
Note that there is a giant bird’s nest inside the mountain ring. Remember this for later.
9. Frozen Vale Island
Build a scout lodge and start exploring, collecting shells along the way. Those of you who played the original Totem Tribe will be pleased to hear that half of those nasty white shells have been replaced with much easier to see brown ones (you sill have to find 30 white ones, though)! While you’re exploring, build a barracks, workshop and archery range.
To the west you will find an Eskimo village. They will share their knowledge of fire with you if you bring them 8 pieces of coal. Six of them are scattered and one of them is in the fire pit by the fishing Eskimos in the south. To find the last one, have your archers attack the giant bird’s nest on the west coast. Drop the coal anywhere inside the Eskimo village and you will get the gift of fire towers!
North of the Eskimo village is a hut with a hermit who wants you to free his penguins from behind the ice. Build towers near each of the ice mounds, convert them to fire towers and watch the ice melt before your eyes (one tower can reach quite a few mounds). Once you’ve released all the penguins, you receive the Healer’s Globe.
Explore the parts of the island behind the ice mounds. In the north is a locked chest that needs your 30 lovely white shells to open. It contains another Ancient Coin. In the far northeast is the Idol of Divination, which needs 25 brown shells to be activated. Make sure you also explore the center of the lake by the idol, as it contains one more brown shell. Activate the idol and charge it, then cast the spell of Clairvoyance in the sea to the right of the island to find the Totem of Polar Bear and finish the level.
You will have found several pieces of a fishing line on your travels on this island. The hook and line are easy to find. The bait is in the brown chest north of your base camp. The lure is on a small island in the southwest, which you can find with the Clairvoyance spell or by building a tower on the building remains. The rod is the hardest to find, but is by the rock where the little Eskimo is fishing in the southwest.
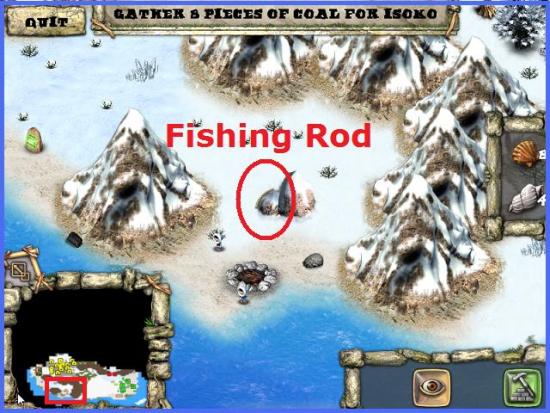
Once you have the completed fishing line, find a spot in the water with white circles (they’re in a different spot each time) and cast your line. Give the fish you catch to the hermit and he will give you a map to the Lonely Iceberg. And that’s it for Frozen Vale Island!
As you now know how to build fire towers, you can go back to Witch Island and explore the northeast part of the island.
9a. Lonely Iceberg
Within seconds after arriving on the Lonely Iceberg the two big ice crystals north of you explode and unleash an attack on the new arrivals. Fight them off and then start exploring. I usually place the attack flag just ahead of the explore flag, so that Aruku and Guro don’t get ambushed and killed.
First go off to the right and pick up the first ice shard, which is clearly visible on the beach. Then go left and make your way around the corner and back east until you reach the village. The alchemist there asks you to make him the Twilight Mixture. To do this, explore the rest of the island, collect the ingredients and take note of the instructions on the guide stones.
Move your attack flag north of the village until you reach a broken ice crystal. Put the shard you found on the crystal to break it and move past. Go off to the right to find the first chest (containing vitriol) and the second shard.
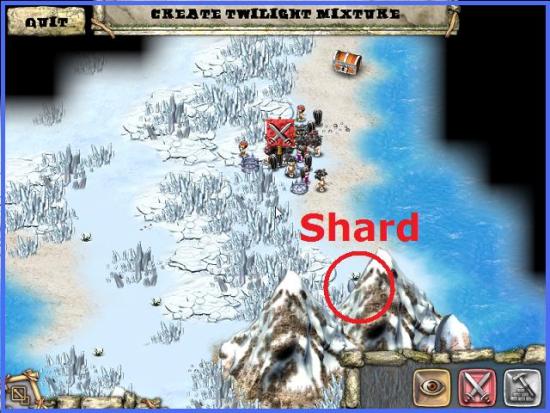
Move to the west, past the scout lodge – which is new in this version of the game – and fight off another attack. Just north of the lodge is another chest, which contains ammonium. Further west still is a chest, with permanganate, and another shard.
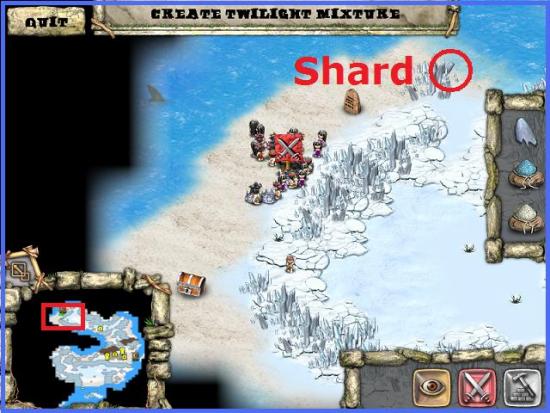
Go back to the village and continue west until you reach another ice crystal. Put your second shard on the crystal to move past. Fight of another attack and find the next shard and a chest containing aurum. Go south to find magnesium and go back to where you went past the second crystal.
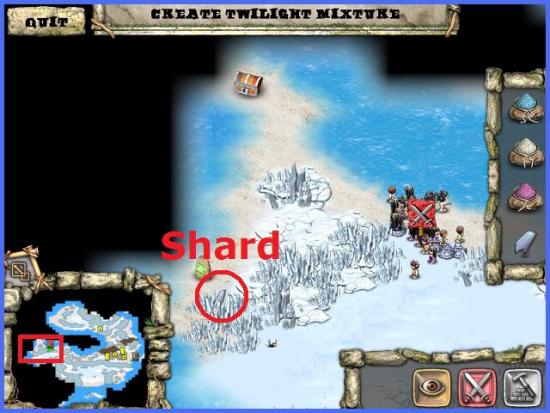
Melt the next crystal with the shard you found last and collect charcoal and alkali from the chests behind it. Then go back to the scout lodge and melt the last crystal to the northeast of it with your last shard. Collect the quicksilver from the chest there and return to the village.
Now it’s time to make the Twilight Mixture according to the instructions on the stone. To do this, put two items on the building to the left of the wise man’s house, which is a laboratory, and pick up any new items you create. If you make a mistake your items will return to your inventory. The recipe is as follows:
- Aurum + Quicksilver = Amalgam
- Magnesium + Permanganate = Salamander Dust
- Ammonium + Alkali = Restoration Liquid
- Vitriol + Charcoal = Midnight Salts
- Amalgam + Salamander Dust = Phoenix Oil
- Midnight Salts + Restoration Liquid = New Moon Elixir
- Phoenix Oil + New Moon Elixir = Twilight Mixture
Give the mixture to the alchemist in the wise man’s house and you’re done! He will give you the building plans for the laboratory and the knowledge of ice towers.
There is one last thing you can do here now. If you’ve played the previous game, you will know that there were lots of gems scattered over some mini islands around the coast. There still are, but this time you can’t find them by simple exploring. Go back to the scout lodge and click on it again now. A scout will come out and tell you to get the Masking Cloak for them if you want them to help you look for the gems. You don’t have that now, so come back later.
When you have the Masking Cloak (found on Worship Island), the scouts will be able to avoid sharks and other enemies. Have your scouts explore the rest of the Lonely Iceberg for more gems. On a little island right by the lodge you will find a chest with a harpoon, which they can use to kill the sharks. You can also use the harpoon to kill the white sharks to collect the shark teeth for your mission on Firefly Island. (Note that the Masking Cloak does not protect you against the white sharks!)
10. Island of Yeti
Yay! You can now build guard towers! This is a great new addition to the game, and will protect your village with guardians even if your army is away fighting.
Build a scout lodge, barracks, workshop, smithy and archery range, and upgrade your weapons and armor at both the workshop and smithy. Build a couple of guard towers around the village. Then send your army to attach the slime lairs to the west and southwest.
To the southeast is the Idol of War, which needs 12 pieces of amber to be activated. They’re easy to find so I’ll leave that to you!
South of the village is a locked chest that needs to be surrounded by 4 lit fires to be opened. To light the fires, you need to catch 4 wandering lights in the fairy forest. This was my least favorite part of the previous version and I am very pleased to tell you that this is now much easier (or maybe I just got better – I don’t know). The chest contains the Bracelet of Hawk, which allows your building to train new troops faster.
Time to do some more building. Build a wise man’s house and laboratory so you can build a fire tower near the ice block to the south. Also expand your army with more barracks and archery ranges.
Once the ice blocks have melted, kill the yetis and destroy the ice lairs on the other side. Build another fire tower near the next ice blocks you find. Prepare for a big boss battle right behind it. First kill the normal yetis and snow lairs, then deal with the giant yeti that appears from the big snow lair. Use the Idol of War to give your army more strength (just charge the idol and cast the spell on your army). Getting some witch doctors helps too. When he’s defeated you get the Totem of Whale and your main mission here is done.
Before you leave, explore east of the giant yeti. There is a guide stone saying “secret passage”. Put your explore flag in the black to the right of it and your scouts will find the way through. To the east there you will find a marketplace. Bring 7 ancient coins to the market place to get the building plans for it and the knowledge of comfortable dwellings and shoe making. You don’t have all coins yet so come back later. Also take note of the giant bird’s nest. Finally, the brown chest contains the map to the Rimy Isles.
10a. Rimy Isles
All you can do right now is move your army with the attack flag, so start exploring that way, collecting the pine and fir cones on the way. Cross the bridge to the north and arrive at Walrus Village. The yetis have kidnapped some of their people and you need to find and release them. You get some bridge parts, with which you can fix the broken bridge near the place where you arrived.
Cross the bridge and kill the yetis on the other side. The purple yeti will drop a thawing potion. Inside the lair you will find an ice key. On the south side of the island you will find more bridge parts, an axe to fix the workshop and a locked chest that needs 8 fir cones.
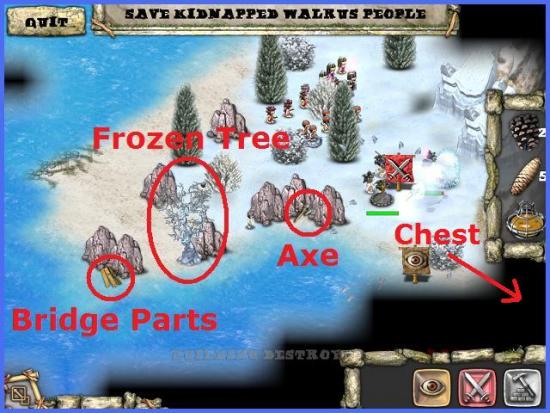
Fix the bridge on the north side of this island and cross it. Deal with the yetis and lairs and collect the thawing potions and ice key. Also collect the hammer to fix the smithy. Once you’ve fixed the smithy and workshop, you can start upgrading your armor.
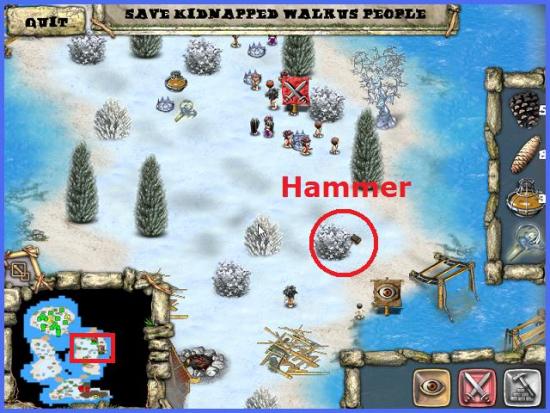
You should now have your 8 fir cones to open the chest, which contains more bridge parts. Fix the northernmost bridge and cross it. Fight more yetis! The chest there opens with 8 pine cones (but you only have 7 so far). It contains the last Ancient Coin. Don’t forget to go back to Yeti Island to get your reward from the marketplace.
The Idol of Flame wants you to bring it 5 winter fruits. To find these you need to thaw the beautiful white frozen trees with the thawing potions. Collect the fruits, claim the idol and charge it. Use the Meteor Shower spell on the frozen passage on the southeast island (The Glacial Gorge). Kill the yetis, find the last pine cone and collect the fourth ice key and more bridge parts.
Fix the bridge leading off this island and cross it. No more yetis to fight this time! But you’ve found the hostages. Release them by using an ice key on each of the towers surrounding them. That’s it for now – come back later when you can swim.
10b. The Great Desert
First Visit
Explore the desert. The guide stones look a bit different here: they’re yellow obelisks. Click on them all and take note of the information on them.
On the north side of the desert you will find a locked gate that you need to open. To do this, first find the bone chest in the northwest and destroy it with your army. Once destroyed, a bronze staff will have appeared by each of the guide stones. The image on each staff will relate to the god mentioned on the guide stone. The staff you found by the bone chest symbolizes Seth.
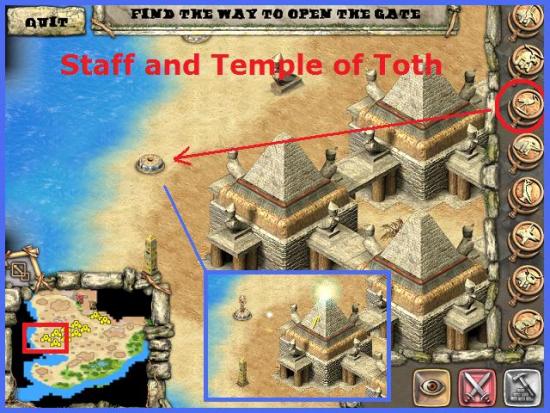
Now go to the big temple in the middle of the desert. If you click on the different parts of the temple, it will tell you which of the gods can be worshipped there. Around the temple you will find metal circles, one for each god/part of the temple. The staffs you’ve found need to go into the circles. If you place a wrong staff, they will all return to where you found them.
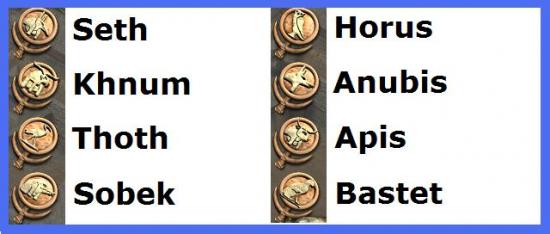
- The first circle to open is the bottom left one, for the Temple of Thoth. Place the staff with the ibis in the hole and the temple will light up.
- Then go to the one on the bottom right, which is for Anubis. Place the staff with the jackal in the hole and the temple will light up.
- The one above Thoth is for Seth. The staff you found by the bone chest goes into this hole.
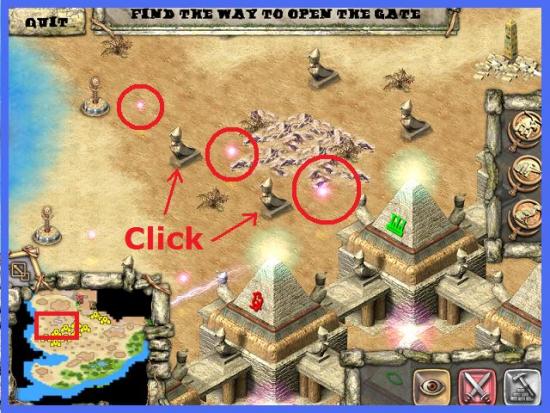
- Above Anubis is Horus, the falcon. When you place this staff, the temple will not light up. Look at the dots of light between the staff and the temple. They need to be lined up from the smallest by the staff to the largest by the temple. To change them around, click the little bird statue between them.
- Next is Apis, the bull, above Seth. Again, line up the lights until they’re small to big, staff to temple.
- Across Apis, above Horus, is Khnum the Ram.
- The top left one is Bastet, the cat.
- The top right one is Sobec, the crocodile.
Once you’ve placed all staffs, the gate will open and you will find another scarab. On the other side of the bridge you find 2 pillars that can contain 8 scarabs. You only have 3 right now, so come back later. Don’t forget to pick up the yellow Gem of Power between the mountains to the right of the pillars.
Second Visit
Once you have your 8 scarabs, place 4 scarabs in each of the two pillars in the north of the map. You need to put them in the hole at the bottom to get them all in.
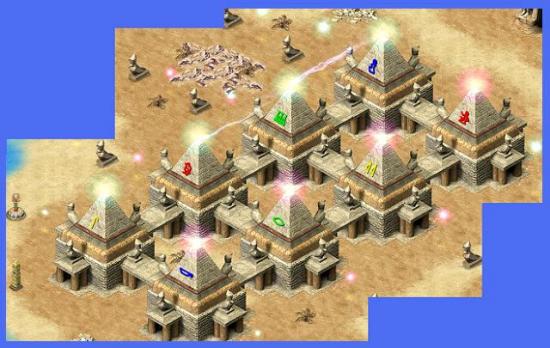
You will notice that they change color. You can change the order of the colors by clicking on the arrows on either side of the pillars. The right arrow will move the whole row of scarabs one up, the left arrow will swap the bottom two scarabs around. Rearrange the scarabs in each tower to match the colors of the runes on the temple south of you, but in reverse order. This means that for the right column they need to be red, yellow, green, blue, from bottom to top. For the left they need to be blue, green, red, yellow, from bottom to top. This opens a passage to a new place, which you can access from the world map.
Third Visit
Once you have the rosaries from the Pyramid and the black and white Oil of Magi from the Oasis and Ghost Island, come back to the Great Desert for one more time (the white Oil of Magi is on Blueberry Island in a chest on a tiny island to the south. The black Oil of Magi is in a chest on Ghost Island).
You’ll find 4 structures that look like gray obelisks with 3 bowls around them. Look at the pattern of the beads on the rosary and pour the oil in the bowls by each obelisk according to that pattern. A pyramid in the east will light up. Click on it to get a piece of an amulet.
10c. The Oasis
Explore the oasis and collect the Eyes of Horus, the cobra figurines and the ostrich figurines on your way.
To the north of the camp you will find a rotating block puzzle. Complete the image as below and 3 more Eyes of Horus and 2 cobra figurines will drop from the sky.
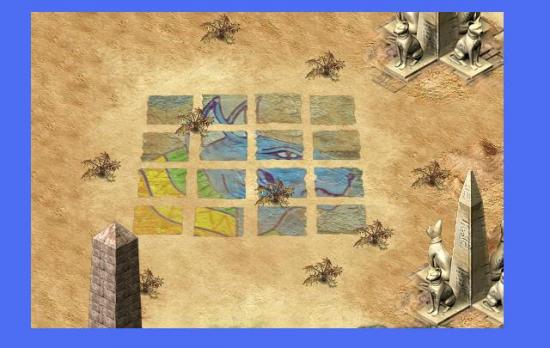
When you have 7 Eyes of Horus, activate the Idol of Divination to the southwest and charge it. With the Clairvoyance spell you can now explore the black parts of the map that you couldn’t access before.
With the Clairvoyance spell you can find a locked chest that requires 11 ostrich figurines in the south of the map, right in the middle. The chest contains the blue Gem of Power.
Once you have 9 cobra figurines, activate the Idol of Storm east of the camp. Use the Thunderstorm spell to wipe out the lairs in the south and southeast of the map. You will find two chests, one with an iron lock and one with a brass lock, and a brass and an iron key. Open the chests with the correct keys to find two pieces of a bronze key. In the northwest is a locked chest with a bronze lock, so you need to fix the key.
Go to the nomad camp in the oasis and get a task to give them exactly 4 measures of water. You get a jar that holds 8 and a jar that holds 5 measures. You can fill or empty the jars in your inventory by dipping them in the well by the tents. You can pour water from one into the other by picking up the jar in your inventory and clicking on the jars by the tents.
To get 4 measures, follow these steps:
- Fill the 8 jar and pour into the 5 jar. 3/8
- Empty the 5 jar.
- Pour the water from 8 into 5. 3/5
- Fill 8 from the well.
- Pour water from 8 into 5. 6/8
- Empty 5.
- Pour water from 8 into 5. 1/8
- Empty 5.
- Pour water from 8 into 5. 1/5
- Fill 8 from the well.
- Pour into 5. 4/8
Then give the 4 measures to the nomads. Receive an energy sphere.
You can find a second energy sphere on an island to the northwest using your Clairvoyance spell.
On the other side of the bridge is a strange structure shaped like the head of a crocodile. Put one energy sphere on the head so the mouth opens. Put the other sphere in the mouth. Place the key parts inside too and the mouth will close and forge the copper key. Pick it up and open the chest to find the scarab.
Return Visits:
When you have the aqualungs and the Seal of Magi, you will be able to find the White Oil of Magi and a feather on small islands offshore.
When you also have the rosaries from the Pyramid and the Black Oil of Magi from Ghost Island, come back here again. You’ll find 4 structures that look like gray obelisks with 3 bowls around them. Look at the pattern of the beads on the rosary and pour the oil in the bowls by each obelisk according to that pattern. A pyramid in the center of the map will light up. Click on it to get a piece of an amulet.
When you have all three pieces of the amulet from the Great Desert, Abandoned City and Oasis, put them all in the crocodile head structure you used for forging the copper key. It will forge it into the Amulet of Magi. Take this back to Firefly Island and put it on the three headed statue.
10d. The Abandoned City
You can do this level now, or later on when you can build stronger armies. In any case, develop your best army as soon as you arrive and start taking them around the City, killing everything on your way. Make sure you pick up all monster drops as you will need them all.
In the northwest lives a nomad, who is asking for 10 demon wings and 10 hearts of stone. Once you’ve collected them, give them to the nomad, who will give you the glyph of air and the glyph of earth as a reward.
Straight south of the nomad’s tent is a locked chest surrounded by 4 pedestals that hold the 4 glyphs. Place the air glyph on the white pedestal and the earth glyph on the green pedestal.
In the far east is a lighthouse with 3 fire trays. Each fire tray can hold 3 lava stones. Light the lighthouse with the lava stones and a ship will bring you the glyph of fire. Put that one on the red pedestal.
In the center of the map, north of your village, is a dried up fountain that you can get working again with 24 dew drops. I had trouble finding the last one, but it was on the island with the hippos near your village. Build a tower near it if necessary. The fountain will give you the glyph of water. Needless to say it goes on the blue pedestal. The chest will open and you will get the scarab.
There are a few more things you can do here. Find the 2 brown chests that each contains a name tablet. There are 2 structures that look like movie screens with lots of arrows on the sides. Place the tablets in the holes in the pillars. The screens will light up and give you a scrambled image. You can unscramble the images with the arrows. Click an arrow 8 times for it to go full circle.
At first, all you can do is click randomly until a vague image starts taking shape. Once you can see outlines of figures, click each arrow individually until you think it’s in the best spot. Then move on to the next arrow. If you look closely, you can see vague shapes scrolling around; try to line them up. Keep tweaking until you have a sharp image.
Once you have a sharp image, you need to center it on the screen as in the images below. To do this, click each arrow on the bottom the same number of times and each arrow on the side the same number of times until it is aligned properly.
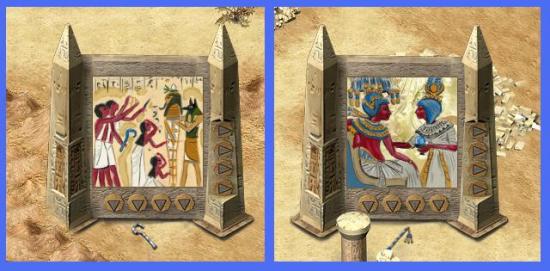
You will be rewarded with a flail and a crook. Find the other locked chest, southwest of the lighthouse, and place the flail and crook on the statue beside it. The chest contains the violet Gem of Power.
You should now have all Gems of Power. Return to Tetala Island and put them on the pedestals around the chest to get the first part of the magnifying glass.
Return Visit
Later on, when you have the rosaries from the Pyramid and the black and white Oil of Magi from the Oasis and Ghost Island, come back here again. You’ll find 4 structures that look like gray obelisks with 3 bowls around them. Look at the pattern of the beads on the rosary and pour the oil in the bowls by each obelisk according to that pattern. A pyramid in the northwest will light up. Click on it to get a piece of an amulet.
11. Cradle of the North
Start building the basics of your village and set your scouts to explore. Northwest of the village lives another hermit in a house who will help you with the totems if you kill the sharks for him. For this you need an archery range. Send your archers to the coast by the house. Alternatively, you can build an arrow tower there. Actually building a tower there is a good idea anyway as you can then see the entire island with the totem pedestal on it. As a reward for killing the sharks, the hermit will give you a Shaman Mask and plans for the shaman tent.
Later on in this level you will encounter a group of huge bosses, who will flatten your village in no time if you don’t keep them at bay. It is therefore essential to defend the north part of your village with several towers. Make them of all kinds of varieties (though don’t bother with guard towers here). Other than that I recommend filling every inch of available space with shaman tents and maybe a marketplace with comfortable dwellings.
While you’re building, explore the rest of the island. Melt the ice block with either a fire tower or with your newly discovered shamans. Keep exploring and melting the ice blocks with your shamans.
In the center of the island you will find the World Seal. It says you need to place your totems on the correct pedestals. Explore the island and find the 12 (yes 12) pedestals and the guide stones explaining which totem goes where.
On a small island in the water in the east you will find a chest with the Pendant of Power. There are also 2 idols, the Idol of Protection and the Idol of Power, which both require 25 ice crystals. I don’t know if it’s me, but they seem much easier to find this time around! Finally, take note of that giant bird’s nest.
When you’re done, it’s time to place the idols. The instructions you should have found are:
- Lizard lives among rocks
- Dolphin lives in water
- Monkey is smart, try hard to find it
- Ice will not scare polar bear
- Bigger water creatures require more water
Place the totems as in the images below. To find the pedestal for the Totem of Monkey you need to build a tower in the central north of the map, as in the images. Be careful! If you place one wrong, all your buildings will be damaged!
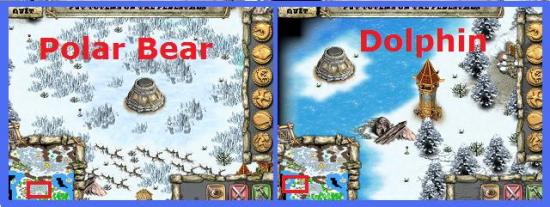
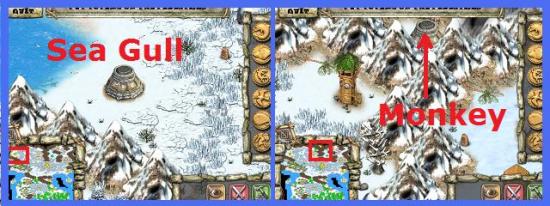
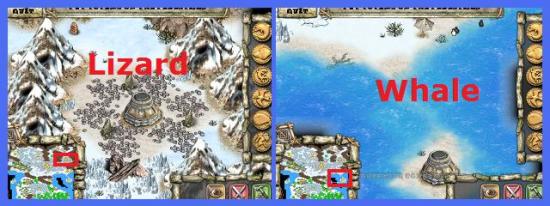
When you’ve placed all the totems and you’re absolutely ready for the big fight, activate the World Seal and watch what happens. Yikes! Try and hold off the shades with your towers as much as you can. Remember to repair your towers when they get damaged during the fight. It’s a big fight, but if you’ve done everything I said, you can do it!
12. Mist Island
Start exploring the areas you can see. It is really helpful to look on your mini map to see if there are any areas that are just obscured a bit with some fog but that are actually accessible. Look for the light spheres and put them in the lamps you find on your way to clear new paths. Collect celestial shards and white shells. If you see any lightning strike the ground, take note of where it hit, as you will need to remember these places later. To complete the main objectives for this level you need to click on all yellow obelisks. The 4 more difficult to find light spheres are shown in the images below:
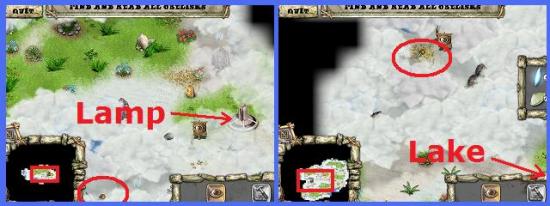
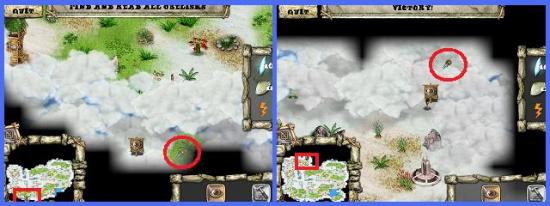
By the water in the south is a giant white shell. A bit further west is a tower. The people in the tower will help you look for gems if you give them something really nice. For those of you who played the previous version: the black pearl is now no longer in the water, but it is inside the shell. Open the shell with 14 small shells and give the pearl to the people in the tower to find the Amulet of Wisdom.
In the north, near the final obelisk is another sphere that interacts with your Sphere of Clarity. Use it to look to the other side of the water and find a locked chest that opens with 21 celestial shards. Inside the chest is another scarab.
When you’ve gone all the way around and lit the last lamp, you will find a locked gate with a symbol of a lightning bolt on it. The lightning bolt rune to open it can be found in the southwest of the map, in the clouds. Look on your mini map for a passage through – it is north of the obelisk and off to the right a bit. If you put your flag right in the middle of the black, Aruku will find herself a way through.
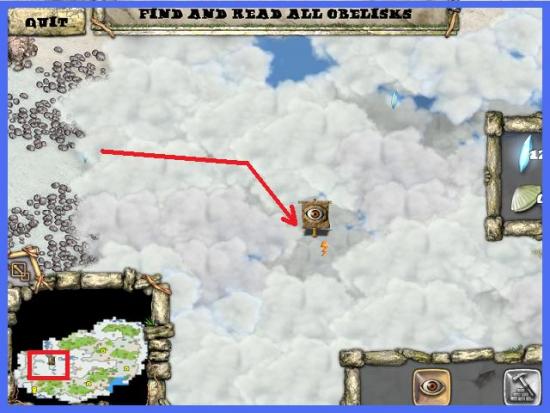
Behind the gate is a small settlement. The wise man there wants you to collect 4 thunderbolts. One bolt will appear right next to you, where the lightning hits the ground. The other 3 are in other places where lightning struck: one just north of the first obelisk, one at the start of a hidden path to the north, right in the middle between the water and the tower, one to the left of the big rock straight north of the tower. Give the thunderbolts to the wise man and he will teach you how to build a sky hall, which allows you to upgrade your towers to lightning towers.
13. Scorched Island
This island consists of a small, green island surrounded by a lot of scorched wasteland. Build your city on the green island, with an army as strong as you can make it. Make sure to surround the two fiery lairs with towers of all varieties, as they will start spewing enemies at some point. On the green island is a chest that will open if you build a fire tower, a frost tower and a thunder tower. It contains the Crown of Defender.
First explore off to the west. In the northwest is another chest, and this one opens with 11 wolverine claws, which are scattered around the map. The chest contains a map to Guro’s lost tribe on Firefly Island.
There is also an Idol of Frost, which requires one ice crystal to be activated. Where do you find an ice crystal in a land of fire and lava!
There is a secret passage between the mountains just north of where you cross the water on the west side of your village. Behind the mountains is a frost tower. The tower keeper asks you to destroy the dragons off to the west. The dragons won’t come near your village, so just send an army to them when you have archers and some shamans. You will be rewarded with the ice crystal for the idol.
Once you’ve got a decent army, go and explore to the north and east. The path to the north is blocked by a fire pit. Extinguish the fire with the Snow Tempest spell from the idol. Directly east is the Wolf Tribe, whose fire towers can take out your army half a dozen at a time, so attack with full force! Collect the fire rune from the remains of their barracks after you’ve finished with them, and then instantly send your army back home to deal with the invasion coming from the fiery lairs (though your towers should make quick work of those).
Now send your army to the locked gate and then open it with the rune. Behind it is yet another part of the Wolf Tribe that you have to deal with. Have no mercy! There is a Shaman Mask in their temple and when they’re defeated you will get the Dark Wolf Totem.
Now explore the rest of the island, blasting the fire pits that block your way with the Snow Tempest spell. If you build a tower on the east coast of your village you will find another giant bird’s nest.
13a. Firefly Island
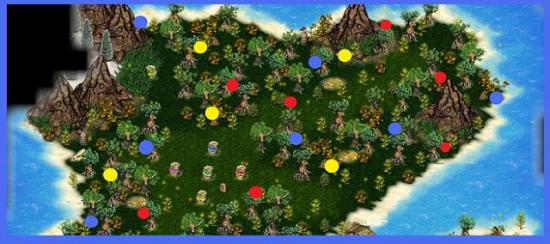
Start exploring the island, picking up the maple, oak and linden leaves on the way. Especially the maple leaves are hard to find, so I’ve indicated them all in the images below. Red = linden, blue = maple, yellow = oak.
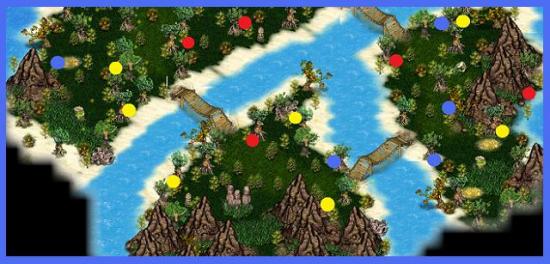
In the middle of the main island you find a cluster of 5 owl statues with green eyes. They should all have a different color of eyes. You need to figure out which statue has which color by following the instructions on the guide stones. They are as follows:
- Northern owl is neither red, nor yellow
- In the middle stands not yellow and not red
- Green is not western, blue is not central
- Yellow owl is neither western, nor eastern
- Western owl is not red and not blue
The reasoning behind the clues is:
- You can tell that the western owl isn’t red, blue, green or yellow, so it has to be purple.
- The central one isn’t yellow, red or blue and it can’t be purple, so it is green.
- The northern one isn’t red or yellow, and it can’t be purple or green, so it is blue.
- The eastern one isn’t yellow and it can’t be purple, green or blue, so it is red.
- That means the southern one is yellow.
When you’ve solved this puzzle, several other green eyed owls will light up. Each of these owls needs a gift of 12 leaves to clear the way around it. Bring them the leaves to find the dwellings of 3 sages, who will each give you a quest.
The one in the southeast will ask you to bring him 8 feathers to make the Head-dress of Dignity. You can find these feathers on the islands where you have seen the giant bird’s nests (there’s a list at the end of the walkthrough).
The sage in the northwest asks for 6 shark teeth to make a necklace. You can find the teeth later, once you can swim and you’ve found the harpoon. You need to find islands where there is a white shark swimming around (list also supplied at the end of the walkthrough). Send your scouts to harpoon the sharks and collect the teeth. This can be a tricky quest, as the sharks can kill your scouts with one bite and you can’t hide from the white ones with the masking cloak, if you’ve found that. The trick is to try and lure the shark to the shore, where it can’t attack you. Also make sure to manually pull your scouts out of the water when the shark gets too close and drop them back in at a close enough distance for them to throw their harpoons. Your reward is the Sharktooth Necklace of Valor.
The sage in the southwest of Firefly Island gives you a riddle about the Amulet of Magi being broken into three pieces that are scattered around the Eastern Lands. You need to find the three rosaries inside The Pyramid to help you find the pieces (level 15b). To do this, you need the ankh key, which you will receive as soon as you return to Firefly Island with one complete set of items.
Once you have the items, return to Firefly Island and give the feathers and teeth to the sages to get your rewards. The necklace, headdress and amulet then need to be placed on the statue of the 3 mages in the south.
14. Volcano Island
Instantly start building your village as you will be attacked by skeletons from the southeast from the moment you arrive. Build towers by the mountain pass in the northeast, but don’t build a frost tower to extinguish the fire until you are ready for proper battle.
Once you have a few shamans, investigate where the attacks are coming from in the southeast. The left of the two pyramids contains an enchanted skeleton that you really can’t beat with just a few fighters and archers, so keep throwing shamans at him. When he’s defeated, pick up his rusty sword.
Now build your frost tower to deal with the fire wall and destroy the enemy pyramid between the mountains. Ignore the east for now and take your army south while you keep building shaman tents and more towers by the mountain passage. Just keep building and building as you go on, filling every inch of available space with shaman tents and support buildings. You’re going to need them!
To the south of the village you will find a battle school. The Battle Master will give you use of his facilities if you bring him the 3 rusty swords from the enchanted skeletons.
A bit further south is another fire wall. Build a frost tower by it. Behind the fire wall is a Hall of Mysteries. The shaman in the Hall will ask you for his missing scroll so he can teach your shamans Frost Power. There are 3 scroll pieces in 3 brown chests around the coastline, one southwest, one southeast and one northeast.
You can’t build a frost tower close enough to the fire wall south of the Hall, so you have to wait until you’ve mastered Frost Power.
Close to the Hall is the Idol of Purity, which needs 8 pieces of obsidian to be activated. There are two more Idols: one in the southeast (the Idol of Flame) and one in the northeast (Idol of War). Each need 8 pieces of obsidian.
On the south side of the island is a hermit in a shack who asks for 6 lava stones, which can be found in the round, orange lava lakes. The structure outside his house is inactive right now. You can build another frost tower by the other fire wall, or you can wait until you’ve mastered Frost Power for your shamans. Behind it is a chest with more obsidian.
A little to the east of the hermit is another pyramid with the second enchanted skeleton. Destroy him and take his sword. Keep moving along the coast until you’ve destroyed the pyramid just above the Idol of Flame, then carefully move your army back around the south coast to your village, leaving the east side of the island undisturbed for now.
Now move your army past your towers to the northeast side of the island and attack the enemy there. The third pyramid with enchanted skeleton is there, so when you’re done, return the 3 swords to the Battle Master and make use of his training.
Also collect the other 3 lava stones from the lakes in the northeast and give them to the hermit. He will let you use the structure outside his house with your Sphere of Clarity and see inside the volcano. Inside the volcano are more pieces of obsidian.
Finally, collect the last scroll piece from the northeast and give it to the shaman in the Hall. He will also give you a Shaman Mask. Click on the hall to upgrade your shamans and then use your shamans to deal with the last fire wall. Behind it are two more pyramids, one containing the Blessed Ring and the other more obsidian and a scarab.
Build a gazillion more shaman tents and make sure all your buildings complete their research. Claim the three idols and charge them. Only when you’re completely ready for your biggest boss fight yet, move your army to the east side of the island. Attack and destroy the last pyramid and fight the king shade. He and his minions will probably make quick work of wiping out your first army, after which some of the minions will move towards your barricade of towers. Move your attack flag to your towers and fight off the siege.
Once you’re finished with the shade minions, regroup your army, recharge your idols and go back to the king shade in the east. Just keep throwing endless shamans at him, using the idols to inflict them with Battle Fury and heal them as you go. When the king shade is defeated you receive the Dark Totem of Snake.
15. Beetle Island
As usual, start building your village. It won’t be under attack so don’t bother with towers, but you will need to fight, so focus on getting a strong shaman army. Give them a Hall of Mysteries so they can learn frost power. While you’re building, explore the east and west of your island. Don’t go past the mountain range in the north yet.
In the southeast is a flame puzzle. You need to click on the small flames surrounding the big fire until all of them are lit. The flames are connected in groups of three. Click a fire to change it and the two flames opposite the circle from it, as in the image below:
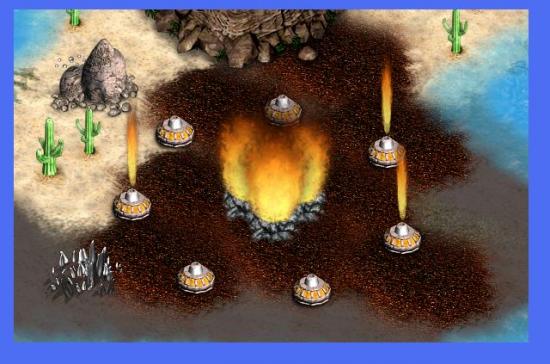
The fastest way to do light them all is to click the fires in sequence going around the circle, starting with the one that’s off. After 6 clicks you get one extinguished fire on one side with two extinguished ones straight across from it (as in the image, though in a different position). Click on the single one and they’re all lit. You will get a Rune of Earth.
To the north of the fire puzzle is a locked chest that can be opened by placing 4 energy spheres in the structure behind it. The spheres are in chests all over the island. Inside the chest is your last scarab.
Straight north of the village, next to the gap in the mountains, is a giant bird’s nest with one of the feathers you’re looking for underneath it.
Once you have a nice group of shamans, start moving through the gap in the mountains. You will be attacked by lots of bugs. Fight off the first lot and have a look at the area. The bugs are appearing from 4 big holes in the ground. After each wave of small bugs, a large beetle will swiftly run from one hole to another. You must kill the giant beetle to get the totem.
I found that the best way to do this is to build mud and arrow towers between the holes. The mud will slow the bug down while the arrow towers will help you fight off the waves of small bugs. Place your attack flag somewhere in the middle, so that your army can go after the large beetle when it scurries past. It will take a few rounds, and your towers will take some damage, so keep repairing them as you go.
Once you’re done, explore the northeast of the island. You will meet the witch from Witch Island again. This time she will give you a seed to plant in some fertile soil.
Now take your Rune of Earth and open the gate west of where you fought the beetles. Cross the sand bridge and arrive on a very fertile-looking island. Plant the seed among the flowers there. Now you need to water the plant three times, using the bowl you find on the fertile island. There are 3 rock pools on the island, one right where you are now, one north of the bird’s nest and one right by your village. Dip the bowl in each of them and pour the water over the plant. Then click the tree 3 times to collect all the fruits for the witch. She will show you how to create a herb garden for your witch doctors.
In the southeast is an island with a chest on it that you can see from the shore when you build a tower. However, you won’t be able to get to it until you can swim. The chest contains the Necklace of Spirits.
Now you have all the scarabs, go back to the Great Desert and complete the instructions for the second visit (above). Then move on to the Gazing Canyon.
15a. The Gazing Canyon
You arrive in a new desert with the only thing to protect you being the gate you came through. You will soon be subjected to aerial attacks, and Aruku and Guru need to be protected from these. So start by building a hut surrounded by several towers, then build your barracks, workshop and archery range so you can upgrade your towers to arrow towers. The attacks will mainly come from the north, but a few from the south as well.
Once you’re well protected, send your army to the eye nest in the southwest and destroy it. Collect the dark eye. Keep your mini map open at all times so you can keep your eye on your village in case there are any attacks going on. Pull Aruku and Guro out of harm’s way, if necessary.
With the first nest destroyed, build up your army. You can now also start exploring the southwest of the map with your scouts. In the southwest you will find a chest with another dark eye.
After the first attack on the village, decide where your defenses are weak and reinforce them with more arrow towers. A fully upgraded workshop will help your towers out tremendously.
When you have a few shaman tents, send your army off to the second nest, in the southeast. Destroy it and get the eye. Then go to the northeast and destroy the nest there. Behind the nest are two mountains with round symbols on them – they’re the eye sockets. Place the dark eyes in the sockets with matching symbols and a new passage opens. Destroy the nest at the end of the passage and then send your army home.
Finally, destroy the nest in the west with your archers and shamans. Don’t do anything with the eye sockets in the north until you have a massive army, though! So build, build, build. Also put some arrow towers near the eye sockets in the north. Position your army between the sockets.
When you’re happy with your army, put the eyes in their matching sockets and watch and tremble as the pyramid is opened and the guardian is unleashed. It’s a big fight, but with the help of the towers and your gazillion shamans, you can do it!
When he’s destroyed, inspect the area around the pyramid for the last blue star and open the two chests in the east and west with 7 yellow and 7 blue
15b. The Pyramid
First Visit
Finally, a level with no fighting – just exploration and puzzles. You get to do half the pyramid in this visit, so you will have to come back later to do the second half.
Explore the tunnels in the pyramid and find ways to access new areas. In this half of the pyramid there are four ways to open up new areas: lighting the unlit torches on the walls, finding protruding bricks in the wall and pushing them, standing on two raised floor tiles at the same time, and pulling down the horns of 8 bull’s heads on the walls. The lights and bull’s heads are easy to find. There are 3 bricks, as shown in the images below:
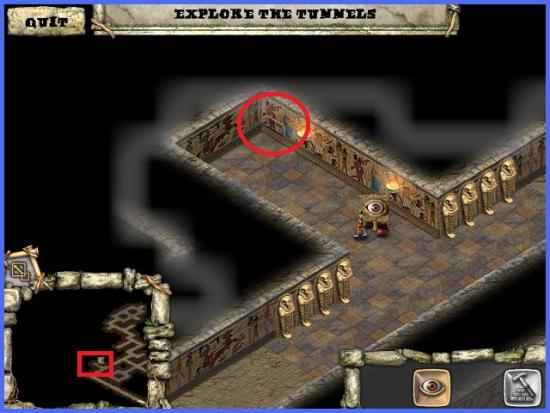
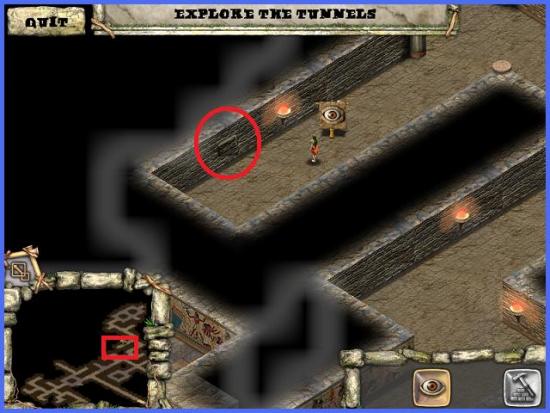
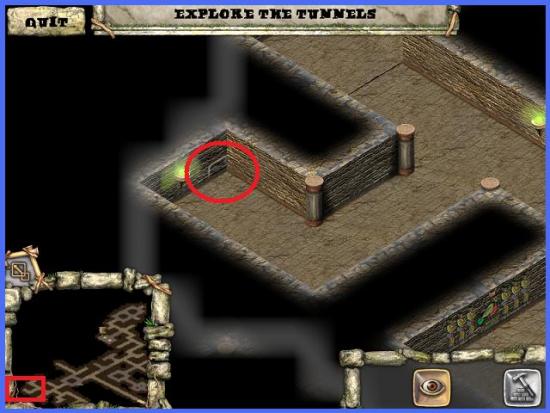
To push down the 2 floor tiles at the same time, place your flag on one of them, then pick up either Aruku or Guro and drop them on the other tile.
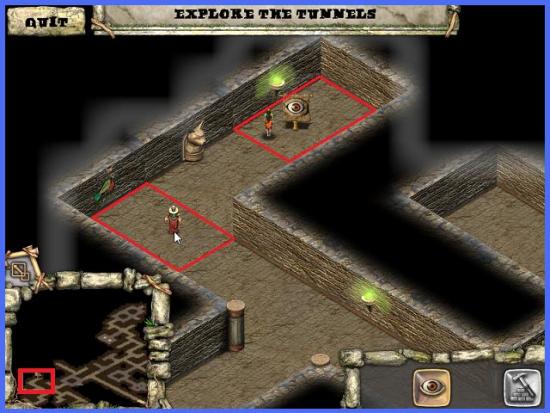
Once you’ve found all areas, the center area will open up. In this area you need to move your flag around until all the floor tiles are down. The best way to do this is to move them clockwise from the start (more or less). Aruku and Guro have to be on a tile together to push it down. As a reward you will get the handle of the magnifying glass – yay!
Second Visit
As soon as you return to Firefly Island with any of the completed collections, you will be given an ankh key that will allow you to continue in the pyramid. On the wall in the room where you left Aruku and Guro are two paintings. One is holding an ankh, the other isn’t. Place your ankh on the one without and explore the second part of the pyramid.
The same principle applies: light torches, push bricks and step on floor tiles to access new areas. The images below show the bricks. The second to last image also shows the first floor tile to step on. Its twin is off to the left, at the end of the corridor.
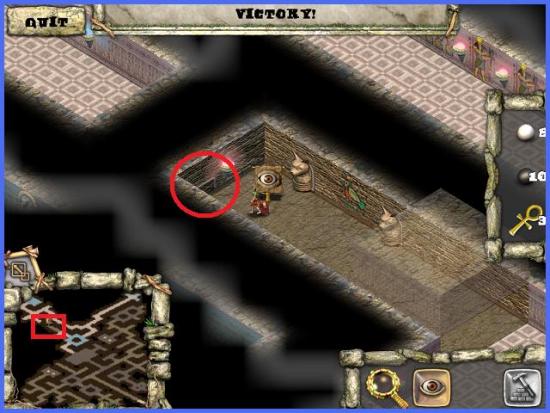
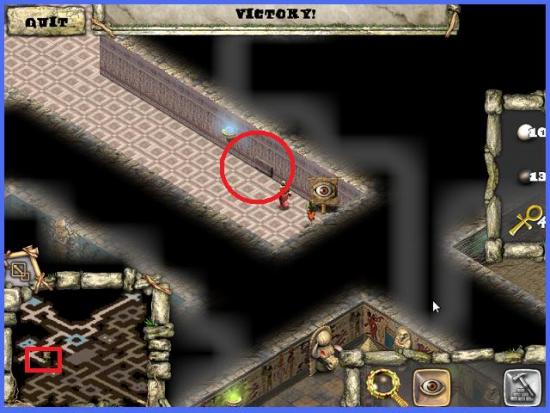
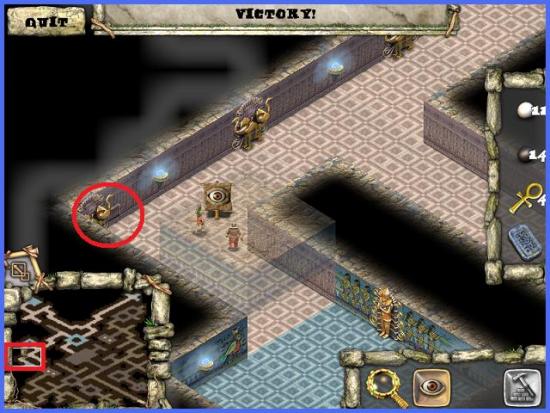
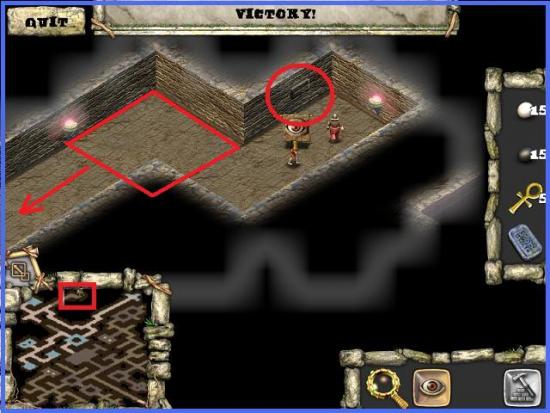
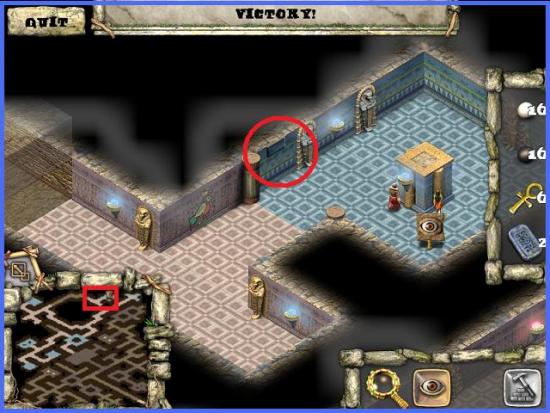
You should collect 6 more ankh keys and 3 pattern tablets, and 17 white and 17 black marbles. When you have everything, go to the area where there is a large square of space yet undiscovered and look at the images on the walls. There are 3 images that should be carrying an ankh on either side of the square (3 in the image below, 3 around the corner to the right). Place the images and the final area opens.
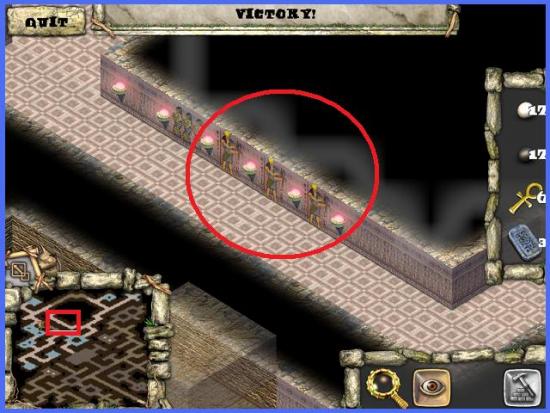
In the middle is a Sacred Summator, surrounded by pillars and keys. Put some black and some white marbles in the hole of the summator, and place one of the tablets in the slot. The summator will fill with black and white marbles. You can switch the color of the lowest row of marbles to change them.
You can look at the images on the yellow columns for clues, though I’ve found that that doesn’t necessarily bring you to the answer. Also, the puzzles aren’t always the same for each game, so simply giving you my answers here won’t help. However, the puzzle follows a simple binary addition system.
Imagine the black marble is 1, and the white marble is 0. Starting from the right, add up the two marbles in each column, and place the answer underneath it. So:
0 + 0 = 0
1 + 0 = 1
0 + 1 = 1
When you have 2 black marbles in a column, the answer should be 2, but that doesn’t work in a binary system, obviously. So what you do is put a 0 in that column, and add 1 to the column to the left of it. Example:
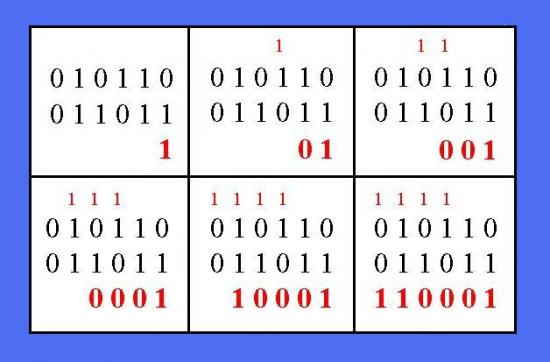
Each time you complete a puzzle, a chest opens and you will find a rosary. If you have the rosaries and the black and white Oils of Magi, go back to the Great Desert, the Abandoned City and the Oasis.
16. Shark Archipelago
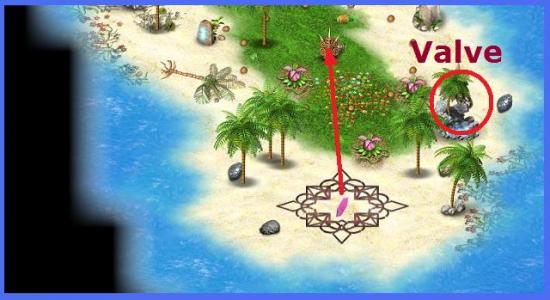
You arrive on a small island with only one scout. Collect the green and blue shells. There is also a valve hidden somewhere. Complete the puzzle as in the image below. Your reward is a pink crystal. Put the crystal in the holder inside the circle of round stones. Put your flag in the circle too, and when the scout is inside the circle, click the crystal and you’re transported to the next island.
On the second island you neat to clean up all the piles of mud for your second crystal. In the west is a ball puzzle. You need to move the balls to the column in front of the one where they start, in the same order: yellow, blue, red from top to bottom. Think of the red ball as the heaviest and the yellow as the lightest. When you push any of the buttons, the heaviest ball in a column will move to the bottom of next column. As a reward you get an energy sphere. Also take note of the circle of red and white flowers in the southeast. Then use the yellow crystal to move to the third island.
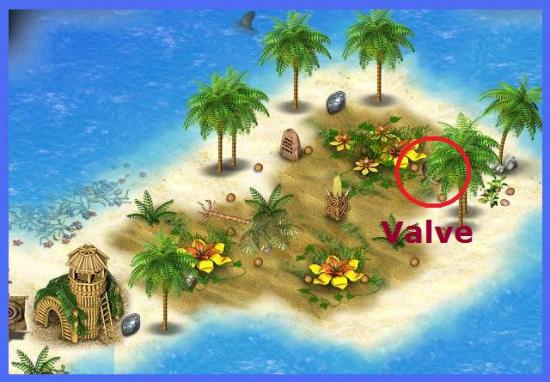
On this island is a scout hut, so your little fella gets a friend. Find another valve in the northeast. Arrange the red and white orbs around the mountain in the pattern you saw with the flowers on the previous island, and get a blue crystal.
Go back to the previous island, place the blue crystal and go to island 4. Put the two valves in the sockets, and the energy sphere in the cup in the middle. Some of the water will drain and reveal a chest that contains the aqualungs. Congratulations, your scouts can now swim! Beware of the sharks, though!
Explore the waters and the mini islands. In the northwest is an island with ghosts on it, which has a chest that opens with 9 skulls. The last skull is on the island in the center of the map. Inside the chest is the map to Ghost Island.
In the southwest is an island with another energy sphere. Next to that is an island with a chest that opens if all the lighthouses in the archipelago are powered.
Now go back to the yellow island. To the southeast of it is an island with a tower on it. Unfortunately, it’s surrounded by sharks. Swim to the island, avoiding the sharks, and the people in the tower will promise to help you get rid of the sharks in return for 24 green shells. Some of them are on the small islands around the perimeter. Give the shells to the tower and watch it kill the sharks.
Once the sharks are gone, swim to the island in the southeast. Place the energy sphere in the cup by the lighthouse. Click on the lighthouse to turn the beam, and then follow the direction of the beam to the next lighthouse and change that one, etc. From the starting point go west, north, east, south, west, south. That brings you to the lighthouse with the locked chest. Inside it is the Rune of Water. Use the rune to open the door on the dirty island and collect the Shaman Mask from the chest.
The last thing you have to do for this level is to find a gap in the sharks to the north of the yellow island and swim to the island in the center of the map. I usually try to pull the scouts out of the water when the sharks get too close and drop them back in when they’ve moved on. Open the chest on the island with 32 blue shells to find the dark Totem of Shark.
You can now go back to the previous islands and explore the waters around them. There will be many more gems and other items to find.
16a. Ghost Island
You arrive on a gloomy, dark island. Your scouts wouldn’t get too far exploring, but they can swim the perimeter. Find 3 small islands with chests containing foxy stones. Meanwhile, build your best army.
When you further explore the island, you will find that two tribes of ghosts are engaged in an eternal war as each tribe accuses the other of having stolen their sacred crown, but they can’t seem to defeat each other. Both tribes also contain three bone chests.
Once you have a large army of shamans, start moving towards the southern tribe, killing enemies along the way. Destroy the southern bone chests one by one. Each chest releases an elder skeleton, which are quite hard to kill, so only do one at a time. It is likely that the elder skeletons will be lured towards your village along the endless stream of appearing shamans and fighters, so it’s also a good idea to build some arrow towers along the edge of the forest to help you out. Don’t leave them alone for too long at any point, as they will slowly heal over time.
As soon as you’ve killed the three elder skeletons of the southern (red) tribe, give the completed blue crown to the chief ghost of the northern (blue tribe). He will find peace and drop another foxy stone. Then repeat the process with the bone chests/elder skeletons in the blue tribe.
Once the tribes have been put to rest, put the 5 foxy stones in the green sparkling fox statues to dispel the darkness and collect the Vial of Longevity from the chest. If you collected the Seals of Magi from the chests at the Gazing Grounds, you can now use one of them to open the locked chest in the south and collect the Black Oil of Magi.
17. Island of Worship
Start exploring the island and building your village, but don’t click on the main temple directly north of the village until you’re ready for battle. When you are, click on the temple and you will first be told that there are 5 Idols that each wants 12 fruits to be activated (this time around, all the fruits can be found on the island and none of them are in chests). Then a dark version of Aruku herself appears and you are attacked by her minions.
- In the southeast is the Idol of Divination, which wants 12 oranges.
- In the northeast is the Idol of Storm, which wants 12 carambola fruits.
- In the southwest is the Idol of Purity, which wants 12 bananas.
- In the northwest is the Idol of Frost, which wants 12 pineapples (if you’re missing a pineapple, closely inspect the trees north of the temple that was lit by the Idol of Divination, in the east. Another hard to find one is on a small island in the northeast).
- In the north are 2 Idols that each wants 12 papayas, so you have to pick one. The right one is the Idol of Protection, the left one is the Idol of War.
Each time you claim an idol, Dark Aruku appears. After the third Idol you’re attacked by flying eyes, and after the last Idol Dark Aruku attacks you herself. She’s very strong, so have your army ready and the other Idols you like charged before you claim your last idol. Some of her spells severely damage any buildings around her, so don’t forget to repair your buildings during the fight.
After you defeat Dark Aruku, you will receive the Dark Totem of Lion. There are several things left to do on this island (though no more green and red sparkling circles like last time, yay!).
In the north are 4 pillars with images on them. The images that are lit up are in the correct position. On each column, the images are in the same order, though the sequence is shifted. Basically, sun goes above moon, moon above star, star above lightning bolt and lightning bolt above sun. Completion of the puzzle gives you the Power of Thunder research (Hall of Mysteries).
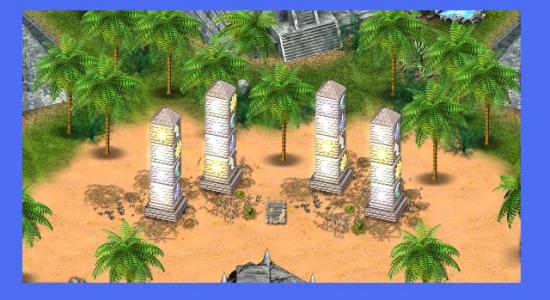
There are some gems hidden in one of the three pyramids in the north. Keep clicking on them until they either say “there is definitely nothing of interest inside this pyramid” or until the gems appear.
Finally, charge your Idol of Divination and cast the Clairvoyance spell in the dark patch in the south. On the right side of that island is a button that moves the rocks blocking the entrance to the clearance out of the way. Have your scouts swim to the island to collect the goodies on one side, then click the button again and do the other side. On the right you will find the Masking Cloak, on the left the last Shaman Mask, which will allow you to build temples.
Now you have the Masking Cloak, go back to the Lone Iceberg and talk to the scouts in the lodge. They will help you find a harpoon, which you can use to kill the white sharks to get the shark teeth for Firefly Island.
18. Ruins of Dream Shore
This level is pretty straightforward and, as far as I can tell, exactly the same as it was in the previous version. Just build up a huge army and kill all the shades. You can now also build a cave of trials to train cavemen, and your training grounds can research Stunning Blow.
While you’re building, send your scouts around the area. They can now move around without being seen by the shades. There are 9 stones scattered around the place that vibrate when you click on them. Click all to gain access to the brown chest in the northeast. Inside it is the Amulet of Great Warriors.
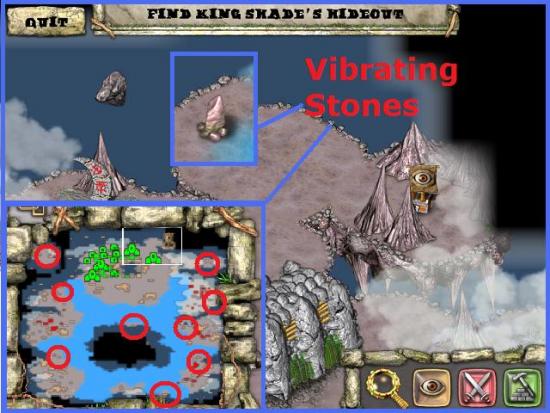
While you’re exploring you will see circles of moving black dots on the floor – these are portals that will transport your army to other islands. The portal on the small island in the far south gets you to a floating island in the northwest, where you can find the eighth vibrating stone.
There are 4 islands with groups of shades on them. Kill them all and collect the 4 Dark Essences that the Shade Princes drop. Once you have them all, and you have the strongest army you can possibly build, put the 4 essences in the lanterns around the hole in the main island. This opens up a portal to the King Shade. Place your attack flag in the portal and watch the fight! Your reward will be your final Dark Totem.
Don’t forget to pick up the final shark tooth and bring them to Firefly Island.
19. Comet Crash Site
Explore the island and find the three Idols in the east. They each need specific crystals to be activated. The first one to focus on is the Idol of Storm on the right, which requires 9 green Thurisaz crystals. One of these is on the other side of the water to the left of the Idols. You can’t walk there, so place Aruku on the shoreline until you can see the crystal. When you have the crystals, activate and charge the Idol.
To the west you will find a crystal pedestal. Once you’re there you’re told your main objective: find all the pedestals and put the dark totems on them to destroy the light ones. It doesn’t matter which totem you put on which pedestal.
Further west is the second pedestal, surrounded by energy spheres and yellow orbs. Click the spheres to light the orbs. Each sphere controls a specific group of orbs. If an orb is switched on twice, it turns yellow, if it’s switched on three times, it turns red. Each orb must only be lit once. Click the 3 spheres as shown in the image.
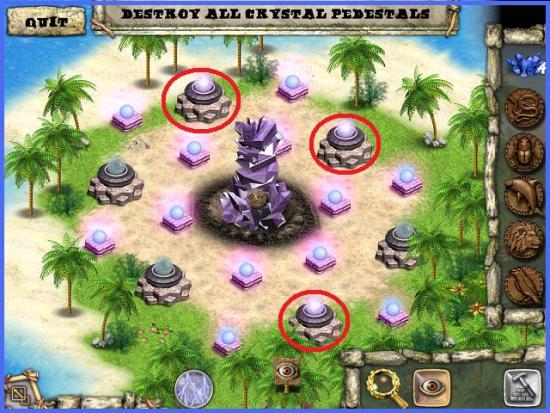
When the orbs are all lit, you can put a dark totem on the pedestal to destroy it.
Use the Thunderstorm spell to destroy the green crystals blocking your way to the north. Go on exploring.
Time to have some fun with the crossbow in the south. Use the top buttons to aim it and the bottom ones to power it. To break the blue crystal mountain to the west, aim it west and charge it with 2 green lights. Then click the bow to shoot the mountain 3 times. Then aim it north, charge up to 5 and shoot 3 times to destroy the green mountain. Finally, aim east, charge to 3 and shoot 3 times to destroy the orange mountain. Collect the gems.
The third pedestal has a simple memory game to be activated. Find pairs of images until they’re all gone and destroy the pedestal.
To activate the fourth pedestal, all the white orbs need to be moved to the left and the black ones to the right. They can hop over one orb of the opposite color at a time.
- Move 1 white to the left
- Jump over it with a black and move the next black one to the right
- Move all 3 whites to the left
- Move all 3 blacks to the right
- Move all 3 whites to the left
- Move the final 2 blacks right
- Move the last white left
Find the 7 blue Ur crystals to claim and charge the Idol of Frost. Use the Snow Tempest spell to break the blue crystals blocking your way to the west. Recharge the Idol.
Move carefully to the west, as at some point you will be attacked by those thorn flowers. And if you lose Guro or Aruku you have to do the level again! As soon as you’re being shot at, move them out of the way and wipe out the flowers with the Snow Tempest spell (Thunderstorm works too).
The fifth pedestal is activated by simply finding it, so go ahead and destroy it with a Dark Totem.
Now find the 5 orange Fehu crystals and claim and charge the Idol of Flame. Use the Meteor Shower spell to destroy the orange crystals blocking your way to the north.
For the final pedestal you need to throw coins in wells until you have no coins left. You get 3 tin coins and 3 copper coins. Throw tin coins into the second well from the left, the one that doubles your tin coins, until you have 6 in total. Then throw them all in the well on the far left until you only have copper ones left (you should have 6). Now throw the copper ones in the third well until they’re gone.
When you’ve destroyed the last pedestal, the whole place blows up and turns the landscape to ashes. The good news is that any colored gems you’ve missed will now light up like Christmas trees!
Charge all 3 idols again and use their spells to destroy the crystals blocking the way to the north. Explore behind the crystals until you’ve found the entrance to the comet.
19a. Guardian Moon
Explore all the islands until you’ve found 100% of the gems, using your magnifying glass if necessary. Once you have them all, you will unlock Guardian Moon, in the north of your world map. The idea here is similar to the Island of Mist – just explore around the fog and light lamps to access new areas.
The first energy sphere is by the second pool. Use it to light the lamp to the right of the first pool.
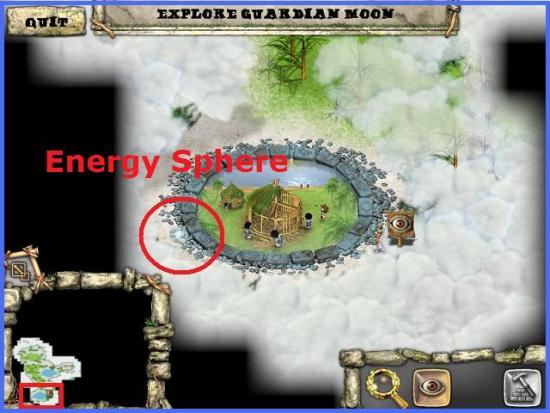
South of the third pool is a lightning trap.
North of the third pool is a locked chest with a light puzzle. Clicking any light will change all the lights in both its row and column. The trick to this is as follows: to change one light and nothing else, click all the lights in its row and column once. So, to click the light marked X here
OOOO
OXOO
OOOO
OOOO
You need to click all the lights marked X here once
OXOO
XXXX
OXOO
OXOO
Inside the chest is the Relic of Prosperity.
By the lighthouse above the puzzle you’ll find an uncharged energy sphere. A second lightning trap is under a tree to the east of the puzzle.
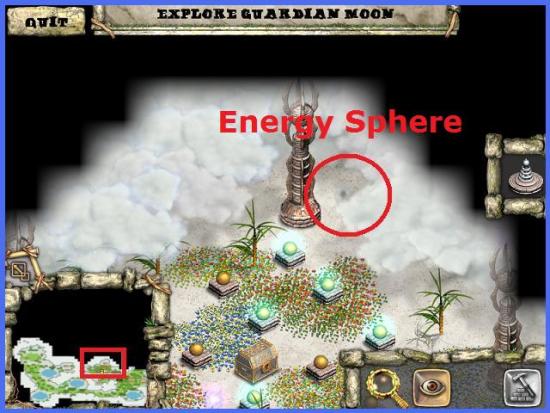
The next puzzle has green squares, black squares and safe places (red circles). Move mini Aruku across the board with the buttons. You get 3 steps to reach another safe place. If you’re not on a safe place then, you’re sent back to the start. You can’t walk across black squares. Make your way across the board. As a reward you get another energy sphere that you can use to light the next lamp.
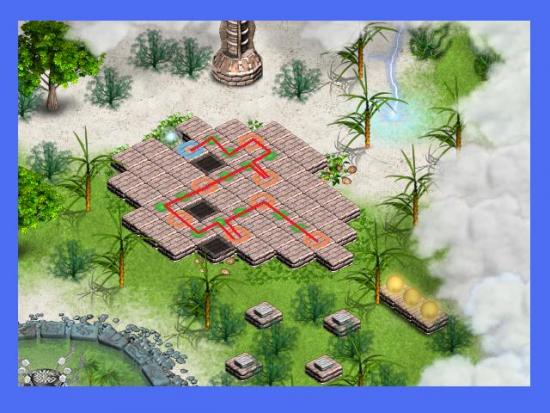
To the left of the pool with the comet is the head of a statue. It’s very hard to see, but the third lightning trap is under the clouds to the right of the head.
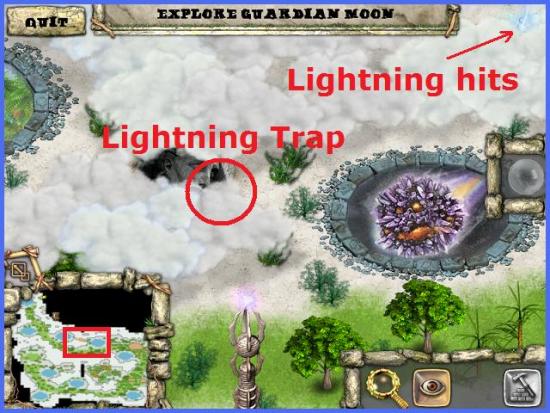
The fourth one is to the right of the futuristic pool, also in the clouds.
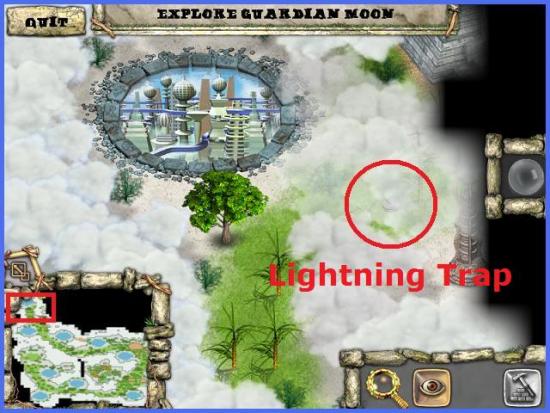
When you have all 4 traps, find the 4 places where lightning hits the ground and put a trap under it. Three are clearly visible, the fourth is behind the clouds north of the comet pool. Place the uncharged sphere into the structure that you lit with the lightning. When the sphere is charged, light the lamp by the futuristic pool.
The last sphere is next to impossible to see, but is next to the plants on the northeast edge of the final pool. Charge it and light the last lamp.
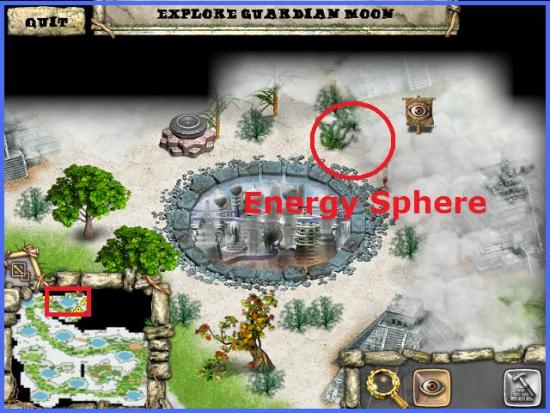
The final thing to do is to put the tear of heaven in the lake.
20. Inside the Comet
Your task is to investigate the inside of the comet. My advice is: don’t! Just start building, because there isn’t that much to explore, and as soon as you’ve found… a certain something, you’ll be over your ears in heavy combat.
The key to this level is to build a very large, well defended village. Start with a small group of huts where you start, and put towers around them. Upgrade them to guard towers as soon as you have barracks.
You will start getting small attacks very soon, coming from the south and east. So when you’re building, put arrow towers in the east and south. Have a good look at where the enemies appear, and leave a small clearance there, circled by arrow towers. Don’t forget to upgrade your workshop to the max, as that makes the arrow towers much more effective.
The safest places to build are in the southeast and southwest. So build your city there, and don’t skimp on support buildings like herb gardens, market places etc. as every little bit helps. As usual, mainly focus on shaman tents, but I like to also have a cave in the south and west near where the enemies appear, as they make quick work of those nasty stone monsters.
When your city grows, put LOTS, and I mean seriously lots of towers in the north. I usually have a mix of arrow towers and mud towers, and now we can have guard towers, I sprinkle a few of those in too. Also have towers around the gap in the wall in the east.
Once every inch of your space has been filled with mainly shaman tents, start exploring. You can only go east through the gap. At the end is a mysterious statue. Place your attack flag on it. While you’re fighting the statue, the attacks on your village start increasing in strength, so keep your mini map open to keep an eye on the homestead and repair any buildings that get damaged. Remember, if Aruku or Guro die, you have to start over!
Once you’ve destroyed the statue, it turns into a mysterious creature. If you thought the statue was hard to beat, this one is even harder! There are two ways to end this game, the good way, and the evil way…
Good Ending
Explore the rest of the comet now – some other paths will have opened. If you come across any small, purple obelisks like the ones surrounding the creature, click on them to destroy them. This will decrease the creature’s defense. There are 6 in total. One of them is behind one of the toothed holes in the northwest, and it’s quite tricky to navigate your scouts around the hole without getting gobbled up, but it can be done. Then go back to the creature with your army and fight it until one of you is destroyed (make it him, if you have the choice). Just before the creature is destroyed, you need to attack it with the purified Tear of Heaven.
Evil Ending
Explore the rest of the comet. You will find 5 large, toothed holes in the ground. Put your attack flag in the center of the hole and watch your people sacrifice themselves. It takes about 40 souls per hole.
Collectables
Gems of Power
1. Orange: Liana Island – brown chest on small island in n/e. Go through mountain to get there.
2. White: Seagull Island – inside hollow tree
3. Red: Red Rock Island – slide puzzle
4. Green: Witch Island – mud pool
5. Yellow: Great Desert – mountains in northeast
6. Blue: Oasis – ostrich figurine chest in south (use clairvoyance spell)
7. Violet: Abandoned City – crook and flail chest
Ancient Coins
1. Dolphin Island – light puzzle
2. Monkey Island – chestnut chest
3. Seagull Island – walnut chest
4. Skull Island – rusty key chest
5. Frozen Vale Island – white shell chest
6. Witch Island – chest on peninsula
7. Rimy Isles – pine cone chest
Scarabs
1. Red Rock Island – beast lair
2. Bone Island – bone chest
3. Great Desert – inside gate
4. Oasis – copper key chest
5. Abandoned City – glyph chest
6. Mist Island – chest found with Sphere of Clarity
7. Volcano Island – Pyramid behind fire wall near Hall of Mysteries
8. Beetle Island – light orb chest
Shaman Masks
1. Cradle of the North – reward for killing sharks
2. Scorched Island – in Wolf Tribe temple
3. Volcano Island – From Hall of Mysteries
4. Shark Achipelago – behind rune door
5. Island of Worship – in mountain enclosure in south, use Idol of Divination
Feathers
1. Beetle Island
2. Monkey Island (small island s/w)
3. Witch Island
4. Skull Island
5. Blueberry Island (small island s/e)
6. Scorched island (small island s/e)
7. Island of Yeti
8. Cradle of the North
Shark teeth
1. Tetala Island (n/w)
2. Lonely Iceberg (n/w)
3. Red Rock Island (e)
4. Blueberry Island (s/e)
5. Shark Archipelago (center)
6. Ruins of Dream Shore (no shark)
More articles...
Monopoly GO! Free Rolls – Links For Free Dice
By Glen Fox
Wondering how to get Monopoly GO! free rolls? Well, you’ve come to the right place. In this guide, we provide you with a bunch of tips and tricks to get some free rolls for the hit new mobile game. We’ll …Best Roblox Horror Games to Play Right Now – Updated Weekly
By Adele Wilson
Our Best Roblox Horror Games guide features the scariest and most creative experiences to play right now on the platform!The BEST Roblox Games of The Week – Games You Need To Play!
By Sho Roberts
Our feature shares our pick for the Best Roblox Games of the week! With our feature, we guarantee you'll find something new to play!Type Soul Clan Rarity Guide – All Legendary And Common Clans Listed!
By Nathan Ball
Wondering what your odds of rolling a particular Clan are? Wonder no more, with my handy Type Soul Clan Rarity guide.


