- Wondering how to get Monopoly GO! free rolls? Well, you’ve come to the right place. In this guide, we provide you with a bunch of tips and tricks to get some free rolls for the hit new mobile game. We’ll …
Best Roblox Horror Games to Play Right Now – Updated Weekly
By Adele Wilson
Our Best Roblox Horror Games guide features the scariest and most creative experiences to play right now on the platform!The BEST Roblox Games of The Week – Games You Need To Play!
By Sho Roberts
Our feature shares our pick for the Best Roblox Games of the week! With our feature, we guarantee you'll find something new to play!All Grades in Type Soul – Each Race Explained
By Adele Wilson
Our All Grades in Type Soul guide lists every grade in the game for all races, including how to increase your grade quickly!
Blackwell Deception Walkthrough
Welcome to the walkthrough for The Blackwell Deception on Gamezebo. The Blackwell Deception is a point-and-click adventure game played on PC created by Wadyet Eye Games. This walkthrough includes tips and tricks, helpful hints, and a strategy guide on how to complete The Blackwell Deception.
Blackwell Deception – Game Introduction
Welcome to the walkthrough for The Blackwell Deception on Gamezebo. The Blackwell Deception is a point-and-click adventure game played on PC created by Wadyet Eye Games. This walkthrough includes tips and tricks, helpful hints, and a strategy guide on how to complete The Blackwell Deception.
General Gameplay
In this game you need to talk to characters and find and interact with objects to get new information that will help you solve the mystery. The game is non-linear and requires a lot of logical thinking and trial and error. Pay close attention to everything you see and hear as you may need it at a later point in the game. Whenever you’re stuck, revisit all the places you have been, talk to everyone again and just try everything you can think of: combine notes, Oogle for information, switch characters and interact with and inspect all objects.
This walkthrough simply describes the actions that need to be taken to progress in the game, but you will miss a lot of the intrigue and humor in the game if you simply follow the walkthrough step by step. For example, do try all other dialog options even if the correct one is given in the walkthrough.
Controls
To move around, simply click on where you want to go and the character will move. People and objects that you can interact with are indicated with mouseovers telling you who or what they are. Left click on a person or object to interact with them and right click on them to inspect them in more detail. It generally pays to try both options as you often get valuable information that way.
Inventory and MyPhone
A menu will drop down if you move your cursor to the top of the screen. The menu contains an inventory of all objects currently in your possession, an options and save menu and Rosa’s MyPhone.
Click on an inventory item to select it, then click on the person or object in the scene to use the item on them. You can also take a closer look at the items in your inventory by right clicking on them. In one occasion in this game you need to combine two items in the inventory to make a new one.
The MyPhone is a very important element of the game: not only can you use it to call people, but notes on the case will be stored there and you can search for information on the Oogle search engine.
The notes contain basic information on things you found during your investigations and are updated automatically. You will get a message to remind you that the notes have been updated. Essential new information is often found when you select two notes on Rosa’s phone to see if there is a connection between them. It is therefore useful to go through your notes each time they are updated to see if new connections can be made.
Dialog
The notes can also be used in conversation with other characters. Next to pre-determined dialog options you can usually select to talk about the items in your notebook. Again, when the notes are updated it is useful to go and talk to everyone again to see if they can give new information.
Always go through all the dialog options given. Sometimes you can choose between different possible replies. It usually doesn’t matter which reply you choose; you may get a slightly different reaction but you should still get the same information. In the cases where it does matter which reply you choose you will simply get to choose again if you picked the wrong one.
Rosa and Joey
In this game you can play with both Rosa and Joey. In fact, you frequently need to switch characters to complete all the objectives. To switch characters, hit Tab or select J or R from the menu. Joey can walk through doors and look inside locked cabinets (if he feels like it). He can also blow on things to make them move.
Introduction – Ryan and June
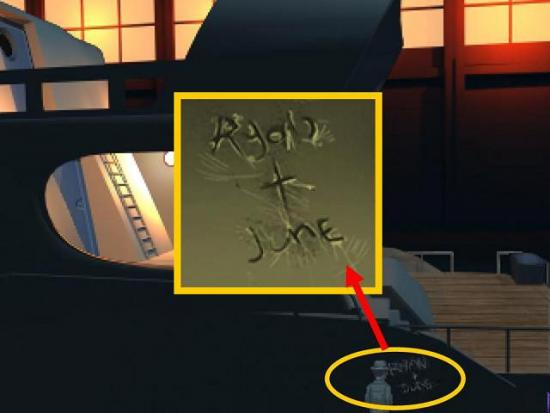
You arrive on the yacht with Rosa and Joey. Select to play with Joey and click on the carvings on the side of the ship. It says “Ryan and June”.

Switch back to Rosa and go inside through the lower door. Click on the light switch by the door and watch the scene.
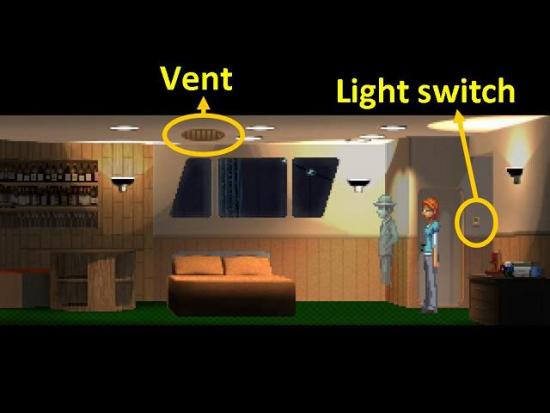
Switch back to Joey and go up the ladder and through the door at the top. Talk to the ghost and watch the scene.
Go back in with Joey and blow on the keys by the door. Blow on them again to move them closer to the vent in the floor.
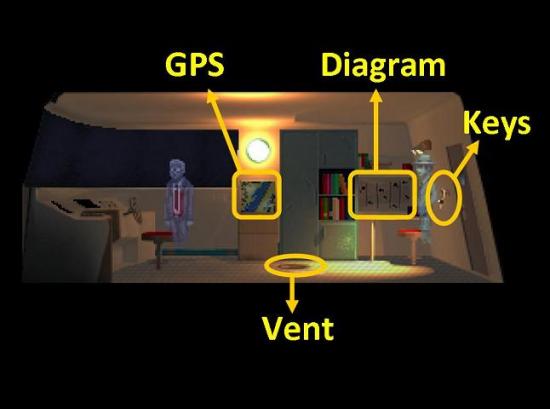
Switch back to Rosa and go in through the downstairs door. Select the dime from the inventory and use it on the vent above the bed. Then click on the vent to go up. Rosa’s arm will appear through the vent in the upper compartment. Click on the key to grab it.
Go outside and up the ladder, and use the key on the upper door. Go in and talk to the ghost. At the end of the scene, inspect the diagram by the door and memorise to positions of the letters.
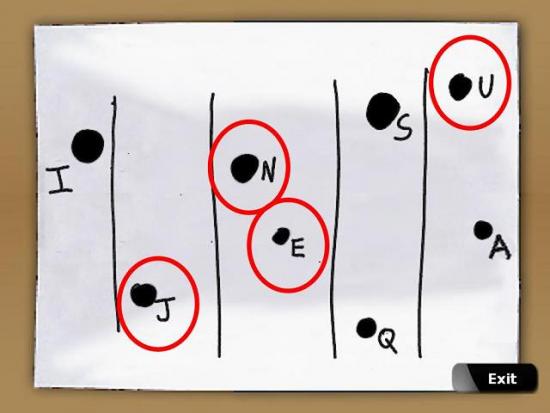
Go back downstairs and walk to the end of the room. Click on the knotty pine.
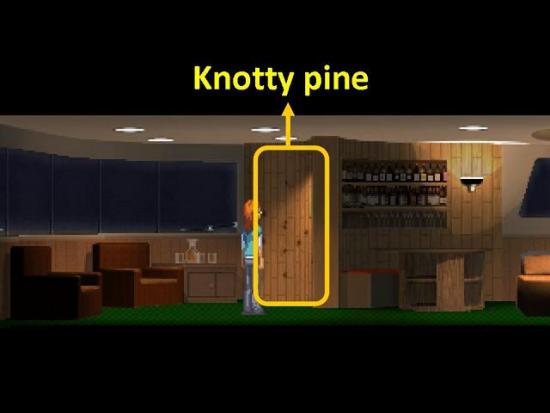
Click on the knots to spell out JUNE according to the diagram.
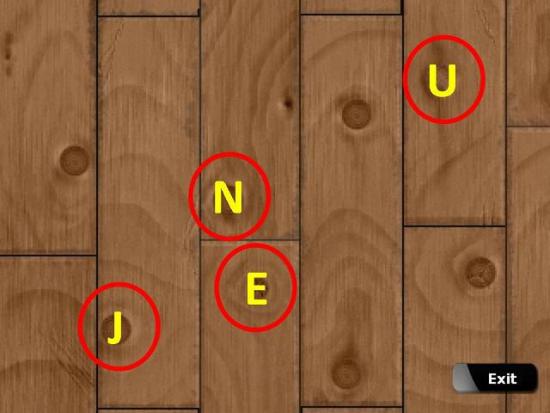
A compartment will open with a lot of money in it. Right click on the money to find out it has wrappers around it saying “GTC”.
Access the phone and go to the notes. Combine “bank” and “GTC” to find out there is a bank named Grant City Trust. Go to the Oogle app on the phone and type in Grant City Trust.
Go back to the bridge upstairs and talk to Ryan. Select Bank Robbery from your notes. Then talk to him about Boston until the conversation ends.
Change back to Joey and click on the GPS system (or the “map gizmo” as he likes to call it). It will start spewing random locations.
Switch back to Rosa and talk to Ryan about Boston again. Keep talking to him until finally the GPS says you’re just outside Boston. Follow Ryan outside and talk to him there.
Switch back to Joey and go back to the bridge. Select Joey’s tie from the inventory and click on Ryan to help him move on.
Have a little chat with Ryan in the afterlife. When you’re back, exit the bridge, go downstairs and jump off the boat through the gap at the rear.
Jeremy Sams
After the opening scene, exit through the door on the right and select to travel to Jeremy. Jeremy has a bit of a surprise for you. Talk through all the dialog options. Inspect his apartment before you leave. In particular, check the pile of photographs on the small table.
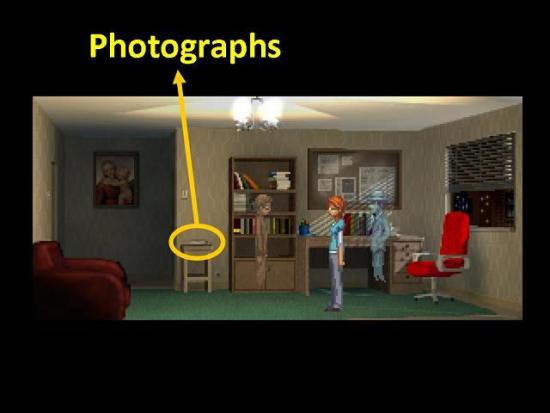
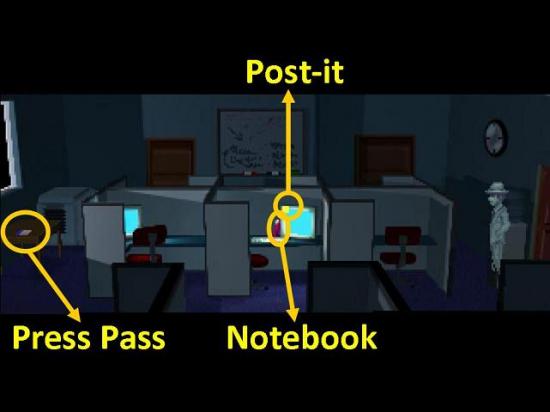
Exit and choose to travel to the City Post. Talk to the receptionist, who is less than helpful. At the end of the conversation switch back to Joey and have him go through the door on the upstairs landing. Check the post-it note on the computer on Jeremy’s desk and go back to Rosa.
Switch back to Rosa and travel to High Line Park. Talk to the detective and go through all the dialog options. Then travel back to Jeremy and ask if you can take the photograph you found earlier. Go back to High Line Park and give the photograph to the detective.
Now go back to the City Post and talk to the receptionist again. Enter the elevator and go upstairs. Enter Jeremy’s office. Pick up the notebook from his desk and click on all the entries for information. Pick up the press pass from the desk by the window and go back out.
Go back to Jeremy and talk to him about his journal. Then talk to him about Penelope Haines.
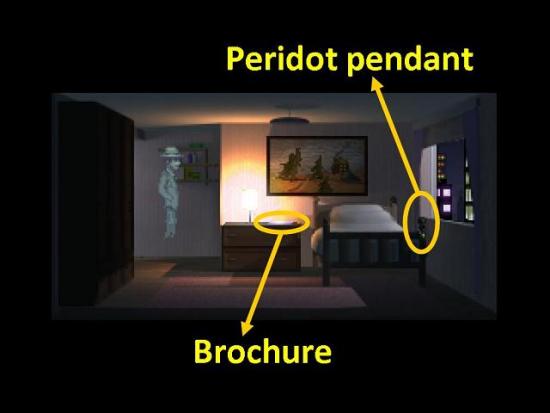
Leave and travel to the Haines residence. Talk to Madison and go through all the dialog options, then leave. After you’ve left you will be asked if you want to send Joey in. Do so and have him go through the door into the bedroom. Read the brochure on the bedside table to find out where Penelope went.
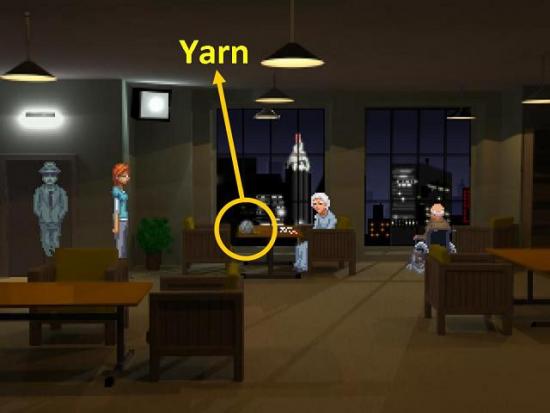
Leave and travel to Seagram Assisted Living. Change back to Rosa and talk to the receptionist. Take the elevator up to the second floor. Take the ball of yarn from the table, as you will need it later. Talk to Penelope and go through all the dialog options. Leave and watch the scene that follows.
Go back to Haines and go through all the dialog options with Madison. Then go back to Seagram. Talk to Penelope again and go through all the dialog options.
Go back downstairs and switch to Joey. Have Joey take a look at the chart on the desk by the nurse.
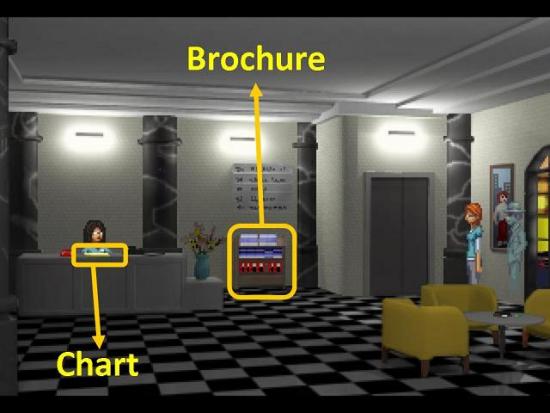
Switch back to Rosa and take one of the brochures from the stand by the elevator. Now take the elevator to the 12th floor. In your inventory, put the yarn on the brochure and then use it on the door. The brochure with the yarn attached will slide under the door.
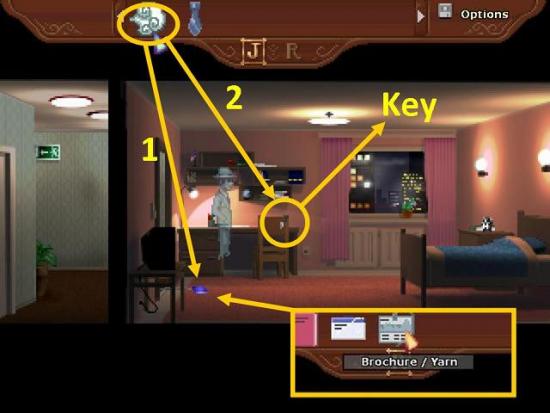
Switch back to Joey and click on the door to have him enter the room. Now first have him blow on the brochure on the floor to move it further into the room. Then blow on the key that’s hanging on the back of the chair so it falls on the brochure.
Switch back to Rosa and click on the brochure (not the key!) and she will reel it in and grab the key. If at any point you make a mistake, leave the room and talk to the nurse again in the lobby about Penelope’s room. She will have someone clean the room, which will reset the puzzle. If your brochure has disappeared from your inventory, you can take a new one after the room has been cleaned.
Go back to the Haines residence and use the key to open the door. Go into the bedroom and take the peridot. Leave the room. The Haineses have come home and you can’t leave the room.
Switch to Joey and go into the living room. Have him blow on the thermostat. Madison will open a door.
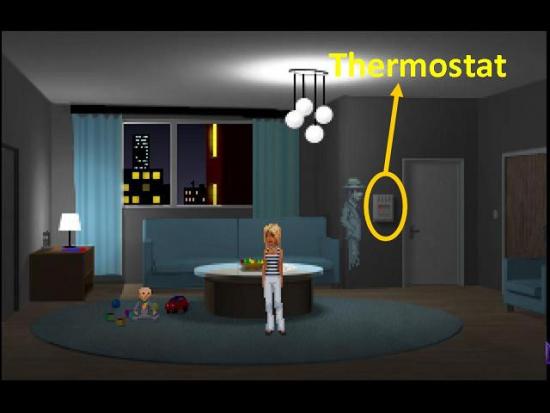
Have Joey talk to the baby and the baby will start following him around. Walk through the newly opened door so the baby will leave the room, followed by his mother. When Joey is back in the room, switch to Rosa and quickly leave.
Go back to Seagram and give the peridot pendant to Penelope. Then ask her about Gavin again.
Now you will be able to visit Lisa Tensing. She’s a psychic, or at least claims to be one. Ring the buzzer and go in. Go through all the dialog options. Also talk to her about Jeremy, in your notes.
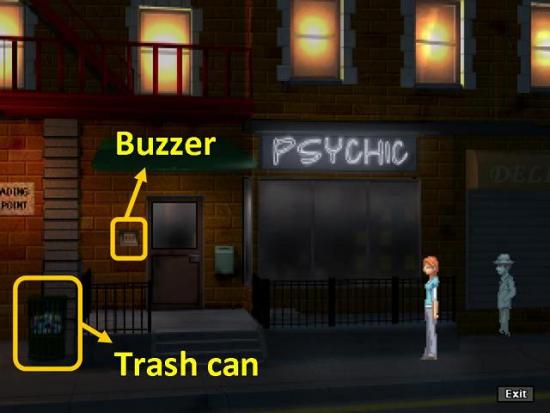
After the conversation you’re back outside. You need to find evidence that Jeremy has been to see her. Go to your phone and call Jeremy’s number while you’re outside of Lisa’s apartment. The phone rings in the trash can. Get it out of the trash can. Go back to Lisa and confront her about Jeremy.
Go back to Jeremy’s apartment and give him the phone. After the conversation go back to High Line Park. Talk to Jeremy again. Then switch to Joey and send Jeremy on using Joey’s tie.
Tiffany Walters
The quests for Tiffany and Jamie can be done simultaneously, but they have no overlapping areas. This section only describes how to solve Tiffany’s quest.
Start by going back to Lisa’s. She’s not coming to the door, so switch to Joey and send him in. Go through the door on the right to Lisa’s sitting room. Take a look at the photo on the table and then go back to Rosa.
Switch back to Rosa and go back to Seagram. Talk to the nurse at the desk about Danny Marconi. Go back to Lisa, talk to her about Danny and tell her he died. Try out a few of the options about how you knew Danny and then ask Joey for help. After his first hint fails, he will give you a slew of information on Danny that will eventually convince Lisa to let you in.
Go through all the dialog options with Lisa and she will give you contact details for two of her former clients. Let’s first focus on Tiffany.
Go to Tiffany’s apartment. Right click on the buzzers to find out she lives in ground floor apartment 2. You can now also interact with her mailbox. However, it is locked.
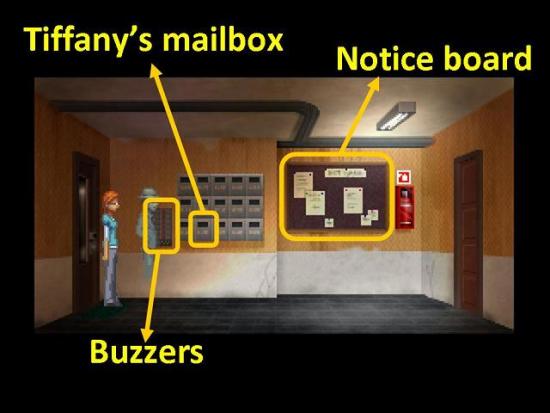
Switch to Joey and have him interact with the mailbox. He can crawl inside. There is a letter in it, but it is too dark to see the return address.
Switch back to Rosa and put Rosa’s business card (which happens to be glow-in-the-dark) in the mailbox. Then switch back to Joey and go into the mailbox again. He can now see the letter was sent by a certain R. Abu.
Exit the mailbox and have Joey walk through Tiffany’s apartment door on the right (if you check the door with Rosa you will find out it’s locked). Inside is Tiffany… who has also entered the spirit world, of course. Talk to her.
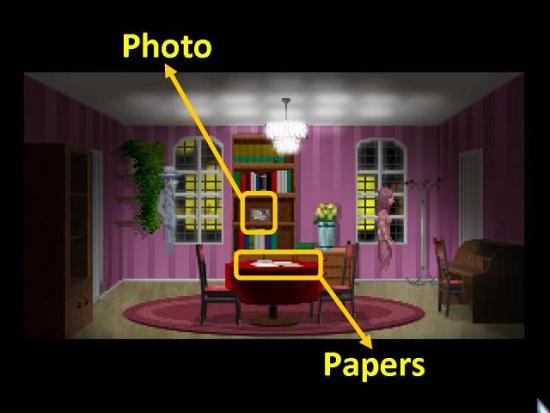
Check out the papers on the table and the picture on the shelf and talk to Tiffany again – make sure to also consult your notes and go through all topics. Tiffany is not exactly forthcoming with information, so go back to Rosa in the corridor with your new information.
Switch to Rosa. R. Abu could be the Rachel from the picture. Search for Rachel Abu on the Oogle app of your phone. Before you leave, check out the notes on the notice board. They’re no use to you now, but may be helpful when solving Jamie’s quest later on.
Leave the apartment block and go to the Cup of Clay café. Talk to the barista about Tiffany. Consult your notes and ask her about everything.
Access the notes on the phone and combine STP with Temp Agency. Now travel to Sterling Temp Placement and talk to the agent. He won’t tell you much so go to Tiffany’s and get Joey to talk to her again about Ken and Sterling. She will tell Joey they terminated her contract.
Go back to Sterling and talk to the agent about Tiffany’s contract. Go through all dialog options and then show him the press pass from Jeremy’s office. Talk to the agent again and blackmail him. He will tell you Tiffany’s lover was Ken Sharpe.
Go to a place where you can access your phone and Oogle Ken Sharpe. He works at Sharpe Sounds, so go there next.
Before you go into Sharpe Sounds on the left, inspect the note on the door on the right. Apparently, Ken has found someone named Becca’s phone and keeps it in his drawer. Remember this for later.
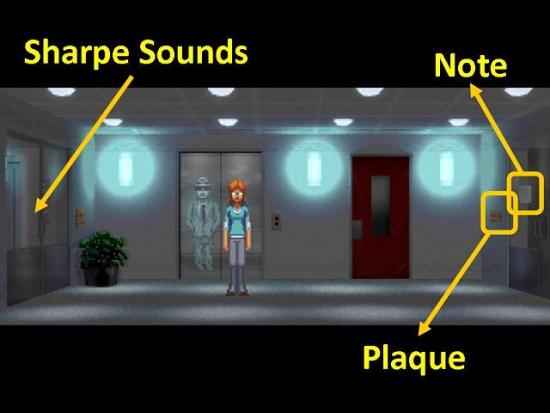
Go into Sharpe Sounds and talk to Ken about Tiffany and Sterling. Go through all dialog options and then go back out into the corridor.
Switch to Joey and send him into Sharpe Sounds. Look at the photos on the wall and check the drawers under the desk.
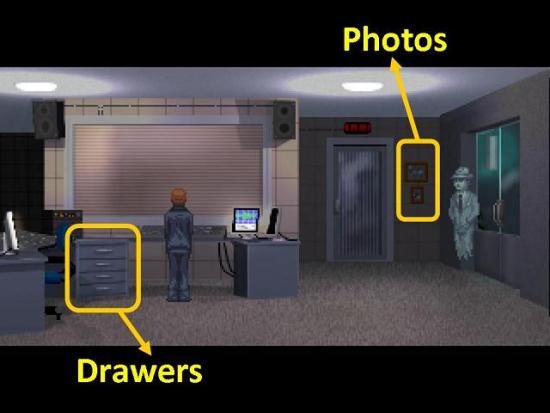
There is a note in the drawer, but it is too dark to read it. There’s also a mobile phone, which must be Becca’s. Go back to Rosa.
Switch back to Rosa and read the plaque beside Becca’s office door. Access the phone and Oogle Gal Friday Publishing. Then call Gal Friday.
While the phone is ringing, switch back to Joey and go back to the drawer. With the light from the phone he can now read the letter. It’s from Tiffany. Go back out to Rosa.
Switch to Rosa, hang up the phone and send her back into Sharpe Sounds to confront Ken. Go through all dialog options. Make sure Ken mentions the word Turtledove.
Then go back to Tiffany’s, switch to Joey and talk to her again about Ken. Mention the word Turtledove.
Go back to Sharpe Sounds and talk to Ken. Have him confirm it is over between him and Tiffany. Back out in the hallway talk to Tiffany again. Then send her on with Joey’s tie. Then return to Lisa and talk to her about Tiffany and Gavin.
Jamie Graham
Now for the second contact Lisa gave you. Travel to Jamie’s dorm, switch to Joey and send him through the door. Read the note on the inside of the door – it says “Remember Waterloo”.
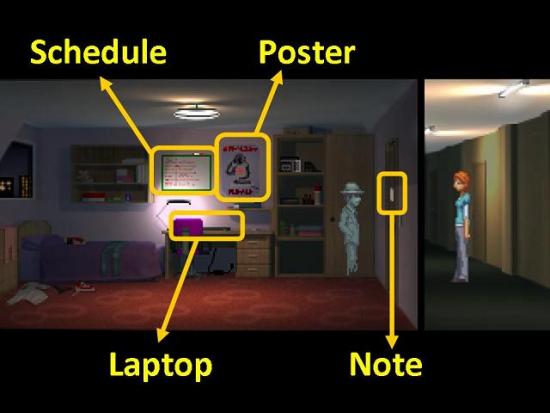
Switch back to Rosa and Oogle Waterloo. You will be told that the Battle of Waterloo was fought in June 1815. Click on the door and enter 1815 into the key pad.
Search the room. In particular, inspect the poster on the wall (for a band called Epileptic Fish), the laptop on the desk (which needs a password you don’t have) and the class schedule on the whiteboard. You find out Jamie took some of the same classes as Rosa did, and even has the same professor.
Go to your phone and Oogle Elaine Appleton. Then call her and go through all the dialog options. In particular, find out she was interested in Middle Eastern history, used to go to a club named Munray’s but now died of natural causes. Also find out that Elaine spoke to Durkin about Jamie’s death.
First call Durkin and agree to meet him at Cup of Clay. Travel to the café and talk to Durkin about Jamie. She was found dead at Munray’s, apparently from natural causes. Durkin promises to send you the coroner’s report. He will do so right after you leave.
Go to a place where you can access your phone and check the coroner’s report on your phone. Then Oogle Munrays (without the apostrophe) and travel there.
Switch to Joey and go upstairs to the VIP lounge. Talk to Jamie. You can go through all the options, but mainly find out she is not interested in dancing because she doesn’t like the music. Also find out under “oh, come on” that she has a dog named Benji. Remember the note on the notice board outside Tiffany’s apartment? Your dog’s name does not make a safe computer password…
So, go back to Jamie’s dorm and have Rosa access the laptop with password “benji” (all lower case). Go through all the emails. Important information is that her parents live out West in Illinois, she has a friend in Mattoon and that her (former) boyfriend is named Seb and at times hangs out at Munray’s.
Return to Munray’s and talk to the blonde guy by the bar. It’s Seb. Go through all the options, including the notes. He says Jamie was using drugs. Go to your phone and combine Jamie and Drugs with the Coroner’s Report. You will wonder if Seb lied.
Talk to him again. He will tell you that Jamie used to like to sit at home and read Ashbless. Oogle Ashbless to find out his most famous book was called Anubis at the Gate.
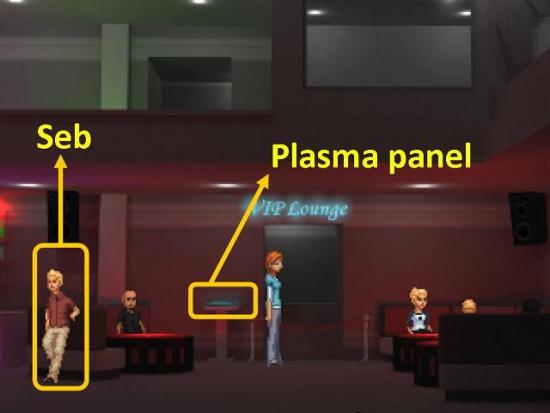
Now access the plasma panel to the left of the stairs and change the music to Epileptic Fish. Switch to Joey, go upstairs and ask Jamie to dance again. Go through the dialog – there is quite a lot of it.
Under “ask about Jamie” select her studies, then history, then Middle Eastern. Under “home town” select out West, then Illinois, then Mattoon. Finally, talk to her about her spare time, select books, Ashbless and Anubis at the Gate. Whaddaya know – spooks can make out.
Follow her out. Rosa ain’t looking too happy. Then go back to Jamie’s dorm and have Joey go in and talk to her. Rosa will come in and send her off into the light.
Go back to Lisa and go through the rather lengthy (but interesting) scenes.
Gavin and Lisa
Rosa has been captured and is tied to a chair in a storeroom. First switch to Joey and go through the door on the right. Lisa is keeping guard on the landing. Joey can’t do anything here, so go downstairs. Click on Gavin to overhear his phone conversation.
Switch to Rosa and click on the door to have her talk to Lisa. Go through all the options, but make sure to tell her that Gavin is planning to kill her.
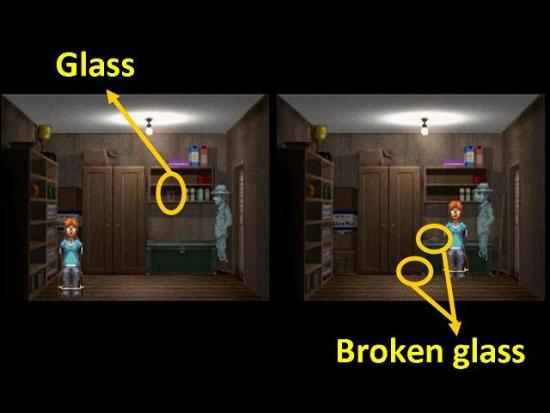
Switch to Joey and blow on the glass on the shelf so it falls and breaks. Then give Joey’s tie to Rosa and pull her to the right twice and to the back wall once. Then switch to Rosa and click on any piece of broken glass you can find. Select the glass from the inventory and click on Rosa so she will cut herself free.
Leave the room and talk to Gavin. At the end of the conversation, switch to Joey and go downstairs. Blow on the photo on the table until it moves under the door to the next room.
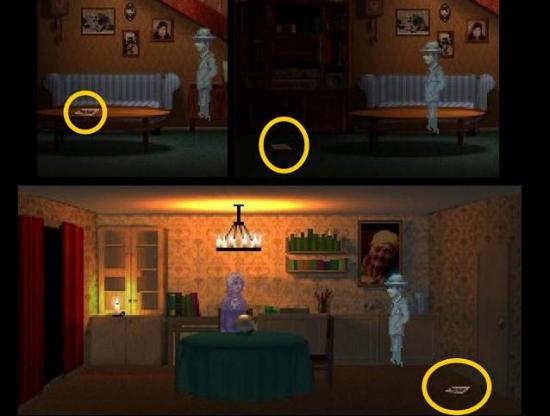
Go to the next room and talk to Lisa, in particular about the photograph. Then go back into the living room for another surprise. When you’re with Joey in “space” (for lack of a better word), move to the right and talk to Madeline. When you’ve gone through all the options, give Madeline Joey’s tie.
Back in the living room, talk to Lisa until she goes away, then start talking to Rosa. Don’t wait for Gavin to finish talking, as he won’t. Just click on Rosa. You need to talk to her into breaking the link with Gavin. Keep trying the different options until things start changing.
Specifically, talk to her about Jeremy and select “yeah, good riddance”. Talk about Jamie and select “you’re nobody”. Talk about Penelope and select “not a damn thing”. Finally, for Tiffany select “you are no better”. If you select a wrong option at any point, you will have to go through the entire process again.
When Lisa has Gavin in a stranglehold, put Joey’s tie on the both of them. Watch the ending.
More articles...
Monopoly GO! Free Rolls – Links For Free Dice
By Glen Fox
Wondering how to get Monopoly GO! free rolls? Well, you’ve come to the right place. In this guide, we provide you with a bunch of tips and tricks to get some free rolls for the hit new mobile game. We’ll …Best Roblox Horror Games to Play Right Now – Updated Weekly
By Adele Wilson
Our Best Roblox Horror Games guide features the scariest and most creative experiences to play right now on the platform!The BEST Roblox Games of The Week – Games You Need To Play!
By Sho Roberts
Our feature shares our pick for the Best Roblox Games of the week! With our feature, we guarantee you'll find something new to play!All Grades in Type Soul – Each Race Explained
By Adele Wilson
Our All Grades in Type Soul guide lists every grade in the game for all races, including how to increase your grade quickly!


