- Wondering how to get Monopoly GO! free rolls? Well, you’ve come to the right place. In this guide, we provide you with a bunch of tips and tricks to get some free rolls for the hit new mobile game. We’ll …
Best Roblox Horror Games to Play Right Now – Updated Weekly
By Adele Wilson
Our Best Roblox Horror Games guide features the scariest and most creative experiences to play right now on the platform!The BEST Roblox Games of The Week – Games You Need To Play!
By Sho Roberts
Our feature shares our pick for the Best Roblox Games of the week! With our feature, we guarantee you'll find something new to play!All Grades in Type Soul – Each Race Explained
By Adele Wilson
Our All Grades in Type Soul guide lists every grade in the game for all races, including how to increase your grade quickly!
Hidden Folks Walkthrough
Hidden Folks is a charming hidden object experience from Adriaan de Jongh. In this game, players will explore detailed, crowded drawings containing thousands of tiny figures and objects in search of specific characters. Gamezebo’s Hidden Folks walkthrough will explain how …
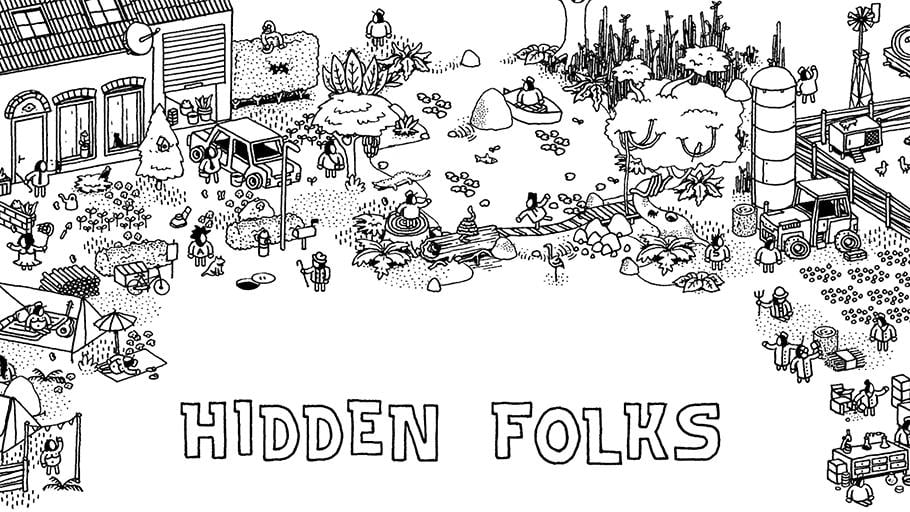
Hidden Folks is a charming hidden object experience from Adriaan de Jongh. In this game, players will explore detailed, crowded drawings containing thousands of tiny figures and objects in search of specific characters. Gamezebo’s Hidden Folks walkthrough will explain how to find all the folks in the game so you can track down any that have escaped detection—so far.
Skip to the bottom of the article if you are looking for help with the new DLC levels in the Beach area.
Tips
We’ve compiled a complete walkthrough below, but this intro section will provide just a few tips for players who want general help with the game before checking the walkthrough directly.
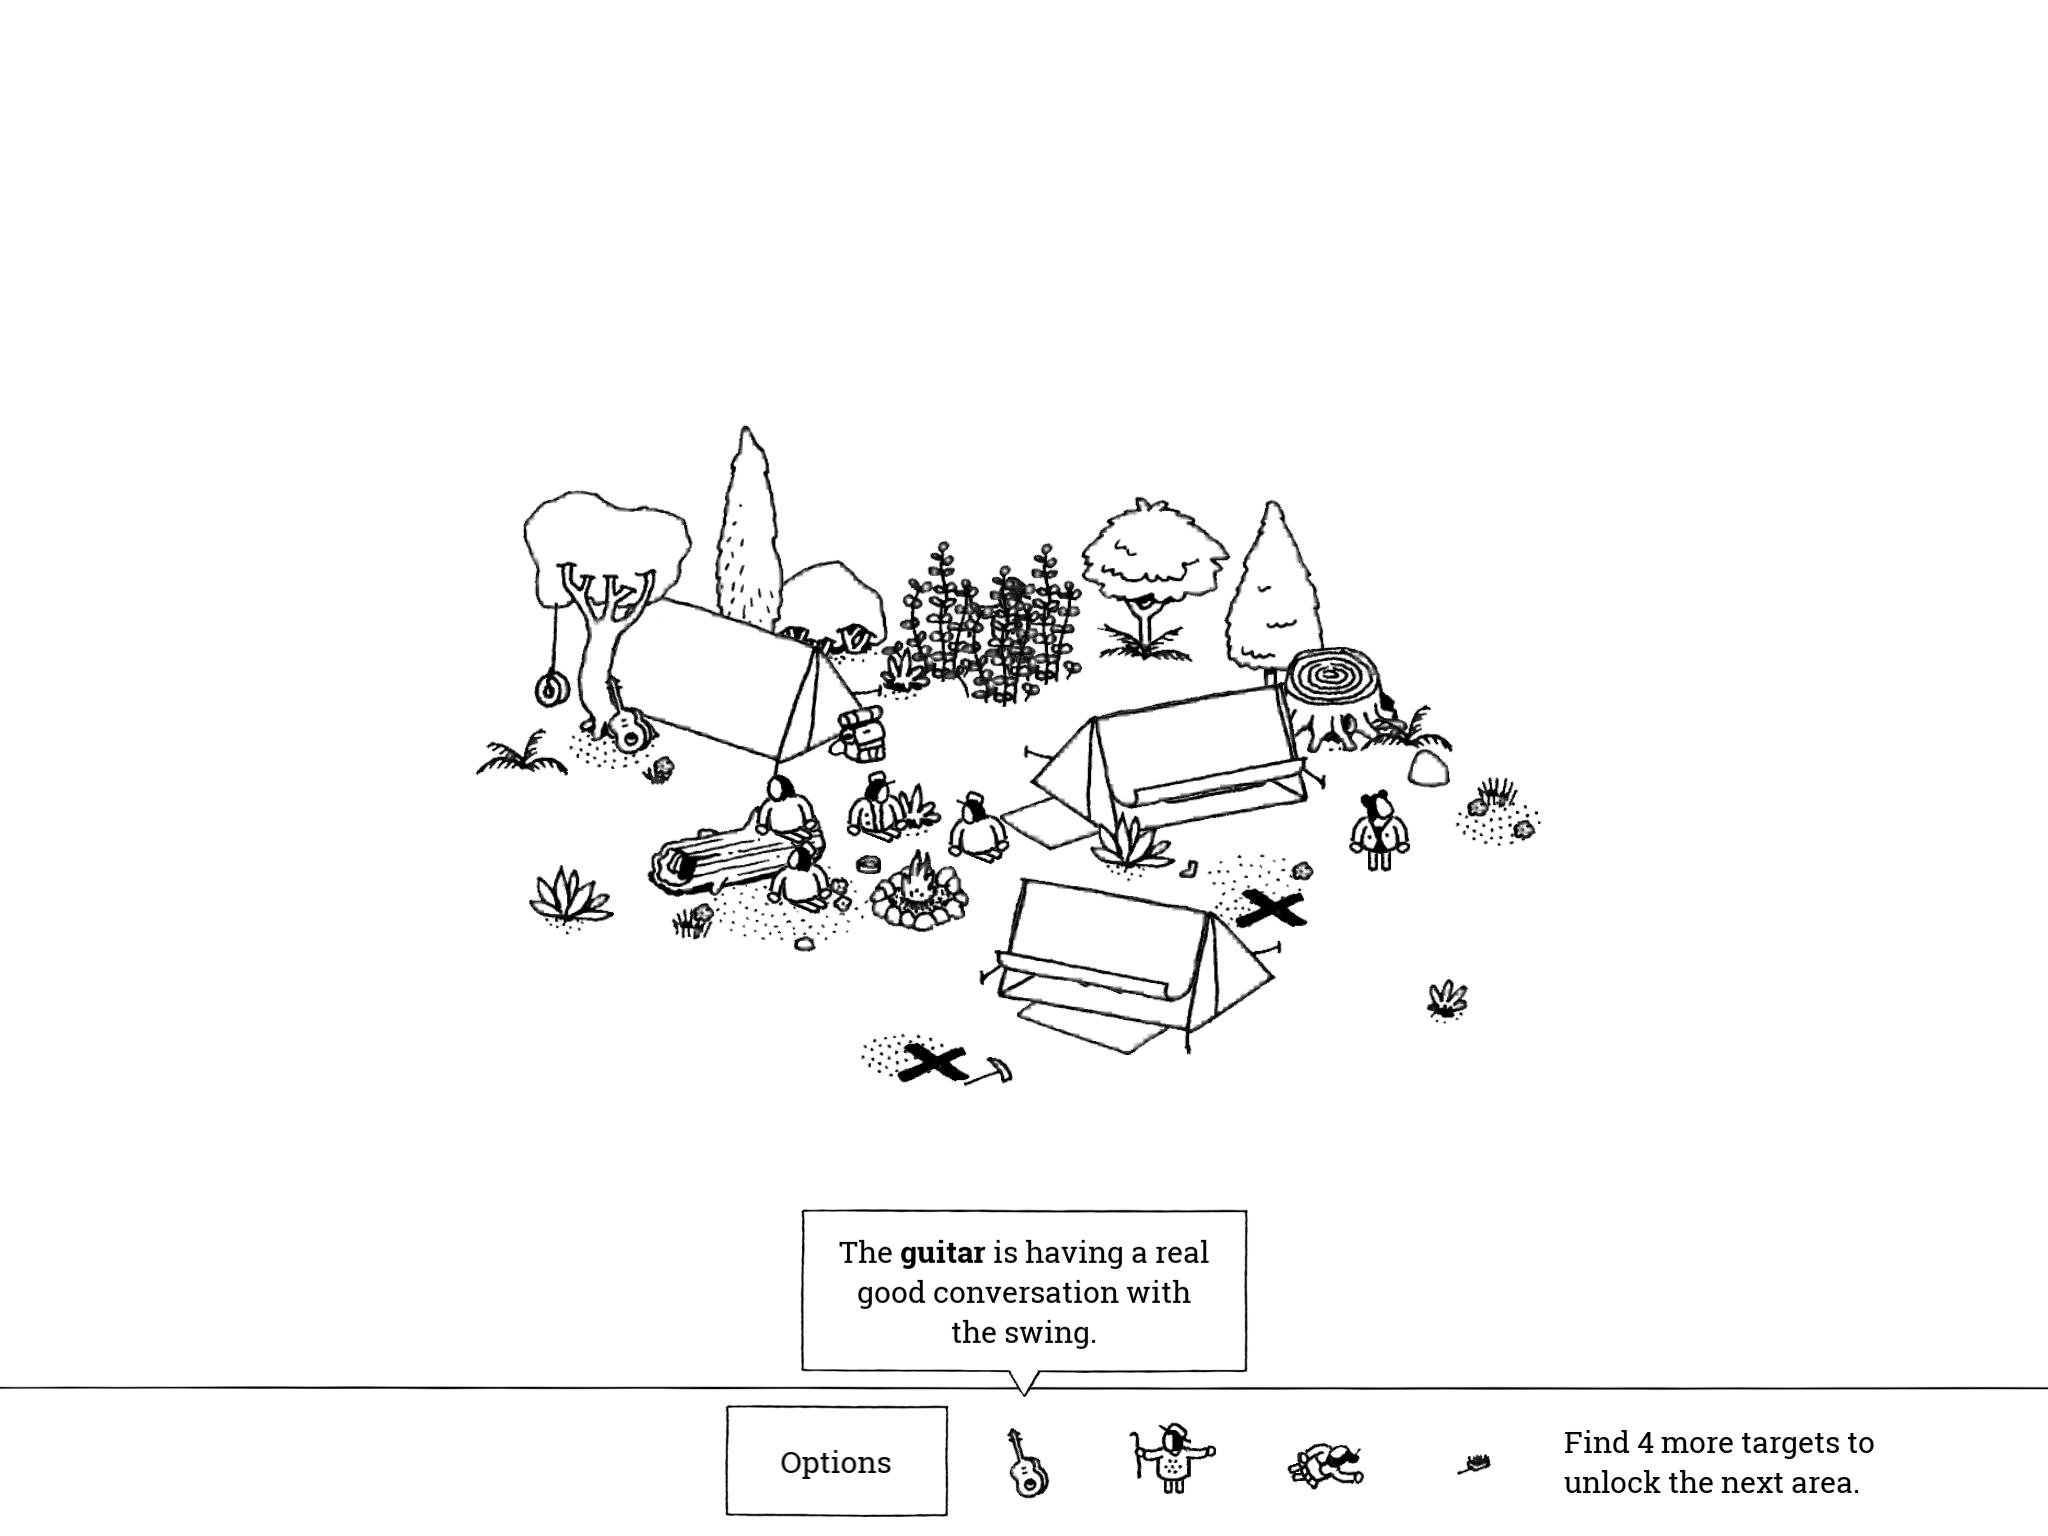
- The descriptions of the folks you are searching for, received by tapping individual folks in the legend at the bottom of the screen, provide hints on where to find them. Sometimes they may seem vague, but they always contain something valuable. In the very first area, Explorer Garland is described as being “fascinated by the tongue of this reptile,” and he is found near an iguana with its tongue sticking out. These types of hints are very useful on larger maps, as you’ll be able to keep an eye out for not just the folk itself, but also the object of their hint.
- You don’t have to find folks in the order they are listed on the legend; you can jump around if you’re stuck on someone. Also, we like to look at and read all the characters’ hints before we start searching. You may notice something in the map that seems familiar because you read a folk’s description about it. (If a descriptor bubble is stuck up and blocking your view, just tap anywhere on the map to get it to go away.)
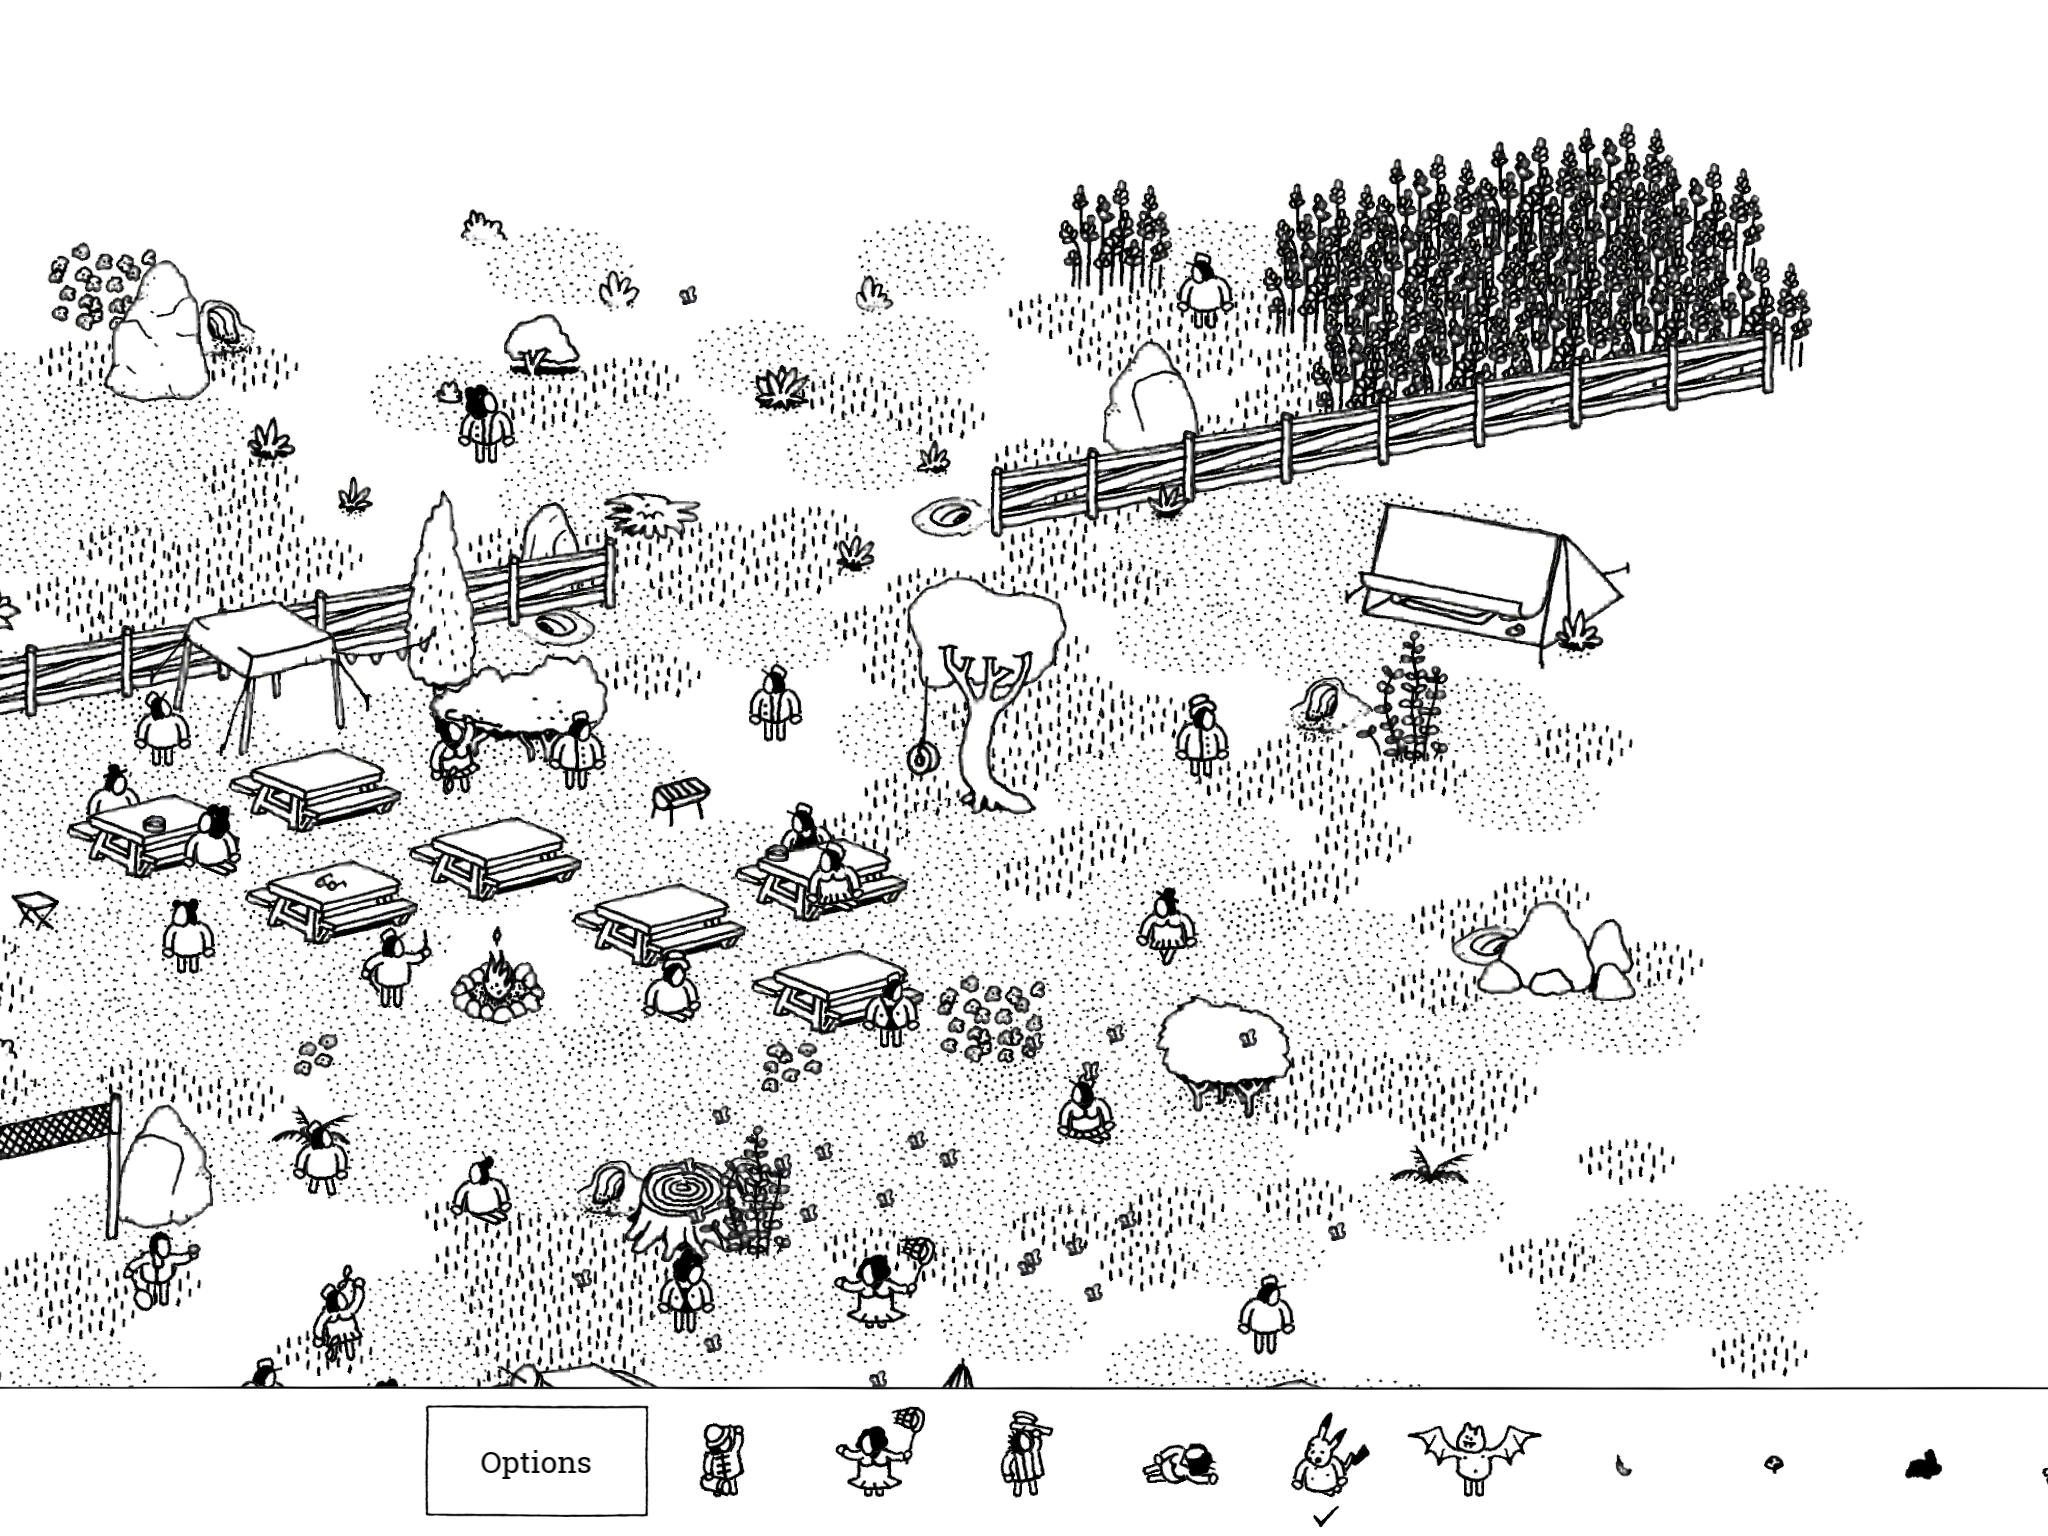
- Folks will always match their image in the legend; if a character is facing right in the legend, they will be facing right in the scene. If they are moving, they will be moving. If their hair is black, it will be black, etc. Of course, if they are hidden behind/under/inside something, you won’t be able to see this until you uncover them.
- Folks are generally spread out throughout the scene. You’re not going to find all ten characters in one corner of the image. If you’ve already found someone in a certain section, try looking elsewhere. There are times that two folks will be pretty close to one another even on large maps, but for the most part, the entire image is used in some capacity.
- When we’re really stuck on a folk, we like to zoom in on specific sections and just sit there for a bit, watching the movement in that area. It’s sort of like a Magic Eye painting—letting your eyes get sort of blurry as you watch what’s going on as a whole. Sometimes this helps things pop more than they would if we’re scrolling around constantly.
- You can zoom in and out by pinching and scroll around by dragging. The very first area is small enough to fit on your screen, but the Jungle and beyond are larger and you’ll need to scroll in order to find everyone, even on a tablet. You can zoom out beyond the “maximum” by pinching with one set of fingers and holding the screen with another, but as soon as you let go it will zoom back in to the normal level.
- The small puzzles at the beginning of a new section are merely warm-ups designed to give you an idea of what you’ll be doing in the next large puzzle. So, the first level of Dry Lands, for instance, has you water some plants as that will be a part of finding someone in the next stage.
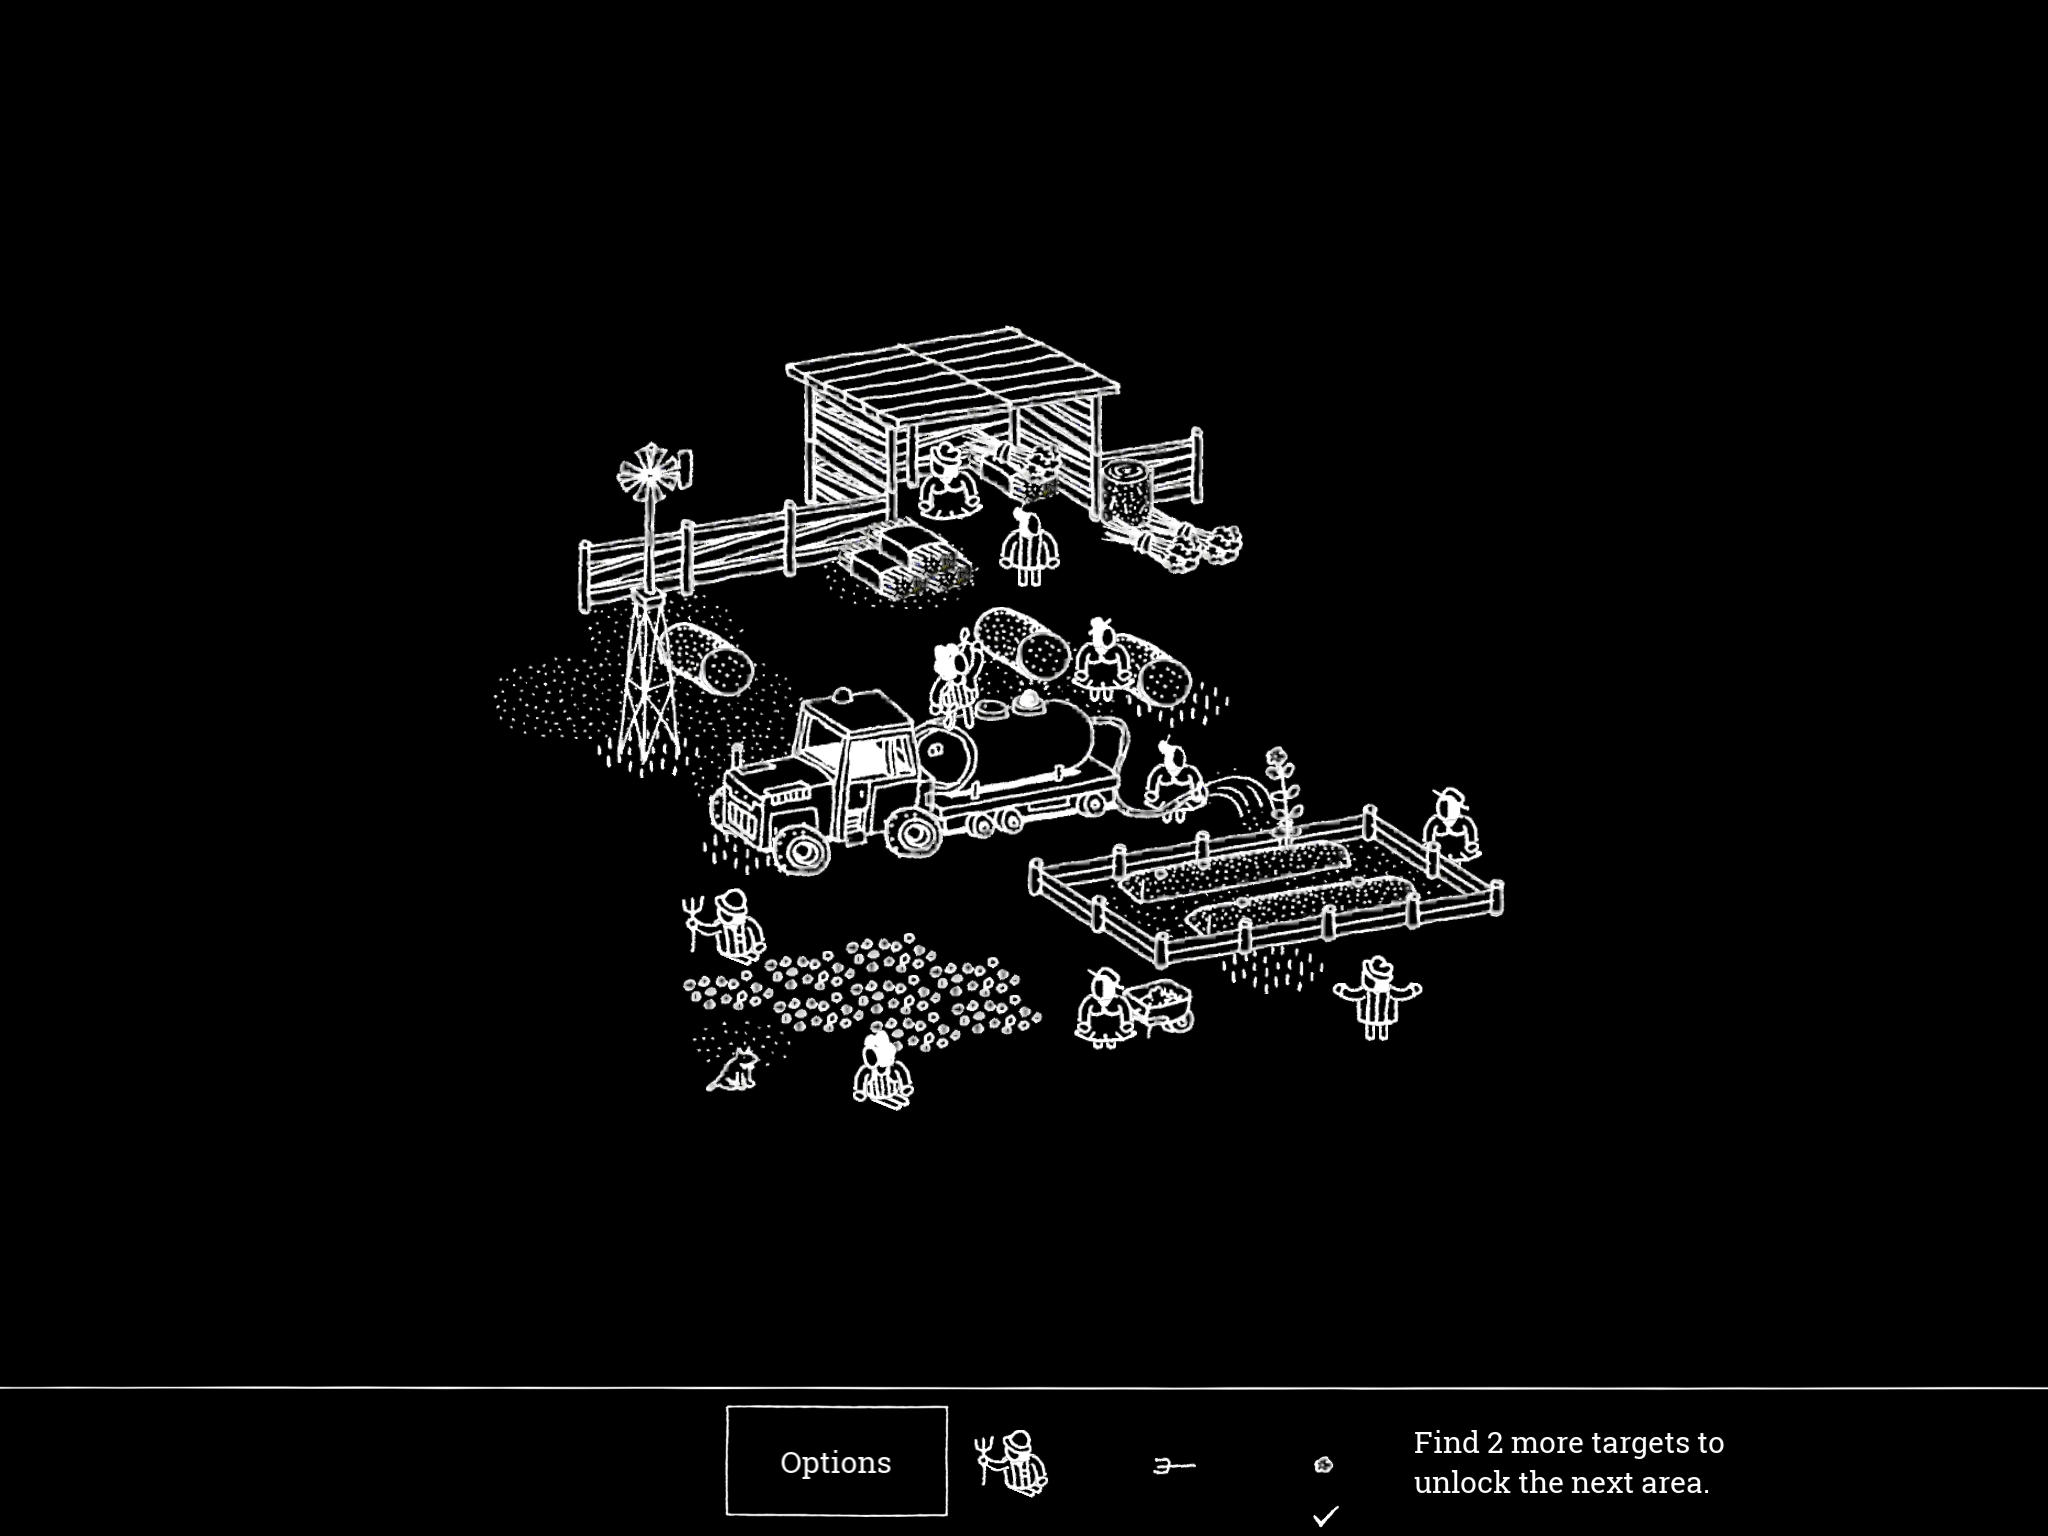
- Choose the color setting that works best for you. There are three options in the settings menu under “Toggle color mode.” If you’re having trouble finding someone, try swapping colors, it might provide a new perspective.
- When you find a folk, the legend at the bottom will center on the person you’ve just found; if you tap on a folk you’ve already located it will still center on them as a reminder you’ve already found them.
Hidden Folks Walkthrough
This Hidden Folks walkthrough below will cover every character or item in the game and where to find them. We’ll list their name as it appears in-game, their in-game hint in quotes, and then a description of where to find them. After that description there will also be a screenshot of their location. On large maps, we try to note folks’ locations based on the entire image (e.g., northwest corner), but we may also describe them in relation to other folks (e.g. north of the camp with the worm). Remember that you can scroll and zoom out, so the location you start doesn’t necessarily represent the whole image. It’s usually helpful to zoom out and get an idea of the center of an image so you can see what would constitute northeast, etc.
Forest 1:
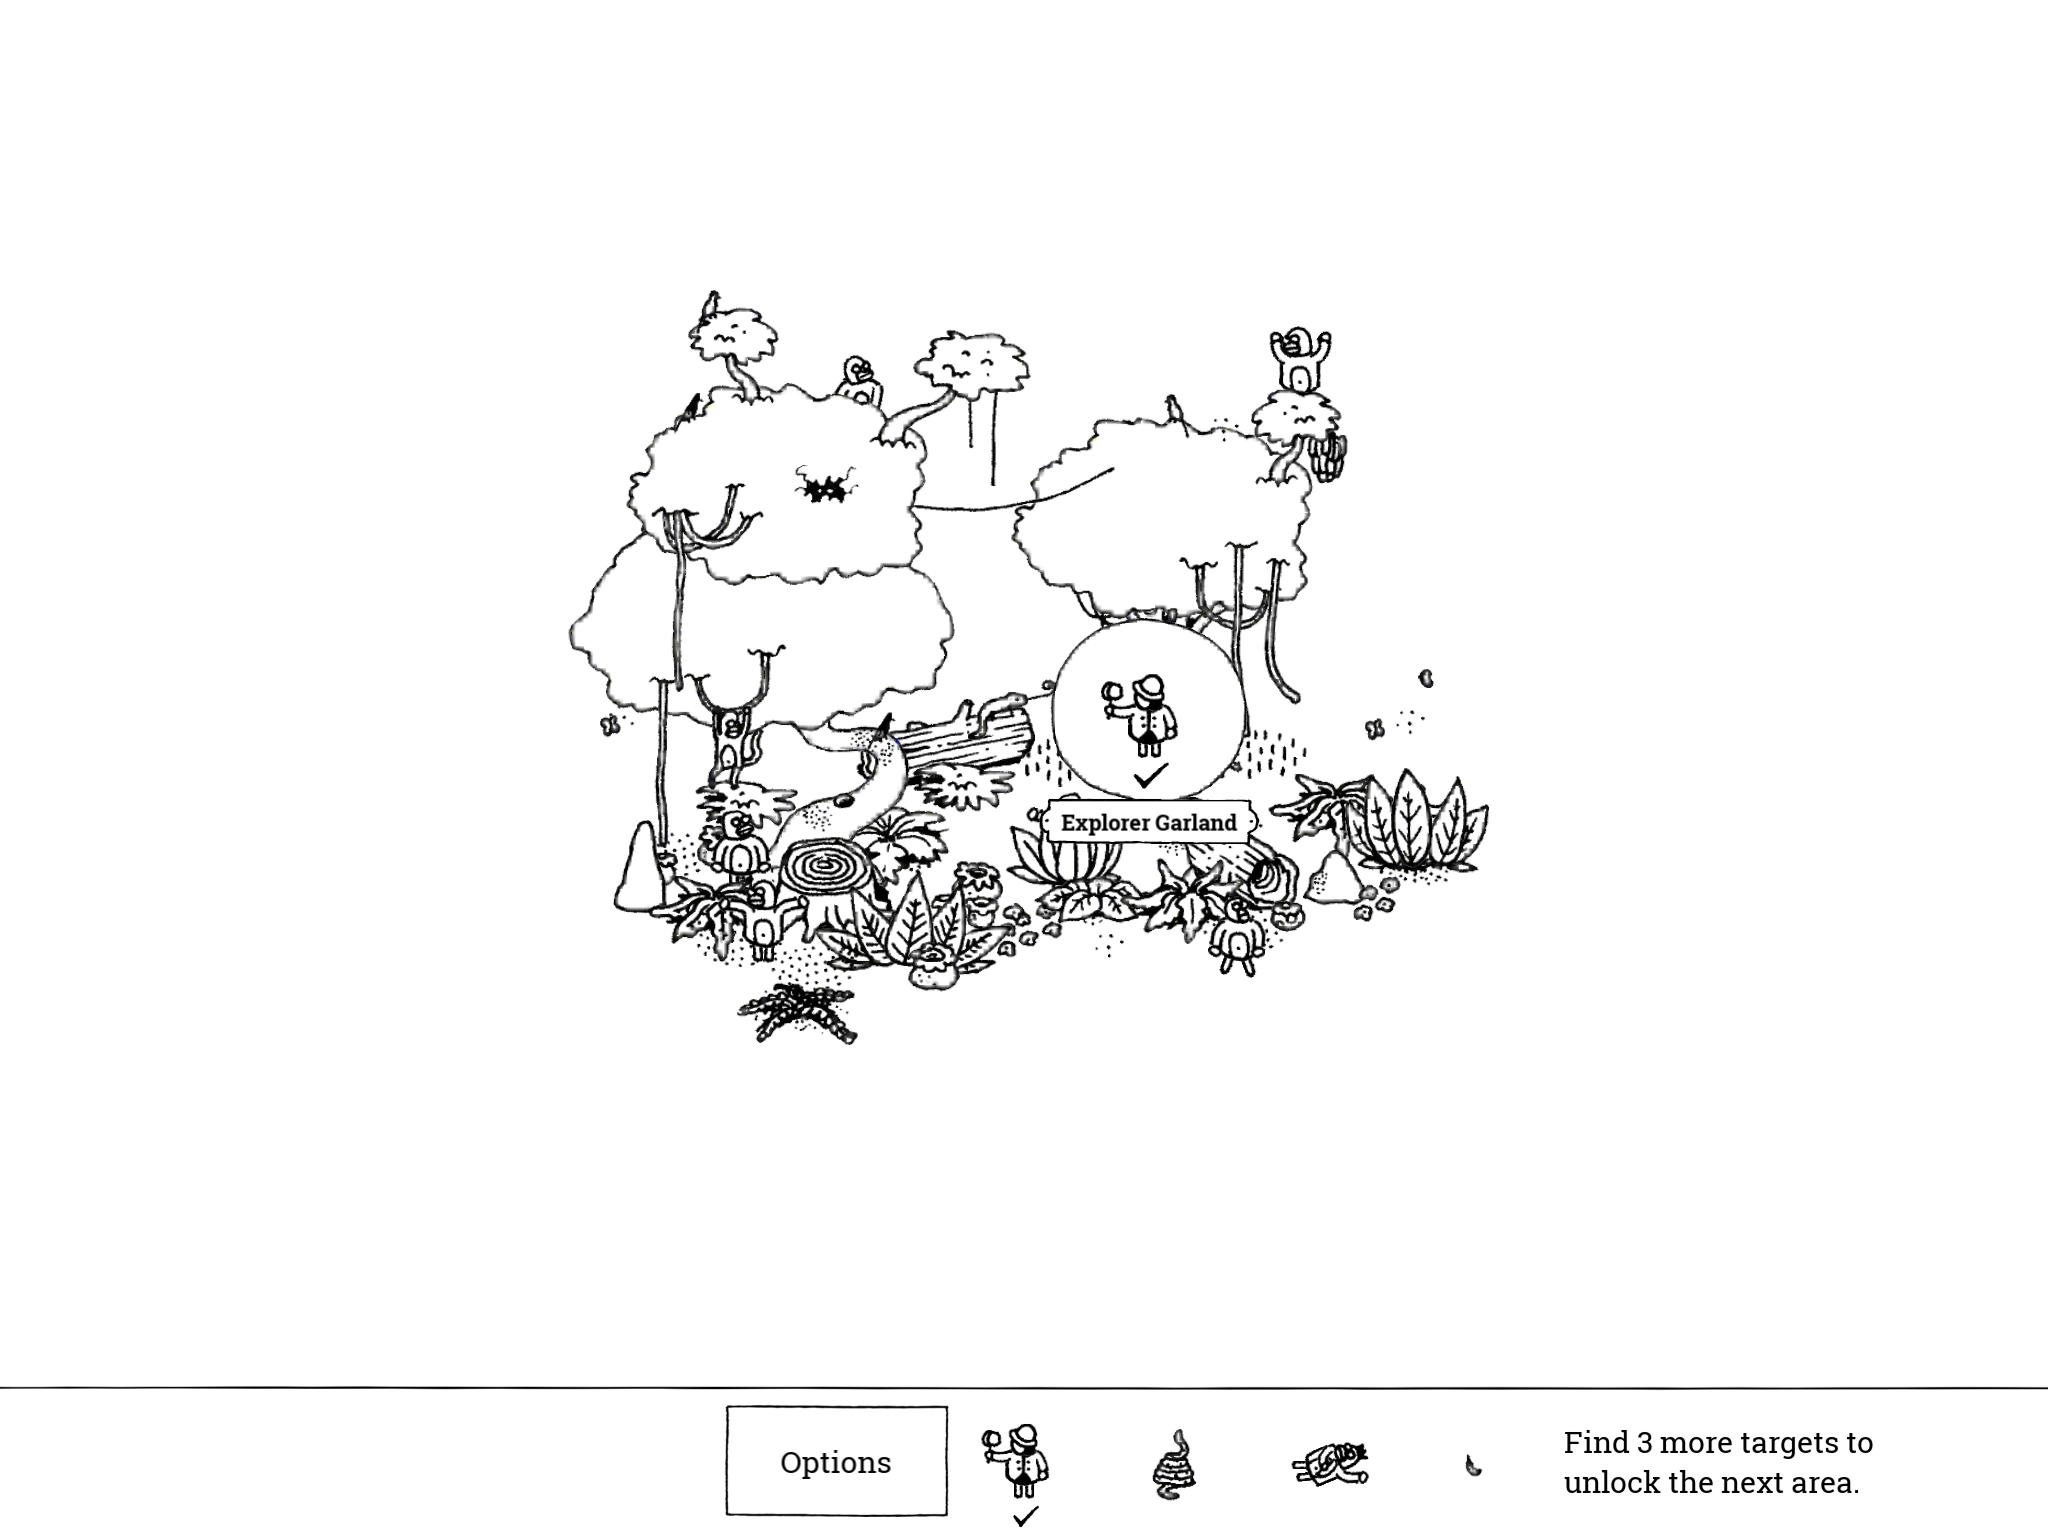
- Explorer Garland: “Explorer Garland is fascinated by the tongue of this reptile.”
Garland is behind the right-hand tree; you can see his arm holding the magnifying glass sticking out; he’s looking at the lizard sitting on the log to his left.
- Explorer Garland: “Explorer Garland is fascinated by the tongue of this reptile.”
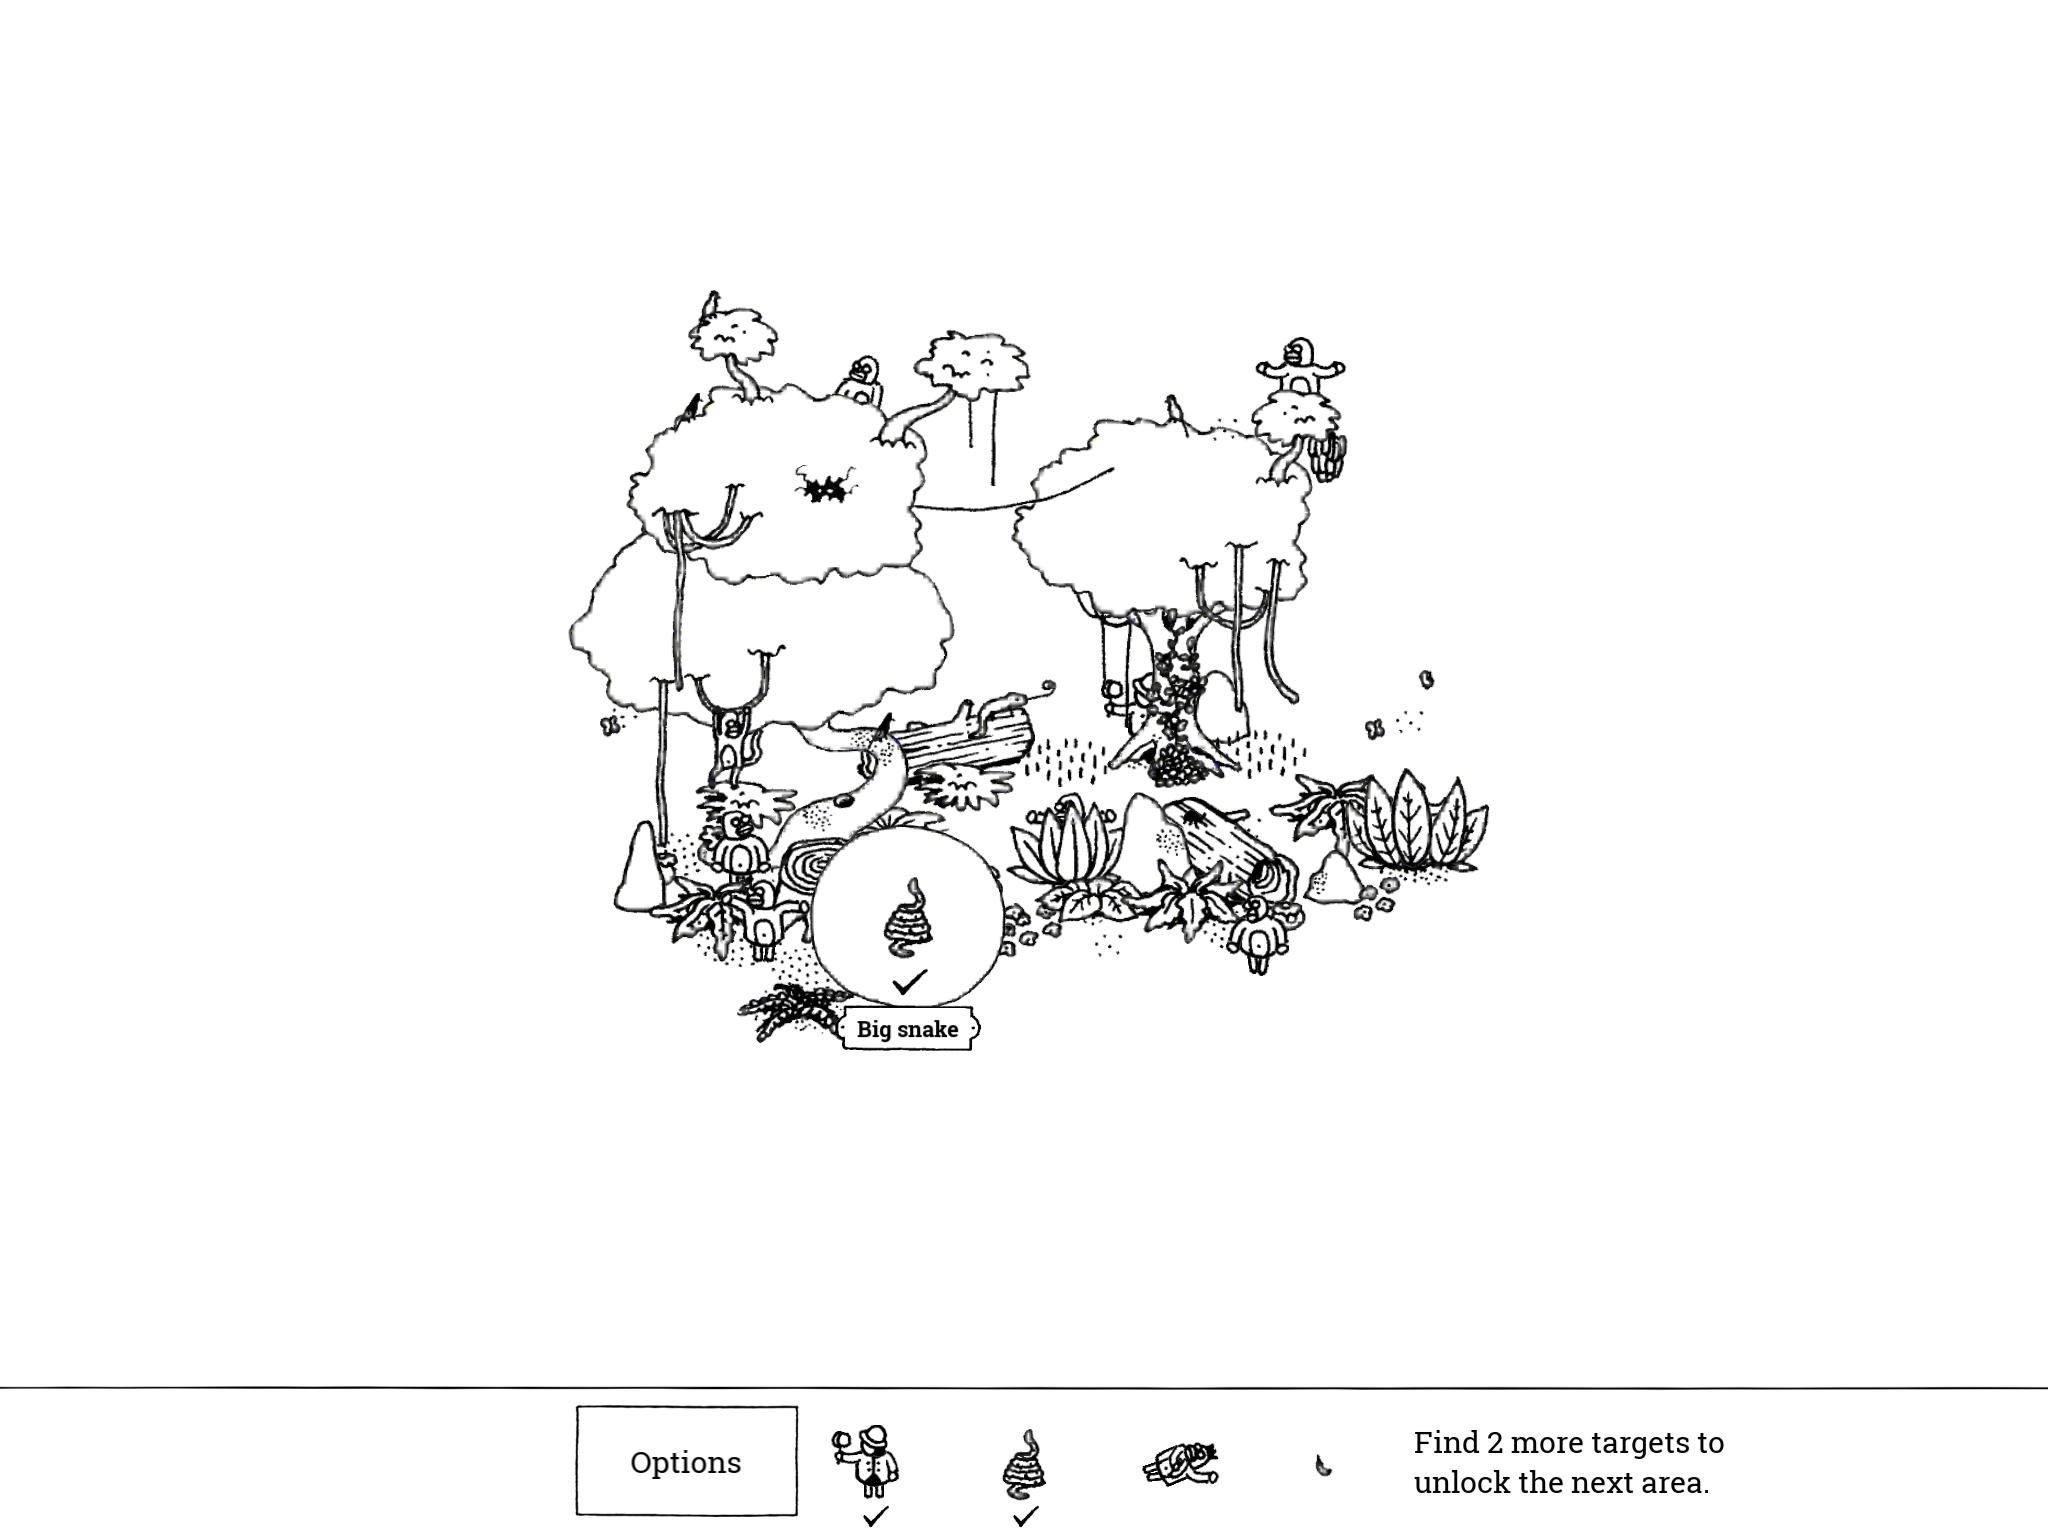
- Big Snake: “This big snake is a real bush crawler.”
Tap the large leaves in front of the stump on the left hand side of the screen to reveal Big Snake; tap him to collect him.
- Big Snake: “This big snake is a real bush crawler.”
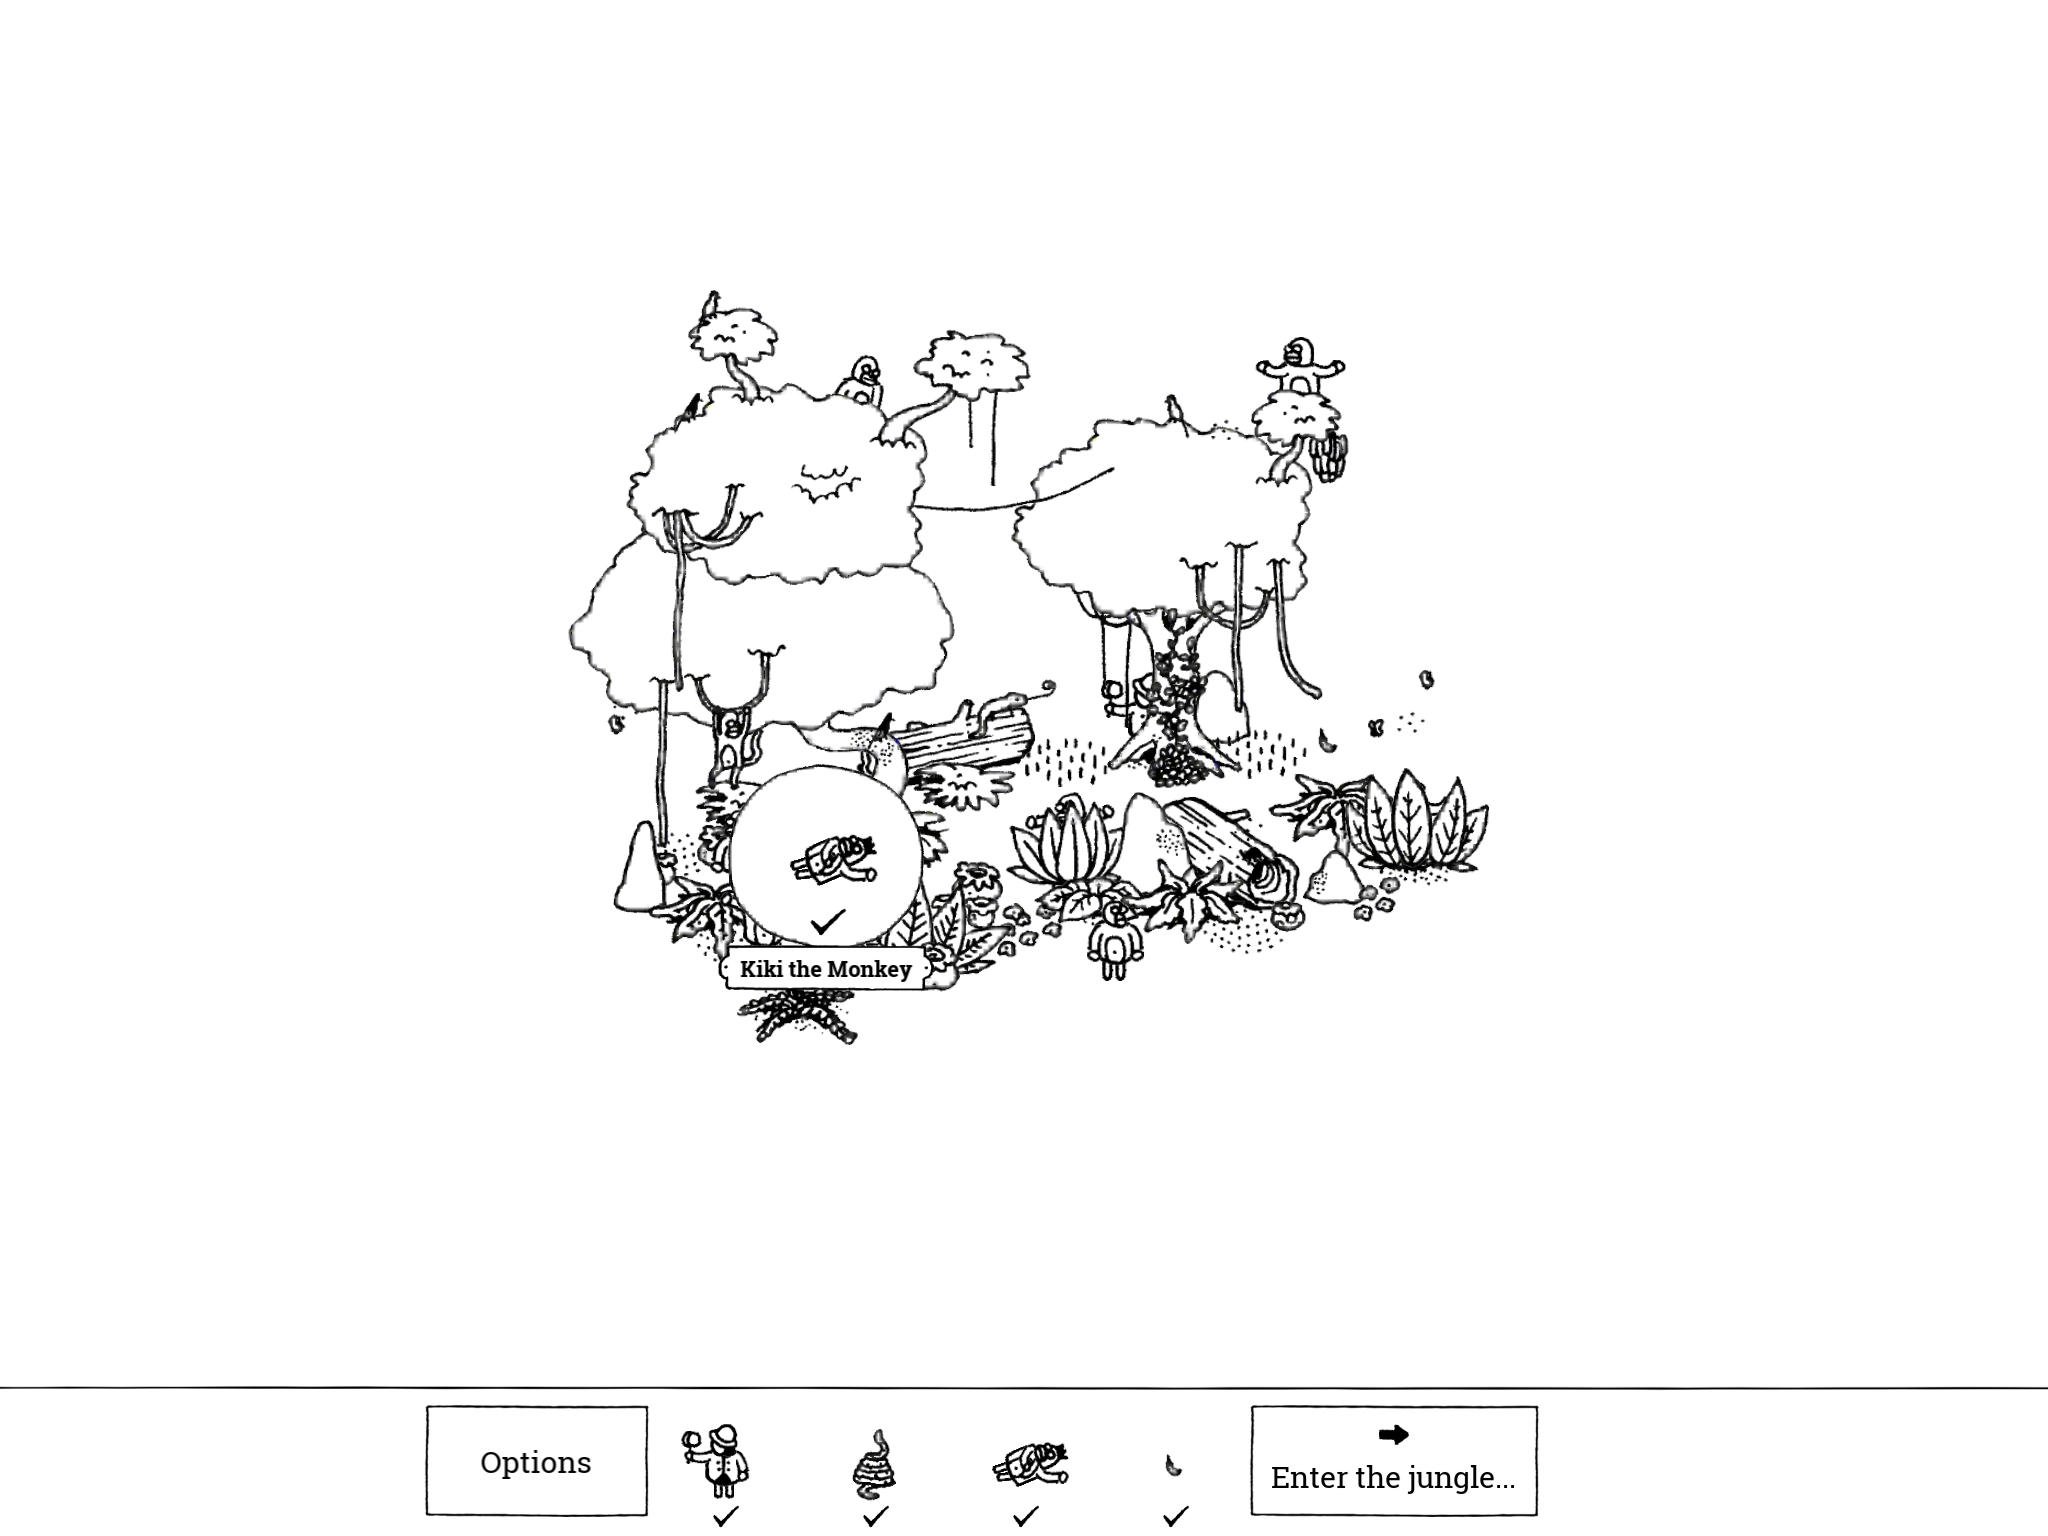
- Kiki the Monkey: “Kiki the Monkey loves a good soft shelter.”
Tap the black hole in the upper left tree (there’s a pair of eyes looking out); Kiki falls onto the stump; tap her.
- Kiki the Monkey: “Kiki the Monkey loves a good soft shelter.”
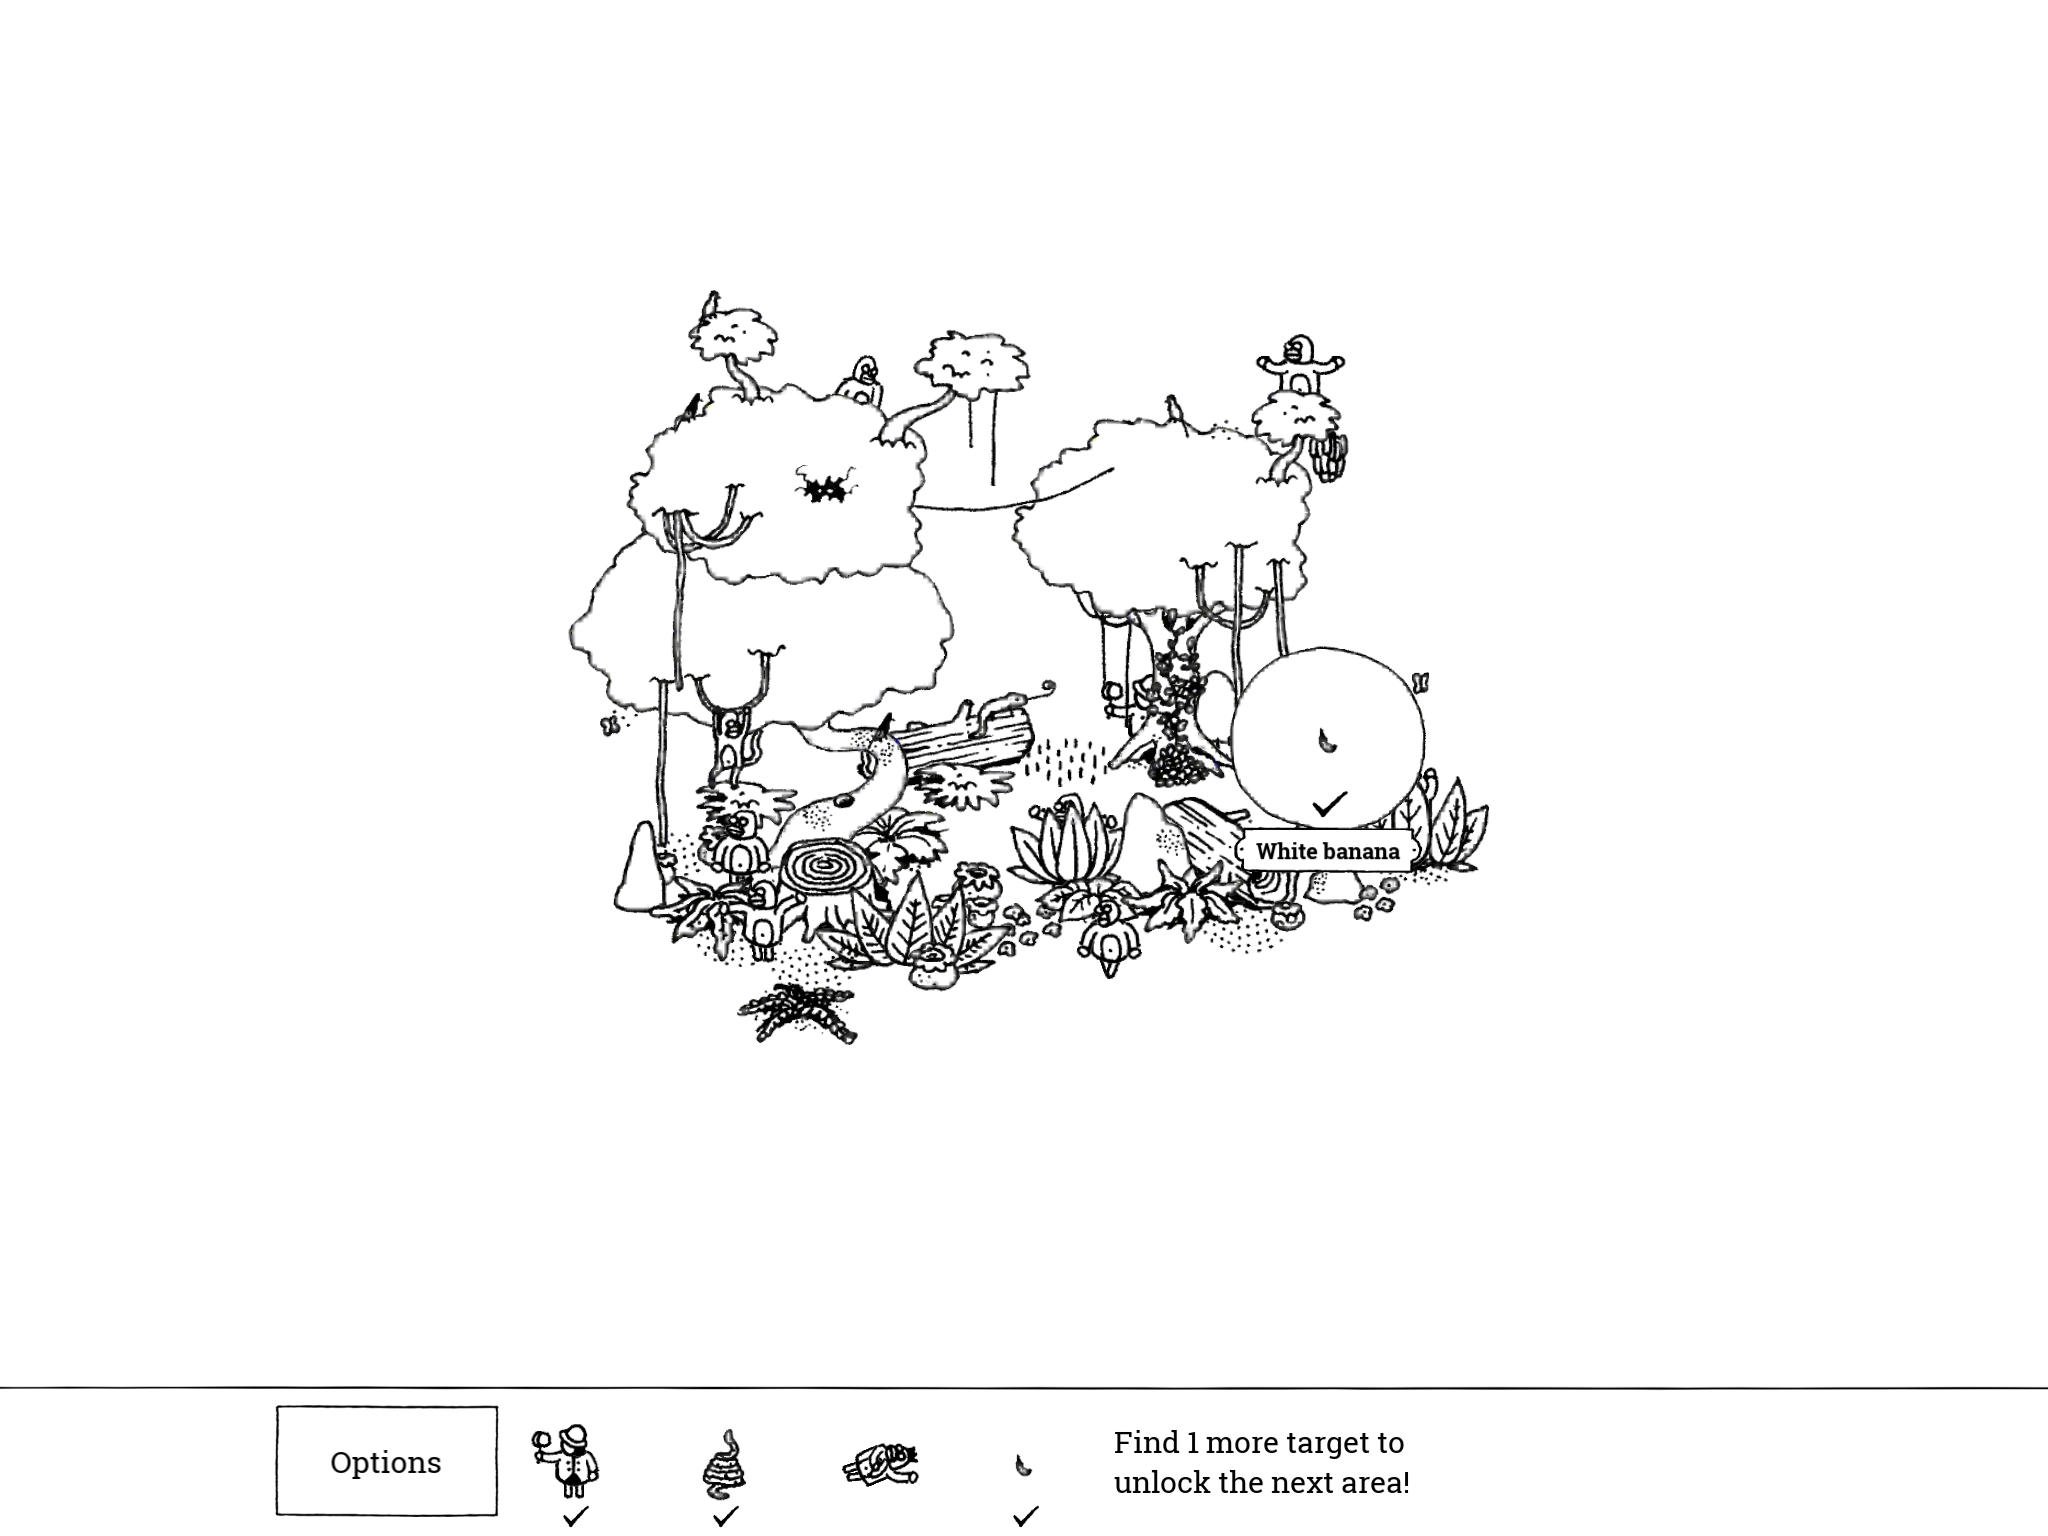
- White Banana: “The only ripe white banana is pretty much up for grabs.”
Tap the bunch of bananas hanging from the tree on the upper right; one falls to the ground; tap it.
- White Banana: “The only ripe white banana is pretty much up for grabs.”
Forest 2: The Jungle
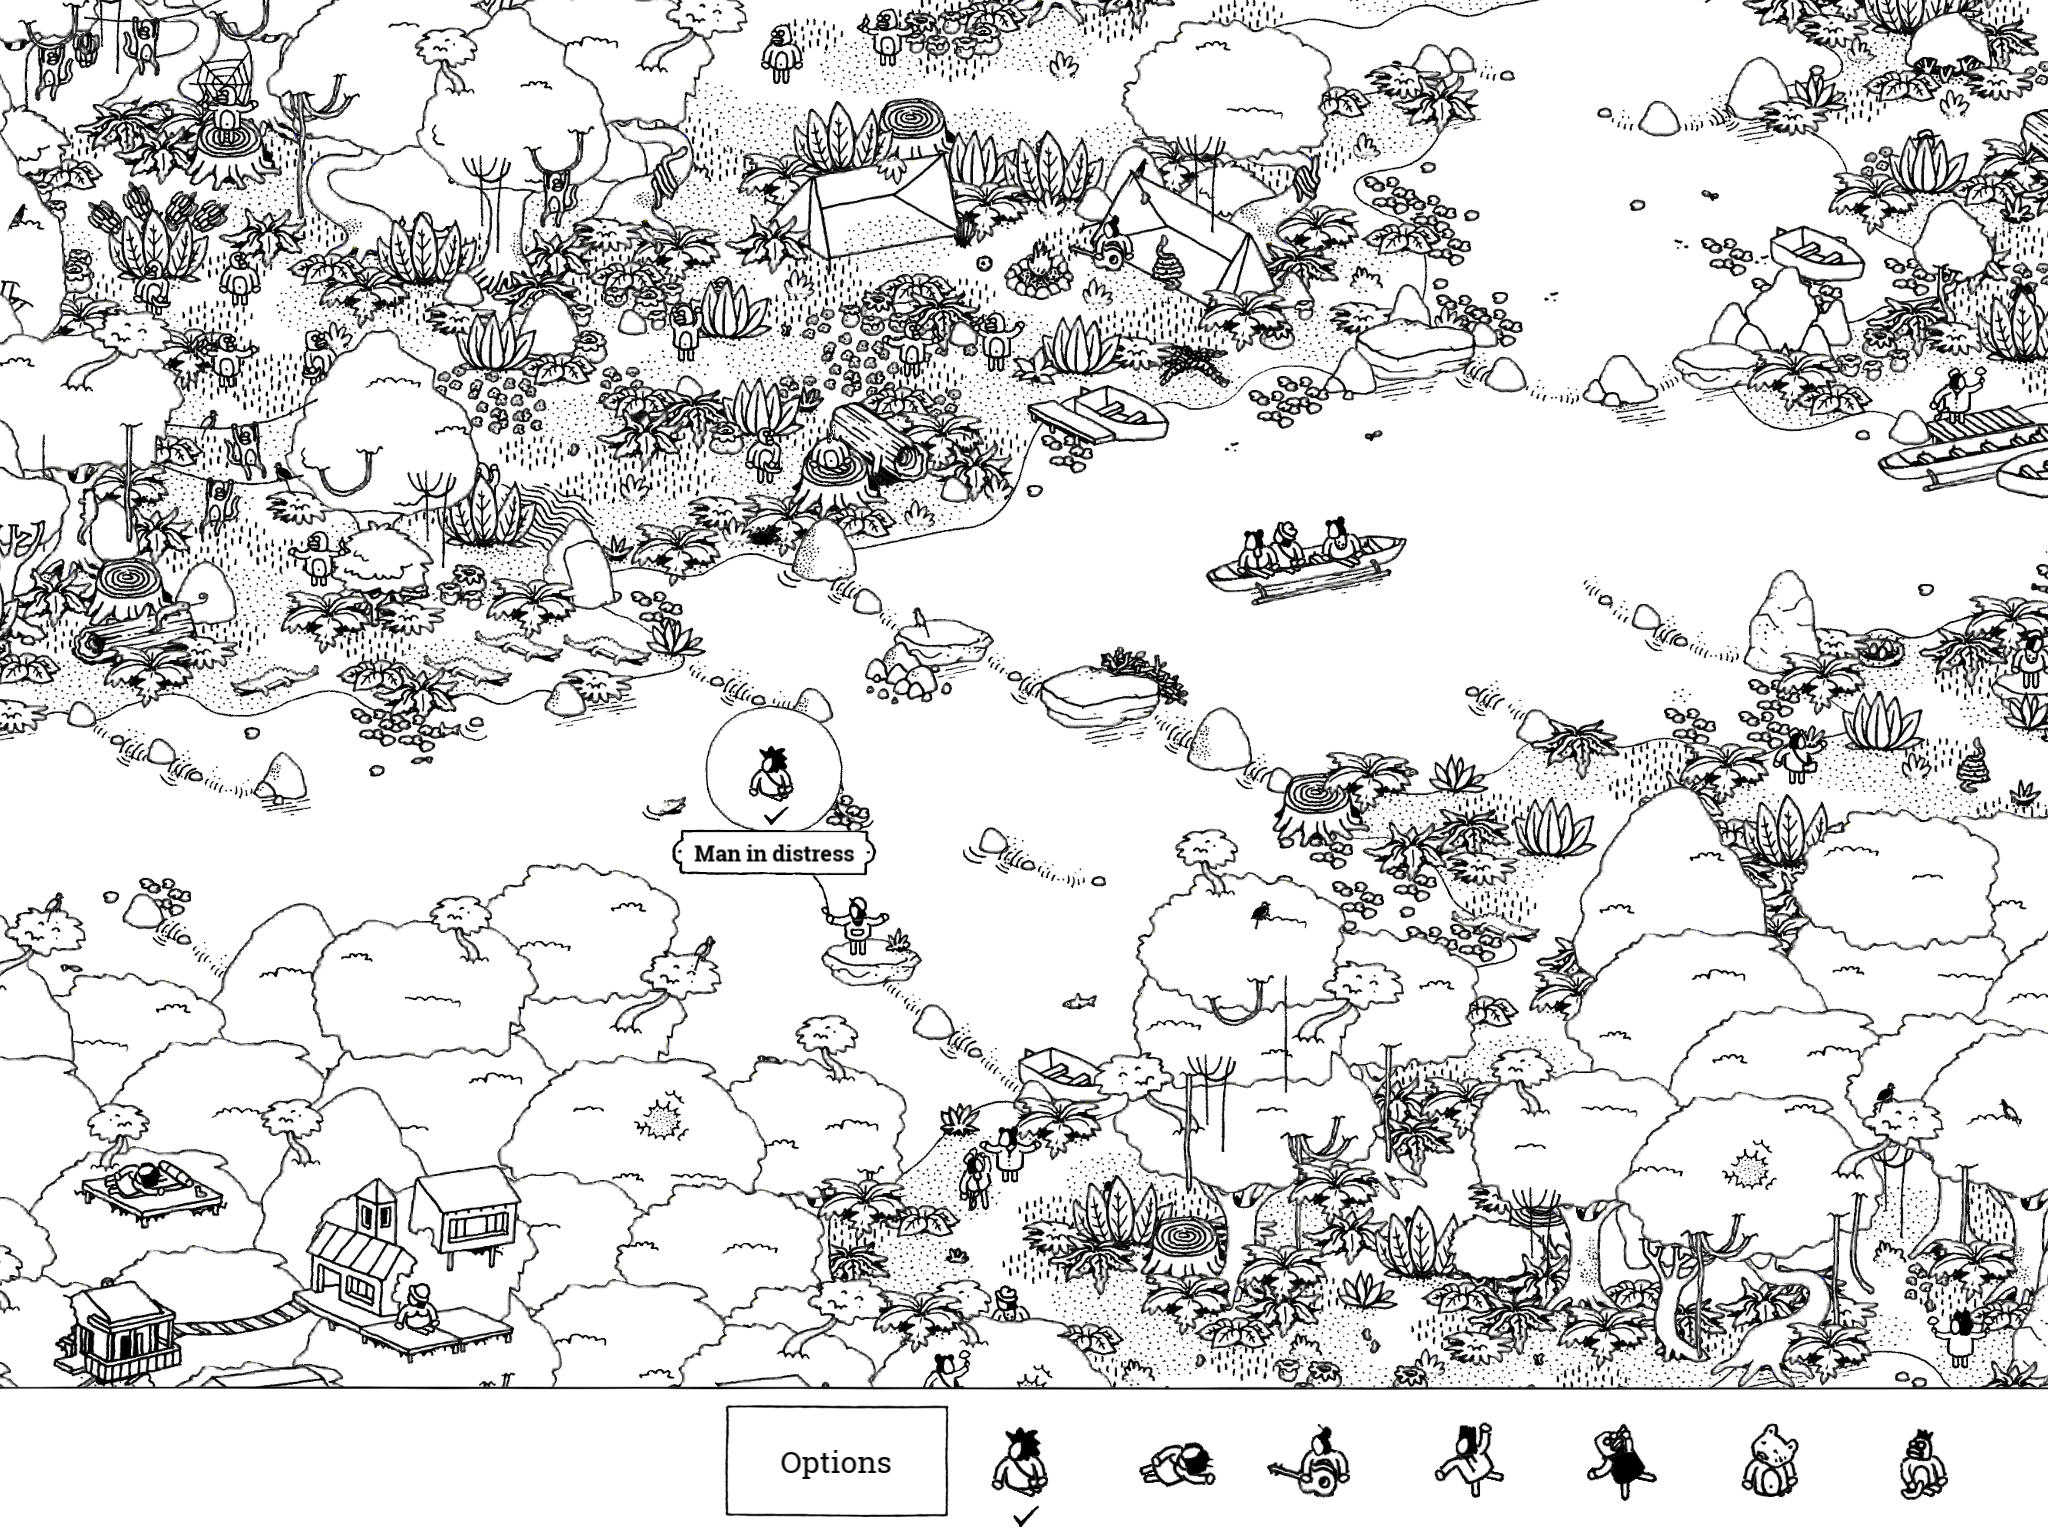
- Man in Distress: “For this man in distress, the uncomfortable seat is the least of his troubles.”
The Man in Distress is floating on a log in the river just to the left of the center of the image (just north of the fisherman jumping up and down on the rock).
- Man in Distress: “For this man in distress, the uncomfortable seat is the least of his troubles.”
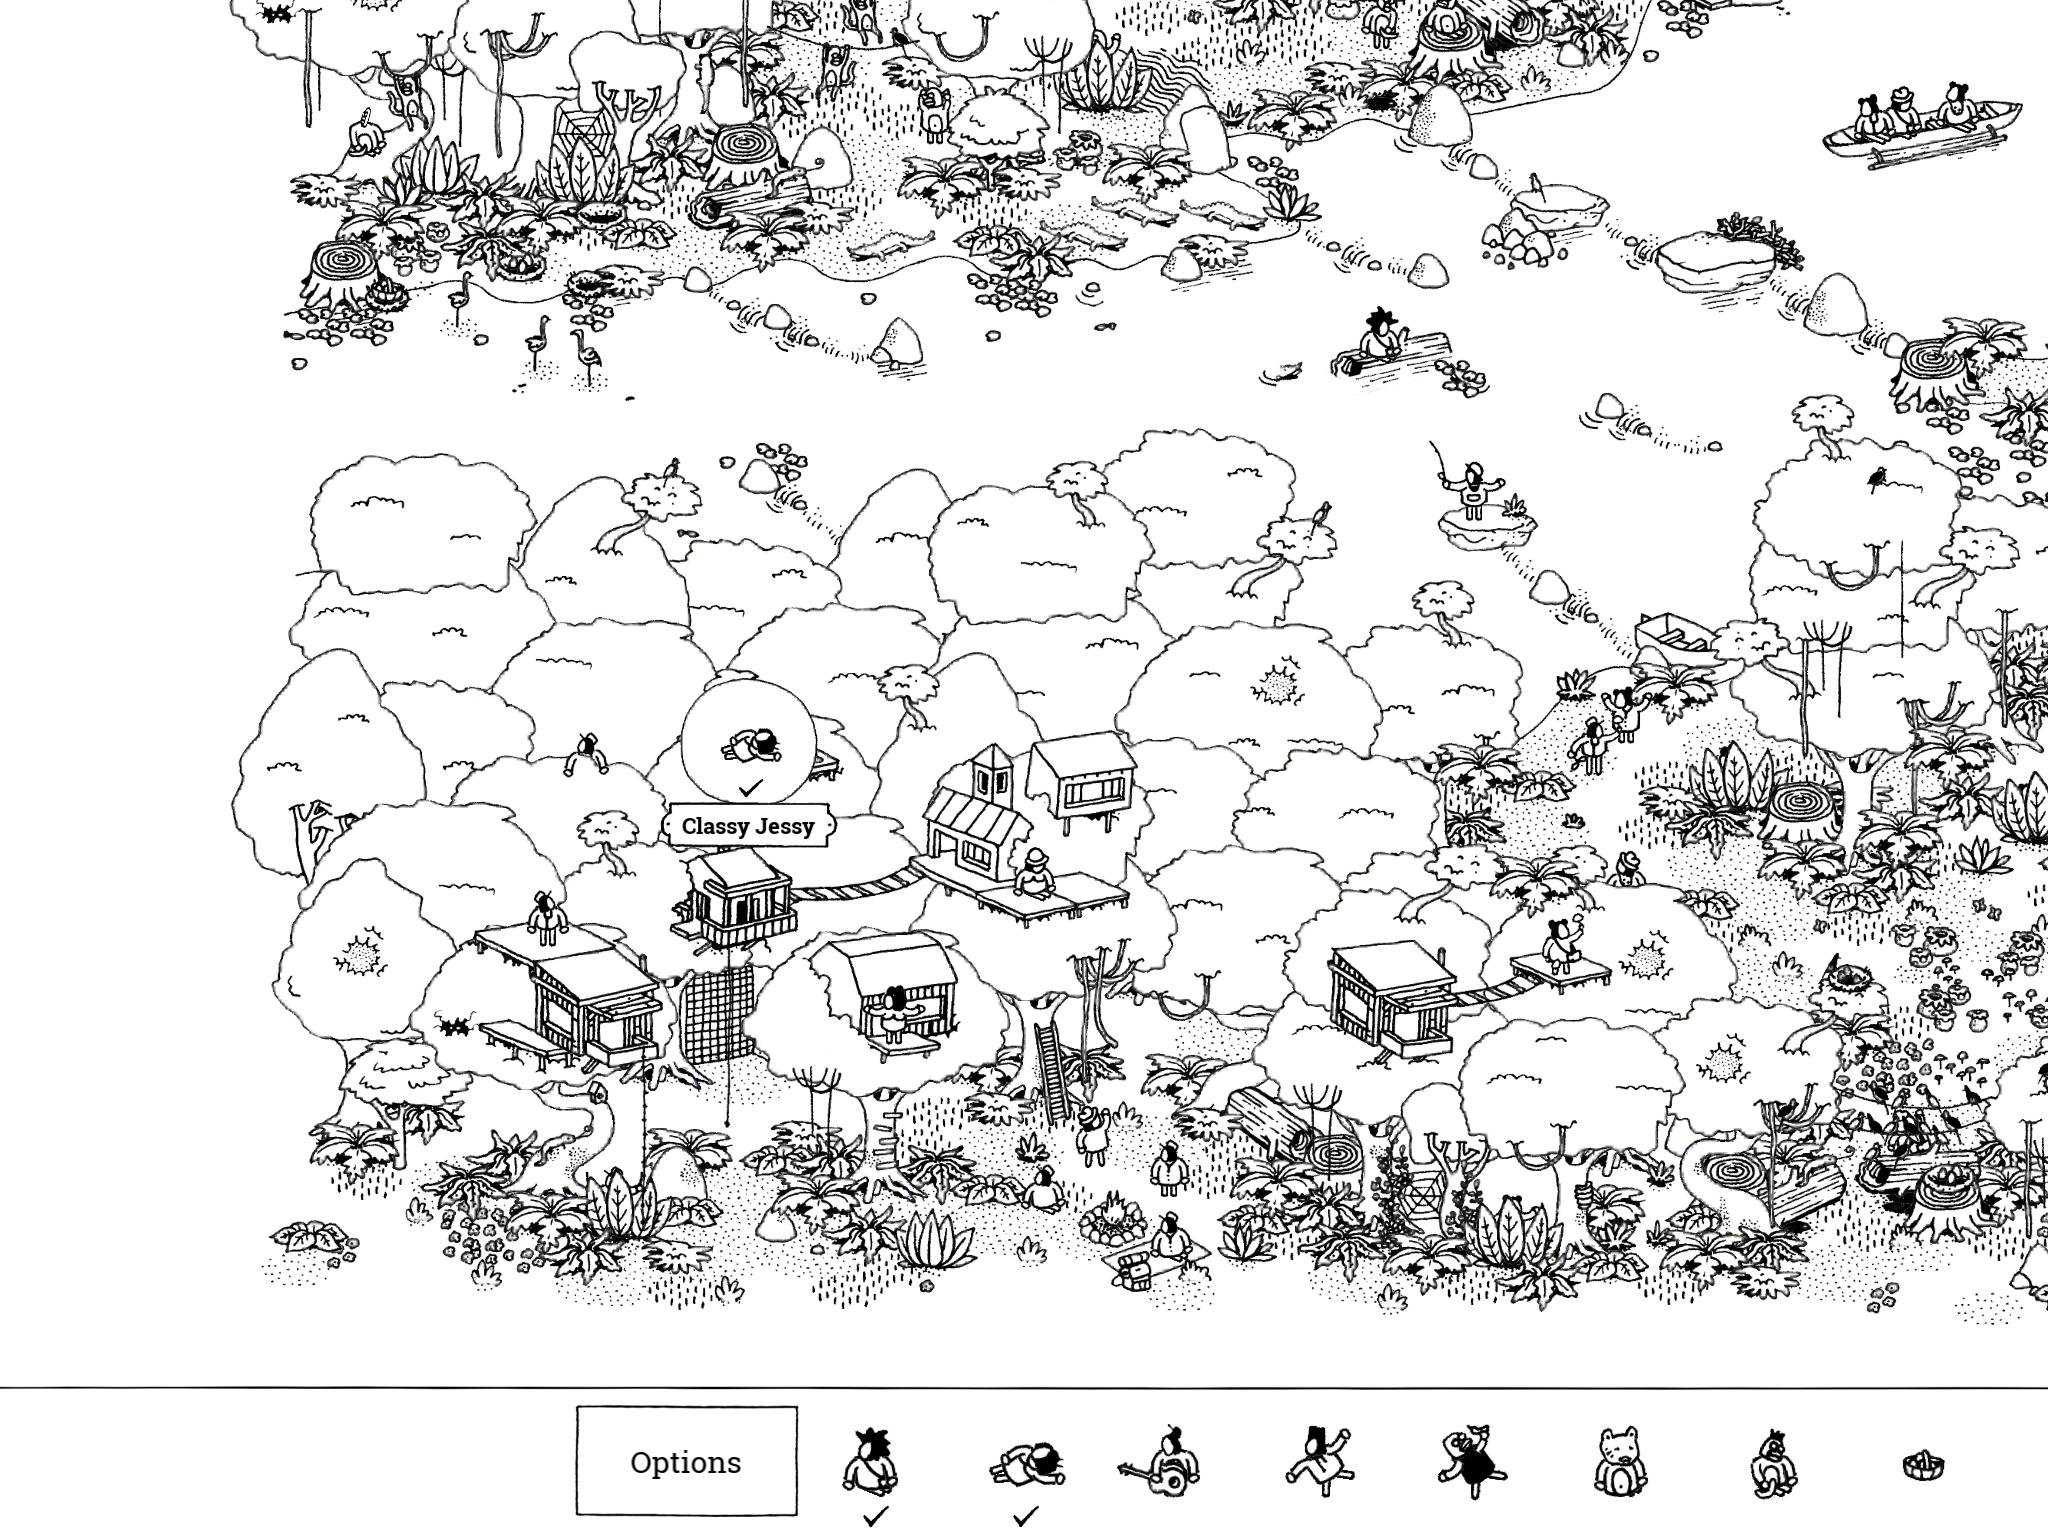
- Classy Jessy: “If you ask Classy Jessy, treetop naps are the best!”
Classy Jessy is near the southwest corner of the image. She is lying on a flat board with a pillow near the center of the group of treetops.
- Classy Jessy: “If you ask Classy Jessy, treetop naps are the best!”
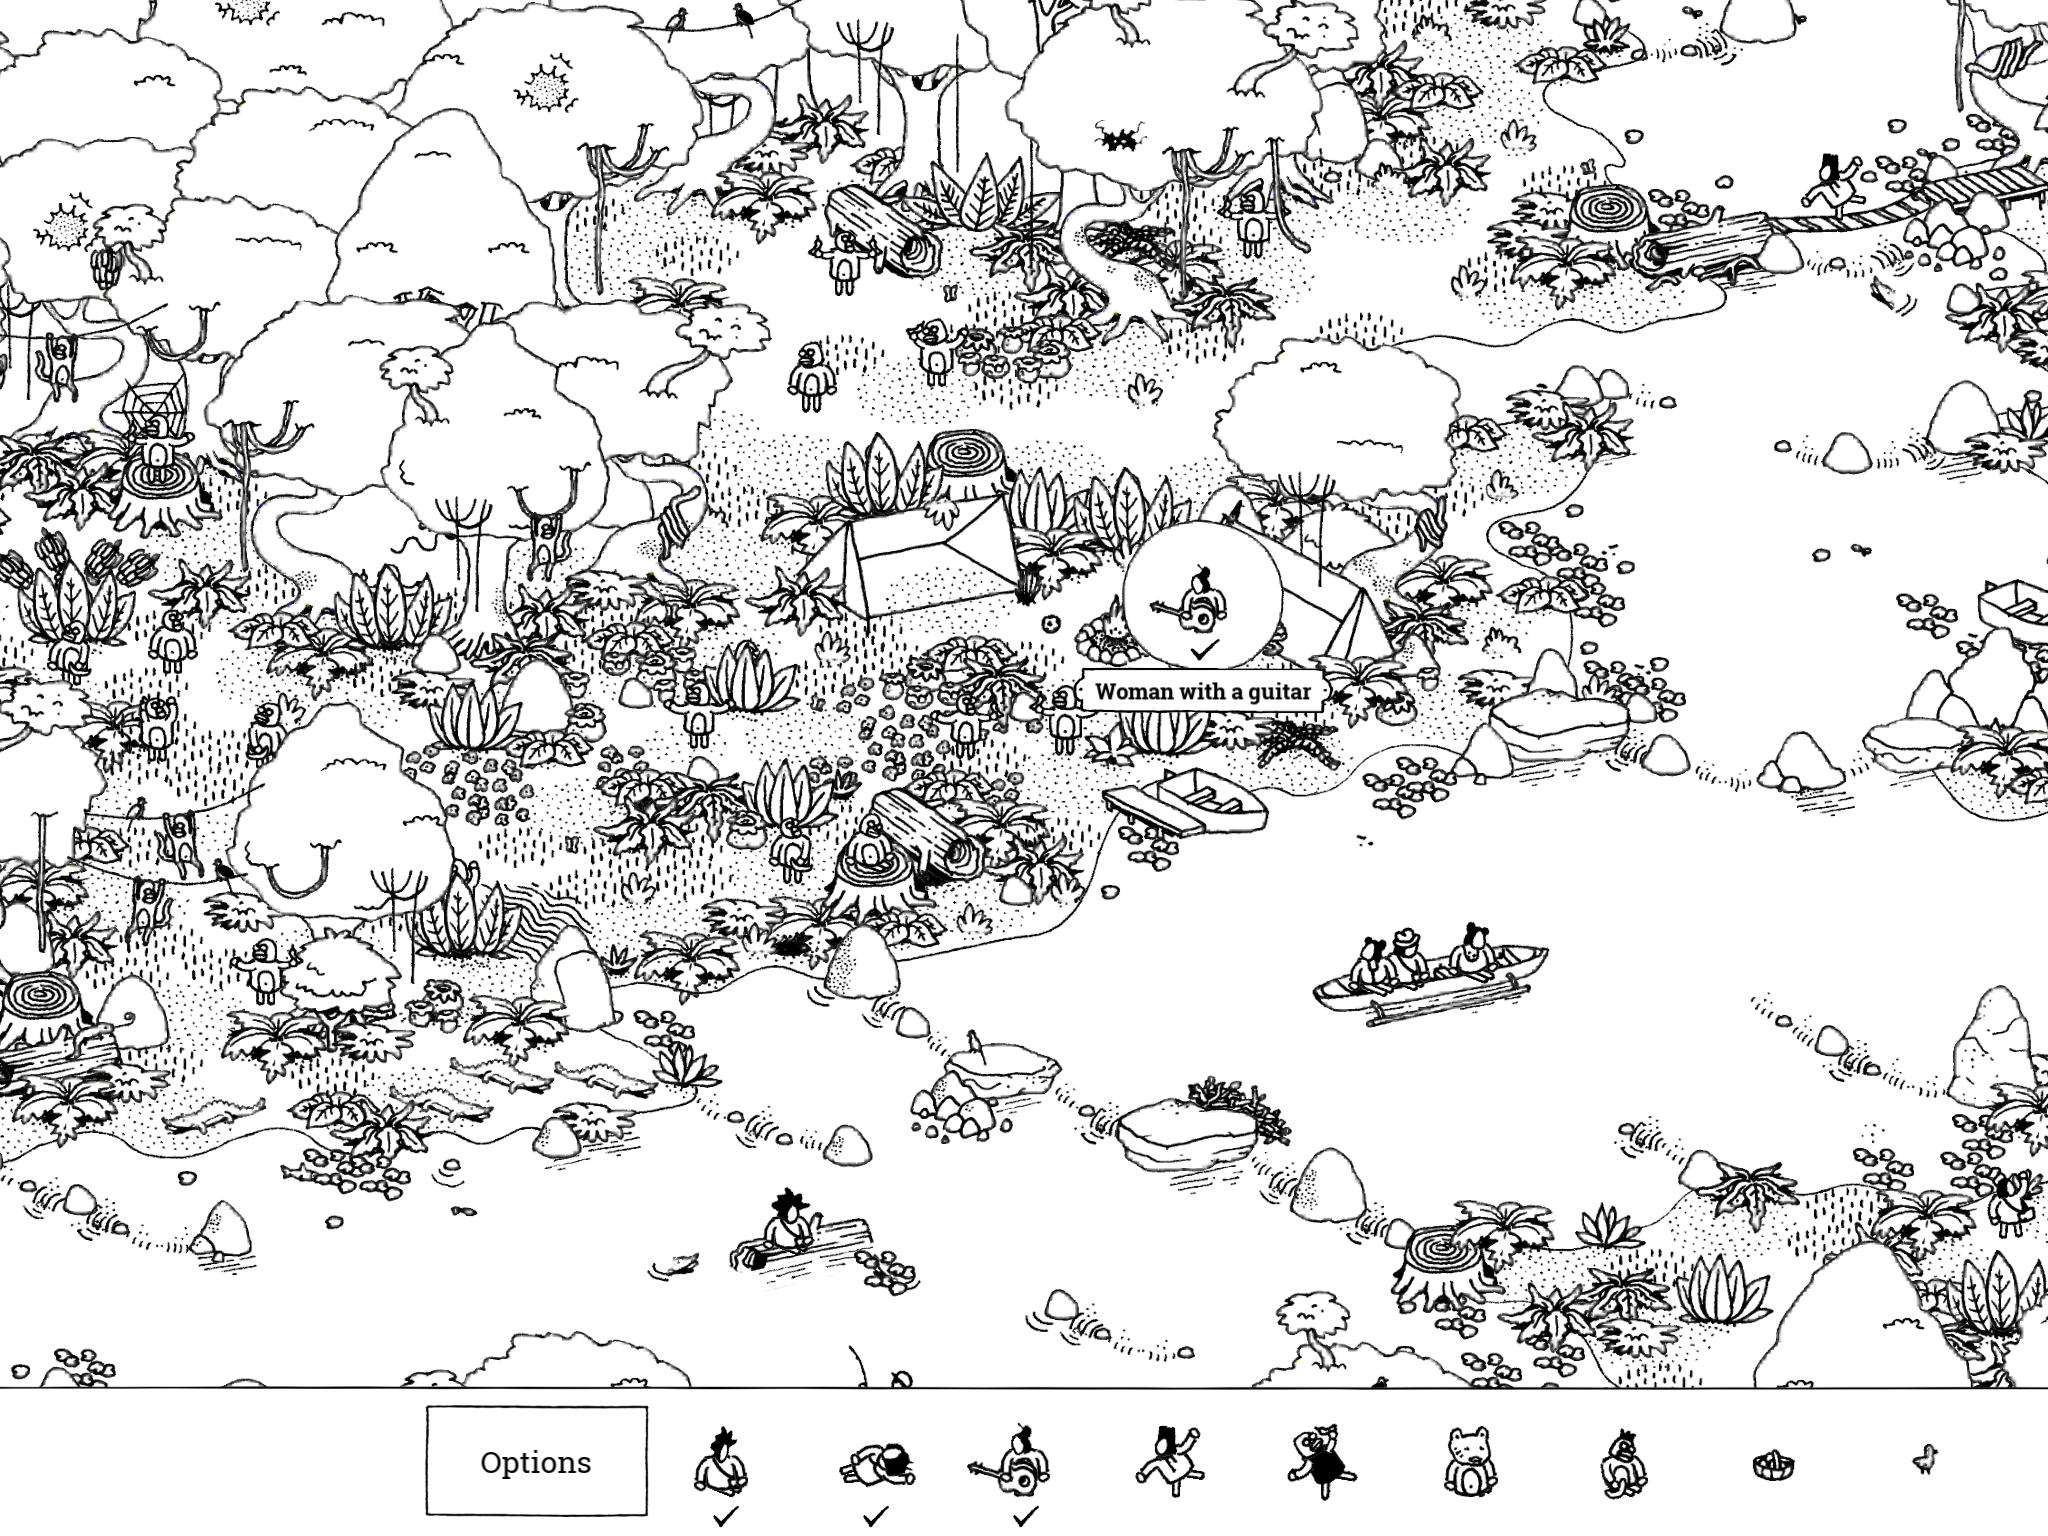
- Woman with a Guitar: “The woman with a guitar plays music that will warm the hearts of men and reptiles.”
North of the center of the image. There is a campground with a fire and two tents; she’s in the rightmost tent with a snake.
- Woman with a Guitar: “The woman with a guitar plays music that will warm the hearts of men and reptiles.”
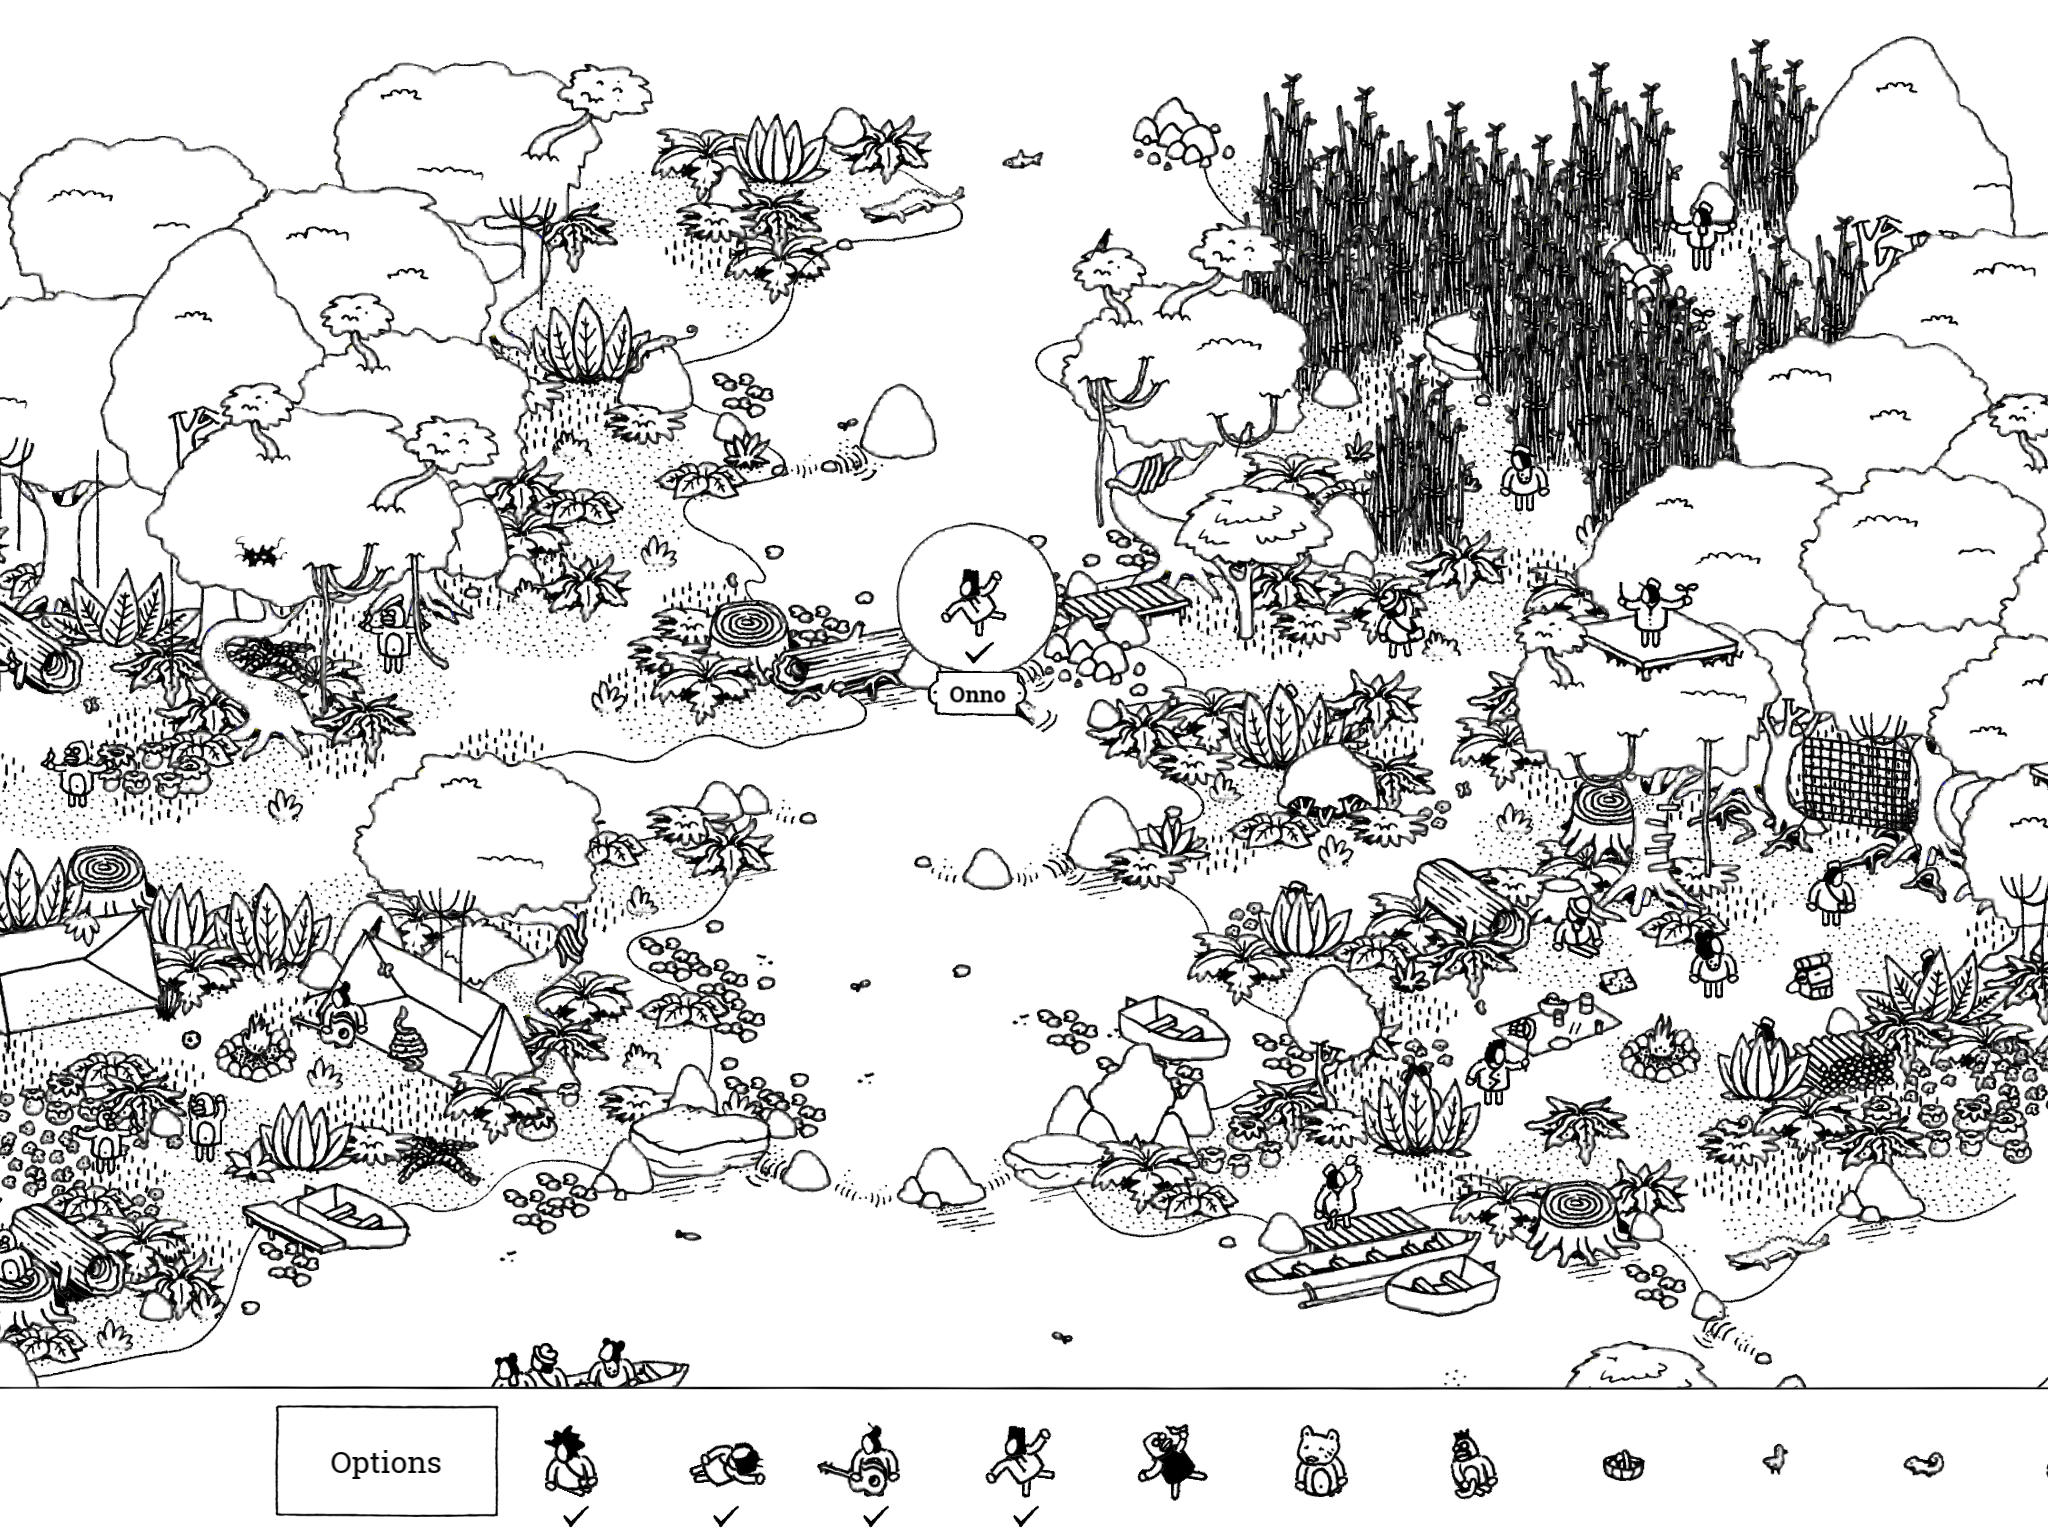
- Onno: “Onno wishes he had paid more attention during his Thai Chi classes.”
Onno is the near northeast corner of the image, just west of the bamboo forest. There is a bridge between the left and right islands with a stump on the left; he’s balancing on the middle of the bridge.
- Onno: “Onno wishes he had paid more attention during his Thai Chi classes.”
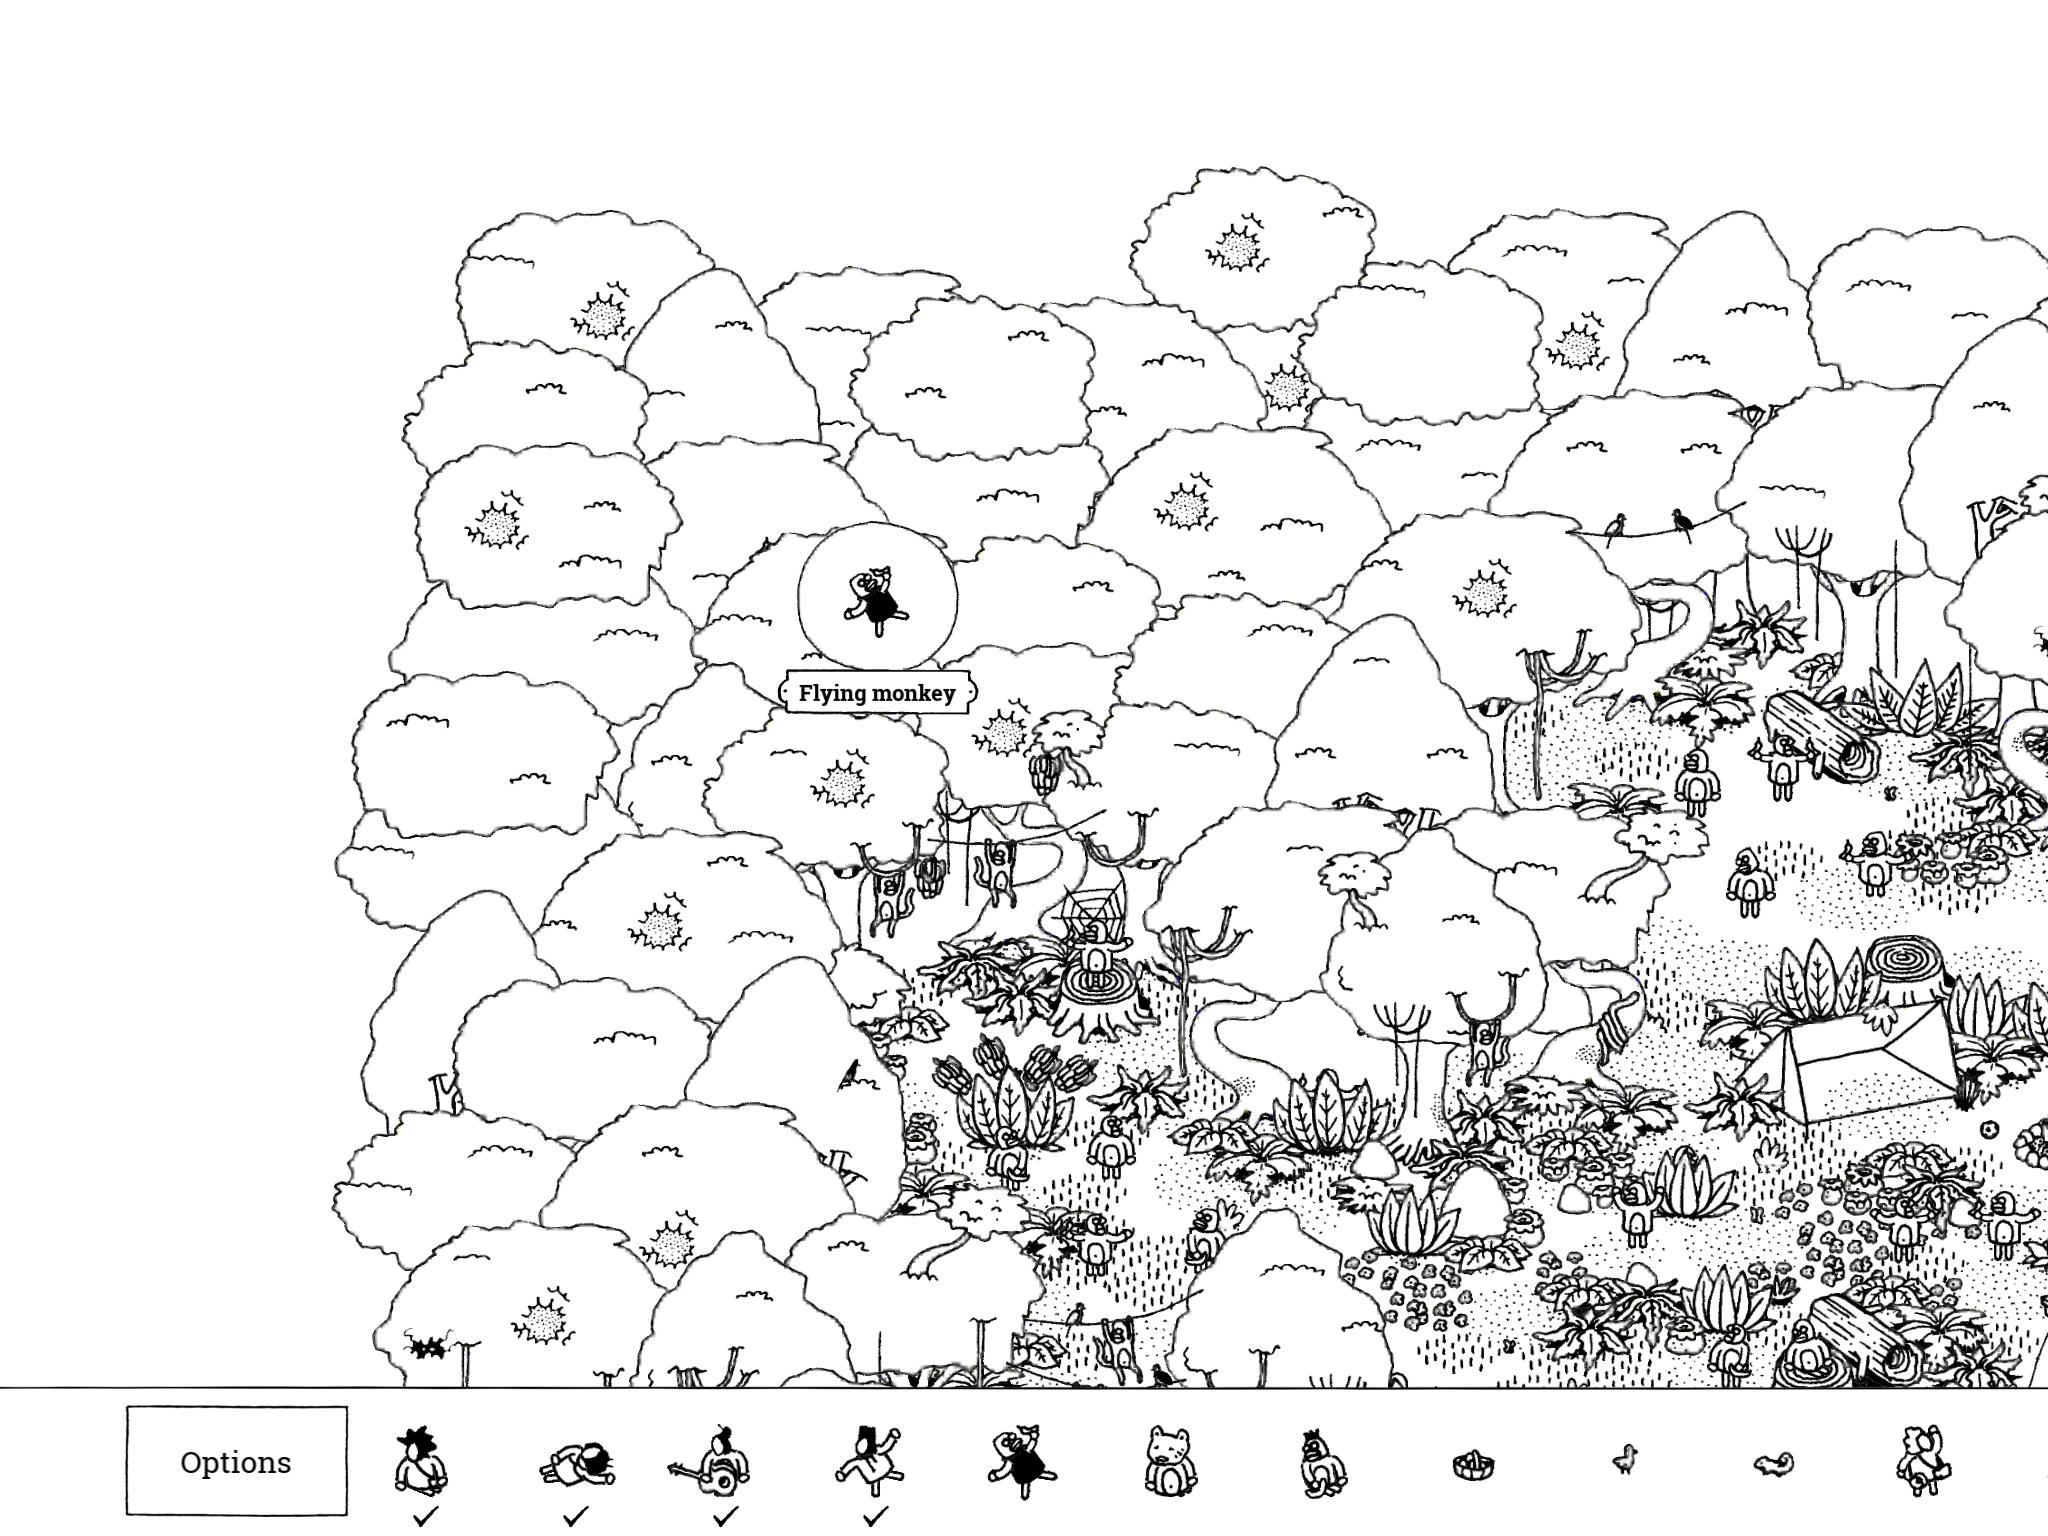
- Flying Monkey: “Whhhhhoooooooooo!!!!!”
The Flying Monkey is in the northwest corner of the image. He’s bouncing up and down in the treetops with another monkey; he’ll vanish temporarily when he falls back behind the treetops. Just watch the area for a few seconds and tap him when he appears above the trees.
- Flying Monkey: “Whhhhhoooooooooo!!!!!”
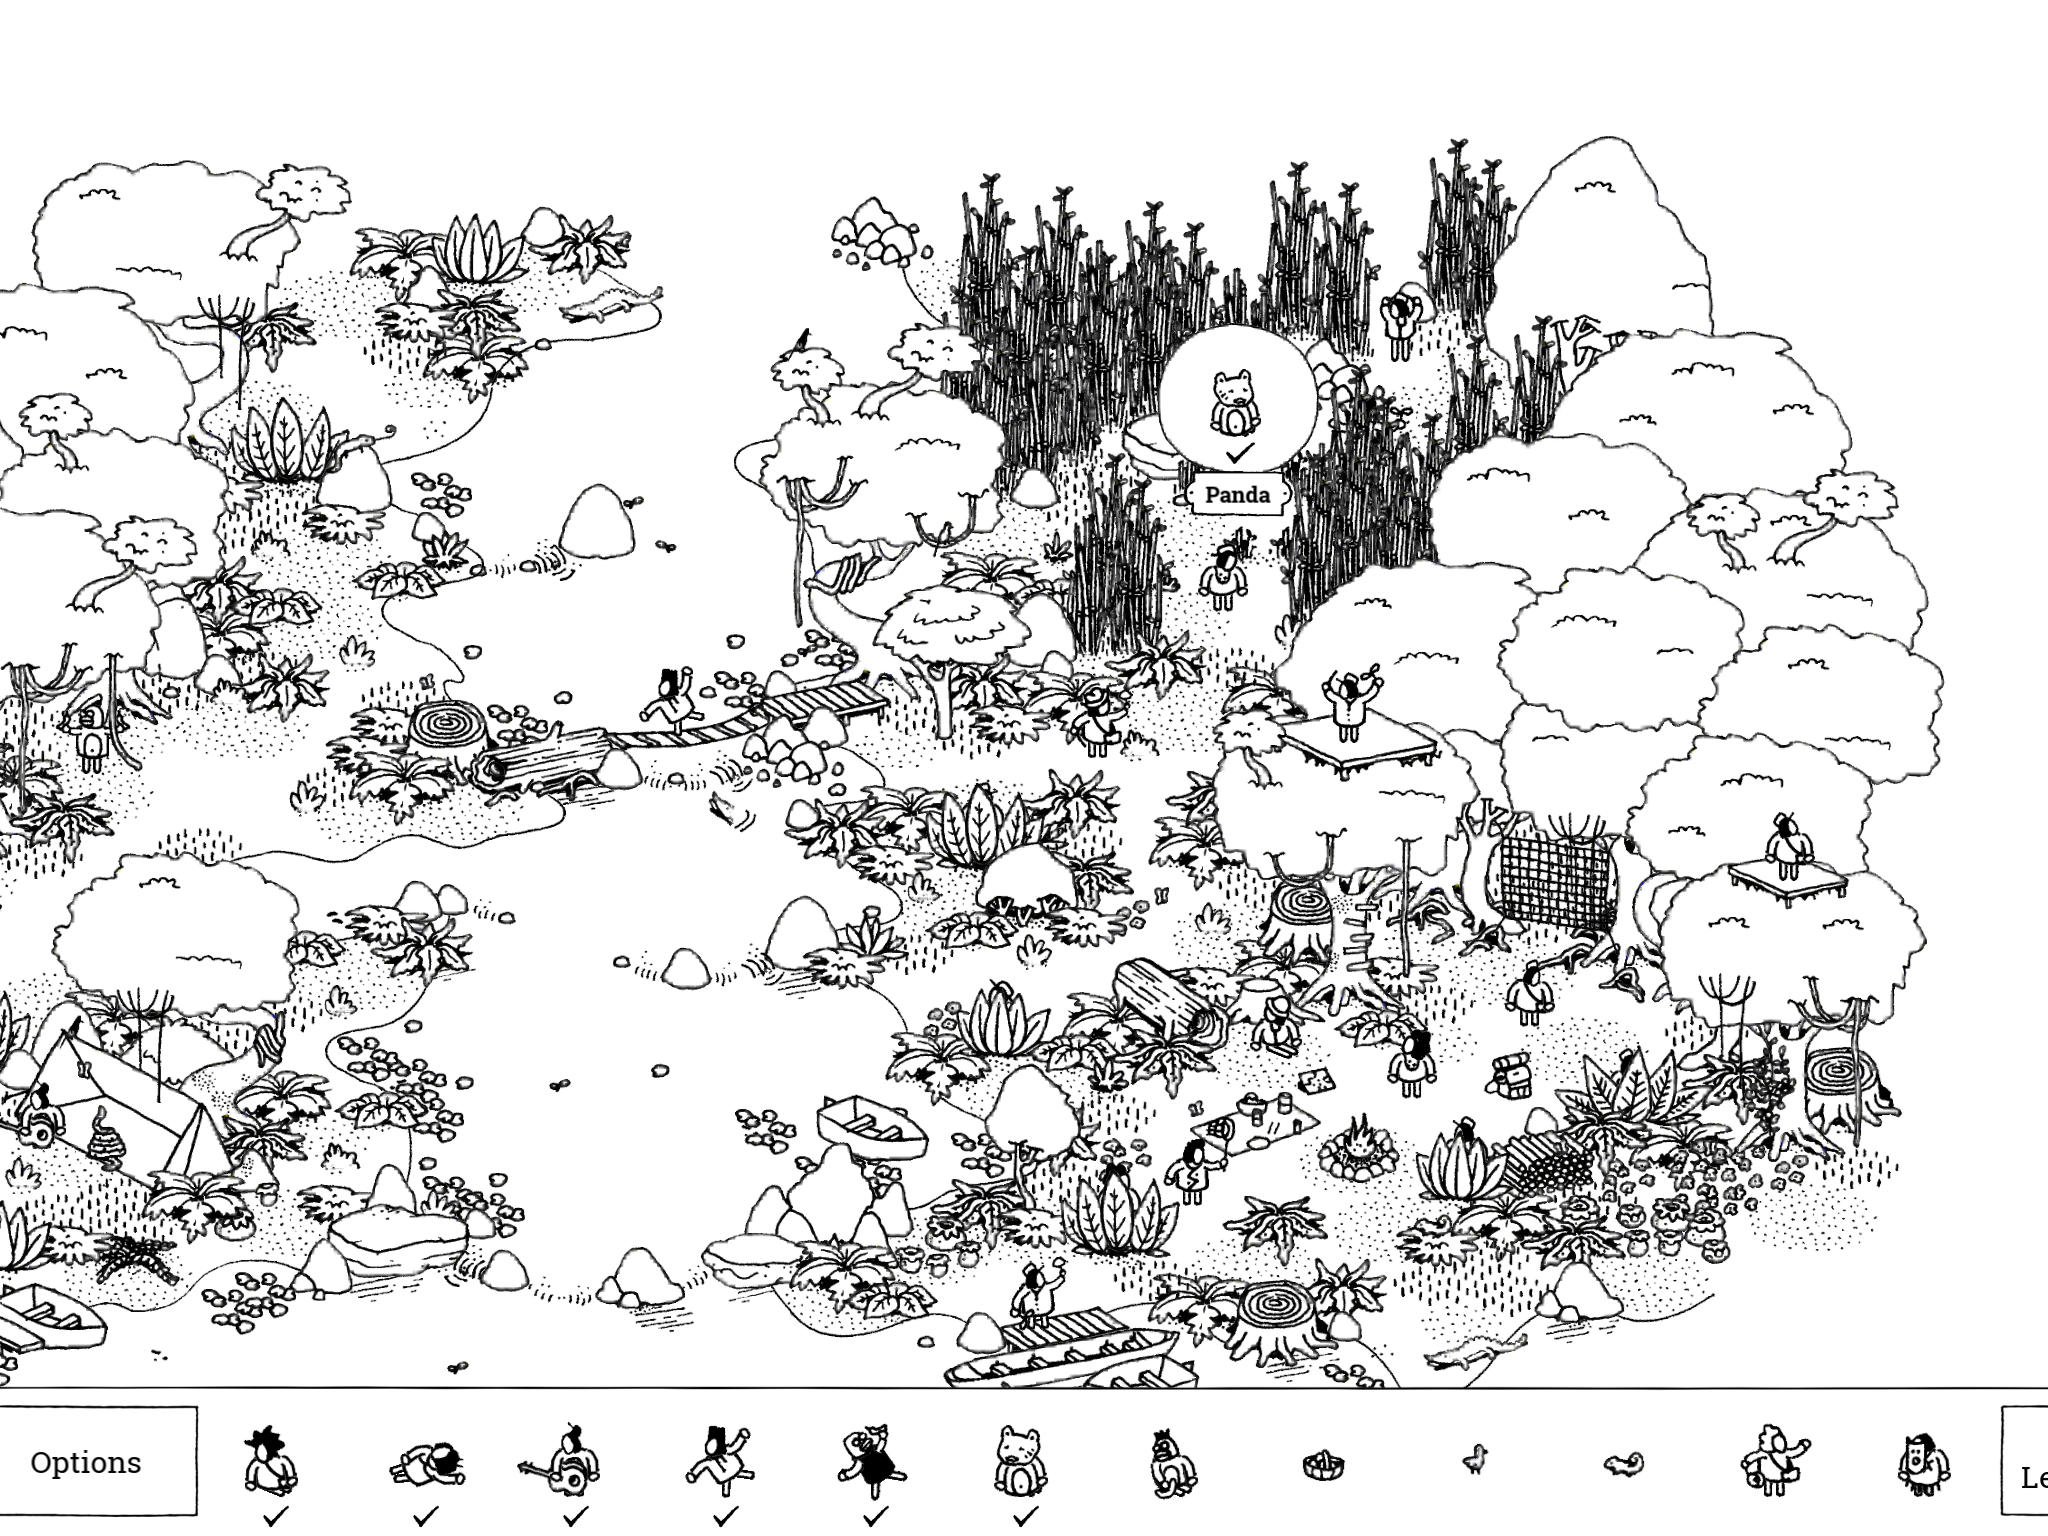
- Fluffy Panda: “Fluffy panda does what fluffy pandas do. (Eating.)”
Fluffy Panda is in the bamboo forest in the northeast corner of the image. Tap the bamboo stalks a few times each to remove them and reveal what’s underneath. Fluffy Panda is behind the bamboo right in the center of the forest.
- Fluffy Panda: “Fluffy panda does what fluffy pandas do. (Eating.)”
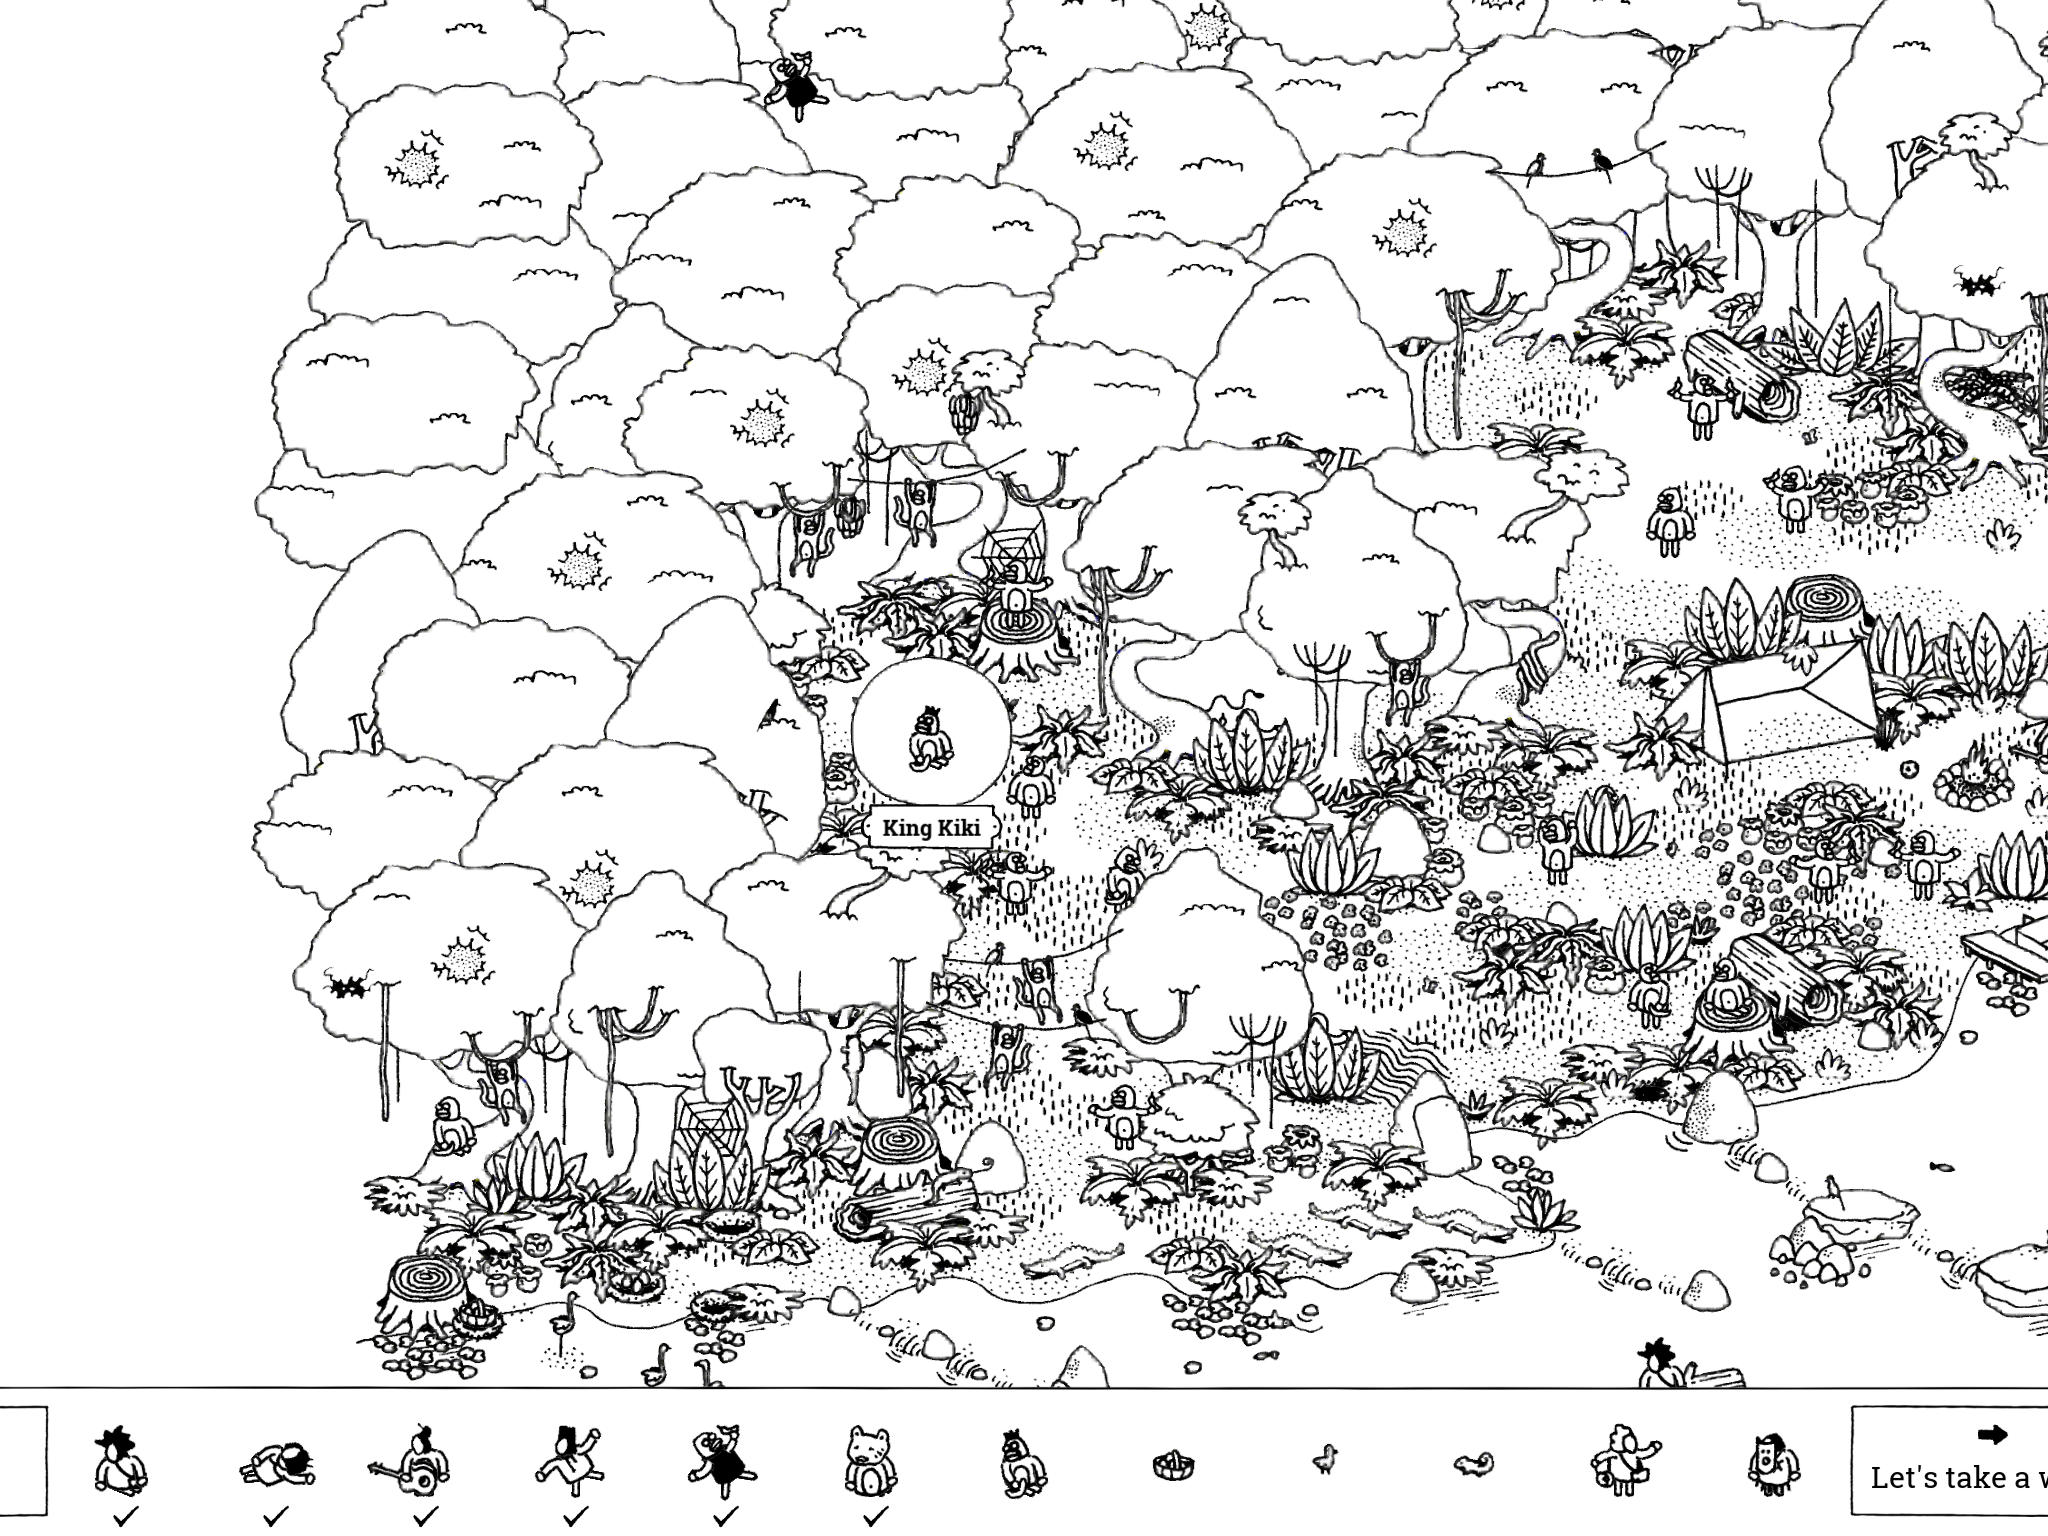
- King Kiki: “The others watch jealously while King Kiki sits on his throne of bananas.”
King Kiki is near the northwest corner, just south of Flying Monkey. He’s hiding behind the large leaf fronds with bananas sticking out of the top; tap the middle leaf to reveal the King, then tap on him. If you wait too long, the leaf will slide back into place, hiding him again and you’ll need to tap it to move it out of the way once more.
- King Kiki: “The others watch jealously while King Kiki sits on his throne of bananas.”
- Eggs: “Long elegant birds lay long elegant eggs.”
On the far west side in the vertical center of the image, there are some flamingoes in the river. Their basket of Eggs is just west of them, next to a tree stump.
- Eggs: “Long elegant birds lay long elegant eggs.”
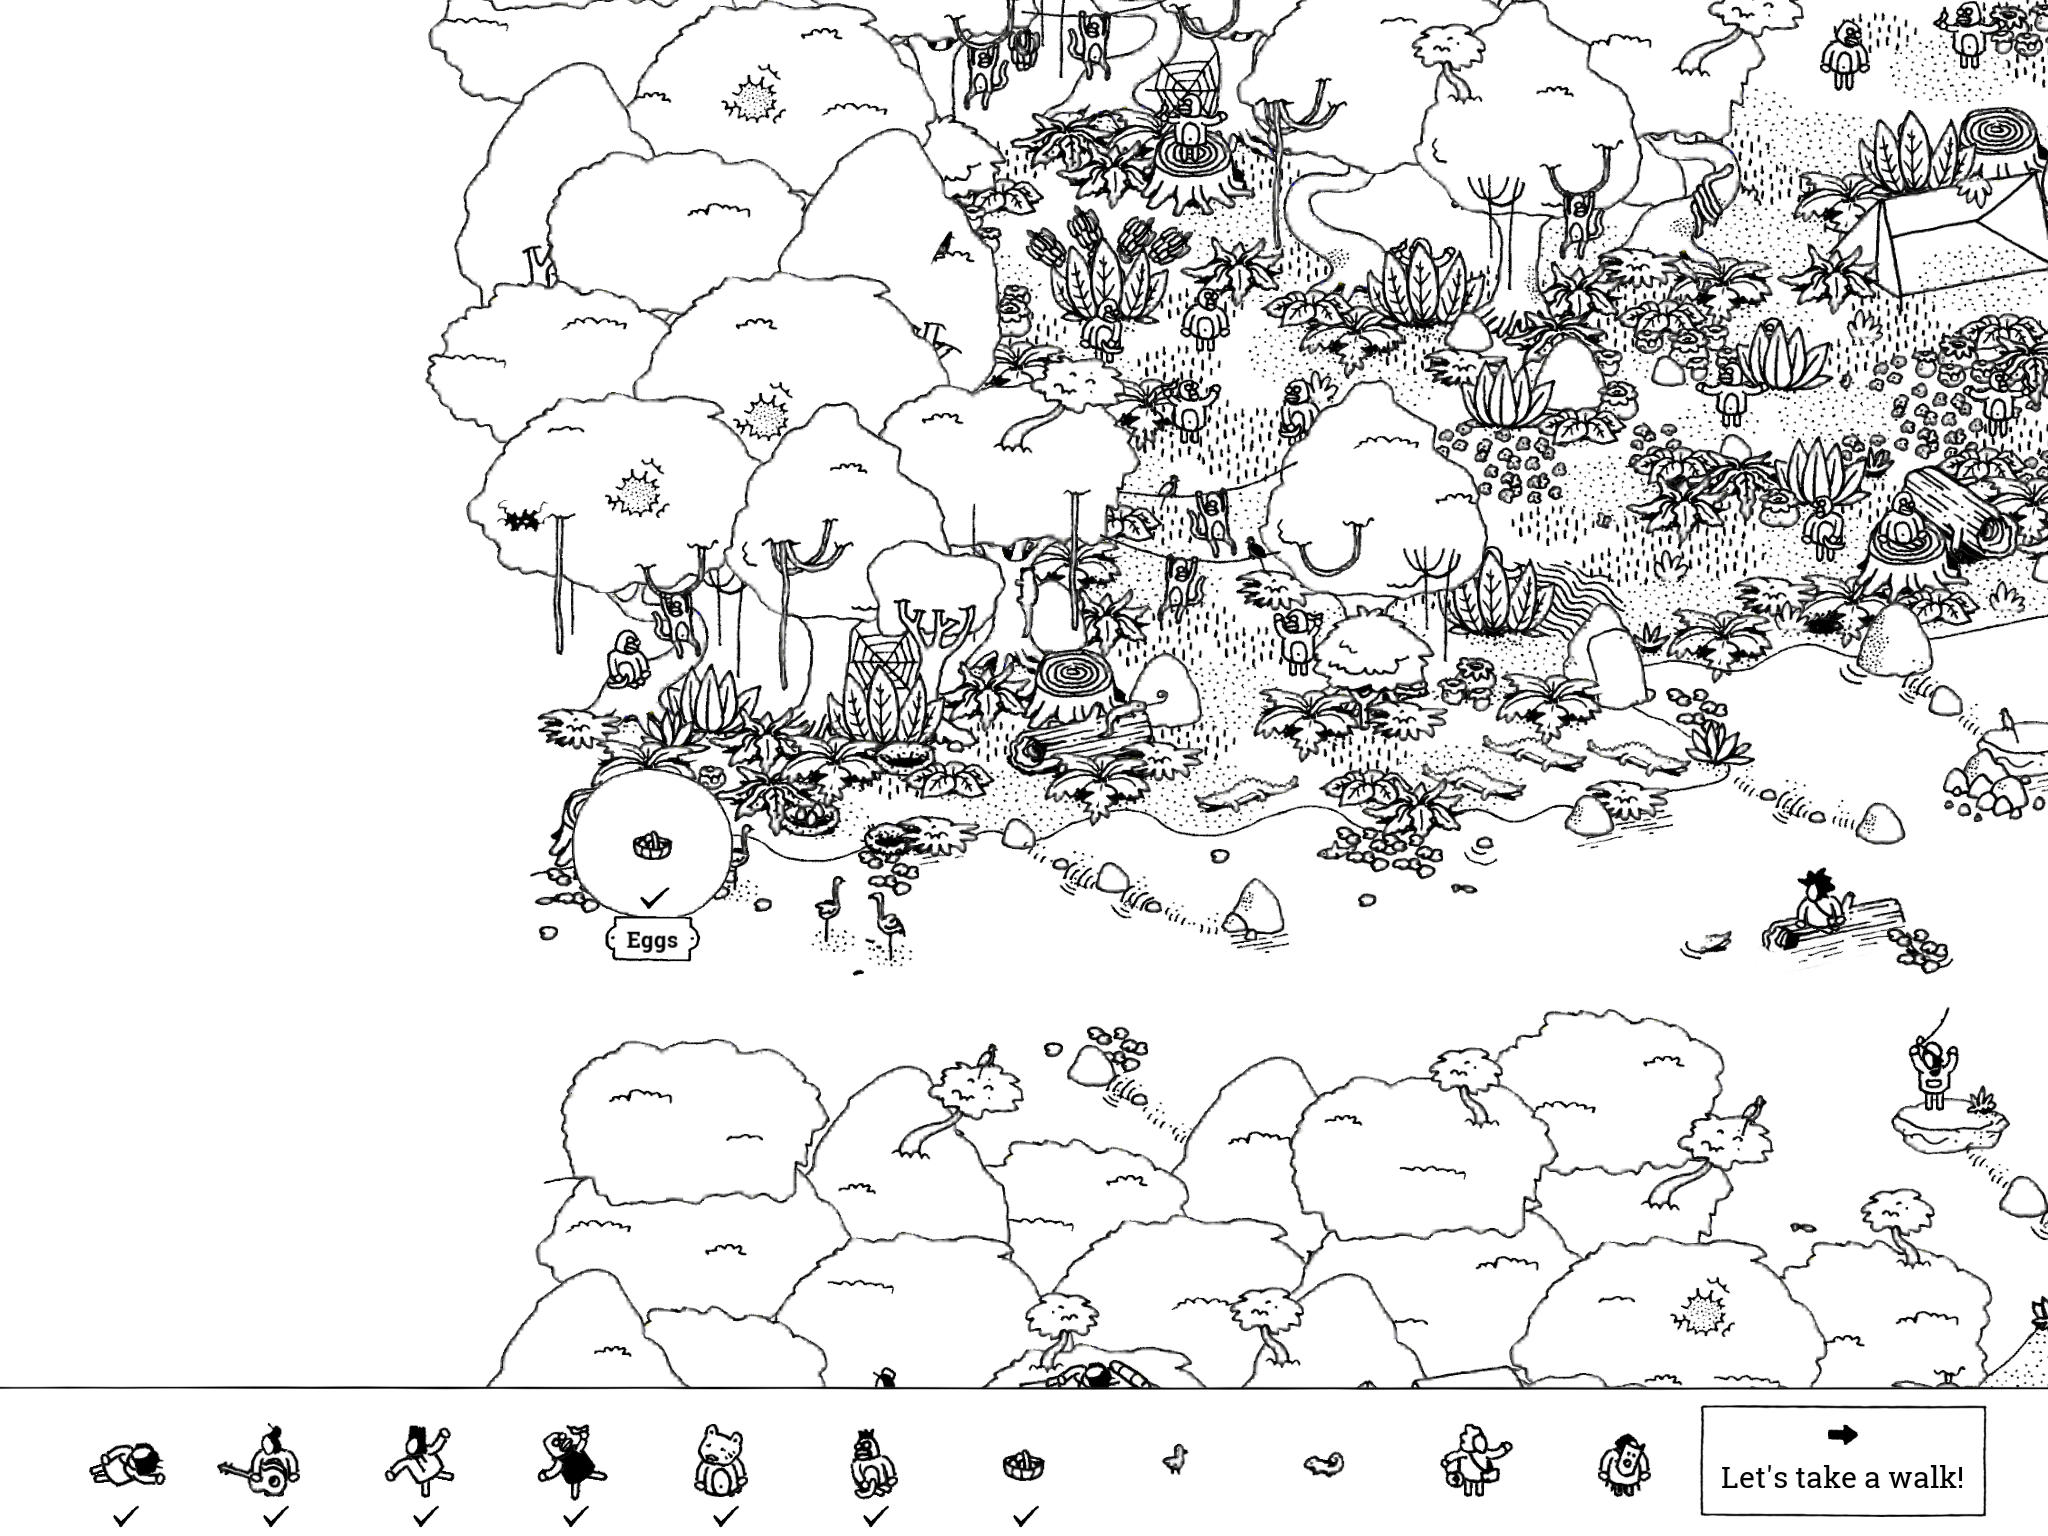
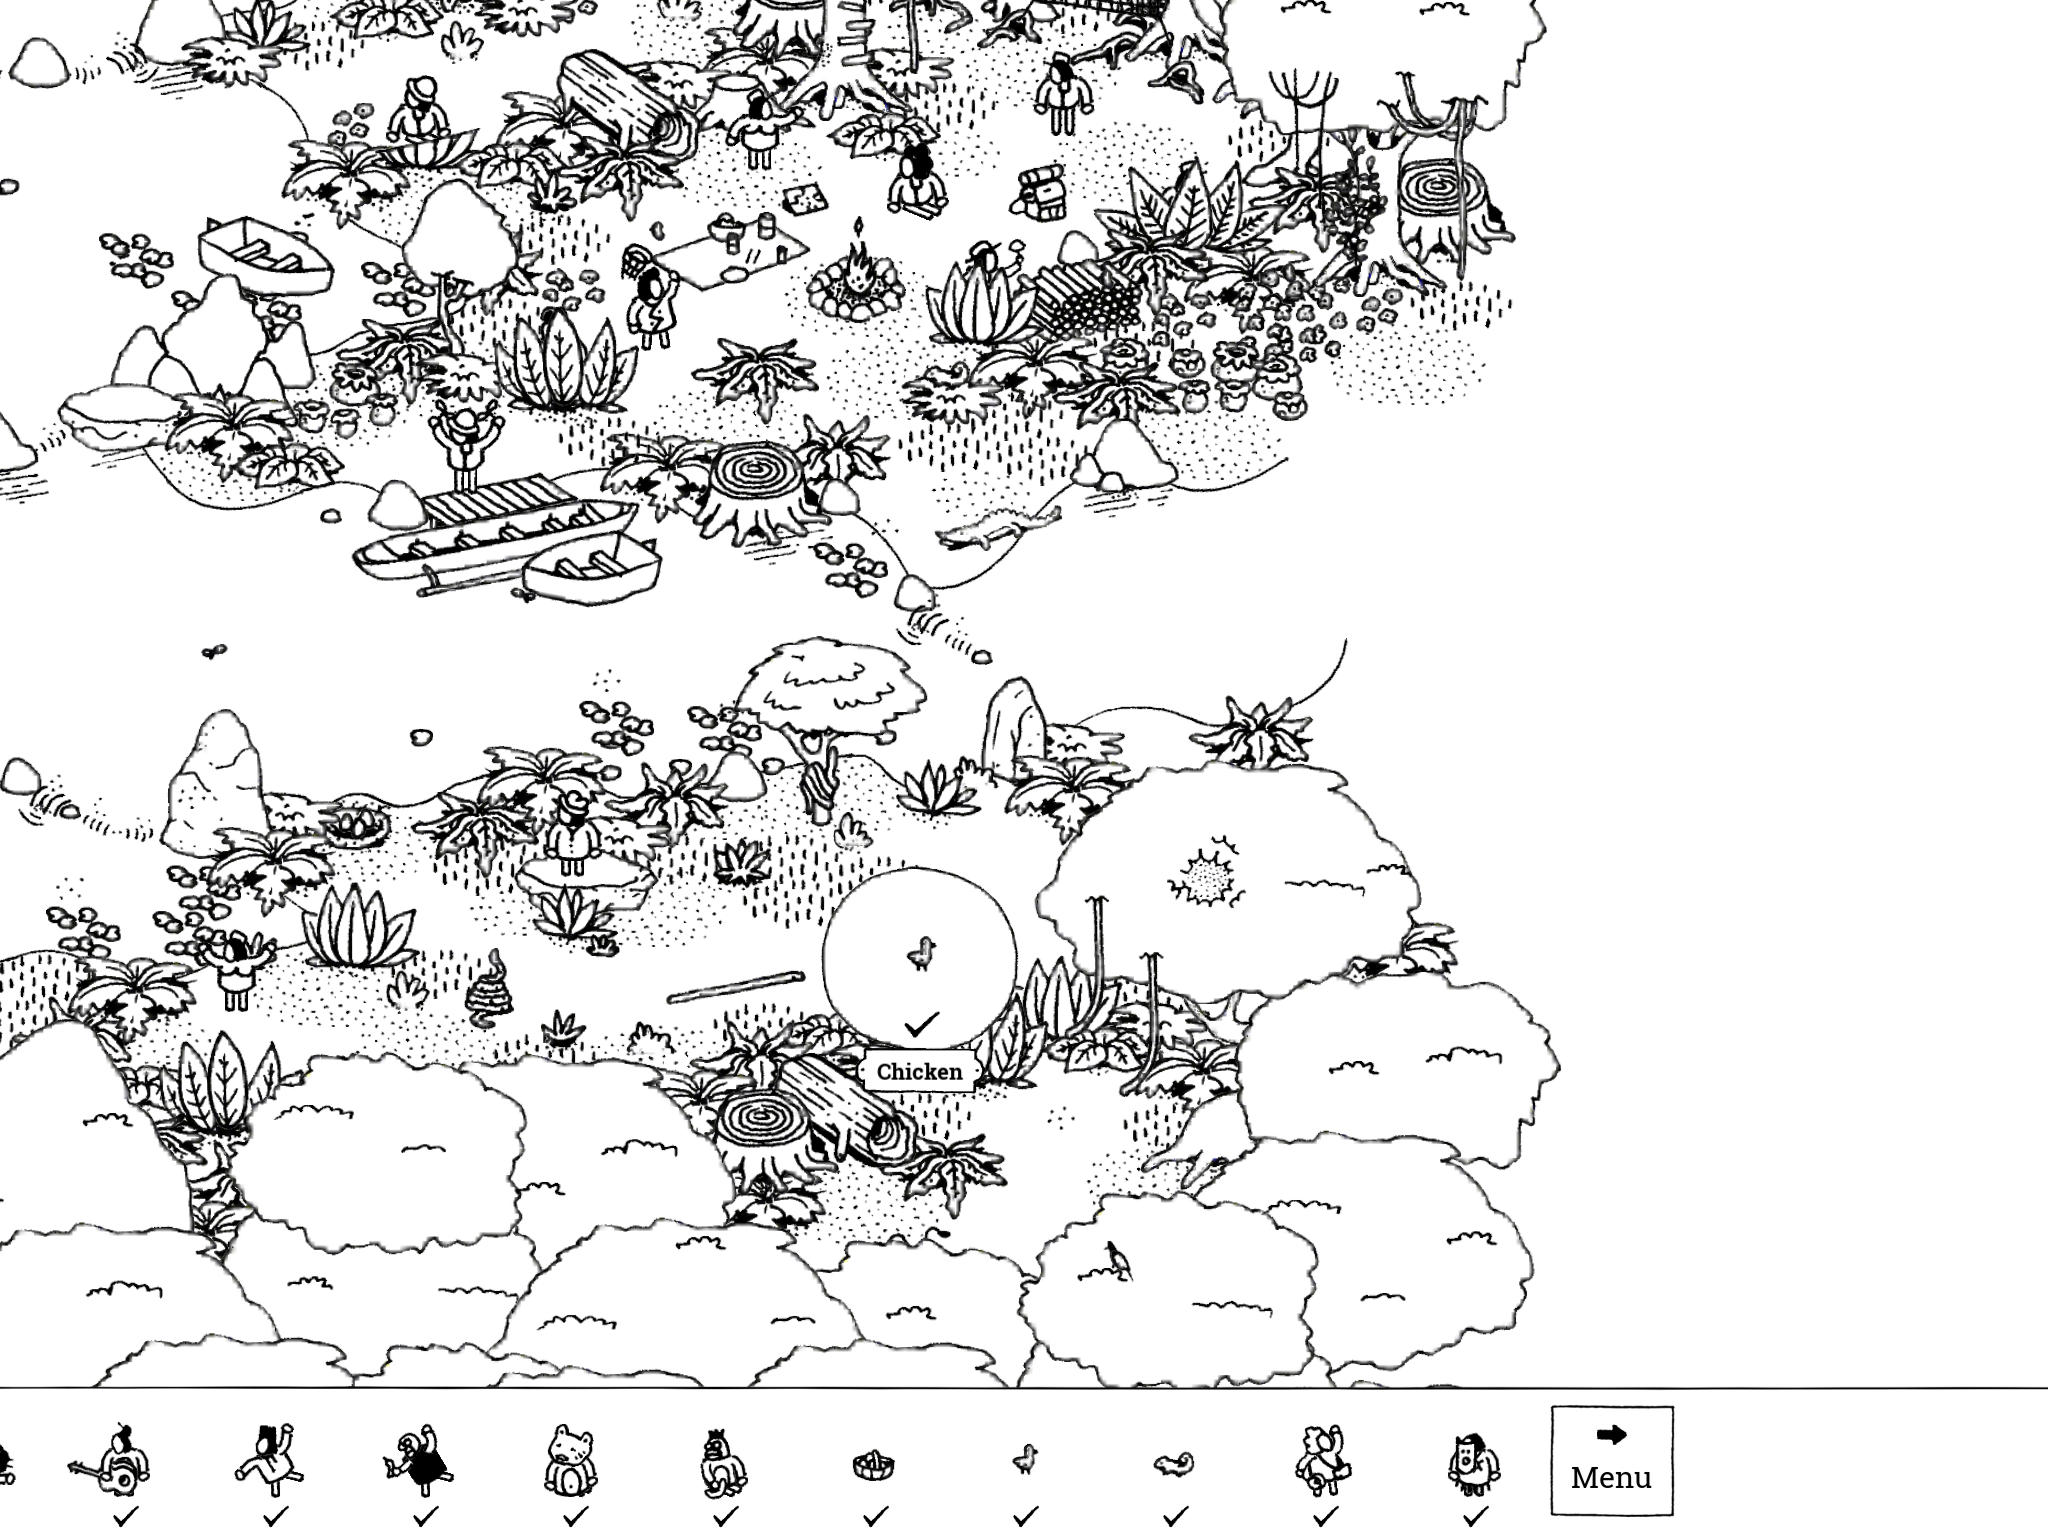
- Chicken: “This chicken was a single bite-sized dinner.”
On the far east side of the image, near the vertical center—just south of the river and the Reptile—is a small clearing. In the clearing is a coiled snake, and just east of the coiled snake is a snake that is stretched out with a large bump in its body. Tap the bumpy snake three times and he will spit out the Chicken. Tap the Chicken to collect her.
- Chicken: “This chicken was a single bite-sized dinner.”
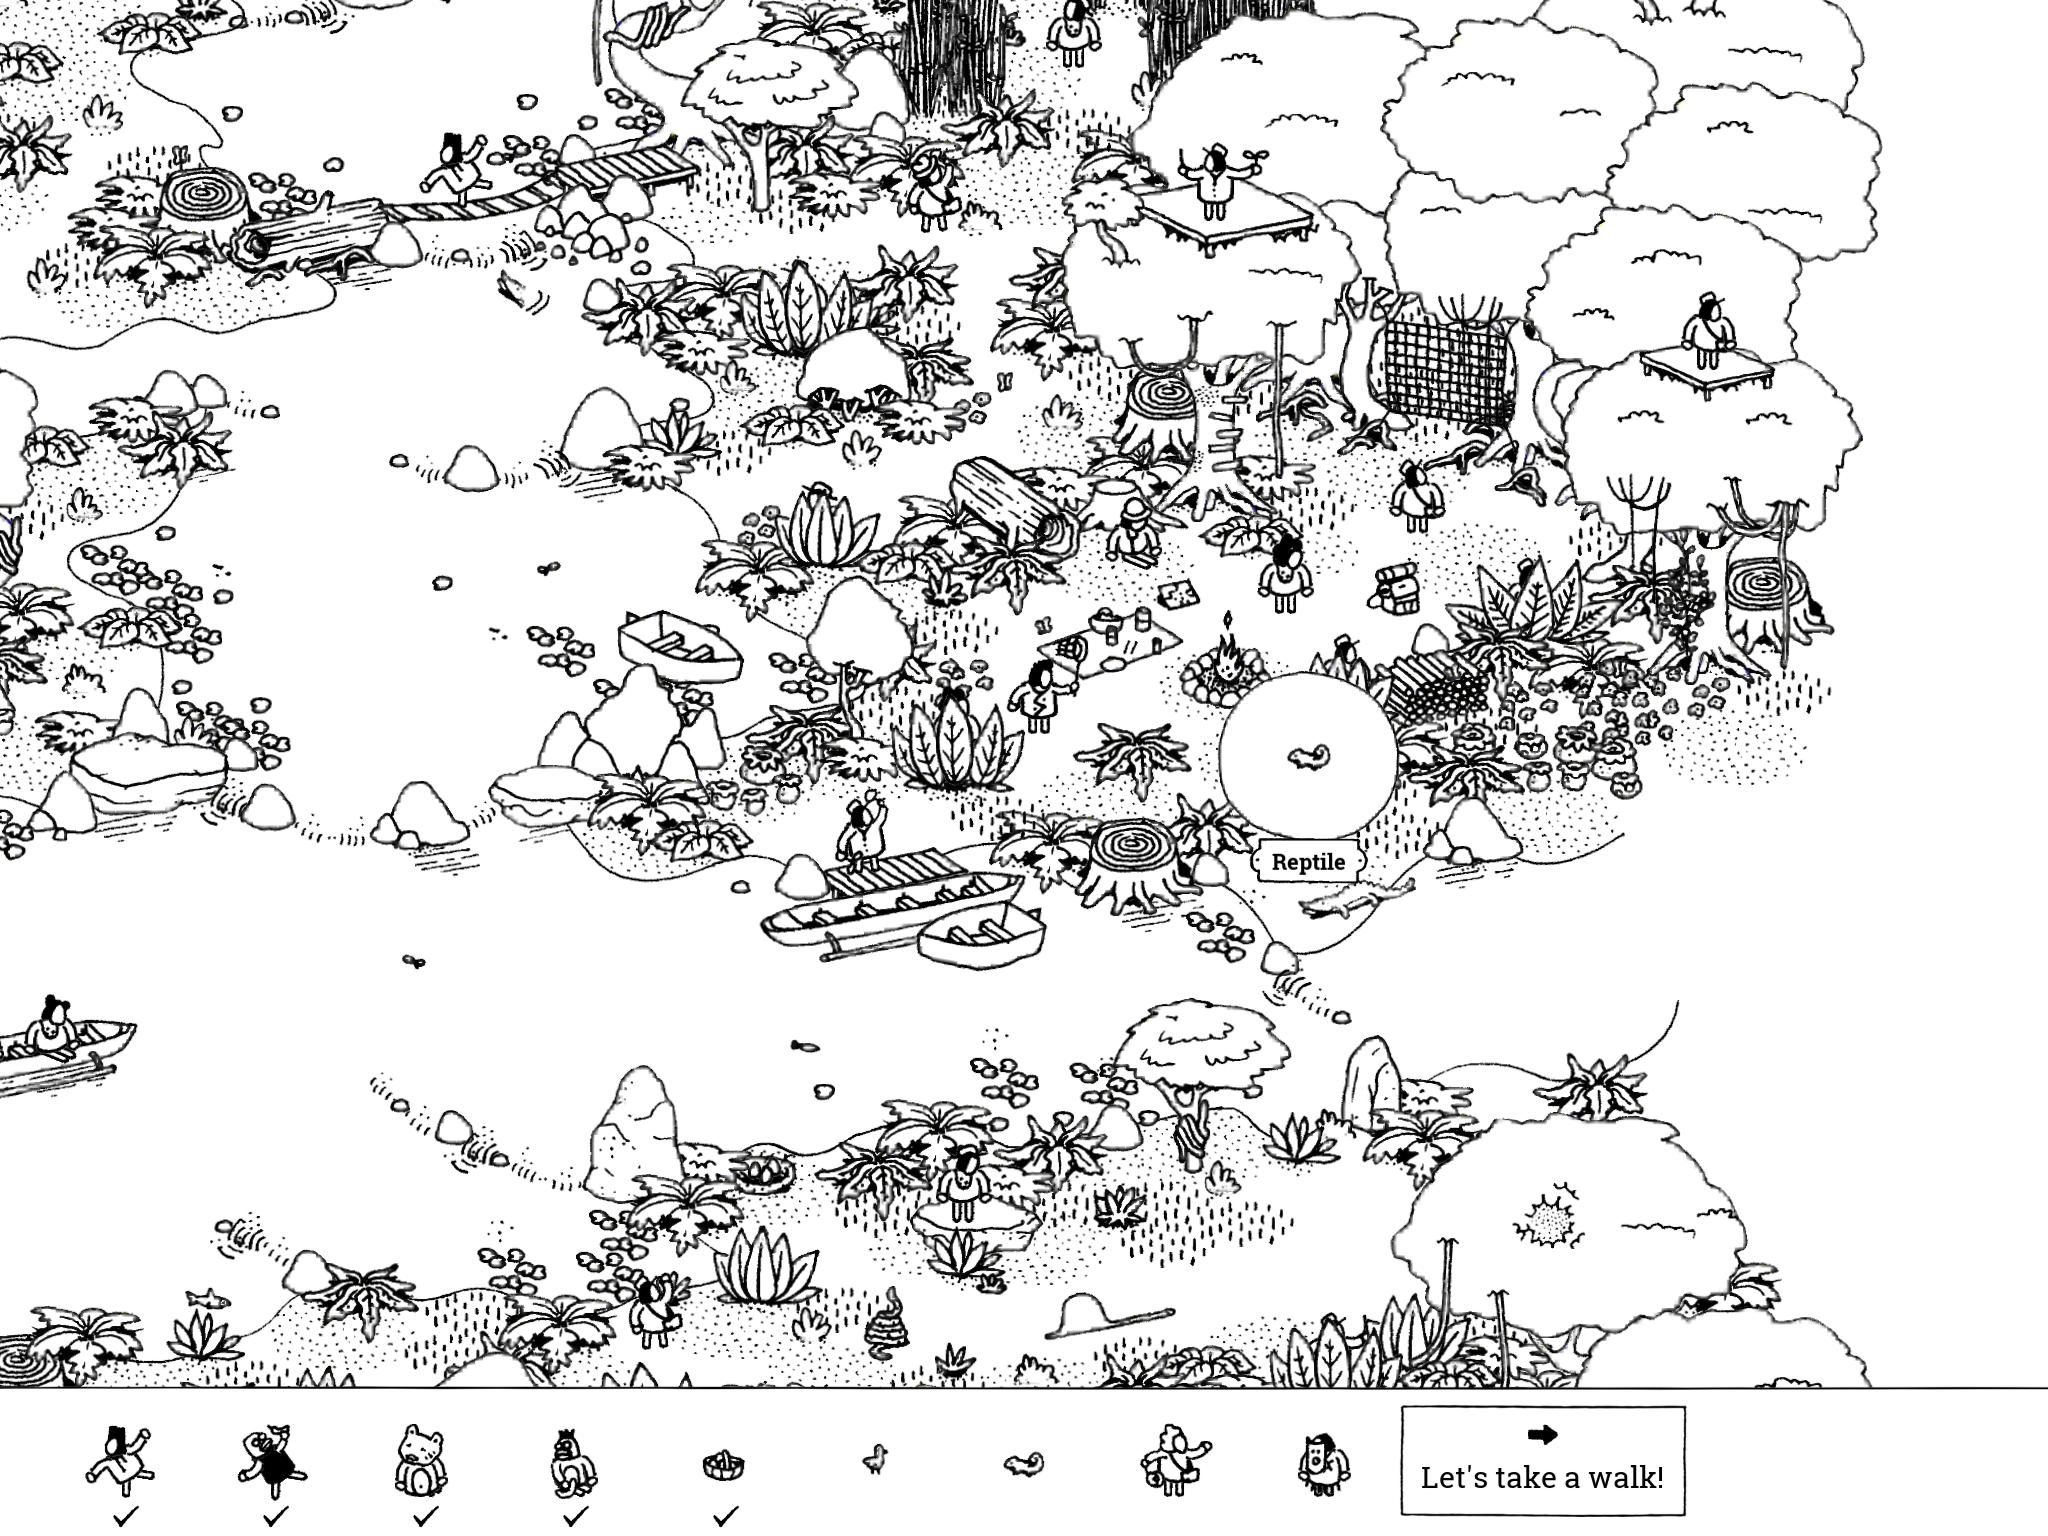
- Reptile: “This reptile laughs at the amateur trying to catch a butterfly!”
On the far east side of the image, near the vertical center—just north of the river and the Chicken—is a campsite. There’s a small dock with boats, a stump, a campfire. Just west of the campfire is a man waving a butterfly net; just southeast of the campfire is a small bush with the Reptile sitting on it, facing the man with the net.
- Reptile: “This reptile laughs at the amateur trying to catch a butterfly!”
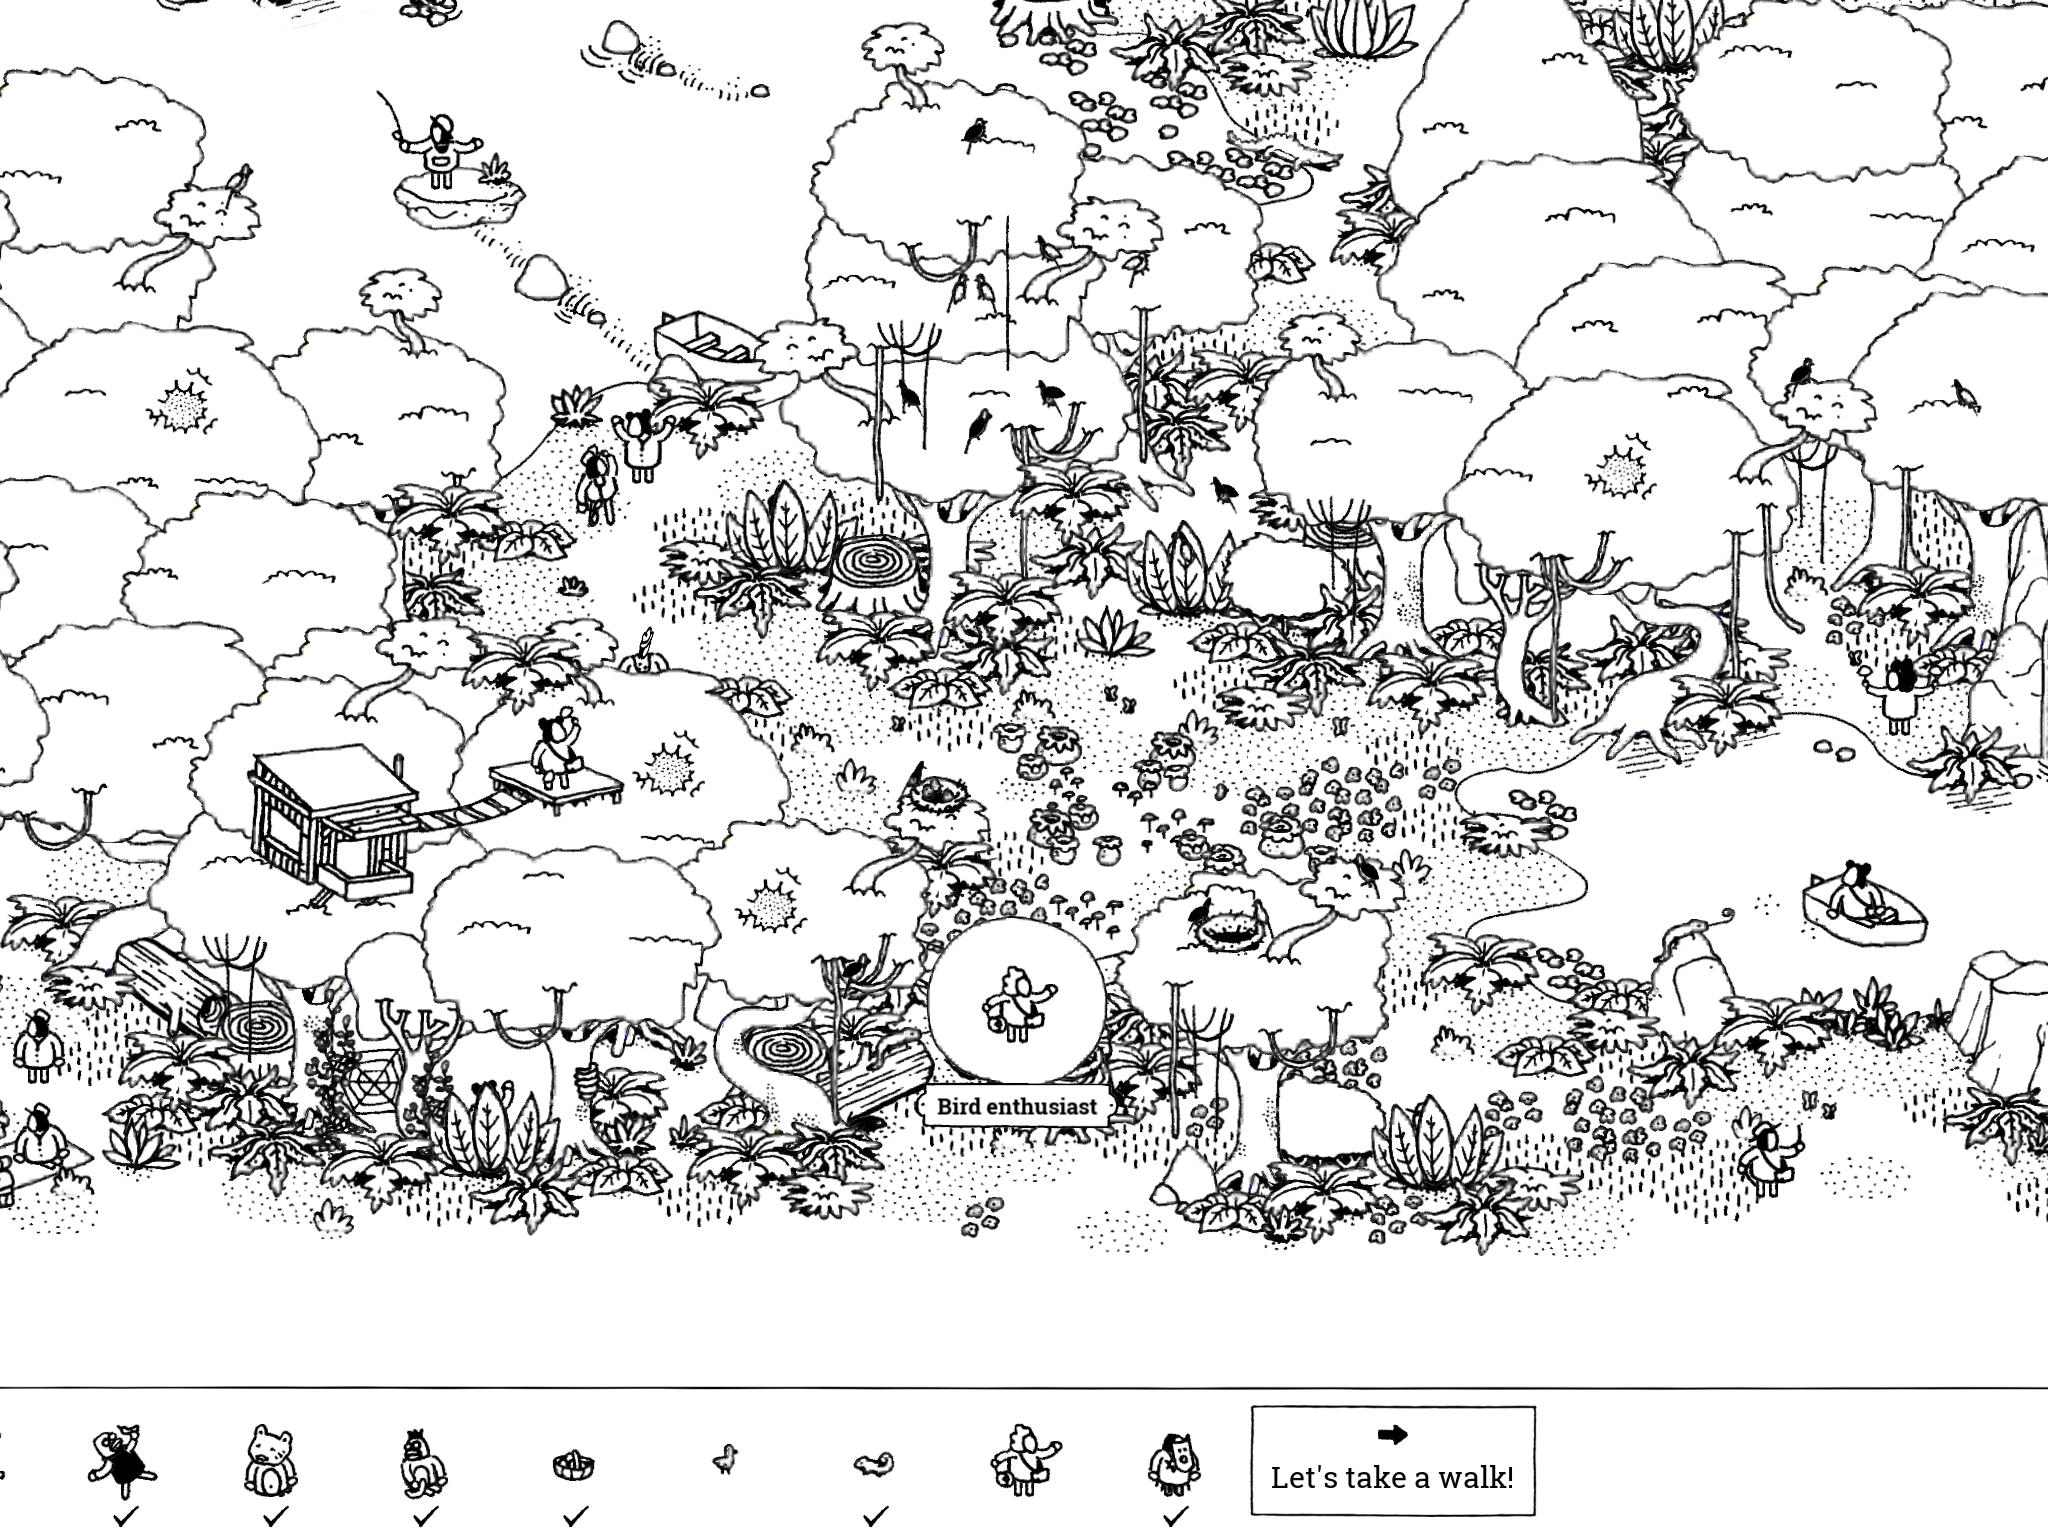
- Bird Enthusiast: “This bird enthusiast is pretty much in heaven right now.”
On the southern edge of the image near the horizontal center is a pair of wires crossing between two trees, filled with black birds. Tap the birds to get them to fly away, revealing the Bird Enthusiast underneath where they were.
- Bird Enthusiast: “This bird enthusiast is pretty much in heaven right now.”
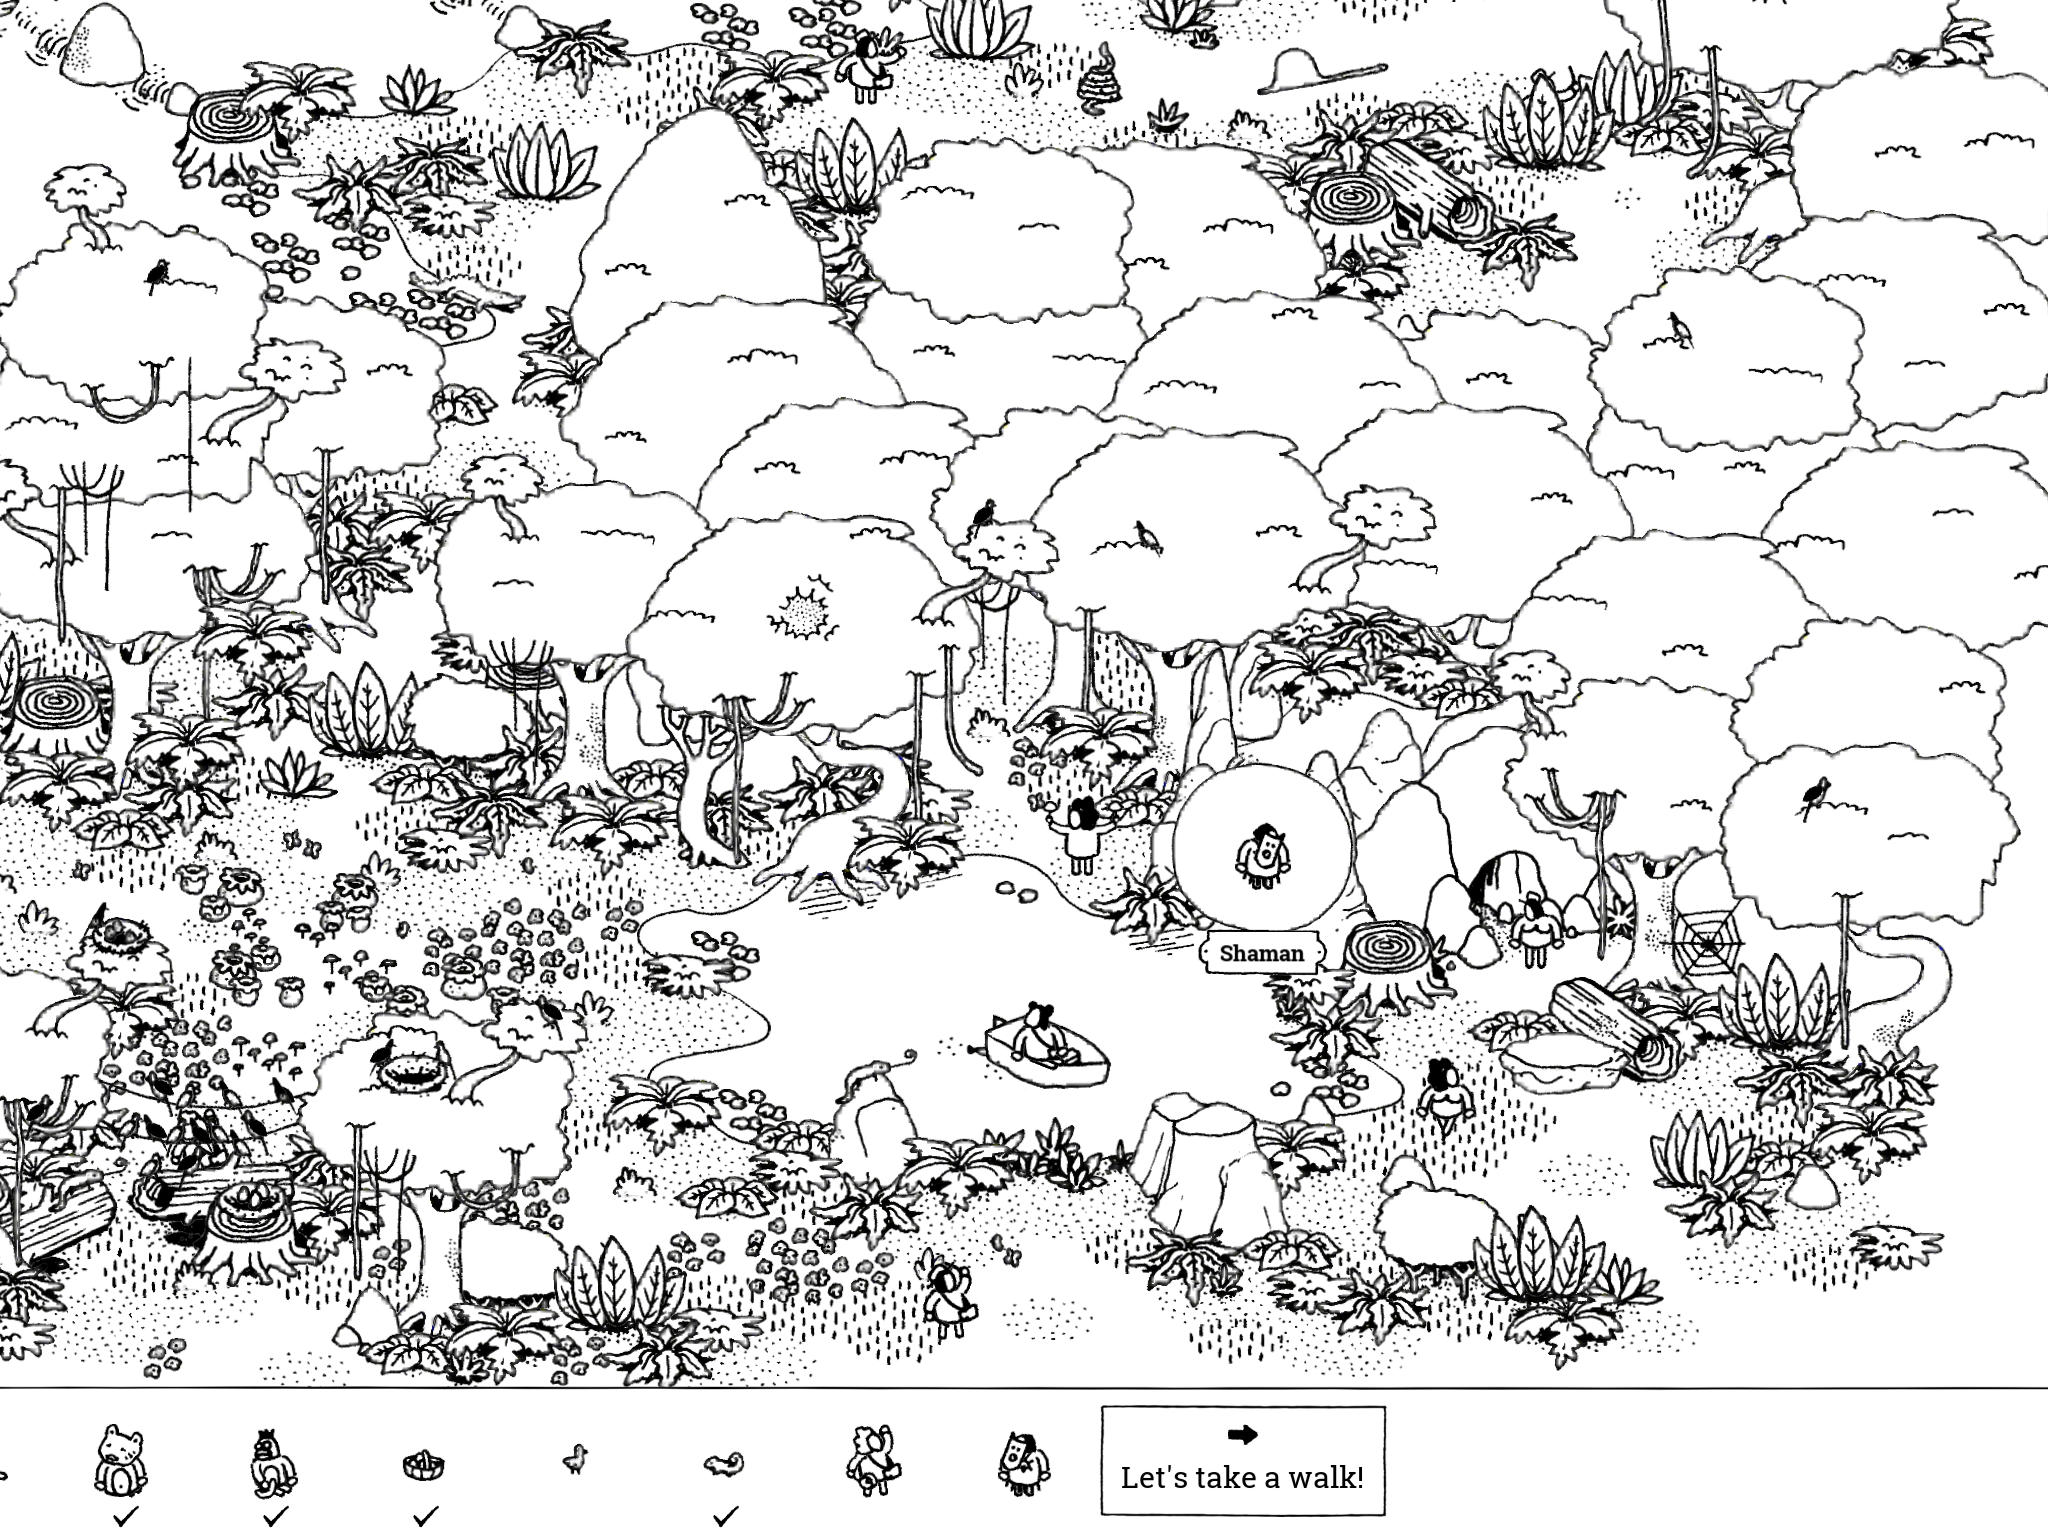
- Shaman: “Only a secret passage will lead you to the shaman…”
In the southeast corner of the image is a small lake; a man is boating in the lake and there’s a waterfall just east of him. Tap the waterfall twice to stop the stream and reveal the Shaman.
- Shaman: “Only a secret passage will lead you to the shaman…”
Forest 3: Tree House Village
- This is the only level in the game where you don’t need to find anybody. You’re just helping the folk cross the treetop bridge. When she stops moving, it indicates your input is needed.
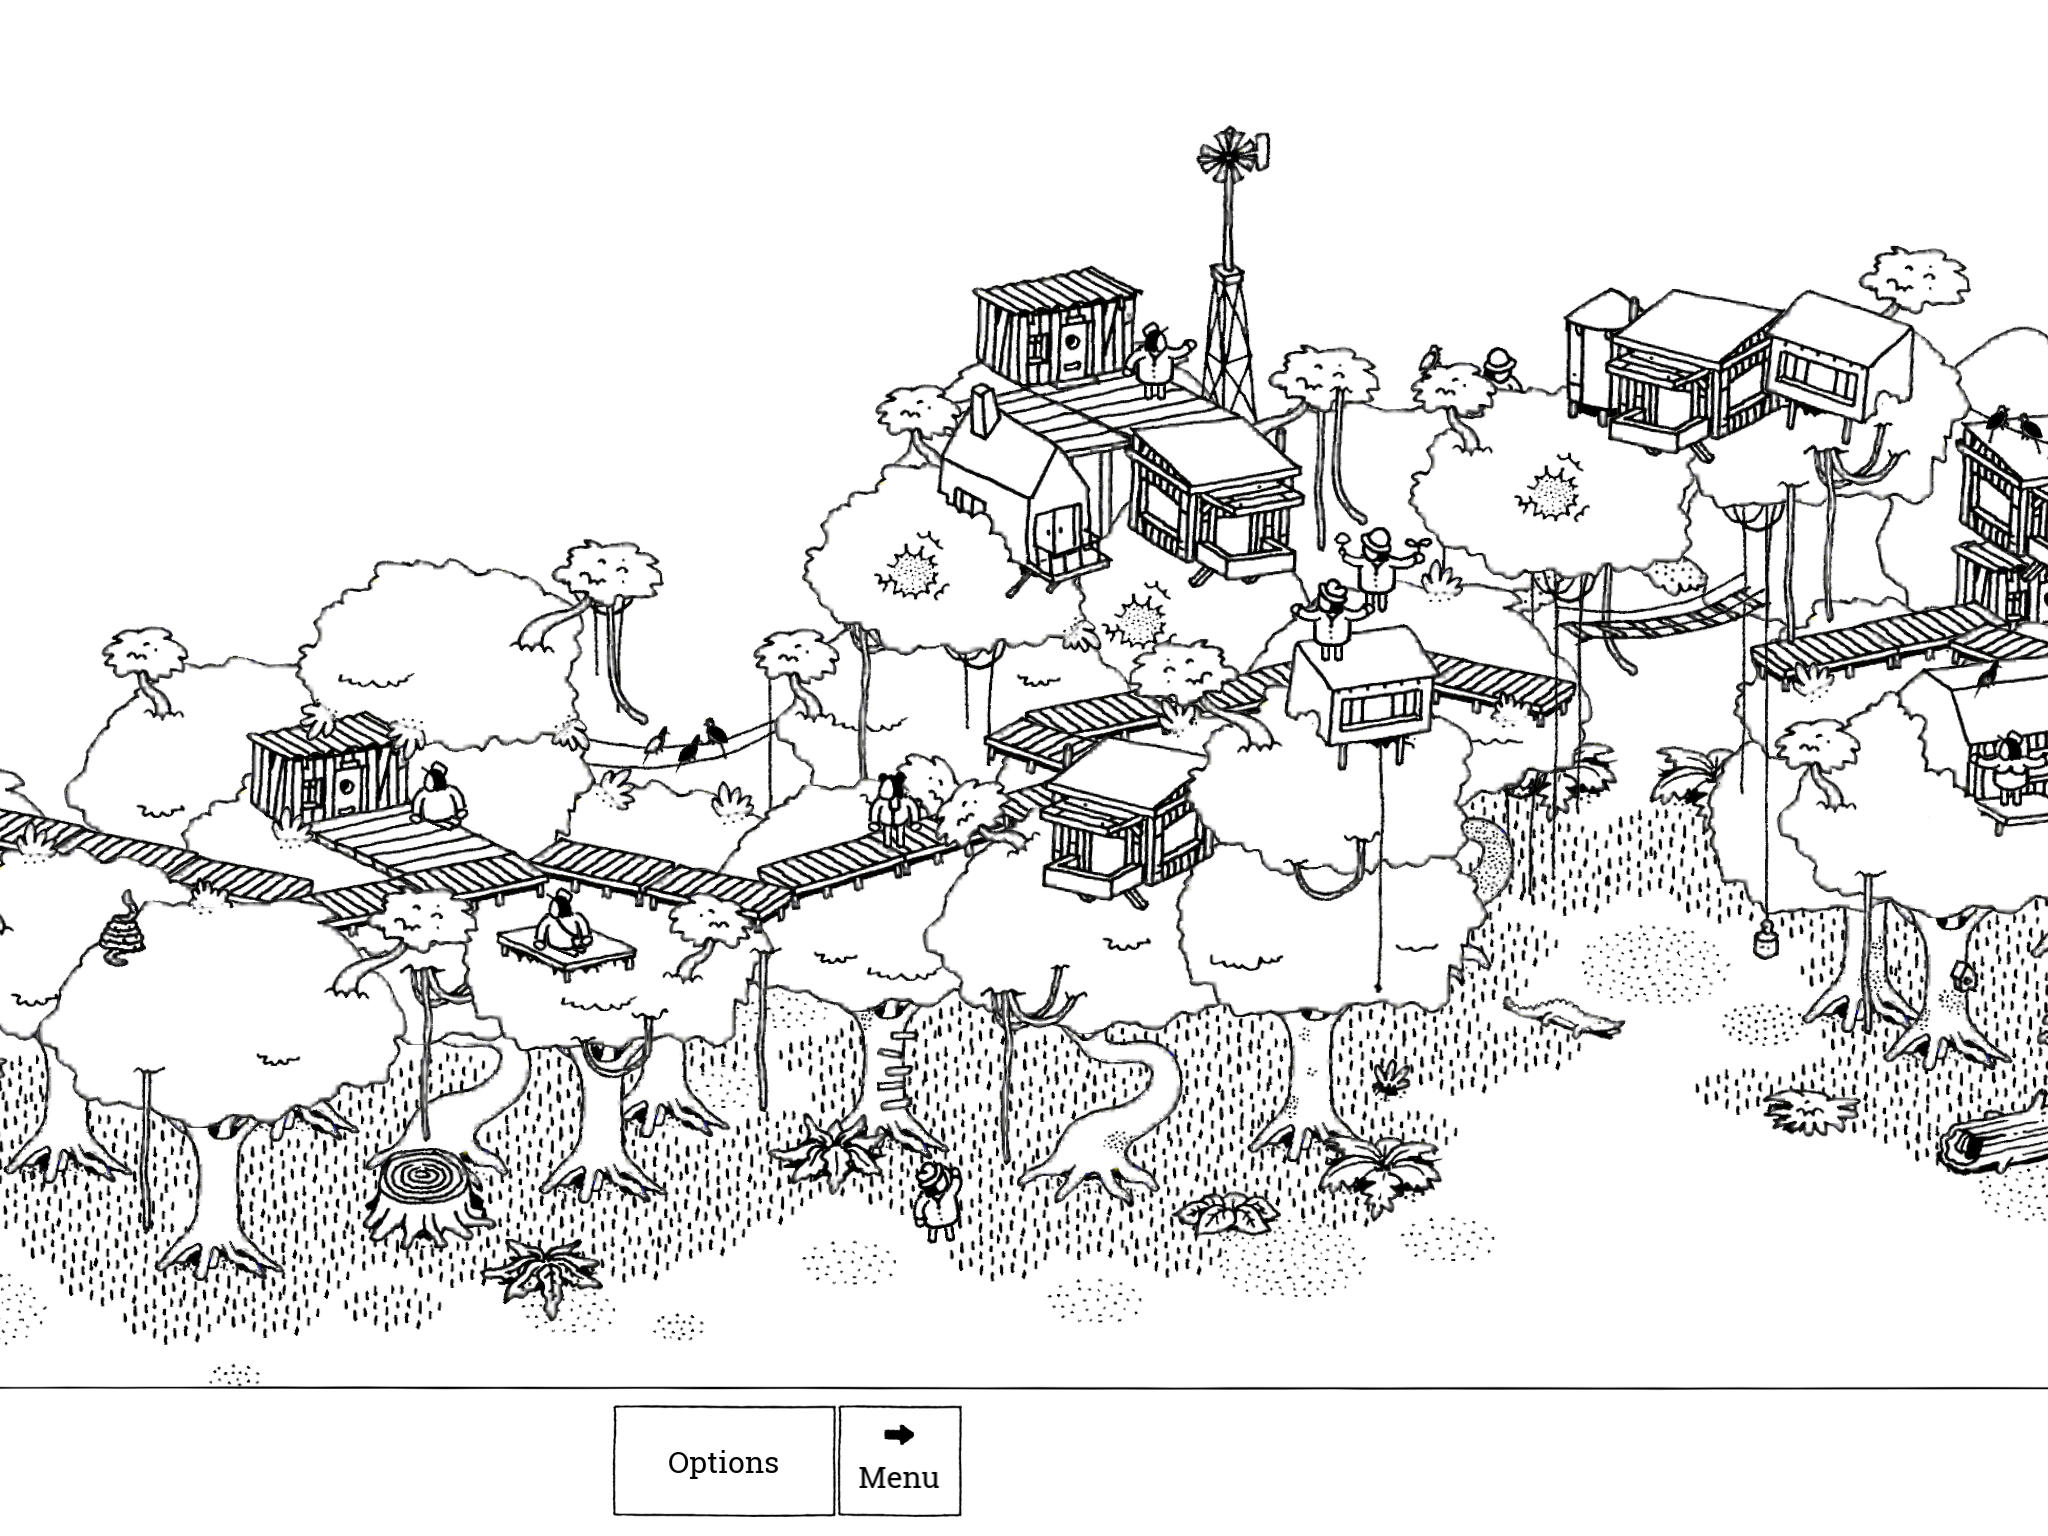
First, you need to tap the trees blocking the path to move them out of the way.
Next, you need to drag the weight down (near the ground) to lower the bridge.
Then you’ll need to tap the birds to get them to fly off the path.
Then tap the bamboo until it’s short enough that she can pass.
Finally, pull down the weight on the last pair of bridges to lower them.
- This is the only level in the game where you don’t need to find anybody. You’re just helping the folk cross the treetop bridge. When she stops moving, it indicates your input is needed.
Forest 4: The Backyard Campground
- Guitar: “The guitar is having a real good conversation with the swing.”
The Guitar is on the west side of the image, leaning against the tree.
- Guitar: “The guitar is having a real good conversation with the swing.”
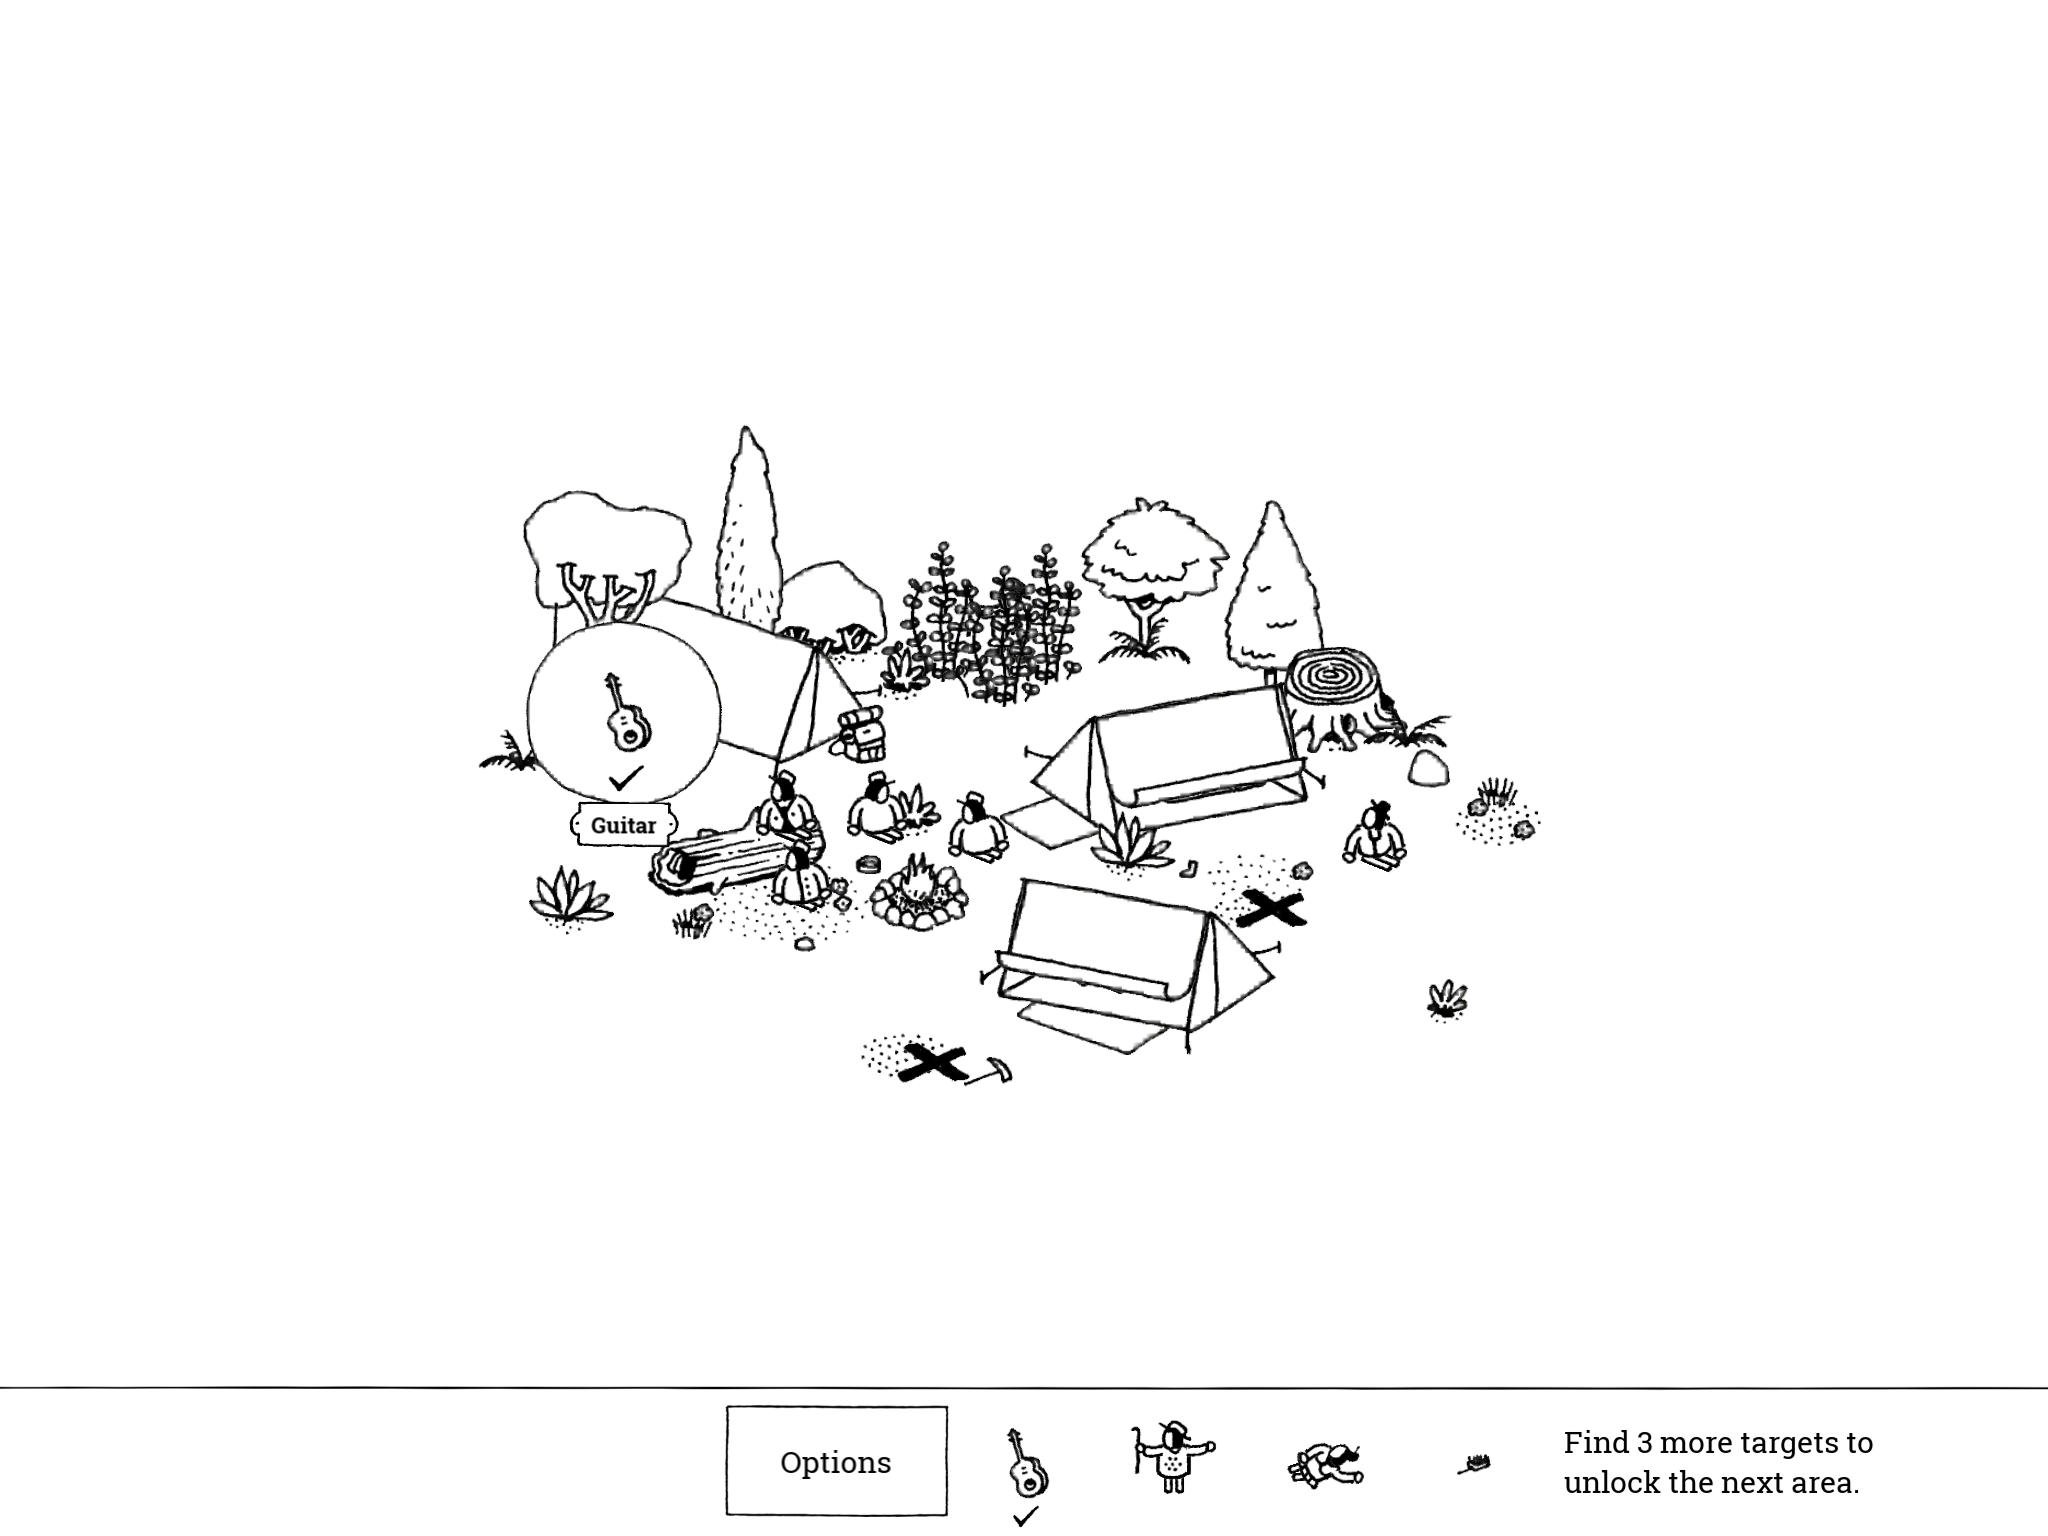
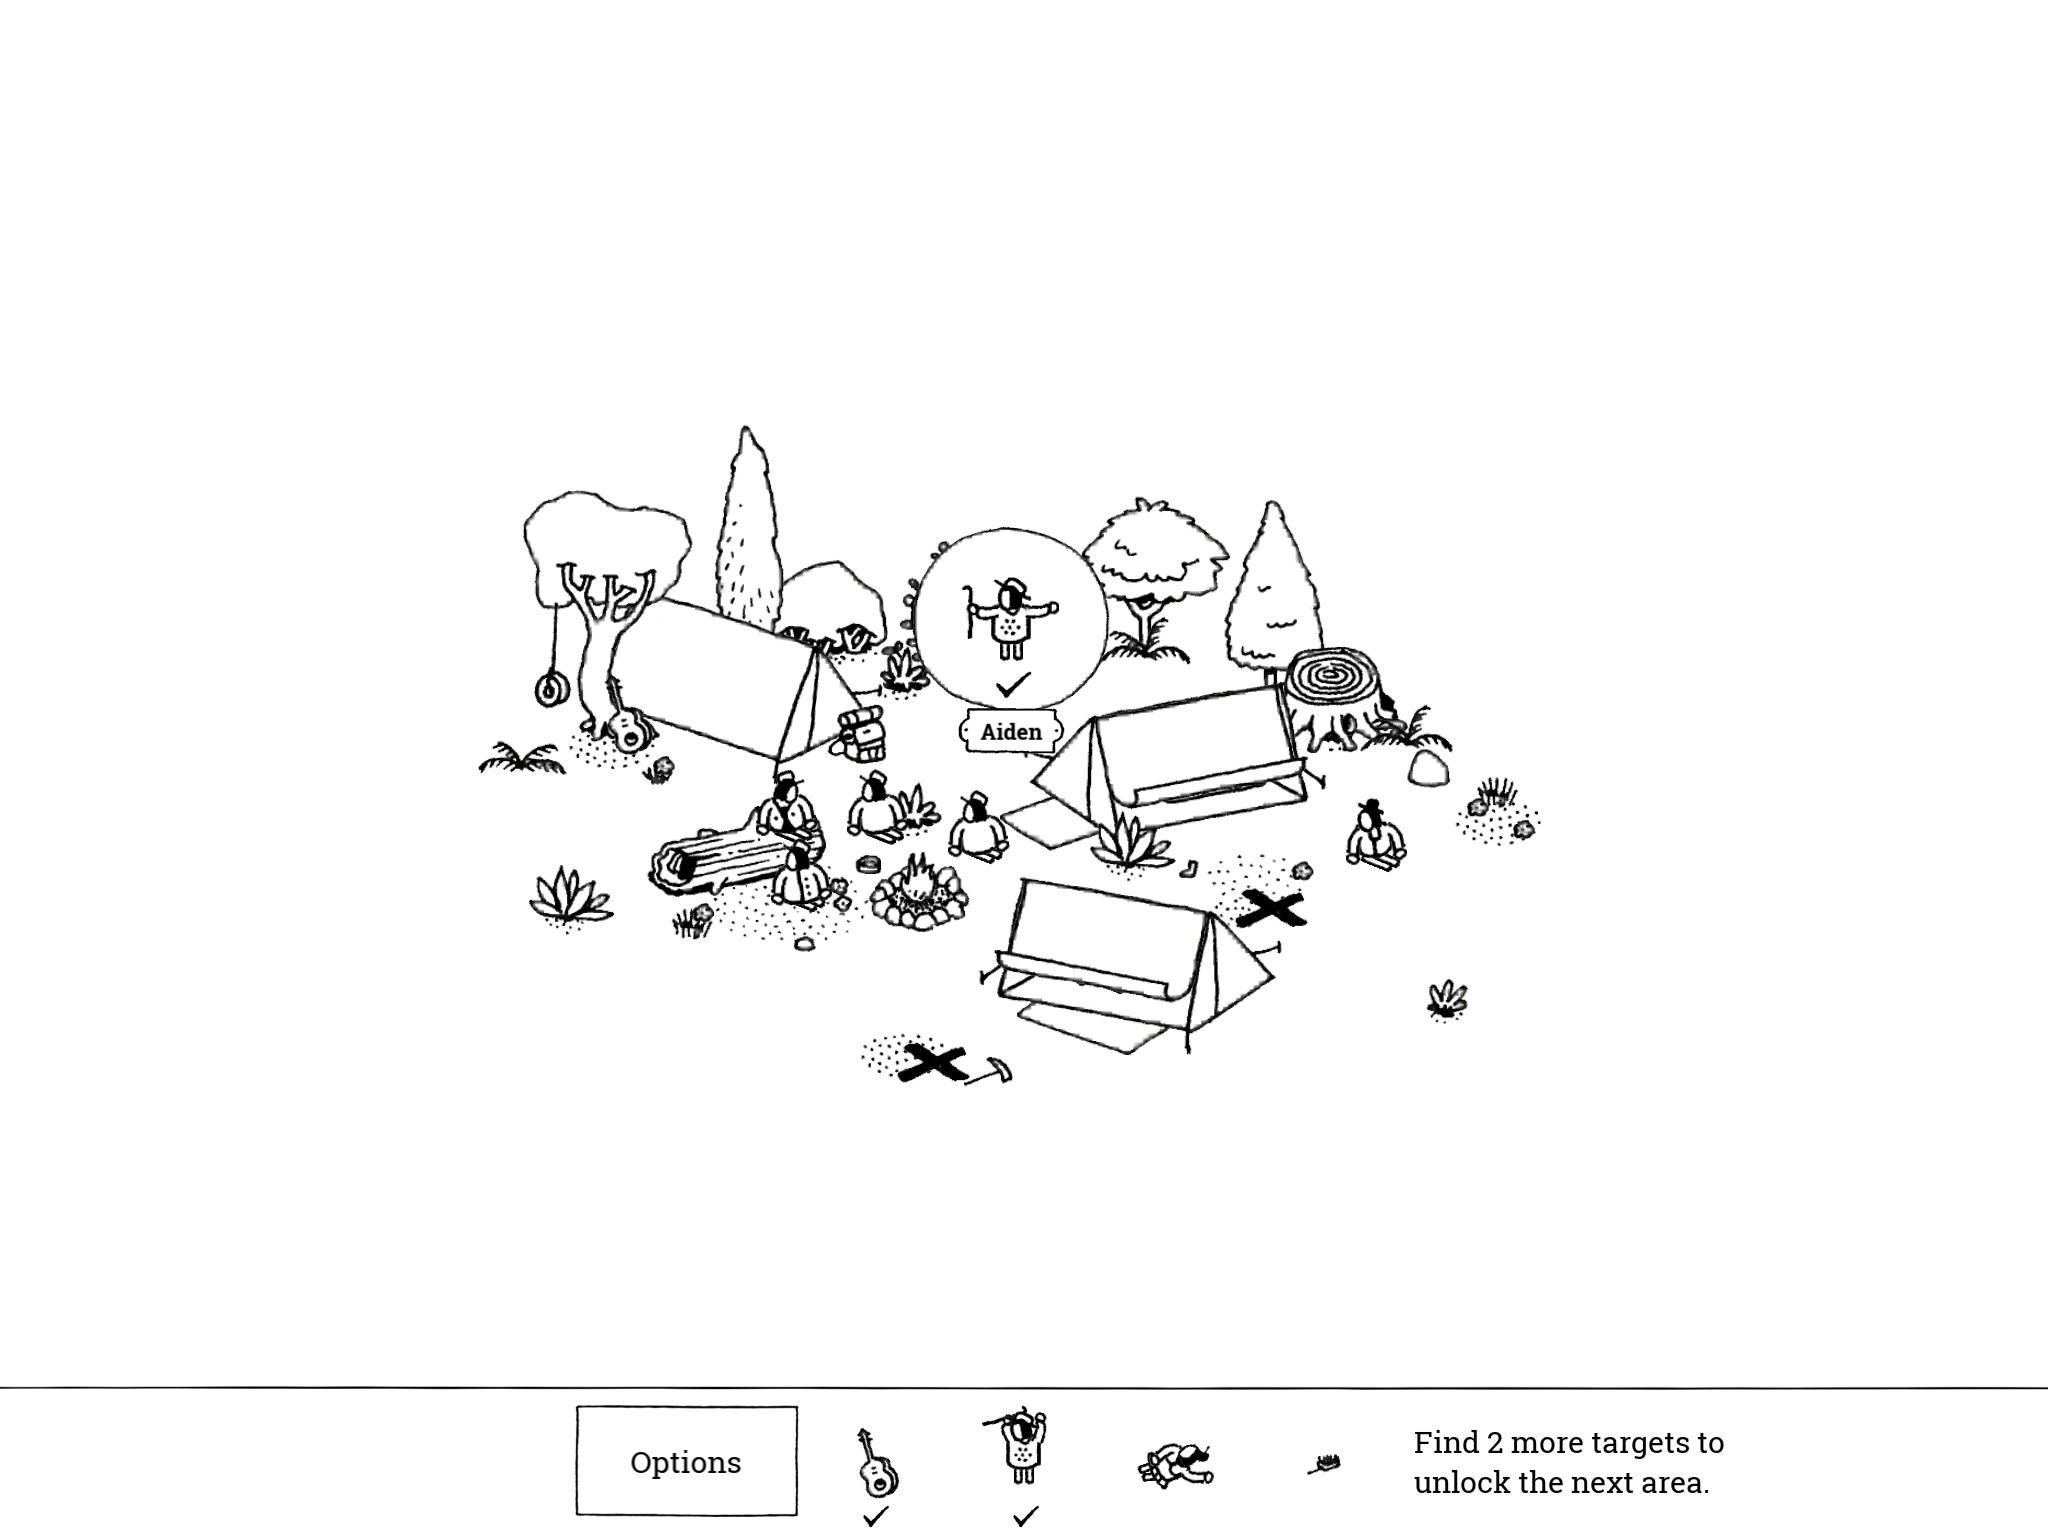
- Aiden: “Aiden really wants to be found.”
Aiden is in the north part of the image, jumping up and down behind some tall grass. Tap the grass to lower it until you can reach Aiden.
- Aiden: “Aiden really wants to be found.”
- Ella: “Ella is testing her airbed.”
Ella is in the tent near the center of the image. Tap the front of the tent twice to open the flap and reveal Ella.
- Ella: “Ella is testing her airbed.”
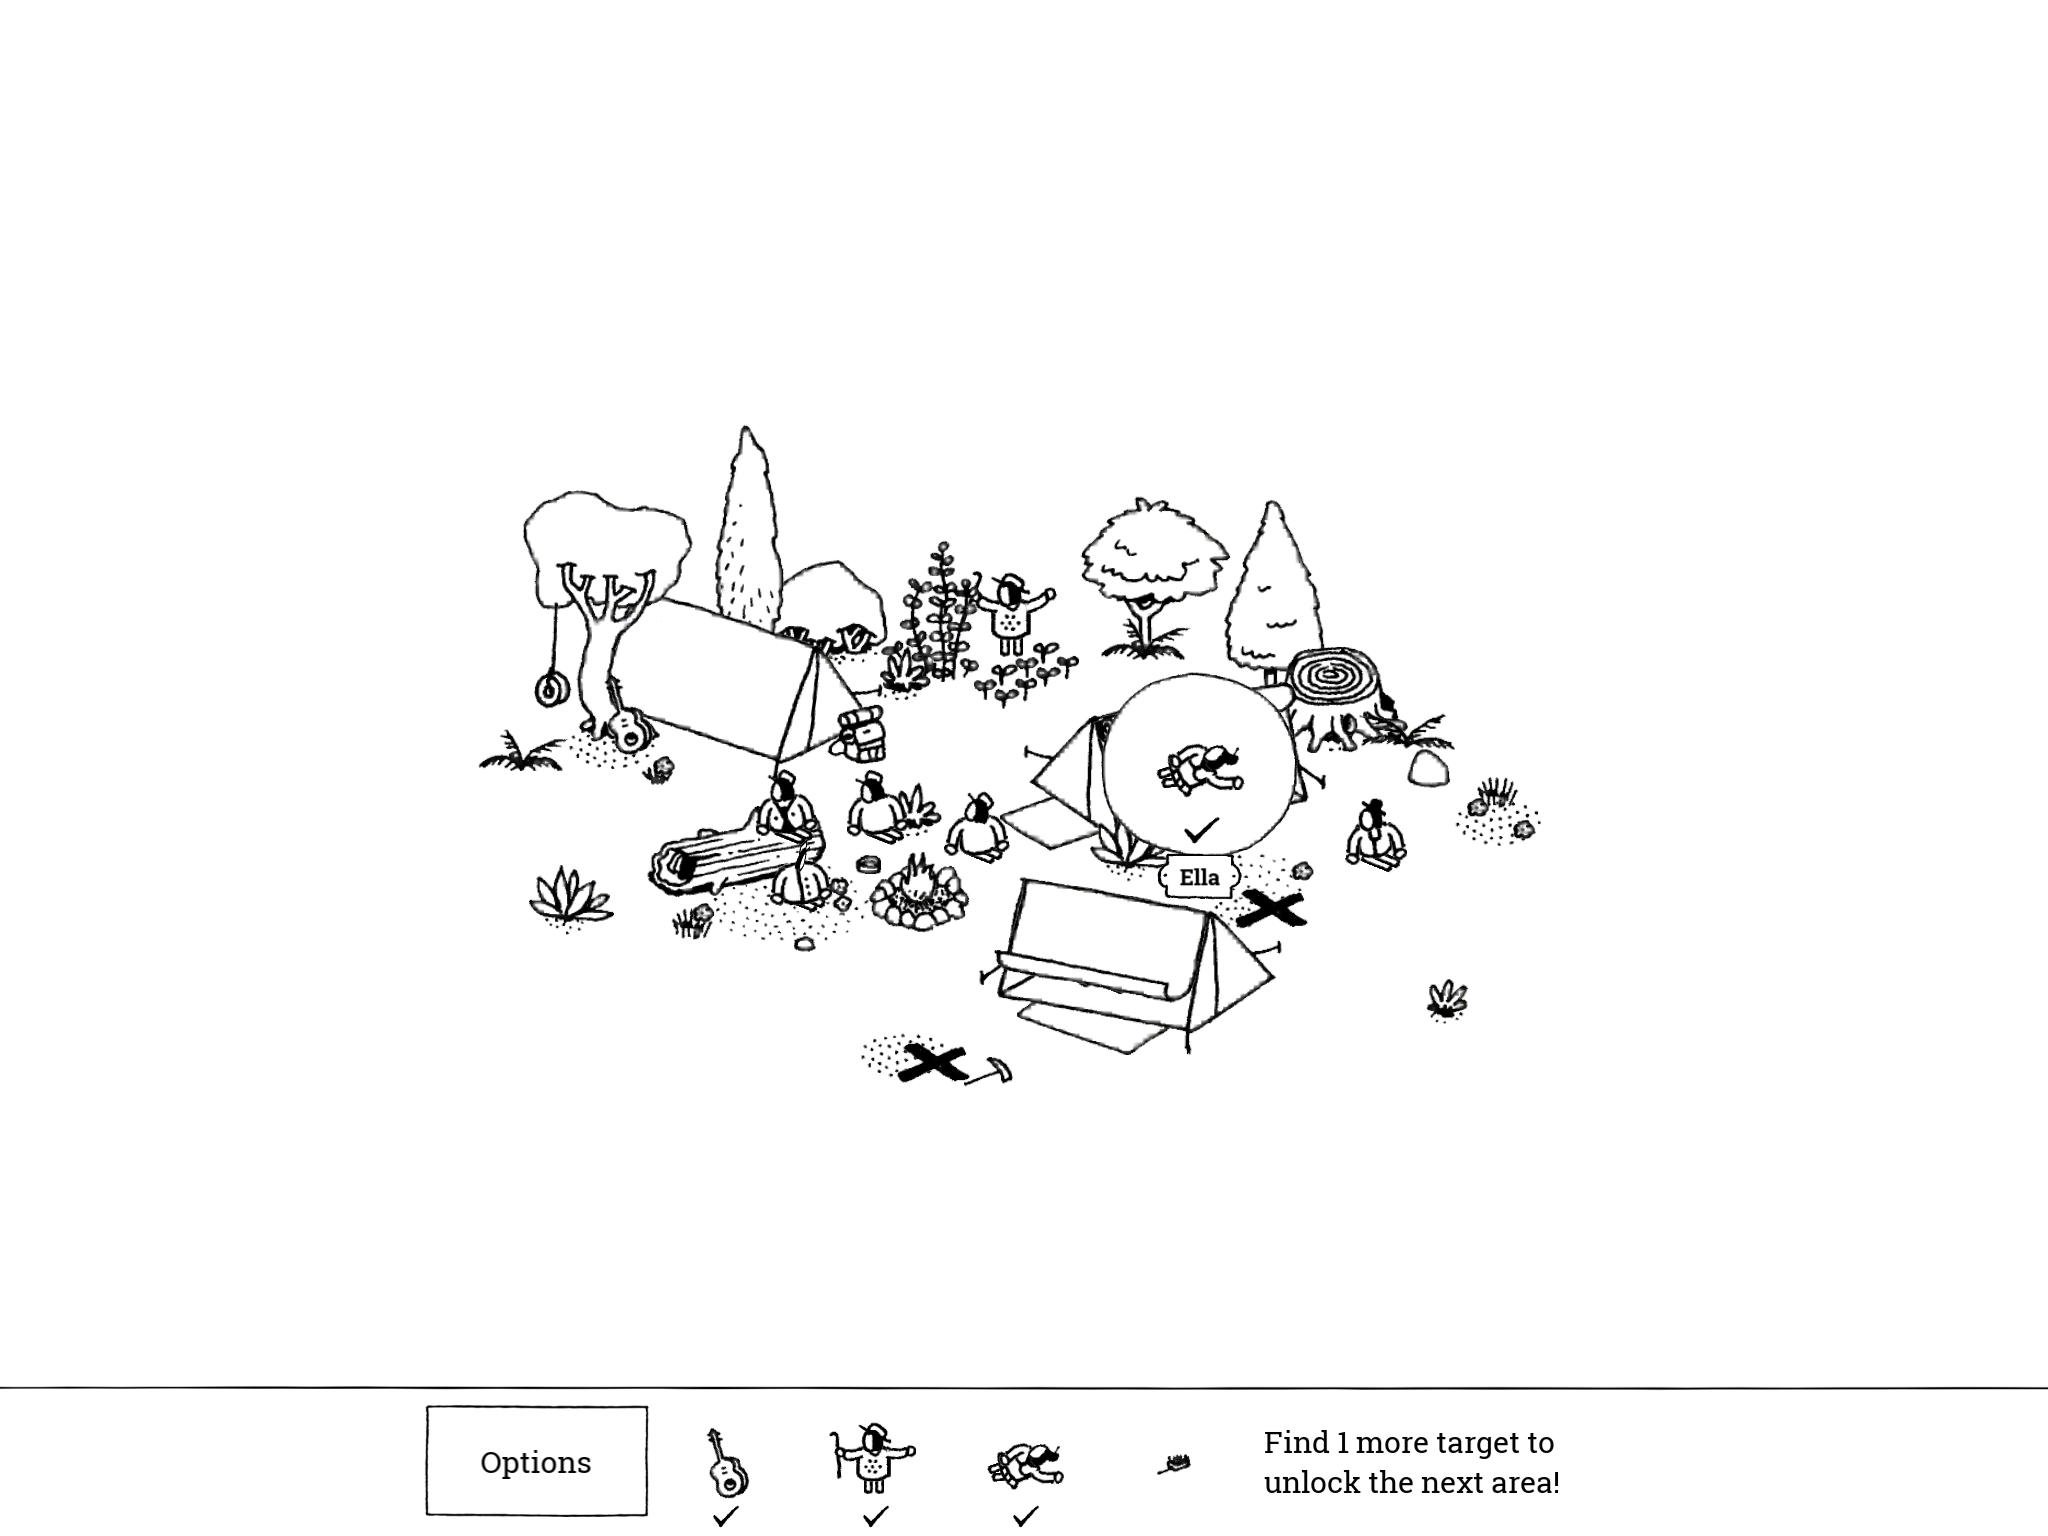
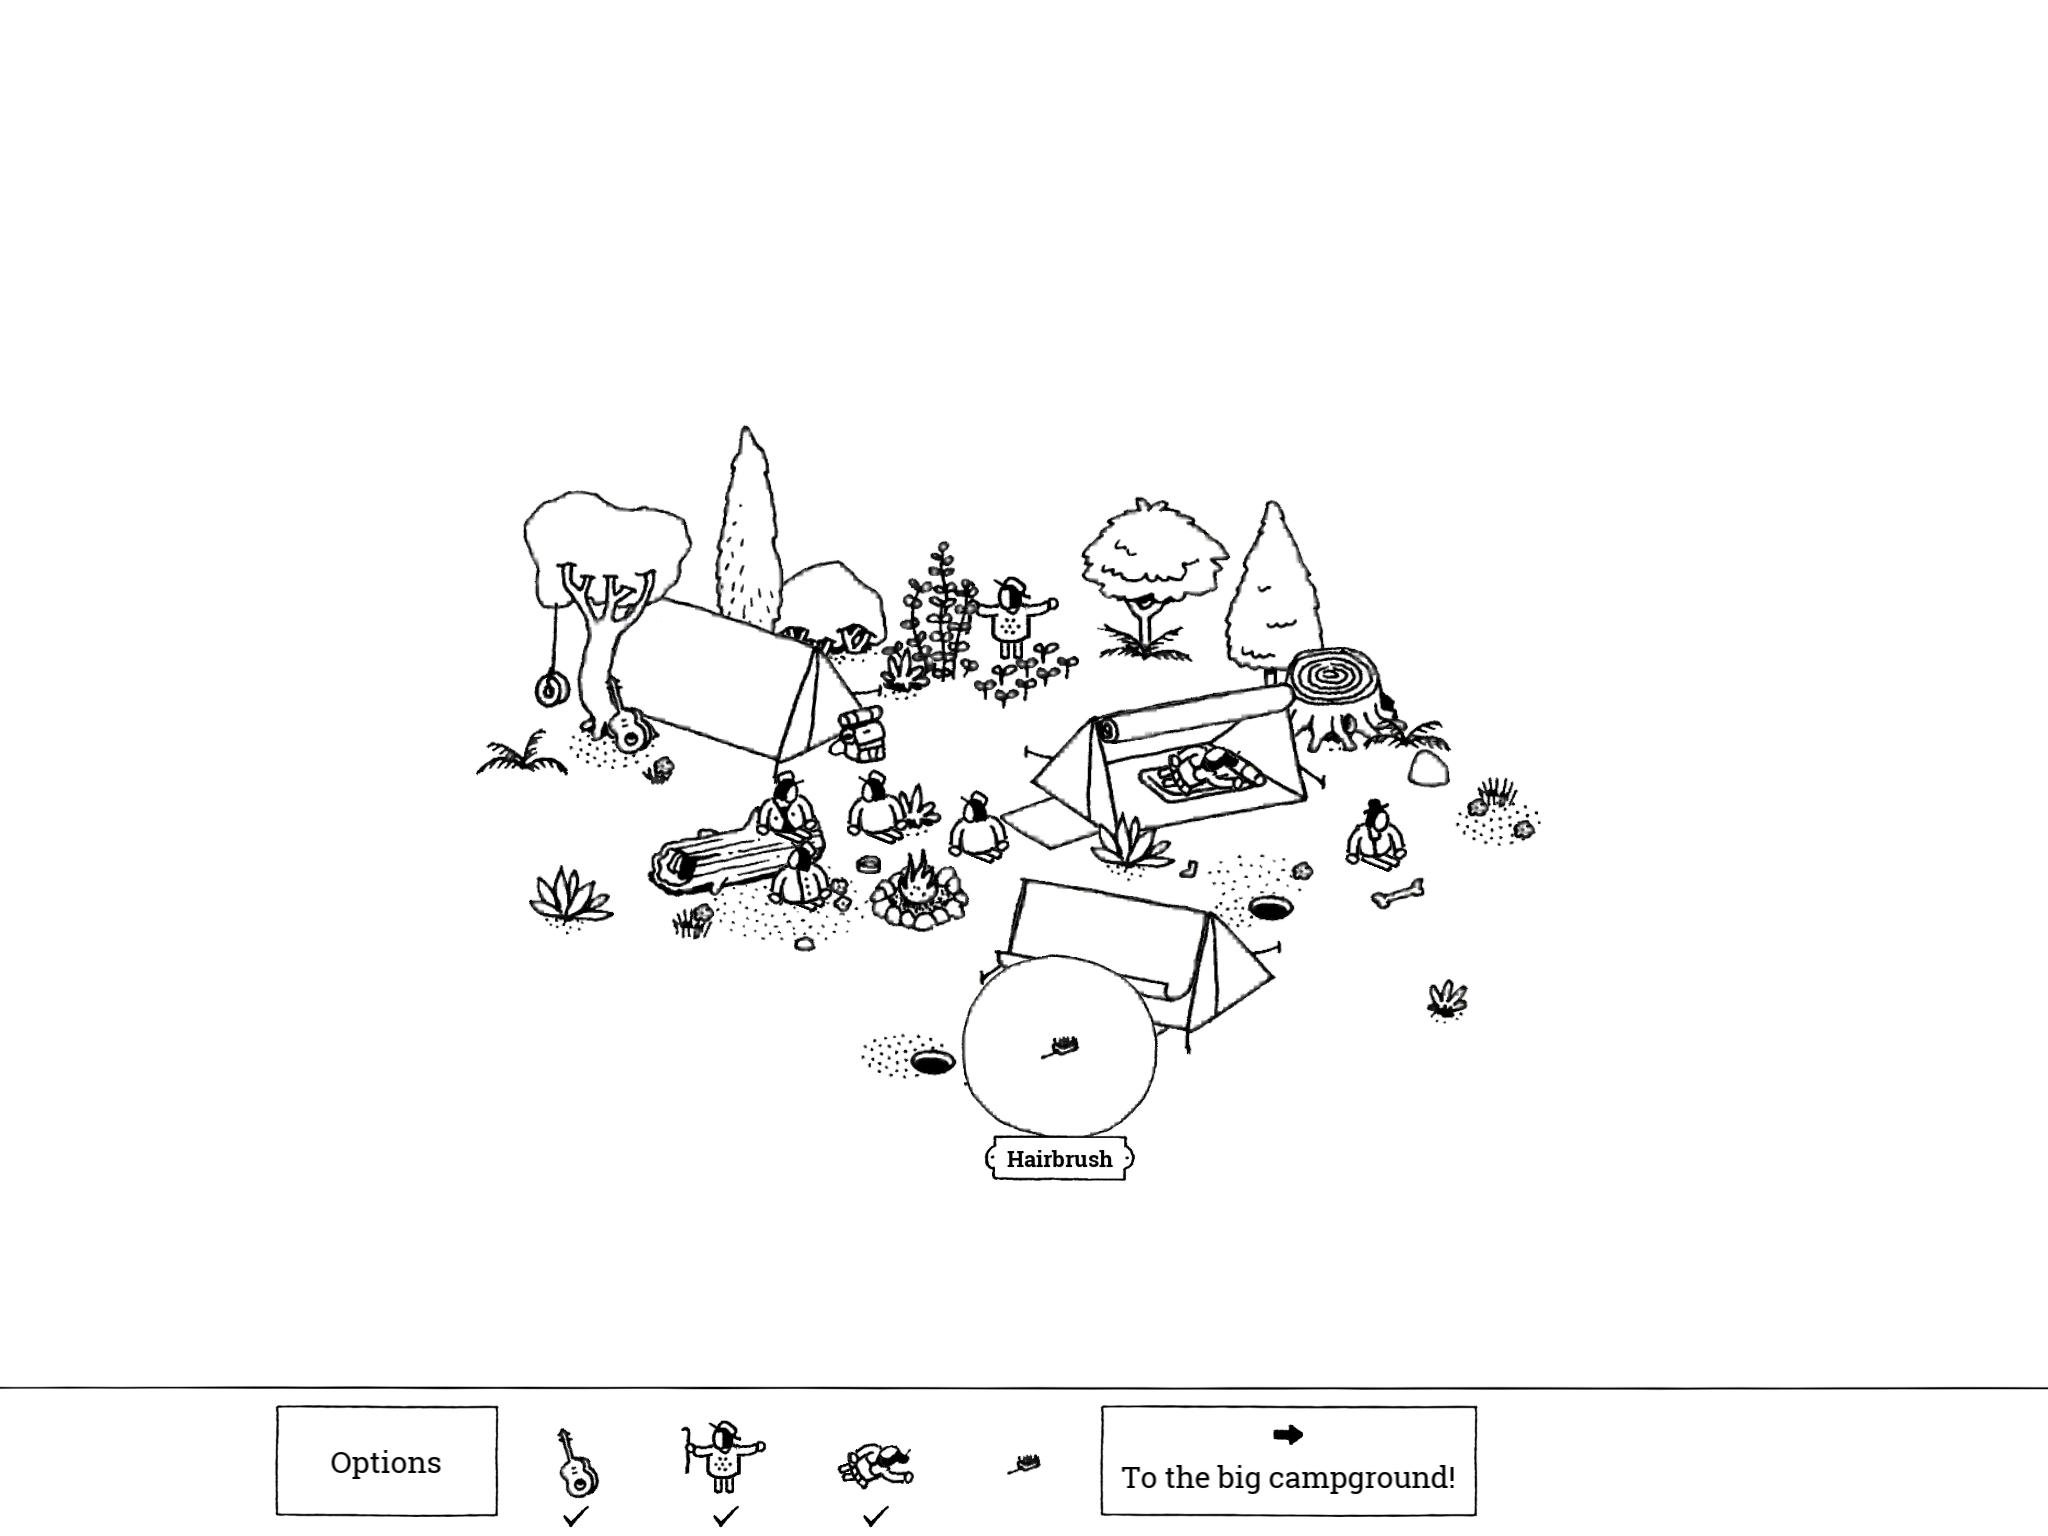
- Hairbrush: “With filthy hands, the bullies quickly returned to the campfire. Ella will never find her hairbrush! Muhahaha”
There is a large black X on the ground on the southern edge of the image. Tap it three times to dig up the spot; once unearthed, the Hairbrush will pop out and land next to the tent.
- Hairbrush: “With filthy hands, the bullies quickly returned to the campfire. Ella will never find her hairbrush! Muhahaha”
Forest 5: The Big Campground
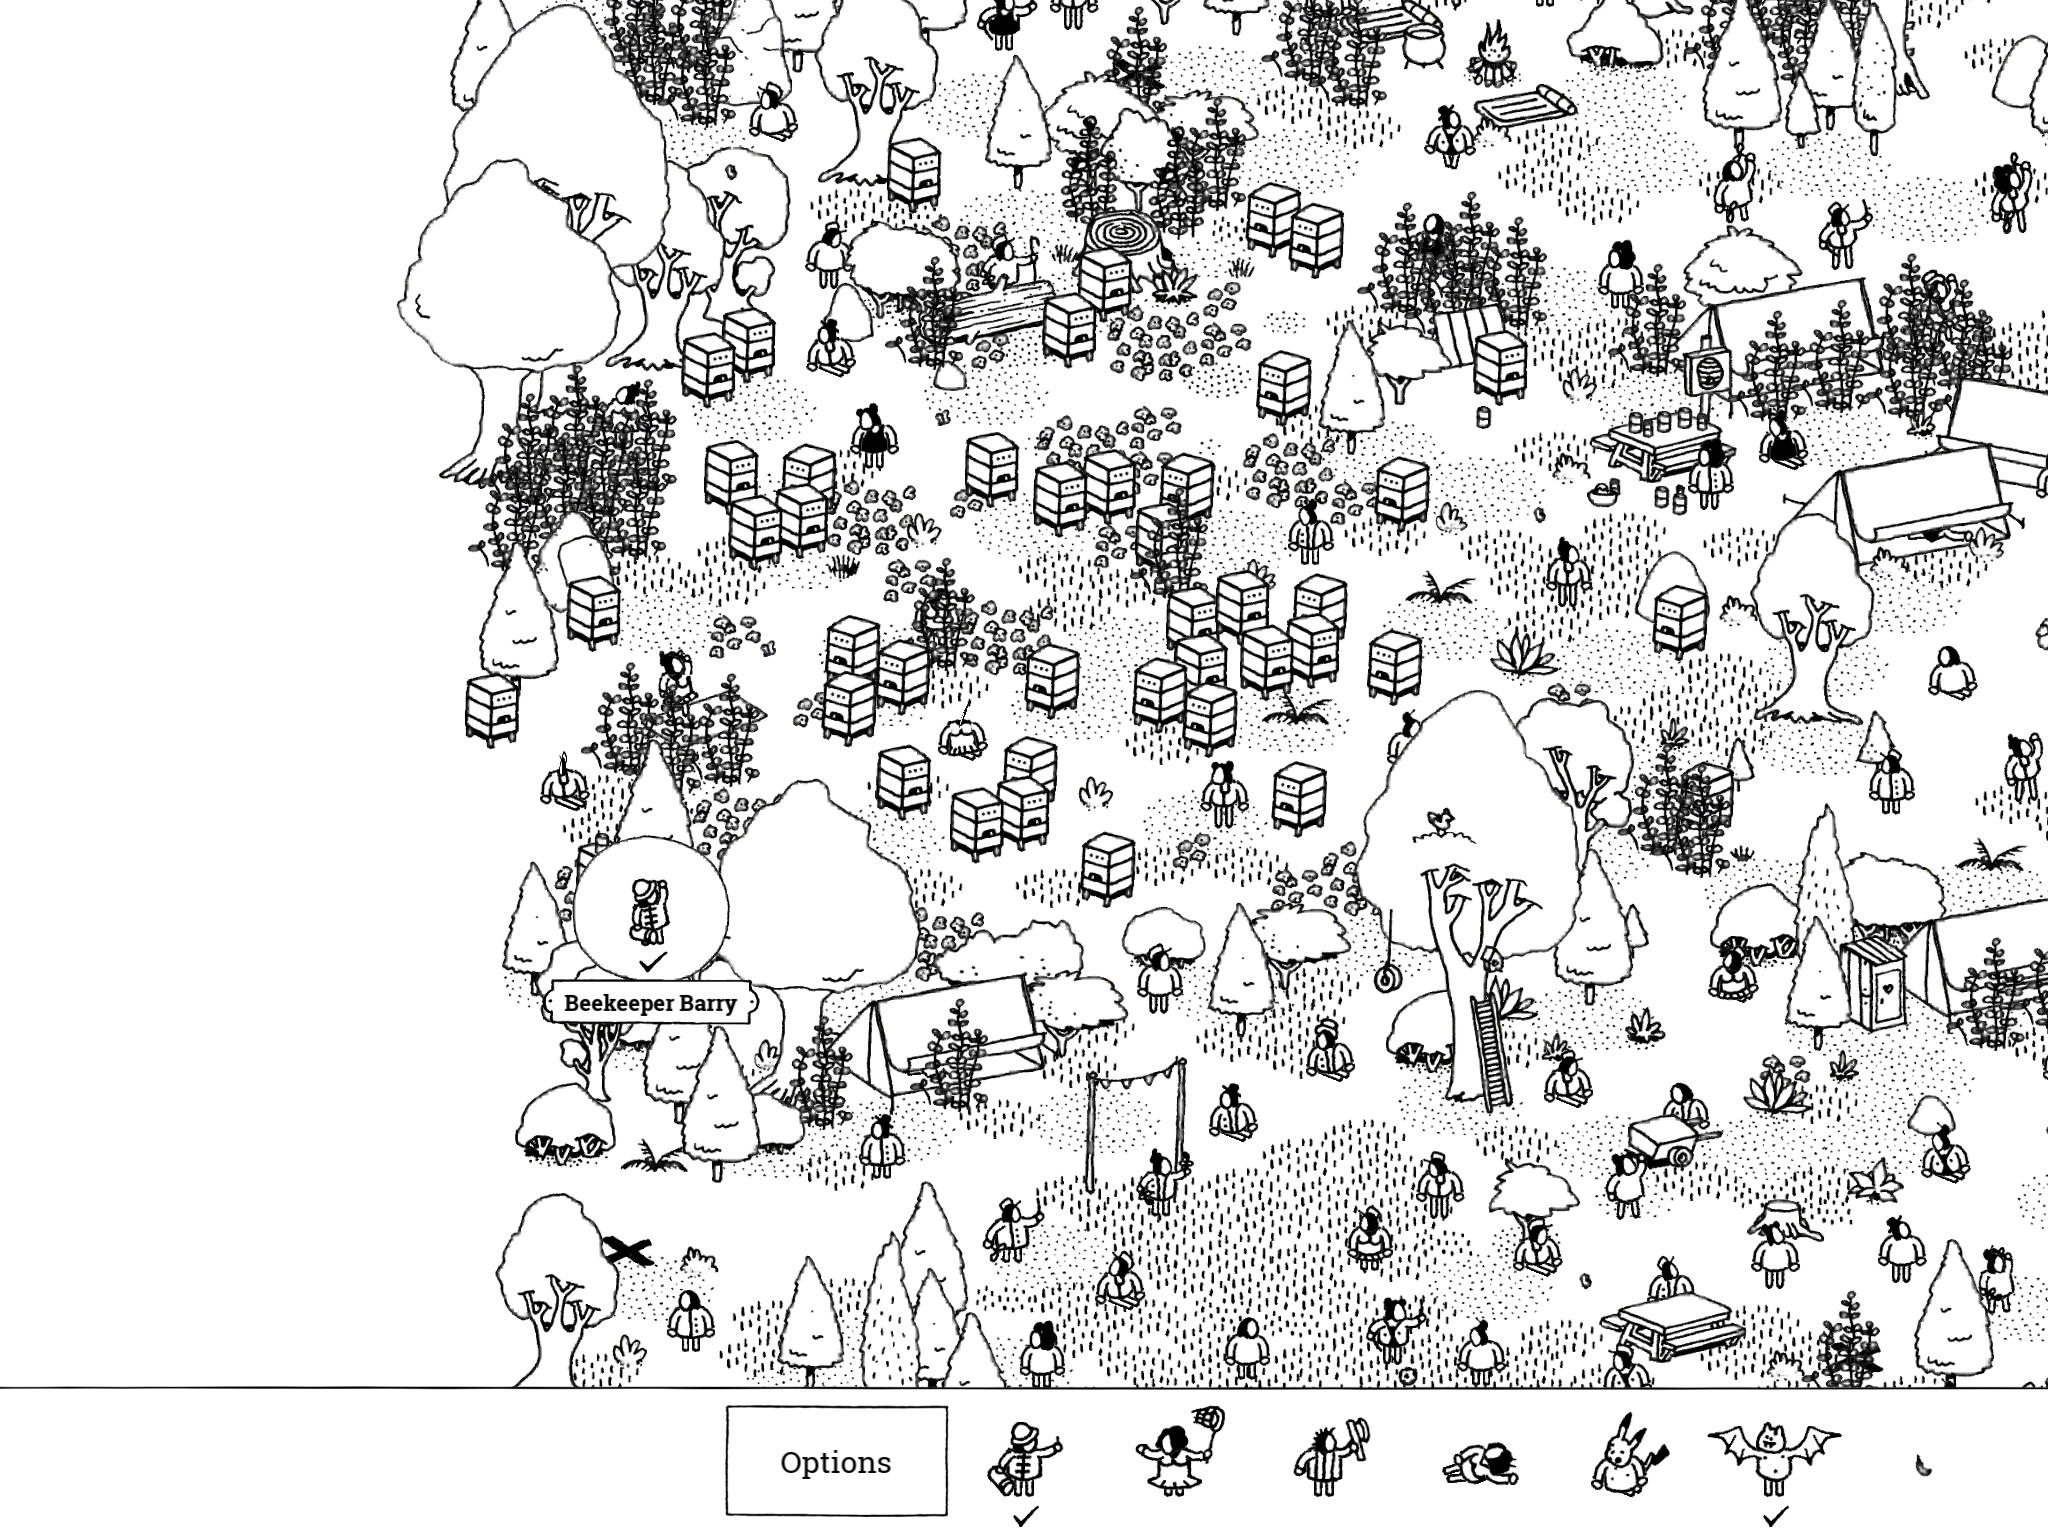
- Beekeeper Barry: “Beekeeper Barry is being terrorized by bees. So stop stealing their honey, man!”
On the far west side of the image, just north of center, is a large group of bee boxes. Beekeeper Barry is in the southwest corner of this beekeeping area, next to one bee box and a bunch of trees.
- Beekeeper Barry: “Beekeeper Barry is being terrorized by bees. So stop stealing their honey, man!”
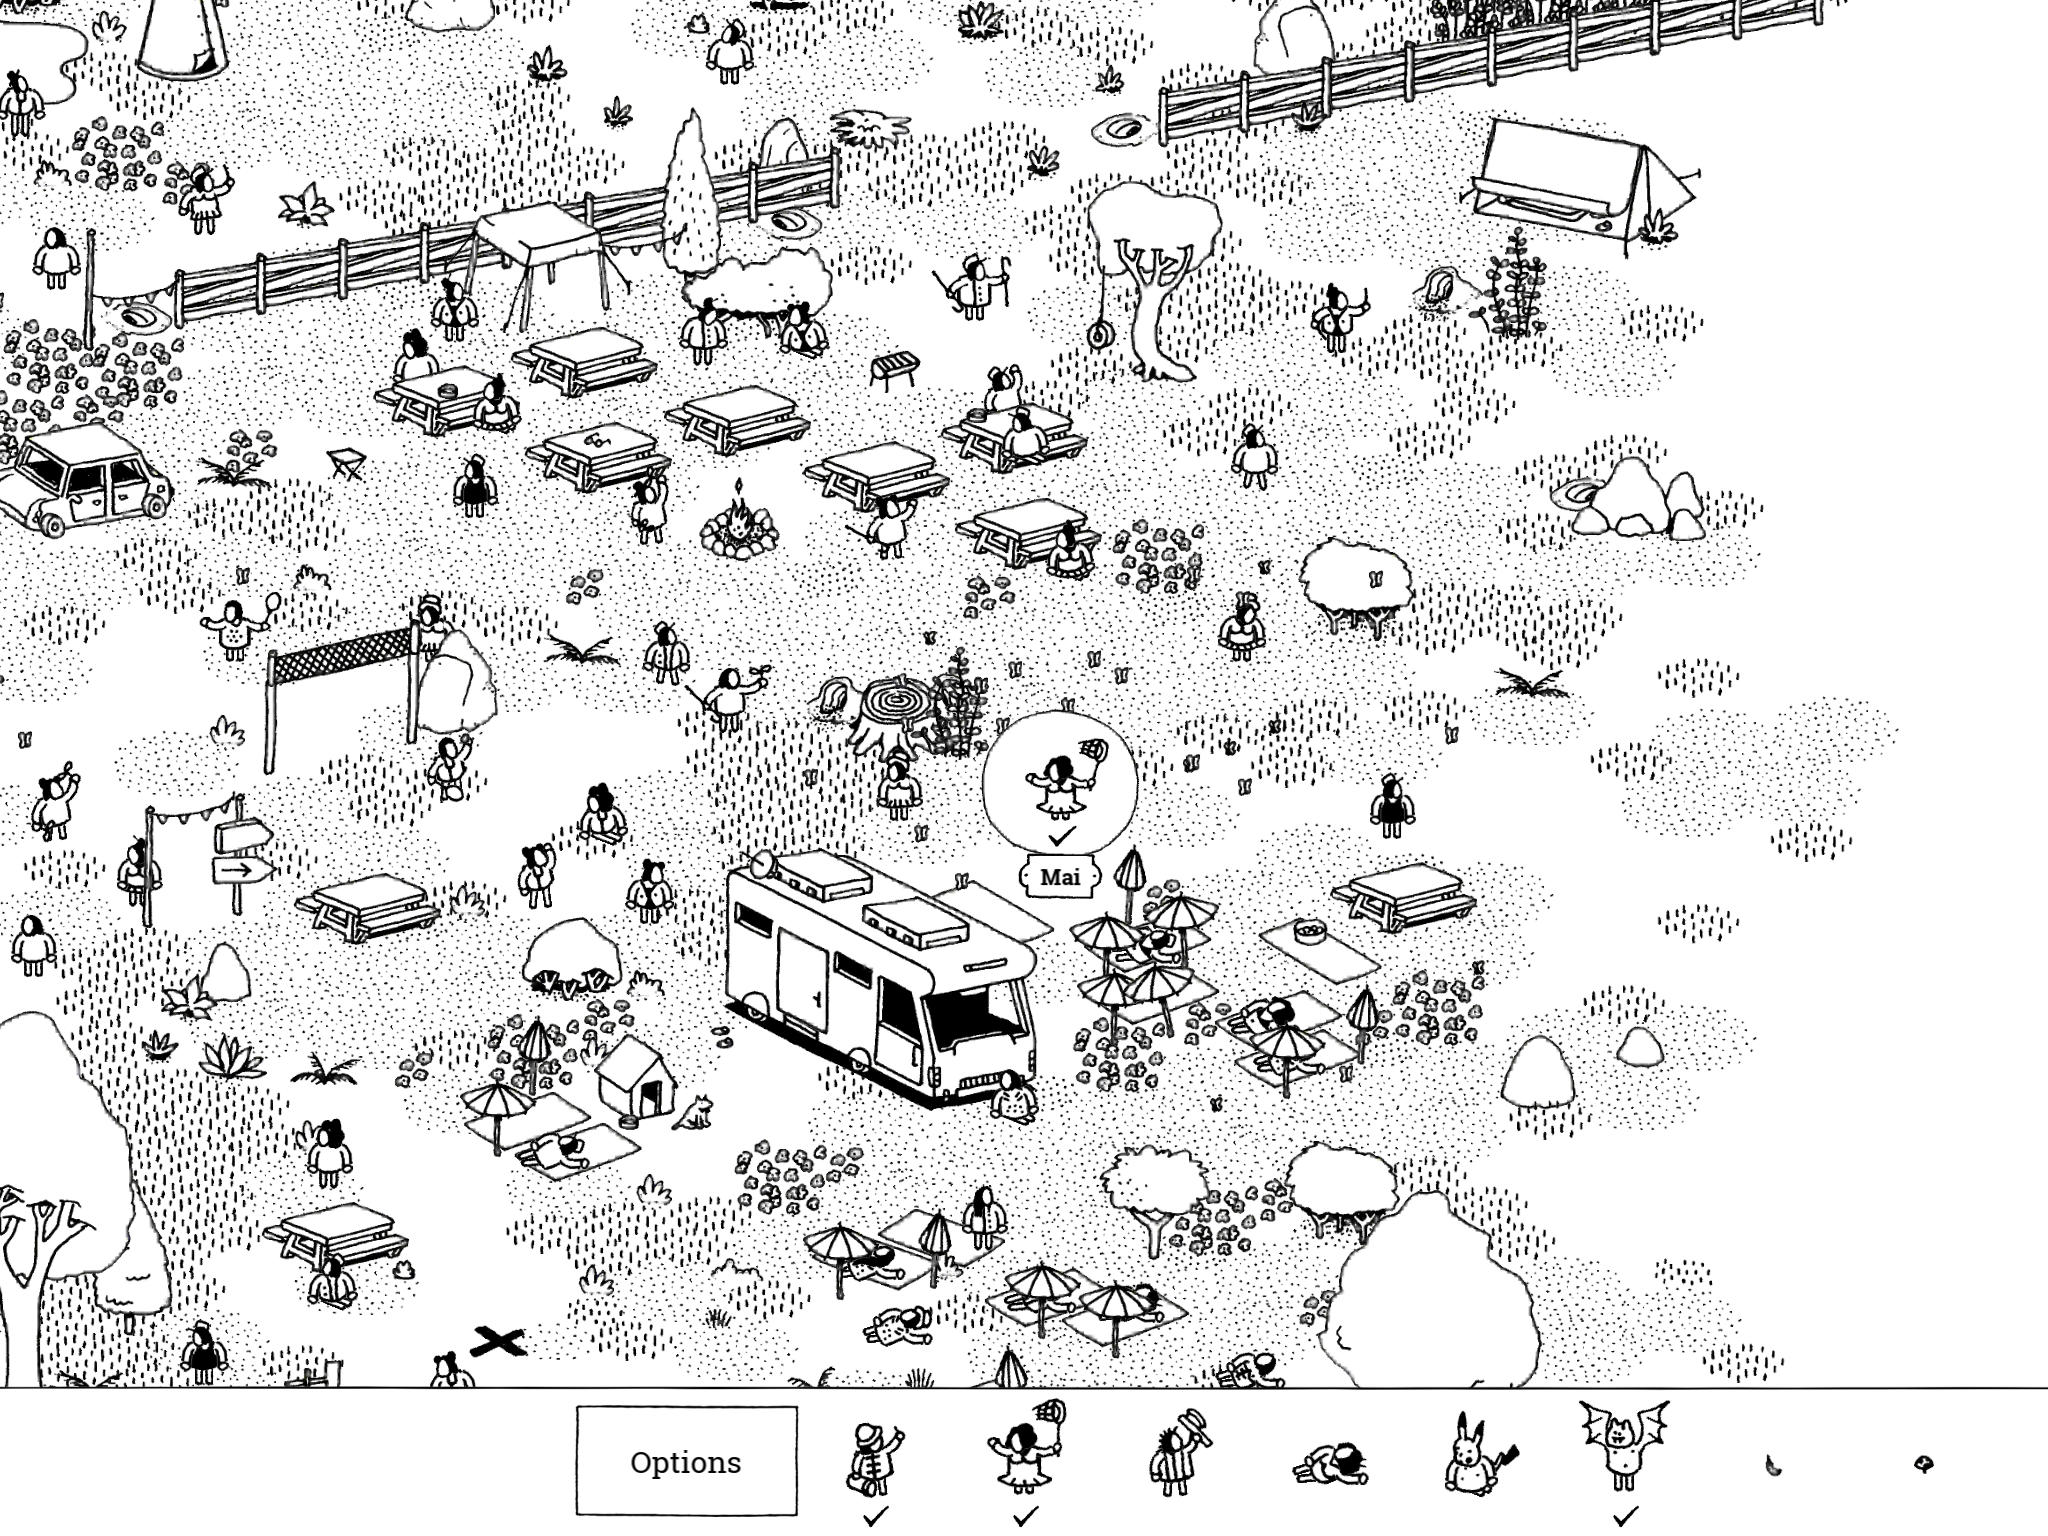
- Mai: “Mai releases every butterfly she catches – that’s why there’s still so many of them here!”
On the far east side of the image, just north of center and slightly north of Classy Jessy, is an RV parked next to some beach blankets with umbrellas. Mai is standing just north of these blankets, near a tree stump, surrounded by butterflies.
- Mai: “Mai releases every butterfly she catches – that’s why there’s still so many of them here!”
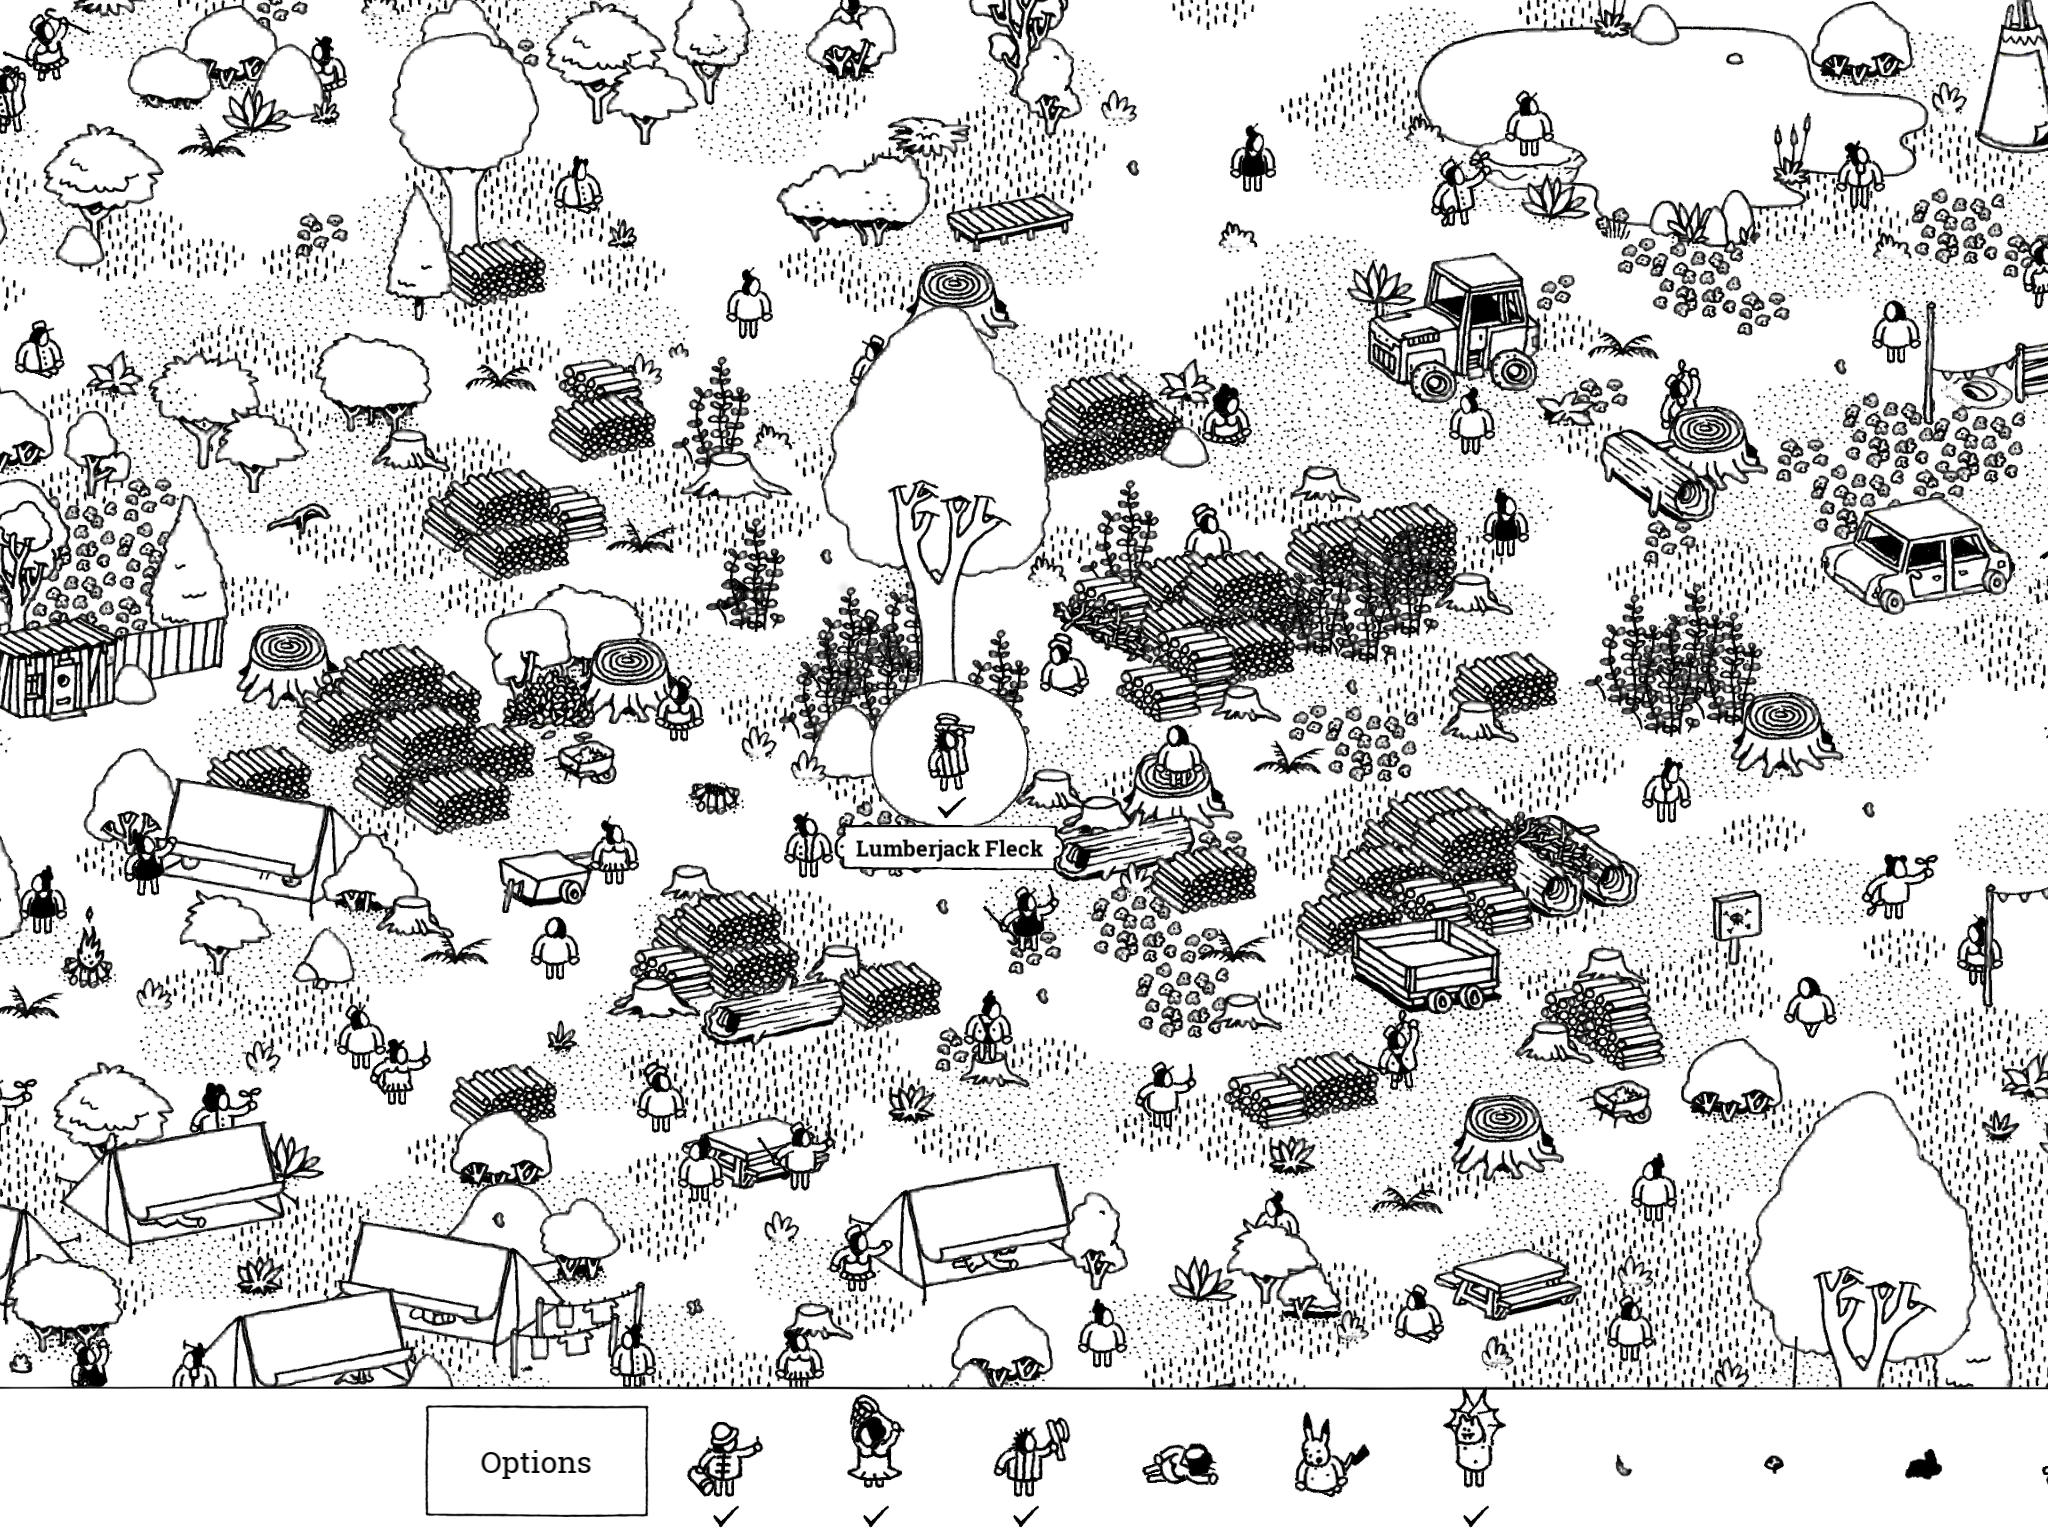
- Lumberjack Fleck: “Lumberjack Fleck stands in front of his grand final challenge.”
In the northern, horizontal center of the image are a number of piles of lumber and tree stumps. In the middle of all this is a giant tree with Lumberjack Fleck standing in front of it.
- Lumberjack Fleck: “Lumberjack Fleck stands in front of his grand final challenge.”
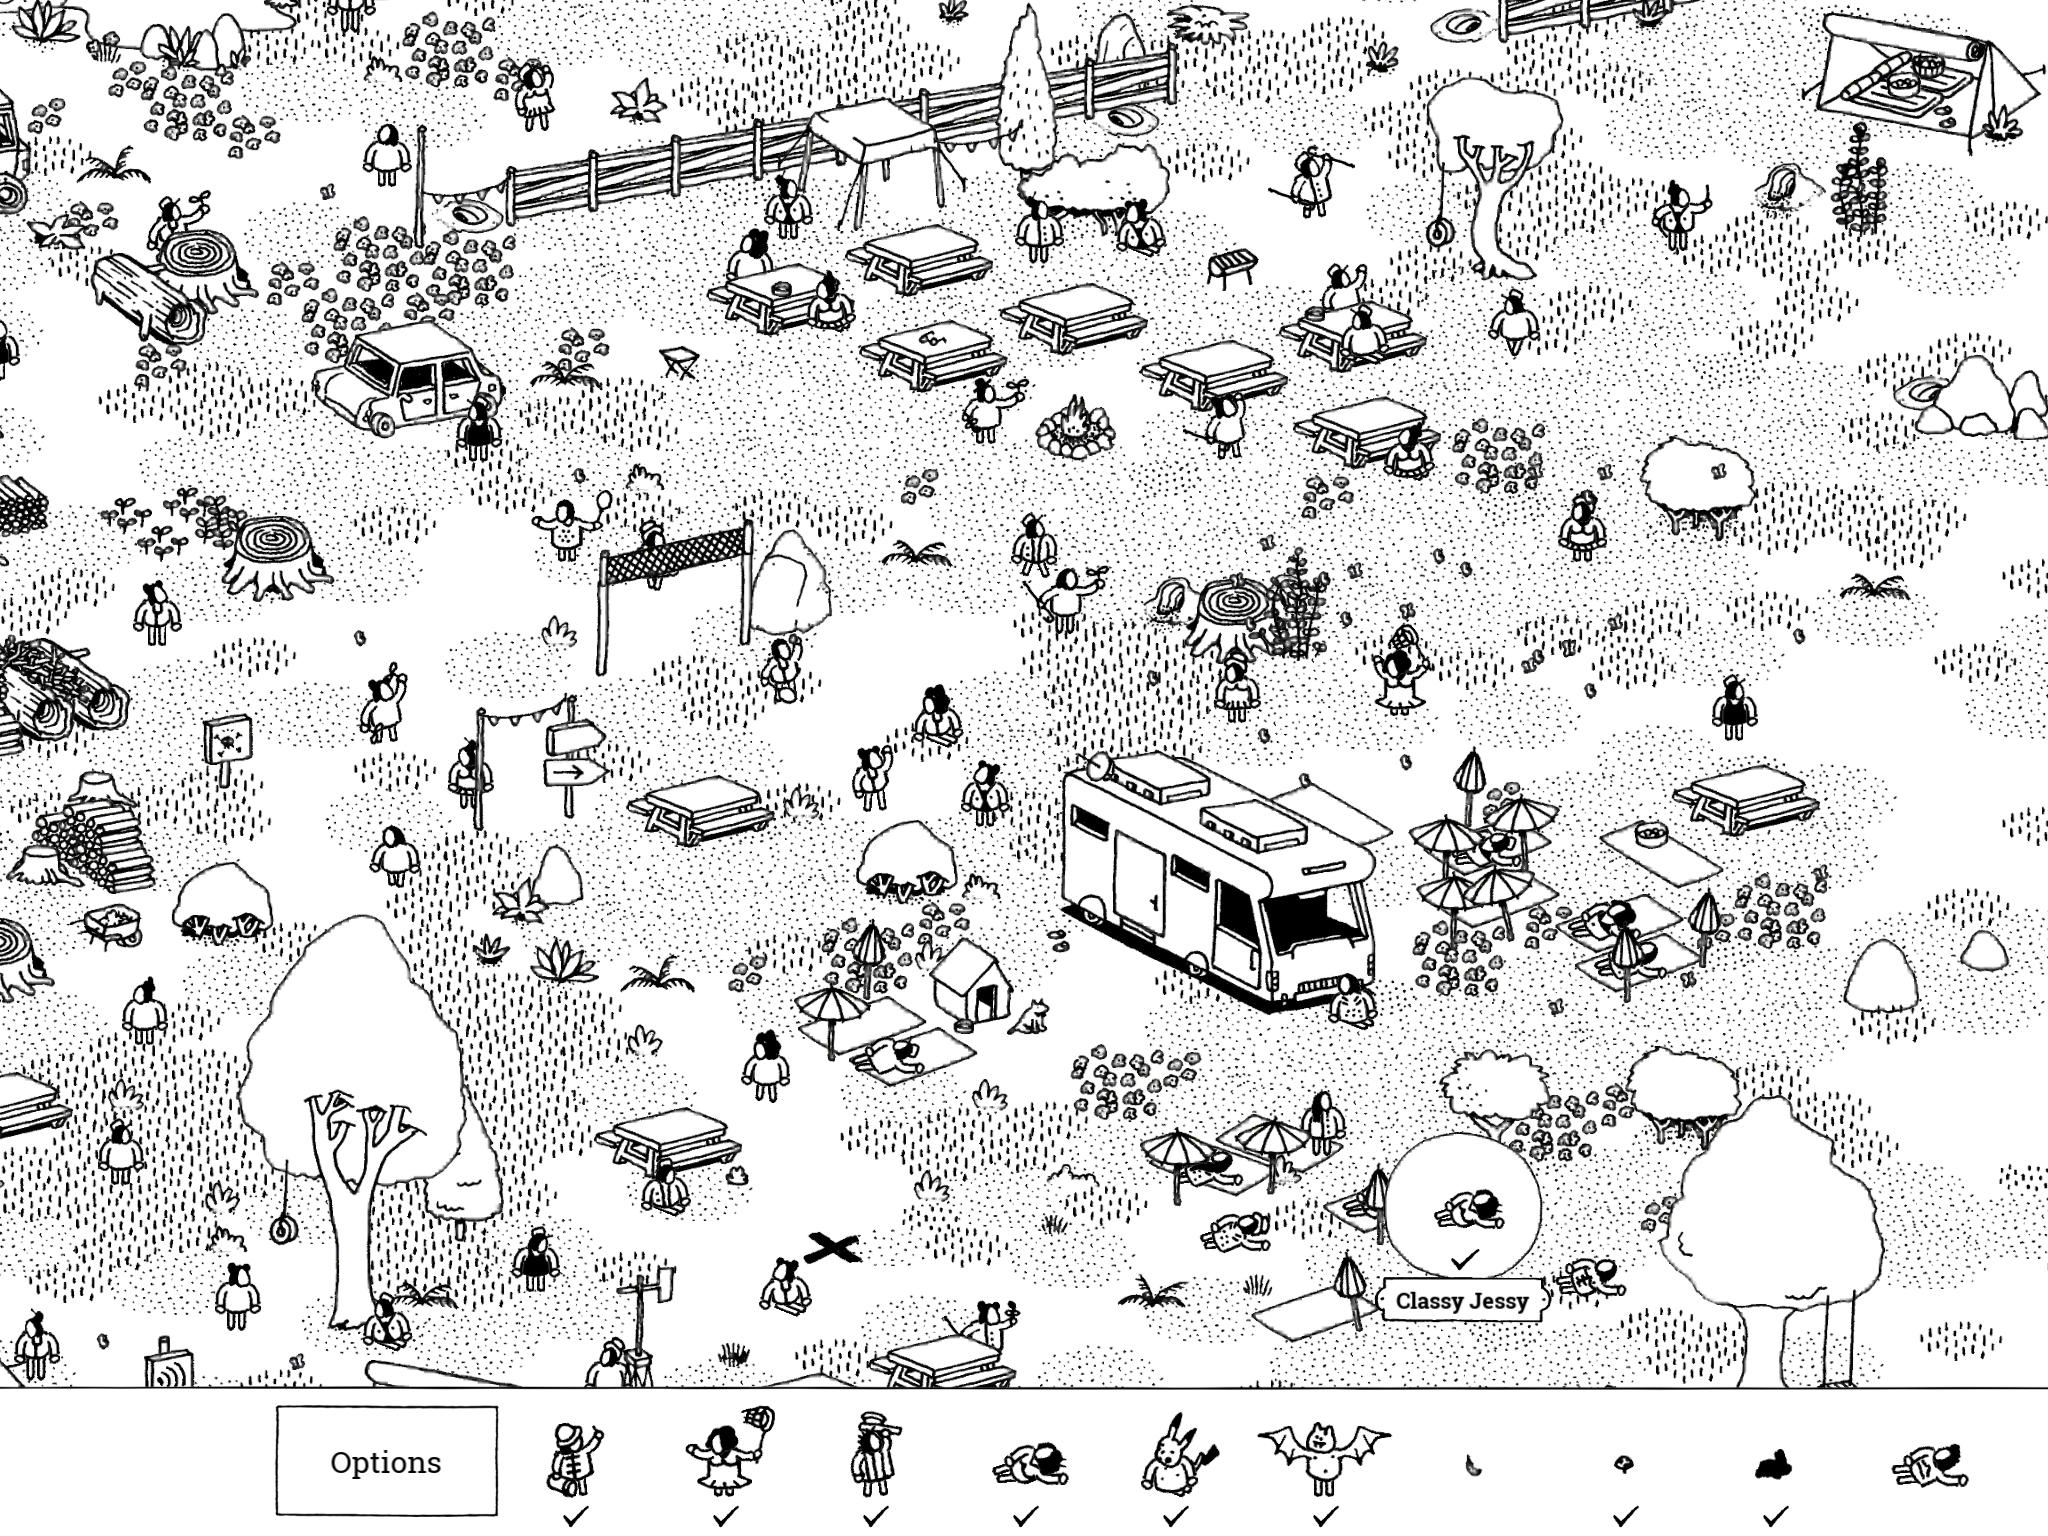
- Classy Jessy: “The sun is shining too brightly today, even for Classy Jessy.”
On the far east side of the image, just north of horizontal center and slightly south of Mai, is a series of beach blankets with umbrellas near an RV. Classy Jessy is under one of the umbrellas just south of the RV; tap the umbrellas to lower them and reveal her.
- Classy Jessy: “The sun is shining too brightly today, even for Classy Jessy.”
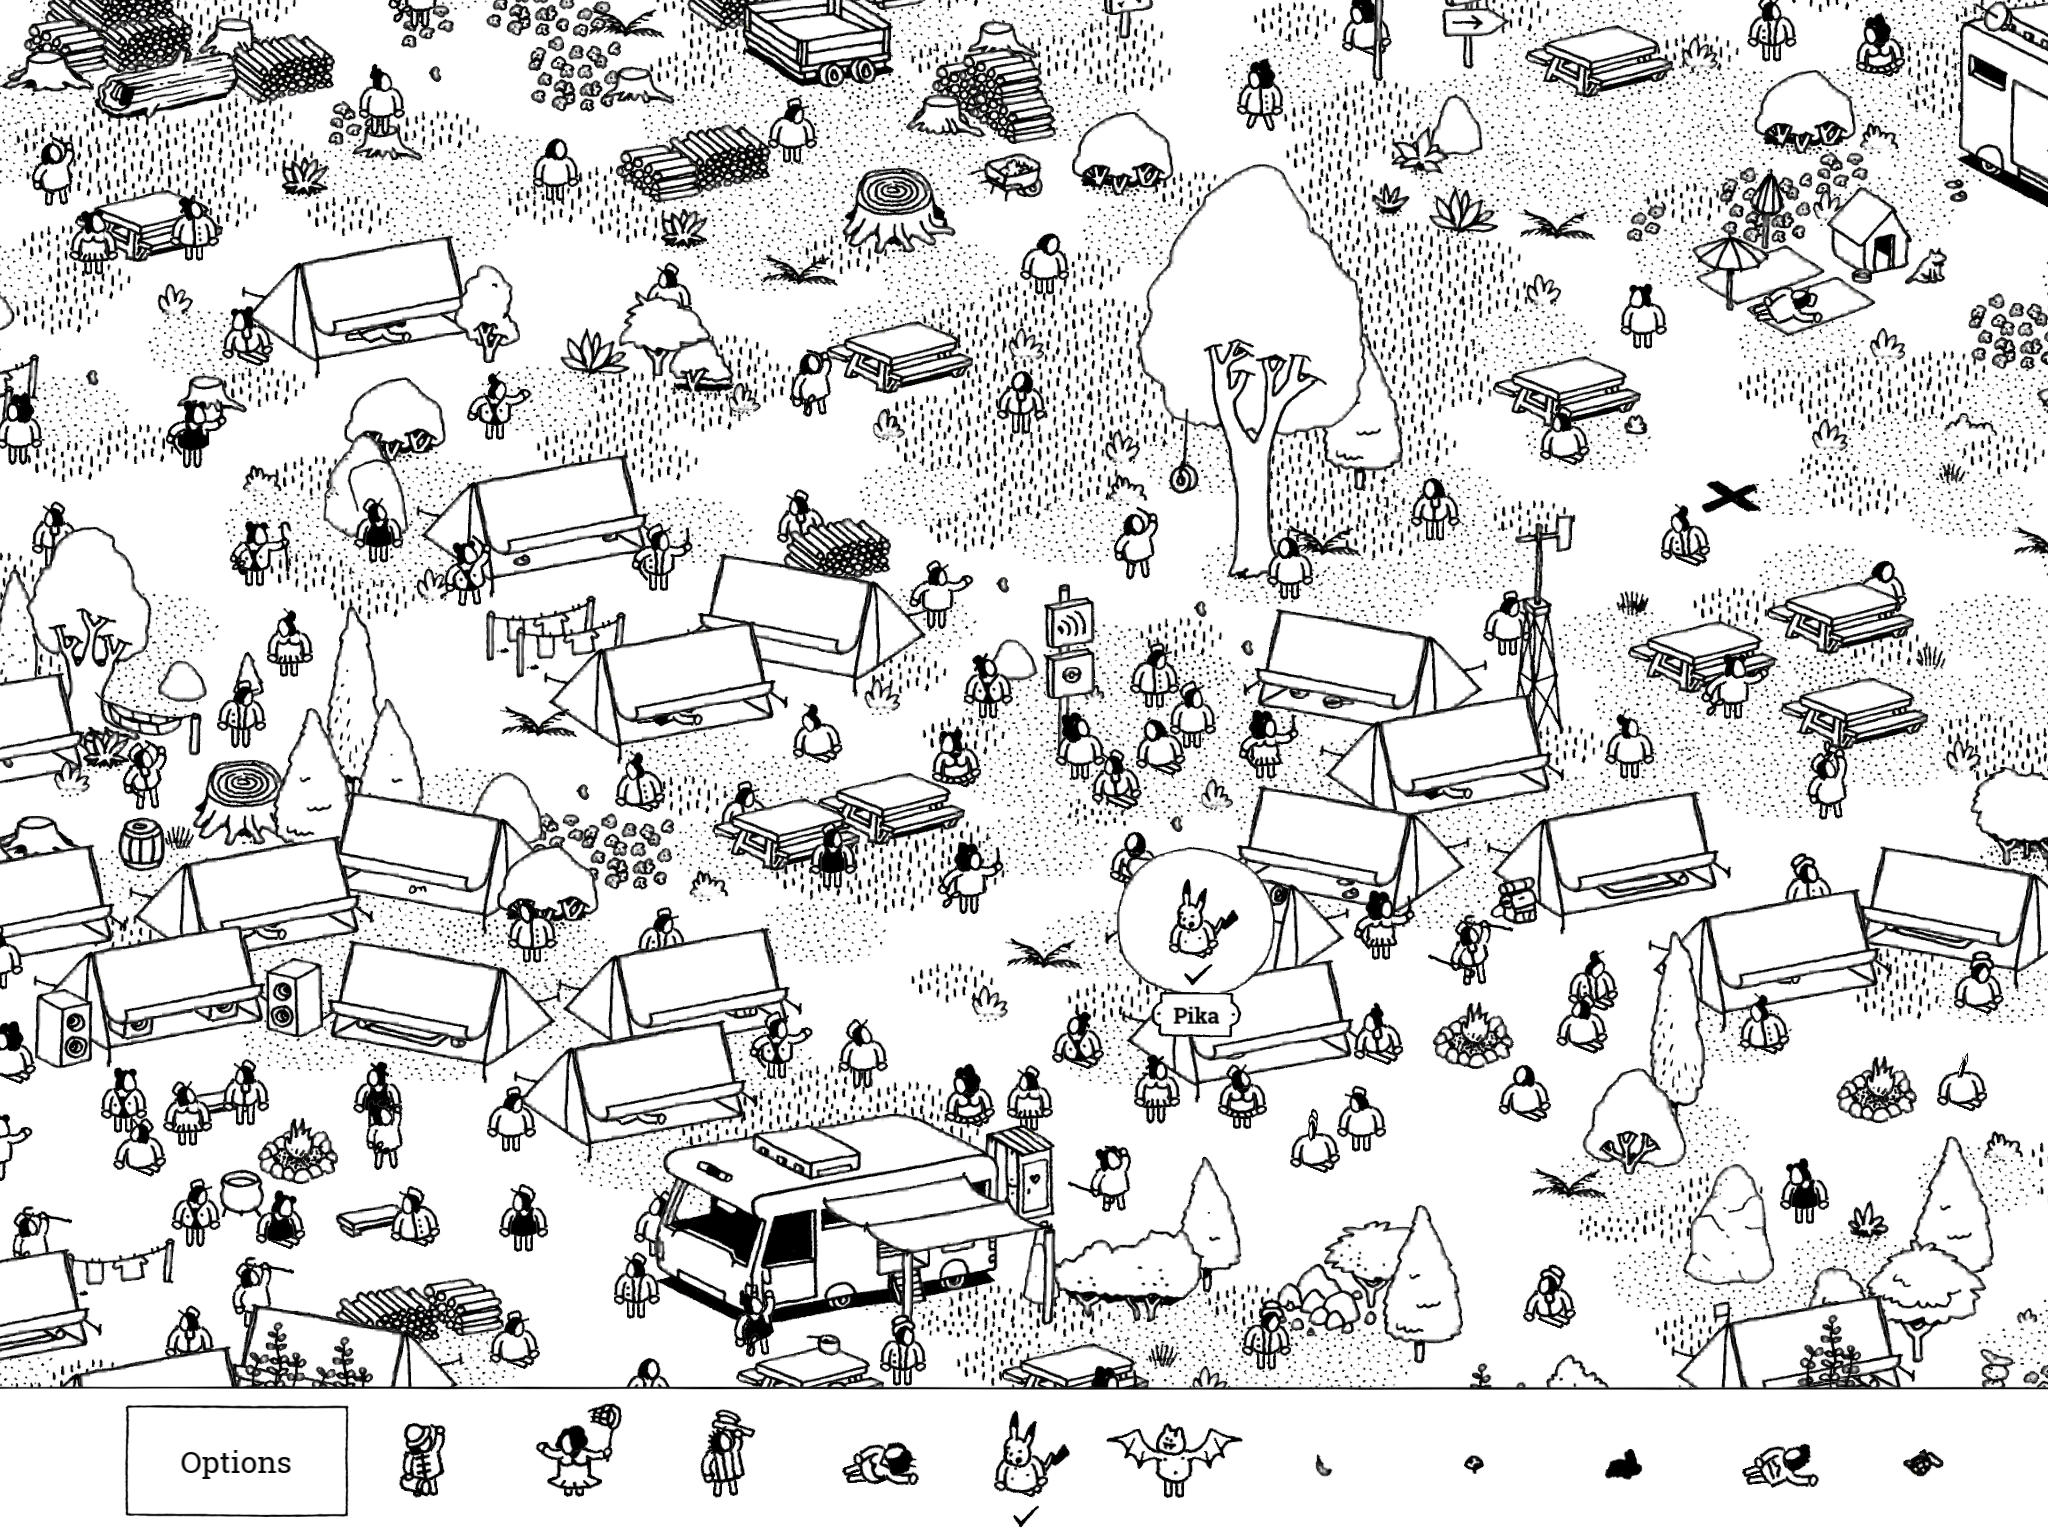
- Pika: “Just when Pika thought he had escaped the crazies, it turns out he put his tent next to the only WiFi point in the campground.”
Just east of the very center of the image is a sign with a WiFi signal on it near a set of tents. Pika is in the tent directly south of the WiFi sign; tap the tent flap twice to open it and reveal him.
- Pika: “Just when Pika thought he had escaped the crazies, it turns out he put his tent next to the only WiFi point in the campground.”
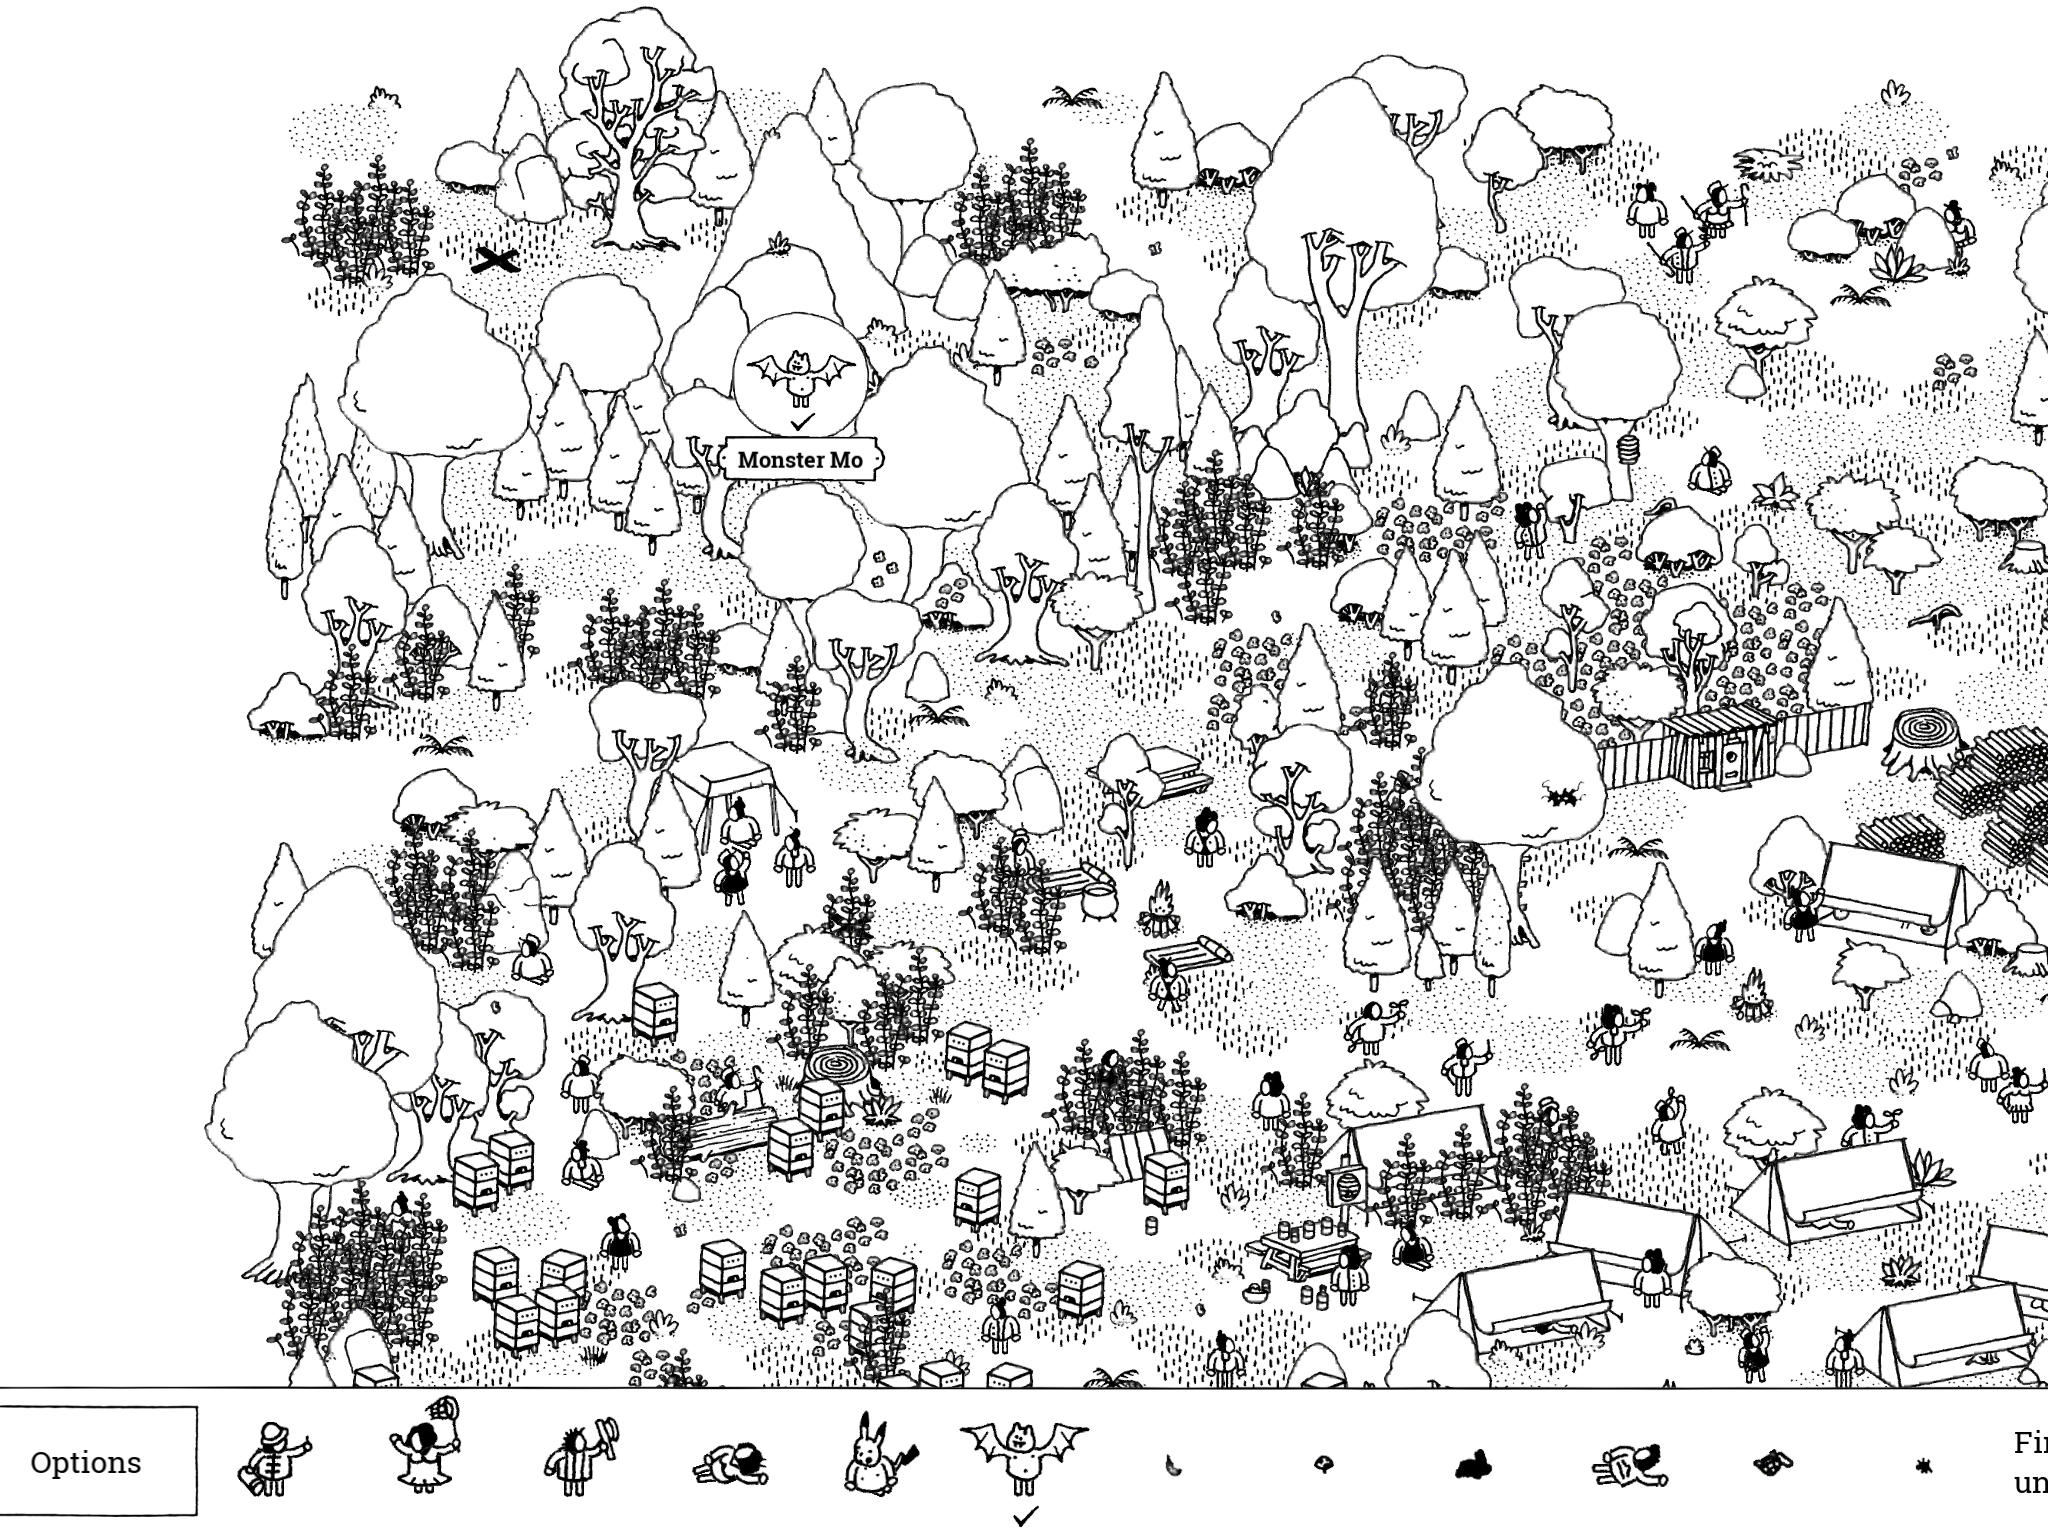
- Monster Mo: “Monster Mo watches society from a distance. What would it be like to be one of them?”
In the far northwest corner of the image is a bunch of trees, rocks, and grass. Monster Mo is hiding behind a batch of grass in front of a rock, just southeast of the black X. Tap the grass four times to reveal him and tap on him.
- Monster Mo: “Monster Mo watches society from a distance. What would it be like to be one of them?”
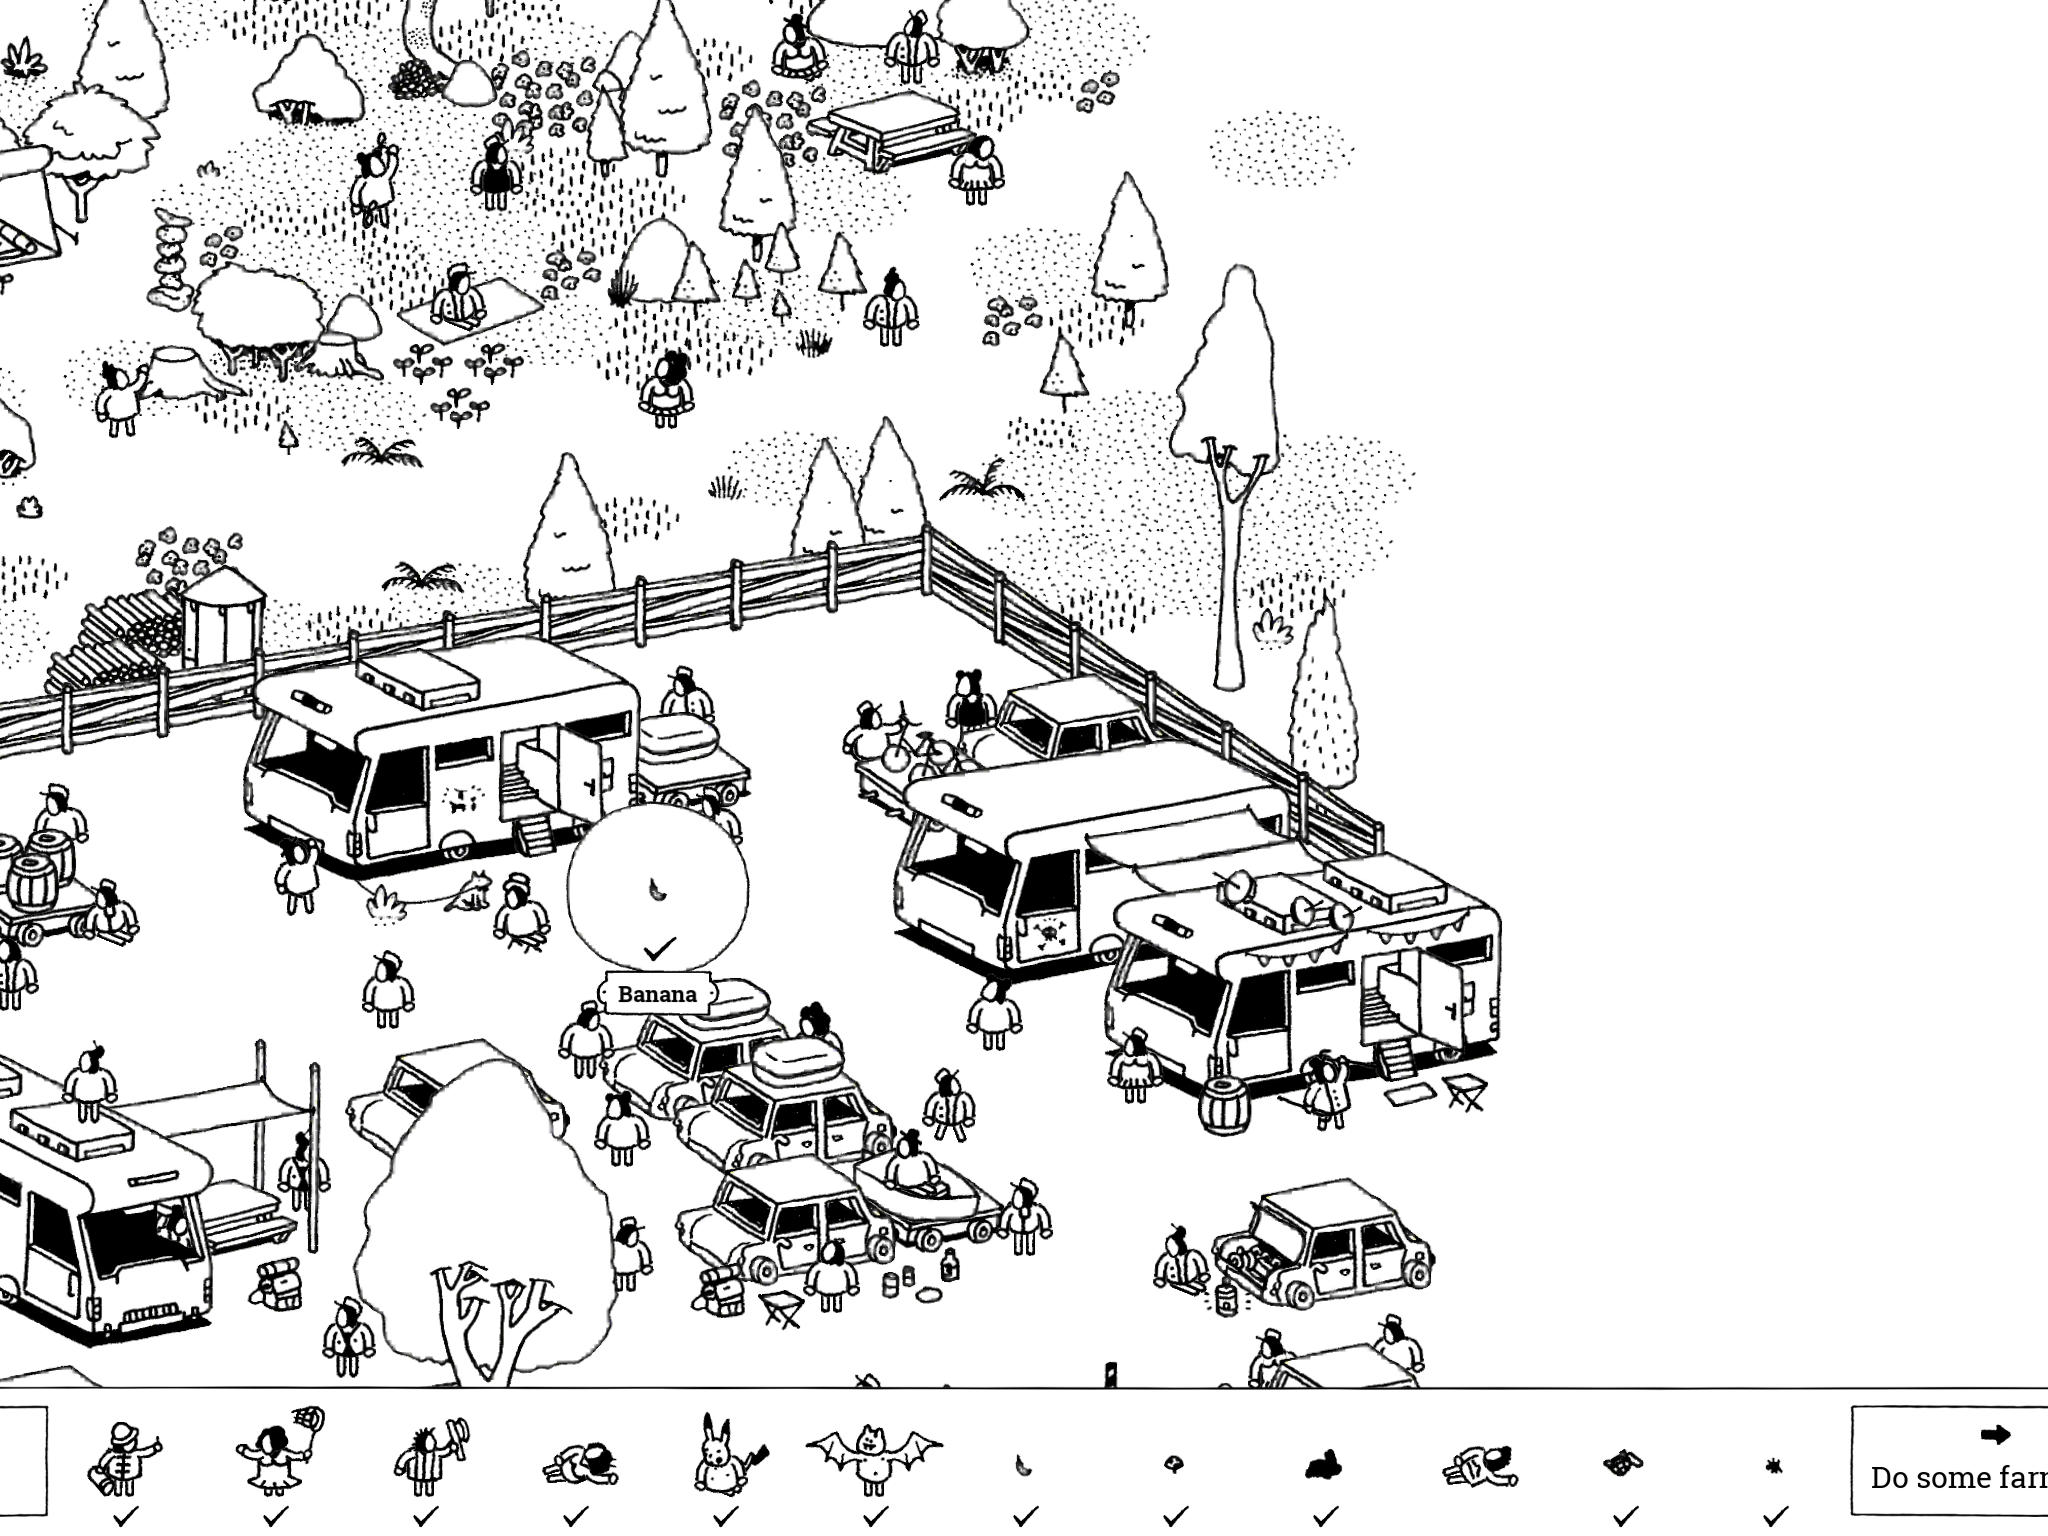
- Banana: “This banana was parked into a fruit basket.”
In the southeast corner of the image is an RV park with multiple RVs and cars. In the north side of this park is an RV with a dog leashed to it and a bowl of fruit sitting in front of it. The banana is on top of this bowl of fruit.
- Banana: “This banana was parked into a fruit basket.”
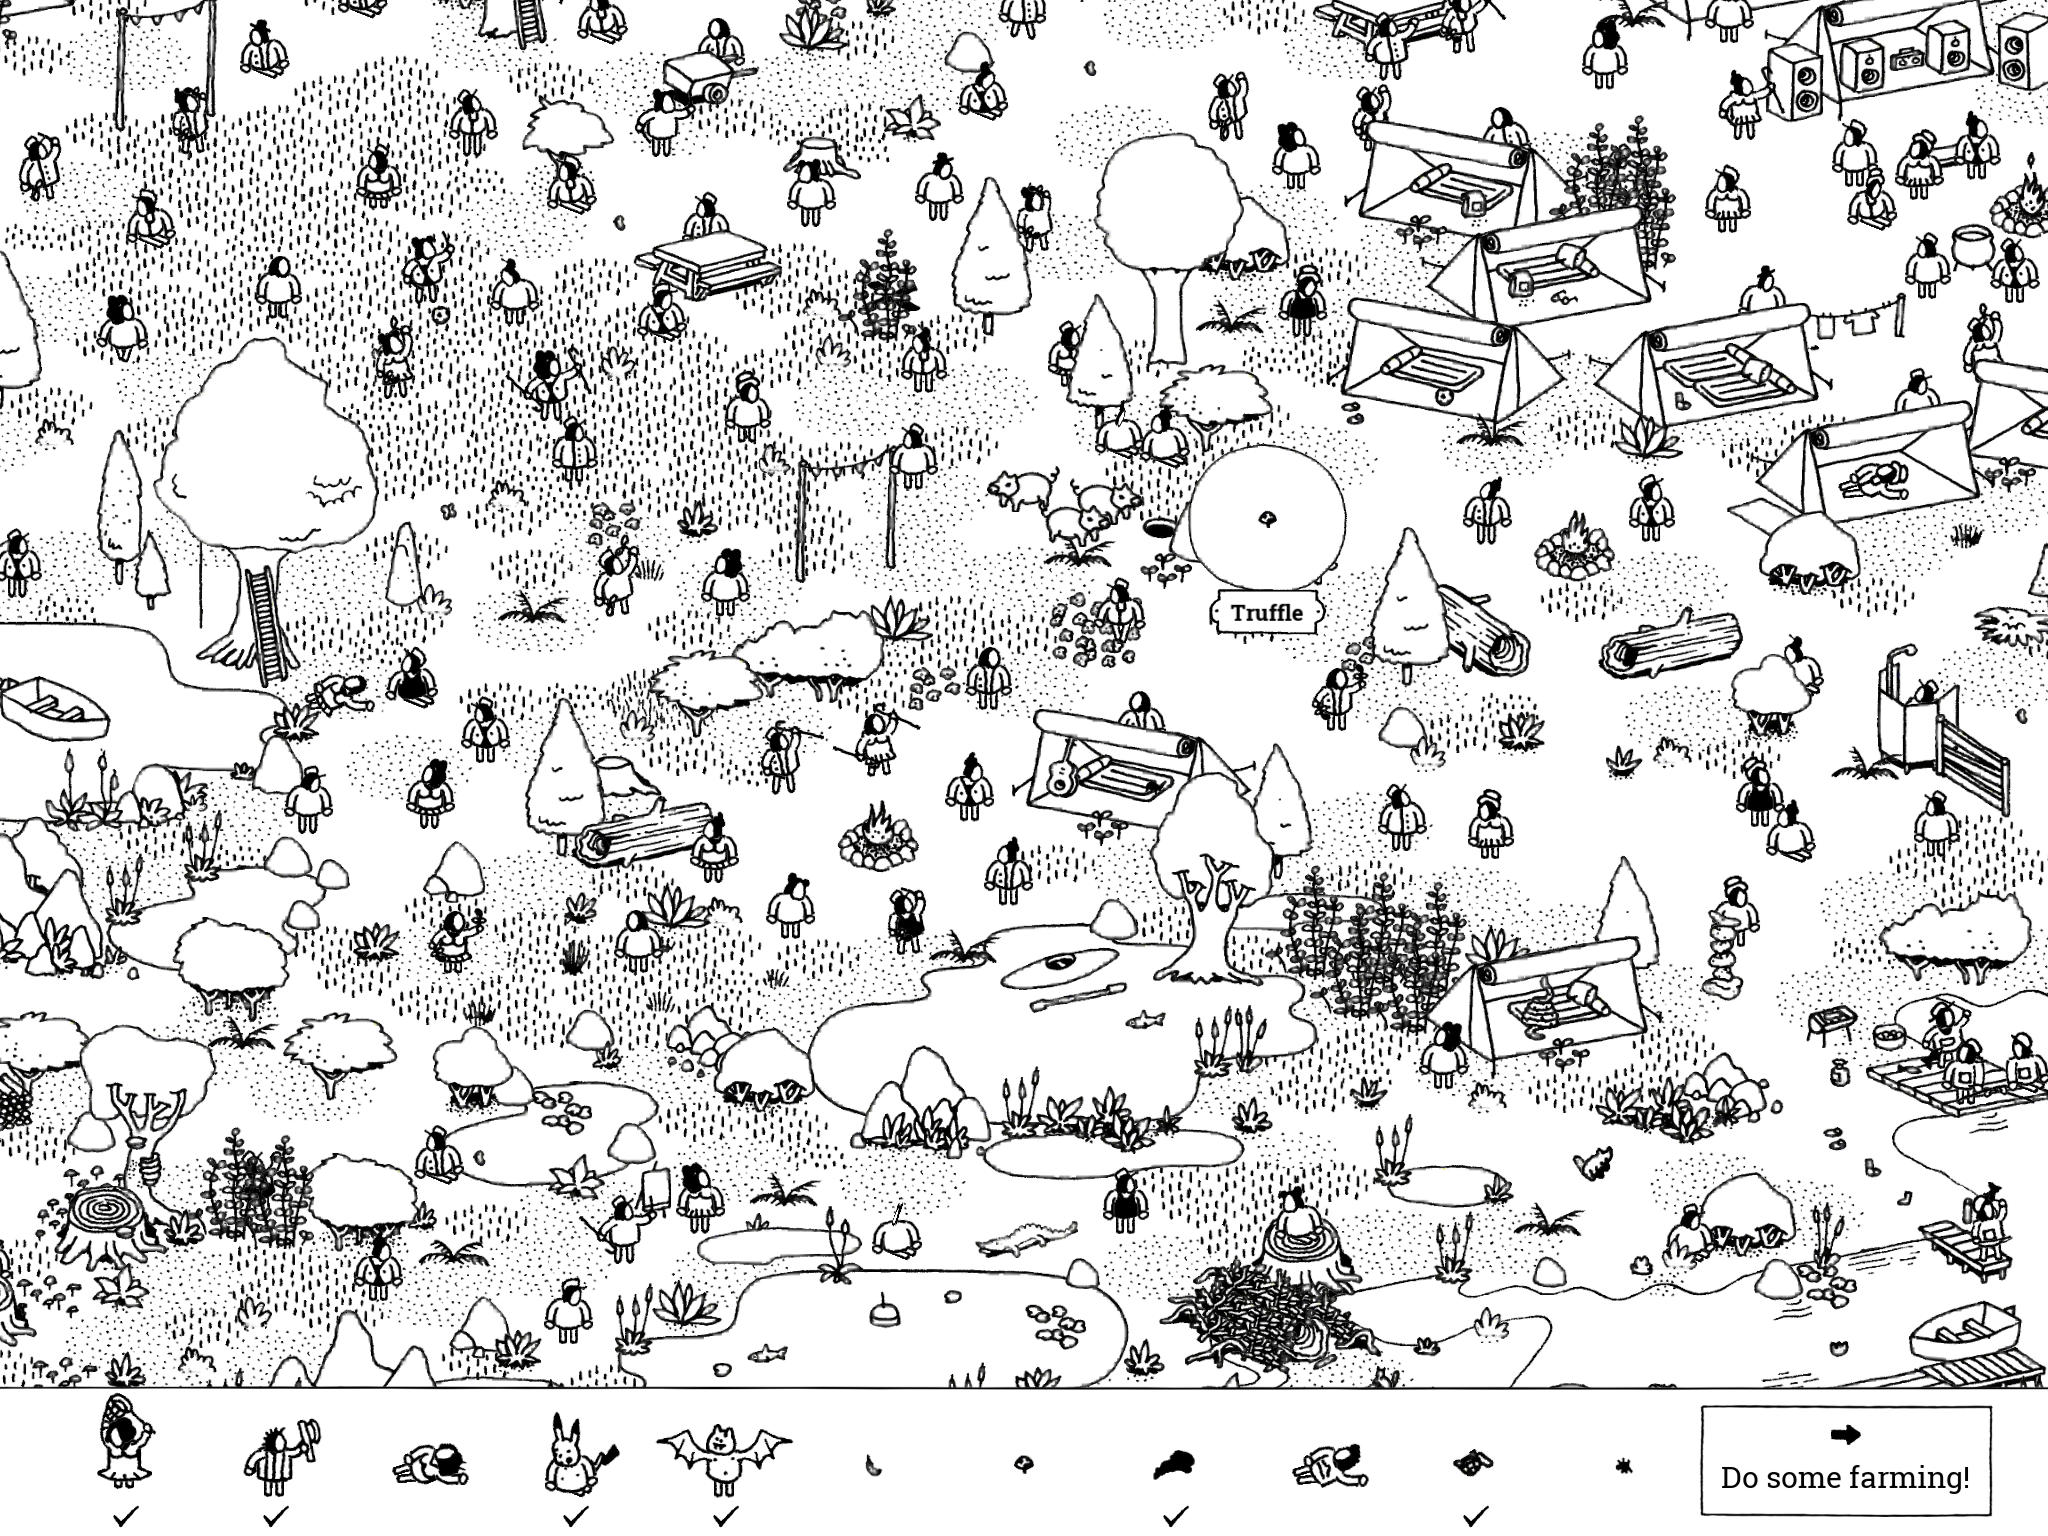
- Truffle: “This truffle is about to be discovered by a hog.”
Just west of the center of the image and ever-so-slightly south are a trio of pigs. Just right of the pigs is a black X on the ground, hidden by some tall grass. Tap the tall grass to cut it down, then tap the X three times to dig up the Truffle. Once unearthed, the Truffle bounces to the right, just past a rock.
- Truffle: “This truffle is about to be discovered by a hog.”
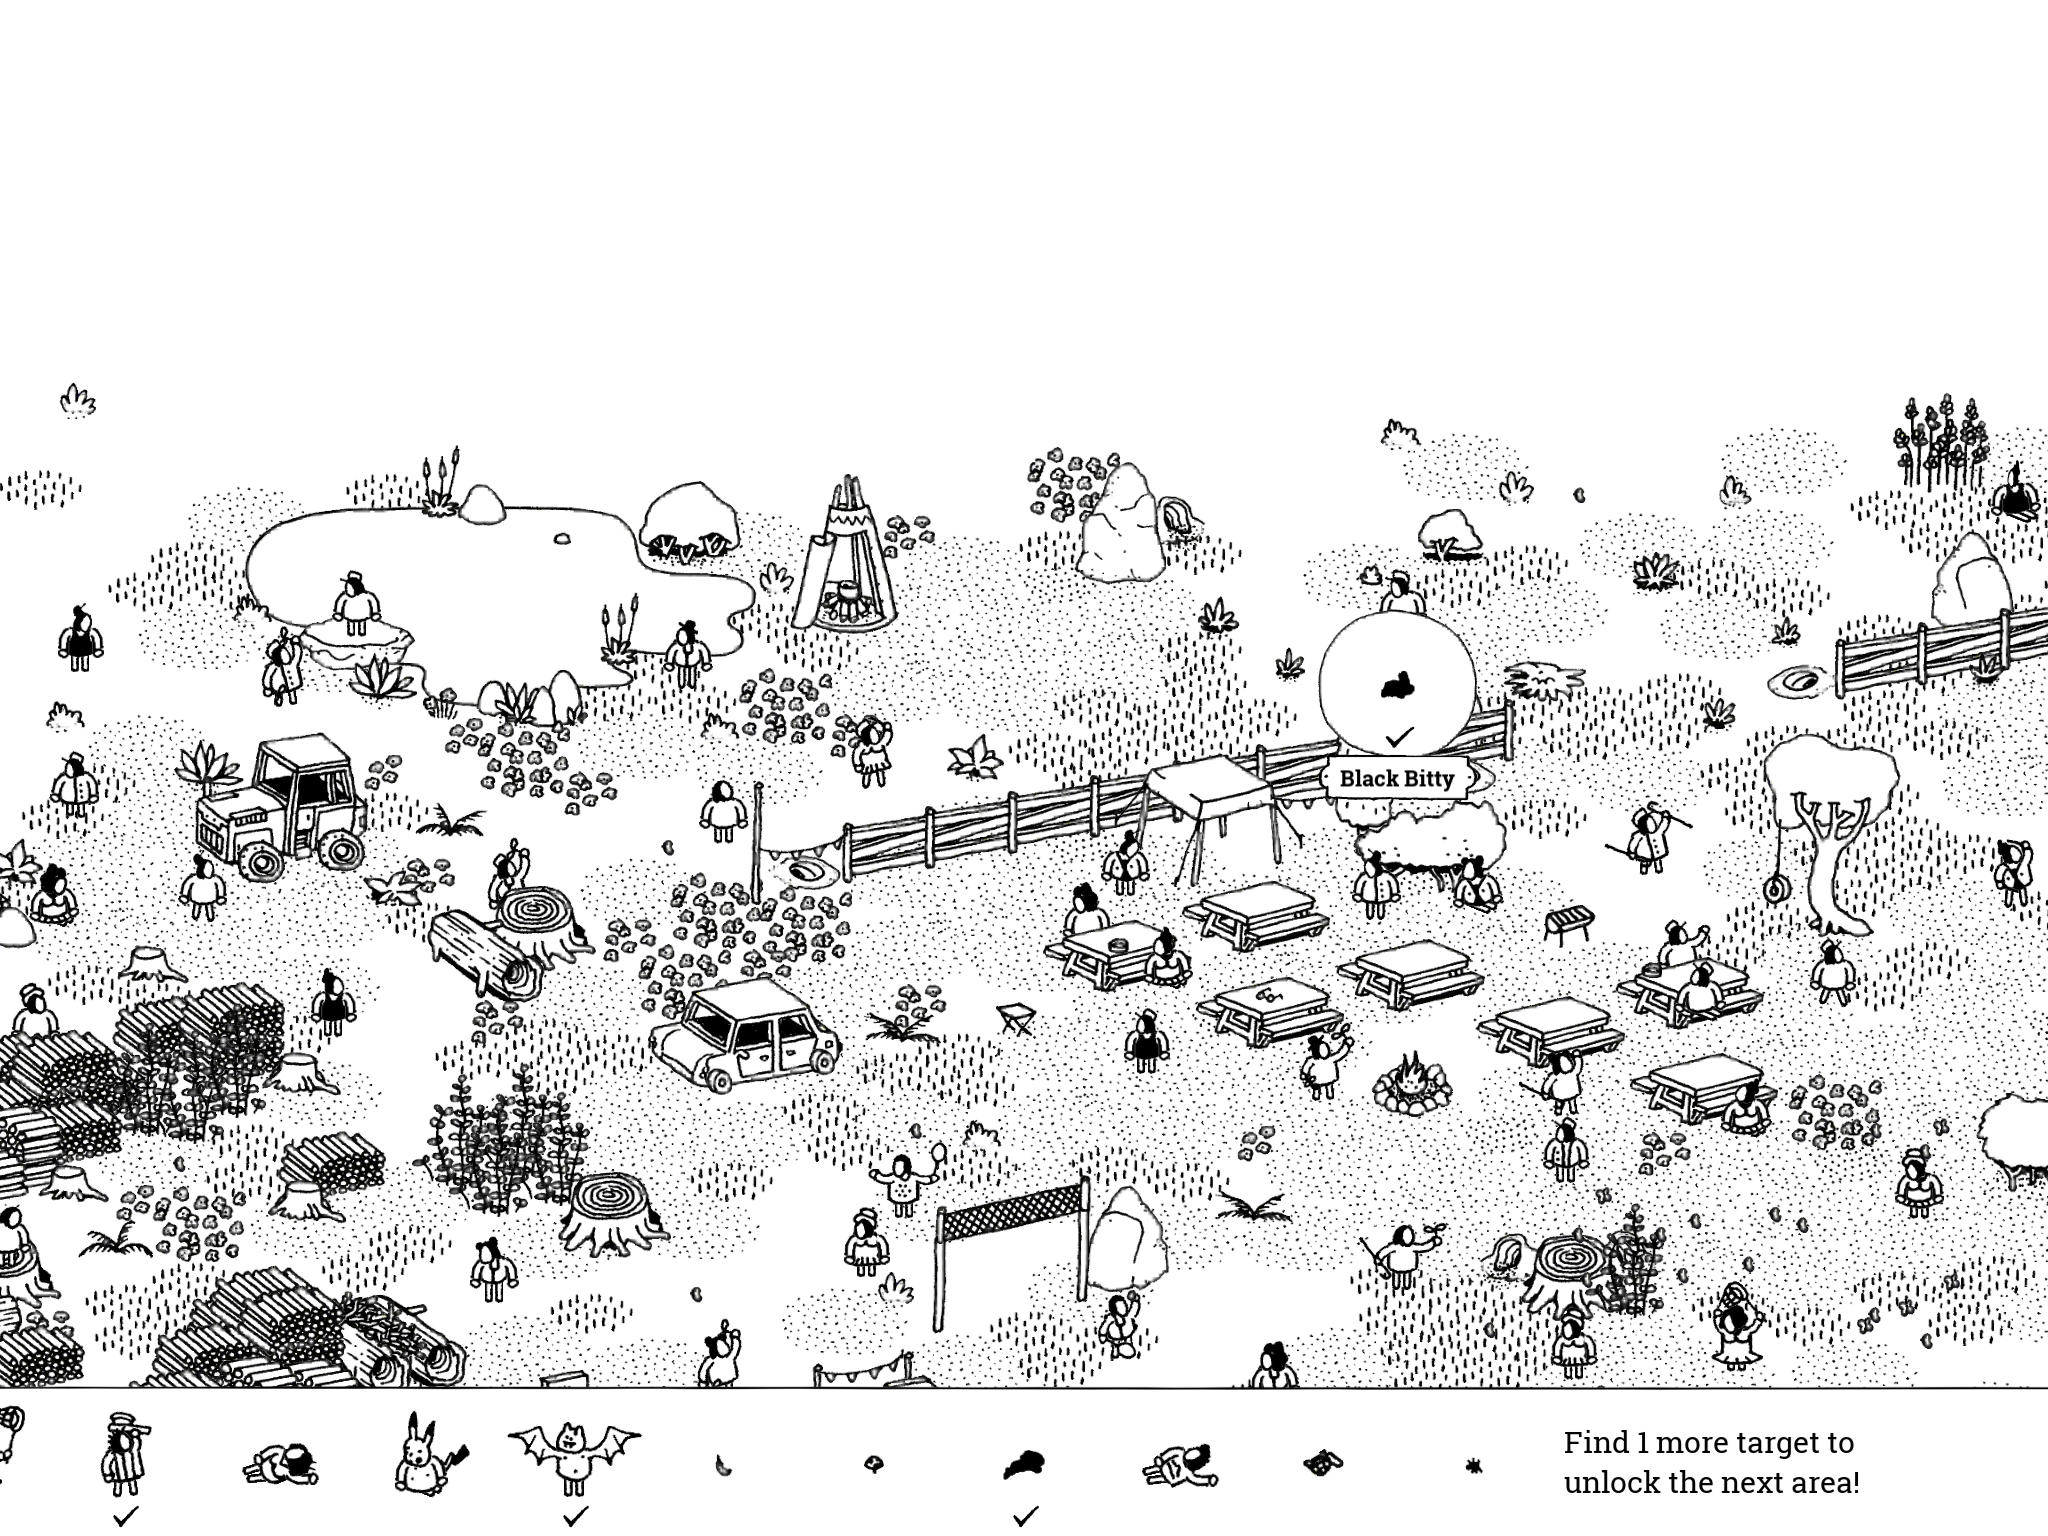
- Black Bitty: “Together with her bunny friends, Black Bitty hides in a hole chewing on some snatched wheat.”
In the northeast corner of the image is a field of wheat; just west of this field are a series of rabbit holes in the ground. If you tap any of the holes, a white rabbit will run out and into a different hole. Eventually, a black rabbit will pop out instead; this is Black Bitty. You need to tap her before she runs back in a hole (although you can keep tapping and she’ll appear again at some point). Both times we found her was after tapping the upper-left hole twice: the first rabbit was white and the second rabbit was Black Bitty.
- Black Bitty: “Together with her bunny friends, Black Bitty hides in a hole chewing on some snatched wheat.”
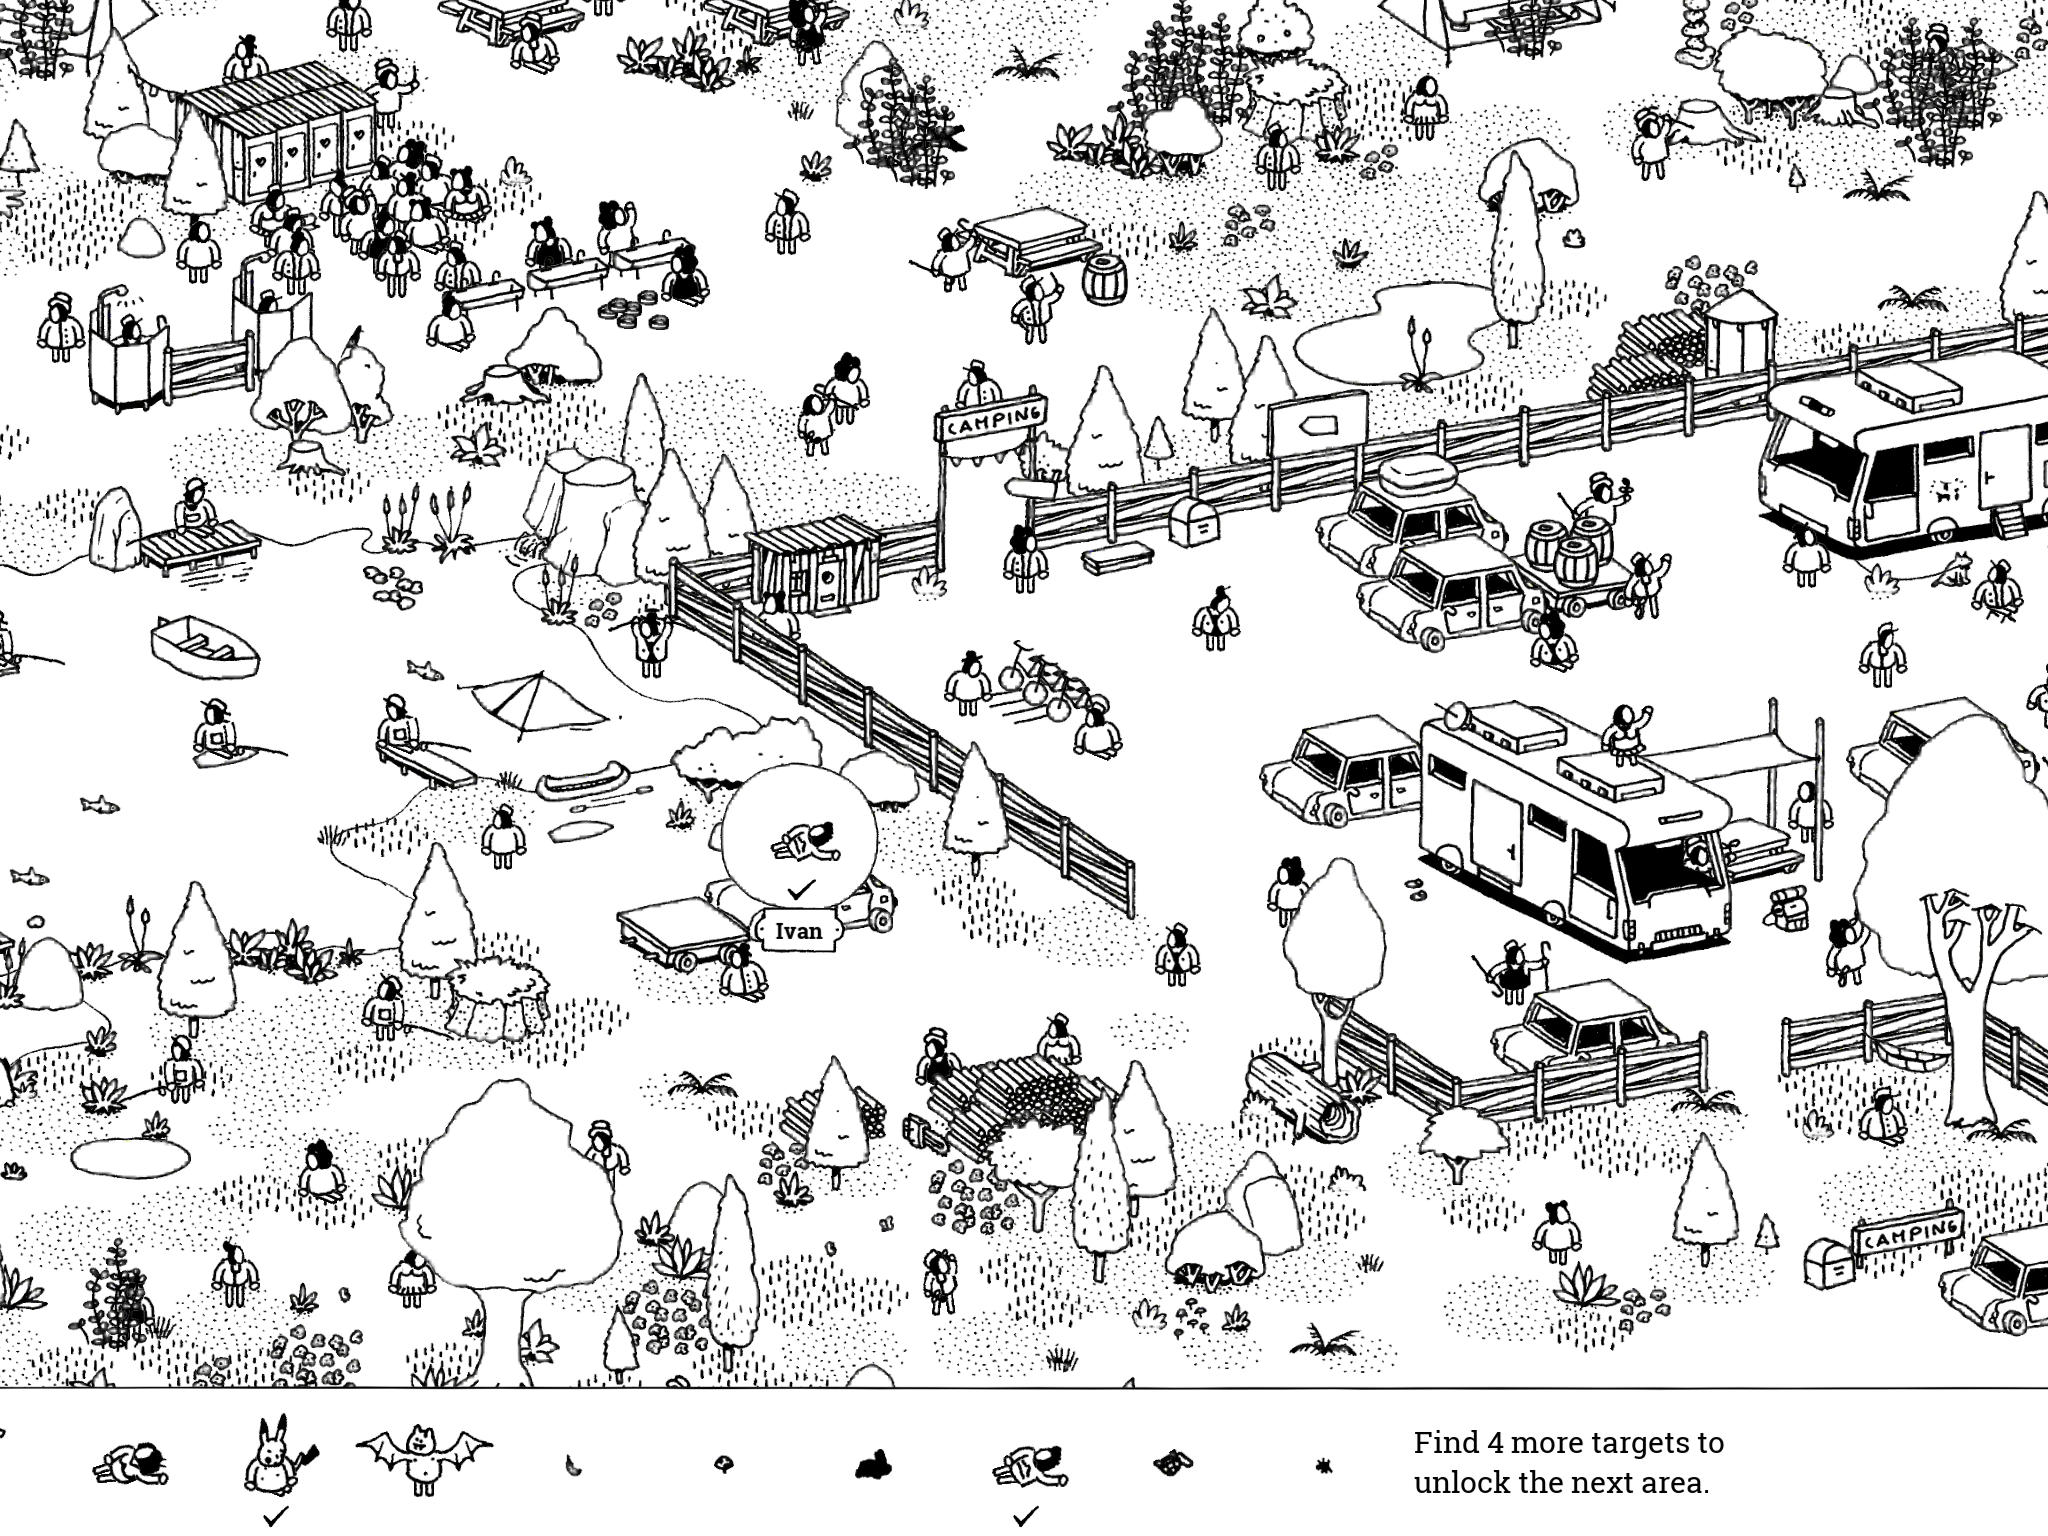
- Ivan: “Ivan hitched a ride without permission and doesn’t have an escape plan.”
In the southeast corner of the image is an RV park; just outside this RV park, to its west, is a car with a flatbed trailer attached and a large suitcase on top. Tap the suitcase to open it and reveal Ivan.
- Ivan: “Ivan hitched a ride without permission and doesn’t have an escape plan.”
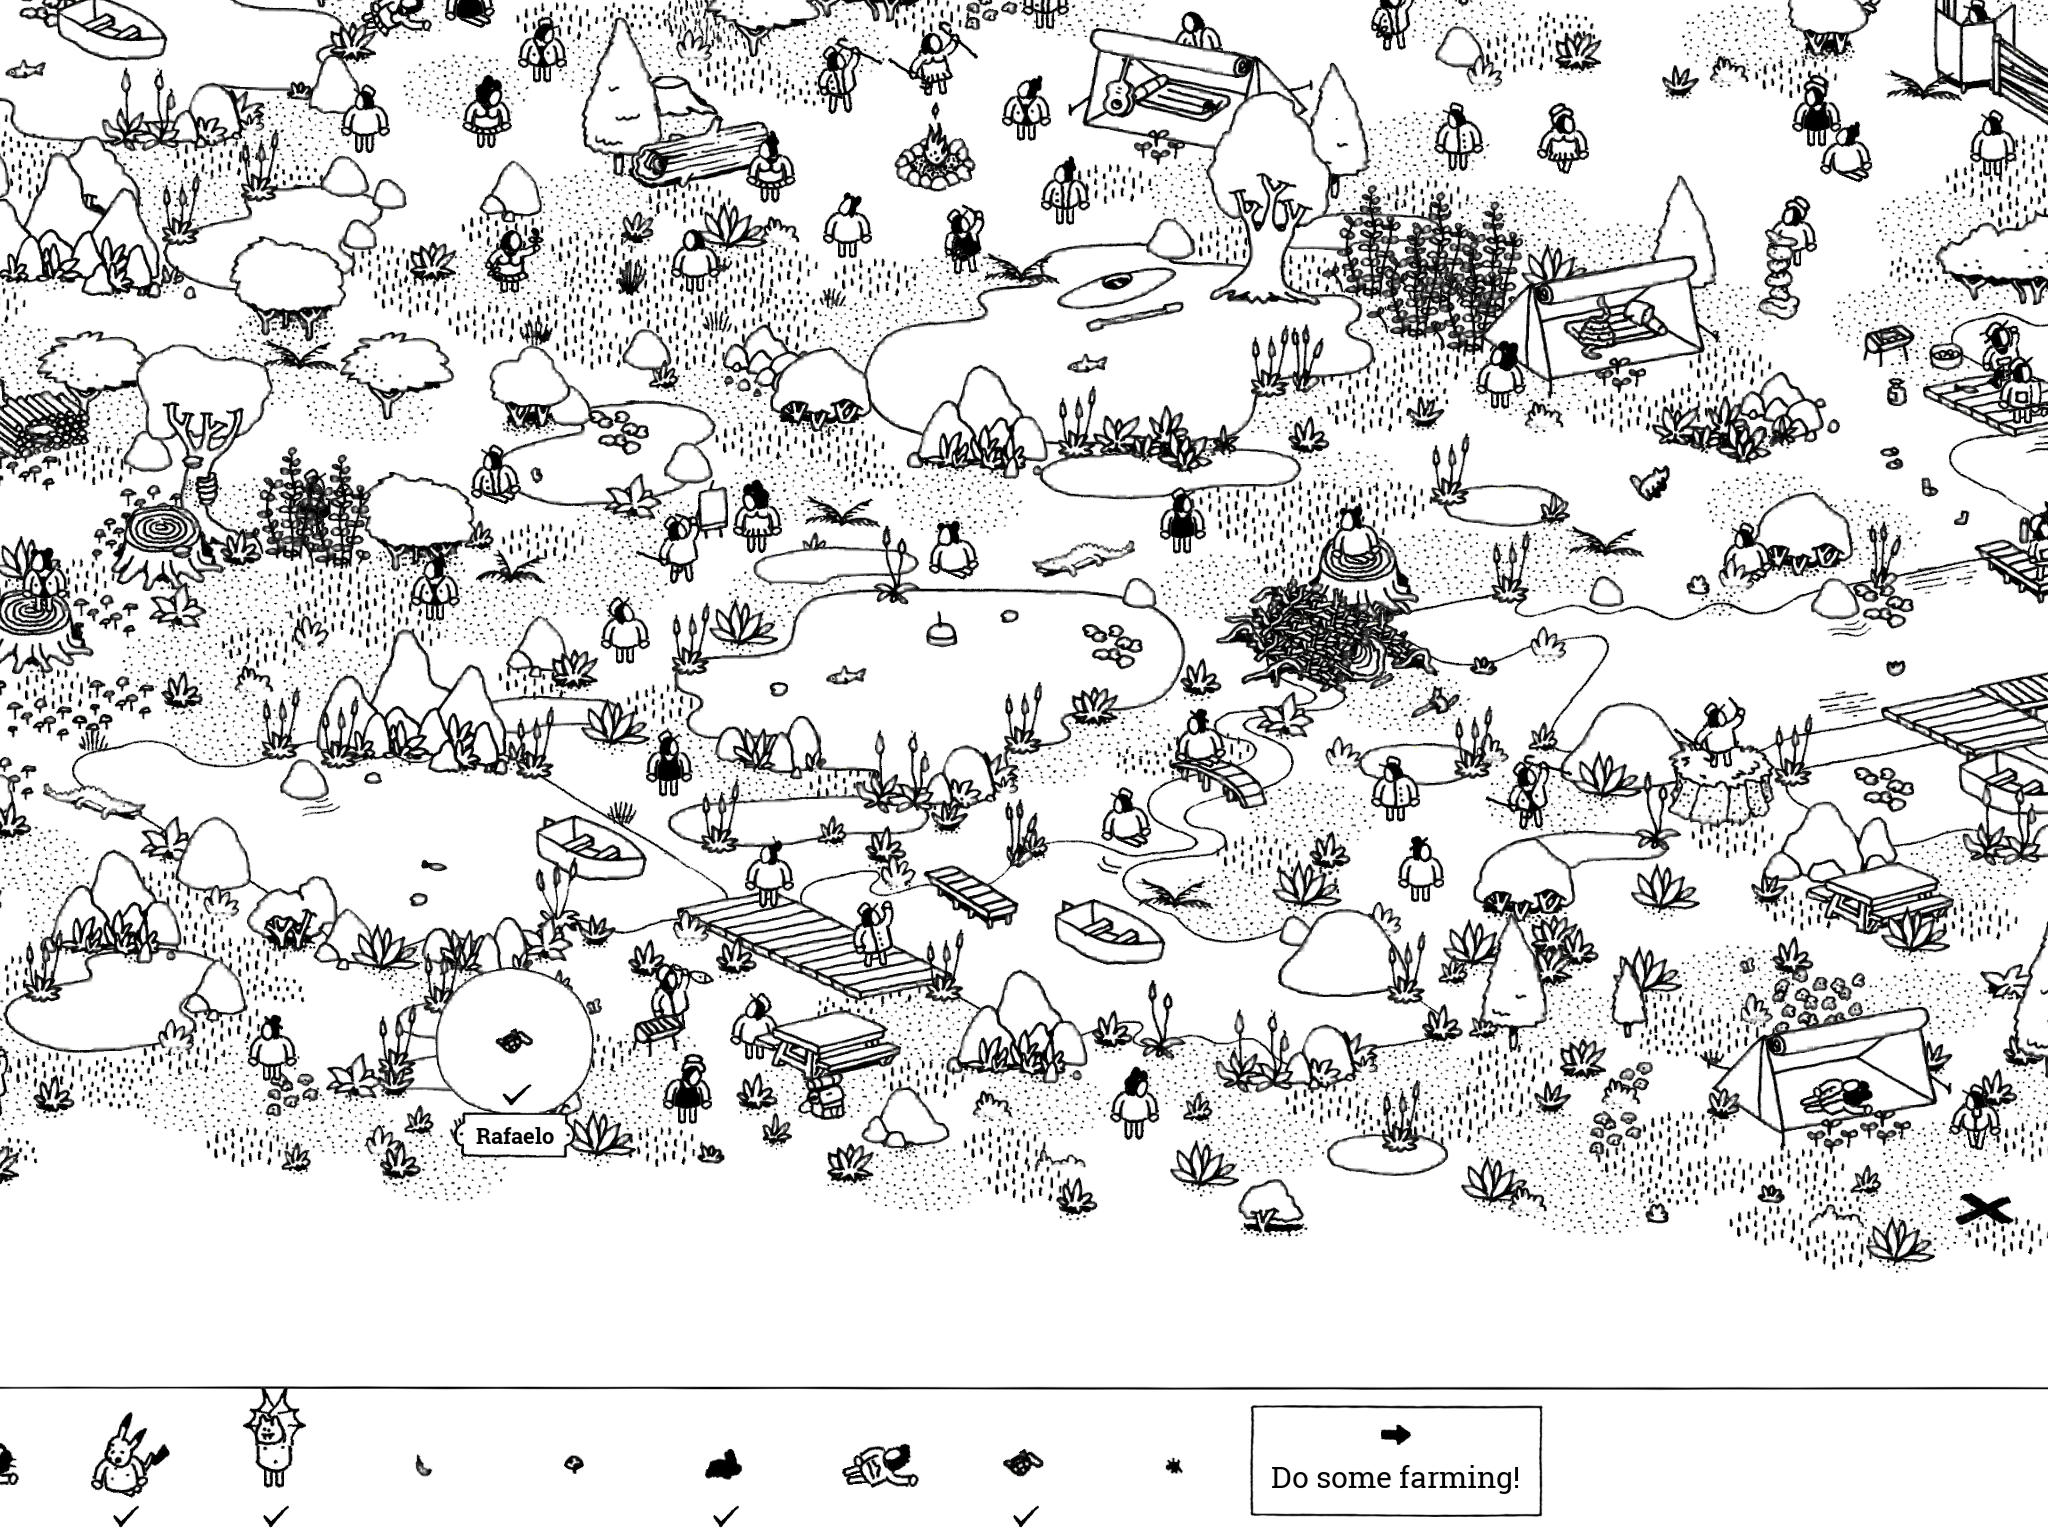
- Rafaelo: “Tortoise Rafaelo dries in the sun.”
On the southern edge of the image, just east of the westernmost corner, is a bridge with two people standing on it above a picnic table and a grill where a man is grilling a fish. Directly to the west of the grill is Rafaelo, lying between two small ponds and just above a tree.
- Rafaelo: “Tortoise Rafaelo dries in the sun.”
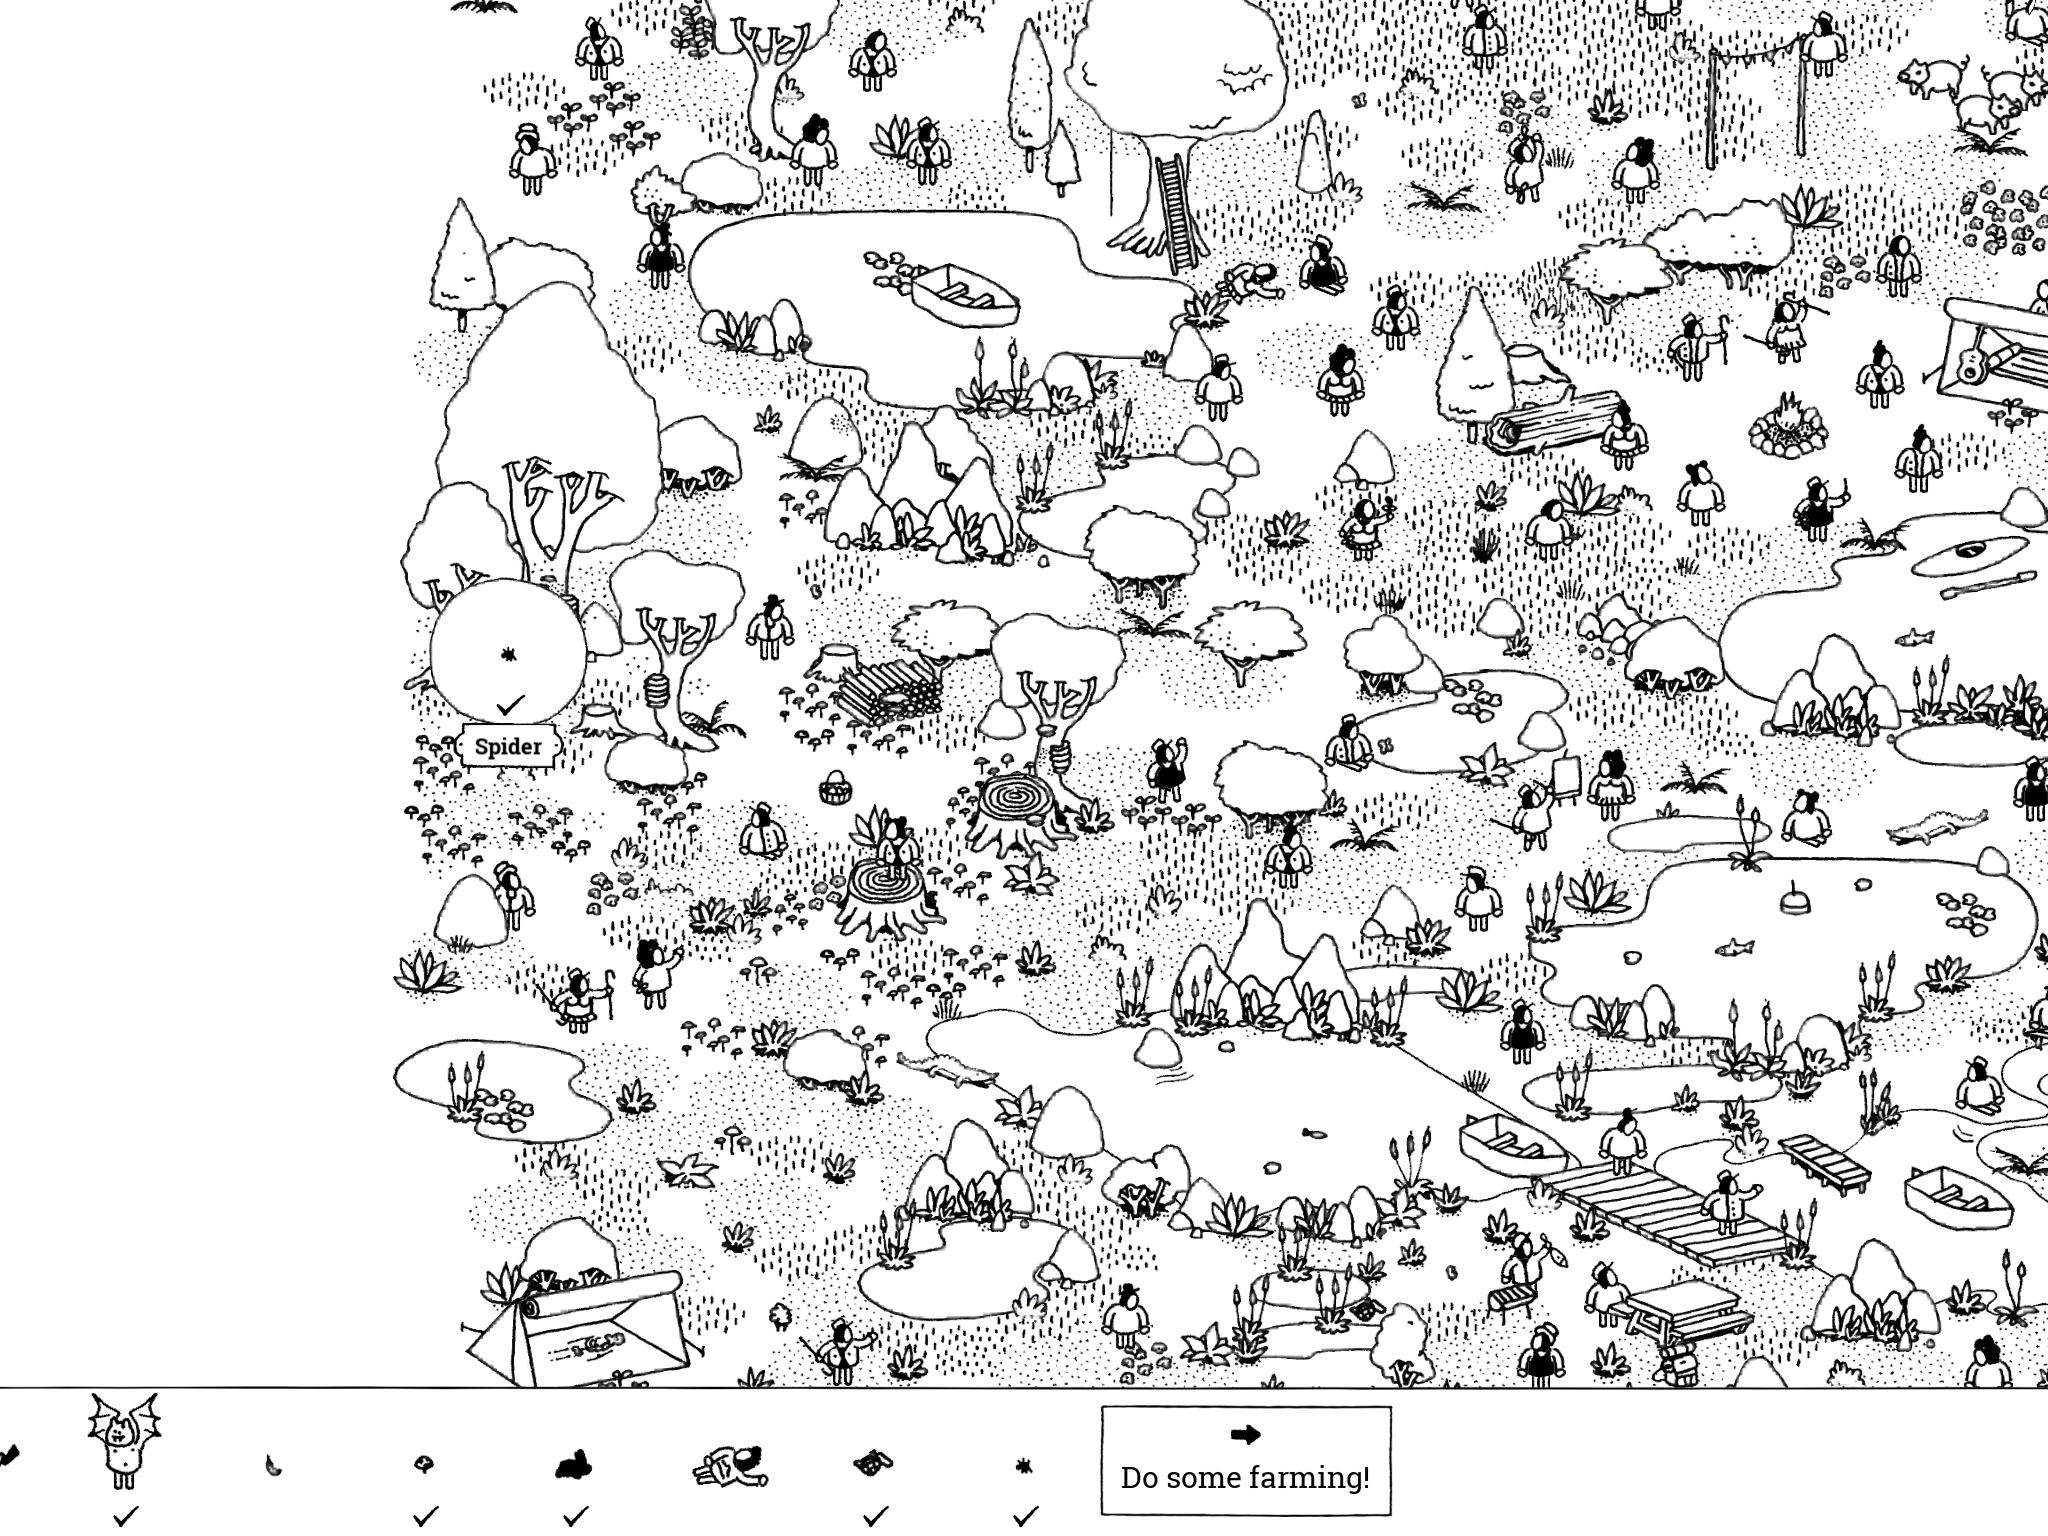
- Spider: “This spider has a particular taste for fungus flies.”
Just above the southwest corner of the map are a lot of tiny mushrooms on the ground. There are three trees just north of these mushrooms with some beehives and a spider web on them. The Spider is walking around on the spider web.
- Spider: “This spider has a particular taste for fungus flies.”
Dry Lands 1: Wyatt’s Field
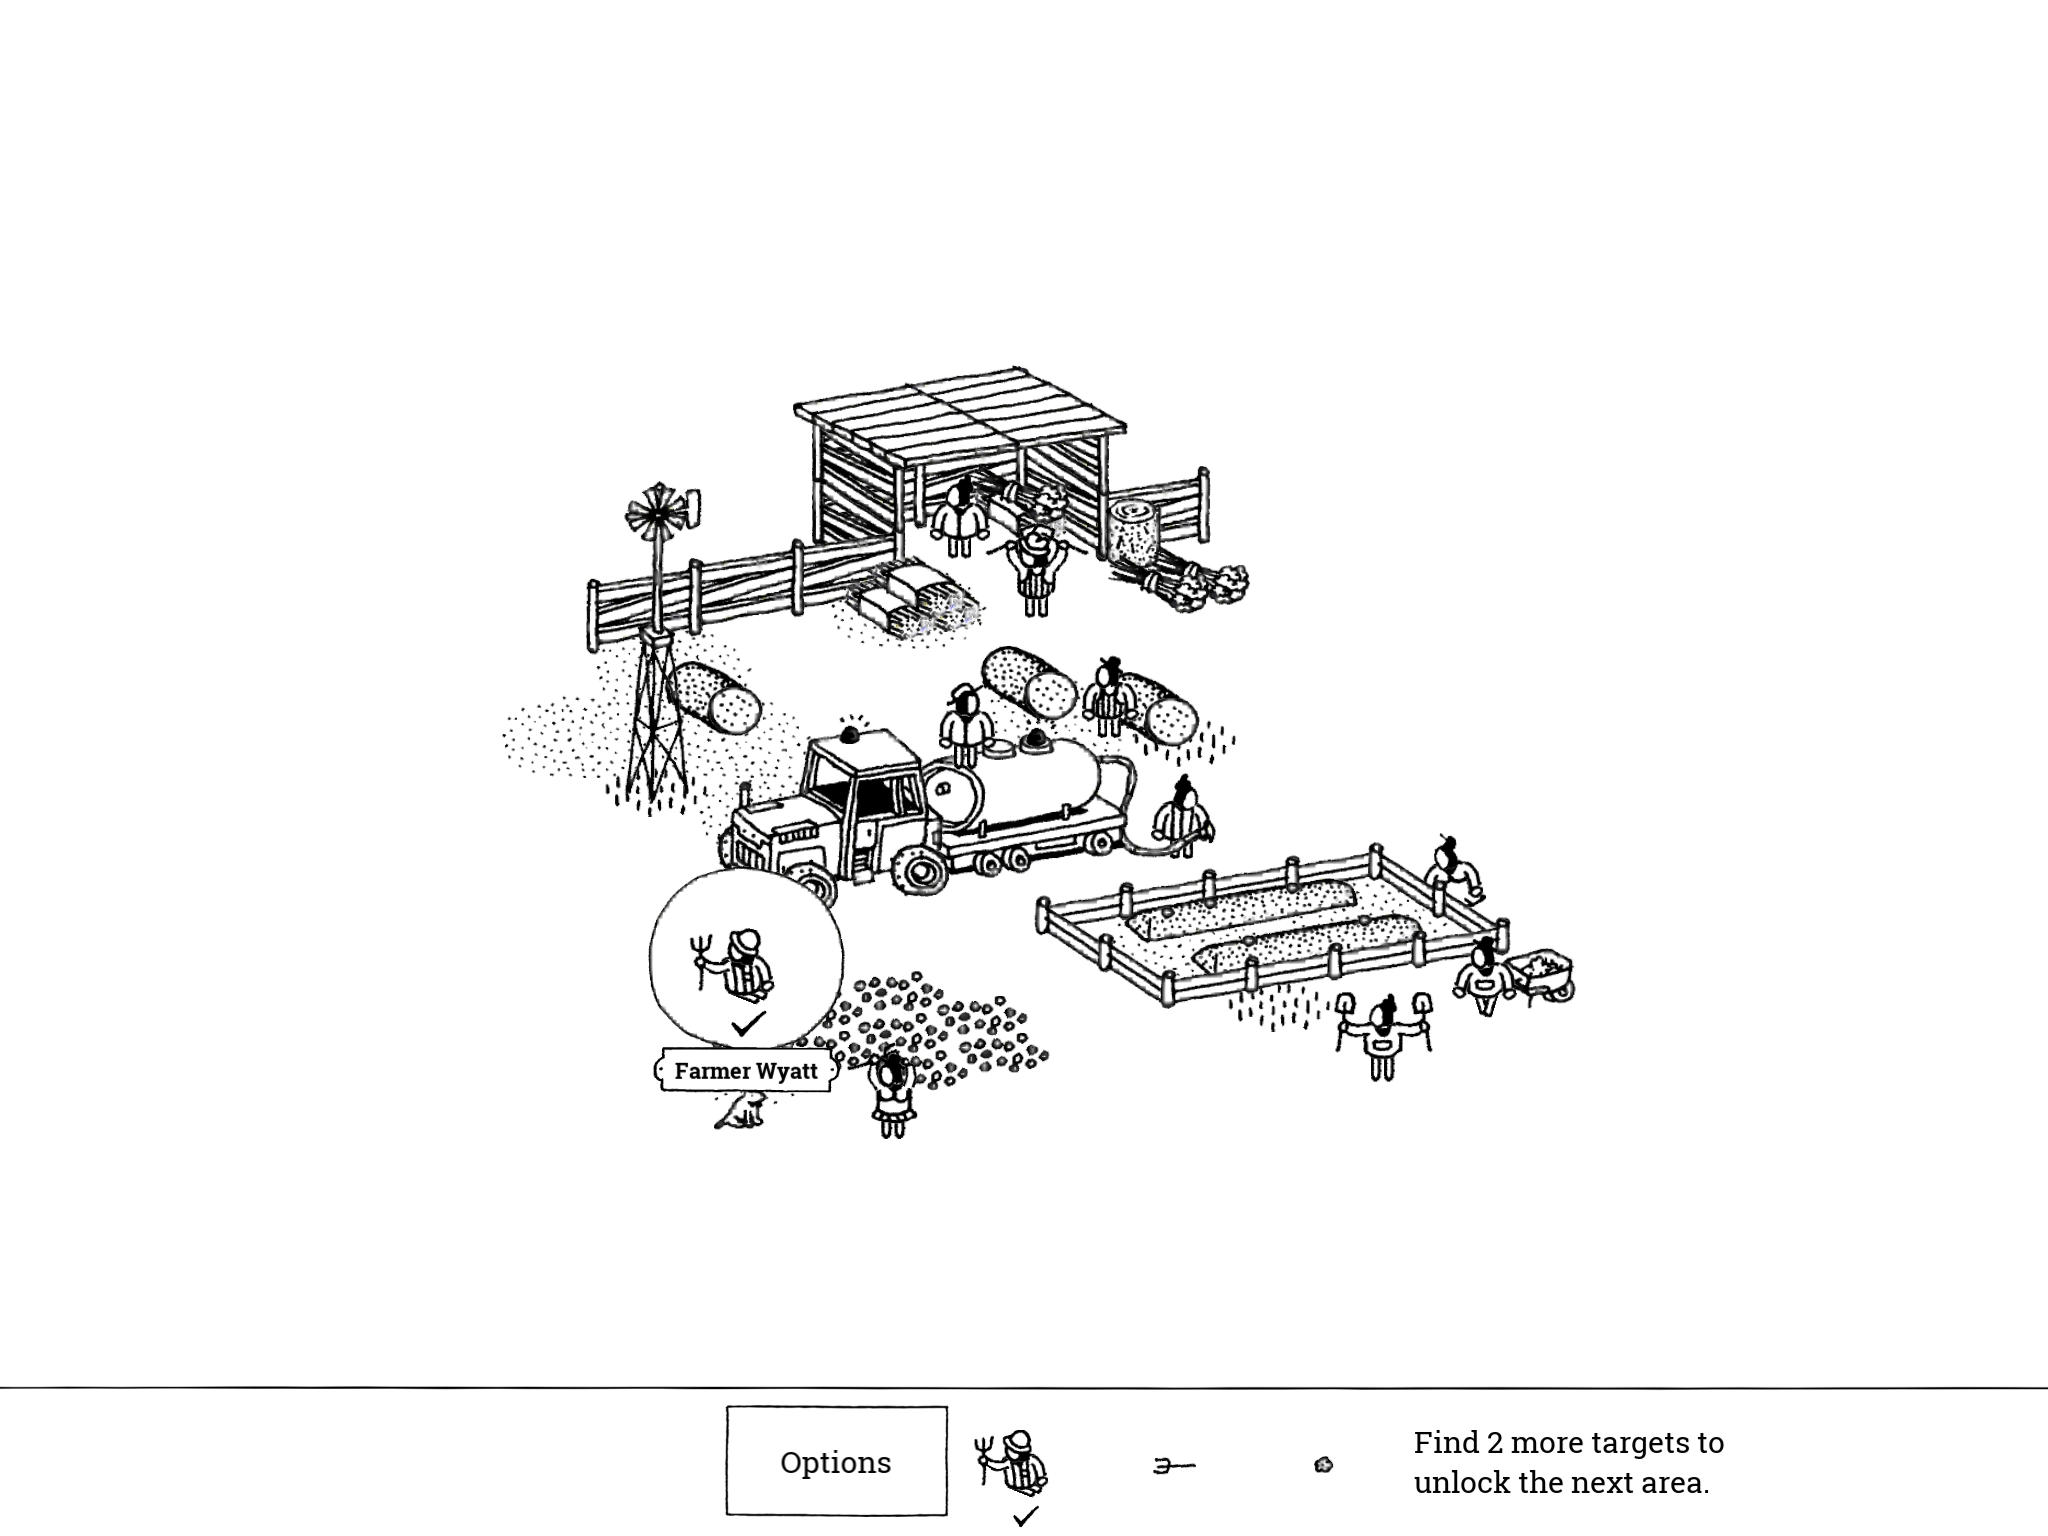
- Farmer Wyatt: “Farmer Wyatt takes his job as wheat supervisor very seriously.”
Farmer Wyatt is just sitting on the ground on the left side of the image. If you already tapped on the wheat and accidentally hid him, you can back out to the menu to reset the growth.
- Farmer Wyatt: “Farmer Wyatt takes his job as wheat supervisor very seriously.”
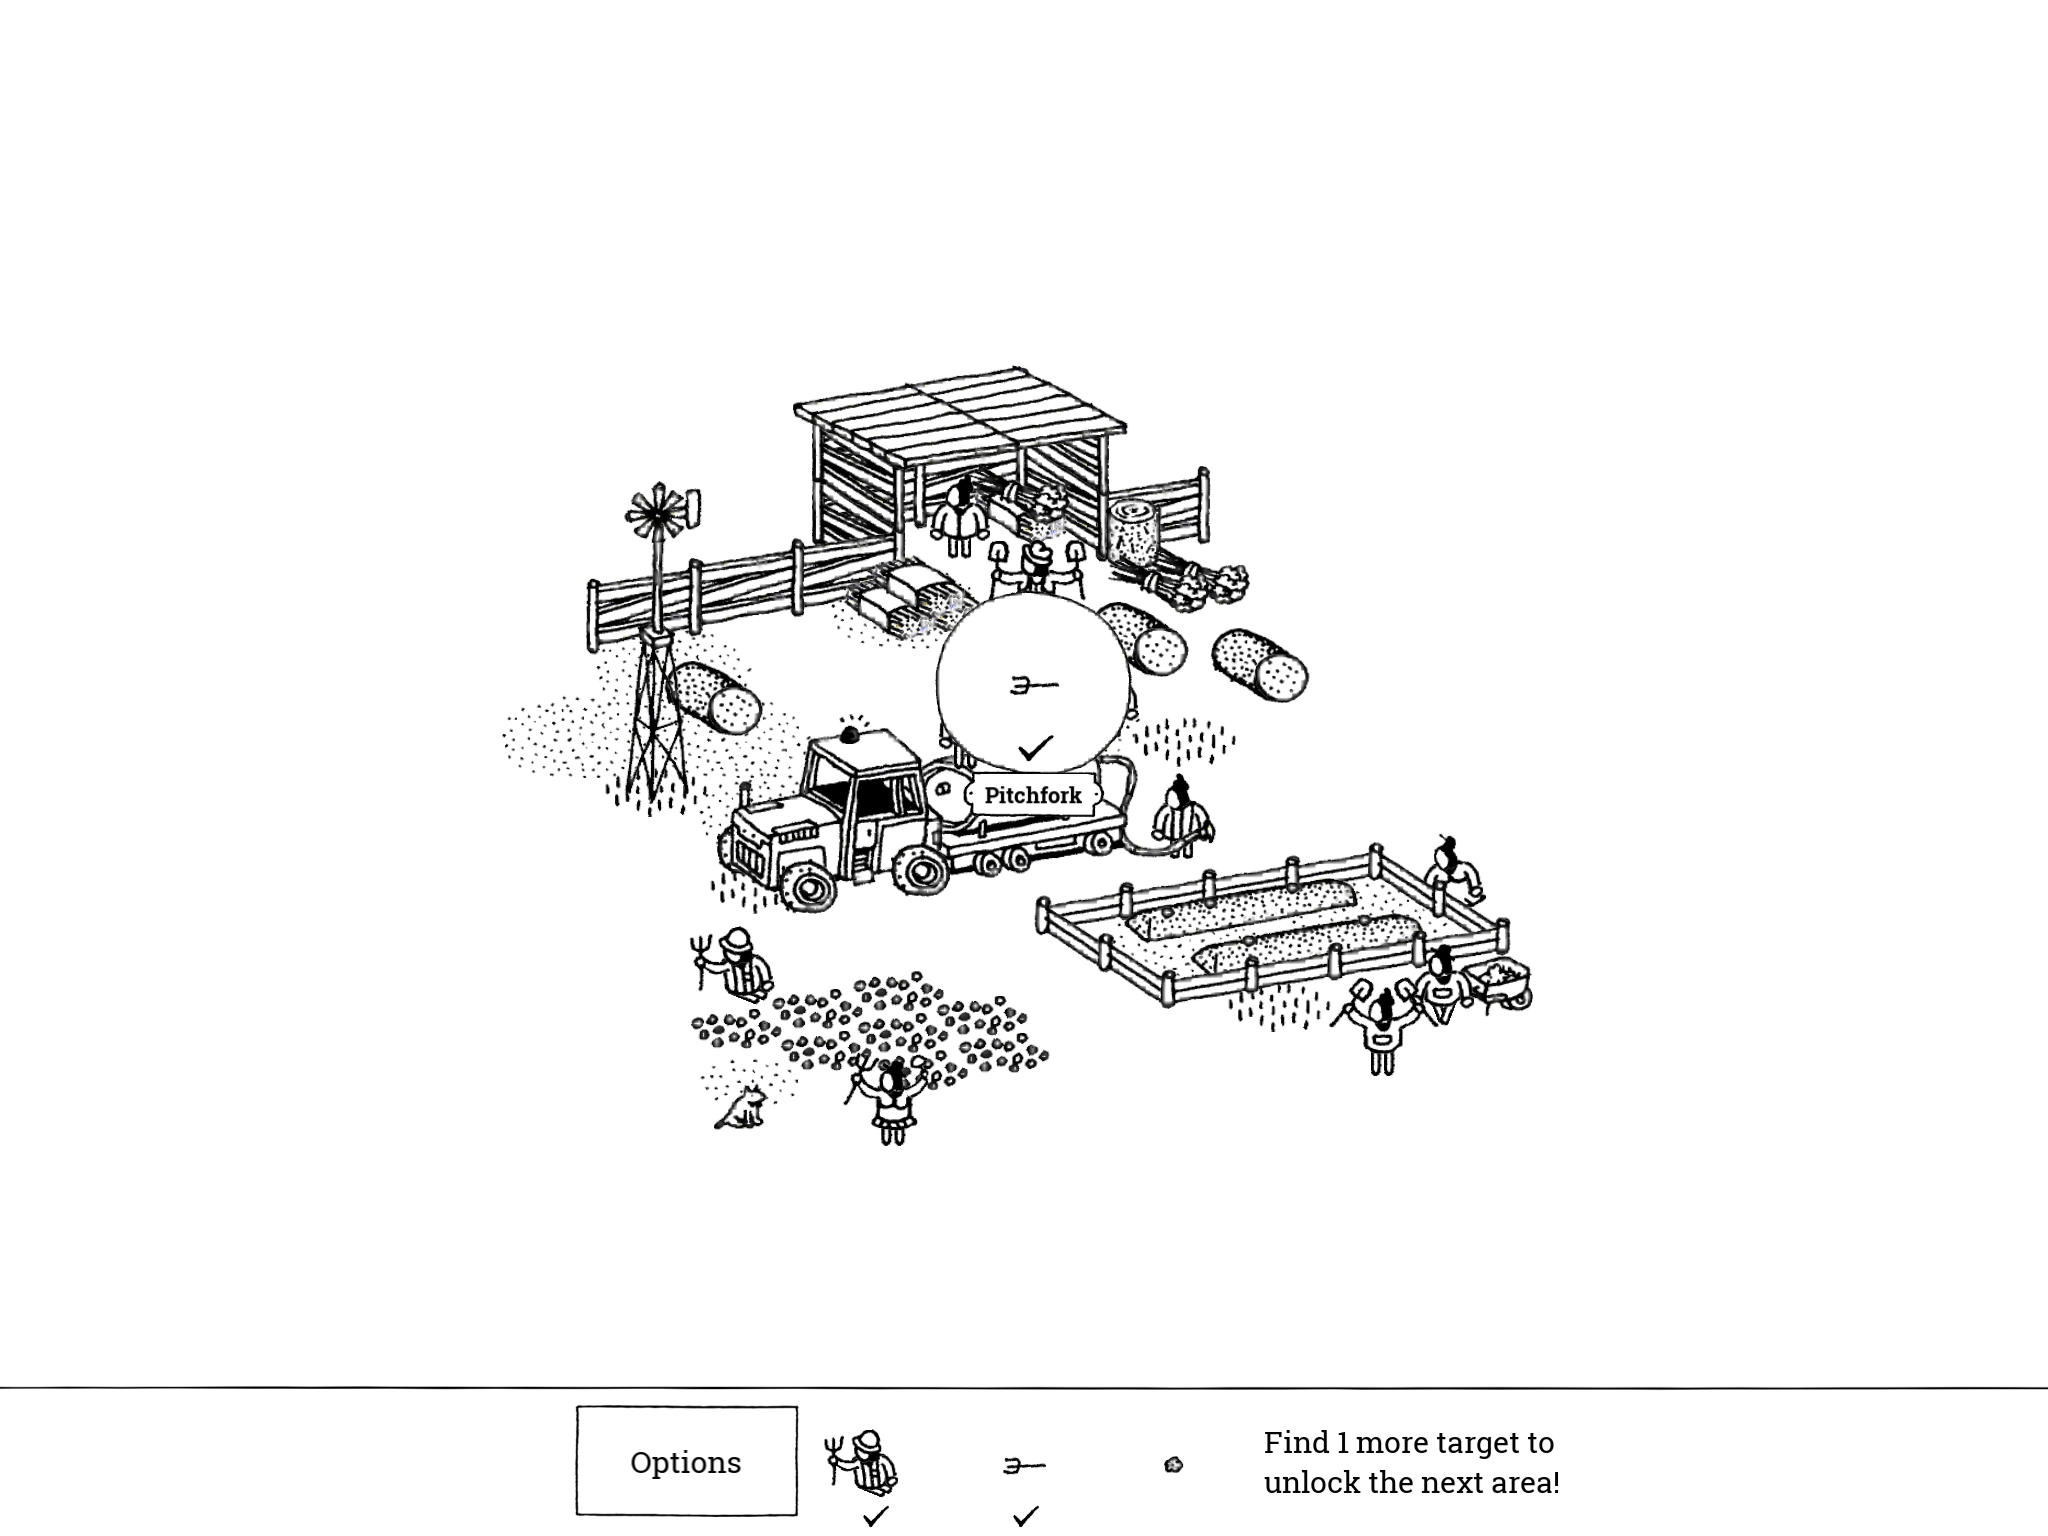
- Pitchfork: “Pitchfork vs. hay: 0-1.”
There are two hay bales on the ground northeast of the truck; tap the upper one to roll it out of the way, revealing the Pitchfork.
- Pitchfork: “Pitchfork vs. hay: 0-1.”
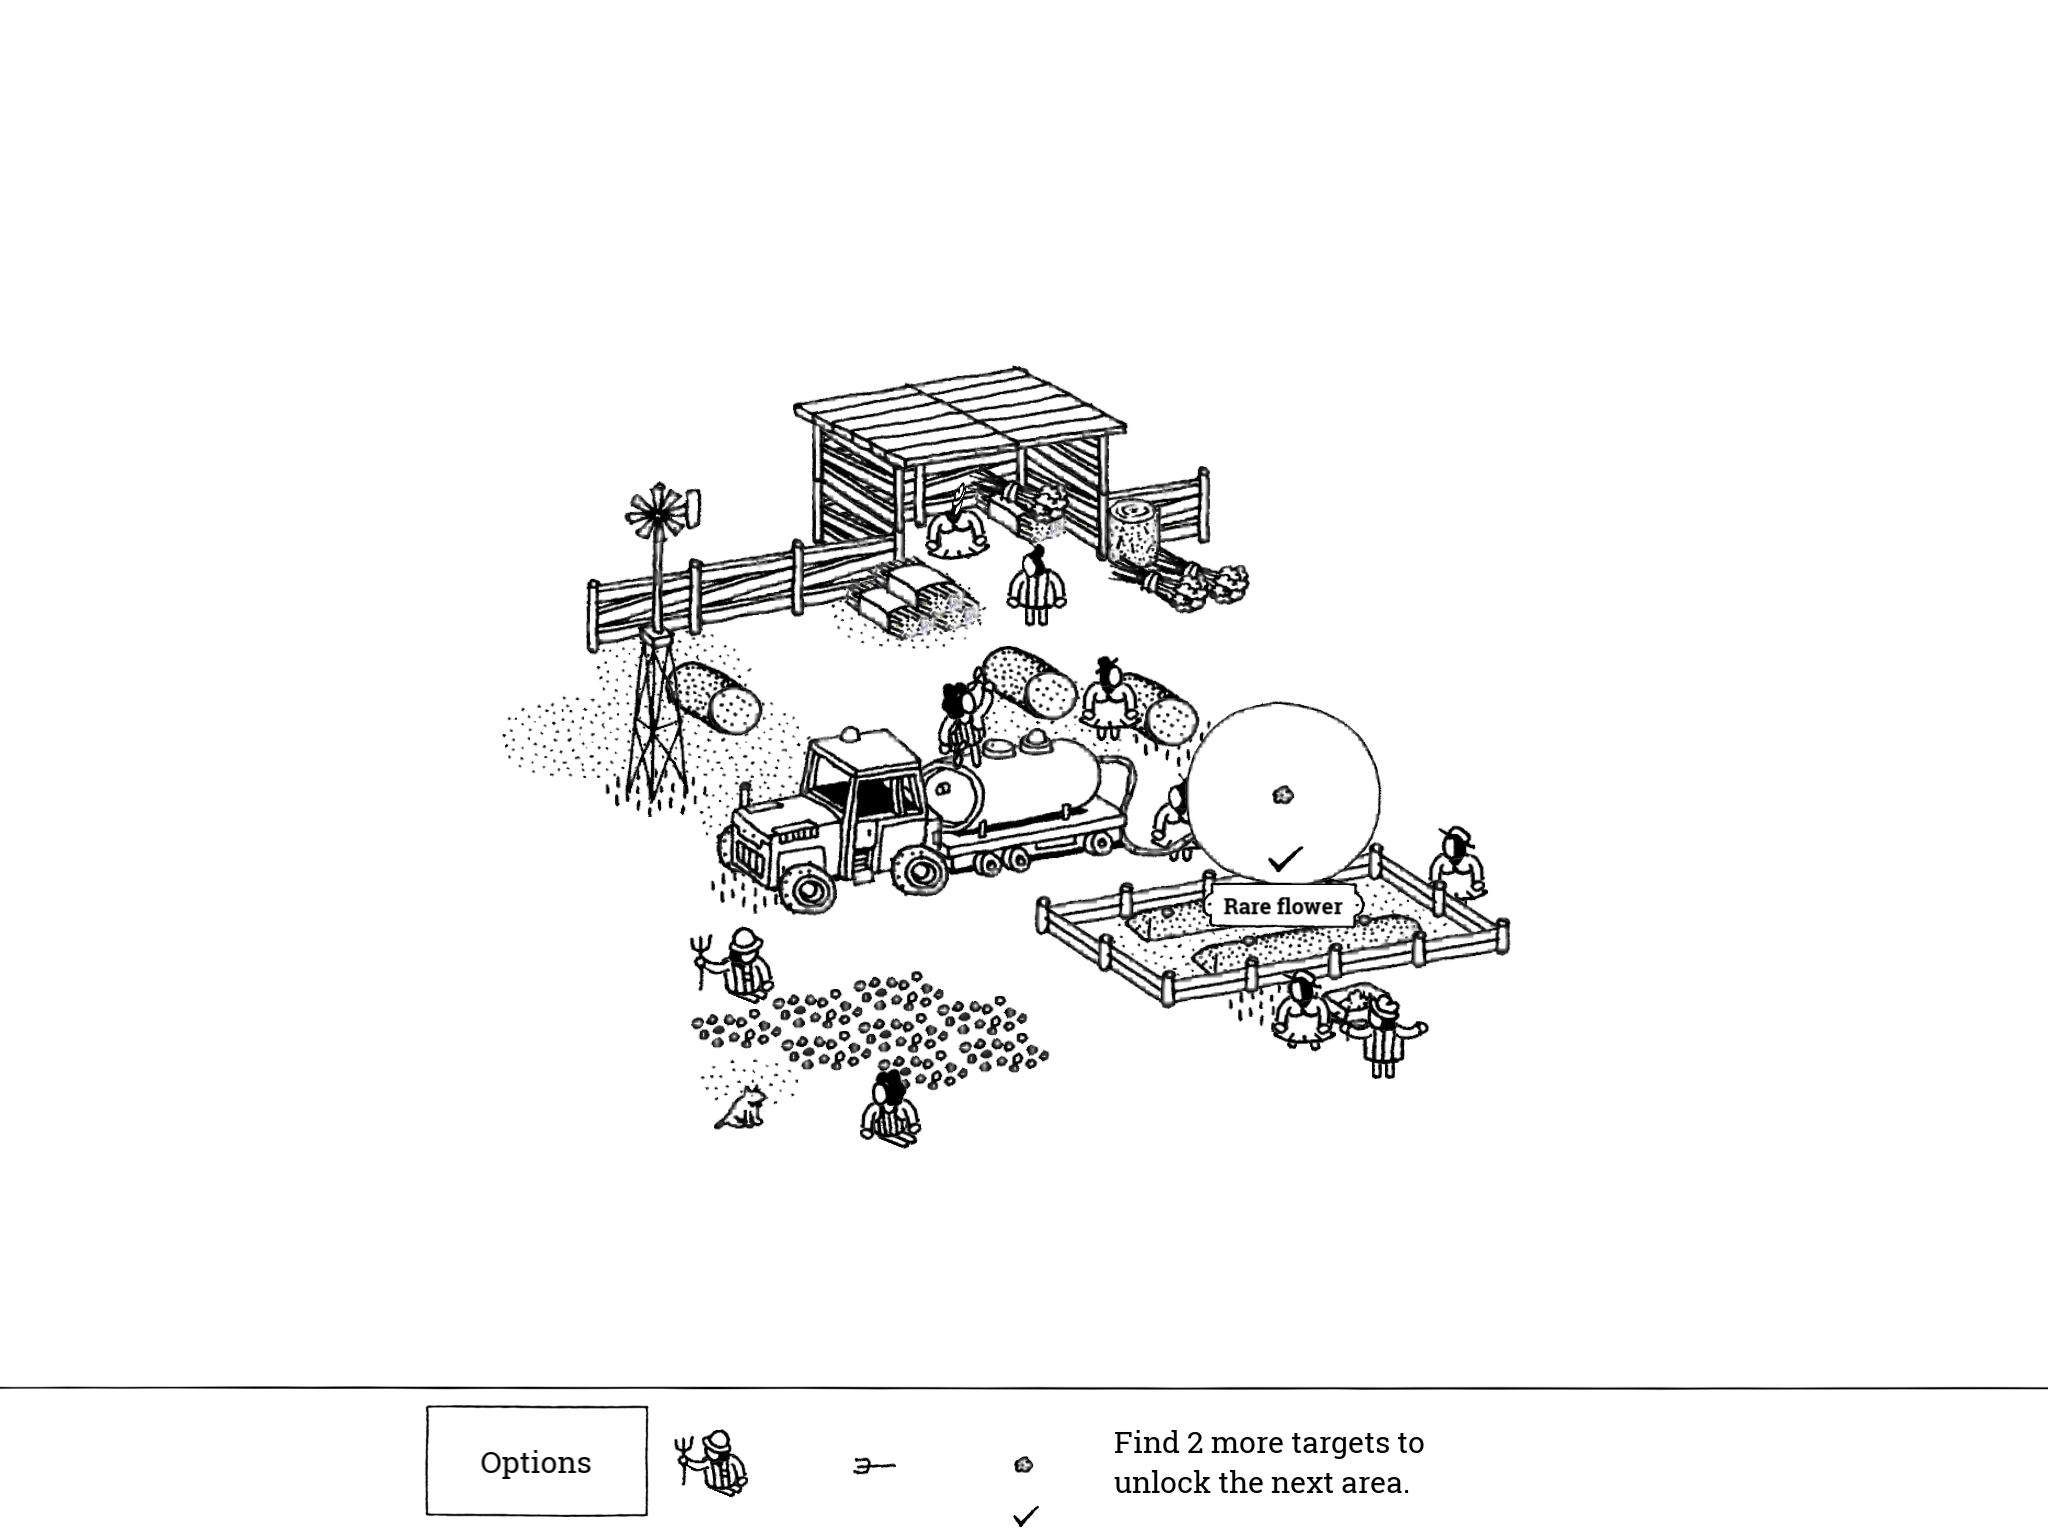
- Rare Flower: “If you water your crops well and give them a little bit of extra attention, you may see this rare flower.”
Tap on the water tanker to have the man with the hose start watering the field. Then tap on the seed he is water—the one in the top row, far right. Keep tapping it until it grows into a full flower, then tap this flower.
- Rare Flower: “If you water your crops well and give them a little bit of extra attention, you may see this rare flower.”
Dry Lands 2: The Farm
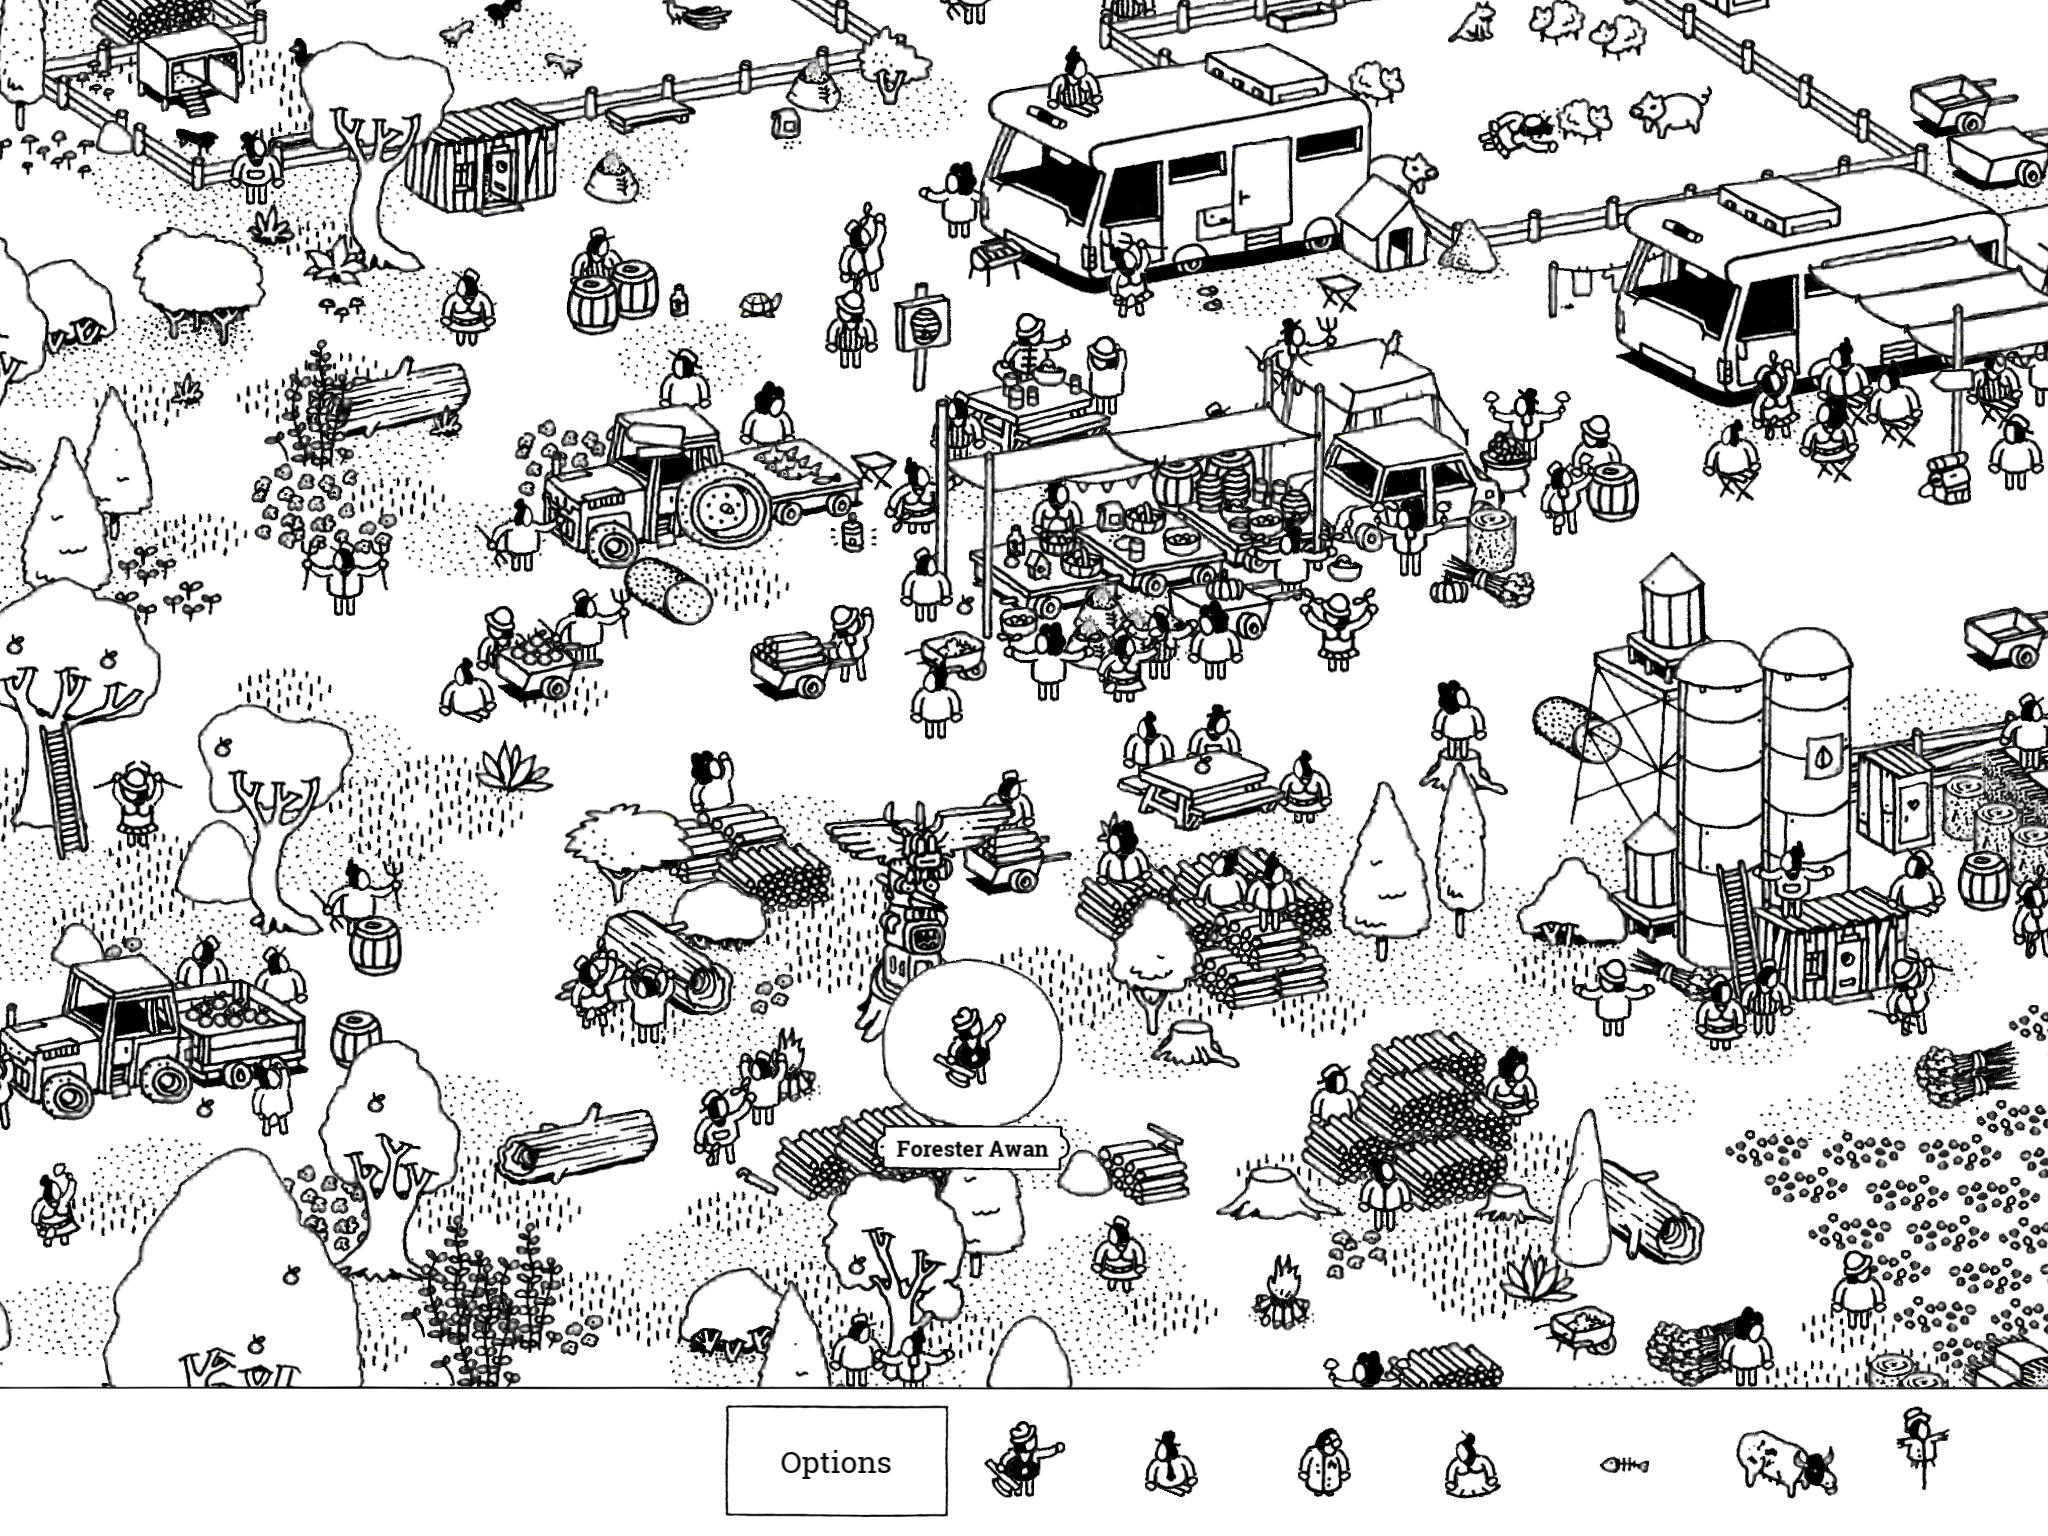
- Forester Awan: “An ancient Native American spirit suddenly possessed Forester Awan.”
Near the western vertical center of the image is a totem surrounded by piles of cut lumber. It is just southwest of the food stand and northeast of the apple orchard in the far southwest corner. Forester Awan is standing in front of this totem.
- Forester Awan: “An ancient Native American spirit suddenly possessed Forester Awan.”
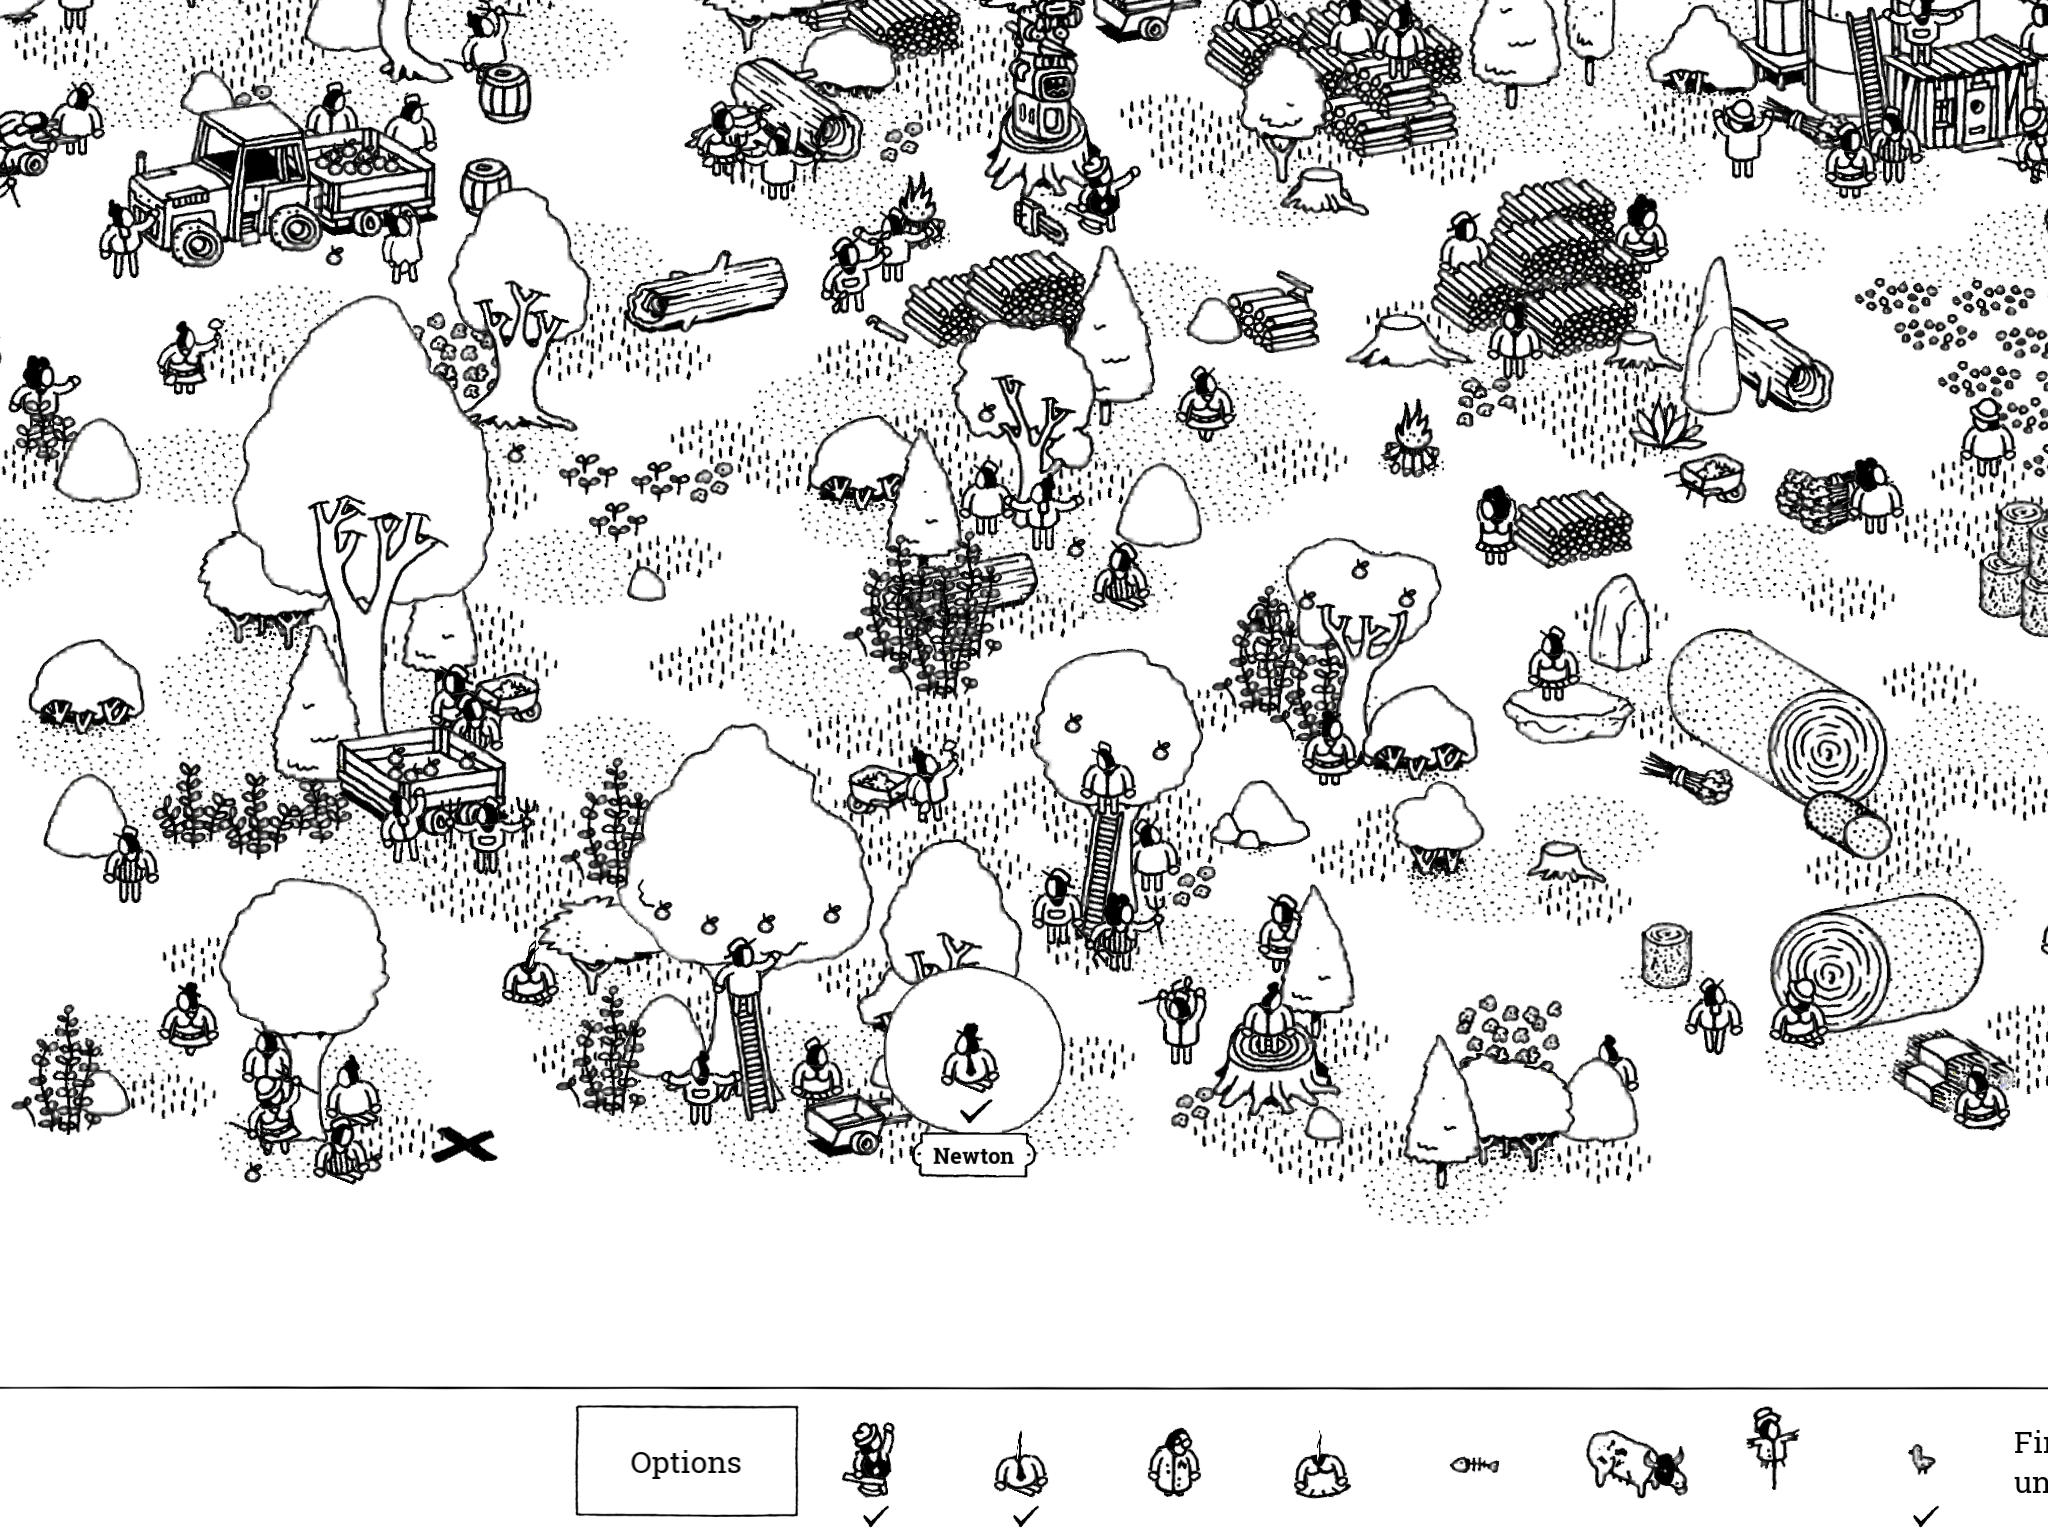
- Newton: “It’s time to get some fruity physics into Newton’s head!”
There is an apple orchard in the southwest corner of the image. Newton is sitting under one of the apple trees, three trees over from the southwest most edge, near a wheelbarrow. If you tap on him, an apple will fall onto his head. Tap on him again to collect him.
- Newton: “It’s time to get some fruity physics into Newton’s head!”
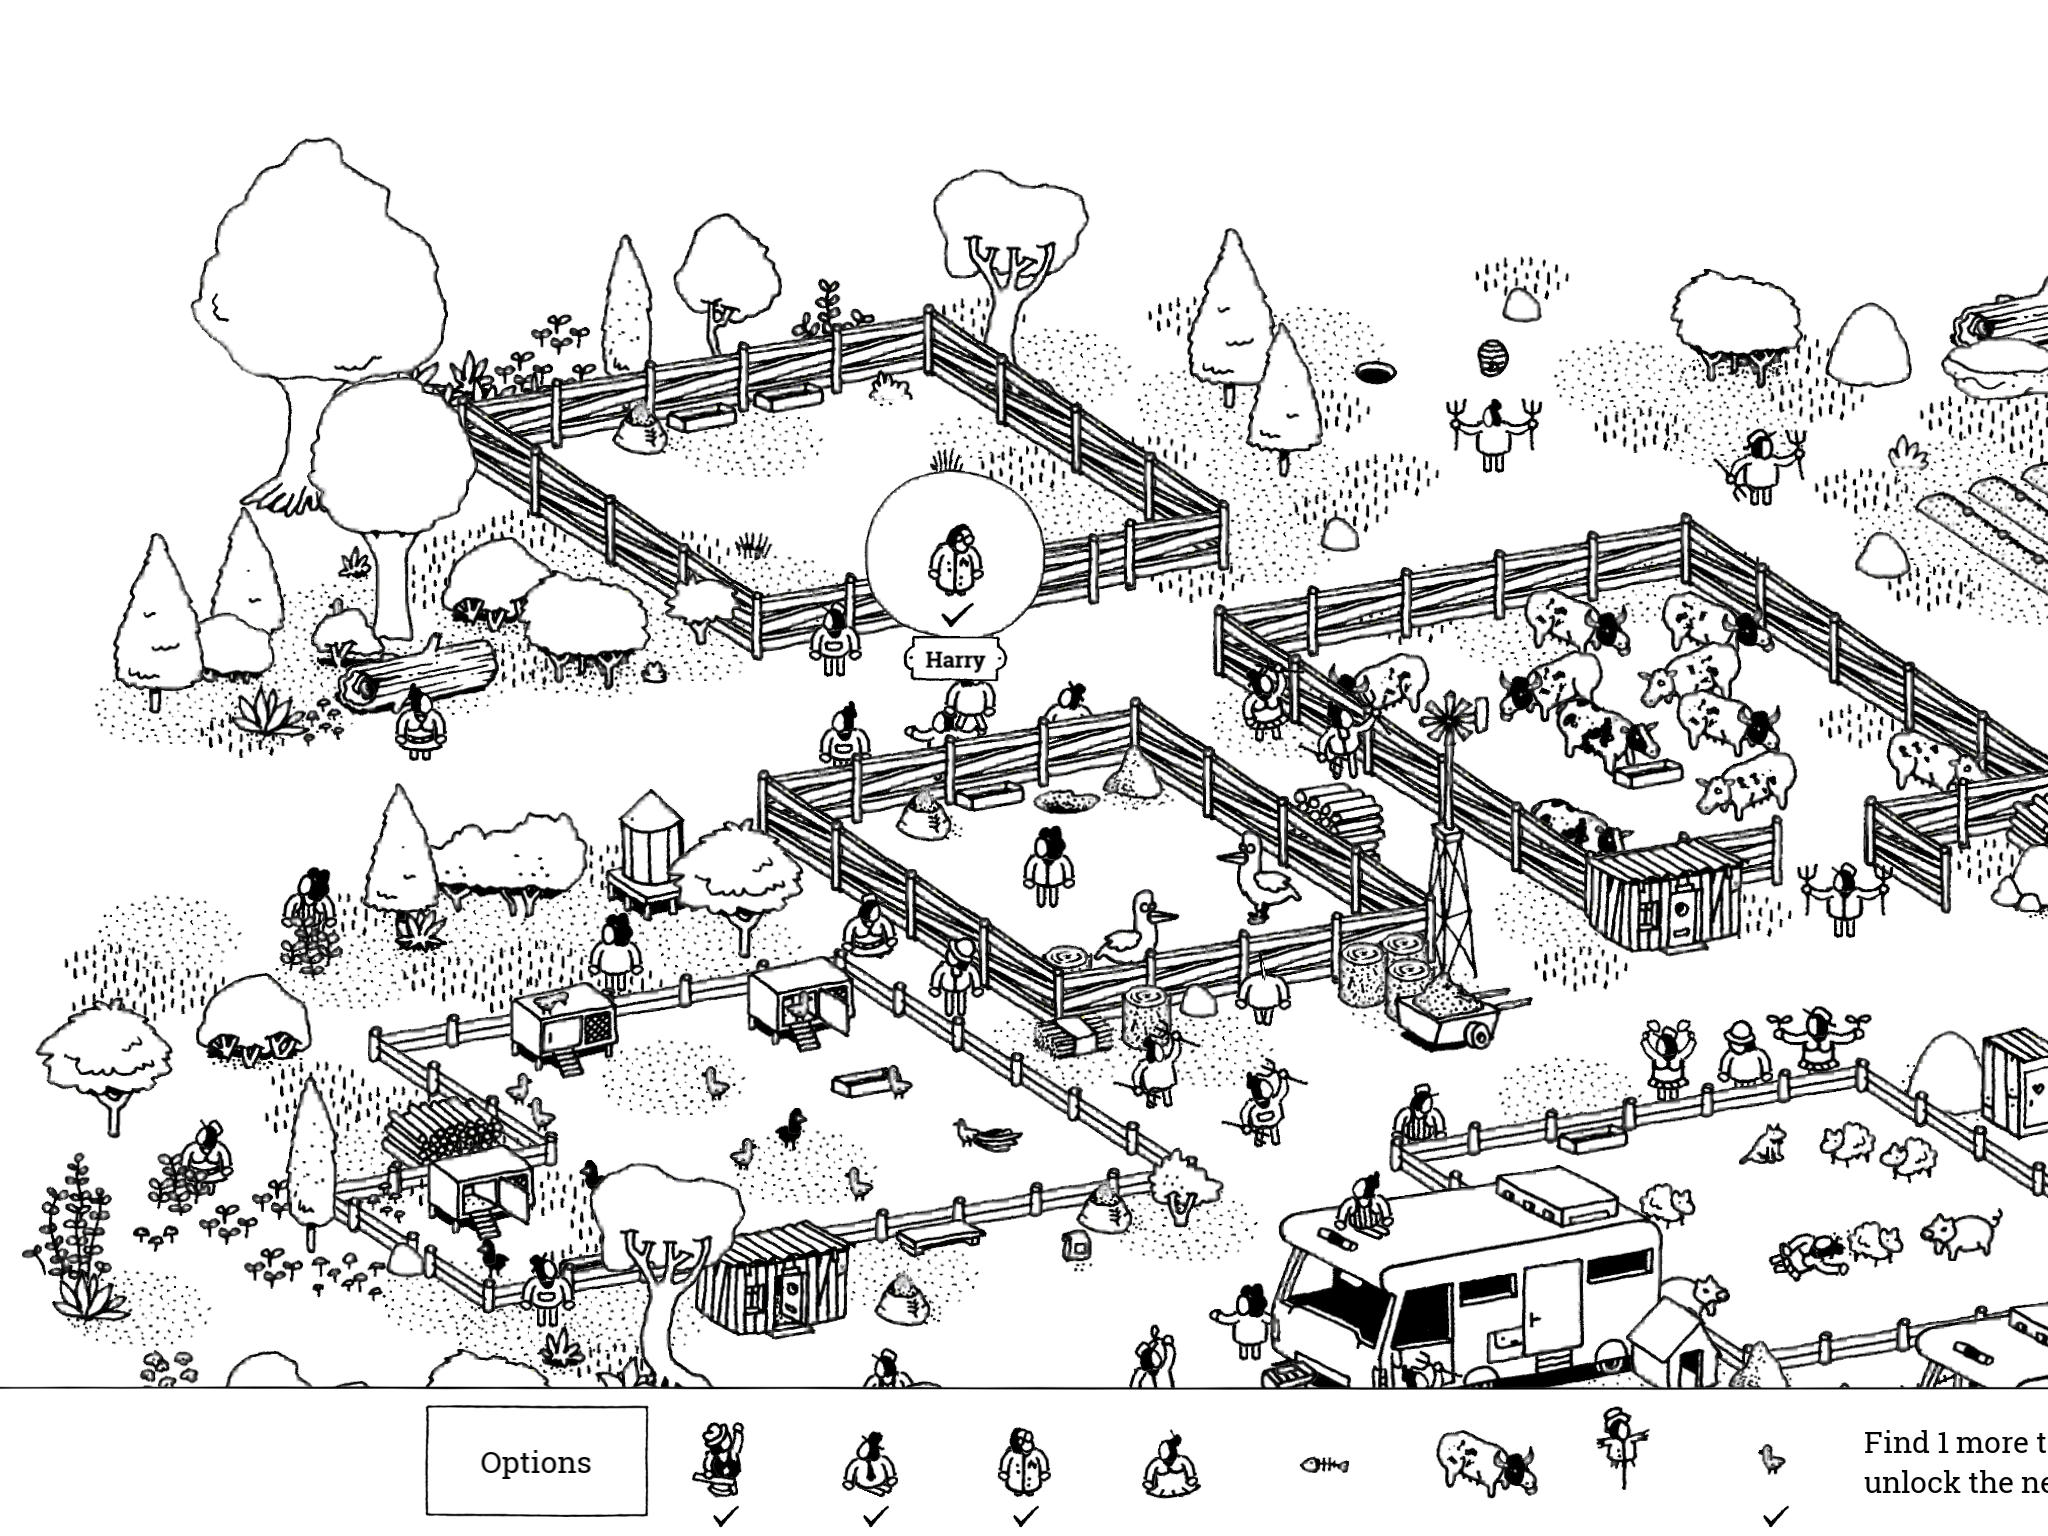
- Harry: “According to Harry, invisible cattle is also cattle.”
In the northwest corner of the image are some trees and an empty animal pen. Harry is standing at the entrance to this pen.
- Harry: “According to Harry, invisible cattle is also cattle.”
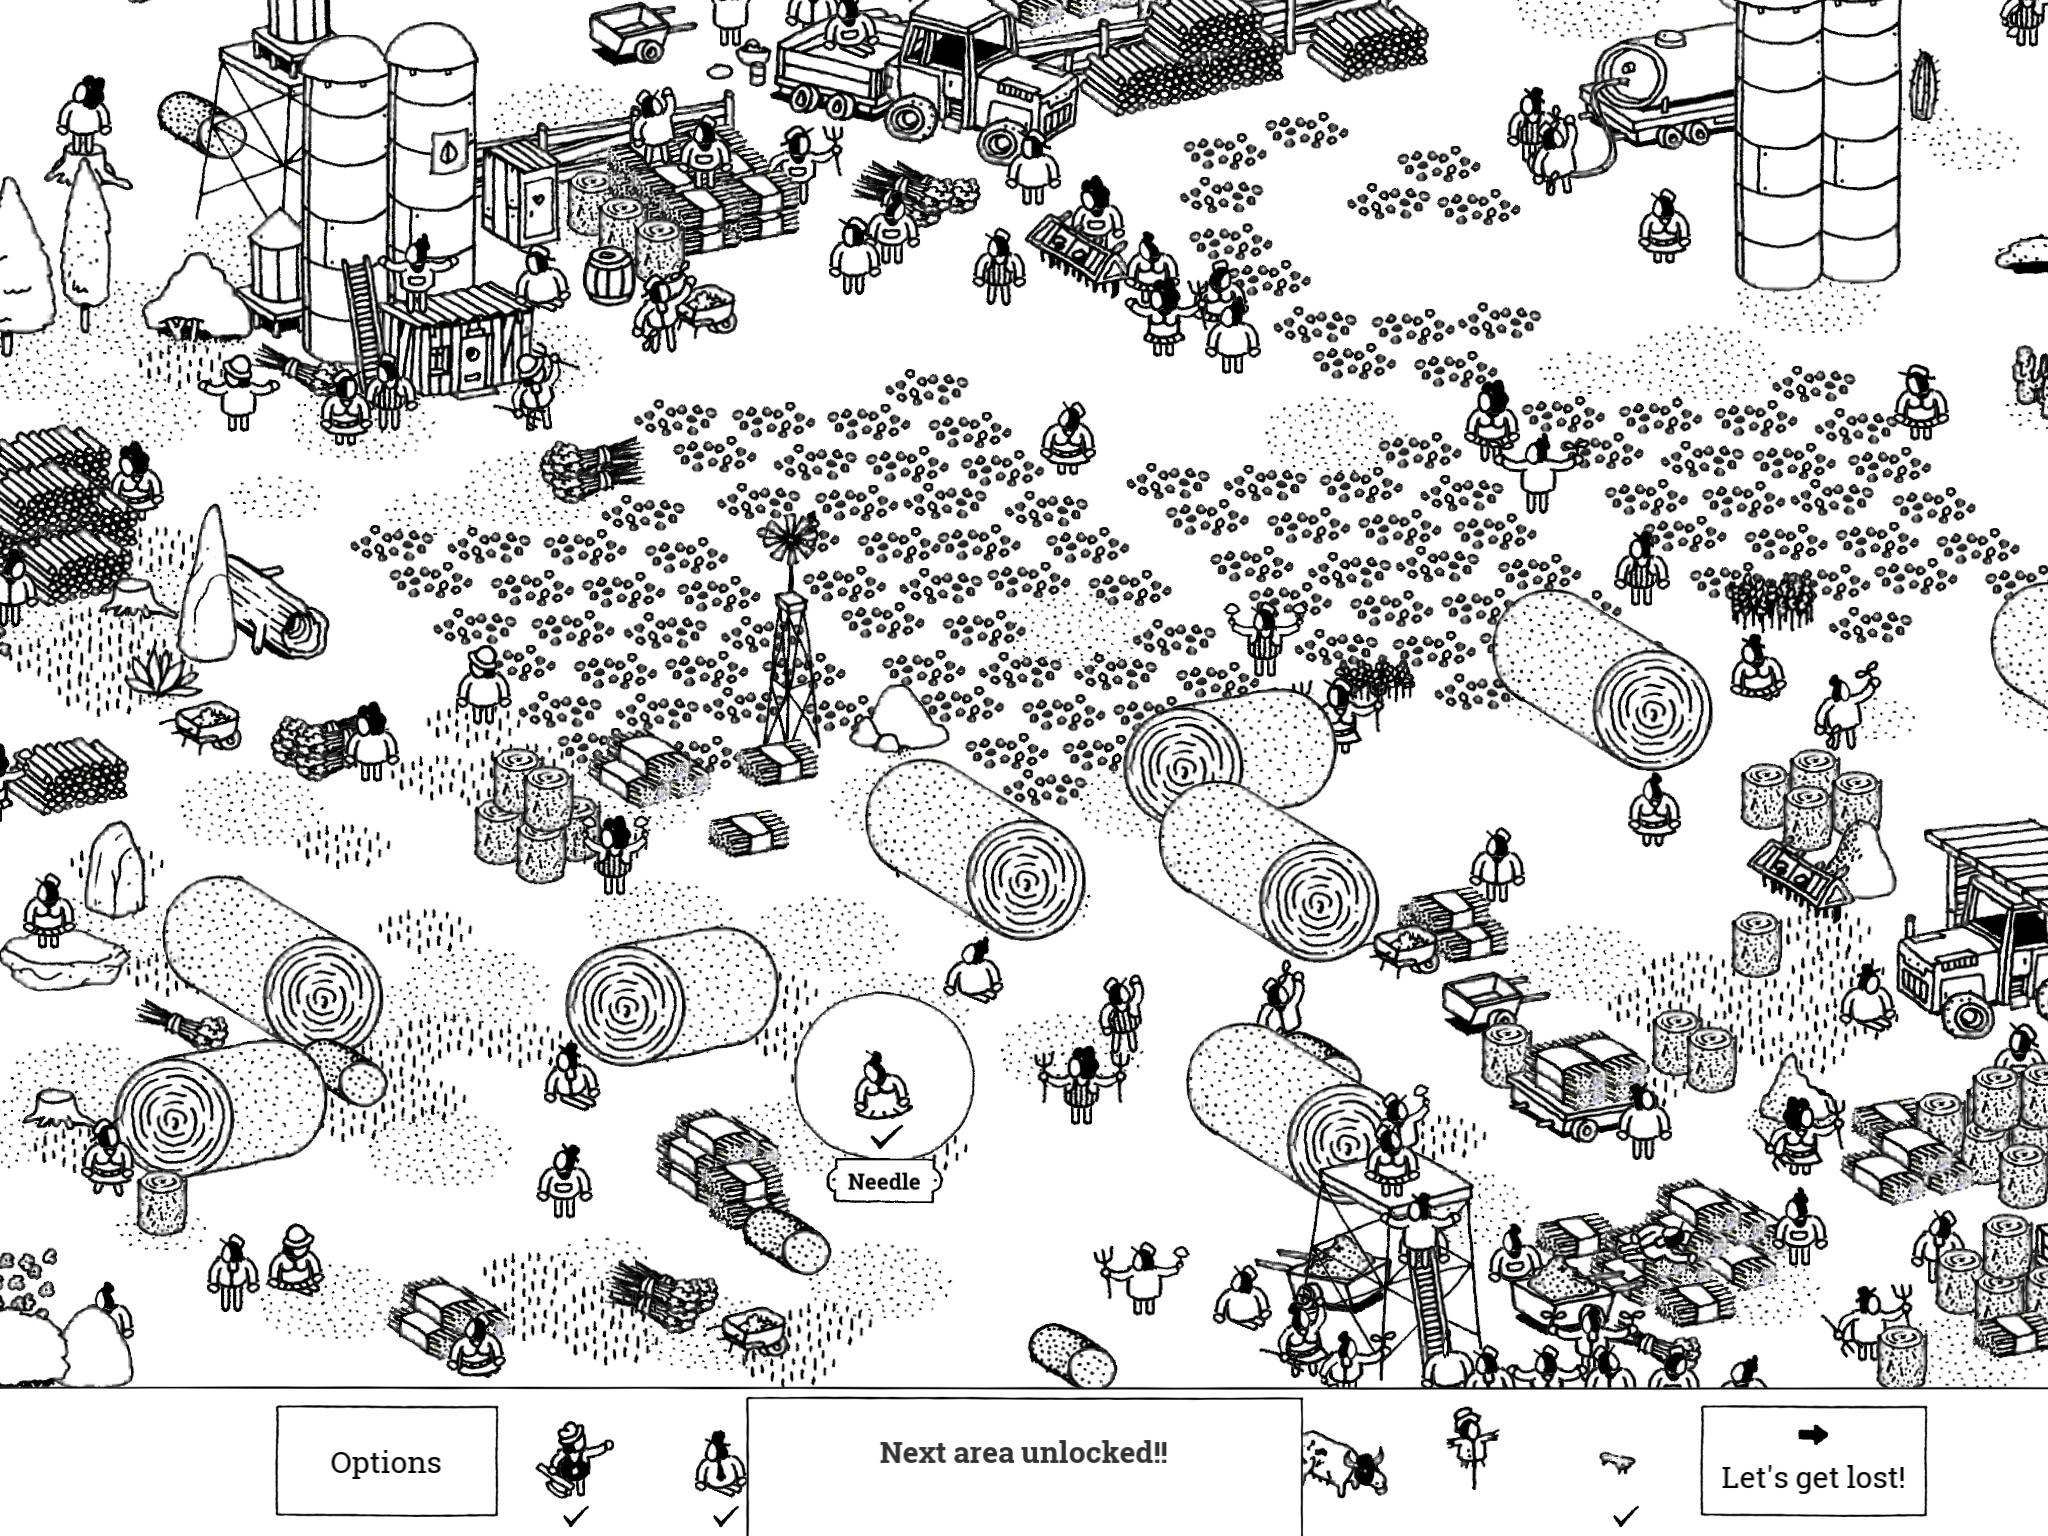
- Needle: “Needle might not be in a hay stack, but she sure knows how to roll.”
On the eastern side of the image, just south of horizontal center, is a field of seeds and some hay bales below this field. There are four hay bales that make a sort of diamond shape just south of the small windmill. Tap the leftmost hay bale in this diamond to make it roll north; Needle will be revealed.
- Needle: “Needle might not be in a hay stack, but she sure knows how to roll.”
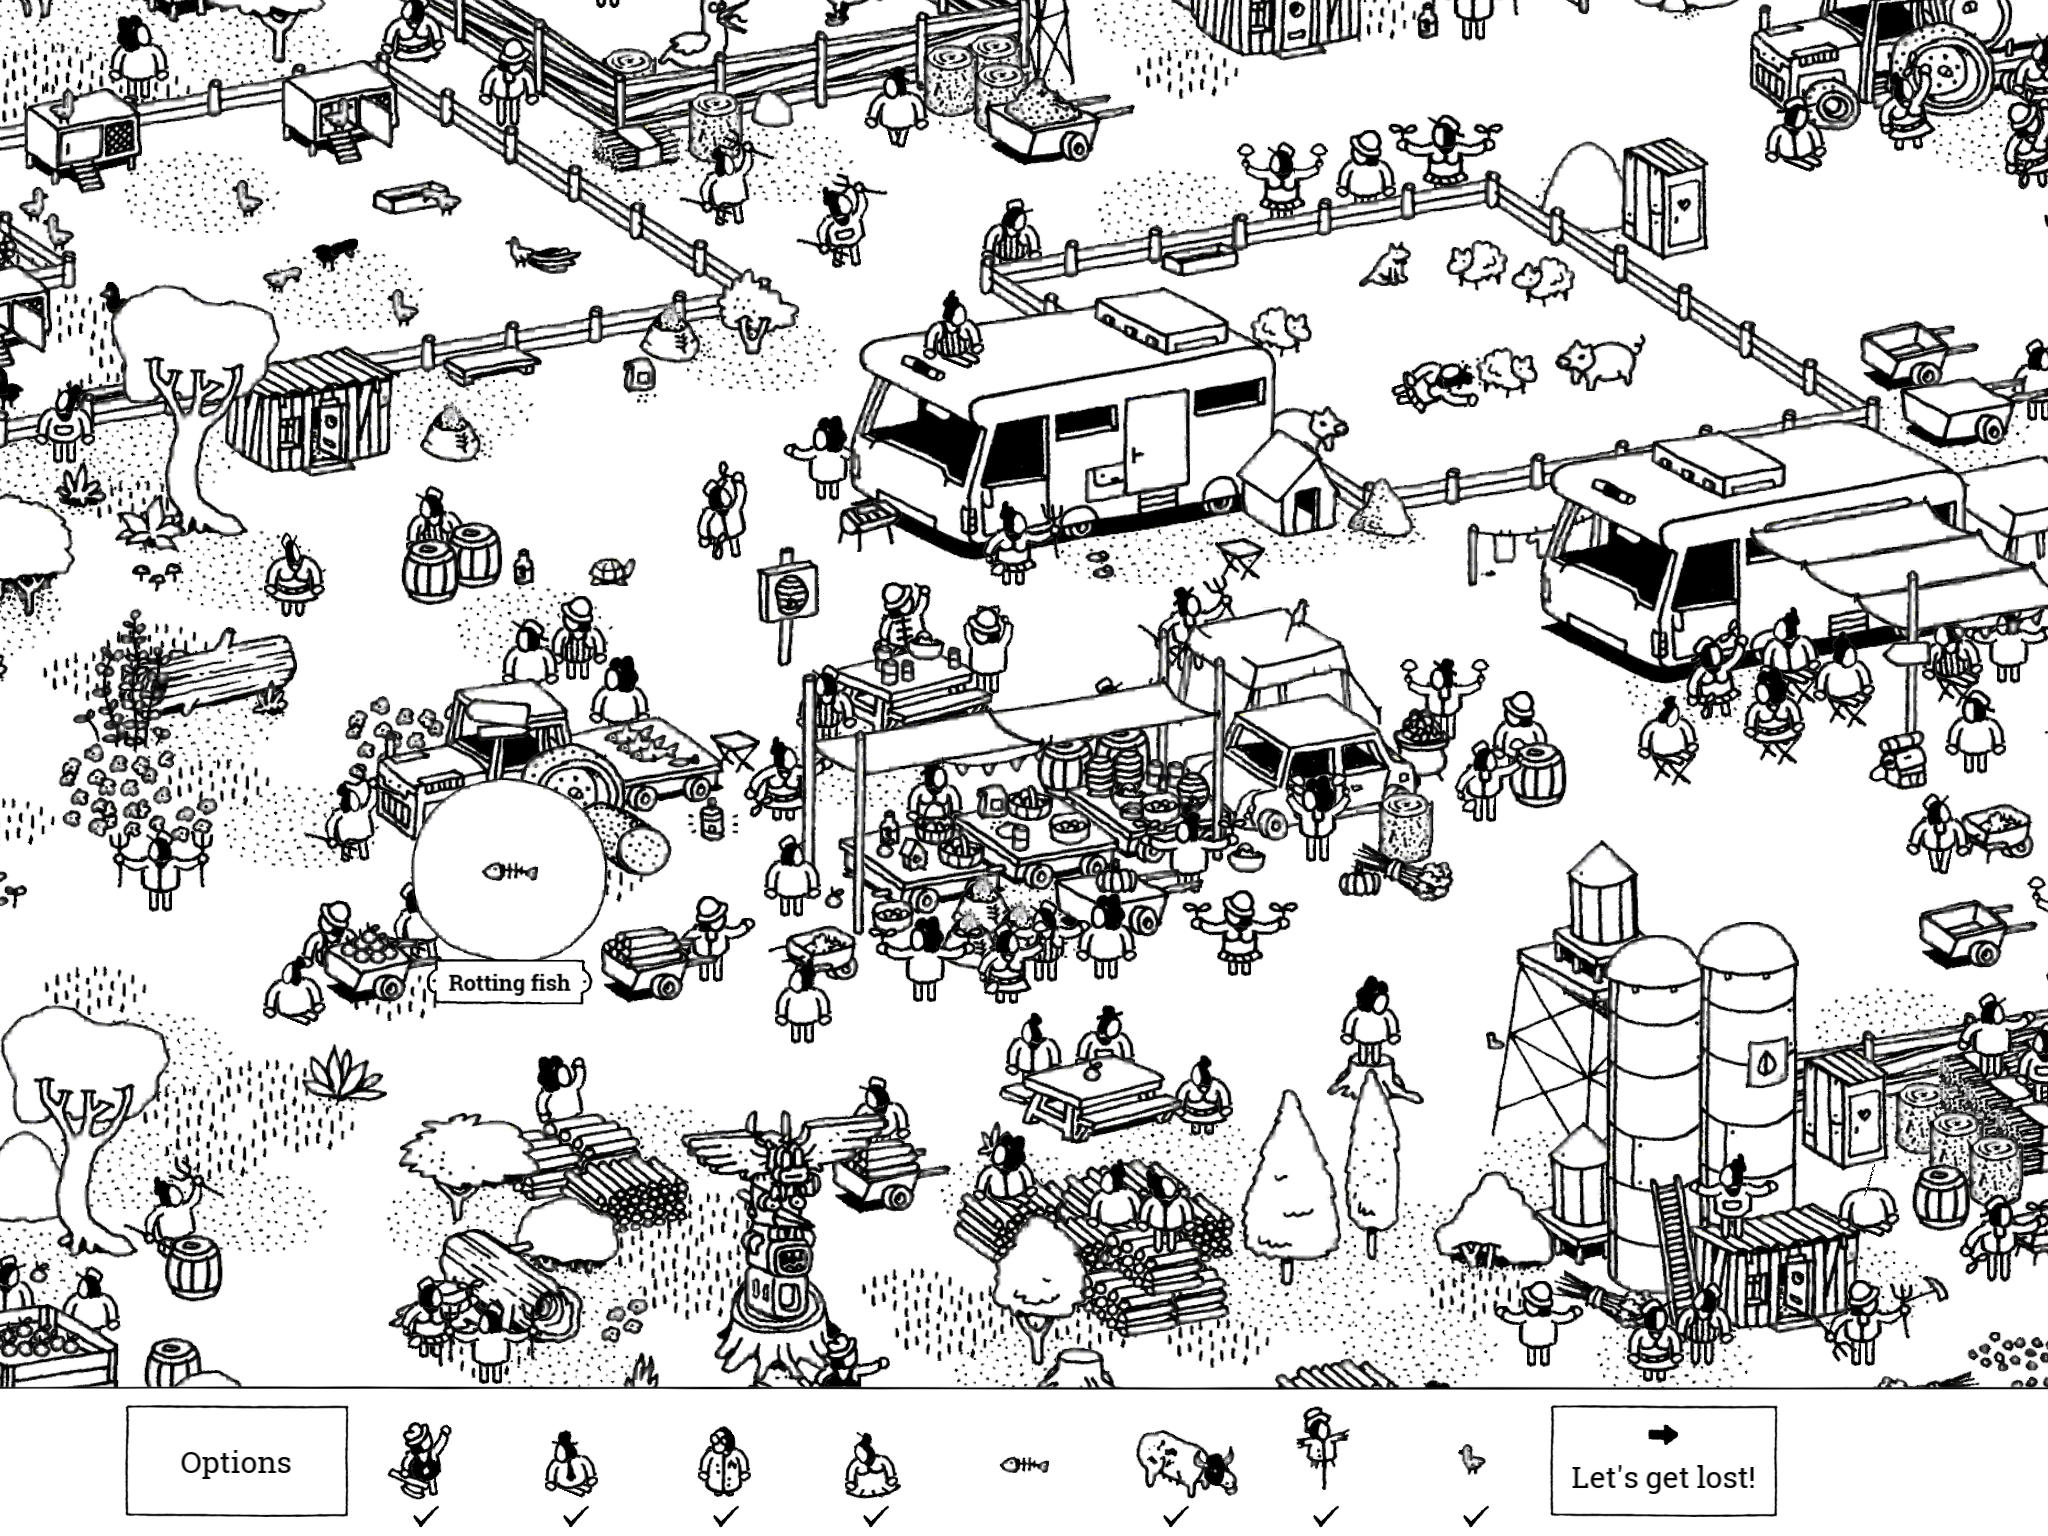
- Rotting Fish: “This rotting fish is repelling potential customers.”
Just west of the center of the image is a food stand; it’s northeast of Forester Awan and south of the chicken pen. Slightly northwest of the food stand is a tractor pulling a cart with fish on it. In front of the tractor is a hay bale; tap the hay to roll it to the right and reveal the Rotting Fish.
- Rotting Fish: “This rotting fish is repelling potential customers.”
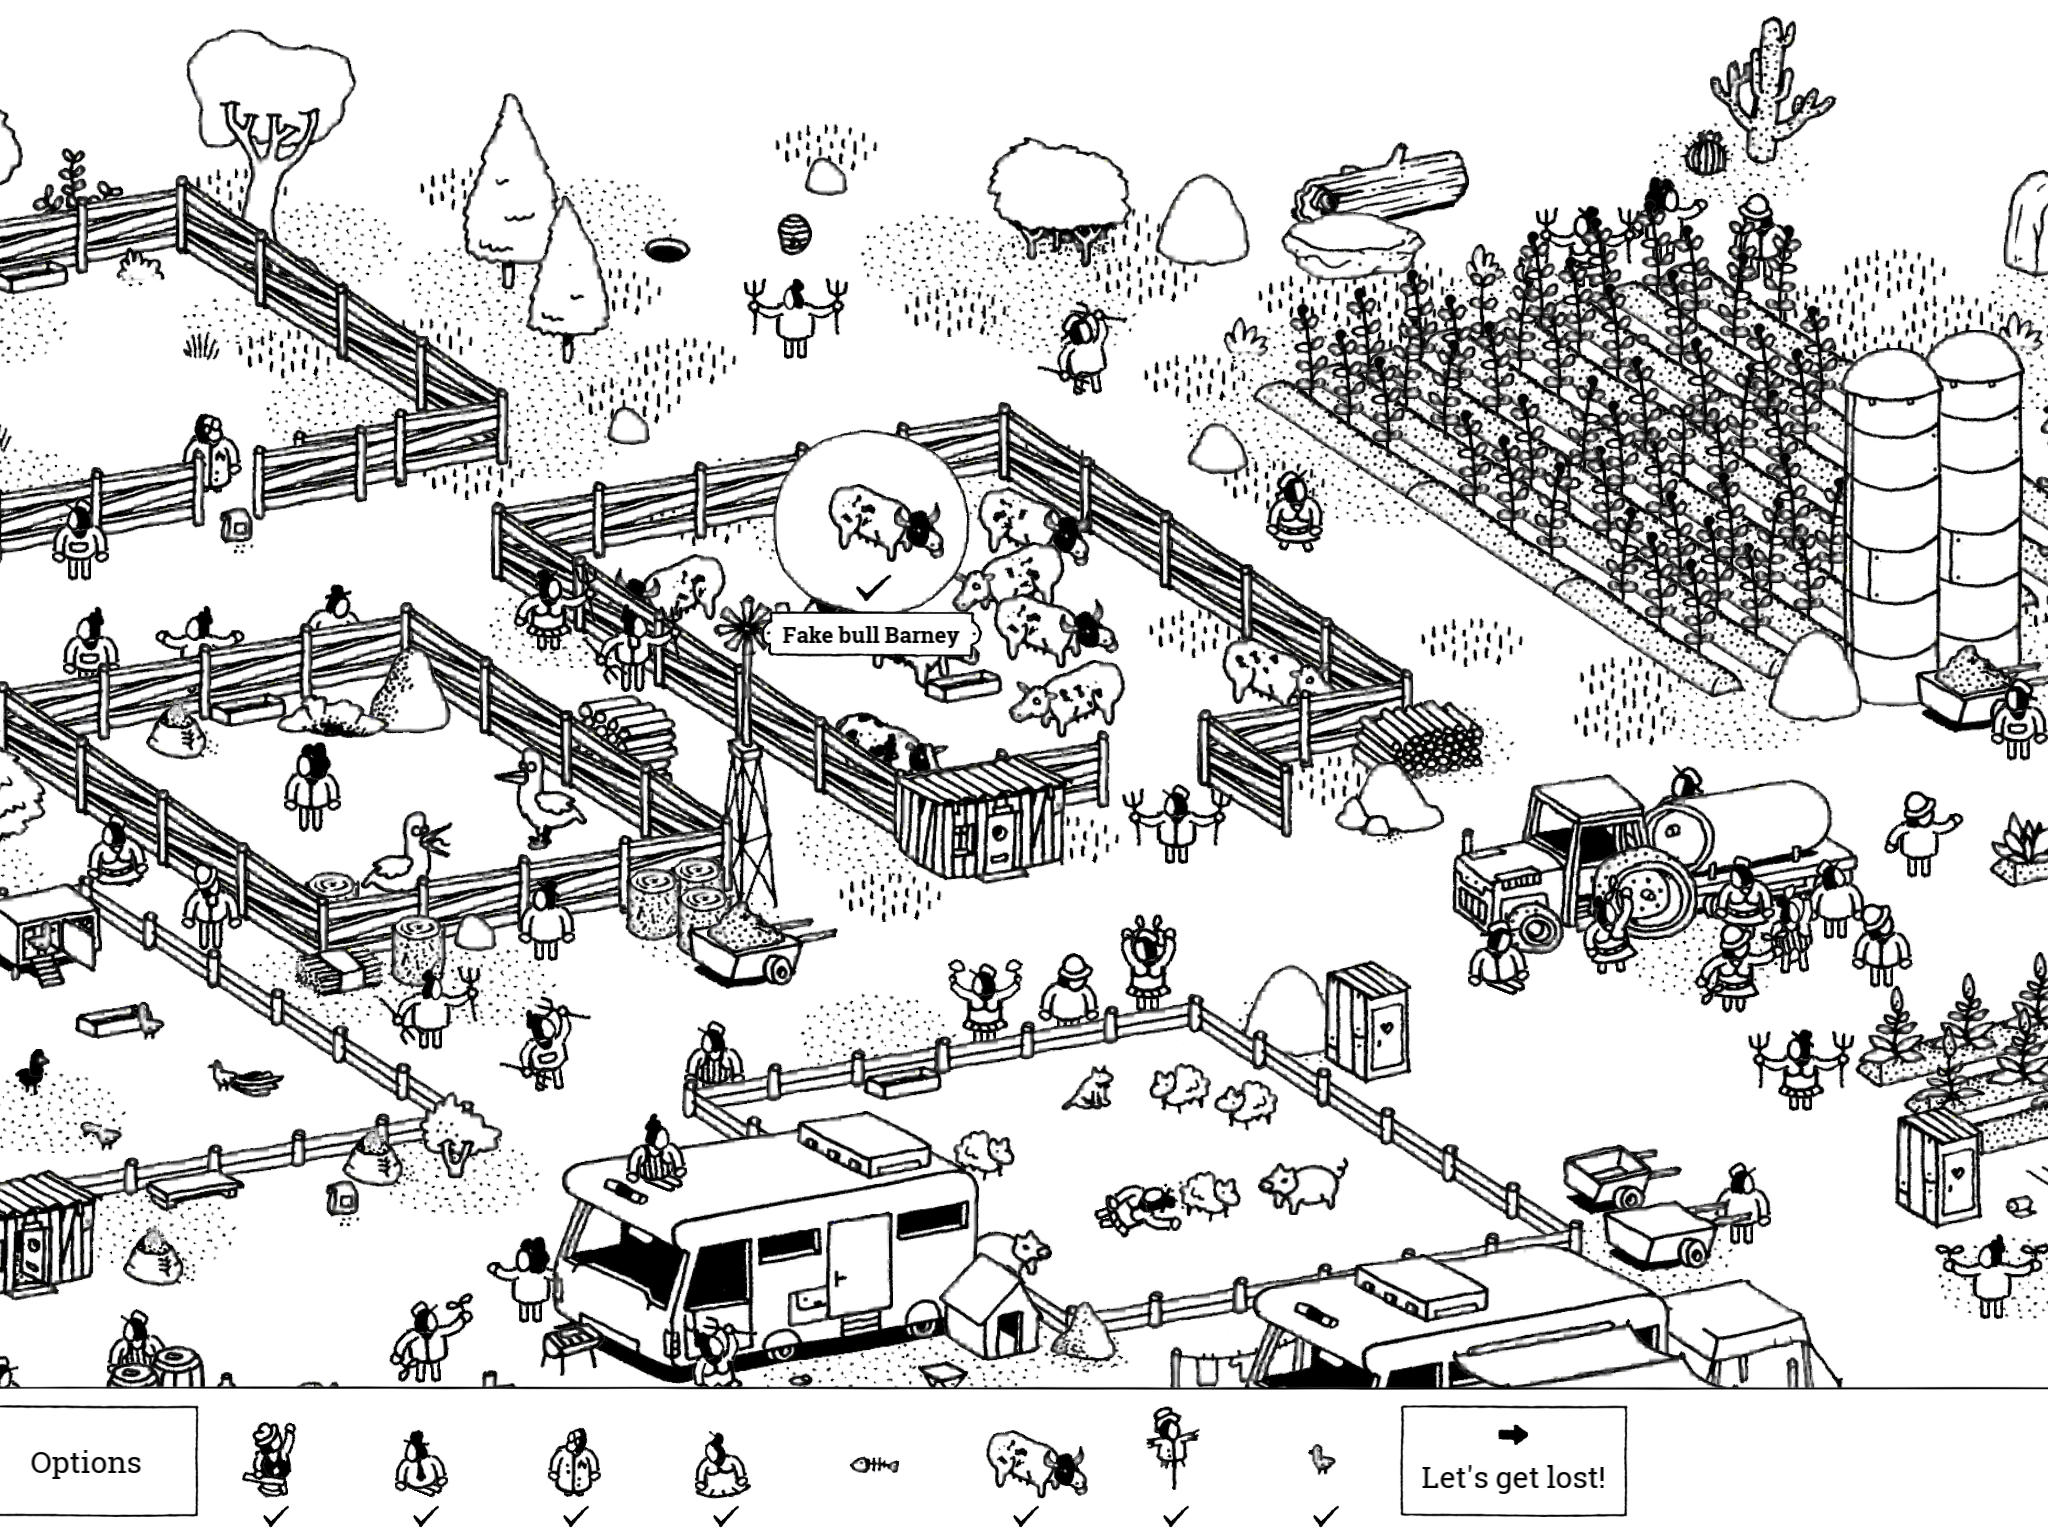
- Fake Bull Barney: “Fake bull Barney is not moved by this pen. Maybe because he’s fake and has no feelings?”
The cow pen is north of the center of the image. Fake Bull Barney is on the north side of the pen. He is the only bull that is not moving at all.
- Fake Bull Barney: “Fake bull Barney is not moved by this pen. Maybe because he’s fake and has no feelings?”
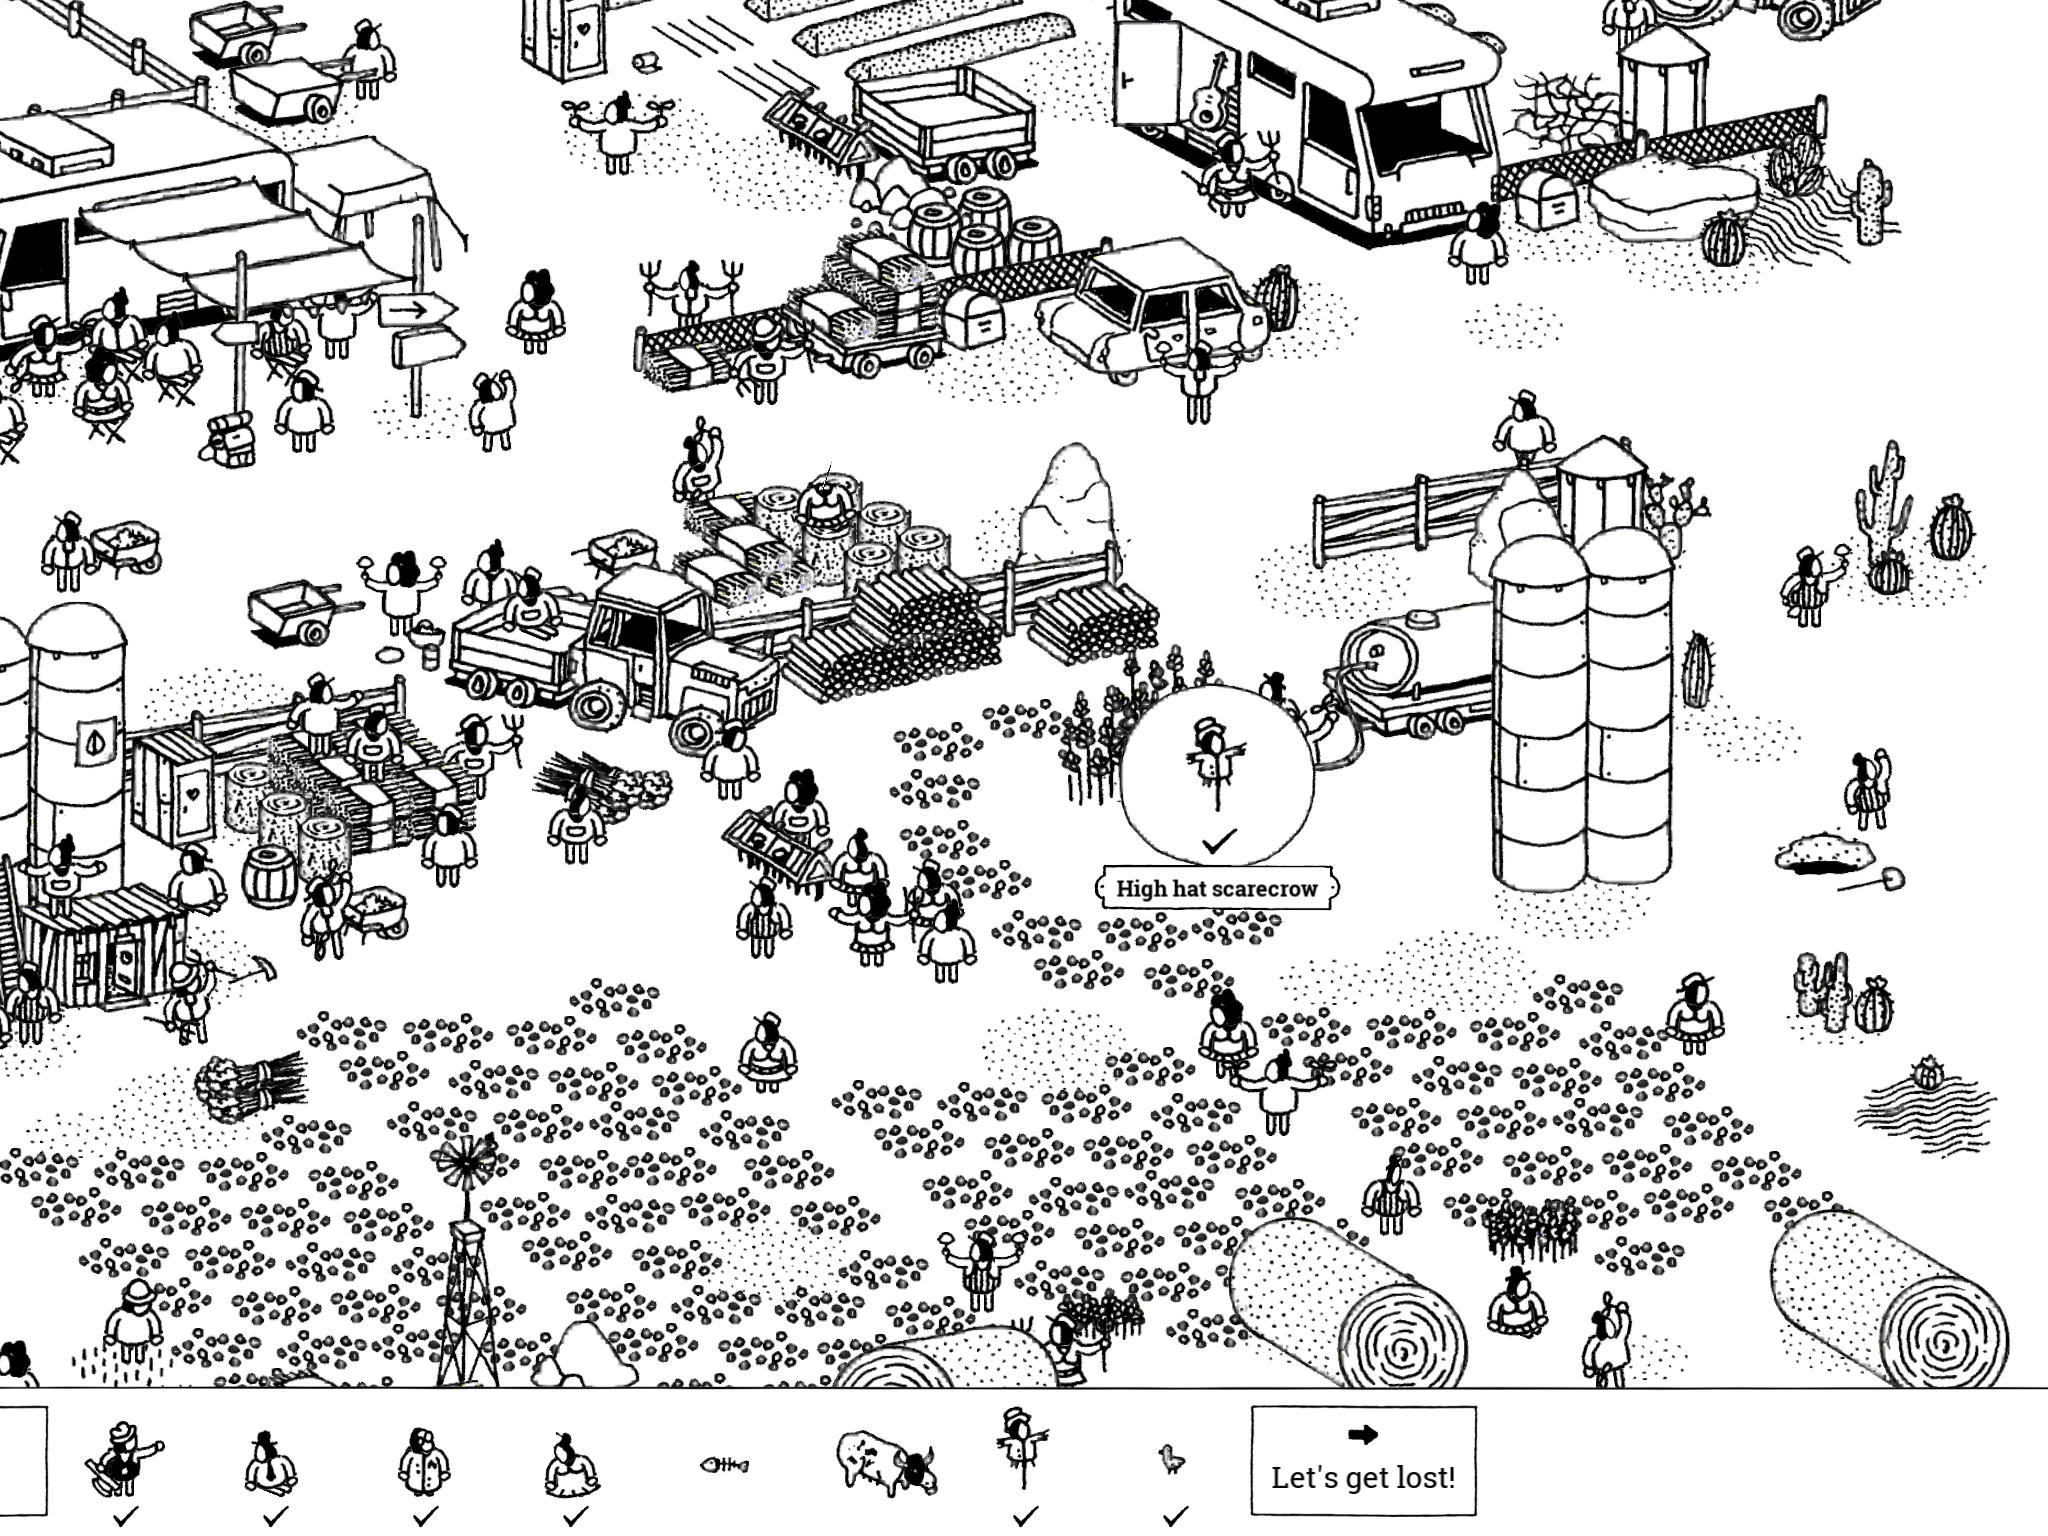
- High Hat Scarecrow: “This high hat scarecrow is really arrogant. He only likes wheat (not crops), wants his area to be watered, and will only show himself when his wheat has fully grown.”
There is a seeded field just north of the southeast corner of the image. On the northeast side of this field is a water tanker truck. Tap the water tanker to start watering that part of the field. Then tap the seeds that are being watered. After four or five taps, the wheat will be fully grown and High Hat Scarecrow will appear; tap him to collect him. If you grow the other, non-watered parts of the field, regular scarecrows will pop up, but you specifically need this high-hatted one.
- High Hat Scarecrow: “This high hat scarecrow is really arrogant. He only likes wheat (not crops), wants his area to be watered, and will only show himself when his wheat has fully grown.”
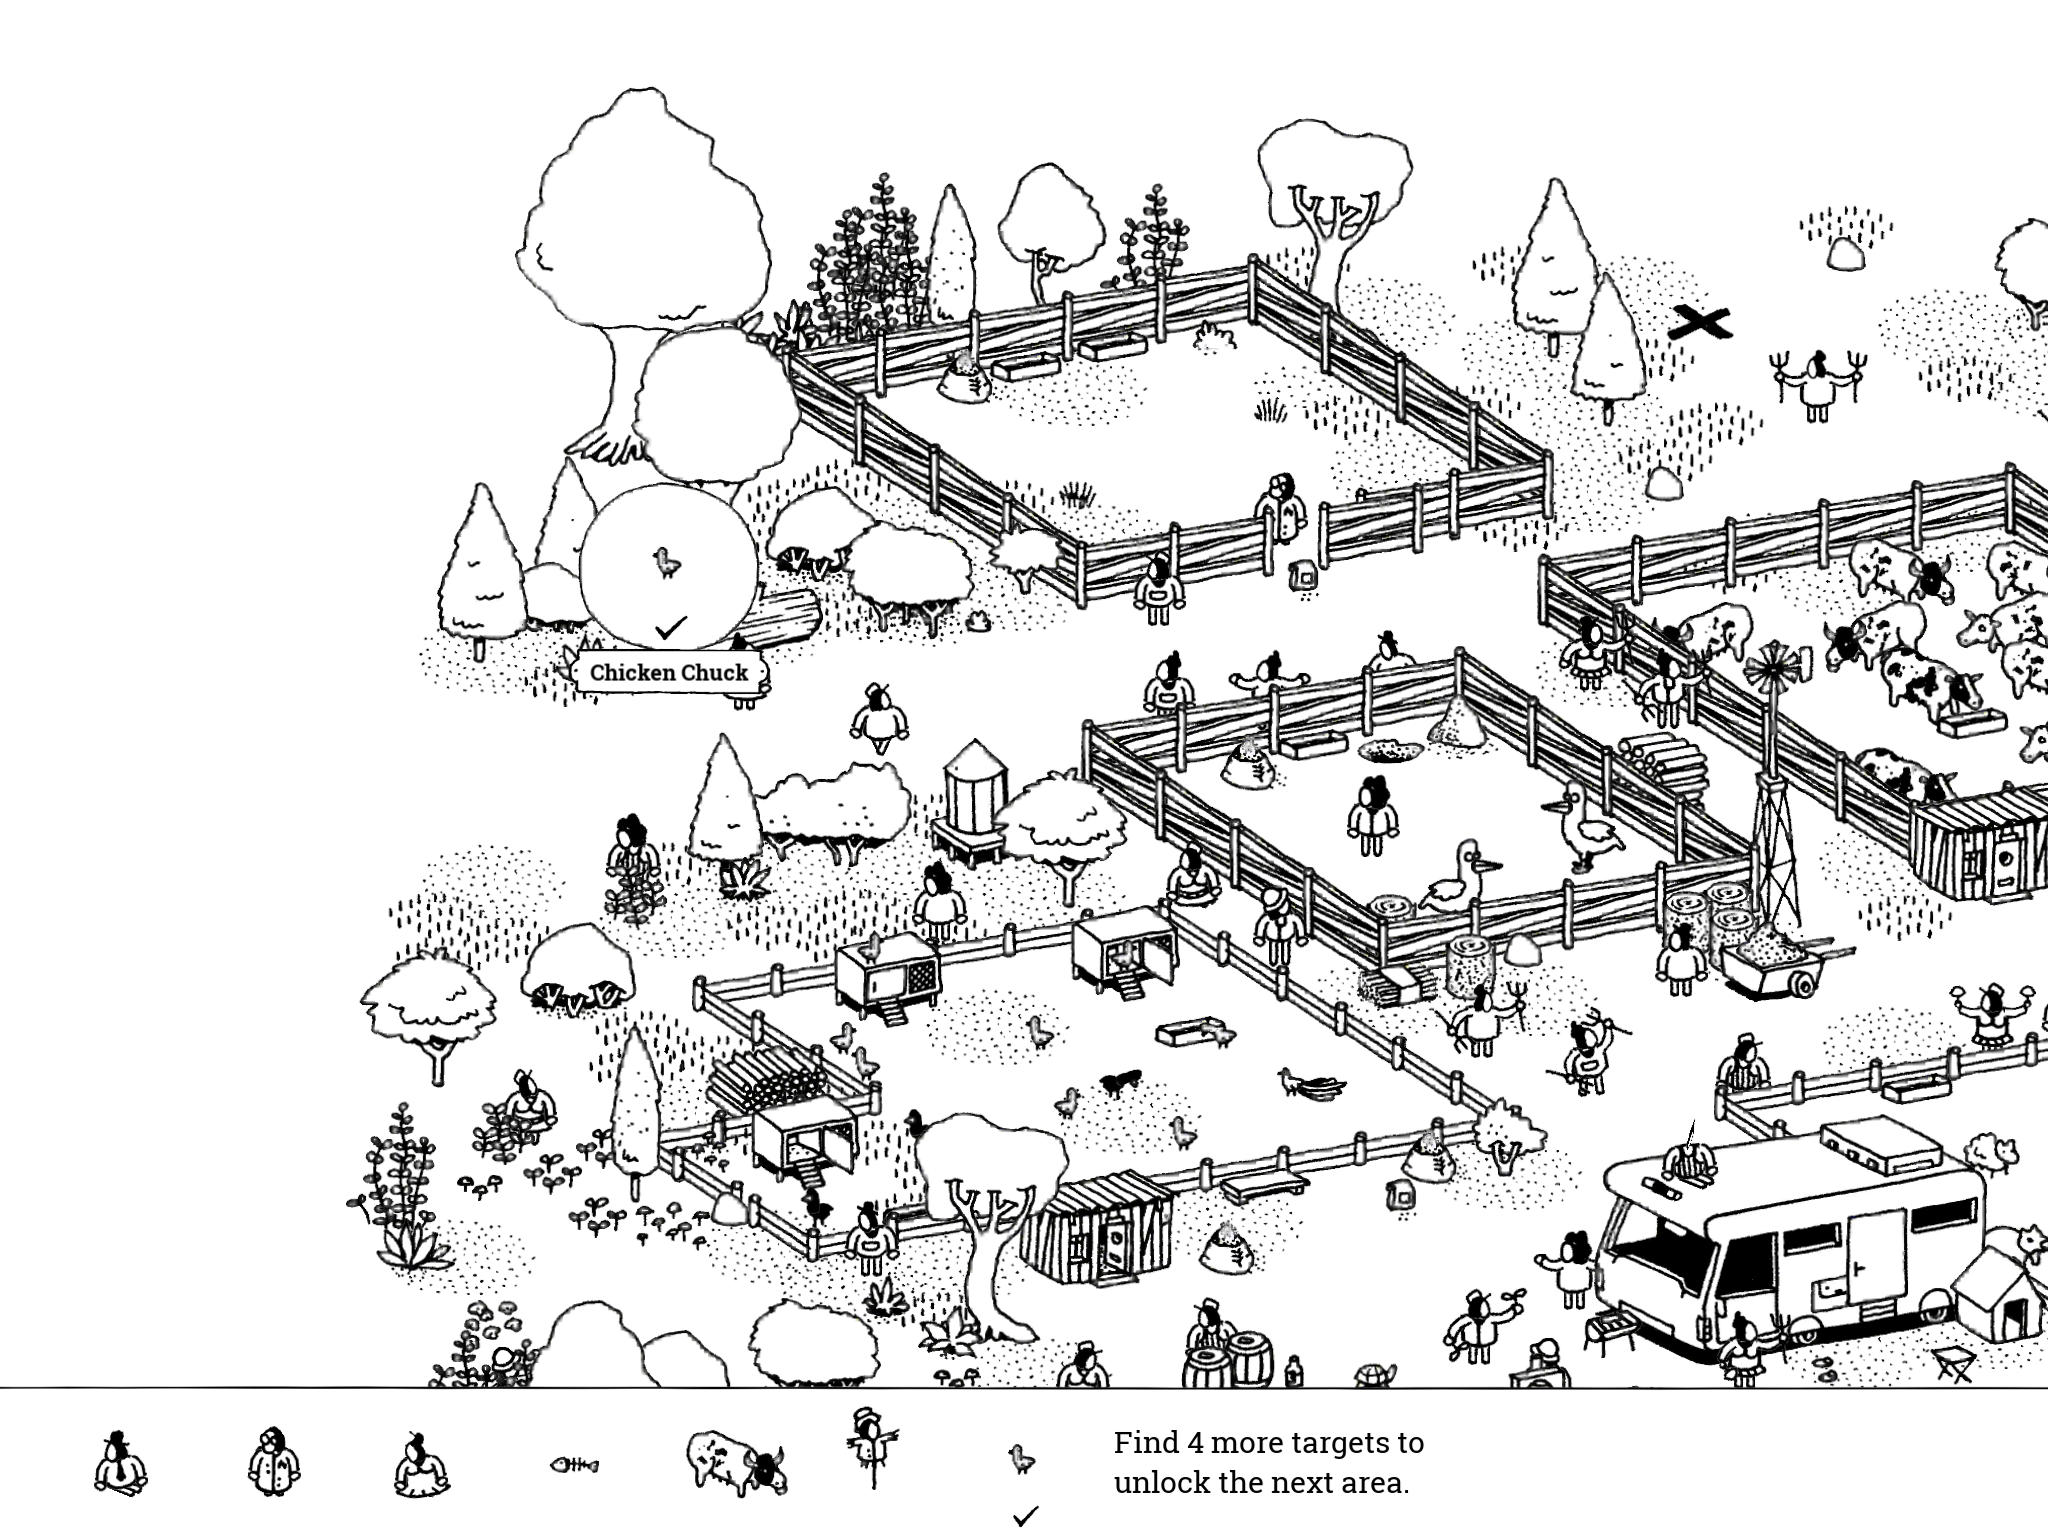
- Chicken Chuck: “Chicken Chuck hasn’t gotten too far, but at least he’s free! Freeeddoooommm!!!!”
The chicken pen is in the northwest corner of the image. North of the chicken pen (and west of Harry in the empty pen) is a small wooded area with a fallen log. Just north of this fallen log is a small bush and Chicken Chuck is hiding behind the bush (you can just see his head sticking out the top).
- Chicken Chuck: “Chicken Chuck hasn’t gotten too far, but at least he’s free! Freeeddoooommm!!!!”
Dry Lands 3: The Desert
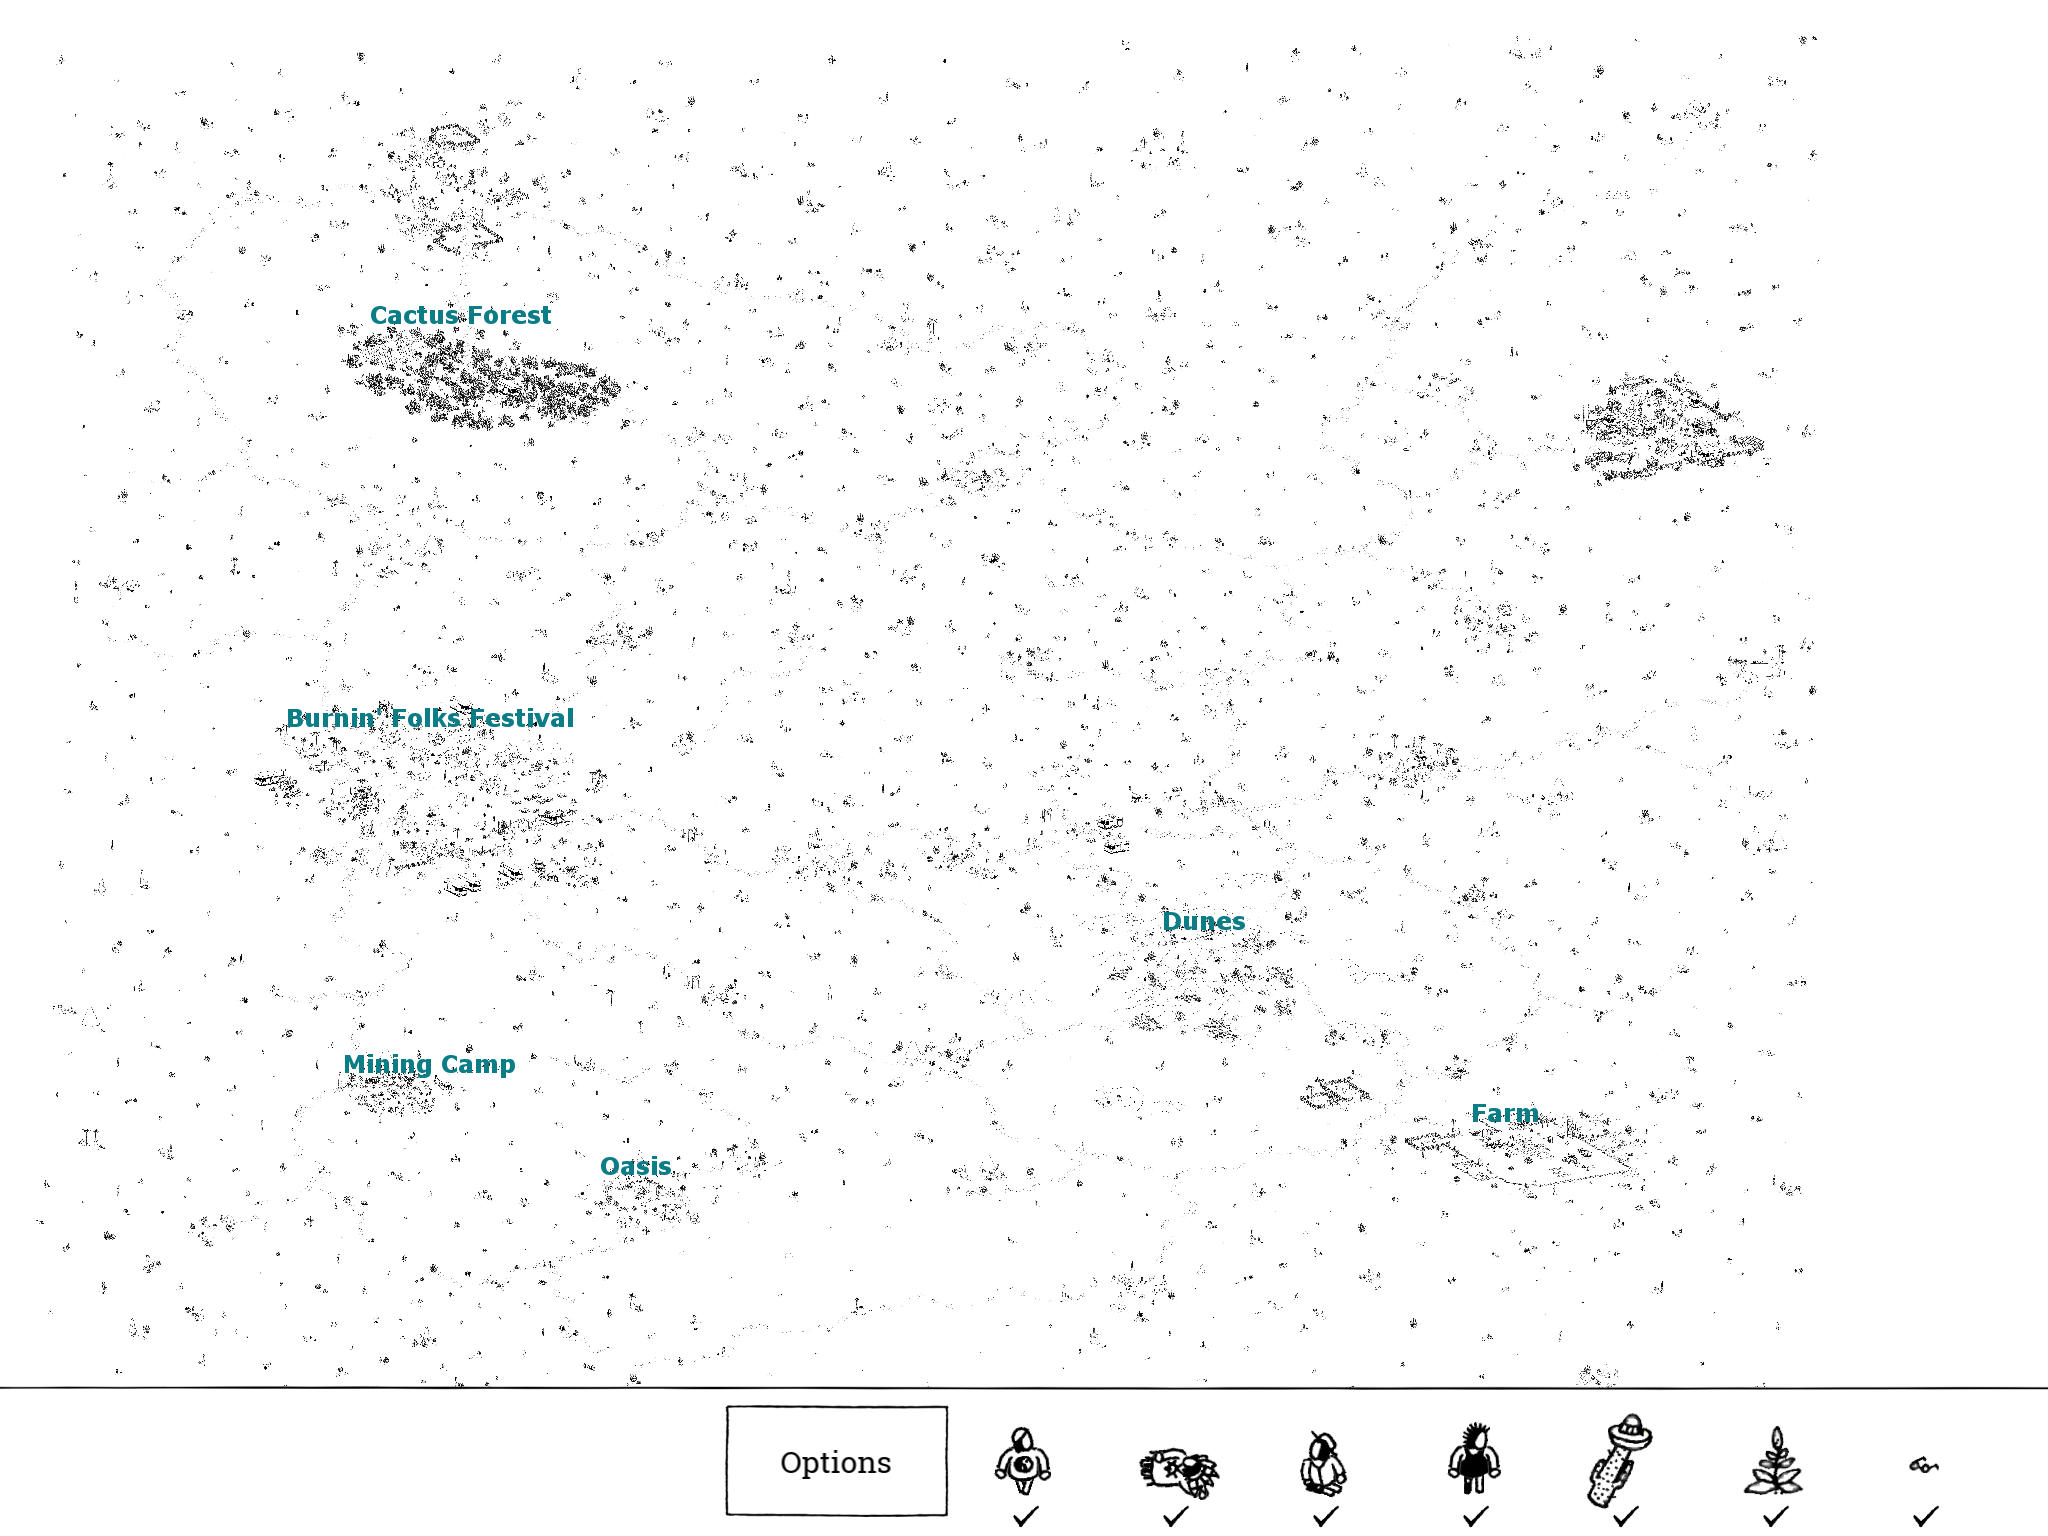
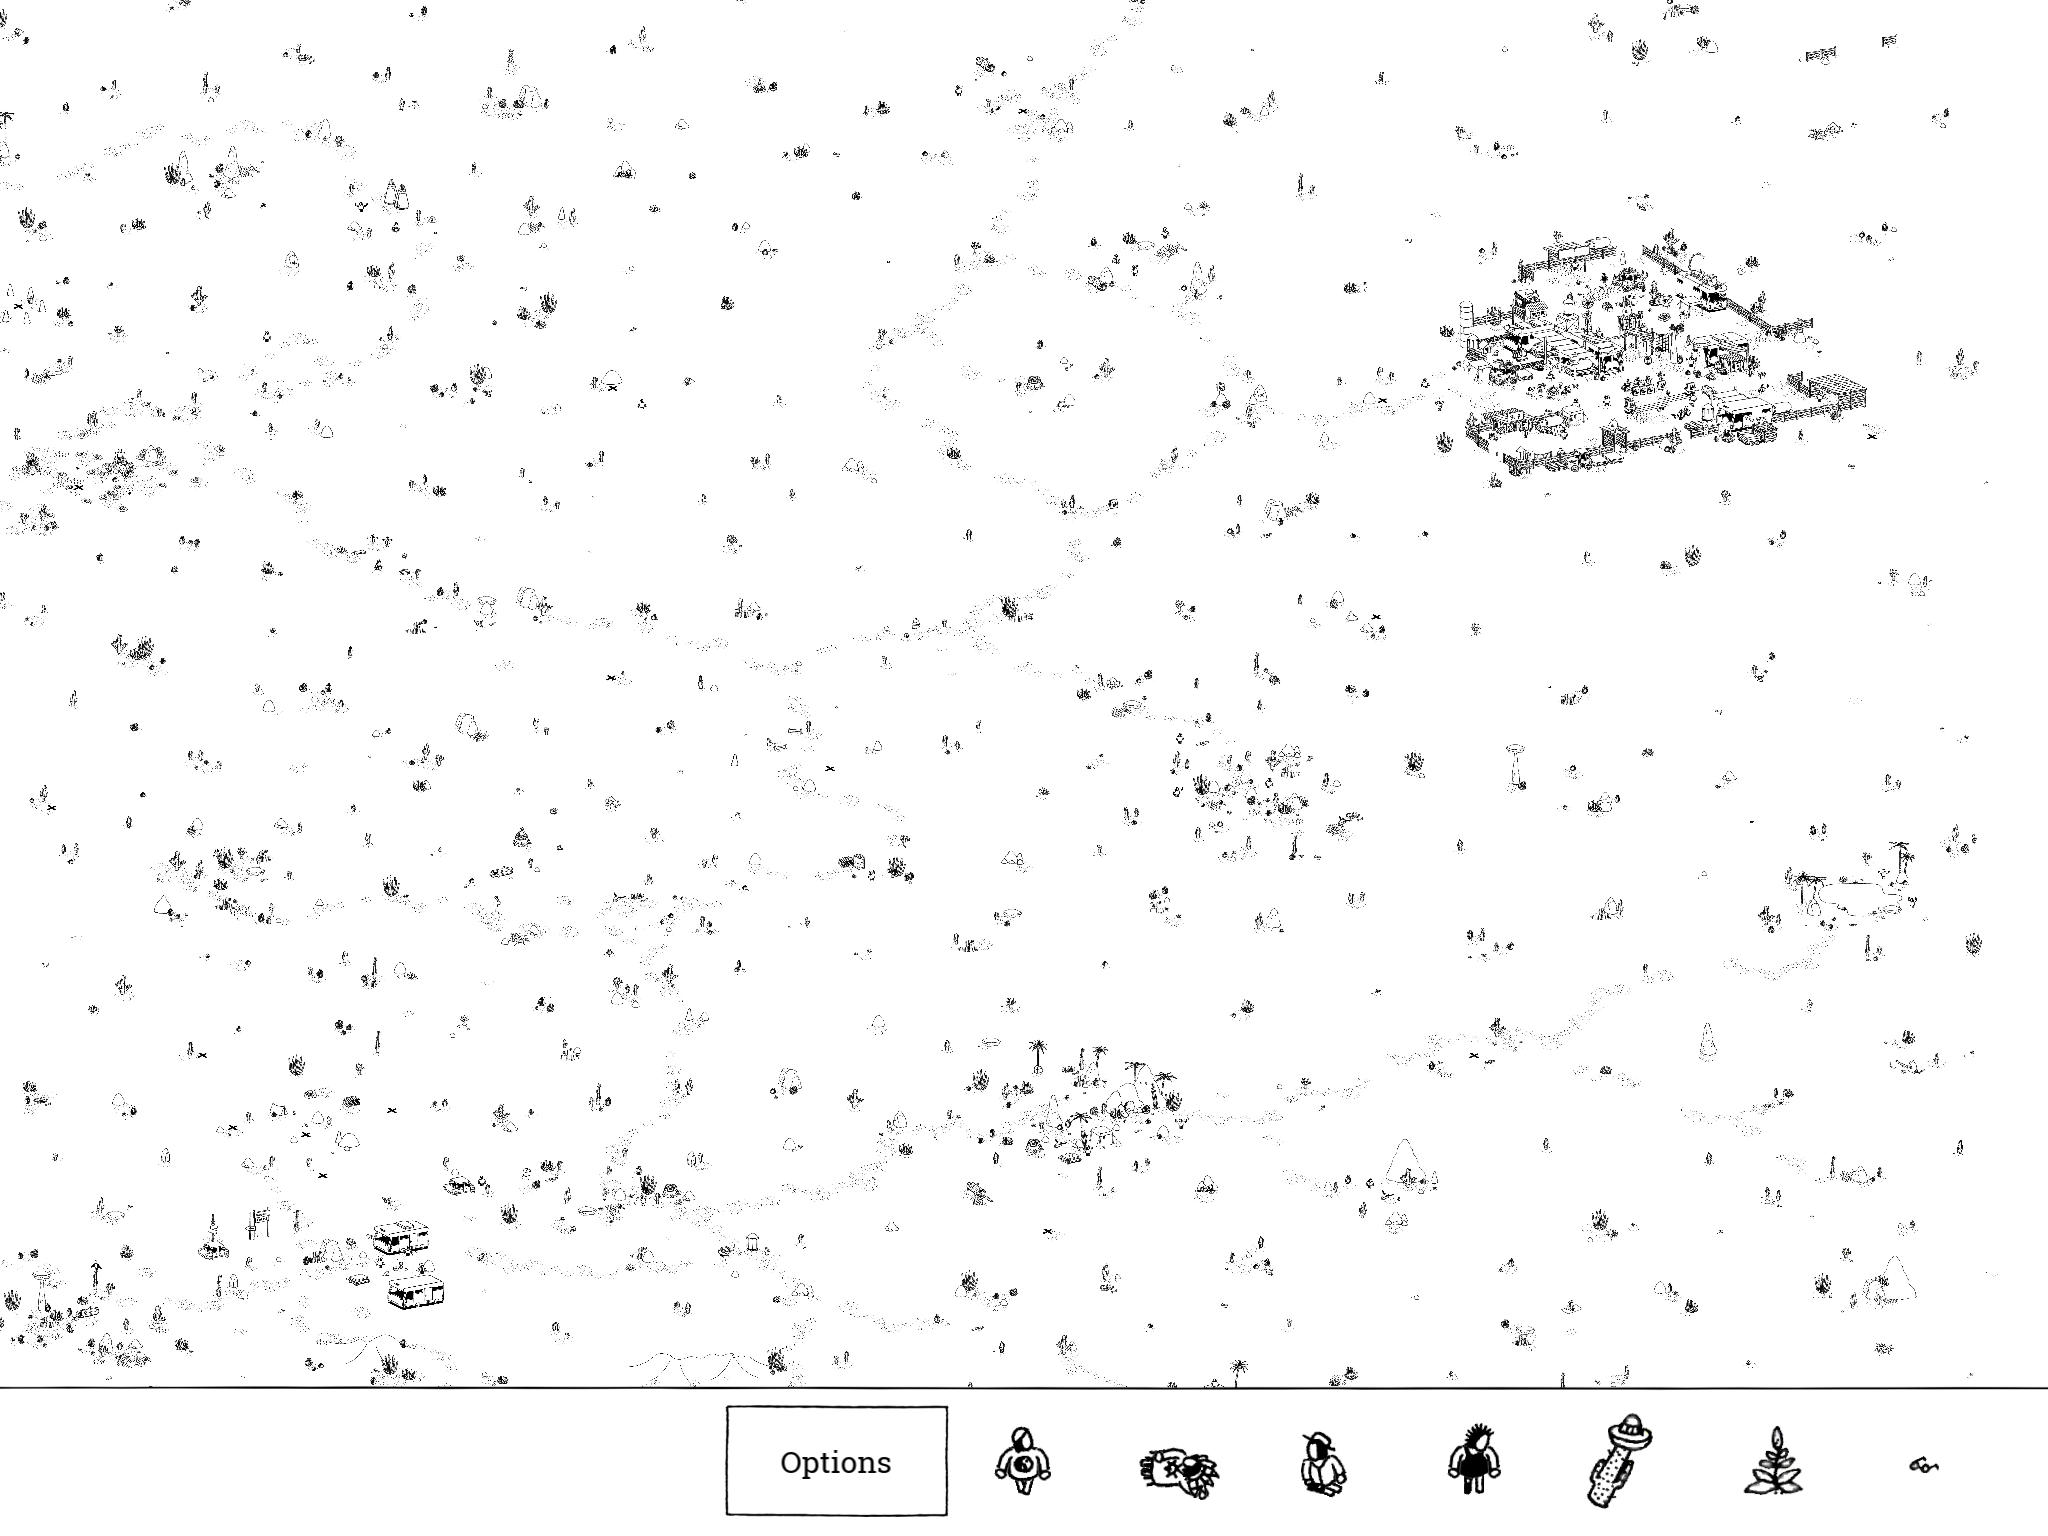
Note: The Desert is a huge, sprawling map with some primary points of interest and a lot of nothingness in between. The image above shows The Desert from the max zoomed out view with certain landmarks labeled. We’ll primarily use these landmarks for giving directions in addition to the general north/south etc. There are trails in the desert that lead from most main landmarks towards others; follow these trails when scrolling around so you don’t get lost.
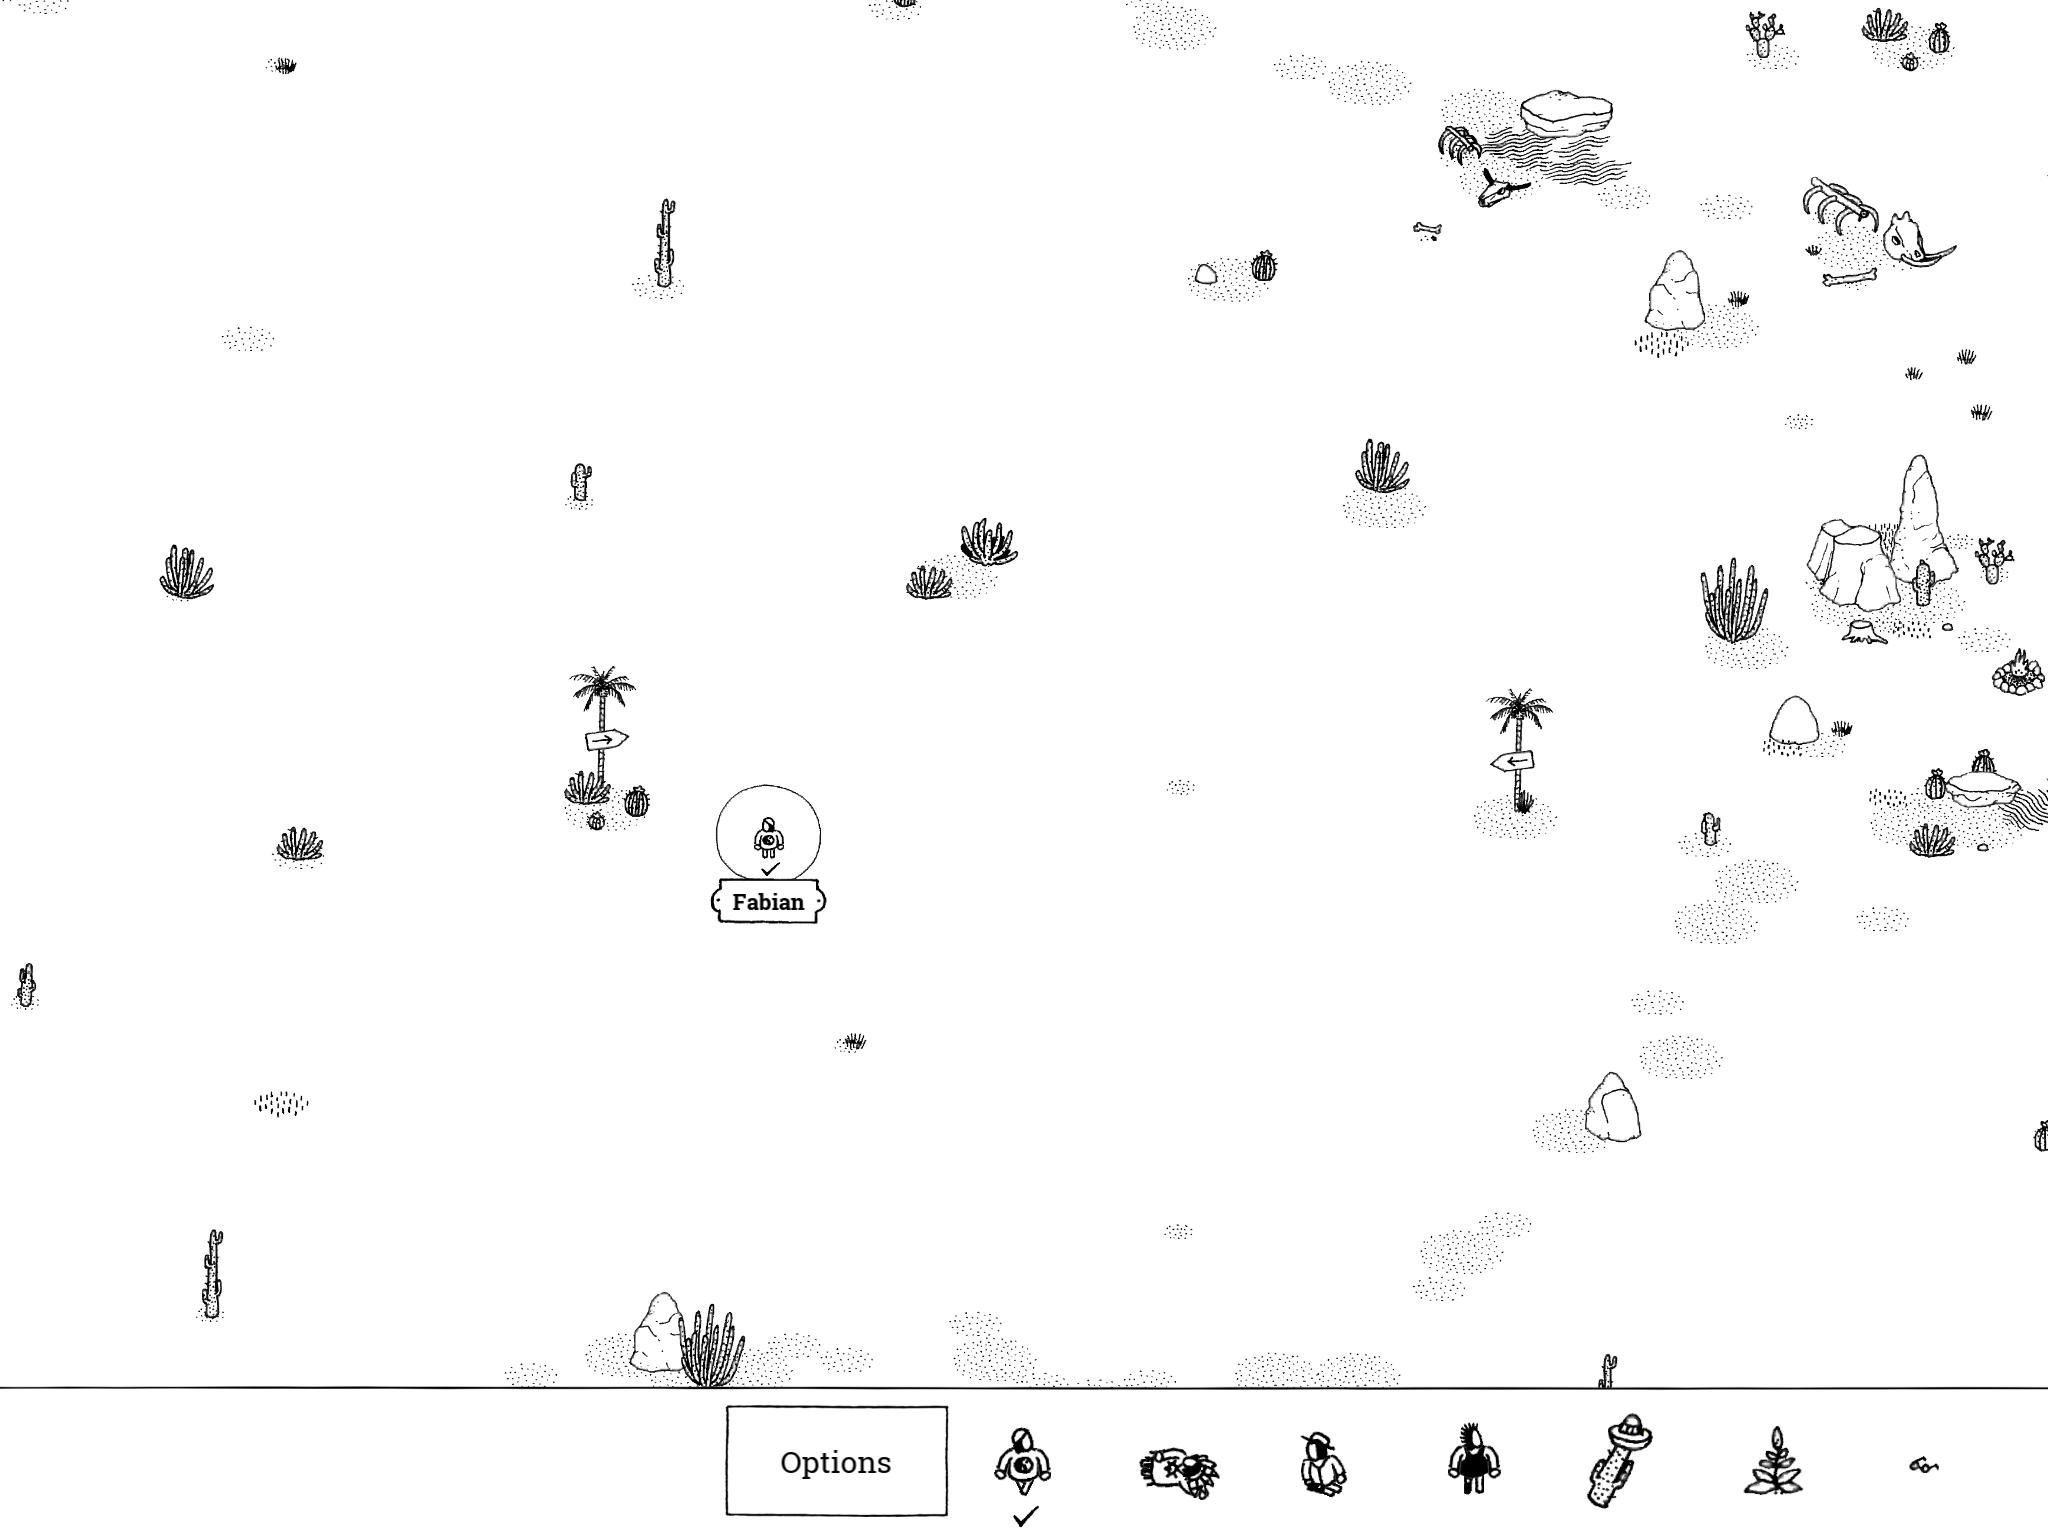
- Fabian: “Fabian wants to get back to the festival, but the signs aren’t helping him.”
Fabian isn’t too far from the Burnin’ Folks festival, which is in the western part of the Desert near the central latitude. If you head north from the totem in the north end of Burnin’ Folks, you should come across a small wooden sign with an arrow pointing left about one full swipe north. To the west of this arrow is another sign with an arrow pointing right. Fabian is endlessly wandering back and forth between these two arrows.
- Fabian: “Fabian wants to get back to the festival, but the signs aren’t helping him.”
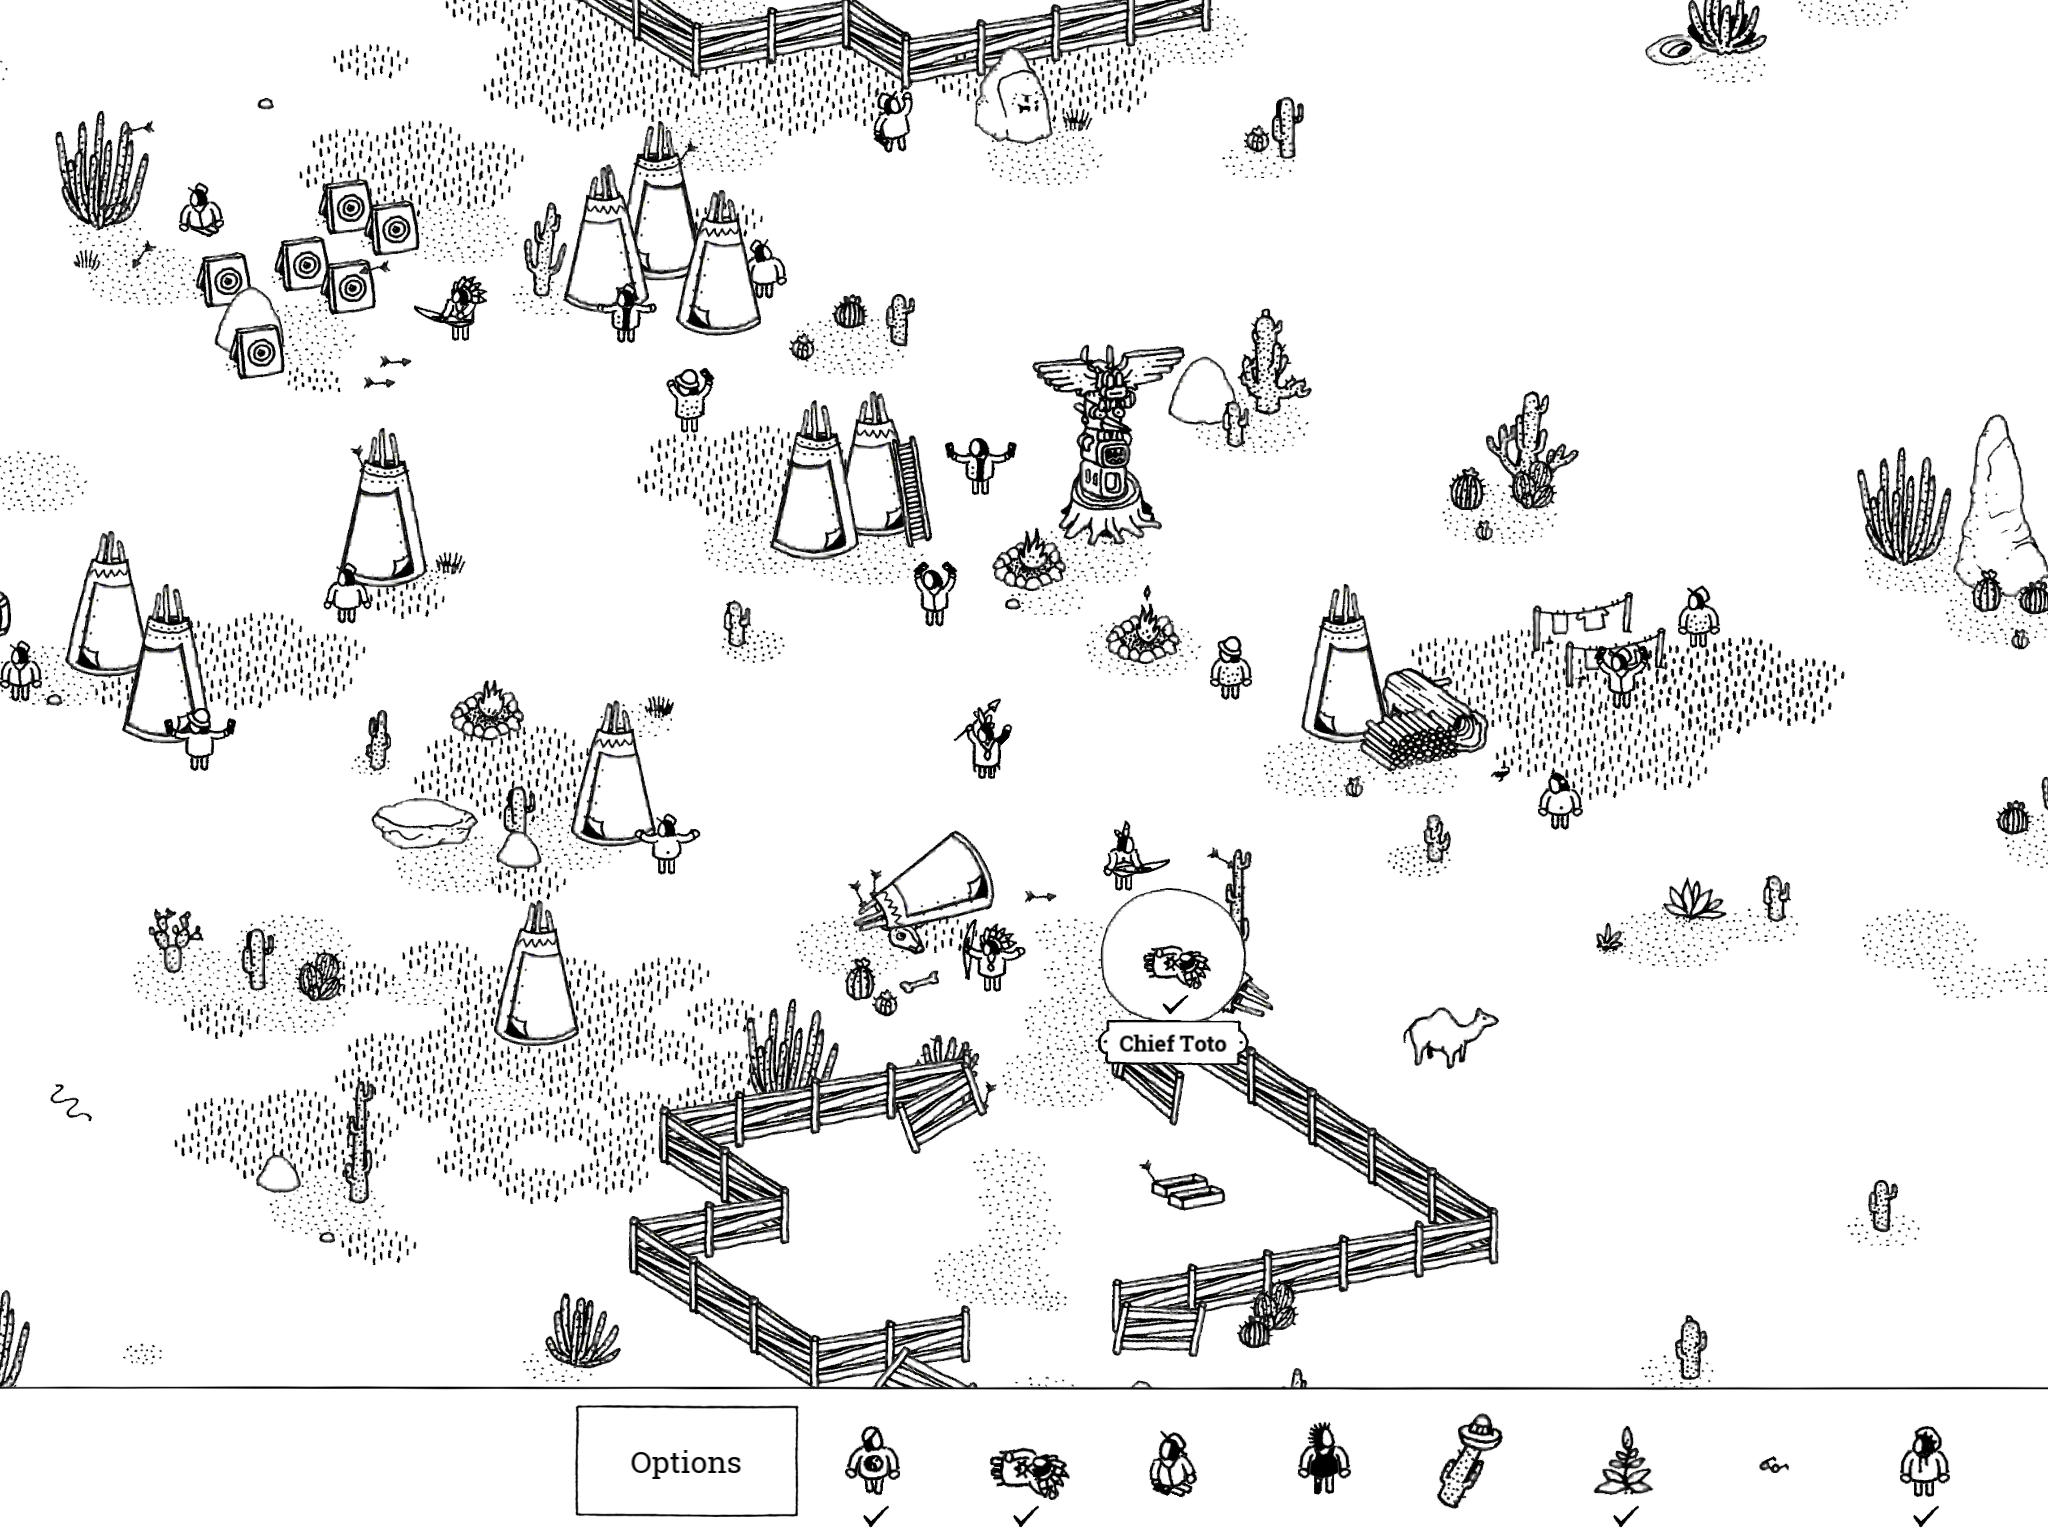
- Chief Toto: “Chief Toto was standing up a minute ago.”
Near the northwest corner of the map, just north of the cactus forest, is a small camp filled with tipis. On the south end of the camp is an empty animal pen and two tipis turned over north of it. Tap on the rightmost tipi to pull back the flap and reveal Chief Toto.
- Chief Toto: “Chief Toto was standing up a minute ago.”
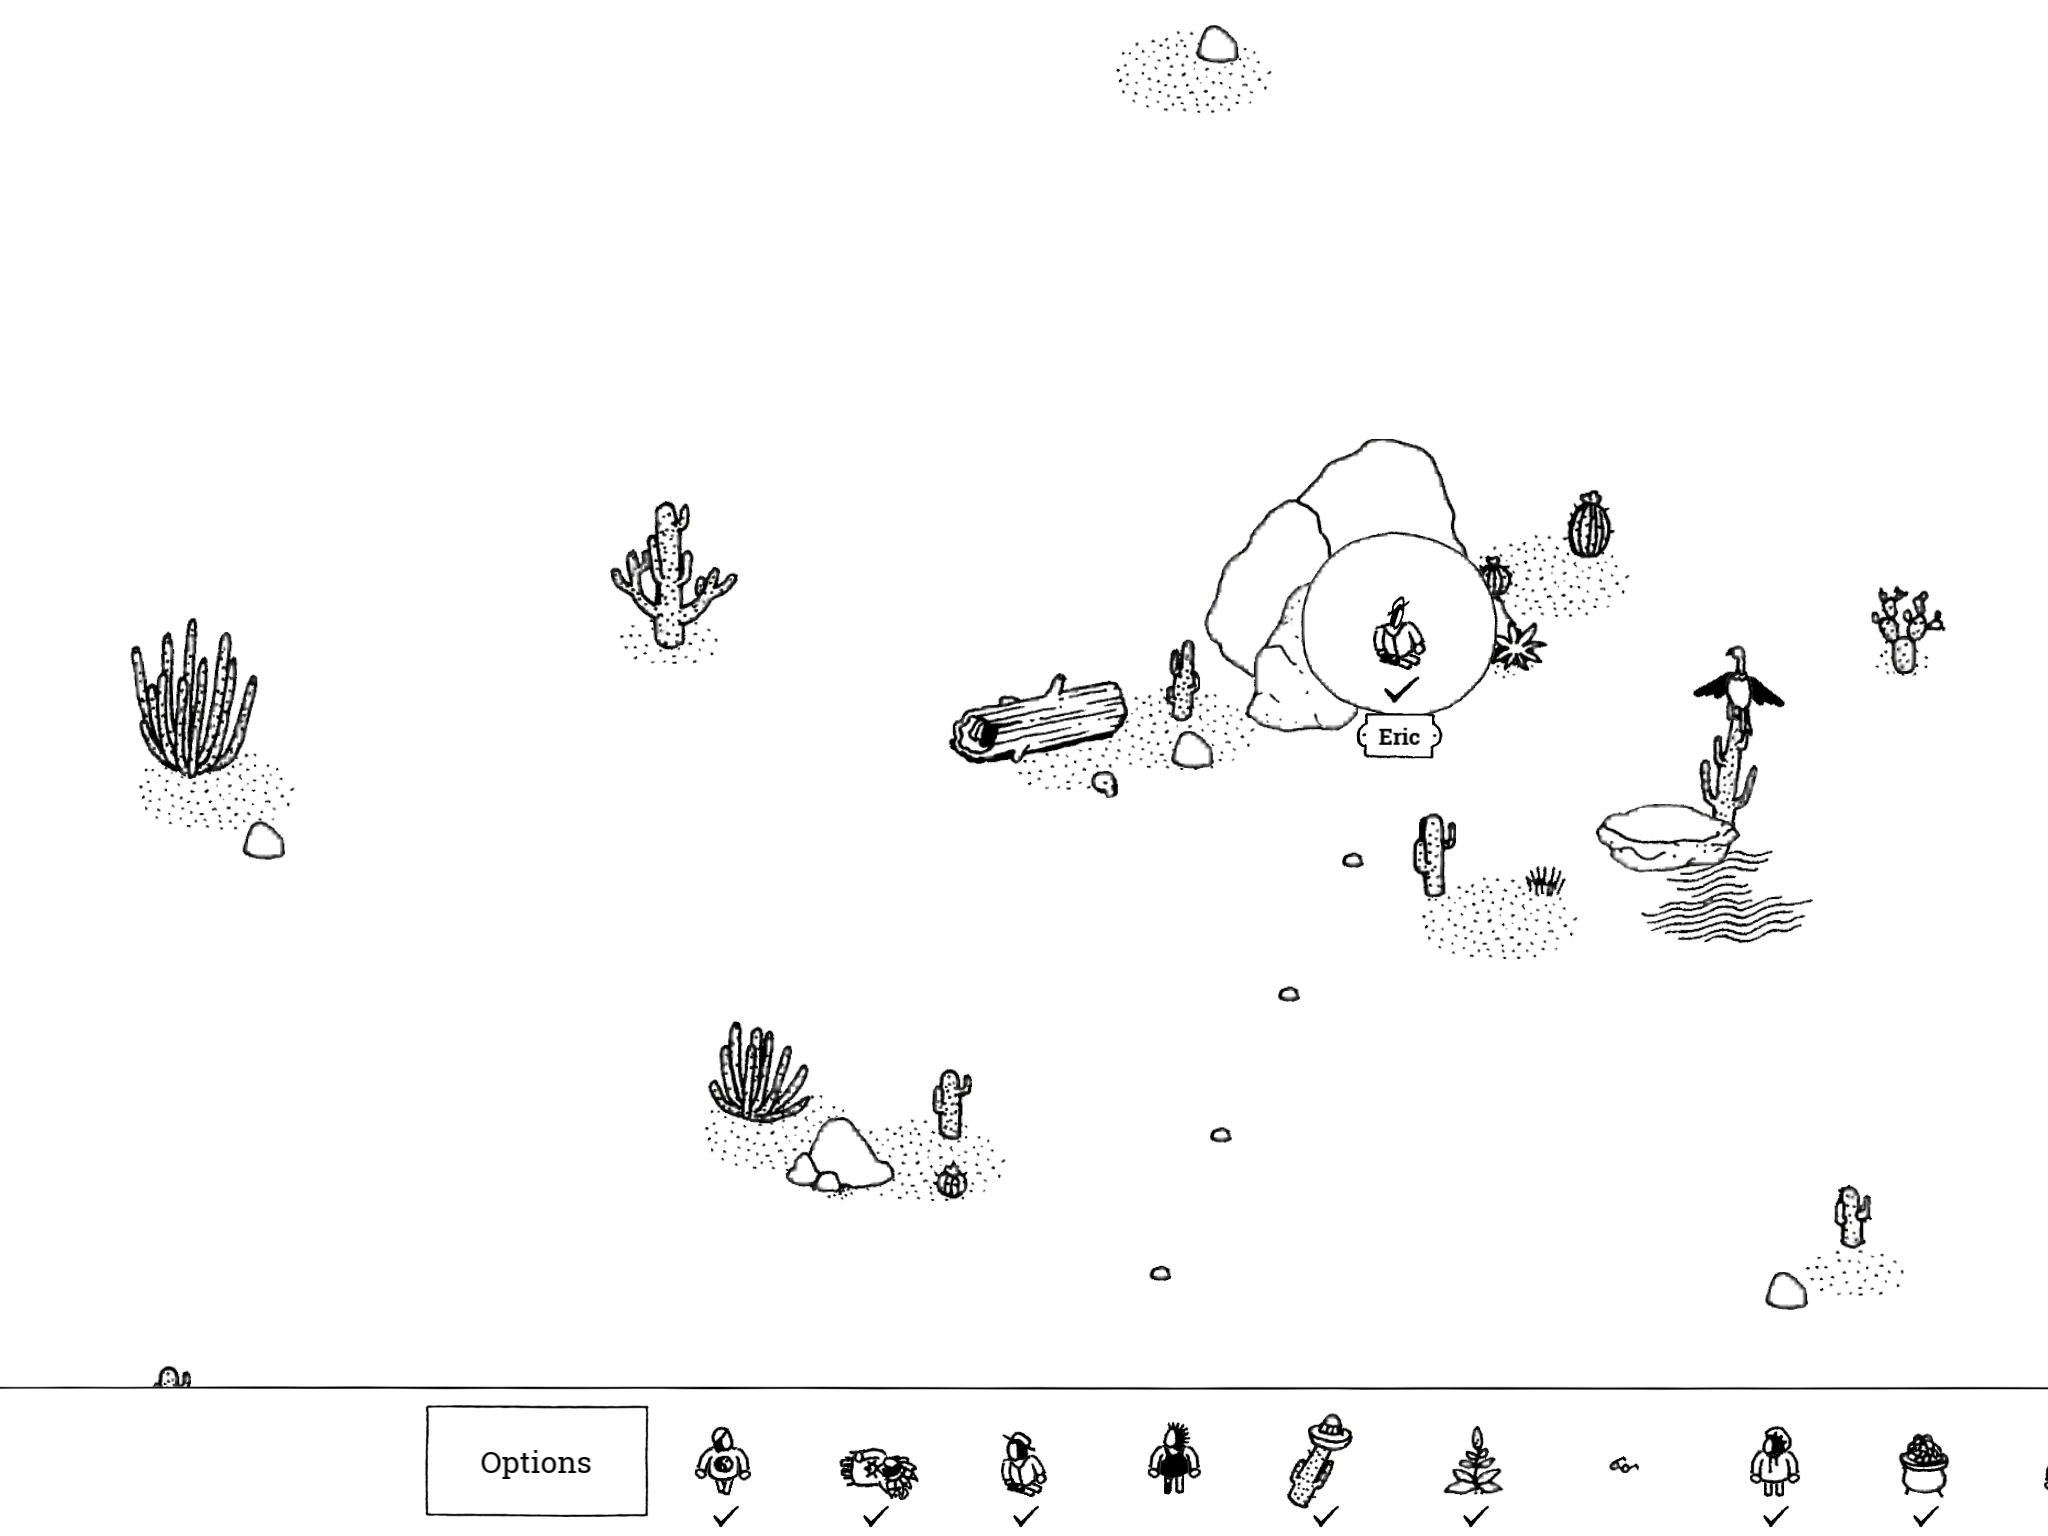
- Eric: “With the signal in place, Eric hopes for help from up above.”
In the northeast corner of the map. There is a small pile of rocks with a vulture sitting on a cactus to their right. There is a single trail of pebbles leading away from the larger rocks and to the southwest; if you follow these pebbles you’ll come across the letters “SOS” spelled out and eventually a broken-down car. Eric is inside the pile of rocks in the northeast corner; tap and hold the rock in front, then drag it to the left to reveal Eric.
- Eric: “With the signal in place, Eric hopes for help from up above.”
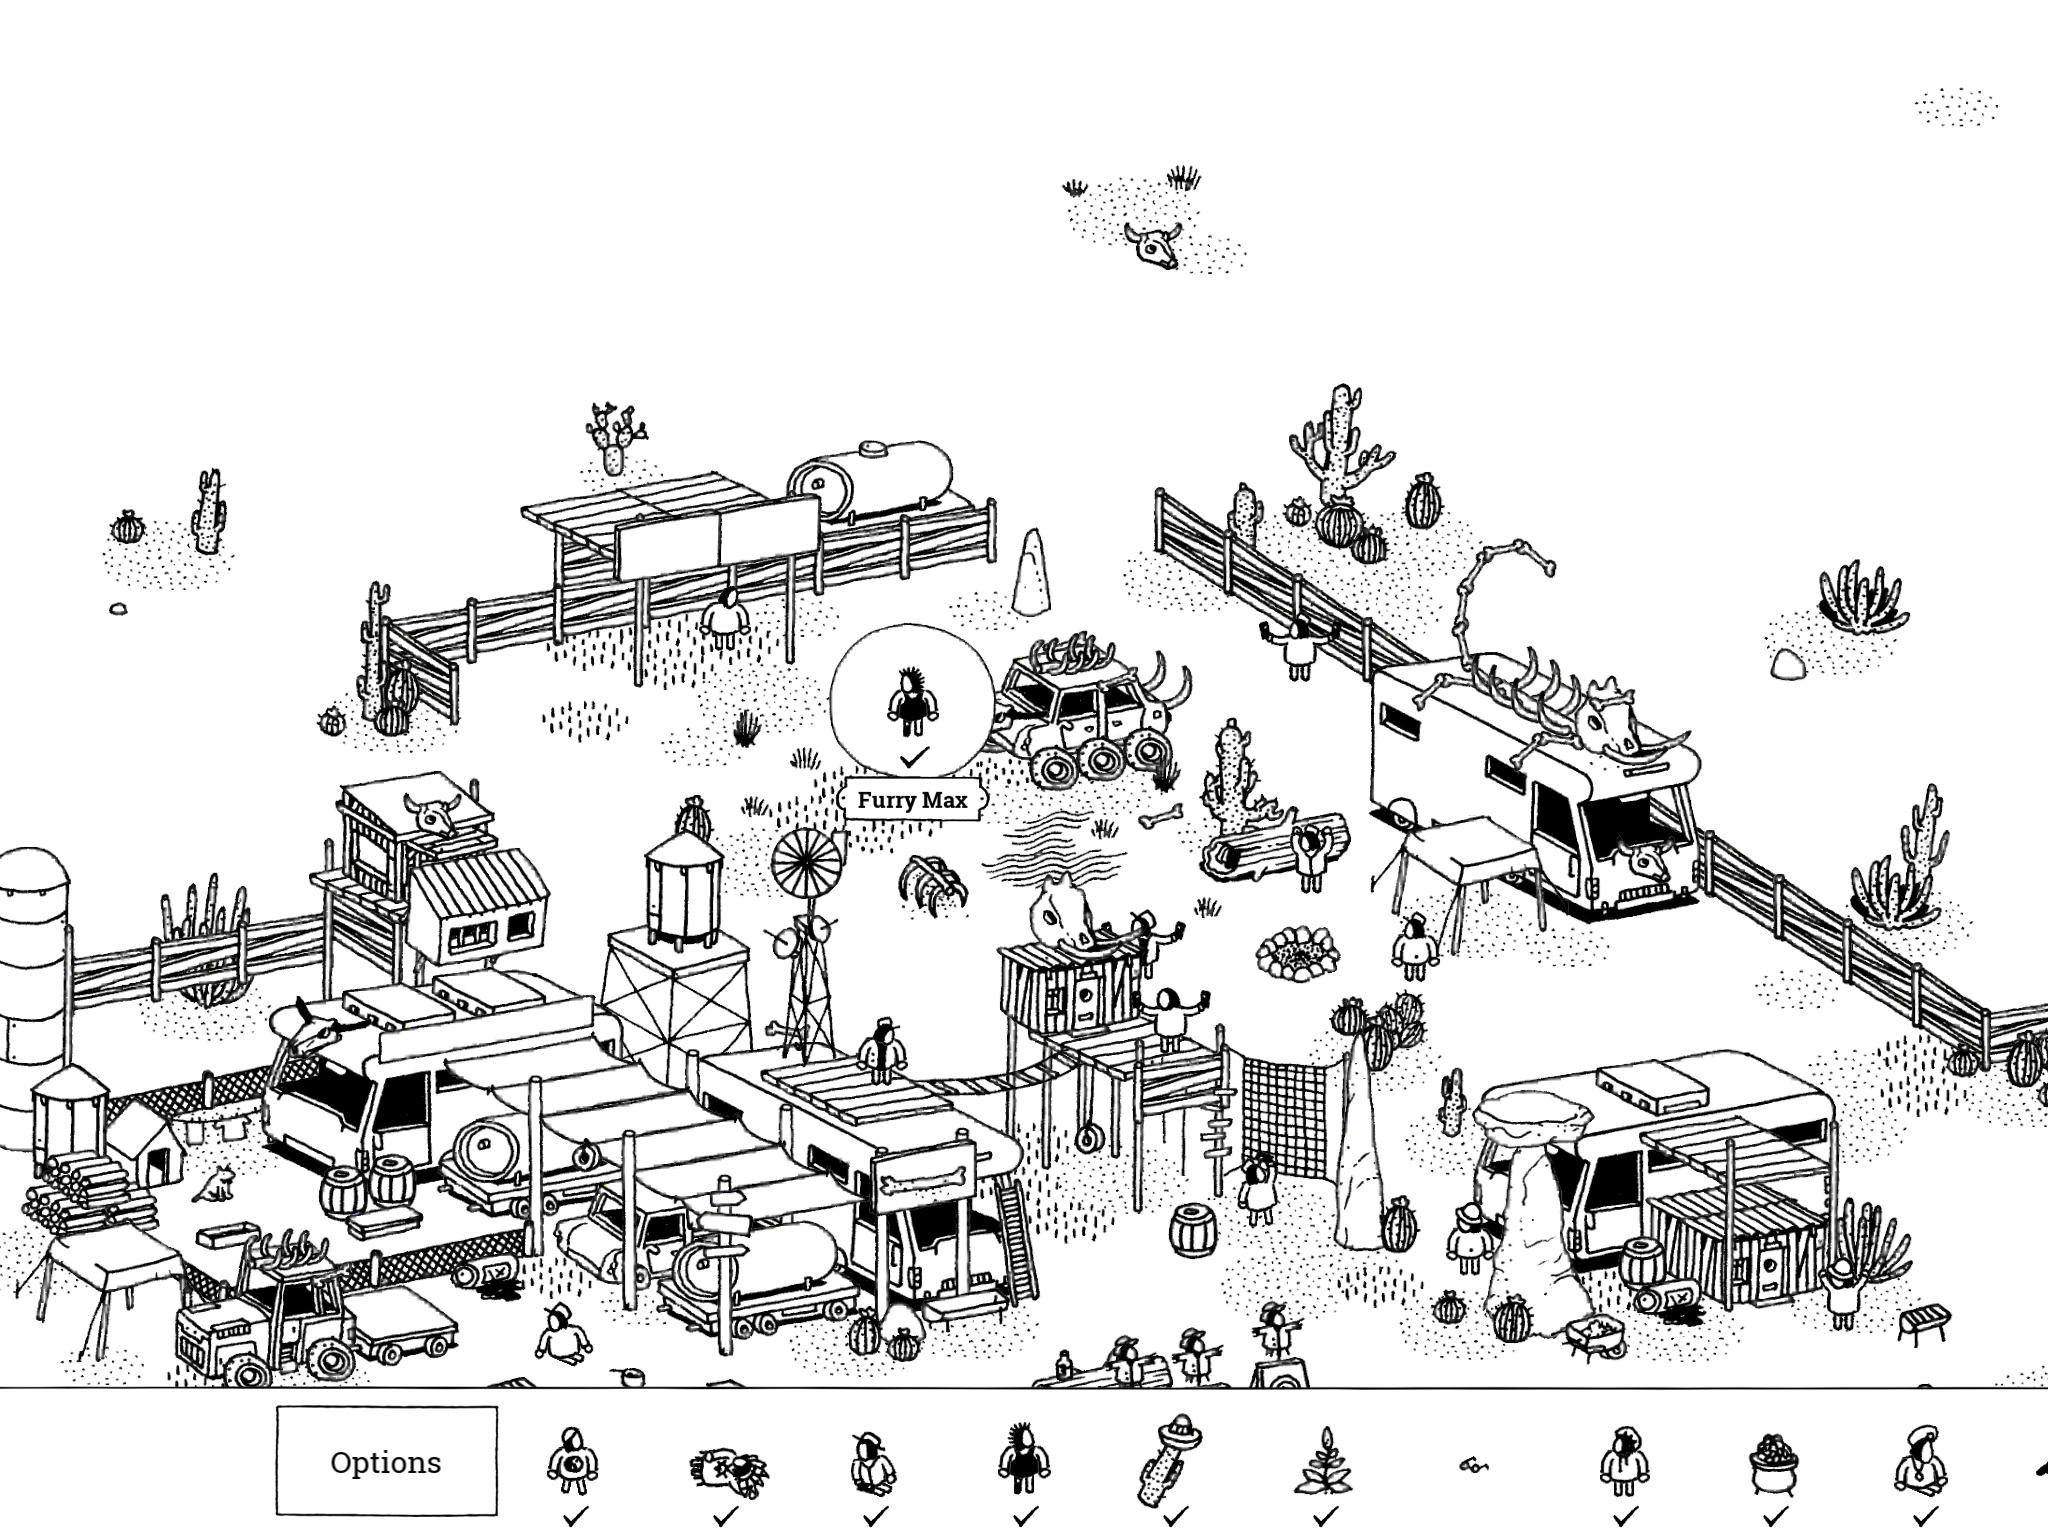
- Furry Max: “One horn wasn’t enough for scavenger Furry Max.”
On the far east side of the map, just south of Eric and just north of vertical center is a fenced-in camp with RVs adorned with bull skulls. Furry Max is in the north end of the camp, admiring his car that has a ribcage on top of it, a set of horns on either side, and six wheels.
- Furry Max: “One horn wasn’t enough for scavenger Furry Max.”
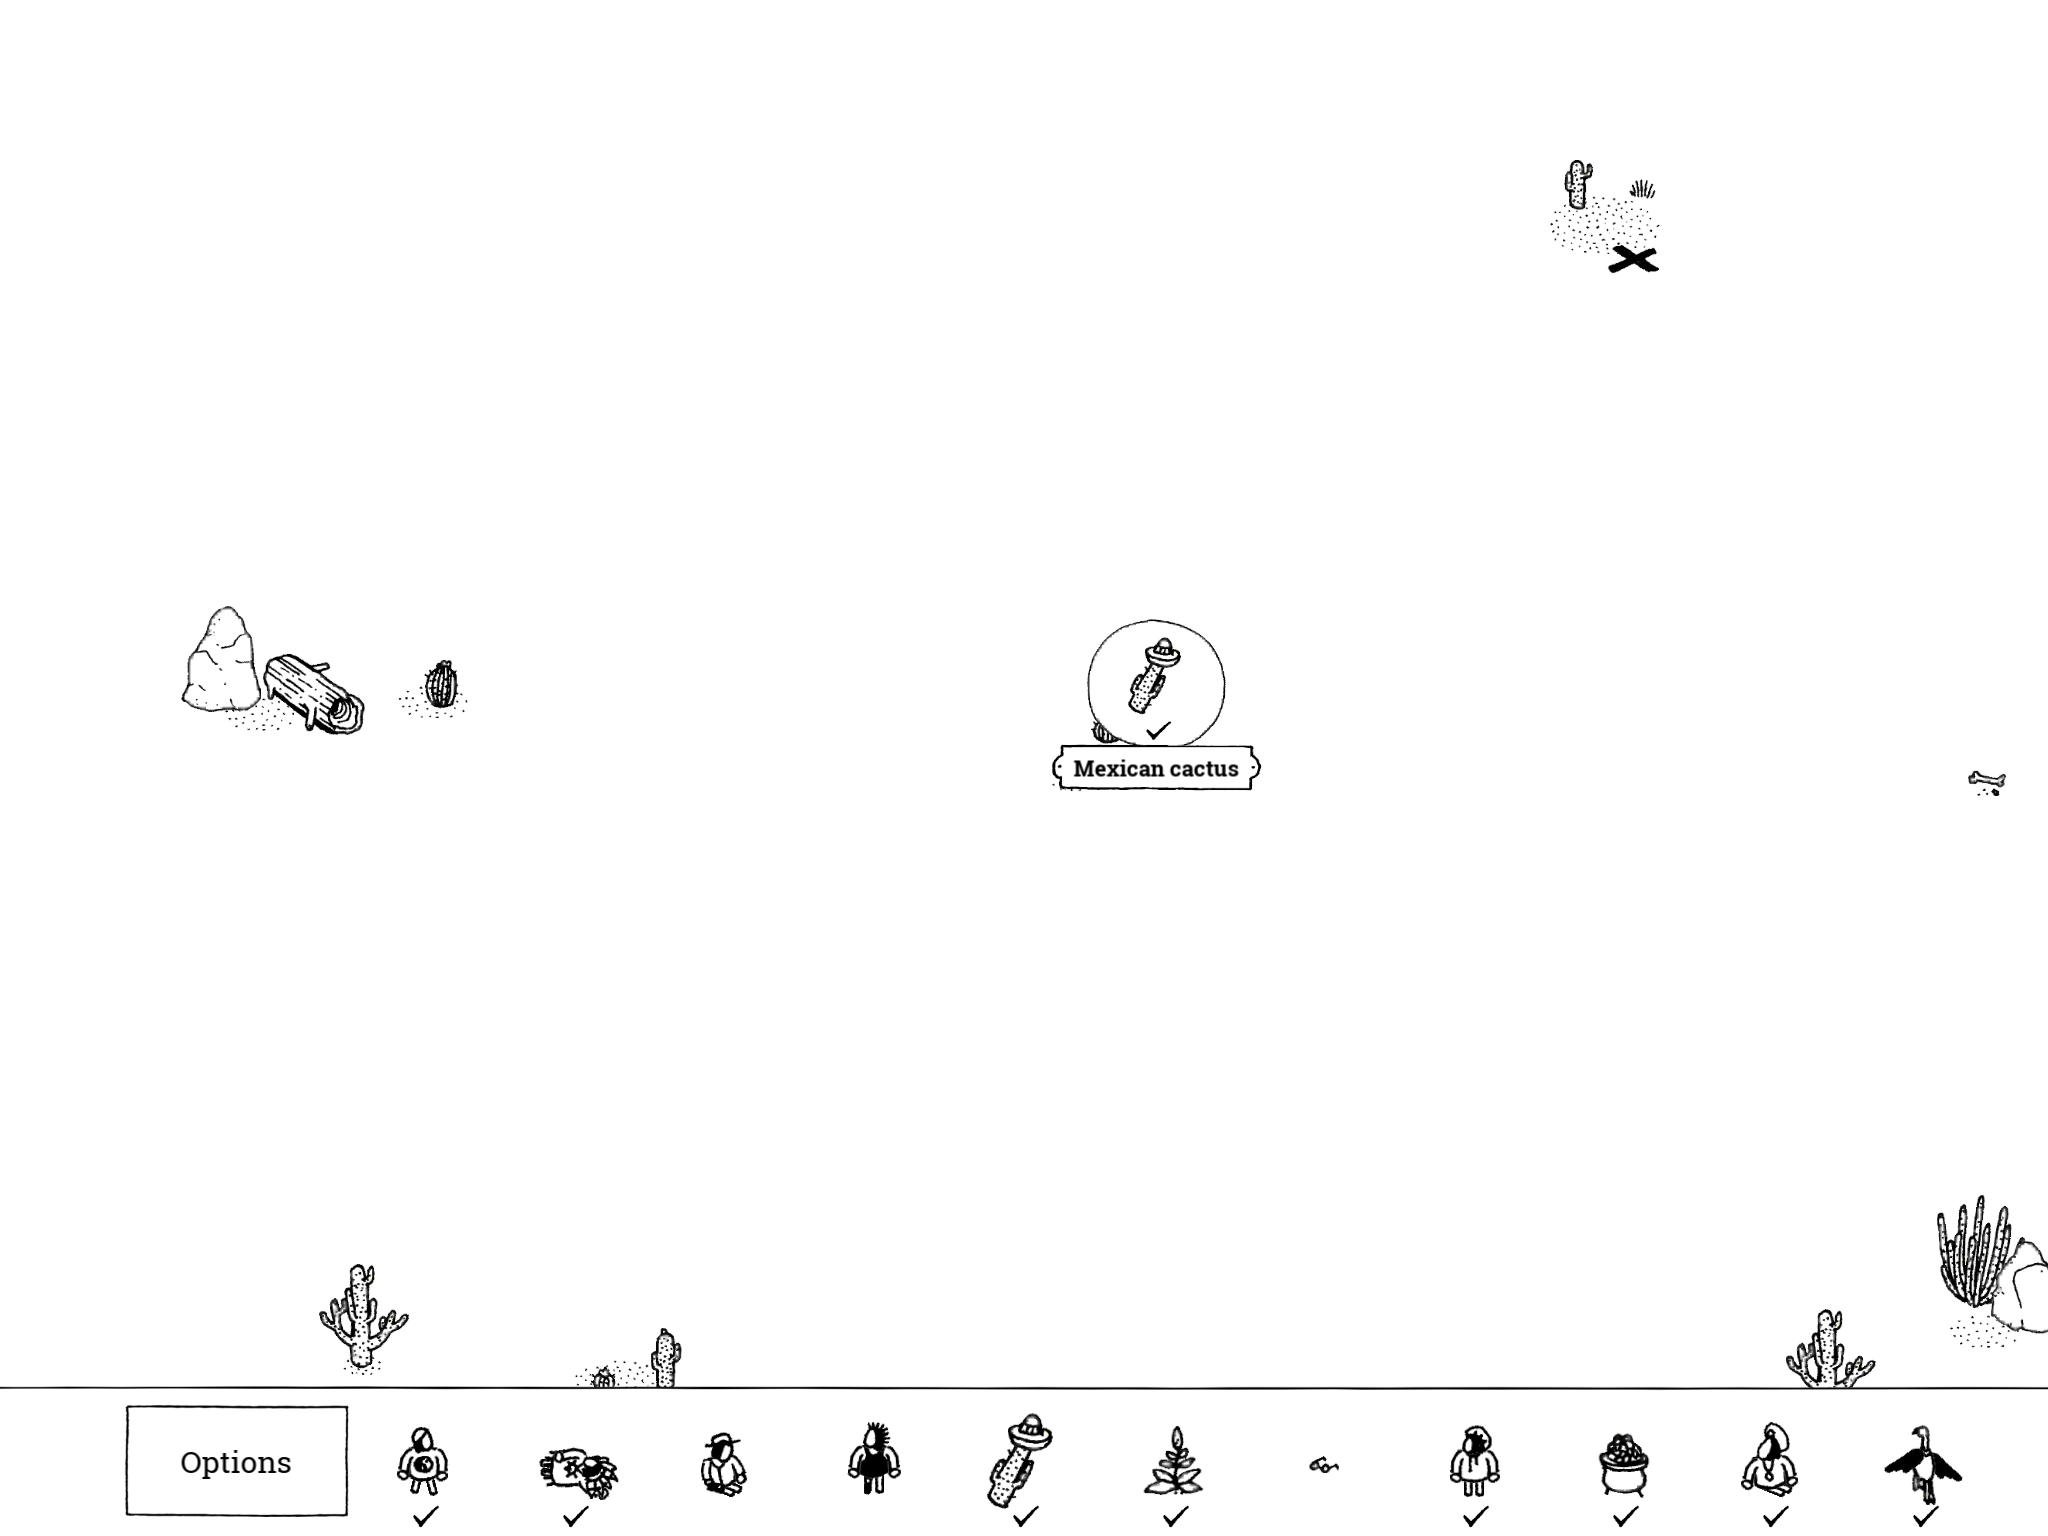
- Mexican Cactus: “¡Sí señor! This Mexican cactus resides somewhere on the outskirts of the desert.”
The Mexican Cactus on the very northern edge of the map in the horizontal center, east of Chief Toto and west of Eric. There’s nothing immediately next to it, but there is a black X just northeast and another X southeast and a fallen log to its west.
- Mexican Cactus: “¡Sí señor! This Mexican cactus resides somewhere on the outskirts of the desert.”
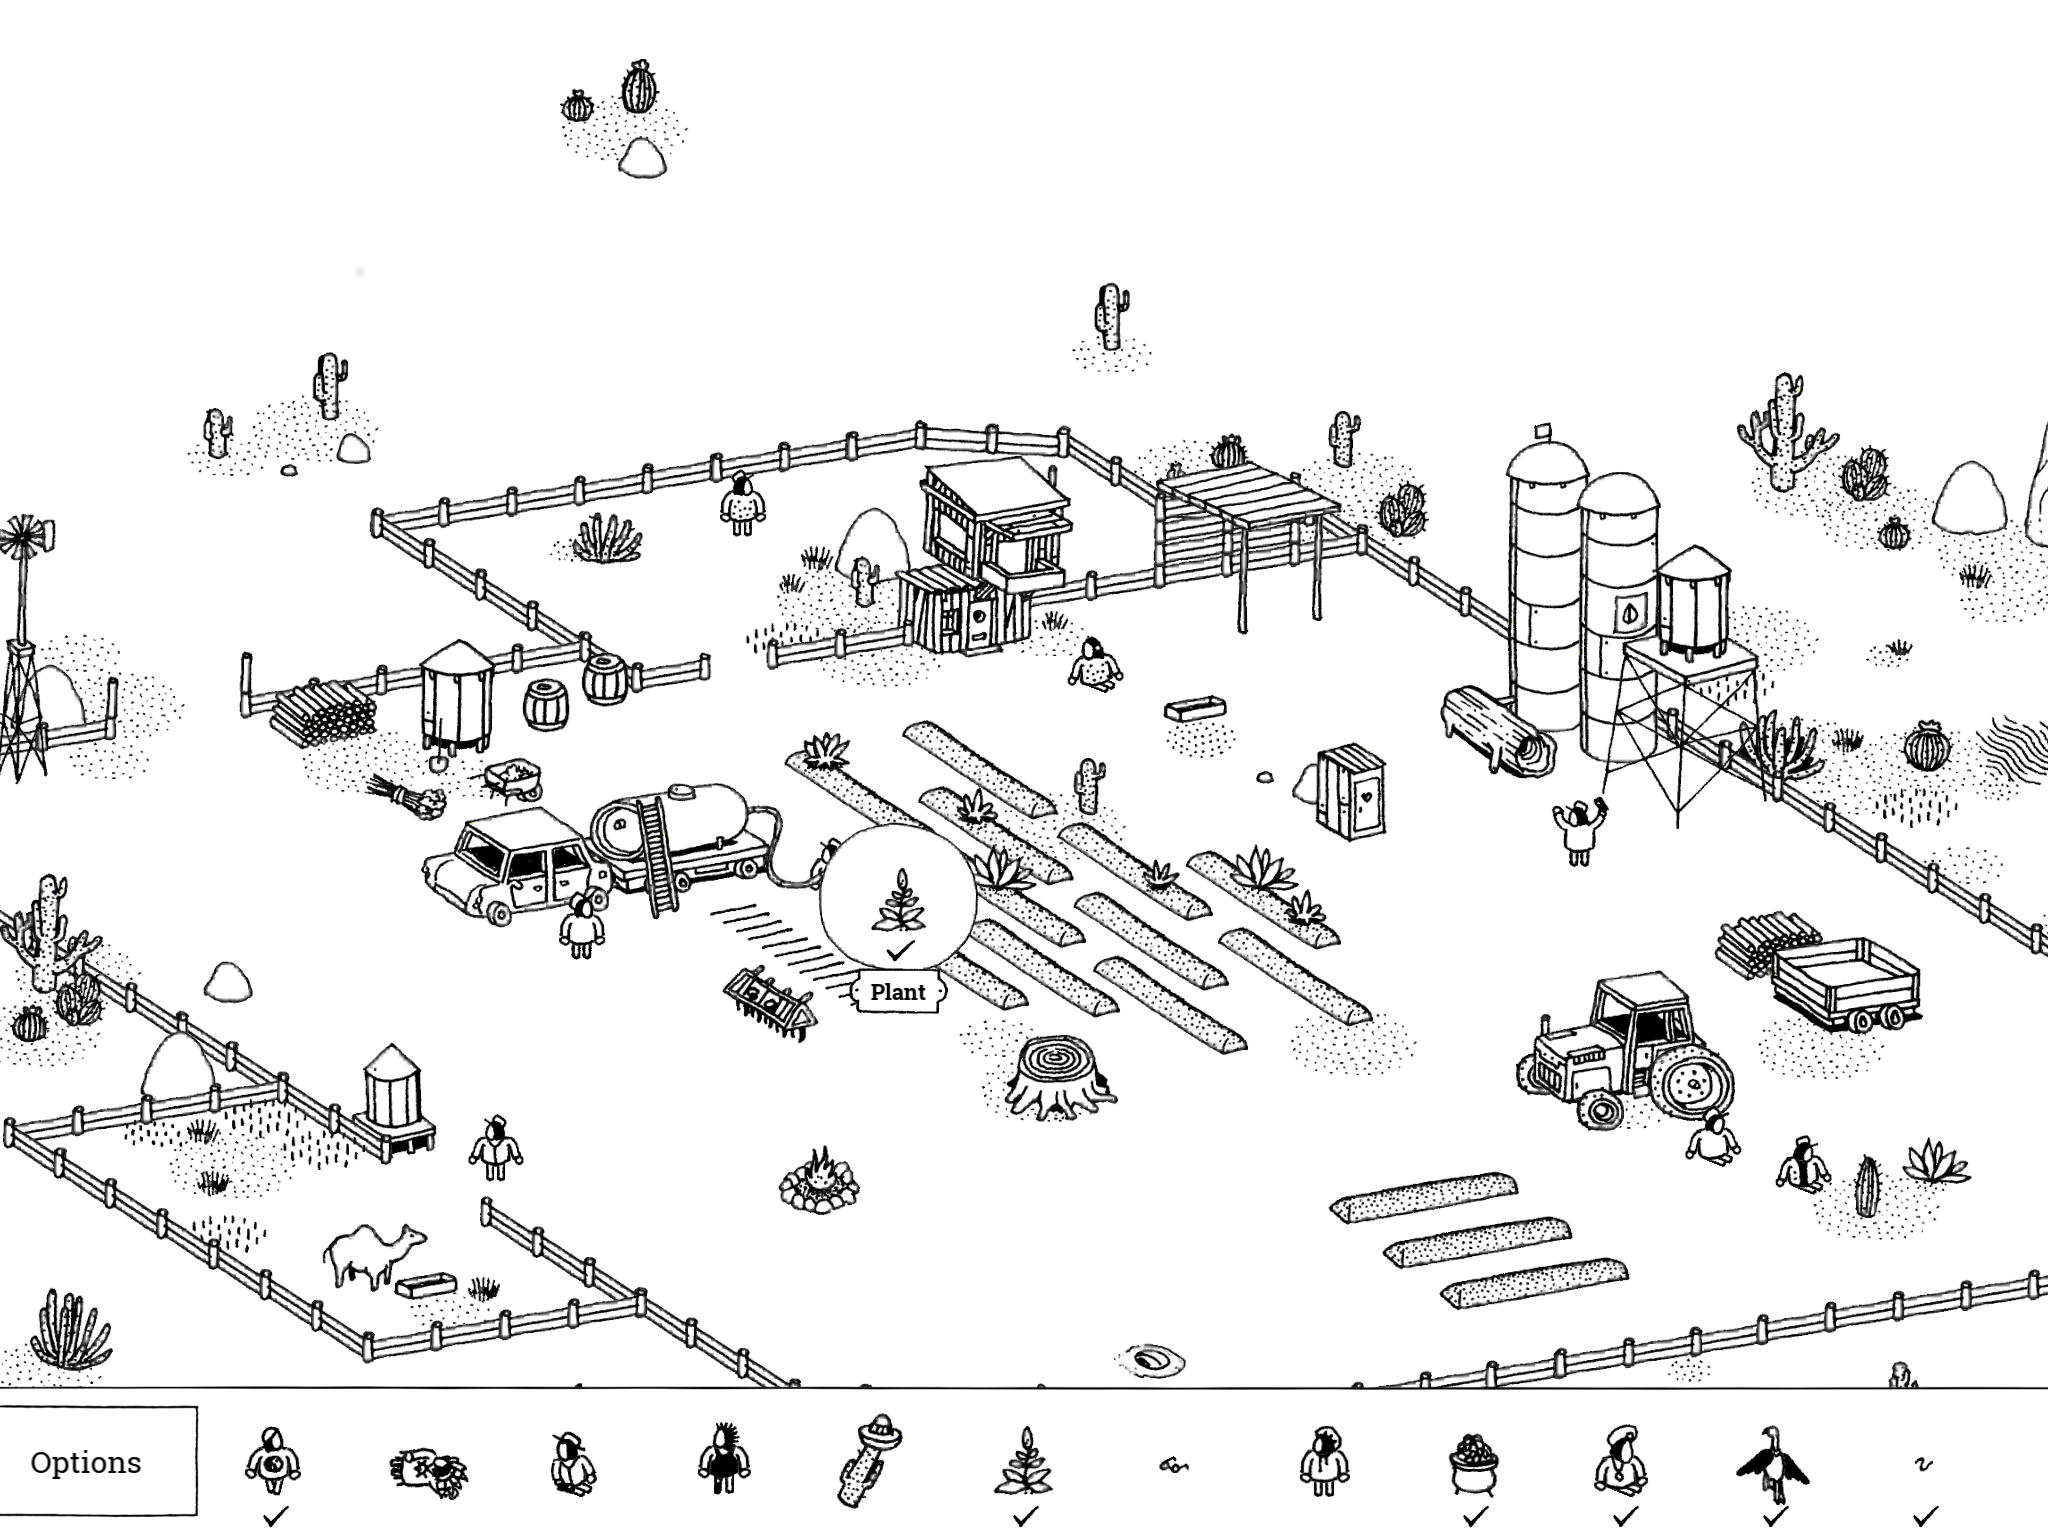
- Plant: “All our hopes are for this one plant to grow here in the desert. Don’t drown it!”
Near the southeast corner of the map (just a little northwest of the actual southeast corner) is a small farm. There is a tanker truck watering a field of seeds; tap the seed directly below the water spray about four times until it grows into a full-sized plant and tap this plant to collect it.
- Plant: “All our hopes are for this one plant to grow here in the desert. Don’t drown it!”
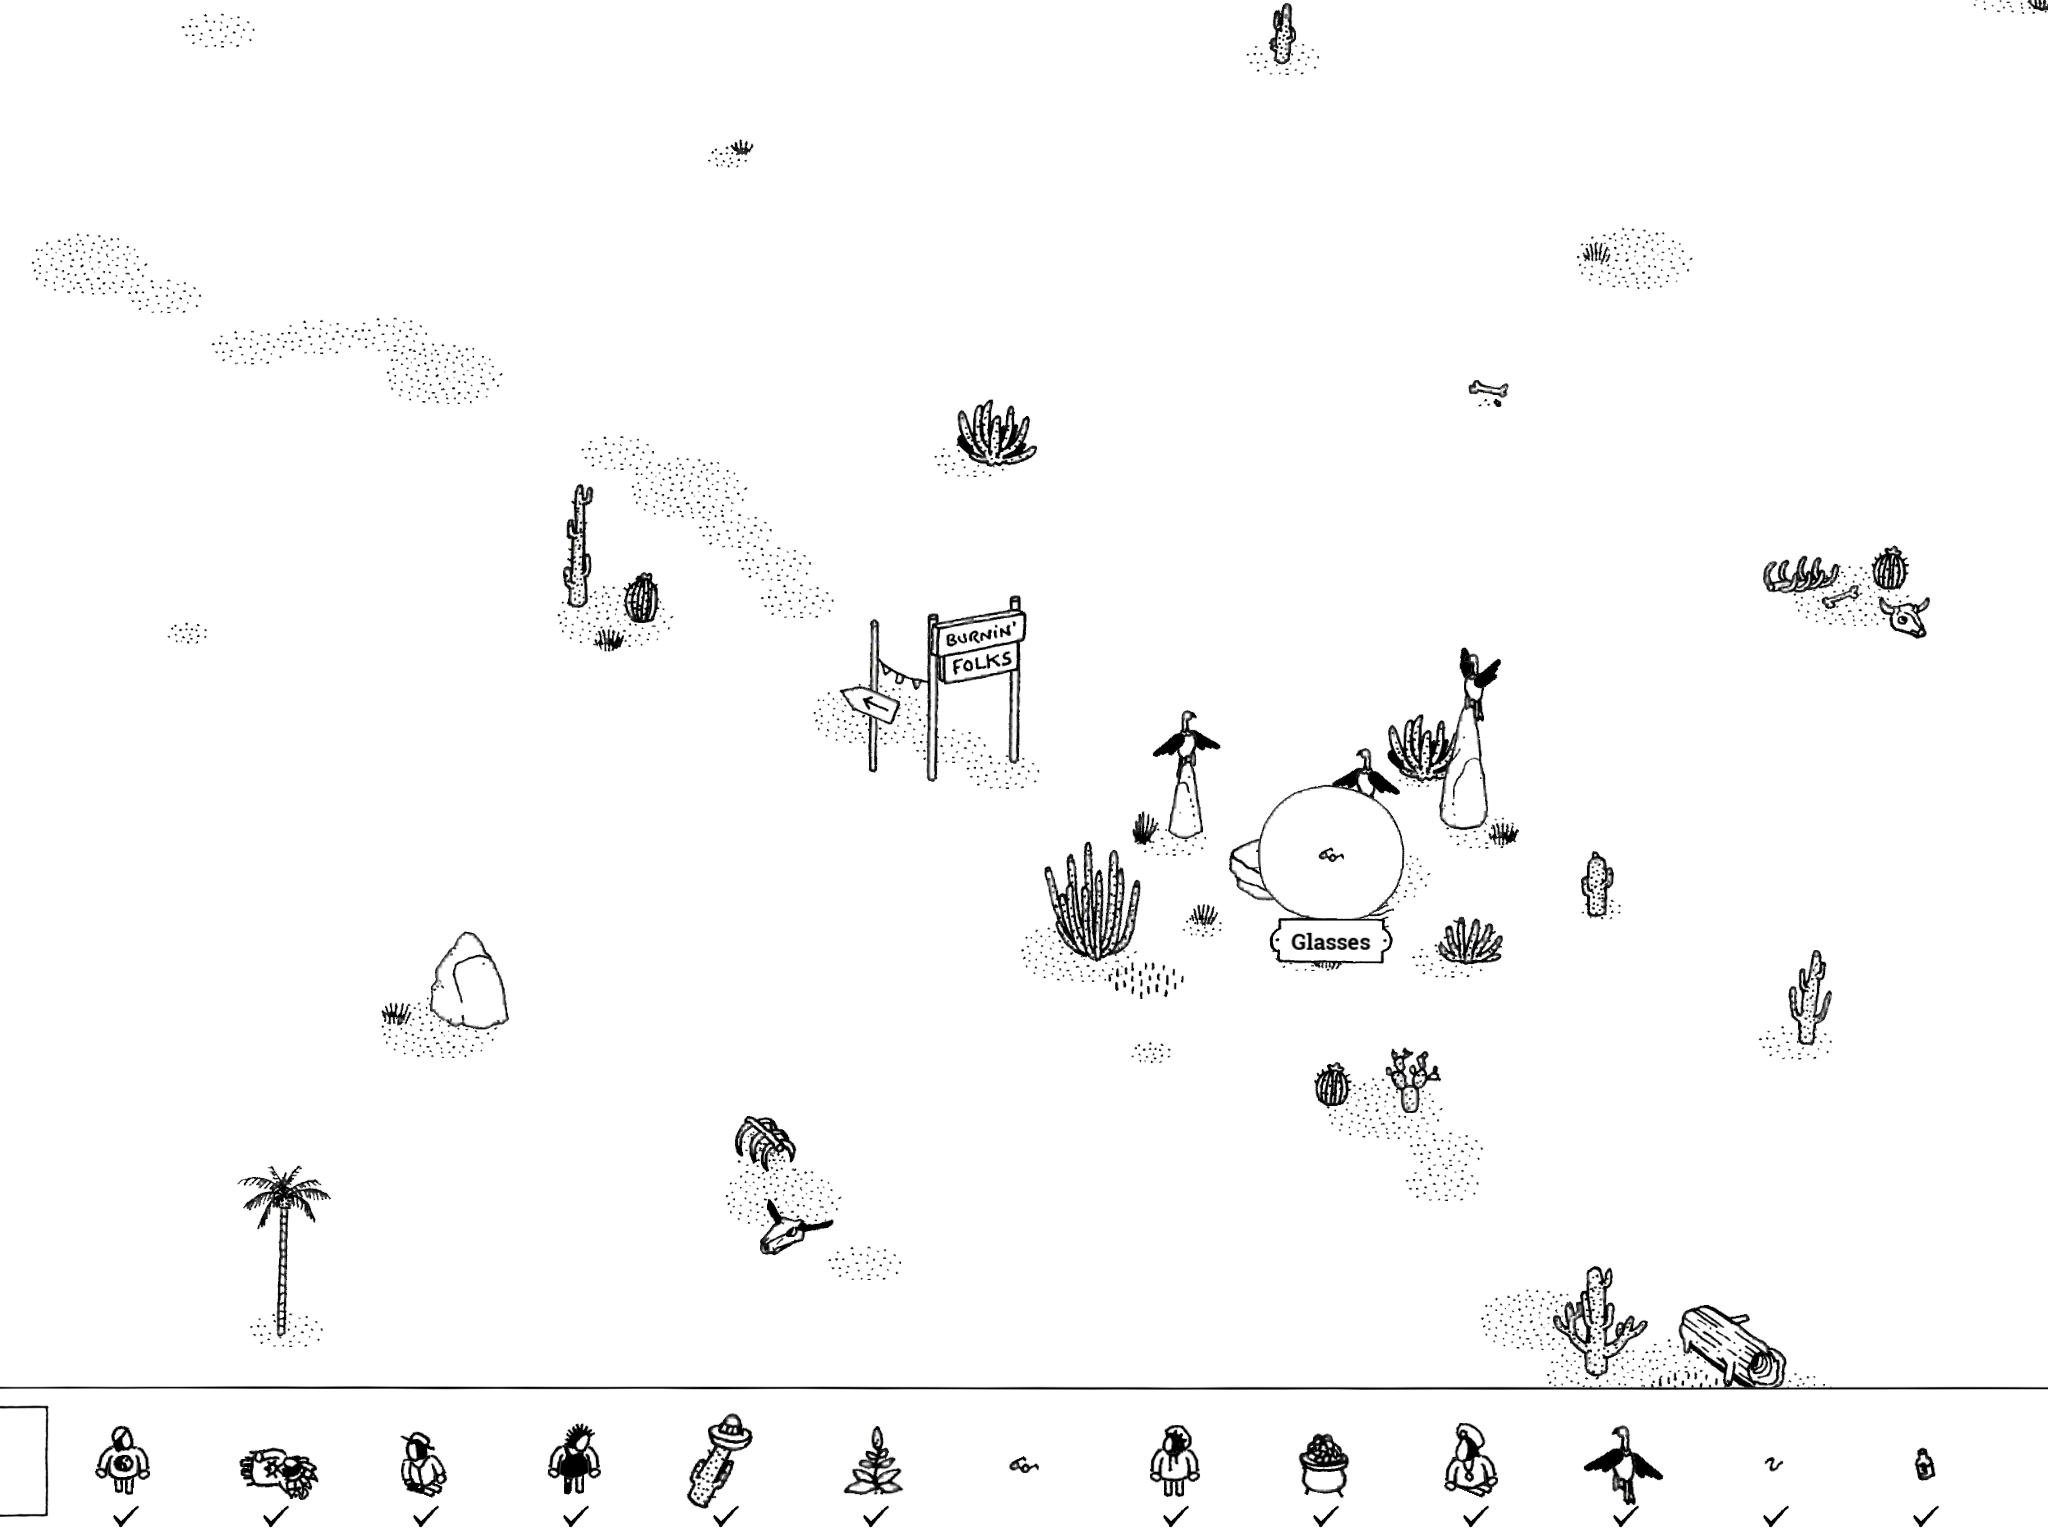
- Glasses: “It was only the woman’s glasses the three vultures didn’t eat.”
If you follow the trail leading southeast from the Burnin’ Folks festival (it passes some RVs and cars), you’ll soon come to a sign for Burnin’ Folks pointing back the direction you just came, and three vultures sitting on a series of rocks. Sitting on the flat rock under the middle vulture is the pair of Glasses.
- Glasses: “It was only the woman’s glasses the three vultures didn’t eat.”
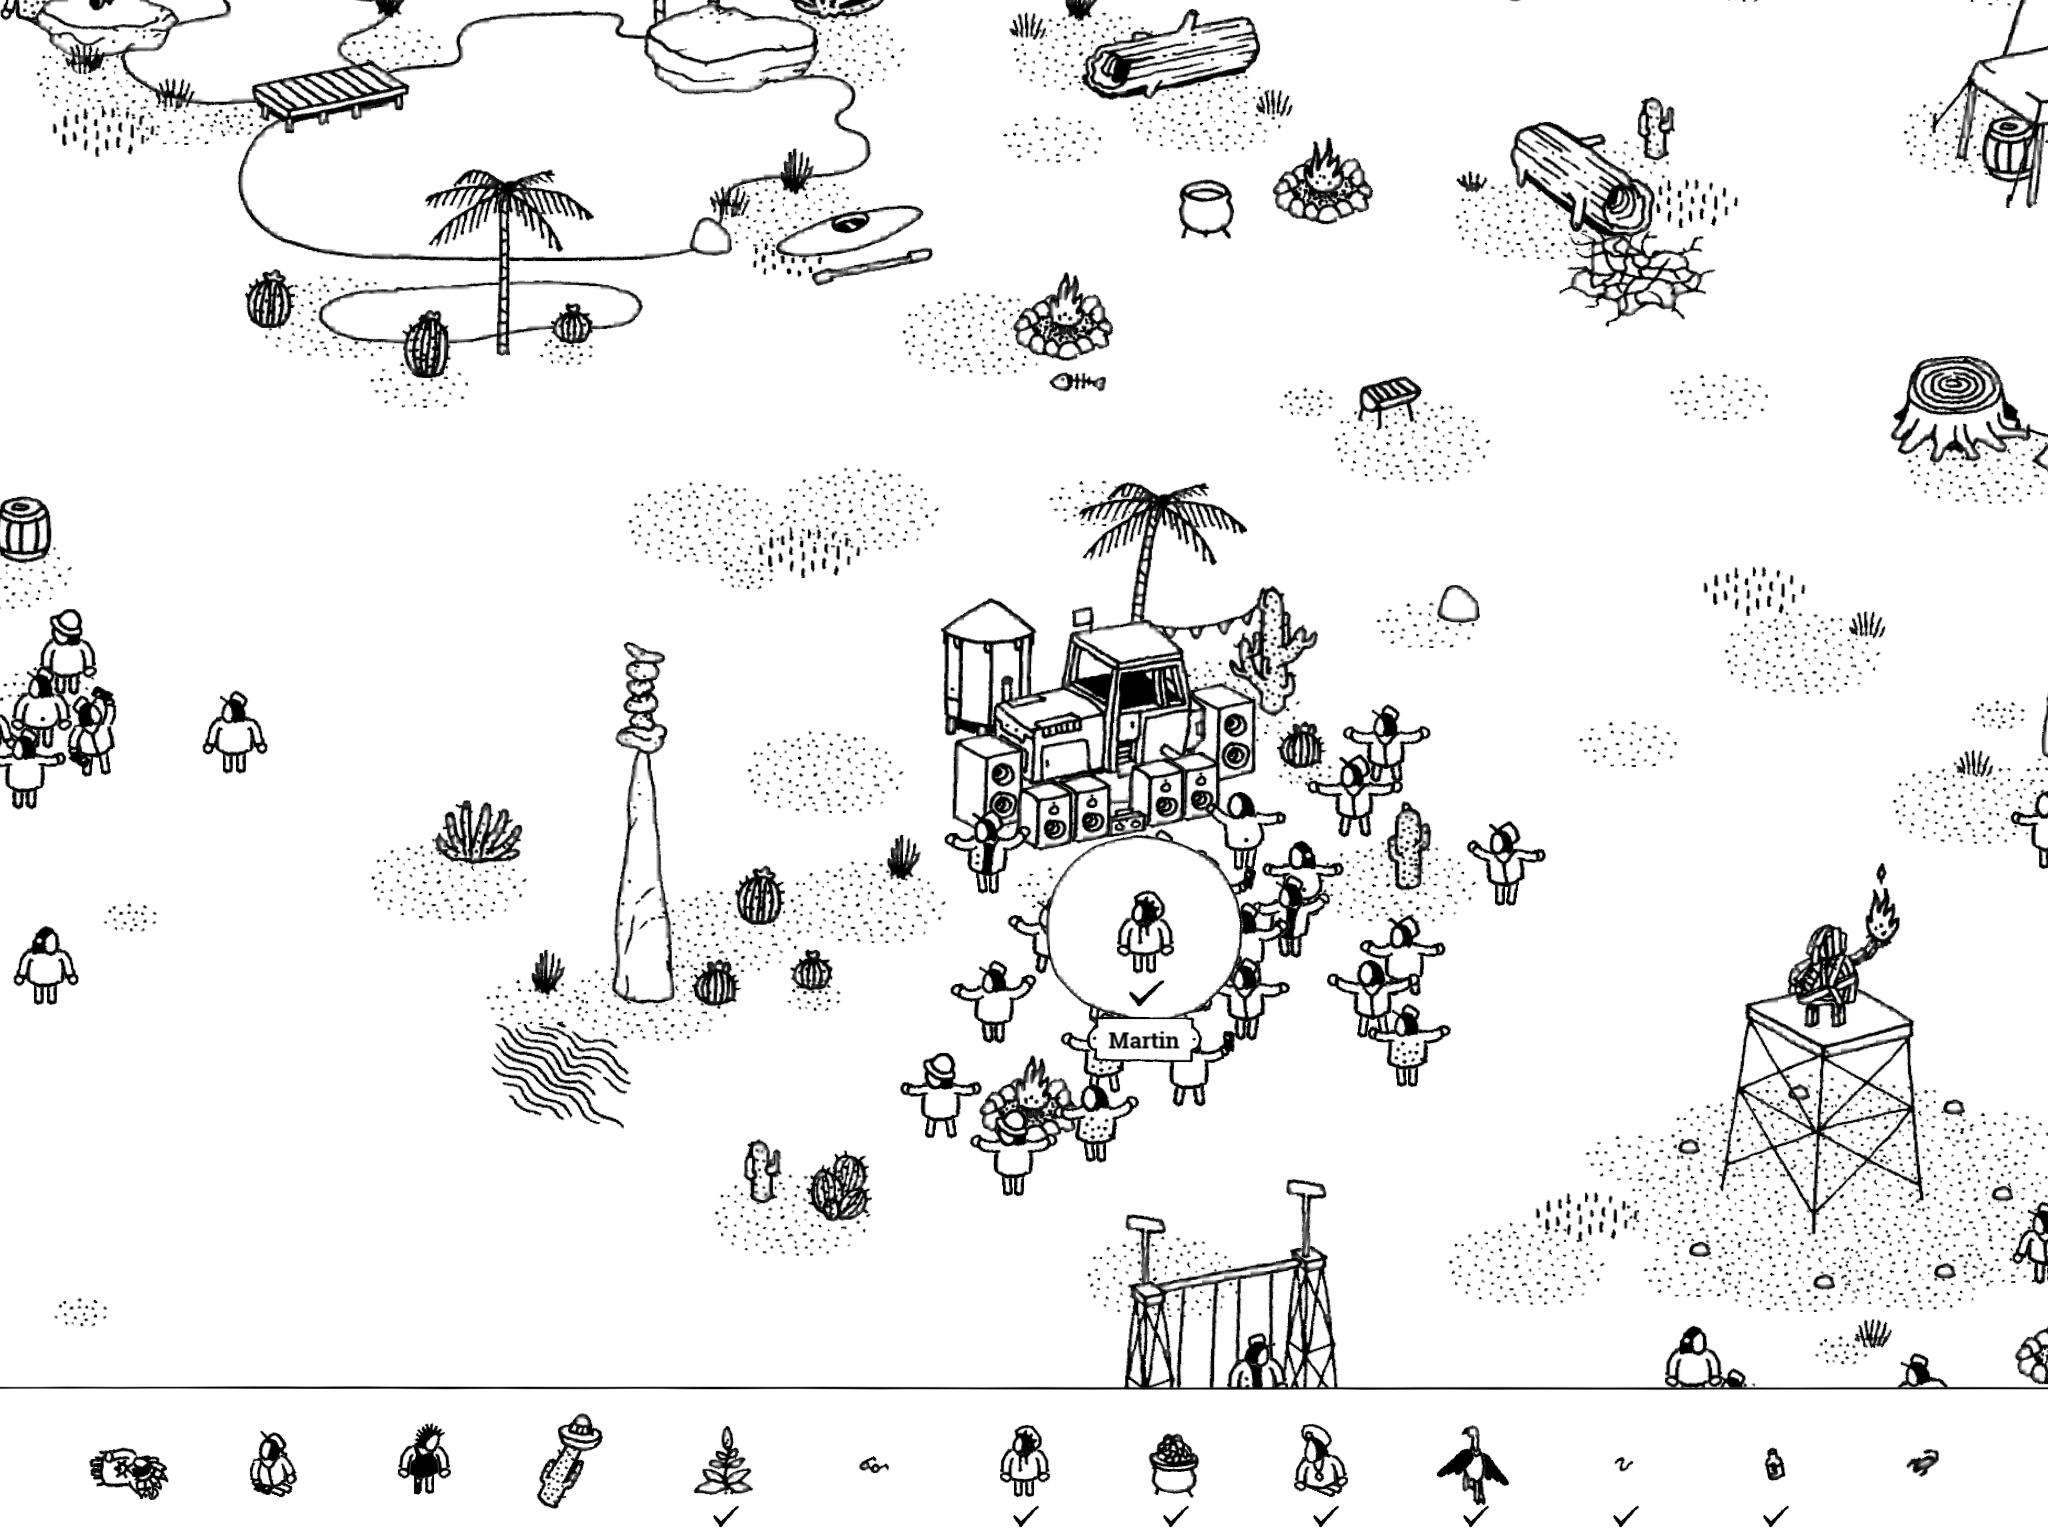
- Martin: “Martin waits for the music to kick in, but will dance primarily on the inside.”
At the Burnin’ Folks festival, just west of the festival’s center, there’s a large crowd standing near some speakers in front of a tractor. Martin is in the middle of this crowd. Tap the speakers to turn on the music, then tap Martin (everyone else begins dancing but he’ll remain still).
- Martin: “Martin waits for the music to kick in, but will dance primarily on the inside.”
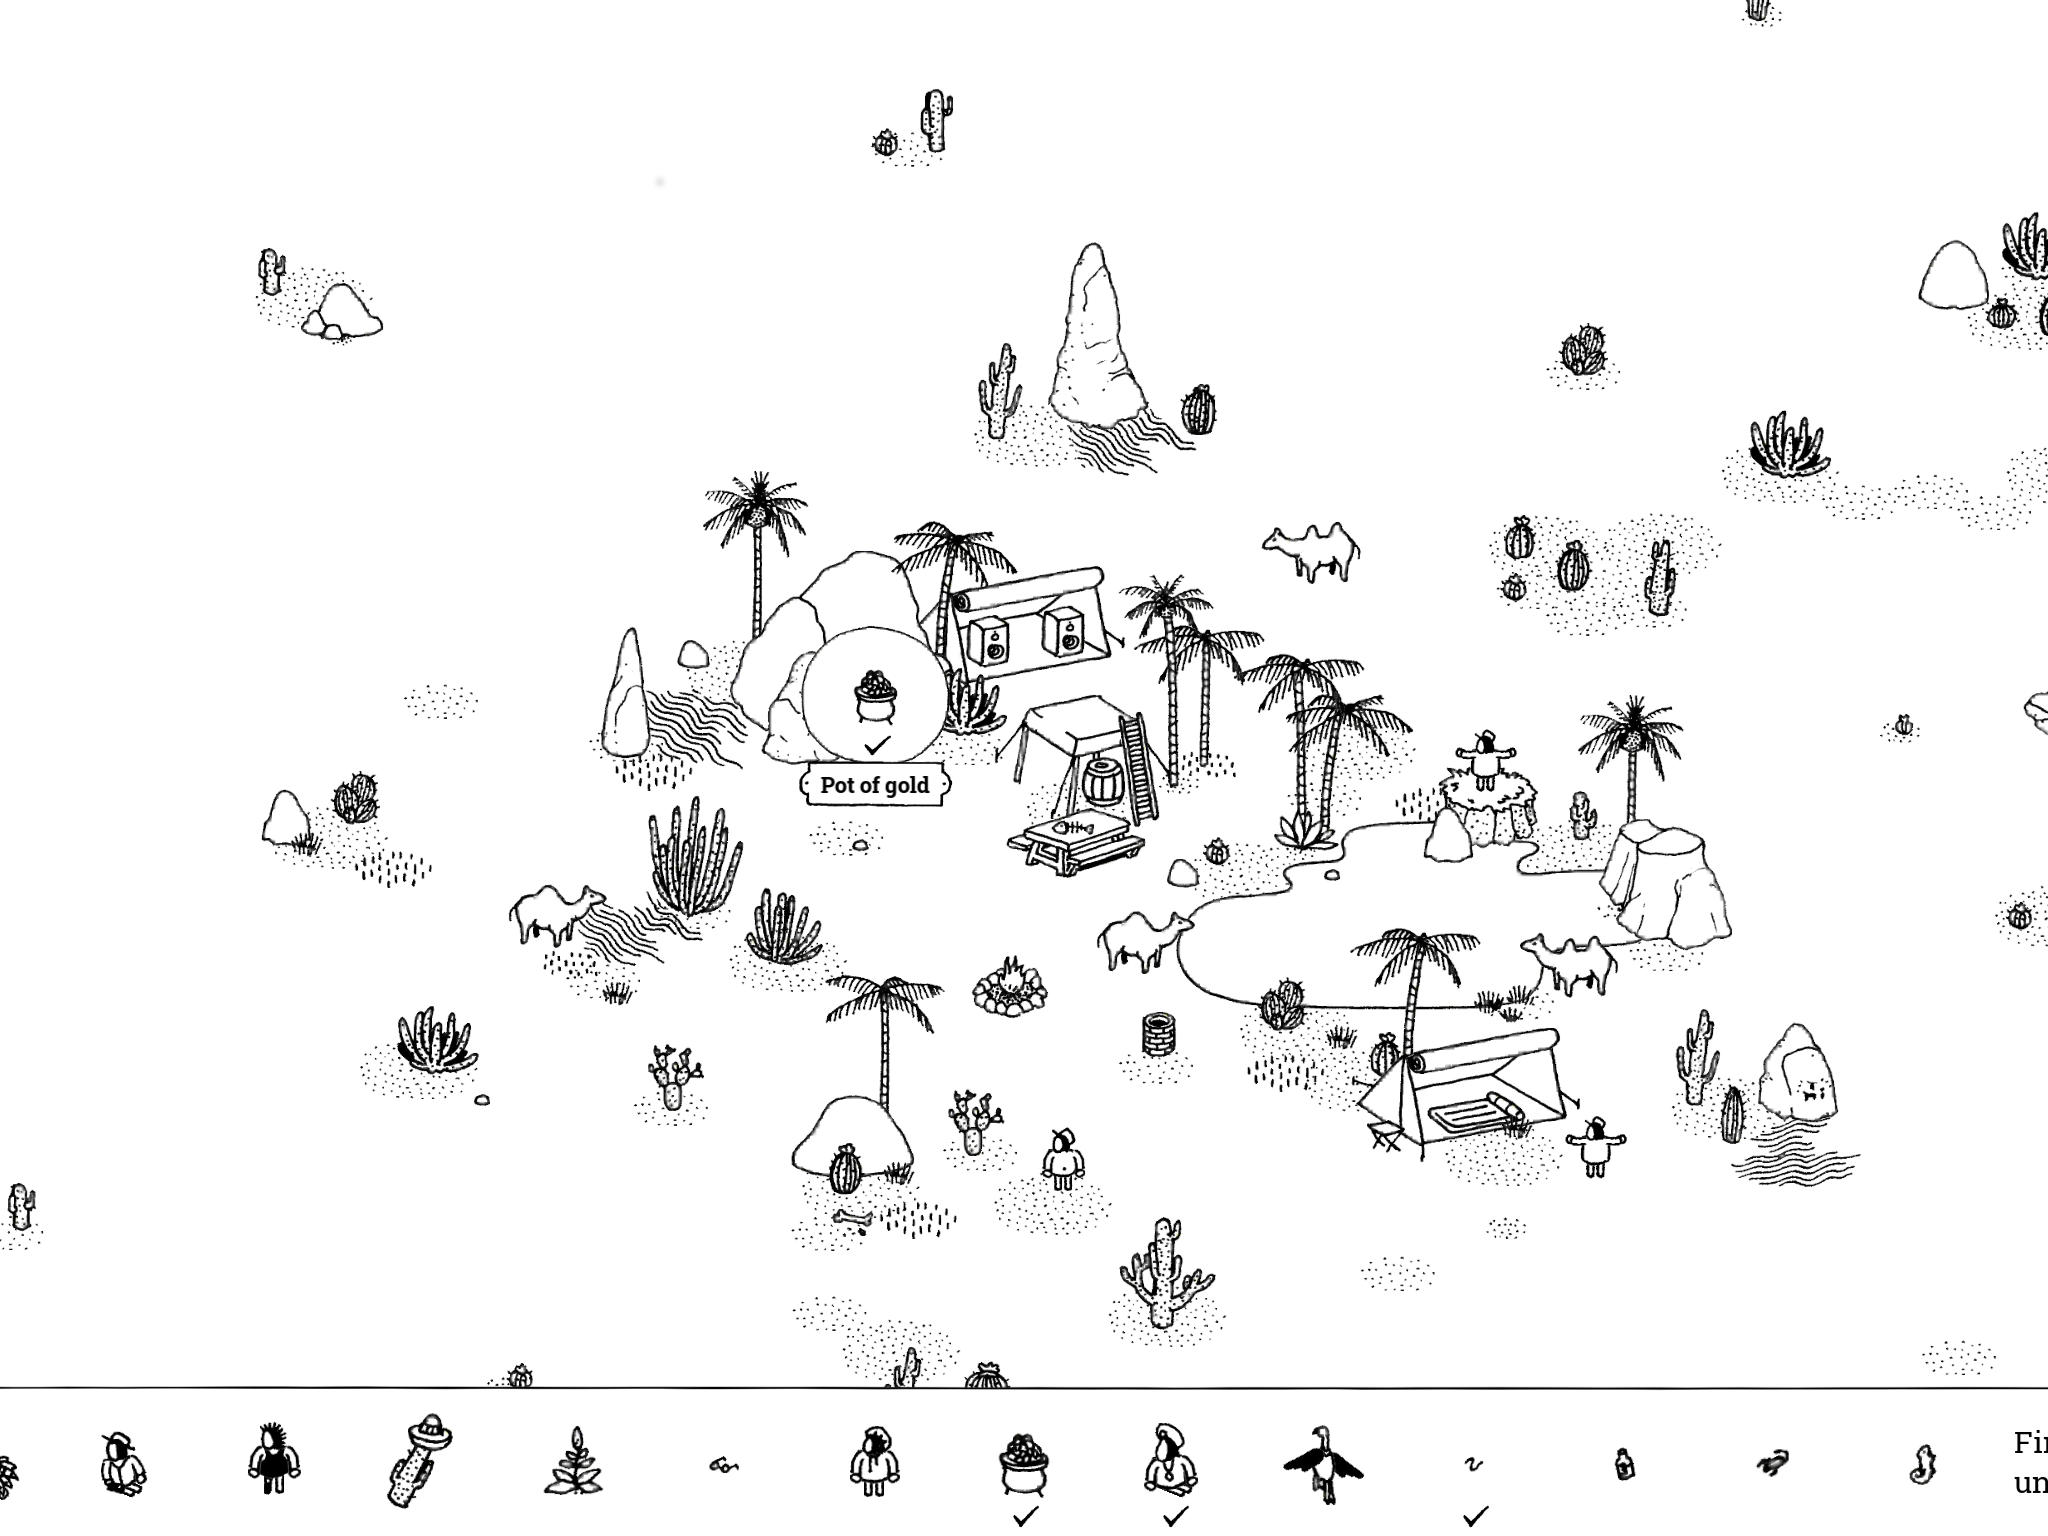
- Pot of Gold: “The pot of gold by this oasis may be attained by the person who says the secret password. Definitely not this guy.”
On the southern edge of the Desert, just west of horizontal center and southeast of the mining camp, is a small oasis with a pond and a few camels. On the north side of this oasis is a rock with a guy jumping up and down in front of it. Tap and hold the rock, then drag it to the left to reveal a secret cave with the Pot of Gold.
- Pot of Gold: “The pot of gold by this oasis may be attained by the person who says the secret password. Definitely not this guy.”
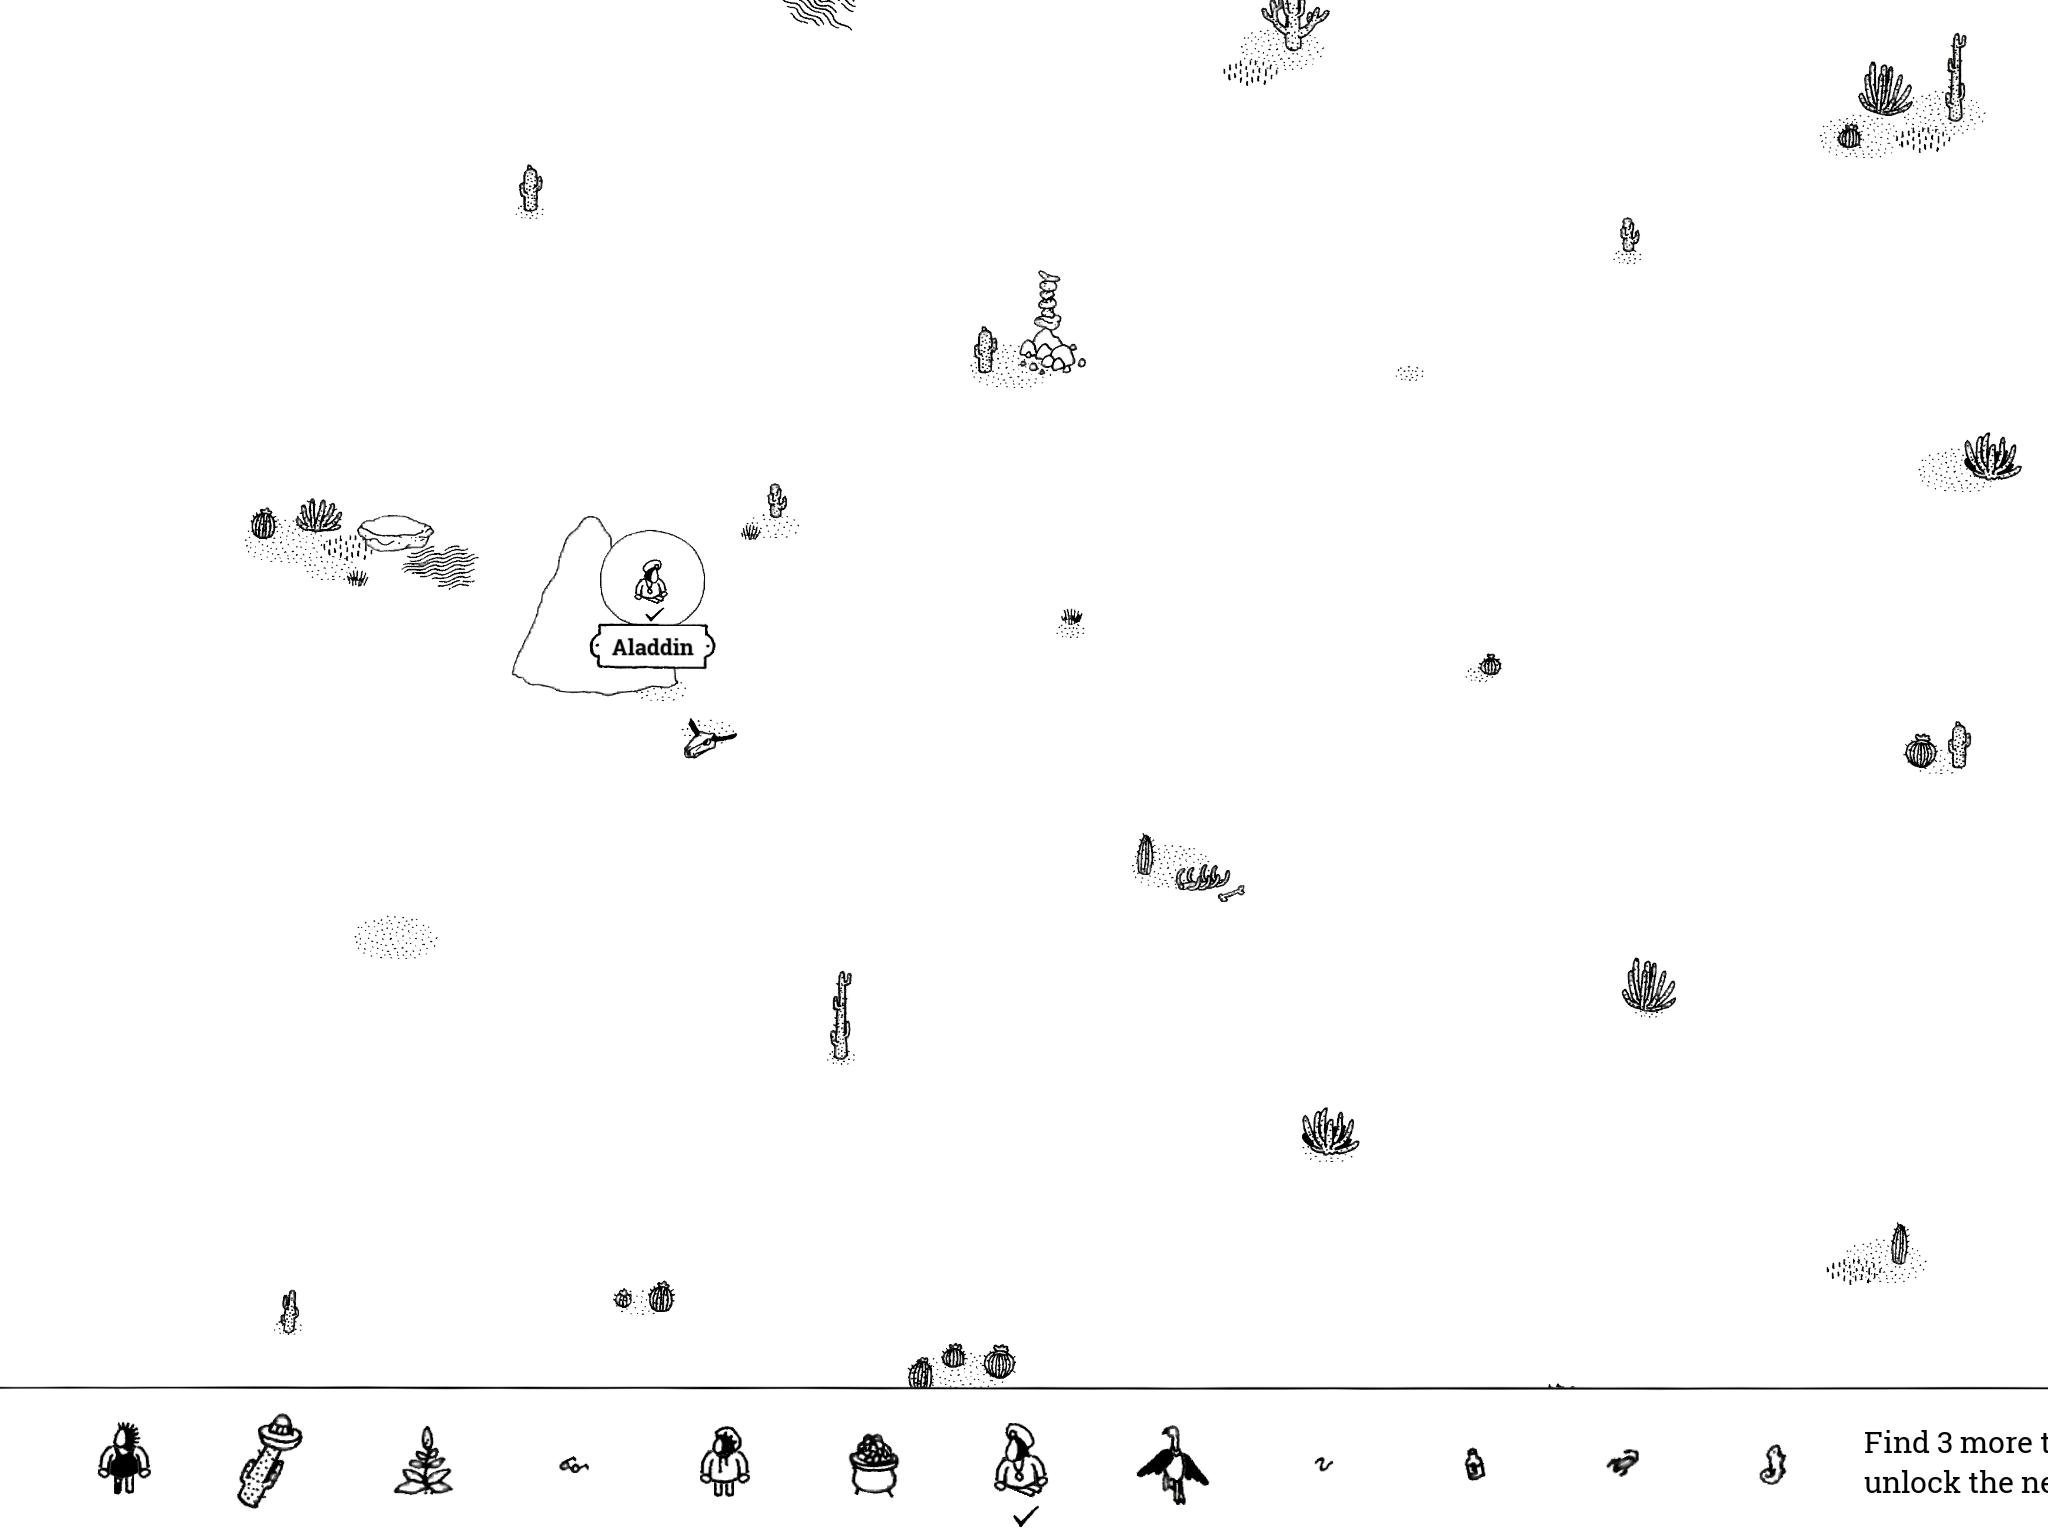
- Aladdin: “Aladdin surfs the mild winds across the desert like nothing weird is happening.”
Aladdin will continuously fly on his magic carpet across the Desert, cutting through the vertical center at a very slightly southern diagonal. He travels west until he reaches a large boulder on the western edge of the map at basically vertical center. You might catch him somewhere else, but if you’re having trouble finding him, you can just wait by this boulder until he makes his return trip—just be sure to tap him before he flies behind the boulder.
- Aladdin: “Aladdin surfs the mild winds across the desert like nothing weird is happening.”
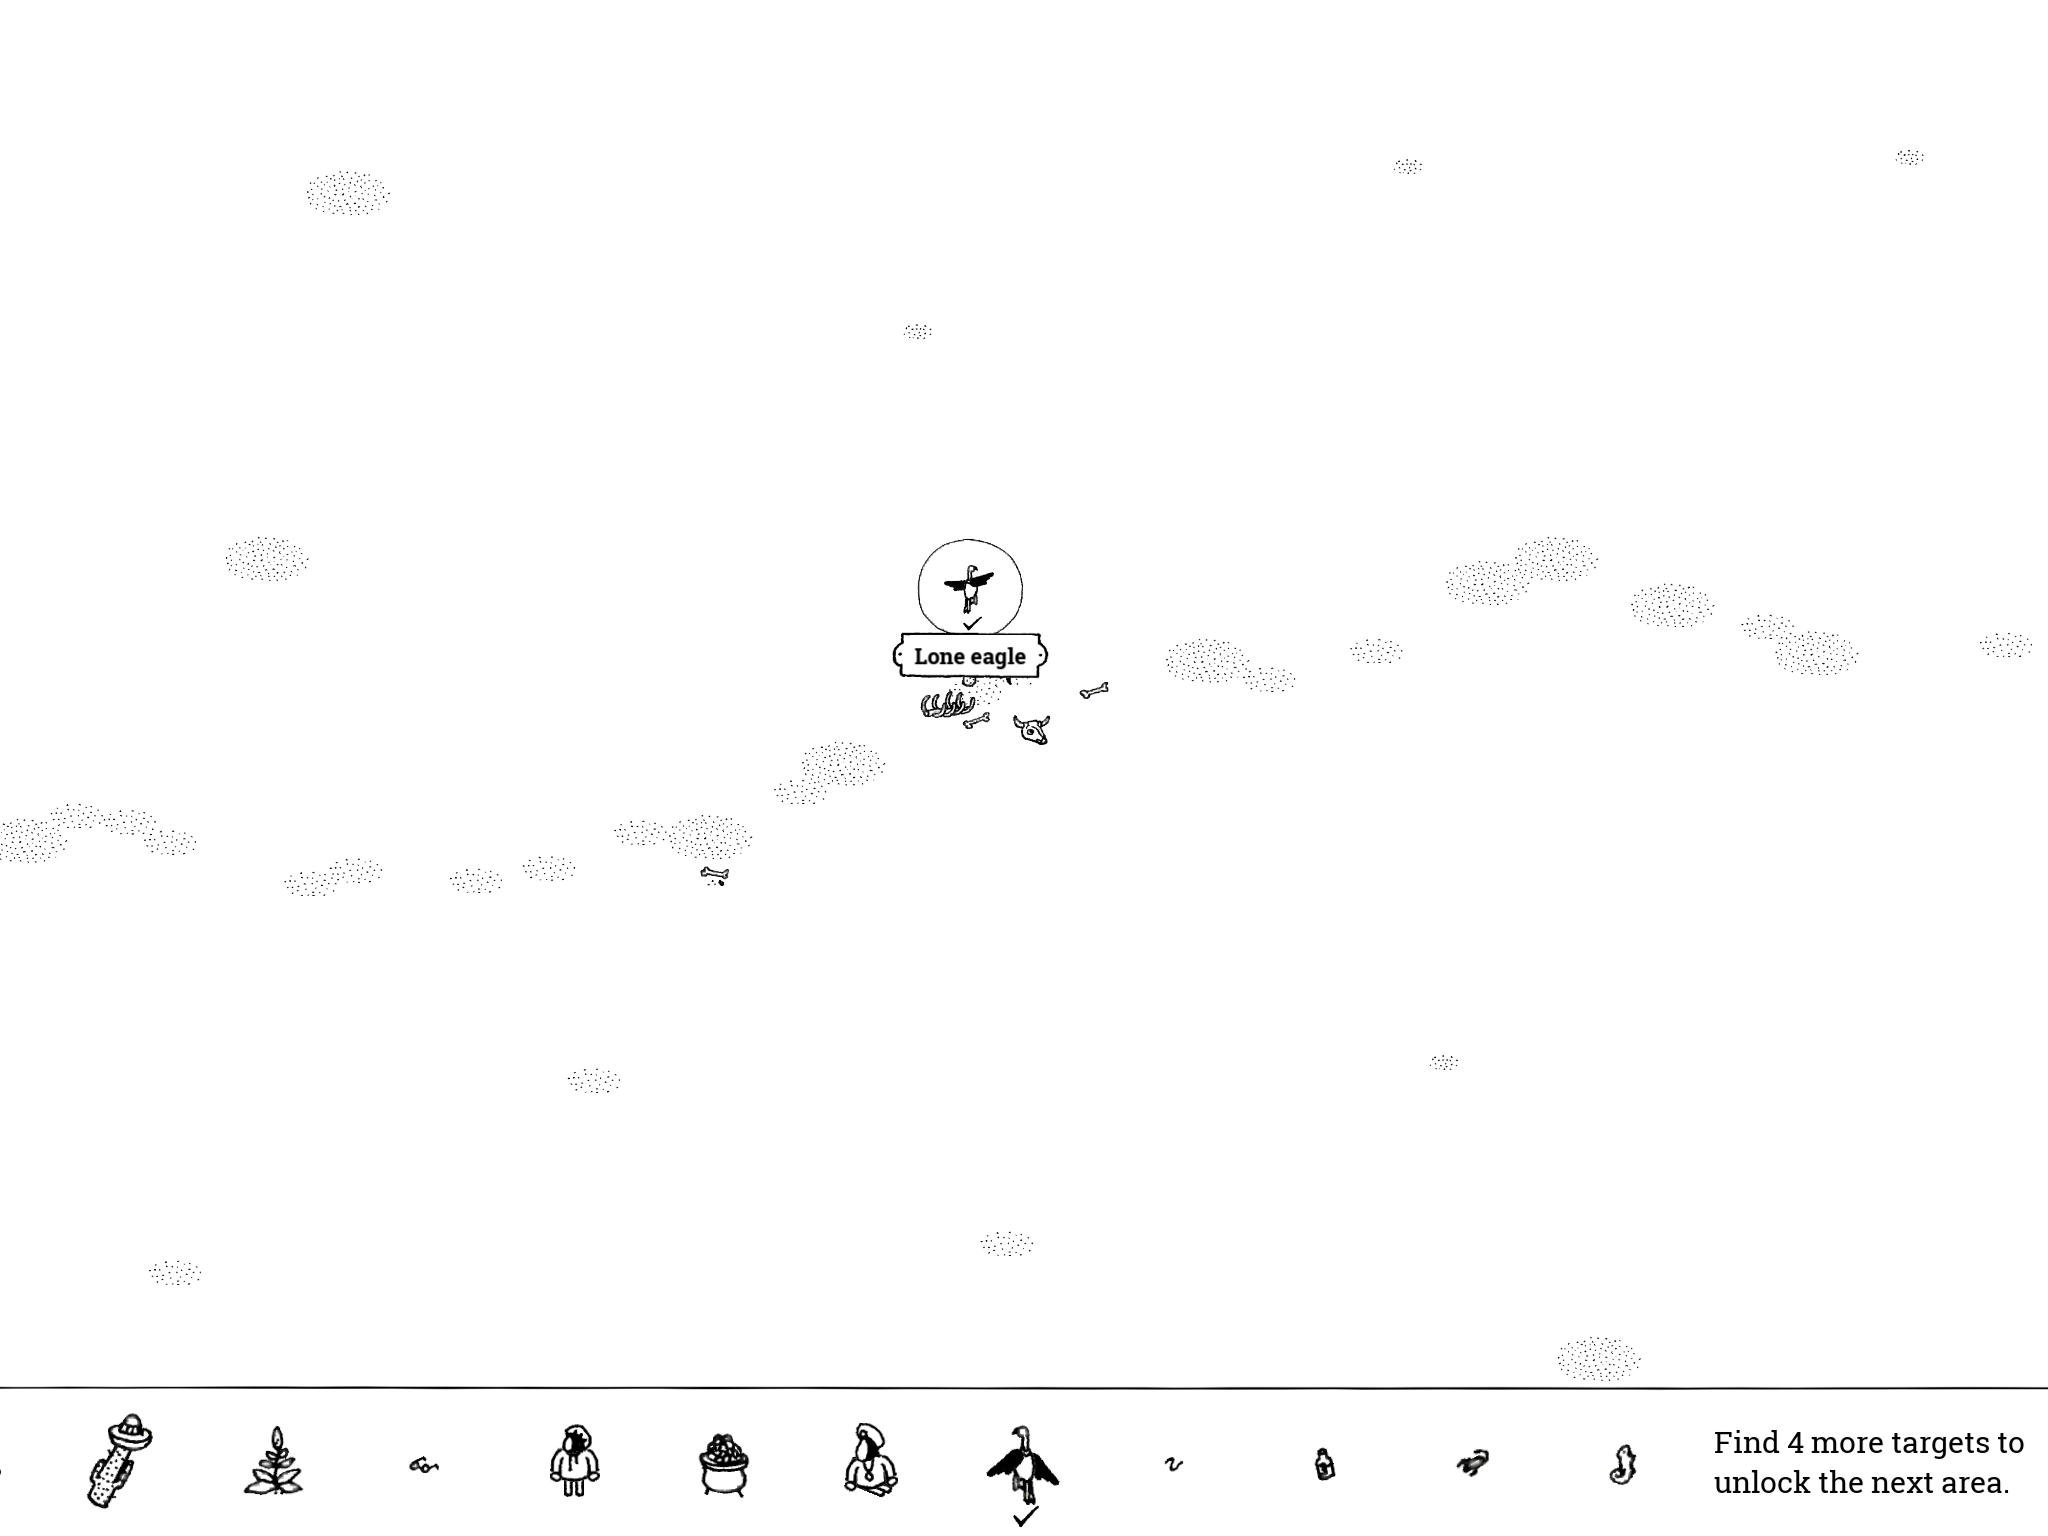
- Lone Eagle: “This lone eagle ate literally everything around him. Everything.”
The Lone Eagle is just southeast of the oasis with the Pot of Gold. He’s really in the middle of nowhere on the southern edge of the map near horizontal center; to his east is very a small excavation camp. He sits on top of a cactus with two ribcages and a skull underneath him.
- Lone Eagle: “This lone eagle ate literally everything around him. Everything.”
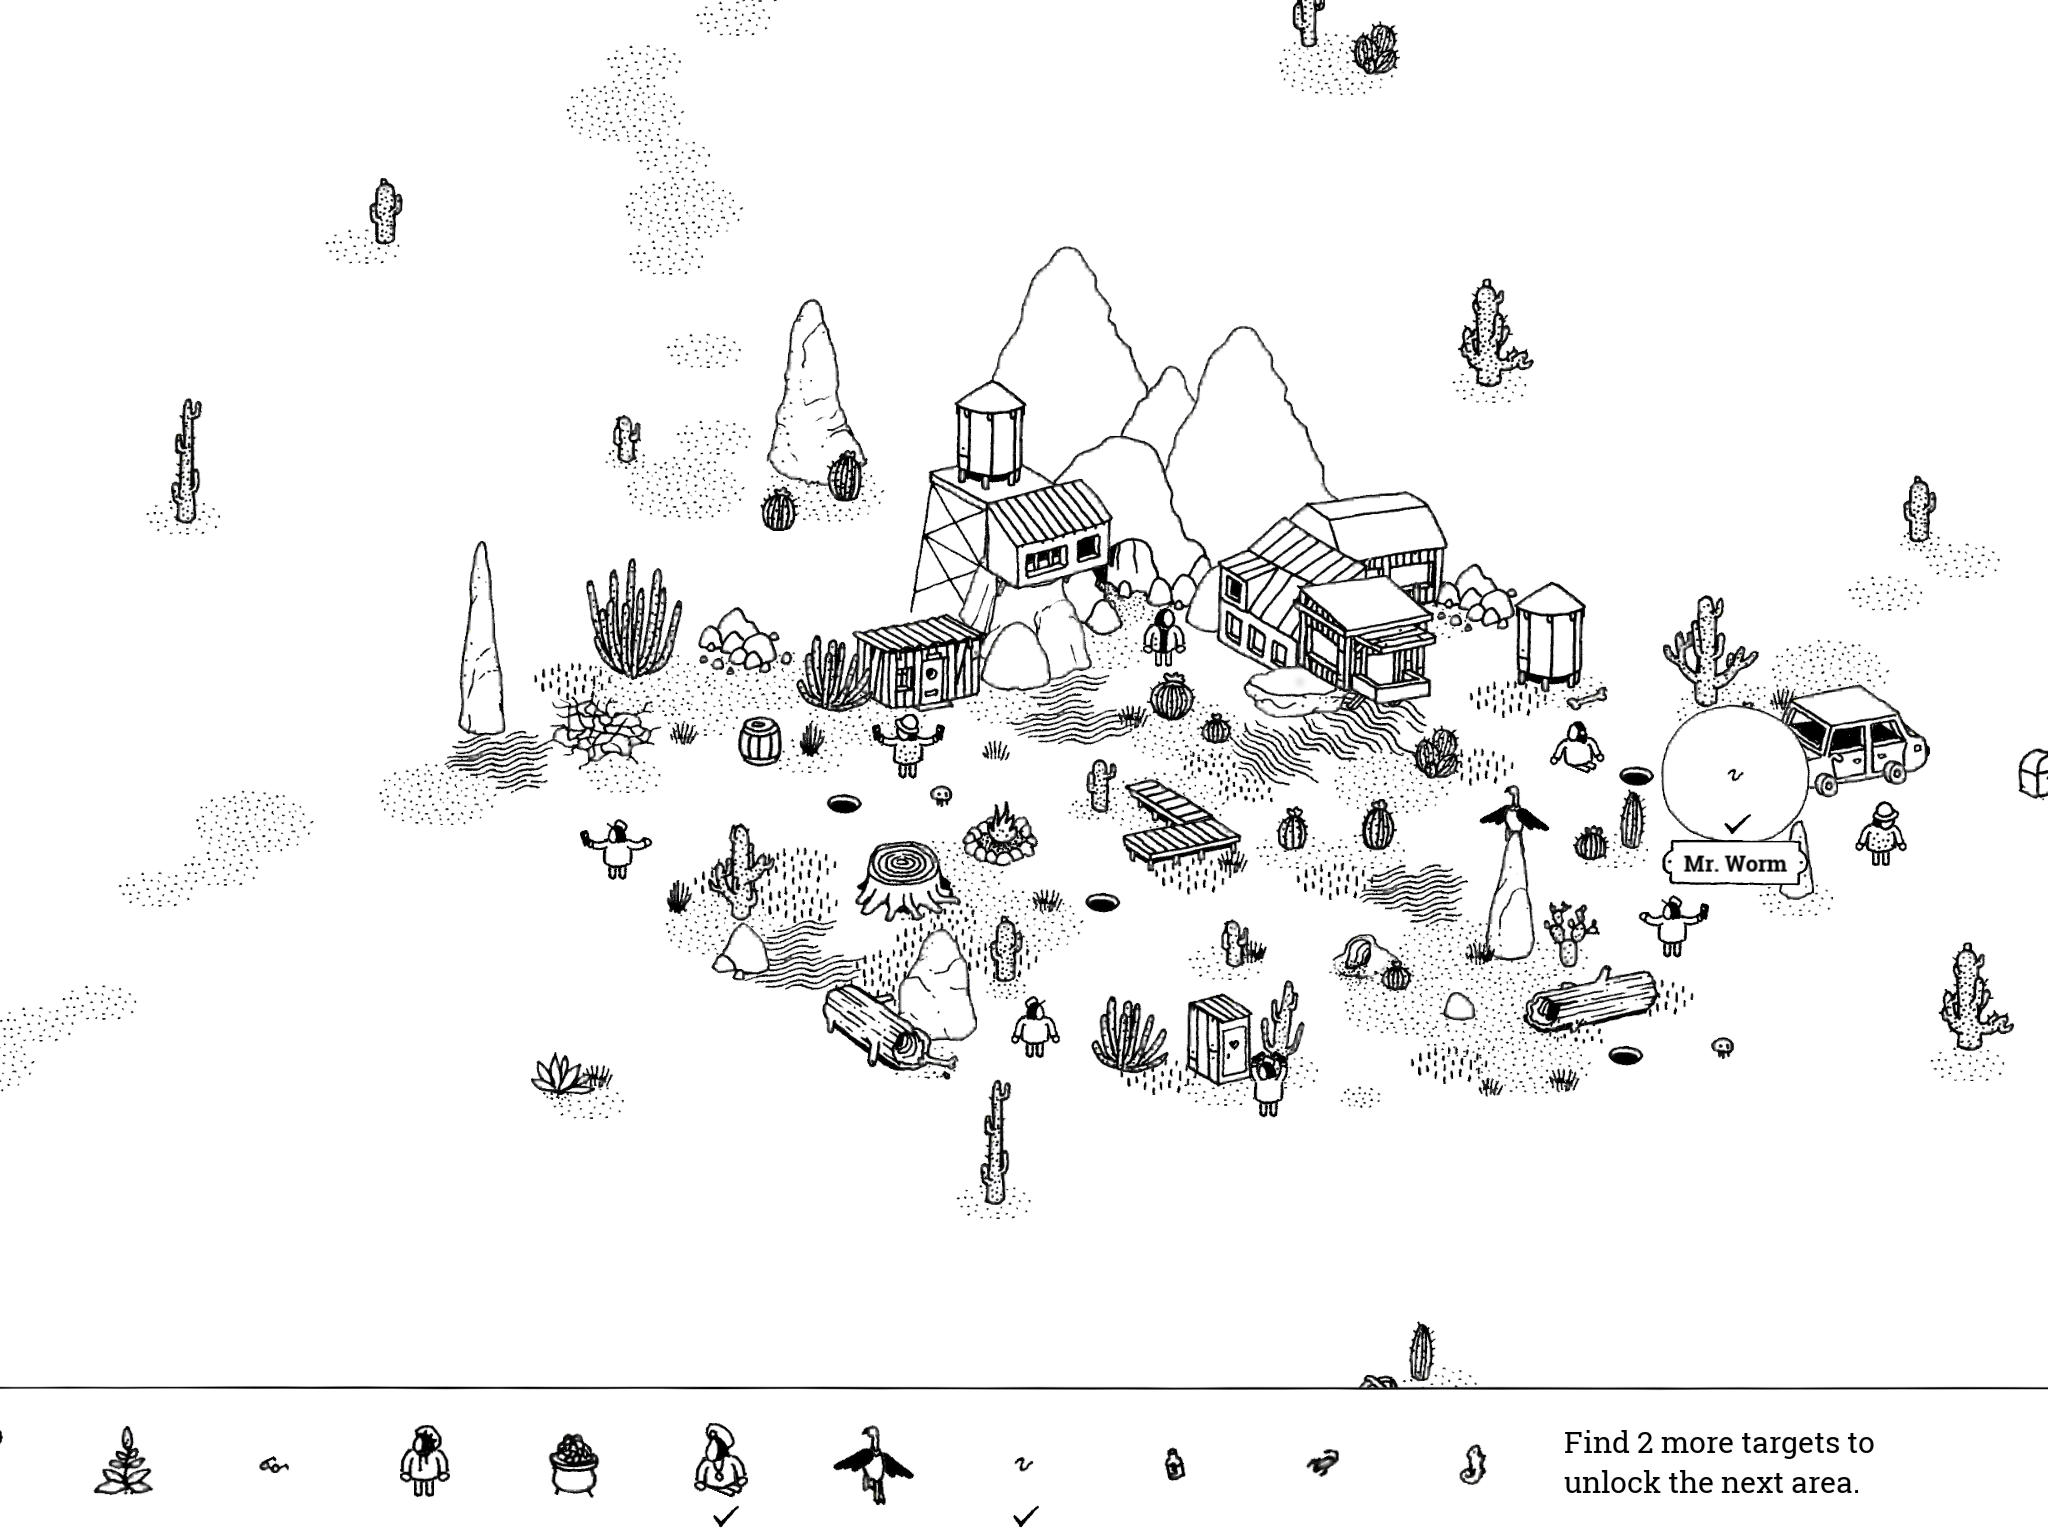
- Mr. Worm: “Mr. Worm feels at home in this mining camp.”
If you follow the southwest trail from the Burnin’ Folks festival, you’ll soon come to the mining camp. It’s just northwest of the oasis with the Pot of Gold. It has three black X’s on the ground; if you dig up the rightmost X, Mr. Worm pops out and lands near the car.
- Mr. Worm: “Mr. Worm feels at home in this mining camp.”
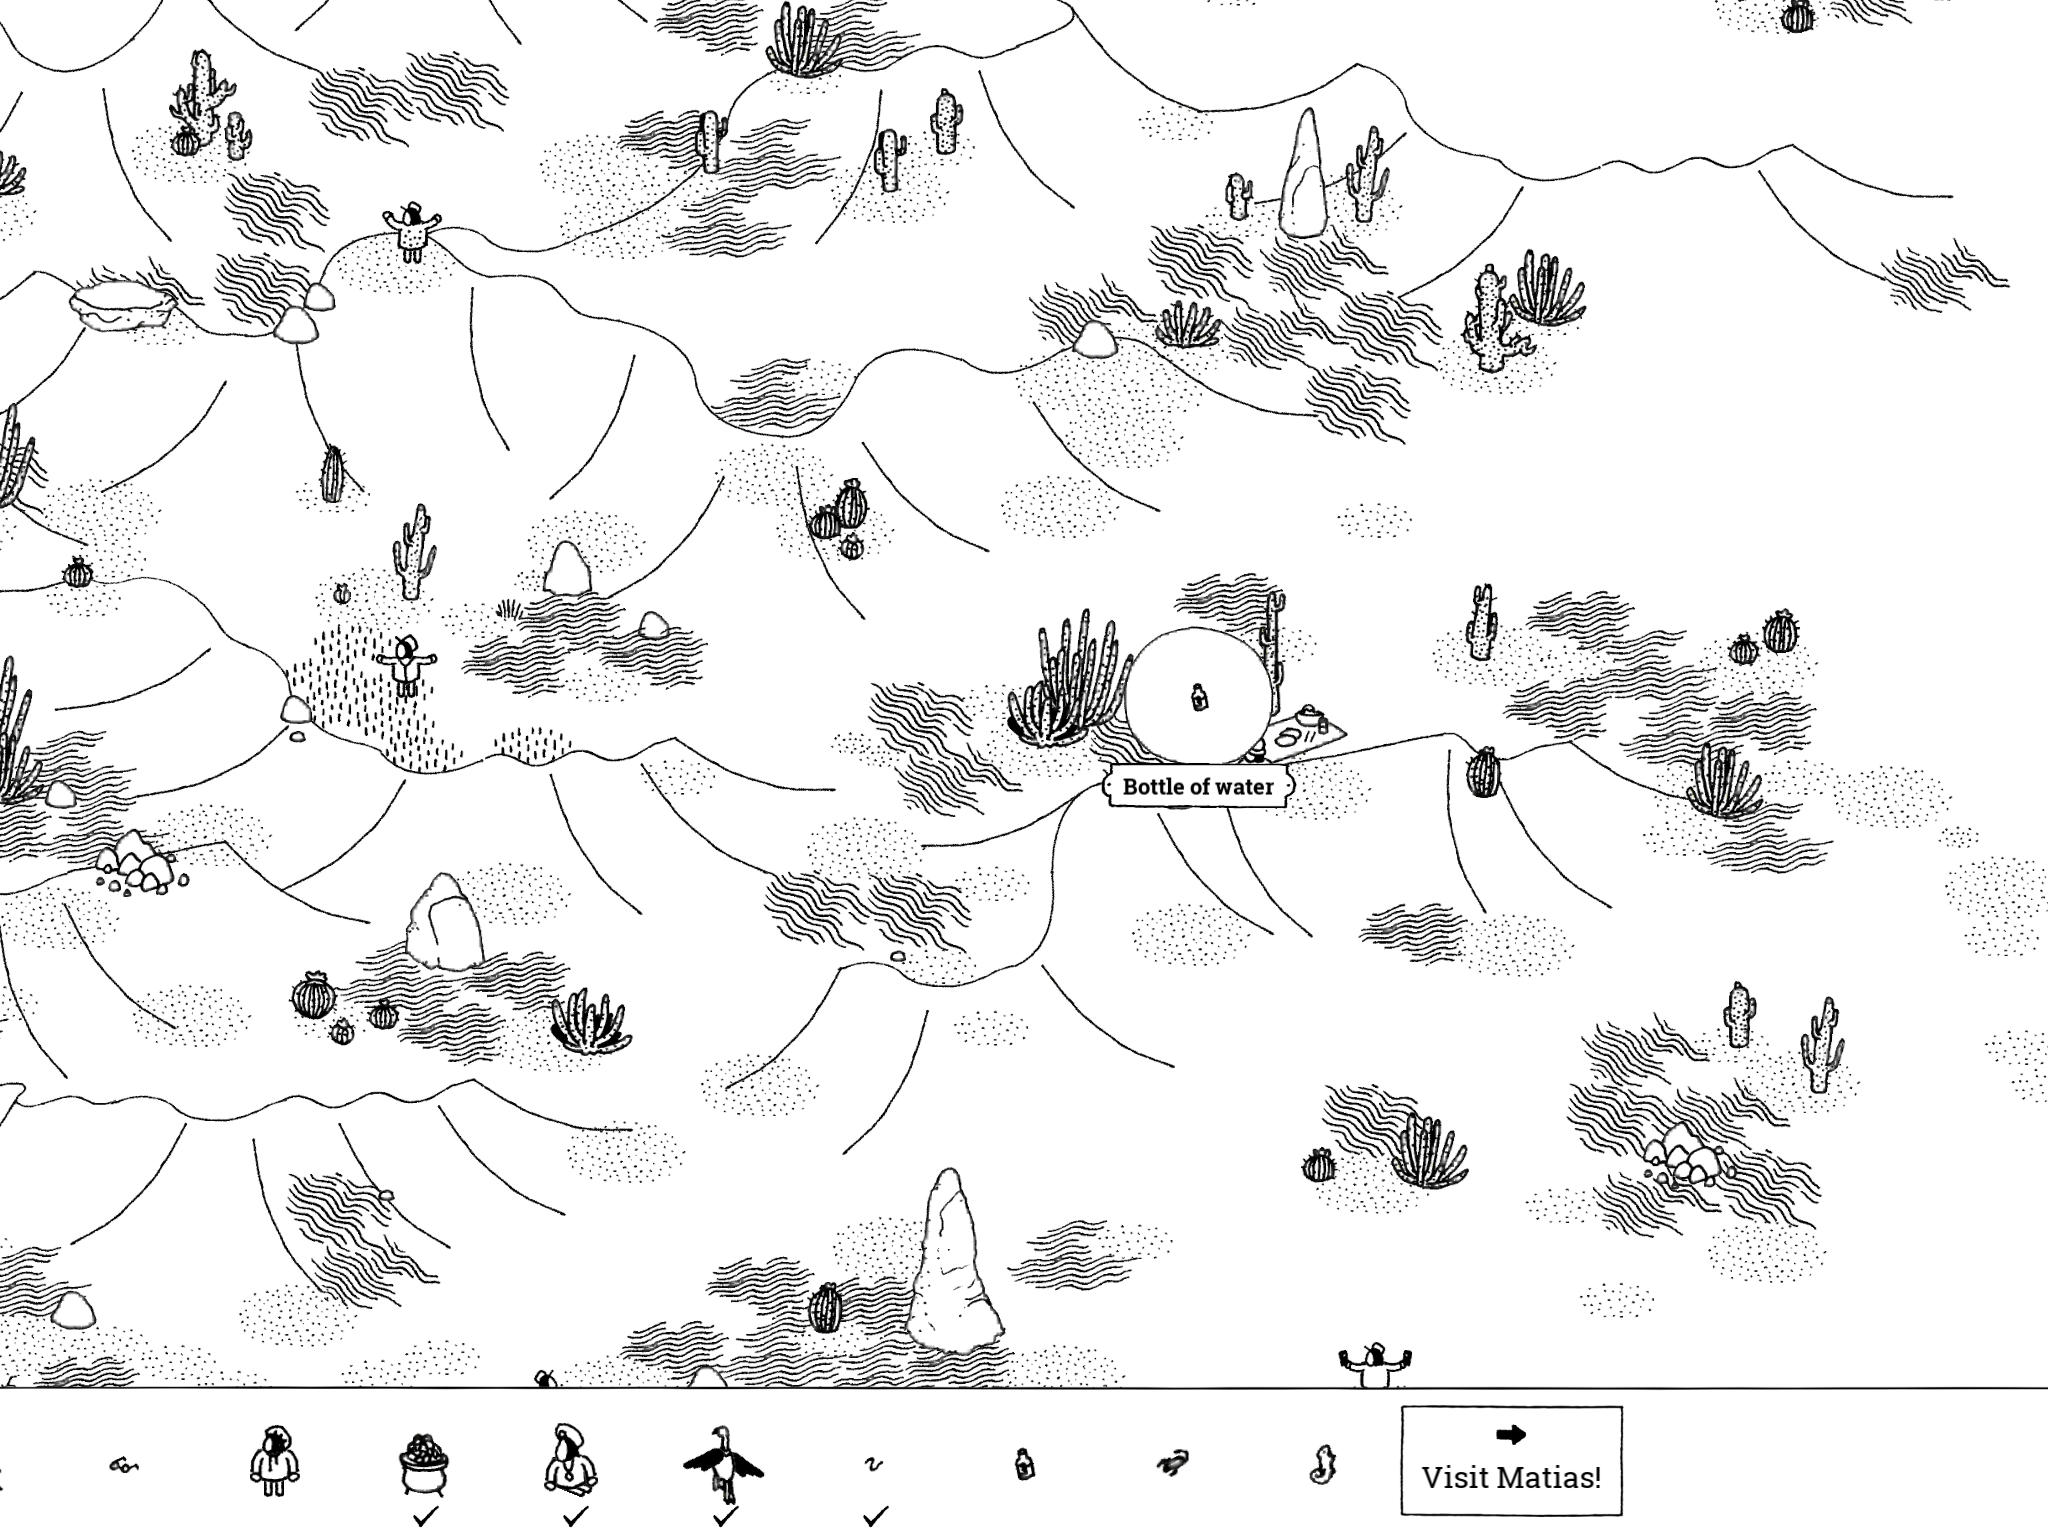
- Bottle of Water: “This bottle of water could save your life in the dunes of the desert.”
The dunes are a fairly large area northwest of the farm with the Plant, which is near the southeast corner of the Desert. On the eastern side of the dunes is a man wandering back and forth in front of a flat rock with a picnic blanket right next to it. The Bottle of Water is on the flat rock.
- Bottle of Water: “This bottle of water could save your life in the dunes of the desert.”
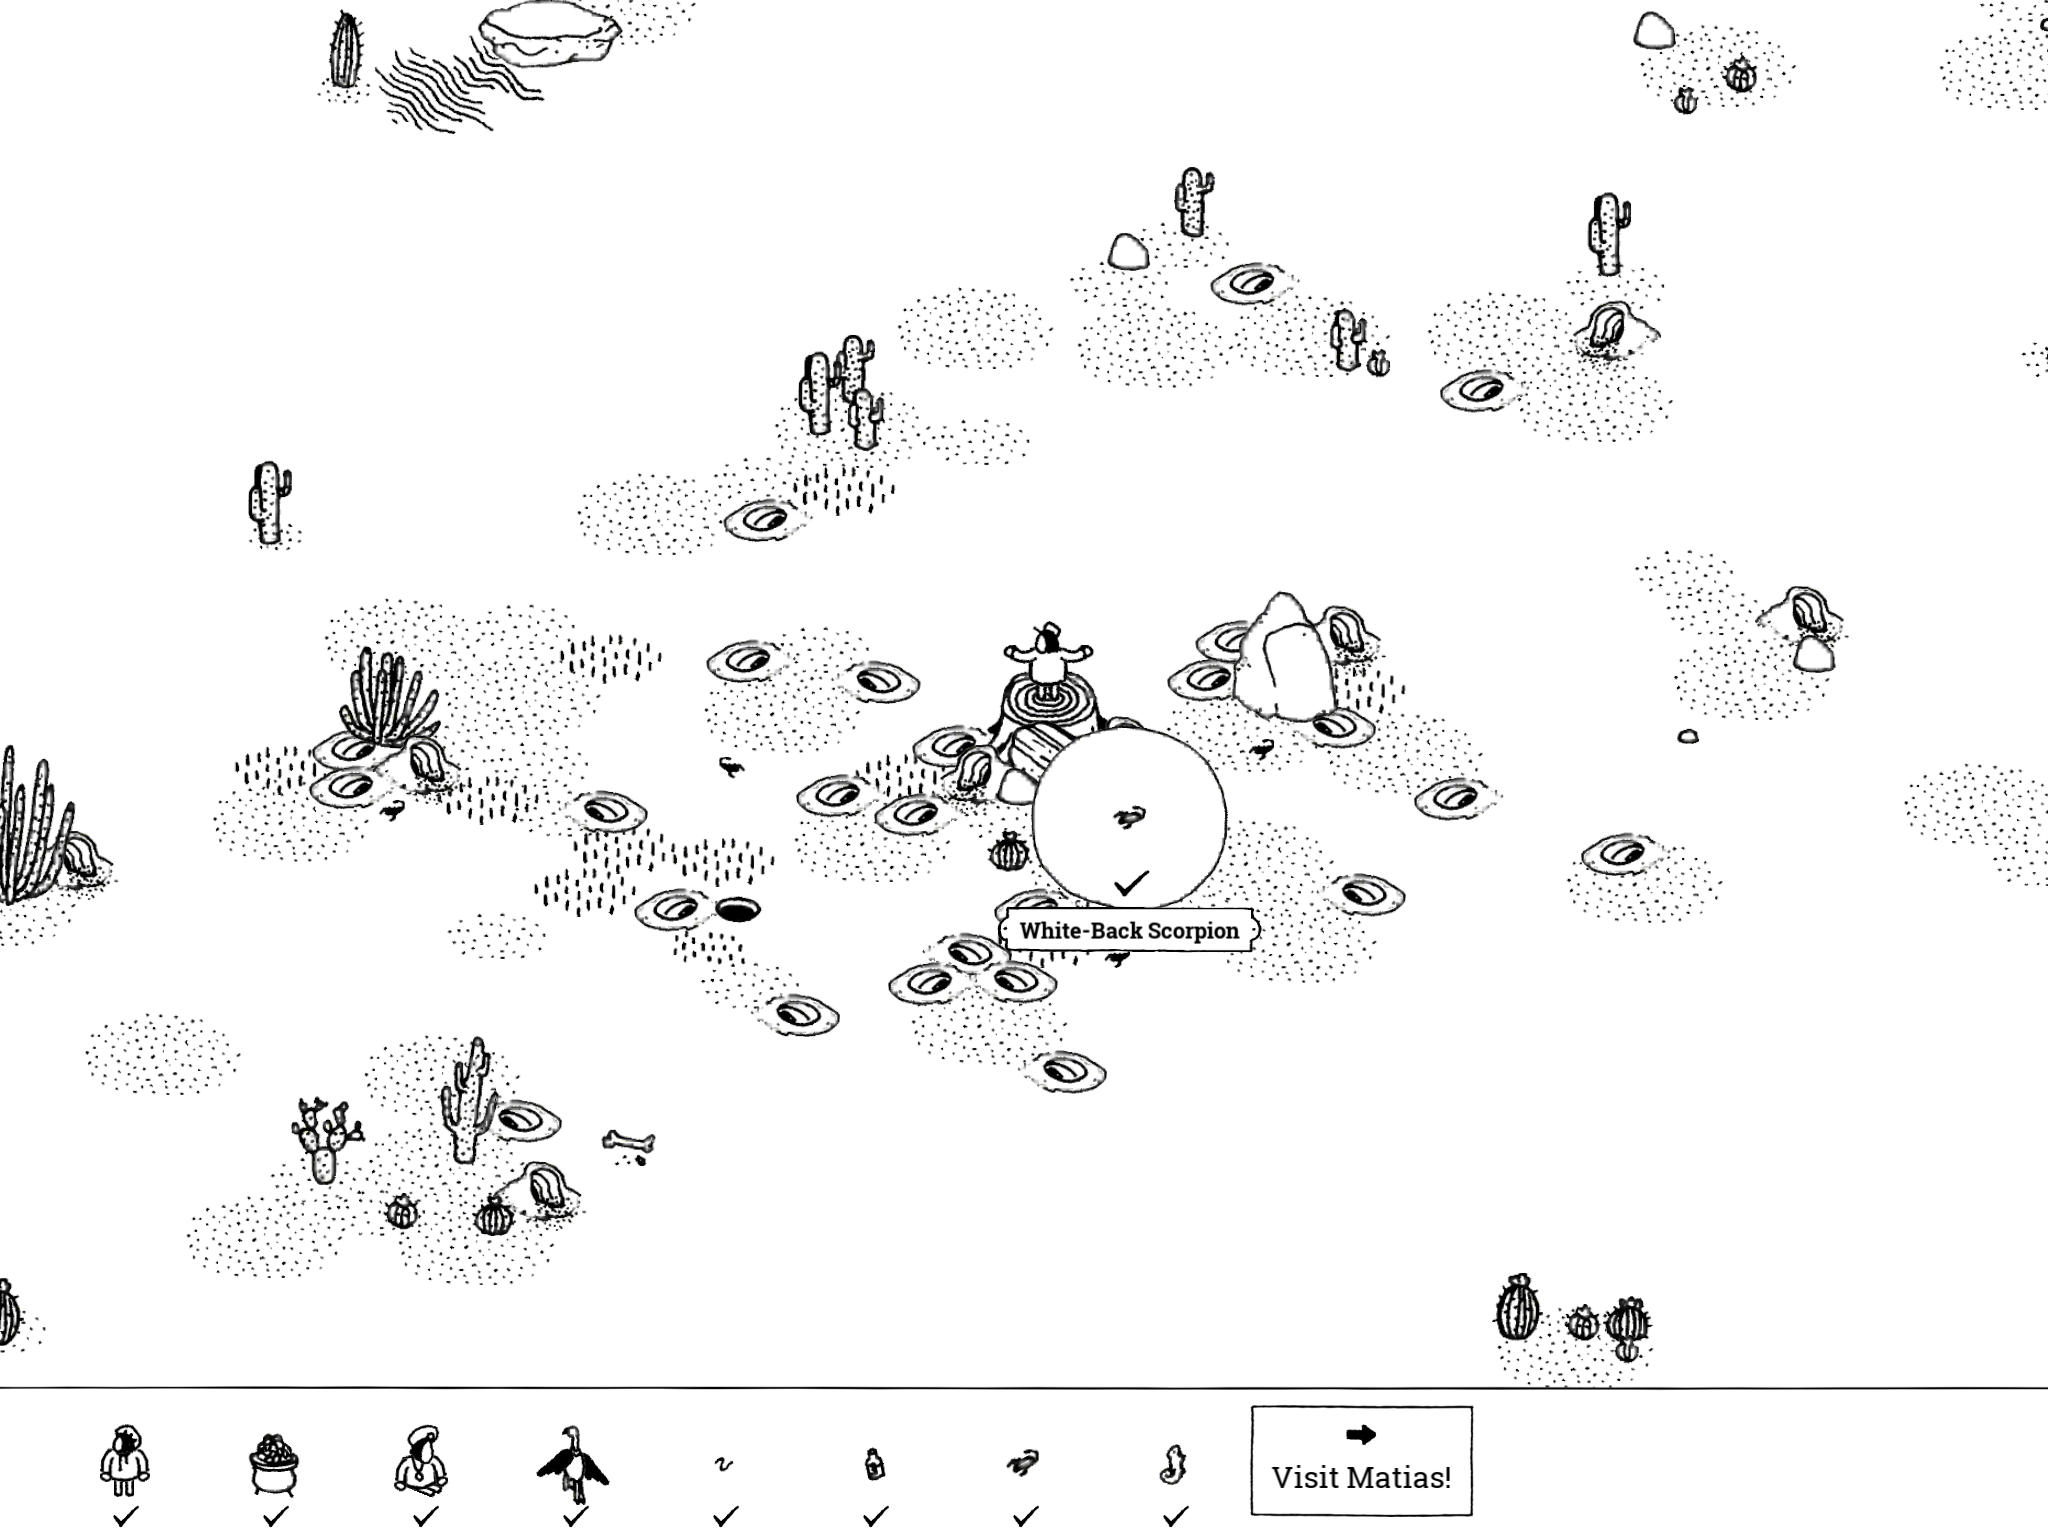
- White-Back Scorpion: “This extremely rare White-Back Scorpion is surrounded by its children. A king of the desert never goes underground.”
Straight north from the Burnin’ Folks festival is a cactus forest. If you follow the southeast path out of the cactus forest until it hits a fork, then take the northeast fork, you’ll come to a man standing on a stump, surrounded by scorpion holes in the ground. Tap on the fallen log in front of the man to reveal the White-Back Scorpion and tap on it before it returns to the log.
- White-Back Scorpion: “This extremely rare White-Back Scorpion is surrounded by its children. A king of the desert never goes underground.”
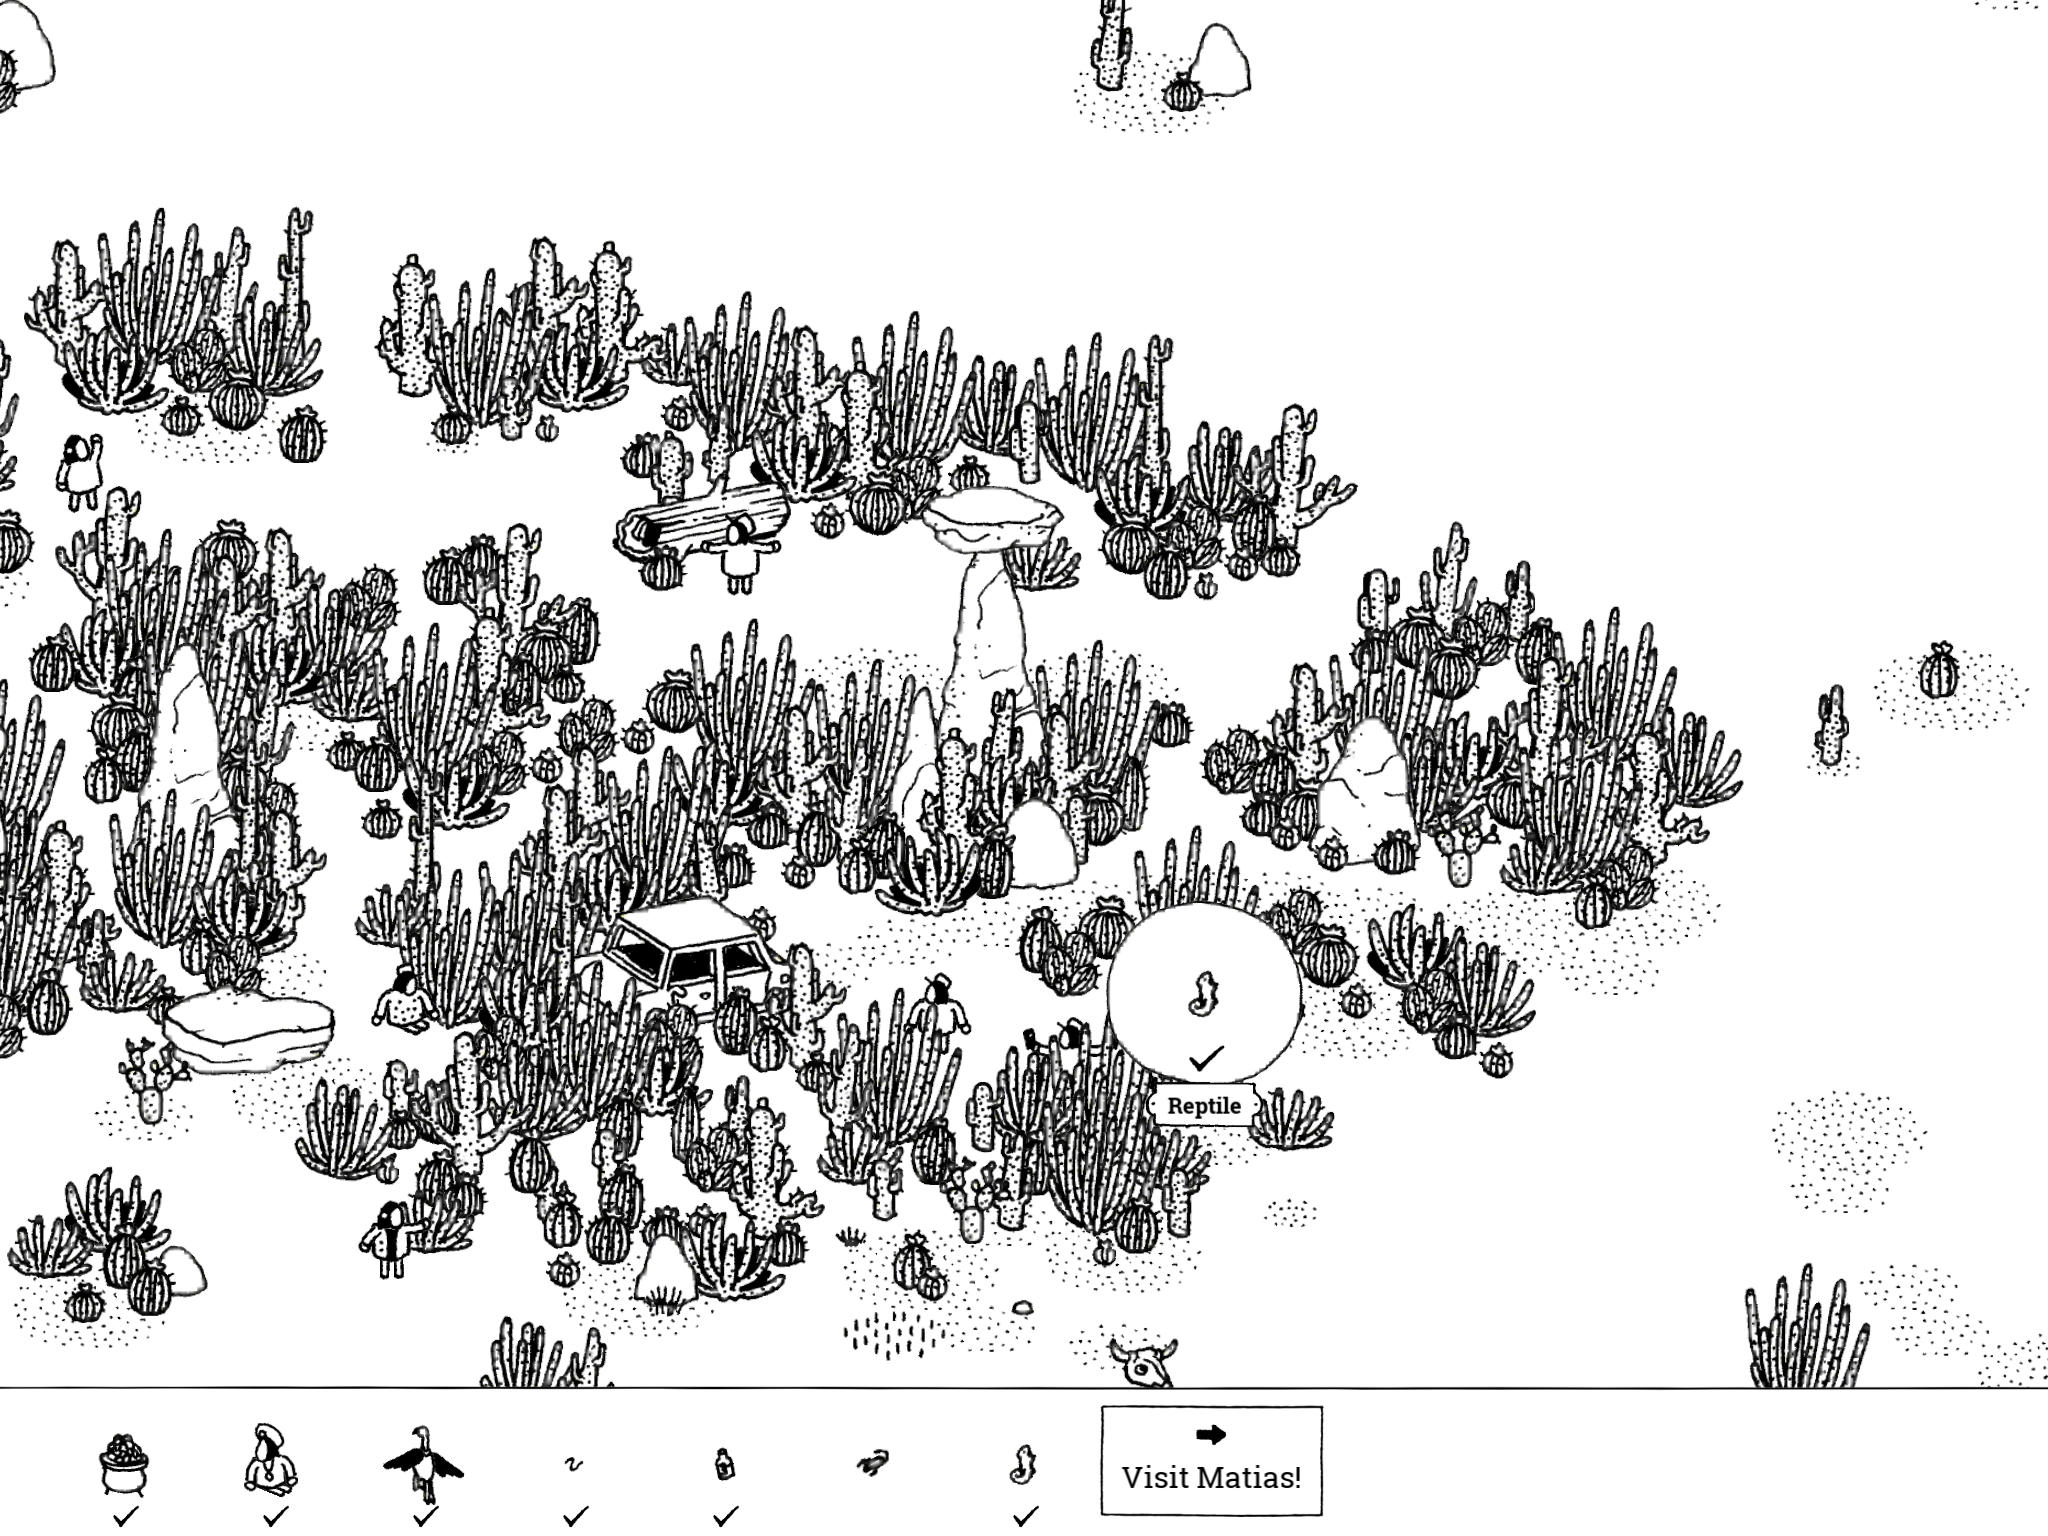
- Reptile: “The reptile in this cactus forest is so well camouflaged it often loses itself!”
The cactus forest is directly north of the Burnin’ Folks festival. In the southeast section of the forest, there’s a car stuck in some cacti, a guy with a hat standing in a small clearing, and then a guy with a smaller hat hiding behind some cacti. To the right of the guy hiding behind the cacti is a large, thicker cactus—and just to the right of this large cactus, clinging to a similar cactus right next to it, is the Reptile.
- Reptile: “The reptile in this cactus forest is so well camouflaged it often loses itself!”
City 1: Matias’ House
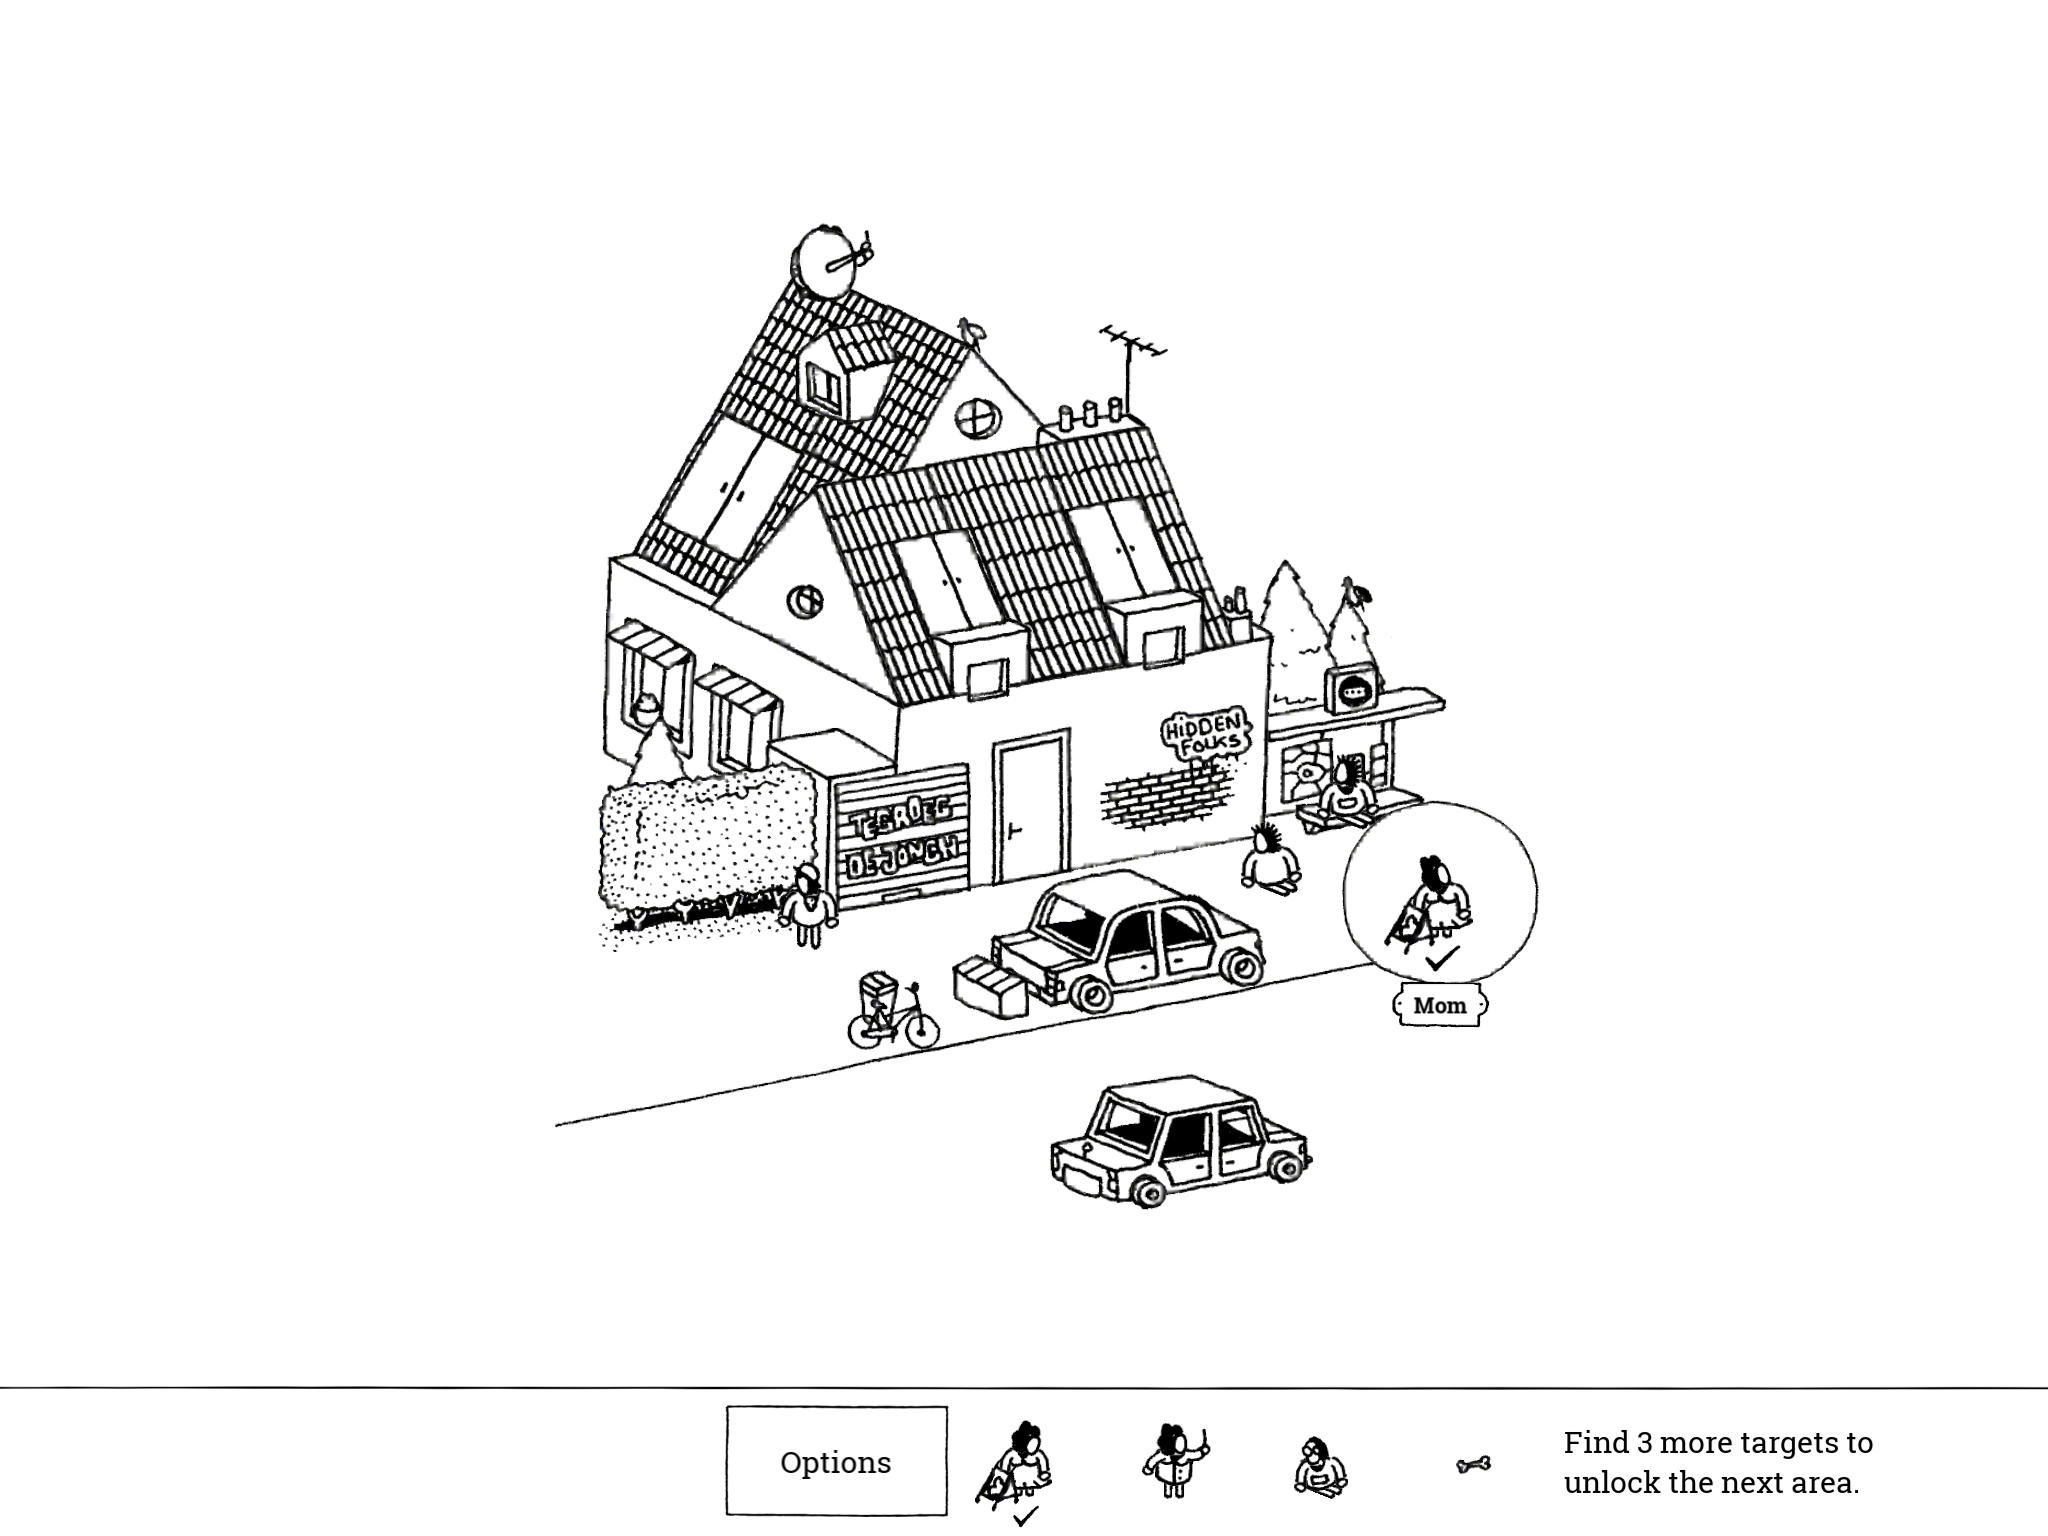
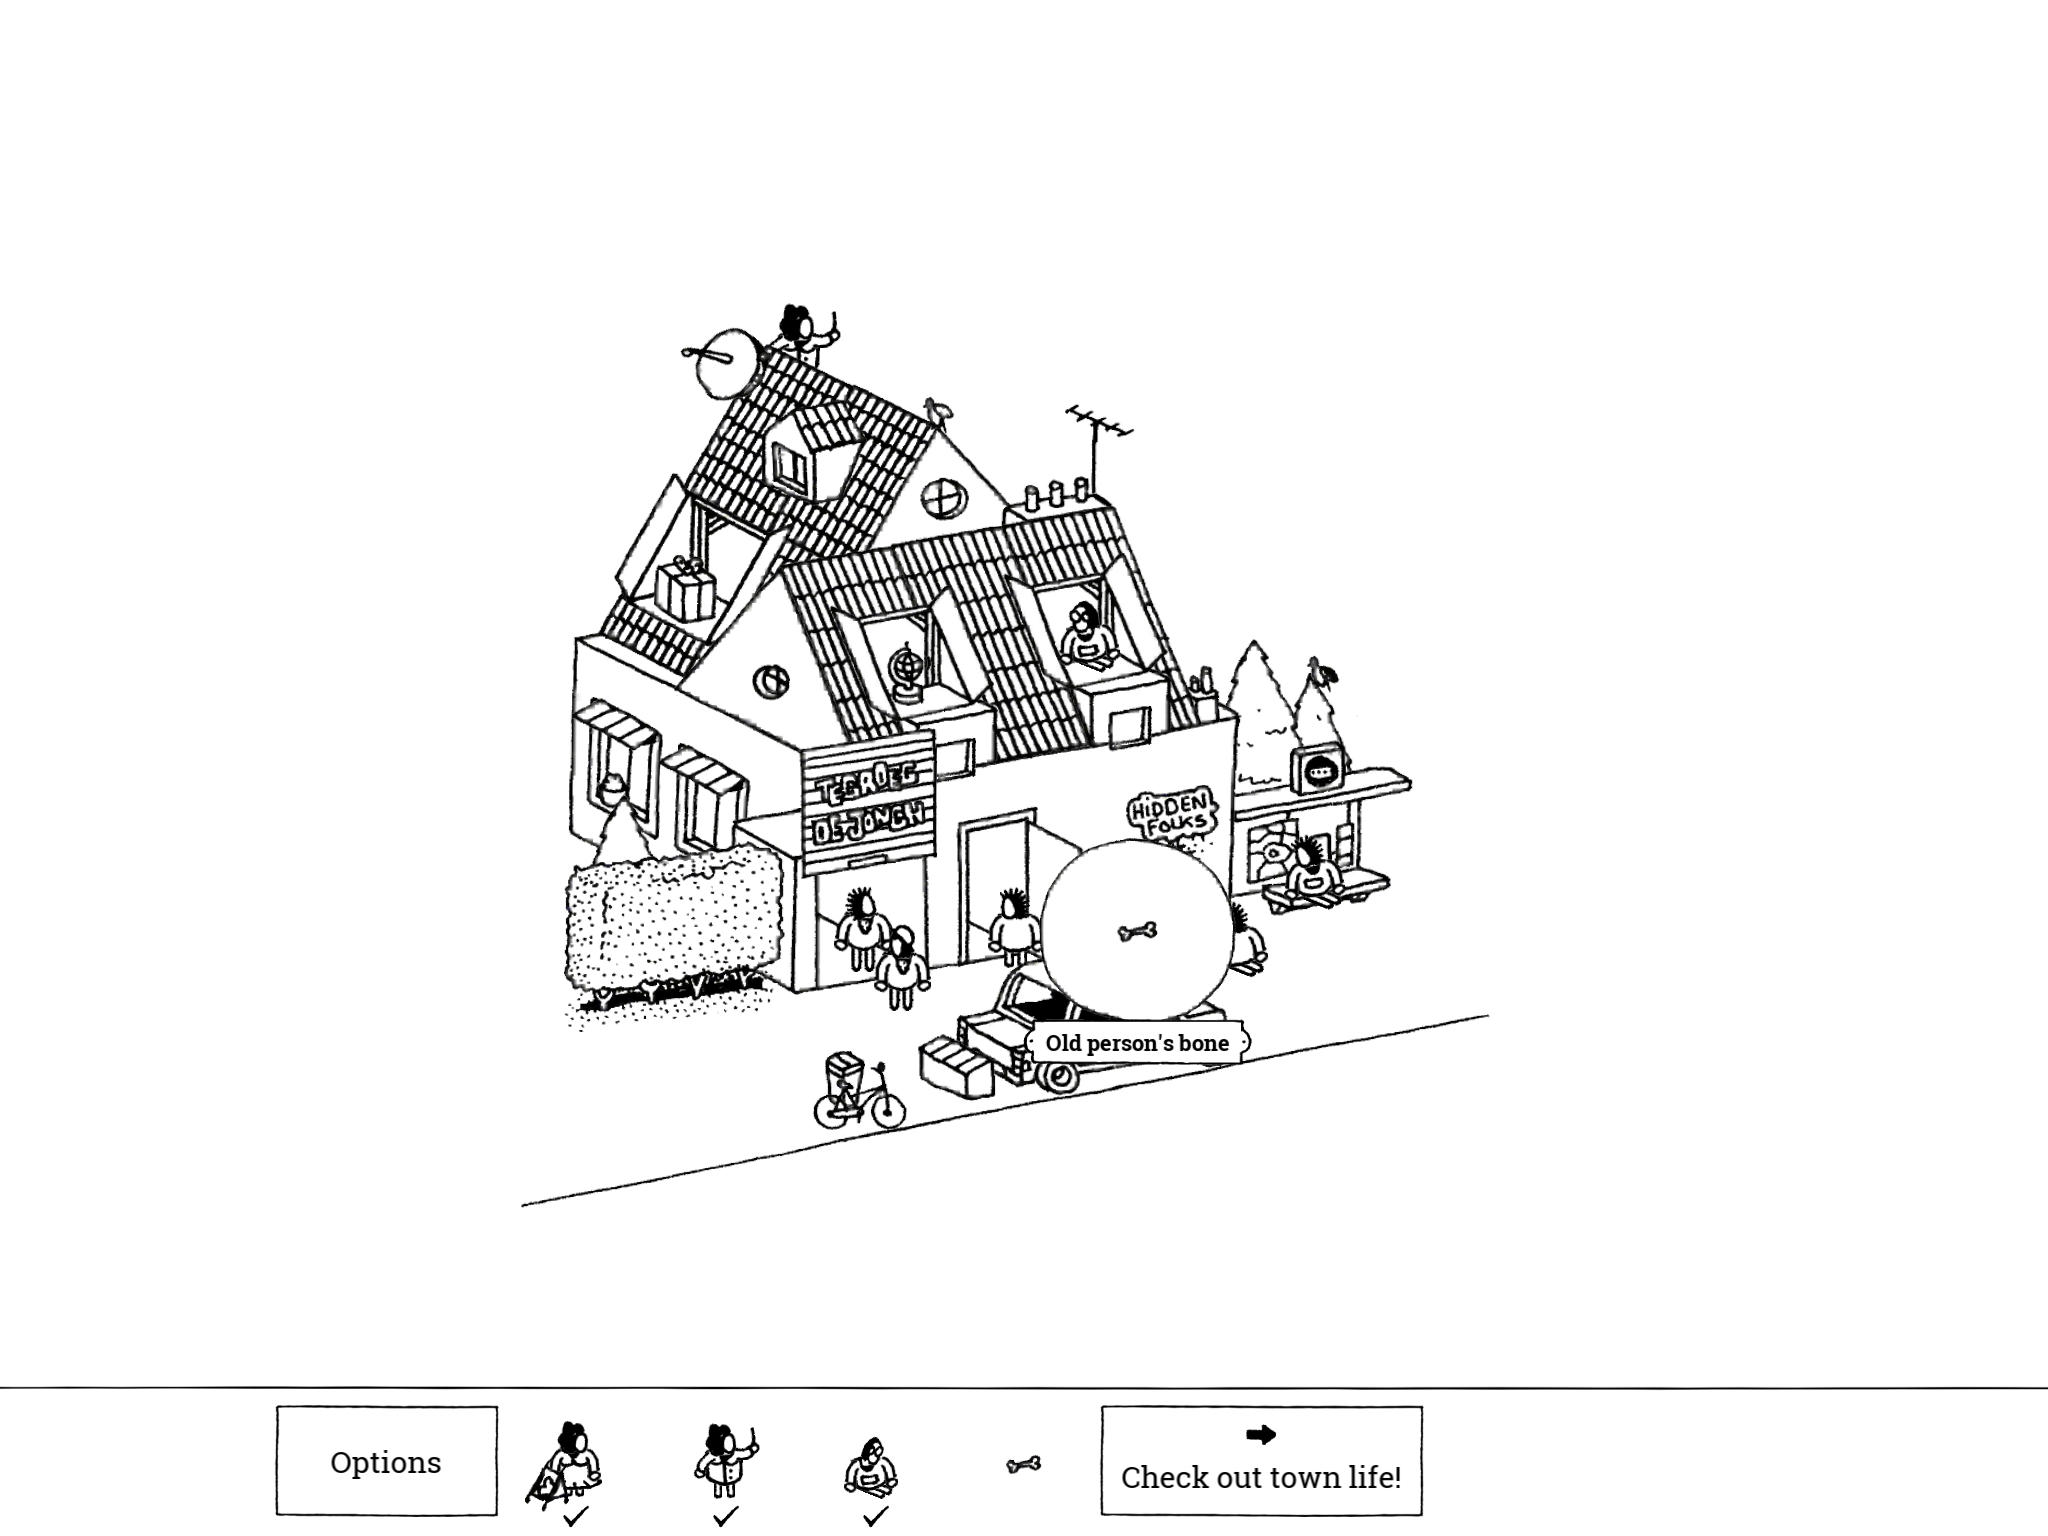
- Mom: “Mom’s waiting for the bus to the big city to buy some diapers!”
Mom’s just standing near the road on the east side of the image.
- Mom: “Mom’s waiting for the bus to the big city to buy some diapers!”
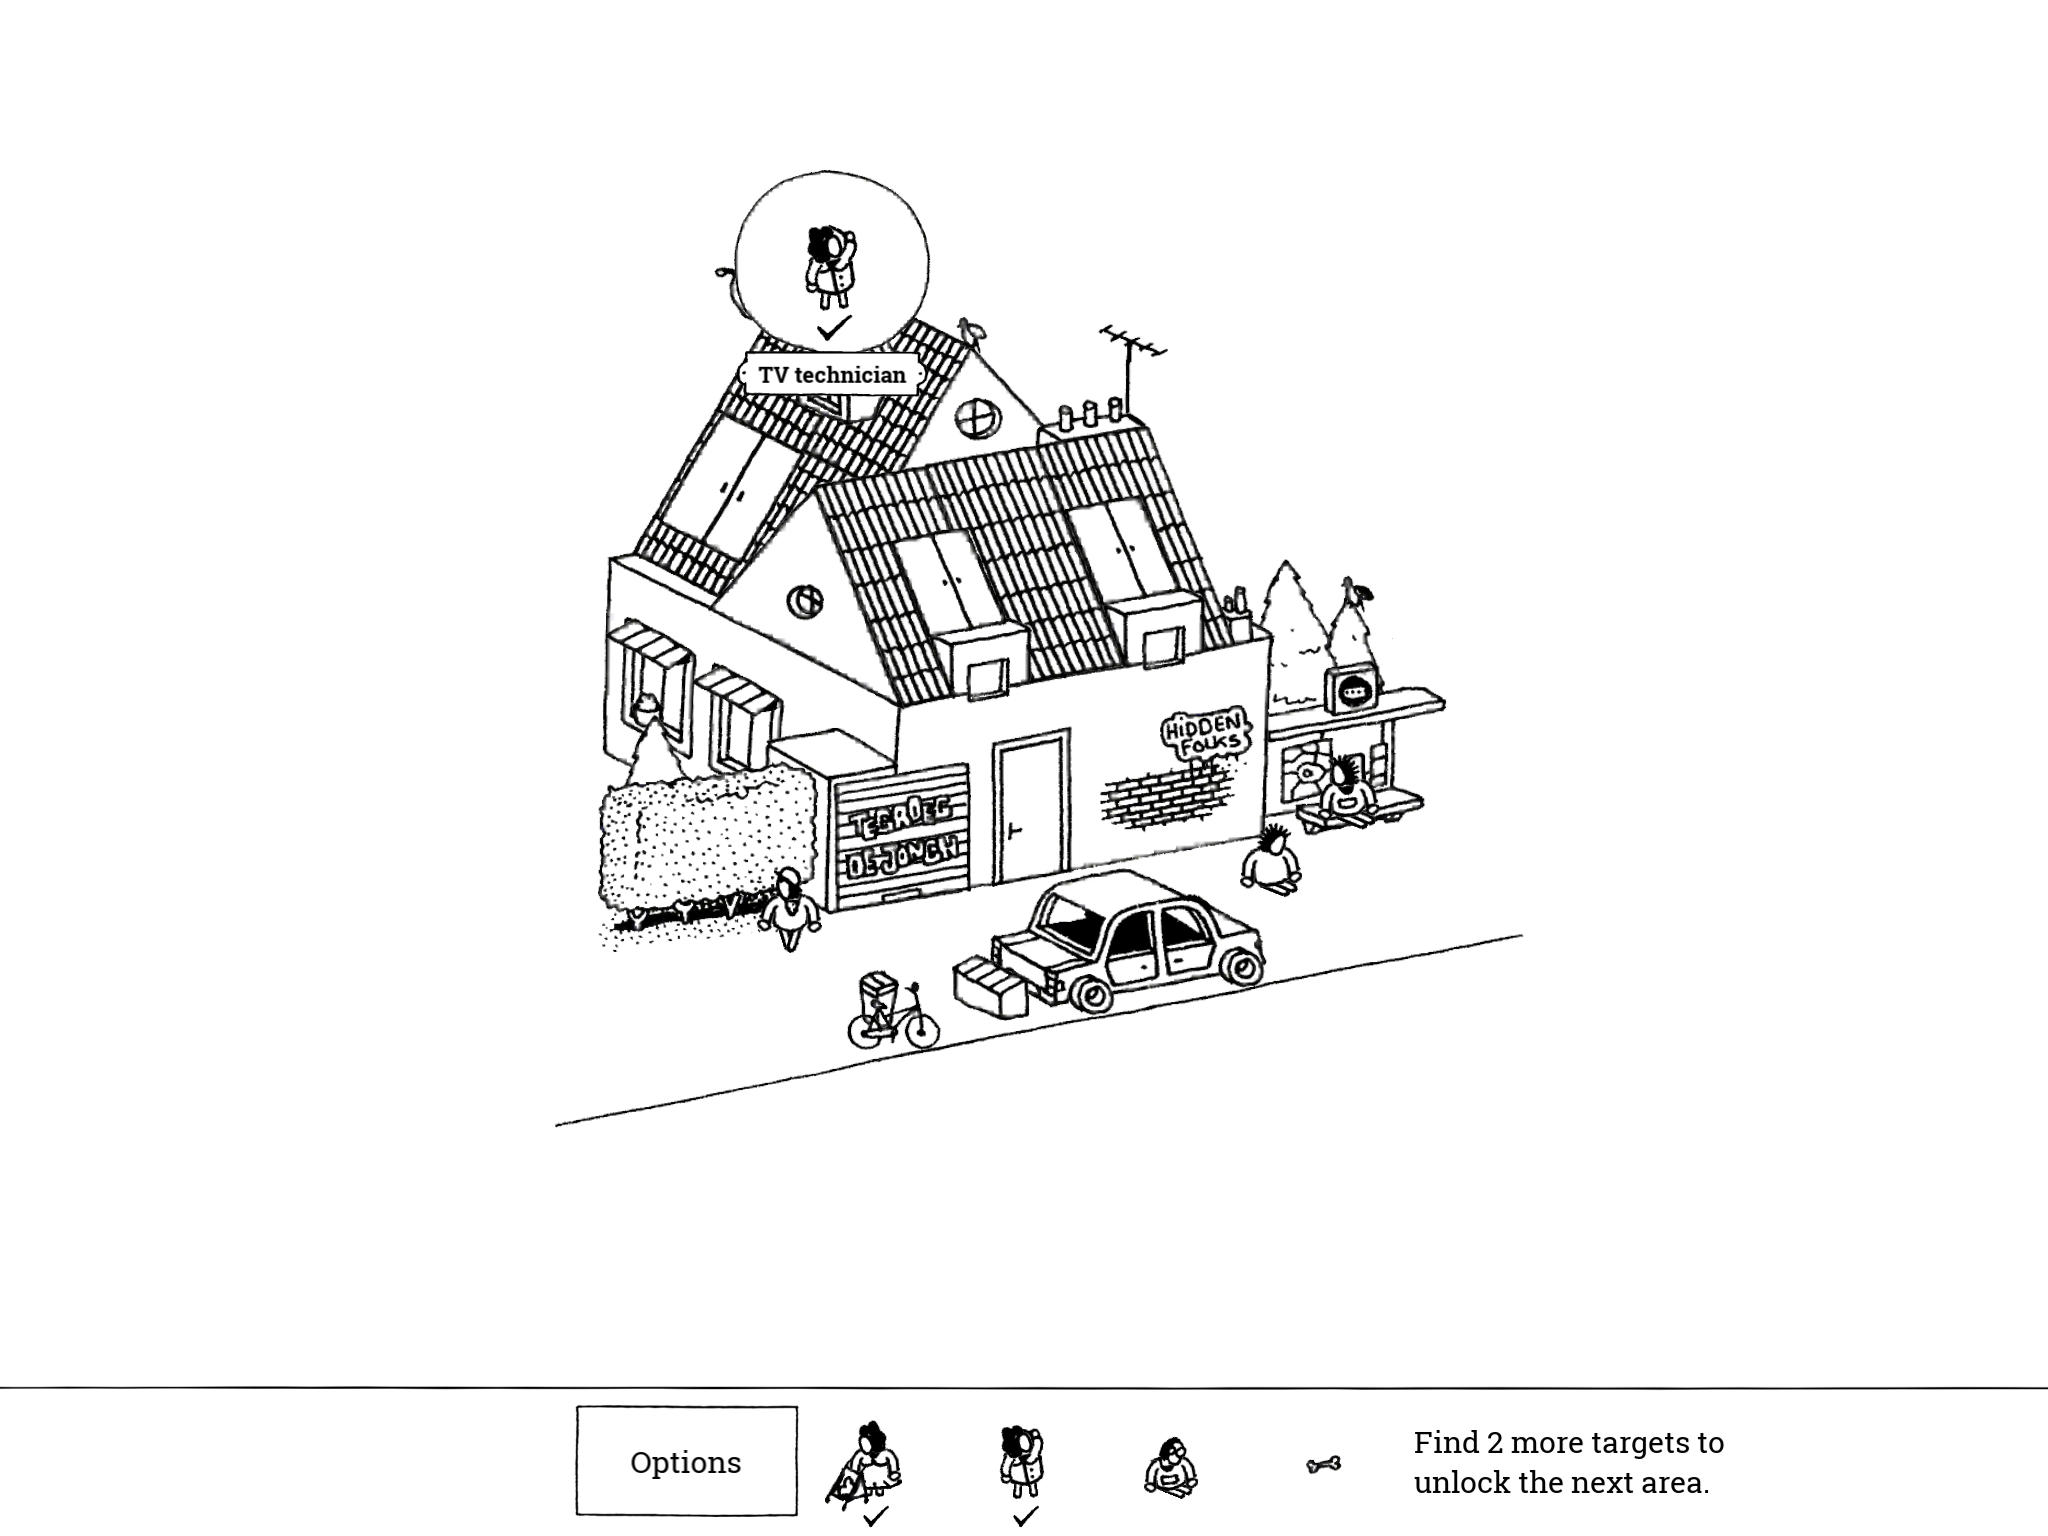
- TV Technician: “The tv technician is fine-tuning your signal.”
On top of the highest point of the roof is a satellite dish; tap and hold it then drag to rotate it up and to the left. This will reveal the TV Technician.
- TV Technician: “The tv technician is fine-tuning your signal.”
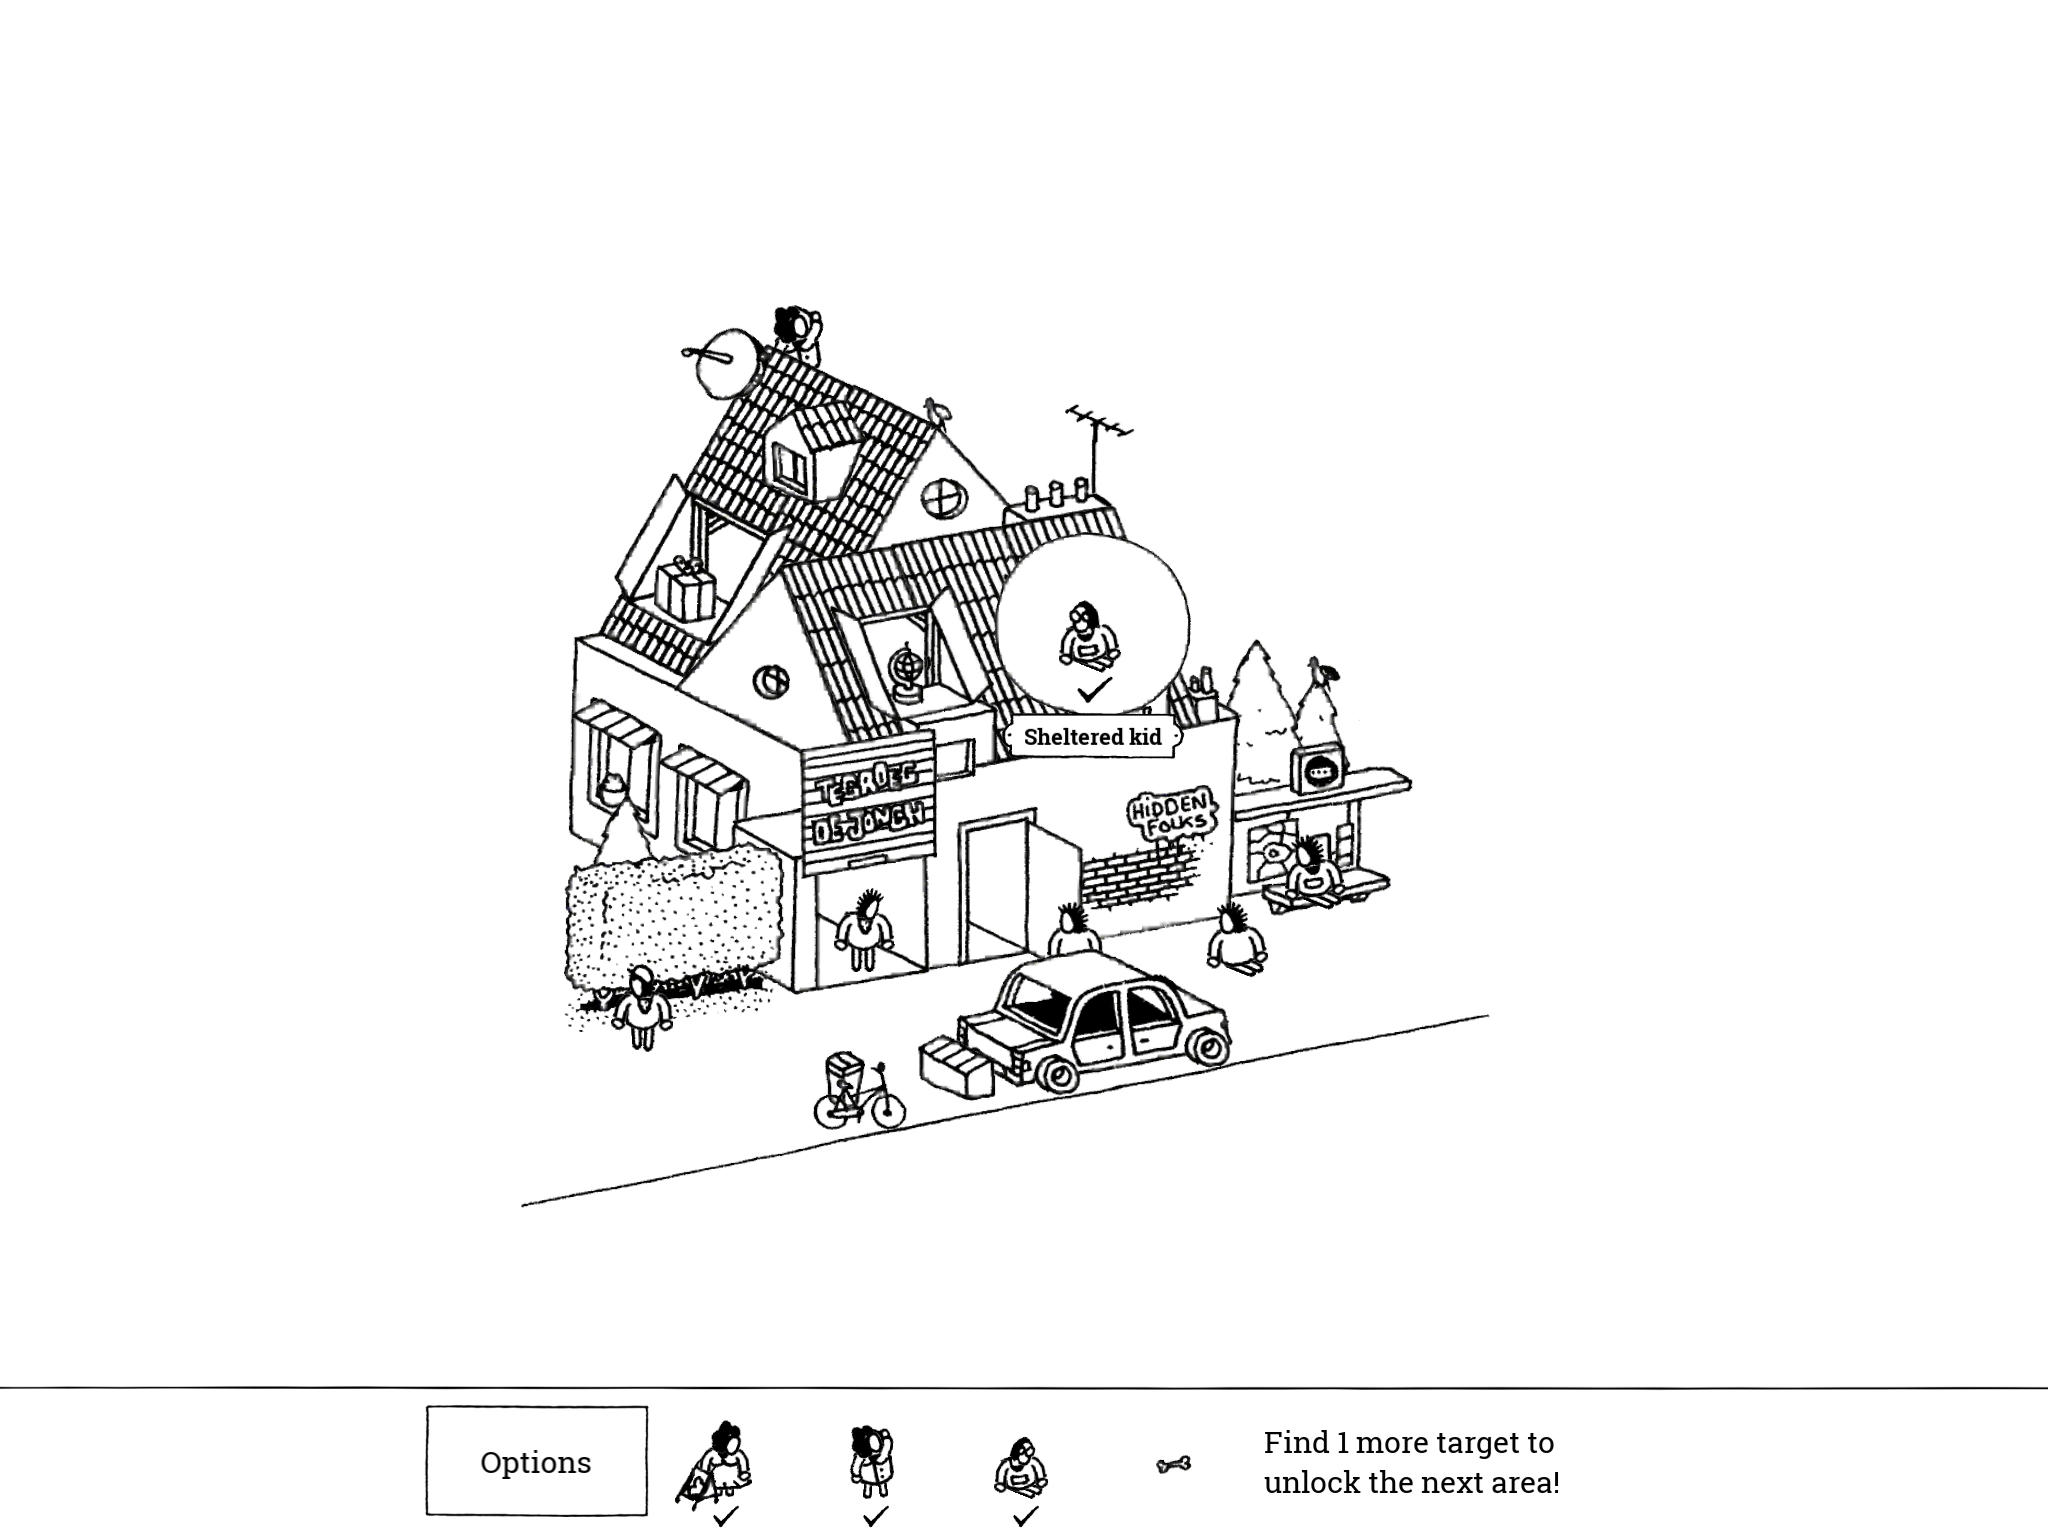
- Sheltered Kid: “This sheltered kid is about to see daylight for the first time.”
Tap the rightmost pair of doors on the roof of the house to open them and reveal the Sheltered Kid.
- Sheltered Kid: “This sheltered kid is about to see daylight for the first time.”
- Old Person’s Bone: “Apparently there is an old person’s bone in some wall. Freaky stuff.”
There’s some exposed brick on the wall under the “Hidden Folks” graffiti. Tap the wall twice to reveal the Old Person’s Bone.
- Old Person’s Bone: “Apparently there is an old person’s bone in some wall. Freaky stuff.”
City 2: The Suburb
Note: The Suburb is laid out in a much easier to diagram fashion: there are four streets with a row of houses on each one. We will explain where a folk is in relation to the houses as read top to bottom and left to right: e.g., “house #4 on street #1” would be the first—northmost—street and the fourth—from the left/west—house.
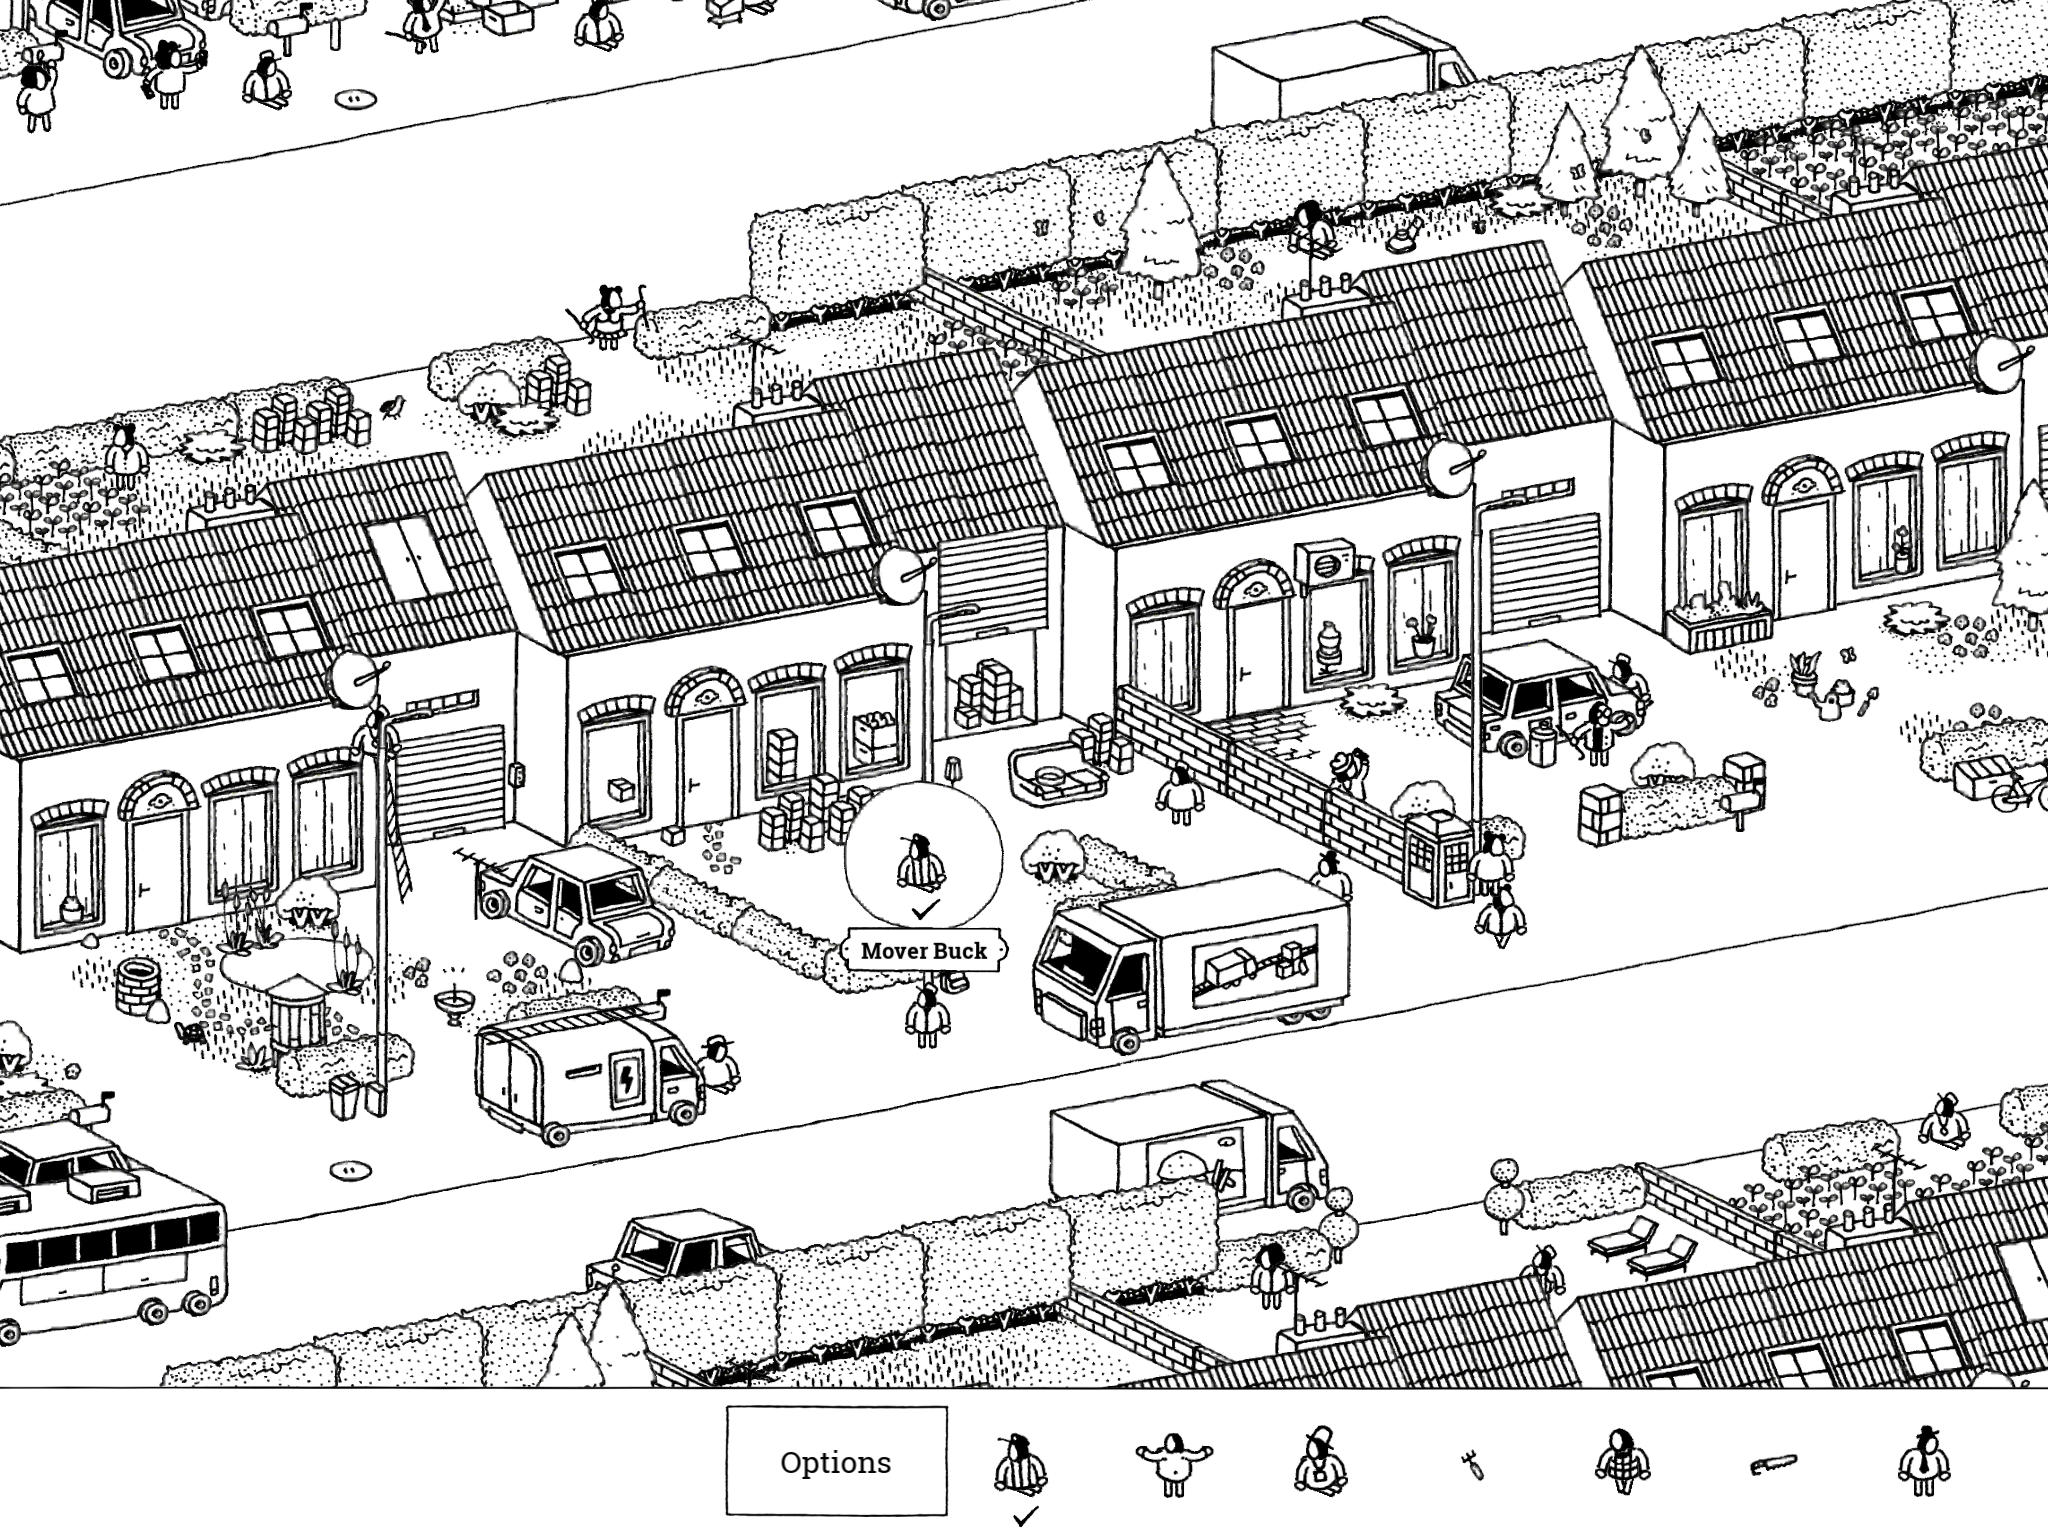
- Mover Buck: “For mover Buck, this job was one box too many.”
Mover Buck is in the front yard of house #3 on street #2. There are a pile of boxes near the front door of this house and a moving truck on the street. Mover Buck is sitting in a chair, partially hidden by the lightpost.
- Mover Buck: “For mover Buck, this job was one box too many.”
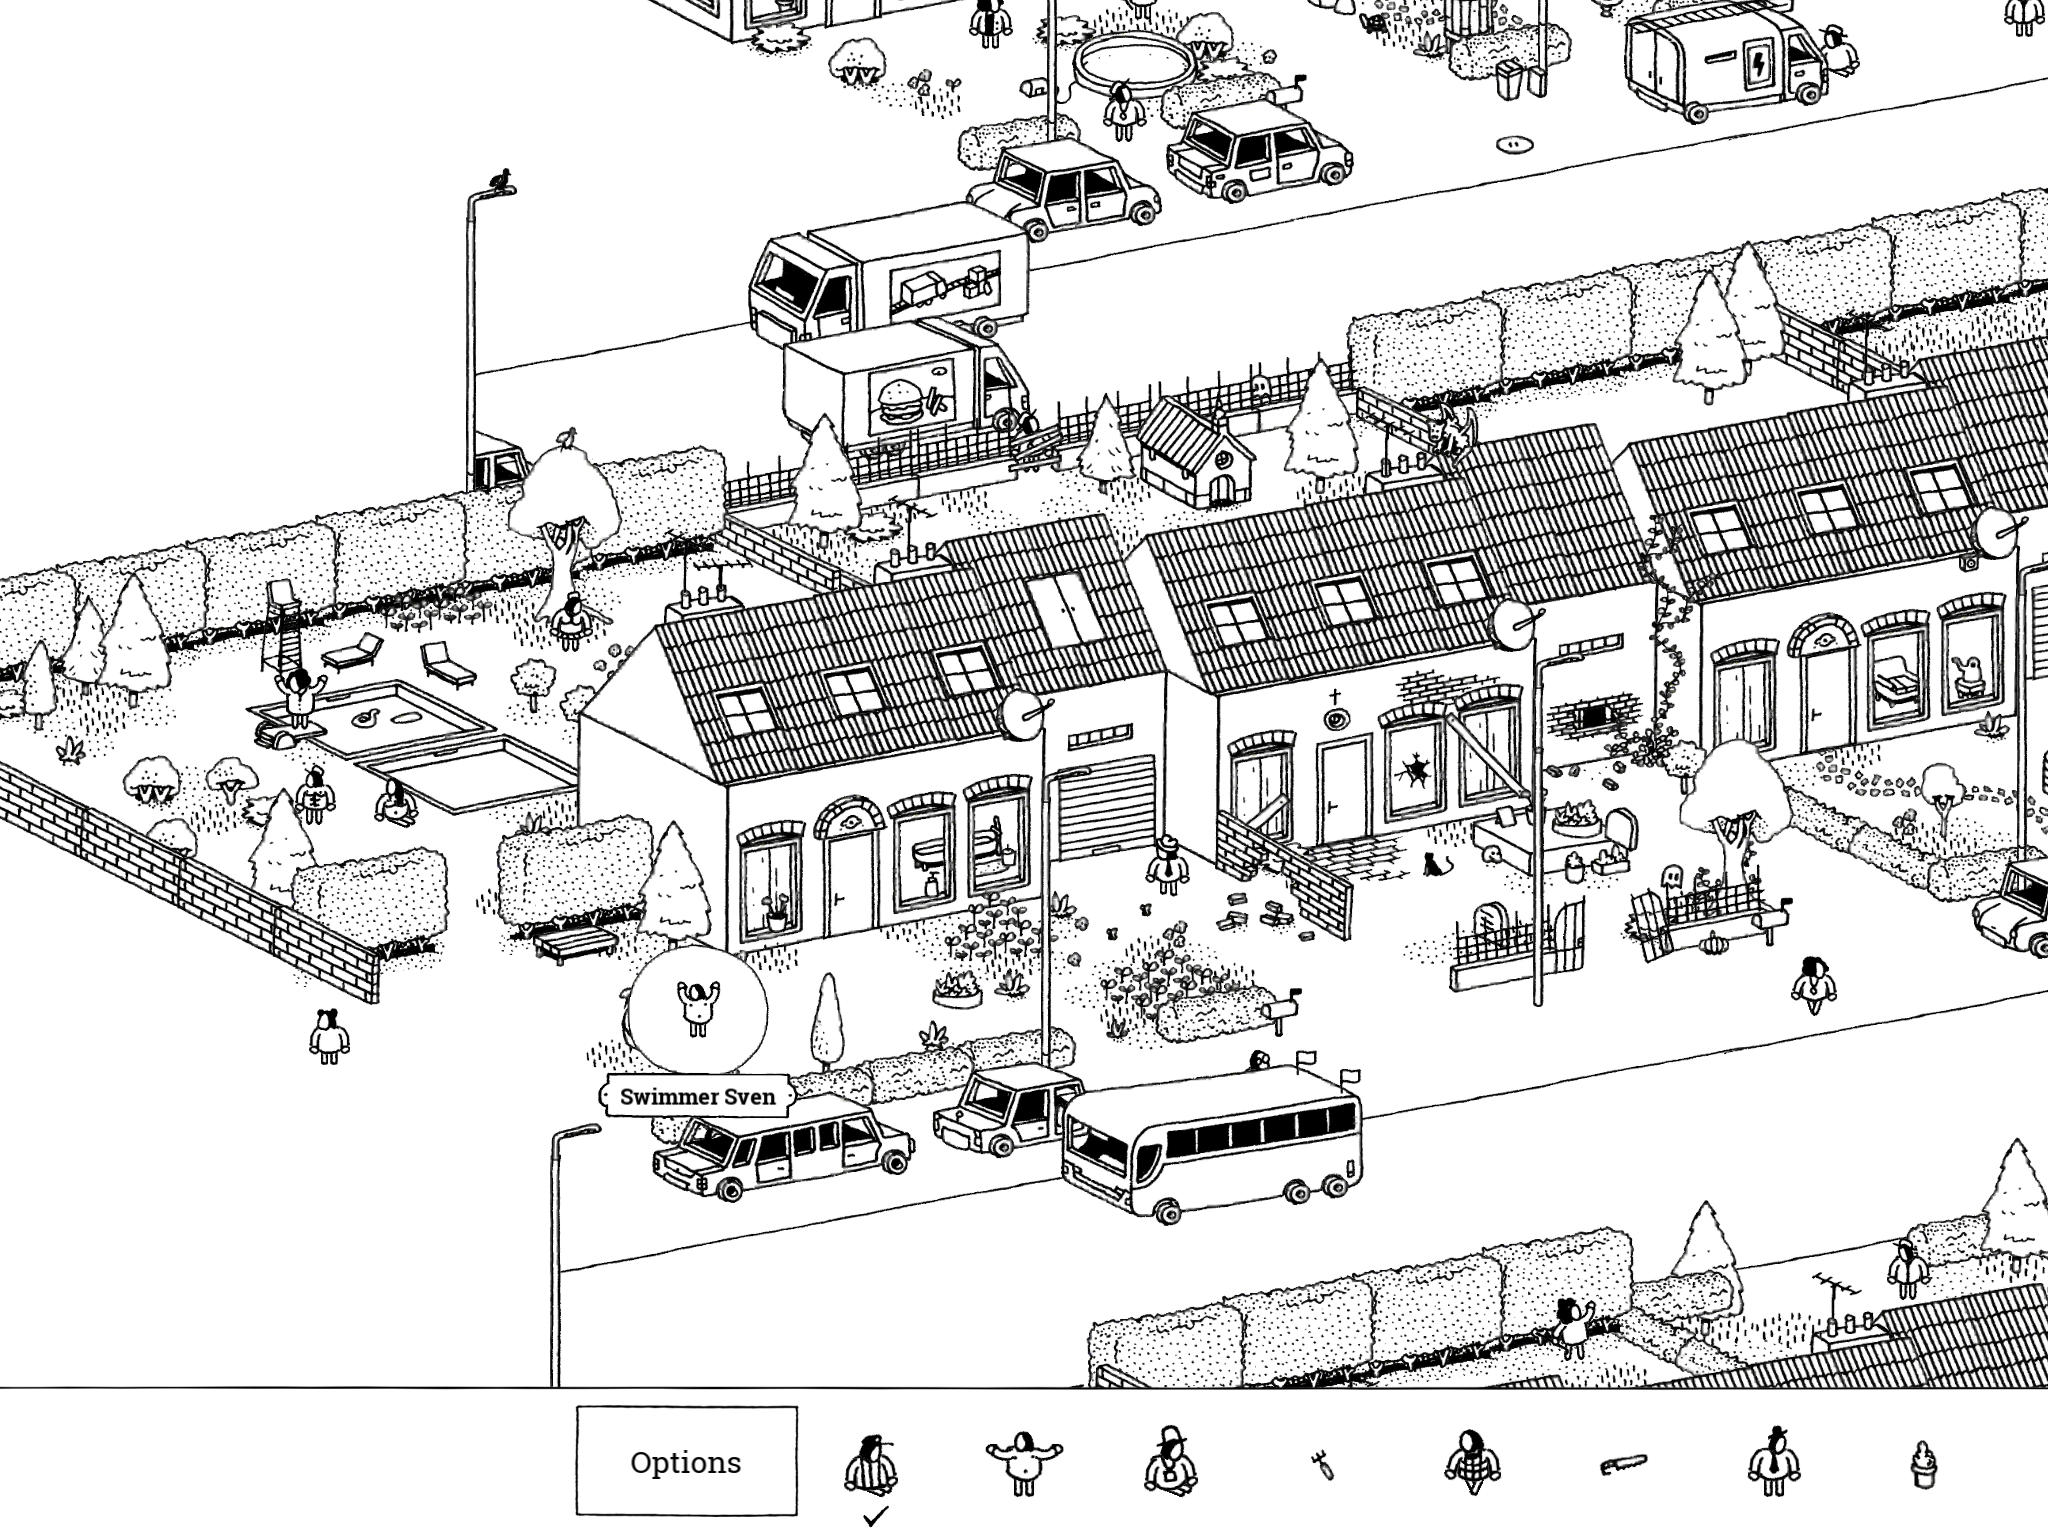
- Swimmer Sven: “Swimmer Sven got the address right, but the pool wrong.”
Swimmer Sven is on street #3, house #1. There are two large pools in the backyard of this house, but Sven is in the front yard, splashing around in the fountain.
- Swimmer Sven: “Swimmer Sven got the address right, but the pool wrong.”
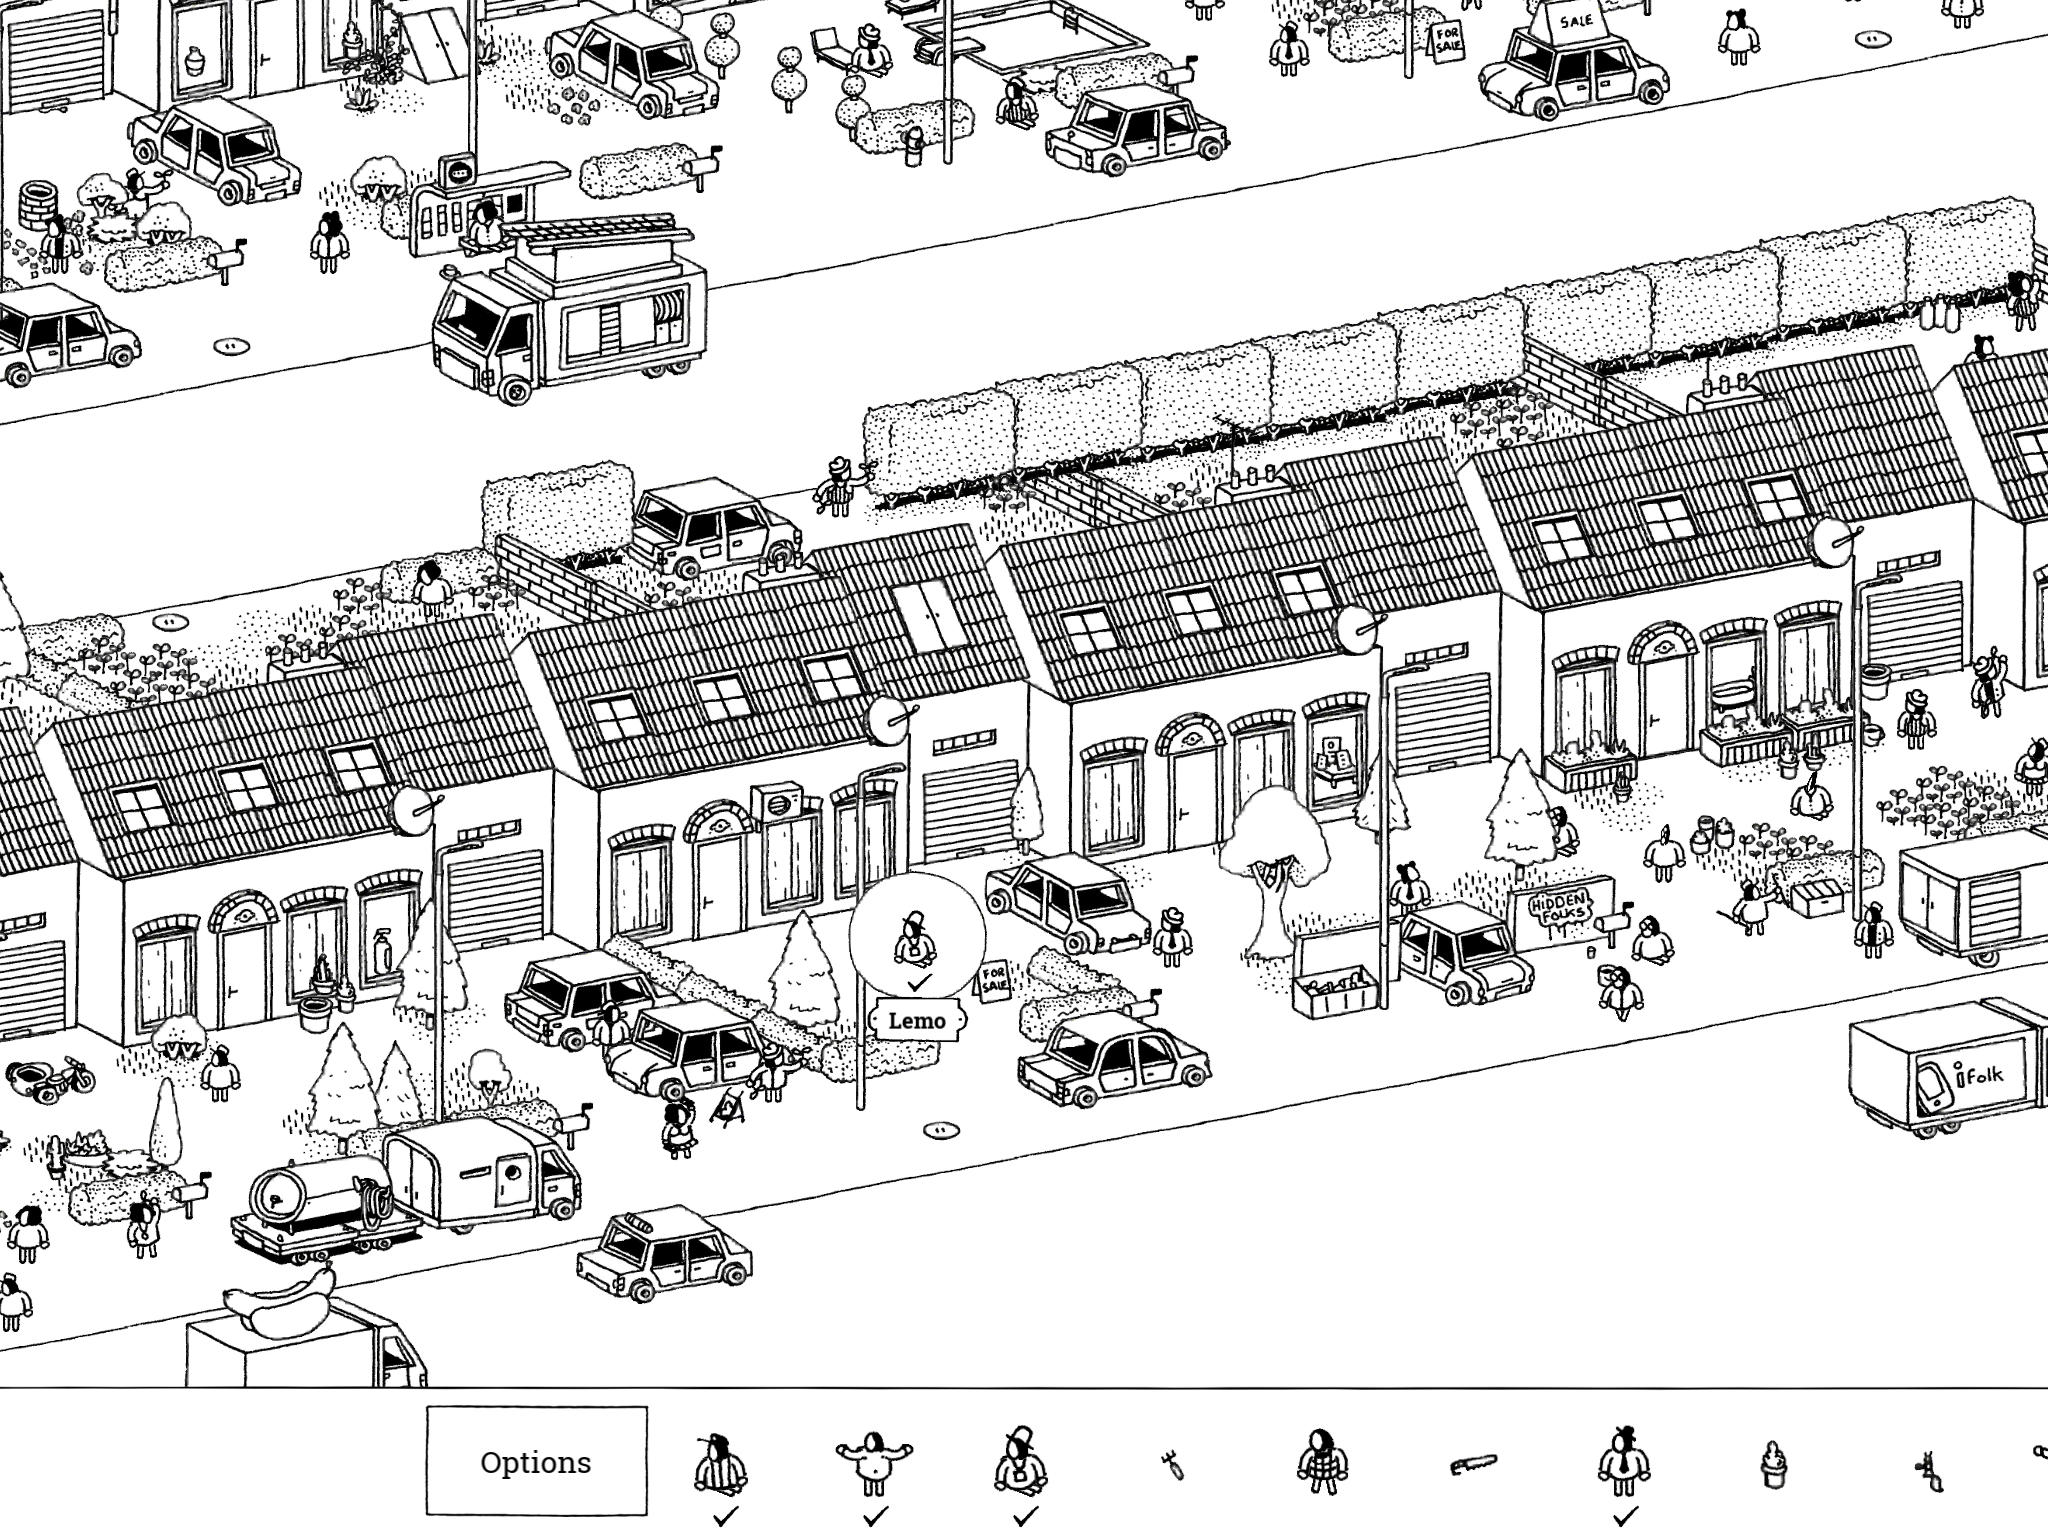
- Lemo: “Maybe a bunch of sugar cubes and 20 lollipops wasn’t the right recipe for lemonade, Lemo…”
Lemo is on street #4, house #5. He’s sitting in the front yard with a small table of lemonade and a “for sale” sign.
- Lemo: “Maybe a bunch of sugar cubes and 20 lollipops wasn’t the right recipe for lemonade, Lemo…”
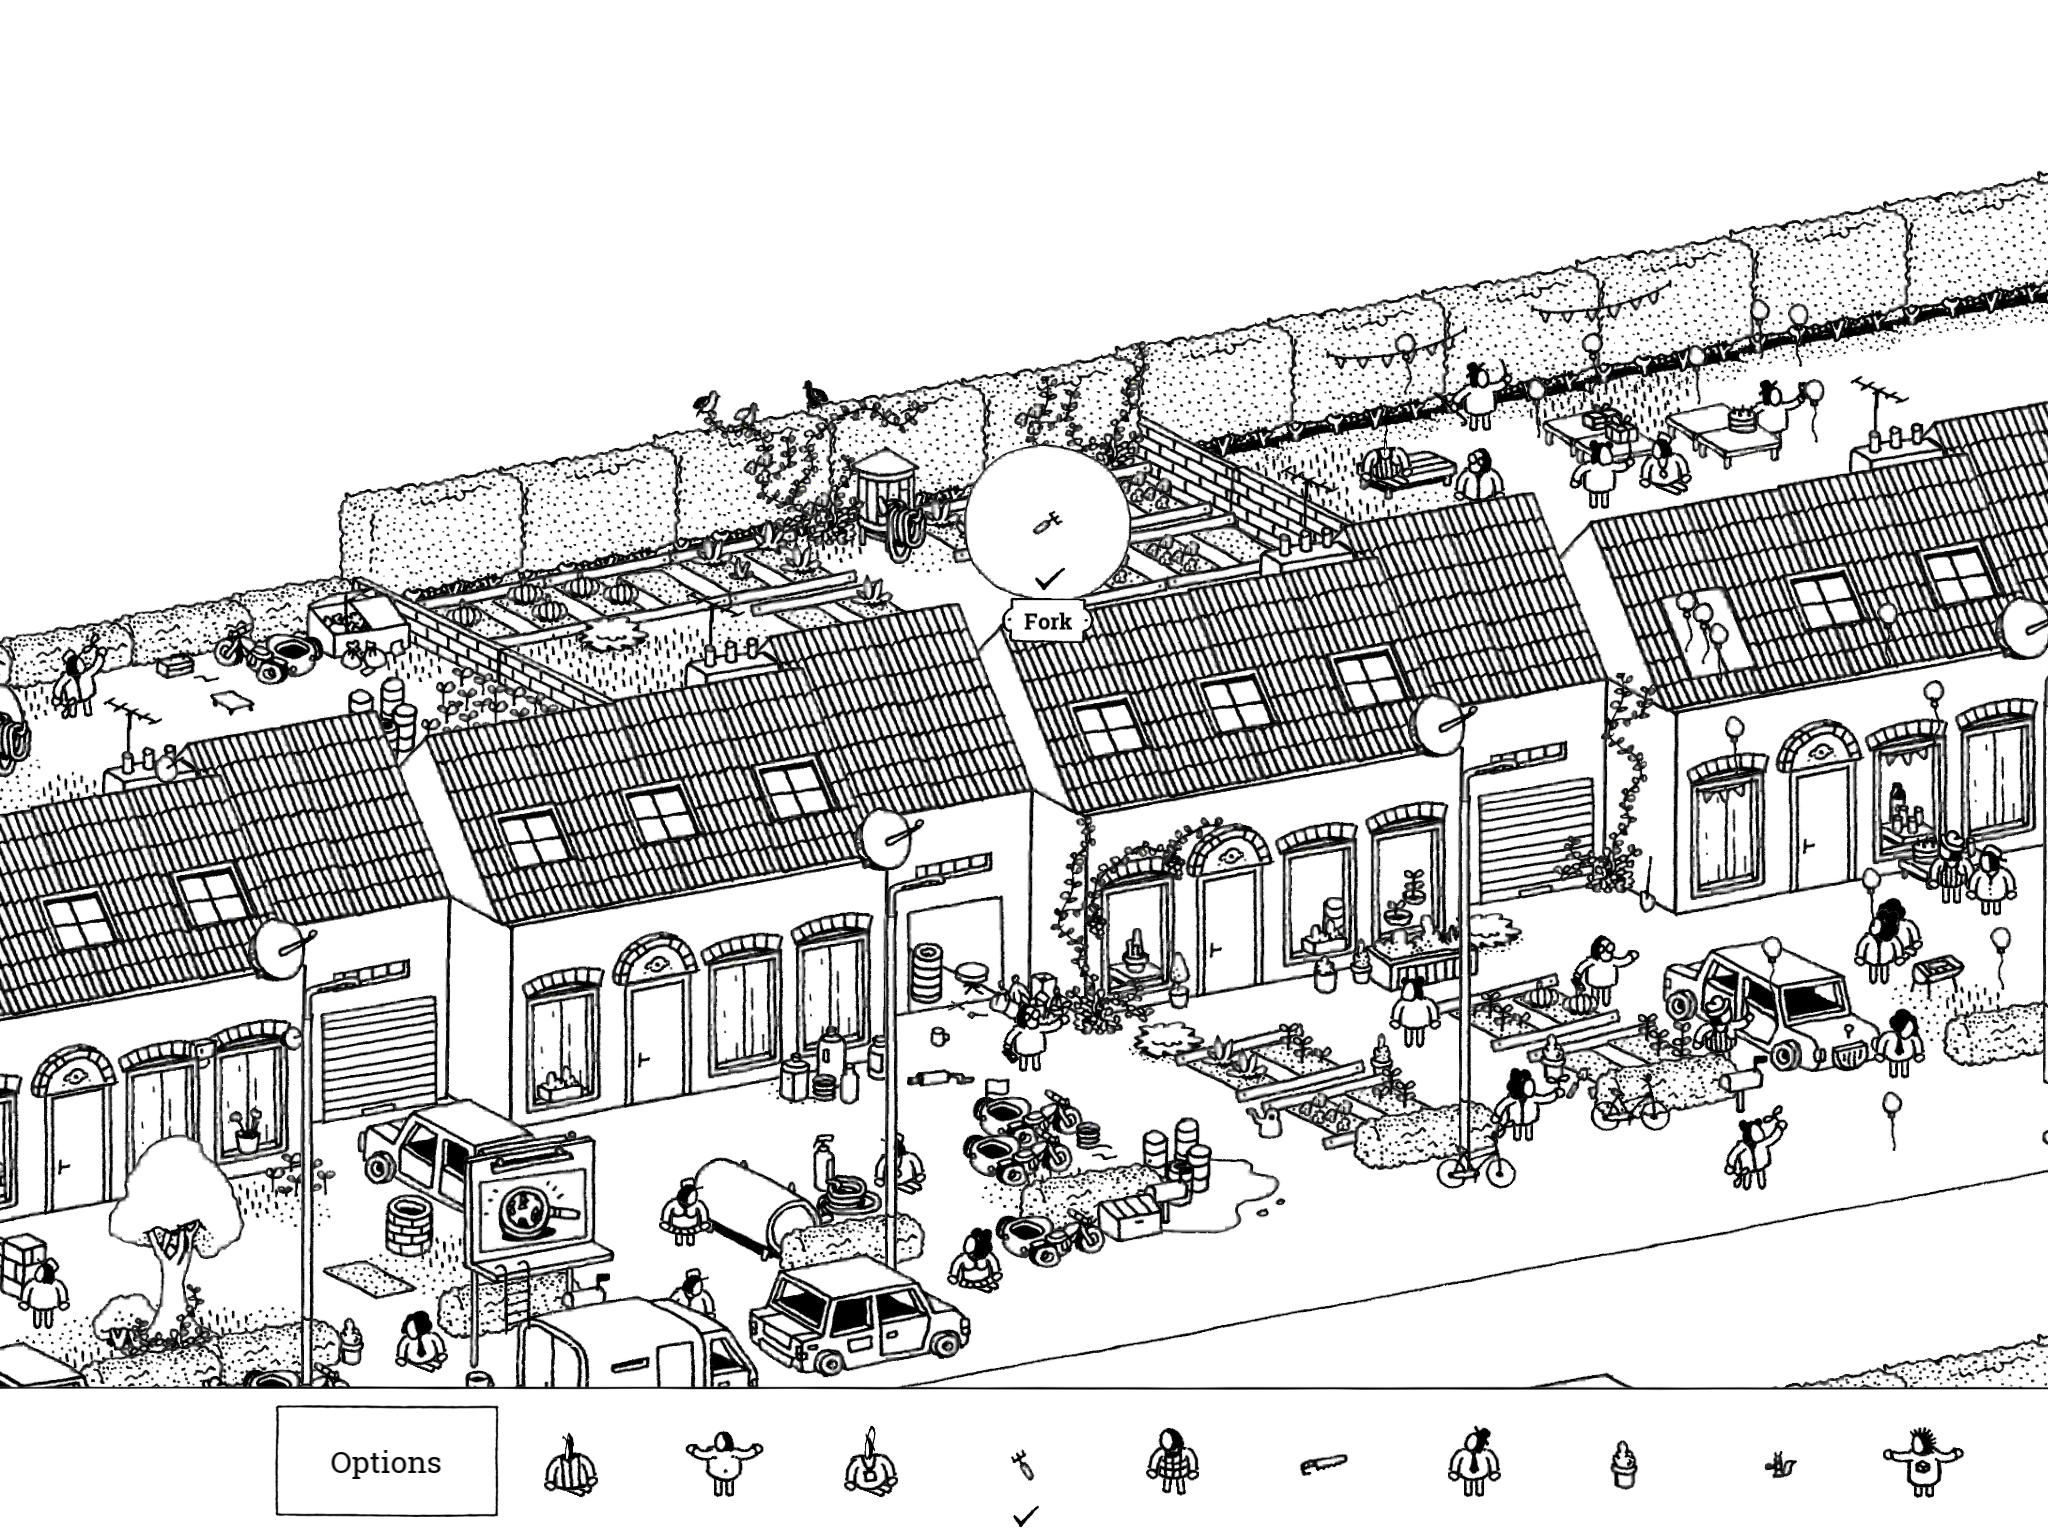
- Fork: “The gardener loves this kitchen garden fork. It’s perfect for turning the soil and he always carries one.”
The Fork can be found on street #1, house #9 (second-to-last house on the street). This house has a large garden in the backyard; the gardener is currently working on the right-hand side of the yard. He’s carrying the Fork in his hand; tap it to collect it.
- Fork: “The gardener loves this kitchen garden fork. It’s perfect for turning the soil and he always carries one.”
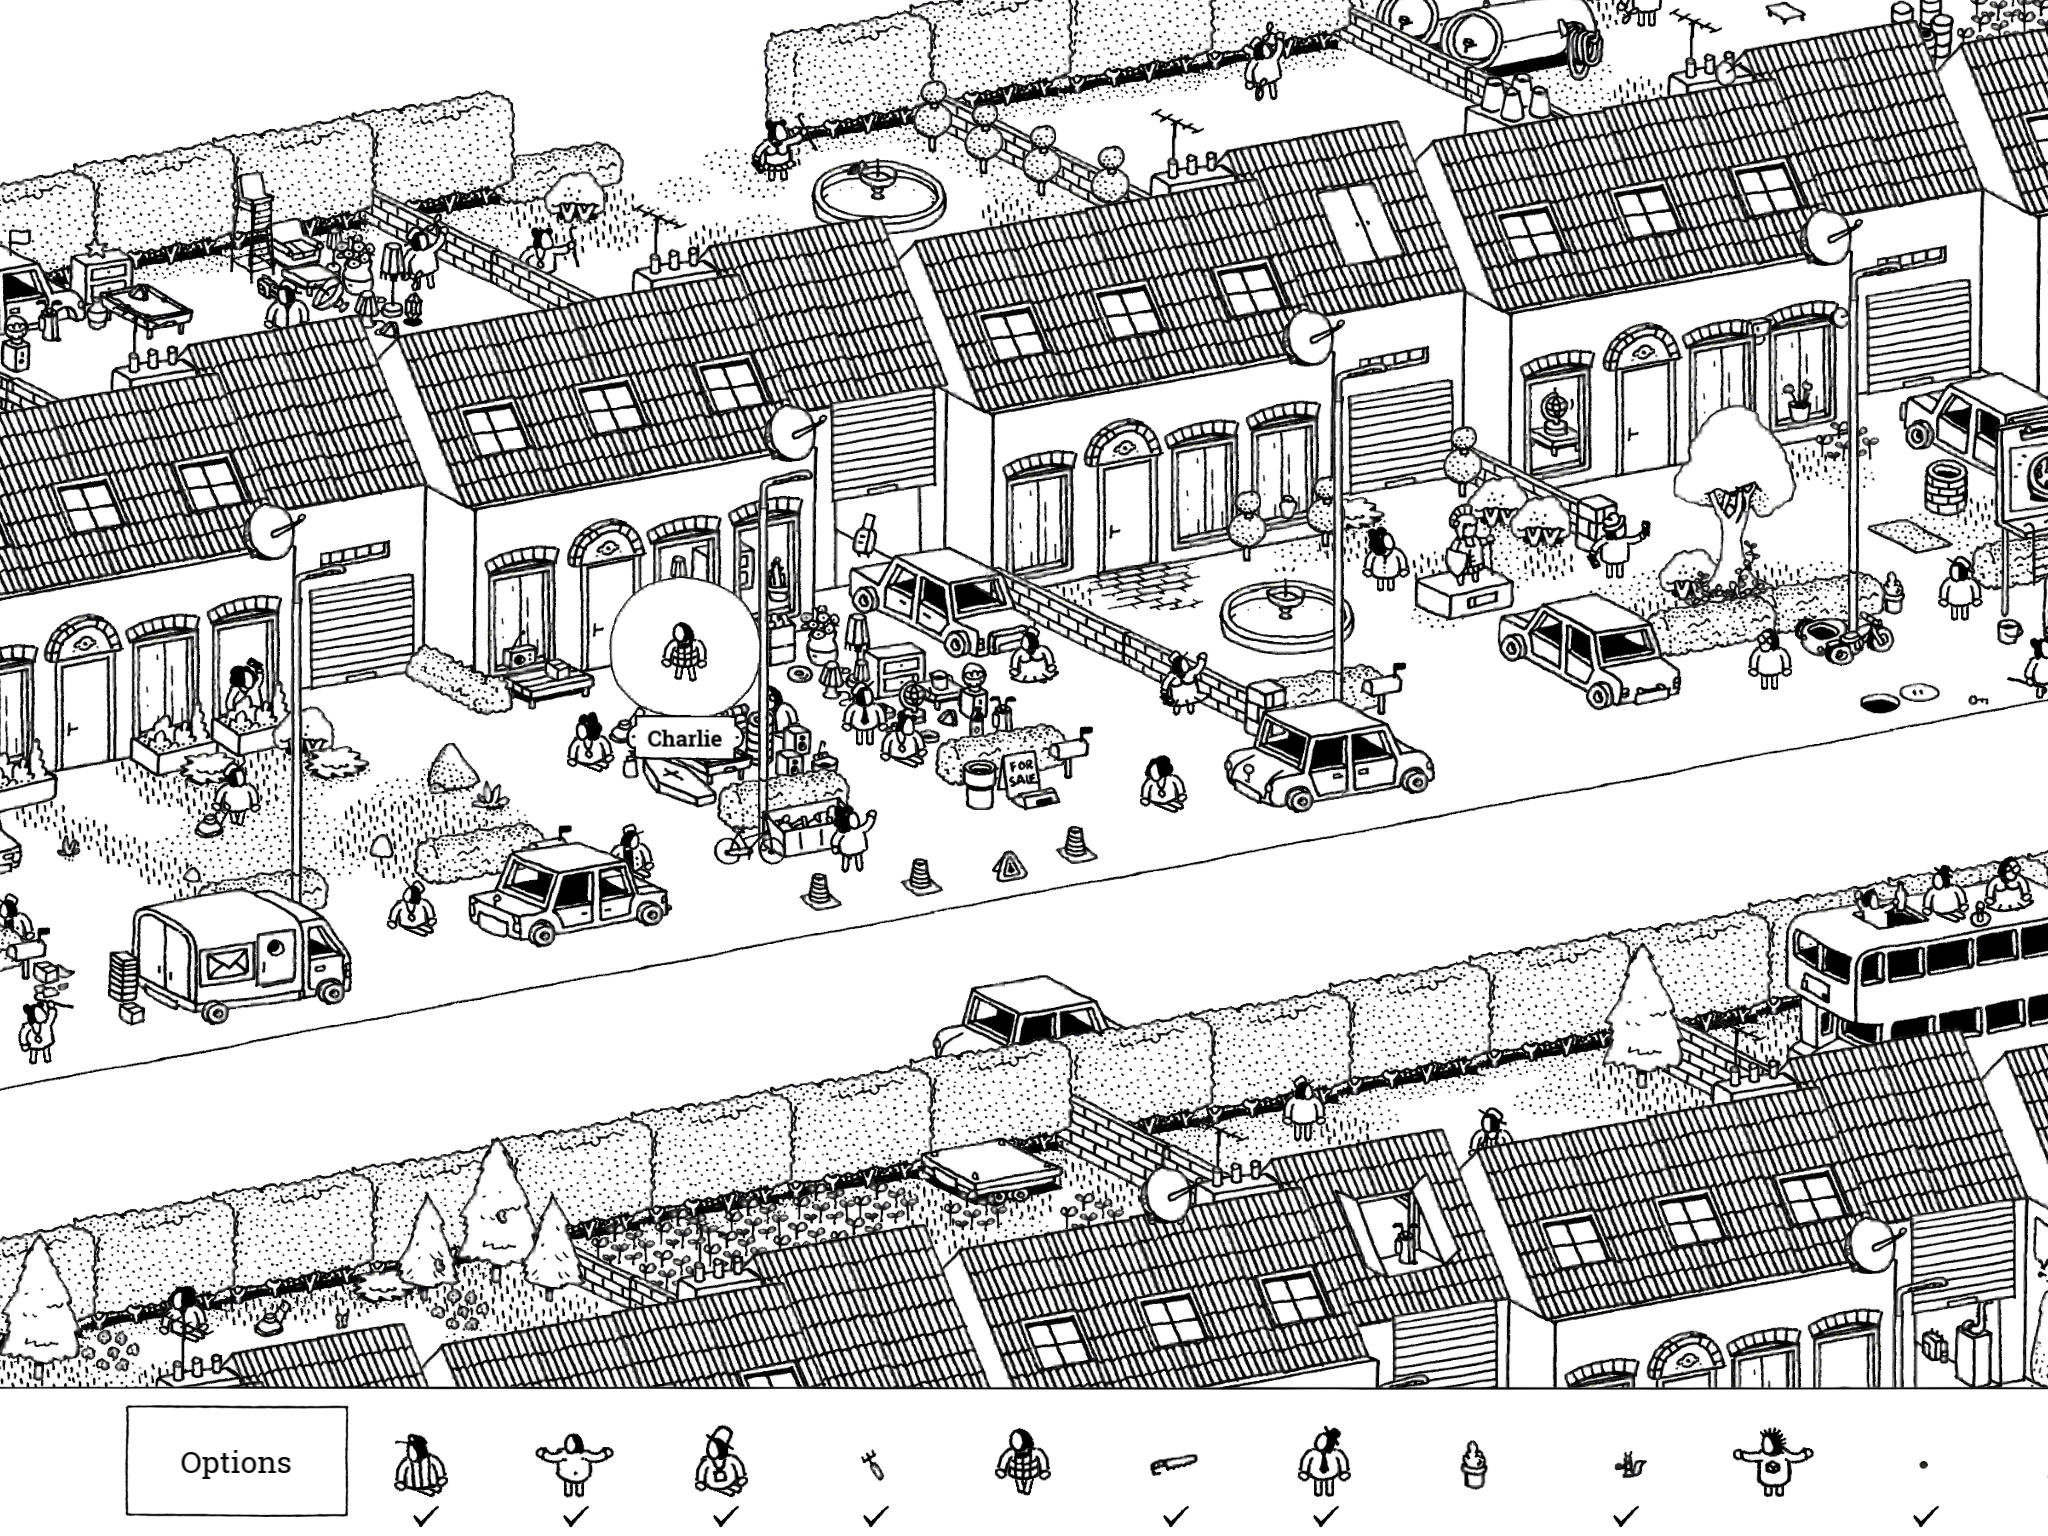
- Charlie: “Charlie’s yard sale is a big success! But where is the salesman himself?”
Charlie’s yard sale is taking place on street #1 at house #5. There’s a lot of stuff in the front- and backyards, with a “for sale” sign by the mailbox. If you tap the door to Charlie’s house, he’ll walk out and wander the sale a bit; tap him to collect him.
- Charlie: “Charlie’s yard sale is a big success! But where is the salesman himself?”
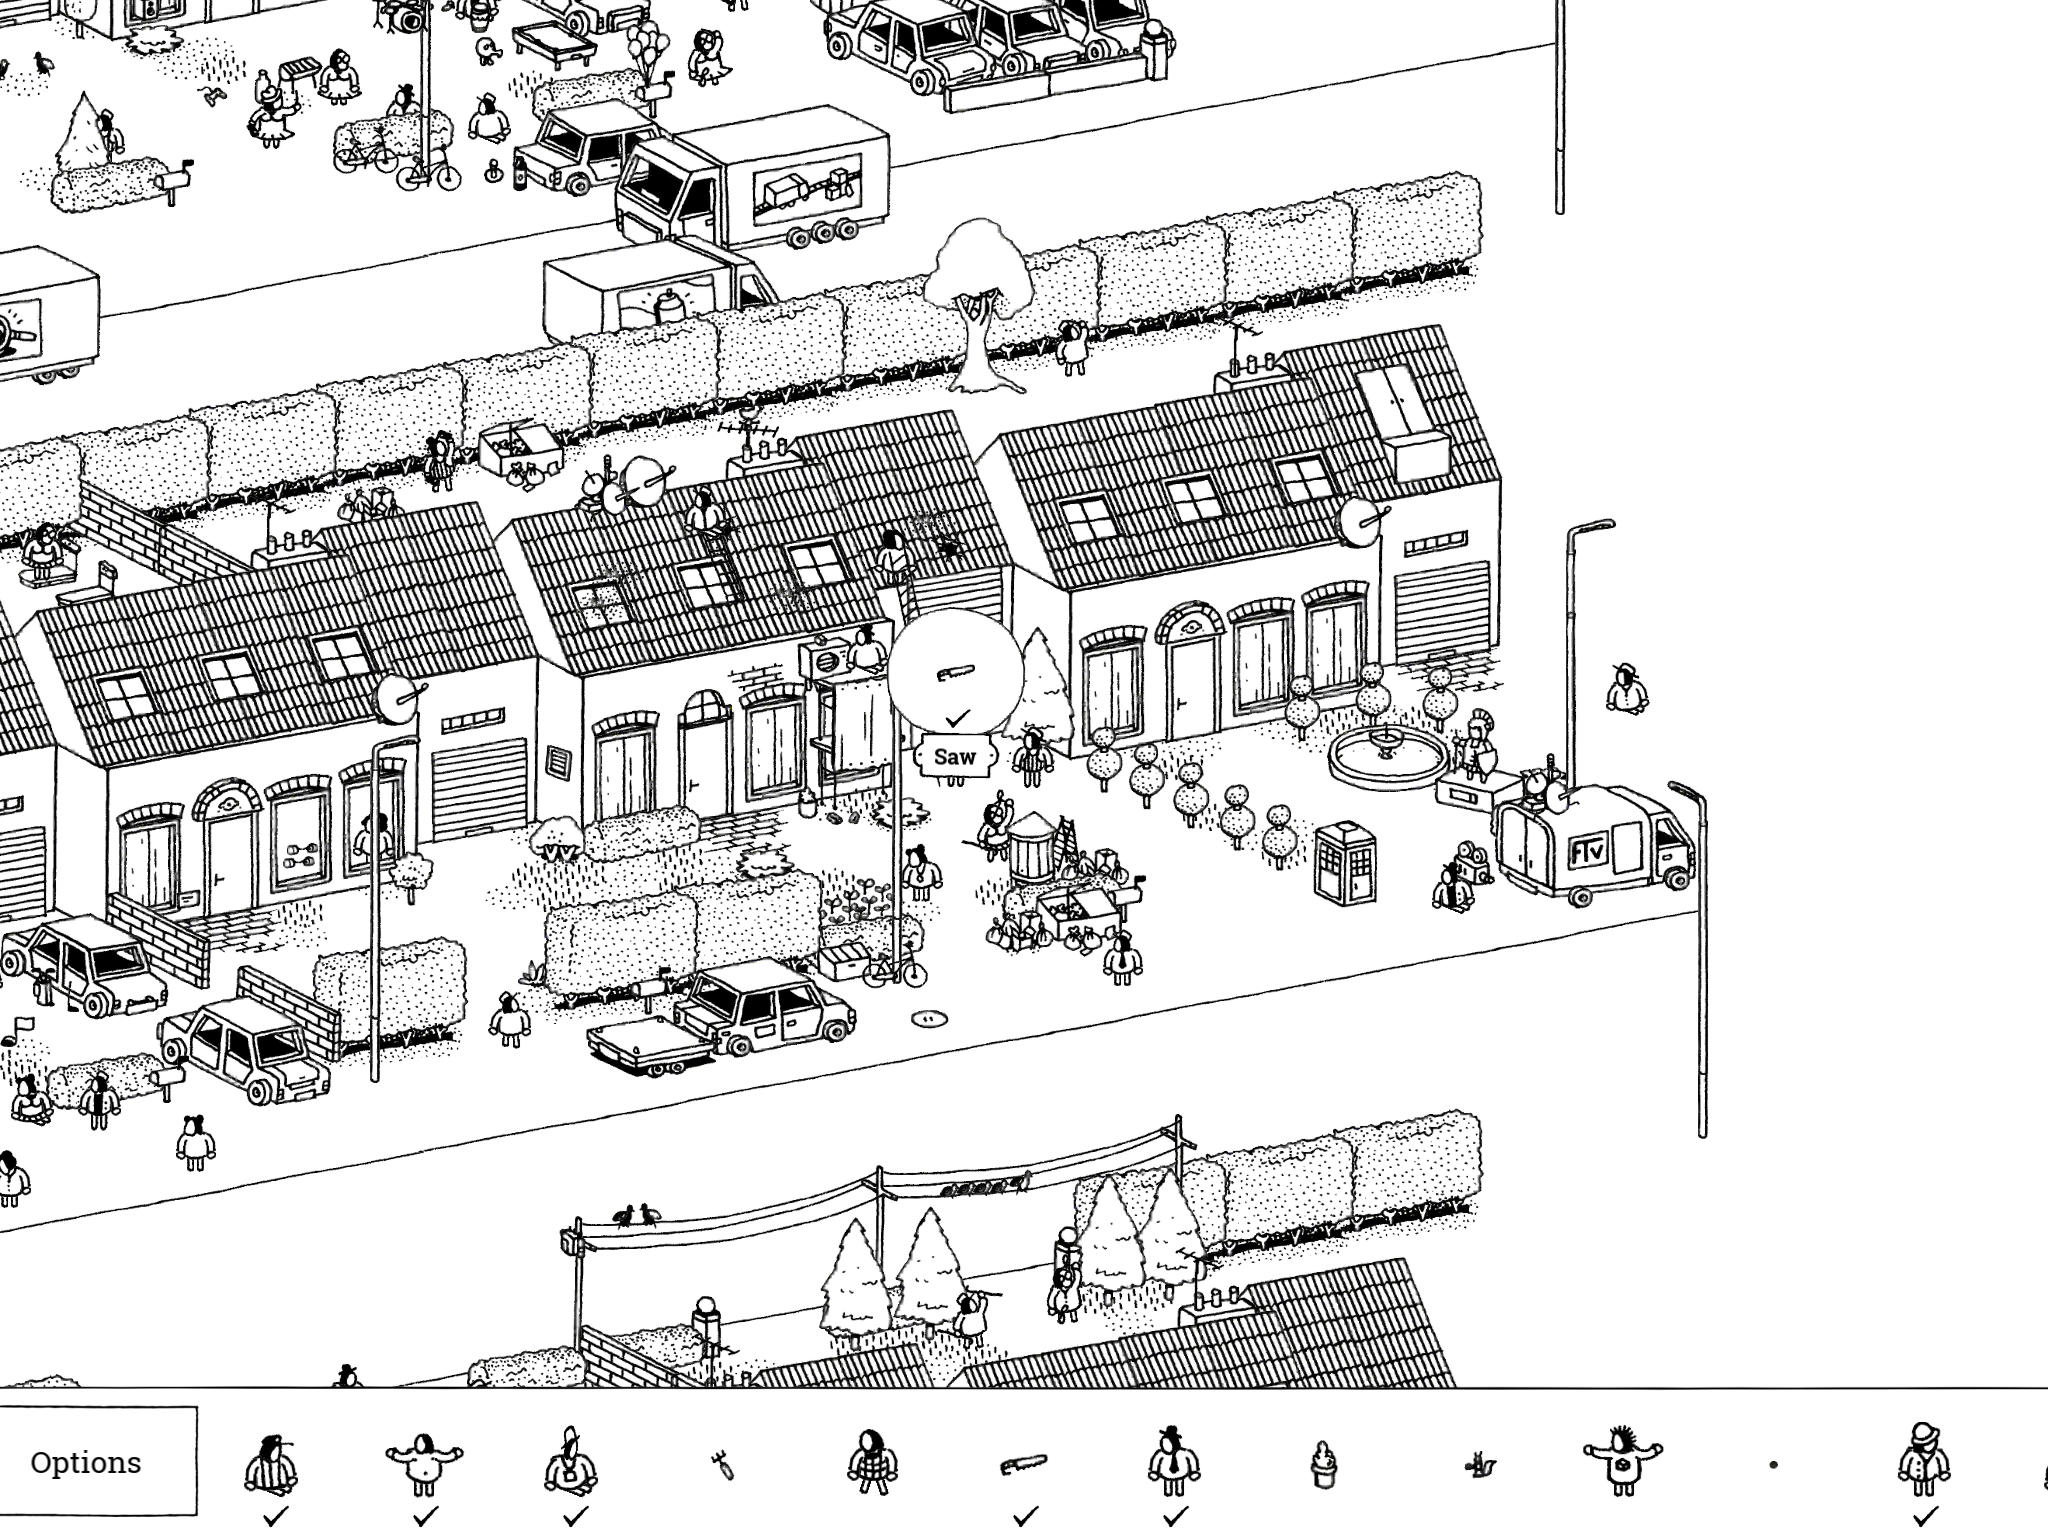
- Saw: “Always know where your saw is hanging out when you’re renovating.”
The house under renovation is house #9 (second from the end) on street #3. Drag the garage door up to open it; the Saw is hanging on the wall.
- Saw: “Always know where your saw is hanging out when you’re renovating.”
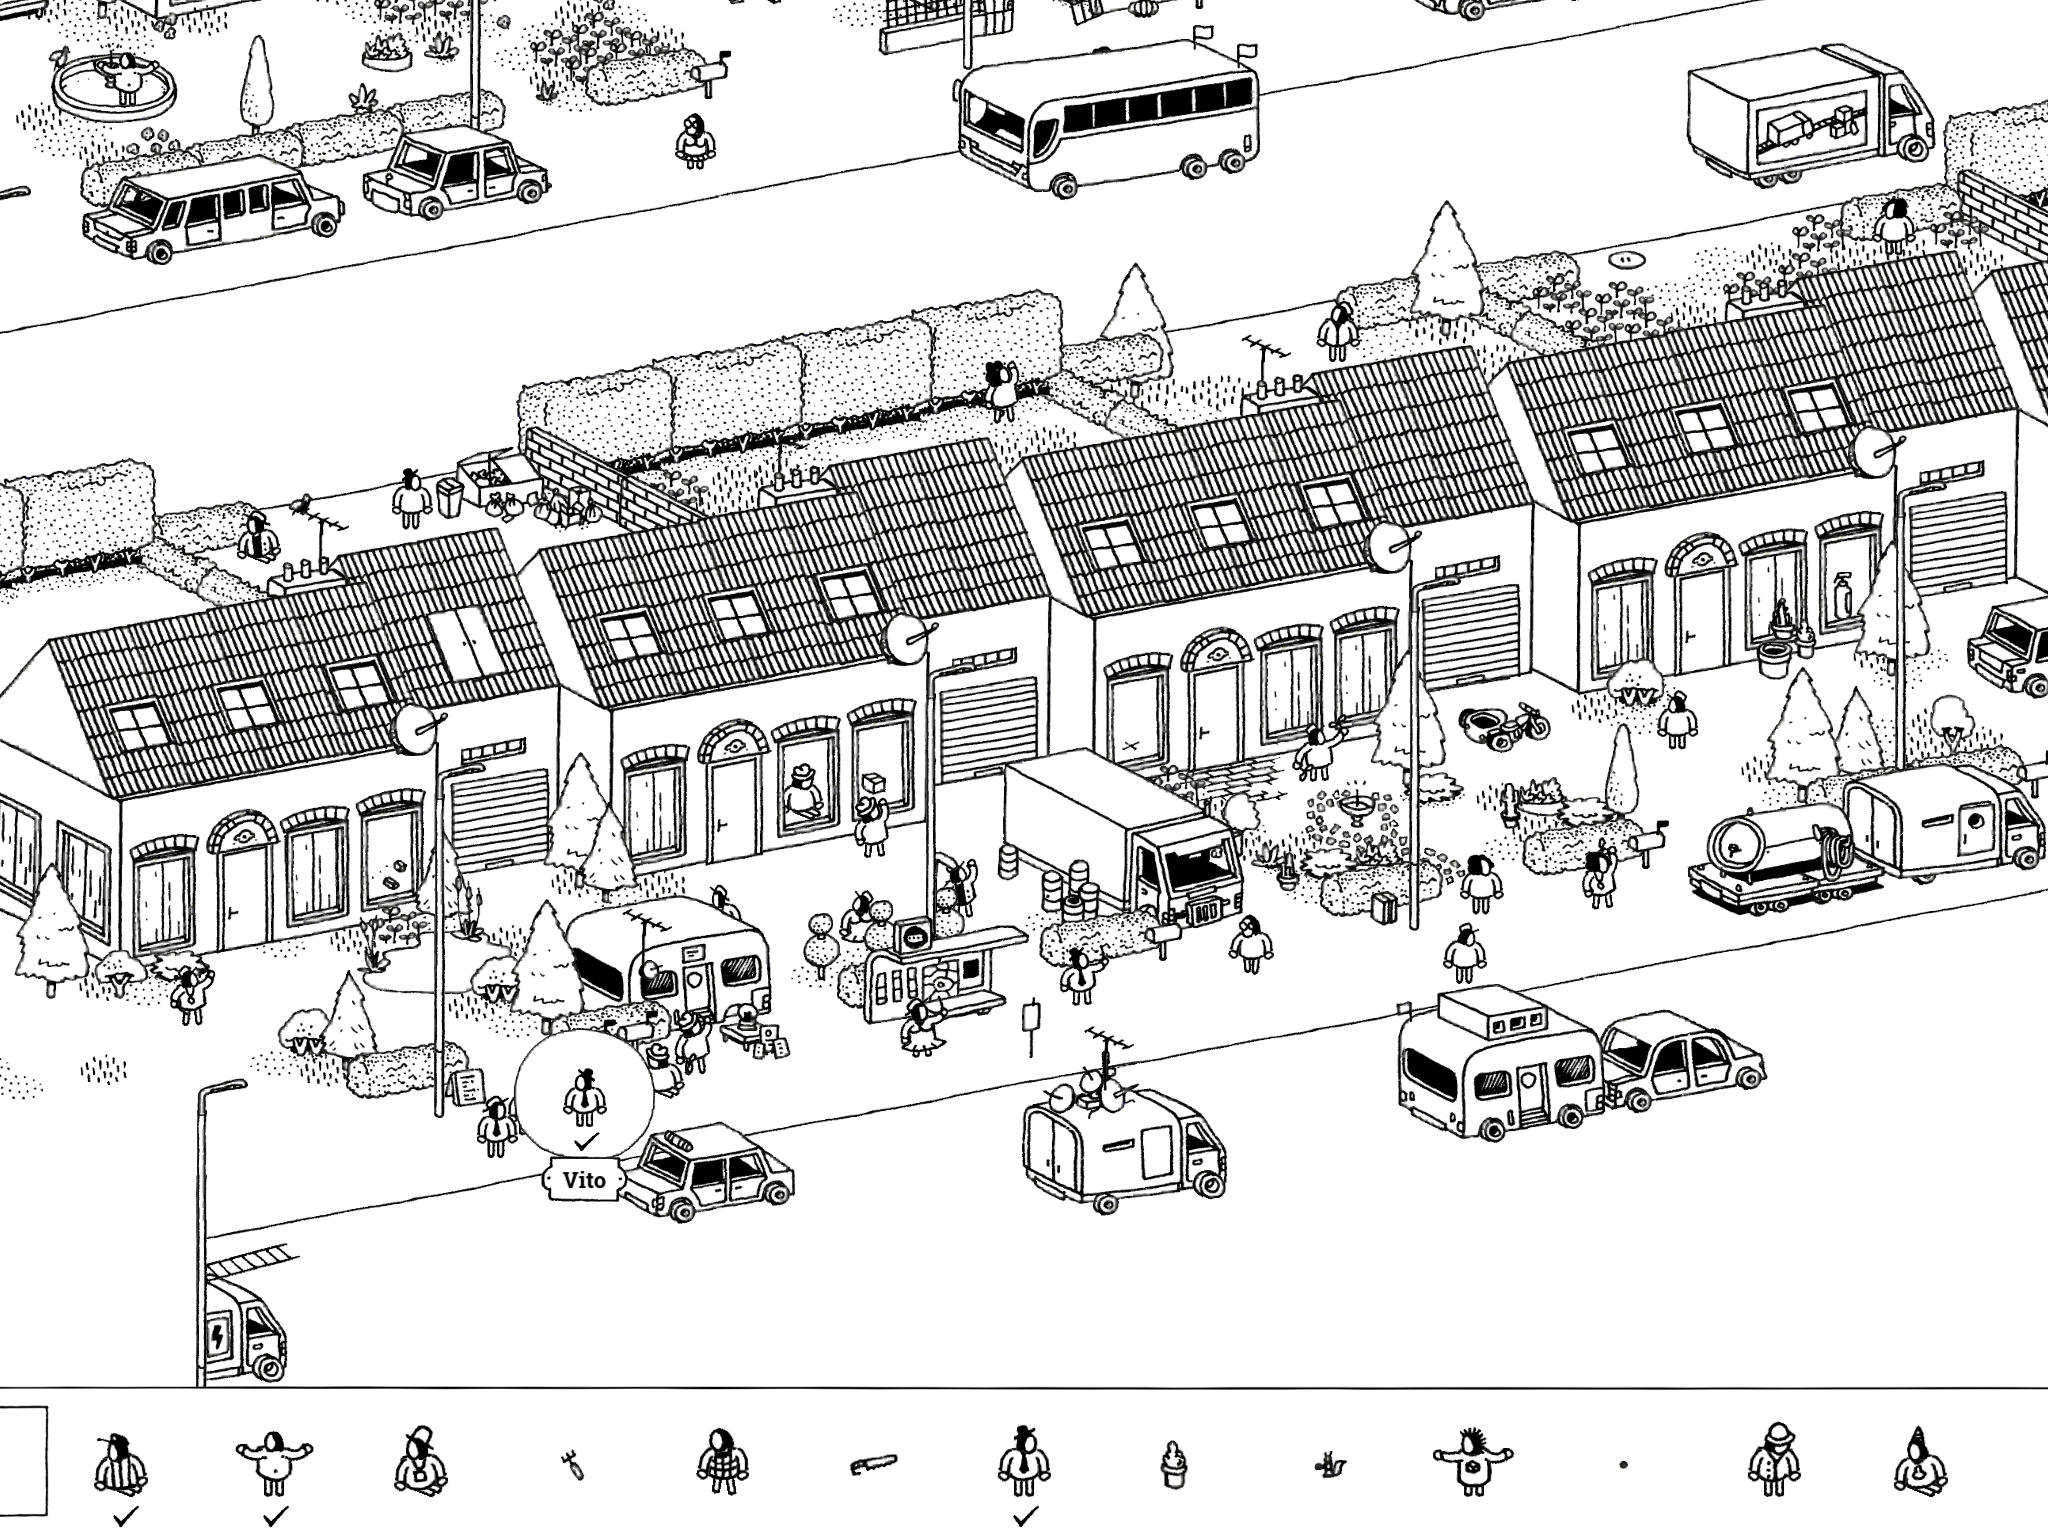
- Vito: “Vito is halfway to hearing his fortune.”
The fortune teller lives in house #1 on street #4. She has a trailer in her front yard with a line of people waiting. Vito is in the middle of this line.
- Vito: “Vito is halfway to hearing his fortune.”
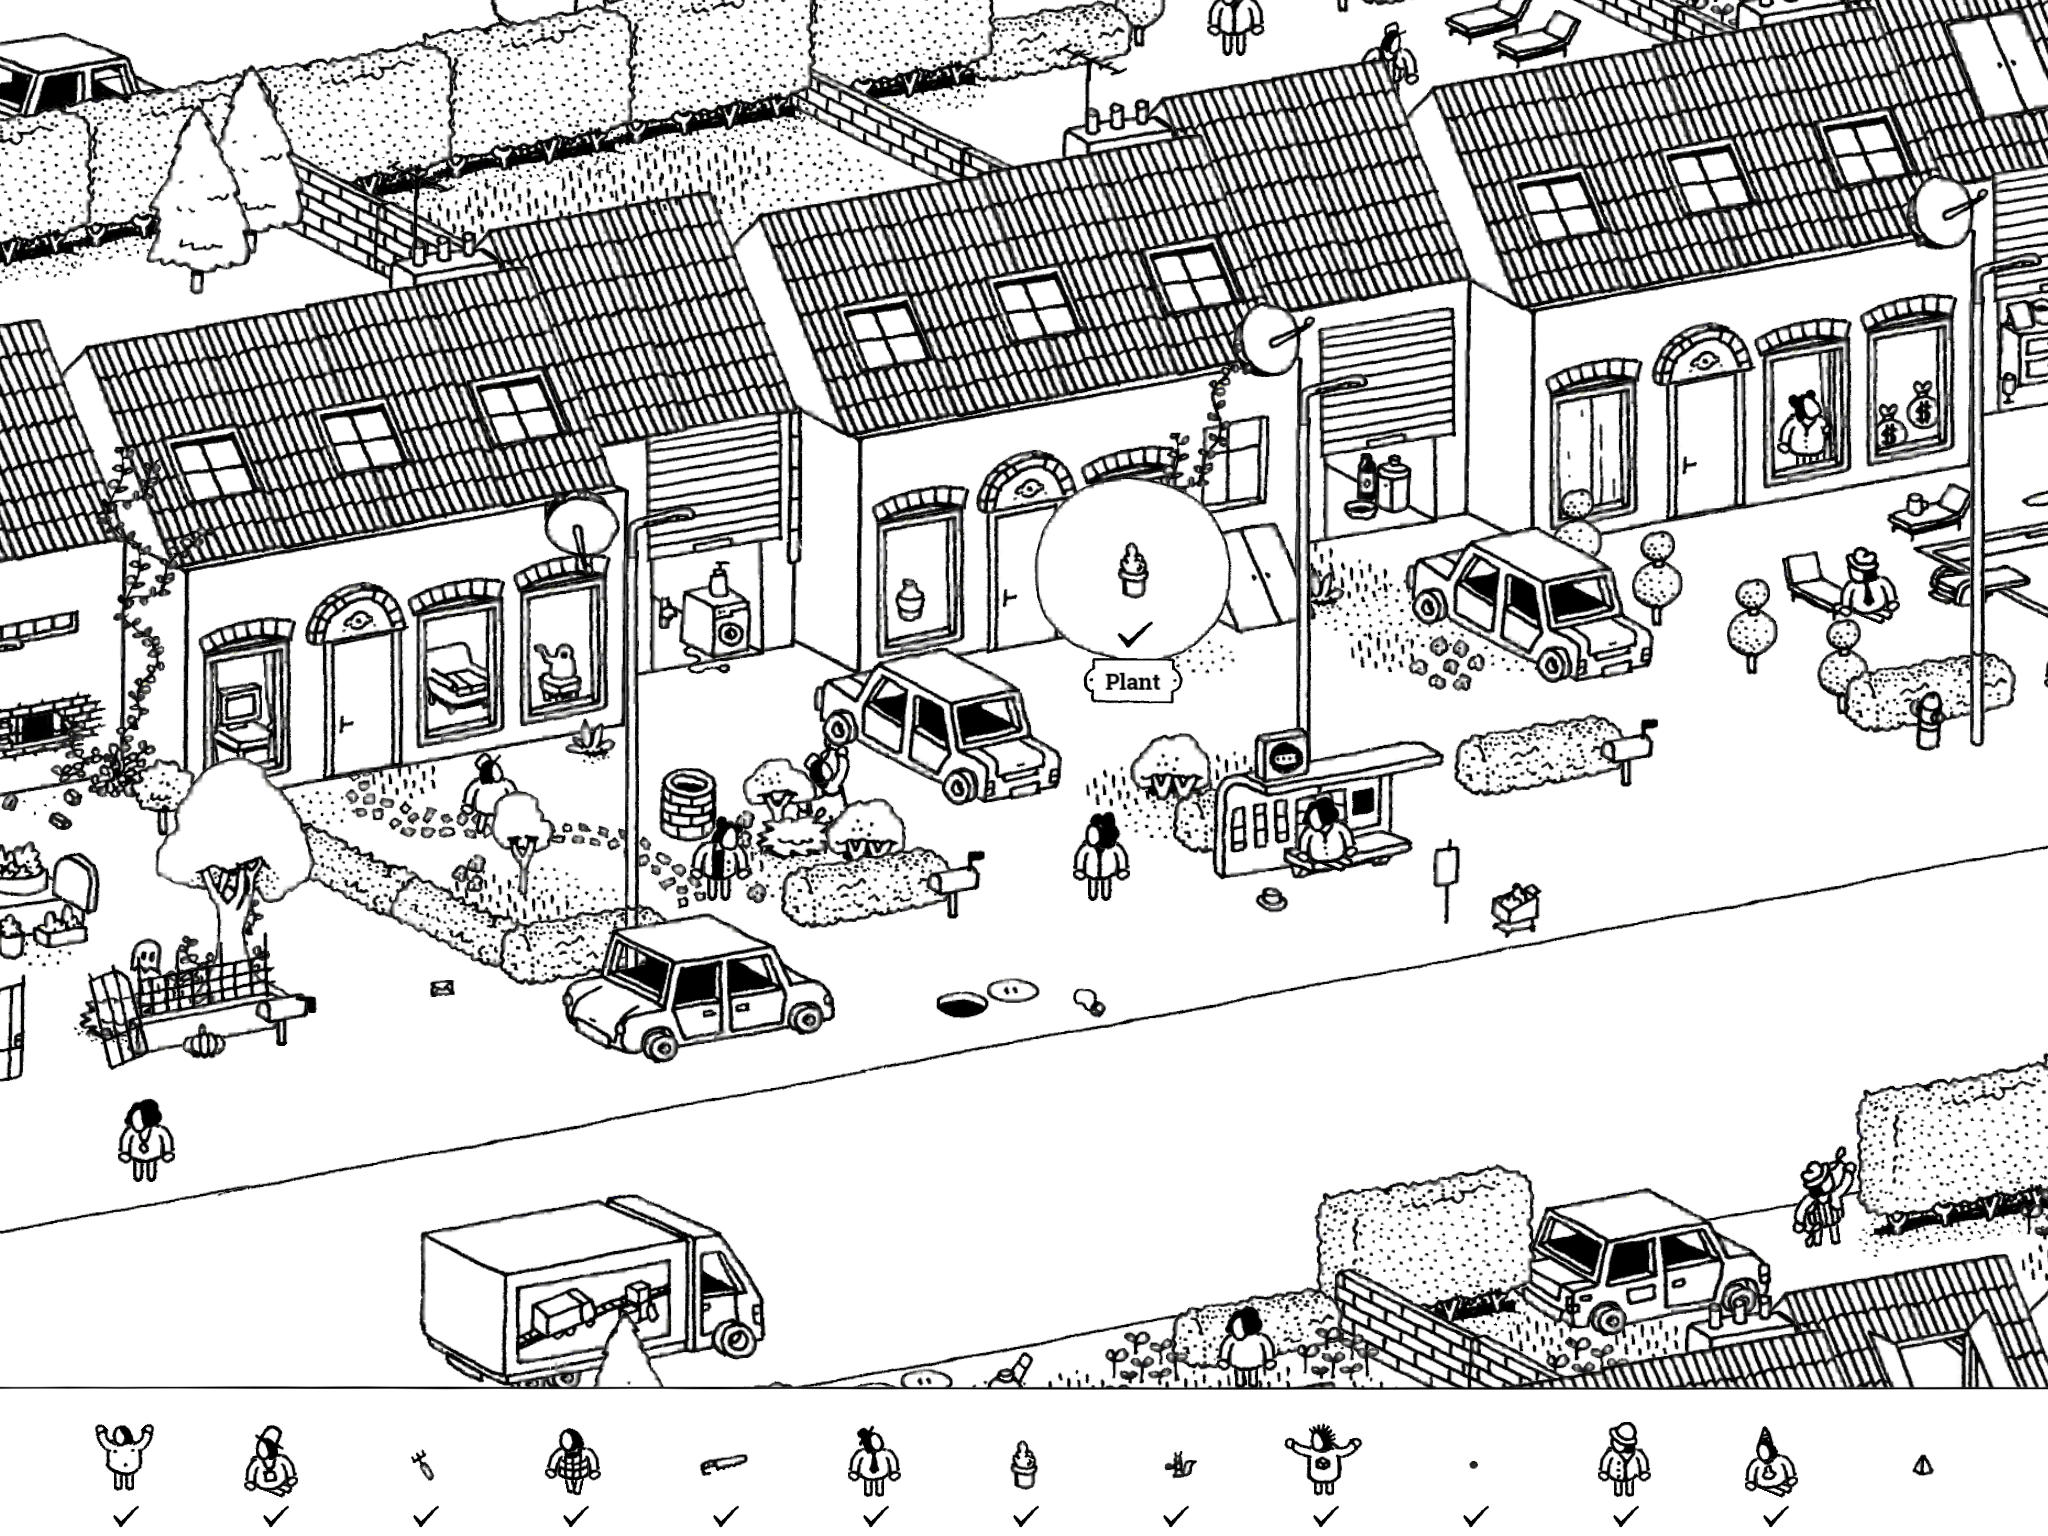
- Plant: “This plant wants to use radiowaves to communicate with other plants. It found a sneaky way.”
The Plant is at house #4 on street #3. It’s sitting in the front window with a chain of ivy stretching from it to the satellite dish on the roof.
- Plant: “This plant wants to use radiowaves to communicate with other plants. It found a sneaky way.”
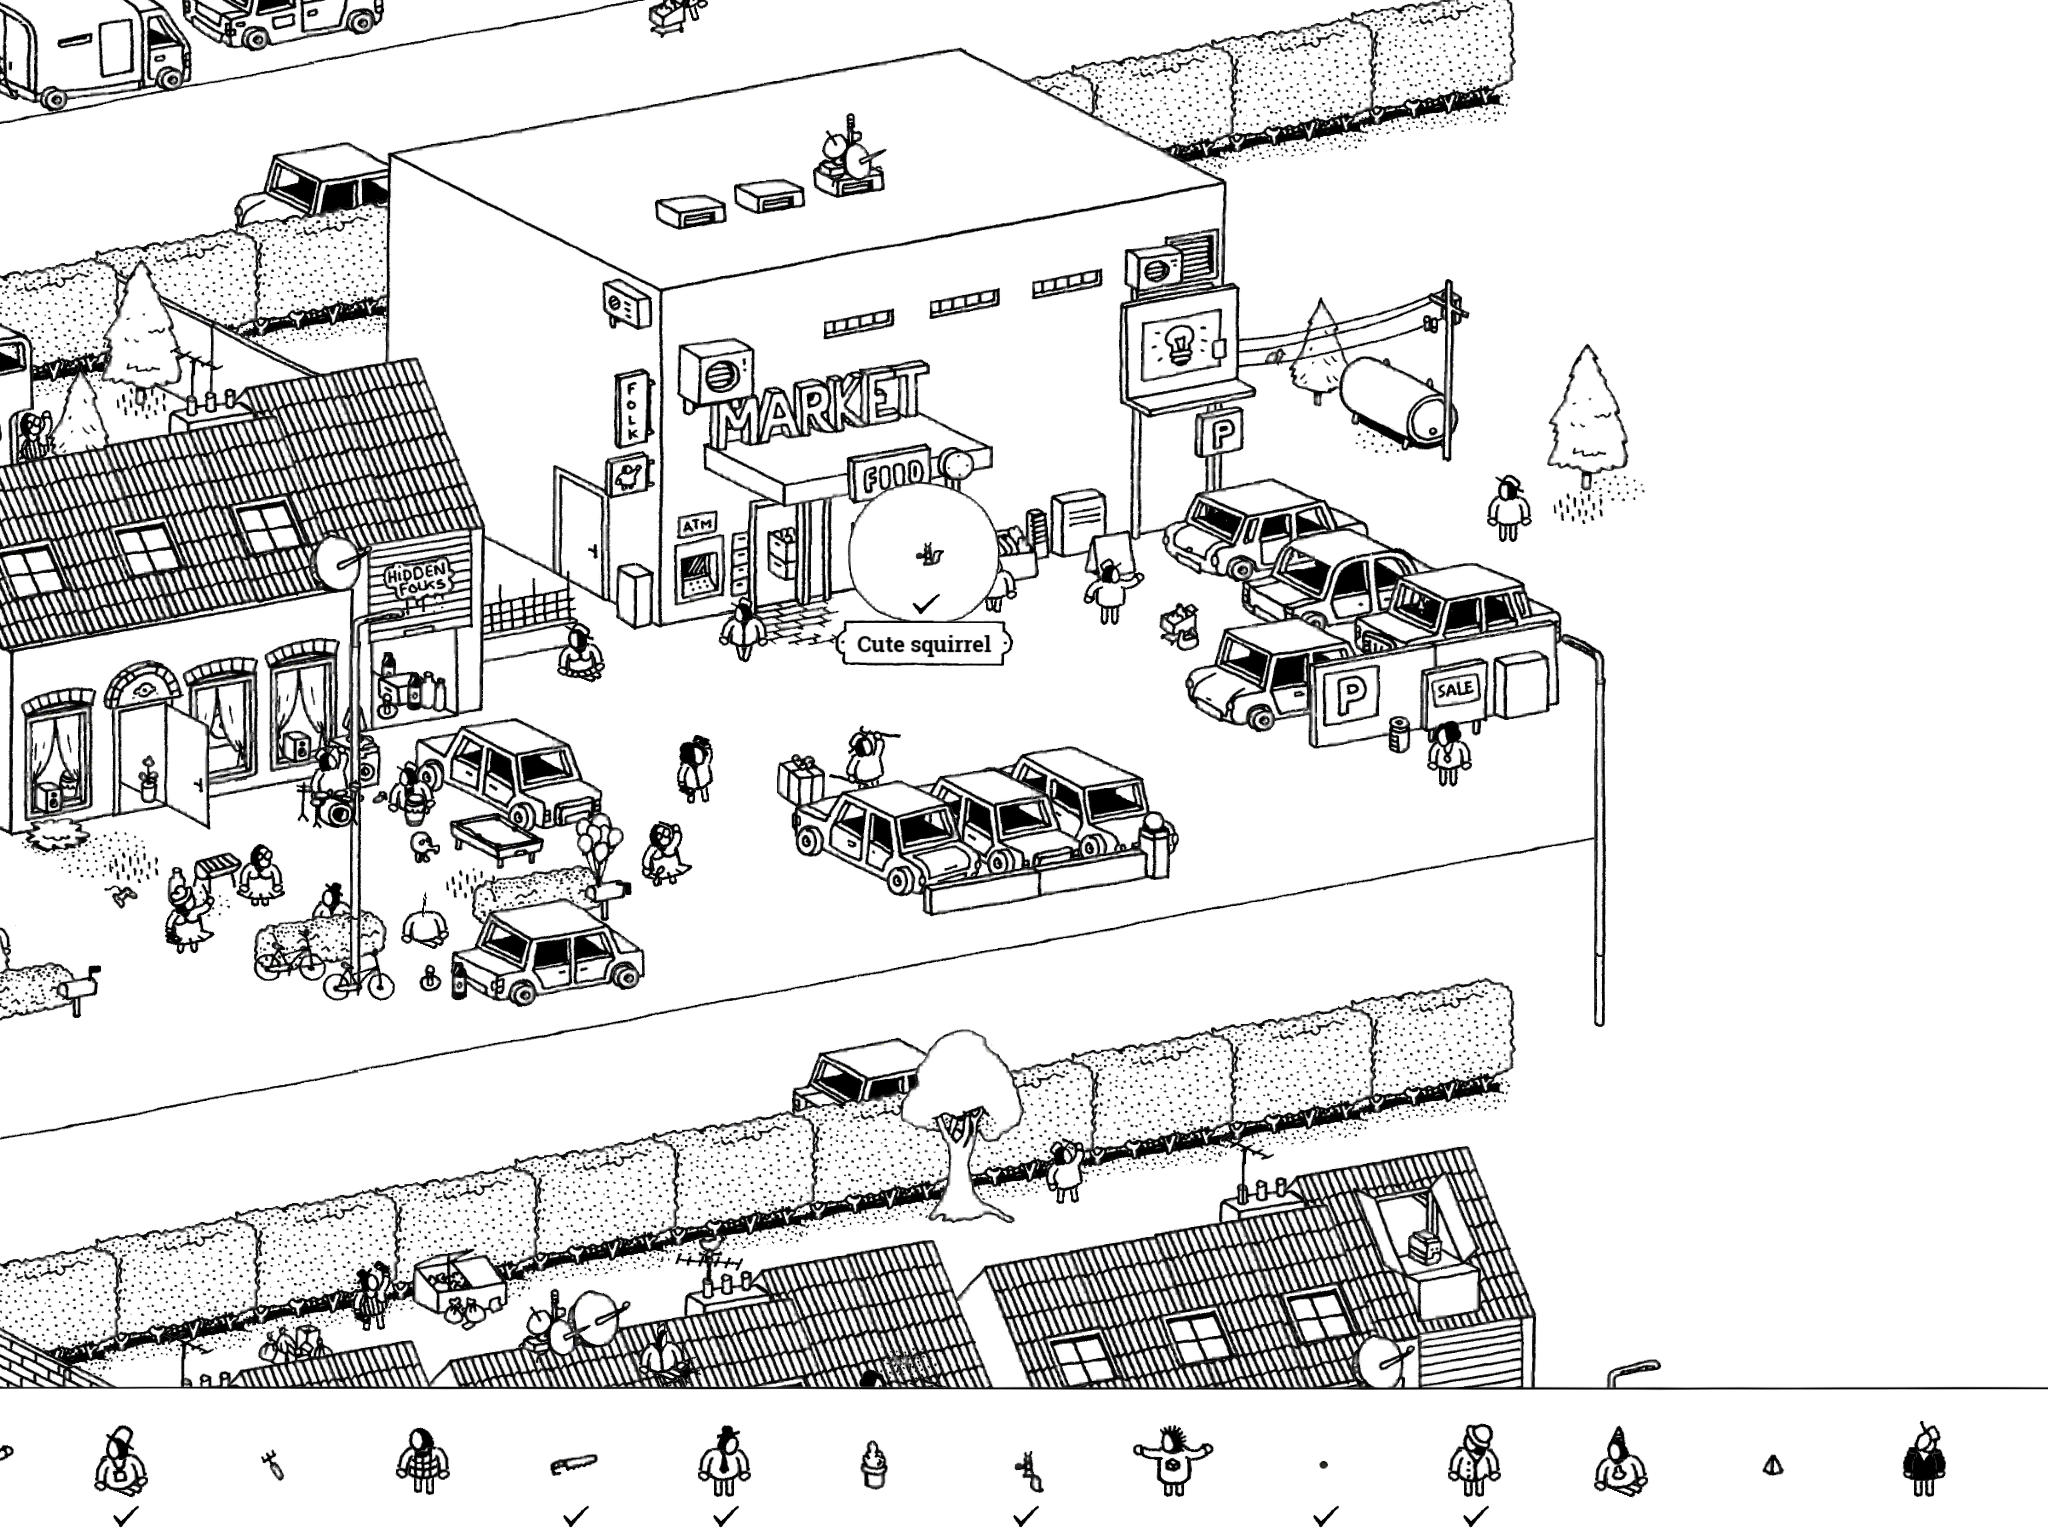
- Squirrel: “This squirrel uses its cuteness to persuade passerby to give it fresh food.”
The Squirrel is at the market, which is building #9 (the last building) on street #2. It’s the only non-house in the Suburb and it clearly says “Market” on the front. The Squirrel is actually just inside the rightmost front door and he blends in with the boxes extremely well. He occasionally swishes his tail just outside the door which makes him a little easier to see. The black-haired woman who walks in front of the door stops just to the right of the Squirrel.
- Squirrel: “This squirrel uses its cuteness to persuade passerby to give it fresh food.”
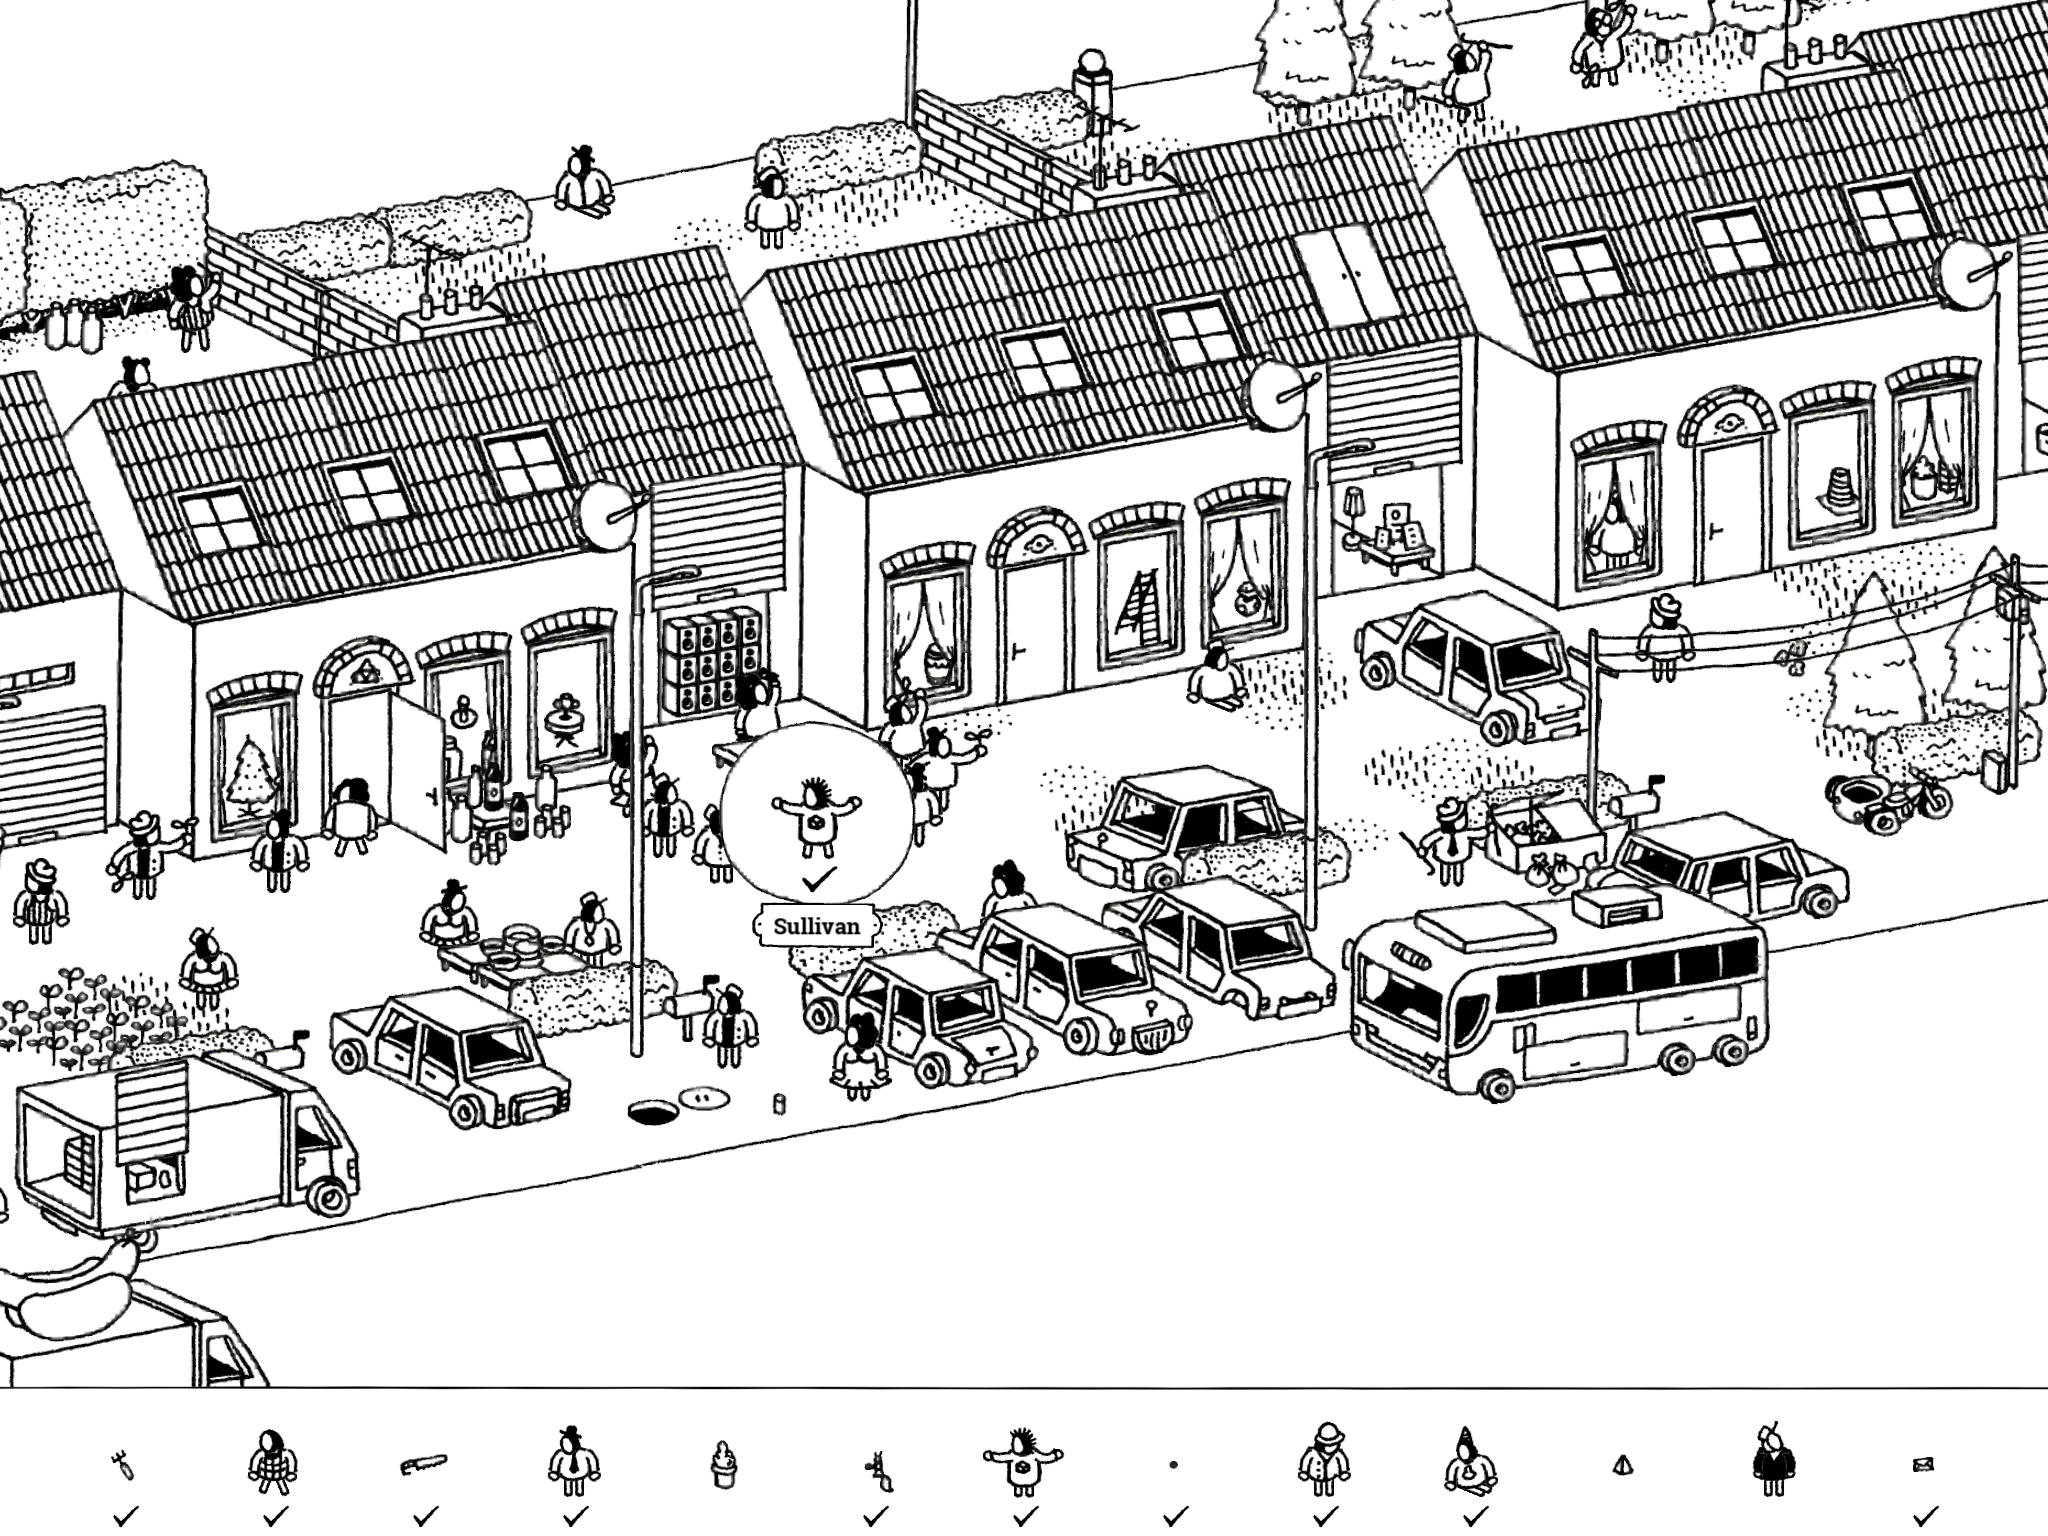
- Sullivan: “Sullivan wants to dance, so he is waiting for the music to kick in!!”
Sullivan is at house #8 on street #4. There is a large group waiting outside the garage near a DJ with a turntable. Sullivan is in the middle of this group, jumping up and down. Open the garage to reveal a stack of speakers; tap the speakers to get the music started. Then tap Sullivan.
- Sullivan: “Sullivan wants to dance, so he is waiting for the music to kick in!!”
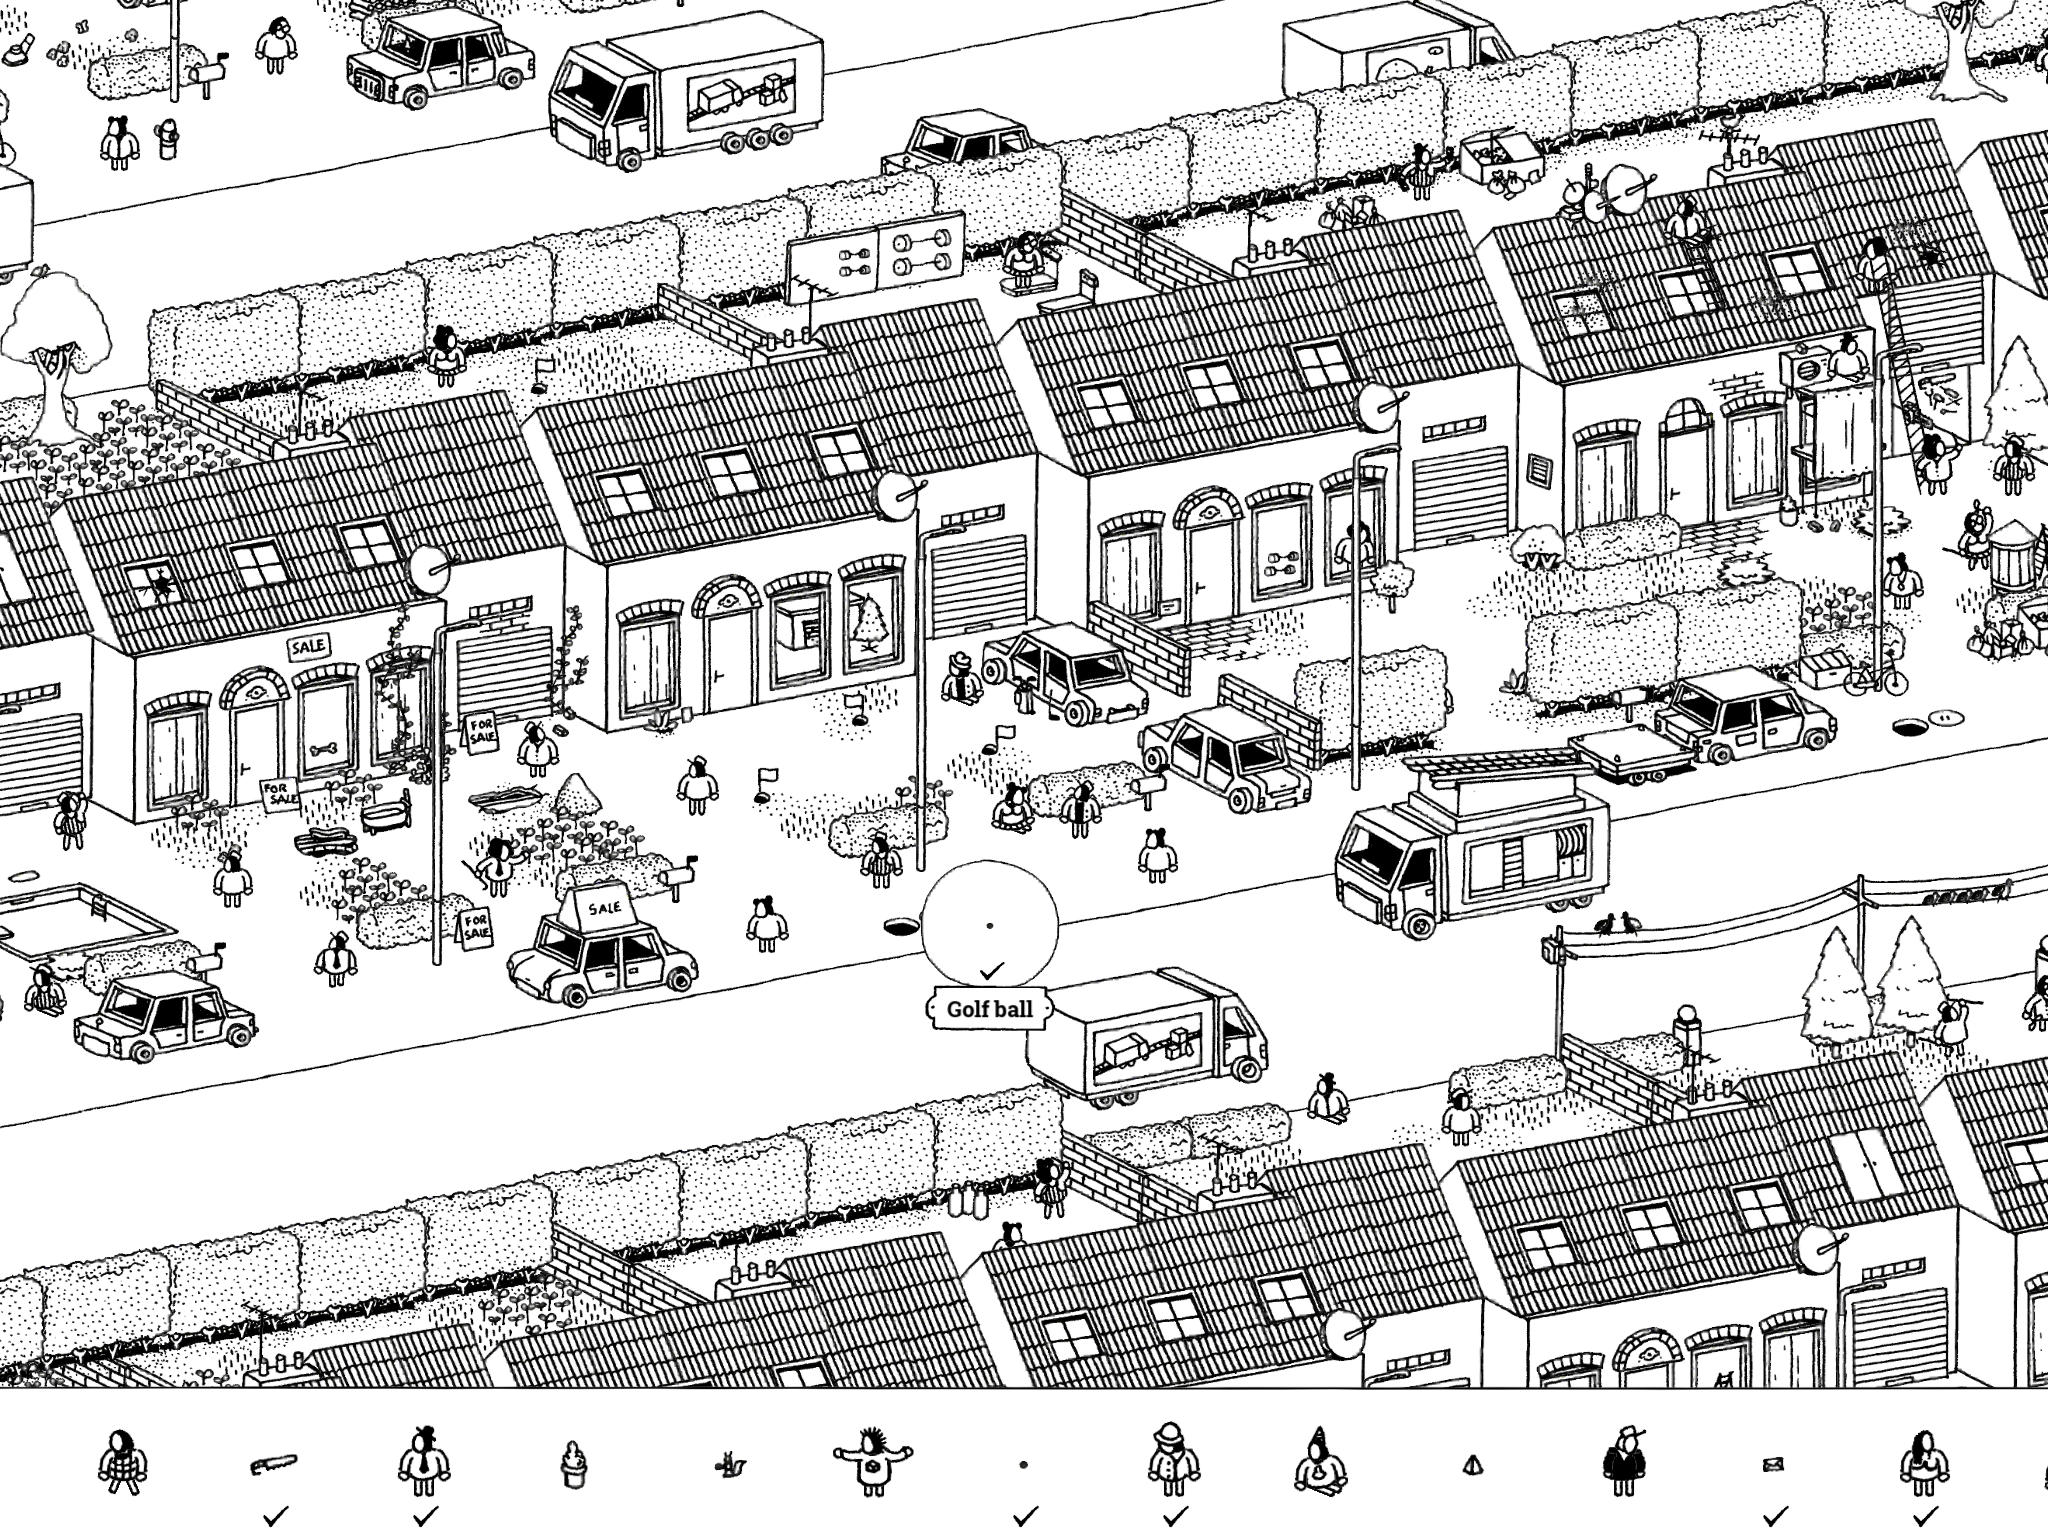
- Golf Ball: “This golf ball’s owner is absolutely sure he saw it fly over the bushes. It couldn’t have disappeared, right?!”
The golf house is #7 on street #3. There are a number of putt-putt holes set up in the front yard with little flags sticking out of them. Tap the sewer cover in the front yard near the street; drag it to the left to open the manhole. The Golf Ball will fly out to the right, landing just below the man with a tie. Tap it to collect it.
- Golf Ball: “This golf ball’s owner is absolutely sure he saw it fly over the bushes. It couldn’t have disappeared, right?!”
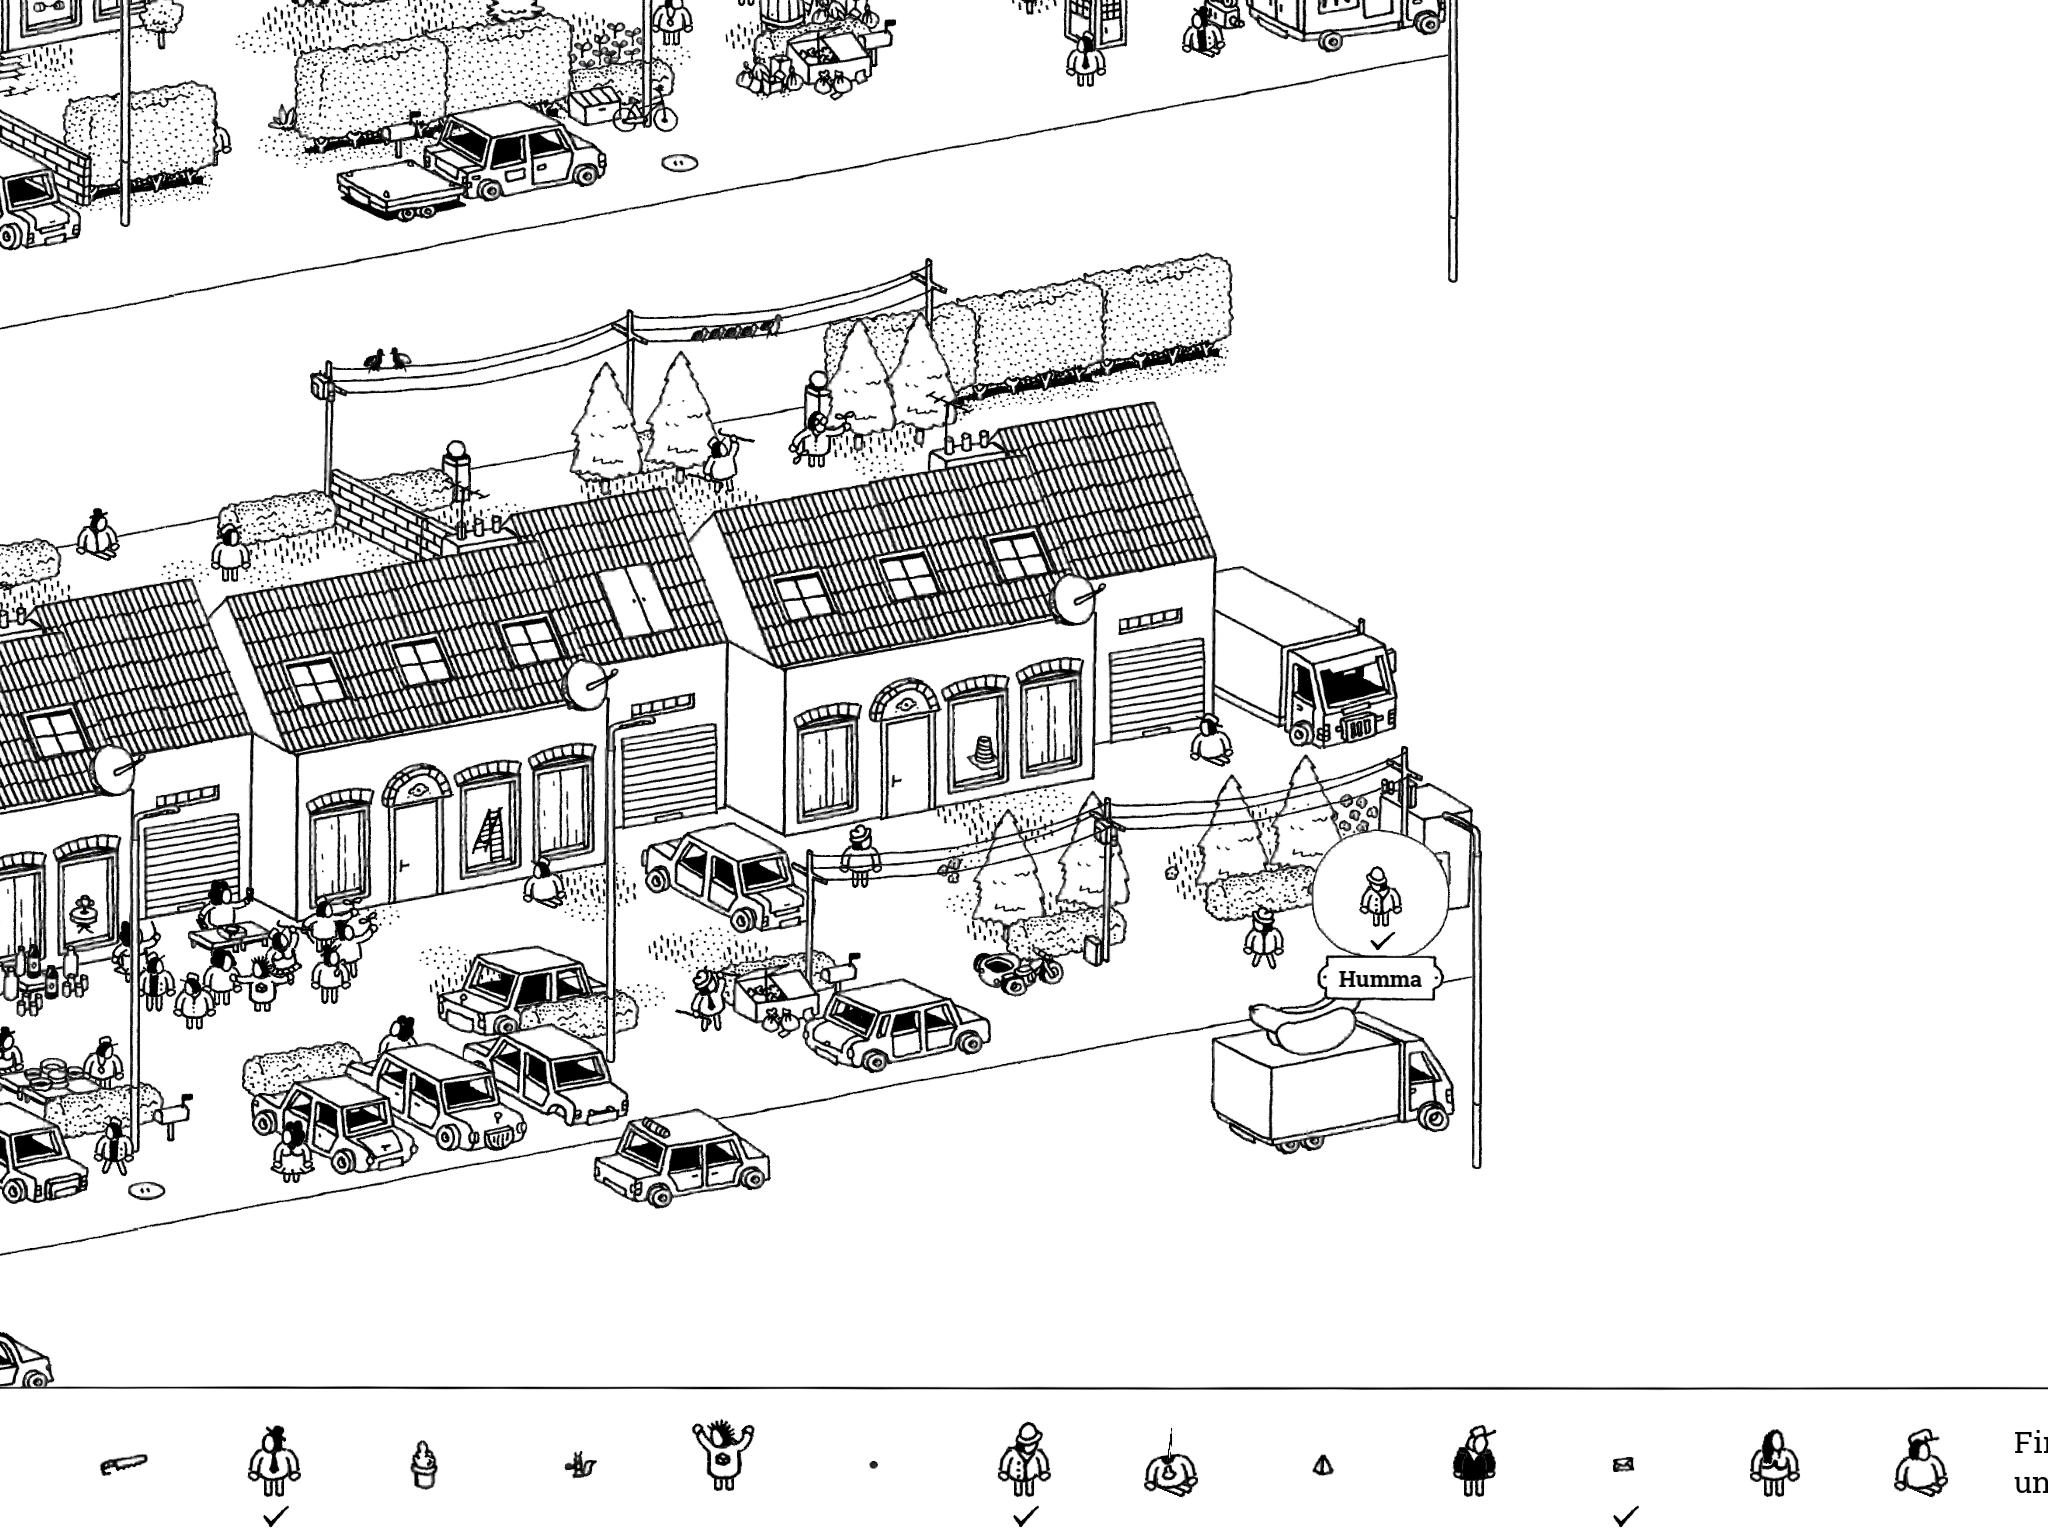
- Humma: “Humma loves the sound of electricity so much…so much…”
Humma is at the very end of street #4. There’s a large electrical box in the front yard of house #10 attached to the power lines; Humma is standing next to this box.
- Humma: “Humma loves the sound of electricity so much…so much…”
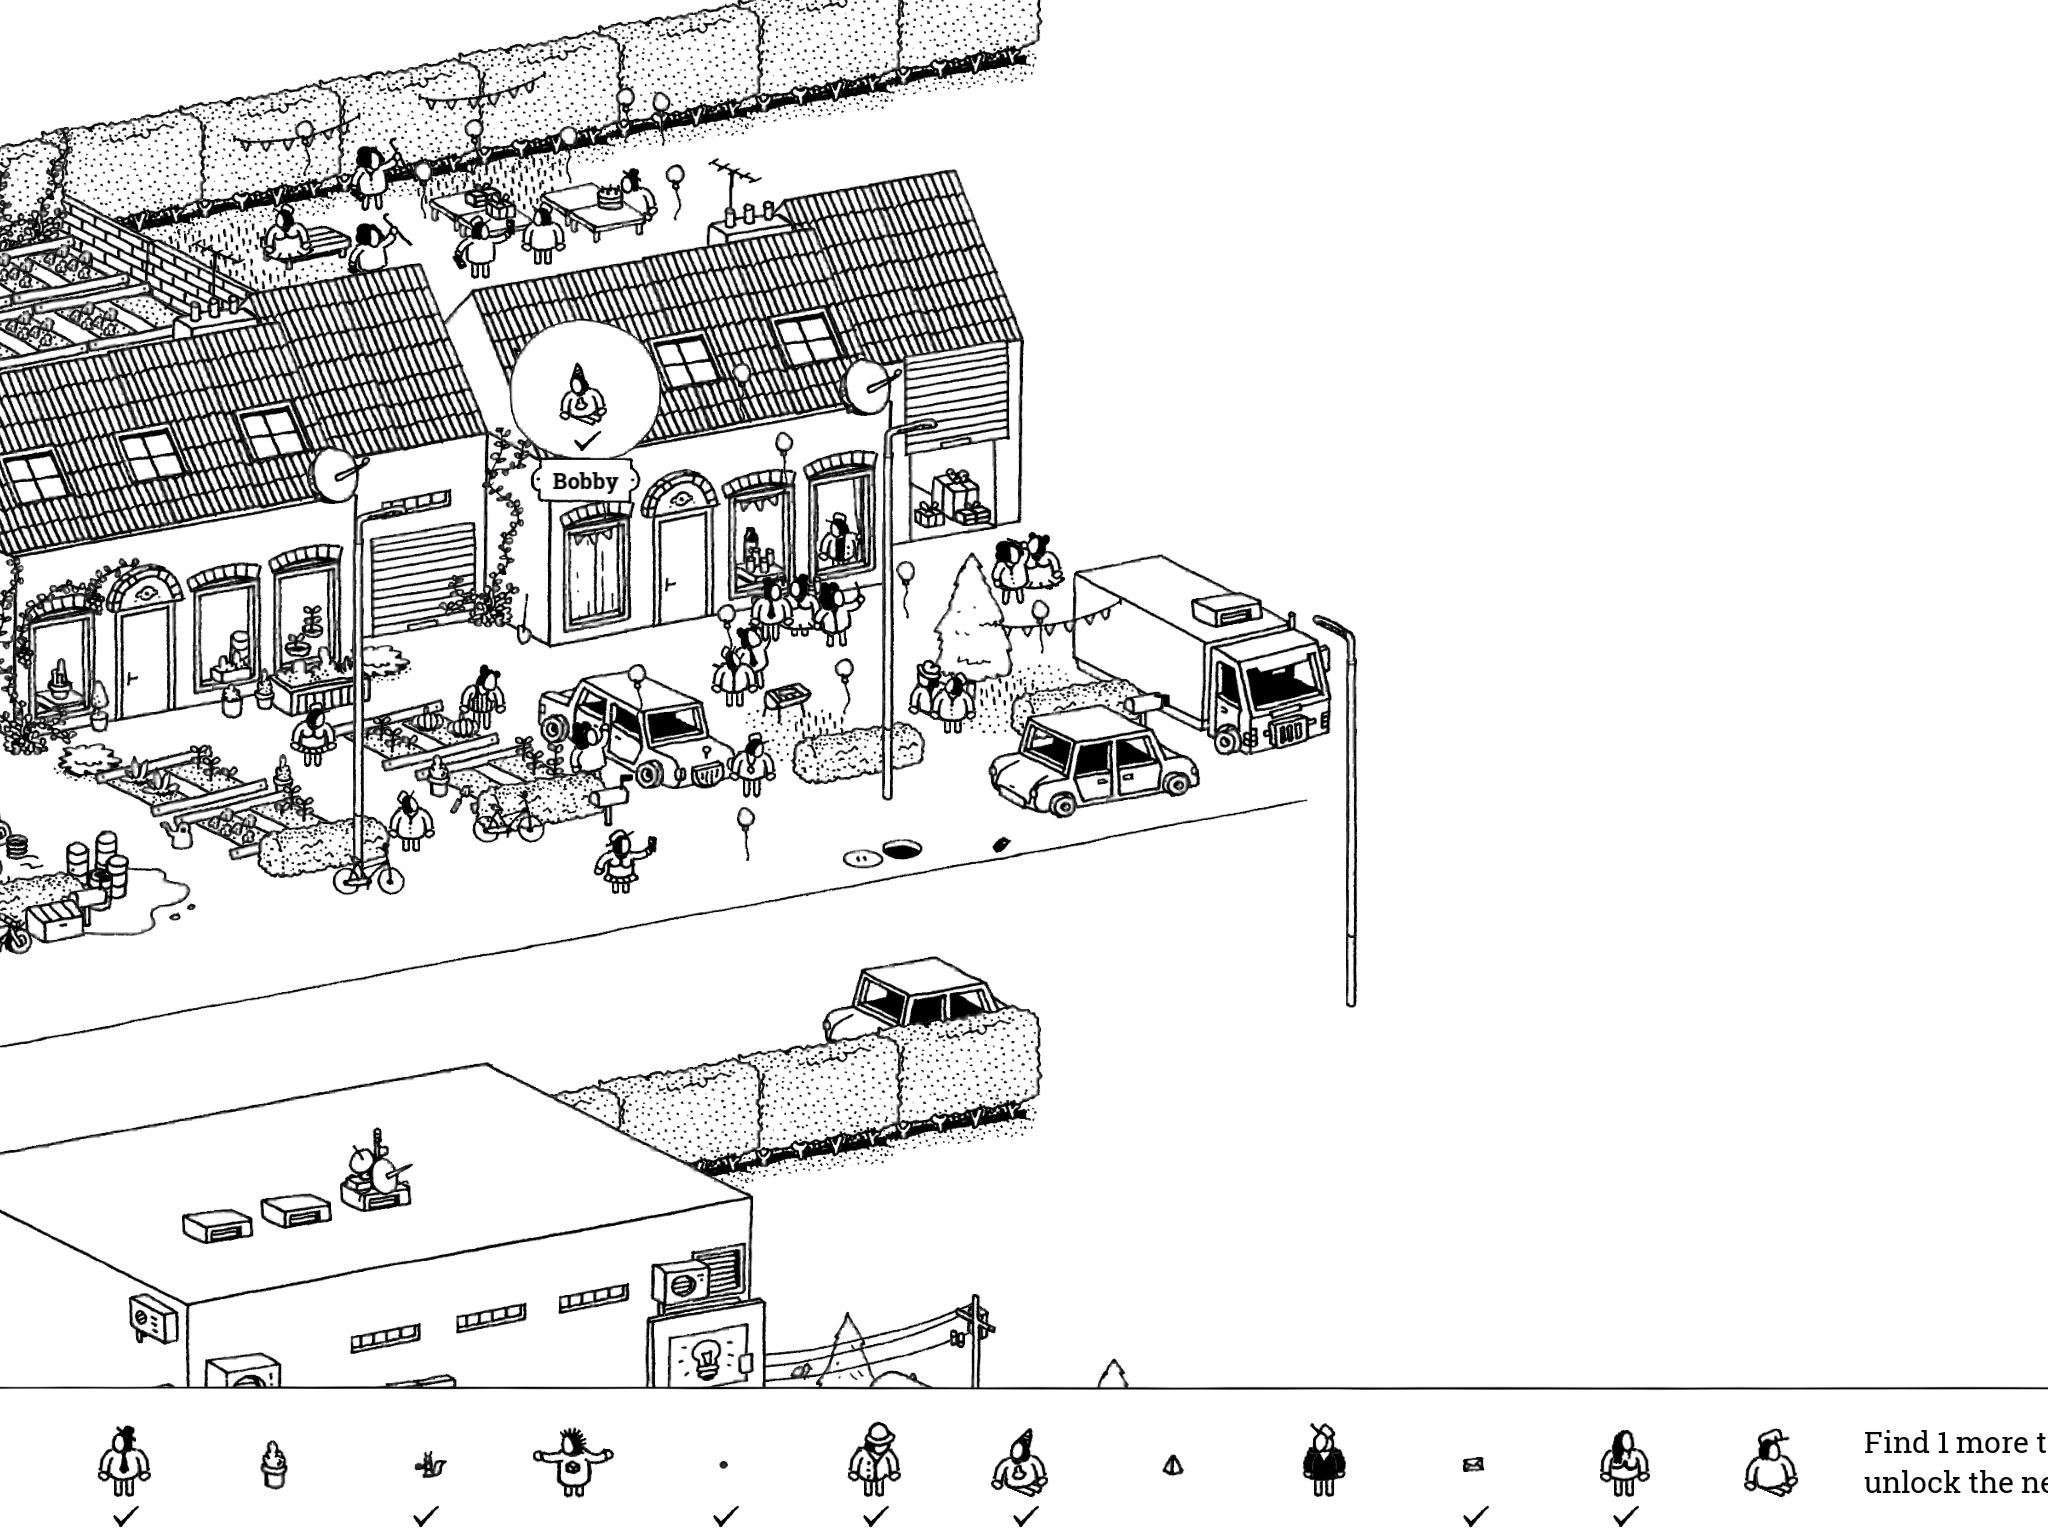
- Bobby: “Bobby could no longer deal with the crowd and hid, even though they all came for him.”
Bobby lives at house #10 on street #1. There are a number of people waiting in his front yard with balloons. Tap the balloons in front of the attic doors to pop them, then tap the doors to open them and reveal Bobby.
- Bobby: “Bobby could no longer deal with the crowd and hid, even though they all came for him.”
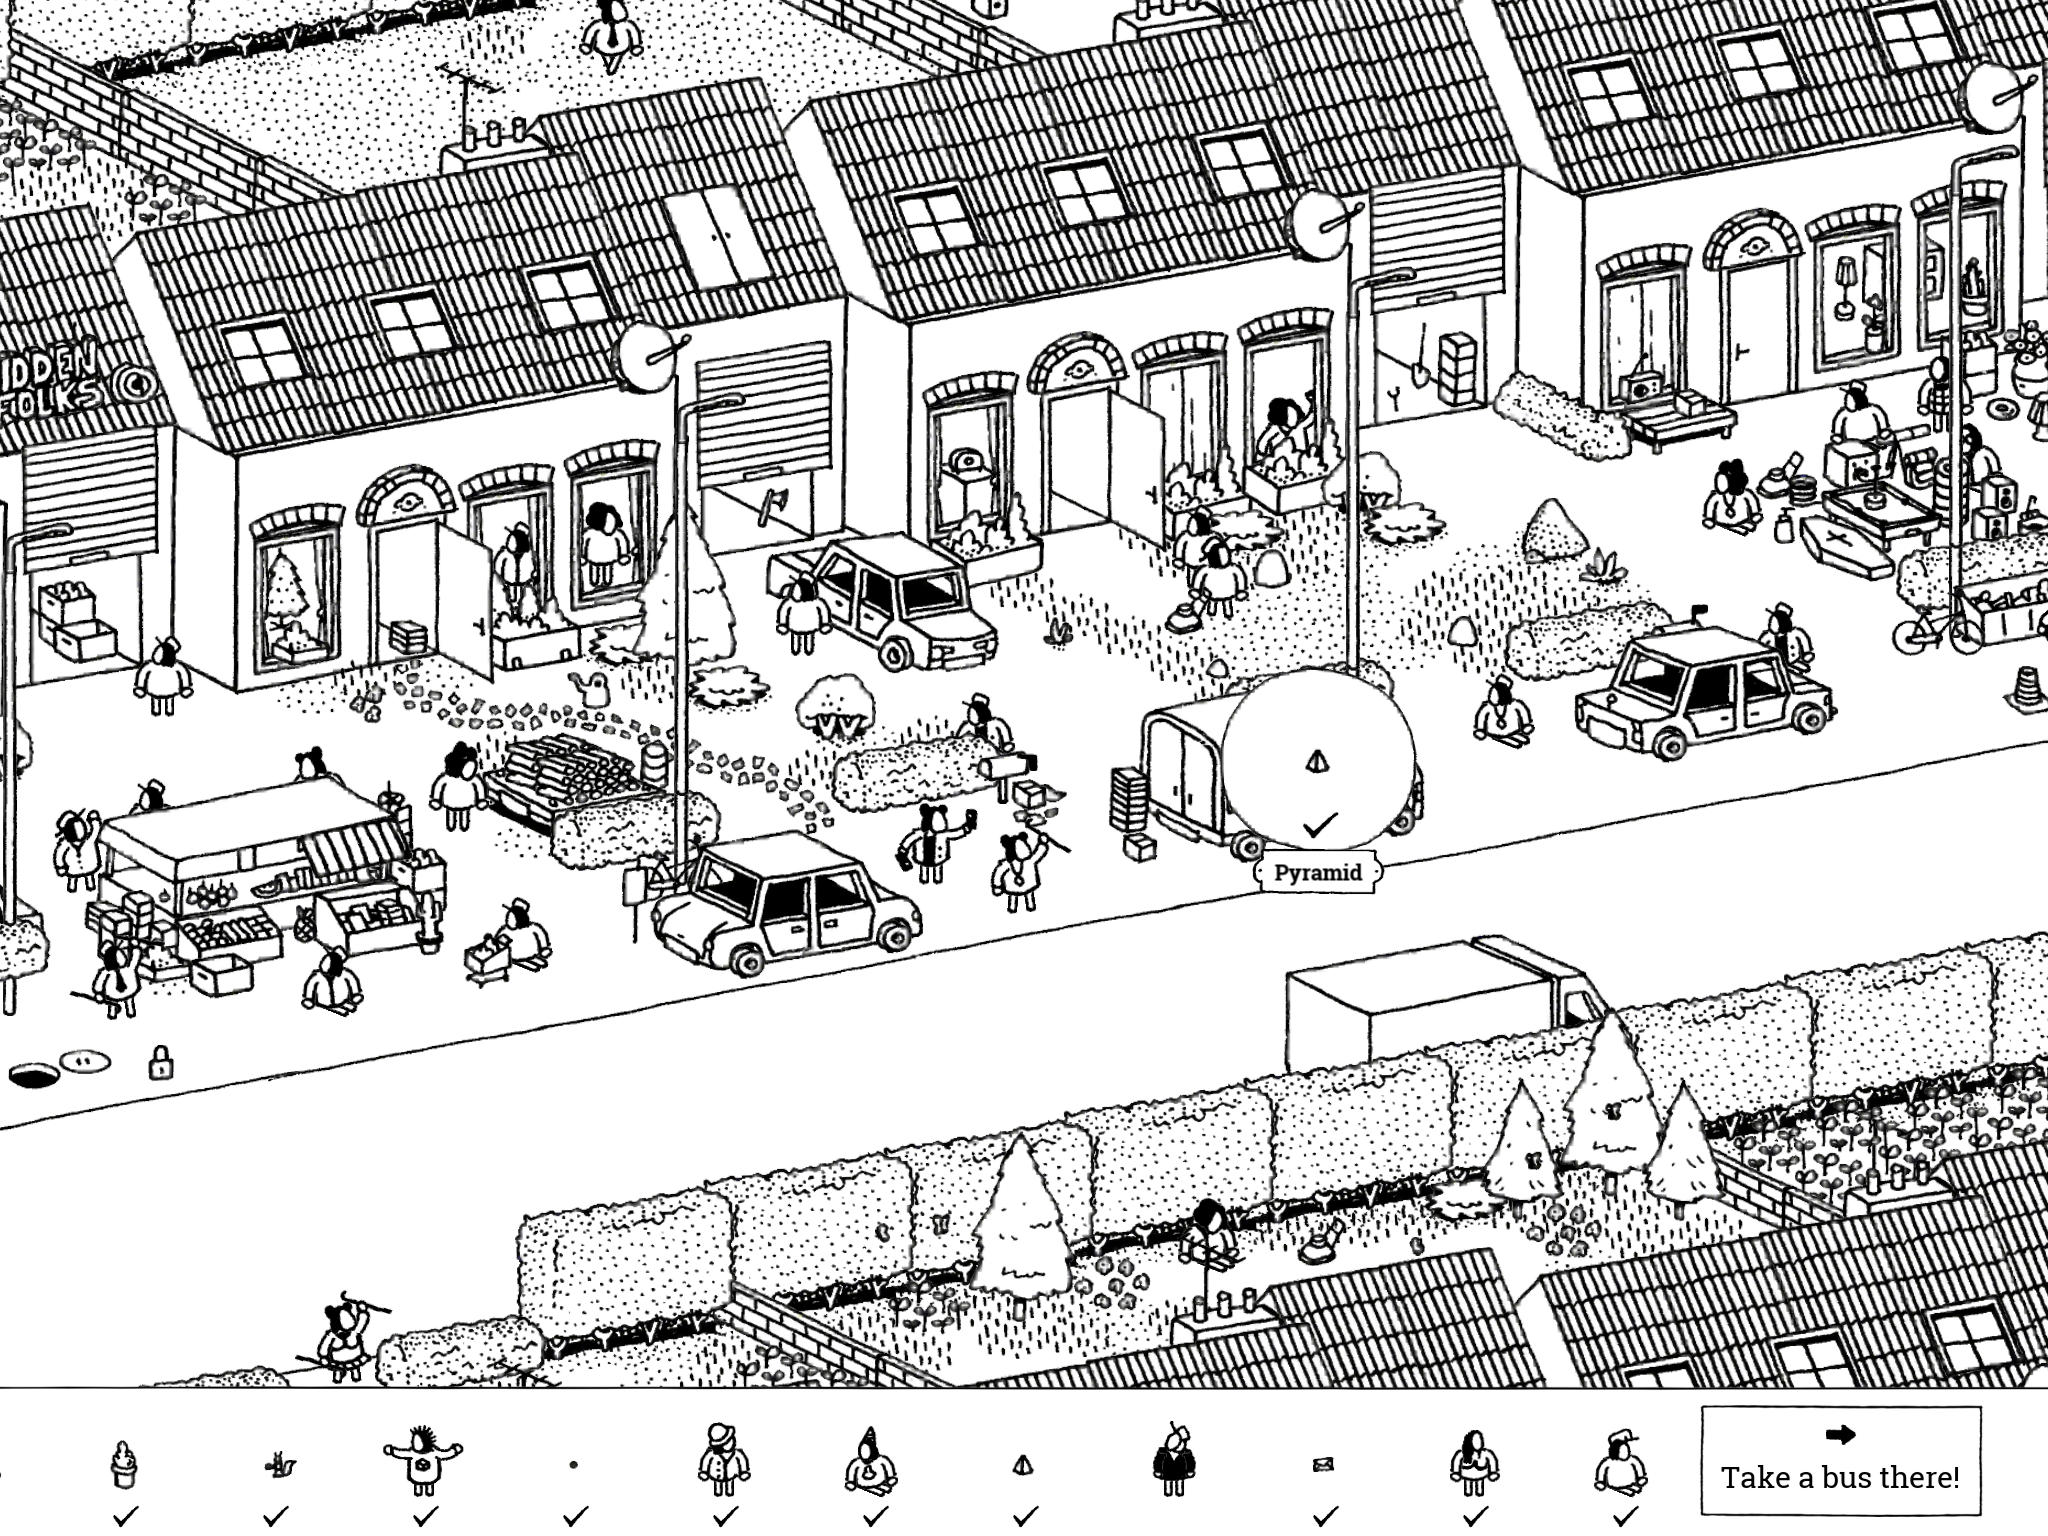
- Pyramid: “This mysterious pyramid-shaped object still needs to be delivered. Fortune teller Terry is still a few blocks away.”
There’s a mail truck sitting on street #1 in front of houses #3 and #4. Tap the door in the side of the mail truck to open it; tap the Pyramid that’s sitting inside this door.
- Pyramid: “This mysterious pyramid-shaped object still needs to be delivered. Fortune teller Terry is still a few blocks away.”
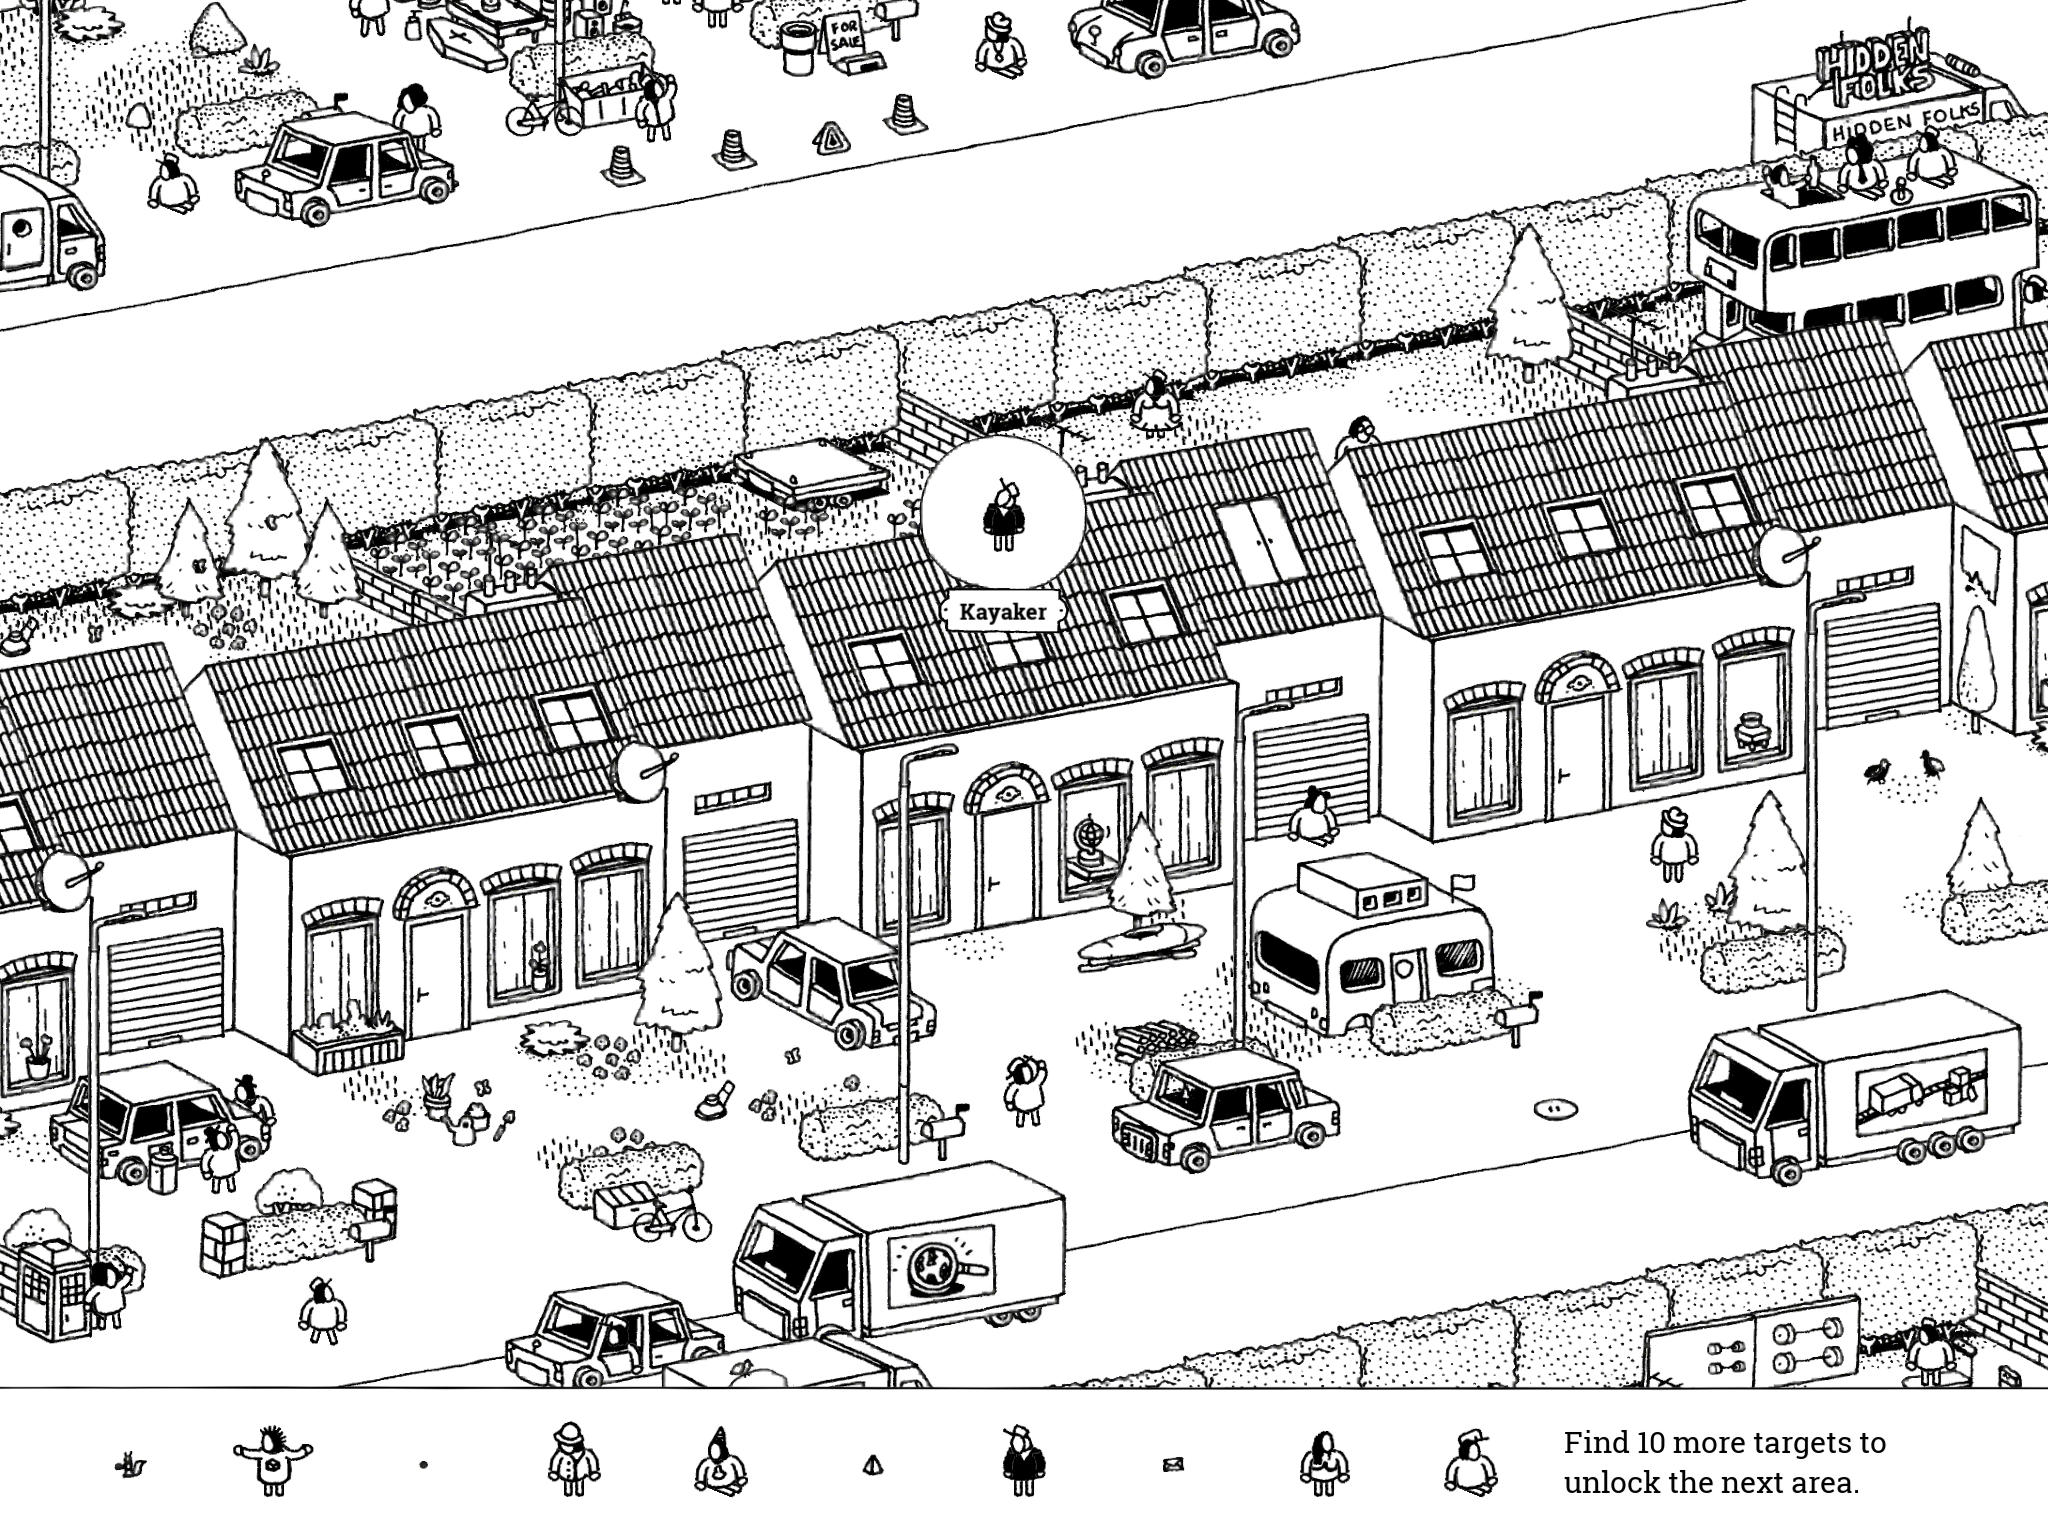
- Kayaker: “This neighbor kayaker got home from a long trip and just wants to watch TV now. But aaarrgghh, that signal!”
The Kayaker lives on street #2, house #6. There is a kayak and a motor home in his front yard. Drag the satellite dish on top of his roof to the left to reveal the Kayaker hanging from the shingles.
- Kayaker: “This neighbor kayaker got home from a long trip and just wants to watch TV now. But aaarrgghh, that signal!”
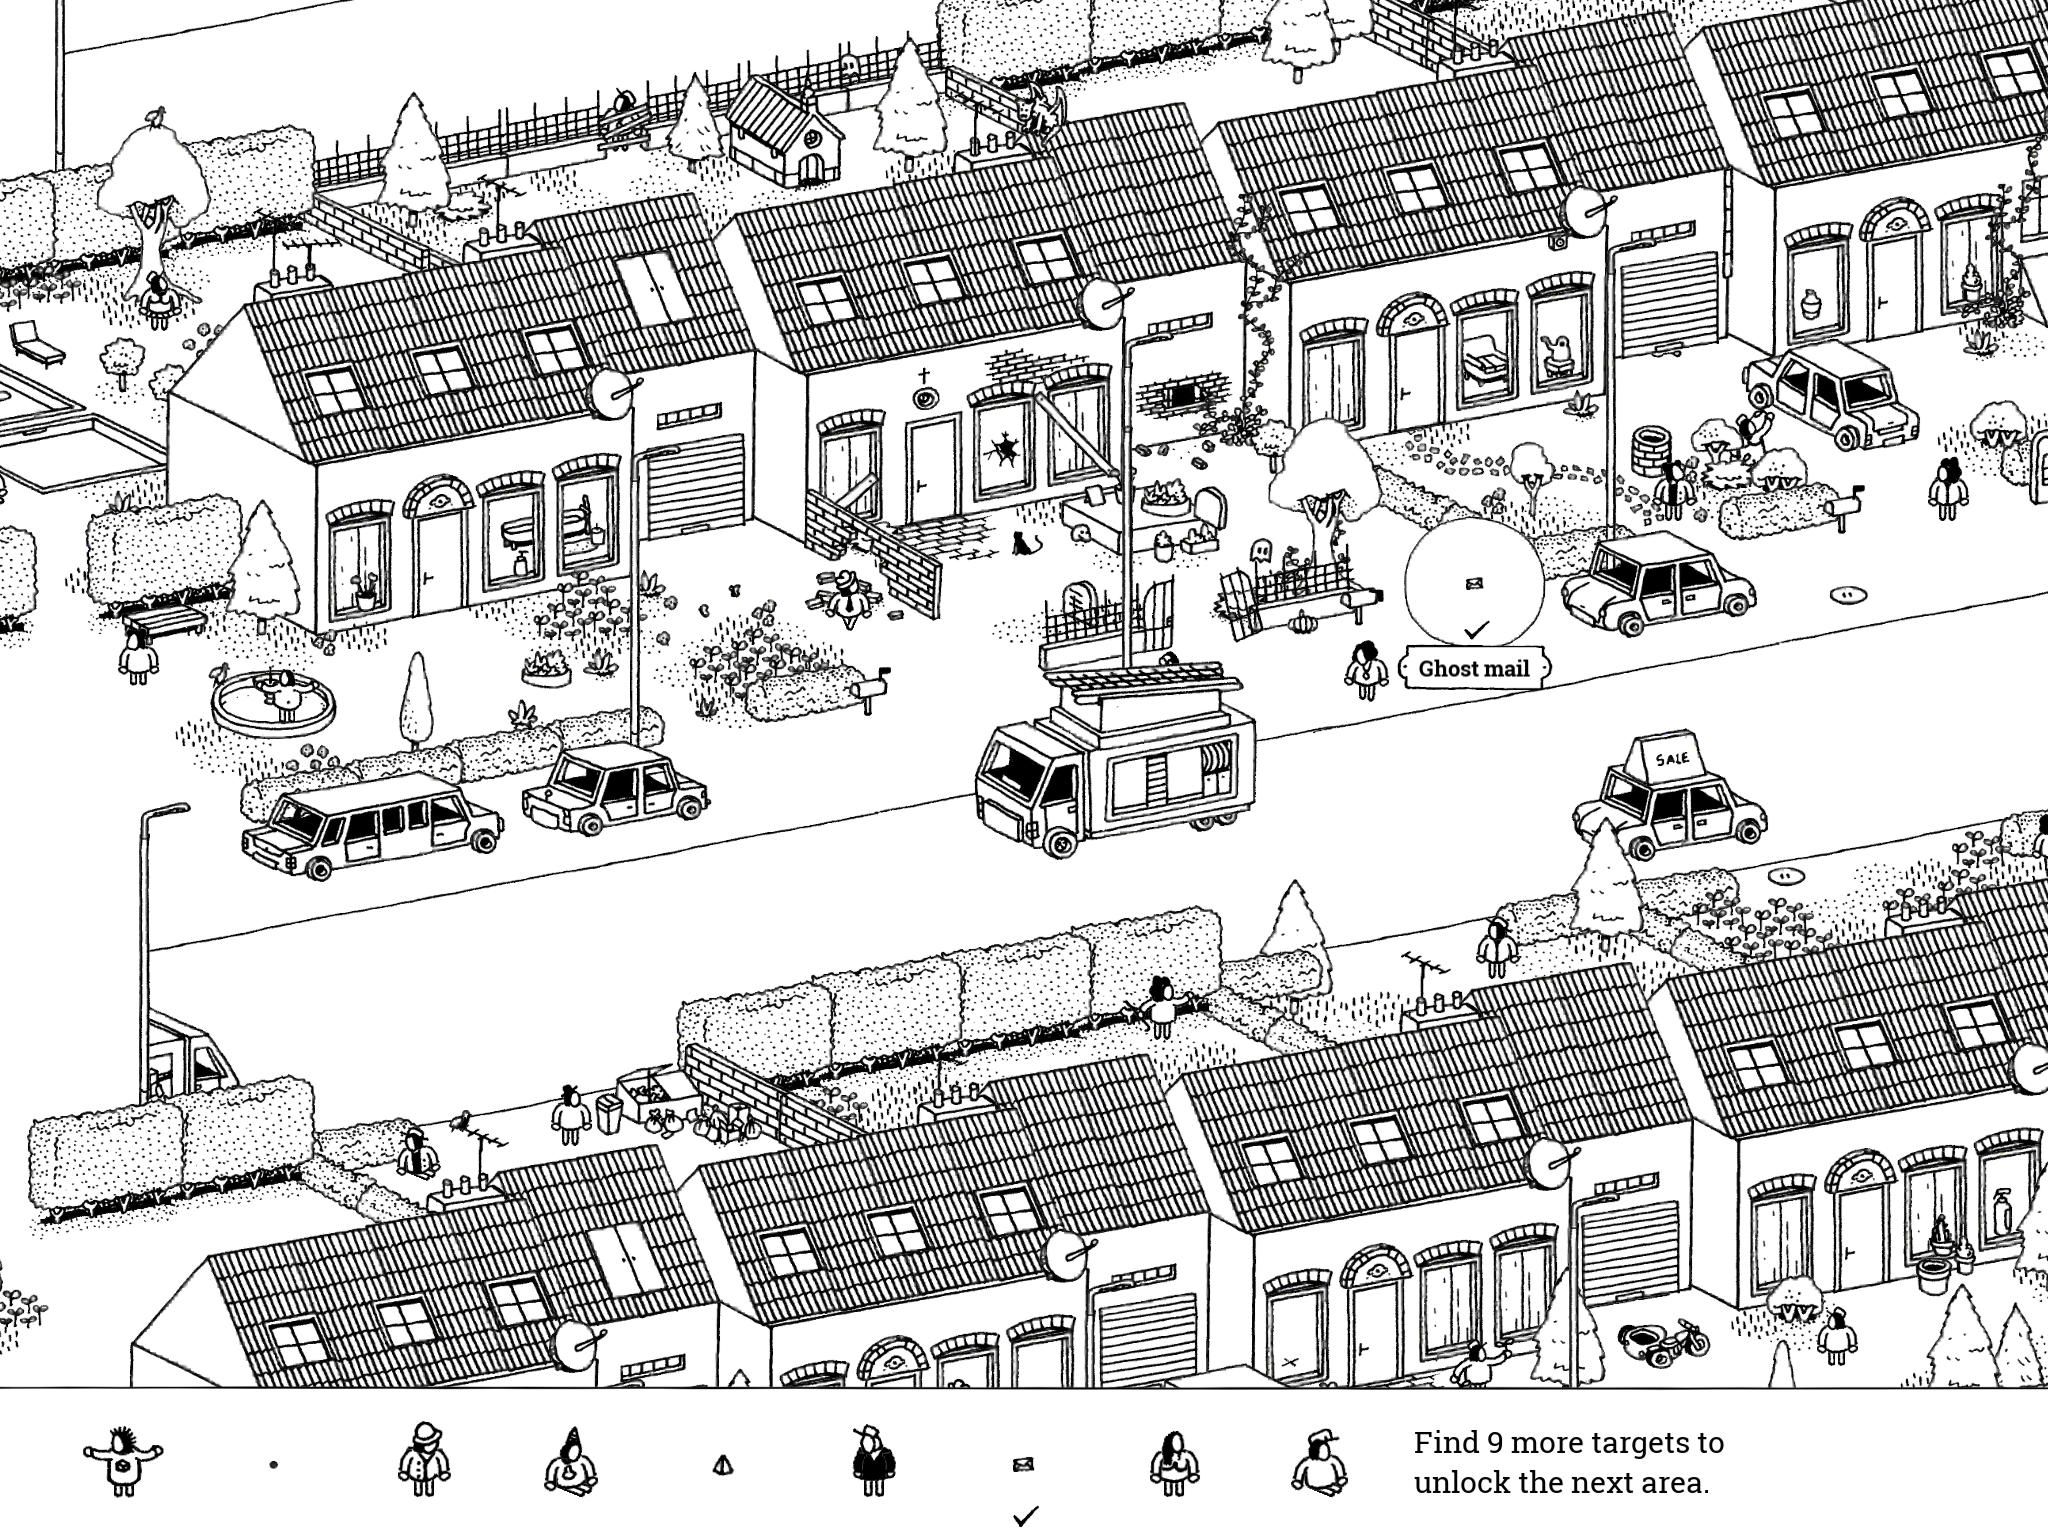
- Ghost Mail: “Some say that opening ghost mail will curse you for 1,000 years.”
The ghost house is #2 on street #3. It has a broken window and a black cat sitting in the front yard, with a ghost floating near the tree. Tap its mailbox (in front of the tree) and a letter flies out, landing near the shrubs of house #4. Tap the letter to collect Ghost Mail.
- Ghost Mail: “Some say that opening ghost mail will curse you for 1,000 years.”
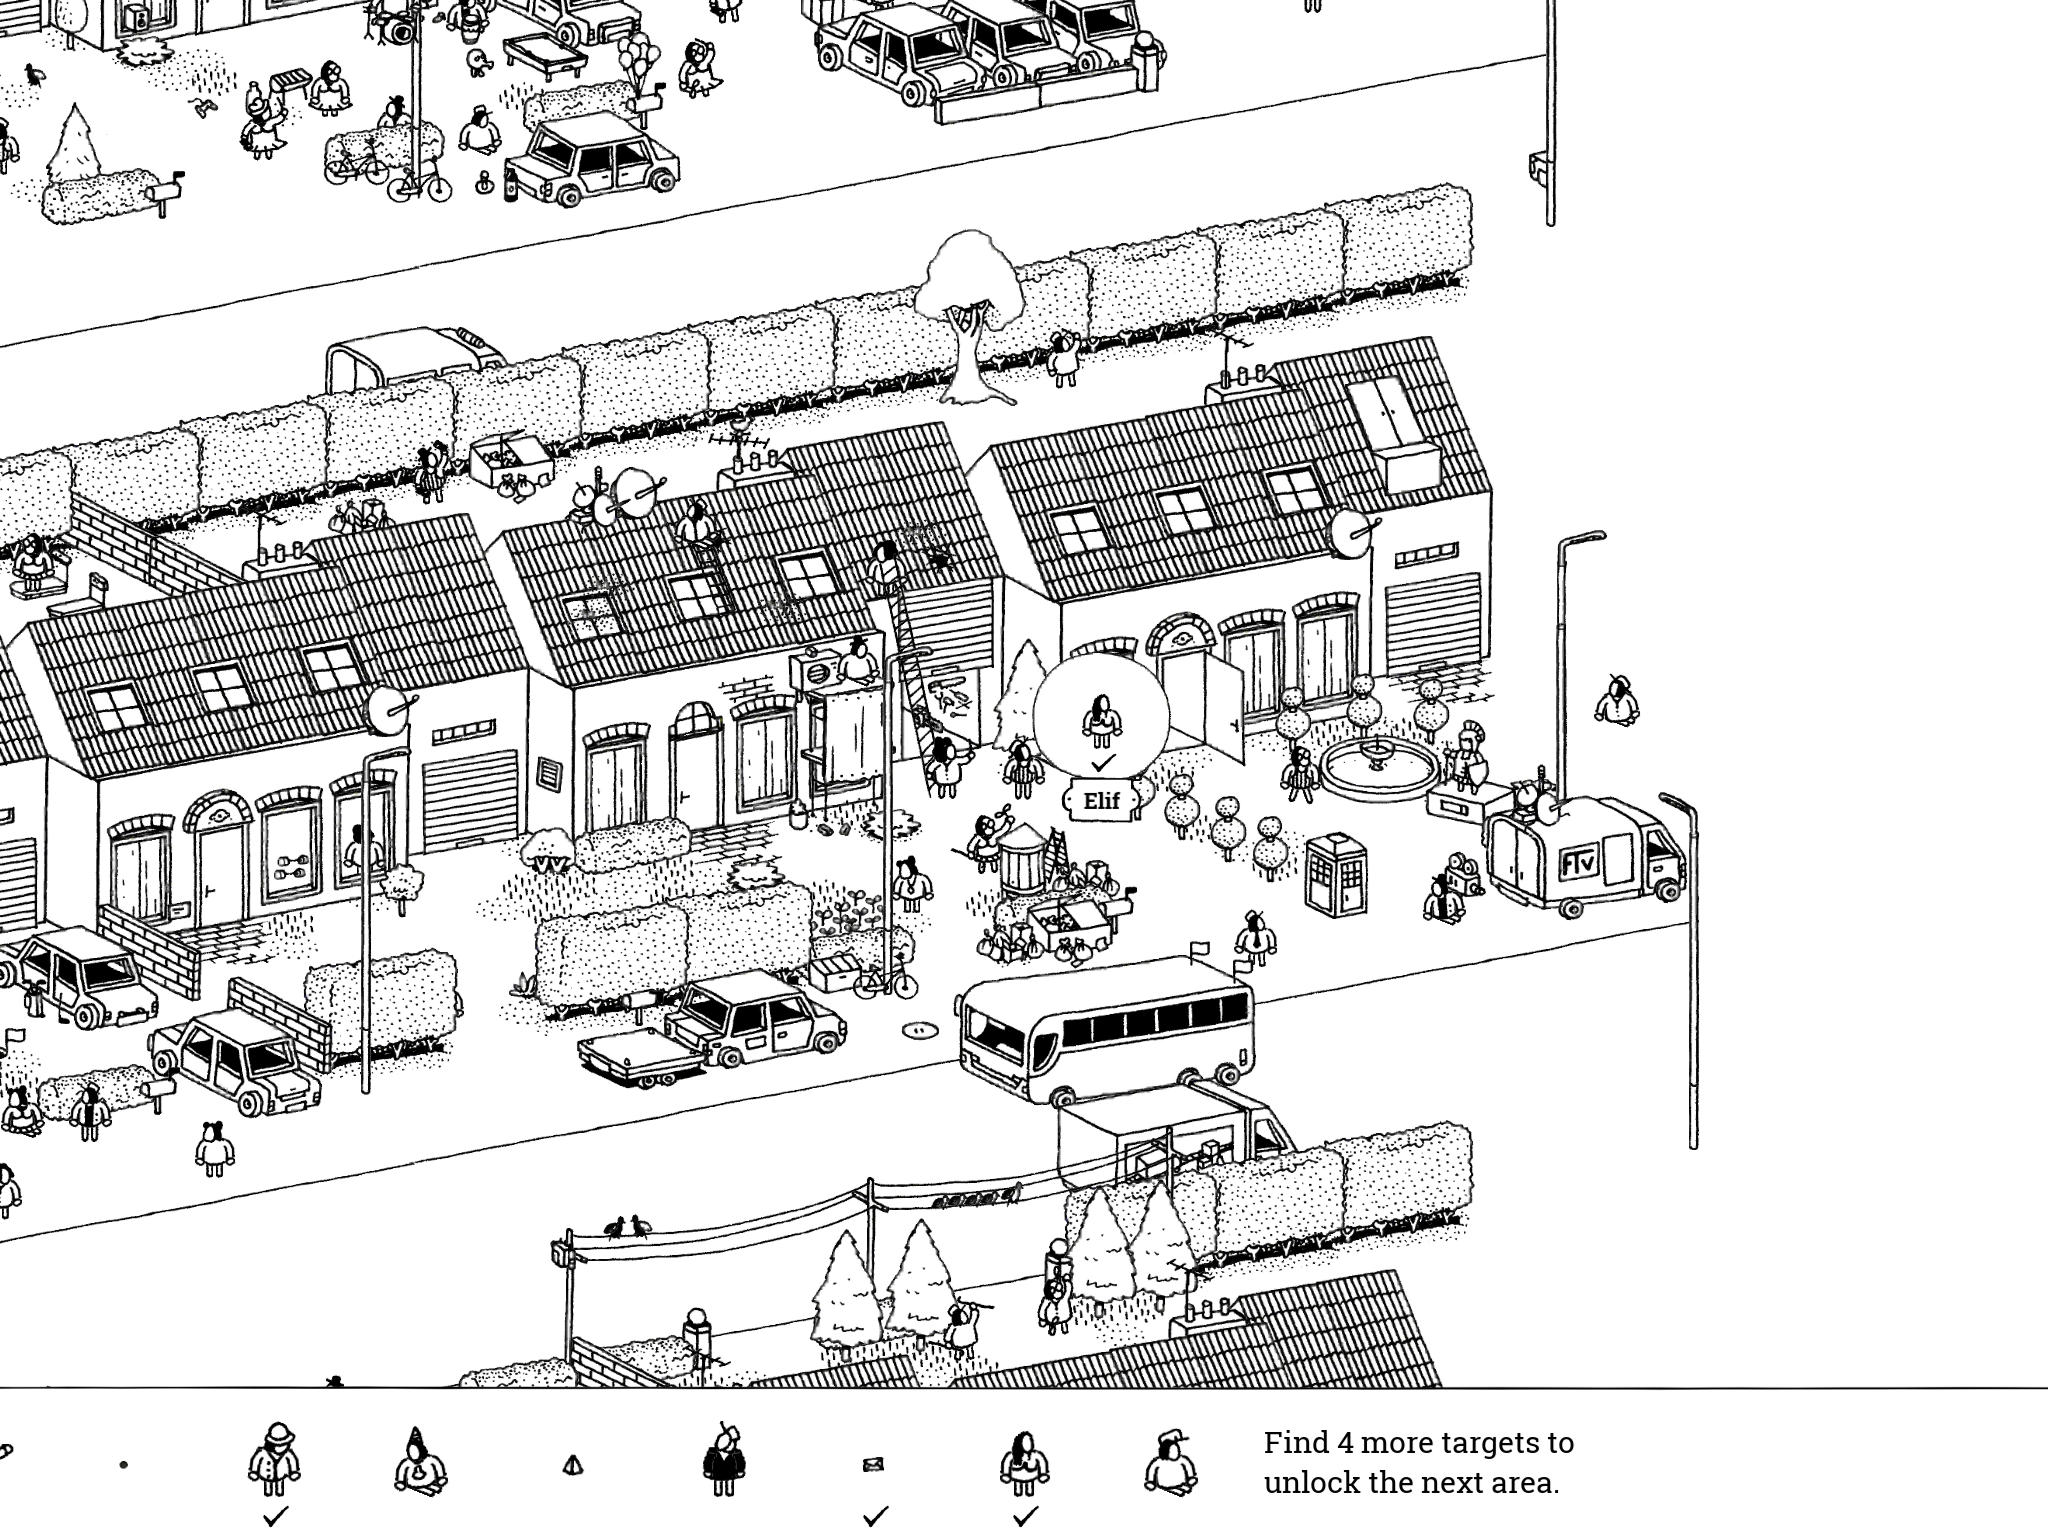
- Elif: “Elif can’t stand that her husband keeps the garden so clean!”
Elif lives in house #10 on street #3. Her front yard is pristinely manicured, with a fountain, rows of shrubbery, a knight statue, and a TV crew filming the decadence. Tap the leftmost curtain of Elif’s house two times to reveal her standing at the window, fuming.
- Elif: “Elif can’t stand that her husband keeps the garden so clean!”
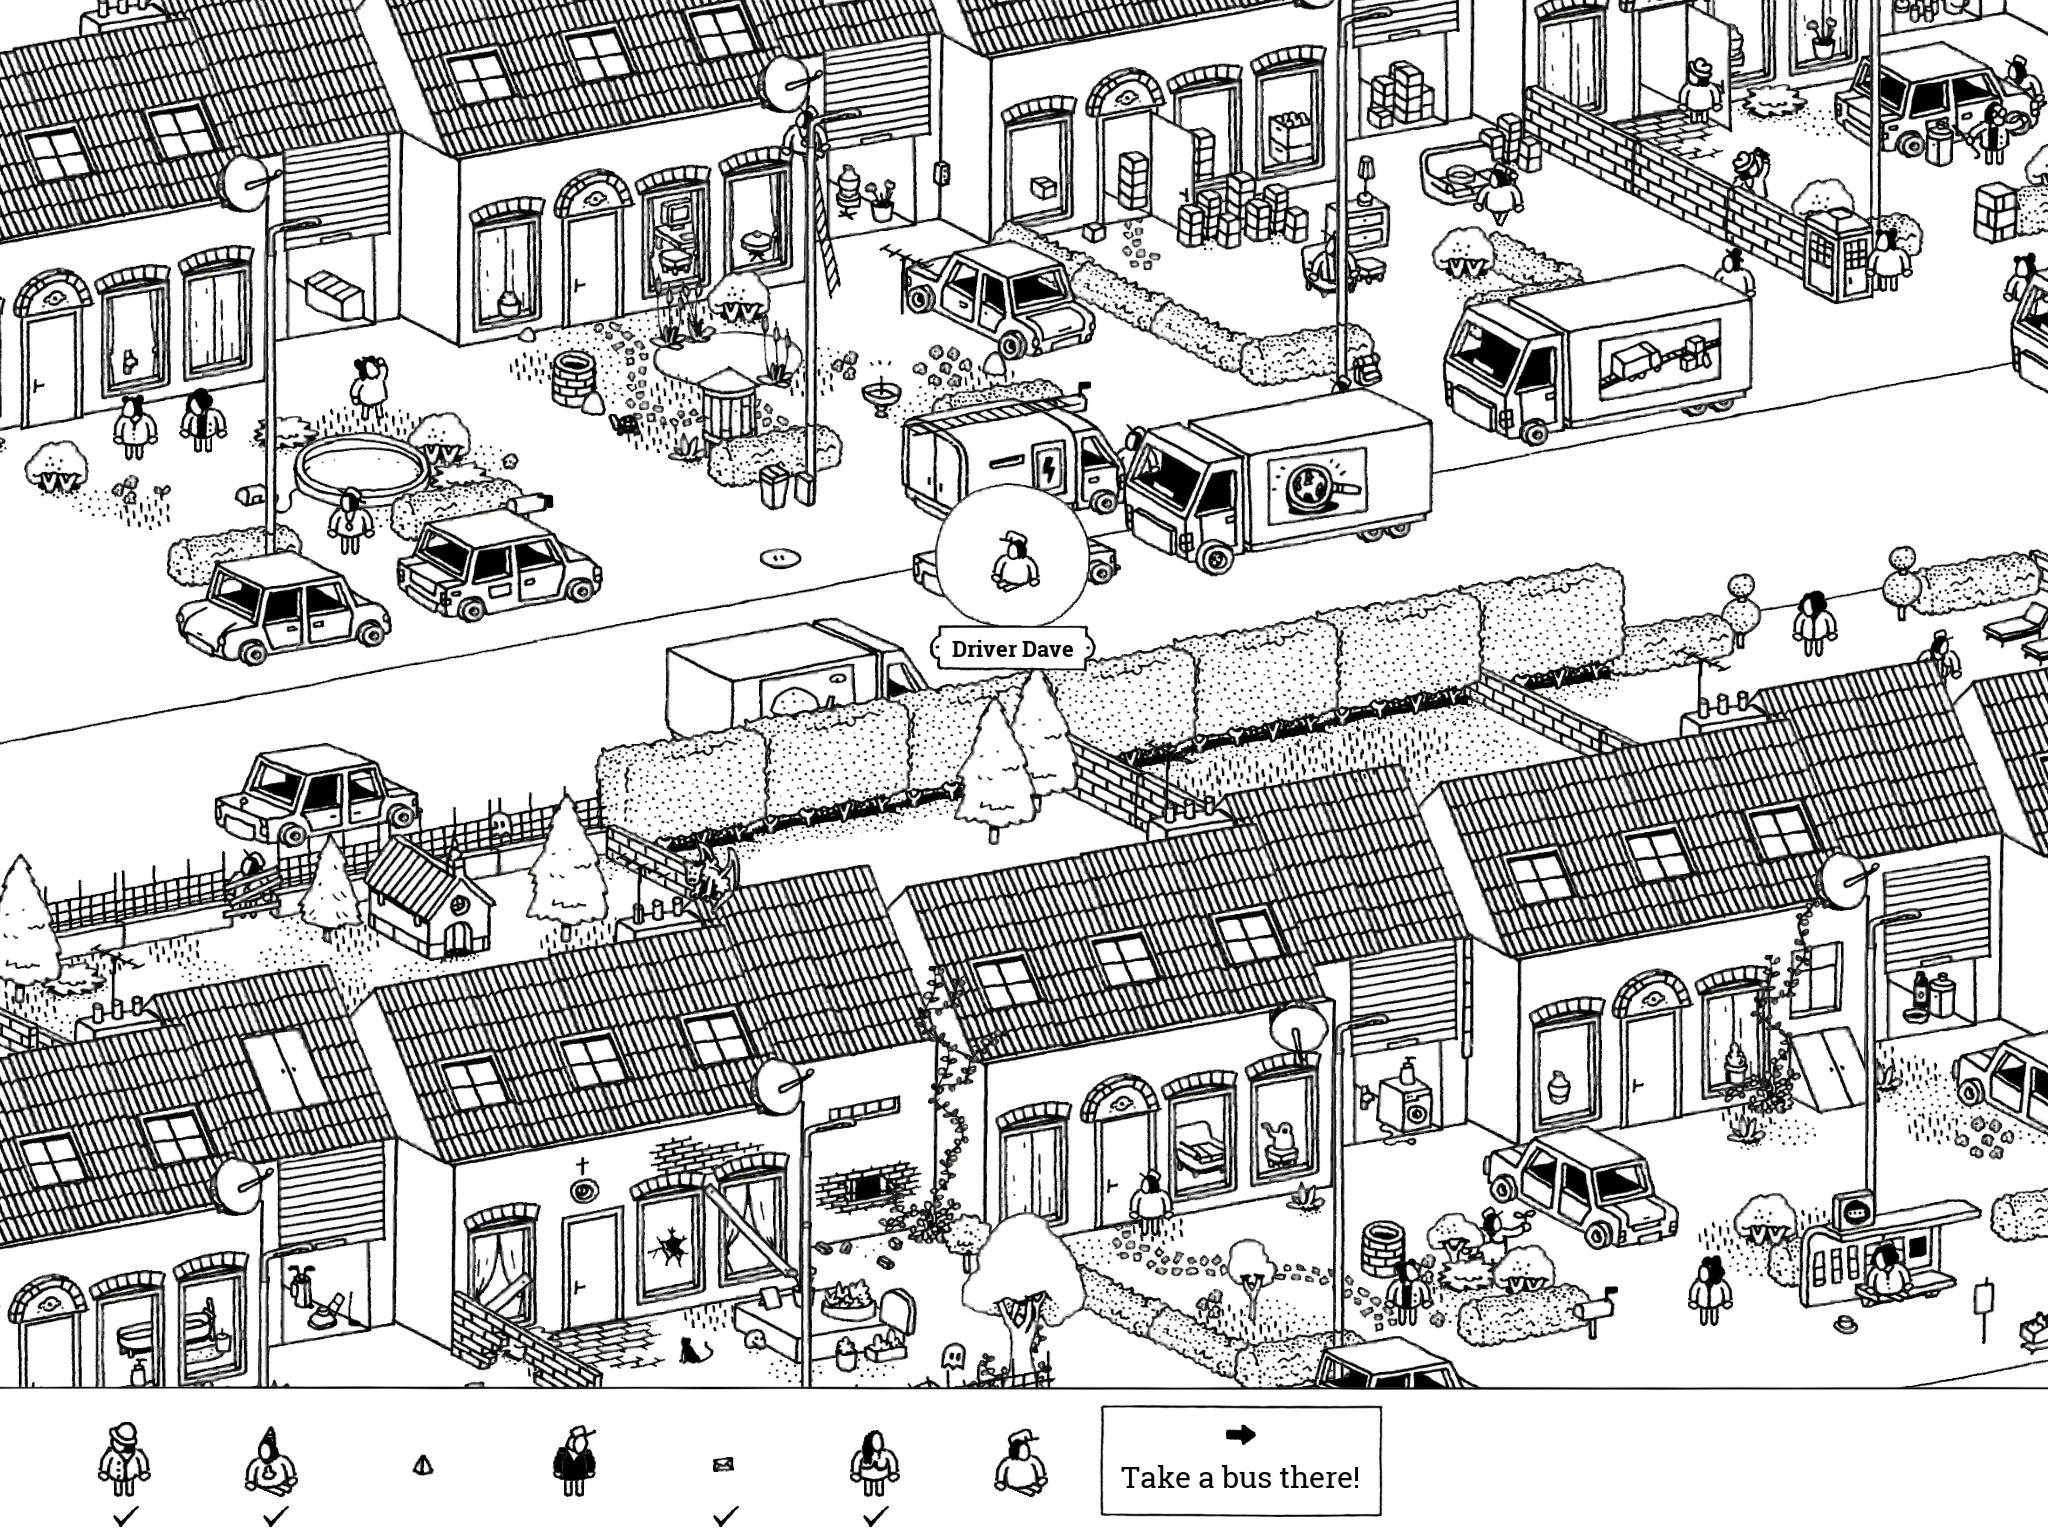
- Driver Dave: “Driver Dave is being tailgated by some crazy truck driver. Beep beep beep!”
Dave is driving on street #2, heading west. He’s in a normal small car; there is a truck with a magnifying glass logo on its side driving directly behind him with barely any space in between. Tap Driver Dave as he goes past to collect him.
- Driver Dave: “Driver Dave is being tailgated by some crazy truck driver. Beep beep beep!”
City 3: The Bus Station
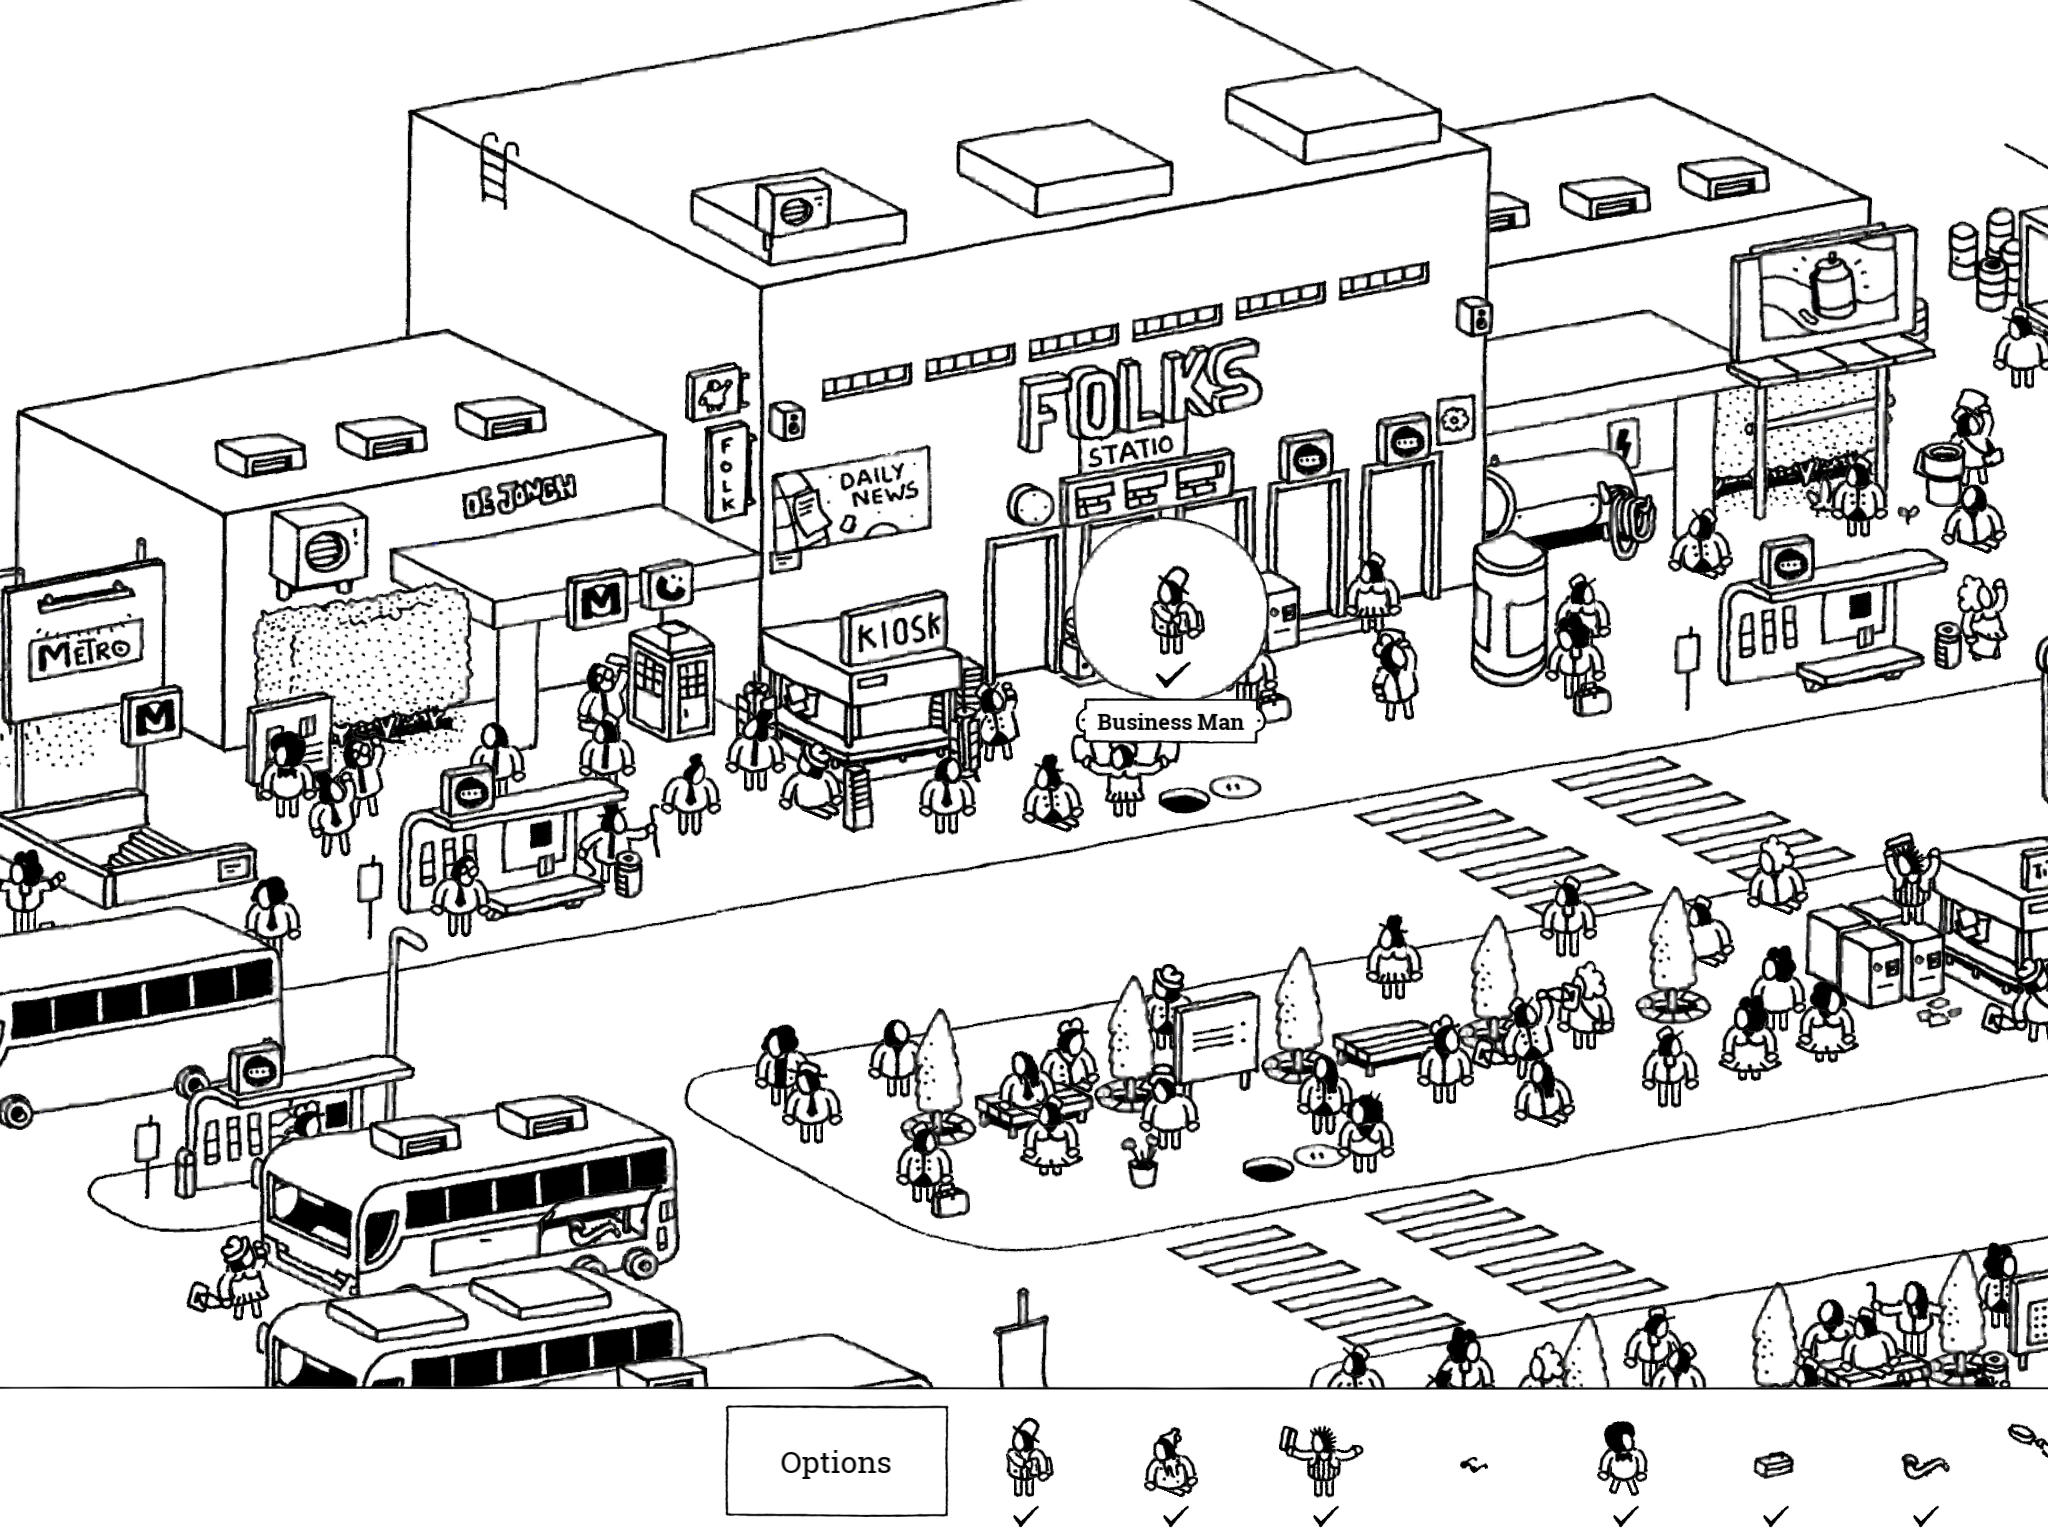
- Business Man: “A real business man stays up to date, folks!”
The Business Man is standing right at the front entrance to the Folks Station, just right of the newspaper kiosk, on the north side of the image.
- Business Man: “A real business man stays up to date, folks!”
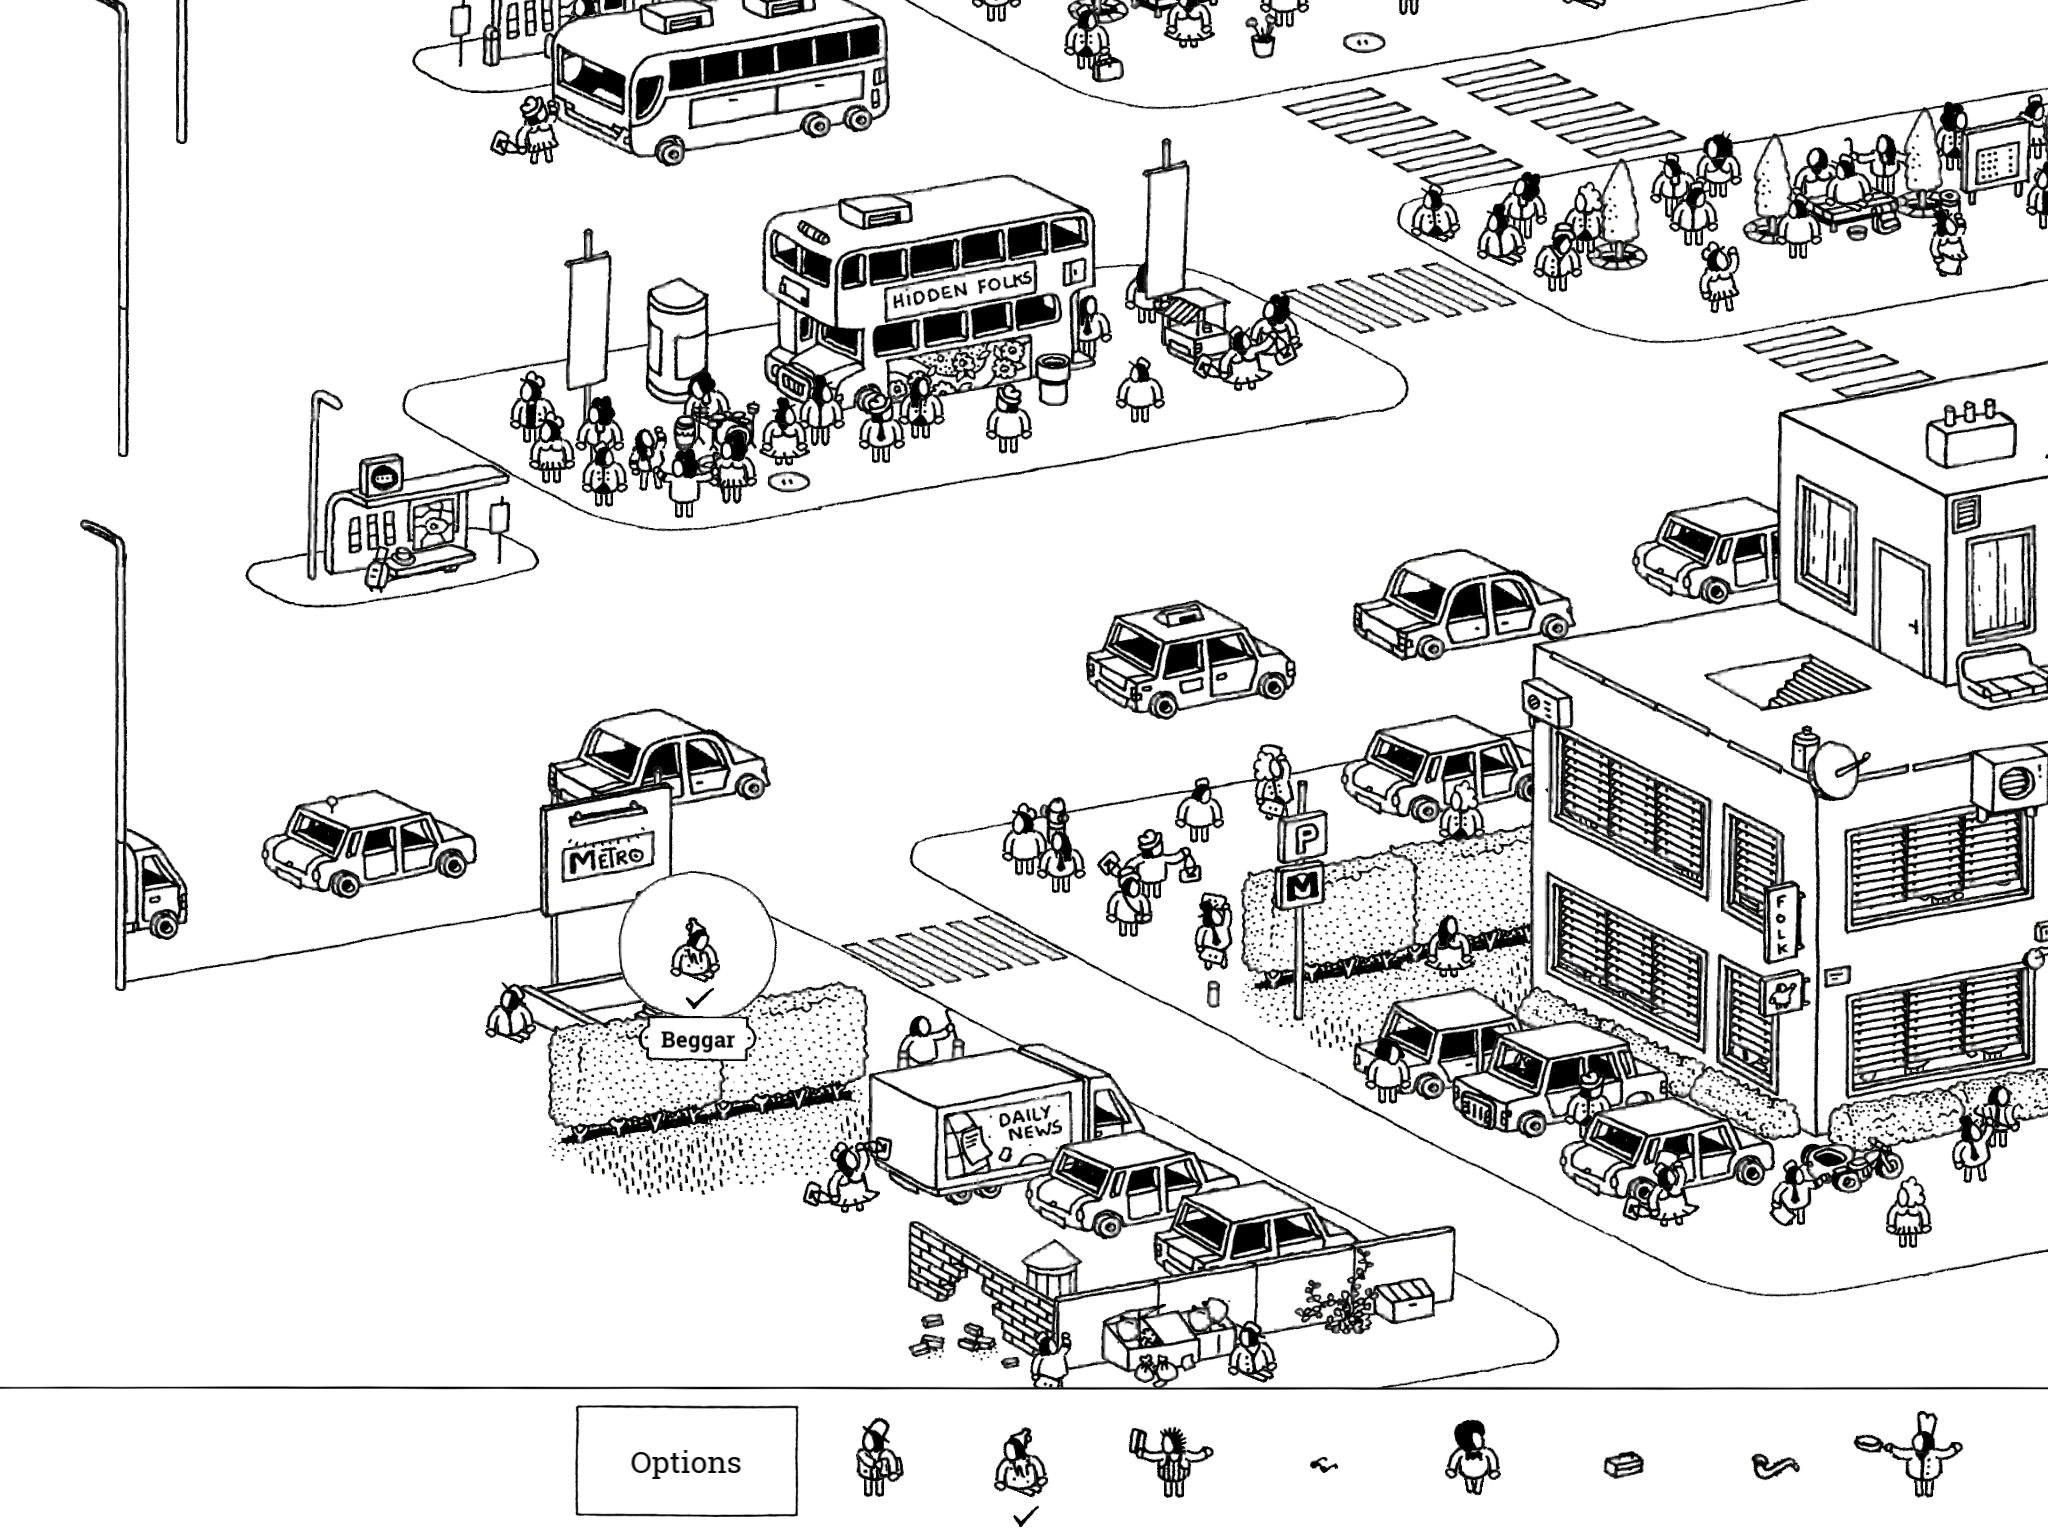
- Beggar: “It’s a bad day for this beggar; people have stopped using her metro entrance.”
The Beggar is sitting right next to the metro sign on the southwest side of the image with a bowl and placard in front of her.
- Beggar: “It’s a bad day for this beggar; people have stopped using her metro entrance.”
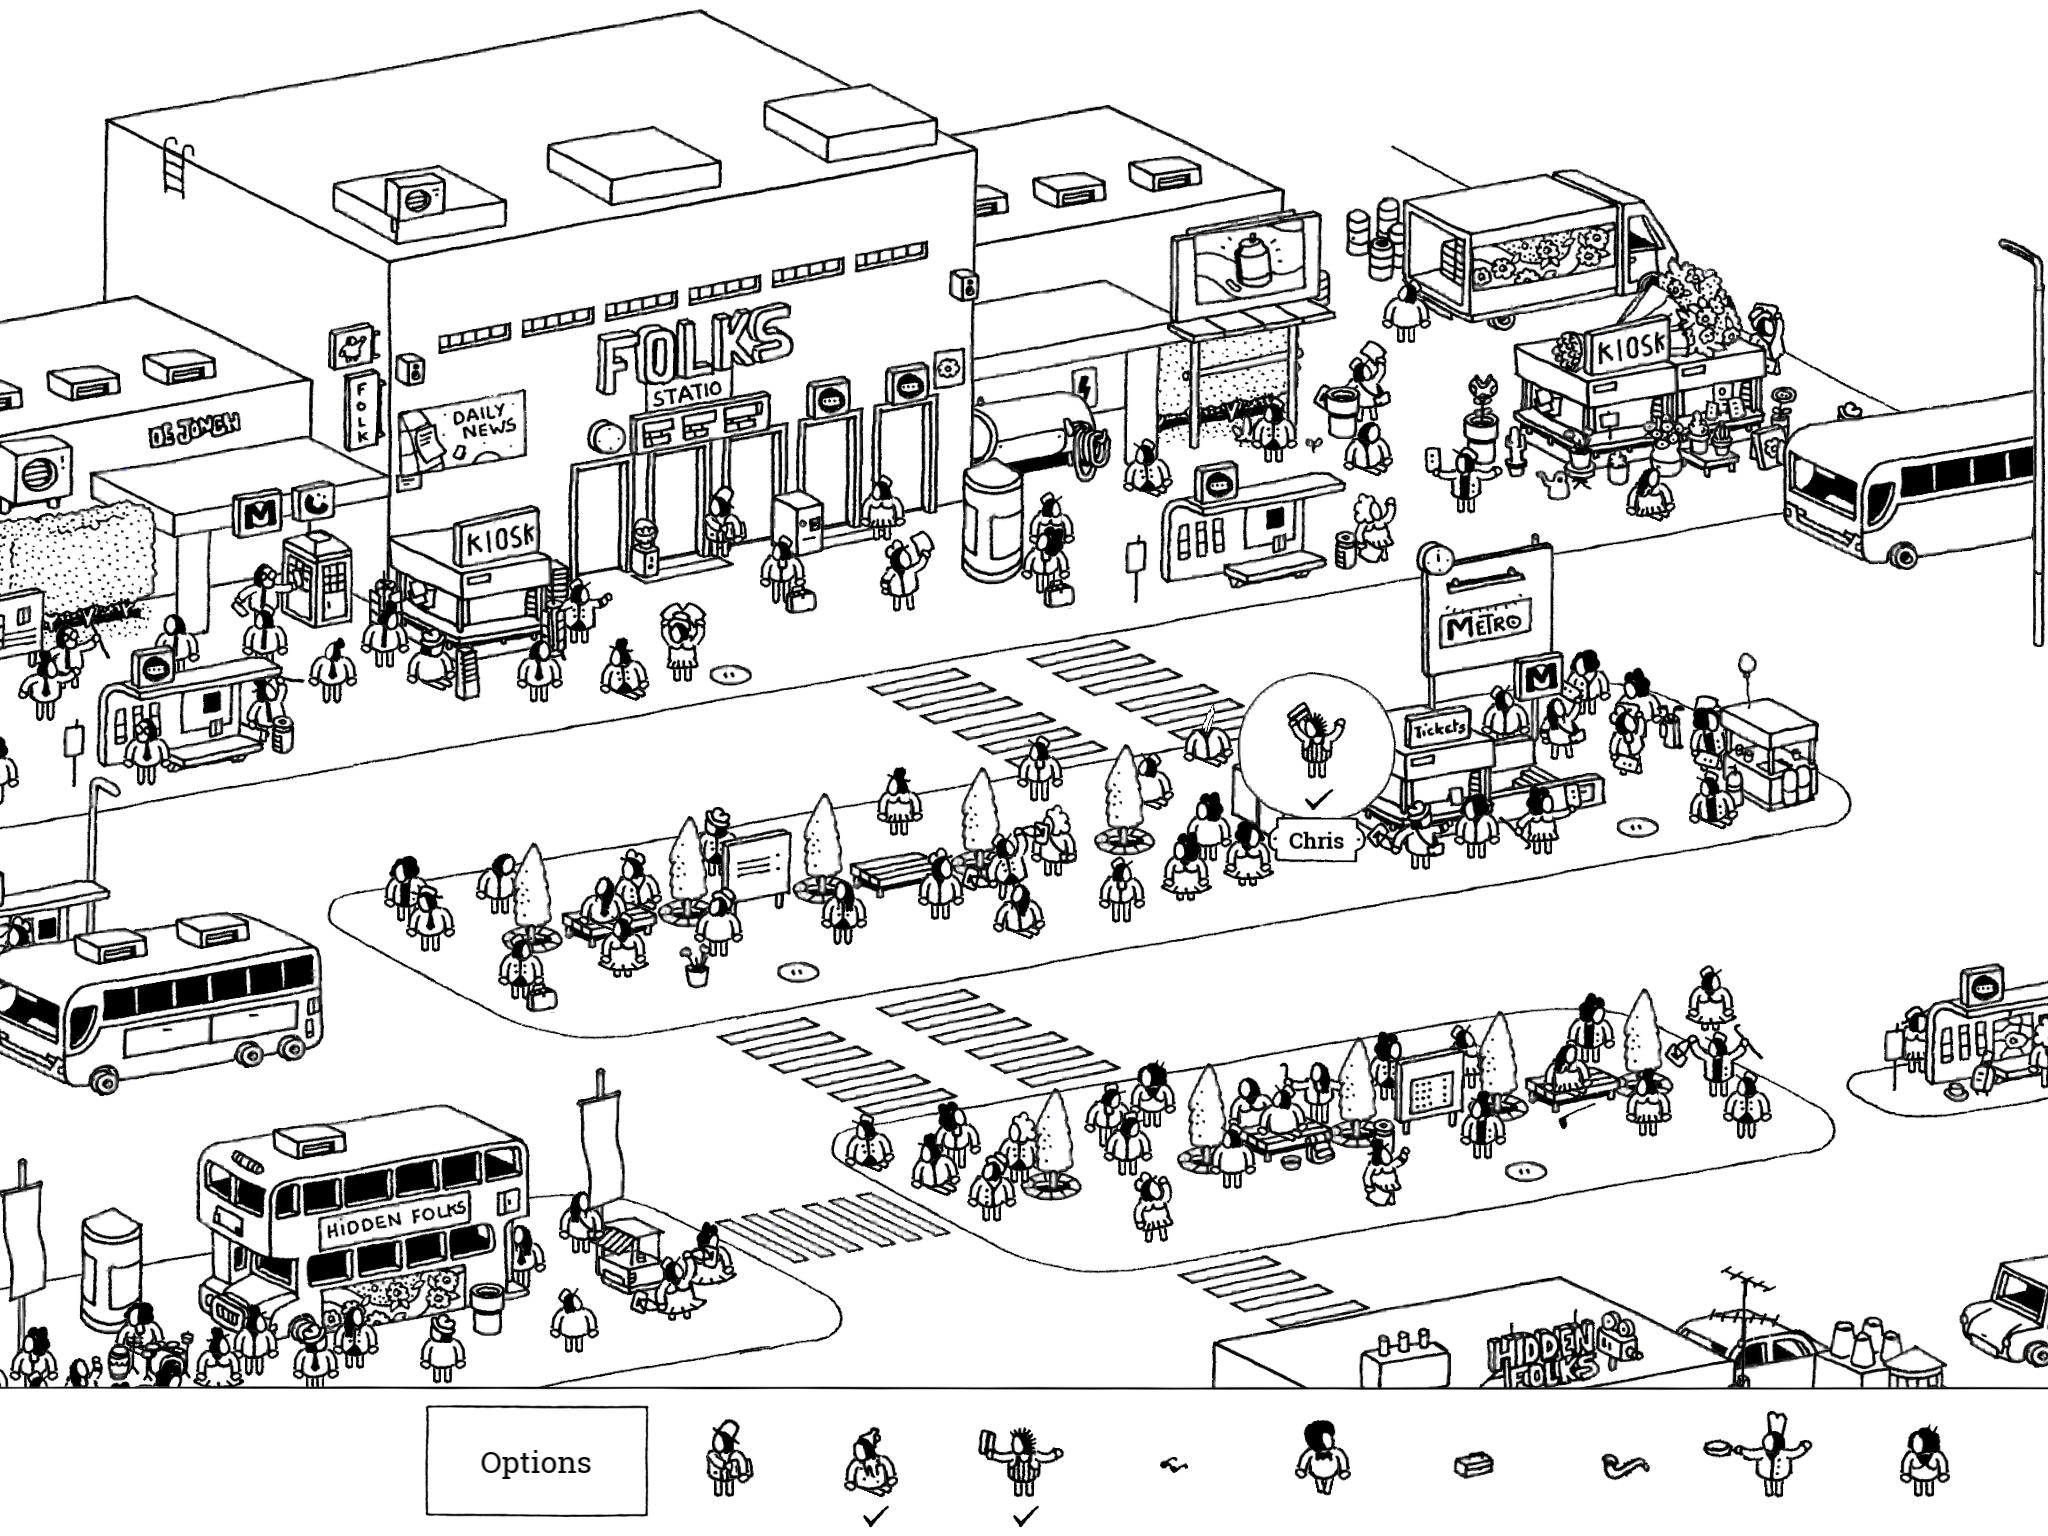
- Chris: “Chris is REALLY angry at this machine.”
Chris is jumping on the ticket machine on the platform south of the Folks Station. There’s a metro sign with a clock on it just east of him.
- Chris: “Chris is REALLY angry at this machine.”
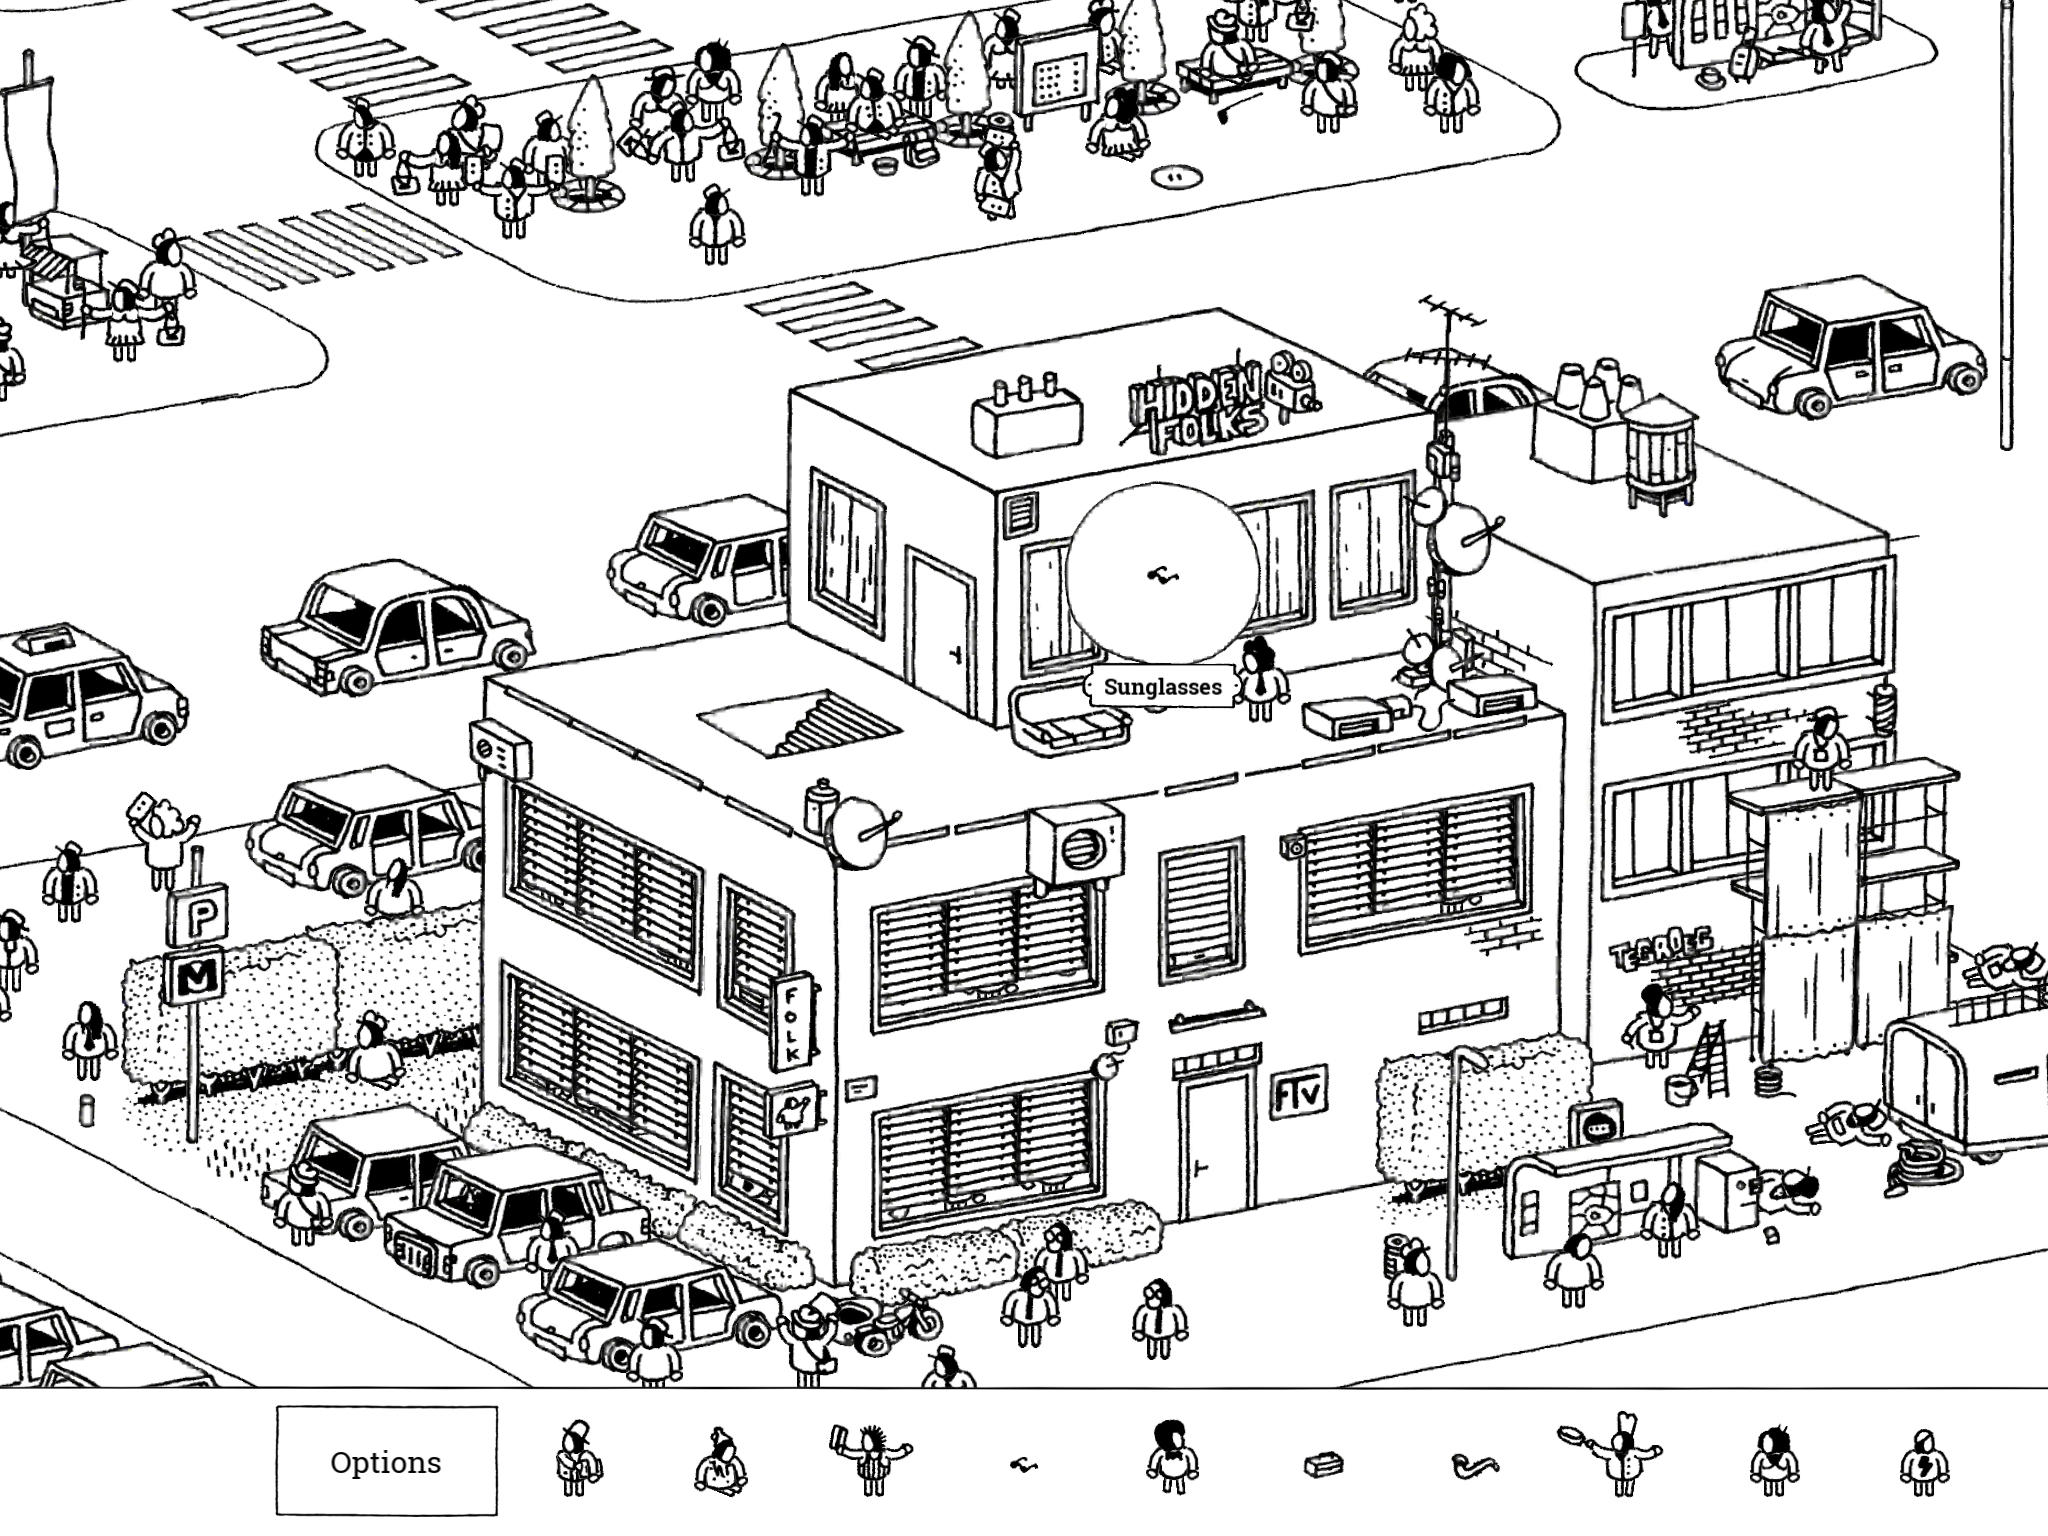
- Sunglasses: “Don’t be afraid to be famous on TV; they always have an extra pair of sunglasses for you.”
There’s a large TV station in the southeast side of the image. On the top floor of the station is a series of curtained windows, with four facing the same direction. Tap the second from the left set of curtains in this set of four; the Sunglasses are on a table behind this window. There is a man wandering around inside who may be blocking the Sunglasses at first; just wait for him to walk away.
- Sunglasses: “Don’t be afraid to be famous on TV; they always have an extra pair of sunglasses for you.”
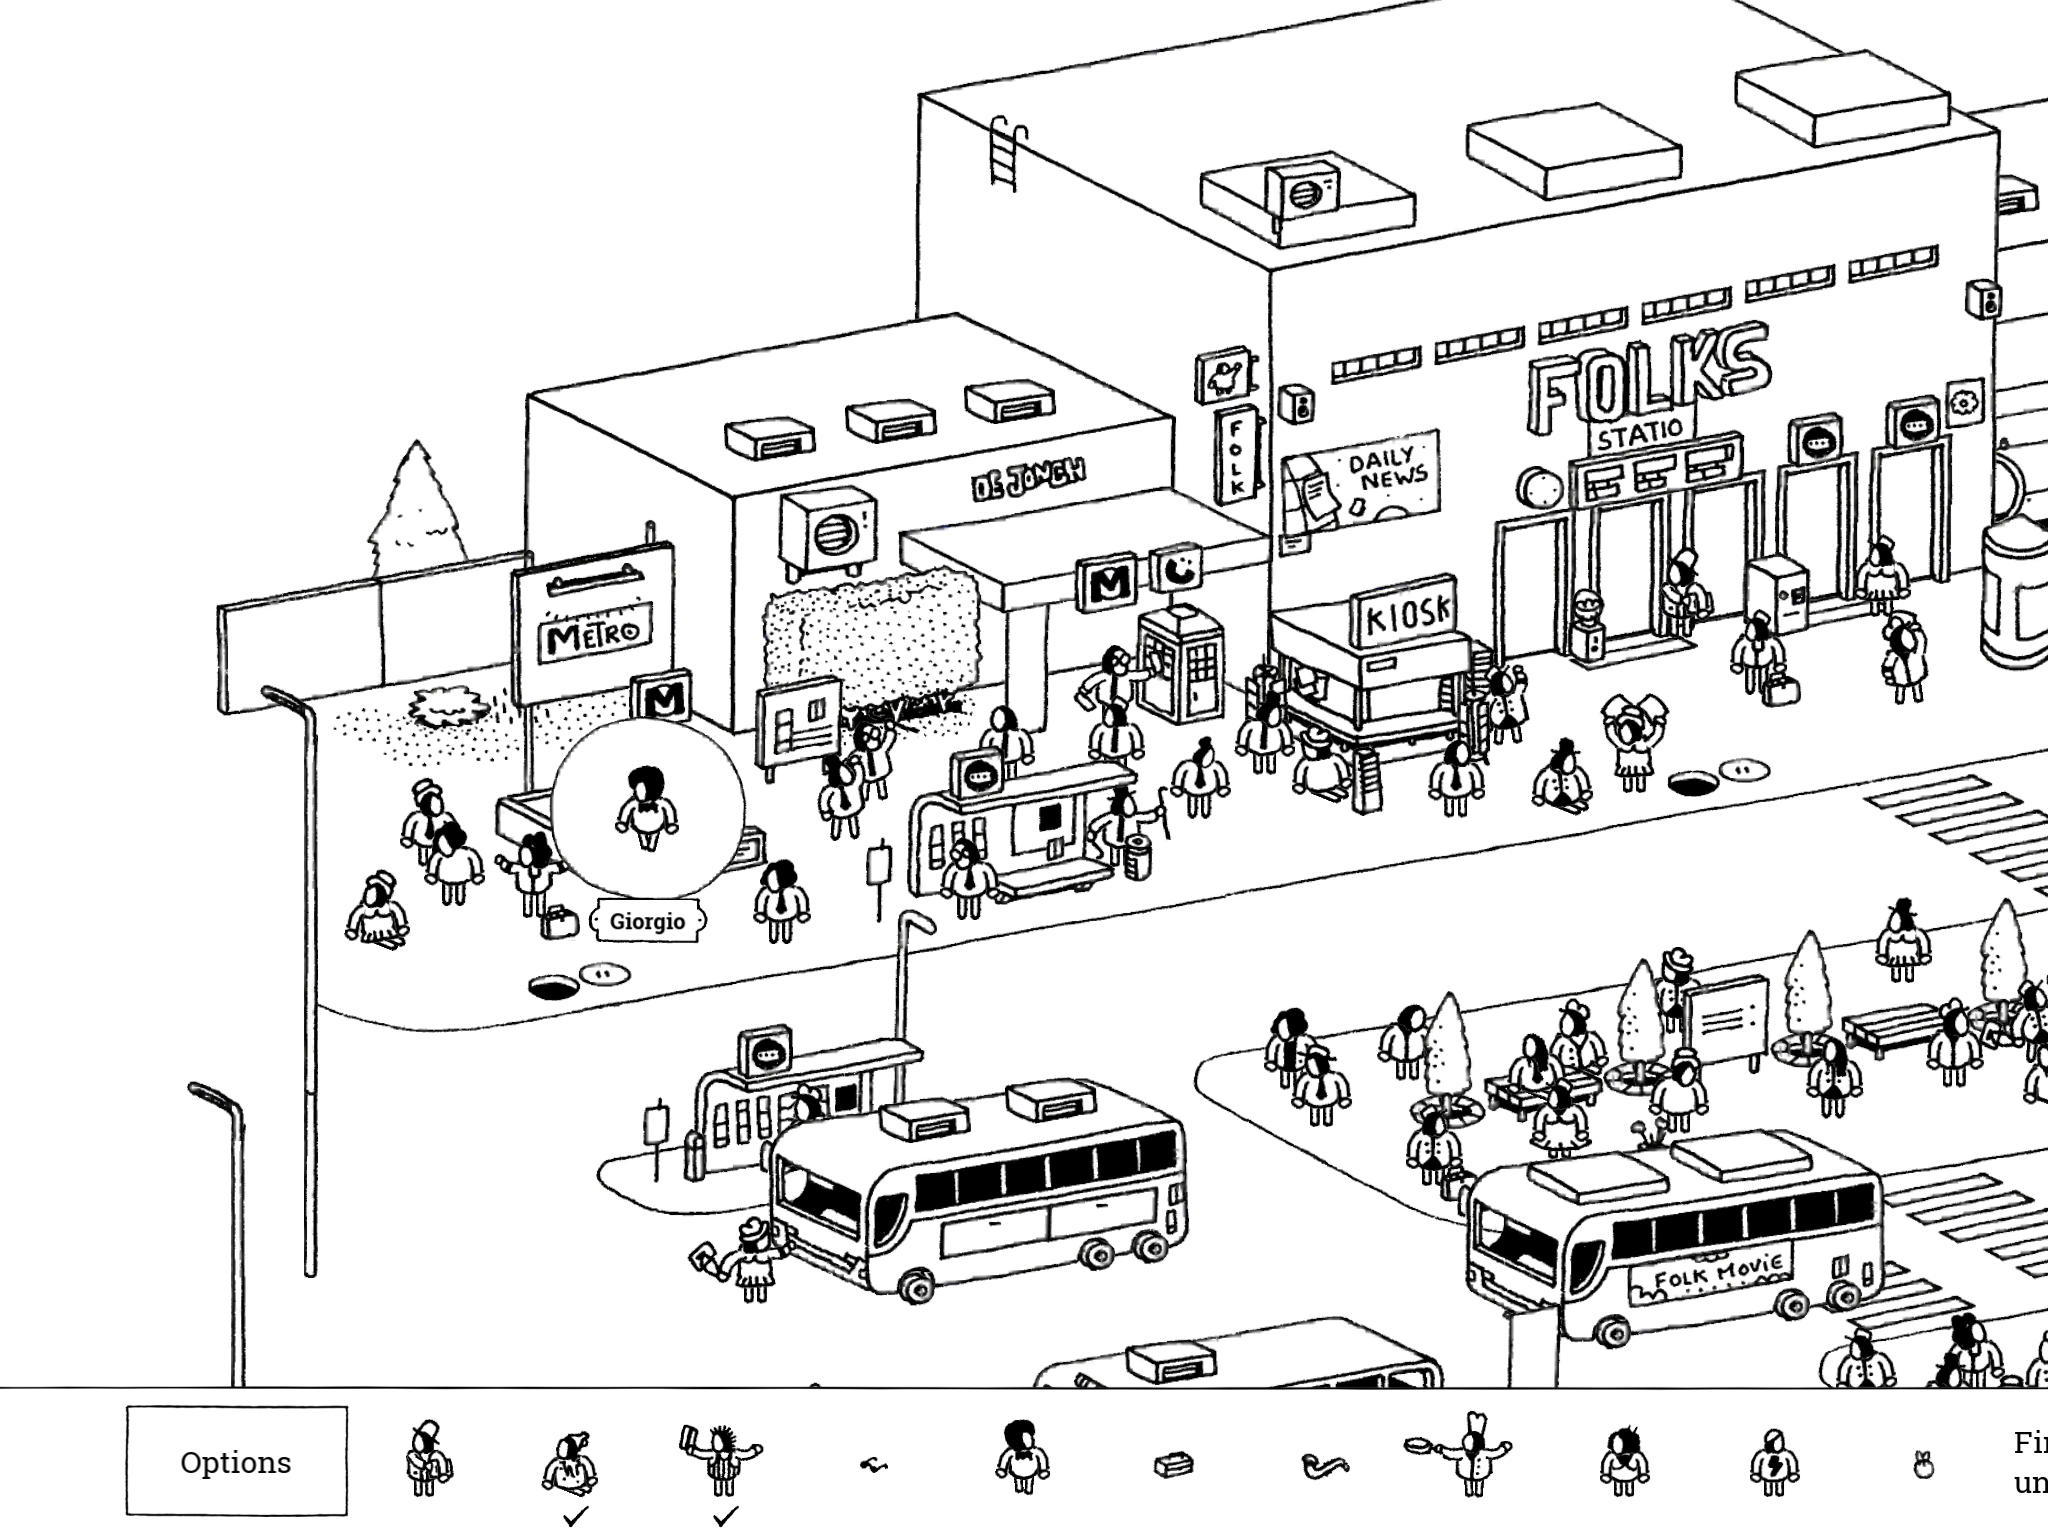
- Giorgio: “Giorgio is leaving. No he isn’t. Yes he is. No he isn’t. Yes he is. No he isn’t.”
In the northwest part of the image, west of the Folks Station, is a set of stairs leading to a metro. Giorgio keeps walking up and down these stairs. If you don’t see him at first, just wait; he’ll walk by at some point.
- Giorgio: “Giorgio is leaving. No he isn’t. Yes he is. No he isn’t. Yes he is. No he isn’t.”
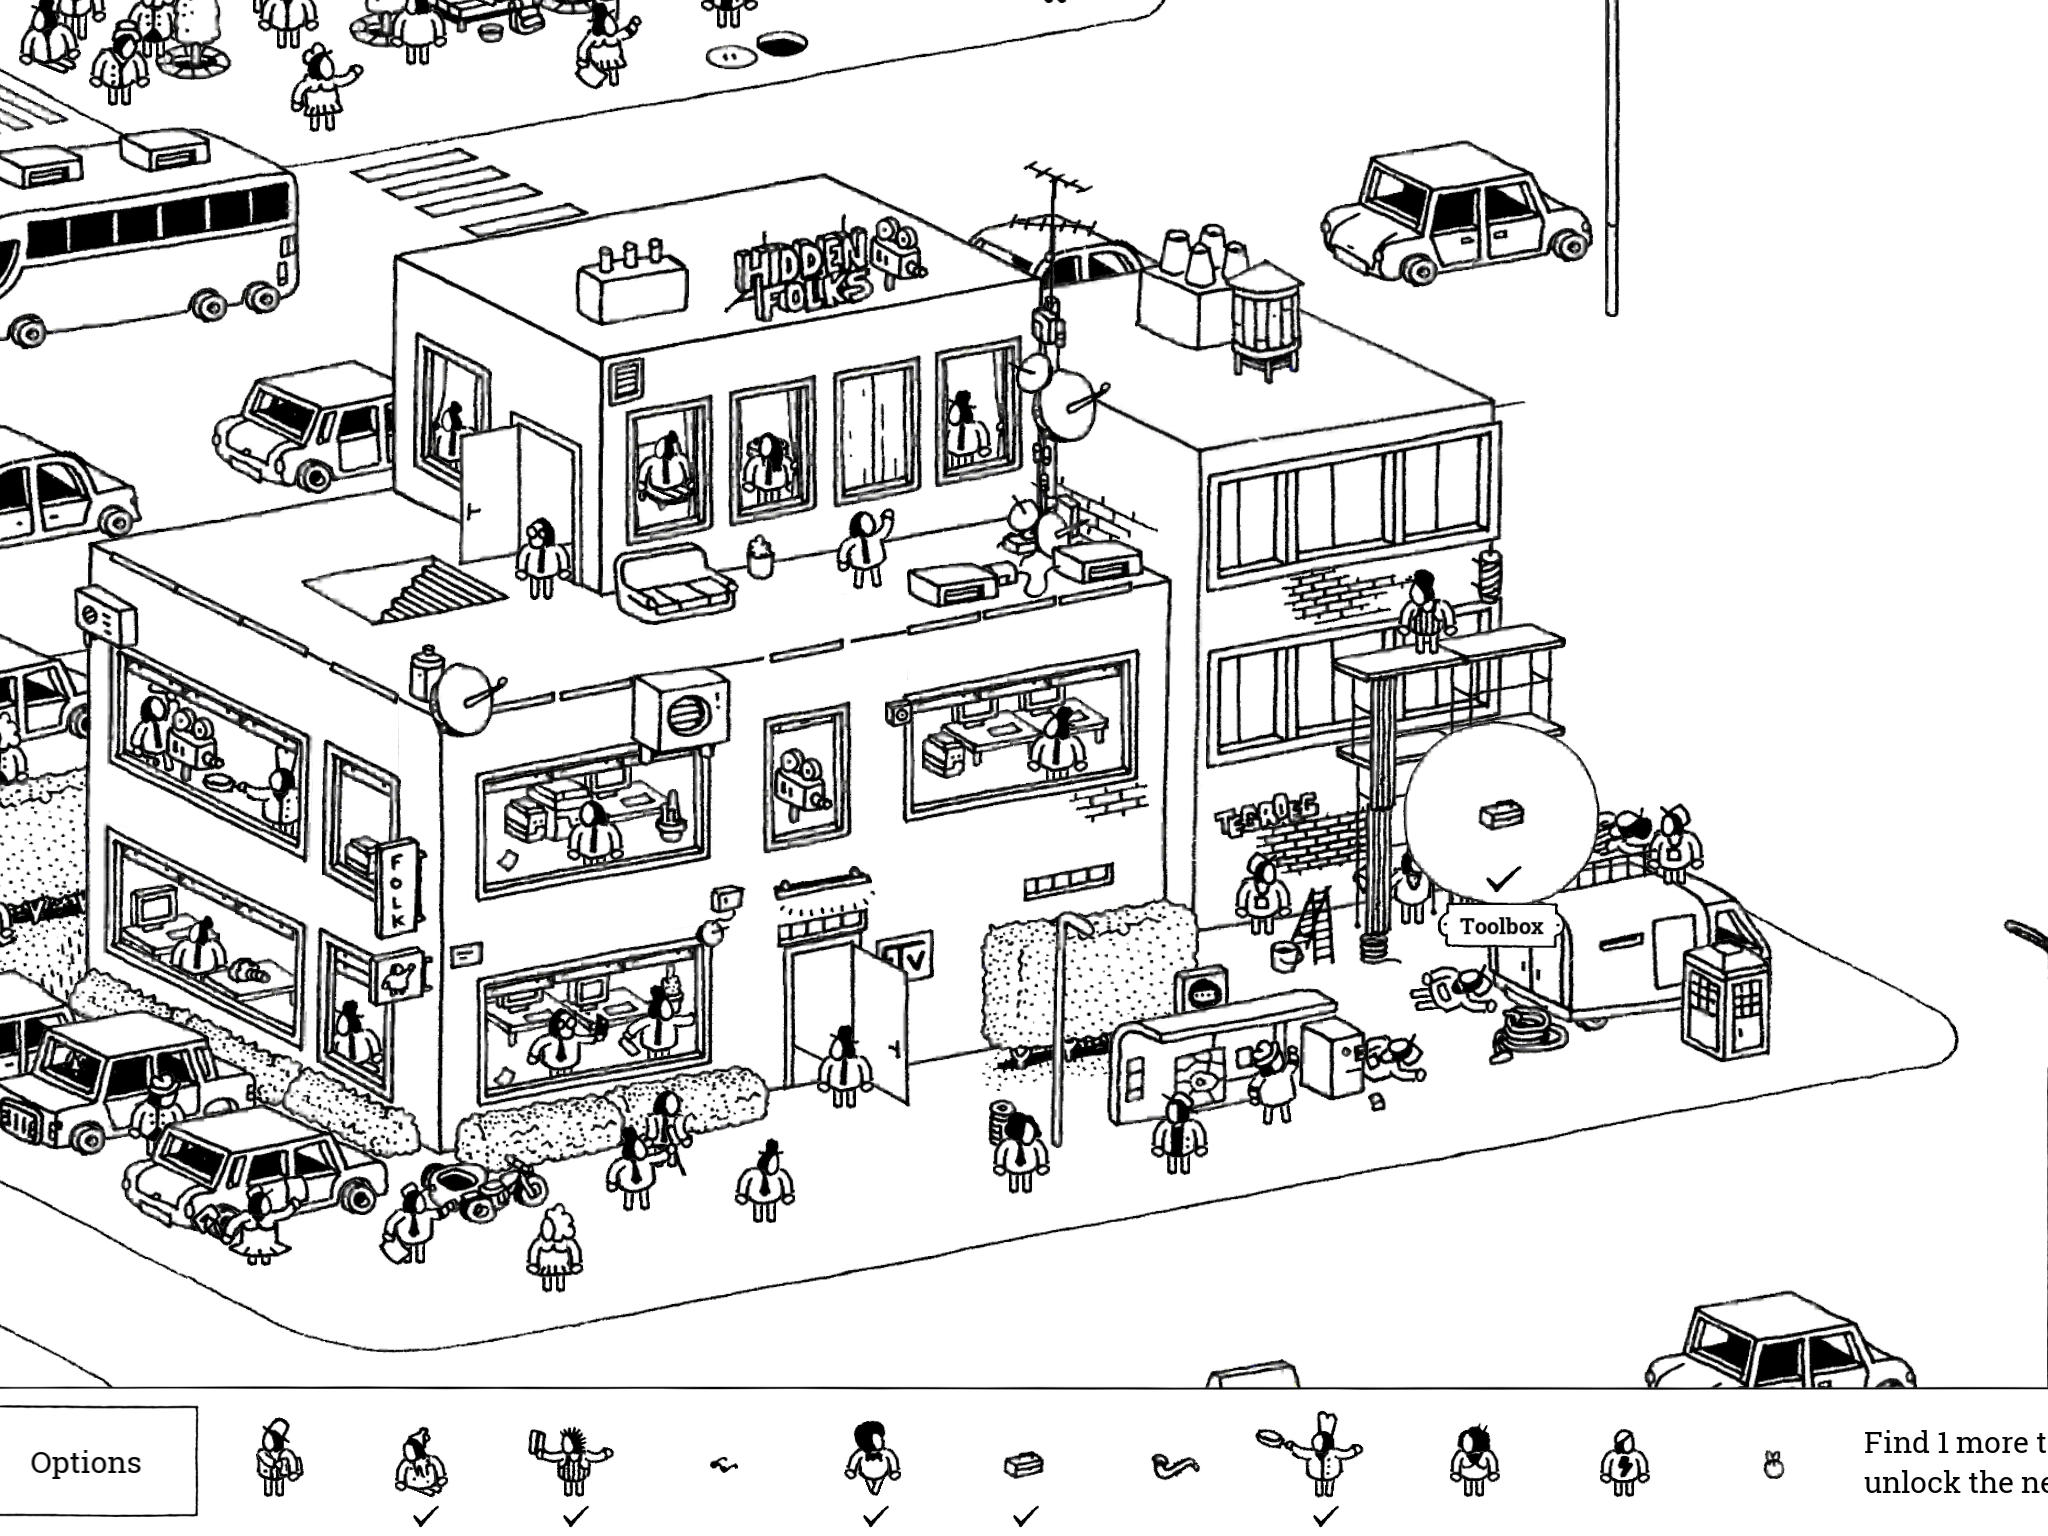
- Toolbox: “This toolbox is so heavy the builders couldn’t carry it up any further.”
In the southeast corner, where the TV station is (and in the southeast corner of the station itself), there are some curtained platforms where builders are working. Tap the bottom-right curtain to open it and reveal the Toolbox.
- Toolbox: “This toolbox is so heavy the builders couldn’t carry it up any further.”
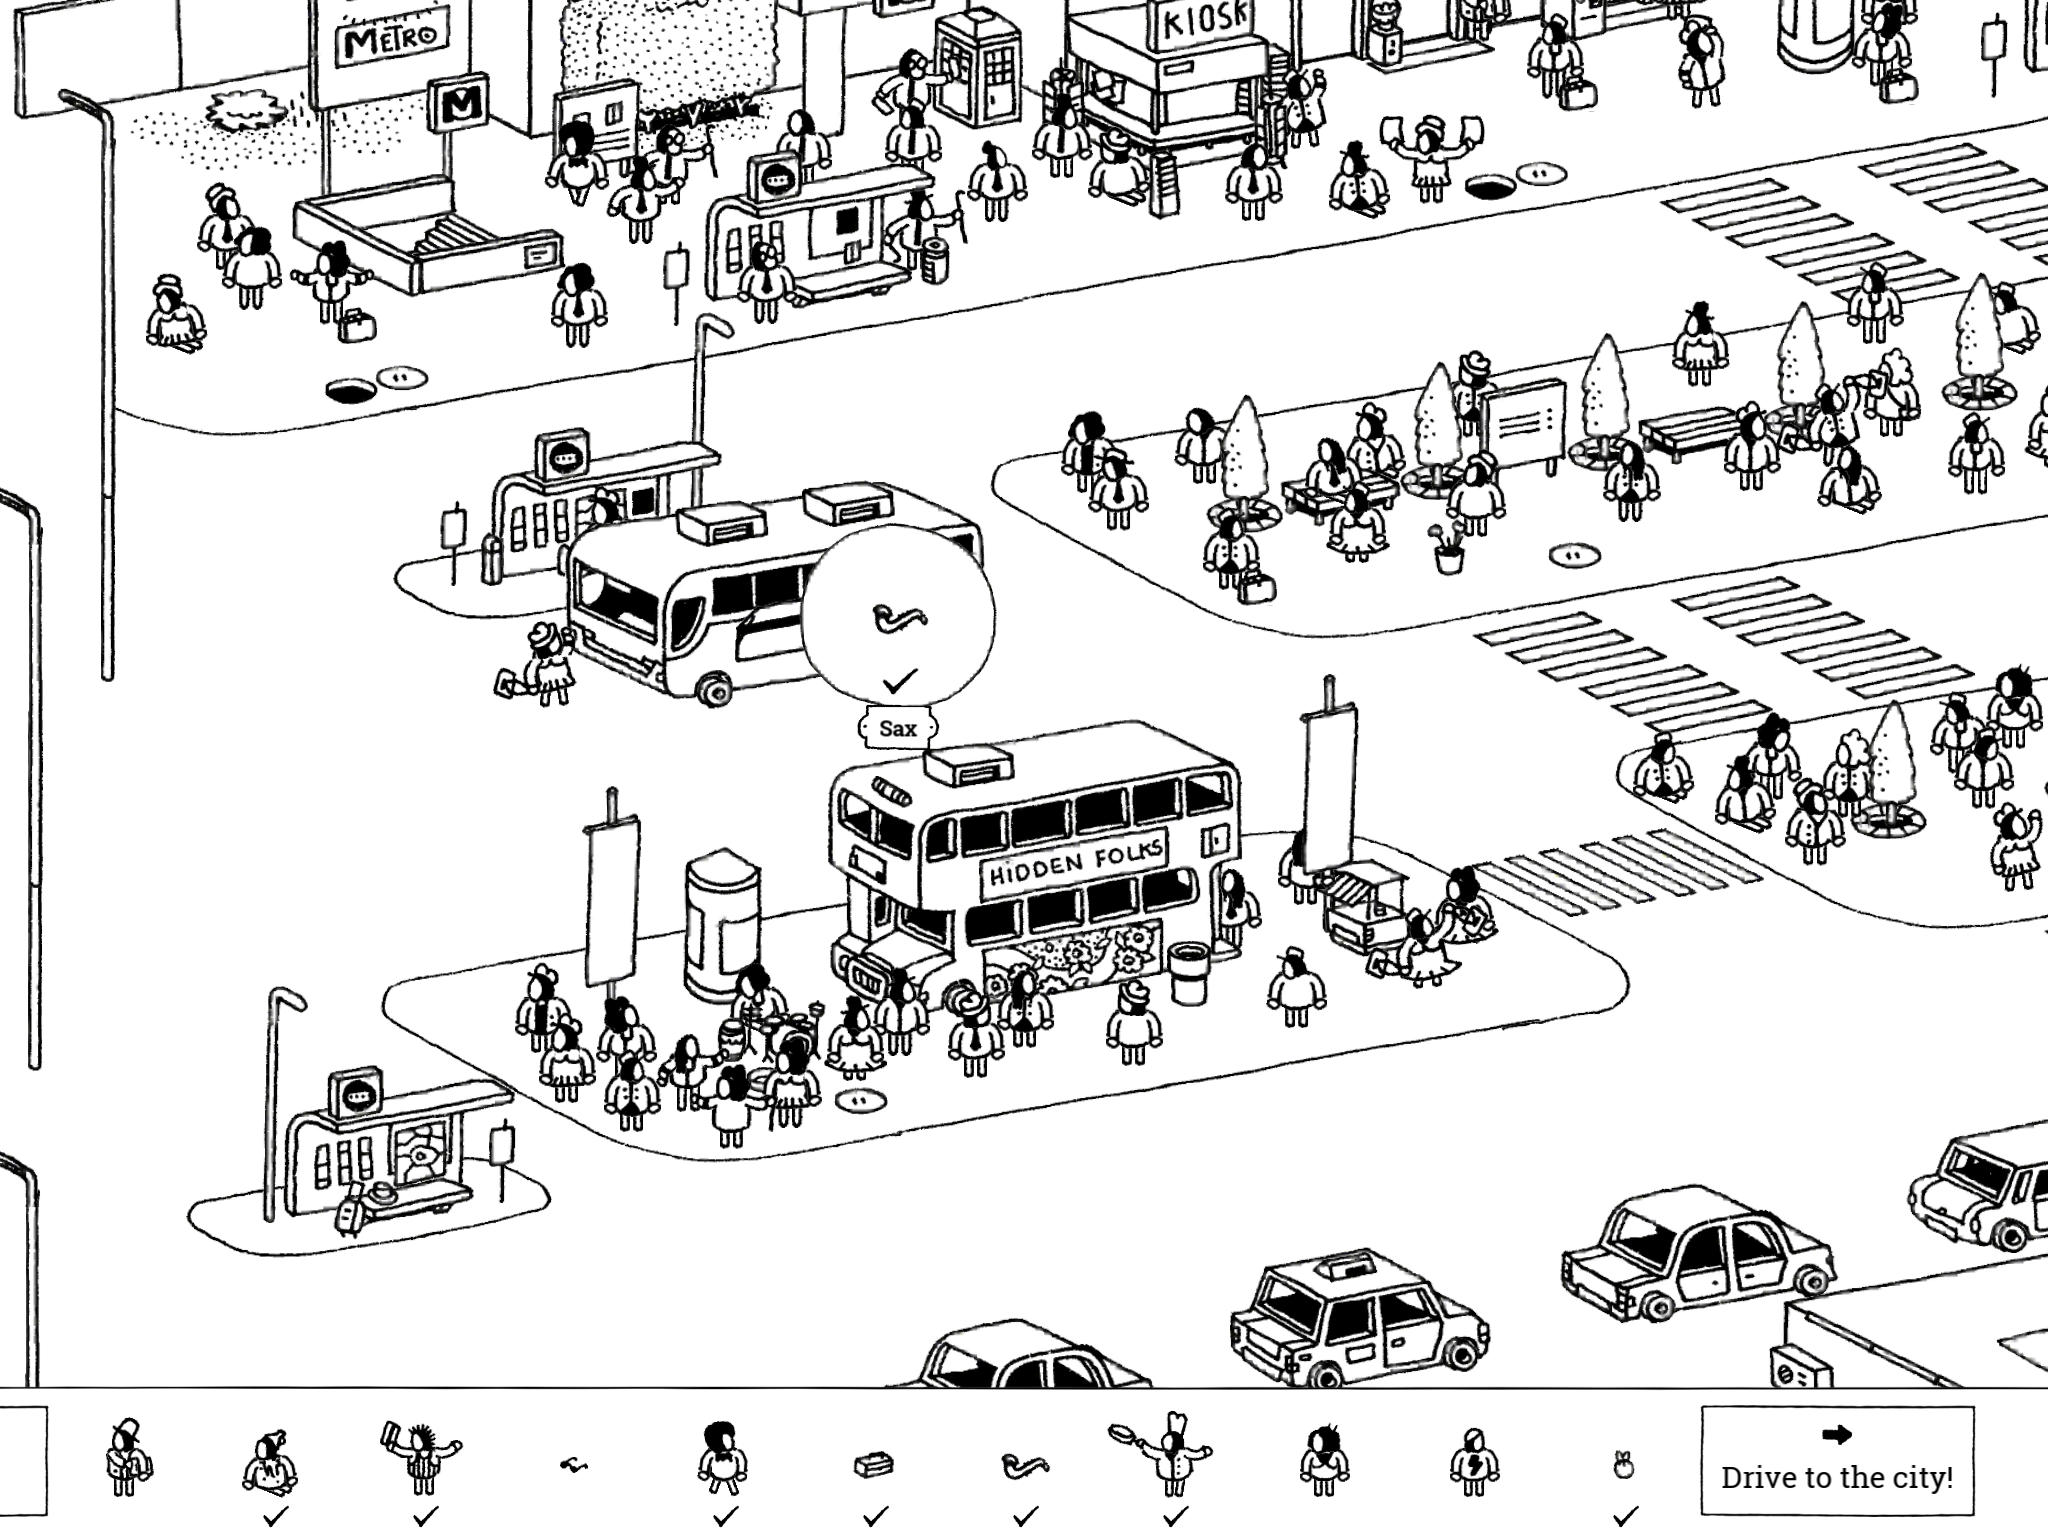
- Sax: “Someone left their sexy Sax in the cargo hold!”
Near the northwest side of the image, just below Giorgio’s metro station, is a stationary bus. It has two doors on its side; tap the right door to reveal the Sax.
- Sax: “Someone left their sexy Sax in the cargo hold!”
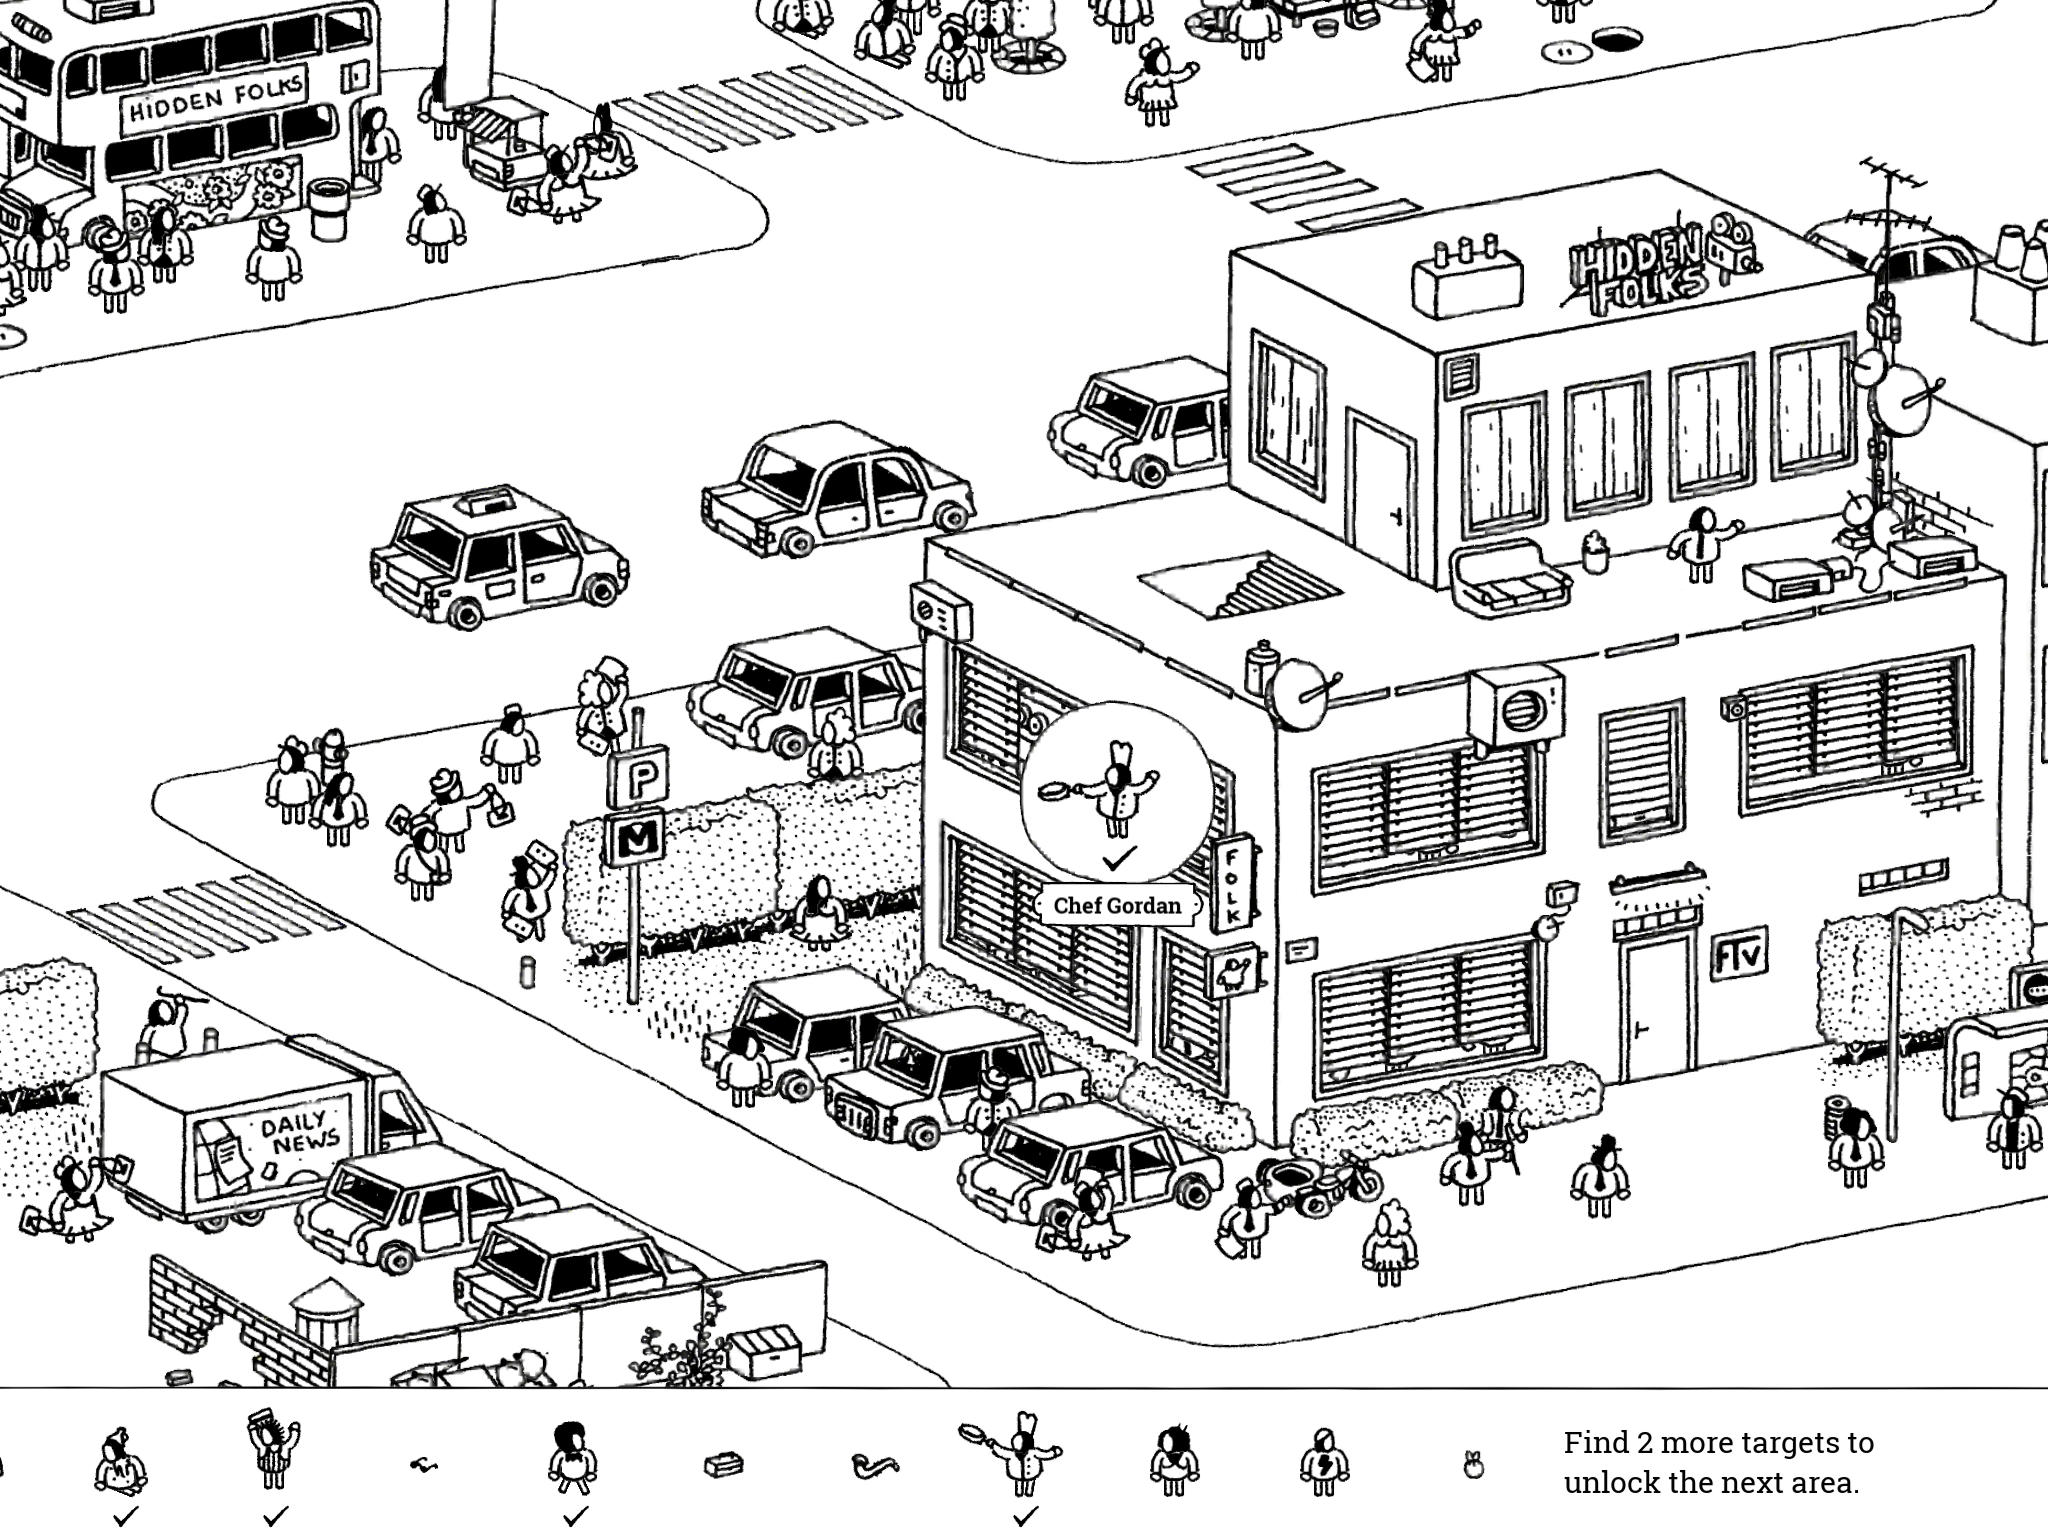
- Chef Gordon: “Tonight, on your favorite FTV channel, channel 2: jolly chef Gordon!”
In the southeast side of the image, at the TV station: on the western side of the station are two floors of windows with blinds. Pull up the set of three blinds on the second floor to reveal Chef Gordon.
- Chef Gordon: “Tonight, on your favorite FTV channel, channel 2: jolly chef Gordon!”
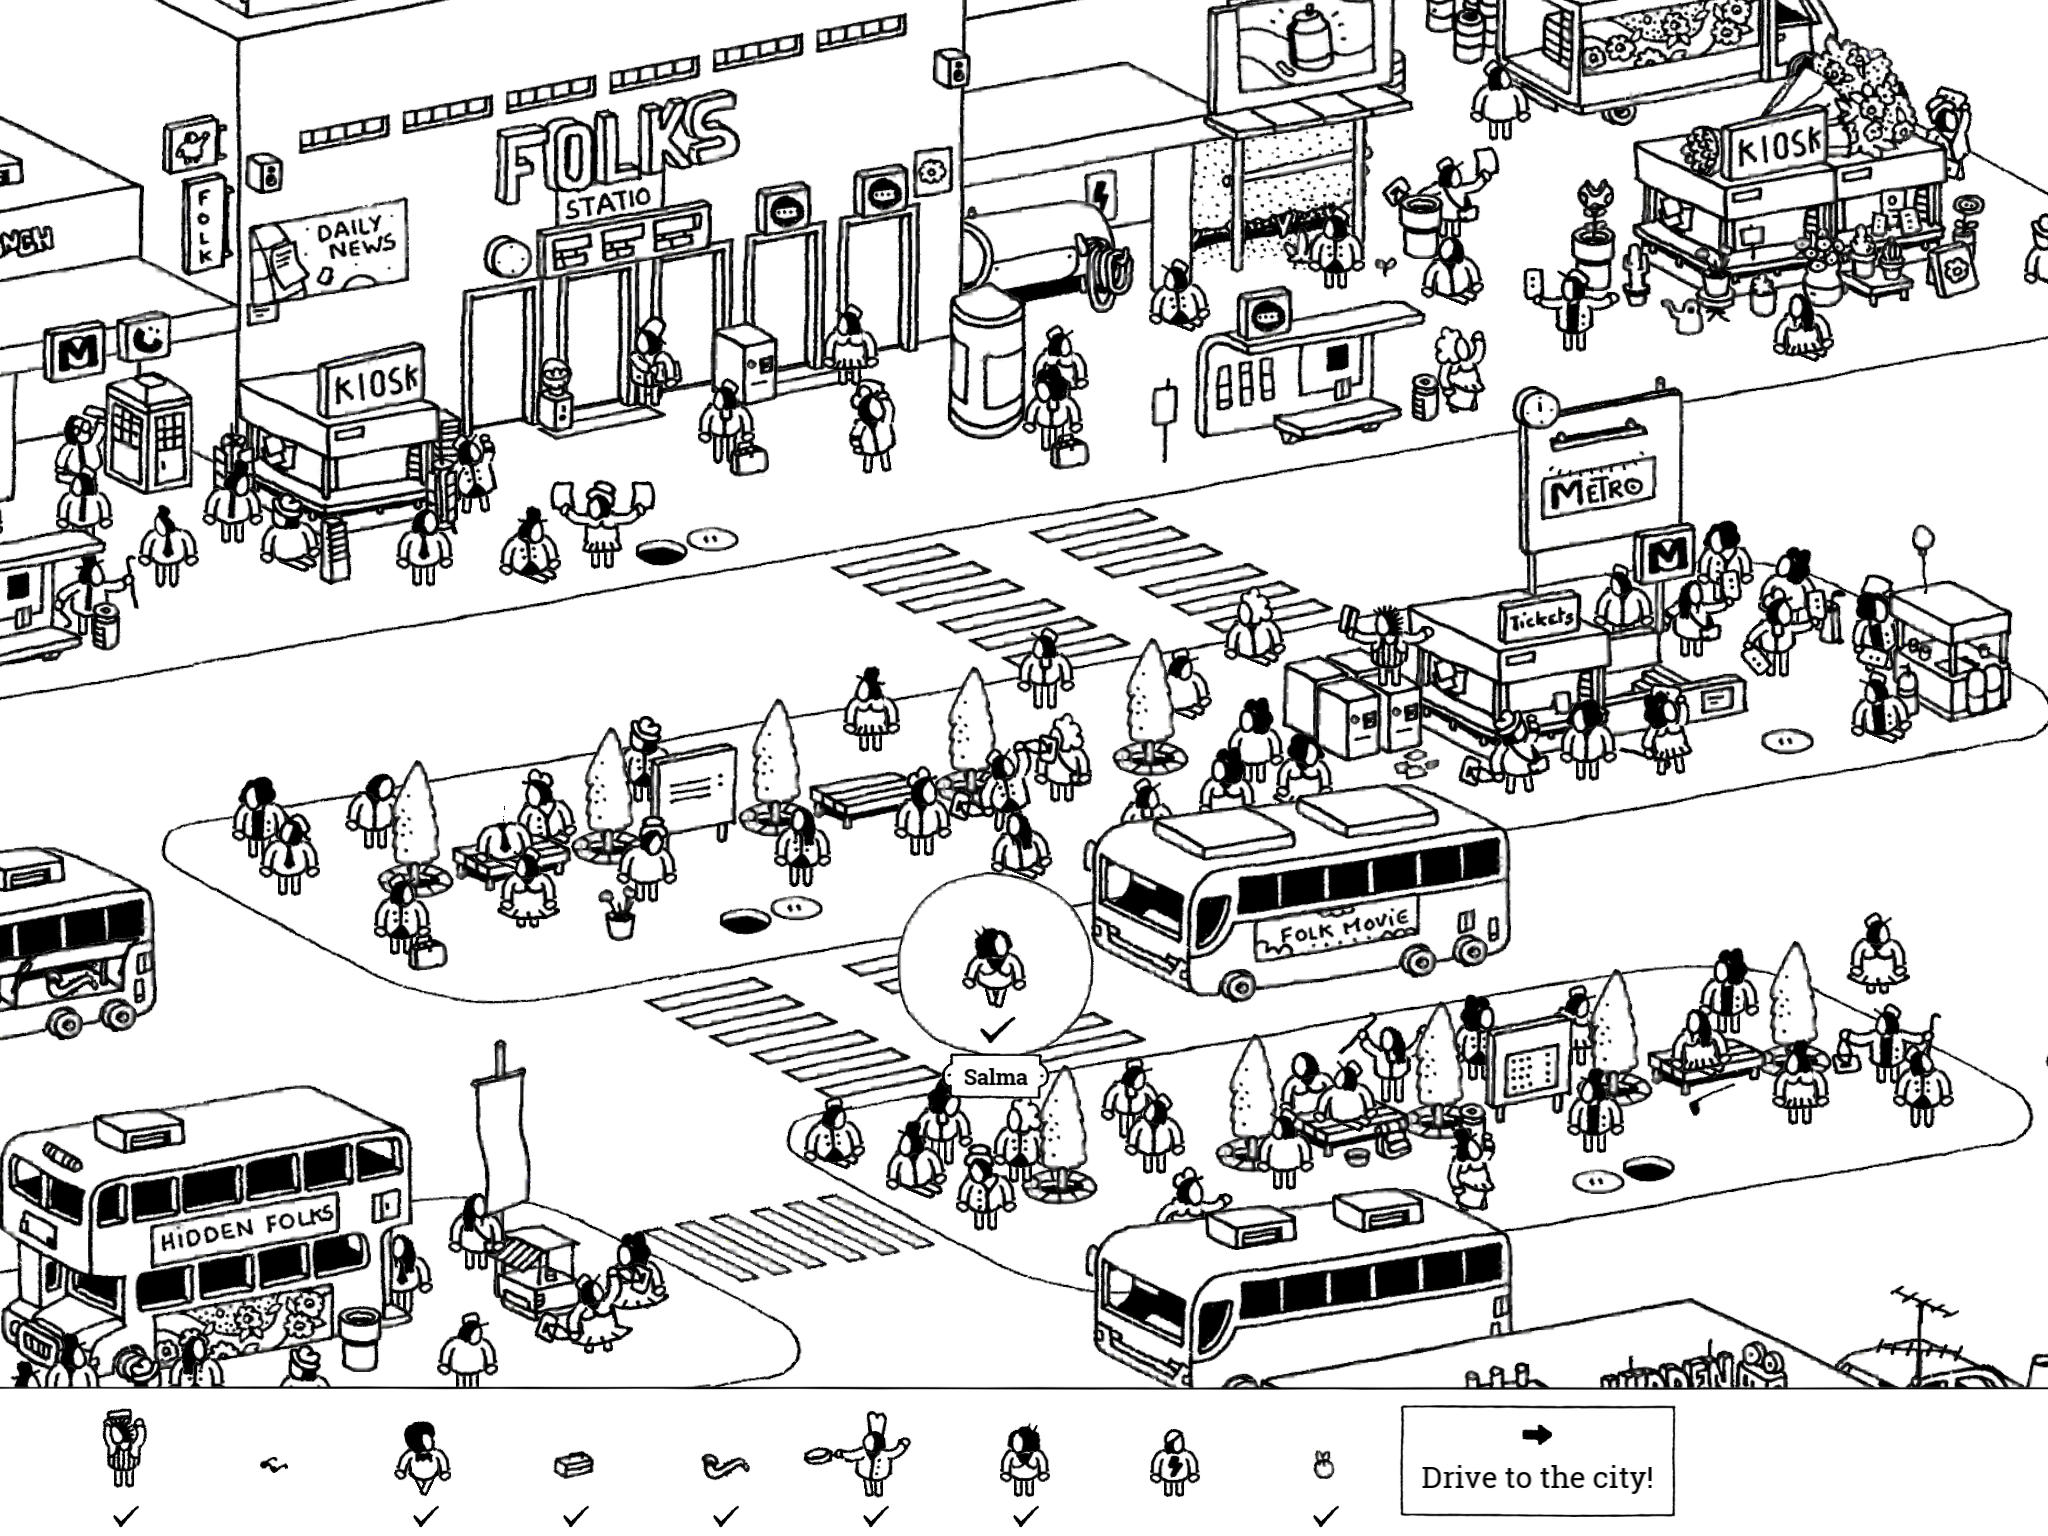
- Salma: “Salma has been waiting for more than two and a half hours to cross the street. Can’t the bus drivers see this is a pedestrian crossing?!”
Salma is standing on the platform just northeast of the TV station. She’s close to the northeast crosswalk. First, help her cross by tapping the bus coming towards that crosswalk; it will stop and let her pass. Tap her while she’s crossing to collect her.
- Salma: “Salma has been waiting for more than two and a half hours to cross the street. Can’t the bus drivers see this is a pedestrian crossing?!”
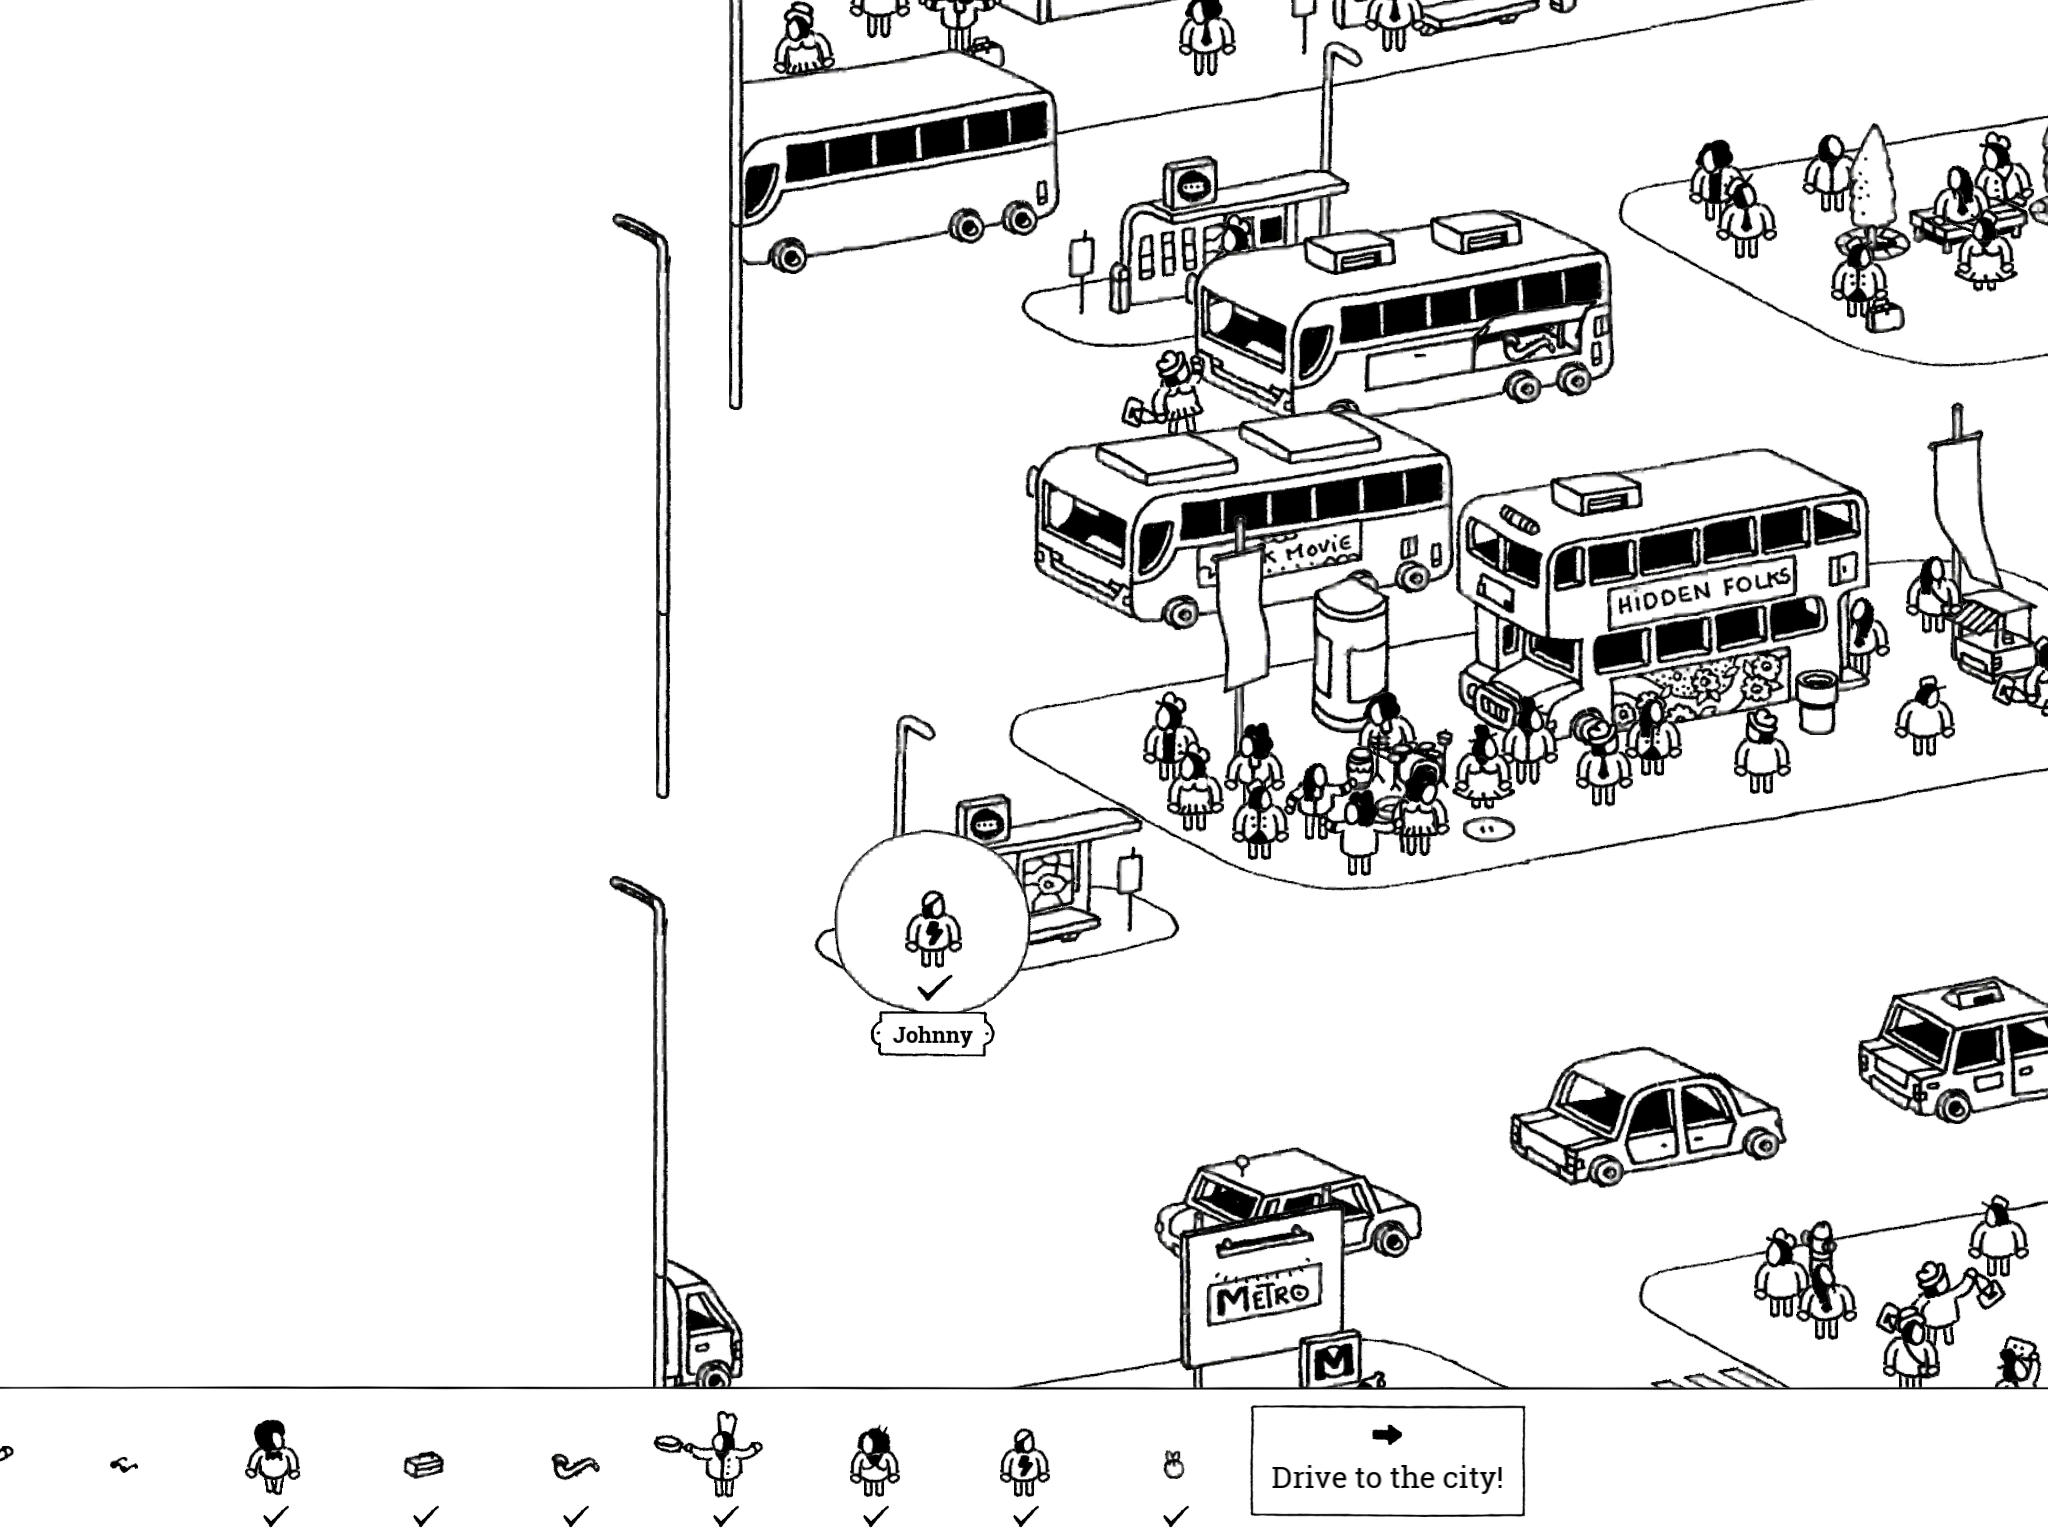
- Johnny: “Johnny forgot his stuff at the bus stop, but no worries; he’s got a round trip ticket and he’s on his way back! Toot toot!”
Johnny’s stuff is at the island bus stop on the far west side of the image, just north of the Beggar’s metro station. You can see a suitcase and hat sitting on the bench. When a bus comes towards the bus stop, tap it before it reaches the stop to make it stop there. Johnny will get off; tap him to collect him.
- Johnny: “Johnny forgot his stuff at the bus stop, but no worries; he’s got a round trip ticket and he’s on his way back! Toot toot!”
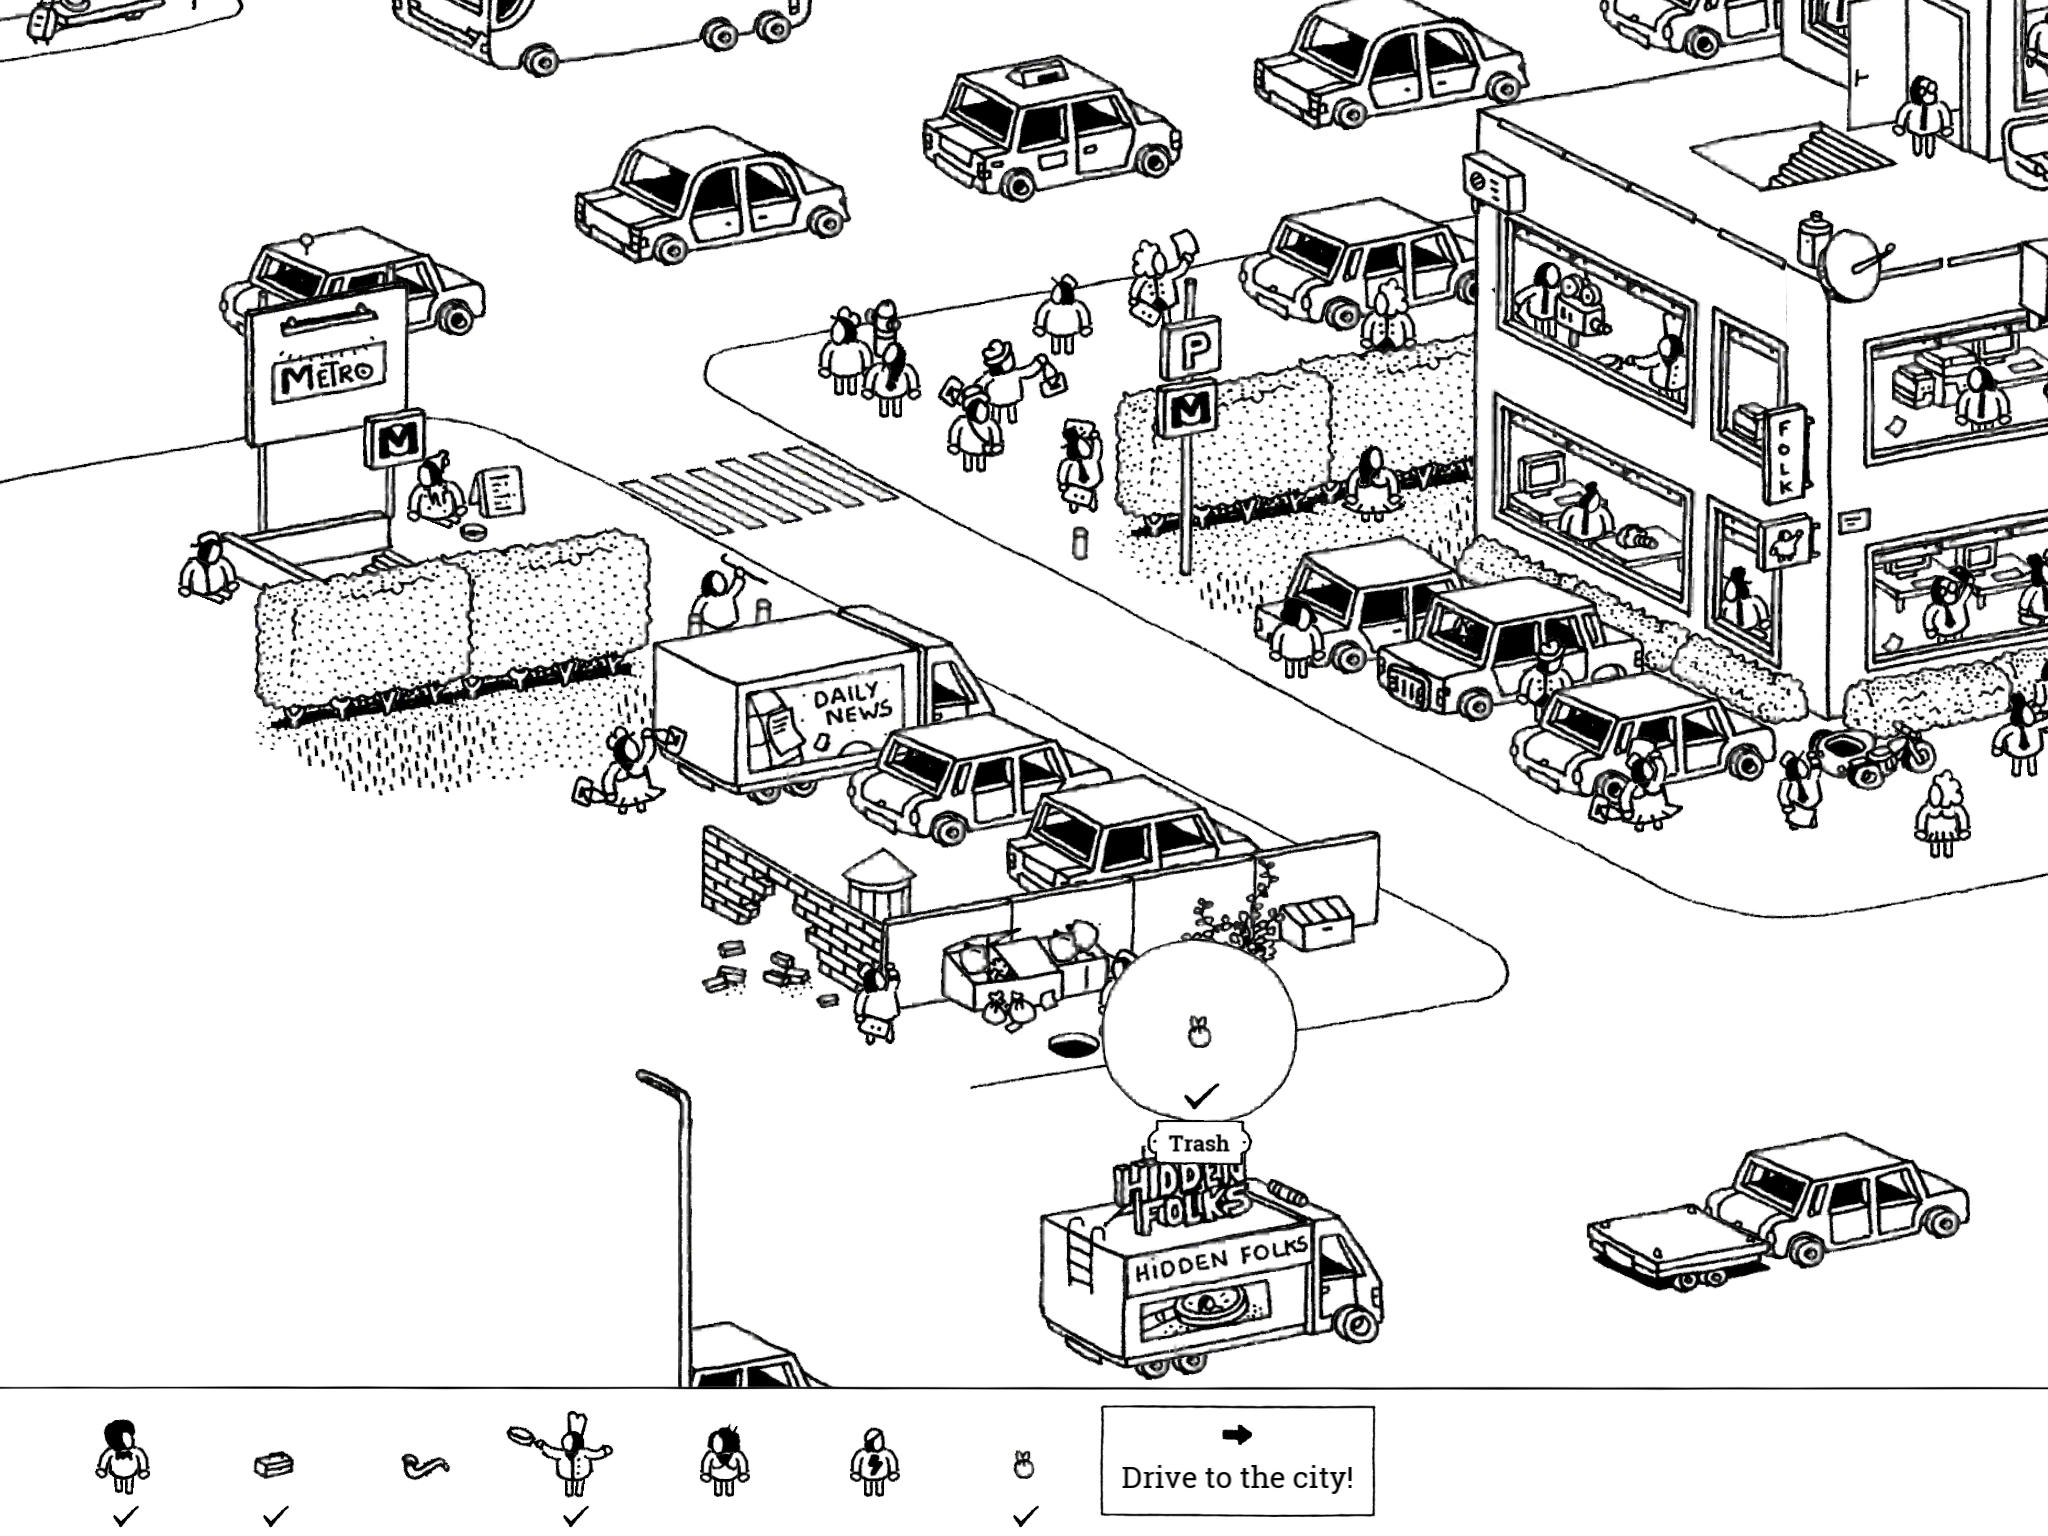
- Trash: “It’s unbelievable what people do with their trash if the container is full…”
In the southwest corner of the image are a couple of trash bins that are overflowing. Tap and drag the manhole cover in front of the trash bins to the left; an apple will pop out and land to the right. Tap the apple to collect Trash.
- Trash: “It’s unbelievable what people do with their trash if the container is full…”
City 4: The Big City
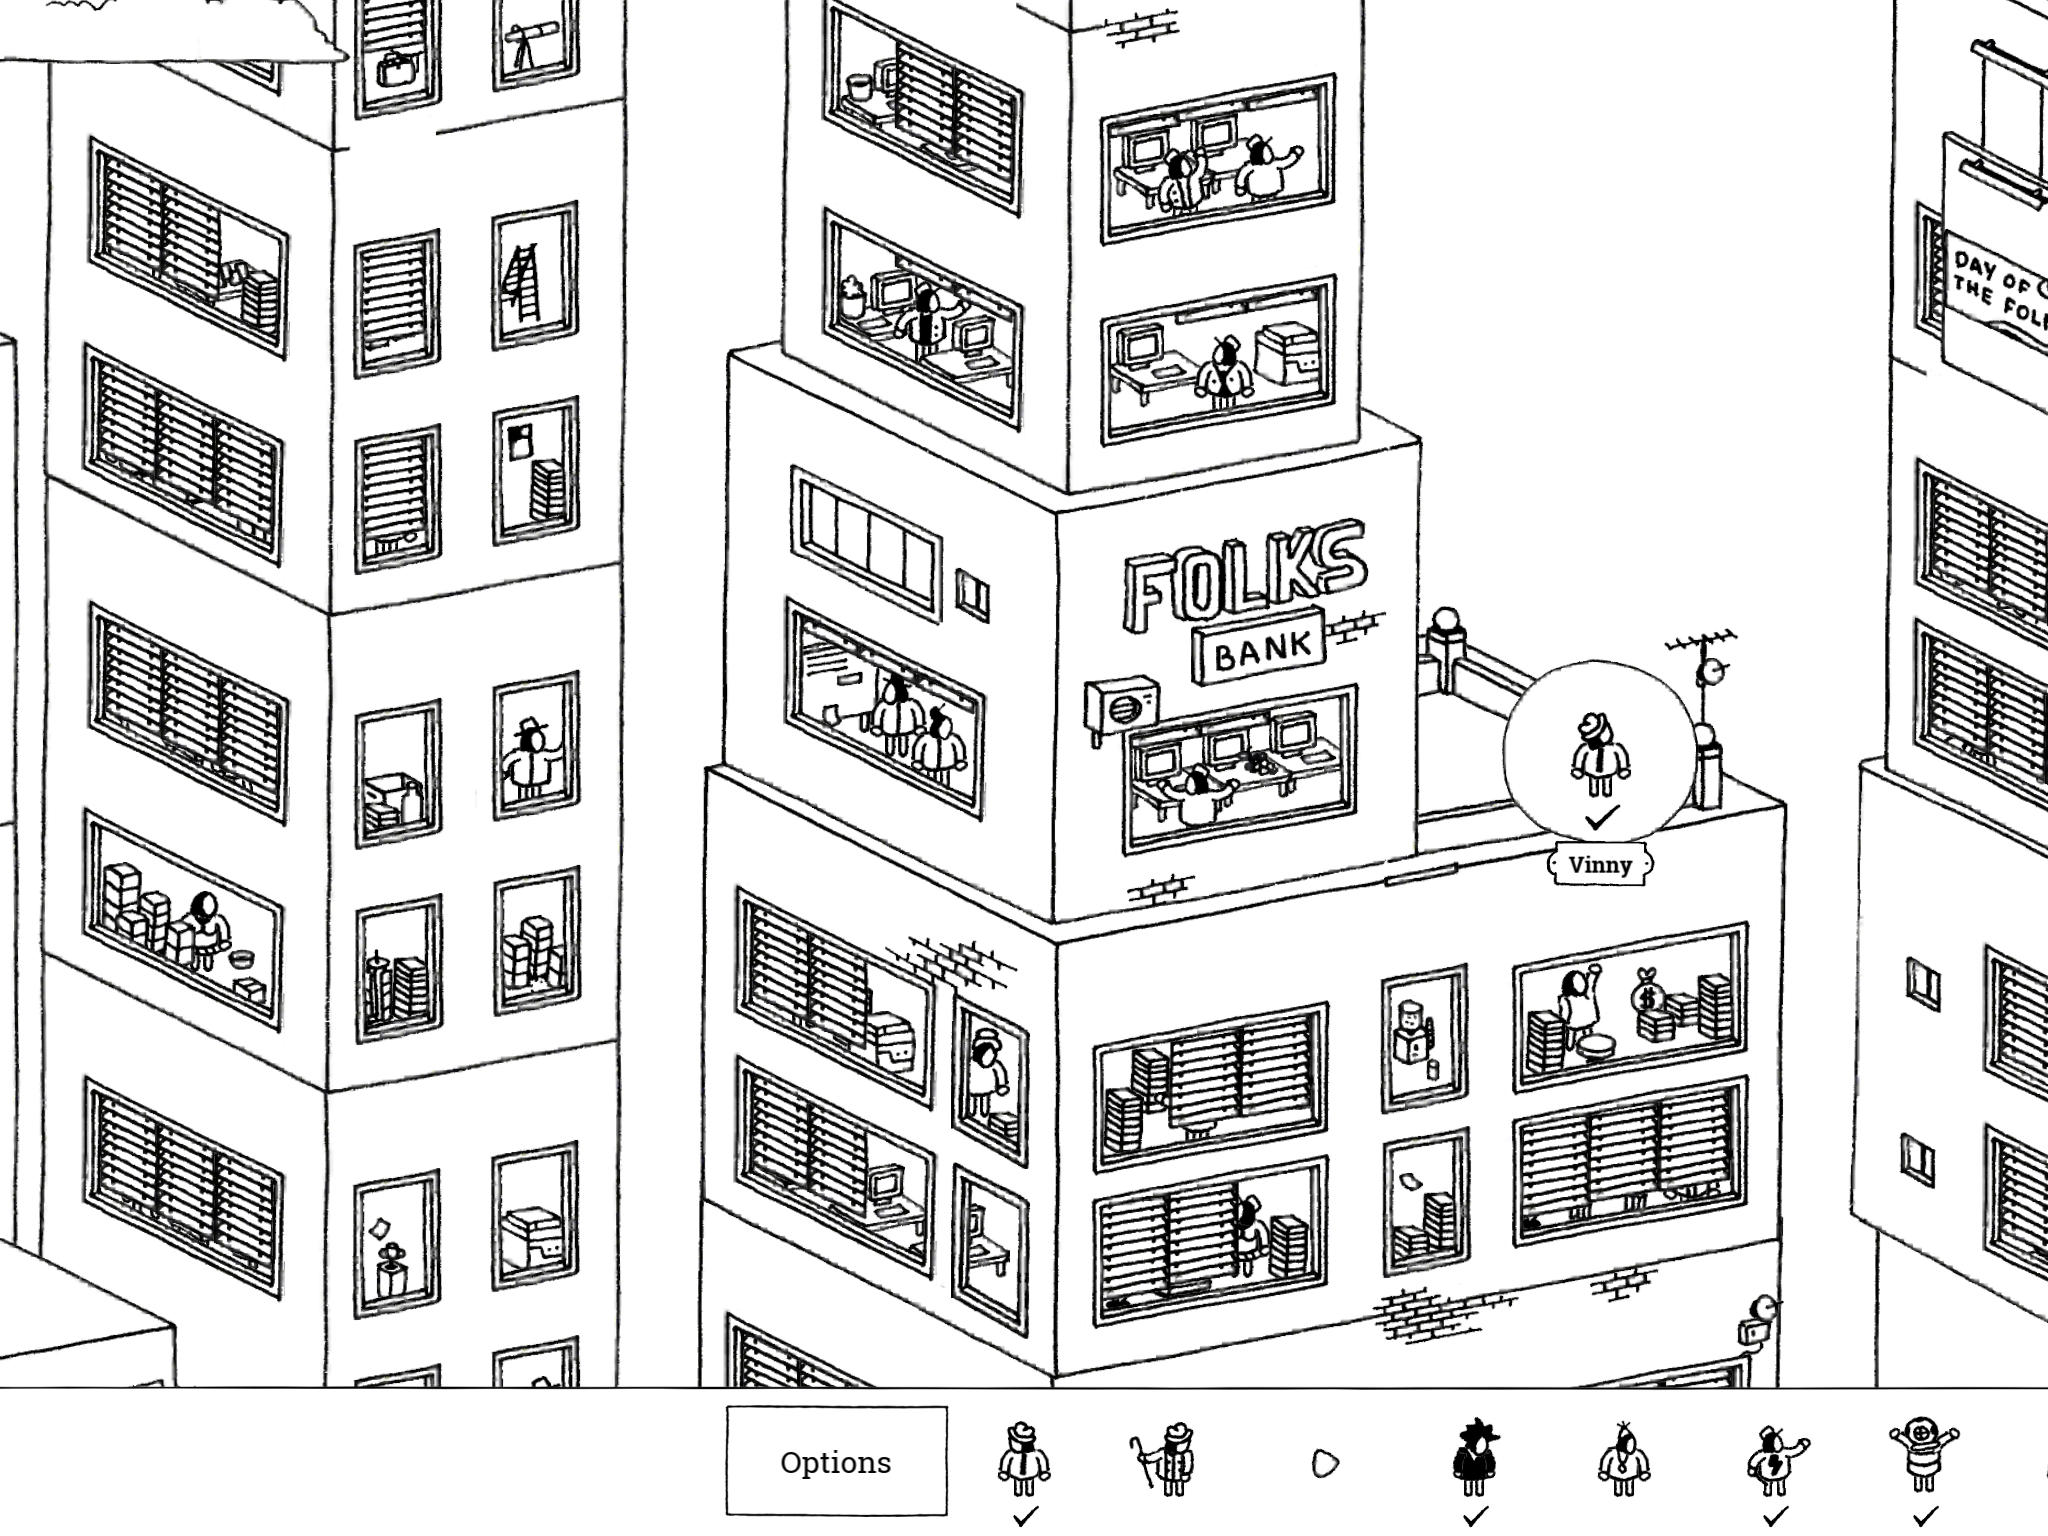
- Vinny: “Vinny is tired of counting money and needs some fresh air.”
Vinny is on the balcony of the bank, slightly northeast of the center of the image. The balcony is only halfway up the bank skyscraper, right next to the “Folks Bank” sign.
- Vinny: “Vinny is tired of counting money and needs some fresh air.”
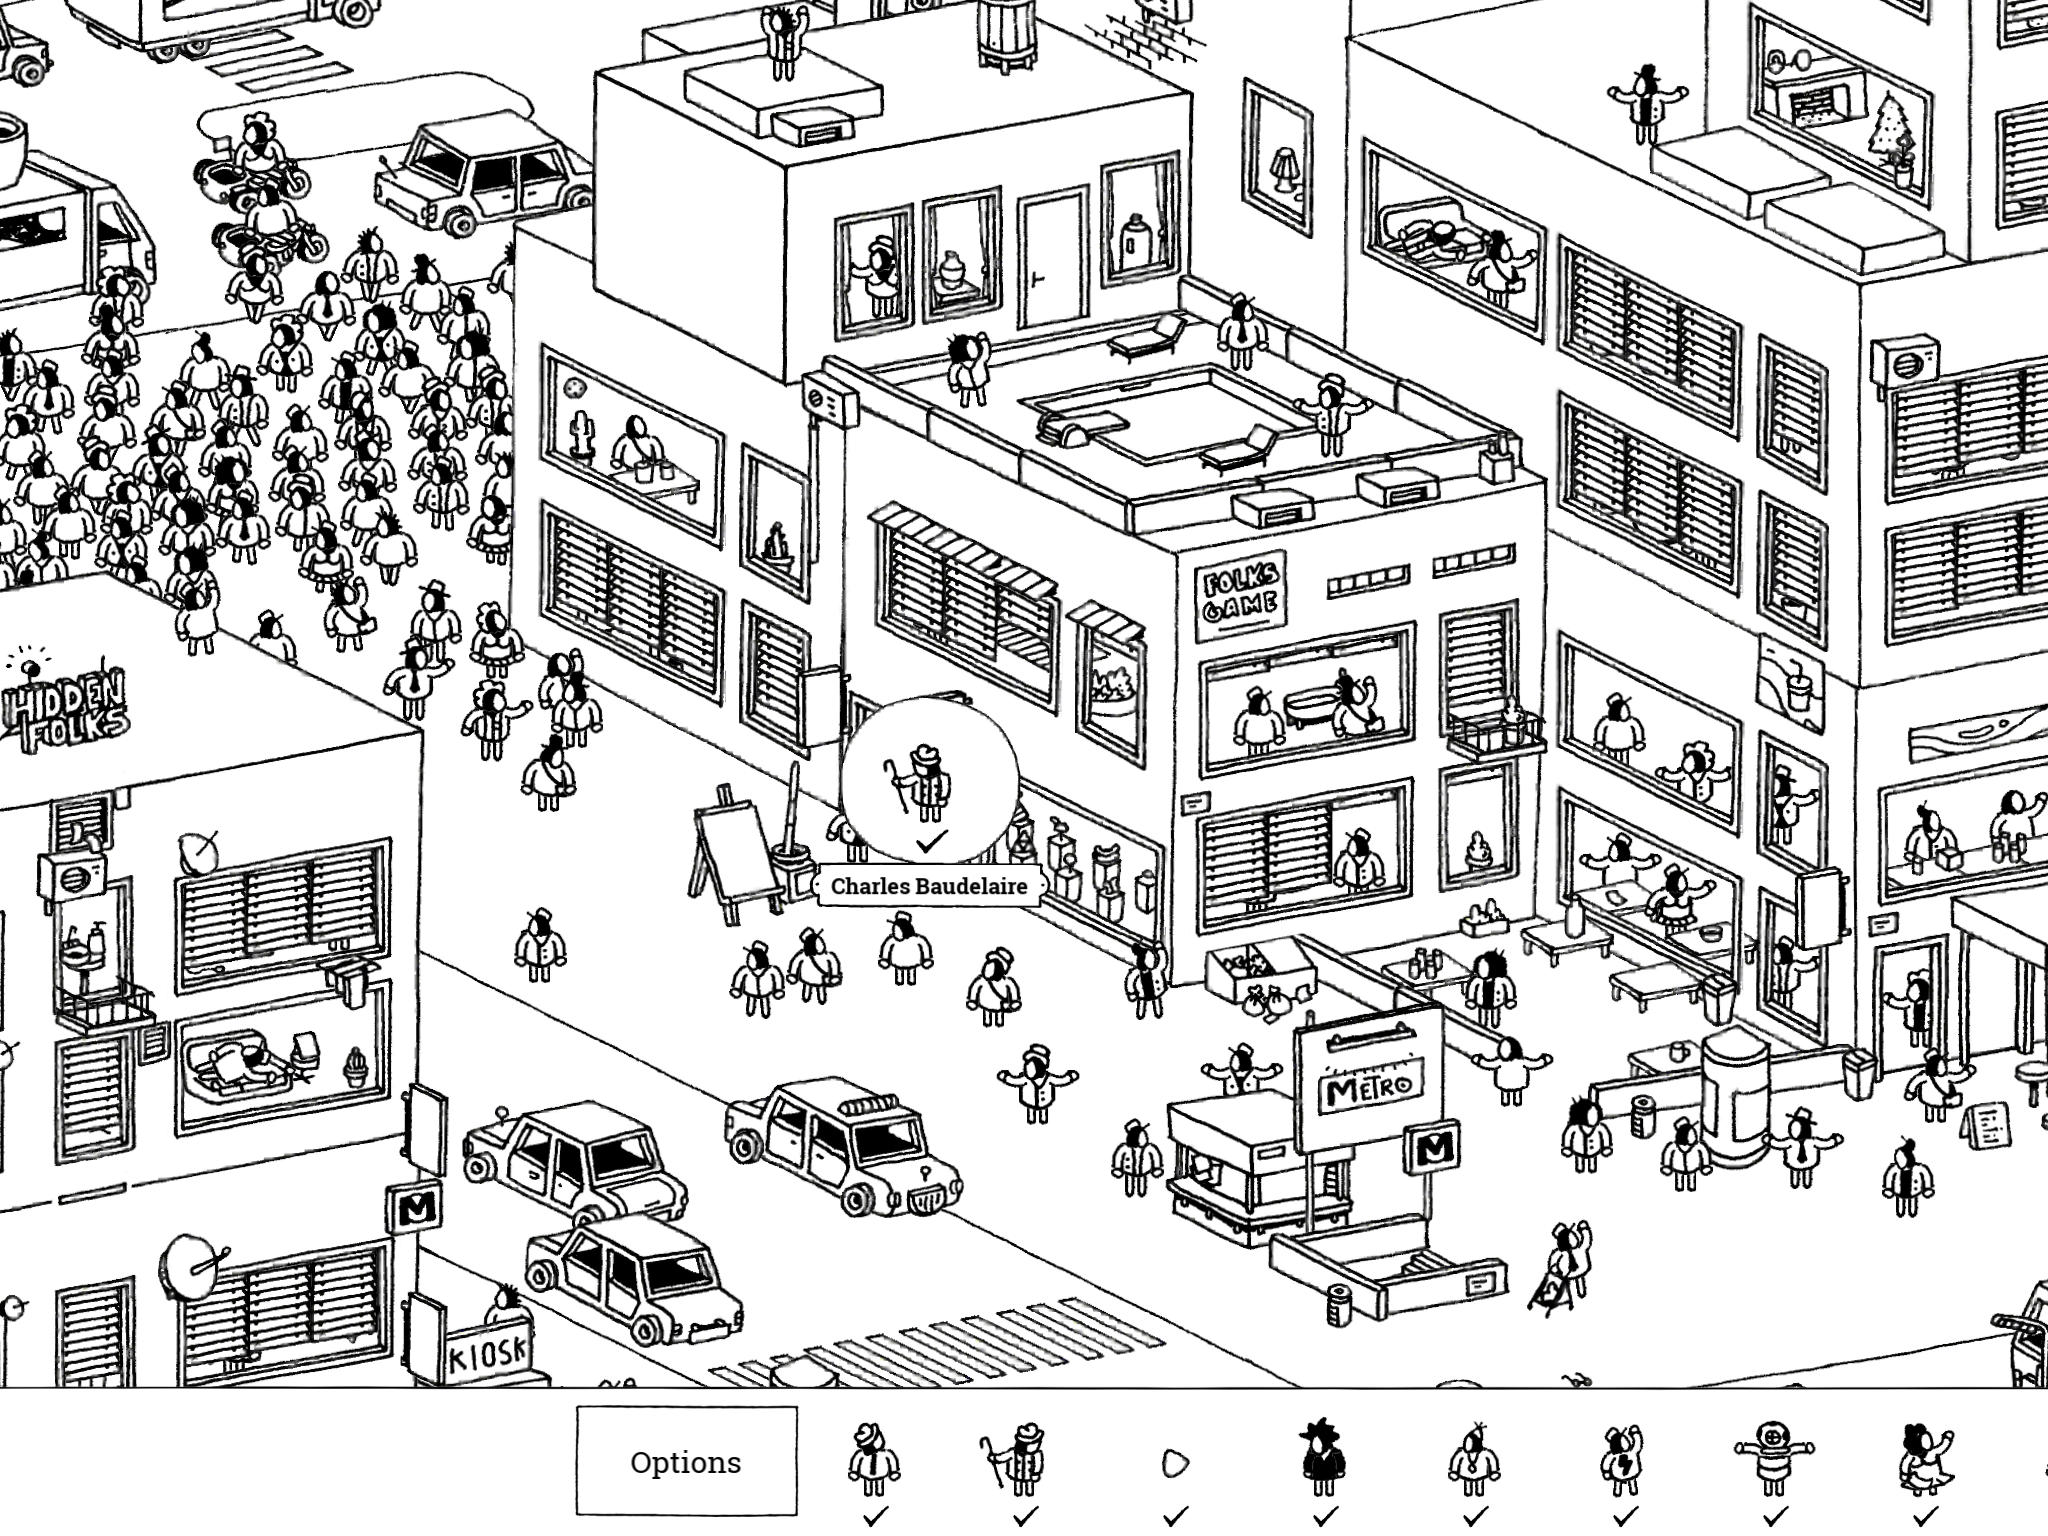
- Charles Baudelaire: “Charles Baudelaire appreciates art for the knowledge and understanding of the universal and timeless qualities that identify all of human’s greatest experiences. And he appreciates art.”
The small Folks Game building is on the ground floor just southeast of center, near the large throng of pedestrians. Charles Baudelaire is on the first floor, standing in the doorway, right under a sign with an arrow pointing down at him.
- Charles Baudelaire: “Charles Baudelaire appreciates art for the knowledge and understanding of the universal and timeless qualities that identify all of human’s greatest experiences. And he appreciates art.”
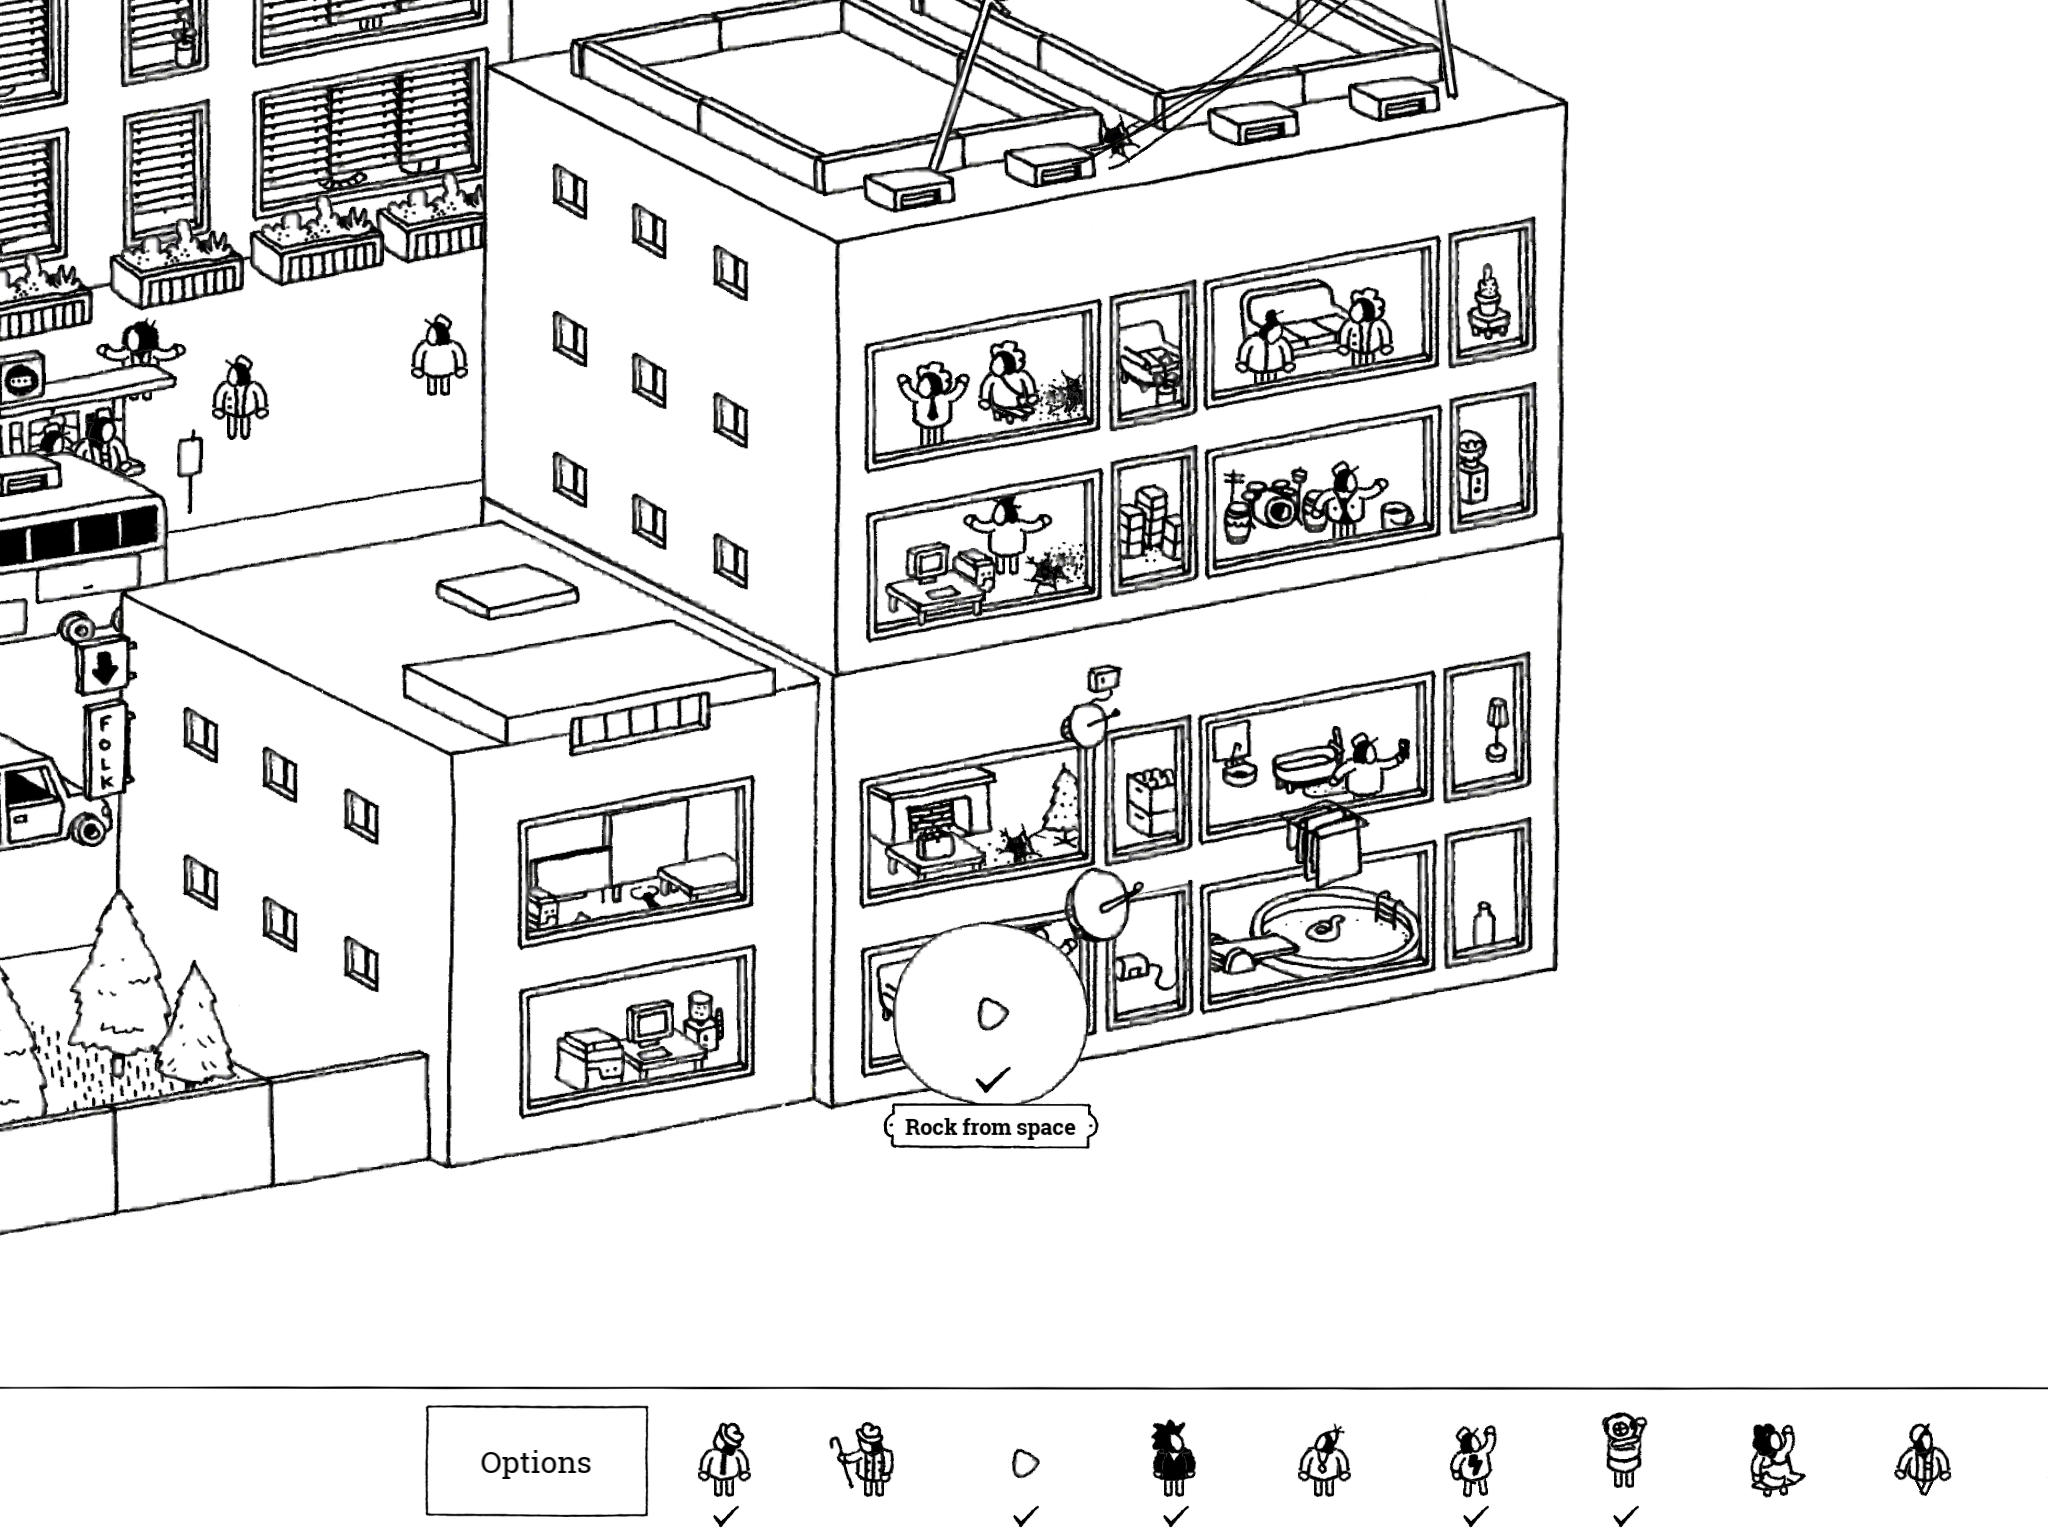
- Rock: “You can tell this rock fell from space!”
In the southeast corner of the image is a smaller apartment building with its large windows all facing south. On the first floor, the second window from the right, is the Rock.
- Rock: “You can tell this rock fell from space!”
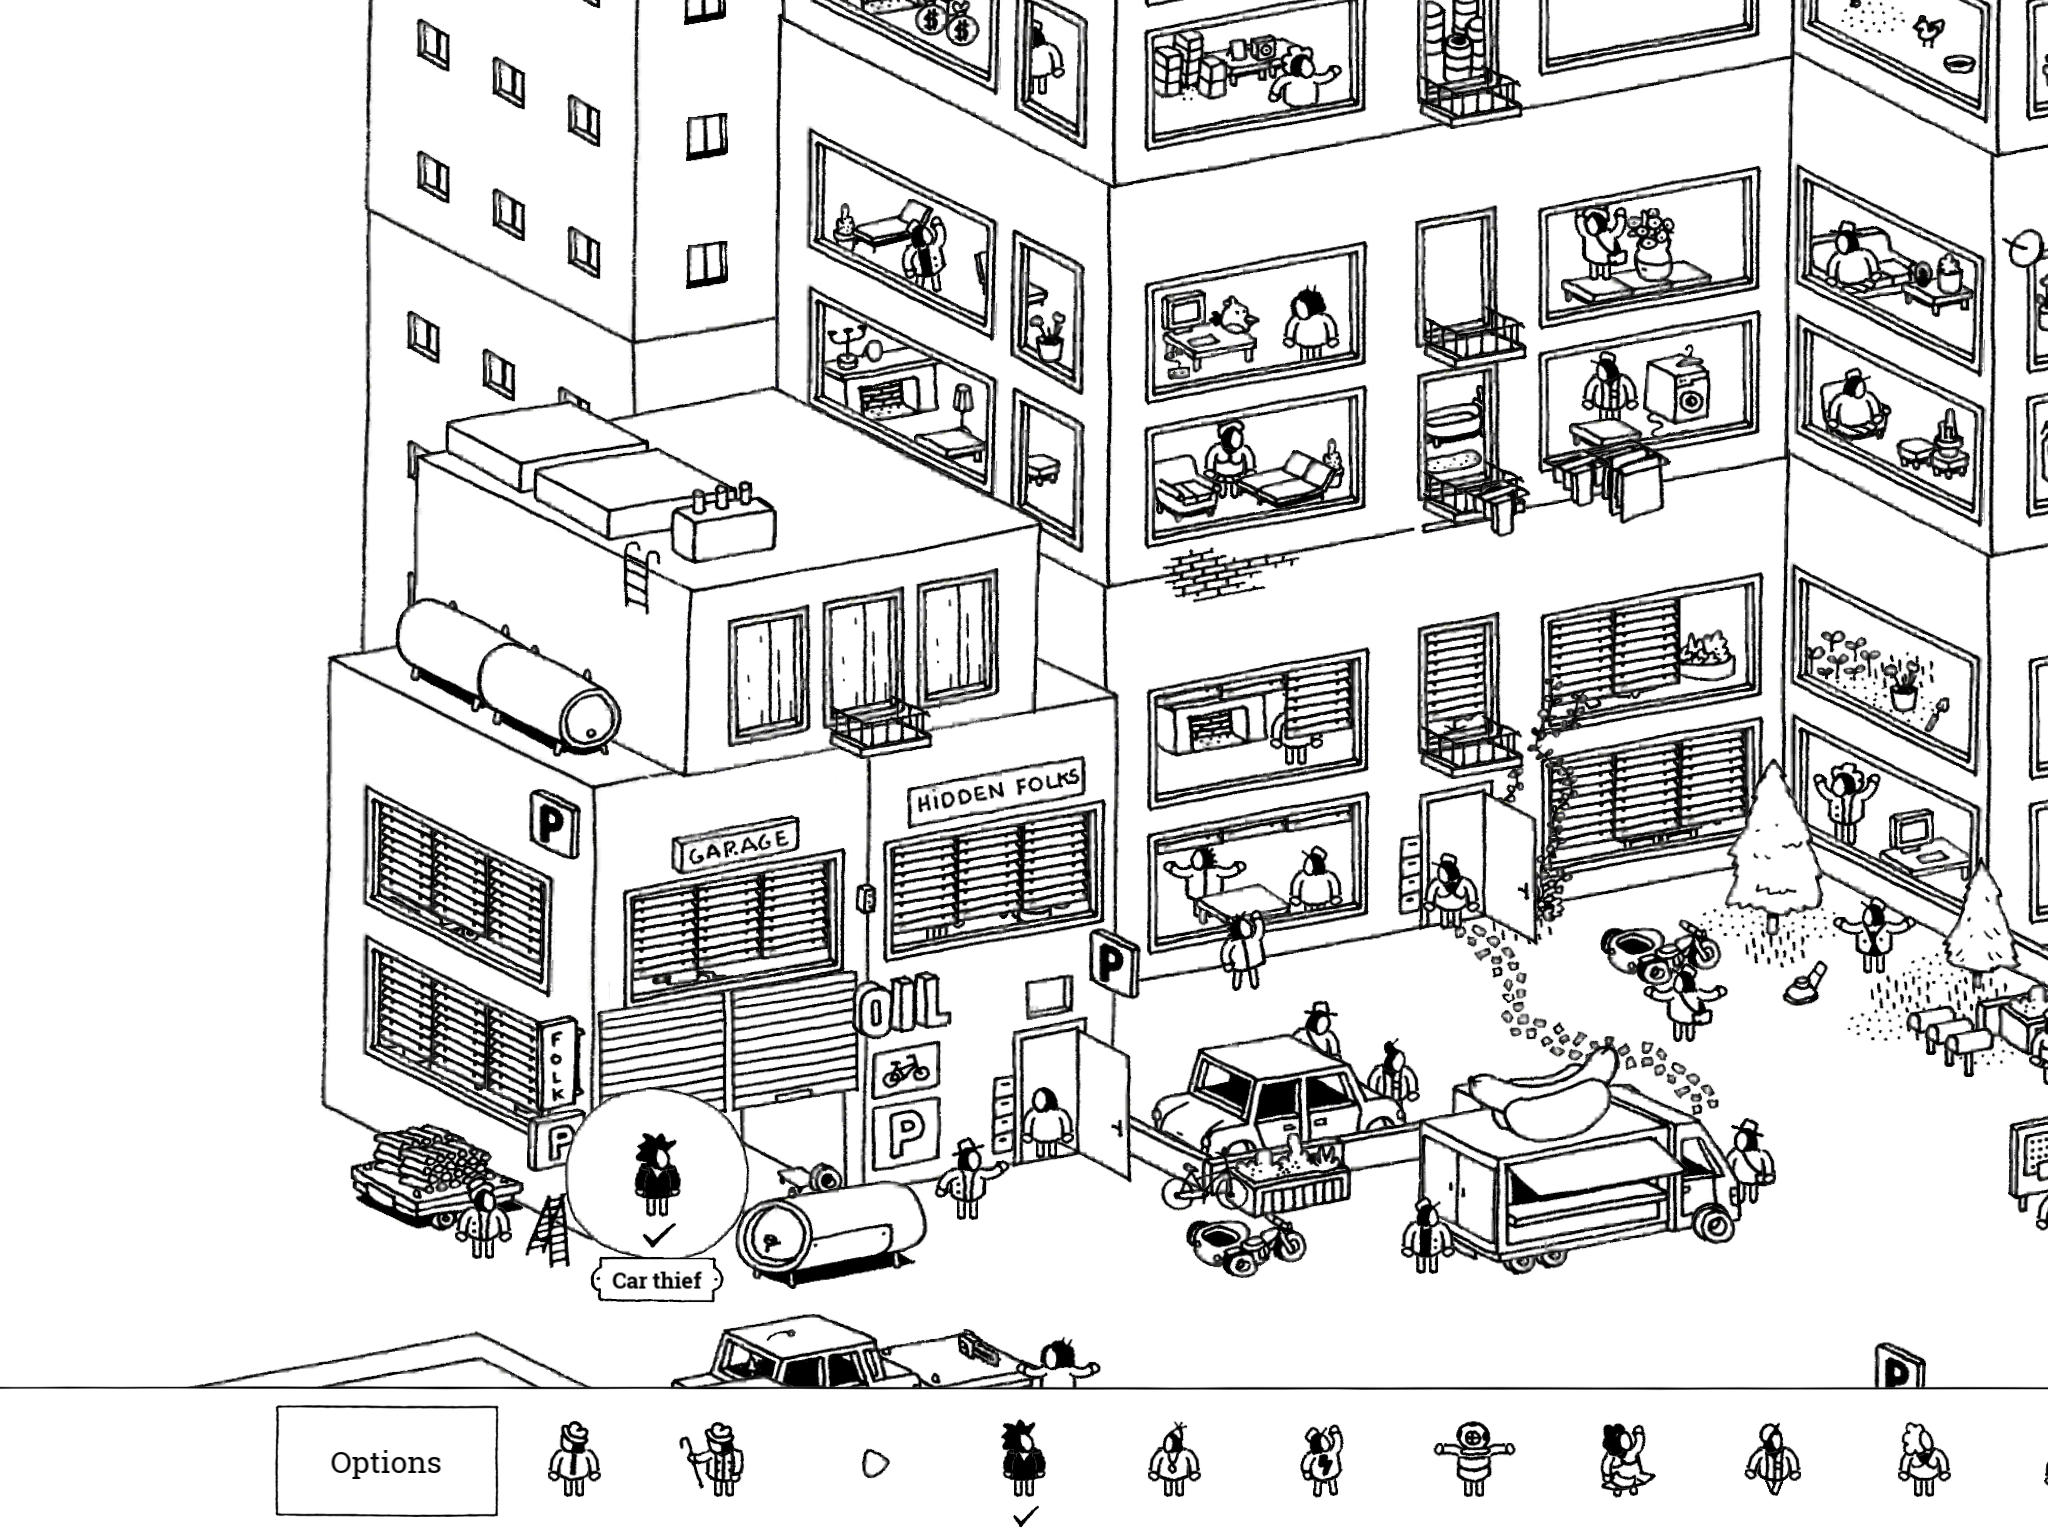
- Car Thief: “This car thief is parked, waiting for his next target.”
In the southwest corner of the image is a garage and oil shop. Open the leftmost garage door to reveal the Car Thief.
- Car Thief: “This car thief is parked, waiting for his next target.”
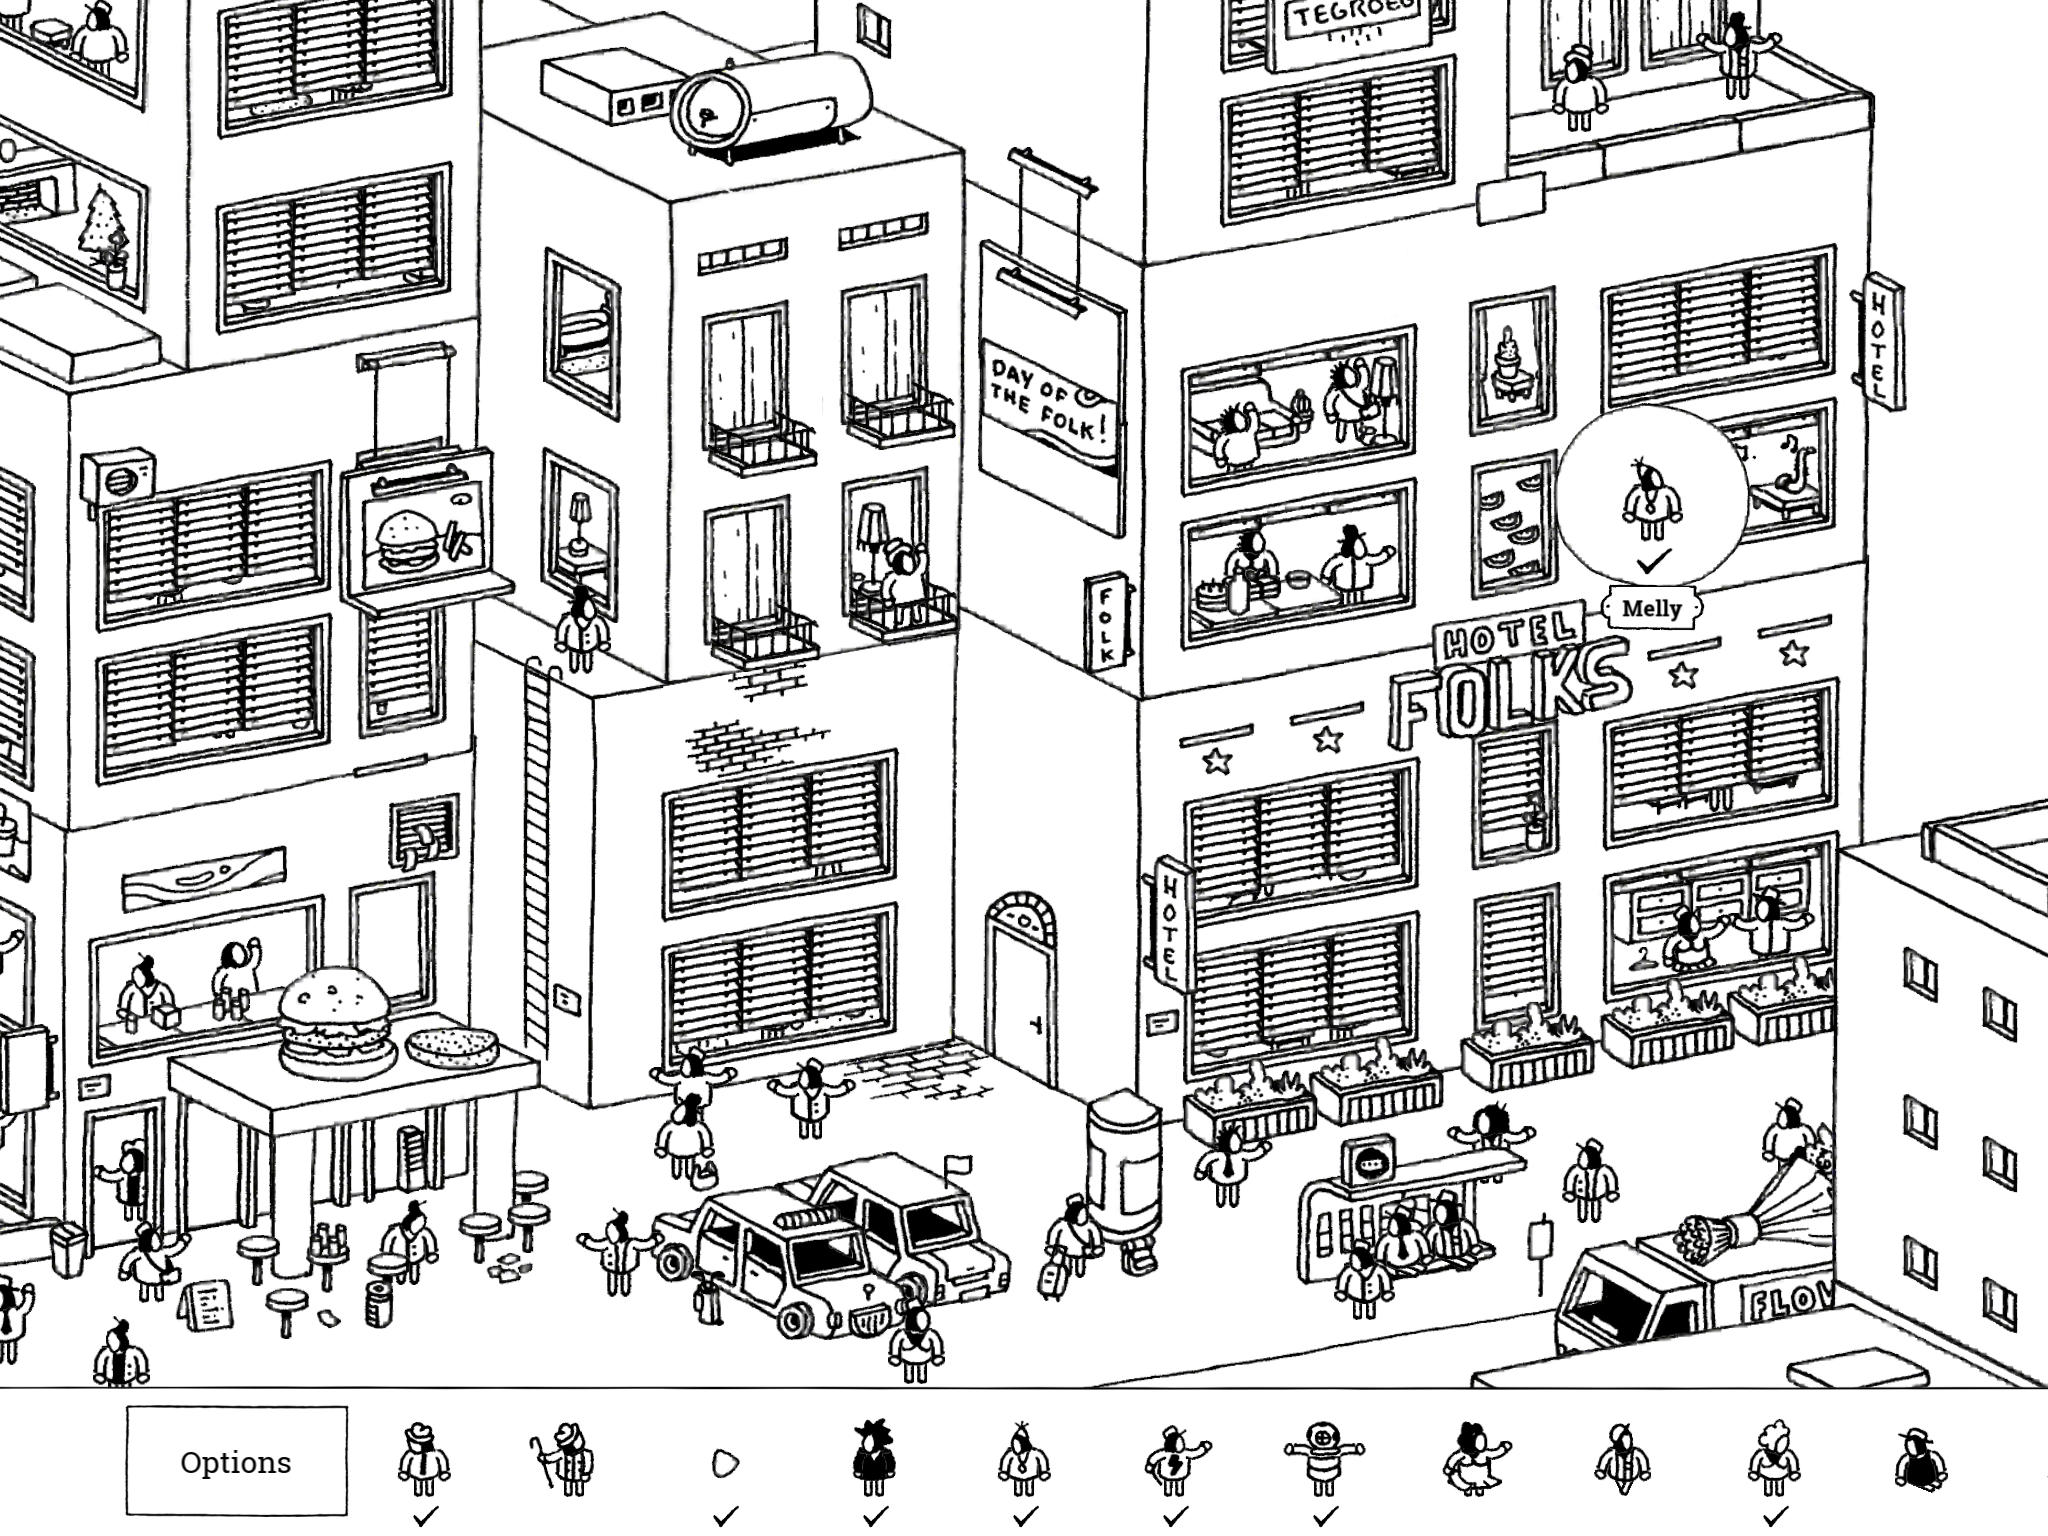
- Melly: “Melly has a melon party in his hotel room. A melon party is a party with a lot of melons. And jazz.”
The hotel is on the far southeast side of the image, just north of the building with the Rock in it. On the third floor you can see some watermelon slices in the center window; lift the blinds just to the right of the watermelons to reveal Melly.
- Melly: “Melly has a melon party in his hotel room. A melon party is a party with a lot of melons. And jazz.”
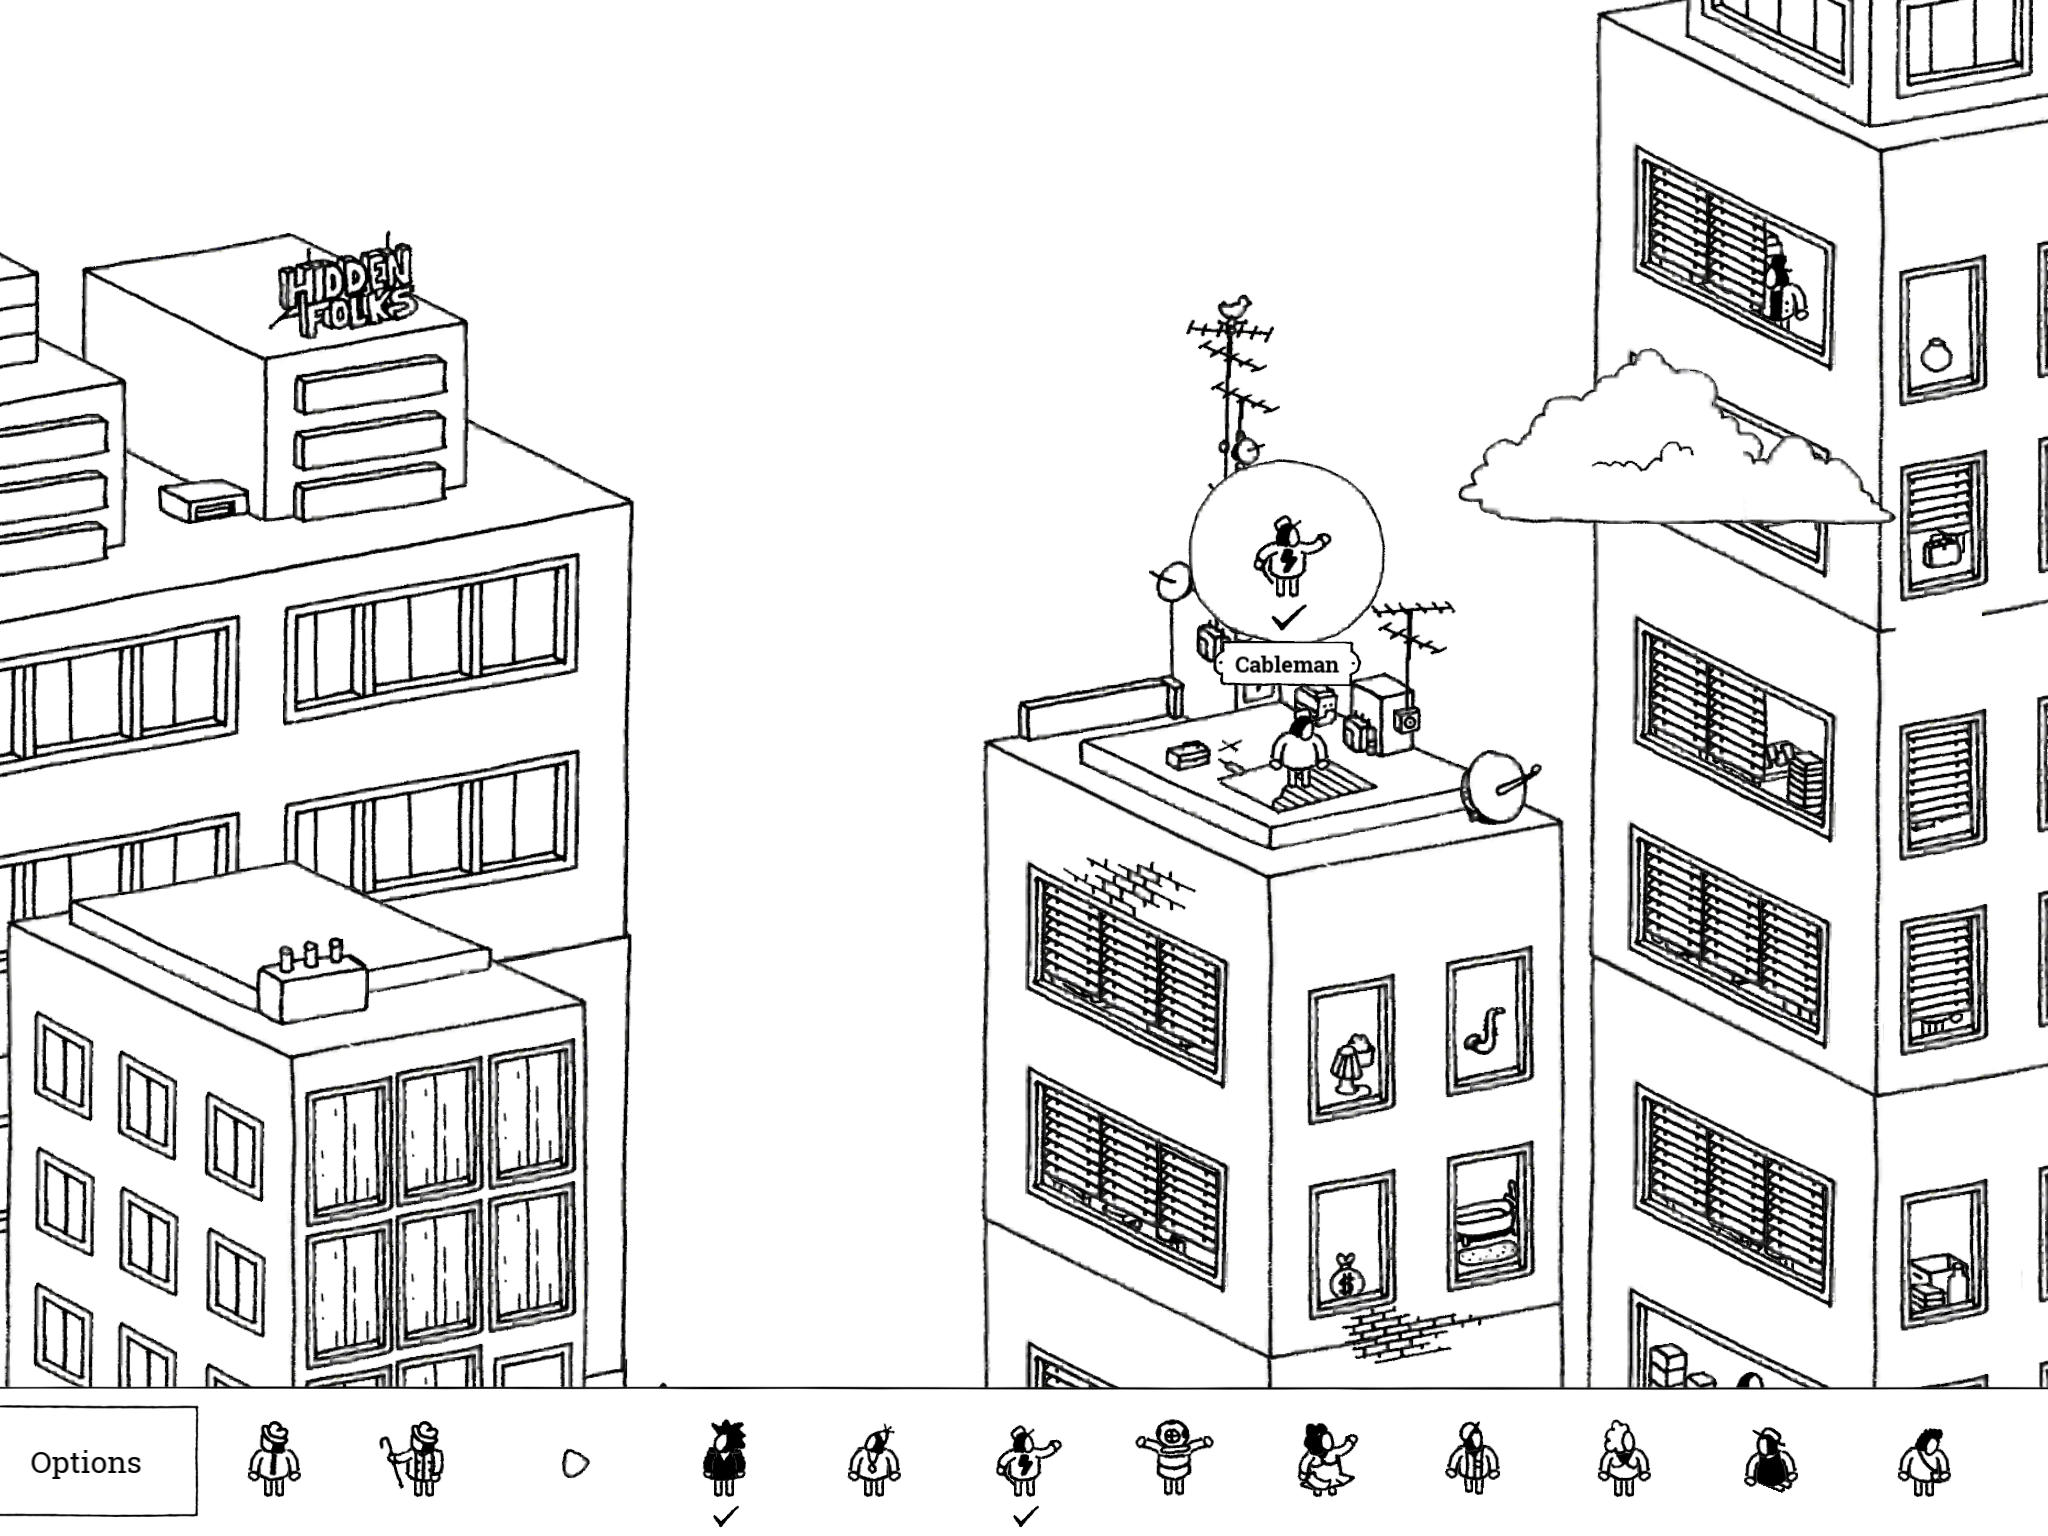
- Cableman: “This cableman is messing with a lot of TV signals right now!”
The Cableman is on top of one of the smaller high rises near the center of the image. He’s northeast of the noodle shop, on the building with the mermaid billboard. He’s on the roof fiddling with a bunch of satellite dishes; you’ll have to rotate the dish above the lightning bolt symbol to the left to reveal the Cableman.
- Cableman: “This cableman is messing with a lot of TV signals right now!”
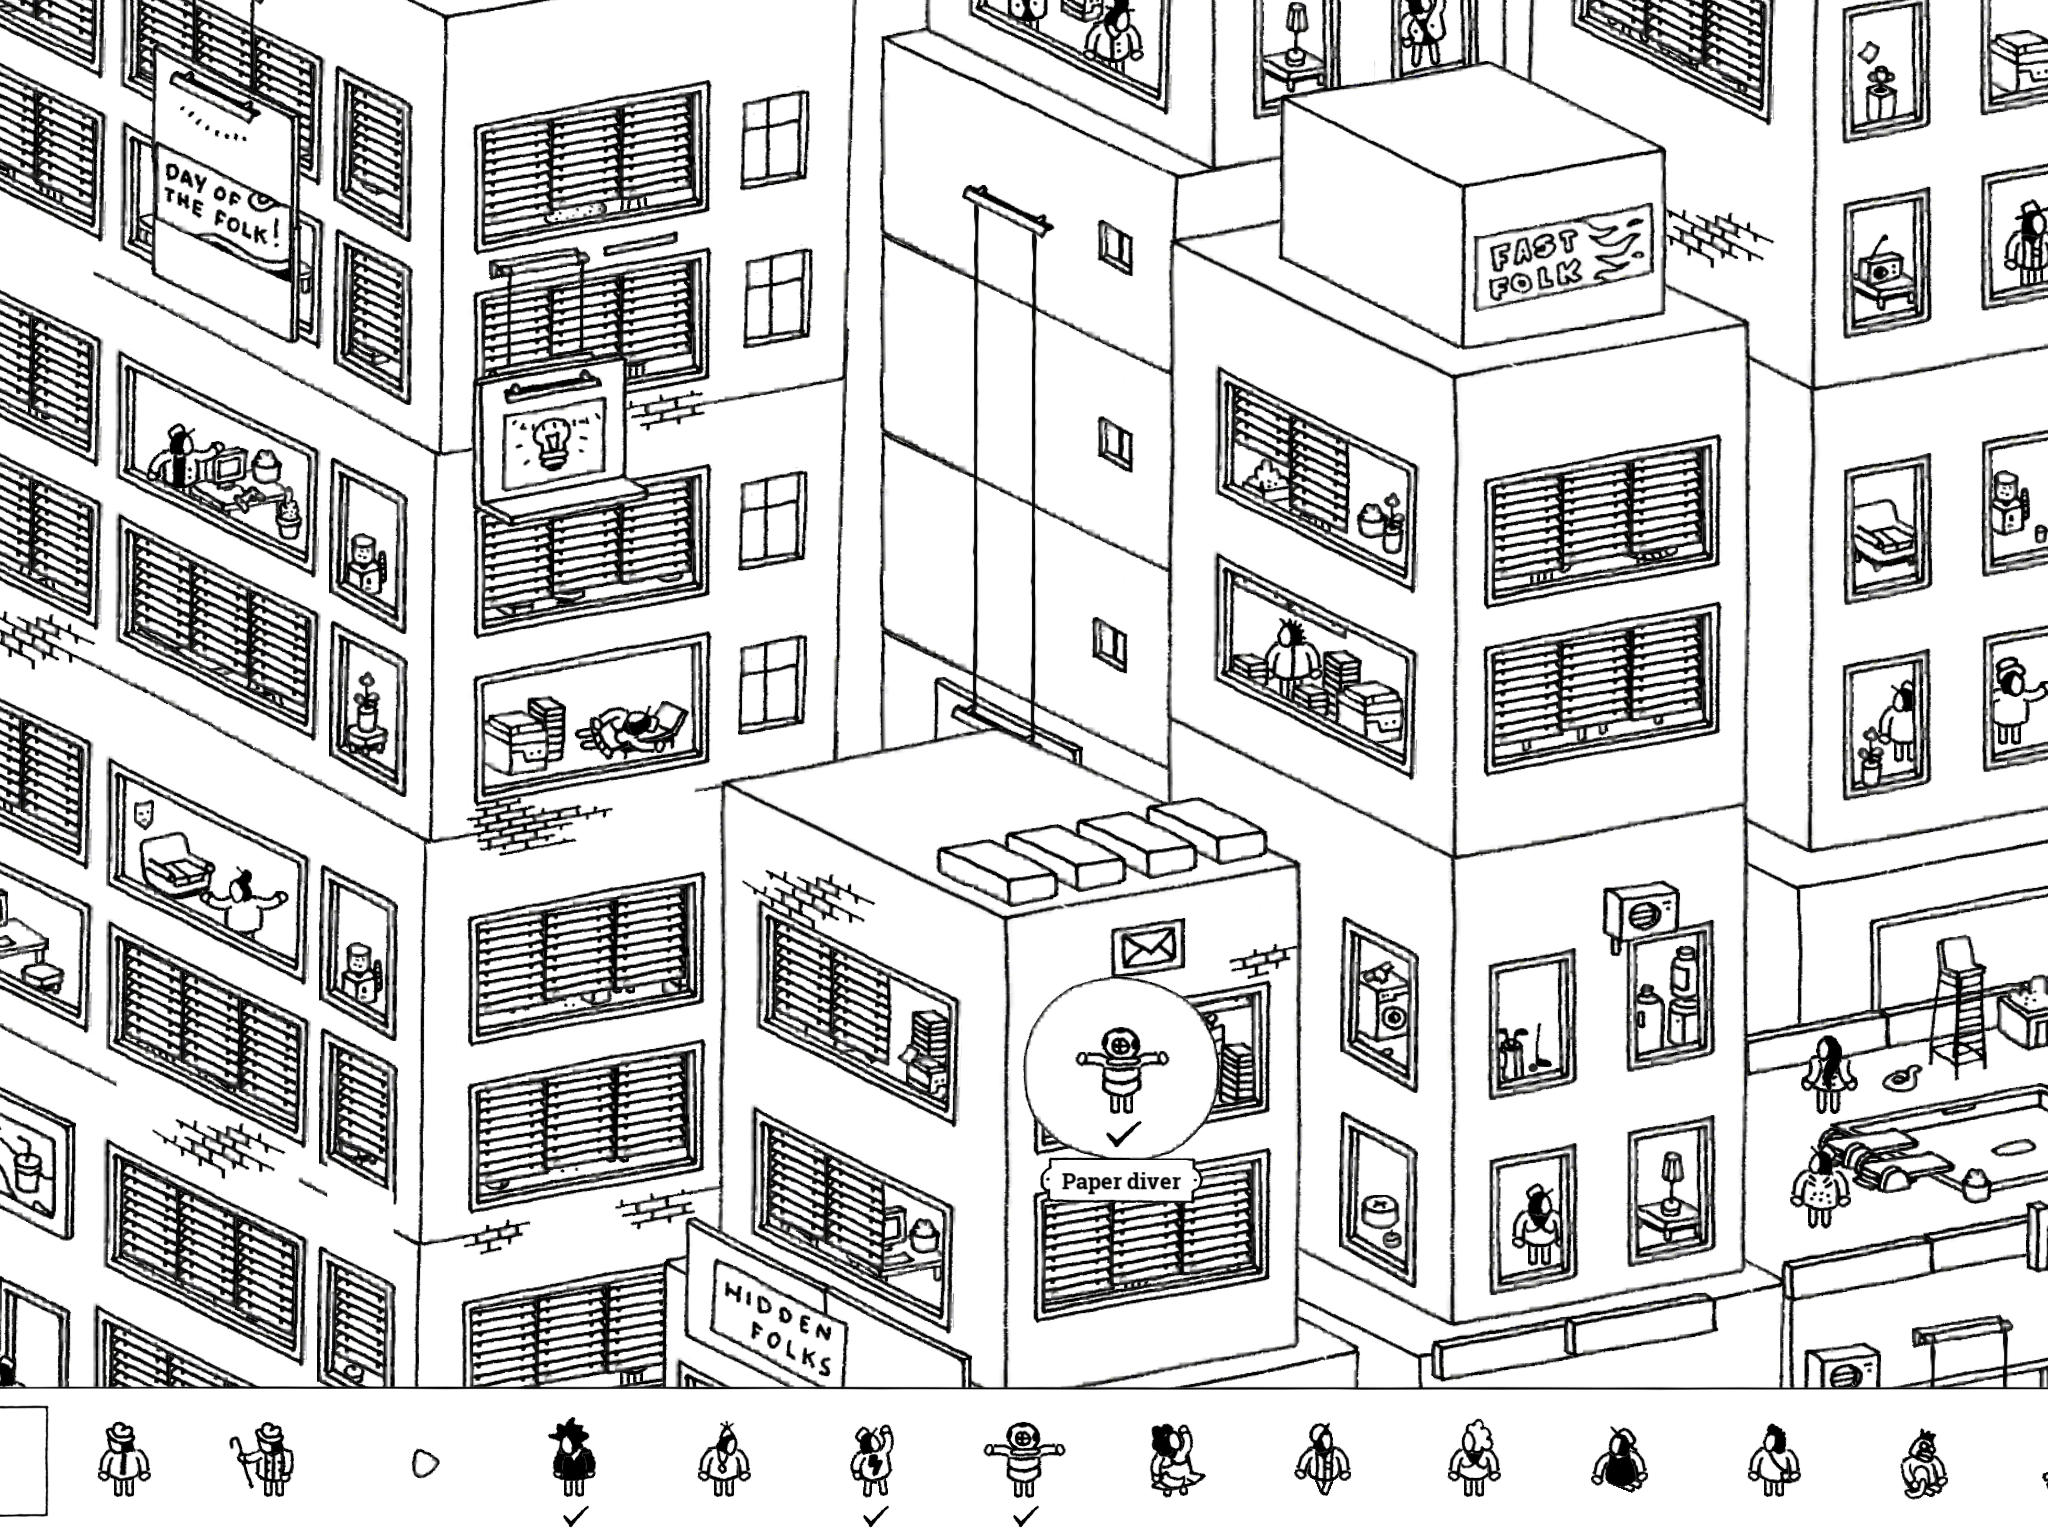
- Paper Diver: “Nobody can sort mail like paper diver can sort mail. What a woman, what a job.”
The post office building is just south of the mermaid billboard on Cableman’s building; it’s pretty much in the center of the image and has a picture of a letter on top of it. Paper Diver is on the top floor, just underneath that letter symbol; pull up the blinds to reveal her.
- Paper Diver: “Nobody can sort mail like paper diver can sort mail. What a woman, what a job.”
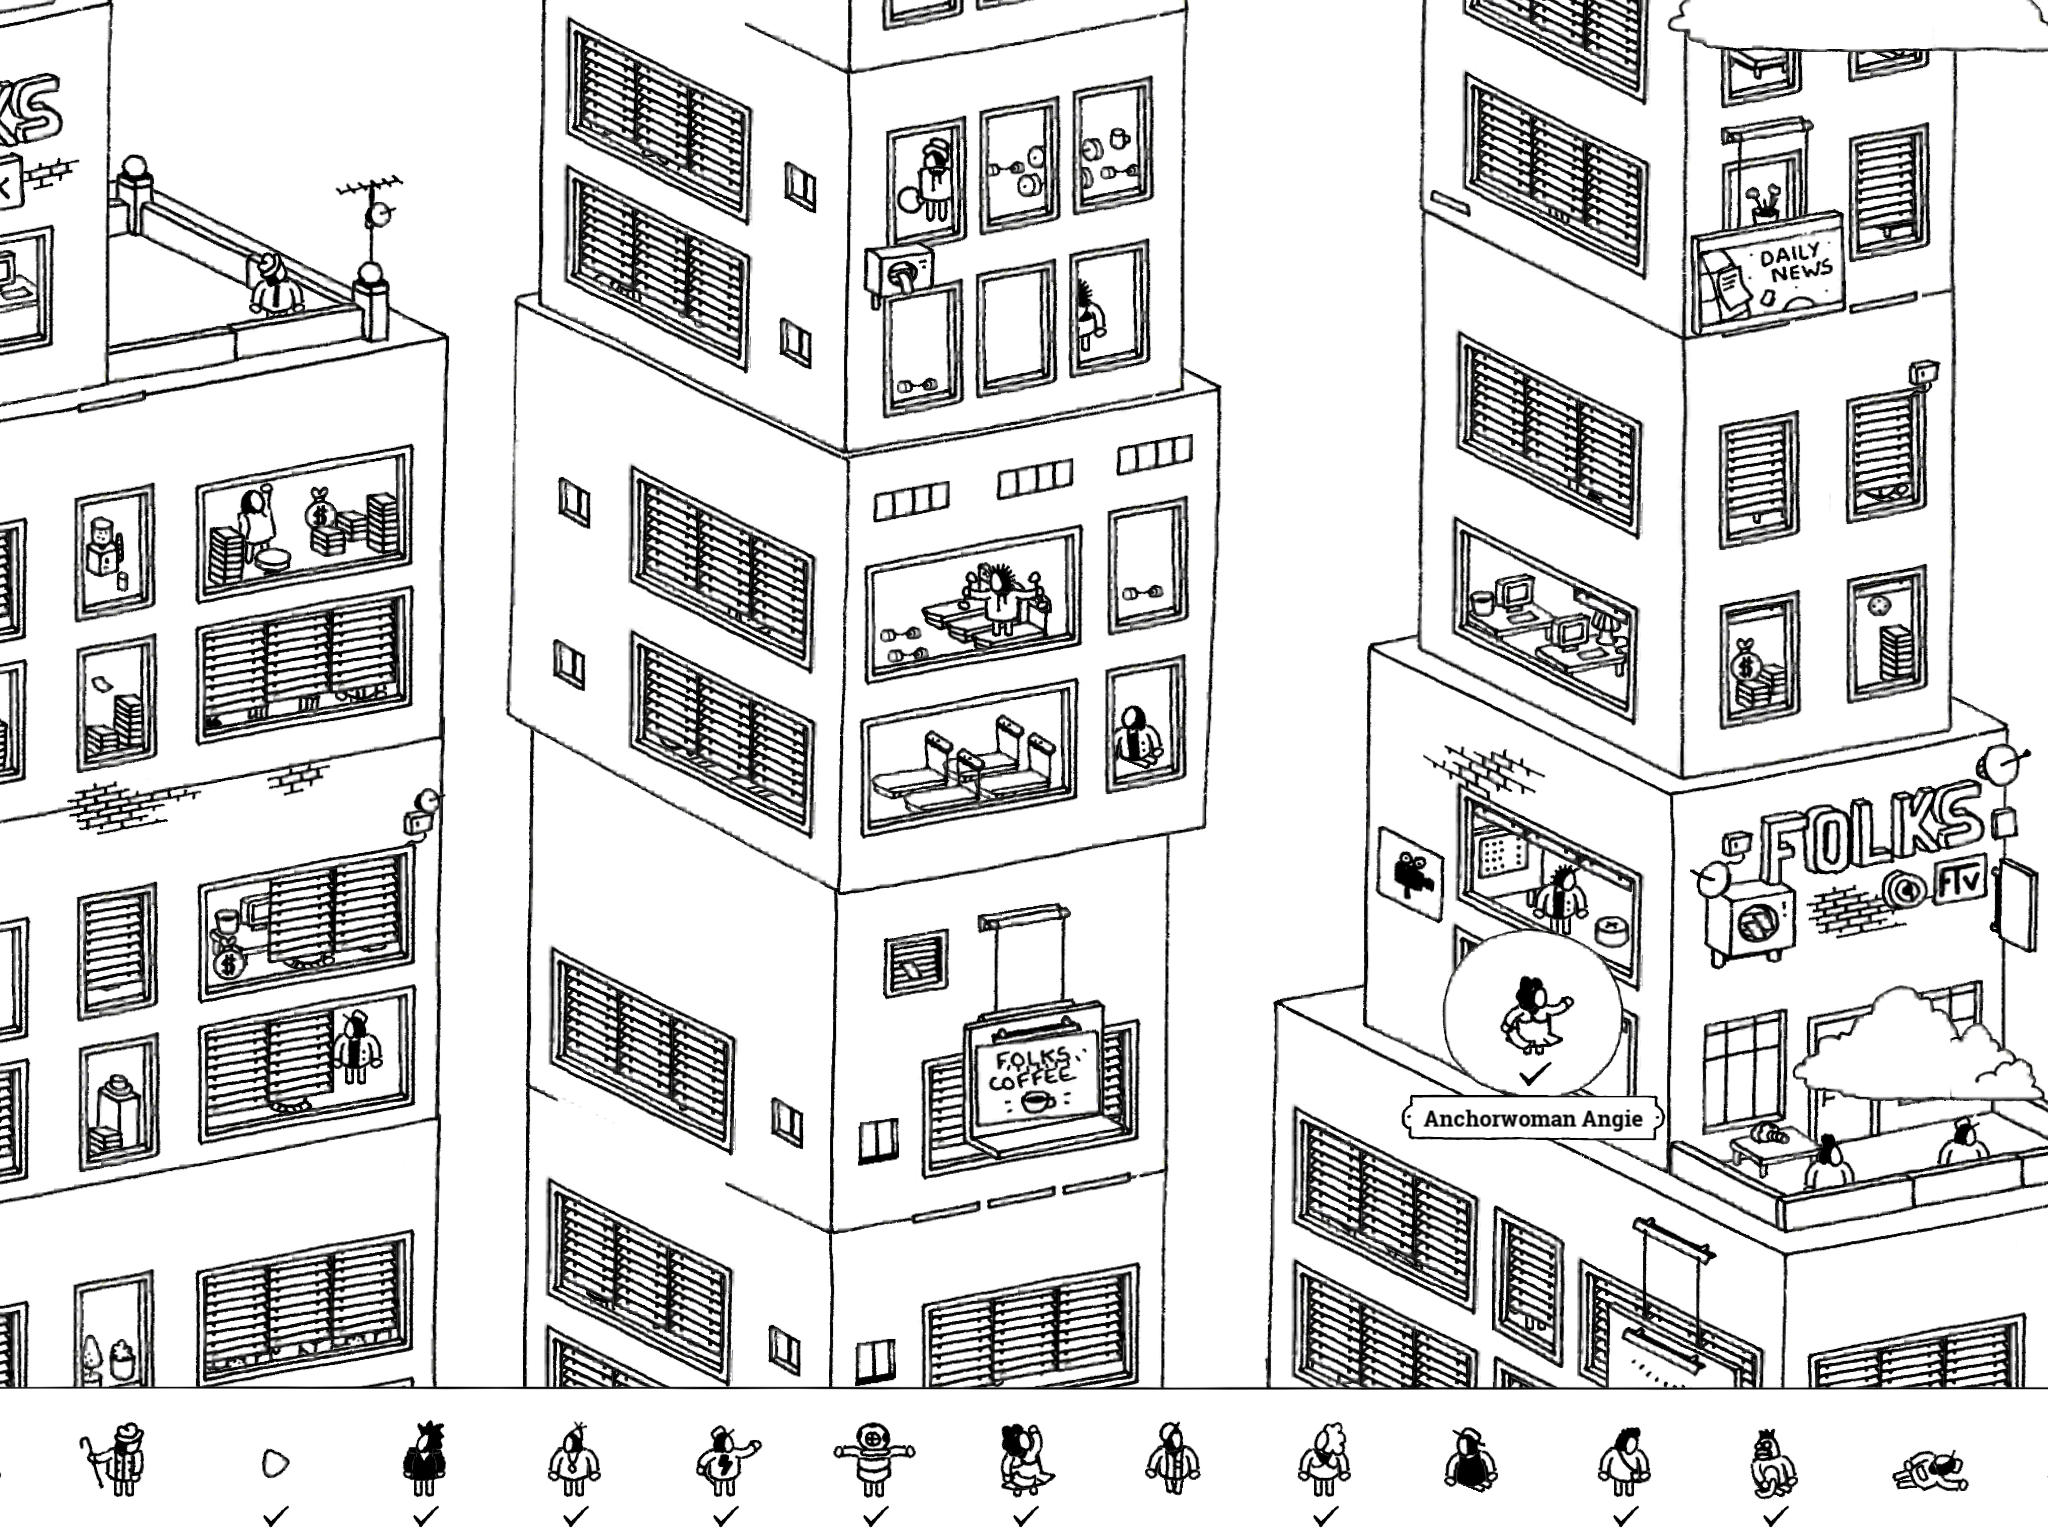
- Anchorwoman Angie: “Anchorwoman Angie is the public’s favorite FTV news anchor!”
The Folks TV building is on the east side of the image, just above the hotel. The Folks TV sign is right above the balcony, and left of this is a picture of a film camera. Open the blinds just right of the camera (the bottom set) to reveal Anchorwoman Angie.
- Anchorwoman Angie: “Anchorwoman Angie is the public’s favorite FTV news anchor!”
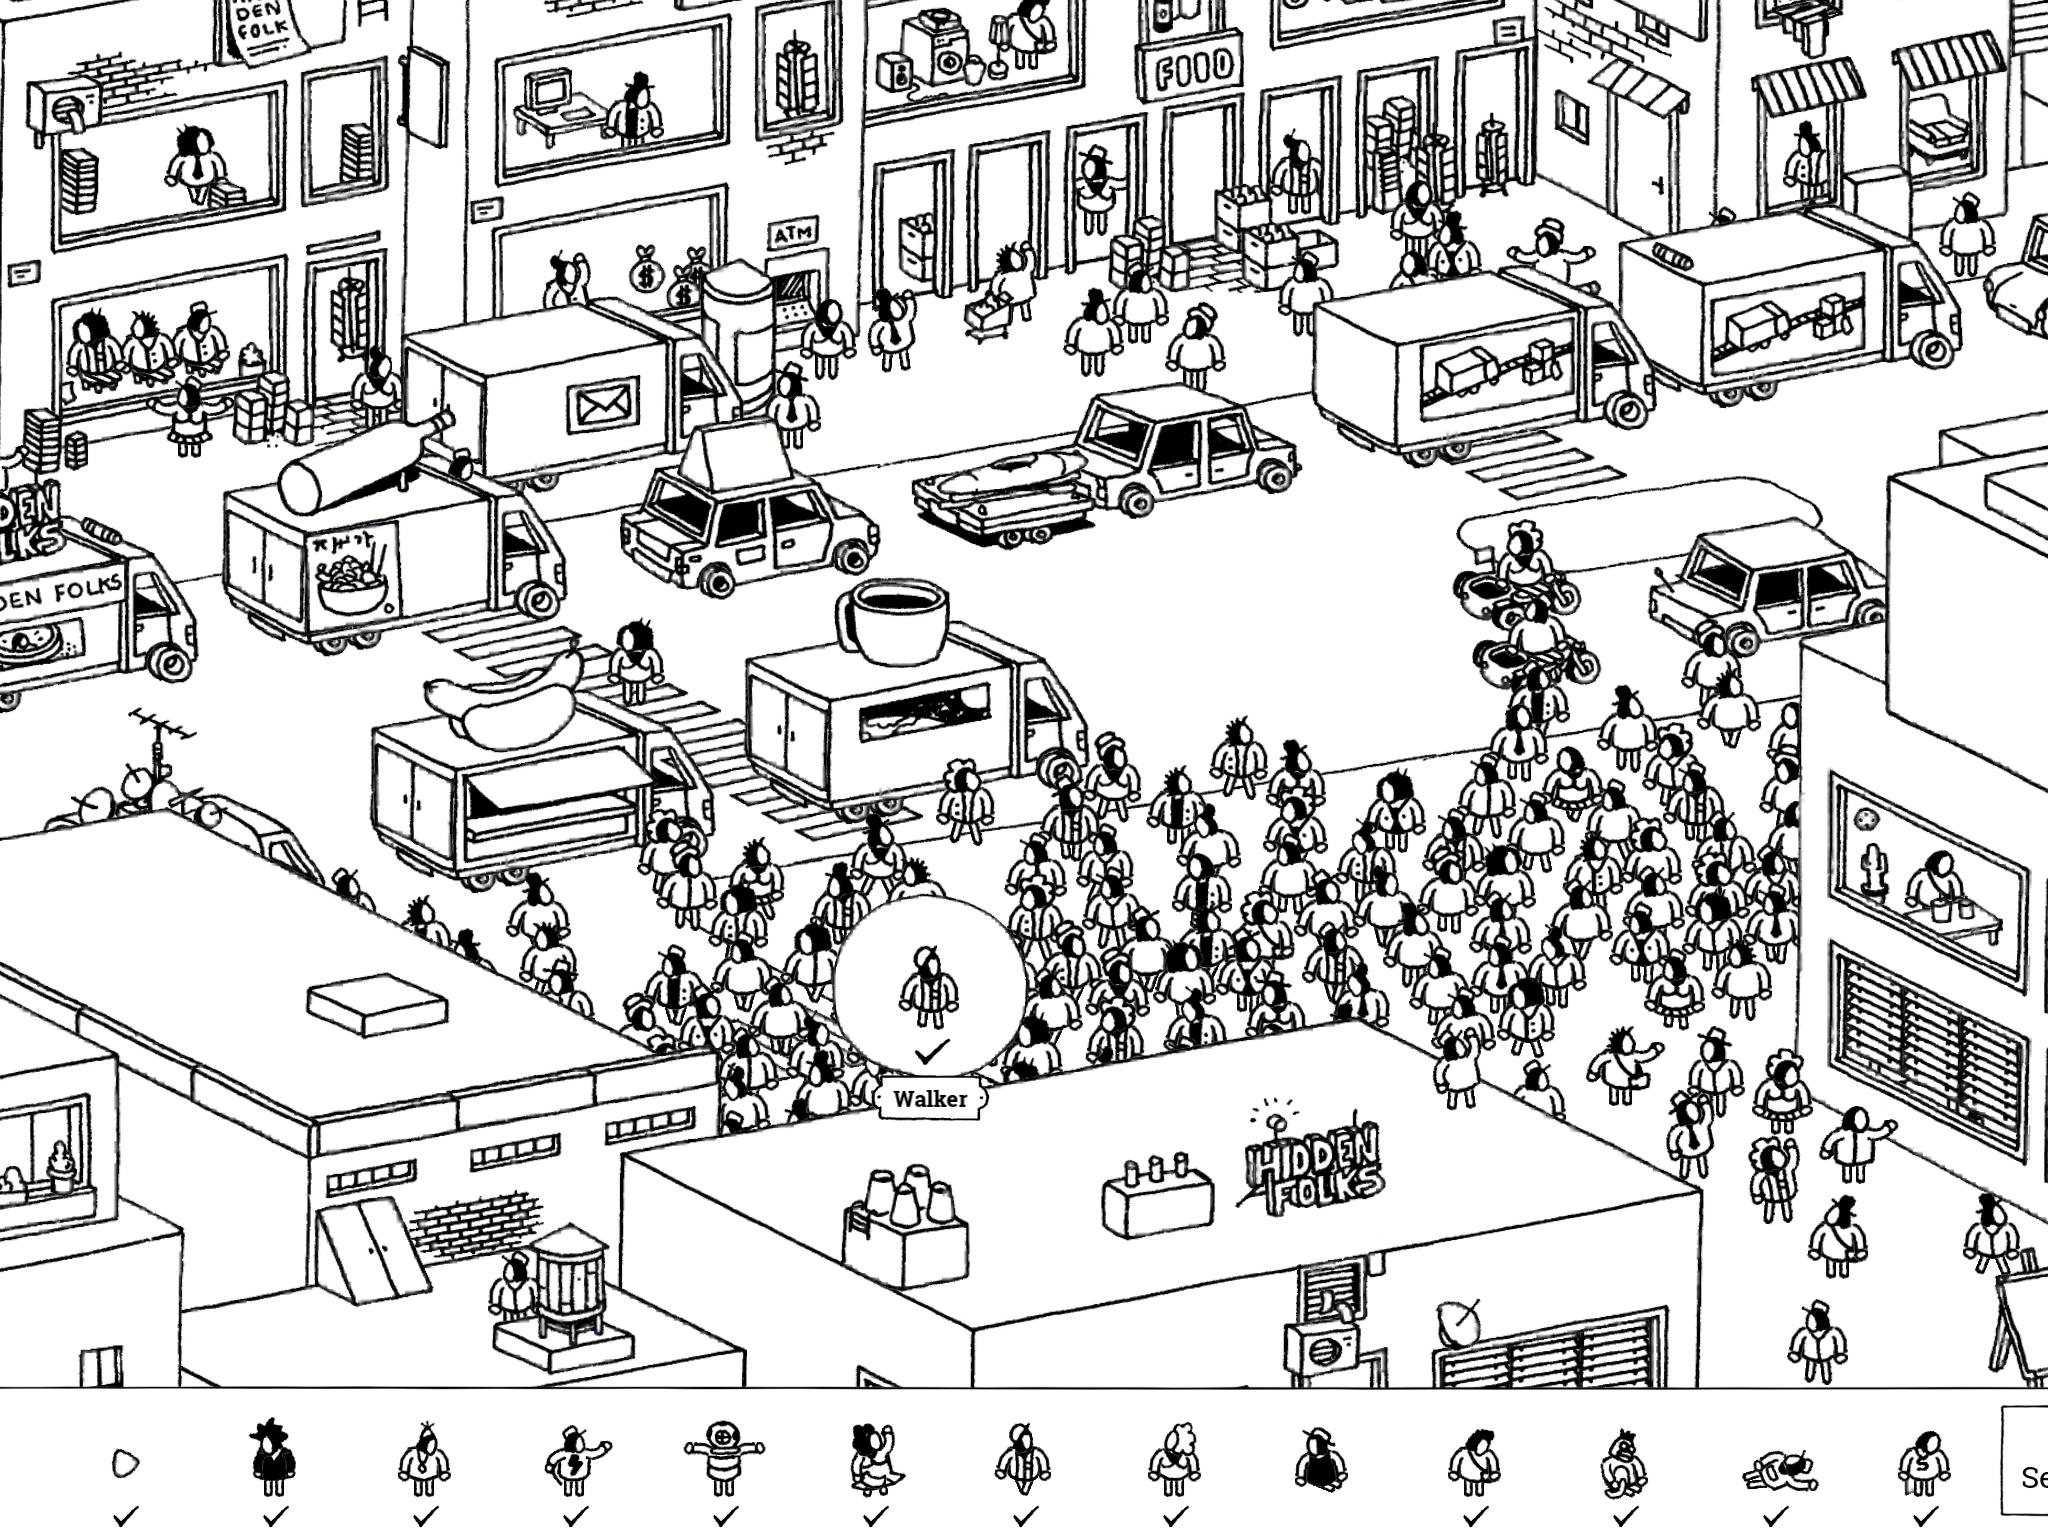
- Walker: “Walker picked the slowest foot traffic line. Again. Ugh.”
Walker is mixed up in the giant group of pedestrians near the center of the image. If you watch them for a bit, you can see that some lines are moving faster than others. Walker is in the slowest line, which is the fourth from the bottom. This line is heading east while the line above them is heading west. Look for Walker’s double-striped suit and white hat; if you miss him, he will pass by again shortly.
- Walker: “Walker picked the slowest foot traffic line. Again. Ugh.”
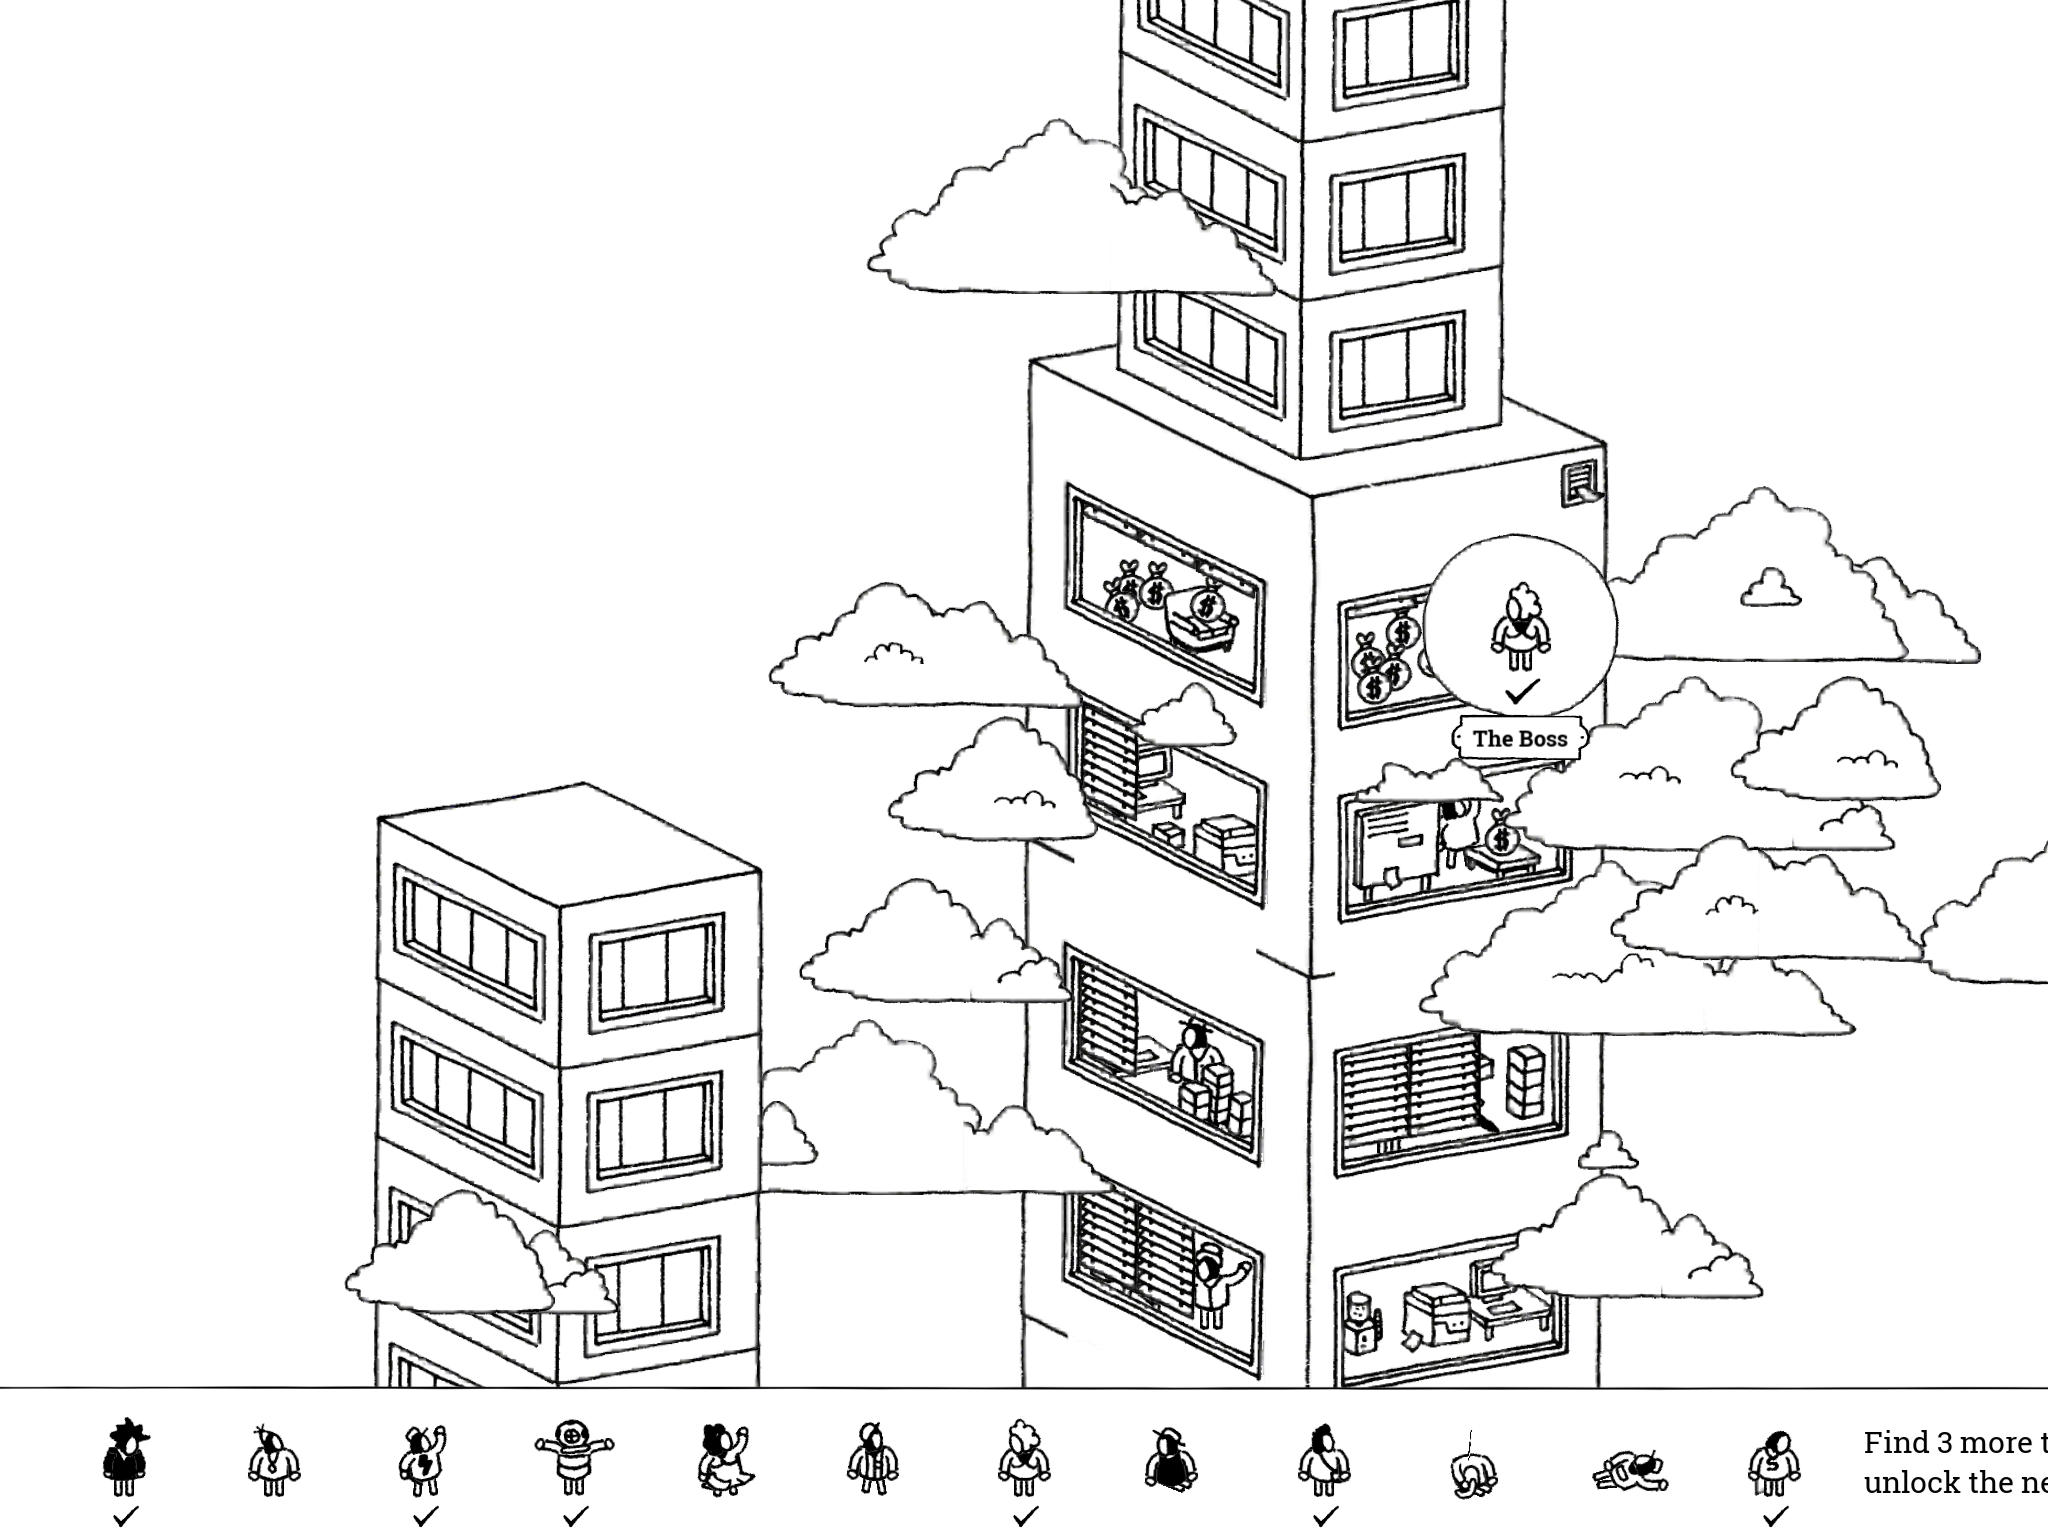
- The Boss: “The Boss does some high-level thinking on his high-profile job at this top-level company.”
The Boss works at the bank, which is the tallest building in the Big City, slightly northeast of the center of the image. Head up from the balcony Vinny is standing on until you see a bunch of clouds around some windows. The Boss is in the upper-most window with blinds on it, on the right side of the building. Tap the clouds to move them away from this window, then drag the blinds up to reveal him.
- The Boss: “The Boss does some high-level thinking on his high-profile job at this top-level company.”
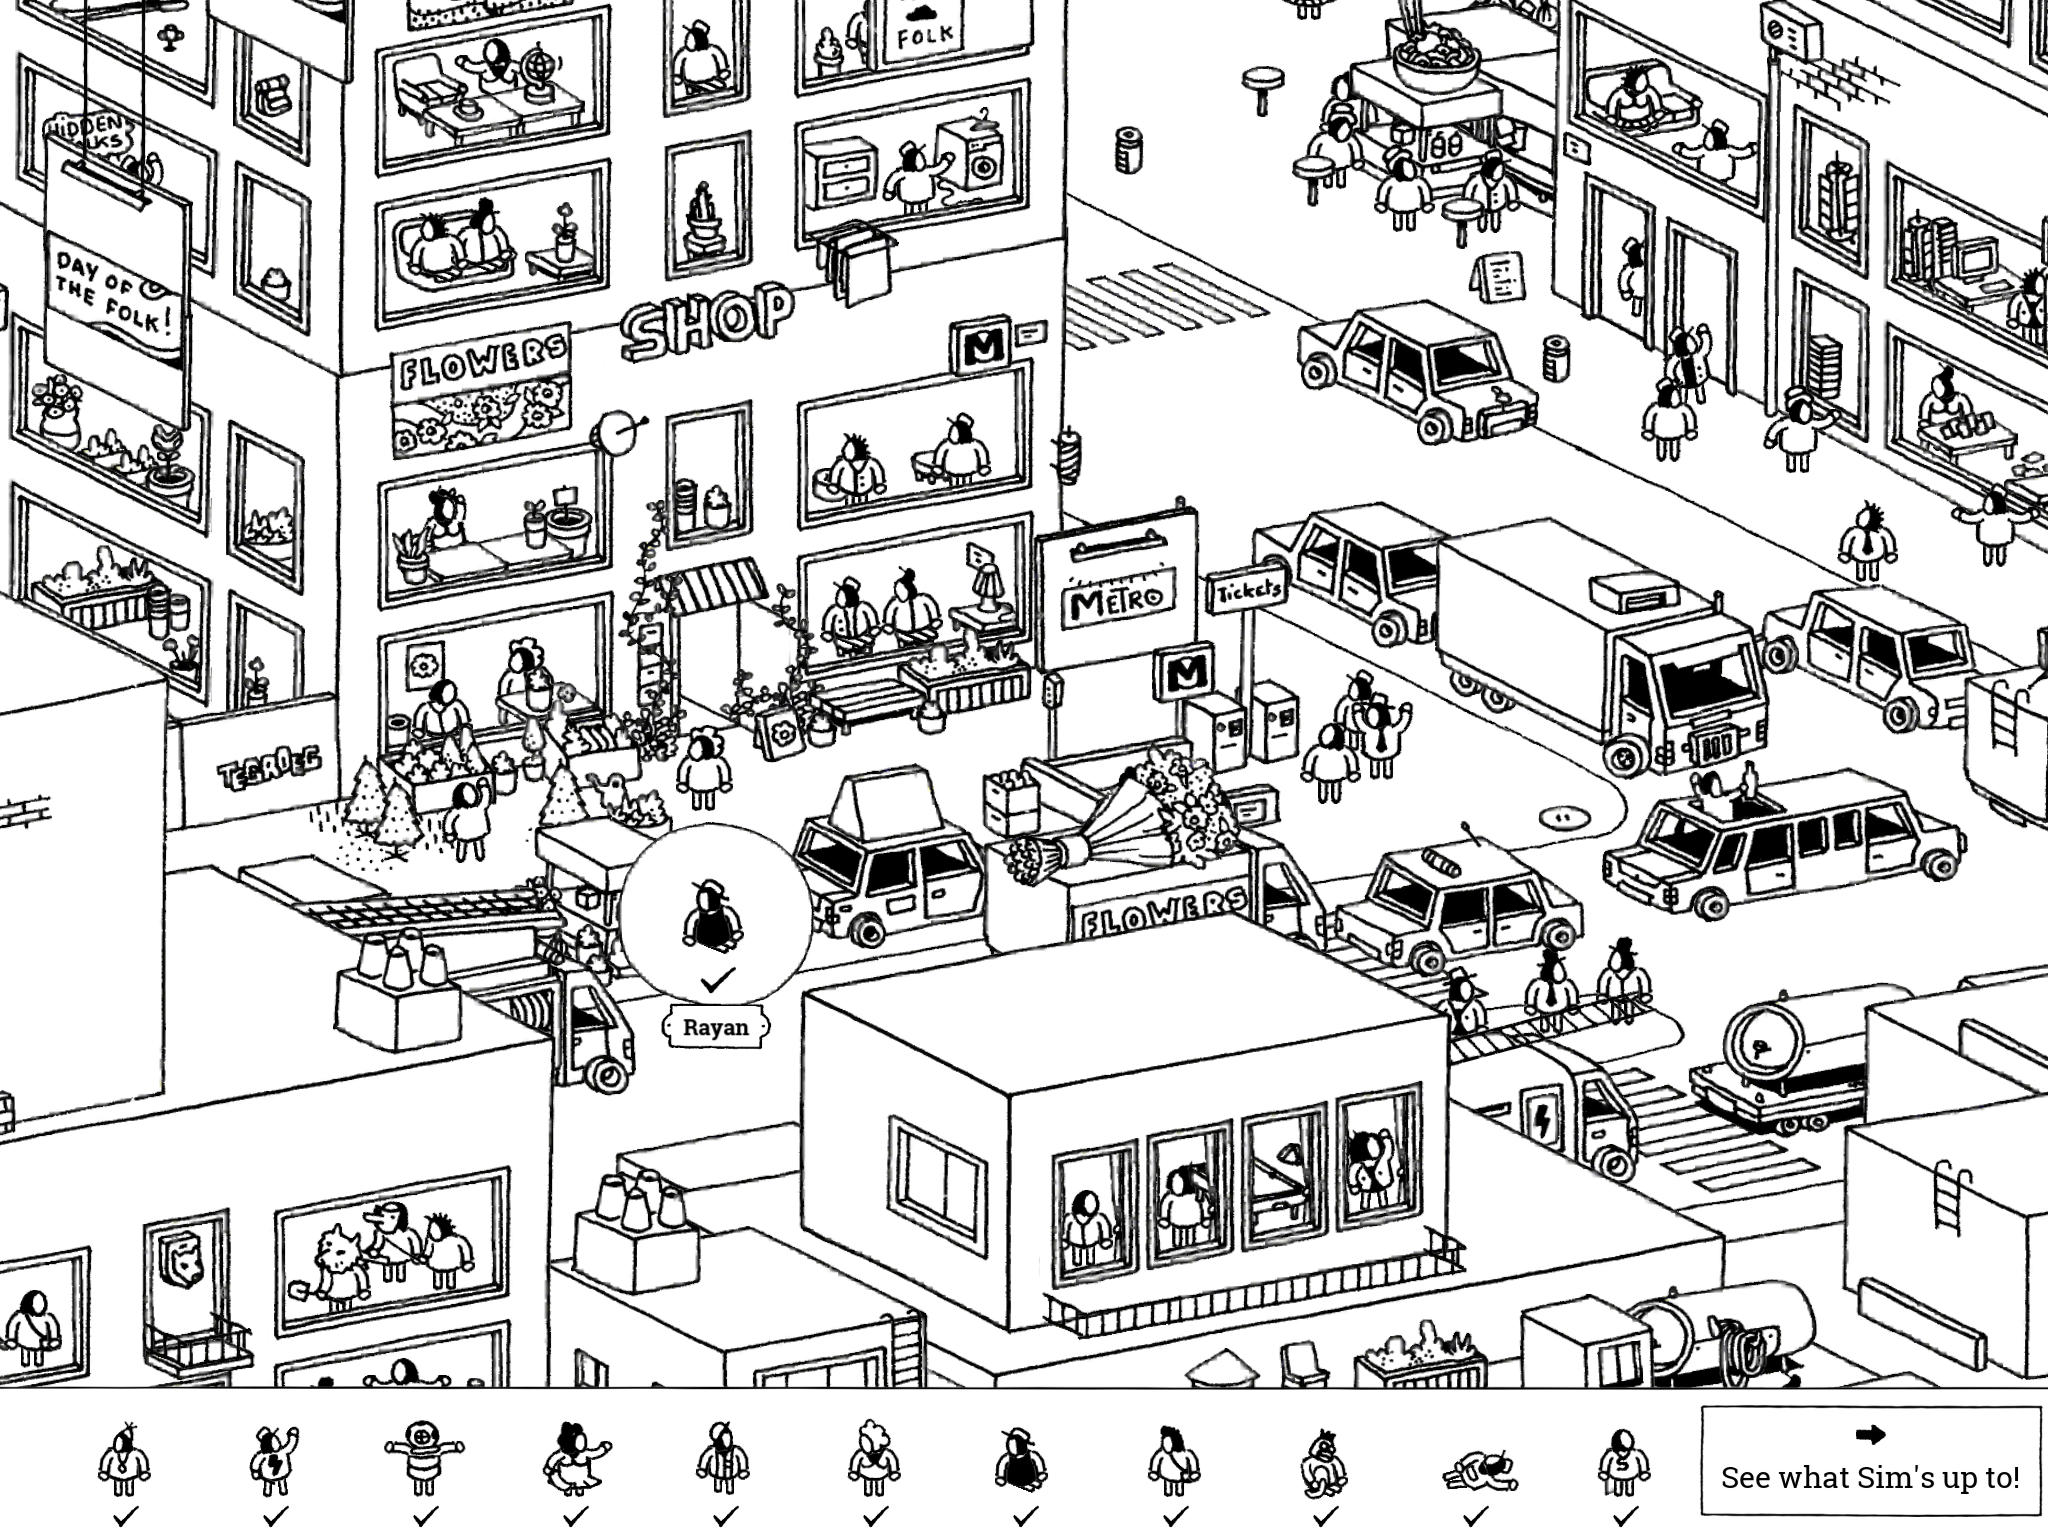
- Rayan: “The traffic jam is bad business for flower stall owner Rayan. Move on, cars!”
On the street just north of the throng of pedestrians are two lines of eastbound cars, with none of them moving. Rayan’s flower shop is on the northwest side of this street, just west of the metro entrance. He’s hidden behind the cars here; you can tell where he’ll be because of the “Flowers” sign on the building and all the plants out front. You need to get the cars to move out of the way of his shop: find a place where there is a space between two cars and tap the car behind this space to move it forward. Then tap every car in the row behind to move them each one space forward until you reveal Rayan. Note: you don’t have to wait for a car to fully move forward before tapping the one behind it; just tap them all in quick succession and they should move up. Also, you can accidentally move a car back in front of Rayan; if this is the case, just tap the frontmost car and do it all again until he’s unblocked.
- Rayan: “The traffic jam is bad business for flower stall owner Rayan. Move on, cars!”
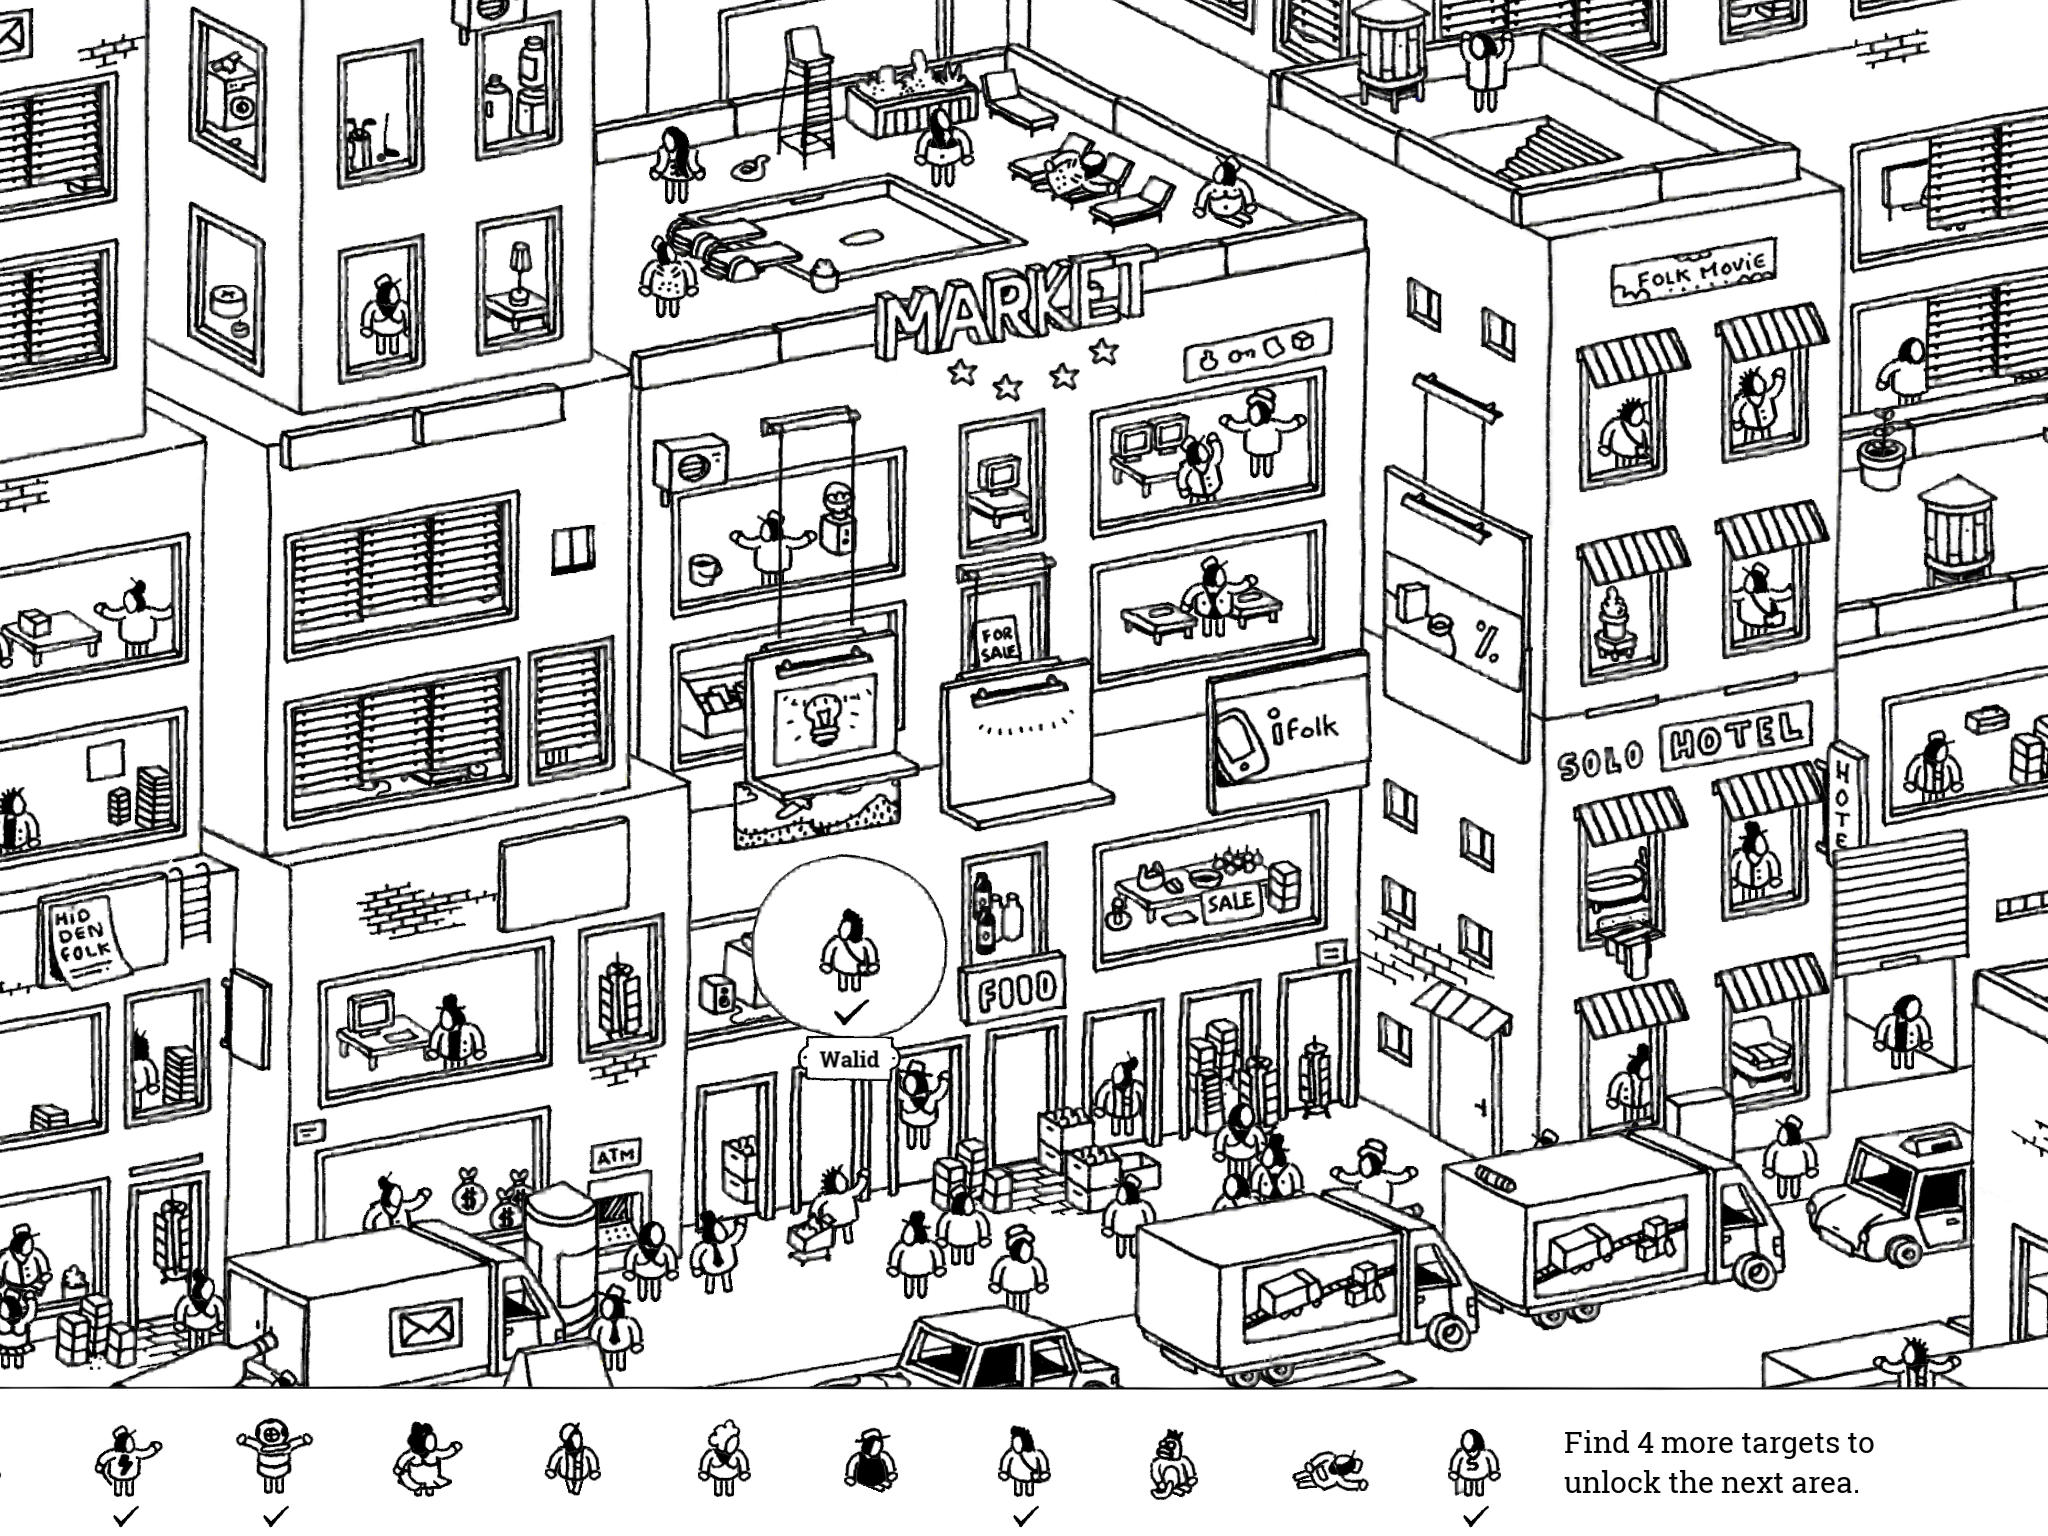
- Walid: “Shopper Walid had the bright idea to go shopping today!”
Walid is shopping at the market, which is just north of the throng of pedestrians the traffic jam blocking Rayan’s stall. There is a hanging billboard with a lightbulb on it in front of a window; tap this billboard to raise it up. Walid is in the window behind where the billboard was, looking at a lamp and a washing machine.
- Walid: “Shopper Walid had the bright idea to go shopping today!”
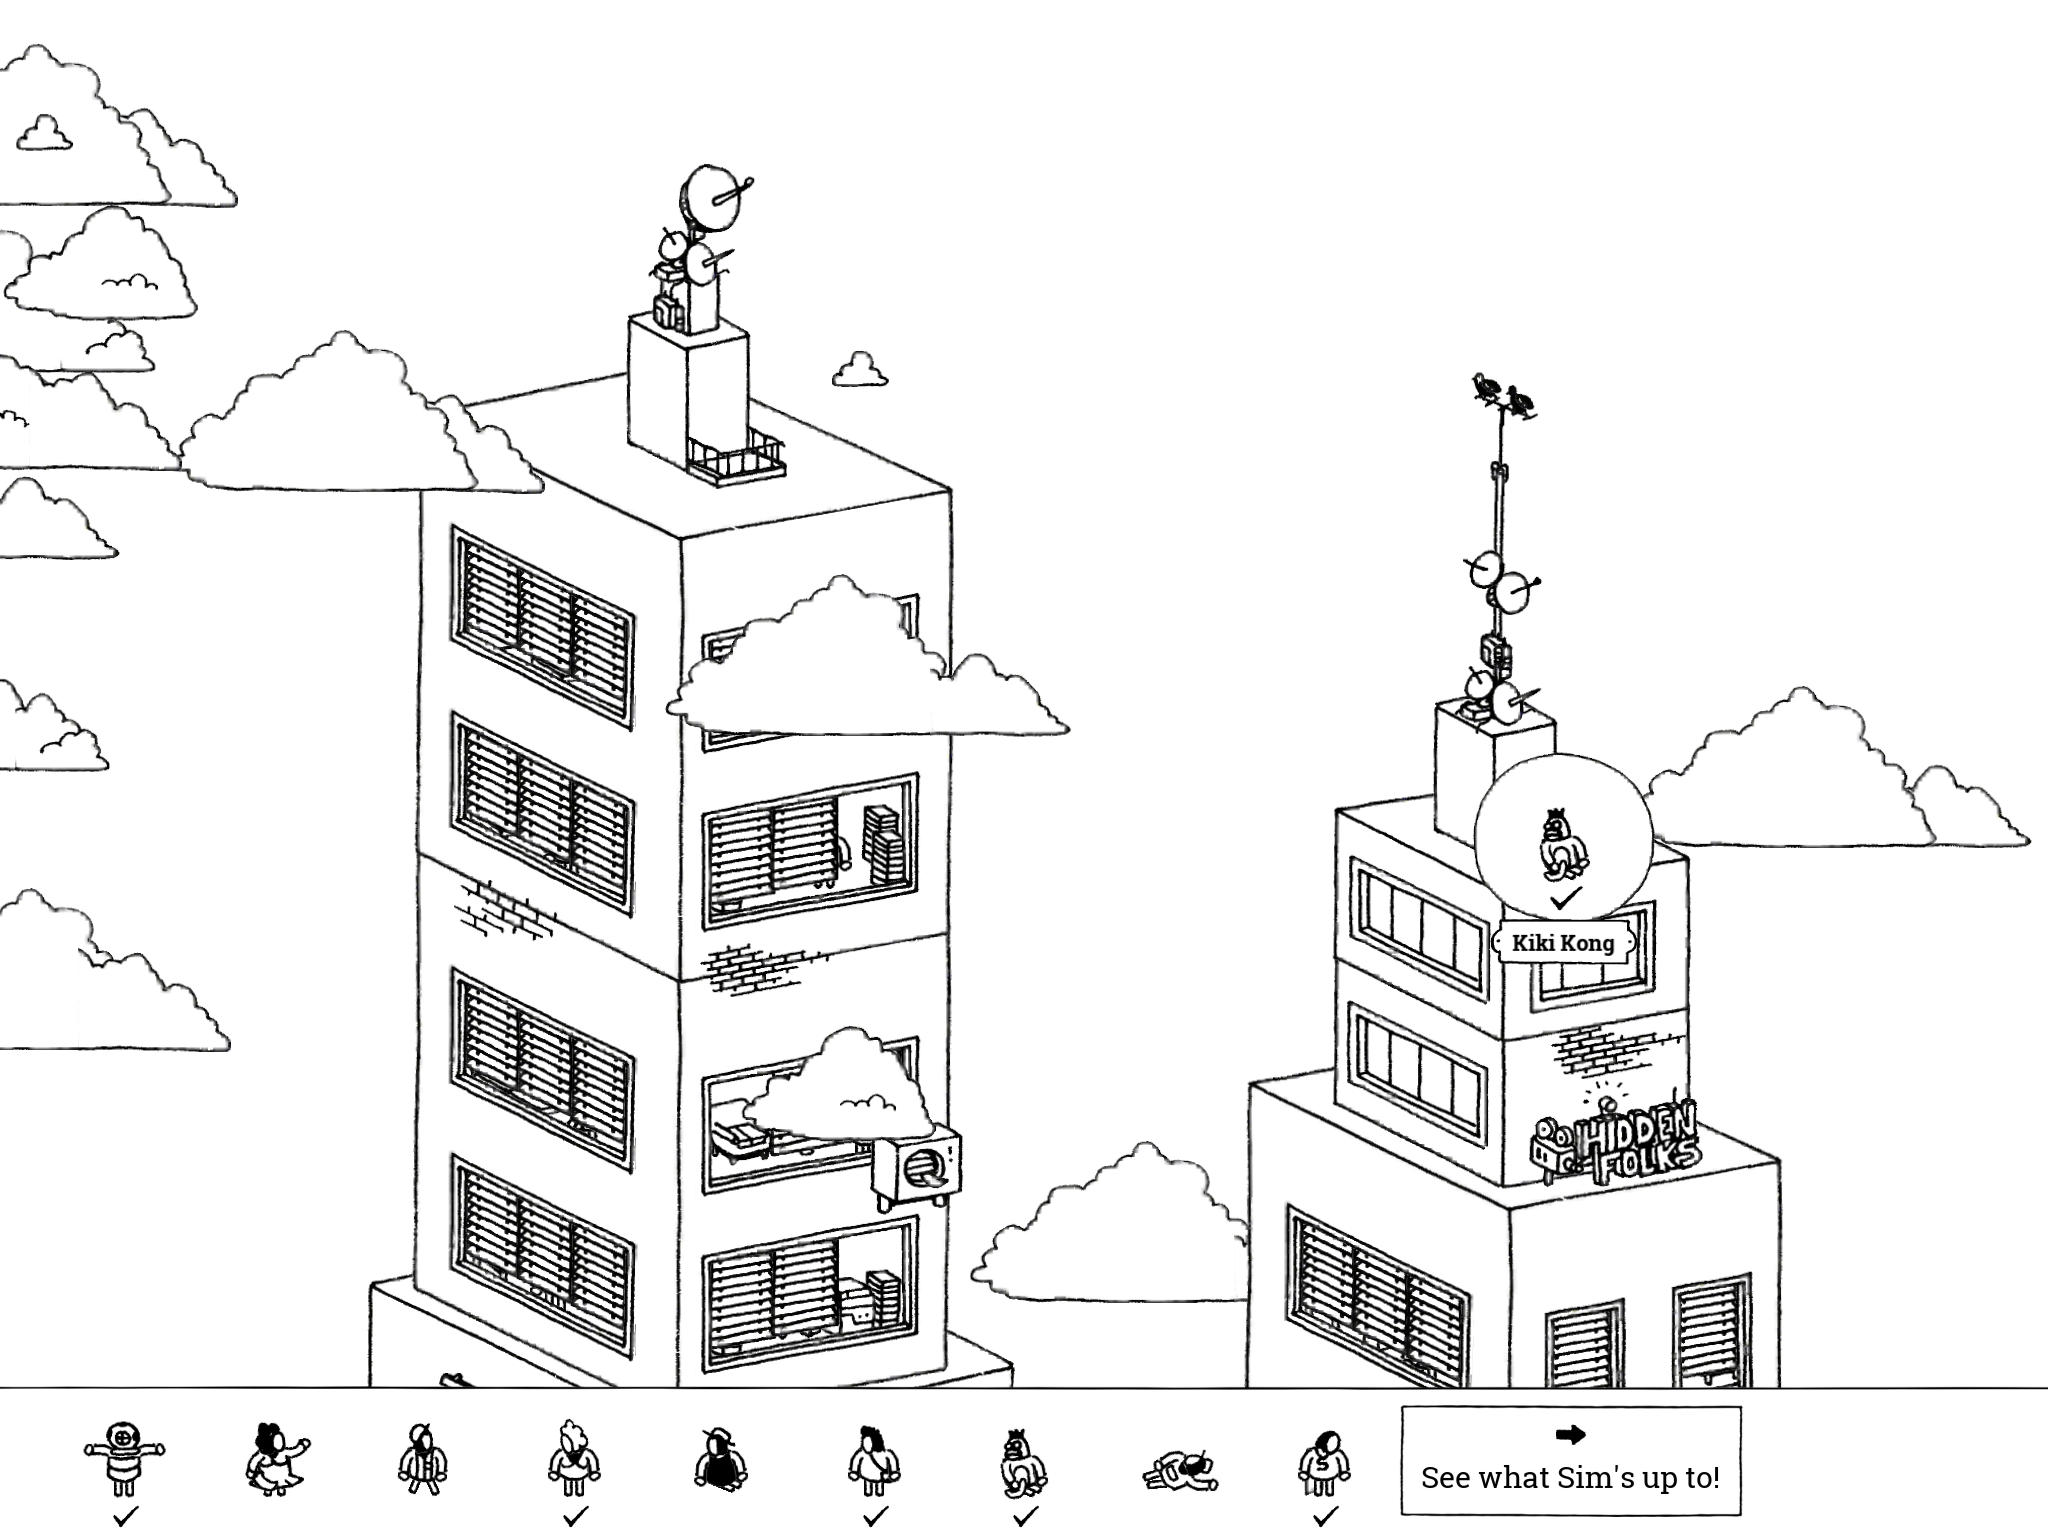
- Kiki Kong: “Kiki Kong didn’t account for the weather at all. Really picked the wrong day.”
Kiki Kong is on top of the Folks TV station on the far east side of the image. There are some clouds floating above the “Hidden Folks” sign and underneath the satellite array; tap the clouds a few times to move them out of the way and reveal Kiki Kong.
- Kiki Kong: “Kiki Kong didn’t account for the weather at all. Really picked the wrong day.”
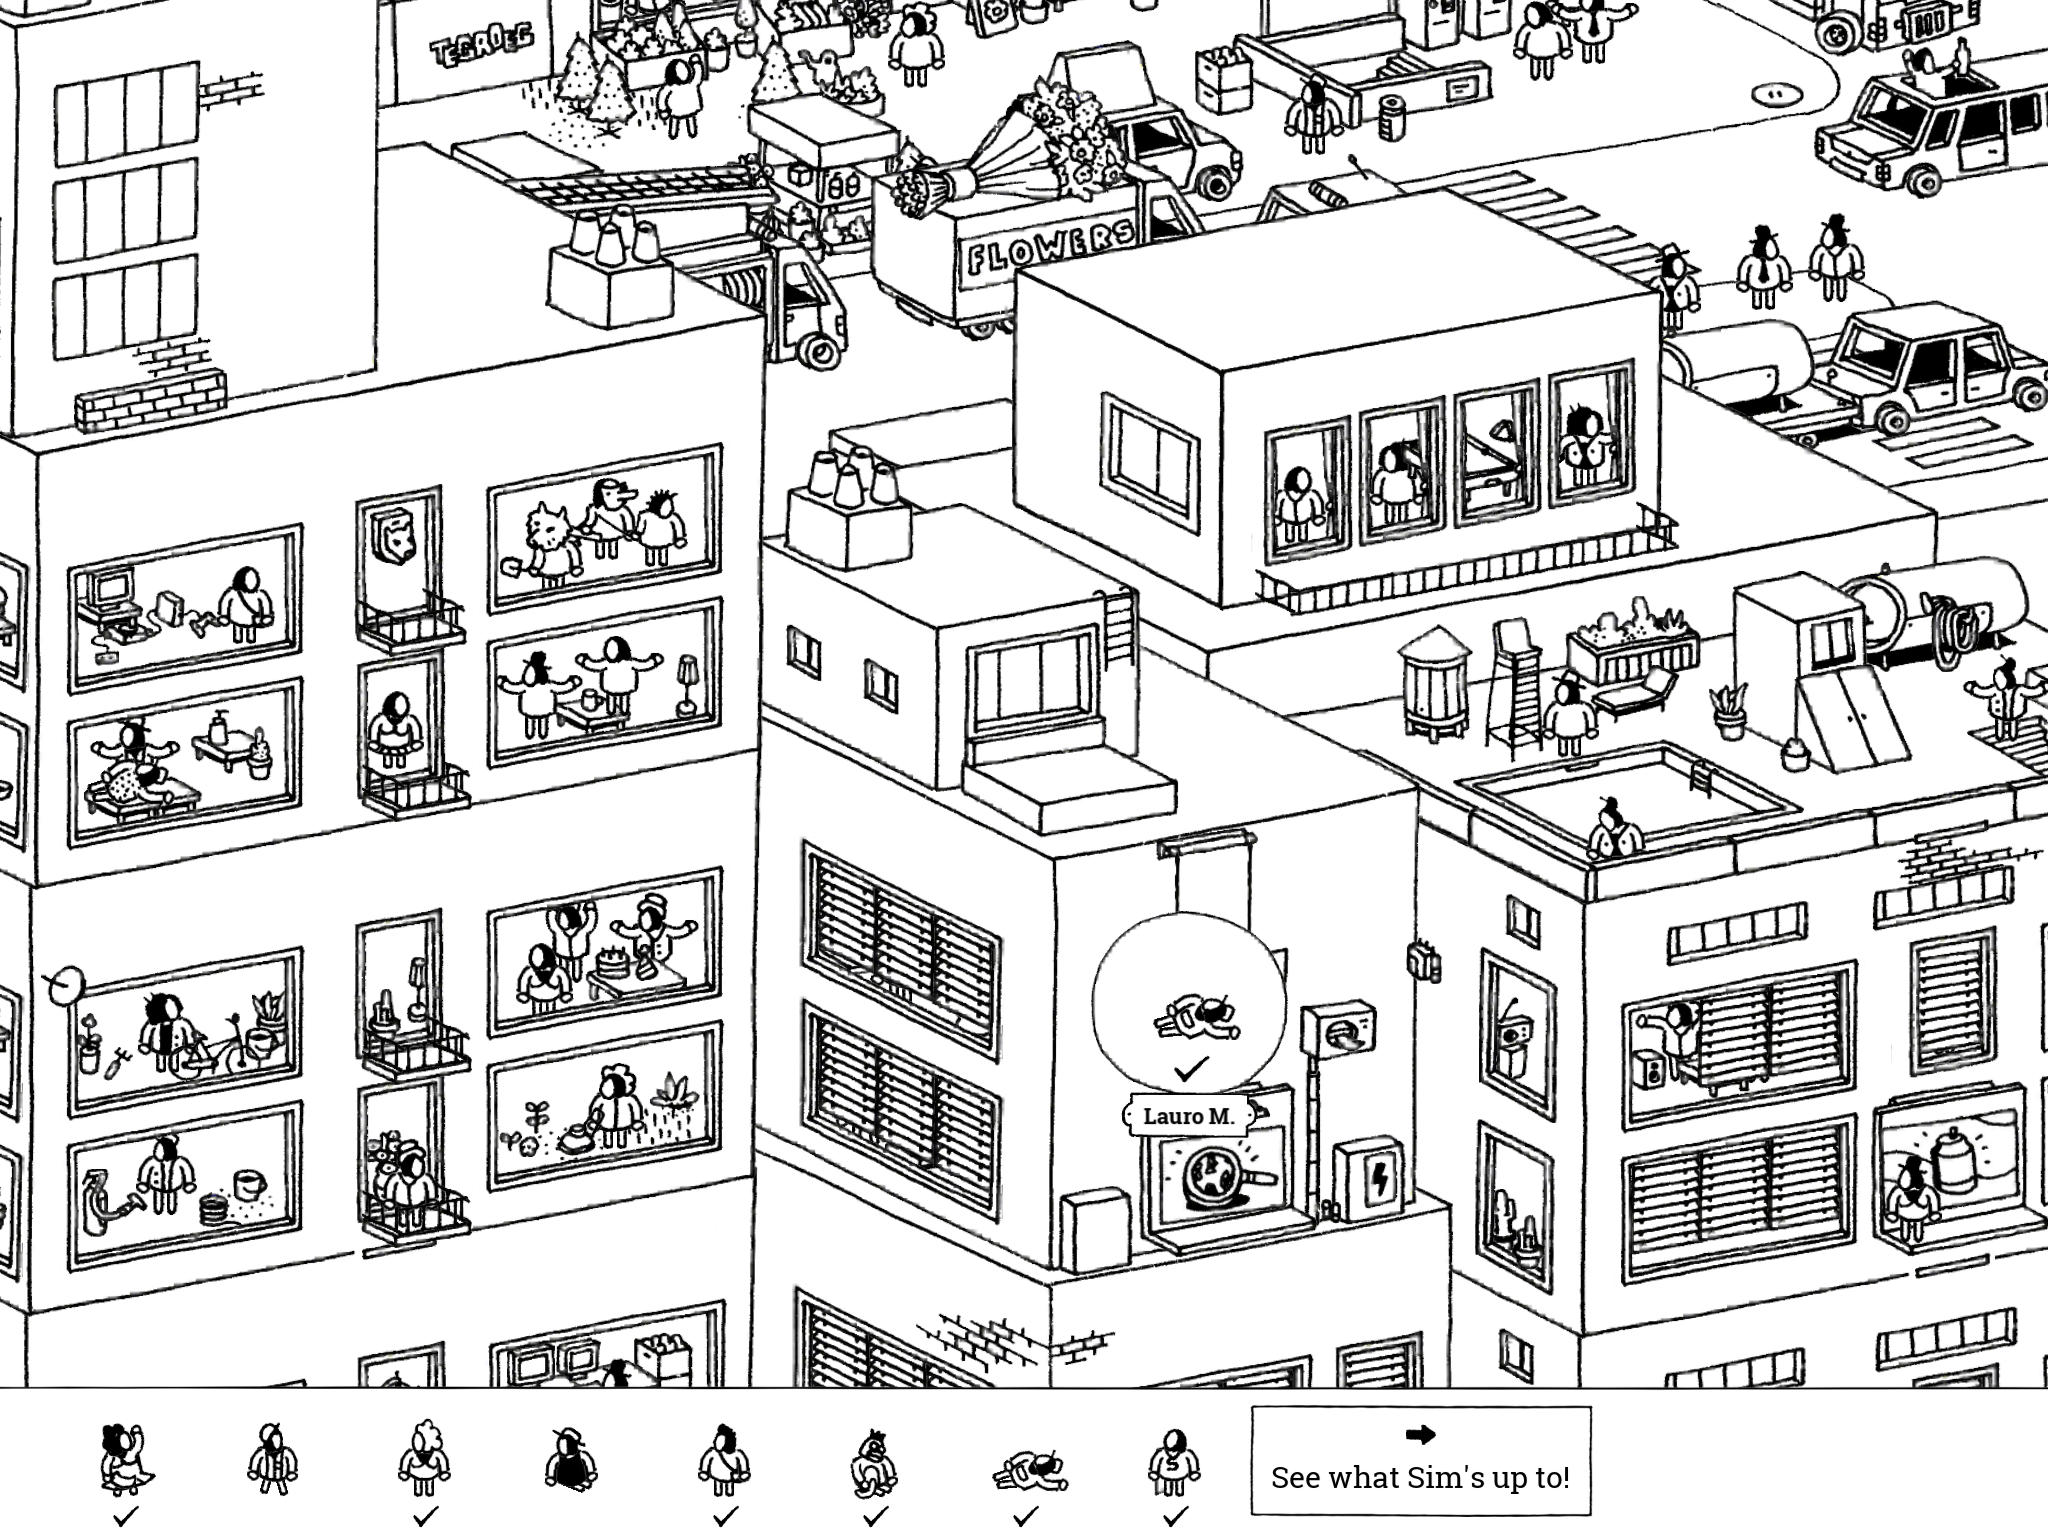
- Lauro M.: “If you zoom in on it, you could say that electrician Lauro M. really suffers from the consequences of ad blockers.”
Lauro M. is in the building just south of Rayan’s flower shop, just west of the building with the rooftop pool. There’s a hanging billboard with a magnifying glass on it; tap this billboard to move it down. Lauro M. is lying down in the window that was behind the billboard.
- Lauro M.: “If you zoom in on it, you could say that electrician Lauro M. really suffers from the consequences of ad blockers.”
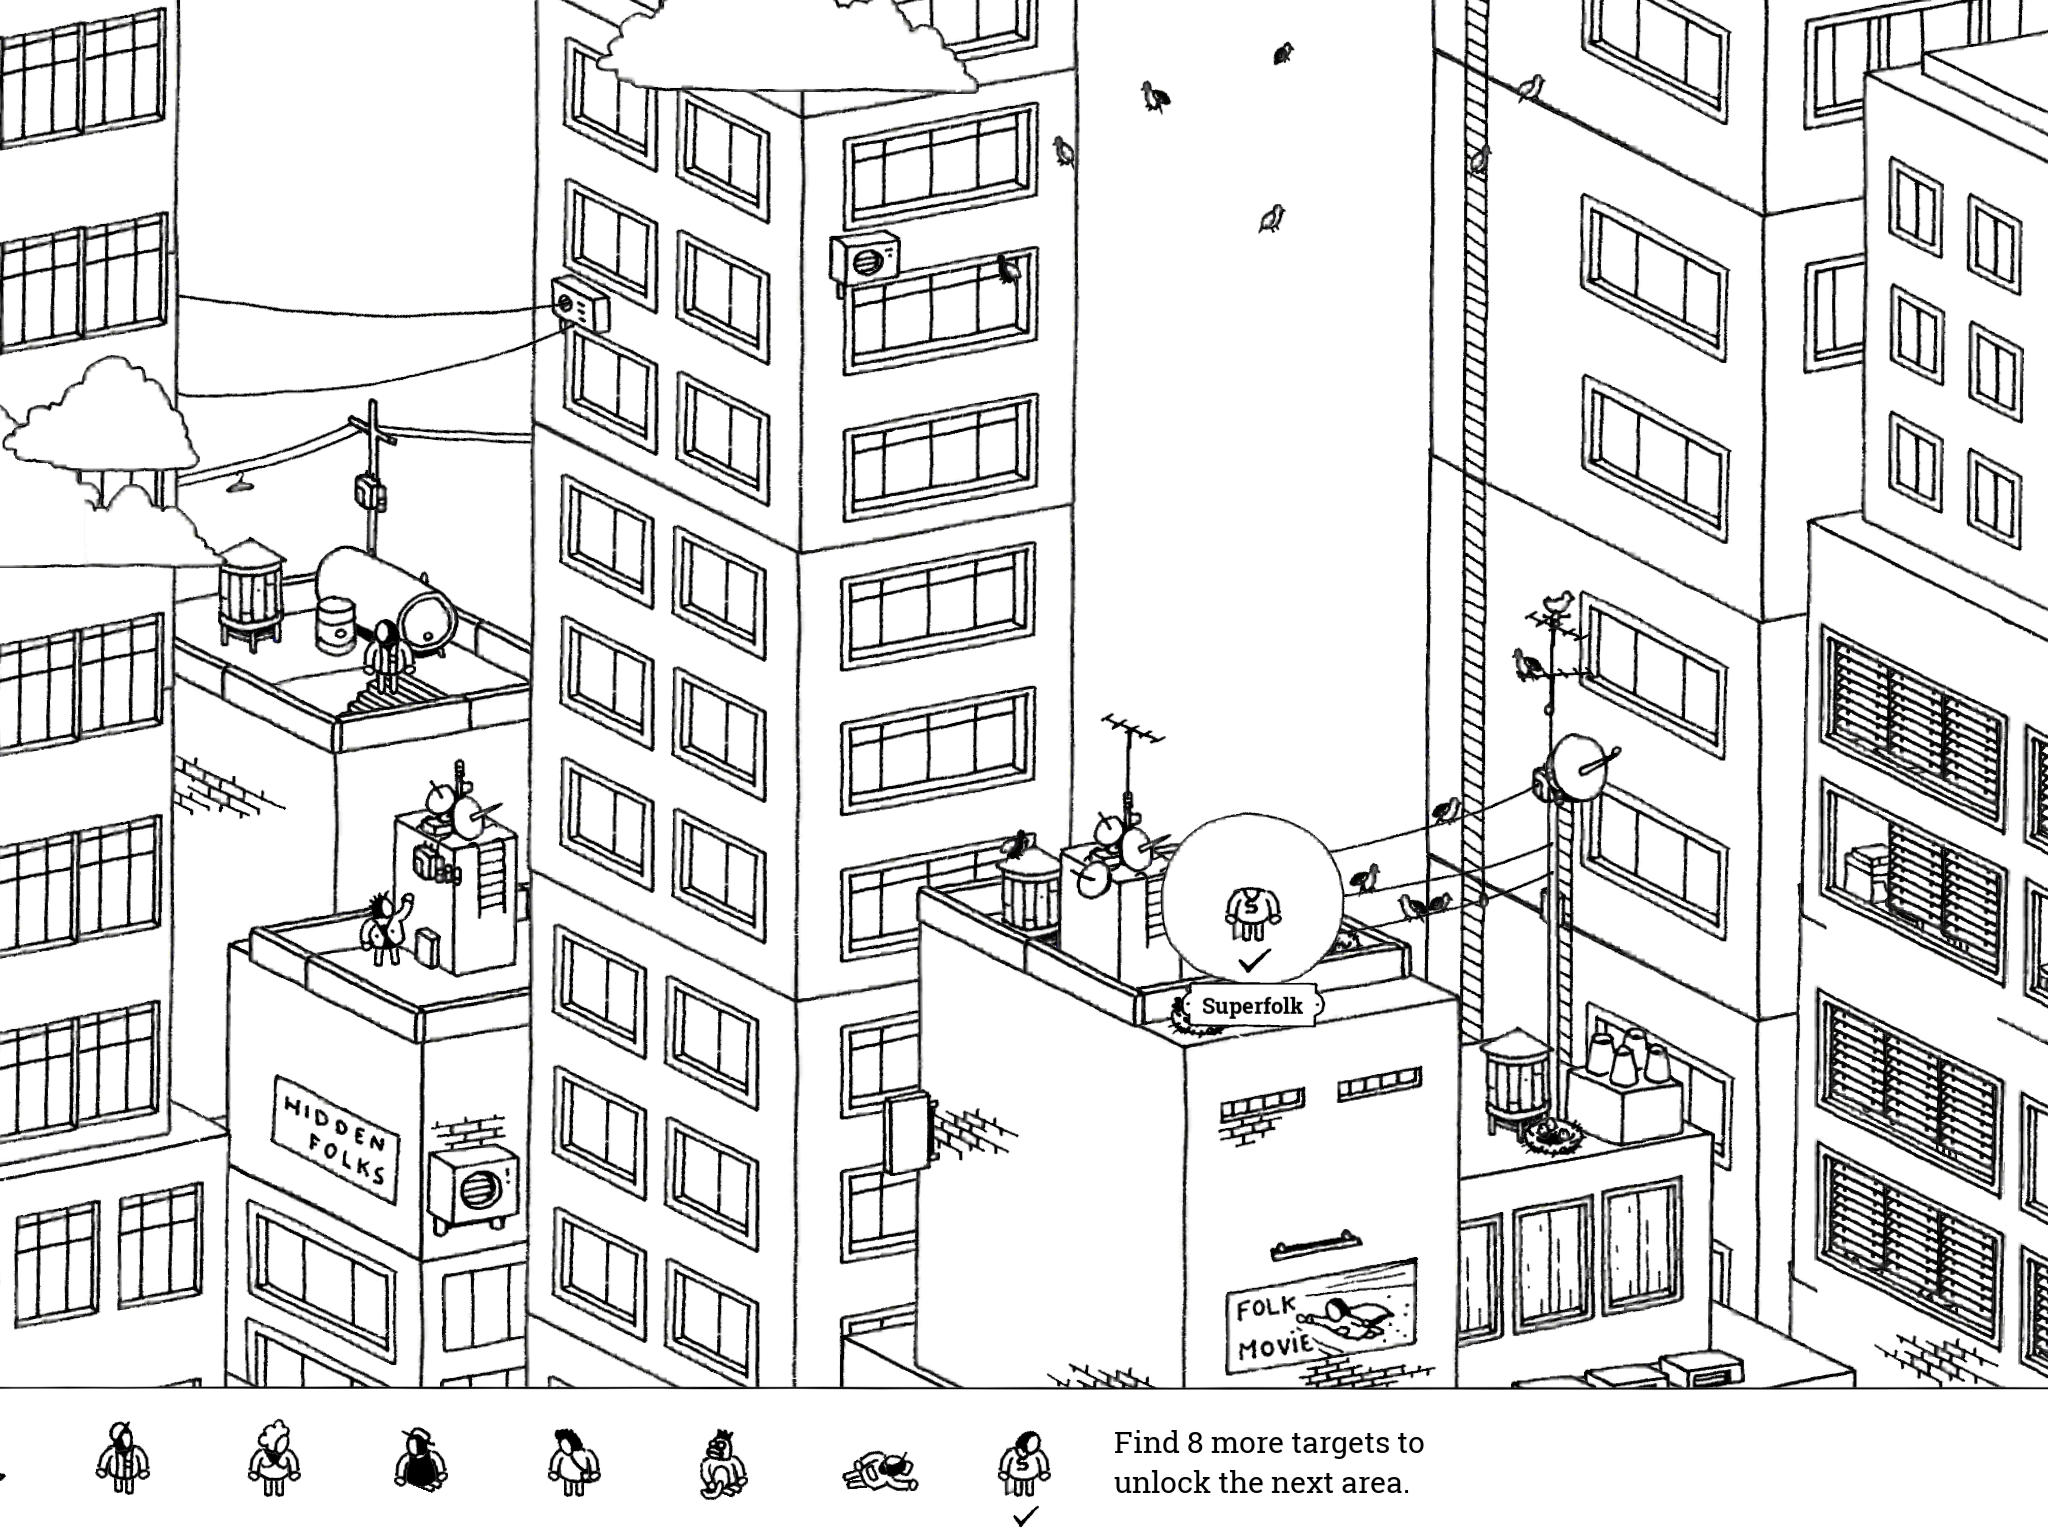
- Superfolk: “Is it a bird? Is it a plane? No! It’s Superfolk!”
Superfolk is on the roof of Rayan’s flower shop building. There are a bunch of birds sitting on power lines on the roof; tap them to get them to fly away, revealing Superfolk.
- Superfolk: “Is it a bird? Is it a plane? No! It’s Superfolk!”
Factory 1: Sim’s Laboratory
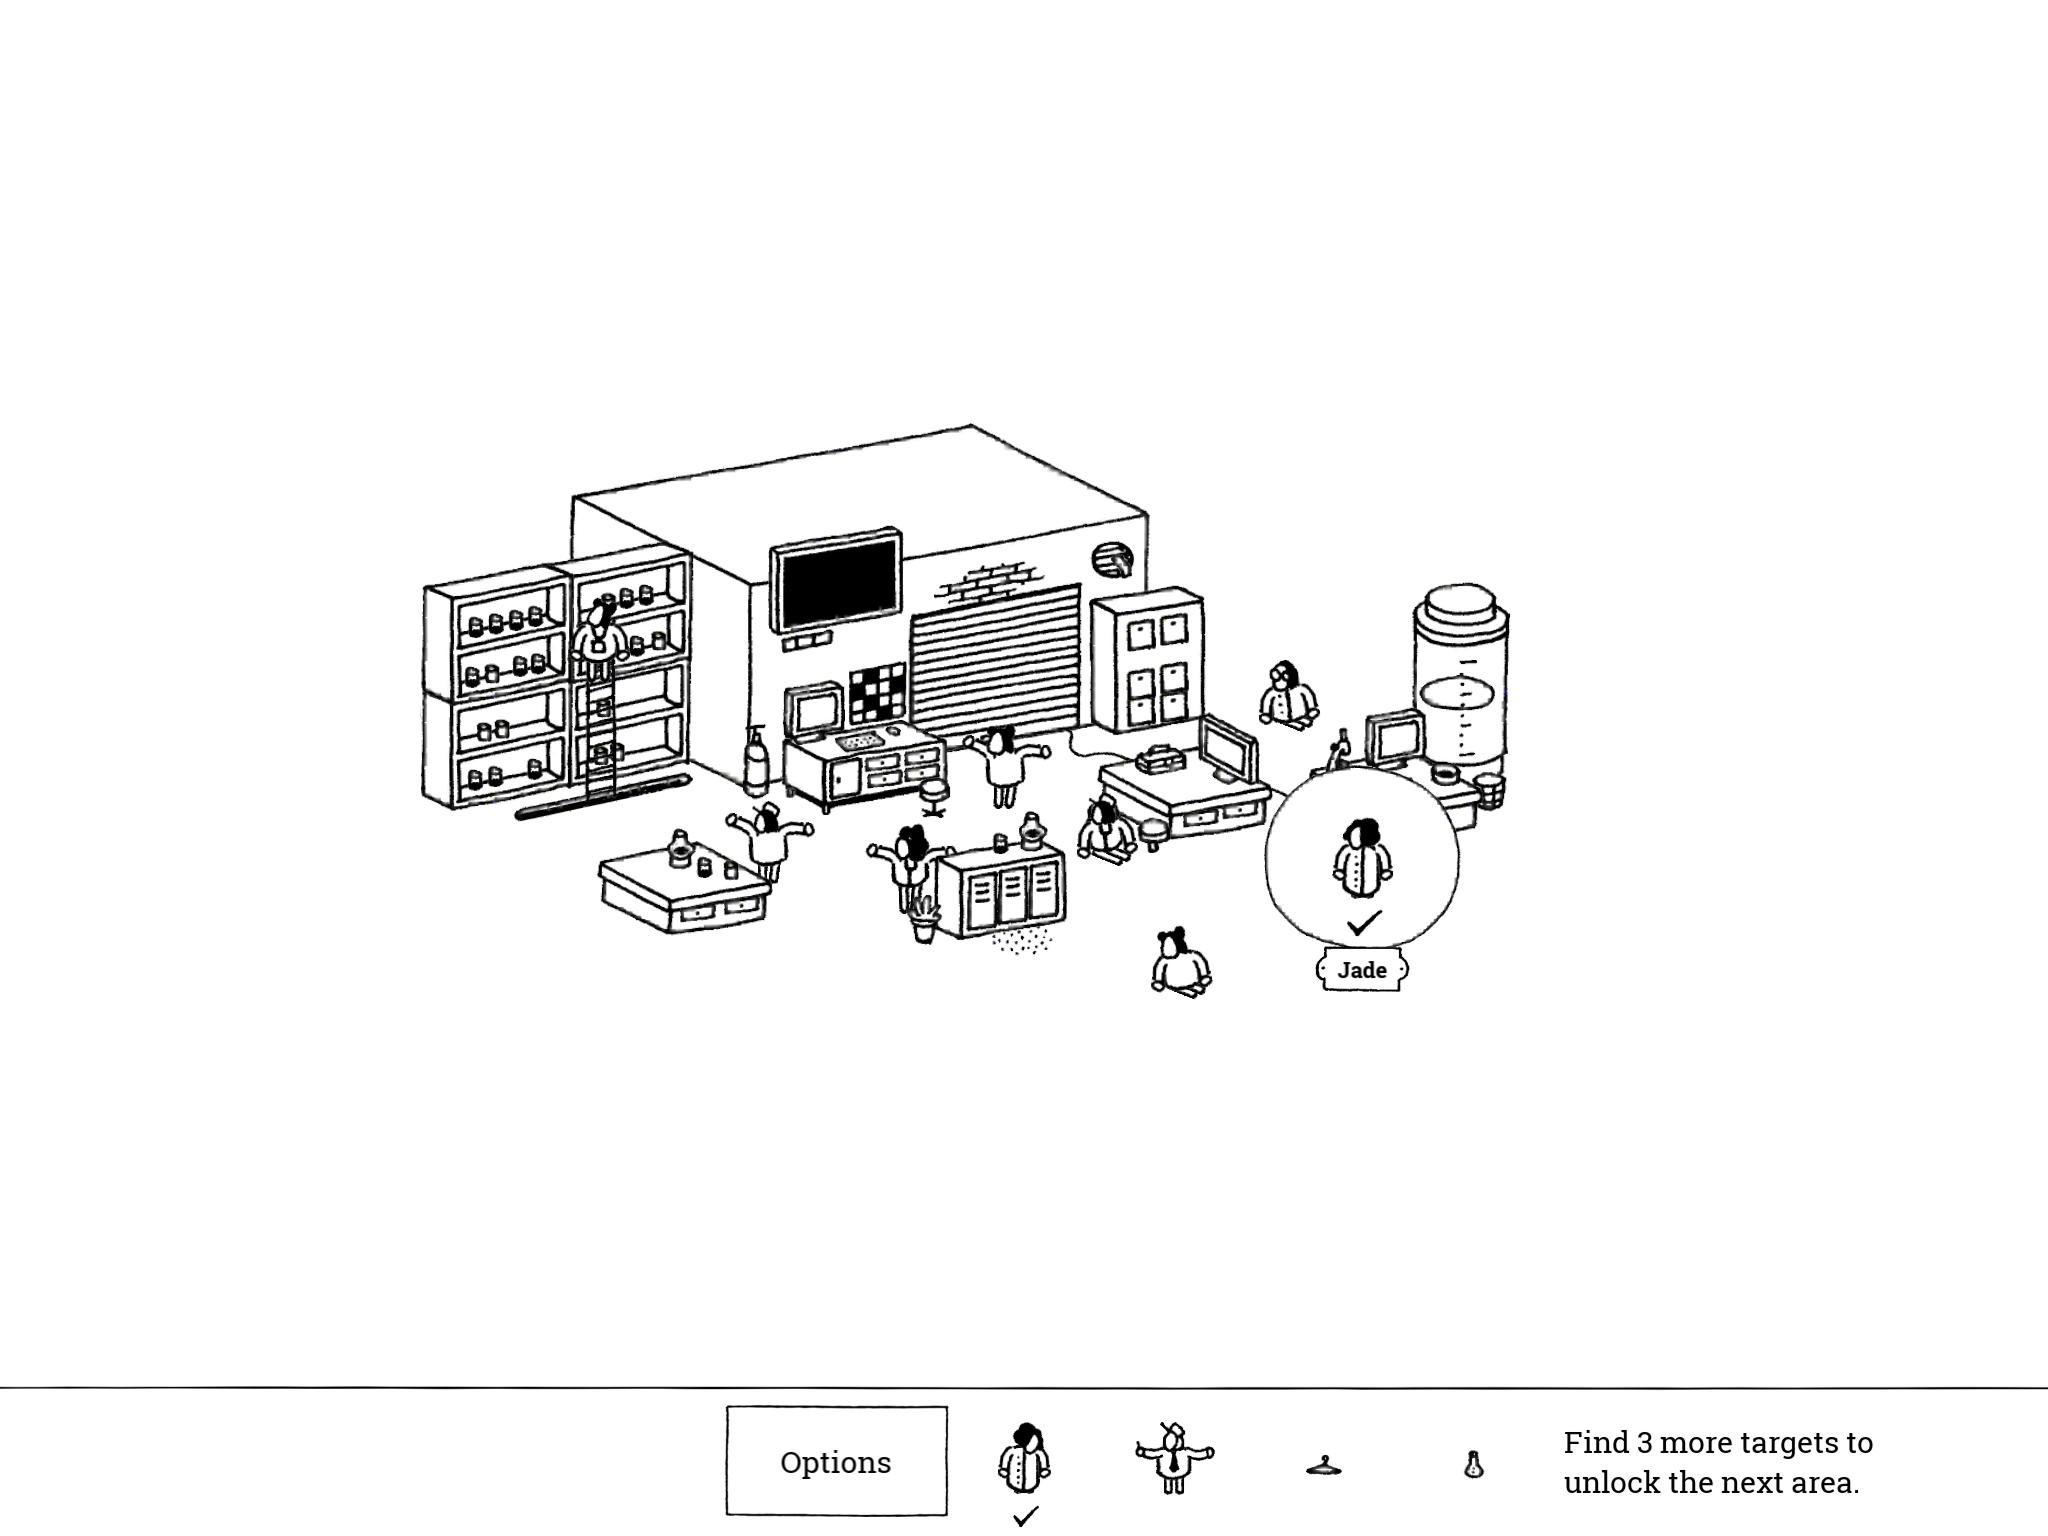
- Jade: “Jade is trying her new XXL lab outfit. lol.”
Jade is on the east side of the image, standing in front of a computer desk.
- Jade: “Jade is trying her new XXL lab outfit. lol.”
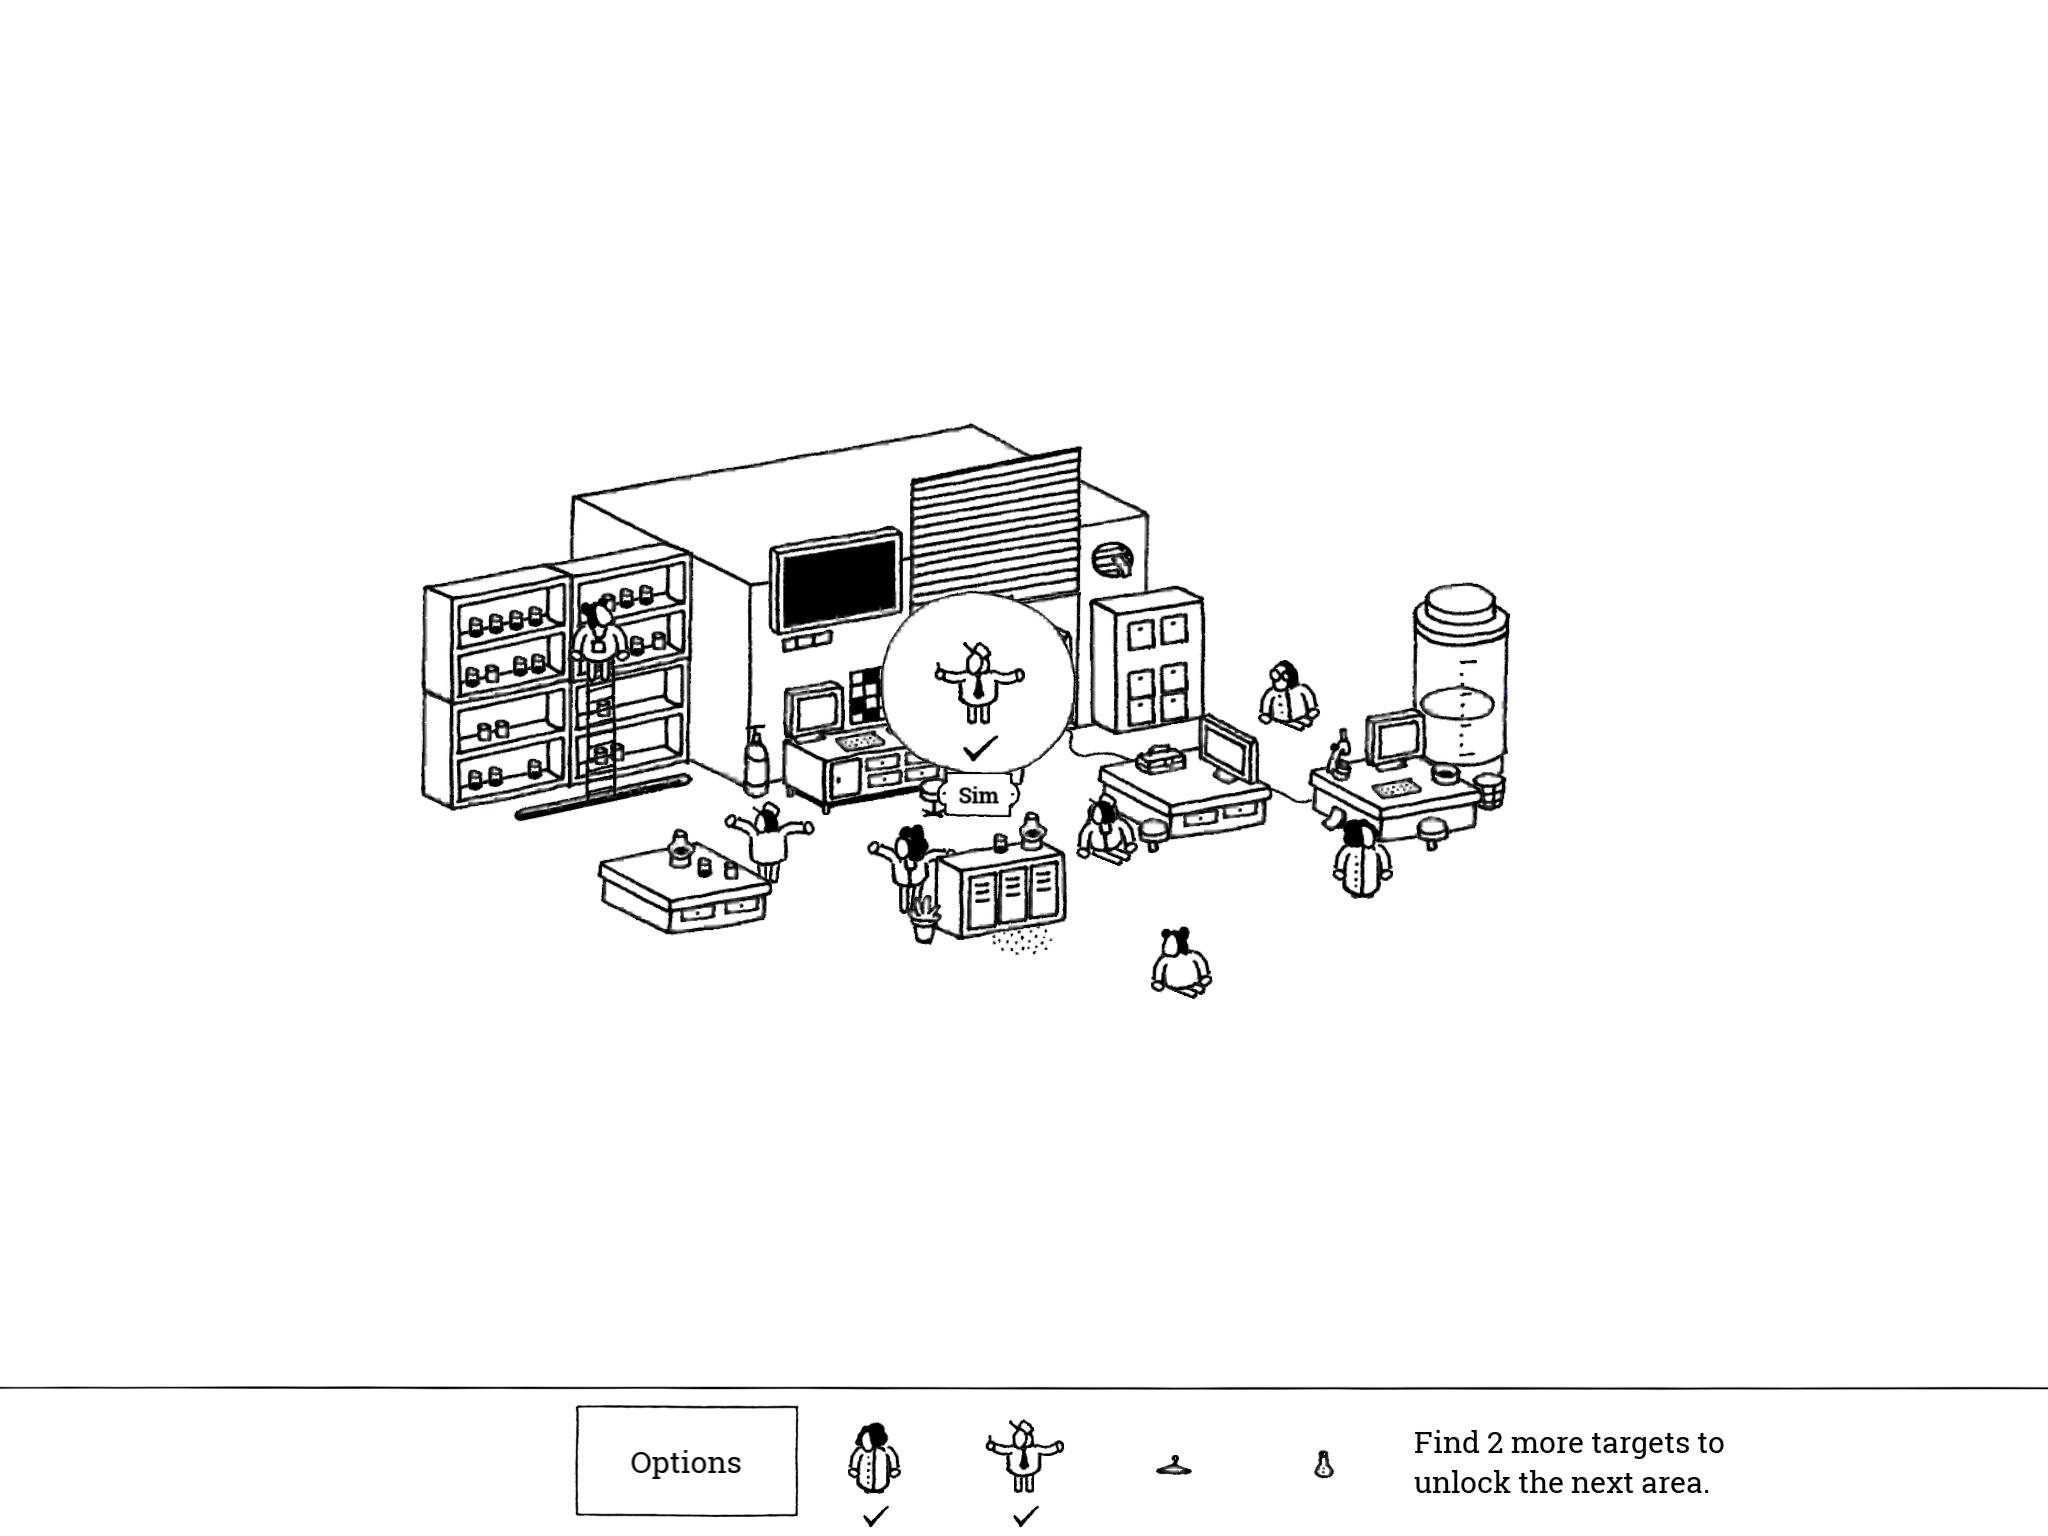
- Sim: “Sim is working on a new program. Do Not Disturb!”
Drag the garage door up to reveal Sim and tap him before the door closes again.
- Sim: “Sim is working on a new program. Do Not Disturb!”
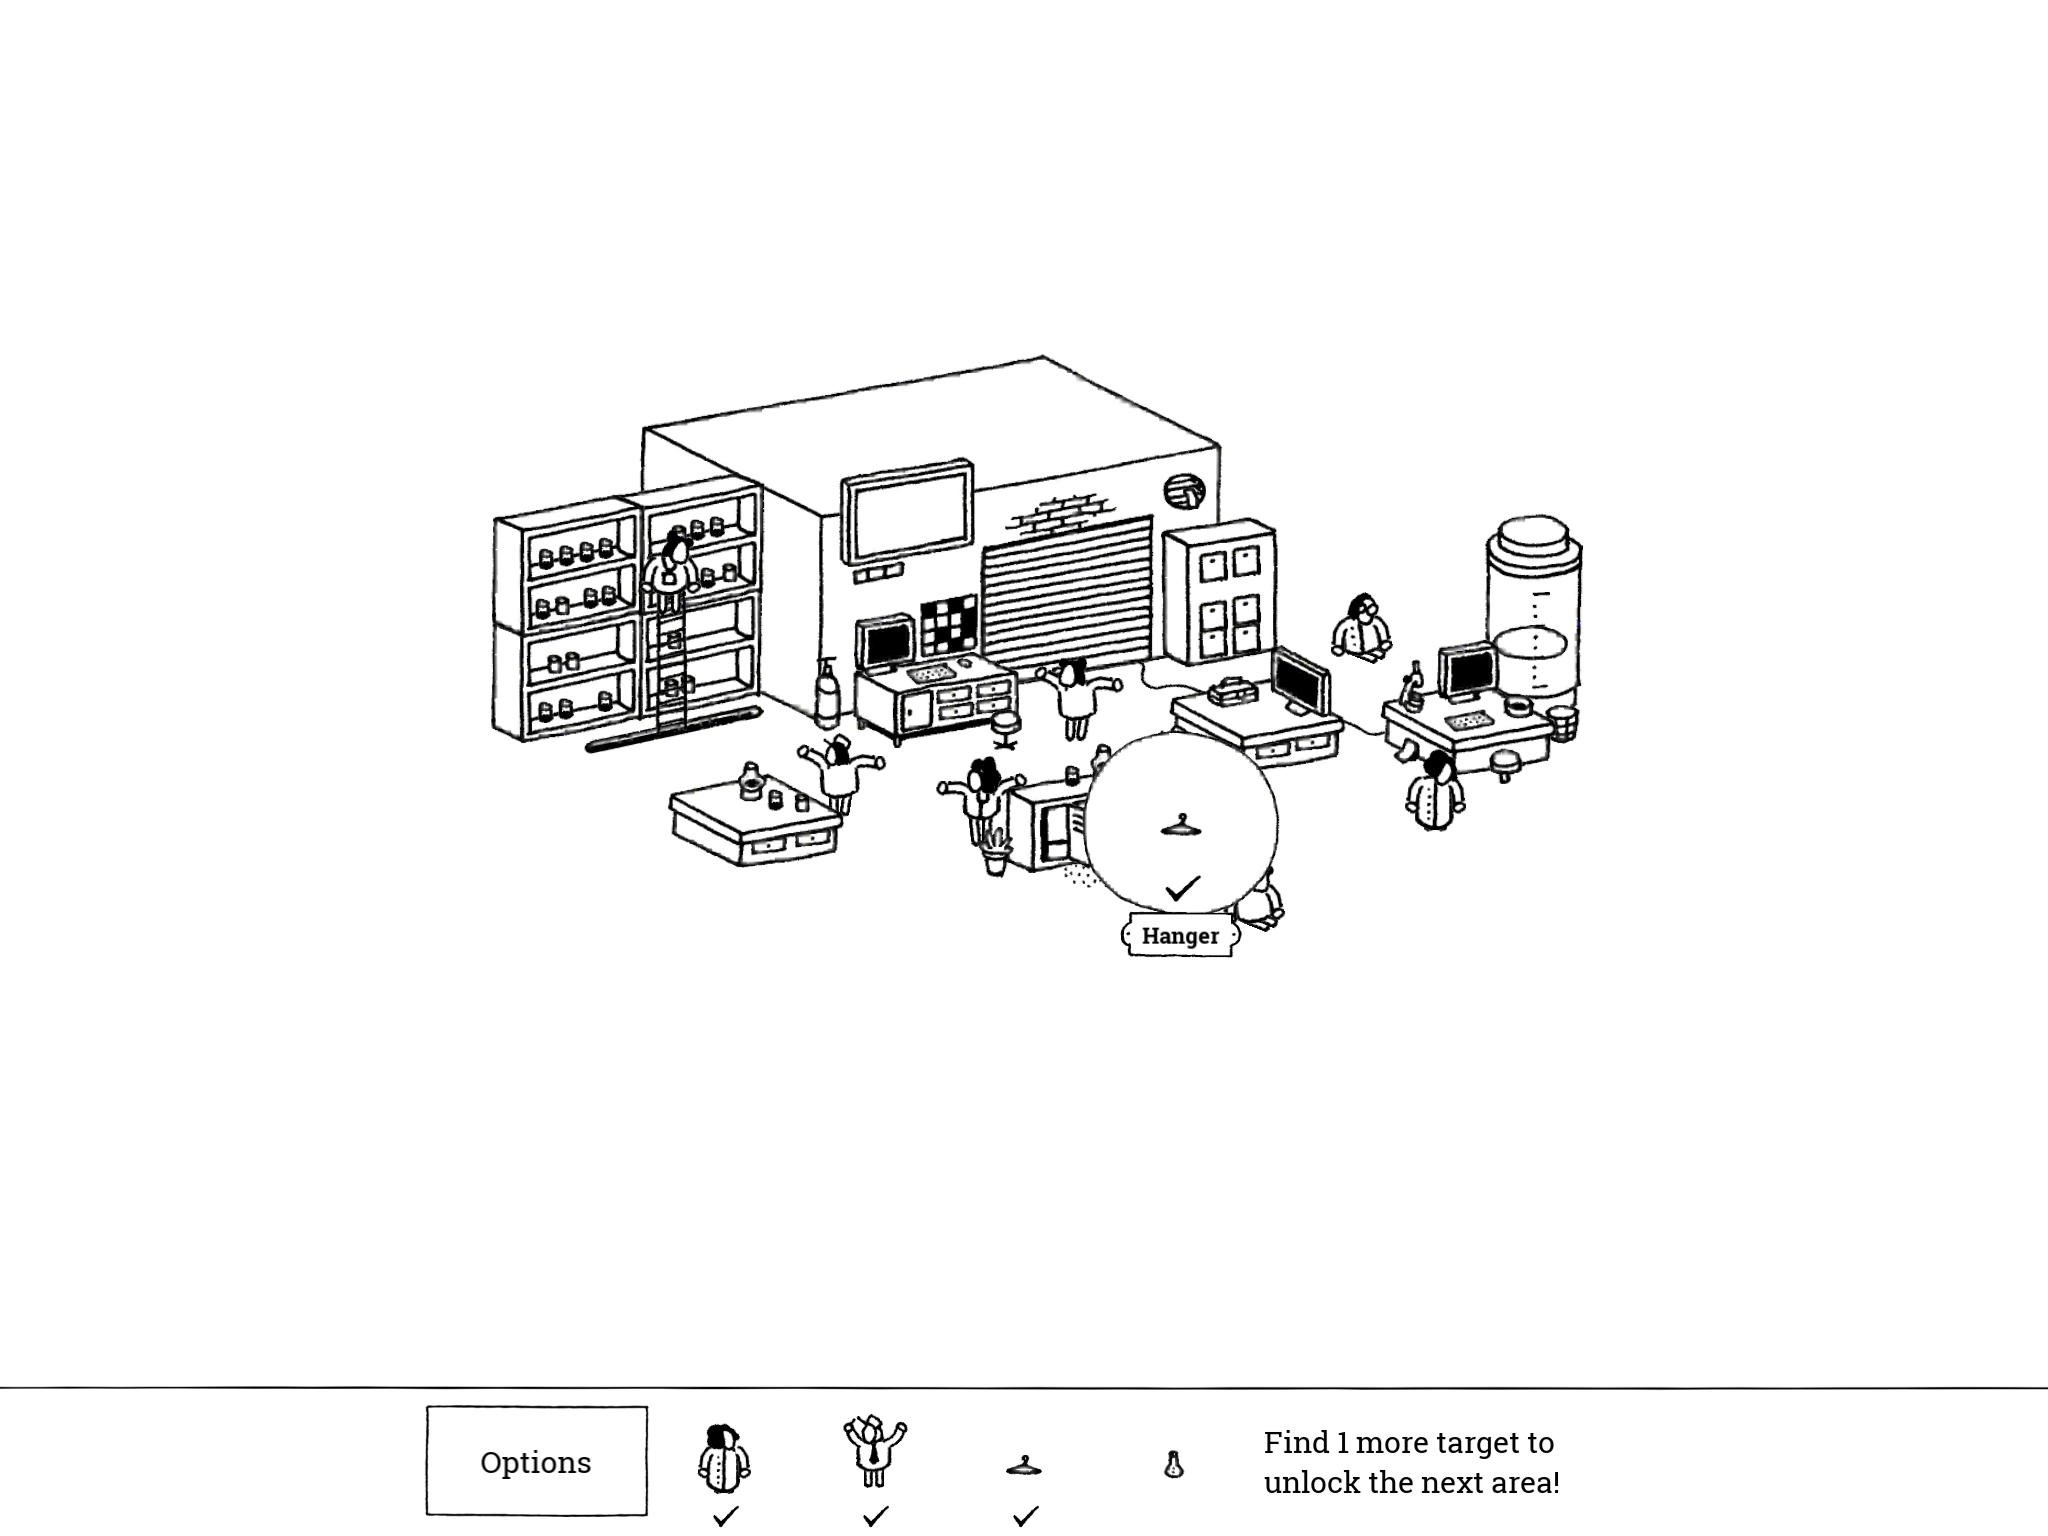
- Hanger: “This hanger is for XXL lab outfits.”
Tap open the lockers to the west of Jade; the Hanger will fly out and land on the floor just east of the lockers.
- Hanger: “This hanger is for XXL lab outfits.”
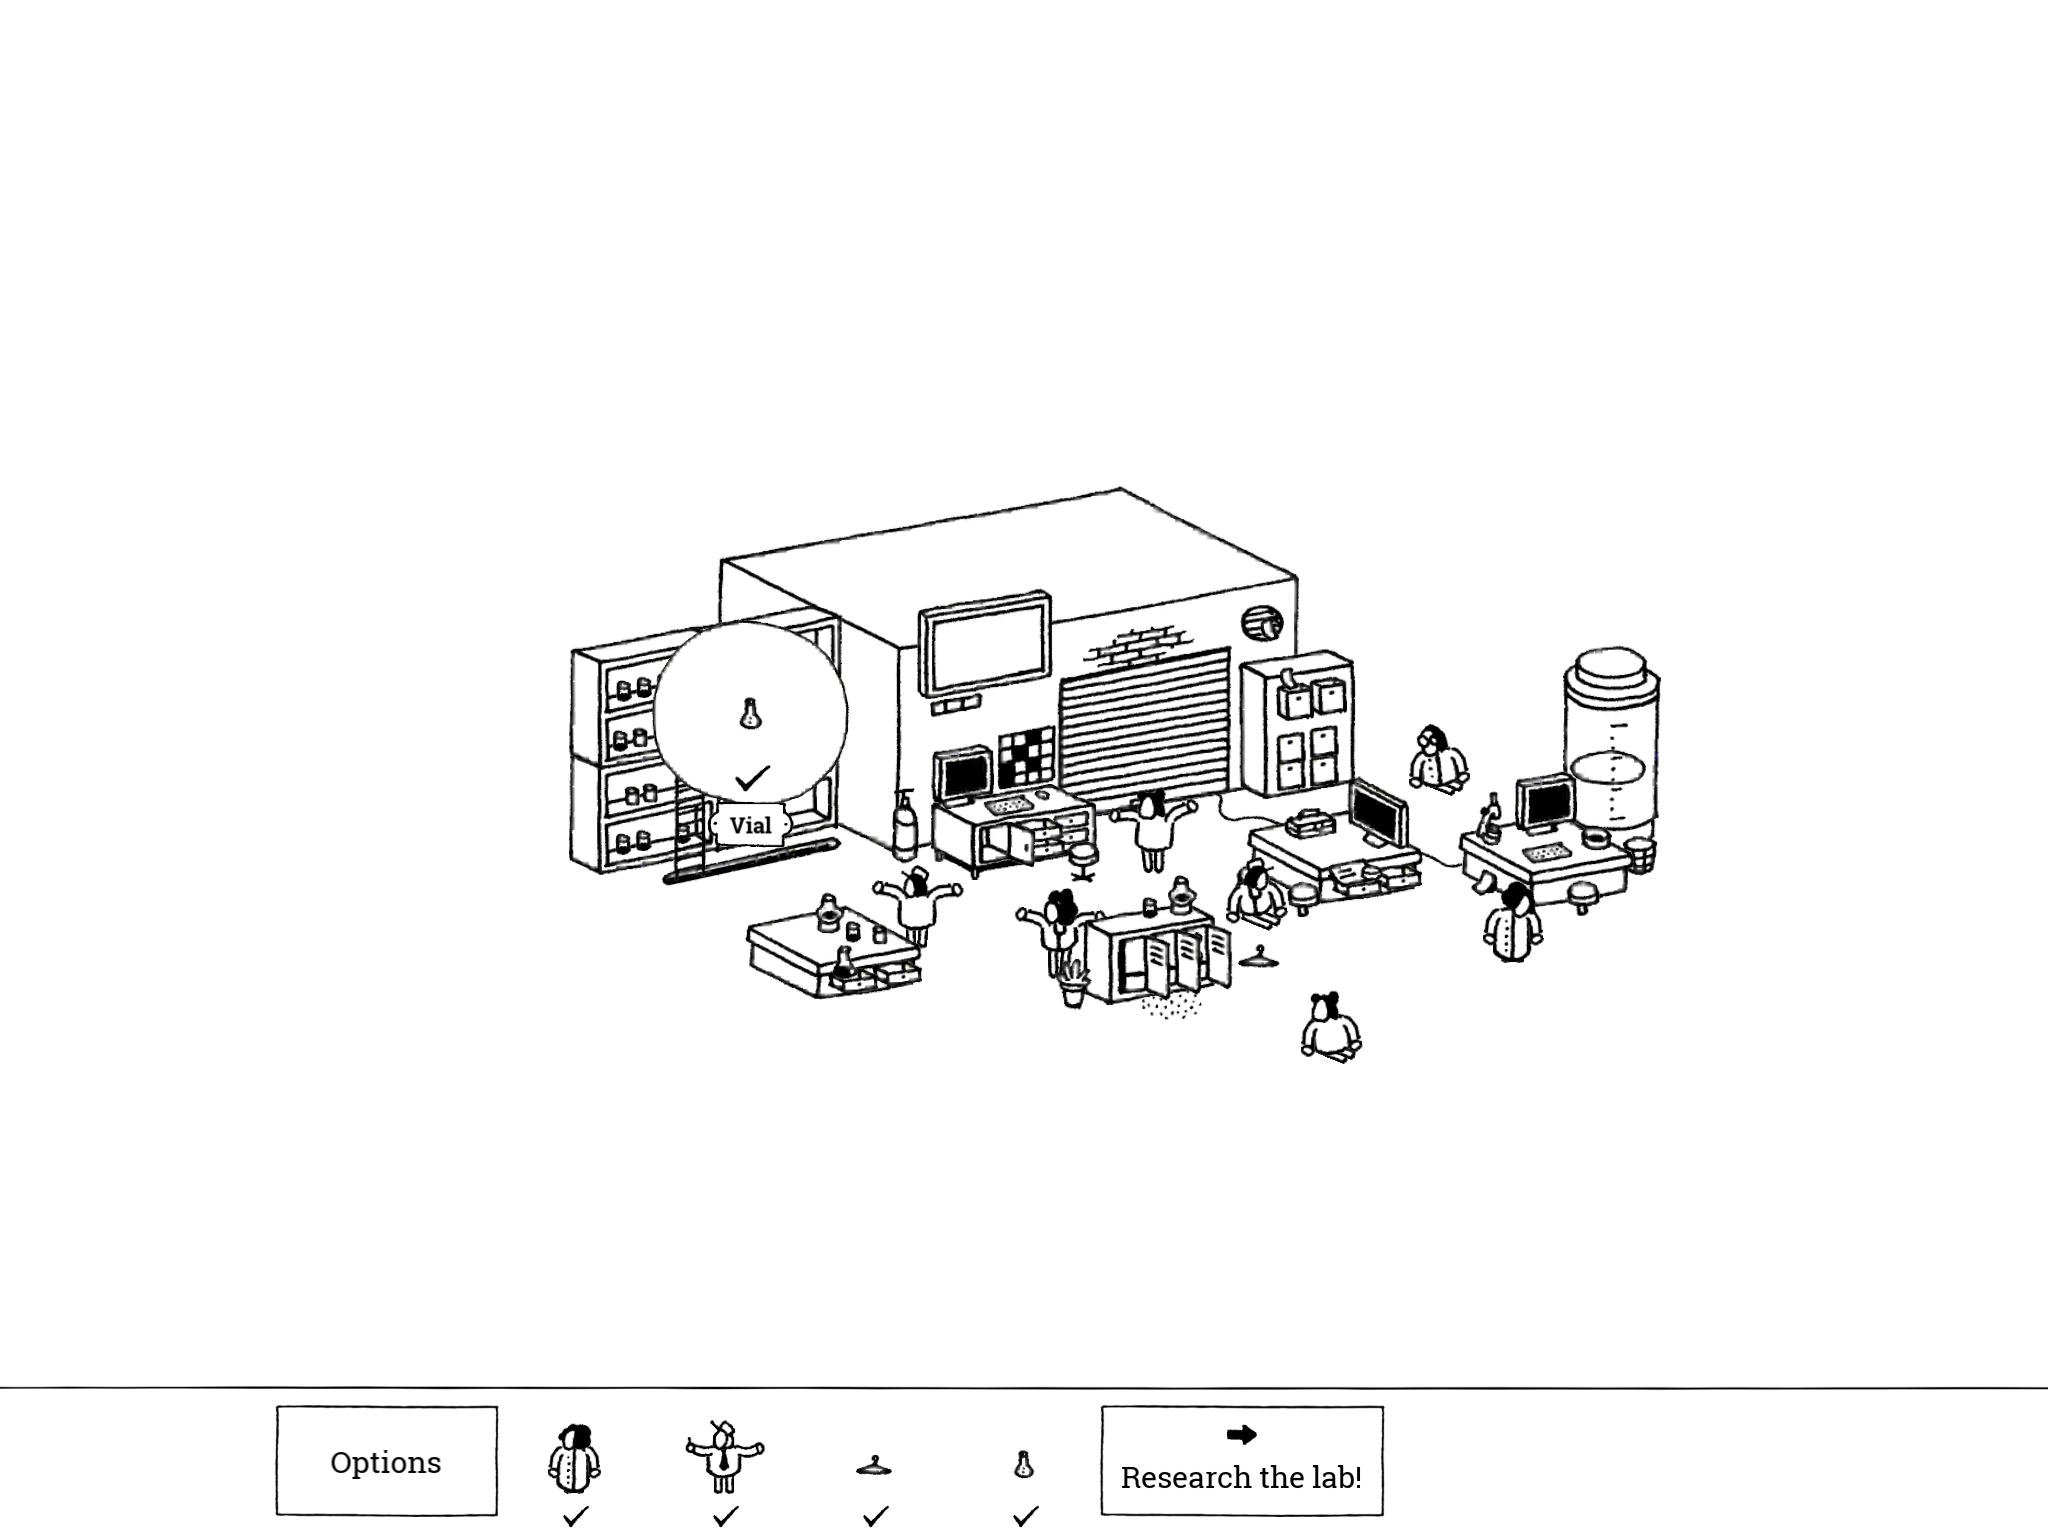
- Vial: “The assistant forgot to bring his glasses. That vial should be here somewhere?!”
The assistant is standing on a sliding ladder near the tall shelves in the northwest side of the room. Drag her to the left to slide the ladder and reveal the Vial on the shelf where she was previously standing.
- Vial: “The assistant forgot to bring his glasses. That vial should be here somewhere?!”
Factory 2: The Lab
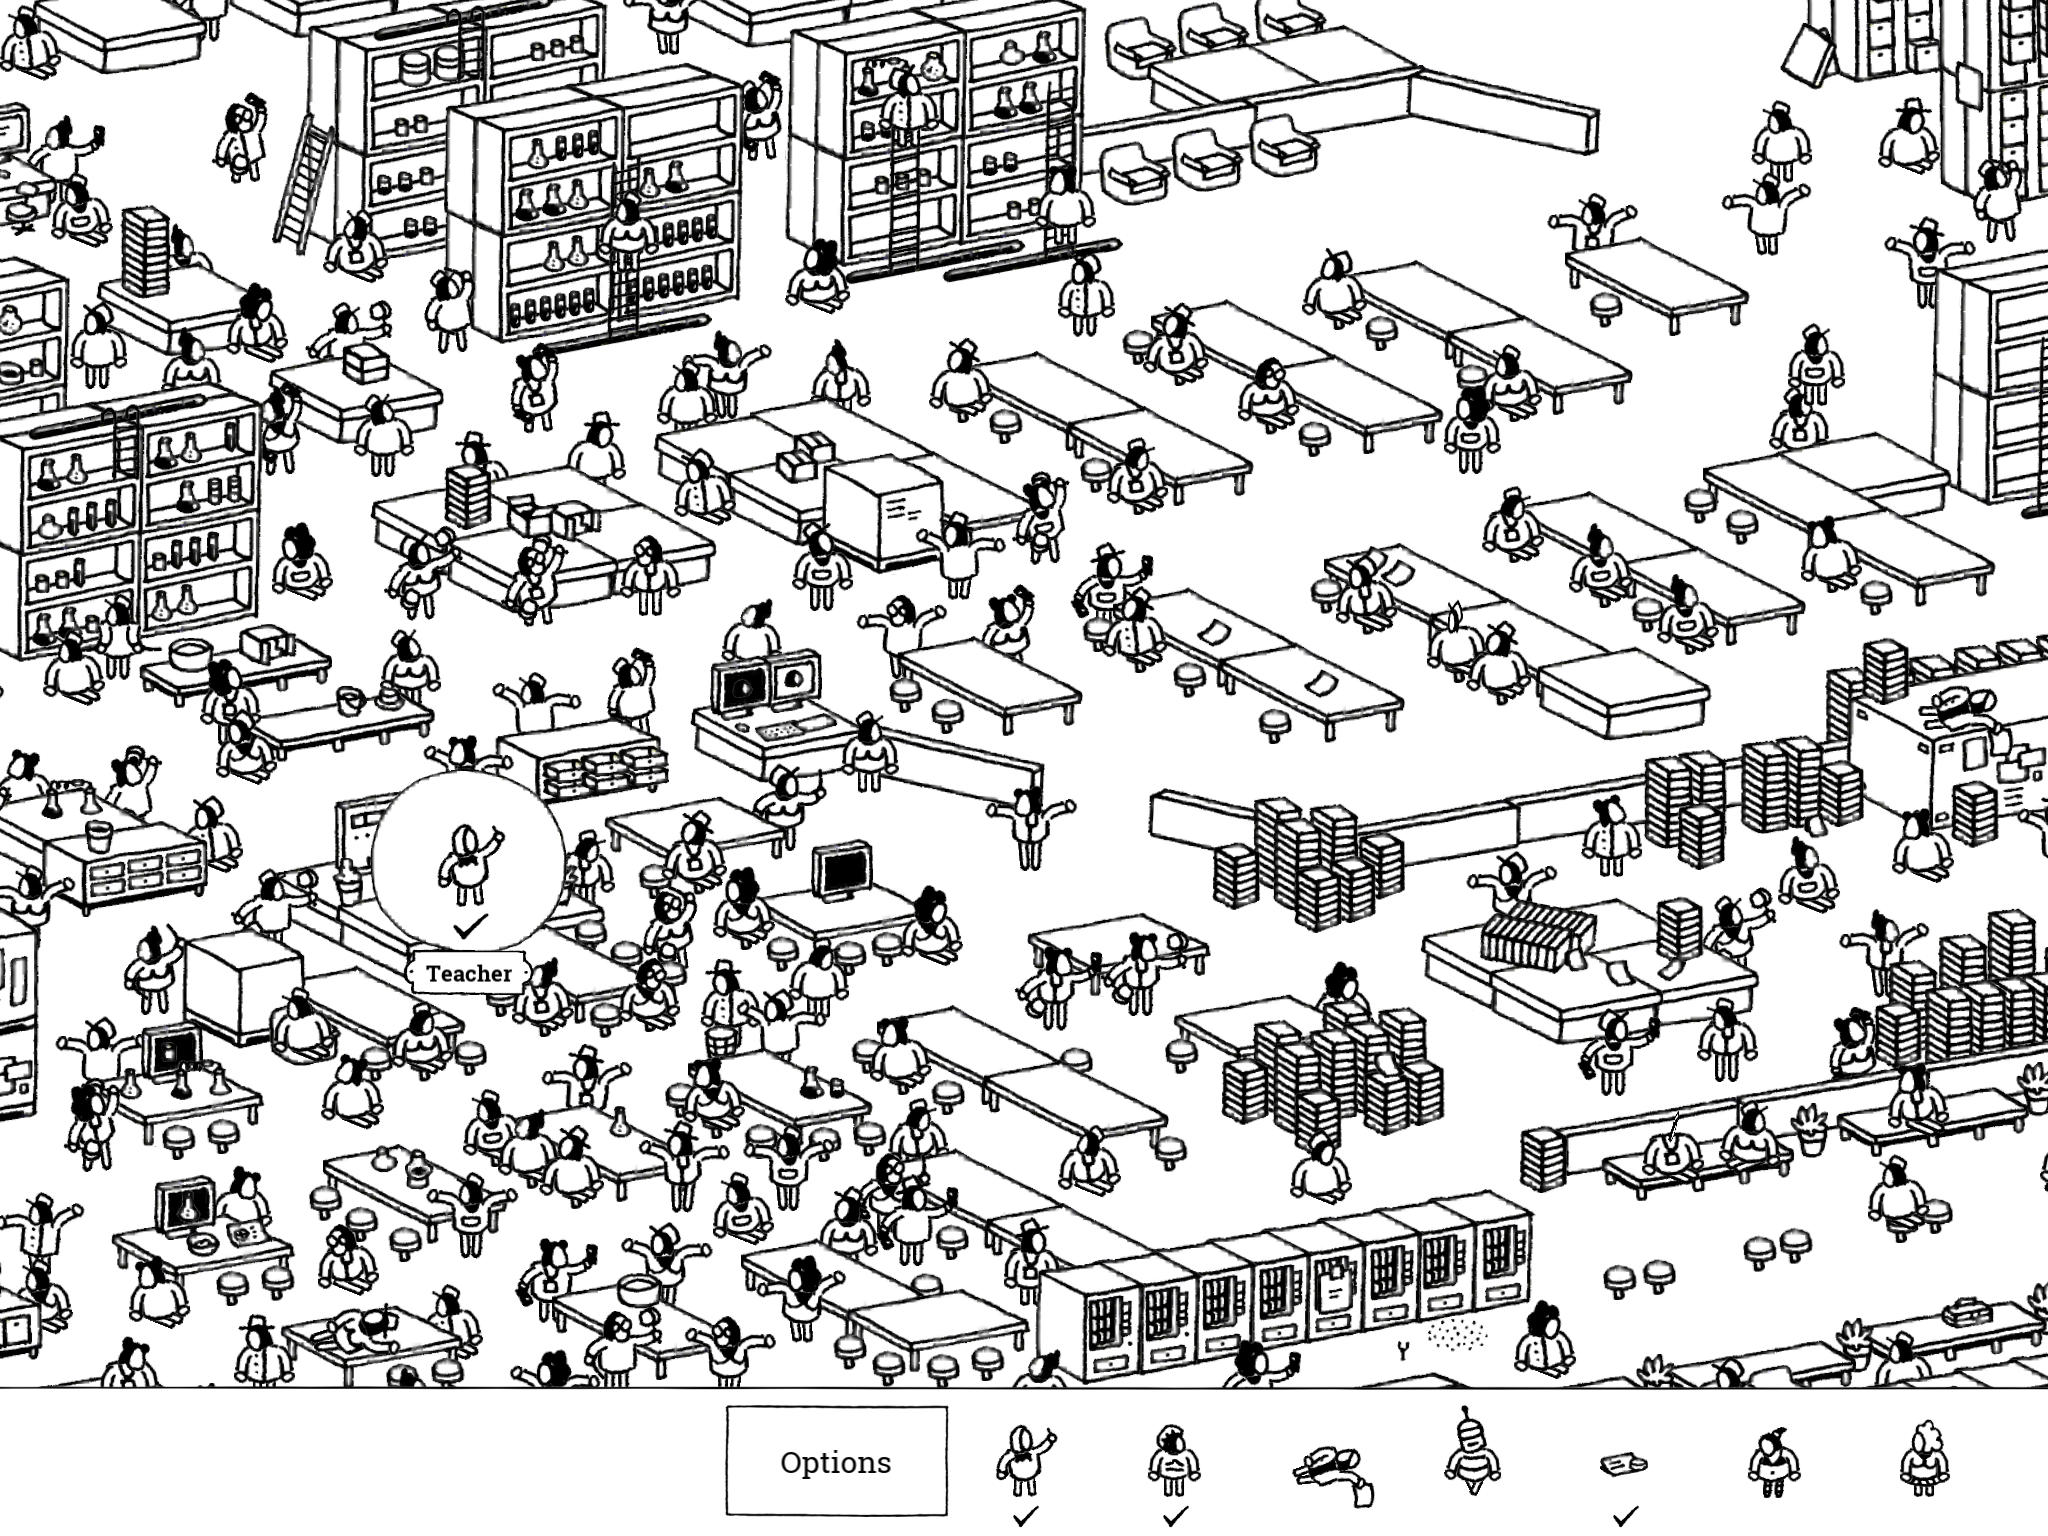
- Teacher: “This teacher’s lesson is a great success! Not.”
The Teacher is in the northern part of the room, near the horizontal center of the image. She is just south of the cabinets containing vials and beakers, north of the candy machines, and west of a series of fairly spaced out tables. She is standing on a four-desk table in front of a whiteboard with a diagram on it containing a circle with a black cross in the center.
- Teacher: “This teacher’s lesson is a great success! Not.”
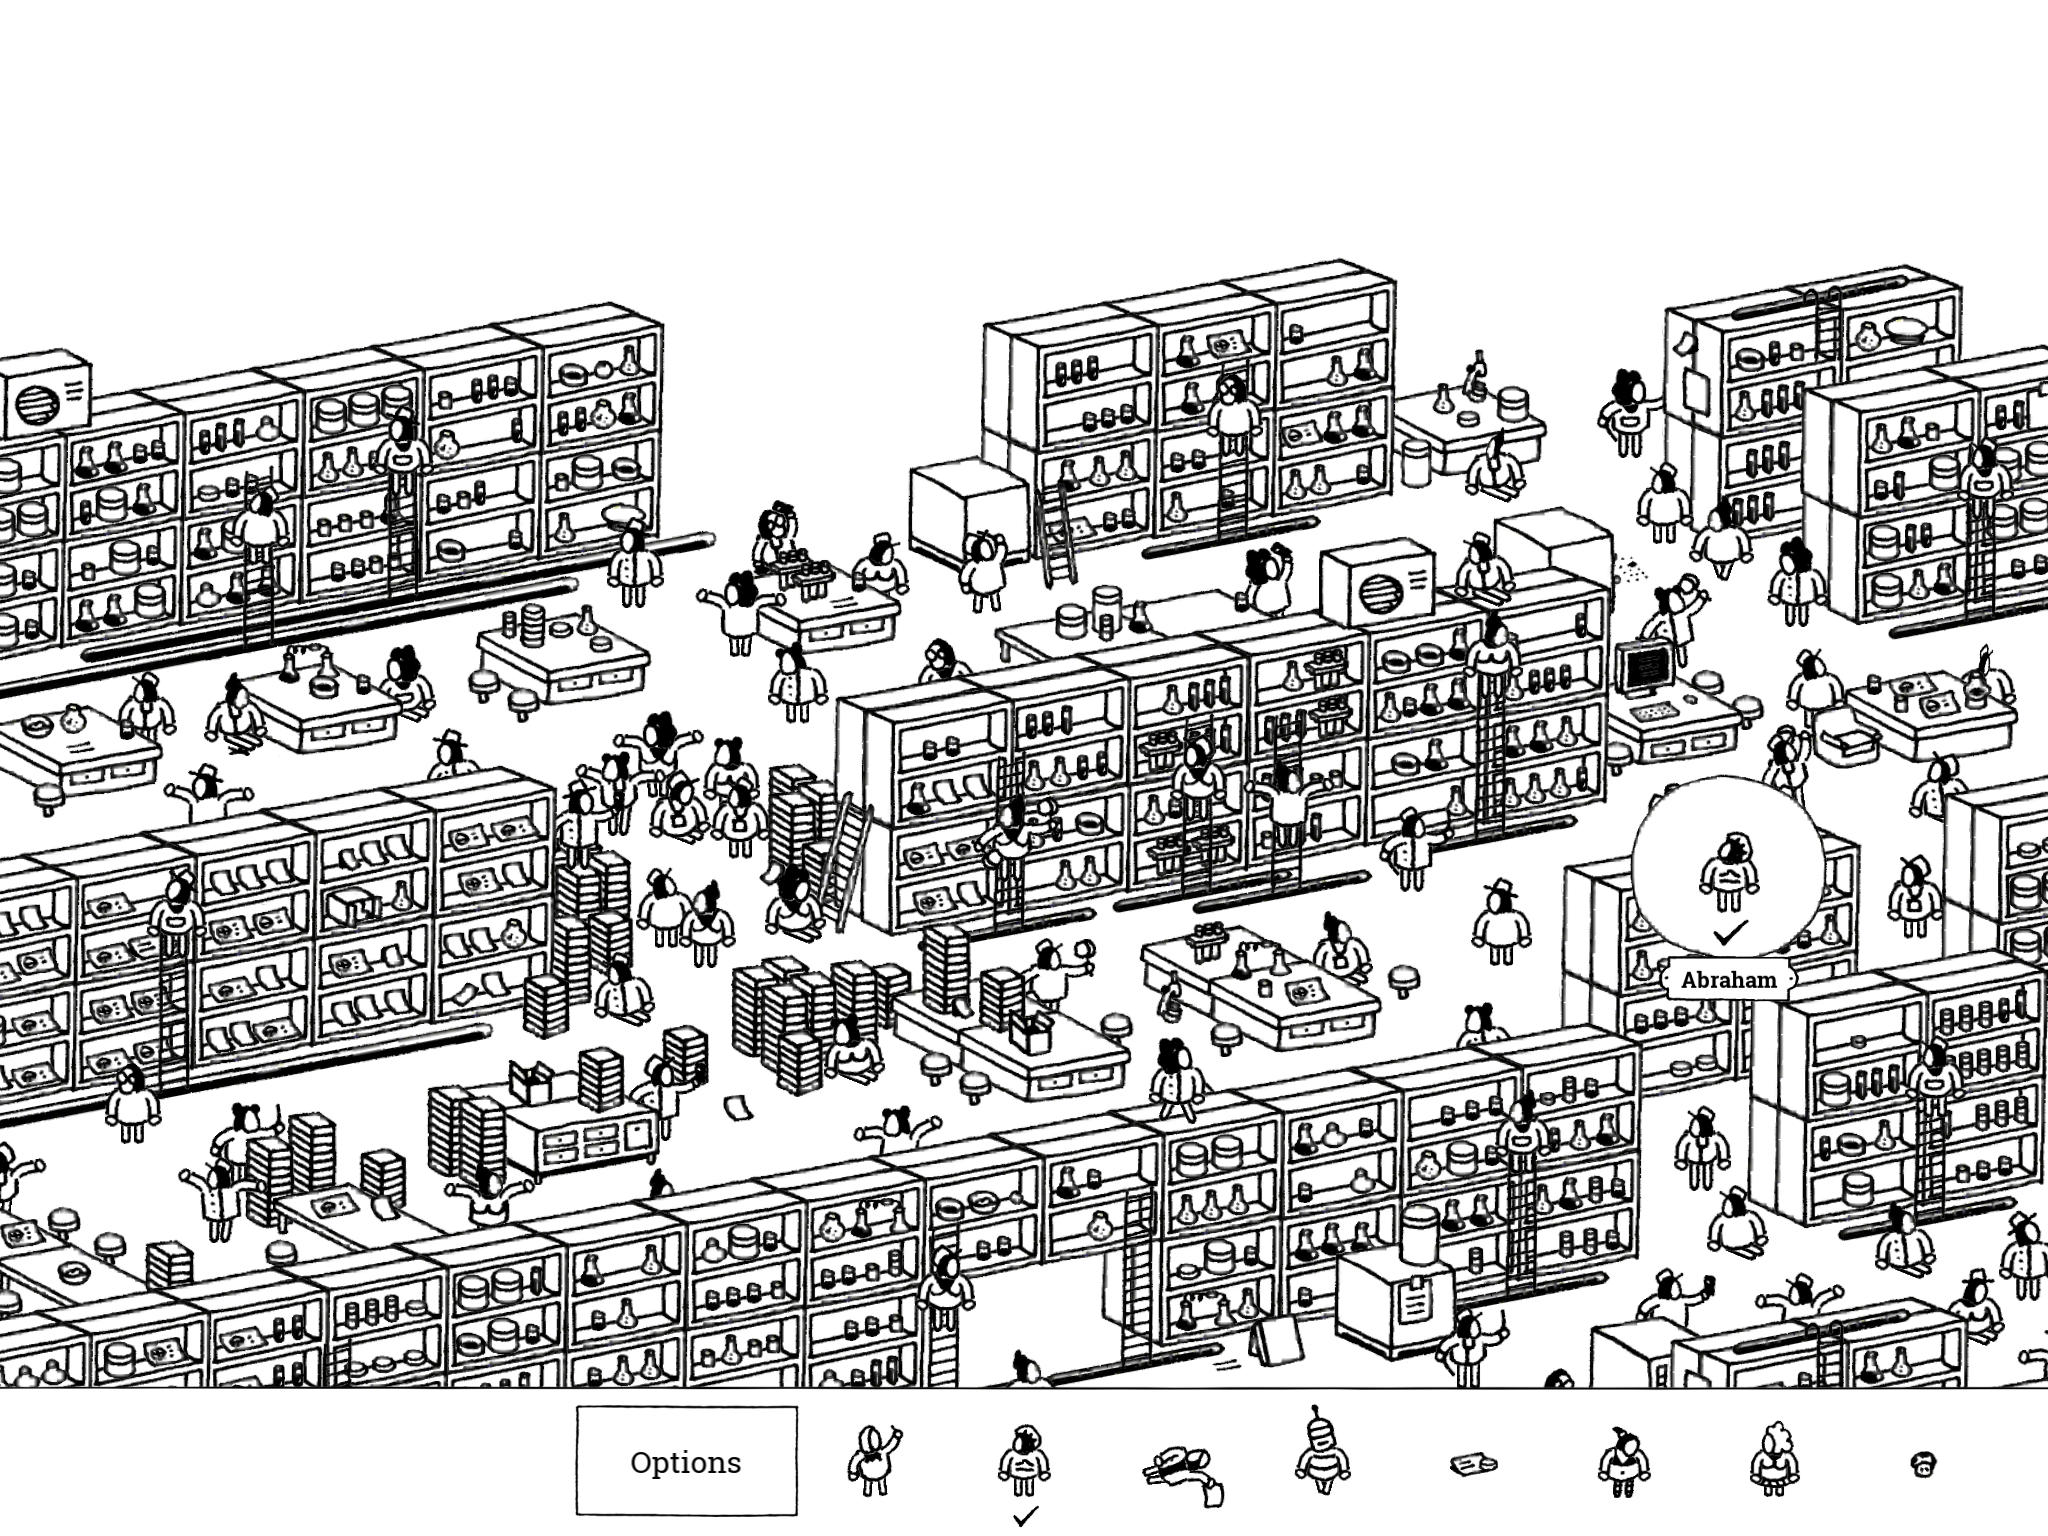
- Abraham: “The question isn’t how Abraham got onto this ladder; the question is how he’s going to get off again.”
Abraham is just slightly northwest of the Teacher. He’s standing in front of a cabinet full of beakers and vials, but he almost appears to be floating at the top of the cabinet because his ladder doesn’t extend beneath him. From the easternmost cabinet, he is in the fourth column to the west.
- Abraham: “The question isn’t how Abraham got onto this ladder; the question is how he’s going to get off again.”
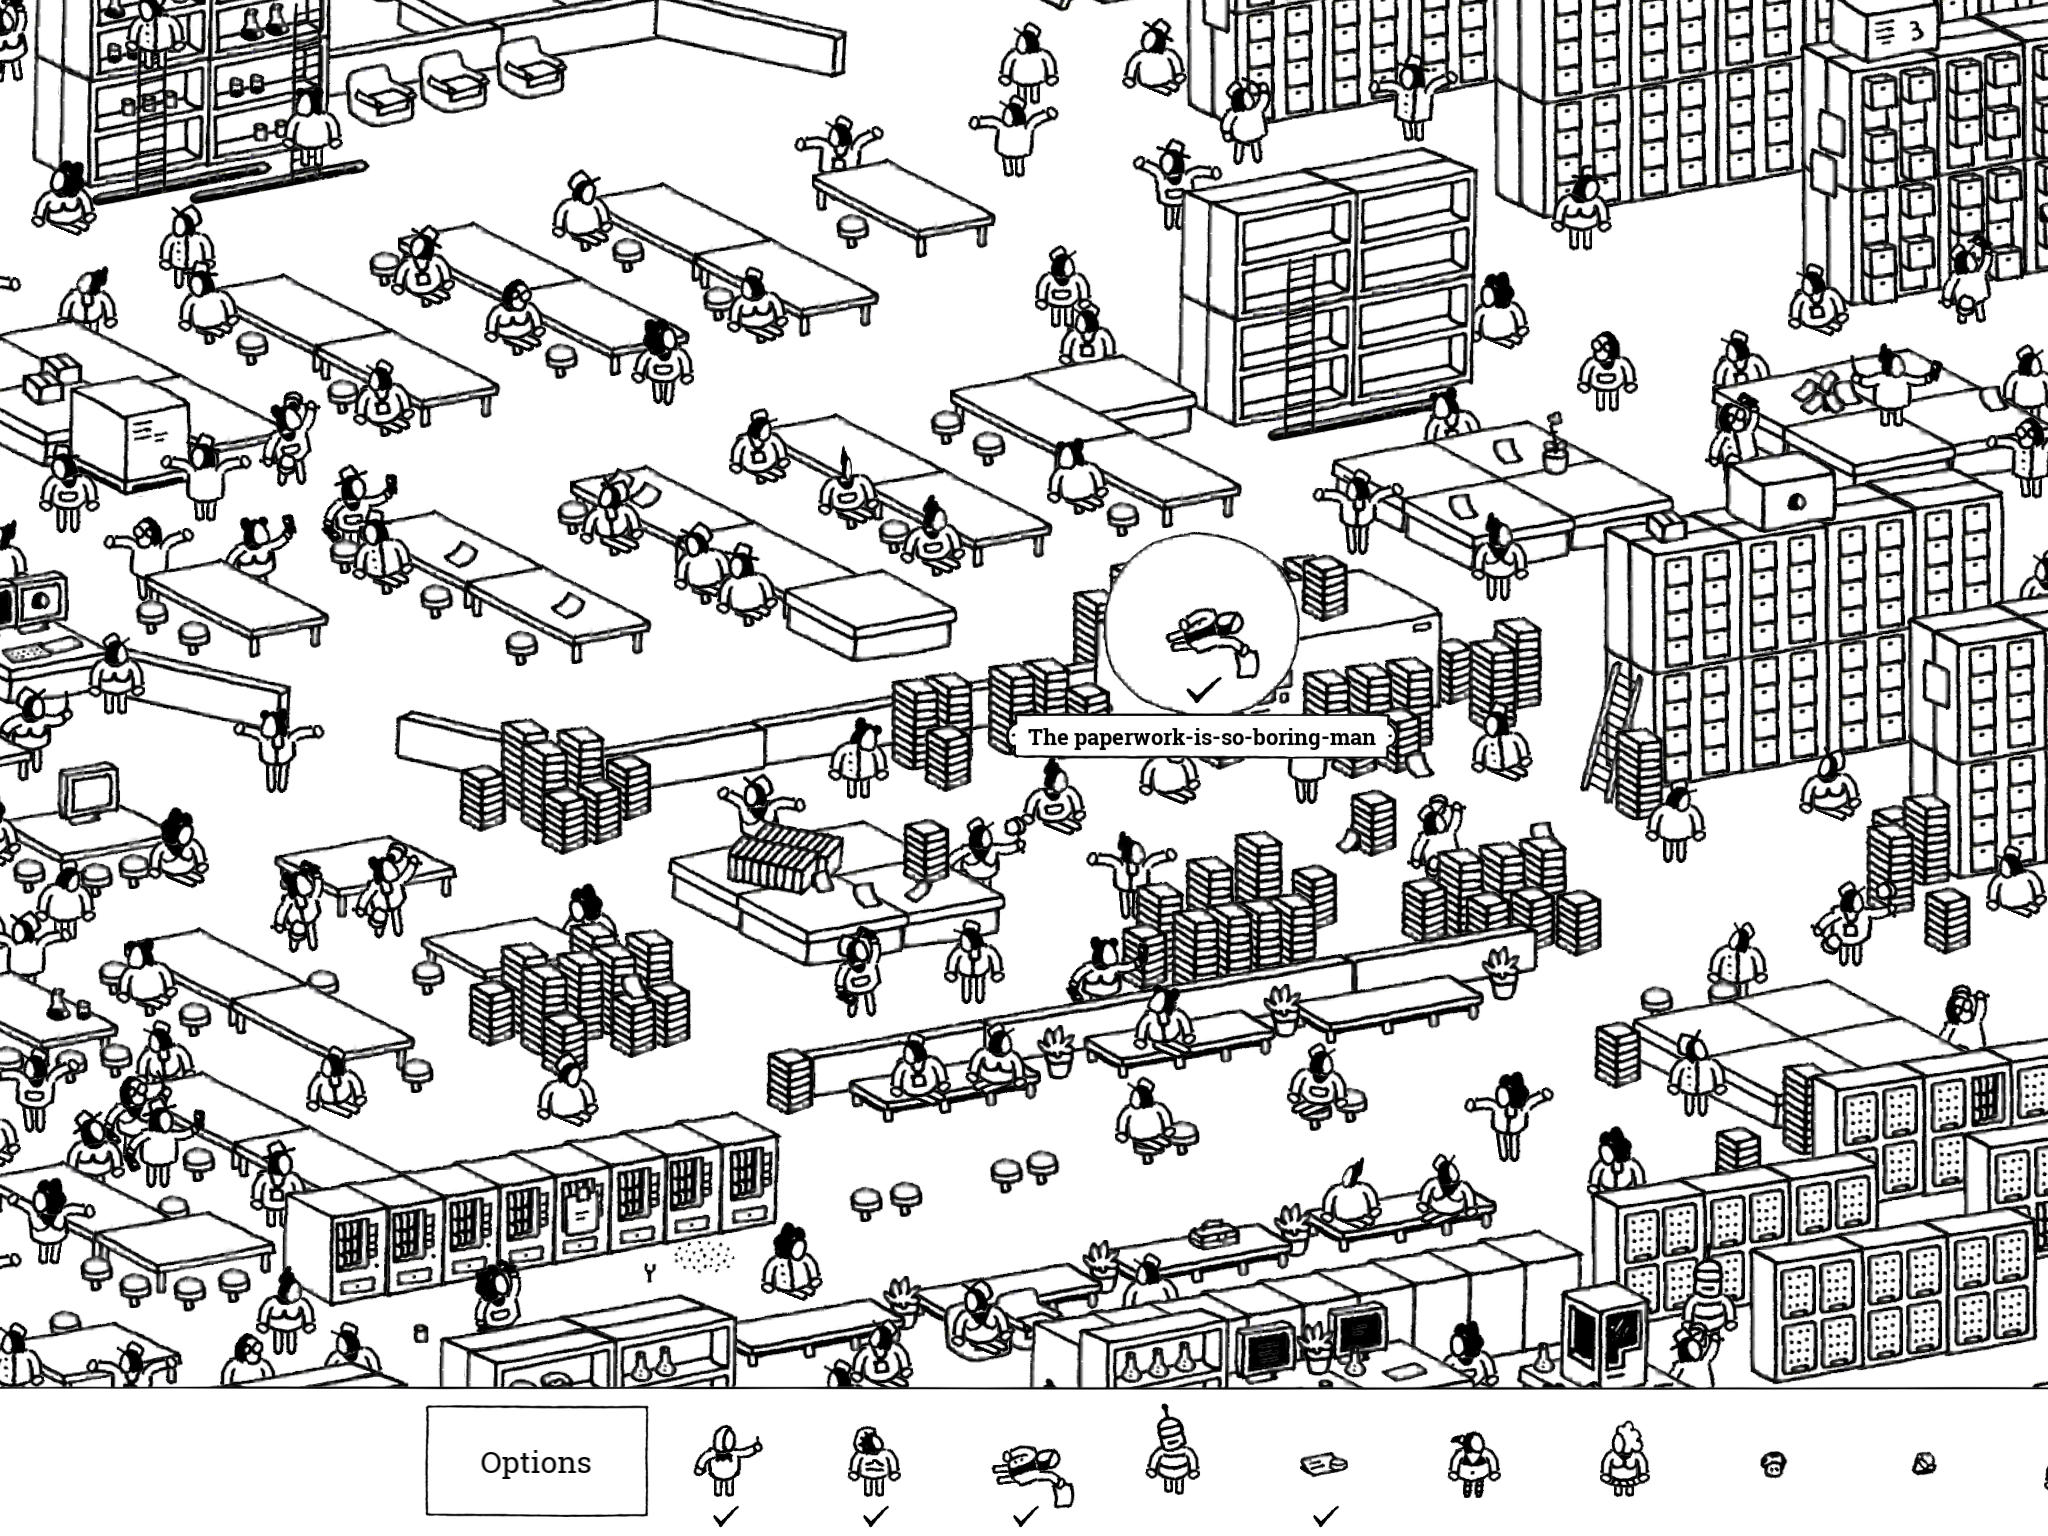
- Paperwork is So Boring Man: “Omggg paperwork is sooooo boring…”
On the far northeast side of the image is a group of tall file cabinets filled with tiny drawers and numbered 1-7. Just west of these cabinets (specifically the one right above “6” without a number) is an area filled with stacks of paper. On top of the cabinet in the northeast section of this area is the Paperwork is So Boring Man.
- Paperwork is So Boring Man: “Omggg paperwork is sooooo boring…”
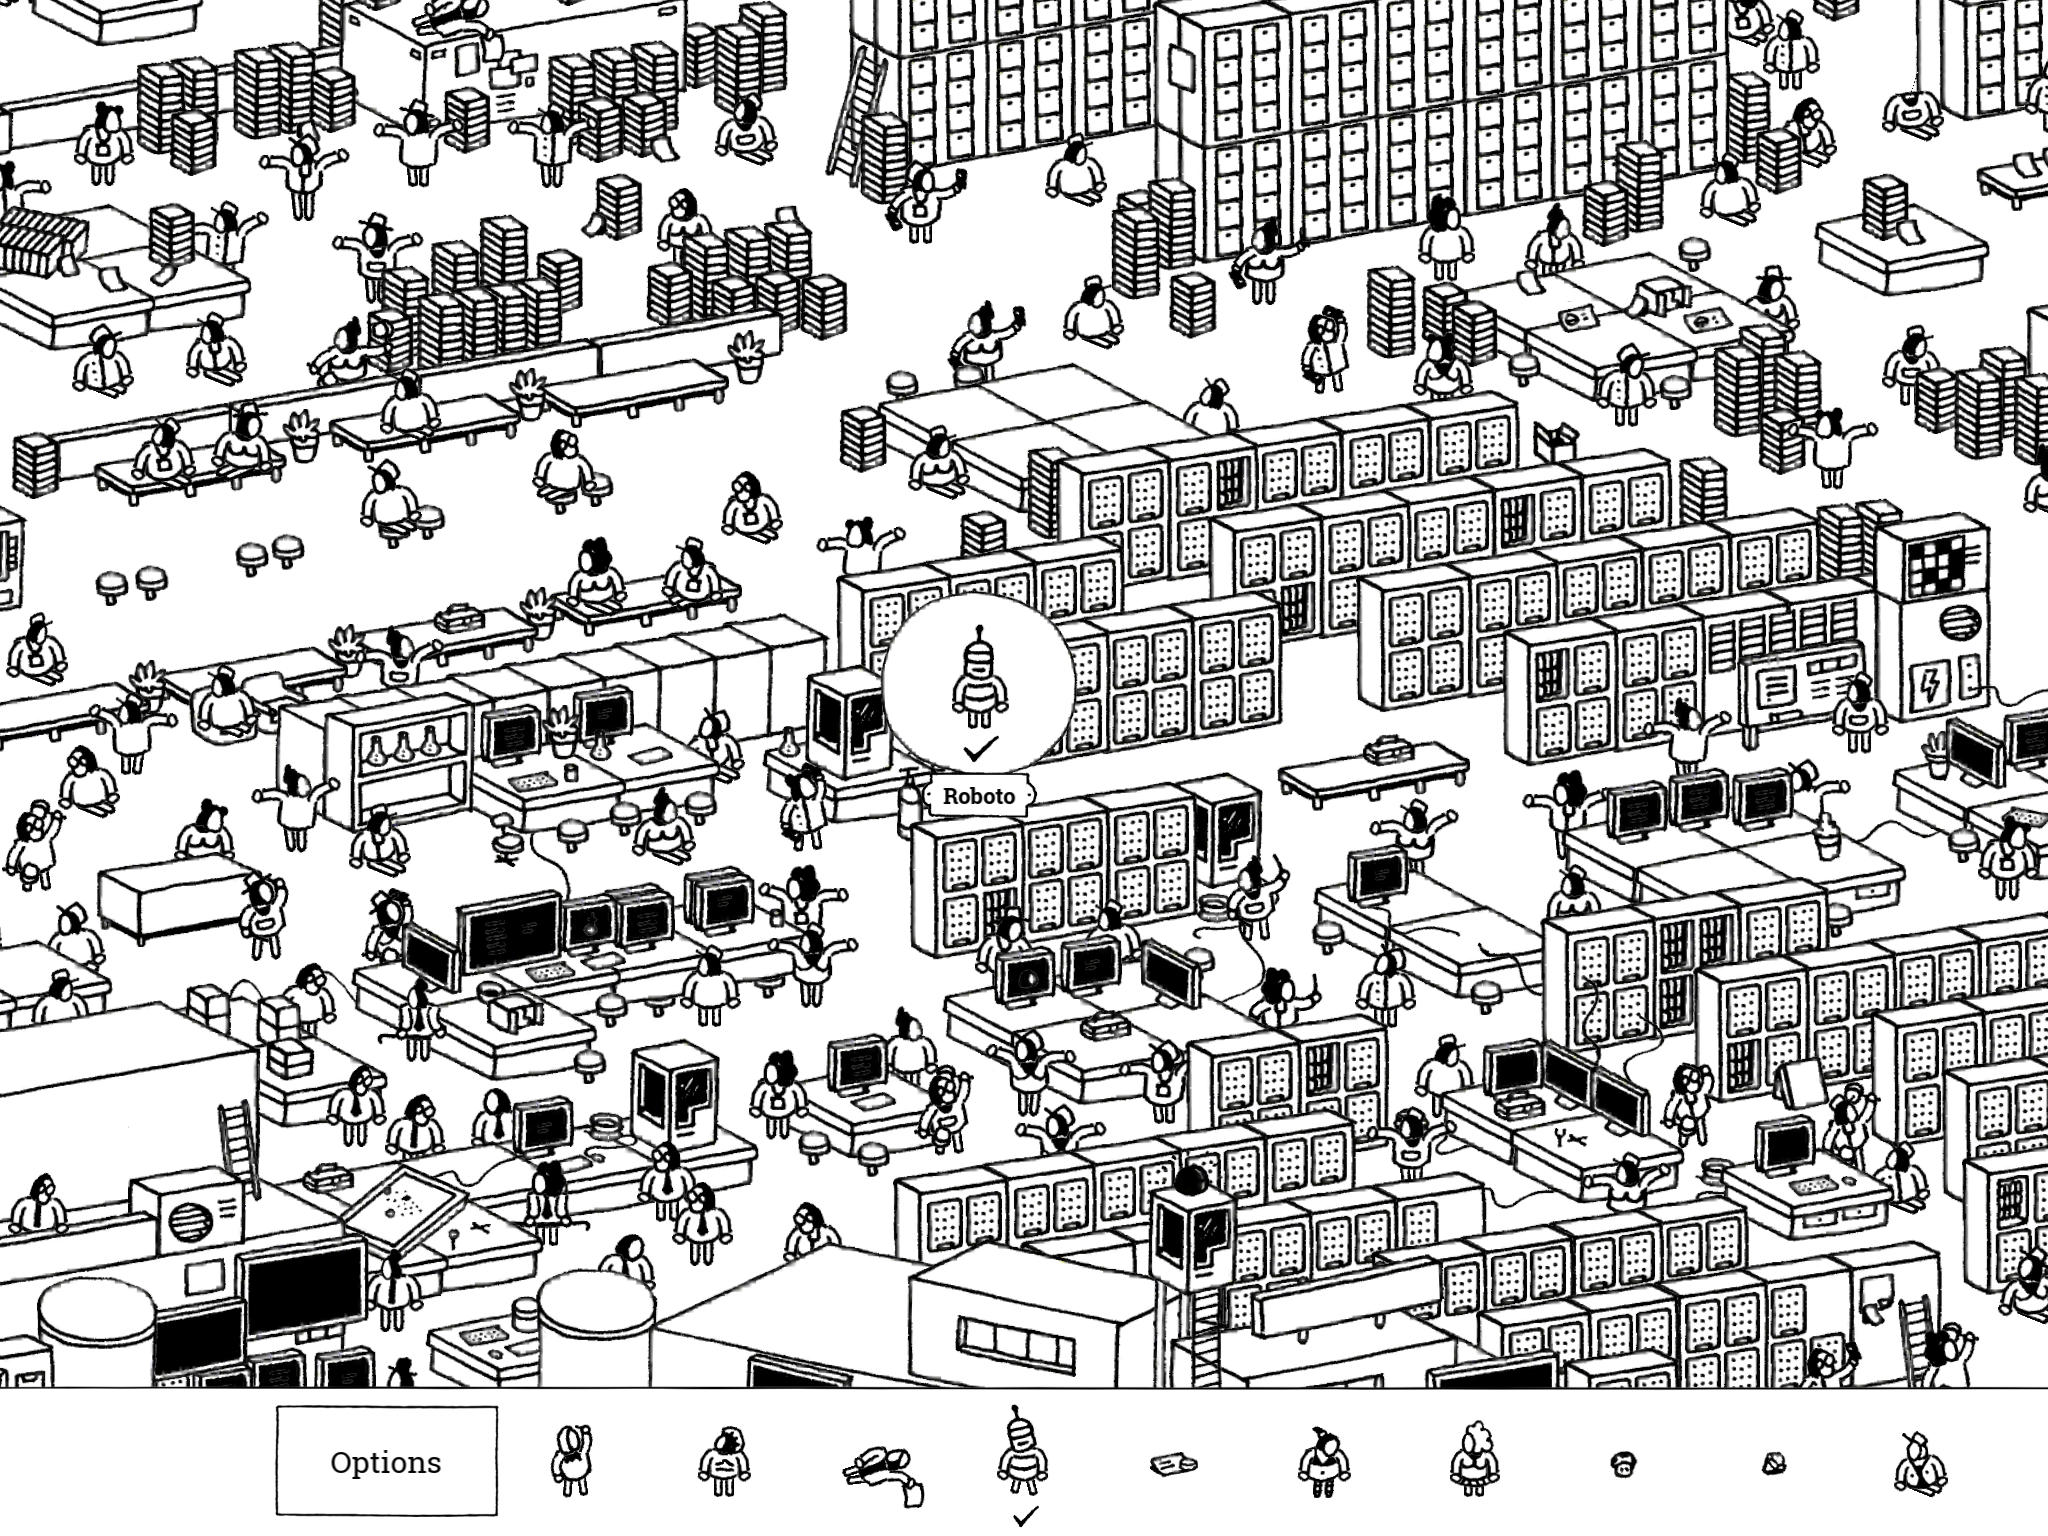
- Roboto: “Roboto is a man of steel and a guardian of data. Don’t you dare touching his servers!”
The servers are just south of the paper-filled area containing the Paperwork is So Boring Man. They are a series of boxes with little dots all over them. Roboto walks back and forth in the second row of servers from the top; you can catch him when he’s on the far west end of this row or in the small gap near the center.
- Roboto: “Roboto is a man of steel and a guardian of data. Don’t you dare touching his servers!”
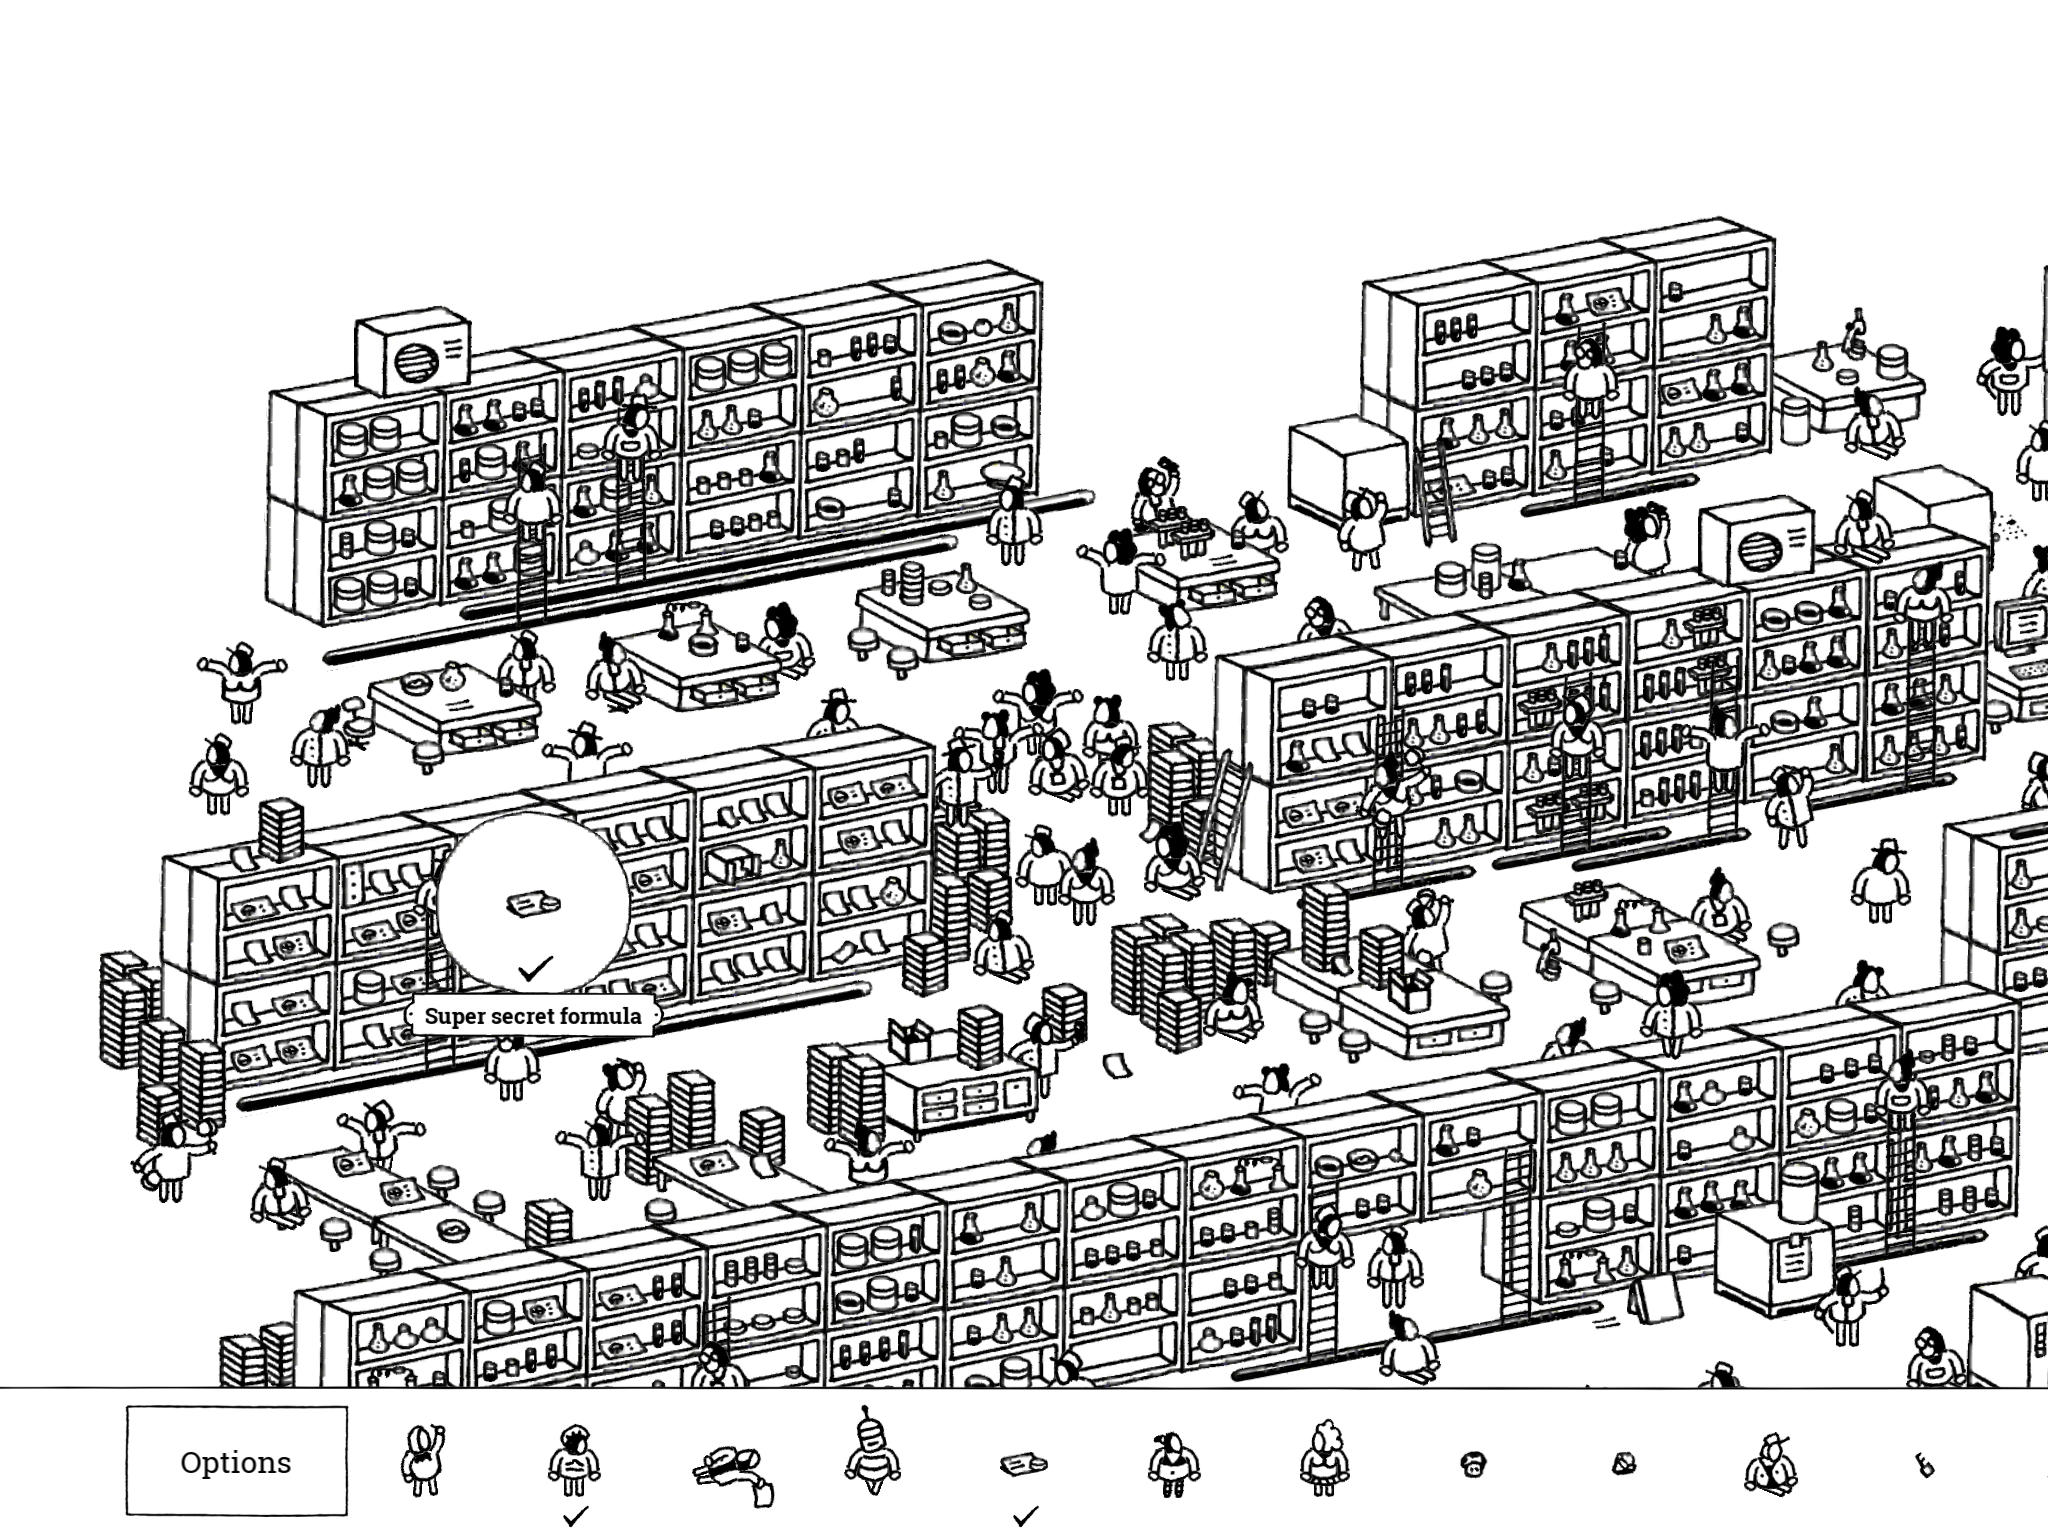
- Formula: “There’s only one formula like this in the cabinets. Good luck finding it.”
The cabinets are in the northwest corner of the image, and the cabinets with formulas are specifically the westernmost group. The formula cabinet you want has only one other cabinet above it and six columns filled with formulas. Slide the lab assistant on the ladder to the left one column; the secret Formula is underneath where she was standing.
- Formula: “There’s only one formula like this in the cabinets. Good luck finding it.”
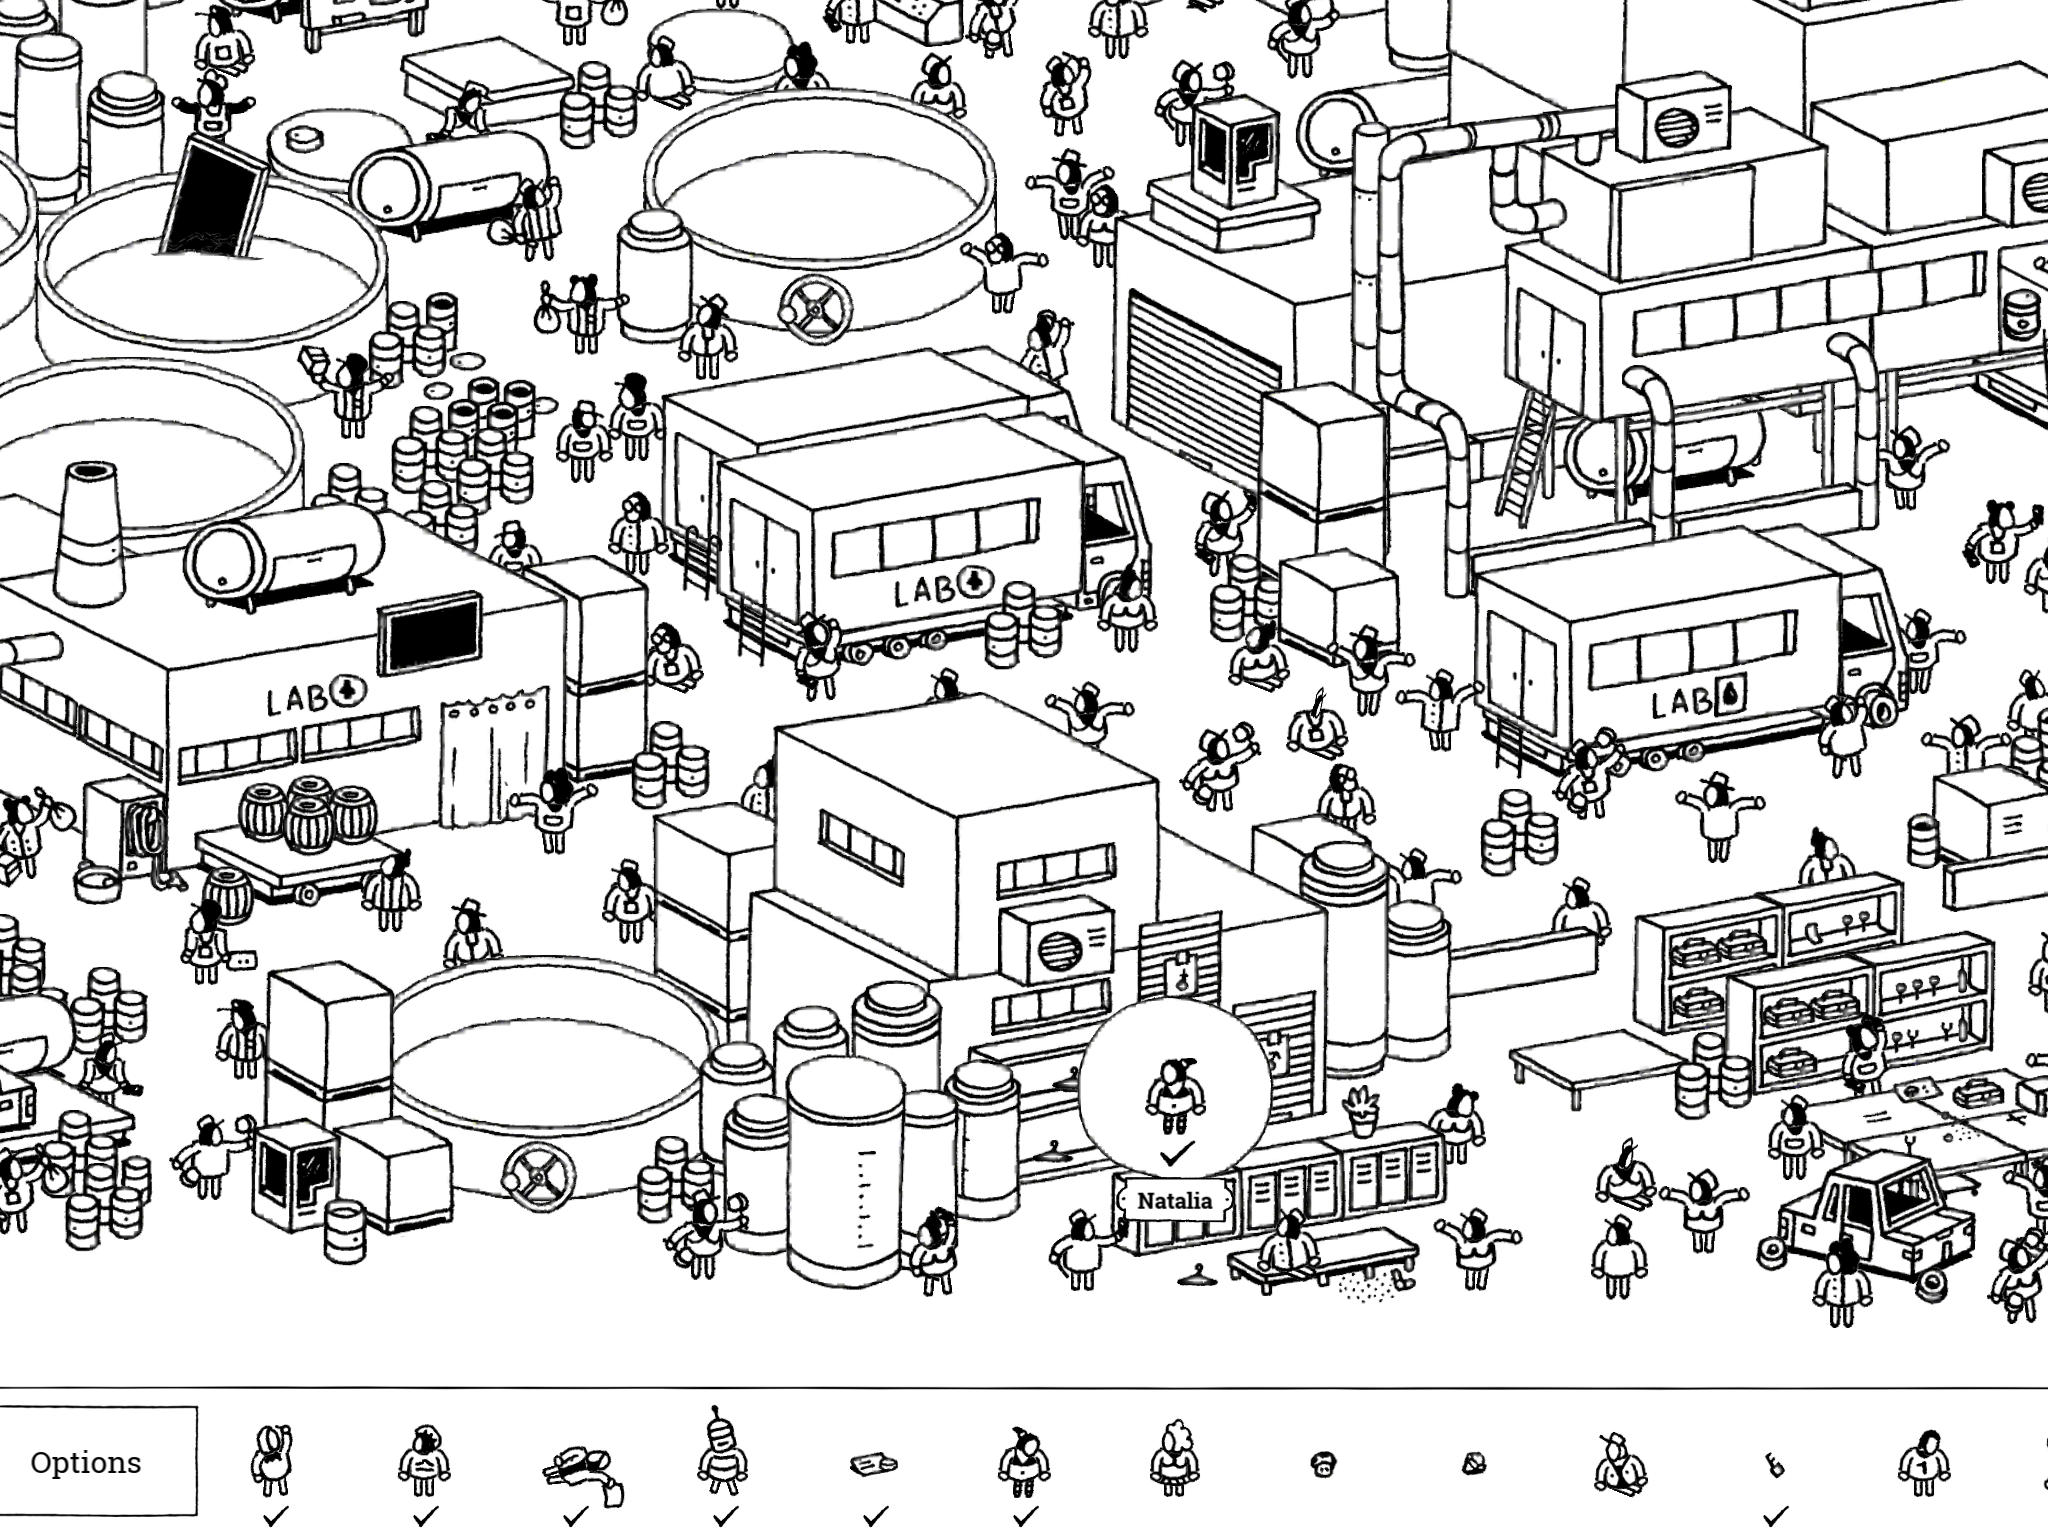
- Natalia: “Natalia changes clothes so quickly, you’ll see her wear something different with every slam of the door.”
Natalia is on the far southern edge of the lab, just west of the image’s vertical center. Behind a small row of lockers are two skinny garage doors, one with a male sign and one with female. Drag the female door (on the left) up so it opens, revealing Natalia. Drag the door back down to slam it shut. Keep opening and shutting the door, revealing Natalia in different outfits. When she appears wearing the outfit in the legend (a black bikini, hair up in a ponytail, black laced up boots), tap on her. It took us about seven or eight door slams before she was wearing the right outfit. If you miss it, just keep opening and closing the door until she puts those clothes on again.
- Natalia: “Natalia changes clothes so quickly, you’ll see her wear something different with every slam of the door.”
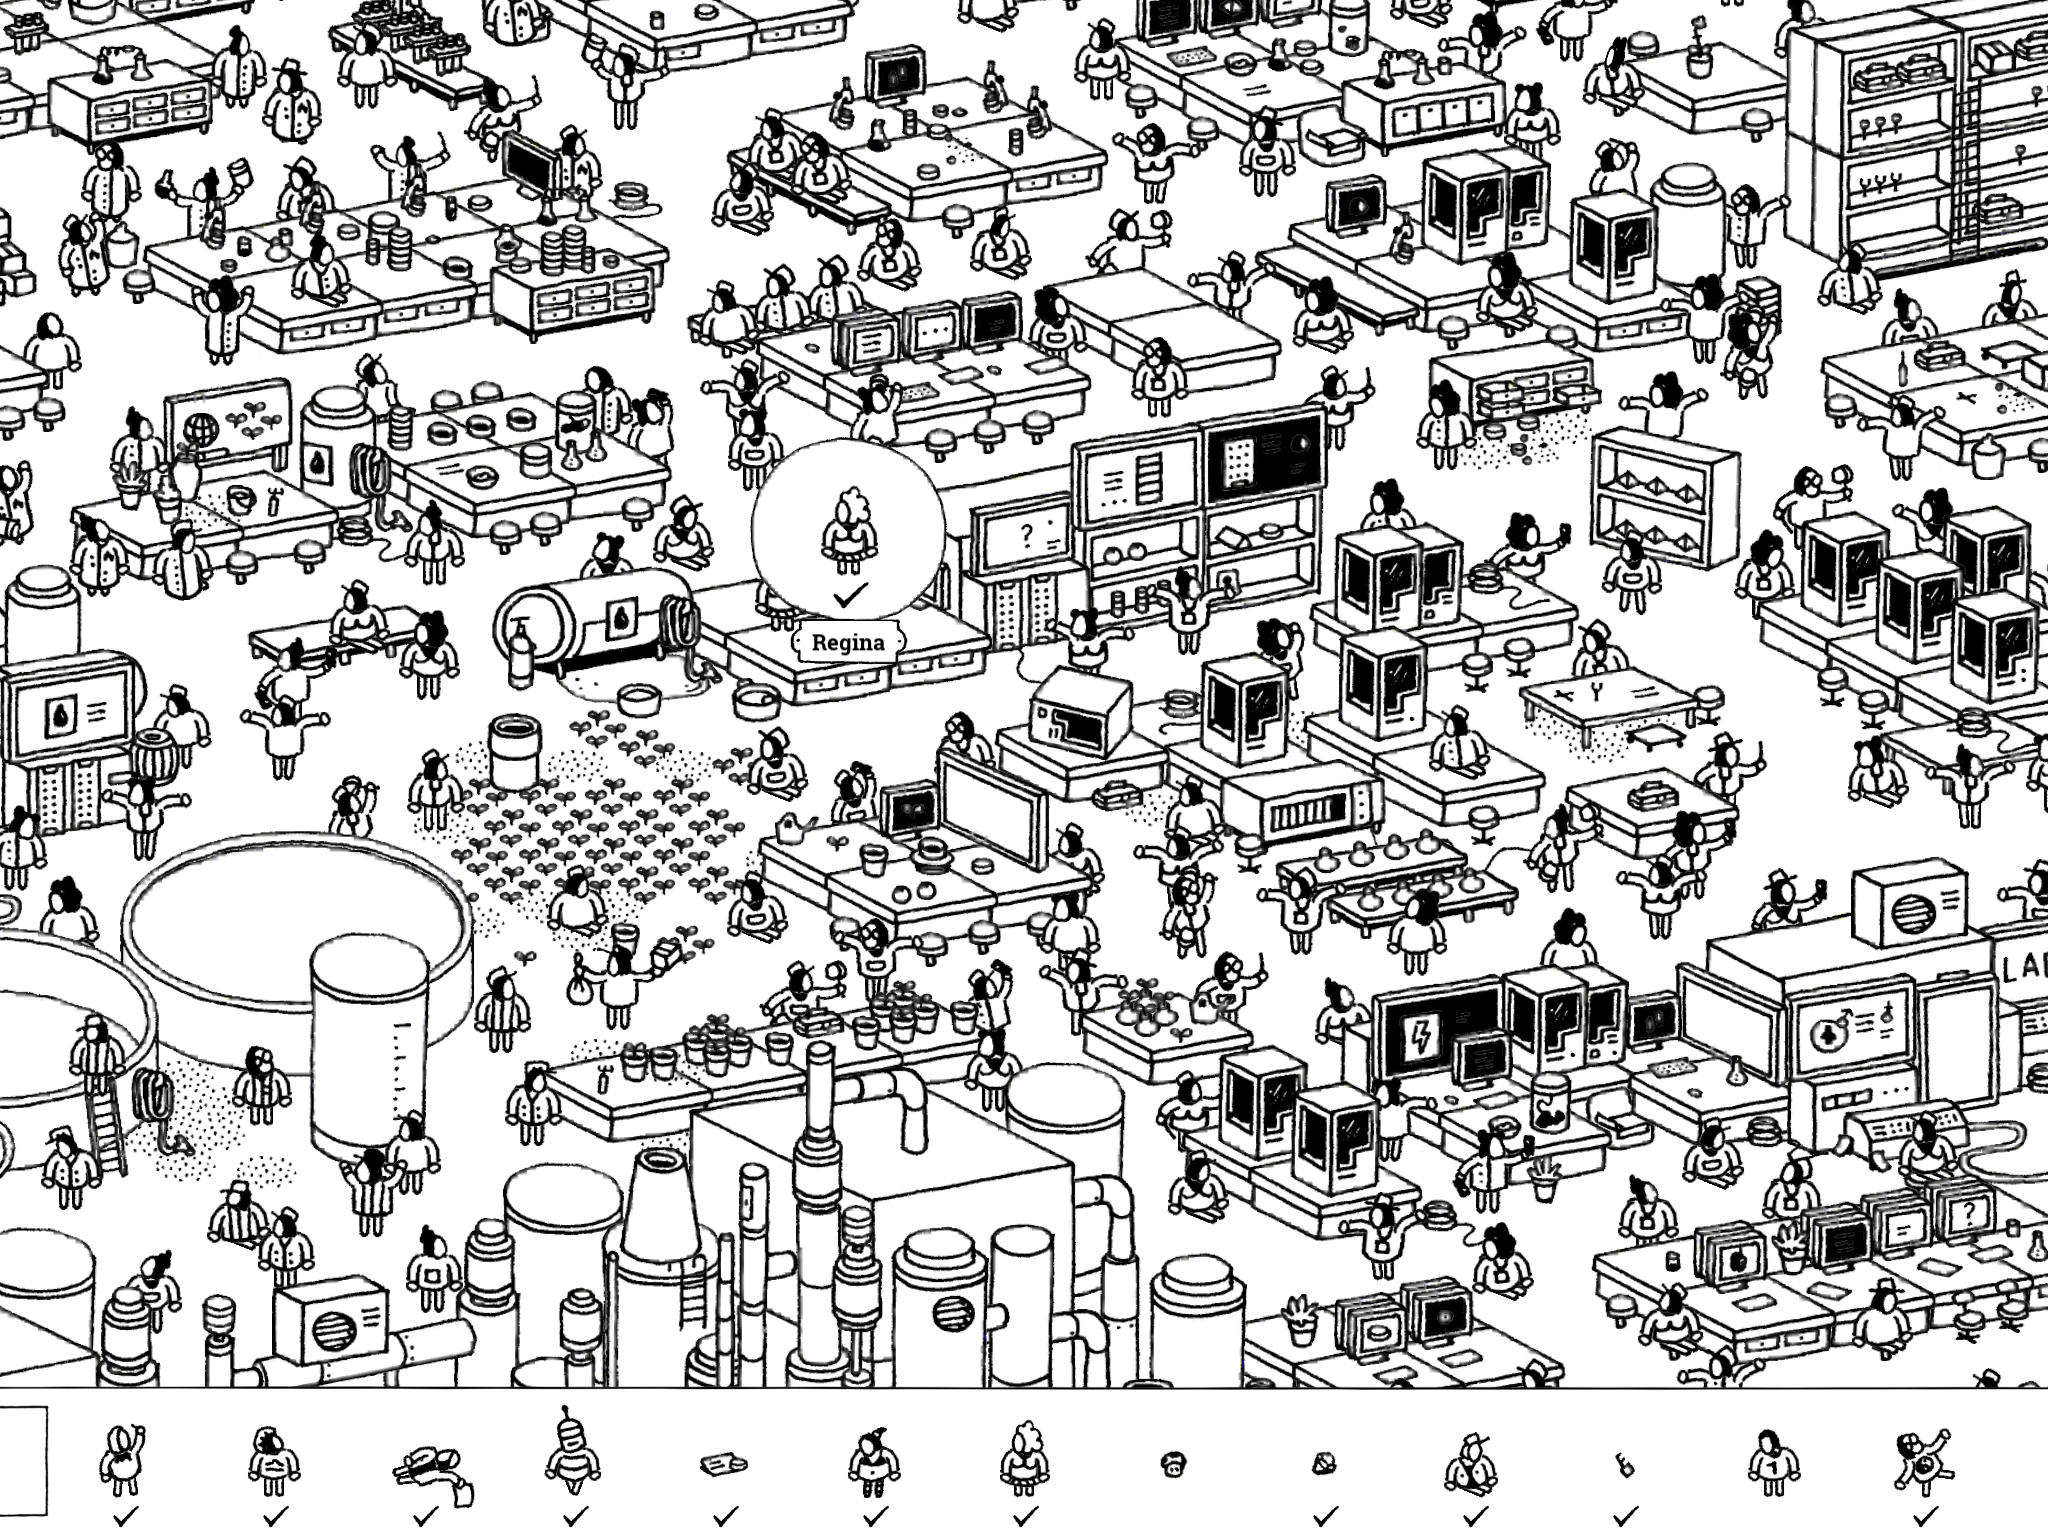
- Regina: “Turn on the electric mirror to reveal Regina’s reflection!”
Regina is near the western side of the image, pretty much at the vertical center. There’s a small patch of grass or flowers behind her. She’s standing on a platform with a large portrait-oriented screen next to her. Tap the tall screen to turn it on and reveal her reflection, then tap Regina.
- Regina: “Turn on the electric mirror to reveal Regina’s reflection!”
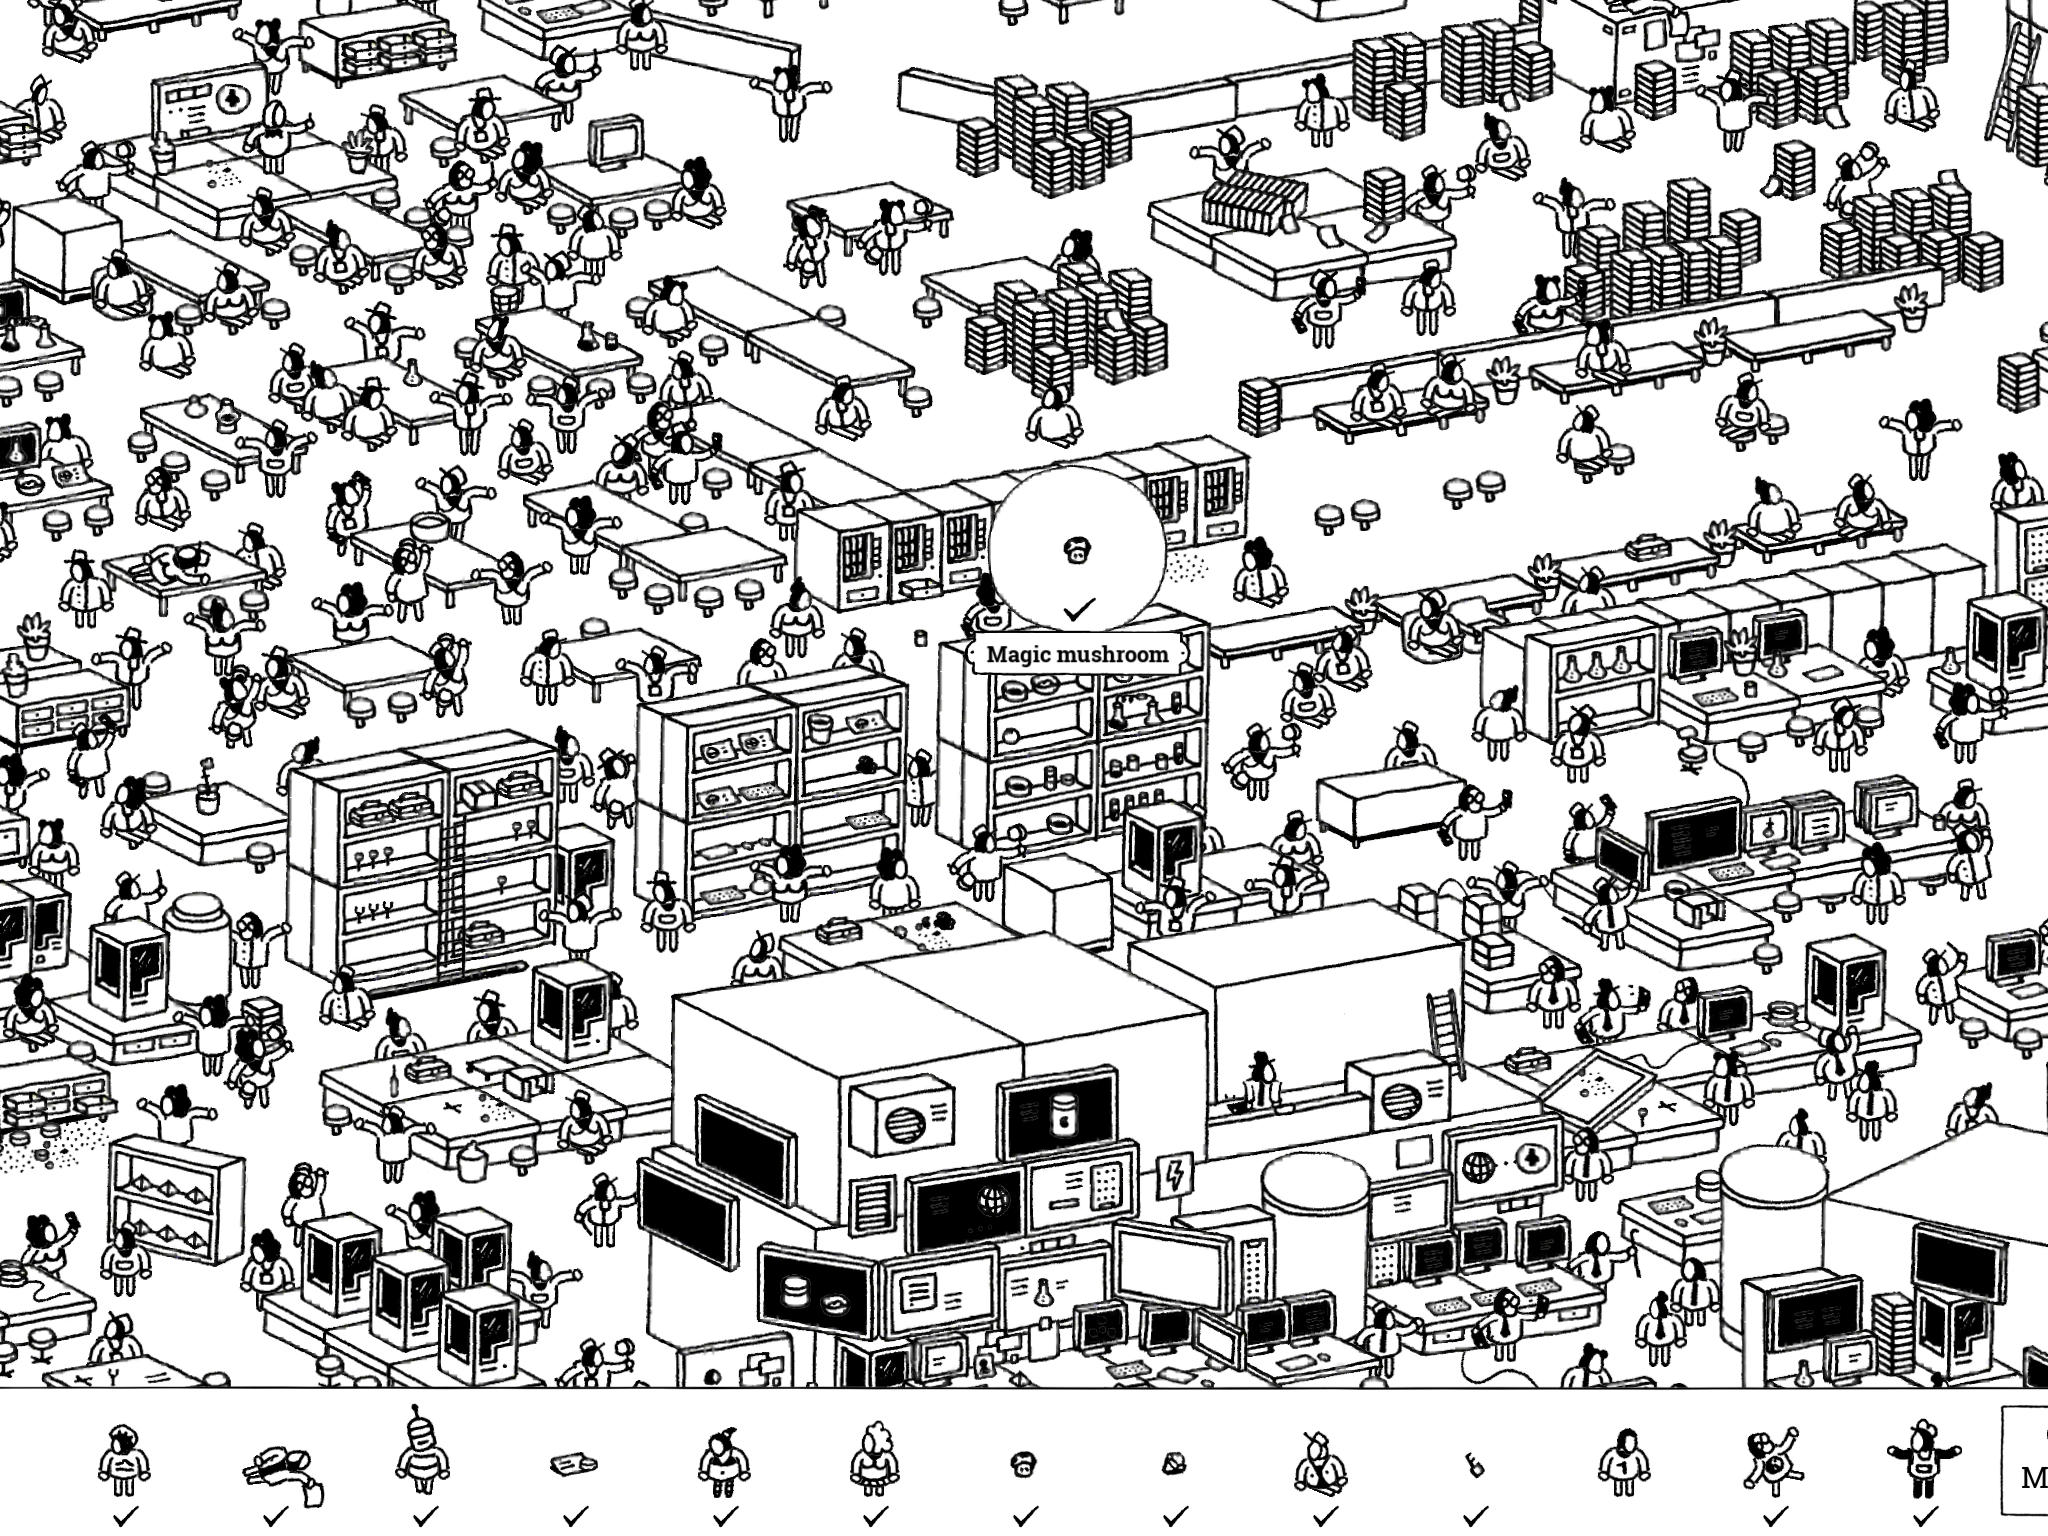
- Magic Mushroom: “The candy machine is out of order; someone put a magic mushroom in it.”
The candy machines are just southwest of the area filled with paperwork and Paperwork is So Boring Man. If you zoom out, they’re just north of the largest wall of computer screens, which are stacked in a triangle shape. The fifth candy machine from the left has a note taped to it; tap the drawer at the bottom of this machine to reveal the Magic Mushroom.
- Magic Mushroom: “The candy machine is out of order; someone put a magic mushroom in it.”
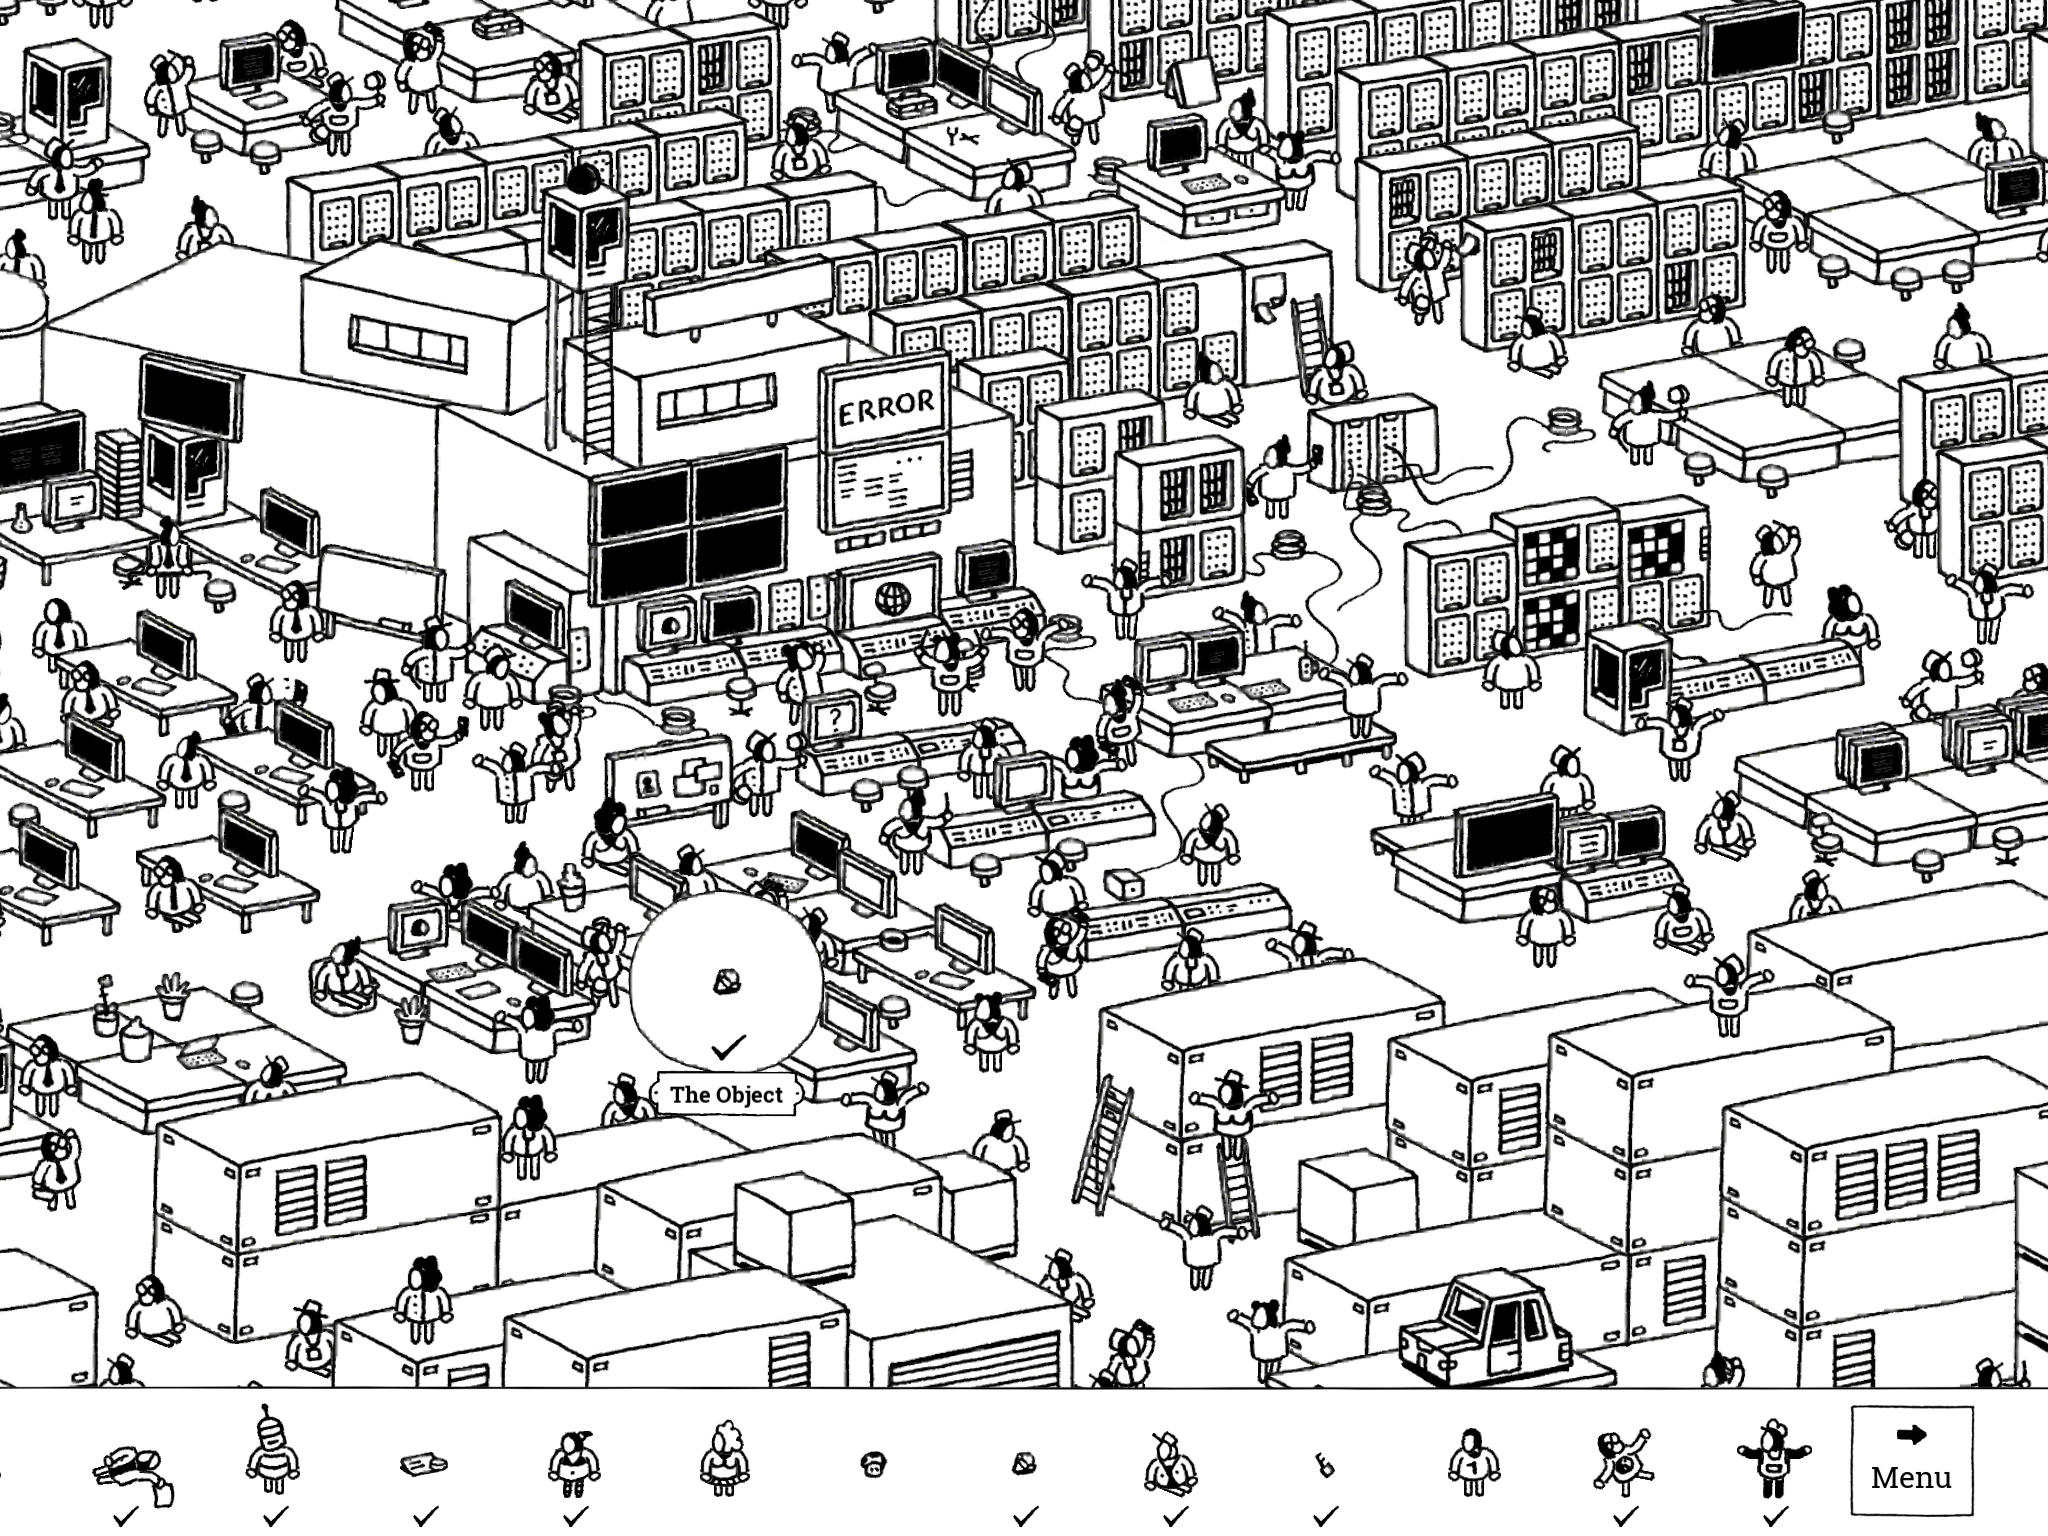
- The Object: “The computers can give you an indication where the Object is.”
If you go around tapping on computer screens, they’ll turn on and some will have arrows on them. These arrows point in the direction of The Object. There’s a wall of computer screens stacked neatly in a square next to two other screens on top of each other just southwest of the servers containing Roboto. Just south of this wall of computer screens (just north of the garage area with incomplete cars) is a group of desks; on the side of one of the desks (facing south) is a tiny drawer. If you tap the drawer to open it, it will reveal The Object.
- The Object: “The computers can give you an indication where the Object is.”
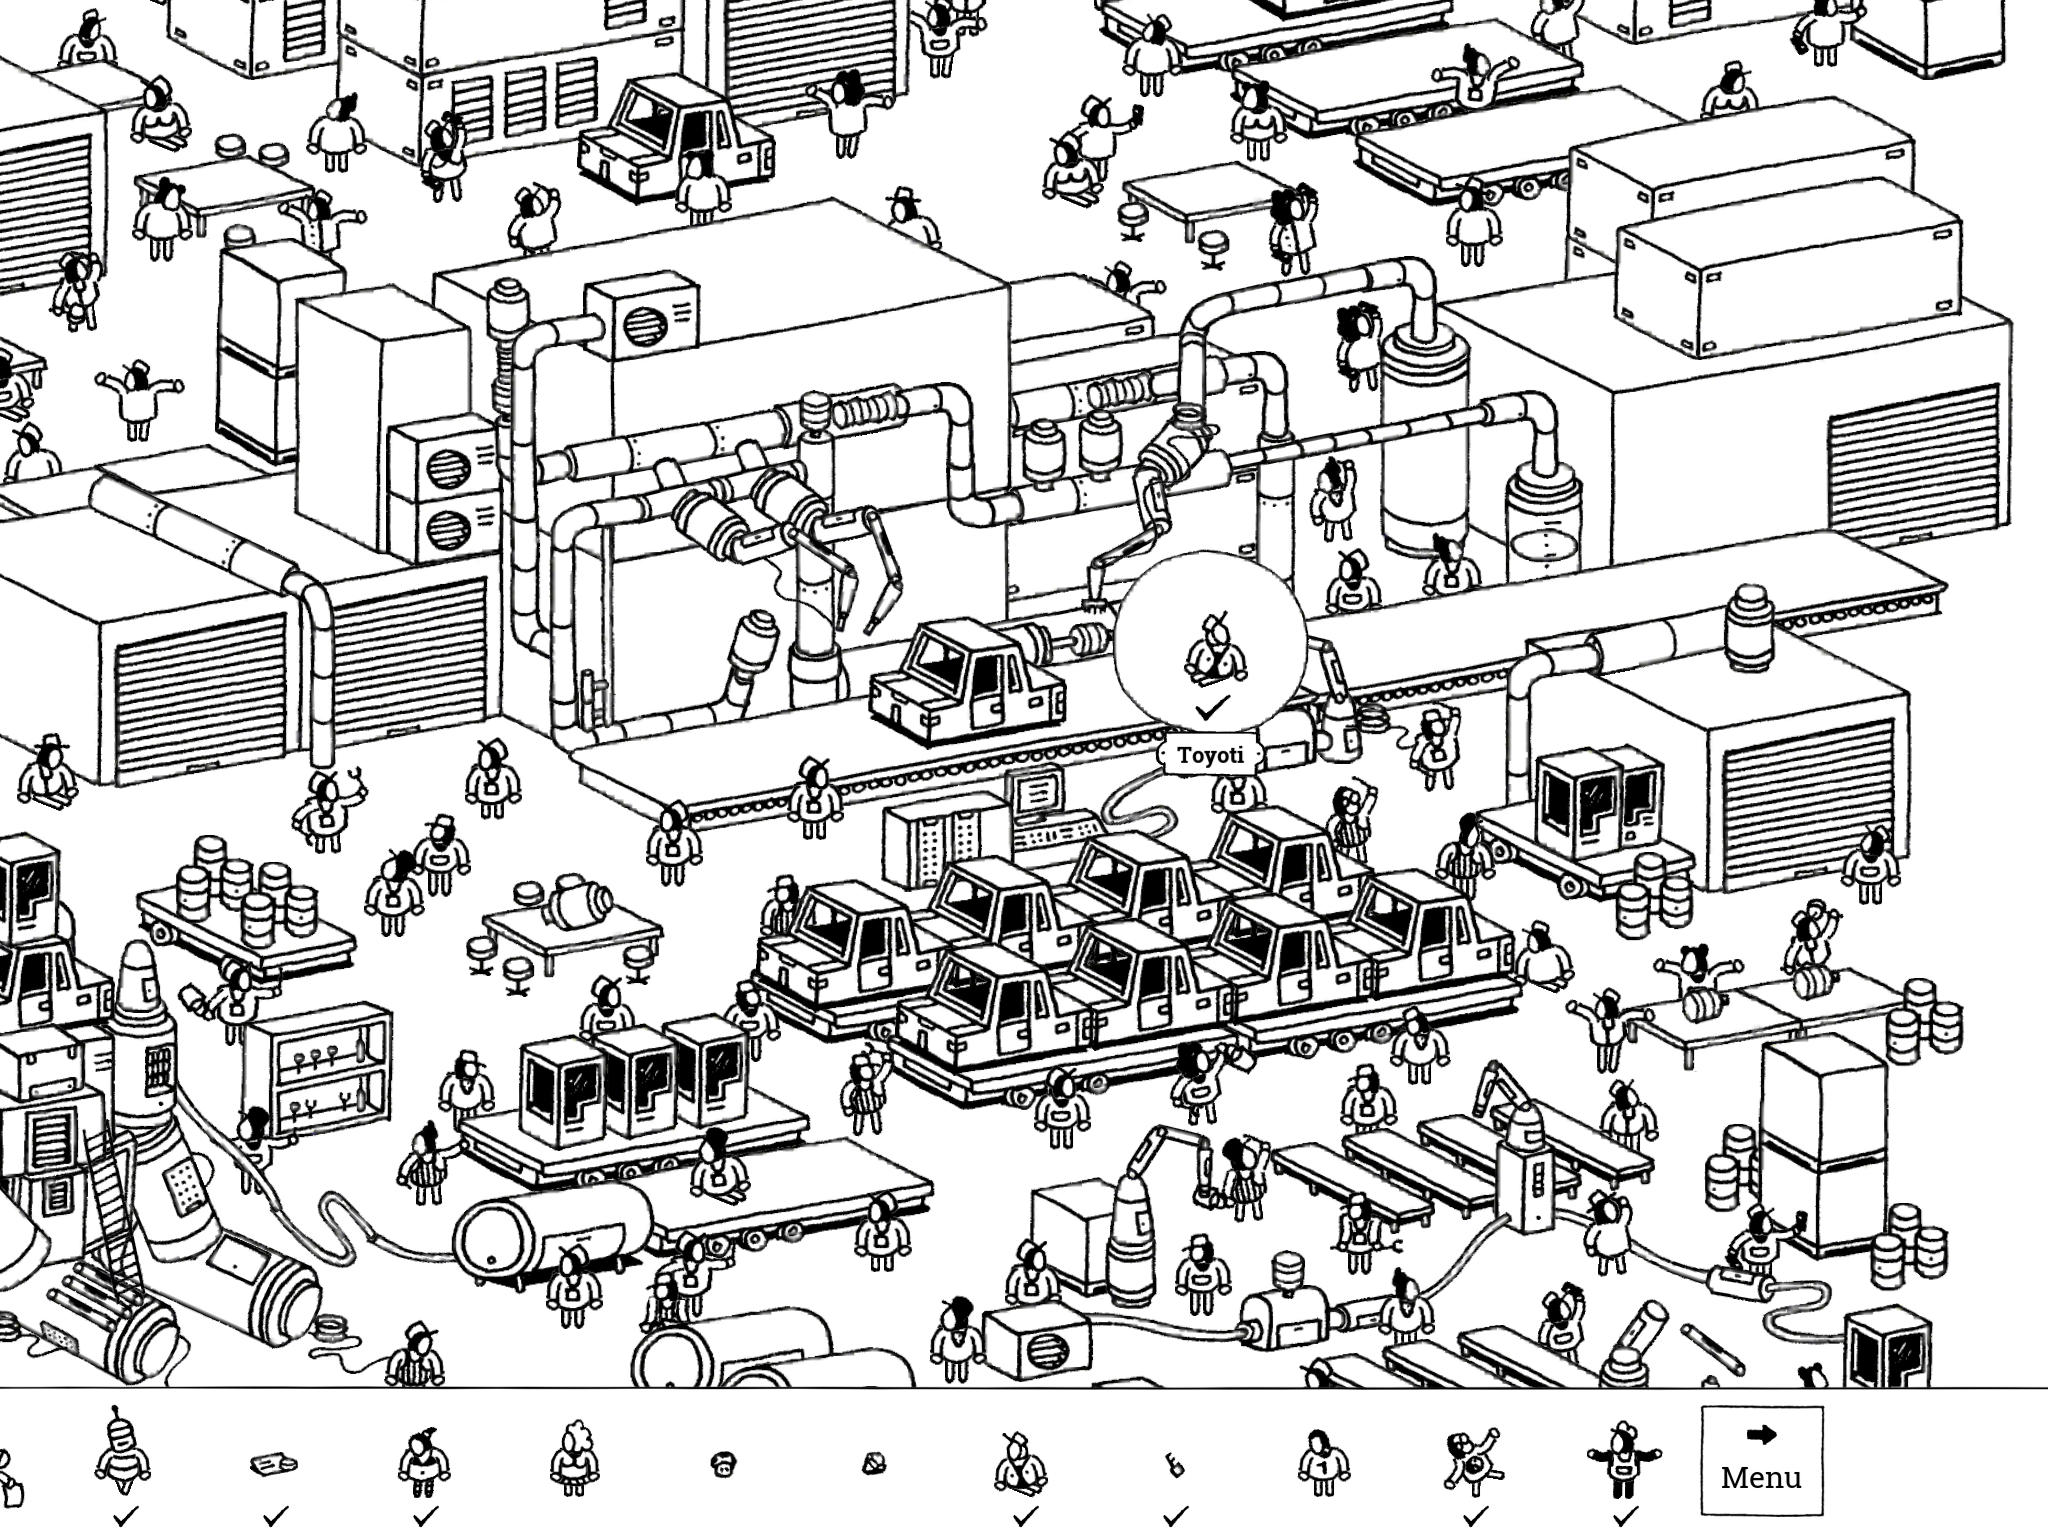
- Toyoti: “This ride is making Toyoti dizzy! Can someone or something pull him out?”
Toyoti is in the southeast corner of the image, inside a car going back and forth on a conveyor belt. There are mechanical arms sticking out on the conveyor belt; Toyoti’s car will stop about midway on the belt on each trip, pausing for a couple of seconds. When he does, tap the mechanical arm coming out of the bottom of the belt that is closest to him. It will pull him out of the car. Tap on him to collect him.
- Toyoti: “This ride is making Toyoti dizzy! Can someone or something pull him out?”
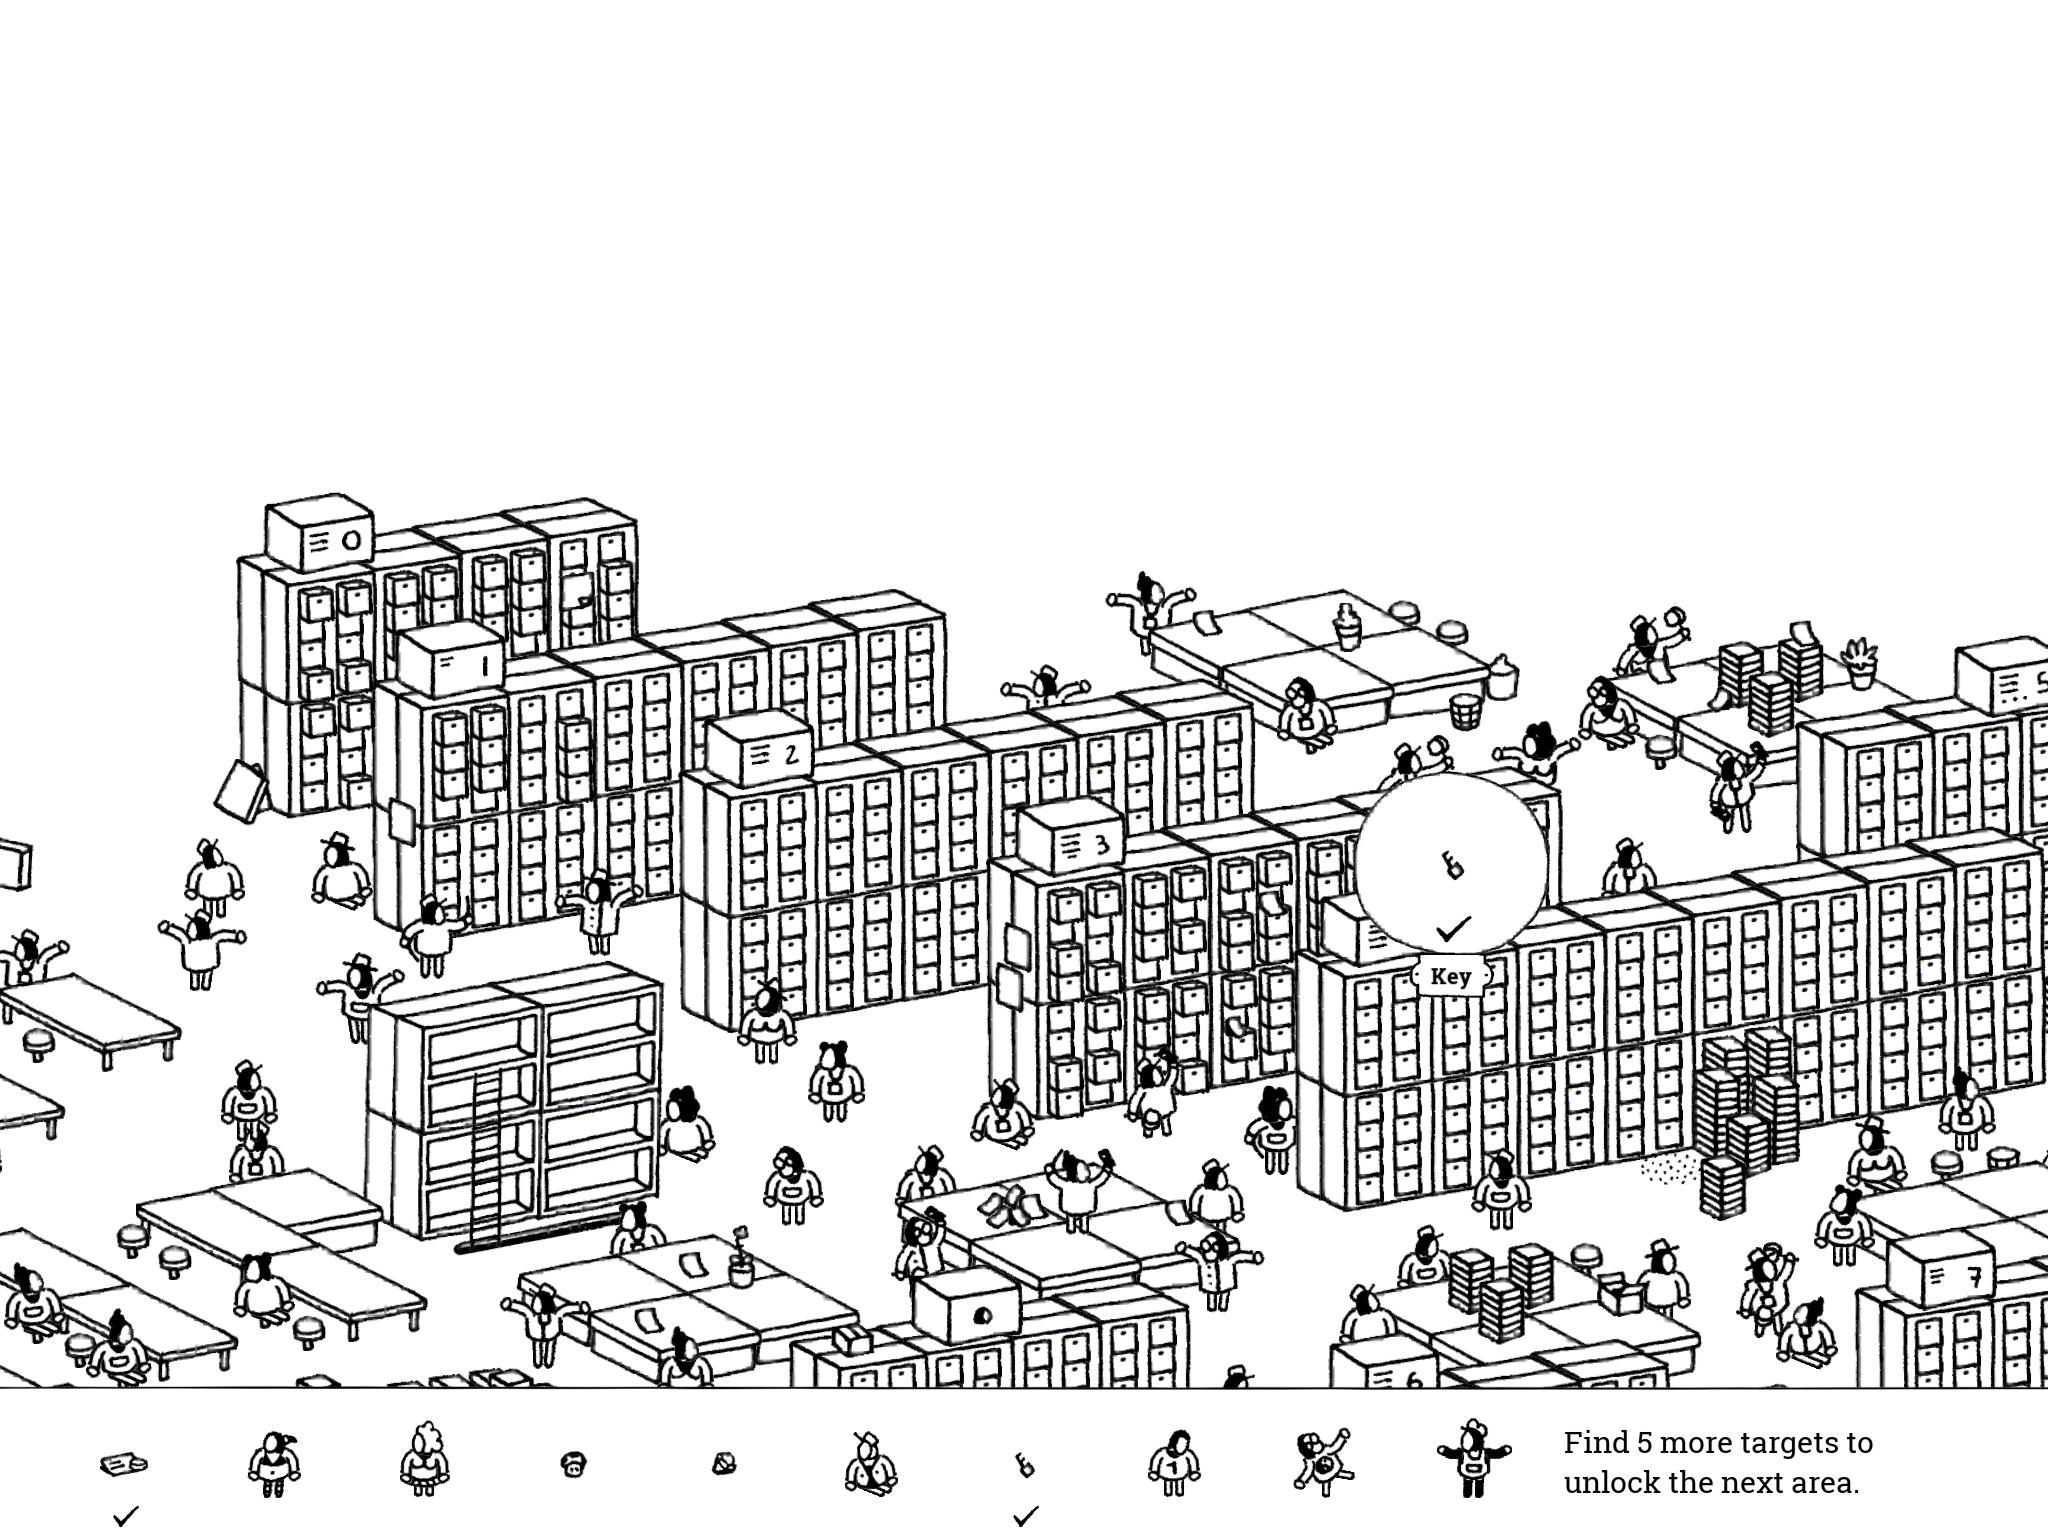
- Key: “3.10.3”
The Key has the most mysterious hint in the game, but it makes more sense when you go to the northeast side of the image. This is where all the tall file cabinets are, with numbered boxes on top. You want to find the cabinet with a box on top labeled “3,” then count ten drawers (in the top row) over from the left, then count three drawers in from this cabinet (top right drawer being 1). Tap on this drawer (or set of drawers—you can open as many as you like, and can open multiples at once if you zoom out) to reveal the Key.
- Key: “3.10.3”
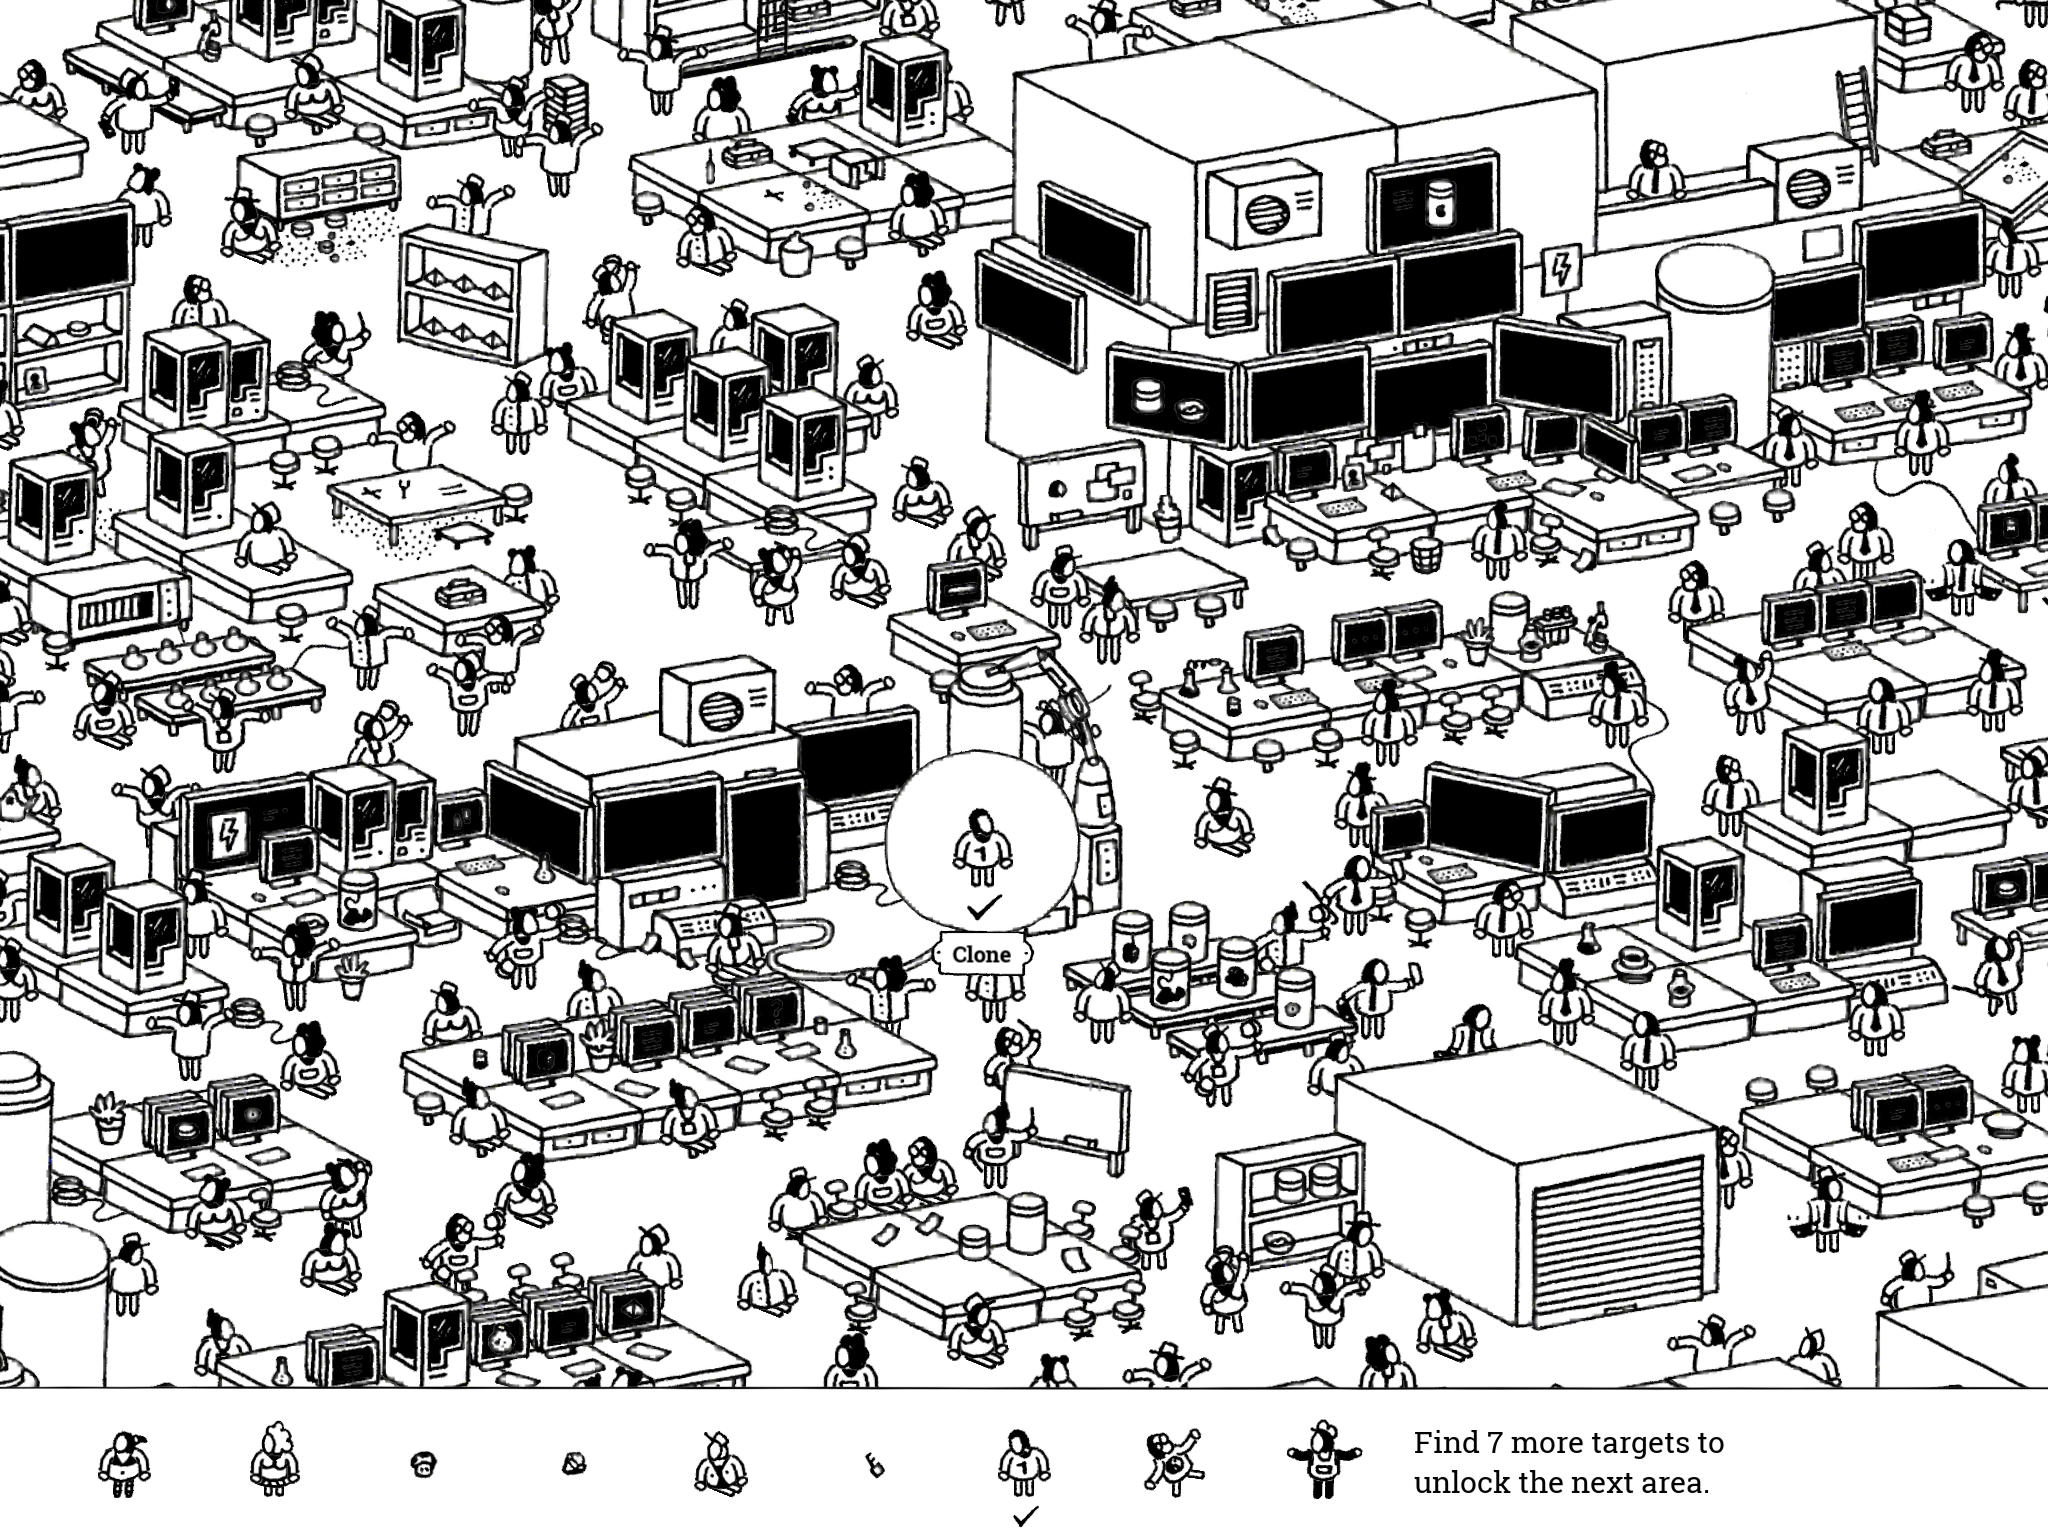
- Clone: “Wait! Do not shut down this computer! The clone still needs to dry.”
The Clone was the hardest folk for us to find in the entire game. His clue is a little bit misleading; you don’t actually want to look near the water vats/tubes on the west side of the lab. He’s fairly close to the center of the image, just southwest of the wall of computers stacked like a triangle. There’s a machine here that’s a giant arm connected to a tube that’s standing on a pedestal. There is a blinking black light on a box next to the machine, connected to a wire leading to a series of computers. The computer just above where this wire connects—the horizontal one, not the vertical one—should be turned on with a white screen. Tap the screen to turn the computer off. This will cause the mechanical arm to lift the tube, revealing the Clone underneath. If you’re really having trouble finding the Clone, we like this tip from AppUnwrapper a lot: exit the scene and come back. This will reset the computers so they’re all turned off. The Clone’s computer will be the only one turned on (with a white screen on the default color mode).
- Clone: “Wait! Do not shut down this computer! The clone still needs to dry.”
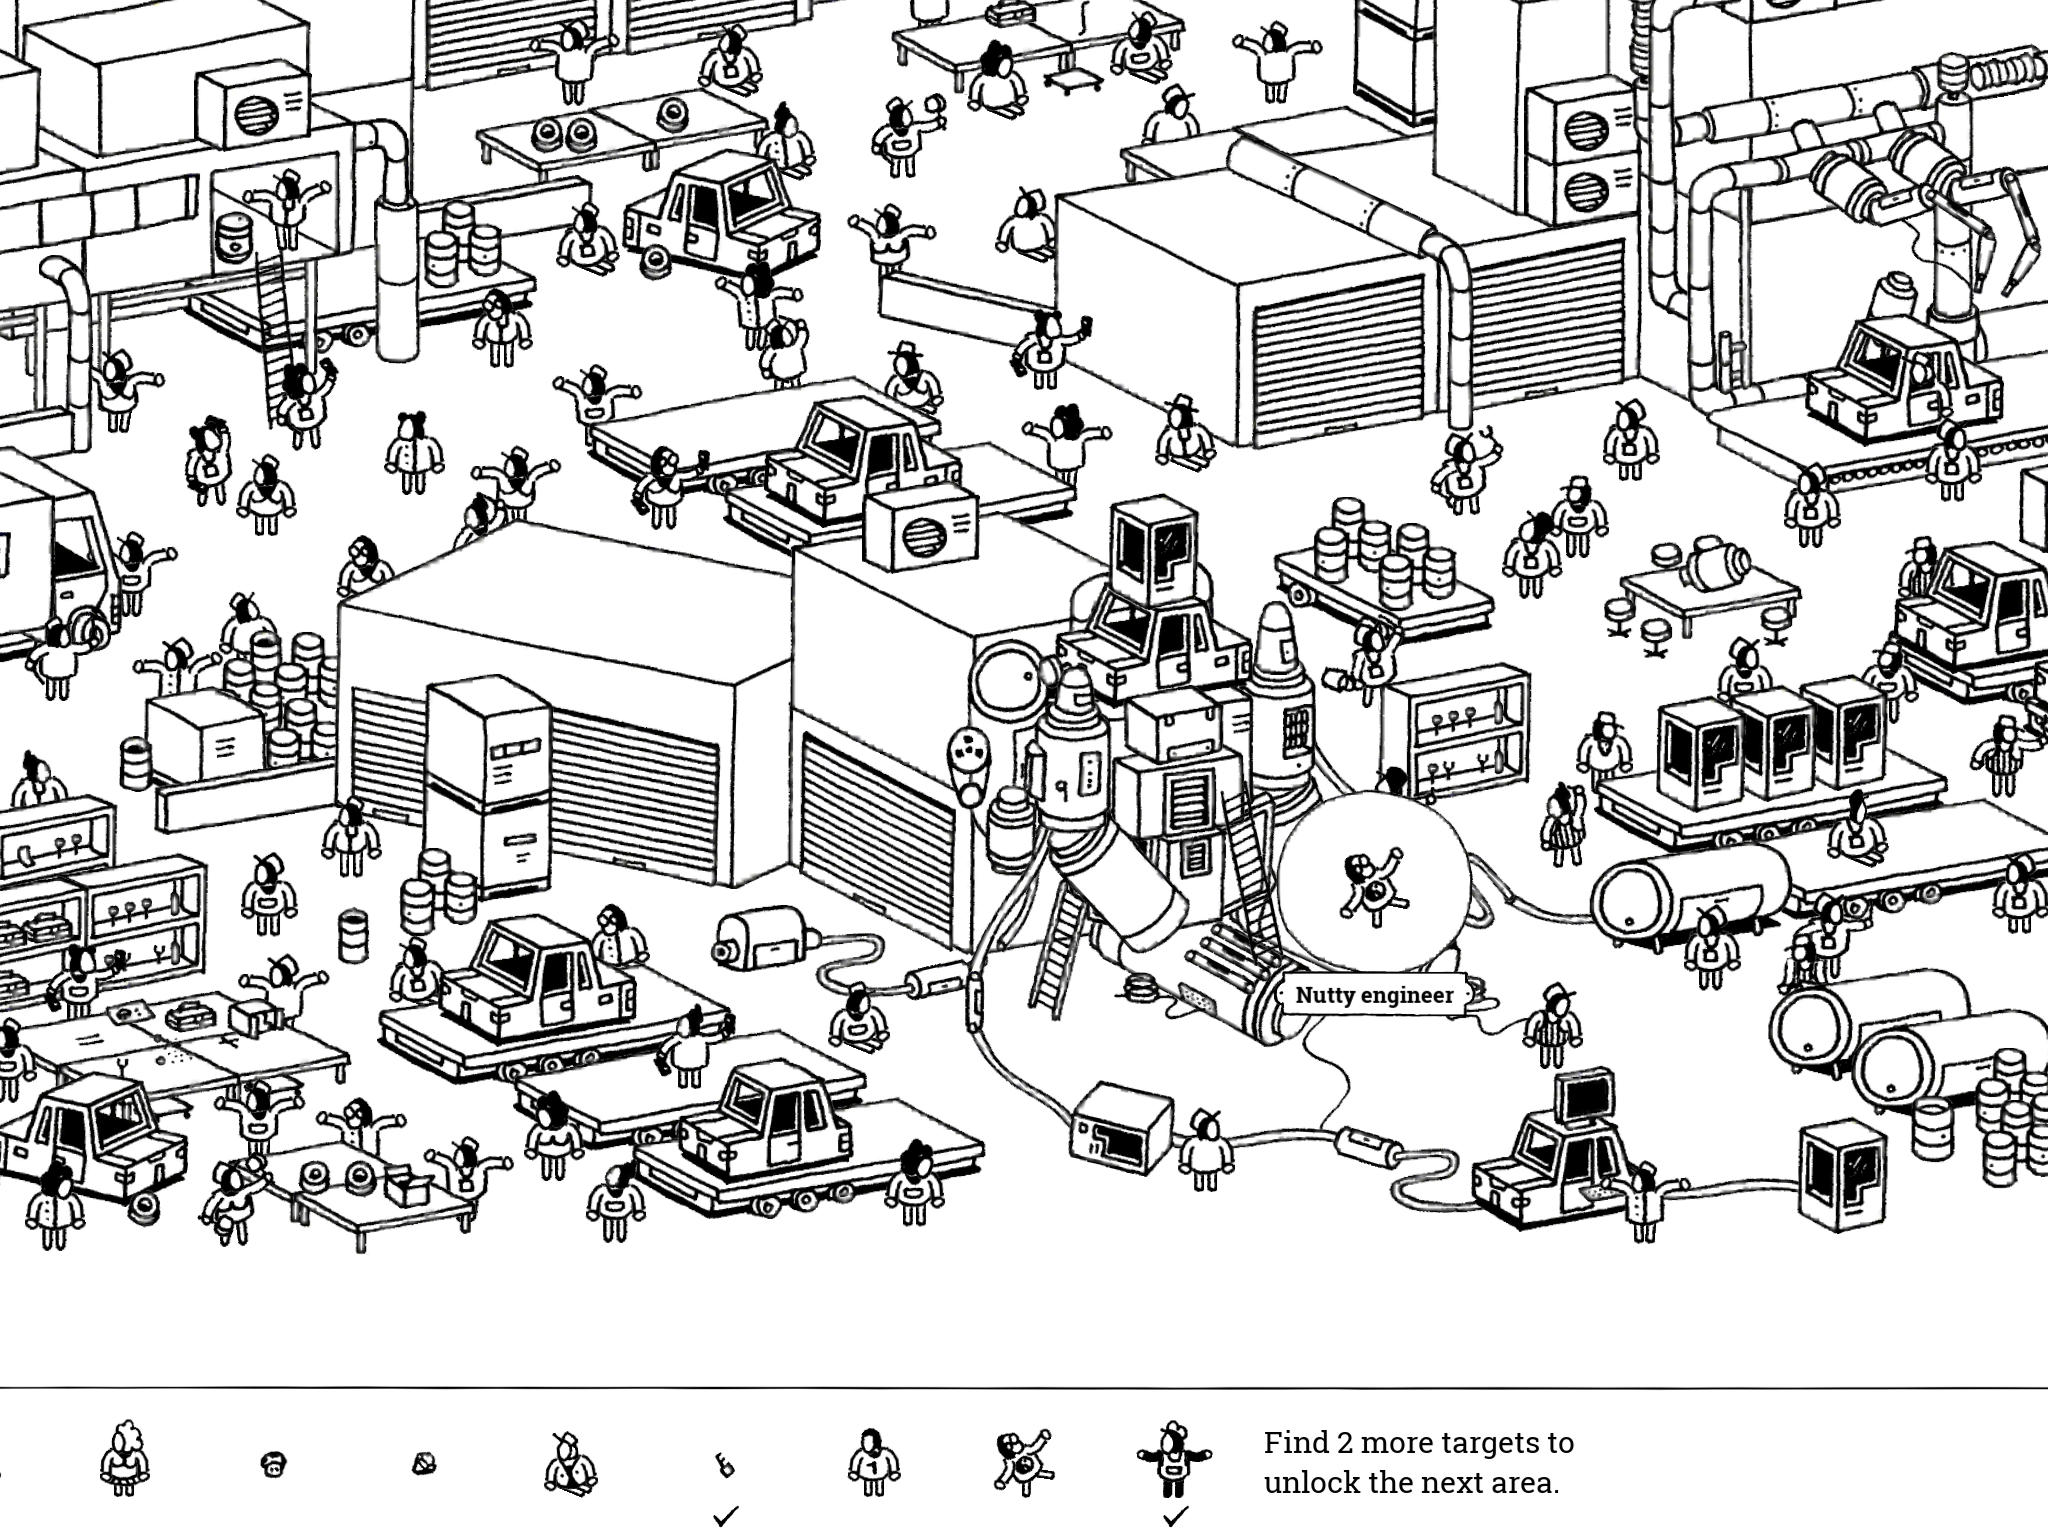
- Nutty Engineer: “The nutty engineer is still working on the internals of her monstrous robot. Other engineers are scared it’ll crush them.”
The giant robot is on the far southern edge of the image, just a little west of the southeastern corner. He’s leaning against a wall and is made up of a variety of parts, like cars and tubes. His left leg (our right) has a door in it; tap the door and the Nutty Engineer will pop up. Tap her while she’s in the air, before she falls back into the robot.
- Nutty Engineer: “The nutty engineer is still working on the internals of her monstrous robot. Other engineers are scared it’ll crush them.”
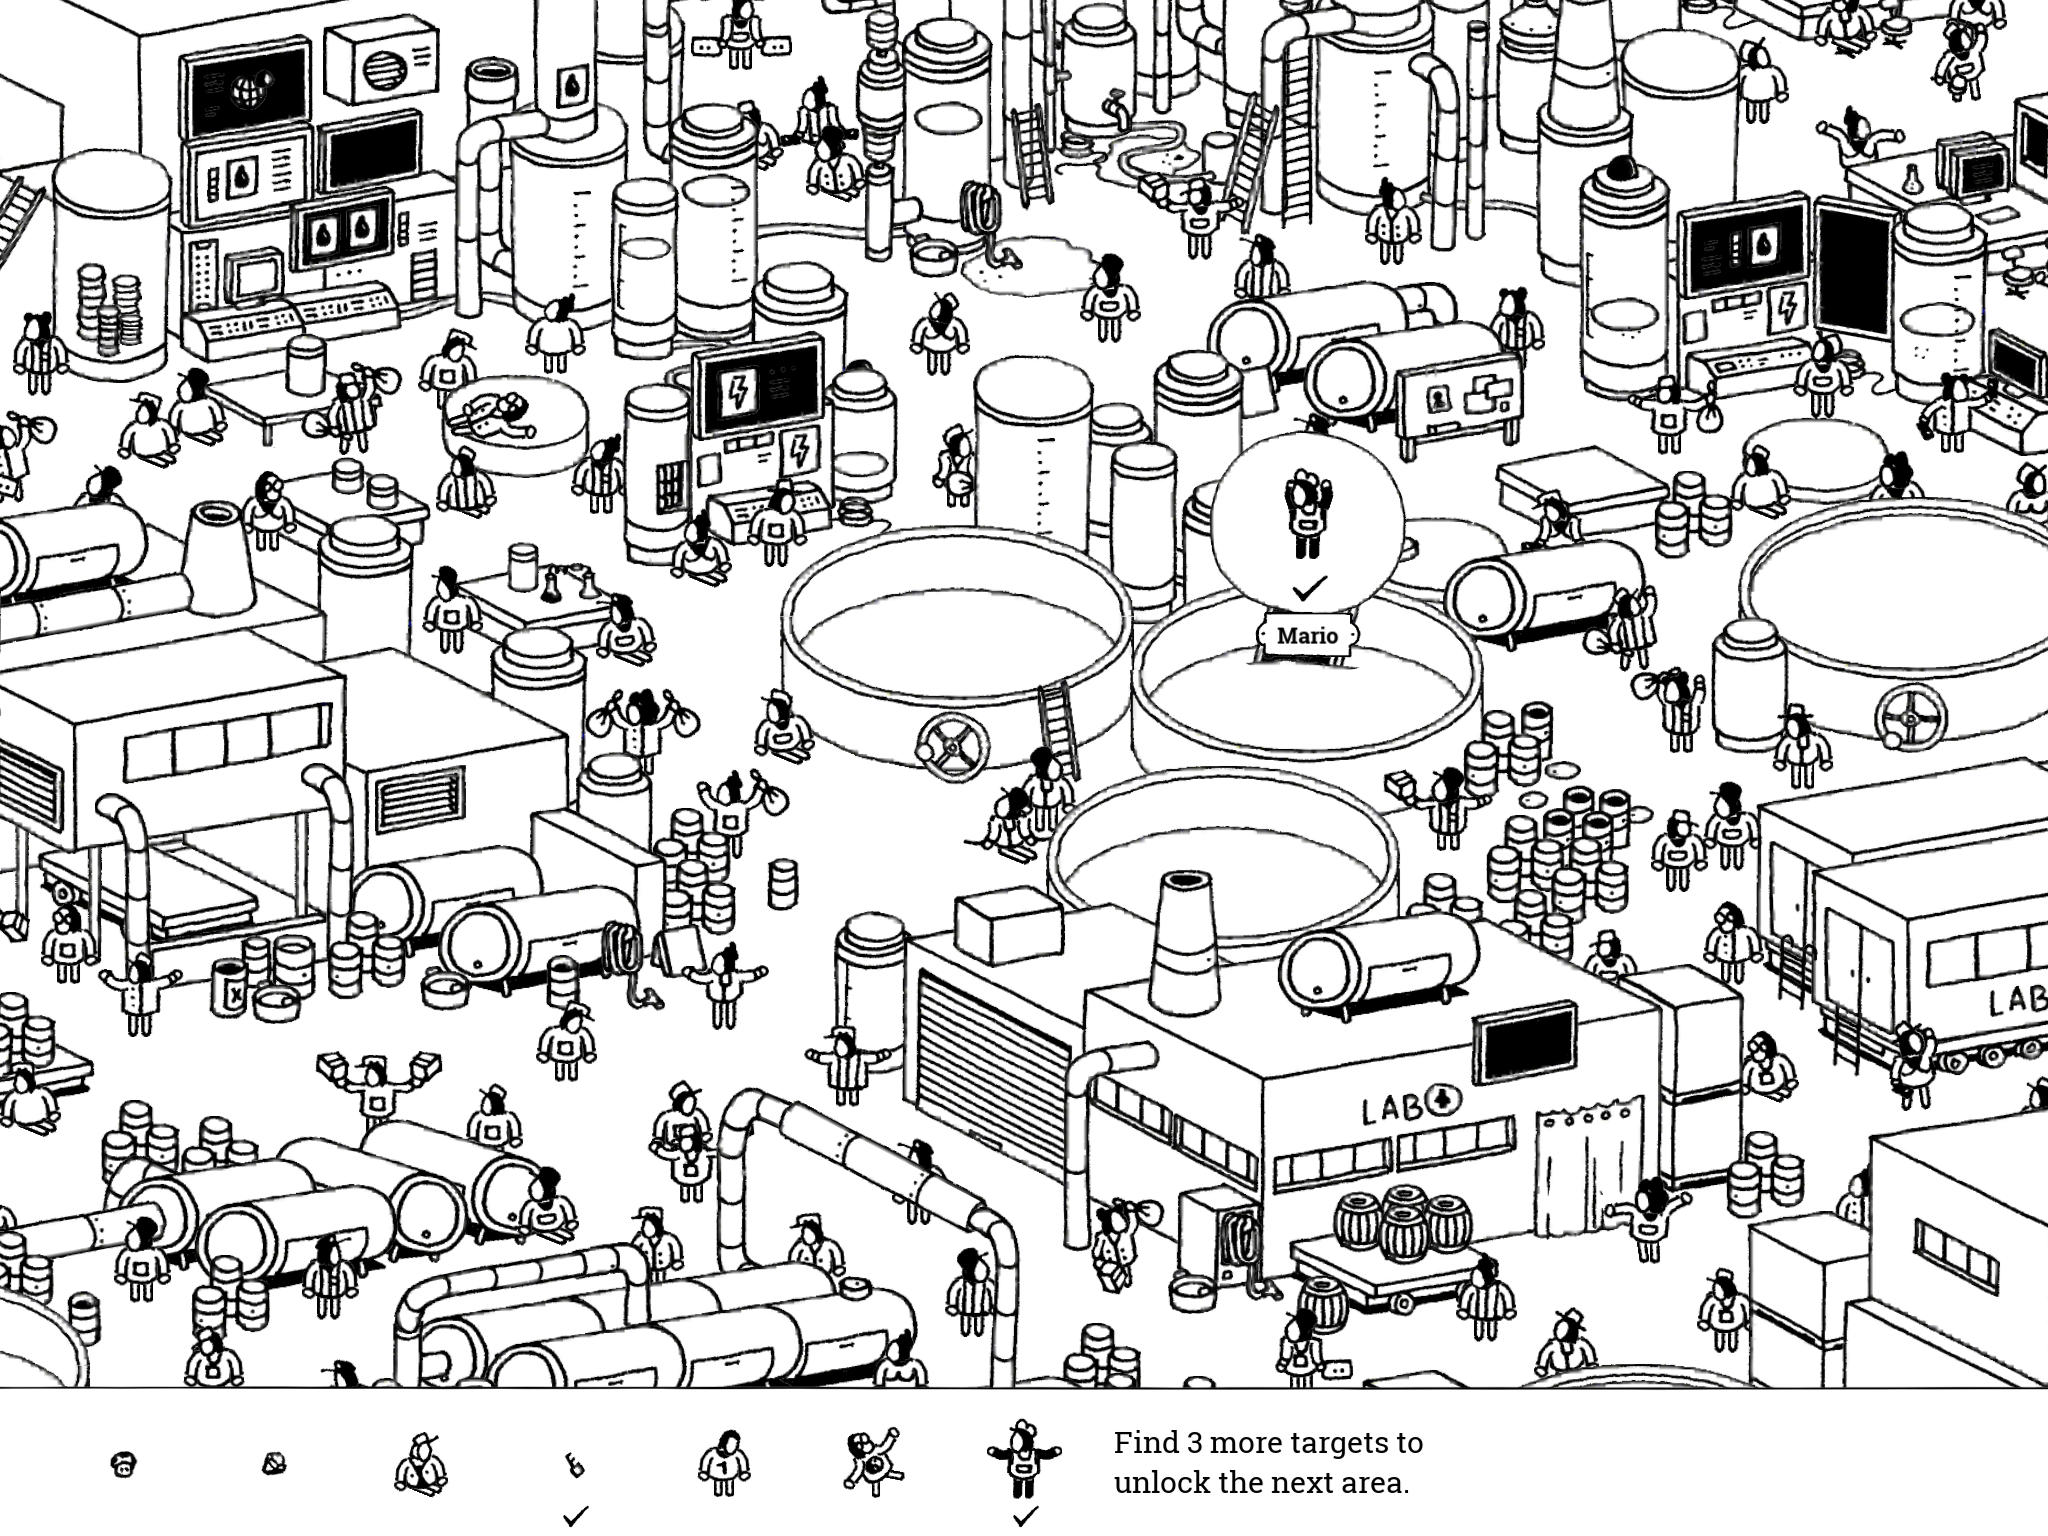
- Mario: “It didn’t take Mario long to see why this 4K HD LED Nanopixel plasma screen stopped working. The problem: water damage. Solution: drain the water.”
Just east of the southwestern corner are three large vats of water sitting right next to one another. Sticking out of one of these vats is a large, portrait-oriented screen. The vat left of this one has a wheel on it. Turn the wheel counter-clockwise to drain the water. The water, and the large screen, will go down some; Mario is jumping up and down behind the screen.
- Mario: “It didn’t take Mario long to see why this 4K HD LED Nanopixel plasma screen stopped working. The problem: water damage. Solution: drain the water.”
Beach DLC
Level 1
- Rihanna (1): “For the tanning, Rihanna didn’t come here; she came for the atmosphere.” Any eagle-eyed player will notice there are four items to find in this small level, one of them being an entire person. Which means this person is probably hiding in plain sight. Look centre left of the scene and you’ll see an umbrella hiding half an individual. This individual is Rihanna.
- Glasses (2): “I know I’m hard to see, but please don’t place your butt on me.” If you were inside this scene, where are the only places to sit without getting sand all over your buttocks? A towel of course, so click the towel in the centre right of the screen. Underneath this beach towel is a pair of reading glasses.
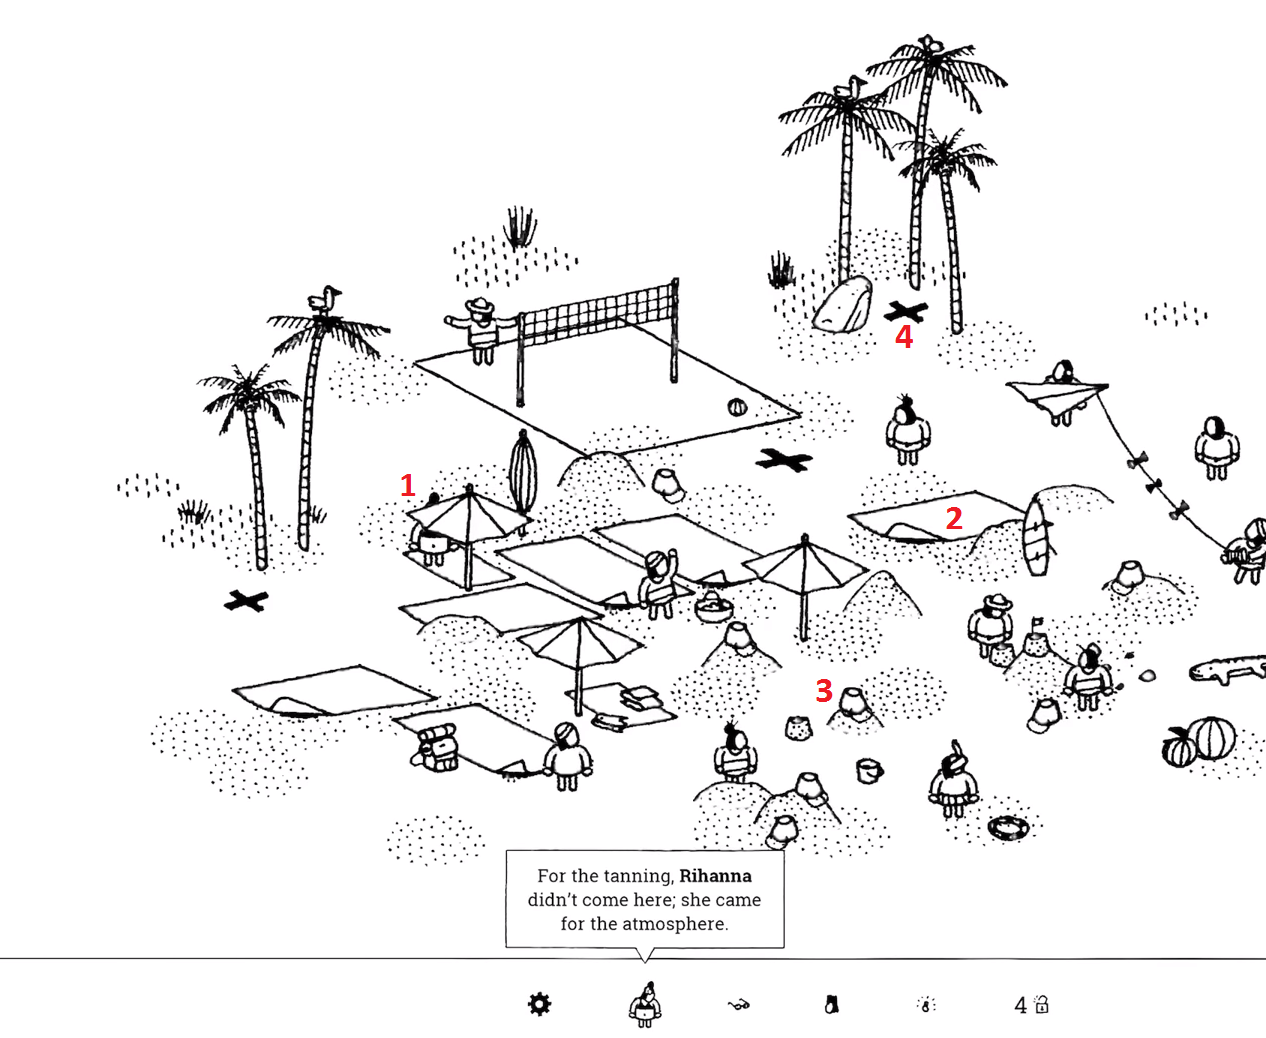
- Gaspar (3): “Gaspar is waiting for his grand reveal. His rectangular hair will certainly have some appeal.” If you were to glance over at the 10 or so people in the scene, you would notice nobody has the hairstyle mentioned in the description. This is because Gaspar has buried his entire body in the sand, except for his head which is being obscured by a sand bucket. Removing this bucket in the centre-right of the scene and it will reveal Gaspar.
- Engagement Ring (4): “Will you marry me? Asked the palm tree.” For this tip ‘X’ really does mark the spot. Pressing the ‘X’ in the top right of the scene will cause an engagement ring to drop from the palm tree. A pesky bird must have hidden it up there.
Level 2
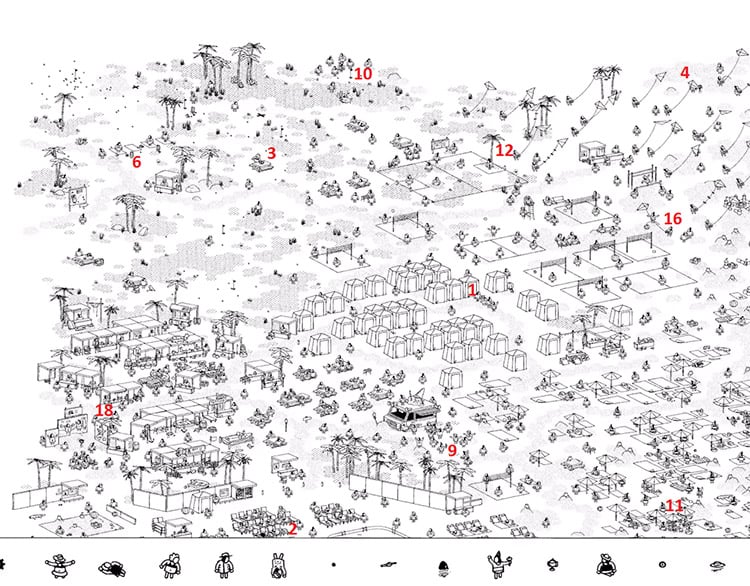
- Anisa (1): “Time’s up, Anisa! It’s someone else’s turn to enjoy the one-person-party-tent.” This clue gives Anisa up straight away. Look dead centre of the scene and you will see a cluster of one-person sized party tents. One of these tents has a sizeable line forming because Anisa is holding everybody up. Click the tent with the massive line to reveal the selfish party-pooper Anisa.
- Lotte (2): “Lotte isn’t the only one who fell asleep in the sun, but she is the only one who doesn’t want to be woken up.” There are many areas a person could be sunbathing in a scene as big as this. But the most common place is down in the bottom left, right in between the two swimming pools. Lotte is right in the middle of the two pools wearing that distinctive black swimsuit.
- Gabi (3): “Can someone take the golf ball out of Gabi’s meal before she chokes on it? Thanks.” This one is surprisingly simple thanks to the clue. The top left of the scene has an area where golfers can put to their heart’s content. Just to the right of the teeing off area, is a single bench with Gabi and a plate of food. Remove the ball from her food and then tap her to complete this part of the level.
- InstaFifi93 (4): “Today has the most incredible sundown ever! Photographer InstaFifi93 just hopes the wind will lay down and clear the sky of those things.” In the top right of the scene, there are a large number of kites polluting the skyline. In the middle of all these kites at the top of the scene is our photographer and her camera. Her camera is not covered by the kite which should help you identify which kite is obscuring our photographer.
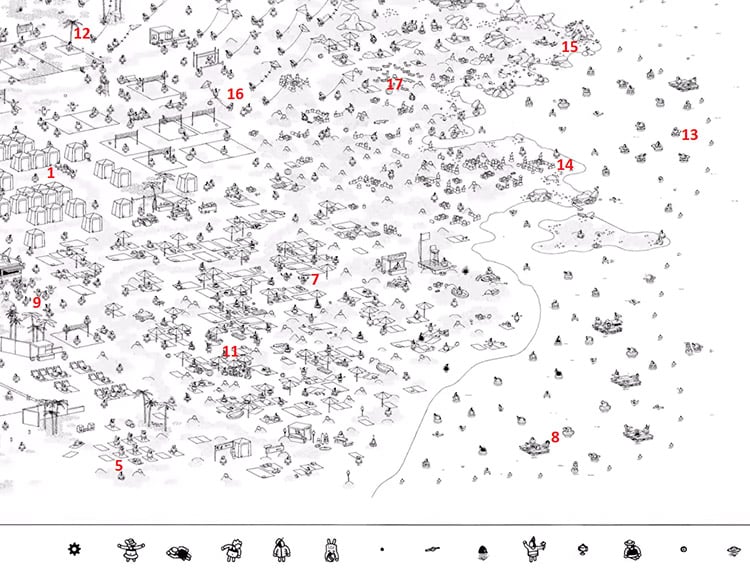
- Wei (5): “Wei is the only folk agile enough to do exactly as the yoga teacher does in this particular exercise.” This tip should have you focused at the bottom of the scene near the middle. Here is a yoga class all imitating what the teacher does. In order to see which person ‘Wei’ and you is will have to coax the teacher into a daring move. Press the teacher a number of times and they will perform a handstand, Wei is the only one able to imitate the teacher, so press the folk who also performs a handstand.
- Black Golf Ball (6): “Could the pile of white golf balls get off the black golf ball, please?” This golfing area is located right in the top left corner of the scene. A pile of golf balls is not something you’ll find on a golf course unless the golfer is teeing off. So look around the golfing area for a pile of white golf balls. Underneath this pile is the one black ball that we are looking for.
- Watch (7): “Hide your watch and other jewellery! Those three beach salesmen are pirates and cannot be trusted.” As the clue states, you should be looking for three beach salesmen, who are located on the right side of the scene near the main cluster of umbrellas and beach towels. Behind these three salesmen is a number of towels and umbrellas. Click the nearest towel to the salesmen and underneath the towel should be a wristwatch.
- Richard (8): “This mossy rock is actually Richard, after his spectacular jump.” In the bottom right corner of the scene is a raft with a man who has an afro style haircut. Pressing this man will cause him to jump into the water where he becomes a mossy looking rock. Pressing the mossy rock will result in finding Richard.
- Ike (9): “Ike can’t wait to eat his ice cream! Let’s just hope no evil person will knock it over…” As the clue suggests, you should be looking for an area where folks can get ice cream. The ice cream truck is located in the bottom left of the scene. Ike has gotten his ice cream, so he is standing now at the back of the queue, ready to enjoy his tasty treat. First, knock his ice cream on the floor, and then press Ike.
- Trophy (10): “If you can hit all the right golf balls and count to 6, there is a trophy waiting for you.” In the top left corner of the map, there are a number of golf balls lying around certain holes. Putting these balls into the holes will result in a flag raising up to signify you have completed this hole. Doing this for the six different flags will cause a man to move out from the crowd revealing a trophy. This crowd is located by the sixth hole, the closest hole to the kite fliers.
- Phoebe (11): “Won’t allow the sun to ruin her incredible beach picnic.” In order to find Phoebe, you are going to have to look at the bottom right corner of the map, near the yoga class. Above and to the right of this class is a number of umbrellas covering a picnic, close the middle umbrella to reveal Phoebe.
- Soccer Ball (12): “You can’t play soccer without a ball, but this soccer ball was destined to get stuck up there.” Next to the kite fliers on the right side of the map is a soccer pitch without a soccer ball. One of the goalposts is a palm tree, press the palm tree to drop the soccer ball. Click the soccer ball to resume the game of soccer!
- Hat (13): “The cowgirl is angry at the herd; one of them stole her hat.” On the right-hand side of the scene is a number of individuals who are in the water and have an inflatable horse around their waste. Click on these individuals and one of them will drop a hat, click this hat and move on.
- King Crab (14): “King Crab considers himself the happiest crab alive. A big house, with an ocean view… Nothing can ruin his day. Probably.” Just next to the herd of inflatable horses are a series of sand castles. Demolish the biggest one near the coast to coax out a King Crab.7
- Normal Crab (15): “It’s not a great day to take a walk outside for this normal crab.” Any fan of Finding Nemo will now be thinking about the flock of seagulls all shouting “mine” at the sight of a crab. In Hidden Folks, the seagulls are just as hungry. Look for the flock of gulls in the top right corner of the map, and click on the cave they are surrounding. Inside is one very scared normal crab.
- Tuuli (16): “Tuuli defies the laws of nature” Simply look for the one individual who is flying their kite in the opposite direction to everyone else.
- Gaspar (17): “For today’s grand reveal, Gaspar’s audience is inflatable.” We all know the tricks Gaspar can pull, so look for a group of inflatable animals. They should all be focused on one bucket, underneath this bucket is Gaspar. If you found the normal crab in the top right, Gaspar is not too far away.
- Mermaid (18): “Don’t walk away from it: be the mermaid you’ve always wanted to be.” In the far left near the bottom is a series of stalls selling goods or tattoos. Even further left is a number of cardboard cut-outs where beachgoers can pose for a photo. If you look at the right time, one folk will pose in the mermaid cut-out, and this is your last hidden folk in the level.
Don’t worry if you can’t see the level you want, we will update this guide with the other Beach DLC levels shortly.
More articles...
Monopoly GO! Free Rolls – Links For Free Dice
By Glen Fox
Wondering how to get Monopoly GO! free rolls? Well, you’ve come to the right place. In this guide, we provide you with a bunch of tips and tricks to get some free rolls for the hit new mobile game. We’ll …Best Roblox Horror Games to Play Right Now – Updated Weekly
By Adele Wilson
Our Best Roblox Horror Games guide features the scariest and most creative experiences to play right now on the platform!The BEST Roblox Games of The Week – Games You Need To Play!
By Sho Roberts
Our feature shares our pick for the Best Roblox Games of the week! With our feature, we guarantee you'll find something new to play!All Grades in Type Soul – Each Race Explained
By Adele Wilson
Our All Grades in Type Soul guide lists every grade in the game for all races, including how to increase your grade quickly!


