- Wondering how to get Monopoly GO! free rolls? Well, you’ve come to the right place. In this guide, we provide you with a bunch of tips and tricks to get some free rolls for the hit new mobile game. We’ll …
Best Roblox Horror Games to Play Right Now – Updated Weekly
By Adele Wilson
Our Best Roblox Horror Games guide features the scariest and most creative experiences to play right now on the platform!The BEST Roblox Games of The Week – Games You Need To Play!
By Sho Roberts
Our feature shares our pick for the Best Roblox Games of the week! With our feature, we guarantee you'll find something new to play!Type Soul Clan Rarity Guide – All Legendary And Common Clans Listed!
By Nathan Ball
Wondering what your odds of rolling a particular Clan are? Wonder no more, with my handy Type Soul Clan Rarity guide.
Mystery Case Files: Shadow Lake Walkthrough
Mystery Case Files – Shadow Lake is a hidden object/adventure game created by Big Fish Games. The player embarks on an eery hunt for an evil relic guilty of destroying a whole town almost forty years ago. Gamezebo’s quick start strategy guide will provide you with detailed images, tips, information, and hints on how to play your best game.
Mystery Case Files: Shadow Lake – Game Introduction
Mystery Case Files – Shadow Lake is a hidden object/adventure game created by Big Fish Games. The player embarks on an eery hunt for an evil relic guilty of destroying a whole town almost forty years ago. Gamezebo’s quick start strategy guide will provide you with detailed images, tips, information, and hints on how to play your best game.
General Tips

- You can select to play in Casual or Expert mode.
- Casual mode gives hint glimmers, faster hints, access to tutorial and instructions.
- Expert mode has no instructions, slower hints and in general “doesn’t hold your hand”.
- You can also select whether you want to use the tutorial or not.
Screen elements
- Along the bottom of the screen you find your most important tools to control the game from left to right you have:
- The strategy guide and your notebook, with the menu button beneath.
- The inventory with scroll arrows (a bit hard to handle, but works OK).
- The map and the hint/skip button, which will later on be completed with a walkie-talkie.
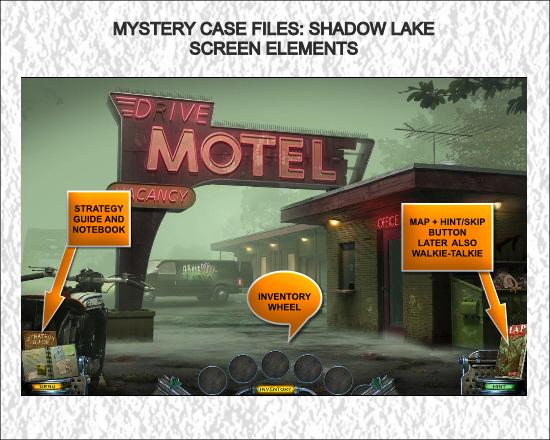
- In the strategy guide you get context sensitive step-by-step help – mostly in the form of images that show what you can/should do at any given moment.
- The notebook works as it usually does in HOGs, the most important information you come across is logged there, including personal comments from the detective you play as.
- The inventory system is slightly annoying; it’s a sort of wheel (reminds me of those Viewmaster toys you had in the 60’s) that you spin around using the arrow buttons on each side. First of all it’s somewhat annoying that you often accidentally pull up the inventory instead of walking south, and more often than not it’s difficult to access items in the end of a “spin cycle” – but you do get used to it after a while. It’s also annoying that it gives off a loud “boing” when you put something back – like you did something stupid; that becomes intensly irritating when you want to look at the drawings you get as the game moves along (more on that later on).
- Then there’s the map, which displays the layout of the town – and it gets updated along with your discovery of new areas to investigate. You can use the map to jump to a certain area, but not to move between places within an area (unfortunately). It does it’s job, but no more.
- Finally the hint button, which on occasion behaves slightly odd – it may be a glitch apparent only on my computer, but sometimes it gets “stuck” looking half charged, but still works as it should.
Cursors
- The default cursor looks like an golden arrow. It can change into the following icons:
- A magnifying glass indicates areas you can take a closer look at.
- A grabbing hand indicates items you can pick up for your inventory.
- A hand with pointed finger indicates objects that you can do something with, like opening a drawer, door or such.
- A longer, extended direction arrow indicates places where you can move to another scene.
- Hidden Object Scenes
- Hidden Object scenes (HOS) are rather complex, more realistic, in this game than in most other games of this type.You get a list of items you need to find. These items are not the same each time you play the game – but a majority of them are – so the objects to search for when writing this guide are indicated in the images in this walkthrough.
Chapter 1 – Introduction at the Motel
The game starts off with a well crafted movie that gives you a first clue to what has happened in this abandoned town.You start out standing by your trusty iron horse (read motor bike) at Drive Motel, a sordid looking place:
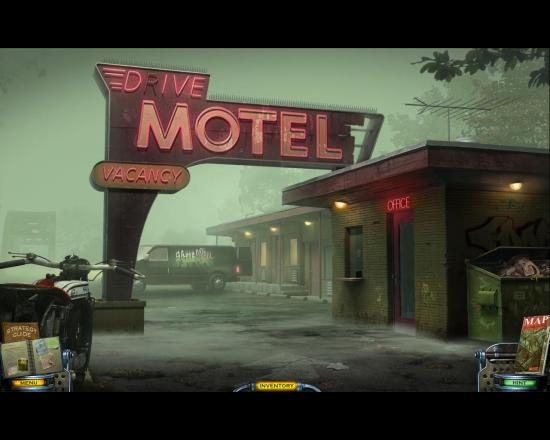
- You can also see the van belonging to Ghost Patrol, a reality TV show, where Cassandra works, Cassandra being the woman who called you for help.
- Zoom in on the garbage dumpster to the right:
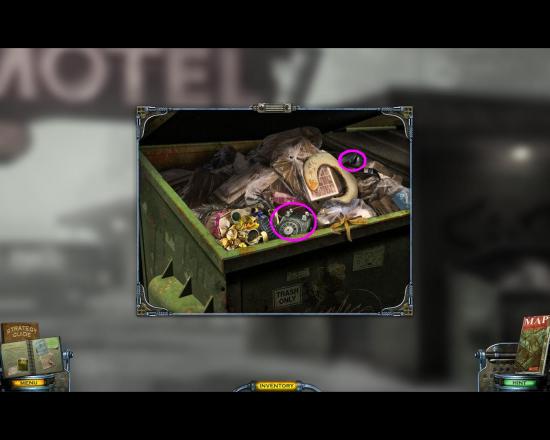
- Pick up the PHONE BASE and the PHONE RECEIVER.
- The zoomed in image closes automatically – which is consistent throughout, when you’ve found everything you need in a zoomed in area, the zoom image disappears.
- You can try the door to the motel office and look in through the drive-up window, but it’s not possible to do anything there – yet.
- Approach the van, and watch the movie.
- Mr cool TV persona and his crew speeds off, never to be seen again (in this game, at least).
- You are left alone, standing outside the motel, not knowing who this Cassandra is, or where she is.
- The door to room number 2 is ajar, so click on the door to enter:
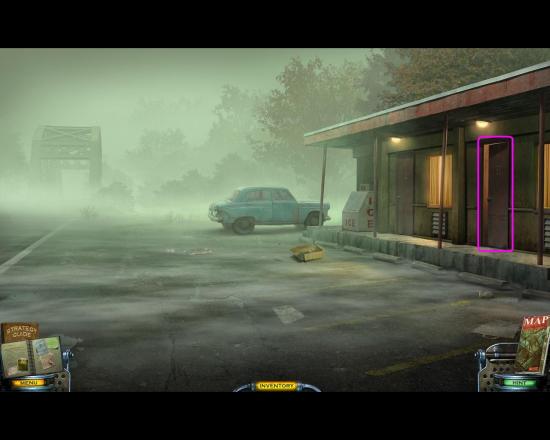
- You find yourself in a room that’s obviously occupied, since you can see someone’s bag lying on the bed.
- Zoom in on the bag, and read the notebook you find there:
- To get into the equipment room (Cassandra might be there) you need the license registration number from the van (the letters), Kelli’s birthday and “my” apartment number – this obviously being the charming Jack.
- Next, check out the desk by clicking on it.
- Open the large drawer and zoom in.
- Take the QUARTER, and click on the telephone number underneath to log it in your notebook.
- Then adjust the TV antenna and watch the newscast (warning to sensitive viewers: something will happen here!). Adjust the ANTENNA again, and it will break off and be put in your inventory.
- You can also look closer at the video camera and safe, but you can’t do anything with them – yet.
- Back away from the desk area and zoom in on the bedside table. It’s obvious something has been removed from it.
- Put the PHONE BASE there, and add the RECEIVER.
- However, there’s no phone outlet nearby, so zoom out from this area, and zoom in on the coin panel to the right of the door.
- Put the QUARTER in, and slide the control to “You Animal” – maximum vibration (you must click and drag, not click only).
- The bed vibrates off, away from the bedside table, and reveals a phone outlet.
- Click on the phone cable to plug it in.
- Zoom in on the phone.
- Use the phone to call Kelli’s cell phone number you just found in the desk drawer: 512-1239. It’s enough to click on the proper numbers on the rotary disk, you don’t have to spin it yourself.
- You hear the cell phone vibrate in the same room you are in!
- The phone screen closes automatically.
- Zoom in on the desk and look underneath it – there is a light coming from the shoes!
- Zoom in on the shoes, and find the phone.
- Answer the call, and get an important piece of information – KELLI’S BIRTHDAY, which is October 7th.
- Now you can open the door to the adjacent room; but only on your side. The other door is locked, but there’s a hole which you can look through – only boxes to be seen, but an odd, scribbling sound to be heard. This is clearly the equipment room!
- Enter the bathroom. It has been converted to a darkroom.
- Cick on the poster on the left wall with instructions on how to develop a film. Note the exposure time – 6-8 seconds.
- Pick up a PHOTO PAPER from the shelf.
- Zoom in on the projector, and put the paper on the base plate.
- Click on the ON/OFF-button, wait 6-8 seconds and click the button again.
- Take the PHOTO PAPER and zoom out.
- Zoom in on the chemical baths.
- Put the paper in the first bath. The rest is handled automatically.
- Zoom in on basin 3, and note that the van’s license plate is clearly visible.
- The letters on the plate are BAC.
- Back out to the yard, then again to the office area.
- Zoom in on the drive-up window.
- Use the broken off TV antenna to get the guestbook.
- Open the guestbook, and click on the page to put the information in your notebook. You see that Jack’s apartment number is 301.
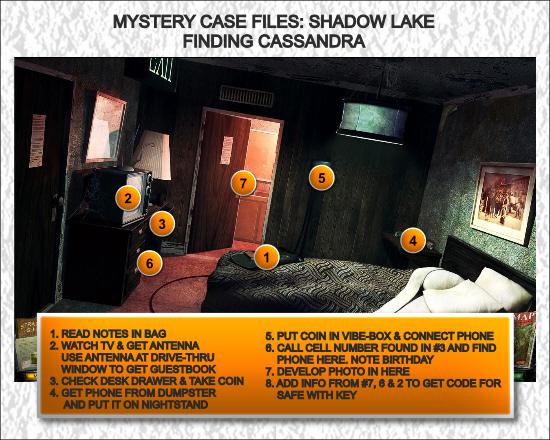
- Now you have the safe code: BAC7301
- Go back to Jack’s room and zoom in on the desk, and then on the safe.
- Enter the code. The indicator changes from red to green (looks more like a bathroom lock, but green is green). Click on the handle to open the safe.
- Take the KEY from the safe.
- Back out on the motel yard again.
- Zoom in on the door to room number one.
- Use the KEY on the door, which opens.
- Enter room 1.
- You can still hear the odd, scribbling sound.
- The TV crew obviously left in a great hurry, because they left a lot of stuff behind, including some things that can be of use for you.
- Pick up the NIGHT-VISION GOGGLES and the INFRA-RED CAMERA.
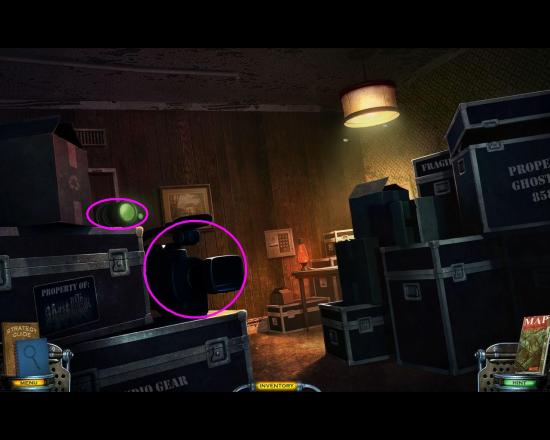
- Take a step forward, and meet Cassandra:
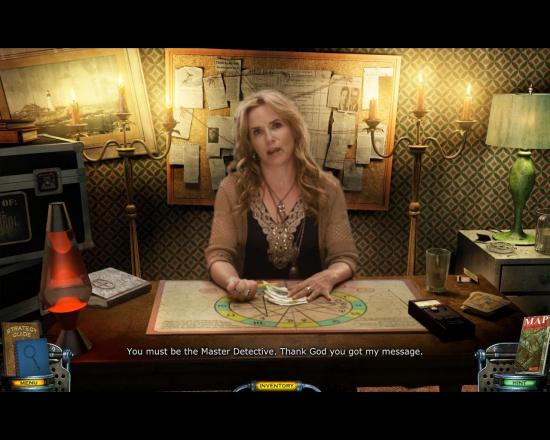
- If she looks familiar to you – no wonder. She’s played by Lea Thompson; in my eyes at least best known for her appearances in the Back to the Future movies.
- Watch the movie.
- Cassandra then gives you SIX DRAWINGS and a walkie-talkie, so you can stay in touch.
Chapter 2 – Shadow Lake Penitentiary
- You now get a new location on your map: the old prison.
- Click on the prison on the map.
- You are instantly put in front of the derelict building.
- Cassandra gets in touch with you via the walkie-talkie, and explains how to use the drawings.
- Follow her instructions and put the appropriate sketch on the matching spot on front of the prison façade:
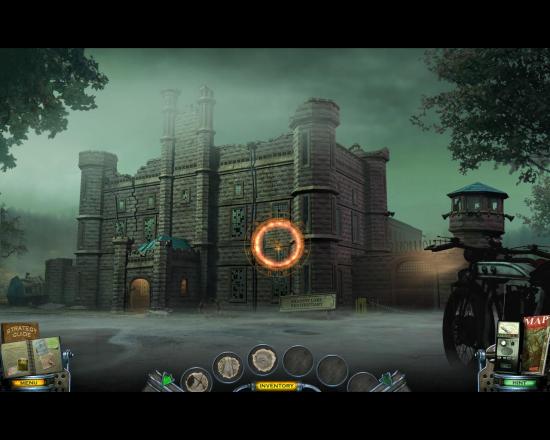
- Listen to Cassandra again, and then zoom in on the prison entrance.
- Then zoom in on the area to the left of the stairs, where you find an audio recorder.
- Click on it to listen – you find out where the key to the entrance is hidden. Beware for surprises though; you might want to turn down the sound a bit.
- Next, click on the stone ball at the steps which then falls to the ground.
- You can now zoom in the spot, where you find the PRISON KEY.
- Zoom in on the chain and lock on the prison door.
- Take the KEY from your inventory and use it on the lock.
- The lock opens, and so does the door. Enter the prison.
- As soon as you are inside the reception area Cassandra contacts you with a list of items that she needs to get a clearer picture of what’s going on.
- Here you can see where to find the objects – note that some objects may have been exchanged, but only a few:
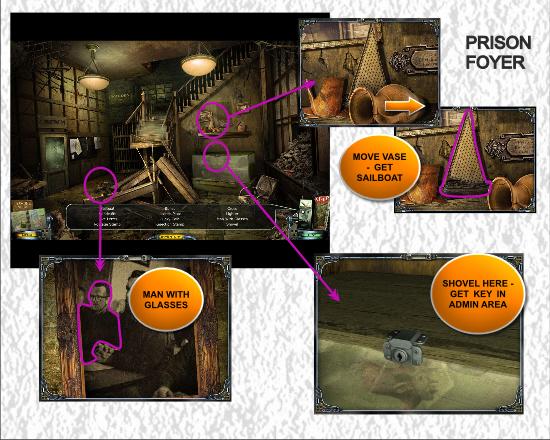
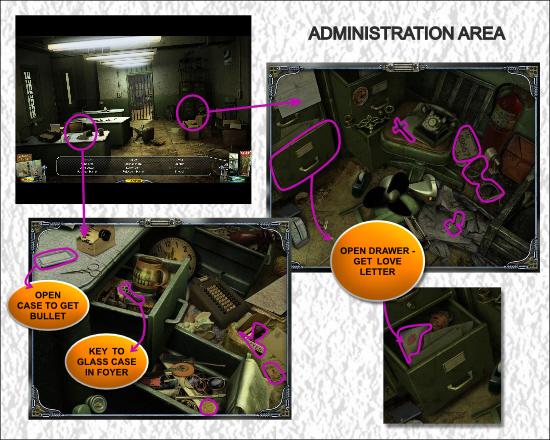
- When you are done with the search it’s time to find the correct place for each of Cassandra’s five remaining drawings.
- Three of the five belong in areas you already have access to:
- Two of them are to be used in the prison archives.
- Click on the door marked PRISON RECORDS.
- You have to solve a lock mini game:
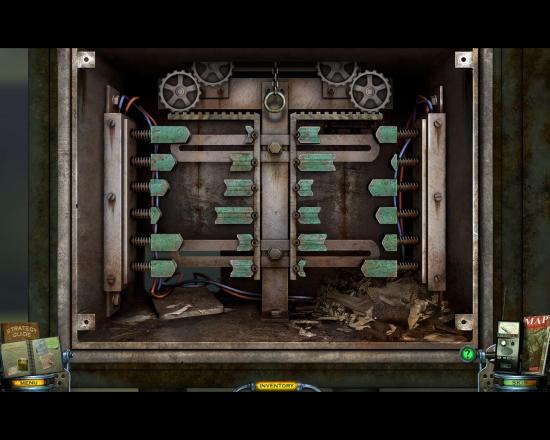
- Pull the ring when you have placed the lock parts correctly.
- Enter the records room.
- You heard from Cassandra that the prisoner’s name was Jaime Monihan, so click on the drawer labeled M in the file cabinet, and then on Monihan’s file:
- Pick up the correct drawing from your inventory and match it with Monihan’s mugshot.
- Zoom out from the file drawer.
- When you let the cursor hover over the open drawer and click on the drawer you are informed that the thing would probably topple over if you put something heavy in it.
- Scoot out to the prison entrance and pick up the big BALL that the key was hidden under.
- Put the BALL in the open drawer and wait for the collapse:
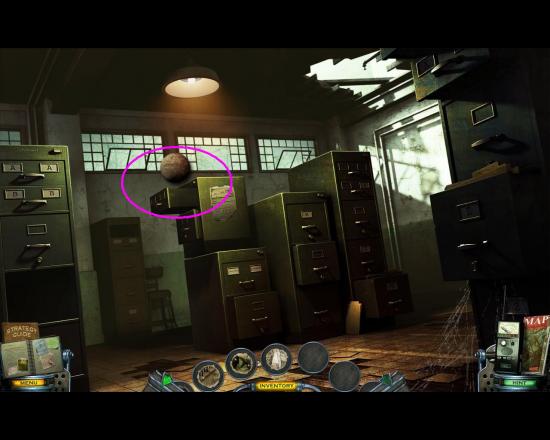
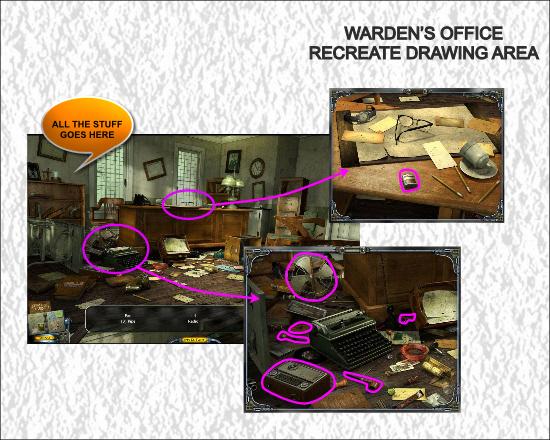
- You now have access too the prison warden’s office – the file cabinets form a kind of staircase so you can get into the office via the hole in the ceiling. The final drawing is depicting the low bookcase to the left, but when you click on it, or try to match the sketch with it, Cassandra contacts you and says that the scene has to be recreated as it was in 1973, and you get a short list of items that will have to be returned to the proper places before matching sketch and shelf again.
- Recreate the warden’s office like this:
- You should now have been able to match all drawings like this (the first one is not included here):
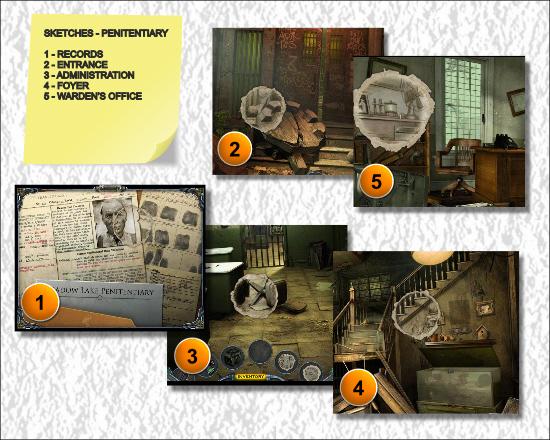
- When you have matched the last drawing Cassandra tells you to return to the motel so she can do a psychic reading on them.
- Open the map and click on the motel.
- Go to room 1, get behind the crates again and talk to Cassandra.
- You automatically give her the sketches, and the interpretation consists of a “moving puzzle” to solve.
Tip for solving these puzzles: do not nudge the pieces in to place – shove them.
- When you have solved the puzzle you get to watch the whole movie – which is the psychic reading of the events connected to the prison.
- The movie shows how the relic is passed on from prisoner to warden.
- When the reading ends, Cassandra instructs you to go back to the prison, specifically the warden’s office. She will get in touch when she has more drawings.
Chapter 3 – Penitentiary Reloaded & Warden’s Home
- Open your map and click on the prison.
- Get back to the warden’s office.
- Zoom in on the desk.
- Click the letter on top of the desk.
- Take the KEY. A new area on the map becomes available: GRIMES QUARRY – this is a bonus area which also unlocks the morphing objects bonus. These will be dealt with separately, towards the end of the walkthrough.
- Check the top left drawer, where the warden put the relic in the movie you just saw.
- Click on the drawer’s content. First you get a faded newspaper clipping describing the probable suicide of the warden’s wife.
- Click on the clipping, and you see an envelope with the warden’s address on. Yet another new area becomes available on the map: WARDEN’S HOME.
- Open the map and click on Warden’s home.
- First click on the area next to the fallen tree to zoom in.
- Take the AXE.
- You can also zoom in on the power box on the corner of the house, but you can’t do anything here yet except verifying that the power’s out.
- Enter the front door of the house.
- Cassandra now gets in touch with you delivering a new list of useful items.
- First find the items that are in the living room:
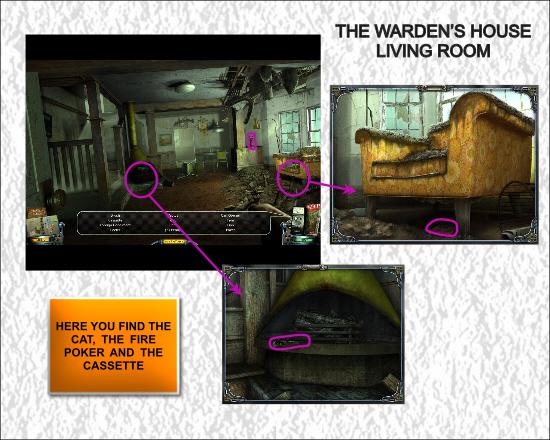
- Then go straight forward into the kitchen – someone was there?!
- Search and find the rest of the items in the kitchen junk drawer:
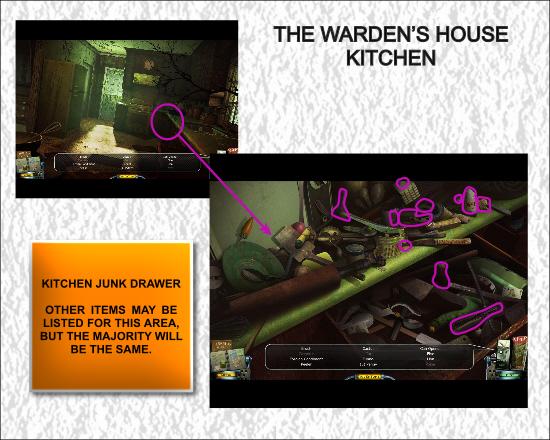
- When you have found all objects Cassandra will contact you again and tell you that there is a secret behind the junk drawer in the kitchen.
- Click on the junk drawer, which falls on the floor.
- Check the area behind the drawer.
- Here you get a FUSE.
- There’s no way you’d go down in the basement in the dark – so take out the NIGHT-VISION GOGGLES that you pinched from the TV crew and use them on the basement door.
- Now you can zoom in on the bolt cutters – but beware as you take them, because things do happen around Shadow Lake …
- You get the BOLT CUTTERS.
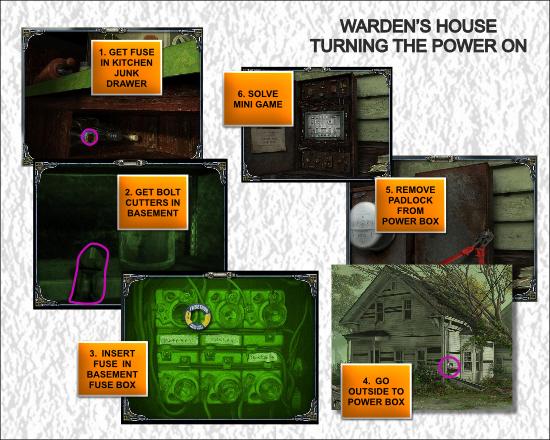
- Then zoom in on the fuse box to the left:
- Plug in the FUSE you found behind the junk drawer in the kitchen.
- Then go back to the living room and climb the stairs.
- Open the door to the left.
- Enter a boy’s room.
- Look in the tent.
- Grab the CABLES in the electric experiment box.
- Go outside and zoom in the electric cabinet.
- Use the BOLT CUTTERS to remove the padlock.
- Zoom in on the electric panel.
- Use the CABLES on the panel.
- Connect all the numbered cubes with cables of the same color.
- Don’t worry about the cables though, just click on one number cube, and drag a cable to another cube with the same number.
- This mini game is slightly misleading – you assume that you are finished with a certain color of cable when it disappears from the sides of the panel, but this is not the case.
- You need to connect ALL the numbered cubes with their counterparts.
- Also note that the board is symmetric. Work on one side first, and then do the same thing on the other side.
Solution:
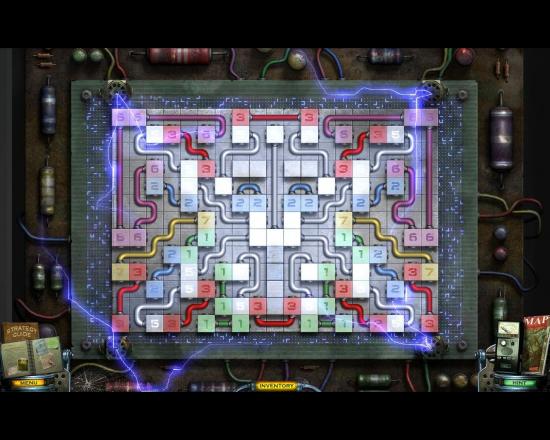
- When you’ve turned the electricity on, Cassandra beckons once again. She has more drawings for you.
- Return to the Drive Motel, talk to Cassandra and fetch the drawings.
- Open the map and go back to the warden’s house.
- Go down to the basement. Since the electricity is now on, you can zoom in on the grinding machine and use it to sharpen the AXE.
- Go upstairs and enter the boy’s room.
- Cassandra gets in touch with you, and gives you a list of items to search for:
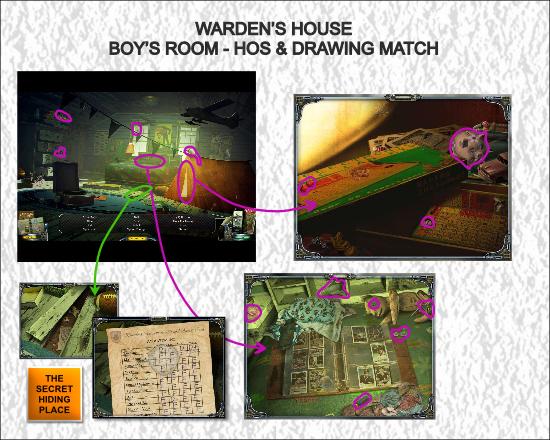
- When you have found the items, Cassandra tells you there’s a secret under a loose floor board.
- Zoom in on the floor board, and check what’s underneath.
- Go back out on the landing and use the AXE on the fallen tree.
- Enter the master bedroom.
- There is something under the bed – so check it out.
- The ghost of the warden’s wife appears, and points you to a photo.
- Zoom in on photo. Open the back cover.
- A farewell letter is where the final drawing fits.
- Now you should have matched all drawings like this:
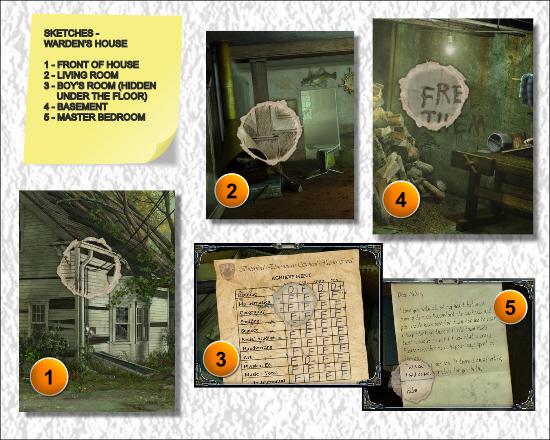
- If you have matched all drawings, Cassandra will call you back to the motel for a new psychic reading.
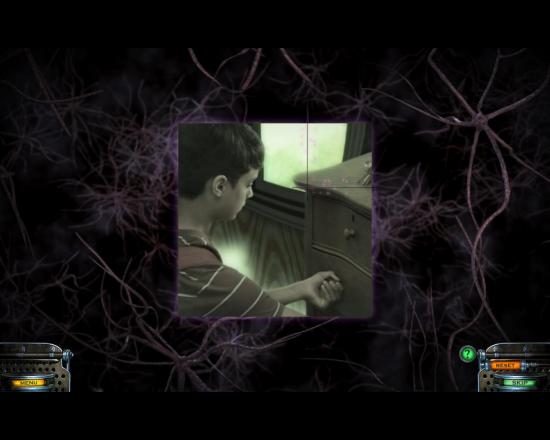
- You get a new puzzle to solve, and the final result looks like this:
Chapter 4 – The School House
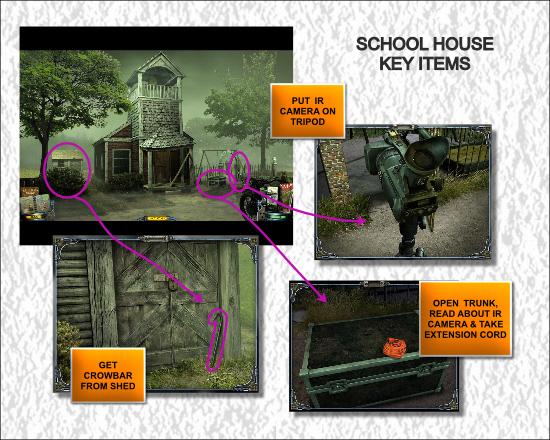
- Start by checking the trunk by the playground.
- Open the trunk.
- Read the description of the IR camera (that you took from the motel).
- Take the EXTENSION CORD.
- Open the door to the school house.
- Cassandra gets in touch with a list of items to find.
- Back out to the yard again, and zoom in on the outhouse to the left.
- Pick up the CROWBAR leaning on the wall by the door.
- Get back into the school house.
- Zoom in on the lockers.
- Find the hidden objects there.
- Open the top right locker and take the KEY TO THE TEACHER’S DRAWER.
- Use the night-vision goggles to enter the classroom.
- After you’ve met the ghost, approach the window.
- Use the CROWBAR on the boards that block the light.
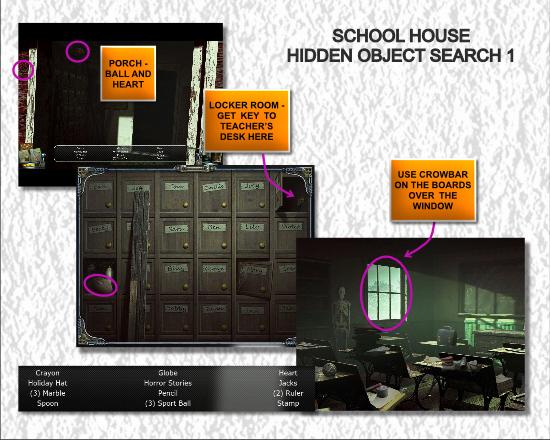
- Find the rest of the hidden objects in the classroom and in the zoomable areas.
- There are a few key items you will find here:
- From a bench in the classroom you get CHALKS.
- In the drawer in the teacher’s desk you get a LIGHTER and KNIFE.
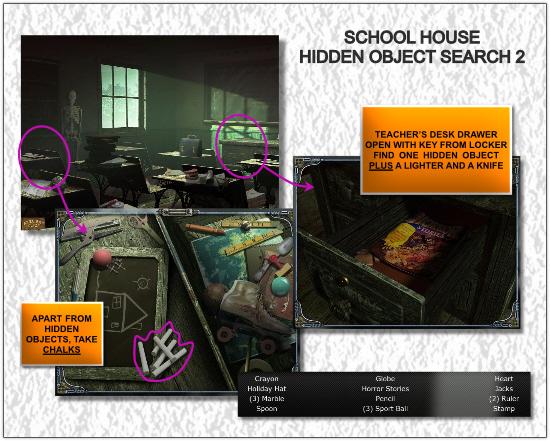
- When you have found all the items Cassandra will contact you again, she senses that Billy was the name of the warden’s son.
- Go back to the locker room and check Billy’s locker out.
- You find a BASEBALL CARD.
- Cassandra gets in touch and asks you to return to the motel to fetch more drawings.
- Go to the motel.
- Get the drawings.
- Go back to the school.
- Enter the classroom.
- Approach the blackboard.
- There’s a hangman game prepared on the blackboard.
- Use the CHALK to play hangman – click the letters you want to use with the chalk.
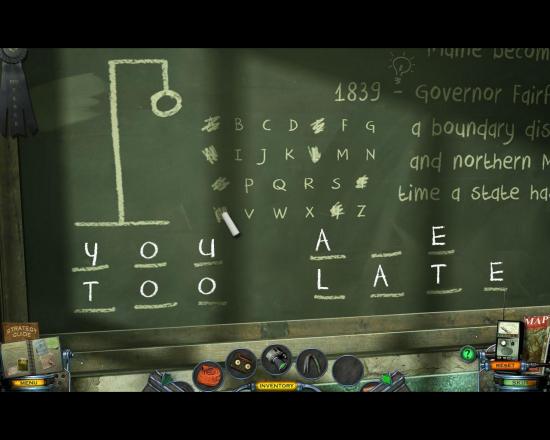
- The phrase is “YOU ARE TOO LATE”.
- The ghost becomes upset when you guess correctly.
- Go outside and put the IR camera on the tripod (unless you’ve done so already, of course).
- Click on the camera to use it, and observe the upset child ghost.
- You suspect that the ghost wants to tell you something.
- Go to the playground.
- Zoom in on the swing set.
- Look at the still moving swing – under the plank it says “SAM”.
- Go back to the school locker room and open Sam’s locker.
- You find an M80.
- Go outside and zoom in on the shed.
- Put the M80 in the padlock.
- Light the fuse with the lighter and wait for the ka-boom.
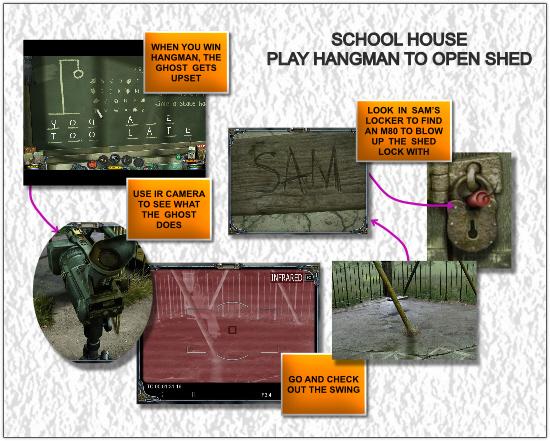
- Open the shed door.
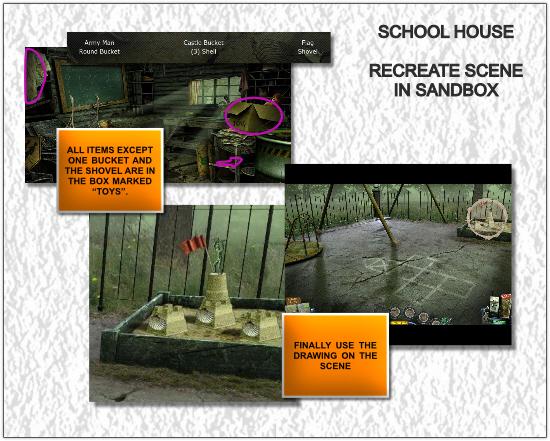
- One of the drawings you got from Cassandra requires you to recreate a scene by the playground sandbox. Here you can find what you need.
- When you’ve found all items, return to the playground.
- Use the CASTLE BUCKET and the ROUND BUCKET on the sand pile.
- Make three castles with the castle bucket.
- Put a tower on the middle castle with the round bucket.
- Place one shell on each castle (doors).
- Put the flag and the soldier on top of the middle castle.
- When finished, match the drawing to the scene.
- For the last drawing you have to go back to the warden’s house, go up to Billy’s room and put the final BASEBALL CARD in the album on the bed.
- The drawings should be matched like this:
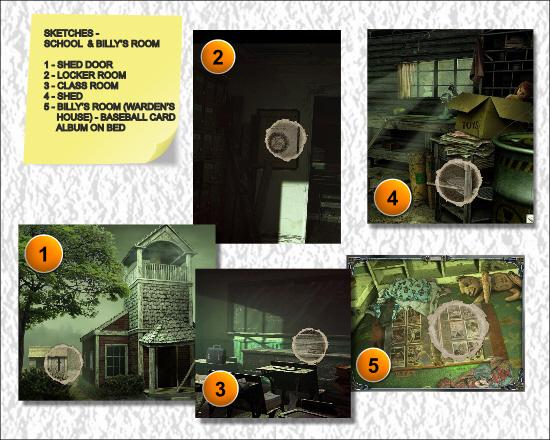
- When you are finished with the drawings, you will be called back to Cassandra to do another reading of the charged sketches.
- Do the puzzle – remember to shove the pieces, never nudge.
- The final picture should look like this:
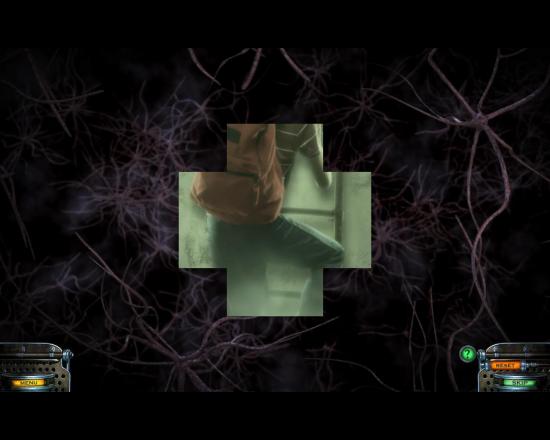
- Watch the movie.
- You see the relic pass from the warden’s son Billy to a teacher.
Chapter 5 – The Teacher
- You now need to find where that teacher lived, so you get back to the school once again.
- Enter the locker room to try and find the way up to the bell tower you saw in the movie.
- Click on the boards leaning on the wall. They fall down.
- Zoom in on the door to the hoist mechanism.
- When you try to use the handle, it breaks off.
- But there’s a small hole in the wall …
- Go to the classroom and zoom in on the teacher’s desk again. Take the KNIFE (if you haven’t done so earlier).
- Use the KNIFE on the hole by the ladder mechanism.
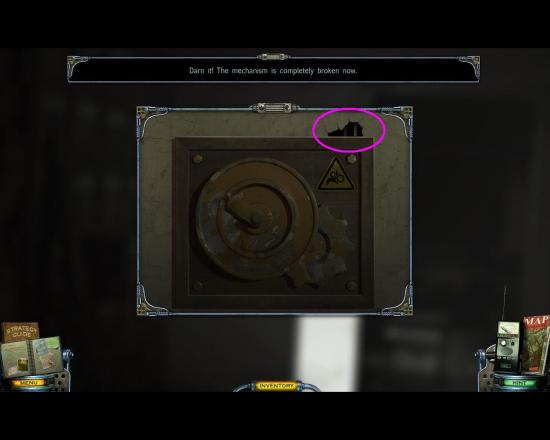
- You cut the rope, and the ladder comes bouncing down.
- Climb up in the bell tower.
- Click on the briefcase lying on the floor. You find a child’s drawing.
- The drawing shows where the teacher used to live, and that location now becomes available.
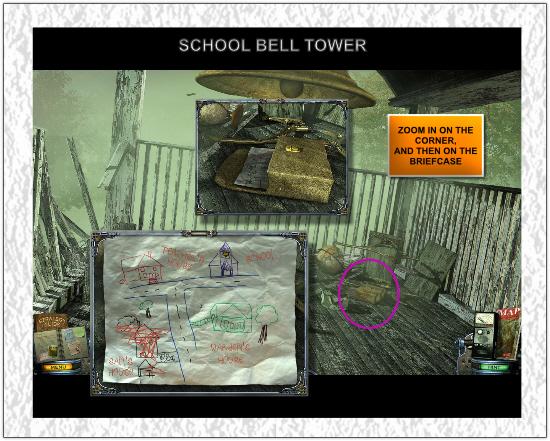
- Open the map and click on the teacher’s house.
- You are shocked to find that the teacher’s house is almost completely ruined by a fire. Still, you enter the house, and as you do, Cassandra gives you a list of items to find.
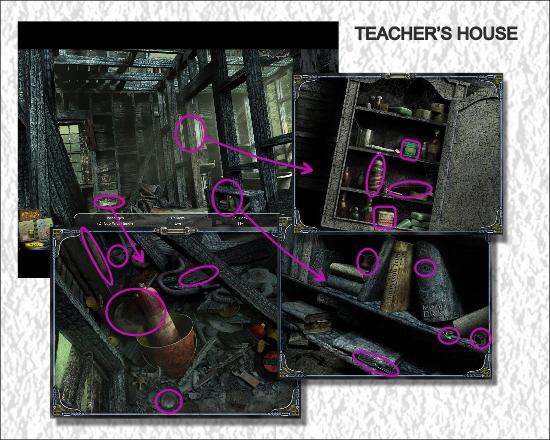
- When you have found all the items, she tells you to look for a leather bound book – The Curse of the Amaseconti Tribe.
- Click on the bookshelf, and then on the yellow book:
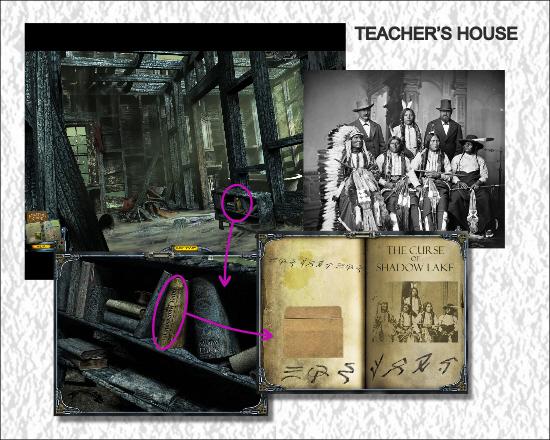
In case anyone is interested, the photo in the book is actually from 1877, taken during a big meeting in Washington DC, and depicts six Sioux chiefs – the two white men who are also in the original photo have been edited out, as you can see from the picture above!
Click on the right page to flip it and note that it comes from the city library – which now becomes available.
Chapter 6 – The City Library
- When you click on the library on the map you are brought to main street, two clicks away from the library itself. There’s an old VW Beetle standing in the middle of the road, and you can examine the car and a few of the houses, though you can’t do anything except approach the library at the moment.
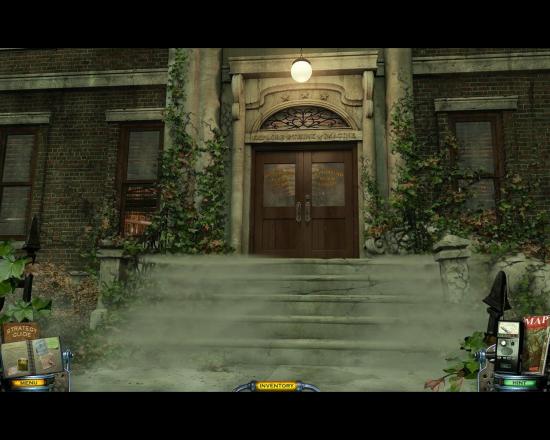
- When you are in front of the library, zoom in on the doors.
- Note that the glass pane is broken.
- Use the crowbar on the pane, zoom in again and turn the lock.
- Enter the library.
- You get another list of items to search for.
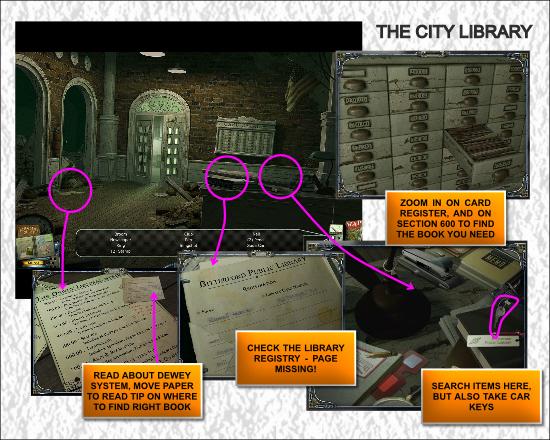
- Zoom in on the floor and read the info on the Dewey decimal system.
- Click on the note to see what’s written underneath.
- There’s a tip on a book to read if you want to fix your car.
- Find any hidden objects here and then back out.
- Zoom in on the card registry.
- Click on the right drawer for car repairs – the 600’s.
- Read the card about a suitable book to look for.
- Zoom in on the reception desk and search for hidden objects.
- Also take the CAR KEYS.
- Enter the library proper.
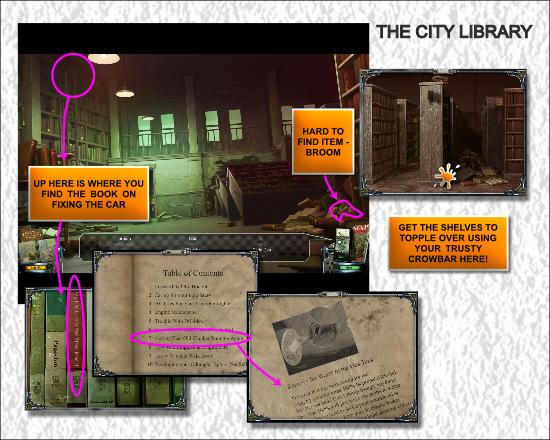
- Click on the book case ladder to the left.
- Zoom in on the books around the 600 series.
- Check out the advise on how to get an old clunker going again.
- Then zoom in on the shelves to the right.
- Use the crowbar to make them topple over and thereby force the door to the inner office open.
- Enter the office. When you do, Cassandra gets in touch with you to tell you she has some more drawings.
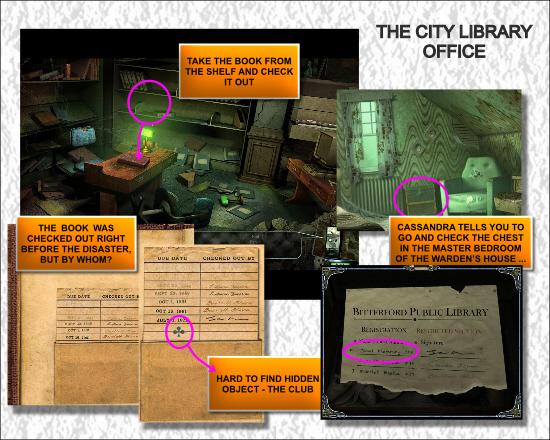
- In the office, take the book from the shelf and examine it.
- When you have found the final object on your list Cassandra will contact you once again, and tell you that the warden’s wife Ellen probably worked here at the library, and that there’s an important item hidden in a chest in the master bedroom in the warden’s house.
- Go back to the master bedroom (upper floor) in warden’s house and open the chest.
- You find the missing page from the library book – it was the town doctor who borrowed the book the last time.
- Go to the motel, see Cassandra and get the sketches, and then go back to town.
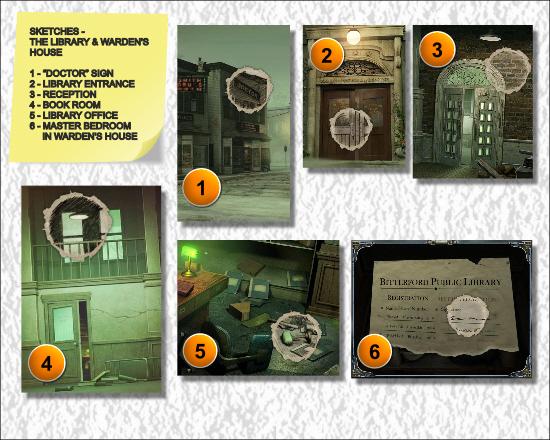
- It’s time to match all the drawings like this:
- When you have done so, go back to the motel, do the usual puzzle and watch what happens to the relic next.
- You realise you have to get in to the doctor’s office – which is also the coroner’s office.
Chapter 7 – The Doctor’s Office
- The basic idea is to use the car to ram the door to the doctor’s house.
- But to do that, you need some essentials.
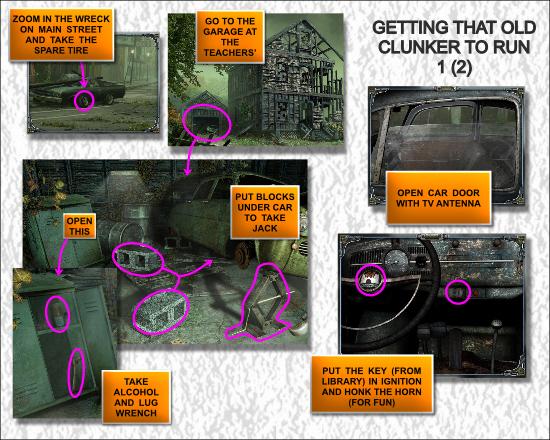
- First go to the teacher’s house – the fire damaged house.
- This time go into the garage.
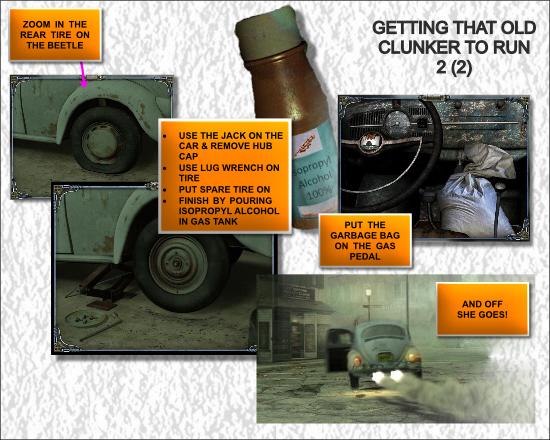
- Pick up the two CINDER BLOCKS.
- Use the blocks on the car, now you can take the jack.
- Zoom in on the storage cabinet and take the LUG WRENCH and then zoom in once more to get the ISOPROPYL ALCOHOL.
- Open the map and go Downtown.
- Zoom in on the larger abandoned car on main street and pick up the SPARE TIRE.
- Zoom in the doc’s house and get the GARBAGE BAG.
- Zoom in the Beetle and change the tire:
- Then zoom in on the gas tank lid, open it, remove the cap and use the isopropyl alcohol on it.
- Zoom in the car window and use the TV ANTENNA on it.
- Zoom in the open car.
- Use the CAR KEY on the ignition lock.
- Put the GARBAGE BAG on the gas pedal.
- And off she goes …!
- Not quite an epic fail, but still not the desired effect, so to speak.
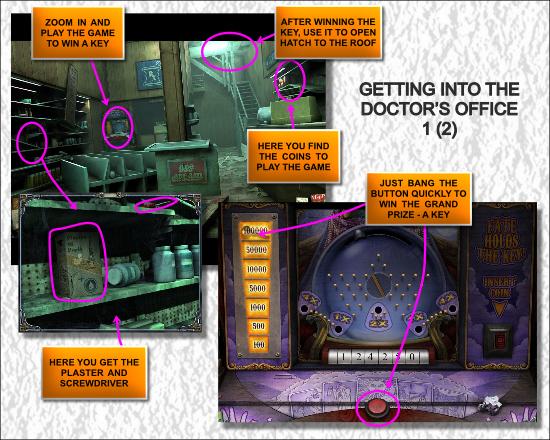
- Enter the pharmacy instead.
- Zoom in on the shelf to the right and pick up some COINS.
- Zoom in on the shelf to the right and take the SCREWDRIVER and the PLASTER OF PARIS box.
- Zoom in on the game to the left.
- Insert the coin and play.
- You get 40 balls per coin – and you only have to push the red button haphazardly and quickly 40 times to win. No aiming needed.
- Use screwdriver to get KEY.
- Zoom in by the stairs, and use the KEY on the lock.
- Click on the hatch opening, and go out on the roof.
- You realise it’s a bit far to jump.
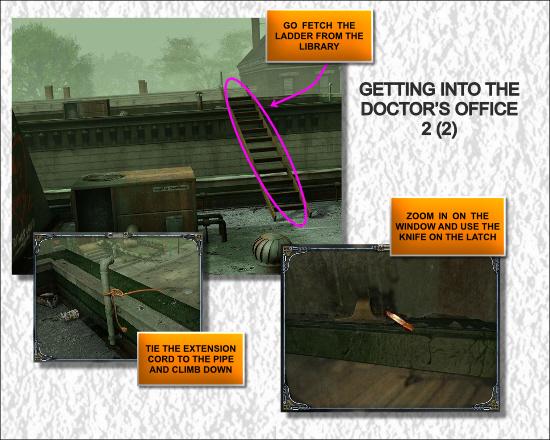
- Go back to the library and fetch the LADDER (the one you used to look at the car fixing book).
- Return to the pharmacy roof and use the LADDER on the gap between the houses.
- Then use the EXTENSION CORD on the pipe.
- Climb down.
- Zoom in on the window.
- Use the KNIFE to open the window latch.
- Enter the doctor’s house.
- You now get a list of items to find from Cassandra.
- Search the hidden objects in the doctor’s bedroom, closet, hallway and living room.
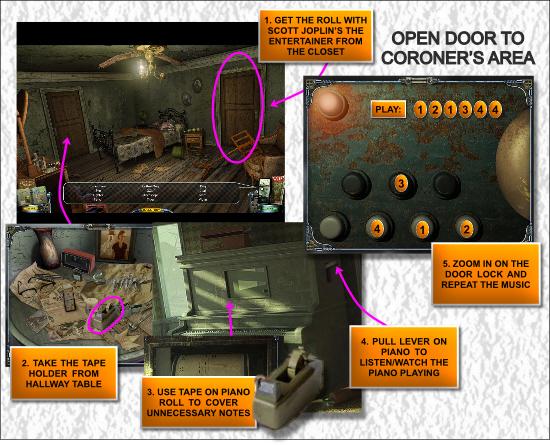
- During the search you will find a TAPE HOLDER on the table in the hallway.
- When you have found all the hidden objects, you get called back to the motel to get more drawings.
- When downstairs Cassandra tells you that there’s a song that seems to have been particularly important to the doctor. Go up to her bedroom closet and fetch Scott Joplin’s The Entertainer.
- Put the paper roll in the automatic piano.
- Use the TAPE on the roll.
- Pull the lever on the side of the piano and watch a sequence of notes being played.
- Zoom in the door to the coroner’s area – the sign says OFFICE.
- Repeate the note sequence on the lock.
- Enter the office.
- You can look around, but not do much at the moment.
- Enter the examination room.
- You find the teacher’s body still there, just as in the movie.
- A new list of items to find appear – these are needed to recreate the scene to match the sketches.
- Find the books and put them in the bookshelf (coded blue).
- Find the test tubes and put them back in their rack in the correct order (short, long, medium from left to right).
- Find the weights and put them on the scale.
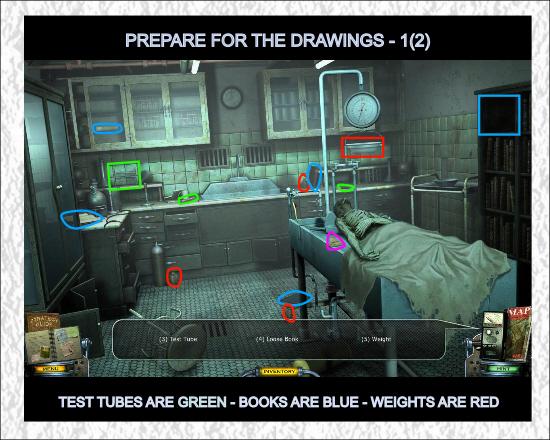
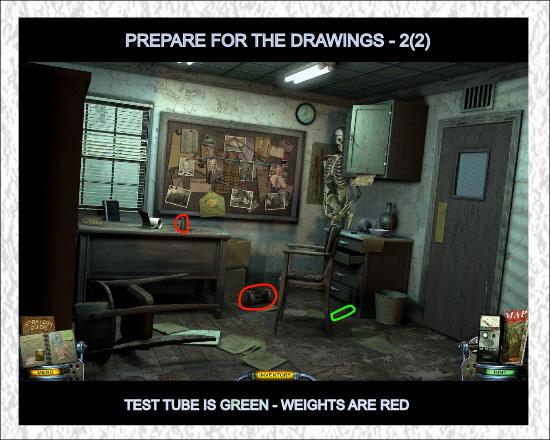
- When you have prepared the scenes take a moment to zoom in on the sink in the examination room.
- You find a mould.
- Put the PLASTER you found in the pharmacy in the mould.
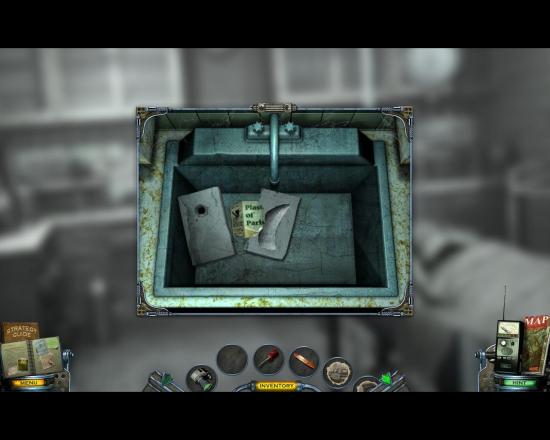
- Close the mould and fill it with water. You cannot take it with you right away, it needs to set for a bit.
- Now match five of the six sketches as follows:
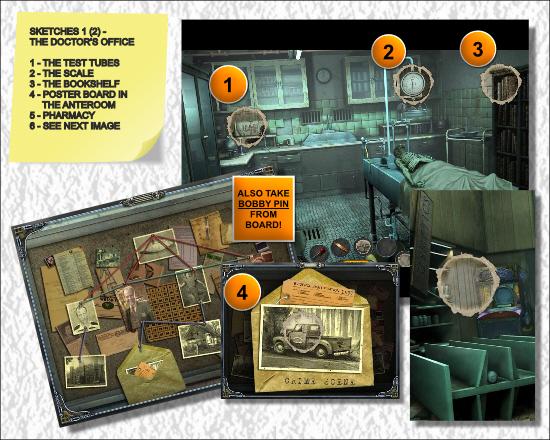
- Remember to pick up the BOBBY PIN from the poster board in the doctor’s office.
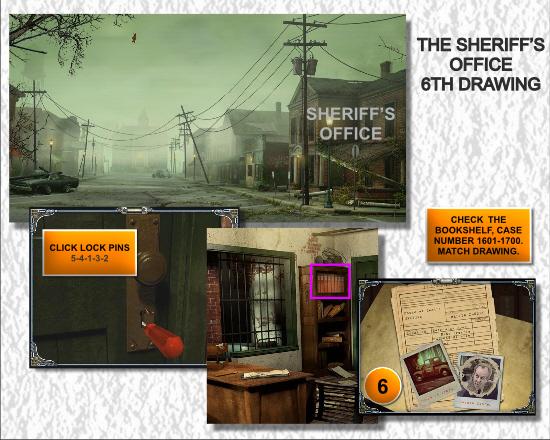
- The sixth sketch requires you to do some further breaking and entering – at the sheriff’s office.
- Go out again to Main street, to the place where you land when clicking on “Downtown” on the map.
- Click on the first house to the right.
- Zoom in on the door.
- Use the SCREWDRIVER and BOBBY PIN on the lock.
- To solve the minigame, check the speed of the different lock pins.
- Click the slowest moving one first, the fastest one last.
- From right to left you should click numbers 5-4-1-3-2.
- Enter the office.
- Zoom in on the bookshelf.
- Look closer att case file number 1601-1700.
- Match the last drawing to the photo in the file.
- Cassandra beckons you back to the motel, where you get to solve yet another “floating” puzzle.
Chapter 8 – Sheriff’s Office and Trestle Road
- From the movie and the info at the sheriff’s office you find out that the warden died when colliding with a tree on Trestle Road, which now becomes available on the map.
- Go to Trestle Road.
- When you arrive Cassandra gives you a list of items to find.
- There may be one or two objects to find outside the car, but a majority will be inside.
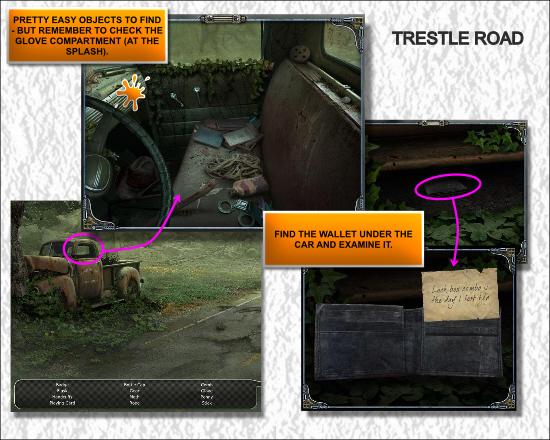
- Click on the driver’s window to zoom in.
- Find all the hidden objects – remember to open the glove compartment and check there.
- When you have found everything, Cassandra tells you that there’s an important object under the car.
- Zoom in the area, and get the warden’s WALLET.
- Inside there’s a note – “Lock box combo is the day I lost her”.
- You now need to find out exactly which date the warden’s wife died.
- Return to the sheriff’s office to investigate.
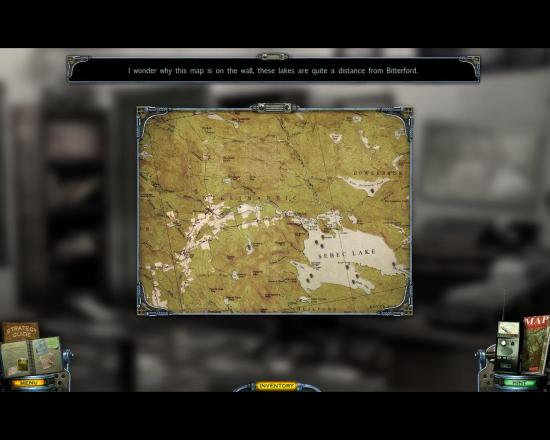
- First take a look at the topographical map on the wall:
- Then click on the door to the Evidence Room. That one sure looks like it should be double-triple locked – but it’s open.
- When you enter the Evidence Room Cassandra gives you a new list of items to find.
- You can find all items there, except for the broach (brooch) and hockey mask:
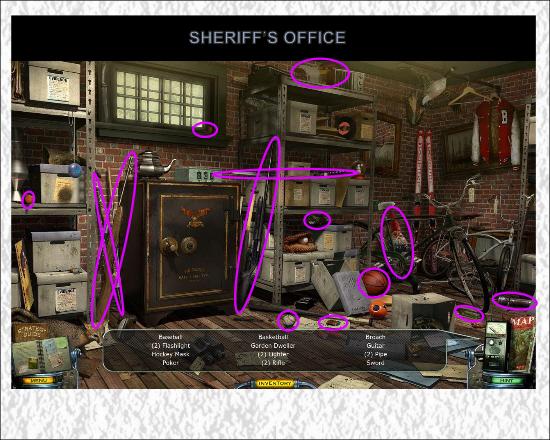
- Those are in the safe, which you have to open.
- Zoom in on the safe – there’s a post-it note that says “Good fishing spot”.
- Use the stethoscope on the safe.
- Spin the wheel around – every time you pass a correct letter, you hear a “click”.
- The letters you find appear on the post-it … B-S-C-E.
- Remember the map in the other room?
- Go and check the map again – Sebec Lake ring a bell?
- Enter the letters SEBEC on the safe. And here’s a confession from yours truly: I chickened out on this. I was spinnin’ and spinnin’ but never got the letters in the right order. Finally I clicked (horror!) SKIP. Frustrating!
- Click the mask and brooch in the safe.
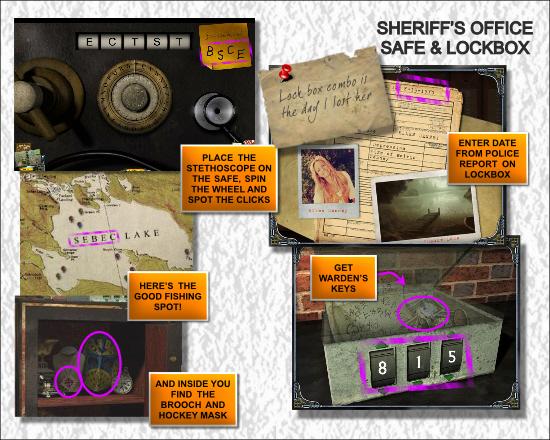
- After that Cassandra gets in touch. The warden’s wife is present here too, and you have to search for the number 1142 – reason so far unknown.
- Go out to the sheriff’s office again and look at the case files.
- Pick out the file that contains case number 1142.
- Information on the warden’s wife is displayed – including the day of her death – August 15th.
- Go back into the evidence room.
- Zoom in on the cash box on top of the safe.
- Enter Ellen’s date of death, 815.
- The box opens.
- Take the WARDEN’S KEYS.
- Now it’s time to match those drawings – four of them here in the sheriff’s house, two at Trestle Road:
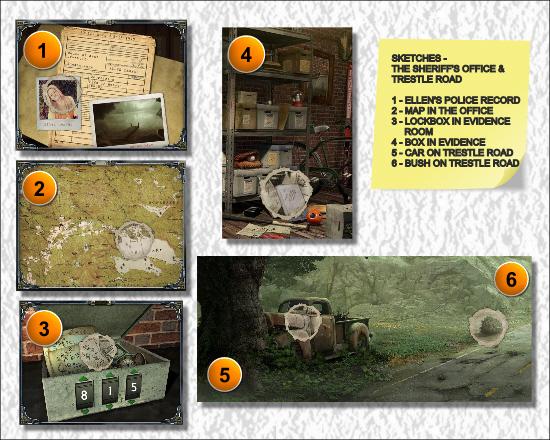
- When you are finished, return to the motel to let Cassandra do the reading – and you the puzzle.
- Watch the tragedy that takes place when the doctor, the sheriff and the reverend try to finish off the relic. Another site becomes available – the church.
Chapter 9 – The Church… and Beyond
- Go to the church and inspect it.
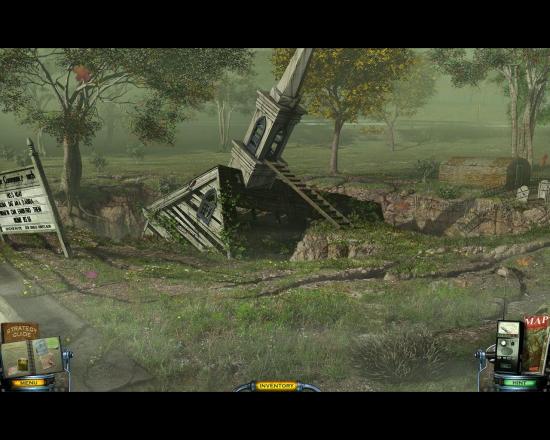
- You get the message that it’s to far to jump.
- Click the map again and go to Downtown.
- Enter the pharmacy and go up on the roof.
- Go to the exam room in the Doctor’s house.
- Pick up the cast of the relic that is now finished – remember the mould in the sink?
- Get back up on the roof of the pharmacy, and this time take the LADDER.
- Click the map and go back to the church.
- Use the ladder on the church tower.
- Enter the church.
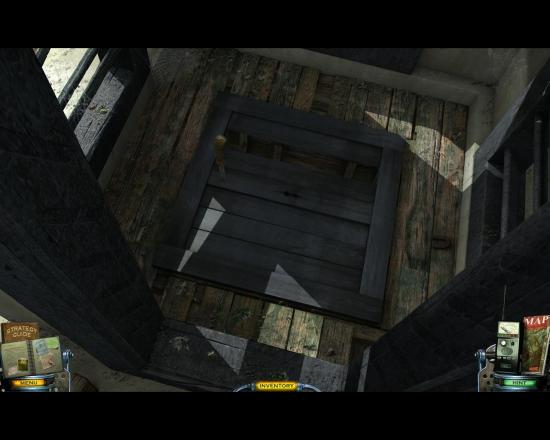
- Try to open the hatch; the handle breaks.
- Use the KNIFE on the hatch.
- Pull knife to open hatch
- Enter the church.
- Cassandra gets in touch with a number of items to find.
- Locate all items.
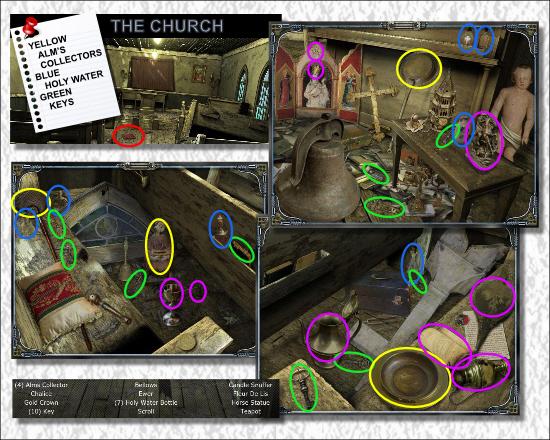
- Cassandra then says that there’s a red book which was very important to pastor Roberts.
- Click on the red book.
- You find a CHURCH KEY. Pick it up.
- Click on the curtains at the back of the church.
- A stained glass window appears.
- Approach it.
- Click on the window, use the CHURCH KEY on it and a minigame starts – fill in the lines in the window without reusing your own tracks.
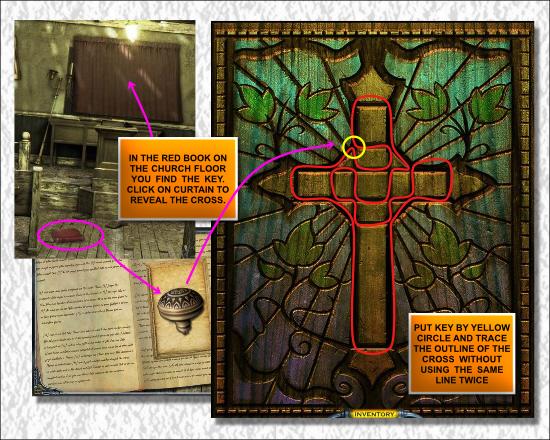
- When you have solved the puzzle, the window opens, and you find a secret passage behind it.
- Cassandra tells you she has more drawings for you.
- Go to the motel and fetch them.
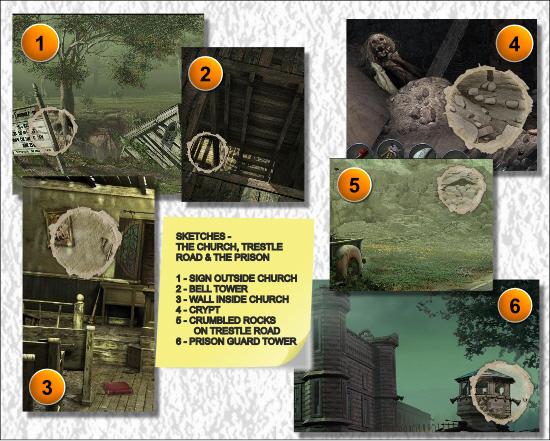
- On drawing belongs at Trestle Road, one at the prison. The rest are to be placed outside and inside the church.
- For the sixth and final match you need to go down in the church crypt.
- There you find the unfortunate doctor, sheriff, and pastor.
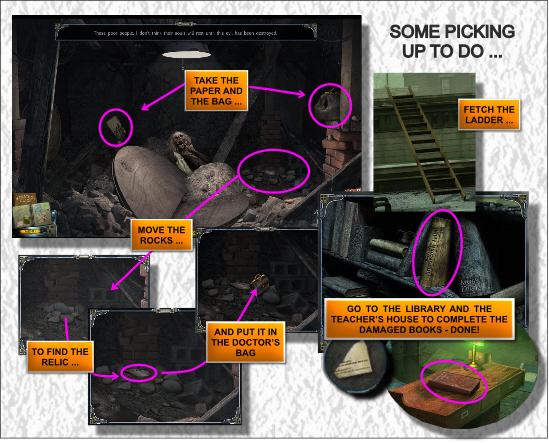
- Pick up the doctor’s BAG.
- Pick up the PAPER from the skeleton hand.
- Zoom in by the pillar.
- Dig around the rocks until you find the RELIC.
- Use the BAG to pick it up.
- Finally match the drawing.
- When done, Cassandra calls you back to the motel for a final reading.
- First back out of the church so you can bring the LADDER with you.
- Go to the teacher’s house, take the book on the Anaseconti tribe and put the paper scrap you found in the doctor’s autopsy room where it belongs.
- Continue to the library, go to the inner office and open the book on the desk.
- Put the paper you took from the skeleton hand in the book.
- Then open the map and go to the motel.
- You turn over the relic and the drawings to Cassandra.
- Solve the puzzle:
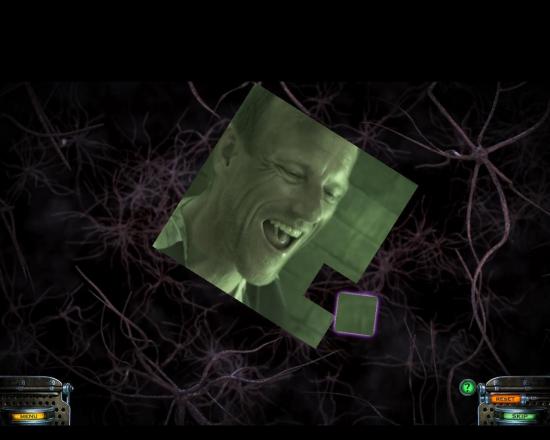
Chapter 10 – The Finale at Relic’s End
- Cassandra sends you off once again to Trestle Road.
- Zoom in on the caved in train tunnel.
- Remove four boulders, start top right, move left and then one in the middle.
- Enter the tunnel.
- Meet the prisoner!
- Zoom in on the wall to see a map, obviously depicting a secret passageway in the penitentiary.
- After you close the map you found a strange noise comes from the radio.
- You hurry back to the motel, to find that Cassandra has been snared by the relic.
- Go to the prison.
- Put the LADDER against the wall by the vent.
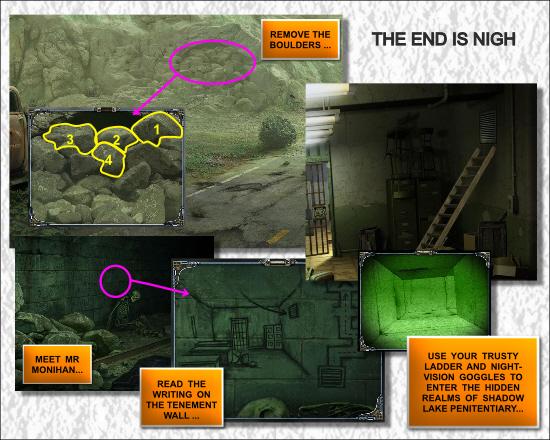
- Zoom in the vent.
- Use the SCREWDRIVER to remove the screws and the vent itself.
- Use the NIGHT-VISION GOGGLES when crawling through the ducts.
- You come to a small room with a locked door.
- Use the WARDEN’S KEYS on the door.
- Enter the room.
- It’s an old cell, and you can see an old pinup calendar on the far wall.
- Zoom in the calendar and click on it.
- A hole appears – the prisoner obviously tried to dig his way out with a spoon.
- Take the SPOON.
- Continue in through the hole.
- First you come to a great cave, lit by large candles.
- Continue forward, and find Cassandra, now worshipping Andramalech who will – according to her, anyway – soon take over the world with fire and brimstone and the usual paraphernalia.
- It’s obvious that the ritualistic elements are important, so take the SPOON and douse the candle right behind Cassandra.
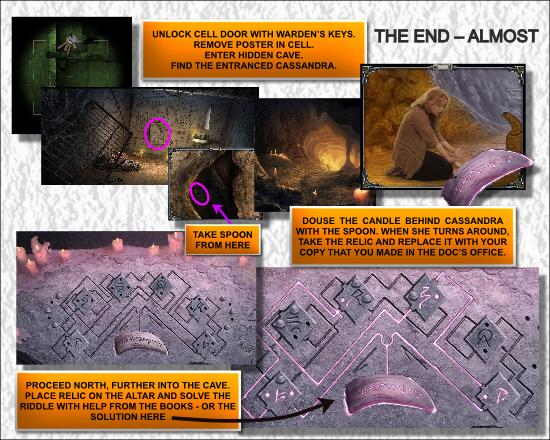
- She gets distracted lighting the candle again and loses sight of the relic, so zoom in on it.
- Use your copy of the relic on the real deal.
- Now you have the genuine relic, and Cassandra the fake one.
- Click on the cave further on with the altar.
- Put the relic in the recess on the altar.
- Solve the minigame.
- There are several clues to help you with this.
- First of all the two books you fixed at the teacher’s house and in the library.
- Then there are cutouts in the altar – the energy needs to create a continuous flow from relic to symbols – note the little tabs on the symbols.
- Final tip – the key phrase is “We must release you spirits” – and it’s not written from left to right.
- When you have the correct combination the energy flows away from the relic which releases its grip on Cassandra.
- Ellen’s ghost asks you to bring the relic to Shadow Lake, where she can bring it with her to the bottom of the lake and forever protect it.
- Cassandra asks you to do so, and returns to the motel.
- Go to the lake.
- Approach the water.
- Use the relic on the water.
- Ellen’s hand comes and takes it away.
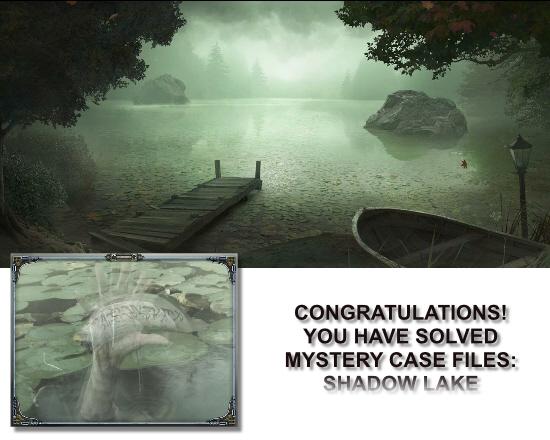
- Go back to the motel, have a chat with Cassandra.
- The end.
Bonus Chapter – Grime’s Quarry
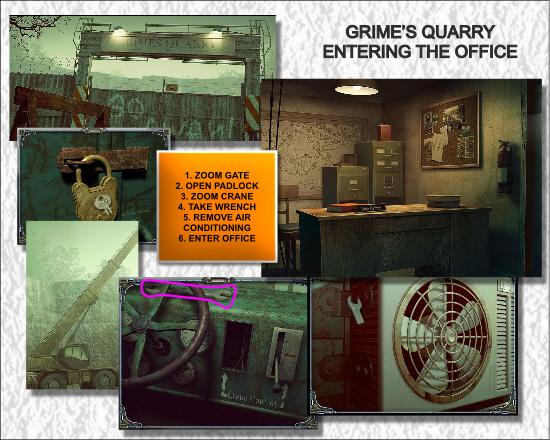
- Zoom in on the gates.
- Use the KEY you found on the warden’s desk in the penitentiary on the padlock.
- Enter the quarry.
- Zoom in on the cabin of the crane.
- Look around, and then take the WRENCH.
- Zoom in on the air conditioning unit outside the office.
- Use the WRENCH on the nuts attaching the unit to the wall.
- The unit falls off, and you can now enter the office.
- Zoom in on the file cabinet.
- The mini game is a variation on a standard theme – you are to flip all of the tiles over, and in this version the symbols on each tile tell you which other tiles that also will flip over.
- It’s a medium tricky game, and here’s the solution:
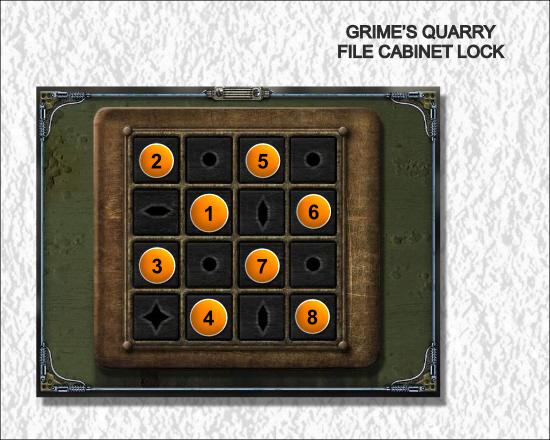
- The file cabinet opens, and you get a CRANE LEVER.
- Go to the crane control cabin and put the LEVER in it’s place.
- Pull the lever to lower the safe that is hoisted high up in the air.
- Study the three dials on the safe.
- Get back into the office and look at the book on the desk.
- It’s the quarry accounts – but with some interesting tabs on top; matching the safe dials.
- Match the dials and the entries in the book like this:
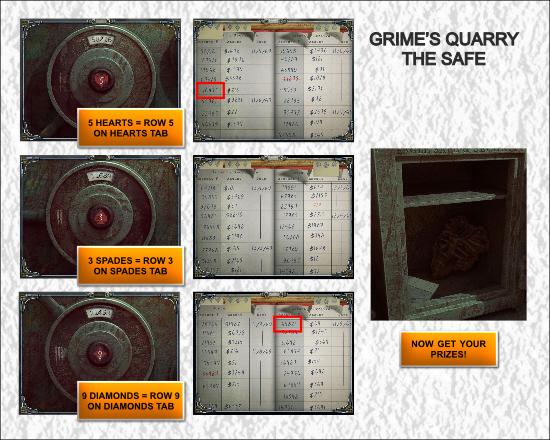
- So set the dial with 5 hearts on 16875.
- Set the dial with 3 spades on 32648.
- Set the dial with 9 diamonds on 64821.
- Turn the wheel and open the safe.
- Read the letter (for added confusion) and take the mask.
- The bonus game is unlocked – finding 50 morphing objects.
These are the objects you can find
Grimes Quarry:
- Inside the office – oil can/bucket on file cabinet
- Out in the yard – OFFICE sign
- Entrance – letter Q on the sign
Penitentiary:
- Outside – window, bottom floor, right of entrance
- Entrance – plant to the left of the door
- Foyer – tube/box at the service window
- Office – tape roll on desk
- Registration – Letters A/C on labels for left file cabinet
- Warden’s office – pyramid on top of safe to the right of the desk
- Warden’s office – playing card on desk
- Cell (after crawling through vent) – hand/foot print below sink
Warden’s home:
- Living room – box/vase on floor
- Kitchen – whisk/spoon in skillet, bottom left
- Basement – shaker/bottle on shelf above grinder
- Upper hall – painting top right
- Boy’s room – sock hanging on drawer
- Master bedroom – clock on bed headboard
Motel:
- The yard – ice box text ICE/ECI
- Room 1 (Cassandra) – decal on box, by video camera
- Room 2 – vent above bathroom door
- Room 2 – handle on desk drawer beneath TV
- Room 2/bathroom – cotton balls/jar on shelf to the left
School:
- Front yard – fence pole, farthest to the right
- Playground – fence rod (vertical), near the rear left support for the swings
- Class room – writing on the blackboard, bottom right
- Shed – pipe/mirror on wall above the toy box
- Bell tower – paintbrush, to the right on the floor
Teacher’s house:
- Outside – Stick leaning on fallen fence
- Inside – board in shelving, next to the left window
- Garage – crack/star on box lying on floor to the left
Downtown:
- Main street, first stop – chimney on the house to the left of the sheriff’s
- Main street, second stop – fencing on the library roof (left)
Library:
- In front of library – statue to the left
- Foyer – gear on floor (middle)
- Book room – panel on wall to the left of the office door
- Office – book/filer on top shelf to the left
Doctor’s house & pharmacy:
- Pharmacy – Rx sign above the game machine
- Bank roll/can – roof to the far right
- Bedroom – ear rings on table to the left
- Hallway – light switch to the right
- Living room – ashtray/hotplate on table
- Office – spyglas/glasses on desk
- Exam room – wall tiles to the right of the test tube rack
Sheriff’s office:
- Main room – clock on the wall (upper right)
- Evidence room – record/sun on right shelf, 2nd from the top
Trestle Road:
- On the road – crack/flower (center)
Church:
- Outside – fence section/bush to the right
- Bell tower – bird dropping on the left sill
- Main hall – right painting on the back wall
- Crypt – pipe/block on the ground to the right
Congratulations!
You have completed Gamezebo’s walkthrough for Mystery Case Files: Shadow Lake – Collector’s edition. Be sure to check back often for game updates, staff and user reviews, user tips, forums comments and much more here at Gamezebo!
More articles...
Monopoly GO! Free Rolls – Links For Free Dice
By Glen Fox
Wondering how to get Monopoly GO! free rolls? Well, you’ve come to the right place. In this guide, we provide you with a bunch of tips and tricks to get some free rolls for the hit new mobile game. We’ll …Best Roblox Horror Games to Play Right Now – Updated Weekly
By Adele Wilson
Our Best Roblox Horror Games guide features the scariest and most creative experiences to play right now on the platform!The BEST Roblox Games of The Week – Games You Need To Play!
By Sho Roberts
Our feature shares our pick for the Best Roblox Games of the week! With our feature, we guarantee you'll find something new to play!Type Soul Clan Rarity Guide – All Legendary And Common Clans Listed!
By Nathan Ball
Wondering what your odds of rolling a particular Clan are? Wonder no more, with my handy Type Soul Clan Rarity guide.


