- Wondering how to get Monopoly GO! free rolls? Well, you’ve come to the right place. In this guide, we provide you with a bunch of tips and tricks to get some free rolls for the hit new mobile game. We’ll …
The BEST Roblox Games of The Week – Games You Need To Play!
By Sho Roberts
Our feature shares our pick for the Best Roblox Games of the week! With our feature, we guarantee you'll find something new to play!All Grades in Type Soul – Each Race Explained
By Adele Wilson
Our All Grades in Type Soul guide lists every grade in the game for all races, including how to increase your grade quickly!Best Roblox Horror Games to Play Right Now – Updated Weekly
By Adele Wilson
Our Best Roblox Horror Games guide features the scariest and most creative experiences to play right now on the platform!
Mortimer Beckett and the Crimson Thief Walkthrough
Welcome to the Mortimer Beckett and the Crimson Thief walkthrough on Gamezebo. Mortimer Beckett and the Crimson Thief is a Hidden Object Game played on the PC created by Paprikari. This walkthrough includes tips and tricks, helpful hints and a strategy guide on how to complete Mortimer Beckett and the Crimson Thief.
Mortimer Beckett and the Crimson Thief – Game Introduction
Welcome to the Mortimer Beckett and the Crimson Thief walkthrough on Gamezebo. Mortimer Beckett and the Crimson Thief is a Hidden Object Game played on the PC created by Paprikari. This walkthrough includes tips and tricks, helpful hints and a strategy guide on how to complete Mortimer Beckett and the Crimson Thief.
Laurie Murphy
General Tips
This hidden object game requires visiting several locations and using inventory items to advance play.
- Play is non-linear within an area.
- Inventory items for the entire area are shown when first arriving at a new area. Visit different locations within the area to find the items.
- Interview all individuals you meet to help find where inventory items belong.
- CAPITALIZED inventory items are meant to make it easier to find where this guide may deviate from your own play.
- Always move the cursor around a scene to see if there are additional sites to visit or interactive areas.
Main Menu:
- Play – Begin or resume a game. You may play the optional tutorial at any time. The tutorial is independent of the game.
- Options – Change music and sound effects volume. You may select or deselect full screen.
- Epilogue – Bonus play that is available after completing the game.
- Profiles – Click the “If this is not you, CLICK HERE” link to create, delete or switch player profiles.
Screen Navigation:
- Menu – Change your options, resume the game or return to the main menu.
- Hint/Skip Bar – Clicking will show a random item from an itemized list. Hints are not limited and the bar refills quickly. The bar turns into a Skip bar for puzzles.
- Notes – Clicking an object can add clues or information. The information helps solve puzzles.
- Inventory List – A list of icons showing all items that need to be found in an area. Once an object is collected, the name of the item and a question mark appear in the inventory list. Using the object deletes it from the list.
Walkthrough Tips
A short clip explains the background and introduces the story line for play.
An optional tutorial walkthough is available to demonstrate how to navigate and interact with objects. The tutorial is not covered in this walkthough.
This walkthrough attempts to show the most direct path through the game. It is assumed you know to look around and speak with people you meet.
Spelling is mostly consistent with what is shown on the screen (i.e. “led bowl” rather than “lead bowl”).
Chapter 1: Paris

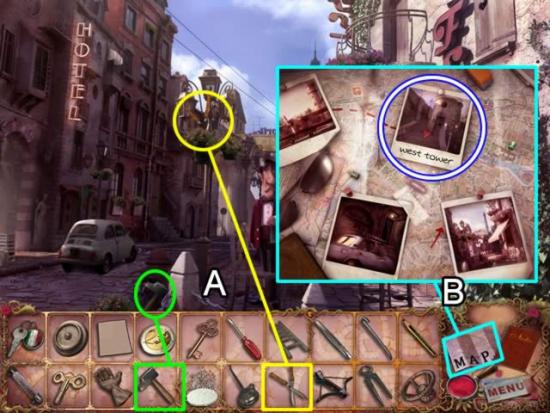
- Pick up the HAMMER and PRUNING SHEARS at the coffee shop.
- Open the Map.
- Select the West Tower.
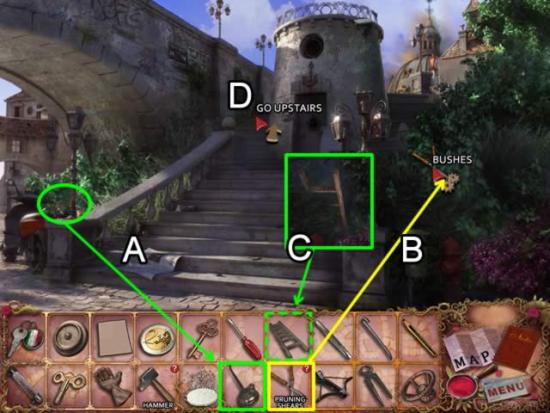
- Pick up the OIL CAN (A).
- Use the PRUNING SHEARS on the bushes (B). Take the LADDER (C).
- Go up the steps (D).
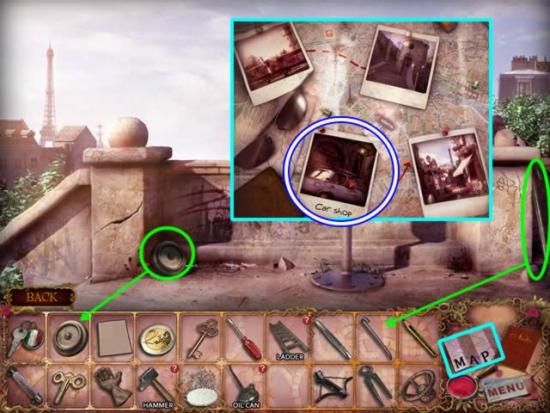
- Pick up the WHEEL and CROWBAR.
- Open the Map.
- Go to the Car Shop.
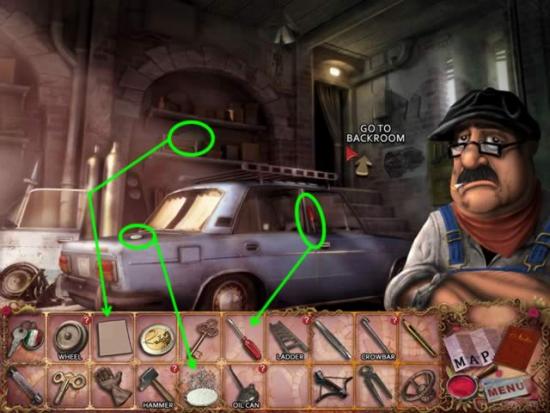
- Speak to the shop owner.
- Take the BLANK PAPER, TABLET and SCREWDRIVER.
- Go to the backroom.
- Pick up the TWEEZERS and PENCIL.
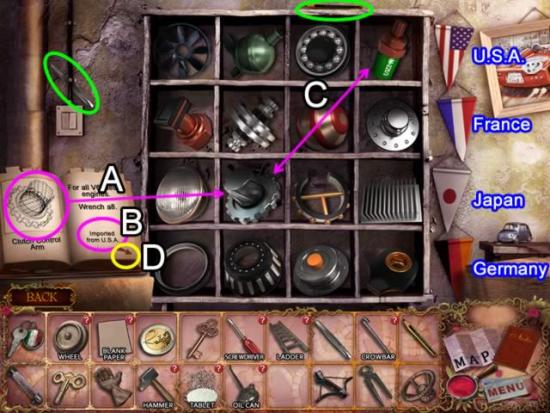
- Play the parts minigame.
- The goal is to place each part in the row associated with its country.
- Use the diagram to locate the part (A). Read the description to find a clue to the country (B). Swap two parts to place the part in the country (C). Click the arrow at the bottom of the description page (D) to go to the next part description.
- Place the pieces beginning in the first row and column of each country. This will help avoid swapping pieces already placed. Another strategy is to flip through the pages and find all the parts one country at a time. See the solution in the next screen shot.
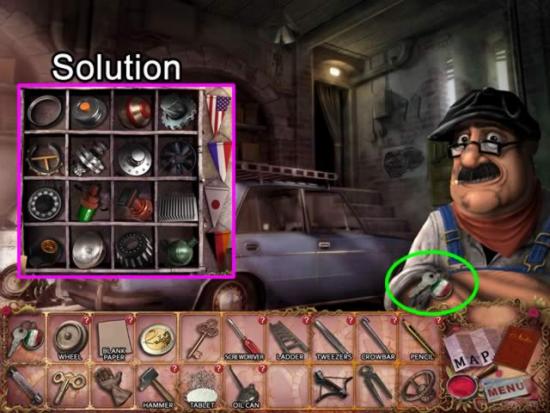
- Take the CAR KEY.
- Open the Map. Return to the Coffee Shop.
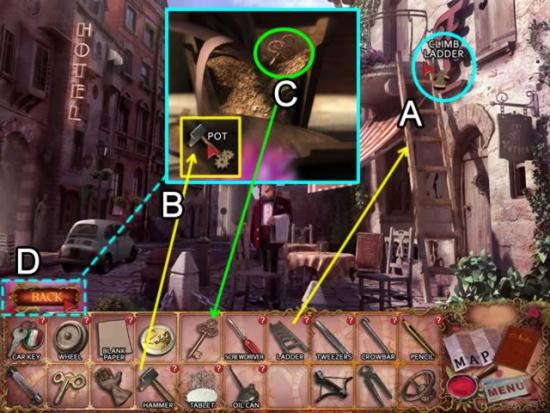
- Place the LADDER against the building (A). Climb up to the balcony.
- Break the clay pot with the HAMMER (B). Take the ROOM KEY (C). Click the “Back” button to return to the main scene (D).
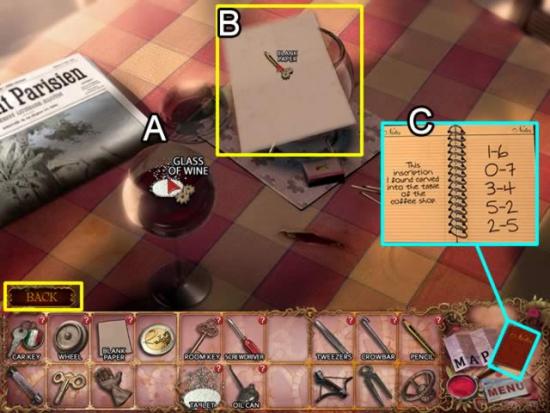
- Approach the table.
- Put the TABLET in the glass of wine (A).
- Place the BLANK PAPER on the table (B). Use the PENCIL to trace the information onto the paper.
- The information is saved in the Notebook (C) for later reference.
- Go back to the main scene.
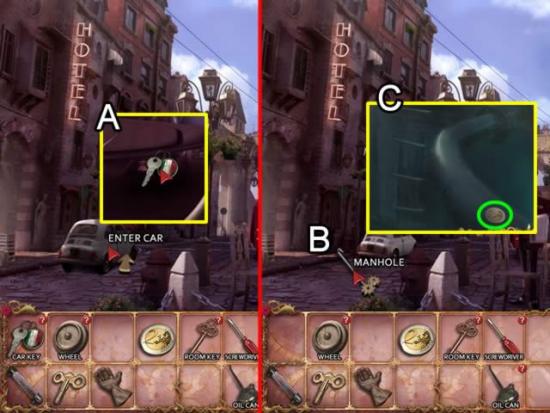
- Enter the car. Place the CAR KEY in the ignition to move the car forward.
- Pry the manhole cover off with the CROWBAR (B). Enter the sewer.
- Take the COIN (C).
- Open the Map. Select the West Tower location.
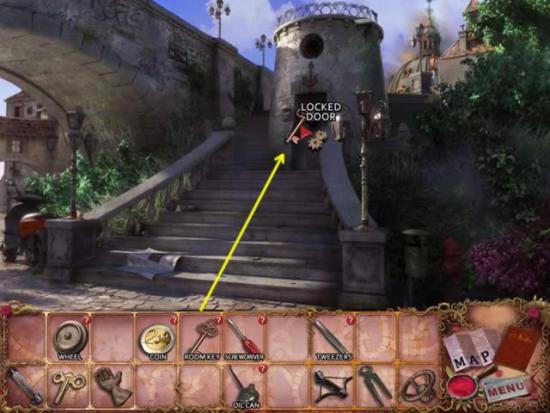
- Use the ROOM KEY to open the tower door and enter the thief’s hideout.
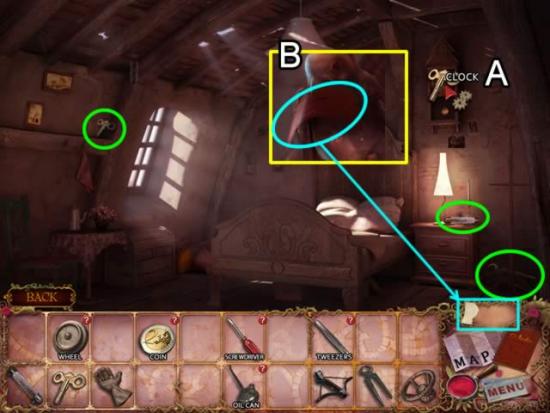
- Pick up the CLOCK KEY, FUSE and PINCERS.
- Use the CLOCK KEY to wind the clock (A).
- Take the ticket piece from the bird’s beak (B).
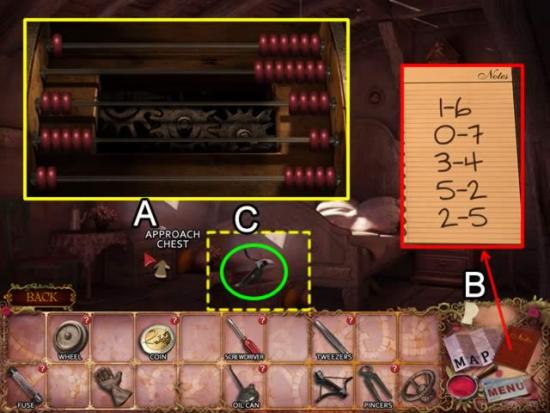
- Approach the chest to open a puzzle (A).
- The goal is to place the beads on either side of the abacus to open the chest.
- Consult the Notebook page from the coffee shop table for the solution (B). The sheet shows how many beads should be on the left (first number) and how many on the right (second number).
- Take the CROSSBOW (C).
- Exit the hideout.
- Go up the steps on the left.
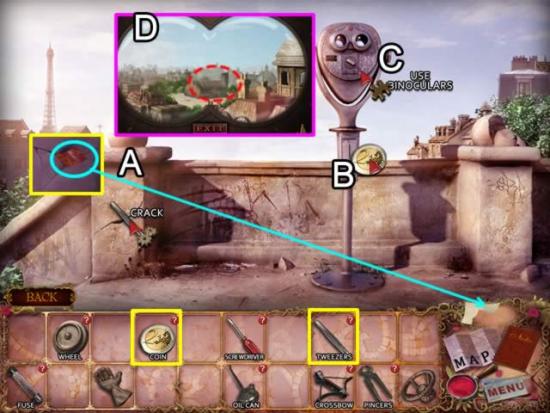
- Use the TWEEZERS to extract the ticket piece (A).
- Insert the COIN in the slot (B).
- Click the binoculars to open a puzzle (C). Use your mouse to scroll until the numbers on the hangar roof (dashed red) come into view. The numbers are recorded in Notes.
- Open the Map. Note that this location is now complete.
- Go to the Airfield. Approach the hangar.
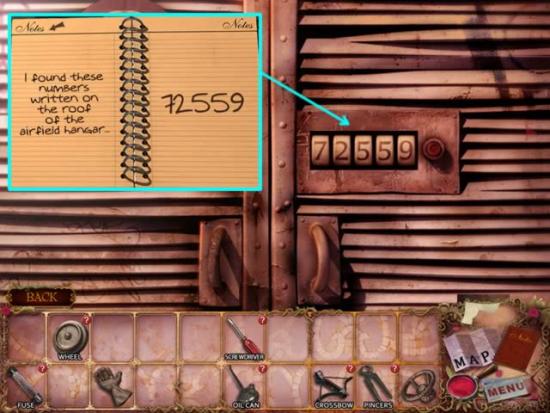
- Open the Notebook to find the lock combination. Click the tumblers until the numbers match.
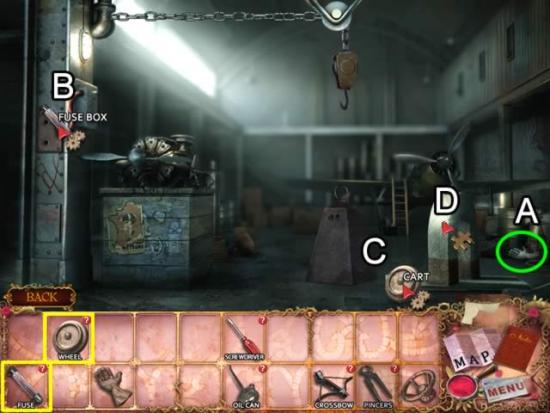
- Pick up the GLOVE (A).
- Insert the FUSE in the fuse box (B).
- Put the WHEEL on the cart (C) to activate a puzzle (D).
- Click the magnet on the cart move it across the floor.
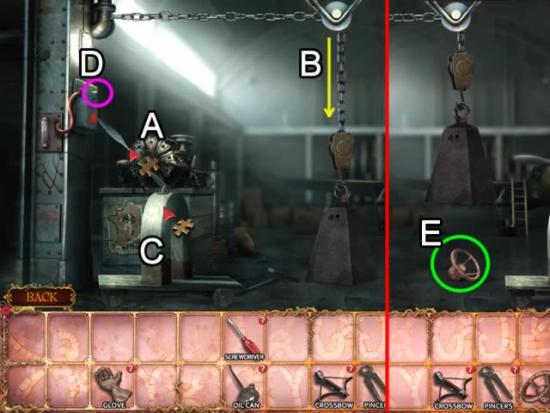
- Clicking the propeller (A) causes the propeller blade to stick to the magnet. This lowers the chain (B) and the hook attaches to the weight.
- Click the magnet again (C) to send the cart back across the floor.
- Press the button on the switch box (D) to lift the weight and expose the VALVE (E).
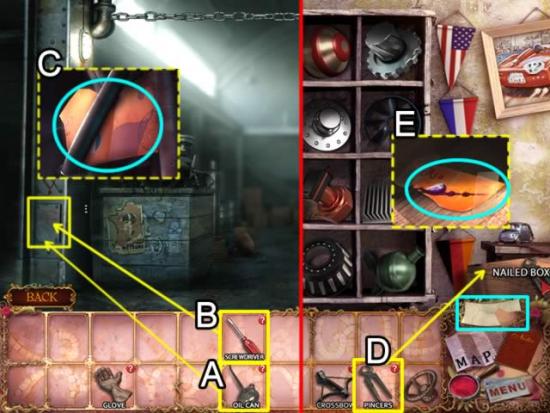
- Apply the OIL to the rusty plate (A). Use the SCREWDRIVER to open it (B). Take the ticket piece (C).
- Go to the Car Shop.
- Use the PINCERS to remove the nails from the nailed box (D). Take the ticket piece.
- Return to the coffee shop. Enter the sewer.
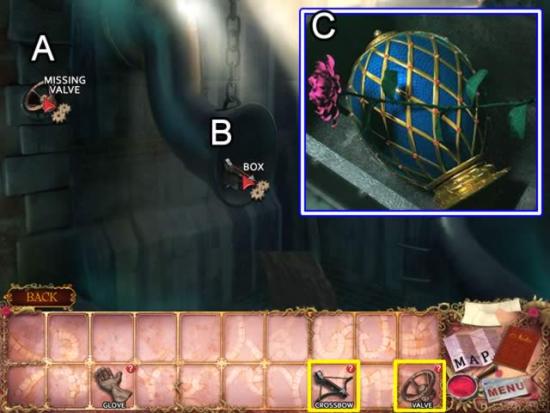
- Place the missing VALVE on the pipe to stop the water flow.
- Use the CROSSBOW to retrieve the box. Take the stolen artifact.
- Return to the airfield.
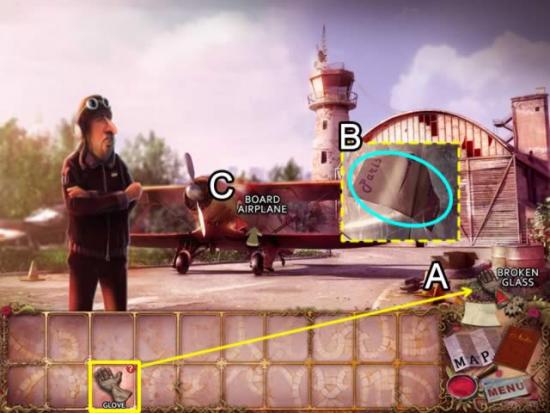
- Use the GLOVE to sift through the broken glass (A).
- Retrieve the last ticket piece (B).
- Board the airplane for the next destination.
Chapter 2: Rio de Janeiro
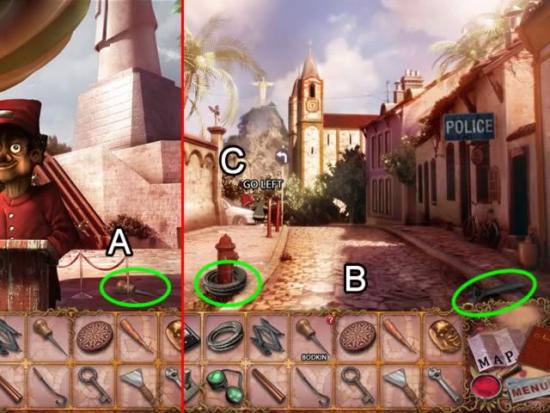
- Pick up the BODKIN (A).
- Go to the Closed Street.
- Pick up the ROPE and WRENCH on the street (B).
- Go left (C) at the end of the street.
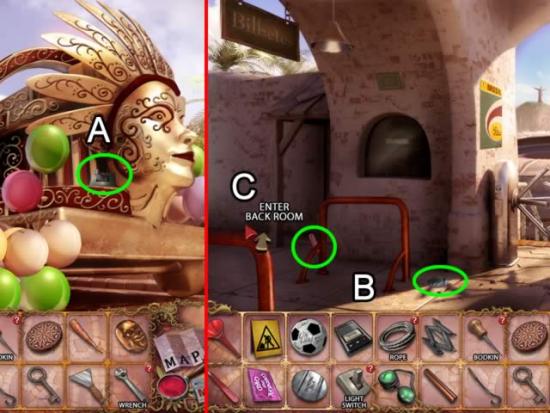
- Take the LIGHT SWITCH from the carnival float (A).
- Go to the Soccer Stadium.
- Get the SCALPEL and COIN on the ground (B).
- Enter the back room (C).
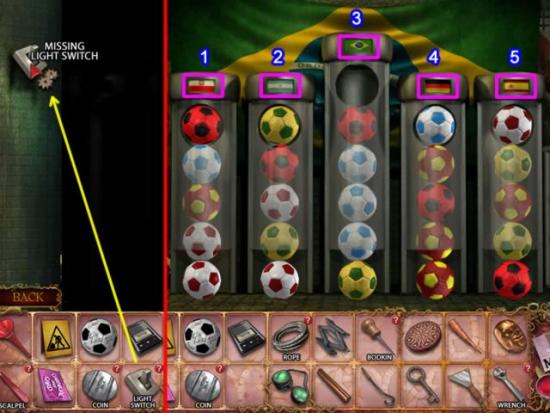
- Place the LIGHT SWITCH in the missing light switch hole to turn on the lights and play a puzzle.
- The goal is to swap the soccer balls so all of the same colored balls are in the shoot associated with the colored flag above the shoot.
- Use the predominate colors on the flag to determine which balls go where. Use the center shoot to help swap balls. Move balls within a shoot by taking the bottom ball and placing it in the top of the shoot until the colored ball needed for another shoot is at the bottom.
- Solution. Shoot 1 – Red and white; Shoot 2 – Blue and white; Shoot 3 – Yellow and green; Shoot 4 – Red and black; Shoot 5 – Red and yellow. The next screenshot shows the solution.
- Go BACK outside to the stadium grounds.
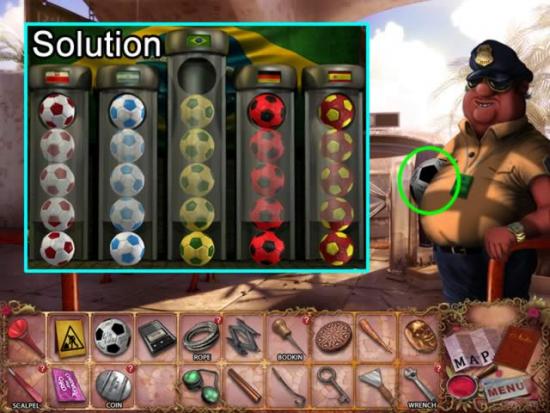
- Get the SOCCER BALL from the security guard.
- Go to the Carnival Store.
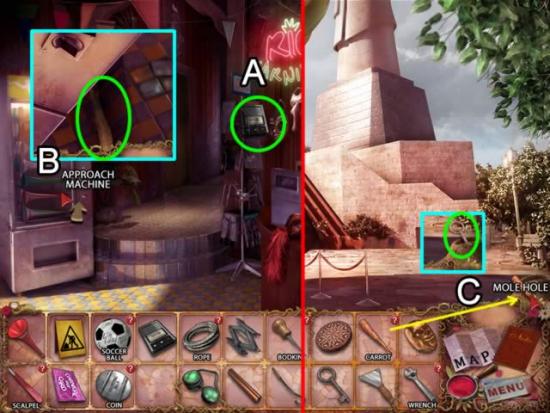
- Pick up the AUDIO RECORDER from the rack (A).
- Approach the machine on the left (B). Take the CARROT wedged between the machine and the tile step.
- Return to the hot air balloon.
- Stuff the CARROT down the mole hole (C). Get the KEY.
- Return to the Carnival Store.
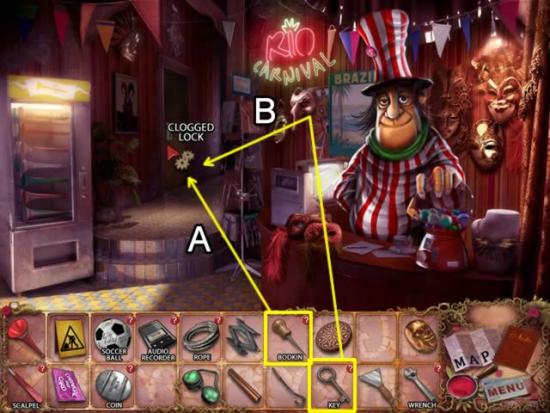
- Use the BODKIN to unclog the lock (A).
- Open the door with the KEY (B).
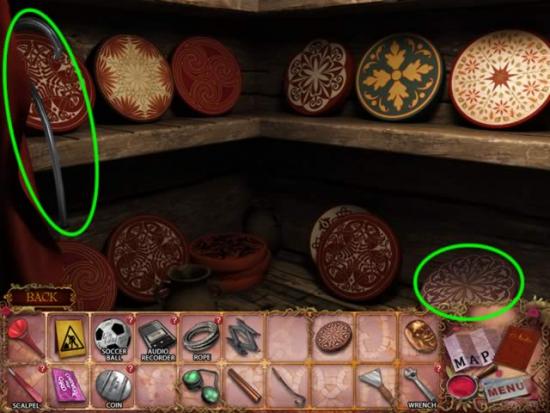
- Take the LONG HOOK and the WHEEL.
- Return to the Closed Street.
- Go left to the carnival float.
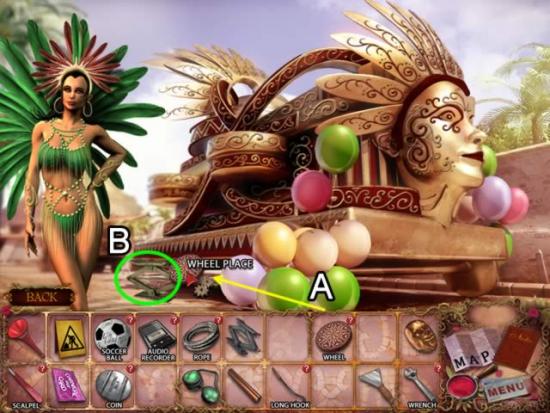
- Place the WHEEL in the wheel place (A).
- The CAR JACK (B) is automatically added to inventory.
- Go to the Park Entrance.
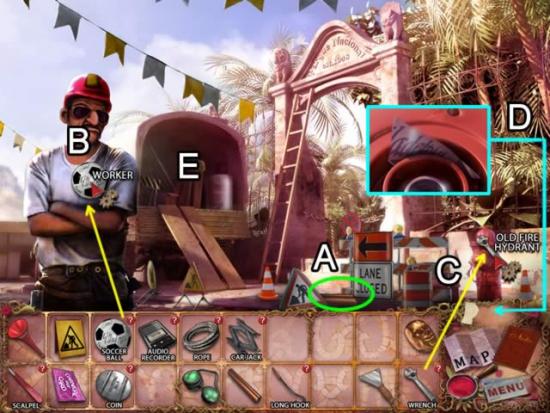
- Pick up the METAL BAR by the sign (A).
- Give the SOCCER BALL to the worker (B).
- Use the WRENCH on the old fire hydrant (C). Receive part of the ticket (D).
- Enter the truck (E).
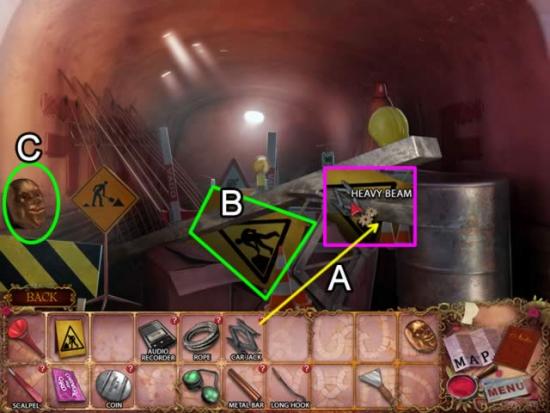
- Use the CAR JACK to lift the heavy beam (A). Take the ROAD SIGN.
- Pick up the BRASS MASK (C).
- Return to the Carnival Store.
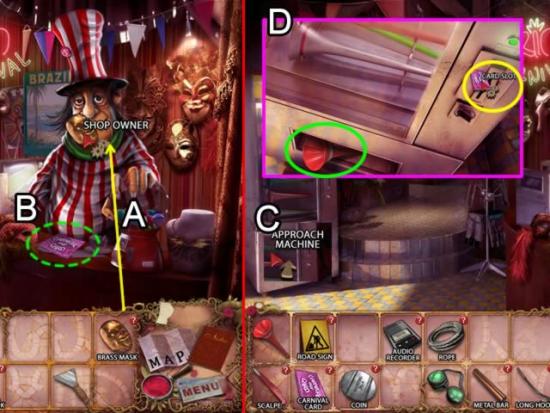
- Give the BRASS MASK to the shop owner (A).
- Receive the CARNIVAL CARD (B).
- Approach the machine on the left (C).
- Insert the CARNIVAL CARD in the slot to get the VUVUZELA (D).
- Return to the Closed Street.
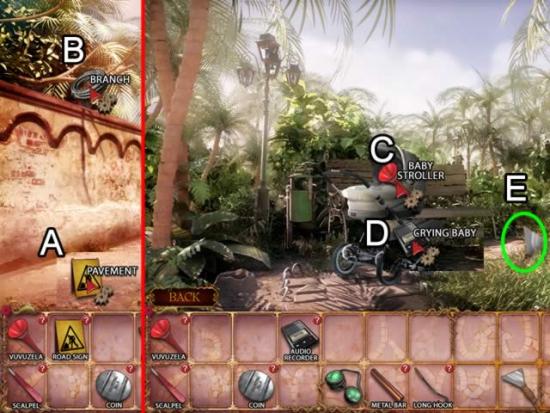
- Place the ROAD SIGN on the crumbling walk (A).
- Attach the ROPE to the branch (B). Climb the rope.
- Use the VUVUZELA to get the baby’s attention (C). Record the crying baby with the AUDIO RECORDER (D). The RECORDED SOUND is automatically added to inventory.
- Pick up the TROWEL from the grass (E).
- Return to the hot air balloon
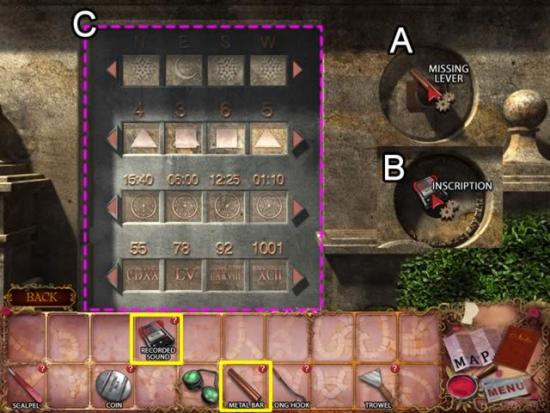
- Approach the statue.
- Place the METAL BAR in the missing lever slot (A).
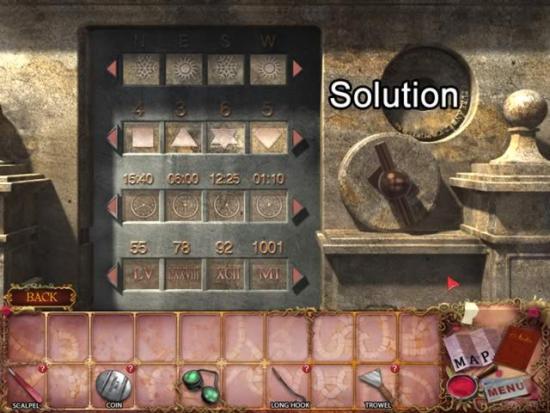
- Put the RECORDED SOUND next to the inscription (B) to open a puzzle (C).
- The goal is to match the icons to the letter or value above them.
- Use the left or right arrows to slide the icons. The best strategy is to find two values you know and slide until they are matched. Matching two values often solves the others.
- The first row is direction and weather icons. I’m not sure what the logic is for this row, so here is my best guess: match the suns with rising and setting directions. This causes snowflakes to appear in north and south. Global warming?
- The second row is number of points in the symbols.
- The third row is 24-hour time matched to 12-hour clocks.
- The last row is decimal and Roman numeral equivalents.
- The next screenshot shows the solution.
- Enter the thief’s hideout.
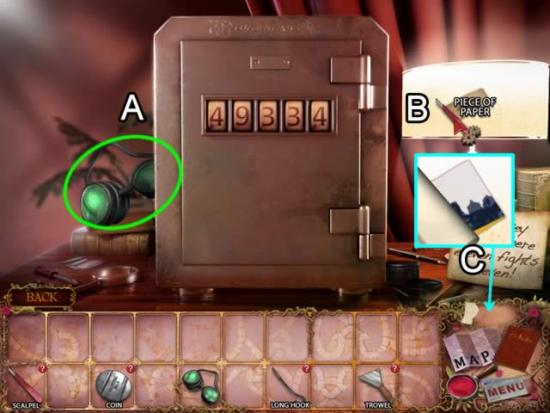
- Pick up the GOGGLES (A).
- Use the SCALPEL to scrape off the piece of paper (B). Receive a part of the ticket (C).
- Return to the soccer stadium.
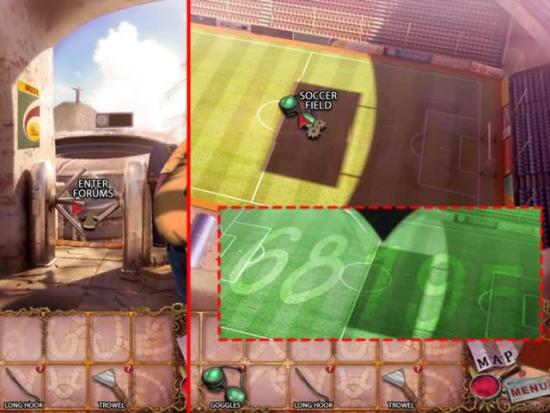
- Go through the turnstile to ener the forums.
- Place the GOGGLES on the soccer field to view the hidden number. The number is recorded in Notes.
- Return to the Carnival Store.
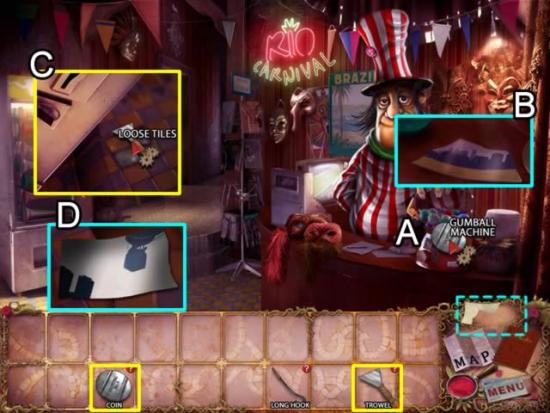
- Insert the COIN in the gumball machine (A). Receive a ticket piece (B).
- Approach the machine on the left.
- Use the TROWEL to pry up the loose tiles (C). Receive a ticket piece (D).
- Return to the hot air balloon. Enter the thief’s hideout.
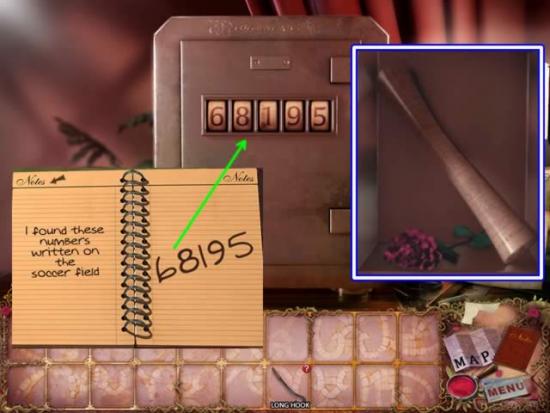
- Refer to the Notes for the safe combination.
- Retrieve the stolen artifact.
- Exit the thief’s hideout.
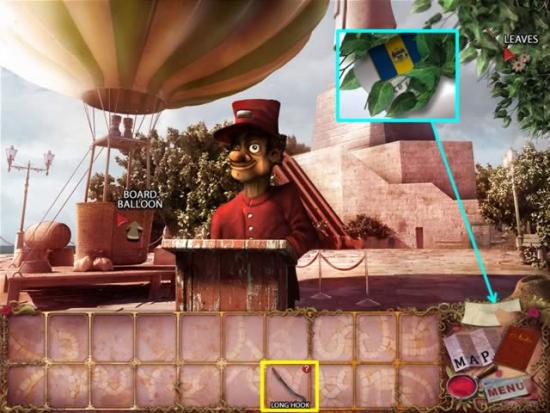
- Use the LONG HOOK to retrieve the ticket piece from the leaves.
- Board the balloon for the next destination.
Chapter 3: Philadelphia
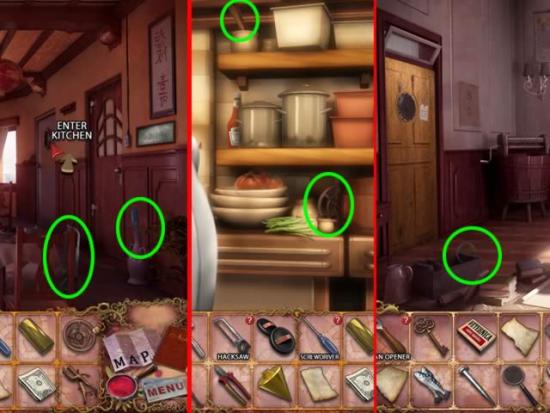
- Pick up the HACKSAW and SCREWDRIVER.
- Enter the kitchen.
- Get the CAN OPENER and HANDLE.
- Go to Benjamin Franklin’s room.
- Take the MAGNIFYING GLASS.
- Go to City Hall. Enter the cinema on the left.
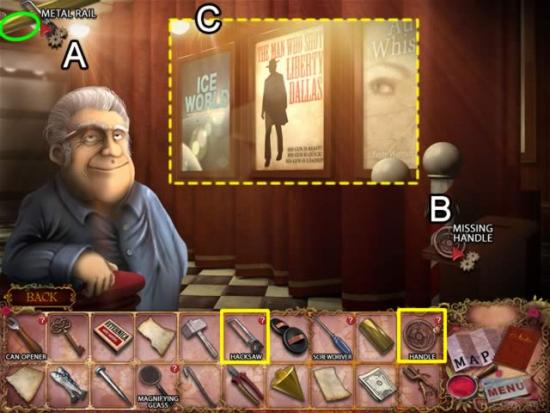
- Use the HACKSAW on the metal rail (A). Take the METAL BAR.
- Affix the missing HANDLE to open the curtains (B).
- Examine the posters (C). The correct movie title is added to Notes.
- Exit the cinema.
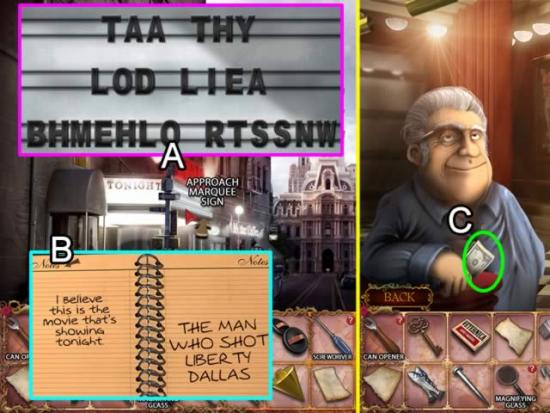
- Approach the marquee sign (A) to open a puzzle.
- Swap the letters in the marquee sign until they match the title from the poster (B).
- Take the MONEY from the cinema owner.
- Go to the Harbor.
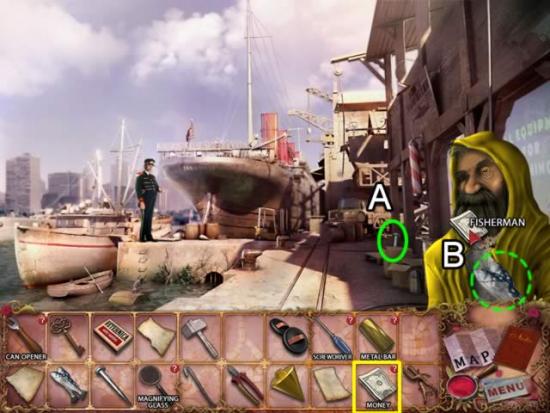
- Pick up the CHISEL (A).
- Give the MONEY to the fisherman (B) and receive FRESH FISH.
- Return to the Chinese restaurant. Enter the kitchen.
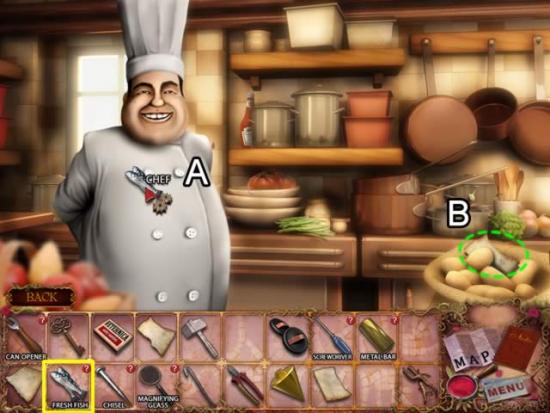
- Give the FRESH FISH to the chef (A) and receive a PARCHMENT FRAGMENT (B).
- Exit to the restaurant.
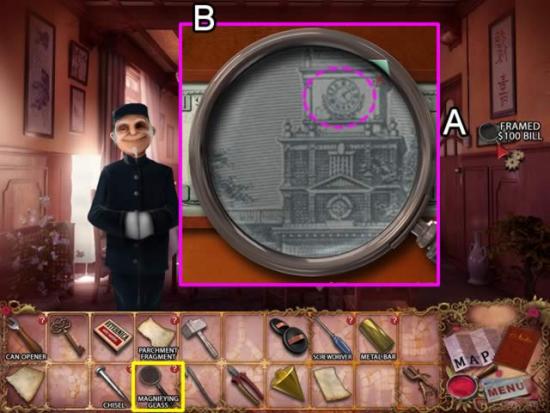
- Use the MAGNIFYING GLASS to examine the framed $100 bill (A).
- Move your mouse right and upward (B) until the time on the clock tower comes into focus. The time is recorded in Notes.
- Go to the Liberty Bell.
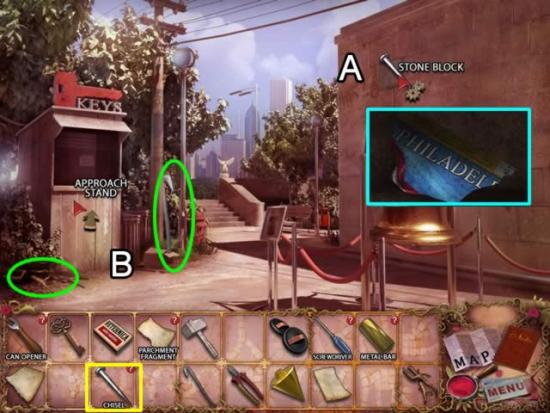
- Use the CHISEL on the stone block (A) to get the first piece of the departure ticket.
- Pick up the BRUSHWOOD and CROWBAR by the stand (B).
- Approach the stand.
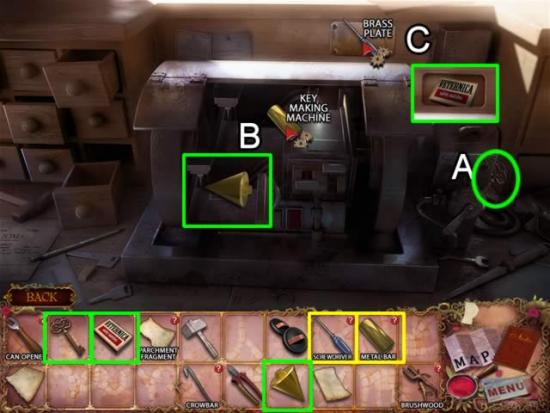
- Pick up the SMALL KEY (A).
- Insert the METAL BAR into the key making machine (B). Take the PLUMB LINE.
- Use the SCREWDRIVER to remove the brass plate (C). Take the MATCHES.
- Return to Benjamin Franklin’s room.
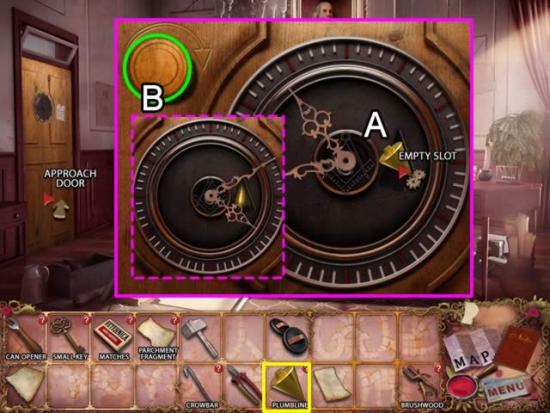
- Approach the door.
- Insert the PLUMB LINE in the empty slot on the clock face (A).
- Based on the information obtained from the $100 bill, use the knob in the upper left corner to set the time to 4:10 (B).
- Examine the cupboard.
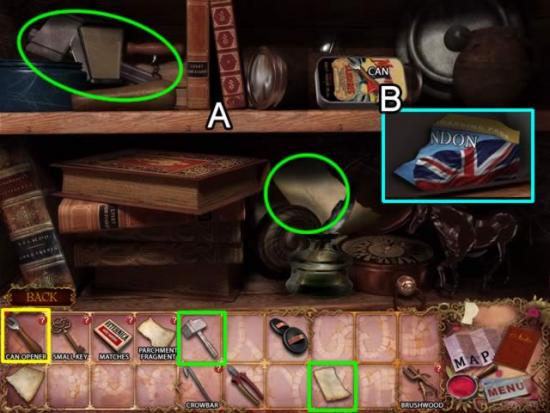
- Take the HAMMER and PARCHMENT FRAGMENT (A).
- Use the CAN OPENER on the can (B). Get another ticket piece.
- Return to the Liberty Bell.
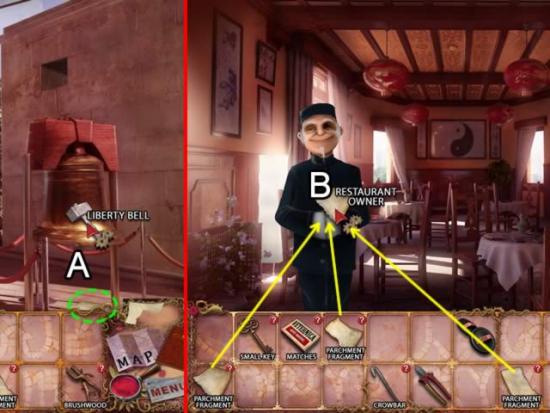
- Use the HAMMER on the bell (A). Pick up the dropped PARCHMENT FRAGMENT.
- Return to the Chinese restaurant.
- Give the three PARCHMENT FRAGMENTS to the restaurant owner (B). Receive a whole PARCHMENT.
- Return to Benjamin Franklin’s room.
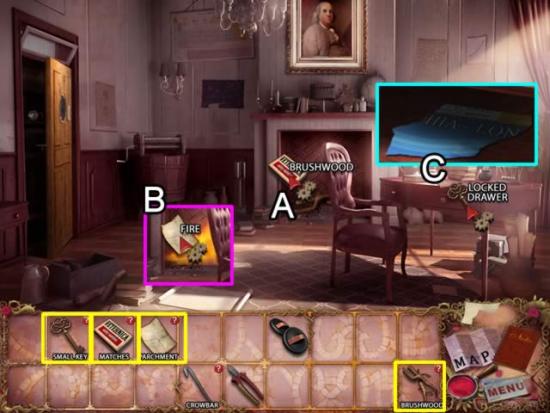
- Place the BRUSHWOOD in the fireplace (A). Use the MATCHES to light a fire.
- Put the PARCHMENT in the fire (B) to reveal lever positions.
- Use the SMALL KEY to open the desk drawer. Get a ticket piece.
- Return to the Chinese restaurant.
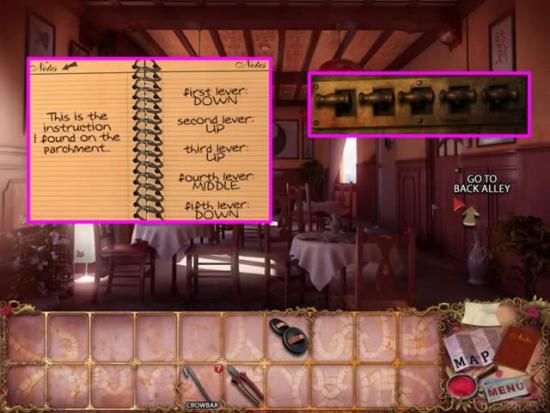
- Approach the door to the back alley.
- Use the directions recorded in Notes to put the levers in the correct position to open the door.
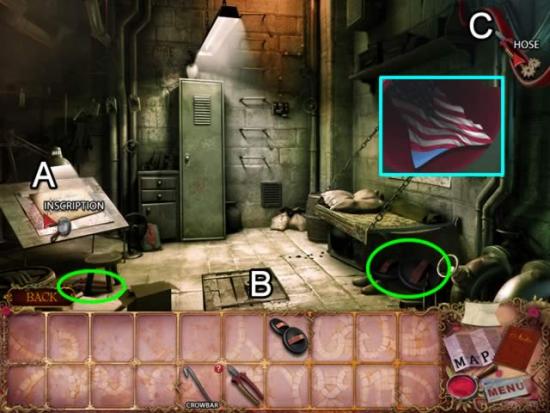
- Read the inscription (A) for a clue to the location of the missing artifact.
- Pick up the PLIERS and CLIMBING GEAR from the floor (B).
- Use the PLIERS on the hose (C). Get a ticket piece.
- Go to City Hall.
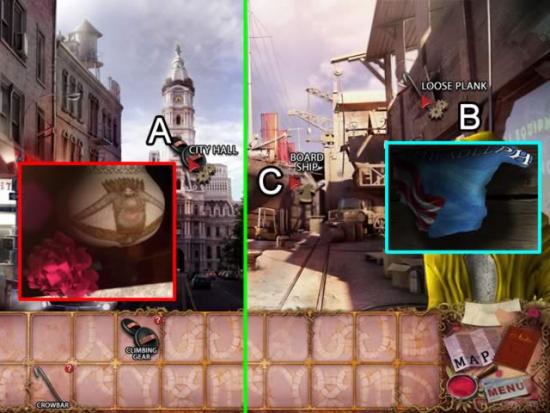
- Use the CLIMBING GEAR to scale the walls of city hall (A). Find the artifact.
- Go to the Harbor.
- Use the CROWBAR to pry off the loose plank (B). Get the last ticket piece.
- Board the ship (C).
Chapter 4: London
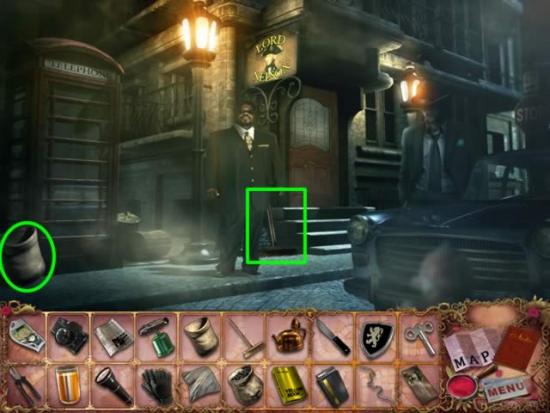
- Pick up the EMPTY SACK and BROOM.
- Go to Kings Cross station
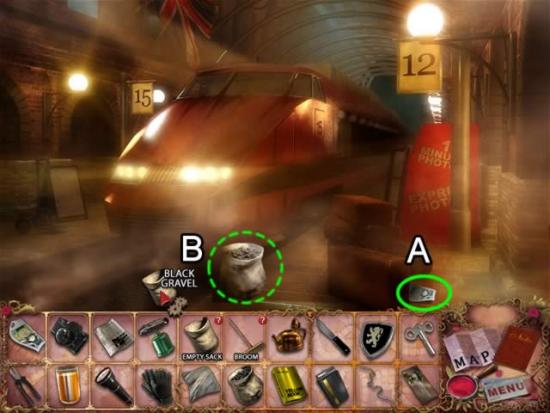
- Pick up the ONE POUND note (A).
- Fill the EMPTY SACK with the gravel between the rails (B). Pick up the sack of BLACK GRAVEL.
- Go to St. James’s PARK
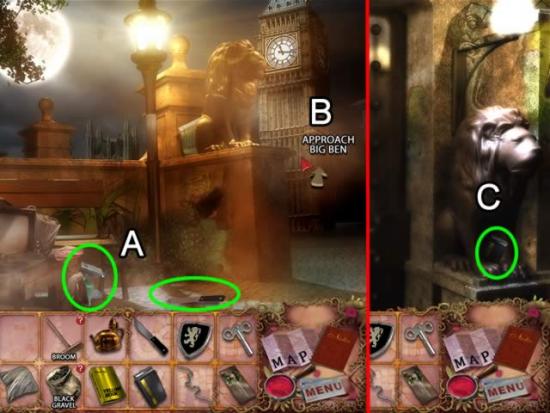
- Pick up the BLOW TORCH and KNIFE (A).
- Approach Big Ben (B).
- Take the LIGHTER (C).
- Return to Old Road street
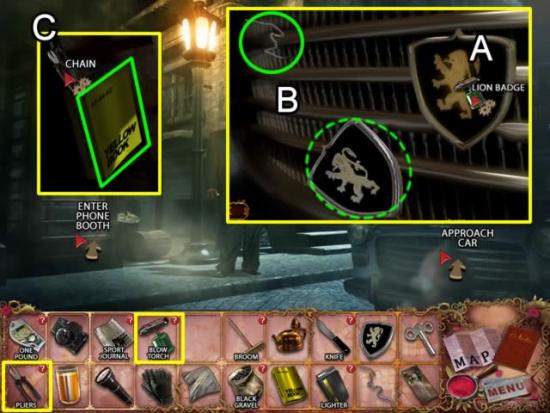
- Approach the car.
- Use the BLOW TORCH on the lion badge (A). Pick up the PIECE OF WIRE and LION CREST (B).
- Enter the phone booth.
- Use the PLIERS to cut the chain (C). Take the YELLOW BOOK.
- Go to the Thames dock.
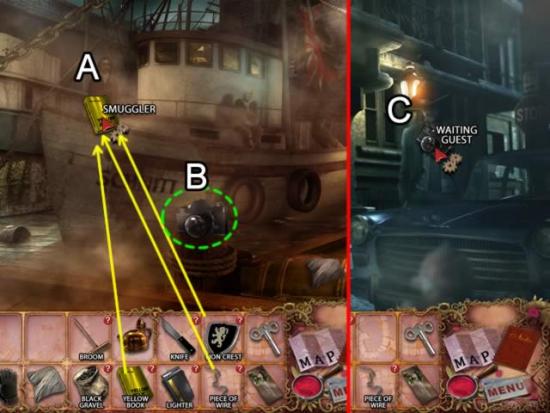
- Give the YELLOW BOOK, PIECE OF WIRE and LION CREST to the smuggler (A).
- Take the CAMERA the smuggler gives you.
- Return to Old Road Street.
- Use the CAMERA to take a picture of the waiting guest’s membership card (C). The MEMORY CARD from the camera is automatically added to inventory.
- Go to Kings Cross station. Enter the photo booth.
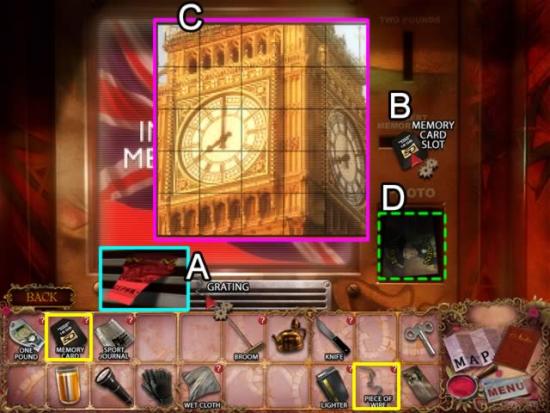
- Use the PIECE OF WIRE on the grating to get the ticket piece (A).
- Insert the MEMORY CARD into the memory card slot (B). Click “Next” twice to open a puzzle.
- Swap the pieces to form a picture of Big Ben (C). Click “Next” and “Print” to get the MEMBERSHIP CARD (D).
- Return to Old Road street.
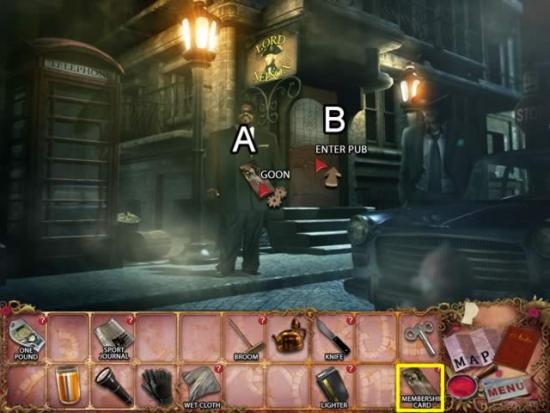
- Give the MEMBERSHIP CARD to the goon (A).
- Enter the pub (B).
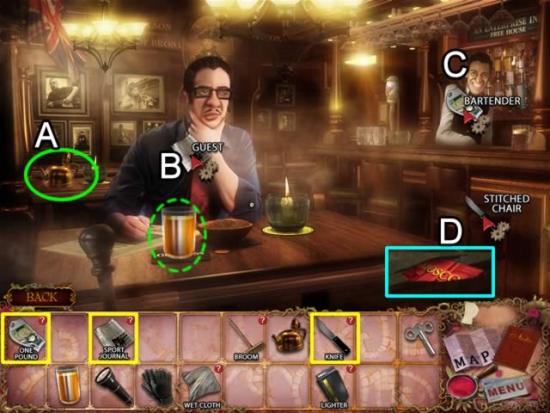
- Pick up the EMPTY KETTLE (A).
- Give the SPORT JOURNAL to the guest (B). Take his PUMPKIN JUICE.
- Get CHANGE for the ONE POUND note from the bartender (C).
- Use the KNIFE on the stitched chair (D) to get a ticket piece.
- Return to St. James’s Park.
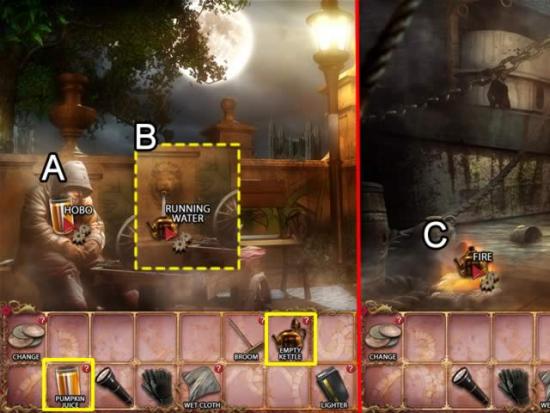
- Give the PUMPKIN JUICE to the hobo (A). He wanders off.
- Place the EMPTY KETTLE under the running water (B) to get a FULL KETTLE returned to inventory.
- Go to the Thames dock.
- Use the LIGHTER to start a fire in the fireplace (C). Put the FULL KETTLE on the fire. A STEAMING KETTLE is returned to inventory.
- Return to St. James’s Park.
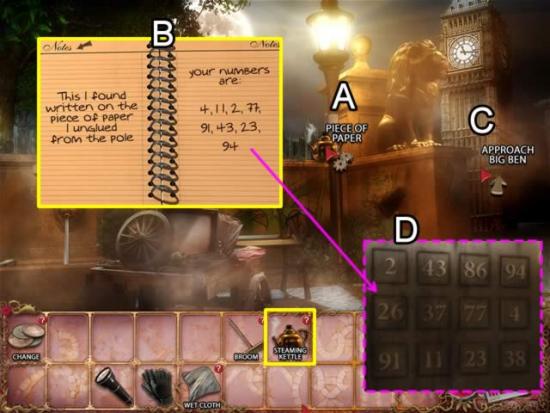
- Use the STEAMING KETTLE on the piece of paper (A).
- The numbers are recorded in Notes (B).
- Approach Big Ben (C) to open a puzzle.
- Click the numbers on the keypad in the same order as written in the Notebook (D).
- Enter Big Ben.
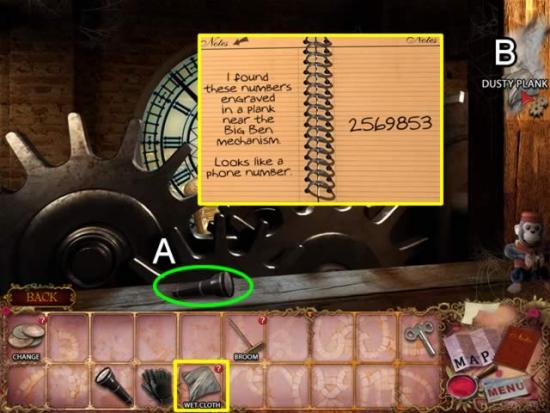
- Pick up the FLASHLIGHT (A).
- Use the WET CLOTH to wipe off the dusty plank (B). The phone number is recorded in the Notebook.
- Return to Old Road Street.
- Enter the phone booth. Place the CHANGE in the coin slot. Enter the phone number shown above to enter the thief’s hideout.
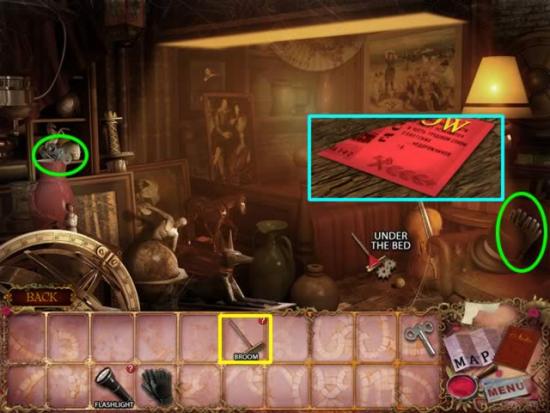
- Pick up the WINDING KEY and KEVLAR GLOVES.
- Use the BROOM to retrieve the ticket piece from under the bed.
- Return to St. James’s Park. Enter Big Ben.
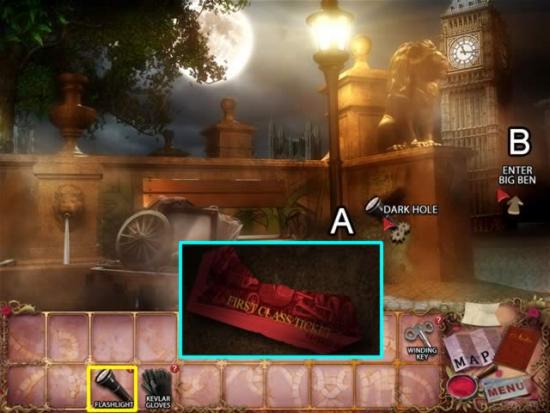
- Use the FLASHLIGHT to look into the dark hole (A) and find the ticket piece.
- Enter Big Ben (B).
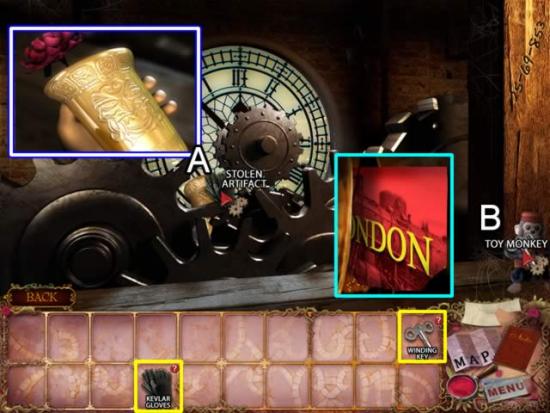
- Use the KEVLAR GLOVES to get the stolen artifact (A).
- Insert the WINDING KEY in the toy monkey to get the last piece of ticket (B).
- Go to Kings Cross station.
- Board the train for the next destination.
Chapter 5: Moscow
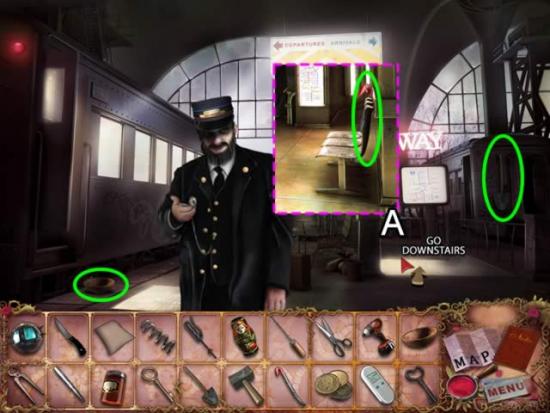
- Pick up the BOWL and SHOVEL.
- Go downstairs (A). Get the CROWBAR from the seats (dashed pink).
- Go to the Market. Pick up the PINCERS on the sidewalk.
- Head to the Theatre.
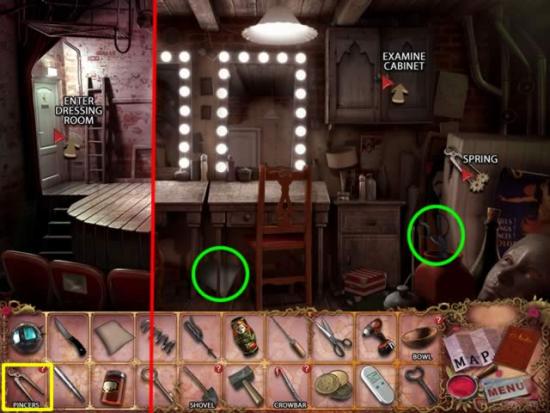
- Enter the dressing room door on the left.
- Pick up the PAPER SHEET and SCISSORS.
- Use the PINCERS to remove the SPRING.
- Examine the cabinet to open a puzzle.
- The goal is to nest the dolls inside each other from smallest to largest. See the next screenshot for the solution.
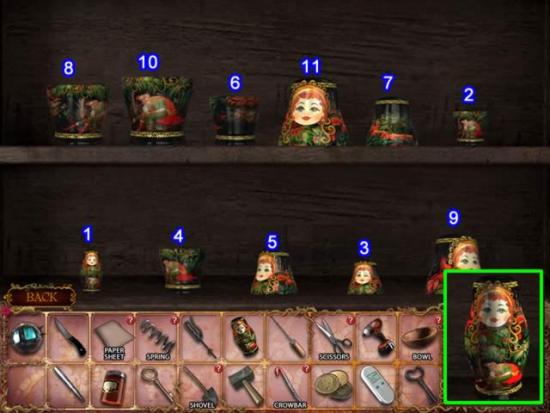
- The numbers above the pieces show the order in which they fit together: Place (1) inside (2); put (3) on top of (2) to form the first doll. Continue nesting following that pattern.
- An incorrect nest spills the pieces in a different order and you must start again.
- Correctly nesting the dolls give you a MATRYOSHKA DOLL.
- Exit the dressing room.
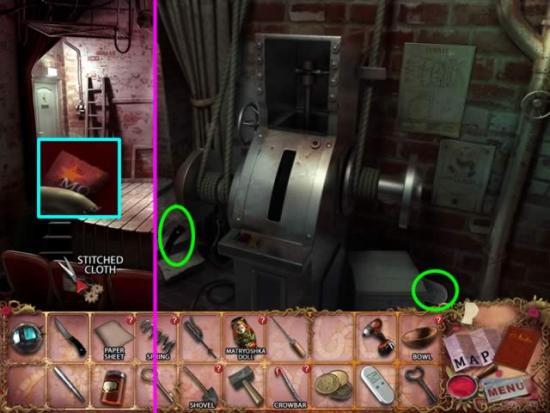
- Use the SCISSORS on the stitched cloth on the back of the seat to get a ticket piece.
- Go back stage through the door on the right.
- Pick up the KNIFE and REMOTE CONTROL.
- Go to the River side
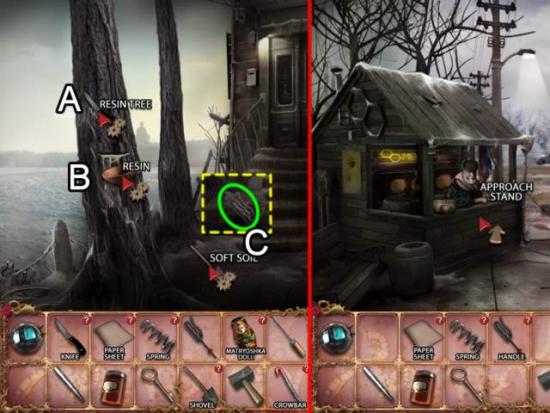
- Use the KNIFE on the resin tree (A).
- Fill the BOWL with RESIN (B).
- Use the SHOVEL to dig in the soft soil (C). Find the HANDLE (dashed yellow).
- Go to the Market. Approach the stand on the left.
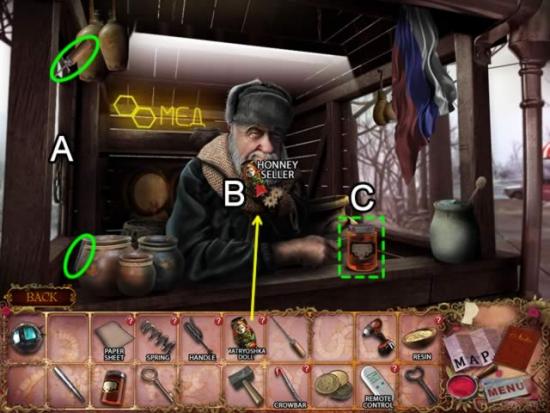
- Take the ICE PICK and LOCK PICK (A).
- Give the MATRYOSHKA DOLL to the honey seller (B).
- Receive the jar of HONEY.
- Exit the stand.
- Approach the woman on the sidewalk to open a jig-saw puzzle.
- Fit the pieces of the two plates together to form a picture. The pieces snap to the board when correctly positioned. Use the two fixed pieces as the starting pointing and work around the rims.
- See the next screen shot for the solution.
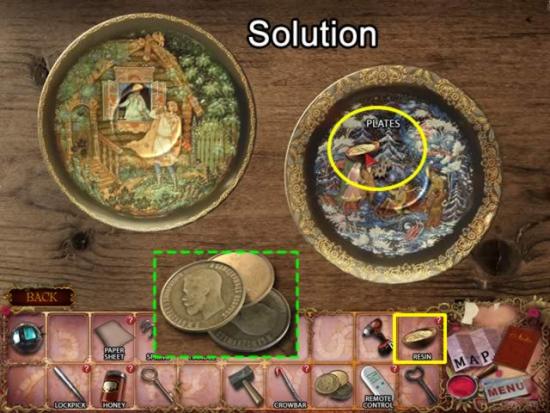
- Use the RESIN to seal the cracks in the plates.
- Get RUBLES for the plates.
- Return to the Theatre. Go back stage.
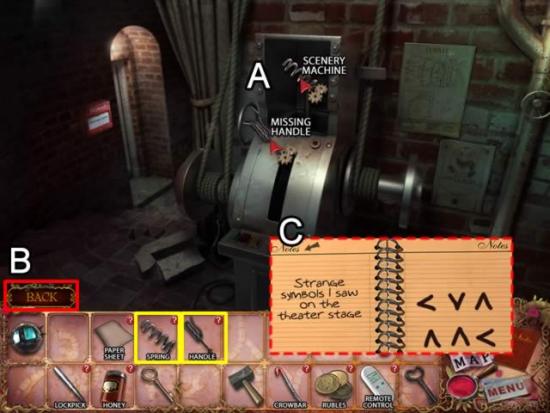
- Put the SPRING in the scenery machine (A). Add the missing HANDLE.
- Go back (B) to the theatre seating to view the curtain. The code is added to the Notebook.
- Return to the River side.
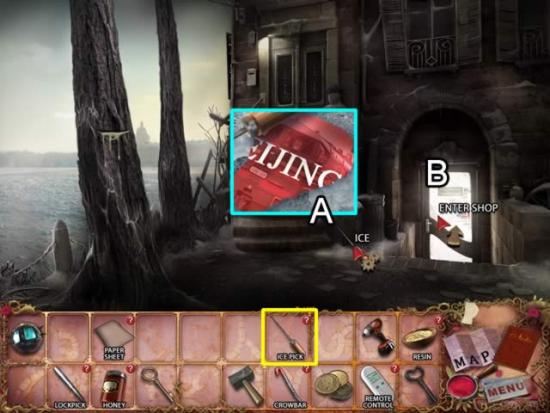
- Use the ICE PICK to get the ticket piece (A).
- Enter the shop (B).
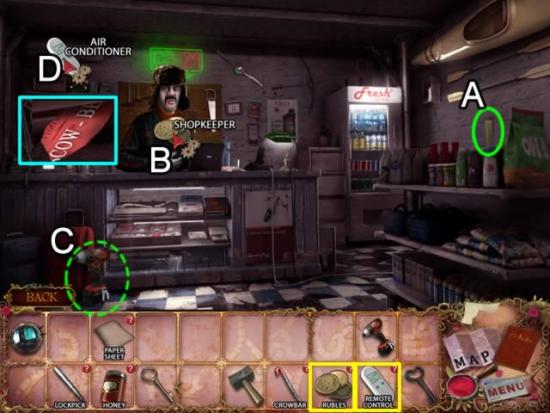
- Pick up the SMALL HAMMER (A).
- Give the RUBLES to the shopkeeper (B). He gives you an IMPACT DRIVER (C).
- Use the REMOTE CONTROL on the air conditioner (D). Get a ticket piece.
- Exit the shop.
- Approach the door at the top of the stairs.
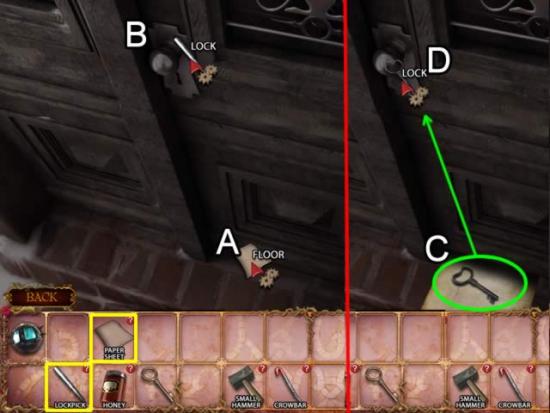
- Place the PAPER SHEET on the floor (A).
- Insert the LOCK PICK in the lock (B). The DOOR KEY falls on the paper and is returned.
- Pick up the DOOR KEY (C). Use it to open the door (D).
- Entering the building opens a puzzle.
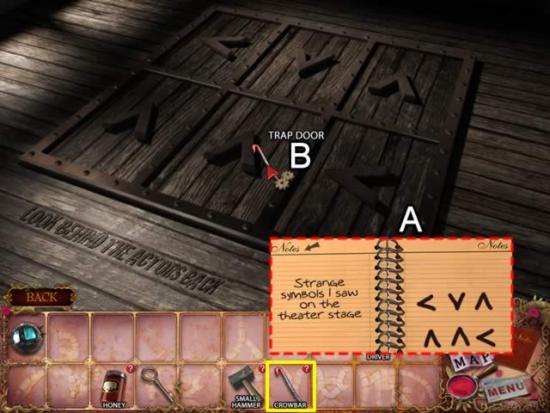
- Click the arrow squares to rotate them into the same positions noted on the theatre curtain (A).
- Use the CROWBAR to pry up the trap door.
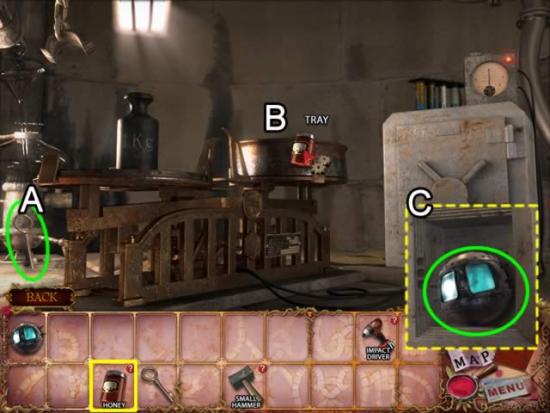
- Pick up the SMALL KEY (A).
- Place the HONEY on the tray to open the safe (C). Take the EMP DEVICE.
- Return to the Theatre.
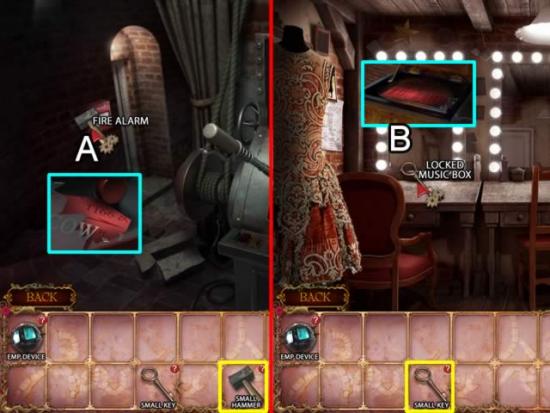
- Go back stage.
- Use the SMALL HAMMER on the fire alarm (A). Receive a ticket piece.
- Go to the dressing room.
- Use the SMALL KEY to open the locked music box (B). Receive a ticket piece.
- Return to the train station. Go down the stairs.
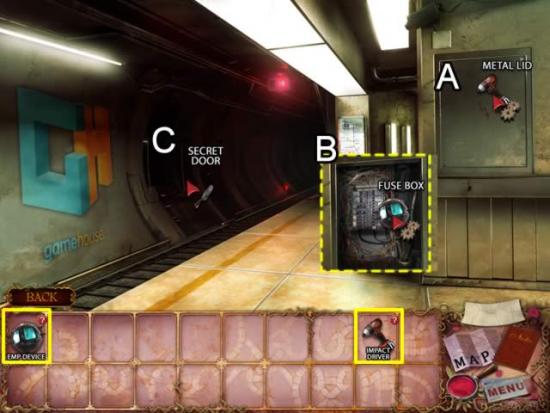
- Use the IMPACT DRIVER to open the metal lid (A).
- Place the EMP DEVICE in the fuse box (B).
- Inspect the secret door (C) to locate the stolen artifact.
- Return to the departure area.
- Board the train to the next location.
Chapter 6: Beijing
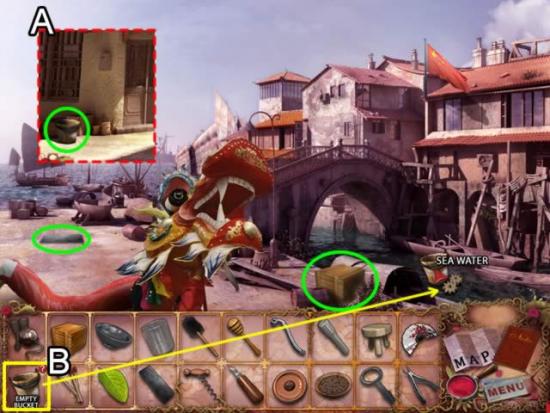
- Pick up the EMPTY BUCKET on the far left part of the scene (A).
- Go to the North Harbor.
- Dip the EMPTY BUCKET in the sea water (B) to get SALT WATER.
- Pick up the METAL BAR and WOOD CRATE.
- Go to the Kung Fu School.
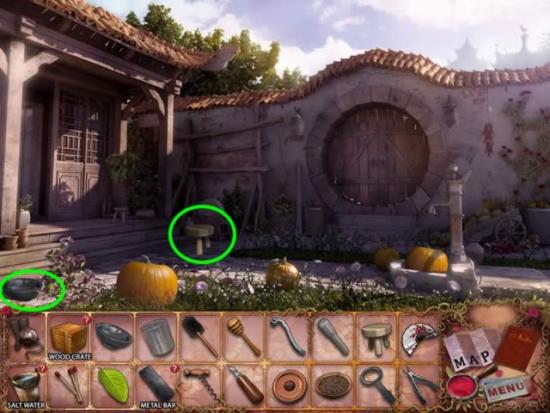
- Pick up the LED BOWL and STOOL.
- Return to the Back Street.
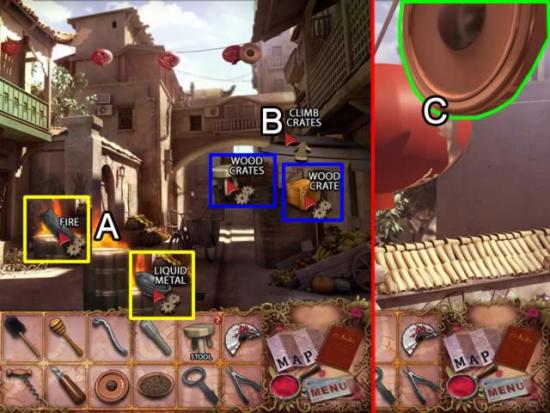
- Put the METAL BAR on the fire (A). Use the LED BOWL to collect the LIQUID METAL.
- Place the WOOD CRATE on the wood crate (B). Put the STOOL on top of the wood crates. Climb the crates.
- Take the GONG from the roof (C).
- Return to the Kung Fu School. Enter the house.
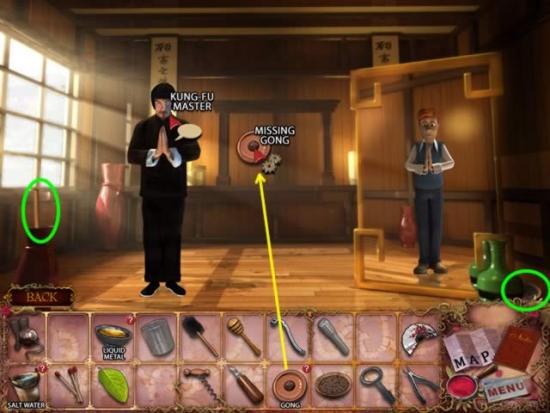
- Pick up the CHIMNEY BRUSH and SEEDS.
- Use the GONG to replace the missing gong.
- Speak with the Kung-Fu Master for the rules for the mini-game.
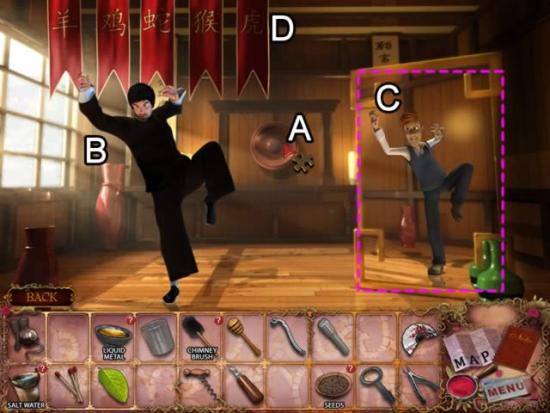
- Click the gong (A) to begin the game.
- The Kung-Fu Master briefly assumes a pose (B) then resumes his original position.
- Click Mortimer until his pose matches the Master’s (C). Click the gong again to see if you are right.
- Correct responses earn a banner (D). Incorrect responses delete a banner. Six banners are need to win the game.
- Receive access to the back yard
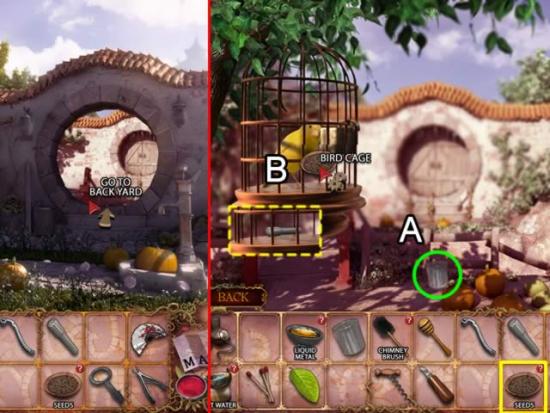
- Click the “Back” tab to return to the courtyard. Go through the circle to the back yard.
- Pick up the EMPTY GLASS (A).
- Slip the SEEDS into the bird cage (B). Pick up the SWITCH.
- Return to the courtyard.
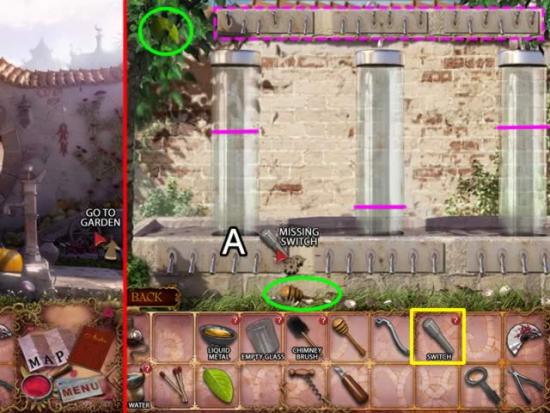
- The entrance to the garden is on the far right side of the courtyard scene.
- Pick up the MINT LEAF from the tree and the HONEY DIPPER on the ground.
- Place the SWITCH in the missing switch slot to begin a mini-game.
- The goal is to flip the switches until the water level in each tube is level with the line. The solution is shown above (dashed pink).
- Return to the back yard.
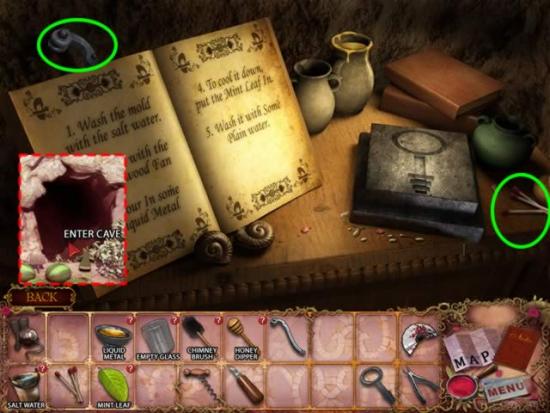
- Enter the cave on the right side of the scene.
- Pick up the HANDLE and MATCHES.
- Go to the South Harbor.
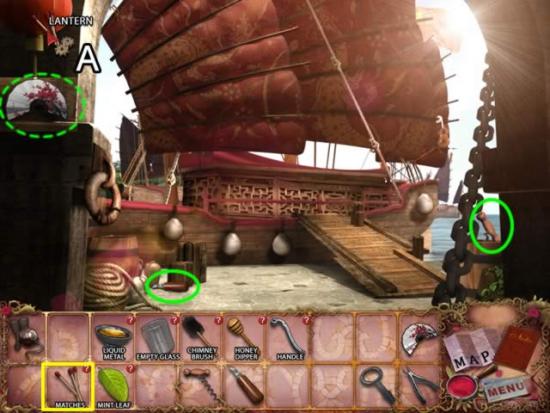
- Pick up the CARVING KNIFE and CORKSCREW.
- Use the MATCHES to light the lantern (A). Take the CHERRY WOOD FAN that is revealed.
- Return to the Kung Fu School.
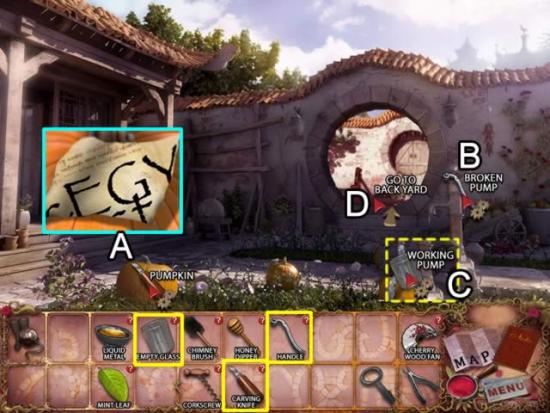
- Use the CARVING KNIFE to open the pumpkin (A) and receive a ticket part.
- Put the HANDLE on the broken pump (B).
- Fill the EMPTY GLASS with PLAIN WATER from the working pump (C).
- Return to the back yard. Enter the cave.
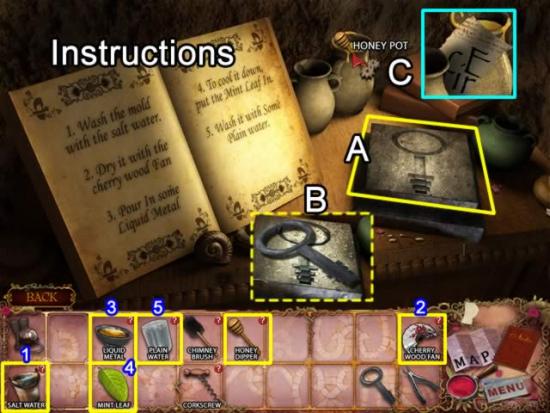
- Follow the instructions in the book to use the mold (A). The number above an inventory item indicates the order in which it is used.
- Take the resulting KEY (B).
- Use the HONEY DIPPER in the honey pot to get a ticket piece.
- Return to the Back Street.
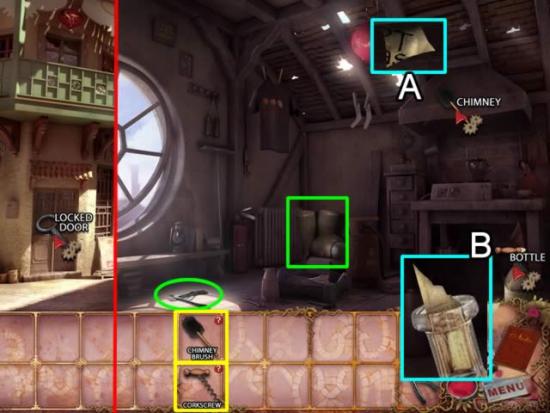
- Use the KEY to open the locked door to the thief’s hideout.
- Pick up the DENTAL FORCEPS and DIVING GEAR.
- Use the CHIMNEY BRUSH on the chimney to get a ticket piece (A).
- Open the bottle with the CORKSCREW to get a ticket piece (B).
- Return to the North Harbor.
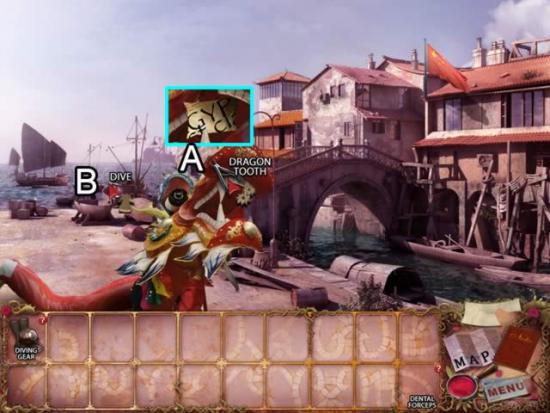
- Use the DENTAL FORCEPS to extract a ticket piece from the dragon tooth (A).
- Dive off the end of the pier (B).
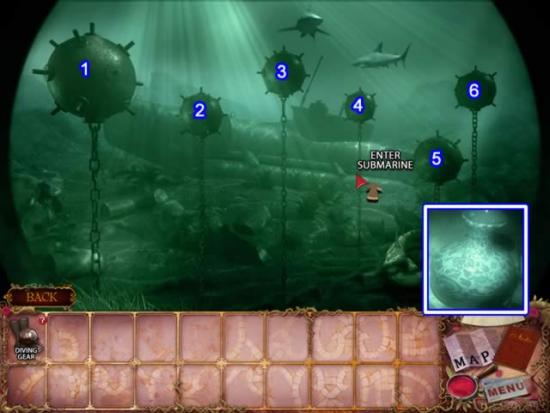
- Try to enter the submarine to start a repeat-the-sequence puzzle.
- Click the mines in the correct order three times to gain entry. Here is the solution:
- Round 1: 1-2-3-6-5-4.
- Round 2: 2-4-6-1-3-5.
- Round 3: 4-1-2-6-5-3.
- Enter the submarine to find the stolen artifact.
- Return to the South Harbor. Board the ship for the next destination.
Chapter 7: Cairo
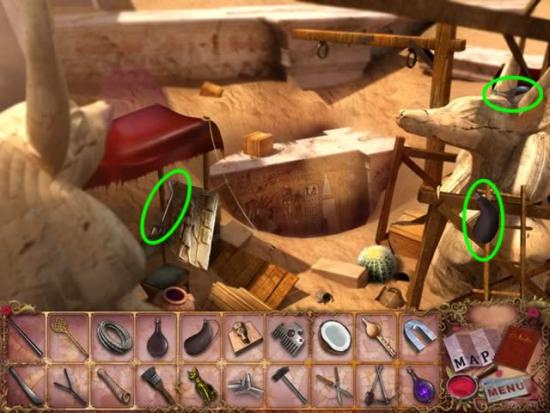
- Pick up the DIGGING TOOLS, BOTTLE and EMPTY LEATHER SACK.
- Go to the Streets.
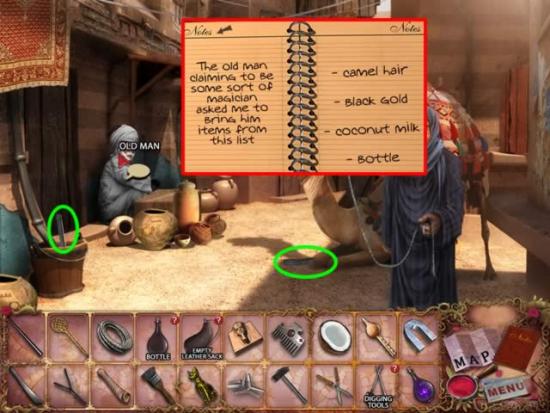
- Pick up the HAMMER and MACHETE.
- The list of items the Old Man requires is added to the Notebook.
- Go to the Harbor.
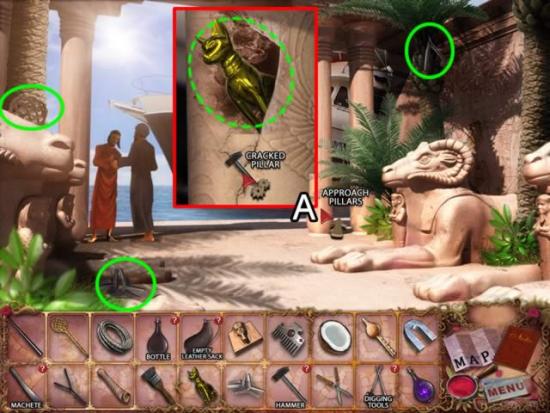
- Pick up the RUG BEATER, METAL WEDGES and DOWSERS.
- Approach the pillars (A). Use the HAMMER on the cracked pillar on the right. Retrieve the GOLD FIGURINE.
- Go to the Sphinx.
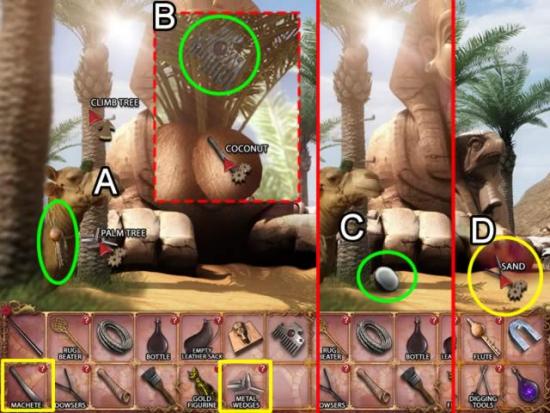
- Pick up the FLUTE.
- Put the METAL WEDGES in the palm tree (A) to climb the tree.
- Use the MACHETE to cut the coconut (B). Take the COMB. Climb back down.
- Pick up the COCONUT MILK (C).
- Use the DOWSERS to mark where to drill (D).
- Return to the Harbor.
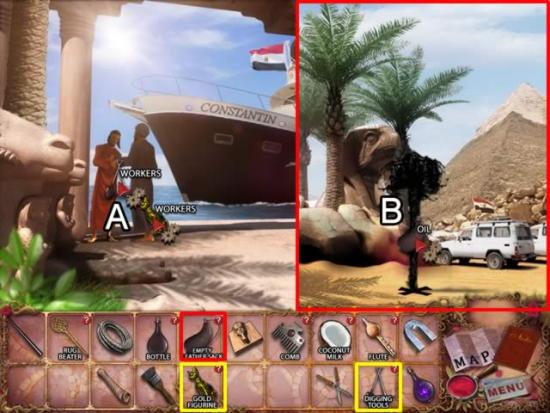
- Give the workers the DIGGING TOOLS and GOLD FIGURINE to work for you (A).
- Return to the Sphinx.
- Fill the EMPTY LEATHER SACK with OIL (B).
- Return to the Streets
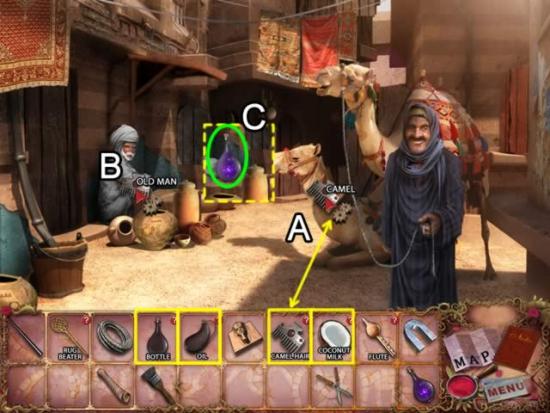
- Use the COMB on the camel to collect some CAMEL HAIR (A).
- Refer to the list in the Notebook if necessary. Give the Old Man the CAMEL HAIR, OIL (Black Gold), COCONUT MILK and BOTTLE (B).
- Receive the BOTTLED MAGIC from the Old Man (C).
- Return to the Sphinx.
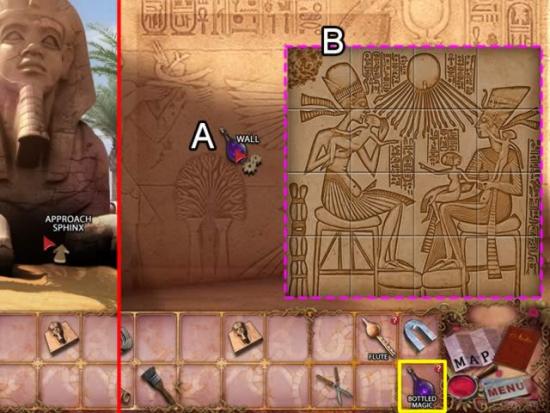
- Approach the Sphinx.
- Place the BOTTLED MAGIC on the wall (A) to start a puzzle.
- The goal is to form a picture with the tiles. Swap any two tiles directly to form the pattern. See the inset (B) for the solution.
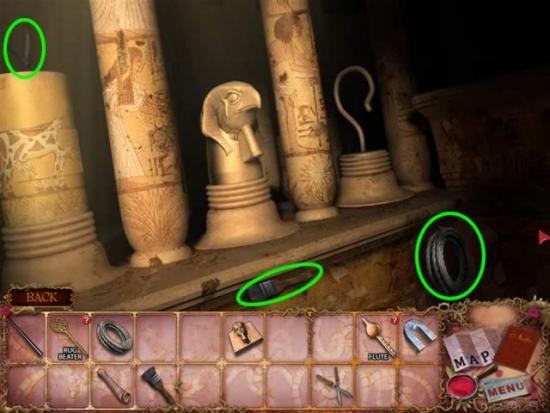
- Enter the thief’s hideout.
- Pick up the GARDENING SHEARS, BRUSH and ROPE.
- Return to the Archaeological Site.
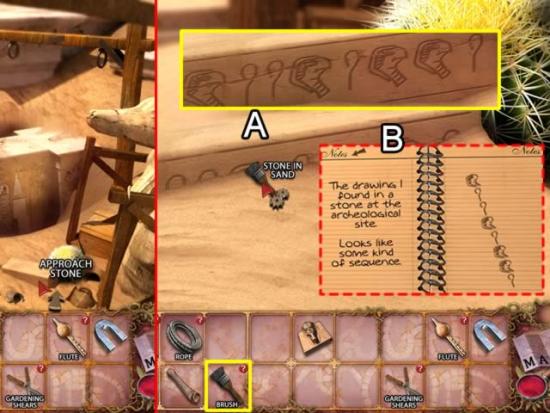
- Approach the stone for an interactive area.
- Use the BRUSH to reveal the stone in sand (A). The information is recorded in the Notebook (B).
- Return to the thief’s hideout at the Sphinx for a mini-game.
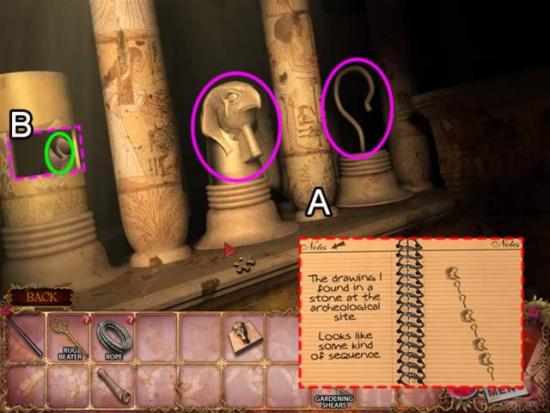
- Click the falcon head and staff in the sequence and number of times shown in the Notebook (A).
- Retrieve the MAP TO LUXOR upon successfully completing the sequence (B).
- Return to the Streets.
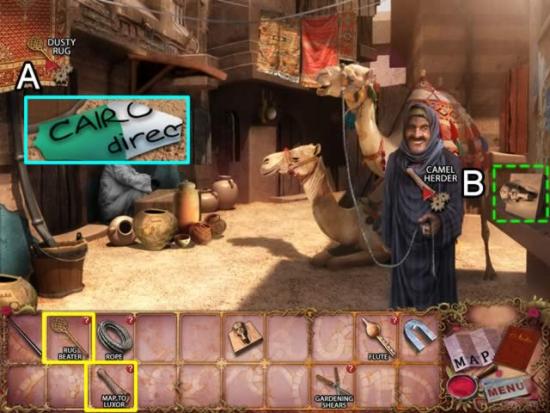
- Use the RUG BEATER on the dusty rug to shake free the ticket piece (A).
- Give the MAP TO LUXOR to the camel herder (B). Receive the PLATE.
- Return to the Archaeological site.
- Place the ROPE on the wooden construction bar. Climb down into the chamber.
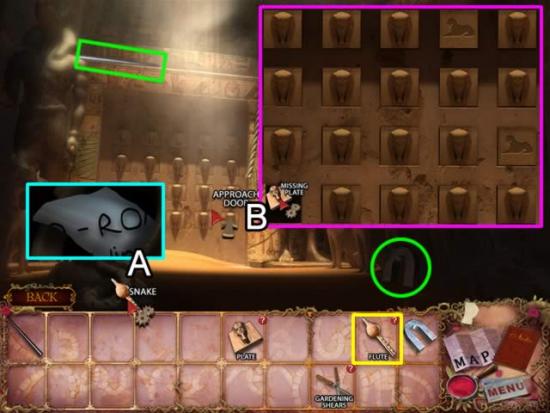
- Pick up the LONG POLE and MAGNET.
- Use the FLUTE to charm the snake out of a piece of the ticket (A).
- Approach the door (B) to access an interactive area.
- Insert the PLATE in the missing plate slot to activate a symbol match puzzle. Match all of the symbols to get the stolen artifact.
- Go back up the rope.
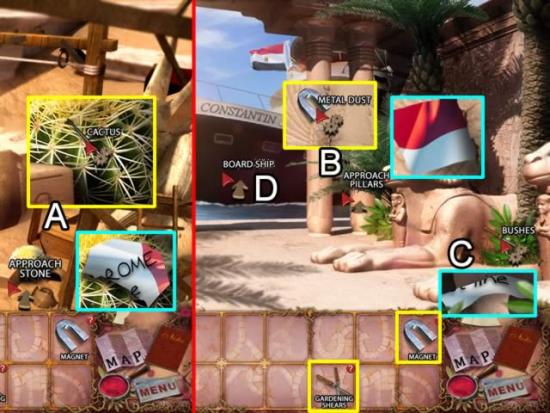
- Use the LONG POLE to retrieve the ticket piece from the cactus (A).
- Return to the Harbor.
- Approach the pillars (B). Use the MAGNET to extract the ticket piece.
- Use the GARDENING SHEARS to remove the bushes and get the ticket piece (C).
- Board the boat for the next destination (D).
Chapter 8: Rome
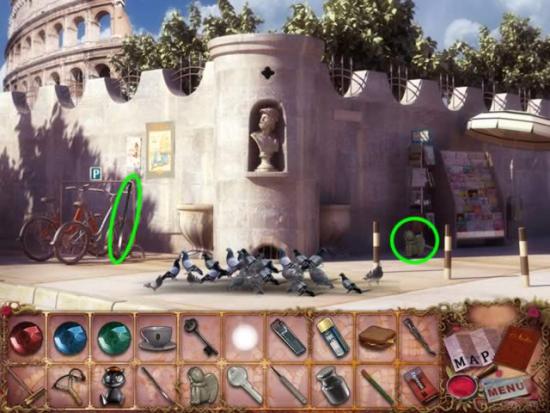
- Pick up the CROWBAR and MARBLE FIGURINE.
- Go to the Library.
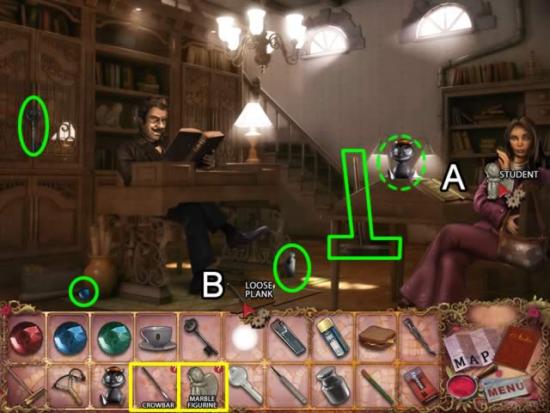
- Pick up the KEY, BLUE GEM, WEIGHT and BROOM.
- Give the student the MARBLE FIGURINE (A) in exchange for the SQUEEKY TOY (dashed green).
- Use the CROWBAR to pry up the loose plank (B) and get a ticket piece.
- Go to the Airport.
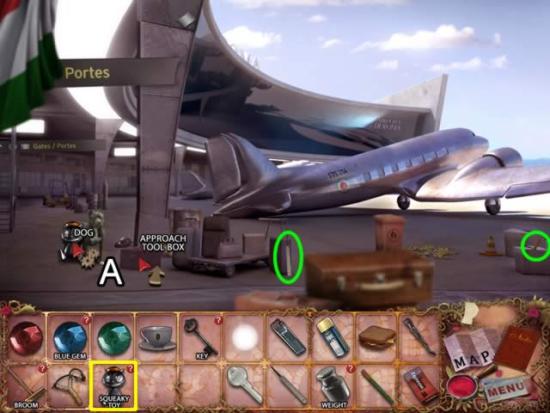
- Pick up the FIRECRACKER and LOCKPICK.
- Give the SQUEEKY TOY to the dog (A). Approach the tool box.
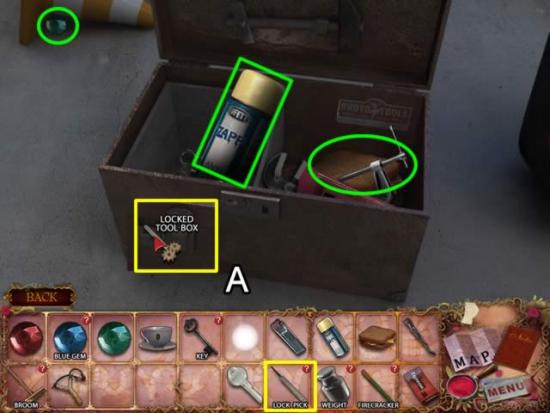
- Use the LOCK PICK to open the locked tool box (A).
- Pick up the GREEN GEM, ANTIRUST SPRAY and SANDWICH.
- Go to the Fountain Di Trevi.
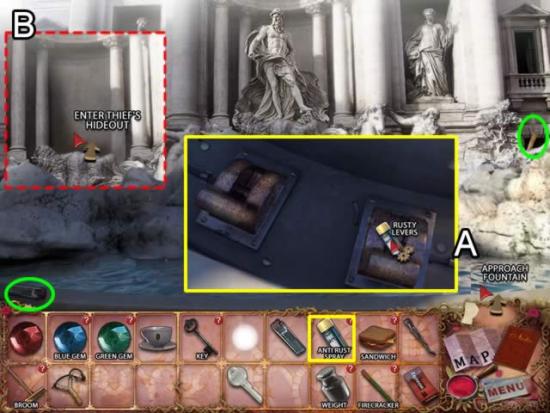
- Pick up the LIGHTER and SLINGSHOT.
- Approach the fountain (A). Spray the ANTIRUST SPRAY on the rusty levers. Flip up both levers to lower the middle statue and reveal the thief’s hideout (B).
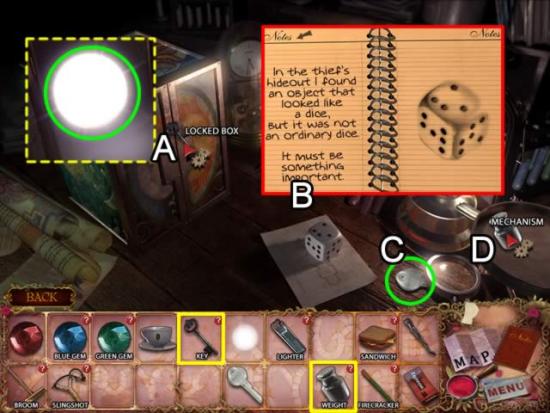
- Use the KEY to open the locked box (A). Take the GLOWING BALL.
- Examine the die (B). The pattern of the dots is recorded in the Notebook.
- Pick up the silver KEY (C).
- Put the WEIGHT on the mechanism to get a ticket piece.
- Return to the Colosseum.
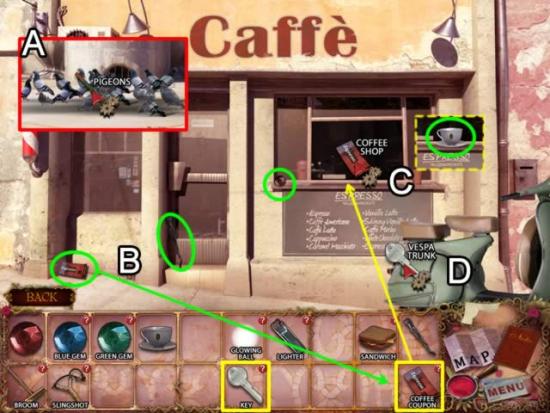
- Use the FIRECRACKER to scatter the pigeons in front of the Colosseum (A). Go right.
- Pick up the TORCH, RED GEM and COFFEE COUPON (A).
- Slip the COFFEE COUPON through the window of the coffee shop (C) to get a cup of COFFEE.
- Open the Vespa trunk with the KEY to get a ticket piece (D).
- Return to the Library.
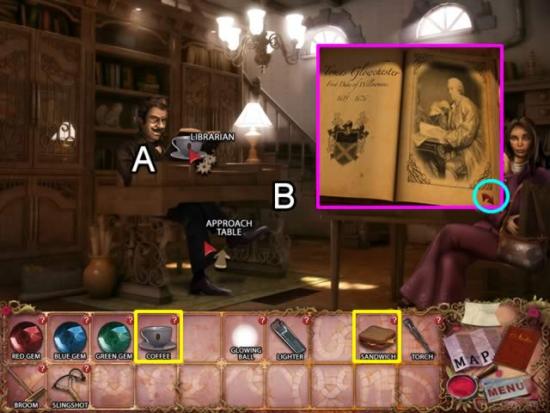
- Give the SANDWICH and COFFEE to the librarian (A).
- Approach the table (B). Flip through the book until information on a coat of arms is recorded in the Notebook.
- Return to the Colosseum.
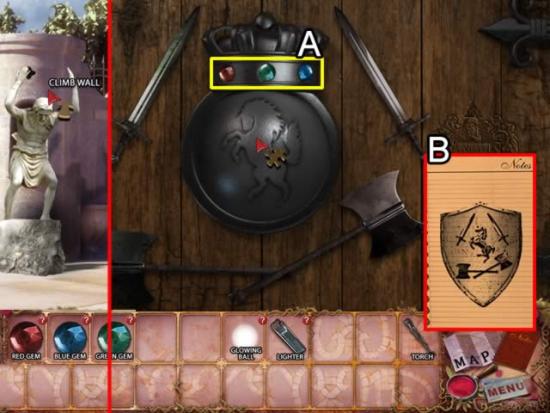
- Use the statue in front to climb the wall.
- Place the RED, BLUE and GREEN GEMS in the holes for the missing gems (A) to start a mini-game.
- Open the Notebook to review the drawing from the library (B). Click the middle of the shield until the horse appears. Click the two swords and two axes until they are in the same position as shown in the drawing.
- A secret room is revealed.
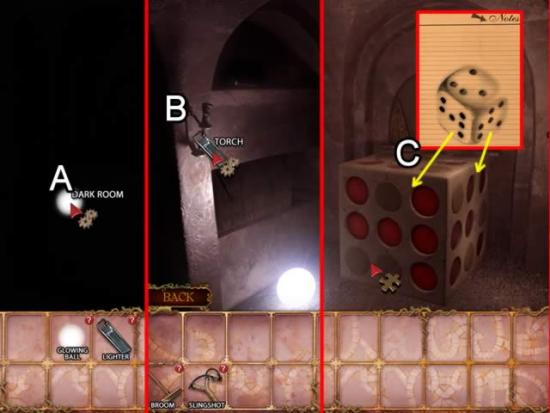
- Use the GLOWING BALL to partially illuminate the dark room (A).
- Put the TORCH in the torch holder. Use the LIGHTER to light the torch (B) and reveal the room.
- Flip back to the page in the Notebook showing the die from the thief’s hideout (C). Click the two sides of the cube until they match the drawing. Retrieve the stolen artifact.
- Return to the Airport.
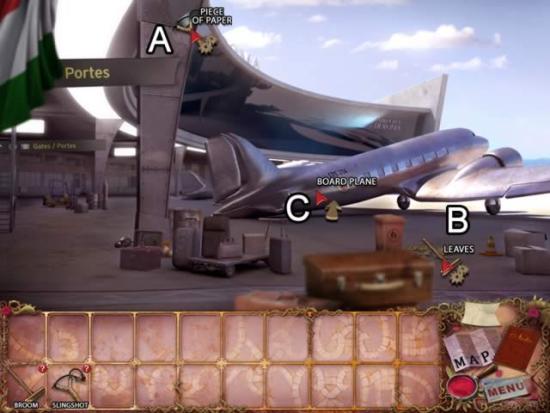
- Use the SLINGSHOT on the piece of paper to get a ticket fragment (A).
- Sweep the leaves with the BROOM to find another ticket piece (B).
- Board the plane (C).
Congratulations! You have completed playing Mortimer Beckett and the Crimson Thief.
Select the Epilogue from the main menu and click “New Game” to play a bonus chapter.
Epilogue
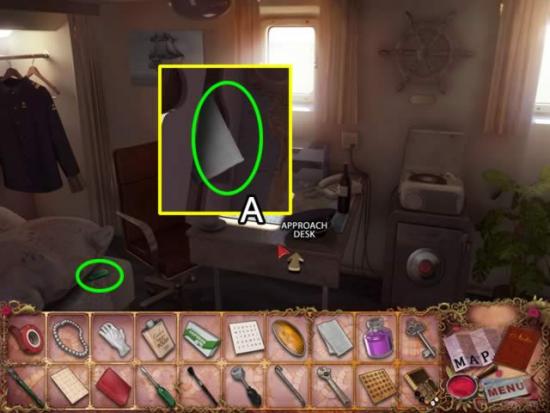
- Pick up the SCREWDRIVER.
- Approach the desk (A). Take the DRY CLOTH.
- Go to the Cargo hold.
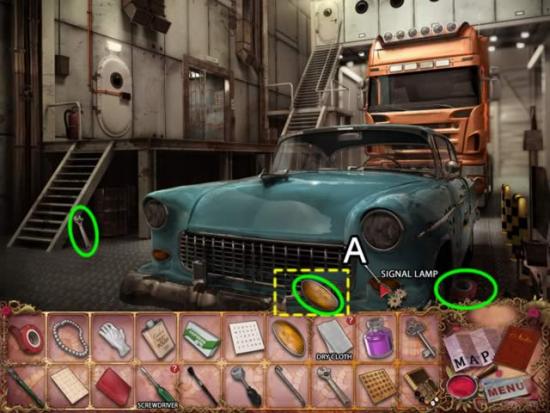
- Pick up the WRENCH and DUCT TAPE.
- Use to SCREWDRIVER on the signal lamp (A). Take the SIGNAL LIGHT.
- Go to the Control room.
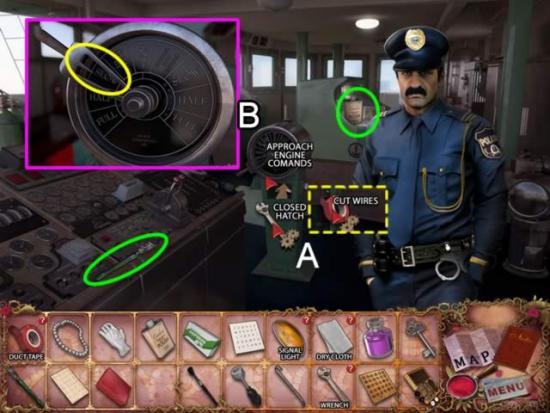
- Pick up the GLASS CUTTER and BRASS POLISH.
- Use the WRENCH to access the closed hatch (A). Apply the DUCT TAPE to the cut wires.
- Approach the engine commands (B). Click the lever to move the speed to “Slow”.
- Go to the Engine Room.
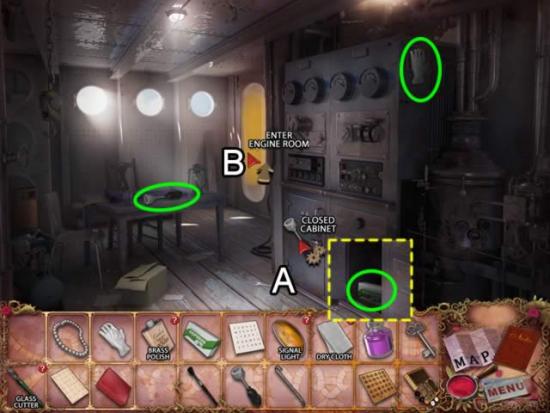
- Pick up the ALLEN KEY and RUBBER GLOVE.
- Use the ALLEN KEY to open the closed cabinet (A). Take the box of ASPIRIN.
- Enter the engine room (B).
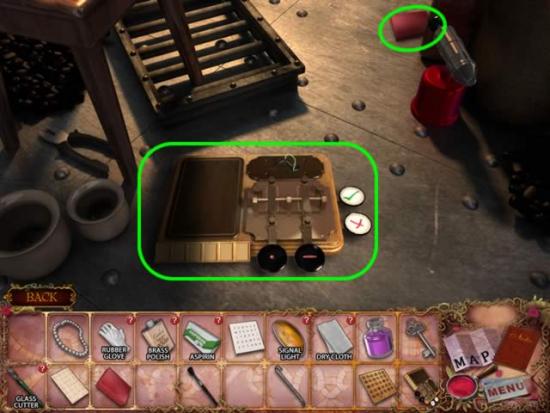
- Pick up the MORSE MACHINE and BUTTON.
- Return to the Control Room.
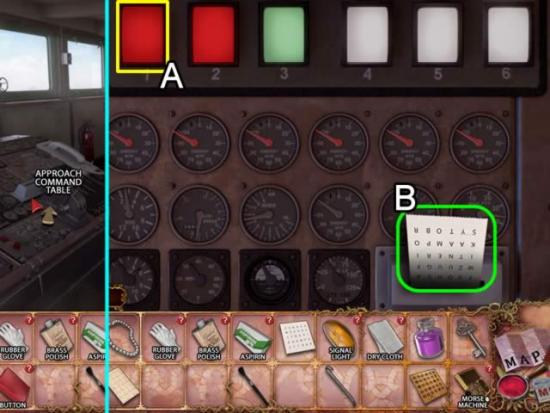
- Approach the command table.
- Insert the BUTTON in the missing button slot (A). Depress all six of the buttons along the top. Take the ENCRYPTED MESSAGE (B).
- Return to the Captain’s Cabin.
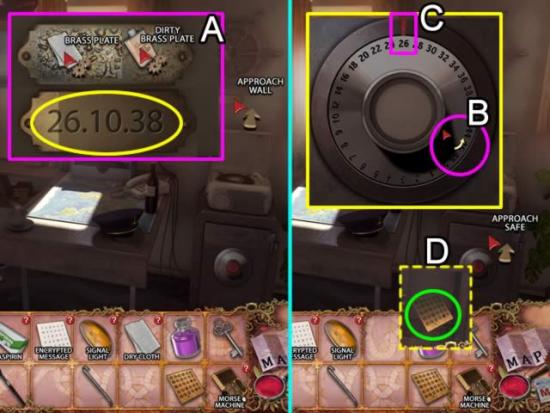
- Approach the wall.
- Use the BRASS POLISH on the dirty brass plate (A). Clean the brass plate with the DRY CLOTH to reveal the safe combination: 26-10-28.
- Approach the safe.
- Click and hold the left mouse button to spin the dial (B) until the first number of the combination is aligned at the top under the red line (C). Repeat the process for the next two numbers.
- Take the CODE PLATE from the open safe (D).
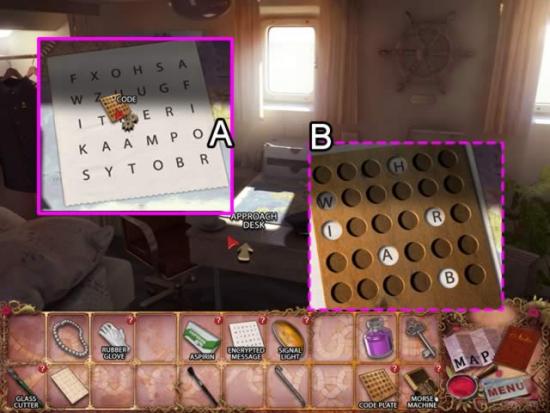
- Approach the desk.
- Place the ENCRYPTED MESSAGE on the desk (A). Cover it with the CODE PLATE to reveal the code (B). It is recorded in the Notebook.
- Go to the Deck.
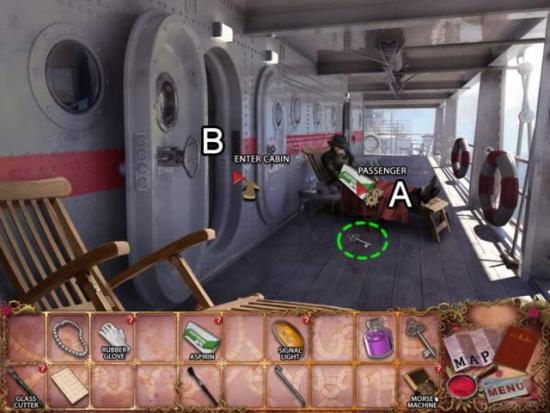
- Give the passenger the ASPIRIN (A). Pick up the dropped KEY (dashed green).
- Enter the cabin on the left (B).
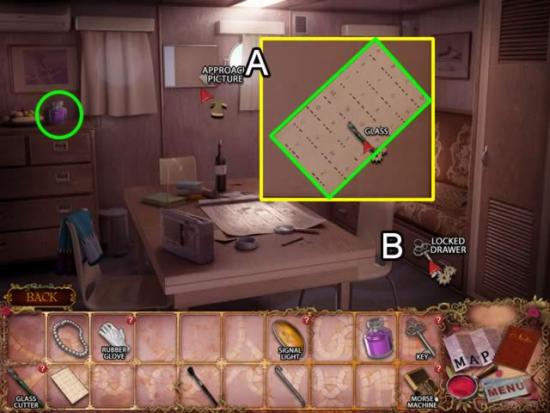
- Pick up the FINE POWDER.
- Approach the picture (A).
- Use the GLASS CUTTER to cut the glass. Take the MORSE CODE sheet.
- Use the KEY on the locked drawer. Approach the drawer.
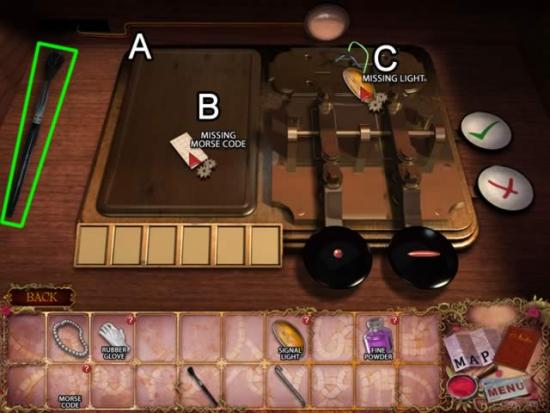
- Take the SOFT BRUSH on the left.
- Put the MORSE MACHINE on the drawer (A). Insert the MORSE CODE in the center area for the missing Morse code (B). Attach the SIGNAL LIGHT to the wires for the missing light (C).
- This triggers a mini-game.
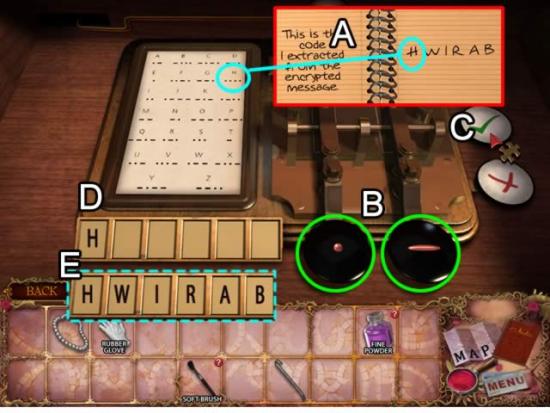
- Open the Notebook to see the code (A). Find the corresponding letter on the Morse code sheet. Below each letter are dots and dashes. Use the buttons (B) to enter the sequence for the letter. Click the check button (C) to enter the letter sequence. If the letter is correctly entered, it appears in the plate (D). Use the “X” button to delete an incorrect code.
- When all letters are entered (E), the message is sent.
- Solution:
- H: dot, dot, dot, dot.
- W: dot, dash, dash.
- I: dot, dot.
- R: dot, dash, dot.
- A: dot, dash.
- B: dash, dot, dot, dot.
- Return to the Captain’s Cabin.
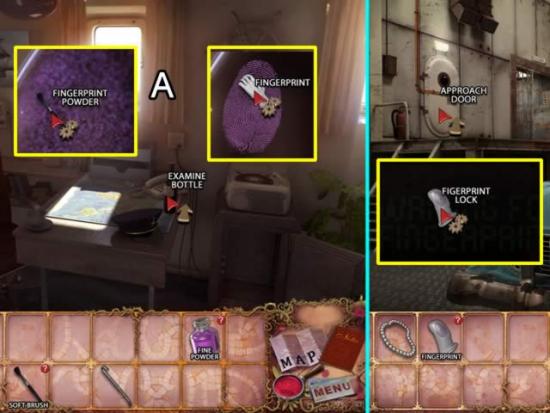
- Examine the bottle (A).
- Put the FINE POWDER on the bottle. Use the SOFT BRUSH on the fingerprint powder to uncover the print. Put the RUBBER GLOVE on the bottle to extract the FINGERPRINT.
- Return to the Cargo hold.
- Approach the door. Put the FINGERPRINT on the fingerprint lock.
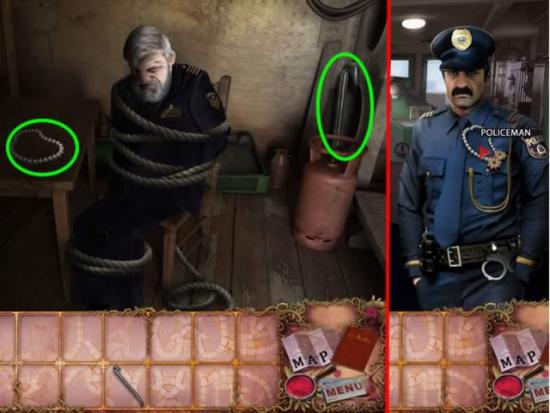
- Pick up the NECKLACE and CROWBAR.
- Return to the Control Room.
- Give the NECKLACE to the policeman.
- Return to the Deck.
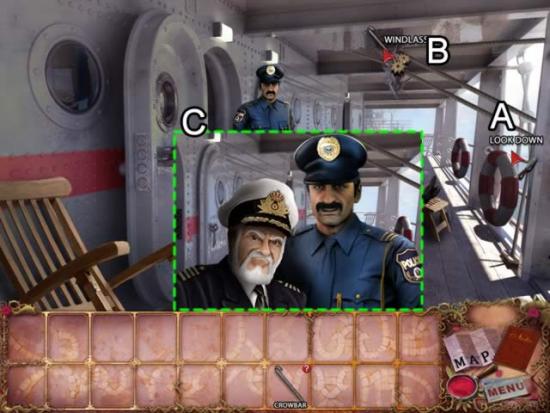
- Lean over and look down the side of the ship (A).
- Put the CROWBAR in the windlass (B).
- Watch the final scenes (C).
Congratulations! You have finished playing the Epilogue to Mortimer Beckett and the Crimson Thief.
More articles...
Monopoly GO! Free Rolls – Links For Free Dice
By Glen Fox
Wondering how to get Monopoly GO! free rolls? Well, you’ve come to the right place. In this guide, we provide you with a bunch of tips and tricks to get some free rolls for the hit new mobile game. We’ll …The BEST Roblox Games of The Week – Games You Need To Play!
By Sho Roberts
Our feature shares our pick for the Best Roblox Games of the week! With our feature, we guarantee you'll find something new to play!All Grades in Type Soul – Each Race Explained
By Adele Wilson
Our All Grades in Type Soul guide lists every grade in the game for all races, including how to increase your grade quickly!Best Roblox Horror Games to Play Right Now – Updated Weekly
By Adele Wilson
Our Best Roblox Horror Games guide features the scariest and most creative experiences to play right now on the platform!


