- Wondering how to get Monopoly GO! free rolls? Well, you’ve come to the right place. In this guide, we provide you with a bunch of tips and tricks to get some free rolls for the hit new mobile game. We’ll …
Best Roblox Horror Games to Play Right Now – Updated Weekly
By Adele Wilson
Our Best Roblox Horror Games guide features the scariest and most creative experiences to play right now on the platform!The BEST Roblox Games of The Week – Games You Need To Play!
By Sho Roberts
Our feature shares our pick for the Best Roblox Games of the week! With our feature, we guarantee you'll find something new to play!Type Soul Clan Rarity Guide – All Legendary And Common Clans Listed!
By Nathan Ball
Wondering what your odds of rolling a particular Clan are? Wonder no more, with my handy Type Soul Clan Rarity guide.
Aveyond: The Lost Orb Walkthrough
Check out Gamezebo’s official walkthrough for Aveyond: The Lost Orb.
Introduction
Note: As this game follows on from two previous games, only maps of new areas are included in this walkthrough. For maps of the main continent (Thais, Harburg, Stormbend, Witchwood, Ghed’ahre) please refer to the walkthrough for Aveyond: Lord of Twilight. Click on the maps to enlarge.
This is the third chapter in what is now called “the Orbs of Magic Series”, or Aveyond 3. In the previous chapters Mel, a street urchin and thief from the city of Harburg, found out that she is the direct descendant of the evil dark wizard Mordred Darkthrop – much to her annoyance! Darktrop failed to achieve his life’s ambition to take over and destroy the world, but left plenty of clues and quests so his descendants can complete his mission on his behalf. In particular, he left a series of Magic Orbs that can only be used by his heirs, whom he presumed all to have magical abilities.
Darkthrop’s heir or not, Mel has no interest in death and destruction. Besides, she doesn’t have a drop of magic in her anyway. But she needs to find those Orbs before another one of Darkthrop’s descendants gets hold of them. Or more urgently, she needs to find them before the vampire Gyendal does! Fortunately, Gyendal is not a descendant of Darkthrop so he can’t use the Orbs without help.
In the previous chapter Mel managed to destroy the Orb of Light and used the Orb of Life to destroy the Orb of Darkness, which was in Gyendal’s possession. There were rumors of yet another Orb, the Orb of Death, but it’s probably just a myth. Besides, Gyendal is now safely tucked away in prison, no longer a vampire and stripped of his magical abilities… right? So we’re in no hurry. What’s more, we have a wedding to go to!
General Gameplay
Solving Quests
Aveyond 3 is a Role Play Game, or RPG, meaning you need to explore worlds and solve quests. In Aveyond, all information you need to solve the main quests will be given to you during the game, provided you explore everything and talk to everyone. But you have to pay attention! Don’t just mindlessly click through dialogue or you’ll miss your clues! Aveyond is one of the few series of games for which listening to the dialogue is essential to solving your quests.
Side quests, which aren’t essential for completion of the game, are a little bit harder to solve. The info you need won’t be spelled out for you step by step, but you have to think and put clues together. Some side quests have multiple outcomes, depending on the choices you make. Sometimes only one of the outcomes will allow you to finish a later quest. In this walkthrough all options are given, and it is indicated which choices you need to make to be able to complete all quests.
If you’re following this walkthrough, make sure to follow all the steps indicated. Sometimes you need a small and seemingly unimportant action to trigger the next step. For example, if you don’t interact with the waterfall at the ruins early on in the game, you won’t be able to move the rock to block the stream and you will have to walk back to the waterfall. So cutting corners may actually slow you down!
One last important tip about solving quests: be patient. Quests generally can’t be solved in the order you receive them. Some quests have to stay in your journal for a long time before you even get a clue about how to solve it. Just keep playing – follow the instructions for the main quest and explore every nook and cranny of the new locations that the main quest leads you to. You will get your information eventually!
Menus
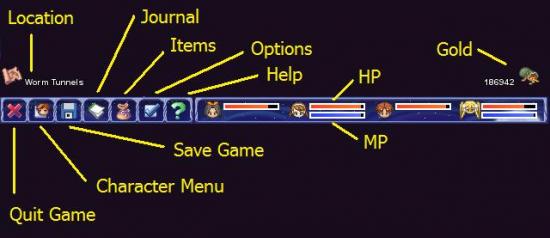
At the bottom of each screen there’s a row of icons that take you the various menus.

You can also access all these menus and a few others by clicking your Esc key on your keyboard. The menus are:
- Items – a list of all your items in your inventory. Items listed in white can be used at present. Items in red can not be used in this menu.
- Equip – in this menu you can select your characters’ weapons and armor. See below for more explanation.
- Skills – a skills list per character. Grayed out skills can’t be used out of battle.
- Battle – select your four active party members.
- Leader – select your party leader. This only makes a difference if you’re in Mel’s apartment in Thais or at the fancy dress party in Underfall.
- Profiles – all the info on your characters on one page.
- Journal – a list of all your unsolved quests. The journal icon at the bottom will glow with a yellow spark each time you get a new quest.
- Options – graphics and sound options.
- Help – some help with basic gameplay.
- Quit – quit to the main menu. You will be asked to save your game.
- Load – load a previously saved game.
- Save – save your game. You can save at any time. Save often and in different slots! That way you can go back to a recent saved game if you’ve missed something important, and you won’t have to repeat a lot if you get killed. The game autosaves each time you enter a new location, but it overwrites its previous autosave.
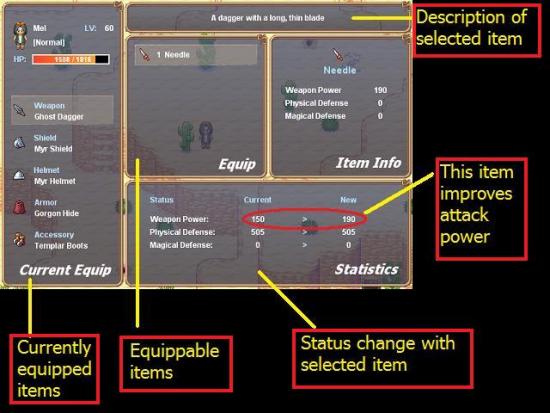
In the equip menu you can see the items your character currently has equipped. In the middle of the screen is a list of items in your possession that this character can use instead of the currently equipped item. On the right it gives you basic info on the item you’ve selected. At the bottom it shows you how your character’s status will change when the selected item is equipped.
So, in the example below, Mel currently has the Ghost Dagger equipped as a weapon. The only other item she can use as a weapon is the Needle. The Needle has an attack power of 190. If you look at the bottom of the screen you can see that the Ghost Dagger only has an attack power of 150. It is therefore a good idea to equip the Needle.
Battle
Fighting is an important part of playing RPGs. You need to fight monsters to get experience, money and sometimes items. So, the more you fight, the easier the game gets! It really pays to fight more than you technically have to, just to level up.
Depending on the difficulty level you chose, some or all monsters respawn when you leave and re-enter an area. I recommend finding a good place where you can relatively easily beat the monsters and they give you a good amount of experience points and then spending some time fighting them over and over just to gain experience. Peliad Sewer is one of those places, for example, but you can do it anywhere, really.
In Aveyond all enemies are visible (no random encounters!) and you can usually outrun them if you have to. Generally, when the game leads you to a new area with new monsters, the monsters tend to be just a little bit too hard to beat with your current weapons and at your current level. So what I often do when I get to a new map is to run through as fast as I can, ignoring all the monsters (or you can use beast repellent, which lasts 30 seconds), until I get to the town behind it. Then in the new town you can buy better weapons and armor for your party, which will help you defeat those pesky beasts.
Always buy all the new weapons and armor you can find in a new town, even if that means going back to a previous area to kill some more monsters to get more gold. More fighting is always better! And don’t forget to equip your new items in the Equip menu; they’re no use when you leave them in your items list!
Fights are turn-based. This means that you get to select your characters’ actions at the start of each turn. After this the actions you selected will be played out and the enemies will each execute their attacks too. You can select the following actions:
- Attack – melee attack with your current weapon.
- Skill – select a skill or spell to use on your enemy or your party. The number behind each spell indicates how many MP (mana points) it takes to use the spell.
- Defend – don’t do anything and reduce the impact of your enemy’s attack this turn.
- Item – select an item from your inventory to use for healing or curing yourself or your allies, or to attack your enemy.
- Equip – this is a new feature in this game. You can use this option to change weapons or armor during a fight.
If you have more than 4 members in your party, you will also get an option to exchange party members during the fight.
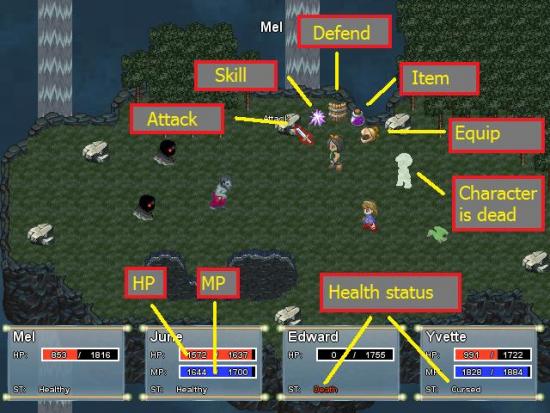
Monsters are sensitive and resistant to different types of weapon or magic. You have to experiment a bit to find what works best on each enemy. Also, keep a close eye on your party’s HP (health points) and MP (mana points) bars during the fight. If a character’s HP gets to 0, they die. Run out of MP and you can no longer do magic. If someone has lost a lot of HP you can use one of your characters to heal themselves or one of the other members of your party. You can also select items to cure various ailments. You can even revive fallen characters during a fight.
Character Health
Don’t walk around low on HP or MP. If you’ve taken damage during a battle, heal up before you go on, so you’re in the best possible condition to fight the next lot of beasts. You can restore your HP and MP by sleeping in an inn or in your apartment in Thais. Sleeping doesn’t cure specific ailments and does not revive characters. Other than sleeping in an inn, you can use various potions and foods to heal up. You can buy items to restore your characters’ health in most towns, though each town has its own selection.
Make sure that your characters aren’t cursed, poisoned or in the stone condition. These are the only ailments that don’t wear off after a fight, though they do disappear when a character dies and is revived. Cursed characters have lower defense and attack points, poisoned characters lose HP with each step until they die (the screen flashes red when you walk around with a poisoned party member so you won’t forget) and “stoned” characters can’t fight at all (but they can get hit!).
Items to cure specific ailments are:
- Cassia Leaf – revive a character. Can be bought in most shops.
- Marsh Tea – cure poison. Can be bought in most shops.
- Witcheye Root – cure curses. Can be bought in Ghed’ahre and Witchwood.
- Elixir – restore 100% HP. Can be bought in Ghed’ahre and Acropolis.
If you’ve used witcheye root and your character is still cursed, make sure you’re not wearing any cursed equipment. In that case, just remove the cursed item and you should be well again. Another tip to remove a curse when you don’t have any witcheye root is to equip and then instantly unequip a cursed item. When the cursed item is taken off, the original curse is lifted too.
There are a few Tinctura Hypericum potions scattered around the game. This is a very useful potion that restores the whole party’s HP and MP in one go. However, there are only a few of them, so use them conscientiously! I like saving them for the final boss fight.
Finally, a new feature of this game is the life crystals. Life crystals restore HP and MP for your whole party and also rid them of any ailments. However, they are scarce and can only be used once each.
Buying and Selling
Each town has various shops, such as armor and weapon shops and different types of items shops. You can mainly earn gold to buy items by fighting monsters and looting their corpses for spoils. Some monsters drop items rather than gold. You can sell any item in your possession to get more money. Don’t worry; you can’t sell items that are required for quests.
In most shops you can trade by talking to the shop owner. There are a few items shops where you can buy specific items by interacting with the items displayed on the tables.
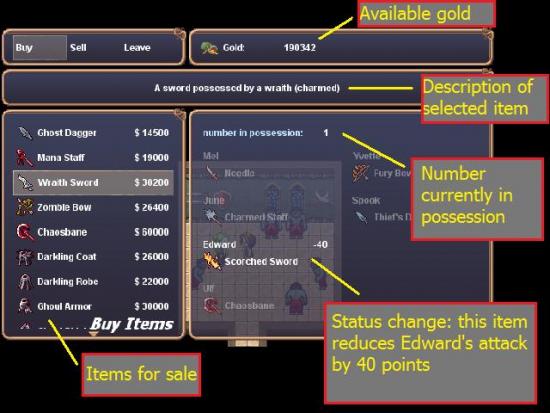
When you’re talking to a shop owner, the left hand side of the shopping menu shows you the items for sale and how much gold they cost. On the right it tells you how many of the item you currently have in your possession. You can increase or decrease the number of items you want to buy or sell with your up and down arrow keys.
When you’re buying armor or weapons, the right hand side of the screen will show you a list of all your party members and the comparable item they currently have equipped. Only the characters listed in white will be able to equip the item once you’ve bought it; grayed out characters cannot. The number behind the character’s name tells you if the selected item will be an upgrade or a downgrade.
So, in the example below only Edward will be able to equip the Wraith Sword. He currently is using the Scorched Sword. If he would swap the Scorched Sword for the Wraith Sword his attack power would be reduced by 40 points. Besides, you already own a Wraith Sword anyway. It is therefore not a good idea for you to buy this sword.
Alchemy
A new feature of this game is alchemy, or potion making. Scattered over the various locations you can find herbs and other items you can use in potions. Herbs grow back 15 minutes after you’ve picked them. Many monster drops can also be used in potions.
To make a potion you first of all need a recipe. Recipes are also scattered across the game. Several recipes can be found as scrolls, sometimes they’re given to you by a character. You can find all the recipes you’ve found in your recipe book in your items menu.
Currently you can only make potions when you’re in the alchemist’s house in Harakauna. A few recipes can only be mixed by the alchemist himself. These are usually recipes that are required for the main quest. To mix your own potions, go to the table with the bowl on it, click on the bowl and select a recipe from the list in the alchemy menu. On the right it will show you the ingredients you need, and how many of each. Select the correct items and click “mix”.
So, in the example below you can see that to make a mushroom pie you need 1 bread, 1 fresh milk and 2 mushrooms.
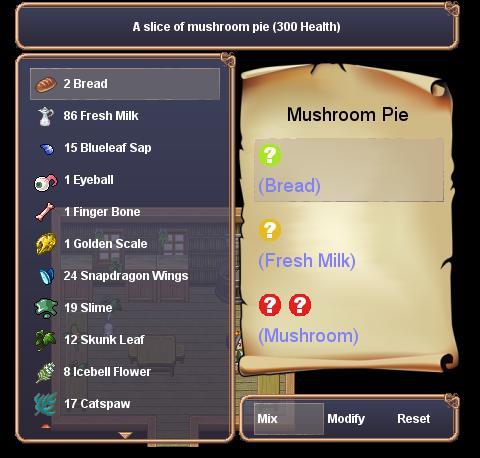
Alternatively, you can experiment: Take an existing recipe, replace one of the items with something else and see what happens! Each recipe you can find in the game has two variations. But it takes some experimenting to get them all! I recommend saving your game before trying a new concoction, especially if you’re using an item of which only one is provided in each game. A full list of recipes and ingredients will be provided at the end of this walkthrough.
Other Useful Tips
Magic Mirror Express
Every town (except Ghed’ahre) has a Magic Mirror Express (MME), which is indicated by a sign with a horse on it. MMEs will instantly teleport you to another town for a small fee. However, you can only teleport to and from an MME if it is switched on. So, whenever you get to a new place, remember to find the house with the horse sign, go in and switch on the MME so you can easily travel back to it later. You can tell if the MME is switched on if the lever on the wall is down. Also, if it is not on and you interact with the money box, it will tell you that the MME is locked.
To use the MME, click on the money box and select your destination. Once a destination is selected, the mirror will glow red. All you then need to do is walk into the mirror. Each MME can only take you to a few places, so sometimes you need to do a few “hops” to get to the place you need. For example, to go from Shoal Leiu to Harakauna you must first hop to Tyobi, and from there on to Harakauna.
New in this game is the Reaper Express, which works in the same way as the MME. The Reaper Express can only take you between Ghed’ahre and Underfall. Look for a grave with a hole in front of it.
If you’re starting a new game rather than playing on from Gates of Night, the MMEs on the main continent will be locked at the start of the game until you come back with June. Don’t forget to switch the mainland MMEs on too! This will save you a lot of walking.
A full list of MME destinations available in this game is provided at the end of the walkthrough.
Statues
Each city or village will have a statue in the center. At the statues you can donate money to the goddess or steal from the donation box. Donating money will increase your luck while stealing will decrease your luck. The higher your luck, the greater your chances of evading attacks during battle and finding spoils when you loot a monster. You can only donate at each statue once, and the game remembers which statues you’ve already donated to in previous chapters.
Moo Hatchery
Moo Hatchery is in the south of Brightwood Forest on the main continent – if you’ve played the previous chapters you’re surely familiar with it. If you’re playing on from a previous chapter, the game will start out with all the animals you had in the previous chapter still at the hatchery. If you’re starting a new game, the hatchery will be empty.
In Moo Hatchery you can hatch animal eggs that you can find in the game. In this game there are two eggs: the Fairy egg (in the Crystal Cavern) and the Metal Specter egg (in Underfall). When you’ve found an egg, take it to the hatchery and put it in the basket behind Professor Moo. Then pull the lever on the right side of the wall and the egg will hatch. The professor’s current assistant is Stella, and she will pick up the hatched animal and bring it to its stable.
Animals at the hatchery lay at 15 minute intervals (not including time spent in menus or battle). Make sure to check back regularly to pick up the eggs. Each egg has its own unique function.
IMPORTANT: If you use an egg before you hatch the animal, it’s gone and you can’t get it back!
Warp Eggs
There are four types of warp eggs:
- Blue: escape a dungeon
- Green: escape battle
- Red: warp to Moo Hatchery
- Purple: warp to Harakauna
Blue, green and red warp eggs can be bought from Professor Moo at Moo Hatchery on the main continent. When you’re stuck in a dungeon and really don’t know how to get out, use a blue warp egg to get you out. However, these aren’t much use in the Worm Tunnels or Crystal Cavern, as they will just take you back to the last outside area you’ve been to. In that case you can use a red warp egg, which will transport you back to the hatchery from wherever you are. It’ll probably a bit of a trudge back to where you were, but at least you’re out of the dungeon.
Purple warp eggs can be made in the alchemist’s house in Harakauna when you’ve found the recipe for it. This egg will warp you straight back to Harakauna. Therefore, once you have the recipe, it is probably better to use a purple egg rather than a red one when you’re stuck in a dungeon, as most of the game takes place on Eldrion, and so Harakauna is likely to be nearer and you won’t have to walk as far back.
Level Eggs
There are about 8 level eggs scattered over the game. If you use a level egg, everyone in your party gains a level. Use these wisely! Before you use a level egg, first check your characters’ experience bars in the esc menu (the green bars). There is no point in using a valuable level egg when your characters are close to leveling up anyway. Wait until most of your party has just leveled up so you can get the most out of the eggs.
Post Office
There are post offices in Thais and Peliad. You can get a mail box in Thais first, and then later you can choose to have your mail forwarded to Peliad. You only get mail if you’re playing on from Gates of Night as Mel’s only correspondent is Te’ijal, her vampire friend from the previous games. Like her brother Gyendal, Te’ijal is no longer a vampire but mortal once more – a condition that embarrasses her terribly!
Letters from Te’ijal arrive 15 minutes of game time after you’ve picked up the previous one, starting at the moment that Mel collects her belongings from the post office in Thais. You can opt to reply to her or not, and your reply can be friendly or a bit cranky. It doesn’t appear to matter which option you select. At least not for this chapter.
Attraction points
As in the previous chapters, you can find attraction points for your characters throughout the game. As the relationship between Mel and Edward was pretty much established during the previous chapter, attraction points now are predominantly for your new friend, Spook. Spook can get anywhere between -7 and +6 attraction points, depending on whether Mel accepts or rejects his advances. It doesn’t appear to matter for the outcome of this chapter how many points he gets. The points are:
- Rat tail in sewer: accept +1, reject -1
- Slice of pie in Tyobi palace kitchen: accept +1, reject -1
- Perfume in Shoal Leiu: accept +1, reject -1
- Flowers in Harakauna: accept +1, reject -1
- Faux Hercules bust in Tyobi: accept +1, reject -1
- Poems in Underfall – -1 always
- Love Potion – either have Edward use it or Spook. If Edward uses it when Spook is in the party, Spook loses a point.
WALKTHROUGH – Getting Started
If you want to continue playing from a game you saved in Gates of Night, you still need to select “New Quest” from the main menu (unlike in Gates of Night, where you had to select “Load Quest”). The advantage of this is that this time all your previous saved games (in case, like me, you tried several of the different endings) are in their own menu and you can’t accidentally overwrite them with the current game.
When you’ve selected the game you want to continue, you get the option to reset Mel to the recommended level for this game (level 30), or to continue at the level where you left her in Gates of Night. Alternatively, you can start a completely new game, which will also start you off at level 30.
Finally, you get to select the difficulty level: easy, normal or hard. Fights get harder and more enemies respawn with increasing difficulty level. In addition, when you’re playing in easy mode, your characters’ health and mana will automatically be restored each time they gain a level.
If you’re new to this type of game, I strongly recommend you play through the tutorial. It’s short, but shows you all the essentials of the game: how to move, how to interact with objects, how to fight and how to use your main menus. There are separate tutorials for using the mouse and the keyboard.
The Wedding
In the intro, a woman with a baby is pursued by a group of Darklings. Her name is Rayina. They want to take her baby so “the Darkthrop will rule the world” and the prophecy is fulfilled. Then Rayina changes into a bird and flies off with the baby – she’s a changeling!
Cut to Thais, the day of the wedding. The start of the game varies slightly according to which of the girls Edward proposed to in your previous game. If you’re starting a new game, Edward is marrying Mel. Well, that was the plan anyway…
In essence, the wedding takes place: vows are exchanged and Edward and his bride are declared husband and wife. But as Edward kisses his bride, Mel charges into the church (with Stella, if you had Edward propose to her at the end of Gates of Night)! But if that is the bride, then who did Edward marry? It turns out to be Lydia. She stuck the bride in a locked cupboard and married Edward instead. And what’s worse – the vows are legal, and Edward and Lydia ARE married.
Suddenly a ghostly figure appears, speaking of destiny. However, only Mel sees her. Mel decides she must be tired. For the next few actions the game varies slightly according to the different storylines.
Version 1: Collect Your Things from the Castle
If Edward intended to marry Mel, Mel decides to go back to the castle and collect her things. The castle is in the north of Thais. You can explore the city on your way. There are some money bags lying around that will come in handy. However, all the shops are closed at the moment, the MME is out of order and the Needle and Thread shop has closed after Lydia cleaned out all the merchandise.
However, when you try to enter the castle you’re turned away! Lydia has barred Mel from the castle. Mel decides to go see her old landlord, Remraldt, who lives in the southwest of Thais. At Remraldt’s you can rent a new apartment for 20g.
Version 2: Go to Pemberly Keep to Get Some Sleep
If Edward intended to marry someone else, Mel decides to go to her house, Pemberly Keep to get some sleep. Make your way through Thais to Pemberly Keep. You can explore the city on your way. There are some money bags lying around that will come in handy. However, all the shops are closed at the moment, the MME is out of order and the Needle and Thread shop has closed after Lydia cleaned out all the merchandise. You also find that Lydia has told the guards that Mel is no longer allowed into the castle.
You try to enter Pemberly Keep, but it’s locked! You need to talk to the landlord, Remraldt, who lives in the southwest of Thais. He tells you that Lydia terminated Mel’s rent and stole all her things. You can rent a new place for 20g.
Meet Professor Gray at the Ruins
The new apartment, #101, is the middle apartment in the gated area of town. Go in, check the chests and equip the goods, and go to bed.
As soon as you’re in bed, there is a knock on the door. It’s a man from the post office. He tells you a friend left a message for you. You need to go to the post office, which is in the shopping district. While you’re there also get yourself a mailbox.
When you leave the post office you’re approached by Matt, a boy from school, who says all students are to meet Professor Gray at the ruins this afternoon. You agree to meet him there.
The shops are now open, so you can get some goodies if you like. Don’t buy the iron dagger at the armory as there is one in a chest right outside the Thais city entrance.
Now leave the city and make your way through Brightwood forest. There are new goodies scattered around for you to collect. The bridge to Istir Forest was flooded and destroyed. To go to the ruins, follow the path through Brightwood Forest as far west as you can go, then cross the bridge on the edge of the map and go north.
Professor Gray is at the ruins and tells the students he’s lost his journal! You have to go find it. The person to find it will get an advantage in the next exam. Go to the southwest corner of the ruins and talk to Peter. A new path is opened in the trees. Go down it.
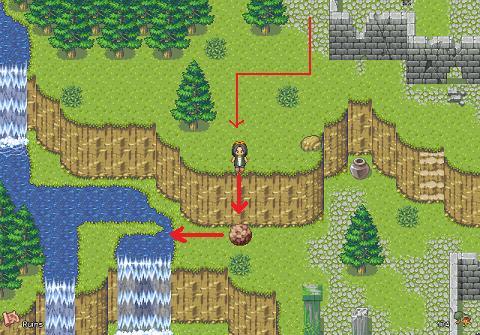
Explore the next area. Go down the two sets of stairs and Mel will see a waterfall with something behind it. She wants to go and inspect it. To trigger the next step you need to click on the waterfall, or walk into it and use your action key (space or enter). When you’re at the waterfall, Mel realizes that she can block the flow of the waterfall by rolling the boulder into the stream above. Go back to the boulder and push it south off the cliff. Then go down the steps and push it west into the water. The waterfall stops and a door is revealed. Go in.
Once inside, the mysterious figure that Mel saw at the wedding appears again! Her name is Nox. She says that Mel can’t run away from her destiny, and she will one day have to assume her role as heir of Mordred Darkthrop. She says there is an Orb of Death, and Mel has to find it before another Darkthrop heir does. The Orb is in Eldrion. Then she disappears.
Mel shakes it off – maybe it was just a daydream. Go deeper into the cave and you will find out that one of the other students, Gracie, found the diary and won the game. Bummer – what a rotten day. Leave the cave. Mel wants to go back to Thais and talk to her only friend: Stella. She is probably in the temple with the priestesses.
Go back to Thais and talk to Stella. Stella thinks it’s a trap and won’t come and help Mel find the Orb. Mel decides to go by herself. Stella also reminds Mel that Edward is still their friend, and thinks Mel should tell him she is leaving. Mel doesn’t intend to do any such thing!
Go to Eldrion
Leave the temple and make your way back to Mel’s new apartment. On your way there you notice there is a new notice on the wall. It announces a new ferry service to Eldrion, which leaves from Chateau Lenore. How convenient!
But first Mel needs to go home to finally get that nap. Go to the apartment and sleep. In the morning, Edward arrives – Stella told him Mel was leaving! Edward wants Mel to stay. He thinks Lydia is up to something. But Mel wants to go, regardless. She asks Edward to have her stolen things sent to the post office.
Go to the post office and get your stuff – Lydia kept most of it. Before you leave Thais, quickly go to the museum and talk to the man there for a side quest, if you haven’t done so already. The golden frog you brought him in Gates of Night is a fake! He asks you to find him a new one.
Do some more shopping if you need to and leave. On your way go south to Moo Hatchery to get another side quest: some of the animals have escaped, and you need to find them. You need to find the Firebird, the Bomber Bird and the Fairy Toad. If you had animals at the hatchery before, don’t forget to collect the eggs! However, note that the lost animal quests are only available if you are playing on from Gates of Night and had the required animals at the Hatchery.
Now go further west to Chateau Lenore, which is straight south of the ruins. Talk to the wine merchant for another side quest. Sienna, the wine merchant’s daughter is still practicing her musical instruments, but she isn’t very good! Fedor the merchant wants you to find her a tutor.
Now take the south exit from Chateau Lenore and you will find yourself on a beach with a ferry station. There is some good money in those chests, to get you started. It’s not allowed to sell armor and weapons on Eldrion (allegedly), so buy some things from the guy on the beach. Then pay the ferry driver and make to leave. Ulf will catch up with you and remind you that you can still continue your spy training in the intelligence agencies all over the world, so keep looking out for those places with a tree sign on the house! Now you can go to Eldrion.
Peliad
Go north to Bristle Woods West. There is plenty of money scattered around the woods, but the monsters are quite hard to beat at this point. I usually make a quick dash through, trying to get to as much of the goodies as possible without getting attacked. There are a few single snakes that you should be able to beat, and they also drop quite a lot of gold, which will come in handy soon. Have your serpent amulet equipped! If you do get poisoned, you can buy marsh tea to cure it in the items shop by the Peliad city entrance.
Bristle Woods West
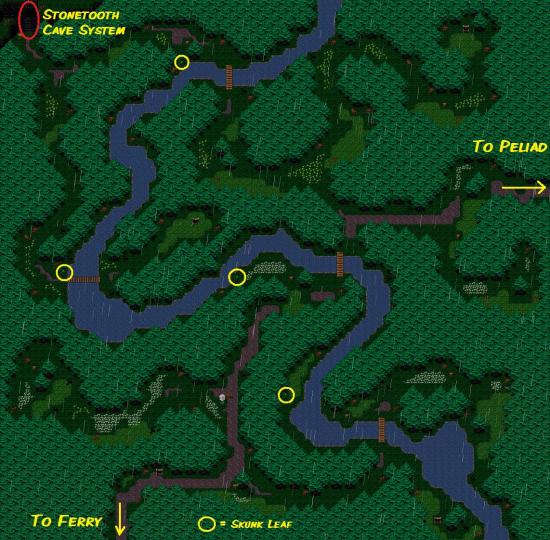
There is a bridge in the northwest that’s blocked off for you right now, so just ignore it. Just follow the path and go east to Peliad.
Peliad
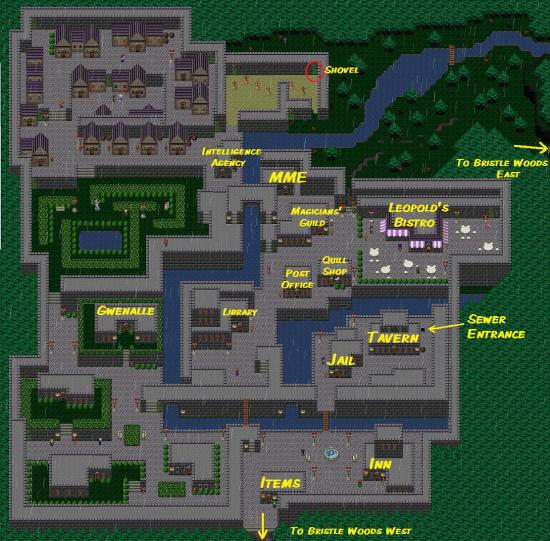
Go into Peliad and walk onto the city square. Mel decides she needs to ask around about the Orb. So go and explore the city. You can get your mail forwarded from Thais to the post office in Peliad if you like. Also make sure to switch on the Magic Mirror Express and to make a donation at the statue in the park.
When you try and cross the wooden bridge from the main square, that annoying Nox talks to you again, telling you to go into the tavern. Well, you’re in luck, the tavern is the building on the right on that side of the bridge! Go in and talk to the guy with the eye patch and white shirt on the left (Gart). For 100G he will take you to someone who might know more about the Orb. Pay him and follow.
On your way out of the temple you’re approached by the girl who was doing magic tricks in the corner. Her name is June, she’s a magician’s apprentice, and she is desperate to come with you as she needs an apprenticeship to finish her education. Mel doesn’t have time to babysit. June poisons Mel to show what she can do. Fortunately, she also has a marsh tea to cure the poison.
IMPORTANT! Don’t forget to take the marsh tea as soon as you can!! If you don’t, Mel will get weaker with every step until she dies, and then it’s Game Over.
Then Gart takes you into Peliad Sewer.
Peliad Sewer
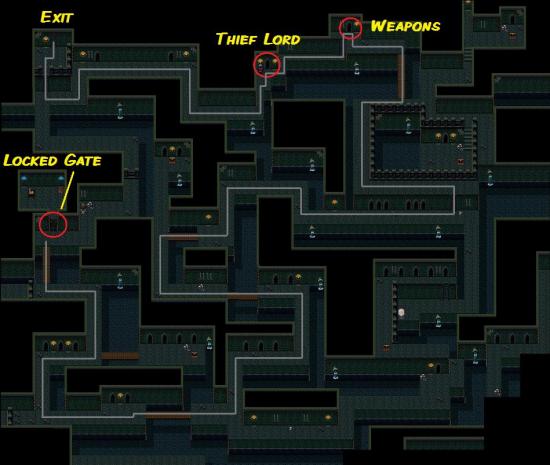
Follow Gart until you reach a thief who is blocking the way. Go into the door there and talk to the Thief Lord. He doesn’t know about the Orb or about Mordred Darkthrop, but he will let you explore his sewer to see if you can find clues.
Exit the room where the Thief Lord is and go east. Go up some steps to an area with another door and two cockroaches. Don’t try and fight the cockroaches right now, they will slaughter you! Do go into the door and talk to the man there. He is an illegal arms trader. You’re going to need to buy all the proper equipment for Mel before you can confidently beat the cockroaches without getting butchered yourself. If you don’t have enough money right now, FIRST buy the thief’s dagger (and the shield if you can). You can try killing the cockroaches with just the dagger and the shield (also don’t forget to take your level egg!), but another thing you can do is to go back to Bristle Woods West to fight the creatures there and to get all those goodies we dashed past earlier.
Once you have enough money, go back to the sewer to buy the rest of the equipment. Now start killing those cockroaches! You should be able to kill them with one or two strikes while they do virtually no damage to you. The sewer is a great place to do some leveling up, if you want! You get lots of money and lots of experience here, so clear the sewer of roaches and mice a few times by exiting and entering so they respawn.
At the end of the sewer is a locked gate. Mel can’t open it but thinks June, the magician’s apprentice, might know a spell for it. Leave the sewer and go to the Magician’s Guild to pick up June. She loves to come with you, so she can finish her education and become a full-fledged magician. To do this, she needs to master three new skills on the way. Before you go back to the sewer, go to the little graveyard in the north of Peliad and pick up the spade as you’re going to need it (location is indicated on the map).
June will be with you for the rest of the game, so when you’re back in the sewer, buy her some good equipment too. Then go back to the gate. June will open it for you. Inside is a diary. It doesn’t say much, but it is obvious that Darkthrop has been there. Now dig up the pile of dirt in the corner. You find a note and a key. The note says you need to go to Darkthrop keep and dig 5 paces north of the tower. Meanwhile in Thais, the wicked Lydia breaks the former vampire Gyendal out of prison. Now doesn’t he look cute now with his pink, rosy face! She needs him to cause a distraction at her and Edward’s upcoming coronation.
Harburg
So now you need to make your way to Harburg. Please check the walkthrough for Aveyond, Lord of Twilight for mainland maps. Go back to the ferry station and take the boat back to the mainland.
If you’re playing a new game you can now activate the MMEs in various places. I recommend taking this time to go back to Thais and Moo Hatchery to switch on the MMEs there.
To get to Harburg, you need to go to the southeast corner of Brightwood Forest and enter the cave there. On the other side of the cave you will find yourself in Thial Mountains South. Go east as much as you can and exit in the southeast corner to get to Shadow Woods North. You can dig for a tinctura hypericum on the east side of the forest. Exit south and you’re in Harburg. If you’re new to the city, explore everything as usual. Don’t forget to switch on the MME and donate at the statue. If you’re well familiar with Harburg, the following things are new:
There is a small side quest in Harburg. Close to the entrance of town is a pink haired girl named Ellie. She says she thinks Osmond is cute. A little further east you find two men, one of them is named Osmond. Get a letter for Ellie from him and give it to Ellie. Then go back to Osmond for a small reward. You won’t get a reward if you give her Lewin’s note instead.
In the house to the right of the town entrance you will either find Lord Burnaby (if you solved his problem in Lord of Twilight) or his niece (if you’re starting a new game). They will give you a recipe for a love potion.
Further south is a beggar woman. Give her a penny then talk to her again. If you give her 100g, she will give you a recipe that involves “some” Icebell Flowers, nectar and mushrooms. Give her 500g and she will give you the exact recipe. It’s for a potion to charm animals.
North of the beggar and then east you find the exit to Darkthrop Keep. Go past the sewer grate in the ground and Mel will start digging behind the tower. You find a box that unlocks with the key from the sewer. Inside the box is another key with a note that says you need to go to the top floor of the tower and open a hidden room in between a suit of armor and some chains on the wall.
Go into the tower and make your way to the top floor. The hidden door is right in front of the entrance. Interact with the wall and go in. Inspect the bookshelves on the back wall to find another note. It is from Darkthrop, saying the Darkthrop heir needs to get the Orb of Death to rule the country. It’s hidden in a cave system near Peliad. Nox briefly appears too, to once against enforce what she thinks Mel needs to do.
Go back out and talk to June. She says she knows a cave near Peliad, but it’s very small. You have no other option than to go check it. So go back to the ferry station and take the boat back to Eldrion.
Meanwhile in Thais, Edward and Lydia get ready for their coronation. Lydia asks Edward if she may be crowned first, he agrees. However, when the chancellor is ready to crown Edward, they’re interrupted by a guard who says that Gyendal has escaped. Ulf adds that Gyendal is after Mel. Edward and Ulf leave to rescue Mel before Edward is crowned.
Leopold’s Bistro
Go to the northwest corner of Bristle Woods West and talk to the thief blocking the bridge. He won’t let you through without permission from the Thief Lord, so go back to the sewer.
The Thief Lord will give you access if you help him put Leopold’s Bistro out of business. Go to the bistro. When you go in, Mel has an idea – she needs to catch five rats. To catch rats, you need to need to learn how to trap them. You can do this in the intelligence agency on the west side of town. All you need to do to learn trapping is to put a trap down by selecting it from your items menu, and then chase a rat towards it. You practice with a rabbit, which Mel is allowed to keep afterward. She has it sent to Stella, who now works at Moo Hatchery.
Now go and catch five rats in the city. Then go back to the bistro and release the rats inside. Upon seeing the rats, the health inspector takes the bistro’s food license away and the place is shut down. Go back to the Thief Lord and he will grant you permission to the north area of the woods.
Go back to the blocked bridge, which is now open, and go west. Enter the cave you find. There is nothing there but a strange symbol on the floor. Mel inspects the cave as June waits outside, and Nox appears again. She tells Mel that only a “familiar” will know what to do with the symbol, then she disappears once more.
Go outside to meet June again, who has now been joined by Ulf and Edward! They exchange stories and join forces. June suggests you should go and find out about familiars in Peliad’s library. When the party leaves, Gyendal appears. Nox talks to him and tells him he needs to come up with a different strategy to get to Mel.
Go back to Peliad and go to the top floor of the library. June will find a book explaining that a familiar is a creature that can change into something else at will. Mostly into animals, sometimes in to humans. There is a village east of Peliad that’s rumored to be run by animals. Maybe you should go there.
Find a Quill for Ulf
While in the library, Ulf finds a book he finds interesting. He can’t check it out, so he wants to take some notes. Mel offers to go find a quill for him. Leave the library and go into the house with the book sign to the right of the library. Try buying a quill by interacting with one on a table. The shopkeeper is a bit of a snob and won’t sell you one.
Mel leaves the shop and walks back toward the library. She is approached by the boy you just saw in the quill shop. His name is Spook and he ‘obtained’ a quill for you. He says that if you ever need any help with anything, you can find him in the tavern. Now go back to your friends in the library and give the quill to Ulf. He writes down a riddle he “feels” may be important.
Side Quest: Baby Thief
Once you’re back in Peliad after going to the cave, there will also be a new quest for you. I’ve you’ve been talking to everyone in town, you should know by now that babies have been disappearing. You can now solve this quest.
Go to Lady Gwenalle’s house, which is in the southwest corner of town. When you go in, Gwenalle and her maid Ines act like they’ve been expecting you, and you’re invited to tea. Mel picks the wrong muffin from the plate and, strangely, Ines panics and rushes off to the kitchen. Mel follows her into the kitchen and catches her in the act of poisoning Lady Gwenelle’s muffin! Ines tells you that Lady Gwenelle has been abducting babies and selling them.
There is a time limit on this quest, so try and solve it right away, especially if you also want to complete the golden frog quest for the museum in Thais later. There are several different ways of solving this quest, but only option 5 will allow you to complete the golden frog quest.
1. Tell on Ines and get 200g from Lady Gwenalle as a reward.
2. Choose the “bring Gwenalle to justice” option. Then go to the jail, talk to inspector and turn in Ines instead of Gwenalle. Go back to Gwenalle and get your 200g.
3. Choose “bring Gwenalle to justice”, go to the inspector and turn her in. Talk to the inspector again without proof and he’ll throw you in jail. In jail is a thief. Talk to him. He’s been falsely arrested for stealing a golden frog. If you decide not to help the thief Ines will come and bail you out. Then you can still follow the steps in option 4.
4. After you speak to the inspector to turn Gwenalle in (or when you’ve been released from jail), go back to her house and inspect her bedside cabinet. You find a list that includes an item saying she is to meet a certain “Edgar”. Mel finds this suspicious, and wants to find Edgar. He is the cloaked man in the tavern. Make a deal with him and meet him in the western gardens at 9 p.m.
Go back to the inspector and then go to the inn and pay for a bed. You will wake at dusk. Go to the western garden (back to Gwenalle’s house and then west) and talk to the inspector. Then talk to Edgar and he will take you to Gwenalle, who has a baby for you. She is arrested. Go back to Gwenalle’s house and talk to Ines, who will give you a lucky charm. Then go back to the inn and finish your night.
5. RECOMMENDED! Bring Gwenalle to justice and go turn her in. Then bother the inspector again without proof and you will get thrown in jail. In jail, talk to the thief and agree to help him. A man named Lloyd is arrested for stealing the golden frog and the thief is set free. The Thief Lord will come and bail you out. Then go do the steps in option 4.
Time to go on with the main quest and make your way to Harakauna! If you want you can buy some weapons and armor for Ulf and Edward from the guy in the sewer, or you can wait until you’re in Harakauna.
Finding a Familiar
Leave Peliad from the forest area in the northeast of town. You’ll get to Bristle Woods East.
Bristle Woods East
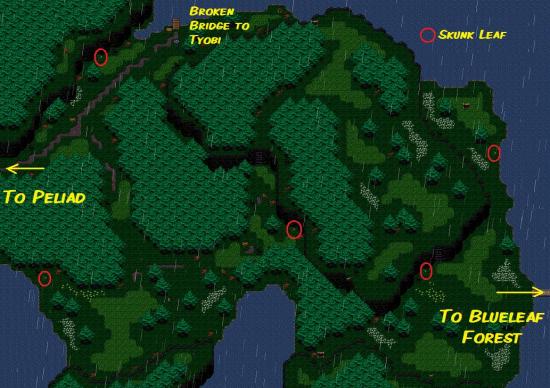
If you go north, you will find that the bridge to Tyobi was flooded and is therefore blocked off. Fortunately, we don’t have to go that way. Keep going east. A little past the second signpost, the road appears to be blocked off again. You’re caught up once again by the little thief named Spook. He clears the path for you.
Keep on going east and cross the bridge into Blueleaf Forest.
Blueleaf Forest
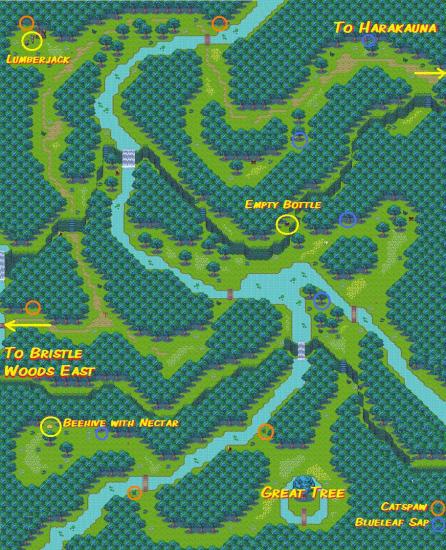
The wolfmen and snapdragons are a bit tougher than the creatures in Bristle Woods. You should be ok to beat them (even if you didn’t buy new equipment for Edward and Ulf), but if you’re not feeling confident you can try to outrun them until you’ve upgraded your weapons in Harakauna. Forget about the path east from the signpost for now, you’ll get to that later, but first go north and then east to Harakauna.
Harakauna
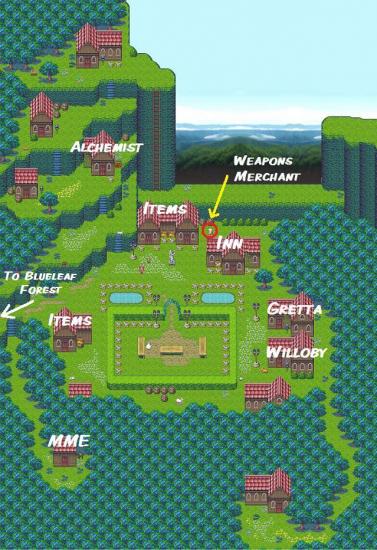
In Harakauna, talk to everyone, as usual, switch on the MME and donate at the statue. Also buy the spell scroll for June in the items shop. It’s the Oodles ‘o Noodles spell – one of the spells June needs to complete her apprenticeship.
In the southeast corner of the village lives a mouse named Willoby who tries to grow mushrooms for his mushroom pie, which he wants to enter into the cooking competition later that week. However, his house is too light, and he asks you to find some boards, nails and a hammer to board up his window. You will need this quest to be able to continue the main quest later on, so don’t forget to get it! However, it will be some time before you will find the hammer and nails, so be patient.
The house north of Willoby’s has a chicken, Gretta, whose husband is out foraging. Remember her for later. Behind Gretta’s house is a squirrel who will give you a new recipe. Behind the inn is Shaun the sheep, who can sell you new equipment. Don’t buy anything for Ulf! He won’t stay with you for much longer.
Go up the two flights of stairs on the northwest side of town. At the top is a rusty chest that you can’t open right now – remember this for later! There is also a girl who keeps changing into a bird and back. Talk to her. Her name is Yvette, and she’s a familiar. She will join you after you’ve played a game with her. For the game you need to go down the ladder and catch 15 of the 20 eggs that Yvette will drop.
When you’re done playing, go back down the stairs to go back to the Stonetooth cave. When you pass the alchemist’s house, you see that the alchemist’s apprentice has quit. The alchemist really needs an apprentice and asks if you know someone. Ulf says he really wants to stay in Harakauna and become an alchemist. So he stays behind and you’re back to being a party of four!
If you go back into the alchemist’s house you can now ask the alchemist about potion making. If you have the money, buy equipment for Yvette and go back to Peliad, either on foot or by MME. Then go back to Stonetooth Cave. Yvette instantly recognizes the symbol on the floor as a sound lock. When she sings it opens a door in the back wall. Mel says Yvette can go home if she likes, but she decides to stay.
Stonetooth Cave
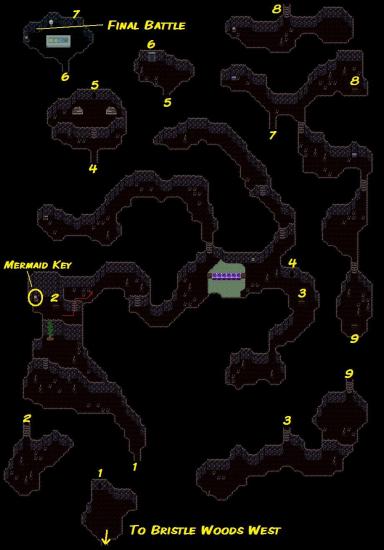
The Stonetooth Cave system will keep getting bigger and bigger at various points in the game, so refer back to this map if you get lost. Go into the second cave and walk until you come to a dead end with a dead tree stump in front of a sheer cliff. You need to find a giant beanstalk seed and plant it where the dead stump is, so you can climb up the wall. Giant beanstalks grow in the Granite Mountains. Unfortunately, the bridge toward the Granite Mountains was broken earlier. You need to go and check if it may have been fixed yet.
Great Tree Root System
So, go back to Peliad. When you get to the main square, a newsboy announces that Queen Lydia has annulled her marriage to Edward, and Edward has been banned from the castle! They need to go back to Thais to sort it out. You can do this at any moment, there’s no rush. When you do, go to Thais castle and talk to Lydia. That’s all for this storyline for now – I assume it will be continued in the next chapter.
To continue with the main quest, take the north exit out of Peliad to Bristle Woods East. Go north to the bridge to talk to the man there. The bridge is still broken, but Yvette knows another way! She happens to know that the root system of the Great Tree runs very far, and maybe they can get the tree’s permission to travel through its roots to the Granite Mountains. You need to go back to Blueleaf Forest and go east at the signpost to find the tree.
Before you interact with the tree, explore the area west of it, where you can find nectar (in the beehive – it grows back after 15 minutes) and the Bomber Bird for Professor Moo (if you have that quest). You can return the bird to Moo Hatchery at any point, but don’t wait too long because you need one of its eggs for a side quest later and it takes 15 minutes of game time for the bird to lay an egg. If you don’t have a Bomber Bird, don’t worry as in that case you will get something to replace the Bomber Bird egg.
Go and talk to the tree. He will allow you passage if you help him get rid of the giant worm that has infested his roots.
Root System
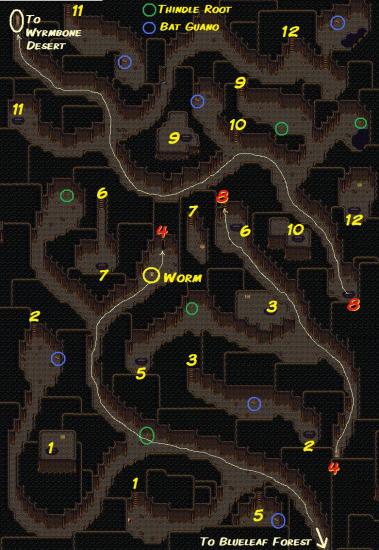
Go into the tree and find the worm. Poison it with June’s Poison Ivy and keep using spells for June and Yvette while simply hitting with Mel and Edward. He’s tough, but the poison and spells should do some good damage. When you’ve defeated the worm, a new passage opens behind it.
The way to the other side of the Root System is marked on the map – take exits 4 and 8.
On the other side of the root system you get to Wyrmbone Desert. The signpost will tell you that the Granite Mountains are to the east. Go east and try to leave the map (you need to do this to trigger the next step in the game). Unfortunately, the empress has closed it off! You need to go to Tyobi and see if you can convince her to open the road for you.
Wyrmbone Desert
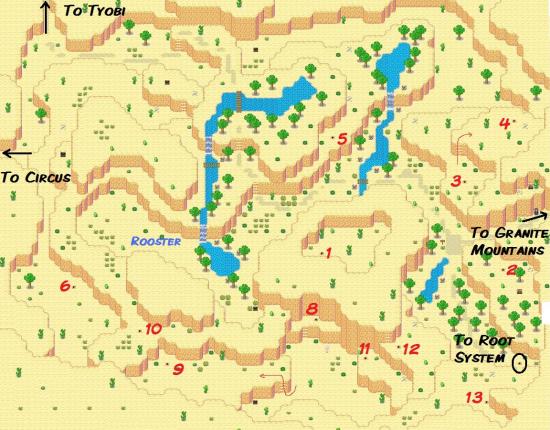
The numbers on the Wyrmbone Desert map correspond with those on the map for the Worm Tunnels.
Go back to the signpost and follow the path to Tyobi. You can do a little bit of exploring in Wyrmbone Desert now if you like, but most of the areas of the desert are inaccessible from this side. You can go to a little place called the Circus, however. Follow the path all the way to Tyobi, but instead of entering the city, go south.
Circus
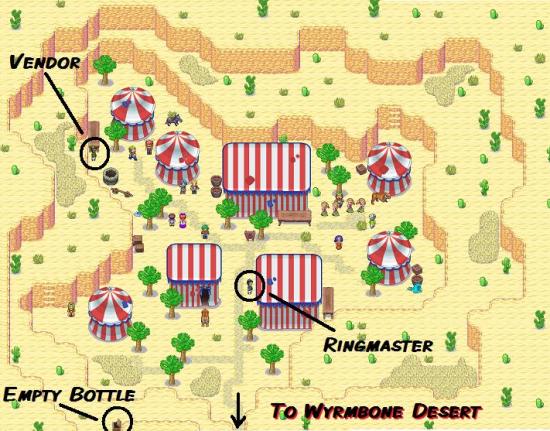
There are a few important things at the Circus. You can exchange June’s Ironwood Staff for a Desert Staff, for only 200g. You can also buy the Fireworks trick for June (100g) and the recipe for Ice Bombs (3500g) from the same guy. By the stairs on the left is another familiar who will teach Yvette a new bird form, the Mogpie, for 11,000g. Up those stairs is a chest, which holds another empty bottle. Keep it; it will come in handy later. Finally, if you talk to the ringmaster (with the little blue hat) he will give you a new sidequest: you need to find him a new circus act for the empty tent. You won’t be able to finish that quest for a long time yet, so be patient.
Get the Empress her Pie
When you’re done exploring the Circus, go into Tyobi. Explore the city and do the usual things such as switching on the MME (believe me, you will need it soon!) and paying a tribute at the statue.
Tyobi
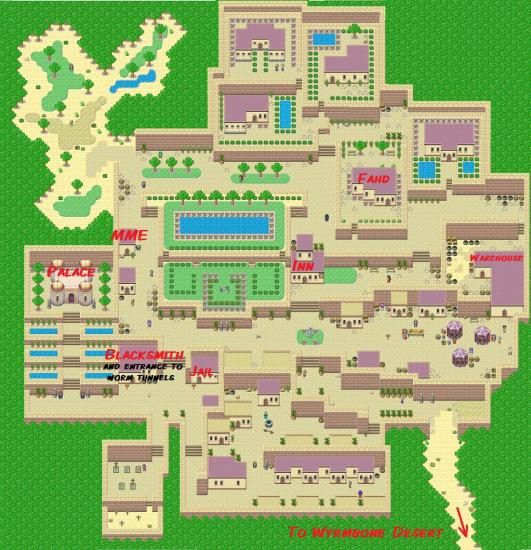
Go to the palace and talk to the empress. She’s waiting for her pie, and as long as she hasn’t had a bite of the perfect pie, no one gets to go through the Granite Mountains. You better go find the chef in the east wing of the palace! He’s in a bit of a panic, as his main ingredient, a rooster, has escaped! You need to go find him one.
While you’re in the palace, go to the west wing and pick up the crowbar that’s in the treasury. You can use it to break open those rusty chests.
Now go back to Wyrmbone Desert. Take the path back, cross the bridge, take two sets of steps down, and then instead of taking the path east, go south and around the water. You should find the rooster wandering around there. He’s quite offended when you grab him, which is odd!
Go back to the chef in the palace and give him the rooster. Suddenly, Yvette realizes that the only place she knows that has talking animals is Harakauna. Ok, now she tells us! You need to go back to Harakauna to make sure the chef isn’t going to cook someone’s husband.
Either walk back to Harakauna or take the MME (thank goodness for the MME! I try to go through that horrible Root System only once if I can help it!), and go back to Gretta the chicken. Turns out, the chef IS about to cook someone’s husband: Gretta’s! His name is Karl. You have to go back to Tyobi and rescue him!
Go and talk to the chef again. He won’t let you have the rooster. Well, I can’t blame him, considering the castle dungeon is full of failed chefs. While you’re talking to him, the Empress’s assistant comes to pick him up to take him to the Empress. When he’s gone, you can break open the pantry door in the kitchen with the crowbar you found earlier in the palace treasury. You persuade Karl to come with you in your backpack. Make sure to check the chest that’s there, as it contains a hammer and nails; you still need to board up the window for Willoby!
Return to Harakauna once more and return Karl to his wife. He will grudgingly give you a rooster feather as a reward. It’s not much of a reward but you did sell him to a chef to be cooked and eaten!
So now the empress still doesn’t have her pie. But didn’t Willoby tell you he wanted to grow mushrooms for a mushroom pie? Better go and board up his windows! You now have the hammer and nails, so all you need are some boards. Leave Harakauna and walk west in Blueleaf Forest until you get to a lumberjack who is chopping wood. Ask him if you can have some. Then go back to Willoby the mouse and board up his windows. You can come back when his mushrooms have grown.
Fortunately, all you need to do for the mushrooms to grow is to exit the village and then enter again. When you come back, the cooking competition has started! Go to the center of the village and test all the entries. Then go to the ballot box and vote for your favorite. When you try to leave the center the winner of the competition will be announced. Whether Willoby wins or not, go and talk to him again and he will give you his amazing mushroom pie! Quickly, bring it to the Empress! Surely she can’t deny you access to the Granite Mountains now!
Of course the Empress loves Willoby’s pie. After all, it is the best mushroom pie ever created. She gives you a summons to bring her the chef who baked it. One last trip to Harakauna! Get Willoby, who is back in his house. While you’re there, get his recipe for mushroom pie from the bookshelves and pick some of his mushrooms, as you can use those in recipes. Then go back to the Empress, who is so happy with Willoby’s pies that she gladly opens the passage to the Granite Mountains.
Side Quest: Get the Four Guard Shields for the Empress
There isn’t a weapons merchant in Tyobi, but the blacksmith can upgrade some of your equipment for you if you bring him the right materials. When you’re there, the smith will tell you the Empress wants four Guard Shields, but he’s lost them somewhere in the back of his shop.
Go into the back of the shop and go into the hole in the corner. You’ll get to a complex tunnel system that comes out in different parts in Wyrmbone Desert – those areas you could see earlier but couldn’t get to.
Worm Tunnels
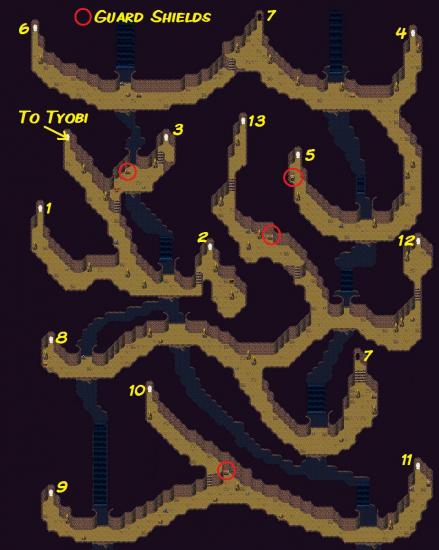
The numbers on the map for the Worm Tunnels correspond with the numbers on the Wyrmbone Desert map.
Inside the worm tunnels you will encounter many of the kind of worms like the one you had to fight in the Great Tree Root System. They hit mighty hard! At this point my characters were between level 39 and 43 with all the best gear from Harakauna and they could beat the worms, but took a lot of damage. Make sure you have plenty of food and cassia leaves with you before you go in, and you’re likely going to need skin cream too.
I recommend going in to fight a few worms, and then going back to the blacksmith to upgrade some weapons and armor. You may have to unequip some stuff to be able to upgrade it.
Upgrades you can buy are:
- Scorpion Sword – needs Falcon Sword and a topaz
- Desert Coat – needs Thief’s Coat and a topaz
- Worm Bone Mail – needs Mercenary Armor and a worm hide
- Worm Hide Shield – needs Plate Shield and a worm hide
- Worm Hide Helmet – needs Leather Helmet and a worm hide
- Worm Hide Boots – needs Leather Boots and 2 worm hides
- Wyvern Bow – needs Raven Bow and an opal
The chest in the first area you get to has the first shield. The rusty chest a bit further down has a better dagger for Mel. The bird flying around is the Firebird for Professor Moo. Please refer to the map for the other shields.
Once you’ve found the four shields, return them to the blacksmith. As a reward he now allows you to buy his upgrades at slightly reduced cost.
Side Quest: Find the Golden Frog for Thais Museum
If you got the Golden Frog quest in Thais museum and got thrown in jail in Peliad during the Baby Thief quest and helped Rat the thief get released, you can now continue the Golden Frog quest.
If you helped Rat get released, you can now find him in the northeast corner of Tyobi marketplace. Talk to him. This quest is another one that has multiple endings. You have the following options:
1. Decline to help Rat with whatever he is doing. End of quest.
2. Agree to help Rat. Edward then separates from the group. Have him follow Rat to the other side of the warehouse. Talk to Rat again, who is at the top of the stairs behind the warehouse. He wants Edward to pick the lock of the house closest to them. Edward fails and is chased away. Rat then tells him he needs help taking back a golden frog that someone stole from him. Yeah right. Rat creates a diversion and then Edward is to go in and steal the frog. If you don’t take the frog or the bust of Hercules on the table, and then go to Rat and say you didn’t get it, the quest will be over.
3. Follow the steps in option 2 and steal the bust and the frog. Then go back to Rat and give him the frog. Rat and his cronies run off and you’re left with nothing. End of quest. You will later find the frog in what used to be the bistro in Pelais, but you can’t get it back. You also won’t be able to give the bust to Walt in the Museum.
4. Give Rat the bust of Hercules. Rat smashes it on the ground. End of quest.
5. RECOMMENDED: Keep the bust and the frog. You can then return the frog to the museum later. For a bit of fun, go and talk to Lydia in the castle after you’ve returned the frog to the museum. For clues on what to do with the bust, see the Hercules Bust quest below.
Return to Mel on the market square and continue the game.
Shoal Leiu and Rock Climbing
Go back into the desert and go to the southeast corner, where the guard is guarding the previously closed passage. Go to the next screen, which is the Granite Mountains.
Granite Mountains
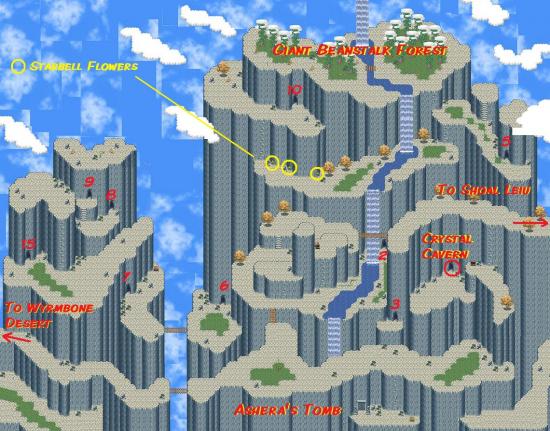
Right now you basically can’t go anywhere in the mountains because you will need to learn rock climbing first. So all you can do, really, is to go north at the signpost and walk straight to Shoal Leiu. Watch out for the rock monsters, they hit hard!
Shoal Leiu
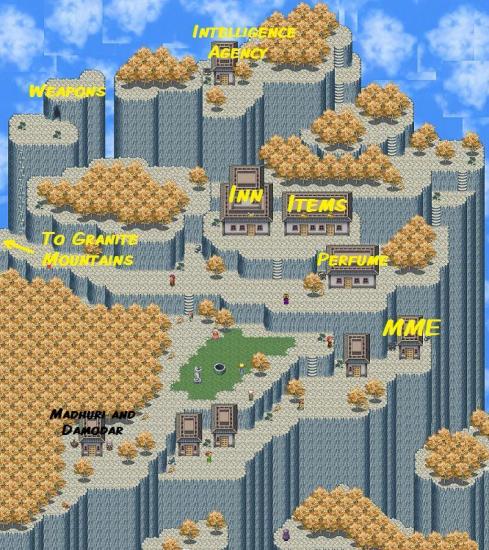
In one of the items shops in Shoal Leiu you can buy the third trick for June, the Gooey Gum trick, for 6750g. If you don’t have a Bomber Bird (because you started a new game or never had one to begin with, not if you just couldn’t find the Bomber Bird for your quest) you can also buy some dynamite in Shoal Leiu.
All the way to the east of Shoal Leiu and then up the stairs you will find the Intelligence Agency where you can learn rock climbing. This one is quite tricky as you have to pay very close attention to the movement of the rocks and then keep moving up to the next level without getting hit. You can save your game in between levels, if you like, so you don’t have to start over when you get hit.
IMPORTANT: for all you mouse jockeys out there, it is recommended to play this game with the arrow keys on your keyboard rather than with your mouse. You have more control that way.
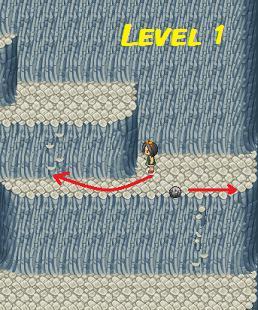
For the first level, wait until the rock is on the far left and then move to the location in the image below. Then when the rock is on its way to the right again and passes you, dash to the next stone steps. The second level works on the same principle.
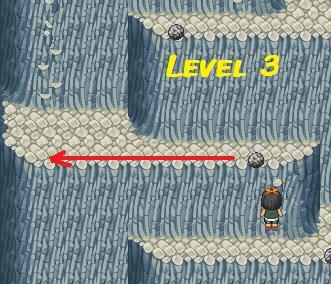
Level 3 is a bit harder as the rock moves a lot faster. Start moving to the ‘safe’ nook as soon as the rock starts moving to the left from the position in the image. Use your arrow keys and be quick!
For level 4 you can quickly hop onto the little steps on the way to let the rock pass, and then move to the steps down when you can.
For level 5 you need to be quite fast. Move to the next steps when both rocks are moving to the right. Same for level 6, but with rocks moving to the left.
At level 7 you’re best to slowly follow the rock as it is moving to the right. Be careful not to go too fast because if you hit it, it’s back to the start for you! And now you’ve come this far, level 8 should be a doddle.
At the top, get the book and step on the star to be taken back to the bottom. Congratulations! You have now mastered the art of rock climbing.
Giant Beanstalk Forest
Now you know how to rock climb, you climb the stone steps right by the entrance to the village. At the top is another cave in which you will find another illegal arms seller. Before you go back out into the Granite Mountains, buy as much gear as you can. If you don’t have enough money to buy it all, go out to fight a couple of monsters and come back for more stuff later – as usual.
Crystal Cavern
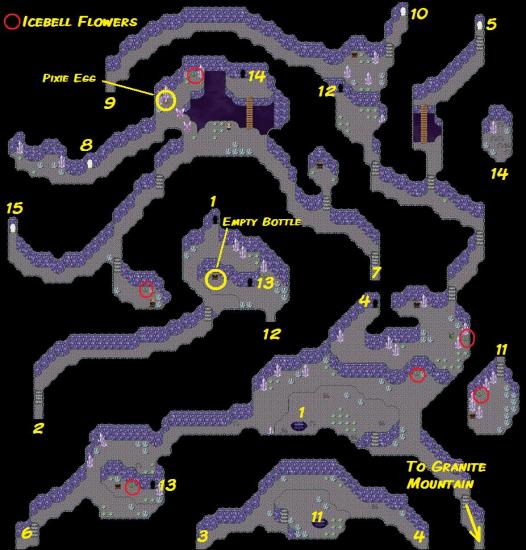
Go back into the mountains and instantly go south down the stone steps outside the village. This will get you to the entrance of the Crystal Cavern cave system. Please refer to the map for the location of the Giant Beanstalk Forest. The route to follow is exits 1, 2, 3, 4, 5.
Once you’ve found the Giant Beanstalks, you need to interact with each of the trees to find the one with a seed – it’s a different tree each game.
Inside the Cavern you will also find the Fairy Toad that escaped from Moo Hatchery, if you had one in the previous game. Catch it and return it to Professor Moo whenever you feel like it.
On the way to the Giant Beanstalk you can also find another empty bottle: instead of taking exit 5 walk on to exit 12. The bottle is in the chest behind it.
Side Quest: Rid the Village of Pixies
Now, if you’ve been good, you undoubtedly noticed that in Shoal Leiu village square, by the statue, you can find an old “friend”: Hercules. You’ve probably already spoken to him, too. Those of you who have played the previous chapters will remember his wicked ways!
This time, he needs you to help him catch the pixies that have overrun the village. You need those empty bottles you’ve been finding! As a reminder, the three bottles were:
- in Blueleaf Forest – on the way to the Great Tree, go up some steps with one Snapdragon at the top. Off to the right is a chest with a bottle
- at the Circus – up the steps on the west side, walk around to the south
- in Crystal Cavern – on the way to the Giant Beanstalk Forest.
The pixies can be found by the MME, on the way to the Intelligence Agency and up the stone steps by the village entrance, near the arms dealer. Hercules himself slithers out of action again, as usual.
Once you have the three pixies, go back into the Cavern and find Hercules (route 6, 7 on the map). Cheeky Yvette will exchange the pixies for something else …
Hercules wants to run off and take credit for your work again, as usual, but the party decides that they have to block all the pixies into the cave so they won’t escape and terrorize the village again. If you’re playing on from previous games and have a Bomber Bird, you need to get a Bomber Bird egg from Moo Hatchery. If you don’t have a Bomber Bird, you can buy a stick of dynamite in the Shoal Leiu items shop.
You also need something sweet to lure the rest of the pixies over the bridge. For this, you need to solve the next side quest.
Side Quest: Break the Curse on Damodar
In the house in the southwest corner of Shoal Leiu is a girl, Madhuri, whose uncle, Damodar, is cursed! Mel thinks it was probably the wickedest witch of all, Heptitus, who cursed him. She lives in Witchwood, on the main continent. So, off we go to the mainland again!
Make your way to witchwood. Please refer to the walkthrough for Aveyond, Lord of Twilight for the maps. In short, you need to go back to Brightwood Forest and go to the Red Rock Pass in the northwest. Make your way west through the pass until you’re in Sinoa Plains.
West of Sinoa Plains is the village of Stormbend. There isn’t much to do there now – just one small sidequest (and switching on the MME! Do it, seriously!). Talk to the bartender in Stormbend Tavern. He wants to retire and is looking for someone to take over the tavern. Now, do we know someone who can cook and is currently out of a job? Yes we do – the former chef of the bistro in Peliad. You best tell him about this when you’re next in Peliad. He’s standing outside the bistro, looking sad. If you go back to talk to him in Stormbend later, you will get a slice of pumpkin pie as a reward.
South of Sinoa Plains are the Mire Woods, and east of those is Witchwood. Heptitus still lives in her little house directly east of the village entrance. Talk to her. She won’t help you, of course, so you need to find someone else in Witchwood who will.
In the north wall of Witchwood is a cave. Inside it lives a witch named Gretchen. She is in love with the vampire Marcello, but they can’t be together as neither of them is accepted in each other’s home town! She will help you with Damodar’s curse if you bring Marcello a letter. He lives in Ghed’ahre.
To get to Ghed’ahre you need to take the MME to Harburg (via Stormbend and Thais – told you to switch on those MMEs!) and leave at the exit in the southwest of the city. You will get to Shadow Woods South (who else remembers how hard it used to be to kill those trolls!). In the middle of the woods is a cave that leads to the catacombs.
Inside the catacombs is the entrance to the underworld. If you started a new game, some doors will be locked and you will have to explore the catacombs and flick some switches to get through. It is important to note that switches should point to the right for them to be on. Do the following steps:
- There is a block with three doors south of entrance. Go into the one on the left. Flick the switch and it opens the locked gates in the southwest and southeast of the main area.
- Go out of this room and to the southwest corner of the main area. Take the door on the right (you just opened this one with the switch). Flicking the switch there opens the gate right in the center of the main area.
- Go through the central gate and go right and into the door there. The third and final switch is in there, so flick it. This opens the door that’s directly south of the central gate. The entrance to the Underworld is through that gate.
In the Underworld go through Wyrm Forest and you’re in Ghed’ahre.
Marcello is in the casino. Give him Gretchen’s note and he will give you one back fro her. Oh yippy, we get to trudge all the way back to Witchwood. Is there no post office in the Underworld? While you’re in Ghed’ahre go north to the mansion where Gyendal used to live. Just off to the east of it is a gravestone with a hole in the ground. Go into the hole and activate the Reaper Express there. You’ll thank me for it later.
Now go back to Gretchen in Witchwood. She tells you that to break the curse you need to feed the victim a Starbell Flower. No idea where they grow, though, so let’s tgo back to Madhuri in Shoal Leiu. She tells you that Starbell Flowers grow at the top of the Granite Mountains, on the other side of the Crystal Cavern. She also gives you a piece of candy, which you will need to lure away the pixies that are blocking the way through the Crystal Cavern.
When you have the candy, the Bomber Bird egg or dynamite and have released the three fairies in the cave, go back to Hercules and the pixies. Interact with the pixie on your left and it will follow Yvette across the bridge. Then walk onto the bridge and it will explode. Hercules will scoot off to the village to take credit for your actions.
Now go into the area that was previously blocked by the pixies. You will find a pixie egg, which you can also hatch at Moo Hatchery. On the other side of this area you will find the Starbell Flowers (follow route 8, 9, 10).
When you return to Shoal Leiu, Hercules is back in the village square, bragging about his heroic deeds. Mel pulls him aside and he gives you 15,000g in hush money! Go back to Madhuri, who will feed one of the Starbell Flowers to her uncle. He is cured! She will give you the Obsidian Amulet as a reward.
Ready to go back to the main quest? I am.
Plant the Giant Beanstalk
Now that you’ve found the Giant Beanstalk seed in the Granite Mountains, go back to Stonetooth Cave near Peliad, remove the dead tree and try to plant the seed. Nothing happens. Maybe Ulf and the Alchemist in Harakauna know of a grow potion you can use.
Talk to Ulf and he will give you a list of ingredients to collect. They are: a rooster feather (which you should have received as a reward for rescuing Karl the rooster from the chef in Tyobi), an emerald (dropped by the emerald slimes in the Crystal Cavern) and Blueleaf Sap (which you can get from the trees with holes in their trunks in Blueleaf Forest). Give the ingredients to Ulf and he will mix the potion for you. When you have the potion you also need some bat guano from the Great Tree root system.
Go back to the Stonetooth Cave and put the potion and fertilizer on the mud with the beanstalk seed. Now watch that thing grow! Climb up the beanstalk and get the Mermaid Key from the chest at the top. Go up the steps and keep going east until you reach a broken bridge across some murky looking water. Yvette will fly over it, provided she learned the Mogpie birdform at the Circus.
She pulls the lever on the other side and you can cross. Then go into the door on the other side. You will see two statues of lions. A mouse scurries around and tries to pass the statues, but it is zapped by one of the statues’ eyes. You need to find a way to pass the statues without getting zapped! Mel suggests finding Spook again, the boy who helped you out twice before. He said he would be in the tavern in Peliad.
Find Spook and he will help you if he can join your party. Mel grudgingly agrees. He says you need a mirror to destroy the statues. Yvette suggests finding a mermaid, as they are the vainest creatures on earth. You need to go to the city of Acropolis, through the Granite Mountains.
Side Quest: A House for Marcello and Gretchen
So go to the Granite Mountains, make your way to the locked door on the southeast side and open it with the Mermaid Key you just found. Enter the tomb.
Ashera’s Tomb
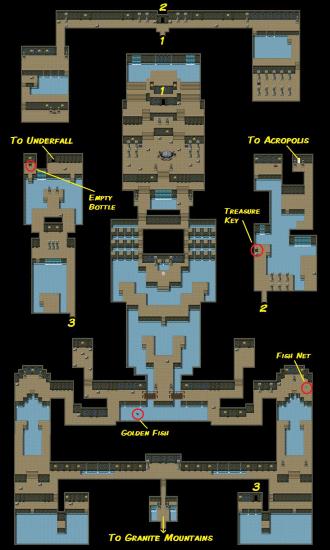
A few steps after you enter you’re caught up by Nox again. She urges Mel to go to the right, to the city of Underfall, as the Darklings there await the return of the heir of Darkthrop.
There are two things you can do now, you can go as Nox suggested and go to Underfall first, or you can ignore her directions and go to Acropolis first. Acropolis has better weapons and armor for sale than Underfall, but you have to pass a giant crab to get there, which is very hard to beat. So if you feel like giving the crab a go, explore Ashera’s tomb and go north. However, it will be an easier route to go to Underfall first, which is what I’ll do. The entrance is quite close by, off to the right as Nox said (marked 3 on the map). By the way, aren’t those attack fish cute?
Underfall
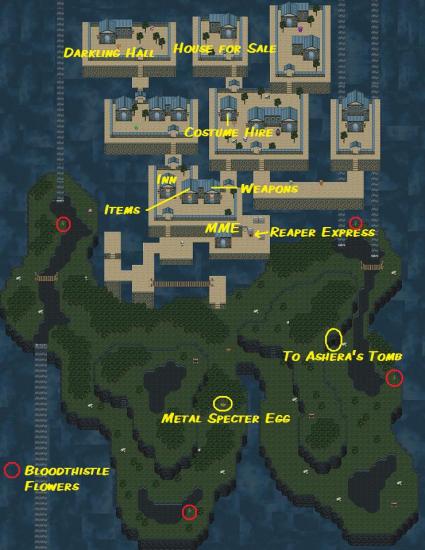
On the way to Underfall you will find another empty bottle. In Underfall, watch out for those ghosts and ghouls – the ghouls cast berserk while the ghosts can curse you or kill a character with one spell. If you decide to fight them, make sure you carry some cassia leaves and witcheye root (witcheye root is sold in Ghed’ahre and Witchwood). In the grounds around Underfall you can find another egg, the Metal Specter egg, to hatch at Moo’s.
In Underfall, switch on both the MME and the Reaper Express on the south side of the city. In the items shop is a book of poems. Buy it and have Spook read it to Mel and he will lose an attraction point. Also don’t use the rotten level egg because it makes your party lose a level. Do get the human repellent, it doesn’t do much but when you use it later it will give you some interesting information about one of your party members… There also is another familiar in Underfall, who will teach Yvette another birdform, the Wobbler, for 20,000g.
On the northwest side of the city is a house named Darkling Hall. Talk to Dollrag inside. She says Mel looks familiar. Nox turns up again and bugs Mel again to assume her role as Darkthrop’s heir.
In the north of Underfall, way at the top in the middle, is a haunted house for sale. June thinks that Marcello and Gretchen, the vampire and witch you helped earlier, might enjoy living in Underfall. Take the flyer from the door and take the Reaper Express to Ghed’ahre. Marcello is still in the casino. He loves the idea of moving to Underfall and rushes out to get Gretchen. While you’re in Ghed’ahre, stock up on some witcheye root and elixirs. They’ll come in useful when you fight the ghouls outside Underfall.
Go back to Underfall and go back up to the house. Gretchen and Marcello have moved in and invite you to a housewarming party. It’s a costume party, so go to the costume shop that’s directly south of their house to hire some costumes. When you have your costumes go back to the house.
There isn’t that much to do at the party, just get an eyeball and some finger bones from the bowls on the table; you can use them later for your alchemy experiments. You can also change the party leader and talk to everyone in the house. This is quite entertaining and informative, especially when you talk to Spook and Nox, who also walks around at the party, posing as a guest. Who is this Spook guy! When you’re done, return the costumes to the shop (unfortunately you can’t keep them) and you’re done here in Underfall. Time to go to Acropolis!
Acropolis – Find the Mermaid’s Mirror
Go back to Ashera’s Tomb and go north. You can pick up the fishing net on your way, but you can’t yet catch the golden fish. Keep going until you get to the giant crab. Make sure your characters have maximum HP and MP (use the life crystal), save and walk up the stairs, which should trigger the fight. If you got good equipment in Underfall, the crab shouldn’t be that hard to beat. He will spawn small crabs, but you can handle those, right? Focus on the giant crab before attacking the small ones. When you’ve defeated the crab he will randomly drop Ashera’s Helmet, Ashera’s Sandals or Ashera’s Bow.
Go north and then north again. In the brown chest you will find the Treasure Key, which opens the blue chests. Keep on going and you will end up in Acropolis.
Acropolis
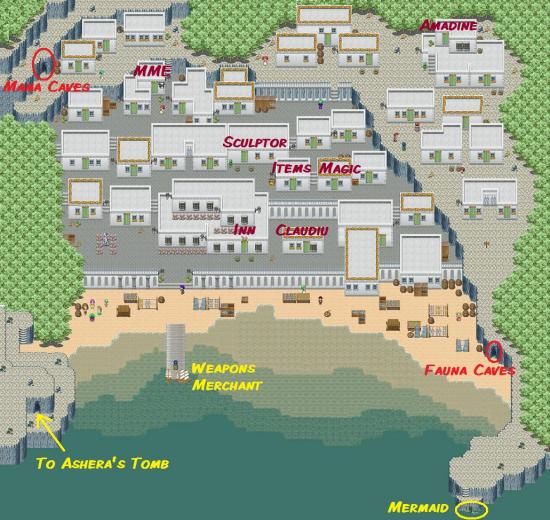
On the beach you will find Hercules again, bragging about his heroic actions as usual. Oh if only you could get back at this guy somehow… You can also buy better weapons from the guy on the dock (isn’t it clever how everyone seems to manage to find a loophole in the “selling weapons is not allowed on Eldrion” law!). In the northwest of the city is another familiar who will teach Yvette her final birdform (the Bluetail) for 35,000.
Go to the northeast of the city and then walk all the way south down the upper rocks to get to the mermaid. Talk to her. Edward will ask for her mirror, but she wants a fruit salad in return. You need to go back to Willoby, who is now the Empress’s chef in Tyobi. Maybe he has a salad for you. So go to Tyobi and talk to Willoby in the kitchen, who will give you a salad. While you’re there, get the slice of pie from the kitchen counter for a positive (of Mel accepts it) or negative (if Mel refuses it) attraction point for Spook.
Take the fruit salad back to the mermaid; she will give you her mirror. Then go back to Stonetooth Cave in Bristle Woods West and use the mirror on the lion statue. It breaks and you can pass. In the next room is a door without a lock. Spook suggests using acid to melt it open. Ulf may be able to mix you some acid.
Side Quest: Find a Music Tutor for Sienna
In the northeast of Acropolis, up on the second floor of the house there, lives Amadine, a music teacher. She gives you her card in case you know someone who needs a teacher. If you’ve explored Chateau Lenore, you will know that Fedor the wine merchant is looking for a teacher for his daughter Sienna. Go back to Chateau Lenore (where the ferry arrives on the mainland) and give him Amadine’s card. Then go back to Acropolis and talk to Amadine again. She will go to Chateau Lenore right away.
If you go back to Fedor, he will give you a bottle of wine as a reward, which you can use for making a love potion. Go to the alchemist in Harakauna and make the love potion. Have Edward use it and he will gain an attraction point. If he does it with Spook in the party, Spook will lose a point at the same time. Have Spook use it and he will gain an attraction point.
Side Quest: Hercules’ Bust
In the house with the green mailbox in Acropolis is a sculptor, Anton, who is working on a bust of our good friend Hercules. Mel says she will pay the sculptor 250g if he makes the nose 2 inches longer! You only need to leave Acropolis and then come back in again for the bust to be finished. Go back to Anton’s house and you’ll find Hercules there. He’s not so pleased with the result!
You have several other options to play out this quest:
1. Mel refuses to take the fake bust from Spook and smashes it. This reduces Spooks attraction points by one.
2. Accept the bust from Spook, which gives him an attraction point. Go to Fahd in Tyobi (the man you stole the bust from) and sell him the real bust. He calls the police and Edward is taken to jail. You need to bail him out for 200g.
3. Accept the fake bust. Then go to the museum in Thais and sell the real bust to Walt for 200g (he doesn’t want the fake one).
4. Accept the fake bust and then first go to Fahd in Tyobi and sell the fake bust for 150g. Then sell the real bust to Walt in the museum for 200g.
Side Quest: Find the Golden Fish
In the small house next to the inn lives Claudiu, who wants you to get him the golden fish you saw swimming around Ashera’s Tomb. Go back into the tomb and get the net, if you haven’t already. It’s just north of the entrance to Underfall. Then go to the two bridges in the center of the tomb, get into the water and walk down under the bridges. The golden fish should be there. You can catch it now. Return the fish to Claudiu. Turns out it’s his wife! Pick up the fish scales and leave – you can use the scales for your alchemy experiments.
Side Quest: Find a new Attraction for the Circus
If you’ve spoken to the ringmaster in the Circus south of Tyobi, you will have found out that they’re missing an attraction. You need to find a new one. To complete this quest, you will first need to complete the quest about Hercules and the pixies in Shoal Leiu. Catch the pixies, release them in the cave, lure them over the bridge and the blow up the bridge.
When you’ve done this, go to the Fauna Caves in Acropolis (it’s the cave southeast, on the beach).
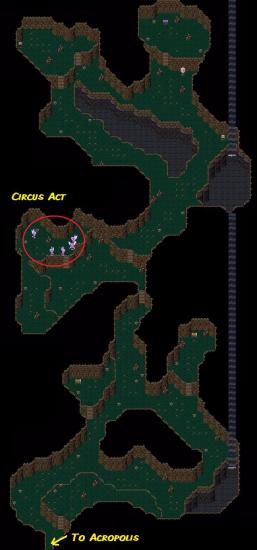
You will need the three empty bottles you used before, plus the one you can find in Ashera’s Tomb and the one that’s in the Mana Caves in Acropolis (northwest, up on the hill).
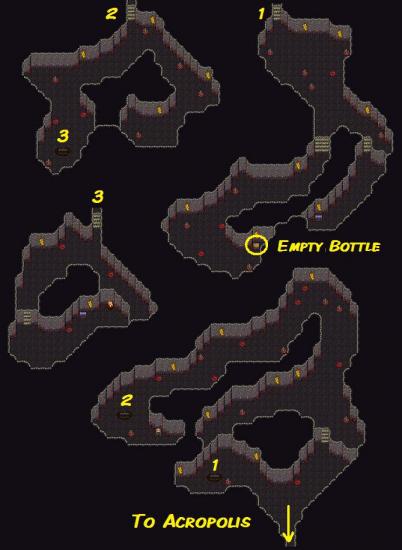
Put the pixies in the bottles one by one and take them to the Circus. Talk to the ringmaster and you will get 300g as a reward.
Get Acid to Melt Open the Door / Colored Block Riddle
After you’ve disarmed the stone lion in Stonetooth Cave, you find a room with a door without a lock. You need to get some acid to melt it open. Go and find Ulf in Harakauna – he may be able to get you some acid.
Ulf isn’t sure how to make acid, but asks the alchemist. The alchemist gives you a list of ingredients, which you can find in your potions book in your inventory. He also tells Ulf to join your party so he can learn plant identification. Yay! Ulf is back!
The ingredients you need are: a diamond, a Bloodthistle Flower and a Thindle Root. Diamonds are dropped by the glowbugs in Fauna Cave southeast of Acropolis, Bloodthistle Flowers grow in the woods around Underfall and Thindle Roots can be found in the Great Tree Root System. When you have the ingredients, give them to the alchemist, as he is the only one who can mix this potion. You receive some acid.
Before you go back to Stonetooth Cave, get Ulf some good gear from Underworld and Acropolis. I strongly recommend you do this, even if he’s not in your active party. Very soon in the game Ulf will be forced to fight and he better have some good equipment!
When you’re done, go back to Stonetooth Cave and use the acid on the door. It melts open. In the next room is yet another puzzle. Ulf thinks this puzzle has something to do with the riddle he copied down in Peliad library at the start of the game. The riddle reads:
The sun must fail to light the day,
The grass and leaves must fade away,
The calmest seas must shake in fright,
The world will be engulfed in night.
In front of you is a series of colored blocks that change color when you push on them. It’s quite simple, really: from left to right pick the colors that are associated with the items mentioned in the riddle: sun, grass, sea and night. Surely you can figure it out from that…
No? Ok then, the colors, from left to right, are: yellow, green, blue and black.
When you’ve entered the correct colors, a new door will open on the left side of the room.
The Final Battle
IMPORTANT: Don’t go into the room that the block puzzle opened until you’re completely done with the game. You will face the final battle and won’t be able to go back to your open quests. In particular, explore the rest of the Stonetooth Caves, as you will find some great equipment there, which will come in handy. So finish all your quests, do some shopping, level up – whatever you want to do.
When you’re ready for the final battle, make sure Edward, Ulf, Yvette and June are equipped with their best weapons and armor, bring many cassia leaves, witcheye roots and elixirs, and go into the room that the block puzzle opened.
I won’t tell you how the game ends, only that you have to fight Gyendal twice. Don’t worry about the first one; Mel is by herself and Gyendal will defeat her in a few blows. The second battle is quite hard, but as final boss fights go, this one actually is quite doable. The best tip I can give you is to use June’s Poison Ivy spell on him – it won’t always work, but keep trying. When he’s poisoned, all you really need to do is try and stay alive. So keep taking those elixirs and cassia leaves etc. until the poison has worn Gyendal out.
When the fight is over, the group gives Mel some space; Edward will take them to the library in Peliad. Mel smashes the Orb. In early versions of the game Mel is left alone and you need to walk back to the library yourself. Theoretically you could go and do some more exploring etc. with only Mel, but this is not recommended – I imagine it could cause bugs in the game. In later versions she’s taken directly to the library.
Either way, you should go back to the library in Peliad, and talk to Edward. He says June has got her magician’s certificate for beating Gyendal. Ulf and Yvette have gone back to Harakauna. Edward suggests that he and Mel should go to visit Te’ijal and her husband Galahad in Sedona, in the Arista Isles.
THE END!
Potions
Purple Warp Egg – recipe found at Moo Hatchery
2x icebell flower
1x snapdragon wings
2x blueleaf sap
Mystery Liquid – use Purple Warp Egg recipe
The squirrel behind Willoby’s house will have given you the hints on how to make this potion. Yields 2 potions that increase walking speed.
2x snapdragon wings
1x blueleaf sap
2x mushroom
Truth Serum – use recipe for Purple Warp Egg
Unfortunately I couldn’t make this potion as some older versions of the game have a bug that deletes the Thindle Root from your items list.
1x golden scale
2x nectar
2x catspaw
Mushroom Pie – recipe found on the bookshelves in Willoby’s house
1x bread
1x fresh milk
2x mushroom
Mystery Powder – use the recipe for Mushroom Pie
Yields 2 powders that restore your party’s HP and MP both in and out of battle.
1x icebell flower
1x golden scale
2x nectar
Mystery Powder – use recipe for Mushroom Pie
Yields 1x charm powder, which can be used in battle to charm the enemy party.
2x icebell flower
1x nectar
1x mushroom
Love Potion – recipe obtained from Lord Burnaby in Harakuna
1x icebell flower
1x wine
1x nectar
Mystery Powder – use the recipe for Love Potion
Yields 3x Sleeping Dust, which can be used to make the enemy party fall asleep.
1x Finger bone
1x icebell flower
1x snapdragon wings
Mystery potion – use recipe for Love Potion
Yields 1x nature potion, which can be used to do damage to the enemy party in battle.
1x slime
1x icebell flower
1x nectar
Moth Powder – recipe found at the items shop in Underfall
1x skunk leaf
1x snapdragon wings
3x mushroom
Mystery Potion – use recipe for Moth Powder
(This potion makes you glow green!)
3x slime
1x eyeball
1x nectar
Mystery Potion – use recipe for Moth Powder
Yields 1x beast begone, a type of beast repellent.
1x slime
3x skunk leaf
1x snapdragon wings
Ice Bomb – buy recipe at the Circus
3x icebell flower
1x catspaw
2x snapdragon wings
Mystery Goop – use recipe for Ice Bomb
Yields 3x toxic sludge, which can be used in battle to both poison and confuse the enemy party.
2x slime
3x cheese
1x finger bone
Mystery Stew – use recipe for Ice Bomb
Venison is scarce this game, and of course I used mine, so if anyone knows what this does, please let me know!
3x venison
2x fresh milk
1x mushroom
Potions Required for Main Quest
These potions can only be mixed by Ulf or the alchemist.
Grow Potion – 1x rooster feather, 1x emerald, 1x blueleaf sap
Acid – 1x diamond, 1x bloodthistle flower, 1x emerald
Potion Ingredients
Bat Guano – Great Tree Root System
Bloodthistle Flower – Underfall
Blueleaf Sap – Blueleaf Forest, inside trees with holes in trunks
Bread – buy in items shops
Catspaw – Blueleaf Forest
Cheese – buy in items shops
Diamond – dropped by Glowbugs in Fauna Caves
Emerald – dropped by Emerald Slimes in Crystal Cavern
Eyeball – costume party in Underfall
Finger Bone – costume party in Underfall
Golden Scale – received when you return the Golden Fish to Claudiu in Acropolis
Icebell Flower – Crystal Cavern
Nectar – Blueleaf Forets, beehive west of Great Tree
Milk – buy in items shops
Mushroom – Willoby’s house
Rooster Feather – “reward” for rescuing Karl the rooster from the chef
Skunk Leaf – Bristle Woods
Slime – dropped by Emerald Slimes in Crystal Cavern
Snapdragon Wings – dropped by Snapdragons in Blueleaf Forest
Snowbell Flower – Granite Mountains
Thindle Root – Great Tree Root System
Venison – very rare, some chests
Wine – reward for finding a music tutor for Sienna at Chateau Lenore
Locations of Animals Missing from Moo Hatchery
Bomber bird – Blueleaf Forest, west of the Giant Tree
Fire Bird – Worm Tunnels, entrance
Fairy Toad – Crystal Cavern, on the way to the Beanstalk Forest
Locations of Empty Bottles
In Blueleaf Forest – on the way to the Great Tree, go up some steps with one Snapdragon at the top. Off to the right is a chest with a bottle.
At the Circus – up the steps on the west side, walk around to the south.
Crystal Cavern – on the way to the Giant Beanstalk Forest.
Ashera’s Tomb – behind the door to Underfall
Mana Caves in Acropolis
Goodie Caves
Like the previous Aveyond games, The Lost Orb has a series of hidden caves that contain all the best weapons and armor, lots of gold, spells for everyone etc. Goodie caves are not required for finishing the game, but are just bonuses. If you use the goodie caves, the game will be a lot quicker and very easy, and might end up being rather disappointing as most of the challenge is gone. I recommend only using the goodie caves on your second play, or if you’re really struggling.
The caves are hidden, meaning that you won’t see any doors. You will need to click on the entrance or walk into the location of the entrance and press space or enter. The caves are:
Gold
This cave contains 60,000g. Walk along the outside of the graveyard in Peliad and click on the wall Mel is facing in the image.
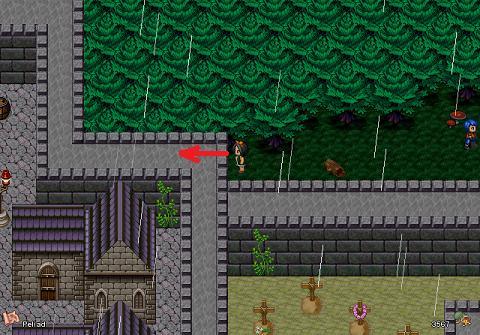
Weapons
This cave contains all the best weapons for all possible party members. In Bristle Woods East, find the broken bridge to Tyobi. The cave is slightly southeast of the bridge.
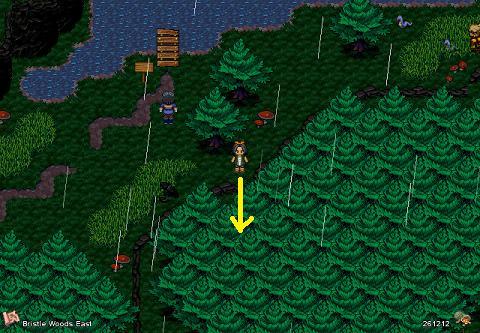
Armor
This contains all the best armor for the entire party. In Blueleaf Forest, just outside the exit to Harakauna, go down some stone steps. Then click on the wall Mel is facing in the image below.
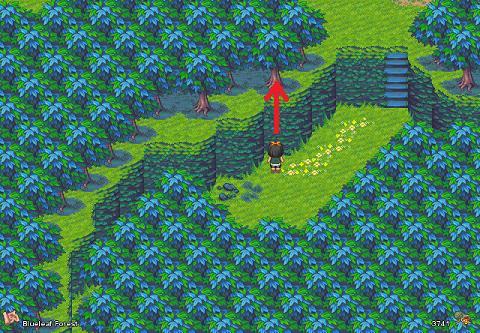
Spells
This cave contains all spells for June and Yvette. Leave Tyobi to go into Wyrmbone desert. Follow the path across the bridge and up and down some steps. Then go across the bridge west and walk south around the wall. The cave is in the wall Mel is facing in the image below.
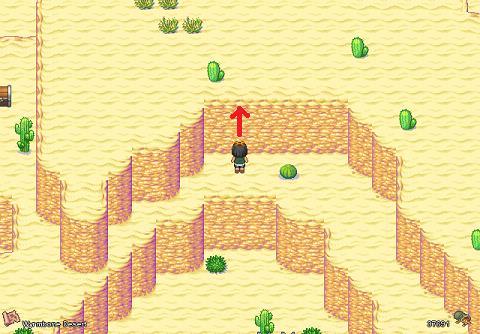
Apothecary
This cave contains all the potion recipes. It is located in the Worm Tunnels, between exits 7 and 8.
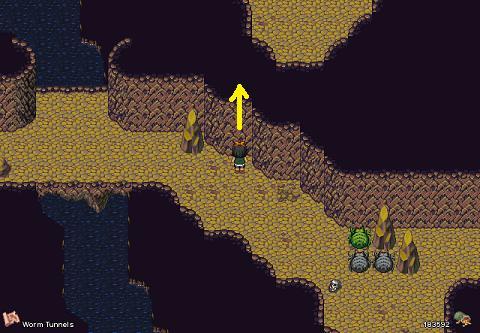
Level
This cave contains a lever that will increase your party’s level by one when you pull it. Pull it as many times as you like for as many levels as you like! The cave is located in Bristle Woods West, east of the signpost.
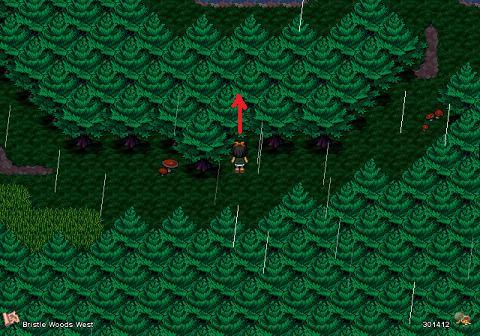
Magic Mirror Express Destinations
Eldrion
Peliad:
Harakauna 200
Tyobi 300
Harakauna:
Peliad 200
Tyobi 300
Tyobi:
Peliad 300
Harakauna 300
Shoal Leiu 500
Shoal Leiu:
Tyobi 500
Acropolis 800
Underfall 800
Underfall:
Shoal Leiu 800
Acropolis 1000
Acropolis:
Shoal Leiu 800
Underfall 1000
Main Continent
Thais:
Harburg 50
Stormbend 200
Moo Hatchery:
Thais 100
Stormbend 200
Harburg:
Thais 50
Stormbend:
Thais 100
Witchwood 200
Moo Hatchery 300
Witchwood:
Stormbend 200
More articles...
Monopoly GO! Free Rolls – Links For Free Dice
By Glen Fox
Wondering how to get Monopoly GO! free rolls? Well, you’ve come to the right place. In this guide, we provide you with a bunch of tips and tricks to get some free rolls for the hit new mobile game. We’ll …Best Roblox Horror Games to Play Right Now – Updated Weekly
By Adele Wilson
Our Best Roblox Horror Games guide features the scariest and most creative experiences to play right now on the platform!The BEST Roblox Games of The Week – Games You Need To Play!
By Sho Roberts
Our feature shares our pick for the Best Roblox Games of the week! With our feature, we guarantee you'll find something new to play!Type Soul Clan Rarity Guide – All Legendary And Common Clans Listed!
By Nathan Ball
Wondering what your odds of rolling a particular Clan are? Wonder no more, with my handy Type Soul Clan Rarity guide.


