- Wondering how to get Monopoly GO! free rolls? Well, you’ve come to the right place. In this guide, we provide you with a bunch of tips and tricks to get some free rolls for the hit new mobile game. We’ll …
Best Roblox Horror Games to Play Right Now – Updated Weekly
By Adele Wilson
Our Best Roblox Horror Games guide features the scariest and most creative experiences to play right now on the platform!The BEST Roblox Games of The Week – Games You Need To Play!
By Sho Roberts
Our feature shares our pick for the Best Roblox Games of the week! With our feature, we guarantee you'll find something new to play!Type Soul Clan Rarity Guide – All Legendary And Common Clans Listed!
By Nathan Ball
Wondering what your odds of rolling a particular Clan are? Wonder no more, with my handy Type Soul Clan Rarity guide.
Nancy Drew: The Final Scene Walkthrough
Welcome to Gamezebo's walkthrough for Nancy Drew: The Final Scene. How to Play Controls The cursor will change into different icons when it moves over interactive areas on the playing area. Left click the mouse to perform an action when an icon is shown. The default cursor is the magnifying glass, which will glow red when it is moved over an area that can be examined more closely. The directional arrows forward, back, up, down, left, right and half turn will move Nancy in those dire…
a:1:i:0;a:2:s:13:”section_title”;s:39:”Nancy Drew: The Final Scene Walkthrough”;s:12:”section_body”;s:34371:”
Welcome to Gamezebo’s walkthrough for Nancy Drew: The Final Scene.
How to Play
Controls
- The cursor will change into different icons when it moves over interactive areas on the playing area.
- Left click the mouse to perform an action when an icon is shown.
- The default cursor is the magnifying glass, which will glow red when it is moved over an area that can be examined more closely.
- The directional arrows forward, back, up, down, left, right and half turn will move Nancy in those directions.
- The hand icon is used to take and interact with different objects.
- The question mark icon allows Nancy to talk to talk to different characters in the game. The conversation window shows Nancy’s text lines in white and other characters text lines in blue.
Screen Layout

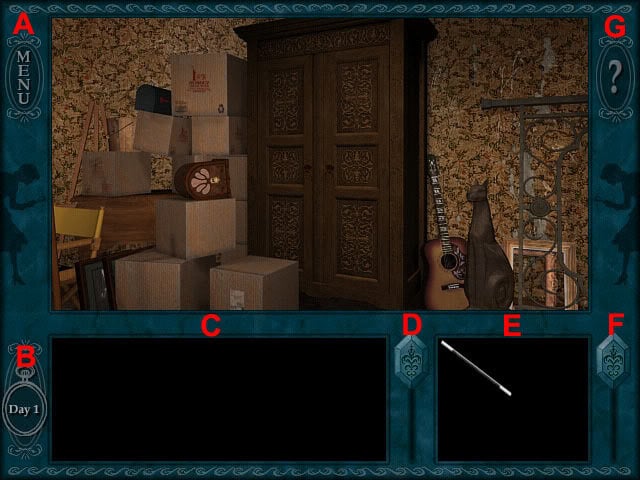
A. Menu. See the Game Menu section for more information.
B. Day. Displays the current day in the game.
C. Conversation window. Displays any conversations that occur in the game. Nancy’s lines are in white and other character’s lines are in blue.
D. Conversation slider. Scroll through text in the conversation window.
E. Inventory. Displays items that have been found in the game.
F. Inventory slider. Scroll through items in the inventory window.
G. Help. Displays a summary of important information about the game.
Game Menu
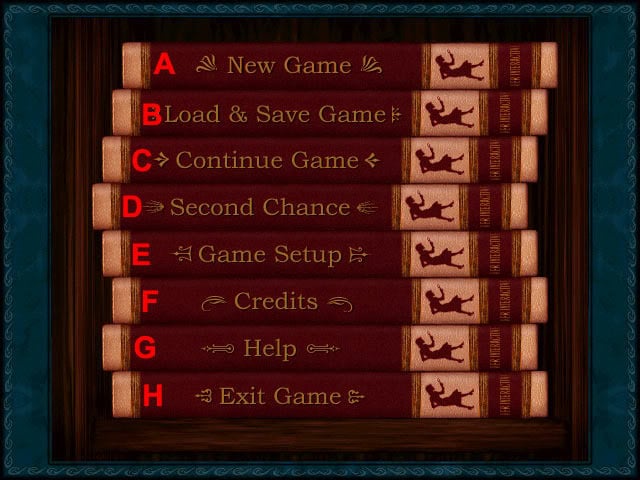
A. New game. The player challenge screen is shown. From here, you can select Junior Detective for the easier version of the game or Senior Detective for the harder version of the game. You can also select the Tutorial button for an interactive tutorial on how to play the game.
B. Load & Save Game. You can enter a name for the game in the text bar at the top of the screen and then click the save button to save, or select one of the previously saved games and then click load to restore the game.
C. Continue Game. Continues a game that is currently being played.
D. Second Chance. If a mistake has been made in the game or you just want to restart a certain scene, the Second Chance button will return Nancy to an earlier point.
E. Game Setup. Change the voice volume, music volume and special effects volume. Toggle player speech, character speech and closed captioning. Select done to return to the menu.
F. Credits. View the list of people involved in the creation of this game. Left click to return to the game menu.
G. Help. Displays a summary of important information to know about the game.
H. Exit game. Select yes to save the game before exiting, no to exit the game without saving or cancel to return to the game menu.
Difficulty
There are two difficulties to choose from when you start a new game: Junior Detective and Senior Detective. The only difference between the difficulties is that the Bee’s Knees jazz machine puzzle in the lobby and the sliding pieces puzzle in the basement is more difficult on Senior Detective mode.
Conversations
It is important to talk to characters that you meet in the game about every subject that is currently available, as sometimes talking about one or more subjects to a character triggers an action that allows you to progress in the game. When talking to a character is mentioned in the walkthrough, it means to talk to that character about every available subject. Sometimes, ending the conversation with a character and then talking to them again brings up a list of new subjects.
Walkthrough
Day 1
The game starts outside the men’s dressing room in the theater. Nancy has just seen Maya Nguyen walk into the dressing room and then heard her scream. Open the door and move forward into the room. Turn slightly left and move forward to hear the phone on the desk ring. Select the phone on the desk:
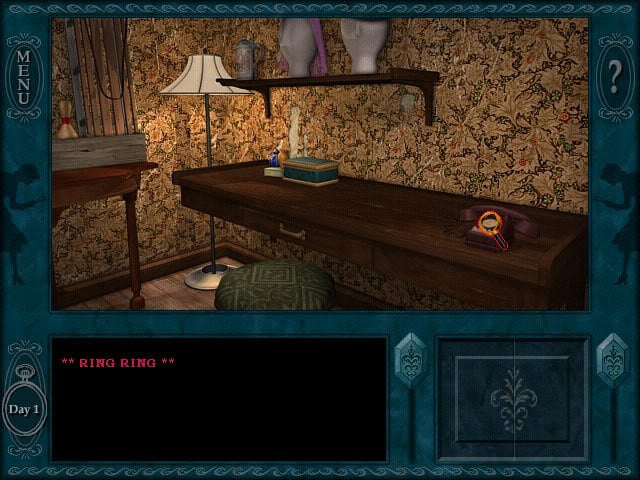
Nancy answers the phone and hears a disguised voice on the other end which threatens that Maya will be in danger if the theater is demolished. Back away from the phone and it will ring again. Move forward to the phone and answer it to talk to Joseph Hughes, the caretaker. Talk to Joseph and he will say that he is looking for Brady Armstrong. Nancy explains that Maya has just disappeared, so he tells Nancy to look for a secret passageway. After Nancy puts the phone down, Brady Armstrong enters the room and asks if Nancy wants a signed autograph. Talk to Brady until he leaves the room. Half turn left to see the wardrobe:
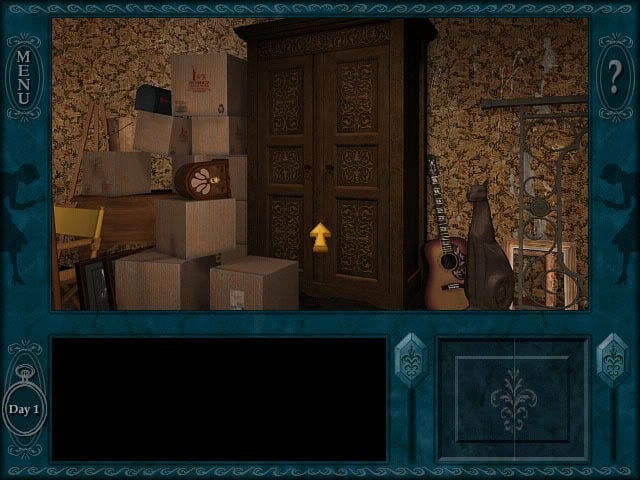
Move forward to the wardrobe and open the right door. Move forward to the wardrobe door and take the magic wand on the top shelf:
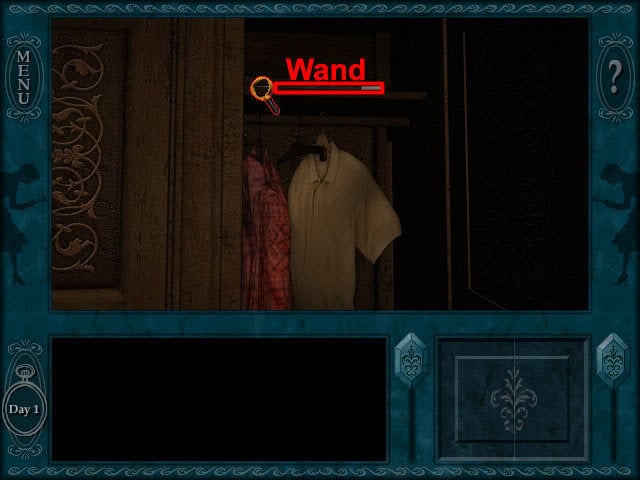
Back away from the wardrobe door and then close the door. Quarter turn left and move forward to the picture on the wall:
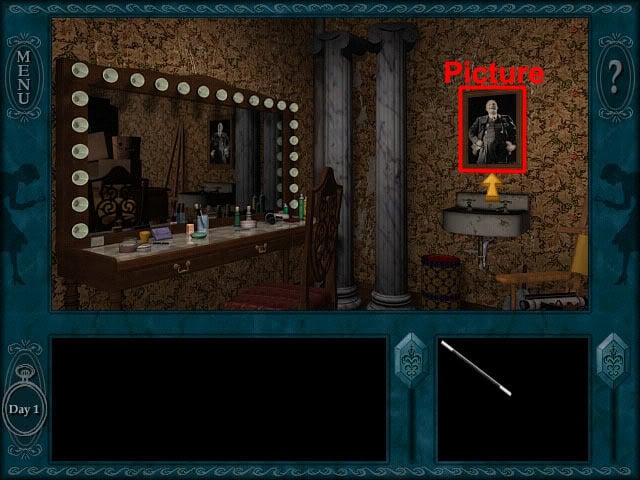
Examine the picture to reveal a lever. Pull the lever to hear a noise. Select the picture to move it back to the wall. Move back twice. Half turn right to see a clothes rack. Move forward to the rack and select the clothes to reveal a hidden door. Move forward through the doorway and then follow the hallway along to the next door.
Open the door and move forward to enter the wardrobe. Open the wardrobe and move forward into the women’s dressing room to meet Simone. Talk to Simone and she will tell Nancy to scram. Quarter turn right, open the door and enter the backstage area. Quarter turn right, open the door and move forward to the hallway. Go through the first door on the left:
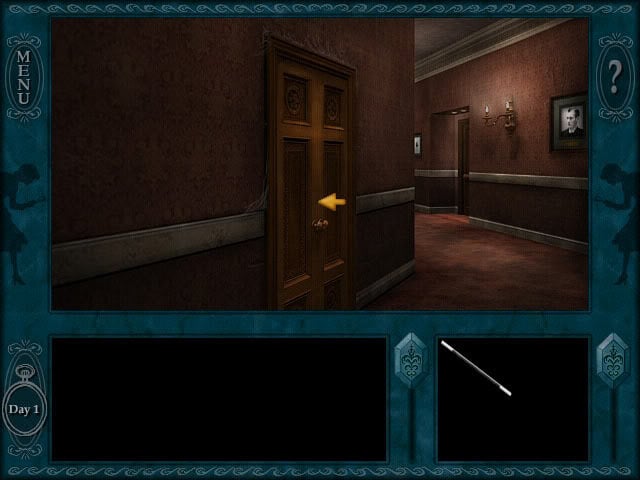
Look down and take the coin on the floor:
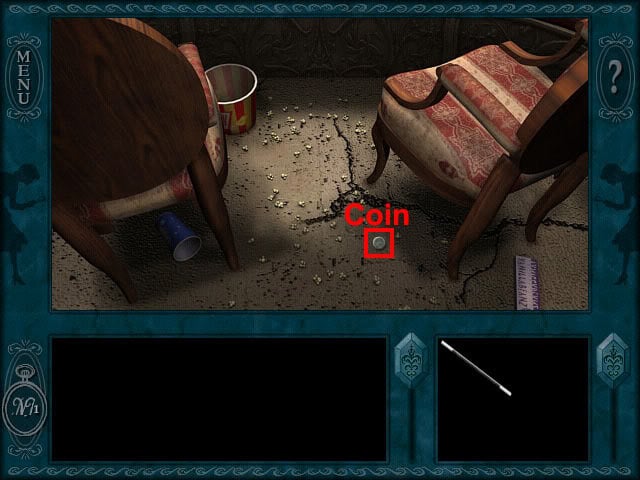
Look up, half turn and go through the door to return to the hall. Quarter turn left and move forward to the other end of the hall. Go through the curtained doorway to enter the lobby. Half turn and go through the double doors to enter the main seating area. Move forward five times to the front of the stage. Quarter turn right and move forward, then quarter turn right to face up the middle aisle of seats:
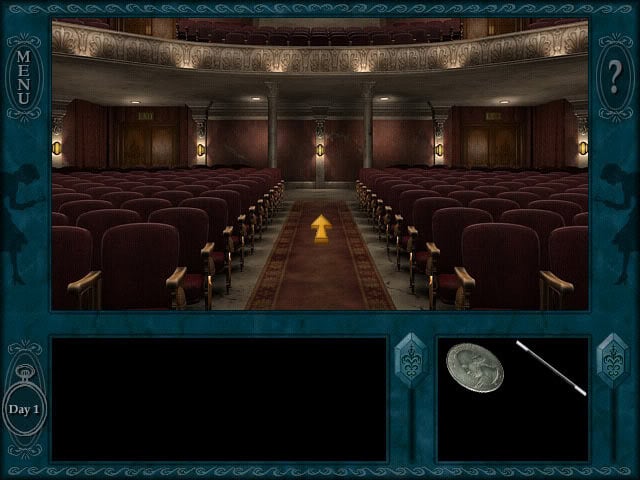
Move forward three times and then examine the bubble gum on the left seat:
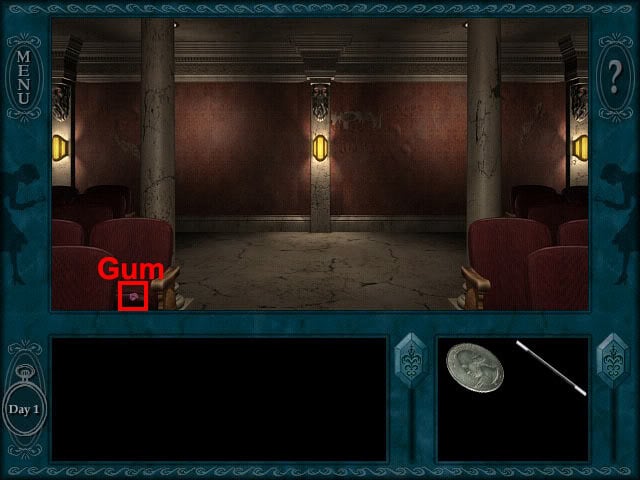
Use the magic wand on the bubble gum to take it. Back away from the seat, move forward, quarter turn right and then go through the double doors on the left to enter the lobby. Go to the Bee’s Knees jazz machine and examine it.
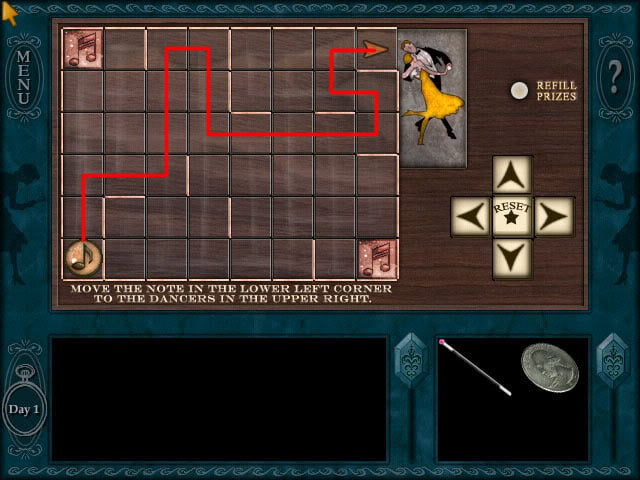
The aim on Junior Detective difficulty is to move the note from the bottom-left corner to the top-right corner. Move up twice, right twice, up three times, right once, down twice, right four times, up once, left once, up once and right once:
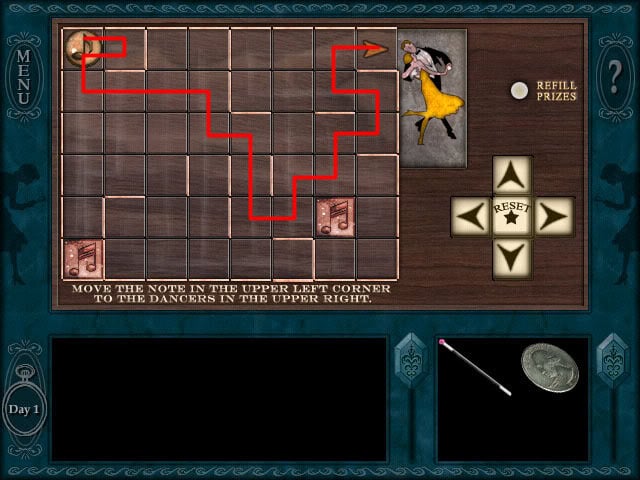
The aim on Senior Detective difficulty is to move the note from the top-left corner to the top-right corner. Move right, left, down, right three times, down, right, down twice, right, up, right, up, right, up, left, up and right:
Take the gear from the slot. Back away from the machine. Go up the stairs that are nearest to the out of service key machine. Open the door at the top of the stairs and move forward to the balcony. Move forward to see that one of the gears on the ledge is missing. Look over the balcony to see the gear. Use the magic wand with the gum on the gear to take it:
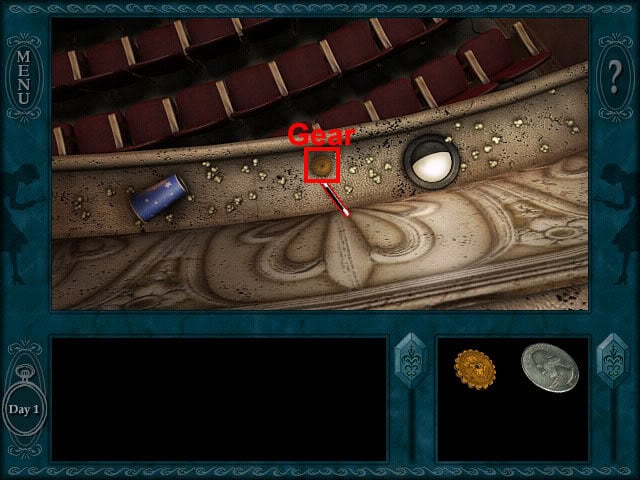
Go downstairs and return to the backstage area. Move toward the ropes at the right side of the area:
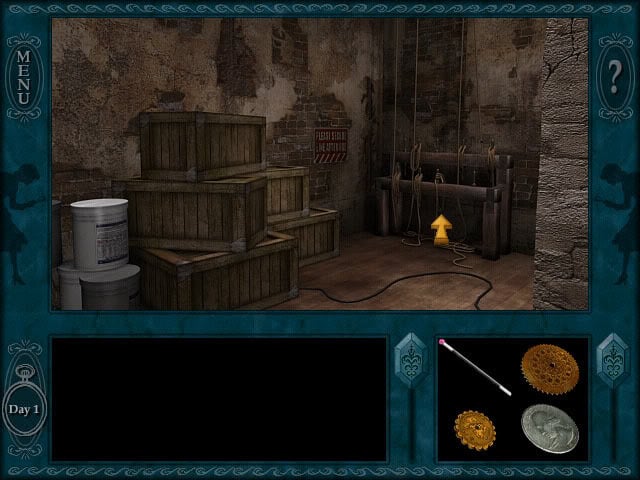
Examine the ropes and then select the left rope eight times to hear a clunk noise. Walk to the other side of the backstage area and examine the crate. Select the hook:
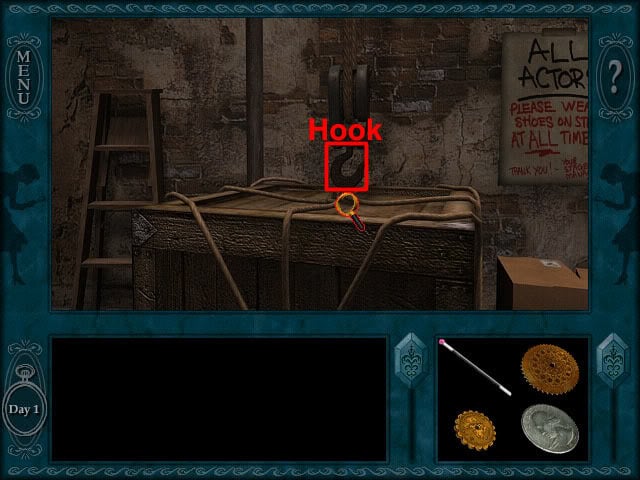
Nancy will attach the hook to a rope on the crate. Return to the ropes at the other side of the backstage area and pull the left rope eight times to raise the crate. Return to the crate to see that a hatch has been revealed below it. Open the hatch and go downstairs to the basement.
Go to the other side of the basement to see the Amazing Monty game. Press the yellow button to play the game. Press the yellow button again and Monty will shuffle the cards. Press the left button to find the Ace of Spades. Open the prize in the slot and take the flash ring. Go to the other side of the basement and examine the panel to see five shapes. Turn all of the buttons to spades in the following order:
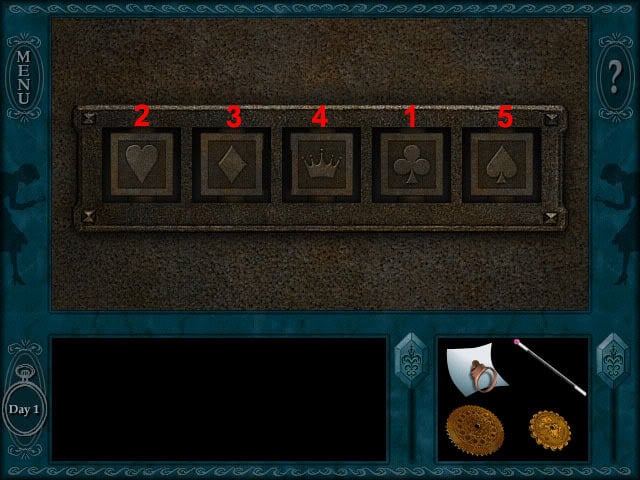
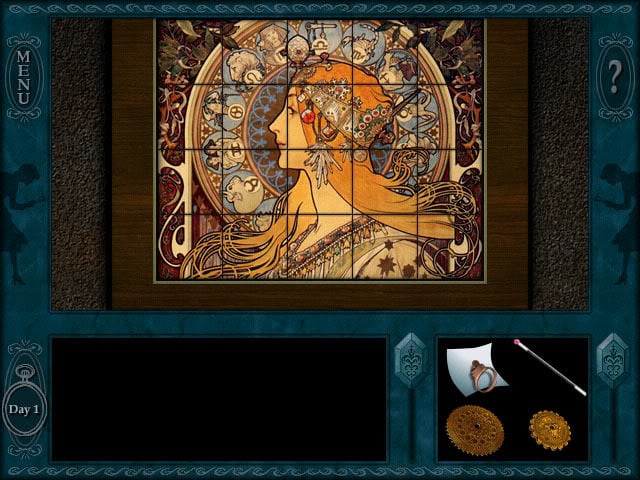
Examine the box that is revealed. Examine the tiles on the box. Tiles can be moved by selecting one and then dropping it on another tile. Tiles can be rotated by moving the mouse cursor to the top-left corner of a tile and then clicking the left mouse button. Move and rotate the tiles to the following positions:
Put the big gear in the left slot and the small gear in the right slot:
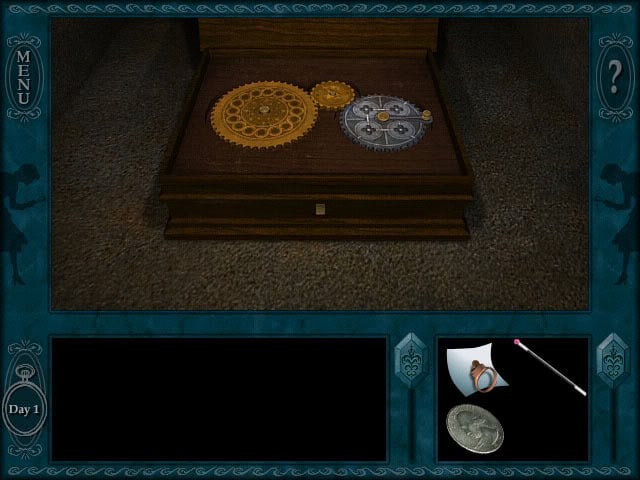
Select the silver gear to open the drawer of the box. Take the key and the letter to Mr. Houdini. Read the three pages of the letter: JJ Thompson would like to make Harry Houdini a business partner in the theater. Close the drawer and the box. Exit the basement and return to the lobby. Open the door opposite the refreshment counter to enter the ticket booth. Move toward the phone at the right side of the room:
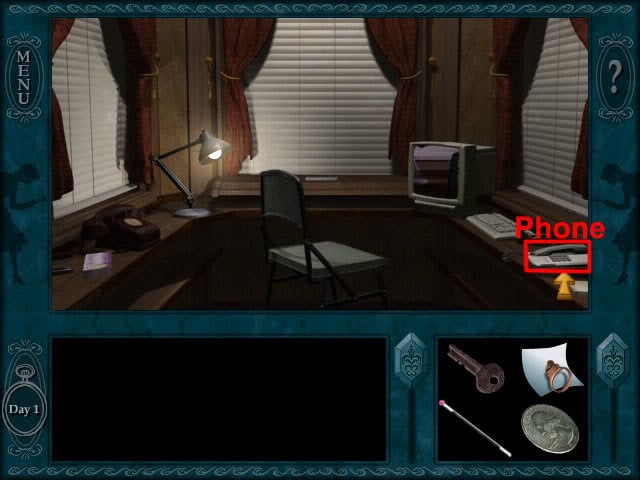
Select the phone and dial 911 to call the police: Ramsay won’t investigate for 24 hours unless Nancy can provide them with evidence. Exit the ticket booth and talk to Nick at the refreshment counter: He doesn’t think that Maya is in any danger.
Go upstairs. Before going through the double door, quarter turn toward the middle of the railing and then move forward to see a small door. Open the door and enter the projection room. Turn slightly left and talk to Joseph: He recommends calling County Administration to ask for a blueprint of the theater that was made before the 1956 remodel. The theater was built in 1925 by JJ Thompson. Exit the projection room and go downstairs.
Go to the women’s dressing room and talk to Simone: She says that Maya being kidnapped will be good publicity for Brady. Return to the lobby and talk to Nick. Exit the conversation with Nick and then talk to him again to see different conversation topics. Keep talking to Nick and he will ask Nancy to see if anything links his grandmother with the theater. Talk to Nick again to tell him about the documents that were found in the basement: He says that he will do some research on his laptop.
Back away from the counter and Joseph will call Nancy to the projection room. Go upstairs and enter the projection room. Talk to Joseph and he will show Maya’s press pass to Nancy: He says that Brady found it. Go downstairs and enter the ticket booth. Use the phone and dial 911 to call the police. Ramsay says that Nicholas Falcone uses extreme tactics to save a theater, and has a history of minor crimes. Exit the ticket booth and the first day will end.
Day 2
Go to the projection room and talk to Joseph: He doesn’t think Nick is dangerous. Go downstairs to the lobby and talk to Nick: He says that he has nothing to do with Maya’s disappearance. Exit the conversation with Nick and then talk to him again: He has the phone number for the widow of one of Houdini’s cousins. Enter the ticket booth and examine the pad of paper at the right side of the phone to see the number for Eustacia Andropov:
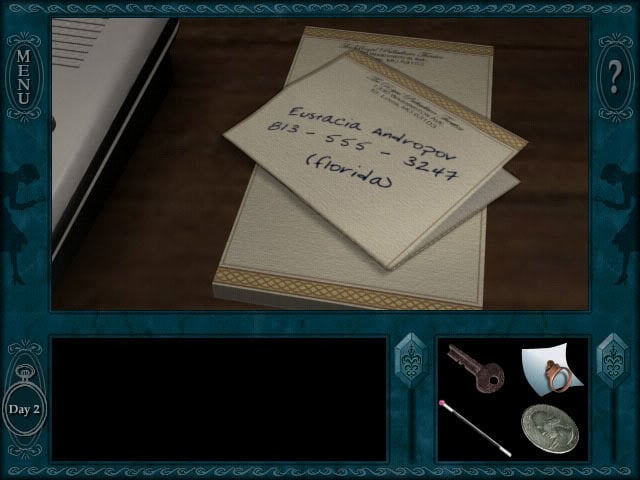
Use the phone and dial 1-813-555-3247 to call Eustacia: She tells Nancy to call the Library of Congress to ask them about the Houdini collection. Dial 1-202-555-5000 to call the Library of Congress: Sherman agrees to send Nancy a slide of the artifact. Exit the ticket booth and talk to Nick to tell him about the package that is being delivered. Return to the women’s dressing room and talk to Simone: She mentions that a press conference will be starting soon.
Return to the men’s dressing room and talk to Brady: He says that the press pass was found in the basement, then corrects himself and says the balcony. Keep talking to Brady until he says that he has to get ready for the press conference. Examine the drawer below the mirror and try to open it to see that it is locked. Return to the lobby and move forward to hear the press conference. Return to the women’s dressing room to see that Simone has gone. Approach Simone’s desk and open the drawer. Take the hairpin:
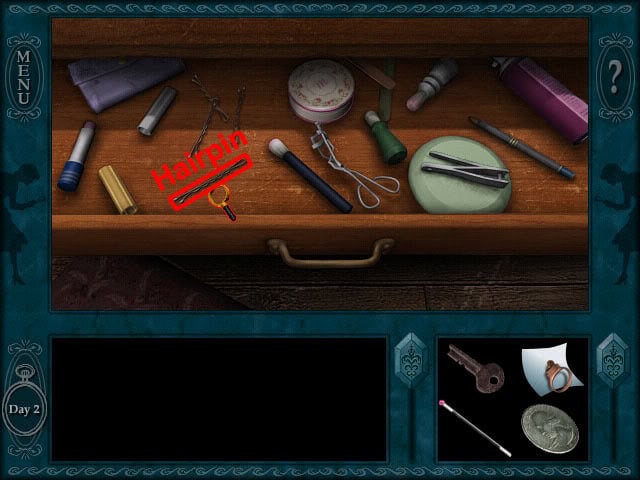
If Nancy doesn’t take the hairpin, you need to examine the drawer below the mirror in the men’s dressing room. After taking the hairpin, return to the men’s dressing room and use the hairpin on the locked drawer below the mirror to open it. Examine the blue stage technician’s guide book:
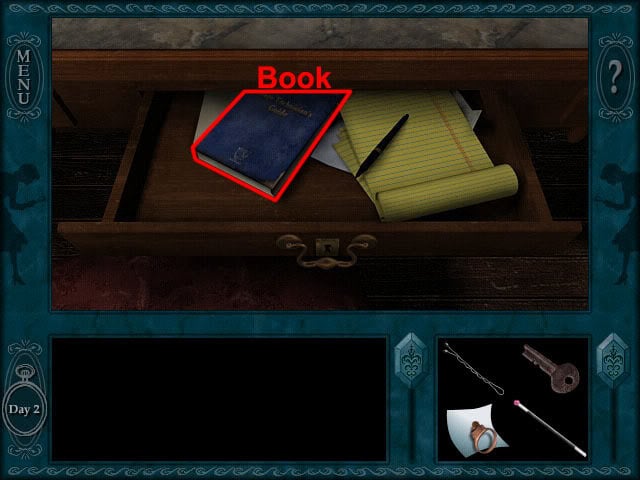
Read the book to see the number 121192. There are also instructions for the Houdini Transformation trick. Close the book and the drawer. Return to the projection room. On the way through the backstage area, you will hear a splattering sound. When this happens, just wait for a few seconds and a stage light will fall to the floor.
If you continued forward instead, you will either need to restore a game or use the Second Chance option. After arriving in the projection room, move forward to the control console and examine the keypad:
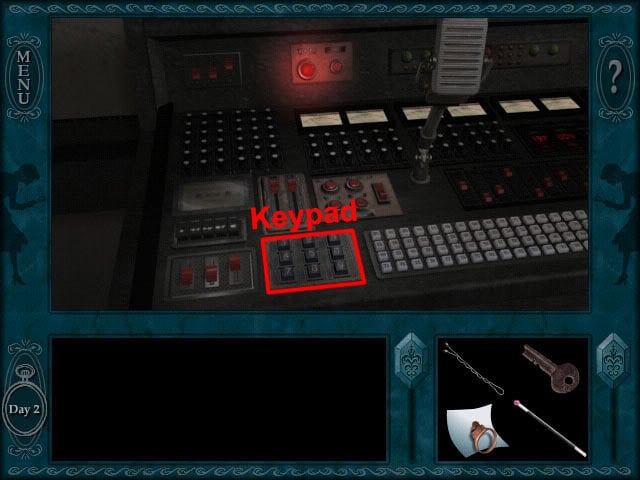
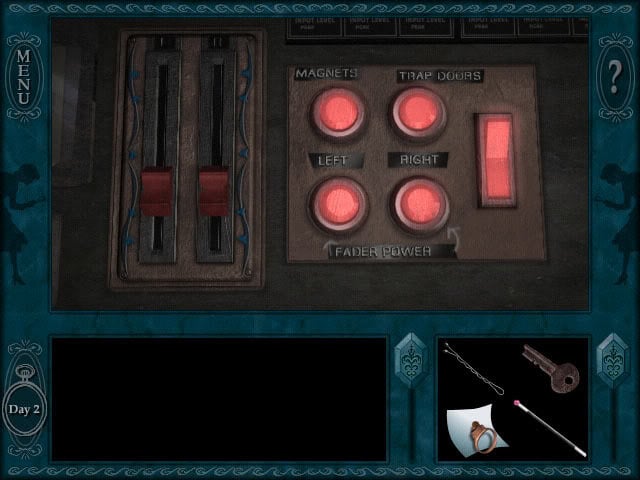
Press the buttons 121192 on the keypad. Examine the buttons above the keypad. Press the left and right fader buttons. Move both fader switches down to the bottom. Press the magnet button. Move both fader switches up one space. Press the trap door button and then press the switch at the right side of the buttons. The panel should end up looking like this:
Exit the projection room and go downstairs. Enter the main stage room and go onto the stage to see that two cages have been lowered. Open one of the cages and move forward to go inside. Look down to see a ladder below. Move down to the area below the stage. Examine the broken light:
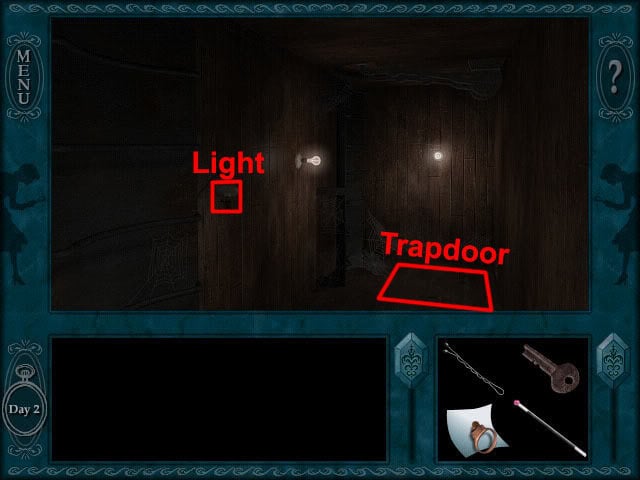
Examine the hole at the top of the light to see Maya in a secret room. Examine the trapdoor on the floor. Open the trapdoor and go downstairs to the basement. Turn left at the bottom of the stairs and examine the puzzle on the wall to see that the pieces are stuck. Back away from the puzzle and move to the other end of the hall. Press the red button to lower the elevator:
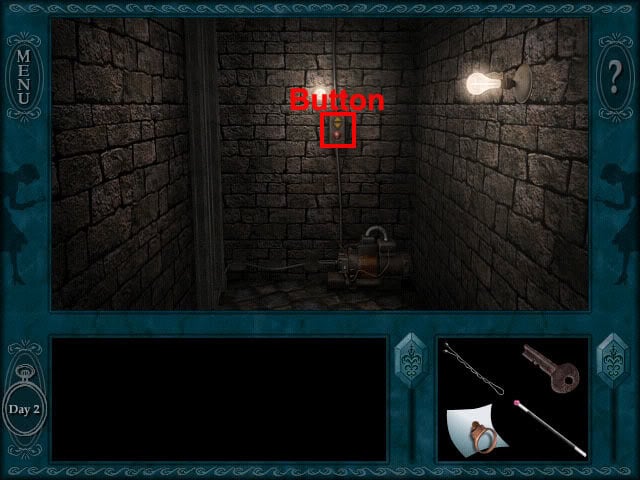
Move onto the elevator and press the red button. Climb up the ladder and select the hatch to hear Joseph on the other side (this will only happen if Nancy has examined the puzzle in the basement with the fixed pieces). Talk to Joseph and he will say that he is greasing the wheels. He eventually opens the hatch and gives Nancy a can of lubricant.
Climb down the ladder and press the red button to return to the basement. Go to the other end of the hall and examine the puzzle. Use the can of lubricant on the puzzle and the pieces can now be moved. Follow the directions below if playing on Junior Detective difficulty:
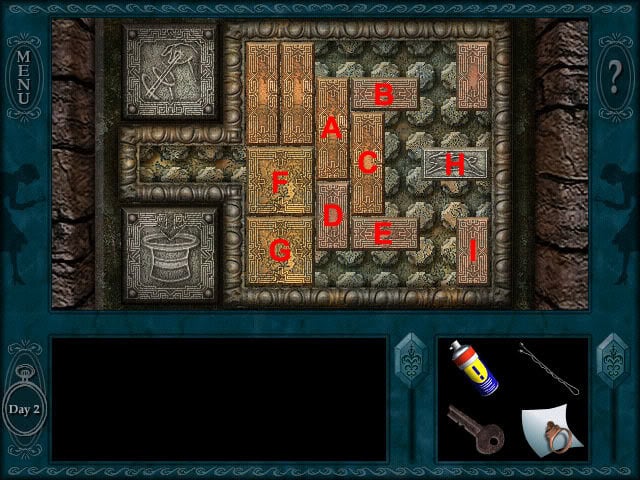
A: Up
B: Right
C: Up
D: Down
E: Right
F: Right
G: Up
D: Up
E: Left
F: Down
F: Right
H: left
I: Up
F: Right
E: Right
G: Down
D: Down
H: Left
Follow the directions below if playing on Senior Detective difficulty:
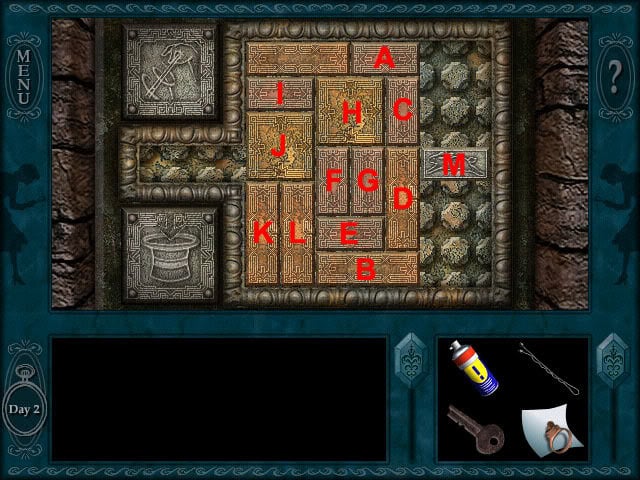
A: Right
B: Right
C: Up
D: Up
E: Right
F: Down
G: Down
H: Down
I: Right
J: Up
K: Up
L: Up
H: Up
F: Up
G: Up
B: Left
D: Down
C: Down
I: Right
C: Up
H: Up
M: Left
D: Up
B: Right
K: Down
L: Down
M: Left
The door to the magician’s room will open after the puzzle has been solved. Examine the chest below the picture of the magician and open it. Move forward to look in the chest. Take the rubber gloves:
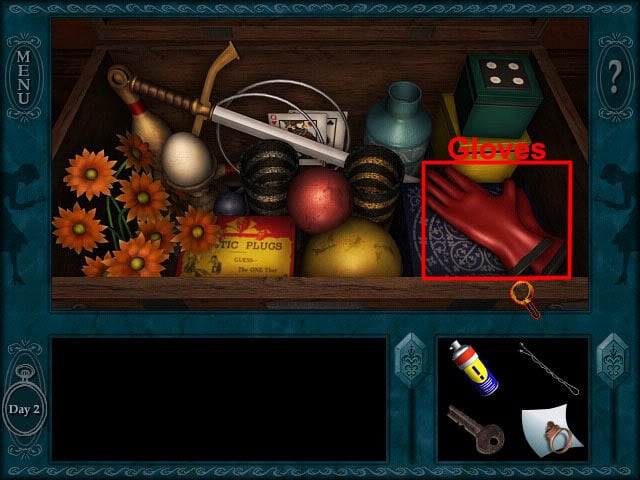
Close the chest. Turn slightly left and examine the pizza box and shoe:
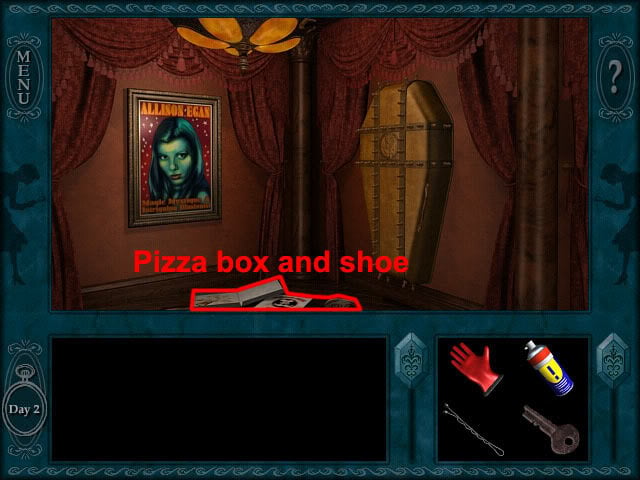
Move forward to the coffin and open it. Go through the doorway and follow the hall along to the electric gate:
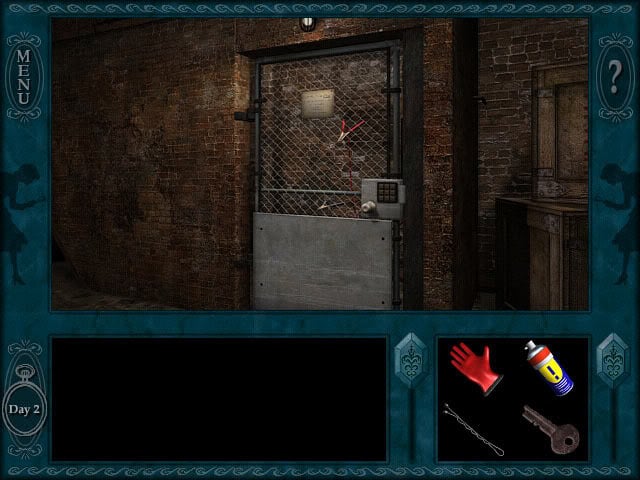
Move forward to the keypad on the gate. Use the rubber gloves on the gate to press a number button. If a buzzer sounds, keep trying other numbers until you find the number button that can be pressed in. Next, try another number. If a buzzer sounds, both buttons will reset, so you need to press the first number again and then find the next correct number. The aim is to find the correct order for all of the buttons in order to open the gate.
After the puzzle has been solved, move forward up the stairs and open the trapdoor. Nancy emerges into the backstage area and sees Brady: He says the he hasn’t seen anything suspicious lately. Return to the ticket office and use the phone. Dial 911 to call Ramsay and tell him about the evidence: He agrees to send someone over to investigate. Return to the projection room and talk to Joseph: He says he will wait up for the police and tells Nancy to get some rest. Exit the projection room and the second day will end.
Day 3
Examine the newspaper to read about the ransom demand for Maya. Back away from the view of the newspaper and exit the ticket booth. Return to the projection room and talk to Joseph: The police couldn’t find any evidence in the magician’s room. Go to the men’s dressing room and talk to Brady: He tells Nancy not to hang around with Nick.
Go to the women’s dressing room and talk to Simone about the ransom demand: She thinks the kidnapper should have demanded a higher amount. Return to the men’s dressing room and turn left to see that Brady has gone. Move forward to the table and open Brady’s bag. Examine the bag and take the pencil:
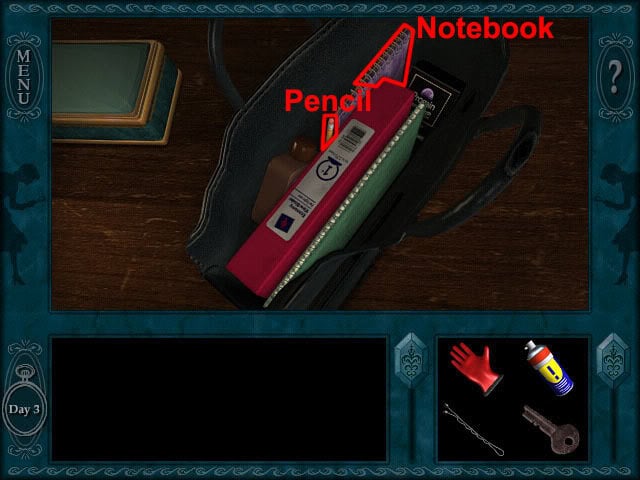
Examine Maya’s notebook. Close the bag. Back away from the bag and Brady will enter the room: He denies kidnapping Maya and says that he is the nephew of JJ Thompson. He found Maya’s notepad and press pass in the basement and decided to hang onto it for a few days. Return to the lobby and talk to Nick: He mentions that a package just came from the museum. Enter the ticket booth and examine the package:
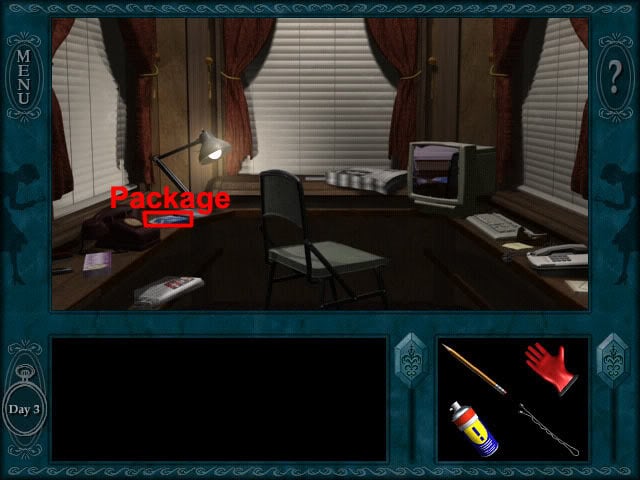
Open the package to see a letter from Sherman and a slide. Take the slide. Return to the projection room and examine the reels at the right side of the room. Examine the projection book on top of the wheels:
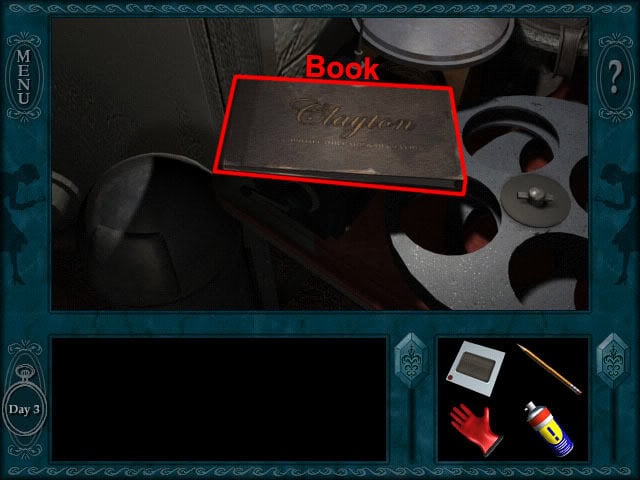
Flip to the last page of the book and use the pencil on the page to reveal the design for the key:
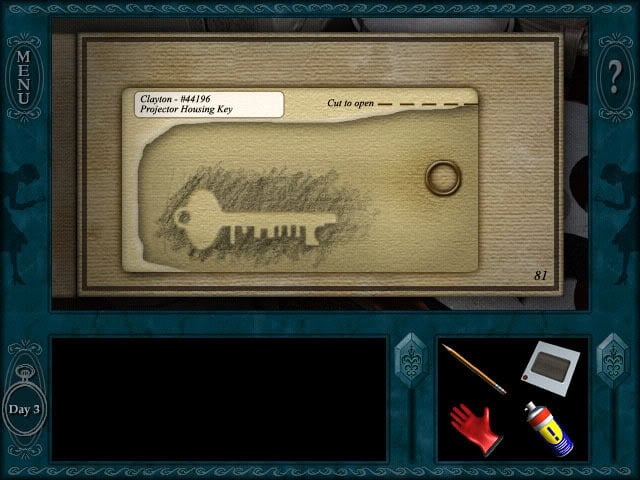
Go to the lobby and examine the key making machine at the left side of the refreshment counter. Use the coin on the coin slot. The aim now is to press the buttons to make a key that looks like the one shown on the last page of the projection book. Press the buttons S, I, V and O:
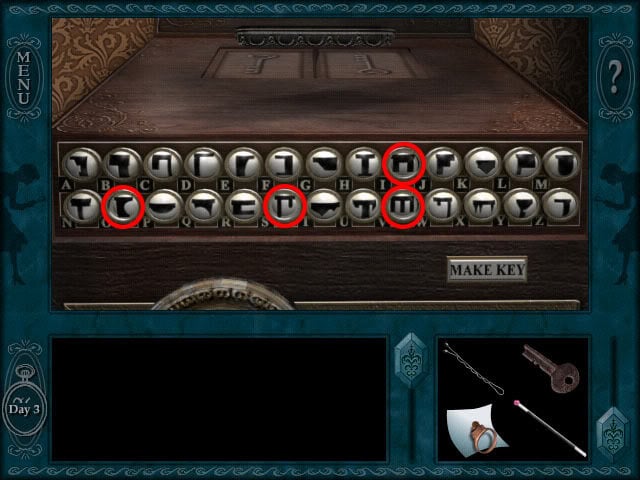
Press the make key button to make the key and then take the key from the tray. Return to the projection room. Quarter turn right and open the cupboard. Move forward to the shelf to see a bulb:
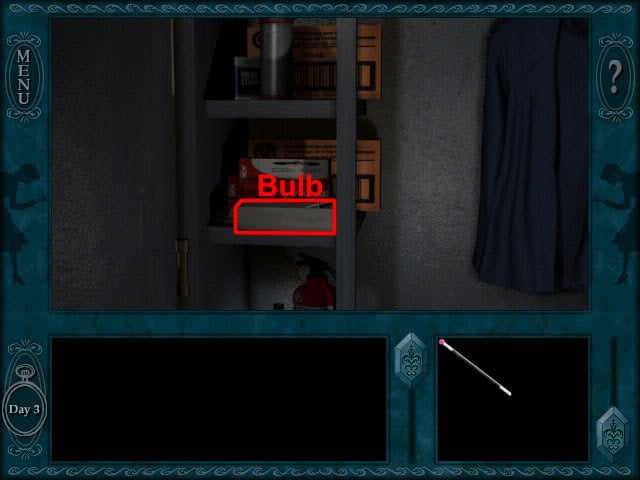
Close the cupboard and quarter turn left. Move forward to the blue projection machine. Use the key on the keyhole to open the machine:
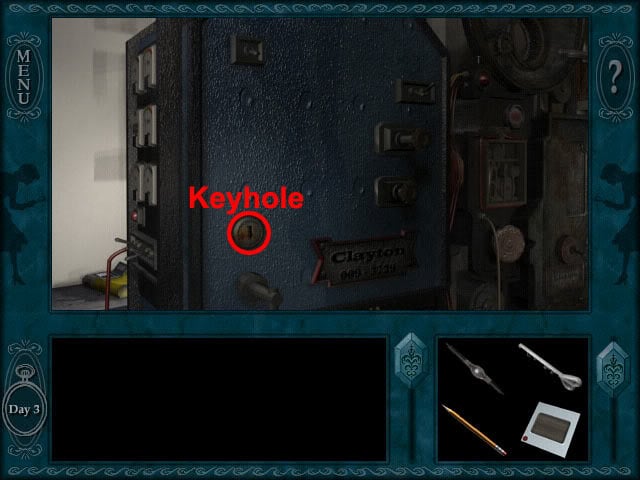
Examine the bulb:
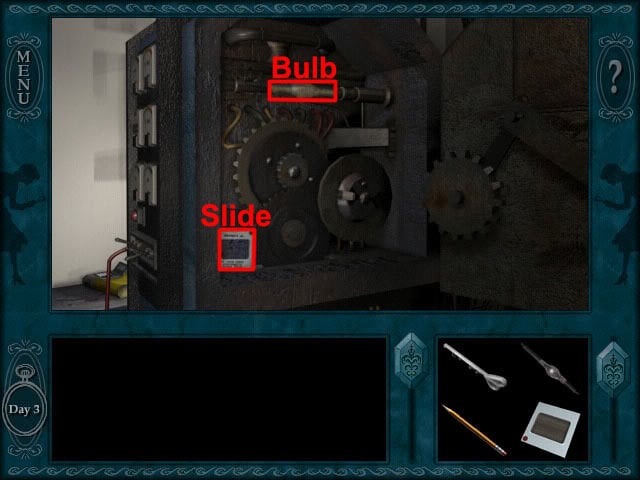
Take the old bulb and replace it with the new bulb from the cupboard. Back away from the view of the bulb and take the slide. The police announce that they are performing a final sweep of the building. Quickly close the projection machine and enter the cupboard. The police will look into the room and say that it is clear. Move to the front of the projection machine and put the slide in the slot. Move back twice. Flip the switch:
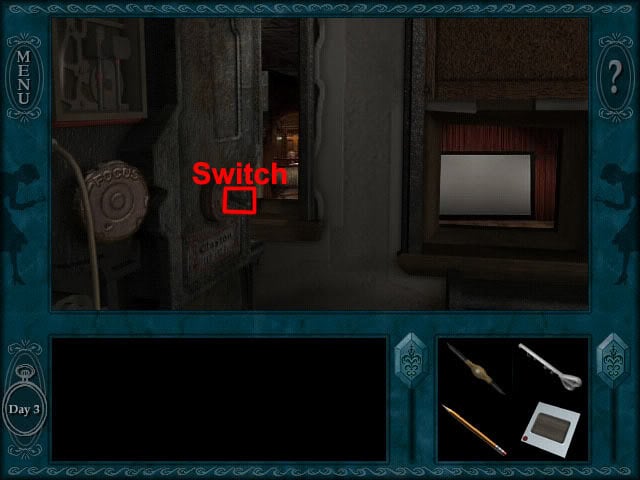
Select the focus wheel and it will fall under the table. Look under the table to see a tape recorder. Move the tape recorder and take the focus wheel. Move the tape recorder back and then look up twice. Put the focus wheel back on the slot and then turn it three times to focus the view of the slide. Move toward the slide to see another secret passageway:
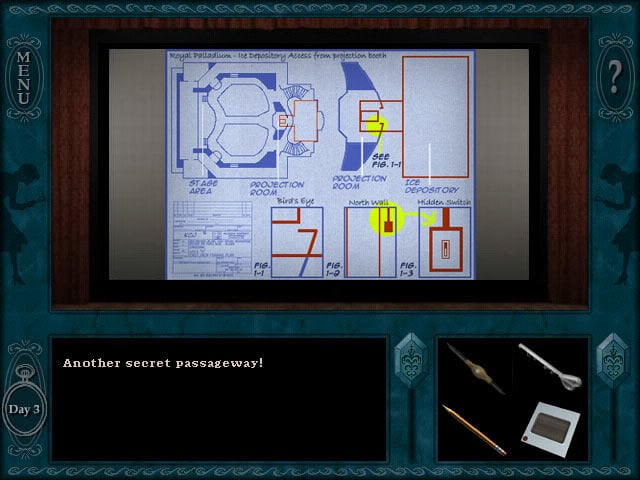
Move back and flip the switch to turn the power off. Move back twice to see Joseph. Talk to him and a countdown will start. Move to the power socket at the right side of the door:
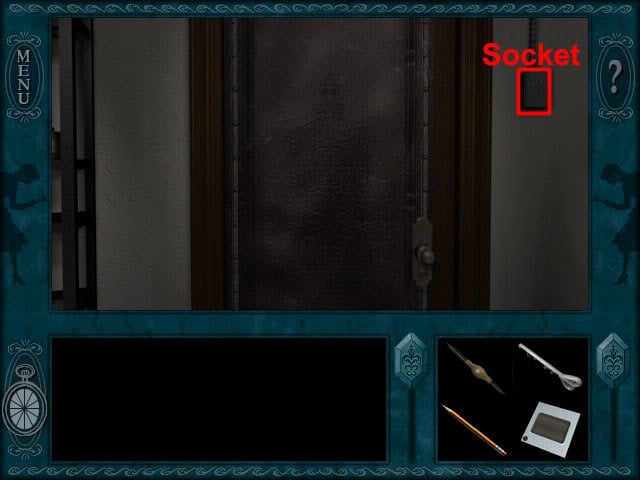
Open the cover and flip the switch. Close the cover, move back and then quarter turn right to see the ladder. Climb up the ladder. Quarter turn right and move forward to the box. Use the black key to open the box:
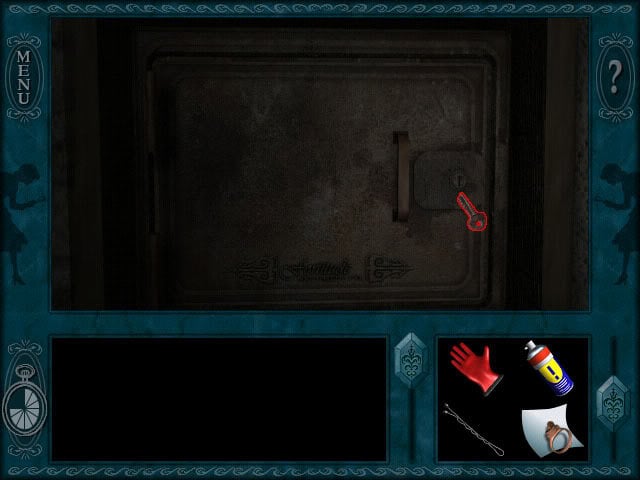
Take all of the keys from the box. Examine the two letters. Close the box and move to the door. Keep trying keys on the door until it opens. Go through the doorway and keep moving forward to see the kidnapper. Keep talking to the kidnapper until he says that he never meant for it to turn out this way. Use the flash ring on the kidnapper and then pull the lever to complete the game.
“;
More articles...
Monopoly GO! Free Rolls – Links For Free Dice
By Glen Fox
Wondering how to get Monopoly GO! free rolls? Well, you’ve come to the right place. In this guide, we provide you with a bunch of tips and tricks to get some free rolls for the hit new mobile game. We’ll …Best Roblox Horror Games to Play Right Now – Updated Weekly
By Adele Wilson
Our Best Roblox Horror Games guide features the scariest and most creative experiences to play right now on the platform!The BEST Roblox Games of The Week – Games You Need To Play!
By Sho Roberts
Our feature shares our pick for the Best Roblox Games of the week! With our feature, we guarantee you'll find something new to play!Type Soul Clan Rarity Guide – All Legendary And Common Clans Listed!
By Nathan Ball
Wondering what your odds of rolling a particular Clan are? Wonder no more, with my handy Type Soul Clan Rarity guide.


